

Walkthrough Menu
- General Tips
- Chapter 1: City Entrance
- Chapter 2: Briar's House
- Chapter 3: Dressing Room
- Chapter 4: Cemetery
- Chapter 5: Mill
General Tips
- This is the official guide for Reflections of Life: Dream Box.
- This guide will not mention each time you have to zoom into a location; the screenshots will show each zoom scene.
- Hidden-object puzzles are referred to as HOPs. This guide will not show HOP solutions. It will identify the location of the HOP and the inventory item acquired.
- This guide will show solutions for non-random puzzles. Please read the in-game instructions for each puzzle.
- In this game, you will sometimes have to select the new scene to trigger dialog, cut-scenes, or tasks prior to interacting with the scene.
Chapter 1: City Entrance
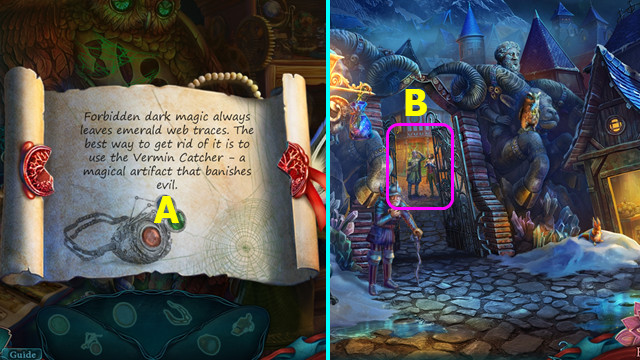
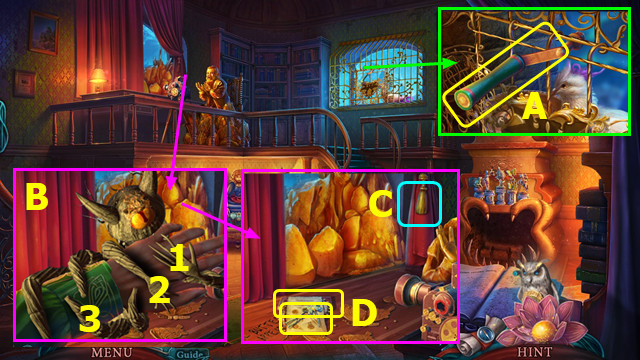
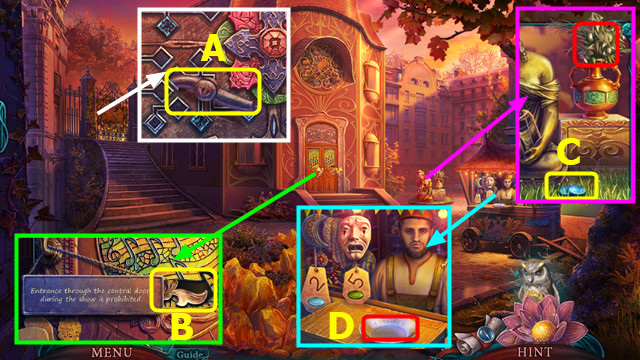
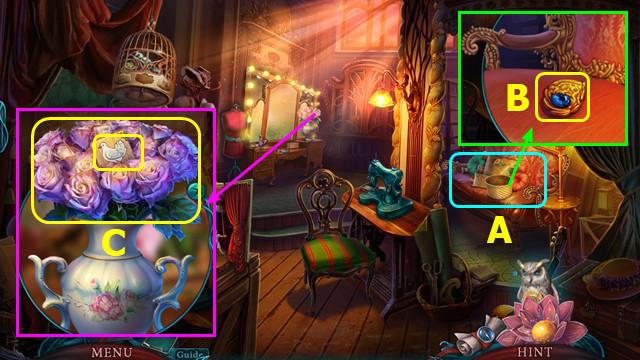
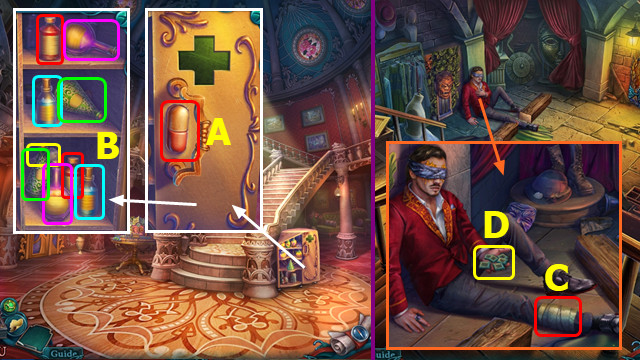
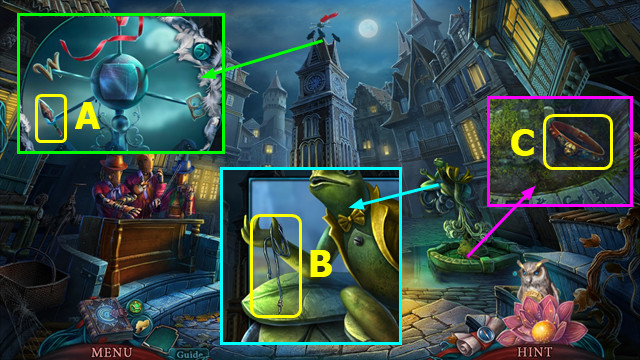
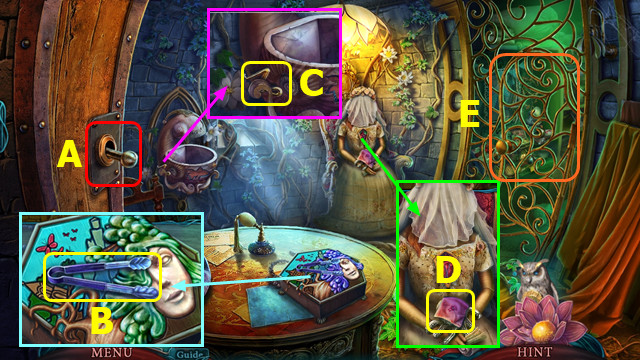
- Select (A).
- Play HOP.
- Select (B).
- You earn HANDBAG.
- Talk (C).
- Solution (D).
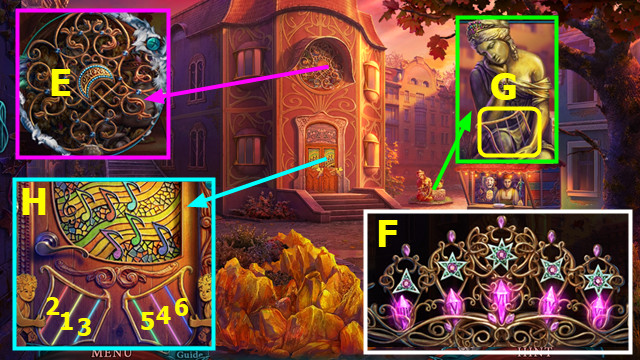
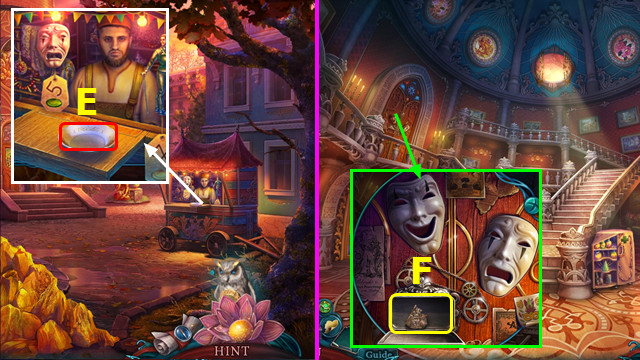
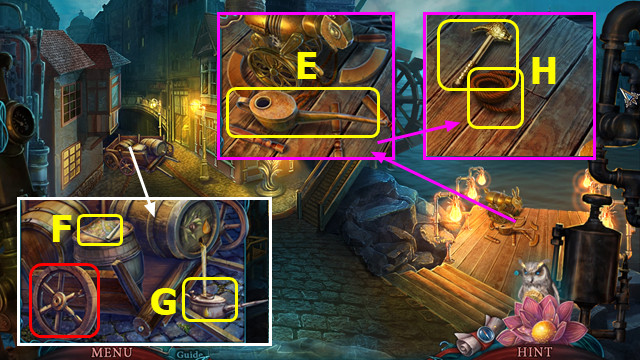
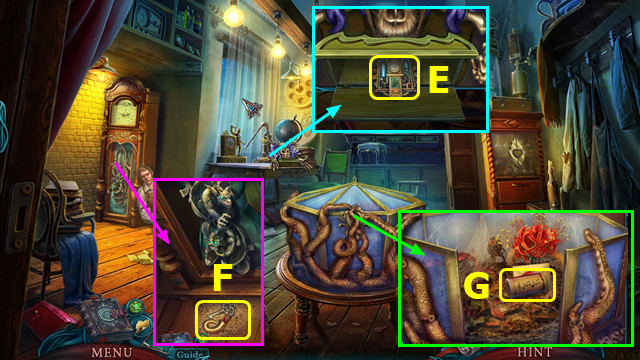
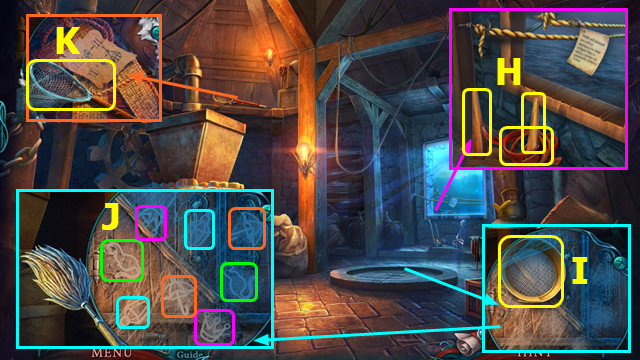
- Take TOY (E).
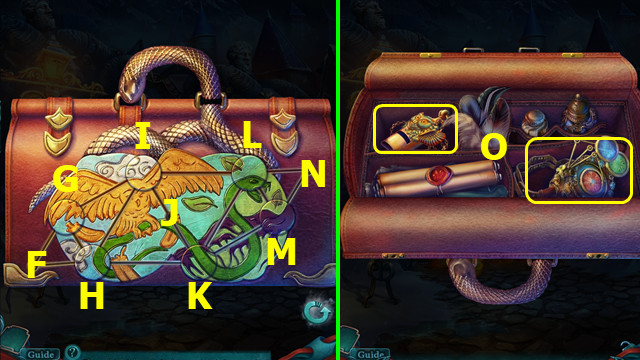
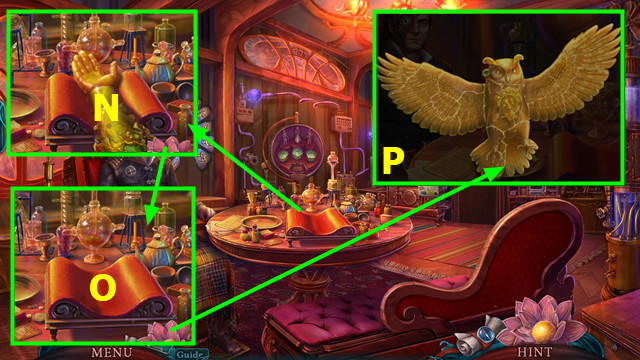
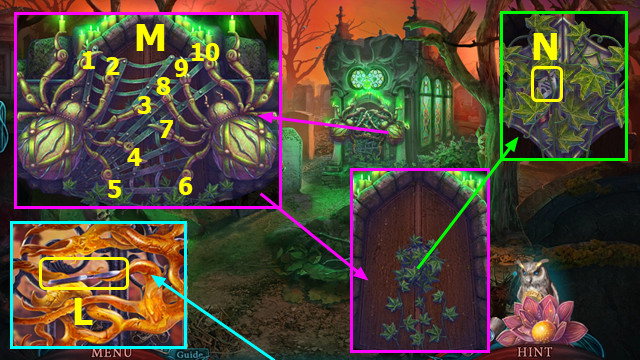
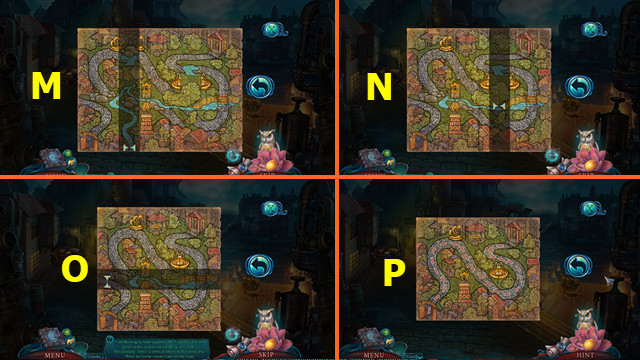
- Select HANDBAG; solution (L-N)-(I-L)-(K-I)-(H-J)-(M-H)-(J-M)-(L-K)-(M-L)-(N-M).
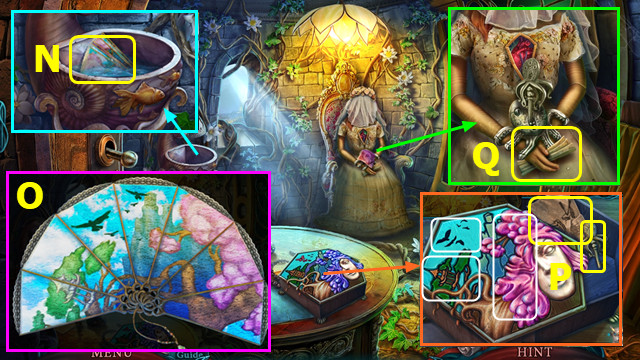
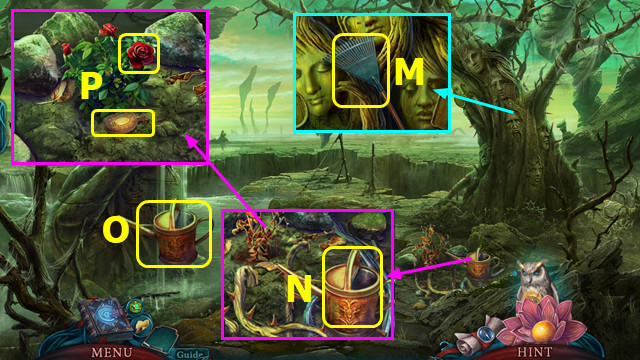
- Read scroll; take OWL WHISTLE and VERMIN CATCHER (O).

- Play HOP; take NUTS, 1/2 FIREWORK EMBLEM. Read note; take TINY SCISSORS (P).
- Use OWL WHISTLE (Q); earn 2/2 FIREWORK EMBLEM.
- Place NUTS; earn MATCHES (R).
- Place FIREWORK EMBLEM; take BIRD DECORATION and FUSE (S).
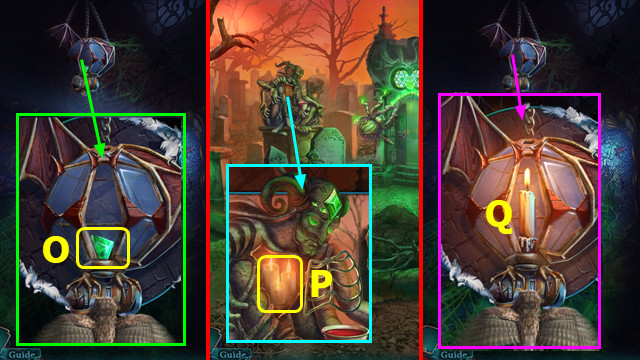
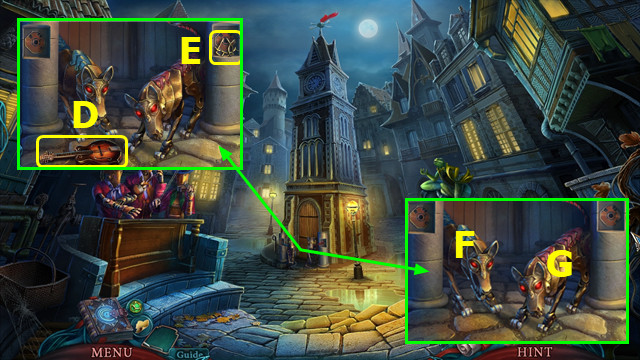
- Select (T).
- Take FIGURINE (U).
- Place FIGURINE; take BLASTING OIL (A).
- Place BLASTING OIL and FUSE (B).
- Use MATCHES (C).
- Go forward.
- Talk (D).
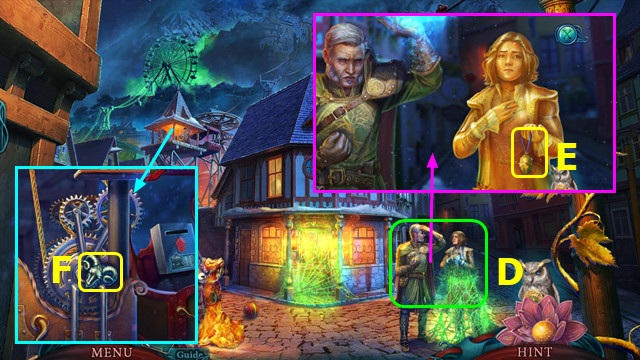
- Use TINY SCISSORS; earn ROSALYN'S MEDALLION (E).
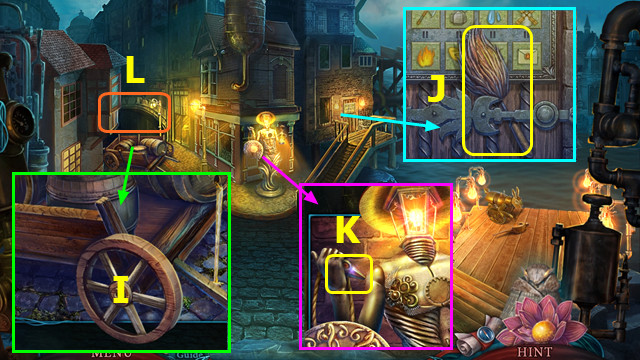
- Take RAM TOKEN (F).
- Take map, note, and BIRDSEED (G).
- Place BIRD DECORATION and RAM TOKEN; earn LEVER (H).
- Use LEVER (I).
- Talk (J).
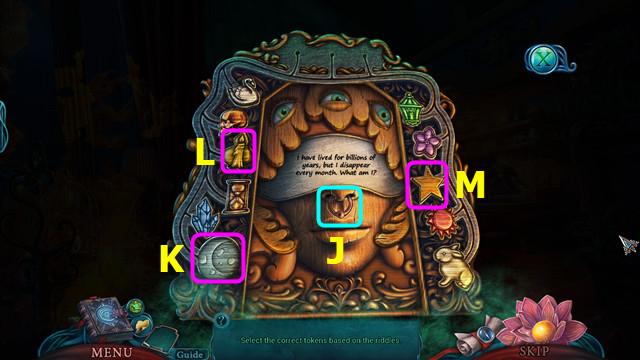
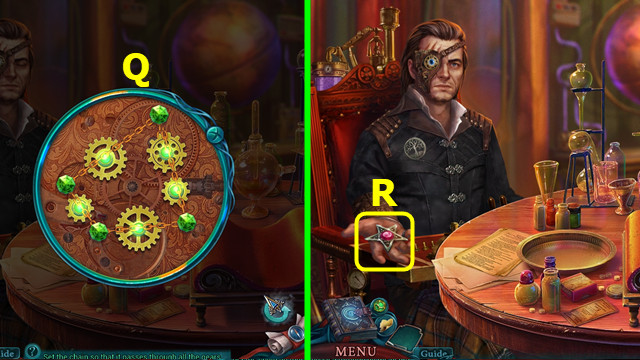
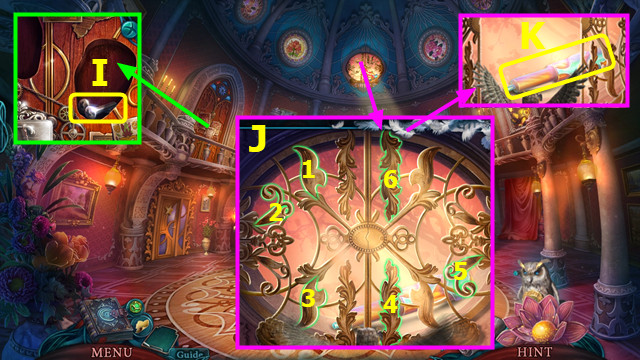
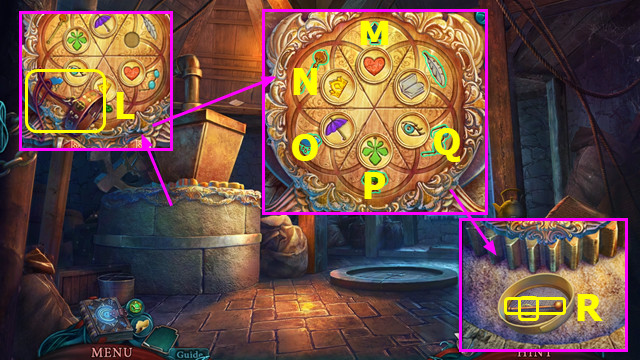
- Solution (K).
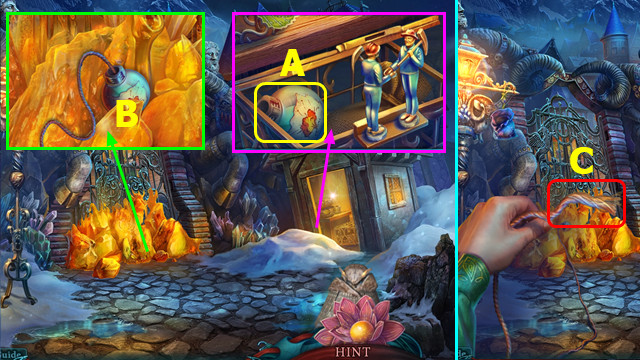
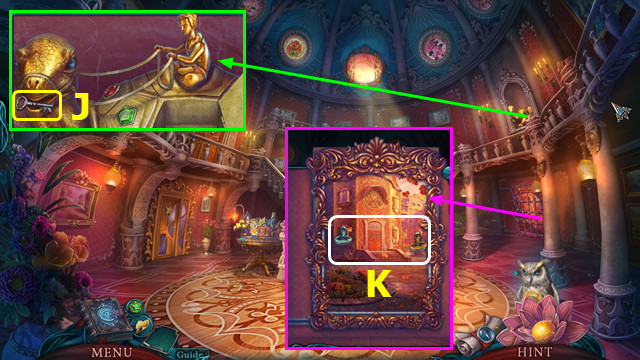
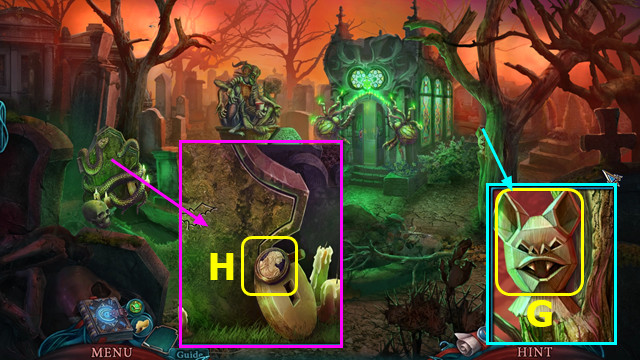
- Take RED LENS (L).
- RED LENS on VERMIN CATCHER.
- Use VERMIN CATCHER (M); play HOP.
- Go forward.
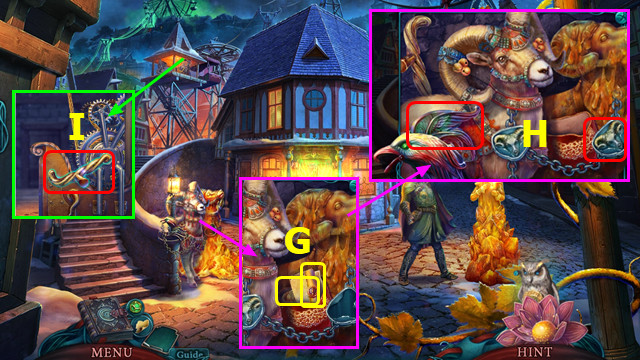
- Take PUPPET KEY (N).
- Take 1/2 CRESCENT; place PUPPET KEY (O).
- Play HOP; take 1/2 DOVE (P).
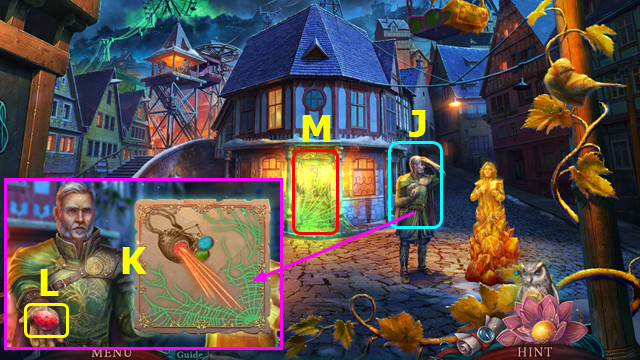
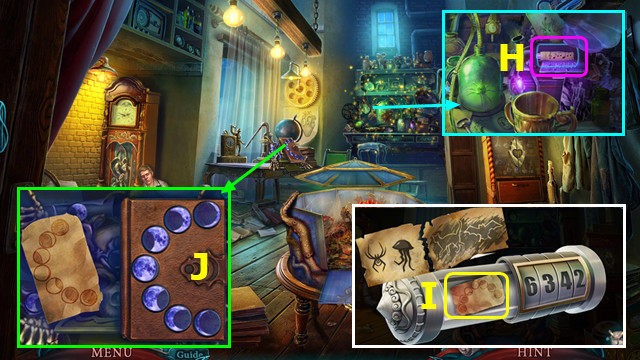
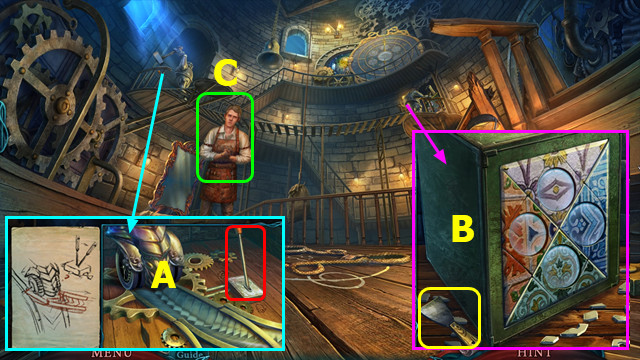
- Take PROJECTOR LEVER (A).
- Select scene; solution 1-3 (B).
- Select (C).
- Take HAIRPIN and read note; take NAME PLATE (D).
- HAIRPIN on ROSALYN'S MEDALLION; take 1/2 CABLE CAR TICKET.
- Place NAME PLATE; solution (E); take 2/2 DOVE.
- Place DOVE; take BUTTONS and place BIRD SEED (F).
- Read note; take FILMSTRIP (G).

- Place PROJECTOR LEVER and FILMSTRIP (H).
- Restore items (I-J).
- Take 2/2 CABLE CAR TICKET (K).
- Walk down.
- Use CABLE CAR TICKET (L).
- Solution (M).
- Talk (N).
- Play HOP; earn GLASS APPLES (O).
- Take 2/2 CRESCENT (P).
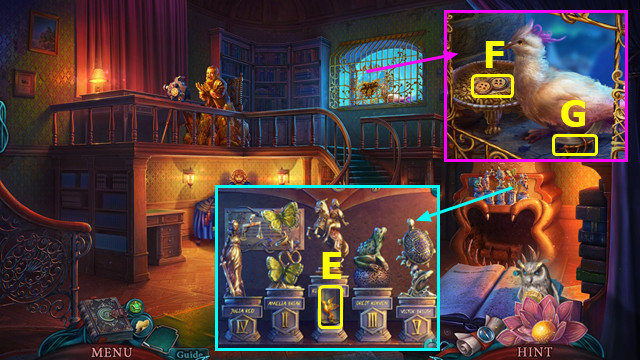
- Take THREAD; place CRESCENT (Q).
- Read note; THREAD and BUTTONS on TOY.
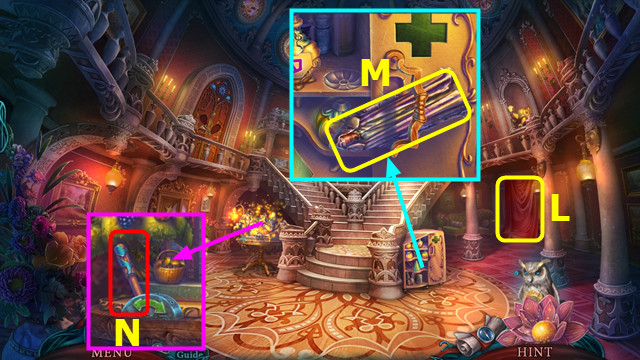
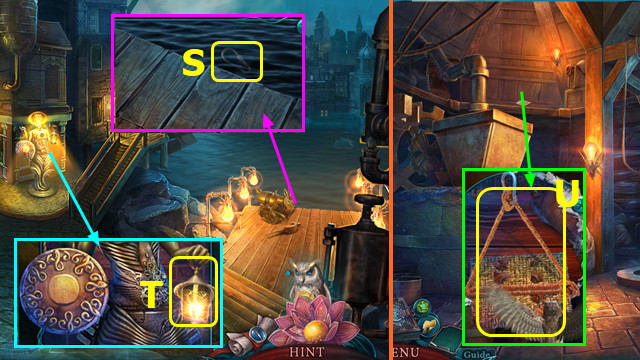
- Take FILE; read award (R).
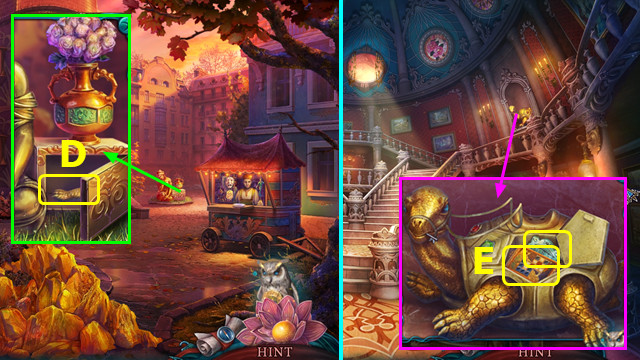
- Place GLASS APPLES; take BUTTERFLY TOKEN and METAL GRAPES (S).
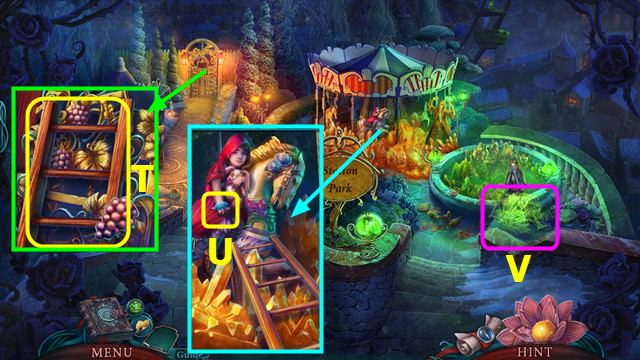
- Use METAL GRAPES; take LADDER (T).
- Use LADDER and TOY; take BLUE LENS (U).
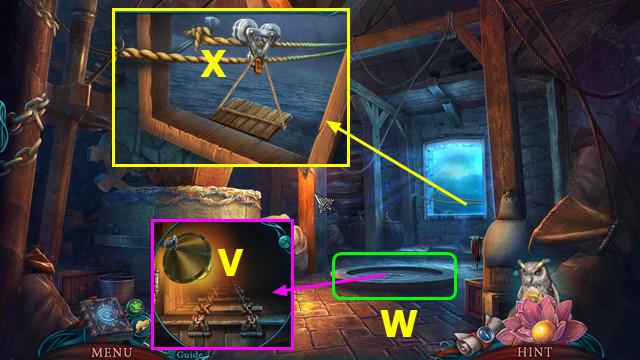
- BLUE LENS on VERMIN CATCHER.
- Use VERMIN CATCHER; play HOP (V).
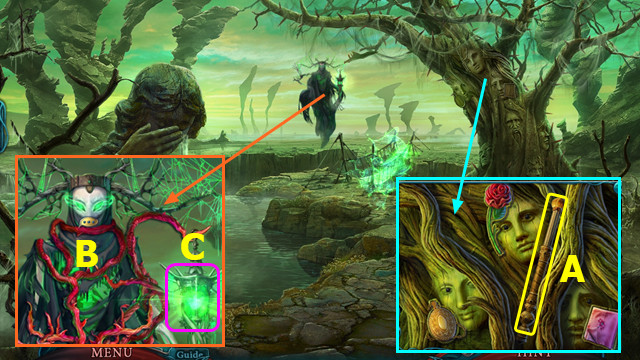
- Play HOP; earn BROKEN OWL.
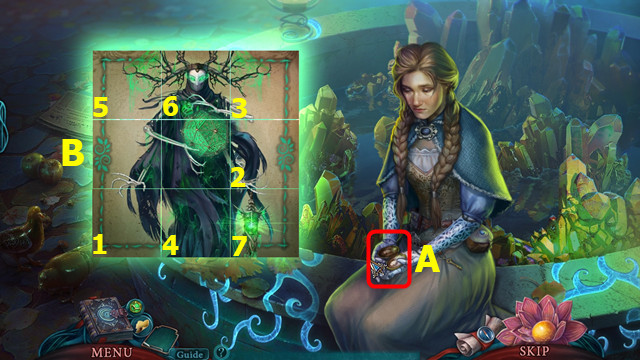
- Give ROSALYN'S MEDALLION (A).
- Solution 1-7 (B).
Chapter 2: Briar's House
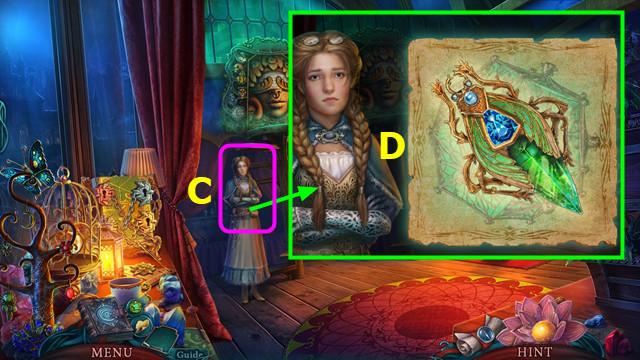
- Talk (C).
- Solution (D).
- Earn DREAM BOX EXILE KEY.
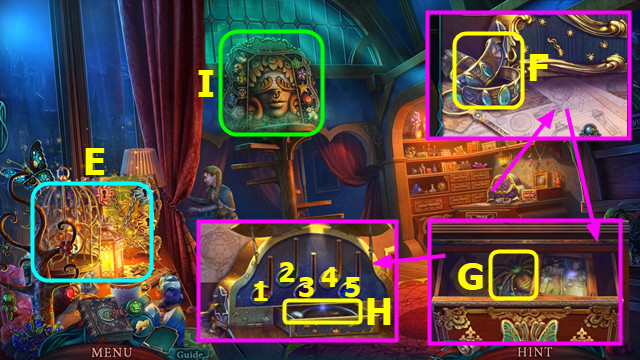
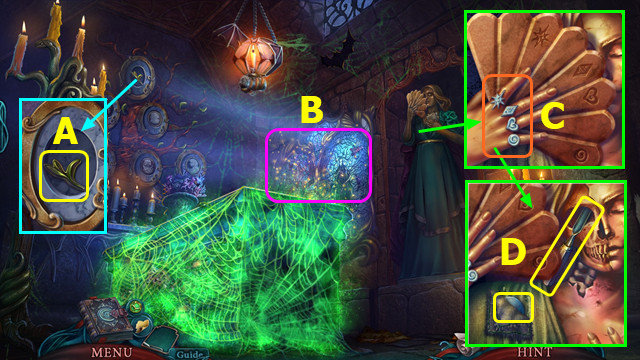
- Play HOP; earn ANCIENT BOOK (E).
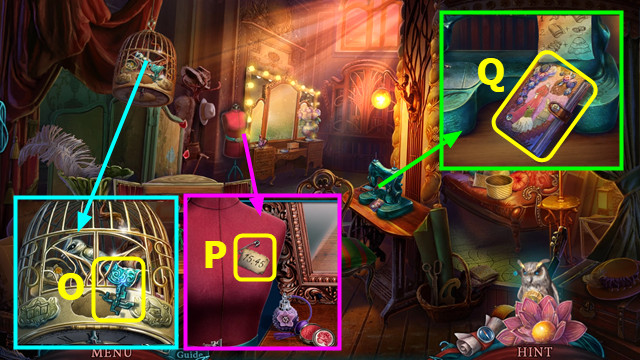
- Take PAIRED BRACELETS (F); pan down.
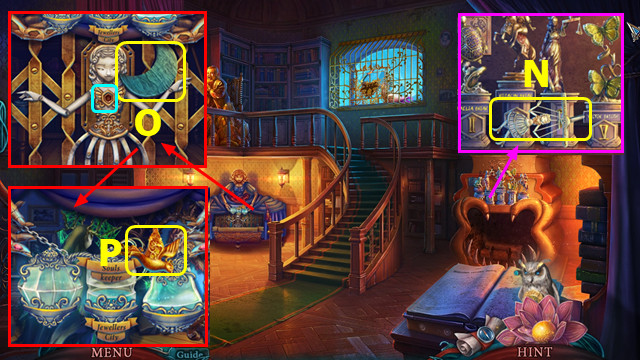
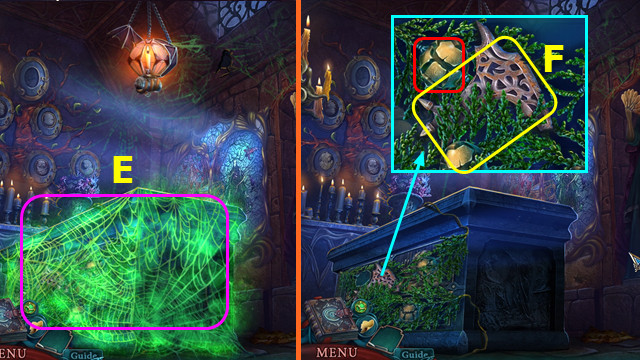
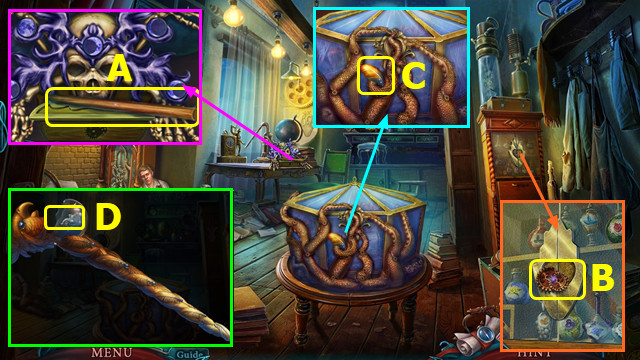
- Place BUTTERFLY TOKEN; read notes and photo; take SPIDER (G).
- SPIDER on ANCIENT BOOK; play HOP; take LEVER.
- Place LEVER; select 2-4-1-5-3; take DOOR RING (H).
- Select (I).
- Place DOOR RING (J).
- Solution K-L-M.
- Go forward.

- Read note (N).
- Place PAIRED BRACELETS (O).
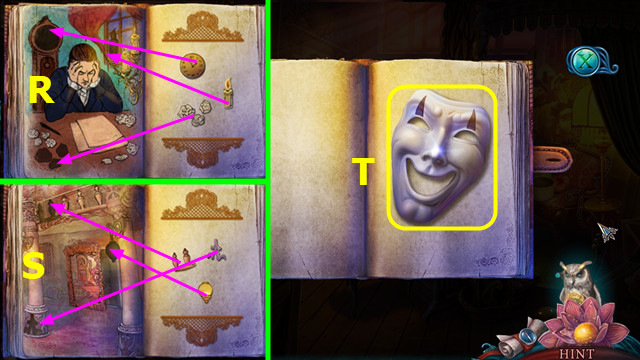
- Read notes and remove items; restore tiles (P).
- Take LENS RECIPE and REAGENT BOTTLE (Q).

- Place REAGENT BOTTLE and LENS RECIPE; select 1-5; take GREEN LENS (R).
- GREEN LENS on VERMIN CATCHER.
- Use VERMIN CATCHER (S); play HOP.
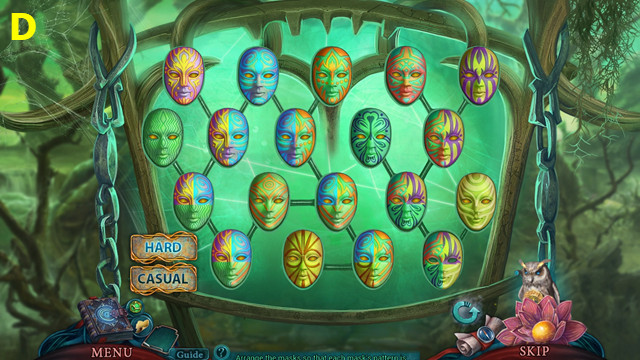
- Use FILE (T).
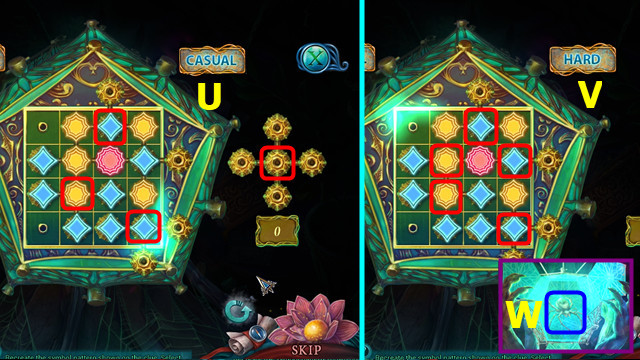
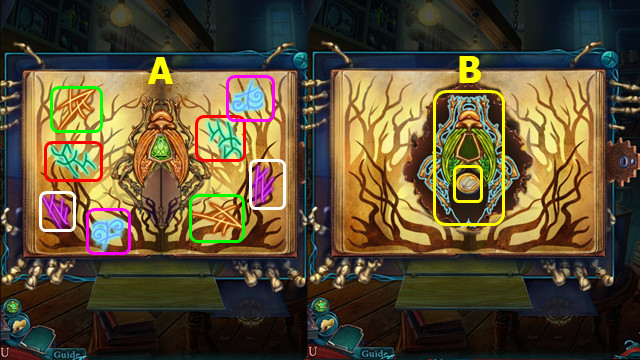
- Place the cross centers where indicated.
- Casual solution (U).
- Hard solution (V).
- Use DREAM BOX EXILE KEY (W).
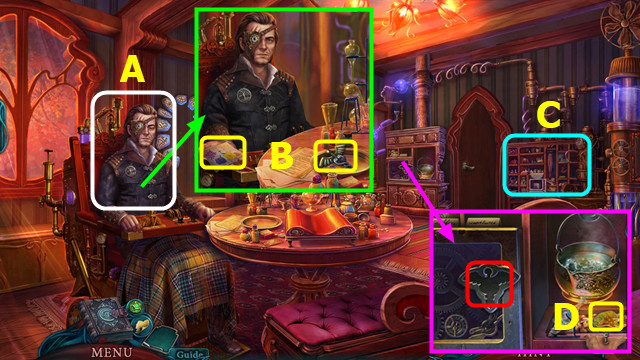
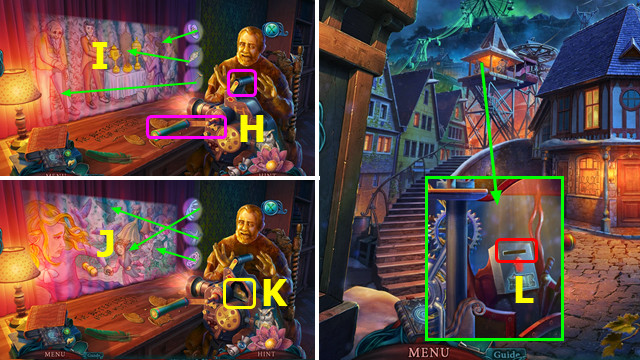
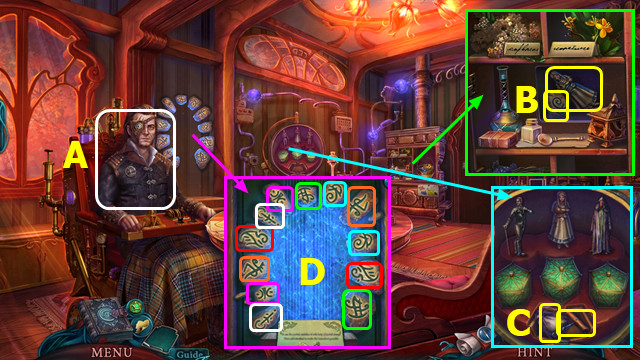
- Talk (A).
- Take POTION RECIPE and CADUCEUS (B).
- Play HOP; earn ICE CUBE (C).
- Place CADUCEUS and ICE CUBE; take GLOBE PART (D).
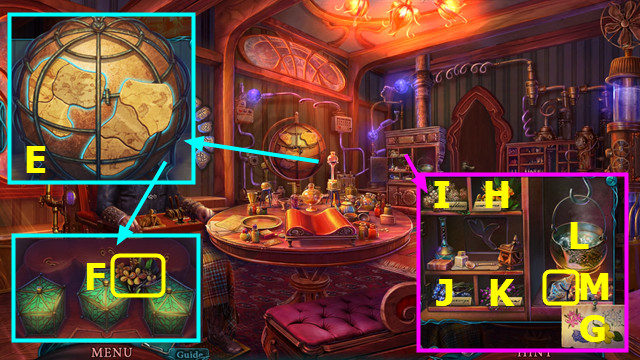
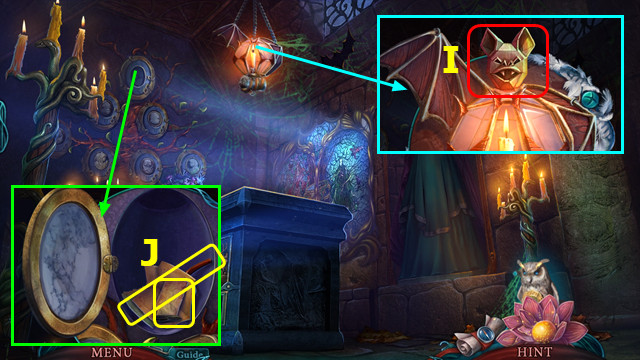
- Take STAINED GLASS SHARD; place GLOBE PART; solution (E).
- Take TUTSAN BLOSSOMS (F).
- Place POTION RECIPE (G) and TUTSAN BLOSSOMS (H).
- Move (H-L)-(I-L)-(J-L)-(K-L).
- Take HEALING POTION (M).
- Use HEALING POTION (N).
- Place BROKEN OWL (O).
- Restore owl (P); use HEALING POTION.
- Solution (Q).
- Take STAR (R).
- Go right.
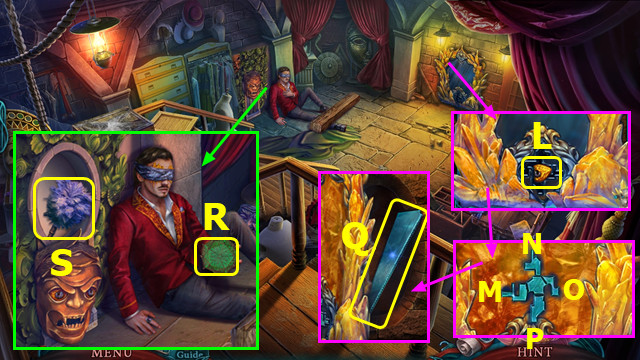
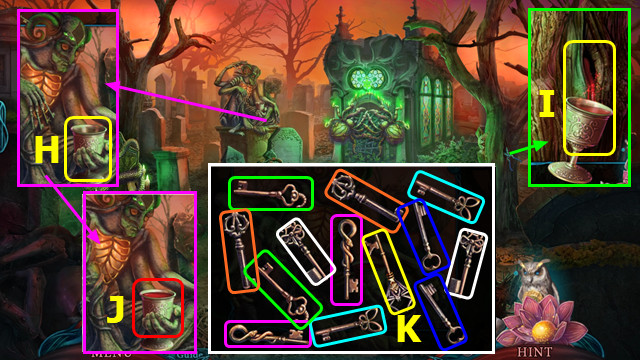
- Take SPIDER LEG (A).
- Read sign; take LATTICE PART (B).
- Remove flowers; take TWO COINS (C).
- Talk; place TWO COINS; earn CRESCENT (D).
- Place CRESCENT (E).
- Play HOP; earn BROKEN TIARA.
- STAR on BROKEN TIARA; solution (F); take TIARA.
- Place TIARA; take LYRE (G).
- Place STAINED GLASS SHARD and LYRE; solution 1-6 (H).
- Go forward.
- Remove notes; take SCREWS (I).
- Take RIBBON; place LATTICE PART; select 1-6 (J).
- Take LEVER (K).
- Take CLOTH (L).
- Take 1/3 FIGURINE (M).
- Use LEVER (N); play HOP; earn METAL CAPS.
- Go left.
Chapter 3: Dressing Room
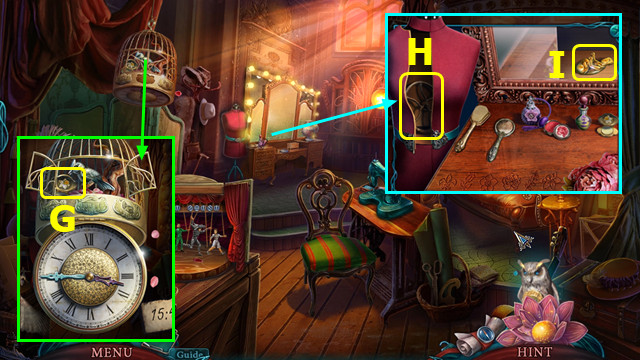
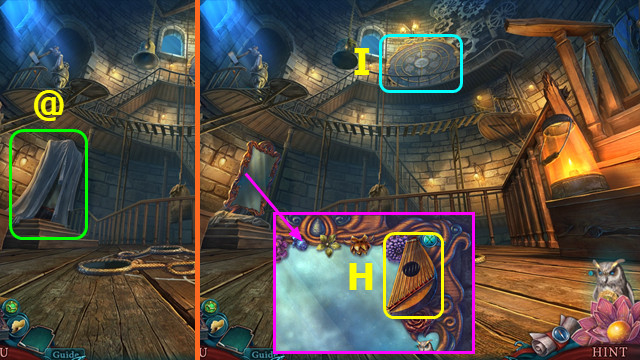
- Take STRANGE KEY (O).
- Take CLOCK HINT (P).
- Take SEAMSTRESS' DIARY (Q).
- Open SEAMSTRESS' DIARY.
- Restore items (R-S).
- Take COMEDY MASK (T).
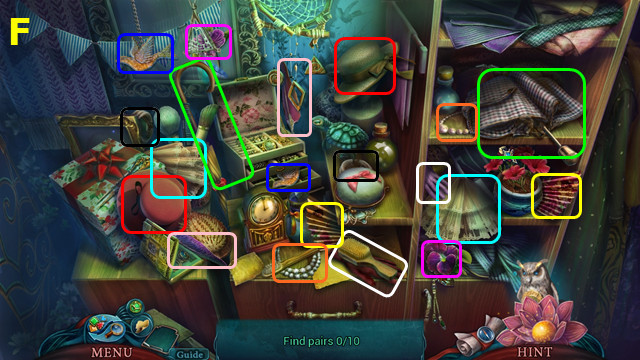
- Play HOP; earn THREAD BASKET (A).
- Move pillows; take 1/2 EYE (B).
- Take BOX PLATE; select flowers and place RIBBON; take FRESH BOUQUET (C).
- Walk down 2x.
- Place FRESH BOUQUET; take TURTLE LEG (D).
- Go forward.
- Place TURTLE LEG; take SMALL CHEST and THEATER EMBLEM (E).
- Place BOX PLATE on SMALL CHEST.
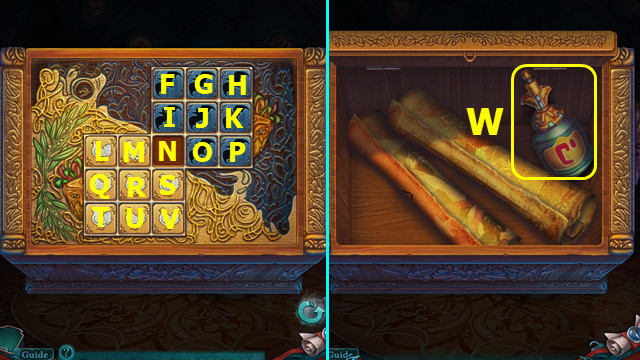
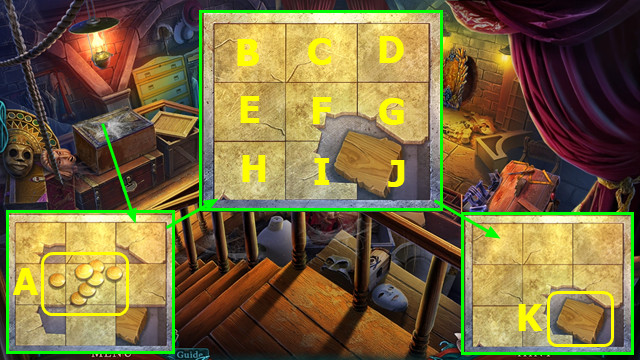
- Solution S-I-N-V-S-Q-T-L-M-O-G-F-I-S-Q-R.
- M-O-J-I-K-P-N-S-I-N-M-U-V-N-M-O-N.
- Read scrolls; take BOTTLE (W).
- Place BOTTLE; select 1-4; take RED LENS (A).
- RED LENS on VERMIN CATCHER.
- Use VERMIN CATCHER; play HOP (B).
- Play HOP; earn FIVE COINS (C).
- Place METAL CAPS; select 1-6 (D).
- Walk down.
- Place FIVE COINS; earn TRAGEDY MASK (E).
- Go forward.
- Place COMEDY MASK and TRAGEDY MASK; take LATCH (F).
- Go left.
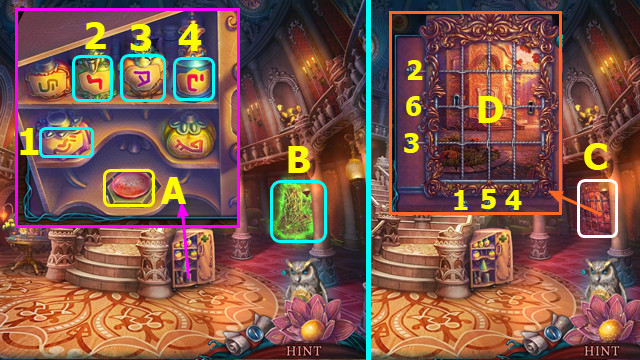
- Place THEATER EMBLEM and CLOCK HINT; solution (G); take POWDER BOX.
- Place LATCH; take SEWING MACHINE WHEEL (H).
- Place POWDER BOX; swap items as shown; take RIDER FIGURINE (I).
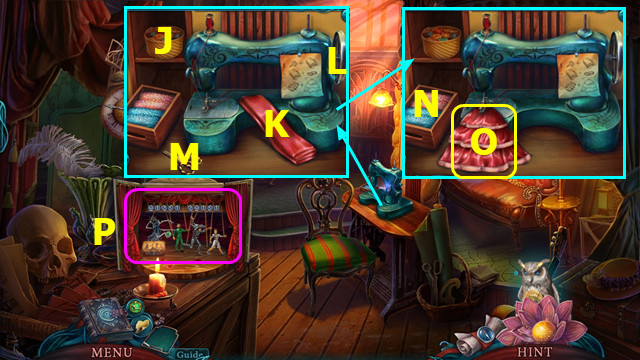
- Place THREAD BASKET (J), CLOTH (K), and SEWING MACHINE WHEEL (L).
- Use (M-K).
- Use (N-O); select (O); take MARIONETTE SKIRT.
- Select (P).
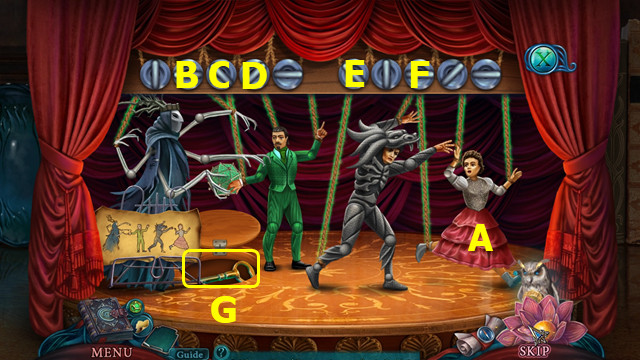
- Place MARIONETTE SKIRT (A).
- Select B-D-F-C-E.
- Take 1/2 PICTURE KEY (G).
- Walk down.
- Place RIDER FIGURINE; take 2/2 PICTURE KEY (J).
- Use PICTURE KEY (K).
- Go right.
- Take 2/2 EYE (L).
- Place STRANGE KEY; select M-Nx2-O-P.
- Take BLADE (Q).
- Talk; take 1/3 DREAM BOX (R).
- Place EYE; take DUSTER (S).
- Use DUSTER; take SEVEN COINS (A).
- Select G-D-C-B-E-F-I-J-G-F-I-H-E-F-C-D-G-J.
- Take WOODEN BLOCK (K).
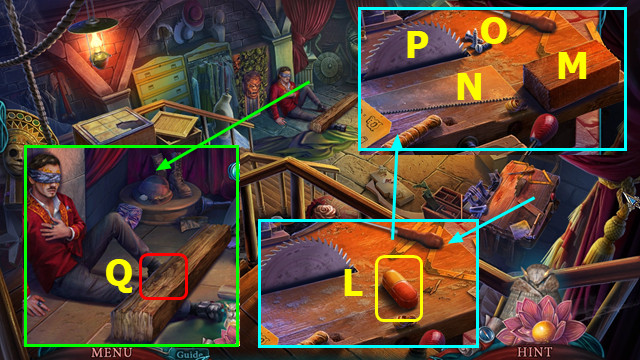
- Take PILL TOKEN (L).
- Place WOODEN BLOCK (M), BLADE(N) and SCREWS (O).
- Use (M-P)-(O-N); take SAW.
- Use SAW (Q).
- Walk down.
- Place PILL TOKEN (A).
- Select pairs (B); take BANDAGES.
- Go right.
- Use BANDAGES (C); play HOP; take OLD CEMETERY TOKENS (D).
- Walk down 2x.
- Place SEVEN COINS; earn 2/3 FIGURINE (E).
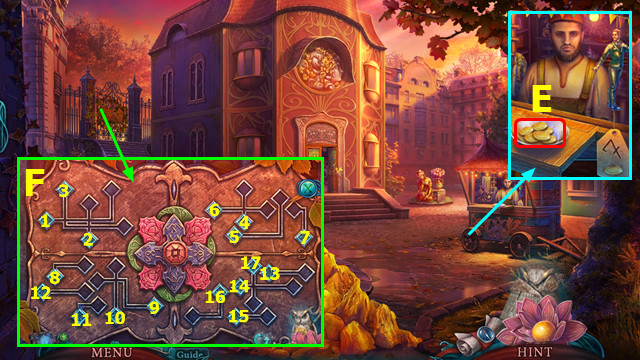
- Remove old tokens; place OLD CEMETERY TOKENS; select 1-17 (F).
- Walk left.
Chapter 4: Cemetery
- Select 1-10 (G).
- Take EMPTY GOBLET (H).
- Take SCISSORS; use EMPTY GOBLET; earn FULL GOBLET (I).
- Place FULL GOBLET; earn BUNCH OF KEYS (J).
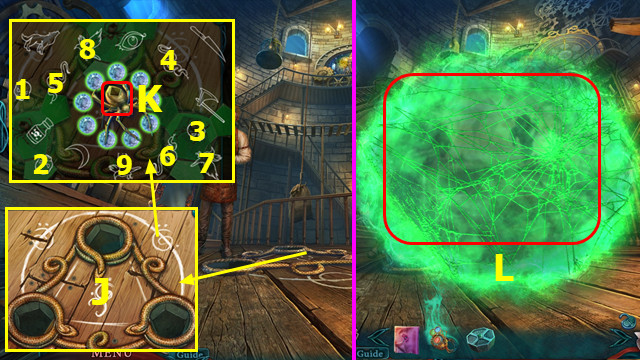
- Select BUNCH OF KEYS; select pairs; take SPIDER KEY (K).
- Take SCALPEL (L).
- Place SPIDER LEG; select 1-10 (M).
- Take STONE PLATE (N); use SCISSORS and SPIDER KEY.
- Go forward.
- Take EMERALD (O).
- Walk down.
- Place EMERALD; take BURNING CANDLE (P).
- Go forward.
- Place BURNING CANDLE (Q).
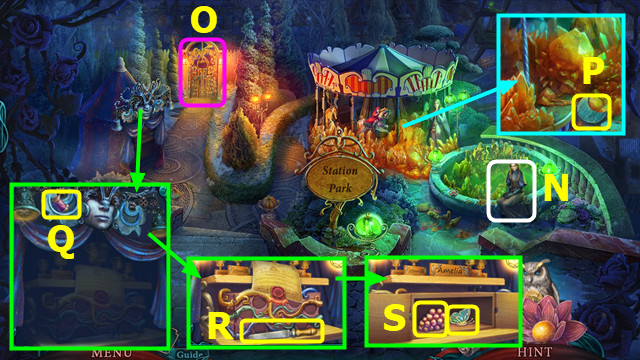
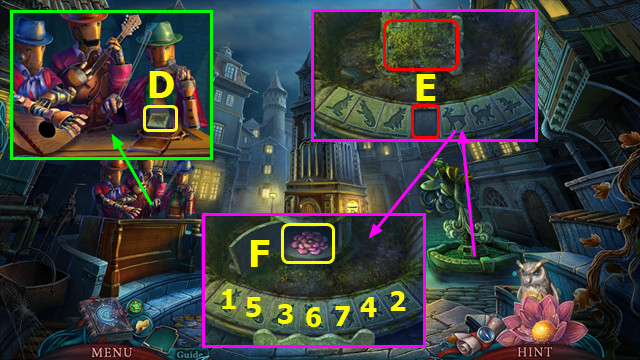
- Take SPROUT TOKEN (A).
- Play HOP; take CYPRESS CONE (B).
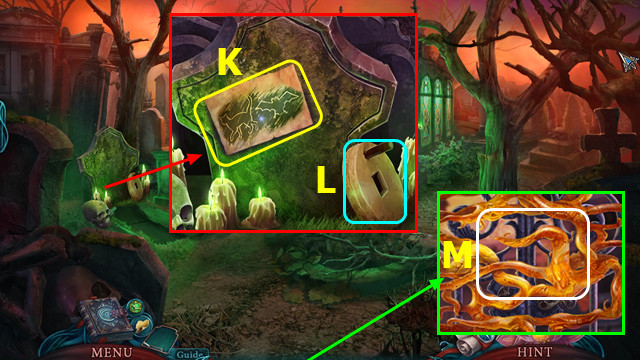
- Read notes; place STONE PLATE; solution (C).
- Use scalpel; take BLUE LENS and CHISEL (D).
- BLUE LENS on VERMIN CATCHER.
- Use VERMIN CATCHER; play HOP (E).
- Take RUSTY BLADE; place CYPRESS CONE (F).
- Play HOP; take FOLIO and SNAKE HEAD.
- Walk down.
- Use CHISEL; take BAT HEAD (G).
- Place SNAKE HEAD; take CAMEO (H).
- Go forward.
- Place BAT HEAD; earn CRYPTEX (I).
- Take LEATHER BELT from CRYPTEX.
- Place CAMEO; take PAPER WITH CHARCOAL, read notes, and take AXE PARTS (J).
- LEATHER BELT and RUSTY BLADE on AXE PARTS; take RUSTY AXE.
- Walk down.
- Use PAPER WITH CHARCOAL; take 1/2 CRYPTEX CODE (K).
- Use RUSTY AXE; earn AXE (L).
- Use AXE (M).
- Walk down 2x.
- Talk; earn CLOSED COMPASS (A).
- Place SPROUT TOKEN; take PORTAL RUNE and 3/3 FIGURINE (B).
- Place FIGURINE; take CORKSCREW and STARDUST (C).
- Place PORTAL RUNE; select pairs; use STARDUST (D).
- Go left.
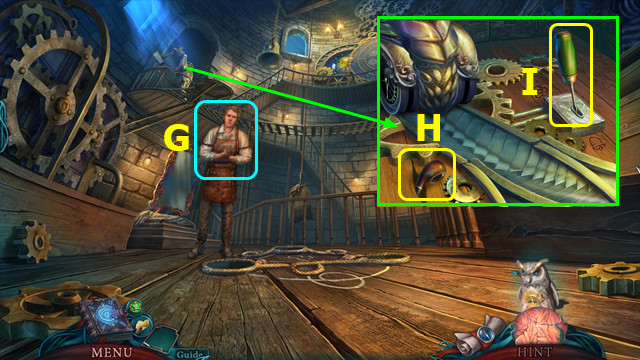
- Take EMPTY OILER (E); play HOP; earn WOODEN WHEEL.
- Take CITY MAP; remove broken wheel (F).
- Use CORKSCREW and EMPTY OILER; earn FULL OILER (G).
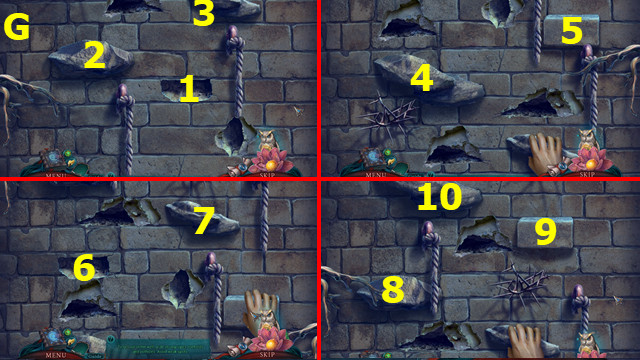
- Use FULL OILER; take ROPE LADDER and HAMMER (H).
- Use WOODEN WHEEL and HAMMER (I).
- Take BROOM (J).
- Take COMPASS ARROW (K).
- COMPASS ARROW and CITY MAP on CLOSED COMPASS; take COMPASS.
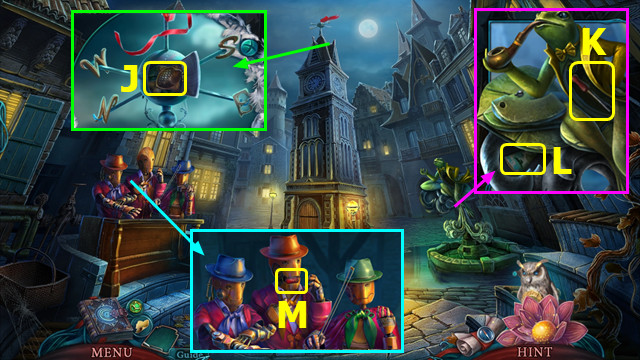
- Use COMPASS (L).
- Select M-N-O.
- Final position (P).
- You earn CANE.
- Take 1/4 STICK (A).
- Take GEARS TOKEN (B).
- Take WOODEN FEATHER (C).
- WOODEN FEATHER on CANE; solution (D); take CHIMERA.
- Place GEARS TOKEN; take CITY EMBLEM (E).
- Place CHIMERA; take RESERVOIR KEY (F).
- Move tentacles 4x; use RESERVOIR KEY. Read note; take RECORD (G).
- Place RECORD (H). Play HOP; earn 2/2 CRYPTEX CODE.
- CRYPTEX CODE on CRYPTEX; solution (I); take FOLIO CODE.
- Place FOLIO and FOLIO CODE; solution (J).
- Play HOP; turn the page.
- Select pairs (A).
- Take DREAM BOX EXILE KEY and ROUND TOKEN (B).
- Walk down.

- Place CITY EMBLEM; take HEART (D).
- Go left.
- Place HEART; swap labels as shown; take AMMONIA (E).
- Use AMMONIA; take 2/3 DREAM BOX and MILL KEY TOKENS (F).
- Walk down.
- Place MILL KEY TOKENS; solution (G).
- Go forward.
Chapter 5: Mill
- Read note and take LEATHER STRAPS. Use HAMMER; earn 2/4-3/4 STICK (H).
- Take SIEVE; use BROOM (I).
- Select pairs; take 4/4 STICK (J).
- Select ROPE LADDER; add STICK.
- Take SCOOP NET and read note (K).
- Take RED COLLAR; place ROUND TOKEN (L).
- Select (Q-M)-(N-P)-(O-Q).
- Use SIEVE; take RING and MALLET (R).
- Walk down.
- Use SCOOP NET; earn CARABINER (S).
- Use MALLET; take LANTERN (T).
- Go forward.
- Place LEATHER STRAPS and select ropes; place CARABINER; take PULLEY SEAT (U).
- Open doors; place LANTERN and ROPE LADDER (V).
- Play HOP; earn PULLEY MECHANISM (W).
- Place PULLEY MECHANISM and PULLEY SEAT (X).
- Take SHARP ARROWHEAD (A).
- Take LEASH (B).
- Take COLLAR (C).
- Take 1/2 METAL LETTER from COLLAR.
- RING and LEASH on COLLAR; take BLUE COLLAR.
- Take 1/3 MUSICAL INSTRUMENT (D) and RUNES (E).
- Place BLUE COLLAR (F) and RED COLLAR (G).
- Go forward.
- Select (@).
- Take 2/3 MUSICAL INSTRUMENT (H).
- Select (I).
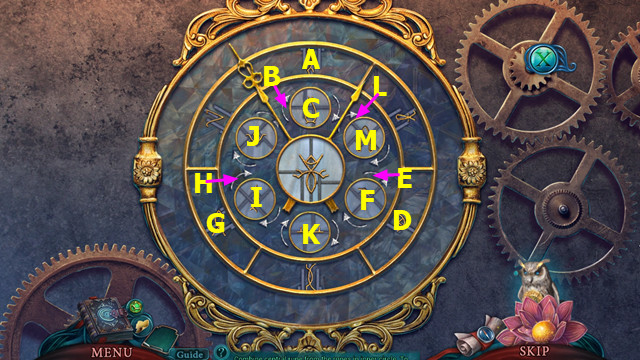
- Place RUNES on device.
- Solution (A-Bx3-C-D-E-F-G-Hx2-I)-(J-G-H-I-D-Ex2-F)-(K-Lx2-M-A-C).
- Go forward.
- Select (A).
- Take FORCEPS (B).
- Use SHARP ARROWHEAD; earn 2/2 METAL LETTER (C).
- Take HANDKERCHIEF (D).
- Open door; select (E).
- Select pairs (F).
- Earn GREEN HAT.
- Walk down.
- Talk; earn PALE CRYSTAL (G).
- Use FORCEPS; earn SMOKING PIPE (H).
- Take SCREWDRIVER (I).
- Walk down.
- Place METAL LETTER; take BRASS FISH (J).
- Use SCREWDRIVER; take RAIL LEVER (K).
- Place SMOKING PIPE; take FAN PART (L).
- Place GREEN HAT; swap as shown; take RED LENS (M).
- RED LENS on VERMIN CATCHER.
- Go forward 2x.
- Place BRASS FISH; take FAN (N).
- FAN PART on FAN; solution (O); take CASKET CODE.
- Place CASKET CODE; solution (P); take RAILS SCHEMATIC and CHAINS KEY.
- Use CHAINS KEY; take BRIDE'S LETTER (Q).
- Walk down.
- Place RAIL LEVER and RAIL SCHEMATIC; select lever (A).
- Restore mosaic (B); take SCRAPER and 3/3 MUSICAL INSTRUMENT.
- Give BRIDES LETTER; earn EMPTY GHOST STONE (C).
- Walk down.
- Place MUSICAL INSTRUMENT; take FOUNTAIN PLATE (D).
- Use SCRAPER; place FOUNTAIN PLATE (E).
- Select 1-7; take MIRROR FLOWER (F).
- Go forward 2x.

- Place EMPTY GHOST STONE; take GHOST STONE (G).
- PALE CRYSTAL and GHOST STONE on DREAM BOX EXILE KEY.
- Walk down.
- Place MIRROR FLOWER; select pairs (H).
- Talk; take WITCH TRAP and 3/3 DREAM BOX (I).
- Place DREAM BOX (J).
- Select 1-9; place DREAM BOX EXILE KEY (K).
- Use VERMIN CATCHER; play HOP (L).
- Go forward.
- Take RAKE (M).
- Take EMPTY WATERING CAN (N).
- Use EMPTY WATERING CAN; earn FULL WATERING CAN (O).
- Use FULL WATERING CAN and RAKE; take ROSE and GOLDEN MEDALLION (P).
- Place GOLDEN MEDALLION, ROSE and HANDKERCHIEF; take ENCHANTED STAFF (A).
- Use WITCH TRAP; talk (B).
- Use ENCHANTED STAFF (C).
- Solution (D).
- Congratulations! You have completed Reflections of Life: Dream Box!
Created at: 2019-09-15