

Walkthrough Menu
- General Tips
- Chapter 1: Creatos
- Chapter 2: Approaching Equilibrium
- Chapter 3: Equilibrium
- Chapter 4: Phobius
- Chapter 5: Finding the Queen
- Chapter 6: Actualus
General Tips
- This is the official guide for Reflections of Life: Equilibrium!
- This guide does not mention each time you have to zoom into a location; the screenshots show each zoom scene.
- Hidden-object puzzles are referred to as HOPs. This guide does not show screenshots of the HOPs, however, it is mentioned when a HOP is available and the inventory item collected.
- This guide gives step-by-step solutions for all puzzles that are not random. Please read the instructions in the game for each puzzle.
Chapter 1: Creatos

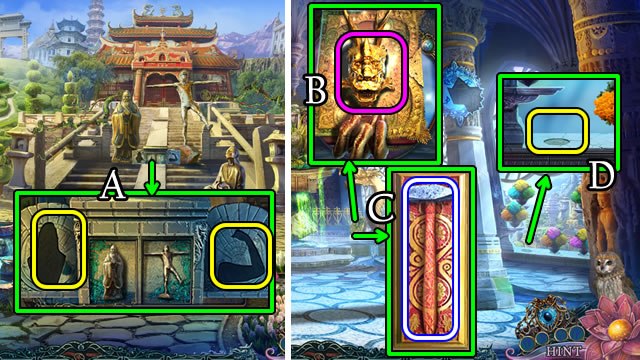
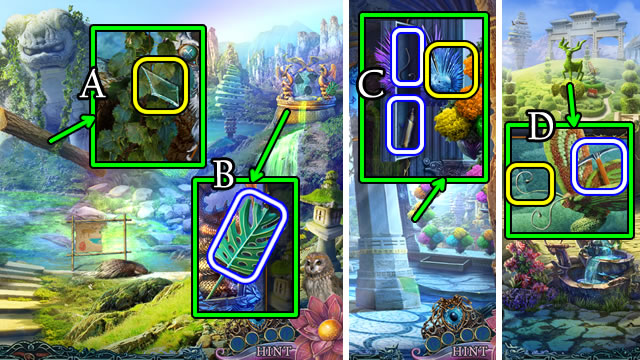
- Speak to the King (A).
- Move the pillow; take the note and METAL CLAWS (B).
- Place the METAL CLAWS (C); receive a LION GEM.
- Place the LION GEM (D).
- Walk forward.
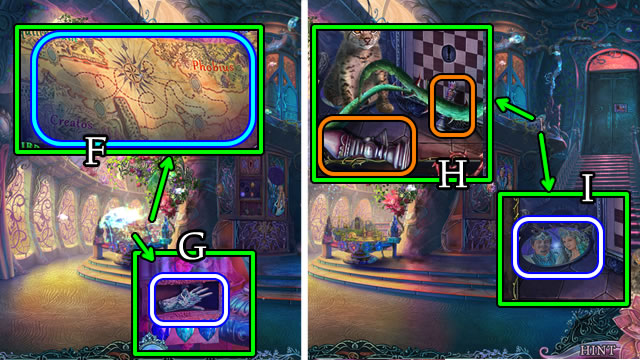
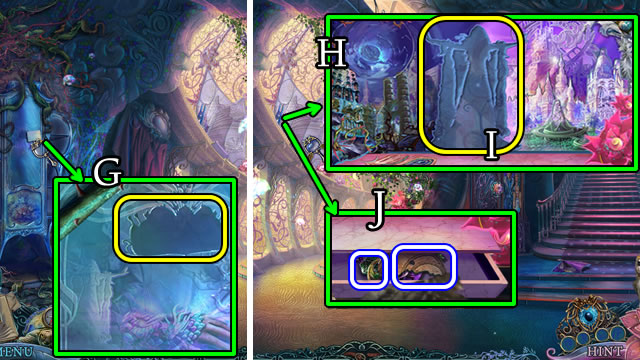
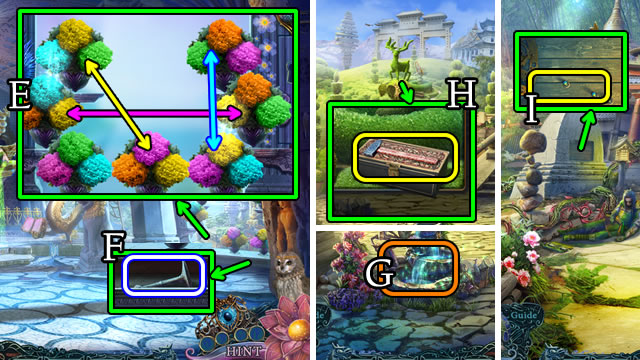
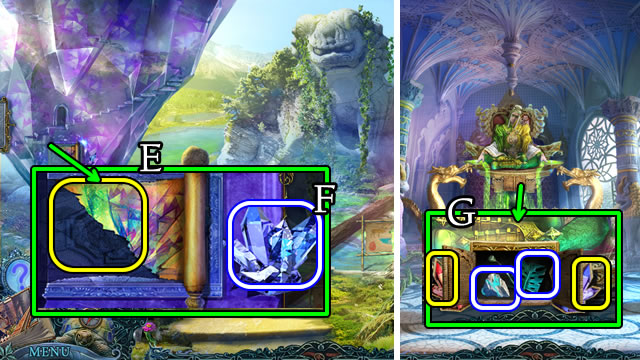
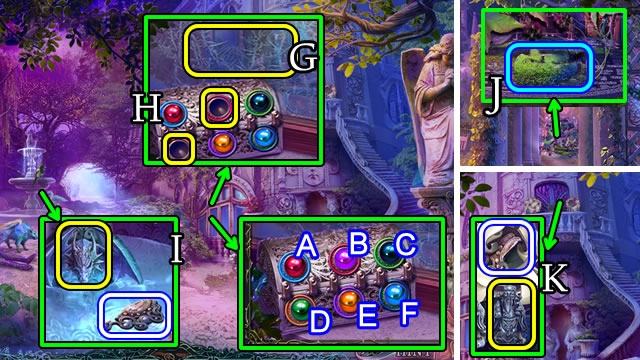
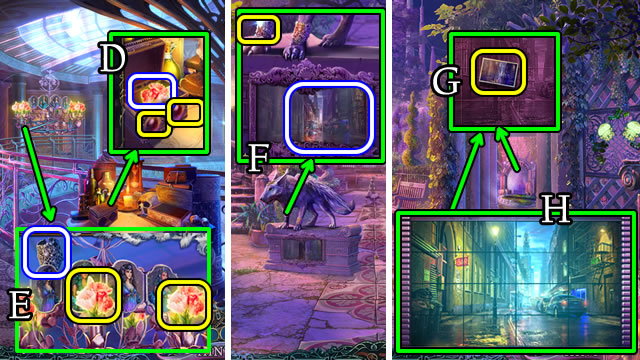
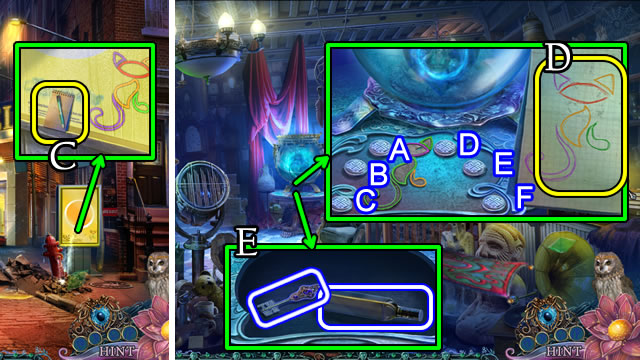
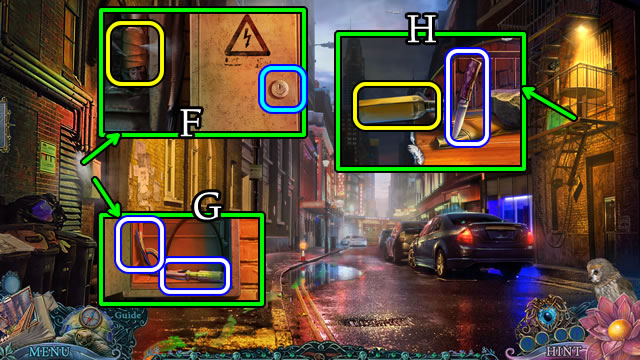
- Take the Map (F) to play a HOP; take the GLOVE TOKEN (G).
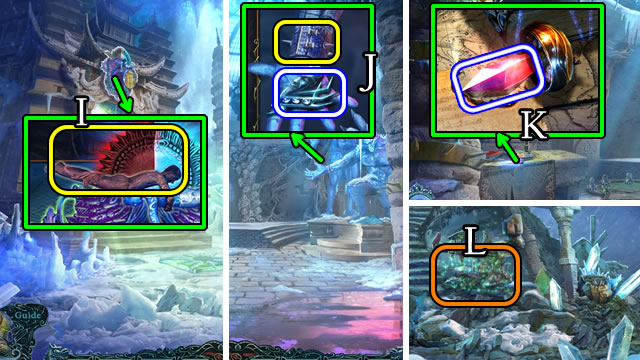
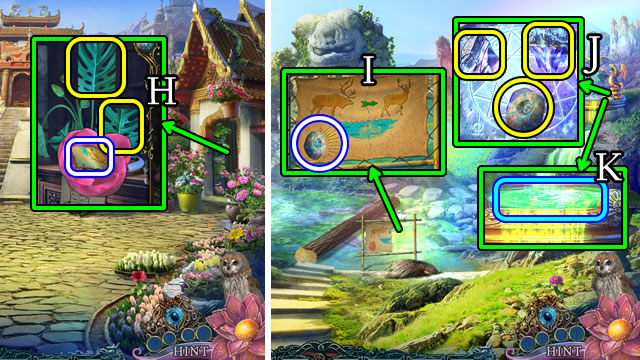
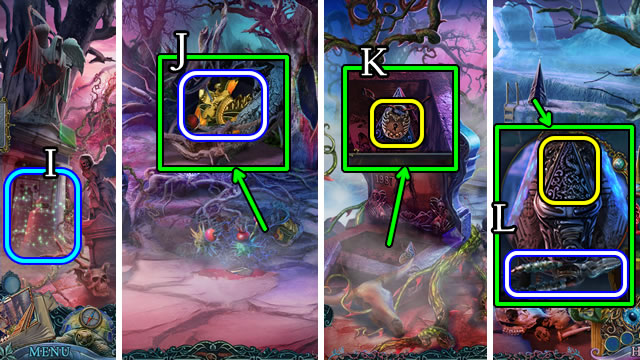
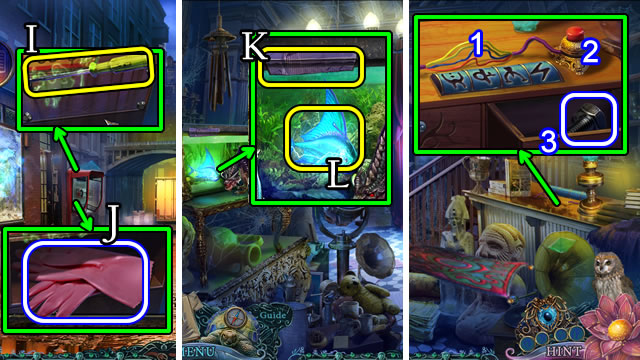
- Select (H); take the KING AND QUEEN (I).

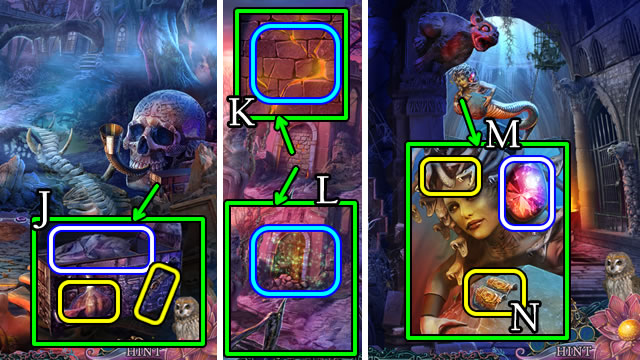
- Place the KING AND QUEEN (J); receive a SMALL FRAME.
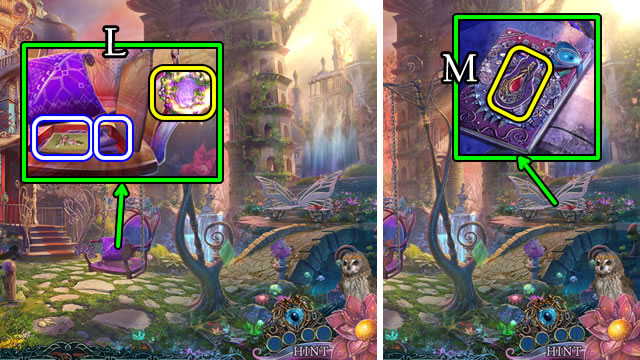
- Place the SMALL FRAME (K).
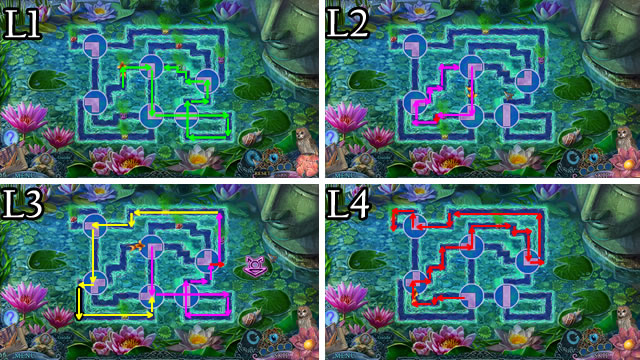
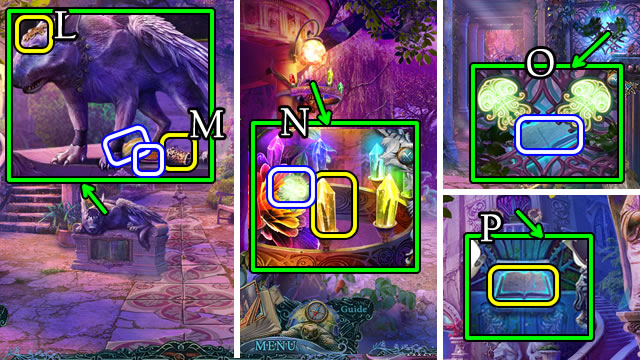
- Solution (L).
- Walk forward.

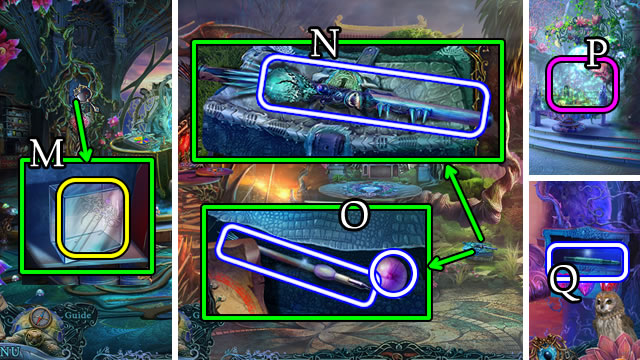
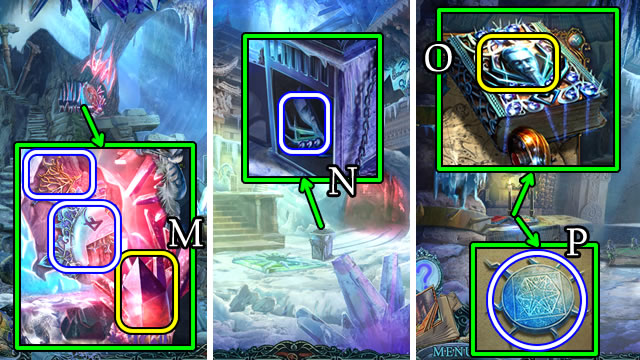
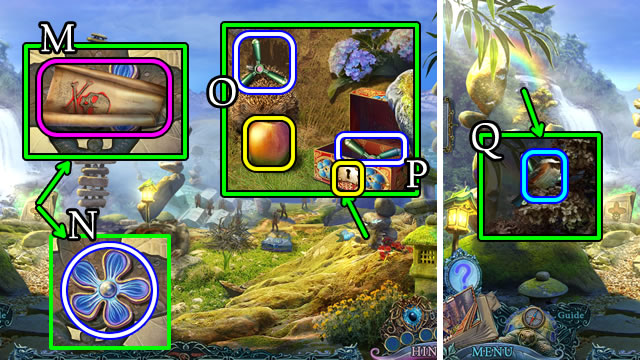
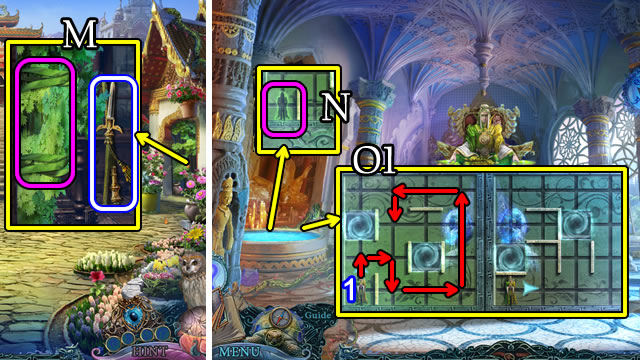
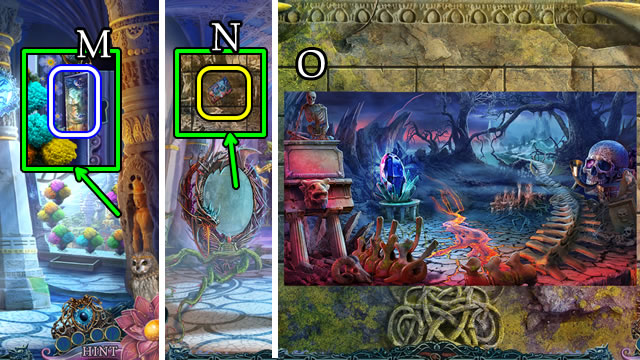
- Take (M).
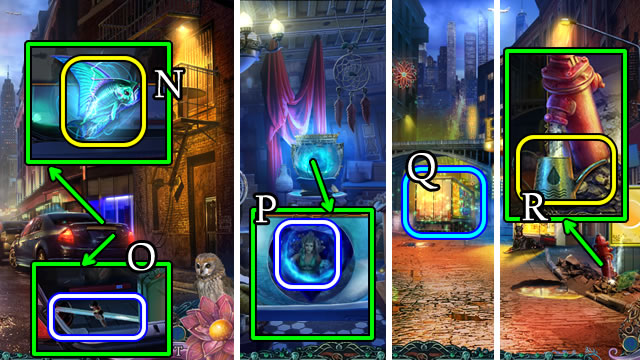
- Move (N); take the FEATHER.
- Walk down.
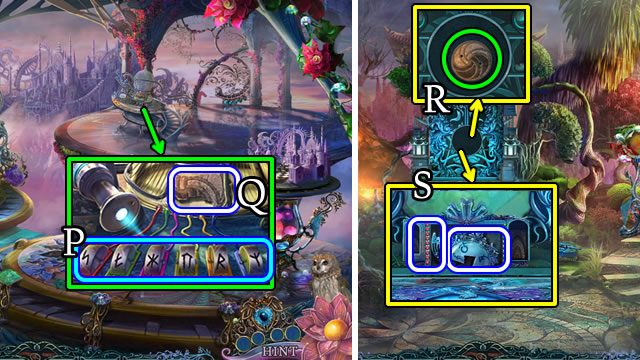
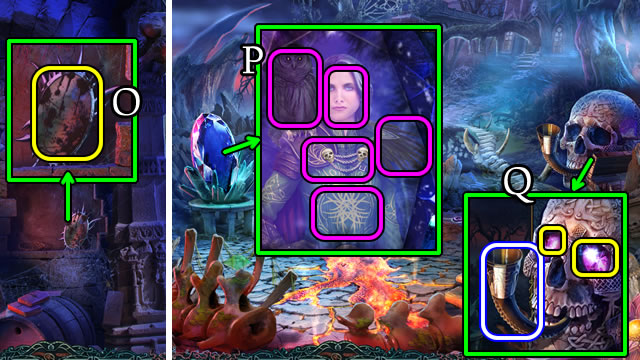
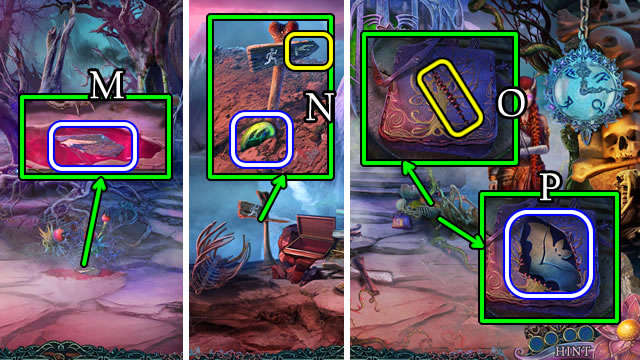
- Place the FEATHER (O). Take the PIANO GEM and DOME KEY (P).
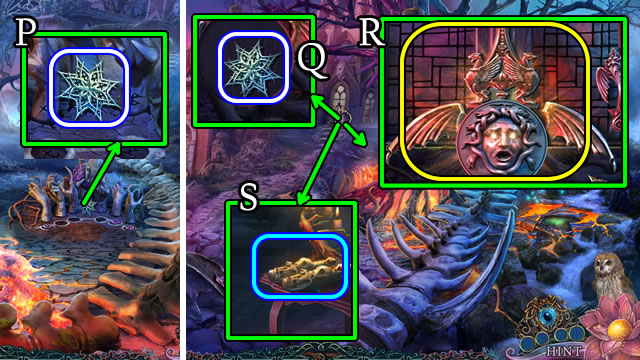
- Walk forward.
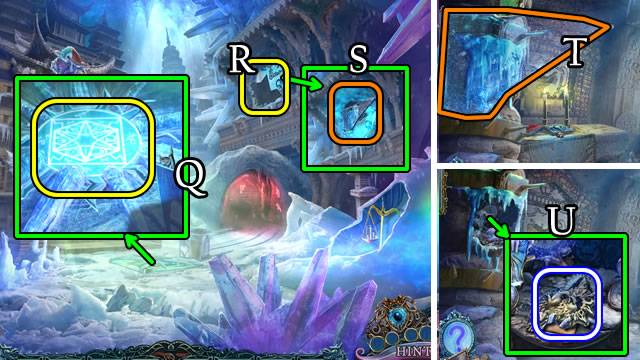
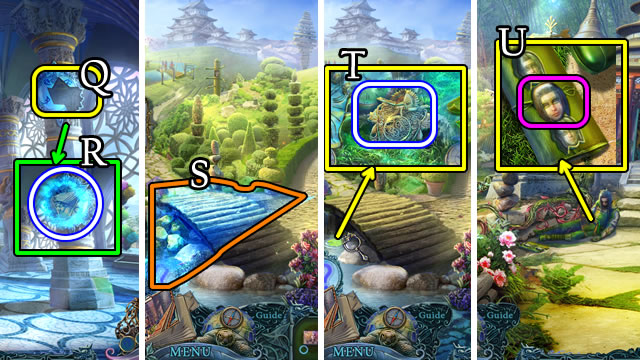
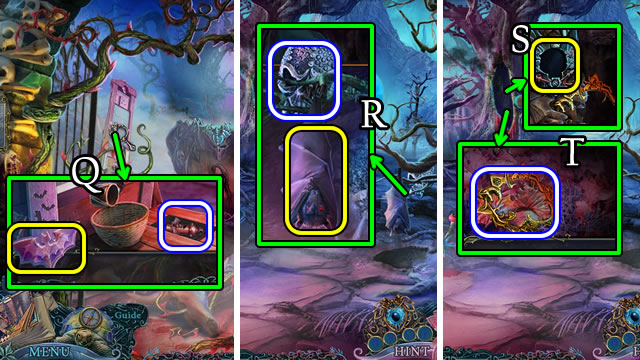
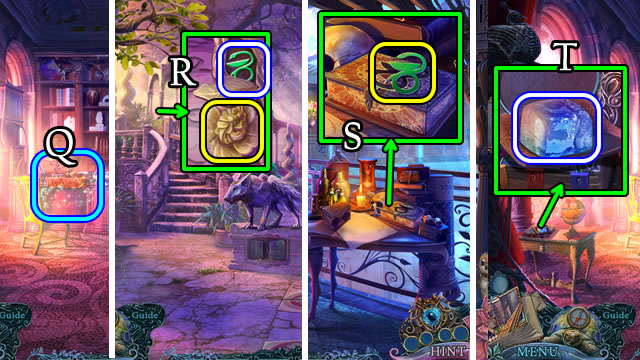
- Place the DOME KEY (Q), open, take the BELL.
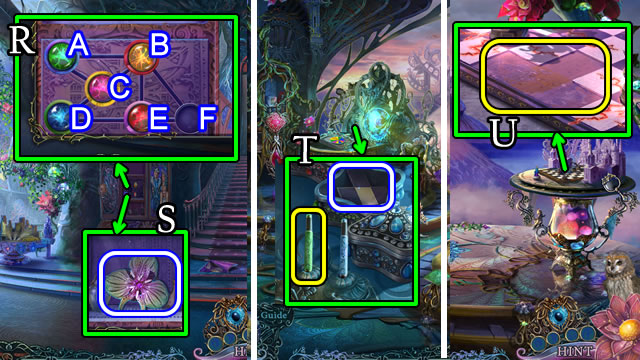
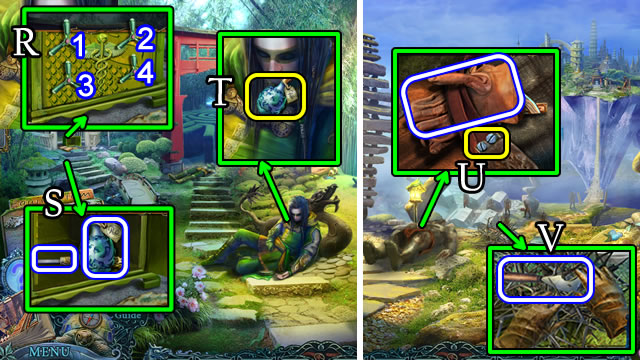
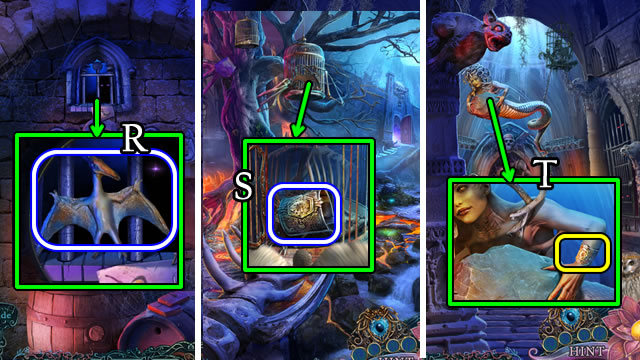
- Place the BELL (R).
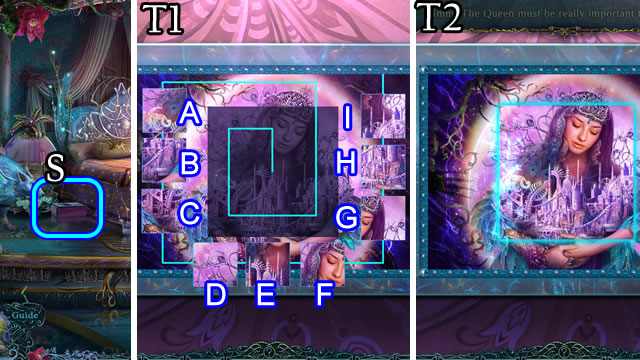
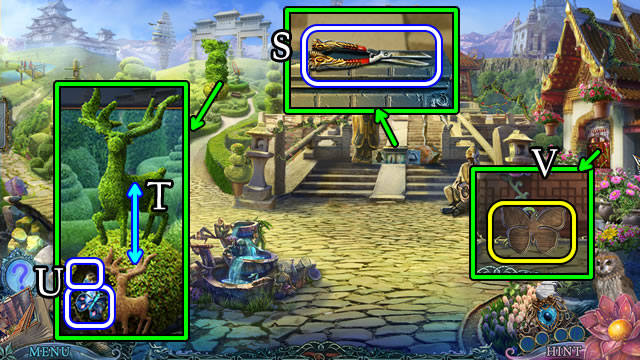
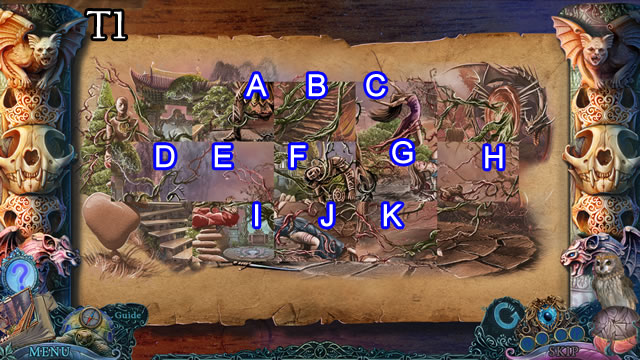
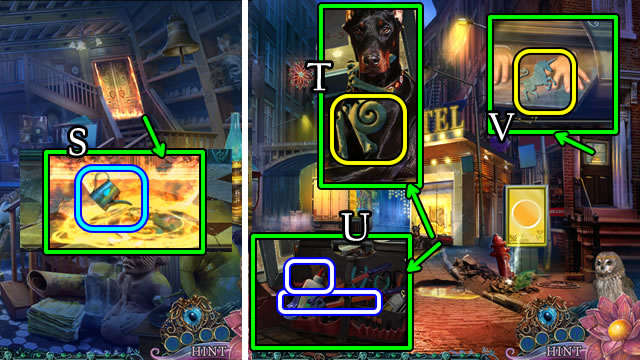
- Select (S).
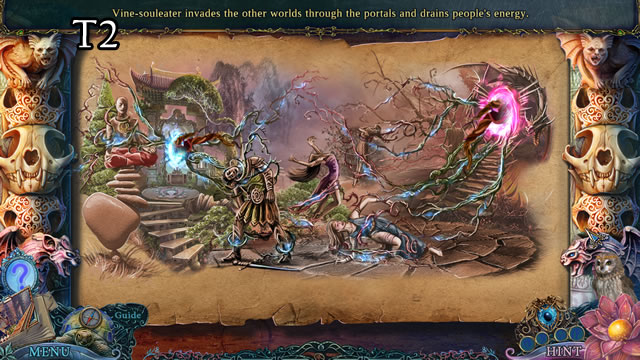
- Solution, part one (T1). A-E, B-F, C-D, D-E, G-I, G-H, F-G.
- Solved (T2).
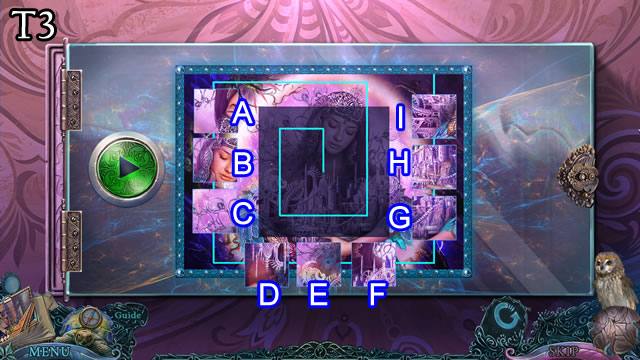
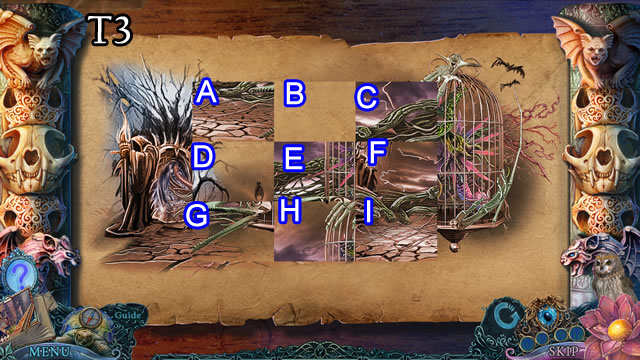
- Solution for Hardcore Mode (T3). Ax2-Dx2-I. A-D, E-I, F-H, D-I.
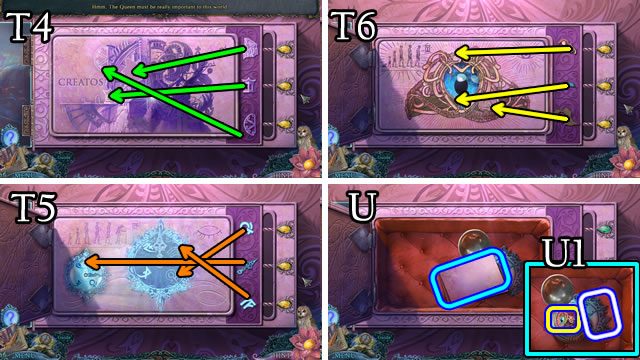
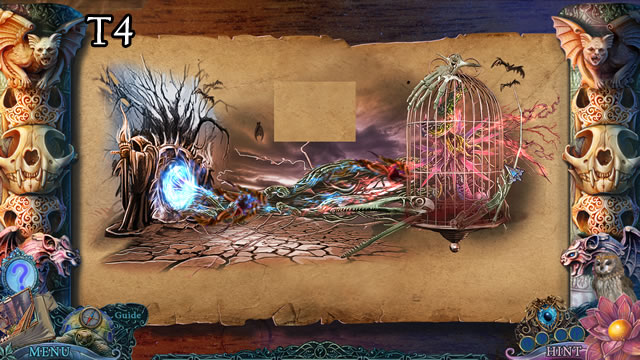
- Solution, part two (T4-T5-T6).
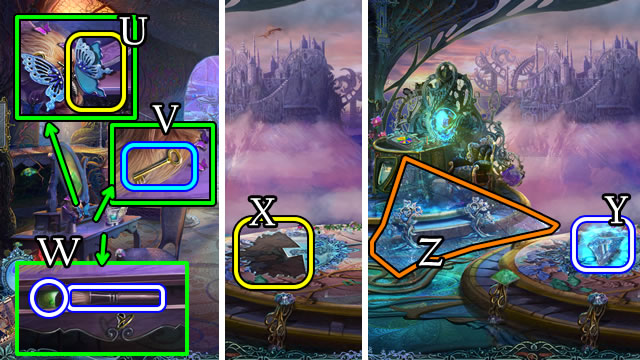
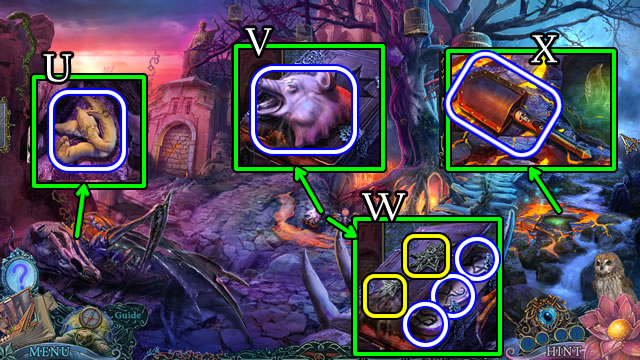
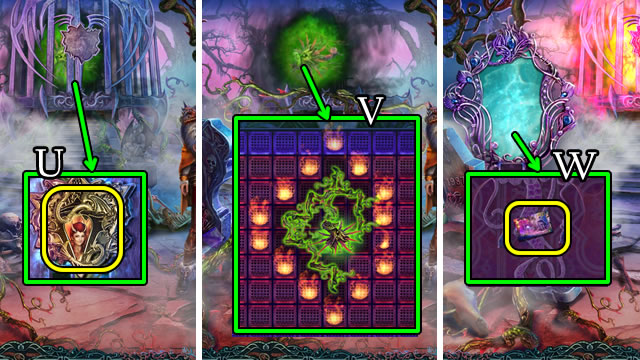
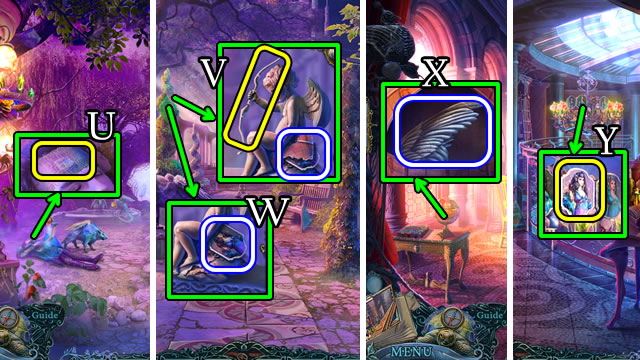
- Take the note (U). Take the Vision Ring and CLOCK HALF (U1).
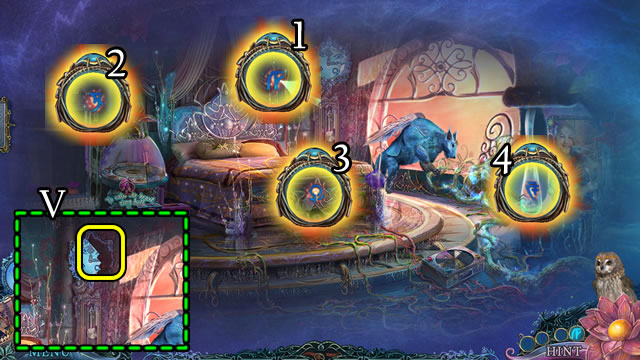
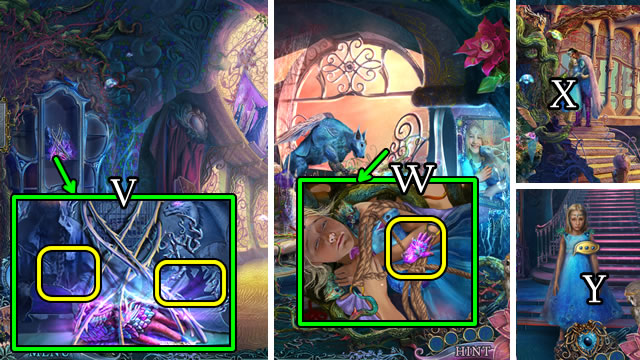
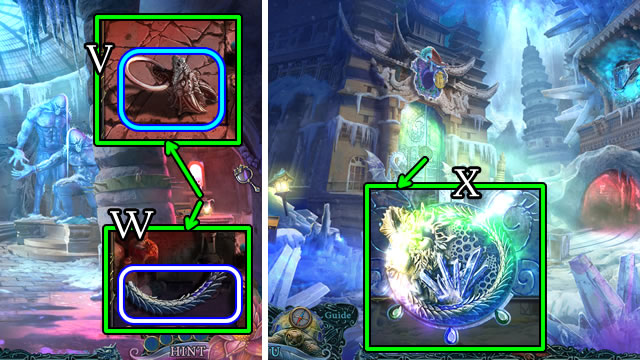
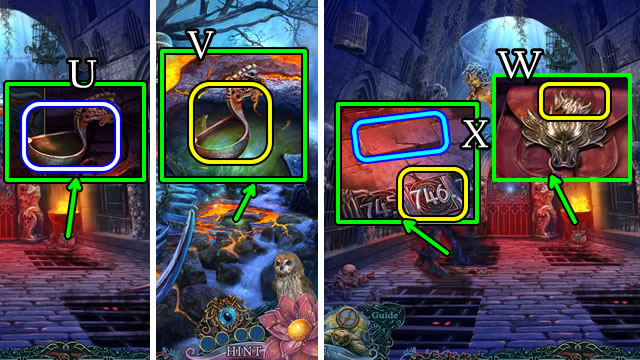
- Place the CLOCK HALF (V).
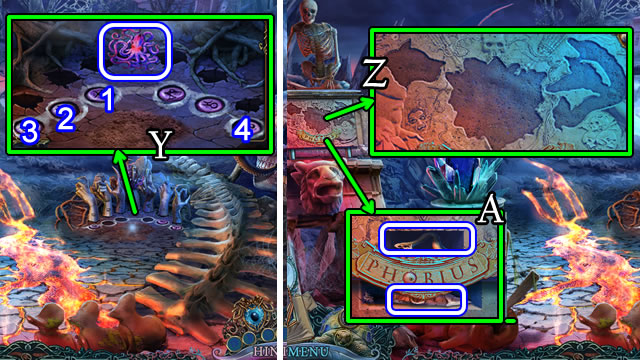
- Use the Vision Ring (1-2-3-4).
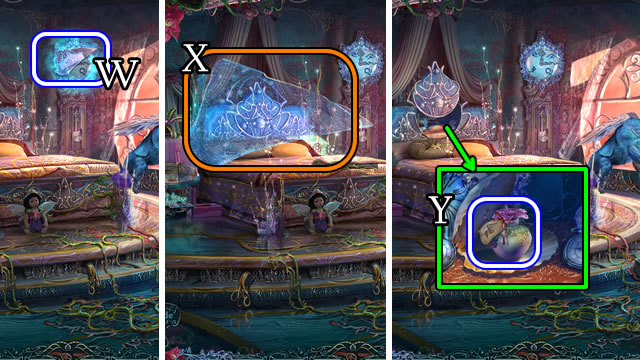
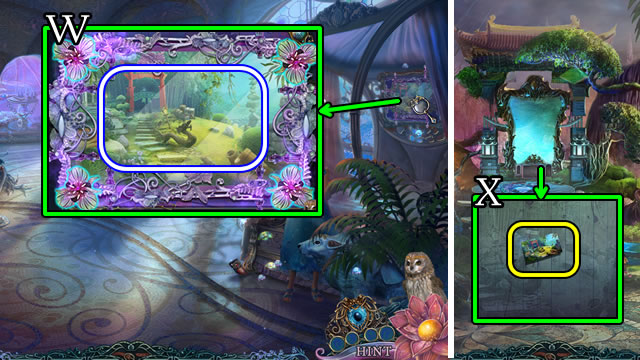
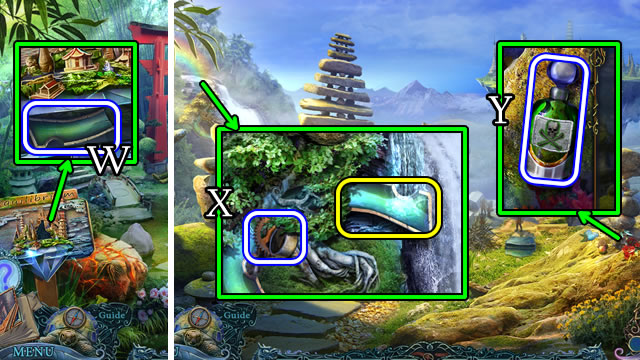
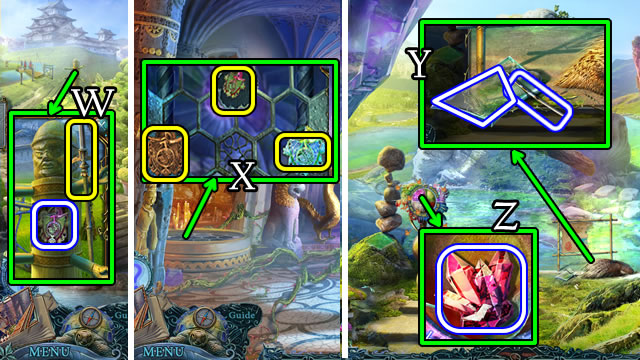
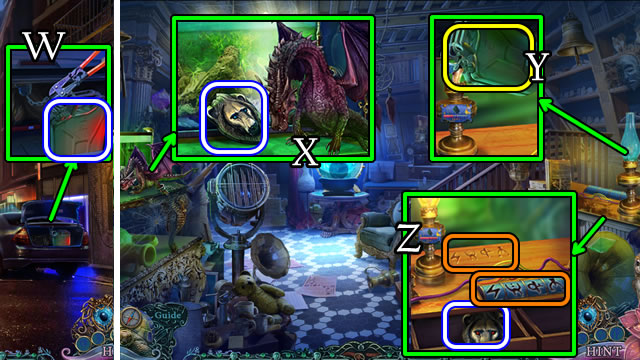
- Take (W), then place (X) the MYSTICAL IMAGE.
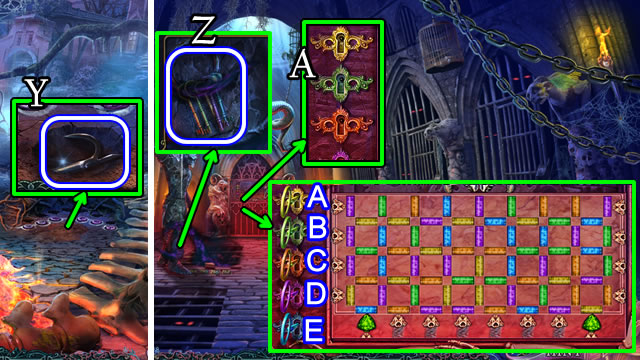
- Open; take the SMELLING SALTS (Y).
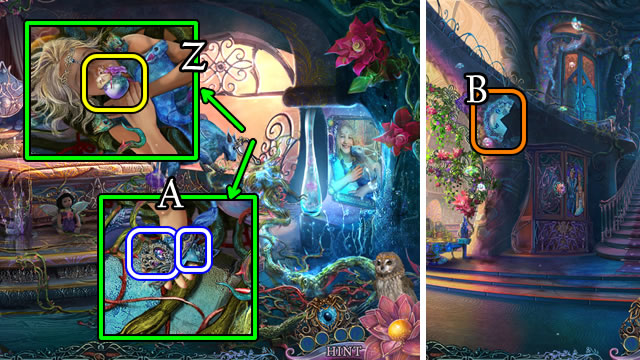
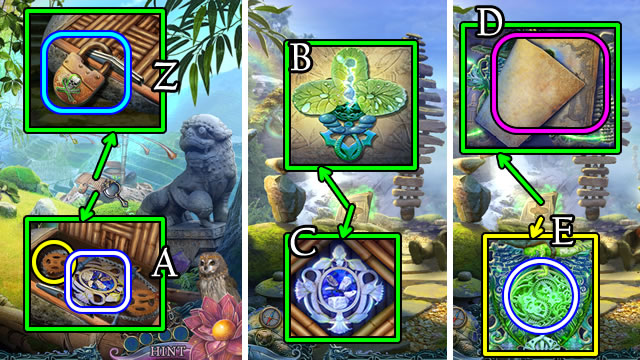
- Place the SMELLING SALTS (Z).
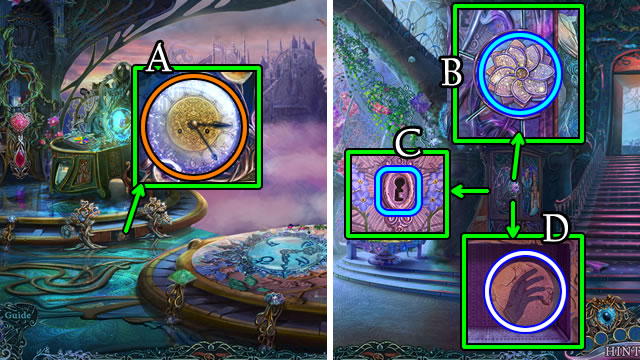
- Take the BROKEN CROWN and CLOCK HALF (A).
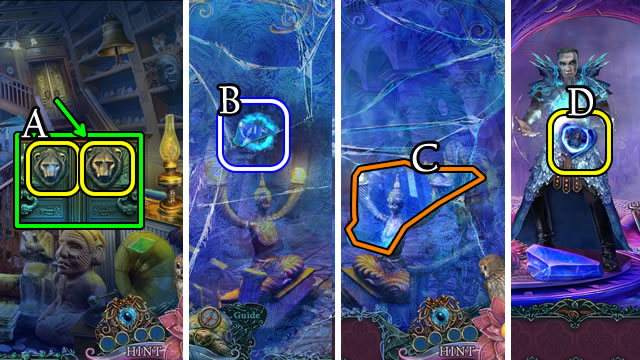
- Walk down.
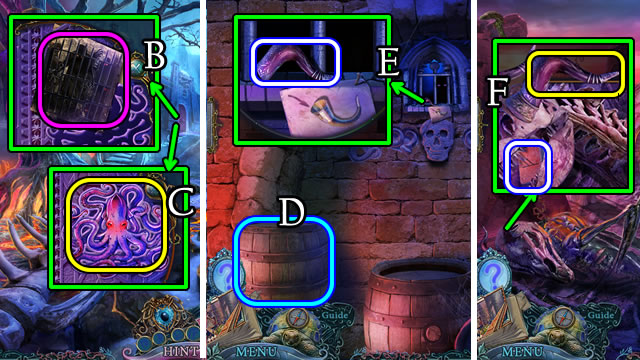
- Place the CLOCK HALF (B).
- Use the Vision Ring.
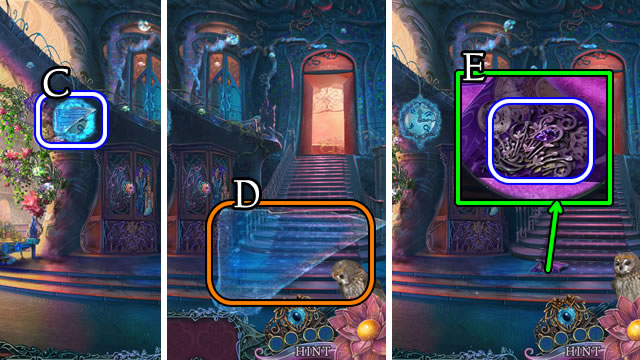
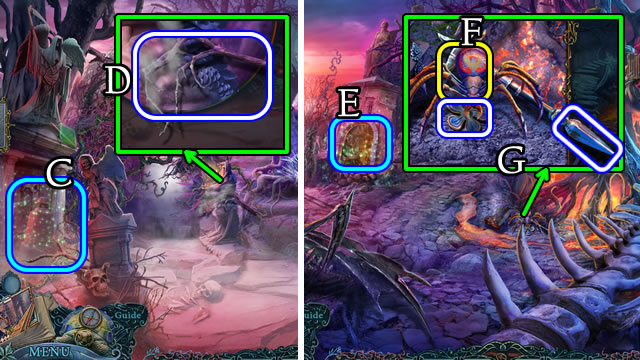
- Take (C), then place (D) the MYSTICAL IMAGE.
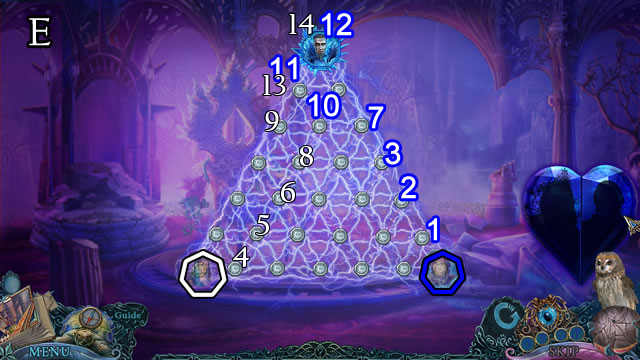
- Select, then take the CROWN SHARDS (E).
- Combine the BROKEN CROWN and CROWN SHARDS; take the CROWN INSERT (Inventory).
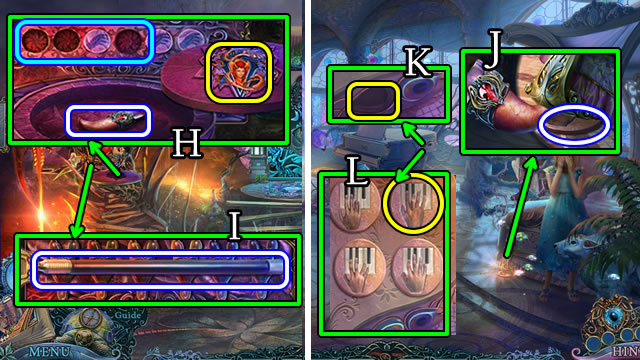
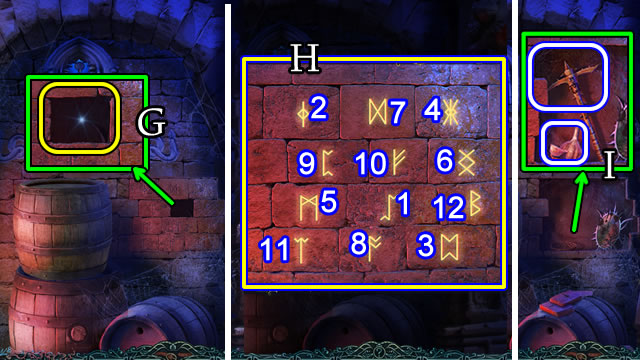
- Take the note; place the CROWN INSERT (G). Take the HUMAN FIGURE.
- Repair the window (H); place the HUMAN FIGURE (I).
- Take the SEAL PART and BROKEN MEDALLION (J).
- Restore the BROKEN MEDALLION; take the CHAIR MEDALLION (Inventory).
- Walk down.
- Place the CHAIR MEDALLION. Take the CARD and HAMMOCK (l).
- Open the CARD; take the BOOK KEY (Inventory).
- Place the BOOK KEY (M), open; take the PUZZLE-BOX PIECE.
- Walk forward 2x.
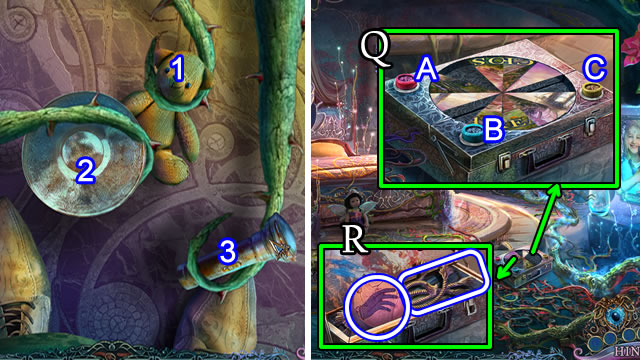
- Select and place the objects (1-2-3).
- Place the PUZZLE-BOX PIECE (Q).
- Solution: Bx6-Ax10-Cx8.
- Open, take the HAND BUTTON 1/3 and SCRAPS OF ROPE (R).
- Combine the HAMMOCK and SCRAPS OF ROPE; take the HAMMOCK ON ROPE (Inventory).

- Place the HAMMOCK ON ROPE; take the GLOVE TOKEN (T).
- Walk down.
- Place 2 GLOVE TOKENS (V). Take the MAGIC GLOVE.
- Walk forward.
- Place the MAGIC GLOVE (W).
- Walk down 2x. Speak to the King (X).
- Walk forward; speak to the Princess (Y).
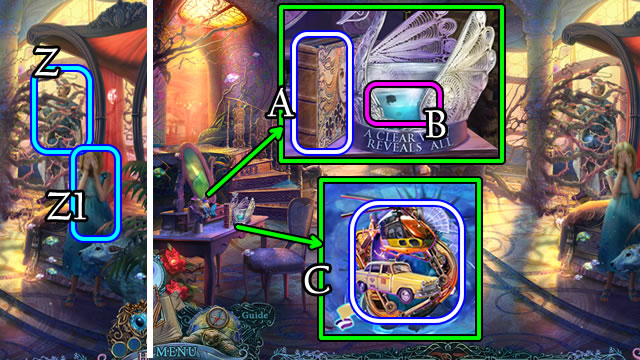
- Walk left; speak to the King (Z); receive a BOOK CIRCLE; speak to the Princess (Z1).
- Take the QUEEN'S DIARY (A); select (B).
- Solutions vary. Take the BROKEN SYMBOL (C).
- Restore the BROKEN SYMBOL; take the ACTUALUS SYMBOL (Inventory).
- Walk left.
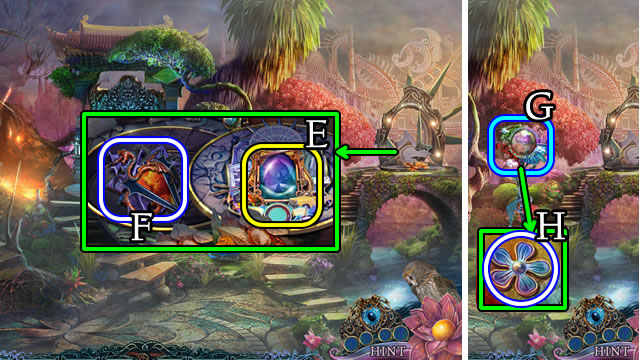
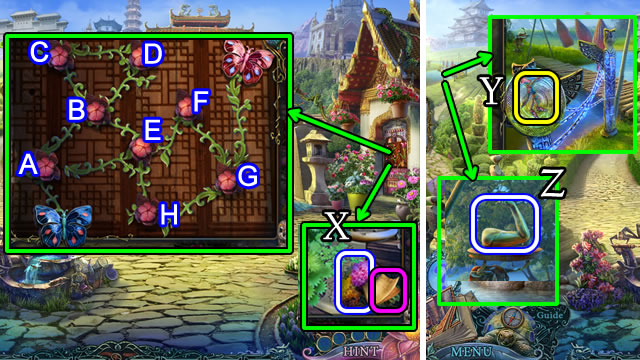
- Move the leaves 2x; place the ACTUALUS SYMBOL (E); take the BROKEN SYMBOL (F).
- Restore the BROKEN SYMBOL; take the PHOBIUS SYMBOL (Inventory).
- Play the HOP (G); take the FORGET-ME-NOT (H).
- Select 2x (J); receive a BROKEN SEAL.
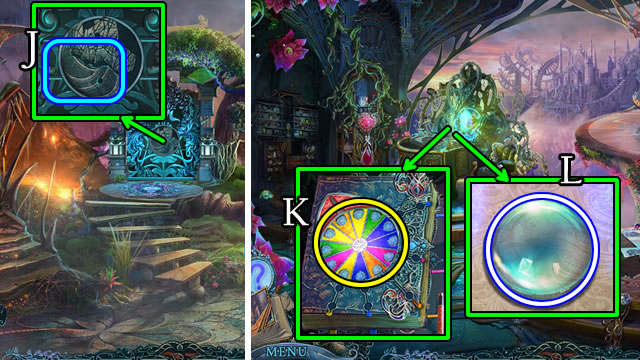
- Walk down and forward.
- Place the BOOK CIRCLE (K); open for a HOP; take the LENS (L).
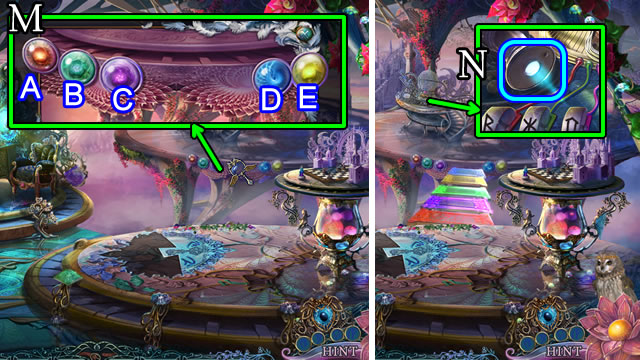
- Select (M).
- Solution: A-B-E-C-D.
- Replace the LENS; (N).
- Solution (P).
- Take the SEAL PART (Q).
- Walk down and left.
- Combine the BROKEN SEAL and 2 SEAL PARTS; take the SEAL (Inventory).
- Place the SEAL (R); take the CLOCK HALF and BUTTERFLY WING (S).
- Walk down.
- Place the BUTTERFLY WING (U); select the butterfly. Take the key (V); turn 2x. Take the MAKEUP BRUSH and PEARL (W).
- Walk forward.
- Place the CLOCK HALF (X).
- Use the Vision Ring.
- Take (Y) then place (Z) the MYSTICAL IMAGE.
- Select (A); take HAND BUTTON 2/3.
- Walk down 2x.
- Combine the QUEEN'S DIARY and FORGET-ME-NOT; take the QUEEN'S KEY (Inventory).
- Select (B); place the QUEEN'S KEY (C); take HAND BUTTON 3/3 (D).
- Walk left 2x.
- Place the PHOBIUS SYMBOL; take the DRAGON TOOTH; place HAND BUTTON 3/3 (H).
- Select all buttons, take the GLASS CUTTER (I).
- Walk down.
- Place the DRAGON TOOTH; take the PIANO TOKEN (J).
- Place the PIANO GEM (K) and PIANO TOKEN (L); take FLOWERS 1/3.
- Walk forward.
- Use the GLASS CUTTER (M); take the HAIRPIN.
- Bend the HAIRPIN 3x; earn the LOCKPICK (Inventory).
- Walk down, then left.
- Pick up the BLOWGUN (N). Use the LOCKPICK. Remove drawings 3x; take the TRANQUILIZER DART and PEARL (O).
- Walk down 2x.
- Play the HOP (P); take the PEN (Q).
- Place 2 PEARLS (R).
- Solution. E-B-A-C-D-E-B-A-C-D-E-B-F.
- Take FLOWERS 2/3 (S).
- Walk left, then forward.
- Place and select the PEN; take the CHESSBOARD PART (T).
- Place the CHESSBOARD PART (U).

- Solution. 1-2-3-4-5-6-7-8-9-10-11.
- Take FLOWERS 3/3.
- Walk down.
- Place FLOWERS 3/3; take the EQUILIBRIUM PHOTO (W).
- Walk left.
- Place the EQUILIBRIUM PHOTO (X).
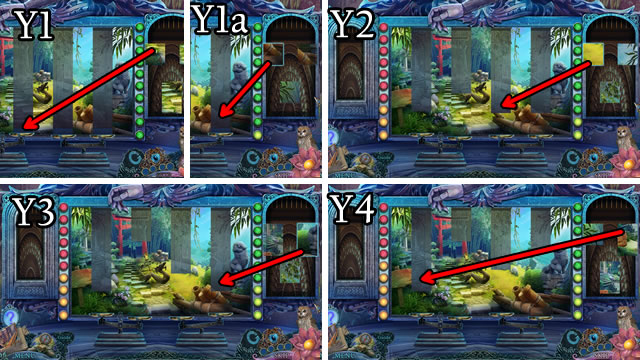

- Solution, part one. (Y1-Y1a-Y2-Y3-Y4).
- Solution, part two. (Y5-Y6-Y7-Y8).
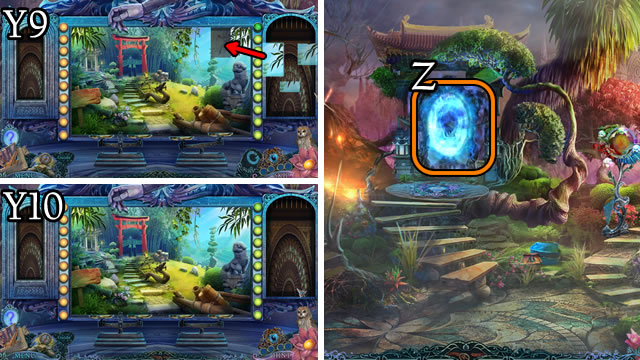
- Solution, part three. (Y9-Y10).
- Walk forward (Z).
Chapter 2: Approaching Equilibrium
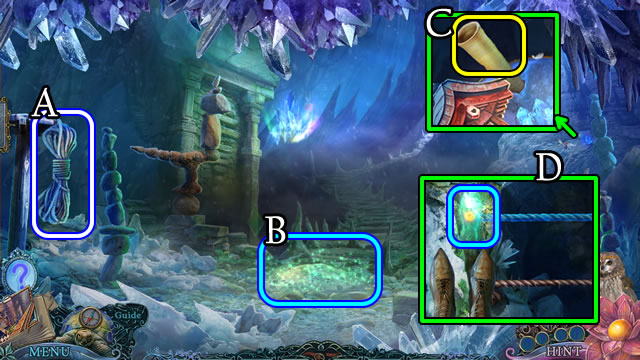
- Grab the ROPE (A).
- Play the HOP (B); take the MESSAGE.
- Untie and take the MESSAGE; take the DAGGER (Inventory).
- Place the ROPE (C) and cross the crevasse (D).
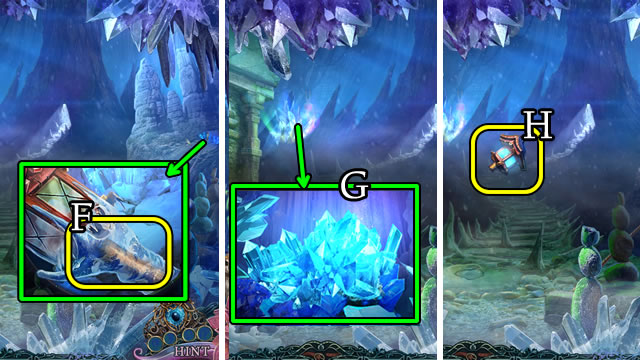
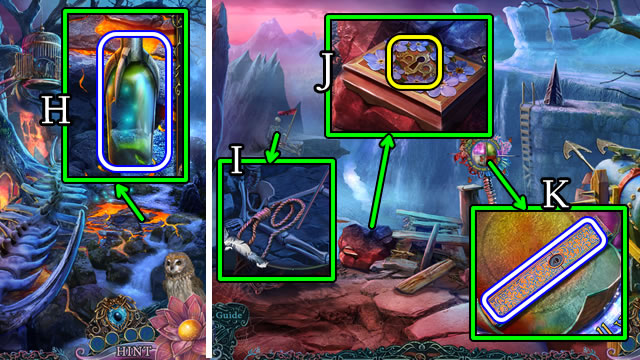
- Use the DAGGER (F); take the EMPTY LAMP.
- Play the HOP; take the GLOWING ICE (G).
- Combine the EMPTY LAMP and GLOWING ICE; take the LAMP (Inventory).
- Place the LAMP (H).
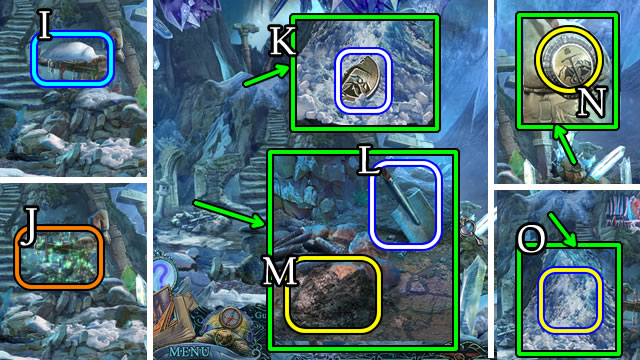
- Remove (I); play the HOP (J); receive ALPINIST'S KEY 1/3.
- Take ALPINIST'S KEY 2/3 (K).
- Select then take the SHOVEL HEAD (L).
- Use the MAKEUP BRUSH, move (M); take ALPINIST'S KEY 3/3.
- Place ALPINIST'S KEY 3/3 (N); open; take the HANDLE.
- Combine the SHOVEL HEAD and HANDLE; take the SHOVEL (Inventory).
- Use the SHOVEL (O).
- Walk forward.
- Take the note (P) and FORGET-ME-NOT (Q).
- Combine the FORGET-ME-NOT and QUEEN'S DIARY; take the QUEEN'S KEY (Inventory).
- Uncover and take GOLDEN COINS 7/7 (R).
- Walk right.

- Use the QUEEN'S KEY; take ICY SCALES (T).
- Place the GOLDEN COINS 7/7; select (U); take the GOLDEN PORTRAIT.
- Place the ICY SCALES (V); take TOOLS TOKEN.
- Depress the buttons; take the note (W); take the GLOWING CYLINDER (X).
- Walk down.
- Place the TOOLS TOKEN; take the HOOK (Y).
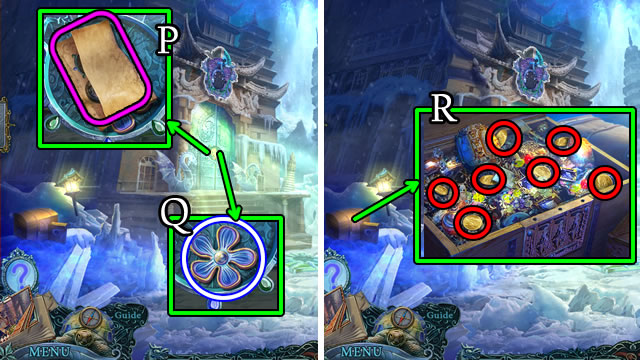
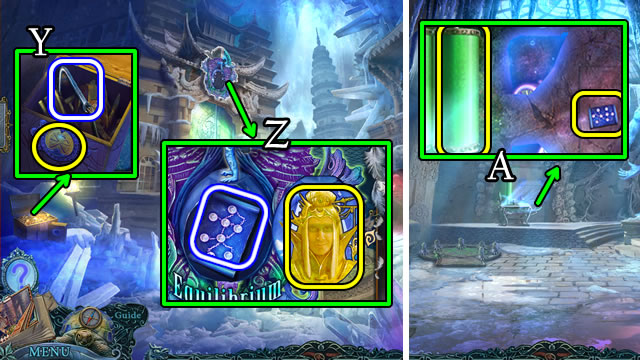
- Place the GOLDEN PORTRAIT; take the MAP (Z).
- Walk right.
- Place the GLOWING CYLINDER and MAP (A).
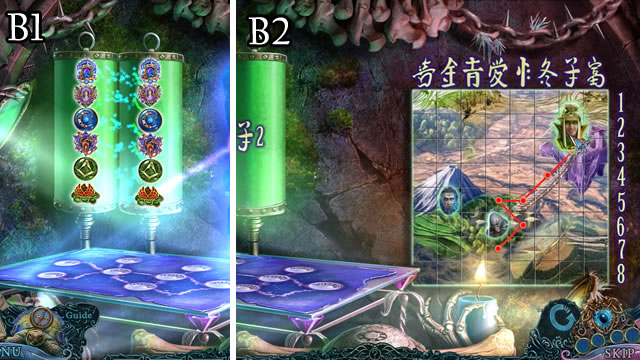
- Solutions vary. Possible solutions (B1-B2).
- Take the SCALE PAN.
- Walk down 2x.
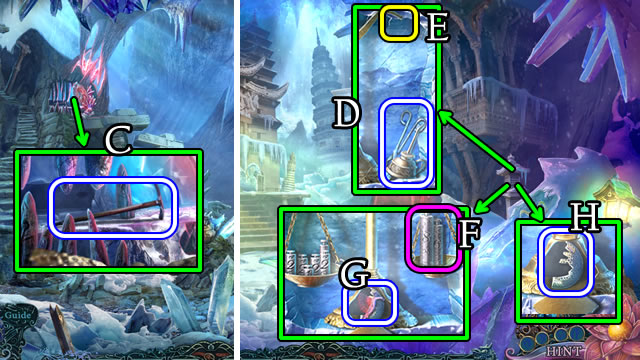
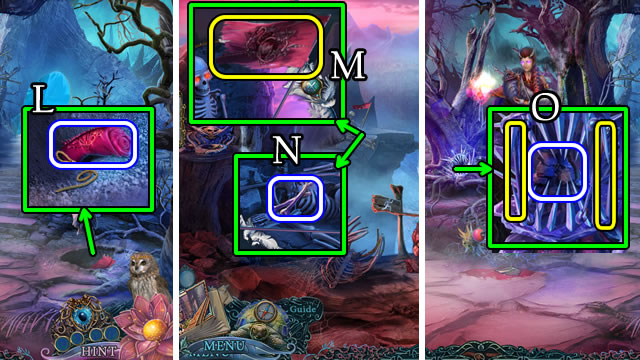
- Use the HOOK; take the PICK (C).
- Walk forward.
- Use the PICK; take the EMPTY OILER and TONGS (D).
- Place the SCALE PAN (E).
- Solution (F).
- Take the BALANCER (G) and ICY STONE (H).
- Place the BALANCER (I); take the BRACELET.
- Walk right.
- Place the BRACELET; take AKVOS PORTRAIT HALF (J).
- Use the TONGS; receive a HOT MINERAL (K).
- Walk down 2x.
- Play the HOP (L); receive a SHAWL.
- Place the HOT MINERAL; take a CLOCK HALF and BAT TOKEN (M).
- Walk forward.
- Place the BAT TOKEN; take AKVOS PORTRAIT HALF (N).
- Walk right.
- Place AKVOS PORTRAIT HALVES (O); play the HOP; take MAGIC ICE (P).
- Walk down.
- Place MAGIC ICE (Q); take an ICY STONE.
- Place the CLOCK HALF (R).
- Use the Vision Ring.
- Take the MYSTICAL IMAGE (S).
- Walk right.
- Place the MYSTICAL IMAGE (T). Uncover and take the BROKEN AMULET (U).
- Use the SHAWL, open (V); take the ICY STONE (W).
- Combine the BROKEN AMULET and 3 ICY STONES; take the ICY AMULET (Inventory).
- Walk down.
- Place the ICY AMULET (X). Walk forward.
- Speak to the guard (A); receive a LABYRINTH MAP HALF.
- Take the MAP PIECE (B).
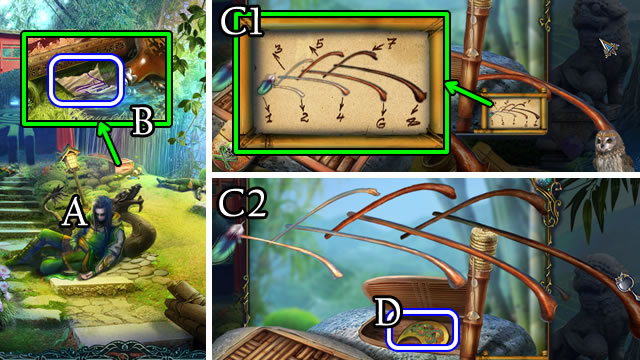
- Touch the mobile.
- Solution (C1-C2).
- Take the DRAGON SYMBOL (D).
- Place the DRAGON SYMBOL (E); open; take a MAP PIECE (F).
- Combine the LABYRINTH MAP HALF and 2 MAP PIECES; take the LABYRINTH MAP (Inventory).
- Walk forward.
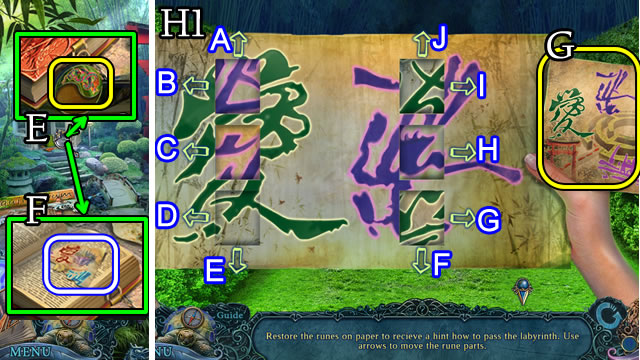
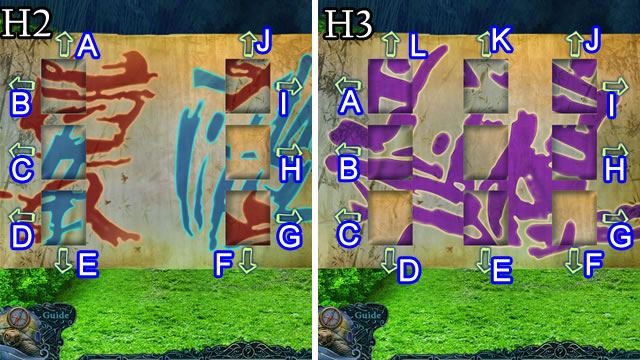
- Place the LABYRINTH MAP (G).
- Solution, part one (H1). C-F-B-C-F.
- Solution, part two (H2). H-F-H-J-G-E.
- Solution, part three (H3). D-K-F-A-H-C.
- Walk forward.
- Combine the BLOWGUN and TRANQUILIZER DART; take the LOADED BLOWGUN (Inventory).
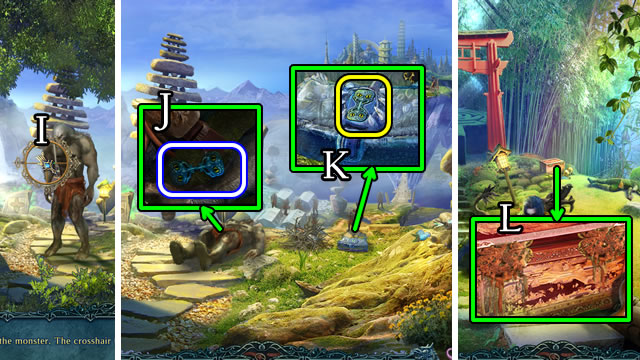
- Use the LOADED BLOWGUN (I).
- Attempt to walk forward 2x.
- Take (J) and place the LIZARD KEY (K); open, take the OIL.
- Combine the OIL and EMPTY OILER; take a FULL OILER (Inventory).
- Walk down.
- Use the FULL OILER (L); open, take the APPLE.
- Walk forward.
- Take the note (M) and FORGET-ME-NOT (N).
- Combine the FORGET-ME-NOT and QUEEN'S DIARY; take the QUEEN'S KEY (Inventory).
- Place the APPLE; take HANDLES 1/3 (O).
- Use the QUEEN'S KEY; take HANDLES 2/3 (P).
- Shoo (Q); take the HANDLES 3/3.
- Walk down.
- Place HANDLES 3/3; turn (1-2-3-4); open; take the ANTIDOTE and SCREWDRIVER (S).
- Place the ANTIDOTE (T); receive a SEAL.
- Walk forward.
- Use the SCREWDRIVER; take GLOVES (U) and CITY IMAGE.
- Use the GLOVES; take the BROKEN SCRAPER (V).
- Walk down.
- Place the CITY IMAGE; take the BAMBOO PIPE (W).
- Walk forward.
- Place the BAMBOO PIPE, take the METAL CLIP and GEAR (X).
- Combine the BROKEN SCRAPER and METAL CLIP; take the SCRAPER (Inventory).
- Use the SCRAPER; take ACID (Y).
- Walk down.
- Use the ACID (Z); open; place the GEAR, take the SEAL (A).
- Walk forward.
- Place SEAL (B) and SEAL (C).
- Take the note (D) and GREEN MECHANISM HEART (E).
- Walk forward.
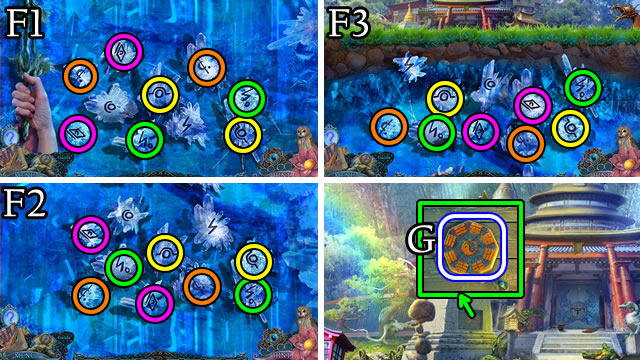
- Solution. (F1-F2-F3); walk forward.
- Take the BUCKLE (G).
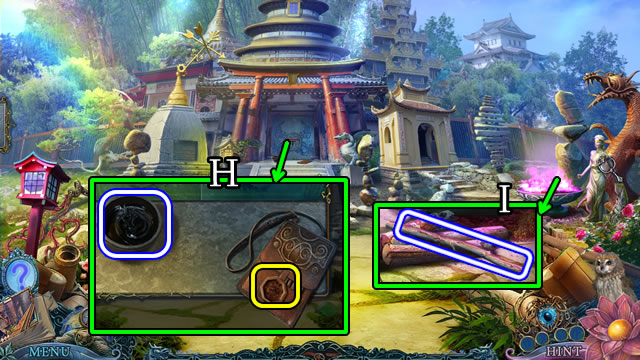
- Take the RESIN; place the BUCKLE (H); open; take the BANDAGE.
- Take the STICK (I).
- Combine the STICK, RESIN and BANDAGE; take the UNLIT TORCH (Inventory).
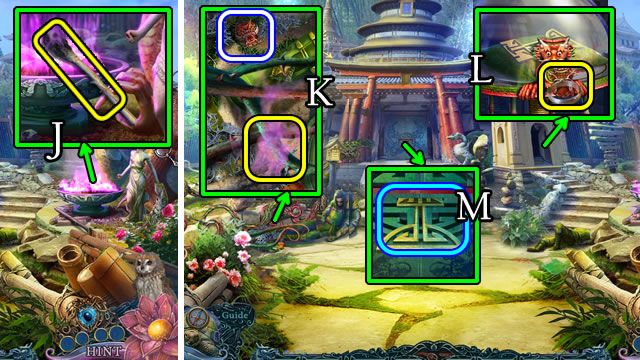
- Place the UNLIT TORCH; receive a TORCH (J).
- Use the TORCH; take a DRAGON RING (K).
- Place the DRAGON RING (L); take the CITY KEY.
- Place the CITY KEY (M).
- Walk forward.
Chapter 3: Equilibrium
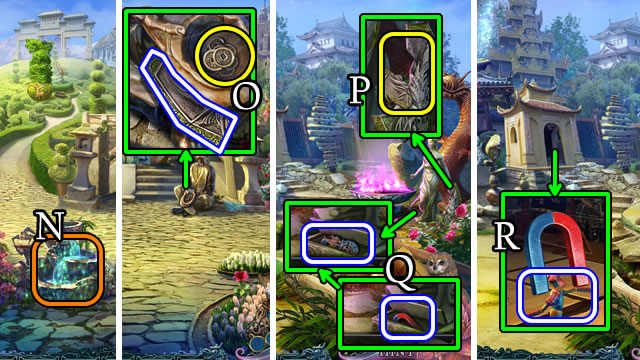
- Shoo the butterflies. Play the HOP (N); receive COINS.
- Place the COINS; take the SHIELD PIECE (O).
- Walk down.
- Place the SHIELD PIECE (P); BRONZE PORTRAIT and MAGNET (Q).
- Use the MAGNET; receive a DOLL ACROBAT (R).
- Walk forward.
- Take PRUNING SHEARS (S).
- Use the PRUNING SHEARS (T); take the BUTTERFLY and WISDOM SYMBOL (U).
- Place the BUTTERFLY (V).
- Solution. A-B-C-D-B-E-B-E-F-G-H-E-F-G-F-G.
- Take the note and DECORATIVE FLOWER (X).
- Place the DOLL ACROBAT (Y); select the totem.
- Solutions vary. Take the STRENGTH SYMBOL (Z).
- Place the WISDOM SYMBOL and STRENGTH SYMBOL (A).
- Walk forward.
- Speak to the King to receive a DRAGON HEAD.
- Place the DRAGON HEAD (B); play the HOP; take the HAMMER PLATE (C).
- Place the DECORATIVE FLOWER (D).
- Solution (E).
- Take the JUSTICE SWORD HANDLE (F).
- Walk down.
- Play the HOP (G); receive JUSTICE SWORD BLADE.
- Combine the JUSTICE SWORD HANDLE and JUSTICE SWORD BLADE; take the SWORD OF JUSTICE (Inventory).
- Place the HAMMER PLATE (H); open, take GEARS.
- Walk down.
- Place the GEARS (I).

- Solution. 1-F, 2-E, 3-G, 4-B, 5-A, 6-D, 7-C.
- Take the SMALL KING.
- Place the SWORD OF JUSTICE; take RIBBON (L).
- Walk forward.
- Place the RIBBON; take SPEAR PARTS (M).
- Walk forward.
- Place the SMALL KING (N).
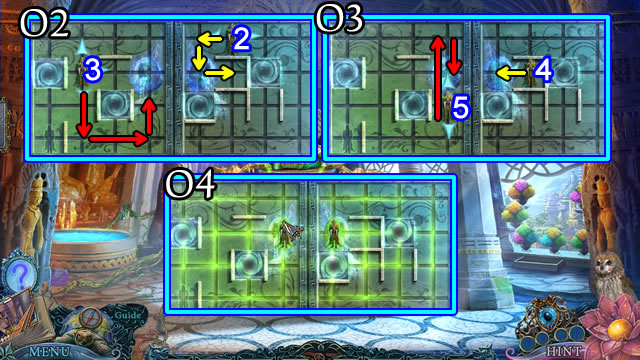
- Solution, part one (O1). 1.
- Solution, part two (O2). 2-3.
- Solution, part three (O3). 4-5.
- Solved (O4).
- Take the GUARD PORTRAIT and CLOCK HALF.
- Place the CLOCK HALF (Q).
- Use the Vision Ring.
- Take the MYSTICAL IMAGE (R).
- Walk down.
- Place the MYSTICAL IMAGE (S).
- Move the lily pad; take the BROWN MECHANISM HEART (T).
- Walk down.
- Place the GUARD PORTRAIT (U); take the SPEAR CLAMP.
- Walk forward.
- Combine the SPEAR PARTS and SPEAR CLAMP; take the EQUILIBRIUM SPEAR (Inventory).
- Place the EQUILIBRIUM SPEAR; take the WOODEN MECHANISM HEART (W).
- Walk forward.
- Place the GREEN MECHANISM HEART, BROWN MECHANISM HEART and WOODEN MECHANISM HEART (X).
- Walk down the steps.
- Take the PORCUPINE NEEDLE and SHARP GLASS (Y).
- Play the HOP; take the RED CRYSTAL (Z).
- Use the SHARP GLASS (A).
- Take the IKEBANA BRANCH (B).
- Walk down.
- Place the PORCUPINE NEEDLE; take the BUTTERFLY ANTENNA and SCROLL (C).
- Walk down.
- Place the BUTTERFLY ANTENNA; take the SMALL PICK (D).
- Walk forward, then left.
- Place the SCROLL (E); take the CRYSTAL CITY IMAGE. Use the SMALL PICK; take the BLUE CRYSTAL (F).
- Walk down.
- Place the RED CRYSTAL and BLUE CRYSTAL; take the FROST CAVES IMAGE and IKEBANA BRANCH (G).
- Walk down.
- Place 2 IKEBANA BRANCHES; take the IMAGE ON PARCHMENT (H).
- Walk forward, then left.
- Place the IMAGE ON PARCHMENT; take the WELLSPRING IMAGE (I).
- Place the CRYSTAL CITY IMAGE, FROST CAVES IMAGE and WELLSPRING IMAGE (J); select (K).
- Solution. (K1-K2-K3-K4).
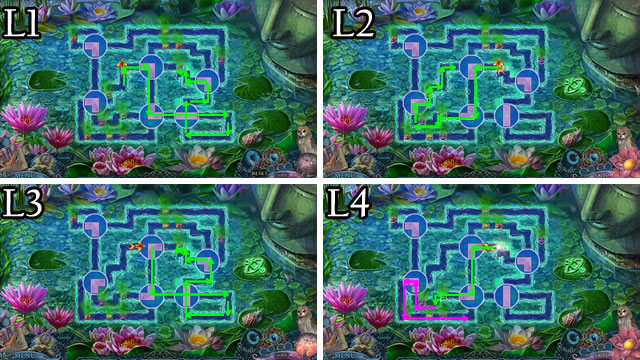
- Solution, Hardcore Mode part one. (L1-L2-L3-L4).
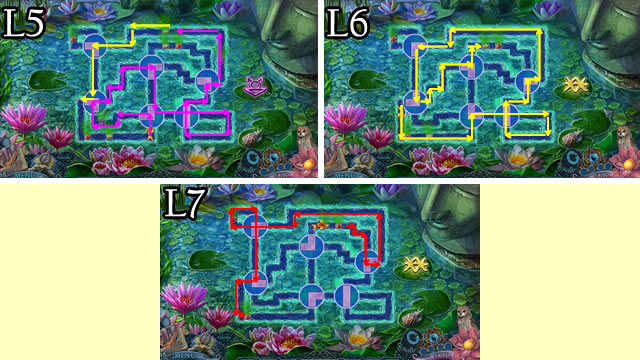
- Solution, Hardcore Mode part two. (L5-L6-L7).
- Walk down; speak to the King; take the FORGET-ME-NOT.
- Combine the FORGET-ME-NOT and the QUEEN'S DIARY; take the QUEEN'S KEY (Inventory).
- Use the QUEEN'S KEY; take the PHOBIUS PHOTO (M).
- Place the PHOBIUS PHOTO (N).
- Solution (O).
- Walk forward.
Chapter 4: Phobius
- Take the STAR (P).
- Walk forward.
- Take the STAR (Q). Place the BRONZE PORTRAIT (R). Select (S).
- Solution, part one (T1). D-I, E-F, A-I, B-H, C-B, G-J, B-F, G-K.
- Solved (T2).
- Solution, part two. C-F-I-H-E-F-I-H-G-D-E-B-C-F-I-H-G-D-A-B-E H-G-D-E-B-A-D-E-H-G-D-E-B-A-D-G-H-E-D-A-B-E-H-G-D-E-B.
- Solved (T4).
- Take the CLAY PHOBIUS SYMBOL.
- Take the CLAY HYDRA (U).
- Take the CLAY WEREWOLF (V). Place 2 STARS; take RUNE STONES 3/3 (W).
- Take the COVERED SHOVEL (X).
- Walk down.
- Place the STONE RUNES 3/3. Press 1-2-3-4; take the METAL OCTOPUS (Y).
- Place the CLAY WEREWOLF, CLAY HYDRA and CLAY PHOBIUS SYMBOL (Z); take the STONE SNAKE and STAKE TOKEN (A).
- Walk forward.
- Take the note (B); place the METAL OCTOPUS (C); walk forward.
- Select the barrel (D). Speak to the prisoner. Take the DRAGON HORN (E).
- Walk down.
- Place the DRAGON HORN; take the RUNE BRICK (F).
- Walk forward.
- Place the RUNE BRICK (G).
- Solution (H).
- Take the PICKAXE and GARLIC TOKEN (I).
- Walk down 2x.
- Place the GARLIC TOKEN and STAKE TOKEN, open, take the RAG (J).
- Walk forward.
- Use the PICKAXE (K); play the HOP (L); receive a STONE SNAKE.
- Walk forward.
- Place 2 STONE SNAKES; take a GEM EYE (M); select (N).
- Use the RAG (O); take the MIRROR.
- Walk down 2x.
- Replace the MIRROR; select the differences (P).
- Take a GEM EYE.
- Place 2 GEM EYES; take the HORN (Q).
- Walk forward 2x.
- Give the HORN; take the PTERODACTYL TOKEN (R).
- Walk down.
- Place the PTERODACTYL TOKEN; take the GOLDEN BRACELET (S).
- Walk forward.
- Place the GOLDEN BRACELET (T); walk forward.
- Take the SCOOP (U); walk down.
- Use the SCOOP (V); take the DRAGON CROWN.
- Walk forward.
- Place the DRAGON CROWN (W); open; take the PRISON PLATE.
- Place the PRISON PLATE, remove (X); take the SKULL BUCKLE.
- Combine the SKULL BUCKLE and COVERED SHOVEL; take the SHOVEL (Inventory).
- Walk down 2x.
- Use the SHOVEL; take the GAFF (Y).
- Walk forward 2x.
- Use the GAFF; receive PRISON KEYS (Z).
- Place the PRISON KEYS (A).
- Solution. E-A-C-D-E-A-D-B-C-A-B-E.
- Speak to Sacrosa.
- Walk down; select Sacrosa; walk left.
- Play the HOP (C); receive FLAG PART.
- Speak to Sacrosa; take the SMOKING BRANCH (D).
- Walk down; play the HOP (E); receive NET AND BOTTLE.
- Use the SMOKING BRANCH (F); take the FORGET-ME-NOT and HAMMER (G).
- Place the NET AND BOTTLE; take BOTTLED SWAMP LIGHTS (H).
- Walk left, then right.
- Take the ROPE (I).
- Combine the FORGET-ME-NOT and QUEEN'S DIARY; take the QUEEN'S KEY (Inventory).
- Use the HAMMER; use the QUEEN'S KEY (J); take the DECORATED HANDLE.
- Play the HOP; take the LOCKED BOX (K).
- Walk down.
- Place the ROPE; receive a FLAG PART (L).
- Walk right.
- Place 2 FLAG PARTS (M); take METAL BONES (N).
- Walk down.
- Place METAL BONES; take COAL LUMP (O).
- Walk right.
- Place the COAL LUMP (P); receive JACK-O-LANTERN.
- Walk down.
- Combine the BOTTLED SWAMP LIGHTS and JACK-O-LANTERN; take the TERRIBLE LANTERN (Inventory).
- Place the TERRIBLE LANTERN; move (Q); select the lantern; move leaves 2x; take the METAL SCISSORS (R).
- Walk down.
- Use the METAL SCISSORS (S); receive a DRAGON SCALE.
- Combine the DRAGON SCALE and DECORATED HANDLE; take the DRAGON SHOVEL (Inventory).
- Use the DRAGON SHOVEL (T); receive DRAGONFIRE.
- Walk left.
- Place the DRAGONFIRE (U).
- Walk left; speak to Sacrosa.
- Select (V); take the DANGEROUS SPHERE and GARGOYLE EYES (W).
- Walk down.

- Place the GARGOYLE EYES (X).
- Solution (Y).
- Take the CLOCK HALF (Z).
- Walk left.
- Place the CLOCK HALF (A).
- Use the Vision Ring; take the MYSTICAL IMAGE (B).
- Walk down.
- Place the MYSTICAL IMAGE (C) to take the LEVER (D).
- Walk right.
- Place (E); select the LEVER.
- Solution (F). Take the CAPSULE (G).
- Walk down, then left.
- Place the CAPSULE; take the DEVICE (H).
- Select the DEVICE 2x; take a POINTER (Inventory).
- Walk down.
- Play the HOP (I); receive a KEY.
- Use the POINTER; take GOLDEN DETAILS (J).
- Walk left.
- Use the KEY (K); take the DARK PYRAMID.
- Walk down, then right.
- Place the DARK PYRAMID; take the FORCEPS (L).
- Walk down.
- Use the FORCEPS; receive a POINTER PART (M).
- Walk right.
- Place the POINTER PART; take the PAW PRINT INLAY (N).
- Walk down, then left.
- Combine the LOCKED BOX and PAW PRINT INLAY; take the RAZOR (Inventory).
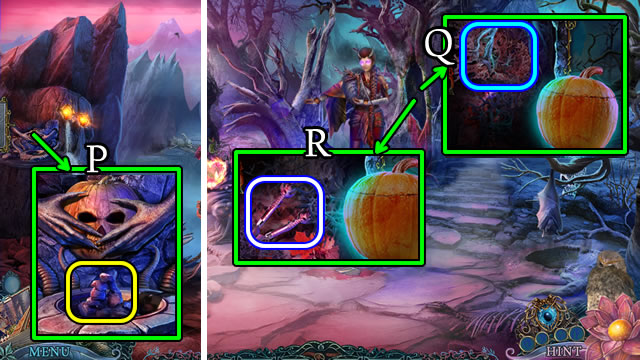
- Use the RAZOR (O); take the BAT (P).
- Place the BAT; take the WHISTLE (Q).
- Walk down.
- Place the WHISTLE; take the SKULL PENDANT (R).
- Select the pumpkin 2x; place the SKULL PENDANT (S); select the pumpkin 3x; take the GOLDEN SYMBOL (T).
- Walk left.
- Combine the GOLDEN SYMBOL and GOLDEN DETAILS; take the GOLDEN PHOBIUS SYMBOL (Inventory).
- Place the GOLDEN PHOBIUS SYMBOL (U).
- Possible solution (V).
- Speak to Sacrosa; receive the CREATOS PHOTO.
- Place the CREATOS PHOTO (W).
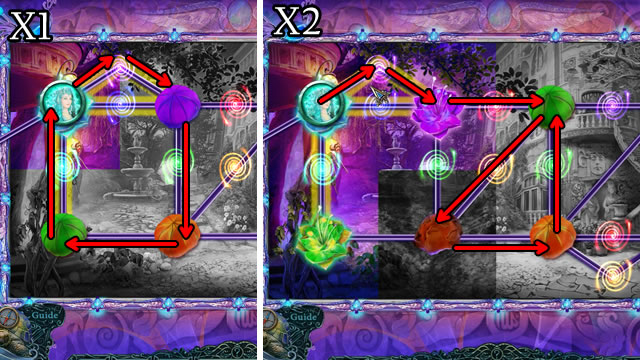
- Solution, part one (X1-X2).
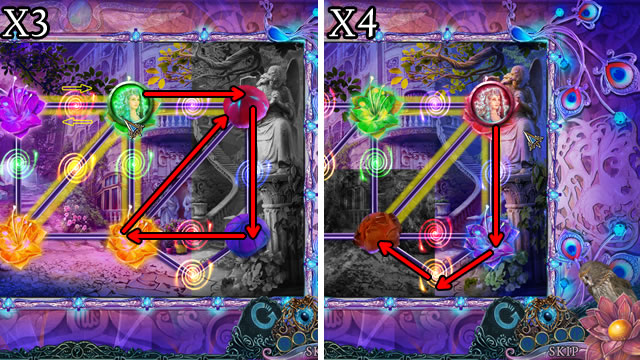
- Solution, part two (X3-X4).
- Walk forward.
Chapter 5: Finding the Queen
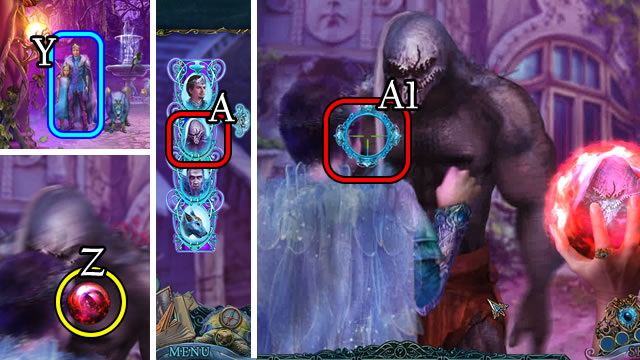
- Speak to the King (Y). Place the DANGEROUS SPHERE (Z).
- Solution (A-A1).
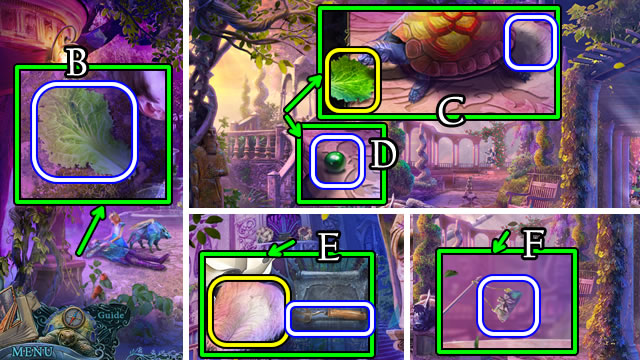
- Take the LETTUCE (B).
- Walk forward.
- Place the LETTUCE; take the FEATHER DUSTER (C) and GREEN PEARL (D).
- Walk down.
- Use the FEATHER DUSTER; take the GARDEN FORK (E).
- Walk forward.
- Use the GARDEN FORK (F); receive a BAG.
- Open the BAG; find and take the PURPLE PEARL and GLOWING JELLYFISH (Inventory).
- Walk down.
- Touch (G); place the GREEN PEARL and PURPLE PEARL (H).
- Solution. B-E, C-F, A-B, D-C, A-D.
- Open; take the FOUNTAIN DECORATION and SCRAPER.
- Place the FOUNTAIN DECORATION; take ARGUS DIADEM 1/2 (I).
- Walk forward.
- Use the SCRAPER (J); take the SAGE FIGURINE.
- Walk down.
- Place the SAGE FIGURINE; take ARGUS DIADEM 2/2 (K).
- Walk forward.
- Place ARGUS DIADEM 2/2 (L). Select (M) then take the ORANGE CRYSTAL and COVERED TOOL.
- Walk down.
- Place the ORANGE CRYSTAL; take a GLOWING JELLYFISH (N).
- Walk forward.
- Remove the foliage 2x; place 2 GLOWING JELLYFISH; take the GLOWING BOOK (O).
- Walk down.
- Place the GLOWING BOOK (P); walk right.
- Play the HOP (Q); receive a STONE FLOWER.
- Select the table; walk down, then forward.
- Place the STONE FLOWER; take a MEDICINE SYMBOL (R).
- Walk down and right.
- Place the MEDICINE SYMBOL (S); take the TOURNIQUET and GAUZE.
- Take the ICE (T).
- Walk down.
- Combine the GAUZE and ICE; receive a COMPRESS (Inventory).
- Place the COMPRESS (U); receive a MARBLE BOW.
- Walk forward.
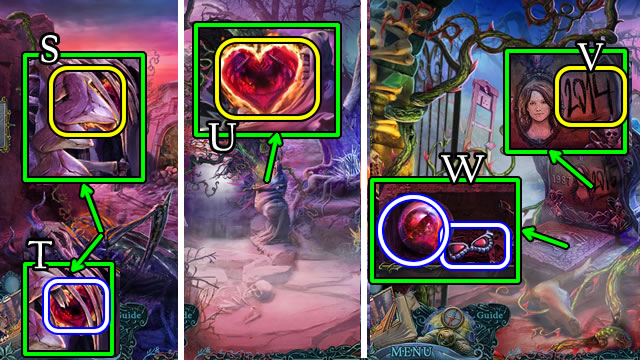
- Place the MARBLE BOW; take a CONTINENT (V) and EVIL QUEEN PORTRAIT (W).
- Walk down, then right.
- Place the CONTINENT; take the WING (X).
- Place the EVIL QUEEN PORTRAIT (Y); receive a DIAMOND.
- Walk down.

- Place the Wing; take the GLOWING FLOWER (Z).
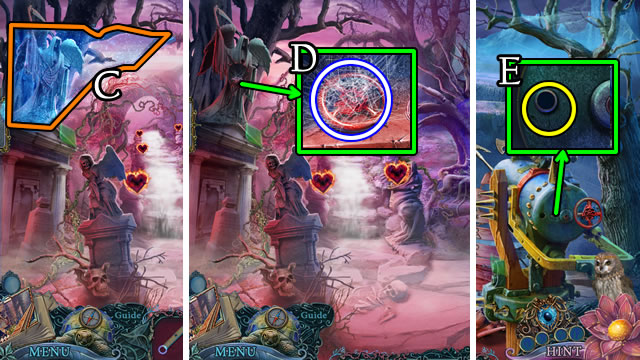
- Use the DIAMOND; take the MULTICOLORED CIRCLE (A).
- Walk right.
- Play the HOP (B); receive an AMBER JEWEL.
- Place the MULTICOLORED CIRCLE (@).
- Solution. A-Ax5-Ax4.
- Open for a HOP; take the BADGE.
- Walk down, then forward.
- Combine the COVERED TOOL and BADGE; take the PRUNING SHEARS (Inventory).
- Use the PRUNING SHEARS; take the AMBER JEWEL (C).
- Walk down and right.
- Place 2 AMBER JEWELS; take the GLOWING FLOWER (D).
- Place 2 GLOWING FLOWERS; take the ARGUS BRACELET (E).
- Walk down, then forward.
- Place the ARGUS BRACELET; take the ACTUALUS PHOTO (F).
- Place the ACTUALUS PHOTO (G).
- Solution (H).
- Walk forward.
Chapter 6: Actualus
- Take the UNICORN HALF (I).
- Take SUBSCRIPTION and CAMERA (J).
- Use the CAMERA (K).

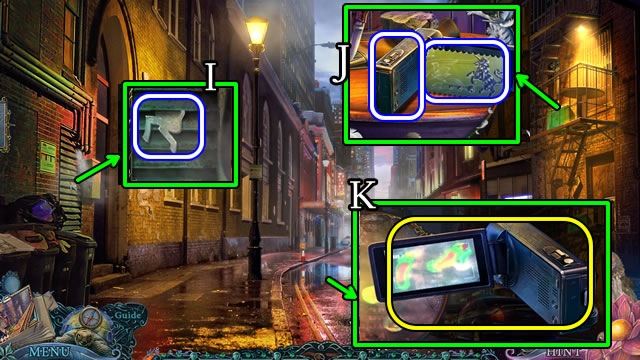
- Walk forward; play the HOP (L); receive a COIN 1/3.
- Use the CAMERA; take the PHONE NUMBER (M).
- Select (N); select 8-3 (O).
- Select (P); select 2-3 (Q); take the PLASTIC BAG.
- Select (R); select 8-6 (S). Give the SUBSCRIPTION (T); take COIN 2/3.
- Walk down.
- Place the PLASTIC BAG; receive COIN 3/3 (U).
- Walk forward.
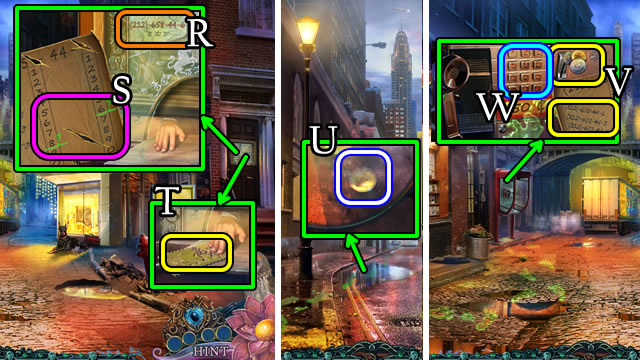
- Select the PHONE NUMBER; receive POTENTIAL PHONE NUMBERS (Inventory).
- Place the POTENTIAL PHONE NUMBERS remove the handset; insert COIN 3/3 (V).
- Solution (W). 2-1-2-6-5-8-4-4-3.
- Walk left.
- Speak to the man (X).
- Solutions vary (X1).
- Take the RUNES CODE (Y).
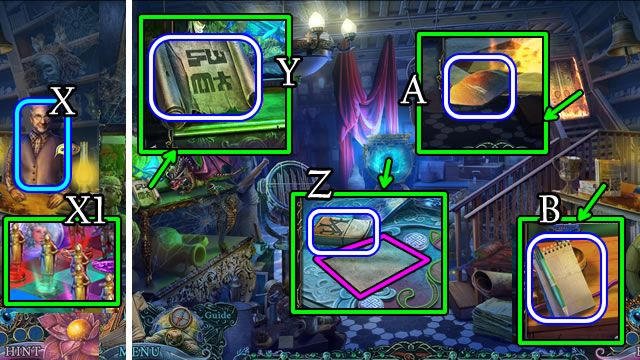
- Take the LIGHTER and note (Z).
- Take the PATCH (A); take PEN AND PAPER (B).
- Walk down.
- Place the PEN AND PAPER (C); receive a CAT LOGO.
- Walk left.
- Place the CAT LOGO (D).
- Solution. Ax3-Dx2-B-Cx3.
- Take an INACTIVE MAGIC KEY and OIL (E).
- Walk down 2x.
- Combine the PATCH and TOURNIQUET for a PATCH WITH RUBBER (Inventory).
- Match the INACTIVE MAGIC KEY teeth to the RUNES CODE; take a SKELETON KEY (Inventory).
- Place the PATCH WITH RUBBER and SKELETON KEY (F), open, take a SCREWDRIVER and WIRE (G).
- Use the OIL; receive a KNIFE (H).
- Walk forward.
- Use the SCREWDRIVER (I); take RUBBER GLOVES (J).
- Walk left.
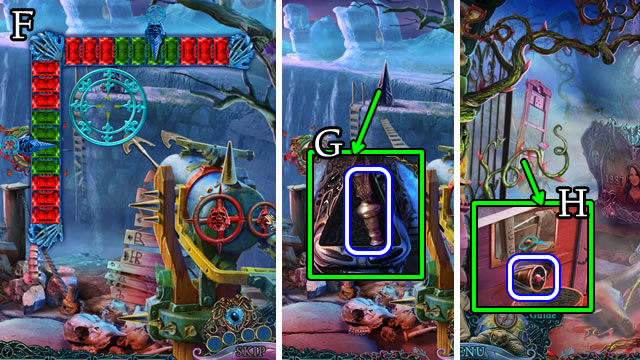
- Use the KNIFE (K) and RUBBER GLOVES (L); receive an ELECTRIC FISH.
- Place the WIRE (1); press (2), take the METAL BOLT (3).
- Walk down 2x.
- Place the ELECTRIC FISH (N); open; take GLASS CUTTER (O).
- Walk forward and left.
- Use the GLASS CUTTER; take a BLACK HEART (P).
- Walk down.
- Play the HOP (Q); receive an EMPTY BUCKET.
- Place the EMPTY BUCKET (R); receive FULL BUCKET.
- Walk left.
- Use the FULL BUCKET (S); take a BONE AMULET and UNICORN HALF.
- Walk down.
- Give the BONE AMULET (T). Open; take BROKEN NIPPERS and GLUE (U).
- Use the GLUE to combine the UNICORN HALVES; take the UNICORN (Inventory).
- Give the UNICORN (V); take a DRAGON POSTER.
- Walk down.
- Combine the BROKEN NIPPERS and METAL BOLT; take NIPPERS (Inventory).
- Use the NIPPERS; take a GASOLINE CANISTER (W).
- Walk forward and left.
- Place the DRAGON POSTER; take the LION HEAD (X).
- Remove lamp glass. Pour the GASOLINE CANISTER (Y); use the LIGHTER.
- Replace lamp glass. Match (Z). Take the LION HEAD.
- Place 2 LION HEADS (A); walk forward 2x.
- Use the Vision Ring.
- Take (B), then place (C) the MYSTICAL IMAGE.
- Place the BLACK HEART (D). Play the HOP.
- One possible solution (E).
- Congratulations, you've completed Reflections of Life: Equilibrium.
Created at: 2015-05-17