

Walkthrough Menu
- General Tips
- Chapter 1: Near the Cave
- Chapter 2: The Village Council Building
- Chapter 3: Zabava's House
- Chapter 4: Kikimora's Domain, The Parlor
- Chapter 5: Drekavak's Domain, The Entrance
General Tips
- This is the official guide for Reflections of Life: Hearts Taken.
- This guide will not mention each time you have to zoom into a location; the screenshots will show each zoom scene.
- Hidden-object puzzles are referred to as HOPs. This guide will not show HOP solutions. It will identify the location of the HOP and the inventory item acquired.
- This guide will show solutions for non-random puzzles. Please read the in-game instructions for each puzzle.
- In this game, you will sometimes have to select the new scene to trigger dialog, cut-scenes, or tasks prior to interacting with the scene.
Chapter 1: Near the Cave
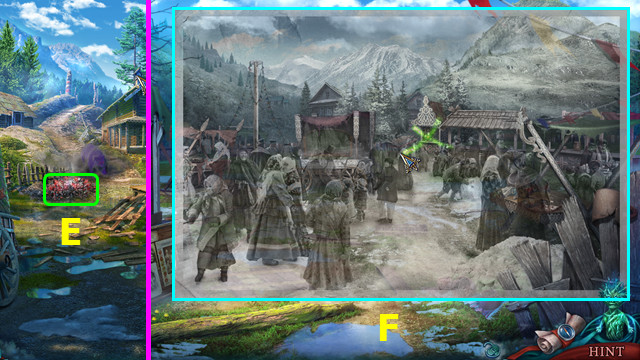
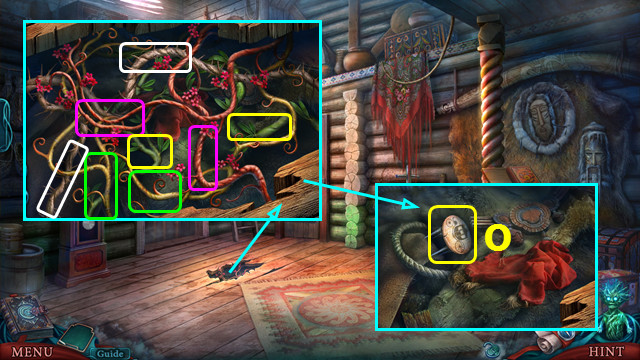
- Play the opening HOP.
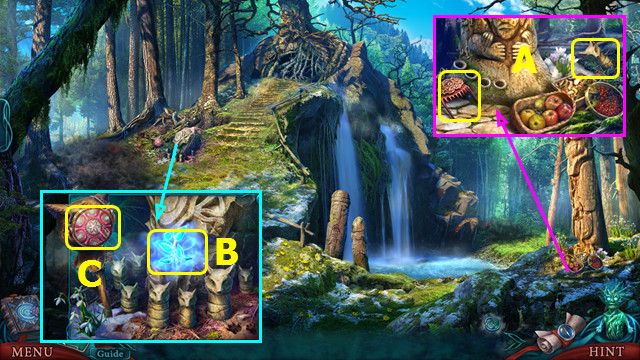
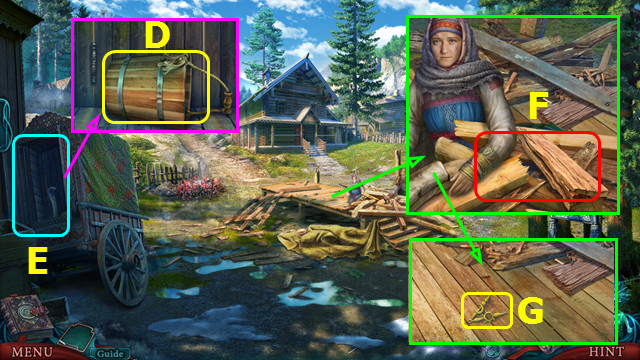
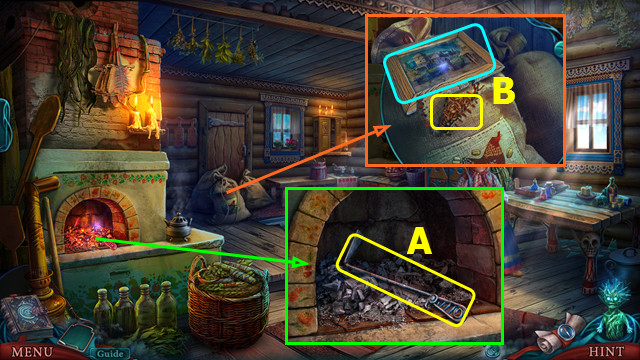
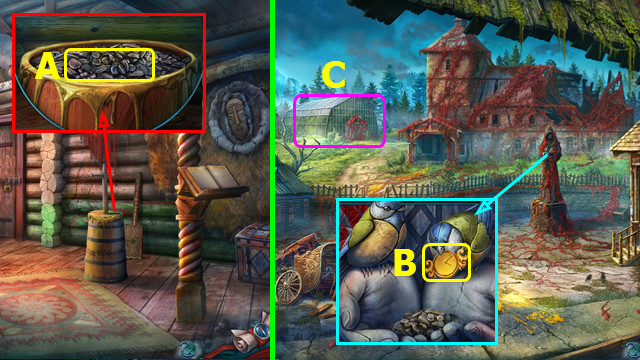
- Move the wreath; take the BROKEN COMB and STONE CUB (A).
- Place the STONE CUB; take the PLANT SPIRIT (B).
- Use the BROKEN COMB; take the MIRROR (C).
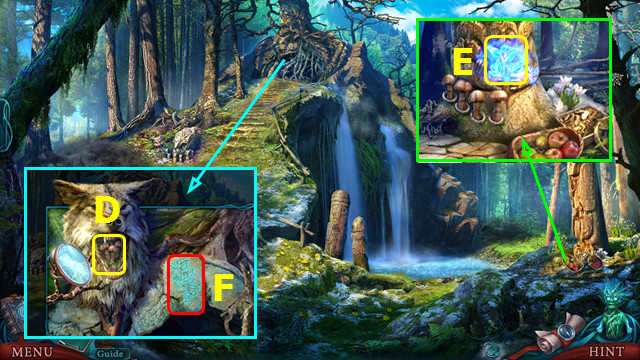
- Use the BROKEN COMB and MIRROR; take the MUSHROOMS (D).
- Place the MUSHROOMS; take the HERB SPIRIT (E).
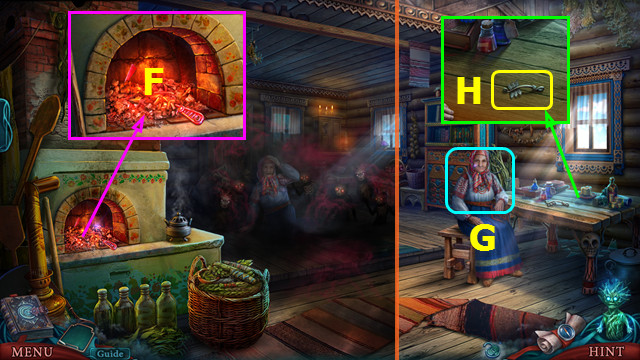
- Place the PLANT SPIRIT and HERB SPIRIT (F).
- Go forward.
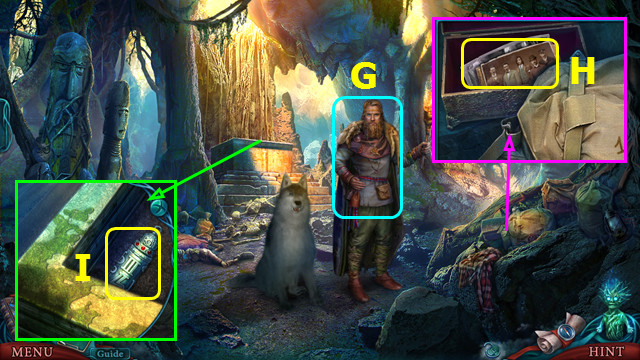
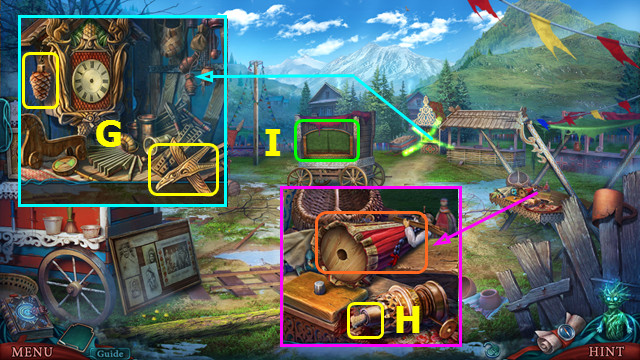
- Talk to Bogdan (G).
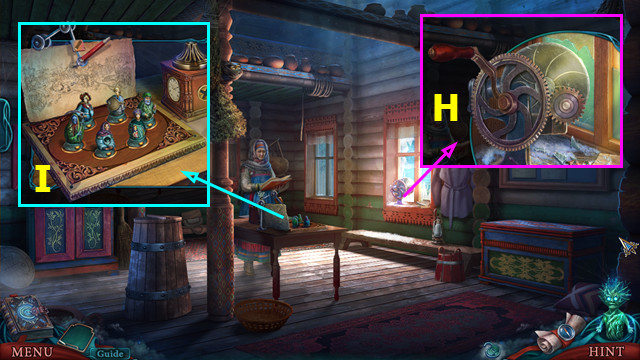
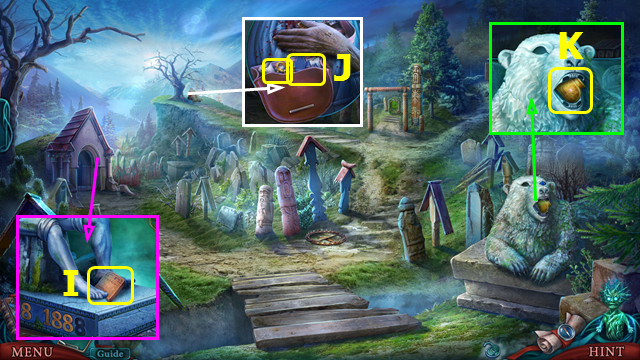
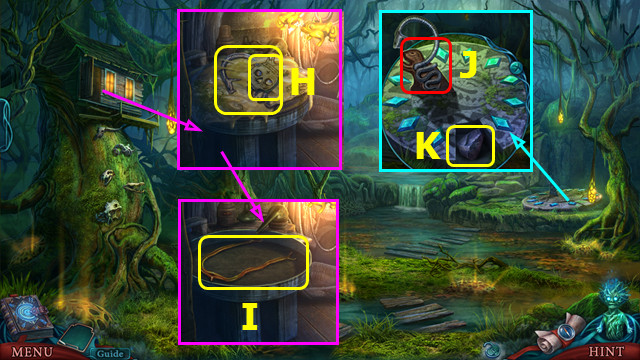
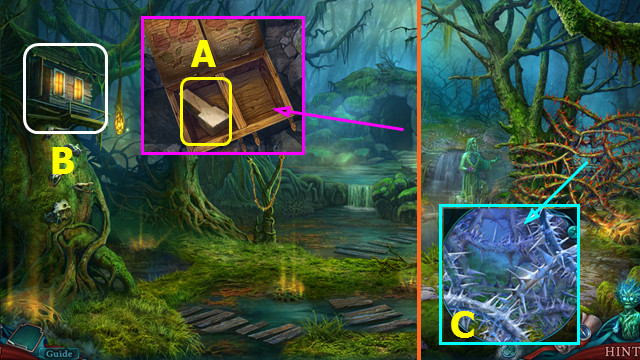
- Open the box; take the GROUP PHOTO, read the note, and take the CAVE PHOTO (H).
- Select and take the ROLLING STAMP (I).

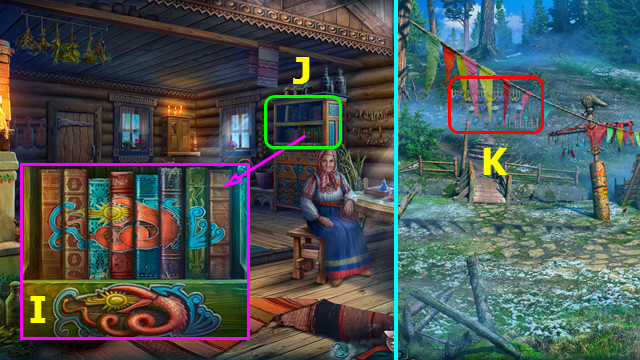
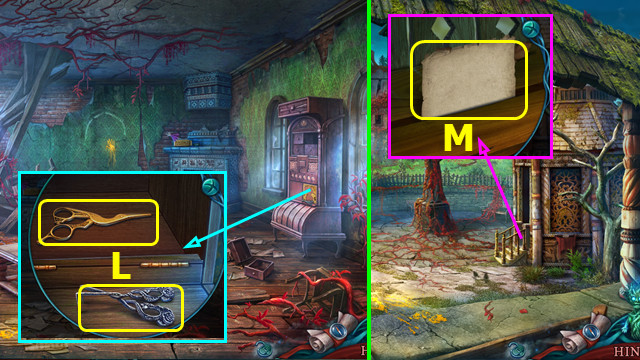
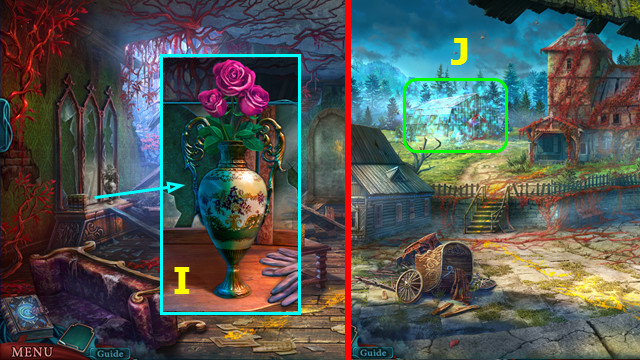
- Place the GROUP PHOTO; play the HOP to earn FRIDRICH'S DIARY (J).
- Open FRIDRICH'S DIARY and remove the page; take the TORN CARDS.
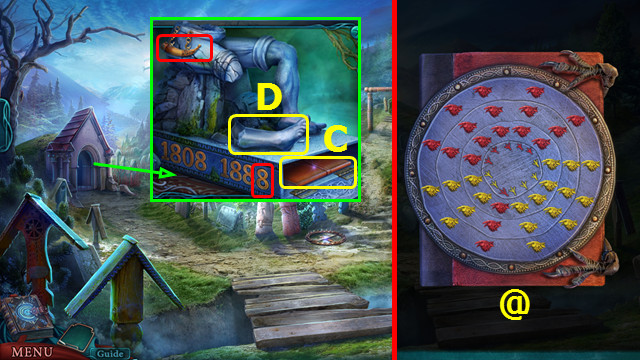
- Place the CAVE PHOTO on the scene (K).
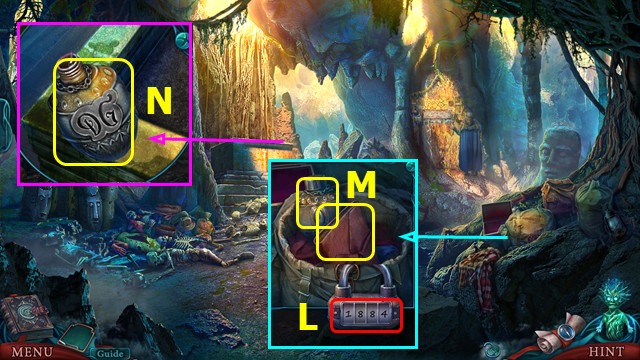
- Set the lock to 1-8-8-4 (L).
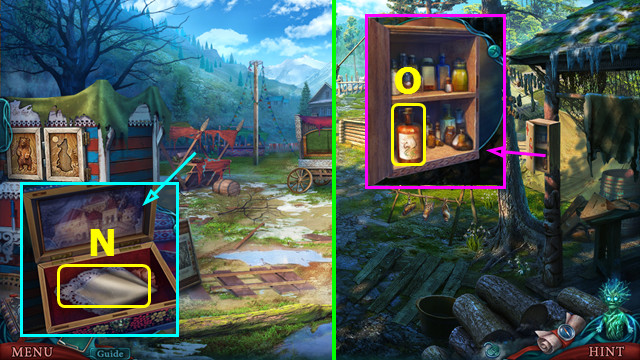
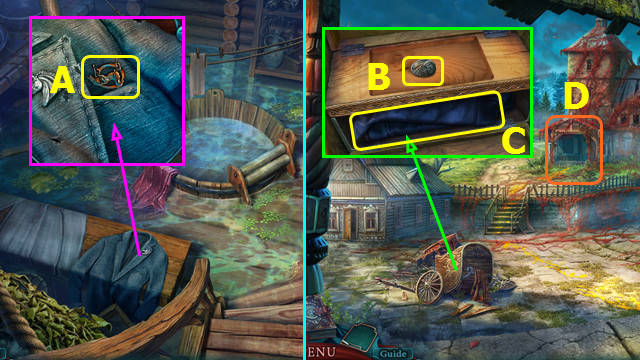
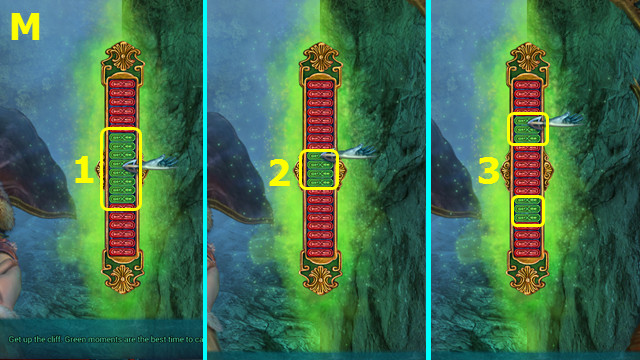
- Open the pack; take the EXPEDITION JOURNAL and FLASK OF DRIED WINE (M).
- Open the EXPEDITION JOURNAL; take the FAIRGROUND PHOTO and BLANK PAPER.
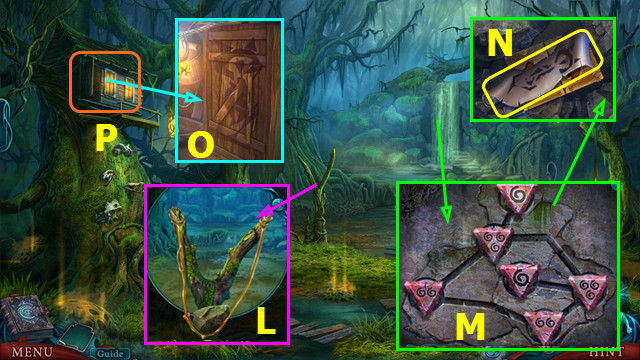
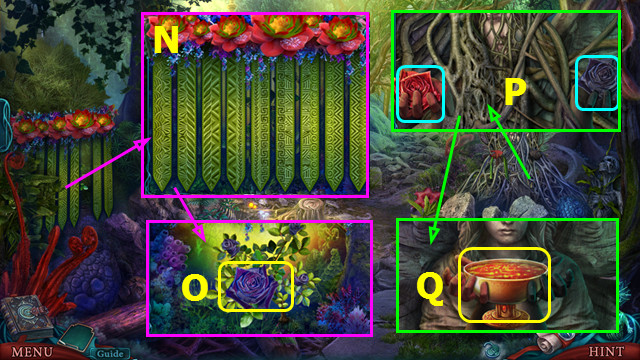
- Use the FLASK OF DRIED WINE to make the FLASK OF WINE (N).
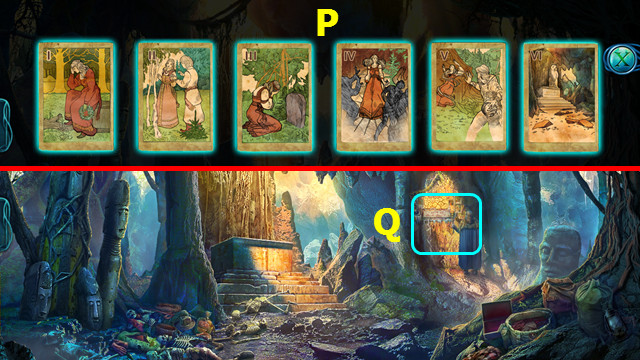
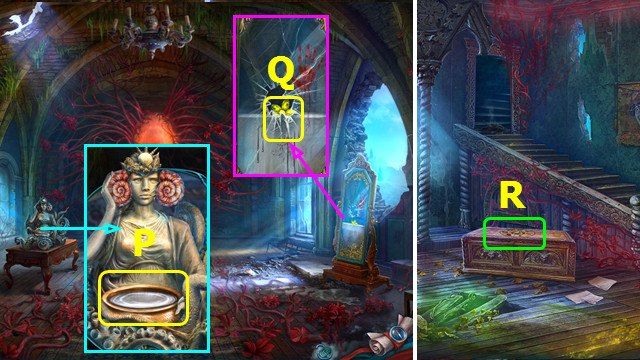
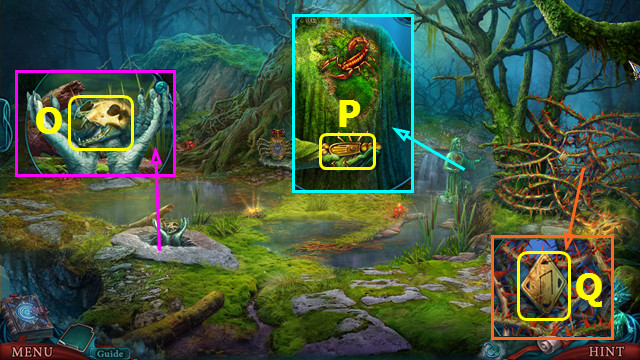
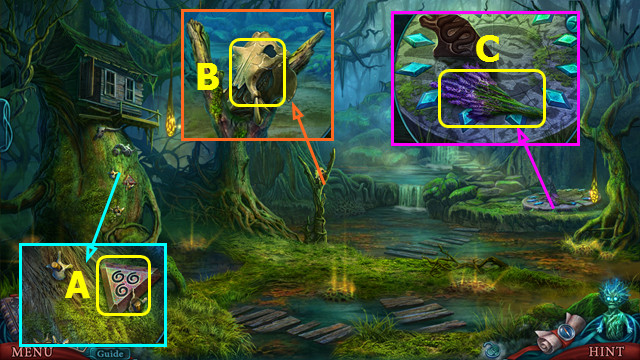
- Select and restore the TORN CARDS as shown to make the NUMBERED CARDS (P).
- Select (Q).
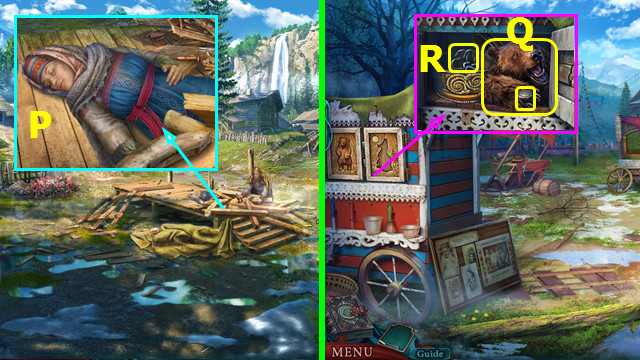
- Place the NUMBERED CARDS on the wall.
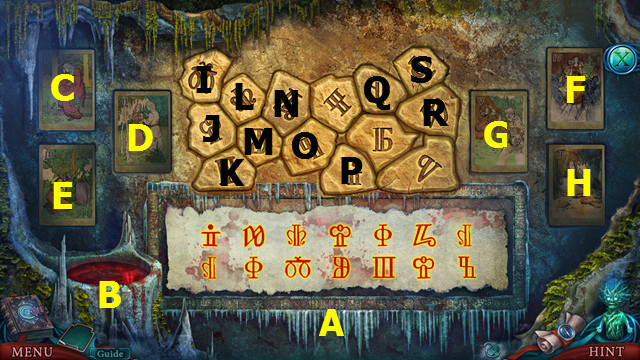
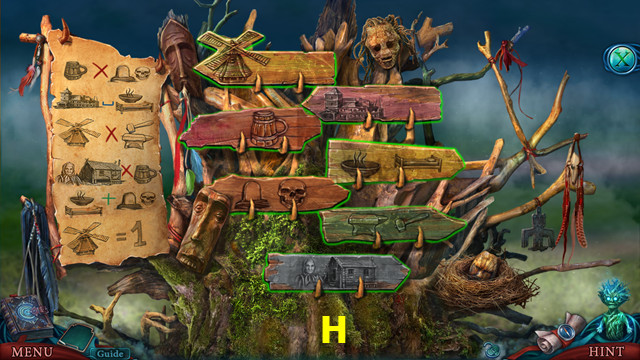
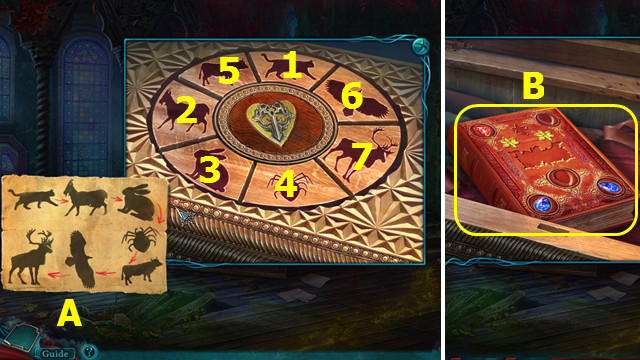
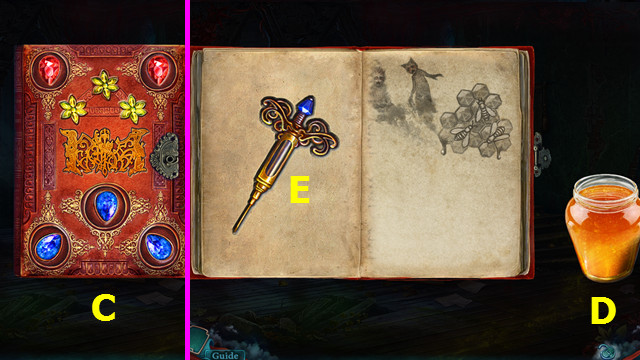
- Place the BLANK PAPER (A); use the FLASK OF WINE and ROLLING STAMP (B).
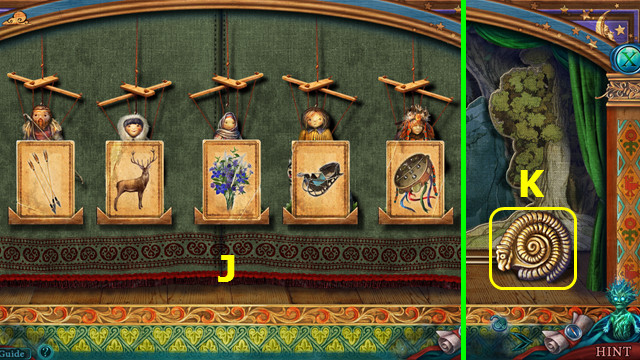
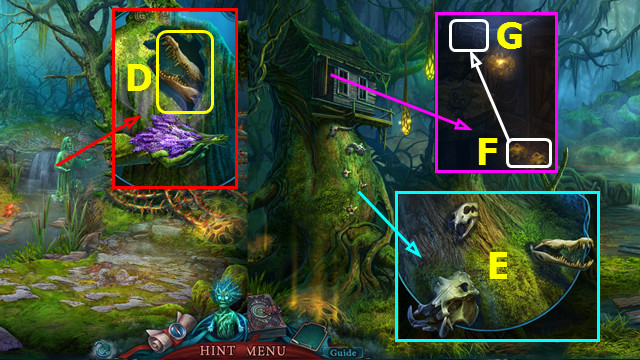
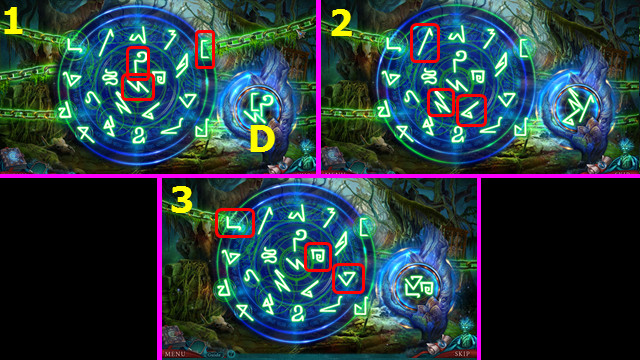
- View C; select P-R-L-J. View D; select S-N.
- View E; select Qx2. View F; select S-I.
- View G; select M-K. View H; select J-O.
- Go forward.
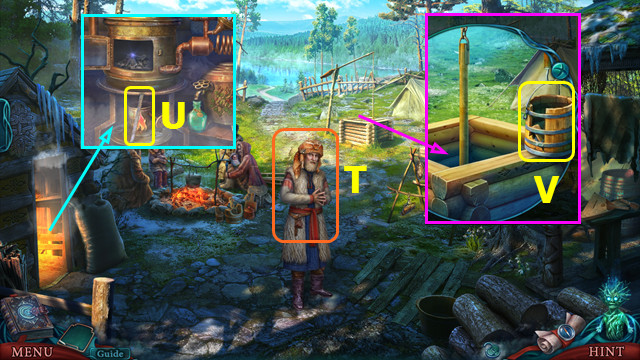
- Speak to the Patriarch (T).
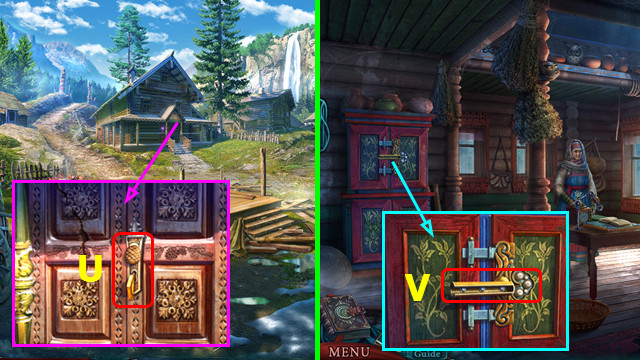
- Take the WOODEN SAW (U).
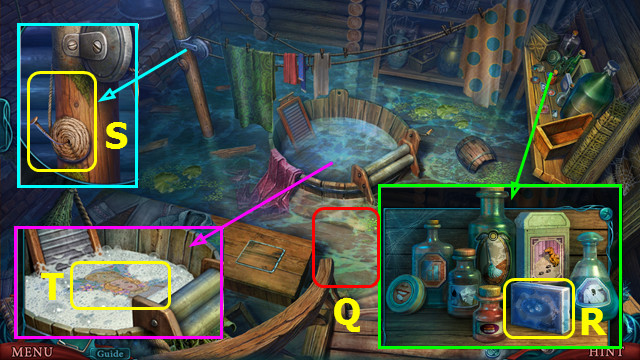
- Select the pole; take the BROKEN BUCKET (V).
- Go forward.
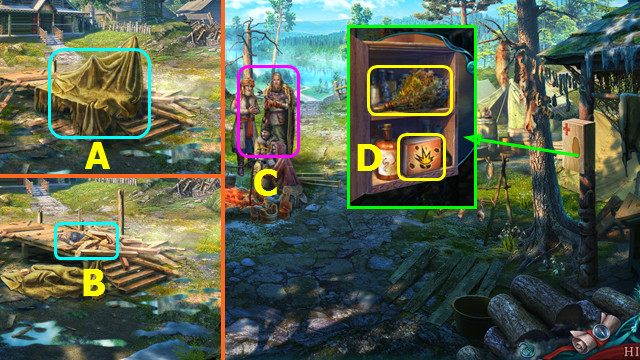
- Select (A).
- Look at the girl (B).
- Walk down.
- Talk to the Patriarch and Bogdan; earn the NURSE DOLL (C).
- Place the NURSE DOLL and read the note; take the HERBS and GUNPOWDER (D).
- Go forward.
- Use the GUNPOWDER (E).
- Go left.
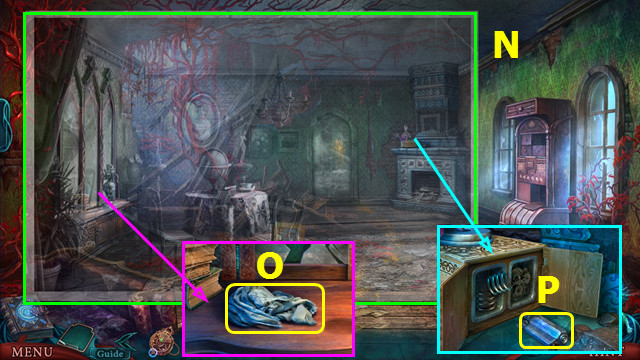
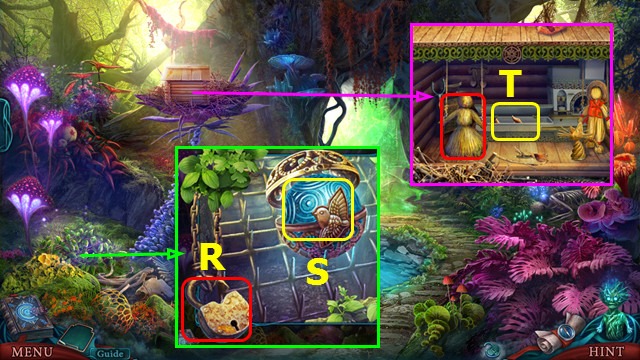
- Place the FAIRGROUND PHOTO (F).
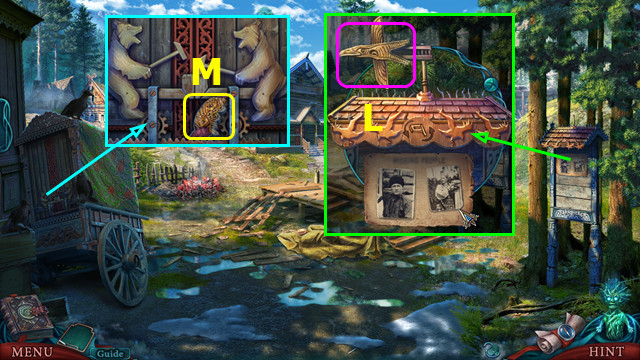
- Take the WOODEN PINECONE and RATTLER (G).
- Select the doll; take the WICK (H).
- Select (I).
- Place the cards as shown (J).
- Take the SNAKE DECORATION (K).
- Return to the Village Square.
- Place the RATTLER (L).
- Take the HEADDRESS and place the WOODEN SAW (M).
- Go left.
- Place the HEADDRESS; take the HANDKERCHIEF (N).
- Walk down 2x.
- Use the HANDKERCHIEF to make the MEDICATED CLOTH (O).
- Go forward.
- Use the MEDICATED CLOTH; earn the FOX EMBLEM (P).
- Go to the Fairground.
- Place the FOX EMBLEM; take the BEAR PELT and COIN (Q).
- Use the COIN on the BROKEN BUCKET to take the BUCKET HANDLE.
- Place the SNAKE DECORATION; take the HOOKS (R).
- Walk down 2x.
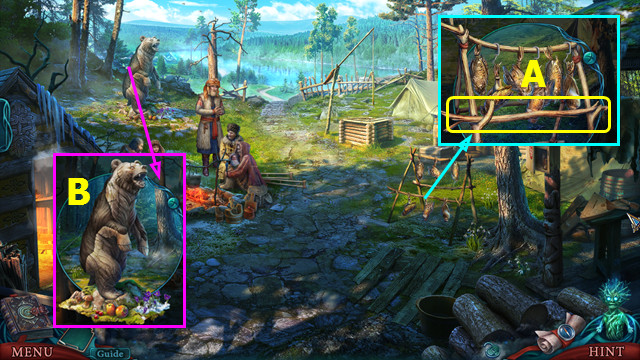
- Use the HOOKS; take the FORKED STICK (A).
- Place the BEAR PELT (B).
- Restore the center emblems with the outer pieces (color-coded).
- Take the BEAR SPIRIT POWER (C).
- Go forward.
- Use the FORKED STICK; take the BUCKET (D).
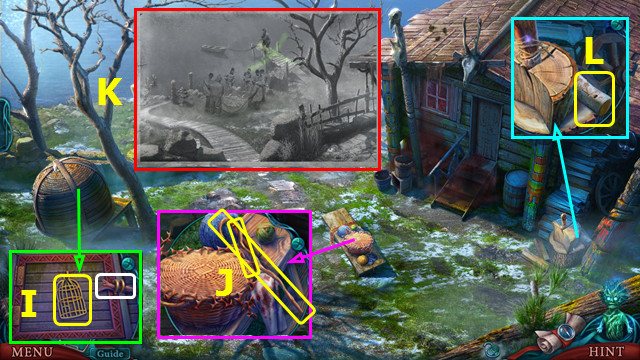
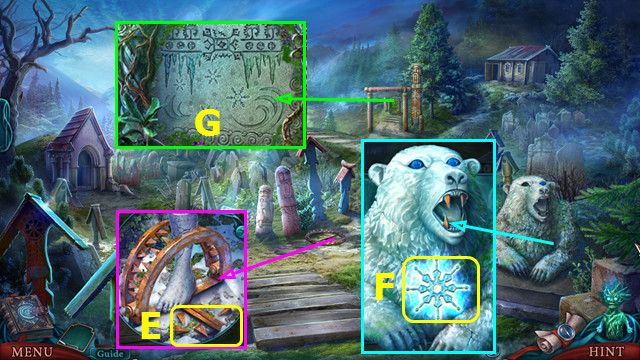
- Play the HOP; earn the BROKEN BEADED NECKLACE (E).
- Use the BEAR SPIRIT POWER; earn DAVE'S PHOTO (F).
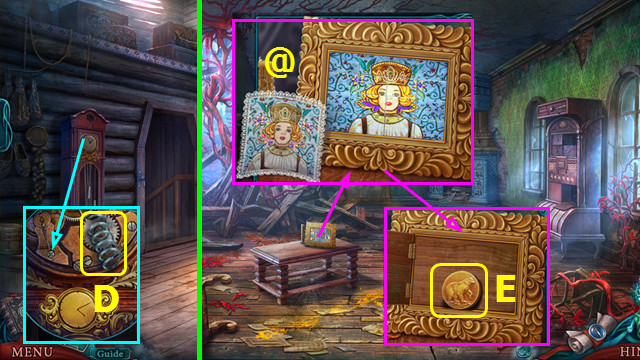
- Take the CLOCK HANDS (G).
- Go left.
- Place the CLOCK HANDS; take the ELDER'S NOTE (H).
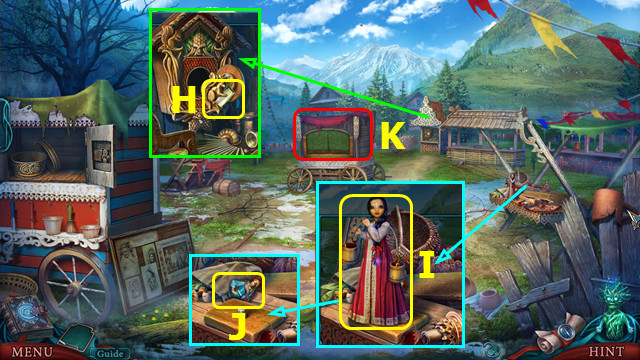
- Open the ELDER'S NOTE; take the ORNATE KEY.
- Use the BUCKET HANDLE; take the PUPPET (I).
- Take the GIRL FIGURINE (J).
- Select (K).
- Place the PUPPET (L).
- Select (M).
- Swap the beads as shown (N).
- Take the BOY FIGURINE (O).
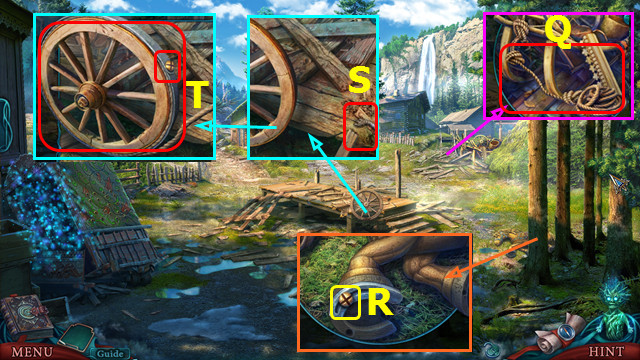
- Go to the Refugee Camp.
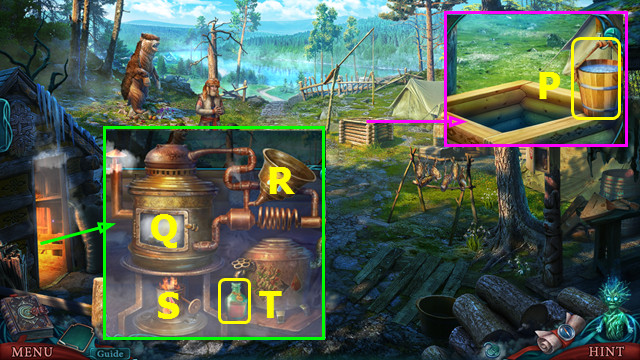
- Place and select the BUCKET; take the BUCKET OF WATER (P).
- Place the HERBS (Q) and BUCKET OF WATER (R); place the WICK and select the wheel (S).
- Take the OIL (T).
- Combine the WOODEN PINECONE and OIL; remove the chain.
- Go forward.
Chapter 2: The Village Council Building
- Use the ORNATE KEY and WOODEN PINECONE (U).
- Go forward.
- Use the BROKEN BEADED NECKLACE (V).
- Play the HOP; earn the TOMBSTONE.
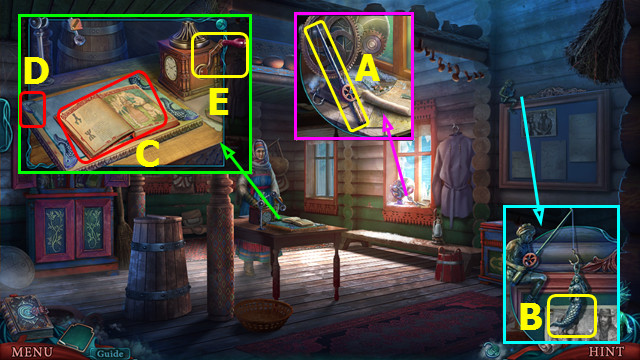
- Take the FISHING POLE (A).
- Place the FISHING POLE; take the MERMAID TAIL (B).
- Pick up the book; earn the LADY FIGURINE (C).
- Place the MERMAID TAIL (D); take the MECHANISM HANDLE (E).
- Walk down and left.
- Place the TOMBSTONE; take the BOOK EMBLEM (F).
- Walk down and forward.
- Place the BOOK EMBLEM; take the BROKEN PENCIL (G).
- Place the MECHANISM HANDLE and BROKEN PENCIL to make the SHARP PENCIL (H).
- Place the LADY FIGURINE, BOY FIGURINE, and GIRL FIGURINE, and SHARP PENCIL (I).
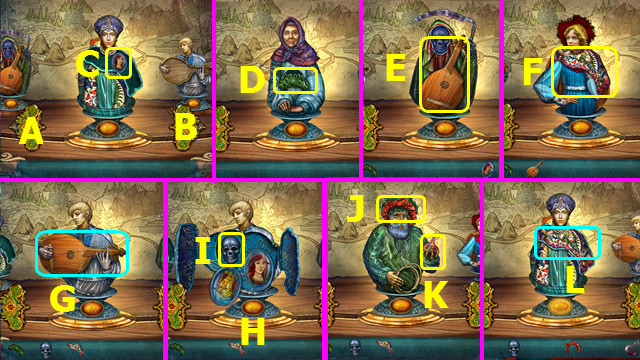
- Use the arrows (A-B) to rotate left or right.
- Take the GIRL'S PORTRAIT (C); select (B).
- Take the HAT (D); rotate right.
- Take the LUTE (E); rotate right.
- Take the SHAWL (F); rotate right.
- Place the LUTE (G).
- Select (H); place the GIRL'S PORTRAIT and take the SKULL (I). Rotate right.
- Take the FLORAL BONNET (J) and EMPTY BOTTLE (K); rotate right.
- Place the SHAWL (L).
- Select (M) and place the EMPTY BOTTLE; take the POISON (N). Rotate left.
- Place the HAT (O); select (P) and place the POISON. Take the HEART (Q); rotate left 2x.
- Place the FLORAL BONNET (R) and select (S). Place the HEART and take the SAD GIRL (T). Rotate left.
- Place the SKULL (U) and select (V). Place the SAD GIRL and take the AMULET (W). Rotate left.
- Place the AMULET (X).
- Select (Y); take the DIRECTIONS (Z).
- You earn the DIRECTIONS.
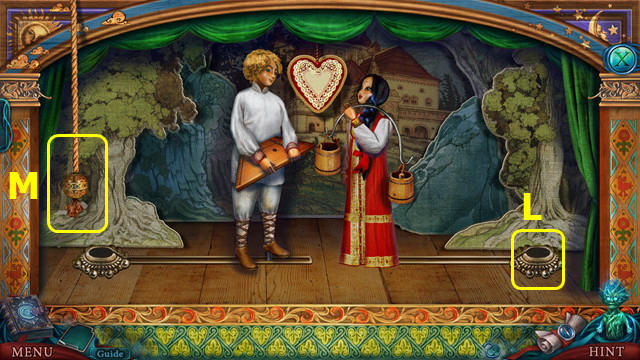
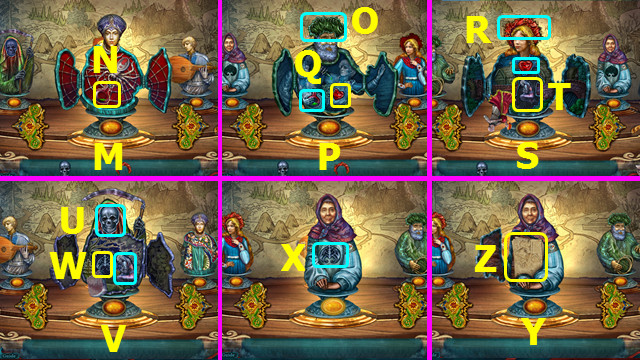
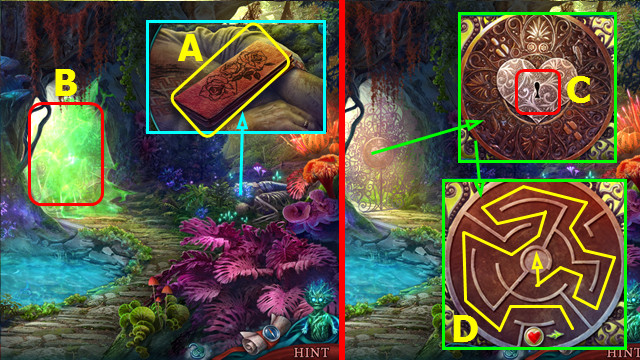
- Take the CHAIN (A).
- Take the FLAG (B).
- Take the CHISEL (C).
- Select (D).
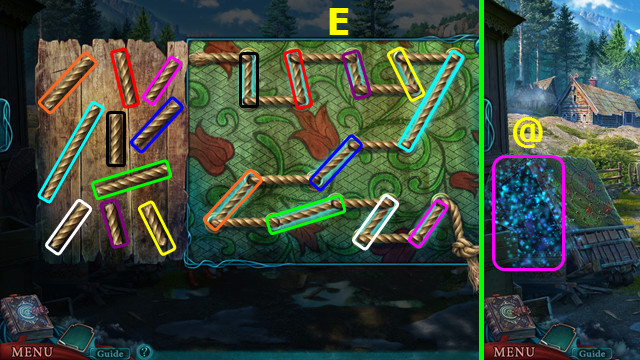
- Place the rope pieces as shown (color-coded) (E).
- You earn the 1st ROPE.
- Play the HOP; earn the FOX FIGURINE (@).
- Go forward.
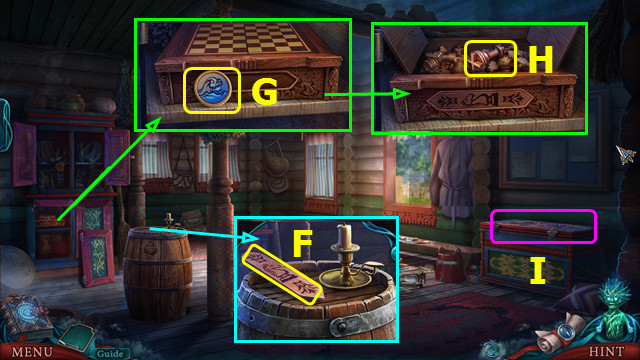
- Take the CHESS PLATE (F).
- Use the FLAG; take the WATER TOKEN (G).
- Place the CHESS PLATE; take the BROKEN ROOK (H).
- Select (I).
- Place the WATER TOKEN (J).
- Select 1-6.
- Take the IRON (K).
- Select (L).
- Take the 2nd ROPE (M).
- Use the CHISEL and IRON to take the BARREL RIM (N).
- Take the BREWERY PLANK (O).
- Walk down.
- Place the 2 ROPES (Q).
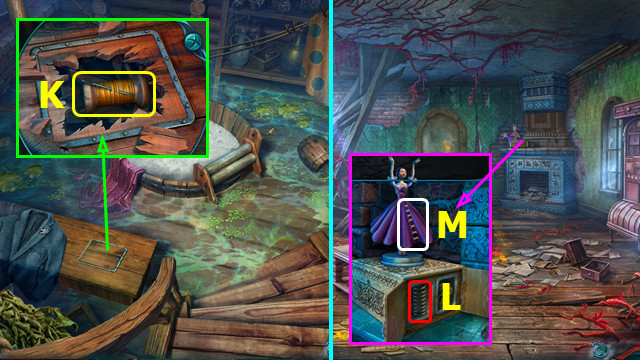
- Use the BROKEN ROOK to take the NAIL (R).
- Select (S).
- Place the BARREL RIM. Use the NAIL and IRON; select the wheel (T).
- Walk right.
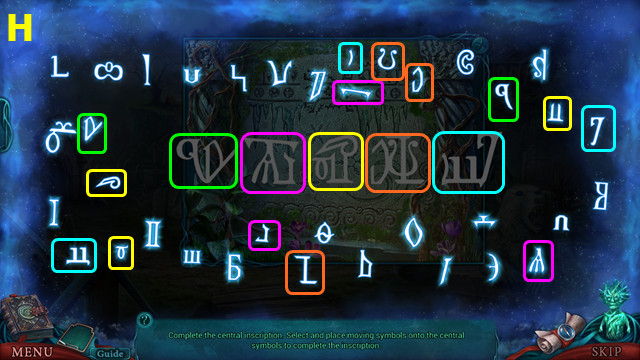
- Select the color-coded pairs (U).
- Select the color-coded pairs (V).
- Select the color-coded pairs (W).
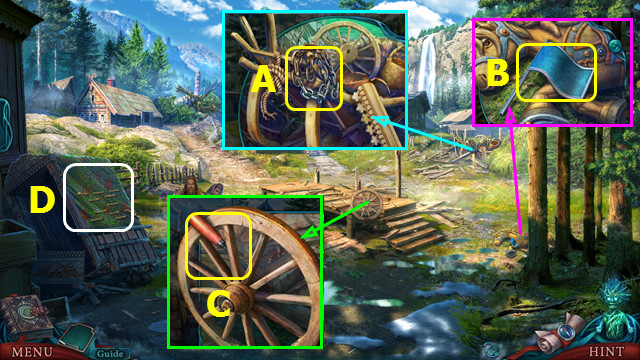
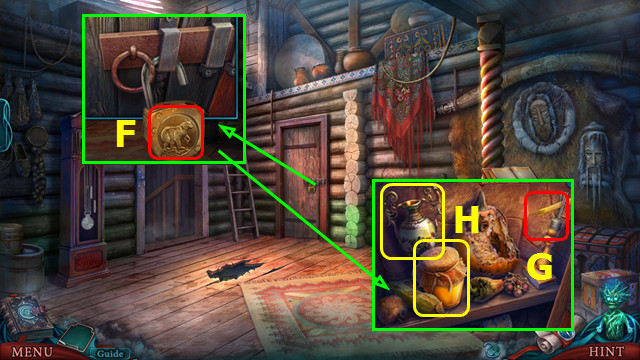
- Take the HAPPY MASK (A).
- Take the MOWER WHEEL (B).
- Walk forward.
- Take the KEY SPOUT; place the MOWER WHEEL and CHAIN (D).
- Place the FOX FIGURINE; take the GRAVEYARD ARROW (E).
- Take the EMPTY CUP; place the DIRECTIONS (F).
- Place the GRAVEYARD ARROW and BREWERY PLANK (G).
- Solution (H).
- Walk forward.
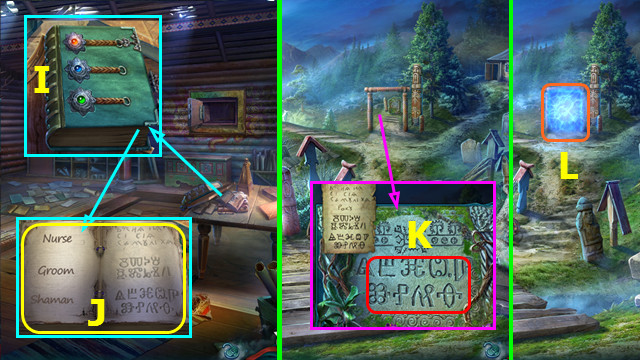
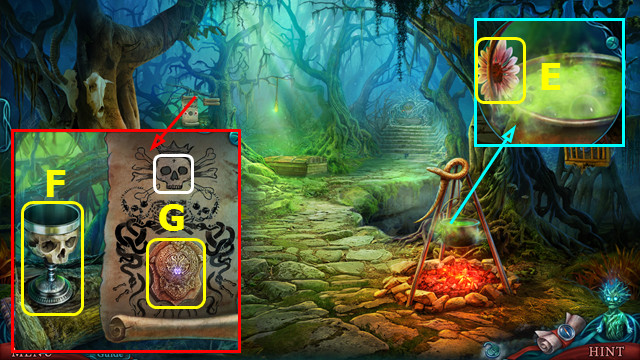
- Take the GOLDEN CAGE and open the latch (I).
- Take the SHEPHERD'S STAFF and CROCHET HOOK (J).
- Place DAVE'S PHOTO (K).
- Take the LOG (L).
- Walk down.
- Take the SAD MASK and use the SHEPHERD'S STAFF (M).
- Take the HORSESHOE (N).
- Walk down.
- Place and select the HORSESHOE; take the SMOKE POWDER (O).

- Place the SAD MASK and HAPPY MASK (P).
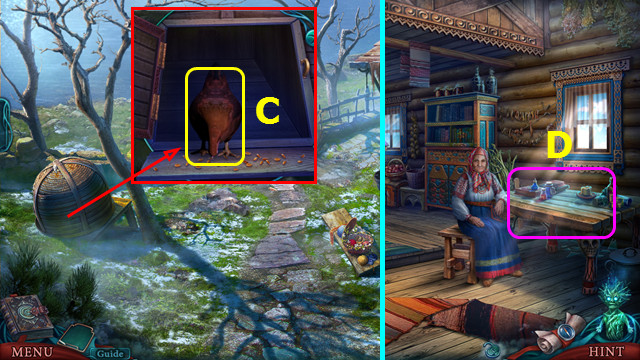
- Play the HOP; earn the FIRE BIRD (Q).
- Place the GOLDEN CAGE and FIRE BIRD; take the SWAN COMB (R).
- Go forward 2x; go right.
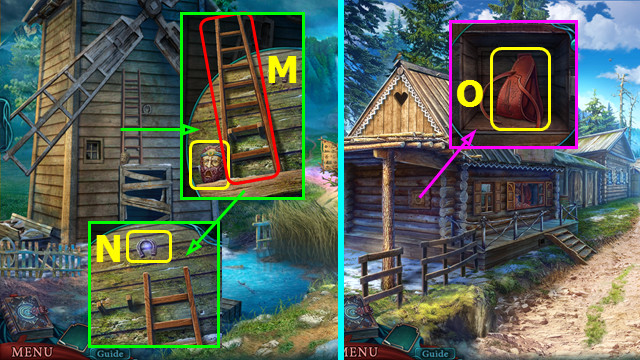
- Use the CROCHET HOOK; take the METAL TUBE (A).
- Use the SWAN COMB to take the WOOL (B).
- Take the ROD (C).
- Combine the METAL TUBE, KEY SPOUT, and ROD to make the METAL KEY.
- Use the METAL KEY (D).
- Enter Zabava's House (E).
Chapter 3: Zabava's House
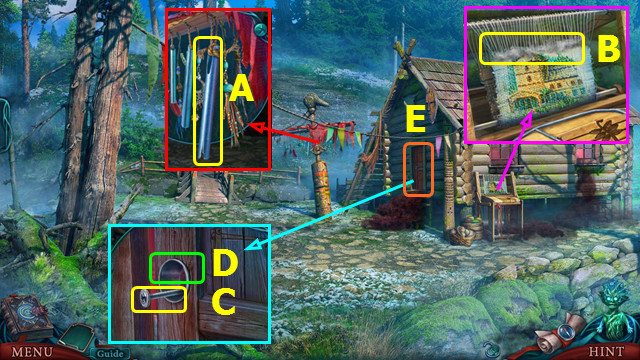
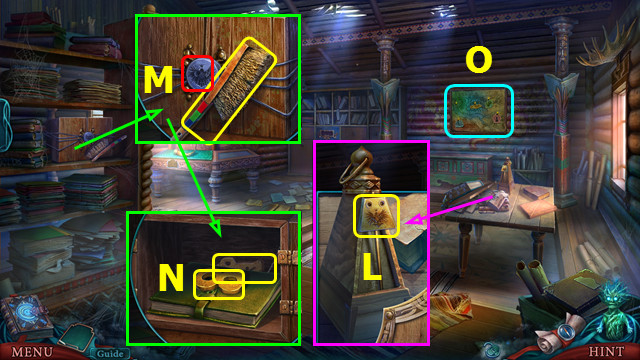
- Use the SMOKE POWDER (F).
- Talk to Zabava (G).
- Take the FLOWER HANDLE (H).
- Restore the books (I).
- Play the HOP; earn the HERB GUIDE (J).
- Walk down.
- Select (K).
- Place the HERB GUIDE (L).
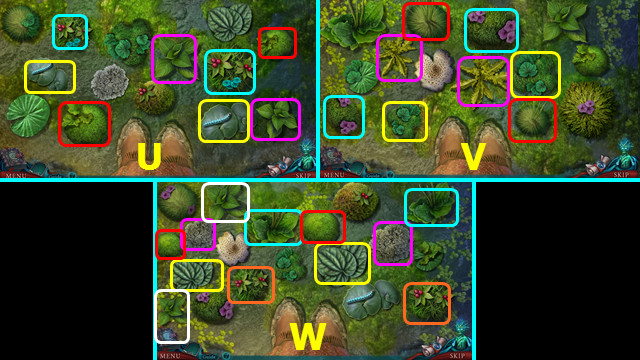
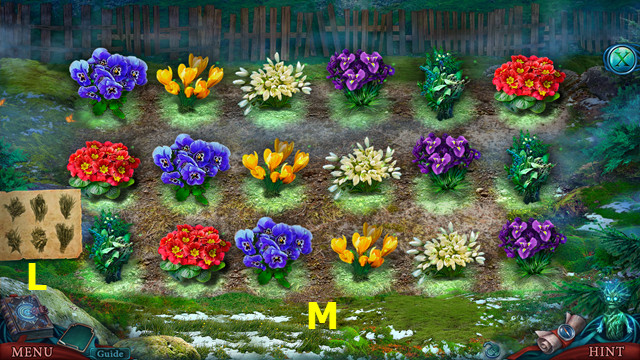
- Arrange the herbs as shown (M).
- Earn the HERBS.
- Walk right; walk down 2x.

- Play the HOP; earn the HARP (N).
- Return to Zabava's House.
- Place the HARP; take the SNOWDROP ESSENCE (O).
- Walk down.
- Place the FLOWER HANDLE; take the NYLON THREAD (P).
- Walk right.
- Use the NYLON THREAD; take the STONE KNIFE (Q).
- Use the SNOWDROP ESSENCE and open the lid; take the MAGICAL AMBER (R).
- Use the STONE KNIFE to take the SEAWEED; use the EMPTY CUP to take the CUP WITH WATER (S).
- Go to Zabava's House.
- Use the CUP WITH WATER; select and take the POKER (A).
- Look at the picture; use the STONE KNIFE and take the GRAIN (B).
- Walk down and right.
- Use the GRAIN; take the CHICKEN (C).
- Go to Zabava's House.
- Select (D).

- Place the WOOL (E), HERBS (F), and SEAWEED (G).
- Place the CHICKEN; take the ENCHANTED CHICKEN (H).
- Walk down.
- Use the ENCHANTED CHICKEN (I).
- Use the LOG and POKER; place the MAGICAL AMBER and take the MYSTICAL CONTAINER (J).
- Enter Zabava's Hose.
- Place and select the MYSTICAL CONTAINER; take the AMULET (K).
- Talk to Zabava; earn the WHARF KEY (L).
- Walk down and right.
- Use the WHARF KEY (M).
- Go forward.
- Enter the Servant's House on the left.
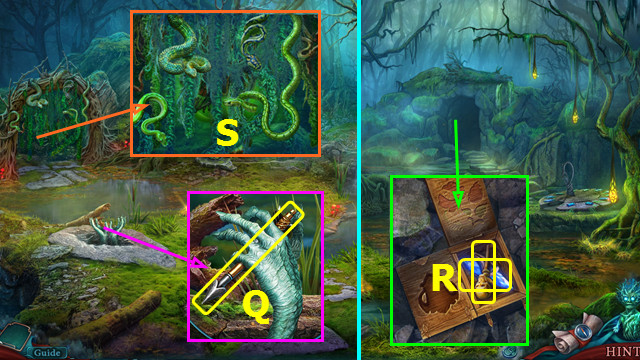
- Select the pairs (color-coded).
- Remove the cloth and take the CARRIAGE BUTTON (O).

- Take the HARE FIGURINE (P).
- Take the TITMOUSE and open the book (Q).
- Play the HOP; take the DOOR HINT.
- Walk left.
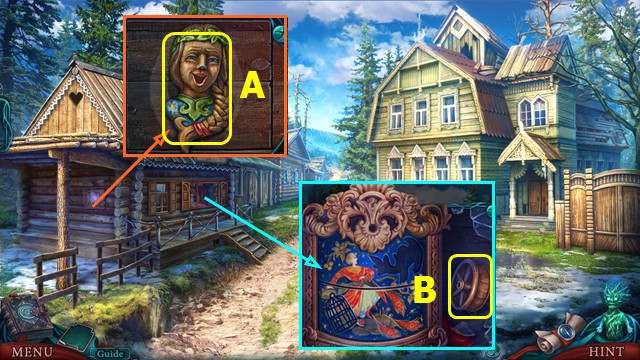
- Take the GROOM'S KEY and move the jacket (A).
- Walk down 2x.
- Place the CARRIAGE BUTTON; read the note and take the SIGNET RING (B).
- Use the GROOM'S KEY; take the GROOM'S BOOTS (C).
- Select (D).

- Place the SIGNET RING (E) and DOOR HINT (F).
- Select Gx4-Hx3-Ix3-Jx5.
- Go forward.
- Take the FORCEPS; place the HARE FIGURINE and take the SCISSORS (L).
- Walk down.
- Read the note and use the FORCEPS; take the MAIN HALL DRAWING (M).
- Go forward.
- Place the MAIN HALL DRAWING (N).
- Read the note and take the DIRTY RAG (O).
- Take the LIGHTER (P).
- Return to the Laundry.
- Use the GROOM'S BOOTS (Q).
- Restore the labels; take the SOAP (R).
- Use the SCISSORS to take the TWINE (S).
- Use the SOAP and DIRTY RAG; select to take the DECORATED HANDKERCHIEF (T).
- Walk down.
- Use the TWINE; take the SUNFLOWER SEEDS (A).
- Walk down.
- Place the TITMOUSE and SUNFLOWER SEEDS; earn the CLOCK PLAQUE (B).
- Play the HOP; earn the ROSES (C).
- Walk left.
- Place the CLOCK PLAQUE; take the SPRING (D).
- Walk down and forward.
- Place the DECORATED HANDKERCHIEF; restore the image (@).
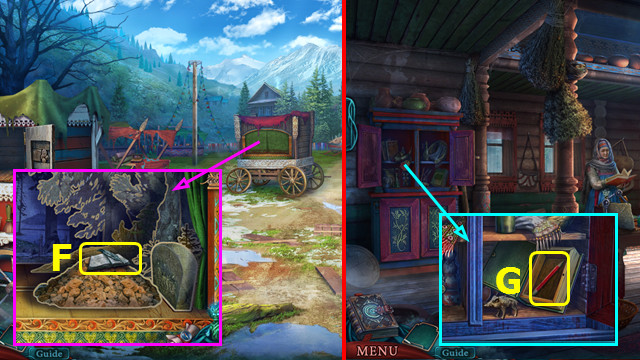
- Take the STORAGE ROOM KEY (E).
- Walk down and left.
- Place and select the STORAGE ROOM KEY (F).
- Use the LIGHTER (G).
- Take the HONEY and VASE (H).
- Go to the Main Hall.
- Place the VASE and ROSES (I).
- Walk down.
- Play the HOP; earn the MARBLE BALL (J).
- Go left 2x.
- Use the MARBLE BALL; take the NEEDLE AND THREAD (K).
- Return to the Main Hall.
- Remove the broken spring; place and select the SPRING (L).
- Use the NEEDLE AND THREAD (M).
- Go forward.
Chapter 4: Kikimoro's Domain, The Parlor
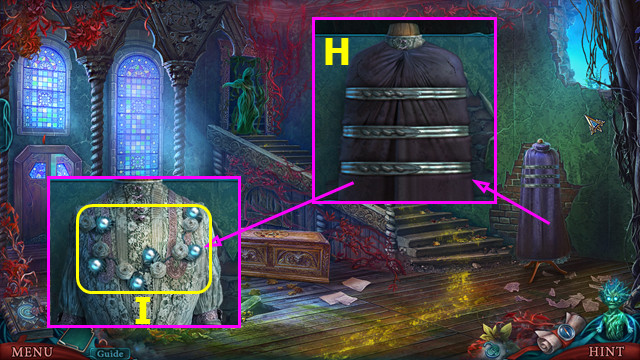
- Take the BLUE WREATH (A).
- Use the SCISSORS to take the RUBY (B).
- Walk left.
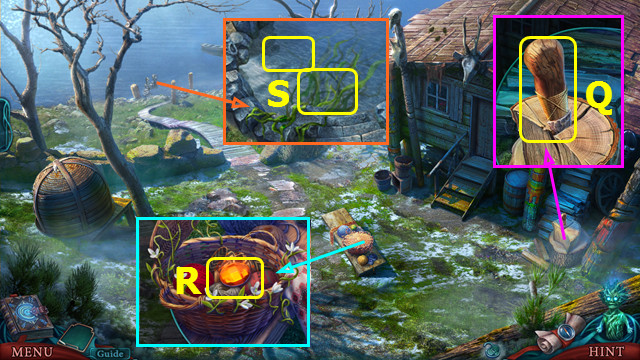
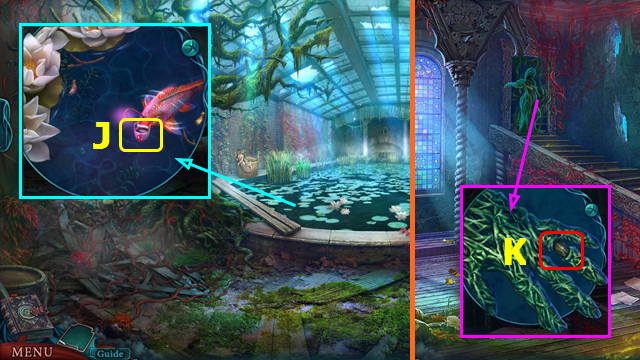
- Place the BLUE WREATH; take the EMPTY VIAL and SCOOP (C).
- Take the FORCEPS; use the SCOOP to take the LILY LEAF (D).
- Use the EMPTY VIAL to take the ACID DROPS (E).
- Use the LILY LEAF; take the SNAKE HINGE (F).
- Play the HOP; earn the DECORATION (G).
- Walk down.
- Use the ACID DROPS; remove the cloak (H).
- Use the FORCEPS to take the PEARLS (I).
- Walk left.
- Use the PEARLS; take the WEDDING RING (J).
- Walk down.
- Place the WEDDING RING (K).
- Go forward.
- Take the SAPPHIRE (L).
- Place the SNAKE HINGE (M).
- Select (N).
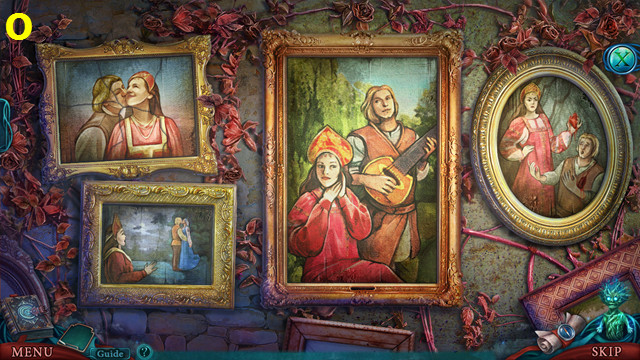
- Restore the paintings (O).
- Take the SHELL and CHEST CODE.
- Place the SHELL; take the BOWL OF QUICKSILVER (P).
- Use the BOWL OF QUICKSILVER; take the TOPAZ CHAMOMILE (Q).
- Walk down.
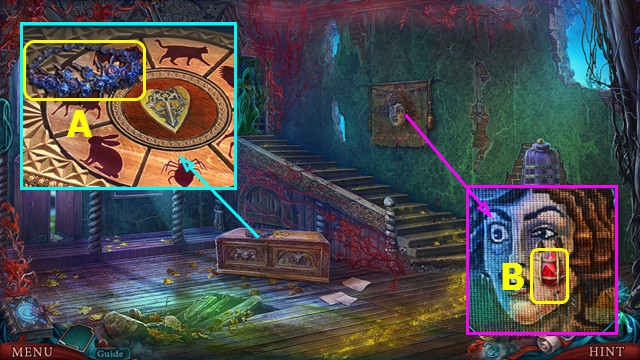
- Select (R).
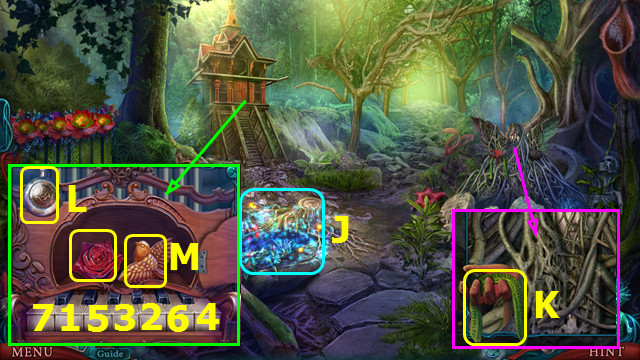
- Place the CHEST CODE (A).
- Select 1-7.
- Take the DIARY (B).
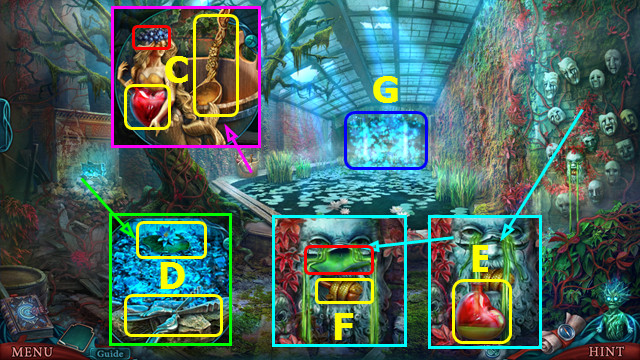
- Place the DECORATION, RUBY, SAPPHIRE, and TOPAZ CHAMOMILE on the DIARY (C).
- Open the DIARY and read the note; place the HONEY (D) and select (E) to earn the SYRINGE WITH HONEY.
- Go forward.
- Use the SYRINGE WITH HONEY (F).
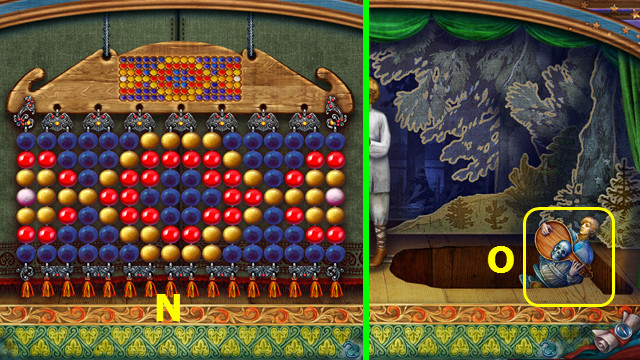
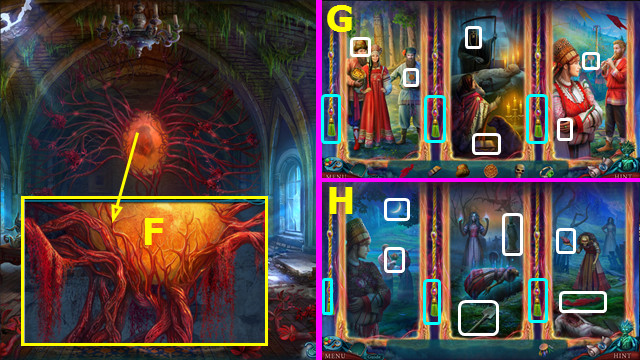
- Restore the 6 images (G-H).
- Use the cords to switch between images (blue).
- You earn the 1st AMULET PART.
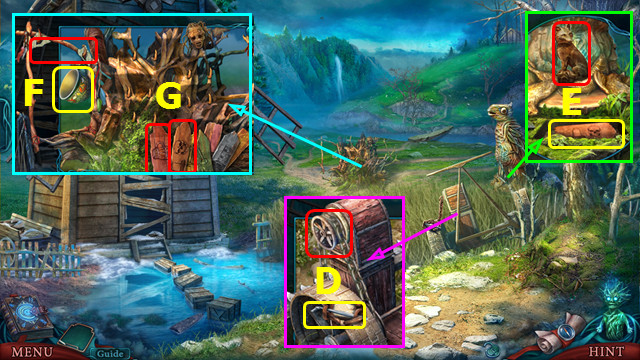
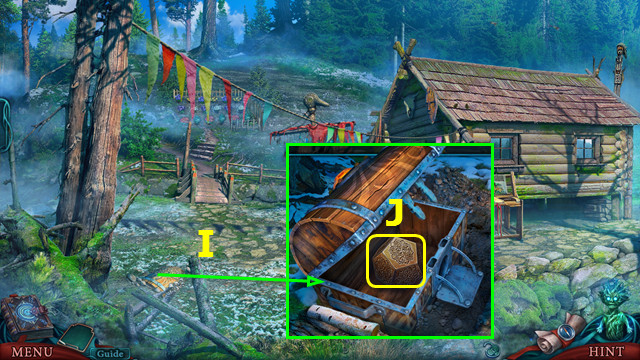
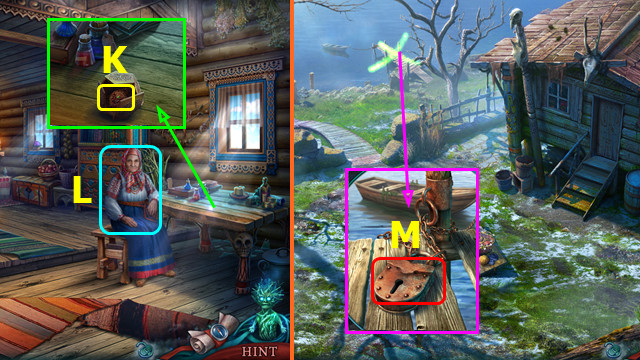
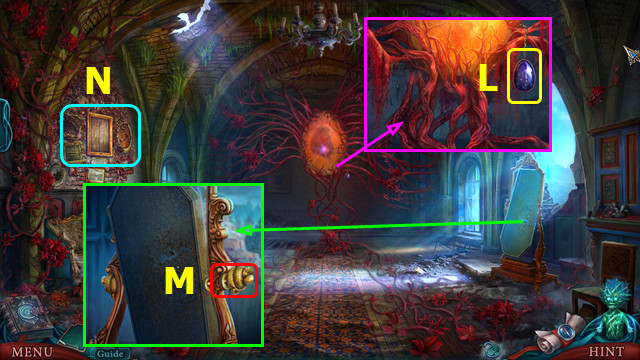
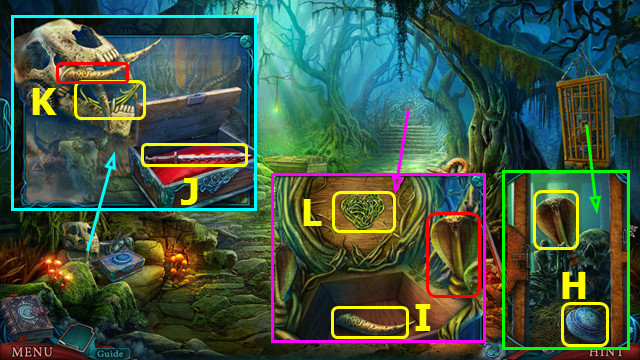
- Take the TOMBSTONE (I).
- Shoo the butterflies and move the hand. Place the INKWELL; take the DEPOSIT KEY and CASTLE TOKEN (J).
- Take the INKWELL (K).
- Go right.
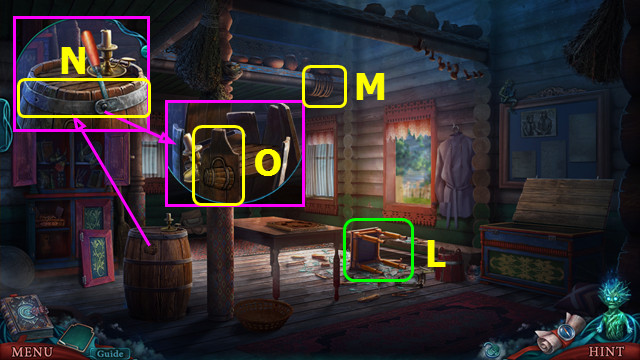
- Take the SINKER (L).
- Take the BRUSH and use the SINKER (M).
- Open the case; take the EIGHT, remove the book, and take the GROUP MINIATURE (N).
- Select (O).

- Place the GROUP MINIATURE on the board.
- Swap the items as shown (P).
- Take the LABEL and place the TOMBSTONE (Q).
- Take the SAPPHIRE and 1st BOOK EMBLEM (R).
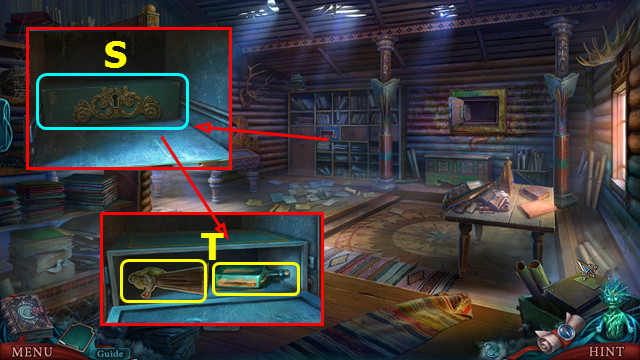
- Place and select the LABEL; remove all the files and select the box (S).
- Use the DEPOSIT KEY; take LIKHO and the SOLVENT (T).
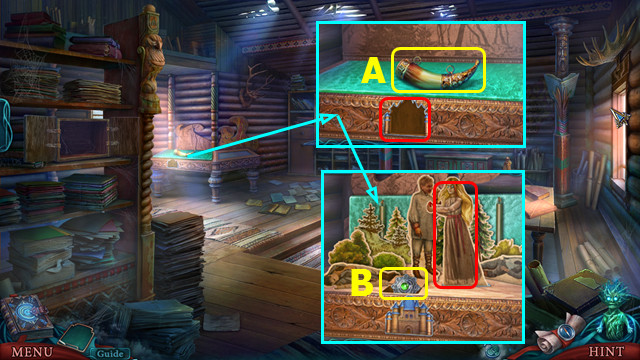
- Take the HUNTER'S HORN and place the CASTLE TOKEN (A).
- Place LIKHO; take the 2nd BOOK EMBLEM (B).
- Walk down.
- Place the EIGHT; take the HUNTER'S NOTES (C).
- Place the HUNTER'S HORN; take the STONE LEG (D).
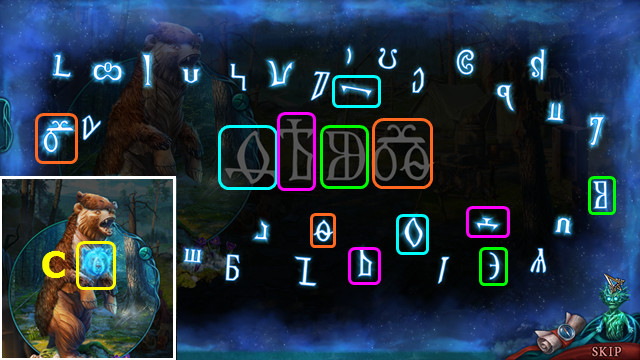
- Select the HUNTER'S NOTES; rotate the rings as shown (@).
- Turn the pages 2x and take the 3rd BOOK EMBLEM.
- Use the STONE LEG; take the METAL TEETH (E).
- Place the SAPPHIRE and METAL TEETH; take the FROST ESSENCE (F).
- Use the SOLVENT and BRUSH; place the FROST ESSENCE (G).
- Restore the symbols using the color-coded fragments (H).
- Walk right.
- Place the 3 BOOK EMBLEMS (I).
- Turn the pages and take the TOMB CLUE (J).
- Walk down.
- Place the TOMB CLUE and select the symbols (K).
- Enter the portal (L).
- Select the green areas (1-3) when the arrow is inside (M).
- Each area gets smaller and the arrow moves faster as you progress.
Chapter 5: Drekavak's Domain, The Entrance
- Take the 1/3 SKULLS (O).
- Take the FIRE BEETLE (P).
- Take the RUNE (Q).
- Walk forward.
- Take the RUNIC TRIANGLE (A).
- Take the 2/3 SKULLS (B).
- Take the LAVENDER (C).
- Walk down.
- Place the LAVENDER; remove the moss and take the 3/3 SKULLS (D).
- Go forward.
- Remove the fragments and place the 3 SKULLS (E).
- Move (F) to (G).
- Take the SKULL TOKEN and METAL SNAKE; remove the cover (H).
- Place the RUNE; take the SLING (I).
- Place the METAL SNAKE (J).
- Select the gem; take the SHARP STONE (K).
- Place the SLING and SHARP STONE (L).
- Select the foliage; place the RUNIC TRIANGLE and arrange the triangles as shown (M).
- Take the SCROLL (N).
- Use the SCROLL (O).
- Play the HOP; earn the BLUE SPHERE (P).
- Walk down.
- Place the BLUE SPHERE; take the ARROW (Q).
- Go forward.
- Place the ARROW; take the ANCIENT KEY and SNAKE CRYSTAL (R).
- Walk down.
- Use the SNAKE CRYSTAL (S).
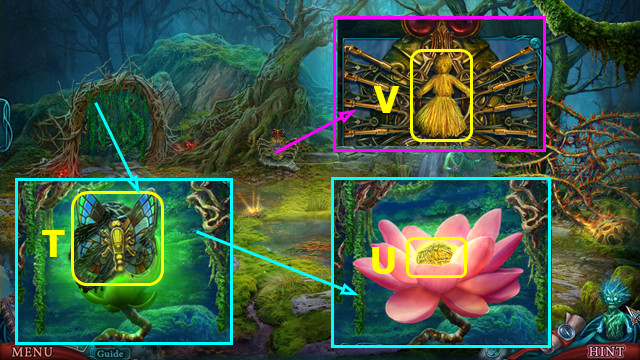
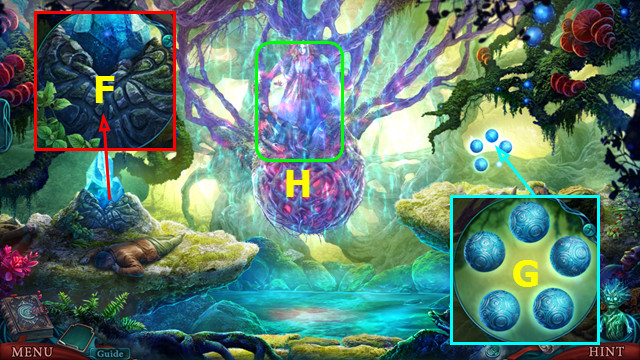
- Move the foliage and place the FIRE BEETLE; earn the LANTERN (T).
- Select the flower; take the GOLDEN THREAD (U).
- Remove the spider web and place the GOLDEN THREAD; take the GOLDEN DOLL and earn the SPIDER DECORATION (V).
- Go forward.
- Place the SPIDER DECORATION; take the ORGAN KEY (A).
- Play the HOP; earn the CRYSTALLIZER (B).
- Walk down.
- Use the CRYSTALLIZER; select (C).
- Walk right.
- Find the 3 symbols shown here (D).
- Solution levels 1-3.
- Take the DRIED FLOWER (E).
- Place the DRIED FLOWER; take the SKULL GOBLET (F).
- Place the SKULL TOKEN; take the EMBLEM PLATE (G).
- Place the EMBLEM PLATE; take the LUNA PENDANT and THRONE SNAKE (H).
- Place the THRONE SNAKE; take the TUSK (I).
- Place the LUNA PENDANT; take the ARBOREAL DAGGER (J).
- Place the TUSK; take the WOODEN PALM (K).
- Place the WOODEN PALM; take the WOODEN HEART (L).

- Use the SKULL GOBLET to take the GOBLET WITH POTION (M).
- Place the WOODEN HEART; use the GOBLET WITH POTION and ARBOREAL DAGGER (N).
- You earn the 2nd AMULET PART.
- Combine the AMULET and 2 AMULET PARTS to make the SHAMAN'S AMULET.
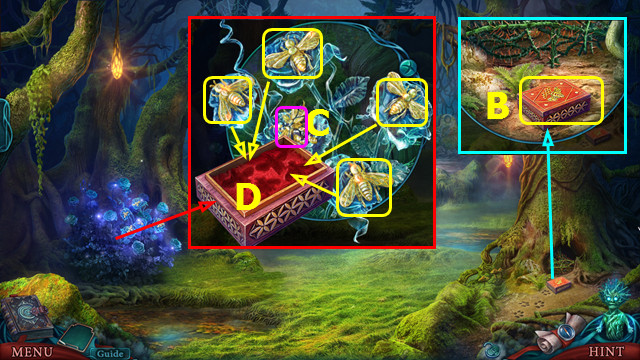
- Take the JEWELED BOX (B).
- Select (C).
- Place the JEWELED BOX; place the 4 bees in the box and take the BOX WITH BEES (D).
- Take the HARP and place the BOX WITH BEES (E).
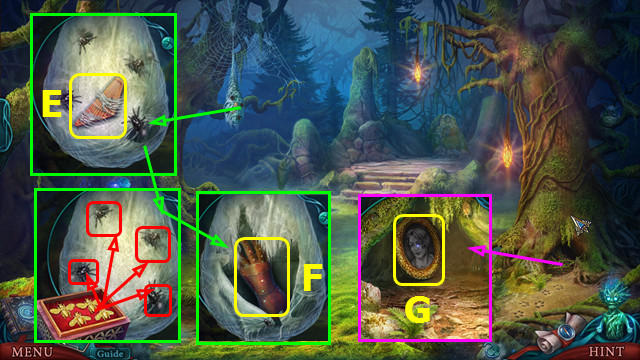
- Give a bee to each spider (red).
- Take the LEATHER GLOVE (F).
- Use the LEATHER GLOVE; take the PORTRAIT (G).
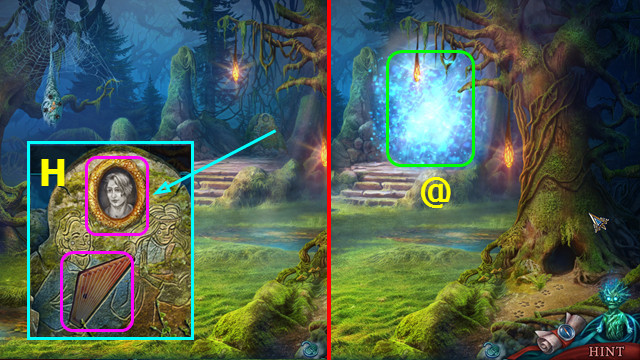
- Place the PORTRAIT and HARP (H).
- Select (@).
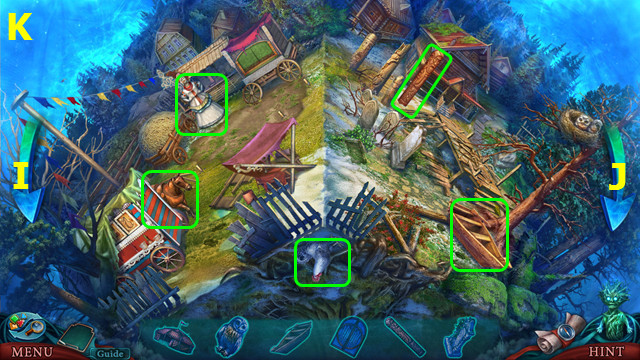
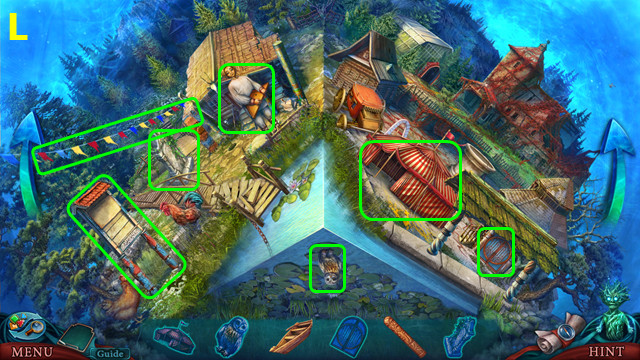
- Use the arrows (I-J) to move between scenes (K-L).
- Locate the misplaced items (green).
- Note: you must restore some items before you can collect them all. Please see the next set of screenshots for placement.
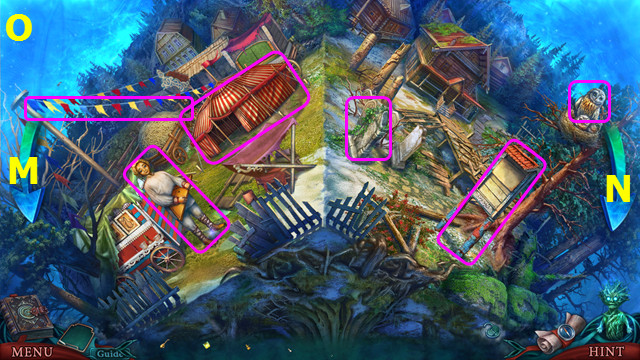
- Use the arrows (M-N) to move between scenes (O-P).
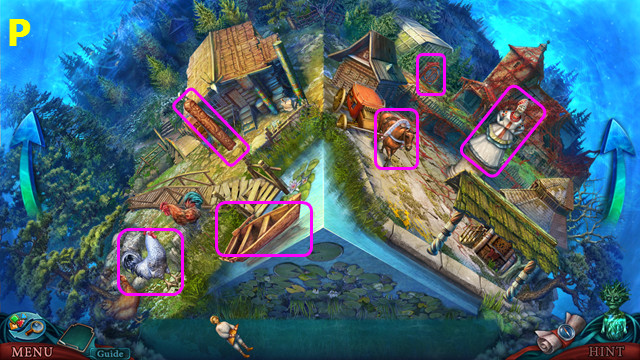
- Restore the items (pink).
- Play the HOP; earn the HEART-SHAPED BOX (J).
- Open the HEART-SHAPED BOX; take the HEART KEY.
- Take the LEAF (K).
- Take the GROWTH POTION and place the ORGAN KEY (L).
- Select 1-7.
- Take the RED ROSE and CANARY (M).
- Place the LEAF; solution (N).
- Use the GROWTH POTION; take the BLACK ROSE (O).
- Place the RED ROSE and BLACK ROSE (P).
- Take the BOWL OF FIRE (Q).
- Go forward.
- Move the foliage and use the ANCIENT KEY (R).
- Place the CANARY; take the SPHERE (S).
- Place the GOLDEN DOLL; take the WHISTLE (T).
- Use the WHISTLE; take the PURSE (A).
- Open the PURSE; read the instructions and take the LENS.
- Use the GOBLET WITH POTION, LENS, and LANTERN (B).
- Use the HEART KEY (C).
- Move the token on the indicated path (D).
- Go forward.
- Use the BOWL OF FIRE (F).
- Place the SPHERE (G).
- Use the SHAMAN'S AMULET (H).
- Arrange the stones as shown (I).
- Arrange the crystals as shown (J).
- Restore the image (K).
- Congratulations! You have completed Reflections of Life: Hearts Taken!
Created at: 2017-06-11