

Walkthrough Menu
- General Tips
- Chapter 1: Michael's House
- Chapter 2: Kurtz and Nova
- Chapter 3: Roses City
- Chapter 4: Twilight City
- Chapter 5: Knowledge City
- Chapter 6: Mechanized City
- Chapter 7: The Mansion
General Tips
- This is the official guide for Reflections of Life: In Screams and Sorrow.
- This guide won't tell you when to zoom into a location; the screenshots show each zoom scene.
- Hidden-object puzzles are referred to as HOPs. Only the locations of the HOPs will be shown.
- A match-3 game can be played instead of an HOP.
- Use the Map to fast travel to a location.
Chapter 1: Michael's House
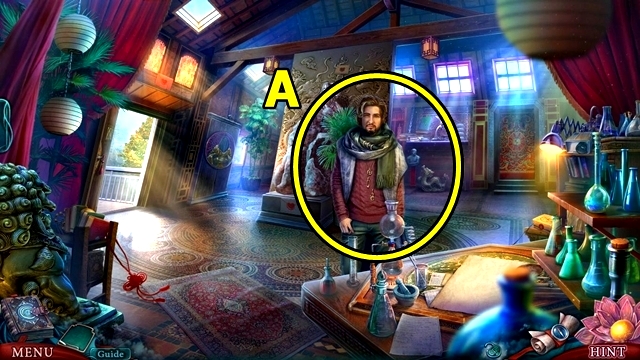
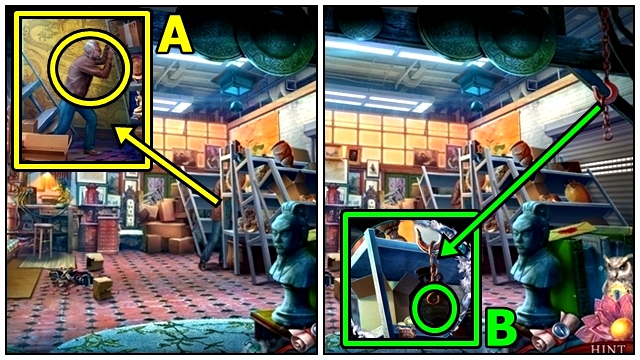
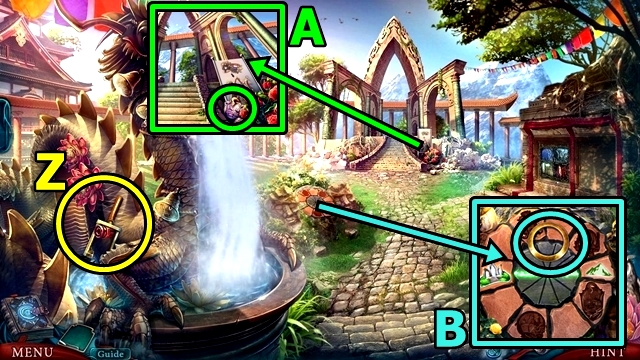
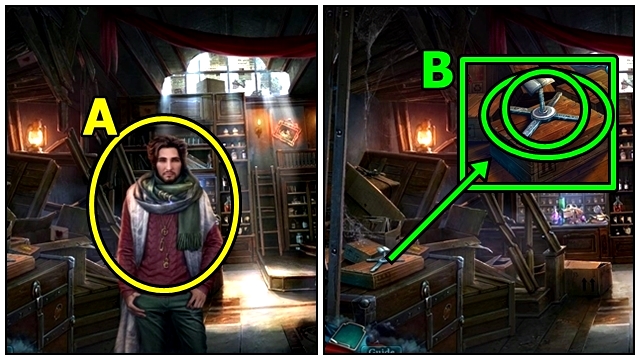
- Talk (A).
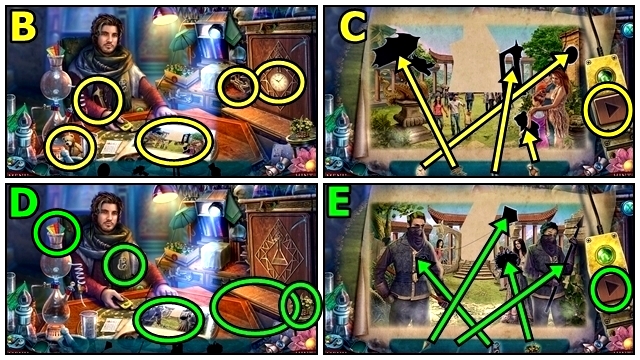
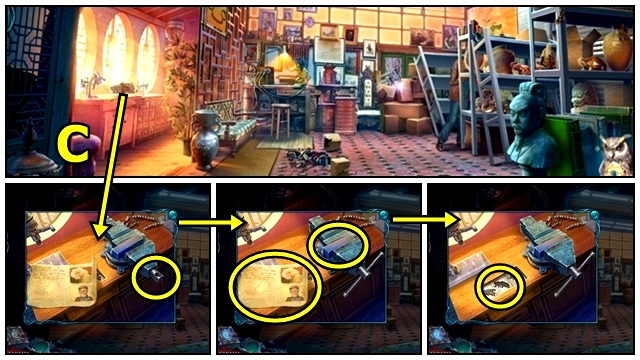
- Find items (B); examine picture.
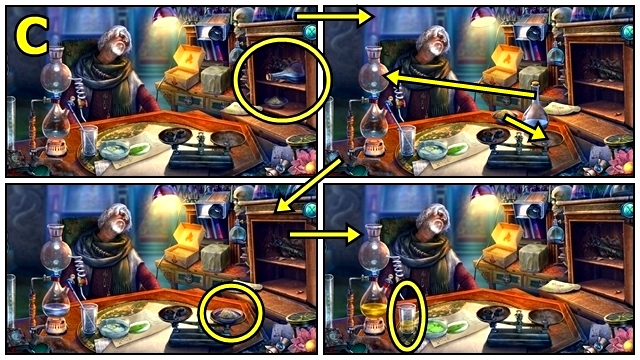
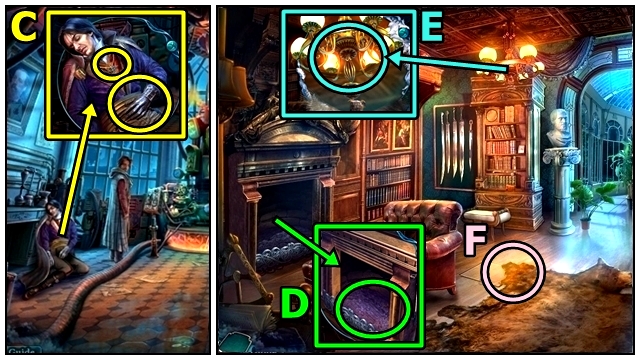
- Replace items (C); press button.
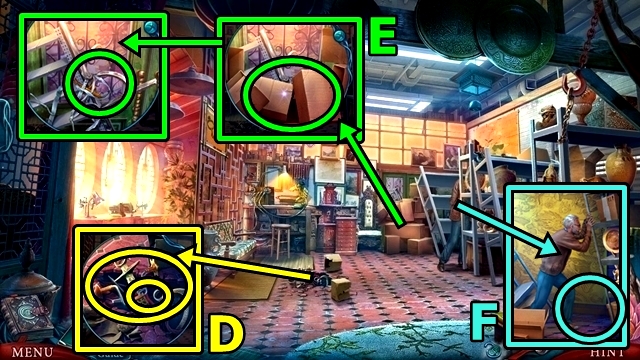
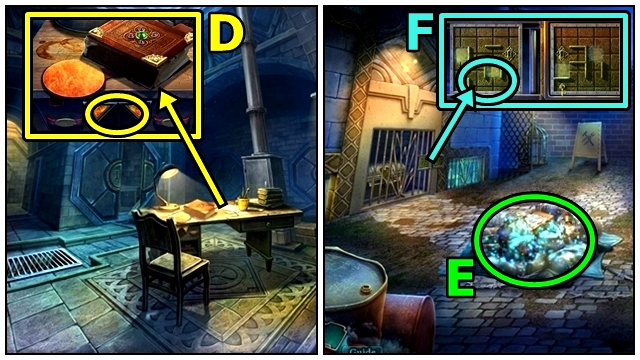
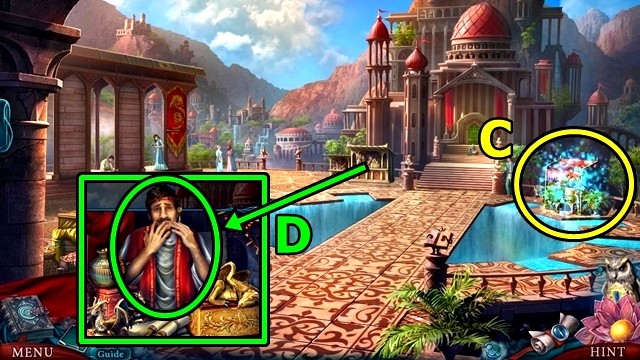
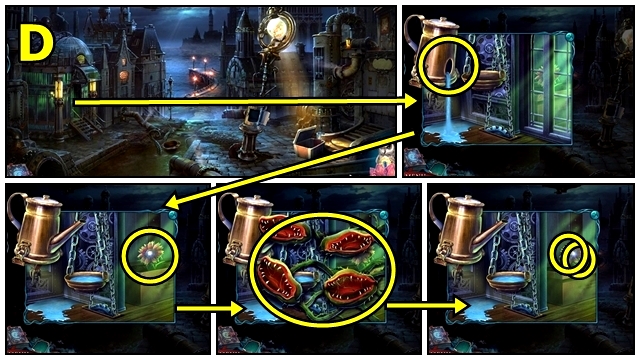
- Find items (D); examine picture.
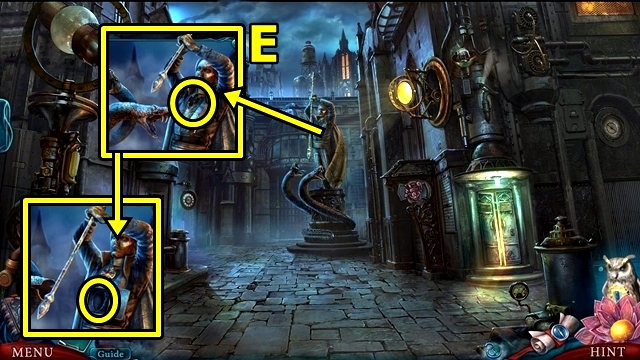
- Replace items (E); press button.
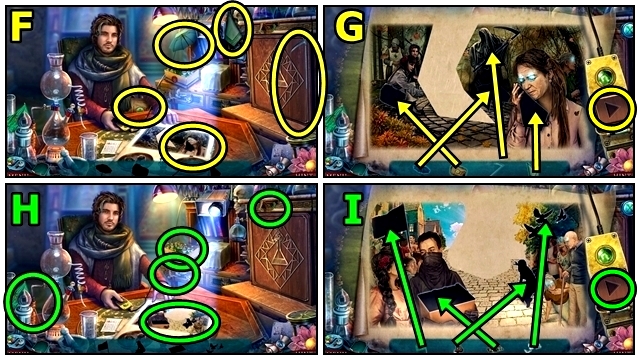
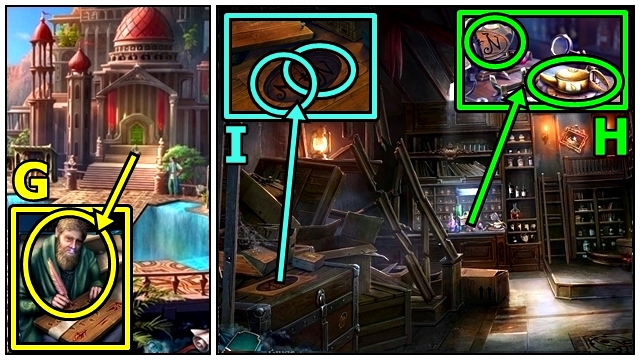
- Find items (F); examine picture.
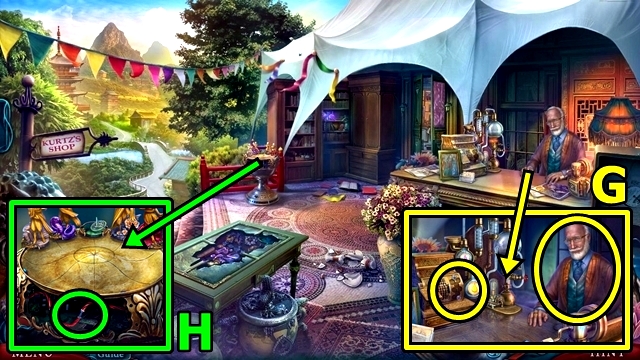
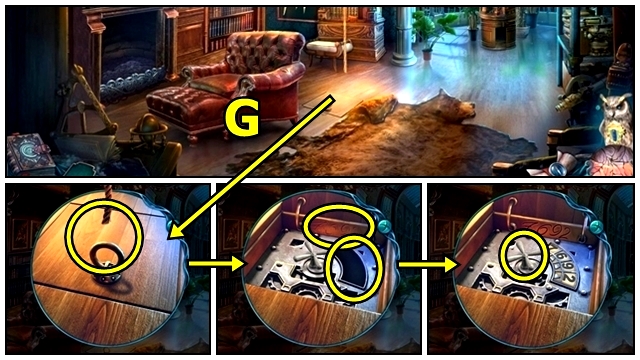
- Replace items (G); press button.
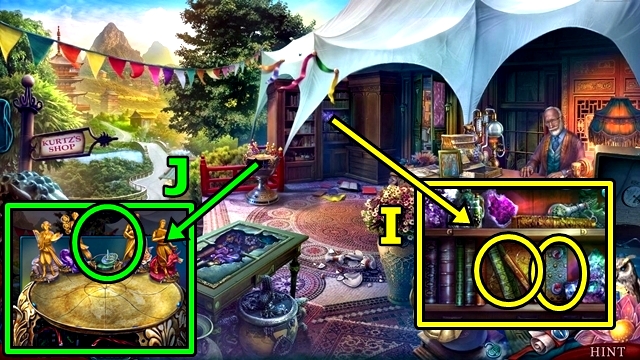
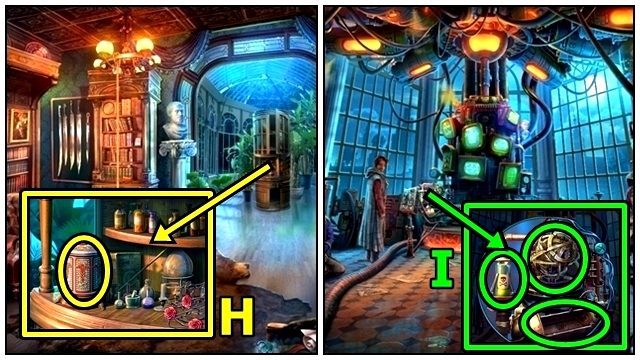
- Find items (H); examine picture.
- Replace items (I); press button.
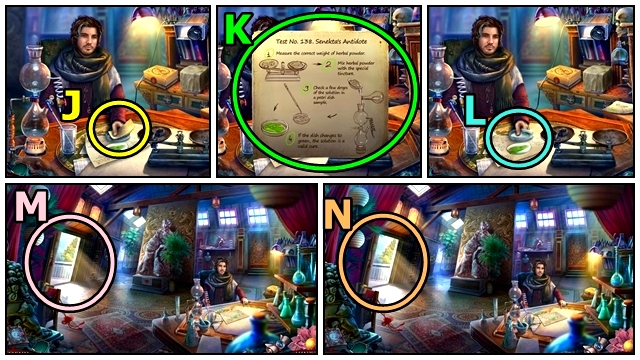
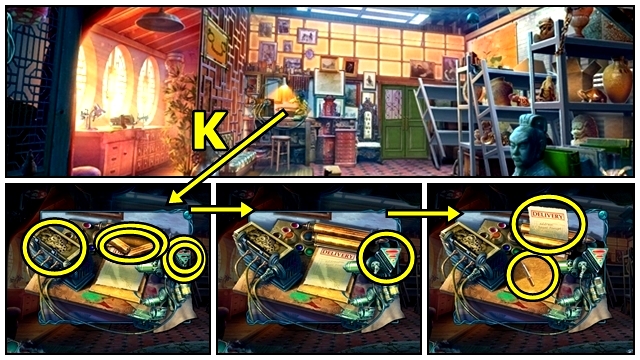
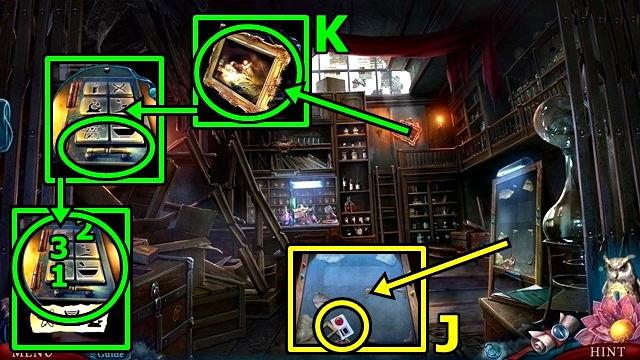
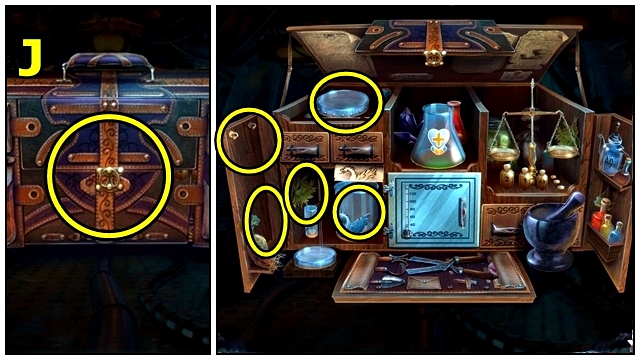
- Examine (J).
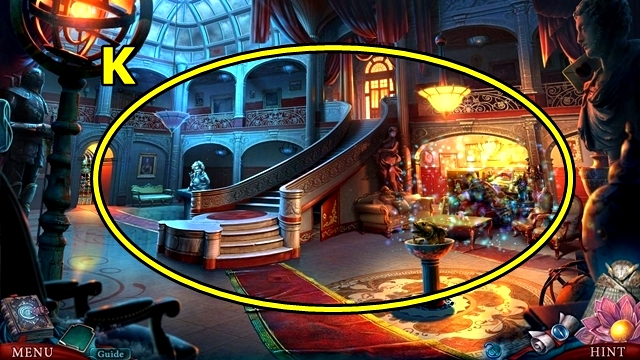
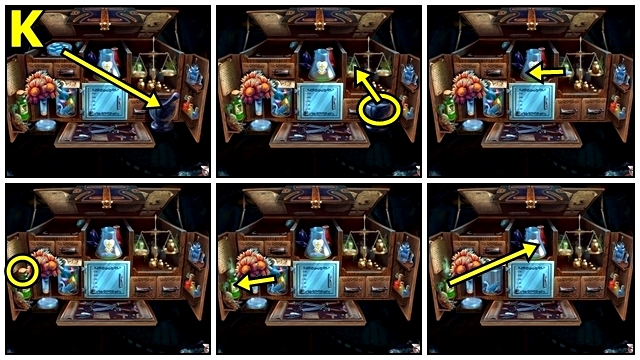
- Set aside (K).
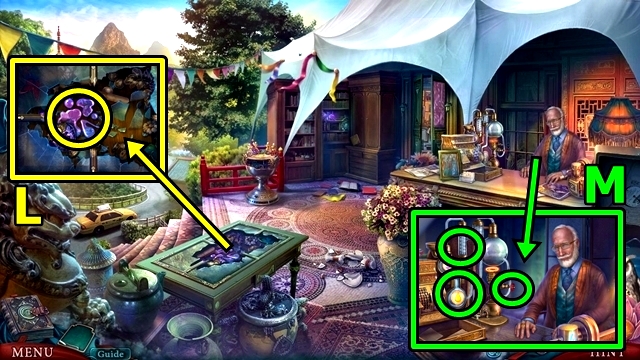
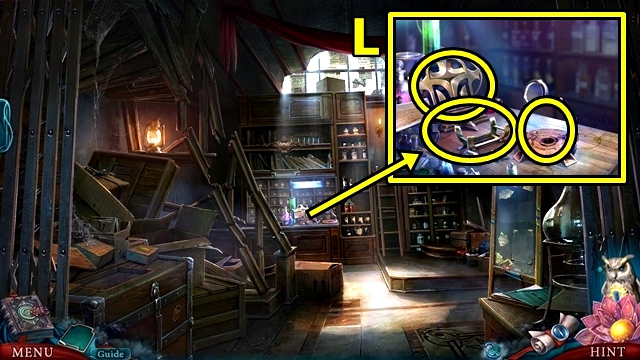
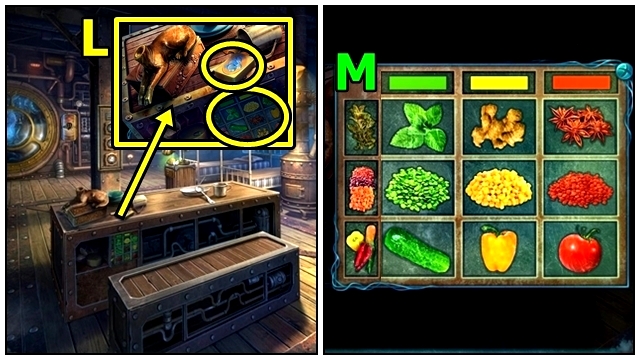
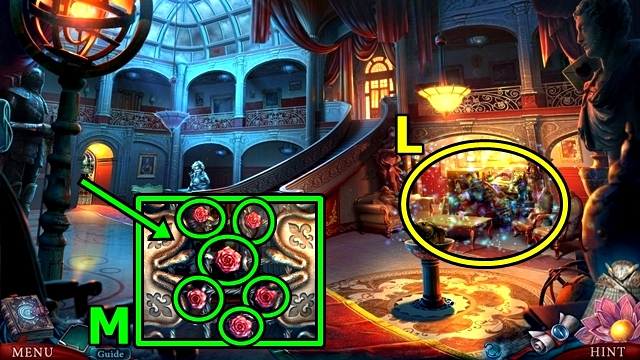
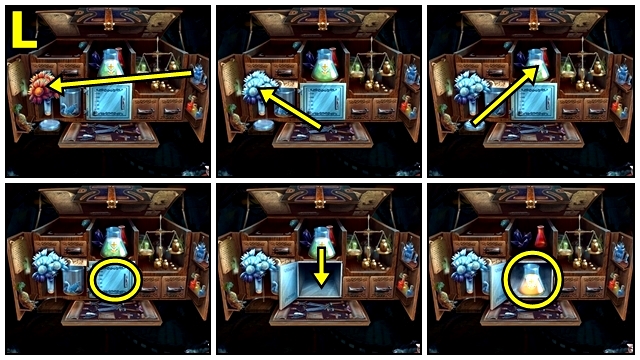
- Take EMPTY PETRI DISH (L).
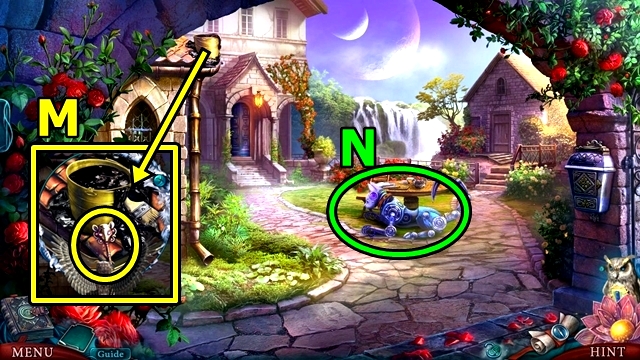
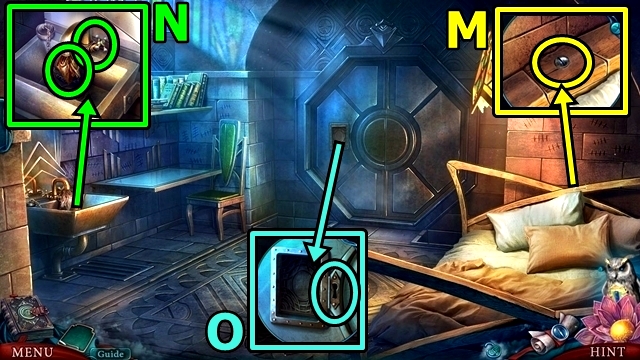
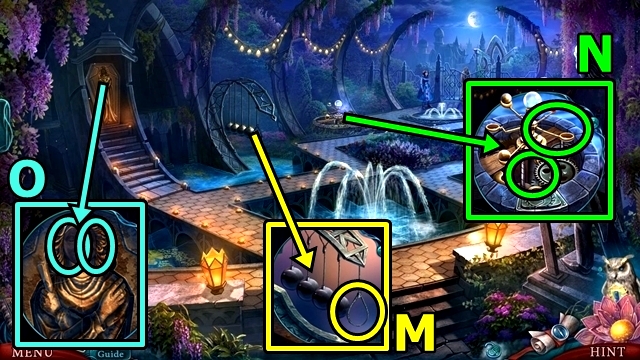
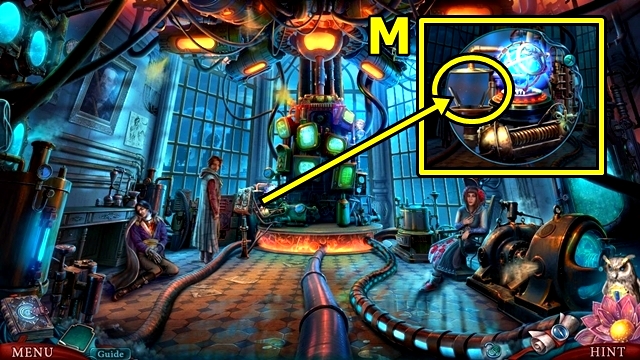
- Try to go to Temple Square (M).
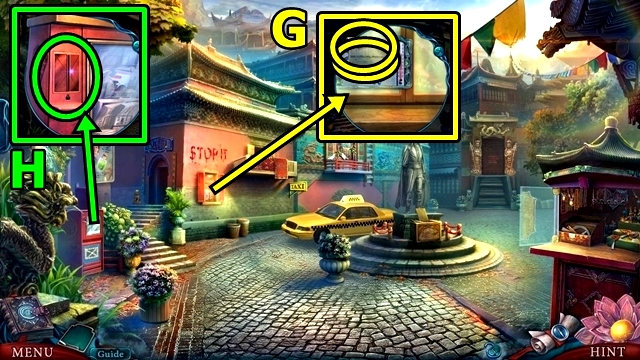
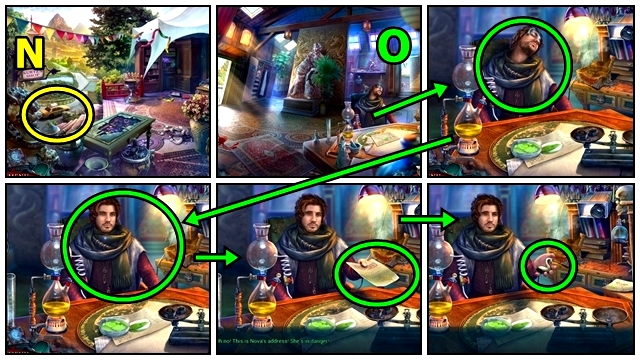
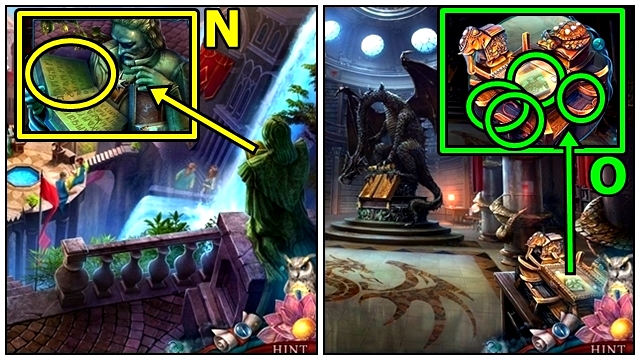
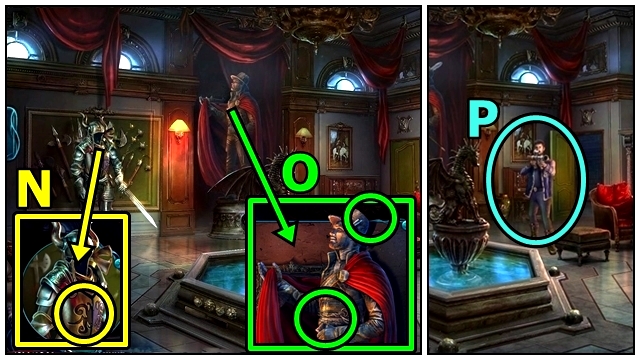
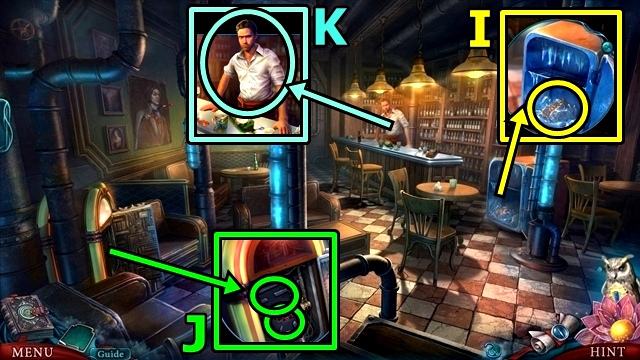
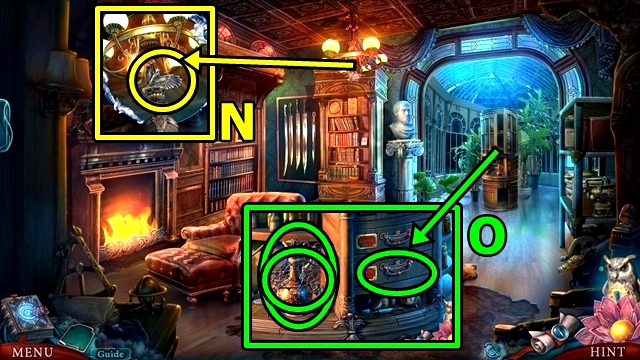
- Go (N).
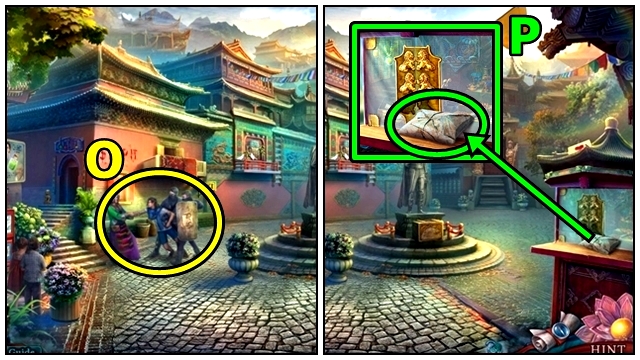
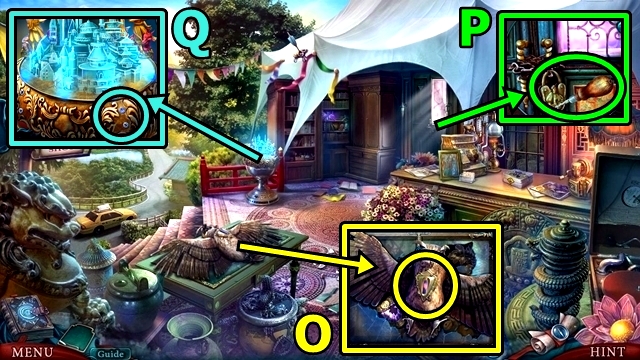
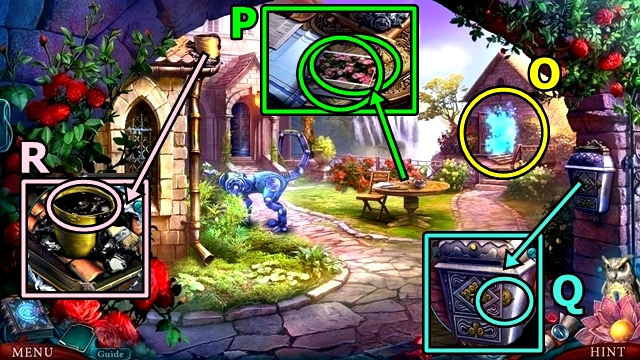
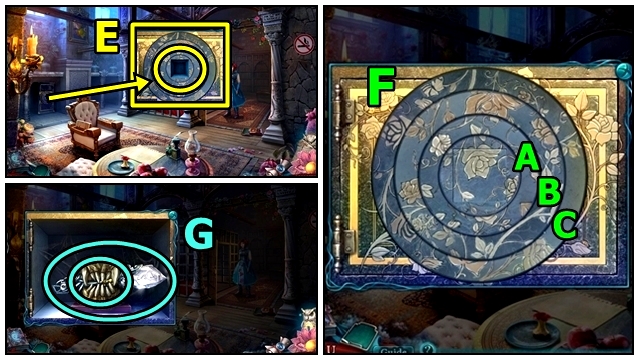
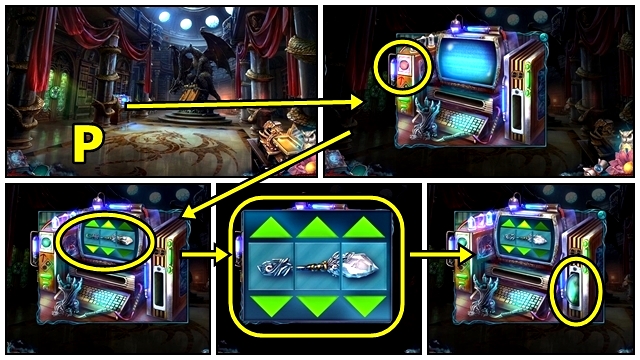
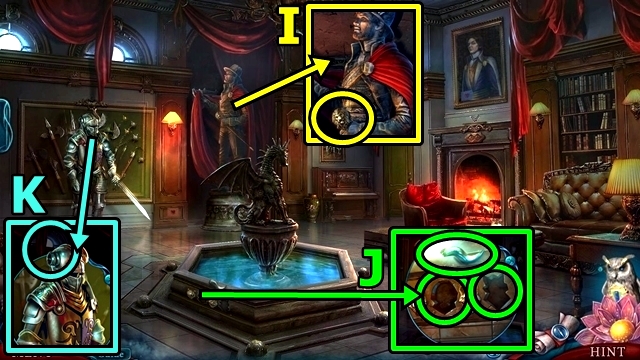
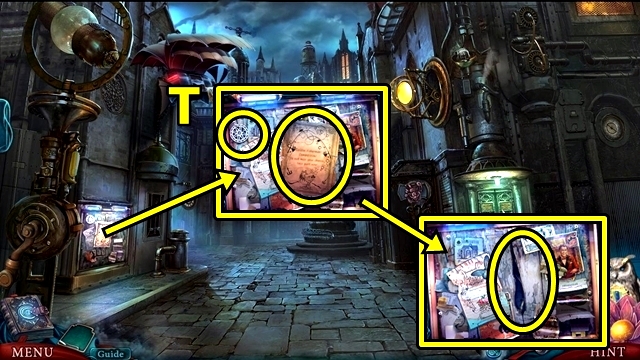
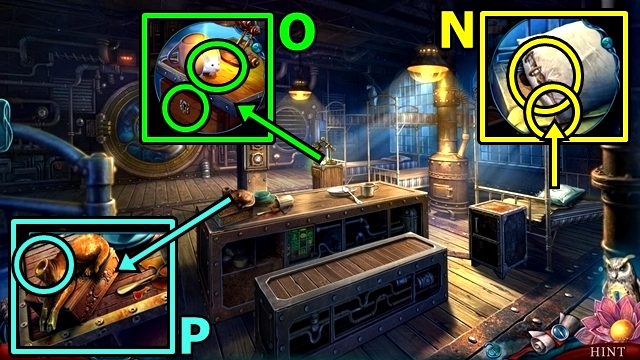
- Examine (O). Play HOP; receive MICROSCOPE EMBLEM.
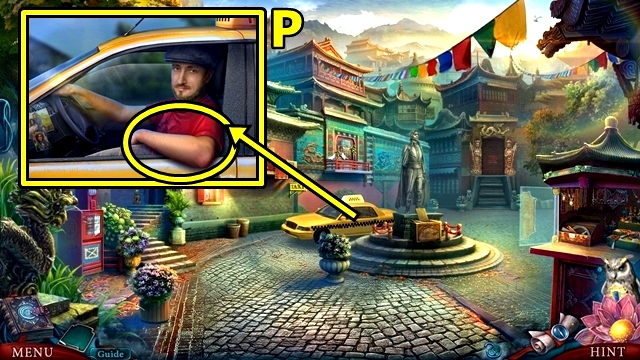
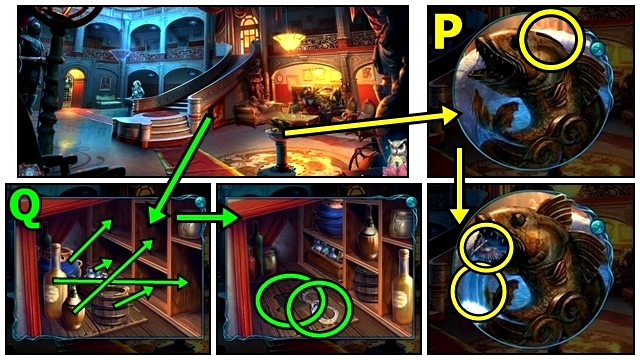
- Open (P); take LETTER H. Read note.
- Enter Michael's House.
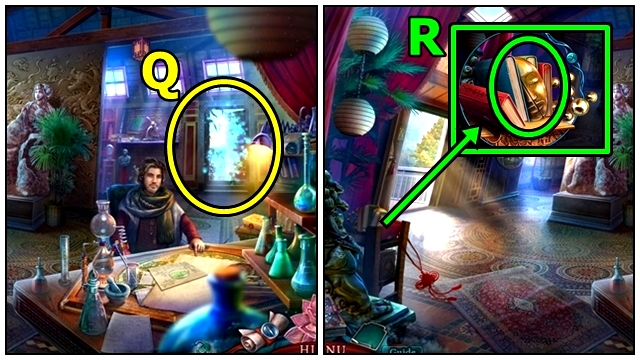
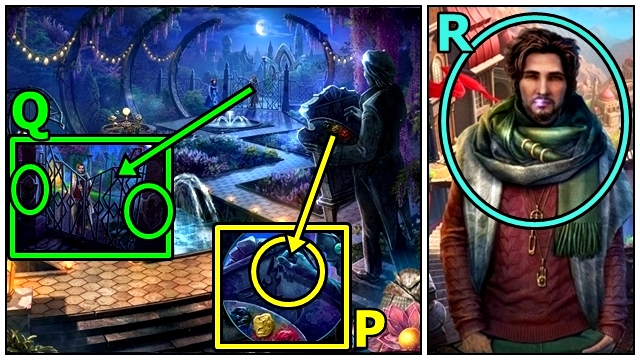
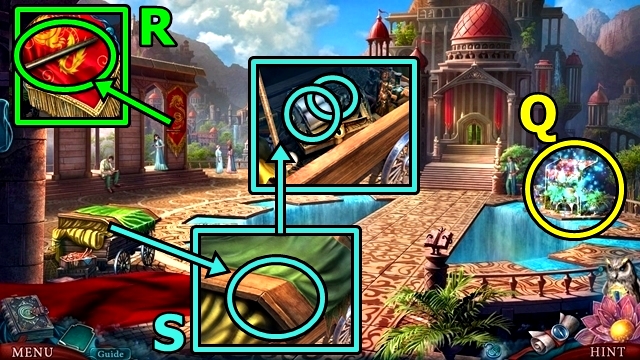
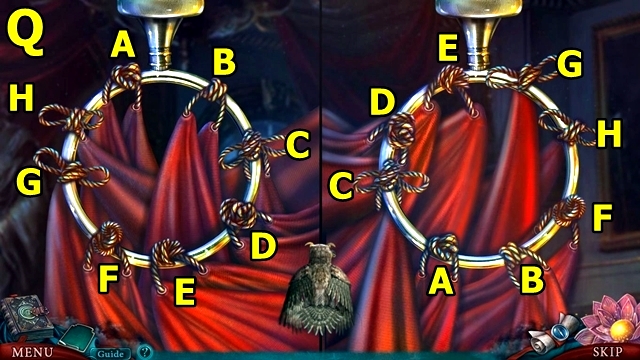
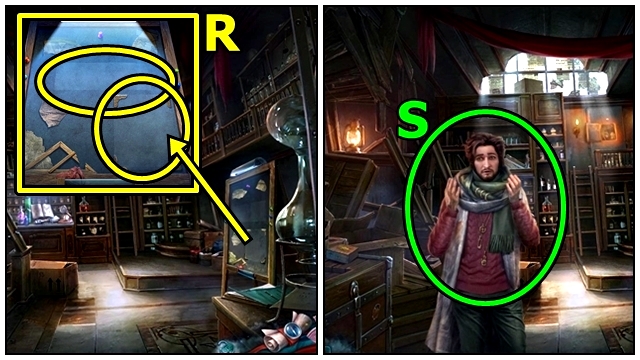
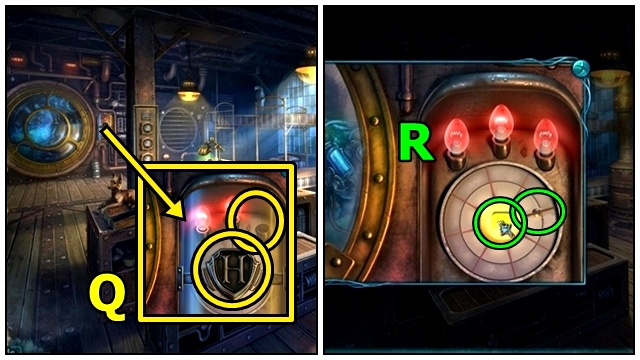
- Play HOP (Q); receive MICROSCOPE LENSES.
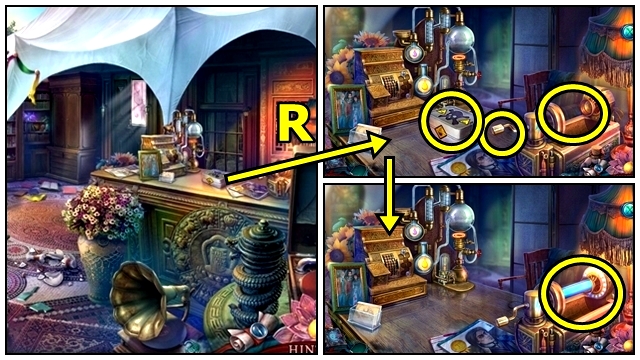
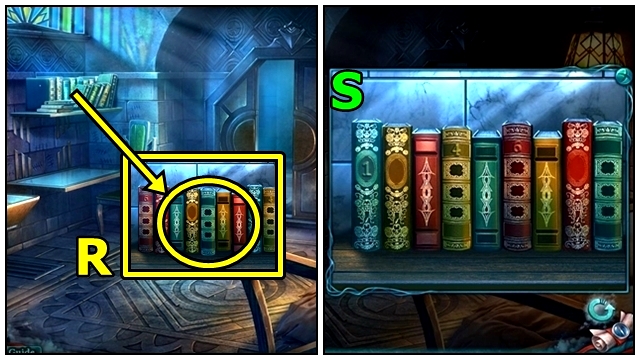
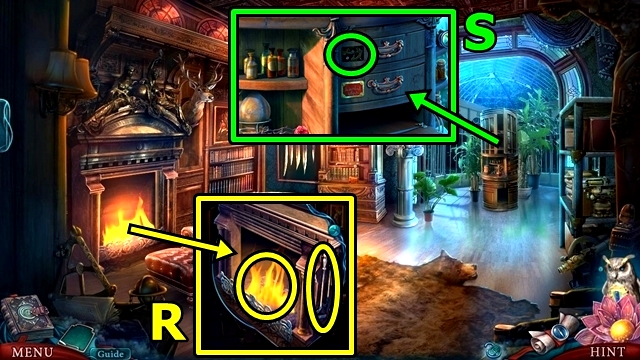
- Take GOLDEN FACE (R).
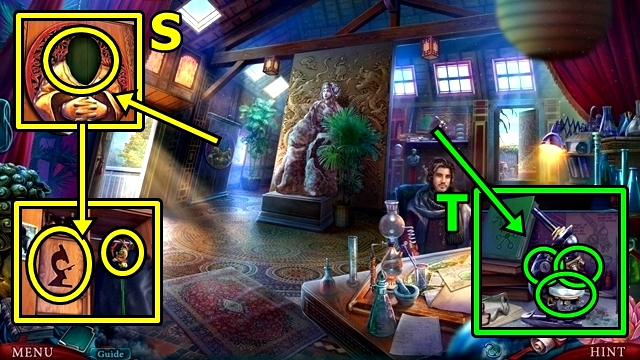
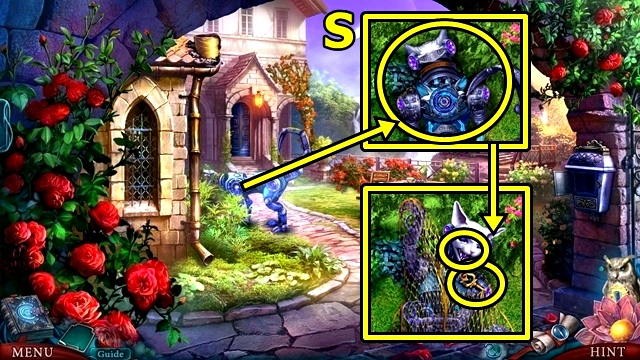
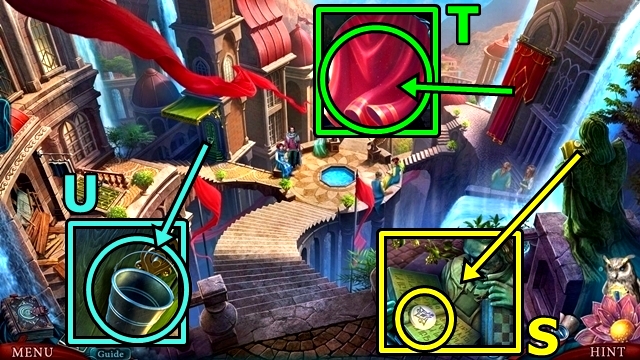
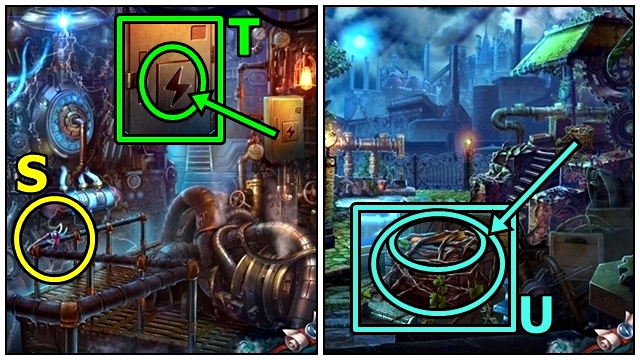
- Insert GOLDEN FACE (S). Take GOLDEN LION 1/2. Insert MICROSCOPE EMBLEM; take FOCUS KNOB.
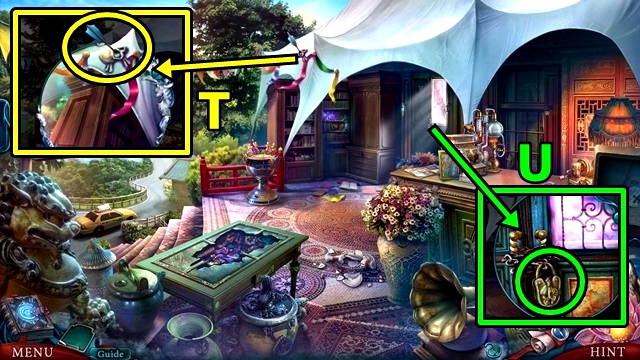
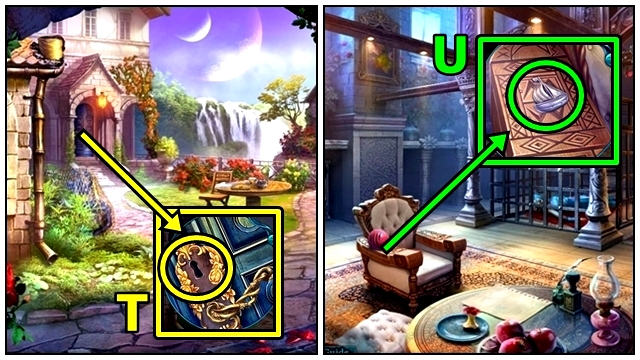
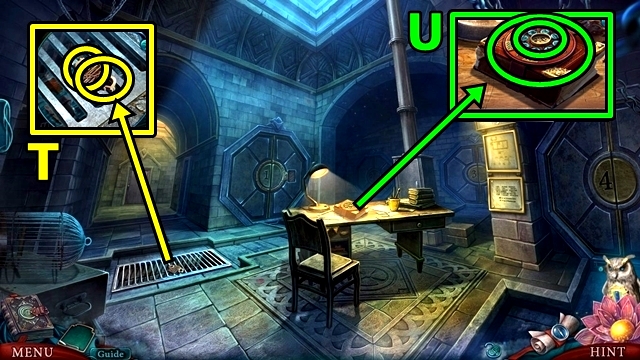
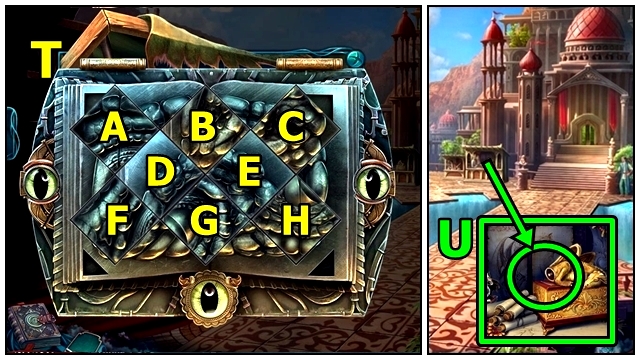
- Add EMPTY PETRI DISH (T), MICROSCOPE LENSES and FOCUS KNOB.
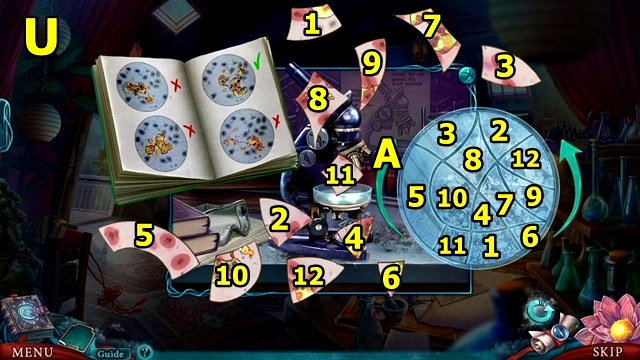
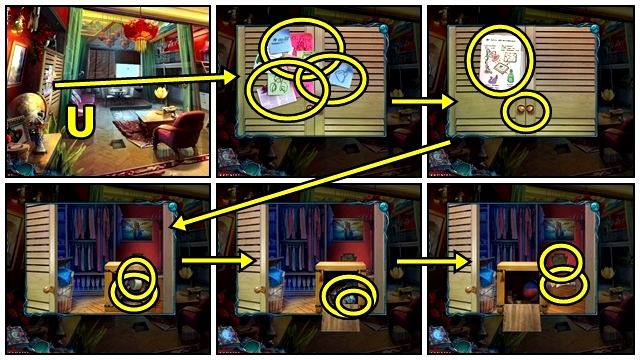
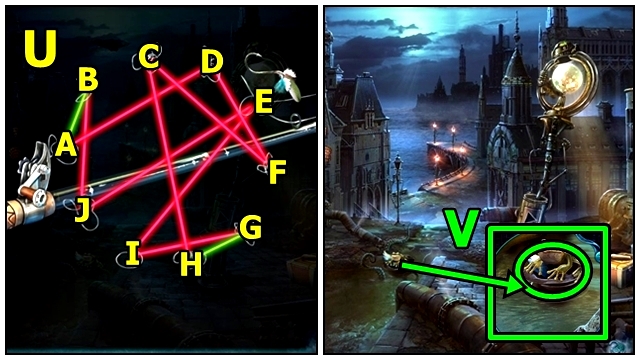
- Solution: Place 1-2, press A. Place 3-4, press A. Place 5-6, press A. Place 7-8, press A. Place 9-10, press A. Place 11-12, press A (U). Receive PETRI DISH WITH SAMPLE.
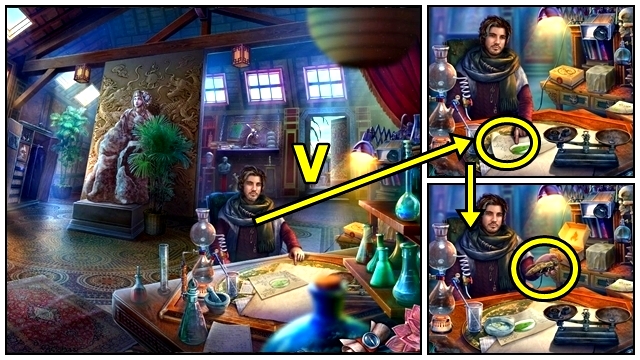
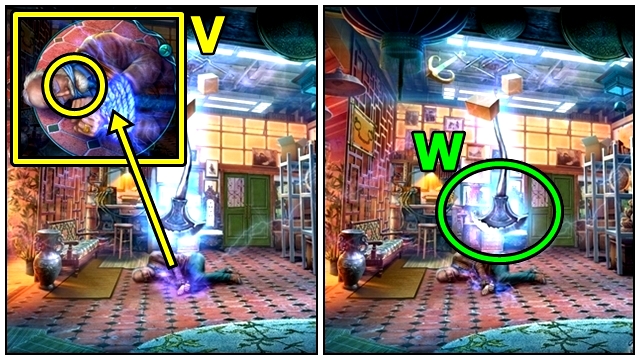
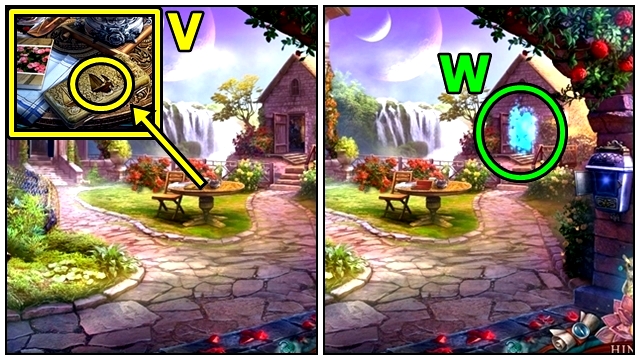
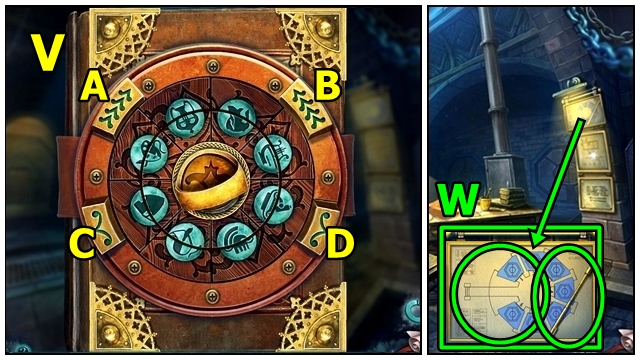
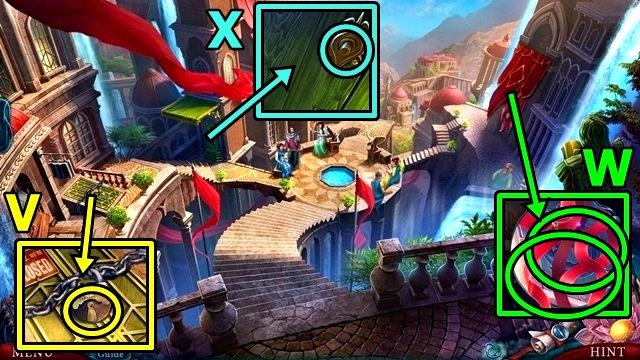
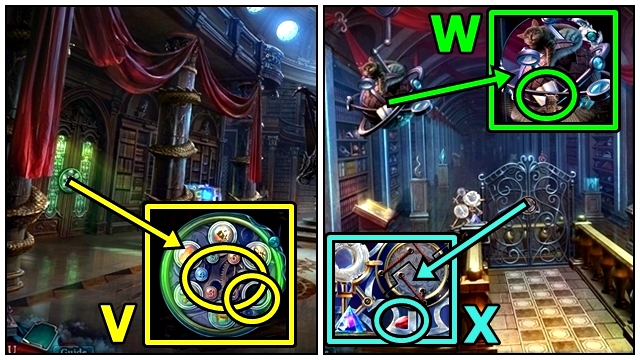
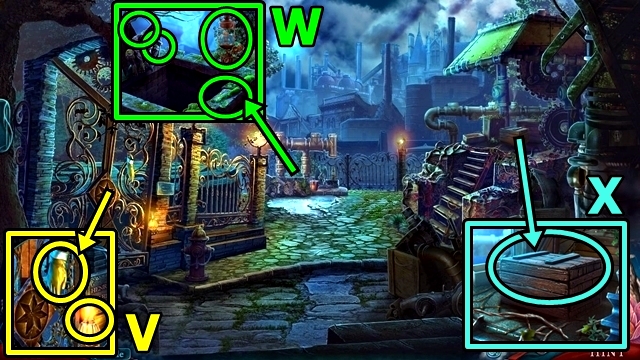
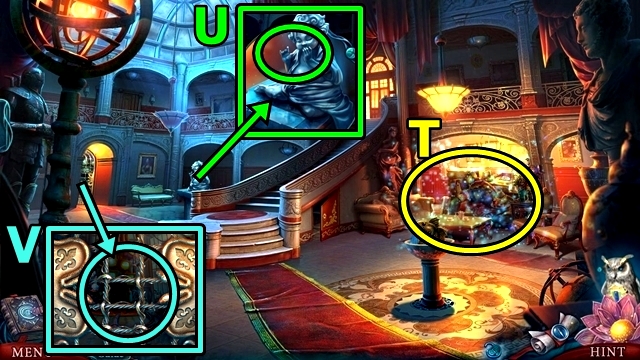
- Add PETRI DISH WITH SAMPLE (V). Examine.
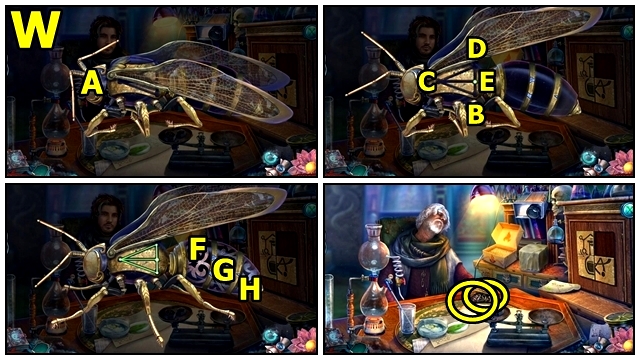
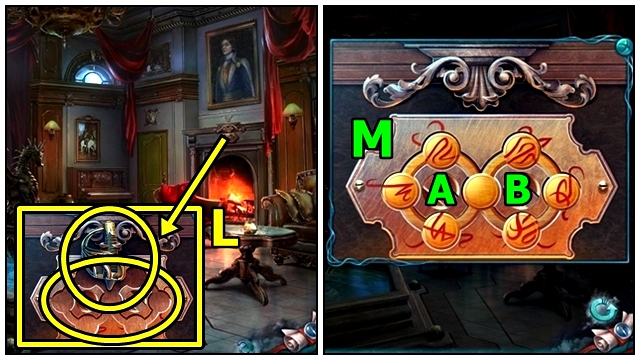
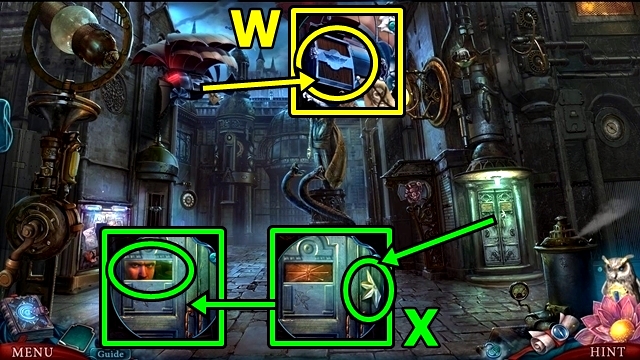
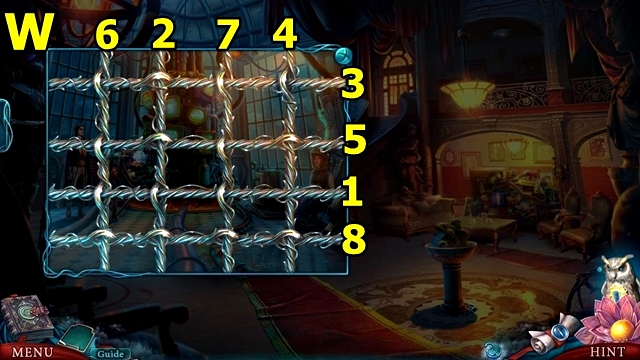
- Solution: Ax3; B-C-D-E-C; Fx2-H (W). Take DEAD WASP and PAPER CLIP.
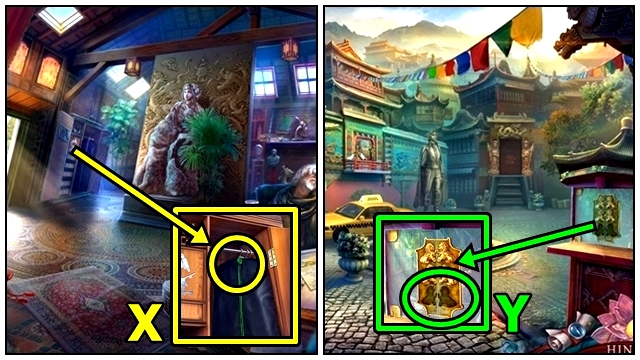
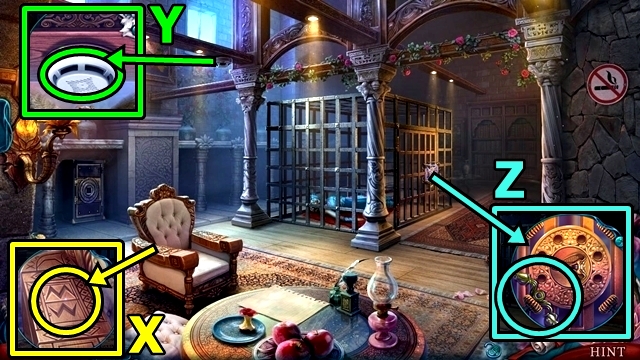
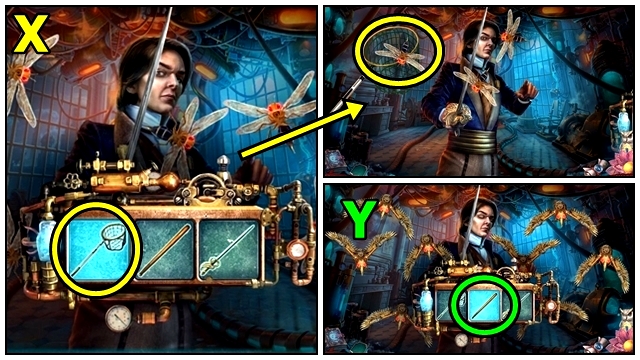
- Use PAPER CLIP (X); take MICHAEL'S DIARY.
- Go to Temple Square.
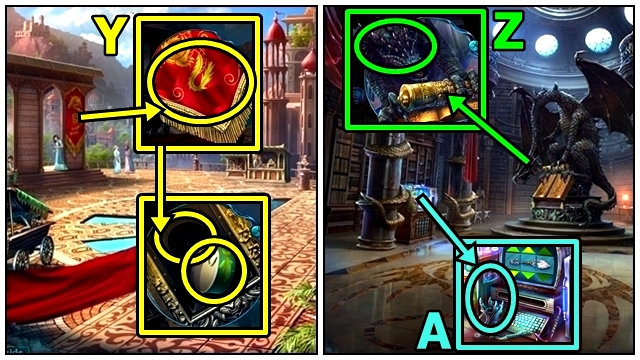
- Open MICHAEL'S DIARY; move picture; take GOLDEN LION 2/2. Take page.
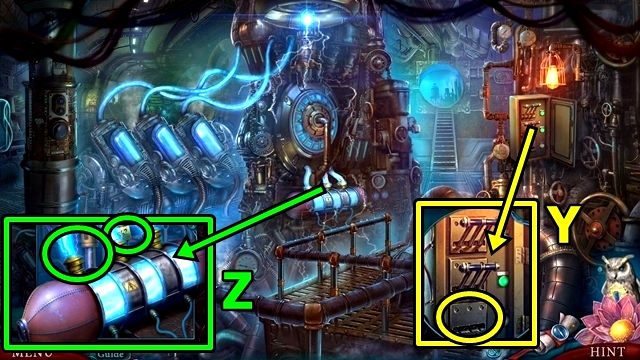
- Add GOLDEN LION (Y); take MOLECULE BOOKEND.
- Enter Michael's House.
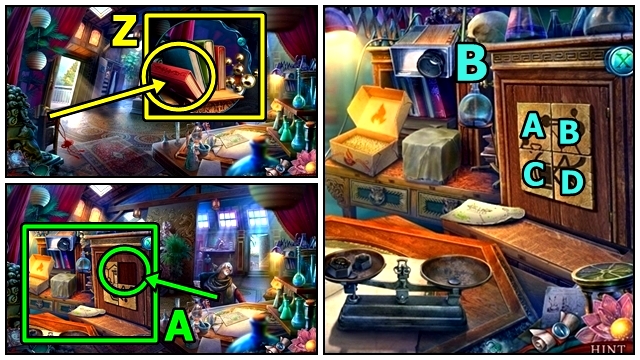
- Add MOLECULE BOOKEND (Z); take DIARY KEY.
- DIARY KEY on MICHAEL'S DIARY. Take page, then STONE TILE.
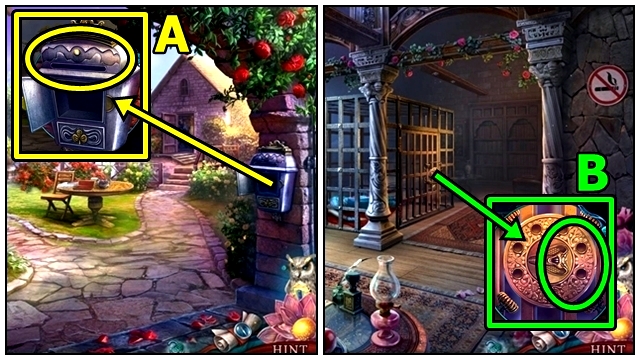
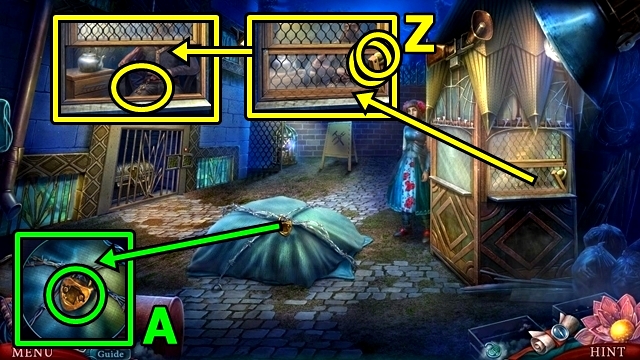
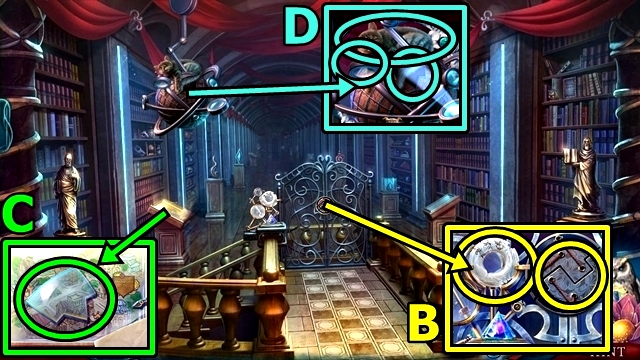
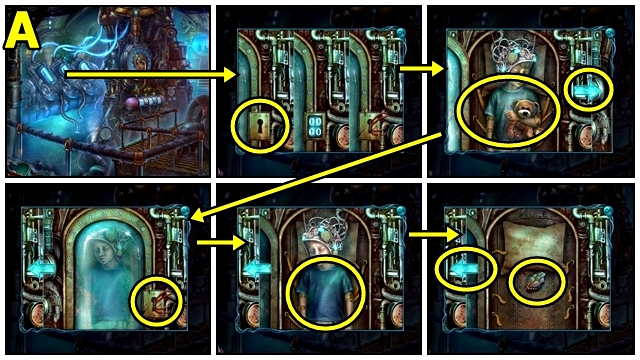
- Add STONE TILE (A).
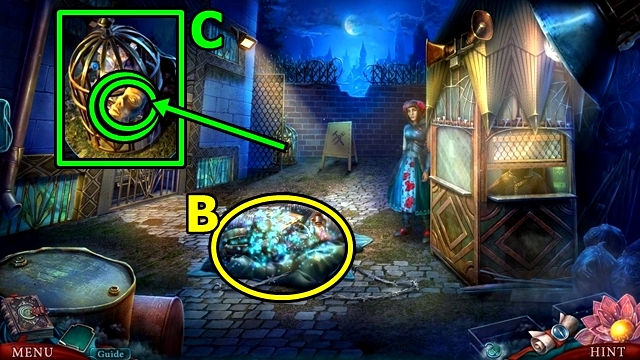
- Press A-C-Dx2 (B).
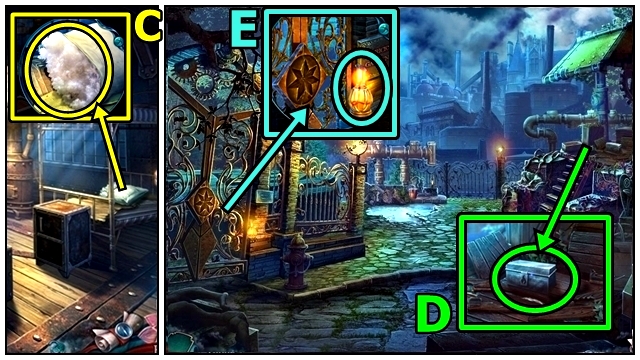
- Take items (C). Place powder, then pour solution. Add powder. Offer. Receive WEAK MEDICINE.
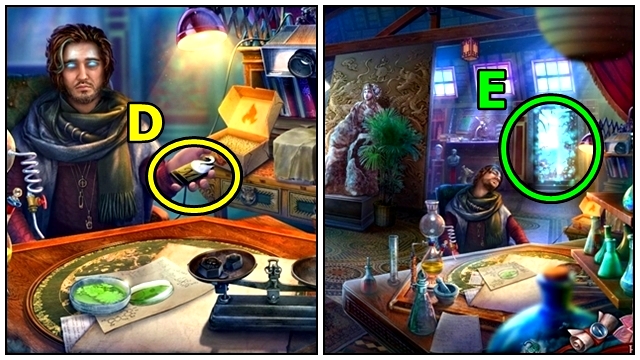
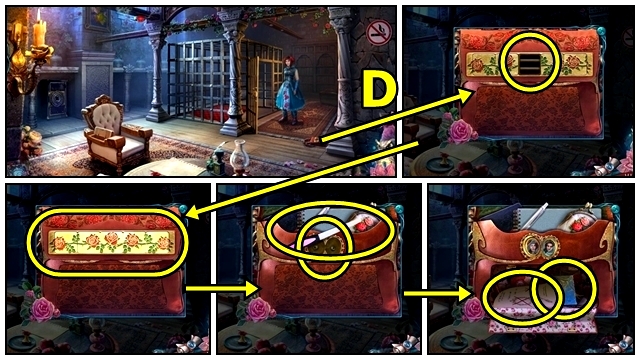
- Take MICHAEL'S ACCESS CARD (D).
- Play HOP (E); receive LETTER KEY CARD.
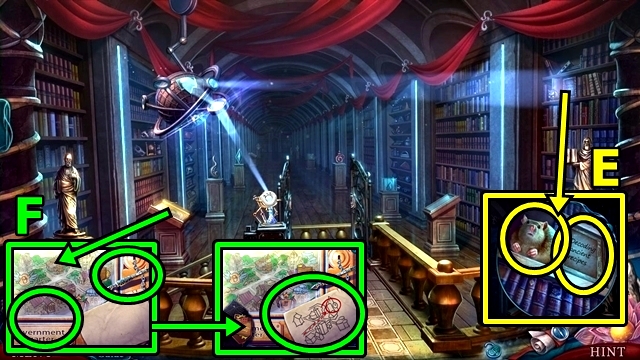
- Go to Temple Square.

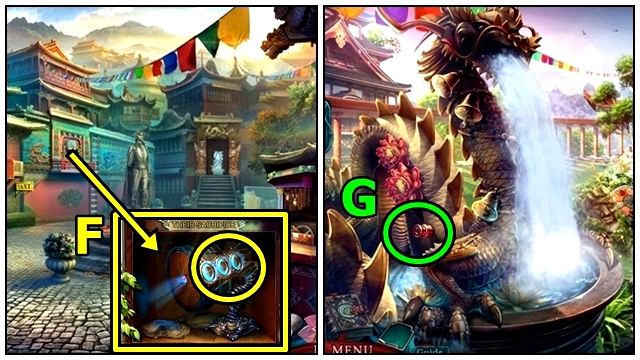
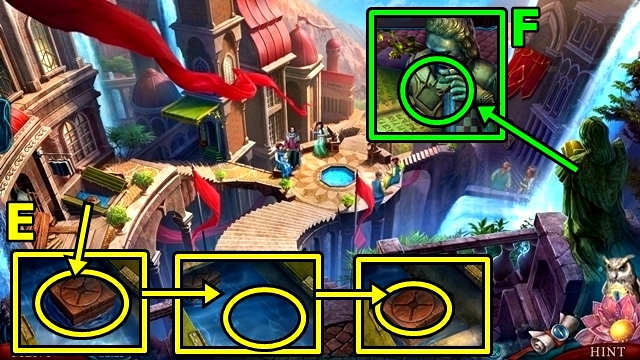
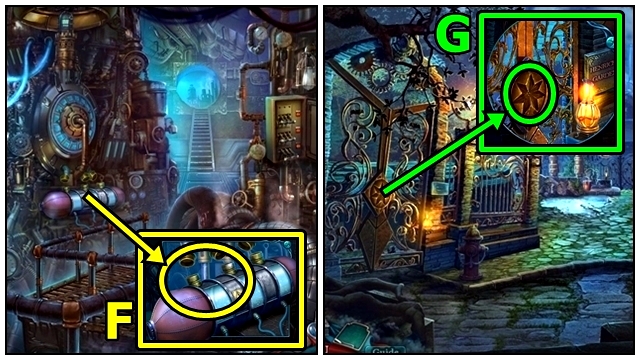
- Insert LETTER H (F); press in order shown. Insert MICHAEL'S ACCESS CARD; take SUN EMBLEM and MICHAEL'S CONTACT LIST.
- Take DELIVERY RECEIPT (G). Add SUN EMBLEM; take SNOWFLAKE.
- Insert LETTER KEY CARD (H). Take BROCHURE.
- Enter Michael's House.
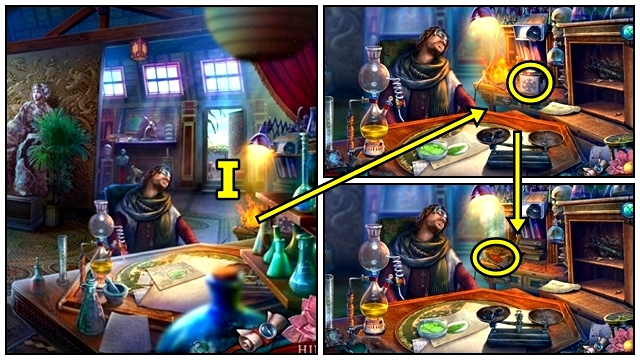
- Insert SNOWFLAKE (I). Take MELTED SEAL.
- Go to Temple Square.
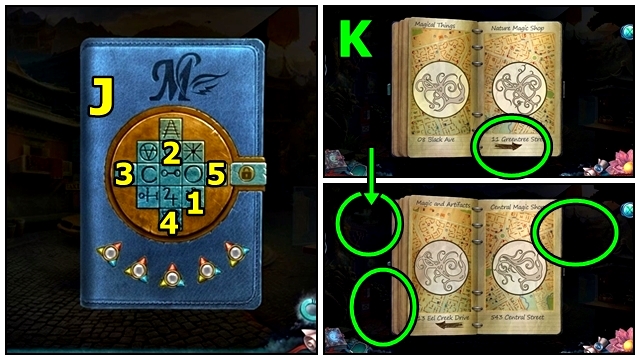
- Examine MICHAEL'S CONTACT LIST. Solution: (J).
- Turn page (K). Add BROCHURE, DELIVERY RECEIPT and MELTED SEAL.
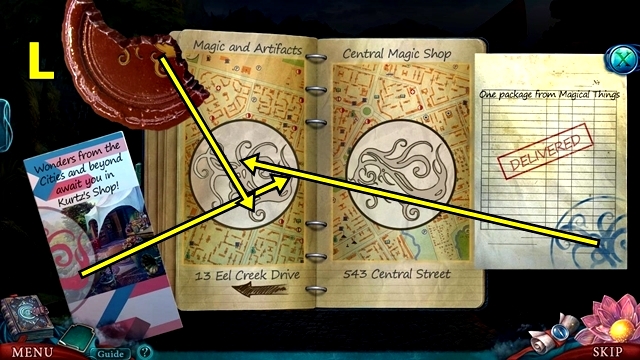
- Solution: (L). Receive KURTZ'S SHOP ADDRESS.
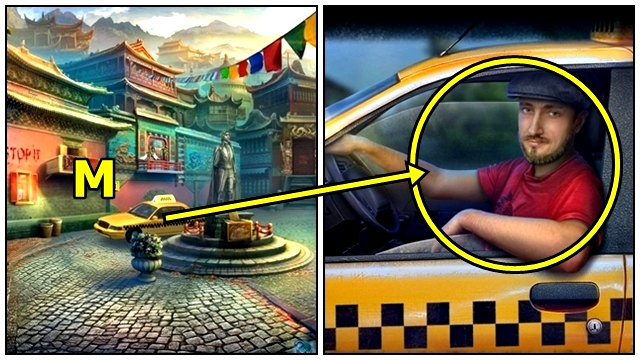
- Give KURTZ'S SHOP ADDRESS (M).
Chapter 2: Kurtz and Nova
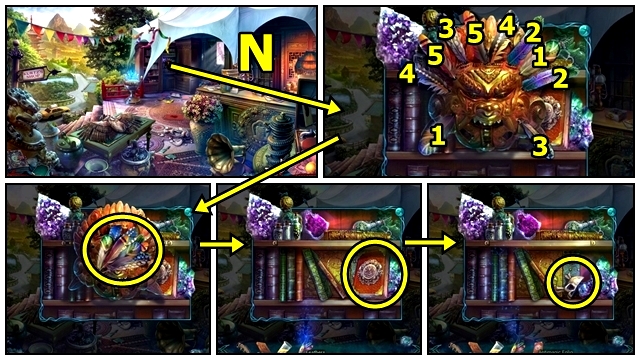
- Solution: (N). Take FEATHERS, ANTI-MAGIC FOLIO and LEFT SKULL HALF.
- Take DEAD ENERGY CORE (O).
- Take TWISTED SCREWDRIVER (P).
- Use TWISTED SCREWDRIVER (Q). Take LENS.
- Take LOCKED BOX (R). Add DEAD ENERGY CORE; turn crank. Take CHARGED ENERGY CORE.

- Remove (S), add LENS; add FEATHERS and CHARGED ENERGY CORE. Take Owl.
- Take RIGHT SKULL HALF (T).
- Add RIGHT SKULL HALF and LEFT SKULL HALF to LOCKED BOX; open; take ACID.
- Pour ACID (U); receive CHAIN.
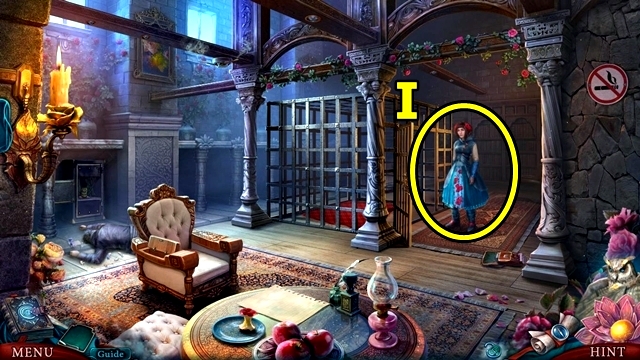
- Enter Back Room.
- Remove gag (V).
- Use ANTI-MAGIC FOLIO (W).
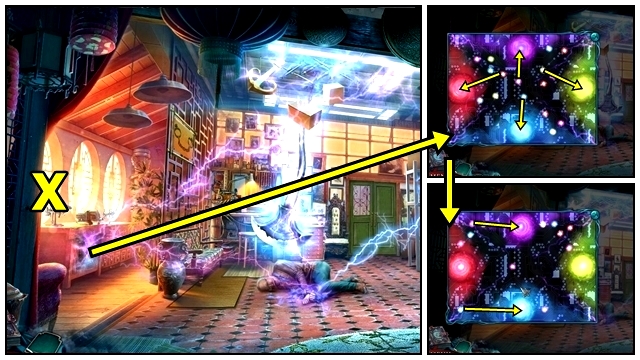
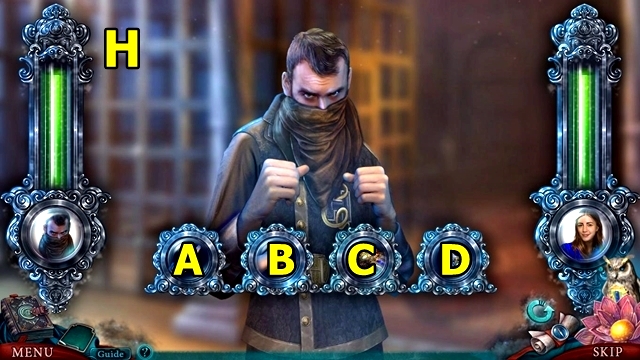
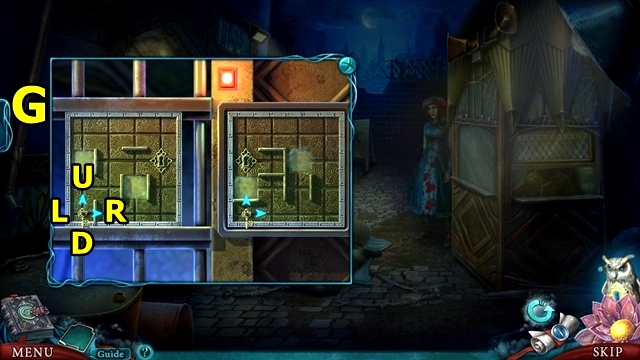
- Solution: (X) Use mouse to guide small balls into their corresponding color funnel; screenshot shows an example.
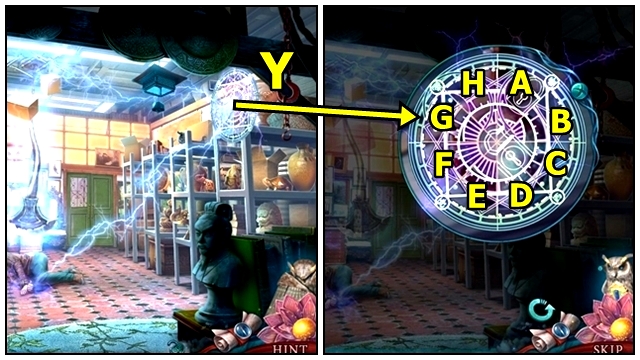
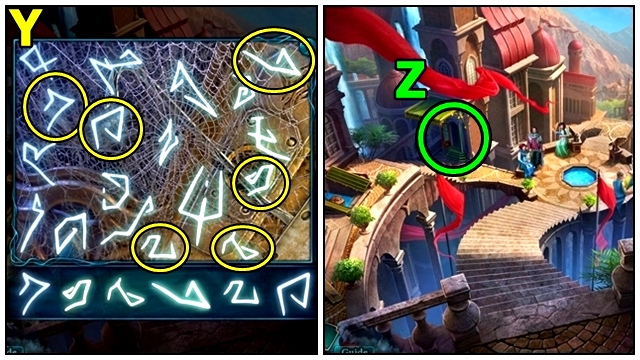
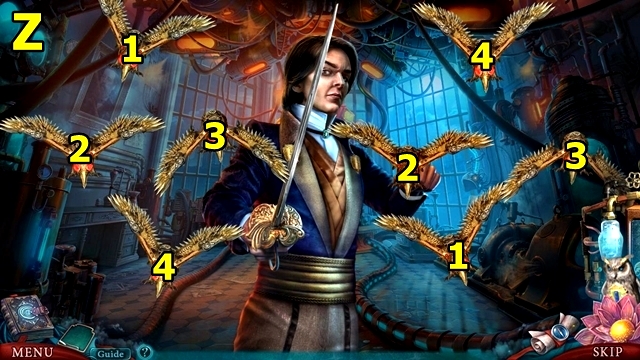
- Solution: (Y) (A-G)-(D-F)-(C-E)-(B-D).
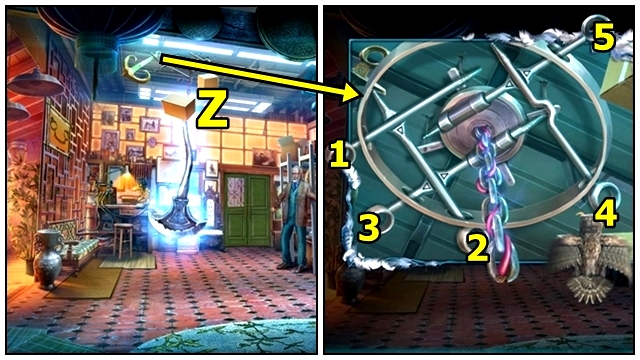
- Solution: (Z).
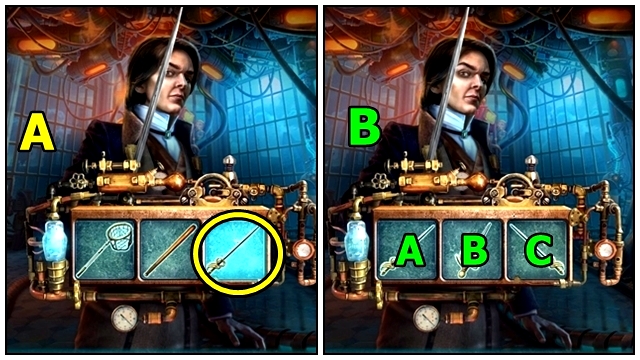
- Talk (A); take BLUNT WIRE CUTTERS.
- Add CHAIN (B); take VISE HANDLE.
- Insert VISE HANDLE (C). Add BLUNT WIRE CUTTERS; receive WIRE CUTTERS. Read note; add DEAD WASP. Take SILVER COINS.
- Take TURNING HANDLE (D); use WIRE CUTTERS; receive WIRE 1/2.
- Move boxes (E). Use WIRE CUTTERS; receive STRONG METAL SUPPORT.
- Add STRONG METAL SUPPORT (F).
- Move forward.
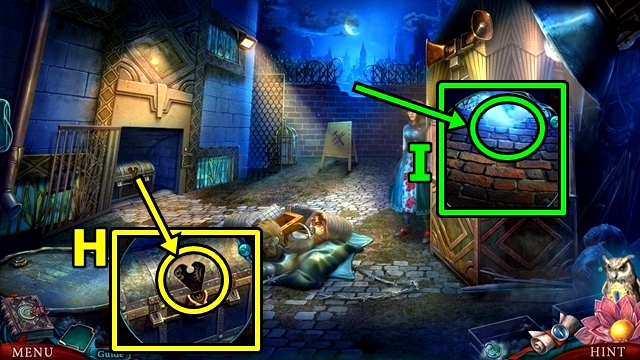
- Talk (G). Add SILVER COINS; take LEATHER ORNAMENT and AXLE.
- Use WIRE CUTTERS (H); receive WIRE 2/2.
- Move (I); add WIRE. Take PRINTING ROLL and STATUETTE.
- Add STATUETTE (J); insert TURNING HANDLE. Take TRIANGULAR BUTTON.
- Enter Back Room.
- Remove broken printing roll (K); add PRINTING ROLL. Add AXLE. Remove broken button; replace TRIANGULAR BUTTON. Press; take MYSTERIOUS ADDRESS and PIPETTE.
- Move forward.
- Use PIPETTE (L); receive LUNARTEAR ESSENCE.
- Add WEAK MEDICINE (M) and LUNARTEAR ESSENCE. Activate. Take STRONG MEDICINE.
- Go (N).
- Enter Michael's House.
- Use STRONG MEDICINE (O). Give MYSTERIOUS ADDRESS; receive NOVA'S ADDRESS. Take SWAN.
- Return to Temple Square.
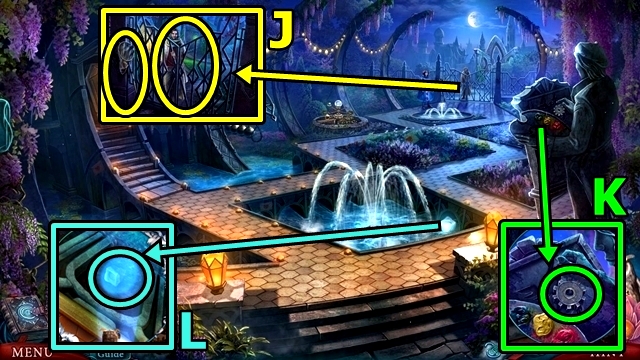
- Give NOVA'S ADDRESS (P).

- Insert SWAN (Q). Read note. Take GALAXY EMBLEM and RED GLASS.
- Take HOOK AND STRING (R) and PORCELAIN ROSE.
- Move (S); take BRASS BADGE and TORN PAPER 1/3. Use HOOK AND STRING; take RED TRIANGLE.

- Lift (T). Take TORN PAPER 2/3. Insert RED TRIANGLE. Press buttons; take BRONZE BELL and DEVELOPER FLUID.
- Remove papers (U); take instructions. Open. Take ADHESIVE TAPE. Insert LEATHER ORNAMENT; take ROSES CITY EMBLEM and PORCELAIN BOX. Insert BRASS BADGE; take TORN PAPER 3/3.
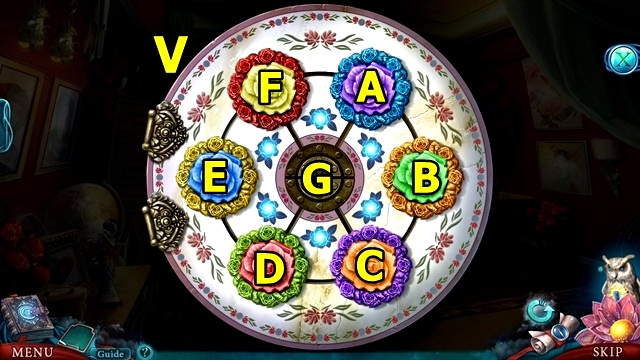
- PORCELAIN ROSE on PORCELAIN BOX. Solution: C-B-A-G-D-C-B-A-F-E-D-G-A-F-G-D-E-F-G (V). Take GOLD LOCKET and TOWER OF WINDOWS.
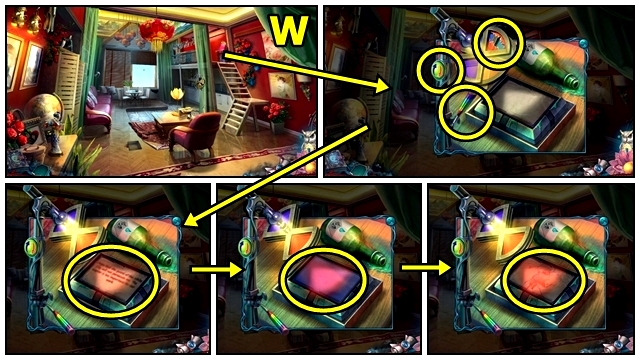
- Add RED GLASS (W); press lever, then button. Read note. Add TORN PAPER, then ADHESIVE TAPE and DEVELOPER FLUID. Read note.
- Play HOP; take COMPASS.
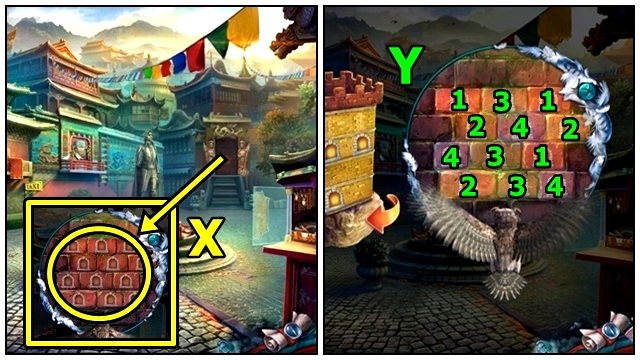
- Add TOWER OF WINDOWS (X).
- Solution: (Y).
- Move forward.
- Take STURDY LEVER (Z).
- Take MECHANIZED CITY EMBLEM (A).
- Take METAL RING 1/3 (B).

- Take DATE PLATE (C). Find items. Take METAL RING 2/3; insert GALAXY EMBLEM. Take BRACELET CUFF and TWILIGHT CITY EMBLEM.
- Move down.

- Add STURDY LEVER (D). Add DATE PLATE.
- Solution: (E). Take DIARY KEY.
- DIARY KEY in MICHAEL'S DIARY; take METAL RING 3/3.
- Insert METAL RING (F); take LOTUS and PORTAL BRACELET.
- Move forward.
- Add LOTUS (G).
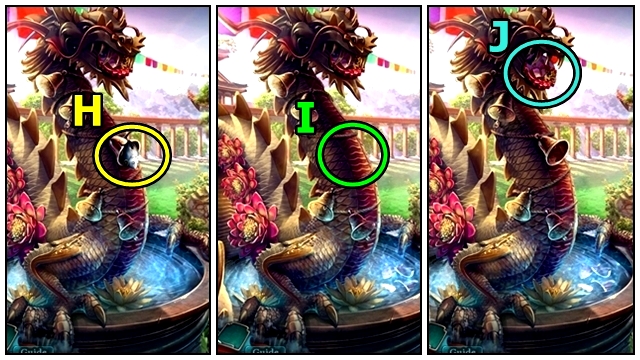
- Take CLOCKWORK MOUSE (H).
- Add BRONZE BELL (I).
- Take KNOWLEDGE CITY EMBLEM (J).
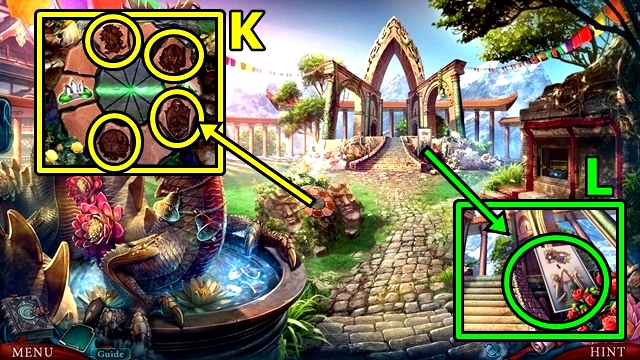
- Add KNOWLEDGE CITY EMBLEM (K), MECHANIZED CITY EMBLEM, TWILIGHT CITY EMBLEM and ROSES CITY EMBLEM. Take COLOR CRYSTALS.
- BRACELET CUFF, COLOR CRYSTALS and COMPASS on PORTAL BRACELET; activate. Receive TELEPORTATION BRACELET.
- Use TELEPORTATION BRACELET (L).
- Move forward.
Chapter 3: Roses City
- Take MOUSE KEY (M).
- MOUSE KEY on CLOCKWORK MOUSE.
- Use CLOCKWORK MOUSE (N).
- Play HOP (O); receive FISHNET.
- Move (P); take HAIRPIN.
- Insert HAIRPIN (Q); read note; take HONEY DIPPER.
- Use HONEY DIPPER (R); receive TAR.
- Throw FISHNET (S); use TAR. Take FLORAL KEY.
- Insert FLORAL KEY (T).
- Enter Guard House.
- Take SAILBOAT EMBLEM (U).
- Move down.
- Insert SAILBOAT EMBLEM (V); take LIGHTER.
- Play HOP (W); receive LIGHTNING BOLTS.
- Enter Guard House.
- Insert LIGHTNING BOLTS (X); read note; take INCENSE.
- Insert INCENSE (Y); use LIGHTER.
- Take BRASS INLAY (Z).
- Move down.
- Add BRASS INLAY (A); take METAL SNAKE.
- Enter Guard House.
- Add METAL SNAKE (B).

- Talk (C). Give STRONG MEDICINE. Take ROSE ORNAMENT.
- Insert ROSE ORNAMENT (D). Solution. Take NAIL FILE. Add GOLD LOCKET. Read note; take EBONITE CUBE.
- Insert EBONITE CUBE (E).
- Solution: Ax5-Bx2-Cx3 (F).
- Use NAIL FILE (G). Attempt to take.
- Solution: B-D-A; D-B-C-A; B-D-A-C-D (H).
- Talk (I); receive SCEPTER OF KNOWLEDGE.
Chapter 4: Twilight City
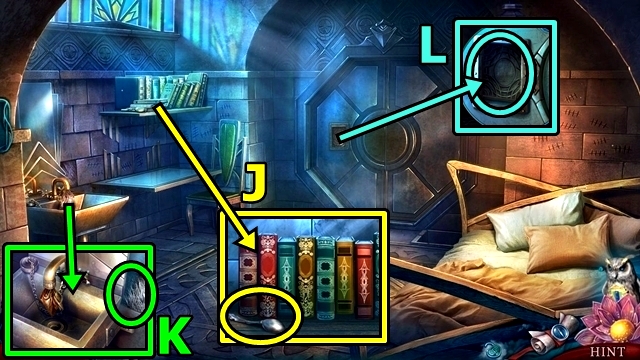
- Take SPOON (J).
- Sharpen SPOON (K); receive SHARP SPOON.
- Lift (L); take USEFUL THINGS.
- SHARP SPOON on USEFUL THINGS; read note; take SCREWDRIVER and CLAY POWDER.
- Use SCREWDRIVER (M); receive SCREW. Use SHARP SPOON; receive WOODEN BLOCK.
- Remove instructions (N). Turn; add CLAY POWDER; take CLAY.
- Add CLAY (O); receive CLAY KEY.

- CLAY KEY and SHARP SPOON on WOODEN BLOCK; take WOODEN KEY.
- Insert WOODEN KEY (P).
- Move forward.
- Take BOY WITH BOOKS (Q).
- Move down.
- Add BOY WITH BOOKS (R).
- Solution: (S). Take book; take FISHING HOOK.
- Move forward.
- Take PRISON EMBLEM (T). Use FISHING HOOK; receive ORNAMENTAL RING.
- Insert ORNAMENTAL RING (U); examine.
- Solution: D-Ax2-C-Bx3-D-B-D-Ax3-C-Bx2-C-Ax4-C-Ax2-C-Bx3-D-Ax3-D-Ax3-C-Bx4-D-Ax2 (V). Take LIST OF PRISONERS.
- Take TELESCOPIC POINTER (W). Add LIST OF PRISONERS.
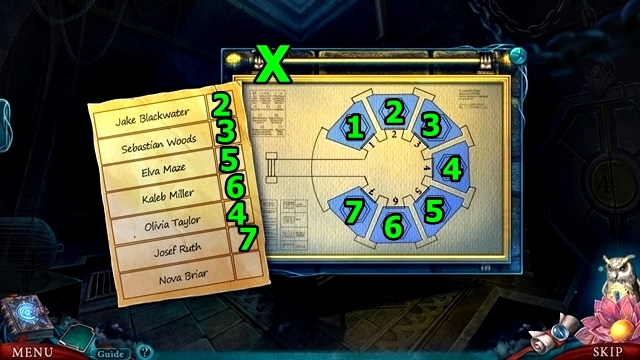
- Solution: (X).
- Lift (Y). Talk. Take ORANGE TRIANGLE 1/2. Use WOODEN KEY.
- Move forward.
- Take PLANET 1/2 (Z); insert SCREW. Use TELESCOPIC POINTER; receive GILDED KEY.
- Insert PRISON EMBLEM (A).
- Play HOP (B); receive WHISTLE.
- Take MASK HALF (C). Use WHISTLE; receive Owl. Take ORANGE TRIANGLE 2/2.
- Move down.
- Insert ORANGE TRIANGLE (D); read note; take EYE EMBLEM.
- Move forward.
- Play HOP (E); take ROPE.
- Insert GILDED KEY (F).
- Solution: U-Rx3-U-R-Ux2-Lx3-D-R-D-Rx2-U-L-Ux2-D (G).
- Insert EYE EMBLEM (H). Take SCEPTER OF KNOWLEDGE, Teleportation Bracelet and LARGE HOOK.
- ROPE on LARGE HOOK; take GRAPPLING HOOK.
- Use GRAPPLING HOOK (I).
- Talk (J). Take BUTTERFLY NET.
- Take IRON GEAR (K).
- Use BUTTERFLY NET (L); receive ICE CUBE.
- Add ICE CUBE (M); take PLANET 2/2.
- Add PLANET (N) and GEAR; take MASK HALF.
- Add MASK HALVES (O); take PAINTBRUSH and SPHINX.
- Add PAINTBRUSH (P); take PHOENIX.
- Add PHOENIX (Q) and SPHINX.
- Move forward.
- Talk (R).
Chapter 5: Knowledge City
- Take LARGE BUTTON (S).
- Lift (T); take BOOKSTORE KEY.
- Take BUCKET (U).
- Insert BOOKSTORE KEY (V); take DRAGON EMBLEM.
- Move (W); insert DRAGON EMBLEM. Take SNAKE FIGURINE and DOOR HANDLE.
- Attach DOOR HANDLE (X).
- Solution: (Y). Take CROWBAR. Insert LARGE BUTTON.
- Go (Z).
- Talk (A).
- Take X-SHAPED HANDLE (B). Use CROWBAR; take HISTORY OF ARTIFACTS.
- Move down, then move forward.
- Play HOP (C); receive FLOWERS.
- Talk (D); give FLOWERS. Talk; take BOOK MEDALLION.
- Move down.
- Move (E); use BUCKET; insert X-SHAPED HANDLE; take SAW and LETTER M.
- Insert BOOK MEDALLION (F); take DIVINATION PENDULUM.
- Move forward.
- Talk (G); offer DIVINATION PENDULUM. Talk; take SCIENTIFIC CODE.
- Return to Michael's Hideout.
- Take OIL (H) and LETTER N.
- Insert LETTER M (I) and LETTER N; take OWL FIGURINE.
- Take ACCESS CARD (J).
- Move (K). Add SCIENTIFIC CODE. Press in order shown. Use OIL. Take SPECIAL LIGHTBULB and STONE PAGE.
- Add SPECIAL LIGHTBULB (L), then SCEPTER OF KNOWLEDGE, then HISTORY OF ARTIFACTS.

- Solution: (M). Take SCEPTER RUNES.
- Move down.
- Add STONE PAGE (N); take SHELL.
- Move forward, then enter Library.
- Take RED CORD (O). Insert OWL FIGURINE and SNAKE FIGURINE; take PAINTED TILE.
- Use ACCESS CARD (P); examine. Adjust; take ARCHIVE ICON.
- Move down.
- Play HOP (Q); receive STONE DISC.
- Take METAL ROD (R).
- Insert METAL ROD (S); take CLOTH BOOK 1/3. Add PAINTED TILE.
- Solution: (D-E)-(D-C)-(E-A)-(E-B)-(E-F)-(D-H)-(D-G)-(D-E) (T). Take DRAGON'S TAIL.
- Attach DRAGON'S TAIL (U); take CLOTH BOOK 2/3.
- Enter Library.
- Insert ARCHIVE ICON (V) and STONE DISC. Turn disc.
- Enter Archive.
- Take CLOTH BOOK 3/3 (W).
- Take DRAGON'S EYE 1/2 (X).
- Return to Knowledge City Square.
- Add CLOTH BOOK (Y); take CANNED FISH; insert SHELL; take DRAGON'S EYE 2/2.
- Move forward.
- Insert DRAGON'S EYE (Z); take MEMORY CRYSTAL.
- Insert MEMORY CRYSTAL (A); read note; take LENS WITH RUNES.
- Enter Archive.
- Add RED CORD (B) and LENS WITH RUNES.
- Take GLASS (C).
- Give CANNED FISH (D); take CAT. Insert GLASS.
- Use CAT (E); open; take WOLF'S HEAD and SCRAP OF LEATHER.
- Add SCRAP OF LEATHER (F); use pen; take ROUTE MAP.
- Return to Knowledge City Square.
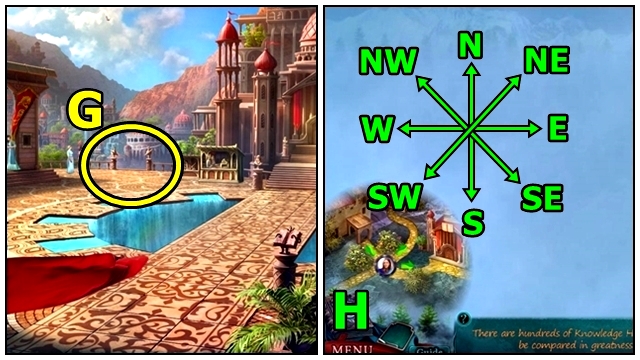
- Add ROUTE MAP (G).
- Solution: (E-E-NE)-(S-NW-SW)-(Ex2-S-E)-(E-NE)-(NE-N) (H).
- Take LION'S HEAD (I).
- Take HORN (J). Insert LION'S HEAD and WOLF'S HEAD; take WOODEN RING 1/2.
- Insert HORN (K); take WOODEN RING 2/2.
- Take SWORD HILT (L); add WOODEN RING.
- Solution: A-B-Ax2-Bx3-A-Bx3-A-Bx2-Ax3-Bx3 (M). Take STEEL ORNAMENT.
- Insert STEEL ORNAMENT (N); take STONE FEATHER.
- Insert STONE FEATHER (O) and SWORD HILT. Take book; open; read note; take FORMULA DECRYPTION.
- Use Owl (P).
- Solution: (Q).
- Add SCEPTER RUNES (R) and FORMULA DECRYPTION. Play HOP; receive MEDICINE FORMULA.
- Talk (S). Take PORTABLE LABORATORY.
Chapter 6: Mechanized City
- Take REEL (T); read note. Use SAW; take TANGLED FISHING ROD.
- Move left.
- Examine TANGLED FISHING ROD. Solution: (C-J)-(D-E)-(E-I)-(F-G)-(G-H)-(H-J)-(I-J) (U). Add REEL; take FISHING ROD.
- Use FISHING ROD (V); take MALDIA FLOWER 1/3 and WINGED ENVELOPE.
- Move down.
- Use WINGED ENVELOPE (W); open envelope; remove note; take REBEL SIGIL.
- Take STAR HALF (X). Offer REBEL SIGIL.
- Enter Bar.

- Play HOP (Y); receive JAR OF BUGS.
- Talk (Z). Offer REBEL SIGIL; receive SILVER DRAGONFLY. Take GEAR EMBLEM.
- Take HEART LANTERN (A).
- Return to Promenade.

- Take SPOUT (B). Insert GEAR EMBLEM; take REGAL BOX and SILVER PYRAMID.
- Insert SILVER PYRAMID (C); take GOLDEN CROWN.
- Add SPOUT (D); try to take flower; offer JAR OF BUGS. Take MALDIA FLOWER 2/3 and TOP OF THE BAR LOGO.
- Move down.
- GOLDEN CROWN on REGAL BOX; take MEDAL and HENRIK'S SIGIL.
- Insert MEDAL (E); receive RHINOCEROS HORN. Insert HEART LANTERN; take MUSIC NOTE.
- Enter Bar.
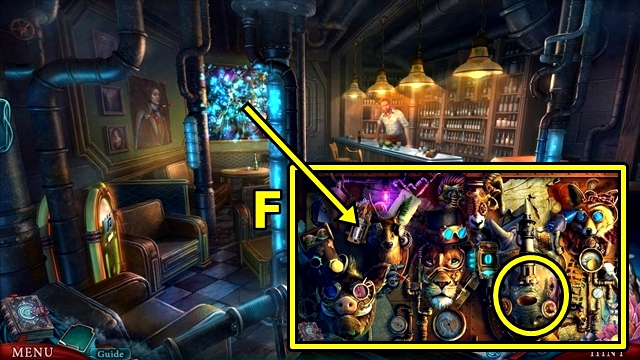
- Play HOP (F); add RHINOCEROS HORN; receive FRIDGE HANDLE.
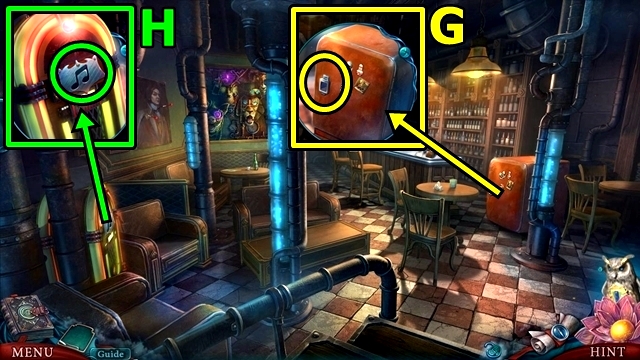
- Insert FRIDGE HANDLE (G); take TONGS.
- Insert MUSIC NOTE (H); use TONGS; receive HOT MOTOR.
- Add HOT MOTOR (I); take BOTTOM OF THE BAR LOGO.
- Insert TOP OF THE BAR LOGO (J) and BOTTOM OF THE BAR LOGO; take DOCUMENT FOLDER.
- SILVER DRAGONFLY on DOCUMENT FOLDER; read note; take DOCUMENTS.
- Offer DOCUMENTS (K).
Chapter 7: The Mansion
- Take SOAP (L). Examine.
- Solution: (M). Take CHEESE.
- Use SOAP (N); take FUSE. Pull stuffing; take SMALL KEY.
- Give CHEESE (O); take DOG'S HEAD. Insert SMALL KEY; read note; take LIGHTNING BOLT.
- Insert DOG'S HEAD (P); take SMALL LIGHTBULB.
- Insert HENRIK'S SIGIL (Q); insert SMALL LIGHTBULB.
- Solution: Press Play; screenshot shows an example of how to proceed (R).
- Move forward.
- Take HAND PRUNER (S).
- Insert LIGHTNING BOLT (T); take GARGOYLE HEAD.
- Move forward.
- Use HAND PRUNER (U); take CANDLE.
- Take RUBBER GLOVE (V); use CANDLE; receive BURNING CANDLE.
- Take BRICK (W). Add GARGOYLE HEAD; take BLUE SWITCH. Use BURNING CANDLE; take MASTER KEYS.
- Use BRICK (X); take DAMP DYNAMITE.
- Move down.
- Insert BLUE SWITCH (Y); pull.
- Use RUBBER GLOVE (Z); take CODE.
- Insert MASTER KEYS (A); use HAND PRUNER. Press right arrow twice. Use HAND PRUNER; use HAND PRUNER; take SNAKE HEAD. Press left arrow.
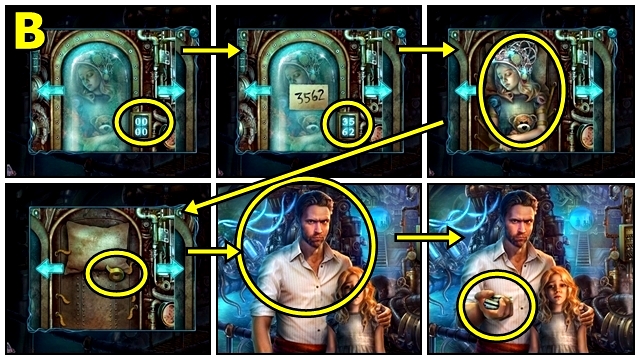
- Add CODE (B); enter 3-5-6-2; use HAND PRUNER; take TAPE. Talk; take DETONATORS.
- Move down.
- Move (C); insert SNAKE HEAD. Read notes; take METAL PANEL and FIRE EMBLEM.
- Return to Mechanized Garden.
- Examine (D); insert FIRE EMBLEM; take BULLETS.
- Open DAMP DYNAMITE; add DETONATORS, BULLETS, FUSE and TAPE. Open bullets; add detonators, then tape. Take UNLIT DYNAMITE.
- Add UNLIT DYNAMITE (E); receive LIT DYNAMITE.
- Move down.
- Add LIT DYNAMITE (F). Receive STAR HALF 2/2.
- Add STAR HALF (G).
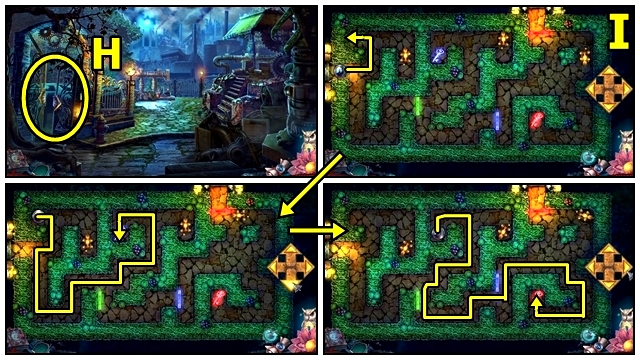
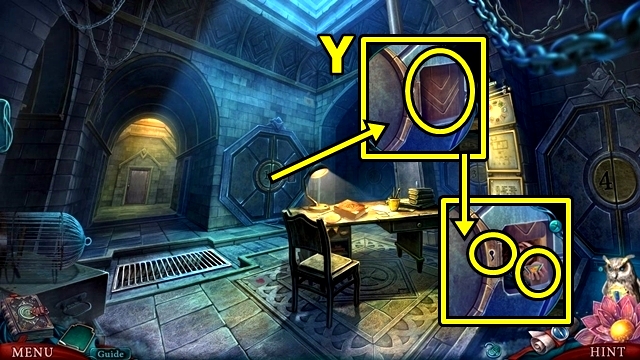
- Examine (H).
- Solution: (I).

- Solution: (J).
- Examine (K).
- Play HOP (L); receive FIN.
- Take METAL ROSES (M).
- Go to Second Floor.
- Take BLACK CROW EMBLEM 1/2 (N).
- Add METAL ROSES (O); take PITCHER. Open; take MOONSTONES.
- Move down.
- Add FIN (P); take BLACK CROW EMBLEM 2/2. Use PITCHER; receive PITCHER OF WATER.
- Move items (Q); take HANDCUFFS. Insert BLACK CROW EMBLEM; take ROPE.
- Return to Second Floor.
- Pour PITCHER OF WATER (R); use poker; take DRAWER LABEL.
- Insert DRAWER LABEL (S); take FLUTE.
- Move down.
- Play HOP (T); receive DRAGON SCALES.
- Place FLUTE (U); take PAINTBRUSH and FLEURS-DE-LIS.
- Add FLEURS-DE-LIS (V).
- Remove vines in order shown (W).
- Enter Henrik's Office.
- Solution: Select, then catch dragonflies (X). Select (Y).
- Solution: (Z).
- Solution: Select (A). C-A-B-A-C; A-C-A-B-C; B-A-A-C-B (B).
- Use HANDCUFFS (C); take MEDICAL EMBLEM.
- Return to Second Floor.
- Use PAINTBRUSH (D); receive BRUSH WITH ASHES.
- Add ROPE (E).
- Lift (F).
- Attach ROPE (G). Add METAL PANEL and BRUSH WITH ASHES. Enter 7-6-9-2. Turn handle; take GLOWING SPHERE.
- Add MEDICAL EMBLEM (H); take MALDIA FLOWER 3/3 and SPRING.
- Return to Henrik's Office.
- Insert SPRING (I) and GLOWING SPHERE. Take SENEKTA SPECIMEN.
- Open PORTABLE LABORATORY (J). Add MEDICINE FORMULA; then MOONSTONES, DRAGON SCALES, MALDIA FLOWER and SENEKTA SPECIMEN.
- Add moonstones; grind (K); add to scale; add ground moonstones. Remove lid from Senekta specimen, add dragon scales; add mixture to beaker.
- Add silver to flowers (L); cut flowers; add to beaker. Open; add beaker; Take ANTIDOTE.
- Add ANTIDOTE (M).
- Congratulations! You've completed Reflections of Life: In Screams and Sorrow.
Created at: 2018-05-25