

Walkthrough Menu
- General Tips
- Chapter 1: Motius
- Chapter 2: Norska
- Chapter 3: Serpentium
- Chapter 4: Flamma
- Chapter 5: Aeterna
General Tips
- This is the official guide for Reflections of Life: Slipping Hope.
- This guide won't tell you when to zoom into a location; the screenshots show each zoom scene.
- Hidden-object puzzles are referred to as HOPs. Only the locations of the HOPs will be shown.
- Use the Map to fast travel to a location.
Chapter 1: Motius
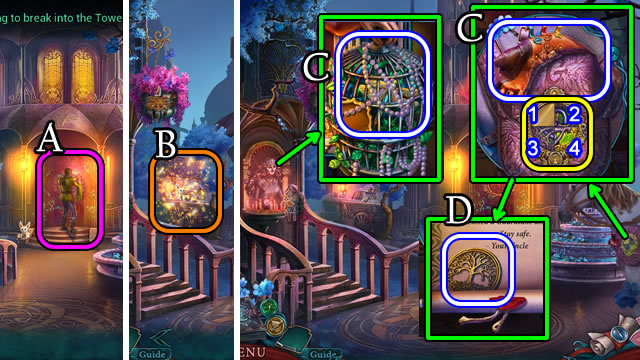
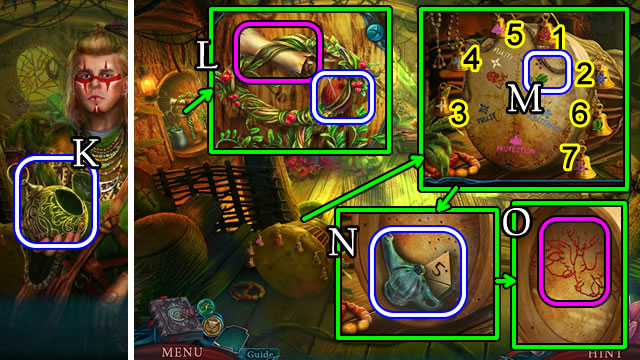
- Speak to character (A); play HOP (B); receive PROJECTION CRYSTALS.
- Take PEARLS; GLOVE (C).
- GLOVE for note; connect straps; receive LOCK PIECE.
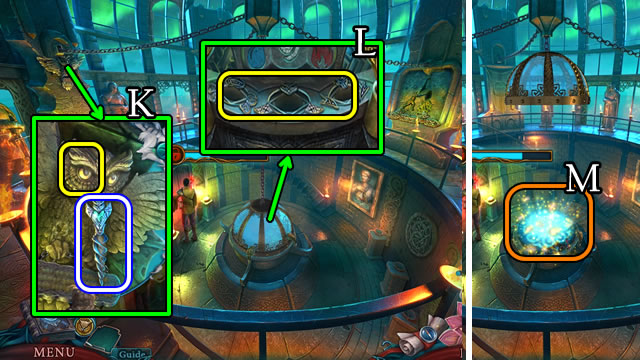
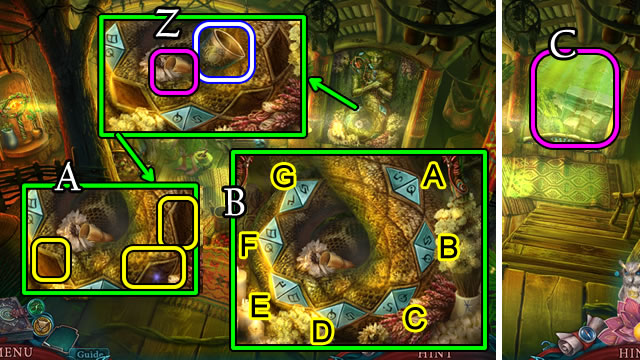
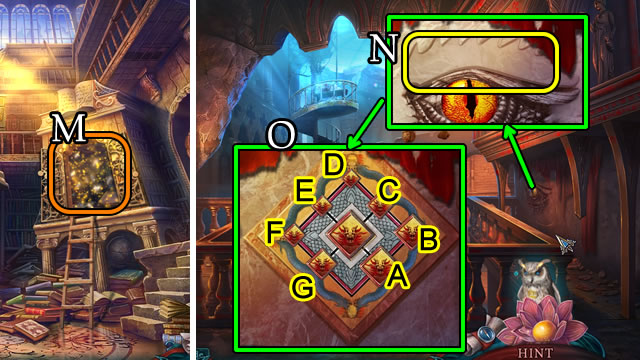
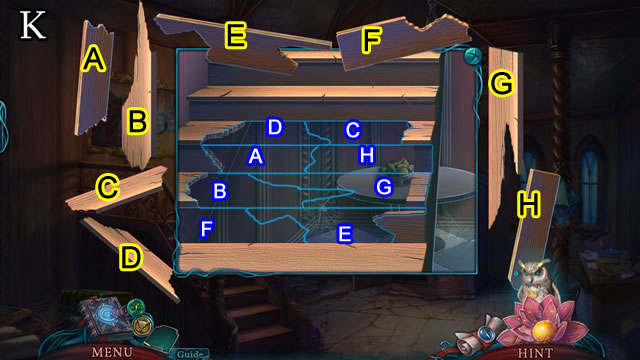
- Place LOCK PIECE (1); solution (3-2)-(1-2); take scroll for GUARDIAN AMULET (D).

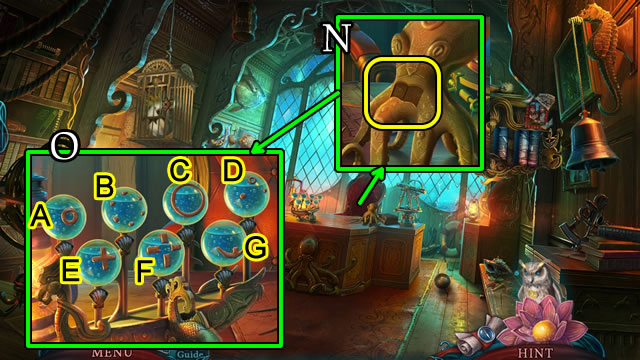
- Place PROJECTION CRYSTALS (E).
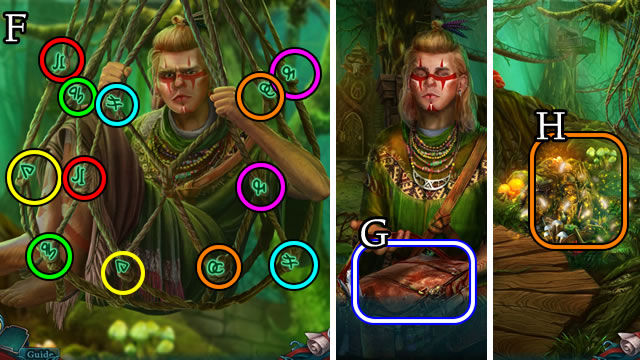
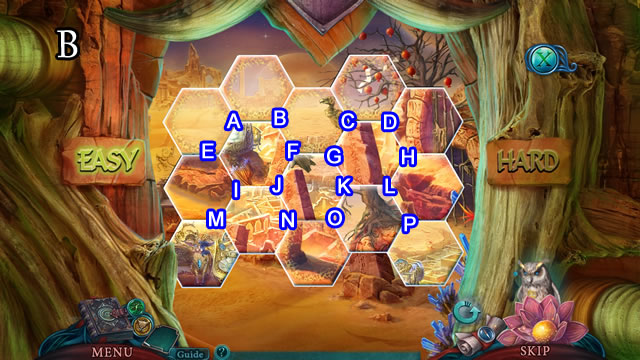
- Solution (F). C-Ax2-D-G-E-H-Kx2-J-L-Ox3-M-P.
- Go forward.
- Speak to character.
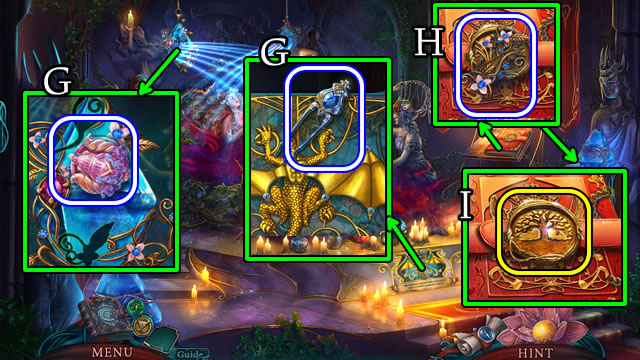
- Take PIN; CAPITAL SYMBOL (G).
- Take JEWELED FLOWERS (H); place GUARDIAN AMULET (I).
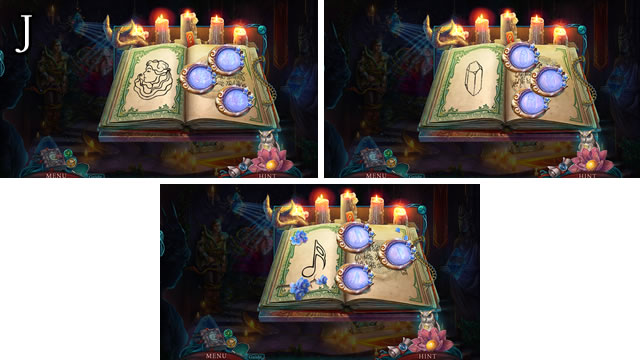
- Solution (J).
- Take MUSIC SHEET.
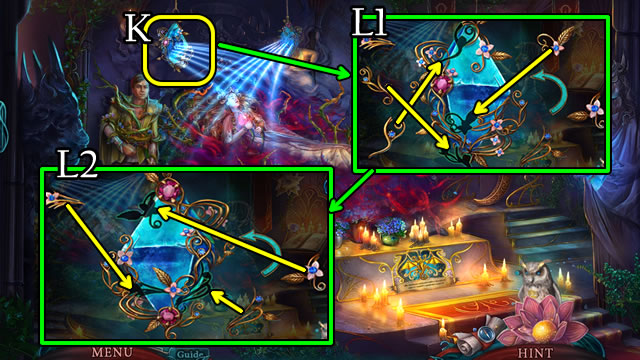
- Place JEWELED FLOWERS (K); solution (L1-L2); speak to character.
- Go down.
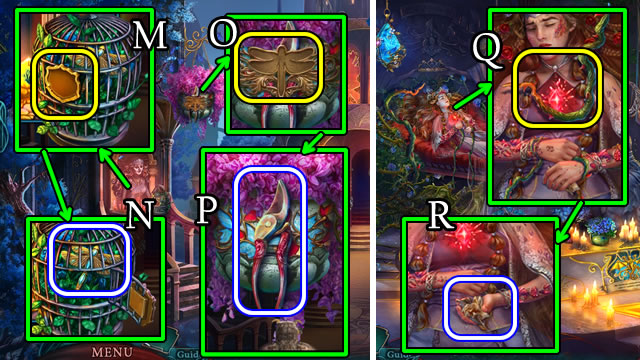
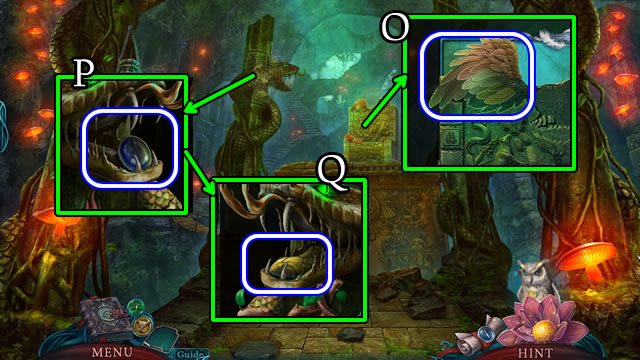
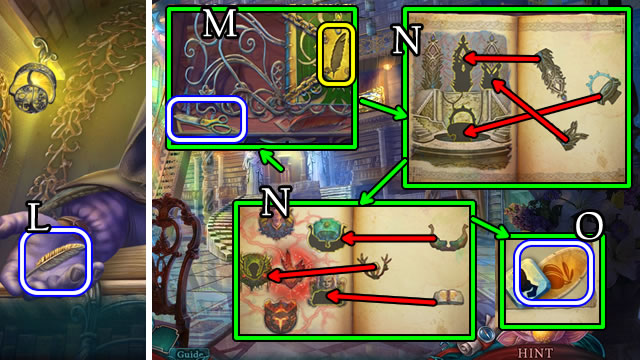
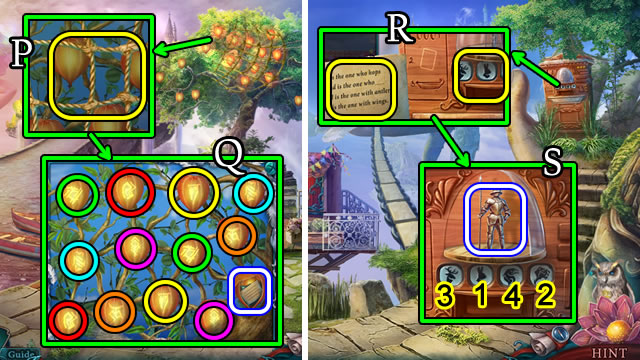
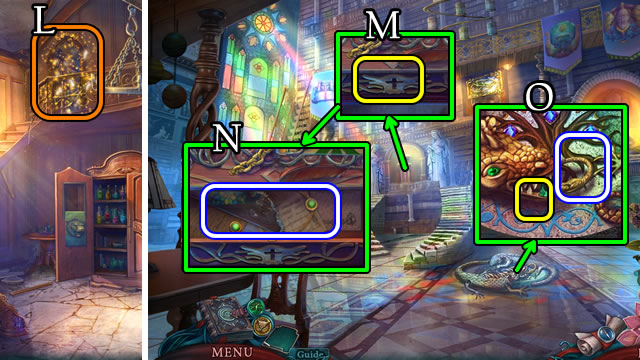
- Place CAPITAL SYMBOL (M); take DRAGONFLY EMBLEM (N).
- Place DRAGONFLY EMBLEM (O); take PRUNERS (P).
- Go forward.
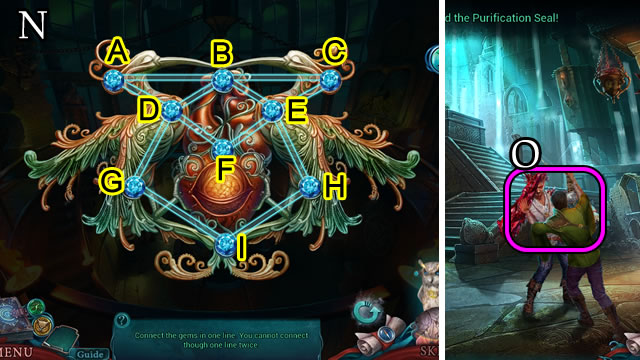
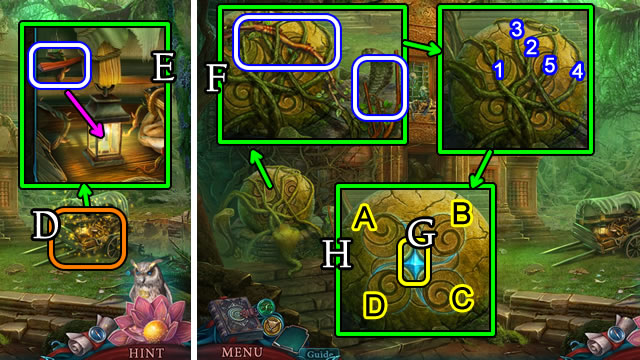
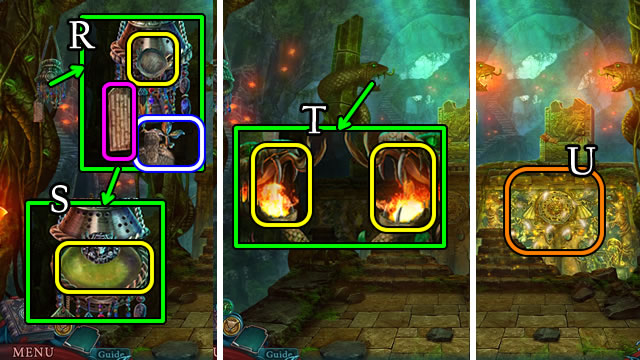
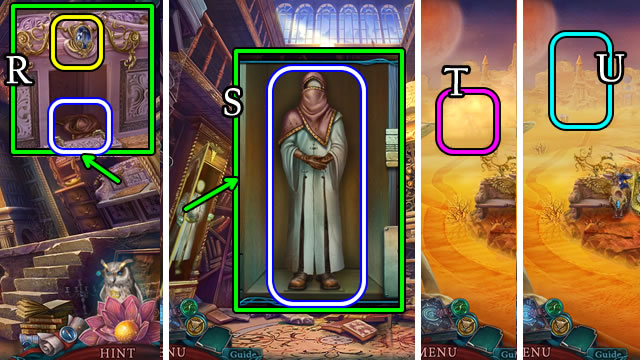
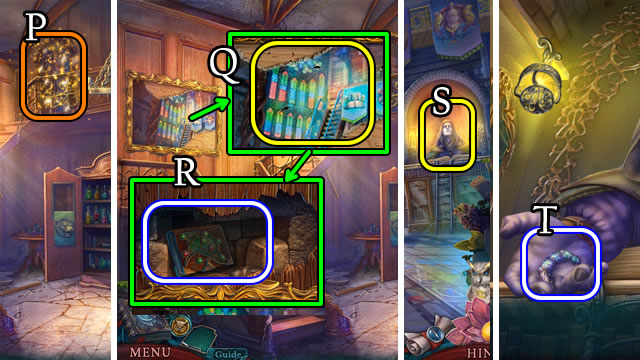
- Use PRUNERS (Q); take note and WINDING KEY (R).
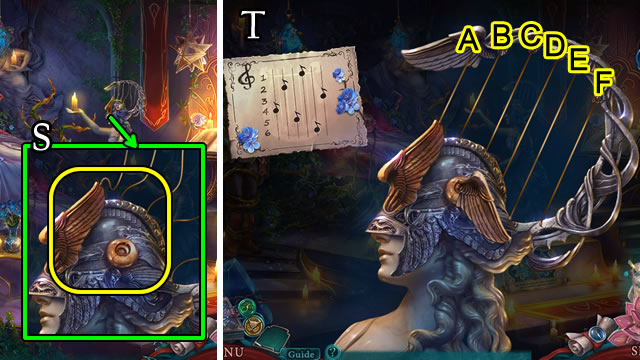
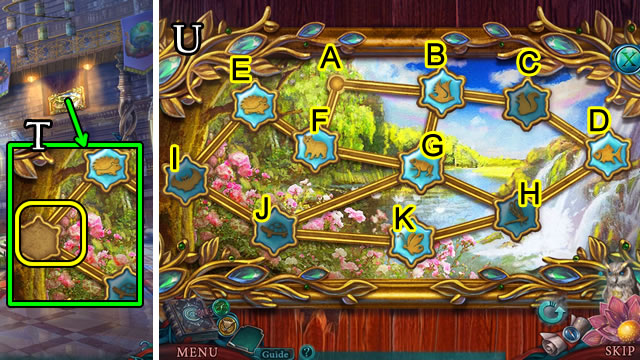
- Take note; place MUSIC SHEET and WINDING KEY (S).
- Solution (T). D-B-F-A-C-E.
- Select bed; receive DRAGON HEAD.
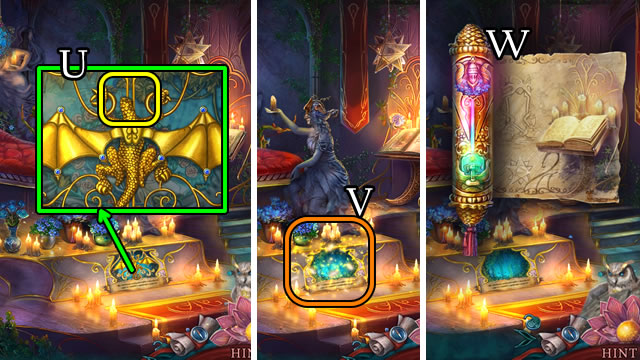
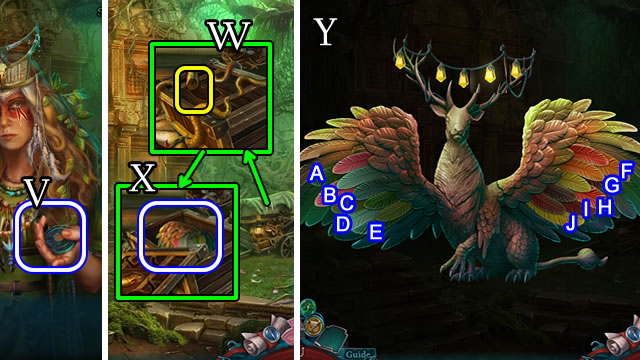
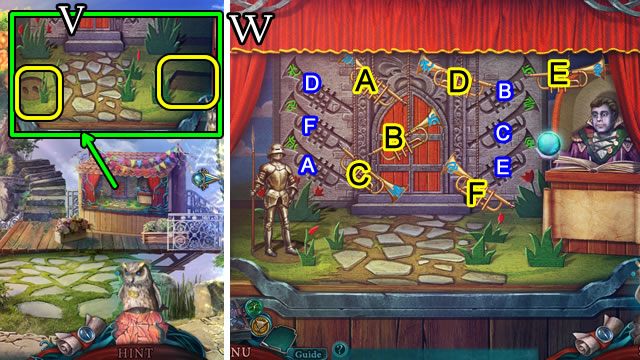
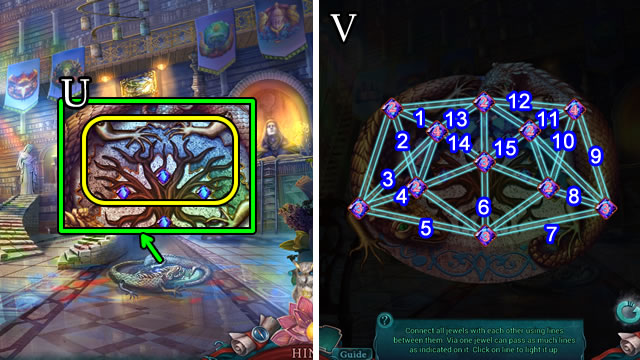
- Place DRAGON HEAD (U); play HOP (V); take PORTAL SCROLL.
- Position PORTAL SCROLL (W); enter portal.
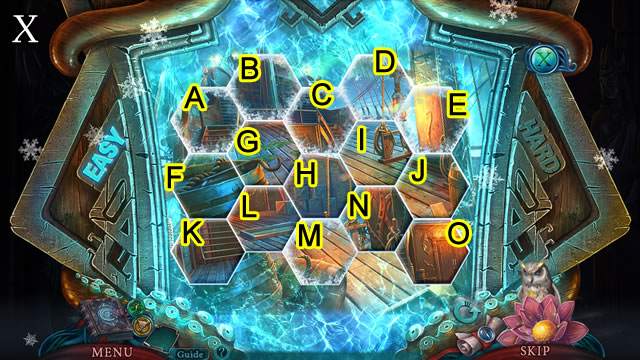
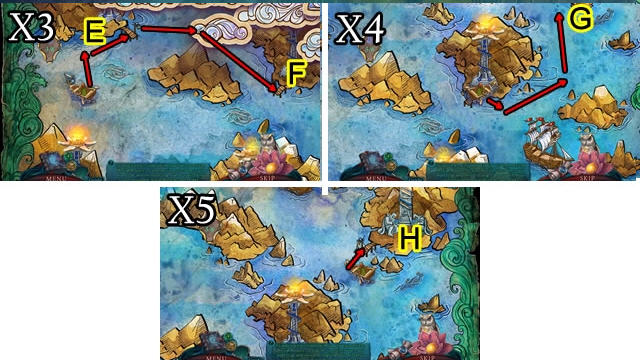
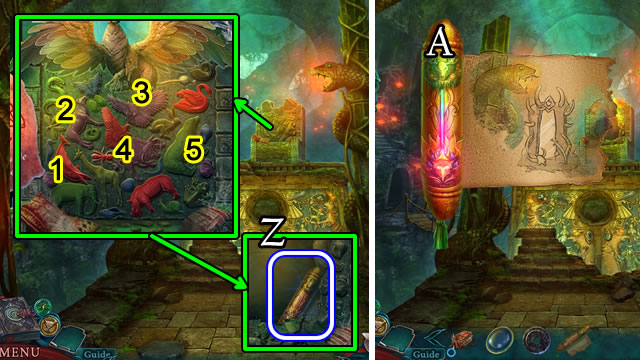
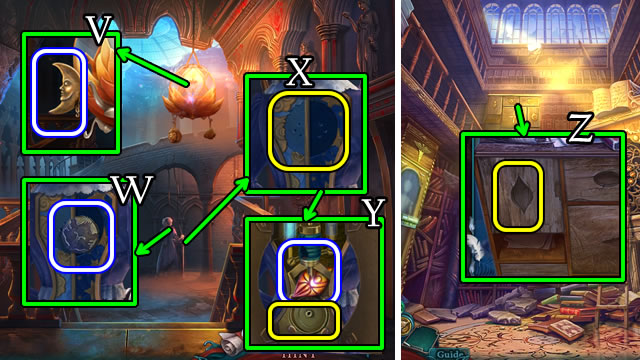
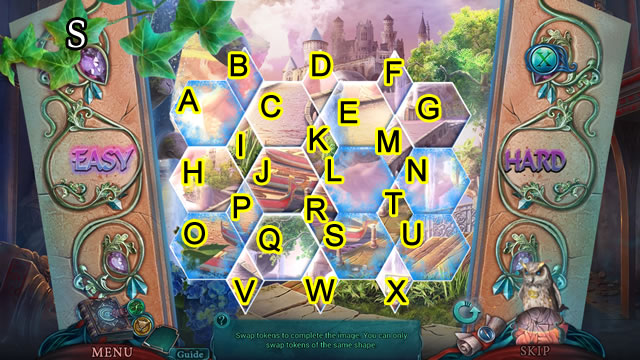
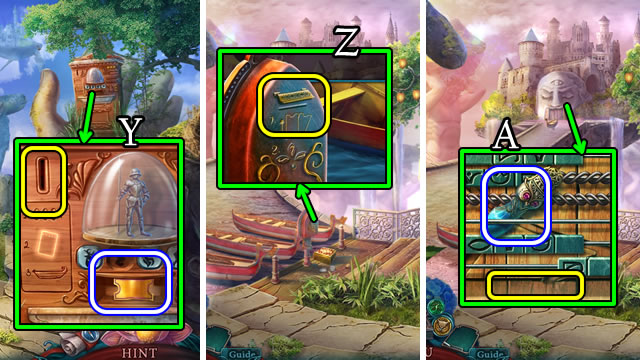
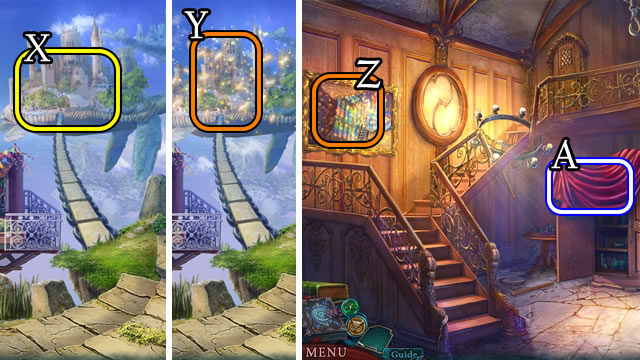
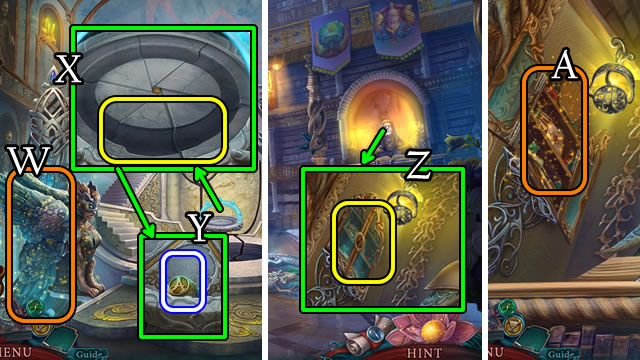
- Easy solution (X). (F-K)-(G-L)-(G-H)-(G-I)-(G-O)-(O-J)-(J-N).
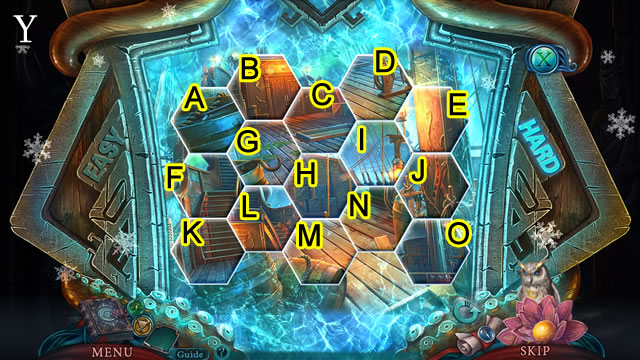
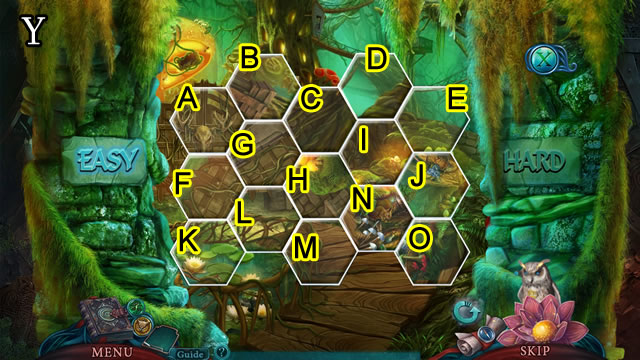
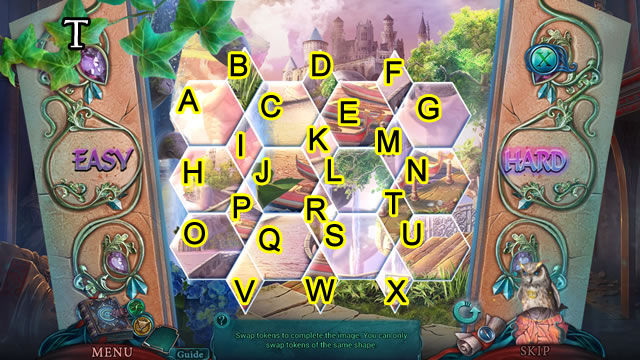
- Hard solution (Y). (A-K)-(G-L)-(F-A)-(B-G)-(O-B)-(O-C)-(D-I)-(O-H)-(O-I)-(O-N).
Chapter 2: Norska
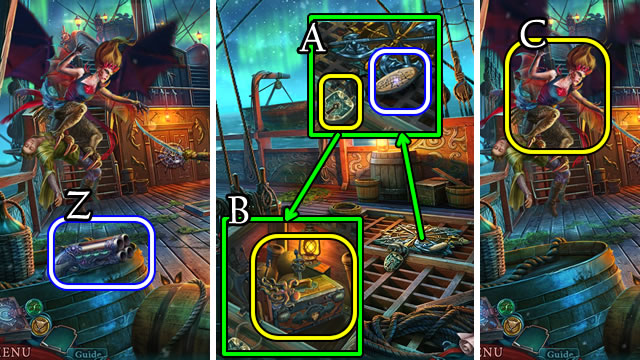
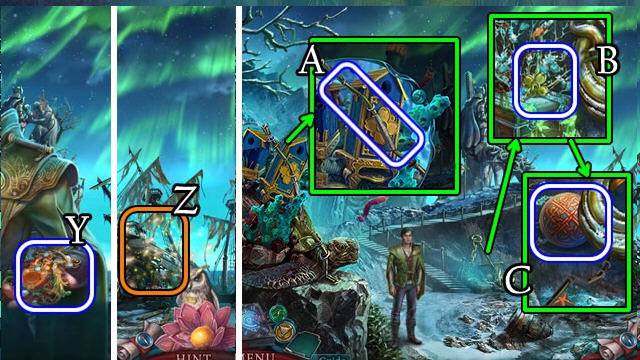
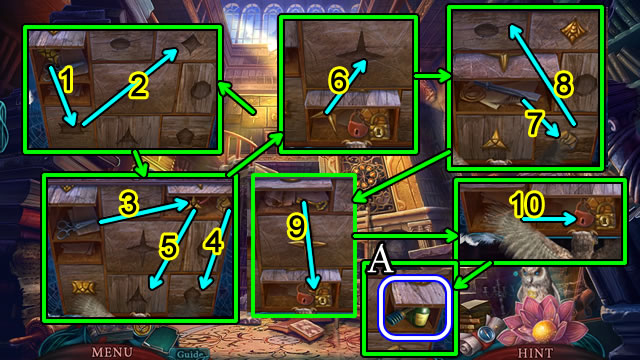
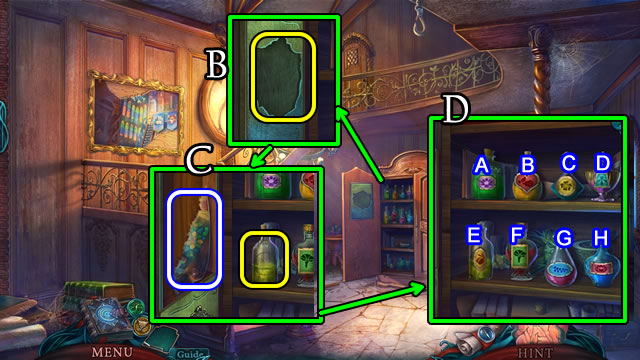
- Take GUN (Z); scroll right.
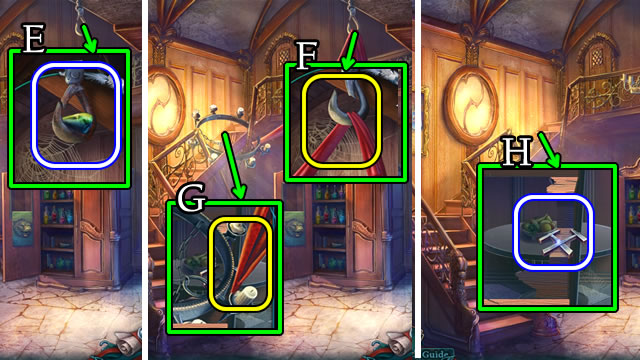
- Take 1/2 CABIN KEY; use PIN (A); take OCTOPUS, TOOLBOX (B).
- Scroll left.
- PEARLS on GUN for LOADED GUN.
- Use LOADED GUN (C).
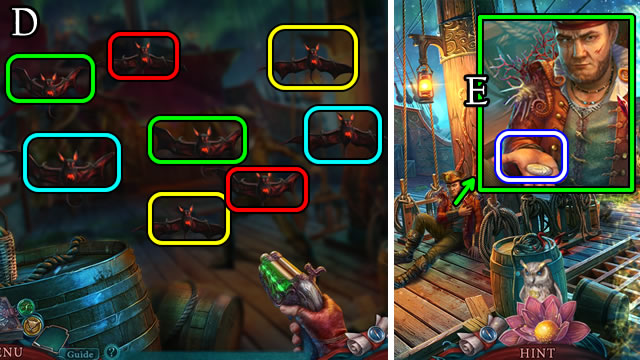
- Solution (D).
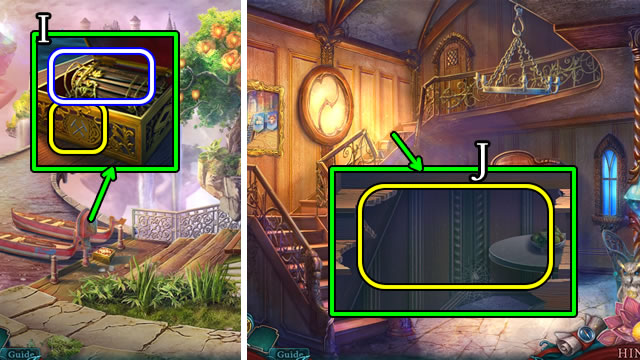
- Speak to character; take 2/2 CABIN KEY (E).

- Take DOLPHINS EMBLEM; use 2/2 CABIN KEYS (F).
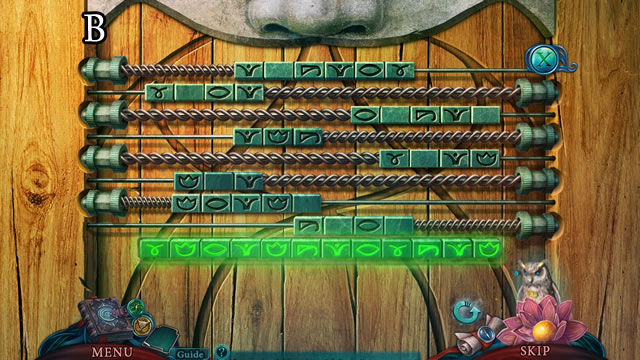
- Solution (G). Bx2-D-Bx2-Dx2-Bx3-C-Dx2-Cx3-Bx2.
- Go forward.
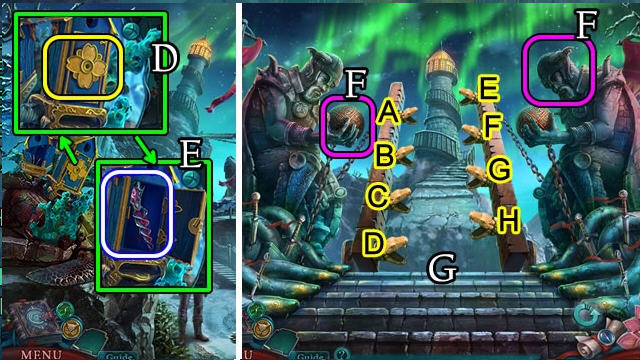
- Select (H) to play HOP (I); receive SHARK TEETH.
- Take HAT TOKEN (J); place DOLPHINS EMBLEM (K); solution (L); take ESSENCE RECIPE (M).
- Place ESSENCE RECIPE (N).
- Solution (O). A-C-F; D-E-G; B-C-E.
- Take VITALIZING ESSENCE.
- Go down.
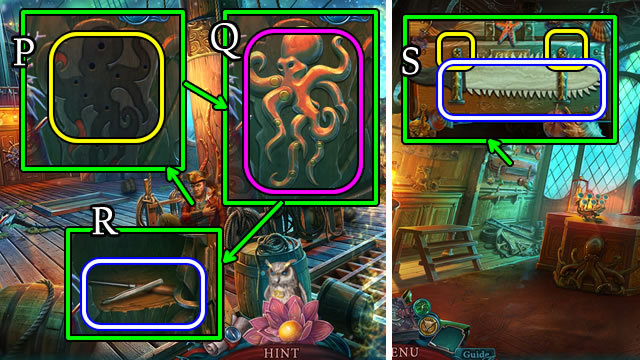
- Place OCTOPUS (P); adjust (Q); take TWEEZERS, STAR SCREWDRIVER (R).
- Go forward.
- Use STAR SCREWDRIVER; take SAW (S).
- Go down.
- HAT TOKEN on TOOLBOX; place VITALIZING ESSENCE, SHARK TEETH, SAW for FULL TOOLBOX.
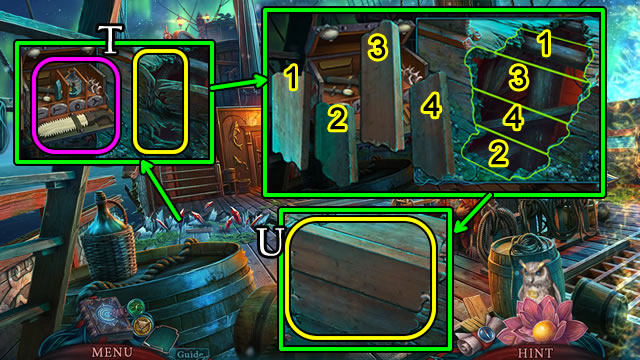
- Place FULL TOOL BOX; use Saw (T); place 1-4, use Shark Teeth and Vitalizing Essence (U).
- Go forward.
- Speak to character; play HOP (V); receive PARROT KEY.
- Use PARROT KEY (W); select parrot.
- Solution (X1-X5). A-H.
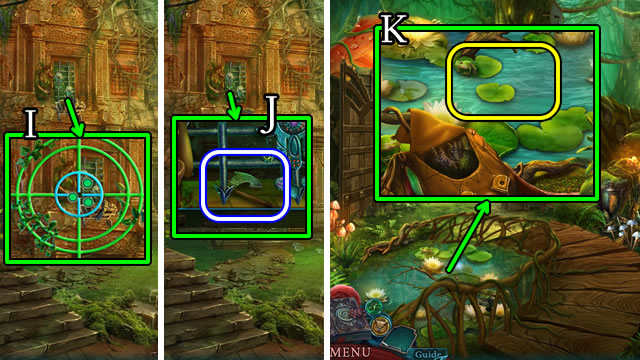
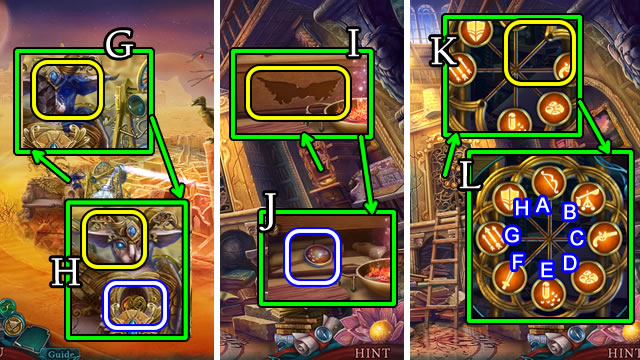
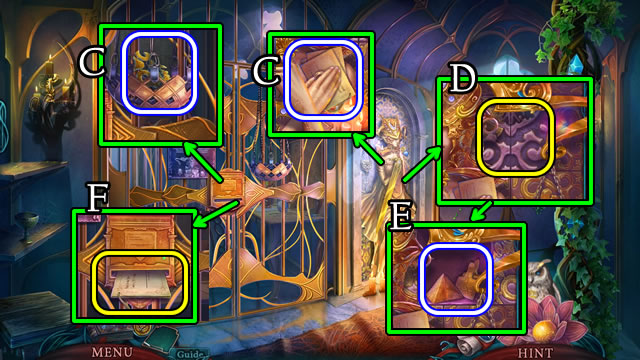
- Speak to character; take PURIFICATION SEAL (Y); select ship for HOP (Z); receive STONE HEAD.
- Take ROD (A).
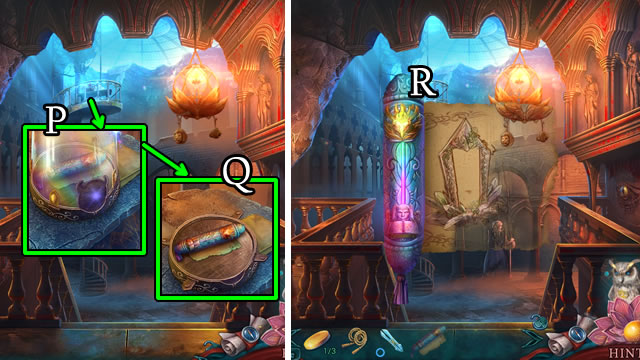
- Take FLOWER HANDLE (B); use ROD; take STONE SPHERE (C).
- Place FLOWER HANDLE (D); take 1/3 DOME KEY (E).
- Place STONE HEAD and STONE SPHERE (F).
- Solution (G). C-F-B-A.
- Go to Temple.
- Speak to character.
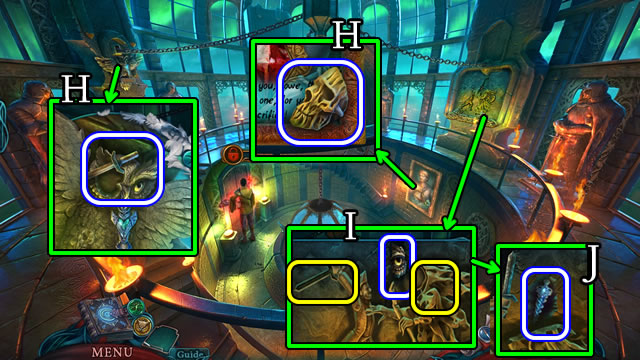
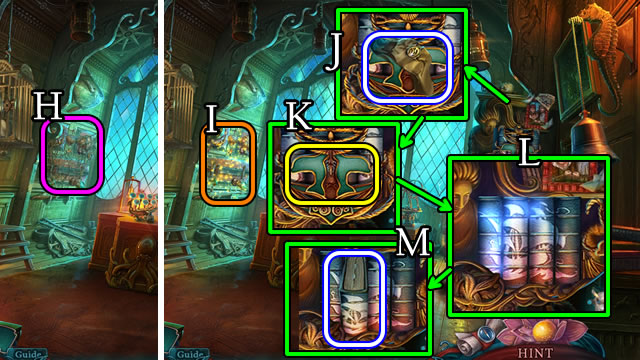
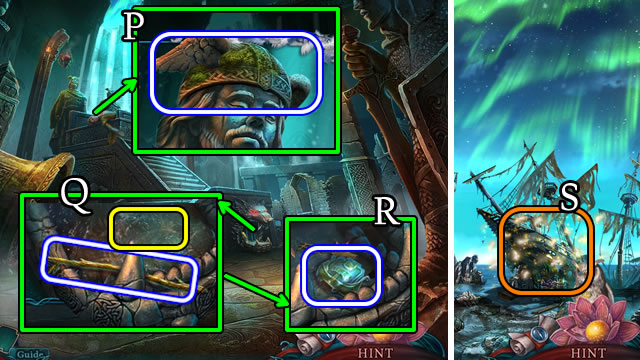
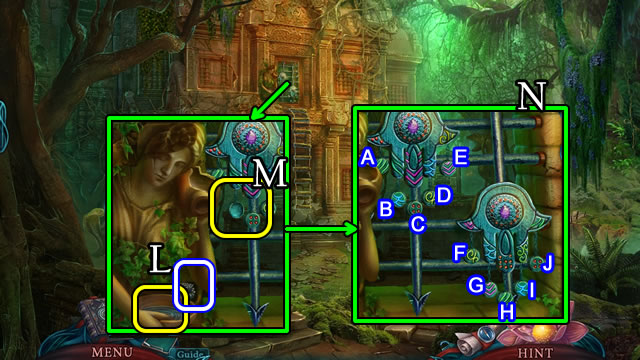
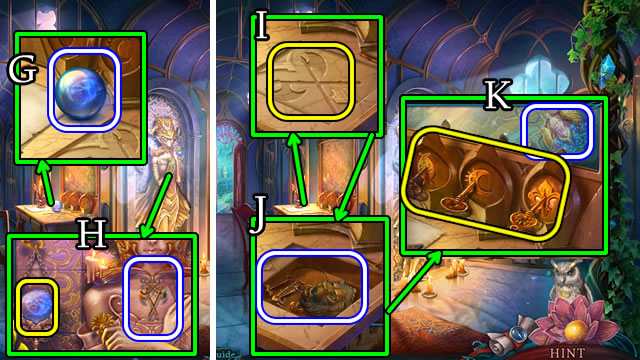
- Take CARVED SKULL; RUSTY SWORD (H).
- Use TWEEZERS for OWL EYE; place RUSTY SWORD, CARVED SKULL (I); receive 2/3 DOME KEY (J).
- Place OWL EYE; receive 3/3 DOME KEY (K).
- Place 3/3 DOME KEYS (L); play HOP (M); receive SEAL PART.
- SEAL PART on PURIFICATION SEAL.
- Solution (N). D-A-B-C-E-B-D-G-I-H-E-F-D.
- Take ASSEMBLED SEAL.
- Speak to character.
- Go left.
- Use ASSEMBLED SEAL (O); select Ceil.
- Take HELMET (P).
- Take LONG STICK; use HELMET (Q); take NORSKA EMBLEM (R).
- Go down 2x.
- Play HOP (S); receive AWL.
- Place NORSKA EMBLEM; take CHAMOMILE and SPATULA (T).
- Return to Towe's Chamber.
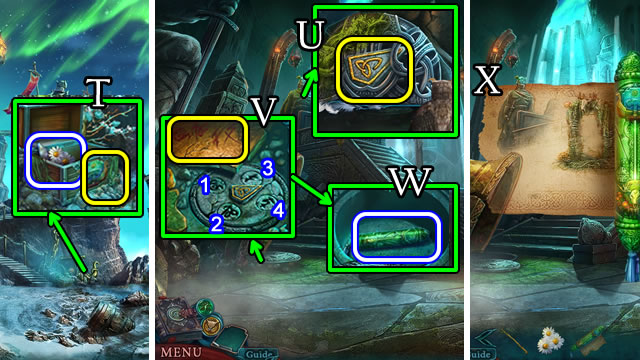
- Use AWL (U); receive TRIANGLE.
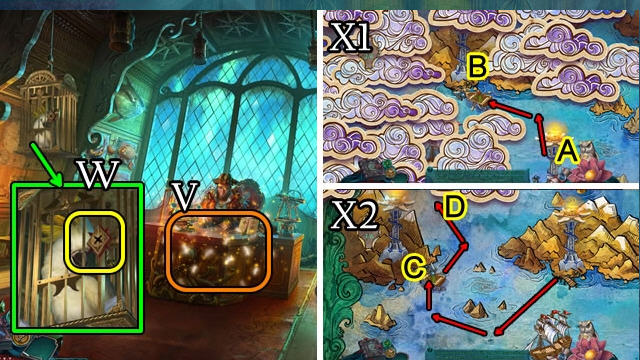
- Use SPATULA; place TRIANGLE (V); select 1-4; take PORTAL SCROLL (W).
- Place PORTAL SCROLL(X); select portal.
- Easy solution (Y). Bx4-Cx5-D-Fx4-Gx2-Hx2-Jx4-Nx5-O.
- Hard solution (Z). Ax5-Bx3-Cx5-Dx2-Fx4-G-Hx2-Jx4-Mx5-Nx5-O.
Chapter 3: Serpentium

- Speak to character; take BAG TOKEN (A).
- Use LONG STICK (B); place BAG TOKEN (C); take KNIFE, MORTAR (D).
- Use KNIFE (E).
- Solution (F).
- Take PESTLE.
- Go forward.
- MORTAR for 1/3 SNAKE SCALE.
- Go down.
- Speak to character; take HERBALIST BAG (G).
- Play HOP (H); receive SLEEPING MUSHROOM.
- SLEEPING MUSHROOM, CHAMOMILE on HERBALIST BAG for SLEEPING POTION INGREDIENTS.
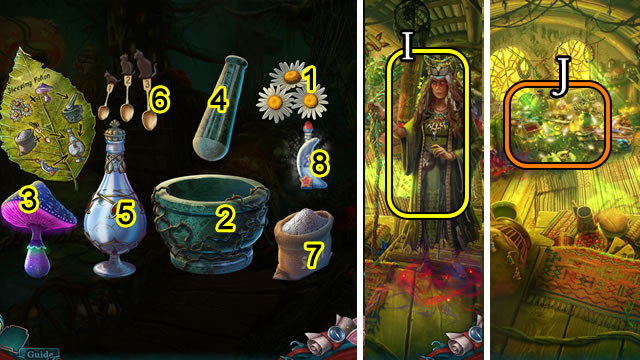
- PESTLE and SLEEPING POTION INGREDIENTS on MORTAR. Select 1-2-3-2-2-6-7-8-5 for SLEEPING POTION.
- Go forward.
- Use SLEEPING POTION (I); play HOP (J); receive FLOWER CODE.
- Speak to character; take EMPTY LANTERN (K).
- Take note, THREAD AND NEEDLE (L).
- Take BOWSTRING; place FLOWER CODE (M); select 1-7; receive RAG; take OILCAN, 2/3 SNAKE SCALE (N).
- Use THREAD AND NEEDLE; take (O), receive CHIMERA PICTURE.
- Go down.
- Play HOP (P); receive STAFF PARTS.
- Use EMPTY LANTERN; receive FIREFLY LANTERN (Q); take EYE; use RAG (R); select board; take 3/3 SNAKE SCALE (S).
- STAFF PARTS; solution 1-12; receive STAFF.
- Go forward.
- Place EYE, FIREFLY LANTERN (T).
- Speak to character; take METAL SPHERE (U).
- METAL SPHERE for BUTTON.
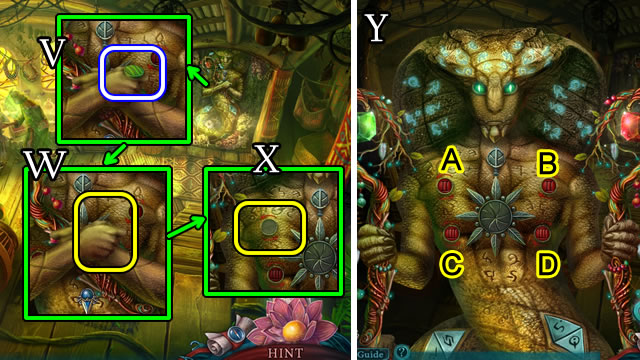
- Take 1/2 ROUND TOKEN (V); place STAFF (W); place BUTTON (X).
- Solution (Y). Ax4-C-Ax3.
- Take GLOWING STAR; scroll down; take note and GOBLET (Z).
- Place 3/3 SNAKE SCALE (A).
- Solution (B). (F-G)-(G-D)-(A-G)-(G-C)-(G-B).
- Go (C).
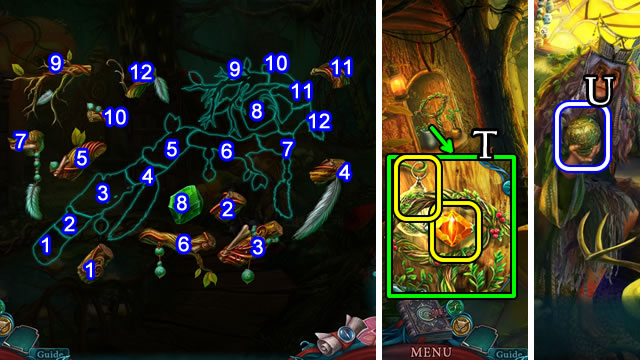
- Play HOP (D); receive FEATHERS; place stick for TORCH (E).
- Take INCOMPLETE BOW, STICKS (F); select 1-5; place GLOWING STAR (G).
- Solution (H). Ax3-Bx2-Cx2-D.
- Take CHIMERA PARTS, 2/2 ROUND TOKEN.
- STICKS, FEATHERS, BOWSTRING, KNIFE, THREAD AND NEEDLE on INCOMPLETE BOW. Assemble for BOW AND ARROWS.
- Use BOW AND ARROWS; solution (I).
- Take HATCHET (J).
- Go down 2x.
- Use GOBLET for FULL GOBLET (K).
- Go forward 2x.
- Use FULL GOBLET; take SERPENTIUM TOKEN (L); place 2/2 ROUND TOKENS (M).
- Solution (N). (A-C)-(B-C)-(C-E)-(D-E)-(F-G)-(G-I)-(H-J).
- Go forward.
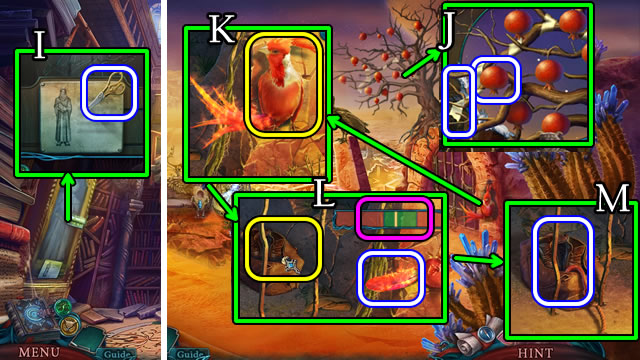
- Take LEFT WING (O).
- Uncover, take LENS (P); select right head; use HATCHET; take SNAKE KEY (Q).
- Read tag, take SPHERE KEY; place SERPENTIUM TOKEN (R); OILCAN for FULL OILCAN (S).
- Use FULL OILCAN, TORCH. Select right head; repeat (T).
- Play HOP (U); receive CHIMERA HEAD.
- Go down.
- Speak to character; take OBSIDIAN DISK (V).
- Use SNAKE KEY (W); take RIGHT WING (X).
- SPHERE KEY on METAL SPHERE for JEWEL.
- LEFT WING, CHIMERA HEAD, JEWEL and RIGHT WING on CHIMERA PARTS.
- Solution (Y). (A-B)-(B-D)-(C-E)-(F-H)-(G-H)-(H-J)-(I-J).
- Take CHIMERA.
- Go forward.
- Place CHIMERA, CHIMERA PICTURE; select 1-5; take PORTAL SCROLL (Z).
- Position PORTAL SCROLL (A); select portal.
- Easy and Hard solutions (B). P-Hx2-L-K-O-N-Mx2-I.
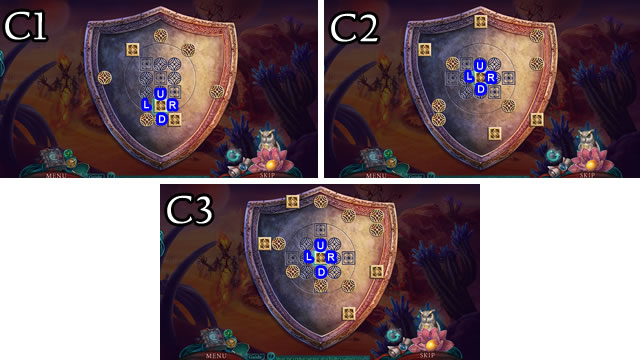
- Solution (C1). Ux2-Lx3-Rx2-U-R-U-D-R-Dx2-Rx2-Lx3-U.
- Solution (C2). Dx2-Lx2-Ux4-D-Rx3-Ux2-D-Rx2-D-L-Dx2-Lx2-Dx2-Rx2-Lx2-Ux3.
- Solution (C3). D-U-L-D-Rx2-Ux2-R-U-R-U-Lx2-Dx2-Lx3-U-Dx3-Rx4-D-Lx2-Ux2.
Chapter 4: Flamma

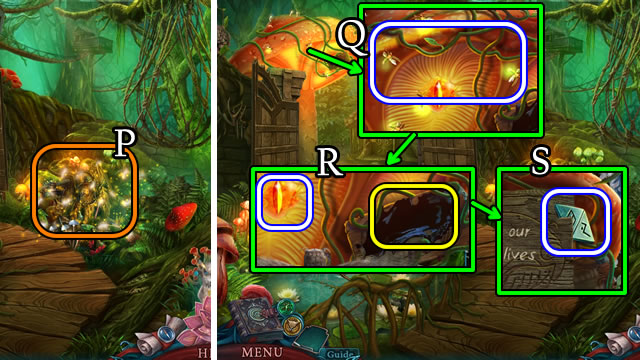
- Speak to character; take ARCHIVES CLUE (D).
- Play HOP (E); replace LENS; place ARCHIVES CLUE (F); take CODE CLUE; place 1-7.

- Move body (F).
- Take HOOK; LYCORIS, SUN EMBLEM (G).
- Speak to character; take GLOVES (H).
- Take note, SCISSORS (I).
- Go down.
- Take POMEGRANATE; select strip; use SCISSORS; receive BANDAGE (J).
- Give POMEGRANATE (K); take PHOENIX FEATHER; use HOOK; stop arrow (L); take BOOTS (M).
- LYCORIS and PHOENIX FEATHER on HERBALIST BAG for HEALING POTION INGREDIENTS.
- Go forward.
- Open drawer; place HEALING POTION INGREDIENTS; use knife on lycoris, place ingredients and BANDAGE in bowl (N).
- Speak to character; take 1/2 SPHINX PART (O).
- Place CODE CLUE; enter 6-5-9 (P); take BENCH PART (Q).
- Use BENCH PART; take MASK (R).
- Place BOOTS, GLOVES and MASK; take PROTECTIVE GEAR (S).
- Go down.
- Use PROTECTIVE GEAR (T).
- Go (U).
- Take MOON EMBLEM (V).
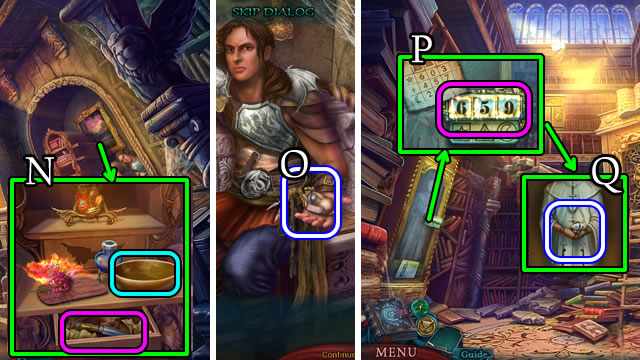
- Take INCOMPLETE KEY (W); place MOON EMBLEM and SUN EMBLEM (X); take MEDALLION; place OBSIDIAN DISK (Y).
- Return to Abandoned Archives.
- Use MEDALLION (Z).
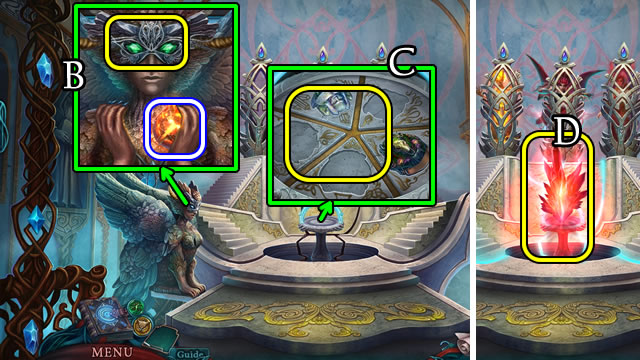
- Place symbols to open cupboards (1-2); use scissors (3); place symbols (4-6); use scraper (7); place symbol (8); use keys (9-10); place symbol to take PISTON and SOLVENT (A).
- Return to Flamma Temple.

- Replace PISTON (B).
- Take scroll, PATTERNED HANDLE; match flowers (C); take 1/3 COIN and LION HEAD (D).
- Place LION HEAD (E); take 2/2 SPHINX PART (F).
- Go down.
- Use SOLVENT (G); place 2/2 SPHINX PARTS; take CURTAIN CORD, 1/2 ROUND TOKEN (H).
- Return to Abandoned Archives.
- Place PATTERNED HANDLE (I); take 2/2 ROUND TOKEN (J).
- Place 2/2 ROUND TOKENS (K).
- Solution (L). (D-F)-(G-E).
- Play HOP (M); receive DRAGON CREST.
- Return to Flamma Temple.
- Place DRAGON CREST (N).
- Solution (O). A-B-A-G-C-F-G-E-D-C.
- Take SWORD PART and KEY PART.
- SWORD PART for note.
- KEY PART on INCOMPLETE KEY for KEY.
- Use KEY (P); take PORTAL SCROLL (Q).
- Position PORTAL SCROLL (R): select portal.
- Easy solution (S). (H-C)-(E-G)-(G-Q)-(H-Q)-(J-Q)-(D-W)-(F-K)-(I-W)-(K-M)-(V-R)-(U-X)-(W-X).
- Hard solution (T). (H-C)-(O-E)-(L-G)-(Q-J)-(N-S)-(O-Q)-(B-I)-(D-R)-(F-R)-(I-K)-(K-R).
- (P-R)-(P-V)-(V-W)-(W-X)-(T-W).
Chapter 5: Aeterna

- Take 2/3 COIN; use CURTAIN CORD (U) for HOP (V); receive METAL HINT.
- Take HAMMER; 3/3 COIN and BOTTLE (W); scroll right; take 1/2 PICTURE PART (X).
- BOTTLE for note.
- Use 3/3 COINS for BOAT TICKET (Y); scroll left.
- Use BOAT TICKET (Z).
- Take DEVELOPER LIQUID; place METAL HINT (A).
- Solution (B).
- Go forward.
- Take EMPTY PERMIT; GOLDEN DECORATION (C).
- Place GOLDEN DECORATION (D); take COLORED POWDER and STAMP (E).
- DEVELOPER LIQUID and COLORED POWDER in BOTTLE for PERMIT POWDER.
- PERMIT POWDER and STAMP on EMPTY PERMIT for VERIFIED PERMIT.
- Use VERIFIED PERMIT (F).
- Take SPHERE (G).
- Place SPHERE; take PRISON EMBLEM (H).
- Place PRISON EMBLEM (I); take LION HEAD, keys (J). Place keys; take 1/3 WORLD ICON (K).
- Go forward.
- Speak to character; take GOLDEN FEATHER (L).
- Take SCISSORS; place GOLDEN FEATHER (M); solutions (N); take HARE TOKEN and STICKER (O).
- Go down 2x.
- Use SCISSORS (P); solution (Q); take ANIMAL HINT and 2/2 PICTURE PART.
- Scroll right; place HARE TOKEN, ANIMAL HINT (R); solution 1-4; take KNIGHT FIGURINE (S).
- Return to Tower of Knowledge.
- Place 2/2 PICTURE PART (T).
- Solution (U). B-G-F-E-I-J-G-F-E-I-J-G-F-E-I-J-K-H-G-B-C-D-H-G-B-A-F-G-B-A.
- F-G-B-C-D-H-G-B-C-D-H-G-F-A-B-C-D-H-G-B-C-D-H-G-B-C-D-H-G-B-A.
- Take SAGE FIGURINE.
- Go down 2x.
- Place KNIGHT FIGURINE, SAGE FIGURINE (V).
- Solution (W). A-F.
- Take MAP.
- Scroll right; place MAP (X); play HOP (Y).
- Enter Traitor's House.
- Play HOP (Z) for NAILS.
- Take LONG CLOTH (A).
- Place LION HEAD (B); take 1/2 PAINTING PART; place STICKER (C).
- Solution (D). (F-A)-(E-B)-(C-D)-(D-F)-(E-F)-(G-H).
- Take OIL.
- Take FANG; use OIL; select hook (E); place LONG CLOTH (F); select (G); select hook cloth.
- Take HAMMER EMBLEM (H).
- Go down; scroll left.
- Place HAMMER EMBLEM; take PLANKS (I).
- Return to Traitor's House.
- Place PLANKS (J).
- Solution (K).
- Use NAILS and HAMMER.
- Play HOP (L) for CREST KEY.
- Return to Tower of Knowledge.
- Use CREST KEY (M); take 2/2 PAINTING PART and DIARY KEY (N).
- Place FANG; take RITUAL KEY (O).
- Return to Traitor's House.
- Play HOP (P); receive SWORD PART.
- Place 2/2 PAINTING PARTS (Q); take DIARY (R).
- DIARY KEY on DIARY; read; receive LARS'S DIARY.
- Return to Tower of Knowledge.
- Give LARS'S DIARY (S); speak to character; take HATCHWAY KEY (T).
- Place HATCHWAY KEY (U).
- Solution (V). 1-15.
- Enter Ritual Hall.
- Play HOP (W); take SWORD PART.
- Take note; place RITUAL KEY (X); take RING (Y).
- Go down.
- Place RING (Z) for HOP (A); receive 2/3 WORLD ICON, take MASK.
- Return to Ritual Hall.
- Place MASK; take 3/3 WORLD ICON (B).
- Place 3/3 WORLD ICONS (C).
- SWORD PART and SWORD PART on SWORD PART for WYRD SWORD.
- Use WYRD SWORD (D).
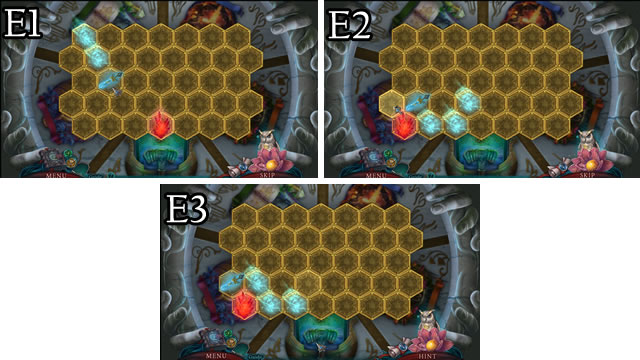
- Solution is random; one possible solution (E1-E3).
- Congratulations, you've completed Reflections of Life: Slipping Hope
Created at: 2019-01-27