

Walkthrough Menu
- General Tips
- Chapter 1: The Front Room
- Chapter 2: Librius
- Chapter 3: The Library
- Chapter 4: Lunos
- Chapter 5: Florus
- Chapter 6: The Dungeon
- Chapter 7: The Hall of Fame
General Tips
- This is the official guide for Reflections of Life: Tree of Dreams.
- Hidden-object puzzles are referred to as HOPs. This guide will not show screenshots of the HOPs, however, it will mention when an HOP is available and the inventory item you'll collect from it.
- This guide will not mention each time you have to zoom into a location; the screenshots will show each zoom scene.
- Use the map to travel to a location.
Chapter 1: The Front Room
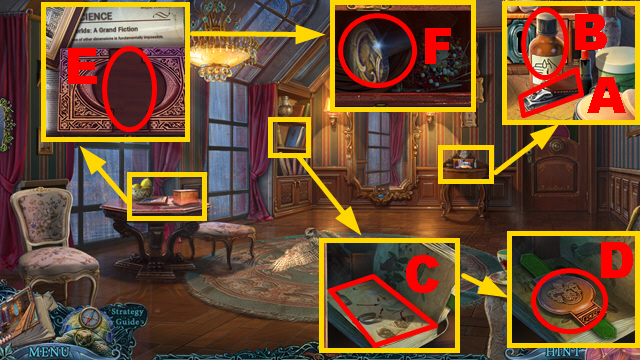
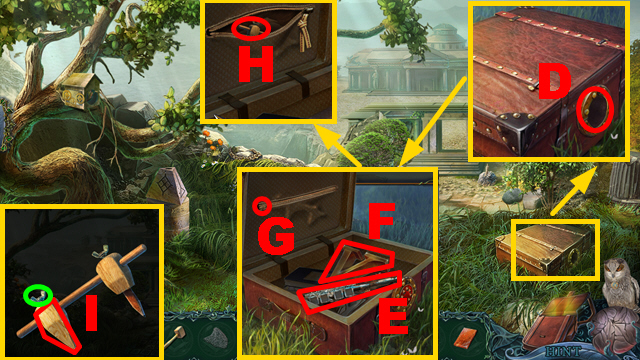
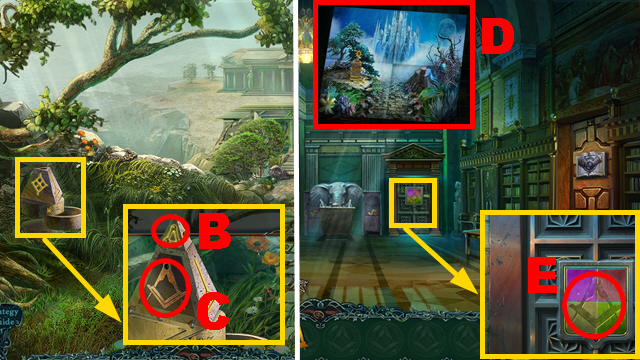
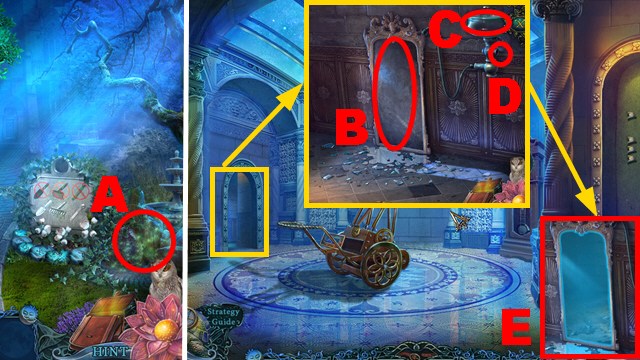
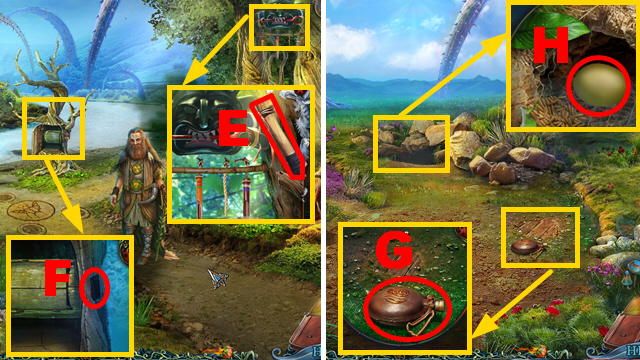
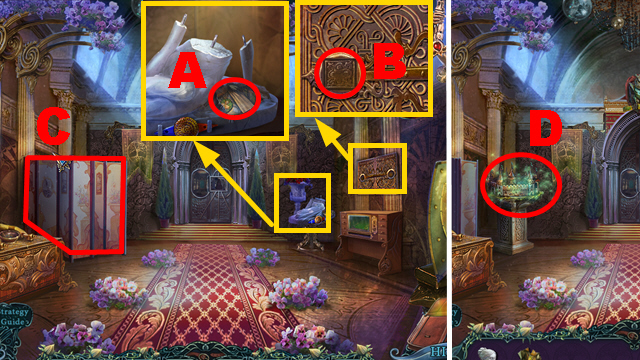
- Remove the makeup; take the CLIPPERS (A) and ANTISEPTIC (B).
- Open the book; take the instructions (C).
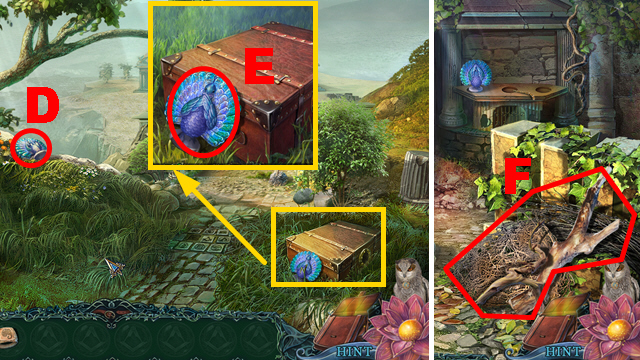
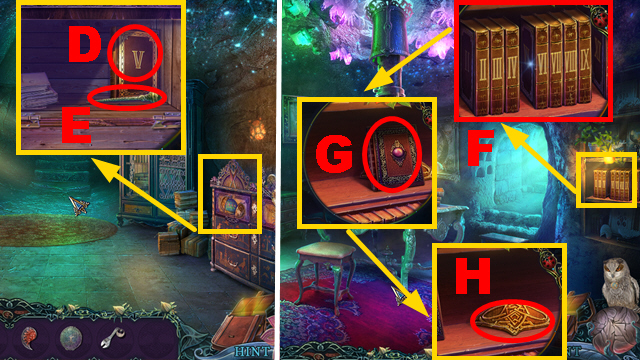
- Turn a page; take the BOOKMARK (D).
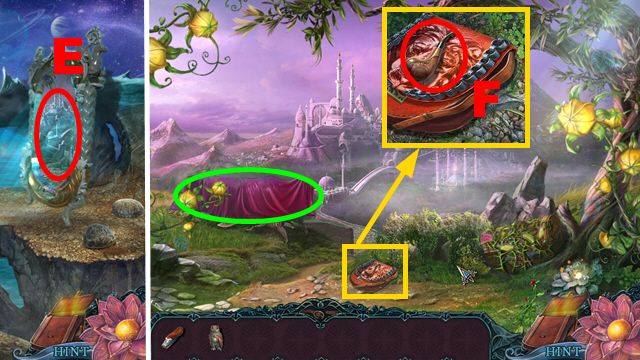
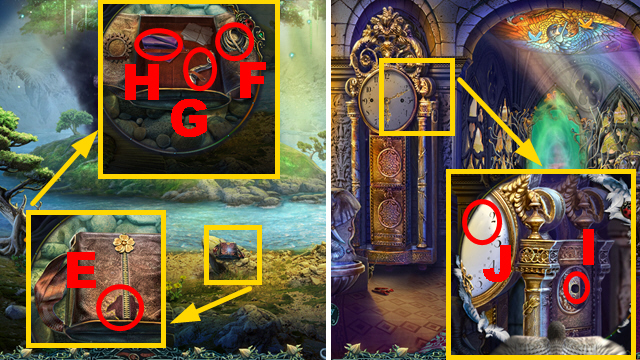
- Place the BOOKMARK (E); open the box.
- Take the HANDLE PART (F).
- Place the HANDLE PART (G).
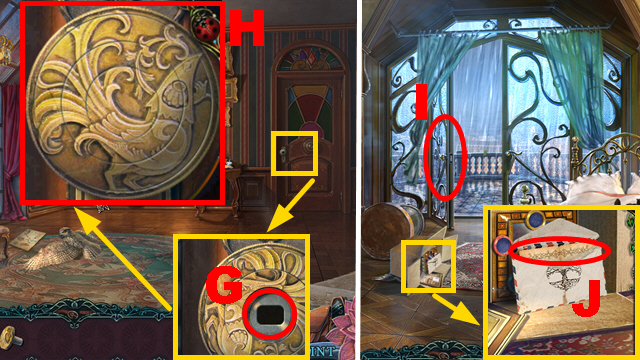
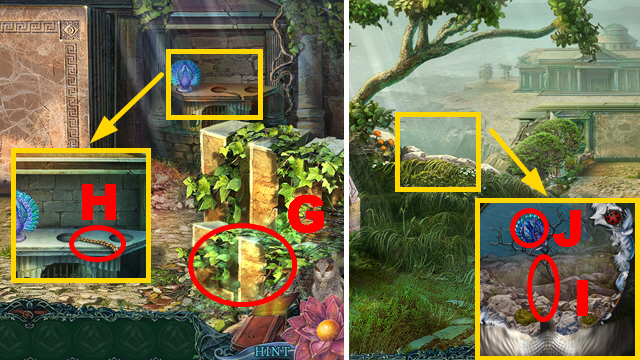
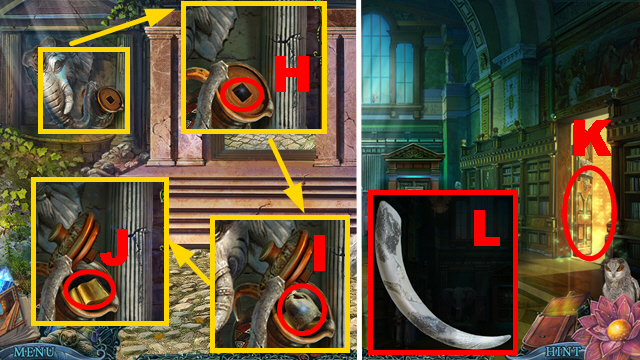
- Arrange the image correctly (H).
- Turn right.
- Close the door (I).
- Open the envelope; take the letter (J).
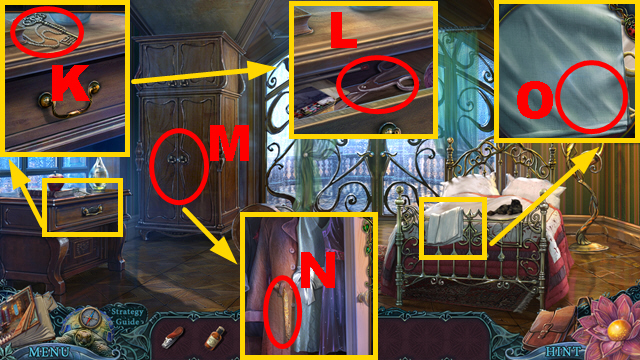
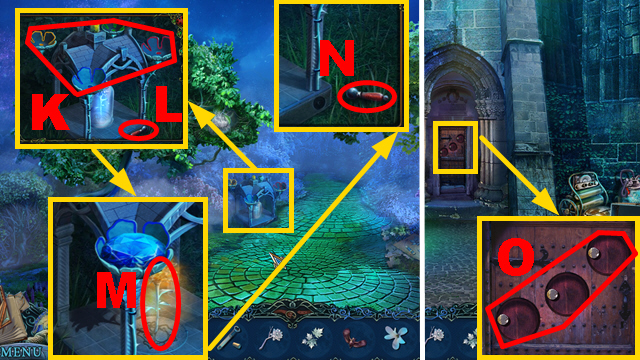
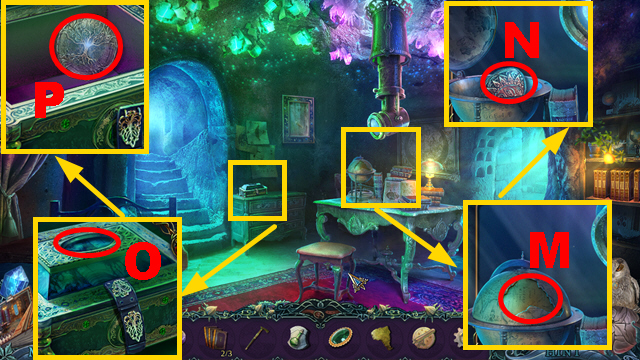
- Take the KEY (K); open the drawer.
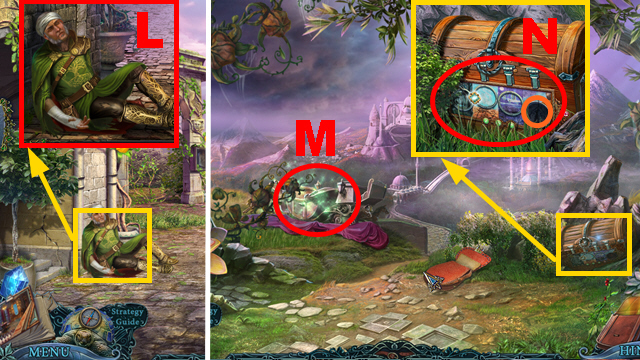
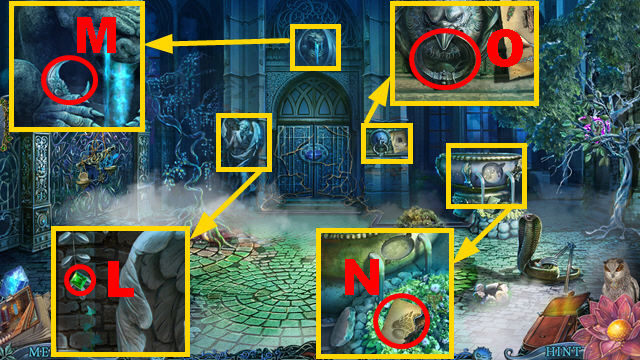
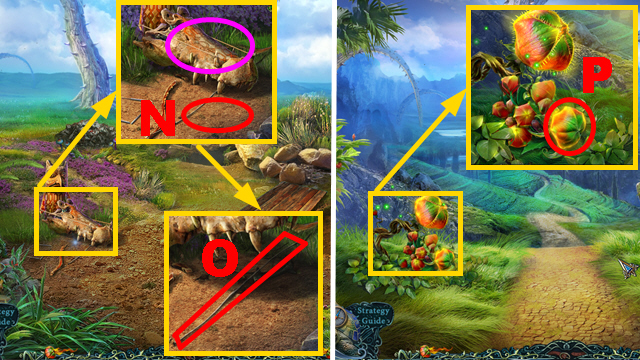
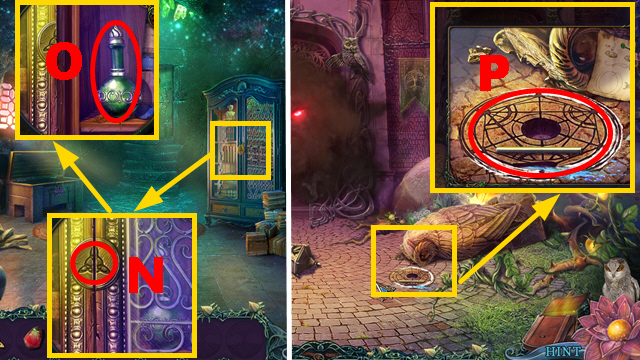
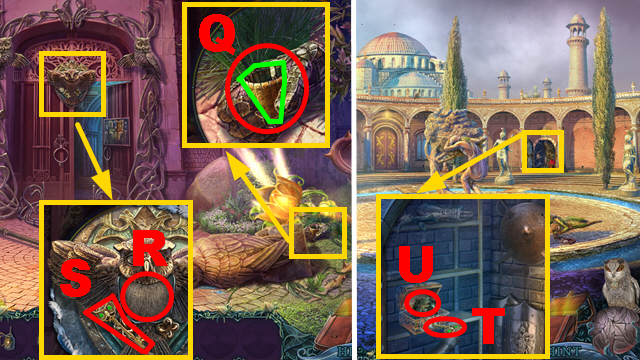
- Move 3 items; take the SCISSORS (L).
- Open the cabinet (M).
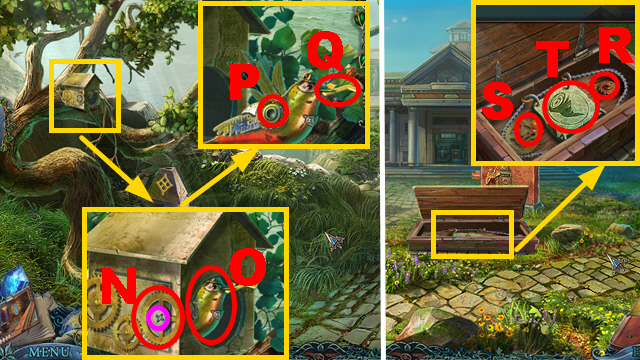
- Move one dress; take the BELT (N).
- Collect the BANDAGE with the SCISSORS (O).
- Walk down.
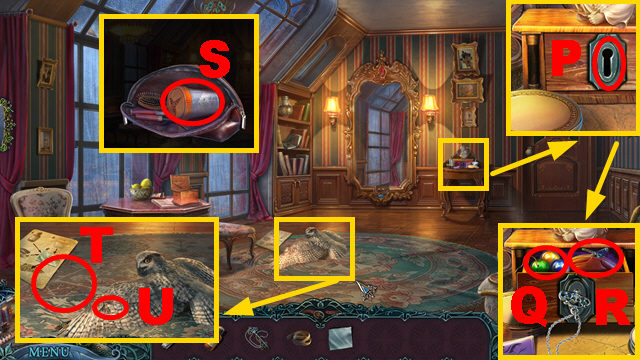
- Use the KEY (P); turn it twice.
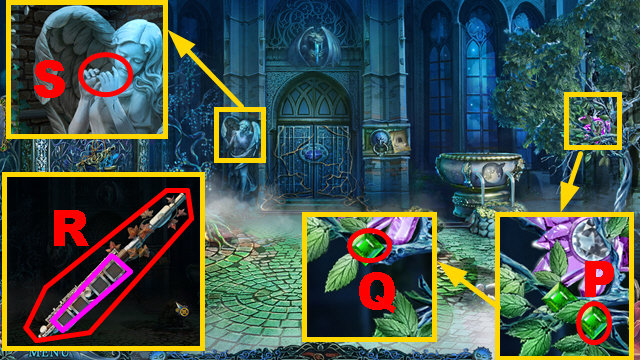
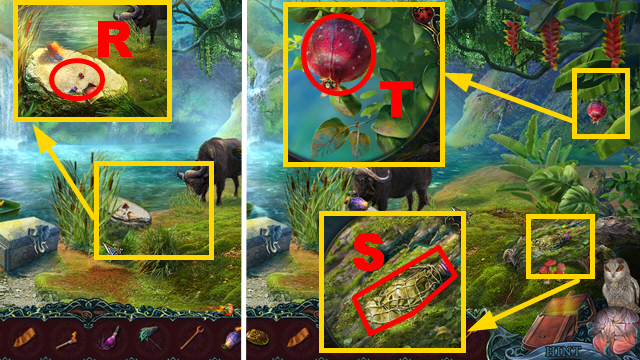
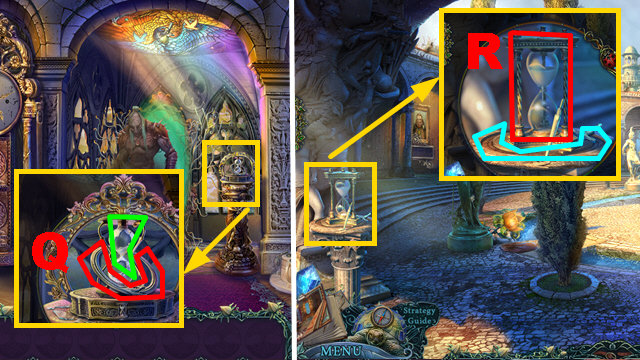
- Take the BEADS (Q) and COSMETICS BAG (R).
- Open the COSMETICS BAG; take the PAIN-KILLER (S).
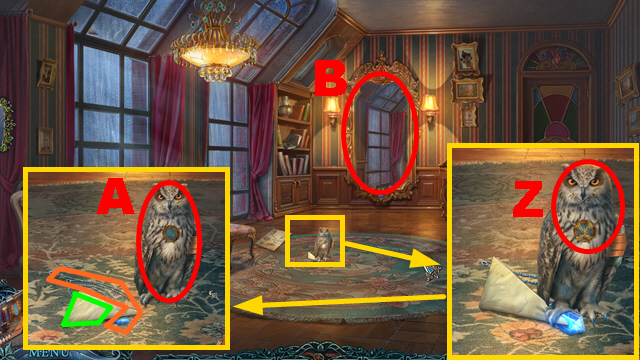
- Place the ANTISEPTIC, BANDAGE, PAIN-KILLER, and BELT (T).
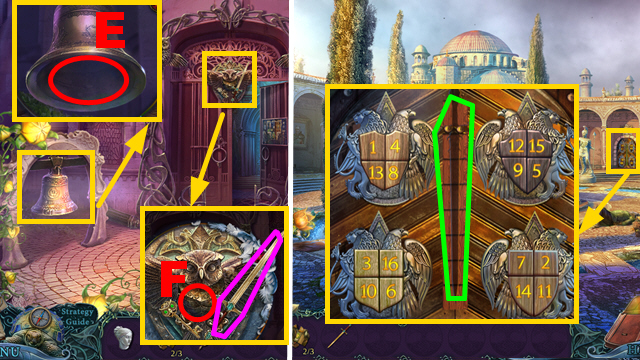
- Apply the antiseptic, pain-killer, and belt on the bandage; put the bandage on the owl (U).
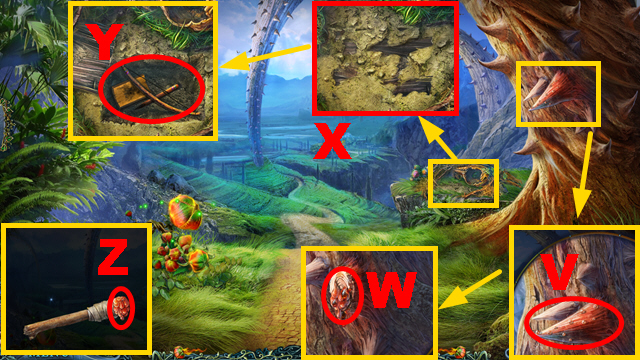
- Turn right.
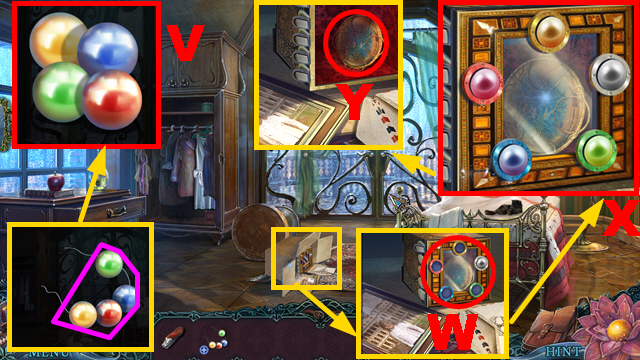
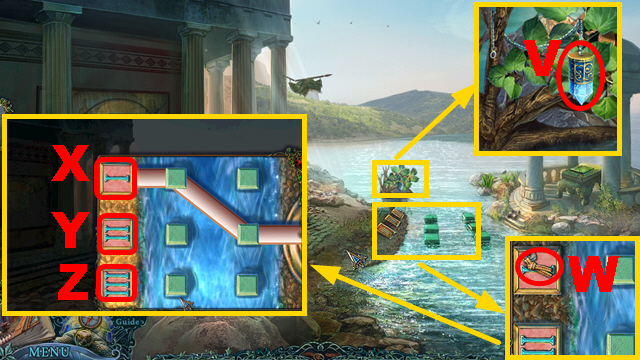
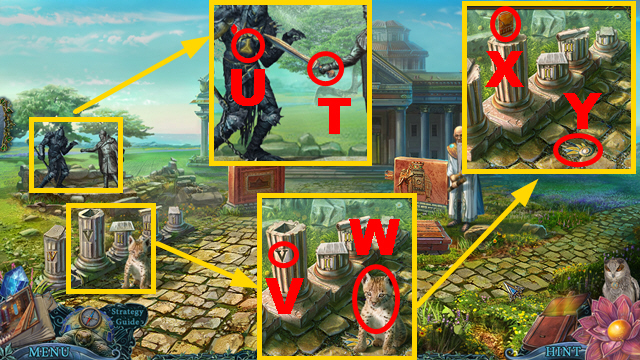
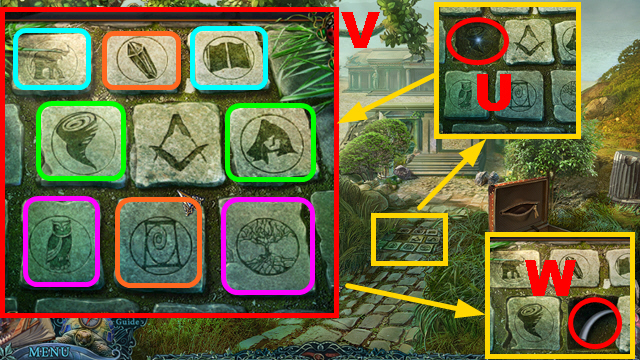
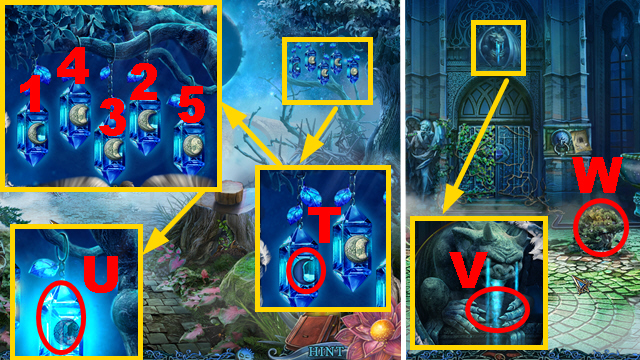
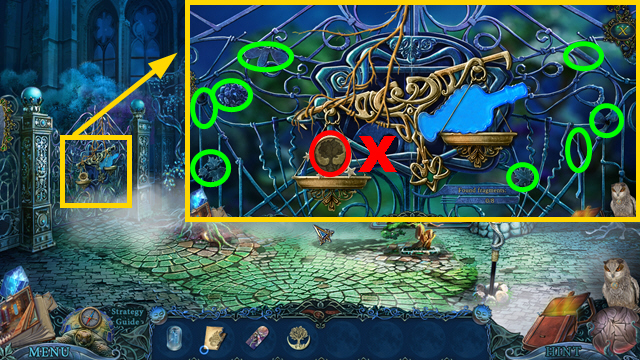
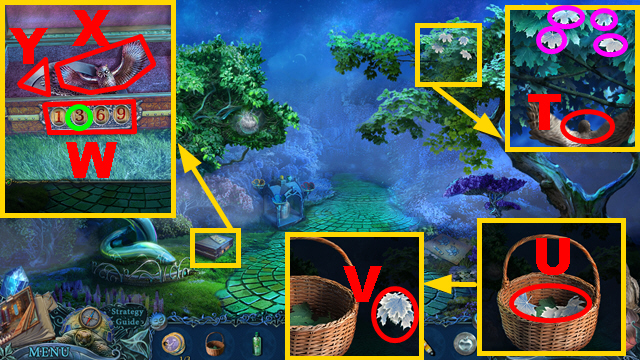
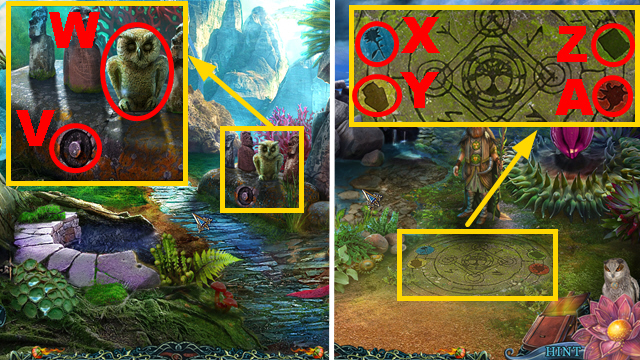
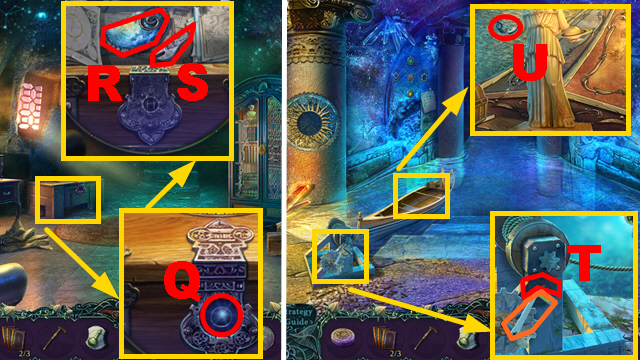
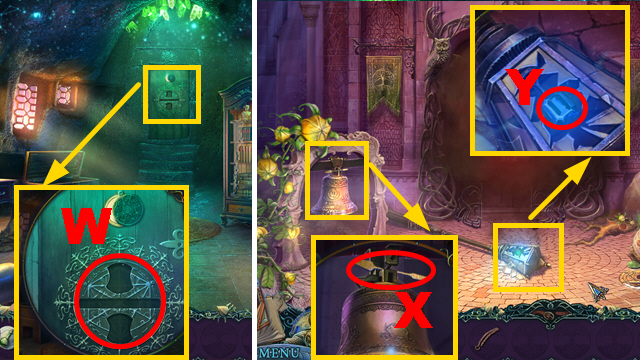
- Remove the BEADS from the string (purple); take the BEADS (V).
- Place the BEADS (W).
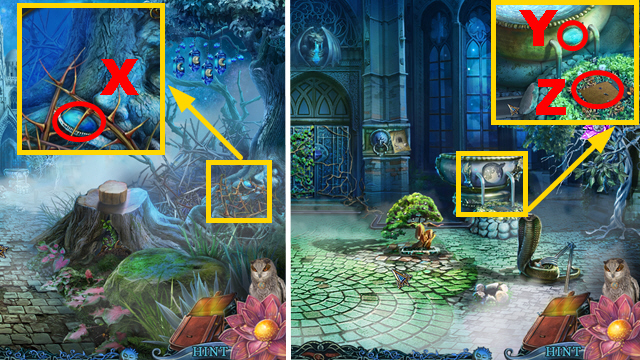
- Arrange the BEADS correctly (X).
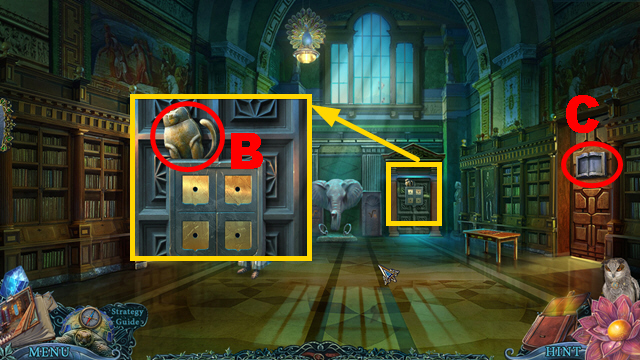
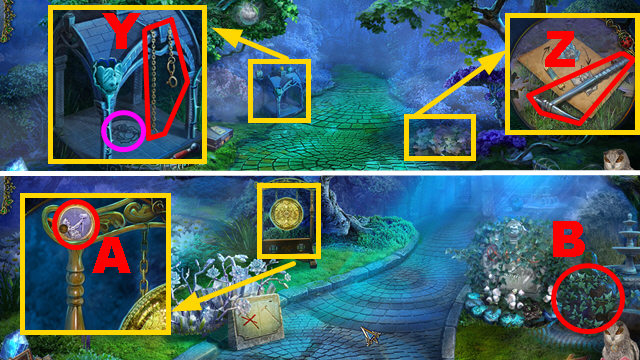
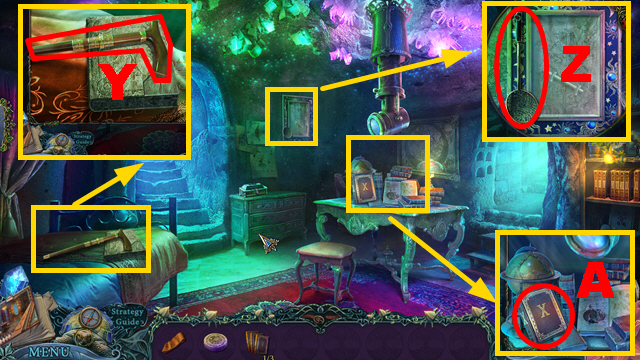
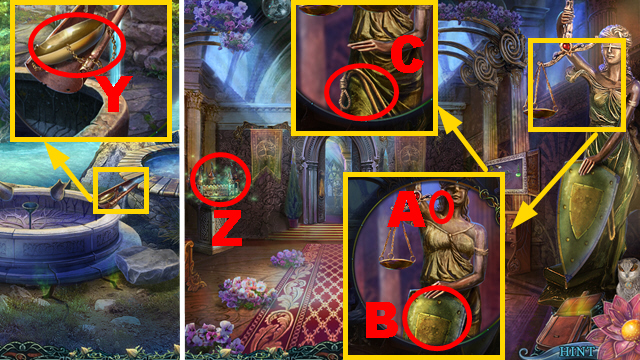
- Open the box; take the AMULET (Y).
- Walk down.
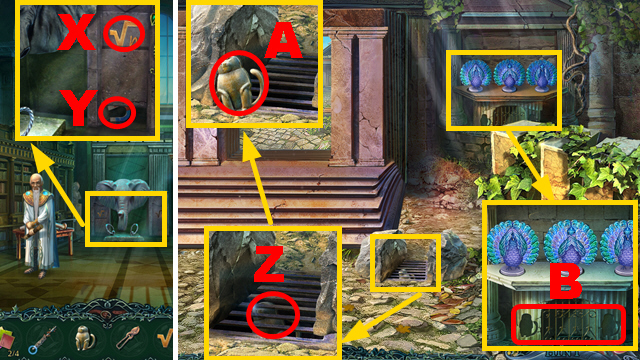
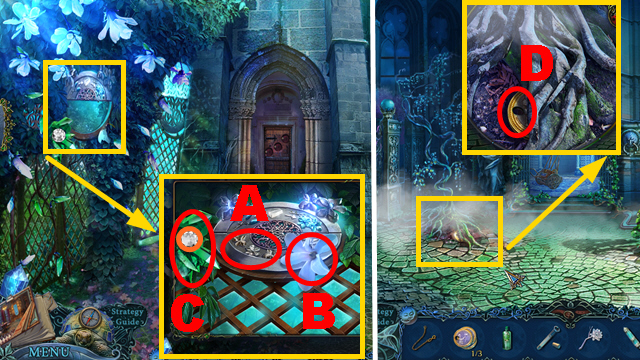
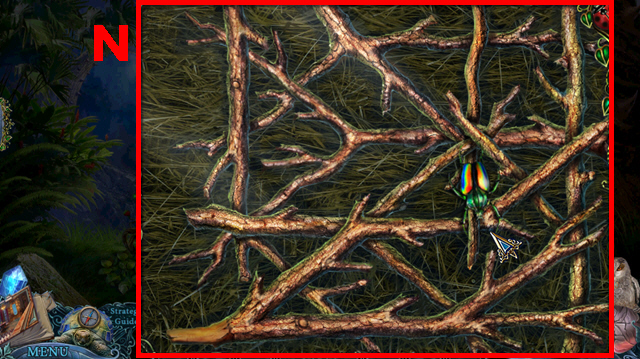
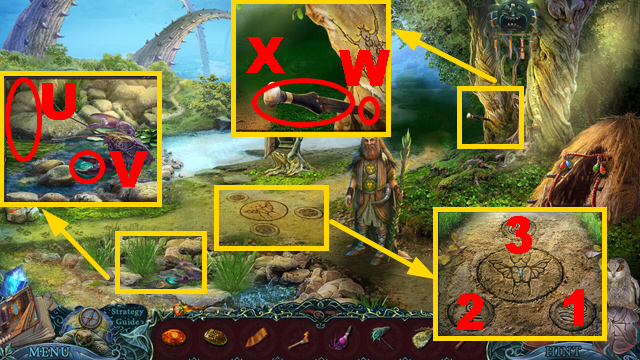
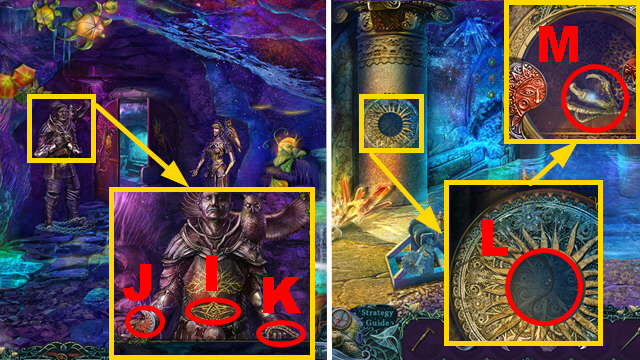
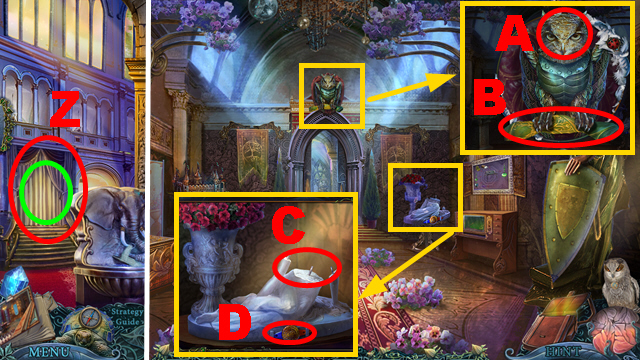
- Use the AMULET (Z); take the WOUNDED OWL (A), letter (green), and crystal (orange).
- Activate the mirror (B).
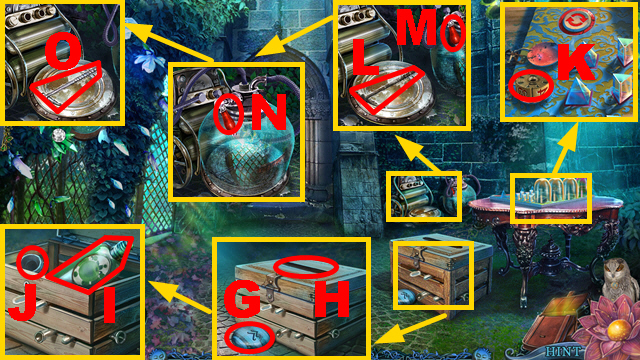
- Move forward.
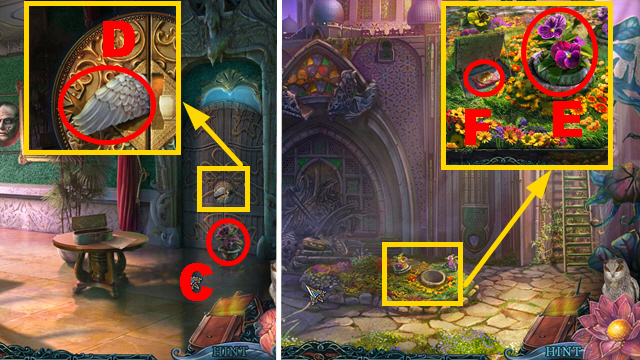
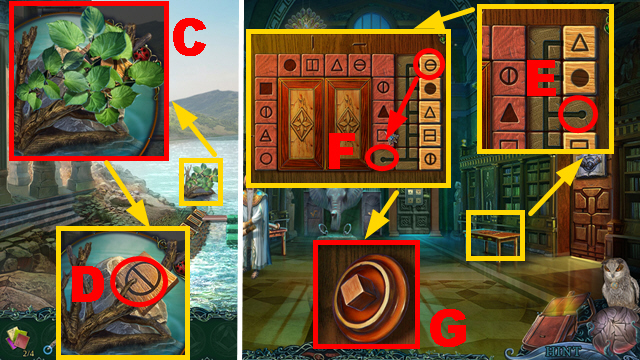
- Take 3 BUTTONS (purple).
- Fix the painting (C); place 3 BUTTONS (D).
- Play the mini-game.
- Solution: 1-3-1-6-3-5-6-4-5-4-2-7-3-1-5.
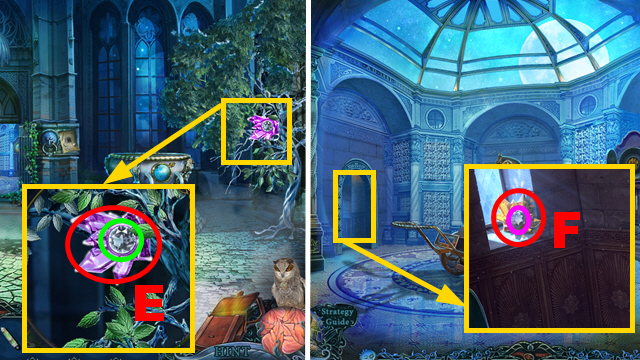
- Activate the portal (E).
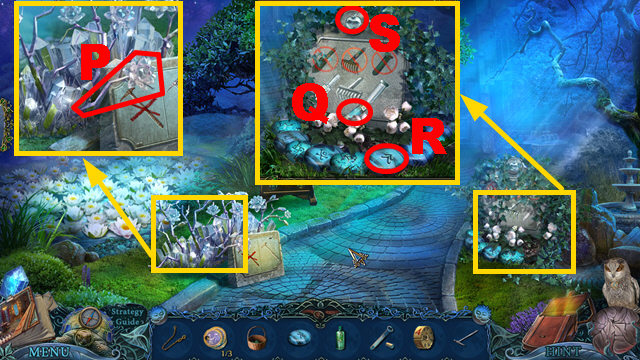
- Turn right.
- Remove the tarp (green).
- Take the TOBACCO-FILLED PIPE (F).
- Play the HOP (G) to receive CADUCEUS HALF 1/2.
- Move forward.
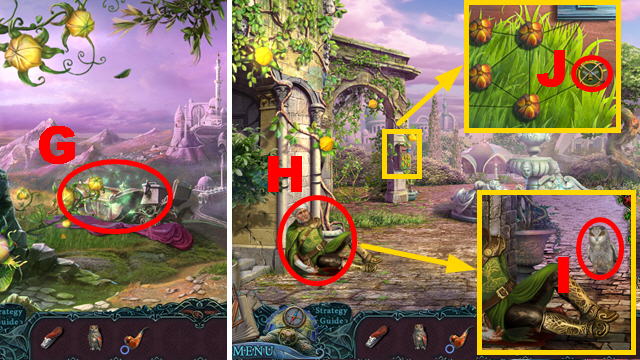
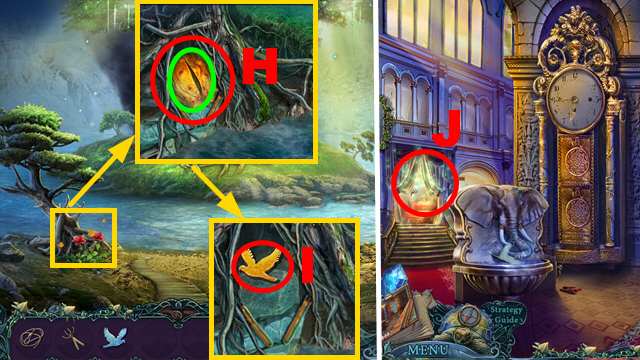
- Examine the man (H) to receive the EXPLOSIVES FLASK.
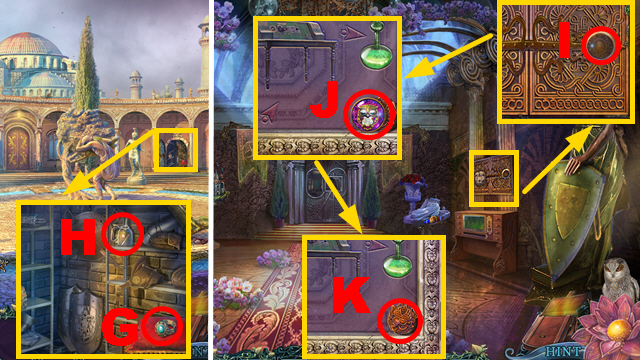
- Take the owl (I).
- Use the CLIPPERS (J).
- Turn right.

- Use the EXPLOSIVES FLASK (K).
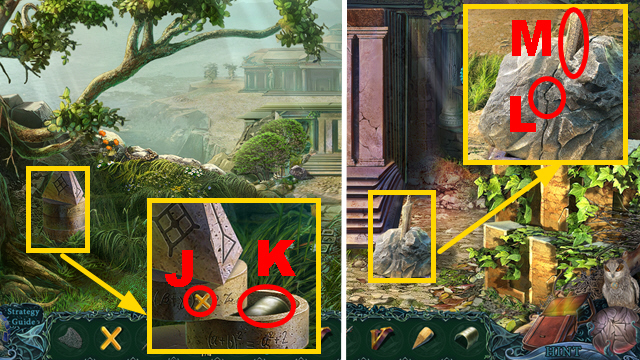
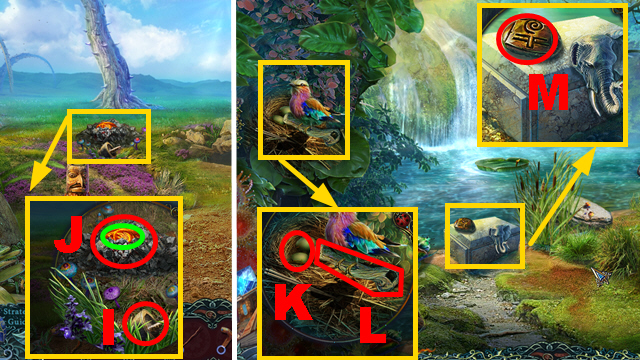
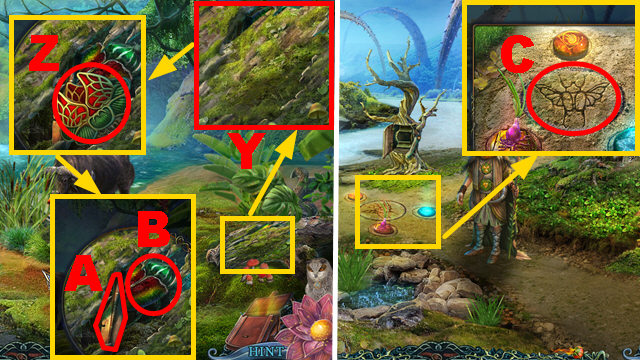
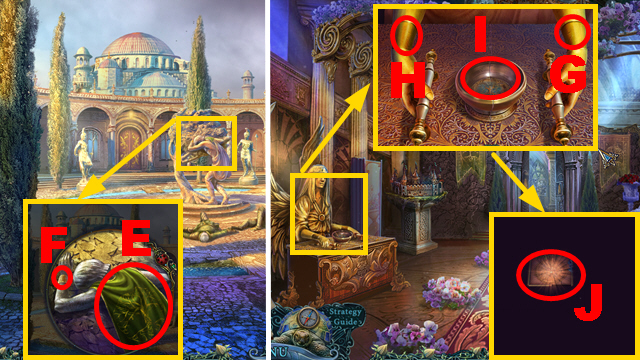
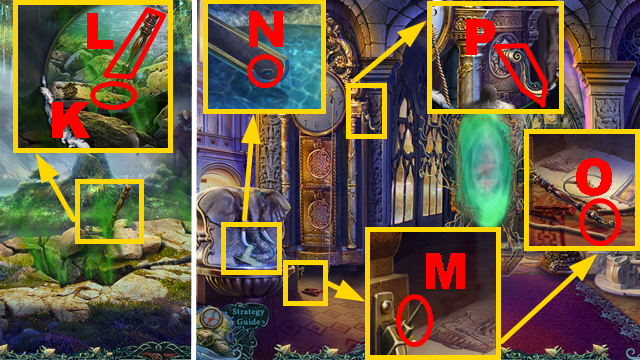
- Take the WEED PULLER (L) and FLINT (M).
- Remove the stones (purple); take ANGEL WING 1/2 (green).
- Walk down twice.
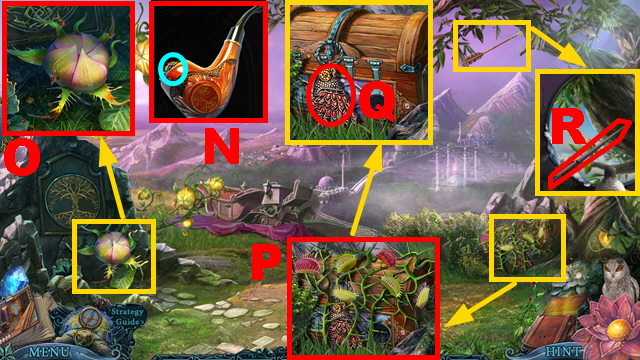
- Spark the TOBACCO-FILLED PIPE with the FLINT (blue); take the SMOKING PIPE (N).
- Use the SMOKING PIPE (O).
- Use the WEED PULLER three times (P); take the CERAMIC OWL (Q).
- Take the ARROW (R).
- Move forward, turn right.

- Place the ARROW (S); take the HEART GEM (T).
- Walk down.
- Place the HEART GEM (U); take the STONE FLOWER (V).
- Walk down.
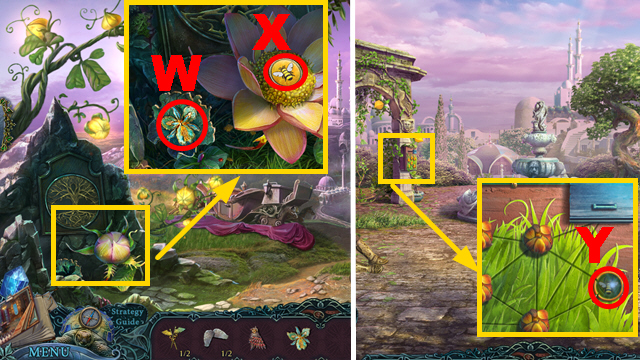
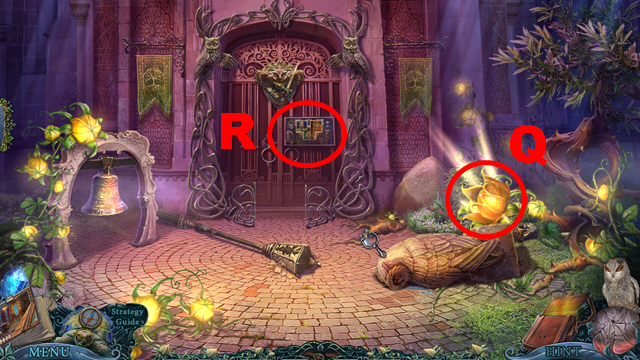
- Place the STONE FLOWER (W); take the BEE TOKEN (X).
- Move forward.
- Place the BEE TOKEN (Y).
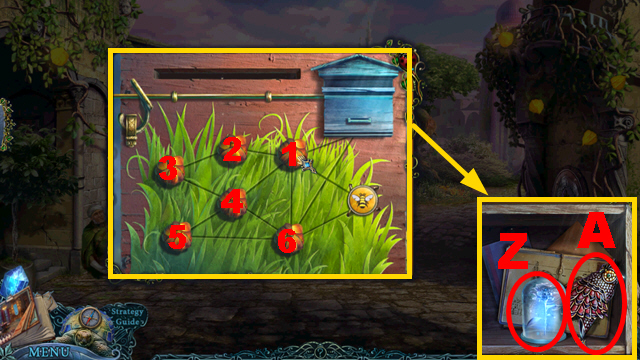
- Play the mini-game.
- Solution: 1-6.
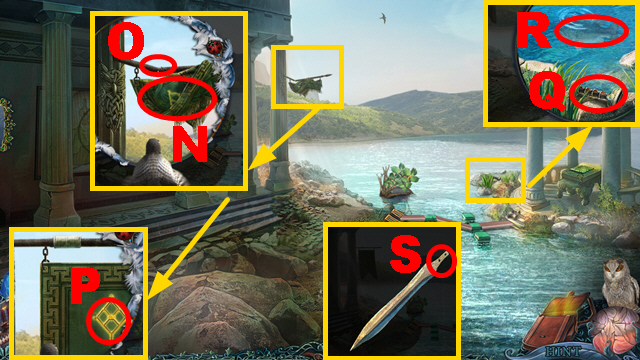
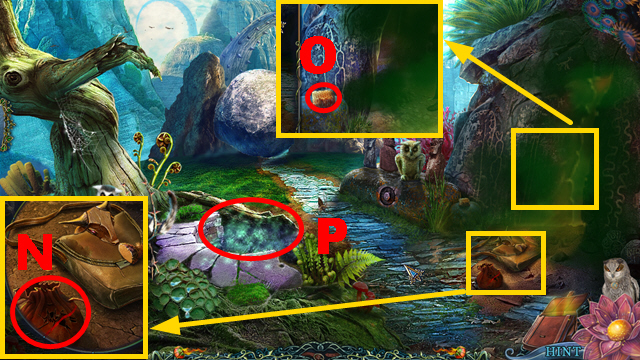
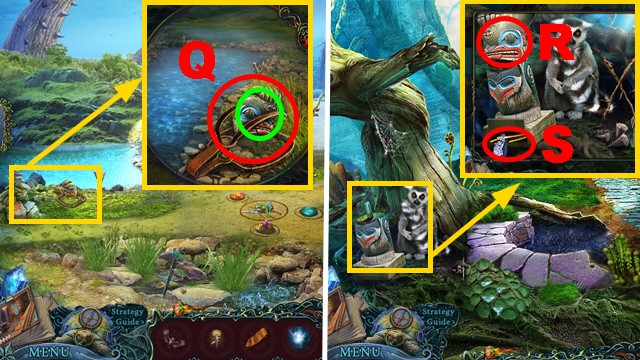
- Take the SILVER ROSE (Z) and CERAMIC OWL (A).
- Turn right.
- Place 2 CERAMIC OWLS (green).
- Turn right.
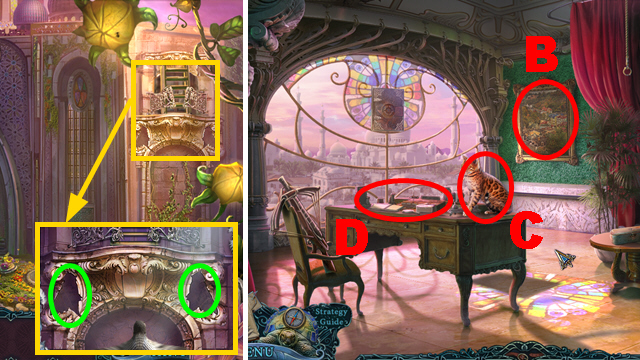
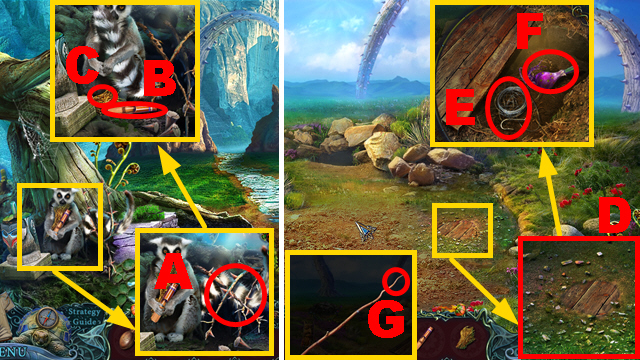
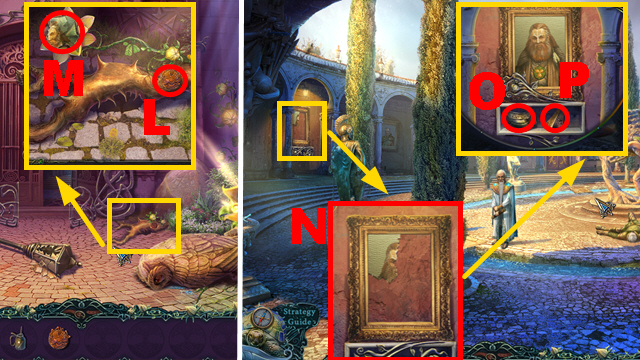
- Move the painting (B).
- Chase away the animal (C).
- Play the HOP (D) to receive the HANDKERCHIEF.
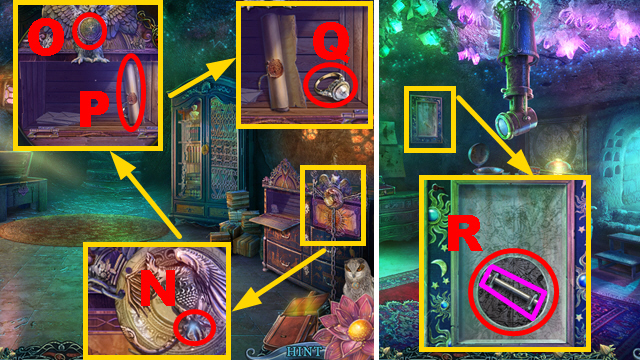
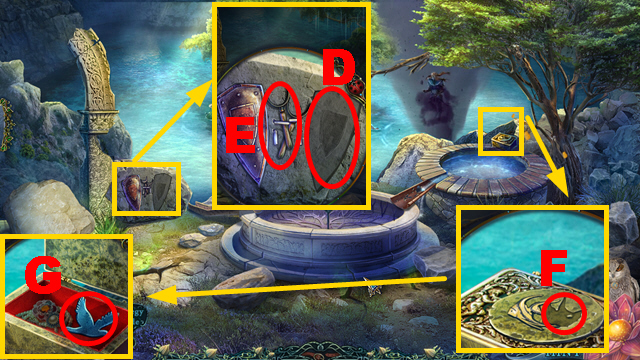
- Take the METAL LEAVES (E).
- Open the box; take the LOCKED POUCH (F).
- Walk down twice.
- Collect the FANG with the HANDKERCHIEF (G).
- Walk down.
- Place the FANG (H); open the bag.
- Take the SCALE (I) and CADUCEUS HALF 2/2 (J).
- Place 2 CADUCEUS HALVES on the LOCKED POUCH (K).
- Take the HEALING POWDER (purple).
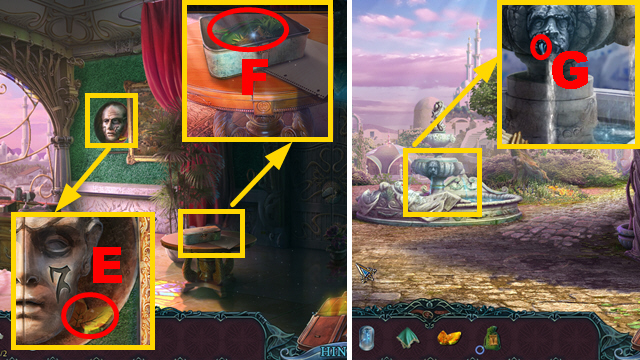
- Move forward.
- Use the HEALING POWDER (L) to receive the IMAGE DISK.
- Walk down.
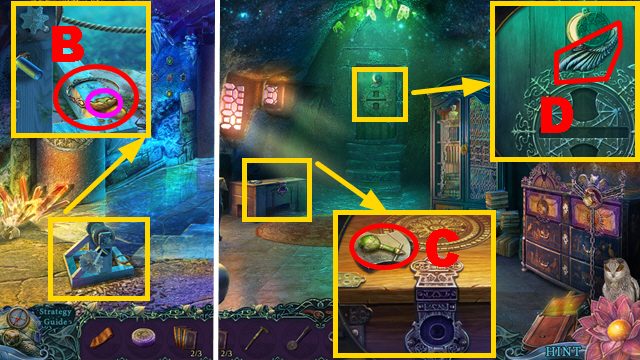
- Play the HOP (M) to receive the ROPE.
- Place the IMAGE DISK (orange); examine the chest (N).
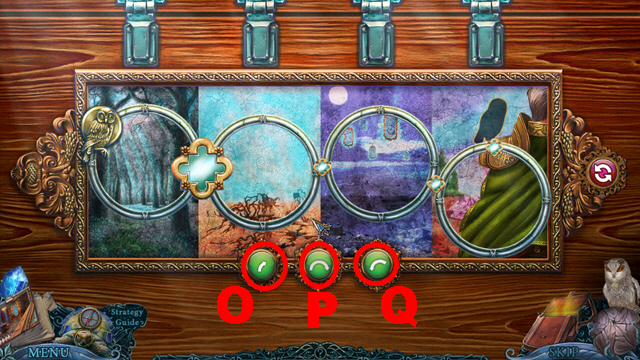
- Play the mini-game.
- Solution: O-P-Q-P-Qx3-O-Qx2-O-Qx3.
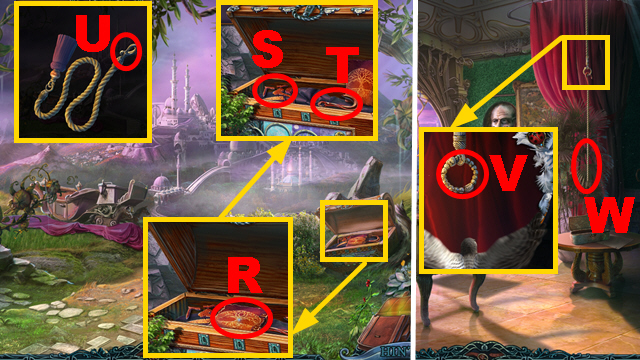
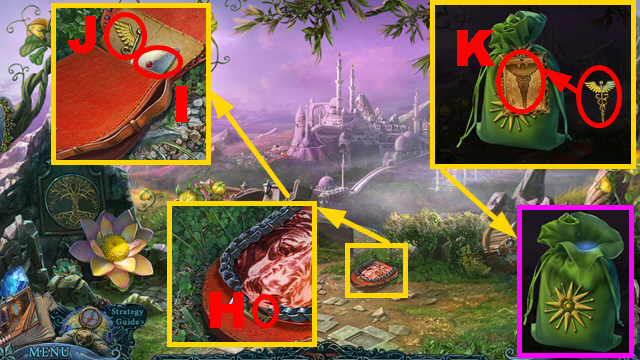
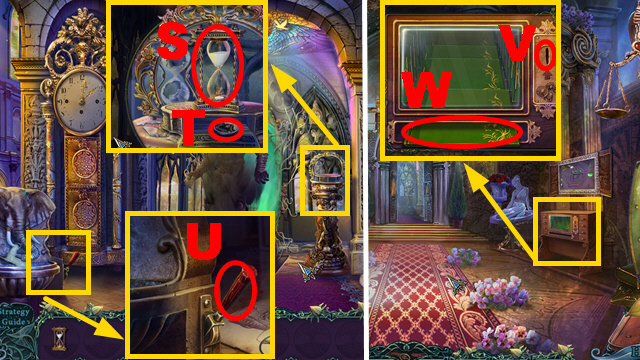
- Open the book (R); read it.
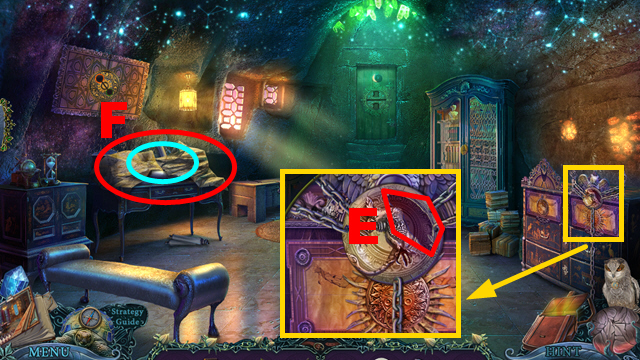
- Take the BROKEN RUNE (S) and HOOK (T).
- Place the HOOK on the ROPE (U); take the ROPE WITH HOOK.
- Move forward, turn right twice.
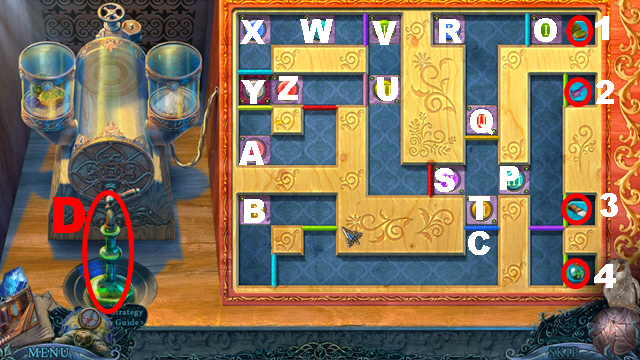
- Place the ROPE WITH HOOK (V).
- Pull the rope (W).
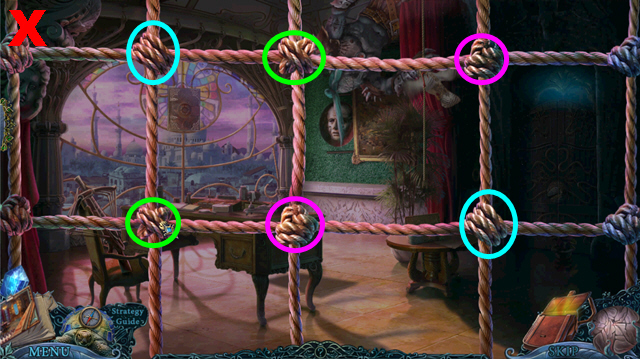
- Play the mini-game.
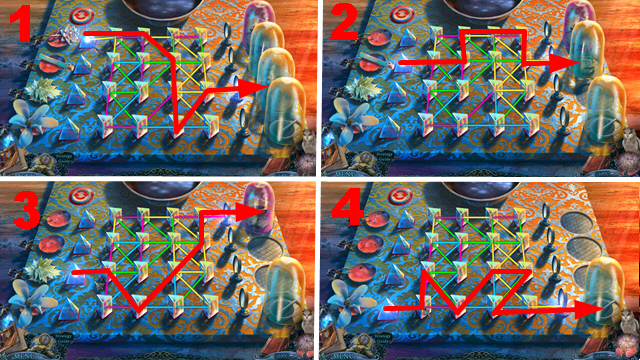
- Select pairs of knots framed in the same color (X).
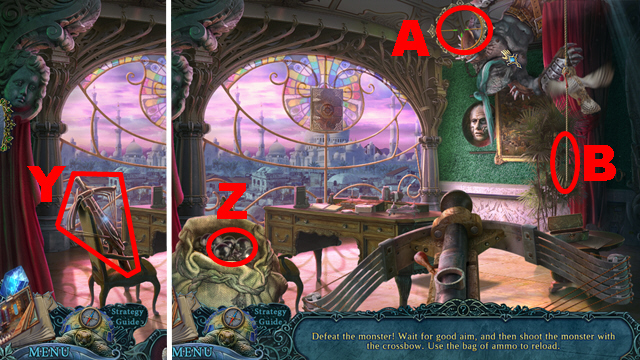
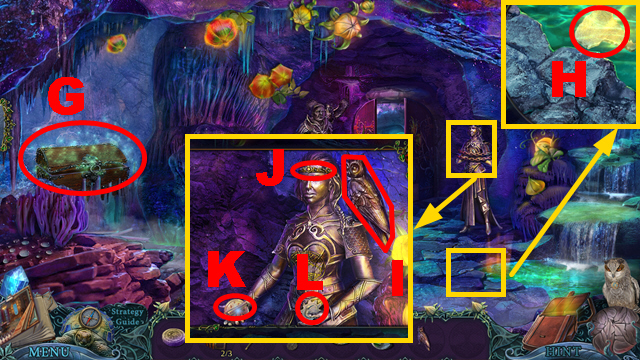
- Take the crossbow (Y).
- Take a bullet (Z) and shoot at the monster with a good aim (A) twice.
- Pull the rope (B).
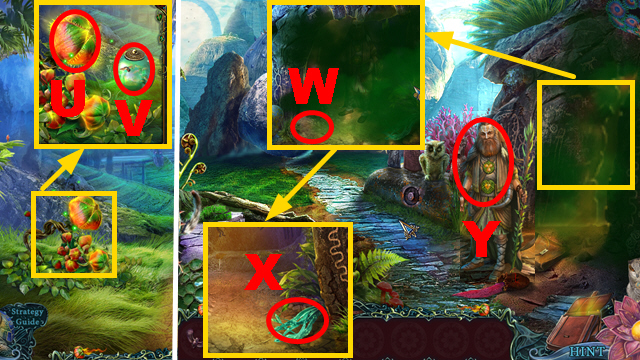
- Take the FLOWER (C) and ANGEL WING 2/2 (D).
- Walk down.
- Place the FLOWER (E); take the METAL SQUIRREL (F).
- Walk down.
- Place the METAL SQUIRREL and METAL LEAVES (G).
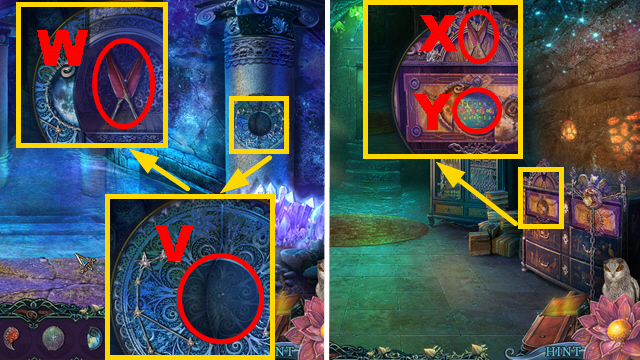
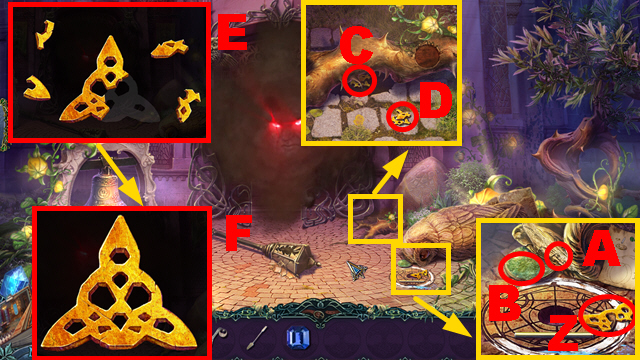
- Take the SIGNET RING (H) and BROKEN RUNE (I); place 2 ANGEL WINGS (green).
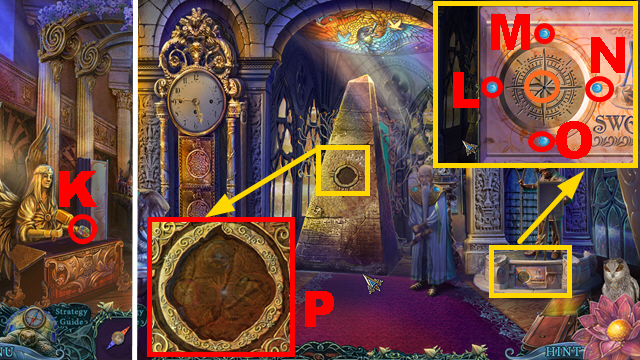
- Take the COMPASS CLASP (J) and METAL STAR 1/2 (K).
- Turn right twice.
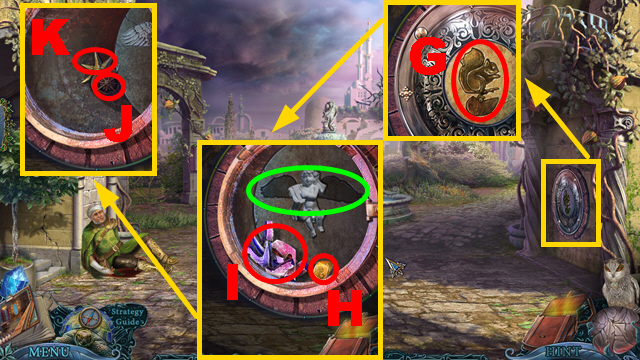
- Assemble 2 BROKEN RUNES (1) and (2); take 2 RUNES.
- Place 2 RUNES (purple).
- Examine the panel (L).
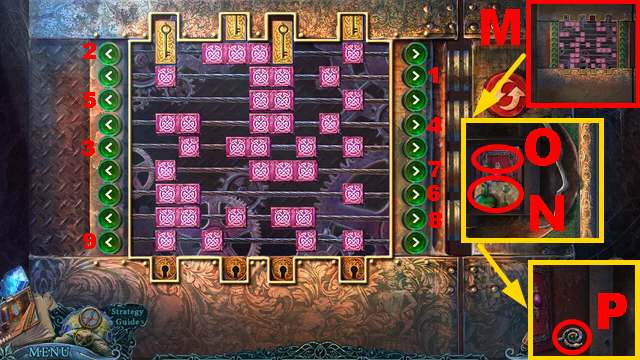
- Play the mini-game.
- Solution: 1-9.
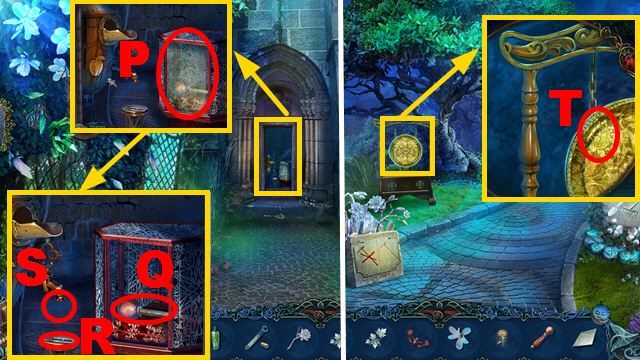
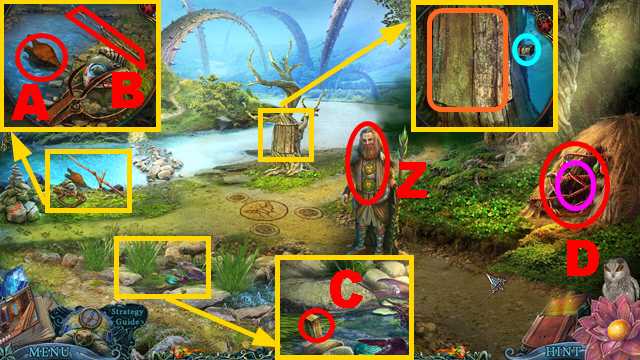
- Open the compartment (M); take the recipe (N).
- Read the book (O); take the SNAKE KEY (P).
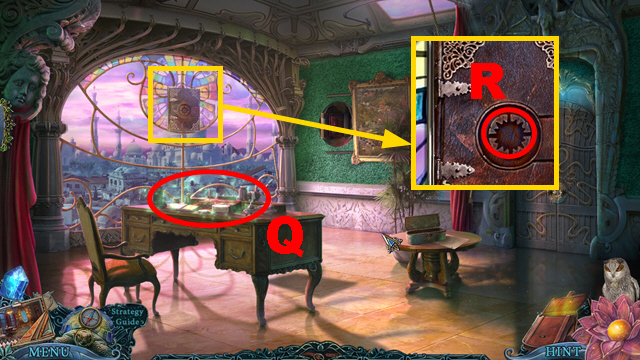
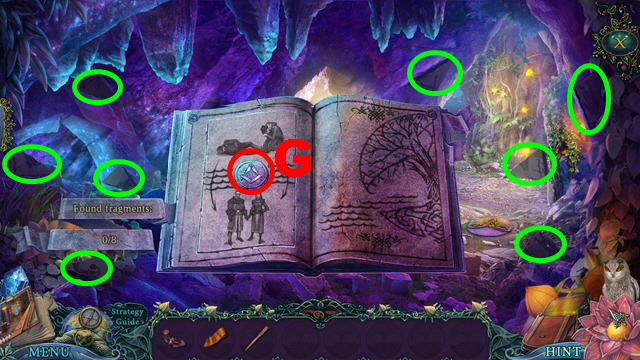
- Play the HOP (Q) to receive the SCALE.
- Place the COMPASS CLASP (R).
- Push the clasp.

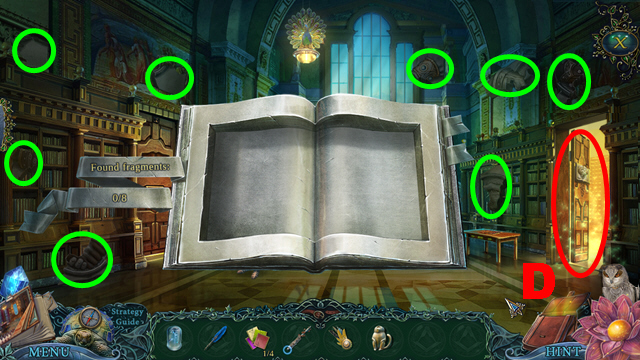
- Collect 8 fragments (green).
- Take the METAL BOOT (S).
- Walk down.

- Place 2 SCALES (purple) and the SNAKE KEY (T).
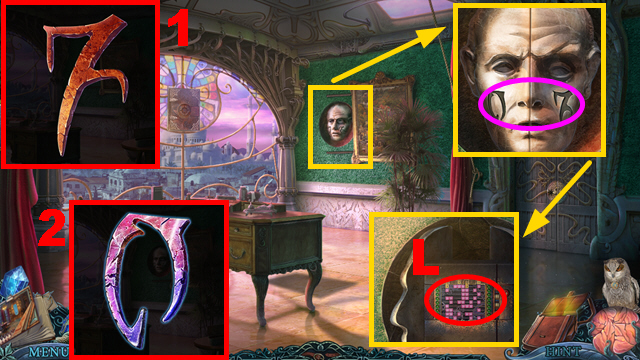
- Turn the key twice; take the SYMBOL ON PAPER (U).
- Take the amulet part (V) and METAL STAR 2/2 (W).
- Turn right.
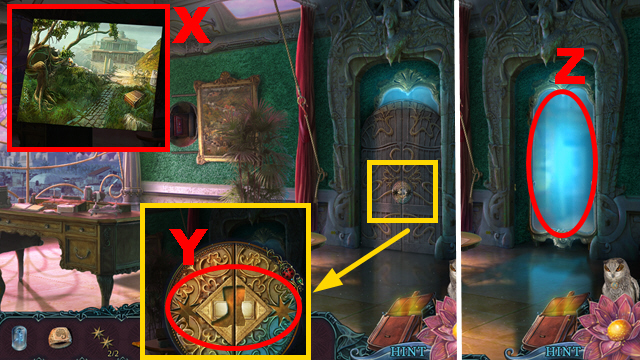
- Unfold the SYMBOL ON PAPER; take the LIBRIUS PHOTO (X).
- Place the METAL BOOT and 2 METAL STARS (Y).
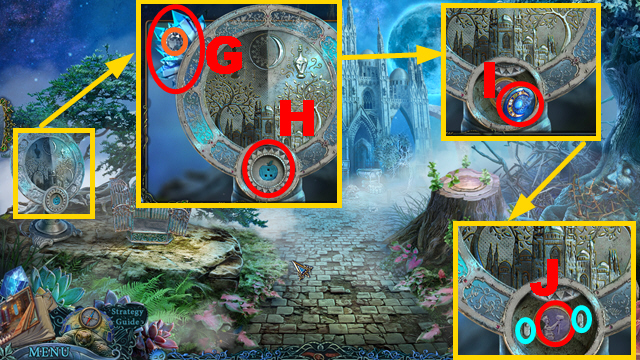
- Activate the portal (Z).
- Turn right.
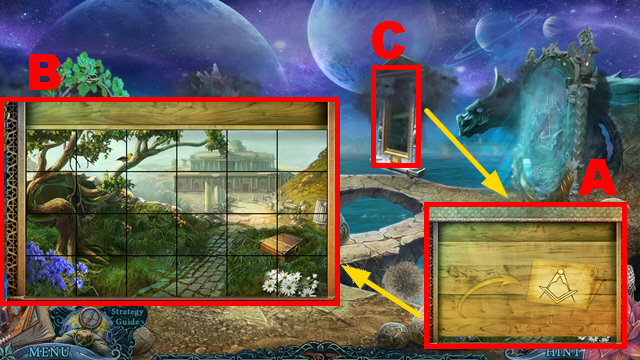
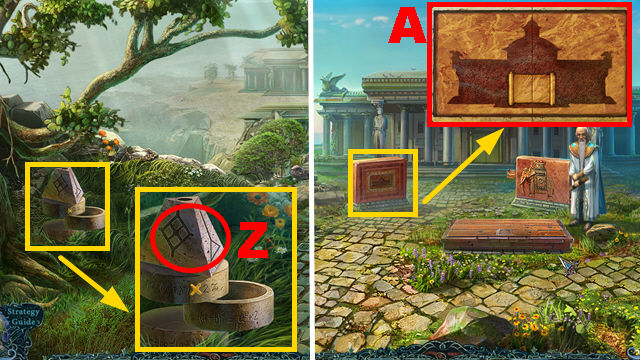
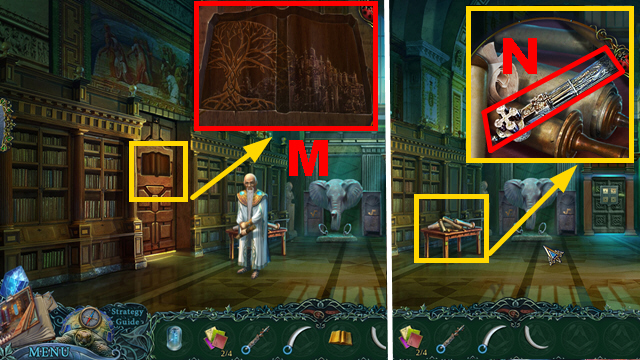
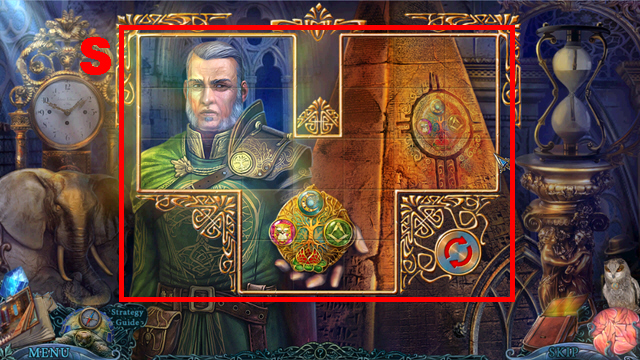
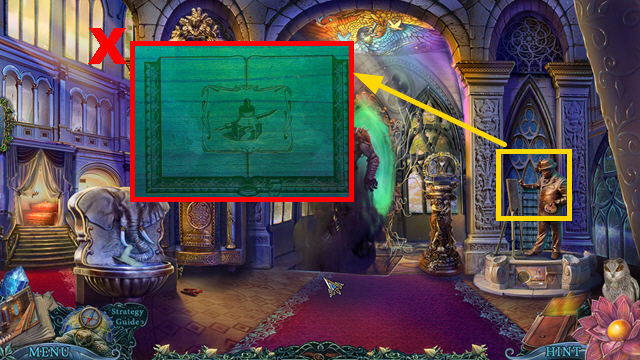
- Place the LIBRIUS PHOTO (A).
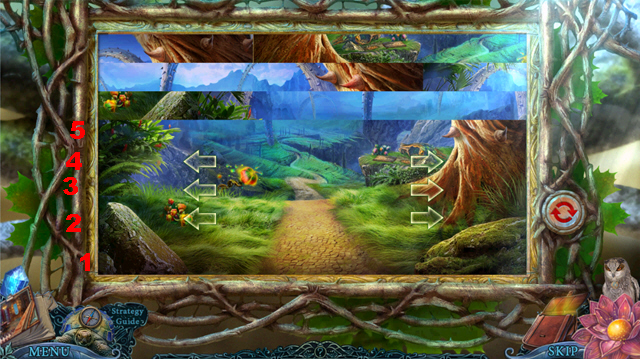
- Play the mini-game.
- Recreate the image correctly (B).
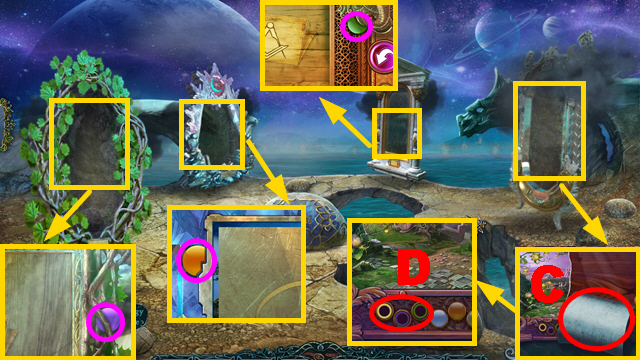
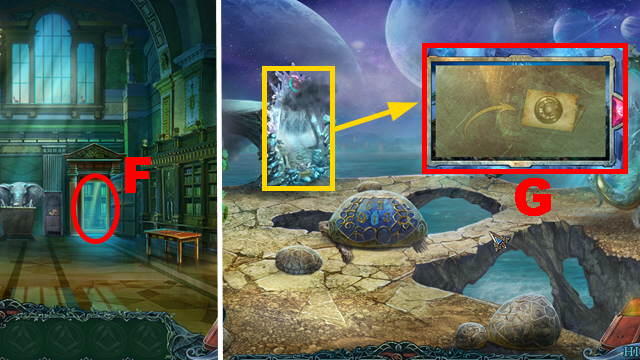
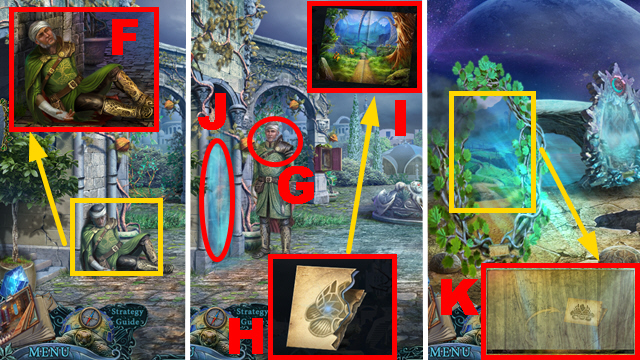
- Activate the portal (C); go through it.
Chapter 2: Librius
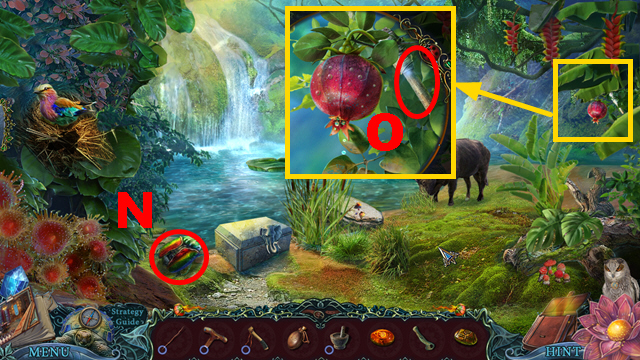
- Grab the figurine (D).
- Take the PEACOCK FIGURINE (E).
- Move forward.
- Remove the debris three times (F).
- Play the HOP (G) to receive CHAIN 1/2.
- Take CHAIN 2/2 (H).
- Walk down.
- Use 2 CHAINS (I); fix the chains.
- Take the PEACOCK FIGURINE (J).
- Move forward.
- Place 2 PEACOCK FIGURINES (K).
- Move forward.
- Take the HAMMER (L) and NET (M).
- Take the ADORNMENT BASE (N).
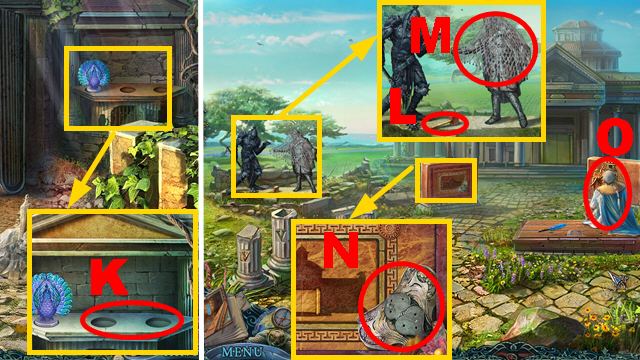
- Talk to the man (O).
- Take the MULTIPLICATION SIGN (P) and PEN (Q).
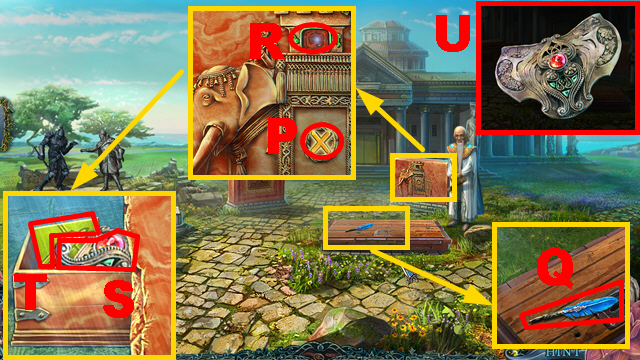
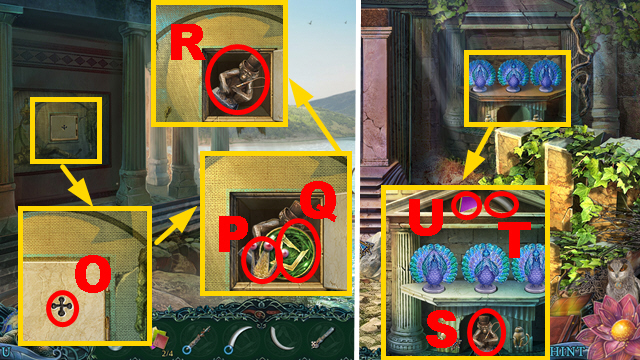
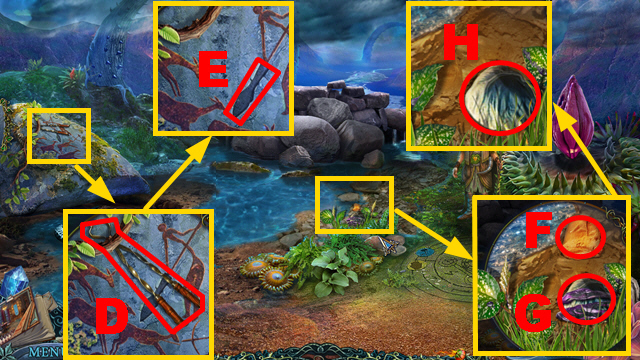
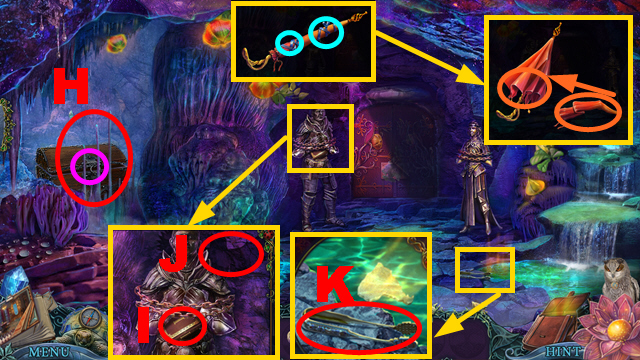
- Use the SIGNET RING (R); take the ADORNMENT PARTS (S) and SHIELD PART 1/4 (T).
- Place the ADORNMENT PARTS on the ADORNMENT BASE; take the ELEPHANT ADORNMENT (U).
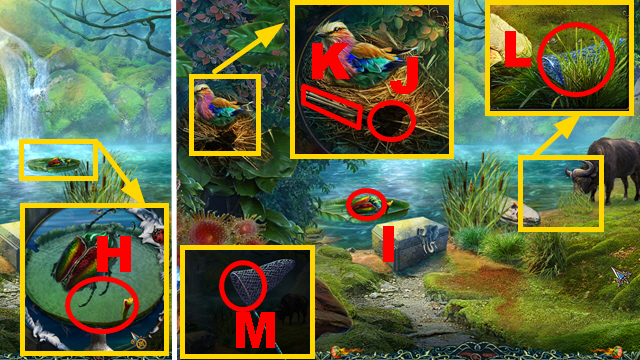
- Turn right.
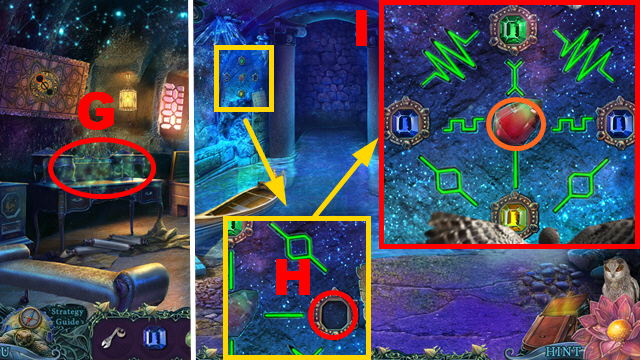
- Take the crystal (V) and ZIPPER SLIDE (W).
- Play the mini-game.
- Solution: X-Y-Zx2-Y-Z.

- Take the LOCK RING (A).
- Walk down twice.
- Place the ELEPHANT ADORNMENT (B).
- Remove the debris; take the LIBRARY EMBLEM (C).
- Walk down.
- Place the LOCK RING (D); open the chest.
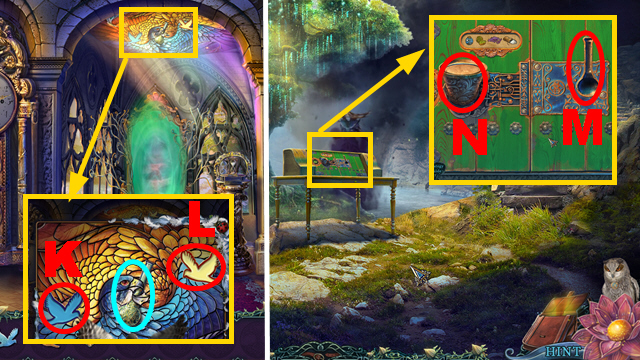
- Take the BROKEN FLUTE (E) and LATIN V (F); place the ZIPPER SLIDE (G).
- Pull the zipper; take the COMPASS (H).
- Remove the wingnut from the COMPASS (green); take the WEDGE (I).
- Place the MULTIPLICATION SIGN (J); take the CLAMP (K).
- Move forward.
- Place the WEDGE (L); hit it with the HAMMER.
- Take the SWORD BLADE (M).
- Move forward, turn right.
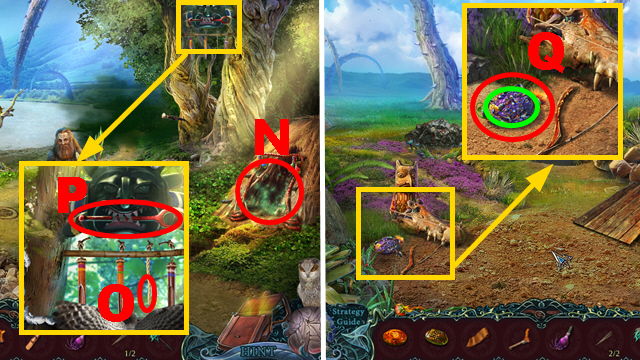
- Place the CLAMP (O); unfold the flag (N).
- Take the GLOWING SYMBOL (P).
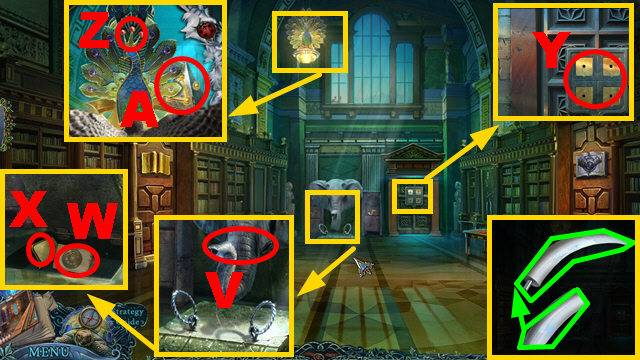
- Take the SWORD HANDLE (Q); use the NET (R) to receive the FISH.
- Place the SWORD HANDLE on the SWORD BLADE (S); take the SWORD.
- Walk down.
- Place the SWORD (T); take the GLOWING SYMBOL (U).
- Place the LATIN V (V); use the FISH (W).
- Take the LIBRARY EMBLEM (X) and BIRD WING (Y).
- Walk down twice.
- Place 2 GLOWING SYMBOLS (Z).
- Move forward twice.
- Place 2 LIBRARY EMBLEMS (A).
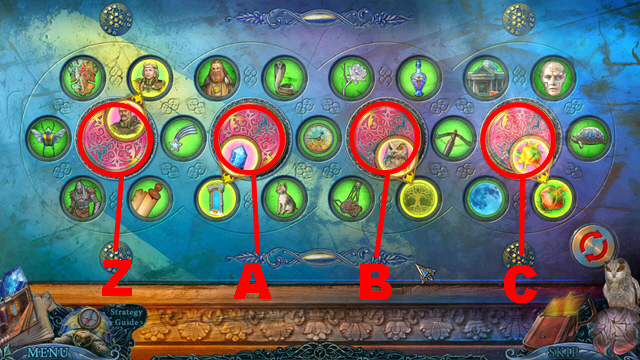
- Play the mini-game.
- Solution part (1): 3-5, 6-5, 6-3, 5-6.
- Solution part (2): 9-10, 9-8, 9-7, 8-9, 7-8, 7-9, 10-7, 10-7, 10-9, 8-10, 8-7, 8-9, 8-10, 7-8, 9-8, 9-8.
- Move forward.
Chapter 3: The Library
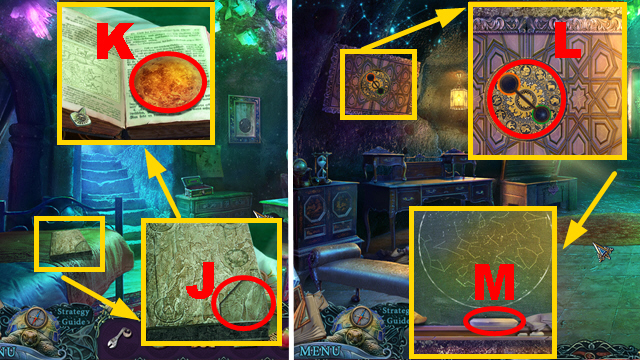
- Take the MONKEY EMBLEM (B).
- Examine the door (C).
- Collect 8 fragments (green).
- Play the HOP (D) to receive the PEN.
- Walk down, turn right.
- Place 2 PENS (green).
- Color the shapes with the pens (E).
- Take the HATCH HANDLE (F) and SHIELD PART 2/4 (G).
- Walk down twice.
- Play the HOP (H) to receive the PICTURE PART.
- Move forward, turn right.
- Place the PICTURE PART (I); move the figure three times (J).
- Walk down.
- Place the HATCH HANDLE (K); turn it twice.
- Take the SCREWDRIVER (L) and CLIPPERS (M).
- Walk down twice.
- Use the SCREWDRIVER (purple); take the GEAR (N).
- Grab the bird (O).
- Place the BIRD WING (P); take the RADICAL SYMBOL (Q).
- Move forward twice.
- Place the GEAR (R); turn the crank (S).
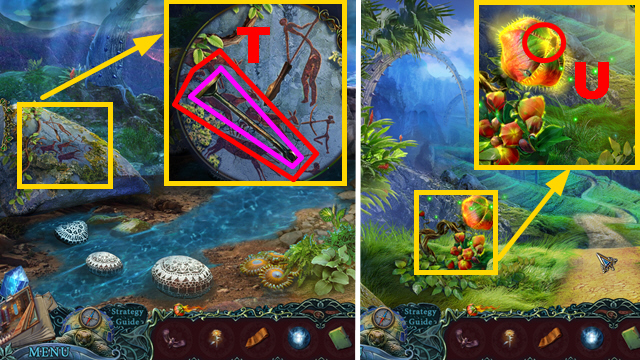
- Take the SYMBOL ON ROCK (T).
- Walk down twice.
- Place the SYMBOL ON A ROCK (U).
- Select 4 pairs framed in a similar color (V).
- Take the TUSK PART (W).
- Move forward three times.
- Place the RADICAL SYMBOL (X); take the MAGNET (Y).
- Walk down twice.
- Use the MAGNET (Z); take the MONKEY EMBLEM (A).
- Place 2 MONKEY EMBLEMS (B).
- Move forward, turn right.
- Use the CLIPPERS (C); take the TILE WITH SYMBOL (D).
- Walk down, move forward.
- Place the TILE WITH SYMBOL (E).
- Play the mini-game.
- Solution: (F).
- Take the VASE LID (G).
- Walk down twice.
- Place the VASE LID (H); open the vase.
- Take the pounded ivory (I) and GOLDEN BOOK (J).
- Move forward twice.
- Play the HOP (K) to receive the DIRTY TUSK.
- Clean the DIRTY TUSK four times (L); take the TUSK.
- Place the GOLDEN BOOK (M).
- Remove the scrolls; take the HANDLE (N).
- Walk down, turn right.
- Place the HANDLE (O); pull it twice.
- Take the CERAMIC CROWN (P), jewel (Q), and MONKEY FIGURINE (R).
- Walk down twice.
- Place the MONKEY FIGURINE (S); take the TUSK PART (T) and SHIELD PART 3/4 (U).
- Move forward twice.
- Combine 2 TUSK PARTS (green); take the TUSK.
- Place 2 TUSKS (V); take the SYMBOL ON PAPER (W) and SHIELD PART 4/4 (X).
- Place 4 SHIELD PARTS (Y).
- Place the CERAMIC CROWN (Z); take the GLOWING SYMBOL (A).
- Walk down three times.
- Place the GLOWING SYMBOL (B); take the LIBRIUS SYMBOL (C).
- Move forward three times.
- Unfold the SYMBOL ON PAPER; take the LUNOS PHOTO (D).
- Place the LIBRIUS SYMBOL (E); open the door.
- Activate the portal (F).
- Go through it.
- Place the LUNOS PHOTO (G).
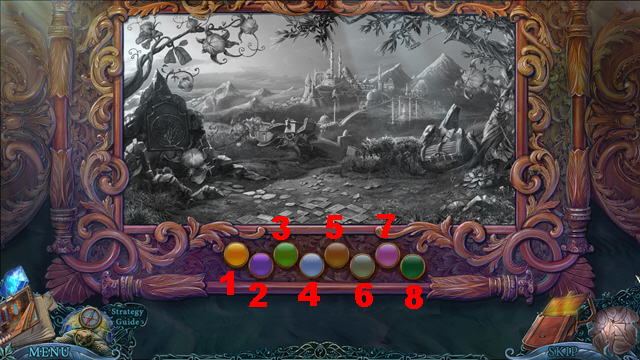
- Play the mini-game.
- Solution: 13-15, 14-4, 9-7, 16-12, 1-11, 6-7, 6-14.
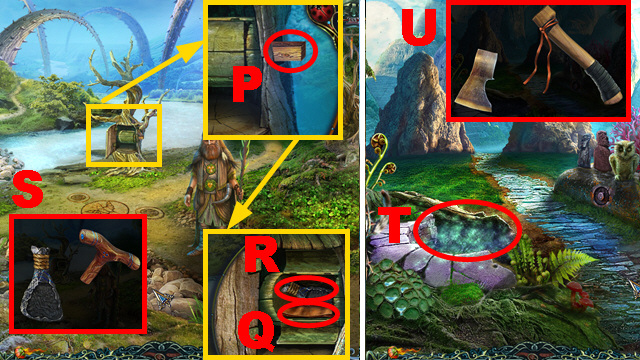
Chapter 4: Lunos
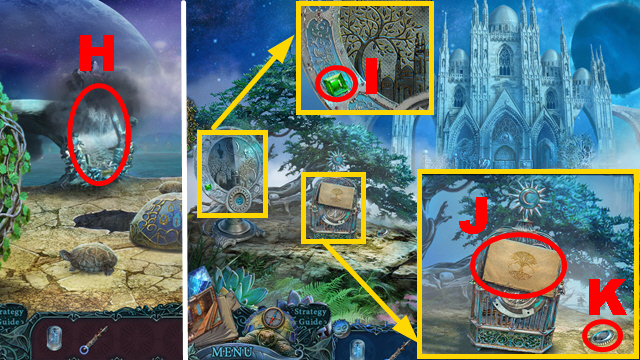
- Activate the portal (H).
- Go through it.
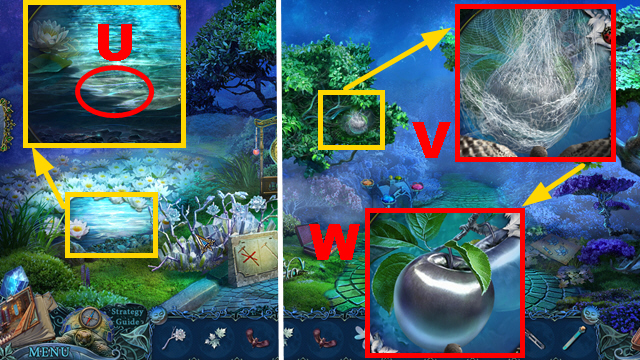
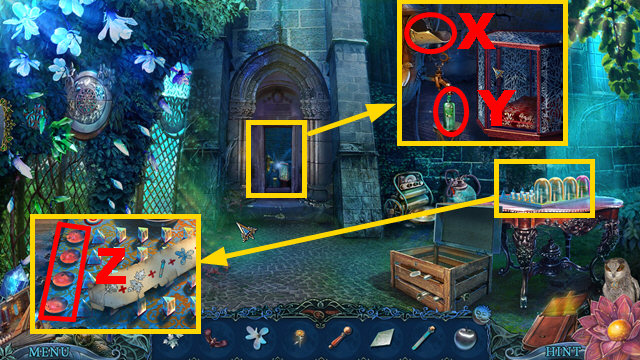
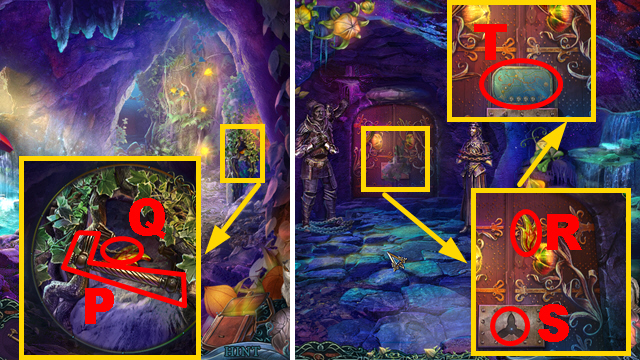
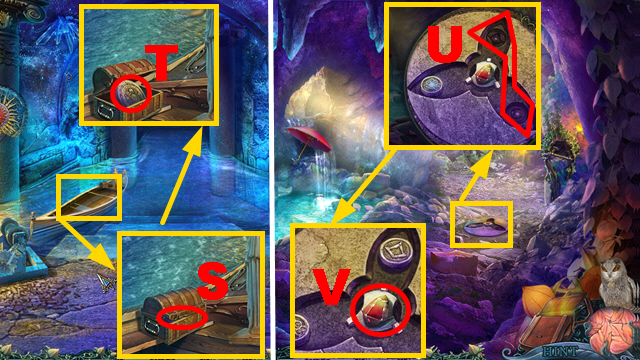
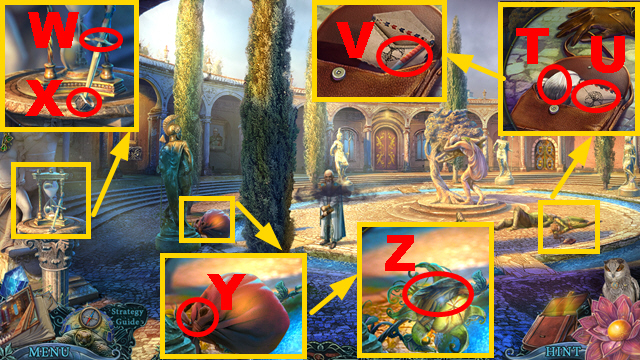
- Take GREEN GEM 1/4 (I), letter (J), and CRYSTAL BUTTON (K).
- Move forward.
- Take GREEN GEM 2/4 (L), the HALF MOON (M), and TORN PAPER (N).
- Use the door knocker (O).
- Remove the leaves; take 2 GREEN GEMS (P) and (Q).
- Place 4 GREEN GEMS on the BROKEN FLUTE (purple); take the BEAUTIFUL FLUTE (R).
- Place the BEAUTIFUL FLUTE (S).
- Walk down.
- Place the HALF MOON (T).
- Activate the crystals: 1-5.
- Take the LIGHT PRISM (U).
- Move forward.
- Place the LIGHT PRISM (V).
- Play the HOP (W) to receive the GAUNTLET.
- Walk down.
- Collect the MOON DISK with the GAUNTLET (X).
- Move forward.
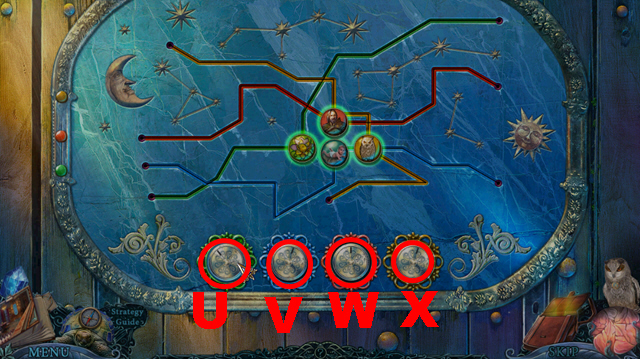
- Place the MOON DISK (Y); examine the board (Z).
- Play the mini-game.
- Solution: 1-3.
- Use the door knocker (A).
- Move forward.
- Take the COMET (B).
- Place the CRYSTAL BUTTON (C).
- Play the mini-game.
- Solution: 2-1-4-2-1.
- Take the SNAKE STAFF (D).
- Walk down.
- Place the SNAKE STAFF (E); take the PARTS OF THE MECHANISM (F) and COMET (purple).
- Walk down.
- Place 2 COMETS (G); open the cage.
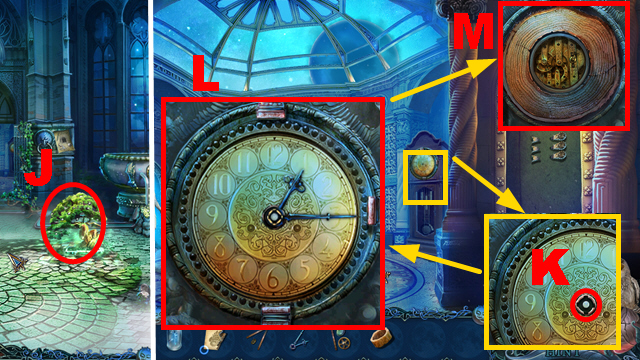
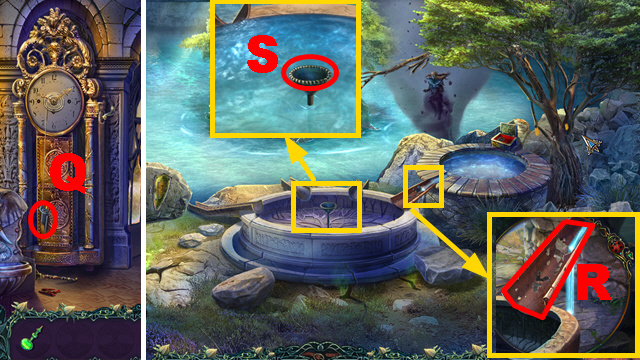
- Take the CLOCK HANDS (H) and PARTS OF THE MECHANISM (I).
- Move forward.
- Play the HOP (J) to receive the SMALL TREE RING.
- Move forward.
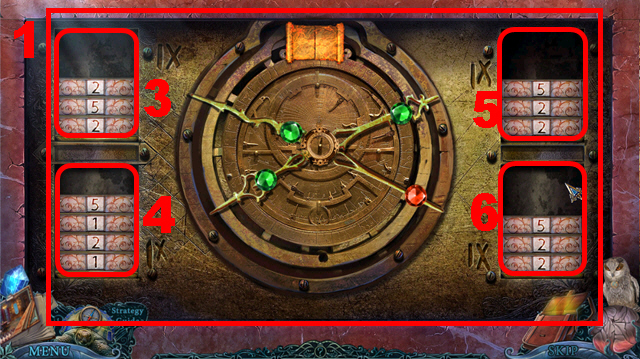
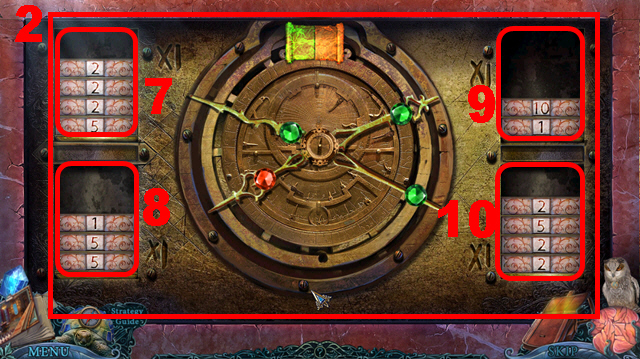
- Place the CLOCK HANDS (K); enter the correct time (L).
- Take the LARGE TREE RING (M).
- Walk down twice.
- Place the SMALL TREE RING and LARGE TREE RING (N).
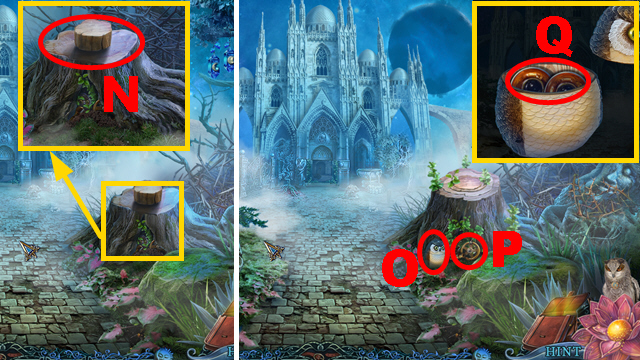
- Take the OWL POT (O) and PARTS OF THE MECHANISM (P).
- Open the OWL POT; take the OWL EYES (Q).
- Move forward twice.
- Place the OWL EYES (R).
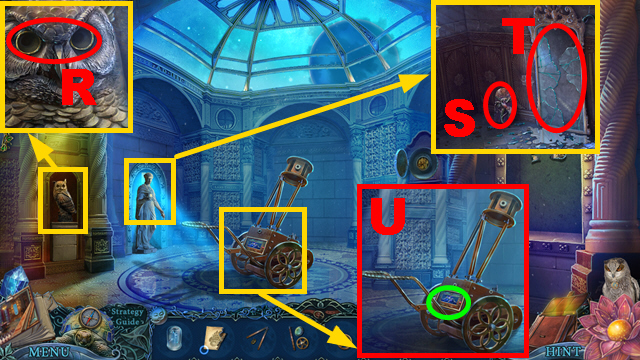
- Take the WOOD PANEL (S).
- Remove the shards twice (T).
- Place 3 PARTS OF THE MECHANISM (U).
- Examine the board (green).
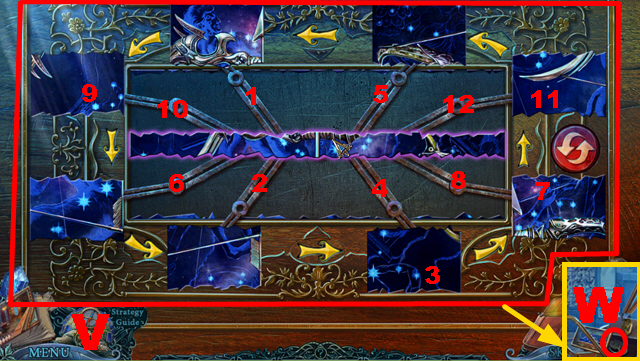
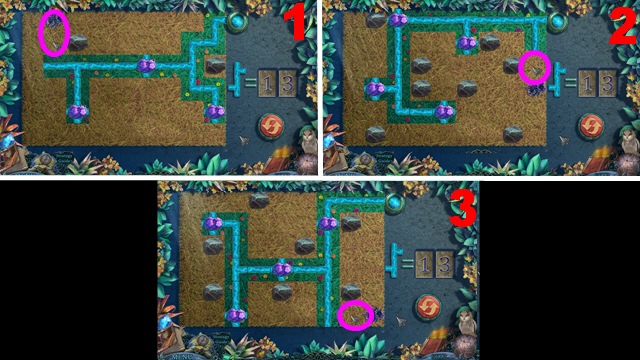
- Play the mini-game.
- Solution (V): 1-rotate-2-3-4-rotate-5-rotate-6-7-8-rotate-9-10-11-12.
- Take the SILVER TREE (W).
- Walk down.
- Place the SILVER TREE (X).
- Collect 8 fragments (green).
- Turn left.
- Take the COPPER CHAIN (Y); place the SILVER ROSE (purple).
- Remove leaves twice; take the HAND PICK (Z).
- Move forward.
- Take HAMMER DISK 1/3 (A).
- Remove leaves three times (B).

- Play the HOP (C) to receive the GLASS PIPE.
- Move forward.
- Remove the debris (D).
- Place the WOOD PANEL (E); take the BASKET (F).
- Take the SYMBOLIC STONE (G); place the GLASS PIPE (H).
- Take the CIDER BOTTLE (I) and EMPTY TEST TUBE (J).
- Take the NUMBERED GEAR (K).
- Place the HAND PICK (L); pull the device (M).
- Turn the handle three times (N); take the SILVER HAND PICK (O).
- Walk down.
- Use the SILVER HAND PICK to acquire the CRYSTAL BRANCH (P).
- Place the SYMBOLIC STONE (R); take the PRISMATIC CRYSTAL (Q) and APPLE TOKEN (S).
- Walk down.
- Place the BASKET (T).
- Collect 4 leaves (purple); take the BASKET OF SILVER LEAVES.
- Pick 4 leaves from the BASKET OF SILVER LEAVES (U); take the SILVER LEAVES (V).
- Place the NUMBERED GEAR (green); enter the correct code (W).
- Take the METAL OWL (X) and SILVER GRATING (Y).
- Move forward twice.
- Place the SILVER GRATING (A); take the SILVER-BLOOMING FLOWER (B).
- Use the PRISMATIC CRYSTAL (C); take BRIGHT CRYSTAL 1/4 (orange).
- Walk down three times.
- Collect HAMMER DISK 2/3 (D) with the COPPER CHAIN.
- Remove leaves; use the PRISMATIC CRYSTAL (E).
- Take BRIGHT CRYSTAL 2/4 (green).
- Move forward.
- Use the PRISMATIC CRYSTAL (F); take BRIGHT CRYSTAL 3/4 (purple).
- Walk down twice.
- Use the PRISMATIC CRYSTAL (G); take BRIGHT CRYSTAL 4/4 (orange).
- Place the APPLE TOKEN (H); take the jewel (I).
- Move the clipping (blue); take HAMMER DISK 3/3 (J).
- Move forward, turn left.
- Place 4 BRIGHT CRYSTALS (K); turn the handle (L).
- Take the ENCHANTED ROSE (M) and HANDLE (N).
- Move forward twice.
- Place 3 HAMMER DISKS (O).
- Take the GLASS PLATE (P), GONG HAMMER (Q), and SILK SCISSORS (R).
- Place the CIDER BOTTLE (S).
- Walk down.
- Use the GONG HAMMER (T).
- Place the EMPTY TEST TUBE (U) to acquire the TEST TUBE OF WATER.
- Walk down.
- Use the SILK SCISSORS (V); take the SILVER APPLE (W).
- Move forward twice.
- Place the SILVER APPLE (X); take the LIQUID SILVER (Y).
- Place the CRYSTAL BRANCH, SILVER LEAVES, TEST TUBE OF WATER, and SILVER-BLOOMING FLOWER (Z).
- Play the mini-game.
- Solution: 1-4.
- You receive UNCLE'S MEDICINE.
- Walk down.
- Play the HOP (A) to receive the GLASS PLATE.
- Walk down twice, move forward.
- Place 2 GLASS PLATES (B), LIQUID SILVER (C), and HANDLE (D); turn the handle.
- Activate the portal (E).
- Go through it.
- Turn right, move forward.
- Use UNCLE'S MEDICINE (F).
- Talk to the man (G) to receive the TORN PAPER.
- Combine 2 TORN PAPERS (H); unfold it.
- Take the FLORUS PHOTO (I).
- Activate the portal (J).
- Go through it.
- Place the FLORUS PHOTO (K).
- Play the mini-game.
- Solution: 1-12.
Chapter 5: Florus
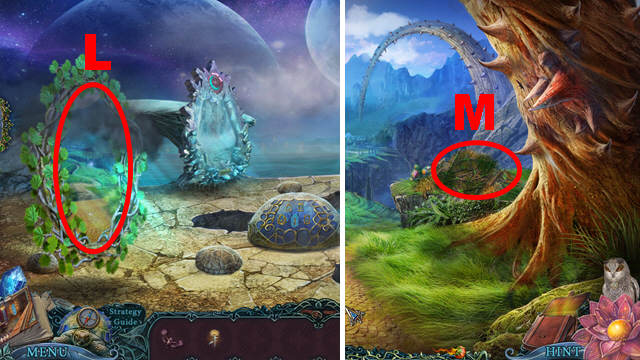
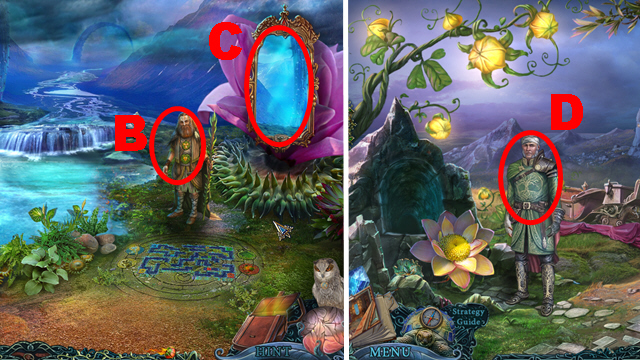
- Activate the portal (L).
- Go through it.
- Examine the hill (M).
- Play the mini-game.
- Clean all the fields with the bug to solve the puzzle (N).
- Move forward.
- Open the pouch (N); flip it around.
- Take the HONEY (O).
- Play the HOP (P) to receive the RATTLE DRUM.
- Walk down.

- Use the RATTLE DRUM (Q); take the FRUIT HALF (green).
- Move forward.
- Place the FRUIT HALF (R); open the bag.
- Take the BOTTLE (S).
- Put the HONEY into the BOTTLE (T); take the BOTTLE WITH BAIT.
- Walk down.
- Use the BOTTLE WITH BAIT (U); take the FIREFLY BOTTLE (V).
- Move forward.
- Place the FIREFLY BOTTLE (W) to receive the magic pollen.
- Take the ROCKWEEDS (X).
- Talk to the man (Y).
- Move forward.
- Talk to the man (Z).
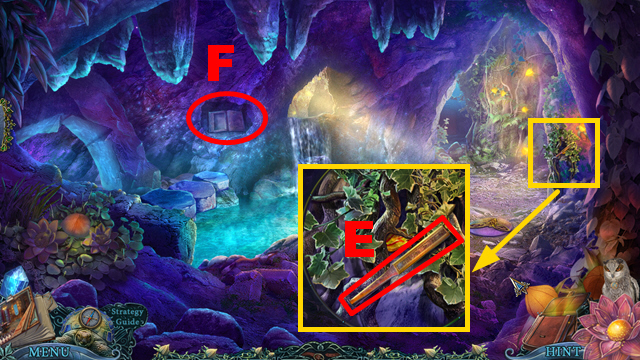
- Take the BELLOWS (A) and STICK (B).
- Remove the grass; take the WOODEN PIN (C).
- Untangle the rope twice (D); play the HOP (purple) to receive the ANCIENT TOOL HANDLE.
- Open the compartment (orange); remove the wood piece (blue).
- Take the AXE HANDLE (E).
- Place the WOODEN PIN (F).
- Move forward.
- Take the FULL WATER SKIN (G).
- Remove 2 items; take the EGG (H).
- Take the MORTAR AND PESTLE (I); use the BELLOWS (J).
- Take the FIRE SYMBOL (green).
- Walk down, turn left.
- Place the EGG (K); take the WOODEN HANDLE (L).
- Take the EARTH SYMBOL (M).
- Take the DRY TORCH (O).
- Chase the bug (N).
- Walk down.
- Place the WOODEN HANDLE (P); pull it.
- Take the LEATHER (Q) and ANCIENT TOOL BLADE (R).
- Combine the ANCIENT TOOL BLADE and ANCIENT TOOL HANDLE (S); take the ANCIENT SHOVEL.
- Walk down.
- Play the HOP (T) to receive the AXE BLADE.
- Combine the AXE BLADE and AXE HANDLE (U); take the AXE.
- Walk down.
- Use the AXE (V) to acquire the THORN.
- Place the DRY TORCH (W) to acquire the TORCH.
- Use the ANCIENT SHOVEL (X); open the compartment.
- Take the STICK LIGHTER (Y).
- Light the TORCH with the STICK LIGHTER (Z); take the LIT TORCH.
- Move forward.
- Use the THORN (A); take the BAMBOO CHIME (B) and STRAW (C).
- Move forward twice.
- Use the ANCIENT SHOVEL (D); open the compartment.
- Take the FISHING LINE (E) and FLOWER BULB (F).
- Combine the FISHING LINE and STICK (G); take the FISHING ROD.
- Walk down, turn left.
- Place the FISHING ROD (H); fix and pull it.
- Chase the bug (I).
- Use the STRAW (J); take INCENSE STICK 1/2 (K).
- Remove the grass; take the EMPTY FISHNET (L).
- Combine the EMPTY FISHNET and ROCKWEEDS (M); take the FULL FISHNET.
- Walk down.
- Play the HOP (N) to receive INCENSE STICK 2/2.
- Place the BAMBOO CHIME (O); take the WOODEN FORK (P).
- Move forward.
- Place 2 INCENSE STICKS (Q); take the GIANT FRUIT (green).
- Walk down, turn left.
- Place the GIANT FRUIT (R).
- Remove the moss; take the OLIVE OIL (S).
- Collect the ACID FRUIT with the WOODEN FORK (T).
- Walk down.
- Place the FULL FISHNET (U); take the WATER SYMBOL (V).
- Place the WATER SYMBOL (1), EARTH SYMBOL (2), and FIRE SYMBOL (3).
- Use the FULL WATER SKIN (1), FLOWER BULB (2), and LIT TORCH (3).
- Use the OLIVE OIL (W); take the DAGGER (X).
- Turn left.
- Use the DAGGER (Y); take the jewel (Z), SPEARHEAD (A), and MAGIC BEETLE (B).
- Walk down.
- Place the MAGIC BEETLE (C).
- Turn right.
- Take the FIRE TONGS (D); place the SPEARHEAD (E).
- Take the BRIGHT CLAY (F); use the ACID FRUIT (G).
- Take the ELEPHANT EAR (H).

- Pound the BRIGHT CLAY with the MORTAR AND PESTLE (I); take the DYE (J).
- Walk down, turn left.
- Place the ELEPHANT EAR (K); open the chest.
- Take the MAGIC ICE (L) and ENCHANTER'S BOOK (M).
- Walk down, move forward.
- Place the DYE (N); apply it to the skull (purple).
- Take the BOW STRING (O).
- Walk down three times.
- Collect the FIRE FLOWER with the FIRE TONGS (P).
- Move forward twice.
- Use the BOW STRING (Q); take the TOTEM HEAD (green).
- Walk down.
- Place the TOTEM HEAD (R).
- Pull the hammer; take the HAMMER (S).
- Move forward, turn right.
- Use the HAMMER twice (T); take the BRANDING IRON (purple).
- Walk down three times.
- Place the BRANDING IRON (U); take the HOT BRANDING IRON.
- Move forward.
- Place the HOT BRANDING IRON and MAGIC ICE (V); take the OWL FIGURINE (W).
- Move forward, turn right.
- Place the ENCHANTED ROSE (X), OWL FIGURINE (Y), ENCHANTER'S BOOK (Z), and FIRE FLOWER (A).
- Play the mini-game.
- Solution: 1-8.
- Talk to the man (B) to receive the fire flower petal.
- Activate the portal (C).
- Go through it.
- Turn right.
- Talk to your uncle (D).
- Turn left.
Chapter 6: The Dungeon
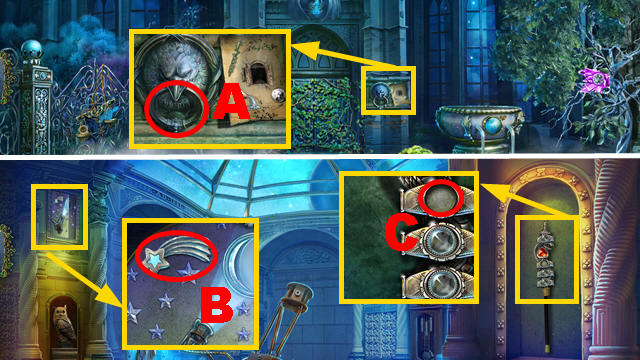
- Take the LETTER OPENER (E).
- Examine the book (F).
- Find 8 fragments (green).
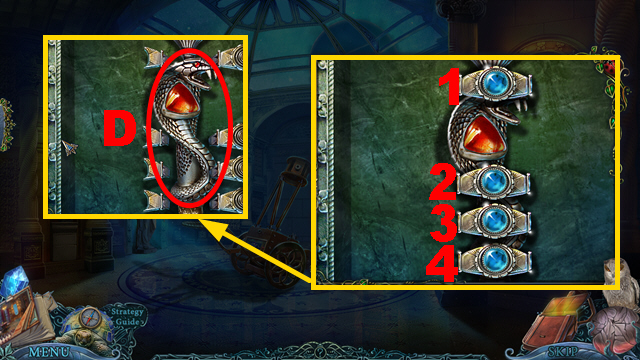
- Take the EMBELLISHED BUTTON (G).
- Move forward.
- Remove the ice (H); play the HOP (purple) to receive the FURLED UMBRELLA.
- Take BOOK 1/3 (I); place the METAL OWL (J).
- Take the SMALL TONGS (K).
- Open the FURLED UMBRELLA with the LETTER OPENER (blue).
- Place the cloth on the umbrella (orange); take the UMBRELLA.
- Walk down.

- Use the UMBRELLA (green); take the DECORATIVE LEAF (L).
- Collect the ORNAMENT with the SMALL TONGS (M).
- Move forward.
- Place the DECORATIVE LEAF (N); take the DOOR HANDLE (O).
- Walk down.
- Place the DOOR HANDLE (P); take the FLAME TONGUE (Q).
- Move forward.
- Place the FLAME TONGUE (R) and ORNAMENT (S).
- Examine the board (T).
- Play the mini-game.
- Solution: X-right x5, V-right x7, W-right x5, U-right x5.
- Move forward.
- Take the CANE (Y), SCOOP (Z), and BOOK 2/3 (A).
- Turn right.
- Use the LEATHER (purple); take the DIADEM (B).
- Walk down, turn left.
- Take the BOTTLE TOKEN (C) and METAL WING (D).
- Place the METAL WING (E).
- Remove the paper and scrolls (F); play the HOP (blue) to receive the METAL OWL.
- Walk down twice.
- Play the HOP (G) to receive the MALACHITE.
- Collect the GEOGRAPHIC CONTINENT with the SCOOP (H).
- Place the METAL OWL (I) and DIADEM (J).
- Take the TELESCOPE TOKEN (K) and GEAR (L).
- Move forward.
- Place the GEOGRAPHIC CONTINENT (M); open the globe.
- Take the SUN PLAQUE HALF (N).
- Place the MALACHITE (O); open the box.
- Take the SMALL AMULET (P).
- Turn left.
- Place the TELESCOPE TOKEN (Q); push it.
- Remove the pages; take the MOON PLAQUE HALF (R) and WRENCH (S).
- Walk down, turn right.
- Place the GEAR (T); turn the handle (orange).
- Take the MOON PLAQUE HALF (U).
- Place 2 MOON PLAQUE HALVES (V); take the FEATHERS (W).
- Walk down, turn left.
- Place the FEATHERS (X); examine the compartment (Y).
- Play the mini-game.
- Solution: Z-A-B-C-Z-A-B-C-Ax3.
- Open the compartment; take BOOK 3/3 (D) and PIN (E).
- Walk down.
- Place 3 BOOKS (F); take the book (G) and TREE SYMBOL PART (H).
- Walk down.
- Place the TREE SYMBOL PART (I); take the SUN PLAQUE HALF (J) and CLOCK CHAIN (K).
- Move forward, turn right.
- Place 2 SUN PLAQUE HALVES (L); take the METAL CLAWS (M).
- Walk down, turn left.
- Place the METAL CLAWS (N) and SMALL AMULET (O).
- Open the compartment; take the scroll (P) and DIAMOND RING (Q).
- Walk down.
- Use the DIAMOND RING (R); take the CENTER BAR (purple).
- Turn right.
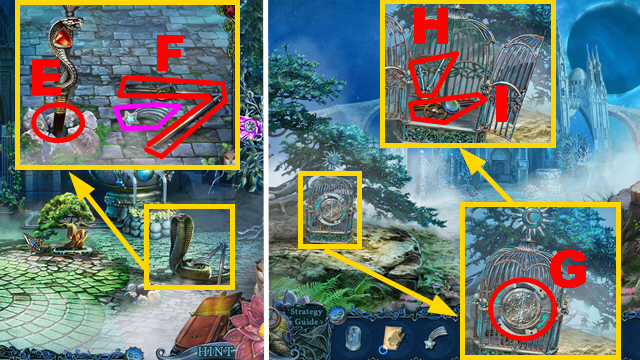
- Use the PIN (S); take the EMBELLISHED BUTTON (T).
- Walk down three times.
- Place 2 EMBELLISHED BUTTONS (U); push 3 buttons.
- Take the CRYSTAL TOKEN (V).
- Move forward twice, turn left.
- Place the BOTTLE TOKEN, CENTER BAR, and CRYSTAL TOKEN (W).
- Move forward.
- Take the SCULPTOR'S TOOL (X).
- Collect the BLUE STONE with the CLOCK CHAIN (Y).
- Take the MYSTIC SYMBOL BASE (Z); use the SCULPTOR'S TOOL (A).
- Remove the debris; take the GREEN PLANET (B).
- Use the CANE (C); take the MYSTIC PARTS (D).
- Combine the MYSTIC SYMBOL BASE and MYSTIC PARTS (E); take the MYSTIC SYMBOL (F).
- Walk down.
- Play the HOP (G) to receive the STONE CORNER PART.
- Walk down, turn right.
- Place the BLUE STONE (H).
- Arrange the connections correctly (I).
- Take the MAGIC CRYSTAL (orange).
- Walk down.
- Place the STONE CORNER PART (J); open the book.
- Turn a page; take the ORANGE PLANET (K).
- Turn left.
- Place the GREEN PLANET and ORANGE PLANET (L); rotate the planets.
- Remove the handkerchiefs; take the CHALK (M).
- Place the MYSTIC SYMBOL (N); open the door.
- Take the MAGIC LIQUID (O).
- Move forward.
- Use the CHALK, MAGIC LIQUID, and MAGIC CRYSTAL (P).
- Open the flower (Q).
- Examine the door (R).
- Play the mini-game.
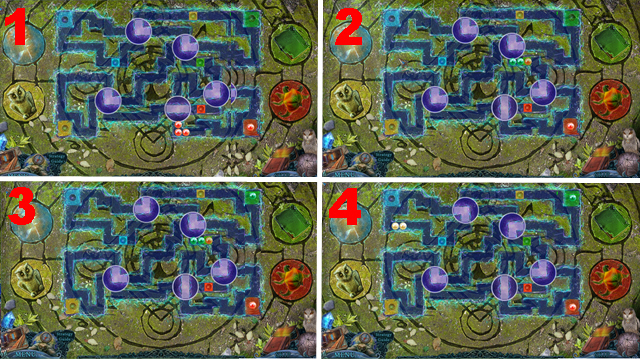
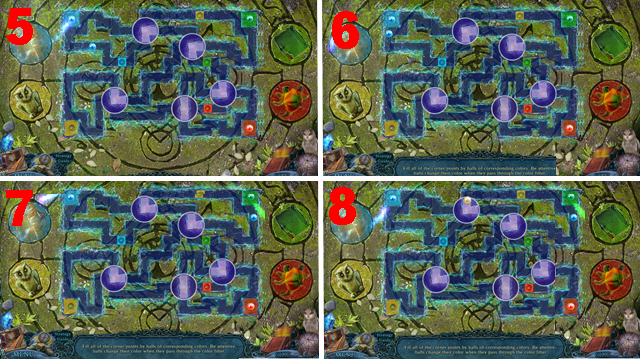
- Restore the image correctly: (S).
- Move forward.
Chapter 7: The Hall of Fame
- Open the bag; take the STATUE HEAD (T).
- Open the letter (U); take the SMALL KNIFE (V).
- Use the WRENCH (W); take the SIGNET RING (X).
- Use the SMALL KNIFE (Y); open the bag.
- Take PORTRAIT PART 1/3 (Z).
- Move forward.
- Take PORTRAIT PART 2/3 (A).
- Place the SIGNET RING (B).
- Remove the room divider (C).
- Play the HOP (D) to receive the CLAPPER.
- Walk down twice.
- Place the CLAPPER (E); ring the bell.
- Take the SWORD (purple); remove the armor (F).
- Move forward.
- Place the SWORD (green); push the buttons 1-16.
- Open the door.
- Take the SIGNET RING (G) and ARMS OIL (H).
- Move forward.
- Place the SIGNET RING (I); take the jewel (J) and WOODEN FLOWER (K).
- Walk down twice.
- Place the WOODEN FLOWER (L); take PORTRAIT PART 3/3 (M).
- Move forward.
- Place 3 PORTRAIT PARTS (N); take the OWL ARMOR (O) and FLAT OBELISK (P).
- Walk down.
- Use the ARMS OIL (Q); take the RIGHT ARMLET (green).
- Place the OWL ARMOR (R); take the OWL KEY (S).
- Move forward.
- Use the OWL KEY (T); turn it twice.
- Take the BROKEN OWL HELMET (U).
- Move forward.

- Place the FLAT OBELISK (V).
- Move forward.
- Take the HELMET PART (W).
- Combine the BROKEN OWL HELMET and HELMET PART (X).
- Fix the helmet (purple); take the OWL HELMET (Y).
- Remove the curtain (Z); play the HOP (green) to receive the STATUE TORSO.
- Walk down.
- Place the OWL HELMET (A); take the CLOAK (B).
- Place the STATUE TORSO and STATUE HEAD (C); take the COMPASS ARROW (D).
- Walk down.
- Place the CLOAK (E); take the LEFT ARMLET (F).
- Move forward.
- Place the LEFT ARMLET (G) and RIGHT ARMLET (H).
- Touch the bowl (I); open the chest.
- Examine the area (J).

- Play the mini-game.
- Follow the line (purple).
- Solution: 1-4.
- For the fourth solution, you may have to wait until necessary passages open up.
- Take the VI ANIMO AMULET (K).
- Move forward.
- Place the COMPASS ARROW (orange).
- Push the buttons: O-L-N-M-O-N-M.
- Place the VI ANIMO AMULET (P).
- Take the OUROBOROS SYMBOL (Q); remove the broken hourglass (green).
- Walk down twice.
- Place the OUROBOROS SYMBOL (blue); take the HOURGLASS (R).
- Move forward twice.
- Place the HOURGLASS (S); take the PORTRAIT DISK (T).
- Grab the lever (U).
- Walk down.
- Use the PORTRAIT DISK (V); take the ALBUM (W).
- Move forward.
- Place the ALBUM (X).
- Open it.
- Find hidden parts (purple): 1-4.
- Go through the portal, turn right.
- Take the SCALE PAN (Y).
- Walk down three times.
- Play the HOP (Z) to receive the GOLDEN FISH.
- Place the SCALE PAN (A); take the SHIELD (B) and CABLE WITH HOOK (C).
- Move forward twice, turn right.
- Place the SHIELD (D); take the PROPS (E).
- Place the GOLDEN FISH (F); open the box.
- Take the BLUE BIRD (G).
- Walk down, turn left.
- Use the PROPS (H); take the fruit (green).
- Take the YELLOW BIRD (I).
- Walk down twice.
- Play the HOP (J) to receive the GOLD LADYBUG.
- Place the BLUE BIRD (K) and YELLOW BIRD (L); take the VIAL (blue).
- Move forward.
- Place the VIAL (M); touch the bowl twice (N).
- Play the mini-game.
- Solution: 1-O, 2-S, 3-S, 4-P, 3-P, 2-P, 1-R, 2-T, 3-T, 4-Q, 1-Q, 3-V, 1-R, 2-B, 4-S, 1-S, 3-W, 2-C, 3-X, 1-P, 2-P, 4-P, 3-Z, 4-U, 2-U, 1-U, 3-A, 1-Z, 2-Z, 4-Z, 3-Y, 4-Y, 2-Y, 1-Y.
- Take the LUMINATOS ELIXIR (D).
- Turn left.
- Place the GOLD LADYBUG (E); open the bag.
- Take the CABLE WITH HOOK (F), METAL LEVER (G), and CLOTH (H).
- Walk down twice.
- Place the METAL LEVER (I); pull it.
- Place the CABLE WITH LOOP (J).
- Move forward.
- Place the CLOTH (K); take the TABLE LEG (L).
- Walk down.
- Place the TABLE LEG (M); pull it.
- Place the CABLE WITH HOOK (N).
- Combine 2 ropes (O).
- Pull the lever (P).
- Take the GUTTER (Q).
- Move forward, turn right.
- Place the GUTTER (R).
- Use the LUMINATOS ELIXIR (S).
- Congratulations, you have completed Reflections of Life: Tree of Dreams.
Created at: 2014-07-20