

Walkthrough Menu
- General Tips
- Introduction: The Office
- Chapter 1: Dr. Herzle’s Mansion
- Chapter 2: Abuja – Buddha Temple
- Chapter 3: Stefan – Prison
- Chapter 4: Jilberto – City Square
- Chapter 5: Buggy – A Dog’s Life in Paris
- Chapter 6: Albertina - Observatory
General Tips
- Click on the character’s icon in the lower right to see your current task list.
- Use the Navigation Arrows to move from scene to scene. The Navigation Arrows are located in the lower left corner of each scene.
- You can click on different parts of the scene to interact with them just for fun. You can touch a wind chime to hear it or press a coffee machine to see steam come out of it.
- The Diary is located in the lower left corner. You can click on it at any time to read information on current adventures or for mini-game explanations.
- Click on a hint button in any Hidden Object scene and a circle will form around the perimeter of a random item. The item the hint is pointing to is usually in the middle of the circle.
- The hints are unlimited but they need time to recharge in between uses.
Orange List Items
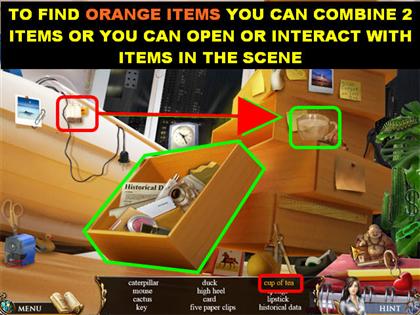
- Orange list items are Interactive Items. In order to find these items you need to open something, look inside other items or interact with items in the scene.
- Your cursor will turn into a hand and the item will sparkle when you hover on an interactive item.
- Once you find the interactive item, drag it to the area you think it belongs to.
- The item will turn white on your list when you’ve merged it together with another item successfully.
Interactive Items – Inventory Box
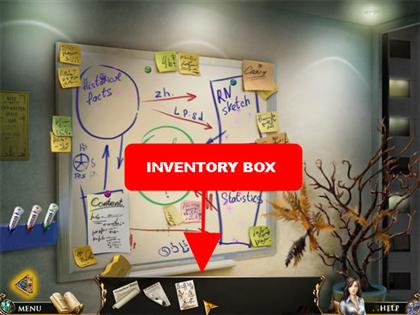
- Your interactive items will go into the inventory box at the bottom of the scene.
- Your inventory box will be hidden unless you place your cursor at the bottom of the scene to bring it up.
- Pick up the interactive item you want to use and drag to the area you want to use it in. If the item is in the right place it will stick. If it isn’t, it will automatically go back into your inventory.
Mini-games
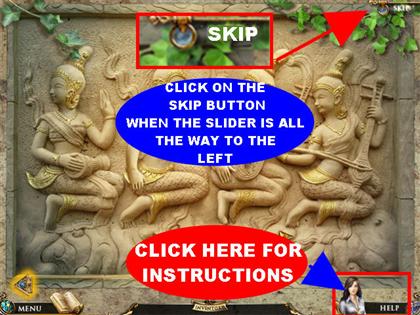
- Click on the help button in the lower right when you need instructions of what you need to do.
- You can skip a mini-game once the skip button is available. You will be able to use the skip when you see the slider has reached the left side.
- Use the Journal in the lower left corner to look for hints that will help you solve the mini-games.
Introduction: The Office
Office
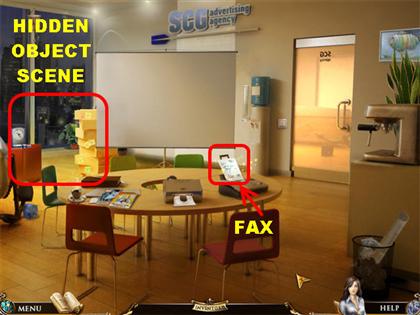
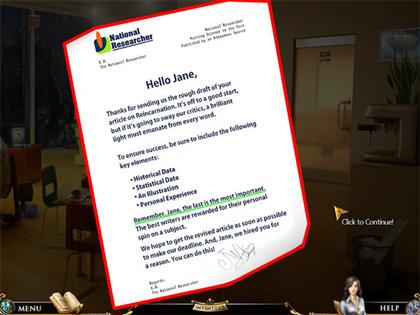
- Pick up the Fax that just came out of the machine on the table.
- Read the Fax and look for the items listed in it.
- Click on the page again to exit out of that view.
- Click on the sparkly area on the left for a closer look at the drawer.
Cup of Tea & Pick up Historical Data – Drawer
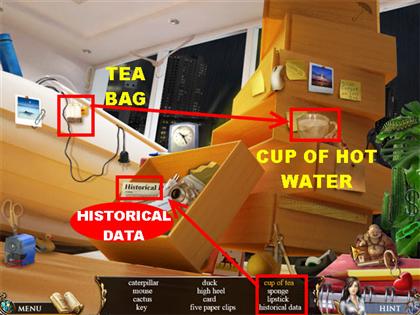
- Grab the Tea Bag in the upper left and place it on the Cup of Hot Water in the upper right.
- Click on the Cup of Tea to take it off your inventory.
- Click on the sparkly drawer on the left. Inside you will find the sponge, lipstick and the Historical Data sheet.
Pick up and Play Mysterious CD
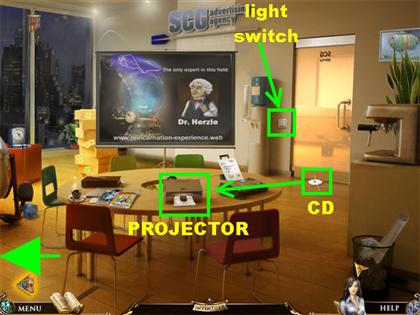
- After you pick up all the items on the list, a man will drop off a Mysterious CD under the door. Click on it to pick it up.
- Place the Mysterious CD on the projector on the table.
- Click on the light switch by the door to turn off the lights.
- Click on the CD to start the projector.
- As soon as the video is finished, click on arrow in the lower left corner to go to the next scene.
Pick up Illustration - Living Room
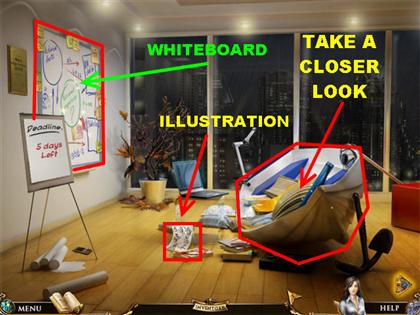
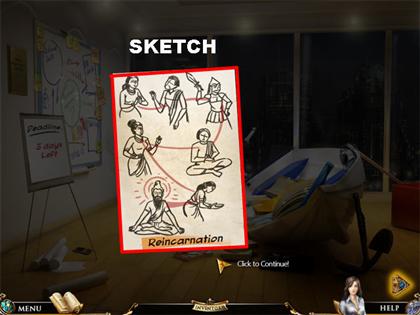
- Click on the Illustration on the floor for a closer view.
- Click on the Illustration again to enter it into inventory.
- Click on the boat for a closer view.
Move the Pillows Mini-game - Pick up Statistical Data
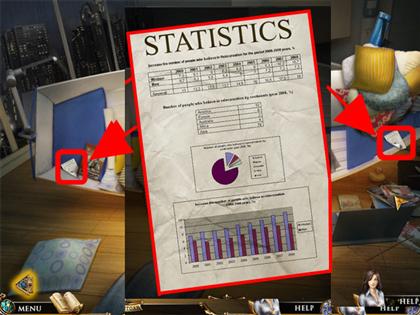
- Your goal is to move the pillows aside so you can find the Statistical Data that is buried under all the stuff.
- Stack the pillows, blankets etc. on top of each other in a corner of the boat.
- Pick up the Statistical Data on the left, middle, or right side of the boat for a closer view.
- The location of the Statistical Data changes with each game, make sure you remove everything you can from the boat.
- Click on the Statistical Data again to enter it into inventory.
Add Material to Whiteboard & Pick up Password
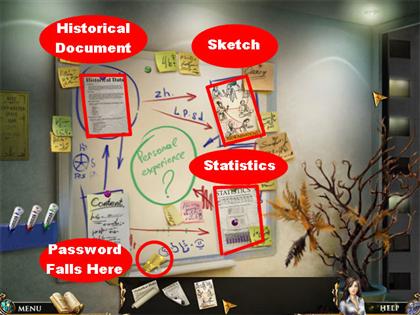
- Click on the Whiteboard for a closer view.
- Your goal here is to place the documents in the right spots on the Whiteboard.
- Drag the following documents to these areas:
- The Historical Data goes in the upper left side, under the Historical Poets section.
- The Sketch goes in the upper right side, under the RN Sketch section.
- The Statistics Document goes in the lower right, under the Statistics section.
- Once all the documents have been placed, the Password falls to the bottom of the Whiteboard, pick it up.
Living Room – Pick up Phone
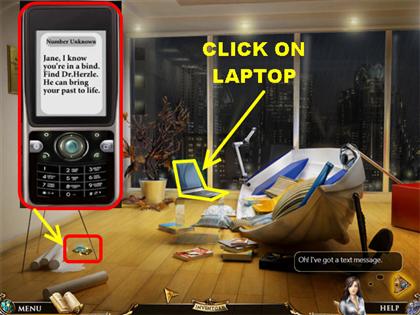
- The phone has a text message. Pick it up in the lower left for a closer view.
- Click on the phone to close out the pop-up window.
- Click on the laptop by the window for a closer view.
Laptop Password
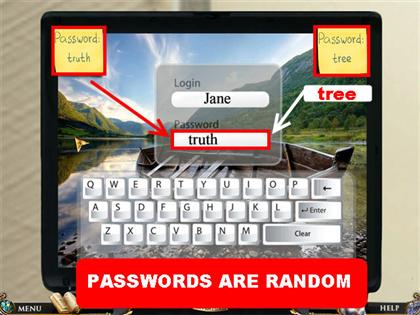
- Drag the Password in the lower left to the login screen.
- The Password is revealed in the upper left as “truth”, “life” or “tree.”
- The password depends on your game, it changes each time. Make sure that you type in whatever password you receive in your game.
- Using your keyboard, or the one on the screen, type in the word: “truth”, “life” or “tree”.
- Hit “Enter” to enter the password.
- The words “Doctor Herzle” appears, click on the “Search” button.
- Read the message on the screen and click on “OK” to read the next message.
- Click “Submit” to sign in for your appointment with Dr. Hezler.
- Once you see the message that confirms your appointment, click on the “OK” button.
Chapter 1: Dr. Herzle’s Mansion
Herzle Mansion Door Lock Puzzle
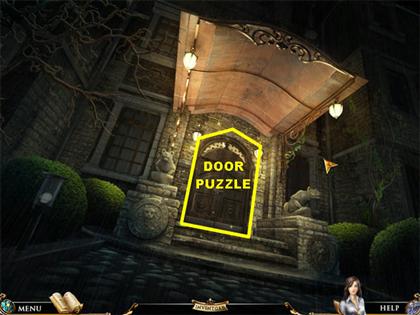
- Click on the door to trigger a mini-game.
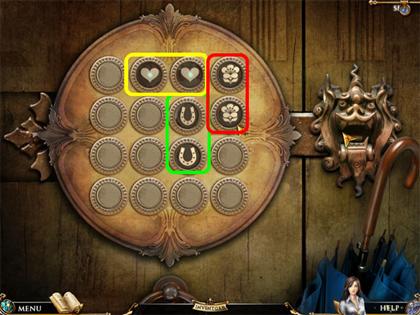
- Your goal here is to match the pairs of identical signs.
- Click on a button to see what’s behind it. Remember where that item is so when you find its matching pair you can eliminate both of them.
- The door will open once all the symbols have been matched correctly.
Mansion Hall
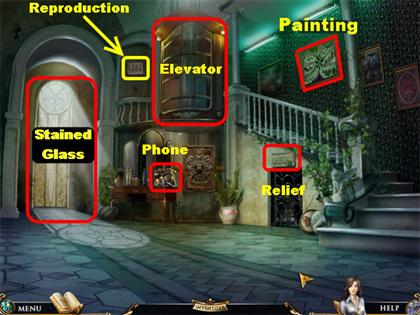
- As soon as you enter the Mansion, the phone starts ringing.
- Pick up the phone and Dr. Herzle will tell you to take the elevator up to his office but you must first find the Blue Gem.
- Click on the sparkly elevator and it will tell you that it is out of order and needs to be repaired.
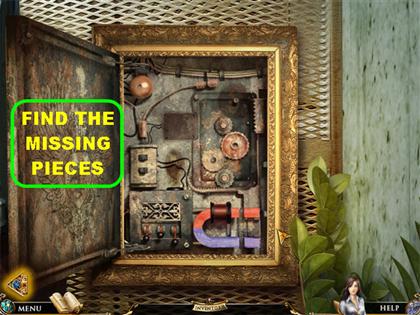
- Click on the Elevator’s Control panel for a closer view.
- Click on it again to open the panel. You will receive the message that it needs to be fixed, the components you need are in the Hall.
- Exit out of the Control Panel by clicking on the arrow in the lower left.
Pick up Blue Gem - Stained Glass Window Puzzle
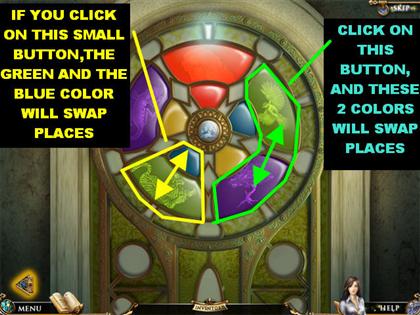
- Click on the stained glass window on the left for a closer view.
- Your goal in this puzzle is to match the inside and outside colored segments of the Reincarnation’s Wheel.
- Click on a large button and it will swap colors with the button to the left of it.
- Clicking on the small buttons will swap the color of the large button with the color of the small one that’s touching it.
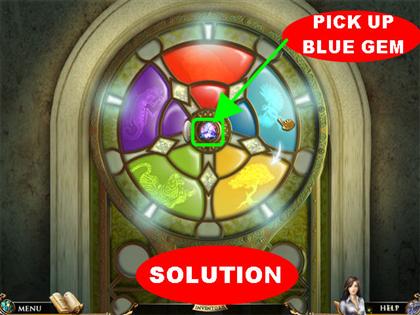
- Please look at the screenshot for the solution.
- Pick up the Blue Gem that appears in the middle of the puzzle after it’s been solved.
Pick up Elevator Gear - Restore Reincarnation Painting
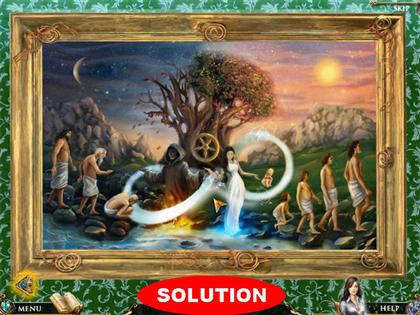
- Click on the large painting in the upper right for a closer view.
- Your goal is to restore the Reincarnation painting.
- When you first see the painting everything is in place for a few seconds.
- The picture will scramble into several small squares. You have to rearrange the squares until you have the image shown at the beginning of the puzzle.
- Click on two pieces and they will swap places.
- When pieces are placed correctly, they will lock into place.
- Once the puzzle is complete, a secret compartment will open behind the picture.
- Pick up the Elevator Gear that appears on the wall in place of the painting.
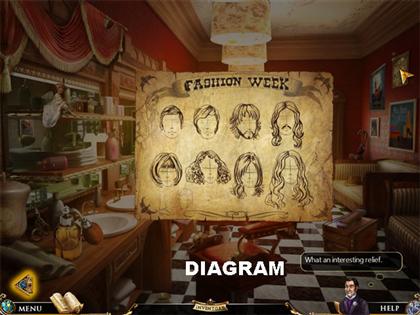
Restore Relief
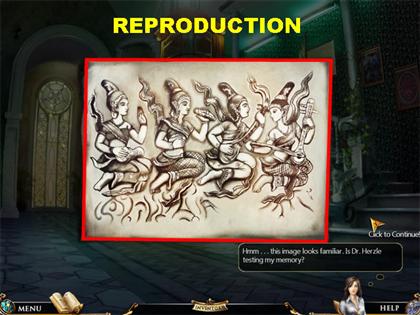
- Click on the Reproduction in the upper left side, between the elevator and the window for a closer view. Use that image to solve the puzzle under the steps.
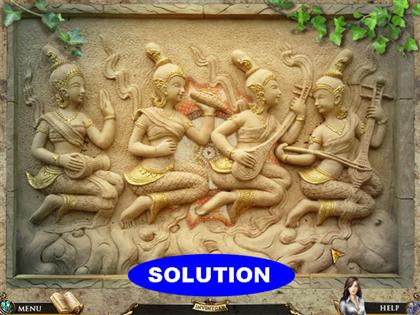
- Zoom in on the Relief on the far right side for a closer view; it is above the Basement door.
- Your goal is to restore the Relief to its original state.
- Click on the hands, feet or heads of the women to reposition them to resemble the position of the women in the Reproduction that is out in the Hall.
- The solution is always the same for this puzzle but the women are positioned differently each time you start the game.
- Please look at the screenshot for the solution.
- After the Relief puzzle has been solved, the door under the steps that leads to the Basement opens up.
Pick up Knife Switch - Basement
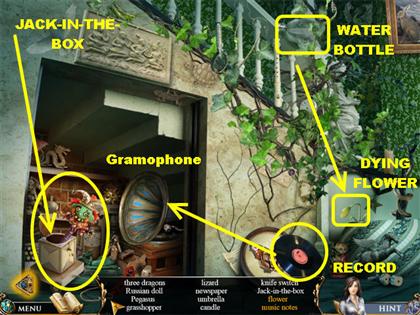
- Go through the door under the steps to reach the Basement.
- Click on the red tag marked “Jack” in the lower left corner and the Jack-in-the-box will pop out of the corner.
- Grab the Record in the lower right corner and place it on the gramophone for the Music Notes to appear.
- Click on the Music Notes that are coming out of the gramophone to take that item off your list.
- Grab the Water Bottle in the upper right corner and place it on the Dying Flower in the lower right corner.
- Click on the Flower once it blooms.
- Pick up the Knife Switch in the lower left. It will be visible after the Jack-in-the-box has been removed.
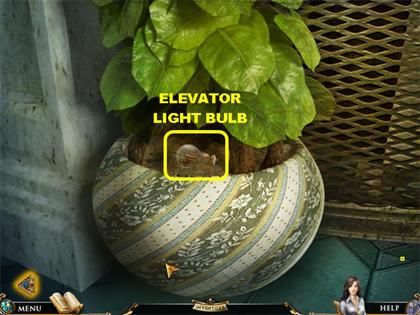
Pick up Elevator Light Bulb
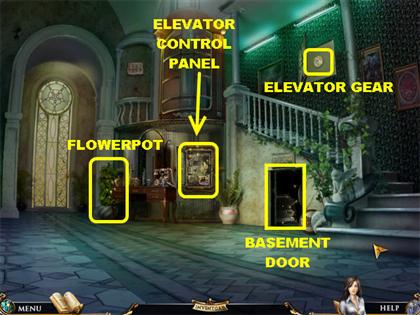
- After all the items have been found, you will be automatically taken back to the Hall.
- Click on the flowerpot on the left for a closer view.
- Pick up the Elevator Light Bulb in the flowerpot.
- Click on the Elevator Control Panel for a closer view.
Fix Elevator Control Panel
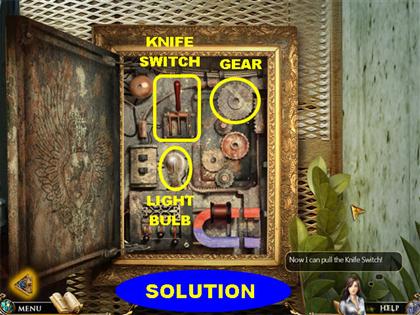
- Place the Elevator Gear in the upper right corner.
- Place the Knife Switch in the upper left corner.
- The Light Bulb goes on the left side of the panel.
- Pull the Knife Switch after all the items have been placed.
- Click on the Elevator itself to go see Mr. Herzle.
Herzle’s Office
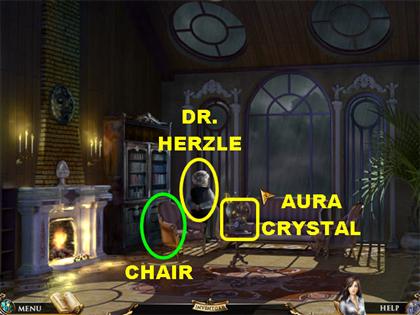
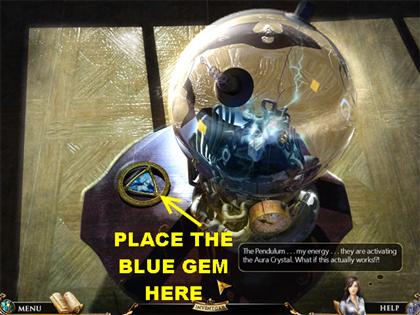
- Click on the Aura Crystal in the center of the room.
- Place the Blue Gem in the Pendulum on the left.
- The Aura Crystal is now activated.
- Click on the sparkly spot by the armchair closer to the bookcase.
- You will be taken to a cut scene in which the Doctor tries to hypnotize you.
- The next scene takes you to portals that lead to your past lives.
- He tells you to take the Purple Gem and place it on the Purple Door.
Chapter 2: Abuja - Buddha Temple
Purple Portal – Abuja

- Place the Purple Gem on the Purple door on the left to enter the Portal.
Wish Tablets – Outside Temple
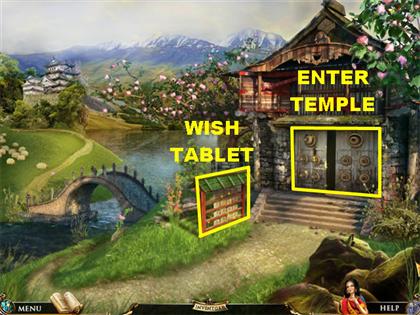
- Click on the Wish Tablets on the left for a closer view.
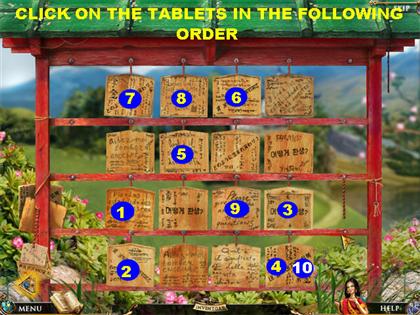
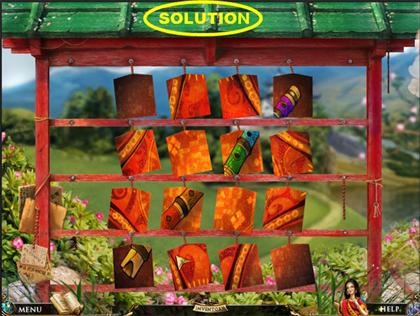
- Your goal is to flip over the tablets to form the image shown in the screenshot provided.
- Each time you click on an image, the tablets surrounding it will also flip.
- Please look at the screenshot for a step-by-step solution for this puzzle. Click on the Tablets in the order shown in the screenshot.
- The Manual will go into your inventory after all the items have been found.
- Click on the Temple Door to open it.
Inside Temple
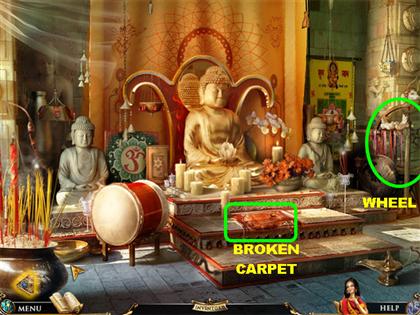
- Click on the Broken Meditation Carpet to trigger a mini-game.
Repair the Meditation Mat
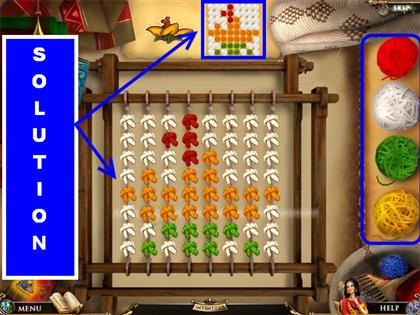
- Your goal is to repair the mat according to the pattern on top of the puzzle.
- Click on the yarn to attach that particular colored knot on your cursor.
- Click on the spot you want to place the knot.
- You do not have to click on the yarn for each knot you want to place.
- If you make a mistake and you want to change the color of the yarn, just grab the color you want to use and place it over the mistake.
- I will name the colored yarn as follows_R= RED G=GREEN W=WHITE Y= YELLOW
- The solution is as follows:ROW 1 = W, W, W, R, W, W, W, W ROW 2 = W, W, R, R, W, W, W, W ROW 3 = W, W, W, R, Y, W, W, W ROW 4 = W, Y, W, Y, Y, W, W, W ROW 5 = Y, Y, Y, Y, Y, Y, Y, Y ROW 6= W, Y, Y, Y, Y, Y, Y, W ROW 7 = W, W, G, G, G, G, W, W ROW 8 = W, G, W, G, G, W, G, W
- You will acquire the Melody Scroll once the puzzle has been solved.
- Click on the wheel on the right to search for a list of hidden objects.
Cabbage Stump & Drumstick
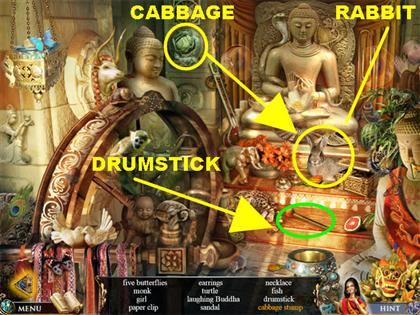
- Grab the Cabbage in the top center and place it in front of the Rabbit in front of the statue.
- The rabbit will start eating the Cabbage.
- Pick up the Cabbage Stump once the rabbit is finished with the food.
- Pick up the Drumstick on the steps and it will go into inventory.
- After all the items have been found you will be taken back to the main scene.
Use Drumstick
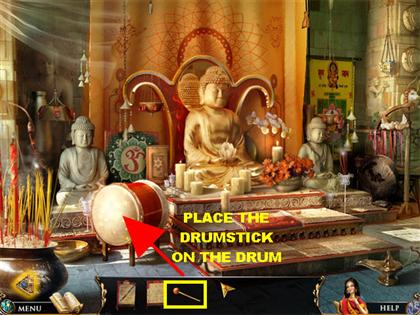
- Place the Drumstick on the drum on the left.
- The Buddha tells you that without his third eye his consciousness is shut. Kung Fu Cha will help you find it.
- Click anywhere on the scene.
- The help section at the bottom tells you that Kung Fu Cha is a tea ceremony.
- Click anywhere on the scene and you will be taken back outside.
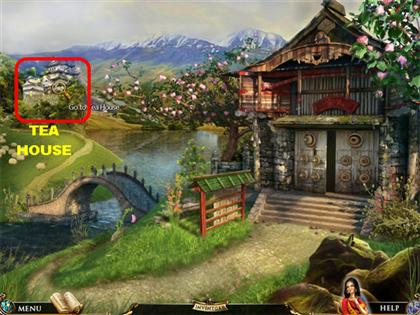
- Click on the Teahouse in the upper left for a closer look.
Teahouse
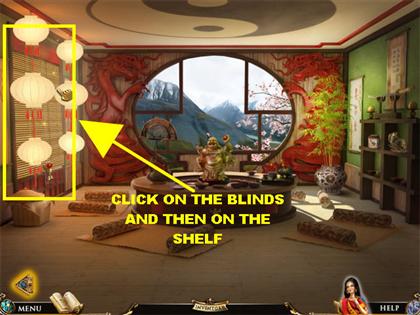
- Click on the blinds on the left and they will lift up.
- Click on the shelves on the left for a closer look.
Skull, Necklace, Pearl, Parrot – Shelves
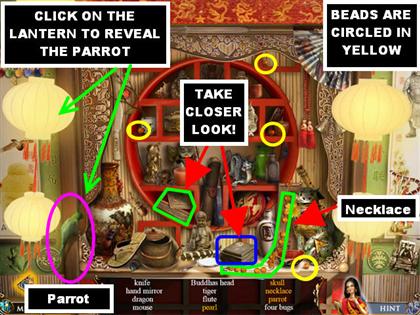
- To assemble the Necklace you need to click on the 4 beads that are scattered around the scene.
- The 4 Beads are highlighted in yellow in the screenshot. Each time you click on a bead it falls on the Necklace in the lower right corner.
- Click on the Necklace once all the beads have been collected.
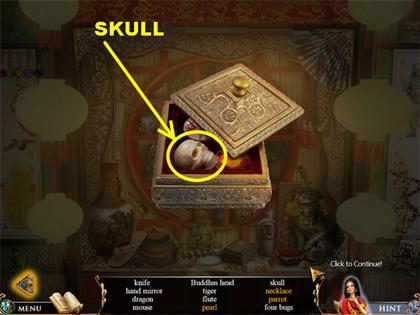
- Click on the open Jewelry Box in the lower left of the shelf for a closer look.
- Click on the Skull inside the box.
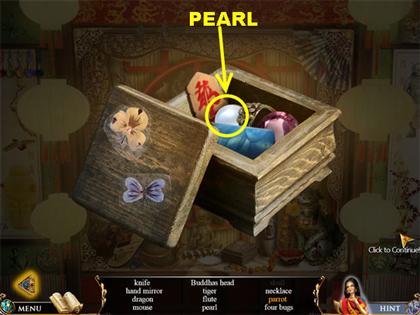
- Click on the other Jewelry Box on the lower right for a closer view.
- Pick up the Pearl inside.
- Click on the left lantern repeatedly so it can swing from side to side. Click on the Parrot next to the vase once the lantern has moved significantly to the left.
- Pick up the Bamboo Flute in the lower right side, behind the dog statue.
- You will receive a Bamboo Flute in your inventory once this scene is completed.
Tea Ceremony

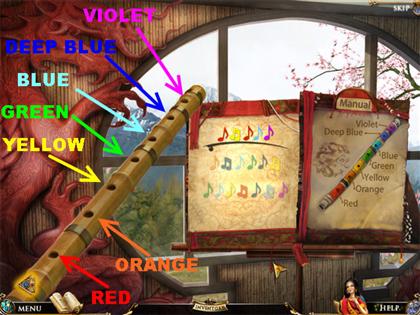
- Click on the Music Stand on the left for a closer view.
- Place the Melody Scroll on the Music Stand.
- Place the Flute Picture next to the Melody Scroll.
- As soon as you place the Flute Picture you will notice that each section of the flute has a different color and they are marked accordingly.
- Place the Bamboo Flute on the left side of the scene.
- Your goal is to click on the Bamboo Flute according to the music notes on the scroll and the color scheme of the Flute Picture.
- You have to play the notes in the order in which they are highlighted. Some notes have to be played more than once.
- To make the solution easier to understand, I labeled the colors in the following manner:DB =DEEP BLUE B= BLUE G= GREEN Y= YELLOW O= ORANGE R= RED V= VIOLET
- Here is the solution:
- First Sequence: R, Y. Y. R. B, V.
- Second Sequence: O, DB, DB, B, G, DP, Y, Y.
- Third Sequence: G, B, Y, R,R, DB, B,B, V.
- Fourth Sequence: R, R,R, O, B, B, R, R, R, O, B, B.
- Once the melody has been played you can begin brewing the tea.
- Click on the Tea Table on the right for a closer view.
Perform Ancient Tea Ceremony of Kung Fu Cha
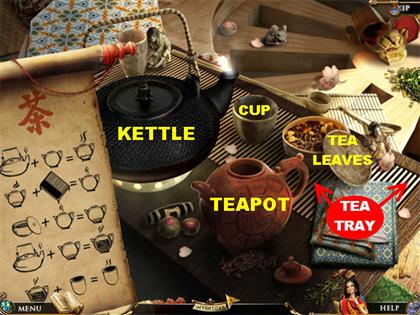
- Your goal is to click on the items in the scene using the diagram on the left.
- Please look at the screenshot for the location of the items you need to click. Keep in mind that some items cannot be clicked until they are needed.
- The solution is as follows:
- SEQUENCE 1 = Click on the Kettle and then on Teapot.
- SEQUENCE 2 = Click on the Teapot and then on the Tea Tray.
- SEQUENCE 3 = Click on the Tea Leaves and then on the Teapot.
- SEQUENCE 4 = Click on the Tea Kettle and then on the Teapot.
- SEQUENCE 5 = Click on the Teapot and then on the Cup.
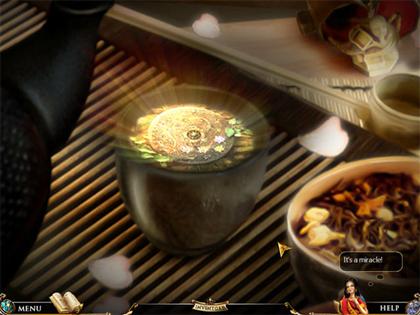
- Once the ceremony has been completed, click on the Tea Cup or anywhere on the scene.
- The next message you see says that the Kung Fu Cha revealed a vision that a shield is buried near the Buddha’s temple.
Dragon on the Rope - Under the Bridge

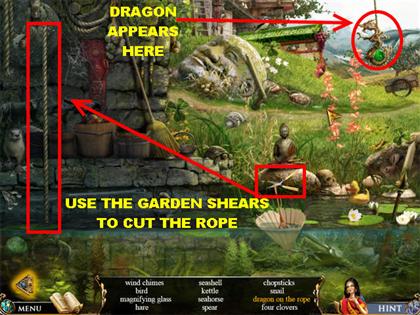
- Click on the Bridge for a closer view.
- Take the Garden Shears on the rock in the lower right and place it on the rope on the left.
- Once the Garden Shears cut the rope, the Dragon will show up in the upper right side.
- Click on the Dragon on the Rope to take that item off your list.
- The Garden Shears will go into your inventory at the end of the round.
Use Garden Shears to find Shield
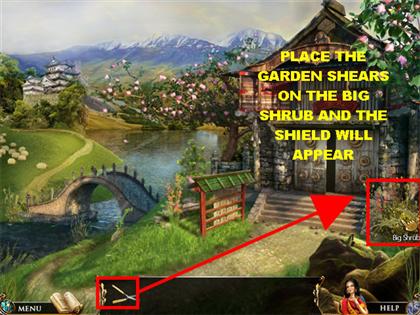
- Place the Garden Shears on the Big Shrub on the right side of the Temple and the Shield will appear.
- Click on the Shield for a closer view.
Open the Flower Buds – Pick up Buddha’s Third Eye
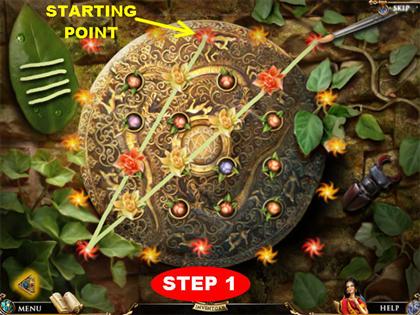
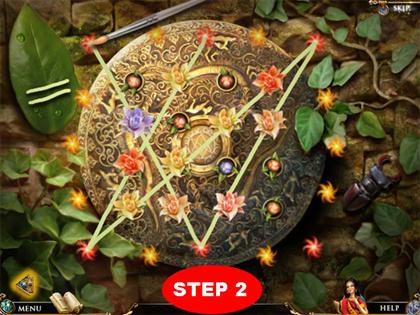
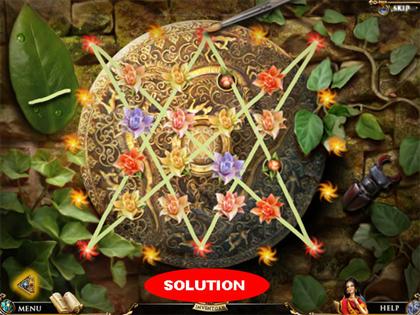
- Your goal is to make the flowers bloom by painting a line that intersects through all the flowers.
- Click on the red glowing light on top of the screen to begin painting.
- Drag the brush to the red glowing lights according to the images in the screenshots.
- The leaf on the left shows how many strings you’ve used. If you make a wrong move the puzzle will reset itself.
- Make sure that you only use the red glowing lights to connect all the buds.
- The solution is divided into 3 screenshots to make it easier to follow.
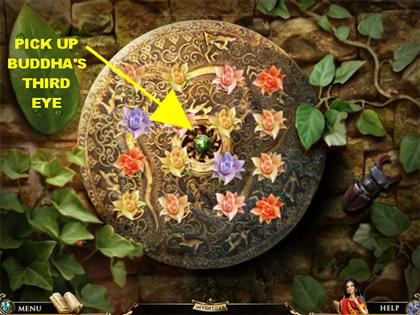
- Once the puzzle has been solved the Buddha’s Third Eye appears, click on it to pick it up.
- Go back into the Temple.
Place Buddha’s Third Eye - Inside Temple
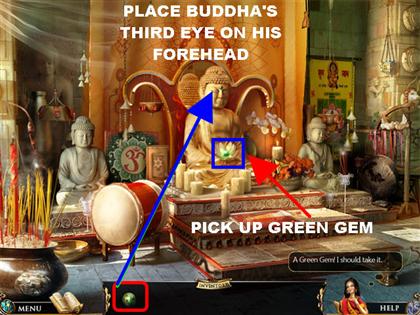
- Place Buddha’s Third Eye on the forehead of the Buddha inside the Temple.
- Pick up the Green Gem that appears in Buddha’s lap.
Chapter 3: Stefan – Prison
Enter the Green Portal

- Place the Green Gem on the Green Door to open the Portal.
Freedom & Cheese – Inside Prison Cell
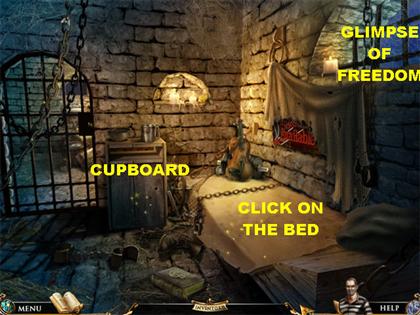
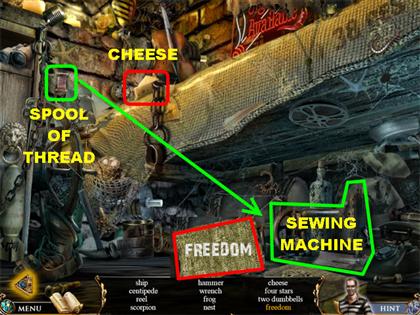
- Click under the bed for a closer look.
- Place the Spool of Thread in the upper left on the Sewing Machine in the lower right.
- The machine will embroider the word “FREEDOM” on a piece of cloth.
- Click on the word “FREEDOM” to eliminate it from the list.
- Pick up the Cheese wedge in the upper left corner; it will go into your inventory after all the items have been found.
Pick up Cupboard Handle & Secret Message – Glimpse of Freedom
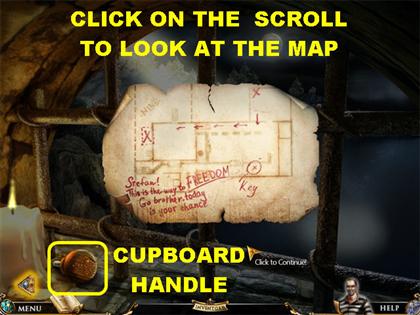
- Click on the “Glimpse of Freedom” window in the upper right for a closer view.
- Pick up the Cupboard Handle in the lower left corner.
- Click on the Secret Message on the bars.
- It is a map with a secret escape route that another prisoner left for Stefan.
- Exit out of that pop up window by using the arrow in the lower left corner.
Place Cupboard Handle & Pick up Mouse
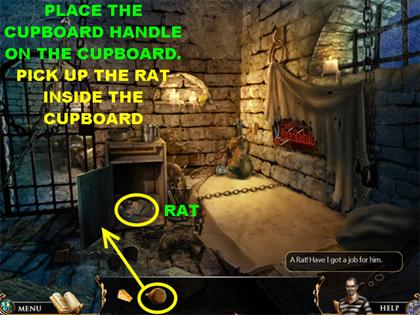
- Place the Cupboard Handle on the Cupboard next to the bed. There’s a Rat inside the cupboard.
- Click on the Rat and it will go into inventory.
Mouse Maze Mini-game – Pick up Cell Key
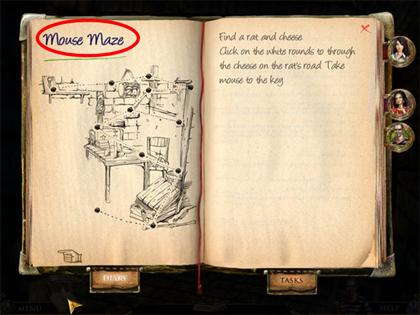
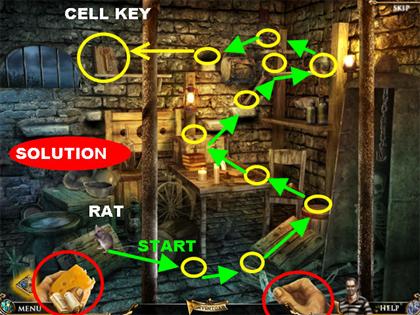
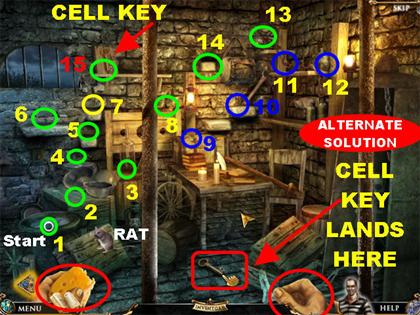
- Click on the Cell Door for a closer look.
- The Cell Key is in the upper left side but you cannot reach it at this time.
- Pick up the Cheese and place it anywhere on the scene and you will see 2 hands appear. The left hand will have the Cheese and the other hand will be empty.
- Place the Rat on the scene and it will land on the crate in the lower left or in the middle of the floor.
- You will see 2 small circles appear on the scene. Click on either spot and the piece of Cheese will land on the spot you chose. The Rat will go eat the Cheese.
- Keep clicking on all the spots that appear until the Rat goes to the spot in which the Cell key is located.
- Once the Rat lands in the spot in which the Cell Key is in, it will knock the key to the ground.
- You can use your Journal in the lower left corner to see a diagram of the solution. You can also look at the screenshots provided for the solutions. There is more than one way to complete this puzzle.
- Pick up the Cell Key from the center of the ground and it will go into inventory.
Exit the Prison Cell
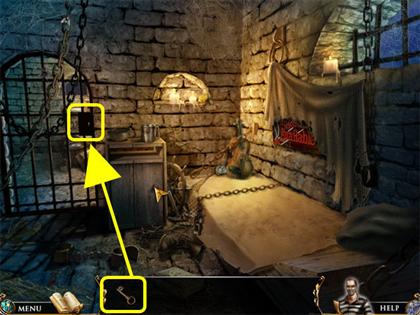
- Place the Cell Key on the lock to open the cell door.
- Click on the door to exit.
Pick up Rope - Outside Storeroom
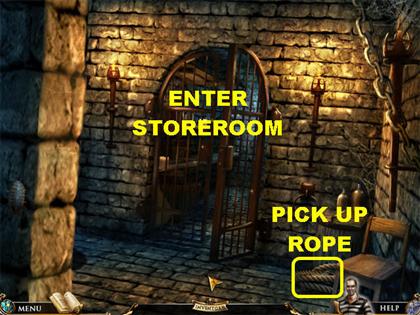
- Pick up the Rope in the lower right.
- Click on the Storeroom door to enter.
Inside Storeroom

- There is a Box in the middle of the floor; you need to find something to open it with.
- There is an Elegant Box in the lower right but you need a key to open it, you can come back to it later.
- Click on the shelves on the left for a closer view.
Pick up Crowbar & Cuckoo – Shelves
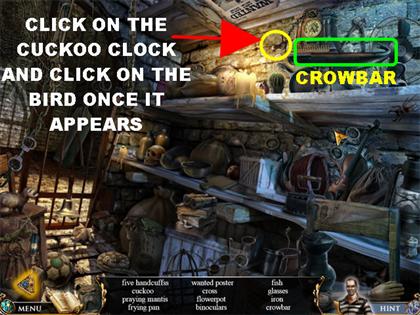
- Click on the Cuckoo Clock in the upper right side and the Cuckoo Bird will appear, click on it.
- Pick up the Crowbar in the upper right and it will be added to your inventory after all the items have been found.
Use Crowbar & Rope - Open Box
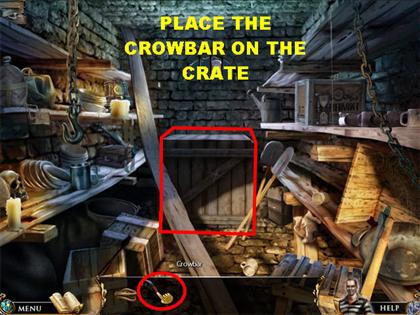
- Place the Crowbar on the box in the middle of the scene. Once the box is destroyed you will uncover an entrance to the Mine.
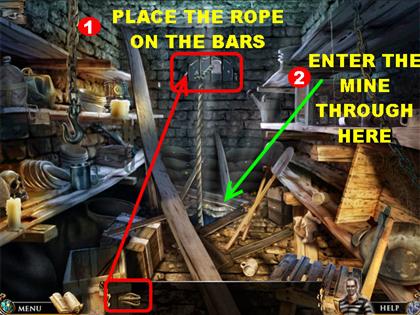
- Place the Rope on the Bars and descend into the Mine by clicking on the hole in the floor.
Pick up Elegant Key & 2 Fuses – Hand Cart
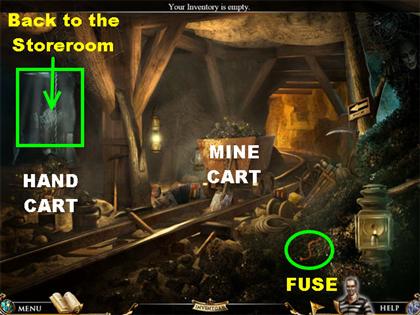
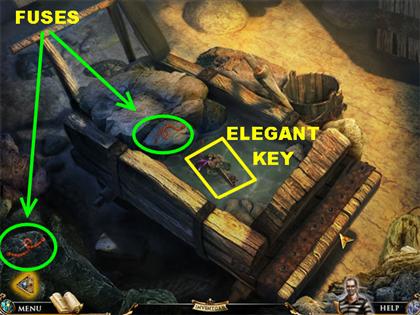
- In the Mine you can click on the Hand Cart on the left for a closer view.
- You can also click on the Mine Cart on the tracks for a closer view.
- Pick up the Red Fuse in the lower right.
- Let’s click on the Hand Cart on the left for now.
- Pick up the Elegant Key that’s in the water and it will go into inventory.
- Pick up the Red Fuse that’s inside the Hand Cart.
- Pick up the other Red Fuse in the lower left corner.
- Click on the arrow in the lower left to exit that scene.
- Go back to the Storeroom by clicking on the rope on the left.
Use Elegant Key, Pick up Fuse - Storeroom
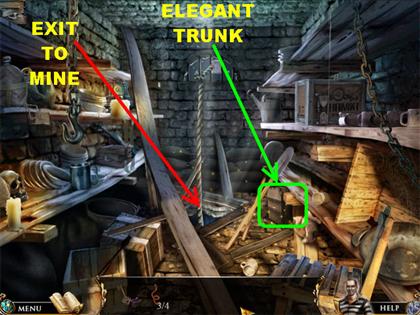
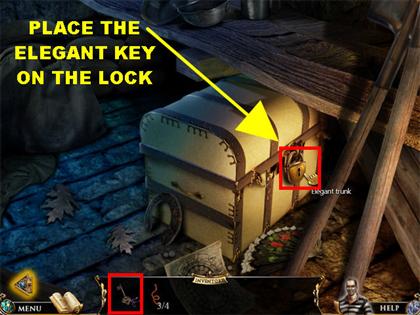
- Click on the Elegant Trunk in the lower right.
- Place the Elegant Key on the trunk’s lock and the lock will fall to the ground.
- Click on the Elegant Trunk again to open it.
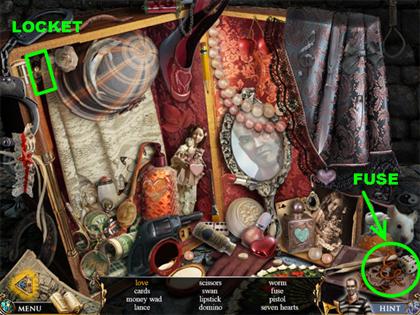
- Pick up the Red Fuse in the lower right corner.
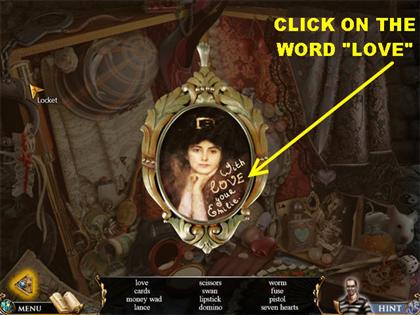
- Click on the Locket in the upper left and it will appear in the middle of the scene.
- The locket says:”With love, your Emilie.”
- Click on the word “LOVE” on the locket to eliminate it from the list.
- Go back to the Mine after all the items have been found.
Pick up Dynamite - Junk Pile - Mine
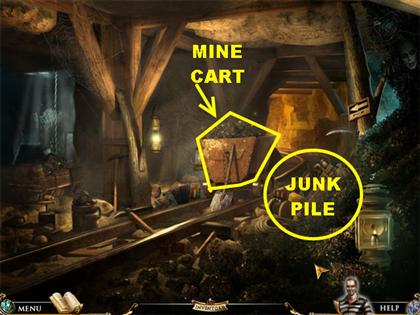
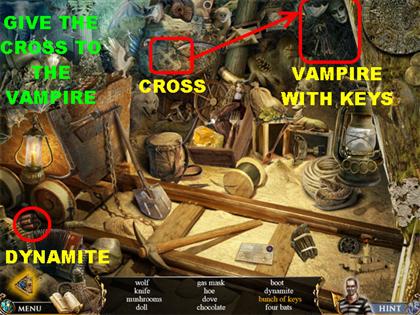
- Click on the Junk Pile on the far right for a closer view.
- Grab the Cross in the upper center and place it on the vampire in the upper right.
- The vampire will drop the Bunch of Keys once the Cross is close to him.
- Pick up the Bunch of Keys on the ground.
- Grab the Dynamite in the lower left corner.
Mine Cart Puzzle
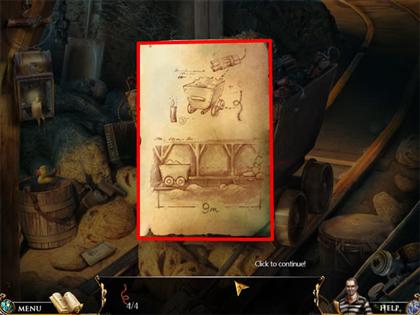
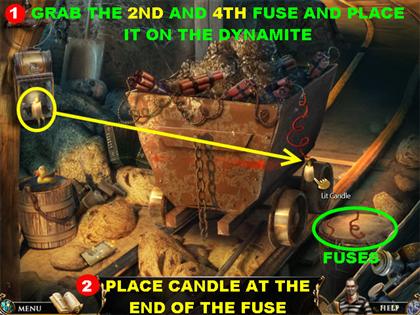
- Click on the Mine Cart on the tracks for a closer view.
- Zoom into the map in the lower left for a closer view on moving the Mine Cart.
- Place the Dynamite on the cart.
- Place the Fuses from inventory anywhere on the scene and the Fuses will appear in the lower right.
- Place the 2nd and 4th fuse on the Dynamite sticks. If you place your cursor over them, you want to choose the Fuses that say 30 and 60 feet.
- Pick up the Lit Candle in the upper left and place it below the Fuses you just added to the Dynamite. Do NOT click the candles onto the fuses because it will disconnect the fuses from the Dynamite.
- To remove the fuses, just click on them.
- The Lit Candle will burn the Fuses and the Mine Cart will start rolling on its own until it explodes.
Chapter 4: Jilberto – City Square
Blue Portal
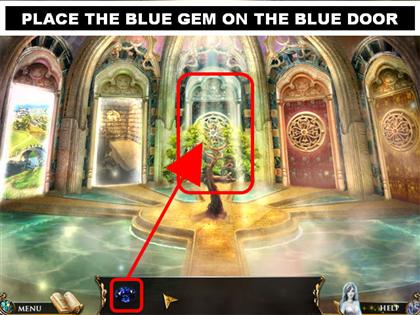
- Place the Blue Pendulum Gem from inventory on the middle Portal to enter it.
Magician’s Tent
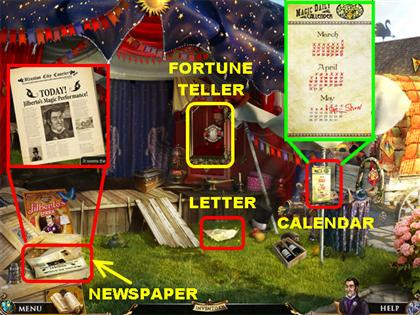
- Click on the Newspaper in the lower left for a closer view.
- Click on the Calendar on the right for a closer view.
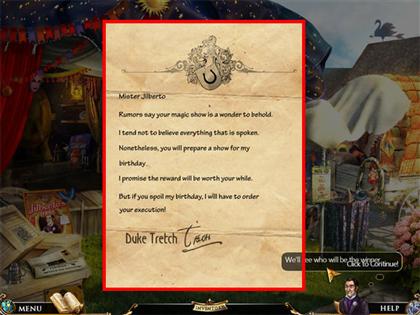
- Click on the Letter from Duke on the grass for a closer view.
- Click on the Fortune Teller on the right for a closer view.
- You will receive a message that you need to find your diary because it has the instructions for your magic tricks.
Sorting Coins Mini-game
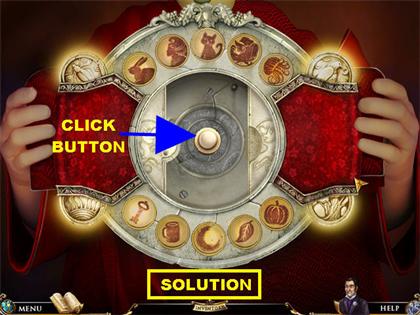
- Click on the apparatus the Fortune Teller is holding for a closer view.
- Your goal is to separate the pictures into animate and inanimate objects.
- Drag the coins into the appropriate cells. If the items are placed correctly, they will light up.
- The solution is as follows:
- Top Row (Animate Objects): Rabbit: Woman, Cat, Bird, and Jellyfish.
- Bottom Row (Inanimate Objects): Key, Metal Cup, Moon, Leaf, and Pumpkin.
- Click on the button that appears in the middle of the puzzle after it’s been solved to uncover a hiding place to the right of the Fortune Teller.
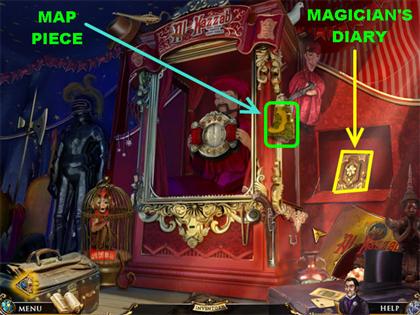
- Click on the Map Piece on the right side of the booth and it will go into inventory.
- Click on the Magician’s Diary that appears in the hiding place.
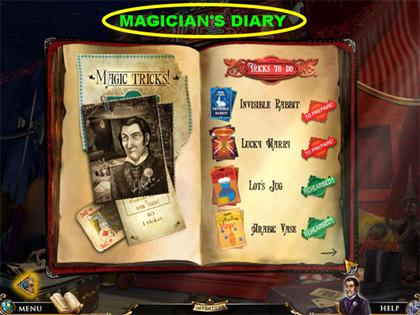
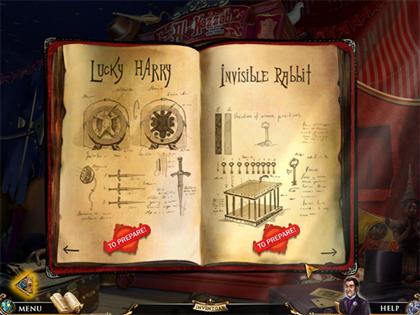
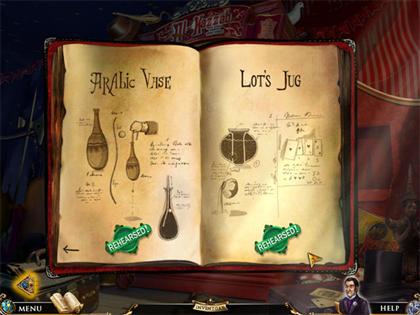
- Click on the book twice to see the pages of the diary.
- The magic tricks are not ready yet but you can read the steps to review them.
- Close the book for now.
- Exit out of that scene by clicking on the arrow in the lower left.
Outside the Magician’s Tent
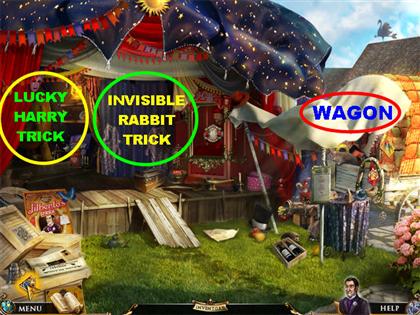
- If you click on the left you will be able to play the Lucky Harry game.
- If you click on the right curtains you will be able to play the Invisible Rabbit trick.
- You can’t do either of those tricks until other items have been found first.
- Click on the Wagon on the right for a closer look.
Pick up Cage Handle - Wagon
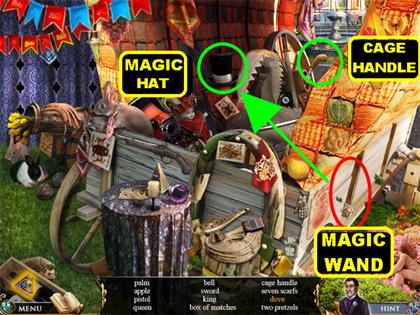
- Pick up the Magic Wand on the side of the wagon and place it on the Magic Hat on the left.
- The Magic Wand will make the Magic Hat disappear and a Dove appears.
- Click on the Dove to take it off your list.
- Pick up the Cage Handle on the upper right.
- You will be automatically transported back to the Magician’s Tent after all the items from the list have been found.
Invisible Rabbit Trick - Magician’s tent
- Now that you are back at the Magician’s Tent, click on the blue curtain to enter the Invisible Rabbit Trick.
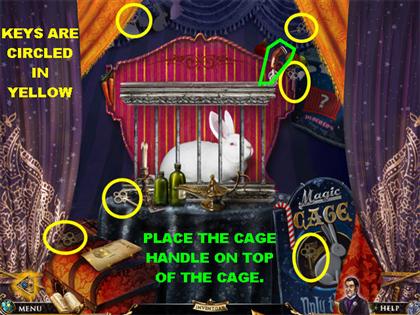
- Place the Cage Handle on top of the Cage.
- The Cage Handle slides to the right.
- Pick up the first Cage Key that’s next to the Cage Handle.
- The Cage Key automatically goes on top of the cage and unlocks a panel. The rest of the keys will do the same.
- Pick up the 2nd Cage Key in the lower left. It will also unlock another panel on the cage.
- Pick up the 3rd Cage Key located on the left side of the round table.
- Pick up the 4th Cage Key in the lower right side, on the poster.
- Pick up the 5th Cage Key in the upper left side; it is partially hidden by the orange curtain.
- Pick up the 6th Cage Key in the upper right side; it is partially hidden by the orange curtain.
Change the Mirrors
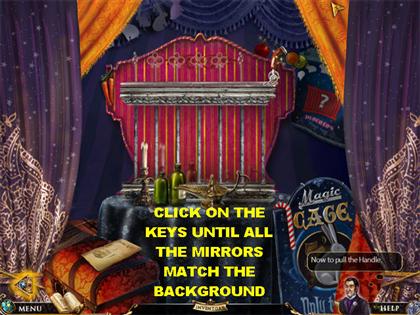
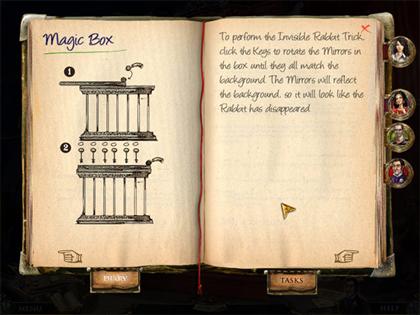
- Click on the diagram in the lower left. It shows you that you need to rotate the keys in order to change the mirrors.
- Now you have to rotate the mirrors on the cage until they resemble the image in the background.
- Once all the images are in place, click on the Cage Handle and the rabbit will reappear.

- Click on the Cage Handle several times until the Magic Diary reappears and places a green “Rehearsed” sticker next to the trick.
City Square
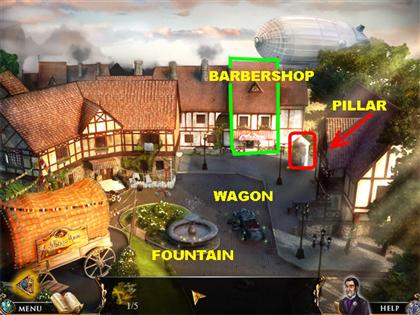
- Go back to the Magician’s Tent and click on the Navigational Arrow in the lower left to go to City Square.
- There are 4 locations to visit here, the Wagon, the Fountain, the Pillar and the Barbershop.
2nd Map Piece – Fountain
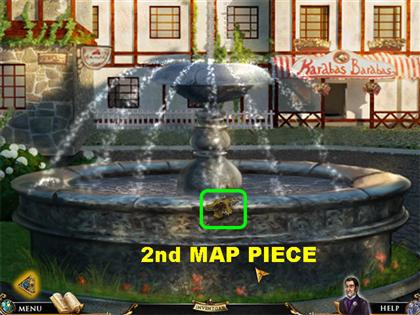
- Click on the Fountain for a closer view.
- Pick up the 2nd Map Piece in the center of the Fountain.
- Exit out of that scene.
- Click on the Wagon next to the Fountain to trigger a mini-game.
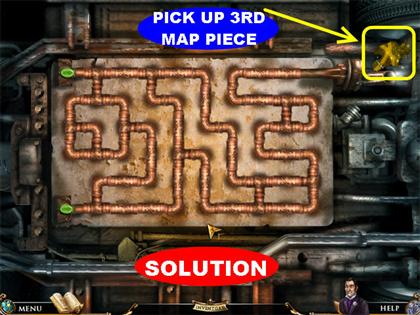
Repair the Engine Mini-Game – Pick up 3rd Map Piece
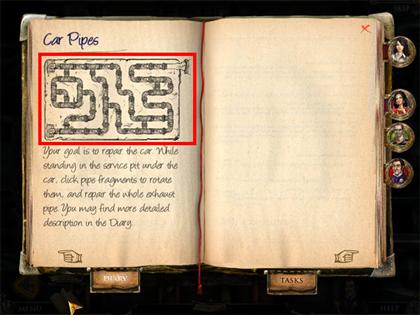
- Your goal is to repair the engine by rotating the pipes into the right spots.
- Click on any piece to rotate it.
- All pipes must be connected.
- Open your diary and you will see the solution for this puzzle. You can also look at the screenshot provided for a different view of the puzzle.
- Once the puzzle has been completed successfully, the 3rd Map Piece will appear in the upper right corner. Click on the Map piece to collect it.
- Go to the Barbershop which is in the far right side of the scene.
4th Map Piece - Barbershop

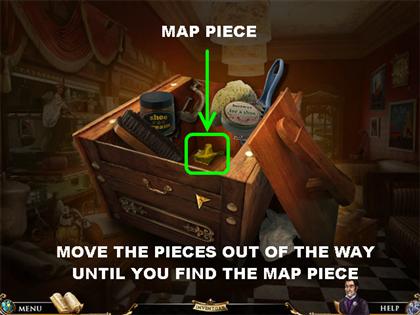
- There are several places you can interact with in this scene.
- Click on the Box in the lower right corner for a closer view.
- Drag all the pieces out of the way until you see the Map Piece appear.
- Click on the 4th Map Piece inside the Box.
Sort the Wigs Mini-game – 5TH Map Piece
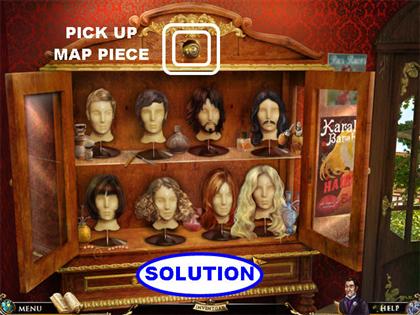
- Click on the Fashion Haircuts Diagram in the upper right corner.
- This diagram is the solution for the puzzle in the Wig Case. The diagram will appear in your diary.
- Click on the Wig Case in the back of the Barbershop for a closer view.
- Sort the wigs according to the diagram in the upper right side of the Barbershop.
- Click on any 2 heads to swap their places.
- Once all the wigs are in the right spot, the Map Piece will appear above the case. Pick up the Map Piece.
- Please look at the screenshot for the solution.
Pick up 5 Throwing Knives - Shelves (Barber Shop)
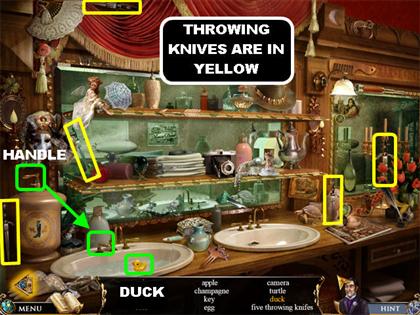
- Click on the left side of the Barbershop for a closer look at the shelves.
- There are 5 Throwing Knives that you need for the Lucky Harry game. The Throwing Knives are highlighted in yellow in the screenshot.
- Grab the Handle in the lower left; it is on top of the large canister.
- Place the Handle on the left Water Tap and click on it to turn on the water.
- As the water rises a rubber duck will appear, click on it to take off your list.
Restore the Map
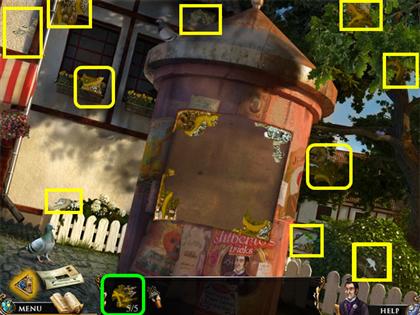
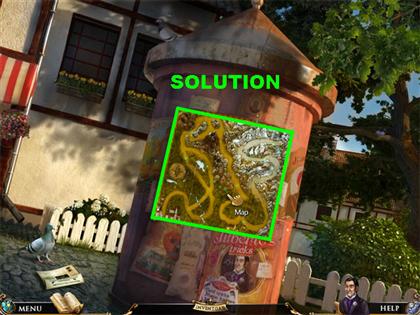
- Click on the Pillar for a closer view.
- Click on the newspaper article in the lower left.
- Place the 5 Parts of the Map anywhere on the scene and they will spread out across the bottom of the puzzle.
- There are several Map pieces in this scene. They are all highlighted in yellow in the screenshot.
- Drag a piece to the center of the Pillar and place it in a spot.
- If the piece is in the right place, it will lock itself in. If the piece is in the wrong spot, it will remain red.
- Please look at the screenshot for the solution.
- Click on the map once it is completed and it will go into your inventory.
- Go back to the Magician’s Tent.
Lucky Harry Trick
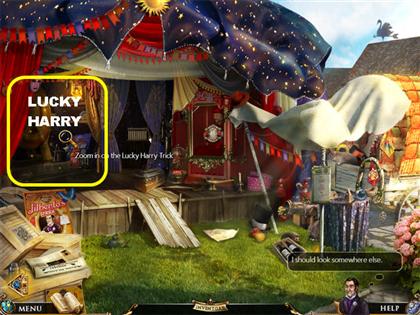
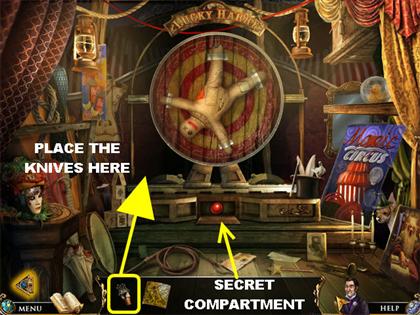
- Click on the left side of the tent to enter the Lucky Harry Trick.
- Click on the diagram in the lower center of the ground for a closer view. The diagram shows you what to do to be successful in this trick.
- Place the Knives from inventory anywhere below the lower left side of the wheel.
- Click on the secret panel below Harry the Dummy and a red button will appear, click on the red button to flip the wheel around.
- Click on the wheel to take a closer look.
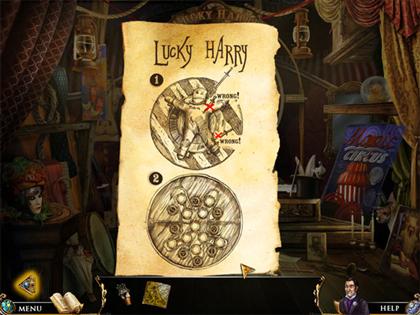
Harry’s Magnet Puzzle
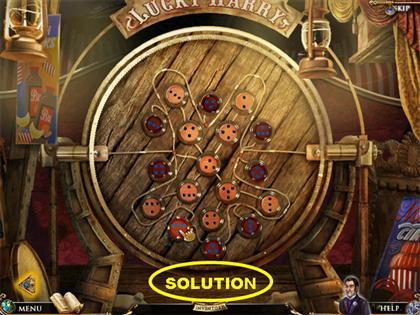
- Your goal is to place the magnets outside of Harry’s body.
- The magnets each have a certain amount of dots on them.
- Drag the magnet to the spot that has the matching dots outside of the body. Keep in mind that the dots have to face in the same direction as the ones you’re trying to match.
- A piece will lock into place when it is in the right spot.
- Once all the pieces are in place, the puzzle will sparkle and you will be taken back to the main scene.
Throw the Knives
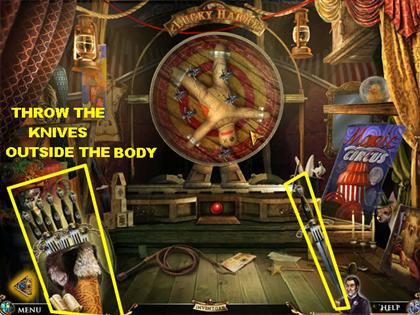
- You can check to see if your magnets are in place by throwing the knives.
- Pick up a Knife in the lower left corner.
- The Knife will appear on the right side of the scene.
- Click on the spot on the wheel you want the Knife to go to and a red mark will appear on the wheel. That’s where the Knife will land.
- Make sure the Knife doesn’t land on Harry’s body by the time the wheel spins around to it.
- Once the Knives have been thrown successfully you will be taken back to the Fortune Teller.
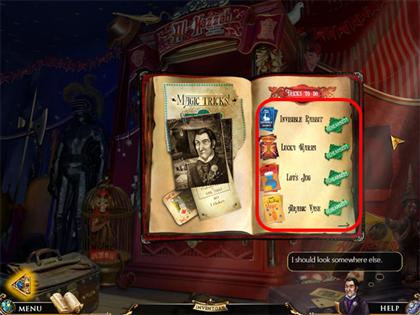
- The Magic Book Diary has been completed at this time.
- Go back to the City Square.
Burgermeister’s Porch
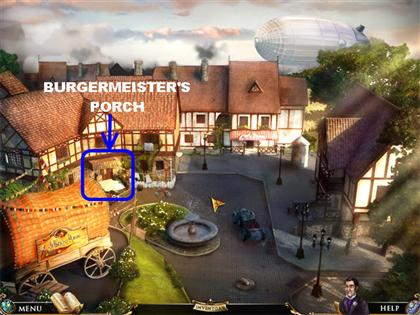
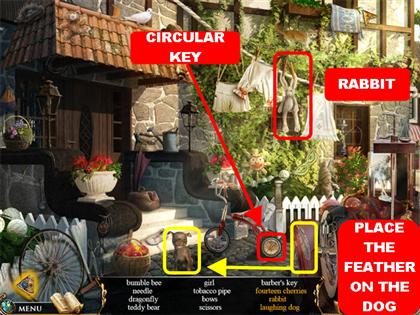
- You still need the Circular Key to the Barbershop Door.
- Click on the Burgermeister’s Porch on the far left side of the scene.
- Pick up the Feather on the fender of the car in the lower right.
- Place the Feather on the Dog in the middle of the street and it will start laughing.
- Click on the Laughing Dog to take it off your inventory.
- The Rabbit is hanging by his ears on the clothesline.
- Click on the 2 clothespins that are attached to the rabbit’s ears and it will fall to the ground.
- Click on the Rabbit on the ground to take it off your list.
- Pick up the Circular Key that’s on the tricycle’s wheel.
14 Cherries
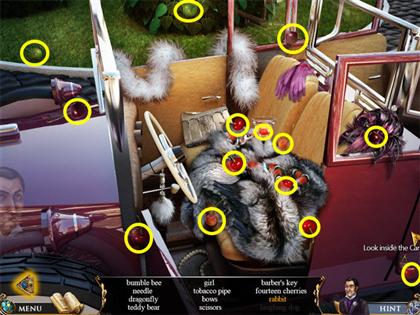
- Click on the lower right side of the car for a closer view.
- Click on the 14 Cherries scattered around the scene. They are circled in yellow in the screenshot.
- Go back to the Barbershop.
Use Circular Key – Barbershop
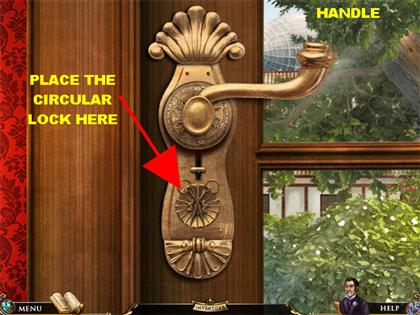
- Click on the door in the back of the Barbershop.
- Place the Circular Key on the lock.
- Click on the Circular Lock a total of 7 times.
- Click on the Handle twice and you will be taken to the Blimp.
Pick up Starter Pull & Cow - Blimp
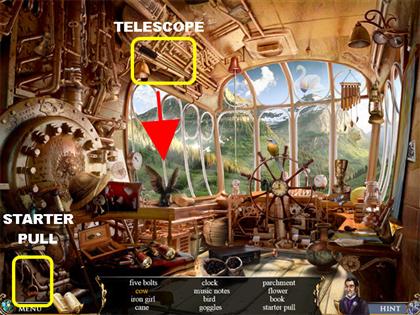
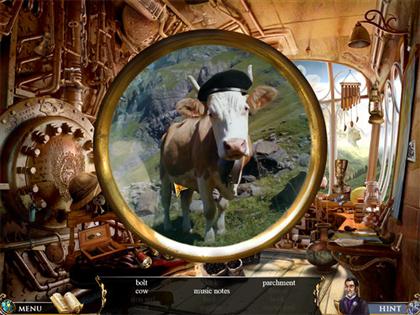
- Click on the Telescope in the upper left side and point it at the pasture below.
- Click on the sparkly spot in the lower left window and a cow will pop up.
- Click on the Cow to eliminate it off your list.
- Pick up the Starter Pull in the lower left corner of the scene.
Use Starter Pull – Blimp
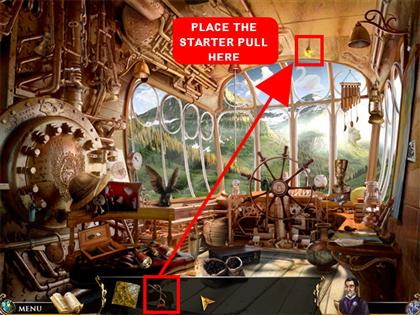
- Place the Starter Pull in the upper right side of the ceiling, where you see the flame.
- Click on the Starter Pull.
Use Map to Steer the Blimp
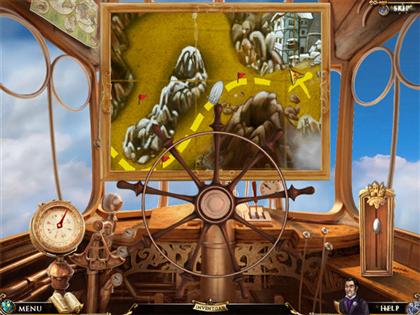
- Place the Map in the frame.
- Use the steering wheel to direct the Blimp to Duke’s Castle.
- Follow the yellow marked road by steering the wheel to stay on the marked path.
- If you start veering off course, a sign pops up saying you’re going the wrong way. Just straighten out your vehicle so it stays on the marked path.
- You will reach your destination when you see the yellow “X” in front of the Castle.
Chapter 5: Buggy - A Dog’s Life in Paris
Red Portal
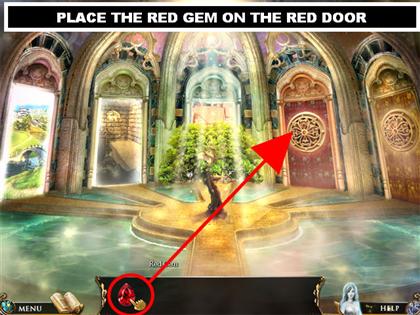
- Place the Red Gem on the Red Portal door.
Pick up Fish - Curious Cat
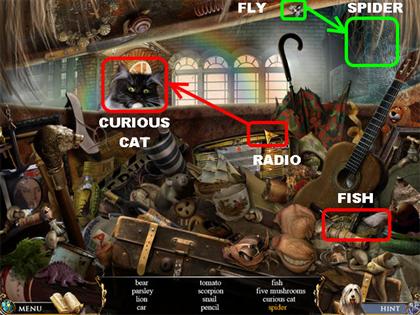
- Click on the Radio’s red button in the far right and the Curious Cat will show up. Click on the Curious Cat to take it off your list.
- Click on the Fly in the upper right. The Fly will land on the spider web in the upper right corner.
- Click on the Spider when it comes down the web to get the Fly.
- Pick up the Fish in the lower right.
Your Soul Mate
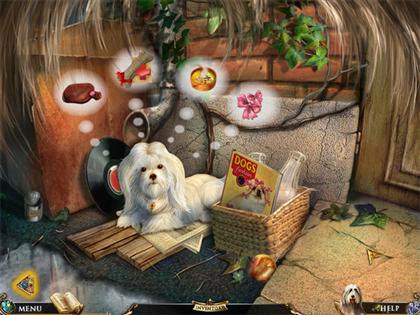
- Click on the Maltese to see the thought bubbles appear.
- Your goal is to pick up all the items shown in the Maltese’s thought bubble so you can gain her affection.
- The items you need to look for are a Full Hot Water Bottle, a Medical Bone, Soup, and Pink Bows.
- Use the Navigational Arrow in the lower left to go to the Restaurant.
Outside Restaurant
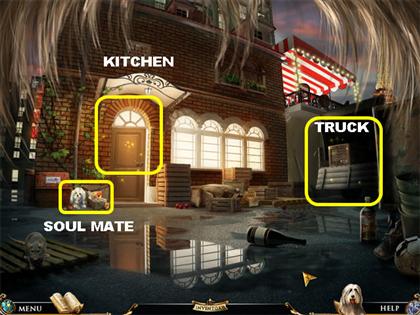
- There are several areas you can explore here.
- Your Soul Mate is on the lower left side, close to the door. This is the scene in which the chapter started.
- You can enter the Kitchen through the door in the back of the Restaurant.
- Click on the Truck on the right for a closer view.
Give the Hungry Cat the Fish
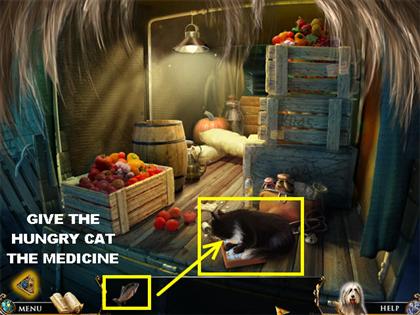
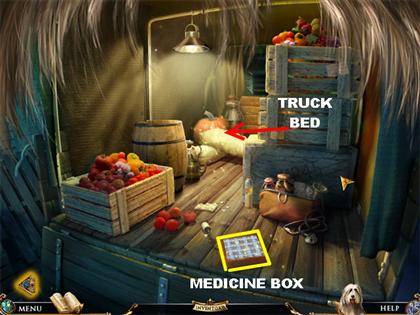
- Give the Fish from inventory to the Hungry Cat in the scene.
- The Hungry Cat will take the Fish and leave.
- Once the Cat leaves, you will find a Box with Medicine in the truck.
Medicine Box Puzzle
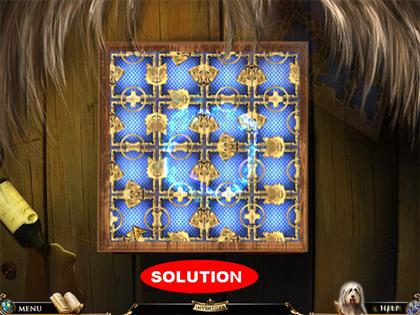
- Click on the Medicine Box for a closer view.
- Your goal is rotate the squares until they are aligned correctly.
- Click on a square to rotate it clockwise.
- When a square is in the right position, a glowing circle will appear for a few seconds.
- Please look at the screenshot for the solution.
Medical Bone
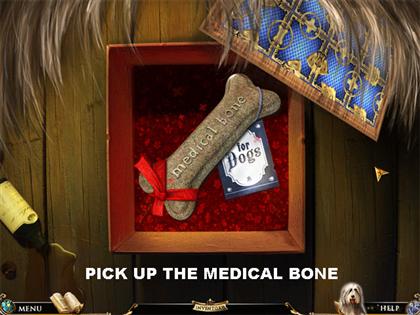
- After the Medicine Box Puzzle has been solved, the box will open up.
- Pick up the Medical Bone that’s inside the box.
Pick up Hot Water Bottle - Truck Bed
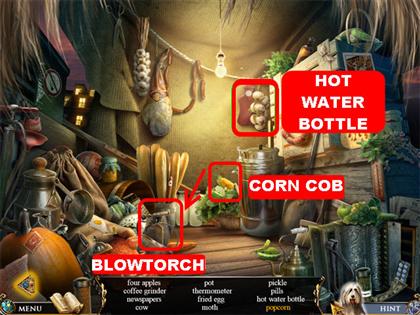
- Click on the Truck Bed for a closer view.
- Pick up the Hot Water Bottle in the upper right; it’s on the wall next to the crates.
- Click on the Corn Cob in the lower center of the scene and drag it to the Blowtorch in the lower left.
- The Corn Cob will be suspended in mid air.
- Click on the Blowtorch to turn it on.
- Drag the Corn Cob to the Blowtorch again and this time it will cook the corn.
- Pick up the Popcorn pieces on the floor.
- Go to the Kitchen by entering through the door in the back.
Pick up Recipe Book - Top of the Table
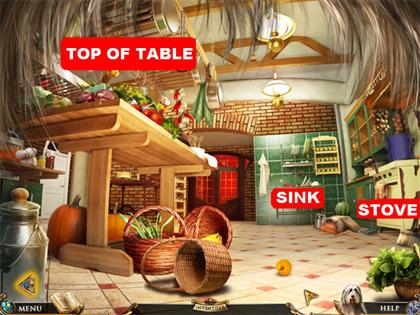
- You can access the Top of the Table, the Stove and the Kitchen Sink from this location.
- Click on Top of the Table for a closer view.
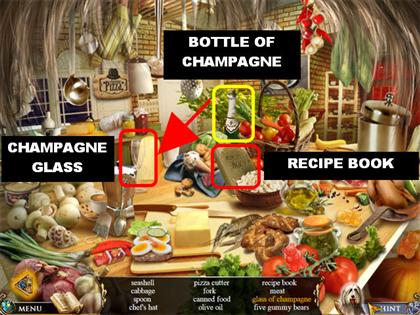
- Pick up the Recipe Book in the center of the table.
- Click on the Bottle of Champagne and the cork will pop out.
- Drag the Bottle of Champagne on the right to the empty Champagne Glass on the left. Click on the bottle so it can pour into the glass.
- Click on the Glass of Champagne to take it off your list.
Create Vegetable Animals - Cutting Board

- After all the items have been found on Top of the Table, the Cutting Board on the right will start to sparkle, click on it for a closer view.
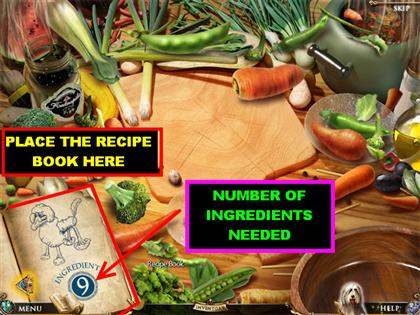
- Place the Recipe Book on the left side of the Cutting Board.
- Your goal is to create the Vegetables Animals you see in the Recipe Book.
- There are five recipes you need to make: Carrot Fox, Cauliflower Sheep, Broccoli Poodle, Peas Grasshopper and China Cabbage Fish.
- You can only click on the pieces in the scene that the Recipe Book is showing.
Carrot Fox
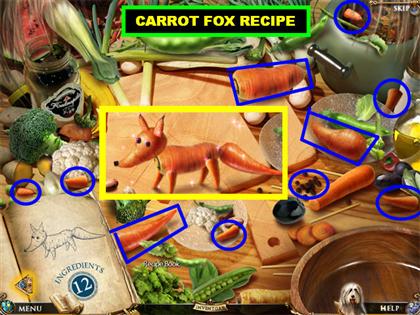
- Click on the pages several times until you reach the Carrot Fox page. You can choose to start on any page you desire.
- Pick up all the pieces shown on the screenshot to make the Carrot Fox.
- Each piece you click will show up in the middle of the Cutting Board.
- Once the Carrot Fox has been assembled it will land in the bowl in the lower right.
- This recipe requires 12 pieces.
- All the ingredients are highlighted in blue in the screenshot.
- The eyes and the nose will be the small black pieces you see on the right side of the Cutting Board.
Broccoli Poodle

- This recipe requires 9 pieces.
- All the pieces are shown in blue in the screenshot.
- The eyes will be the small black pieces you see on the right side of the Cutting Board.
Peas Grasshopper

- This recipe requires 7 pieces.
- All the pieces are shown in red in the screenshot.
Cauliflower Sheep
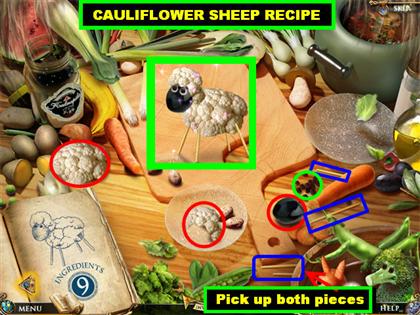
- This recipe requires 9 pieces.
- All the pieces are shown in blue, red and green in the screenshot.
- The eyes will be the small black pieces you see on the right side of the Cutting Board.
China Cabbage Fish
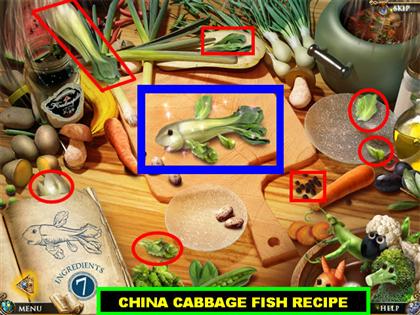
- This recipe requires 7 pieces.
- All the pieces are shown in red in the screenshot.
- The one eye will be in the pile of small black pieces you see on the right side of the Cutting Board.
- After all the Vegetable Animals have been formed, you will have a Vegetable Mix added to your inventory.
- You will be automatically taken back to the Kitchen scene.
Fill Hot Water Bottle - Kitchen Sink
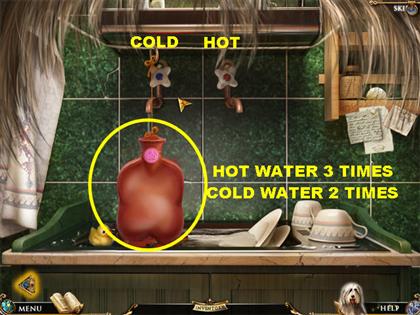
- Click on the Kitchen Sink for a closer view.
- Your goal is to fill the Hot Water Bottle with the correct ratio of hot and cold water.
- The Cold Water Tap is on the left and the Hot Water Tap is on the right.
- Attached to the Cold Water Tap is a string for tying up the Hot Water Bottle.
- Grab the Empty Hot Water Bottle from inventory and place it under the string that’s on the cold water tap on the left.
- Move the Hot Water Bottle over to the Hot Water Tap on the right.
- Click on the Hot Tap Water 3 TIMES to fill it with water and the seal around the Hot Water Bottle will be red.
- Slide the Hot Water Bottle to the Cold Water Tap and click on it 2 TIMES. The cold water will turn the seal pink.
- The Full Hot Water Bottle will go into your inventory after everything has been completed.
- Click on the Kitchen Stove on the right for a closer view.
Cook the Soup - Kitchen Stove
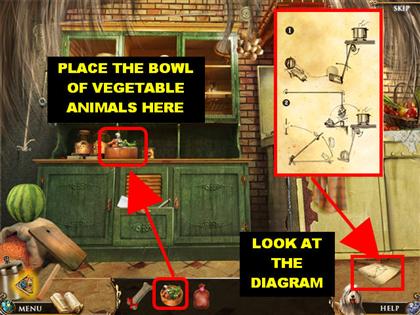
- Your goal is to cook the soup by arranging the items in the kitchen so you can make an apparatus that will toss the Vegetables into the Pot and turn on the Stove.
- Place the Bowl of Vegetable Animals on the left side of the counter. Please look at the screenshot for the exact location.
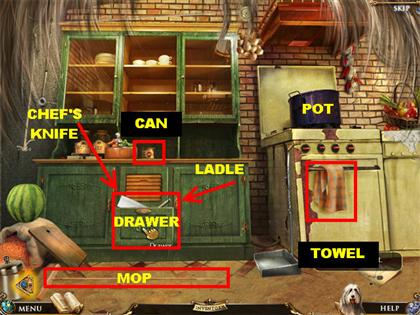
- There are several items that will begin to sparkle after the Bowl of Vegetable Animals has been placed on the counter.
- The Mop is on the left side of the floor.
- The Drawer contains the Chef’s Knife on the left and the Ladle on the right.
- The Towel is hanging in front of the stove.
- The Can is next to the Bowl of Vegetable Animals.
- The following steps have to be performed in the exact order.
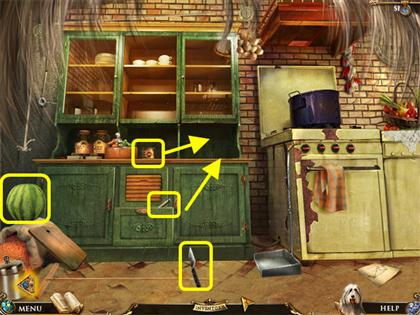
- Click on the Chef’s Knife that’s in the Drawer and it will land over the Mop Handle.
- Click on the Can next to the Bowl of Vegetable Animals and it will land on the right side of the counter.
- Click on the Ladle that’s inside the Drawer and it will land over the Can on the right side of the Counter.
- Click on the Drawer that contained the Ladle and the Knife to close it, otherwise the Watermelon will not be able to roll properly.
- Click on the Watermelon on the left and it will roll to the Dust Pan next to the Stove. This action will turn on the Stove.
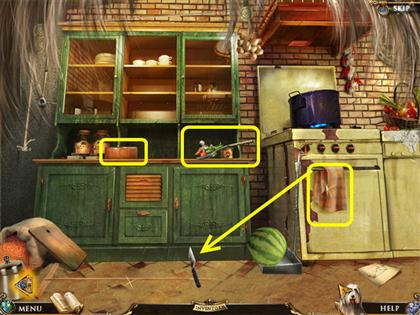
- Click on the Bowl with Vegetables and it will land on the Ladle on the right side of the counter.
- Click on the Towel and it will wrap itself around the Chef’s Knife on the floor.
- Click on the Mop, this causes the onions to fall and land on the Ladle. This action will toss the vegetables into the Pot on the stove.
- The Funny Soup will be added to your inventory at the end of this process.
Give Funny Soup, Bone and Bottle to Soul Mate
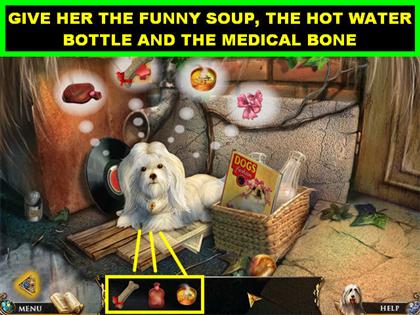
- You will be taken back to the back of the Restaurant.
- Click on your Soul Mate on the left for a closer view.
- Give your Soul Mate the Medical Bone.
- Give your Soul Mate the Funny Soup.
- Give your Soul Mate the Full Hot Water Bottle.
- She still needs the Pink Bows.
- Exit out of that scene to go back to the outside of the Restaurant.
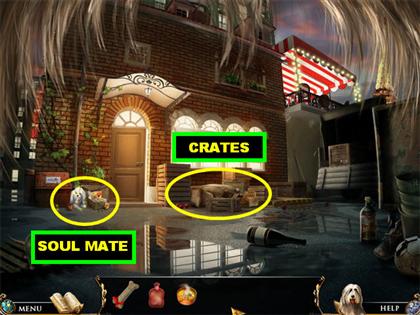
Pick up 6 Pink Bows
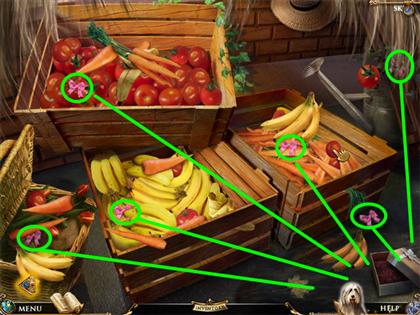
- Click on the Crates next to the door for a closer view.
- Move the vegetables out of the way until you find the 6 Pink Bows.
- The Bows may be in different locations according to each game. The screenshots shows you where we found ours.
- As you find and click each bow, they will automatically go into the box in the lower right.
- Go back to your Soul Mate after all the Bows have been collected.
Pink Bows Mini-game
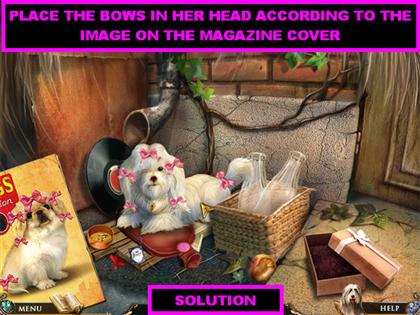
- Your goal is to place the bows on the Maltese according to the image in the Fashion Magazine.
- Drag the Bows from inventory to the Maltese.
- The Magazine will come out of the basket and land in the lower left side of the scene.
- Grab the Bows from the box in the lower right and place it on the Maltese’s head according to the image on the Magazine.
- Place the Last Bow on her tail.
- Please look at the screenshot for the solution.
Chapter 6: Albertina – Observatory
Yellow Portal
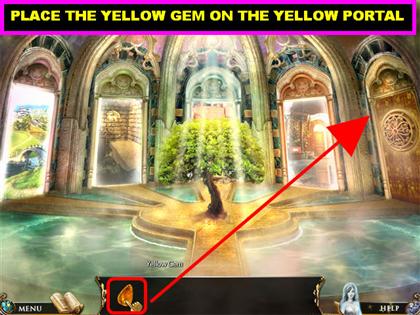
- Place the Yellow Gem on the Yellow Portal.
- Click on the door to go through it.
Park
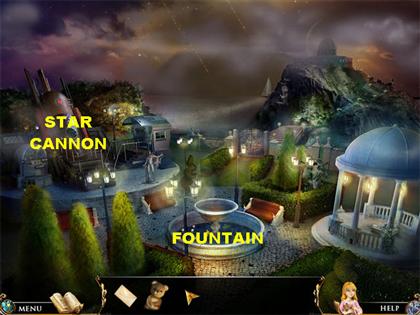
- You will have a Bear and a Letter in your inventory as you begin this journey.
- On the far left side you have the Star Cannon.
- In the lower center you have the Fountain.
- Click on the Star Cannon on the far left for a closer view.
Star Cannon
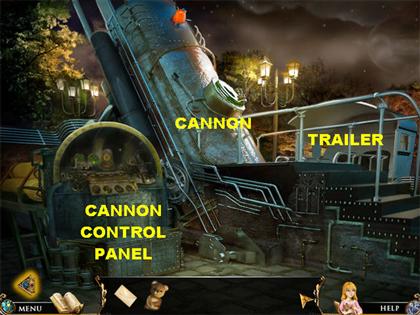
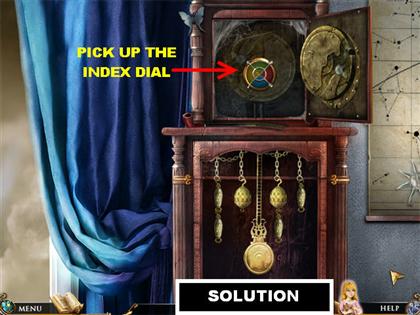
- Click on the Cannon’s Control Panel on the left for a closer view. You will receive a message that you need 3 more Index Dials to operate the console.
- Exit out of that scene by clicking on the arrow in the lower left.
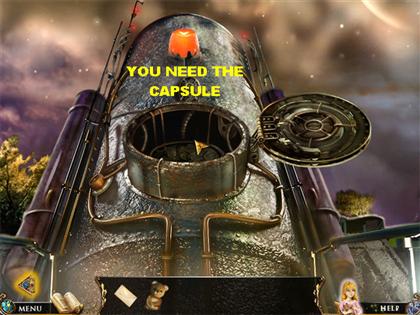
- Click on the Cannon on the right for a closer view.
- Click on the Hatch to open it. Click on the Hatch again and you will be told that you need to find a Capsule first.
- Close the Hatch and exit the scene by clicking on the arrow in the lower left.
- Once you return to the main scene, the Trailer on the right will sparkle.
- Click on the Trailer for a closer view.
Pick up Capsule – Trailer
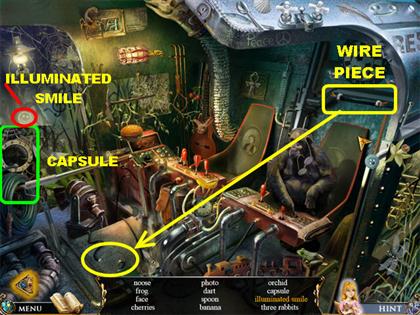
- Click on the Capsule on the left edge of the scene.
- Grab the Wire in the upper right and place it on the broken wires in the lower left. This action will fix the spotlight.
- Once the wires are repaired, an Illuminated Smile will appear on the left side of the wall, click on it to take it off your list.
Use Capsule, Bear & letter - Cannon
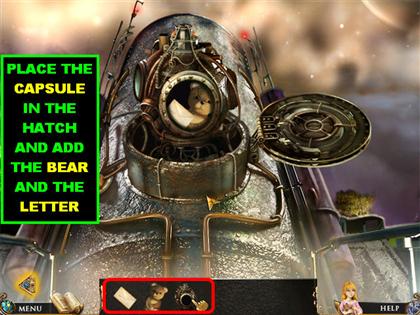
- Click on the Cannon on the right for a closer view.
- Click on the Hatch Cover to open it.
- Place the Capsule in the Hatch.
- Place the Bear and the Letter in the Capsule.
- Click on the Capsule so it can drop down into the Cannon.
- Close the Hatch Cover.
- You will be taken back to the main scene.
- Go back to the Park by clicking on the arrow in the lower left corner.
Park
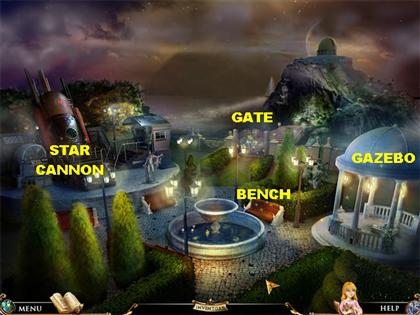
- When you return to the Park, there will be several sparkly areas that were not available previously.
- The Gazebo is on the right side.
- The Gate is in the back of the Park.
- The Bench is behind the Fountain, click on it for a closer view.
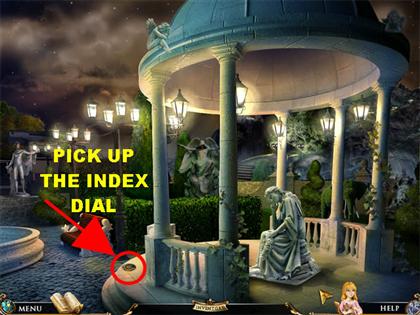
Index Dial # 1- Bench
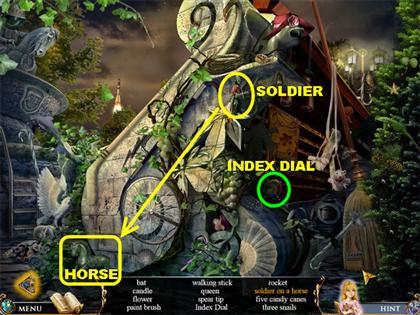
- Pick up the Index Dial in the lower right and it will go into inventory.
- Grab the Soldier in the top center of the scene and place it on the Horse in the lower left.
- Click on the Soldier on a Horse to take it off your list.
- You can only click on the Rocket when it appears on the left side of the sky. It flies in and out of the scene.
Index Dial # 2 - Find Statue Pieces - Gazebo
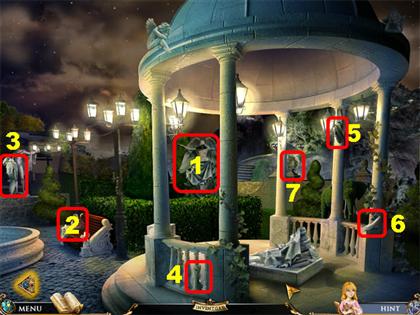
- Click on the Gazebo on the right for a closer view.
- Your goal is to find all the Statue Pieces and reassemble the Statue.
- The Statue Pieces are highlighted in red in the screenshot.
- The Statue Pieces have to be picked up in a particular order.
- Each piece you pick up will be added to the Broken Statue in the middle of the Gazebo.
- Once the Statue has been reassembled, the Index Dial will fall on the steps of the Gazebo, click on it to pick it up.
Zodiac Sign Puzzle – Gate
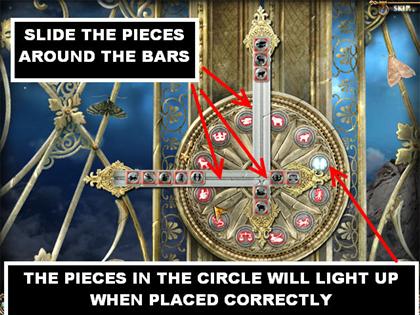
- Your goal is to move the Zodiac signs in the correct order on the horizontal bar.
- The correct order is shown in the vertical bar. You have to move the Zodiac signs so that they are in the same order horizontally as they WERE vertically.
- Use the bars in the lower right and at the bottom to help you store pieces as you move them out of the way.
- Each time you place a Zodiac sign correctly, the matching zodiac sign will light up on the wheel.
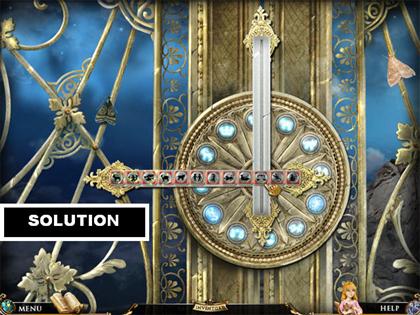
- Please look at the screenshot for the solution. The order from left to right is:Capricorn Aquarius Pisces Aries Taurus Gemini Cancer Leo Virgo Libra Scorpio Sagittarius
- Once they’ve been placed correctly the wheel will start spinning.
- The Observatory will open up in the upper right side of the park. Click on it to enter it.
Observatory
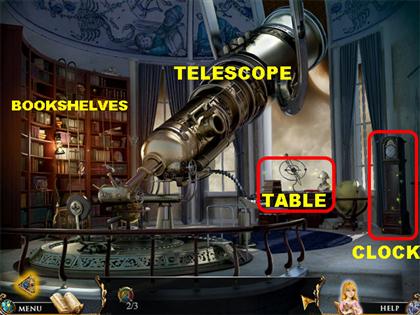
- When you enter the Observatory there are many areas to explore.
- The Bookshelves are on the left.
- The Table is on the right.
- The Telescope is in the middle of the room.
- Click on the clock on the right for a closer view.
Index Dial # 3 - Clock Puzzle
- Your goal is to balance the weight of the Cones so they are all even.
- Grab the Cones and move them to some of the other Cones and you will notice the weight shift.
- The weight of the Big Cone is the same as the 2 Small Cones.
- Please look at the screenshot for the solution. From left to right you should have the following cones on the clock:2 Small Cones 1 Big Cone 1 Big Cone, 1 Small Cone 1 Small Cone
- Once the clock has been balanced, the Index Dial will appear on top, pick it up.
Bookcase
- Click on the Bookcase for a closer view.
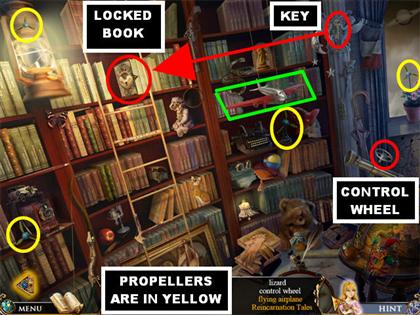
- You need to fix the Broken Airplane on the right side of the Bookcase.
- Pick up the 4 Propeller’s scattered around the scene and place them on the Airplane on the right.
- The propellers are circled in yellow in the screenshot.
- Click on the Airplane after all the propellers have been added to take the Flying Airplane off your list.
- Pick up the Telescope Control Wheel on the telescope in the lower right.
- Pick up the Key in the upper right corner and place it on the Locked Book in the upper left side.
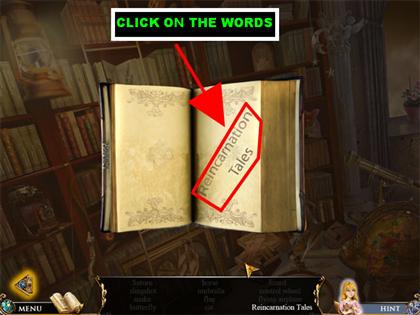
- Once the lock opens the book, it will say “Reincarnation Tales” inside, click on it and the page will show up on your screen.
- Click on the words “Reincarnation Tales” to take it off your list.
Planet Tablet Mini-game - Table
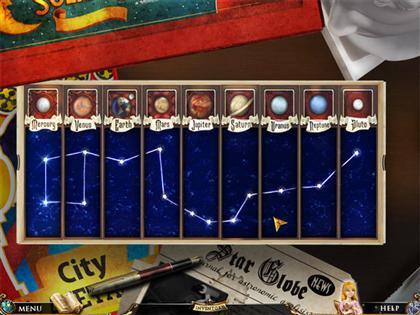
- Click on the Table for a closer view.
- Your goal is to swap the Planet Tablets until they are in the correct order to form the Magic Constellation.
- Click on the Solar System cover to remove it.
- Click on any 2 Tablets and they will swap places.
- When a Tablet is placed correctly it will glow for a few seconds. The other correct pieces will glow as well.
- Here is the correct order of the Tablets from left to right:MERCURY VENUS EARTH MARS JUPITER SATURN URANUS NEPTUNE PLUTO
- As soon as the puzzle has been completed you will be taken back to the Observatory scene.
Dragon Constellation Mini-Game
- Place the Control Wheel on the lower side of the Telescope to activate it.
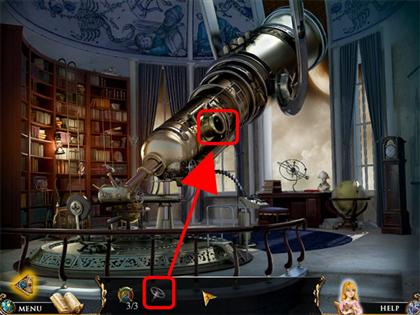
- Click on the giant Telescope for a closer view.
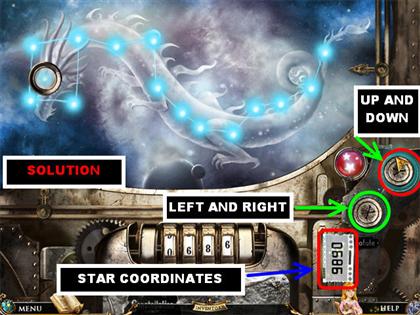
- Your goal is to reproduce the Dragon Constellation by maneuvering the X and Y dials to the right spots.
- The X and Y dials are located in the lower right corner.
- The X dial moves the viewer from left to right.
- The Y dial moves the viewer up and down.
- Grab the dials and rotate them until they are focused on a star. You will know you’ve located a star when it glows while the viewer is focused on it.
- Click on the Red Button on the right to enter the star into the Constellation.
- Once the Dragon is completed, Albertina says she will send her Teddy to it so he can make her dream come true.
- Click on the Red Button after the puzzle has been completed and a ticket with the Star Coordinates will appear in the lower right corner. Click on it to pick it up.
- You will be automatically taken back to the Park, click on the Star Cannon on the left to access it.
Navigation Console
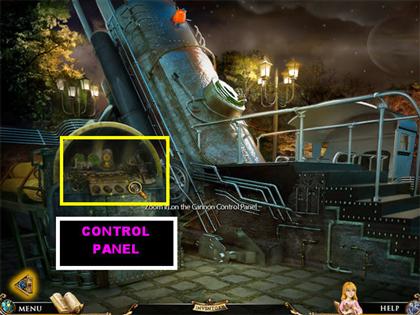
- Click on the Cannon’s Control Panel for a closer view.
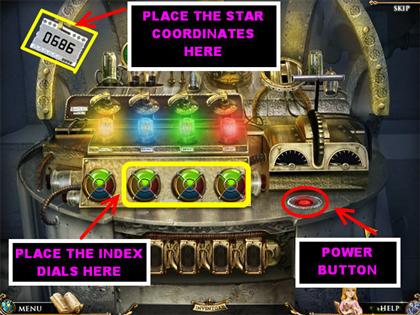
- Place the Star Coordinates from inventory anywhere on the scene and it will attach itself in the upper left corner of the machine.
- Place the Index Dials in the empty slots next to the Index Dial that’s already on the machine.
- Click on the Red Power Button on the right to activate the machine.
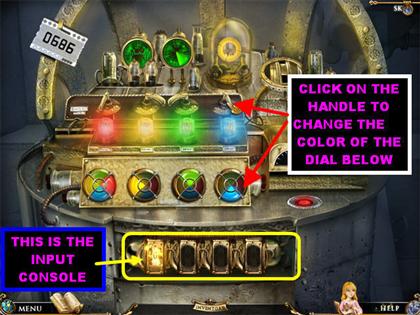
- The machine will light up and the Input Console will open up at the bottom of the machine. The input Console is where you will place the Star Coordinates for the Cannon.
- Only one dial at a time will become available on the Input Console. You have to match 4 sets of lights to reveal all of them.
- The solution for this puzzle is random.
- Your goal is to match the color of the big lights on top of the Console with the lights on the Index Dials below them.
- Click on the handle of the big light to change the color of the Index Dial. Stop clicking on the handle once the Index Dial has the same color as the big light above it.
- Follow the same procedure for the next 3 lights on the Console.
- When the lights have been matched correctly, a dial will appear on the Input Console and the 4 big lights will flash simultaneously.
- Repeat the light sequences 3 more times to reveal all the dials on the Input Console.
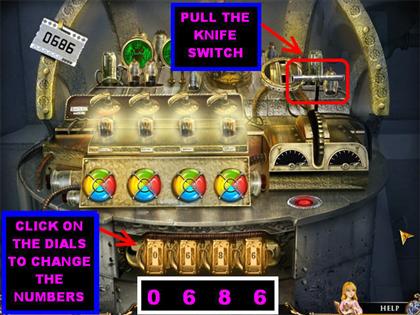
- It is time to enter the Star Coordinates into the Input Console.
- Click on each dial to change the numbers to “0686” on the Input Console.
- Click on the Knife Switch in the upper right.
- The Cannon will blast off.
Pick up Gem at the Fountain
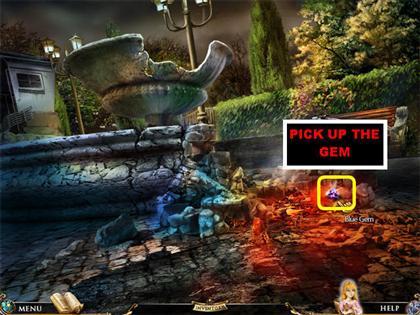
- Pick up the Gem in the lower right.
Tree of Life
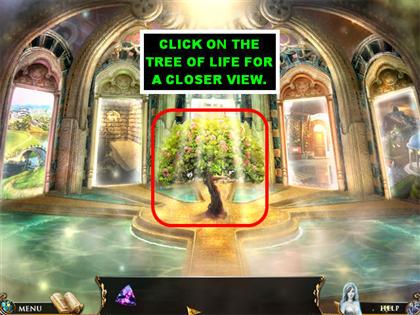
- Click on the Tree of Life for a closer view.
Reincarnation Tree
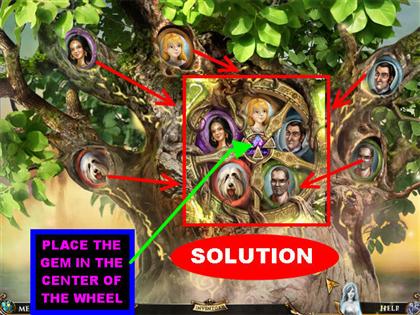
- Place the Gem in the center of the Reincarnation Wheel.
- Place all of Jane’s Past Lives on the corresponding Gem of the Reincarnation’s Wheel.
- If you look at the outline of each of the Past Lives you will notice a faint color around it, place the disk in the matching color.
- The solution is as follows:Albertina goes on the Yellow Gem. Jilberto goes on the Blue Gem. Stefan goes on the Green Gem. Abuja goes on the Purple Gem. Buggy goes on the Red Gem.
- Watch the ending scenes!
Created at: 2009-10-09