

Walkthrough Menu
- General Tips
- Chapter 1: King Richard
- Chapter 2: The Magic Mirror
- Chapter 3: The Castle
- Chapter 4: Into the Tower
- Chapter 5: Dark Wing
General Tips
- This is the official guide for Reveries: Soul Collector.
- This guide will not show when you have to zoom into a location; the screenshots will show each zoom scene.
- Hidden-object puzzles are referred to as HOPs. This guide will not show screenshots of the HOPs, however, it will mention when an HOP is available and the inventory item you'll collect from it.
- Mini-games are sometimes randomized; your solution may vary.
- Use the Map to fast travel to a location.
Chapter 1: King Richard
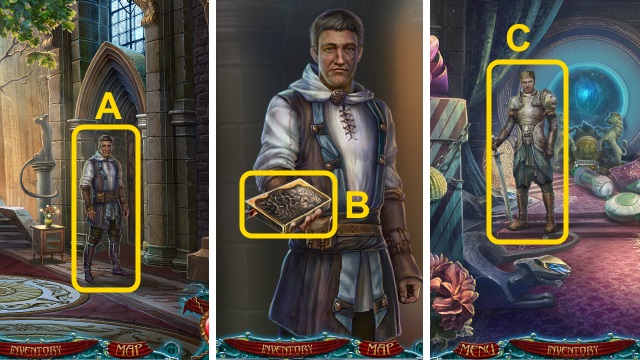
- Talk to the man (A).
- Take the book (B); close it.
- Walk right.
- Talk to Richard (C).
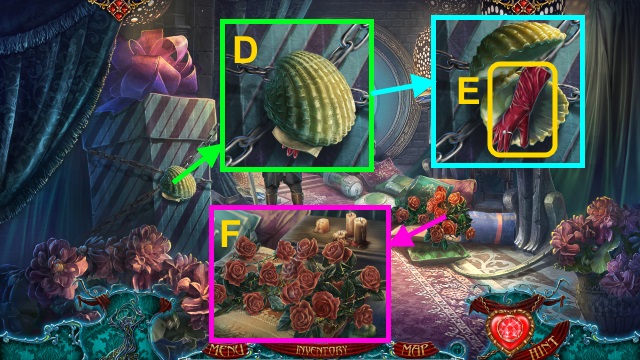
- Read the note; open the shell (D).
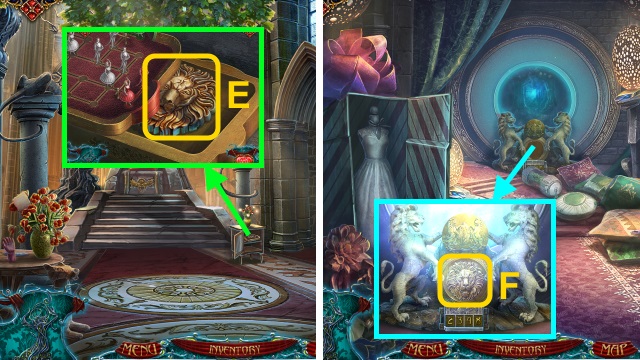
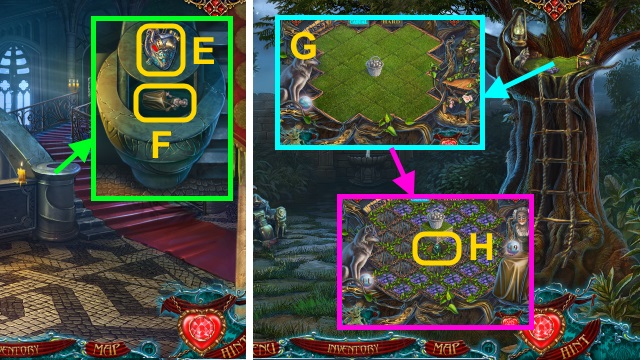
- Take the RING and GLOVE (E).
- Use the GLOVE (F).
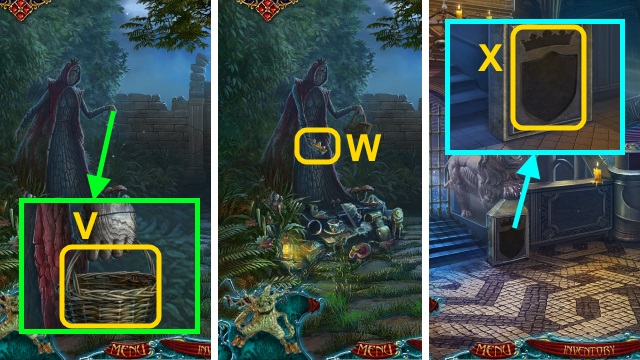
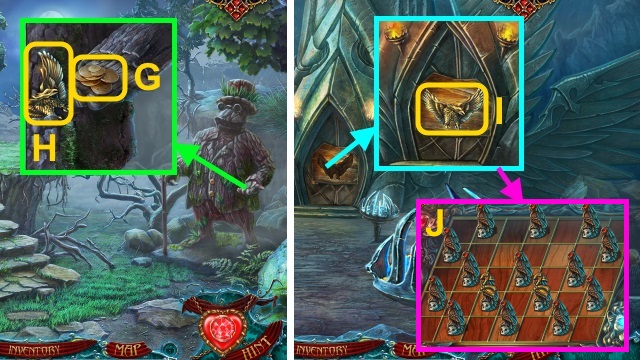
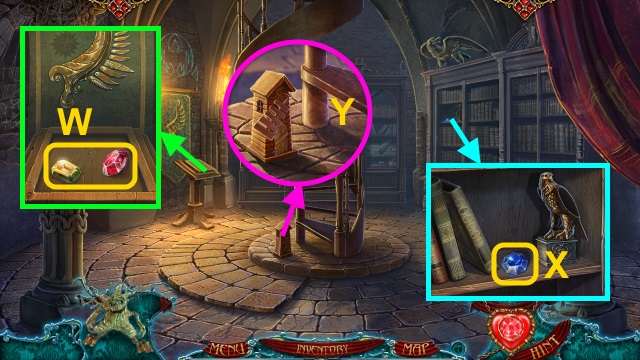
- Take the MEDALLION and PANTHER EYE (G).
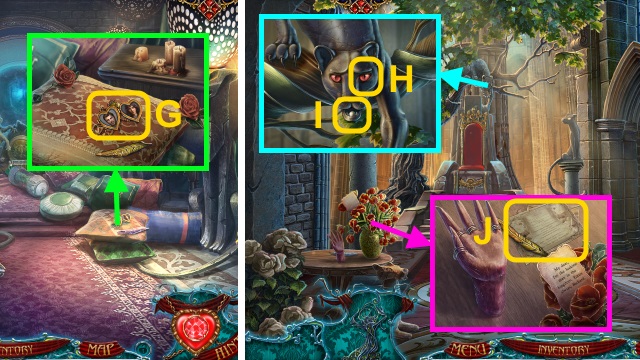
- Walk down.
- Place the PANTHER EYE (H); take the PEARL (I).
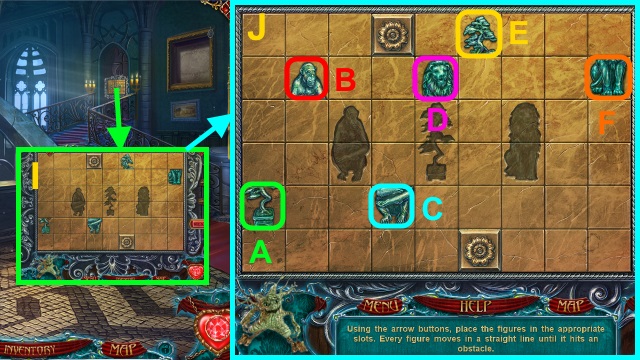
- Move the letters (J); take the MISTY ISLANDS STANDARD.
- Place the RING (K).
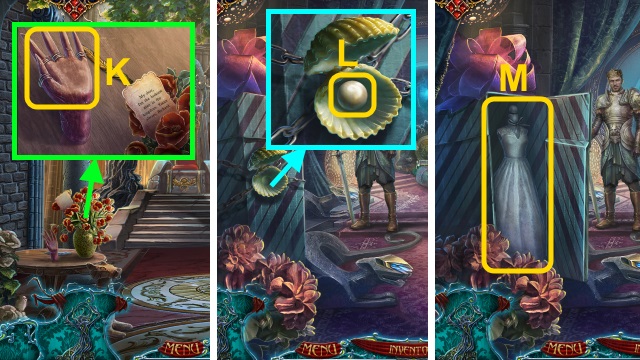
- Walk right.
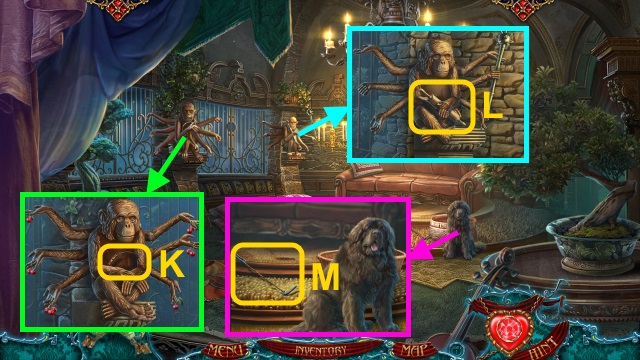
- Place the PEARL (L).
- Take the gown (M).
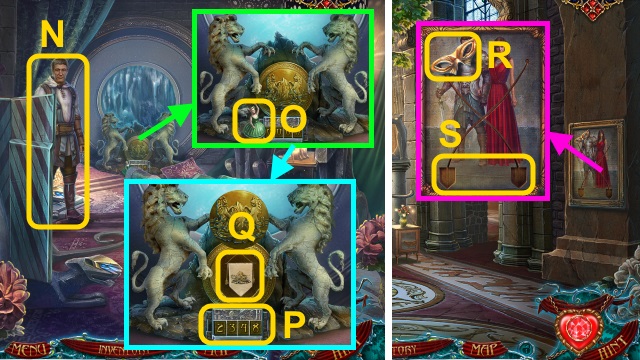
- Talk to the man (N).
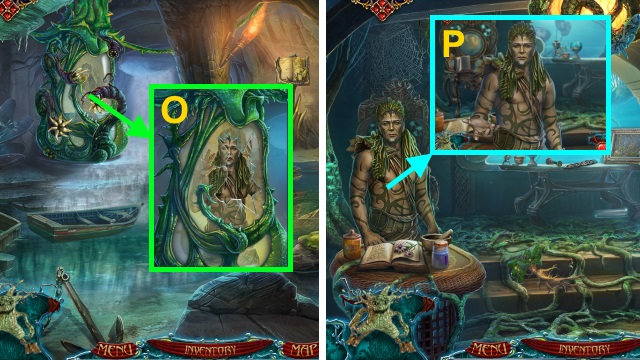
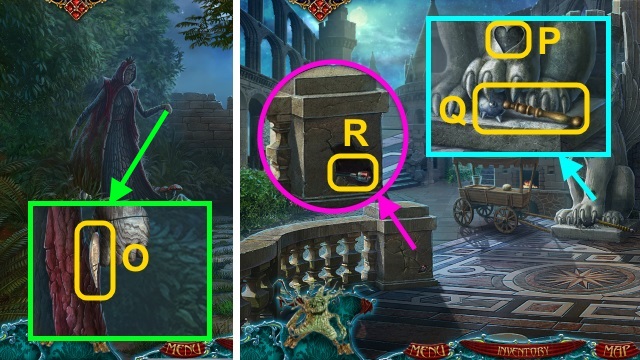
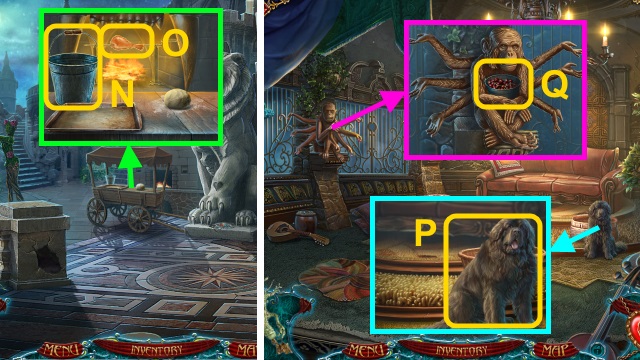
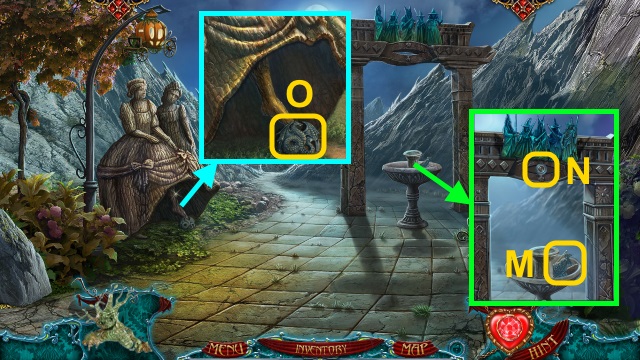
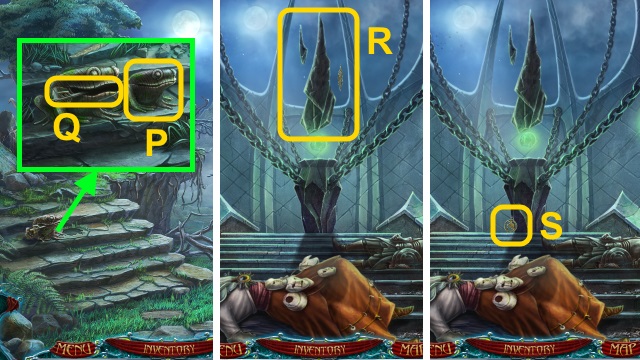
- Take the DANCER FIGURE (1/2) (O).
- Enter the code (P); take the WHITE LION STANDARD (Q).
- Walk down.
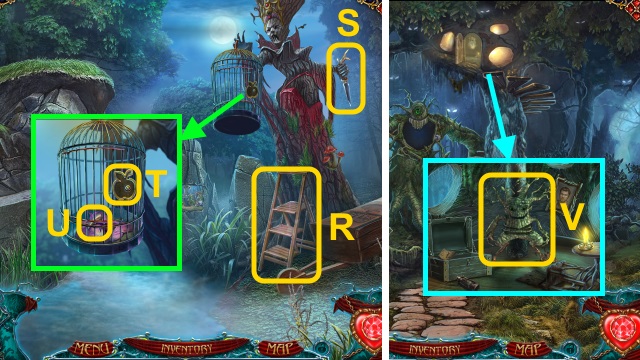
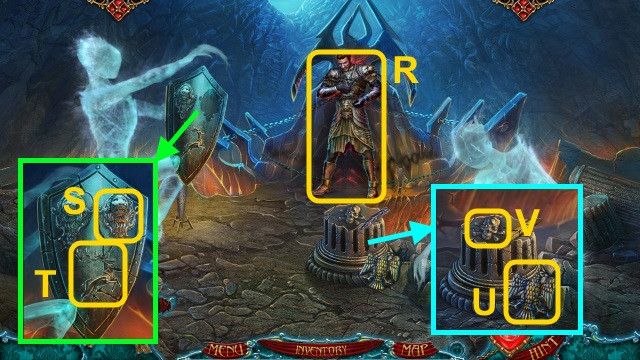
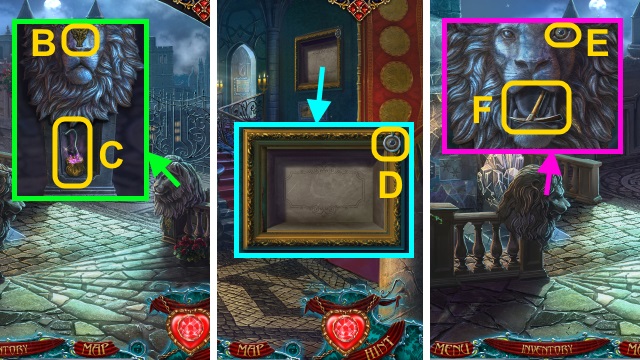
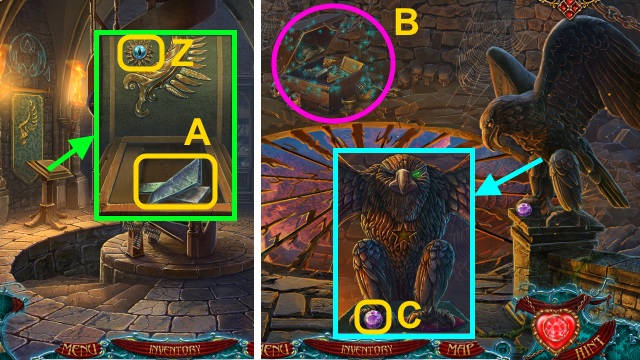
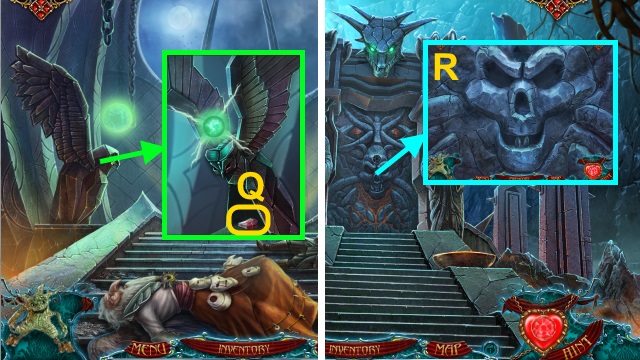
- Take the MASK (R).
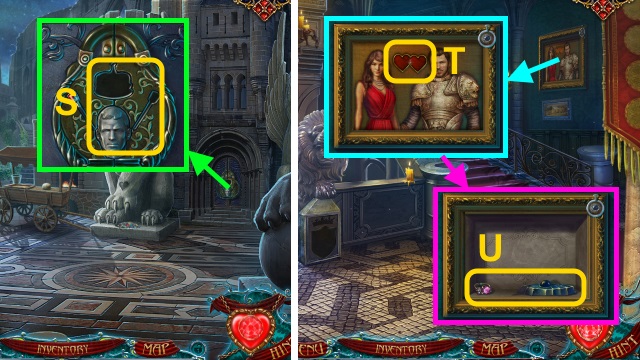
- Place the MISTY ISLANDS STANDARD and WHITE LION STANDARD (S); move them.
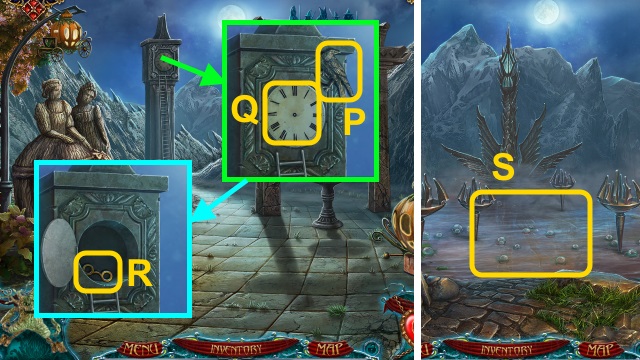
- Take the DANCER FIGURE (2/2) (T).
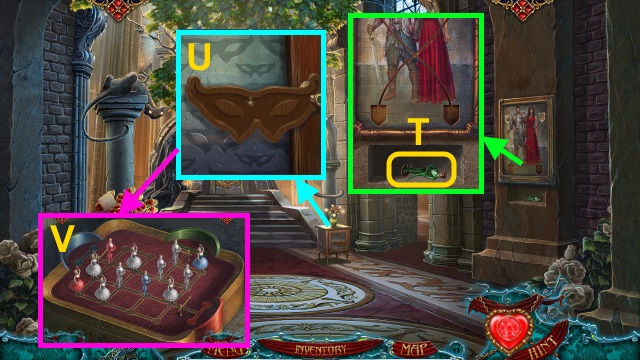
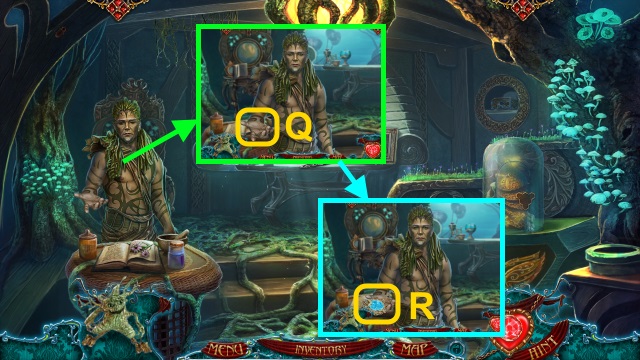
- Place the MASK (U).
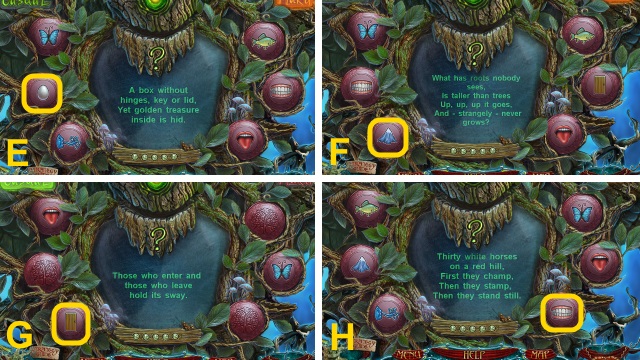
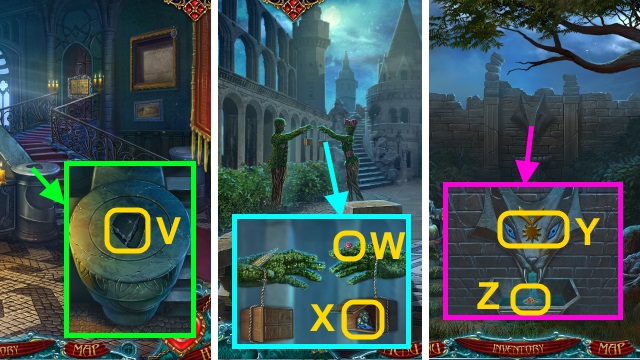
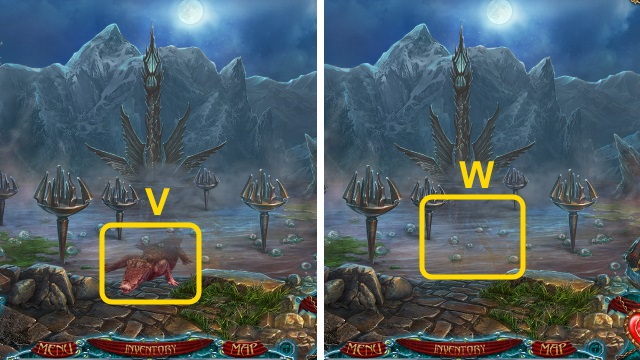
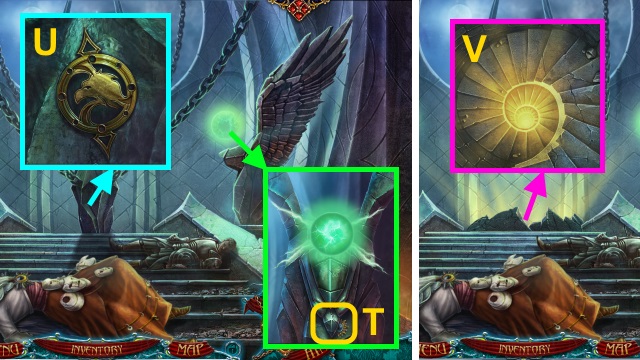
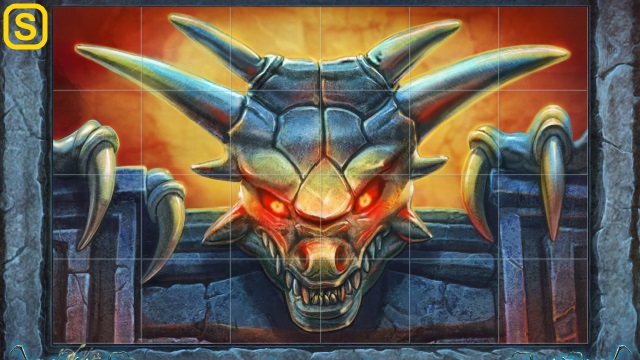
- Place the DANCER FIGURE (2/2) for a mini-game (V).
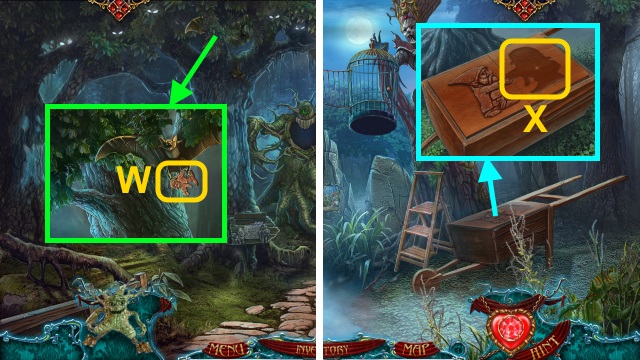
- Solution (W-D).
- Take the PORTAL KEY (E).
- Walk right.
- Place the PORTAL KEY (F).
- Walk forward.
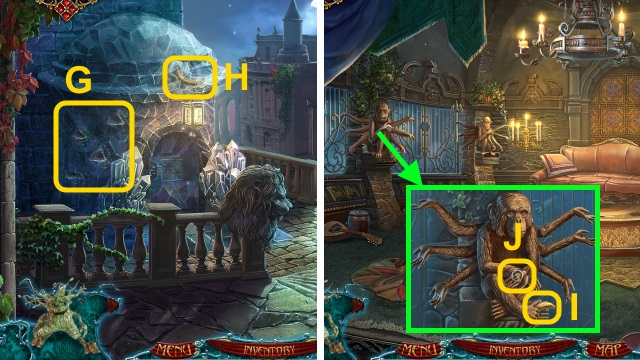
- Try to walk forward (G).
- Pull the lever (H).
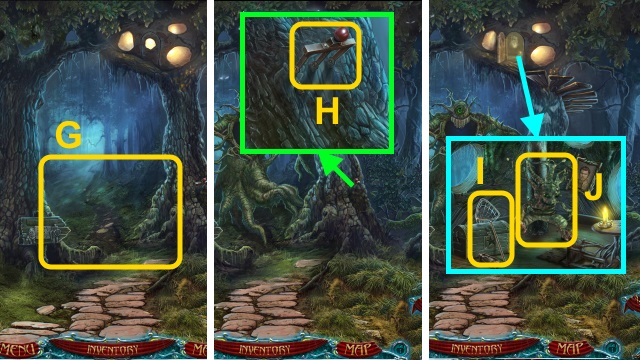
- Take the NET (I); talk to the Sprite (J).
- Walk left.
- Play the HOP to receive the APPLE (K).
- Take the DRAGON EYE (1/2) (L).
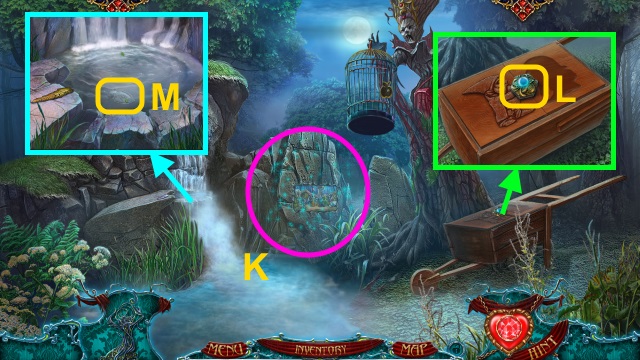
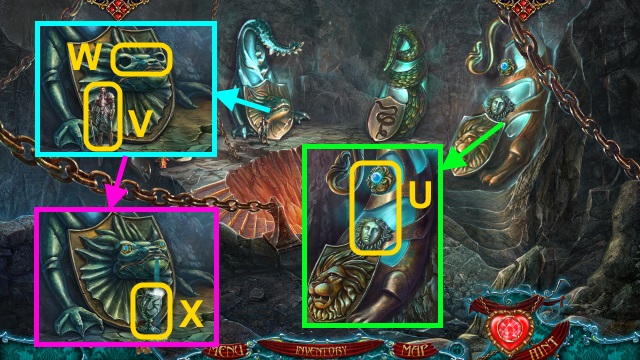
- Use the NET to take the SHIELD (M).
- Walk down.
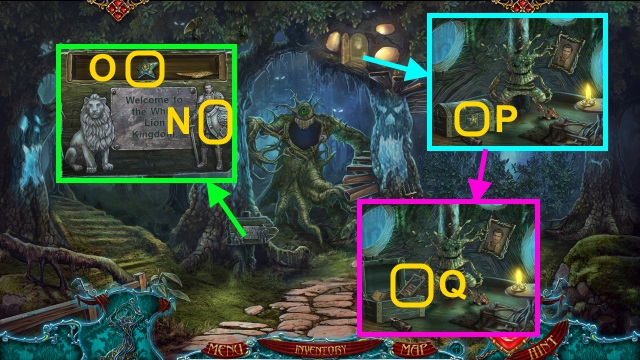
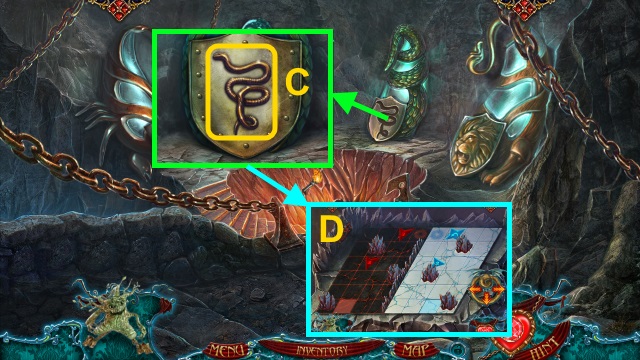
- Place the SHIELD (N); take the STAR (O).
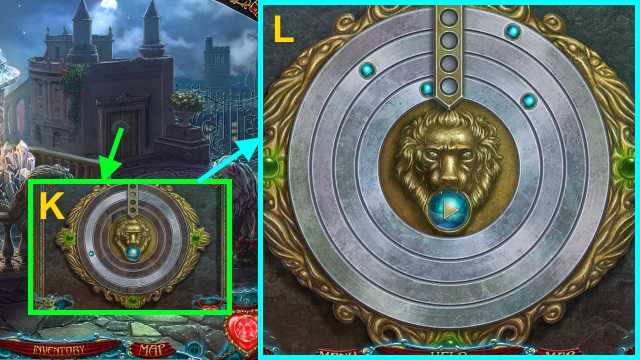
- Place the STAR (P); open the chest.
- Take the MAGICAL STAIRS (Q).
- Walk left.
- Place the MAGICAL STAIRS (R).
- Take the KNIFE (S).
- Place the APPLE (T); take the DRAGON FANG (1/2) (U).
- Walk down.
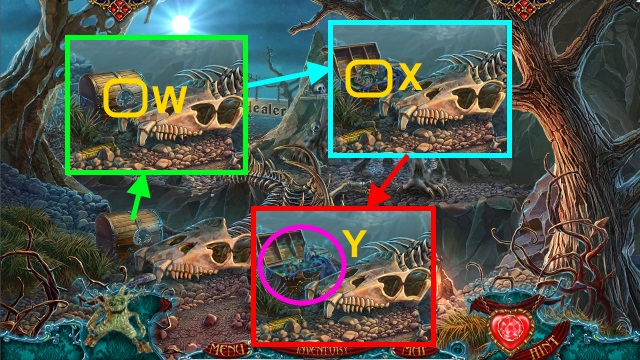
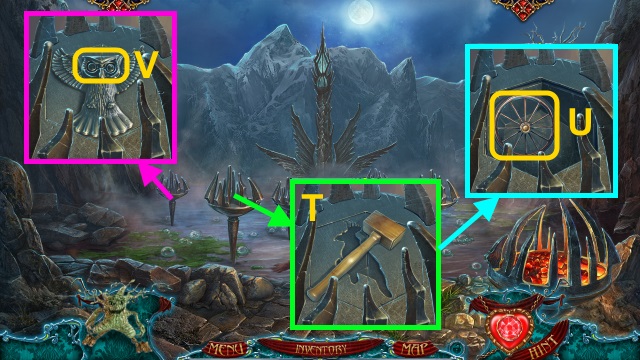
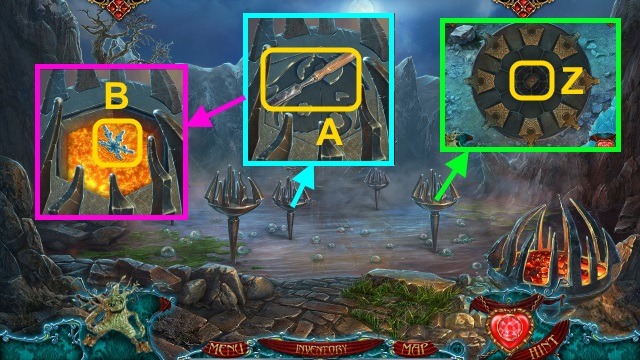
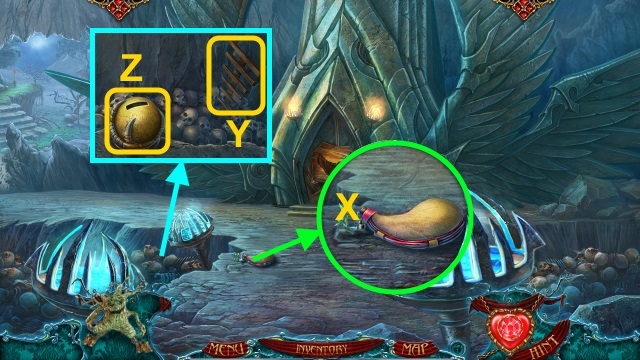
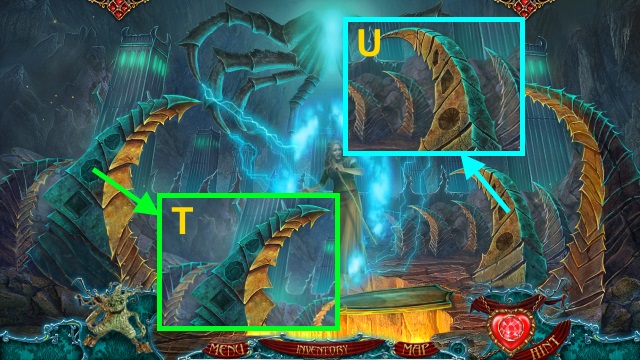
- Use the KNIFE (V); take the Sprite.
- Use the Sprite to take the GNOME (W).
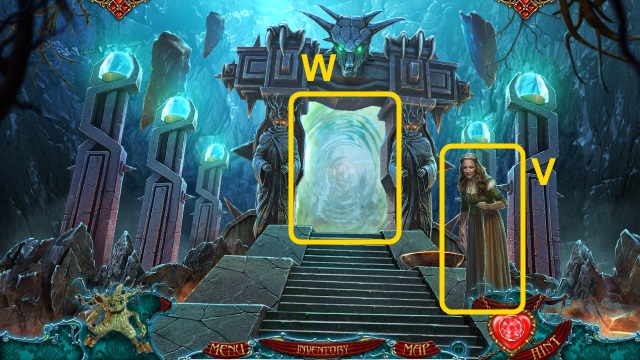
- Walk left.
- Place the GNOME (X).
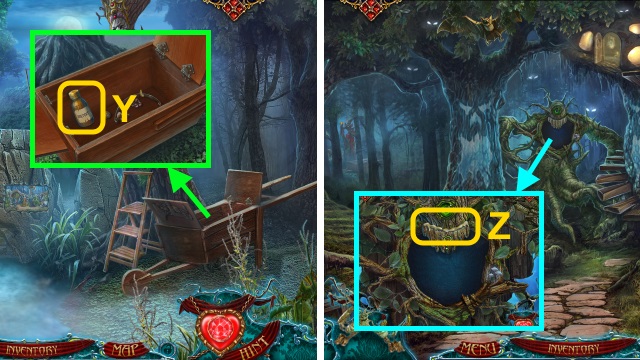
- Take the SOLVENT (Y).
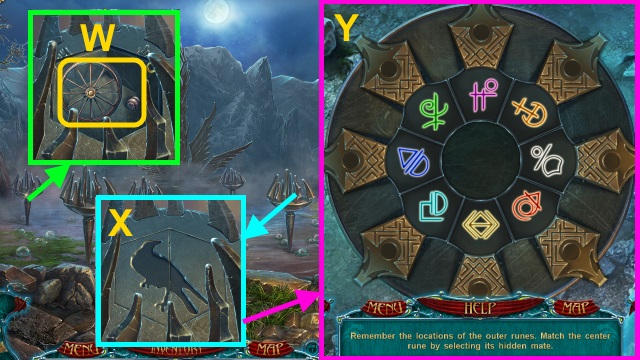
- Walk down.
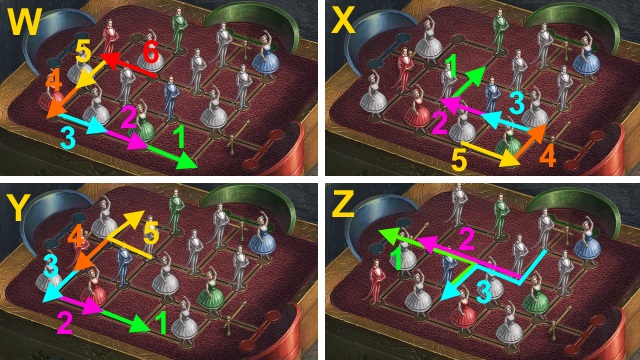
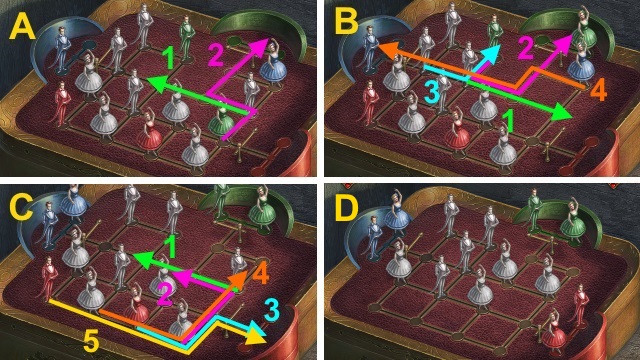
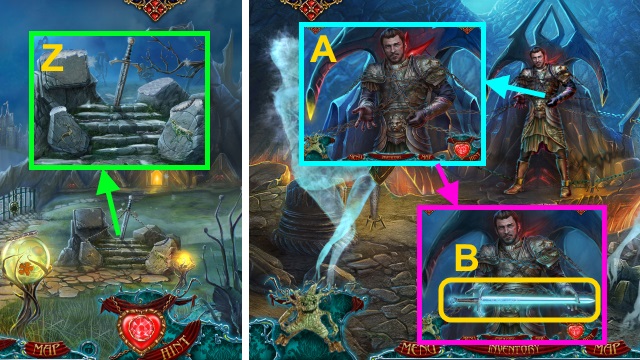
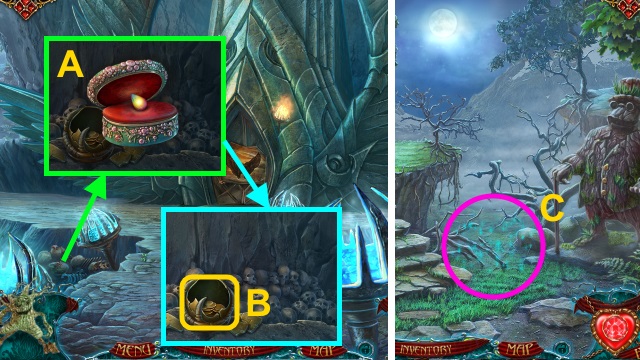
- Use the SOLVENT for a mini-game (Z).
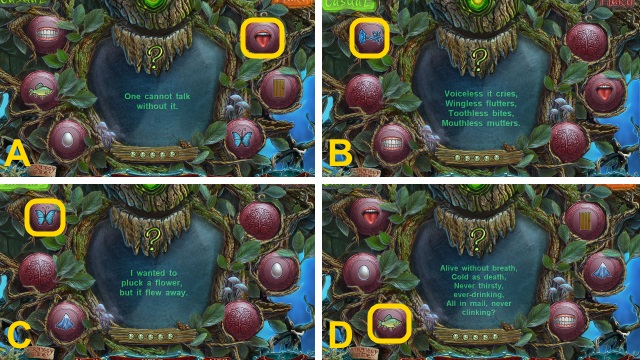
- Multiple solutions are possible. All potential solutions are shown: (A-H).
- Walk forward.
Chapter 2: The Magic Mirror
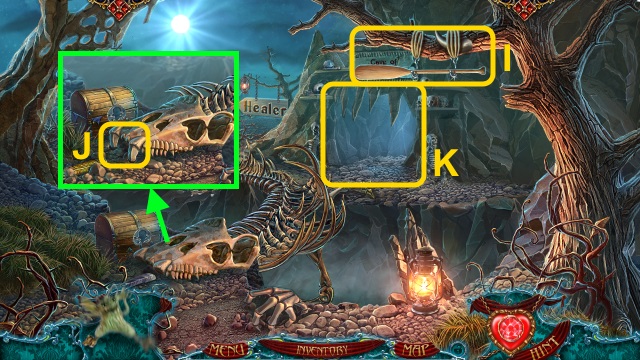
- Use the Sprite to take the PADDLE and DRAGON FANG (2/2) (I).
- Place the DRAGON FANG (2/2) (J).
- Try to walk forward (K).
- Walk left.
- Talk to the man (L); you receive the CRYSTAL (1/2).
- Take the SHIELD PART (M) and HAT (N).
- Walk down.
- Place the HAT (O); take the CRYSTAL (2/2) (P).
- Walk left.
- Place the CRYSTAL (2/2) (Q).
- Walk right.
- Talk to Richard (R).
- Place the SHIELD PART (S); take the DEER (T).
- Take the EAGLE (U) and JOLLY ROGER (V).
- Walk down twice.
- Place the JOLLY ROGER (W); take the CUP (X).
- Play the HOP to receive the ELK (Y).
- Walk left.
- Place the DEER and ELK; take the SWORD (Z).
- Walk right.
- Give the SWORD (A).
- Take the SWORD (B).
- Walk down twice.

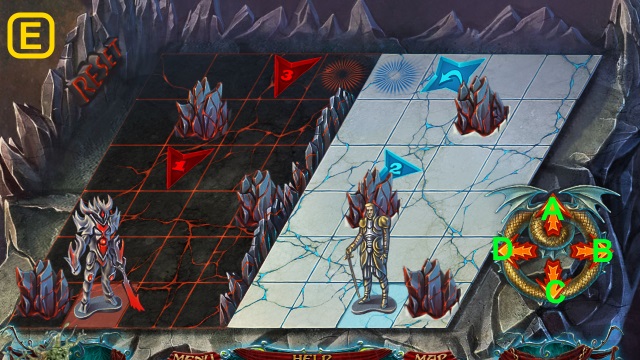
- Use the SWORD for a mini-game (C).
- Solution is random (D).
- Walk forward.
- Take the WOODEN LEG and SCORPION (E).
- Walk down.

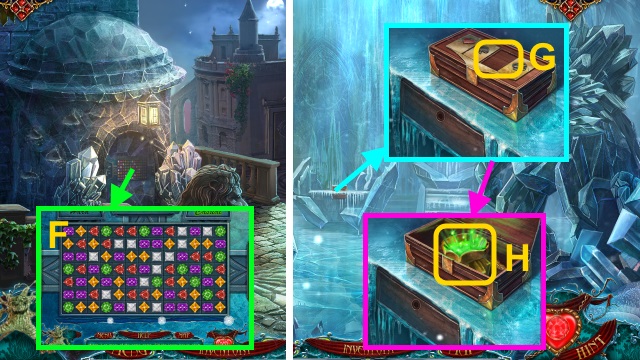
- Play the HOP to receive the SPATULA (F).
- Place the WOODEN LEG; take the BUCKET (G).
- Walk forward.
- Use the BUCKET; place the PADDLE (H).
- Use the Sprite.

- Place the EAGLE (I).
- Open the book; take the MIRROR FRAME (J).
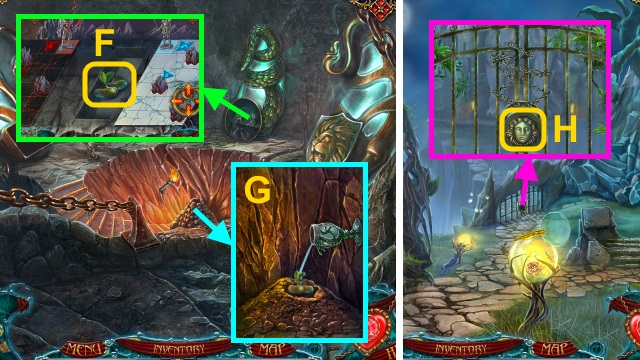
- Use the SPATULA; take the MACE (K).
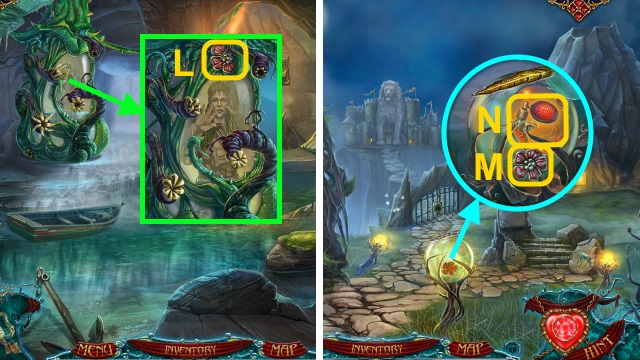
- Use the Sprite to take the FLOWER (L).
- Walk down, then left.
- Place the FLOWER (M).
- Take the HERBICIDE (N).
- Walk down, then forward.
- Use the HERBICIDE and MACE (O).
- Walk down, then left twice.
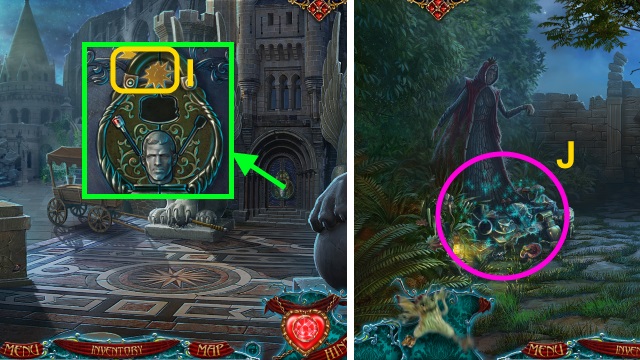
- Talk to the man (P); give the MIRROR FRAME for an HOP.
- Play the HOP to receive the INGREDIENTS.
- Give the INGREDIENTS (Q); take the MIRROR (R).
- Walk down, then right.

- Give the MIRROR (S).
- Talk to Dark Wing (T).
Chapter 3: The Castle
- Take the GATE LOCK and DRAGON EYE (2/2) (U).
- Take the KING (V); place the DRAGON EYE (2/2) (W).
- Place the CUP to receive the CUP OF WATER (X).

- Place the SCORPION (Y).
- Take ARROW (Z) and SCORPION.
- Take the DEMON (A).
- Take the SNAKE (B).
- Place the SNAKE (C); move the shield.
- Place the ARROW, KING, and DEMON for a mini-game (D).
- Solution (E): Ax3, B, Ax2, Dx4, Ax2, B, Ax3.
- Take the MAGIC BEANS (F).
- Place the MAGIC BEANS; use the CUP of WATER (G).
- Go up.
- Place the GATE LOCK (H).
- Walk forward.
- Take the TWIN-TAIL STAR (I).
- Walk left.
- Play the HOP to receive the CROWN (J).
- Use the Sprite (K).
- Take the HEART HALF (1/2) (L).
- Place the TWIN-TAIL STAR (M); take the FIRST MECHANICAL PART (N).
- Take the HEART HALF (2/2) (O).
- Walk down.
- Place the HEART HALF (2/2) (P); take the MACE (Q).
- Use the MACE; take the SCEPTER (R).
- Place the CROWN and SCEPTER (S).
- Walk forward.
- Place the MEDALLION (T).
- Take the QUEEN'S RING and WOLF EYE (1/2) (U).
- Take the CLOCK HANDS (V).
- Walk down.
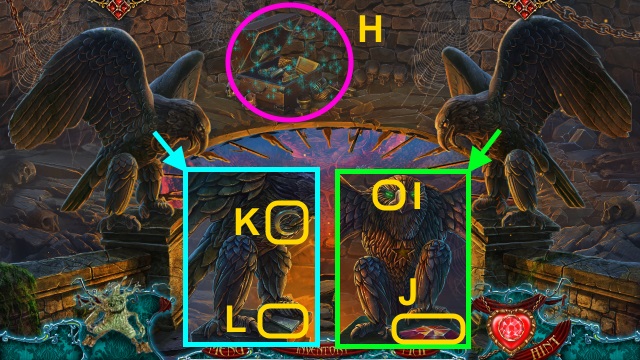
- Place the QUEEN'S RING (W); take the WOLF EYE (2/2) and ANIMAL HEAD (1/2) (X).
- Walk left.
- Place the WOLF EYE (2/2) (Y); take the KING'S RING (Z).
- Walk down.

- Place the KING'S RING (A); take the SECOND MECHANICAL PART (B).
- Place the FIRST MECHANICAL PART and SECOND MECHANICAL PART for a mini-game (C).
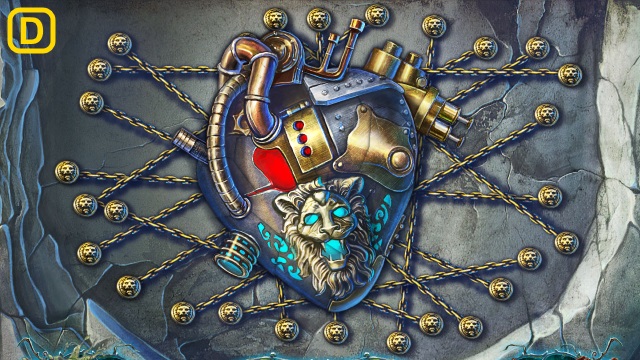
- Solution (D).
- Take the MECHANICAL HEART.
- Walk right.
- Place the MECHANICAL HEART (E); take the GRANDMA FIGURE (F).
- Walk down, then left.
- Place the GRANDMA FIGURE for a mini-game (G).
- Solution is random.
- Take the ANIMAL HEAD (2/2) (H).
- Walk down, then right.
- Place the ANIMAL HEAD (2/2) for a mini-game (I).
- Solution (J): E down, E left, E up, D right, D down, D left, B right, A down, C up, C right, D up, F down, F left, F up, B down, B left, B up, B left, B up, B right, C left, B down, C up, C right, C down, A up, A right, A down, B left, B up, B right, B down, C down, A right, A down, C up, A left, A down, A right, A up.
- Walk right.
- Take the HANDLE (K).
- Take the ROLLING PIN (L).
- Take the POKER (M).
- Walk down twice.
- Place the HANDLE; take the BUCKET (N).
- Use the POKER to take the TASTY BONE (O).
- Walk right twice.
- Give the TASTY BONE (P); take the BASKET.
- Place the BUCKET; place the cherries.
- Take the CHERRY-FILLED BUCKET (Q).
- Walk down twice.

- Place the CHERRY-FILLED BUCKET (R); use the ROLLING PIN (S).
- Place the cherries; place the tray in the fire.
- Take the BAKED PIES (T).
- Walk left.
- Play the HOP to receive the GATE PART (1/3) (U).
- Place the BASKET and BAKED PIES (V).
- Take the CROWN (W).
- Walk down, then right.
- Place the SCORPION and CROWN (X).
- Walk left.
Chapter 4: Into the Tower

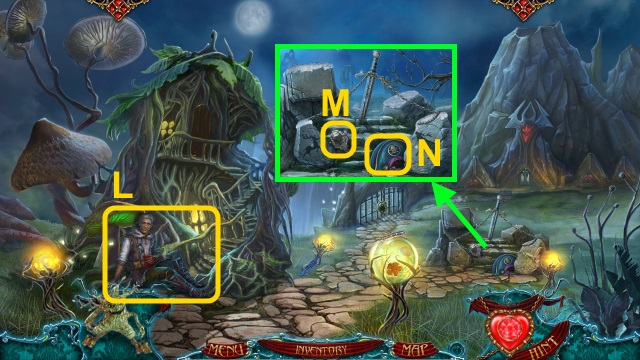
- Take the TRIDENT (Y).
- Take the RAPIER (Z).
- Walk down, then right.
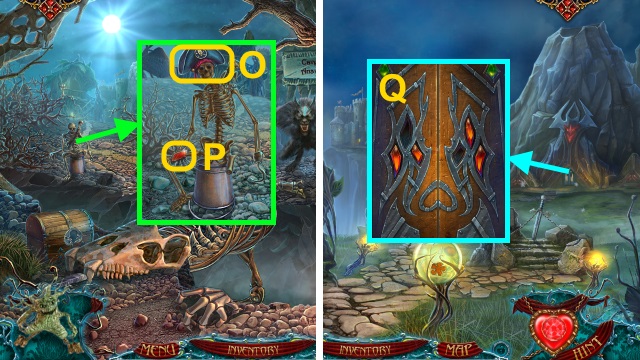
- Place the RAPIER and TRIDENT; take the LION FLAIR and SNOWFLAKES (1/3) (A).
- Walk down, then left.
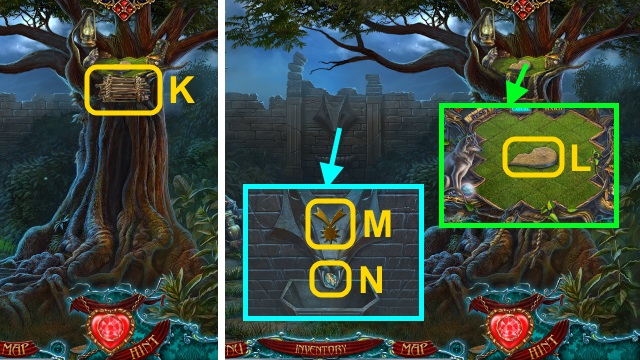
- Place the LION FLAIR (B); take the PURPLE MAGIC POLLEN and NAIL PULLER (C).
- Walk down.
- Use the NAIL PULLER to take the LION EYE and GATE PART (2/3) (D).
- Walk left.
- Place the LION EYE (E); take the PICKAXE (F).
- Use the PICKAXE (G).
- Use the Sprite to receive the WOODEN BANANA (H).
- Walk down, then right.
- Place the WOODEN BANANA (I); take the GATE PART (3/3) (J).
- Walk down, then left.
- Place the GATE PART (3/3) for a mini-game (K).
- Solution (L).
- Walk forward.
- Take the PARROT and CHOPSTICKS (M); use the Sprite to take the FISH EYE (N).
- Take the DRAGON (O).
- Take the RAVEN (P); place the CLOCK HANDS (Q).
- Take the OWL'S GLASSES (R).
- Walk forward.
- Try to walk forward (S).
- Take the MALLET (T); place the PARROT.
- Take the PUMPKIN WHEEL (1/2) (U).
- Place the OWL'S GLASSES (V).
- Take the PUMPKIN WHEEL (2/2) and DRAWER HANDLE (W).
- Place the RAVEN (X); examine the stand for a mini-game.
- Solution is random (Y).
- Take the PLAYING CARD (Z).
- Take the CHISEL (A); place the DRAGON.
- Use the CHOPSTICKS to take the SNOWFLAKE (2/3) (B).
- Walk down.

- Place the PUMPKIN WHEEL (2/2) (C).
- Play the HOP to receive the SNOWFLAKE (3/3) (D).
- Walk down.
- Place the SNOWFLAKE (3/3) for a mini-game (E).
- Solution is random (F).
- Walk left.
- Place the PLAYING CARD (G); take the GREEN MAGIC POLLEN (H).

- Place the DRAWER HANDLE (I); open the drawer.
- Take the YELLOW MAGIC POLLEN (J).
- Use the CHISEL and MALLET (K); take the GLASS SLIPPER.
- Take the RED MAGIC POLLEN (L).
- Place the FISH EYE (M); take the EMPTY ICE SPHERE (N).
- Walk down, then forward.
- Play the HOP to receive the BEAR (O).

- Place the GLASS SLIPPER (P).
- Take the SLEEPING POTION (Q).
- Walk down, then left.
- Place the BEAR (R); take the MILL BLADE (1/3) and BLUE MAGIC POLLEN (S).
- Walk down, then forward.
- Place the EMPTY ICE SPHERE, PURPLE MAGIC POLLEN, GREEN MAGIC POLLEN, YELLOW MAGIC POLLEN, RED MAGIC POLLEN, and BLUE MAGIC POLLEN (T); take the CHARGED ICE SPHERE (U).
- Walk forward.
- Use the SLEEPING POTION (V).
- Use the CHARGED ICE SPHERE (W).
- Walk forward.
- Take the WATER SKIN (X).
- Take the MILL BLADE (2/3) (Y); use the MALLET (Z).
- Open the box; take the WISHING SEED (A).
- Take the COINS (B).
- Walk left.
- Play the HOP to receive the LION (C).
- Take the BOW (1/2) (D).
- Take the RIGHT STONE SET (1/3) (E).
- Place the WISHING SEED and WATER SKIN; take the MILL BLADE (3/3) (F).
- Give the COINS (G); take the EAGLE (H).
- Walk down.
- Place the EAGLE (I).
- Place the LION for a mini-game (J).

- Solution (K): rightx2, down, left, up, down, left, upx2, rightx3, downx2, left, up, right.
- Use the Sprite (L).
- Walk forward.
Chapter 5: Dark Wing
- Talk to Dark Wing (M); you receive the LOCKET.
- Take the FROG SON (N).
- Walk down, then left.
- Play the HOP to receive the BEAK (O).
- Place the FROG SON (P); take the ARROW (2/2) (Q).
- Walk down, then forward.
- Use the BOW (2/2) (R).
- Take the KEY (S).
- Place the BEAK; take the EVER-SEEING EYE (T).
- Take the feather; place the KEY (U).
- Press the key.
- Go downstairs (V).
- Take the RIGHT STONE SET (2/3) and PORTAL PART (W).
- Take the LEFT STONE SET (1/3) (X).
- Place the MILL BLADE (3/3) (Y).
- Place the EVER-SEEING EYE (Z); take the FEATHER (1/2) (A).
- Walk forward.
- Play the HOP to receive the HORN (B).
- Take the RIGHT STONE SET (3/3) (C).
- Place the LOCKET (D).
- Walk forward.
- Take the EAGLE EYE (E).
- Take the LEFT STONE SET (2/3) (F).
- Place the HORN; take the MOON (G).
- Walk down.
- Play the HOP to receive the EAGLE WING (H).
- Place the EAGLE EYE (I); take the PORTAL PART (2/3) (J).
- Place the MOON (K); take the FEATHER (2/2) (L).
- Walk down.

- Place the EAGLE WING (M); take the SPHERE OF SOULS and STAR (N).
- Walk forward.
- Place the STAR (O); take the LEFT STONE SET (3/3) (P).
- Walk down twice.
- Place the FEATHER (2/2); take the PORTAL PART (3/3) (Q).
- Go to the Gate.
- Place the PORTAL PART (3/3) for a mini-game (R).
- Solution (S).
- Walk forward.
- Place the LEFT STONE SET (3/3) (T).
- Place the RIGHT STONE SET (3/3) (U).
- Walk down.
- Talk to the woman (V).
- Use the SPHERE OF SOULS (W).
- Congratulations! You have completed Reveries: Soul Collector.
Created at: 2015-01-09