

Walkthrough Menu
- General Tips
- Chapter 1: Riddlestone
- Chapter 2: The Bank
- Chapter 3: King Henry
- Chapter 4: The Doctor
- Chapter 5: The Cabaret
- Chapter 6: Prince Edwin
General Tips
- This is the official guide for Riddles of Fate: Into Oblivion.
- This guide will not show when you have to zoom into a location; the screenshots will show each zoom scene.
- Hidden-object puzzles are referred to as HOPs in this guide. Interactive items in HOPs are color-coded.
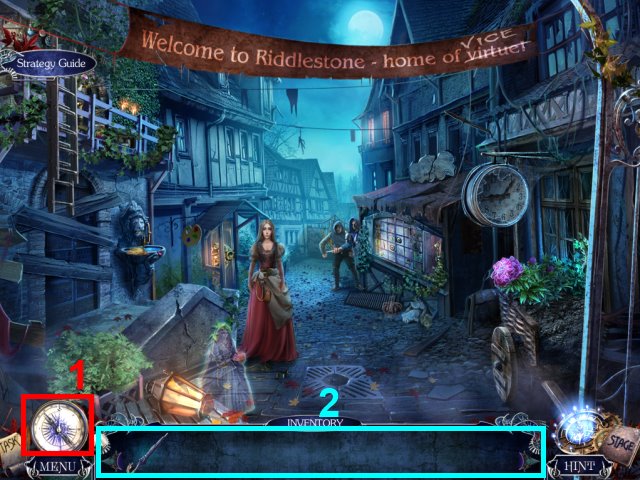
- Use the Map to travel to a location (1).
- Move the mouse down to open your inventory panel and select your items (2).
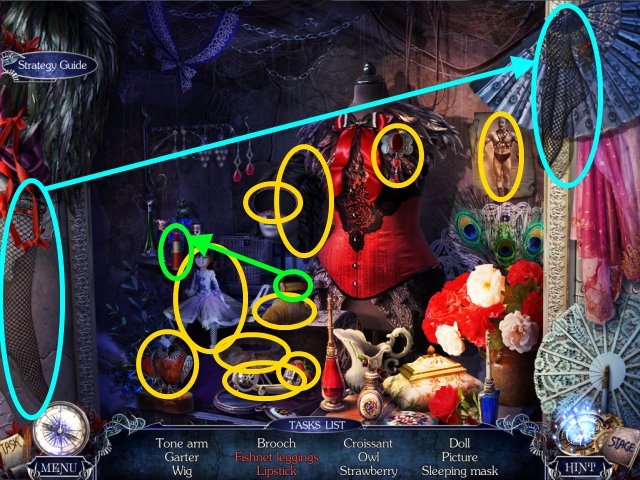
Chapter 1: Riddlestone
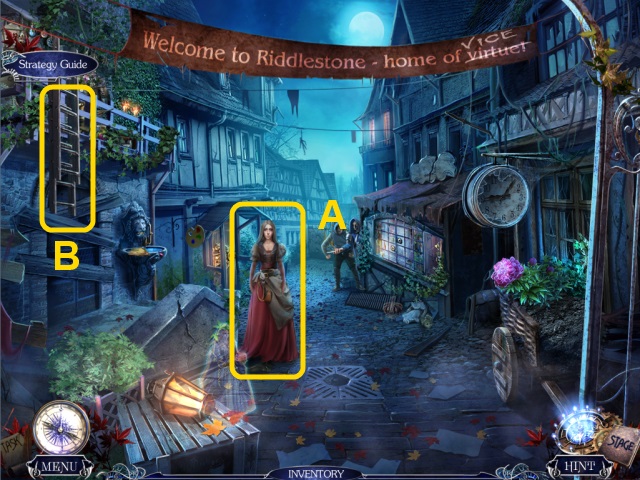
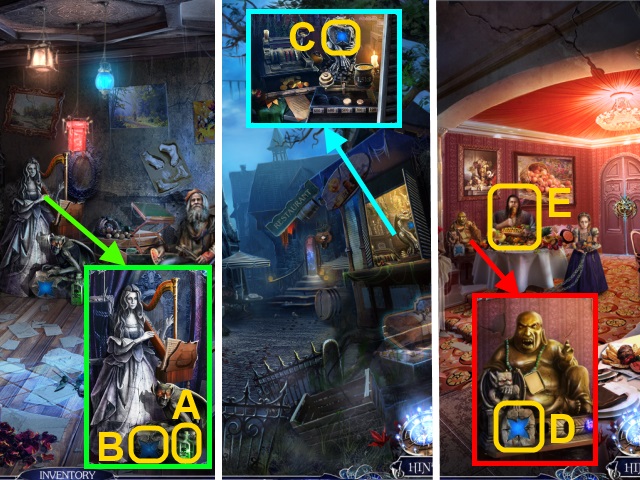
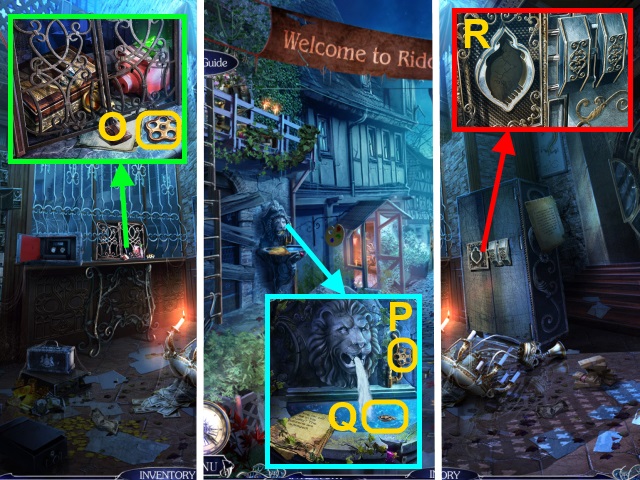
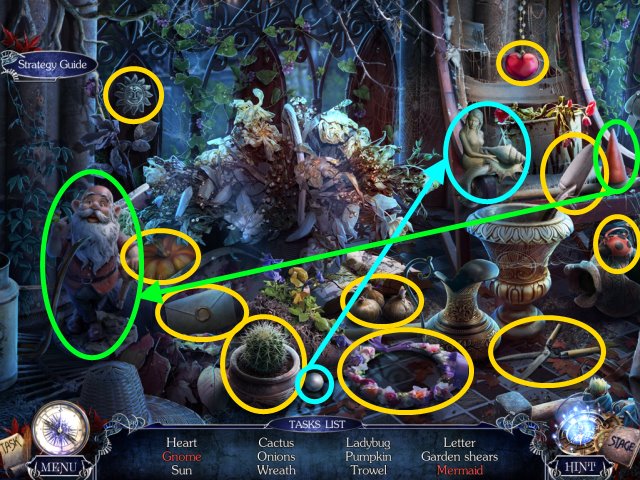
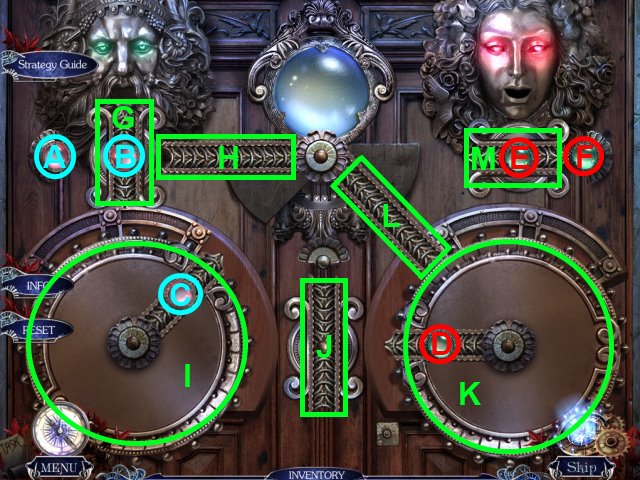
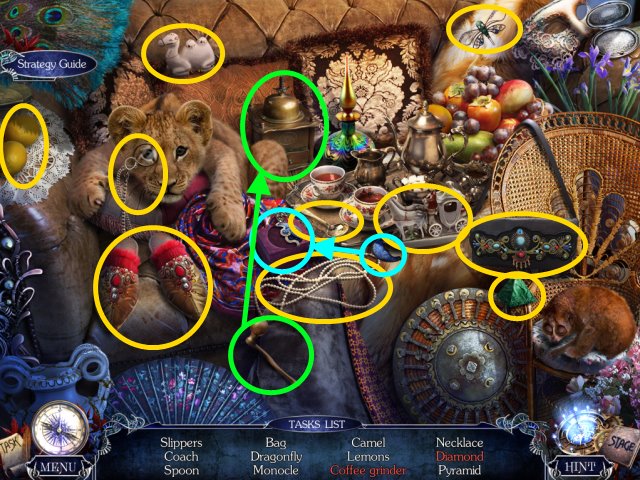
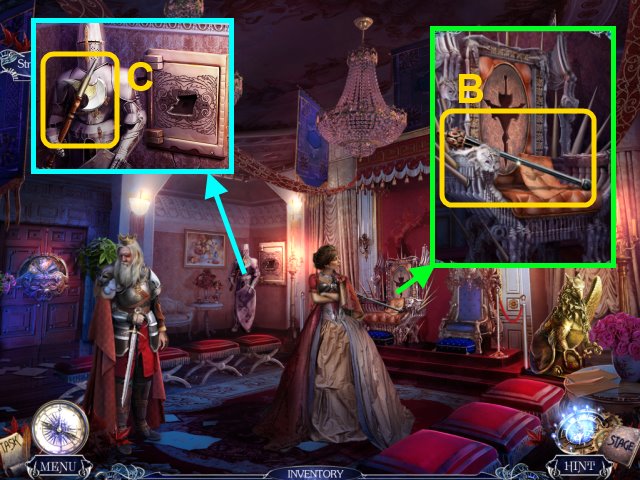
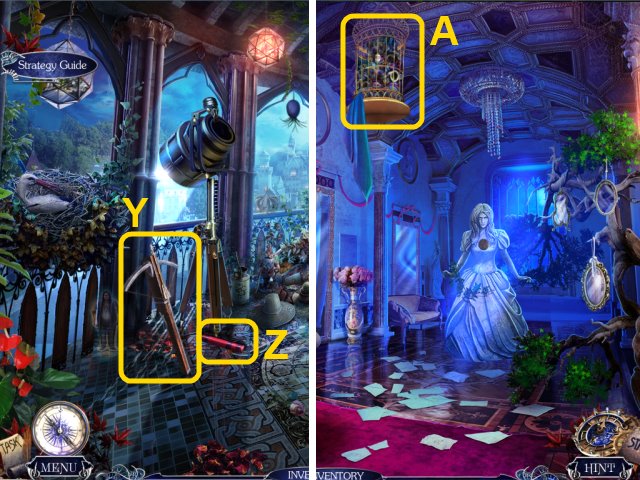
- Talk to the girl to receive the UMBRELLA (A).
- Use the UMBRELLA on the ladder (B).
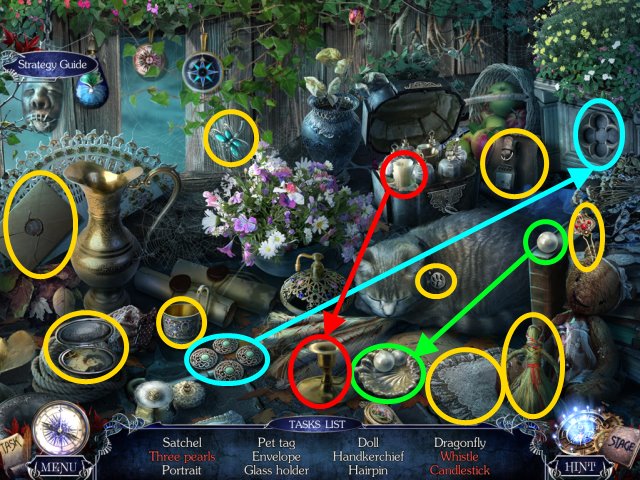
- Play the HOP.
- You receive the WHISTLE.
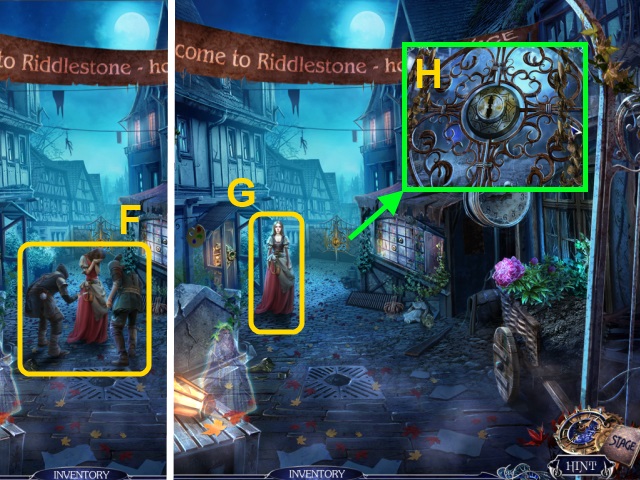
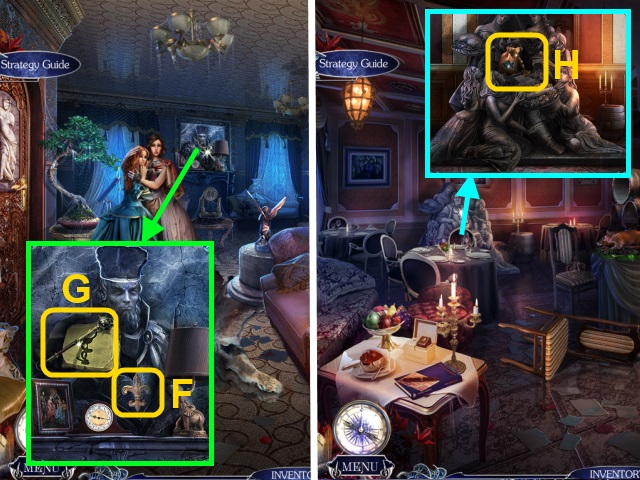
- Use the WHISTLE on the criminals (F).
- Talk to the girl to receive the GATE KEY (G).
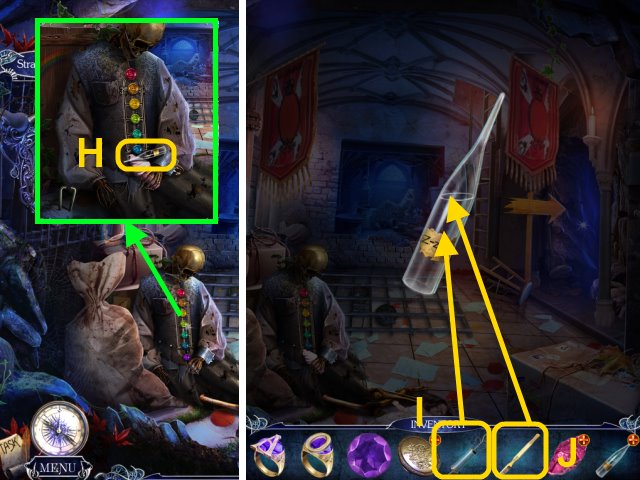
- Use the GATE KEY on the lock (H).
- Walk forward.
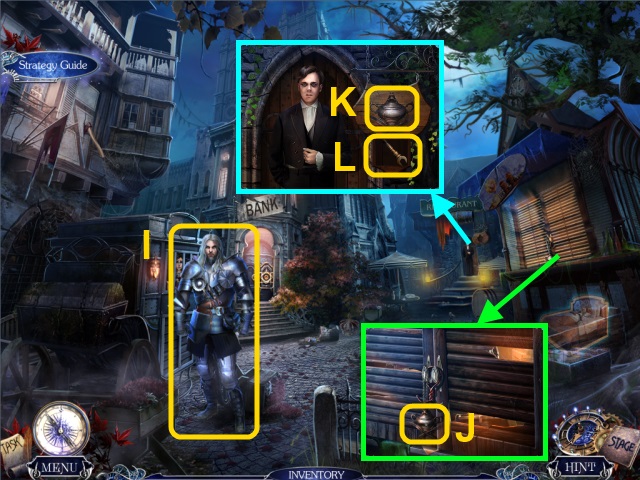
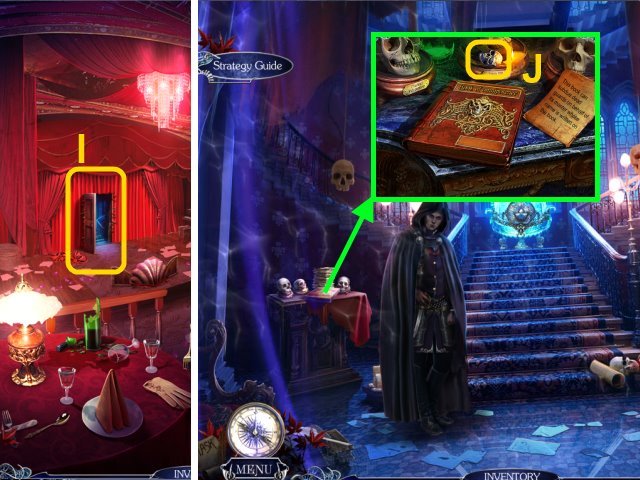
- Talk to the guard (I).
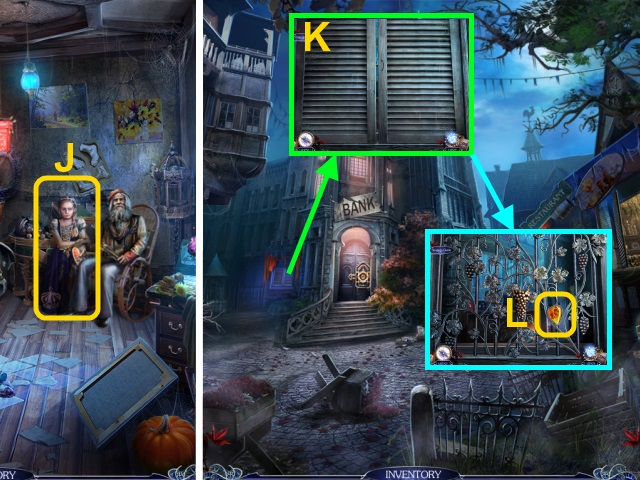
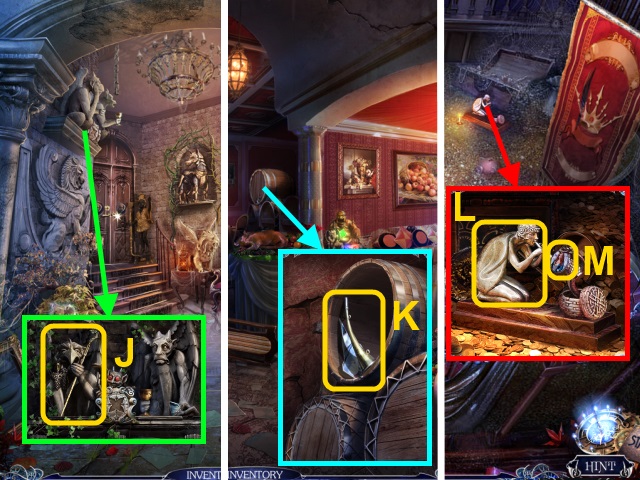
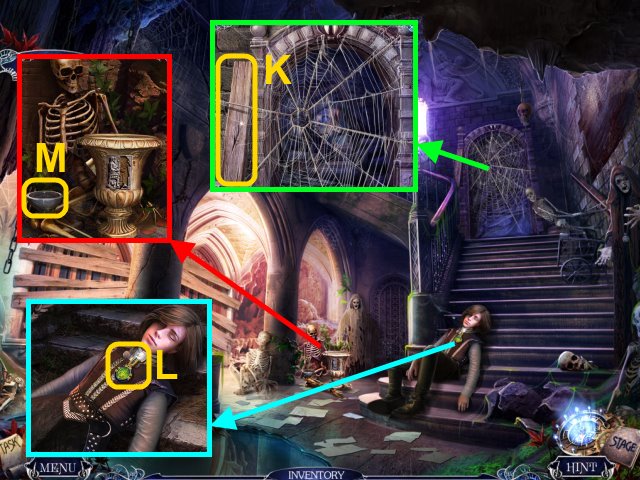
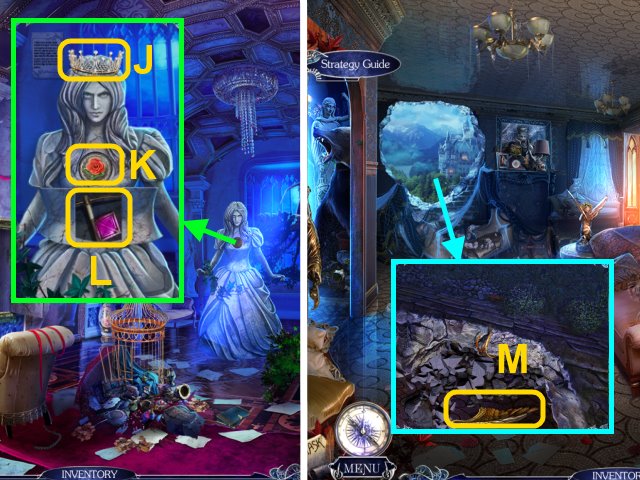
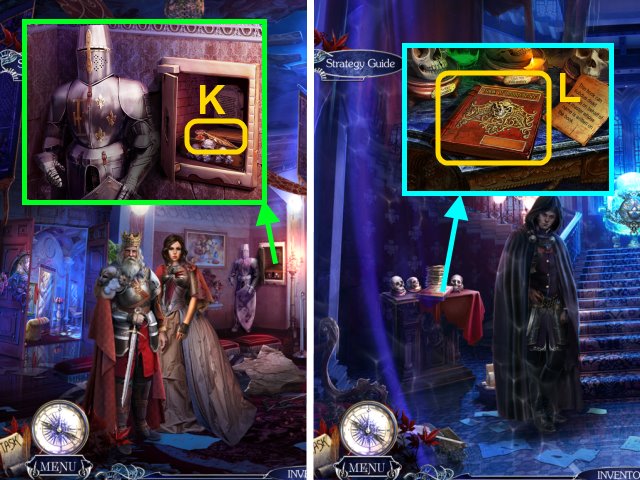
- Take the RESTAURANT EMBLEM (J).
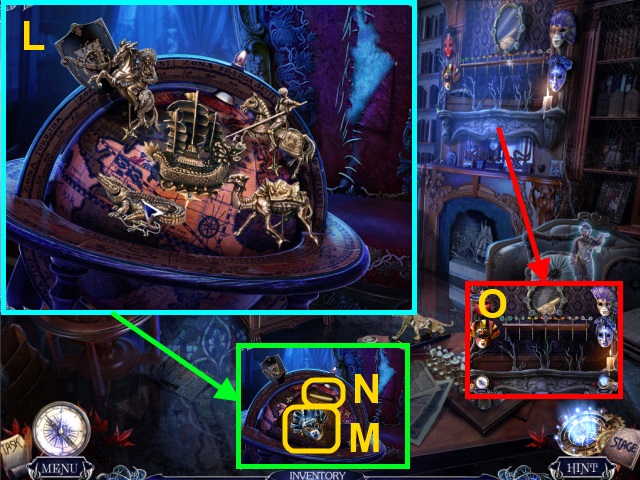
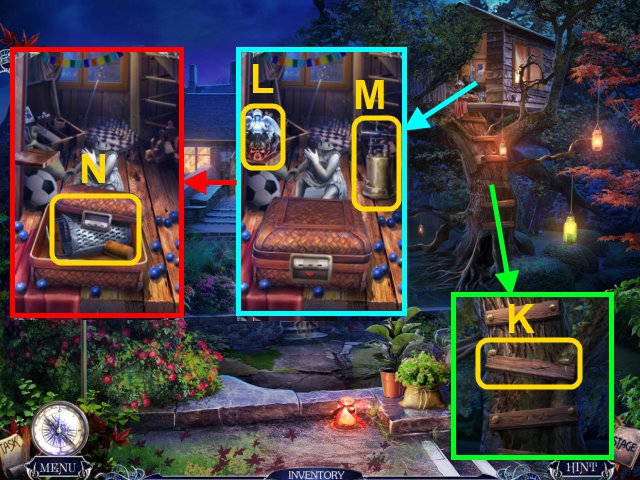
- Place the RESTAURANT EMBLEM on the sign (K); take the WRENCH (L).
- Walk down.
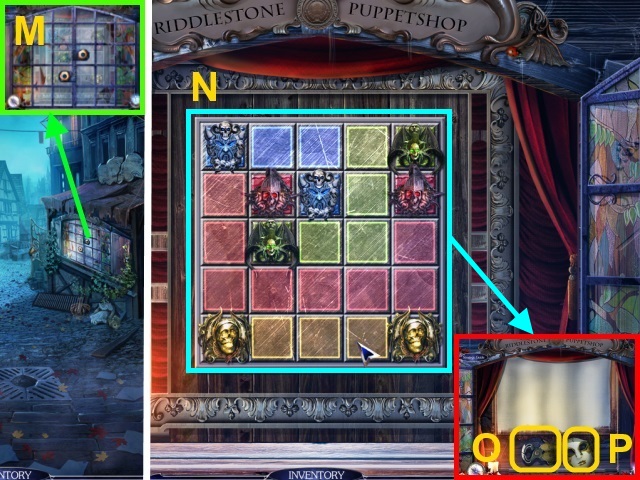
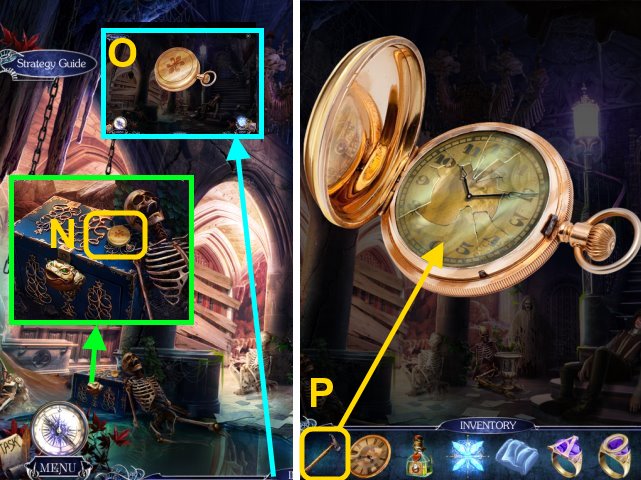
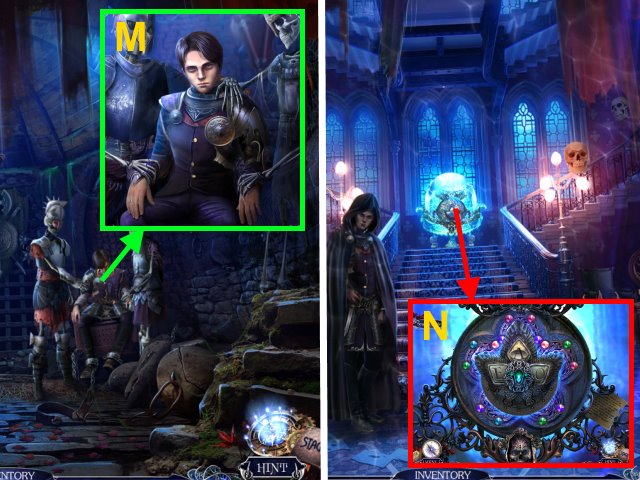
- Use the WRENCH on the nuts (M) for a mini-game.
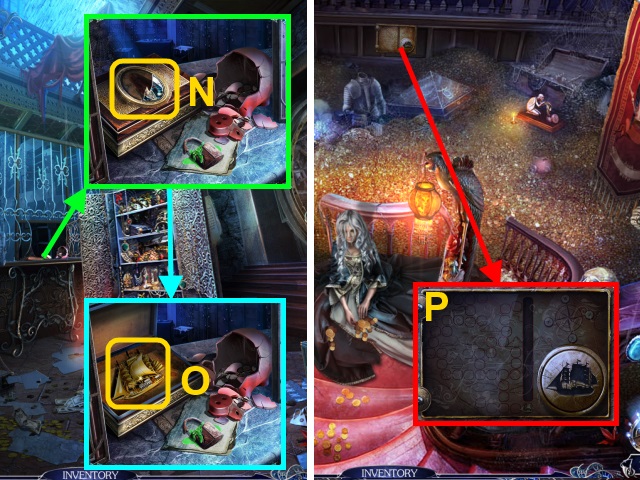
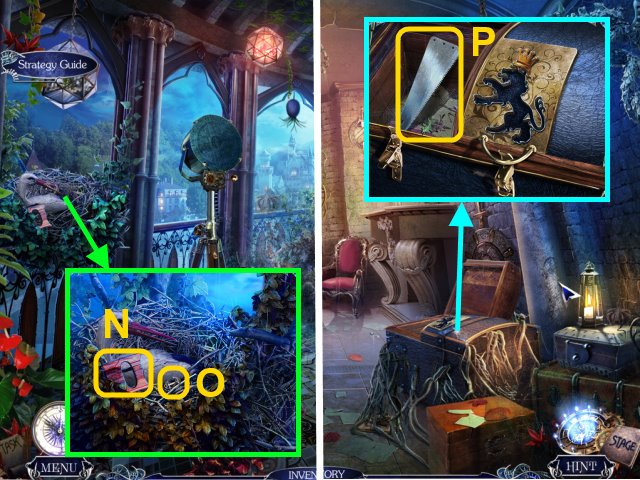
- Solution (N).
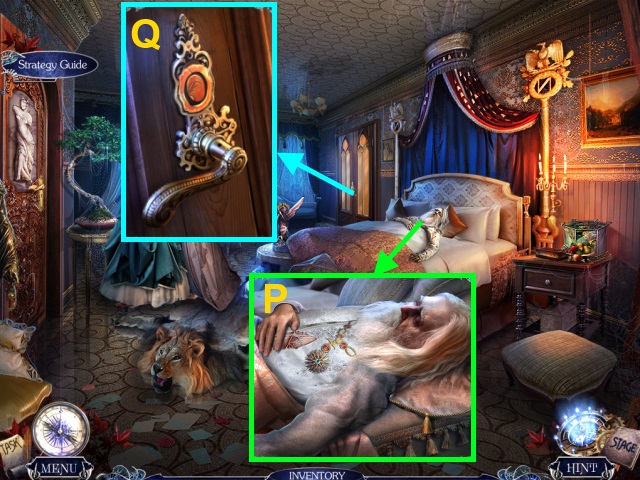
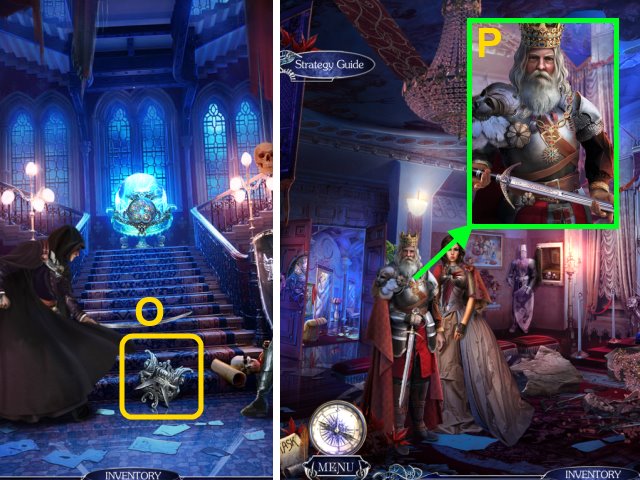
- Take the WIRE CUTTERS (O) and the MASK (P).
- Go to the Square.
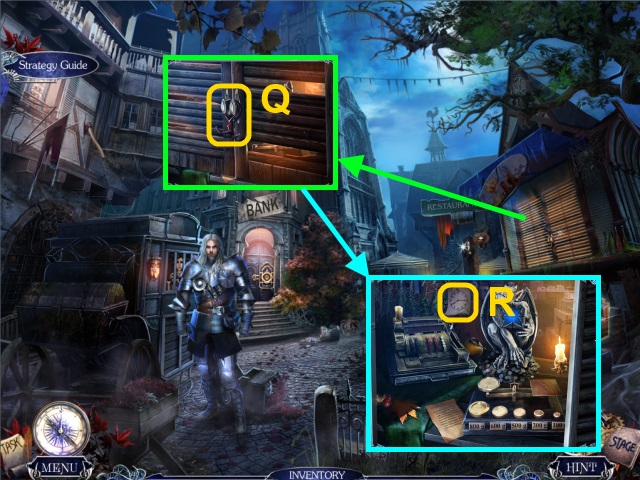
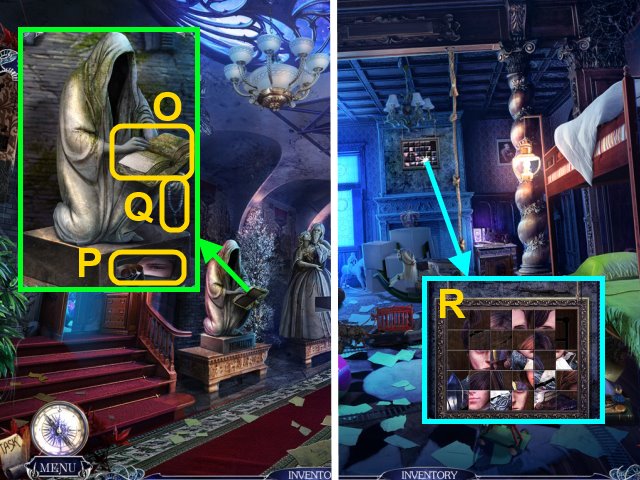
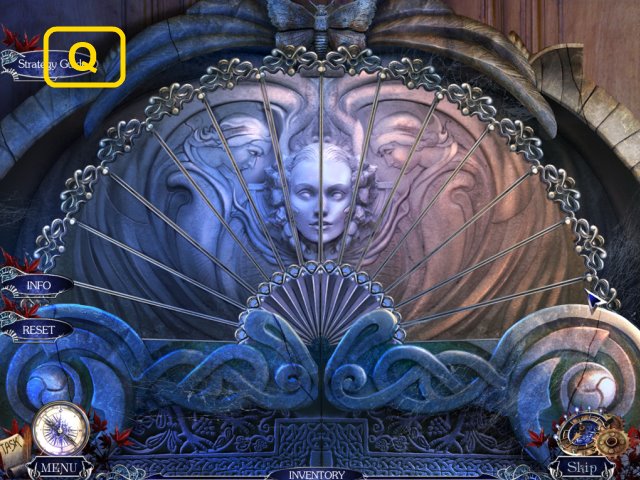
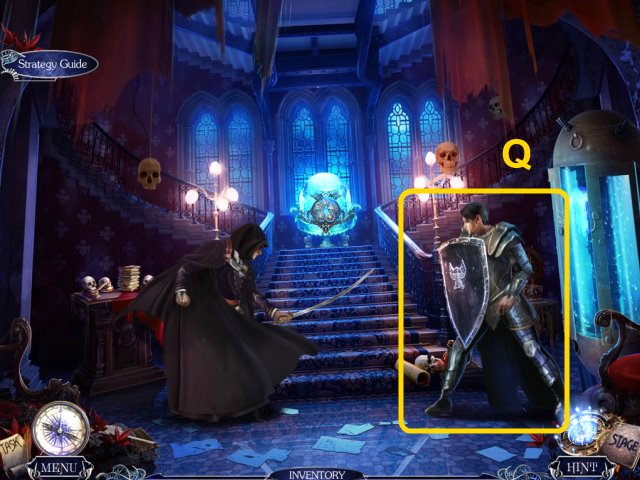
- Use the WIRE CUTTERS on the wire (Q); open the shutters.
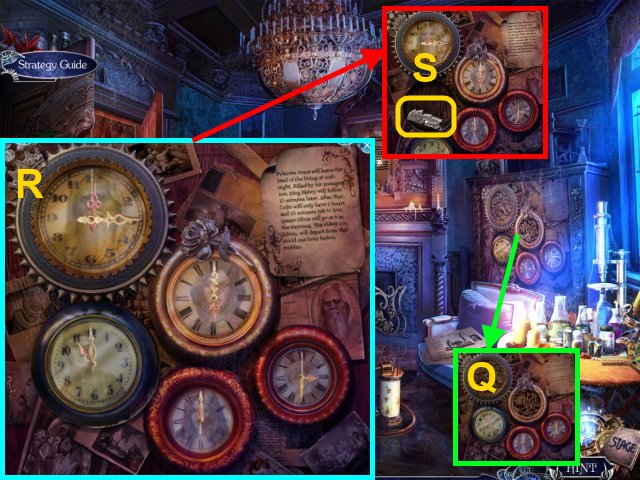
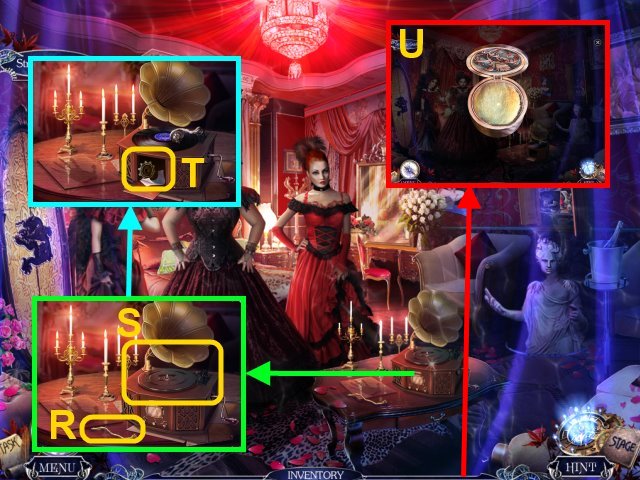
- Take the CLOCK CLUE (R).
- Walk down.
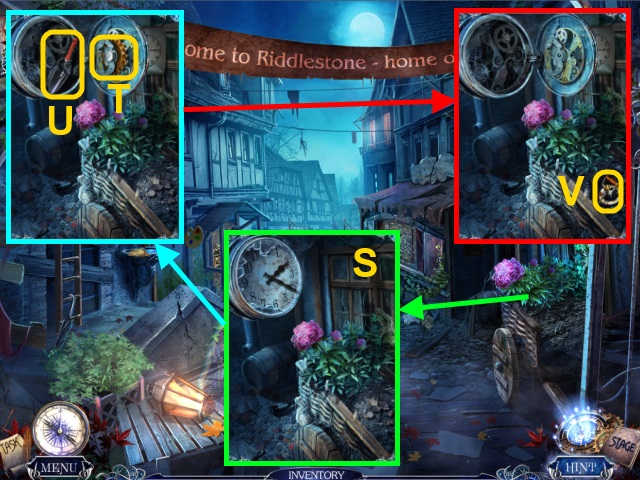
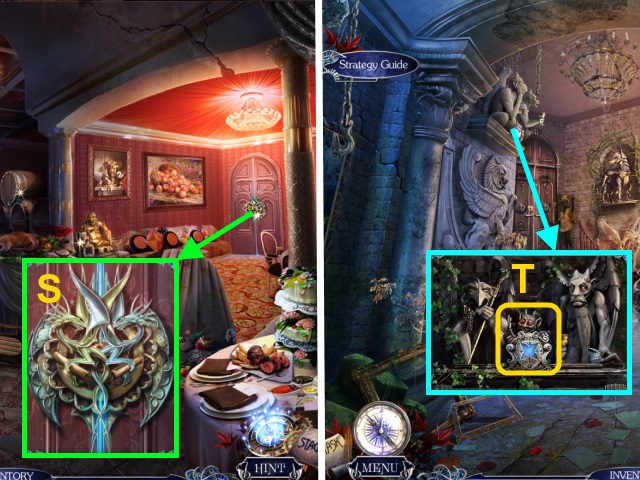
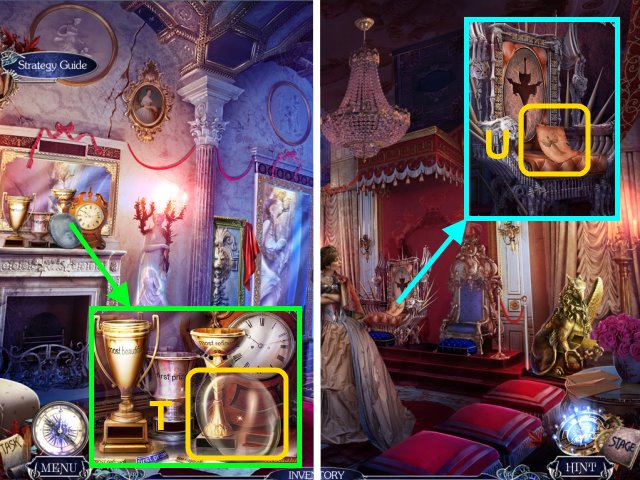
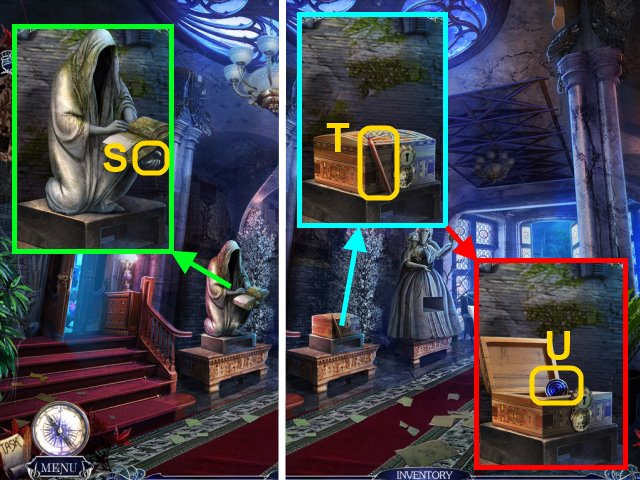
- Place the CLOCK HANDS next to the broken clock (S).
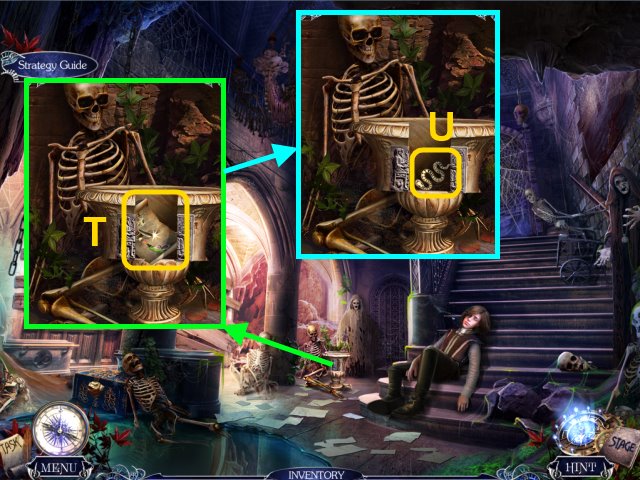
- Press the broken clock twice; use the WRENCH on the bolt to take the COG (T).
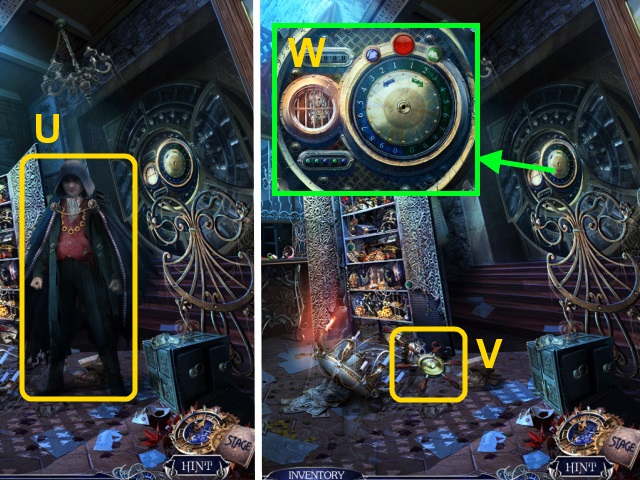
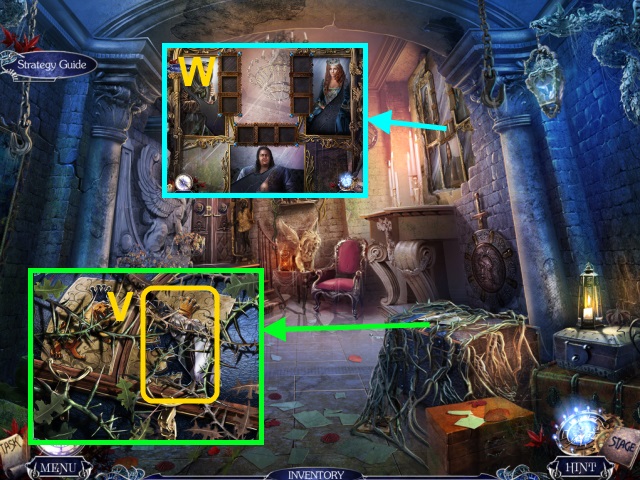
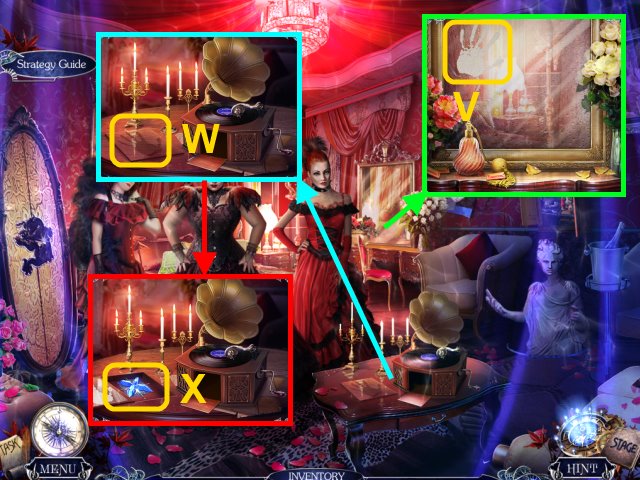
- Take the TROWEL (U) and use it on the dirt.
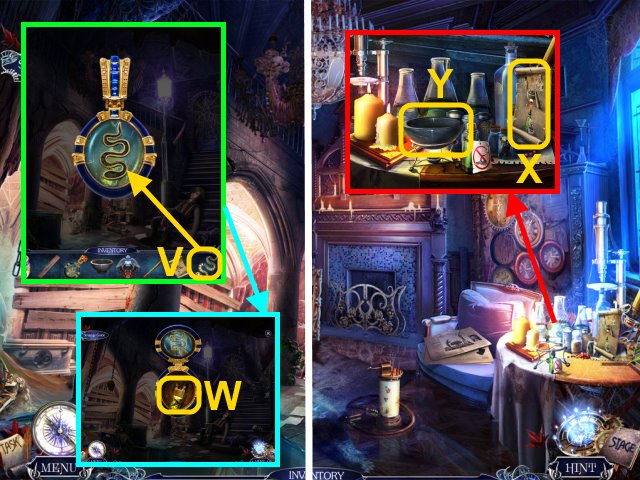
- Take the REGISTER HANDLE and LOCK PART (V).
- Walk forward.
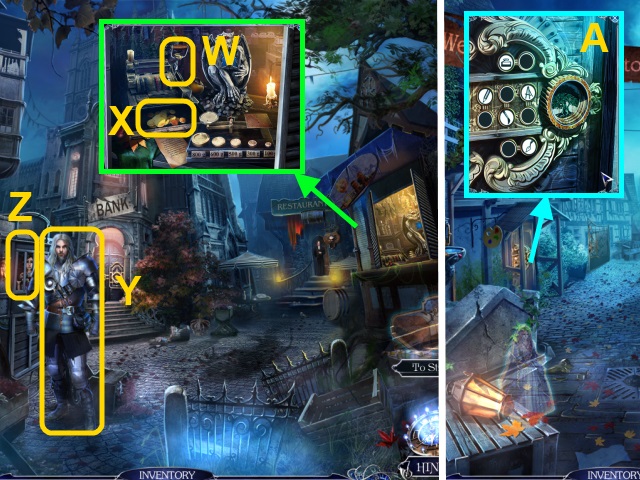
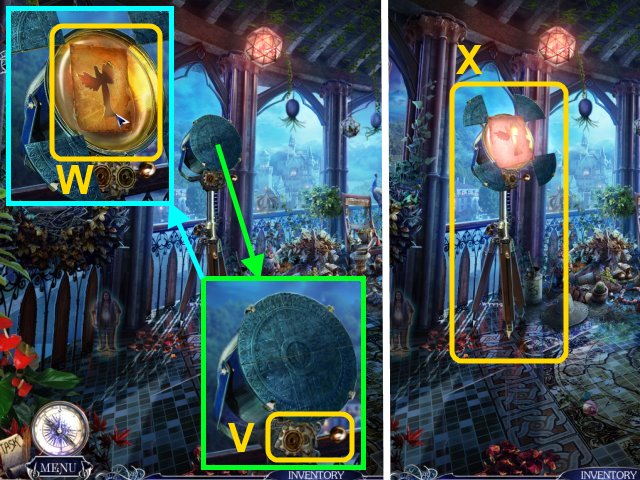
- Use the REGISTER HANDLE on the register (W); pull the handle.
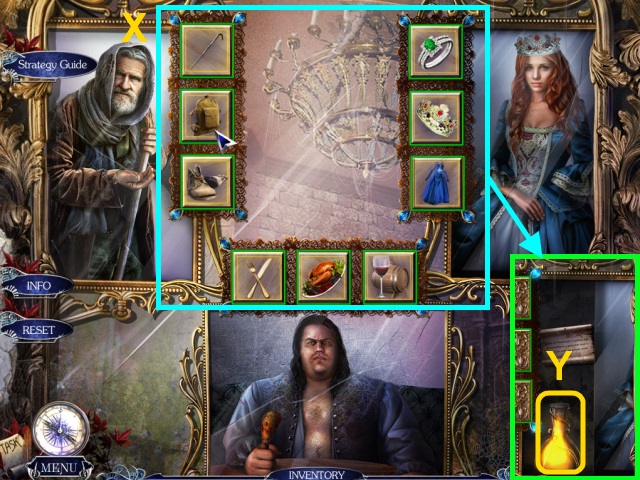
- Take the MONEY (X).
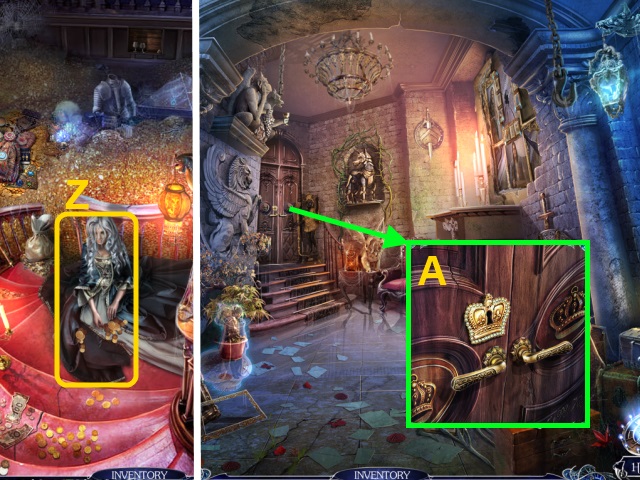
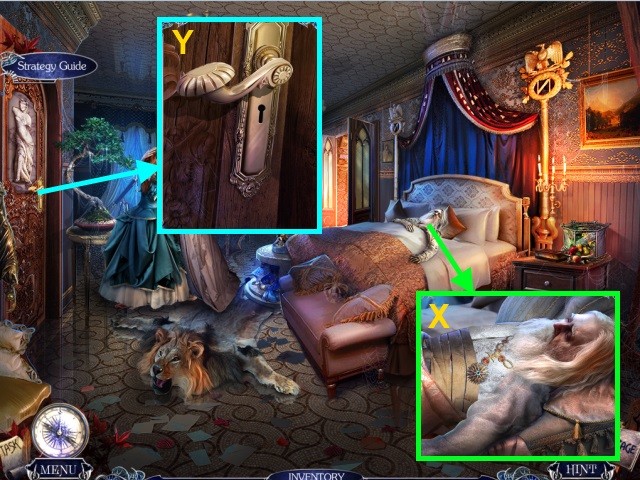
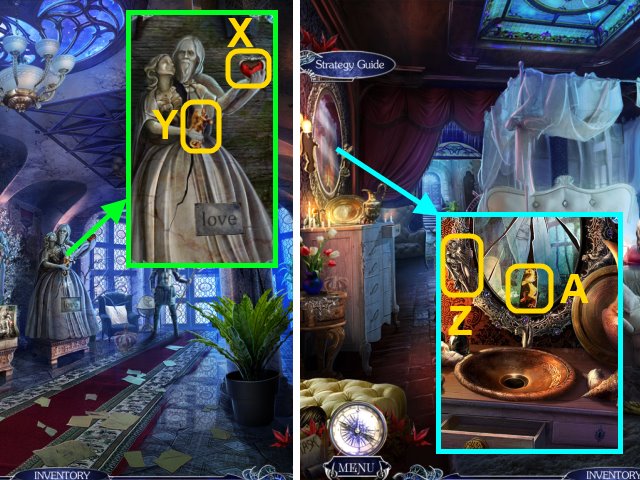
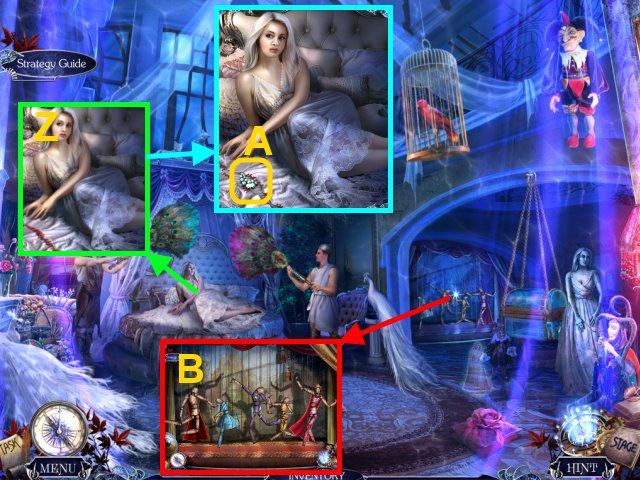
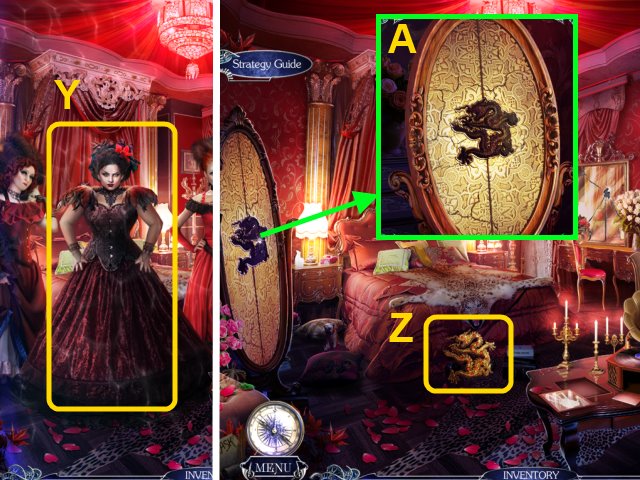
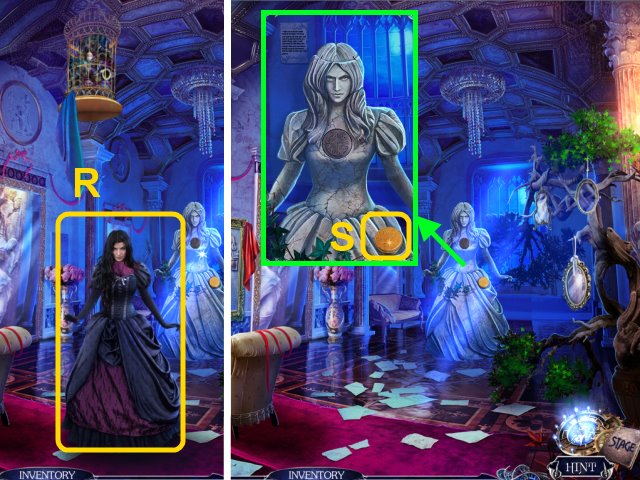
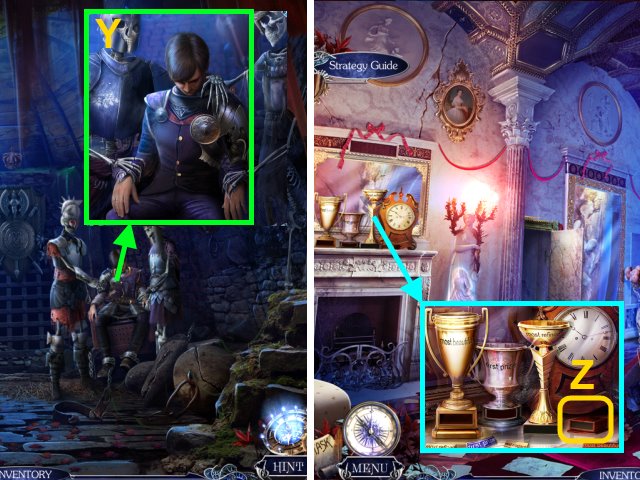
- Give the MONEY to the guard (Y); talk to Queen Olivia (Z).
- You receive ANNA'S RING and the TRINKET.
- Walk down.
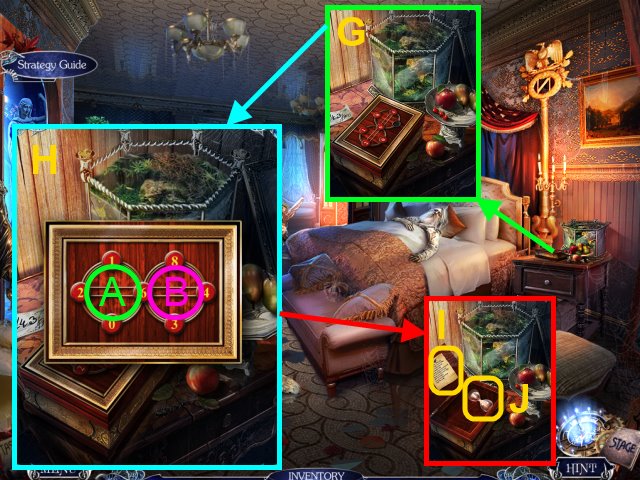
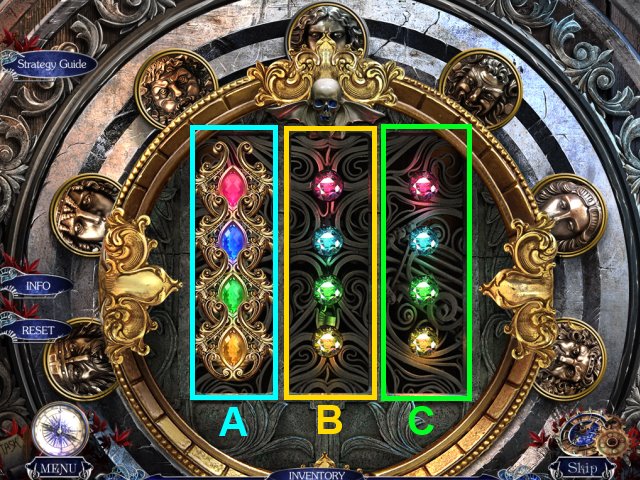
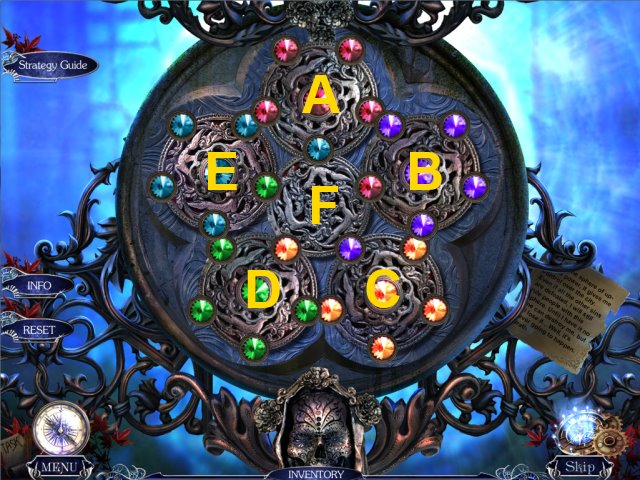
- Place the TRINKET in the lock for a mini-game (A).
- Solution (B).
- Walk left.
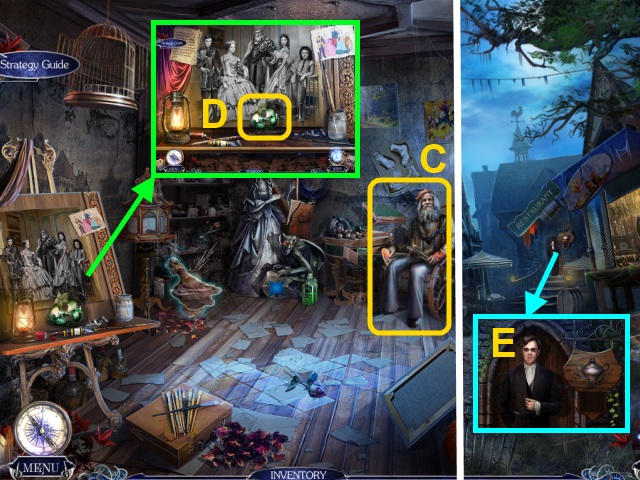
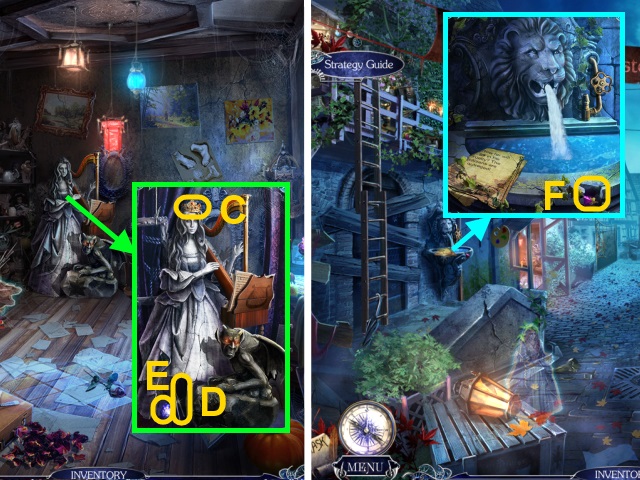
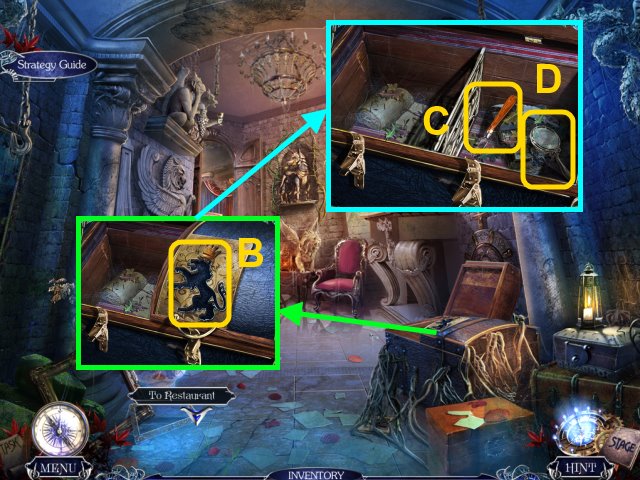
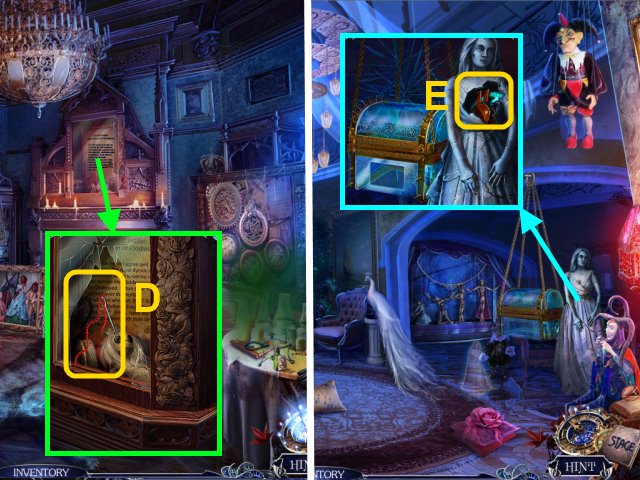
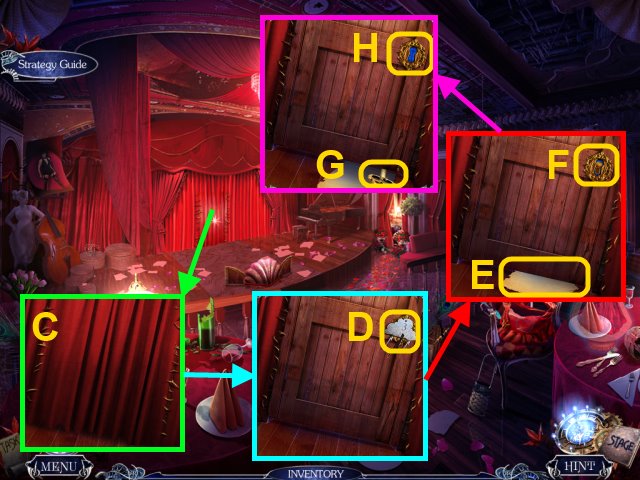
- Talk to the artist to receive the EXCLUSIVE INVITATION (C).
- Take the MASK (D).
- Go to the Square.
- Give the EXCLUSIVE INVITATION to the host (E).
- Walk forward.
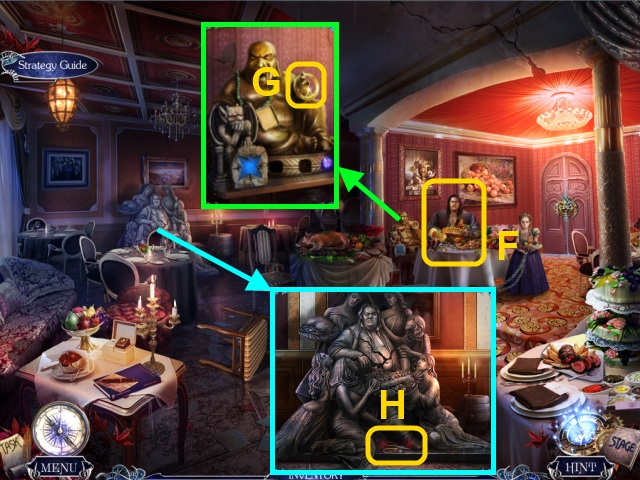
- Talk to Gluttony (F).
- Take the LOCK PART (G).
- Take the SCISSORS (H).
- Walk down twice.
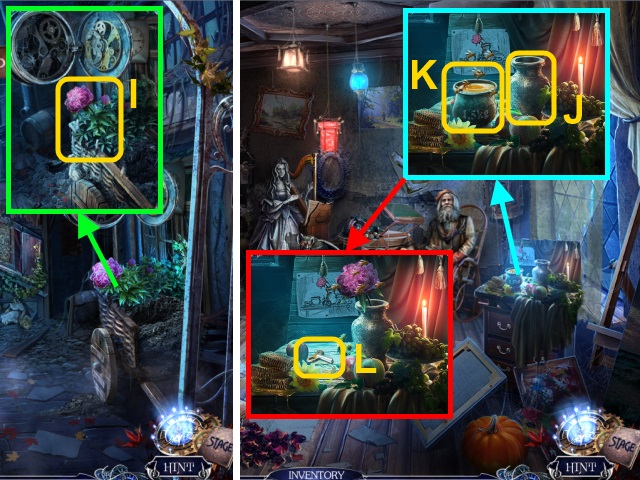
- Use the SCISSORS to get the FLOWER (I).
- Walk left.
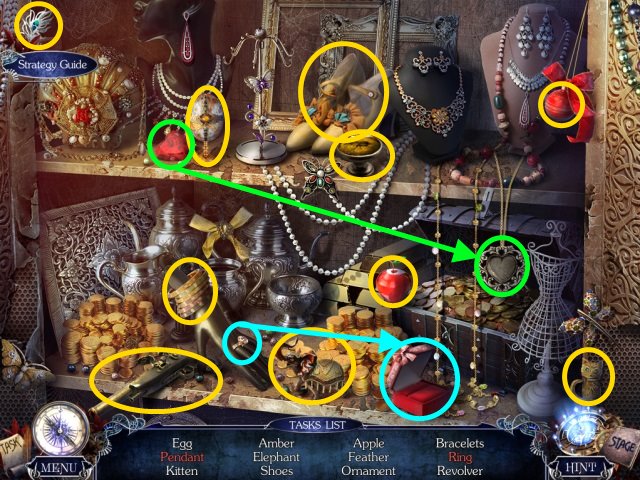
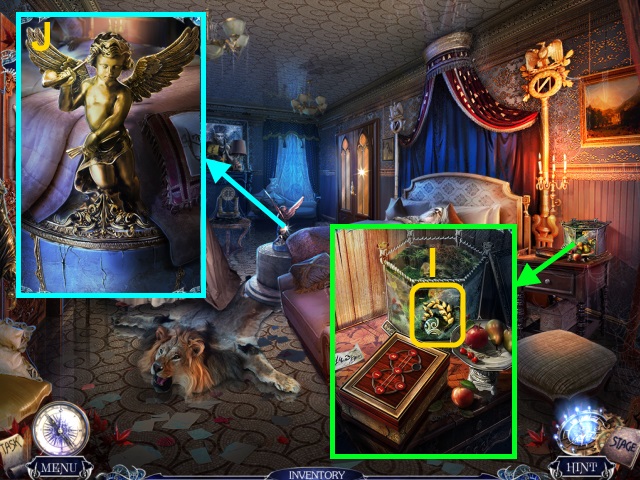
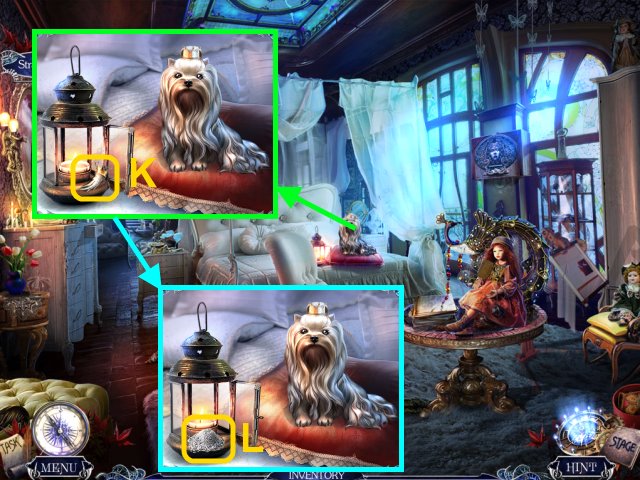
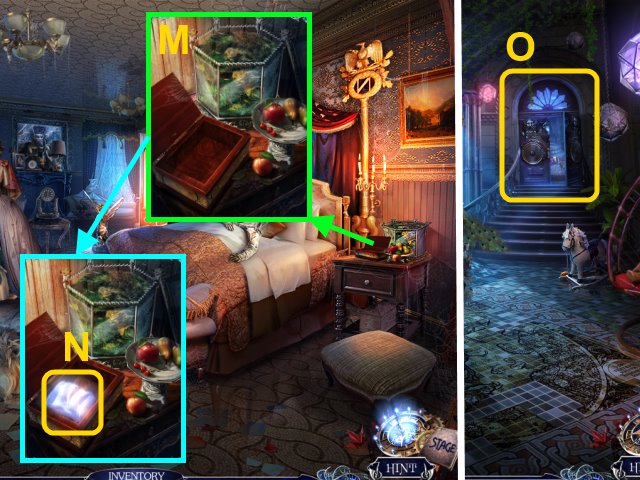
- Place the FLOWER in the vase (J); take the POT OF HONEY (K) and WIND-UP KEY (L).
- Go to the Square.
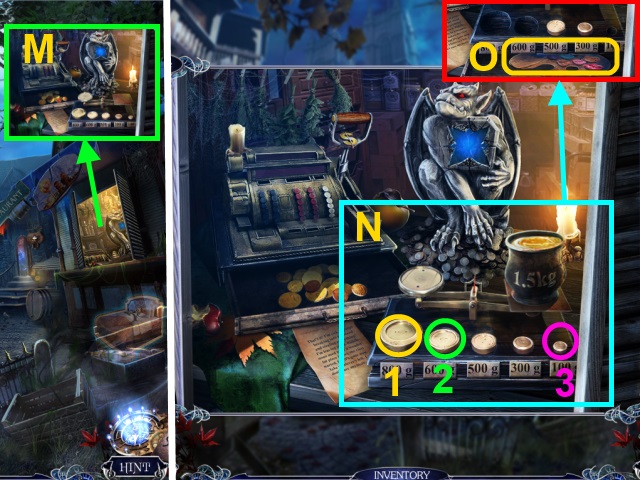
- Place the POT OF HONEY on the scale for a mini-game (M).
- Place the weights on the scale in numerical order (N).
- Take the PALETTE (O).
- Go to the Art Studio.
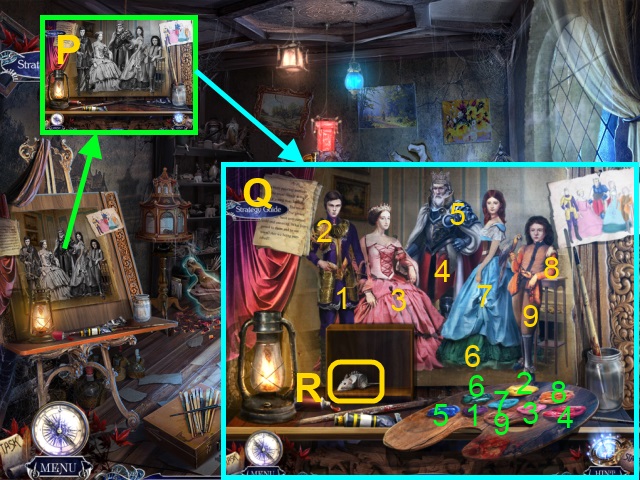
- Place the PALETTE on the easel for a mini-game (P).
- Paint the portrait according to the numbers (Q).
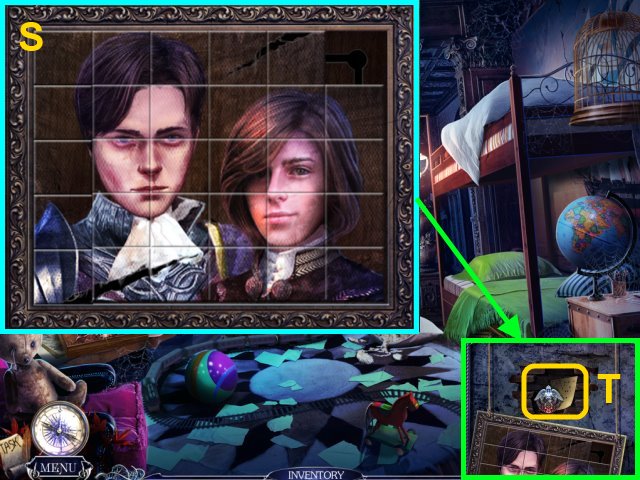
- Take the BROKEN WIND-UP MOUSE (R).

- Use the COG (T) and the WIND-UP KEY (U) on the BROKEN WIND-UP MOUSE (S) to create the WIND-UP MOUSE.
- Go to the Square.
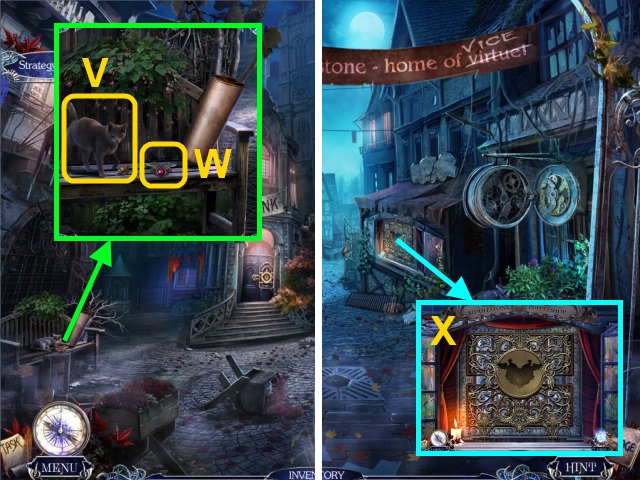
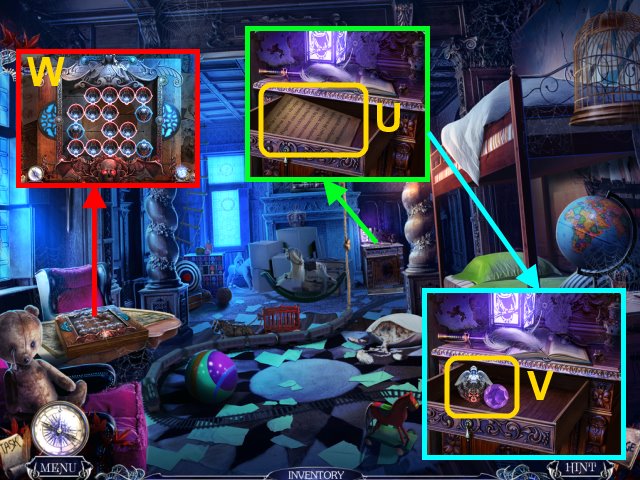
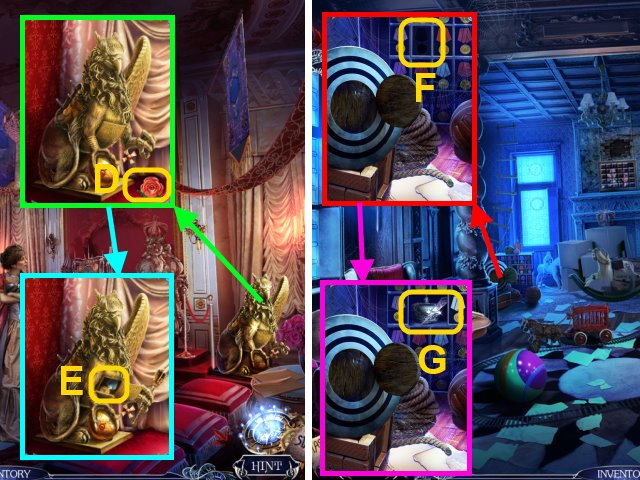
- Give the WIND-UP MOUSE to the cat (V); take the RUBY EMBLEM (W).
- Walk down.
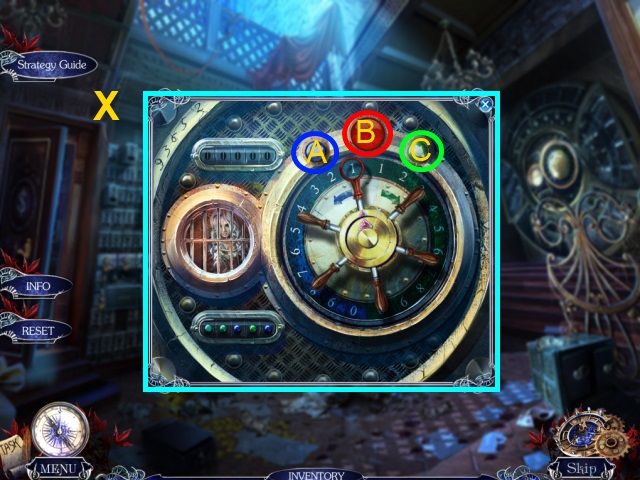
- Place the RUBY EMBLEM in the slot for a mini-game (X).

- Press the buttons in numerical order (Y).
- Take the DRAINED BANISHING CRYSTAL (Z).
- Go to the Art Studio.
- Take the BOTTLE OF ACID (A).
- Place the DRAINED BANISHING CRYSTAL on the gargoyle (B); retrieve it.
- Go to the Square.
- Place the DRAINED BANISHING CRYSTAL on the gargoyle (C); retrieve it.
- Walk forward.
- Place the DRAINED BANISHING CRYSTAL on the gargoyle (D); retrieve it.
- Use the DRAINED BANISHING CRYSTAL on Gluttony (E).
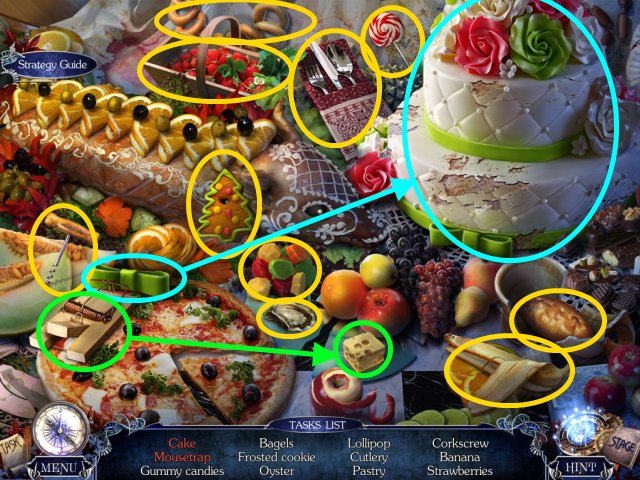
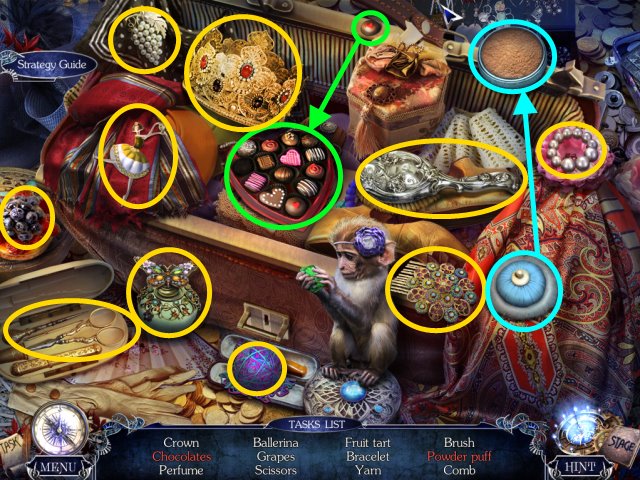
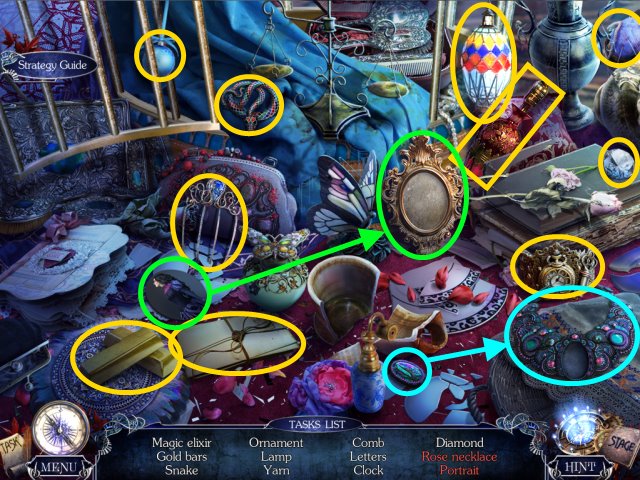
- Play the HOP.
- You receive the CAKE.

- Remove the CAKE slices; take the HANDCUFF KEY (H).
- Use the HANDCUFF KEY on the handcuffs (I); you receive the ARTIST'S DAUGHTER.
- Go to the Art Studio.
- Return the ARTIST'S DAUGHTER to the artist (J); you receive the PENCIL.
- Go to the Square.
- Use the PENCIL to open the shutters (K); take the BANK NOTE (L).
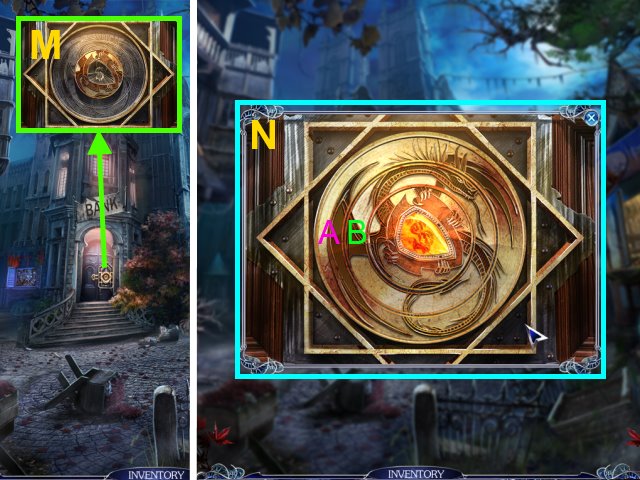
- Place the BANK NOTE and LOCK PARTS in the lock for a mini-game (M).
- Solution (N): Ax10, Bx1.
- Walk forward.
Chapter 2: The Bank
- Take the VALVE (O).
- Walk down twice.
- Place the VENT on the pipe and turn it (P); take the BANK TOKEN (Q).
- Return to the Bank.
- Place the BANK TOKEN in the slot (R).
- Play the HOP.
- You receive the MECHANICAL EGG.
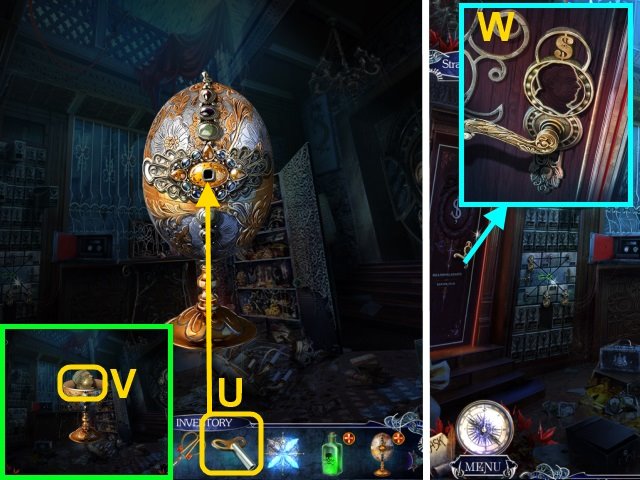
- Use the WIND-UP KEY (U) on the MECHANICAL EGG; take the PROFILE KEY (V).
- Use the PROFILE KEY to open the office door (W).
- Walk left.
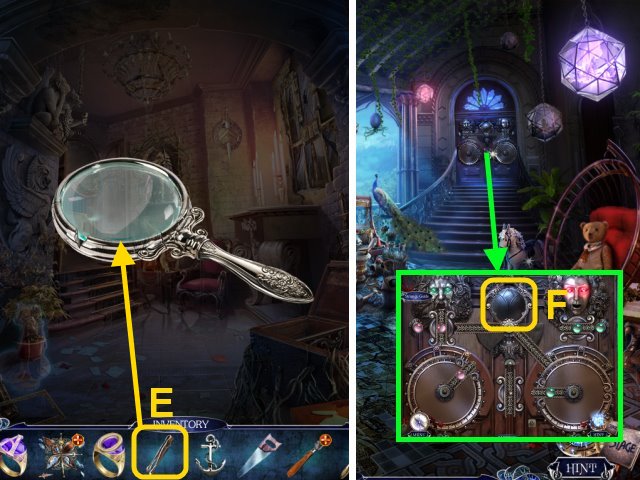
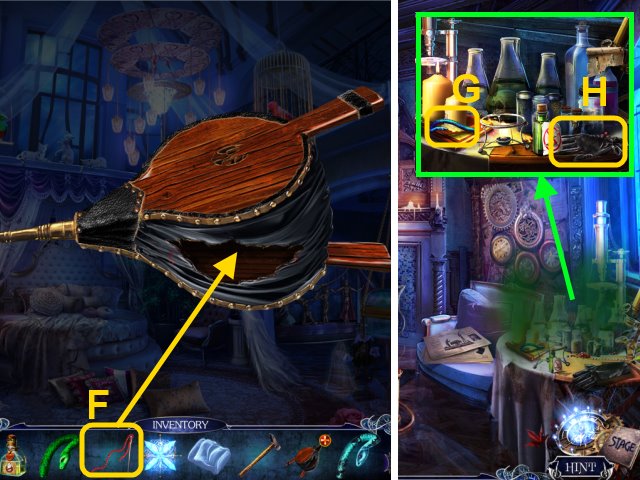
- Take the CORKSCREW (X).
- Use the SCISSORS on the chair (Y); take the NUMBERED KEY.
- Take the PAPERWEIGHT (Z).
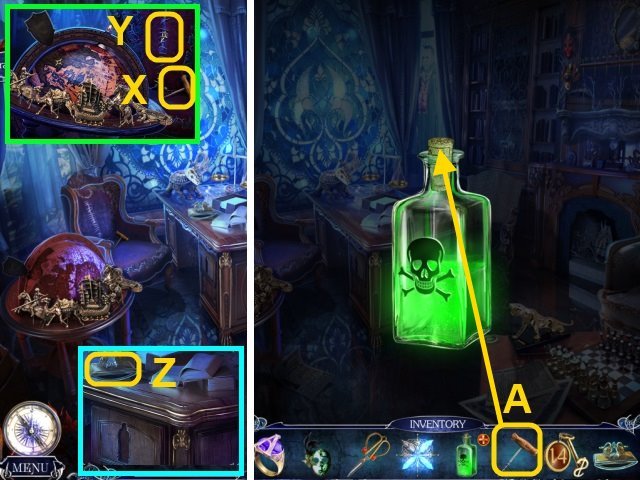
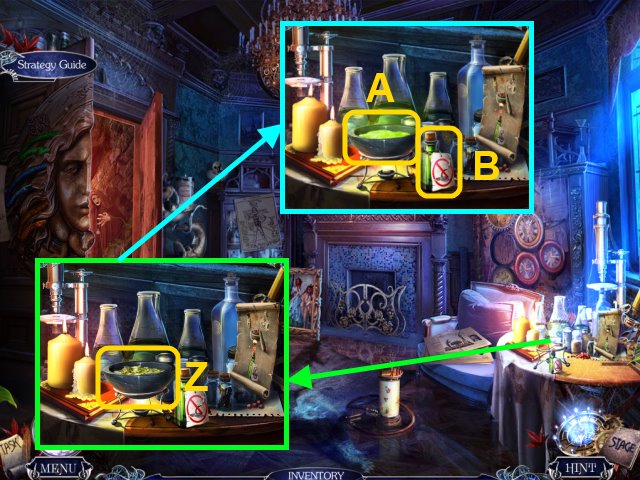
- Use the CORKSCREW (A) on the BOTTLE OF ACID; take the ACID.
- Walk down.
- Use the ACID on the lock (B); open the grate.
- Take the NUMBERED KEY (C).
- Take the NUMBERED KEY (D).
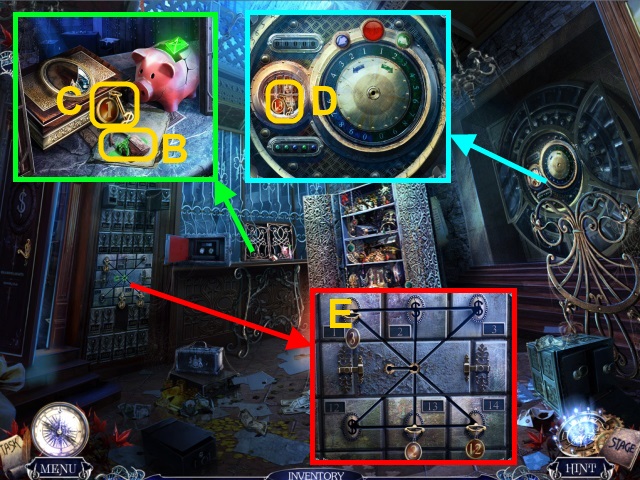
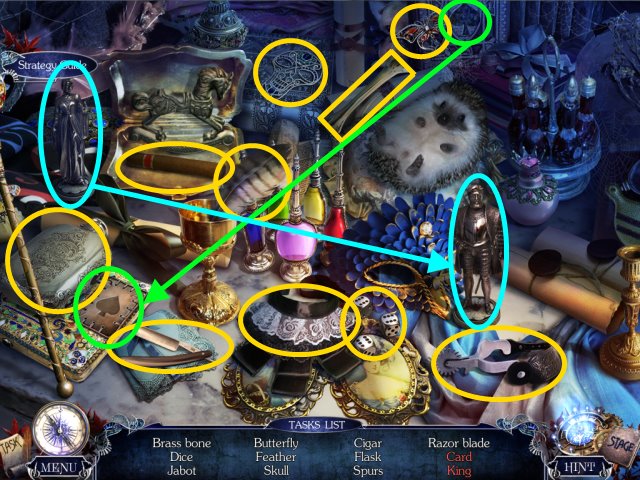
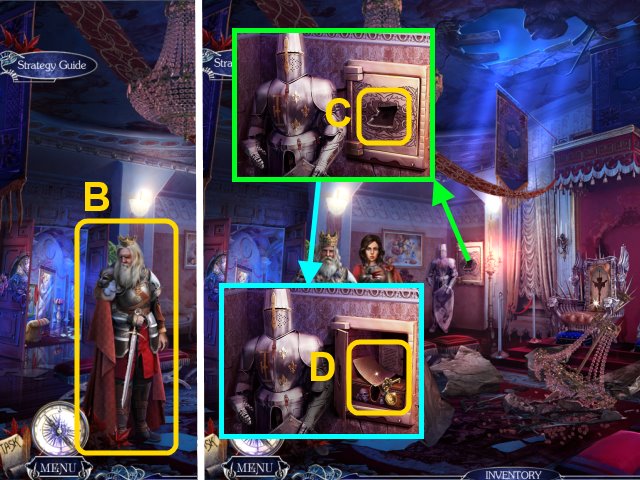
- Use the 3 NUMBERED KEYS on the safety deposit boxes for a mini-game (E).
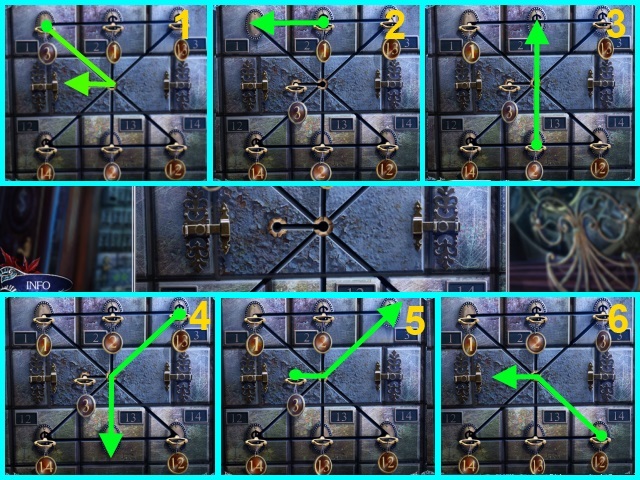
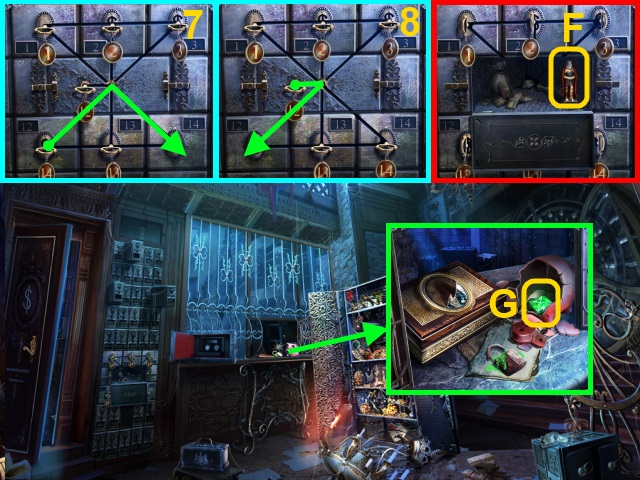
- Follow steps 1-8 to solve.
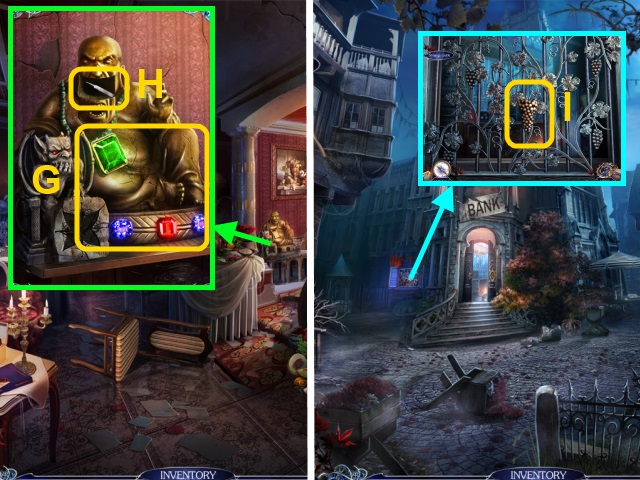
- Take the KING FIGURINE (F).
- Use the PAPERWEIGHT to break the piggybank; take the EMERALD (G).
- Walk left.
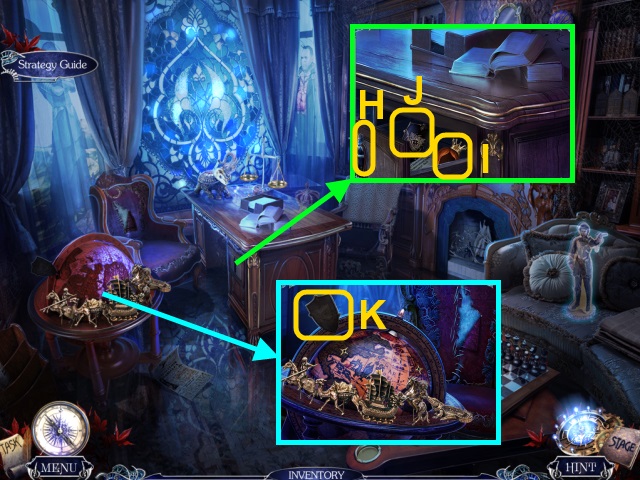
- Place the KING FIGURINE on the drawer (H); take the PUPPET PART (I) and COAT OF ARMS (J).
- Place the COAT OF ARMS on the globe for a mini game (K).
- Solution (L).
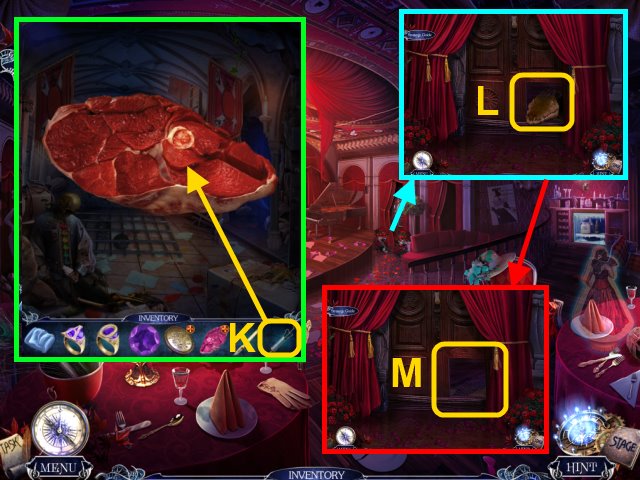
- Take the MASK (M) and the SCROLL (N).
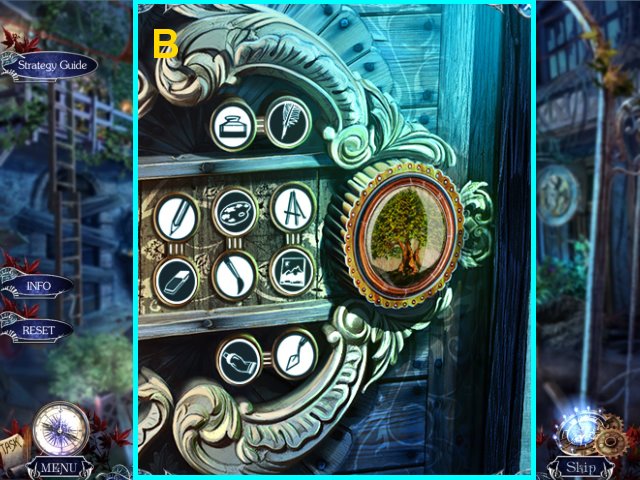
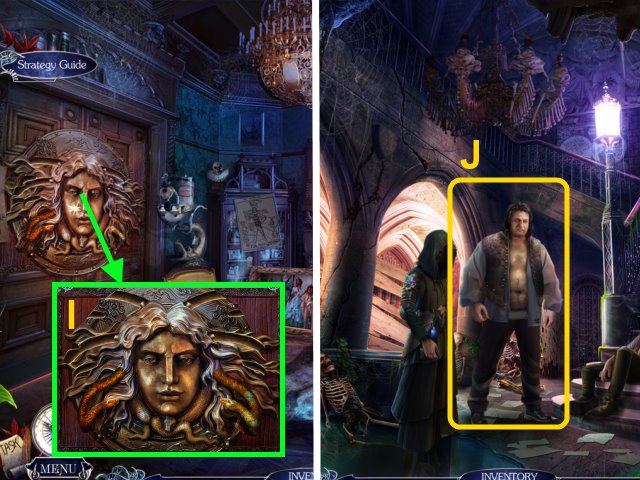
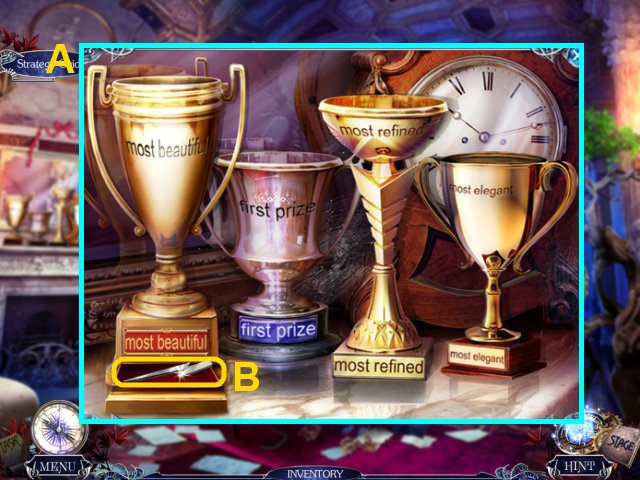
- Place the 3 MASKS on the display stand for a mini-game (O).
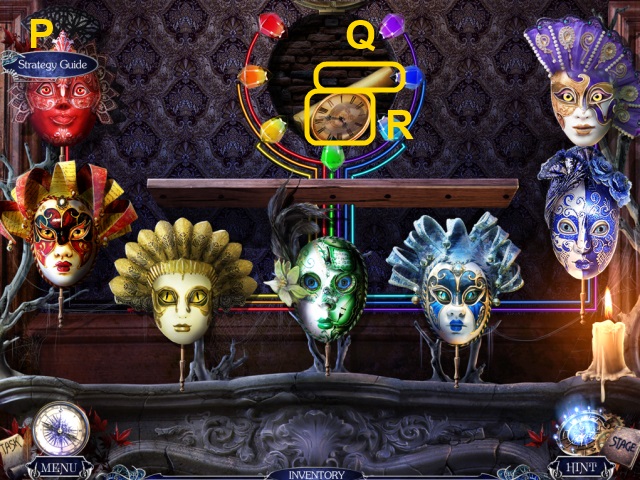
- Solution (P).
- Take the SCROLL (Q) and the CLOCK FACE (R).
- Go to the Restaurant.
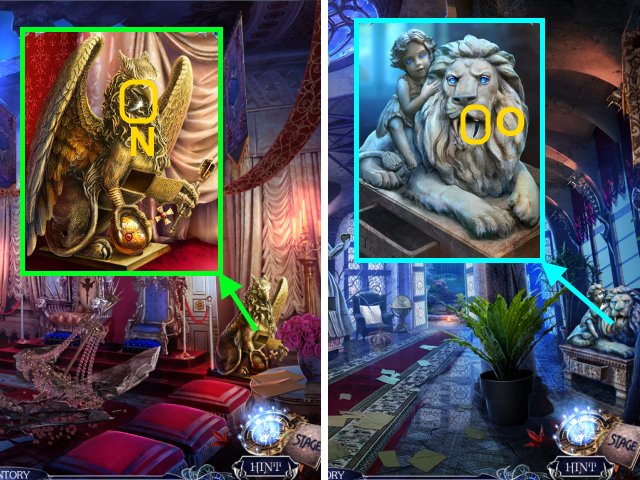
- Press the dragon lock (S); place the 2 SCROLLS in the dragons' claws.
- Walk forward.
- Place the DRAINED BANISHING CRYSTAL on the gargoyle (T); take the CHARGED BANISHING CRYSTAL.
- Return to the Bank.
- Use the CHARGED BANISHING CRYSTAL on Greed (U).
- Take the SAFE HANDLE (V).
- Place the SAFE HANDLE on the safe for a mini-game (W).
- Solution (X): Cx9, B, Ax6, B, Ax8, Cx10, B, Ax6, B.
- Walk right.

- Talk to Princess Anna (Y).
- Use ANNA'S RING on the bag (Z).
- Play the HOP.
- You receive the CROWN.
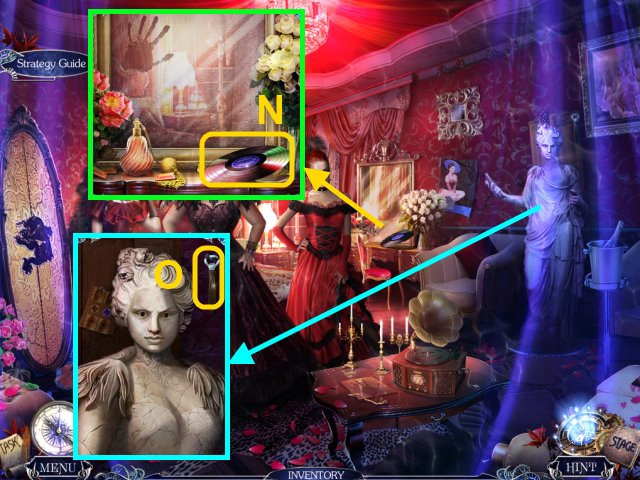
- Go to the Art Studio.
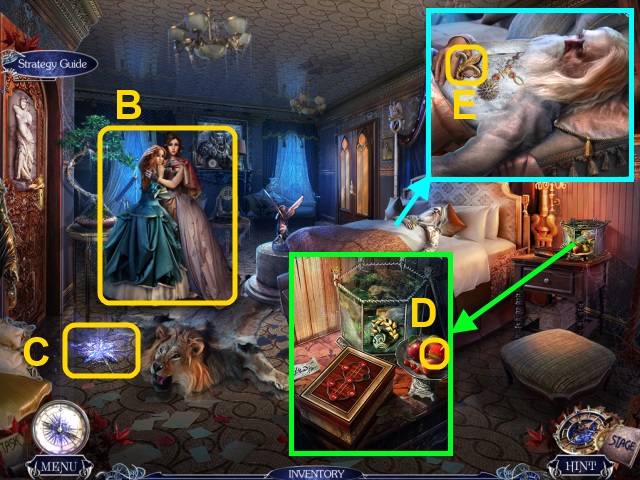
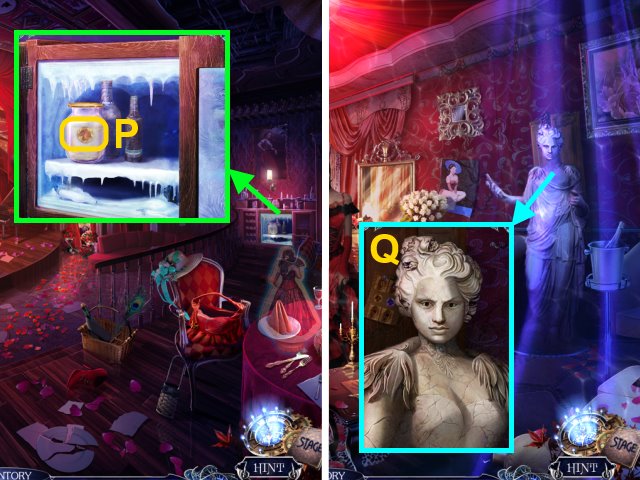
- Place the CROWN on the statue (C); take the TWEEZERS (D) and SAPPHIRE (E).
- Walk down.
- Use the TWEEZERS to get the RUBY (F).
- Go to the Restaurant.
- Place the EMERALD, RUBY, and SAPPHIRE in the gold statue (G); take the FILE (H).
- Walk down.
- Use the FILE on the grapes (I); take the METAL GRAPES.
- Go to the Secret Passage.
- Place the METAL GRAPES in the gargoyle's mouth (J); take the STAFF.
- Walk down.
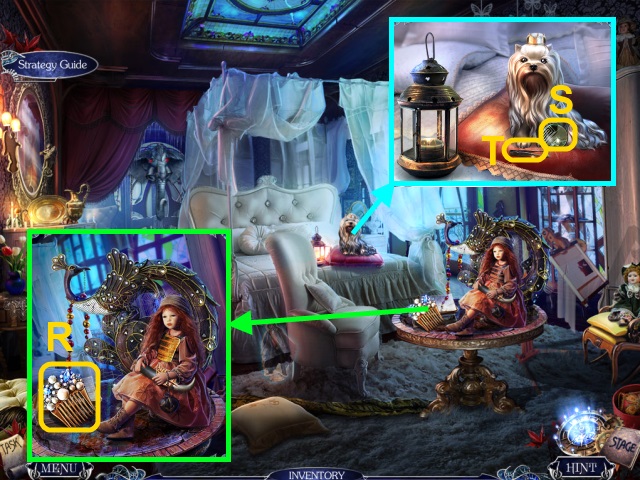
- Use the STAFF to open the barrel; take the MINIATURE HORN and MIRROR SHARD (K).
- Go to the Treasury.
- Place the MINIATURE HORN in the statuette's hands (L); take ANNA'S PORTRAIT (M).
- Walk down.
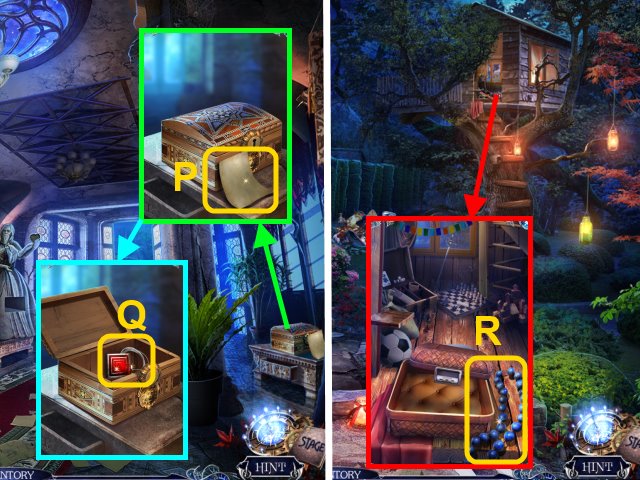
- Place ANNA'S PORTRAIT on the box (N); take the SHIP FIGURINE (O).
- Walk right.
- Place the SHIP FIGURINE on the plaque for a mini-game (P).
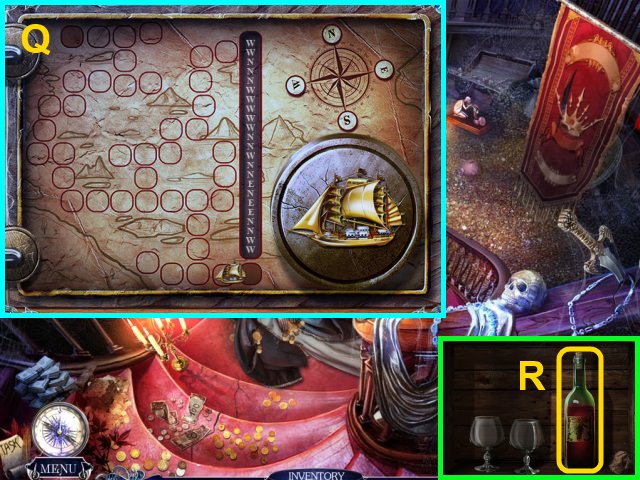
- Solution (Q): Wx2, Nx3, Wx5, Nx2, W, Nx2, E, N, Ex2, Nx2, Wx2.
- Take the WINE (R).
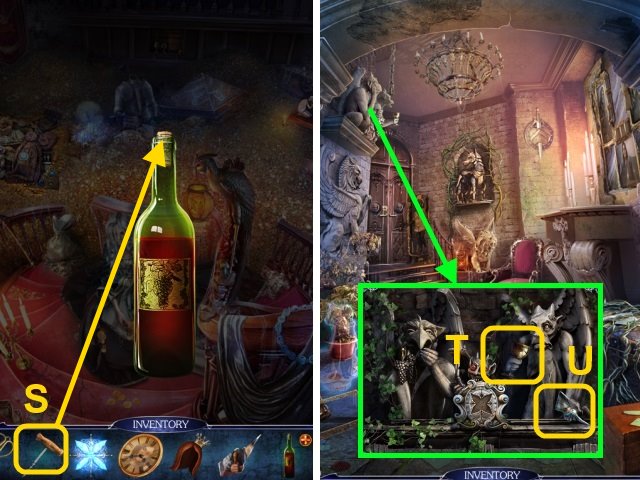
- Use the CORKSCREW to open the WINE (S).
- Go to the Secret Passage.
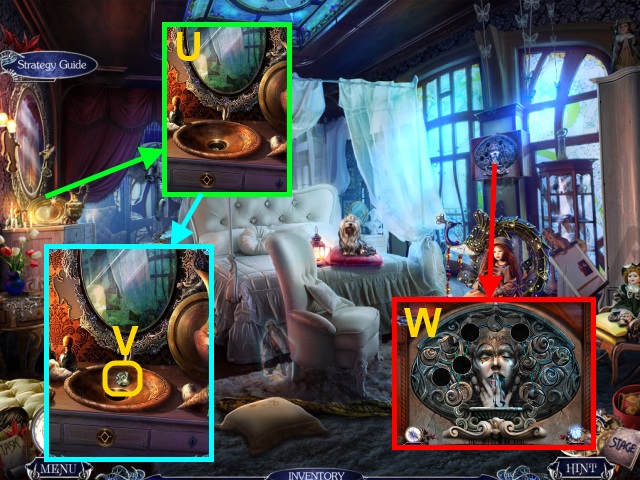
- Pour the WINE in the goblet (T); take the MIRROR SHARD (U).
- Use the SCISSORS on the thorns; take the MIRROR SHARD (V).
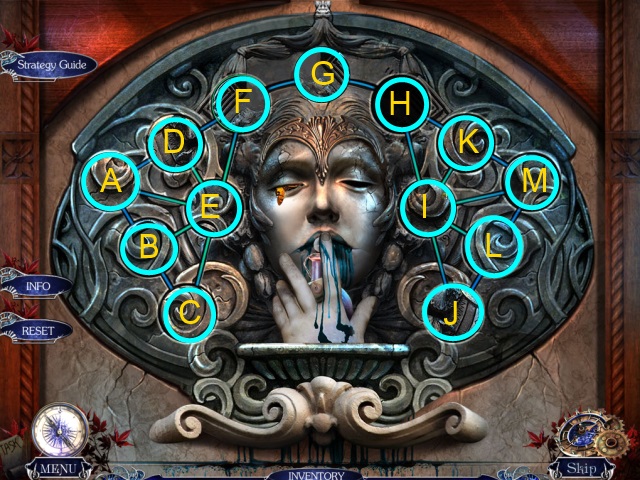
- Place the 3 MIRROR SHARDS on the portraits for a mini-game (W).
- Solution (X).
- Take the GENEROSITY ELIXIR (Y).
- Return to the treasury.
- Give the GENEROSITY ELIXIR to Princess Anna (Z).
- You receive the CROWN KEY.
- Go to the Secret Passage.
- Use the CROWN KEY on the lock (A).
- Walk forward.
Chapter 3: King Henry
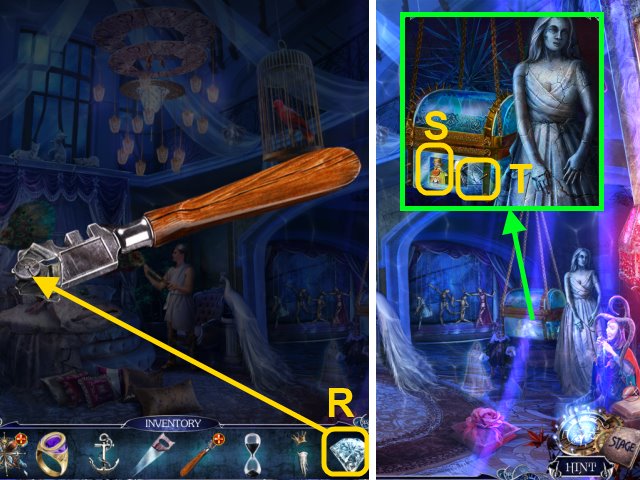
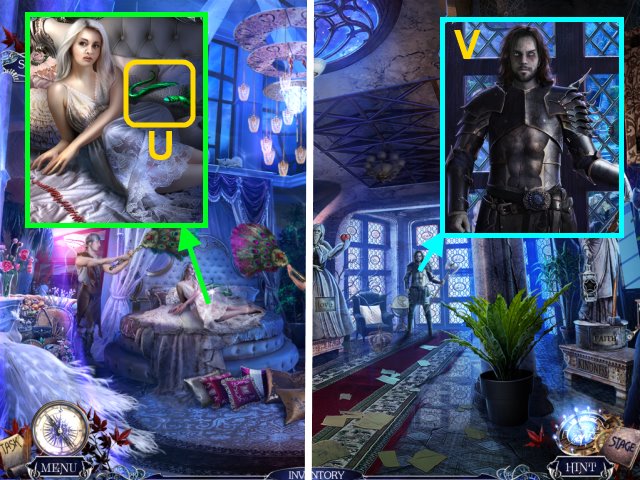
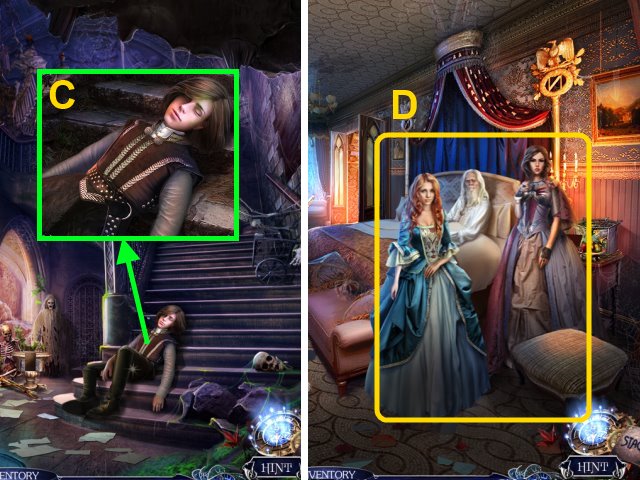
- Talk to Queen Olivia (B); take the BROKEN BANISHING CRYSTAL (C).
- Take the RUBY APPLE (D).
- Take the ROYAL LILY (E).
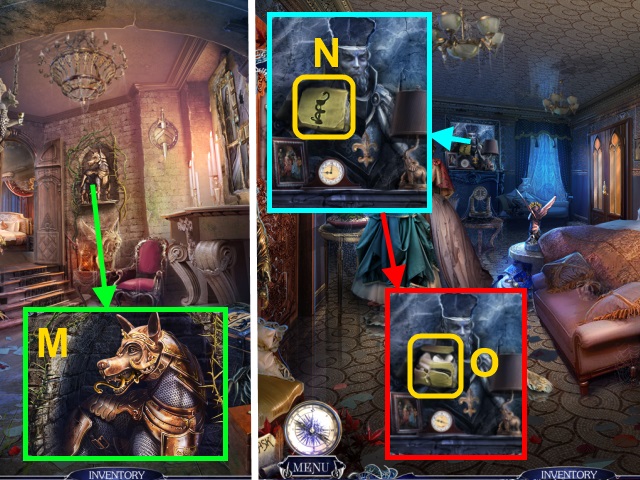
- Place the ROYAL LILY in the bas-relief (F); take the MACE (G).
- Walk down twice.
- Use the MACE on the statue; take the FISH FOOD and SANITARY SYMBOL (H).
- Walk up twice.
- Feed the FISH FOOD to the fish; take the CHIP and the WREATH (I).
- Place the WREATH on the angel (J).
- Play the HOP.
- You receive the BRASS BONE.
- Walk down.
- Place the BRASS BONE in the dog's mouth to receive the SANITARY SYMBOL (M).
- Walk forward.
- Place the SANITARY SYMBOLS on the stash (N); take the BANDAGE (O).
- Use the BANDAGE on the king (P); you receive OLIVIA'S RING.
- Use the OLIVIA'S RING on the door (Q).
- Walk forward.
- Take the PEARL COMB (R).
- Use the PEARL COMB on the dog; take the CHIP (S) and PINCERS (T).
- Use the PINCERS on the sink (U); take the CHIP (V).
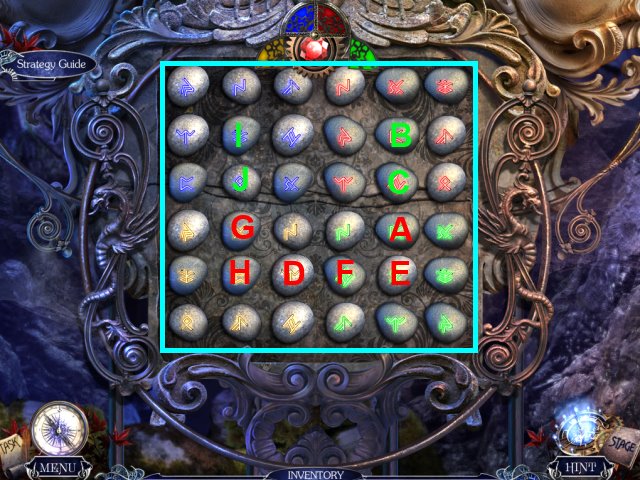
- Place the 3 CHIPS on the sculpture for a mini-game (W).
- Solution: K, M, L, J, I, H, K, M, L, I, M, K, H, G, F, D, E, A, B, C, E, F, and G.
- Take the POISON ANTIDOTE.
- Walk down.
- Use the POISON ANTIDOTE on the king (X).
- You receive the HALL OF STATUES KEY.
- Use the HALL OF STATUES KEY on the door (Y).
- Walk left.
- Take the TUSK (Z).
- Take the CROWN (A).
- Take the METAL RING (B).
- Walk down twice.
- Place the CROWN on the chest (C); Take the OIL CAN and TWIGS (D).
- Go to the Queen's Parlor.
- Open the doll; Use the OIL CAN (E).
- Take the METAL LEAF and the TUSK (F).
- Use the 2 TUSKS on the elephant (G); press the elephant.
- Walk forward.
- Take the KNOB (H).
- Go to the Queen's Parlor.
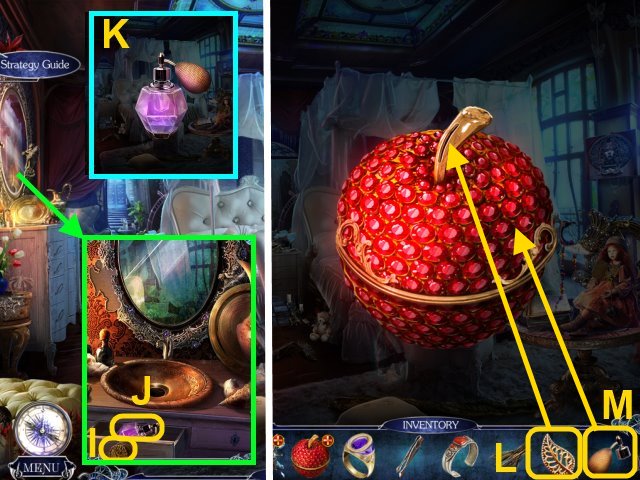
- Use the KNOB on the drawer (I); take the PERFUME (J).
- Remove the top from the PERFUME (K); take the SPRAYER.
- Use the METAL LEAF (L) and SPRAYER (M) on the RUBY APPLE to make the POISON SPRAY.
- Walk forward.
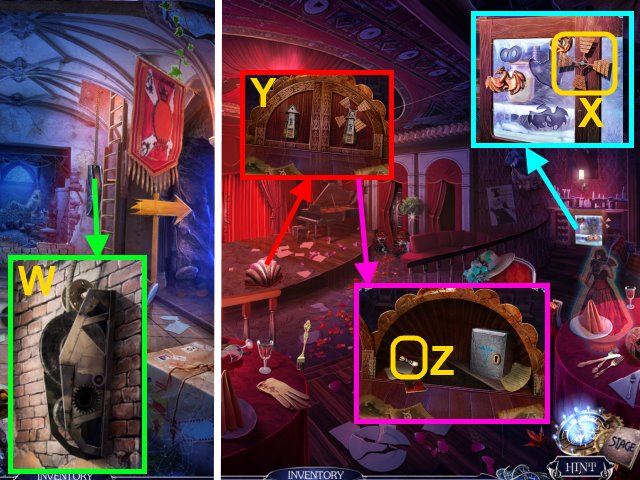
- Use the POISON SPRAY on the weeds; take the HACKSAW HANDLE (N) and ANCHOR FIGURINE (O).
- Go to the Secret Passage.
- Use the HACKSAW HANDLE on the blade (P); take the HACKSAW.
- Go to the Hall of Statues.
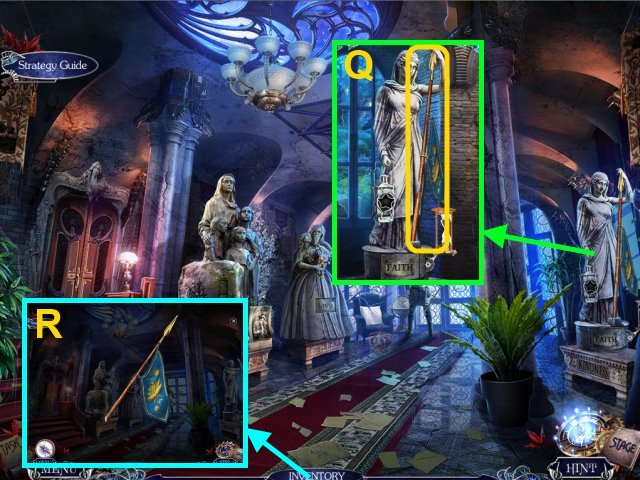
- Use the HACKSAW on the spear (Q); take the FLAG.
- Remove the spearhead and the flag from the FLAG to make the HANDLE.
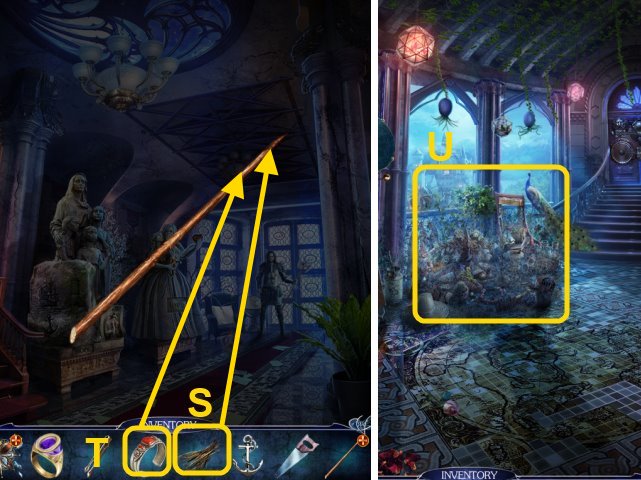
- Use the TWIGS (S) and METAL RING (T) on the HANDLE to make the BROOM.
- Go to the Balcony.
- Use the BROOM on the dust (U).
- Play the HOP.
- You receive the HEART.
- Go to the Hall of Statues.
- Try to take the broken heart; Place the HEART in the slot (X) and take the GUARDIAN ANGEL (Y).
- Go to the Queen's Parlor.
- Place the GUARDIAN ANGEL on the mirror (Z); take the LION SYMBOL (A).
- Walk down twice.
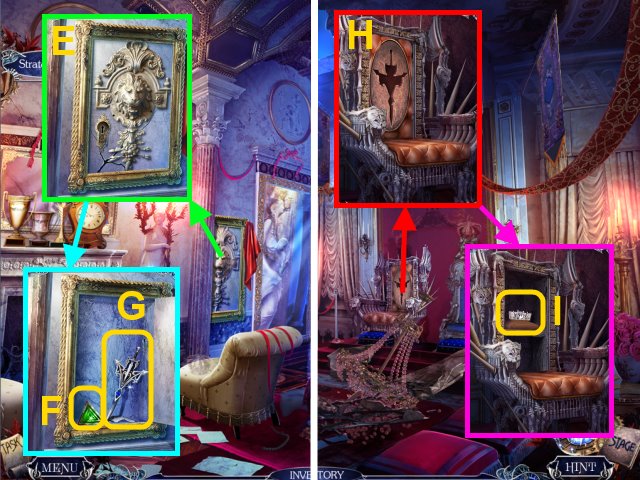
- Place the LION on the chest (B); take the BROKEN GLASS CUTTER (C) and MAGNIFYING GLASS (D).
- Use the PINCERS (E) on the MAGNIFYING GLASS to get the LENS.
- Go to the Balcony.
- Open the peephole (F); place the LENS in the peephole for a mini-game.
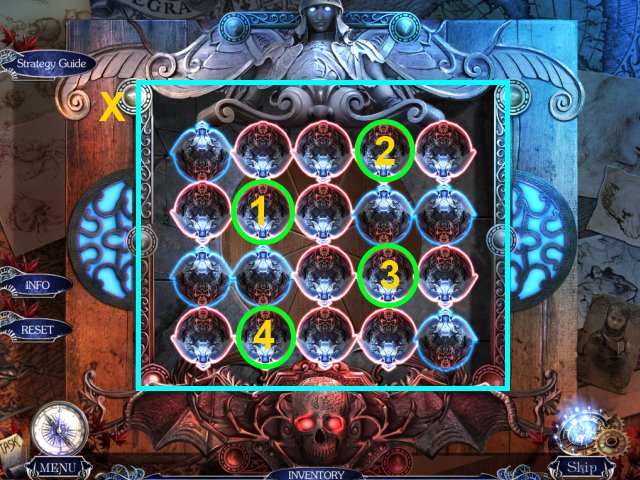
- Solution: J, D left, J, D up, I, J, C right twice, K, D up, G, B right, H, I, B down, I, K, B right twice, J, D down, J, D left, I, D up, H, D left, G, D up.
- I, B left twice, I, H, B up, K, C down, K, I, C left twice, L, E left, L, K, E down, K, E left, J, E up, J, C right twice, K, C up, L, C right, M, C up.
- I, B down, I, K, B right twice, K, L, B up, L, M, B right, M, B up.
- G, H, A right twice, H, I, A down, I, K, A right twice, K, L, A up, L, M, A right, M, A up.
- M, F left twice, L, F down, K, F left twice, I, F up, H, F left, G, F up.
- J, E down, J, I, E left, I, H, E up, H, G, E left, G, E up.
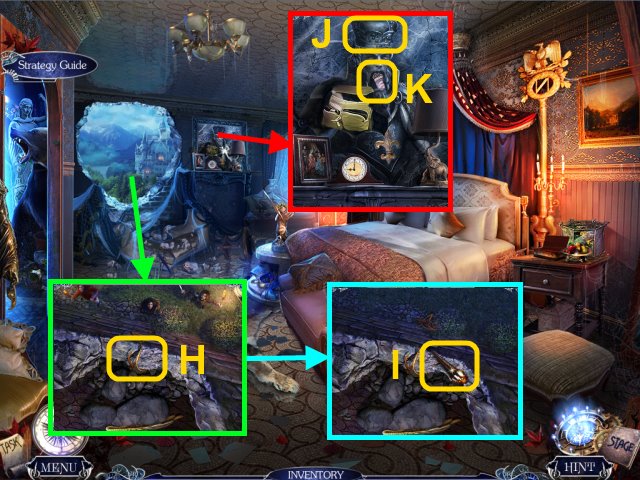
- Take the NUMBER.
- Walk down twice.
- Place the NUMBER on the puzzle box for a mini-game (G).
- Solution (H): A, Bx2, A, Bx3, Ax3.
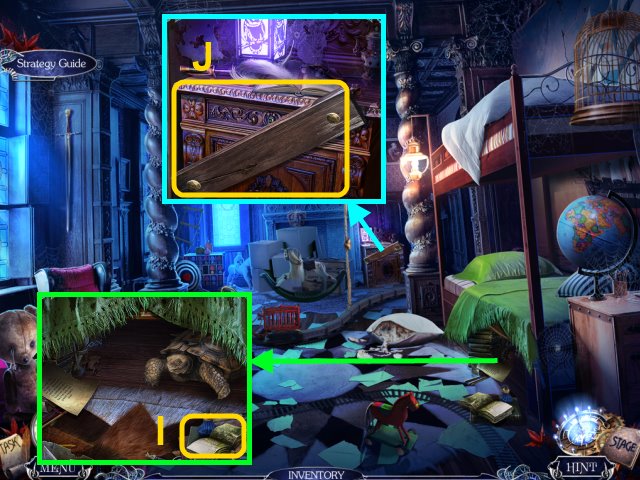
- Take the SHEET OF PAPER (I) and HOURGLASS (J).
- Walk forward.
- Open the lantern; take the PUPPET PART (K).
- Place the SHEET OF PAPER on the candle; take the ASHES (L).
- Walk down.
- Place the ASHES in the puzzle box (M); take the INVISIBILITY CLOAK (N).
- Walk forward twice.
- Use the INVISIBILITY CLOAK on the door (O).
- Walk forward.
- Play the HOP.
- You receive the DIAMOND.
- Use the DIAMOND on the BROKEN GLASS CUTTER to make the GLASS CUTTER (R).
- Use the GLASS CUTTER on the chest; take the ENVY ELIXIR (S) and PUPPET PART (T).
- Take the MALACHITE SNAKE (U).
- Go to the Hall of Statues.
- Give the ENVY ELIXIR to the guard (V).
- Walk forward.
Chapter 4: The Doctor
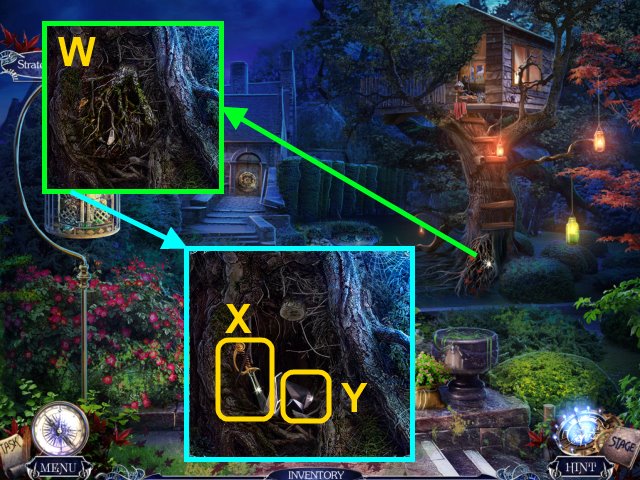
- Use the HACKSAW on the roots (W); take the PRINCE'S LITTLE SWORD (X) and PAPER CRANE (Y).
- Go to the Golden Gallery.
- Use the PRINCE'S LITTLE SWORD on the bed (Z); take the PUPPET PART (A).
- Place the 4 PUPPET PARTS on the puppets for a mini-game (B).
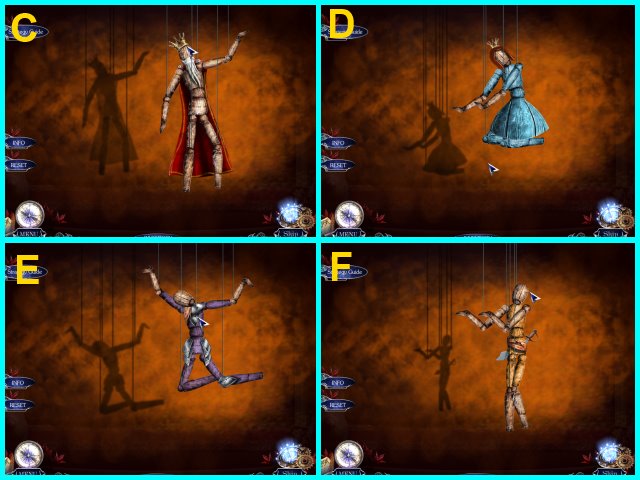
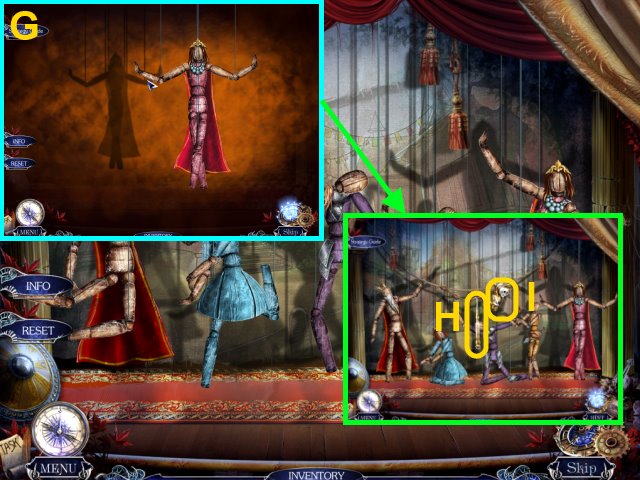
- Arrange the puppets according to screenshots C-G.
- Take the HOOK (H) and SIN'S RELIC (I).
- Go to the Palace Garden.
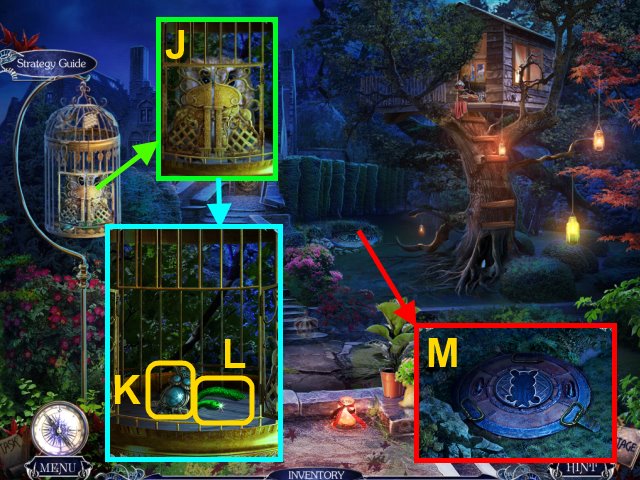
- Use the HOOK on the cage (J); take the OWL EMBLEM (K) and EMERALD SNAKE (L).
- Place the OWL EMBLEM in the slot (M).
- Play the HOP.
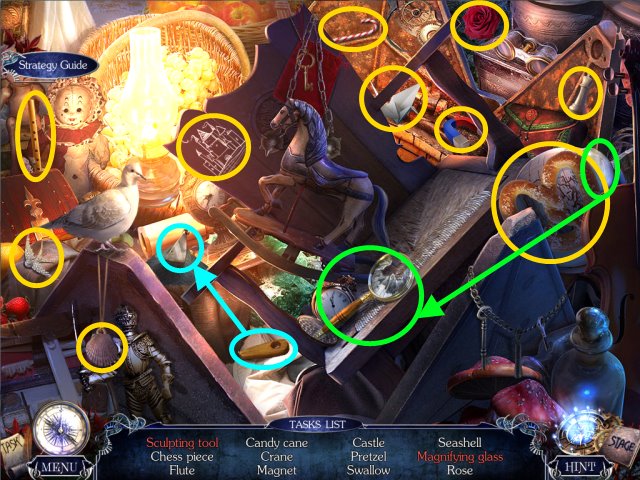
- You receive the SCULPTING TOOL.
- Walk down.
- Use the SCULPTING TOOL on the statue; take the STAR OF FAITH and BANISHING CRYSTAL PART (P).
- Put the ANCHOR FIGURINE in the slot (Q); place the PAPER CRANE in the child's hand (R) and take the BANISHING CRYSTAL PART (S).
- Try to take the hourglass; place the HOURGLASS on the stand (T).
- Put the STAR OF FAITH in the lantern (U); take the BANISHING CRYSTAL PART (V).
- Restore the BROKEN BANISHING CRYSTAL (W).
- Use the 3 BANISHING CRYSTAL PARTS to make the BANISHING CRYSTAL (X).
- Go to the Golden Gallery.
- Use the BANISHING CRYSTAL on Sloth (Y).
- Take the SIN'S RELIC (Z).
- Go to the Palace Garden.
- Use the 2 SIN'S RELICS on the door for a mini-game (A).
- Solution: A-B, A-C, B-C, A-B, C-A, C-B, A-B, A-C, B-C, B-A, C-A, B-C, A-B, A-C, and B-C.
- Walk forward.

- Take the HAMMER HANDLE (B).
- Walk down.
- Attach the HAMMER HANDLE to the hammer head (C); take the HAMMER.
- Walk forward.
- Use the HAMMER to break the glass; take the THREAD AND NEEDLE (D).
- Go to the Golden Gallery.
- Use the HAMMER on the statue; take the DAMAGED BELLOWS and TURQUOISE SNAKE (E).
- Go to the Lair of Envy.
- Use the THREAD AND NEEDLE on the DAMAGED BELLOWS to make the BELLOWS (F).
- Use the BELLOWS on the poison fog; take the NEPHRITE SNAKE (G) and RUBBER GLOVE (H).
- Place the MALACHITE SNAKE, EMERALD SNAKE, TURQUOISE SNAKE, and NEPHRITE SNAKE on the statue (I).
- Walk left.
- Use the BANISHING CRYSTAL on Gluttony (J).
- Take the BOARD (K).
- Use the RUBBER GLOVE to take the SNAKE MEDALLION (L).
- Take the MORTAR AND PESTLE (M).
- Take the POCKET WATCH (N).
- Open the POCKET WATCH; take the SOLDIER (O).
- Use the HAMMER to break the glass (P); take the CLOCK FACE.
- Walk down.
- Place the 2 CLOCK FACES on the clocks for a mini-game (Q).
- Solution (R).
- Take the HEALER STONE (S).
- Walk left.
- Place the HEALER STONE on the urn; take the RECIPE (T) and SNAKE OF HATRED (U).
- Place the SNAKE OF HATRED on the SNAKE MEDALLION (V); take the SNAKE POISON (W).
- Walk down.
- Place the RECIPE on the stand (X).
- Place the MORTAR AND PESTLE on the burner (Y).
- Pour the SNAKE POISON and HALF POTION OF VIRTUE into the bowl (Z).
- Select the concoction (A); take the ENVY ANTIDOTE (B).
- Give the ENVY ANTIDOTE to Prince Colin (C); you receive COLIN.
- Go to the King's Bedroom.
- Put COLIN with his family (D); you receive the PRINCES' ROOM KEY.
- Walk left.

- Put the PRINCES' ROOM KEY in the door (E).
- Walk left.
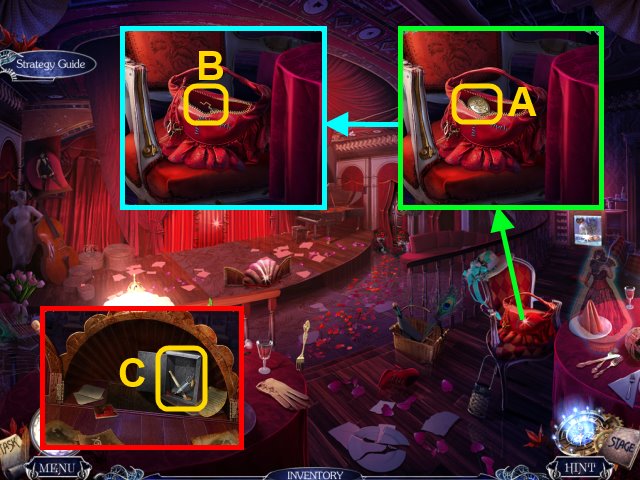
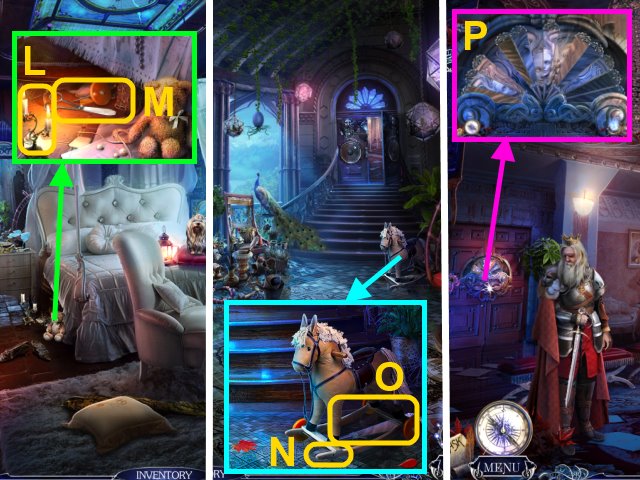
- Take the FORK (F).
- Take the NAIL PULLER (G) and WEIGHT (H).
- Take the TOME (I).
- Use the NAIL PULLER to get the NAILS (J).
- Go to the Palace Garden.
- Place the BOARD and NAILS on the tree (K); use the HAMMER.
- Take the SOLDIER (L) and BROKEN BLOWTORCH (M).
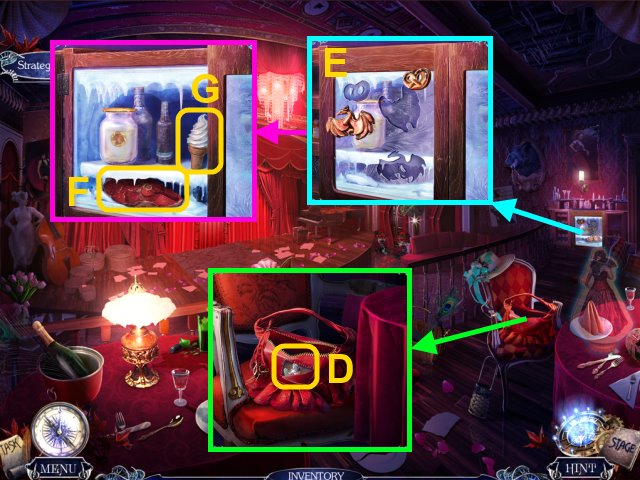
- Use the FORK to open the case; take the GRATER and CORK (N).
- Walk down.
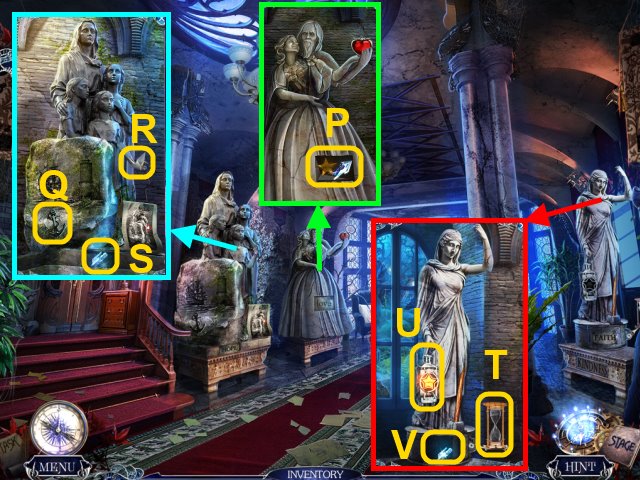
- Place the TOME on the statue (O); take the BELT and PORTRAIT PIECE (P).
- Try to take the beads (Q).
- Walk left.
- Place the PORTRAIT PIECE in the frame for a mini-game (R).
- Solution (S).
- Take the SOLDIER and STENCIL (T).
- Use the STENCIL on the paper (U); take the SOLDIER and AMETHYST EYE (V).
- Place the 4 SOLDIERS on the board for a mini-game (W).
- Solution (X): 1-4.
- Take the KEROSENE and RUNE.
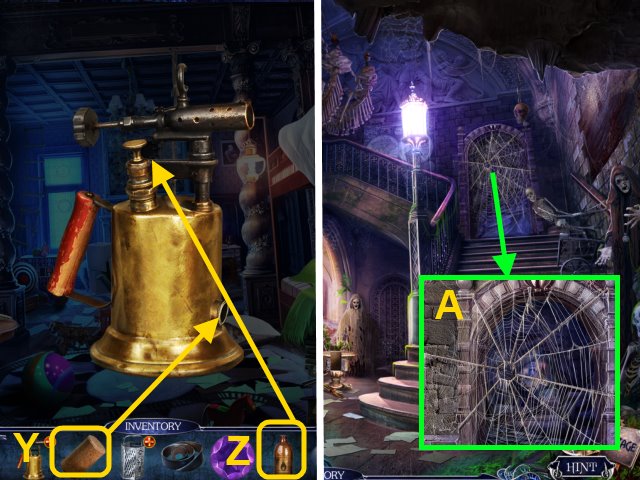
- Remove the cap from the BROKEN BLOWTORCH; use the CORK (Y) and KEROSENE (Z) to make the BLOWTORCH.
- Go to the Vault Entrance.
- Use the BLOWTORCH on the web (A).
- Walk forward.
Chapter 5: The Cabaret
- Use the BANISHING CRYSTAL on Envy (B).
- Take the CARROT (C).
- Use the CARROT on the GRATER to make the GRATED CARROT (D).
- Go to the Princes' Room.
- Give the GRATED CARROT to the turtle (E); take the TOKEN and PLIERS (F).
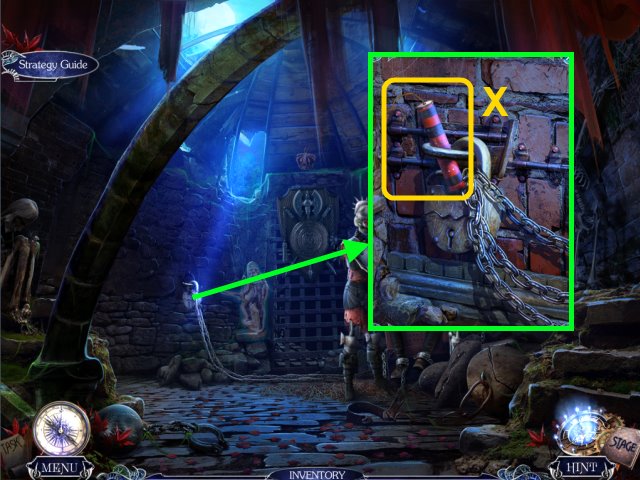
- Go to the Catacombs.
- Use the PLIERS on the chain (G); take the CHAIN.
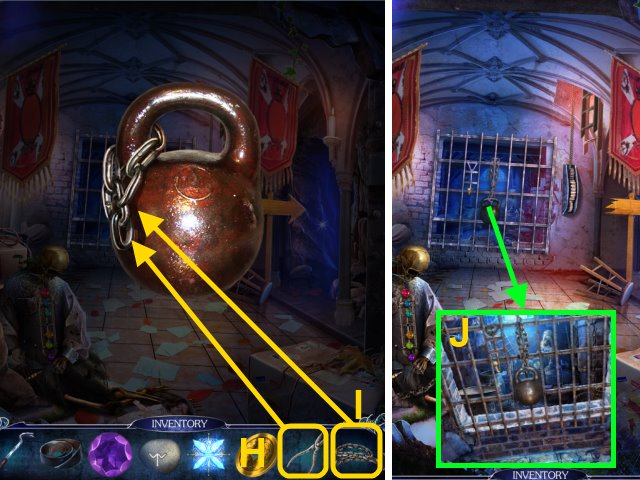
- Attach the CHAIN (H) to the WEIGHT and use the PLIERS (I) to make the BALL AND CHAIN.
- Use the BALL AND CHAIN on the bars (J).

- Play the HOP.
- You receive the HANDLE.
- Walk down.
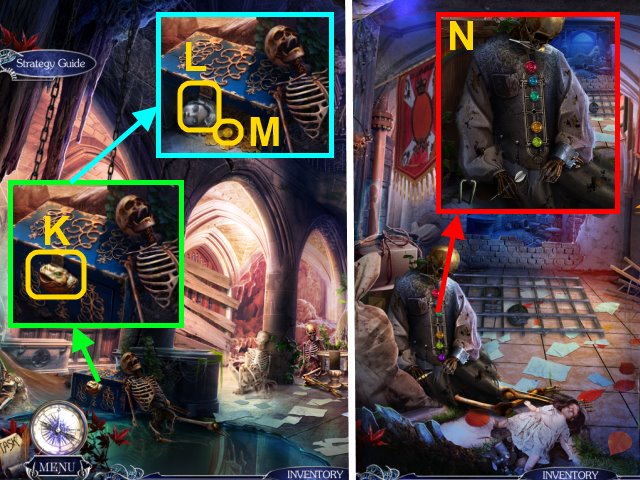
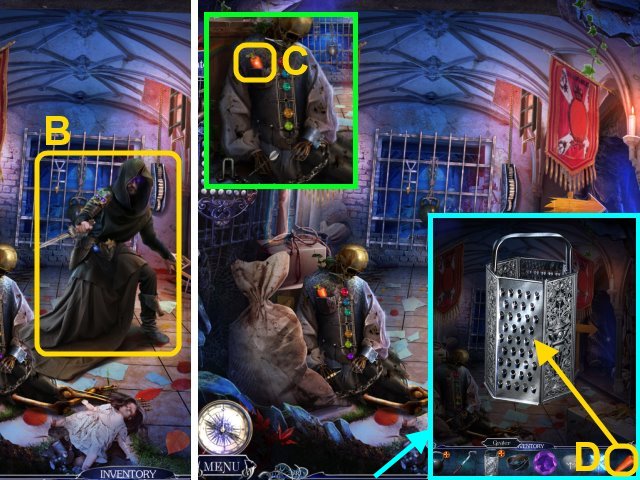
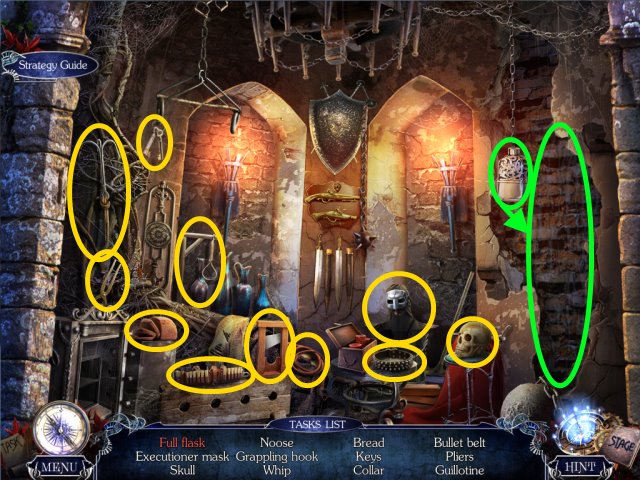
- Place the TOKEN in the toad's mouth (K); take the STATUE HEAD (L) and BUTTON (M).
- Walk forward.
- Place the BUTTON on the vest for a mini-game (N).
- Solution (O): D, B, C, A.
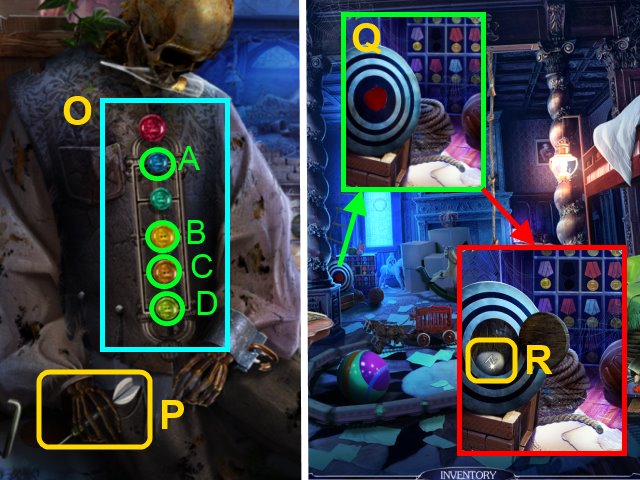
- Take the DART (P).
- Go to the Princes' Room.
- Use the DART on the dartboard (Q); take the RUNE (R).
- Go to the Palace Garden.
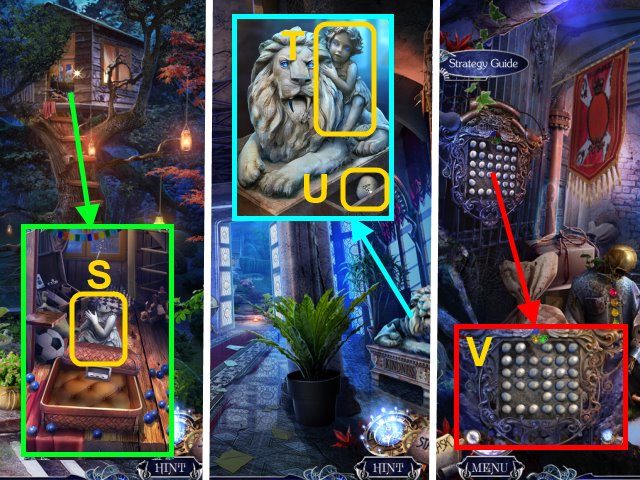
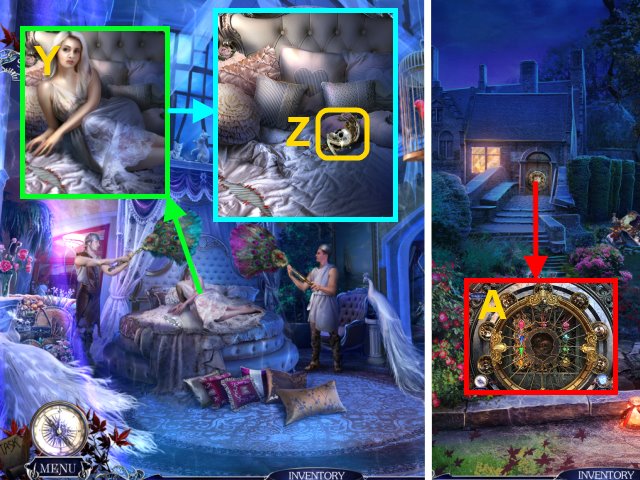
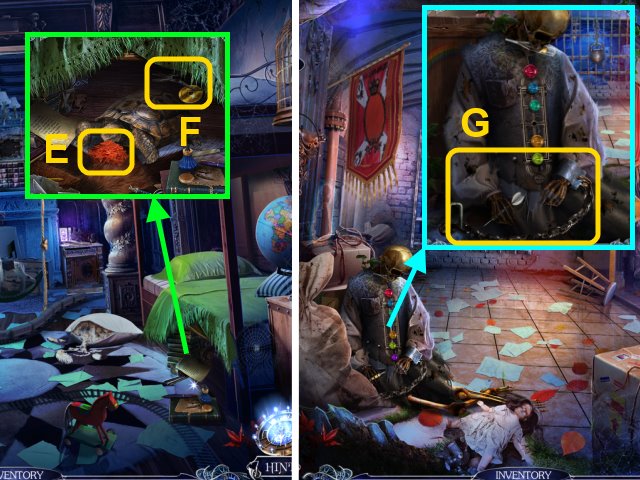
- Place the STATUE HEAD on the statue (S); take the CHILD STATUE.
- Walk down.
- Place the CHILD STATUE on the lion (T); take the RUNE (U).
- Go to the Catacombs.
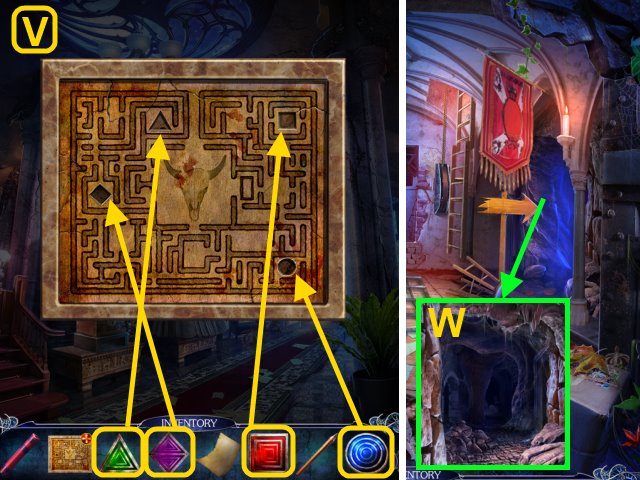
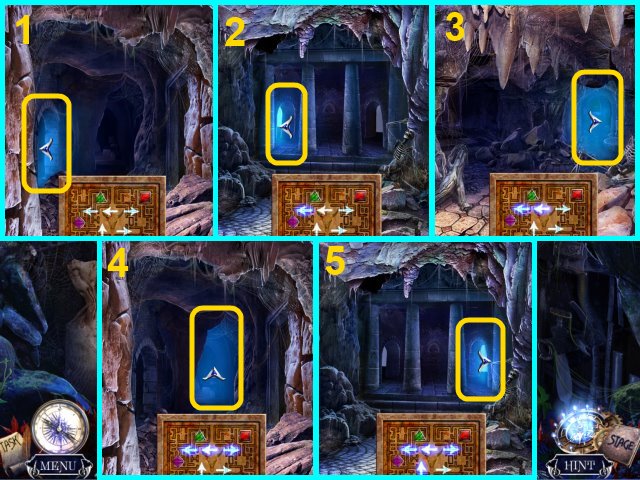
- Place the 3 RUNES on the plaque for a mini-game (V).
- Solution: Ax3, Bx3, A, Cx2, Ax2, Dx3, A, Dx2, A, Dx2, Ex5, Dx2, Fx2, D, Gx2, D, Gx3, D, Ix5, Hx3, Jx4, H, Gx2.
- Take the COG AMULET.
- Place the COG AMULET, HANDLE, and BELT on the mechanism (W); turn the handle.
- Go up.
- Use the NAIL PULLER on the nail; take the WINDMILL FAN (X).
- Place the WINDMILL FAN on the windmill (Y); move the photo and take the ZIPPER (Z).
- Use the ZIPPER on the purse; take the POWDER (A) and EARRING (B).
- Use the EARRING to open the first-aid kit; take the SYRINGE and SCALPEL (C).
- Use the SCALPEL on the purse; take the MAGNET (D).
- Place the MAGNET on the cabinet (E); move the other magnets into place.
- Take the STEAK (F) and ICE CREAM (G).
- Go to the Catacombs.
- Place the ICE CREAM in the skeleton's hand; take the GLASS VIAL (H).
- Use the SCALPEL (I) and SYRINGE (J) on the GLASS VIAL to make the SOPORIFIC SYRINGE.
- Use the SOPORIFIC SYRINGE (K) on the STEAK to make the SOPORIFIC STEAK.
- Go up.
- Try to open the door; give the SPOPORIFIC STEAK to the crocodile (L).
- Use the INVISIBILITY CLOAK on the hole to move forward (M).
- Take the RECORD (N).
- Take the CAN OPENER (O).
- Walk down.
- Use the CAN OPENER on the jar; take the AMBER EYE (P).
- Walk forward.
- Place the AMBER EYE and AMETHYST EYE in the statue (Q).
- Play the HOP.
- You receive the TONE ARM.
- Take the WICK (R).
- Place the RECORD and the TONE ARM on the record player (S); take the GEAR and ADHESIVE TAPE (T).
- Remove the lid from the POWDER and take the POWDER PUFF (U).
- Use the POWDER PUFF on the handprint; use the ADHESIVE TAPE to receive the LUST'S HANDPRINT (V).
- Use LUST'S HANDPRINT on the stash (W); take the BANISHING CRYSTAL (X).
- Use the BANISHING CRYSTAL on Lust (Y).
- Take the DRAGON FIGURINE (Z).
- Place the DRAGON FIGURINE on the mirror (A).
- Walk forward.
Chapter 6: Prince Edwin
- Take the SCEPTER (B).
- Take the POLEAXE (C).
- Take the NECKLACE (D).
- Place the SCEPTER in the griffin's claw; take the COLLECTION MEDAL (E).
- Go to the Princes' Room.
- Place the COLLECTION MEDAL in the case (F); take the PRIDE DOOR PART and CROWN (G).
- Walk down twice.
- Use the POLEAXE on the ladder (H); take the TORCH (I).
- Place the CROWN on the statue (J); take the PRIDE DOOR PART (K).
- Walk forward.
- Use the TORCH on the candles (L); take the WHEEL and SCISSORS (M).
- Walk forward.
- Place the WHEEL on the horse (N); take the PRIDE DOOR PART (O).
- Walk forward.
- Place the 3 PRIDE DOOR PARTS on the fan for a mini-game (P).
- Solution: (Q).
- Walk forward.
- Use the BANISHING CRYSTAL on Pride (R).
- Take the POLISH (S).
- Use the POLISH on the lens; take the PROJECTOR LENS (T).
- Walk down.
- Use the SCISSORS on the paper to receive the ANGEL CUTOUT (U).
- Walk down.
- Place the GEAR on the projector and pull the lever (V); remove the glass.
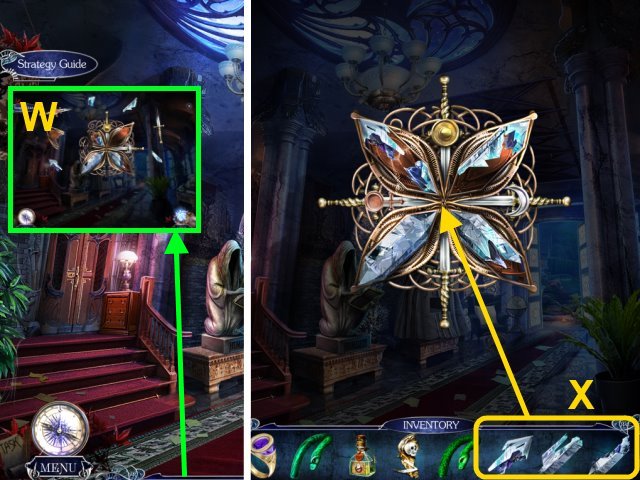
- Place the PROJECTOR LENS and ANGEL CUTOUT on the projector (W); turn the projector (X).
- Take the CROSSBOW (Y) and DYNAMITE (Z).
- Walk forward twice.
- Use the CROSSBOW on the cage (A).
- Play the HOP.
- You receive the PRIDE CURE.
- Give the PRIDE CURE to the king (B); you receive the ARCHIVAL SEAL.
- Place the ARCHIVAL SEAL on the safe (C); take the MAZE SCHEMATIC and SPECIAL KEY (D).
- Walk forward.
- Put the SPECIAL KEY in the lock (E); take the CODE SYMBOL (F) and ROYAL ENGRAVING (G).
- Walk down.
- Place the ROYAL ENGRAVING in the throne (H); take the DIADEM (I).
- Walk forward.
- Place the DIADEM on the statue's head (J); place the NECKLACE in the slot (K).
- Take the CODE SYMBOL and PICKAXE (L).
- Go to the King's Bedroom.
- Use the PICKAXE on the rocks; take the GRIFFIN WING (M).
- Go to the Throne Room.
- Place the GRIFFIN WING on the griffin; take the LION'S FANG (N).
- Go to the Hall of Statues.
- Place the LION'S FANG in the lion's mouth (O).
- Take the PARCHMENT (P).
- Use the SPECIAL KEY to open the chest; take the CODE SYMBOL and SEA LINE (Q).
- Walk forward.
- Use the SEA LINE to take the BEADS (R).
- Walk down.
- Give the BEADS to the statue (S).
- Take the PENCIL (T).
- Use the SPECIAL KEY on the box; take the CODE SYMBOL (U).
- Place the 4 CODE SYMBOLS on the MAZE SCHEMATIC to make the MAZE MAP (V).
- Go to the Catacombs.
- Use the MAZE MAP for a mini game (W).
- Solution: 1-5.
- Place the DYNAMITE on the lock; place the WICK on the dynamite (X).
- Use the TORCH to light it.
- Play the HOP.
- You receive the FULL FLASK.
- Give the FULL FLASK to Prince Edwin (Y); you receive the TROPHY.
- Go to the Hall of Distorting Mirrors.
- Place the TROPHY on the stand for a mini-game (Z).
- Solution (A).
- Take the LIGHTNING BOLT (B).
- Go to the Cabaret.
- Use the SCALPEL on the curtain (C); place the LIGHTNING BOLT in the slot (D).
- Slide the PARCHMENT under the door (E); put the PENCIL in the lock (F).
- Slide the paper; take the BUNKER KEY (G).
- Use the BUNKER KEY on the lock (H).
- Use the INVISIBILITY CLOAK on the door to move forward (I).
- Take the IRON SKULL (J).
- Go to the Throne Room.
- Use the IRON SKULL on the box; take the QUILL (K).
- Go to the Bunker.
- Use the QUILL on the book; take the BOOK OF POWER (L).
- Go to the Cell.
- Use the BOOK OF POWER on the skeletons (M); you receive EDWIN'S RING.
- Go to the Bunker.
- Use ANNA'S RING, OLIVIA'S RING, and EDWIN'S RING on the orb for a mini-game (N).
- Solution: Fx2, A, E, Fx2, Ax3, E, F, B, F, B, Fx2, B, Cx2, F, Dx2, F, Dx2, C, Fx4, Dx4, Ex2, Fx2, Cx4, B, Fx3.
- Take the ROCKWOOD BANNER (O).
- Go to the Throne Room.
- Give the ROCKWOOD BANNER to the king; take the ANCIENT SWORD (P).
- Go to the Bunker.
- Give the ANCIENT SWORD to Prince Edwin (Q).
- Congratulations, you have completed Riddles of Fate: Into Oblivion!
Created at: 2014-04-04