

Walkthrough Menu
- General Tips
- Chapter 1: Paris-Part 1
- Chapter 2: Paris-Part 2
- Chapter 3: London-Part 1
- Chapter 4: London-Part 2
- Chapter 5: Prague-Part 1
- Chapter 6: Prague-Part 2
General Tips
- This is the official guide for Riddles of Fate: Memento Mori!
- This guide will not mention each time you have to zoom into a location; the screenshots will show each zoom scene.
- Hidden-object puzzles are referred to as HOPS. This guide will not show screenshots of the HOPS, however, it will mention when an HOP is available and the inventory item you'll collect from it.
- This guide will give step-by-step solutions for all puzzles which are not random. Please read the instructions in the game for each puzzle.
Chapter 1: Paris-Part 1
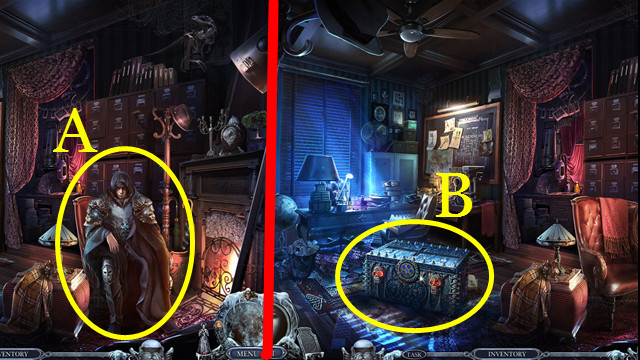
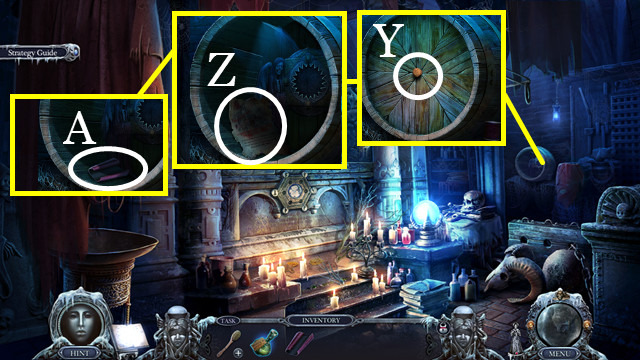
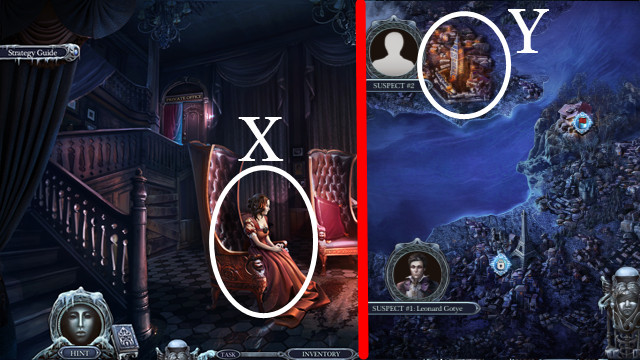
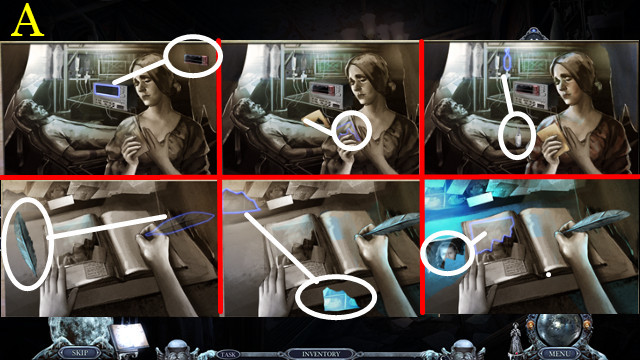
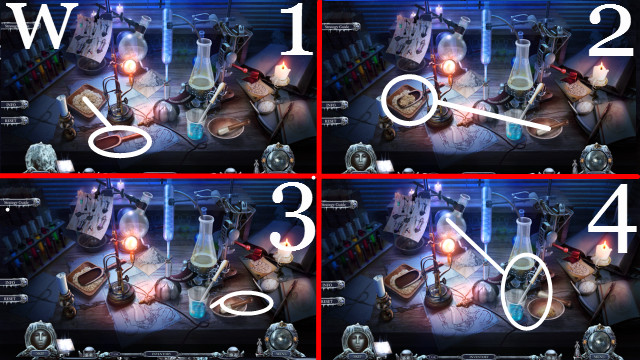
- Talk (A).
- Look (B) to trigger a mini-game.
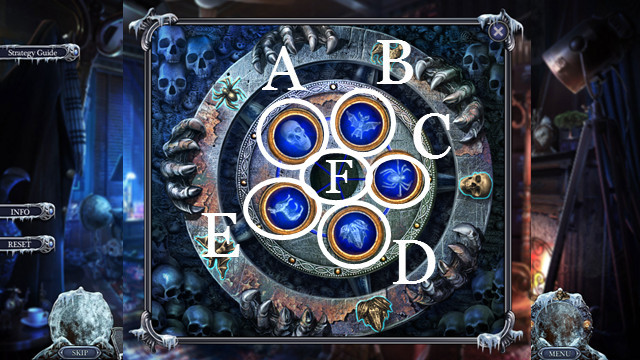
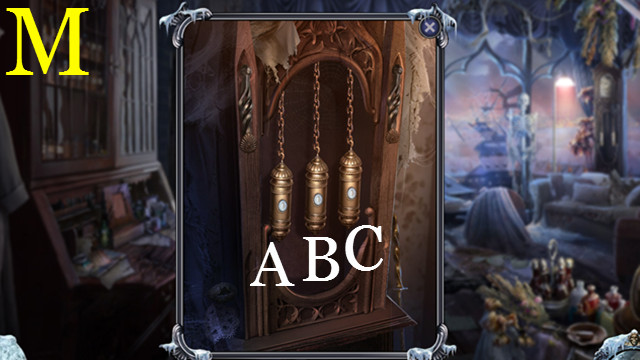
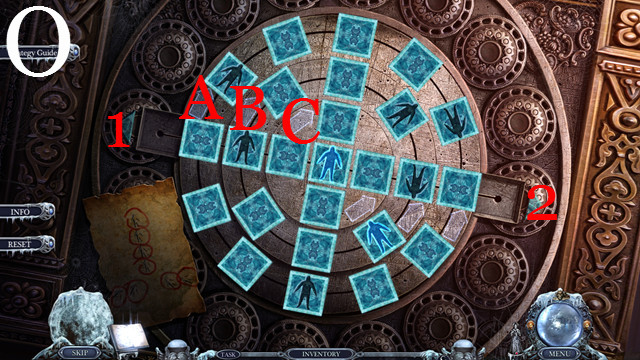
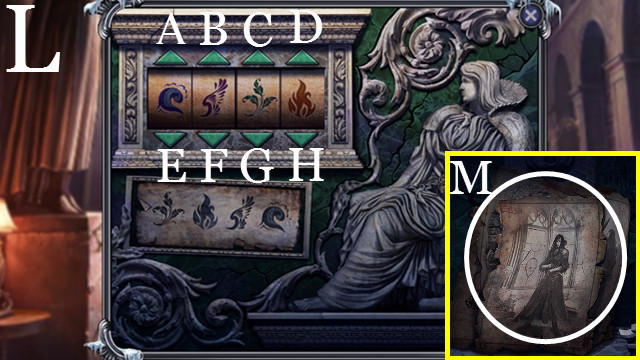
- Solution: B, A, E, F, C, B, A, F.
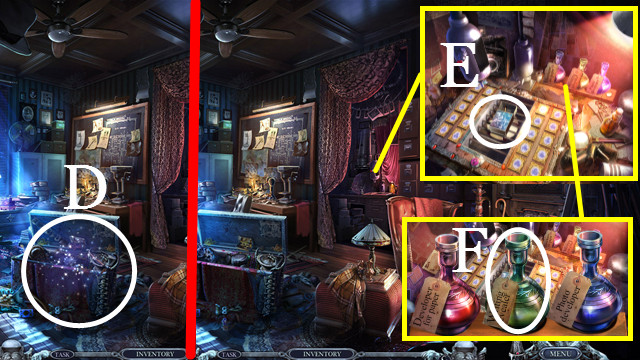
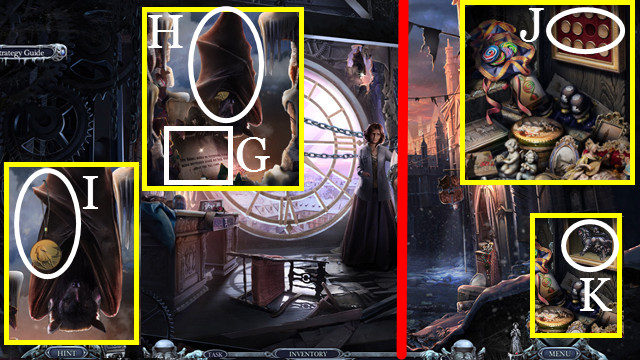
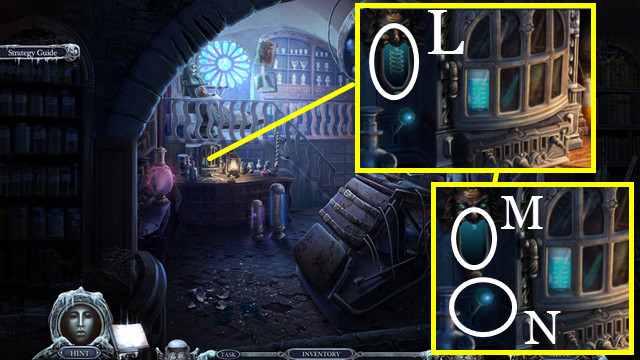
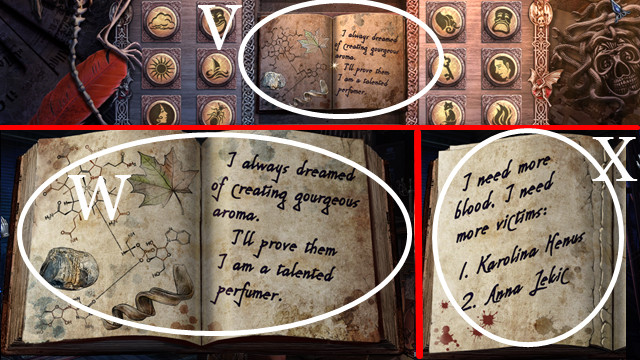
- Play the HOP (D) to receive DEATH'S SPHERE.
- Take the EMPTY BOTTLE (E) and MATCHES (F).
- Look at DEATH'S SPHERE and use the MATCHES on it (inventory).
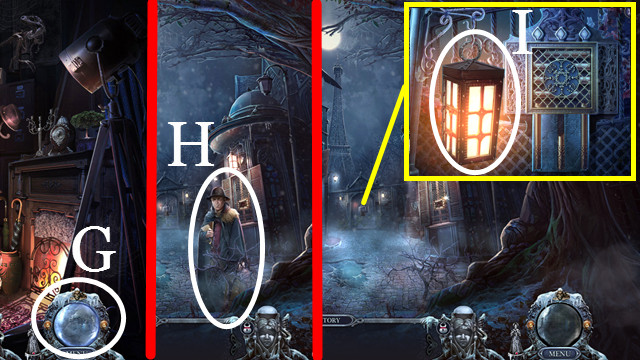
- Select the Sphere (G).
- Follow the map prompts to visit Main Street in Paris.
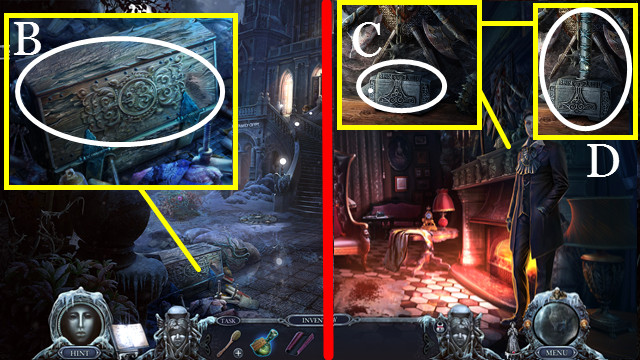
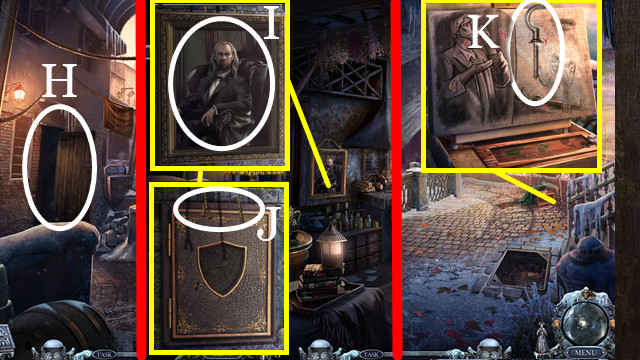
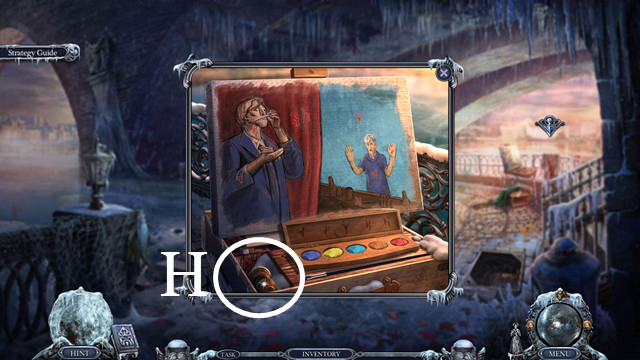
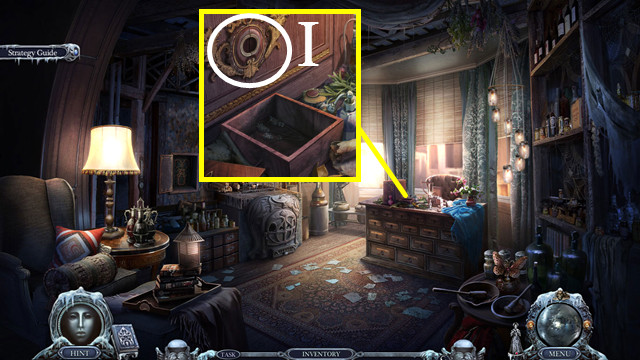
- Talk (H).
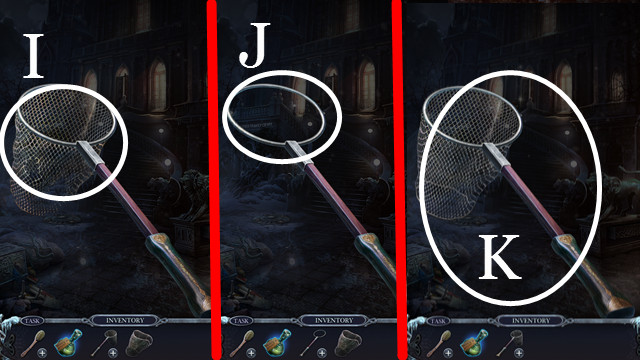
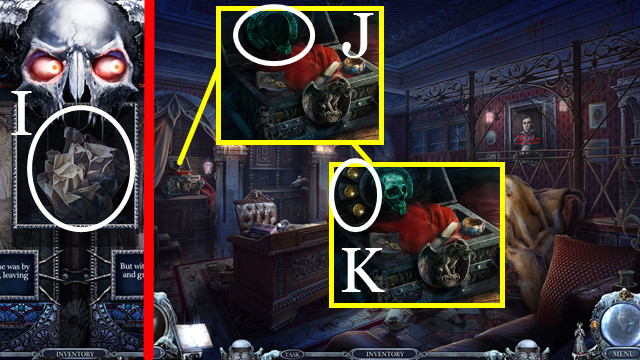
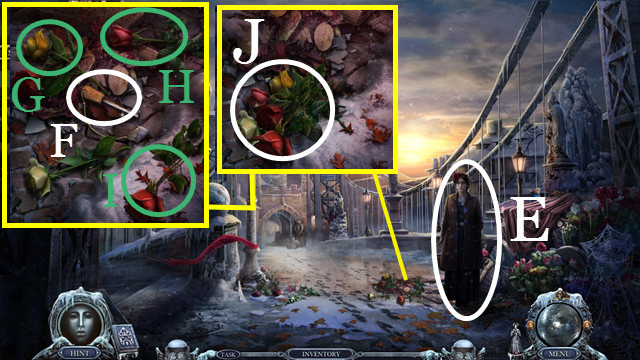
- Take the LANTERN (I).
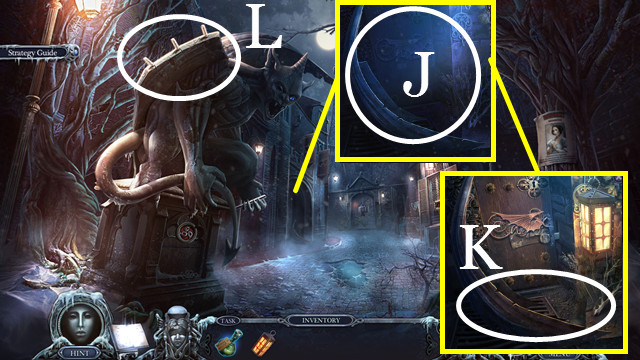
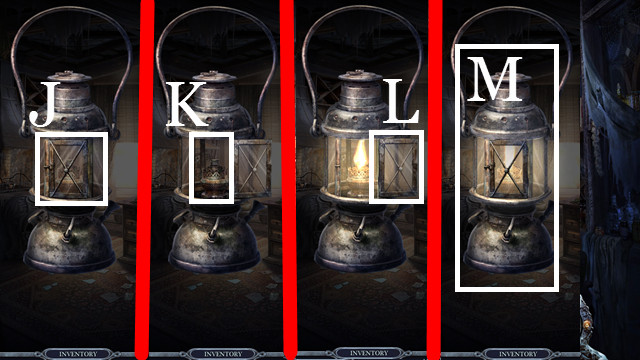
- Use the LANTERN (J).
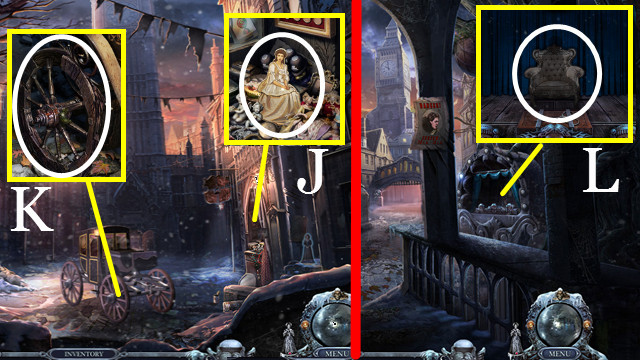
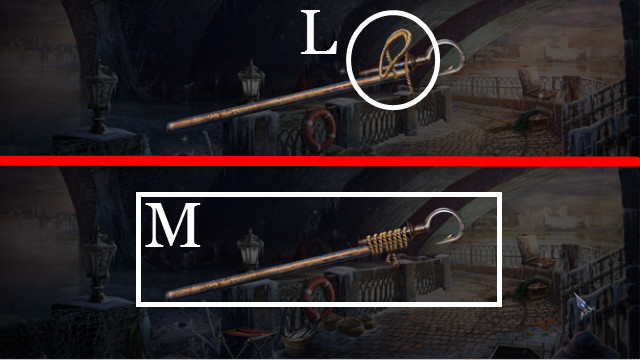
- Take the WING TIP (K).
- Use the WING TIP (L).
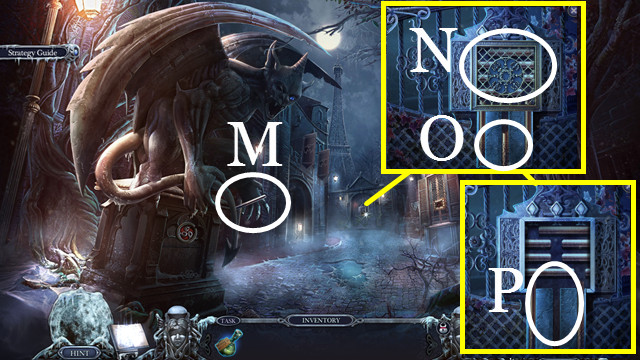
- Take the BOLT (M).
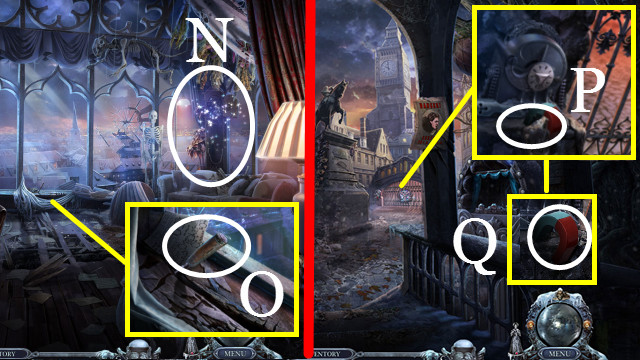
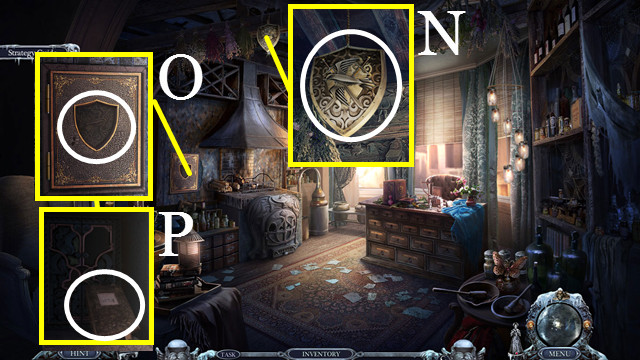
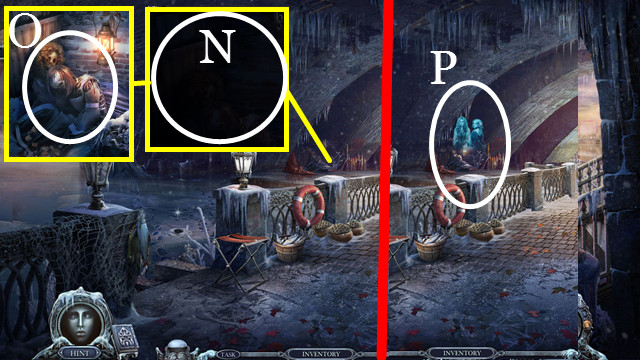
- Select (N-O).
- Use the BOLT (P) to trigger a mini-game.
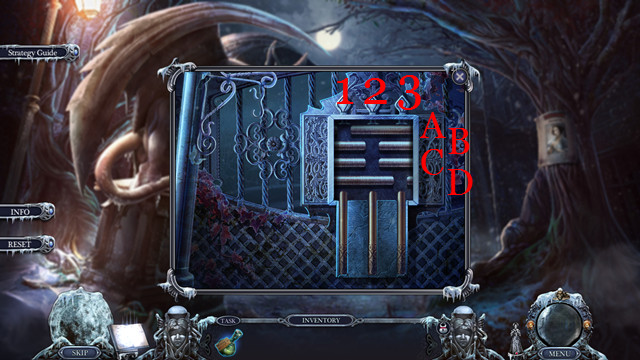
- Slide the horizontal bars so the open slots line up.
- Solution: A1-A3, B1-B3, A3-A1, B3-B2, D3-D2, D2-D1, A3-A1, B3-B1.
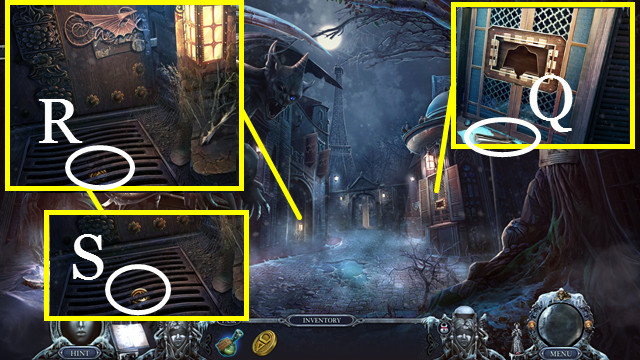
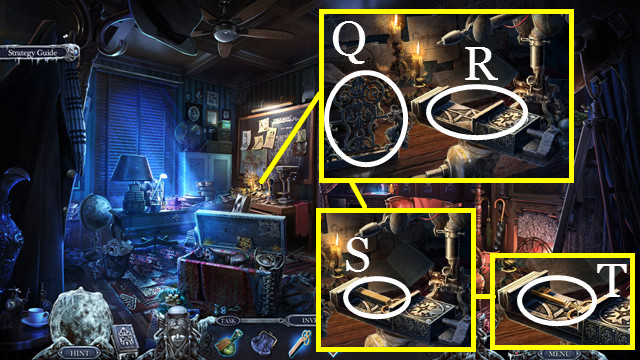
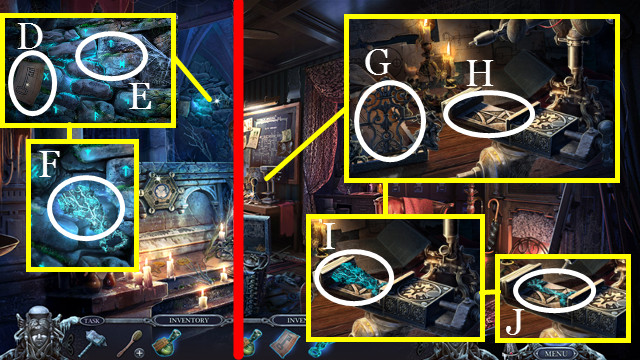
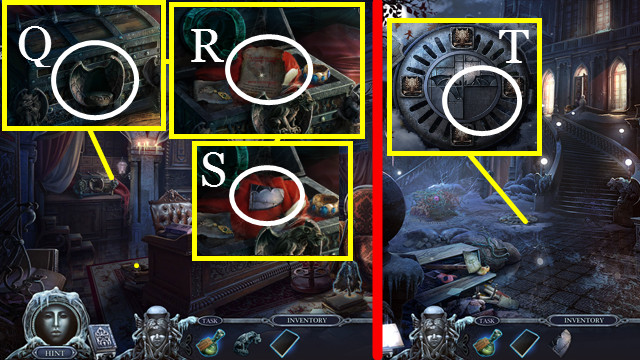
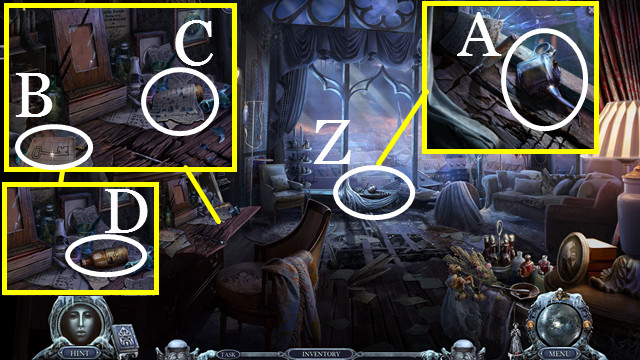
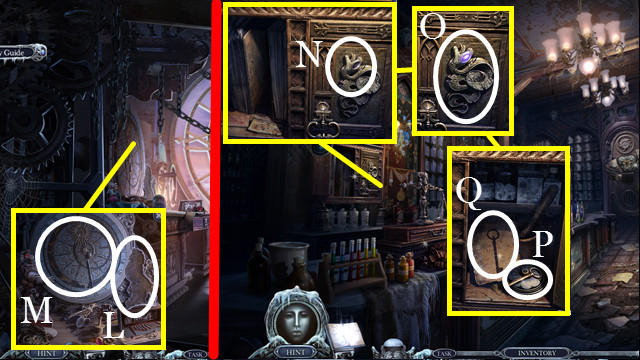
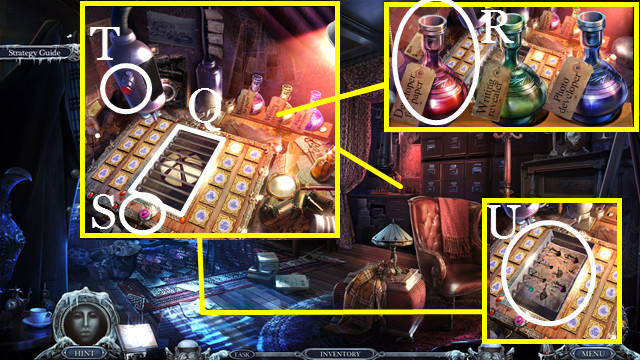
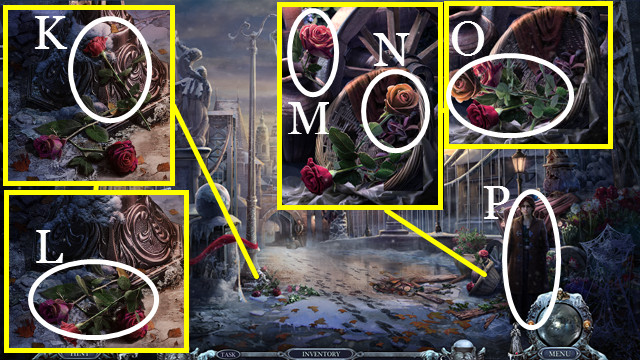
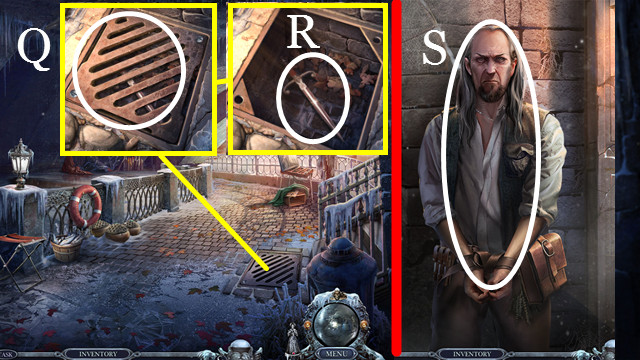
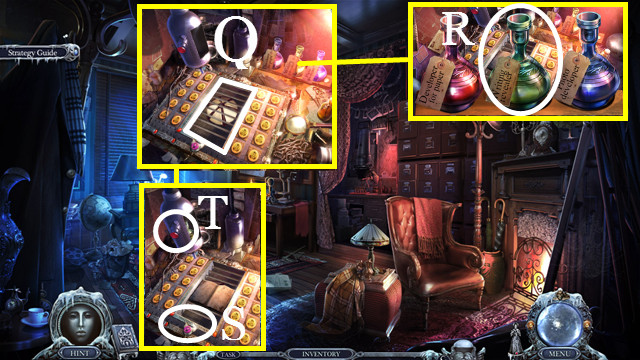
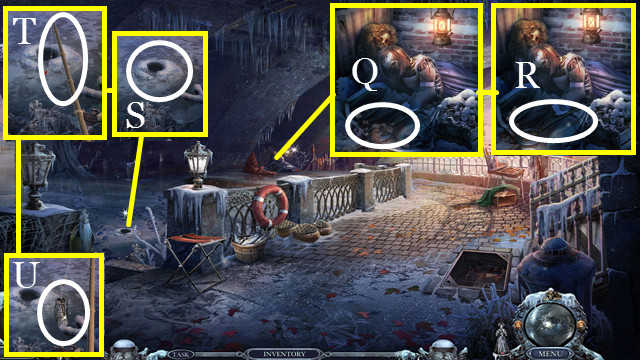
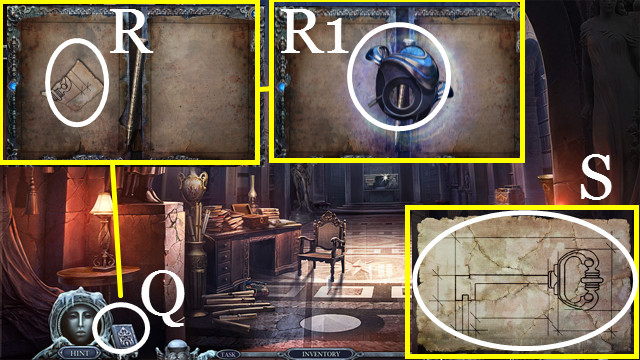
- Take the TWEEZERS (Q).
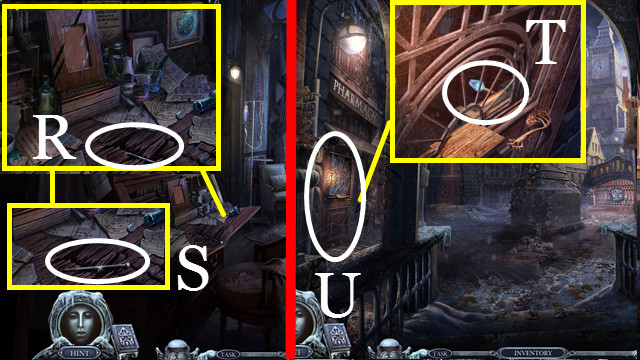
- Use the TWEEZERS (R); take the COIN (S).
- Walk forward.
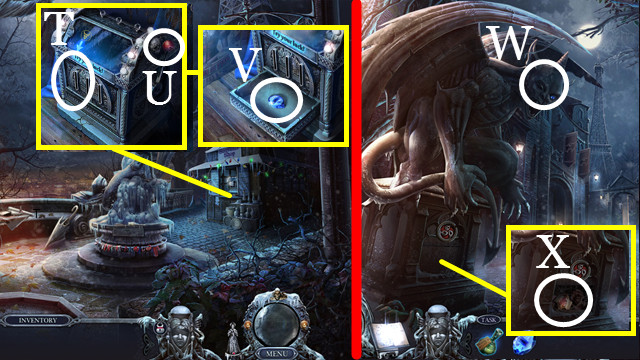
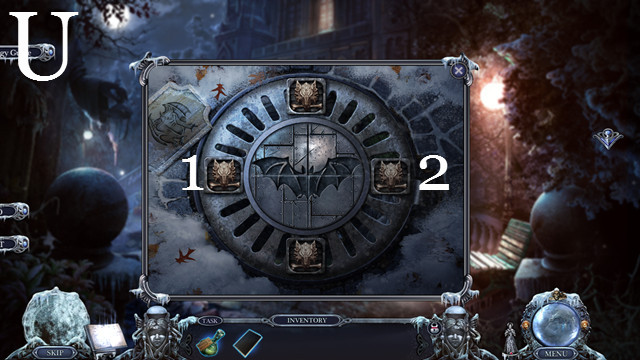
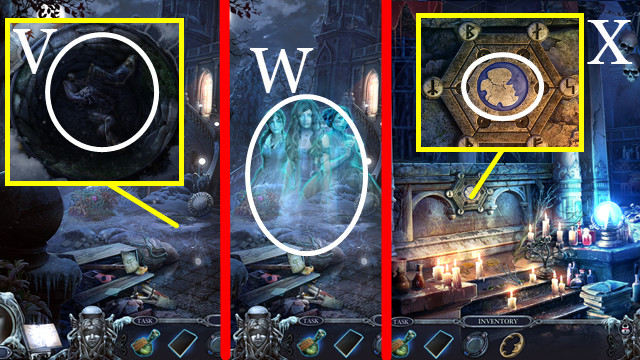
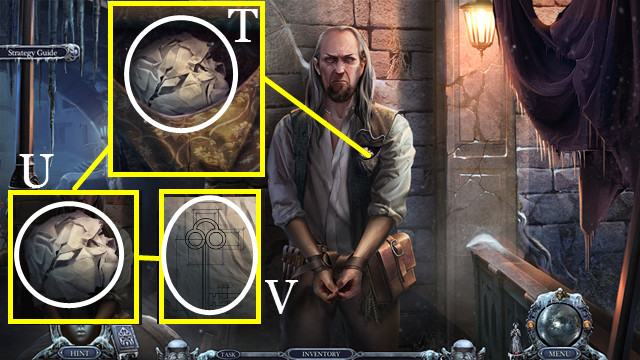
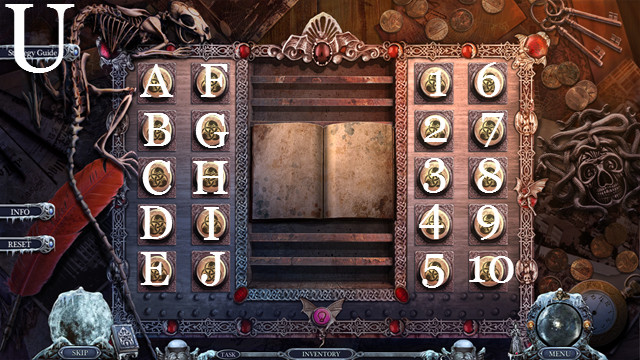
- Use the COIN (T); select (U); take the BLUE EYE (V).
- Walk south.
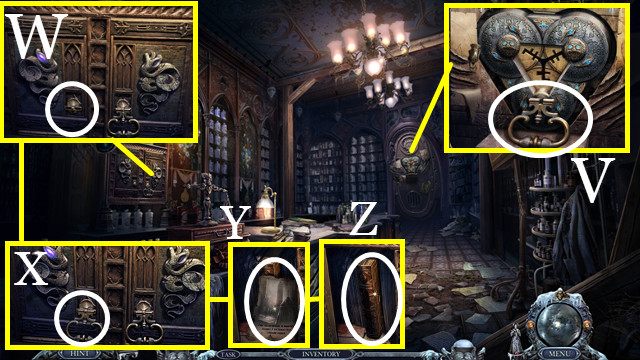
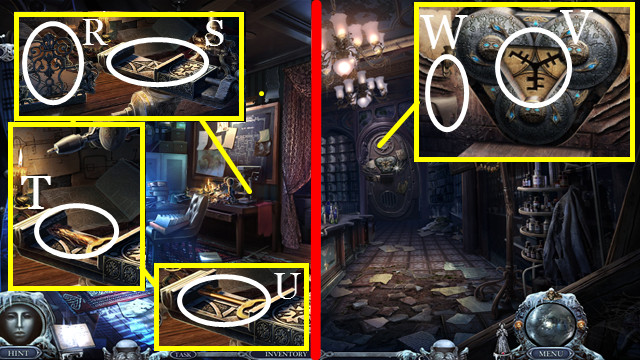
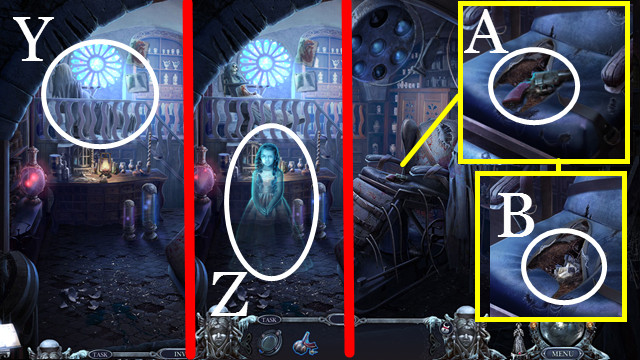
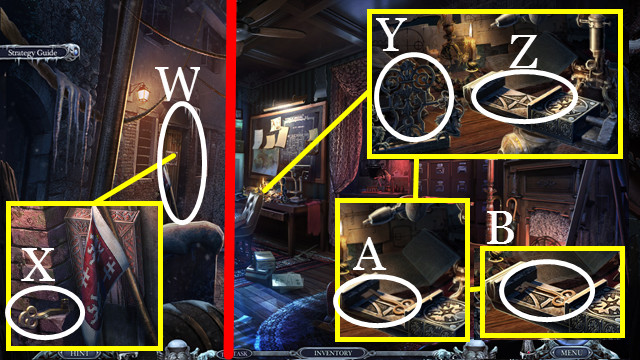
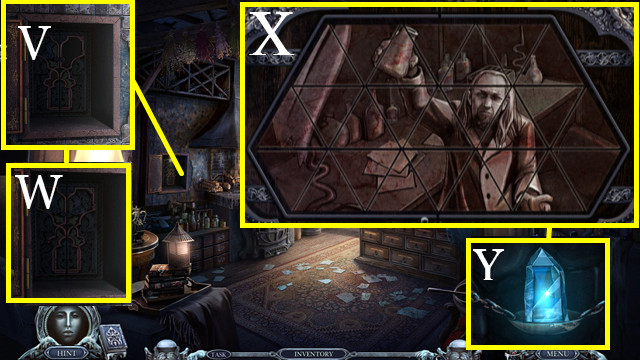
- Use the BLUE EYE (W); take the BOOK TRINKET (X).

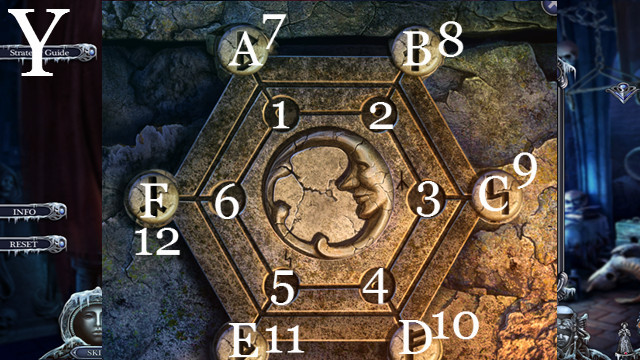
- Use the BOOK TRINKET (Y).
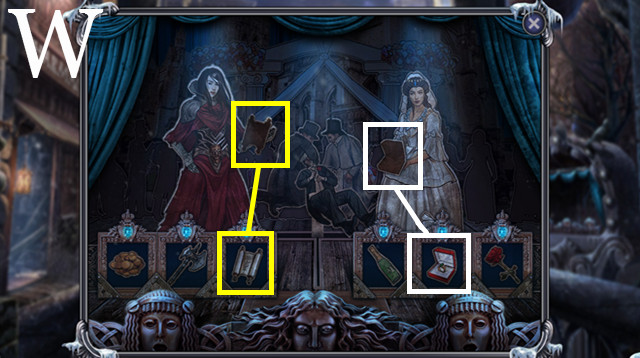
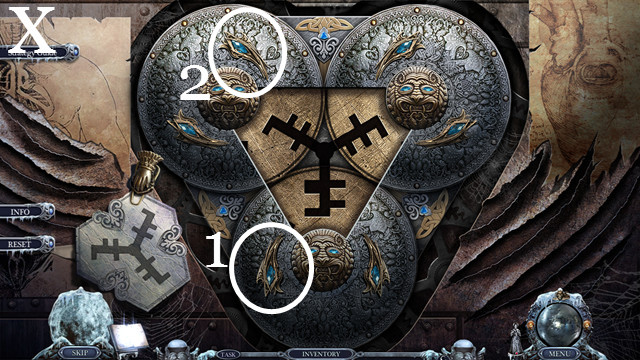
- Place the puzzle pieces (Z) to trigger a mini-game.
- Solution (A).
- Select the puzzle.
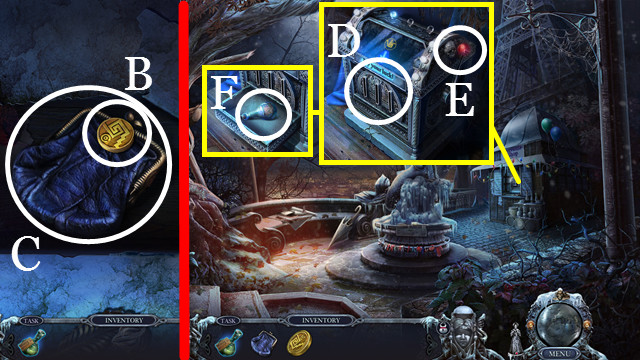
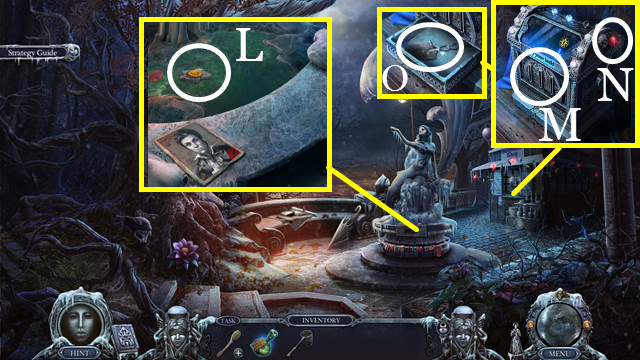
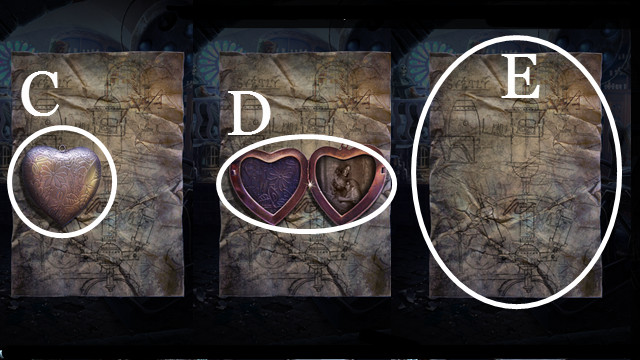
- Take the COIN (B) and ZOE'S PURSE (C).
- Walk up.
- Use the COIN (D); select (E); take the FERTILIZER (F).

- Use the FERTILIZER (G); take the STONE AMULET (H).
- Walk down.
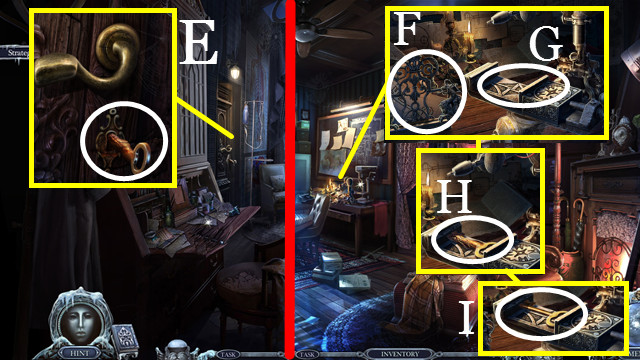
- Use the STONE AMULET (I).
- Take the UNDEVELOPED PHOTO and DUMMY KEY (J).
- Use Death's Sphere (K) to return to your house.
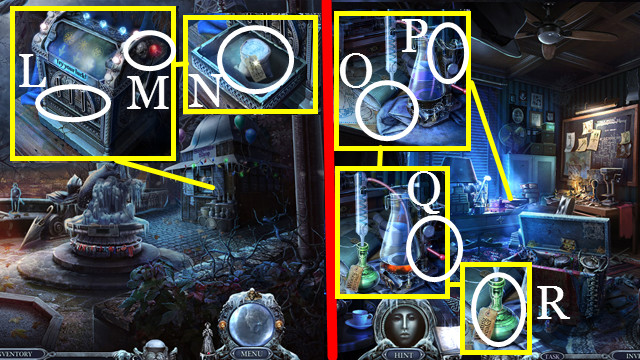
- Place the UNDEVELOPED PHOTO (L).
- Select (M).
- Press (N), then (O).
- Take the KEY SKETCH (P).
- Place the KEY SKETCH (Q) and DUMMY KEY (R).
- Select (S) twice.
- Take the YARD KEY (T).
- Return to Main Street.
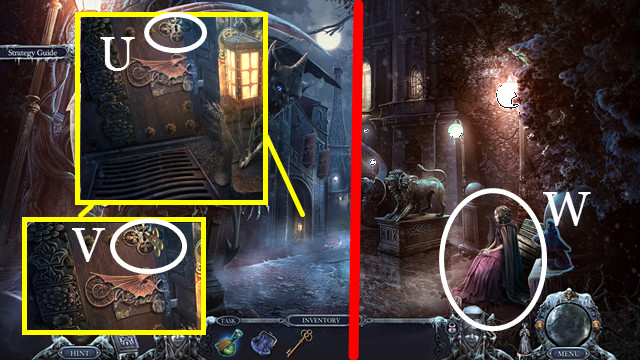
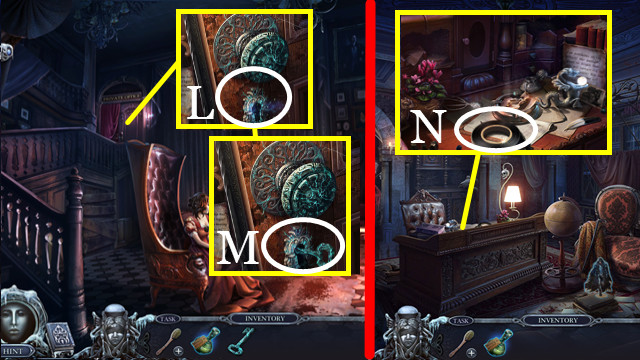
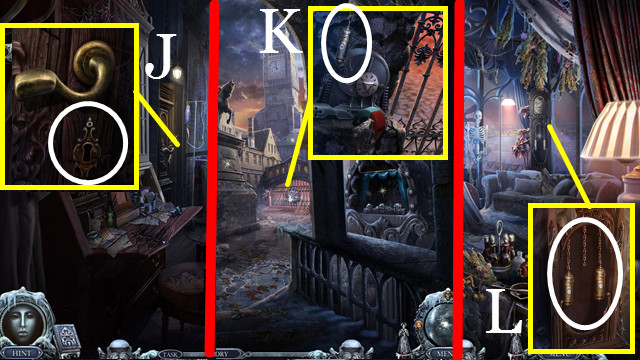
- Use the YARD KEY (U); select (V).
- Go through the door.
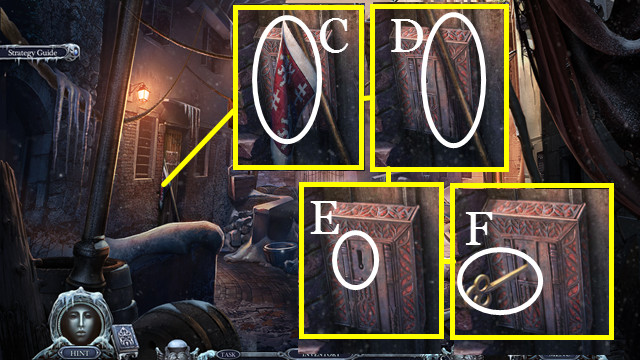
- Use ZOE'S PURSE (W).
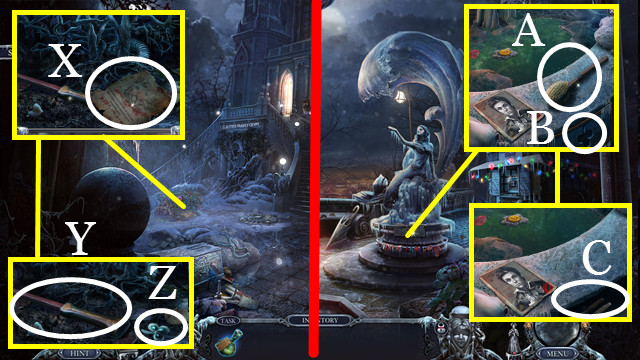
- Take the Diary Page (X) by selecting it twice.
- Take the NET HANDLE (Y) and SHAMROCK SYMBOL (Z).
- Return to the Tower Park.
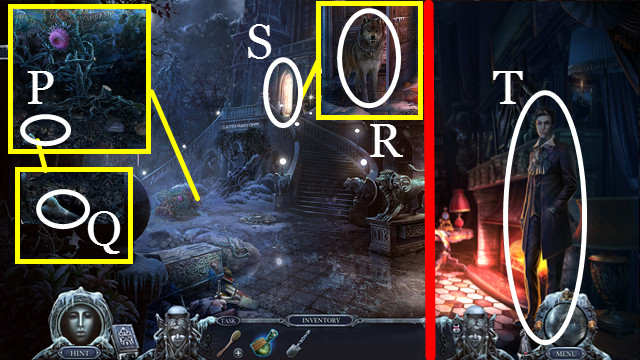
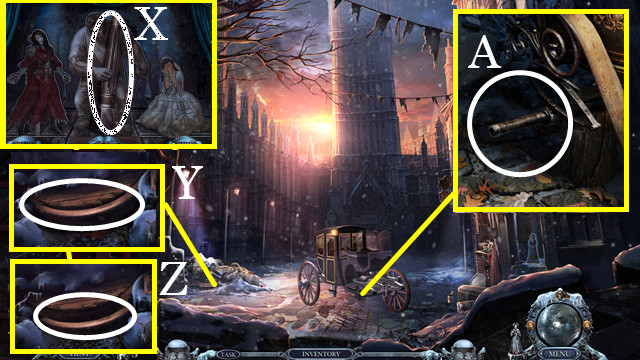
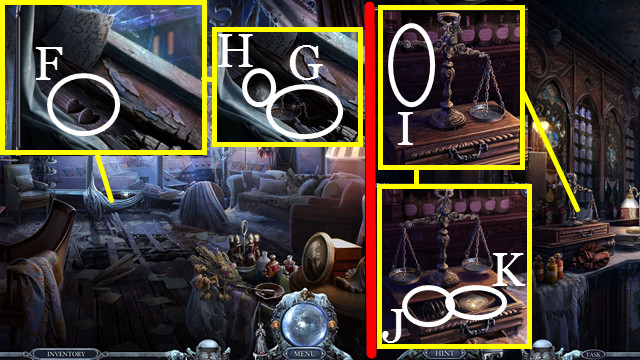
- Take the BROKEN BRUSH (A).
- Use the SHAMROCK SYMBOL (B); take the PRUNERS (C).
- Return to the Mansion Yard.
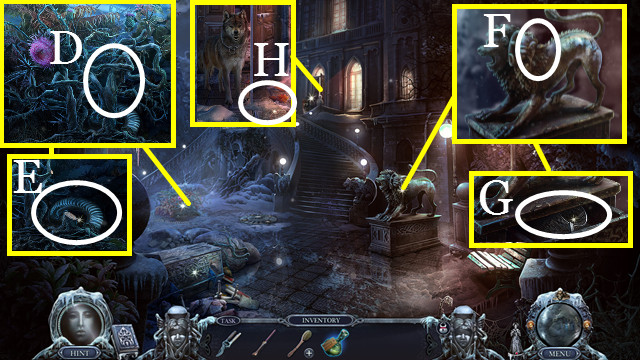
- Use the PRUNERS (D); take the HORN (E).
- Use the HORN (F); take the BROKEN NET (G).
- Take the NET (H).
- Select the BROKEN NET and use the NET HANDLE on it (inventory).
- Select (I). Use the NET (J); take the NET (K).
- Return to the Tower Park.
- Use the NET (L); receive the COIN.
- Use the COIN (M); select (N); take the SHOVEL (O).
- Return to the Mansion Yard.
- Use the SHOVEL (P); take the BONE (Q).
- Use the BONE (R).
- Enter (S).
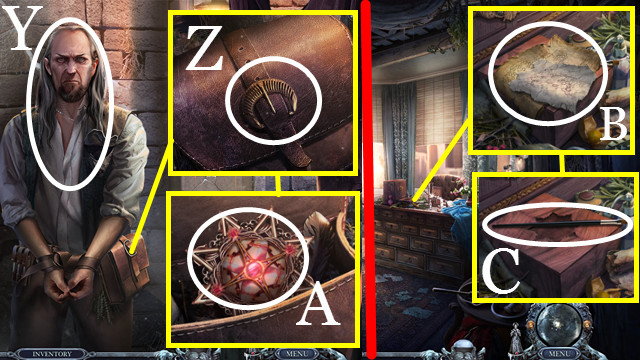
- Talk (T).
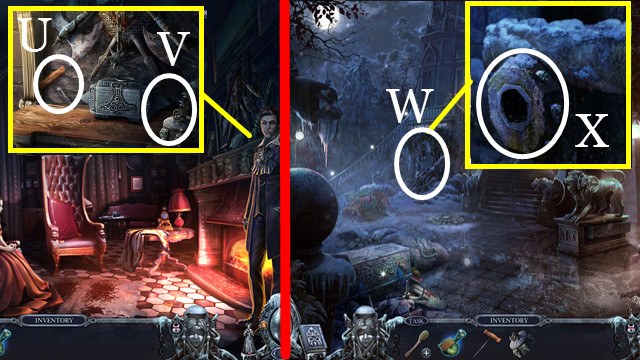
- Take the CORKSCREW (U) and SKULL HANDLE (V).
- Walk down.
- Select twice (W).
- Use the SKULL HANDLE (X); go through the door.
Chapter 2: Paris-Part 2
- Use the CORKSCREW (Y); take the Diary Page (Z) and SANDPAPER (A).
- Walk down.
- Use the SANDPAPER (B), select to trigger a HOP.
- Play the HOP; receive the DECORATED HANDLE.
- Return to the Front Hall.
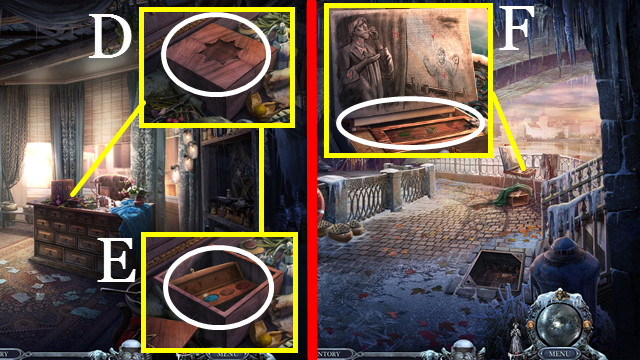
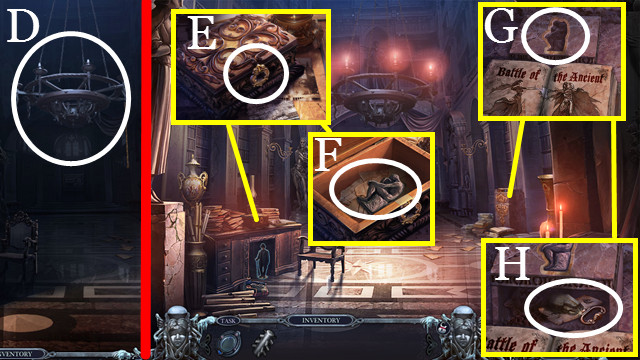
- Use the DECORATED HANDLE (C); take the ENCHANTED HAMMER (D).
- Return to the Basement.
- Take the KEY SKETCH (D); use the HAMMER (E); take the GLOWING ORE (F).
- Return to Your House.
- Place the KEY SKETCH (G) and GLOWING ORE (H).
- Select twice (I); take the OFFICE KEY (J).
- Return to the Front Hall.
- Use the OFFICE KEY (L); select (M).
- Go through the door.
- Take the ELECTRICAL TAPE (N).
- Select the BROKEN BRUSH and use the ELECTRICAL TAPE on it (inventory).
- Return to the Basement.

- Use the BRUSH (O).
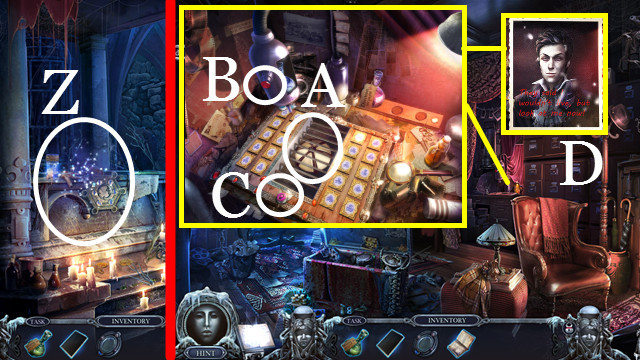
- Take the GARGOYLE STATUETTE and UNDEVELOPED PHOTO (P)..
- Return to Leonard's Office.
- Use the GARGOYLE STATUETTE (Q); take the Diary Page (R) and BAT SYMBOL PART (S).
- Return to the Mansion Yard.
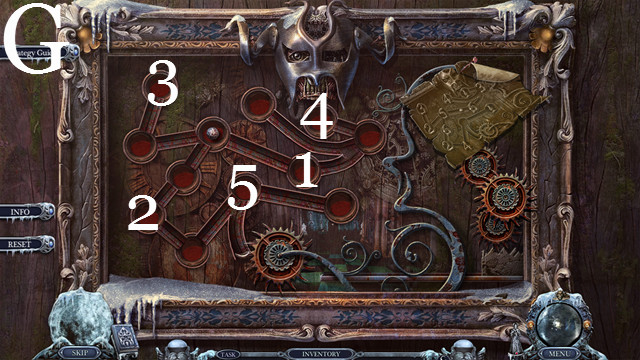
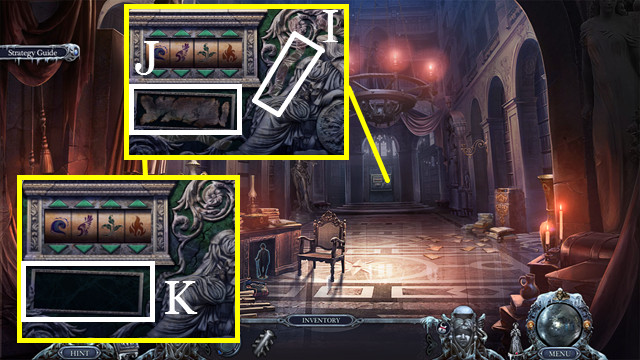
- Place the BAT SYMBOL PART (T) to trigger a mini-game.
- Solution (U): 1x3, 2x3.
- Select (V); receive DEATH'S AMULET.
- Use DEATH'S AMULET (V).
- Select (W) to receive the GLOWING AMULET.
- Return to the Basement.
- Place the GLOWING AMULET (X) to trigger a mini-game.
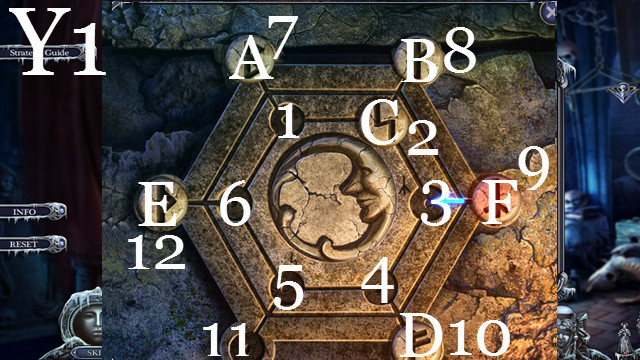
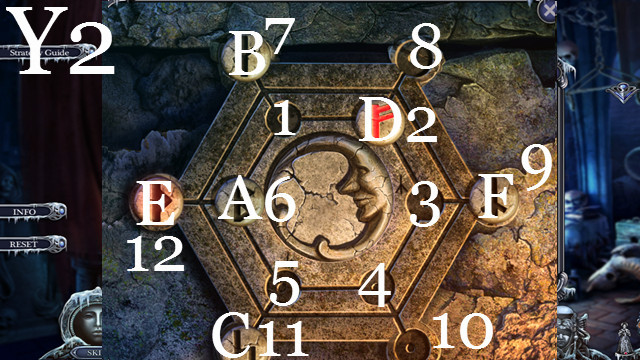
- Solution (Y-Y2):.
- (Y) Move C to Slot 2, F to 9, E-12..
- (Y1) C-11, A-6, B-7, D-2..
- (Y2) A-4, F-3, B-1, E-6, C-5.
- Play the HOP (Z); receive the ENCRYPTED DIARY.
- Return to Your House.
- Place the UNDEVELOPED PHOTO (A)..
- Press (B). Press (C) if the light is off..
- Take LEONARD'S PORTRAIT (D).
- Return to Leonard's Office.

- Place LEONARD'S PORTRAIT (E); take the FAMILY SEAL (F).
- Return to the Basement.
- Place the FAMILY SEAL (G) to trigger a mini-game.
- Solution (H).
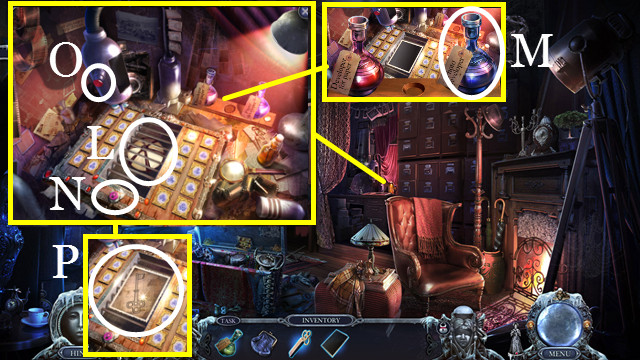
- Take the PACKAGE (I).
- Select the PACKAGE three times; take the SKULL (inventory).
- Return to Leonard's Office.
- Place the SKULL (J); take the three COINS (K).
- Return to the Tower Park.
- Place the three COINS (L); select (M); take the GLOWING POWDER (N).
- Return to Your House.
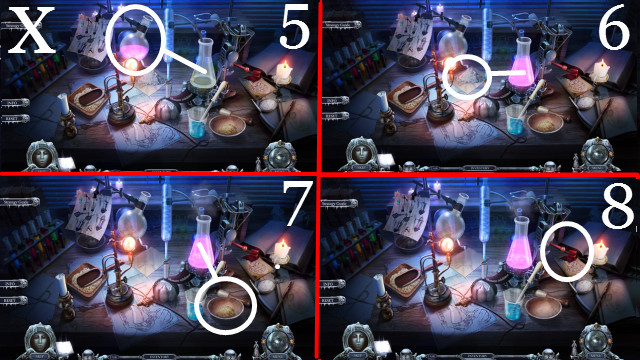
- Place the EMPTY BOTTLE (O) and GLOWING POWDER (P). Select (Q).
- Take the REVEALER (R).
- Select (S)..
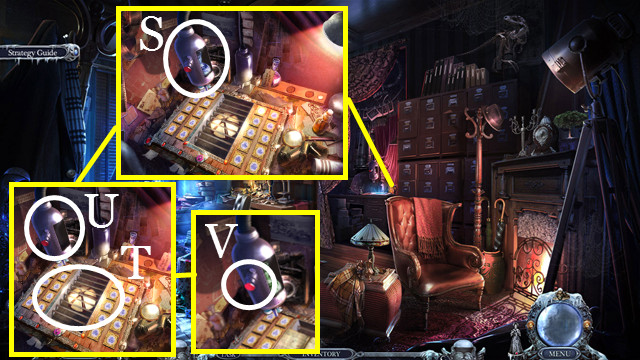
- Place the ENCRYPTED DIARY (T) and REVEALER (U).
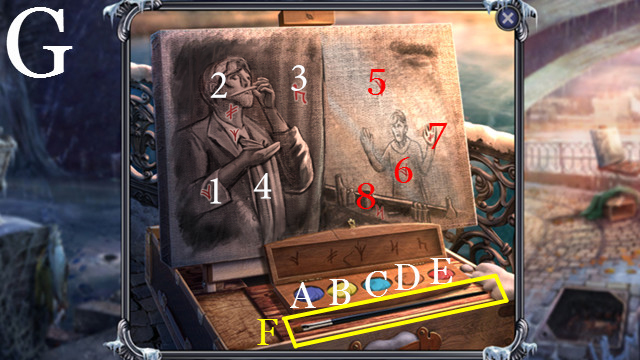
- Select (V) to trigger a mini-game.
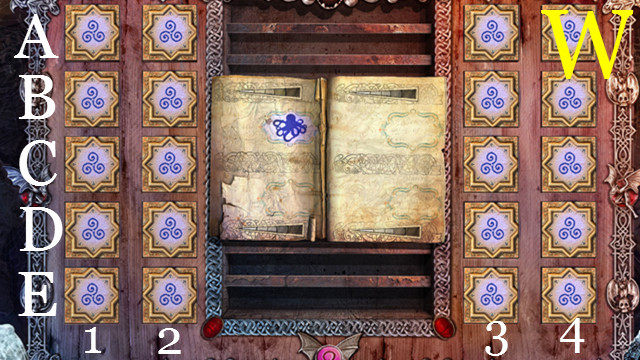
- Solution (W) part one. Select E2, C2, B1, A2, C1.
- Solution part two: E1, A3, E3, A1, D2.
- Solution part three: D1, C4, D4, E4, C3.
- Solution part four: B4, B3, D3, A4, D2.
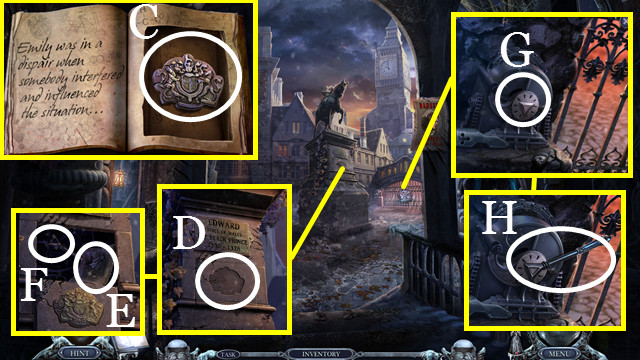
- Take the VICTIMS LIST.
- Return to the Front Hall.
- Use the VICTIMS LIST (X).
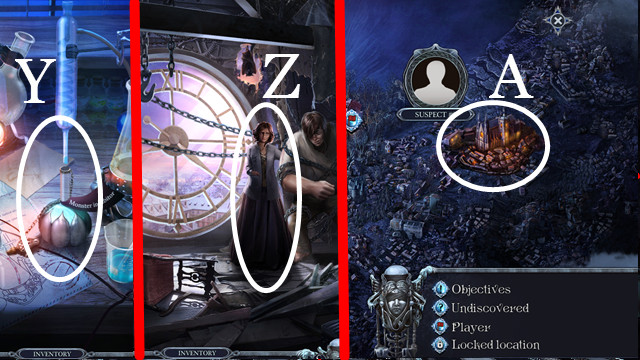
- Travel to London (Y), then to the Apartment.
Chapter 3: London-Part 1
- Select (Z).
- Take the EMPTY OILCAN (A) and APARTMENT KEY SKETCH (B).
- Move the papers (C) twice; take the OIL (D).
- Select the EMPTY OILCAN and use the OIL on it (inventory).
- Use the OILCAN (E); take the BROKEN APARTMENT KEY (E).
- Return to Your House.
- Place the APARTMENT KEY SKETCH (F) and BROKEN APARTMENT KEY (G).
- Select (H) Twice. Take the APARTMENT KEY (I).
- Return to the Apartment.
- Use the APARTMENT KEY (J); select.
- Go through the door.
- Take the PENDULUM (K).
- Walk down.
- Place the PENDULUM (L) to trigger a mini-game.
- Solution (M). Select A, B, C. Select B, A, C. Select C, A, B.
- Play the HOP (N); receive the HAMMER.
- Use the HAMMER (O); receive the WHEEL PAR.
- Return to the Square.
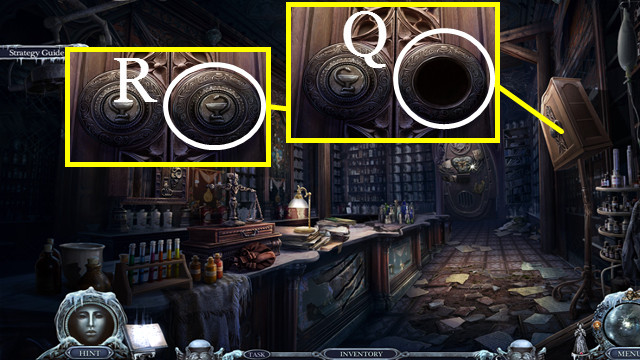
- Use the CHISEL (P); take the MAGNET (Q).
- Return to the Apartment.
- Use the MAGNET (R); take the KNITTING NEEDLE (S).
- Return to the Square.
- Use the KNITTING NEEDLE (T).
- Walk left (U).
- Take the SHELF HANDLE (V).
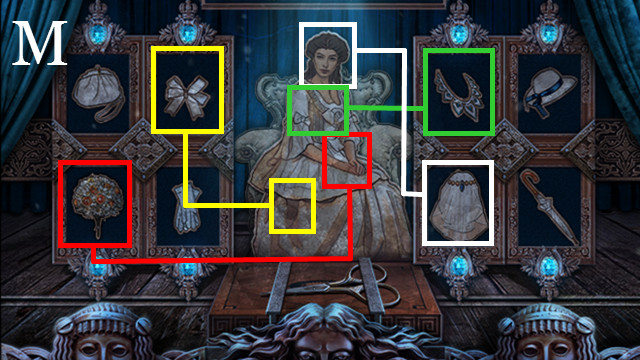
- Use the SHELF HANDLE (W); select (X); take the Diary Page (Y) and APOCETHARY BOOK (Z).
- Open the APOCETHARY BOOK (inventory) to trigger a mini-game.
- Solution (A-B).
- Take the COAT OF ARMS (C).
- Return to the Square.
- Place the Coat of Arms (D); take the Diary Page (E) and LEVER (F).
- Use the LEVER (G); select (H) to trigger a mini-game.
- Solution (I). The letters in the screenshot refer to the positions, not the pictures. Move F-E, E-D, D-C, B-C, C-G, G-H, H-I.
- Solution part two: A-B, B-C, C-G, G-H, C-B, B-A, B-C.
- Walk forward.
- Touch anywhere.
- Take the DOLL (J) and BROKEN WHEEL (K).
- Walk down.
- Place the DOLL (L) to trigger a mini-game.
- Solution (M).

- Take the SCISSORS (N).
- Return to the Pharmacy.
- Use the SCISSORS (O); take the SILVER RIVET (P).
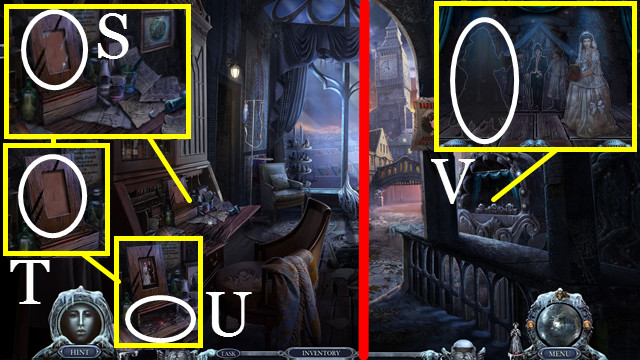
- Place the SILVER RIVET (Q); select (R) to trigger a HOP.
- Play the HOP; receive the WEDDING PHOTO.
- Return to the Apartmen.
- Select (S). Place the WEDDING PHOTO (T); take the DOLL (U).
- Walk left.
- Place the DOLL (V) to trigger a mini-game.
- Solution (W).
- Take the WHEEL SPINDLE (X).
- Walk forward.
- Use the CHISEL (Y); take the WHEEL PART (Z).
- Select the BROKEN WHEEL, use the WHEEL PART, WHEEL PART and WHEEL SPINDLE on it (inventory). Take the WHEEL.
- Place the WHEEL (A).
- Walk forward.
Chapter 4: London-Part 2
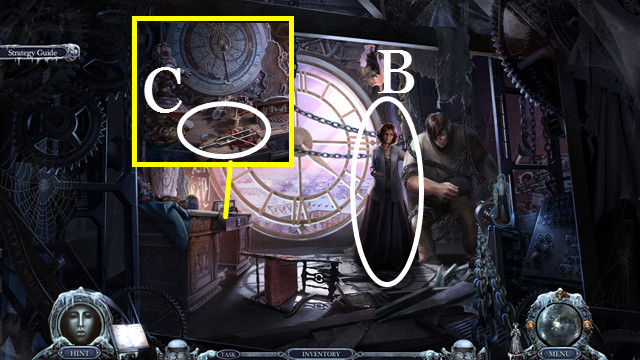
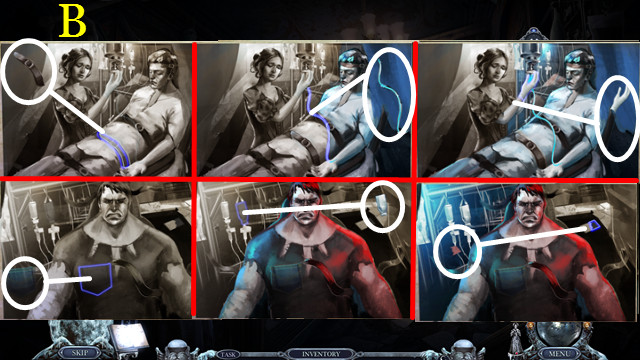
- Talk (B); receive the INHIBITOR BOTTLE and LAB CODE.
- Take the TUNING FORK (C).
- Walk down.
- Use the TUNING FORK (D).
- Select three times (E); take the CANDY (F).
- Walk forward.
- Take the Diary Page (G); use the CANDY (H); take the MEDAL (I).
- Walk down.
- Place the MEDAL (J); take the LION STATUETTE (K).
- Walk forward.
- Place the LION STATUETTE (L); select (M) to trigger a HOP.
- Play the HOP; receive the ENCHANTED RING.
- Select the ENCHANTED RING and use the CHISEL on it (inventory); take the GEM.
- Return to the Pharmacy.
- Place the GEM (N); select (O); take the BROKEN LAB KEY (P) and LAB KEY SKETCH (Q).
- Return to Your House.
- Place the LAB KEY SKETCH (R) and BROKEN LAB KEY (S).
- Select (T) twice; take the LAB KEY (U).
- Return to the Pharmacy.
- Use the LAB KEY (V) and LAB CODE (W) to trigger a mini-game.
- Solution (X): 1x4-2x2.
- Walk forward.
- Select (Y); use DEATH'S AMULET (Y).
- Talk (Z); receive the BELT.
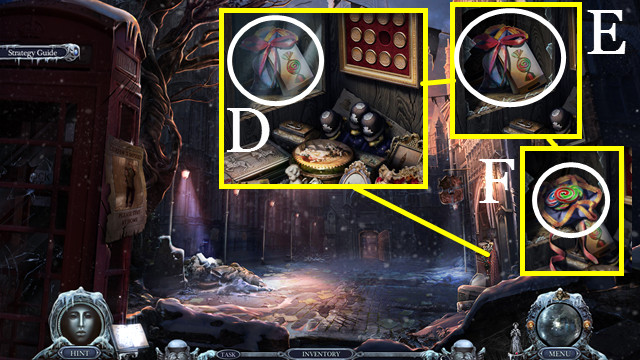
- Take the SIGNAL FLARE (A); select EMILY'S PARCEL (B) three times to take it.
- Select EMILY'S PARCEL three times (inventory).
- Select (C); take EMILY'S AMULET (D). Take the ENCODED RECIPE (E).
- Return to the Apartment.
- Place EMILY'S AMULET (F); take the INGREDIENT (G) and SCALE (H).
- Return to the Pharmacy.
- Place the SCALE (I); take the SPRING (J) and INGREDIENT (K).
- Walk forward.
- Select (L); place the SPRING (M).
- Select (N) to trigger a mini-game.
- Solution (O): 1, C, 2, C, 2, C, 1, 1, B, B, A, A.
- Take the INGREDIENT (P).
- Return to Your House.
- Place the ENCODED RECIPE (Q).
- Use (R).
- Press (S) then (T).
- Take the MEDICINE RECIPE (U).
- Place the INHIBITOR BOTTLE, MEDICINE RECIPE, and the three INGREDIENTS (V) to trigger a mini-game.
- Solution (W-X.
- Take the MEDICINE (Y).
- Return to the Tower Top.
- Give the MEDICINE (Z).
- Travel to Prague (A), then to the Bridge.
Chapter 5: Prague-Part 1
- Use the SIGNAL FLARE (B).
- Walk forward.
- Use (C).
- Use the BELT (D).
- Walk down.
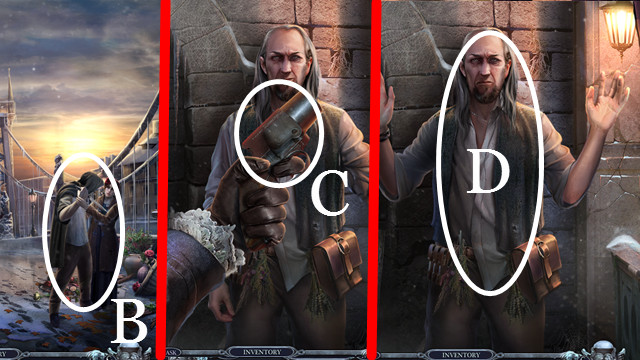
- Talk (E).
- Take the FLINT STONE (F).
- Select (G), (H), (I); Take the FLOWER BASKET 1/3 (J).
- Select (K); take the FLOWER BASKET 2/3 (L)..
- Select (M), (N); take the FLOWER BASKET 3/3 (O).
- Give the FLOWER BASKET (P) to trigger a HOP.
- Play the HOP; receive the SCREWDRIVER.
- Walk left.
- Use the SCREWDRIVER (Q); take ALFRED'S WEAPON (R).
- Return to Alfred Kristen.
- Use ALFRED'S WEAPON (S).
- Take (T).
- Select (U) twice; take KRISTEN'S KEY DRAWING (V).
- Walk to the Lane.
- Select twice (W).
- Take the DUMMY KEY (X).
- Return to Your House.
- Place KRISTEN'S KEY DRAWING (Y) and DUMMY KEY (Z)..
- Select twice (A); take KRISTEN'S HOUSE KEY (B).
- Return to the Lane.
- Move (C).
- Take the STICK (D).
- Use KRISTEN'S HOUSE KEY (E); select (F) to trigger a mini-game.
- Solution (G): 1, 2, 3, 4, 5.
- Enter (H).
- Select (I); take the ROPE (J).
- Return to Under Bridge.
- Take the HOOK (K).
- Select the STICK and use the HOOK and then the ROPE on it (inventory).
- Select three times (L); take the STICK WITH HOOK (M).
- Return to Alfred Kristen's House.
- Use the STICK AND HOOK (N); receive the FAMILY BANNER.
- Place the FAMILY BANNER (O); take the CODED DIARY (P).
- Return to Your House.
- Place the CODED DIARY (Q).
- Select (R).
- Select (S) and (T) to trigger a mini-game.
- Solution (U): A-3, B-1, C-10, D-8, E-4, F-5, G-7, H-9, I-2, J-6.
- Take ALFRED'S DIARY (V).
- Examine ALFRED'S DIARY (inventory); select four times (W); take ALFRED'S LIST (X).
- Return to Alfred Kristen.
- Use ALFRED'S LIST (Y).
- Select (Z); take the CHAOS MEDALLION (A).
- Return to Alfred Kristen's House.
- Move the papers twice (B.
- Take the BRUSH (C).
Chapter 6: Prague-Part 2
- Place the CHAOS MEDALLION (D).
- Take the PAINT SET (E).
- Return to Under Bridge.
- Place the BRUSH and PAINT SET (F) to trigger a mini-game.
- Solution (G): F-A-1, F-A-6, F-B-2, F-B-7, F-C-5, F-C-4, F-D-8, F-E-3.
- Note: You must select the tip of the brush to the paint.
- Take the SEAL (H).
- Return to Alfred Kristen's House.
- Place the SEAL (I) to trigger a HOP.
- Play the HOP; receive ALFRED'S LAMP.
- Examine ALFRED'S LAMP (inventory); select (J); use the FLINT STONE (K); select (L); take the BURNING LAMP (M).
- Return to Under Bridge.
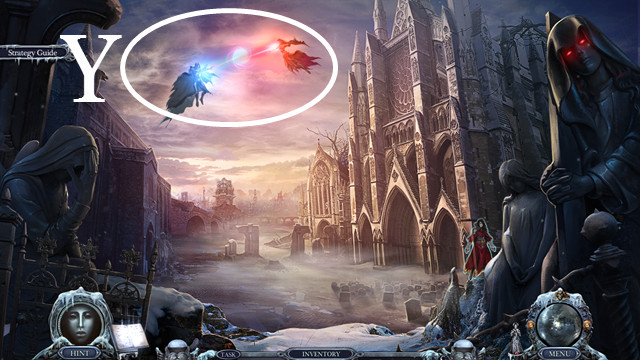
- Use the BURNING LAMP (N) and DEATH'S AMULET (O).
- Talk (P); receive the CACHE PART.
- Clear the leaves twice (Q); take the FISHING ROD (R).
- Use the FISHING ROD (S); Select (T) twice; take the WORN-OUT BOOT (U).
- Examine the WORN-OUT BOOT (inventory); select it twice; take the CACHE PART.
- Return to Alfred Kristen's House.
- Place the two CACHE PARTS (V); select (W) to trigger a mini-game.
- Solution (X).
- Take the PHILOSOPHER'S STONE (Y).
- Return to Alfred Kristen.

- Use the PHILOSOPHER'S STONE (Z).
- Talk (A); receive the ARCHIVIST'S AMULET.
- Select the ARCHIVIST'S AMULET twice (inventory); take the ARCHIVIST'S PUNCHCARD.
- Use the ARCHIVIST'S PUNCHCARD (B).
- Enter (C).
- Use the FLINT STONE (D)..
- Use the ARCHIVIST'S PUNCHCARD (E); take the GARGOYLE STATUETTE and TORN PAPER (F).
- Use the GARGOYLE STATUETTE (G); take the DUMMY KEY and GERARD'S CODE (H).
- Take the ADHESIVE TAPE (I); move (J).
- Use GERARD'S CODE (K) to trigger a mini-game.
- Solution (L): H, C, F, F, E, E.
- Take the ARCHIVIST'S BOOK (M).
- Examine the ARCHIVIST'S BOOK (inventory) to trigger a puzzle.
- Solution (N-O-P).
- Select the diary (Q); take the PAPER PIECE (R) and TRANSMITTER PART (R1).
- Select the TORN PAPER and use the PAPER PIECE on it (inventory).
- Select each paper piece; use the ADHESIVE TAPE; take the ARCHIVIST'S KEY DRAWING (S).
- Return to Your House.

- Place the ARCHIVIST'S KEY DRAWING (T) and KEY DUMMY (U).
- Select twice (V); take the ARCHIVIST'S STASH KEY (W).
- Return to the Prague Archive.
- Use the ARCHIVIST'S STASH KEY (X) to trigger a HOP.
- Play the HOP; receive the TRANSMITTER PART.
- Select the TRANSMITTER PART with the '+' and use the other TRANSMITTER PART and DEATH'S AMULET on it (inventory).
- Return to Outside Cathedral.
- Use the ISOLATION TRANSMITTER (Y).
- Congratulations, you've completed Riddles of Fate: Memento Mori.
Created at: 2014-11-10