

Walkthrough Menu
- General Tips
- Chapter 1: The Bridge
- Chapter 2: The Tower
- Chapter 3: Inside the Chapel
- Chapter 4: The Royal Shrine
- Chapter 5: The Fair Square
- Chapter 6: The Sacred Grove
- Chapter 7: Angelica's Room
General Tips
- This is the official guide for Riddles of Fate: Wild Hunt.
- This guide will not mention each time you have to zoom into a location; the screenshots will show each zoom scene.
- We will use the acronym HOP for Hidden-object puzzles. Interactive items will be color-coded and some will be numbered; please follow the numbers in sequence.
- Use the map to travel to a location.
Chapter 1: The Bridge
- You receive the HOUSE KEY.
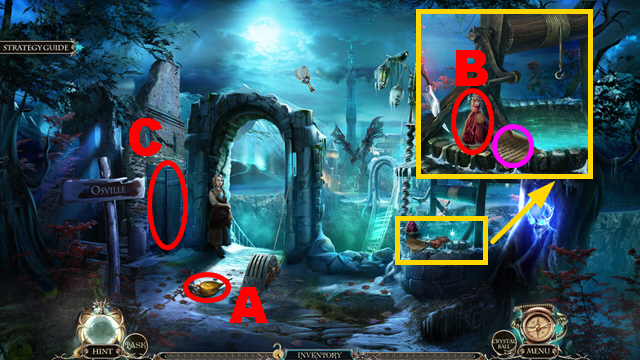
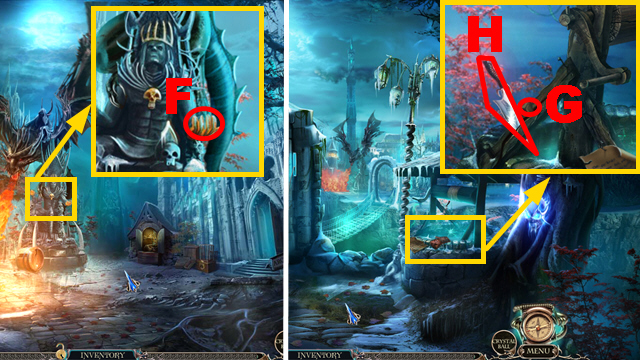
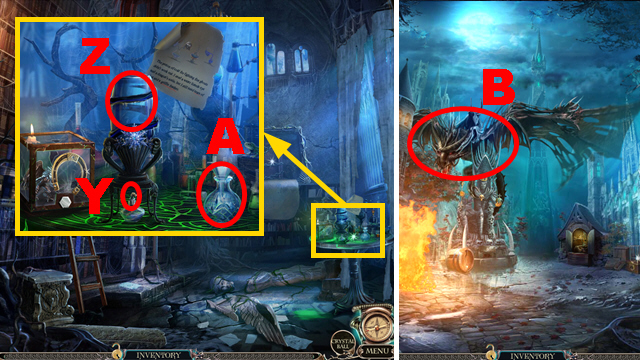
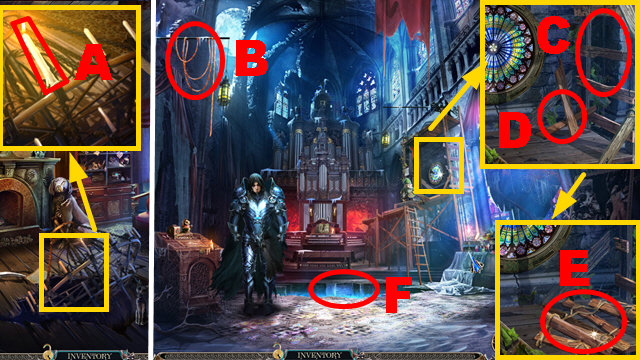
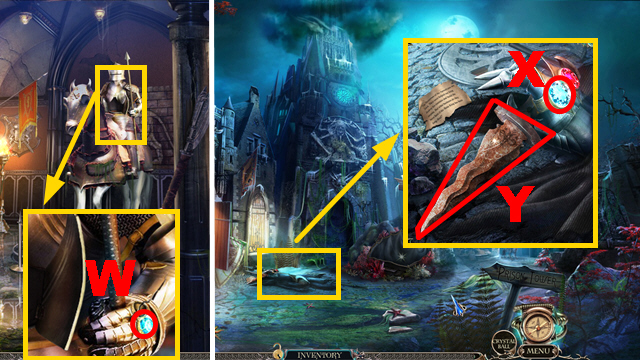
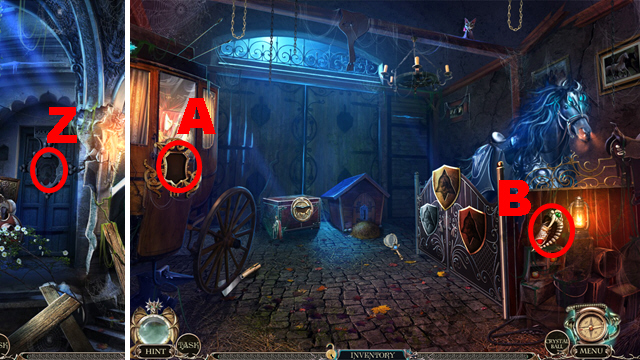
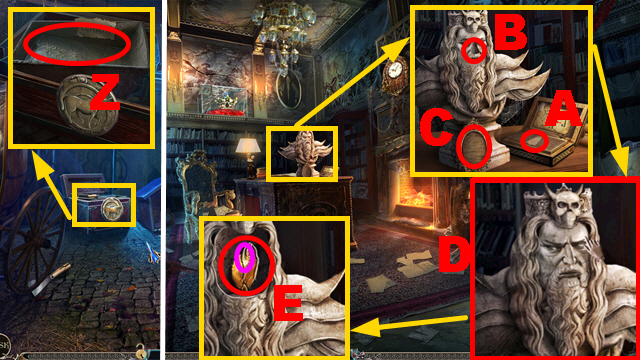
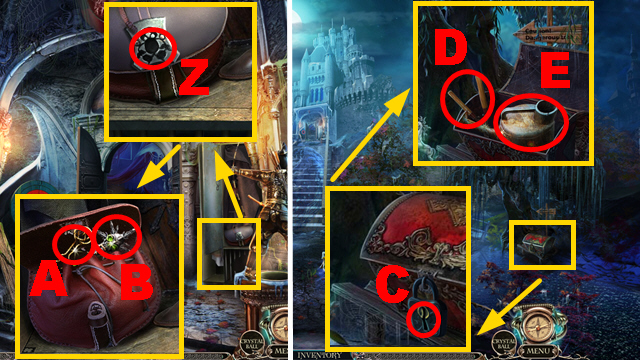
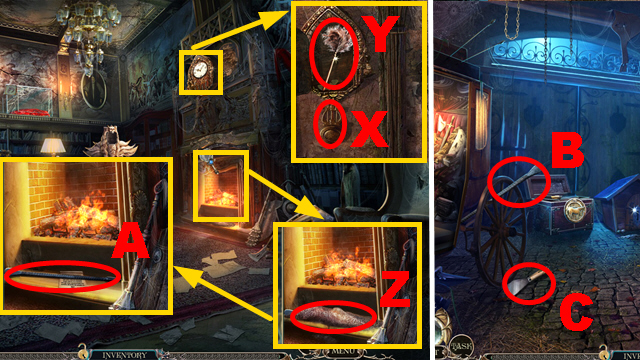
- Take the OILCAN (A).
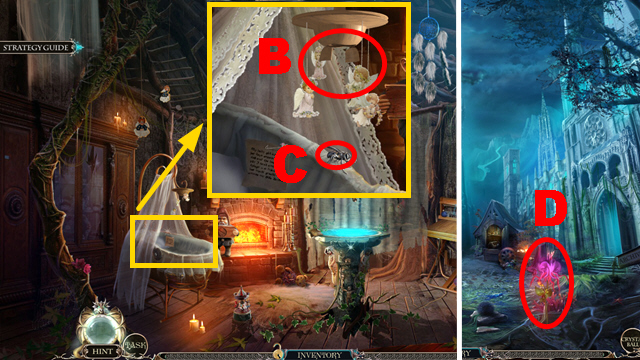
- Take DOLL 1/3 (B); read the note (purple).
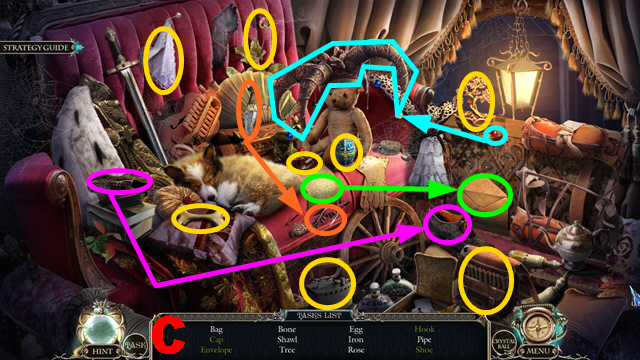
- Open the door (C).
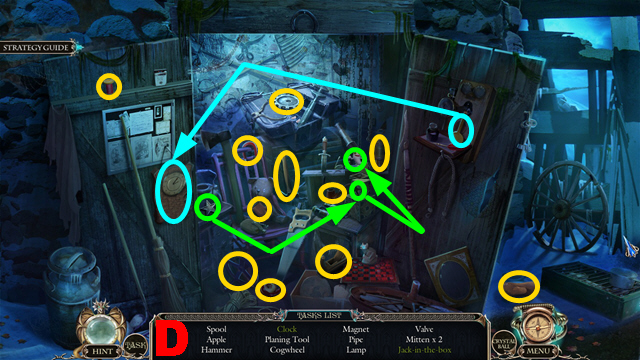
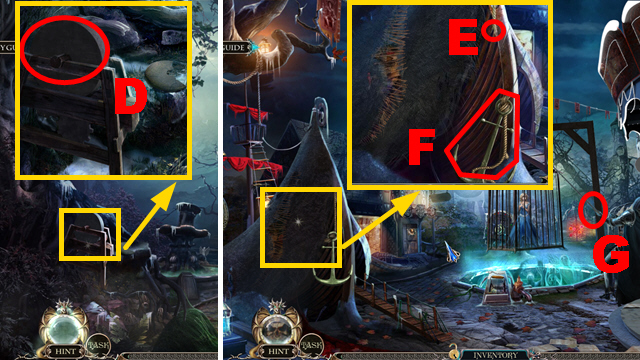
- Play the HOP.
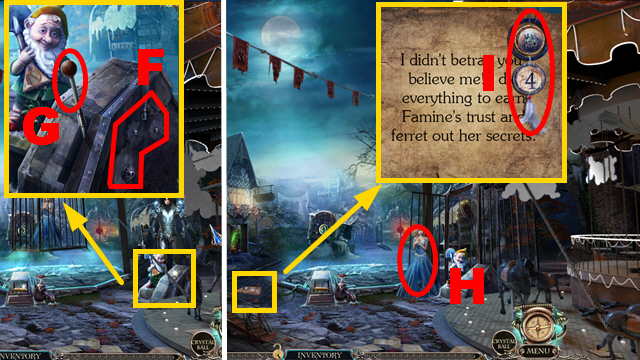
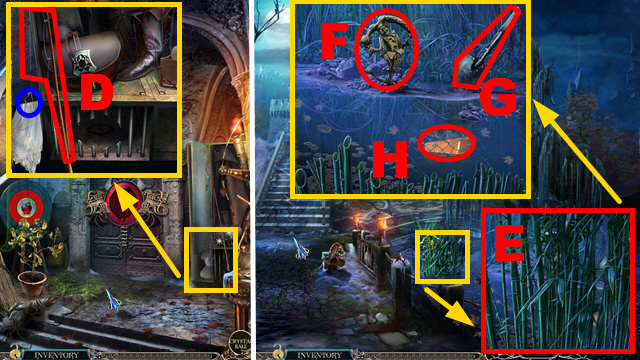
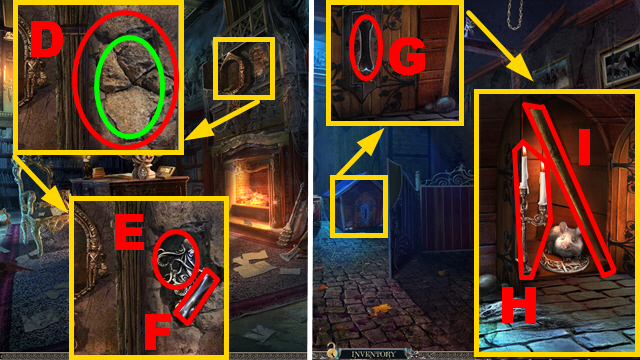
- You receive the GEAR (D).
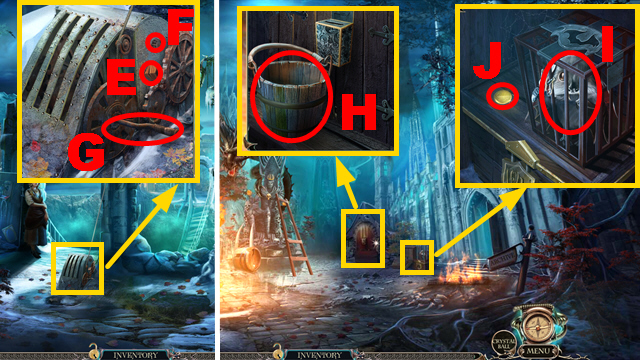
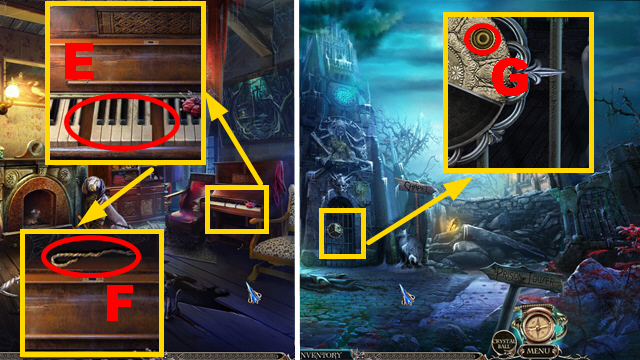
- Take the WEDGE (E); connect the GEAR to the mechanism (F), pour the OILCAN over the lever (G), and turn the lever.
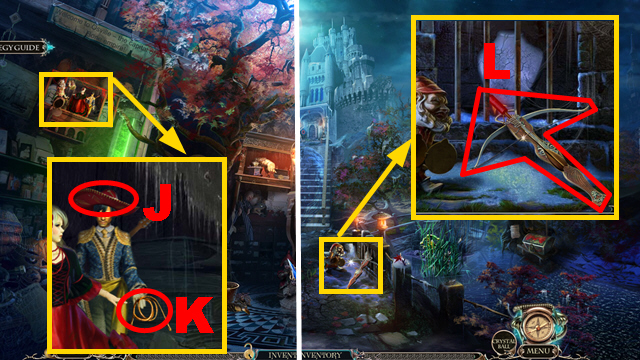
- Go to the City Square.
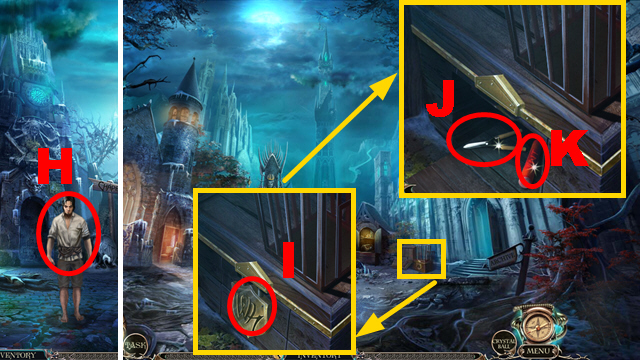
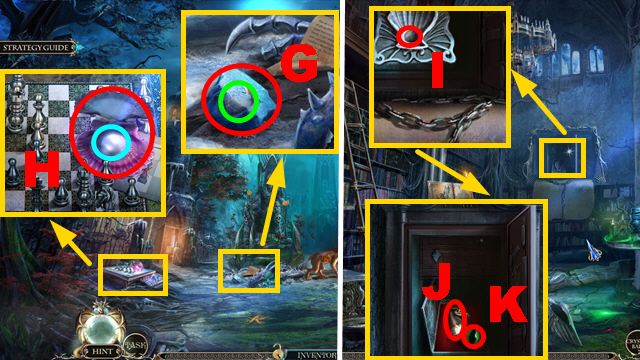
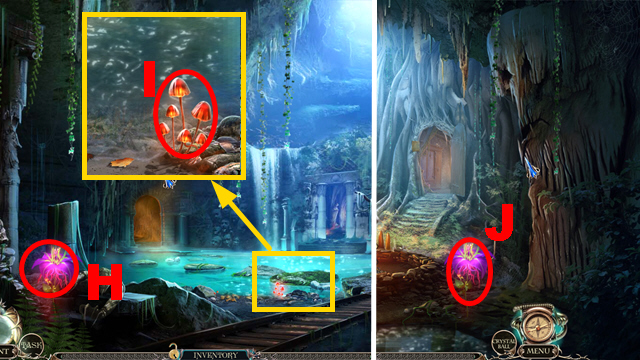
- Take the BUCKET (H).
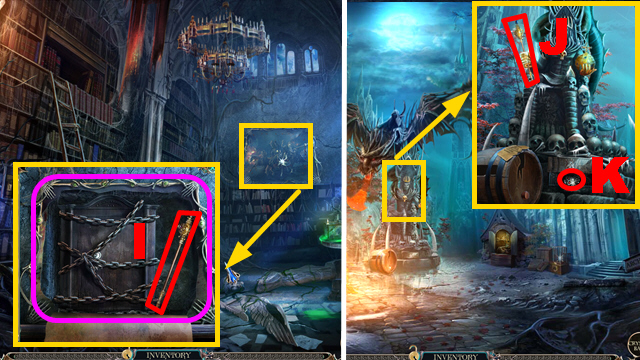
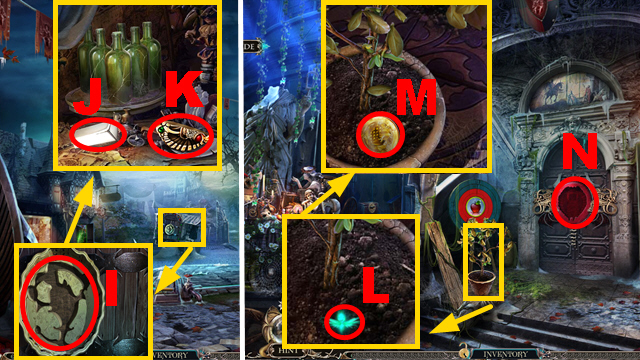
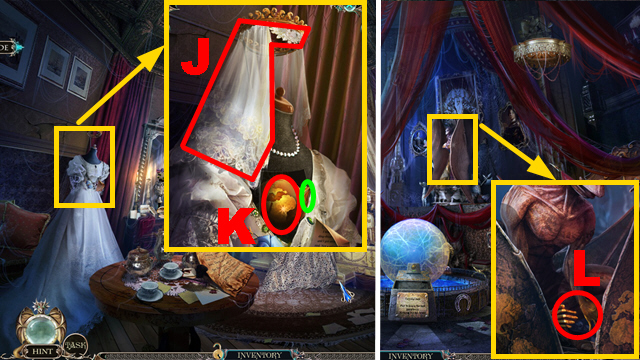
- Talk to the bat (I), take COIN 1/3 (J); you receive the SLINGSHOT.
- Walk down.
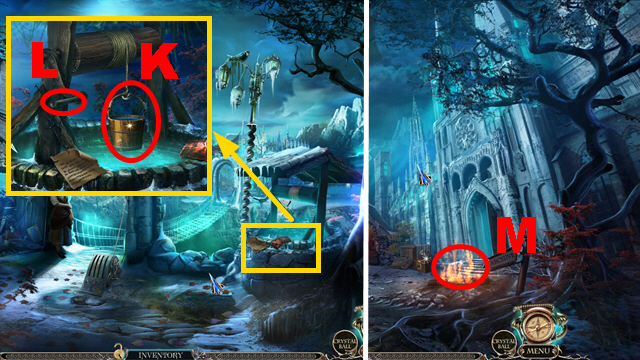
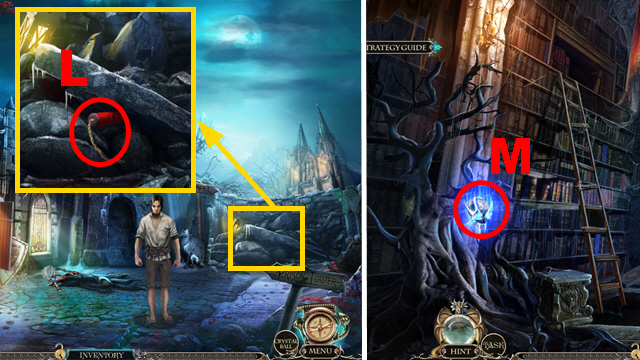
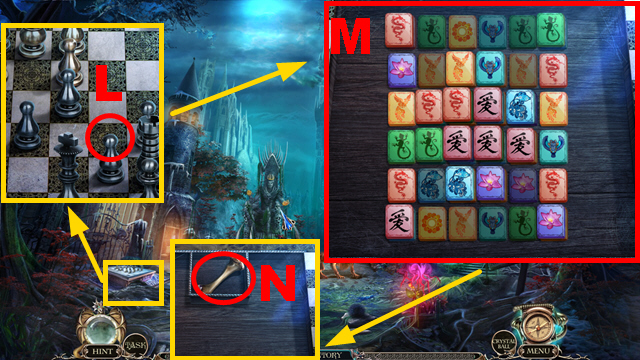
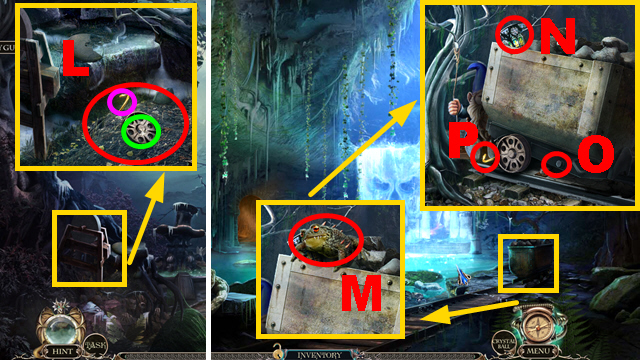
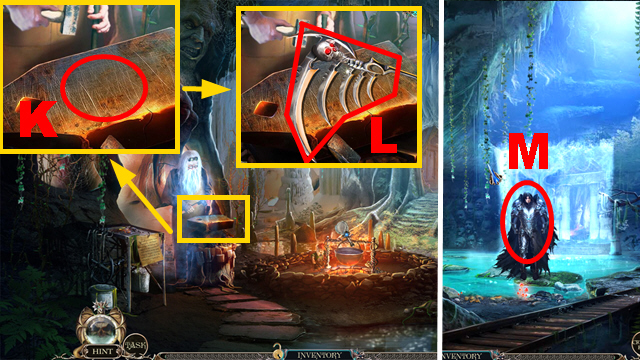
- Connect the BUCKET to the hook (K), turn the handle (L), and take the BUCKET OF WATER.
- Move forward.
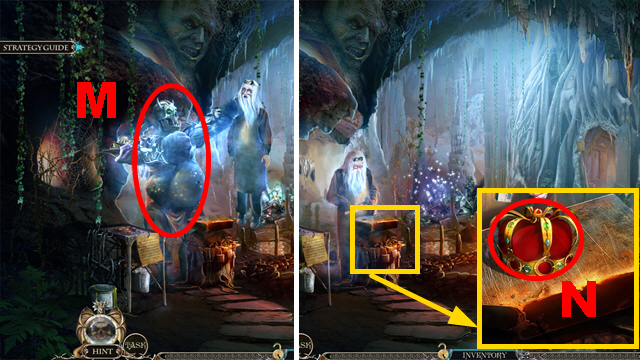
- Pour the BUCKET OF WATER over the flames (M).
- Enter the Archive.
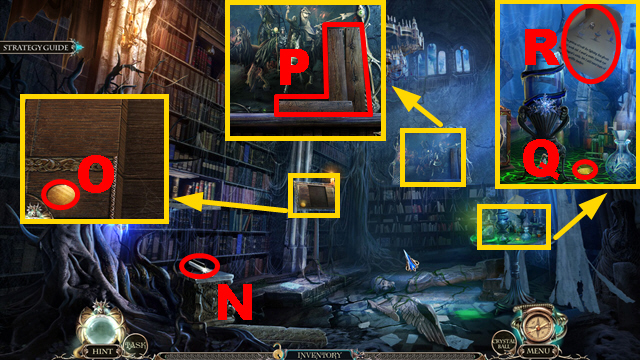
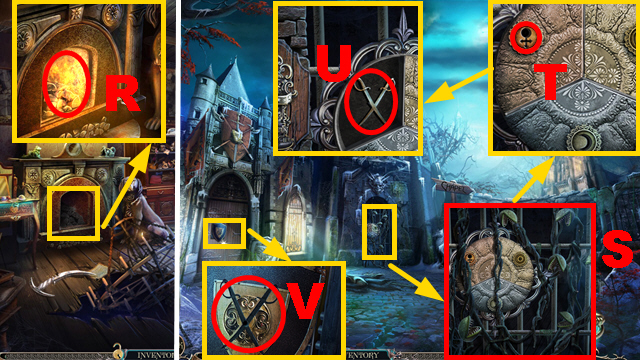
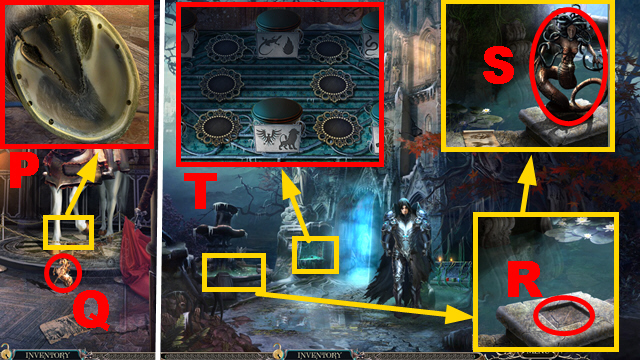
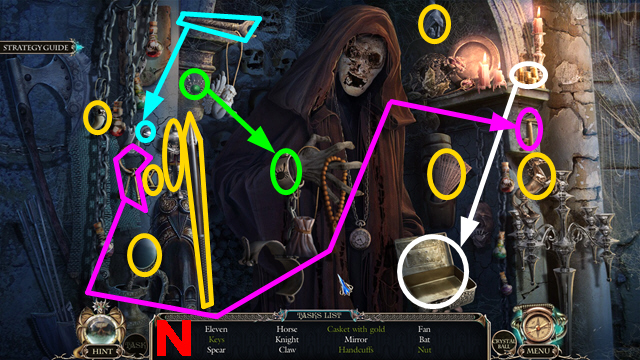
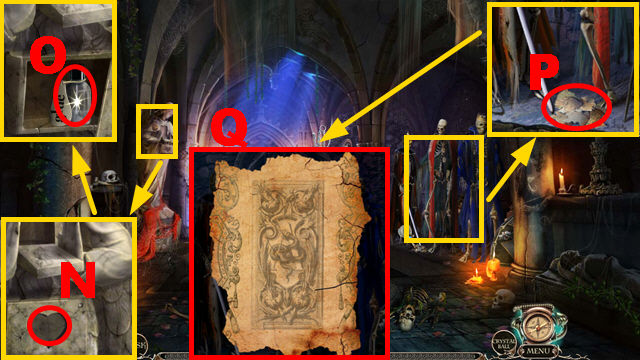
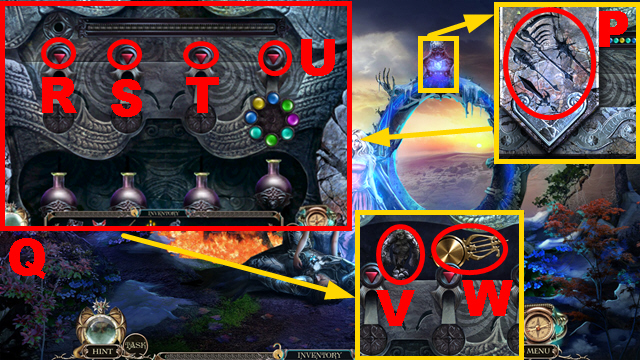
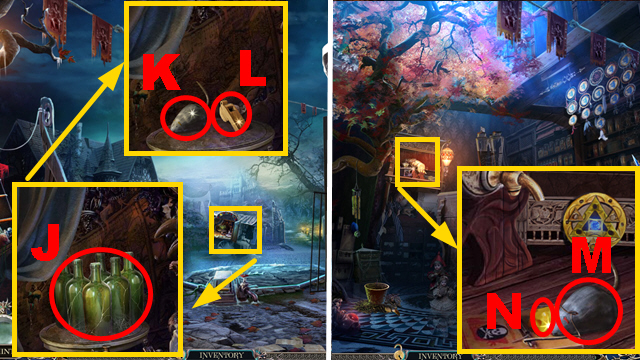
- Take the PIANO KEY (N).
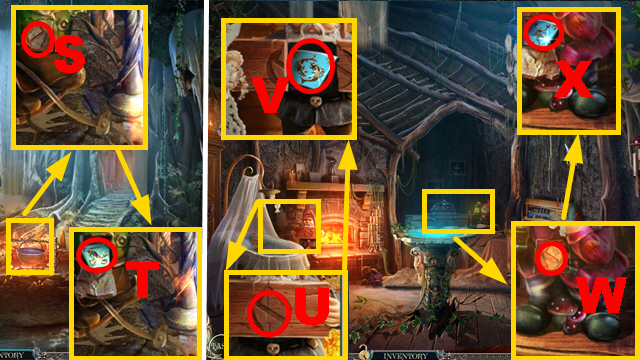
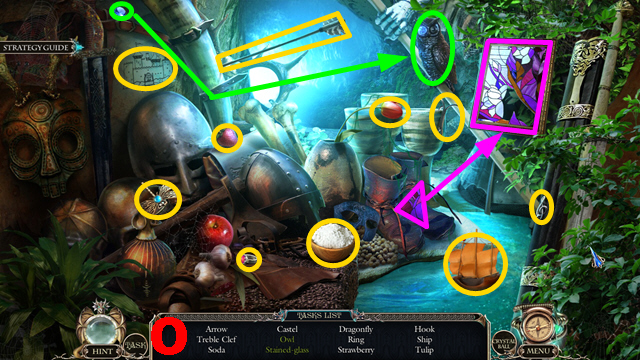
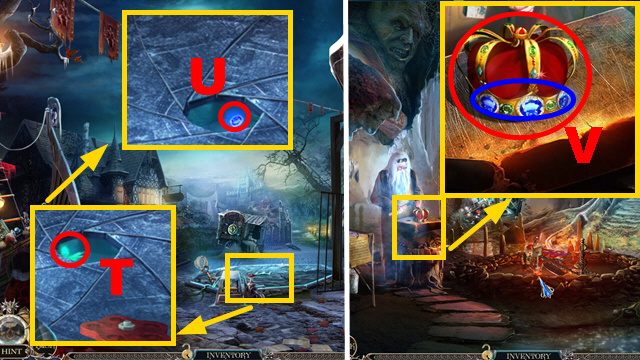
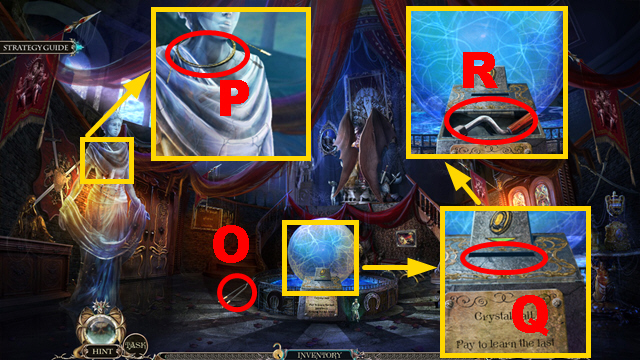
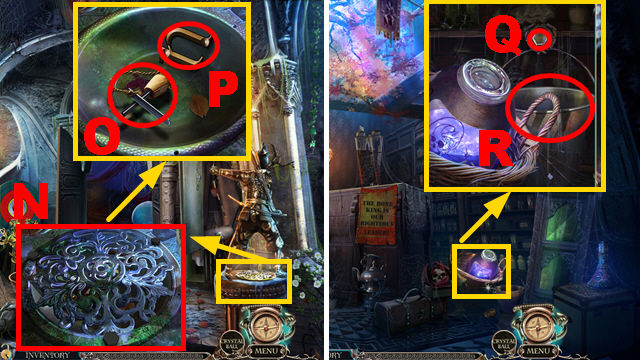
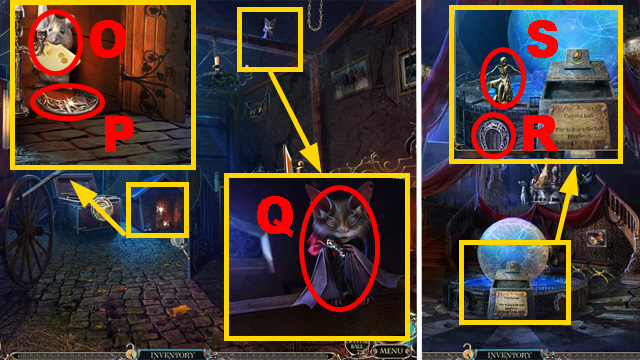
- Take COIN 2/3 (O).
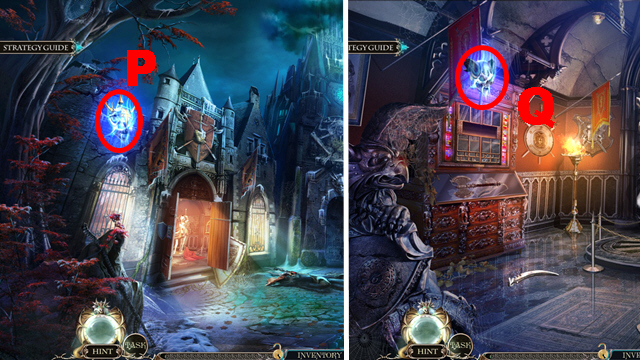
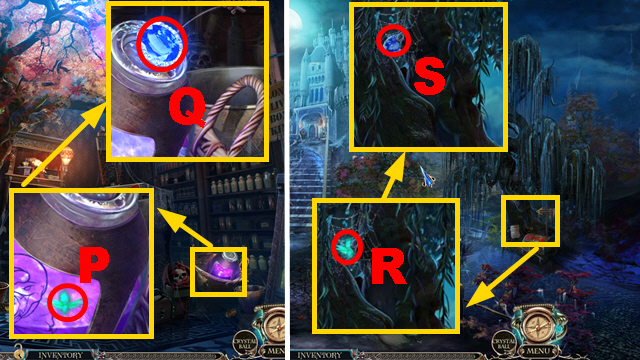
- Take the RUNGS (P).
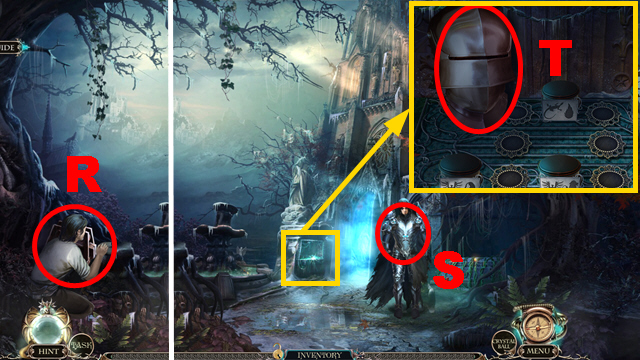
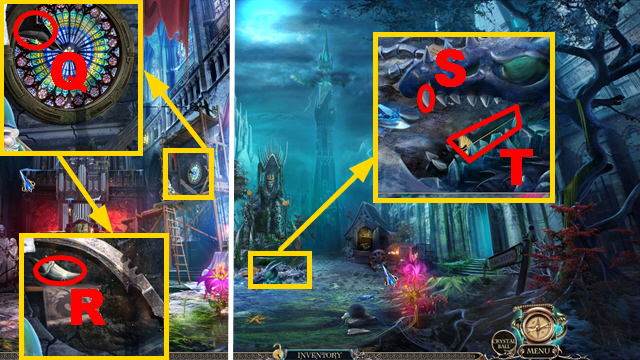
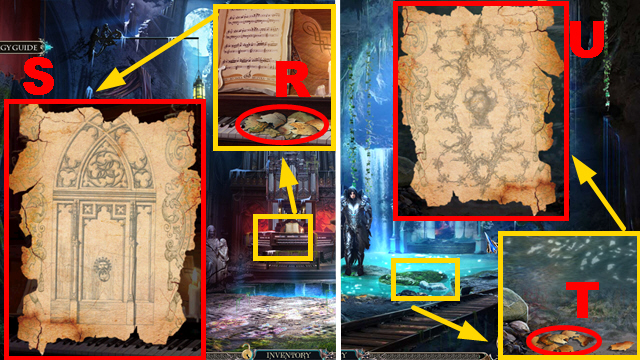
- Take COIN 3/3 (Q) and read the note (R).
- Walk down.
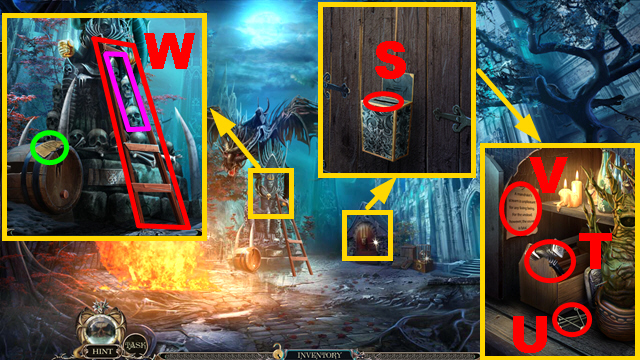
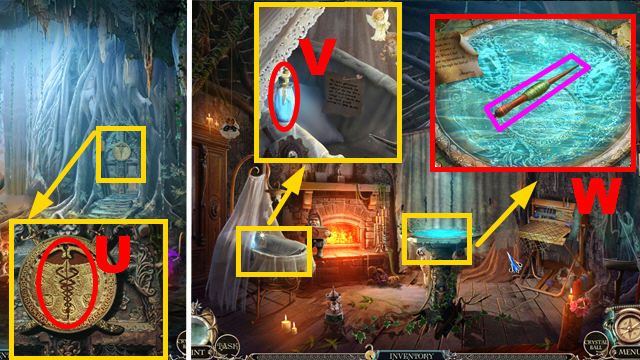
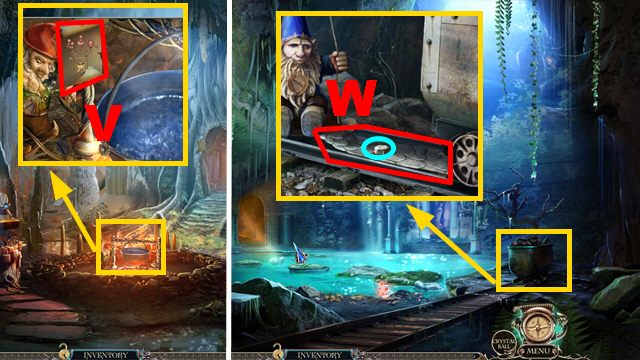
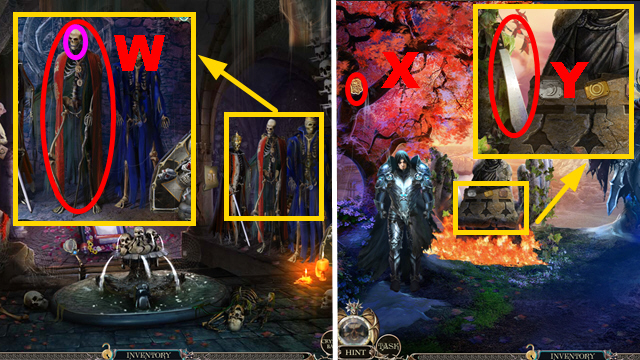
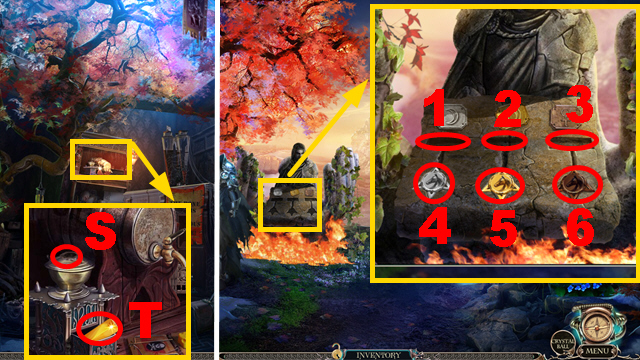
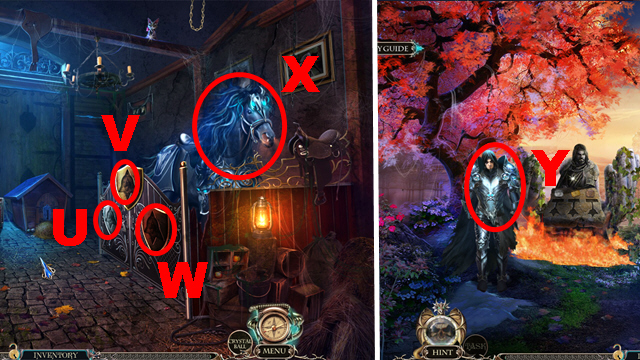
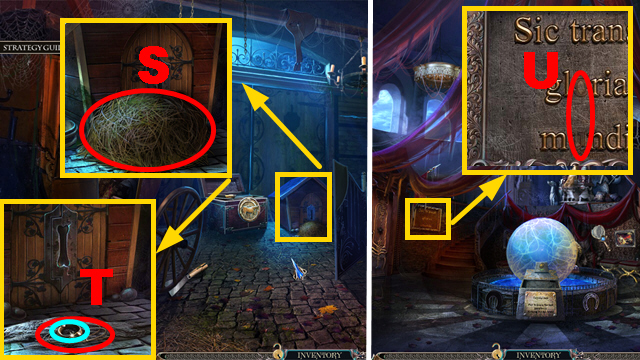
- Insert the 3 COINS into the slot (S); take the HAMMER (T), the NAILS (U), and read the note (V).
- Read the note (green); connect the RUNGS and NAILS to the ladder (purple), hit the nails with the HAMMER, and take the LADDER (W).
- Walk down.
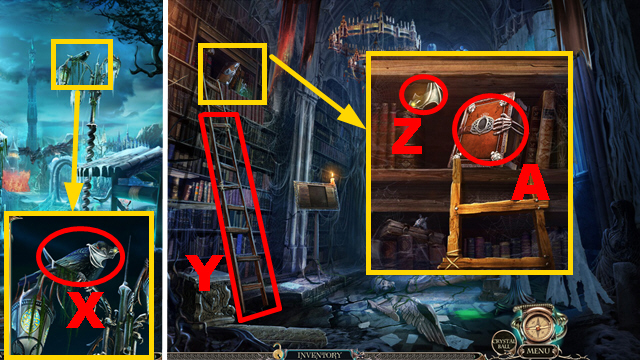
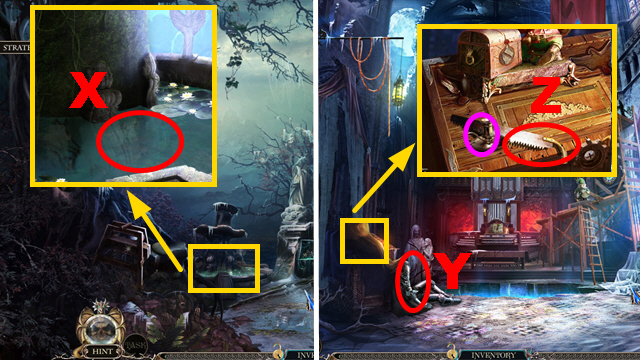
- Shoot the SLINGSHOT at the raven (X) to acquire BAT AMULET 1/2.
- Go to the Archive.
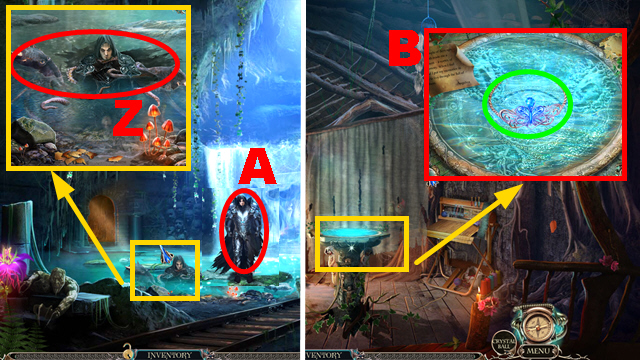
- Put down the LADDER (Y).
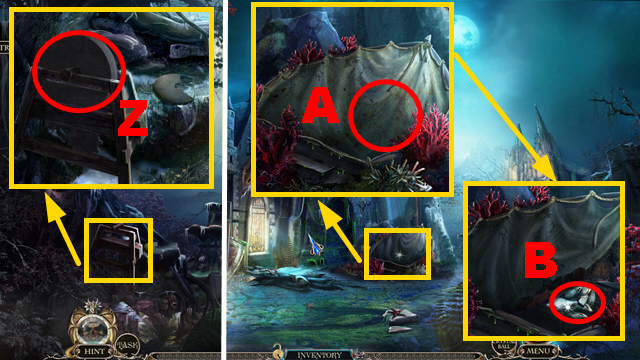
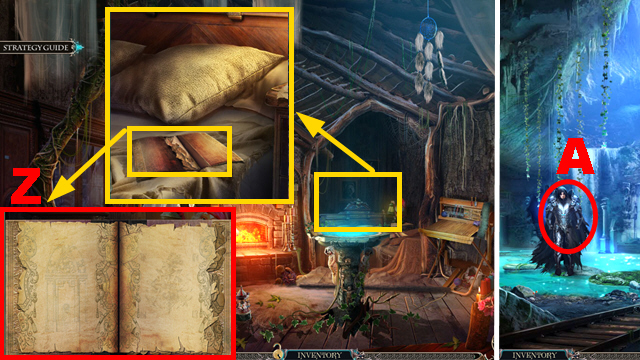
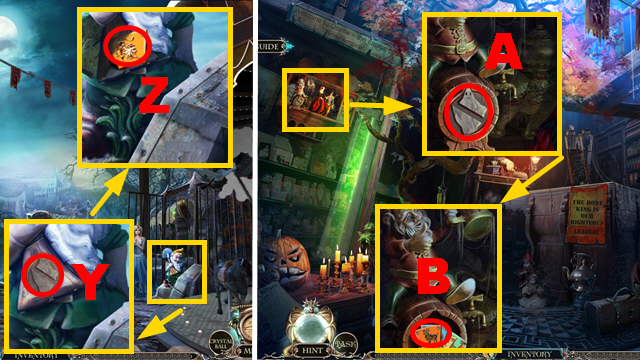
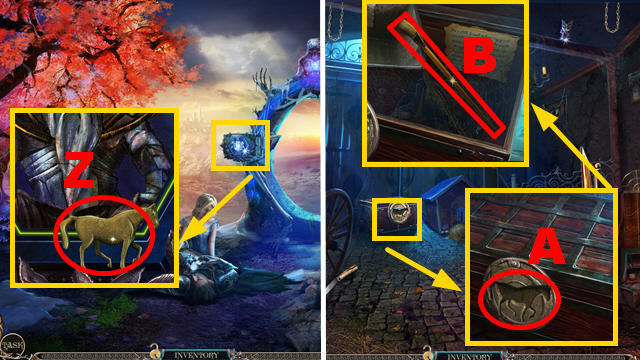
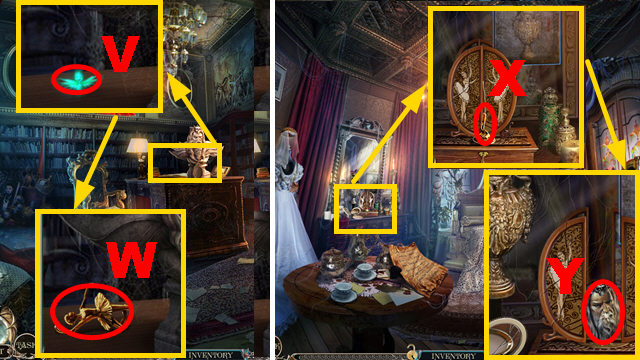
- Take BAT AMULET 2/2 (Z) and the FOLIO (A).
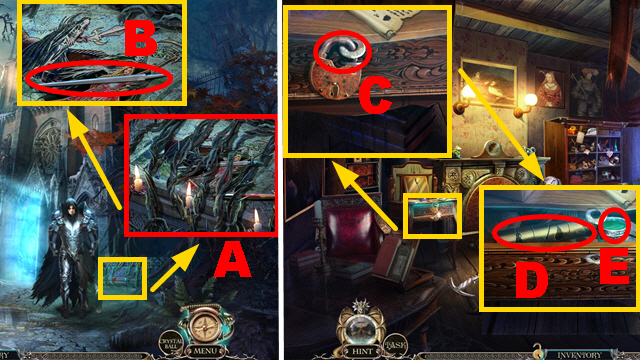
- Walk down.
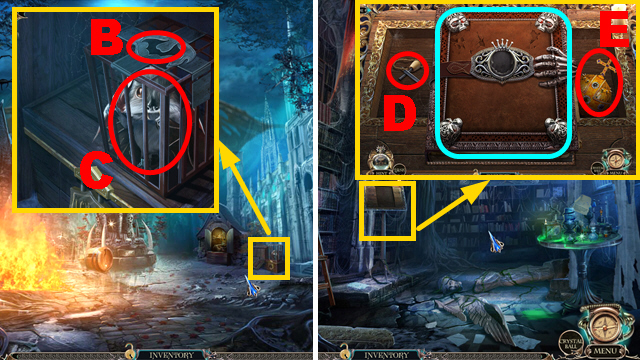
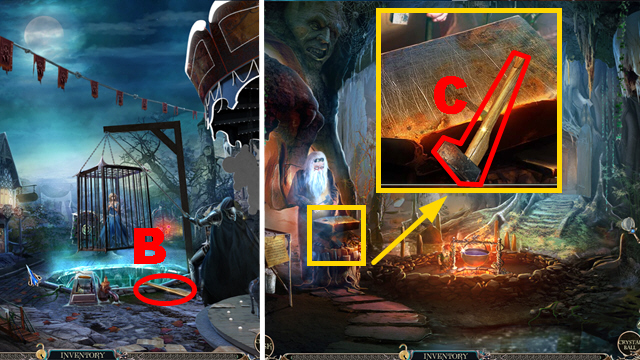
- Insert the 2 BAT AMULETS into the niche (B); take LOUIS THE BAT (C).
- Enter the Archive.
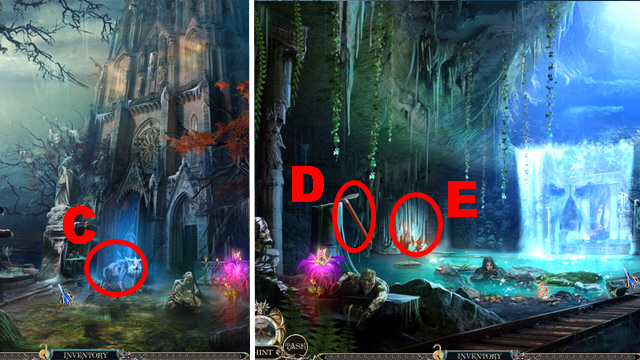
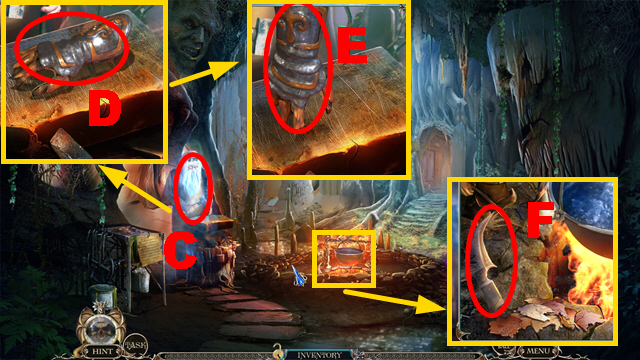
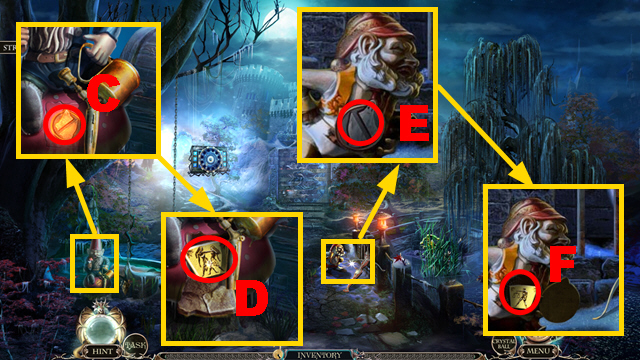
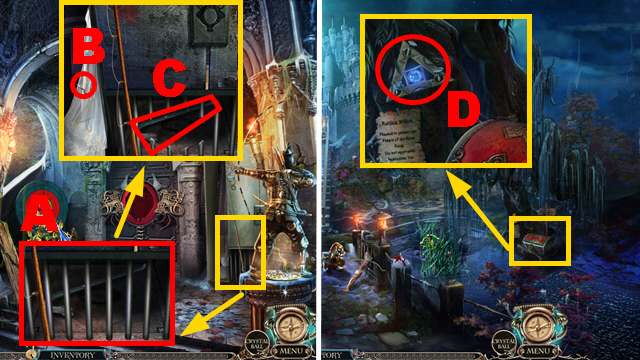
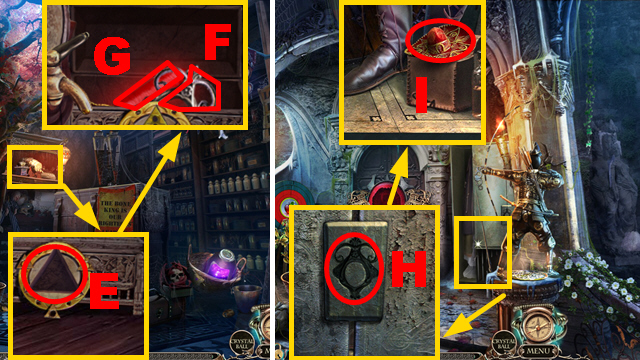
- Put the FOLIO into the slot (blue); take the FLINT (D) and the ORB (E).
- Walk down.
- Place the ORB into the hand (F).
- Walk down.
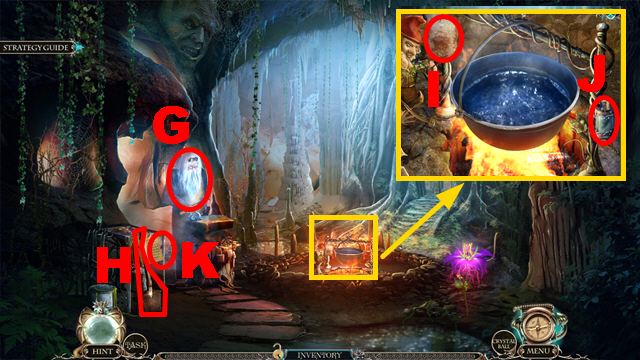
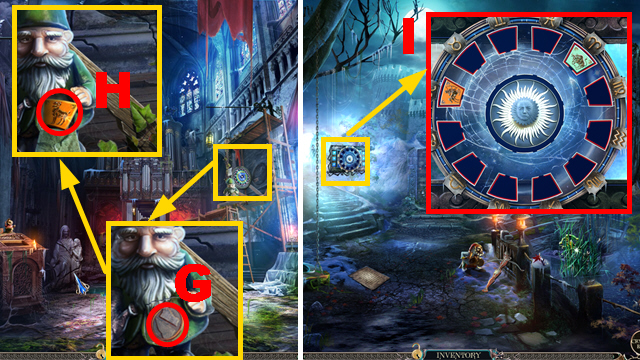
- Put the WEDGE into the crack (G), hit the wedge with the HAMMER, and take the DAGGER (H).
- Go to the Archive.
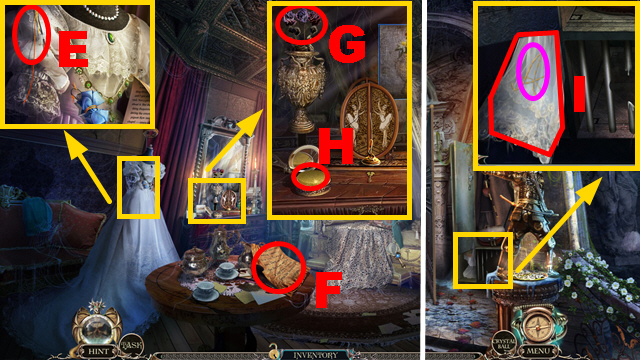
- Cut the painting with the DAGGER (purple); take the SCEPTER (I).
- Walk down.
- Put the SCEPTER into the hand (J); take the KING'S AMULET (K).
- Enter the Archive.
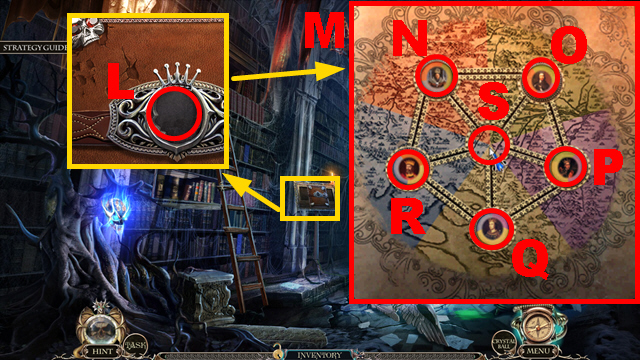
- Insert the KING'S AMULET into the niche (L).
- Play the mini-game.
- Solution (M): Q, P, O, N, R, S, N, O, P, S, Q, R, N, O, S, N, R, Q, S, R, N, O, and S.
- Play the mini-game.
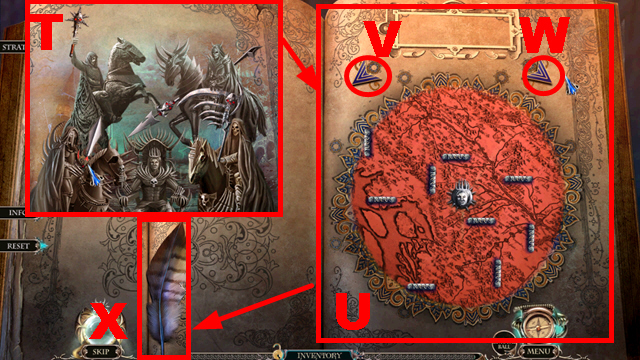
- To solve this puzzle (T), put the weapons into the correct positions.
- Play the mini-game.
- Solution (U): V, Wx2, V, Wx2, V, and Wx2.
- Take the GRIFFIN FEATHER (X).
- Light the burner with the FLINT (Y); insert the FEATHER into the flask (Z).
- Hold LOUIS next to the flask; take the POTION OF COLD (A).
- Walk down.
- Throw the POTION OF COLD at the dragon (B).
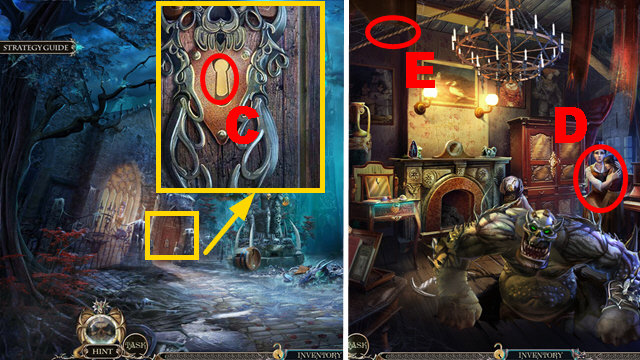
- Insert the HOUSE KEY into the lock (C); turn the key.
- Enter the House.
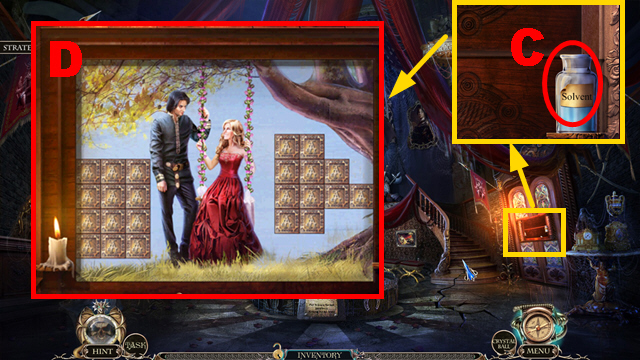
- Zoom into the family (D).
- Cut the rope with the DAGGER (E).

- Talk to the woman (F); you receive the ROUND KEY.
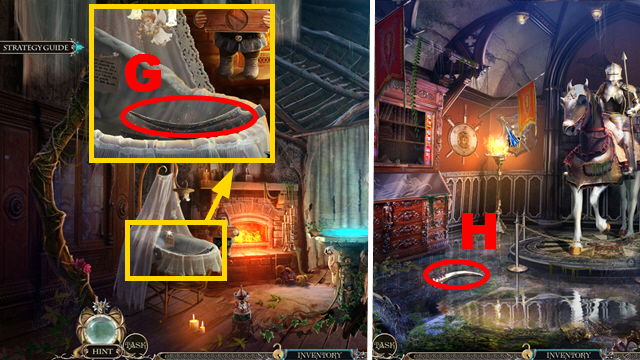
- Take DOLL 2/3 (G).
- Take the NEEDLE AND THREAD (H).
- Insert the ROUND KEY into the lock (I); turn the key.
- Play the HOP.
- You receive the CORKSCREW (J).
- Walk down twice.
- Sew the mitten with the NEEDLE AND THREAD (K); take the MITTEN.
- Move forward.
- Remove the cork with the CORKSCREW (L) to acquire the CORK.
- Put the CORK into the mandrake (light blue); take the MANDRAKE with the MITTEN (M).
- Go to the Tower.
Chapter 2: The Tower

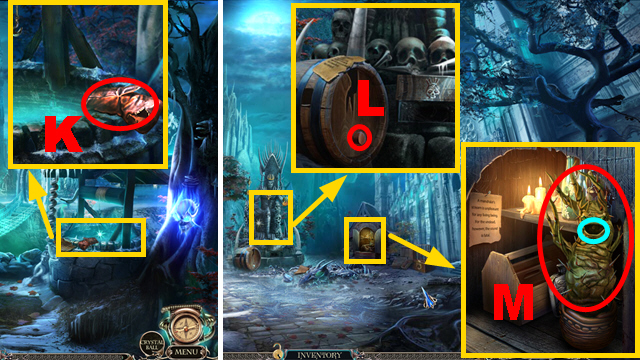
- Chase away the guards with the MANDRAKE (N).
- Read the note (O); take the BRONZE KEY (P).
- Take the TORCH (Q).
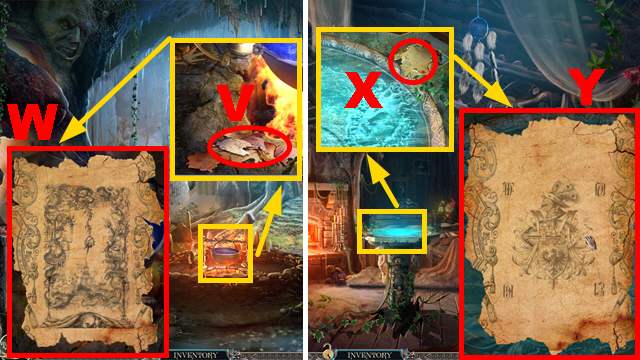
- Go to the House.
- Light the wood with the FLINT (R); hold LOUIS next to the flames; put the TORCH into the flames to acquire the BURNING TORCH.
- Go to the Tower.
- Burn the vines with the BURNING TORCH (S); insert the BRONZE KEY into the lock (T), turn the key; take the SABERS AMULET (U).
- Put the SABERS AMULET into the niche (V).
- Play the mini-game.
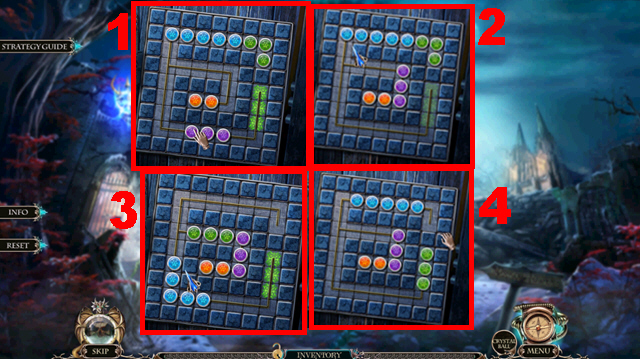
- To solve this puzzle, move the colored beans in numerical order 1-4.
- Enter the Armory.
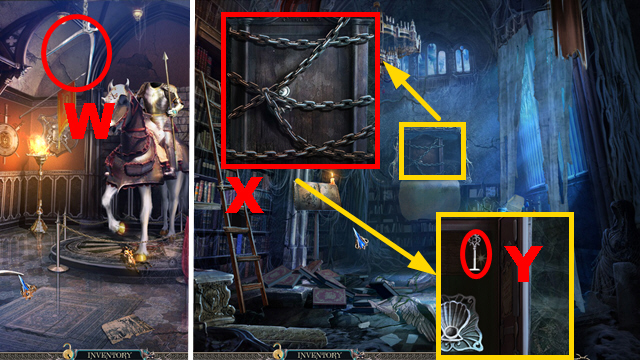
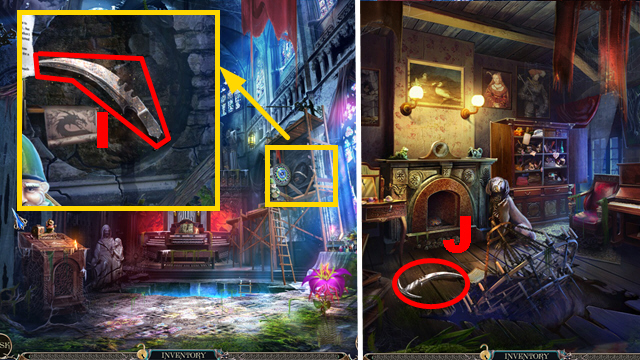
- Send LOUIS to acquire the CUTTING PLIERS (W).
- Go to the Archive.
- Cut the chain with the CUTTING PLIERS (X); take the SILVER KEY (Y).
- Go to the Tower.

- Insert the SILVER KEY into the lock (Z); turn the key. Take DOLL 3/3 (A).
- Enter the Armory.
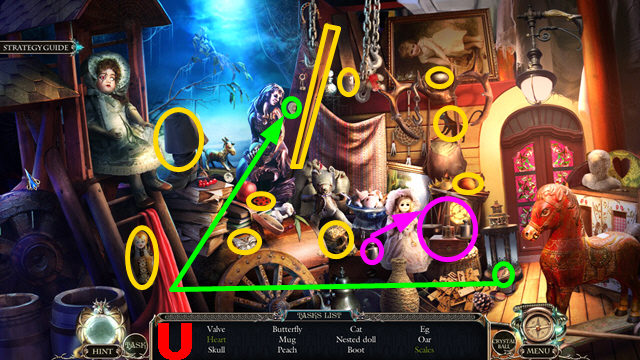
- Place the 3 DOLLS on the stage (B).
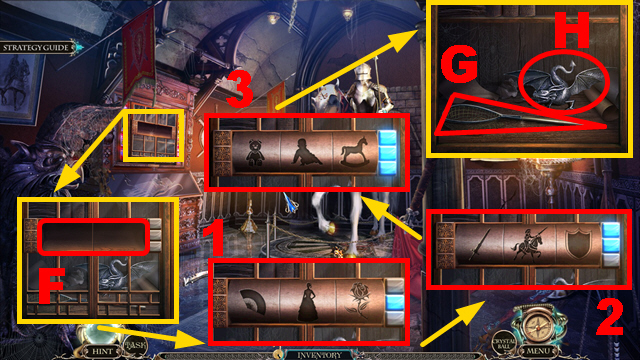
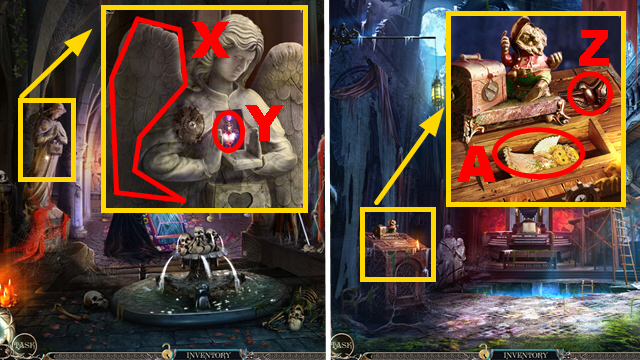
- Play the mini-game.
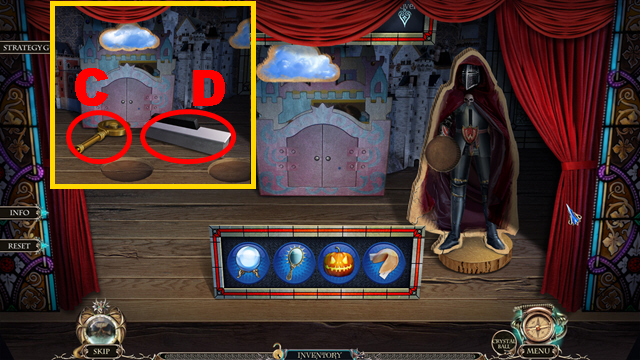
- To solve this puzzle, choose the correct items in the following order: crystal ball, death, flowers, heart, and baby.
- Take the GOLDEN KEY (C) and the PIANO KEY (D).
- Go to the House.
- Insert the 2 PIANO KEYS into the gaps (E); take the WICK (F).
- Go to the Tower.
- Insert the GOLDEN KEY into the lock (G); turn it.
- Talk to Death (H); you receive the MONOGRAM.
- Walk down.
- Insert the MONOGRAM into the niche (I); take the PRUNING SHEARS (J) and the DYNAMITE (K).
- Go to the Tower.
- Put down the DYNAMITE (L); insert the WICK into the dynamite, light the wick with the FLINT.
- Move forward.
- Zoom anywhere to receive the BOOK OF DEAD.
- Go to the Archive.
- Use the BOOK OF DEAD to acquire SPIRIT OF VENGEANCE 1/4 (M).
- Go to the Bridge.
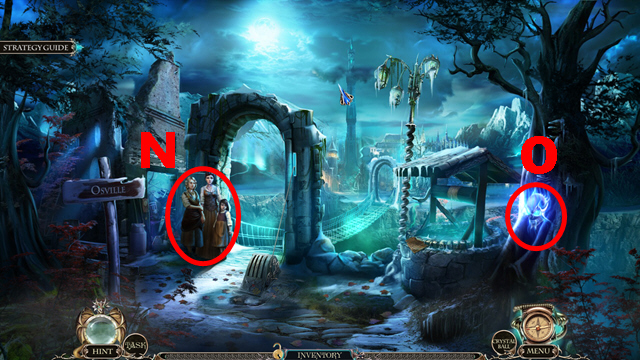
- Talk to the family (N).
- Use the BOOK OF DEAD to acquire SPIRIT OF VENGEANCE 2/4 (O).
- Go to the Tower.
- Use the BOOK OF DEAD to acquire SPIRIT OF VENGEANCE 3/4 (P).
- Enter the Armory.
- Use the BOOK OF DEAD to acquire SPIRIT OF VENGEANCE 4/4 (Q).
- Go to the Chapel's front.
- Give the 4 SPIRITS OF VENGEANCE to Death (R).
- Talk to Death (S).
- Take the HELMET (T).
- Go to the Armory.
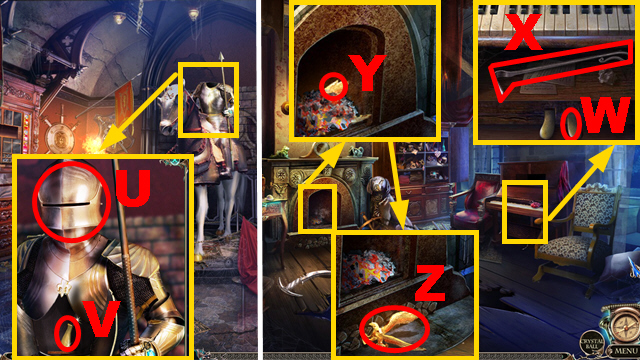
- Connect the HELMET to the armor (U); take the PIANO PEDAL (V).
- Go to the House.
- Connect the PIANO PEDAL to the piano (W); take the POKER (X).
- Pull out the PHOENIX with the POKER (Y); take the PHOENIX (Z).
- Go to the Chapel's front.
- Cut the vines with the PRUNING SHEARS (A); take the FILE (B).
- Go to the House.
- Open the lock with the FILE (C); take the CODE REEL (D) and the PAINT (E).
- Go to the Armory.
- Insert the CODE REEL into the niche (F).
- Play the mini-game.
- Solution (1-3).
- Take the NET (G) and the DRAGON (H).
- Go to the Chapel's front.
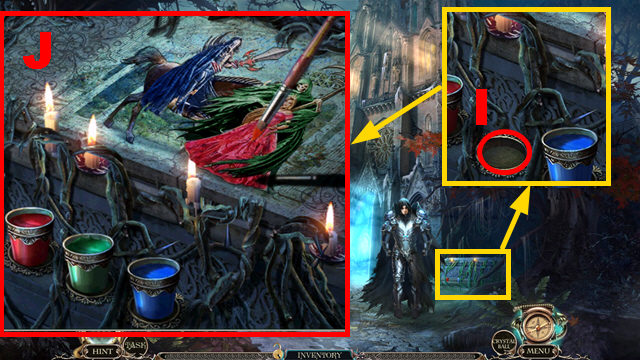
- Put down the PAINT (I).
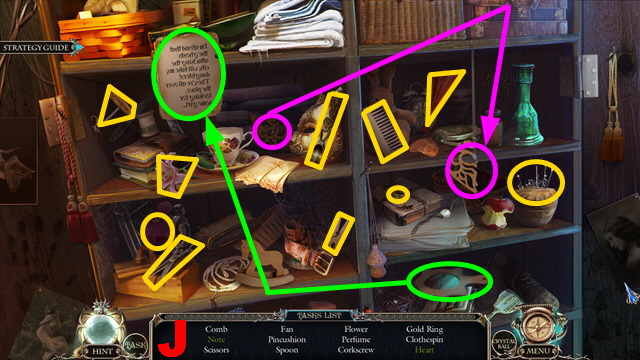
- Play the mini-game.
- To solve this puzzle (J), paint the grave correctly with the brush.
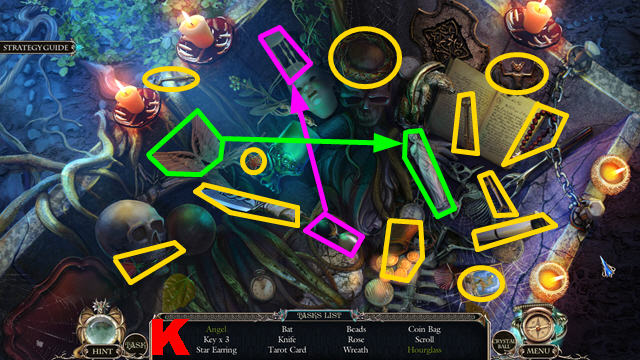
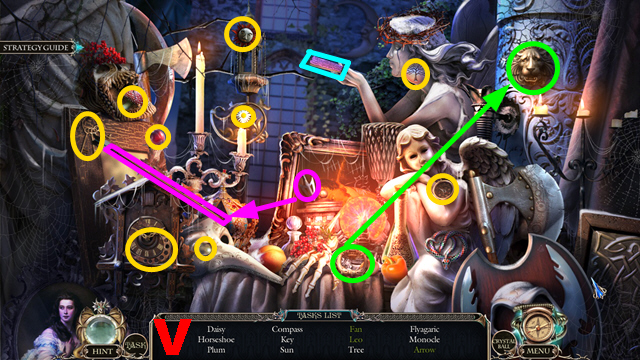
- Play the HOP.
- You receive the ANGEL (K).
- Put the NET into the water (L) to acquire the WRENCH and the GRIFFIN.
- Go to the Archive.
- Remove the bolt with the WRENCH (M); take the HORSESHOE (N) and the HARPY (O).
- Go to the Armory.
- Connect the HORSESHOE to the hoof (P).
- Take the UNICORN (Q).
- Go to the Chapel's front.
- Put the ANGEL into the niche (R); take the MEDUSA (S).
- Put down the MEDUSA, PHOENIX, DRAGON, GRIFFIN, HARPY, and UNICORN (T).
- Play the mini-game.
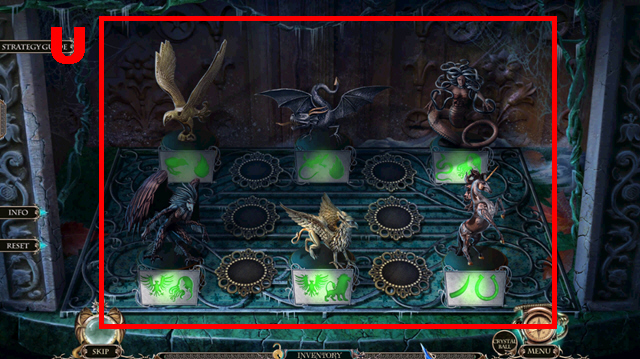
- To solve this puzzle (U), place the figurines correctly.
- Enter the Chapel.
Chapter 3: Inside the Chapel
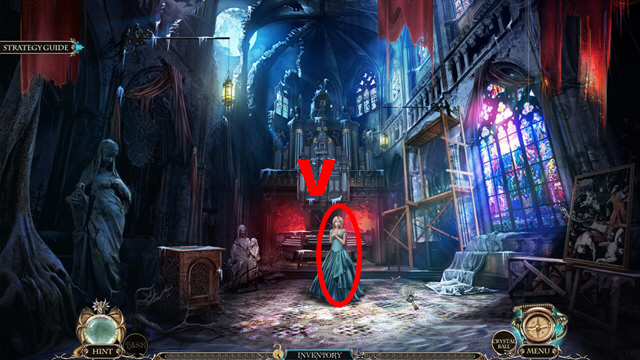
- Talk to the woman (V).
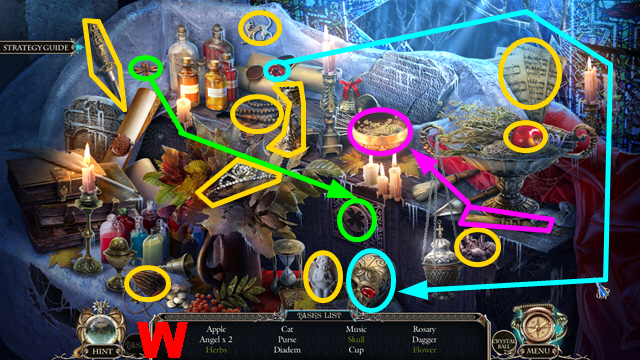
- Play the HOP.
- You receive the CUP (W).
- Walk down.
- Put the CUP into the water (X) to acquire the CUP WITH WATER.
- Enter the Chapel.
- Pour the CUP WITH WATER over Death (Y).
- Talk to Death.
- Take the CANDLESTICK (purple) and the SAW (Z).
- Go to the House.
- Collect the CANDLE with the CANDLESTICK (A).
- Go to the Chapel.
- Collect the ROPE with LOUIS (B).
- Cut the boards with the SAW (C); connect the boards with the ROPE (D) and take the ROPE LADDER (E).
- Put down the ROPE LADDER (F).
- Go to the Underground Lake.
- Zoom anywhere.
- Melt the ice with the CANDLE (G); take the DRAGON'S CLAW (green).
- Open the shell with the DRAGON'S CLAW (H); take the PEARL (blue).
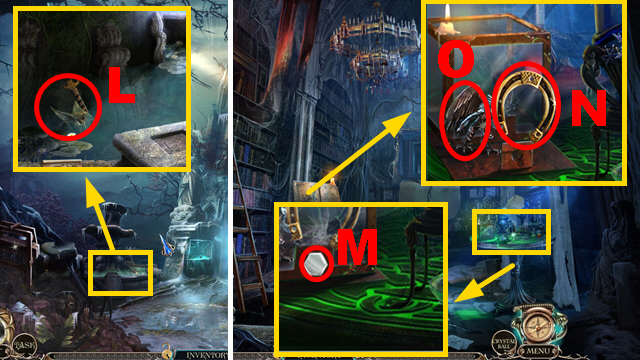
- Enter the Archive.
- Insert the PEARL into the slot (I); take the KNIGHT (J) and EYE 1/2 (K).
- Walk down.
- Put down the KNIGHT (L).
- Play the mini-game.
- To solve this puzzle, remove all the chips from the board (M).
- Remove chips by pairing two chips that are free on at least two sides.
- Take the BONE (N).
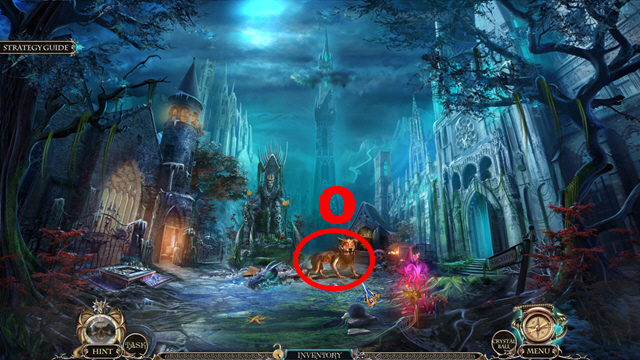
- Give the BONE to the dog (O).
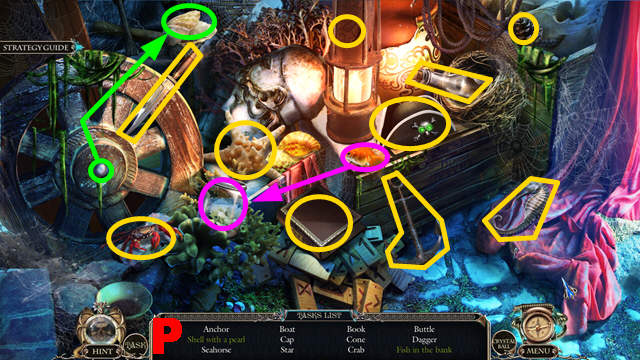
- Play the HOP.
- You receive the BOOK (P).
- Enter the Archive.
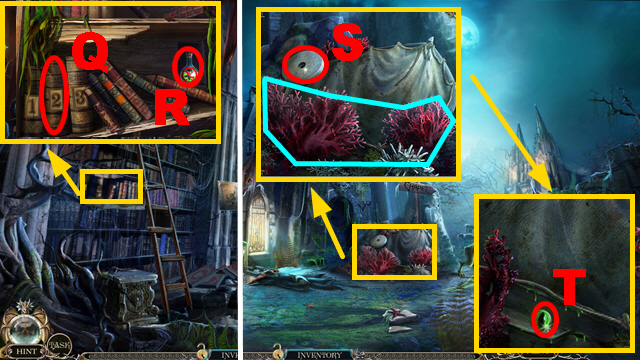
- Put the BOOK into the gap (Q); take the ACID (R).
- Go to the Tower.
- Take the GRINDSTONE (S); remove the corals with the ACID (blue); take EYE 2/2 (T).
- Go to the House.
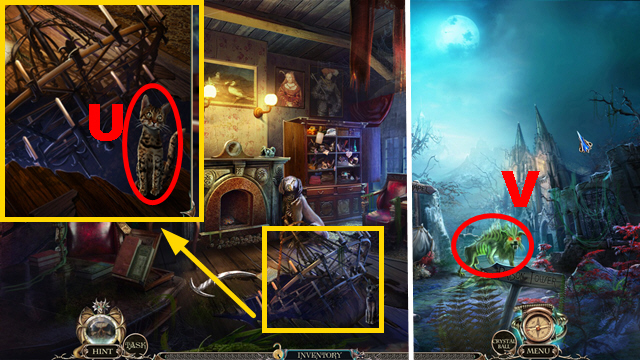
- Put the 2 EYES into the cat (U); use the BOOK OF DEAD on the cat; take the CAT.
- Go to the Tower.
- Chase away the dog with the CAT (V).
- Enter the Armory.
- Remove the opal with the DRAGON'S CLAW (W) to acquire the OPAL.
- Walk down.
- Insert the OPAL into the slot (X); take the RUSTY KNIFE (Y).
- Go to the Chapel's front.
- Connect the GRINDSTONE to the device (Z); sharpen the RUSTY KNIFE on the grindstone to acquire the KNIFE.
- Walk down.
- Cut the tent with the KNIFE (A); take the FISH (B).
- Go to the Chapel's Front.
- Give the FISH to the dog (C).
- Go to the Underground Lake.
- Take the PICK HAMMER (D).
- Break the stalagmites with the PICK HAMMER (E).
- Zoom into the door behind the stalagmites.
- Play the mini-game.

- To solve this puzzle (F), assemble the puzzle pieces correctly.
- Push the complete picture.
- Enter the Yard.
- Talk to the blacksmith (G).
- Take the SPADE (H).
- Remove the paper (I); take the EMPTY PHIAL (J).
- Read the note (K).
- Go to the Chapel's front.
- Remove the soil with the SPADE (L); take CADUCEUS AMULET 1/3 (purple) and the WHEEL (green).
- Go to the Underground Lake.
- Chase away the frog with LOUIS (M); take the STAINED GLASS SPLINTER (N).
- Connect the WHEEL to the trolley (O); take CADUCEUS AMULET 2/3 (P).
- Go to the Chapel.
- Insert the STAINED GLASS SPLINTER into the gap (Q); take the DRAGON'S FANG (R).
- Go to the City Square.
- Put the DRAGON'S FANG into the mouth (S); take CADUCEUS AMULET 3/3 (T).
- Go to the Yard.
- Insert the 3 CADUCEUS AMULETS into the niche (U).
- Enter the Shelter.
- Move the curtain on the crib; take ANGELICA'S VESSEL OF MEMORIES (V).
- Pour ANGELICA'S VESSEL OF MEMORIES into the vortex (W); take the SPINDLE (purple).
- Connect the SPINDLE to the spinning wheel (X).
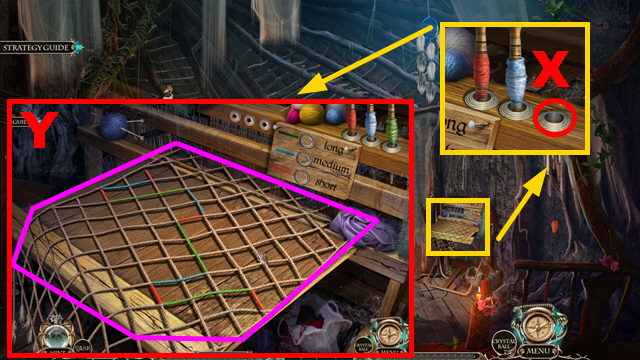
- Play the mini-game.
- To solve this puzzle (Y), complete the net with the correctly colored threads.
- Take the NET (purple).
- Walk down twice.
- Cast the NET at the monsters (Z).
- Talk to Death (A); you receive DEATH'S VESSEL OF MEMORIES.
- Go to the Shelter.
- Pour DEATH'S VESSEL OF MEMORIES into the vortex (B); take the DIADEM (green).
- Walk down.
- Give the DIADEM to the blacksmith (C).
- Use the BOOK OF DEAD on the gauntlet (D); take the GAUNTLET (E).
- Collect SCYTHE BLADE 1/5 with the GAUNTLET (F).
- Move forward.
- Collect SCYTHE BLADE 2/5 with the GAUNTLET (G).
- Go to the Armory.
- Collect SCYTHE BLADE 3/5 with the GAUNTLET (H).
- Go to the Chapel.
- Collect SCYTHE BLADE 4/5 with the GAUNTLET (I).
- Go to the House.
- Collect the SCYTHE BLADE 5/5 with the GAUNTLET (J).
- Go to the Yard.
- Put down the 5 SCYTHE BLADES (K); take DEATH'S SCYTHE (L).
- Walk down.
- Give DEATH'S SCYTHE to Death (M).
- Enter the Royal Shrine.
Chapter 4: The Royal Shrine
- Play the HOP.
- You receive the WRENCH (N).
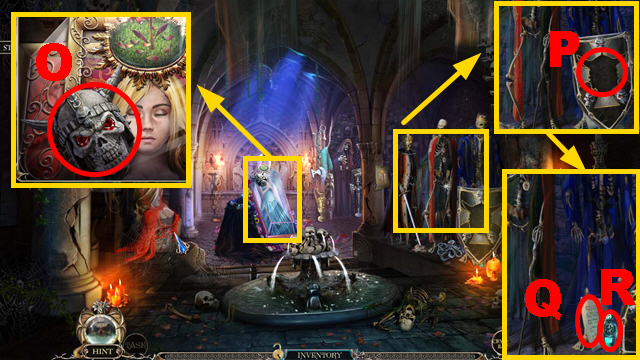
- Take the MASK (O).
- You receive the ANTIDOTE RECIPE.
- Insert the MASK into the shield (P); take the MUSIC SHEET (Q) and PESTILENCE'S VESSEL OF MEMORIES (R).
- Go to the Shelter.
- Pour PESTILENCE'S VESSEL OF MEMORIES into the vortex (S); take the SICKLE (purple).
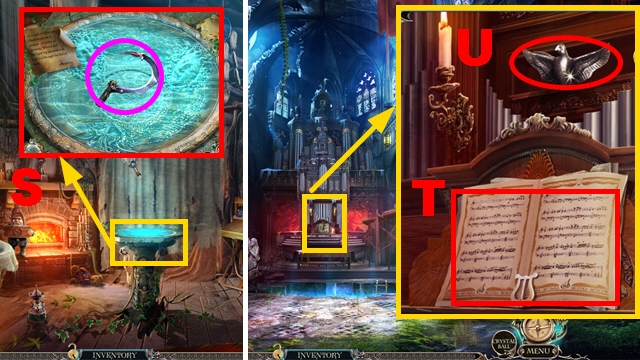
- Go to the Chapel.
- Put down the MUSIC SHEET (T); take the DOVE (U).
- Go to the Yard.
- Place the ANTIDOTE RECIPE next to the cauldron (V).
- Walk down.
- Remove the bolt with the WRENCH (blue); take the WING (W).
- Enter the Royal Shrine.
- Connect the WING to the statue (X); take the ROSE OIL (Y).
- Go to the Chapel.
- Insert the DOVE into the niche (Z); take the DOLL (A).
- Go to the Shelter.
- Connect the DOLL to the toy (B), use the BOOK OF DEAD on the bee (C); take the BEE.
- Go to the City Square.
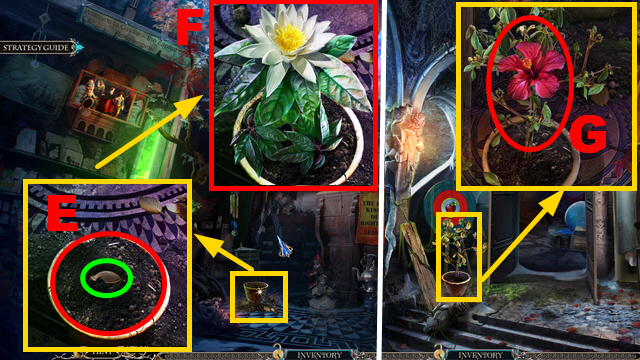
- Send the BEE to pollinate the flower (D); acquire POISONOUS FLOWER 1/6 with the SICKLE.
- Move forward.
- Send the BEE to pollinate the flower (E); acquire POISONOUS FLOWER 2/6 with the SICKLE.
- Move forward.
- Send the BEE to pollinate the flower (F); acquire POISONOUS FLOWER 3/6 with the SICKLE.
- Enter the Chapel.
- Acquire POISONOUS FLOWER 4/6 with the SICKLE.
- Go to the Underground Lake.
- Acquire POISONOUS FLOWER 5/6 with the SICKLE.
- Acquire the MUSHROOM with the SICKLE (I).
- Enter the Yard.
- Acquire POISONOUS FLOWER 6/6 with the SICKLE.
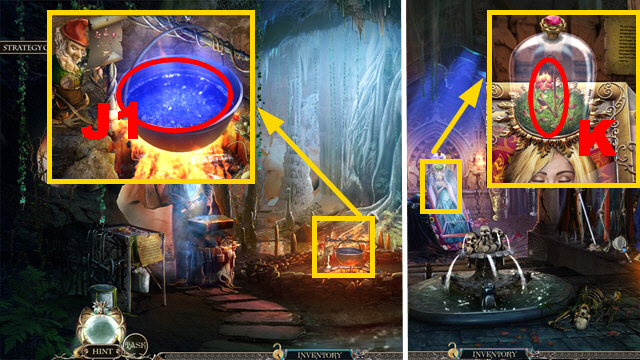
- Pour the 6 POISONOUS FLOWERS, MUSHROOM, and ROSE OIL into the cauldron (J1); insert the EMPTY PHIAL into the cauldron to acquire the ANTIDOTE.
- Go to the Royal Shrine.
- Remove the cover; pour the ANTIDOTE over the flower (K).
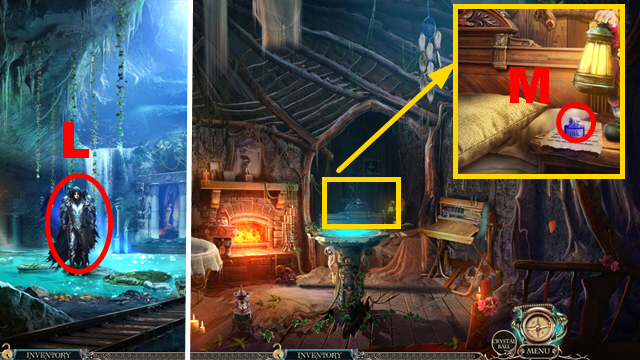
- Talk to Death (L); you receive the HEART RING.
- Enter the Shelter.
- Unfold the paper; take the REAPPEARING INK (M).
- Go to the Royal Shrine.
- Put the HEART RING into the slot (N); take the GLUE (O).
- Apply the GLUE to the paper pieces (P).
- Play the mini-game.
- To solve this puzzle (Q), create the correct picture; take PAGE 1/5.
- Go to the Chapel.
- Apply the GLUE to the paper pieces (R).
- Play the mini-game.
- To solve this puzzle (S), create the correct picture; take PAGE 2/5.
- Go to the Underground Lake.
- Apply the GLUE to the paper pieces (T).
- Play the mini-game.
- To solve this puzzle (U), create the correct picture; take PAGE 3/5.
- Go to the Yard.
- Apply the GLUE to the paper pieces (V).
- Play the mini-game.
- To solve this puzzle (W), create the correct picture; take PAGE 4/5.
- Go to the Shelter.
- Apply the GLUE to the paper pieces (X).
- Play the mini-game.
- To solve this puzzle (Y), create the correct picture; take PAGE 5/5.
- Insert the 5 PAGES into the book (Z); pour the REAPPEARING INK over the page.
- You receive ANGELICA'S DIARY.
- Walk down twice.
- Give ANGELICA'S DIARY to Death (A).
- Go to the Fair Square.
Chapter 5: The Fair Square
- Zoom anywhere twice.
- Take the AXE HANDLE (B).
- Go to the Yard.
- Connect the AXE HANDLE to the blade (C); take the RUSTY AXE.
- Go to the Chapel's front.
- Sharpen the RUSTY AXE on the grindstone (D) to acquire the AXE.
- Go to the Fair Square.
- Cut the rope holding the anchor with the AXE (E); take the ROPE (F).
- Zoom into the gate (G).
- Play the mini-game.
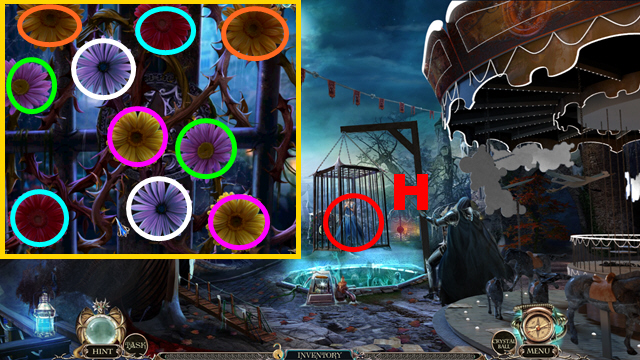
- To solve this puzzle, collect pairs of flowers framed in the same color.
- Connect the ROPE to the cage (H).
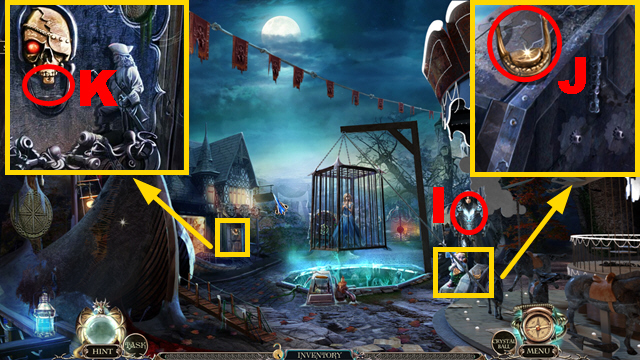
- Talk to Death (I).
- Take the DOOR KNOCKER (J).
- Insert the DOOR KNOCKER into the gap (K); push it.
- Enter the Shop of Wonders.
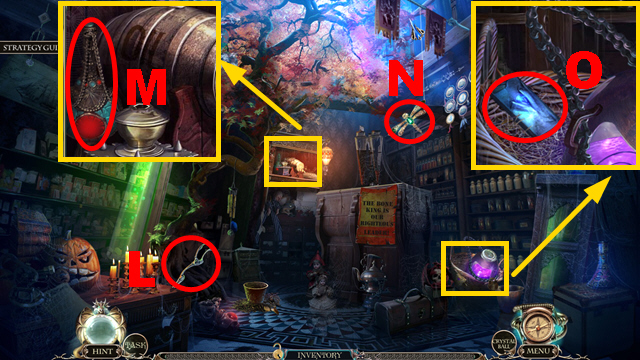
- Take the SCISSORS HALF (L).
- Take FAMINE'S FLASK OF MEMORIES (M).
- Send LOUIS to acquire the DRAGONFLY (N).
- Take PUZZLE 1/2 (O).
- Go to the Shelter.
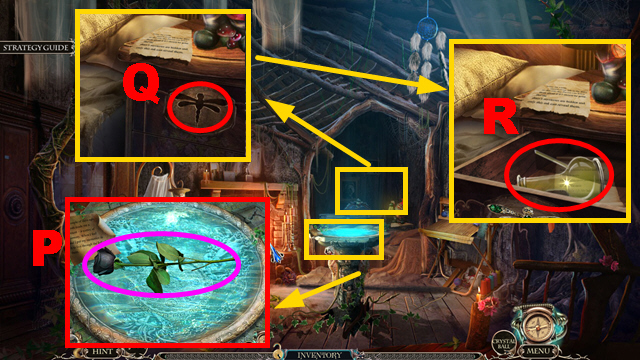
- Pour FAMINE'S FLASK OF MEMORIES into the vortex (P); take the BLACK ROSE (purple).
- Insert the DRAGONFLY into the niche (Q); take the BOTTLE (R).
- Go to the Fair Square.

- Connect the SCISSORS HALF to its other half (S); take the SCISSORS.
- Cut the seam with the SCISSORS (T).
- Play the HOP.
- You receive the VALVE (U).
- Enter the Shop of Wonders.

- Put down the BOTTLE (V); turn the faucet (W) and take the OIL.
- Walk down.
- Pour the OIL over the mechanism (X), connect the VALVE to it; turn the valve, pull the handle (Y).
- Talk to Death (Z); you receive the SCREWDRIVER.
- Go to the Chapel.
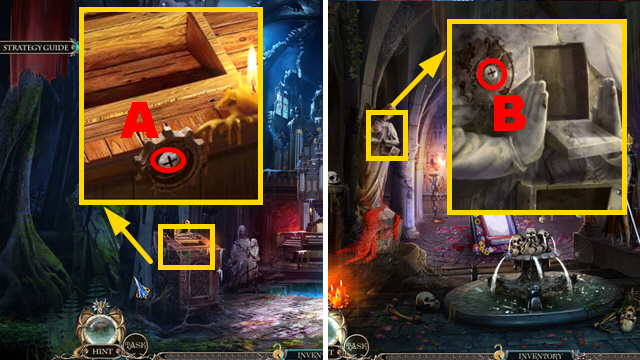
- Remove the screw with the SCREWDRIVER (A) to acquire GEAR 1/3.
- Go to the Royal Shrine.
- Remove the screw with the SCREWDRIVER (B) to acquire GEAR 2/3.
- Go to the Shelter.
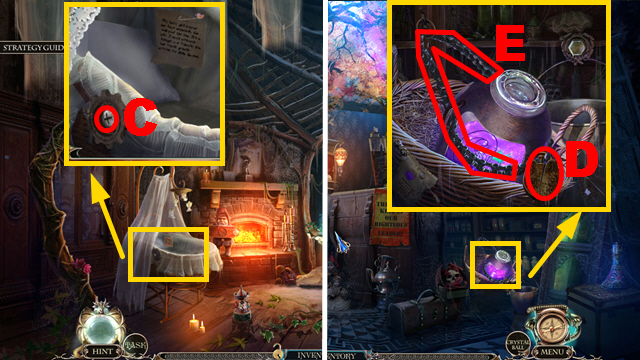
- Remove the screw with the SCREWDRIVER (C) to acquire GEAR 3/3.
- Go to the Shop of Wonders.
- Break the padlock with the AXE (D); take the CHAIN (E).
- Walk down.
- Connect the 3 GEARS and the CHAIN to the device (F); pull the lever (G).
- Talk to the woman (H).
- Take the DREAM CATCHER (I).
- Enter the Shop of Wonders.
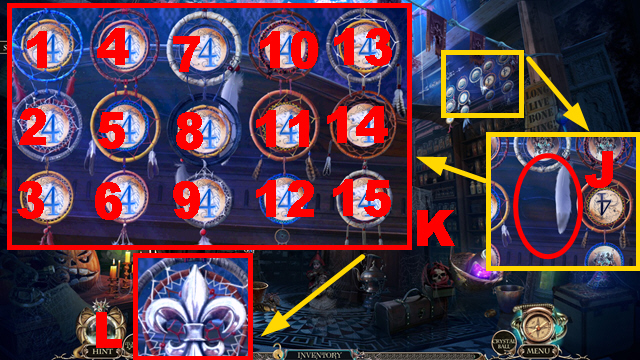
- Connect the DREAM CATCHER to the incomplete one (J).
- Play the mini-game.
- To solve this puzzle (K), swap the buttons in the following order: 1-4, 5-2, 8-5, 5-2, 6-9, 8-7, 11-10, 10-13, 12-15, 15-14, 12-15, 15-14.
- Take the ROYAL LILY (L).
- Walk down.
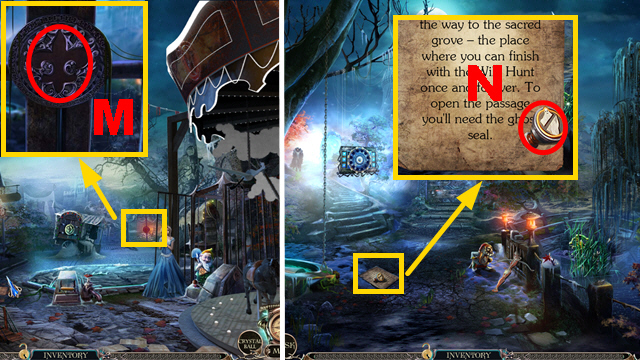
- Insert the ROYAL LILY into the slot (M).
- Enter the Alley.
- Take the GHOST SEAL (N).
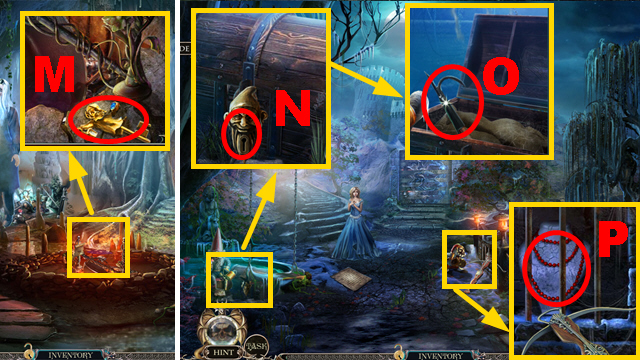
- Go to the Chapel.
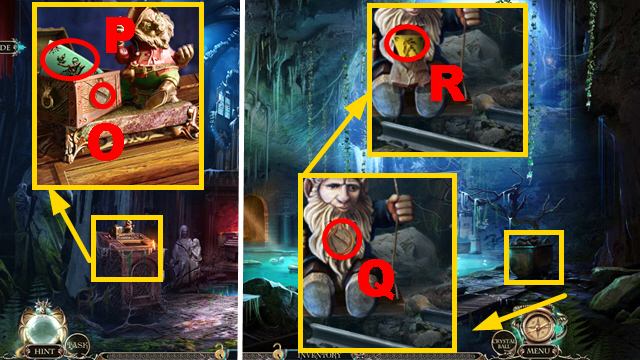
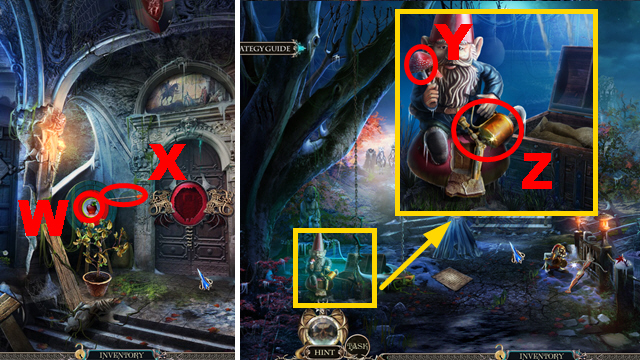
- Put the GHOST SEAL on the box (O); take ZODIAC 1/10 (P).
- Move forward.
- Put the GHOST SEAL on the gnome (Q); take ZODIAC 2/10 (R).
- Enter the Yard.
- Put the GHOST SEAL on the gnome (S); take ZODIAC 3/10 (T).
- Enter the Shelter.
- Put the GHOST SEAL on the gnome (U); take ZODIAC 4/10 (V).
- Put the GHOST SEAL on the gnome (W); take ZODIAC 5/10 (X).
- Go to the Fair Square.
- Put the GHOST SEAL on the gnome (Y); take ZODIAC 6/10 (Z).
- Enter the Shop of Wonders.
- Put the GHOST SEAL on the gnome (A); take ZODIAC 7/10 (B).
- Go to the Alley.
- Put the GHOST SEAL on the gnome (C); take ZODIAC 8/10 (D).
- Put the GHOST SEAL on the gnome (E); take ZODIAC 9/10 (F).
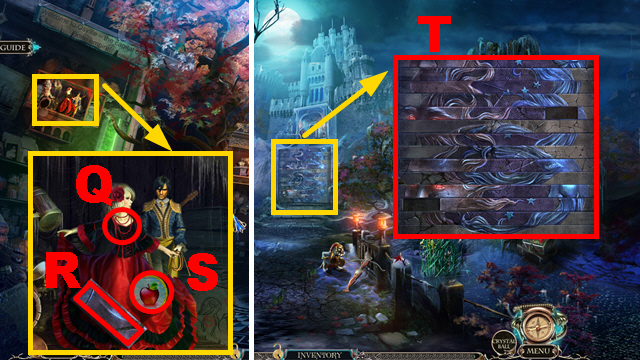
- Go to the Chapel.
- Put the GHOST SEAL on the gnome (G); take ZODIAC 10/10 (H).
- Go to the Alley.
- Insert the 10 ZODIACS (I).
- Play the mini-game.
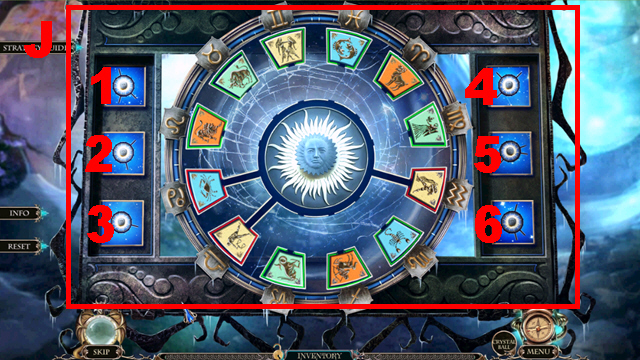
- Solution (J): 4, 5, 6, 1, 2, and 3.
- Enter the Sacred Grove.
Chapter 6: The Sacred Grove

- Zoom anywhere.
- Talk to the woman (K); you receive the BROKEN KINGS CROWN.
- Go to the Yard.
- Talk to the blacksmith (L).
- Take the GARDEN KEY (M).
- Go to the Alley.
- Insert the GARDEN KEY into the lock (N); turn the key, take the BOAT HOOK (O).
- Collect the NECKLACE with the BOAT HOOK (P).
- Go to the Shop of Wonders.
- Put the NECKLACE on the dancer (Q); take PUZZLE 2/2 (R) and the BULL'S EYE (S).
- Go to the Alley.
- Put down the 2 PUZZLES (T).
- Play the mini-game.
- To solve this puzzle (U), swap the picture pieces to create the correct image.
- Go to the Palace Entrance.
- Play the HOP.
- You receive the FLY AGARIC (V).
- Place the BULL'S EYE into the target (W); take the ARROW (X).
- Walk down.
- Give the FLY AGARIC to the gnome (Y); take the BLOW LAMP (Z).
- Go to the Palace Entrance.
- Melt the metal bars with the BLOW LAMP (A); remove the old hook (B) and take the NAIL PULLER (C).
- Walk down.
- Collect the TRIANGLE SIGN with the NAIL PULLER (D).
- Go to the Shop of Wonders.
- Insert the TRIANGLE SIGN into the slot (E); take the SILVER CHARM (F) and the FIREWORK (G).
- Go to the Palace Entrance.
- Insert the SILVER CHARM into the niche (H); take the SOMBRERO (I).
- Go to the Shop of Wonders.
- Put the SOMBRERO on the dancer (J); take the BOWSTRING (K).
- Go to the Alley.
- Connect the BOWSTRING, ARROW, and FIREWORK to the crossbow; take the FIRE CROSSBOW (L).
- Go to the Yard.
- Shoot the FIRE CROSSBOW at the monster (M).
- Put down the BROKEN KINGS CROWN (N); you receive the MAGICAL EYEGLASS.
- Play the HOP.
- You receive the SODA POWDER (O).
- Go to the Shop of Wonders.
- Use the MAGICAL EYEGLASS on the symbol (P); pour the SODA into the acid tank and take MAGICAL CRYSTAL 1/3 (Q).
- Go to the Alley.
- Use the MAGICAL EYEGLASS on the symbol (R); acquire MAGICAL CRYSTAL 2/3 with LOUIS (S).
- Walk down.
- Use the MAGICAL EYE-GLASS on the symbol (T); acquire MAGICAL CRYSTAL 3/3 with LOUIS (U).
- Go to the Yard.
- Insert the 3 MAGICAL CRYSTALS into the crown (blue); take the ENCHANTED KING'S CROWN (V).
- Go to the Royal Shrine.
- Put the ENCHANTED KING'S CROWN on the skeleton (purple); use the BOOK OF DEAD on the skeleton (W).
- Zoom anywhere twice; you receive the HORSE FIGURINE.
- Send Louis to collect the CARRIAGE KEY (X).
- Take the MACHETE (Y).
- Go to the Palace Entrance.
- Insert the HORSE FIGURINE into the niche (Z).
- Enter the Royal Stables.
- Take SKULL 1/2 (B).
- Put the CARRIAGE KEY into the slot (A).
- Play the HOP.
- You receive the FISHING HOOK (C).
- Walk down.
- Connect the FISHING HOOK to the fishing rod (blue); take the FISHING ROD (D).
- Walk down.
- Cut the reed with the MACHETE (E); take the CLOWN (F), the SHOVEL (G), and collect the BRONZE with the FISHING ROD (H).
- Walk down.
- Insert the CLOWN into the niche (I); take the SILVER (J) and SKULL 2/2 (K).
- Go to the Palace Entrance.
- Use the MAGICAL EYEGLASS on the symbol (L); take the COIN (M).
- Insert the 2 SKULLS into the slot (N).
- Enter the Throne Room.
- Take the FIREPLACE TONGS (O).
- Take STRING 1/4 (P).
- Insert the COIN into the slot (Q); take the MILL HANDLE (R).
- Go to the Shop of Wonders.
- Connect the MILL HANDLE to the mill (S); take the GOLD (T).
- Go to the Sacred Grove.
- Put the SILVER (1), GOLD (2), and BRONZE (3) into the niches; use the FIREPLACE TONGS to acquire the SILVER STAMP (4), GOLD STAMP (5), and BRONZE STAMP (6).
- Go to the Royal Stables.
- Insert the SILVER STAMP (U), GOLD STAMP (V), and BRONZE STAMP (W) into the niches.
- Use the BOOK OF DEAD on the horse (X); take HORSE DEATH.
- Go to the Sacred Grove.
- Give HORSE DEATH to Death (Y).
- Take the BUTTON (Z).
- Go to the Royal Stables.
- Insert the BUTTON into the niche (A); take the BRUSH (B).
- Go to the Throne Room.
- Put the BRUSH into the solvent (C).
- Play the mini-game.
- To solve this puzzle (D), turn around the correct tiles.
- Enter Angelica's Room.
Chapter 7: Angelica's Room
- Take the GOLDEN THREAD (E).
- Read the note (F).
- Remove the flowers (G); open the box, take the SPONGE (H).
- Go to the Palace Entrance.
- Sew the veil with the GOLDEN THREAD (purple); take the VEIL (I).
- Go to Angelica's Room.
- Connect the VEIL to the dress (J); take the BRASS GLOBE (K) and LEAF 1/2 (green).
- Walk down.
- Put the BRASS GLOBE into the hands (L).

- Play the HOP.
- You receive the HEX KEY (M).
- Walk down.
- Remove the cover with the HEX KEY (N); take the FLINT (O) and LATIN LETTER 1/2 (P).
- Go to the Shop of Wonders.
- Remove the bolt with the HEX KEY (Q); take the BUCKET (R).
- Go to the Royal Stables.
- Burn the hay with the FLINT (S); take STRING 2/4 (T) and LATIN LETTER 2/2 (blue).
- Go to the Throne Room.
- Connect the 2 LATIN LETTERS to the board (U).
- Enter the King's Parlor.
- Use the MAGICAL EYEGLASS on the symbol (V); take the BALLET DANCER (W).
- Go to Angelica's Room.
- Put the BALLET DANCER on the box (X); take the KING'S PORTRAIT (Y).
- Go to the Royal Stables.
- Put the BUCKET into the cement (Z) to acquire the BUCKET WITH CEMENT.
- Go to the King's Parlor.
- Pour the BUCKET WITH CEMENT into the niche (A), put the nose on the bust (B); insert the KING'S PORTRAIT into the niche (C).
- Play the mini-game.
- To solve this puzzle (D), adjust the bust according to the portrait.
- Take STRING 3/4 (purple) and LEAF 2/2 (E).
- Go to the Sacred Grove.
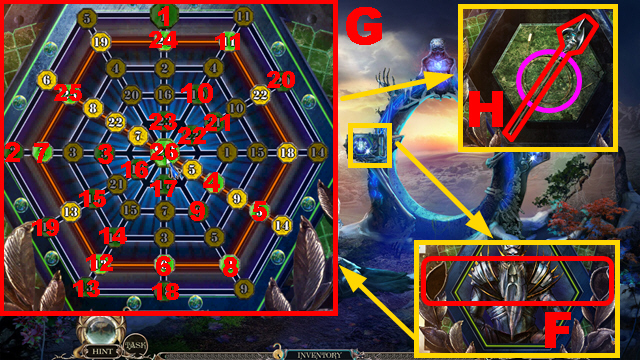
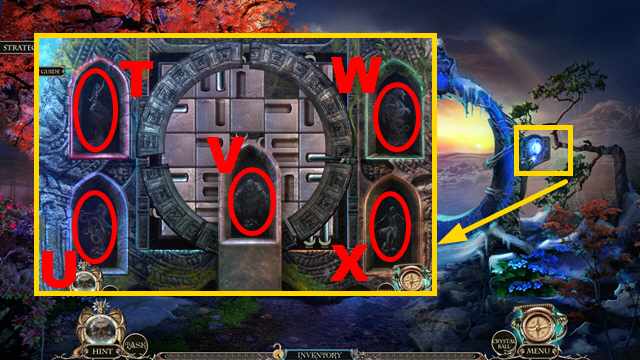
- Insert the 2 LEAVES into the niches (F).
- Solution (G): 1-26.
- Take STRING 4/4 (purple) and the SPEAR (H).
- Go to Angelica's Room.
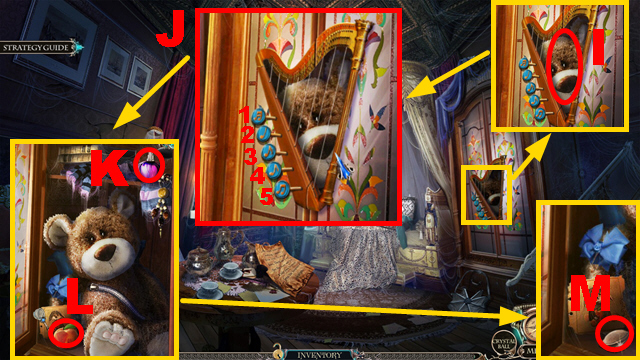
- Connect the 4 STRINGS to the harp (I).
- Play the mini-game.
- Solution (J): 5, 2, 4, 1, 4, 5, 1, 4, 5, 2, and 3.
- Take the PERFUME (K); send LOUIS to the peach (L).
- Take the PIT (M).
- Go to the King's Parlor.
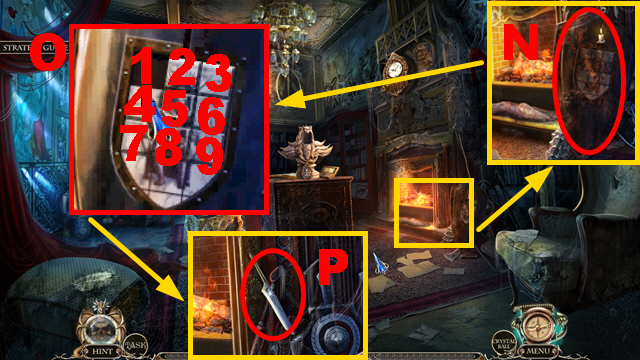
- Spray the PERFUME on the shield (N); wipe the shield with the SPONGE.
- Play the mini-game.
- Solution (O): 4, 7, 8, 9, 6, 3, 2, 1, 4, 7, 8, 9, 6, 3, 2, 1, 4, 7, 8, 9, 6, 3, 2, 1, 4, 7, 8, 9, 6, 3, 2, 5, 6, 3, 2, 1, 4, 7, 8, 9, 6, 3, 2, 1, 4, 7, 8, 9, 6, 3, 2, 1, 4, 7, 8, 9, 6, 3, 2, 5, 6, 3, 2, and 1.
- Take the DAGGER SPLINTER (P).
- Go to Angelica's Room.
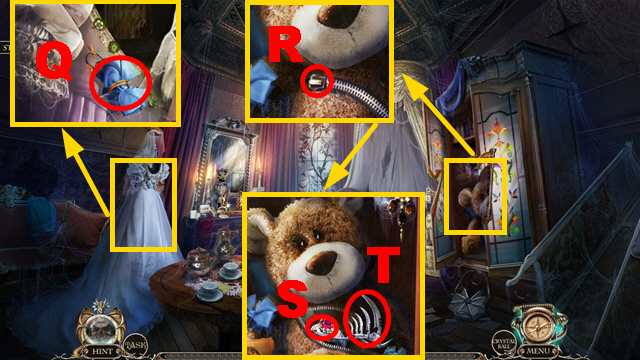
- Acquire the BOW with the DAGGER SPLINTER (Q).
- Connect the BOW to the teddy bear (R); take the DIAMOND RING (S) and the SCYTHE (T).
- Go to the King's Parlor.
- Cut the glass with the DIAMOND RING (U); take the TUNING FORK (purple).
- Go to the Throne Room.
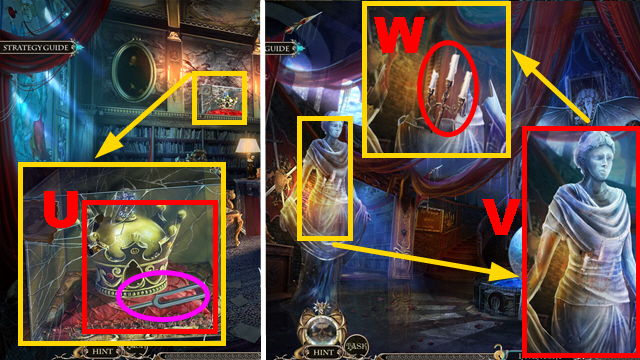
- Break the statue with the TUNING FORK (V); light the candles with the FLINT (W), take the LIT CANDLE HOLDER.
- Go to the King's Parlor.
- Put down the LIT CANDLE HOLDER (X).
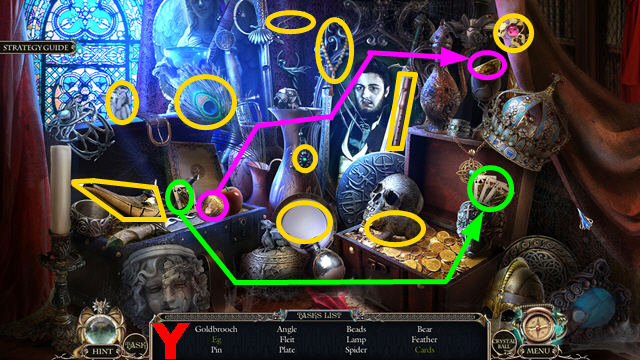
- Play the HOP.
- You receive the GOLD BROOCH (Y).
- Walk down twice.
- Insert the GOLD BROOCH into the slot (Z); take the PIN (A) and the MACE (B).
- Walk down.
- Insert the PIN into the lock (C); take the GARDENING PRUNERS (D) and the WATERING CAN (E).
- Enter the Shop of Wonders.
- Dig through the soil with the SHOVEL (E), put the PIT into the pot (green); dig through the soil with the SHOVEL, pour the WATERING CAN over it; acquire the PEACH FLOWER with the GARDENING PRUNERS (F).
- Go to the Palace Entrance.
- Pour the WATERING CAN over the flower; acquire the LILY with the GARDENING PRUNERS (G).
- Go to Angelica's Room.
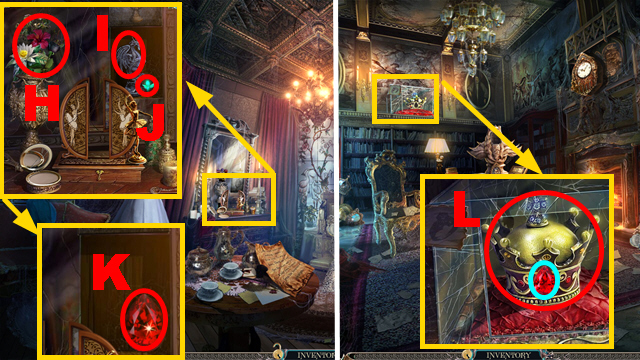
- Put the LILY, PEACH FLOWER, and BLACK ROSE into the vase (H); take the DRAGON (I), use the MAGICAL EYEGLASS on the symbol (J); take the BLOOD-RED RUBY (K).
- Go to the King's Parlor.
- Insert the BLOOD-RED RUBY into the niche (blue); take the CROWN (L).
- Go to the Sacred Grove.
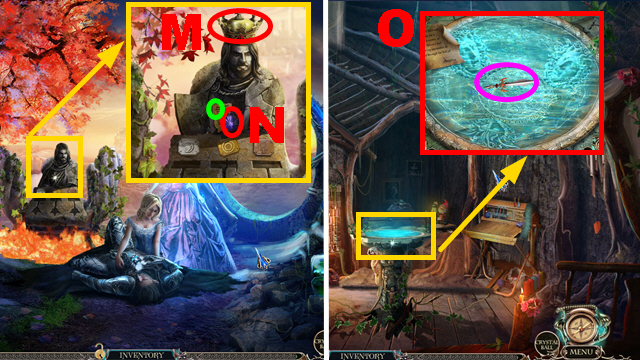
- Put the CROWN on the statue (M); take WAR'S FLASK OF MEMORIES (N), read the note (green).
- Go to the Shelter.
- Pour WAR'S FLASK OF MEMORIES into the vortex (O); take the SWORD (purple).
- Go to the Sacred Grove.
- Insert the MACE, SPEAR, SCYTHE, and SWORD into the niches (P).
- Play the mini-game.
- Solution (Q): Rx4, T, Sx2, U, T, Ux2, Tx4, R, T, S, T, Sx2, R, Sx3, U, R, Ux3, R, and U.
- Take the GOBLIN (V) and the CLOCK PENDULUM (W).
- Go to the King's Parlor.
- Connect the CLOCK PENDULUM to the clock (X); take the FEATHER DUSTER (Y).
- Remove the dust with the FEATHER DUSTER (Z); take the LEVER (A), read the note below the lever.
- Go to the Royal Stables.
- Lift the wheel with the LEVER (B); take the PALETTE KNIFE (C).
- Go to the King's Parlor.
- Remove the paint with the PALETTE KNIFE (D); remove the stones with the DAGGER SPLINTER (green); take the KRAKEN (E) and the BONE (F).
- Go to the Royal Stables.
- Insert the BONE into the slot (G); put down the LIT CANDLE HOLDER (H), take the BAT (I).
- Go to the Fair Square.
- Break the bottles with the BAT (J); take the WIND-UP MOUSE (K) and the WHISTLE (L).
- Enter the Shop of Wonders.
- Put the WIND-UP MOUSE into the trap (M); take the CHEESE (N).
- Go to the Royal Stables.
- Give the CHEESE to the mouse (O); take the HORSESHOE (P).
- Wake the bat with the WHISTLE (Q), send LOUIS to the bat; you receive the WITCH.
- Go to the Throne Room.
- Insert the HORSESHOE into the niche (R); take the UNDEAD (S).
- Go to the Sacred Grove.
- Insert the WITCH (T), KRAKEN (U), GOBLIN (V), DRAGON (W), and UNDEAD (X) into the niches.
- Play the mini-game.
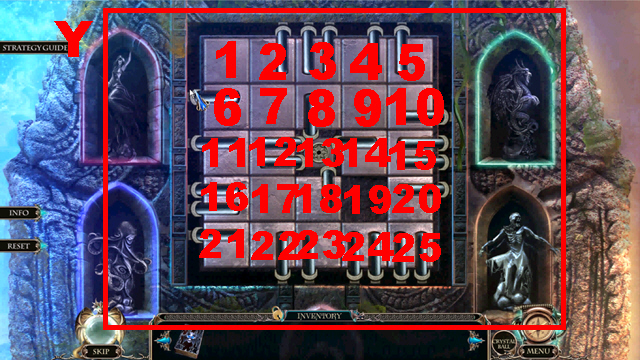
- Solution (Y): 9, 8, 3, 2, 7, 12, 11, 6, 7, 8, 9, 4, 5, 10, 15, 14, 9, 8, 7, 12, 17, 18, 23, 22, 17, 16, 21, 22, 23, 18, 17, 16, 21, 22, 17, and 16.
- 21, 22, 23, 18, 17, 22, 23, 18, 17, 16, 21, 22, 23, 18, 17, 16, 21, 22, 17, 18, 23, 22, 21, 16, 17, 22, 23, 18, 19, 24, 23, 18, 19, 24, 23, 18, and 19.
- Congratulations, you have completed Riddles of Fate: Wild Hunt.
Created at: 2013-10-04