

Walkthrough Menu
- General Tips
- Chapter 1: SF Airport
- Chapter 2: Tibet Airport
- Chapter 3: Tibet Village
- Chapter 4: The Airship
- Chapter 5: The Sawmill
- Chapter 6: The Monastery on the Mount
- Chapter 7: Shangri La
General Tips
• This is a Hidden Object Puzzle Adventure game. Throughout the guide, we will use the acronym “HOS” for Hidden Object Scene. We will list inventory items in ALL CAPS. • There is no timer except in a few of the mini-games. • Use the Main Menu icon in the lower left to return to the Main Menu. • The Globe in the lower right has a list of current Tasks. • There are many inventory items to take in the main scenes, so click on anything that looks interesting. You can also try inventory items, like using a crowbar on a stuck door. • The HINT button works in the main scenes as well as the HOS. • Click on the HINT button in the mini-games to read the instructions.Chapter 1: SF Airport
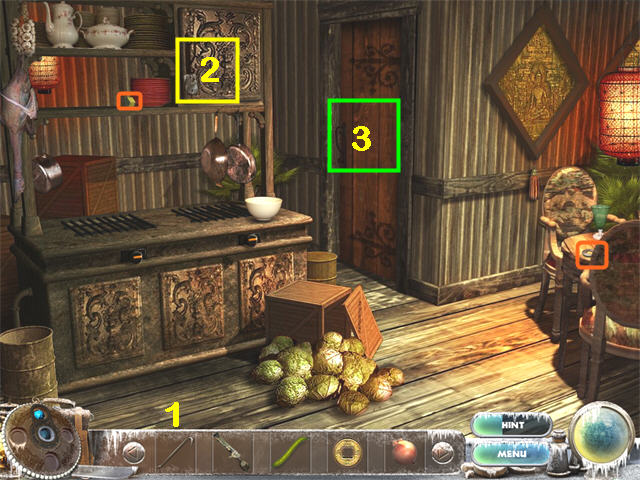
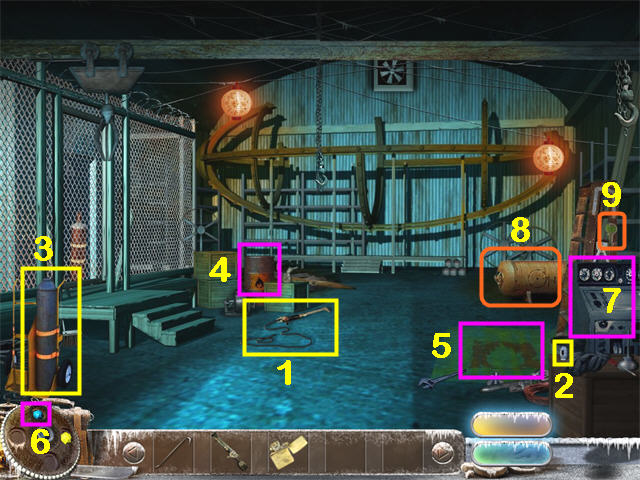
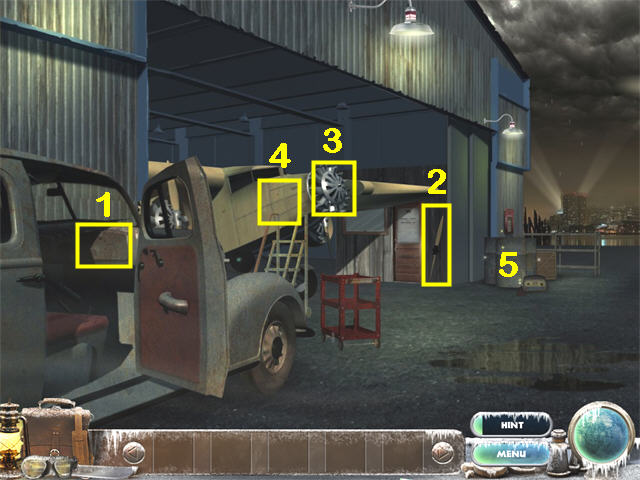 • Marked in Yellow: Open the Glovebox (1) and take the
SCREWDRIVER. Drag the PROPELLOR (2) to the Plane (3). The Side
Panel will open (4). Zoom in on the Side Panel (4); Use the
SCREWDRIVER on each of the 4 screws. Exit Down. • Zoom into
the Fuel Drums (5) to do a HOS.
• Marked in Yellow: Open the Glovebox (1) and take the
SCREWDRIVER. Drag the PROPELLOR (2) to the Plane (3). The Side
Panel will open (4). Zoom in on the Side Panel (4); Use the
SCREWDRIVER on each of the 4 screws. Exit Down. • Zoom into
the Fuel Drums (5) to do a HOS.
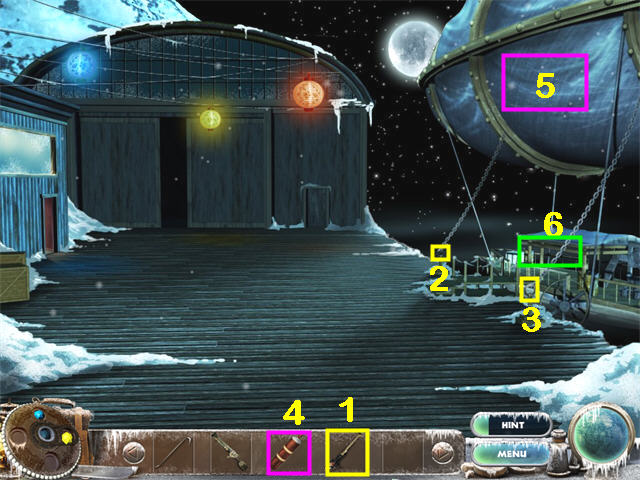
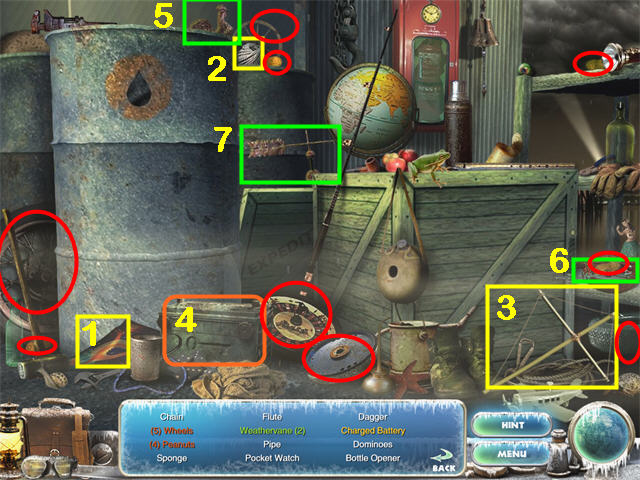 • Marked in Yellow: Drag the Cloth (1) and the String (2) to
the Kite Frame (3). Take the Charged Battery (4). It will be
added to your inventory. • Marked in Green: Drag the Rooster
(5) and the Arrows (6) to the incomplete Weathervane (7). Take
the Weathervane. • Marked in Red: Wheels and Peanuts. • After
the lightning strikes, go through the hole in the wall.
• Marked in Yellow: Drag the Cloth (1) and the String (2) to
the Kite Frame (3). Take the Charged Battery (4). It will be
added to your inventory. • Marked in Green: Drag the Rooster
(5) and the Arrows (6) to the incomplete Weathervane (7). Take
the Weathervane. • Marked in Red: Wheels and Peanuts. • After
the lightning strikes, go through the hole in the wall.
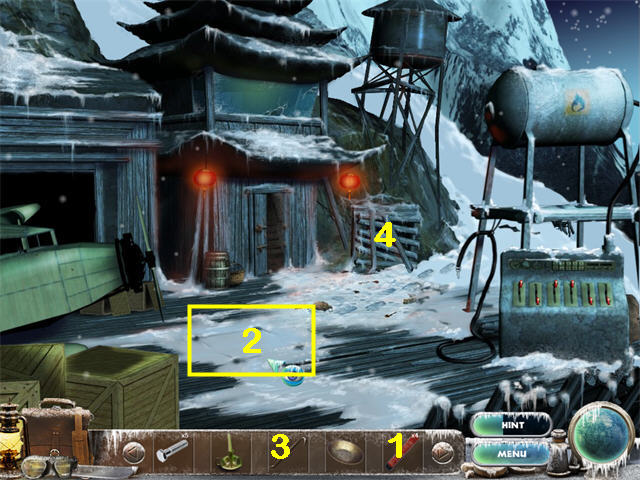
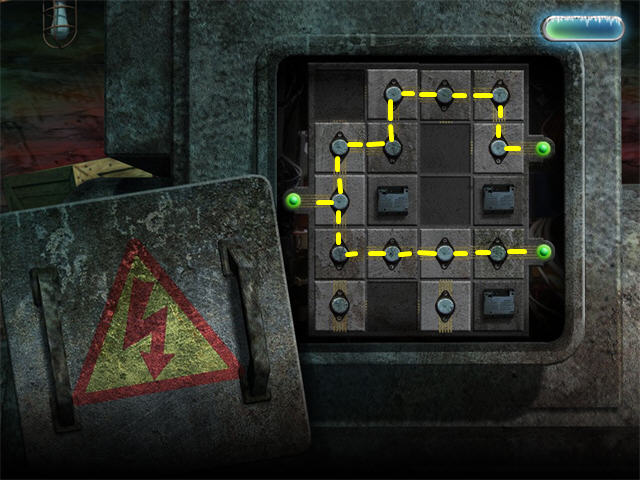
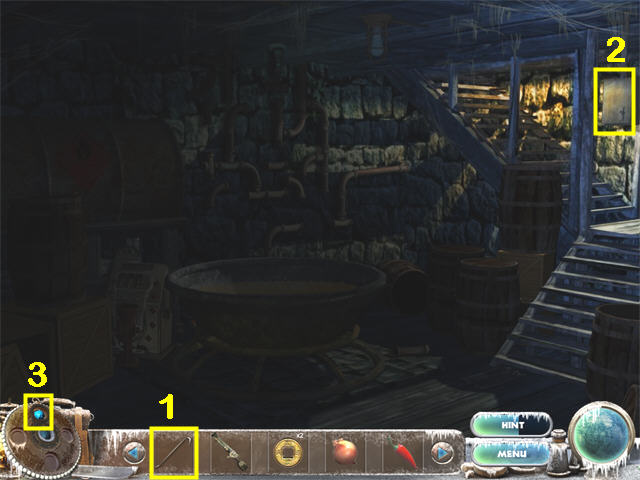
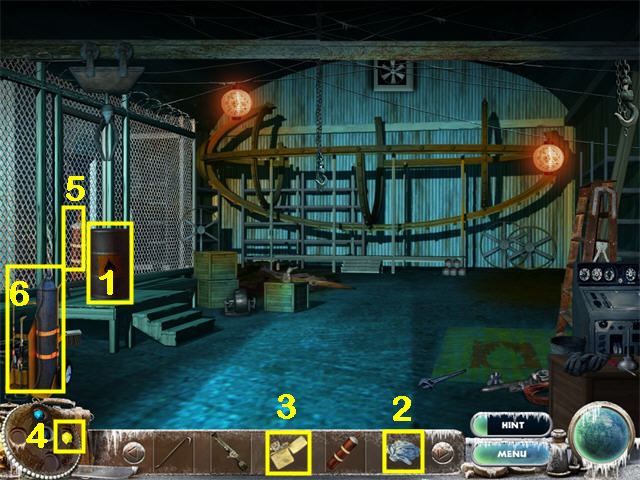
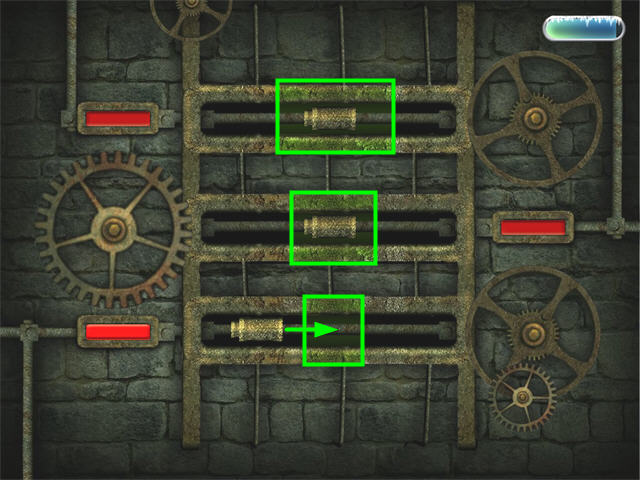
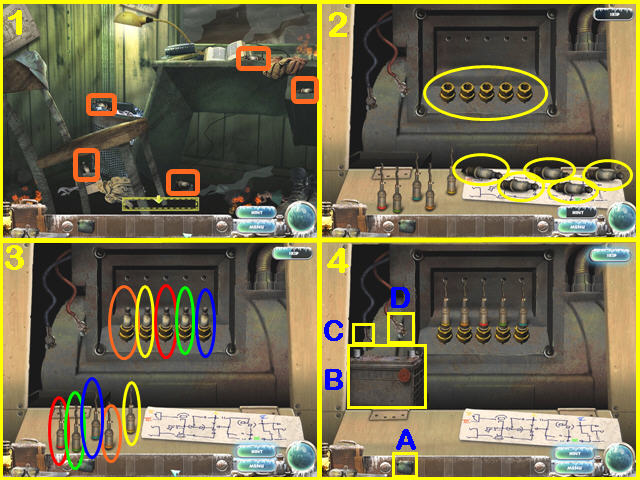 • Take the 5 SPARK PLUGS. • Exit Down. • Zoom in on the
Plane’s Side Panel. • Put the 5 SPARK PLUGS in the holes. •
Put the 5 Spark Plug Caps on the SPARK PLUGS. Their positions
match the colored numbers on the diagram (Orange, Yellow, Red,
Green, Blue). • Put the BATTERY (A) by the two Wires (B). •
Click on each Wire end (C, D) to connect it.
• Take the 5 SPARK PLUGS. • Exit Down. • Zoom in on the
Plane’s Side Panel. • Put the 5 SPARK PLUGS in the holes. •
Put the 5 Spark Plug Caps on the SPARK PLUGS. Their positions
match the colored numbers on the diagram (Orange, Yellow, Red,
Green, Blue). • Put the BATTERY (A) by the two Wires (B). •
Click on each Wire end (C, D) to connect it.
Chapter 2: Tibet Airport
 • Take the BOLT (1). • Zoom in on the Canteen (2).
 • Take 2 BOLTS, the KEY and the SMALL WEIGHT. • Exit Down. •
Zoom into the Control Room Door.
• Take 2 BOLTS, the KEY and the SMALL WEIGHT. • Exit Down. •
Zoom into the Control Room Door.
 • Move the Large Gear (A), Small Gear (B) and Medium Gear (C)
to the positions shown. • Put the SMALL WEIGHT (1) on the
mechanism and the KEY (2) in the keyhole. (The SMALL WEIGHT
and the KEY were in the zoom scene by the Canteen.) • Use the
Lever (D) to open the lock. • Enter the Control Room.
• Move the Large Gear (A), Small Gear (B) and Medium Gear (C)
to the positions shown. • Put the SMALL WEIGHT (1) on the
mechanism and the KEY (2) in the keyhole. (The SMALL WEIGHT
and the KEY were in the zoom scene by the Canteen.) • Use the
Lever (D) to open the lock. • Enter the Control Room.
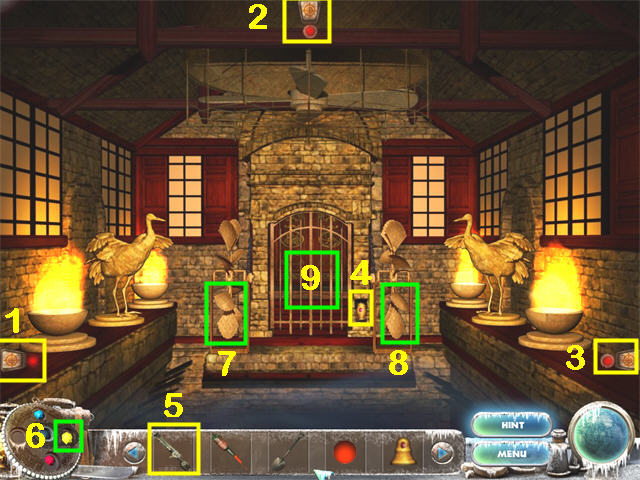
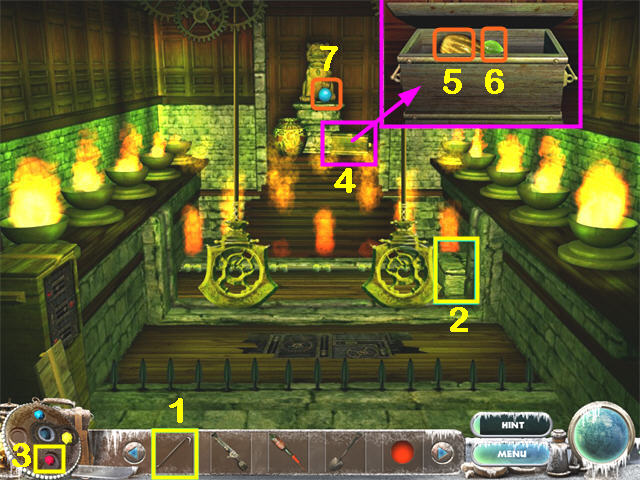
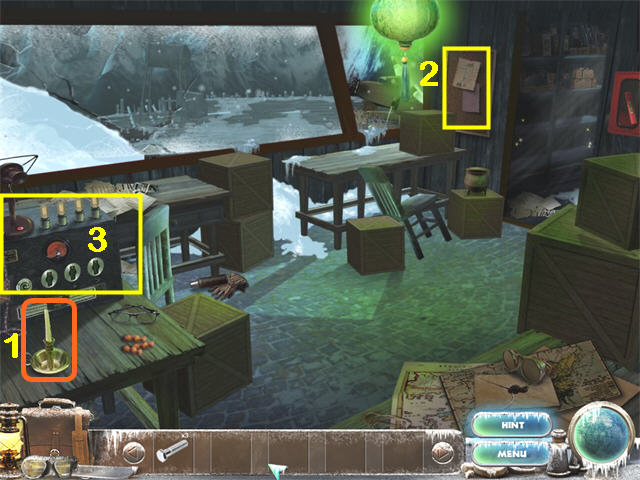 • Take the CANDLESTICK (1). • Zoom in on the Corkboard (2) and
read the flyers. • Zoom in on the Radio(3) for a mini-game
• Take the CANDLESTICK (1). • Zoom in on the Corkboard (2) and
read the flyers. • Zoom in on the Radio(3) for a mini-game
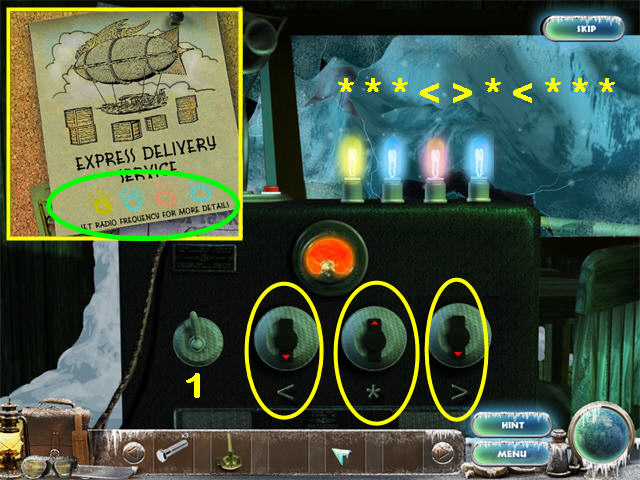 • Set the Dials so the lights on top match the code on the
flyers (Yellow, Blue, Orange, Blue). • Start by turning on the
Switch (1). If at any time you want to reset and go back to
the beginning, move all 3 Dials to the Up position and turn
the Switch off and then on again. • The 3 dials are marked:
(). • Solution: (*,*,*,, *, • Enter the Storage Room.
• Set the Dials so the lights on top match the code on the
flyers (Yellow, Blue, Orange, Blue). • Start by turning on the
Switch (1). If at any time you want to reset and go back to
the beginning, move all 3 Dials to the Up position and turn
the Switch off and then on again. • The 3 dials are marked:
(). • Solution: (*,*,*,, *, • Enter the Storage Room.
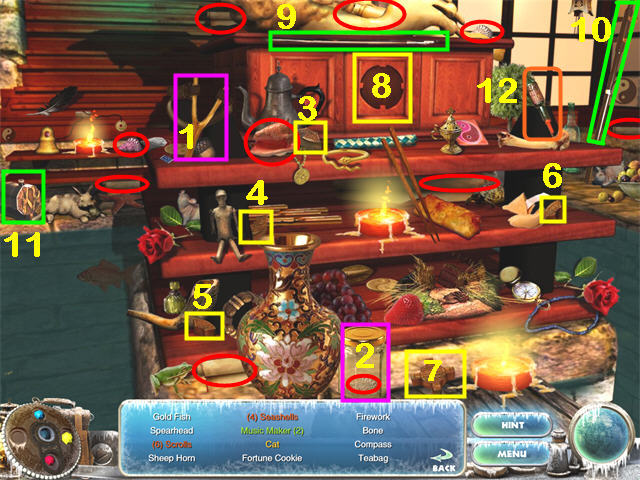
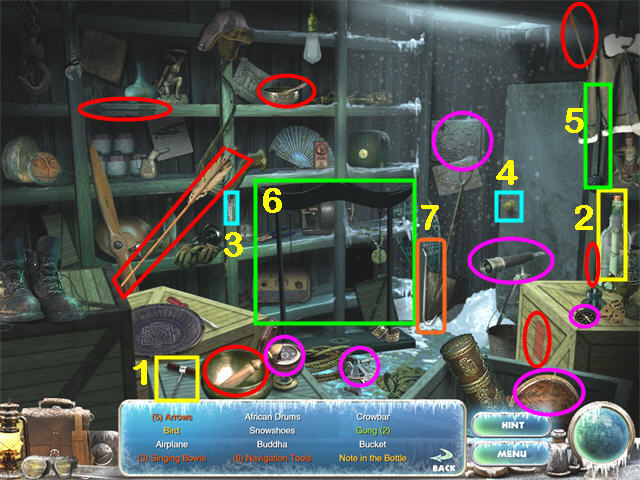 • Take the items on the Find List. • Marked in Yellow: Use the
Corkscrew (1) on the Bottle (2) to reveal the Note in the
Bottle. • Marked in Cyan: Use the Key (3) on the Door (4) to
reveal an Arrow, the Gong Plate and the Bird. • Marked in
Green: Put the Gong Mallet (5) on the right side of the Gong
Stand (6). Put the Gong Plate in the middle of the Gong Stand.
Take the Gong. • Marked in Pink: Navigation Tools (two
Compasses, a Map, a Telescope, a Globe, and a Sextant). •
Marked in Red: Arrows and Singing Bowls. One of the Singing
Bowls is on the shelf behind the Note in the Bottle. • The
CROWBAR (7) will go into your inventory. • Return to the
Control Room.
• Take the items on the Find List. • Marked in Yellow: Use the
Corkscrew (1) on the Bottle (2) to reveal the Note in the
Bottle. • Marked in Cyan: Use the Key (3) on the Door (4) to
reveal an Arrow, the Gong Plate and the Bird. • Marked in
Green: Put the Gong Mallet (5) on the right side of the Gong
Stand (6). Put the Gong Plate in the middle of the Gong Stand.
Take the Gong. • Marked in Pink: Navigation Tools (two
Compasses, a Map, a Telescope, a Globe, and a Sextant). •
Marked in Red: Arrows and Singing Bowls. One of the Singing
Bowls is on the shelf behind the Note in the Bottle. • The
CROWBAR (7) will go into your inventory. • Return to the
Control Room.
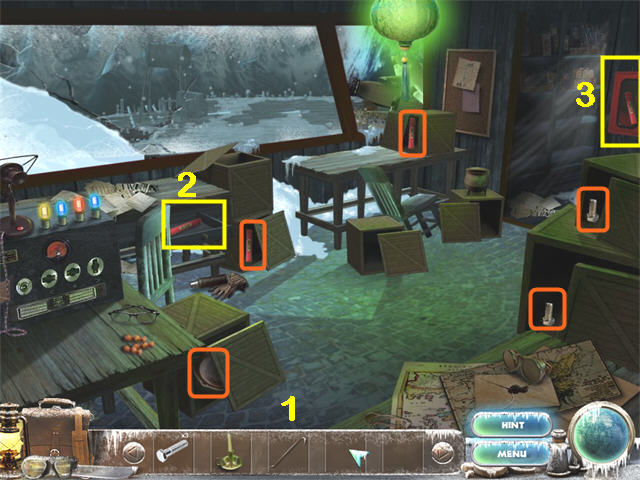 • Uses the CROWBAR (1) (from the HOS in the Storage Room) to
open all the Crates. • Take the GOLD MINER’S PAN, 2 FLARES,
and 2 BOLTS from the open Crates. • Open the Desk Drawer (2)
and take another FLARE. • Open the Glass Case (3) and take the
4th FLARE. • Exit Down.
• Uses the CROWBAR (1) (from the HOS in the Storage Room) to
open all the Crates. • Take the GOLD MINER’S PAN, 2 FLARES,
and 2 BOLTS from the open Crates. • Open the Desk Drawer (2)
and take another FLARE. • Open the Glass Case (3) and take the
4th FLARE. • Exit Down.
 • Put the FLARES (1) (from the Control Room) in the Square
(2). • Examine the Crate that lands on the Square. • Use the
CROWBAR (3) on the Crate and take the RIFLE. • Use the CROWBAR
on the Mine Entrance (4) until you can enter. • Enter the
Mine.
• Put the FLARES (1) (from the Control Room) in the Square
(2). • Examine the Crate that lands on the Square. • Use the
CROWBAR (3) on the Crate and take the RIFLE. • Use the CROWBAR
on the Mine Entrance (4) until you can enter. • Enter the
Mine.
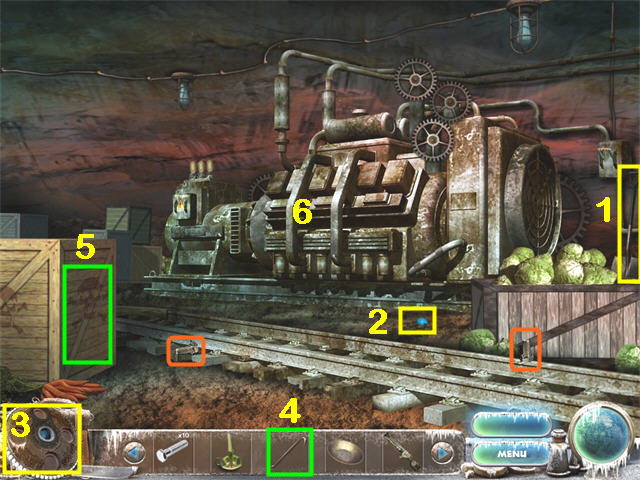
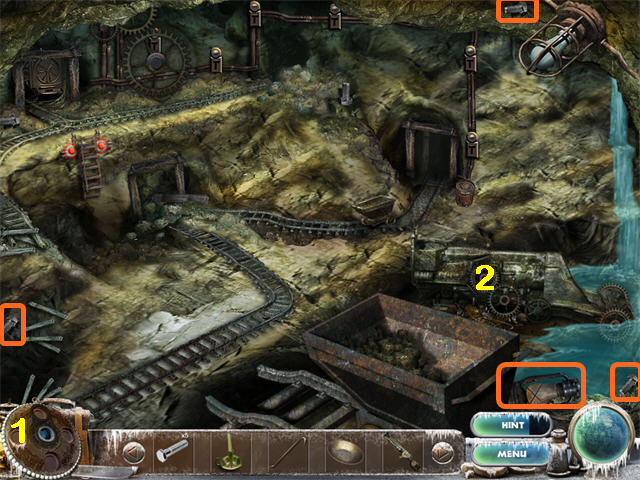 • The Professor says you need to find 4 Elemental Crystals for
his Amulet (1). • Marked in Orange: take the available BOLTS
and the OIL LAMP. • Zoom in on the Machine (2) for a HOS.
• The Professor says you need to find 4 Elemental Crystals for
his Amulet (1). • Marked in Orange: take the available BOLTS
and the OIL LAMP. • Zoom in on the Machine (2) for a HOS.
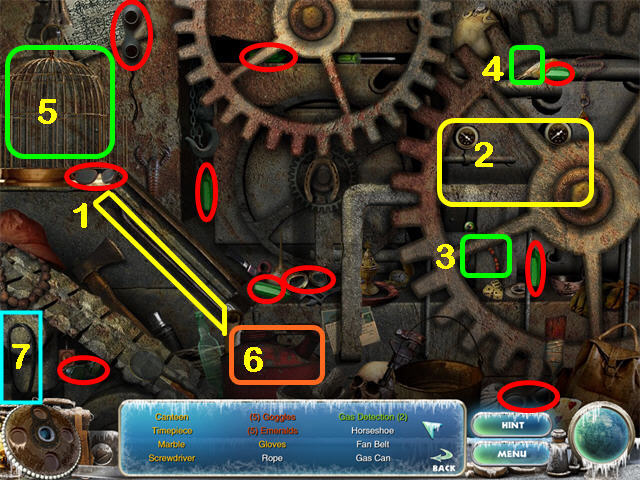 • Marked in Yellow: Drag the Crowbar (1) to the lower Gear (2)
to jam the machine. Now you can take the items behind the
Gears. • Marked in Green: Put the Beaded Bird Swing (3) and
the Bird (4) in the Birdcage (5) to create the Gas Detection
item. • The only Rope that counts is just to the left of the
Gas Can (6). • Marked in Red: Goggles and Emeralds. • The
EMPTY GAS CAN (6) will go into your inventory. • The Fan Belt
is item (7).
• Marked in Yellow: Drag the Crowbar (1) to the lower Gear (2)
to jam the machine. Now you can take the items behind the
Gears. • Marked in Green: Put the Beaded Bird Swing (3) and
the Bird (4) in the Birdcage (5) to create the Gas Detection
item. • The only Rope that counts is just to the left of the
Gas Can (6). • Marked in Red: Goggles and Emeralds. • The
EMPTY GAS CAN (6) will go into your inventory. • The Fan Belt
is item (7).
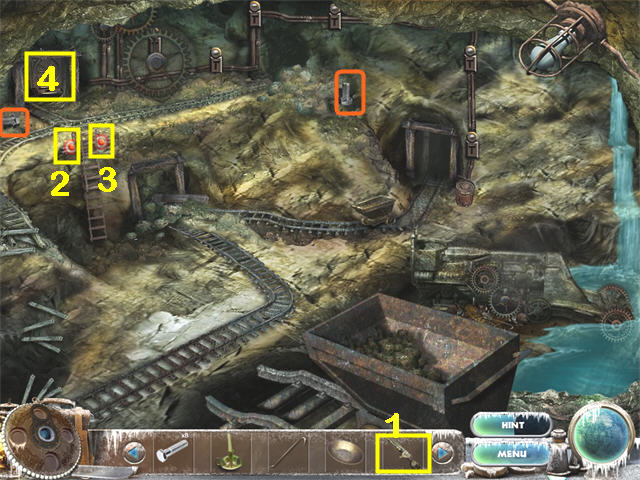 • Click the RIFLE (1) (from the Crate on the Landing Strip) on
the Lights on each side of the Ladder (2 and 3) and the Ladder
will drop down. You now have access to the Mine Upper Level. •
Marked in Orange: Take the BOLTS. • Enter the Generator Room
(4).
• Click the RIFLE (1) (from the Crate on the Landing Strip) on
the Lights on each side of the Ladder (2 and 3) and the Ladder
will drop down. You now have access to the Mine Upper Level. •
Marked in Orange: Take the BOLTS. • Enter the Generator Room
(4).
 • Marked in Orange: Take the BOLTS. • Marked in Yellow: Take
the SHOVEL (1). Use the SHOVEL on the BLUE AMULET CRYSTAL (2).
It will automatically be added to the Amulet (3). You will
probably have to scroll through your inventory tray to find
the SHOVEL. • Marked in Green: Use the CROWBAR (4) on the
Pirate Crate (5) and take the MATCHES. • Examine the Generator
(6). It needs gas. • Exit Down to the Mine. • Enter the Pump
Room through the Shaft to the right of the Cave-in.
• Marked in Orange: Take the BOLTS. • Marked in Yellow: Take
the SHOVEL (1). Use the SHOVEL on the BLUE AMULET CRYSTAL (2).
It will automatically be added to the Amulet (3). You will
probably have to scroll through your inventory tray to find
the SHOVEL. • Marked in Green: Use the CROWBAR (4) on the
Pirate Crate (5) and take the MATCHES. • Examine the Generator
(6). It needs gas. • Exit Down to the Mine. • Enter the Pump
Room through the Shaft to the right of the Cave-in.
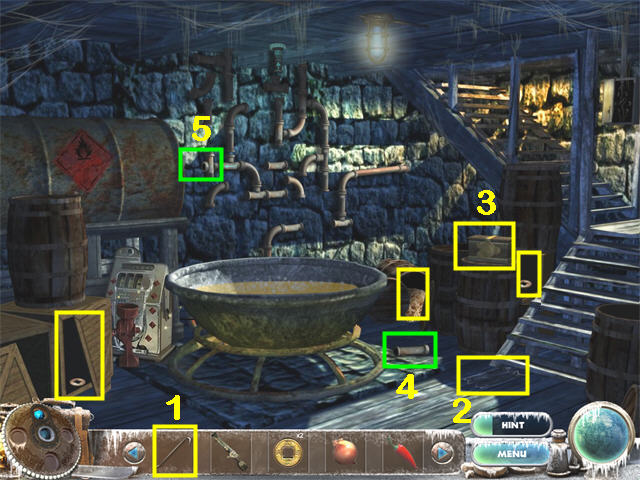
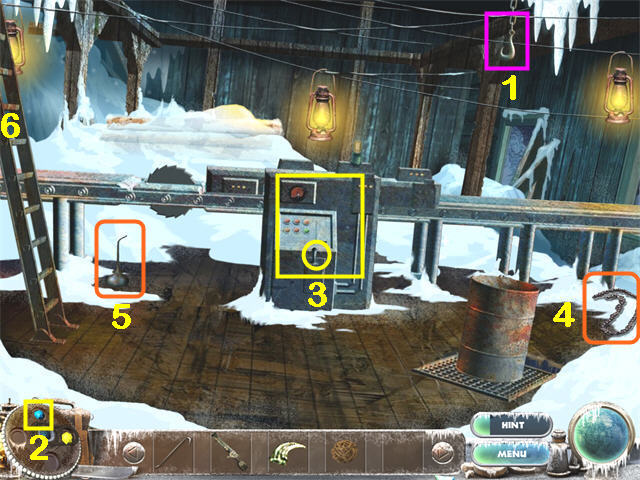
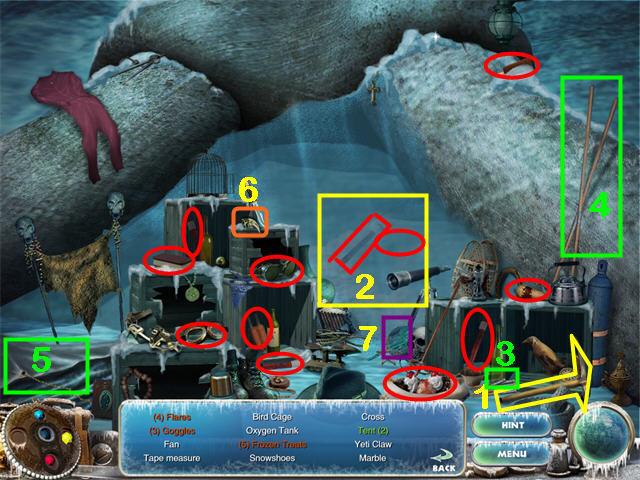
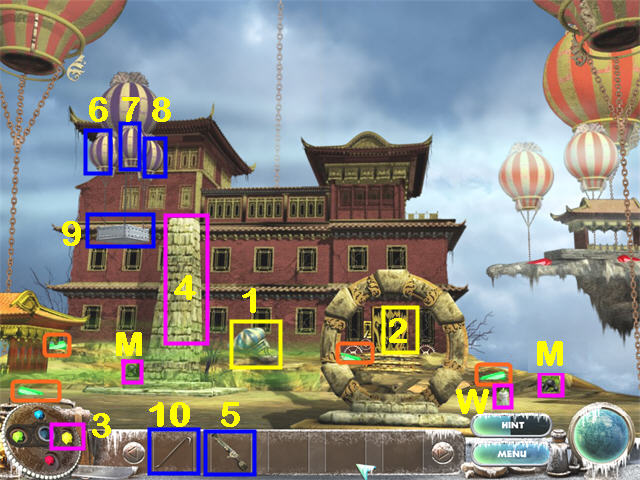
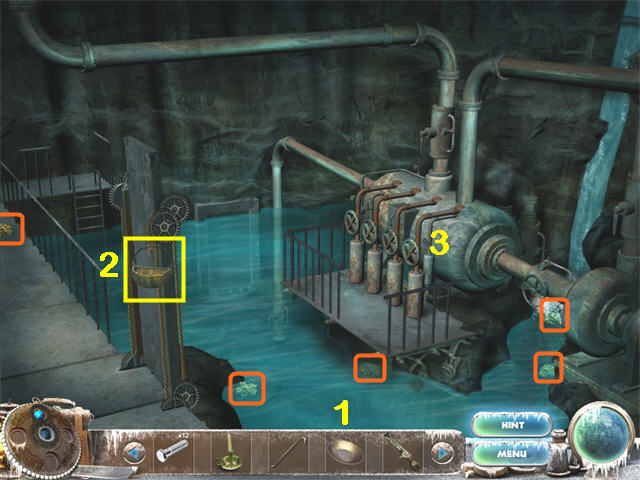 • Marked in Orange: Take 5 FOOL’S GOLD from around the room.
You will need to use the GOLD MINER’S PAN (1) (from a Crate in
the Control Room) to get the pieces in the water. • Put the
FOOL’S GOLD into the Counterweight Basket (2) to lower the
Drawbridge. • Examine the PUMP (3).
• Marked in Orange: Take 5 FOOL’S GOLD from around the room.
You will need to use the GOLD MINER’S PAN (1) (from a Crate in
the Control Room) to get the pieces in the water. • Put the
FOOL’S GOLD into the Counterweight Basket (2) to lower the
Drawbridge. • Examine the PUMP (3).
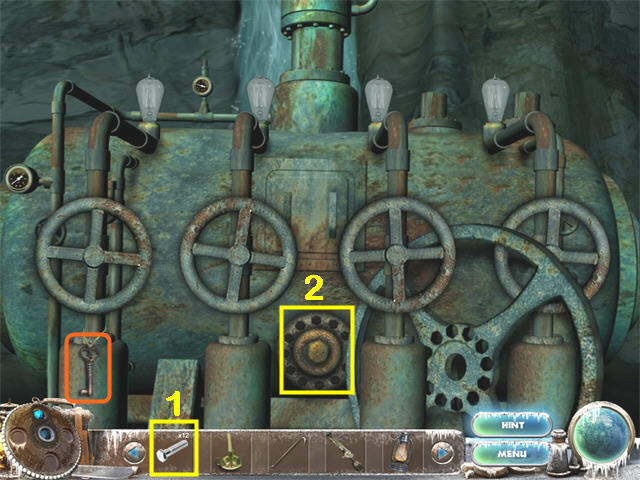 • Take the PADLOCK KEY (orange). • Put the 12 BOLTS (1) on the
Flywheel (2). There was 1 BOLT on a Crate at the Landing
Strip, 2 BOLTS in the zoom scene at the Landing Strip, 2 BOLTS
in the Crates in the Control Room, 3 BOLTS on the lower level
of the Mine, 2 BOLTS on the upper level of the Mine, and 2
BOLTS in the Generator Room. That is all you can do until you
get the Generator turned on. • Exit Down twice to the Landing
Strip.
• Take the PADLOCK KEY (orange). • Put the 12 BOLTS (1) on the
Flywheel (2). There was 1 BOLT on a Crate at the Landing
Strip, 2 BOLTS in the zoom scene at the Landing Strip, 2 BOLTS
in the Crates in the Control Room, 3 BOLTS on the lower level
of the Mine, 2 BOLTS on the upper level of the Mine, and 2
BOLTS in the Generator Room. That is all you can do until you
get the Generator turned on. • Exit Down twice to the Landing
Strip.
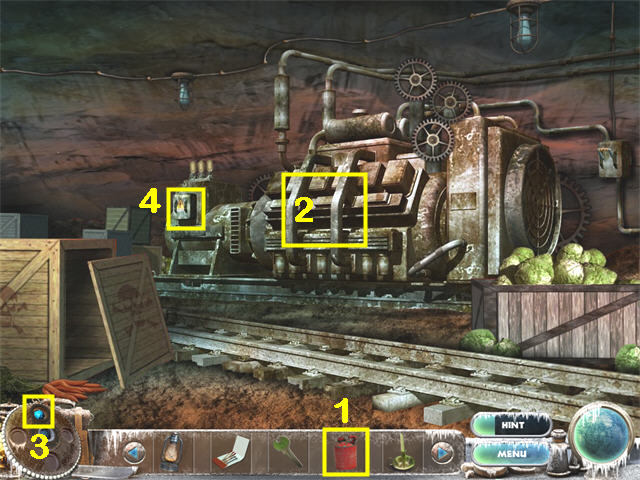
 • Put the EMPTY GAS CAN (1) (from the HOS on the Machine in
the Mine) on the Hose (2) from the Fuel Pump. • Set the
Switches on the Fuel Pump (3) to match the pattern on the
Corkboard in the Control Room (A). • Take the FULL GAS CAN
(4). • Go into the Mine (B). • Enter the Generator Room on the
upper level.
• Put the EMPTY GAS CAN (1) (from the HOS on the Machine in
the Mine) on the Hose (2) from the Fuel Pump. • Set the
Switches on the Fuel Pump (3) to match the pattern on the
Corkboard in the Control Room (A). • Take the FULL GAS CAN
(4). • Go into the Mine (B). • Enter the Generator Room on the
upper level.
 • Put the FULL TANK OF GAS (1) (from the Fuel Pump at the
Landing Strip) on the Generator (2). • Use the BLUE AMULET
CRYSTAL (3) on the Generator (2). • Zoom in on the broken
Circuit Board (4) for a mini-game.
• Put the FULL TANK OF GAS (1) (from the Fuel Pump at the
Landing Strip) on the Generator (2). • Use the BLUE AMULET
CRYSTAL (3) on the Generator (2). • Zoom in on the broken
Circuit Board (4) for a mini-game.
 • Click on a piece and move it to any empty space. • You do
not need to use all the pieces. • Once the Circuit Board is
repaired, pull the Switch on the wall to the right of the
Generator to turn on the lights. • Exit Down to the Mine.
• Click on a piece and move it to any empty space. • You do
not need to use all the pieces. • Once the Circuit Board is
repaired, pull the Switch on the wall to the right of the
Generator to turn on the lights. • Exit Down to the Mine.
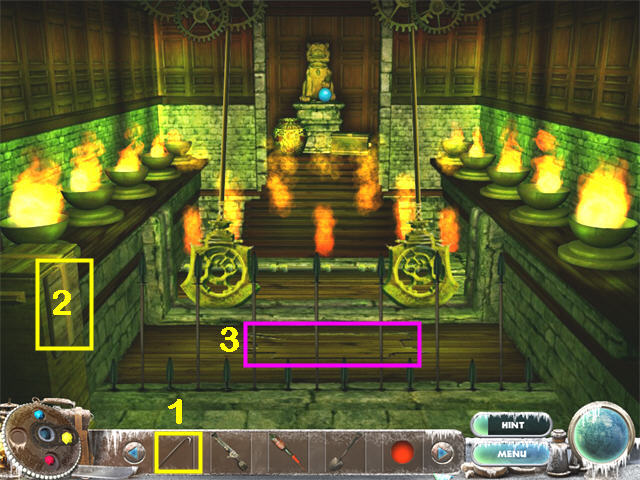
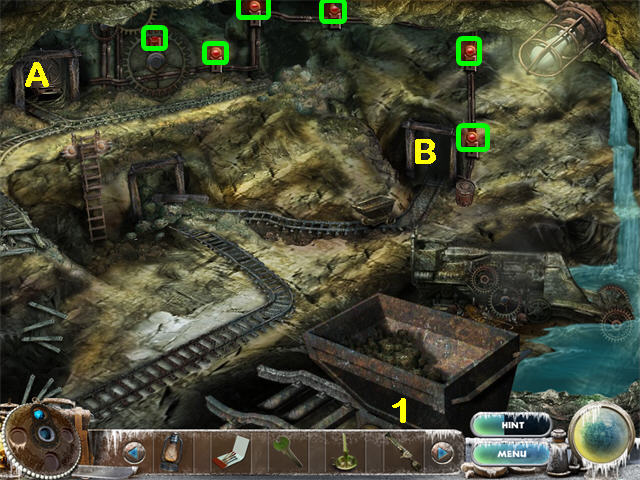 • Marked in Green: Use the RIFLE (1) on each of the 6 Lights.
Each Light will turn green as you shoot it. • When all the
Lights are green, enter the Pump Room (B) and zoom in on the
Pump.
• Marked in Green: Use the RIFLE (1) on each of the 6 Lights.
Each Light will turn green as you shoot it. • When all the
Lights are green, enter the Pump Room (B) and zoom in on the
Pump.
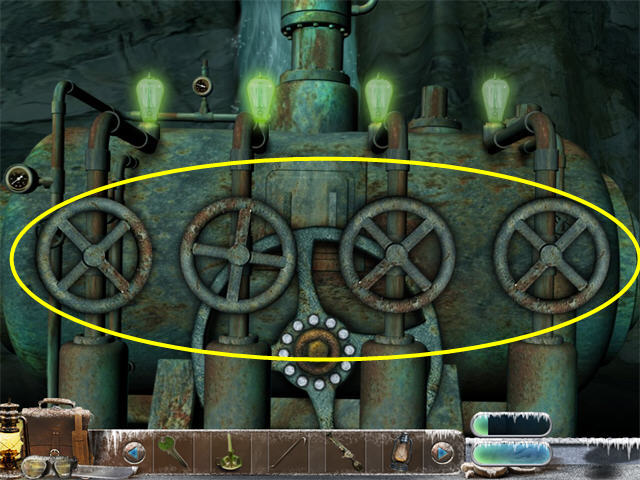 • Once you have turned on the Generator and all the Lights in
the Mine, the bulbs on the Pump will be flickering. • Turn the
Wheels as shown in the screenshot so all four bulbs are green.
• Exit Down to the Pump Room. The flooded Doorway will now be
available. Go through it.
• Once you have turned on the Generator and all the Lights in
the Mine, the bulbs on the Pump will be flickering. • Turn the
Wheels as shown in the screenshot so all four bulbs are green.
• Exit Down to the Pump Room. The flooded Doorway will now be
available. Go through it.
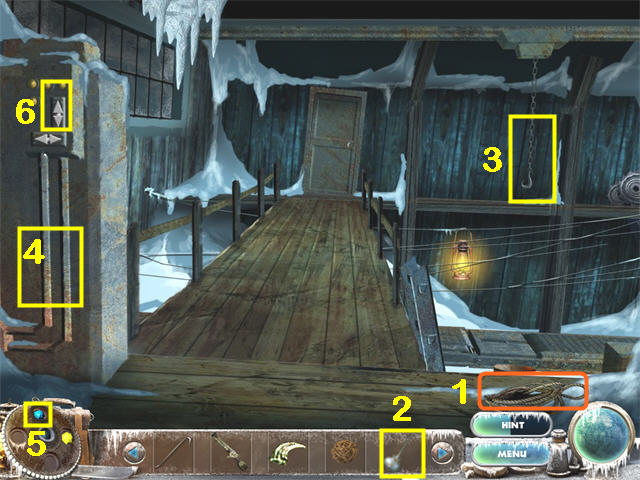
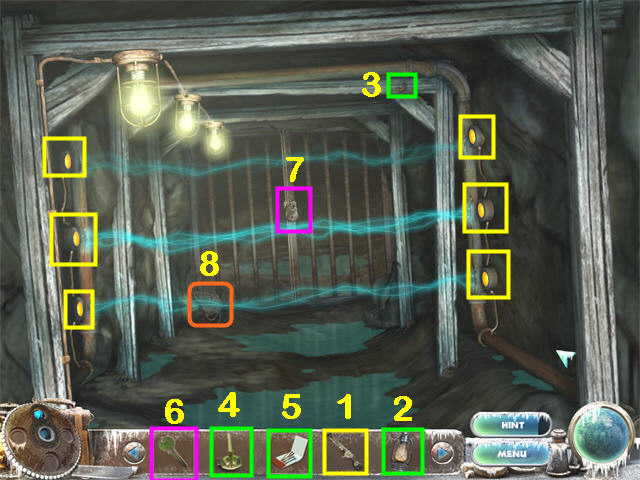 • Marked in Yellow: Use the RIFLE (1) to shoot out all 6 arc
generators. The lights will go out. • Marked in Green: Hang
the LANTERN (2) (from the Mine) on the Crossbeam Hook (3). Put
the CANDLE (4) (from the Control Room) in the Lantern (3). Use
the MATCHES (5) (from the Crate in the Generator Room) on the
Lantern (3). The lights will come on. • Marked in Pink: Use
the PADLOCK KEY (6) (from the Pump) on the Padlock (7). The
gate will open. • Take the PRIMER CORD (8). • Zoom in for a
HOS.
• Marked in Yellow: Use the RIFLE (1) to shoot out all 6 arc
generators. The lights will go out. • Marked in Green: Hang
the LANTERN (2) (from the Mine) on the Crossbeam Hook (3). Put
the CANDLE (4) (from the Control Room) in the Lantern (3). Use
the MATCHES (5) (from the Crate in the Generator Room) on the
Lantern (3). The lights will come on. • Marked in Pink: Use
the PADLOCK KEY (6) (from the Pump) on the Padlock (7). The
gate will open. • Take the PRIMER CORD (8). • Zoom in for a
HOS.
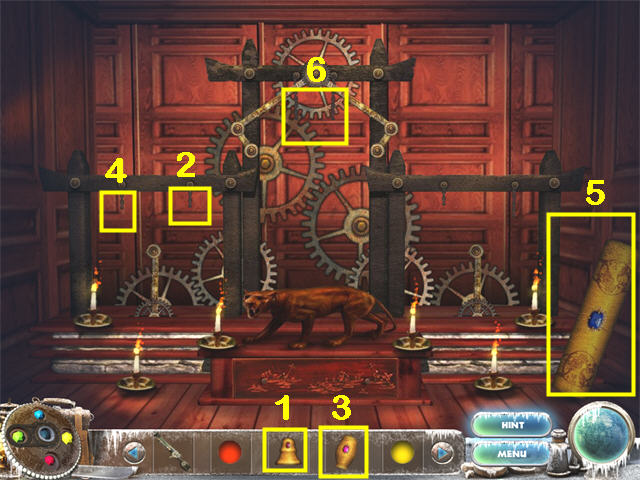
 • Marked in Yellow: Put the Clock Hand (1) and the Pendulum
(2) on the Clock (3) to create the Working Clock. • Marked in
Blue: Use the Pick (4) on the Rock (5) to reveal the Geode. •
Marked in Green: Put the Machine Belt (6) on the Rock Polisher
(7). Flip the switch on the front of the Rock Polisher. Put
the Dull Crystal (8) on the Rock Polisher to create the
Polished Rock. Take it. • The MINE CART WHEEL (9) will go into
your inventory. • Exit Down twice to the Mine.
• Marked in Yellow: Put the Clock Hand (1) and the Pendulum
(2) on the Clock (3) to create the Working Clock. • Marked in
Blue: Use the Pick (4) on the Rock (5) to reveal the Geode. •
Marked in Green: Put the Machine Belt (6) on the Rock Polisher
(7). Flip the switch on the front of the Rock Polisher. Put
the Dull Crystal (8) on the Rock Polisher to create the
Polished Rock. Take it. • The MINE CART WHEEL (9) will go into
your inventory. • Exit Down twice to the Mine.
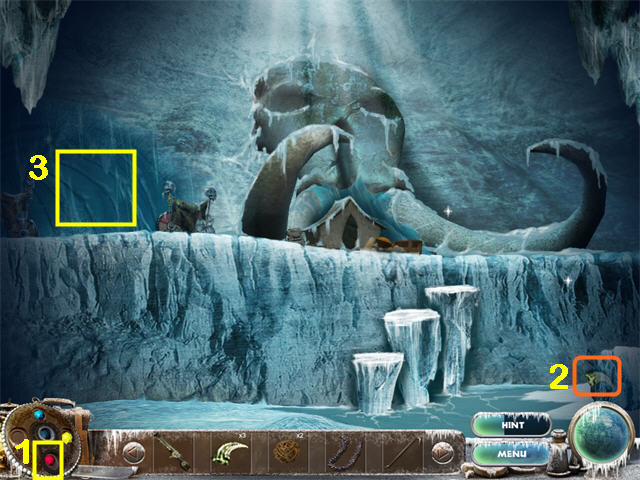
 • Put the MINE CART WHEEL (1) (from the HOS in the room off
the Pump Room) on the Cart (2). • Marked in Red: Put the
Barrel of Explosives (3) on the Pile of Rocks (4). Add the
PRIMER CORD (5) (from the room off the Pump Room). Use the
BLUE AMULET CRYSTAL (6) on the Pile of Rocks (4). The cave-in
will be cleared. • Exit through the left Mine Shaft (7).
• Put the MINE CART WHEEL (1) (from the HOS in the room off
the Pump Room) on the Cart (2). • Marked in Red: Put the
Barrel of Explosives (3) on the Pile of Rocks (4). Add the
PRIMER CORD (5) (from the room off the Pump Room). Use the
BLUE AMULET CRYSTAL (6) on the Pile of Rocks (4). The cave-in
will be cleared. • Exit through the left Mine Shaft (7).
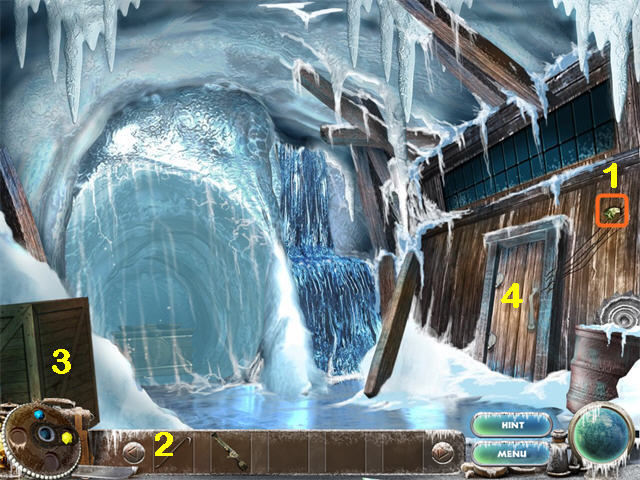
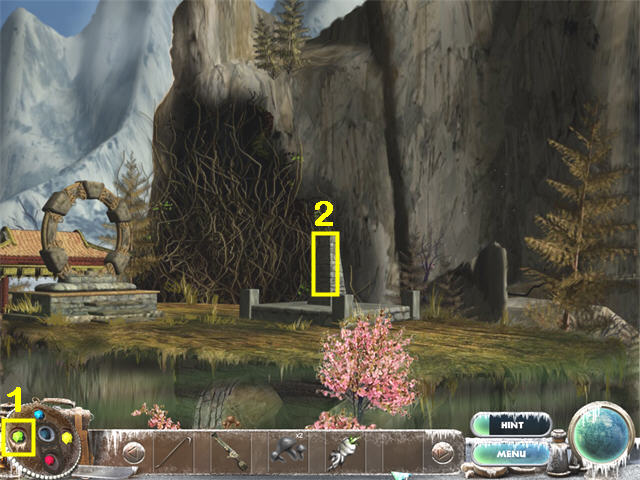
Chapter 3: Tibet Village
 • Examine the Origami Crane (1). You need wind to blow it
down. • Marked in Orange: Take the GREEN BEANS and the TOKEN.
• Zoom in on the Well (2) for a HOS.
• Examine the Origami Crane (1). You need wind to blow it
down. • Marked in Orange: Take the GREEN BEANS and the TOKEN.
• Zoom in on the Well (2) for a HOS.
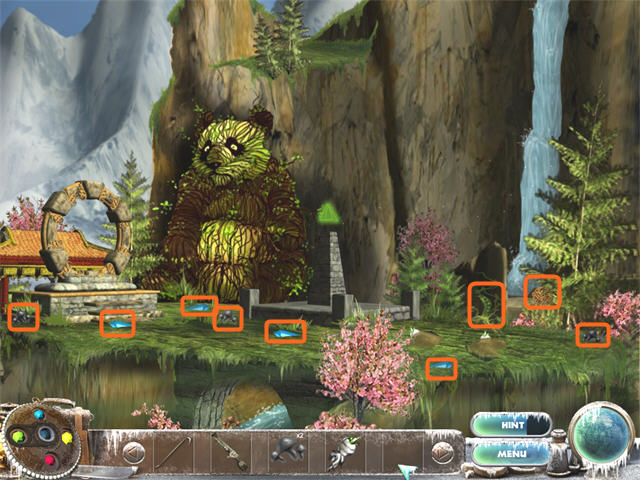
 • Marked in Yellow: Put the Bucket (1) on the Rope (2). Put
the Handle (3) on the Well (4). Crank the Handle to pull up
the Onion. • Marked in Green: Put the Wheel (5) and the
Handlebars (6) on the Bike (7). • Marked in Red: Soap and
Water Containers. • The ONION will go into your inventory. •
Enter the Restaurant through the Door standing open on the
right side of the Courtyard.
• Marked in Yellow: Put the Bucket (1) on the Rope (2). Put
the Handle (3) on the Well (4). Crank the Handle to pull up
the Onion. • Marked in Green: Put the Wheel (5) and the
Handlebars (6) on the Bike (7). • Marked in Red: Soap and
Water Containers. • The ONION will go into your inventory. •
Enter the Restaurant through the Door standing open on the
right side of the Courtyard.
 • Marked in Orange: take the TOKEN and the PENTAGON PUZZLE
PIECE. • Use the CROWBAR (1) to open the Cabinet (2) and take
the RED PEPPER. • Use the CROWBAR to open the Locked Door (3).
• Go through the Door (3) to the Restaurant Basement.
• Marked in Orange: take the TOKEN and the PENTAGON PUZZLE
PIECE. • Use the CROWBAR (1) to open the Cabinet (2) and take
the RED PEPPER. • Use the CROWBAR to open the Locked Door (3).
• Go through the Door (3) to the Restaurant Basement.
 • Use the CROWBAR (1) on the Power Box (2). • Use the BLUE
AMULET CRYSTAL (3) on the Power Box (2).
• Use the CROWBAR (1) on the Power Box (2). • Use the BLUE
AMULET CRYSTAL (3) on the Power Box (2).
 • Marked in Yellow: use the CROWBAR (1) on all the Boxes and
Barrels. Take two TOKENS and the NOODLES. Use the CROWBAR (1)
on the Loose Floorboard (2) and take one more TOKEN. Examine
the Puzzle Box (3). • Marked in Green: move the Pipe (4) to
the Wall (5). • Zoom in on the Wall (5) for a mini-game.
• Marked in Yellow: use the CROWBAR (1) on all the Boxes and
Barrels. Take two TOKENS and the NOODLES. Use the CROWBAR (1)
on the Loose Floorboard (2) and take one more TOKEN. Examine
the Puzzle Box (3). • Marked in Green: move the Pipe (4) to
the Wall (5). • Zoom in on the Wall (5) for a mini-game.
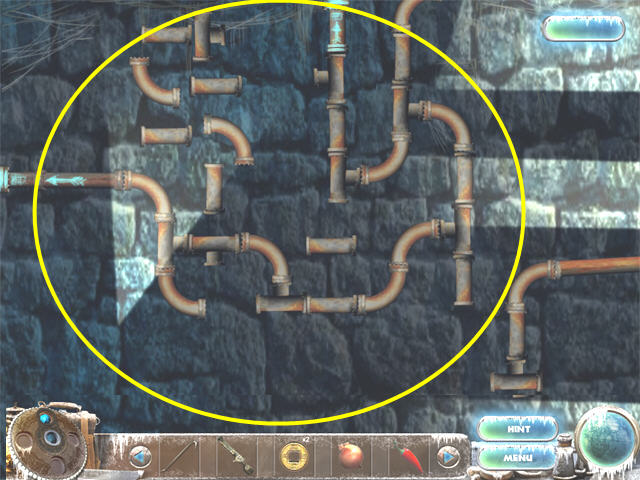 • Connect the two pipes with blue arrows. You do not need to
use all the pieces. You do not have to worry about pipes with
extra connectors. • Zoom in on the Lucky 7’s Game Machine for
a HOS.
• Connect the two pipes with blue arrows. You do not need to
use all the pieces. You do not have to worry about pipes with
extra connectors. • Zoom in on the Lucky 7’s Game Machine for
a HOS.
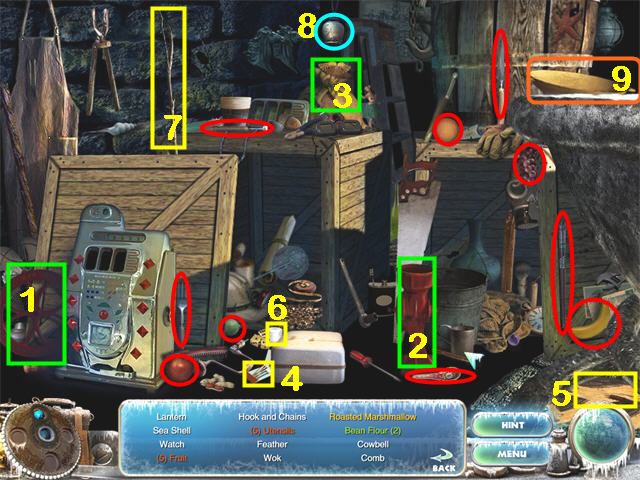 • Marked in Green: Put the Wheel (1) on the Grinder (2). Put
the Sack of Beans (3) in the Grinder. Take the Bean Flour. •
Marked in Yellow: Put the Matches (4) on the Firewood (5) to
start a Fire. Put the Marshmallow (6) on the Stick (7). Put
the Stick with the Marshmallow on the Fire. Take the Toasted
Marshmallow. • The Utensils and the Fruit are marked in Red. •
The Cowbell is item #8. • The WOK (9) will go into your
inventory. • Go upstairs.
• Marked in Green: Put the Wheel (1) on the Grinder (2). Put
the Sack of Beans (3) in the Grinder. Take the Bean Flour. •
Marked in Yellow: Put the Matches (4) on the Firewood (5) to
start a Fire. Put the Marshmallow (6) on the Stick (7). Put
the Stick with the Marshmallow on the Fire. Take the Toasted
Marshmallow. • The Utensils and the Fruit are marked in Red. •
The Cowbell is item #8. • The WOK (9) will go into your
inventory. • Go upstairs.
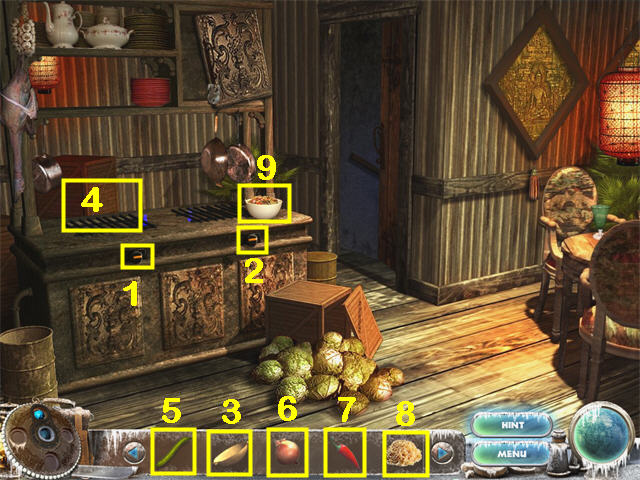 • Marked in Yellow: Turn the two Knobs on the stove (1, 2) to
start the fire. Put the WOK (3) (from the HOS at the Lucky 7
Game Machine in the Restaurant Basement) on the Stove (4). Add
the GREEN BEANS (5) (from the Courtyard), the ONION (6) (from
the HOS at the Well), the RED PEPPER (7) (from the Cabinet in
the Restaurant), and the NOODLES (8) (from the Barrel in the
Restaurant Basement). Take the PREPARED MEAL (9). • Exit Down
to the Village Courtyard.
• Marked in Yellow: Turn the two Knobs on the stove (1, 2) to
start the fire. Put the WOK (3) (from the HOS at the Lucky 7
Game Machine in the Restaurant Basement) on the Stove (4). Add
the GREEN BEANS (5) (from the Courtyard), the ONION (6) (from
the HOS at the Well), the RED PEPPER (7) (from the Cabinet in
the Restaurant), and the NOODLES (8) (from the Barrel in the
Restaurant Basement). Take the PREPARED MEAL (9). • Exit Down
to the Village Courtyard.
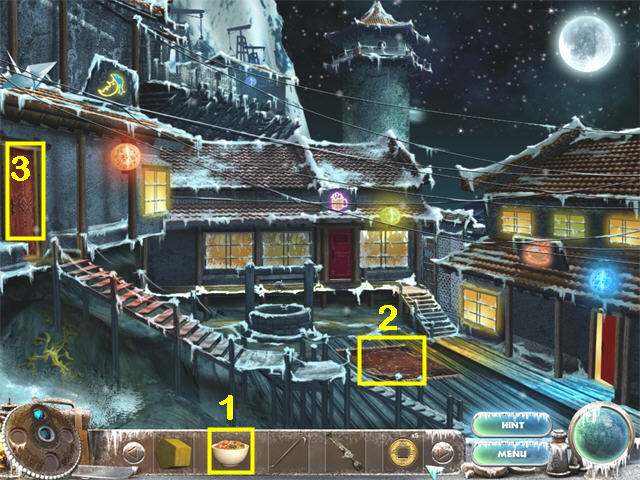 • Put the PREPARED MEAL (1) (from the Restaurant) on the
Carpet (2). After the Ghost takes the food, the Inn Door (3)
will open. • Enter the Inn.
• Put the PREPARED MEAL (1) (from the Restaurant) on the
Carpet (2). After the Ghost takes the food, the Inn Door (3)
will open. • Enter the Inn.
 • Marked in Orange: Take the CIRCLE PUZZLE PIECE and the
TOKEN. • Zoom in on the Painting (A). • Exit to the Inn Lobby.
• Zoom in on the Safe (B) for a mini-game.
• Marked in Orange: Take the CIRCLE PUZZLE PIECE and the
TOKEN. • Zoom in on the Painting (A). • Exit to the Inn Lobby.
• Zoom in on the Safe (B) for a mini-game.
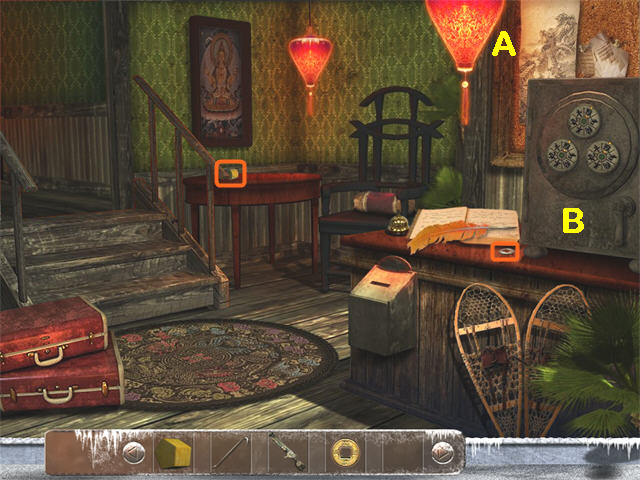
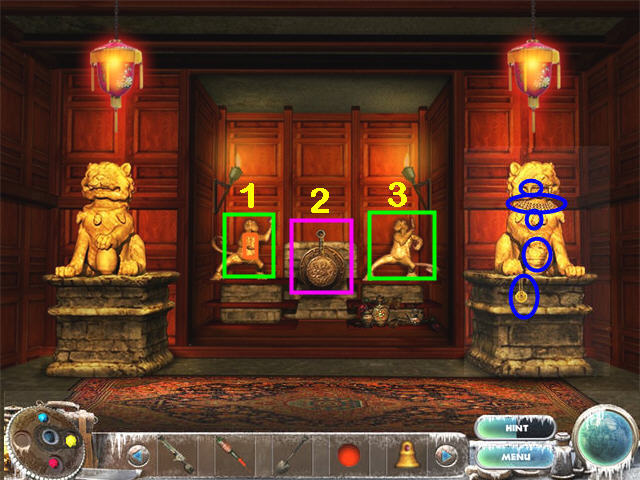
 • There are three Dials, two with blue centers and one with a
red center. Turn each to the matching colored symbol from the
Painting. The solution is shown in the screenshot. • Open the
Handle (A) and take the TOKEN. • You now have 7 TOKENS. You
need 10 to rent a room. • Go upstairs.
• There are three Dials, two with blue centers and one with a
red center. Turn each to the matching colored symbol from the
Painting. The solution is shown in the screenshot. • Open the
Handle (A) and take the TOKEN. • You now have 7 TOKENS. You
need 10 to rent a room. • Go upstairs.
 • Marked in Orange: Take the TOKEN (1) and the MINER’S SHIRT
(2). • Use the CROWBAR (3) to break the VASE (4) and take a
TOKEN. • Use the CROWBAR (3) to open the Cabinet (5) and take
the SQUARE PUZZLE PIECE. • Exit Down twice to the Village
Courtyard. • Go back to the Restaurant Basement. • Zoom in on
the Puzzle Chest. • Put the SQUARE PUZZLE PIECE (from the
Cabinet Upstairs at the Inn), the PENTAGON PUZZLE PIECE (from
the Cabinet in the Restaurant), and the CIRCLE PUZZLE PIECE
(from the Table in the Inn) in place. The Puzzle Chest will
open. Take the YELLOW AMULET CRYSTAL and it will automatically
go into the Amulet. • Return to the Village Courtyard.
• Marked in Orange: Take the TOKEN (1) and the MINER’S SHIRT
(2). • Use the CROWBAR (3) to break the VASE (4) and take a
TOKEN. • Use the CROWBAR (3) to open the Cabinet (5) and take
the SQUARE PUZZLE PIECE. • Exit Down twice to the Village
Courtyard. • Go back to the Restaurant Basement. • Zoom in on
the Puzzle Chest. • Put the SQUARE PUZZLE PIECE (from the
Cabinet Upstairs at the Inn), the PENTAGON PUZZLE PIECE (from
the Cabinet in the Restaurant), and the CIRCLE PUZZLE PIECE
(from the Table in the Inn) in place. The Puzzle Chest will
open. Take the YELLOW AMULET CRYSTAL and it will automatically
go into the Amulet. • Return to the Village Courtyard.
 • Marked in Yellow: Use the Yellow Amulet Crystal (2) on the
Origami Bird (1). The Origami Bird will blow across the
Village Courtyard to the roof of the Restaurant (3). Use the
BLUE AMULET CRYSTAL (4) on the Origami Bird (3). The TOKEN (5)
will fall to the ground. Take it. • Enter the INN (A). • You
now have 10 Tokens (1 from the Village Courtyard, 1 from the
Restaurant table, 2 from the Crates in the Restaurant
Basement, 1 from under the Floorboards in the Restaurant
Basement, 1 from the Inn Lobby counter, 1 from the Safe in the
Inn Lobby, 1 from Door #2 upstairs at the Inn, 1 from the Vase
upstairs at the Inn, and 1 from the Origami Crane in the
Courtyard.). Put them in the wood Coin Box below the Safe. •
The Coin Box will open. Take the ROOM KEY. • Go Upstairs. •
Use the ROOM KEY on Door #1. • Enter the room. • Put the
MINER’S SHIRT (from Upstairs at the Inn) on the Mannequin. •
Zoom in on the Nightstand left of the Bed for a HOS.
• Marked in Yellow: Use the Yellow Amulet Crystal (2) on the
Origami Bird (1). The Origami Bird will blow across the
Village Courtyard to the roof of the Restaurant (3). Use the
BLUE AMULET CRYSTAL (4) on the Origami Bird (3). The TOKEN (5)
will fall to the ground. Take it. • Enter the INN (A). • You
now have 10 Tokens (1 from the Village Courtyard, 1 from the
Restaurant table, 2 from the Crates in the Restaurant
Basement, 1 from under the Floorboards in the Restaurant
Basement, 1 from the Inn Lobby counter, 1 from the Safe in the
Inn Lobby, 1 from Door #2 upstairs at the Inn, 1 from the Vase
upstairs at the Inn, and 1 from the Origami Crane in the
Courtyard.). Put them in the wood Coin Box below the Safe. •
The Coin Box will open. Take the ROOM KEY. • Go Upstairs. •
Use the ROOM KEY on Door #1. • Enter the room. • Put the
MINER’S SHIRT (from Upstairs at the Inn) on the Mannequin. •
Zoom in on the Nightstand left of the Bed for a HOS.
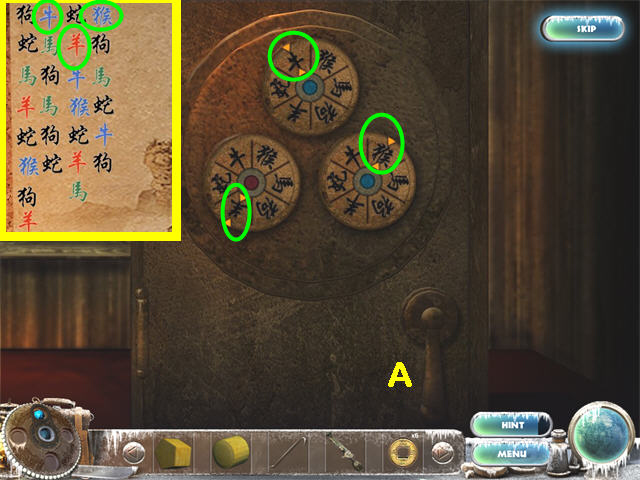
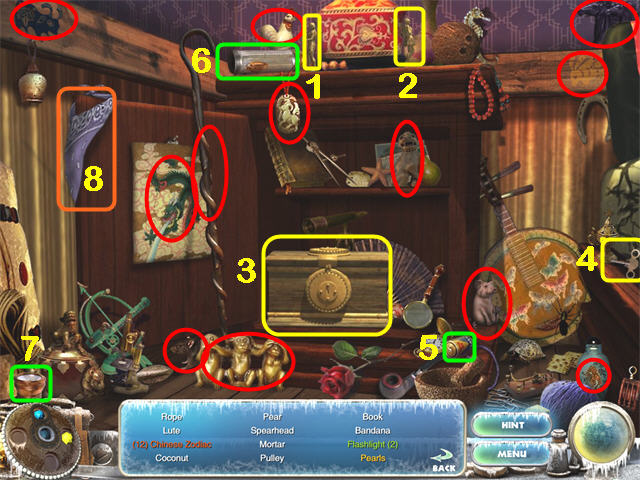 • Marked in Red: the Twelve Signs of the Chinese Zodiac (Rat,
Ox, Tiger, Rabbit, Dragon, Snake, Horse, Goat, Monkey,
Rooster, Dog, Pig). The Dog is the statuette on the shelf
above the Music Box. The Snake is wrapped around the black
walking stick. • Marked in Yellow: Put the Male Figurine (1)
and the Female Figurine (2) on top of the Music Box (3). Use
the Key (4) to open the Music Box and take the Pearls. •
Marked in Green: Put the Battery (5) into the Flashlight Base
(6). Put the Flashlight Top (7) on the Flashlight Base and
take the Flashlight. • The BANDANA (8) will go into your
inventory. • Put the BANDANA (from the HOS in this room) on
the Mannequin. • Unlock the Chest by pointing each latch down
to reveal the BOOTS. • Take the BOOTS and put them on the
Mannequin. • Return to the Village Courtyard and zoom in on
the Well for a HOS.
• Marked in Red: the Twelve Signs of the Chinese Zodiac (Rat,
Ox, Tiger, Rabbit, Dragon, Snake, Horse, Goat, Monkey,
Rooster, Dog, Pig). The Dog is the statuette on the shelf
above the Music Box. The Snake is wrapped around the black
walking stick. • Marked in Yellow: Put the Male Figurine (1)
and the Female Figurine (2) on top of the Music Box (3). Use
the Key (4) to open the Music Box and take the Pearls. •
Marked in Green: Put the Battery (5) into the Flashlight Base
(6). Put the Flashlight Top (7) on the Flashlight Base and
take the Flashlight. • The BANDANA (8) will go into your
inventory. • Put the BANDANA (from the HOS in this room) on
the Mannequin. • Unlock the Chest by pointing each latch down
to reveal the BOOTS. • Take the BOOTS and put them on the
Mannequin. • Return to the Village Courtyard and zoom in on
the Well for a HOS.
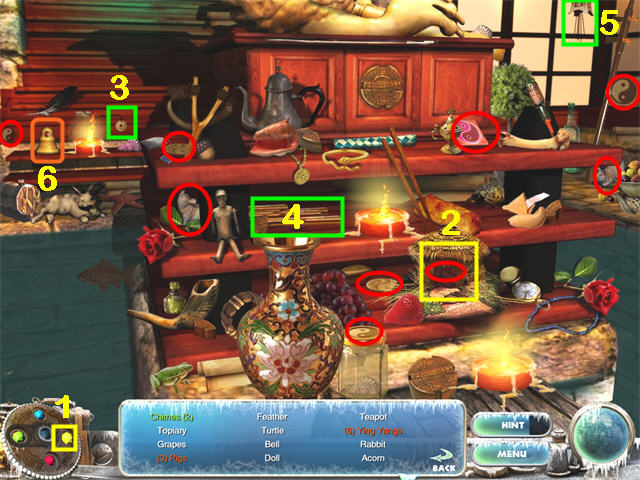
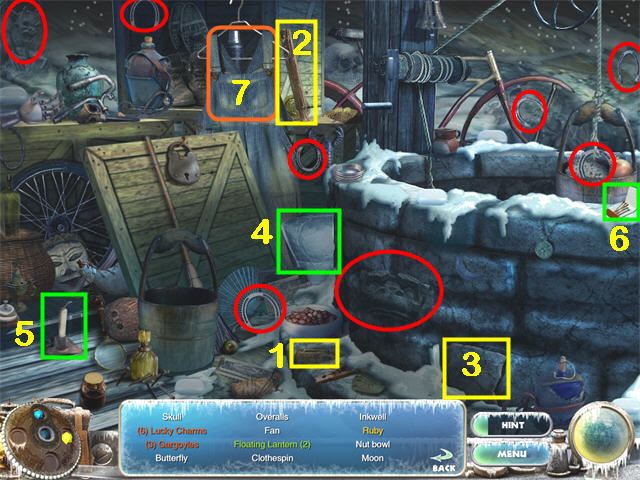 • Marked in Red: Gargoyles and Lucky Charms (Horseshoes). •
Marked in Yellow; Put the Hammer Head (1) on the Hammer Handle
(2). Use the Hammer on the Cracked Stone (3) to reveal the
Ruby. • Marked in Green: Put the Lantern Top (4) on the
Candlestick (5). Use the Matches (6) to light the Candlestick
(5). Take the Floating Lantern. • The Inkwell is the brown jar
just below the Candlestick (5). • The Moon is the crescent
stone above the Cracked Stone (3). • The OVERALLS (7) will go
into your inventory. • Enter the Restaurant, go down to the
Basement, and zoom in on the Lucky 7’s Game Machine for a HOS.
• Marked in Red: Gargoyles and Lucky Charms (Horseshoes). •
Marked in Yellow; Put the Hammer Head (1) on the Hammer Handle
(2). Use the Hammer on the Cracked Stone (3) to reveal the
Ruby. • Marked in Green: Put the Lantern Top (4) on the
Candlestick (5). Use the Matches (6) to light the Candlestick
(5). Take the Floating Lantern. • The Inkwell is the brown jar
just below the Candlestick (5). • The Moon is the crescent
stone above the Cracked Stone (3). • The OVERALLS (7) will go
into your inventory. • Enter the Restaurant, go down to the
Basement, and zoom in on the Lucky 7’s Game Machine for a HOS.
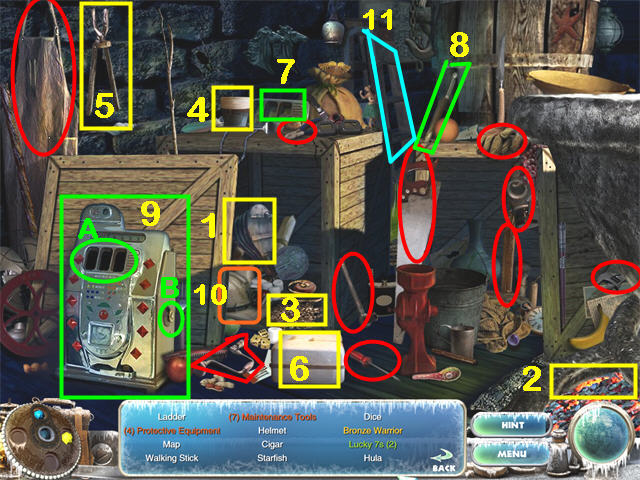 • Marked in Yellow: Use the Bellows (1) on the Fire (2). Put
the Bronze (3) into the Cup (4). Put the Full Cup (4) on the
Tongs (5) and they will automatically go into the Fire (2).
Pour the Cup of liquid bronze into the Statue Mold (6). Take
the Bronze Warrior. • Marked in Red: Protective Equipment (Gas
Mask, Goggles, Gloves, and Apron) and Maintenance Tools
(Screwdriver, Hand Drill, Hammer, Pliers, Saw, 2 Wrenches.)
You can only see the handle of the Hammer; it is just below
the Gas Mask. • Marked in Green: Put the Number Tray (7) into
the Slot (A) on the front of the Game Machine (9). Put the
Handle (8) on the side (B) of the Game Machine. Take the Lucky
7’s Game Machine. • The HELMET (10) will go into your
inventory. • The Map is a scroll behind the Helmet. • The
Ladder (11) is black. • Return to your room at the Inn. •
Complete the Miner’s Outfit on the Mannequin. You need the
MINER’S SHIRT (hanging by Door #2 upstairs at the Inn), the
BANDANA (from the HOS in the Nightstand in this room), the
OVERALLS (from the 2nd HOS at the Well in the Village
Courtyard), the BOOTS (from the Chest in this room) and the
HELMET (from the 2nd HOS at the Game Machine in the Restaurant
Basement). • Take the MINER’S UNIFORM. It will not show in
your inventory because you are wearing it. • Go to the Village
Courtyard and enter the Tavern. • Raymond Halliday will offer
to play a game with you. This is a standard Shell game. You
must win 3 times (or use SKIP) to continue.
• Marked in Yellow: Use the Bellows (1) on the Fire (2). Put
the Bronze (3) into the Cup (4). Put the Full Cup (4) on the
Tongs (5) and they will automatically go into the Fire (2).
Pour the Cup of liquid bronze into the Statue Mold (6). Take
the Bronze Warrior. • Marked in Red: Protective Equipment (Gas
Mask, Goggles, Gloves, and Apron) and Maintenance Tools
(Screwdriver, Hand Drill, Hammer, Pliers, Saw, 2 Wrenches.)
You can only see the handle of the Hammer; it is just below
the Gas Mask. • Marked in Green: Put the Number Tray (7) into
the Slot (A) on the front of the Game Machine (9). Put the
Handle (8) on the side (B) of the Game Machine. Take the Lucky
7’s Game Machine. • The HELMET (10) will go into your
inventory. • The Map is a scroll behind the Helmet. • The
Ladder (11) is black. • Return to your room at the Inn. •
Complete the Miner’s Outfit on the Mannequin. You need the
MINER’S SHIRT (hanging by Door #2 upstairs at the Inn), the
BANDANA (from the HOS in the Nightstand in this room), the
OVERALLS (from the 2nd HOS at the Well in the Village
Courtyard), the BOOTS (from the Chest in this room) and the
HELMET (from the 2nd HOS at the Game Machine in the Restaurant
Basement). • Take the MINER’S UNIFORM. It will not show in
your inventory because you are wearing it. • Go to the Village
Courtyard and enter the Tavern. • Raymond Halliday will offer
to play a game with you. This is a standard Shell game. You
must win 3 times (or use SKIP) to continue.
Chapter 4: The Airship
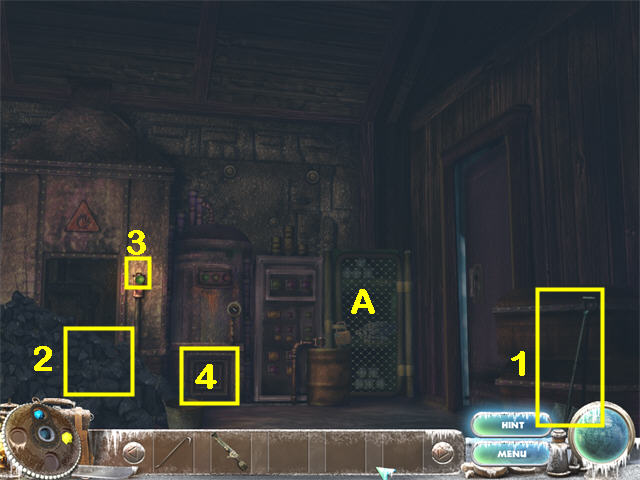 • Enter the Furnace Building on the Left. • Examine the Locked
Cabinet (A). • Marked in Yellow: Use the SHOVEL (1) on the
Coal (2). Press the Button (3) to start the Furnace. The Panel
(4) will open. Zoom in for a HOS.
• Enter the Furnace Building on the Left. • Examine the Locked
Cabinet (A). • Marked in Yellow: Use the SHOVEL (1) on the
Coal (2). Press the Button (3) to start the Furnace. The Panel
(4) will open. Zoom in for a HOS.
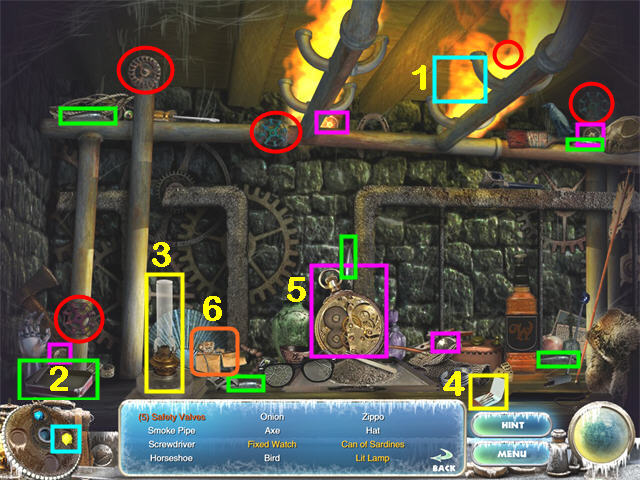 • Marked in Red: Safety Valves. Use the YELLOW AMULET CRYSTAL
on the Flames (1) to reveal one of the Safety Valves. • Marked
in Green: Put the Sardines in the Can (2) and take the Sardine
Can. • Marked in Yellow: Use the Matches (4) on the Lantern
(3). Take the Lit Lamp. • Marked in Pink: Replace the Gears in
the Watch (5) and take the Fixed Watch. • The ZIPPO LIGHTER
(6) will go into your inventory. • Exit Right to return to the
Airship Dock. • Enter the Hangar straight ahead.
• Marked in Red: Safety Valves. Use the YELLOW AMULET CRYSTAL
on the Flames (1) to reveal one of the Safety Valves. • Marked
in Green: Put the Sardines in the Can (2) and take the Sardine
Can. • Marked in Yellow: Use the Matches (4) on the Lantern
(3). Take the Lit Lamp. • Marked in Pink: Replace the Gears in
the Watch (5) and take the Fixed Watch. • The ZIPPO LIGHTER
(6) will go into your inventory. • Exit Right to return to the
Airship Dock. • Enter the Hangar straight ahead.
 • Marked in Yellow: put the Hose (1) and the Valve (2) on the
Torch Cutter (3). • Marked in Pink: Put the Fuel Tank (4) on
the Loading Area (5). Use the BLUE AMULET CRYSTAL (6) to
charge the Crane Control Panel (7). The Fuel Tank will move
next to the Gate. • Marked in Orange: take the STORAGE KEY (8)
and the HYDROGEN TANK (9). • That is all you can do here for
now. Return to the Furnace Room. • Use the STORAGE KEY (from
the Hangar) on the Locked Cabinet and take the OILY RAG. •
Return to the Hangar.
• Marked in Yellow: put the Hose (1) and the Valve (2) on the
Torch Cutter (3). • Marked in Pink: Put the Fuel Tank (4) on
the Loading Area (5). Use the BLUE AMULET CRYSTAL (6) to
charge the Crane Control Panel (7). The Fuel Tank will move
next to the Gate. • Marked in Orange: take the STORAGE KEY (8)
and the HYDROGEN TANK (9). • That is all you can do here for
now. Return to the Furnace Room. • Use the STORAGE KEY (from
the Hangar) on the Locked Cabinet and take the OILY RAG. •
Return to the Hangar.
 • Marked in Yellow: put the OILY RAG (2) (from the Locked
Cabinet in the Furnace Room) on the Fuel Tank (1). Use the
ZIPPO LIGHTER (3) (from the HOS in the Furnace Room) on the
OILY RAG. A fire will start. Use the YELLOW AMULET CRYSTAL (4)
to blow out the fire. Take the ACETYLENE TANK (5) and put it
on the TORCH CUTTER (6). Take the completed TORCH CUTTER. •
Exit to the Dock.
• Marked in Yellow: put the OILY RAG (2) (from the Locked
Cabinet in the Furnace Room) on the Fuel Tank (1). Use the
ZIPPO LIGHTER (3) (from the HOS in the Furnace Room) on the
OILY RAG. A fire will start. Use the YELLOW AMULET CRYSTAL (4)
to blow out the fire. Take the ACETYLENE TANK (5) and put it
on the TORCH CUTTER (6). Take the completed TORCH CUTTER. •
Exit to the Dock.
 • Marked in Yellow: Use the TORCH CUTTER (1) (from the Hangar)
on the two Rings at the end of the chains (2, 3) to free the
Airship. • Use the HYDROGEN TANK (4) (from the Hangar) on the
Airship Balloon (5). • Enter the Airship Cabin (6).
• Marked in Yellow: Use the TORCH CUTTER (1) (from the Hangar)
on the two Rings at the end of the chains (2, 3) to free the
Airship. • Use the HYDROGEN TANK (4) (from the Hangar) on the
Airship Balloon (5). • Enter the Airship Cabin (6).
Chapter 5: The Sawmill
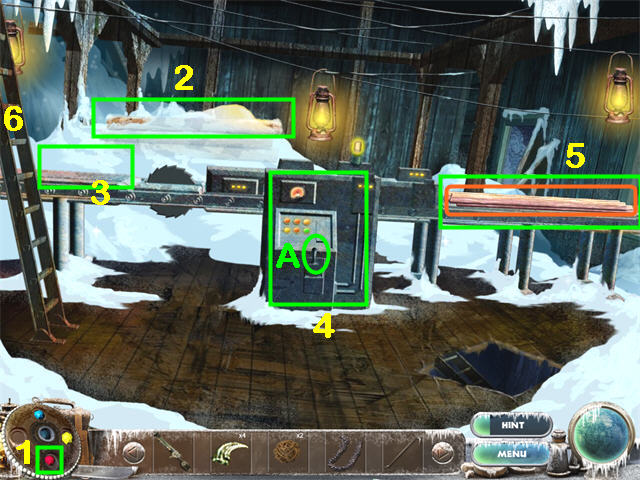
 • Take the YETI CLAW (1). • Use the CROWBAR (2) to open the
Crate (3) and take the FIRE FRUIT. • Use the CROWBAR to open
the Door (4). • Go through the Door.
• Take the YETI CLAW (1). • Use the CROWBAR (2) to open the
Crate (3) and take the FIRE FRUIT. • Use the CROWBAR to open
the Door (4). • Go through the Door.
 • Examine the Hook (1). • Marked in Yellow: Use the BLUE
AMULET CRYSTAL (2) on the Sawmill Control Panel (3). Flip the
Switch. • Take the CHAIN (4) and the OIL CAN (5). • Go up the
Ladder (6).
• Examine the Hook (1). • Marked in Yellow: Use the BLUE
AMULET CRYSTAL (2) on the Sawmill Control Panel (3). Flip the
Switch. • Take the CHAIN (4) and the OIL CAN (5). • Go up the
Ladder (6).
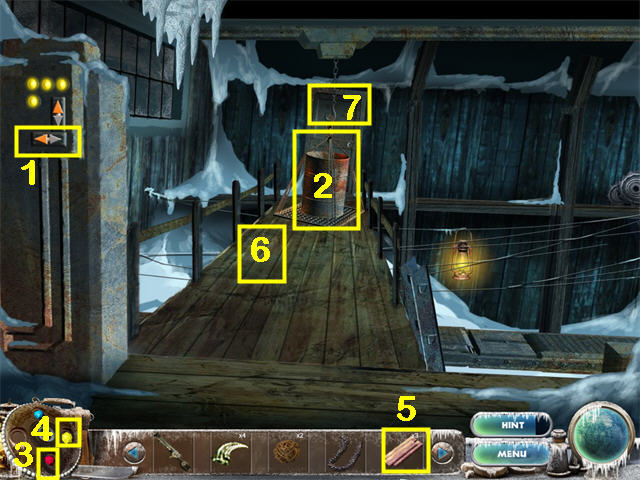
 • Take the ROPE (1). • Marked in Yellow: Use the OIL CAN (2)
(from downstairs) on the Hook (3). Use the BLUE AMULET CRYSTAL
(4) on the Crane Controls (5). Click the Up/Down Button (6) to
lower the Hook. • Go Down to the Sawmill Control Room. • Use
the ROPE (from upstairs) on the Barrel. • Go Up the Ladder. •
Use the Up/Down Button (6) to raise the Barrel. • Go Down to
the Sawmill Control Room. • The trap door is open. Exit
through the trap door.
• Take the ROPE (1). • Marked in Yellow: Use the OIL CAN (2)
(from downstairs) on the Hook (3). Use the BLUE AMULET CRYSTAL
(4) on the Crane Controls (5). Click the Up/Down Button (6) to
lower the Hook. • Go Down to the Sawmill Control Room. • Use
the ROPE (from upstairs) on the Barrel. • Go Up the Ladder. •
Use the Up/Down Button (6) to raise the Barrel. • Go Down to
the Sawmill Control Room. • The trap door is open. Exit
through the trap door.
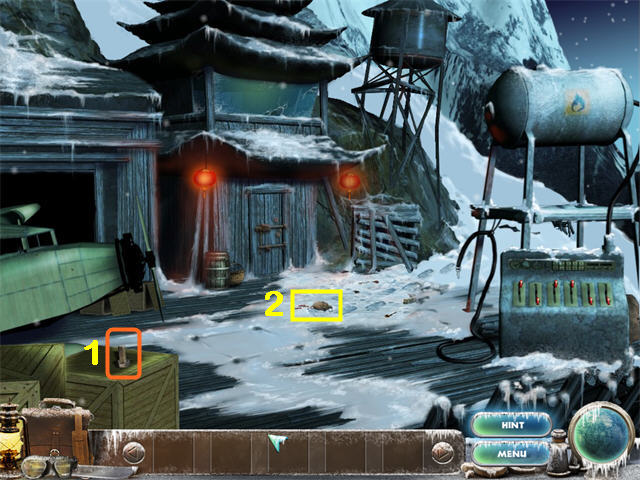
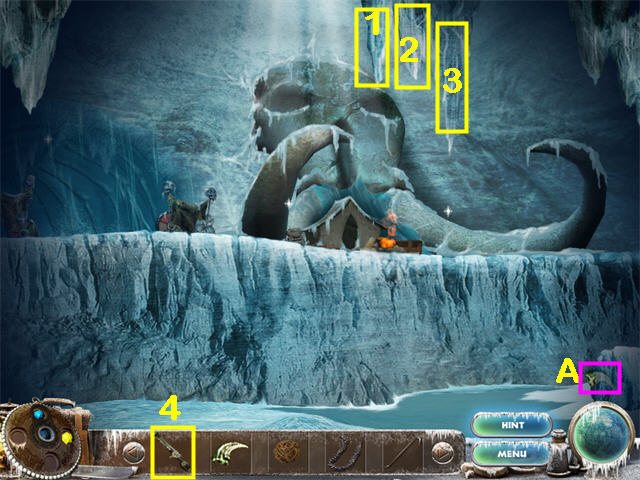 • Examine the YETI CLAW (A). You need something to melt the
ice. • Marked in Yellow: use the RIFLE (4) to shoot the 3
loose Stalactites (1, 2, 3). • Go across the fallen
Stalactites to the Campsite.
• Examine the YETI CLAW (A). You need something to melt the
ice. • Marked in Yellow: use the RIFLE (4) to shoot the 3
loose Stalactites (1, 2, 3). • Go across the fallen
Stalactites to the Campsite.
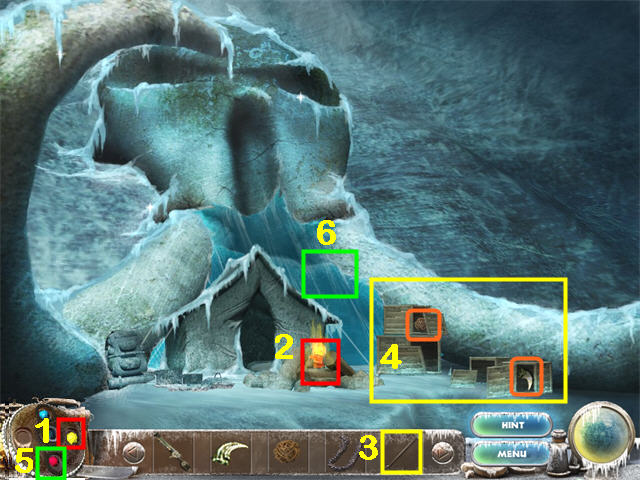 • Marked in Red: Use the YELLOW AMULET CRYSTAL (1) to blow out
the Fire (2). Take the RED AMULET CRYSTAL. It will
automatically go into the Amulet. • Marked in Yellow: Use the
CROWBAR (3) to open all the Crates (4). Take the FIRE FRUIT
and the YETI CLAW. • Marked in Green: Use the RED AMULET
CRYSTAL (5) to melt the Ice Wall (6) behind the Tent. Zoom in
for a HOS.
• Marked in Red: Use the YELLOW AMULET CRYSTAL (1) to blow out
the Fire (2). Take the RED AMULET CRYSTAL. It will
automatically go into the Amulet. • Marked in Yellow: Use the
CROWBAR (3) to open all the Crates (4). Take the FIRE FRUIT
and the YETI CLAW. • Marked in Green: Use the RED AMULET
CRYSTAL (5) to melt the Ice Wall (6) behind the Tent. Zoom in
for a HOS.
 • Marked in Yellow: Use the Pick (1) on the Ice (2) three
times to break it. • Marked in Red: Goggles, Frozen Treats,
and Flares. You will have to break the Ice (2) to get at one
pair of Goggles and one Flare. • Marked in Green: Put the Pegs
(3) and the Tent Poles (4) on the Tent Fabric (5) and take the
Tent. • The YETI CLAW (6) will be added to your inventory. •
The Fan (7) is the round blue item by the Skull. • Exit Down
to the Lower Cavern.
• Marked in Yellow: Use the Pick (1) on the Ice (2) three
times to break it. • Marked in Red: Goggles, Frozen Treats,
and Flares. You will have to break the Ice (2) to get at one
pair of Goggles and one Flare. • Marked in Green: Put the Pegs
(3) and the Tent Poles (4) on the Tent Fabric (5) and take the
Tent. • The YETI CLAW (6) will be added to your inventory. •
The Fan (7) is the round blue item by the Skull. • Exit Down
to the Lower Cavern.
 • Use the RED AMULET CRYSTAL (1) to melt the ice over the YETI
CLAW (2) and take it. • Use the RED AMULET CRYSTAL (2) to melt
the ice over the Upper Cavern (3) and enter the Upper Cavern.
• Examine the area, but there is nothing to do here yet. •
Exit Down 2 times so you are back in the Sawmill Control Room.
• Use the RED AMULET CRYSTAL (1) to melt the ice over the YETI
CLAW (2) and take it. • Use the RED AMULET CRYSTAL (2) to melt
the ice over the Upper Cavern (3) and enter the Upper Cavern.
• Examine the area, but there is nothing to do here yet. •
Exit Down 2 times so you are back in the Sawmill Control Room.
 • Marked in Green: Use the RED AMULET CRYSTAL (1) on the
frozen Wood (2). Take the Wood and put it on left side of the
Saw (3). If you haven’t already, use the BLUE AMULET CRYSTAL
to zap the Control Panel (4). Flip the Switch (A) on the
Control Panel (4). Take all 3 pieces of cut WOOD (5). • Go up
the Ladder (6).
• Marked in Green: Use the RED AMULET CRYSTAL (1) on the
frozen Wood (2). Take the Wood and put it on left side of the
Saw (3). If you haven’t already, use the BLUE AMULET CRYSTAL
to zap the Control Panel (4). Flip the Switch (A) on the
Control Panel (4). Take all 3 pieces of cut WOOD (5). • Go up
the Ladder (6).
 • Marked in Yellow: Use the Crane Control Panel (1) to move
the Barrel (2) in front of the Door. Use the RED AMULET
CRYSTAL (3) to explode the Barrel (2). Use the YELLOW AMULET
CRYSTAL (4) to blow out the fire. Use the WOOD (5) (from
downstairs) on the hole in the Walkway (6). Zoom in on the
Door (7) for a HOS.
• Marked in Yellow: Use the Crane Control Panel (1) to move
the Barrel (2) in front of the Door. Use the RED AMULET
CRYSTAL (3) to explode the Barrel (2). Use the YELLOW AMULET
CRYSTAL (4) to blow out the fire. Use the WOOD (5) (from
downstairs) on the hole in the Walkway (6). Zoom in on the
Door (7) for a HOS.
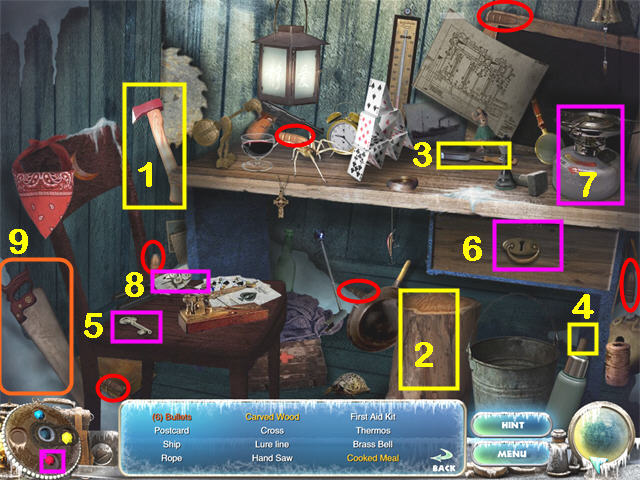 • Marked in Red: Bullets • Marked in Yellow: Use the Axe (1)
on the Wood (2). Use the Awl (3) and the Mallet (4) on the
Wood. Take the Carved Wood. The Mallet is behind the Thermos.
• Marked in Pink: Use the Key (5) on the Drawer (6) to reveal
the Can of Linguini-Os. Put the Can of Linguini-Os on the Camp
Stove (7). Use the RED AMULET CRYSTAL on the Camp Stove to
start a fire. Use the Can Opener (8) to open the Can. Take the
Cooked Meal. • The HAND SAW (9) will go into your inventory. •
Exit Down twice to the Outside. • Use the RED AMULET CRYSTAL
to melt the Wall of Ice in front of you. • Zoom into the
Chest.
• Marked in Red: Bullets • Marked in Yellow: Use the Axe (1)
on the Wood (2). Use the Awl (3) and the Mallet (4) on the
Wood. Take the Carved Wood. The Mallet is behind the Thermos.
• Marked in Pink: Use the Key (5) on the Drawer (6) to reveal
the Can of Linguini-Os. Put the Can of Linguini-Os on the Camp
Stove (7). Use the RED AMULET CRYSTAL on the Camp Stove to
start a fire. Use the Can Opener (8) to open the Can. Take the
Cooked Meal. • The HAND SAW (9) will go into your inventory. •
Exit Down twice to the Outside. • Use the RED AMULET CRYSTAL
to melt the Wall of Ice in front of you. • Zoom into the
Chest.
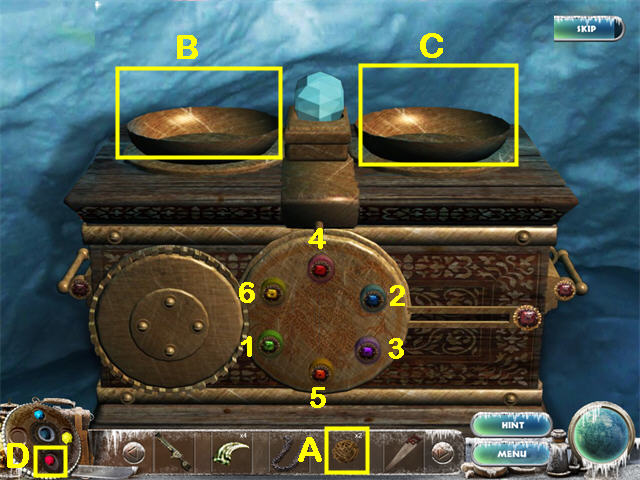 • Marked in Yellow: Set one FIRE FRUIT (A) in each pan (B, C).
(There was one FIRE FRUIT in the Crate just outside the first
Door, and another FIRE FRUIT in a Crate by the Campsite in the
Cavern.) Use the RED AMULET CRYSTAL (D) to ignite each FIRE
FRUIT. The Lock will open. • Press the colored buttons in the
order shown: Green, Blue, Purple, Red, Orange, Yellow. • Take
the YETI CLAW. • Return to the Upper Cavern.
• Marked in Yellow: Set one FIRE FRUIT (A) in each pan (B, C).
(There was one FIRE FRUIT in the Crate just outside the first
Door, and another FIRE FRUIT in a Crate by the Campsite in the
Cavern.) Use the RED AMULET CRYSTAL (D) to ignite each FIRE
FRUIT. The Lock will open. • Press the colored buttons in the
order shown: Green, Blue, Purple, Red, Orange, Yellow. • Take
the YETI CLAW. • Return to the Upper Cavern.
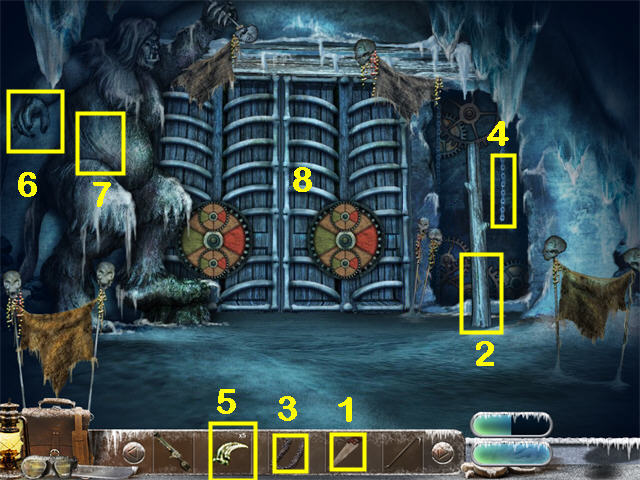 • Use the SAW (1) (from the HOS in the room upstairs at the
Sawmill) on the Wooden Post (2). • Use the CHAIN (3) (from
downstairs at the Sawmill) on the Broken Chain (4). • Put the
5 YETI CLAWS (5) on the Statue’s Hand (6). (There was one YETI
CLAW on the wall outside the Sawmill, one in the Crate at the
Campsite, one in the HOS at the Campsite, one in the Lower
Cavern, and one in the Chest behind the Ice Wall outside the
Sawmill.) • Click on the Yeti’s side (7) and the Gate will
open. • Exit through the Gate (8).
• Use the SAW (1) (from the HOS in the room upstairs at the
Sawmill) on the Wooden Post (2). • Use the CHAIN (3) (from
downstairs at the Sawmill) on the Broken Chain (4). • Put the
5 YETI CLAWS (5) on the Statue’s Hand (6). (There was one YETI
CLAW on the wall outside the Sawmill, one in the Crate at the
Campsite, one in the HOS at the Campsite, one in the Lower
Cavern, and one in the Chest behind the Ice Wall outside the
Sawmill.) • Click on the Yeti’s side (7) and the Gate will
open. • Exit through the Gate (8).
Chapter 6: The Monastery on the Mount
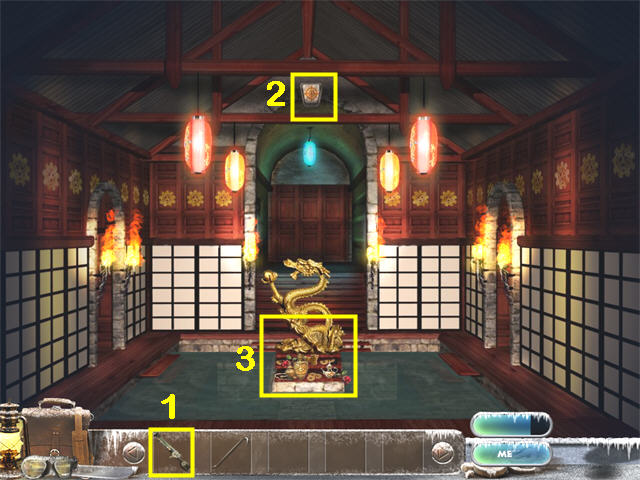 • Marked in Yellow: Use the RIFLE (1) to shoot the Target (2).
Zoom into the Dragon (3) for a HOS.
• Marked in Yellow: Use the RIFLE (1) to shoot the Target (2).
Zoom into the Dragon (3) for a HOS.
 • Marked in Pink: Use the Slingshot (1) to break the Jar (2),
revealing one Seashell. • Marked in Red: Scrolls, Seashells. •
Marked in Yellow: Move Pieces 3, 4, 5, and 6 to the Wooden
Artifact (7). When assembled, move the Wooden Artifact to the
Lock (8) to reveal the Cat. • Marked in Green: Move the Bow
(9) and the Neck (10) to the Base (11). Take the completed
Music Maker. • The FIREWORK (12) will be added to your
inventory. • Go through the left Door to the Blue Lantern
Room.
• Marked in Pink: Use the Slingshot (1) to break the Jar (2),
revealing one Seashell. • Marked in Red: Scrolls, Seashells. •
Marked in Yellow: Move Pieces 3, 4, 5, and 6 to the Wooden
Artifact (7). When assembled, move the Wooden Artifact to the
Lock (8) to reveal the Cat. • Marked in Green: Move the Bow
(9) and the Neck (10) to the Base (11). Take the completed
Music Maker. • The FIREWORK (12) will be added to your
inventory. • Go through the left Door to the Blue Lantern
Room.
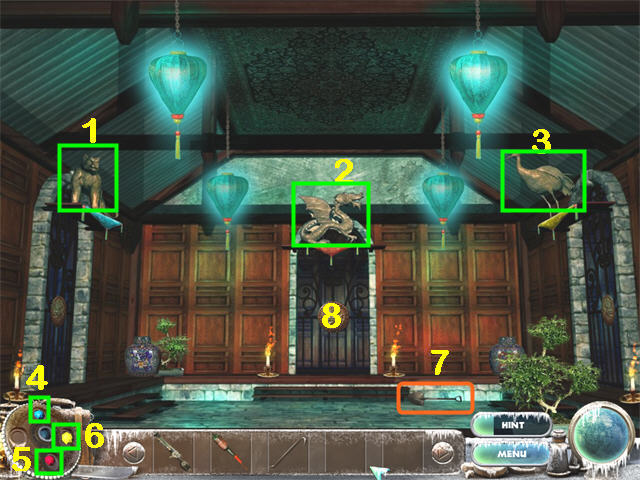 • Marked in Green: Use each Amulet Crystal on the Animal
Statue with the matching color banner. Use the BLUE AMULET
CRYSTAL (4) on the Tiger (1). Use the RED AMULET CRYSTAL (5)
on the Dragon (2). Use the YELLOW AMULET CRYSTAL (6) on the
Crane (3). The Door to the Dragon Room will open. • Take the
SHOVEL (7). • Enter the Dragon Room (8).
• Marked in Green: Use each Amulet Crystal on the Animal
Statue with the matching color banner. Use the BLUE AMULET
CRYSTAL (4) on the Tiger (1). Use the RED AMULET CRYSTAL (5)
on the Dragon (2). Use the YELLOW AMULET CRYSTAL (6) on the
Crane (3). The Door to the Dragon Room will open. • Take the
SHOVEL (7). • Enter the Dragon Room (8).
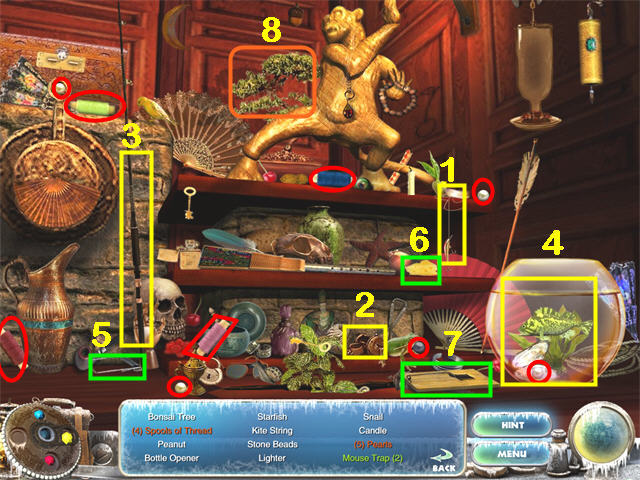
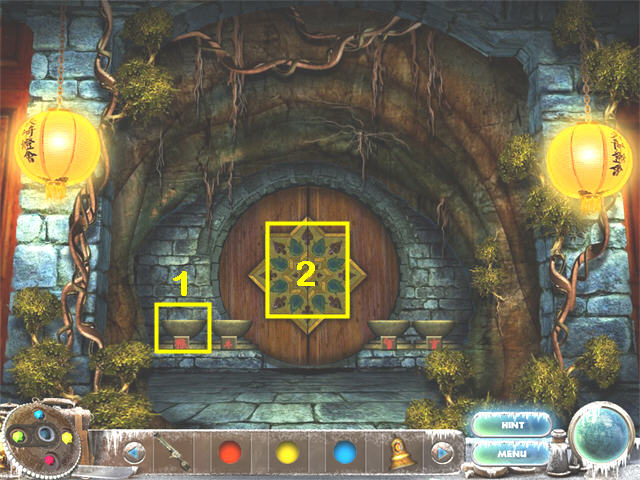
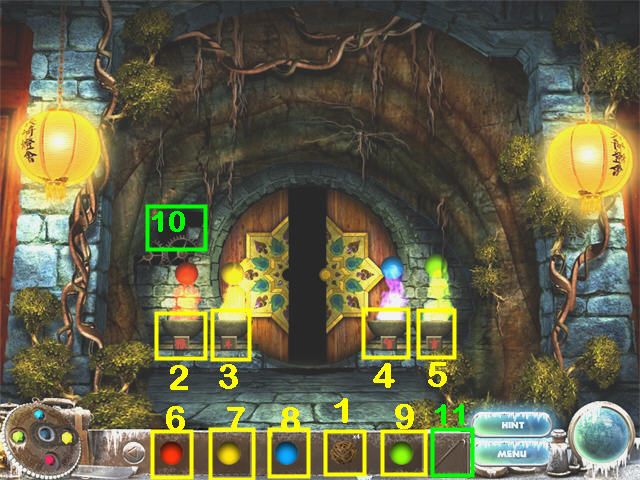
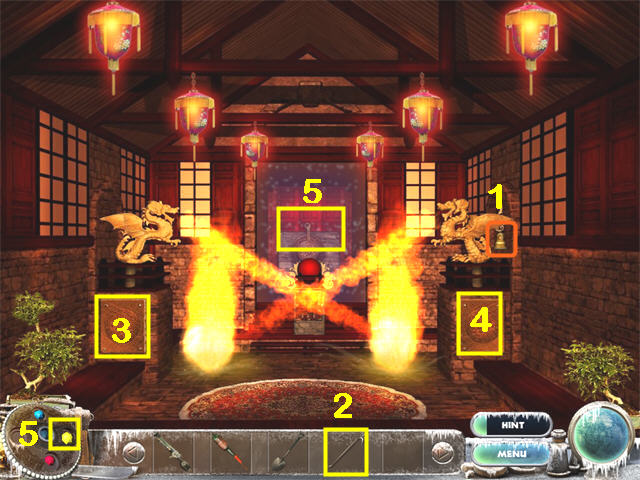 • Take the RED BELL (1). • Marked in Yellow: Use the CROWBAR
(2) on the Panels (3 and 4) to reveal the Fire Source. Use the
YELLOW AMULET CRYSTAL (5) on each Fire Source. Zoom in on the
Altar (6) for a mini-game.
• Take the RED BELL (1). • Marked in Yellow: Use the CROWBAR
(2) on the Panels (3 and 4) to reveal the Fire Source. Use the
YELLOW AMULET CRYSTAL (5) on each Fire Source. Zoom in on the
Altar (6) for a mini-game.
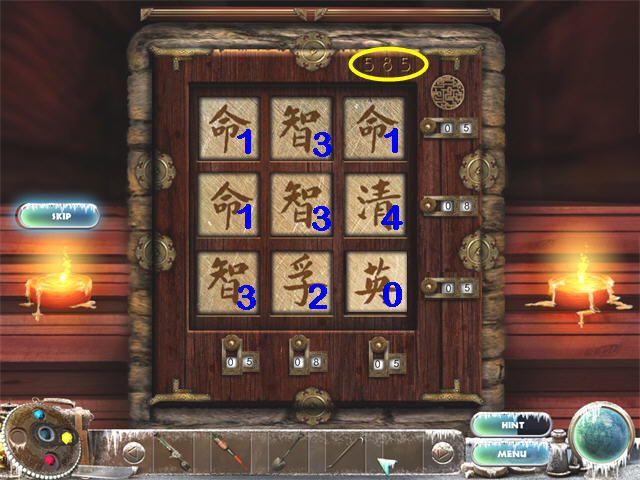 • The tiles should add up to 5, 8, 5 both horizontally and
vertically. • You can determine the value of a tile by first
putting 3 identical tiles in a row, finding out their value,
and dividing by 3. Then you can replace one of the identical
tiles with any other tile to figure out its value. • Our
solution is in the screenshot. We have marked the numeric
value of each tile in blue. • When the puzzle is complete,
take the RED ORB. • Click on the Lever on the Wall behind the
Altar. • Exit Down to the Room of the Blue Lanterns. • The
Crane Room Door is now unlocked. Enter the Crane Room.
• The tiles should add up to 5, 8, 5 both horizontally and
vertically. • You can determine the value of a tile by first
putting 3 identical tiles in a row, finding out their value,
and dividing by 3. Then you can replace one of the identical
tiles with any other tile to figure out its value. • Our
solution is in the screenshot. We have marked the numeric
value of each tile in blue. • When the puzzle is complete,
take the RED ORB. • Click on the Lever on the Wall behind the
Altar. • Exit Down to the Room of the Blue Lanterns. • The
Crane Room Door is now unlocked. Enter the Crane Room.
 • Marked in Yellow: Use the RIFLE (5) to shoot the 3 Targets
(1, 2, 3). Take the PINK BELL (4). • Marked in Green: Use the
YELLOW AMULET CRYSTAL (6) on the Fans (7 and 8) on each side
of the gate. The Gate (9) will open. Go through it.
• Marked in Yellow: Use the RIFLE (5) to shoot the 3 Targets
(1, 2, 3). Take the PINK BELL (4). • Marked in Green: Use the
YELLOW AMULET CRYSTAL (6) on the Fans (7 and 8) on each side
of the gate. The Gate (9) will open. Go through it.
 • Marked in Blue: There are five differences between the two
statues: the teeth, the necklace, one pendant, what the statue
is holding, and the necklace hanging off the pedestal. When
you have clicked on all 5 differences, the doors will open. •
Take the YELLOW ORB from the left Monkey Statue (1). • Move
the Lever (2). This will unlock the Tiger Room Door. • Zoom in
on the right Monkey Statue (3) for a HOS.
• Marked in Blue: There are five differences between the two
statues: the teeth, the necklace, one pendant, what the statue
is holding, and the necklace hanging off the pedestal. When
you have clicked on all 5 differences, the doors will open. •
Take the YELLOW ORB from the left Monkey Statue (1). • Move
the Lever (2). This will unlock the Tiger Room Door. • Zoom in
on the right Monkey Statue (3) for a HOS.
 • Marked in Yellow: Put the Hook (1) and the Reel (2) on the
Fishing Pole (3). Use the Completed Fishing Pole to get the
Pearl out of the Fish Bowl (4). Take the Pearl. • Marked in
Red: Pearls and Spools of Thread. One of the Pearls is black.
• Marked in Green: Put the Metal Piece (5) and the Cheese (5)
on the Mouse Trap (7). Take the completed Mouse Trap. • The
BONSAI TREE (8) will go into your inventory. • Exit Down to
the Blue Lantern Room. • The Tiger Door is now open. Enter the
Tiger Room.
• Marked in Yellow: Put the Hook (1) and the Reel (2) on the
Fishing Pole (3). Use the Completed Fishing Pole to get the
Pearl out of the Fish Bowl (4). Take the Pearl. • Marked in
Red: Pearls and Spools of Thread. One of the Pearls is black.
• Marked in Green: Put the Metal Piece (5) and the Cheese (5)
on the Mouse Trap (7). Take the completed Mouse Trap. • The
BONSAI TREE (8) will go into your inventory. • Exit Down to
the Blue Lantern Room. • The Tiger Door is now open. Enter the
Tiger Room.
 • Marked in Yellow: Use the CROWBAR (1) to open the Panel (2).
There is a broken Floorboard (3), but you can’t get to it yet.
Zoom in on the Panel for a mini-game.
• Marked in Yellow: Use the CROWBAR (1) to open the Panel (2).
There is a broken Floorboard (3), but you can’t get to it yet.
Zoom in on the Panel for a mini-game.
 • Each Piston has a red Control Button. • Push the Control
Button so the Piston stops in its green area. • When you
complete the mini-game, the spikes will lower. • Use the
CROWBAR on the broken Floorboard. Zoom in for a mini-game.
This is the same type as the previous mini-game except that on
the right side one button controls two pistons. Focus on the
faster piston. • When you complete the mini-game, the
Pendulums will stop.
• Each Piston has a red Control Button. • Push the Control
Button so the Piston stops in its green area. • When you
complete the mini-game, the spikes will lower. • Use the
CROWBAR on the broken Floorboard. Zoom in for a mini-game.
This is the same type as the previous mini-game except that on
the right side one button controls two pistons. Focus on the
faster piston. • When you complete the mini-game, the
Pendulums will stop.
 • Marked in Yellow: Put the FIREWORK (1) (from the HOS at the
Dragon Pool) on the Stone Box (2). Use the RED AMULET CRYSTAL
(3) on the FIREWORK. Zoom in for a mini-game. • Marked in
Pink: Zoom in on the Wooden Box (4) on the Altar. Use the
CROWBAR (1) to open the Wooden Box. Take the FIRE SEED (5),
and the GREEN AMULET CRYSTAL (6). • Take the BLUE ORB (7). •
Return to the Dragon Pool. • Go right into the Bonsai Room.
• Marked in Yellow: Put the FIREWORK (1) (from the HOS at the
Dragon Pool) on the Stone Box (2). Use the RED AMULET CRYSTAL
(3) on the FIREWORK. Zoom in for a mini-game. • Marked in
Pink: Zoom in on the Wooden Box (4) on the Altar. Use the
CROWBAR (1) to open the Wooden Box. Take the FIRE SEED (5),
and the GREEN AMULET CRYSTAL (6). • Take the BLUE ORB (7). •
Return to the Dragon Pool. • Go right into the Bonsai Room.
 • Marked in Yellow: Use the SHOVEL (1) (from the Blue Lantern
Room) on the Dirt (2). Put the BONSAI TREE (3) (from the HOS
on the right Monkey on the Altar in the Crane Room) in the
Dirt (2). Use the GREEN AMULET CRYSTAL (4) on the Tree. Enter
the Upper Alcove (5).
• Marked in Yellow: Use the SHOVEL (1) (from the Blue Lantern
Room) on the Dirt (2). Put the BONSAI TREE (3) (from the HOS
on the right Monkey on the Altar in the Crane Room) in the
Dirt (2). Use the GREEN AMULET CRYSTAL (4) on the Tree. Enter
the Upper Alcove (5).
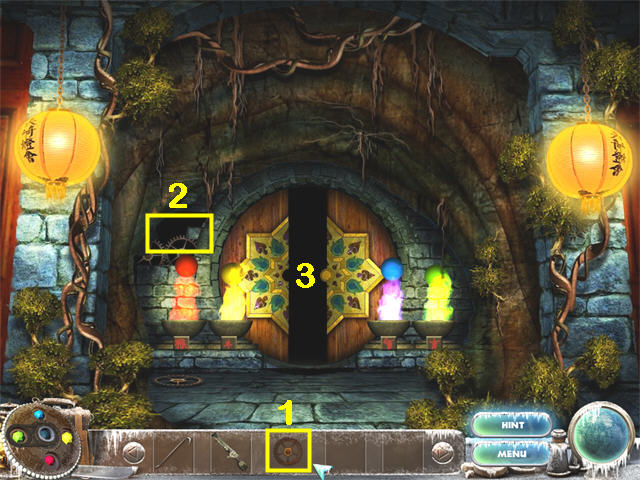
 • Marked in Yellow: Put the RED BELL (1) (from the Dragon
Room) on the Bell Chain (2). Put the PINK BELL (3) (from the
Crane Room) on the Bell Chain (4). Put the Blue Bell (5) on
the center Bell Chain (6). That is all you can do here until
you get more bells. • Return to the Dragon Pool. • Zoom in on
the Dragon for a HOS.
• Marked in Yellow: Put the RED BELL (1) (from the Dragon
Room) on the Bell Chain (2). Put the PINK BELL (3) (from the
Crane Room) on the Bell Chain (4). Put the Blue Bell (5) on
the center Bell Chain (6). That is all you can do here until
you get more bells. • Return to the Dragon Pool. • Zoom in on
the Dragon for a HOS.
 • Marked in Yellow: Use the YELLOW AMULET CRYSTAL (1) on the
small Straw House (2) and reveal a Pig. • Marked in Red: Yin
Yangs and Pigs. One Pig is hiding in the small Straw House. •
Marked in Green: Put the Pendant (3) and the Chime Tubes (4)
on the Chime Top (5) and take the completed Chimes. • The
YELLOW BELL (6) will go into your inventory. • Go up the
stairs.
• Marked in Yellow: Use the YELLOW AMULET CRYSTAL (1) on the
small Straw House (2) and reveal a Pig. • Marked in Red: Yin
Yangs and Pigs. One Pig is hiding in the small Straw House. •
Marked in Green: Put the Pendant (3) and the Chime Tubes (4)
on the Chime Top (5) and take the completed Chimes. • The
YELLOW BELL (6) will go into your inventory. • Go up the
stairs.
 • Marked in Yellow: Put the FIRE SEED (1) (from the Wooden Box
on the Altar in the Tiger Room) in the Pot (2). Use the RED
AMULET CRYSTAL (3) to sprout the seed. Use the GREEN AMULET
CRYSTAL (4) to make it grow. • Marked in Green: Use the Rifle
(5) to shoot the Weights (6 and 7) by the Gate. Enter the Gate
(8).
• Marked in Yellow: Put the FIRE SEED (1) (from the Wooden Box
on the Altar in the Tiger Room) in the Pot (2). Use the RED
AMULET CRYSTAL (3) to sprout the seed. Use the GREEN AMULET
CRYSTAL (4) to make it grow. • Marked in Green: Use the Rifle
(5) to shoot the Weights (6 and 7) by the Gate. Enter the Gate
(8).
 • Examine the Bowls (1) by the Door to Shangri La (2). You
need 4 pieces of Fire Fruit. • Return to the Dragon Pool. • Go
right into the Bonsai Room.
• Examine the Bowls (1) by the Door to Shangri La (2). You
need 4 pieces of Fire Fruit. • Return to the Dragon Pool. • Go
right into the Bonsai Room.
 • Use the Rifle (1) to shoot down the four FIRE FRUIT
(orange). Take the first 3. • Zoom in on the Statue (2) for a
HOS.
• Use the Rifle (1) to shoot down the four FIRE FRUIT
(orange). Take the first 3. • Zoom in on the Statue (2) for a
HOS.
 • Marked in Red: Flies and Acorns • Marked in Blue: Put the
Teapot (1) on the Stove (2). Take four Tea Leaves (T) and put
them in the Tea Pot. Use the RED AMULET CRYSTAL (3) to light
the Stove (2). Put the Full Tea Pot on the Empty Cup (4). Take
the Cup of Tea. • Marked in Green: Put the Tomato Seed Packet
(5) on the Pot (6). Use the Watering Can (7) on the Pot (6).
Take the Tomato Plant. • The 4th FIRE FRUIT (8) will go into
your inventory. • The Red Jewel is the pendant necklace on the
Statue. • Exit to the Dragon Pool. • Go left into the Blue
Lantern Room. • Enter the Crane Room. • Zoom in on the Altar,
then on the right Monkey Statue for a HOS.
• Marked in Red: Flies and Acorns • Marked in Blue: Put the
Teapot (1) on the Stove (2). Take four Tea Leaves (T) and put
them in the Tea Pot. Use the RED AMULET CRYSTAL (3) to light
the Stove (2). Put the Full Tea Pot on the Empty Cup (4). Take
the Cup of Tea. • Marked in Green: Put the Tomato Seed Packet
(5) on the Pot (6). Use the Watering Can (7) on the Pot (6).
Take the Tomato Plant. • The 4th FIRE FRUIT (8) will go into
your inventory. • The Red Jewel is the pendant necklace on the
Statue. • Exit to the Dragon Pool. • Go left into the Blue
Lantern Room. • Enter the Crane Room. • Zoom in on the Altar,
then on the right Monkey Statue for a HOS.
 • Marked in Red: Fans and Cherries. One of the Cherries is in
the Locked Chest. • Marked in Yellow: Put the first Key (1) in
the Lock (2). Put the Seed (3) in the broken Floorboard (4).
Use the GREEN AMULET CRYSTAL (5) on the Seed (4) and it will
grow, bringing up the second Key. Use the second Key on the
Lock (2) and the Locked Chest will open revealing a Cherry. •
Marked in Green: Put the Red Seeds (6) in the Empty Bird
Feeder (7). Add Water (8). Take the completed Bird Feeder. •
The GREEN BELL (9) will go into your inventory. • Return to
the Dragon Pool. • Go right into the Bonsai Room. • Go to the
upper alcove.
• Marked in Red: Fans and Cherries. One of the Cherries is in
the Locked Chest. • Marked in Yellow: Put the first Key (1) in
the Lock (2). Put the Seed (3) in the broken Floorboard (4).
Use the GREEN AMULET CRYSTAL (5) on the Seed (4) and it will
grow, bringing up the second Key. Use the second Key on the
Lock (2) and the Locked Chest will open revealing a Cherry. •
Marked in Green: Put the Red Seeds (6) in the Empty Bird
Feeder (7). Add Water (8). Take the completed Bird Feeder. •
The GREEN BELL (9) will go into your inventory. • Return to
the Dragon Pool. • Go right into the Bonsai Room. • Go to the
upper alcove.
 • Put the last Bells in place. The GREEN BELL (1) goes on the
left chain (2) and the YELLOW BELL (3) goes on the end chain
(4). • From left to right: PINK BELL (from the Crane Room),
RED BELL (from the Dragon Room), Blue Bell (from this room),
GREEN BELL (from the 2nd HOS at the Monkey Statue in the Crane
Room). YELLOW BELL (from the 2nd HOS at the Dragon Pool), •
Click on the Lever (5). This will start a mini-game.
• Put the last Bells in place. The GREEN BELL (1) goes on the
left chain (2) and the YELLOW BELL (3) goes on the end chain
(4). • From left to right: PINK BELL (from the Crane Room),
RED BELL (from the Dragon Room), Blue Bell (from this room),
GREEN BELL (from the 2nd HOS at the Monkey Statue in the Crane
Room). YELLOW BELL (from the 2nd HOS at the Dragon Pool), •
Click on the Lever (5). This will start a mini-game.
 • Repeat the song by clicking on the bells. • Solution: Green,
Red, Blue, Pink, Green, Yellow, Blue, Green, Red. • The chest
will open to reveal the GREEN ORB. Take it. • Return to the
Dragon Pool. • Go forward twice to the Gate to Shangri La.
• Repeat the song by clicking on the bells. • Solution: Green,
Red, Blue, Pink, Green, Yellow, Blue, Green, Red. • The chest
will open to reveal the GREEN ORB. Take it. • Return to the
Dragon Pool. • Go forward twice to the Gate to Shangri La.
 • Put one FIRE FRUIT (1) (from the Tree in the Bonsai Room) in
each Bowl (2, 3, 4, 5). They will light by themselves. •
Marked in Yellow: Put the RED ORB (6) (from the Altar in the
Dragon Room) in the first Bowl. Put the YELLOW ORB (7) (from
the left Monkey Statue on the Altar in the Crane Room) in the
second Bowl. Put the BLUE ORB (8) (from the Altar in the Tiger
Room) in the third Bowl. Put the GREEN ORB (9) (from the
locked chest in the Upper Alcove of the Bonsai Room) in the
4th Bowl. The Gate will start to open and then break. Use the
CROWBAR (11) to remove the Broken Gear (10). • Return to the
Dragon Pool. • Go right into the Bonsai Room. • Zoom in on the
Statue for a HOS.
• Put one FIRE FRUIT (1) (from the Tree in the Bonsai Room) in
each Bowl (2, 3, 4, 5). They will light by themselves. •
Marked in Yellow: Put the RED ORB (6) (from the Altar in the
Dragon Room) in the first Bowl. Put the YELLOW ORB (7) (from
the left Monkey Statue on the Altar in the Crane Room) in the
second Bowl. Put the BLUE ORB (8) (from the Altar in the Tiger
Room) in the third Bowl. Put the GREEN ORB (9) (from the
locked chest in the Upper Alcove of the Bonsai Room) in the
4th Bowl. The Gate will start to open and then break. Use the
CROWBAR (11) to remove the Broken Gear (10). • Return to the
Dragon Pool. • Go right into the Bonsai Room. • Zoom in on the
Statue for a HOS.
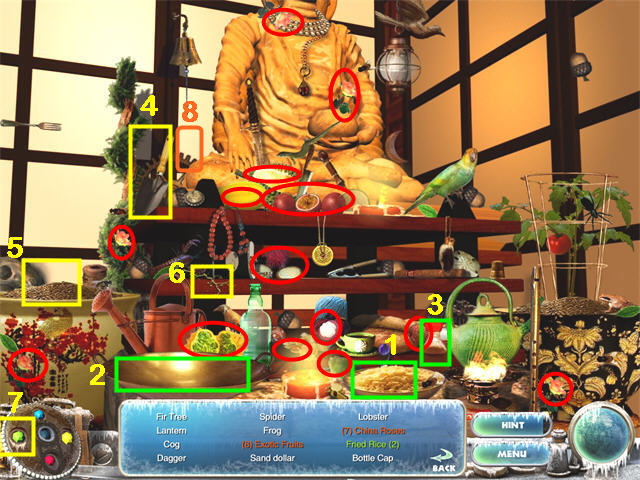 • Marked in Red: China Roses and Exotic Fruits. There is a
small China Rose by the peanuts which is hard to see. • Marked
in Green: Put the Rice (1) into the Wok (2). Add the Soy Sauce
(3). Take the Fried Rice. • Marked in Yellow: Use the Spade
(4) to dig a hole in the Dirt (5). Put the Twig (6) in the
hole. Use the GREEN AMULET CRYSTAL (7) to help the plant grow.
The entire Rose Bush will count as one China Rose. Take it. •
The COG (8) will go into your inventory. • Return to the Gate
to Shangri La.
• Marked in Red: China Roses and Exotic Fruits. There is a
small China Rose by the peanuts which is hard to see. • Marked
in Green: Put the Rice (1) into the Wok (2). Add the Soy Sauce
(3). Take the Fried Rice. • Marked in Yellow: Use the Spade
(4) to dig a hole in the Dirt (5). Put the Twig (6) in the
hole. Use the GREEN AMULET CRYSTAL (7) to help the plant grow.
The entire Rose Bush will count as one China Rose. Take it. •
The COG (8) will go into your inventory. • Return to the Gate
to Shangri La.
 • Put the COG (1) (from the 2nd HOS by the statue in the room
Bonsai Room) in the Gearbox (2). • Enter the Gate to Shangri
La (3).
• Put the COG (1) (from the 2nd HOS by the statue in the room
Bonsai Room) in the Gearbox (2). • Enter the Gate to Shangri
La (3).
Chapter 7: Shangri La
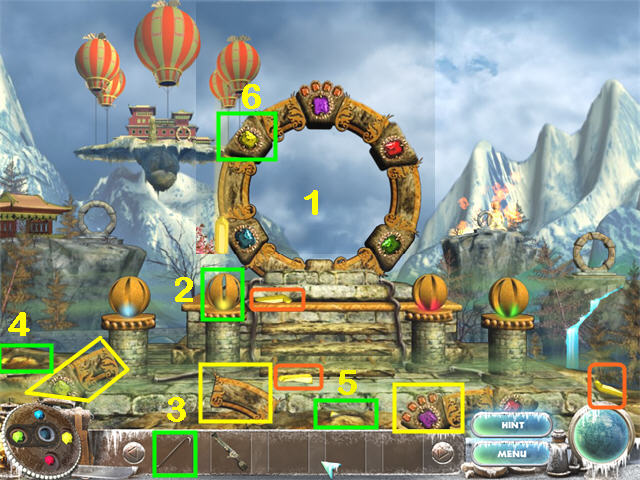 • Marked in Yellow: Take the Stone Fragments and assemble the
Main Portal (1) as shown. They will rotate automatically to
fit. • Marked in Orange: take 3 YELLOW SHARDS. • Marked in
Green: Use the CROWBAR (3) to uncover two more YELLOW SHARDS
(4 and 5) and take them. You now have 5. Put the 5 YELLOW
SHARDS into the Yellow Lotus (2). Press the Yellow Gem (6) on
the Main Portal to view a new location through the Main
Portal. • Exit through the Main Portal to the Floating Temple.
• Marked in Yellow: Take the Stone Fragments and assemble the
Main Portal (1) as shown. They will rotate automatically to
fit. • Marked in Orange: take 3 YELLOW SHARDS. • Marked in
Green: Use the CROWBAR (3) to uncover two more YELLOW SHARDS
(4 and 5) and take them. You now have 5. Put the 5 YELLOW
SHARDS into the Yellow Lotus (2). Press the Yellow Gem (6) on
the Main Portal to view a new location through the Main
Portal. • Exit through the Main Portal to the Floating Temple.
 • Marked in Orange: Take 4 GREEN SHARDS. • Marked in Yellow:
Move the Deflated Balloon (1) by the Door (2). • Marked in
Pink: Use the YELLOW AMULET CRYSTAL (3) on the Obelisk (4).
Take 2 Black Mushrooms (M) and the White Root (W) that grow
after you activate the Obelisk. • Marked in Blue: Use the
RIFLE (5) to shoot the 3 Small Purple Balloons (6, 7, 8). The
Crate (9) will fall to the ground. Open the Crate with the
CROWBAR (10) to reveal the 5th GREEN SHARD. Take it. • Exit
Down to the Main Portal.
• Marked in Orange: Take 4 GREEN SHARDS. • Marked in Yellow:
Move the Deflated Balloon (1) by the Door (2). • Marked in
Pink: Use the YELLOW AMULET CRYSTAL (3) on the Obelisk (4).
Take 2 Black Mushrooms (M) and the White Root (W) that grow
after you activate the Obelisk. • Marked in Blue: Use the
RIFLE (5) to shoot the 3 Small Purple Balloons (6, 7, 8). The
Crate (9) will fall to the ground. Open the Crate with the
CROWBAR (10) to reveal the 5th GREEN SHARD. Take it. • Exit
Down to the Main Portal.
 • Marked in Yellow: Put the 5 GREEN SHARDS (1) (from the
Floating Temple) in the Green Lotus (2). Press the Green Gem
(3) on the Main Portal. Exit through the Main Portal to the
Cliff Edge.
• Marked in Yellow: Put the 5 GREEN SHARDS (1) (from the
Floating Temple) in the Green Lotus (2). Press the Green Gem
(3) on the Main Portal. Exit through the Main Portal to the
Cliff Edge.
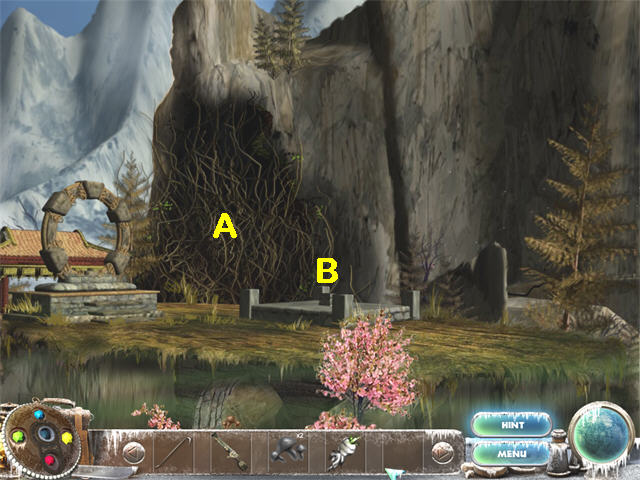 • Examine the Vines (A); there is a Creature hiding there. •
Zoom in on the Platform (B) for a mini-game.
• Examine the Vines (A); there is a Creature hiding there. •
Zoom in on the Platform (B) for a mini-game.
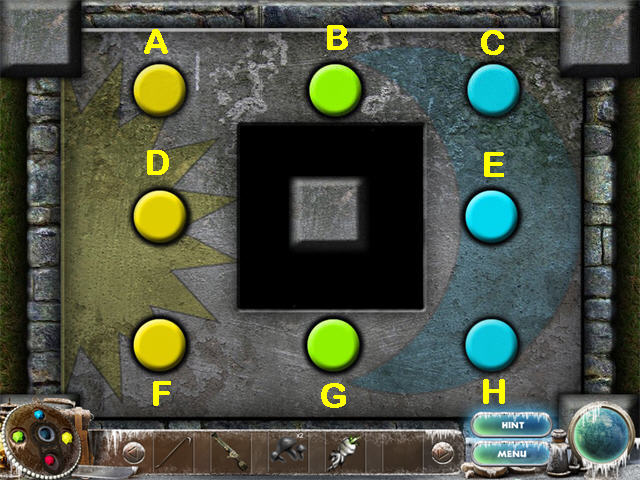 • Solution: 3 Yellow Buttons on the left, 3 Blue Buttons on
the right, and the Green Buttons in the center. There are many
possible ways to create the solution. We used: F, F, H, A, F,
F, C, H, H, F, F, H, H. • When the mini-game is complete, an
Obelisk will rise up from the Platform.
• Solution: 3 Yellow Buttons on the left, 3 Blue Buttons on
the right, and the Green Buttons in the center. There are many
possible ways to create the solution. We used: F, F, H, A, F,
F, C, H, H, F, F, H, H. • When the mini-game is complete, an
Obelisk will rise up from the Platform.
 • Use the GREEN AMULET CRYSTAL (1) on the Obelisk (2) and
everything will start to bloom.
• Use the GREEN AMULET CRYSTAL (1) on the Obelisk (2) and
everything will start to bloom.
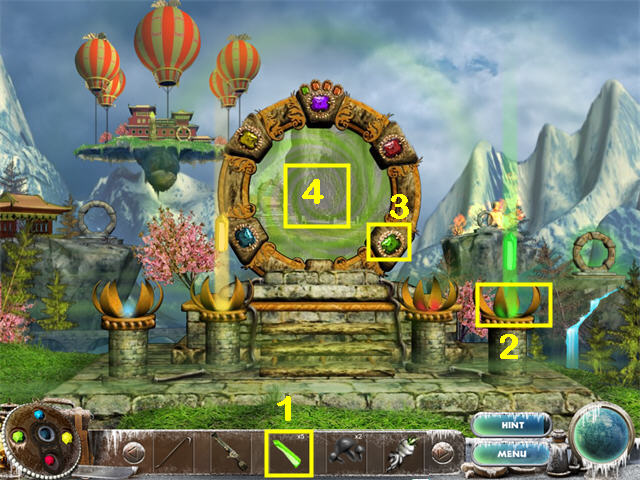
 • Take 4 BLUE SHARDS, 3 BLACK MUSHROOMS, 1 FIRE FRUIT, and 1
PEAPOD. • That is all you can do for now. Exit Down to the
Main Portal. • Click on the Yellow Gem on the Main Portal. •
Exit through the Main Portal to the Floating Temple.
• Take 4 BLUE SHARDS, 3 BLACK MUSHROOMS, 1 FIRE FRUIT, and 1
PEAPOD. • That is all you can do for now. Exit Down to the
Main Portal. • Click on the Yellow Gem on the Main Portal. •
Exit through the Main Portal to the Floating Temple.
 • Marked in Yellow: Put the FIRE FRUIT (1) (from the Cliff
Edge) on the Deflated Balloon (2). Ignite the FIRE FRUIT with
the RED AMULET CRYSTAL (3). The Balloon will rise, opening the
Temple Door to reveal the 5th BLUE SHARD. Take it. • Exit Down
to the Main Portal.
• Marked in Yellow: Put the FIRE FRUIT (1) (from the Cliff
Edge) on the Deflated Balloon (2). Ignite the FIRE FRUIT with
the RED AMULET CRYSTAL (3). The Balloon will rise, opening the
Temple Door to reveal the 5th BLUE SHARD. Take it. • Exit Down
to the Main Portal.
 • Marked in Yellow: Put the 5 BLUE SHARDS (1) (4 from the
Cliff Edge, 1 from inside the Floating Temple) in the Blue
Lotus (2). Press the Blue Gem on the Main Portal (3). Exit
through the Main Portal (4) to the River.
• Marked in Yellow: Put the 5 BLUE SHARDS (1) (4 from the
Cliff Edge, 1 from inside the Floating Temple) in the Blue
Lotus (2). Press the Blue Gem on the Main Portal (3). Exit
through the Main Portal (4) to the River.
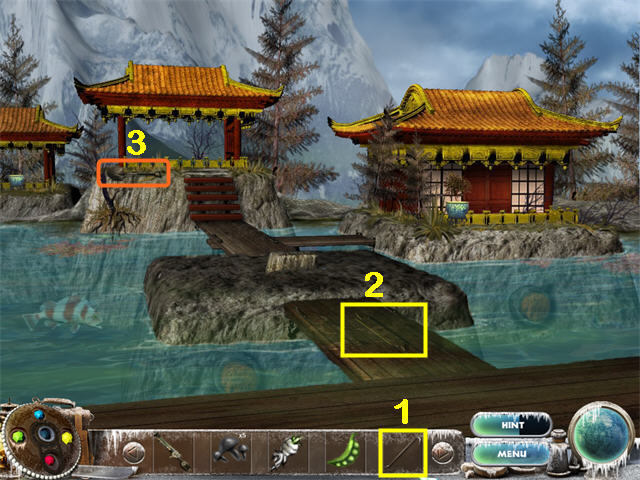 • Use the CROWBAR (1) on the Loose Floorboard (2) to reveal a
RED SHARD. Take it. • Take the SHOVEL (3). • Exit Down to the
Main Portal. • Press the Green Gem on the Main Portal and exit
through the Main Portal to the Cliff Edge.
• Use the CROWBAR (1) on the Loose Floorboard (2) to reveal a
RED SHARD. Take it. • Take the SHOVEL (3). • Exit Down to the
Main Portal. • Press the Green Gem on the Main Portal and exit
through the Main Portal to the Cliff Edge.
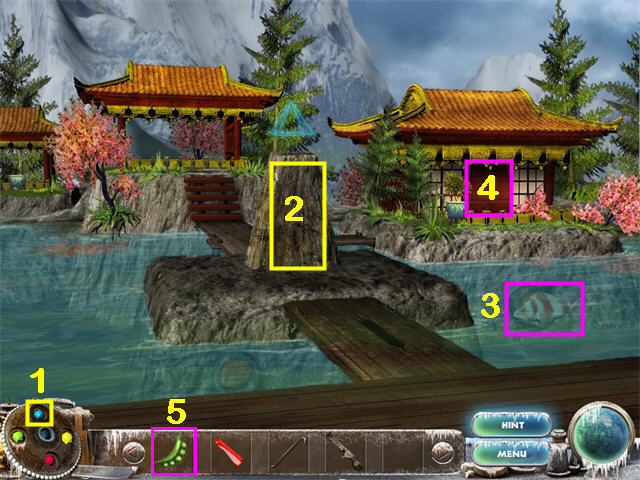
 • Use the SHOVEL (1) (from the River) to dig up the two WHITE
ROOTS (2 and 3) and take them. • Exit Down to the Main Portal.
• Click on the Blue Gem on the Main Portal and exit through
the Main Portal to the River. • Give the 3 WHITE ROOTS (1 from
the Floating Temple and 2 from the Cliff Edge) to the Fish in
the water. • Give the 5 BLACK MUSHROOMS (2 from the Floating
Temple and 3 from the Cliff Edge) to the Fish. • The Fish will
push the Obelisk Button for you and the Obelisk will rise.
• Use the SHOVEL (1) (from the River) to dig up the two WHITE
ROOTS (2 and 3) and take them. • Exit Down to the Main Portal.
• Click on the Blue Gem on the Main Portal and exit through
the Main Portal to the River. • Give the 3 WHITE ROOTS (1 from
the Floating Temple and 2 from the Cliff Edge) to the Fish in
the water. • Give the 5 BLACK MUSHROOMS (2 from the Floating
Temple and 3 from the Cliff Edge) to the Fish. • The Fish will
push the Obelisk Button for you and the Obelisk will rise.
 • Marked in Yellow: Use the BLUE AMULET CRYSTAL (1) on the
Obelisk (2). • Marked in Pink: The Fish (3) will come back and
wait in front of the River House Button. Give the Fish (3) the
PEAS (5) (from the Cliff Edge) and the Doors (4) will open.
Zoom in for a HOS.
• Marked in Yellow: Use the BLUE AMULET CRYSTAL (1) on the
Obelisk (2). • Marked in Pink: The Fish (3) will come back and
wait in front of the River House Button. Give the Fish (3) the
PEAS (5) (from the Cliff Edge) and the Doors (4) will open.
Zoom in for a HOS.
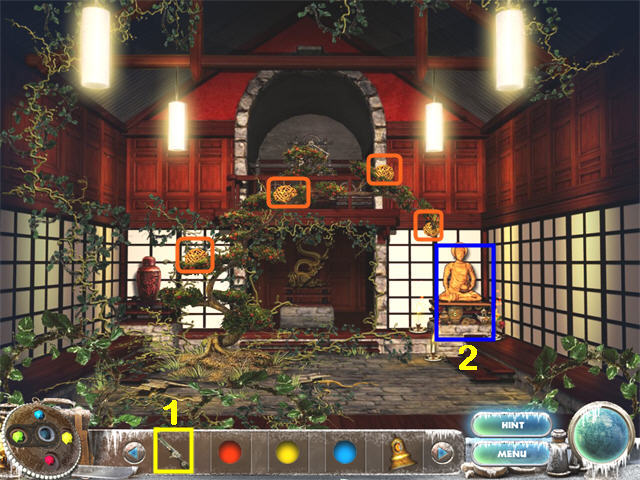
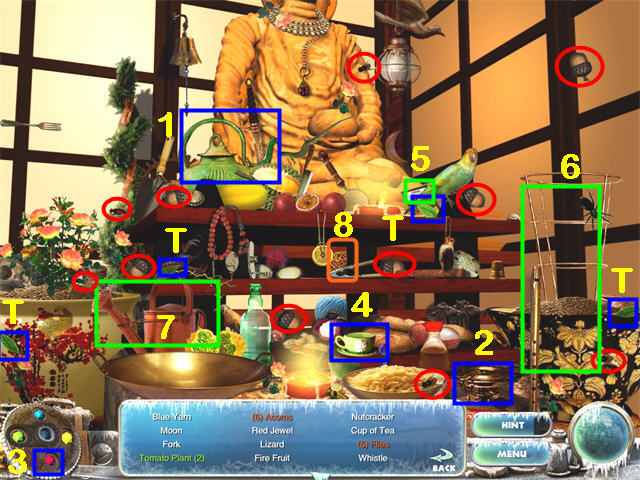
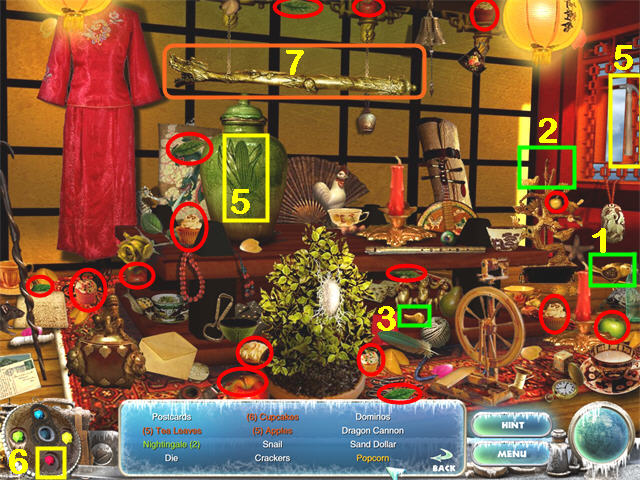 • Marked in Red: Tea Leaves, Apples, and Cupcakes. • Marked in
Green: Put the Brass Bird (1) on the Brass Tree (2). Put the
Bird Wing (3) on the Brass Bird. Take the completed
Nightingale by clicking on the tree, not the bird. • Marked in
Yellow: Use the Hammer (4) on the Jar (5) to reveal an Ear of
Corn. Use the RED AMULET CRYSTAL (6) to pop the Ear of Corn.
Take the Popcorn. • The Crackers are to the left of the Brass
Monkeys under the Table. • The DRAGON CANNON (7) will go into
your inventory. • Return to the Main Portal. • Press the
Yellow Gem on the Main Portal and exit through the Main Portal
to the Floating Temple.
• Marked in Red: Tea Leaves, Apples, and Cupcakes. • Marked in
Green: Put the Brass Bird (1) on the Brass Tree (2). Put the
Bird Wing (3) on the Brass Bird. Take the completed
Nightingale by clicking on the tree, not the bird. • Marked in
Yellow: Use the Hammer (4) on the Jar (5) to reveal an Ear of
Corn. Use the RED AMULET CRYSTAL (6) to pop the Ear of Corn.
Take the Popcorn. • The Crackers are to the left of the Brass
Monkeys under the Table. • The DRAGON CANNON (7) will go into
your inventory. • Return to the Main Portal. • Press the
Yellow Gem on the Main Portal and exit through the Main Portal
to the Floating Temple.
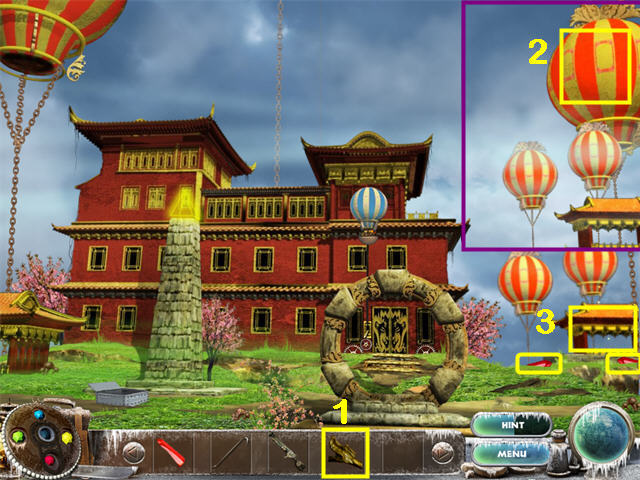 • Marked in Yellow: Use the DRAGON CANNON (1) (from the HOS in
the River House) to shoot the Large Balloon (2). Take the two
RED SHARDS. Zoom in on the Balloon Tent (3) for a HOS.
• Marked in Yellow: Use the DRAGON CANNON (1) (from the HOS in
the River House) to shoot the Large Balloon (2). Take the two
RED SHARDS. Zoom in on the Balloon Tent (3) for a HOS.
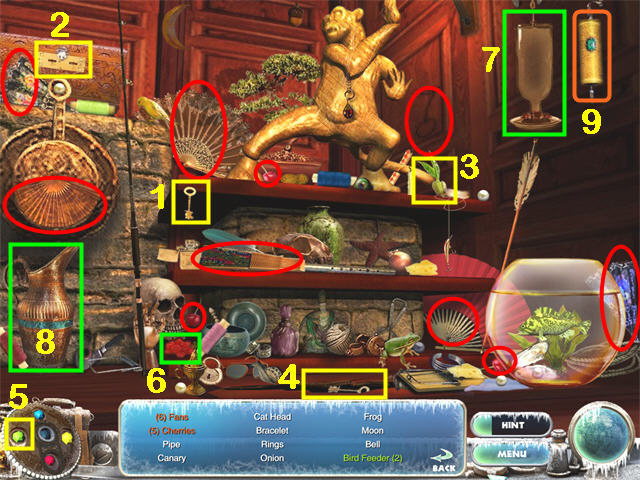
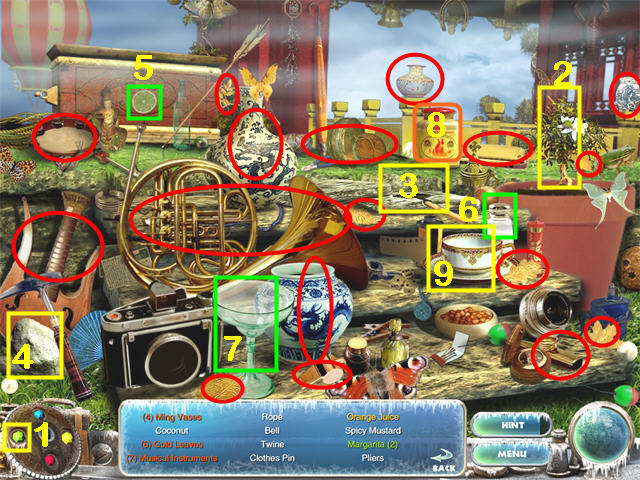 • Marked in Red: Ming Vases, Gold Leaves, and Musical
Instruments. There will be one Gold Leaf on the orange tree
after it grows. • Marked in Yellow: Use the GREEN AMULET
CRYSTAL (1) on the Plant (2). Take the Orange (2) and put it
on the Ancient Juicer (3). Put the Rock (4) on the Juicer
(aiming the cursor at the Orange). Take the cup of Orange
Juice (9). • Marked in Green: Put the Lime (5) and the Salt
(6) in the Margarita Glass (7) and take the Margarita. • The
SPICY MUSTARD (8) will go into your inventory. • Return to the
Main Portal. • Press the Green Jewel on the Main Portal and
exit through the Main Portal to the Cliff Edge.
• Marked in Red: Ming Vases, Gold Leaves, and Musical
Instruments. There will be one Gold Leaf on the orange tree
after it grows. • Marked in Yellow: Use the GREEN AMULET
CRYSTAL (1) on the Plant (2). Take the Orange (2) and put it
on the Ancient Juicer (3). Put the Rock (4) on the Juicer
(aiming the cursor at the Orange). Take the cup of Orange
Juice (9). • Marked in Green: Put the Lime (5) and the Salt
(6) in the Margarita Glass (7) and take the Margarita. • The
SPICY MUSTARD (8) will go into your inventory. • Return to the
Main Portal. • Press the Green Jewel on the Main Portal and
exit through the Main Portal to the Cliff Edge.
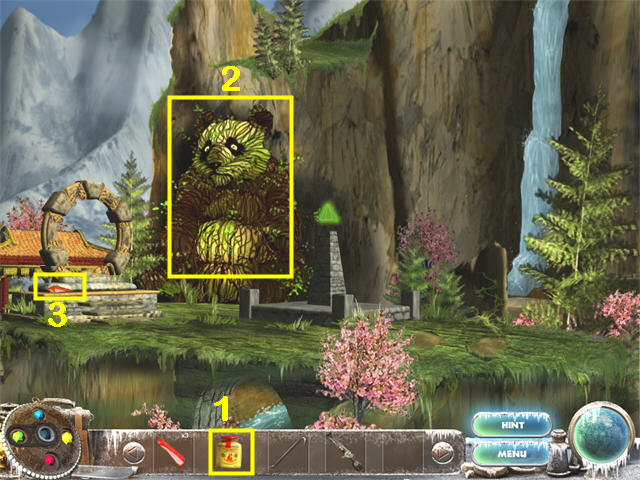 • Marked in Yellow: Give the SPICY MUSTARD (1) (from the HOS
in the Balloon Tent at the Floating Temple) to the Panda (2).
He will spit out the 4th RED SHARD (3). Take it. • Return to
the Main Portal. • Press on the Blue Gem on the Main Portal
and exit through the Main Portal to the River. • Zoom in on
the River House for a HOS.
• Marked in Yellow: Give the SPICY MUSTARD (1) (from the HOS
in the Balloon Tent at the Floating Temple) to the Panda (2).
He will spit out the 4th RED SHARD (3). Take it. • Return to
the Main Portal. • Press on the Blue Gem on the Main Portal
and exit through the Main Portal to the River. • Zoom in on
the River House for a HOS.
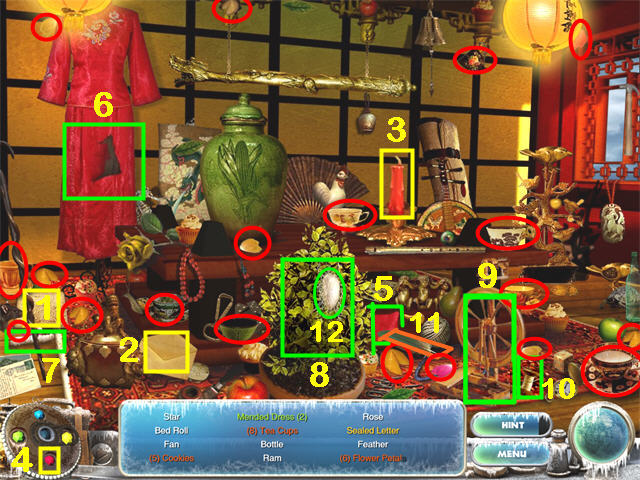 • Marked in Red: Tea Cups, Cookies, and Flower Petals. •
Marked in Yellow: Put the Letter (1) into the Envelope (2).
Put the Envelope onto the Candle (3). Use the RED AMULET
CRYSTAL (4) to melt the Candle (3). Take the Sealed Letter. •
Marked in Green: Put the Patch (5) onto the Dress (6). Put the
Silk Worm (7) onto the Bush (8). Take the Raw Silk (12) and
put it on the Spinning Wheel (9). Take the Silk Thread (10)
and use it on the Dress (6). Take the Mended Dress. • The
FEATHER (11) will go into your inventory. • The Star is a
Starfish behind the Brass Nightingale. • Return to the Main
Portal. • Press the Green Gem on the Main Portal. • Exit
through the Main Portal to the Cliff Edge.
• Marked in Red: Tea Cups, Cookies, and Flower Petals. •
Marked in Yellow: Put the Letter (1) into the Envelope (2).
Put the Envelope onto the Candle (3). Use the RED AMULET
CRYSTAL (4) to melt the Candle (3). Take the Sealed Letter. •
Marked in Green: Put the Patch (5) onto the Dress (6). Put the
Silk Worm (7) onto the Bush (8). Take the Raw Silk (12) and
put it on the Spinning Wheel (9). Take the Silk Thread (10)
and use it on the Dress (6). Take the Mended Dress. • The
FEATHER (11) will go into your inventory. • The Star is a
Starfish behind the Brass Nightingale. • Return to the Main
Portal. • Press the Green Gem on the Main Portal. • Exit
through the Main Portal to the Cliff Edge.
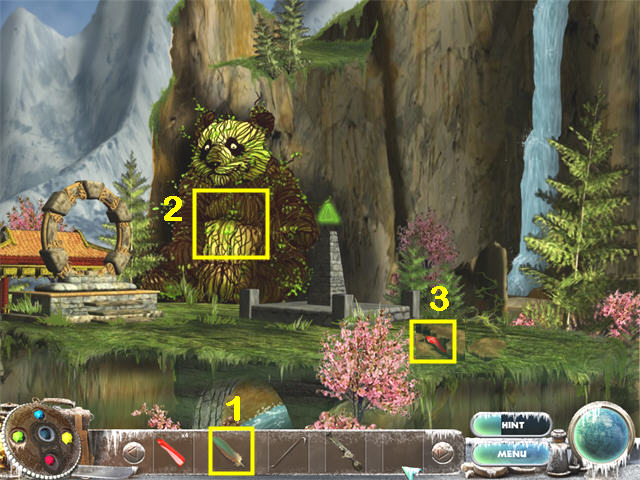 • Marked in Yellow: Tickle the Panda (1) with the FEATHER (2)
(from the 2nd HOS at the River House). He will give up the
fifth RED SHARD (3). Take it. • Return to the Main Portal.
• Marked in Yellow: Tickle the Panda (1) with the FEATHER (2)
(from the 2nd HOS at the River House). He will give up the
fifth RED SHARD (3). Take it. • Return to the Main Portal.
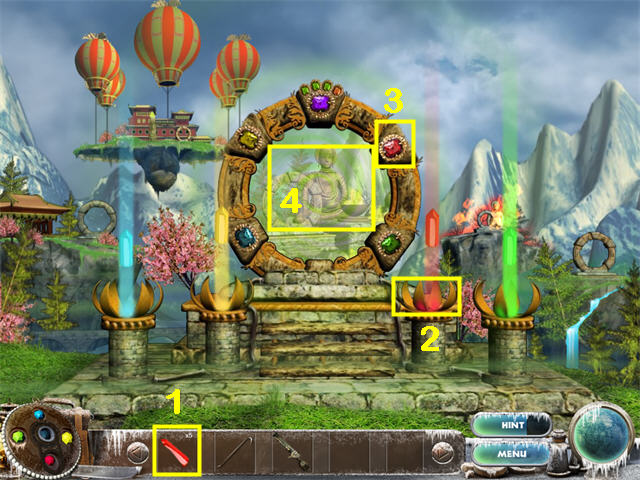 • Marked in Yellow: Put the 5 RED SHARDS (1) (2 from the
Floating Temple, 1 from the Loose Floorboard on the Bridge at
the River, and 2 from the Panda at the Cliff Edge) in the Red
Lotus (2). Press the Red Gem (3) on the Main Portal. Exit
through the Main Portal (4) to the Statue.
• Marked in Yellow: Put the 5 RED SHARDS (1) (2 from the
Floating Temple, 1 from the Loose Floorboard on the Bridge at
the River, and 2 from the Panda at the Cliff Edge) in the Red
Lotus (2). Press the Red Gem (3) on the Main Portal. Exit
through the Main Portal (4) to the Statue.
 • Marked in Blue: There are six fires. Use the YELLOW AMULET
CRYSTAL (1) on the Fires marked 2, 3, and 4 in the screenshot.
That is all you can do for now. • Exit Down to the Main
Portal. • Click on the Yellow Gem on the Main Portal. • Exit
through the Main Portal to the Floating Temple. • Zoom in on
the Balloon Tent for a HOS.
• Marked in Blue: There are six fires. Use the YELLOW AMULET
CRYSTAL (1) on the Fires marked 2, 3, and 4 in the screenshot.
That is all you can do for now. • Exit Down to the Main
Portal. • Click on the Yellow Gem on the Main Portal. • Exit
through the Main Portal to the Floating Temple. • Zoom in on
the Balloon Tent for a HOS.
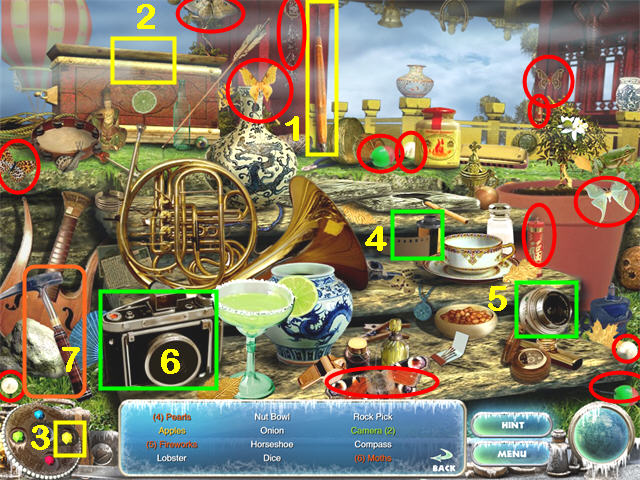 • Marked in Red: Pearls, Moths, and Fireworks. There are
several different kinds of Fireworks. • Marked in Green: Put
the Film (4) and the Lens (5) on the Camera (6) and take the
Camera. • Marked in Yellow: Put the Umbrella (1) on the Chest
(2). Use the YELLOW AMULET CRYSTAL (3) on the Umbrella (2). It
will lift the lid, revealing a Pearl and the Apples. Take
them. • The ROCK PICK (7) will go into your inventory. •
Return to the Main Portal. • Press the Red Gem on the Main
Portal. • Exit through the Main Portal to the Statue.
• Marked in Red: Pearls, Moths, and Fireworks. There are
several different kinds of Fireworks. • Marked in Green: Put
the Film (4) and the Lens (5) on the Camera (6) and take the
Camera. • Marked in Yellow: Put the Umbrella (1) on the Chest
(2). Use the YELLOW AMULET CRYSTAL (3) on the Umbrella (2). It
will lift the lid, revealing a Pearl and the Apples. Take
them. • The ROCK PICK (7) will go into your inventory. •
Return to the Main Portal. • Press the Red Gem on the Main
Portal. • Exit through the Main Portal to the Statue.
 • Marked in Yellow: Use the ROCK PICK (1) (from the second HOS
at the Balloon Tent at the Floating Temple) several times on
the Boulder (2). Zoom in on the Obelisk for a mini-game.
• Marked in Yellow: Use the ROCK PICK (1) (from the second HOS
at the Balloon Tent at the Floating Temple) several times on
the Boulder (2). Zoom in on the Obelisk for a mini-game.
 • This is a pairs matching game. You get as many tries as you
like, and the pictures will always be in the same place. • You
must match all the pairs before the Hourglass timer at the top
runs out, or start again. • When the mini-game is complete,
use the RED AMULET CRYSTAL on the Obelisk. • Return to the
Main Portal. • Press the Purple Gem at the top of the Main
Portal. • Exit through the Main Portal after the Diamond
Lotus.
• This is a pairs matching game. You get as many tries as you
like, and the pictures will always be in the same place. • You
must match all the pairs before the Hourglass timer at the top
runs out, or start again. • When the mini-game is complete,
use the RED AMULET CRYSTAL on the Obelisk. • Return to the
Main Portal. • Press the Purple Gem at the top of the Main
Portal. • Exit through the Main Portal after the Diamond
Lotus.
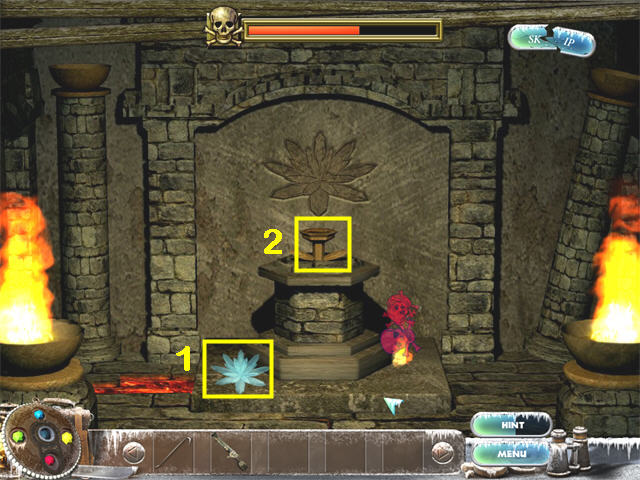 • The last mini-game is simple: just put the Diamond Lotus (1)
on the Altar (2). If you don’t make it in time, you will get
another chance. • Watch the last cut scene.
• The last mini-game is simple: just put the Diamond Lotus (1)
on the Altar (2). If you don’t make it in time, you will get
another chance. • Watch the last cut scene.
Created at: 2012-03-26