

Walkthrough Menu
- General Tips
- Chapter 1: Banisher
- Chapter 2: Shaman
- Chapter 3: Beast
- Chapter 4: Lurker
- Chapter 5: Heart's Desire
General Tips
- This is the official guide for Rite of Passage: Deck of Fates.
- This guide will not show when you have to zoom into a location; the screenshots will show each zoom scene.
- Hidden-object puzzles are referred to as HOPs. This guide will not show screenshots of the HOPs, however, it will mention when an HOP is available and the inventory item you'll collect from it.
- Use the Map to fast travel to a location.
Chapter 1: Banisher
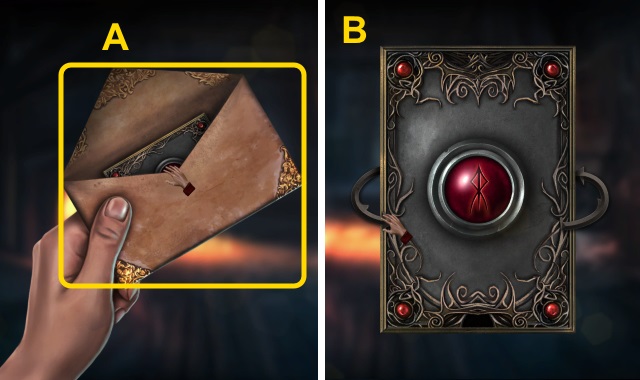
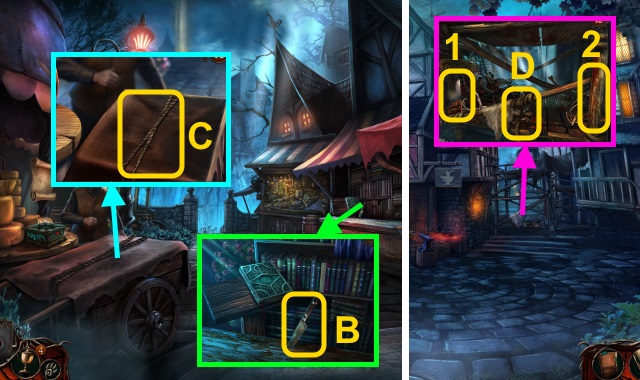
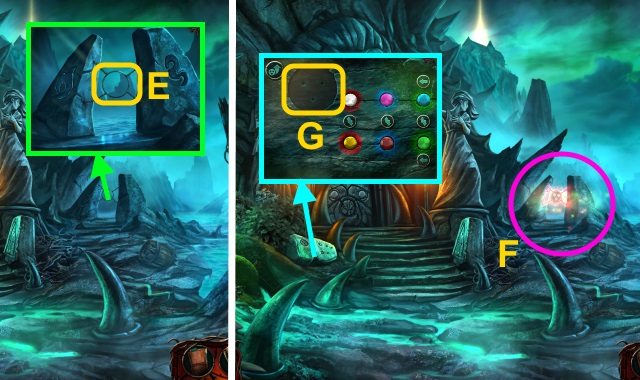
- Open the letter; take the card (A).
- Turn the card (B).
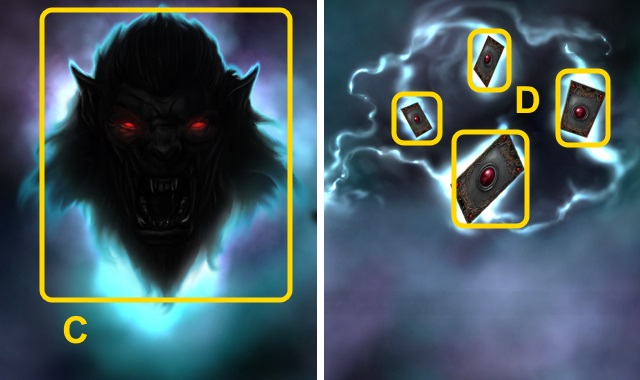
- Examine the shadow (C).
- Examine the four cards (D).
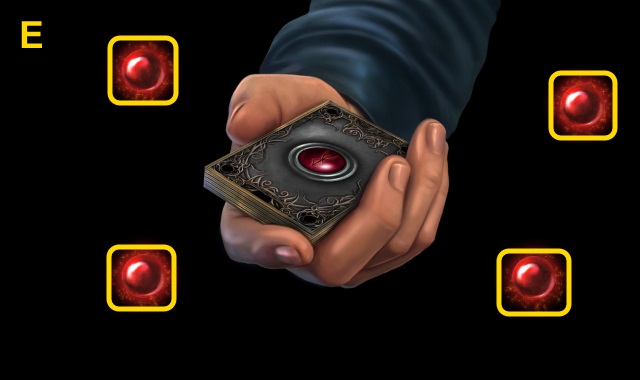
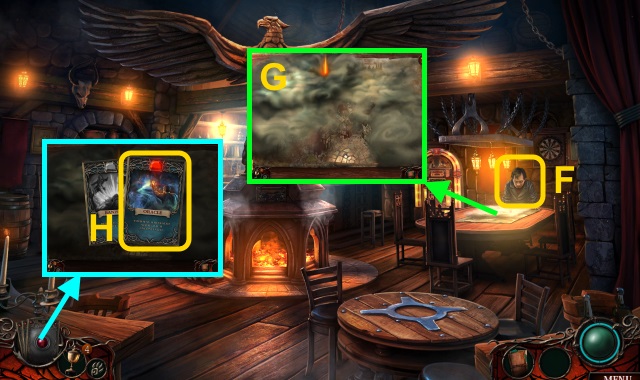
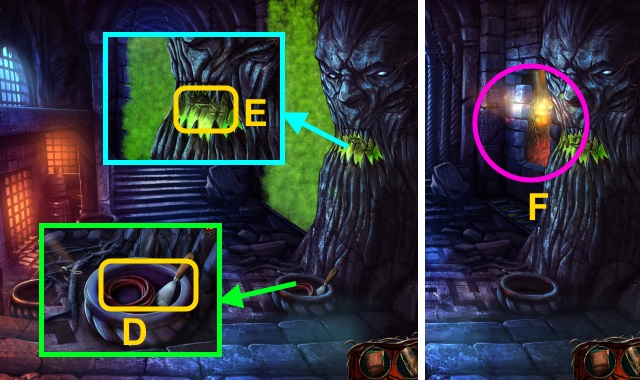
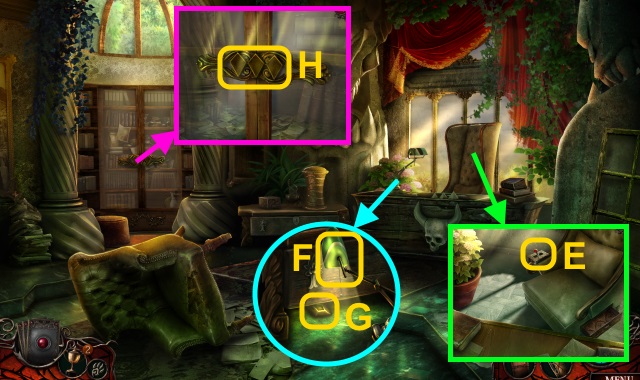
- Gather the jewels (E).
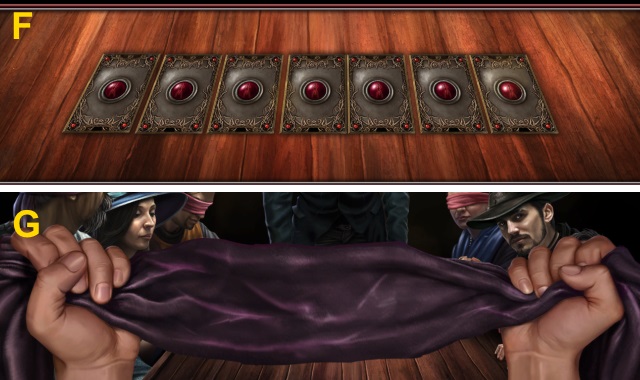
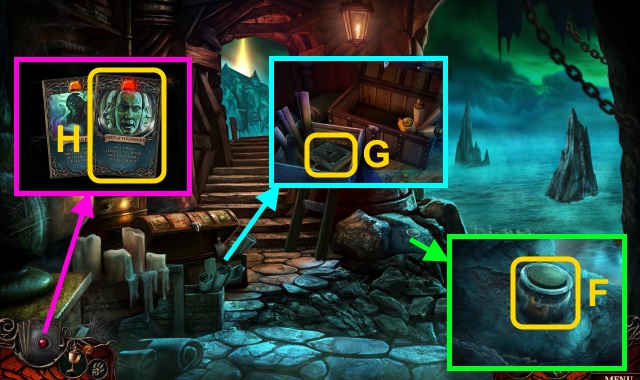
- Take any card (F).
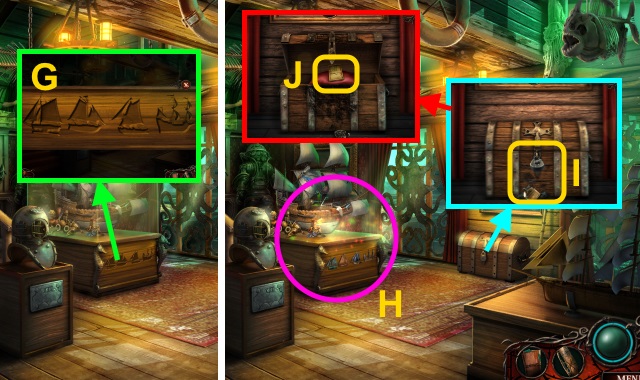
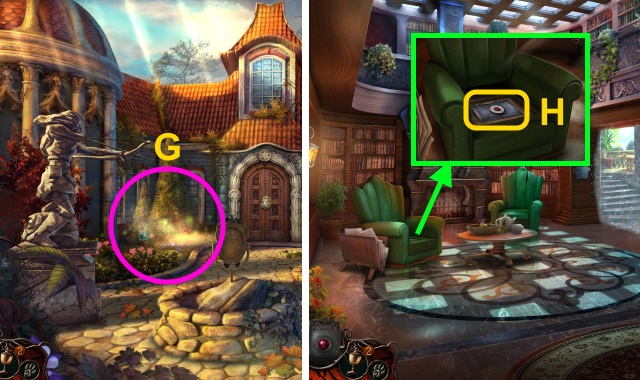
- Examine the blindfold (G).

- Examine the blindfold (H); flip it over.
- Fold the corners; take the blindfold (I).
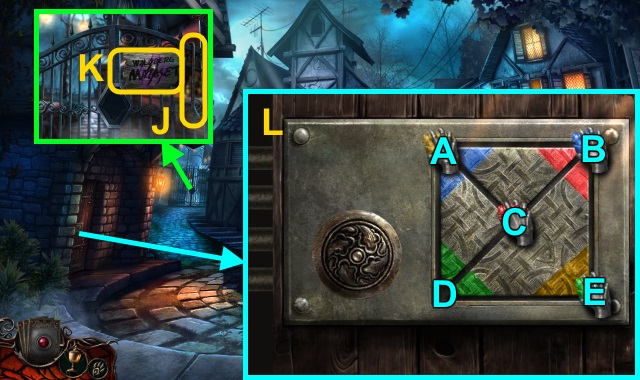
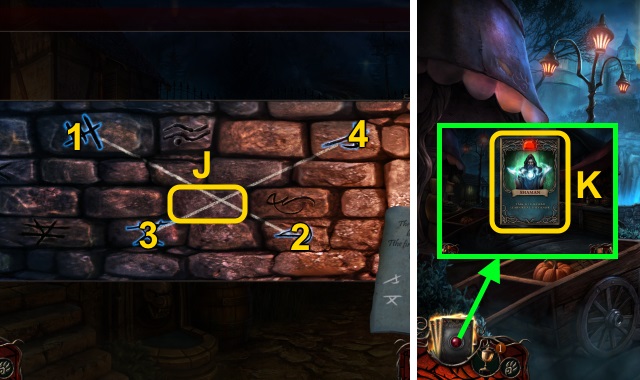
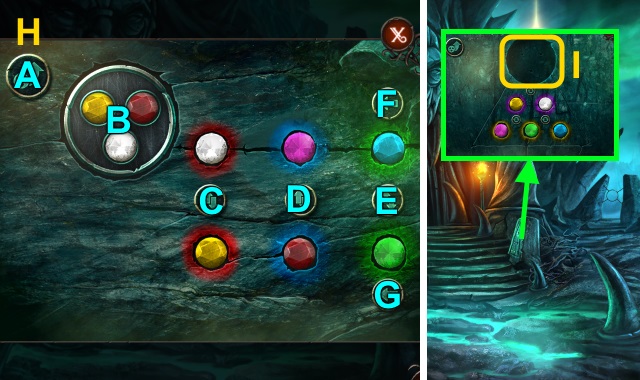
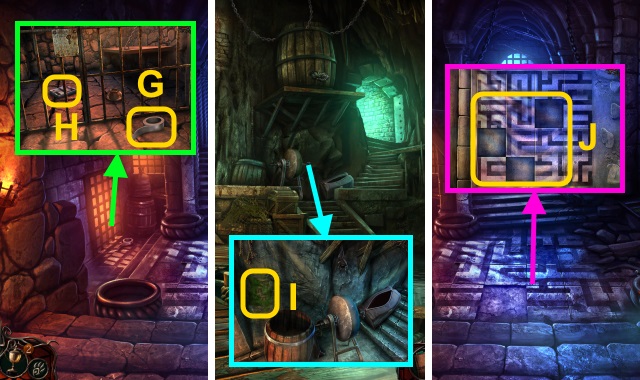
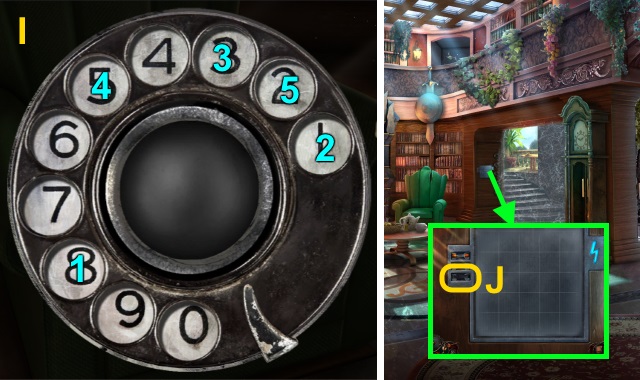
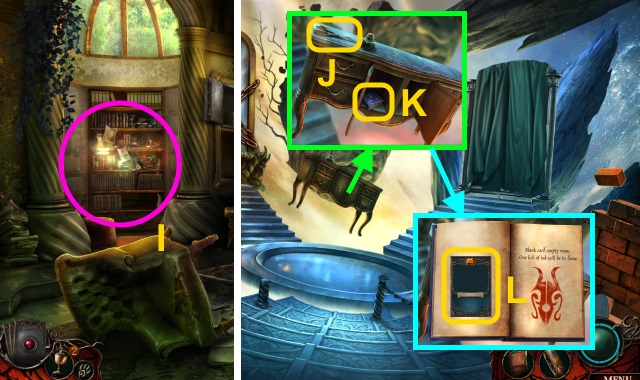
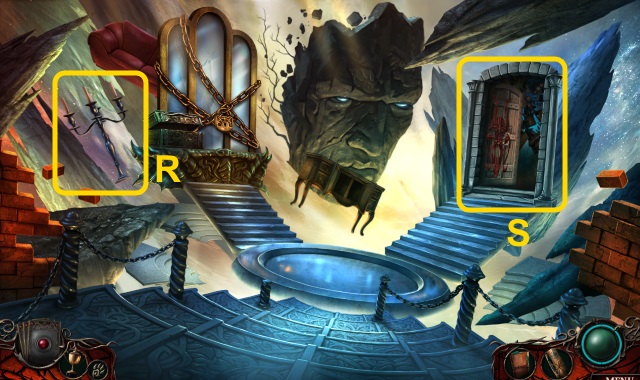
- Take the CROWBAR (J). Examine the sign (K); take the HAND FIGURINE.
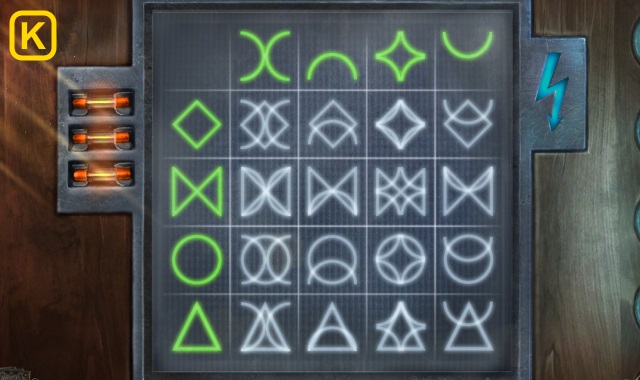
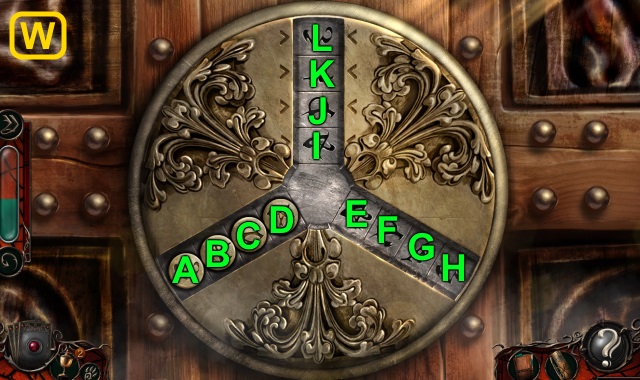
- Use the HAND FIGURINE for a mini-game.
- Solution (L): A-C-B-E-D-C-B-A-D-C.
- Open the door.
- Walk left.
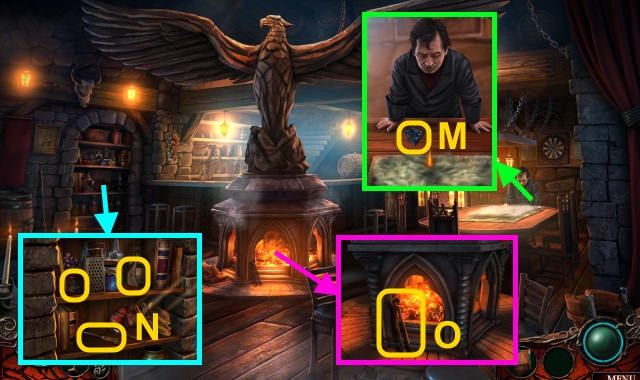
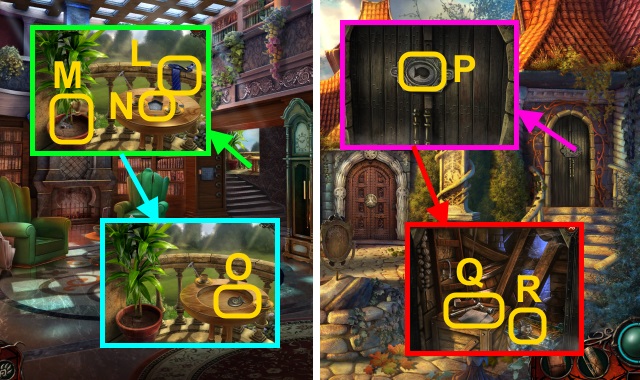
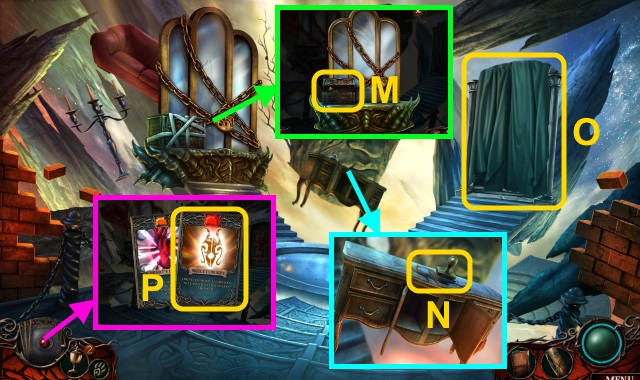
- Talk to the man; try to take the seal (M).
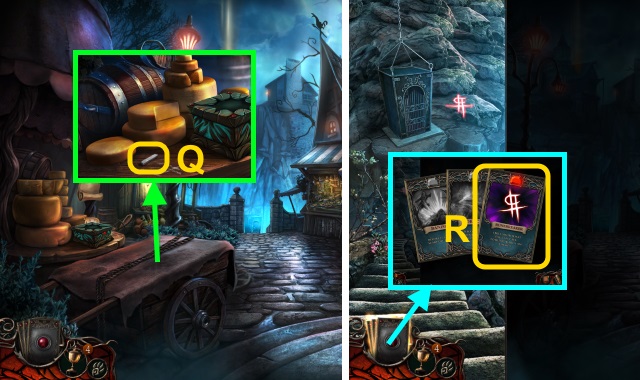
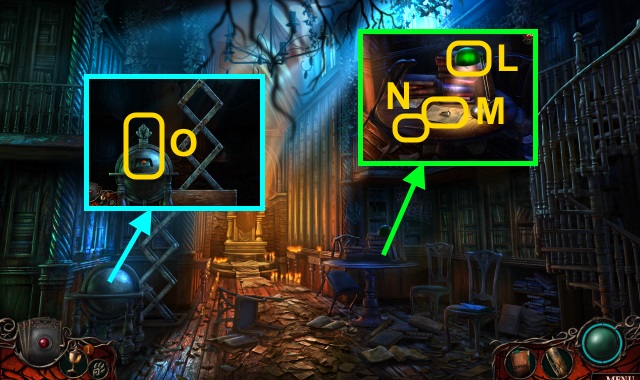
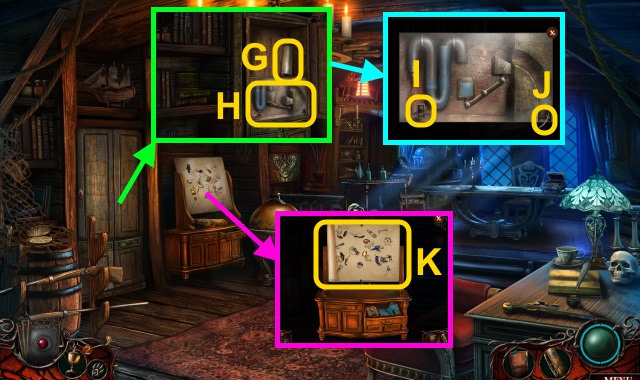
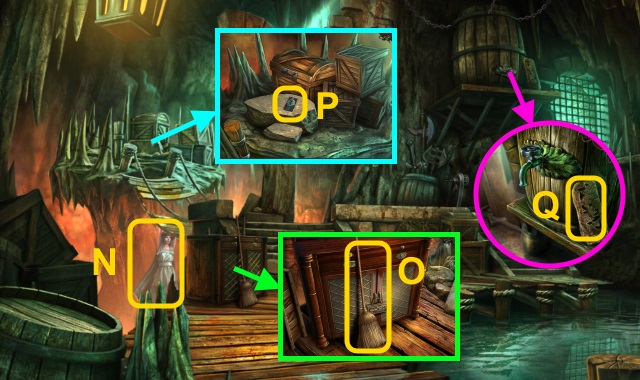
- Move the jar; take the ARROW BUTTON, SCREWDRIVER, and GATE SEAL PART (1/3) (N).
- Take the TONGS (O).
- Walk down.
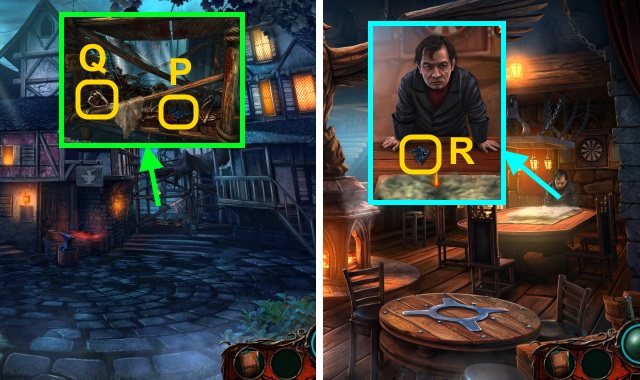
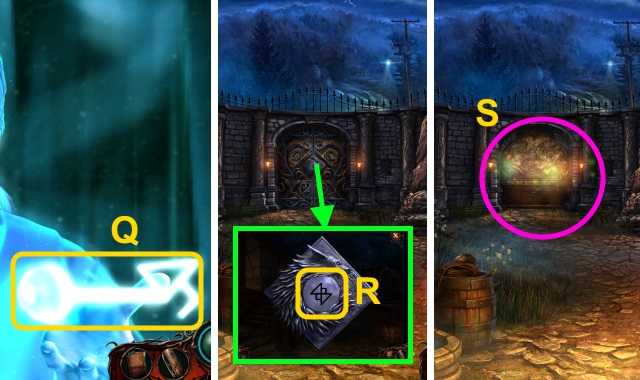
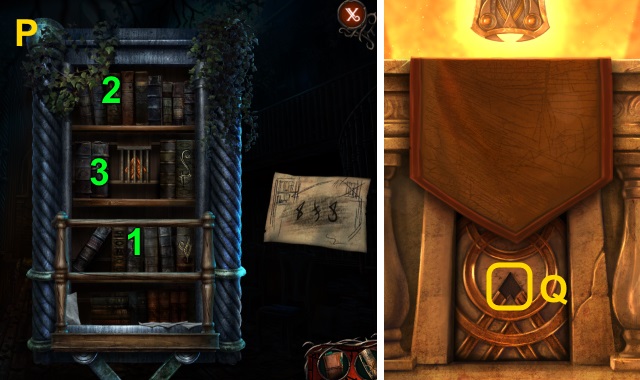
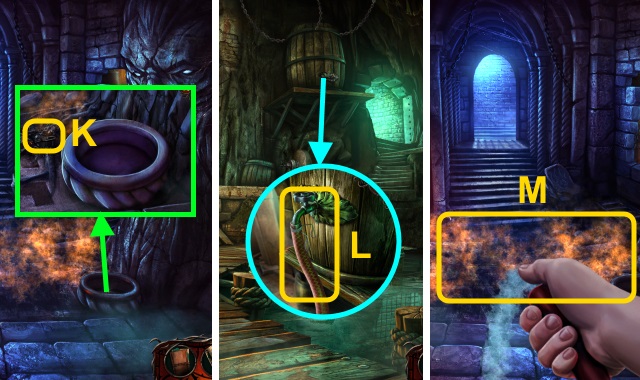
- Examine the fur and skull; take the GATE SEAL PART (2/3) (P). Use the CROWBAR; take the POUCH (Q).
- Open the POUCH; move the items. Take the GOLD COIN.
- Walk left.
- Give the GOLD COIN; take the GATE SEAL PART (3/3) (R).
- Walk down.
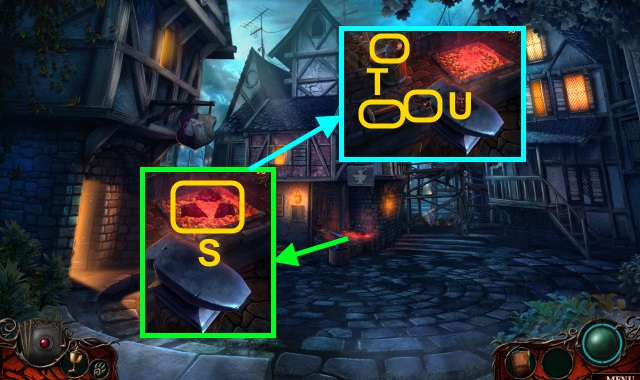
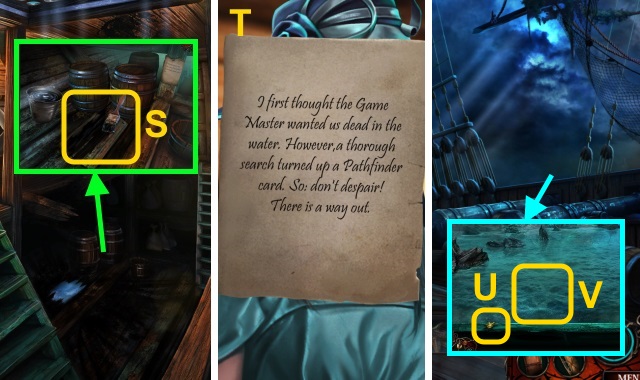
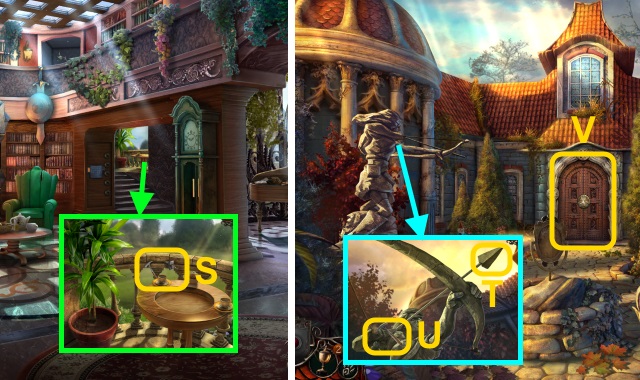
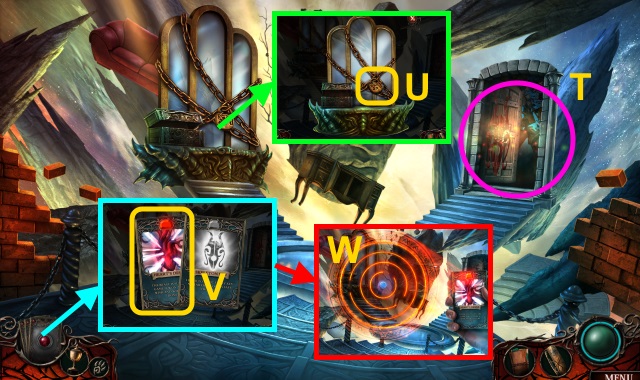
- Place the GATE SEAL PART (3/3) (S); use the TONGS.
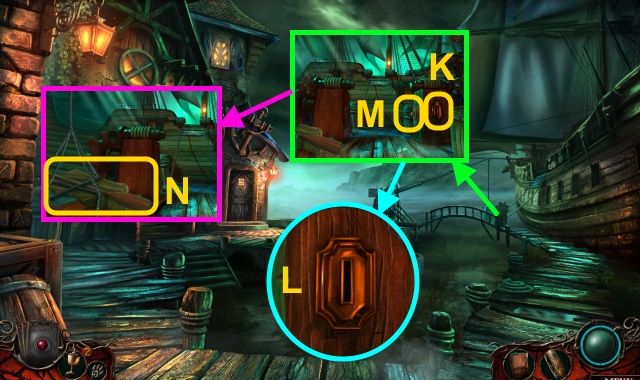
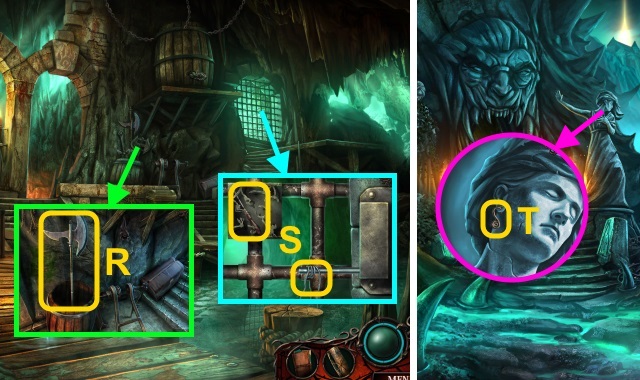
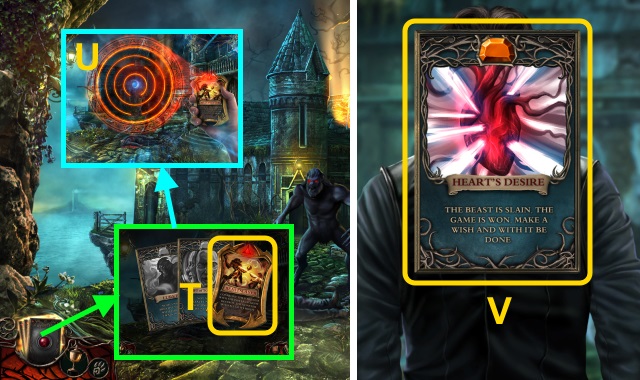
- Take the HAMMER and SPONGE (T). Examine the tongs (U); take the GATE KEY.
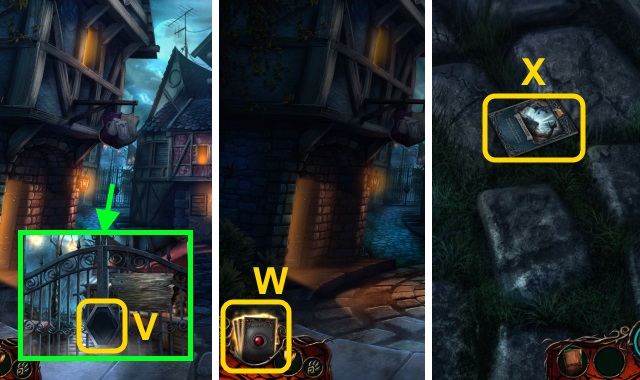
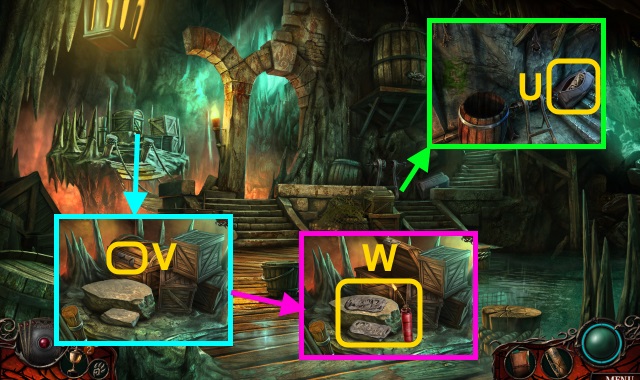
- Place the GATE KEY (V).
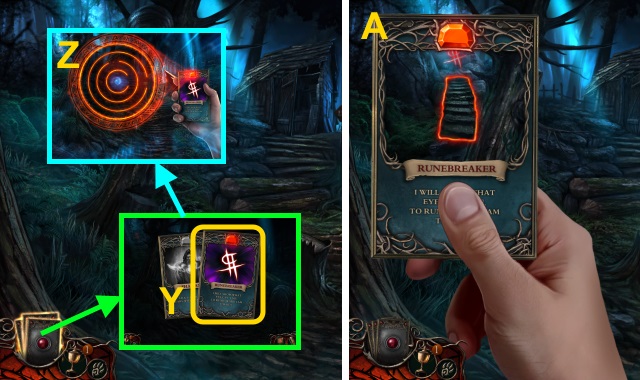
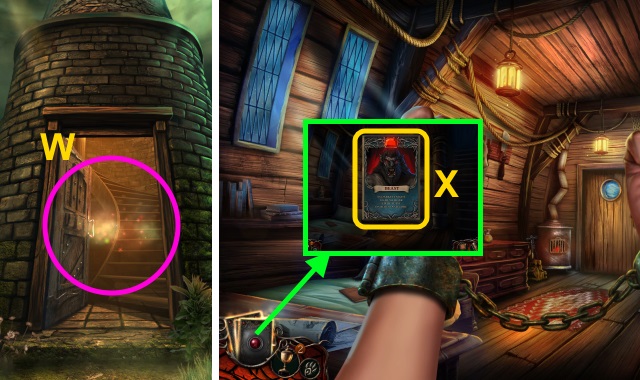
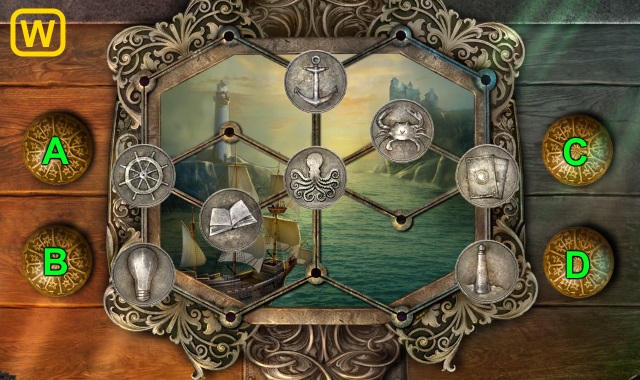
- Use the Deck of Fates (W).
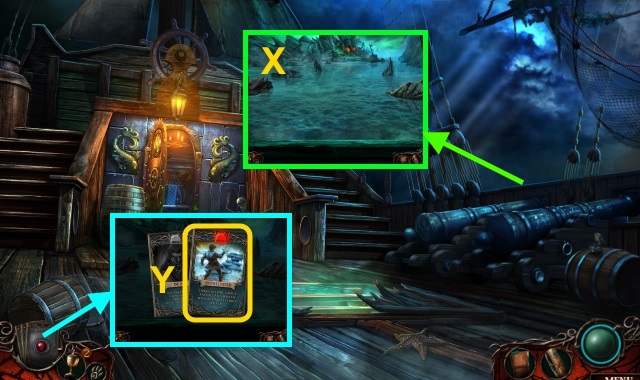
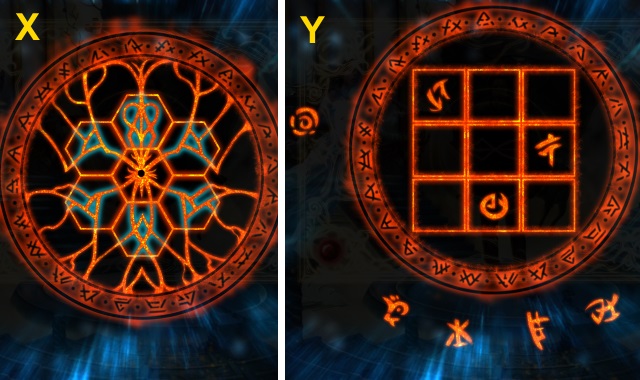
- Take the card (X).
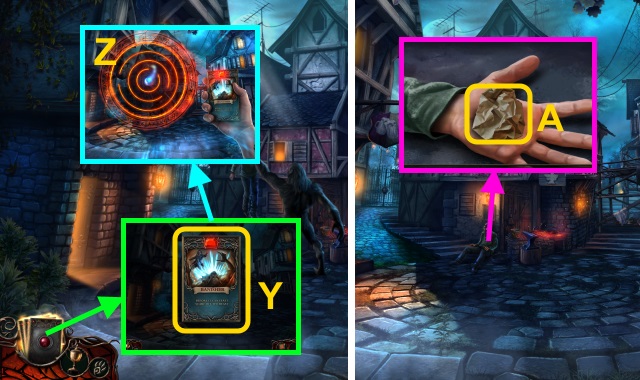
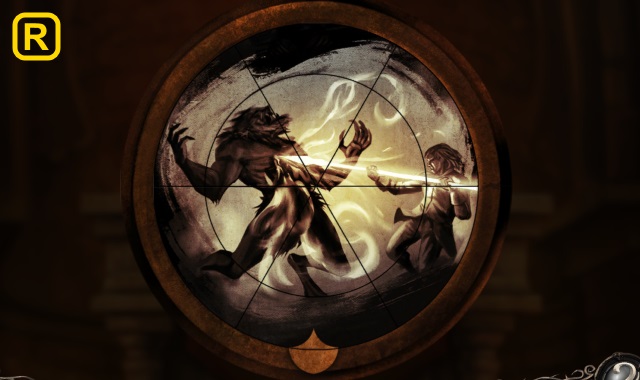
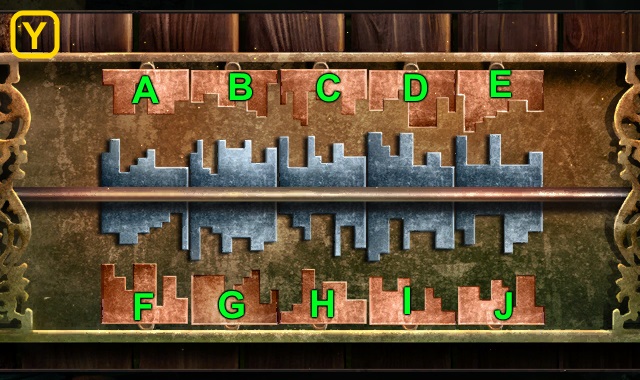
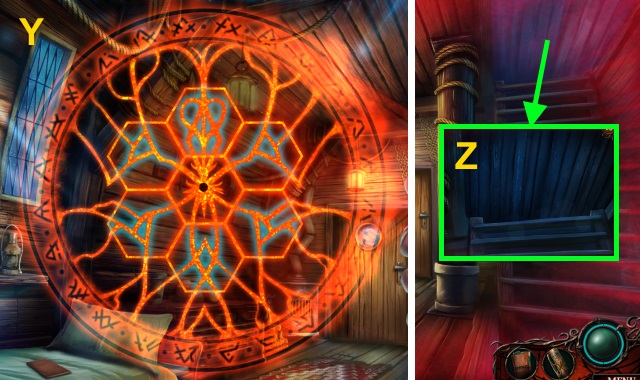
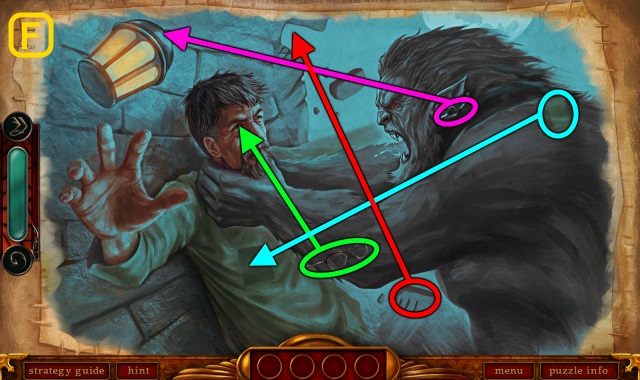
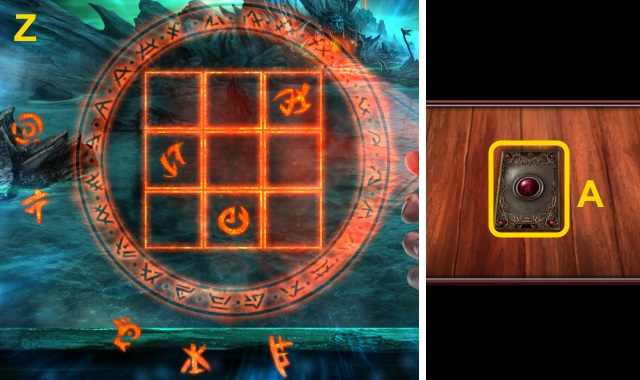
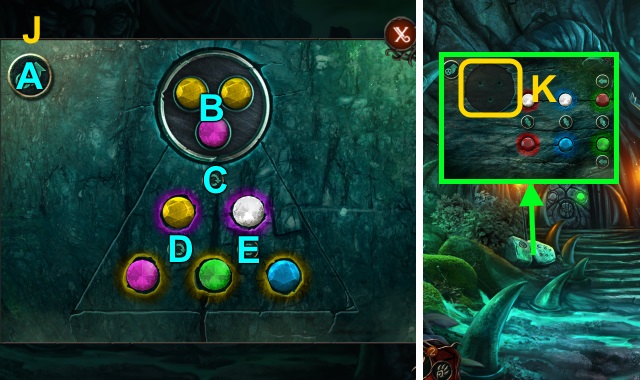
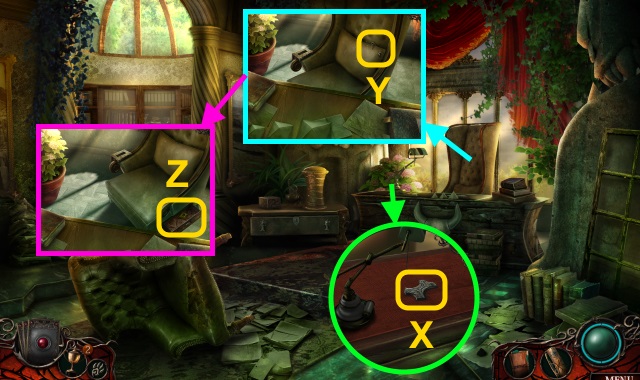
- Use the Deck of Fates; use Banisher for a mini-game (Y).
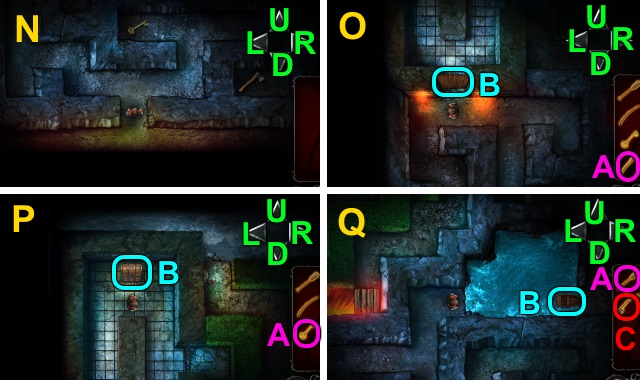
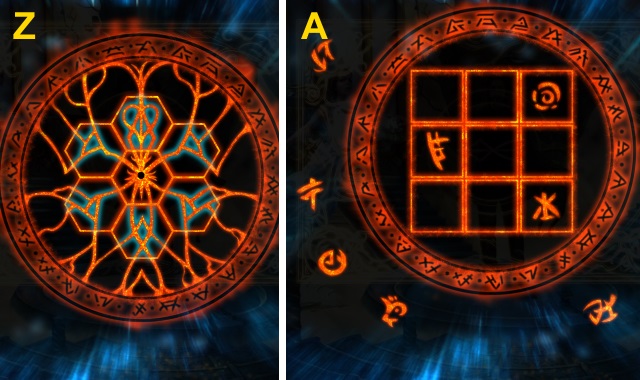
- Solution (Z): move the ball through the maze.
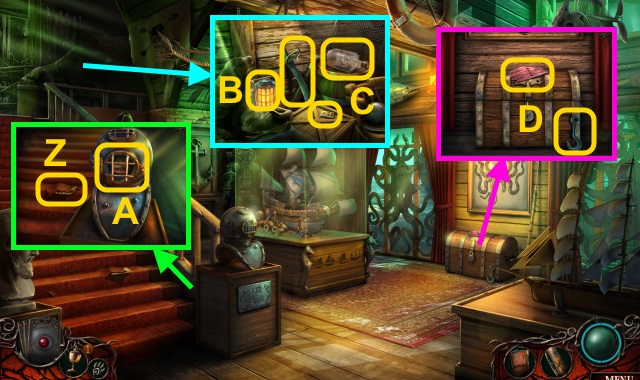
- Talk to the man; take the FOLDED PAPER (A).
- Open the FOLDED PAPER; take the EAGLE FIGURINE.
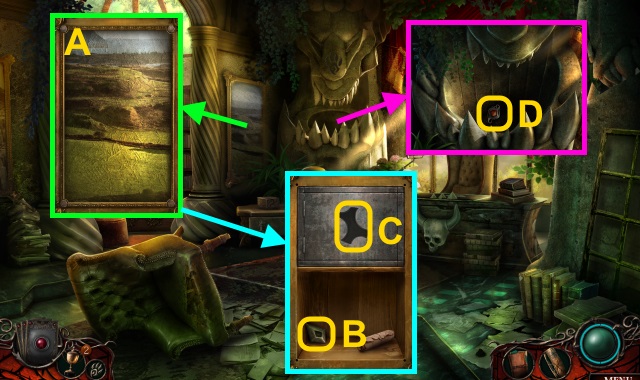
- Walk left.
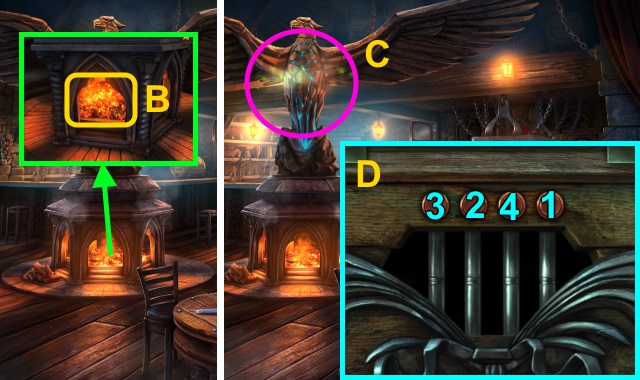
- Place the EAGLE FIGURINE (B).
- Play the HOP; receive the BROKEN PICTURE (C).
- HOP mini-game solution (D).
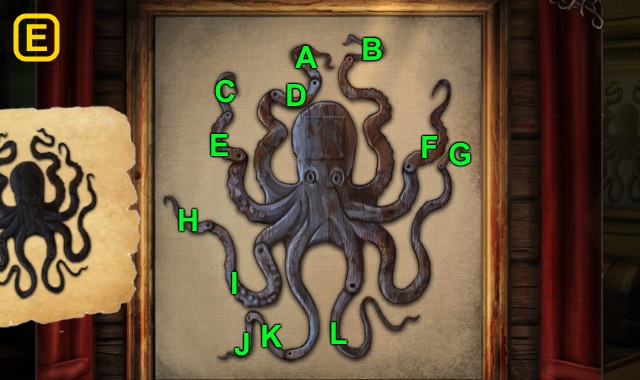
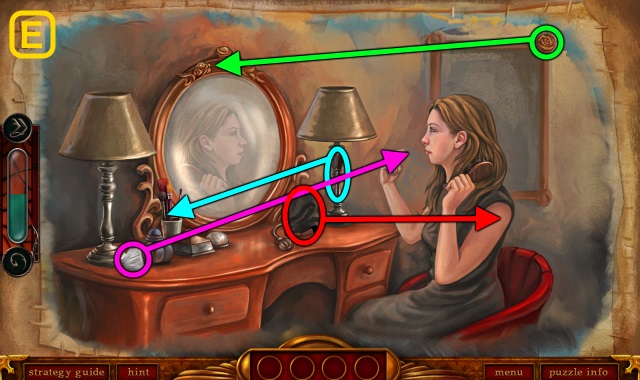
- Examine the BROKEN PICTURE for a mini-game.
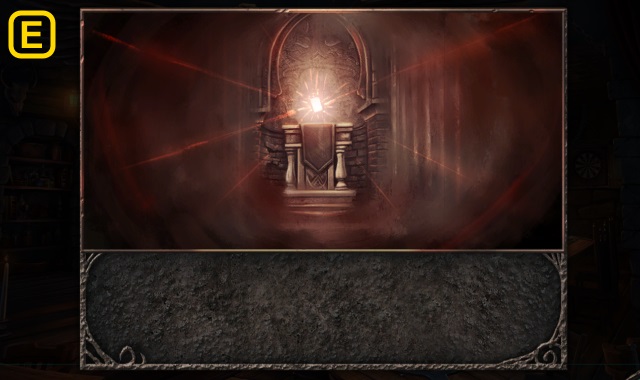
- Solution (E).
- Turn the picture; take the card.
- Talk to the man (F).
- Examine the map (G).
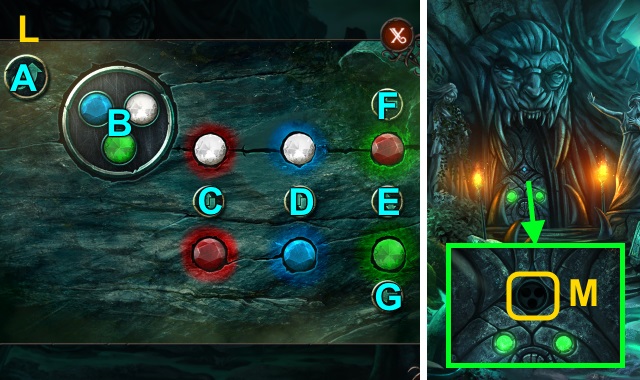
- Use the Deck of Fates; use Oracle for a mini-game (H).

- Solution (I).
- Take the Map and MESSAGE.
- Read the MESSAGE; take the card.
- Walk down.
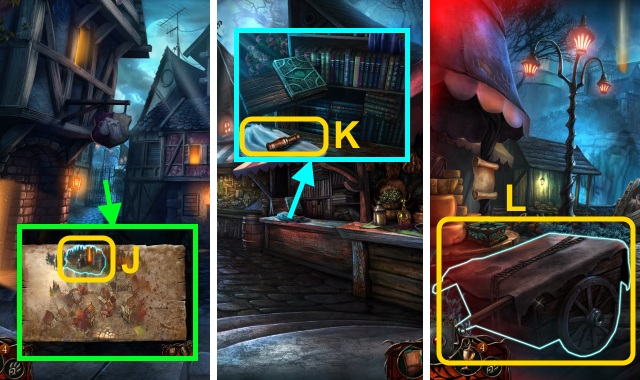
- Examine the gate; select the library (J).
- Walk forward through the gate.
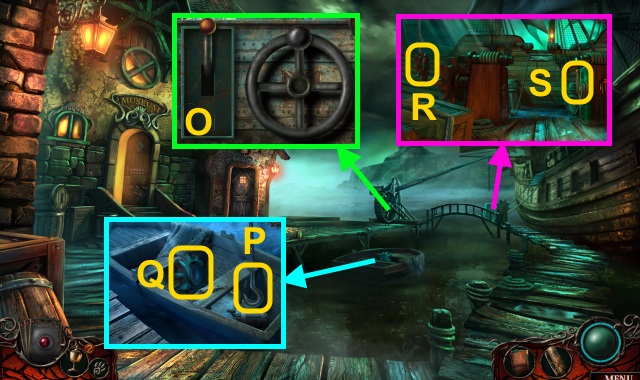
- Take the WHISTLE and cloth (K).
- Examine the cart for a mini-game (L).
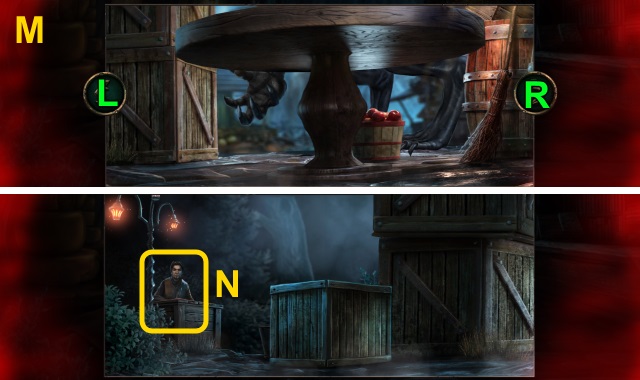
- Solution (M): L-R-Lx2.
- Use the WHISTLE for a mini-game (N).
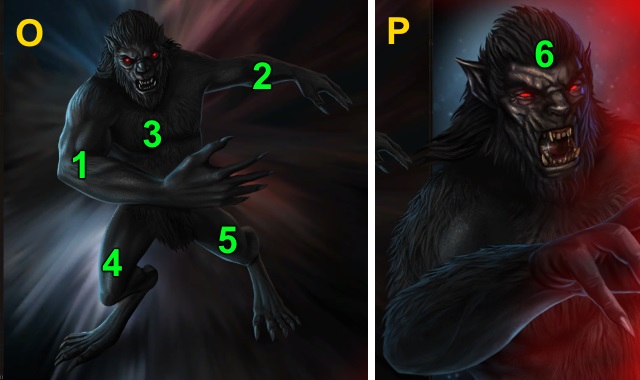
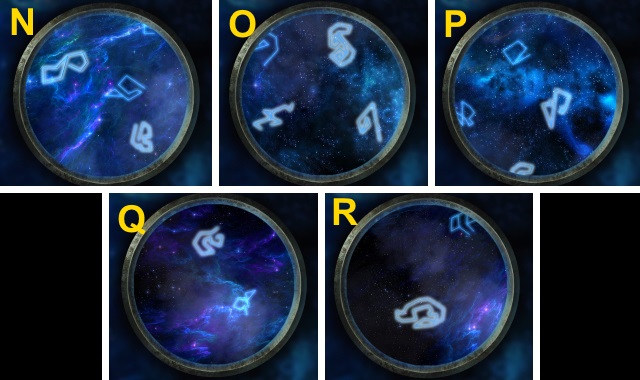
- Solution (O-P).
- Take the CHALK (Q).
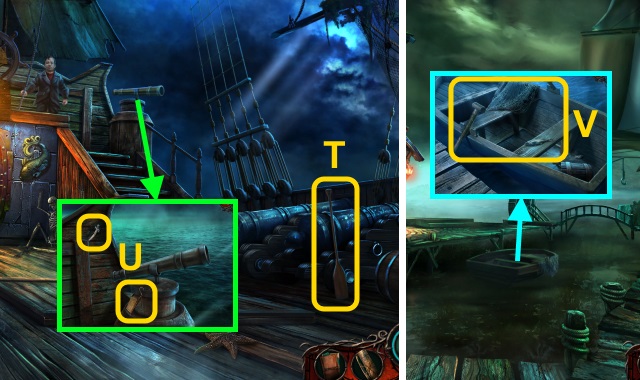
- Walk forward.
- Use the Deck of Fates; use Runebreaker for a mini-game (R).

- Solution (S).
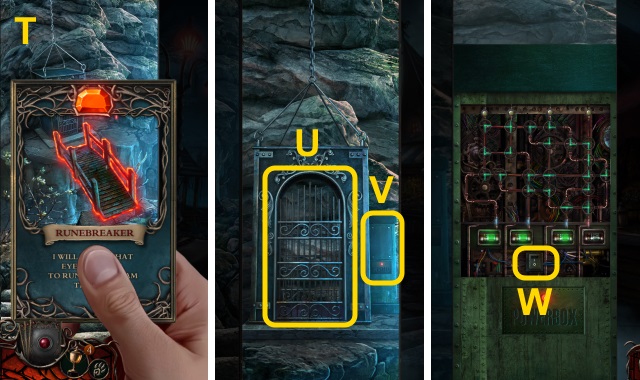
- Use the card (T).
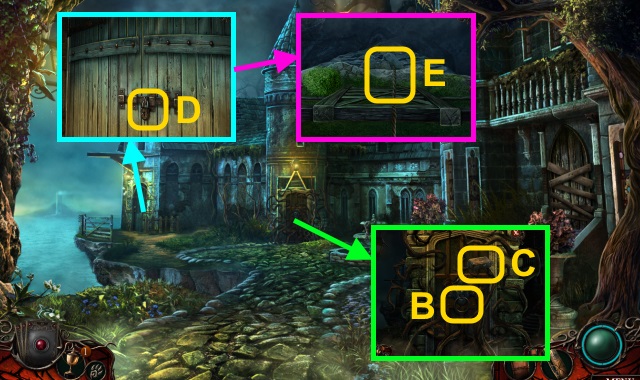
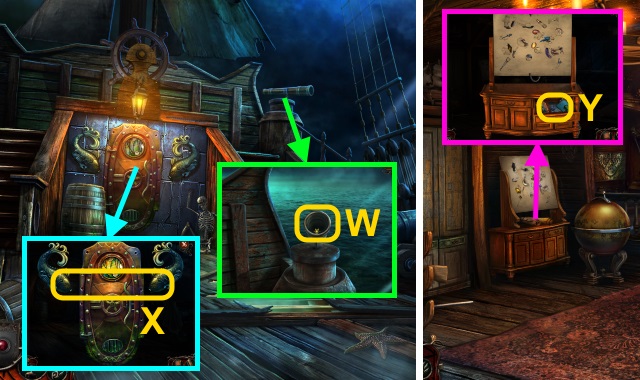
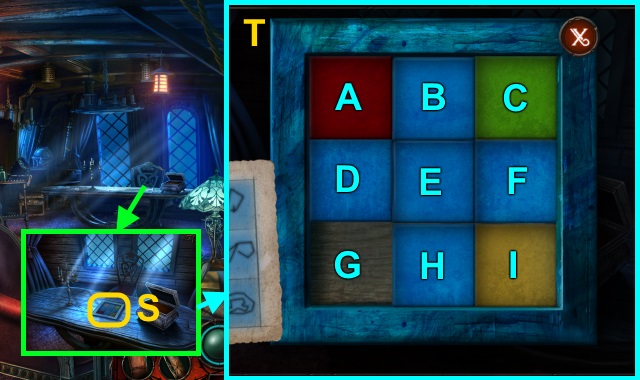
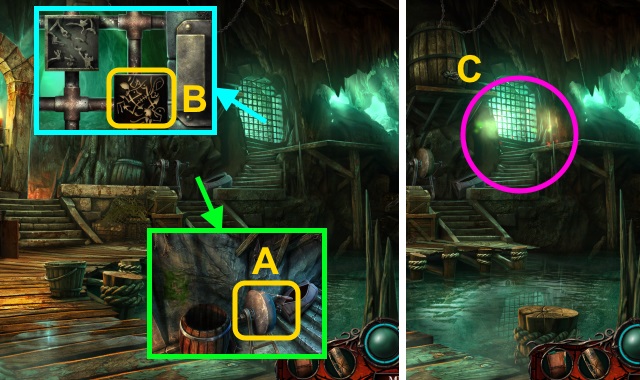
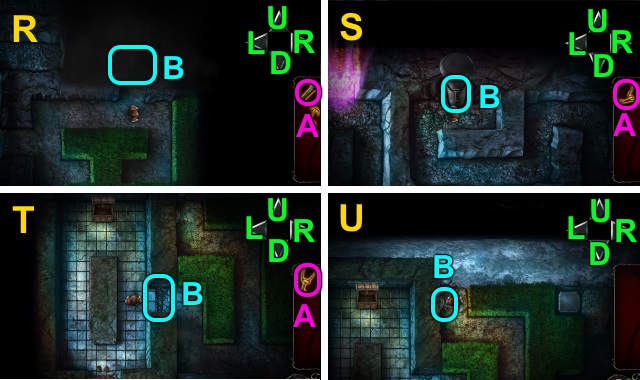
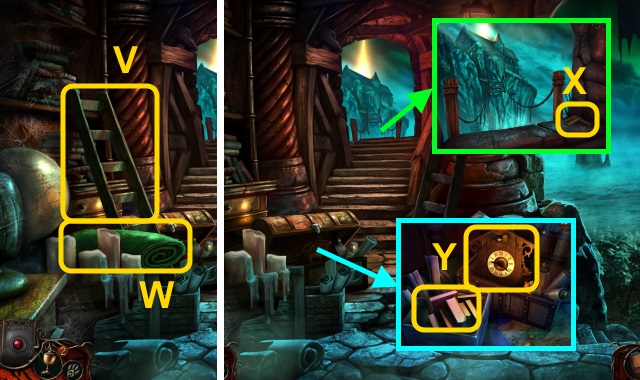
- Examine the door 2x (U); scroll right. Examine the box (V).
- Use the SCREWDRIVER; examine the switch for a mini-game (W).
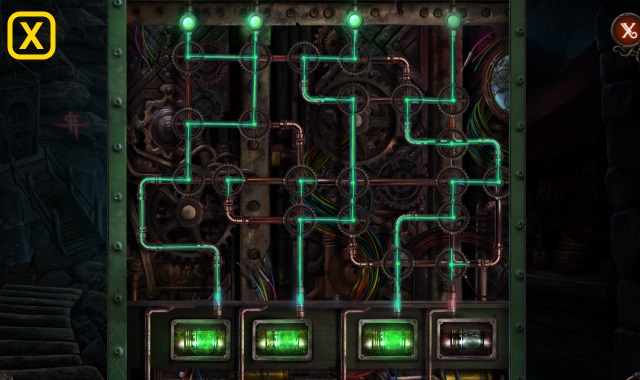
- Solution (X).
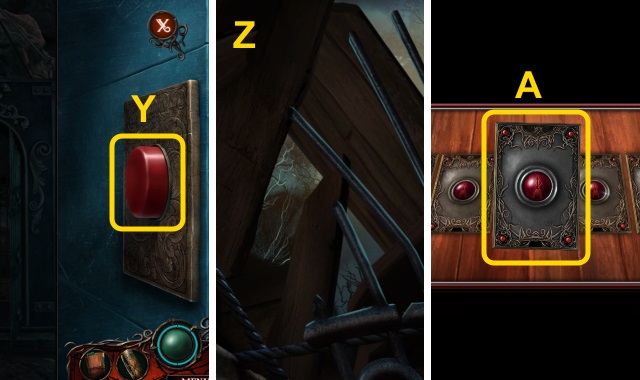
- Examine the elevator; press the button (Y).
- Examine the scene; move the parts (Z).
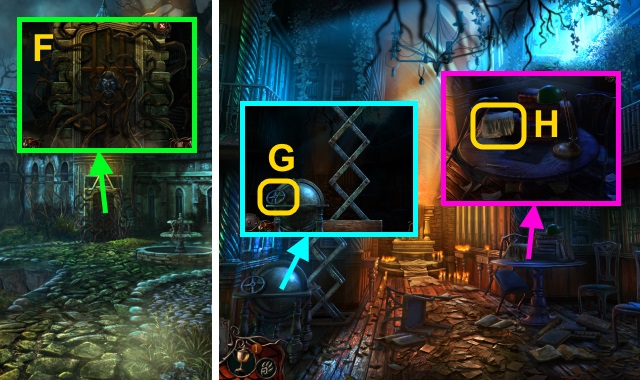
- Take any card (A).
Chapter 2: Shaman
- Walk forward through the gate.
- Take the KNIFE (B).
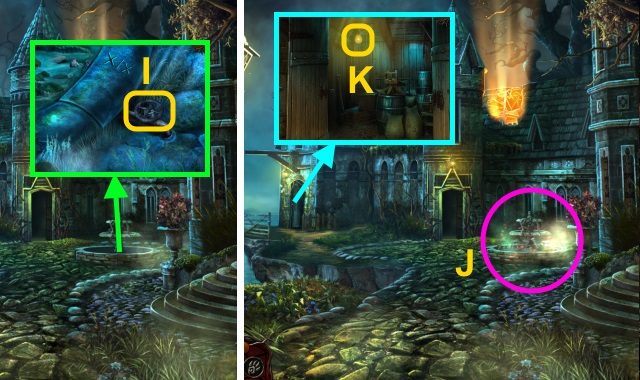
- Use the KNIFE; take the ROPE (C). Move the cloth and items; take the HAND SAW.
- Walk down.
- Tie the ROPE (D); use the HAND SAW 2x (1-2). Pull the rope.
- Walk right.
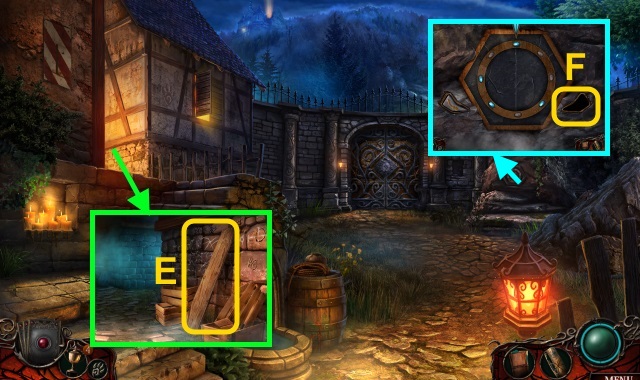
- Take the WOODEN PLANK (E).
- Place the ARROW BUTTON for a mini-game (F).

- Solution (G): Ax2-B-Ax5.
- Take the TREE SYMBOL.
- Walk down, then left.
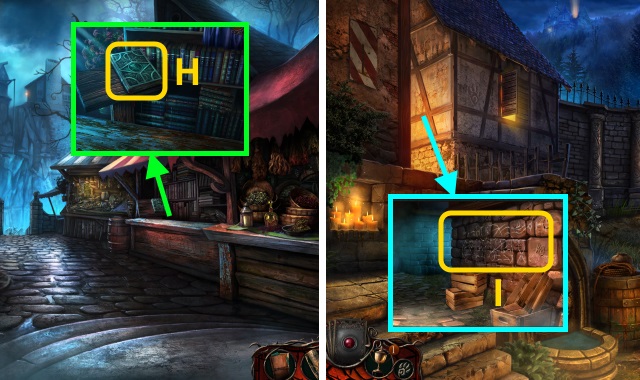
- Place the TREE SYMBOL (H); read the book.
- Go to the Market.
- Examine the wall; use the SPONGE and CHALK for a mini-game (I).
- Solution: 1-4.
- Use the CROWBAR and HAMMER (J); take the GATE KEY PART and STAR-SHAPED TOKEN.
- Go to the Market.
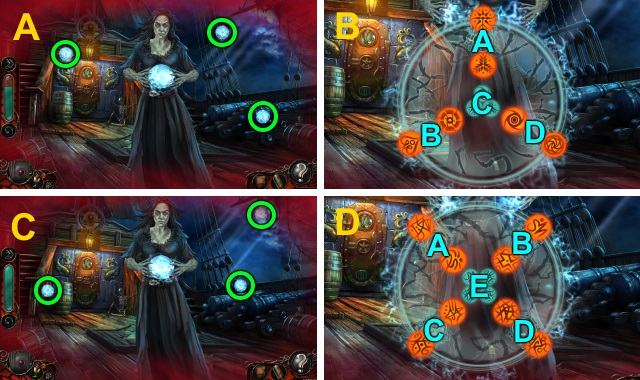
- Use the Deck of Fates; use Shaman for a mini-game (K).
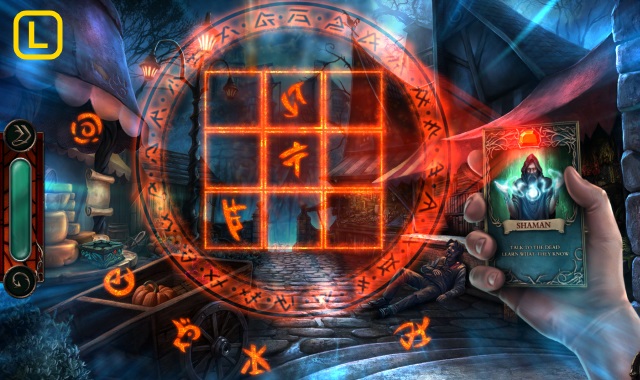
- Solution (L).
- Place the STAR-SHAPED TOKEN (M); open the box. Examine the key.
- Talk to the ghost for a mini-game (N).
- Solution (O-P).
- Use the GATE KEY PART (Q); receive the GATE KEY.
- Walk down, then right.
- Use the GATE KEY (R).
- Play the HOP; receive the METAL KNOCKER (S).
- Walk forward.
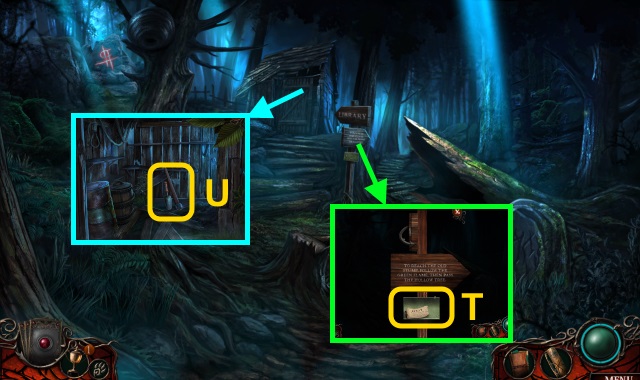
- Turn the sign. Open the box; take the clue and MATCHES (T).
- Open the door; take the PICKAXE and TROWEL (U).
- Walk forward.
- Use the MATCHES 3x (1-3).
- Go forward past the green flame.
- Use the WOODEN PLANK (V).
- Go forward.
- Move the plants; use the TROWEL. Examine the box for a mini-game (W).
- Solution (X): A-E-B-D-C-A-E-B.
- Open the box; take the card.
- Examine the Deck of Fates; use Runebreaker for a mini-game (Y).
- Solution (Z): move the ball through the maze.
- Place the card (A).
- Walk left.
- Place the METAL KNOCKER (B); take the BRICK (C).
- Use the BRICK (D); open the door.
- Scroll left. Examine the cliff; use the PICKAXE (E). Examine the rope; take the HAND SHEARS.
- Use the HAND SHEARS (F).
- Walk forward.
- Take the VALVE (G).
- Take the RAG (H).
- Walk down.
- Use the VALVE (I).
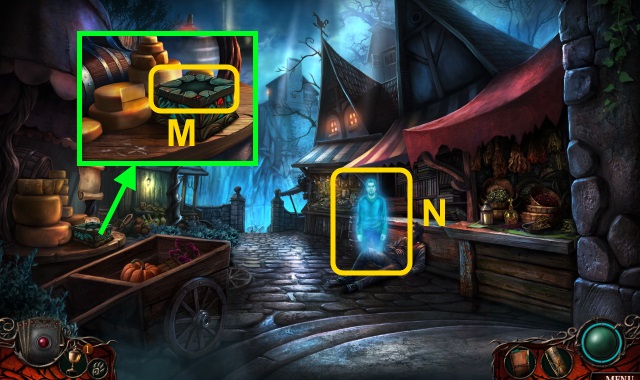
- Play the HOP; receive the BEAST FIGURINE (J).
- Scroll right. Use the RAG (K); receive the LIGHTBULB.
- Walk forward.
- Place the LIGHTBULB (L); take the DIAMOND RING (M). Examine the paper and pencil (N); take the BOOK SYMBOLS.
- Place the BEAST FIGURINE; press the button (O).
- Use the BOOK SYMBOLS for a mini-game; solution (P). Take the ALTAR SEAL.
- Walk forward.
- Place the ALTAR SEAL for a mini-game (Q).
- Solution (R).

- Take the card (S).
- Turn around.
- Use the Deck of Fates (T).
- Take the card (U).
Chapter 3: Beast
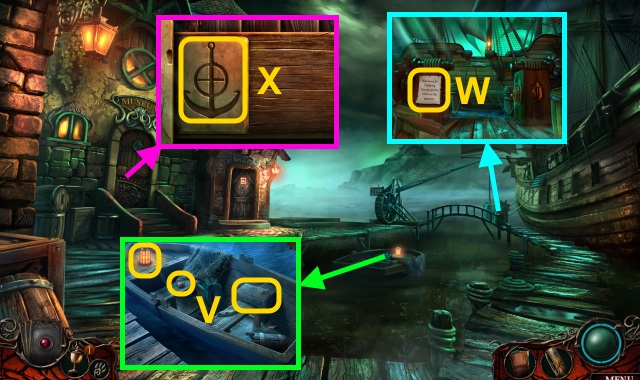
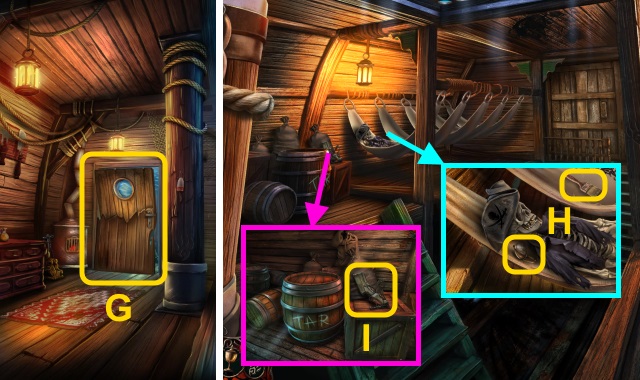
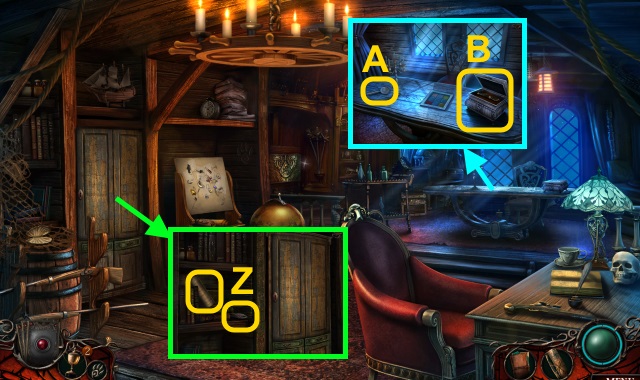
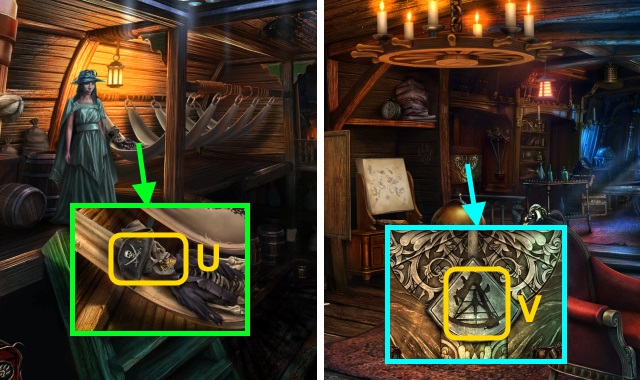
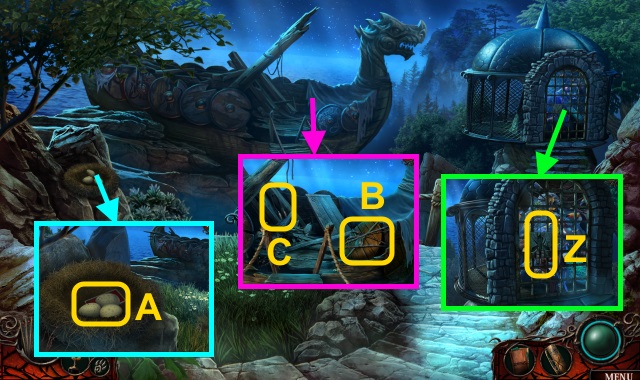
- Take the BOLT, LIGHTER, LANTERN, and DOMINO BOX (V).
- Read the note; take the ANCHOR EMBLEM (W).
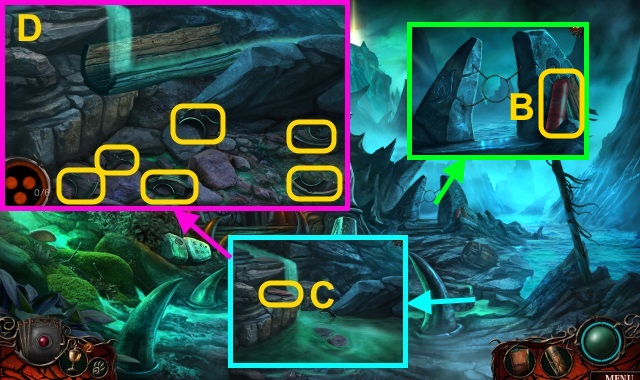
- Place the ANCHOR EMBLEM (X); examine the door for a mini-game.
- Solution (Y): (A-B)-(B-C)-(C-D)-(D-E)-(I-D)-(J-I).
- (I-H)-(H-C)-(G-F)-(F-A)-(J-I)-(I-H)-(H-G)-(G-F)-(J-I).
- Walk left.
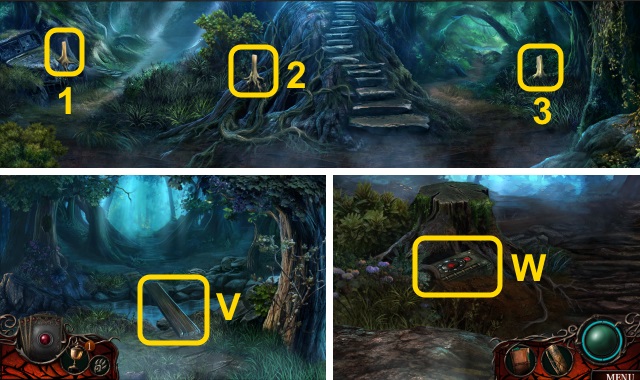
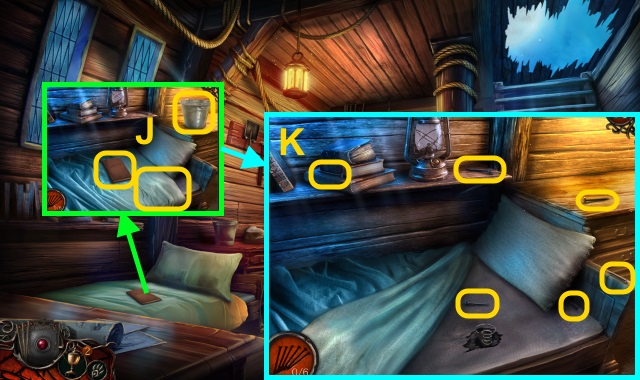
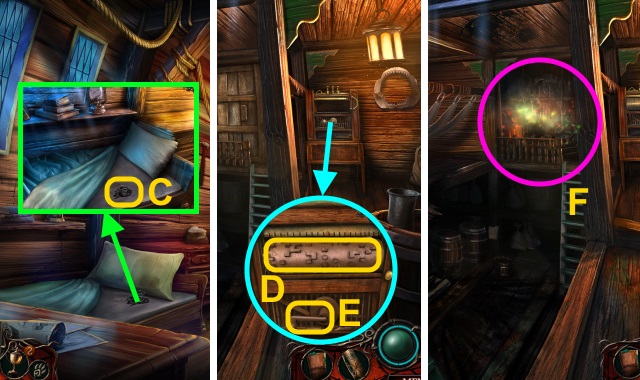
- Examine the stair; take the paper and TENTACLE (Z).
- Use the BOLT; take the SMALL SHIP (1/4) (A).
- Use the LANTERN (B); take the SCIMITAR, SHIP BOTTLE, and DOMINO (C).
- Combine the SHIP BOTTLE and DIAMOND RING. Open the bottle; take the SMALL SHIP (2/4).
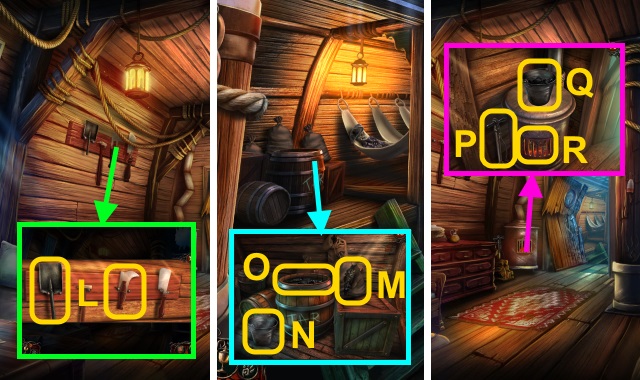
- Take the glove and HOOK (D). Scroll up; place the TENTACLE for a mini-game.
- Solution (E): A-B-D-E-F-G-H-I-K.
- Take the SMALL SHIP (3/4).
- Open the DOMINO BOX; place the DOMINO for a mini-game.
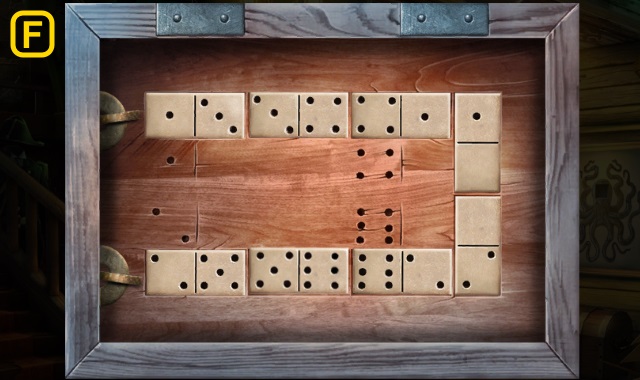
- Solution (F).
- Open the box; take the SMALL SHIP (4/4).
- Place the SMALL SHIP (4/4) (G).
- Play the HOP; receive the GUN POWDER KEG (H).
- Scroll down. Use the GUN POWDER KEG and LIGHTER (I).
- Take the PUNCH CARD (J).
- Walk down.
- Examine the slot (K); use the PUNCH CARD (L). Turn the handle (M).
- Use the SCIMITAR; take the OAR (1/2) (N). Move the cloth; take the HANDLE.
- Place the HANDLE; turn the wheel (O). Pull the handle.
- Use the HOOK (P); examine the gear (Q).
- Pull the handle and wheel (O).
- Examine the gear (R); pull the handle (S).
- Walk right.
- Take the OAR (2/2) (T).
- Take the FISH HOOK and SMALL SWORD (1/2) (U).
- Walk down.
- Place the OAR (2/2) (V); get in the boat.
- Open the door; play the HOP (W).
- Walk right.
- Use the Deck of Fates; use Beast for a mini-game (X).
- Solution (Y).
- Examine the doors (Z).
- Walk right.
- Play the mini-game; solution (A).
- Solution (B): D-C-A-C-D-B-A.
- Solution (C).
- Solution (D): Ex2-B-D-E-D-C-A.
- Solution (E-F).
- Go to the Surgeon's Quarters.
- Open the door (G).
- Walk forward.
- Take the BRUSH and EMPTY FLASK (H).
- Combine the FISH HOOK and EMPTY FLASK; receive the FLASK ON HOOK.
- Take the NAIL GUN (I).
- Walk down.
- Take the BUCKET and journal; move the sheet (J).
- Gather the NAILS (K).
- Open the NAIL GUN; place the NAILS. Take the LOADED NAIL GUN.
- Take the CHOPPER and SMALL SHOVEL (L).
- Walk forward.
- Use the CHOPPER and SMALL SHOVEL (M); receive the SHOVEL WITH COAL. Place the BUCKET (N); examine the BARREL 2x (O). Take the BUCKET OF SOLID TAR.
- Walk down.
- Take the BROKEN PUMP (P). Place the BUCKET OF SOLID TAR (Q). Open the grate; use the SHOVEL WITH COAL (R). Use the BRUSH; take the TAR AND BRUSH.
- Walk forward.
- Examine the note. Examine the boards (S); Use the LOADED NAIL GUN and TAR AND BRUSH.
- Take the note (T).
- Walk down, then right.
- Take the STAR EYE (1/2) (U); use the FLASK ON HOOK (V). Receive the FULL FLASK.
- Turn the telescope; remove the lens (W). Pour the FULL FLASK; take the STAR EYE (2/2).
- Place the STAR EYE (2/2) (X); open the door.
- Walk forward.
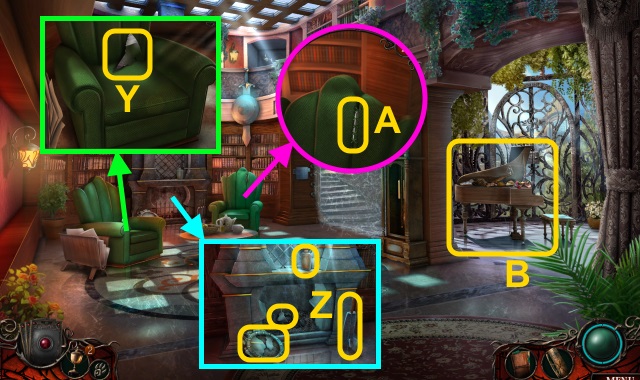
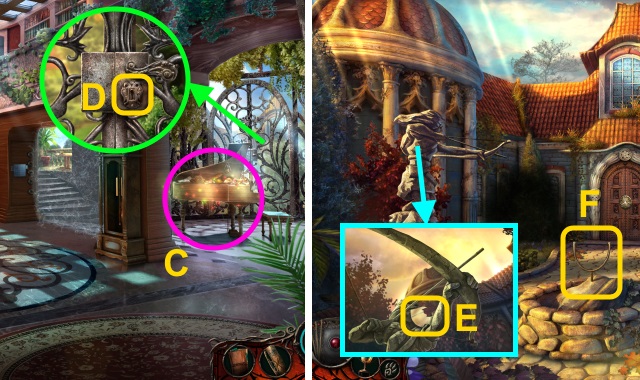
- Open the drawer; move the items. Take the BOX INSET (Y).
- Take the PLIERS and BARREL ORGAN CYLINDER (Z).
- Take the MAGNIFYING GLASS (A). Place the BOX INSET; open the box (B). Take the PEN.
- Examine the MAGNIFYING GLASS 3x; take the GLASS LENS.
- Go to the Surgeon's Quarters.
- Use the PLIERS (C); receive the SPRING.
- Examine the BROKEN PUMP 3x; use the SPRING. Take the PUMP.
- Walk forward.
- Place the BARREL ORGAN CYLINDER (D); turn the handle (E).
- Play the HOP; receive the CUPBOARD KEY (F).
- Go to the Captain's Quarters.
- Use the CUPBOARD KEY. Take the TRANSPARENT FOIL (G); examine the machinery (H).
- Use the PUMP (I); take the SMALL SWORD (2/2) (J).
- Use the TRANSPARENT FOIL and PEN; take the foil (K). Flip and examine the board.

- Play the HOP; receive the STAR PATTERN (L).
- Walk down.
- Place the GLASS LENS; examine the telescope 2x (M).Use the STAR PATTERN for a mini-game.
- Solution (N-R).
- Take the COLOR PATTERN.
- Walk left.
- Examine the desk (S); place the COLOR PATTERN for a mini-game.
- Solution (T): D-A-B-C-F-I-H-G-D-E.
- F-C-B-A-D-E-F-C-B-E-H-I-F-E-H-I-F-E.
- Take the SMALL SKULL.
- Go to Belowdecks.
- Place the SMALL SWORD (2/2) and SMALL SKULL; take the SEXTANT (U).
- Go to the Captain's Quarters.
- Place the SEXTANT; examine it for a mini-game (V).
- Solution (W): B-A-Bx3-Dx2-Ax2.
- D-Ax2-C-D-Cx2-Dx4-C-D-Ax2.
- Take the card.
- Walk down.
- Examine the water (X).
- Examine the Deck of Fates; use Pathfinder for a mini-game (Y).
- Solution (Z).
- Walk forward.
- Take the card (A).
Chapter 4: Lurker
- Take the GAS CANNISTER (B).
- Take the BOX CUTTER (C); place the GUTTER.
- Gather the pieces (D); receive the EMPTY DISC.
- Place the EMPTY DISC (E).
- Play the HOP; receive the DISC (F).
- Place the DISC for a mini-game (G).
- Solution (H): D-F-C-D-F-B-F-A.
- Receive the DISC.
- Place the DISC for a mini-game (I).
- Solution (J): Cx2-E-Dx2-B-C-B-C-E-D.
- Receive the DISC.
- Place the DISC for a mini-game (K).
- Solution (L): Bx2-F-B-F.
- Receive the DISC.
- Examine the stone; place the DISC (M).
- Walk forward.
- Talk to the woman (N).
- Take the BROOM (O).
- Take the card (P).
- Take the PLATE (1/2) (Q).
- Move the weapons; take the RUSTY FAUCHARD (R).
- Take the BENT WIRE and BLUNT AWL (S).
- Walk down.
- Use the RUSTY FAUCHARD (T); receive the EARRING.
- Walk forward.
- Use the EARRING; open the bag. Take the SHARK INSET and PLATE (2/2) (U).
- Place the SHARK INSET (V); open the chest. Take the GAUNTLET; examine the canister.
- Use the GAS CANNISTER; place the PLATE (2/2) (W). Examine the plates.

- Examine the lock for a mini-game (X).
- Solution (Y).
- Remove the lock; open the doors.
- Take the GRINDSTONE, note, and CUBE (Z).
- Place the GRINDSTONE; use the BLUNT AWL (A). Receive the SHARPENED AWL.
- Combine the CUBE and SHARPENED AWL; examine the cube 2x. Take the ENGRAVED CUBE KEY.
- Place the ENGRAVED CUBE KEY (B).
- Play the HOP (C).
- Walk right.
- Take the HOSE and SCRAPER (D).
- Use the GAUNTLET (E).
- Play the HOP; receive the MAZE TILE (1/3) (F).
- Take the ADHESIVE TAPE (G).
- Use the RUSTY FACHARD; take the MAZE TILE (2/3) (H).
- Combine the HOSE and ADHESIVE TAPE; take the PATCHED HOSE.
- Walk down.
- Use the SCRAPER (I); take the MAZE TILE (3/3).
- Walk right.
- Place the MAZE TILE (3/3) (J).
- Use the BENT WIRE; take the SPRING COLLAR (K).
- Walk down.
- Place the PATCHED HOSE and SPRING COLLAR (L); turn the valve.
- Walk right.
- Examine the fire (M).
- Walk forward for a mini-game.
- Solution (N): U-Lx2-U-Lx2-Ux3-Rx2-D-U.
- Lx5-Dx2-R-Dx2-L-R-Ux2-L-Ux2-Rx3.
- Dx3-Rx2-D-Rx4-Ux2-Lx2-Rx5-Dx2-L.
- R-Ux2-Lx3-Dx2-Lx4-U-Lx2-Ux3-Lx2.
- Solution (O): A-B-Ux2-L-Ux4-R.
- Solution (P): A-B-R-Dx4-L-Dx2-Rx2.
- Dx3-Rx2-D-Rx4-Ux2-Rx3-Ux2-R.
- Solution (Q): C-B-A-B-Rx6-Dx4-Lx3-Ux2-Lx2.
- Dx2-Ux2-Rx2-Dx2-Rx5-U-Rx2-D-U-Lx2-D.
- Lx2-Ux4-Lx2-Ux3-Rx2-Lx2-Dx3-Rx2-U-Rx3.
- Solution (R): A-B-Ux2-R-Ux4-Lx2-Dx2-Lx4-Ux2-R.
- Solution (S): A-B-L-Dx2-Rx4-Ux2-Rx2.
- Dx4-L-Dx2-Lx3-D-Lx7-Dx2-Lx3-Dx2-Lx4.
- U-Lx2-Ux3-Lx2-Ux2-R-Ux2.
- Solution (T): A-B-Rx2-Dx2-Rx2-Ux4-Lx2-U.
- Solution (U): B-D-Rx2-Dx4-R-Dx2-Ux2-Rx2.
- U-R-Ux2-Lx3-D-L-Ux2-D-Rx2-Ux2-Lx2-Rx2.
- Dx2-Rx2-Ux2-Rx2-Dx3-Ux3-L-Ux2.
- Move the ladder (V).
- Take the RUG (W).
- Move the web; take the NOISE MAKER (X).
- Take the books, BLUE PANE, and CLOCK (Y).
- Walk right.
- Take the PENDULUM (1/2) (Z).
- Examine the eggs (A); use the NOISE MAKER. Move the eggs; take the RED PANE.
- Move the cloth; use the BOX CUTTER (B). Take the SHIELD.
- Move the board; take the PENDULUM (2/2) (C).
- Combine the CLOCK and PENDULUM (2/2); examine the clock for a mini-game.
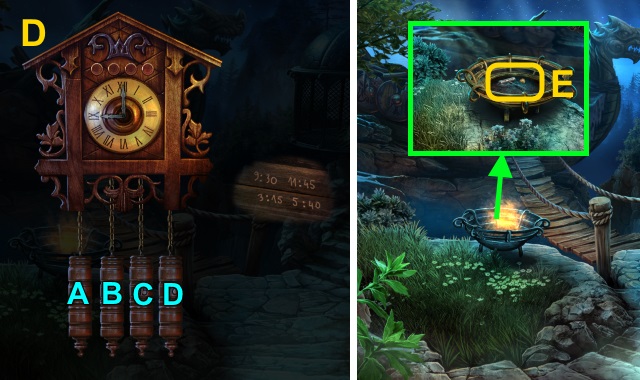
- Solution (D): Dx5-C-Dx7-C-B-Dx4.
- Take the GRIMOIRE KEY.
- Use the SHIELD and BROOM; take the CORKSCREW and GOLD COIN (E).
- Walk down.
- Examine the jar; use the CORKSCREW (F). Take the BIRD INSET and GOLD DUST.
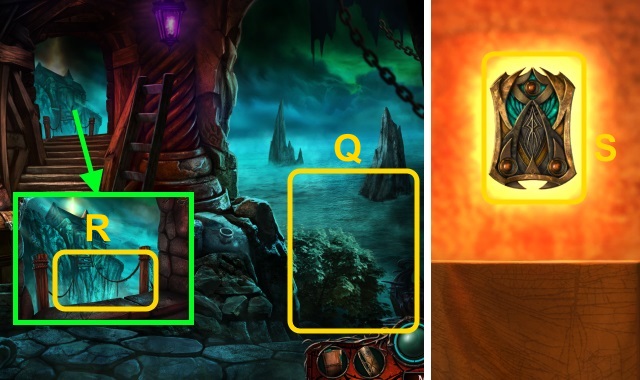
- Examine the book (G); place the GRIMOIRE KEY.
- Use the Deck of Fates; use Gift of Tongues for a mini-game (H).
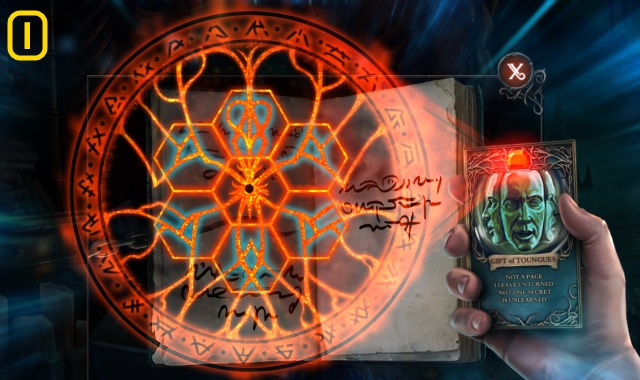
- Solution (I).
- Walk right.
- Use the BIRD INSET (J).
- Play the HOP; receive the FEATHER (K).
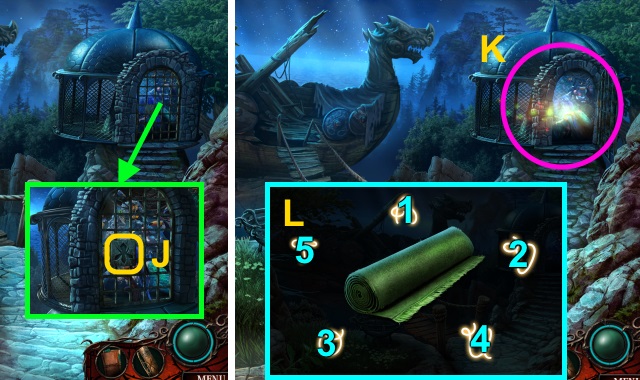
- Examine the RUG for a mini-game; solution (L).
- Combine the RUG, GOLD DUST, and FEATHER; take the ENCHANTED RUG.
- Walk down.

- Place the BLUE PANE and RED PANE (M).
- Place the ENCHANTED RUG (N); take the FLYING CARPET.
- Use the Deck of Fates; use the Lurker for a mini-game (O).
- Solution (P): move the ball through the maze.
- Use the GOLD COIN (Q).
- Use the FLYING CARPET (R).
- Walk forward twice.
- Take the card (S).
- Walk down twice.
- Examine the Deck of Fates; use Beastslayer for a mini-game (T).
- Solution (U): move the ball through the maze.
- Take the card for a mini-game (V).

- Solution (W-X).
- Walk right.
Chapter 5: Heart's Desire
- Take the MIRROR PART (1/3) (Y). Flip the cushion; take the LETTER OPENER.
- Remove the grate; take the MIRROR PART (2/3), BROKEN MIRROR, FIRE POKER, and GLUE (Z).
- Use the LETTER OPENER; take the ORNAMENT (1/2) (A).
- Examine the piano; use the FIRE POKER (B).
- Play the HOP; receive the GARDEN KEY (C).
- Use the GARDEN KEY (D); open the door.
- Walk right.
- Take the MIRROR PART (3/3) (E).
- Examine the BROKEN MIRROR; take the note. Use the GLUE and MIRROR PART (3/3); take the MIRROR.
- Place the MIRROR (F); turn it 2x.
- Play the HOP; receive the DIAL (G).
- Walk down.
- Examine the chair (H); place the DIAL for a mini-game.
- Solution (I).
- Take the ELECTRICAL FUSE.
- Place the ELECTRICAL FUSE for a mini-game (J).
- Solution (K).
- Take the NECKTIE (L). Pour the tea; use the LETTER OPENER (M). Take the ORNAMENT (2/2).
- Move the cups; place the ORNAMENT (2/2) (N). Examine the table; take the DOOR INSET (O).
- Walk right.
- Place the DOOR INSET (P); open the door.
- Move the papers; take the SOCKET WRENCH (Q). Take the SEPARATOR (R); use the NECKTIE. Take the ADAMANTITE ARROWHEAD.
- Walk down.
- Use the SEPARATOR; take the GEOLOGIST HAMMER (S).
- Walk right.
- Place the ADAMANTITE ARROWHEAD (T); use the GEOLOGIST HAMMER (U).
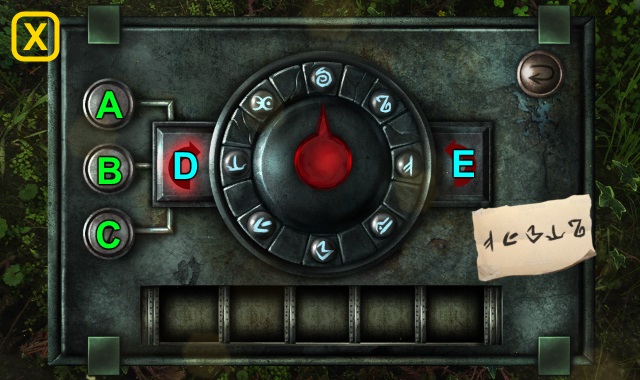
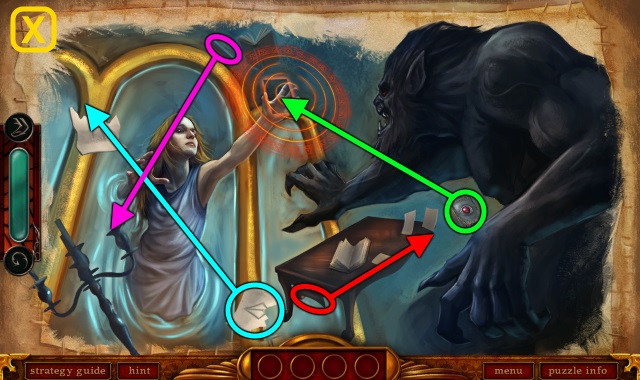
- Examine the door for a mini-game (V).
- Solution (W): (D-I)-(C-F)-(I-E)-(B-K)-(E-I).
- (F-C)-(I-E)-(C-J)-(E-I)-(A-H)-(I-D)-(J-F)-(D-E).
- (K-B)-(E-I)-(F-C)-(I-D)-(H-L)-(D-E)-(C-J)-(E-I).
- (B-G)-(I-E)-(J-C)-(E-D)-(G-K)-(D-E)-(C-J)-(E-I).
- Walk forward.
- Move the papers; take the LOCK INSET (X).
- Take the SAFETY PIN (Y); examine the chair.
- Open the drawer; take the LOCK MEDALLION (1/3) (Z).
- Use the SOCKET WRENCH (A); move the painting.
- Take the LOCK MEDALLION (2/3) (B). Place the LOCK INSET (C); take the POCKET WATCH and LEVER.
- Examine the POCKET WATCH; use the SAFETY PIN. Take the HOOK ON A CHAIN.
- Use the HOOK ON A CHAIN (D); receive MELISSA'S PENDANT.
- Use the LEVER; pull it (E).
- Turn the lamp (F); take the LOCK MEDALLION (3/3) (G).
- Place the LOCK MEDALLION (3/3) (H).
- Play the HOP (I).
- Walk left.
- Take the SCISSORS (J). Open the cupboard; examine the book (K).
- Place MELISSA'S PENDANT; take the BLANK CARD (L).
- Use the SCISSORS; open the box. Take the KEY STAMP (M).
- Pour the ink; use the BLANK CARD and KEY STAMP (N). Take the card.
- Move the cloth (O).
- Use the Deck of Fates; use Skeleton Key for a mini-game (P).
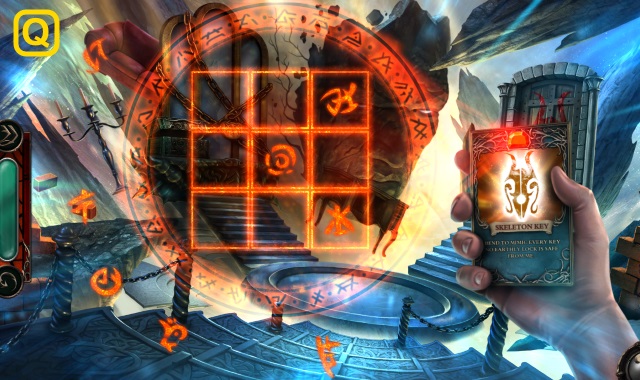
- Solution (Q).
- Use the candlestick (R) on the door (S).
- Play the HOP; receive the GOLDEN KEY (T).
- Use the GOLDEN KEY (U).
- Use the Deck of Fates; play Heart's Desire for a mini-game (V).
- Solution (W): move the ball through the maze.
- Solution (X-A).
- Congratulations! You have completed Rite of Passage: Deck of Fates.
Created at: 2016-11-25