

Walkthrough Menu
- General Tips
- Chapter 1: Ashen Rise
- Chapter 2: The Weather Tower
- Chapter 3: The Ranger Cabin
- Chapter 4: Rob's Backyard
- Chapter 5: The Temple's Main Hall
- Chapter 6: The Bargaining Plateau
General Tips
- This is the official guide for Rite of Passage: Heart of the Storm.
- This guide will not mention each time you have to zoom into a location; the screenshots will show each zoom scene.
- Hidden-object puzzles are referred to as HOPs. This guide will not show HOP solutions. It will identify the location of the HOP and the inventory item acquired.
- This guide will show solutions for non-random puzzles. Please read the in-game instructions for each puzzle.
- In this game, you will sometimes have to select the new scene to trigger dialog, cut-scenes, or tasks prior to interacting with the scene.
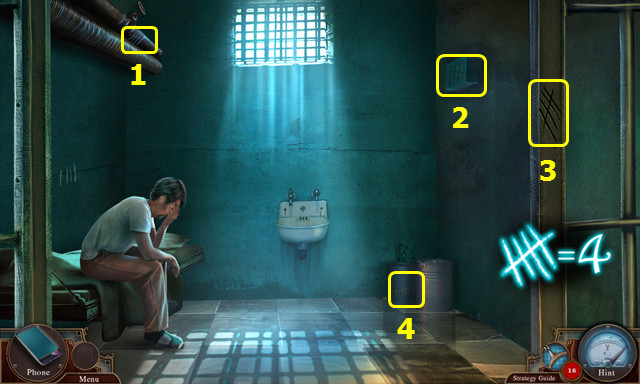
Chapter 1: Ashen Rise
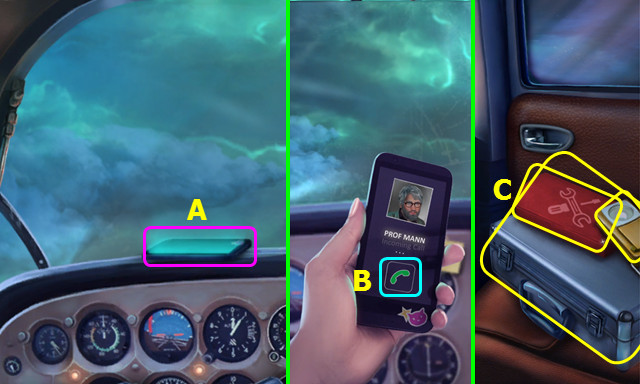
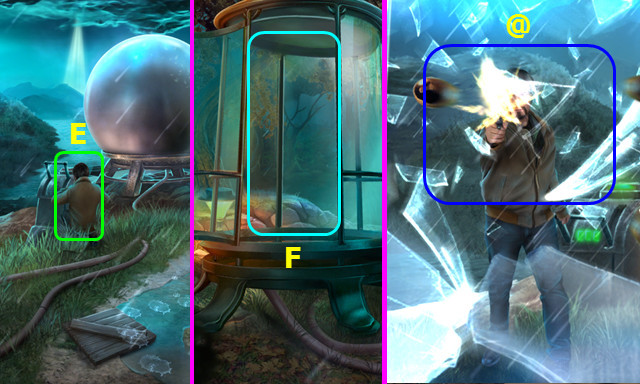
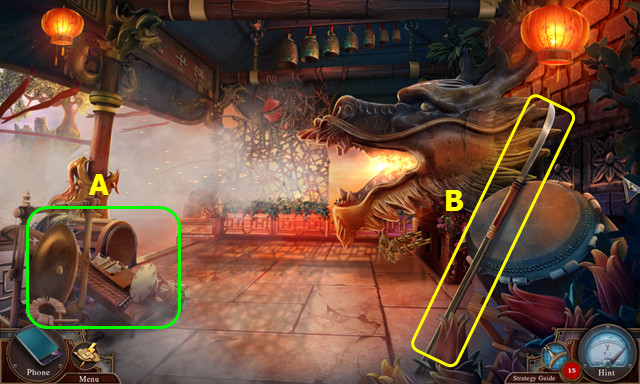
- Select (A).
- Answer the cell phone (B).
- Take the FLASHLIGHT, TOOLBOX, and SUITCASE (C).

- Open the SUITCASE; take the ANCIENT RELIC (inventory).
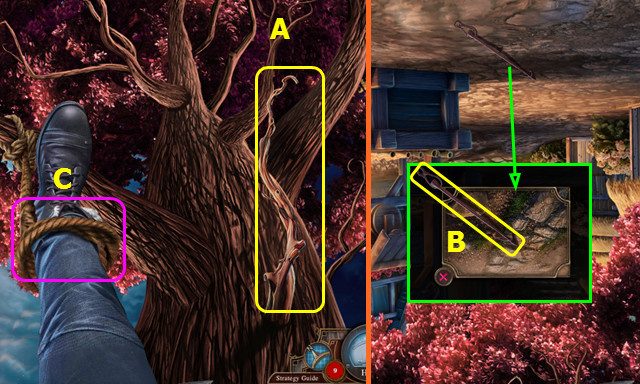
- Take the PARACHUTE (D).
- Select the PARACHUTE 4x to wear (inventory).
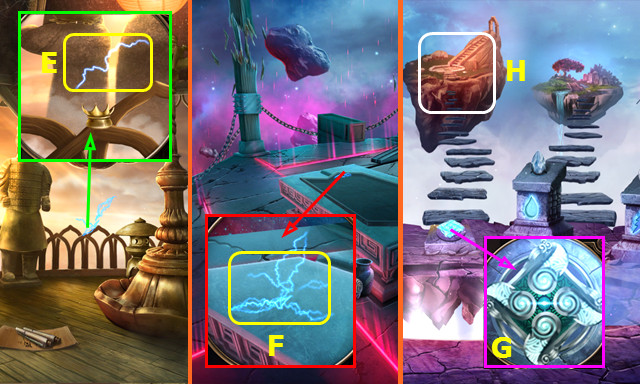
- Select (E); next, use the SUITCASE 3x.
- Jump left.
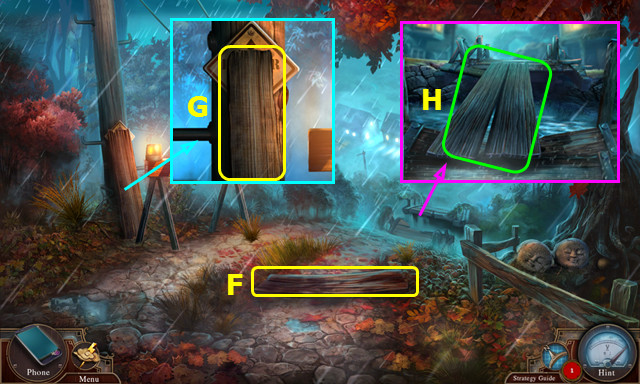
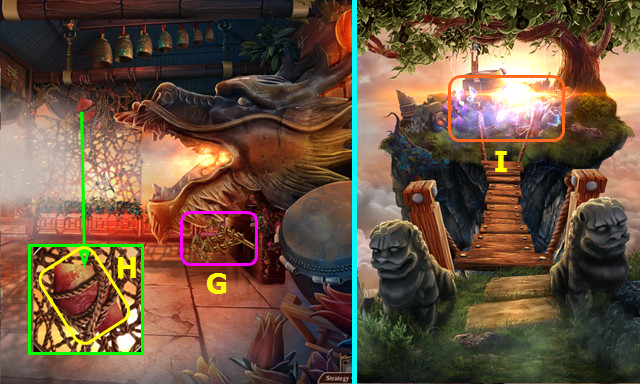
- Take the 1/2 PLANK (F).
- Take the 2/2 PLANK (G).
- Place the 2 PLANKS (H).
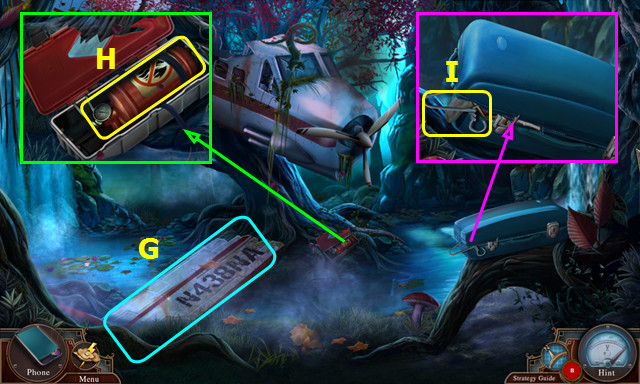
- Go forward.

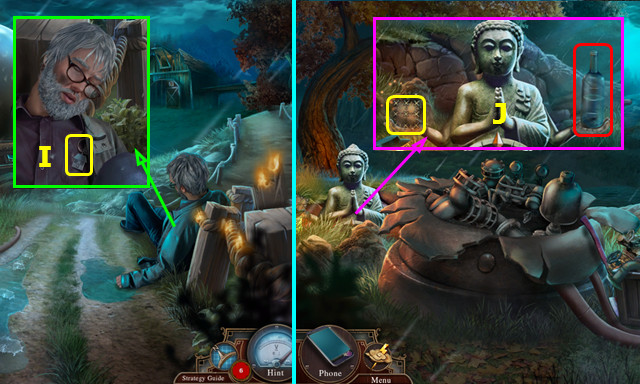
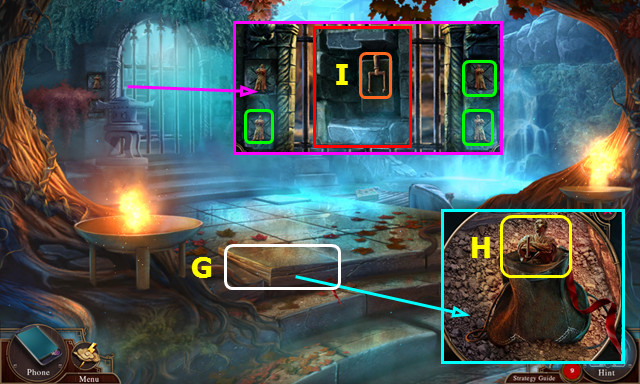
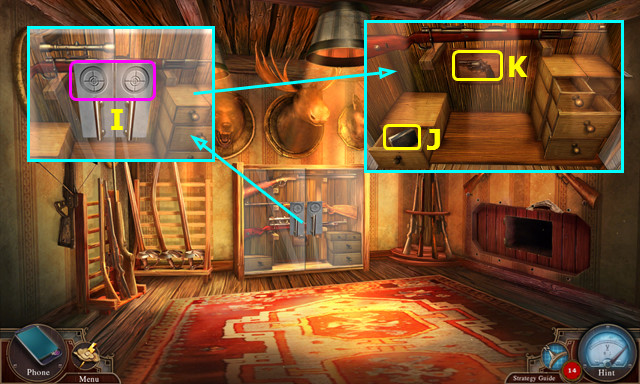
- Talk to the Officer; take the MAP (I).
- Try to walk forward.
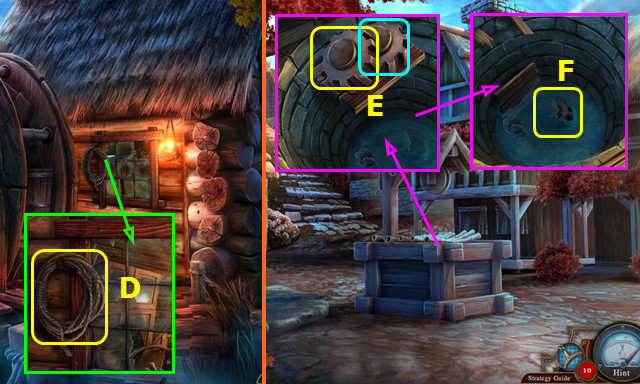
- Move the roots 3x; take the BOTTLE WITH LEVELS (J).
- Remove the CORKSCREW from the BOTTLE WITH LEVELS (inventory).
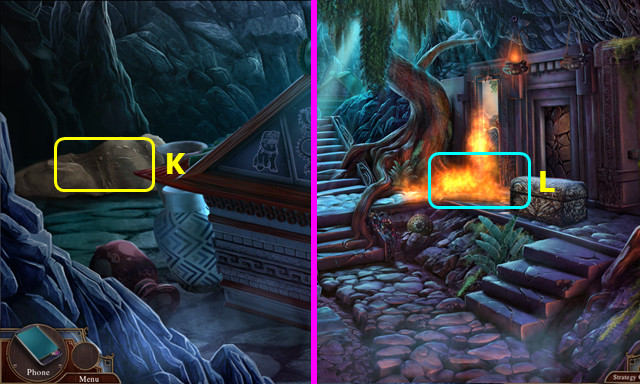
- Take the 2 METAL PEGS (K).
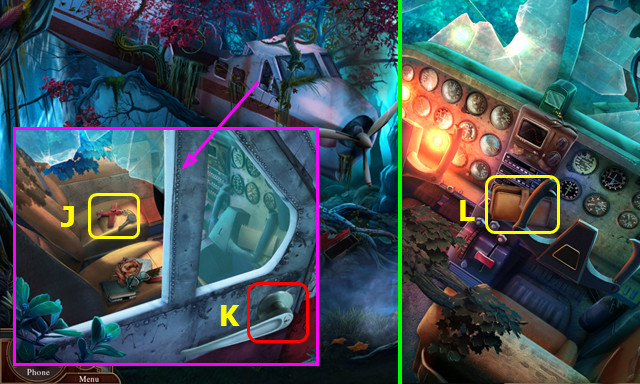
- Walk down.
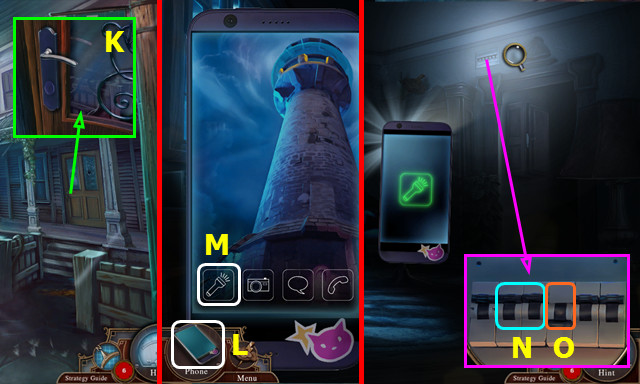
- Place the 2 METAL PEGS (L).
- Climb up 3x.
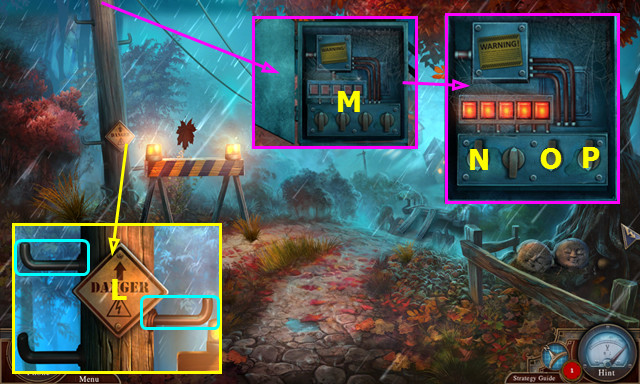
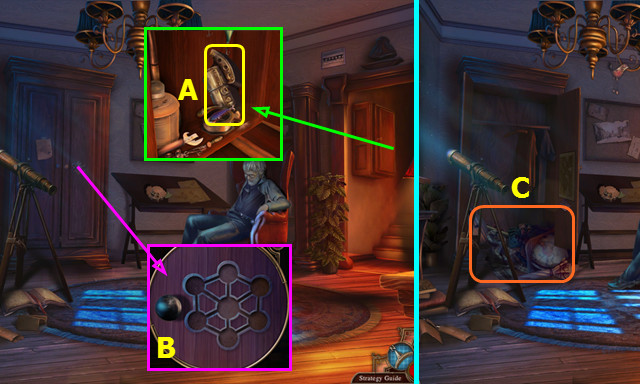
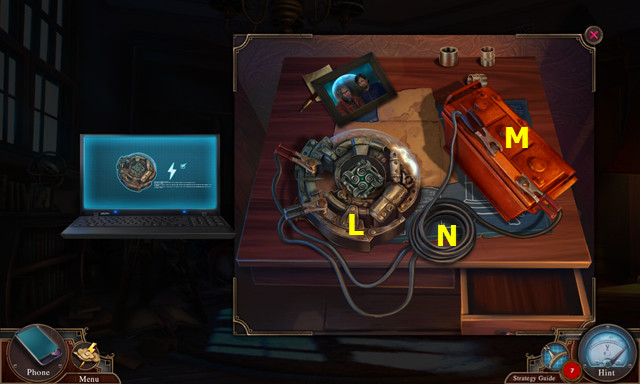
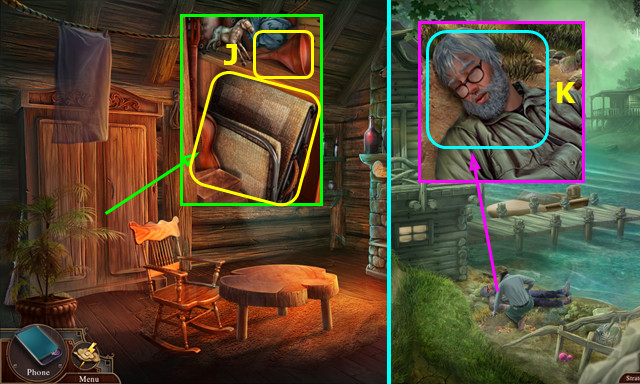
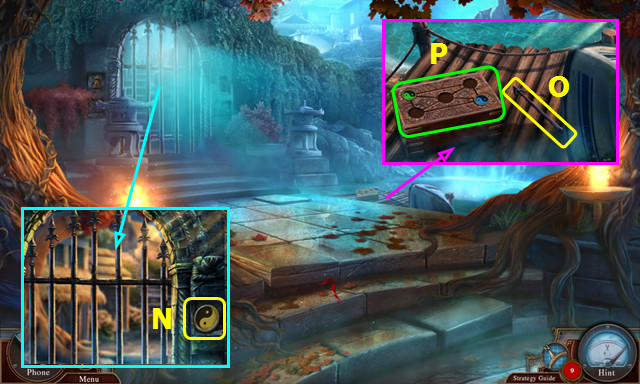
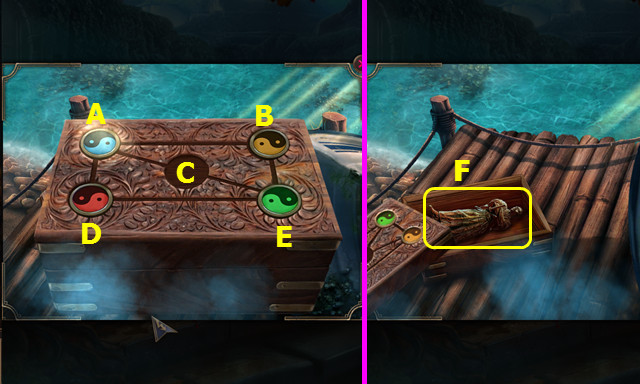
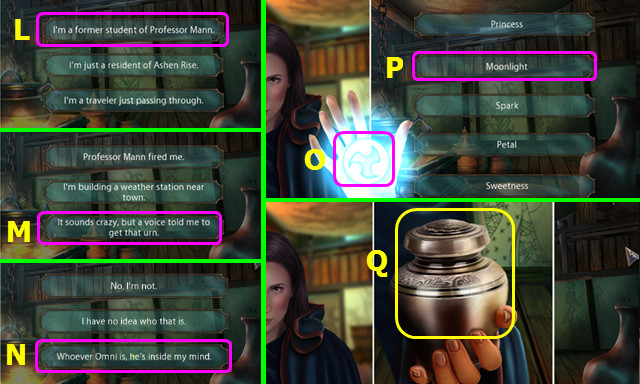
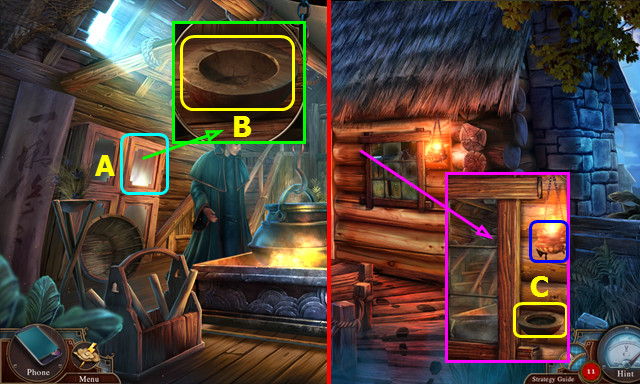
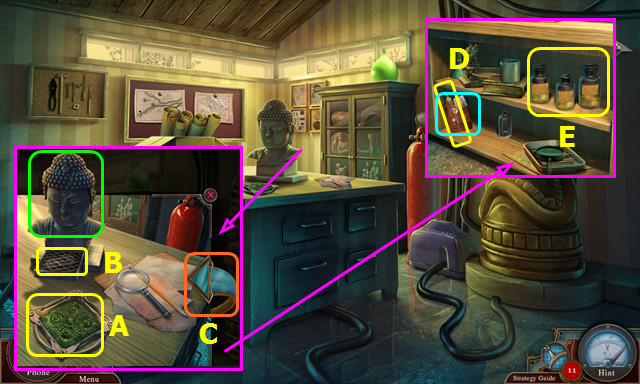
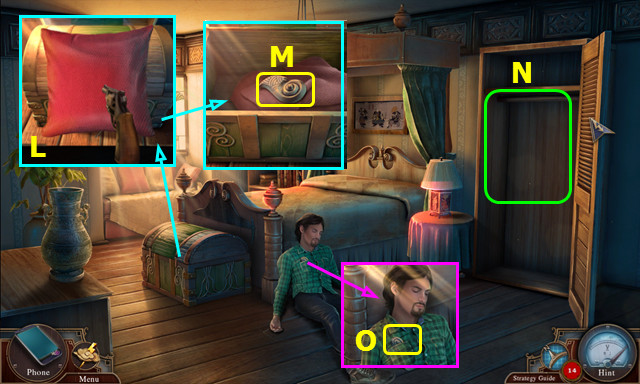
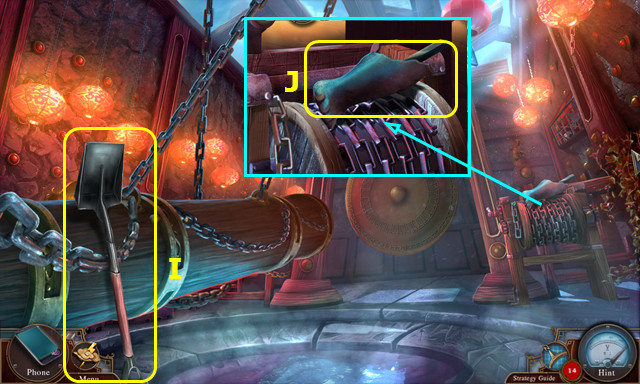
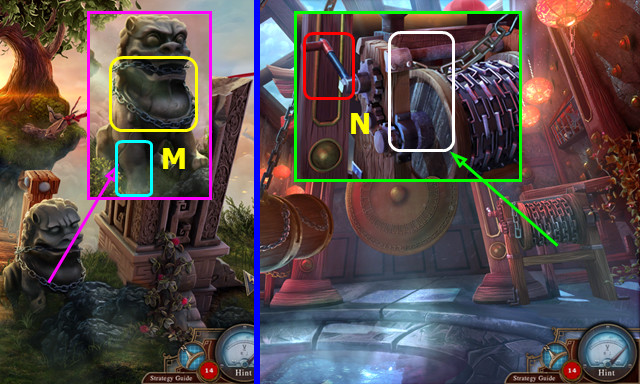
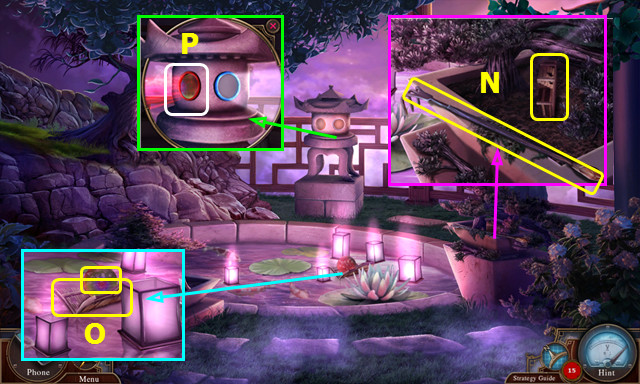
- Open the cabinet and select (M).
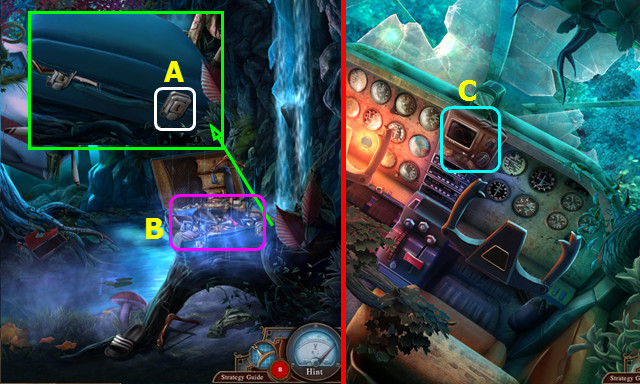
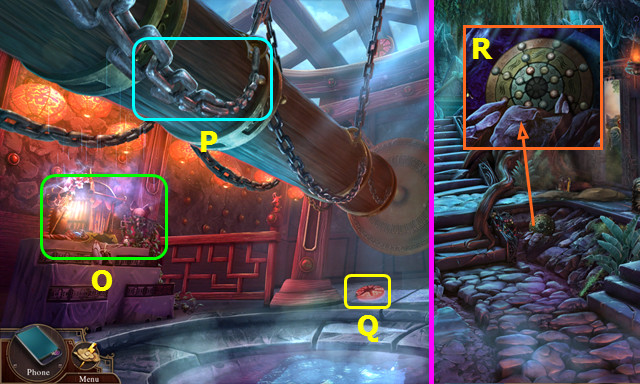
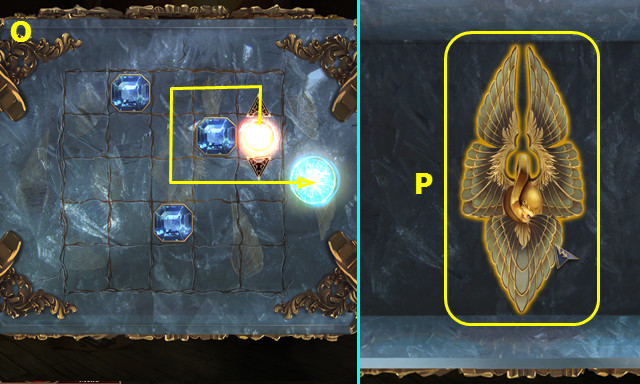
- Select (N-O-P).
- Walk forward 2x.
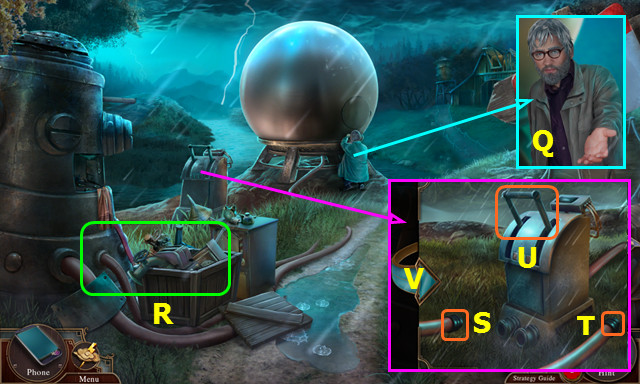
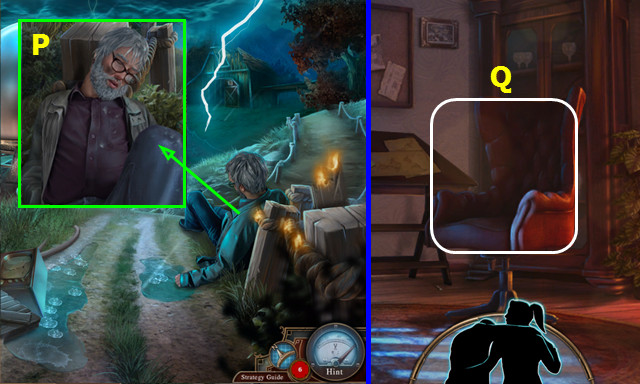
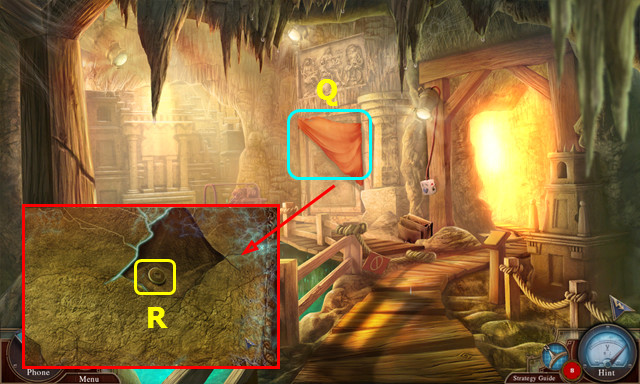
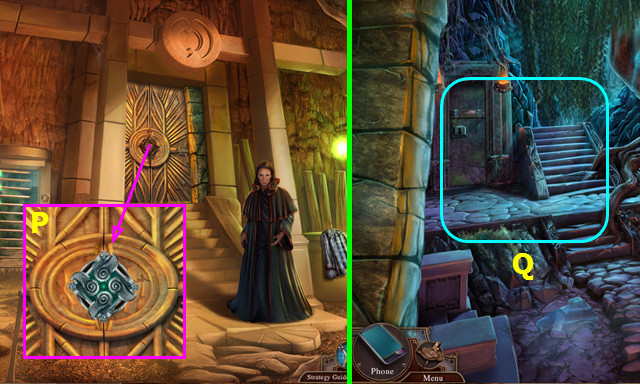
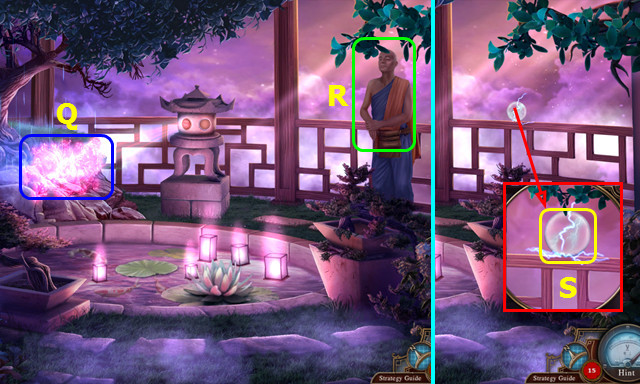
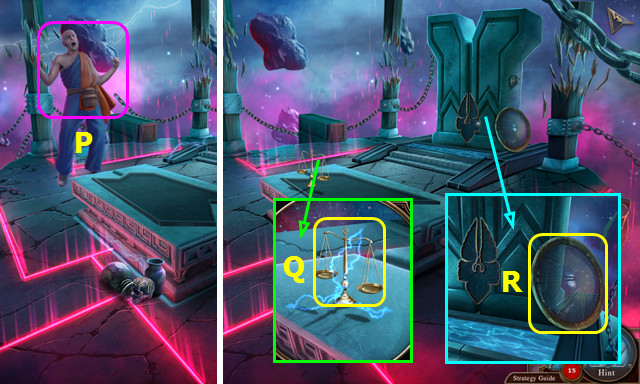
- Talk to the Professor; give him the ANCIENT RELIC (Q).
- Play the HOP (R).
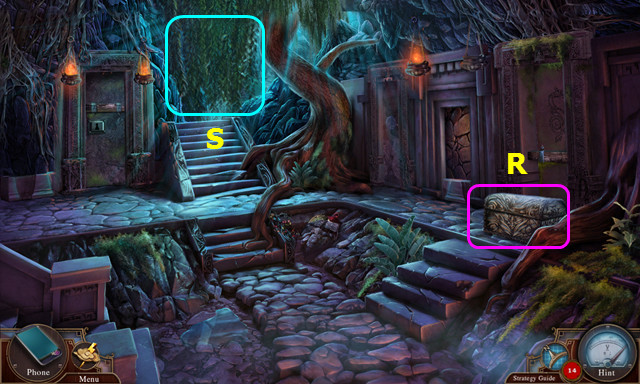
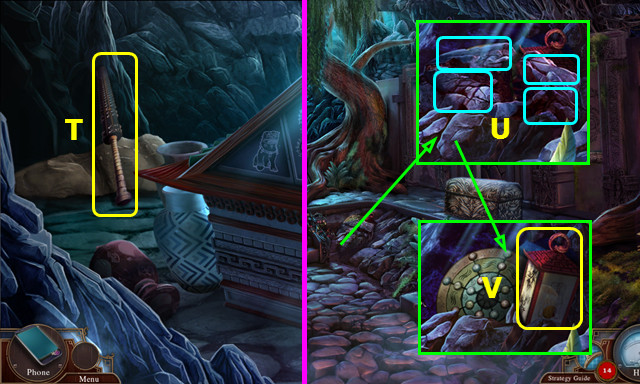
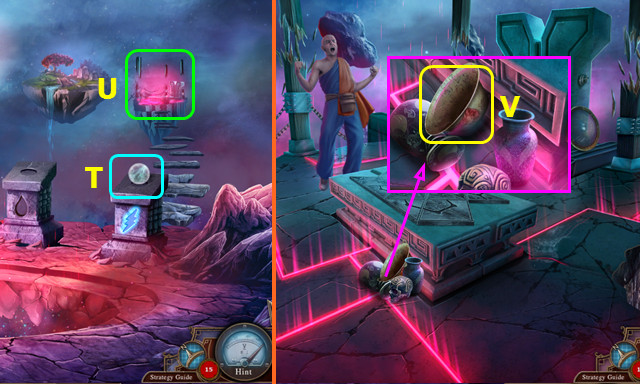
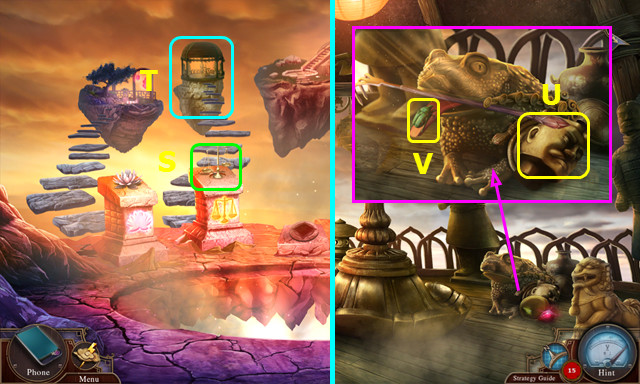
- Select (S-T-U).
- Rotate the view (V).
- Walk down.
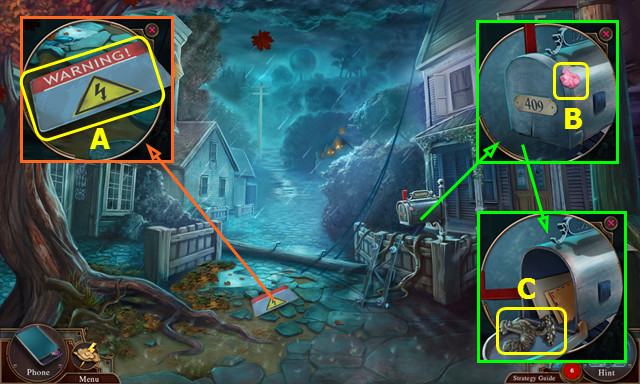
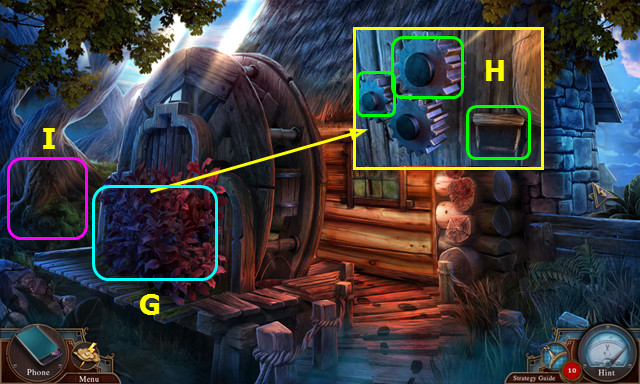
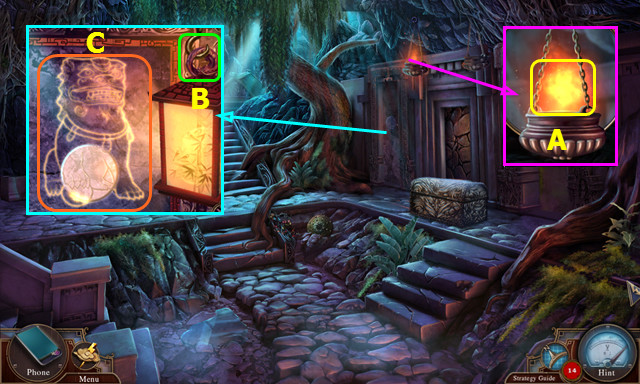
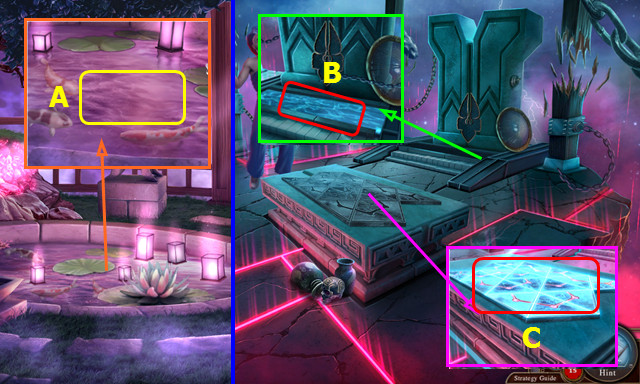
- Take the WARNING SIGN (A).
- Use the WARNING SIGN; take the BUBBLE GUM (B).
- Open the mailbox; take the IRON ROOSTER (C).
- Walk forward.
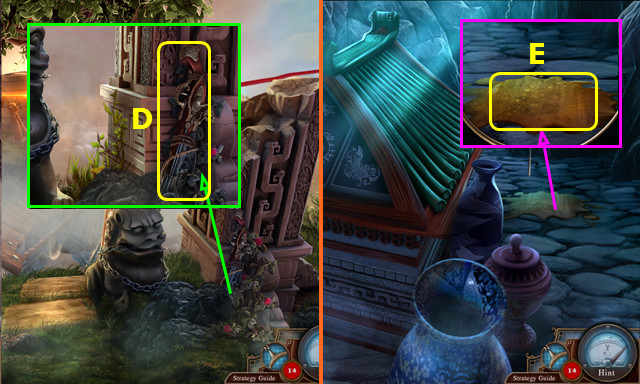
- Place the BUBBLE GUM (D).
- Rotate the view (E).
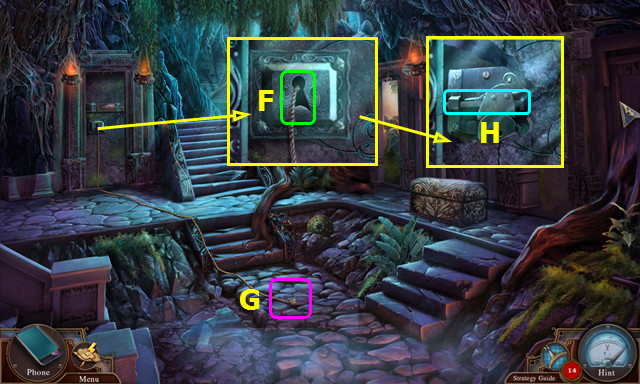
- Select (F).
- Talk to the Professor (G).
- Walk forward.
- Move the 2 frogs; take the IRON PIG (H).
- Take the PITCHFORK (I).
- Select (J).
- Open the pouch; take the ADJUSTABLE WRENCH (K).
- Walk down.
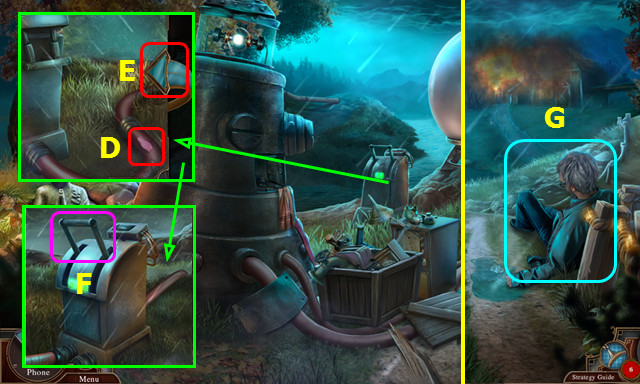
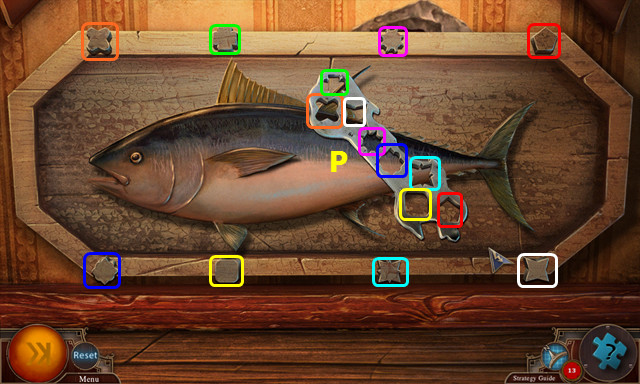
- Move the 2 panels (green); use the ADJUSTABLE WRENCH and take the VALVE (L).
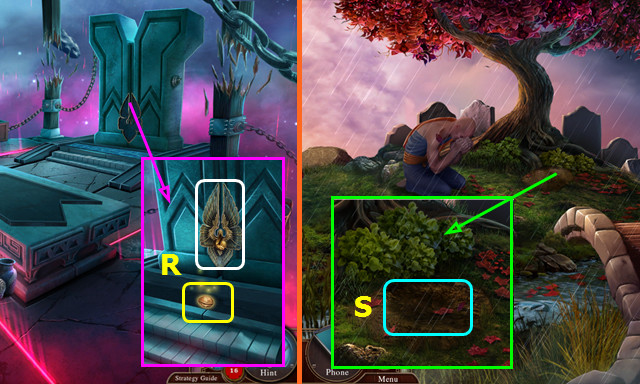
- Open the door; select 4x and take the ANCIENT RELIC (M).
- Go forward.
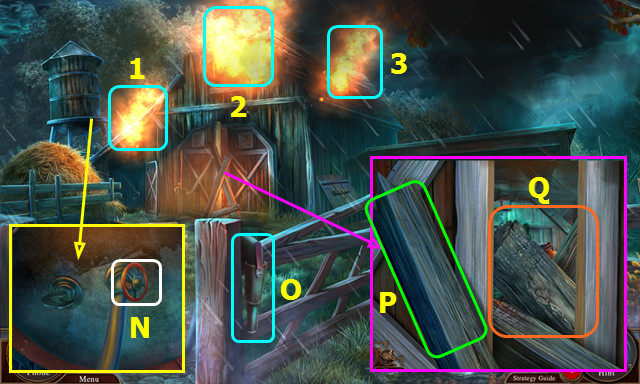
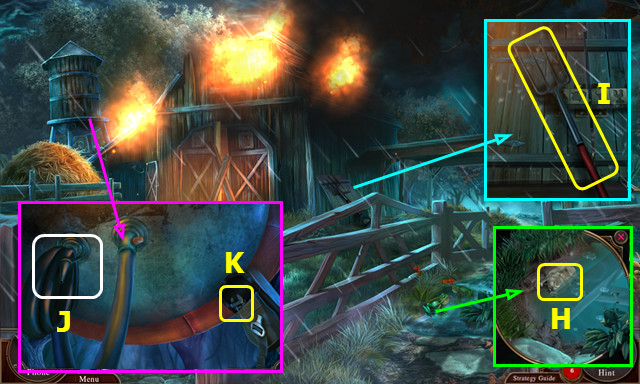
- Place and turn the VALVE (N).
- Select the hose (O) and use on the flames (1-3).
- Select (P).
- Use the PITCHFORK 3x; open the door (Q).
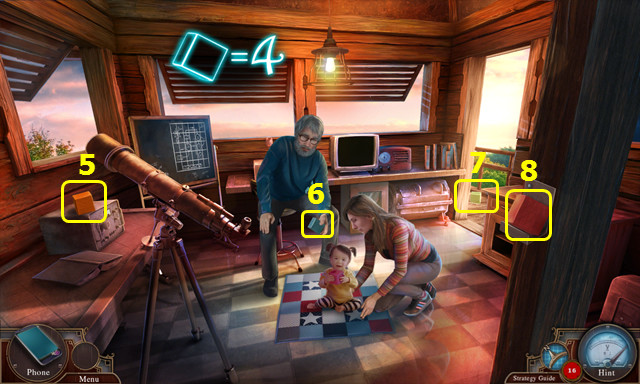
- Talk to Rob (R).
- Take the JUMPER CABLES (S).
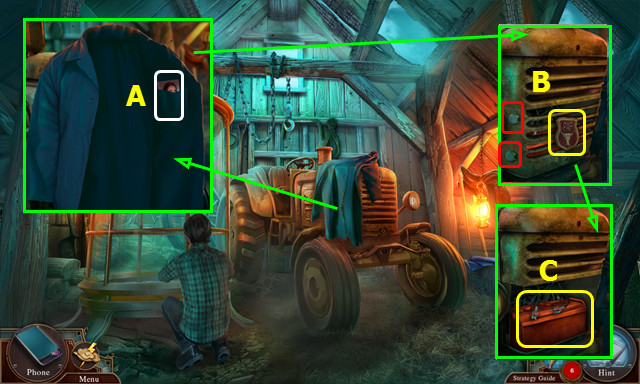
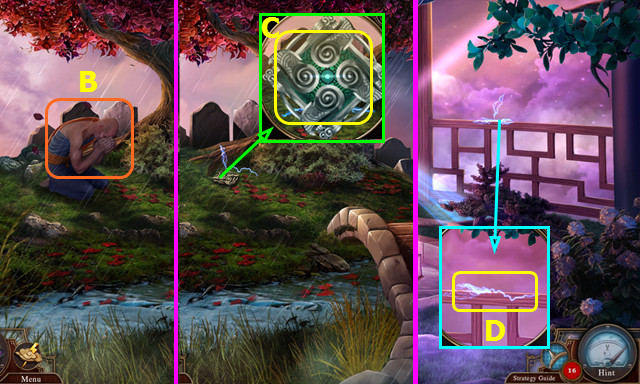
- Pick up and open the jacket; take the photo (A).
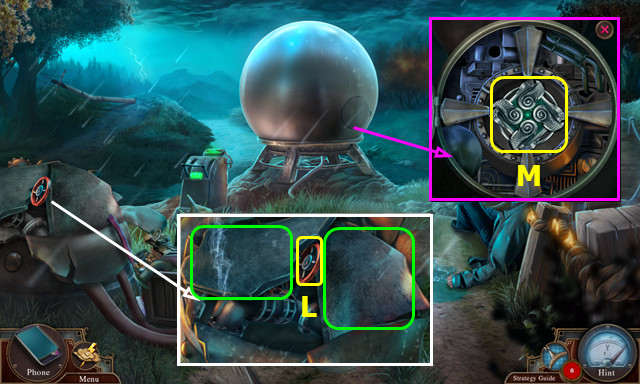
- Take the TRACTOR EMBLEM; use the ADJUSTABLE WRENCH 2x and remove the grill (B).
- Remove the 2 clamps; take the BATTERY (C).
- Walk down.
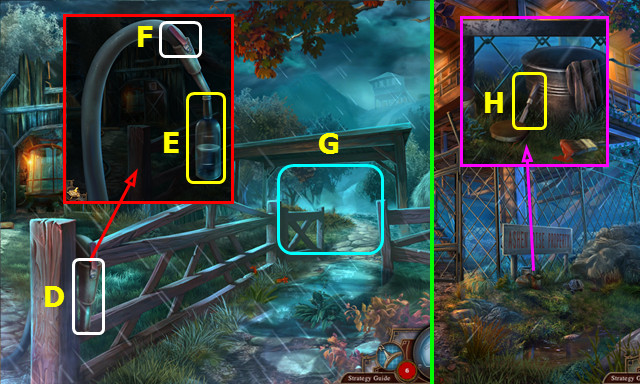
- Select the hose (D).
- Use the BOTTLE WITH LEVELS (E); select the lever 2x (F) and take the BOTTLE WITH WATER.
- Walk right (G).
- Move the items; take the OLD CHISEL (H).
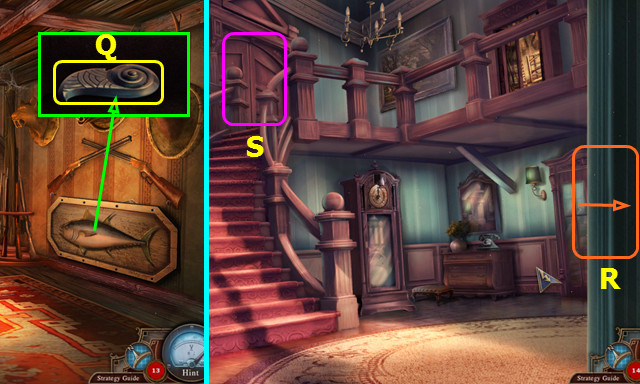
- Combine the TRACTOR EMBLEM and OLD CHISEL to find the IRON BULL (inventory).
- Walk down 2x.
- Shake the Professor; take the HOUSE KEY (I).
- Pan left.
- Place the BOTTLE WITH WATER; take the SAFE PLATE (J).
- Walk down.
- Use the HOUSE KEY; enter the Professor's House (K).
- Select (L-M).
- Flip 2 switches (N).
- Return and flip the 3rd switch (O).
- Walk down and forward.
- Pan right.
- Take the Professor (P).
- Walk down and right.
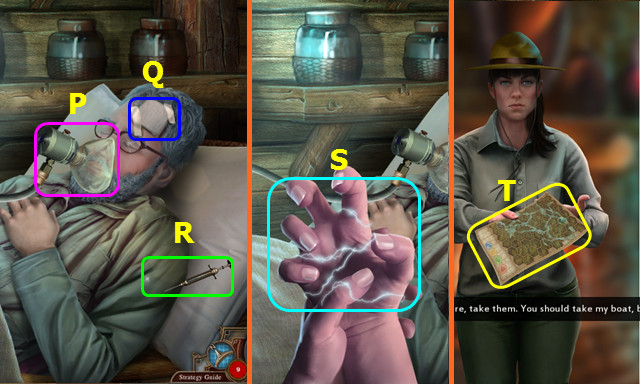
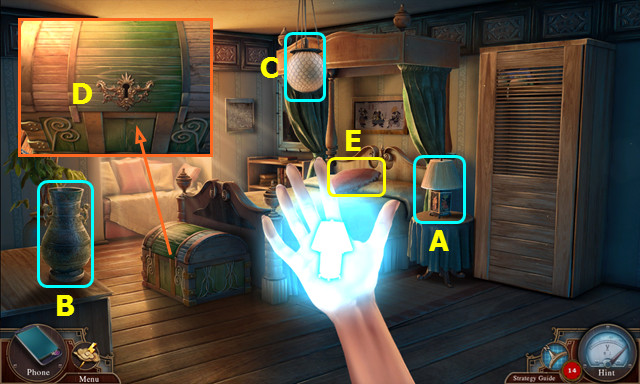
- Select (Q).
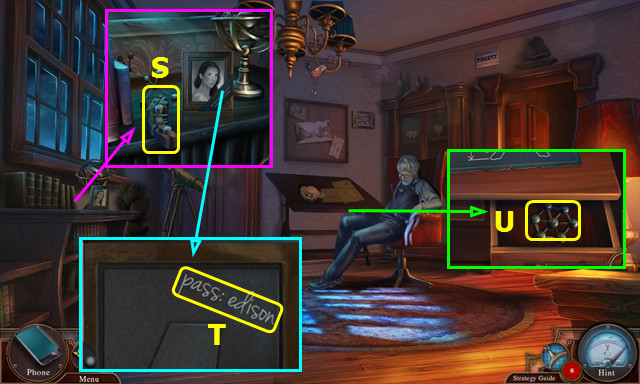
- Take the 1/3 MACHINE COMPONENT (S).
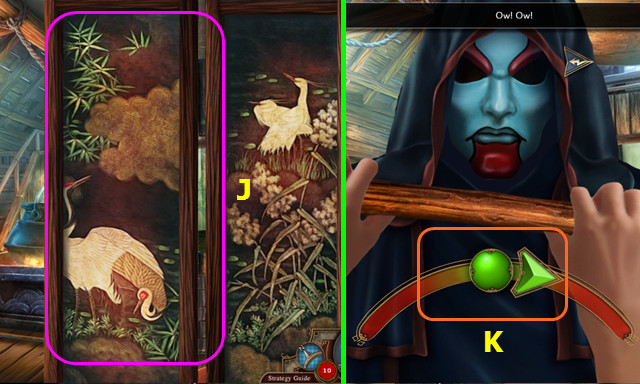
- Look at and turn over the photo; select the password (T).
- Open the drawer; look at the photo and take the MOLECULE MODEL (U).
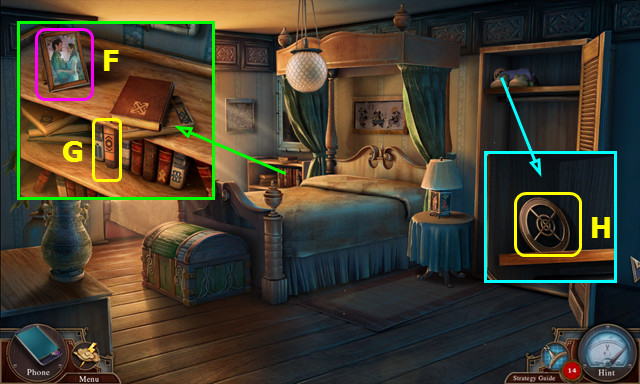
- Use the CORKSCREW and open the cabinet; move the items and take the 2/3 MACHINE COMPONENTS (A).
- Place the MOLECULE MODEL (B).
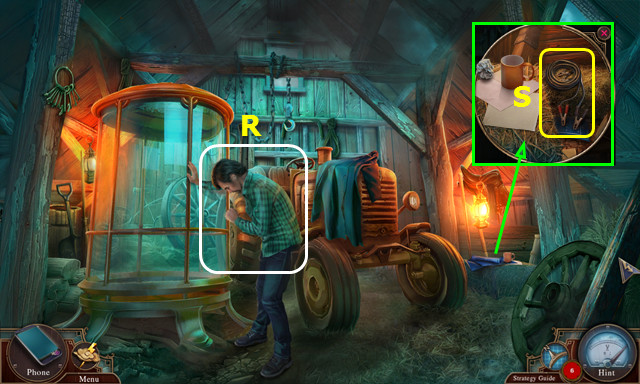
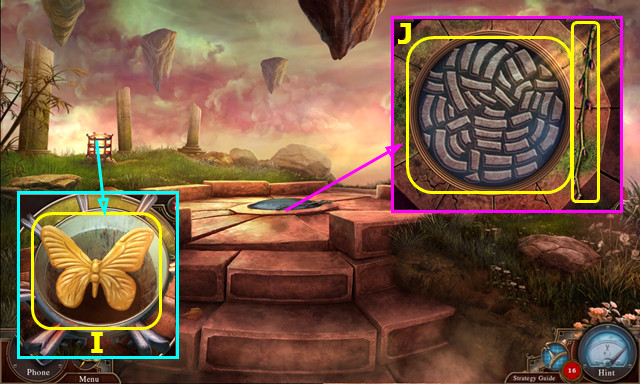
- Open the wardrobe. Play the HOP; earn the LAPTOP (C).
- Open the LAPTOP and select the screen; type EDISON and select the enter button (inventory).
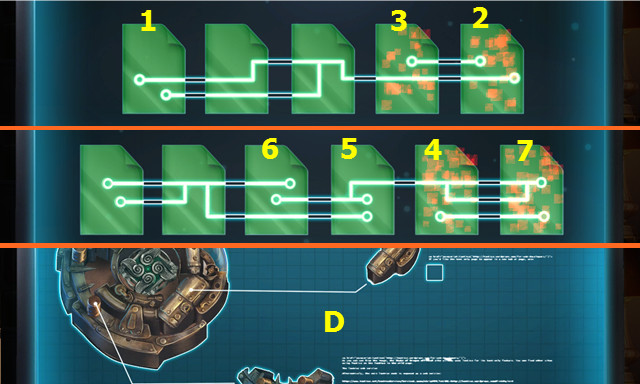
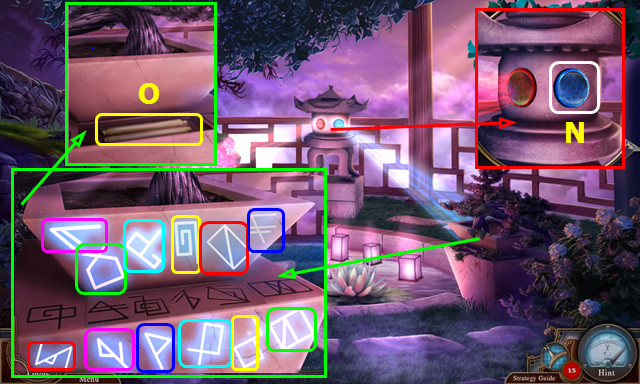
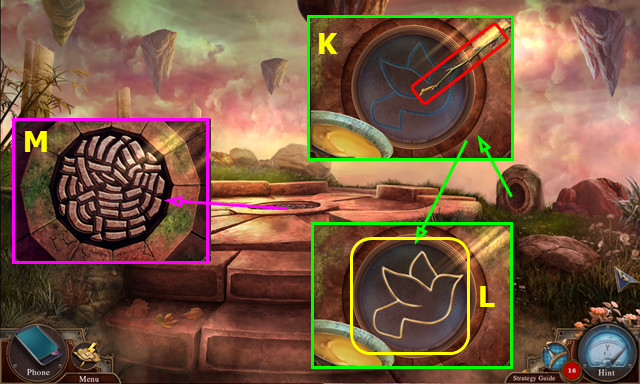
- Select 1-2-3.
- Select 4-5-6-7-4-5-4.
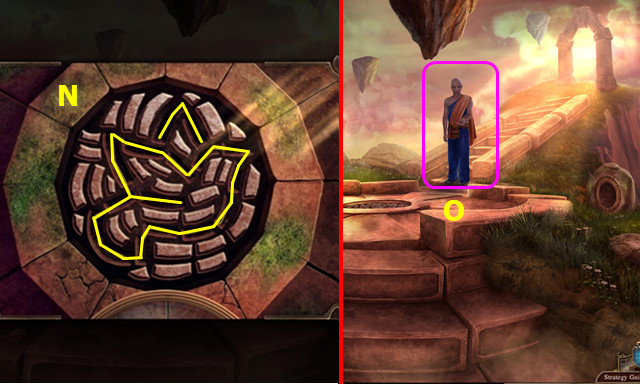
- Select the blueprints (D).
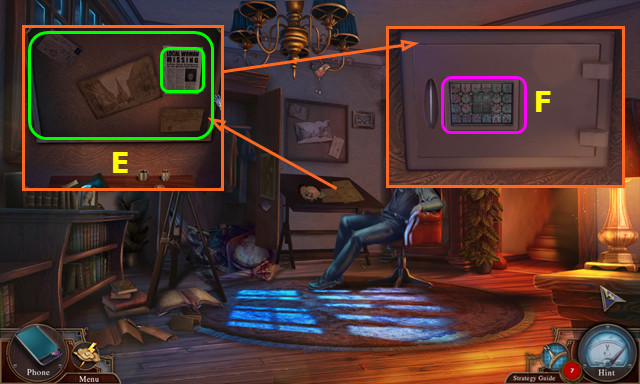
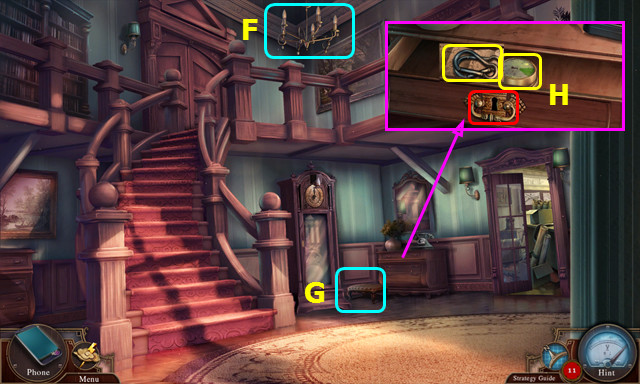
- Pan up. Read the article and remove the corkboard (E).
- Select (F).
- Place the SAFE PLATE.
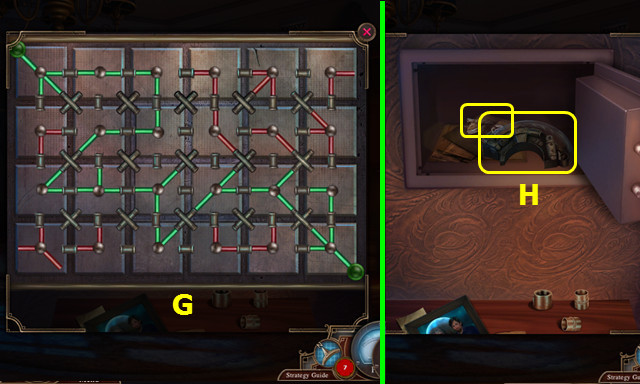
- Restore the connections (G).
- Open the safe; take the 3/3 MACHINE COMPONENT and the IRON HORSE (H).
- Pan down.
- Place the 3 MACHINE COMPONENTS, select the laptop, and add the ANCIENT RELIC (L).
- Select the laptop.
- Place the BATTERY (M) and JUMPER CABLES (N).
- Select the battery (M) and machine components (L).
- Take the COMPLETED MACHINE PART.
- Walk down and go forward 3x.
- Give the COMPLETED MACHINE PART (O).
- Walk right.
- Play the HOP; earn the IRON SHEEP (P).
- Walk down.
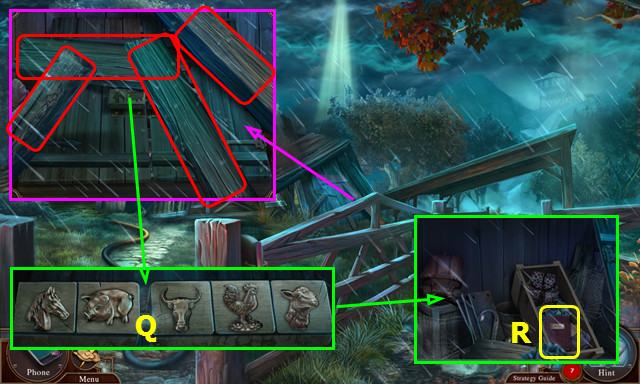
- Remove the 4 boards (red).
- Place the IRON HORSE, IRON PIG, IRON BULL, IRON ROOSTER, and IRON SHEEP (Q).
- Open the doors; move the items and take the JOURNAL (R).
- Read the JOURNAL to find the TOWER KEYCARD (inventory).
- Walk right.
Chapter 2: The Weather Tower
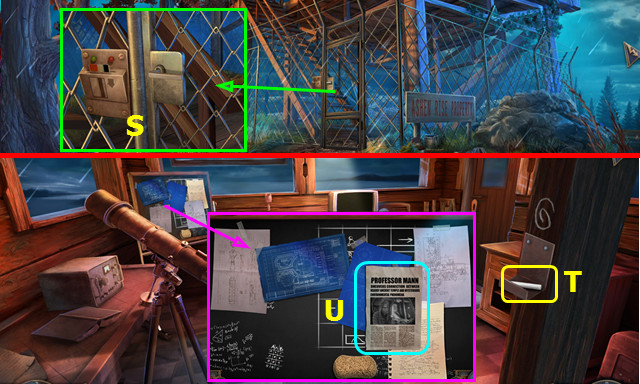
- Use the TOWER KEYCARD and turn the handle (S).
- Go forward.
- Take the PIECE OF CHALK (T).
- Read the article and remove all the papers (U).
- Place the PIECE OF CHALK (A).
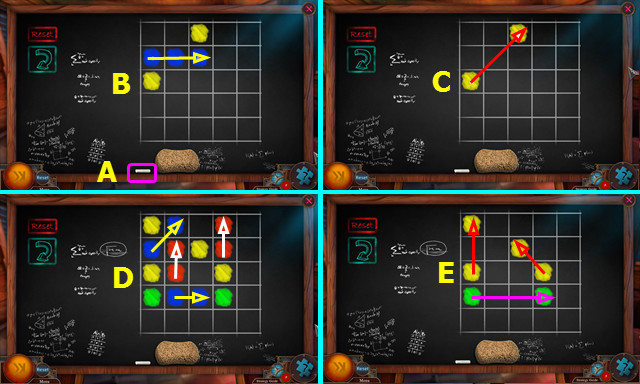
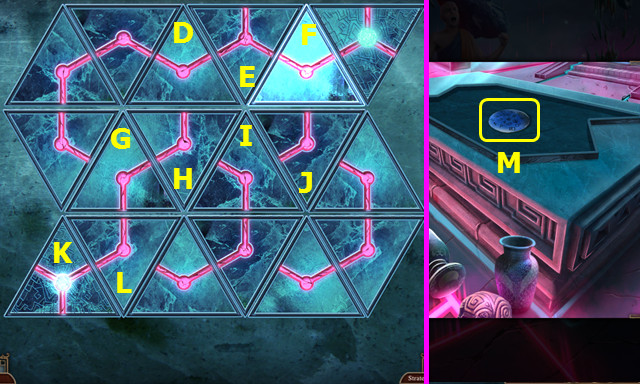
- Drag a line through the marked sets (B-E).
- Drag a line through the marked sets (F-I).
- Drag a line through the marked sets (J).
- Select the cell phone, and then the camera (K).
- Take a picture of the PROFESSOR'S FORMULA (L).
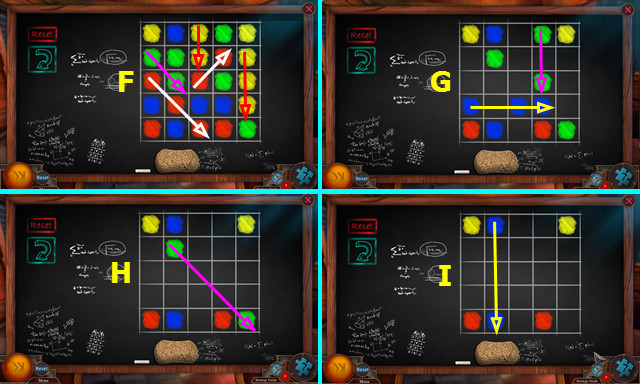
- Open the door; take the ROCKET LOCKER KEY (A).
- Use the ROCKET LOCKER KEY; take a ROCKET (B).
- Place the ROCKET (C).
- Select (D).
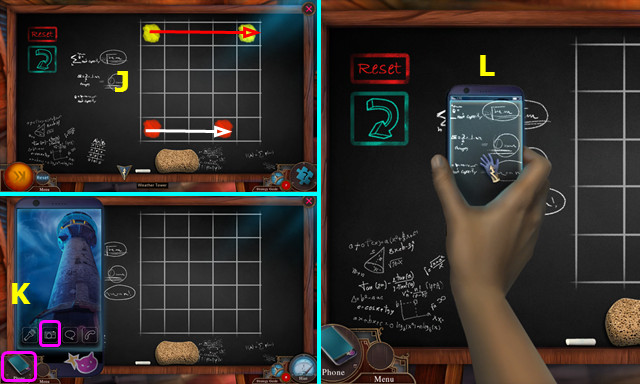
- Walk down 3x.
- Give the PROFESSOR'S FORMULA (E).
- Enter the chamber (F).
- Select 8x (@).
- Go forward.
- Go forward.
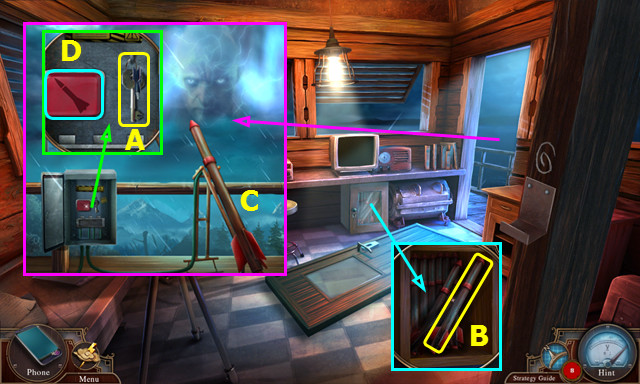
- Select the wing 3x (G).
- Take the EXTINGUISHER (H).
- Take the COAT HANGER (I).
- Bend the COAT HANGER 3x to make the IMPROVISED HOOK (inventory).
- Use the EXTINGUISHER on the glass; use the IMPROVISED HOOK to take the COCKPIT KEY (J).
- Use the COCKPIT KEY and open the door (K).
- Go forward.
- Take the WALLET (L).
- Open the WALLET, remove the cards, and take the PAPER CLIP (inventory).
- Walk down.
- Use the PAPER CLIP (A).
- Play the HOP; earn the HEADSET (B).
- Go forward.
- Select (C).
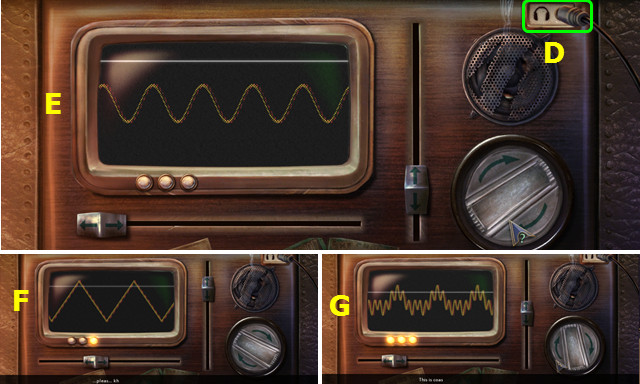
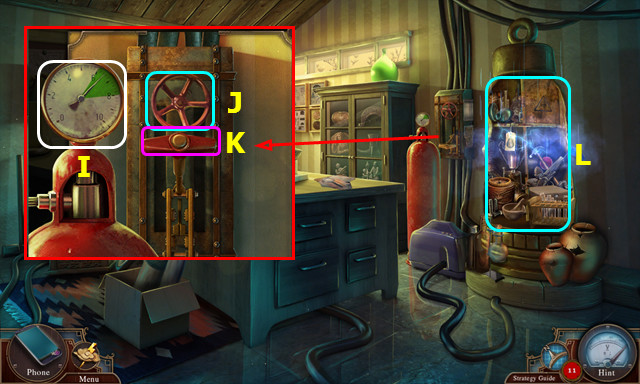
- Use the HEADSET; plug it in the socket (D).
- Align the 3 frequencies (E-F-G).
- Set the controls as shown.
- Walk down.
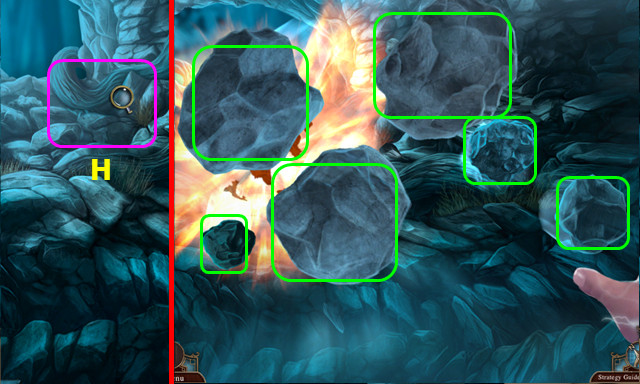
- Pan up; select (H).
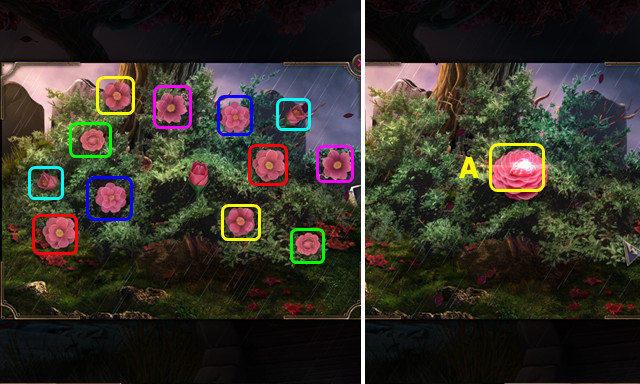
- Select the 6 rocks (green).
- Select (I).
- Press the button (J).
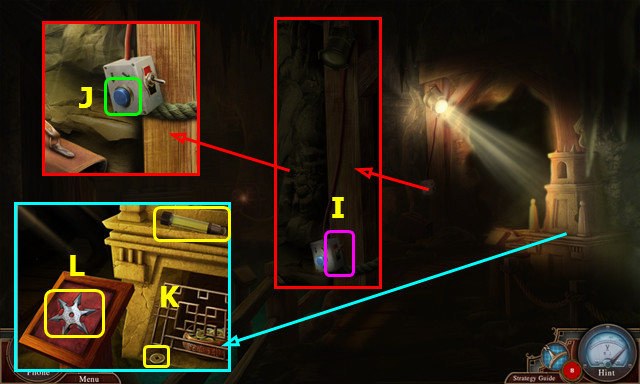
- Take the 1/5 COIN and GLOW STICK (K).
- Remove the cover and take the THROWING STAR (L).
- Shake the GLOW STICK to make the LIT GLOW STICK (inventory).
- Press the button (M).
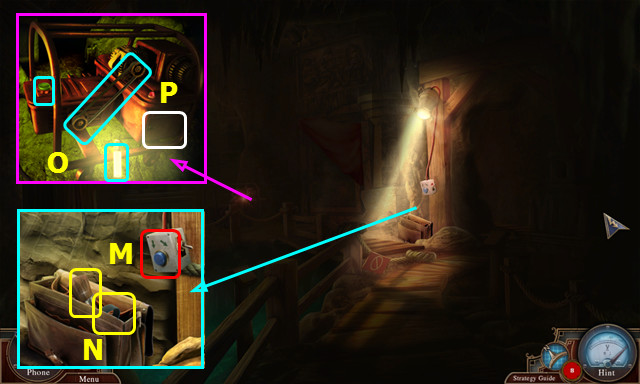
- Use the THROWING STAR, open the case, and take the BRUSH and DRIVE BELT (N).
- Place the LIT GLOW STICK and DRIVE BELT; press the button (O).
- Note the locked fuel tank (P).
- Remove the cloth and select (Q).
- Use the BRUSH over the entire mural; remove the piece and take the 2/5 COIN (R).
- Walk right.
- Look at the ID tag; scroll through the photos on the phone (A).
- Turn over the plate; take the 3/5 COIN and METAL PLATE (B).
- Take the 4/5 COIN (C).
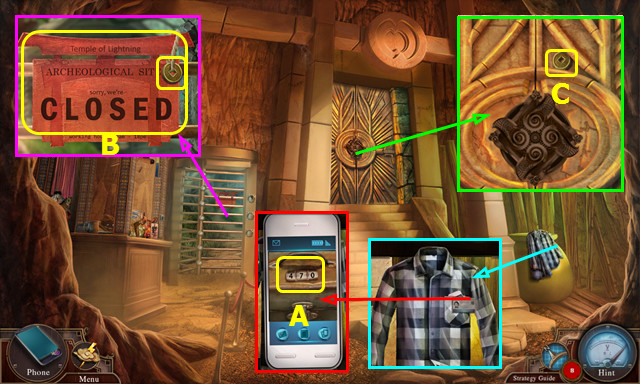
- Take the 1/3 WARRIOR FIGURINE (D).
- Enter 4-7-0 (E).
- Take the 5/5 COIN and SMALL KEY (F).
- Use the 5 COINS (G).
- Play the HOP; earn the METAL PIECE (H).
- Select (I).

- Place the METAL PIECE.
- Select A-Bx2.
- Select C-D-Cx2-Dx3.
- Select F-Ex2-Fx2-Ex3.
- Enter the turnstile (G).
Chapter 3: The Ranger Cabin
- Do 4 chest compressions (H).
- Go forward.
- Knock (I).
- Open the wardrobe, move the items, and take the FUNNEL and FIELD BED (J).
- Unfold the FIELD BED (inventory); it will go automatically to the floor.
- Walk down.
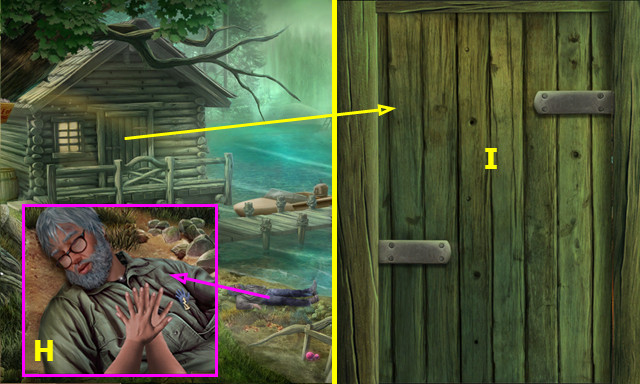
- Take the Professor (K).
- Go forward.

- Take the DUCT TAPE and read the newspaper (L).
- Open the first aid kit (M).
- Play the HOP; earn the SYRINGE, OXYGEN, and GAUZE (N).
- Select (O).
- Use the OXYGEN (P), GAUZE (Q), and SYRINGE (R).
- Select (S).
- Take the SWAMP MAP (T).
- Walk down.
- Select (A).
- Take the GLUE GUN (B).
- Take the EMPTY CANISTER (C).
- Look at the EMPTY CANISTER; take the HOSE and EMPTY FUEL CANISTER (inventory).
- Walk down 2x.
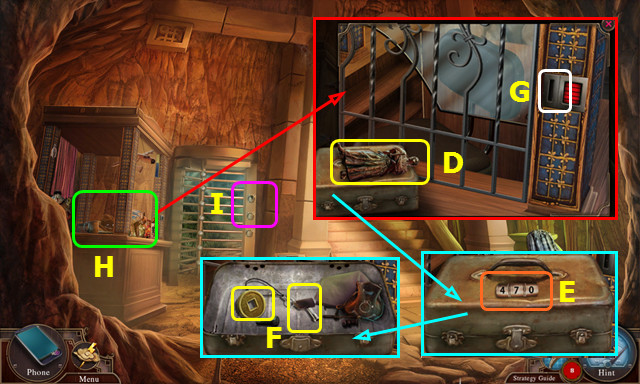
- Use the SMALL KEY and open the cover (D).
- Place the HOSE (E) and EMPTY FUEL CANISTER (F).
- Select 3x (G); take the FULL CANISTER.
- Walk forward and left.
- Use the GLUE GUN and METAL PLATE (H).
- Open the cover; use the DUCT TAPE (I).
- Use the FUNNEL and FULL CANISTER (J).
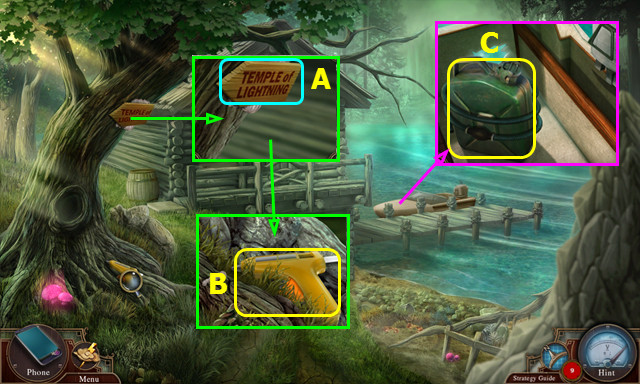
- Select, and then use the SWAMP MAP (K).
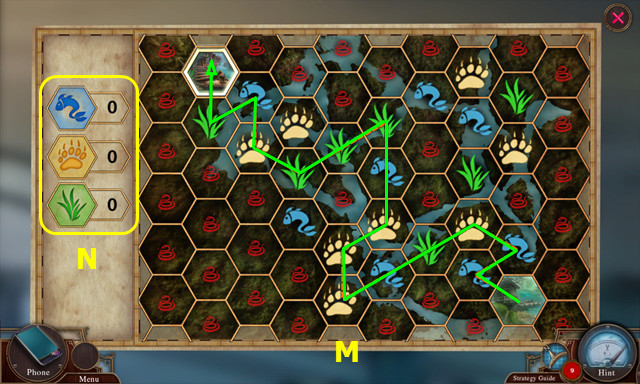
- Move on the indicated path (M).
- Track your requirements (N).
- Select and take the DOOR HANDLE (O).
- Rotate the view (P).
- Note the symbols (Q).
- Take the 1/2 BOX TOKEN; use the DOOR HANDLE (R).
- Go forward.
- Take the HOOK (A).
- Select the symbols (green).
- Open the box; take the LIGHTNING EMBLEM (B).
- Place the LIGHTNING EMBLEM; open the book (C).
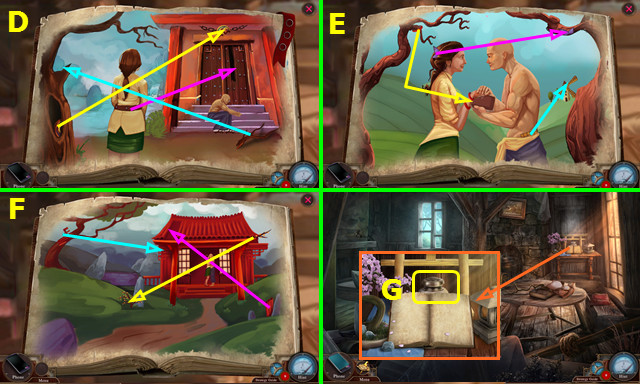
- Restore the 3 items (color-coded); turn the page (D).
- Restore the 3 items (color-coded); turn the page (E).
- Restore the 3 items (color-coded); turn the page (F).
- Select the pages several times to complete the story.
- Take the URN (G).
- Walk down.

- Select (J).
- Walk right.
- Select the 3 paths in any order K-L-M.
- Take the 3rd path selected, and then go forward.
- Take the 2/2 BOX TOKEN (N).
- Move the boat; take the HARPOON (O).
- Place the 2 BOX TOKENS (P).
- Solution: A-D-E-B-A-D-E-C.
- Open the box; take the 2/3 WARRIOR FIGURINE (F).
- Use the HARPOON (G).
- Take the 3/3 WARRIOR FIGURINE (H).
- Place the 3 WARRIOR FIGURINES (green).
- Flip the switch (I).
- Walk left and forward.
- Pan down.
- Take the BRANCH (A).
- Pan up.
- Use the BRANCH; take the HARPOON (B).
- Pan down.
- Use the HARPOON (C).
- Walk forward.
- Take the ROPE (D).
- Combine the HOOK and ROPE to make the HOOK WITH ROPE (inventory).
- Walk down.
- Move the bamboo 3x; take the 1/2 GEAR (E). Try to take the second gear.
- Use the HOOK WITH ROPE; take the 2/2 GEAR (F).
- Walk forward.
- Move the bushes 3x (G).
- Place the 2 GEARS; pull the lever (H).
- Play the HOP (I).
- Go forward.
- Select the panels (J).
- Move your mouse left and right to keep the ball balanced in the green until you hit your opponent (K).
- Repeat this process 3x.
- Select (L-N).
- Select (O-P).
- Take the URN (Q).
- Open the cabinet (A).
- Take the BOWL (B).
- Walk down.
- Use the BOWL; take the OIL (C).
- Go forward.

- Use the OIL; slide the panel (D).
- Take the RIVER MAP (E).
- Give the RIVER MAP (F).
- Walk down 4x; go forward.
Chapter 4: Rob's Backyard
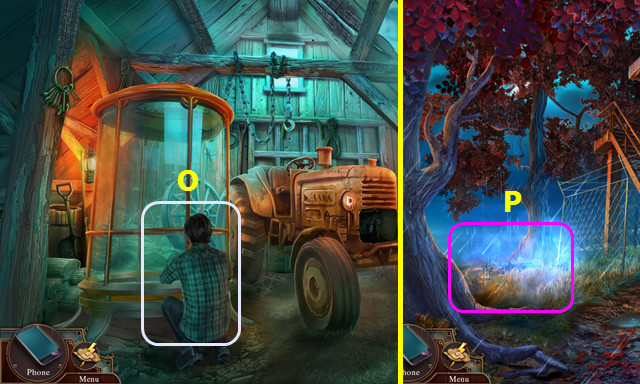
- Pan up, zoom in, and move the vines (G).
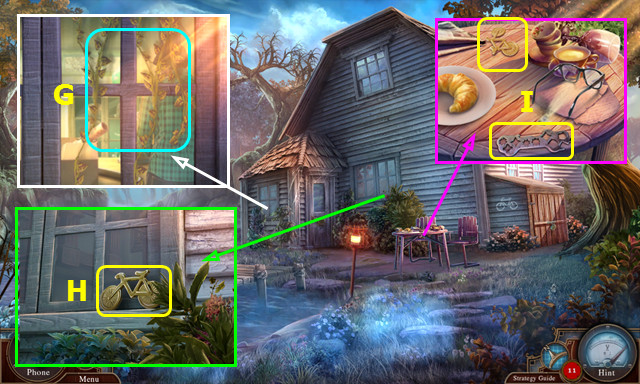
- Move the bush; take the 1/2 BIKE TOKEN (H).
- Take the BICYCLE TOOL; move the newspaper and take the 2/2 BIKE TOKEN (I).
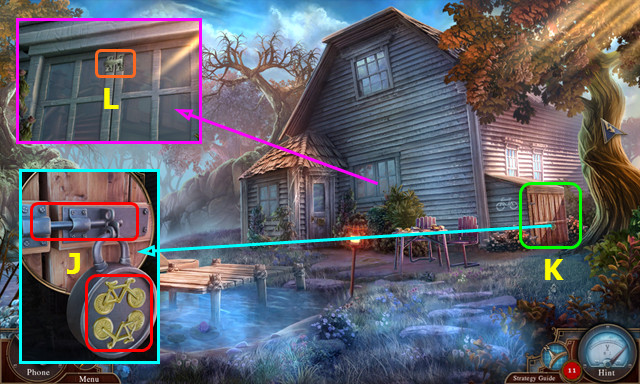
- Place the 2 BIKE FIGURINES; open the latch (J).
- Play the HOP; earn the RADIO (K).
- Look at the RADIO; take and extend the RADIO ANTENNA (inventory).
- Use the RADIO ANTENNA 2x, open the window, and go in (L).

- Select (M).
- Move right (N).
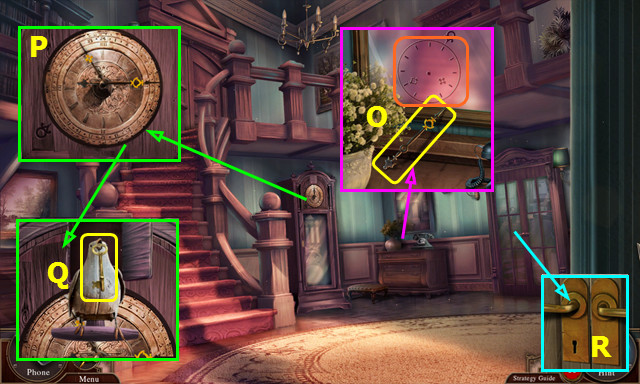
- Move the plant; take the CLOCK HAND and note the mirror clue (O).
- Place the CLOCK HAND and set the hands as shown (P).
- Take the ROOM KEY (Q).
- Use the ROOM KEY (R).
- Walk right.
- Take the ANCIENT RELIC (A).
- Select the bust; take the BOX (B).
- Rotate the view (C).
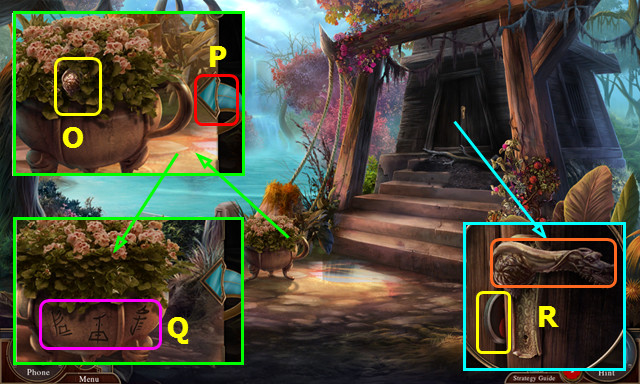
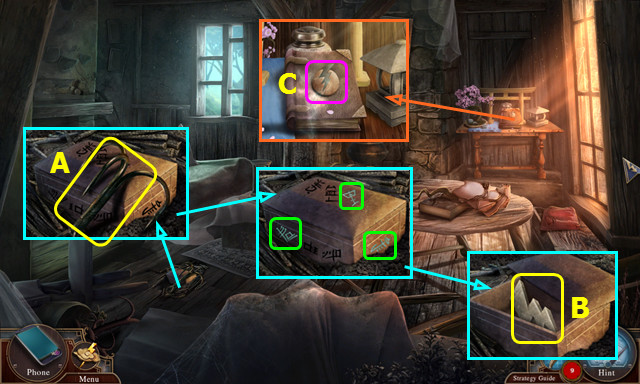
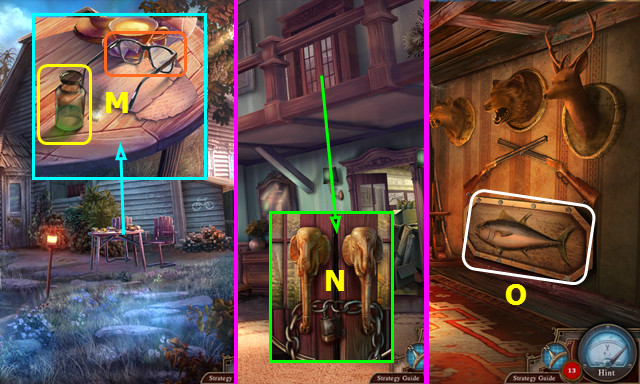
- Take the ANCIENT HAIRPIN; read the note and manual (D).
- Look at the 3 bottles; take the 3rd bottle to find the NITROGEN DIOXIDE (E).
- Walk down.
- Select (F-G).
- Use the ANCIENT HAIRPIN; take the CLASP. Move the papers and take the GAUGE (H).
- Walk right.
- Replace the GAUGE (I).
- Turn 2x (J).
- Flip the lever (K).
- Play the HOP; earn the HYDROGEN PEROXIDE (L).
- Combine the NITROGEN DIOXIDE and HYDROGEN PEROXIDE; shake the bottle to make the CHEMICAL MIXTURE (inventory).
- Walk down 2x.
- Place the CHEMICAL MIXTURE and select the glasses; take the ACID VIAL (M).
- Combine the BOX and ACID VIAL to find the 1/4 SEAL PART (inventory).
- Go forward.
- Use the ACID VIAL (N).
- Enter Rob's Trophy Room.
- Select (O).
- Place the BICYCLE TOOL (P).
- Select the tool slot and matching bolt (color-coded).
- Remove the fish; open the safe and take the 2/4 SEAL PART (Q).
- Walk down.
- Duck right (R).
- Open the door (S) and go left.
- Select (A-B-C).
- Use the ANCIENT HAIRPIN (D).
- Take the PILLOW (E).
- Look at the photo and turn it over (F).
- Select and open the book; take the 1/2 TARGET TOKEN (G).
- Open the door, move the items, and take the 2/2 TARGET TOKEN (H).
- Walk down and go right.
- Place the 2 TARGET TOKENS and open the doors (I).
- Open the drawers, open the box, and take the BULLET (J).
- Take the REVOLVER (K).
- Load the REVOLVER with the BULLET (inventory).
- Walk down and go left.
- Place the PILLOW and REVOLVER and select the revolver; remove the revolver and pillow (L).
- Open the chest; move the items and take the 3/4 SEAL PART (M).
- You will go automatically into the closet (N).
- Take the 4/4 SEAL PART (O).
- Walk down 2x; get in the boat.
- Walk down.
- Combine the ANCIENT RELIC and 4 SEAL PARTS to make the TEMPLE SEAL (inventory).
- Place the TEMPLE SEAL (P).
- Go forward (Q).
Chapter 5: The Temple's Main Hall
- Push the chest 2x (R).
- Move the vines 3x (S).
- Go forward.
- Take the KANABO (T).
- Walk down.
- Use the KANABO 2x; remove the 4 broken rock pieces (U).
- Take the LANTERN and note the mini-game (V).
- Open the LANTERN and remove the LANTERN CANDLE (inventory).
- Use the LANTERN CANDLE to get the LIT LANTERN CANDLE (A).
- Combine the EMPTY LANTERN and LIT LANTERN CANDLE to make the GLOWING LANTERN (inventory).
- Hang the GLOWING LANTERN (B).
- Rotate the disc to complete the image (C).
- The GLOWING LANTERN returns to inventory; open it and take the LIT LANTERN CANDLE (inventory).
- Walk right.
- Take the BLUNDERBUSS (D).
- Untie the BLUNDERBUSS and load it with gunpowder; take the ROPE and GUNPOWDER (inventory).
- Try to go forward.
- Walk down and forward.
- Place the ROPE to make the OILED ROPE (E).
- Walk down.
- Place the GUNPOWDER and OILED ROPE (F).
- Use the LIT LANTERN CANDLE (G).
- Open the latch (H).
- Go left.
- Take the SHOVEL (I).
- Take the STATUE LEG (J).
- Walk down and forward.
- Use the SHOVEL to take the SHOVEL WITH SAND (K).
- Walk down.
- Use the SHOVEL WITH SAND (L).
- Walk right.
- Place the STATUE LEG; take the CHAIN (M).
- Add the CLASPS to the CHAIN (inventory).
- Walk down and left.
- Place the CHAIN; turn the crank (N).
- Play the HOP; earn the LEATHER STRAP (O).
- Select (P).
- Take the ORB (Q).
- Walk down.
- Select (R).
- Place the ORB.
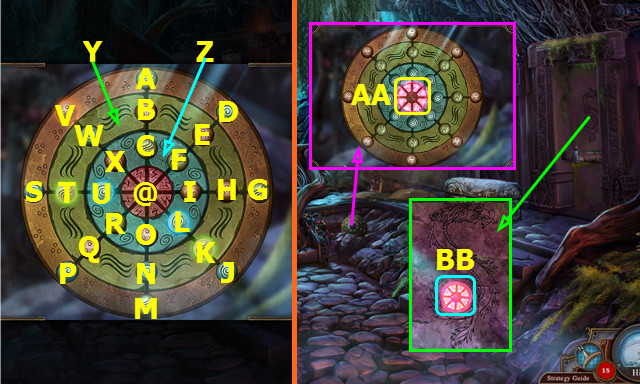
- Note the Y and Z rings will move clockwise (cw) or counterclockwise (ccw).
- Solution: O-N-M-Yccwx1-N- Yccwx1-J-Yccwx3-K-Yccwx1-G-Yccwx1-H-Yccwx1-D- Yccwx1-E-F-@-C-B-Zcwx1-C-@-U-T-S-Yccwx2-T-Zcwx4-U-@-R-Q-P- Yccwx1-Q-R-@-F-E-Zcwx2-F-@-O-N- Yccwx4-A- Yccwx5-B-C-Zcwx2-H-Zcwx2-i-@.
- Take the CHARGED ORB (AA).
- Place the CHARGED ORB (BB).
- Enter the Dragon Room.
- Play the HOP; earn the AMMUNITION (A).
- Load the BLUNDERBUSS with the AMMUNITION (inventory).
- Take the NAGINATA (B).
- Remove the NAGINATA BLADE from the NAGINATA and add the LEATHER STRAP to make the NAGINATA HOOK (inventory).
- Go to the Temple Bridge.

- Use the NAGINATA HOOK to take the WOODEN BIRD (C).
- Walk down and left.
- Pan up, place the WOODEN BIRD, move the vase, and take the HANDLE (D).
- Use the OLD BLUNDERBUSS; fire when the target is green (E).
- Take the FISH STONE (F).
- Go to the Dragon Room.
- Place and select the HANDLE (G).
- Use the NAGINATA BLADE; take the DRAGON STONE (H).
- Go to the Temple Bridge.
- Play the HOP; earn the LION STONE (I).
- Walk down and forward.
- Place the LION STONE, DRAGON STONE, and FISH STONE (J).
- Use the URN (K).

- Select (L).
- Go to the Denial Plateau (M).
- Take the BURNED HOUSE and RAKE (N).
- Use the RAKE; take the EYE OF TRUTH and HOUSE ROOF (O).
- Place the EYE OF TRUTH (P).
- Play the HOP; earn the HOUSE WALLS (Q).
- Add the HOUSE WALLS and HOUSE ROOF to the BURNED HOUSE (inventory).
- Use the BURNED HOUSE (R).
- Take the SPARK OF LIGHTNING (S).
- Walk down.
- Place the SPARK OF LIGHTNING (T).
- Go to the Anger Plateau (U).
- Move the items; take the CERAMIC BOWL (V).
- Return to Denial Plateau.
- Use the CERAMIC BOWL to take the WATER (A).
- Return to Anger Plateau.
- Use the WATER (B).
- Select (C).
- Solution: F-E-D-H-G-H-I-J-I-H-G-L-K.
- Take the EYE OF MEMORY (M).
- Go to the Denial Plateau.
- Place the EYE OF MEMORY (N).
- Rotate the view; select the symbol pairs (color-coded).
- Take the MEMENTO OF ASHLEY (O).
- Return to the Anger Plateau.
- Give the MEMENTO OF ASHLEY (P).
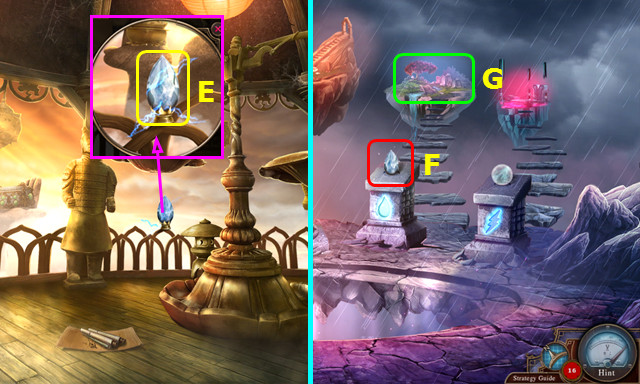
- Take the SCALES (Q).
- Take the 1/2 SCALE PLATE (R).
- Walk down.
Chapter 6: The Bargaining Plateau
- Place the SCALES (S).
- Go to the Bargaining Plateau (T).
- Move the items; take the GOLDEN HEAD (U).
- Use the RAKE; take the FLY TOKEN (V).
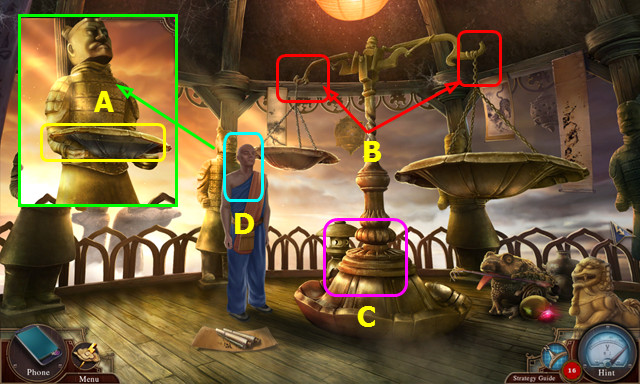
- Place the GOLDEN HEAD; take the 2/2 SCALE PLATE (A).
- Place the 2 SCALE PLATES (B).
- Play the HOP; earn LIFE AND DEATH TOKEN (C).
- Give the LIFE AND DEATH TOKEN (D).
- Take the TEARDROP (E).
- Walk down.
- Place the TEARDROP (F).
- Go to the SADNESS PLATEAU (G).
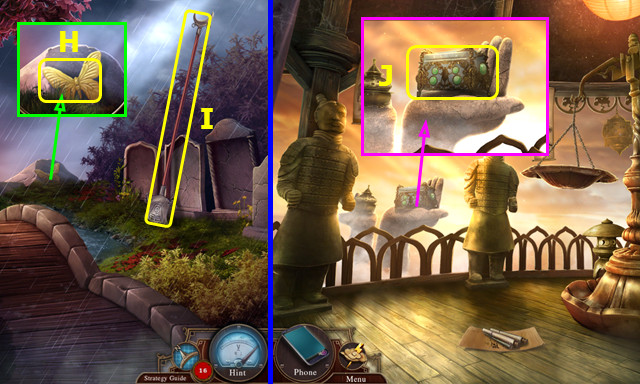
- Take the WAX FIGURINE (H).
- Take the MONK'S SPADE (I).
- Go to the Bargaining Plateau.
- Use the MONK'S SPADE to take the CRYSTAL BOX (J).
- Use the FLY TOKEN on the CRYSTAL BOX (inventory).
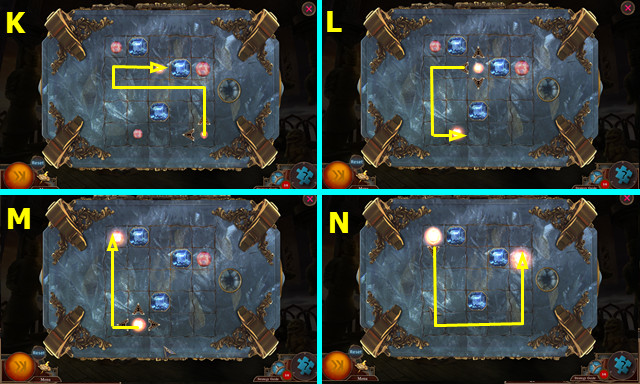
- Move the orb on the indicated paths (K-O).
- Restore and take the PHOENIX TEARS (P).
- Go to the Anger Plateau.
- Place the PHOENIX TEARS; take the CRYSTAL SEED (R).
- Go to the Sadness Plateau.
- Move the dirt 4x; place the CRYSTAL SEED (S).
- Select pairs (color-coded).
- Take the CRYSTAL HEART (A).
- Give the CRYSTAL HEART (B).
- Select and take the TEMPLE SEAL (C).
- Go to the Denial Plateau.
- Place and take the TEMPLE SEAL (D).
- Go to the Bargaining Plateau.
- Place and take the TEMPLE SEAL (E).
- Go to the Anger Plateau.
- Place and take the TEMPLE SEAL (F).
- Walk down.
- Place the CHARGED SEAL (G).
- Go to the Acceptance Plateau (H).
- Place the CERAMIC BOWL and WAX FIGURE; take the BOWL WITH WAX (I).
- Take the TWIG and DECORATED GLASS (J).
- Place the DECORATED GLASS and BOWL WITH WAX; place and select the TWIG 4x (K).
- Take the GLASS WITH WAX (L).
- Place the GLASS WITH WAX (M).
- Press the stones that match the bird outline (N).
- Select (O).
- Select 1-4.
- Select 5-8.
- Congratulations! You have completed Rite of Passage: Heart of the Storm!
Created at: 2016-02-14