

Walkthrough Menu
- General Tips
- Chapter 1: Greystone
- Chapter 2: The Great Gate
- Chapter 3: The Observatory
- Chapter 4: The Windmill
- Chapter 5: Up the Mountain
- Chapter 6: Repairing the Balloon
- Chapter 7: Taking Flight
- Chapter 8: The Mystery House
General Tips
- This is the official guide for Rite of Passage: Hide and Seek.
- This guide will not mention each time you have to zoom into a location; the screenshots will identify each location.
- Hidden-object puzzles are referred to as HOPs. This guide will not show screenshots of the HOPs; however, it will mention when a HOP is available and the inventory item you'll collect from it.
- This guide will give step-by-step solutions for all puzzles which are not random. Please read the instructions in the game for each puzzle.
Chapter 1: Greystone
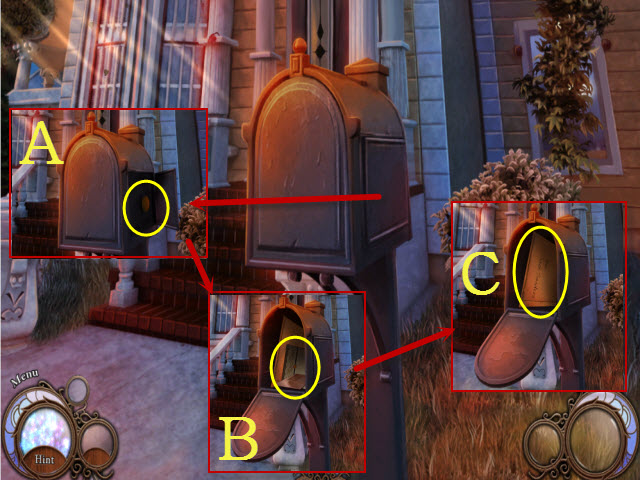
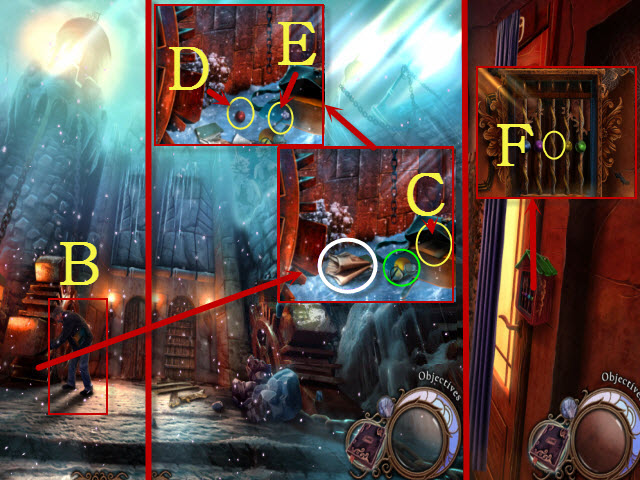
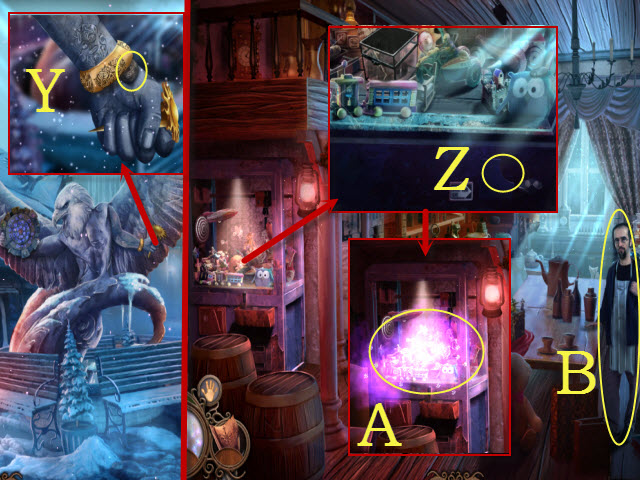
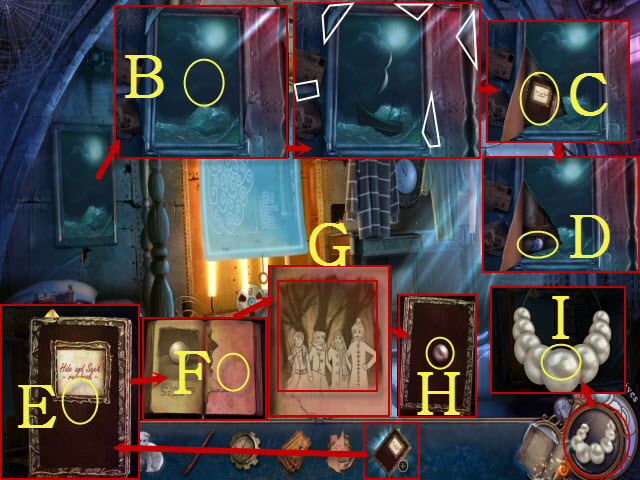
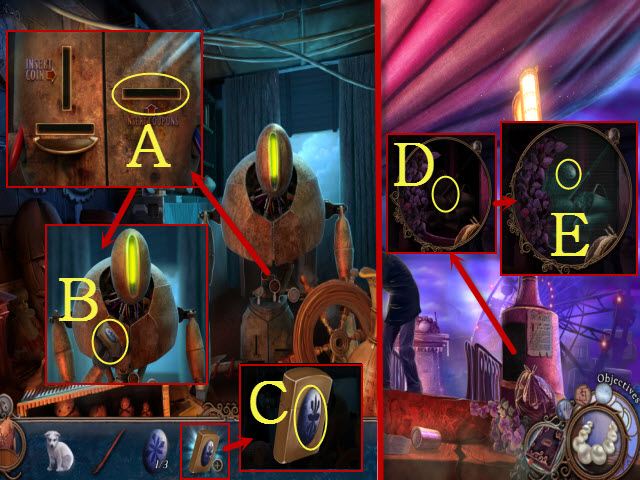
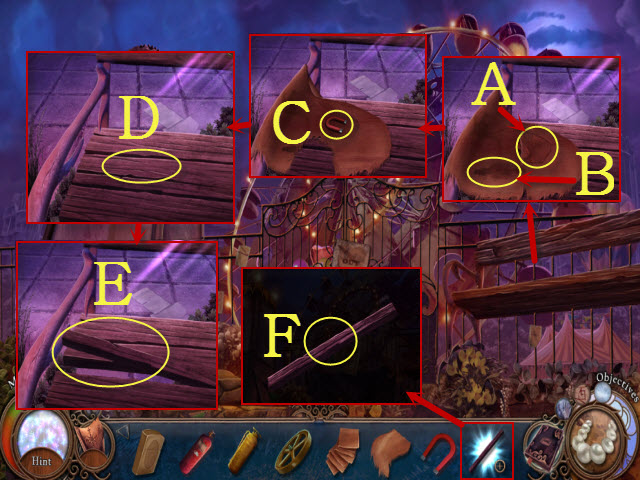
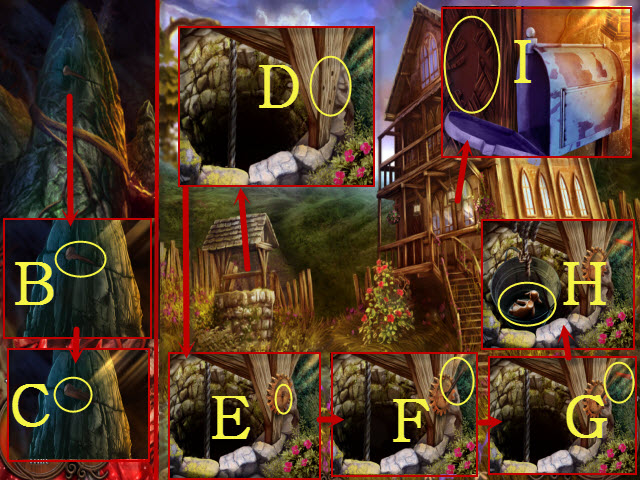
- Open the mailbox panel; press the button (A).
- Read the letter and invitation (B).
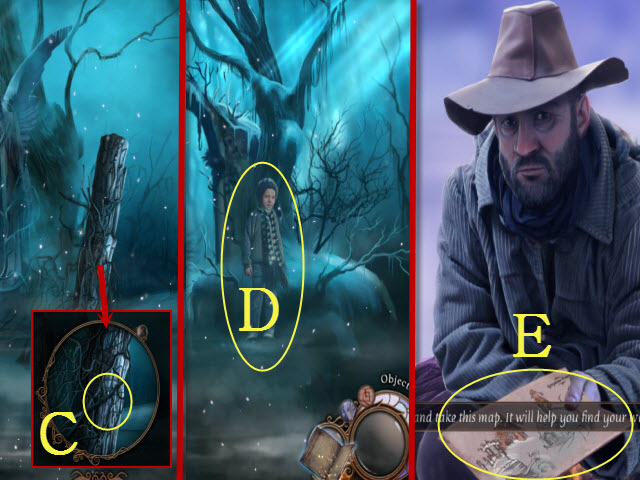
- Take the package; open it (C).
- Take the journal (D).
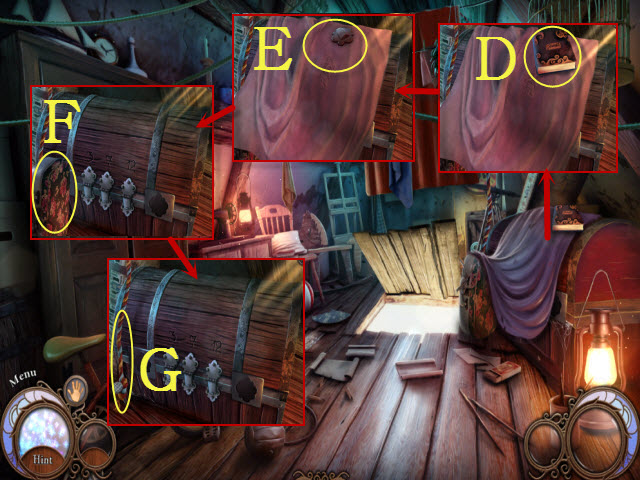
- Grab the 1/2 CHEST DIAL (E).
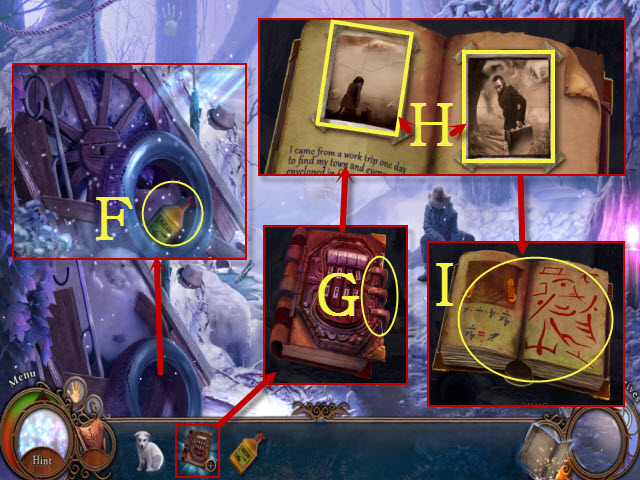
- Move the blanket; take the VANITY CASE (F).
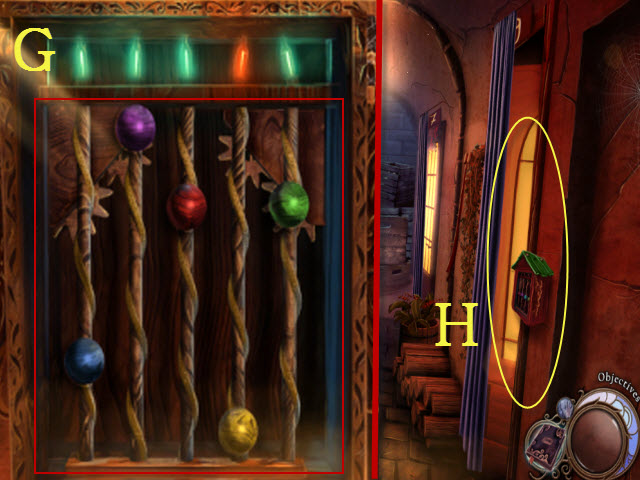
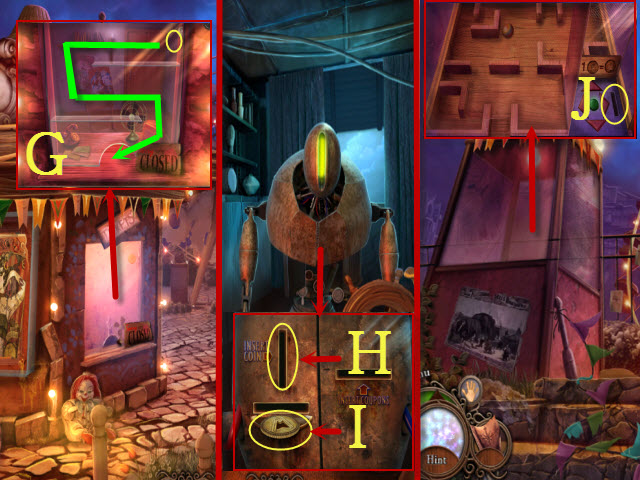
- Pull the rope (G).
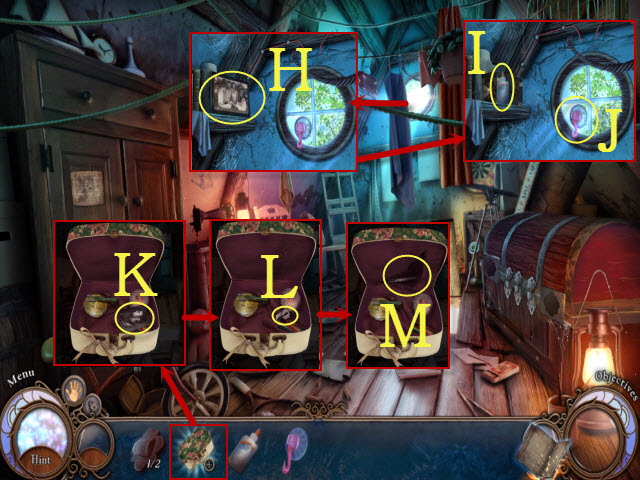
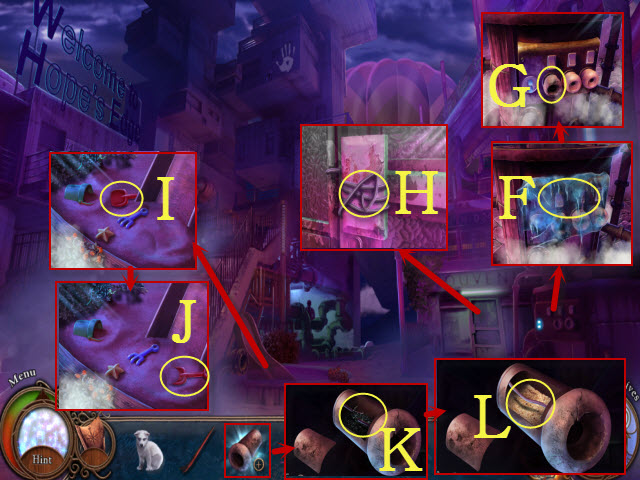
- Take the picture (H) and GLUE (I).
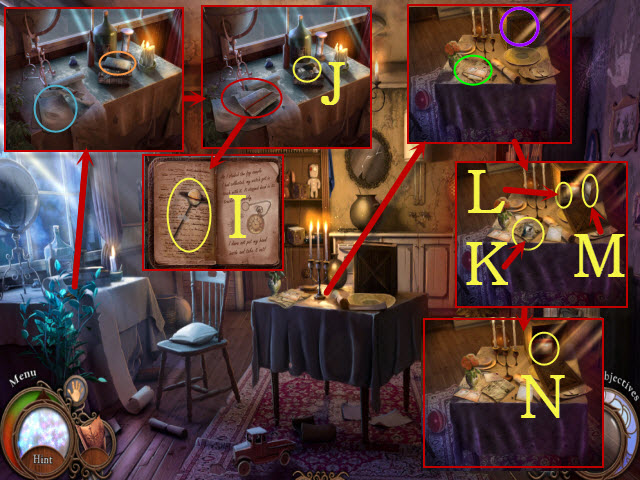
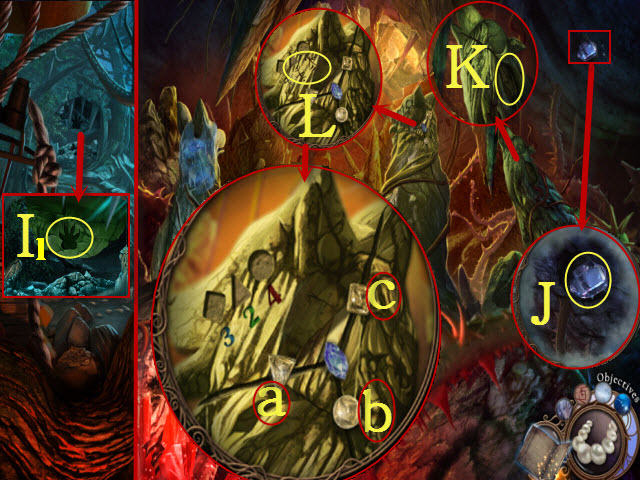
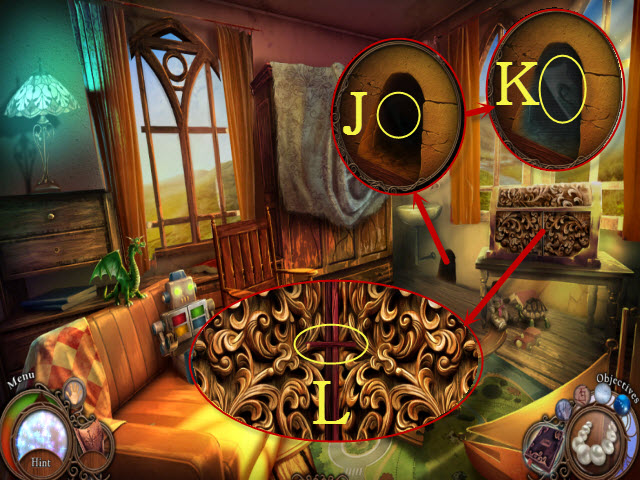
- Pull the hook three times; receive the VACUUM HOOK (J).
- Open the VANITY CASE; take the picture (K).
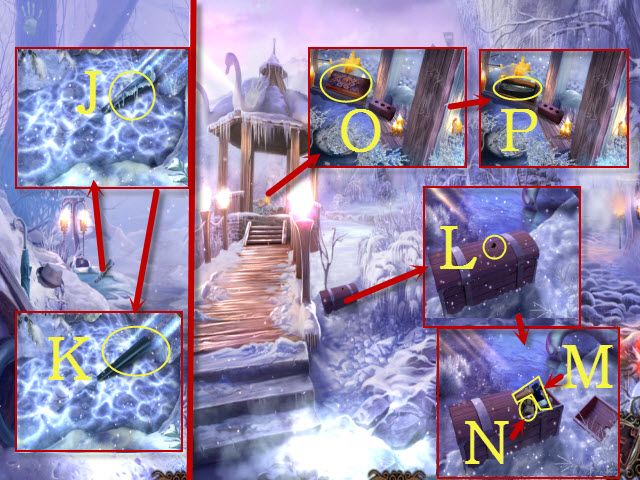
- Select the blade (L).
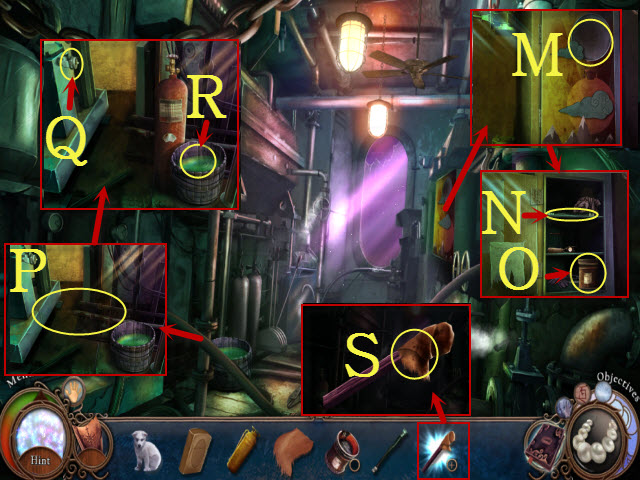
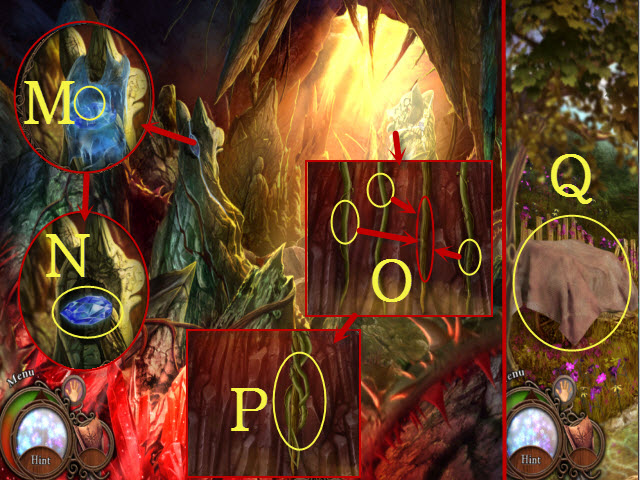
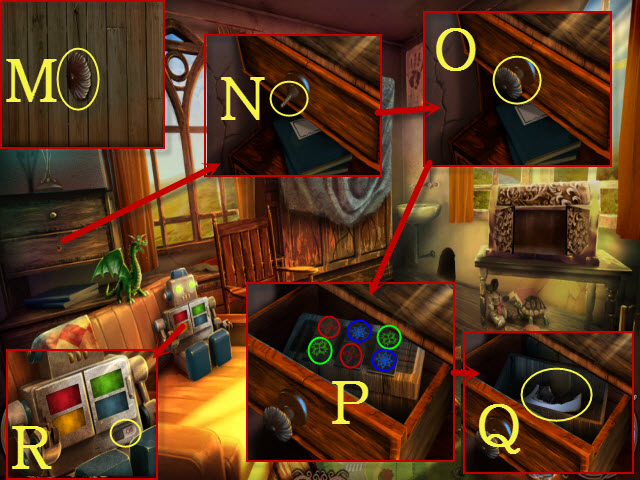
- Move the flap; take the TWEEZERS (M).
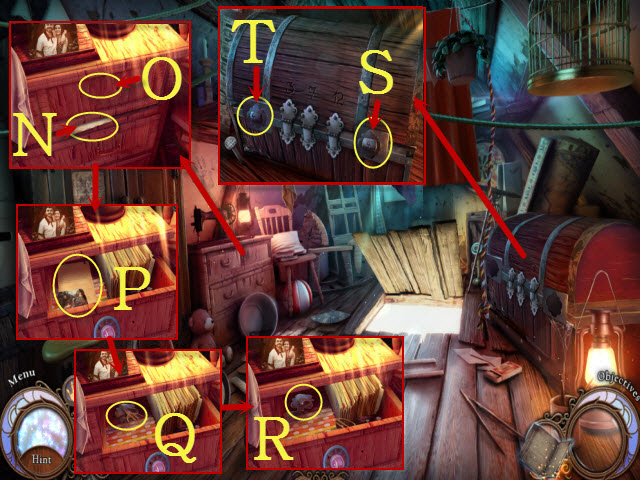
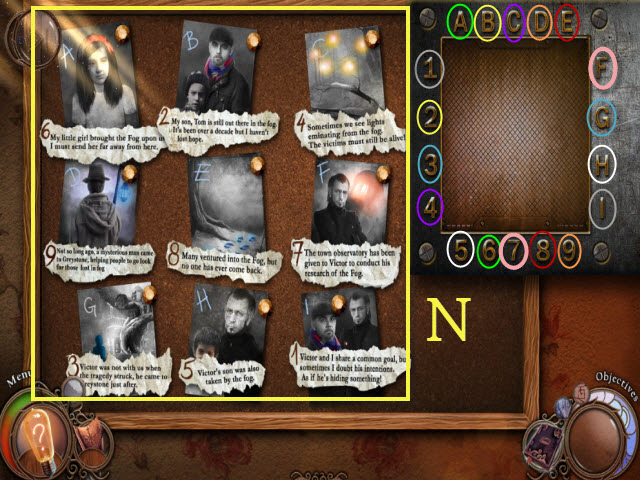
- Use the TWEEZERS; read the letter (N).
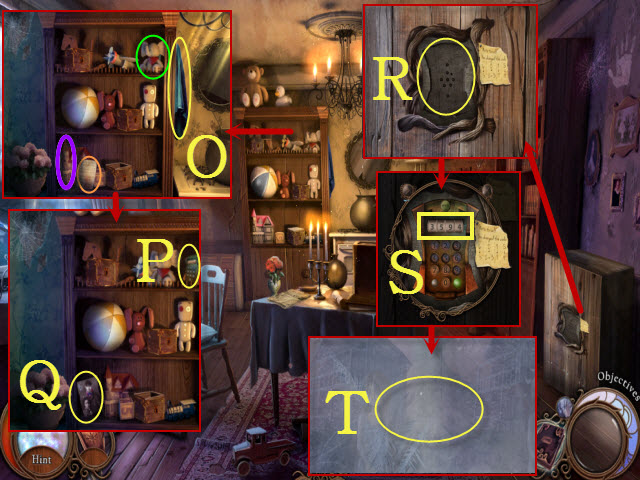
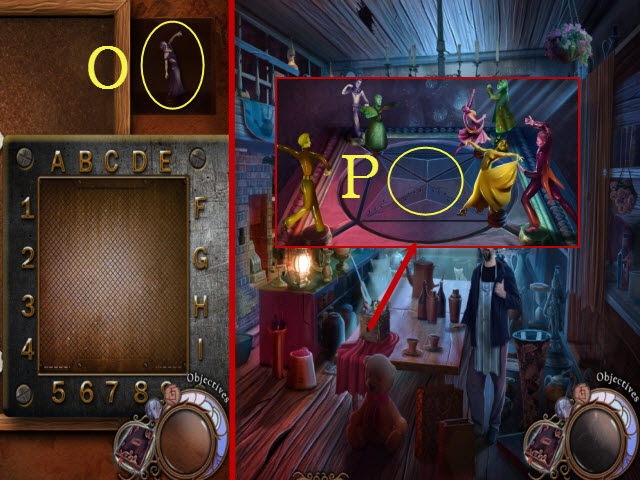
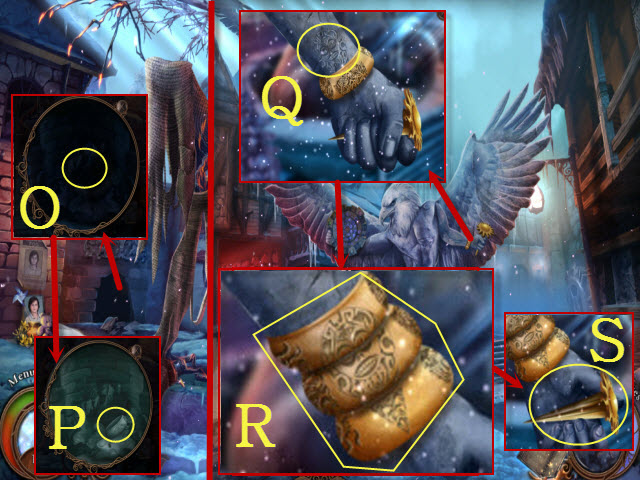
- Place the VACUUM HOOK (O); open the drawer and take the letter (P).
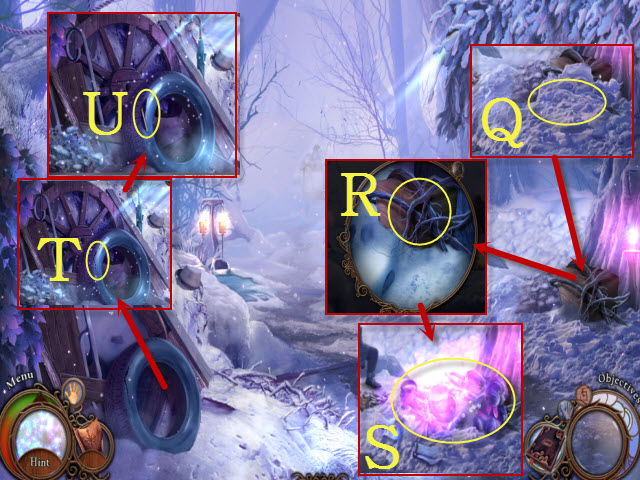
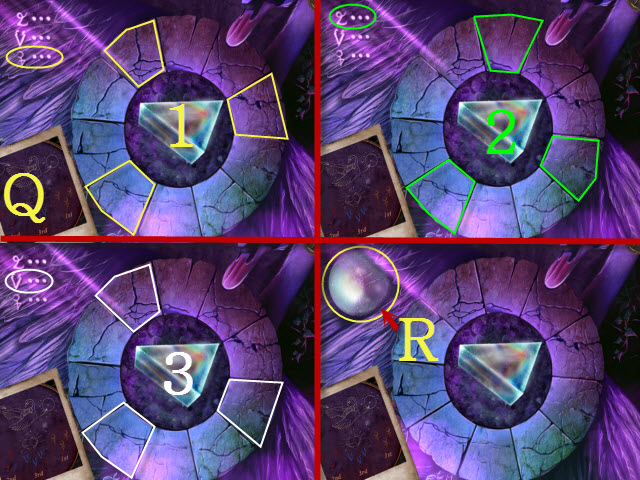
- Move the items aside (Q).
- Take the 2/2 CHEST DIAL (R).
- Place the 1/2 CHEST DIAL (S) and the 2/2 CHEST DIAL (T) to activate a mini-game.
- Solution: 1-2, 3-4, and 4-8.
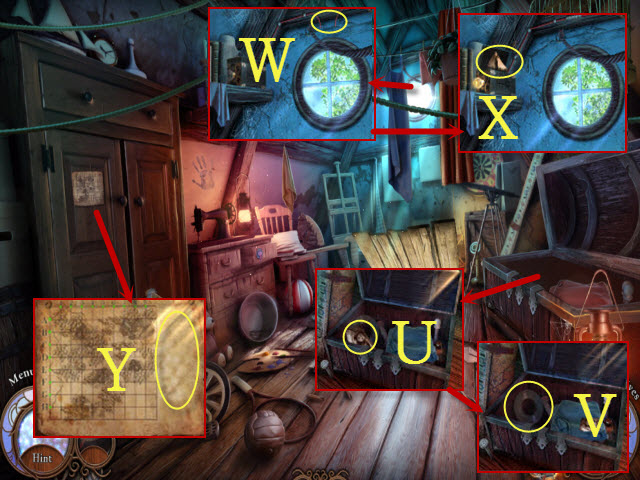
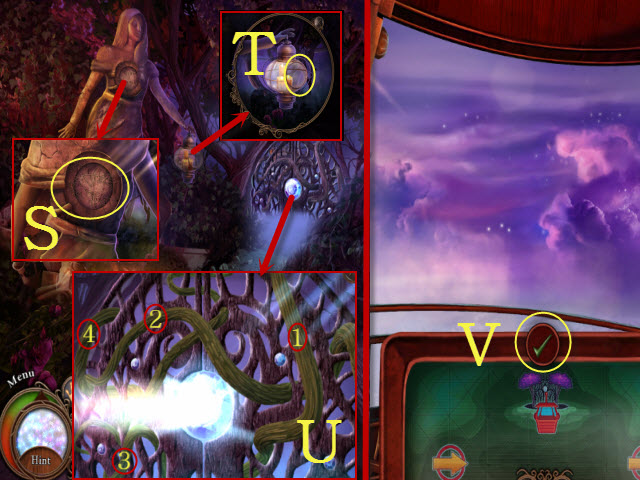
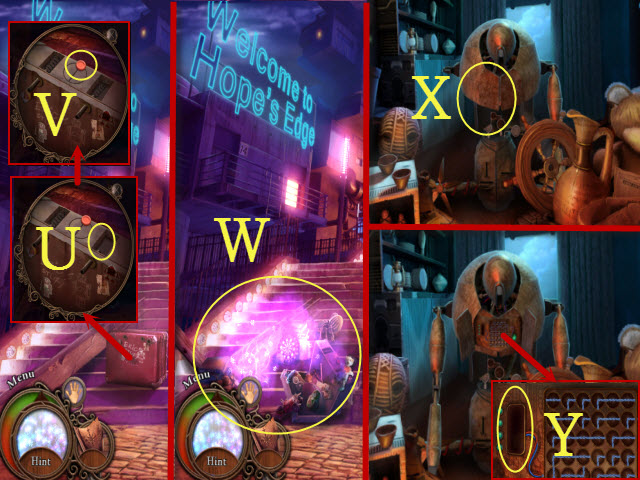
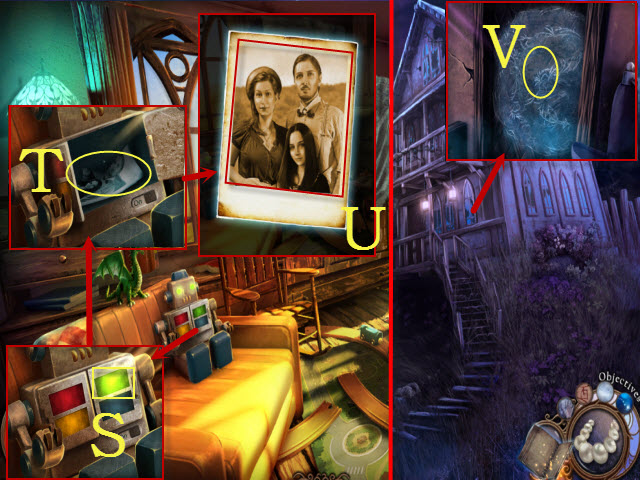
- Open the chest; move the photo (U).
- Take the INSULATING TAPE (V); place it on the wires (W).
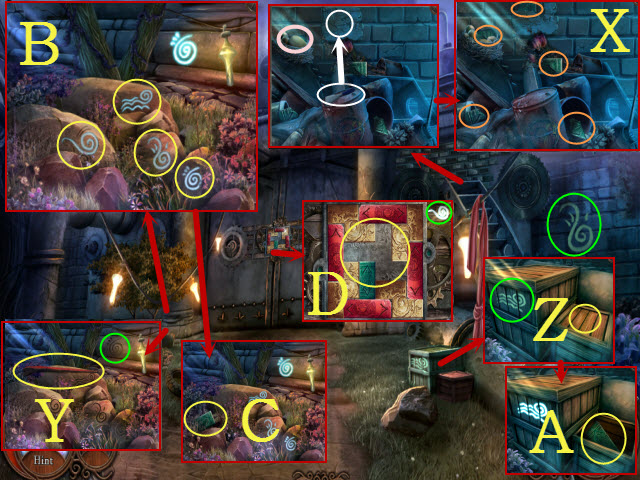
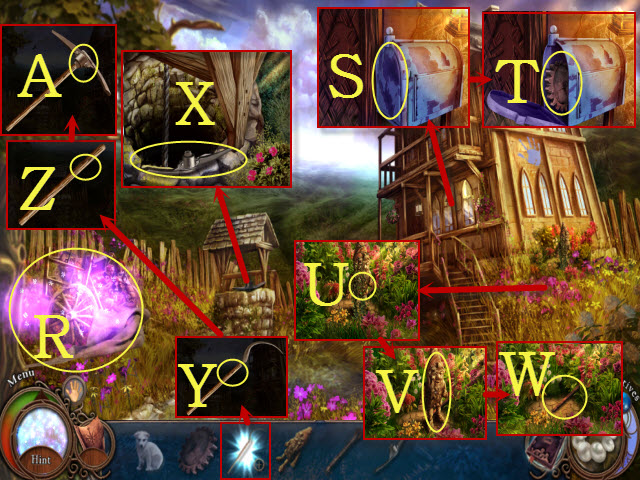
- Take the POSTCARD (X); place it on the map to activate a mini-game (Y).
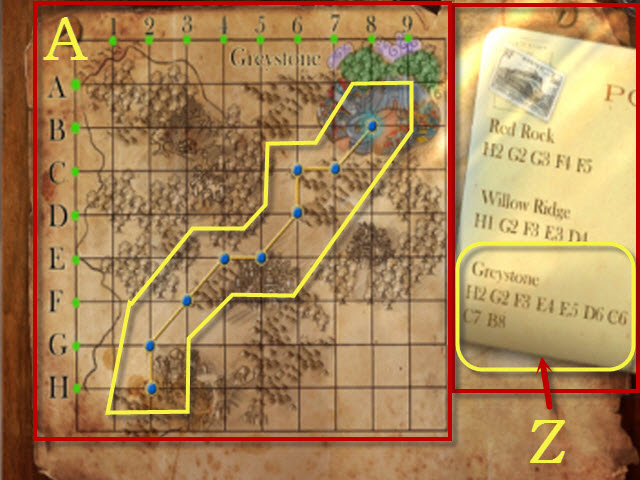
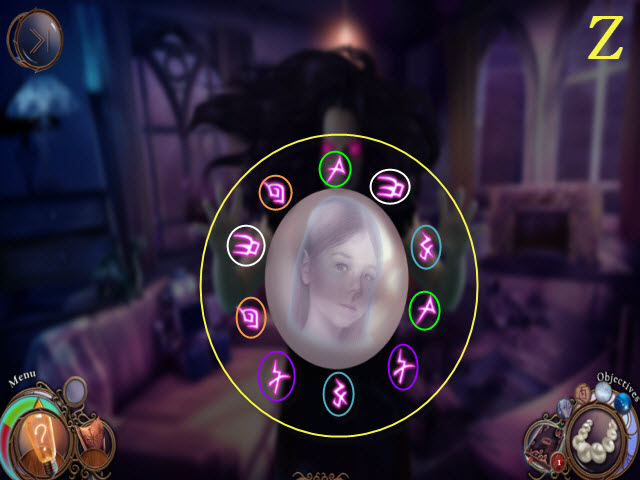
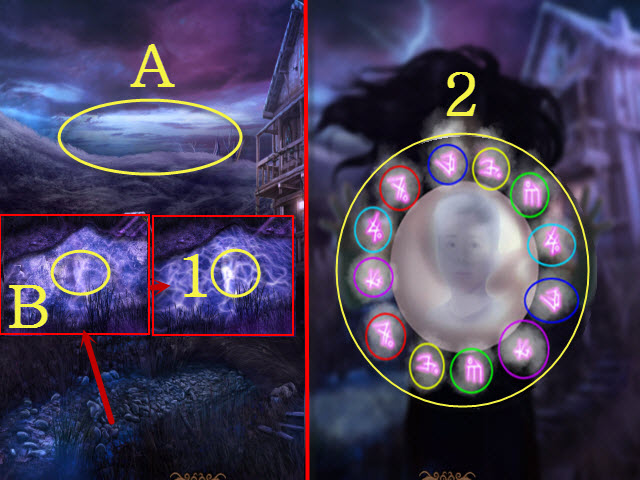
- Plot the coordinates (Z).
- Solution (A).
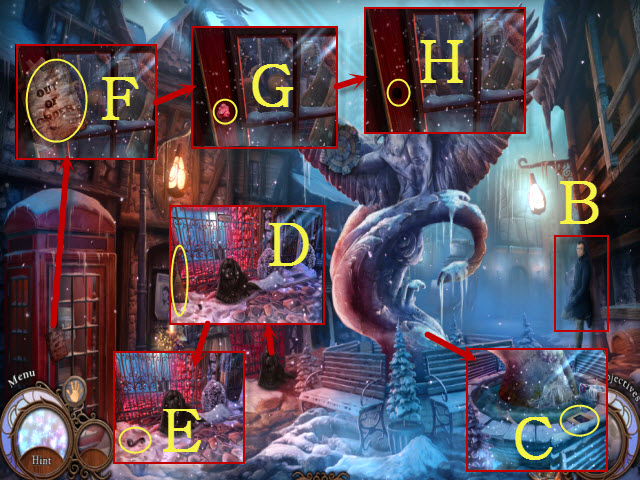
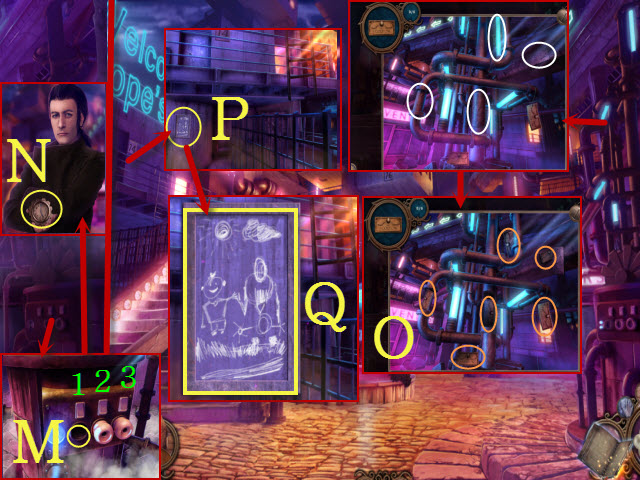
- Select the man (B).
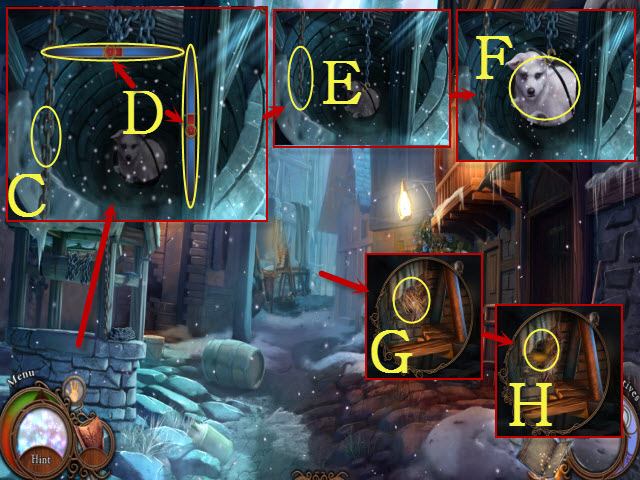
- Take the 1/4 SLIDE (C).
- Select the broom (D); take the HANDLE (E).
- Move the sign (F) and the gum (G).
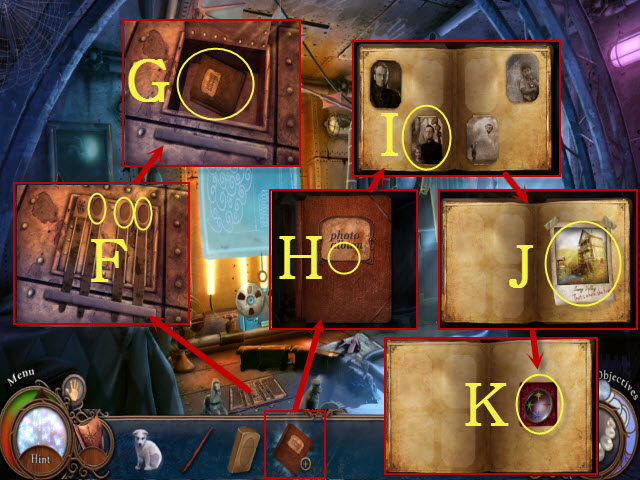
- Place the HANDLE; select it to activate a HOP (H).
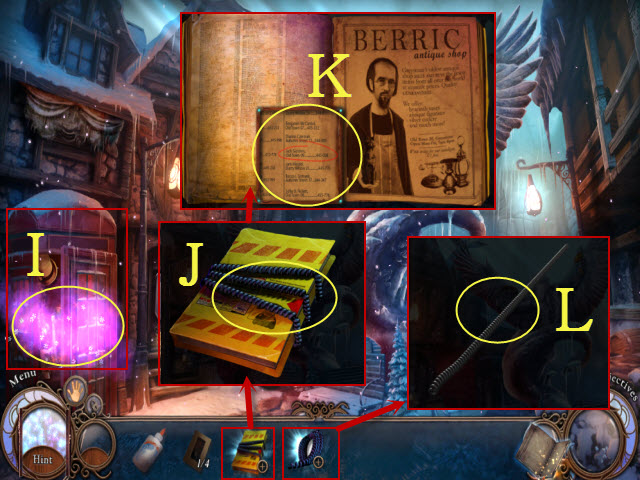
- Play the HOP (I); receive the PHONE BOOK.
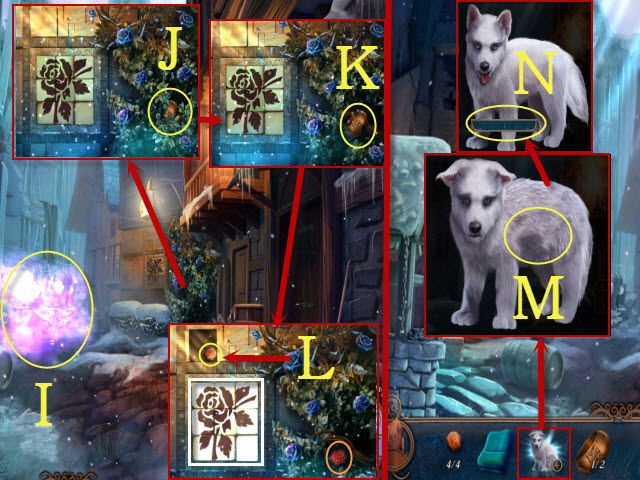
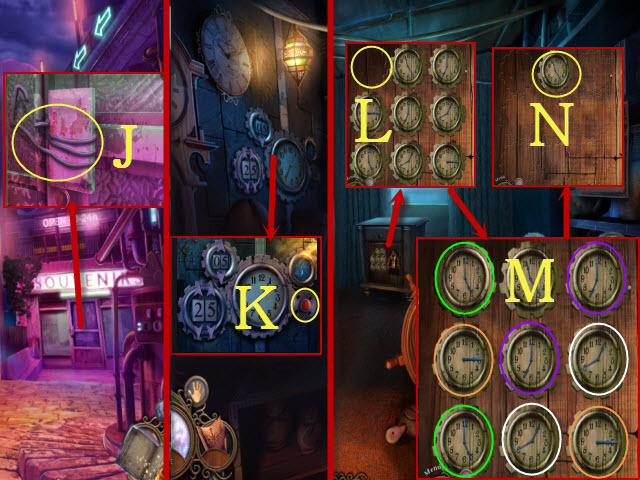
- Examine the PHONE BOOK; take the PHONE CABLE (J).
- Open the PHONE BOOK; locate Jack Sanders (K).
- Examine the PHONE CABLE; select it to receive the LASSO (L).
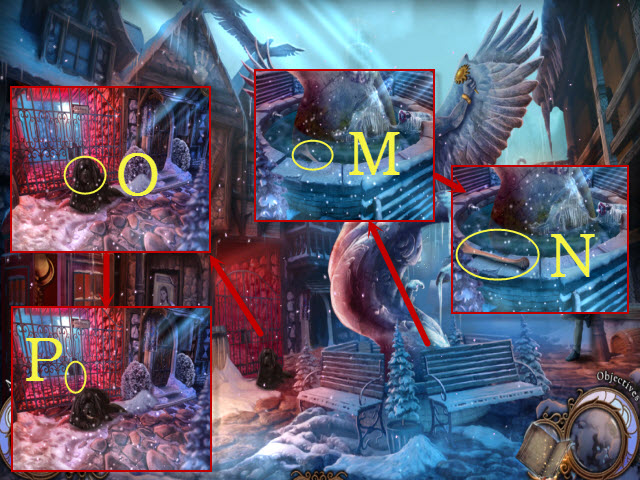
- Use the LASSO (M); take the BONE (N).
- Give the dog the BONE (O).
- Move the chain; open the gate (P).
- Walk left.
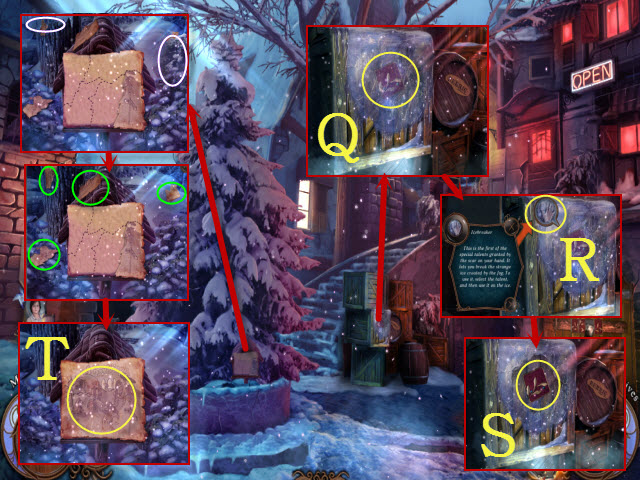
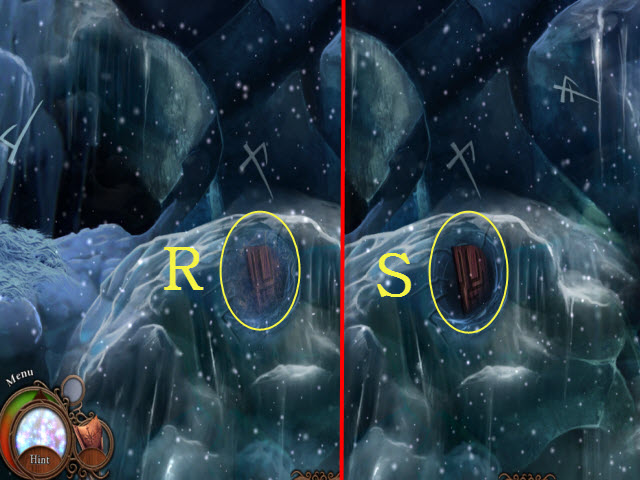
- Touch the ice twice (Q).
- Select icebreaker to break the ice (R).
- Take the ORNAMENTAL TILE (S).
- Move the items (white).
- Collect the map pieces (green).
- Use the GLUE on the map; take the map (T).
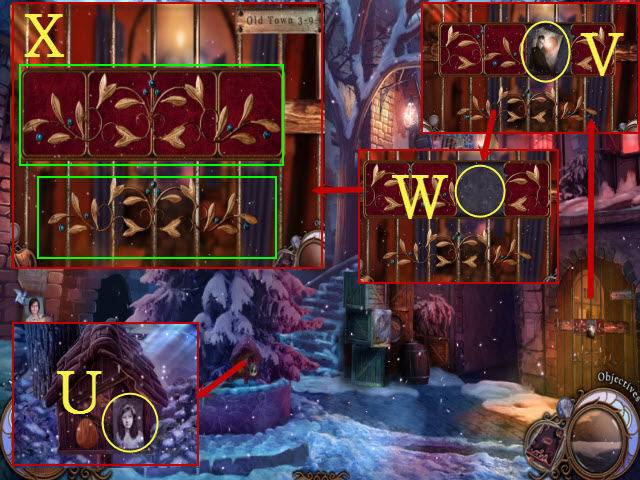
- Take the 1/6 and 2/6 PHOTO (U-V).
- Place the ORNAMENTAL TILE to activate a mini-game (W).
- Solution (X).
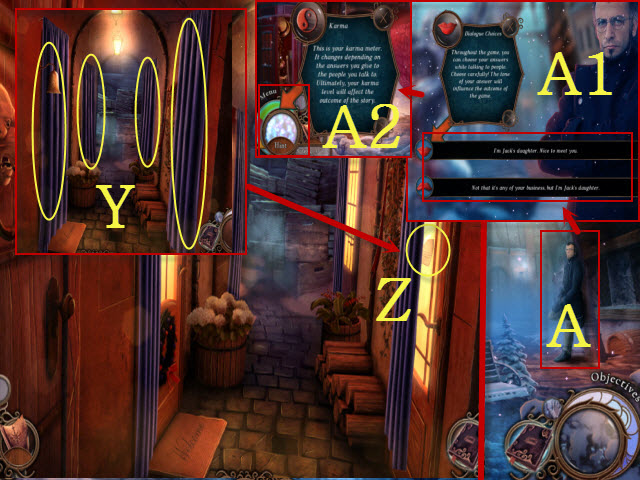
- Move the drapes (Y); take the DOOR NOTE (Z).
- Walk down twice.
- Give the DOOR NOTE to Victor (A).
- Select a conversation choice when interacting with characters (A1).
- The choices you make alter your karma level (A2), which changes how the story plays out.
- Walk forward.
Chapter 2: The Great Gate
- Talk to your father (B).
- Move all the items (green and white).
- Take the 2/4 SLIDE (C), the WOODEN BALL (D) and the 1/4 PLANET (E).
- Return to Old Town and walk right.
- Place the WOODEN BALL to activate a puzzle (F).
- Solution (G).
- Enter Jack's House (H).
- Move the page; read the note (blue).
- Move the book (orange).
- Read the notebook; take the 2/4 PLANET (I).
- Take the 3/6 PHOTO (J).
- Move the mail (green); open the crate (purple).
- Take the 3/4 SLIDE (L) the 4/6 (K) and 5/6 PHOTO (M).
- Take the SLIDE VIEWER (N).
- Read the note (orange).
- Move the elephant (green) and dollhouse (purple); take the TOWEL (O).
- Take the KEYPAD (P) and 6/6 PHOTO (Q).
- Place the KEYPAD (R) and select it; enter 3594 (S).
- Open the door; touch the fog and the ice twice to activate a puzzle (T).
- Restore the incorrect elements.
- Solution: (1-3).
- Take the WOODEN EGG (U).
- Walk down.
- Use icebreaker (V). Place the WOODEN EGG (W).
- Select the eggs (X); open the door to activate a HOP.
- Play the HOP (Y) to receive the BALLERINA SHOES.
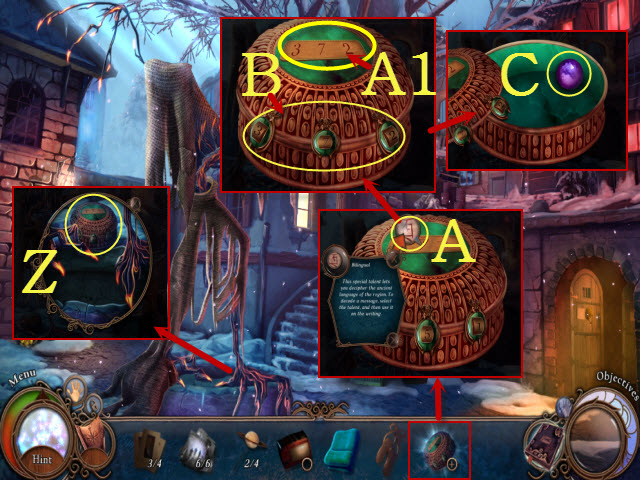
- Take the INTRICATE BOX (Z).
- Examine the INTRICATE BOX; select the lid to get the translator talent (A). Use translator (A1).
- Align the numbers: 372 (B).
- Open the box; take the GEMSTONE (C).
- Walk upstairs.
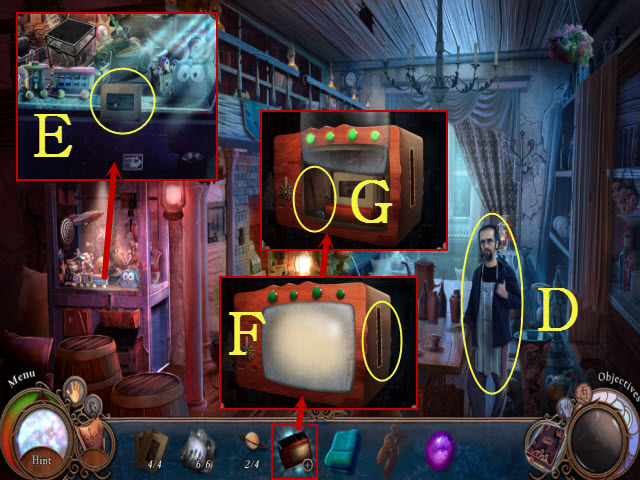
- Talk to the Owner (D).
- Take the 4/4 SLIDE (E).
- Examine the SLIDE VIEWER and place the 4/4 SLIDE in the slot; leaf through the slides (F).
- Move the glass; take the 3/4 PLANET (G).
- Move the items (green).
- Select the handle (H).
- Place the BALLERINA SHOES (I).
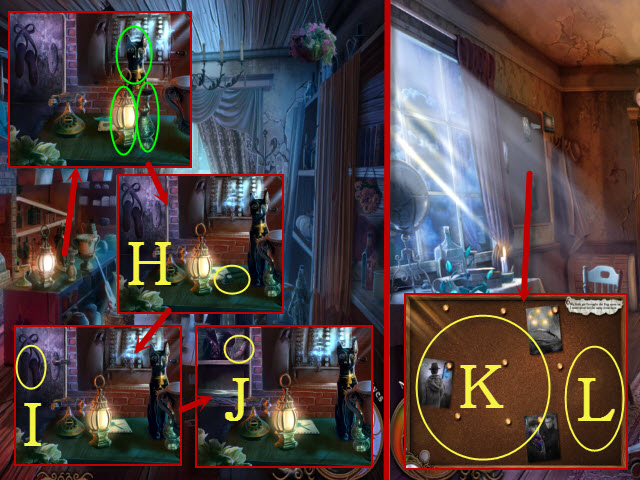
- Open the door; take the BUNDLE OF NOTES (J).
- Return to Jack's House.
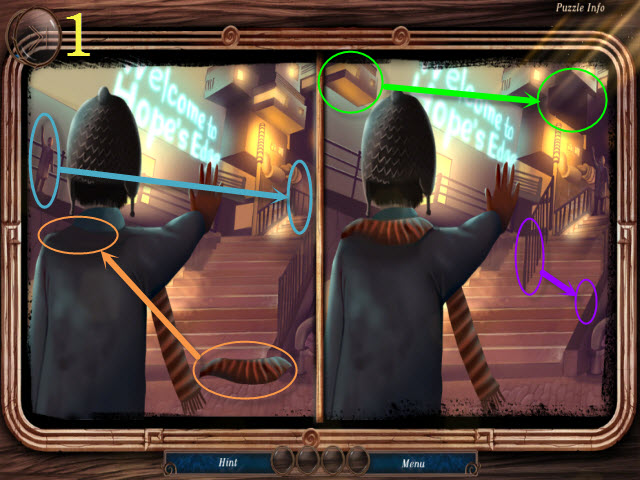
- Place the PHOTOS (K) and the BUNDLE OF NOTES (L) to activate a mini-game.
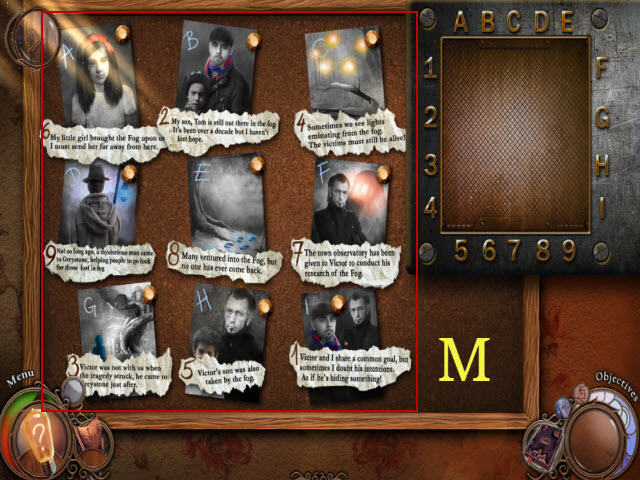
- Place each note with the correct photo (M).
- Play the puzzle.
- Select the corresponding letters and numbers.
- Solution (N).
- Take the DANCER FIGURINE (O).
- Return to the Greystone Shop.
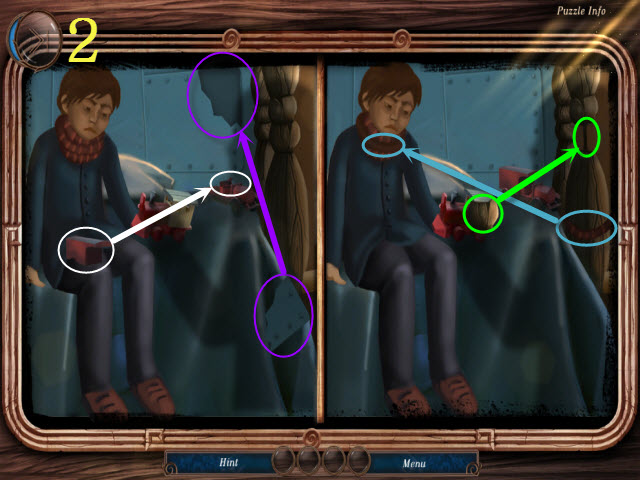
- Place the DANCER FIGURINE to activate a puzzle (P).
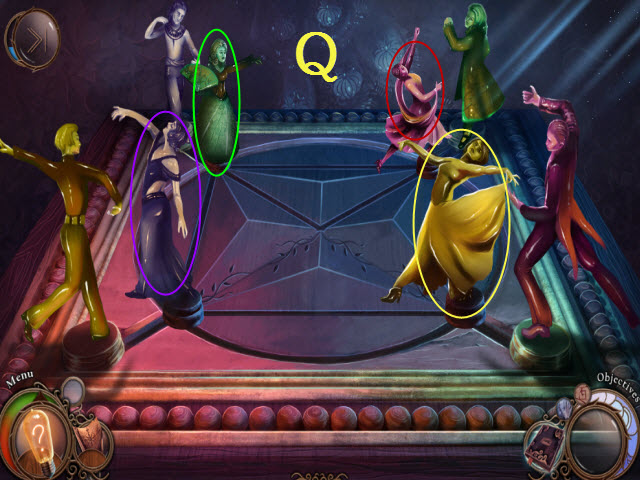
- Solution: green, purple, yellow, red, and green (Q).
- Take the DOLL (R).
- Examine the DOLL; select it repeatedly (S); receive the T-SHAPED WRENCH.
- Return to the Town Square.
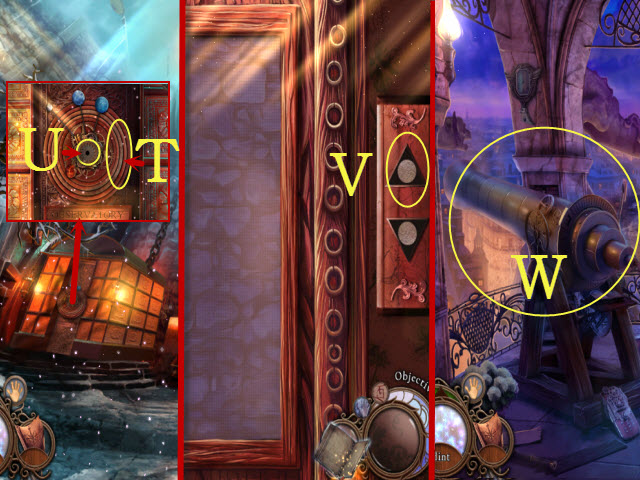
- Use icebreaker (T).
- Use the T-SHAPED WRENCH (U).
- Open the panel; press the button (V).
- Place the GEMSTONE to activate a puzzle (W).
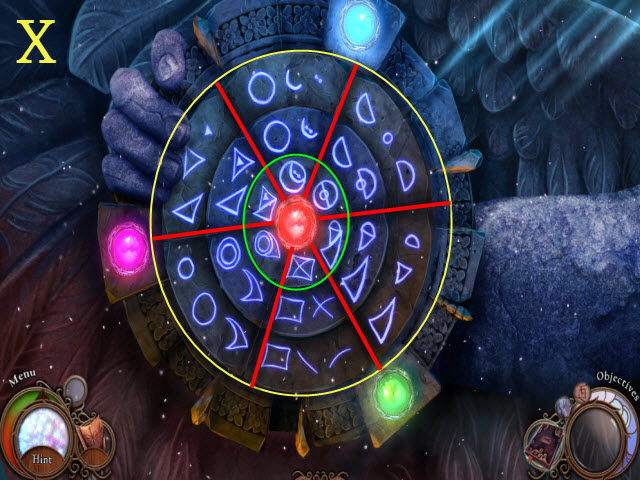
- Align the symbols so each section includes the elements of the center.
- Solution (X).
- Take the COIN (Y).
- Return to the Greystone Shop.
- Place the COIN to activate a HOP (Z); play it (A) to receive the GATE KEY.
- Give the GATE KEY to the owner (B).
- Walk under the arch.
Chapter 3: Observatory
- Select the chain (C) to activate a mini-game.
- Select the meters when the targets are in the center (D).
- Pull the chain (E).
- Take the WOLF CUB (F).
- Move the straw (G) and gloves (H).
- Play the HOP (I) to receive the GARDENING GLOVES.
- Use the GARDENING GLOVES (J); take the 1/2 BRACELET SECTION (K).
- Press the button (orange); select the nine tiles (white).
- Take the 4/4 PLANET (L).
- Examine the WOLF CUB; use the TOWEL (M).
- Name the WOLF CUB (N).
- Walk down.
- Use the WOLF CUB (O).
- Take the 2/2 BRACELET SECTION (P).
- Walk down.
- Place the 2/2 BRACELET SECTION to activate a mini-game (Q).
- Align the image (R).
- Take the SUN KEY (S).
- Walk forward.
- Place the 4/4 PLANET (T); place the SUN KEY (U) and select it.
- Enter the Observatory.
- Press the button (V). Step out of the elevator.
- Look at the telescope to activate a puzzle (W).
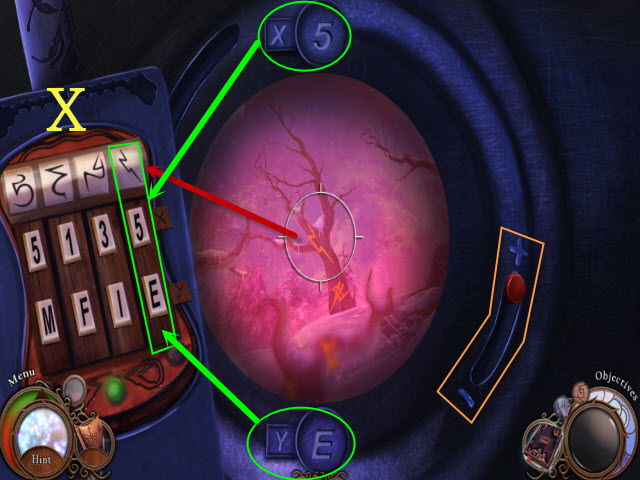
- Locate the symbols with the telescope and then enter the coordinates (green).
- The sliders (orange) will correct the focus.
- Solution (X).
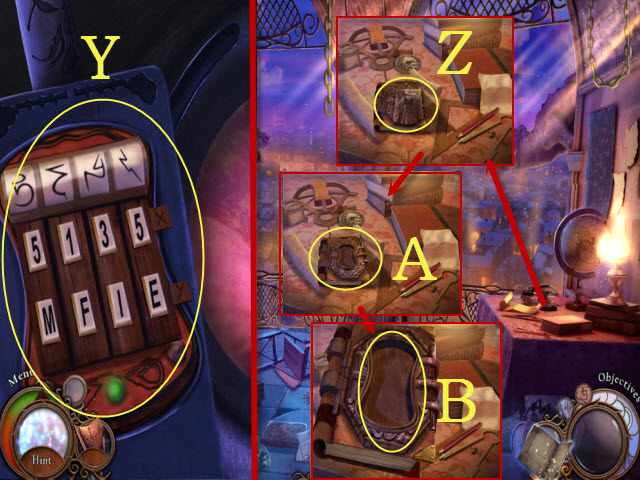
- Take the CODED CALCULATOR (Y).
- Examine the desk photo (Z) and book (A).
- Place the CODED CALCULATOR to get VICTOR'S NOTEBOOK (B).
- Walk left; walk forward twice.
- Move the three branches (C).
- Walk forward.
- Talk to the boy (D).
- Take the map (E).
- Take the ACID (F).
- Examine the VICTOR'S NOTEBOOK; use the ACID (G).
- Open the notebook; restore the photos (H).
- Turn the page; take the NOTEBOOK PAGE (I).
- Use icebreaker (J); take the POLE (K).
- Walk forward.
- Use the pole (L).
- Take the AXE (M) and BROKEN LANTERN (N).
- Open the box (O); take the RAZOR (P).
- Walk down.
- Use the WOLF CUB (Q).
- Use the AXE to activate a HOP (R).
- Play the HOP (S) to receive the LAMP OIL.
- Use the RAZOR (T).
- Move the flap; take the WICK (U).

- Examine the BROKEN LANTERN; repair the pieces (1-5).
- Place the LAMP OIL and WICK (V) on the aseembled lantern to receive the UNLIT LANTERN.
- Give the UNLIT LANTERN to the man (W).
- Take the LIT LANTERN (X).
- Walk forward.
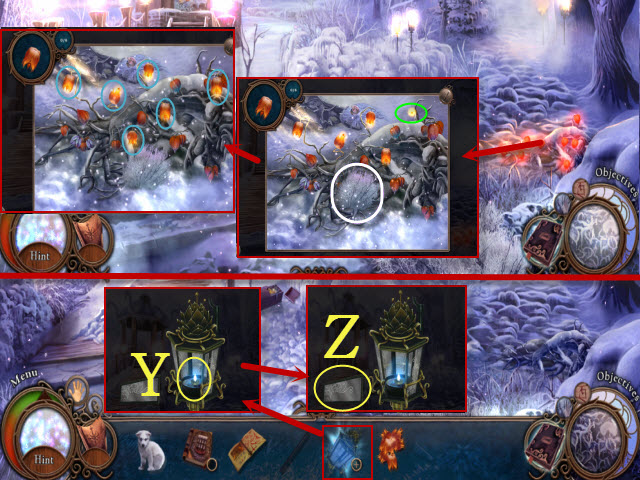
- Move the plant (white) and select the firefly three times (green).
- Obtain the six fireflowers (blue); receive the FIREFLOWERS.
- Examine the LIT LANTERN; open it and place the FIREFLOWERS (Y).
- Select the glass (Z); receive the LANTERN.
- Walk right.
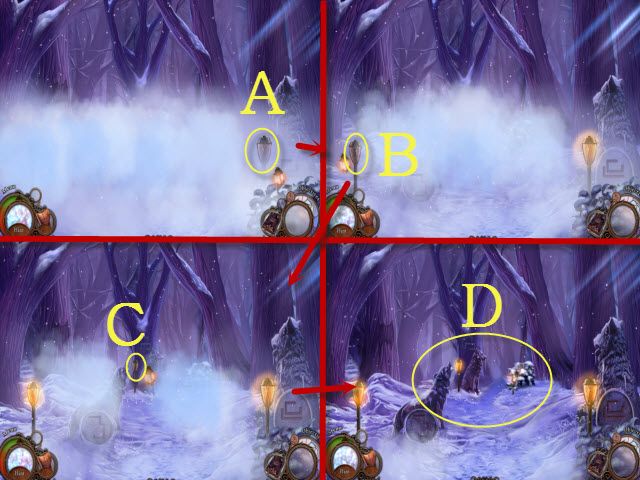
- Select the lamps in order: A-B-C.
- Use the NOTEBOOK PAGE anywhere (D) to activate a puzzle.
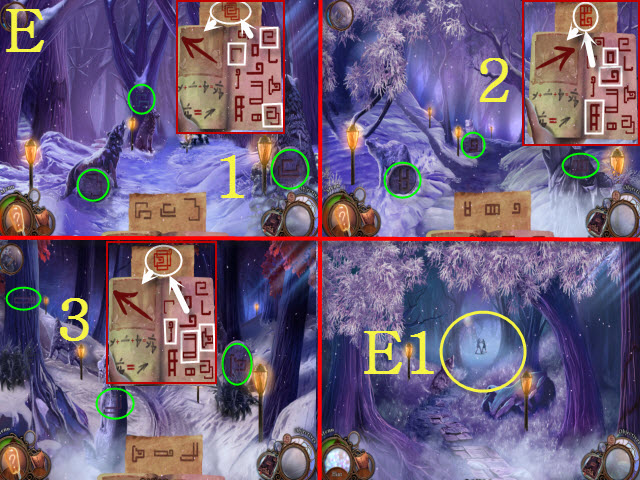
- Locate each symbol (green) and then find the three symbols on the note (white) to navigate the forest.
- Solution: 1-3 (E).
- Walk forward (E1).
Chapter 4: The Windmill
- Talk to Victor (F).
- Select the ice patches (white); take the beads (green).
- Take the pearl necklace (G).
- Move the handle three times; receive the CHISEL (H).
- Walk down twice.
- Use the CHISEL (I).
- Select the brick (J); receive the BRICK.
- Take the BOY (K).
- Walk right.
- Place the BOY to activate a mini-game (L).
- Uncover the pairs of matching children; the puzzle will be jumbled after each turn.
- This puzzle is random; here is one possible solution: 1-7 (M).
- Enter the Windmill Interior.
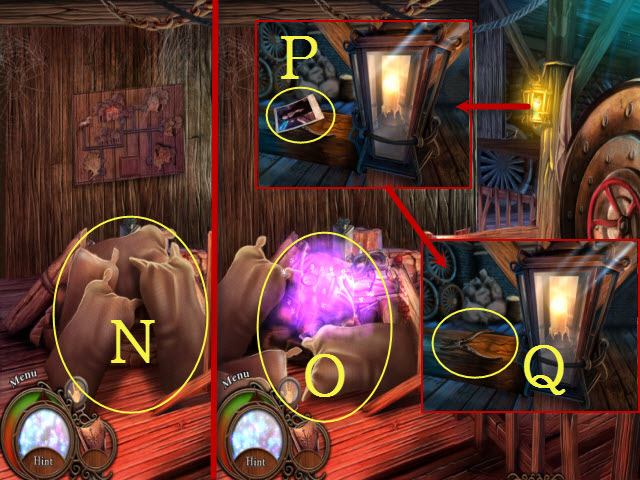
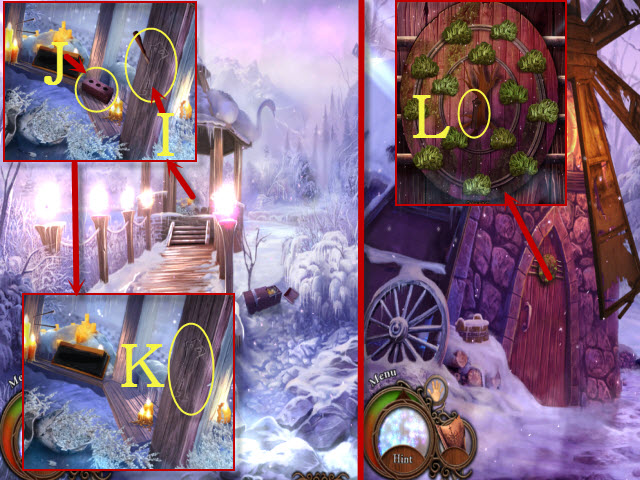
- Move the sacks (N); play the HOP (O) to receive the OCTAGONAL BLOCK.
- Look at the photo (P); take the PLIERS (Q).
- Walk down twice.
- Use the PLIERS to get the NAILS (R).
- Return to the Windmill Interior.
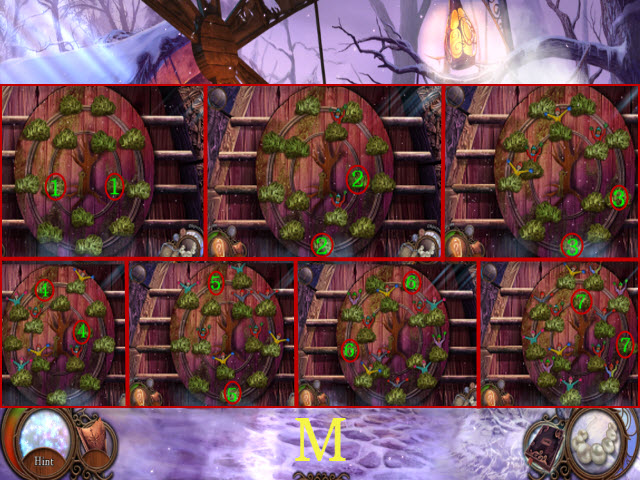
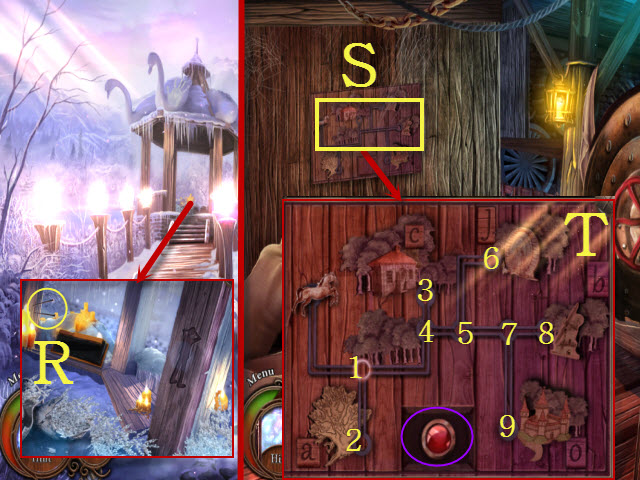
- Examine the board to activate a mini-game (S).
- Solution: 1-4-5-6-5-4-1-2-1-4-3-4-5-7-9-7-8 (T).
- Press the button (purple).
- Move the barrel (green); place the OCTAGONAL BLOCK (U).
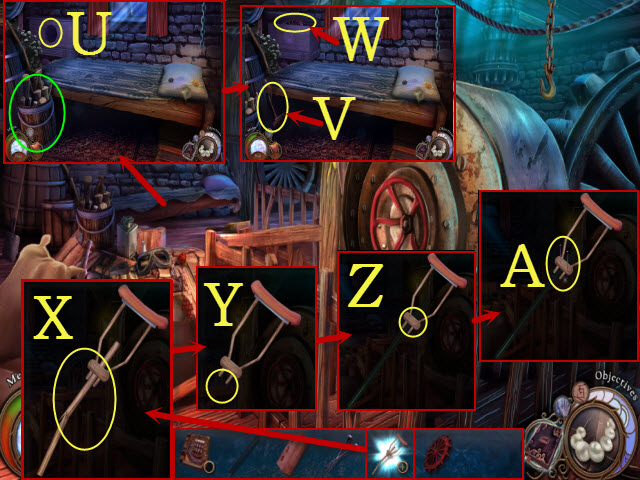
- Take the BROKEN CRUTCH (V) and COGWHEEL (W).
- Examine the BROKEN CRUTCH; select it (X).
- Place the POLE and NAILS (Y-Z).
- Use the BRICK to receive the CRUTCH (A).
- Walk down.
- Open the hatch (B); press the switch (C).
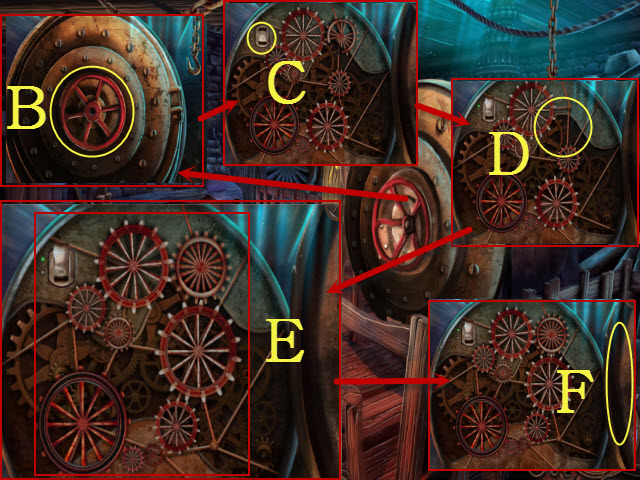
- Place the COGWHEEL with the cogs to activate a mini-game (D).
- Solution (E).
- Close the hatch (F).
- Walk down.

- Give the CRUTCH to Victor (G).
- Enter the Windmill Interior.
- Talk to Victor (H); take VICTOR'S PAPERS (I).
- Examine VICTOR'S NOTEBOOK; place VICTOR'S PAPERS (J).
- Reassemble the photo (K).
- Turn the page; look through the photos (L).
- Walk down.
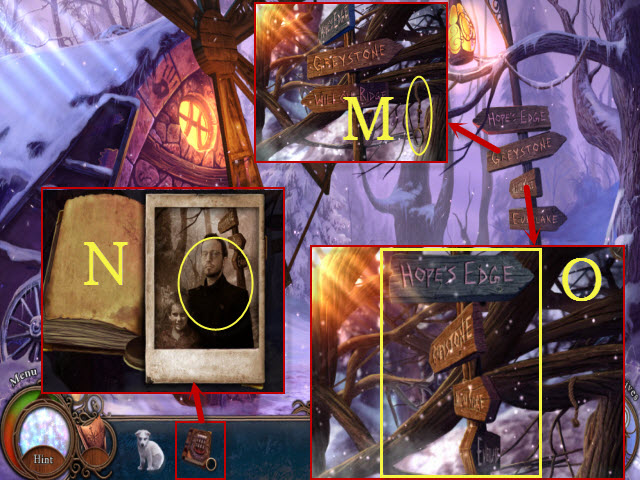
- Take the MAGNIFYING GLASS (M).
- Examine VICTOR'S NOTEBOOK; use the MAGNIFYING GLASS (N).
- Look at the signpost to activate a mini-game (O).
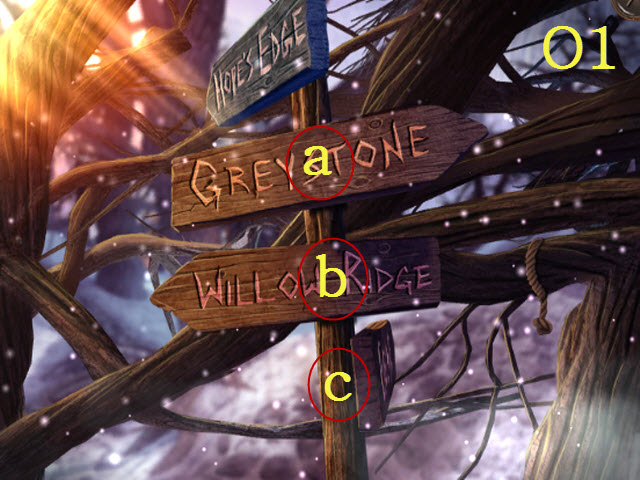
- Solution: ax3, bx3, and cx2 (O1).
- Walk right to the Cathedral of the Lost.

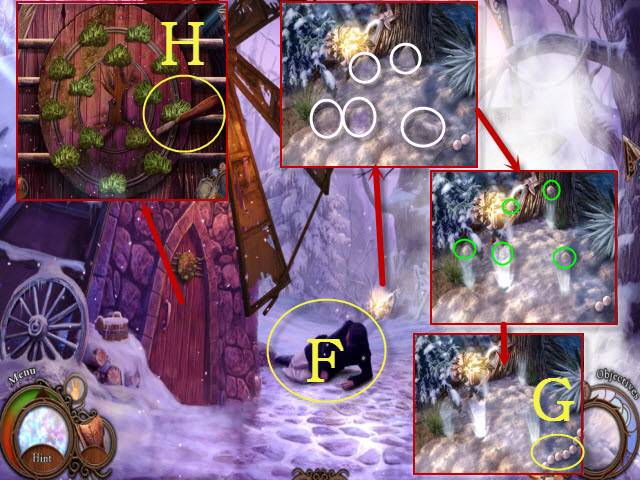
- Move the board (blue); use the plunger (white).
- Find the objects (green); receive the CLIMBING GEAR.
- Use the icebreaker (P).
- Play the HOP (Q) to receive the HAMMER.
- Walk forward.
- Use the icebreaker (R); take the WOODEN PLATE (S).
- Walk down; enter the Cathedral Interior.

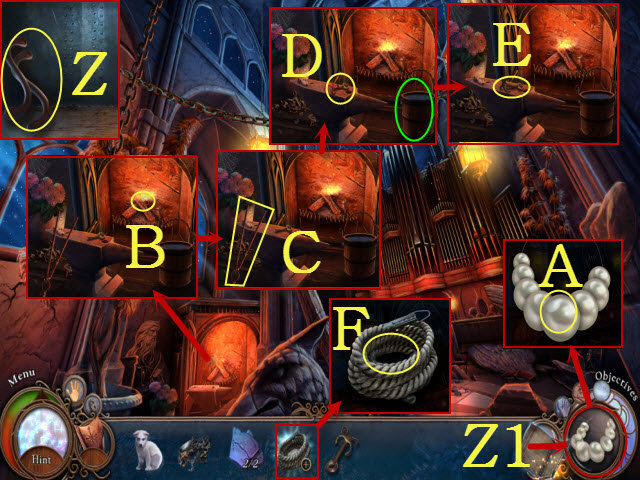
- Take the 1/2 LOST SYMBOL (T); you receive the PEARL.
- Touch the lantern and select the summoner talent; use summoner on the lantern (U).
- Select the rope (V); take the ROPE (W).
- Take the 2/2 LOST SYMBOL (X).
- Place the WOODEN PLATE to activate a puzzle (Y).
- Restore the incorrect elements.
- Solution (1-3).
- Take the METAL PIECE (Z).
- View the necklace (Z1); place the PEARL (A).
- Open the fireplace; place the METAL PIECE (B).
- Select the grips (C).
- Use the HAMMER (D); select the bucket (green).
- Take the IMPROVISED HOOK (E).
- Examine the ROPE; use the IMPROVISED HOOK (F) to get the GRAPPLING ROPE.
- Return to the Cave.
Chapter 5: Up the Mountain
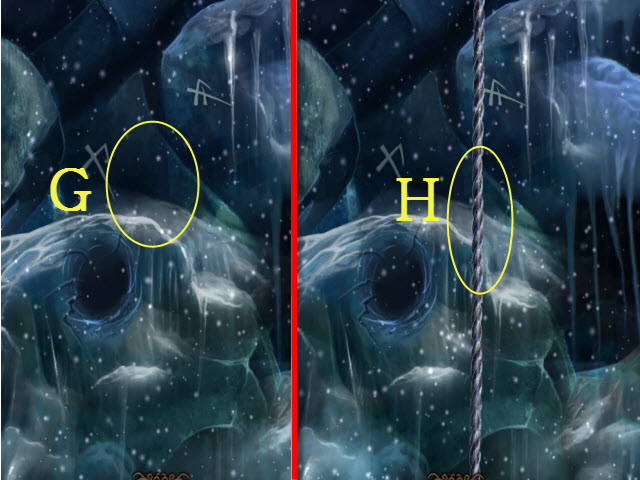
- Use the GRAPPLING ROPE (G).
- Use the CLIMBING GEAR to activate a mini-game (H).
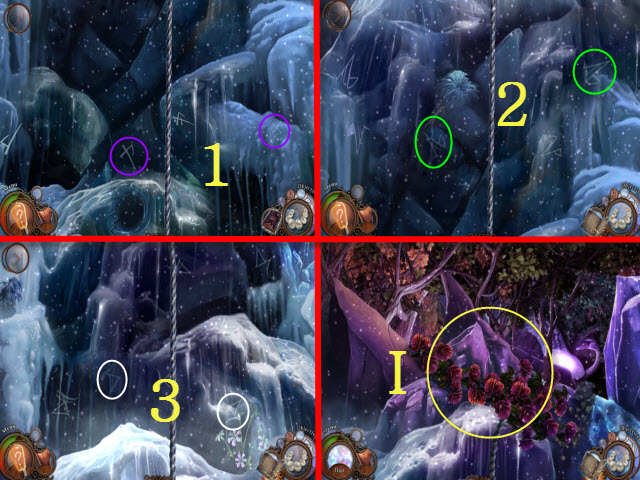
- Solution (1-3).
- Select the ledge (I).
- Move the branch; use translator (J).
- Select the clue (K).
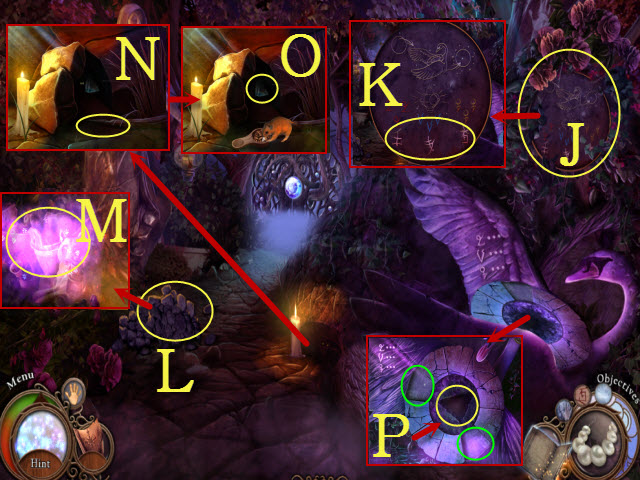
- Use the WOLF CUB (L).
- Play the HOP (M) to receive the GRAIN.
- Place the GRAIN (N).
- Take the GLASS PRISM (O).
- Place the GLASS PRISM (P) and the 2/2 LOST SYMBOLS (green) to activate a mini-game.
- Solution: 1-3 (Q).
- Take the CARVED LENS (R).
- Rotate each disc (S); place the CARVED LENS (T).
- Move the vines: 1-4 (U).
- Walk forward.
- Select the check mark to activate a mini-game (V).
- Rotate the arrows (red) to create a path; select check mark (green) to try a path.
- Solution (W).
- Exit the cable car.
- Move the eggs (pink); use the scraper (white).
- Find the tiles (X) to receive the 1/3 STONE TILE.
- Take the CROWBAR (Y); use the CROWBAR; move the lid (Z).
- Take the 2/3 STONE TILE (A).
- Select the four symbols (green).
- Cycle the four symbols so they match the four located previously (B).
- Take the 3/3 STONE TILE (C).
- Place the 3/3 STONE TILE to activate a puzzle (D).

- Solution: 1-12 (E).
- Walk forward.
- Use the icebreaker (F).
- Take the BLOWN FUSE (G) and WIRE (H).
- Select the shovel (I); take the SAND (J).
- Examine the BLOWN FUSE and open the panel; remove the wire and sand (K).
- Place the WIRE and SAND (L); close the panel to receive the FUSE.
- Place the FUSE (M); select switches: 2, 3, and 1.
- Take the WOODEN CLOCK (N).
- Open the three panels; take the light bulb (white).
- Collect the coupons; receive the 6 COUPONS (O).
- Look at the chalkboard (P); restore the image (Q).
- Select the ladder and enter House No. 14.
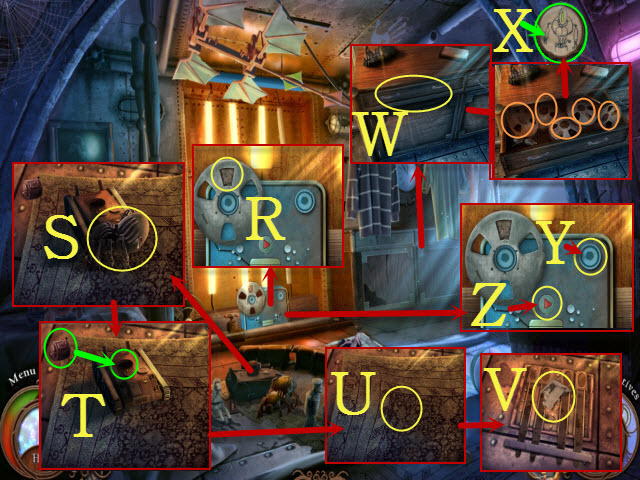
- Look at the film reel; select the film (R).
- Press the switch (S). Place the toy part (T). Move the rug (U).
- Take the TORN NOTEBOOK PAGE (V).
- Open the drawer (W) and examine the reels (orange); locate the one with the robot and select it (X) to receive the TAPE RECORDING.
- Place the TAPE RECORDING (Y); press the button (Z) to activate a mini-game.
- Play the mini-game.
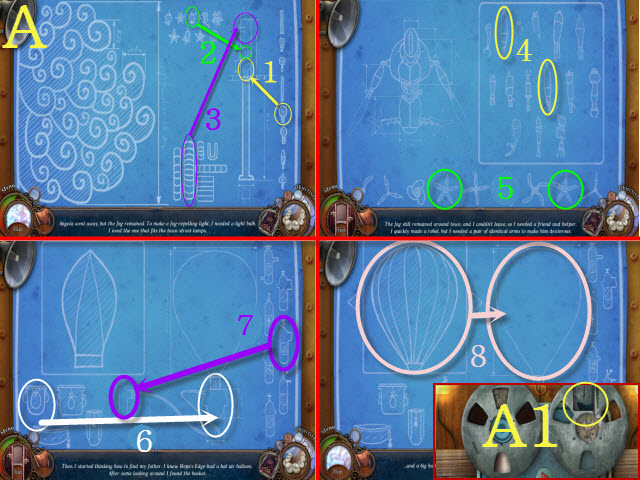
- Solution: 1-8 (A).
- Open the panel; take the BOAT (A1).
- Place the BOAT (B).
- Select the sails (white); take the HIDE-AND-SEEK RULEBOOK (C).
- Take the 1/3 OVAL TOKEN (D).
- Open the HIDE-AND-SEEK RULEBOOK (E). Turn the page; place the TORN NOTEBOOK PAGE (F).
- Restore the page (G). Turn the page; take the PEARL (H). Place the PEARL (I).
- Walk down.
- Move three wires; open the door (J).
- Enter the Souvenir Shop.
- Press the button (K).
- Place the WOODEN CLOCK (L).
- Select matching pairs (M).
- Select the clock to activate a puzzle (N).


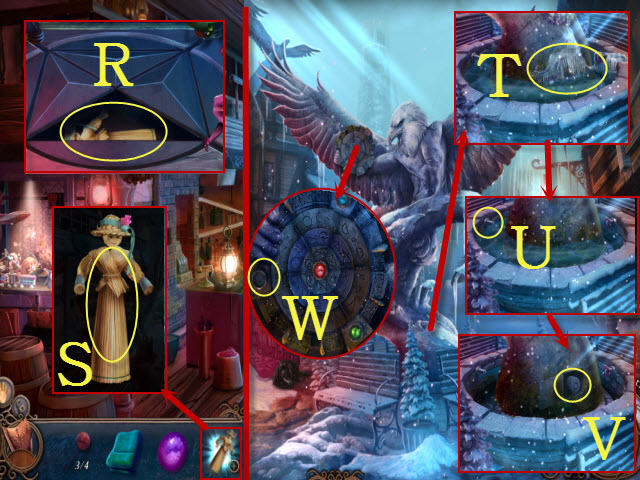
- Restore the incorrect elements.
- Solution (1-3).
Chapter 6: Repairing the Balloon
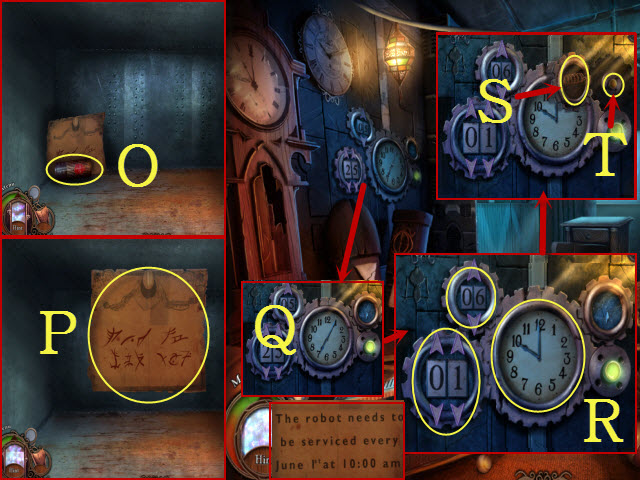
- Take the BATTERY (O).
- Look at the note; use translator (P).
- Examine the clocks to activate a mini-game (Q).
- Enter the date and time (R).
- Take the SPRING COIL (S).
- Push the button (T).
- Walk down.

- Place the SPRING COIL (U).
- Slide the button (V).
- Play the HOP (W) to receive the ROBOT ARM.
- Return to the Souvenir Shop.
- Place the ROBOT ARM (X).
- Place the BATTERY to activate a mini-game (Y).
- Solution (Z).
- Place the 6 COUPONS (A); take the SOUVENIR LIGHTER (B).
- Examine the SOUVENIR LIGHTER; take the OVAL TOKEN 2/3 (C); receive the LIGHTER.
- Walk down and then forward.
- Use the WOLF CUB (D).
- Take the 3/3 OVAL TOKEN (E).
- Return to House No. 14.
- Place the 3/3 OVAL TOKEN; open the hatch (F).
- Take the ALBUM (G).
- Examine the ALBUM; open it (H).
- Look at the photo (I).
- Turn the page; examine the picture and receive the FAMILY-PHOTO ALBUM (J).
- Take the STAR DISK (K).
- Return to the Balloon Plateau.
- Give the FAMILY-PHOTO ALBUM to the man (L).
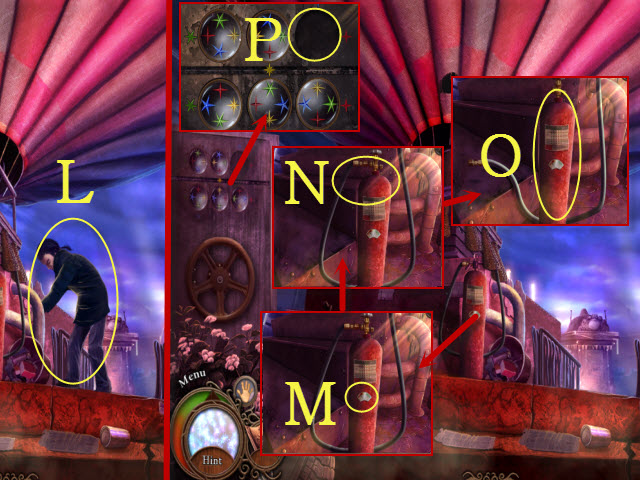
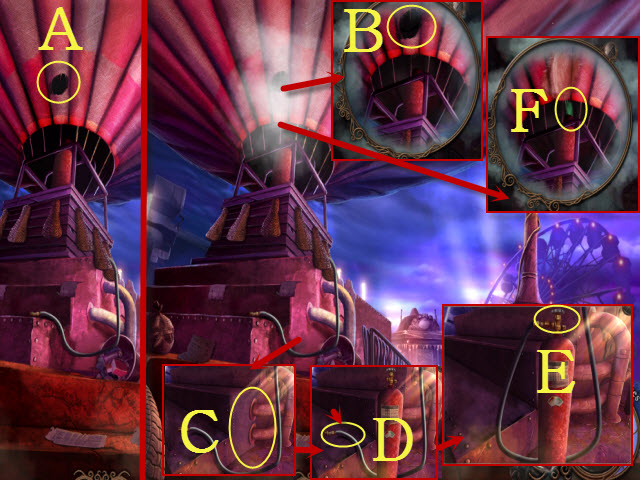
- Look at the meter; select it (M).
- Select the tank (N); take the EMPTY PROPANE BOTTLE (O).
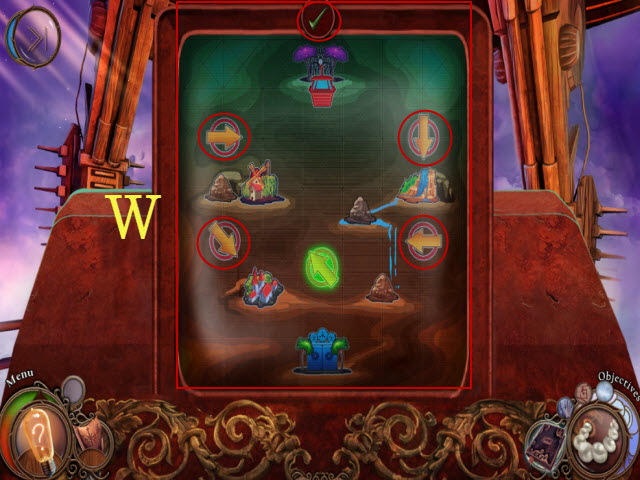
- Place the STAR DISK to activate a mini-game (P).
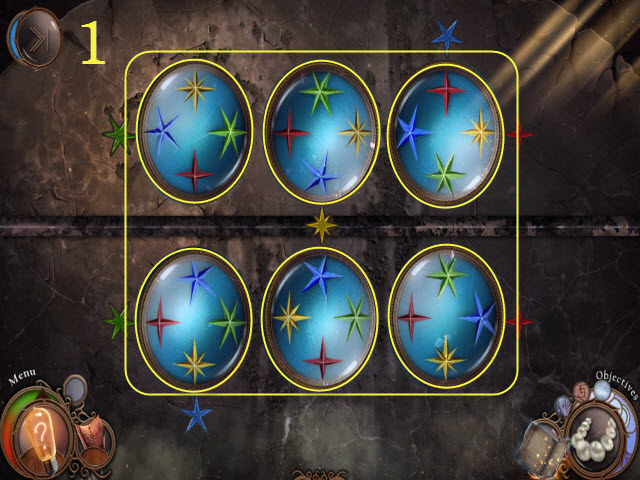
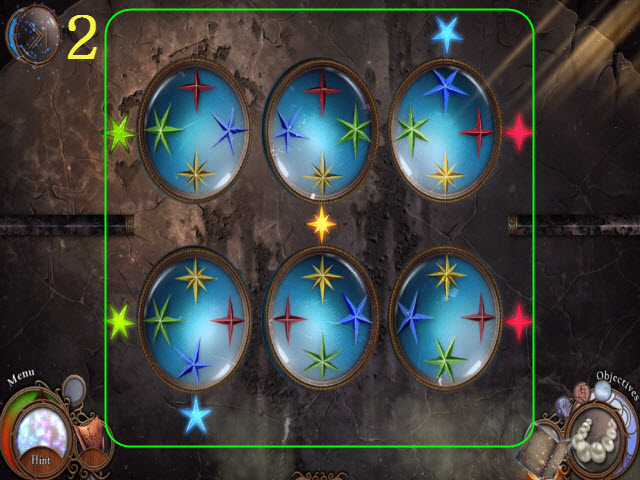
- Align the colors of the stars.
- Solution: (1-2).
- Walk downstairs to the Auxiliary Room.
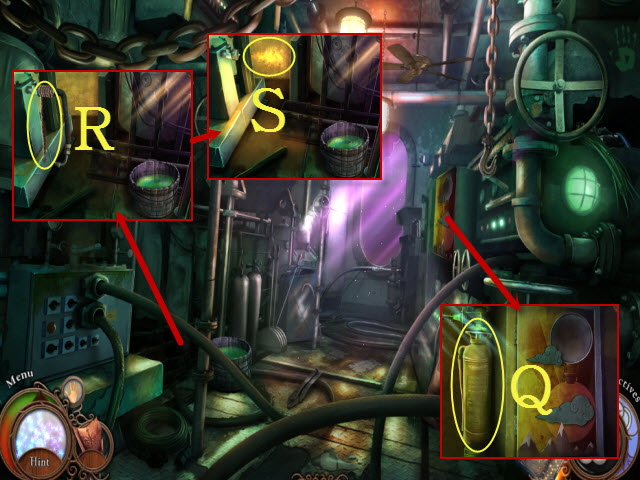
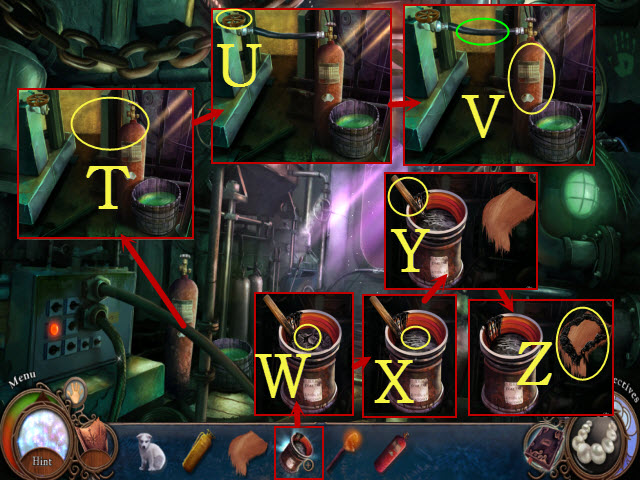
- Take the FIRE EXTINGUISHER (Q).
- Take the ROPE (R).
- Use the FIRE EXTINGUISHER (S).
- Walk back and then forward.
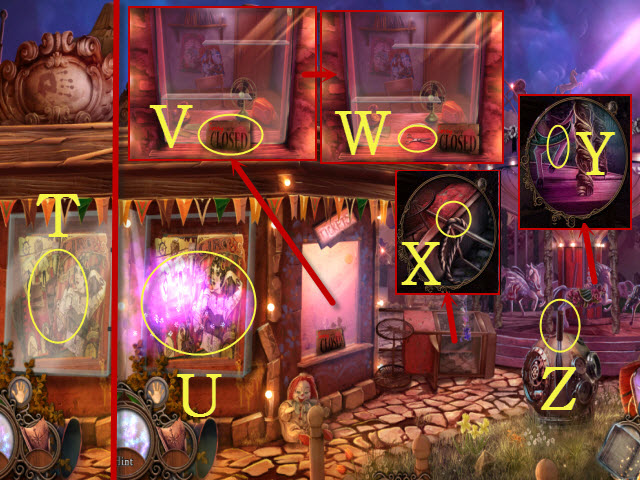
- Move the glass (T).
- Play the HOP (U) to receive the VALVE.
- Move the sign (V); take the SCISSORS (W).
- Attach the ROPE (X).
- Attach the rope (Y); pull the lever (Z).
- Walk forward.
- Tale the PATCH (A).
- Use the SCISSORS (B) to get the PIECE OF CLOTH.
- Take the MAGNET (C).
- Move the cloth; use the CROWBAR (D).
- Get the STICK (E).
- Examine the STICK; use the PIECE OF CLOTH (F) with it; receive the STICK WITH CLOTH.
- Walk down.
- Use the MAGNET to get the COIN; guide it around the shelves towards the opening (G).
- Return to the Souvenir Shop.
- Place the COIN (H); take the GAME TOKEN (I).
- Return to Luna Park.
- Place the GAME TOKEN (J) to activate a mini-game.
- Solution: 1-2-1-2-4-1-2-4-2-4-3-3-1-3-4-4-3-4-2-1-2-4 (K).
- Take the MARBLE (L).
- Return to the Auxiliary Room.
- Place the MARBLE; open the cupboard (M).
- Take the TUBE (N) and the TAR (O).
- Place the EMPTY PROPANE BOTTLE (P).
- Place the VALVE (Q); use the STICK WITH CLOTH (R) to get the UNLIT TORCH.
- Examine the UNLIT TORCH; use the LIGHTER (S) to get the TORCH.
- Place the TUBE (T). Turn the valve (U).
- Move the tube (green); take the FILLED PROPANE BOTTLE (V).
- Examine the TAR; use the TORCH (W).
- Place the PATCH (X).
- Select the spoon (Y); take the STICKY PATCH (Z).
- Walk back.
- Use summoner (A).
- Place the STICKY PATCH (B).
- Place the FILLED PROPANE BOTTLE (C).
- Move the hose (D); turn the valve (E).
- Use the TORCH (F).
- Enter the Balloon.
Chapter 7: Taking Flight
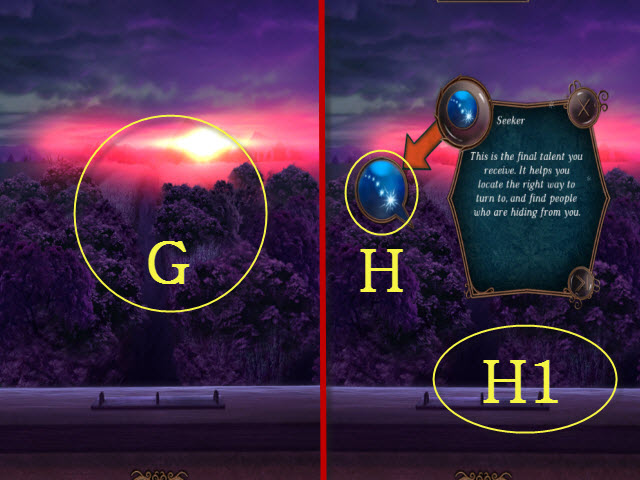
- Select anywhere (G).
- Select the seeker talent anywhere (H1).
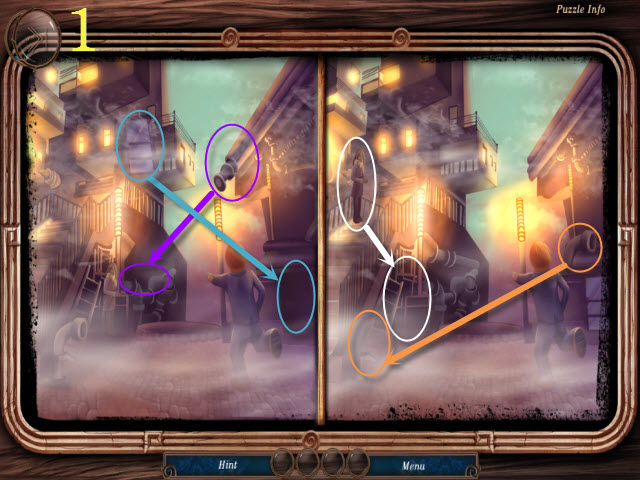
- Go right to activate a mini-game.
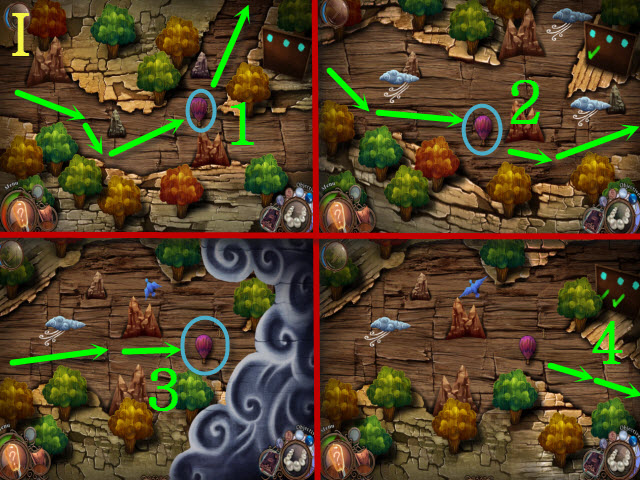
- Guide the balloon around the obstacles (green); use the seeker ability on the balloon if you hit an intersection (blue).
- Solution: 1-4 (I).
- Use the FIRE EXTINGUISHER (J).
- Take the RED MEDALLION (K).
- Take the BROKEN CHAINSAW (L).
- Use summoner on the light; examine it (M).
- Use the scissors (pink); move the vine (white).
- Find the items to receive the CHAIN (N).
- Walk right.
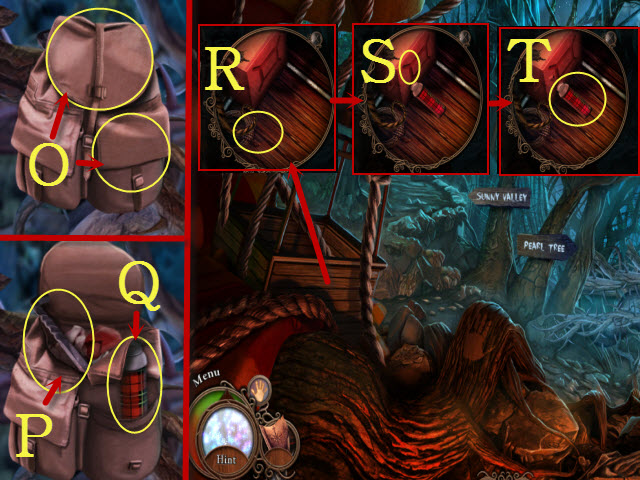
- Open the pockets (O).
- Take the METAL SPIKE (P) and VACUUM BOTTLE (Q).
- Walk back.
- Place the VACUUM BOTTLE (R).
- Use the METAL SPIKE (S).
- Take the GASOLINE (T).
- Walk right.

- Examine the BROKEN CHAINSAW; place the CHAIN (U).
- Move the cap; use the GASOLINE (V).
- Close the cap (W); pull the starter three times (X) to receive the CHAINSAW.
- Use the CHAINSAW to activate a mini-game (Y).
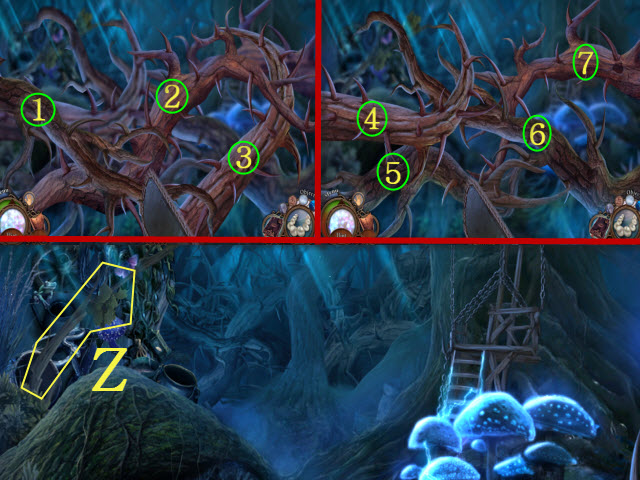
- Cut the branches in order (1-7).
- Take the BRANCH (Z).
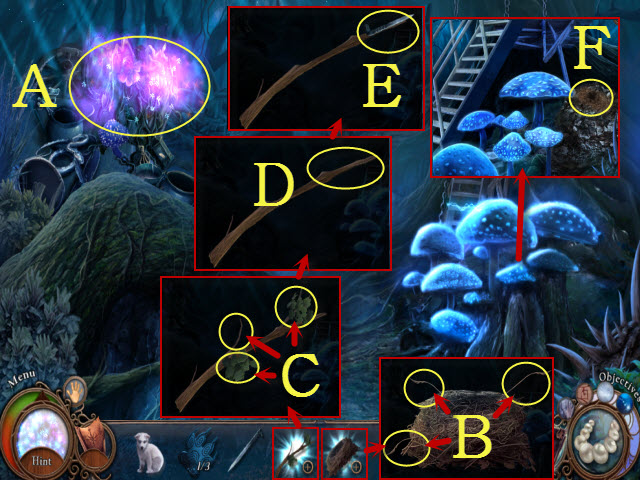
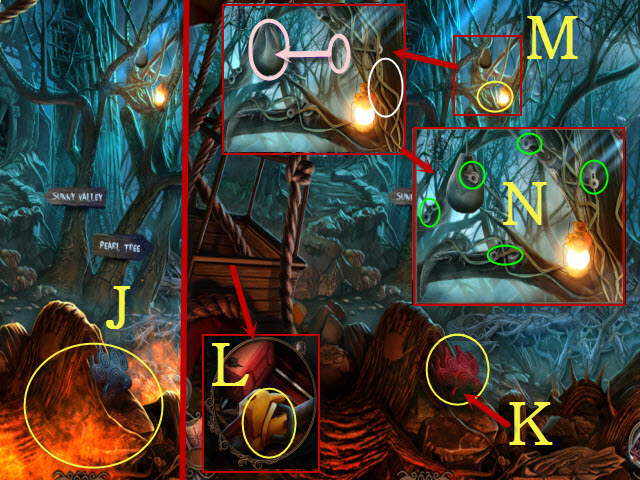
- Play the HOP (A) to receive the BIRD'S NEST.
- Examine the BIRD'S NEST; select the strings (B) to get the LONG STRING.
- Examine the BRANCH; remove the leaves and the stick (C).
- Use the METAL SPIKE with the BRANCH (D).
- Use the LONG STRING with the BRANCH (E) to receive the IMPROVISED LIGHTNING ROD.
- Place the IMPROVISED LIGHTNING ROD (F).
- Enter the Treehouse; walk forward and then left.
- Move the doormat (G).
- Select the key (H); open the door.
- Walk forward.
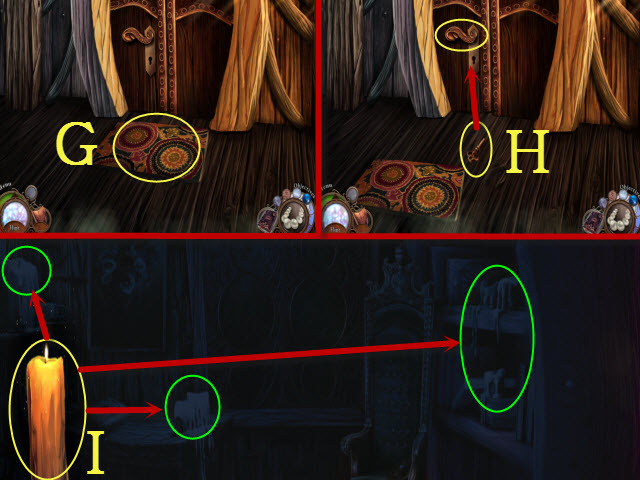
- Select the candle (I); move it over the unlit candles (green).

- Open the lid (J); take the 1/5 FLOWER ORNAMENT (K).
- Take the 2/5 FLOWER ORNAMENT (L), the 3/5 FLOWER ORNAMENT (M), and the 4/5 FLOWER ORNAMENT (N).
- Take the CANDLE (O) and the 5/5 FLOWER ORNAMENT (P).
- Use the CANDLE (Q); take the WAX FLOWER ORNAMENT (R).
- Place the 5/5 FLOWER ORNAMENT (S) and the WAX FLOWER ORNAMENT (S1); select the ornaments.
- Open the door; take the BLUE MEDALLION (T).
- Walk down three times.
- Place the RED MEDALLION (U) and BLUE MEDALLION (V).
- Take the WOODEN HOUSE (W).
- Return to the Treehouse Interior.
- Place the WOODEN HOUSE (X).
- Select the ladder (Y).
- Walk back; walk upstairs.
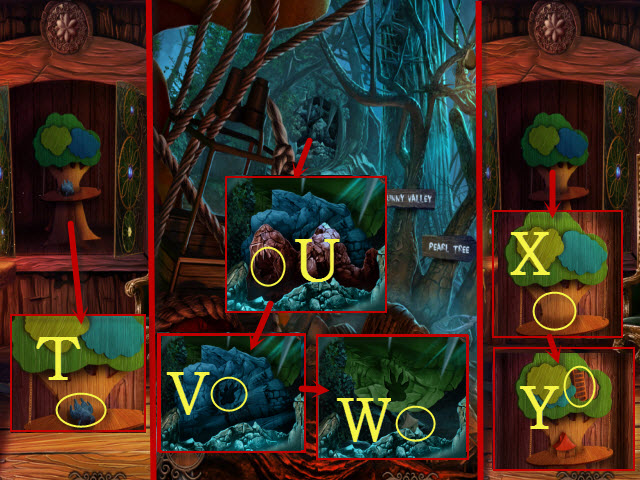
- Align the metal bars (Z); select the branch (A).
- Move the leaves; align the metal bars (B); select the branch (C).
- Move the leaves; align the metal bars (D) and select the branch (E).
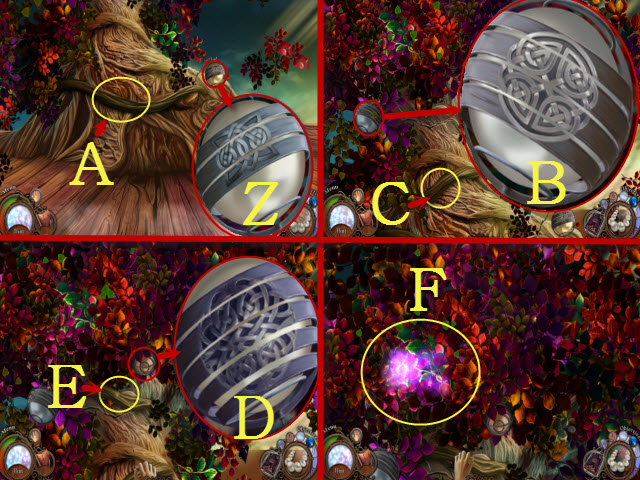
- Select the tree to activate a mini-game (F).
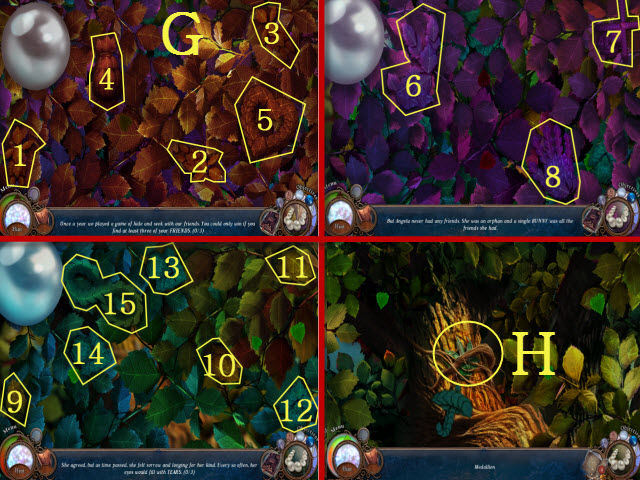
- Solution: 1-15 (G).
- Move the branches; take the GREEN MEDALLION (H).
- Walk back three times.
Chapter 8: The Mystery House
- Place the GREEN MEDALLION (I).
- Walk left to the Cave of Mind.
- Use the summoner (I2); take the CRYSTAL (J).
- Place the CRYSTAL (K).
- Use the translator (L) to activate a mini-game.
- Select each symbol the number of times indicated.
- Solution: ax2, bx4, cx3.
- Use the icebreaker (M); turn the crystal (N).
- Place the vines together (O).
- Select the vine (P).
- Walk forward.
- Move the cloth (Q).
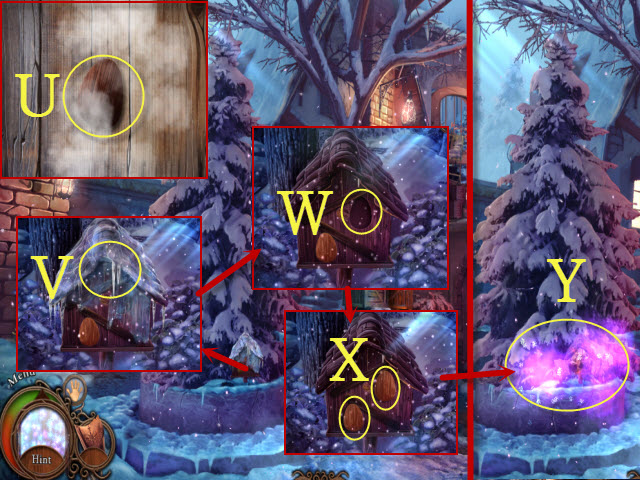
- Play the HOP (R) to receive the SICKLE.
- Open the mailbox (S); take the WINCH PART (T).
- Use the SICKLE (U).
- Take the STONE GNOME (V) and WELL LEVER (W).
- Take the PICKAXE HEAD (X).
- Examine the SICKLE; select the handle (Y).
- Place the PICKAXE HEAD (Z); use the STONE GNOME (A) to receive the PICKAXE.
- Walk down.
- Use the PICKAXE (B).
- Select the HANDLE three times (C).
- Walk forward.
- Place the WINCH PART (D).
- Place the WELL LEVER (E).
- Place the HANDLE (F); select it (G).
- Take the GOLDEN GIRL (H).
- Place the GOLDEN GIRL; open the door (I).
- Enter Angela's House.
- Use the WOLF CUB (J).
- Take the 1/3 PHOTO PIECE (K).
- Move the latch to activate a puzzle (L).
- Restore the incorrect elements.
- Solution (1-3).
- Take the DRAWER HANDLE (M) and place it (N).
- Open the drawer to activate a mini-game (O).
- Select matching symbols (P).
- Move the lid; take the 2/3 PHOTO PIECE (Q).
- Turn the robot on to activate a puzzle (R).
- Select the buttons to repeat the patterns (S); this puzzle is random.
- Open the robot; take the 3/3 PHOTO PIECE (T).
- Restore the old photo (U).
- Use the icebreaker three times (V).
- Enter Angela's House.

- Use the summoner; select the light bulb to activate a puzzle (W).
- Solution (X).
- Use translator to activate a puzzle (Y).
- Find matching pairs (Z).
- Walk down.
- Use the seeker anywhere (A).
- Use the icebreaker (B); examine the water to activate a puzzle (1).
- Find matching pairs (2).
- Enter Angela's House to activate a puzzle.
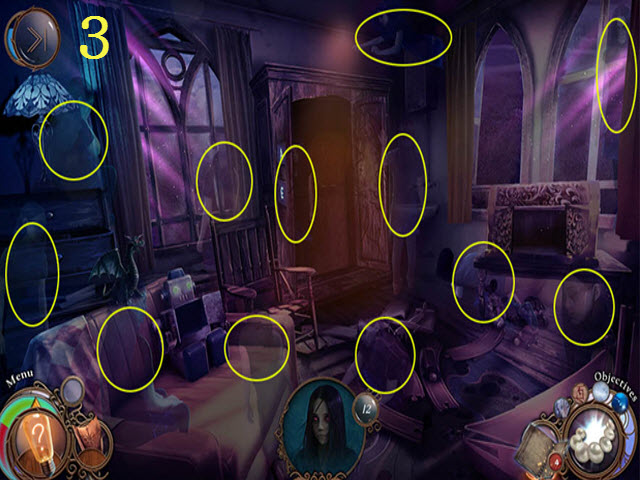
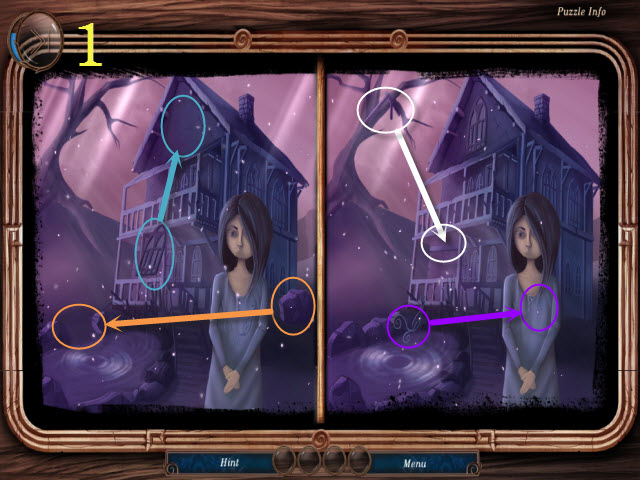
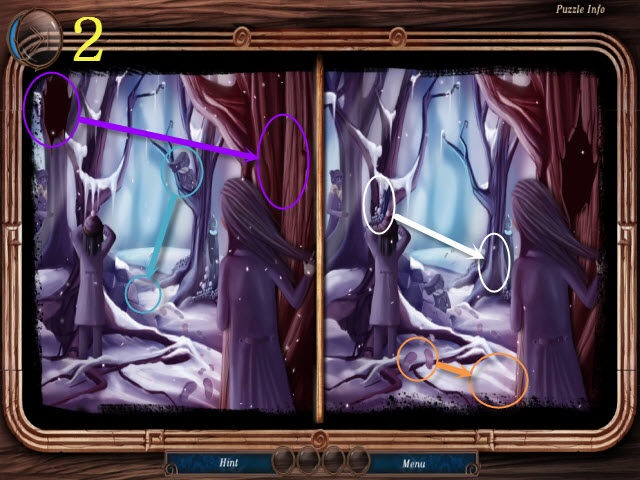
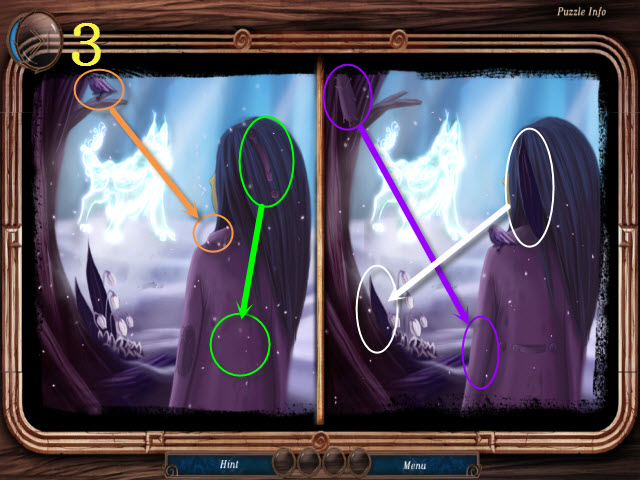
- Locate the illusions.
- Solution (3).
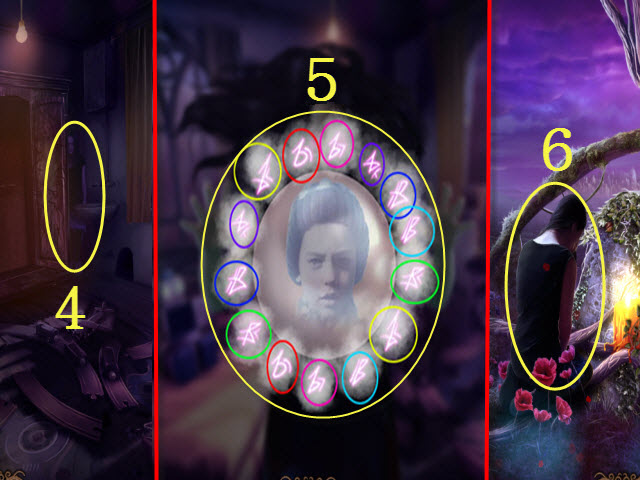
- Select Angela to activate a puzzle (4).
- Solution: (5).
- Walk back and then forward.
- Select Angela (6).
- Congratulations! You have completed Rite of Passage: Hide and Seek!
Created at: 2014-07-11