

Walkthrough Menu
- General Tips
- Chapter 1: The Playground
- Chapter 2: The Cemetery
- Chapter 3: The Theater Yard
- Chapter 4: Backstage
- Chapter 5: The Doll Manufacturing Room
- Chapter 6: The Mansion
- Chapter 7: The Kid's Room
General Tips
- This is the official guide for Rite of Passage: The Perfect Show.
- You will not need to follow the exact path of this guide; however, some actions are required before you can complete another scene.
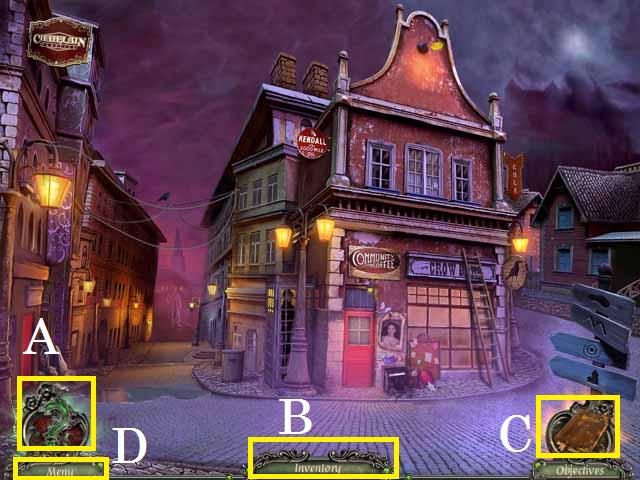
- Use the Hint Button (A) if you get stuck during play.
- Your inventory bar (B) will hold your inventory items.
- Zoom into any sparkling scene to trigger a Hidden Object Scene. In this guide we will use the acronym 'HOS' for Hidden Object Scenes.
- The item lists in the HOS are random.
- Item names colored in White are in plain view. Yellow colored items are hidden inside other objects. Green colored items need to be assembled.
- Notes can be viewed in the journal if you need extra help (C).
- Click on the Menu (D) button to exit, pause, or resume the game. You can also adjust your options (sound, music, and screen size).
Chapter 1: The Playground
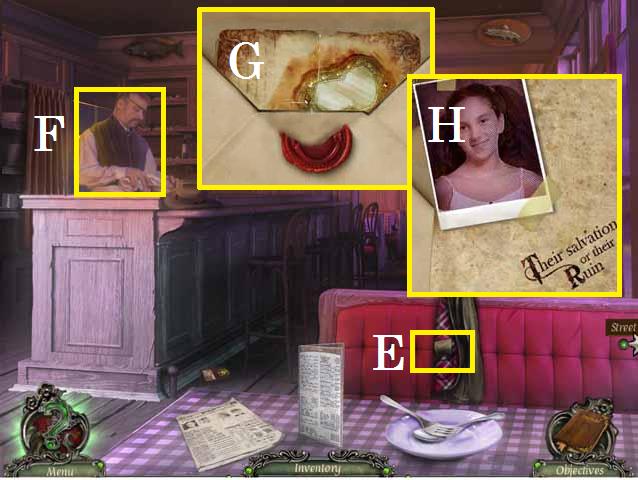
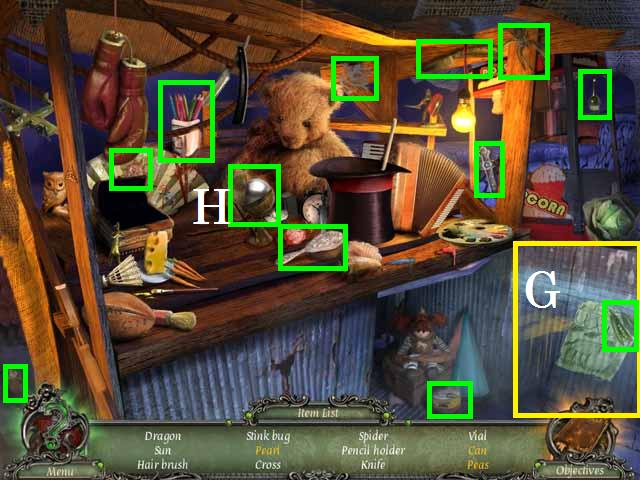
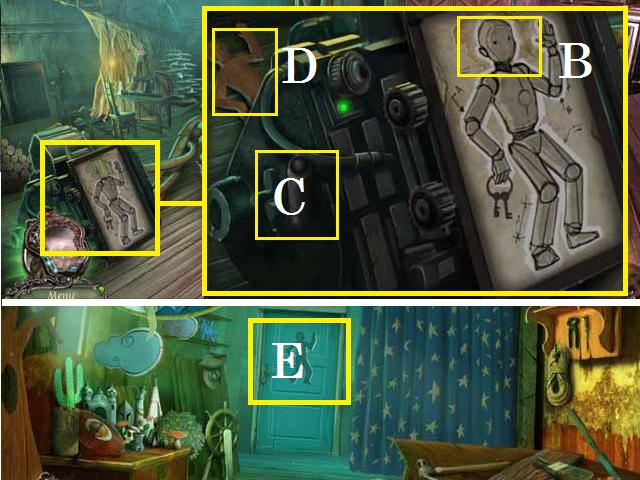
- Give the MYSTERIOUS NOTE (E) to the bartender (F).
- Take the letter from the bartender; open the envelope and pick up the letter (G).
- Flip the letter over and pick up the first CHILD'S PHOTO (H) and collect the letter.
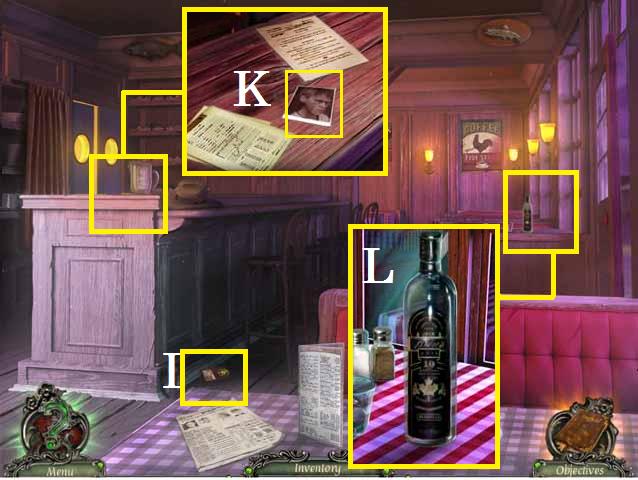
- Pick up the BADGE (I).
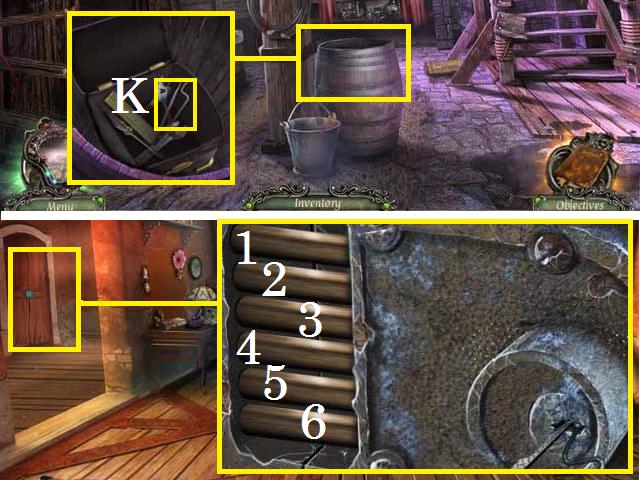
- Zoom into the counter; pick up the folder, move the papers and pick up the second CHILD'S PHOTO (K).
- Zoom into the booth; pick up the EMTPY BOTTLE (L).
- Exit the Diner to the Street.
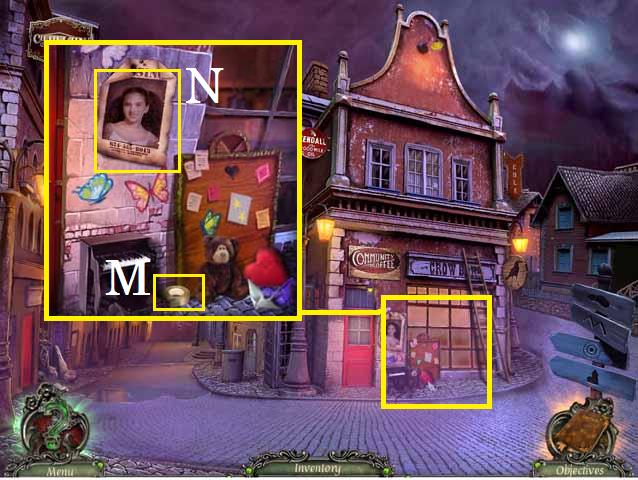
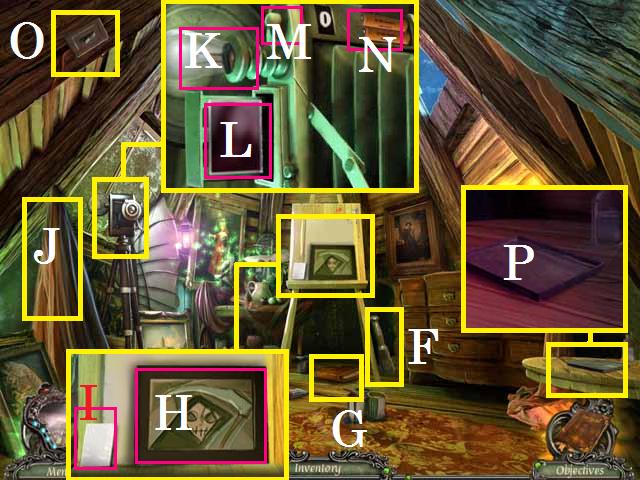
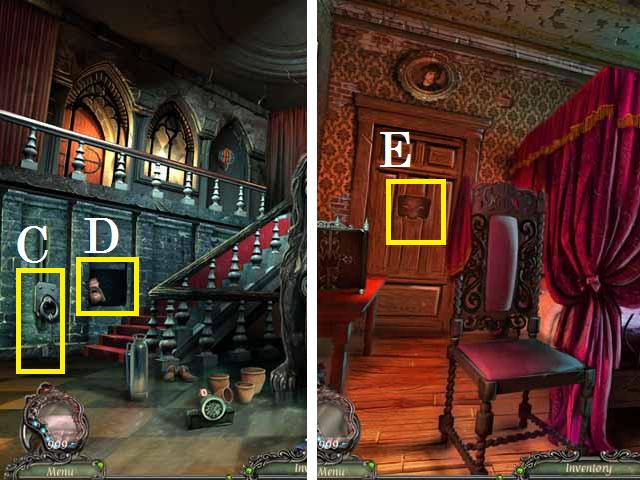
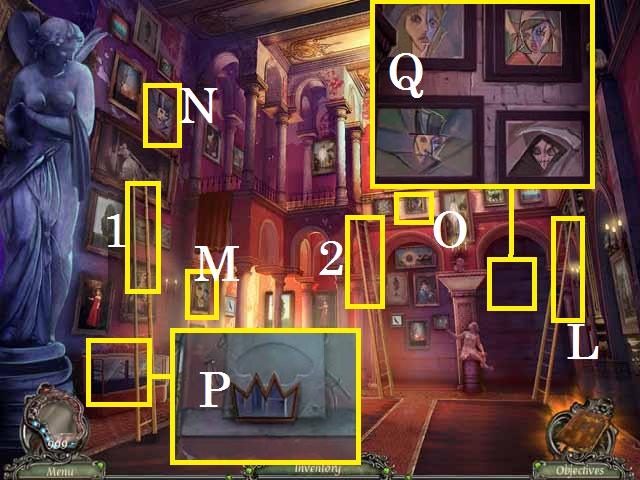
- Zoom into the red door; move the items and pick up the DUCT TAPE (M).
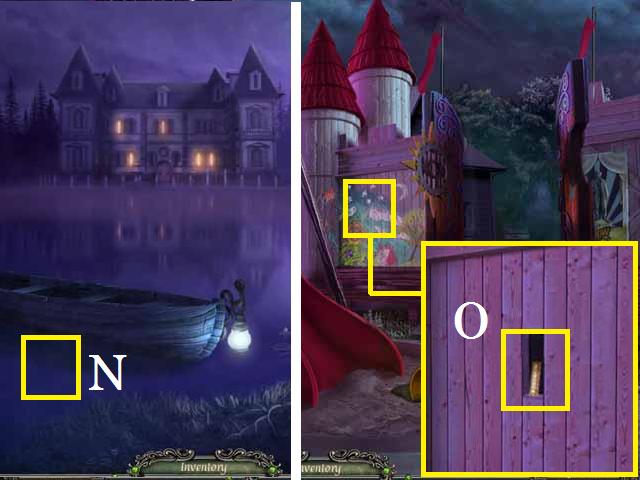
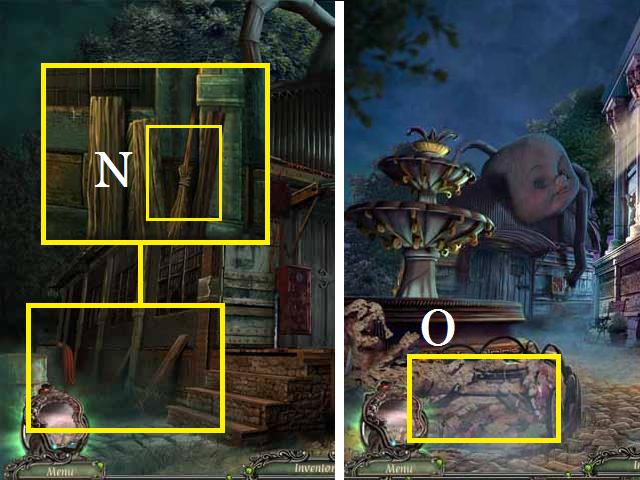
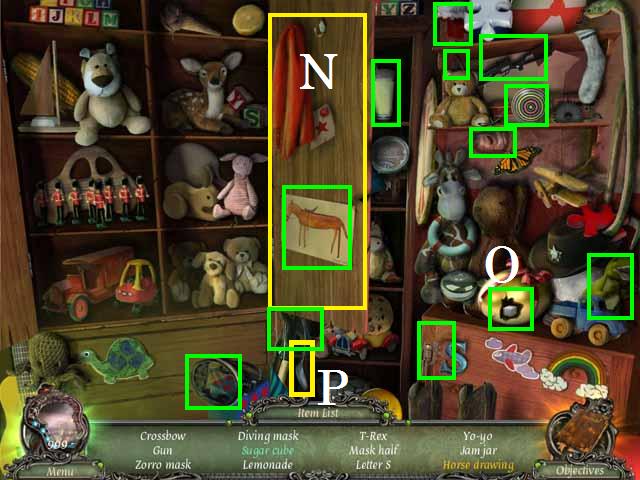
- Pick up the missing poster (N).
- Try to move to the Town Square. Take a right to move to Havenhills.
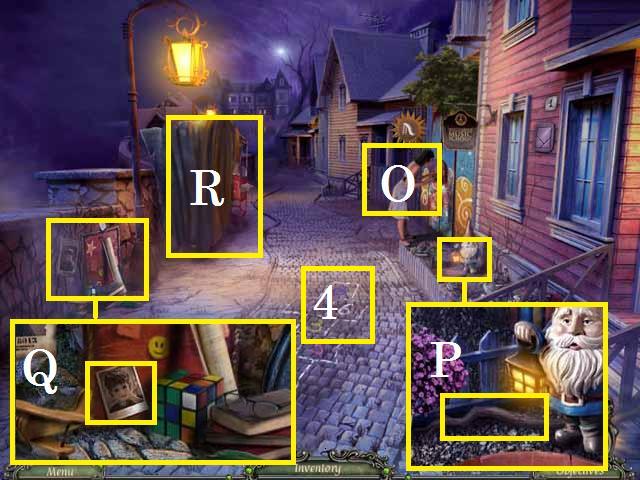
- Talk with Ben's mom (O).
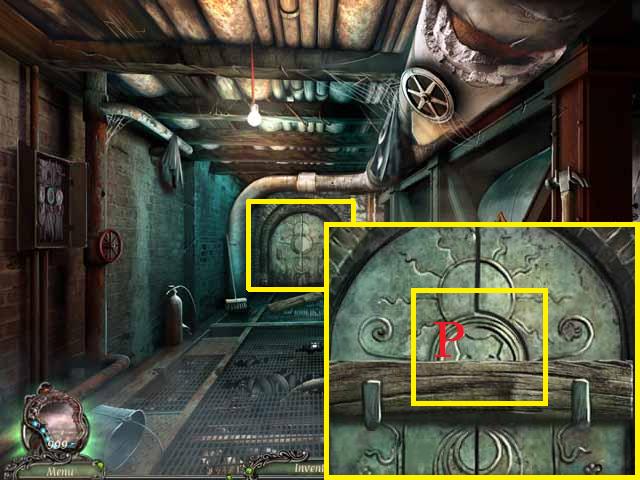
- Zoom into the flowerbed; pick up the BRANCH (P).
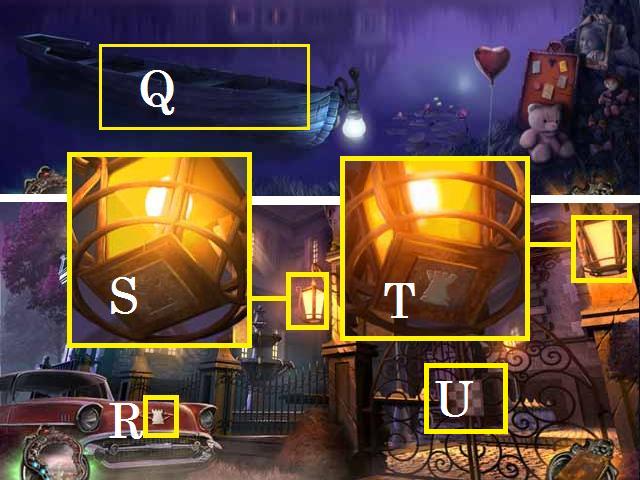
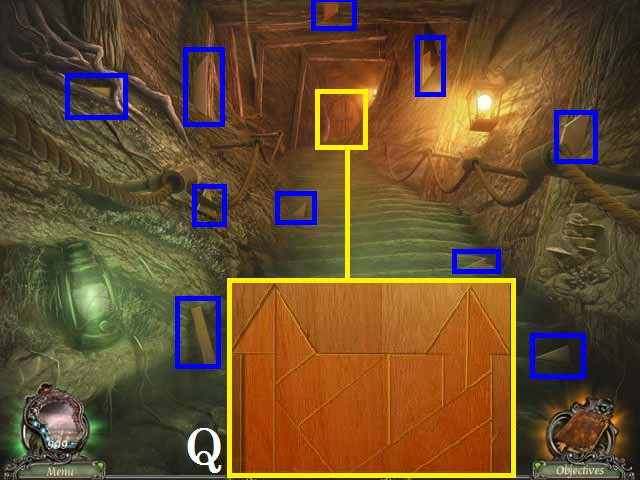
- Zoom into the wanted poster; move the items around and pick up the third CHILD'S PHOTO (Q).
- Collect the pattern from the hopscotch game (4) for later use.
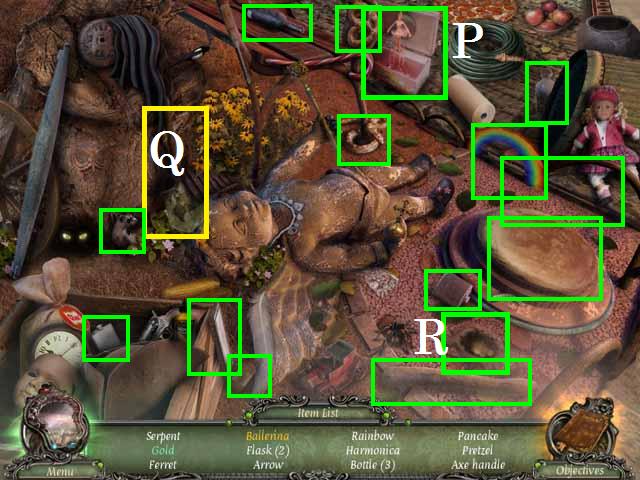
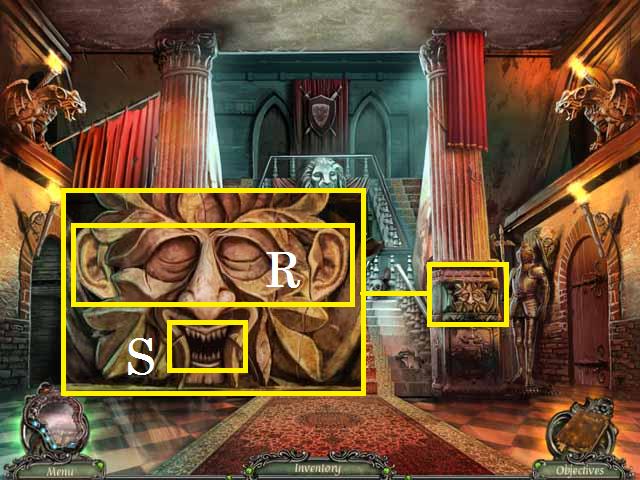
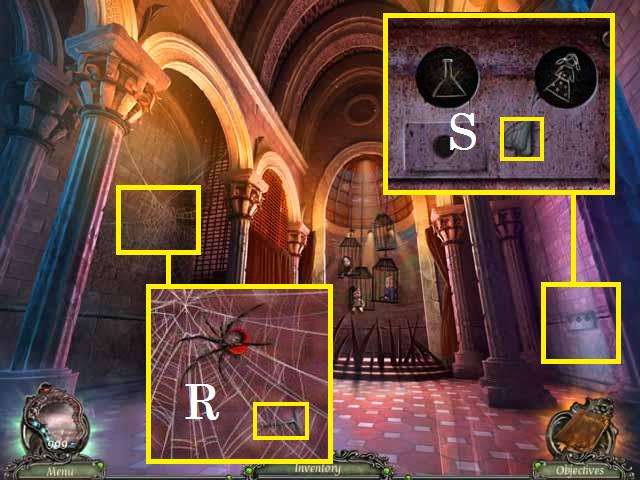
- Remove the blanket (R) and then zoom into the sparkles to play a HOS.

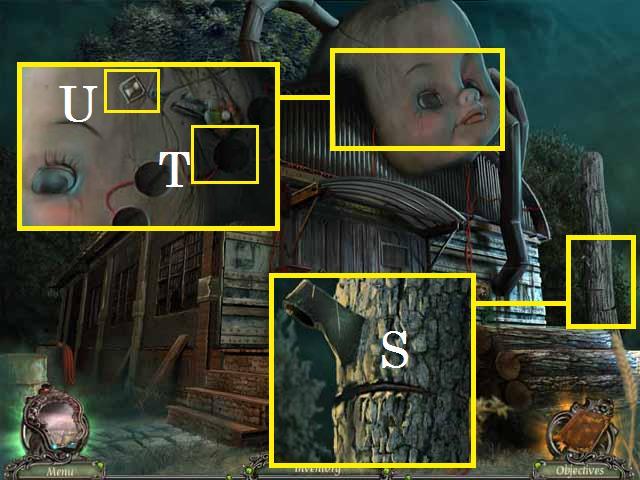
- Open the door (S).
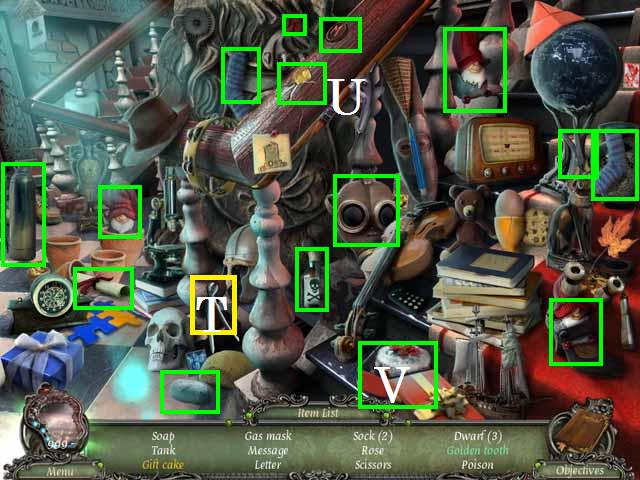
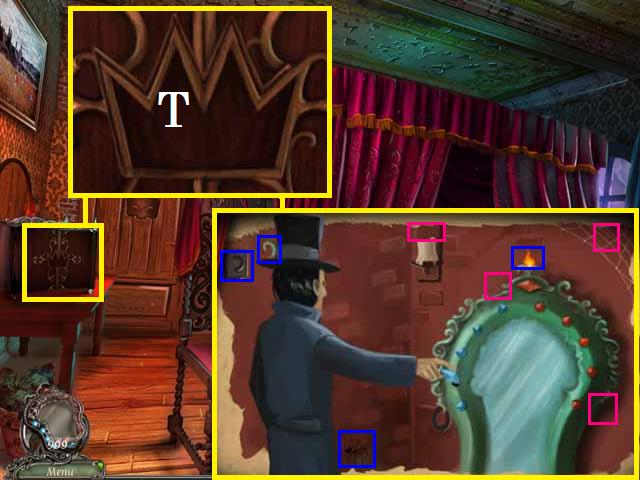
- Open the box (T).
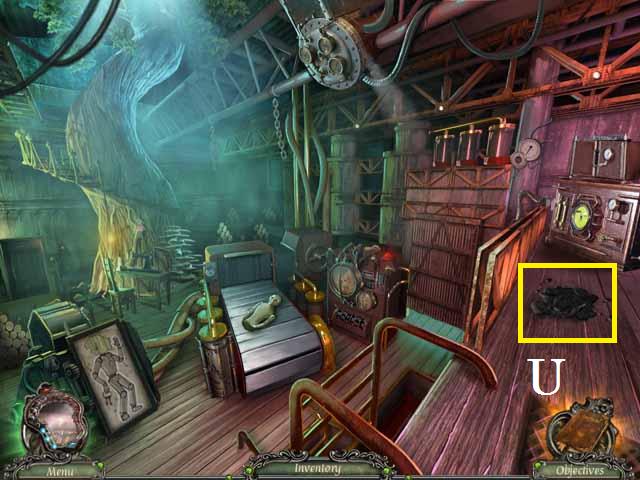
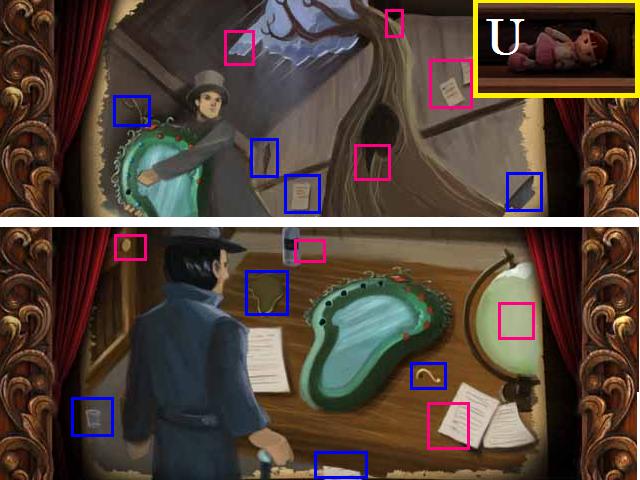
- Paint the pony (U) with the paintbrush (V).
- Pick up the items marked in green to receive the CROWN.
- Move forward to the Lake.
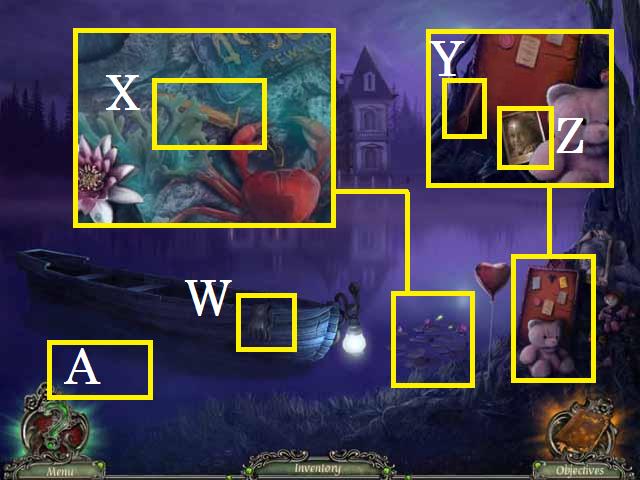
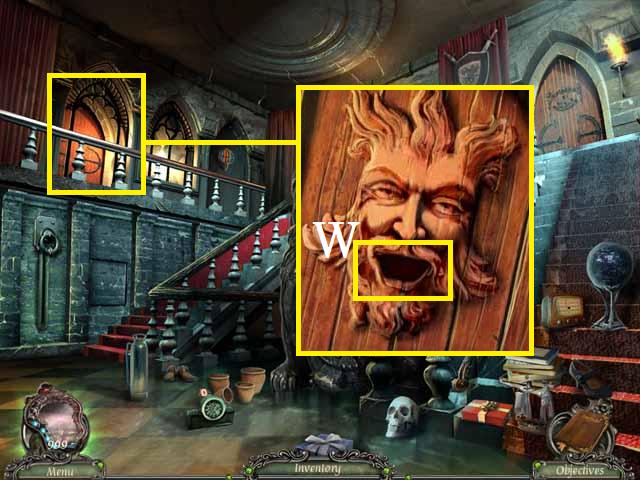
- Pick up the RUBBER GLOVES (W).
- Zoom into the lily pads; move the pads around; then use the BRANCH to fish out the SWORD (X).
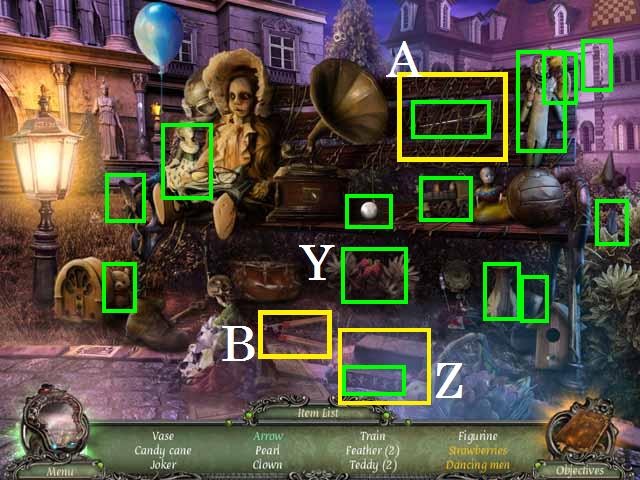
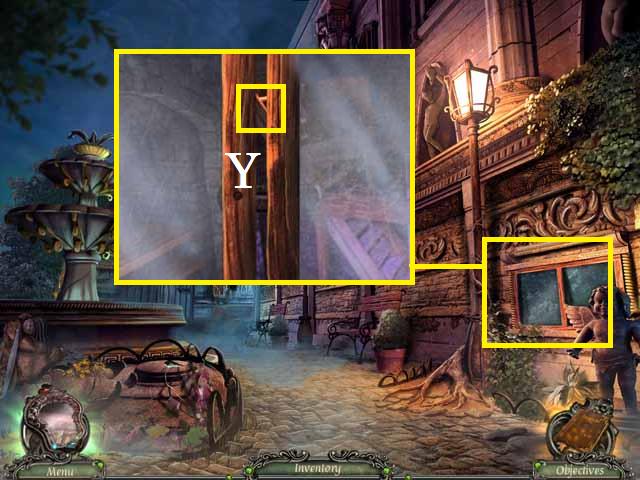
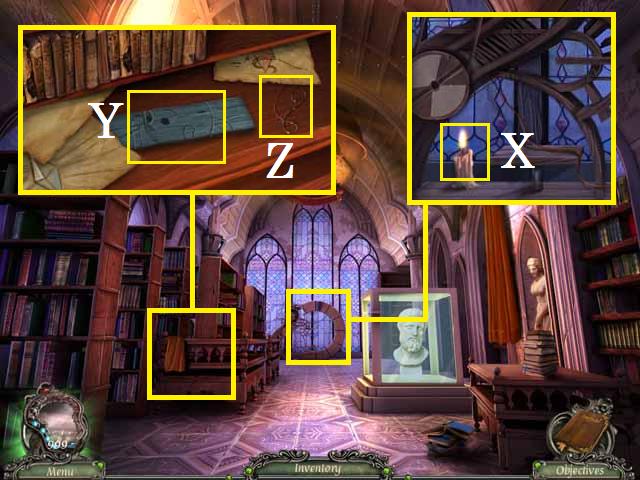
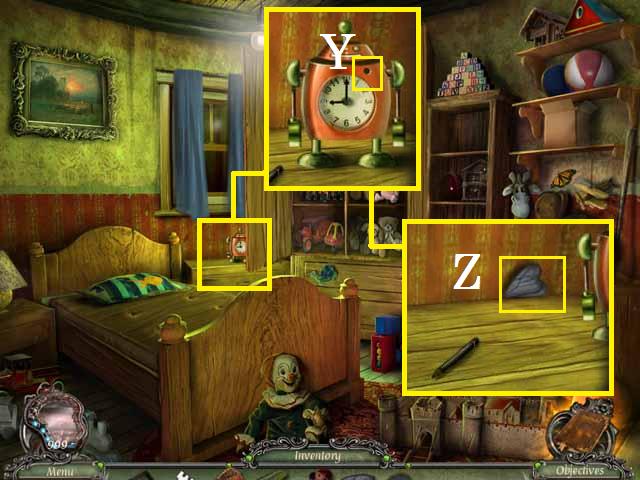
- Zoom into the wanted poster; pick up the WOODEN SPOON (Y), move the items around and pick up the fourth CHILD'S PHOTO (Z).
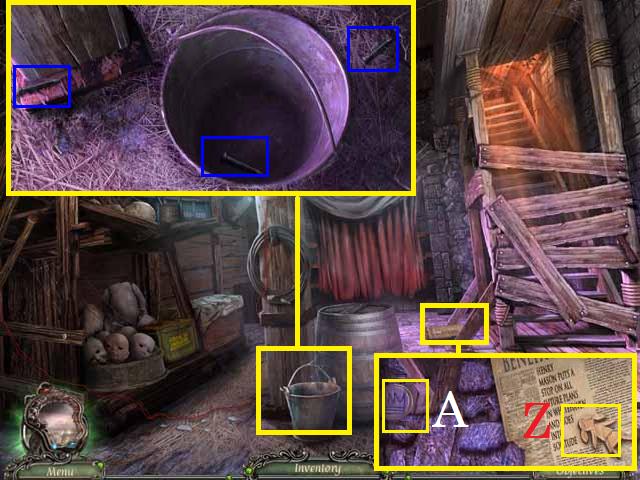
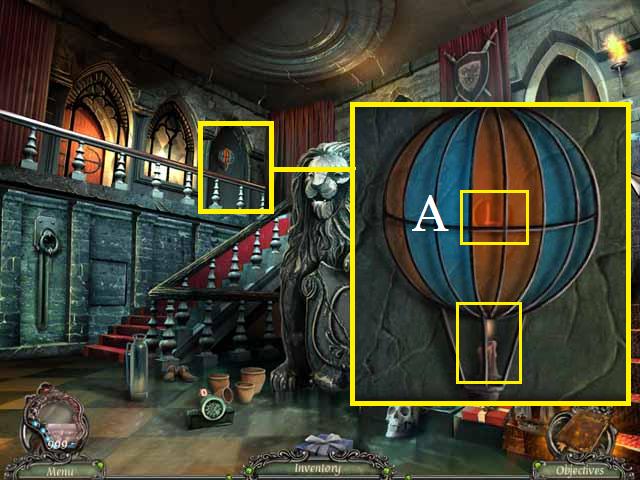
- Fill the EMPTY BOTTLE with water from the lake (A) to receive the BOTTLE WITH WATER.
- Return to the Street.
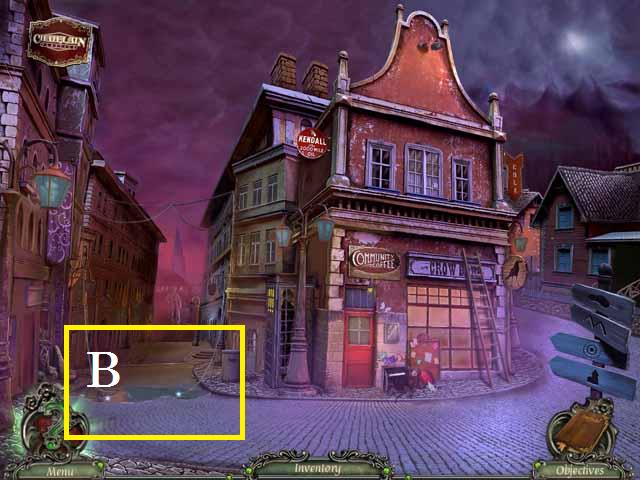
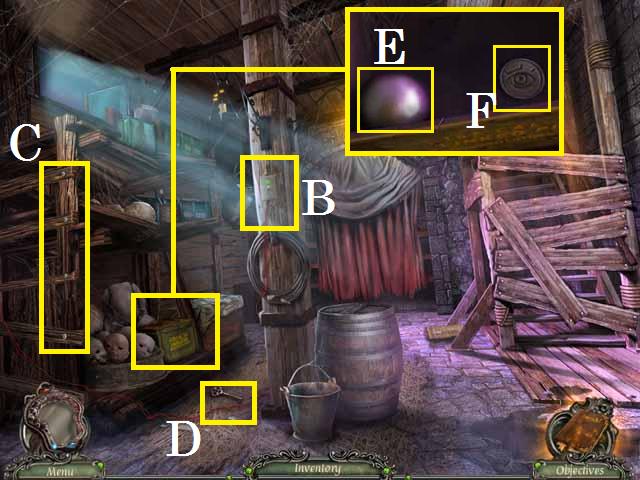
- Move the live wire (B) with the RUBBER GLOVES.
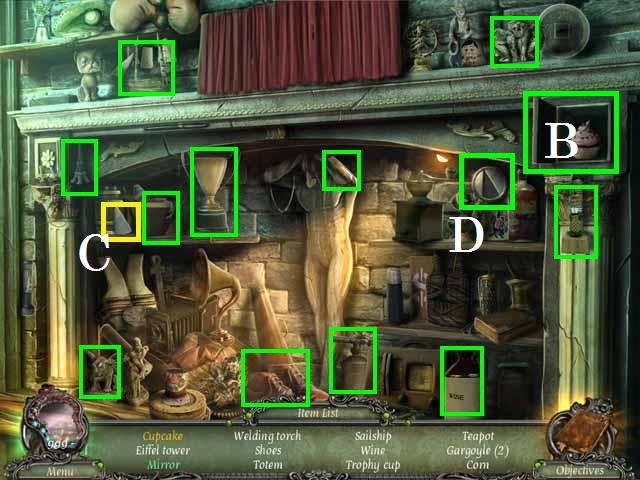
- Zoom into the sparkles to play a HOS.
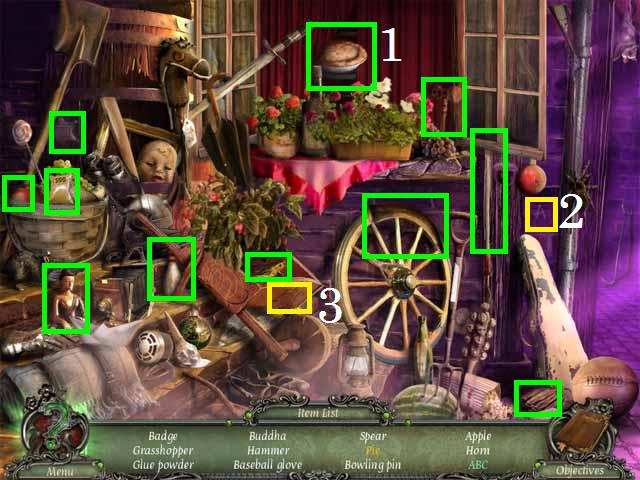
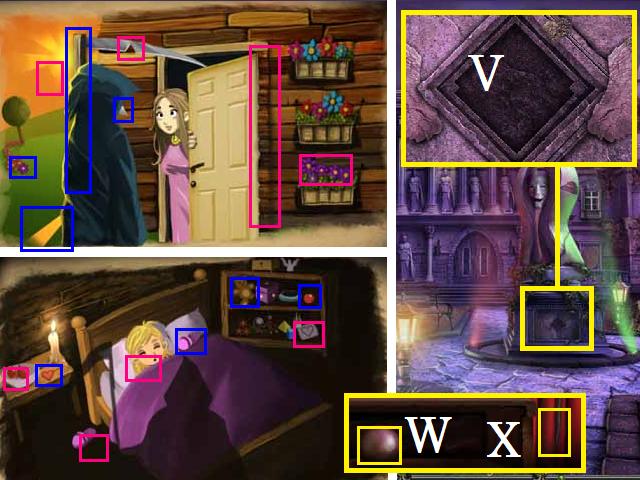
- Open the curtain (1).
- Place the 'A' (2) with the 'BC' (3).
- Collect all of the items marked in green to receive the GLUE POWDER.
- Return to Havenhills.
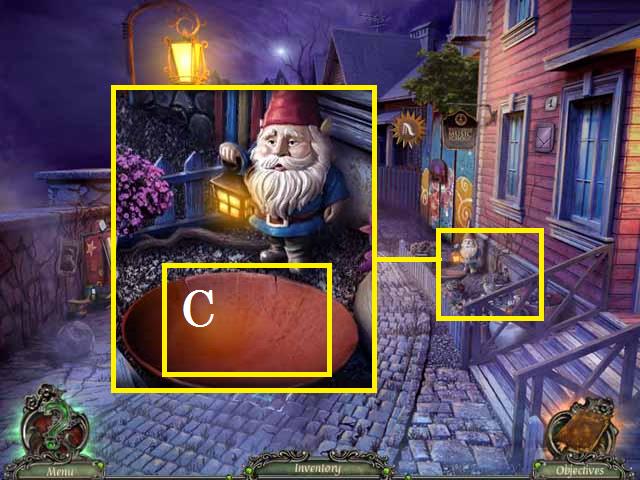
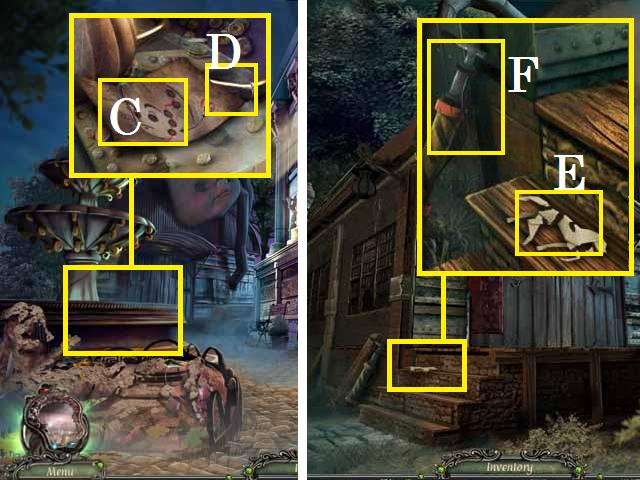
- Zoom into the flowerbed; place the GLUE POWDER, BOTTLE WITH WATER, and the WOODEN SPOON in the bowl (C) to receive the GLUE ON SPOON.
- Return to the Street and move to the Town Square.

- Zoom into the statue; try to pick up the jewel (D).
- Zoom into the base and try to pick up the SHIELD (E). Use the GLUE ON SPOON to fuse the two SHIELD pieces; collect the SHIELD.
- Return to Havenhills.
- Zoom into the playground gate; open the doors and the gate; place the CROWN, SWORD, and SHIELD (pink).
- Lower the bars in the following order (note: the solution is random, this is only an example); 3, 1, 2, 4, 7, 5, 6, 10, 11, 12, 9, and 8.
- Enter the Playground.
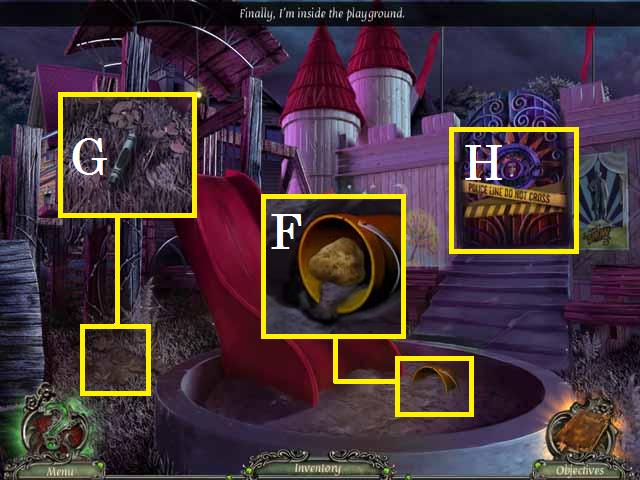
- Zoom into the sandbox; remove the sand and pick up the DRY SPONGE (F).
- Zoom into the leaves; move the leaves and pick up the CRAYON (G).
- Remove the police tape (H) and enter the gate to the Play Castle.

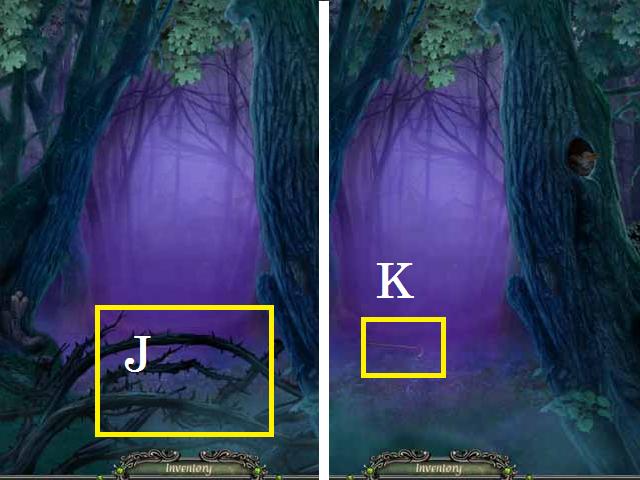
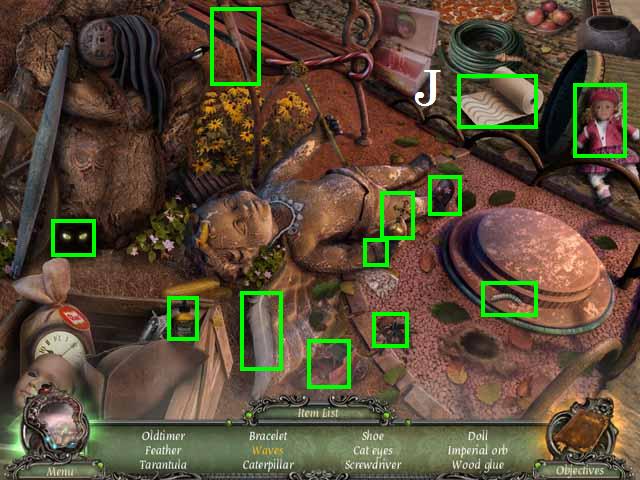
- Zoom into the doll; pick up the note (I) and the TWIN DOLL (J).
- Move forward into the Havengrove.
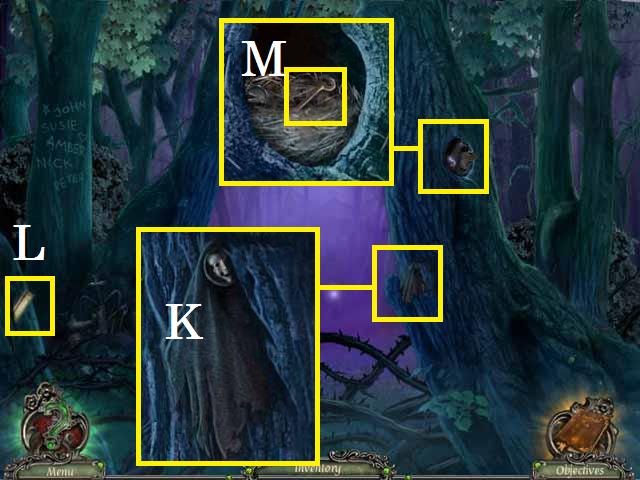
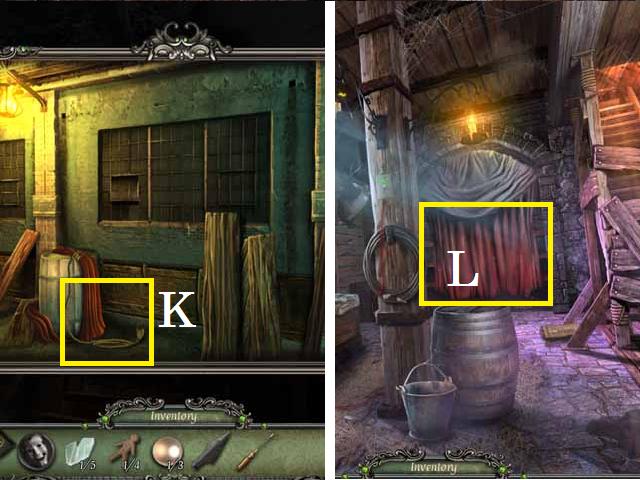
- Zoom into the tree; pick up the CLUE (K).
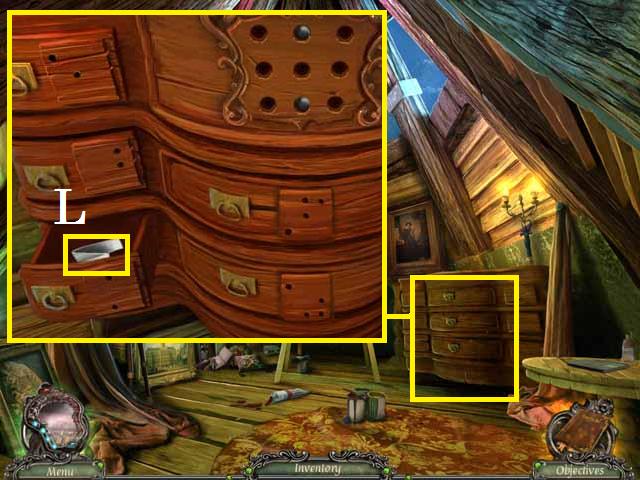
- Pick up the first PUNCH CARD (L).
- Zoom into the tree; move the items and pick up the CEMETERY KEY (M).
- Return to the Lake.
- Dip the DRY SPONGE into the lake (N) to receive the WET SPONGE.
- Return to the Playground.
- Zoom into the fence; use the WET SPONGE several times to fully remove the chalk, open the compartment and pick up the second PUNCH CARD (O).
- Return to the Street.

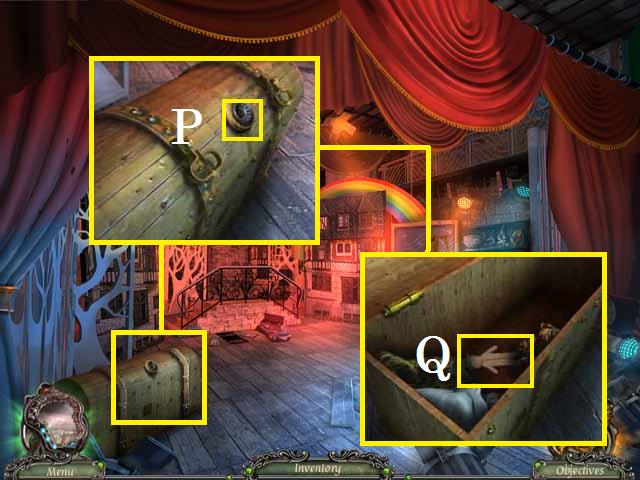
- Zoom into the sparkles to play a HOS.
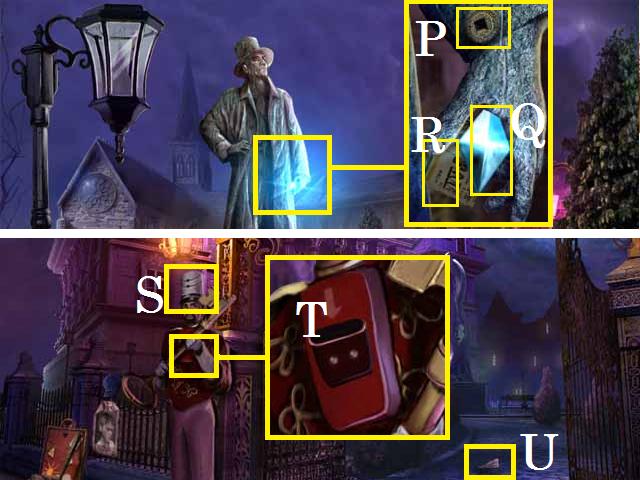
- Use the tweezers (P) on the bottle (Q).
- Open the guitar case (R).
- Receive the ROD.
- Enter the Town Square.
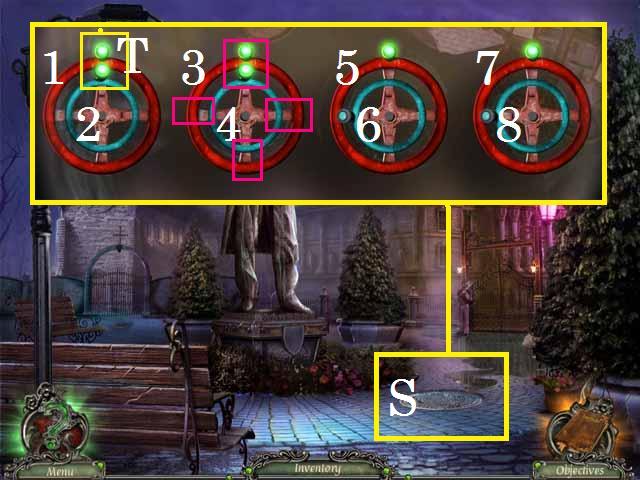
- Remove the manhole cover (S) with the ROD and zoom in.
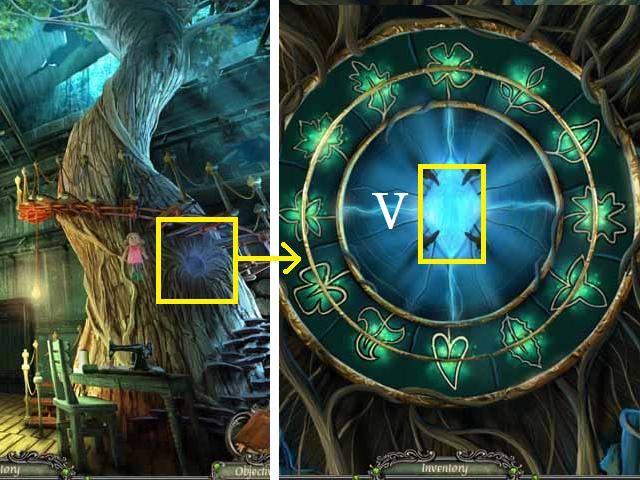
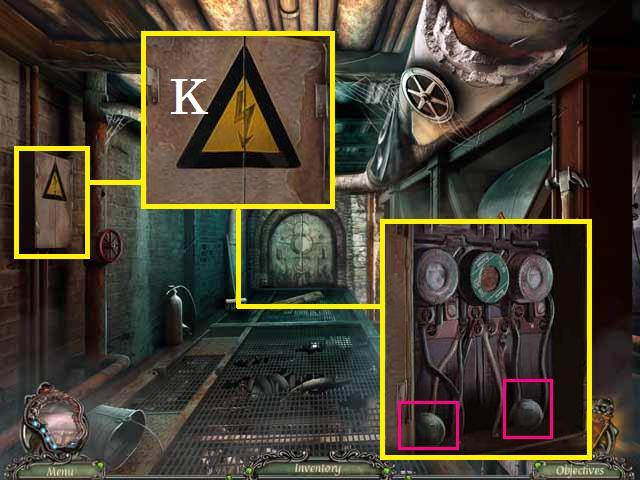
- The beginning configurations is random, the easiest way to solve this puzzle is to spin the (1) wheel until its knob is in the 12 o'clock position (T) and the (3) wheel knob is in one of the four quarter positions (pink) as shown in the screenshot. (Note: you may have to spin it several times past the 12 position to achieve this).
- Next, spin the (2) wheel until its knob is in the 12 o'clock position and the (4) knob is in one of the four quarter positions. Repeat the same process to set wheels (3) and (4) beginning with wheel (3) while making sure wheels (5) and (6) stay in one of the four quarter positions.
- Set (5) and (6) in the same manner then finish by setting (7) and then (8) to 12 o'clock.
- Move forward to the Intricate Gate.
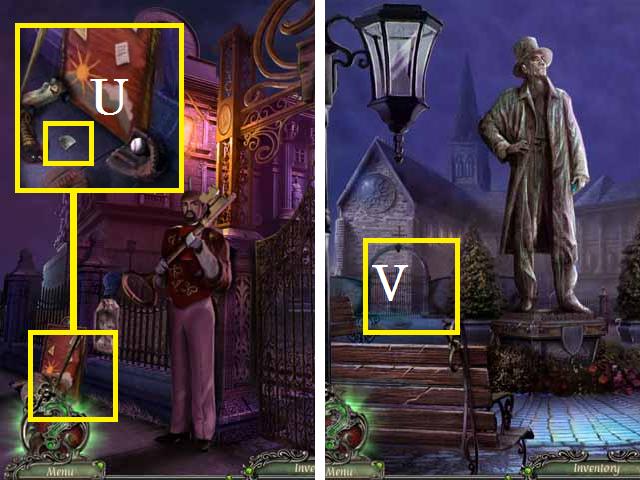
- Zoom into the wanted poster; move the items and pick up the first of four MEDALLION QUARTER (U).
- Back out from the Intricate Gate.
- Zoom into the Cemetery gate (V); unlock it with the CEMETERY KEY.
- Enter the Cemetery.
Chapter 2: The Cemetery
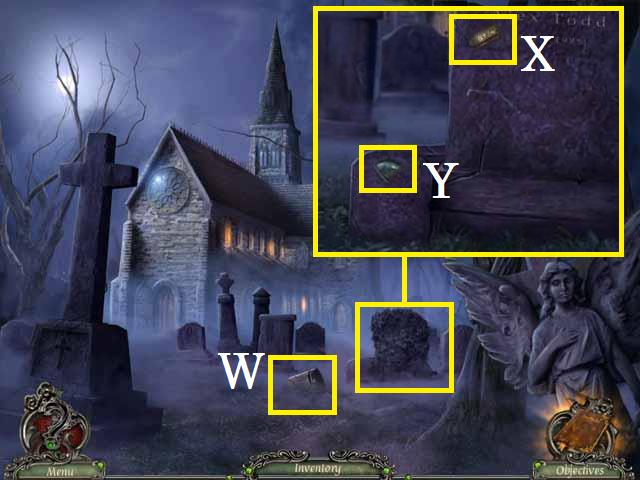
- Pick up the SOLDIER'S HAT (W).
- Zoom into the grave; remove the vines and pick up the third PUNCH CARD (X) and the second MEDALLION QUARTER (Y).
- Enter the Church.
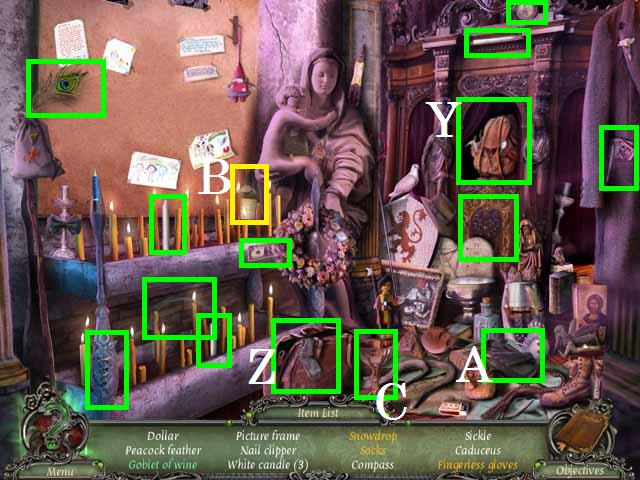
- Zoom into the sparkles to play a HOS.
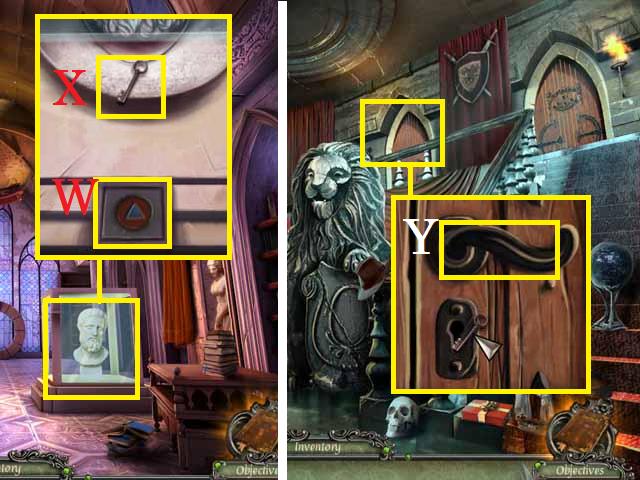
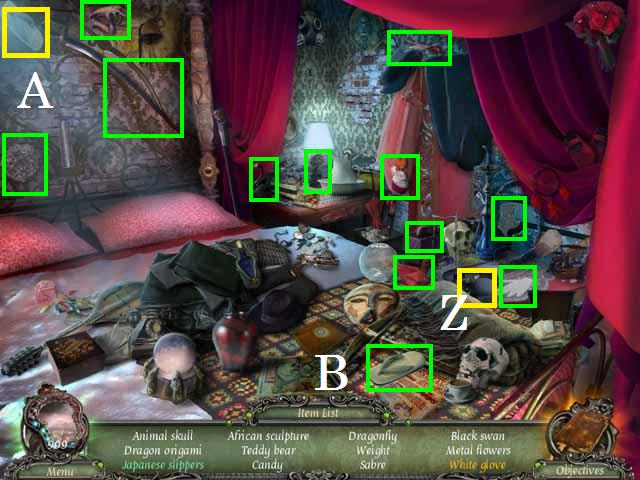
- Open the curtain (Y) and the case (Z).
- Open the bag to reveal the fingerprint gloves (A).
- Pour the wine (B) into the goblet (C).
- Receive the SICKLE.
- Zoom into the podium; flip the pages until you reveal the third MEDALLION QUARTER (D) and pick it up.
- Zoom into the candle; pick up the fourth MEDALLION QUARTER (E) and place all four in the case (F); then pick up the MEDALLION.
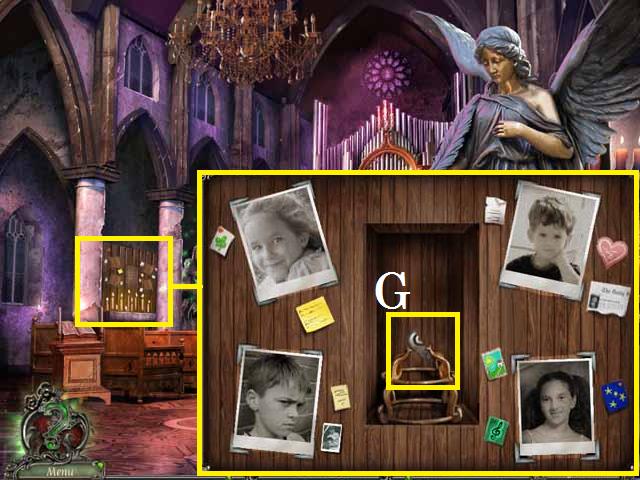
- Zoom into the back board; place the four CHILD'S PHOTO as shown in the screenshot and pick up the first of two AMULETS (G).
- Return to the Play Castle.
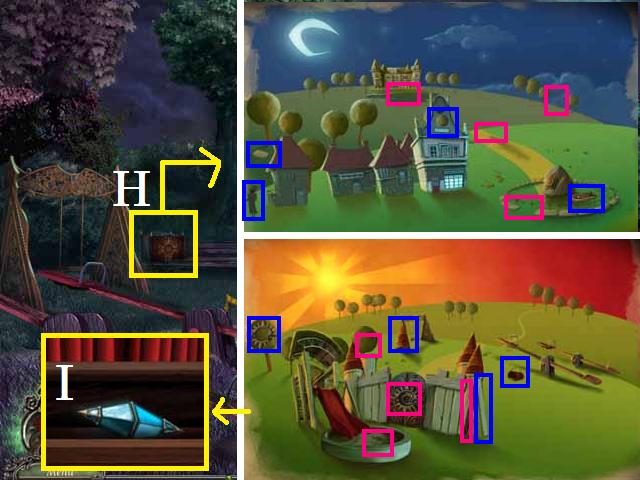
- Zoom into the chest (H); place the MEDALLION in the lock.
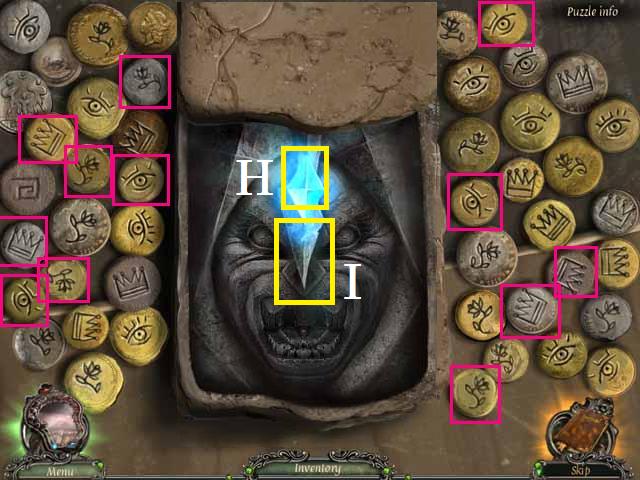
- Tap the picture and then place the items (blue) in the correct places (pink). Repeat until all of the slides are complete; pick up the BLUE JEWEL (I).
- Move forward into the Havengrove.
- Remove the thorns (J) with the SICKLE.
- Pick up the CROWBAR (K).
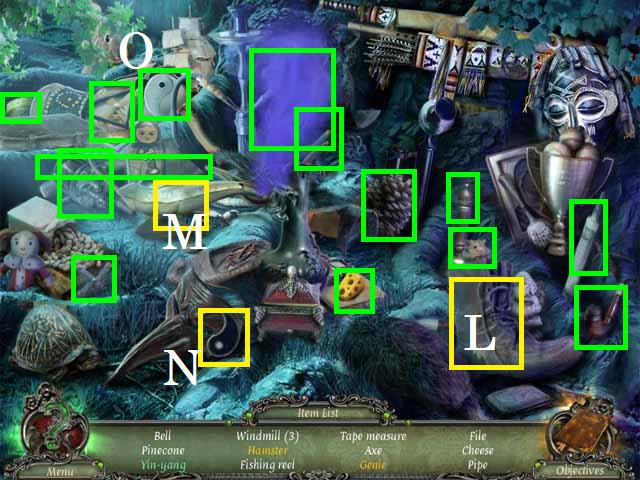
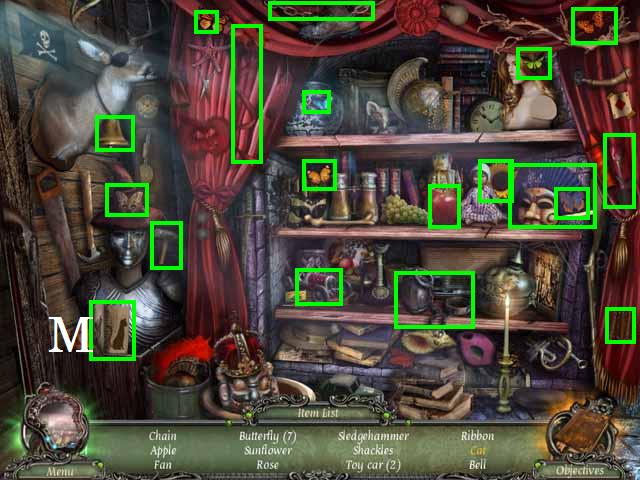
- Zoom into the sparkles to play a HOS.
- Tap the boot (L) and rub the lamp (M).
- Place the yang (N) with the yin (O).
- Receive the CHEESE TOY.
- Move forward to Amber's House.
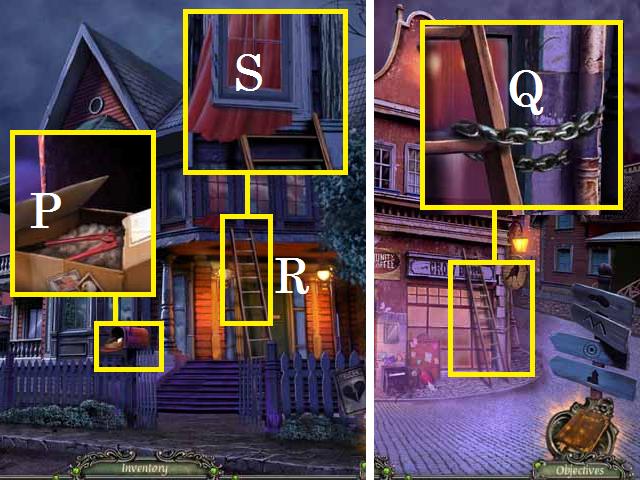
- Zoom into the mailbox; open the box and pull out the package and then open it. Pick up the CHAIN CUTTER (P).
- Return to the Street.
- Zoom into the LADDER; cut the chain (Q) with the CHAIN CUTTER, then pick up the LADDER.
- Return to Amber's House.
- Lean the LADDER (R) on the house and zoom into the window (S).
- Use the CROWBAR on the window, then open it with your hand; enter Amber's Room.
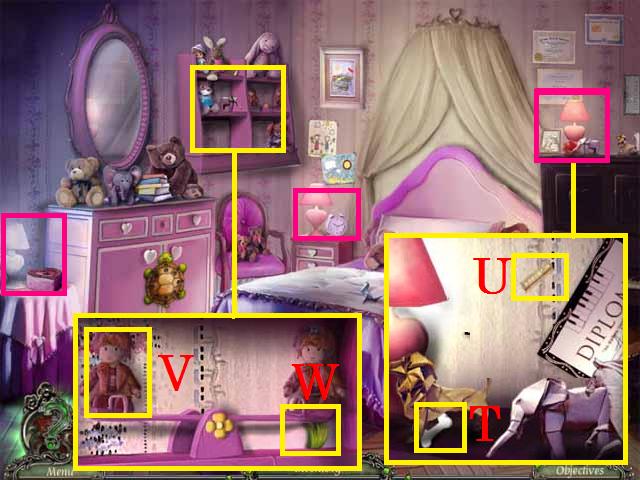
- Turn on the three lamps (pink).
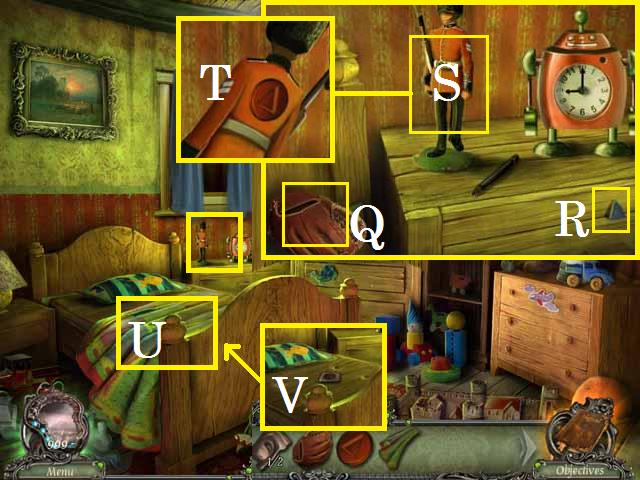
- Zoom into the lamp; move the items and pick up the BONE TOY (T) then move the diploma and pick up the fourth PUNCH CARD (U).
- Zoom into the shelf; place the TWIN DOLL (V) and pick up the GRASS TOY (W).
- Return to the Play Castle.
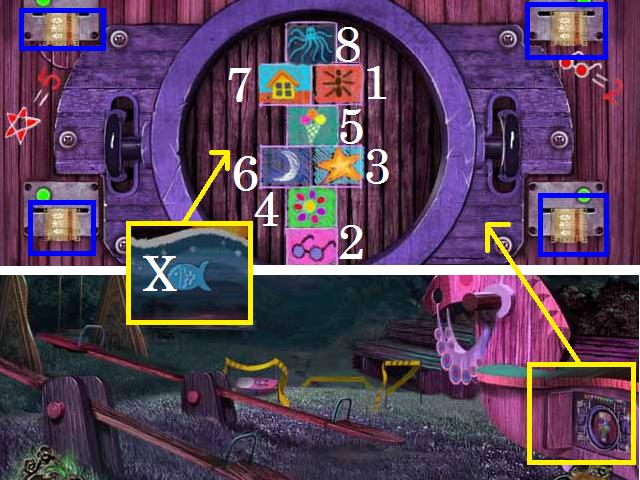
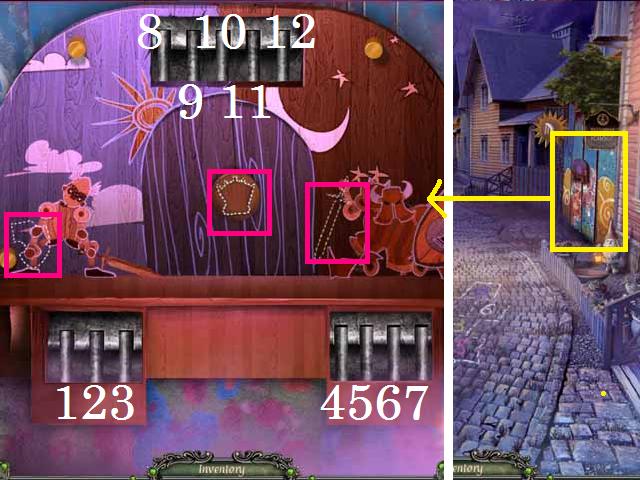
- Zoom into the horse; place the four PUNCH CARDS in the slots (blue) and arrange the pictures as shown in the screenshot (Hint: remember the pattern from the hopscotch game earlier).
- Play the squares in the following order: 1, 1, 2, 2, 3, 3, 4, 5, 5, 6, 6, 7, 7, and 8.
- Pick up the FISH TOY (X).
- Return to Amber's Room.
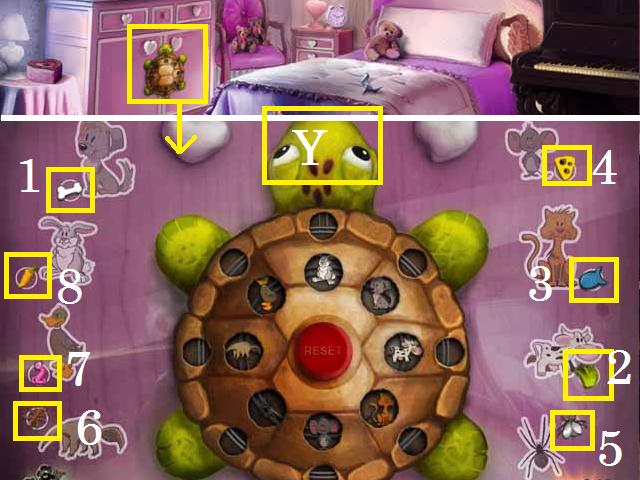
- Zoom into the dresser; Place the BONE TOY, GRASS TOY, CHEESE TOY and FISH TOY as shown in the screenshot.
- Place the items in the turtle's mouth (Y) in the following order: 1 thru 8.
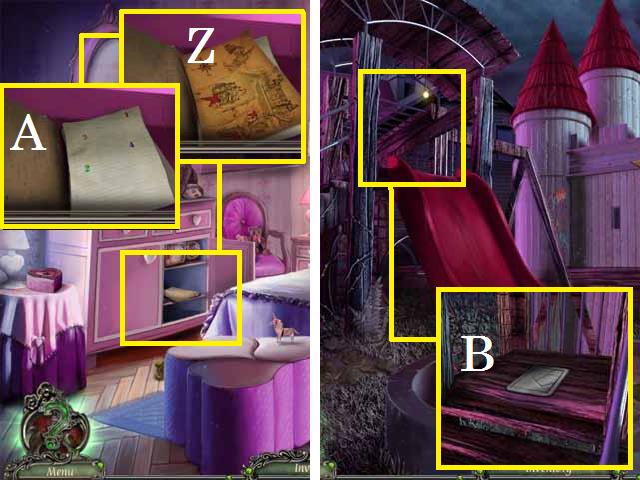
- Open the door and zoom in.Open the book; pick up the map (Z), then the BLANK PAPER (A).
- Return to the Playground.
- Zoom into the play structure; place the BLANK PAPER on the board (B) and use the CRAYON to receive the PAPER.
- Return to Havenhills.
- Zoom into the board (C) and place the PAPER followed by the CRAYON.
- Return to the Street.
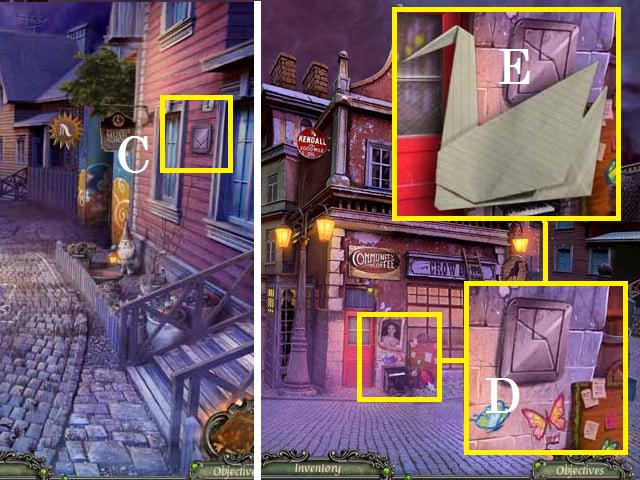
- Zoom into the red door; place the PAPER on the board (D) and use the CRAYON.
- Tap the paper over the numbers in order of 1 thru 7. Collect the ORIGAMI SWAN (E).
- Return to Amber's Room.

- Zoom into the box; place the ORIGAMI SWAN in the middle.
- Use the screenshot as a sample key to match the pairs. The solution is random.
- Pick up the TORN THEATER TICKET (F).
- Return to Havenhills.
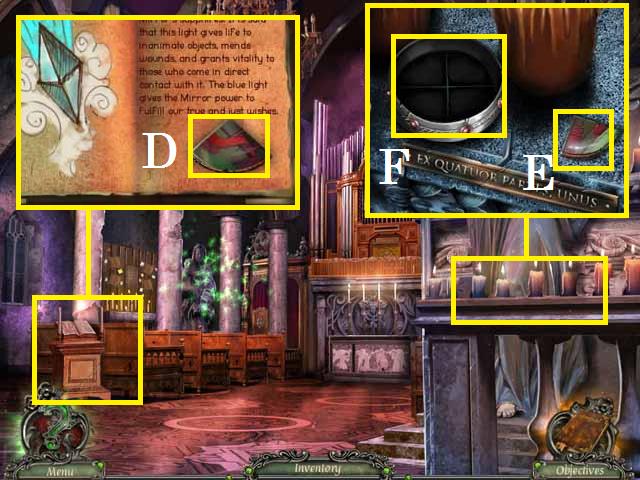
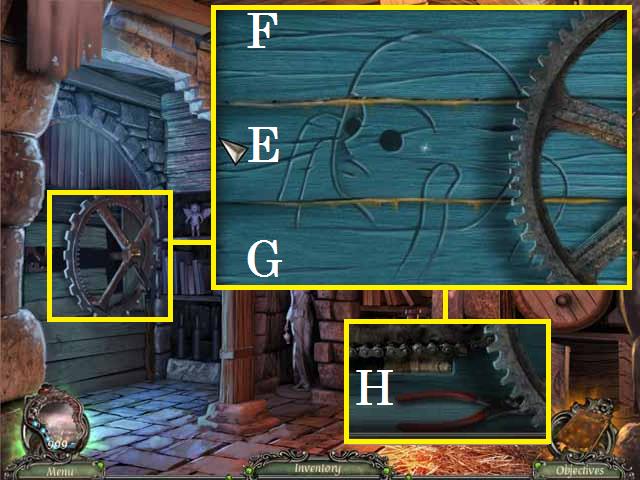
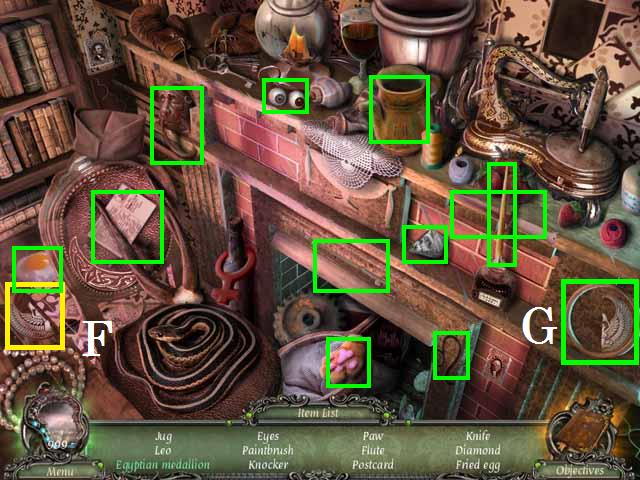
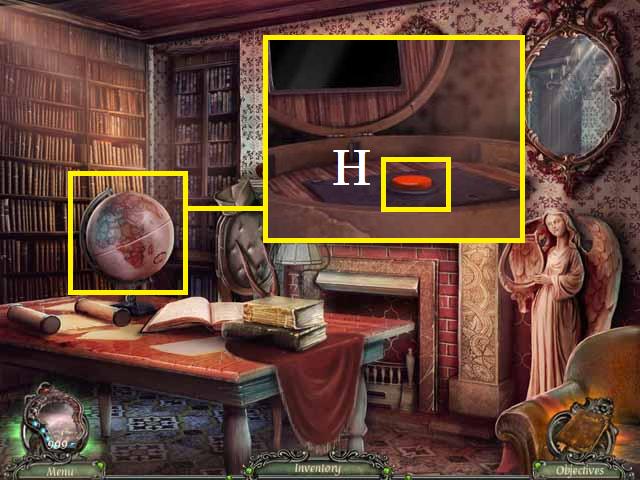
- Speak with Dan's Mom, then zoom into the sparkles to play a HOS.
- Open the door (G) and the globe (H).
- Receive the CROSS.
- Return to the Cemetery.

- Place the CROSS (I) and zoom into the grave. Unscramble the set of four photographs by flipping the individual squares until you have four squares of the same photograph, then use the arrows to spin the squares to the correct orientation.
- If you end up with 3 squares in the same orientation and one out of place, flip the odd square to another photograph, spin the row so that the odd one is in. Flip that square back to the correct photograph and rotate the squares back to the correct orientation.
- Repeat this process until all four squares are correctly oriented. See the screenshot for the final images (J).
- Pick up the second AMULET (K).
- Enter the Church.
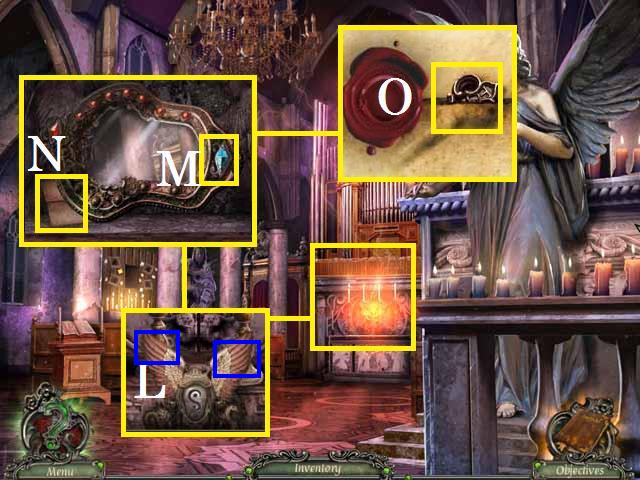
- Zoom into the altar; place both AMULETS (L) and remove the wings (blue).
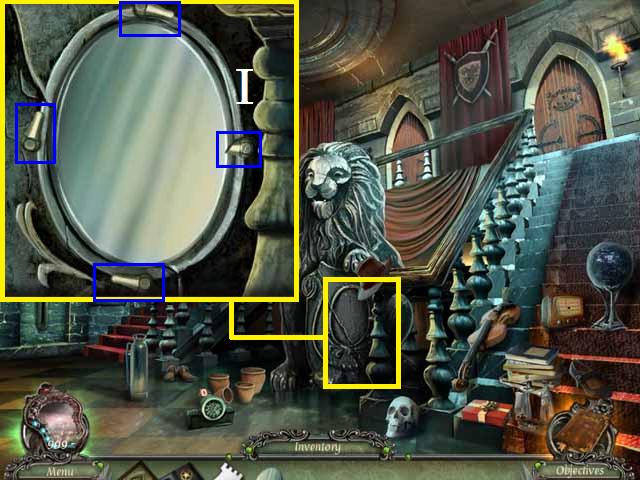
- Place the BLUE JEWEL in the MIRROR (M).
- Pick up the MIRROR, and then open the letter (N).
- Pick up the SQUARE KEY (O) and collect the letter.
- Return to Town Square.
- Zoom into the statue. Place the SQUARE KEY in the keyhole (P); pick up the jewel (Q) and the TORN THEATER TICKET (R).
- Place the other half of the TORN THEATER TICKET on the screen and use the DUCT TAPE to receive the THEATER TICKET.
- Return to the Intricate Gate.
- Place the SOLDIER'S HAT (S), zoom in and place the THEATER TICKET in the slot (T).
- Pick up the first MIRROR SHARD (U).
- Enter the Theater Yard.
Chapter 3: The Theater Yard
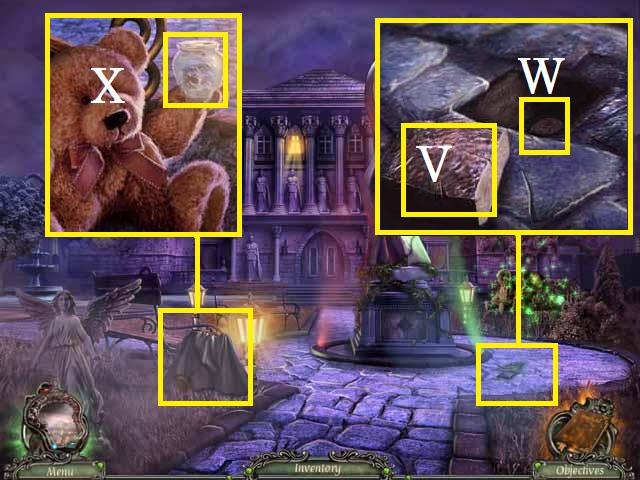
- Zoom into the poster; pick up the poster and use the CROWBAR on the BRICK three times. Pick up the BRICK (V) and the first TOKEN (W).
- Zoom into the teddy bear; remove the blanket and pick up the HONEY JAR (X).
- Zoom into the sparkles to play a HOS.
- Move the plants (Y) and the stone (Z).
- Cut the vines (A) with the clippers (B).
- Receive the first PEARL.
- Move to the Backyard.
- Zoom into the fountain; pick up the note (C) then use the BRICK on the pipe several times and pick up the SHARP PIPE (D).
- Move forward to the Workshop.
- Zoom into the stairs; pick up and open the note (E) fully.
- Pick up the BEE SMOKER (F).
- Return to the Backyard.
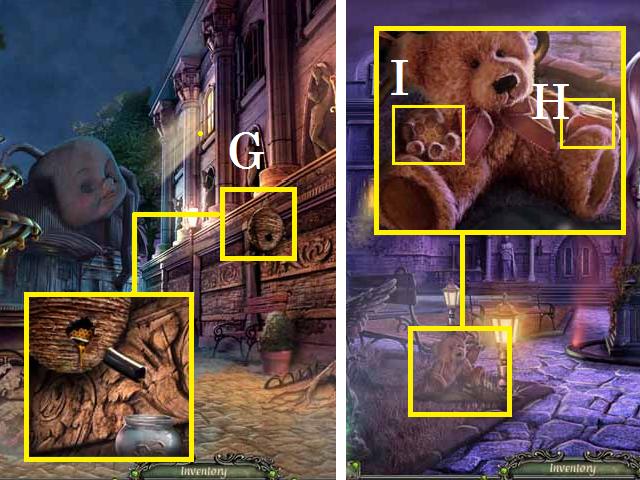
- Use the BEE SMOKER on the beehive (G).
- Zoom into the beehive; stick the SHARP PIPE in the beehive. Place the EMPTY HONEY JAR under the beehive to receive the FULL HONEY JAR.
- Return to the Theater Yard.
- Zoom into the teddy bear; place the FULL HONEY JAR in the bear's hand (H) and pick up the METAL HONEYCOMB (I).
- Return to the Workshop.
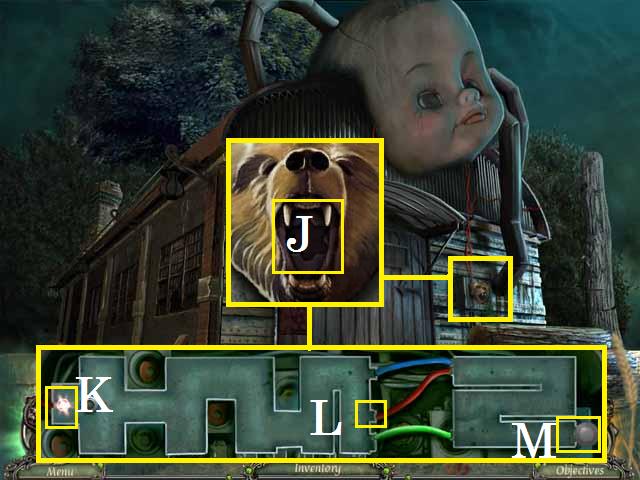
- Zoom into the door lock; open the bear's mouth and place the METAL HONEYCOMB inside (J), then open the doors.
- Move the lights along the path without touching the sides. Place the red light (K) in the red wire (L), then move to the end (M). Repeat with the green and blue lights.
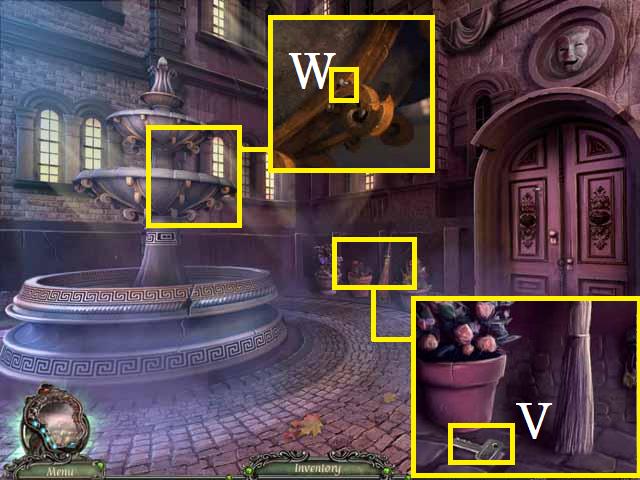
- Zoom into the side of the building; move the wood and pick up the BROOM (N).
- Return to the Backyard.
- Sweep the flowerbed (O) with the BROOM.
- Zoom into the sparkles to play a HOS.
- Open the music box (P).
- Use the shovel (Q) on the 'X' (R).
- Receive the AXE HANDLE.
- Return to the Workshop.
- Zoom into the tree; place the AXE HANDLE on the blade (S) and chop the tree three times with the AXE.
- Zoom into the roof; place the PEARL (T) and pick up the MEDALLION (U).
- Return to the Theater Yard.
- Zoom into the statue; place the MEDALLION (V).
- Tap the picture and then place the items (blue) in the correct places (pink). Repeat until all of the slides are complete.
- Pick up the second PEARL (W) and the WIRE HOOK (X).
- Return to the Backyard.
- Zoom into the window; open the latch (Y) with the WIRE HOOK.
- Enter the Theater Basement.
- Zoom into the paper; pick up the paper, move the top paper and pick up the first CARDBOARD FIGURE (Z) and the second TOKEN (A).
- Zoom into the pail; pick up the three NAILS (blue).
- Zoom into the switch (B) and flip it.
- Place each NAIL on the loose boards (C), then hammer each one with the BRICK.
- Pick up the BOX KEY (D).
- Zoom into the box; open the lock with the BOX KEY. Pick up the photo and dust it off.
- Pick up the third PEARL (E) and the last TOKEN (F).
- Exit the Theater Basement.

- Zoom into the fountain and then into the puzzle (G).
- Place the three TOKENS as shown in the screenshot.
- Collect the matching tokens (pink), then press the original tokens to open the lid.
- Pick up the blue jewel (H) and the SHARP STONE (I).
- Zoom into the sparkles to play a HOS.
- Open the paper towel roll (J).
- Receive the SCREWDRIVER.
- Return to the Workshop.
- Zoom into the side of the building.
- Cut the CURTAIN ROPE (K) with the SHARP STONE and pick it up.
- Return to the Theater Basement.
- Open the curtain (L) with the CURTAIN ROPE.
- Zoom into the sparkles to play a HOS.
- Open the card (M) and take the cat.
- Receive the HAMMER.
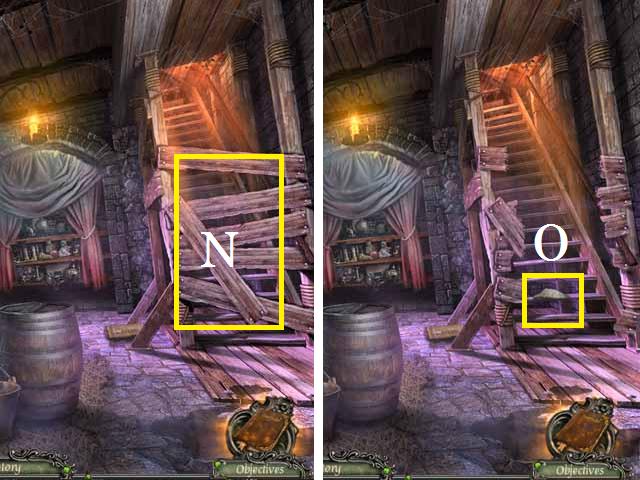
- Remove the wood (N) off the stairs with the HAMMER.
- Pick up the second MIRROR SHARD (O).
- Climb the stairs to the Backstage.
Chapter 4: Backstage
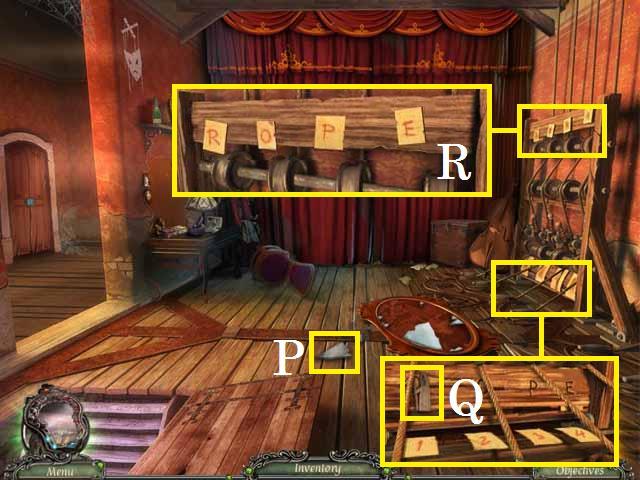
- Pick up the third MIRROR SHARD (P).
- Zoom into the curtain crank; arrange the number cards in order of 1, 2, 3, 4, then remove them and pick up the second CARDBOARD FIGURE (Q).
- Zoom into the top of the curtain crank; spell out R O P E (R).
- Enter the Stage to the right.
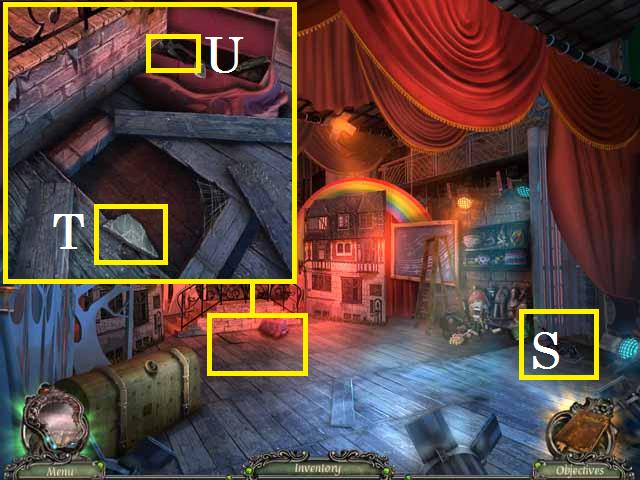
- Zoom in and flip the handle (S).
- Zoom into the floor; open the toolbox and move the floorboards.
- Pick up the fourth MIRROR SHARD (T) and the NAIL PULLER (U).
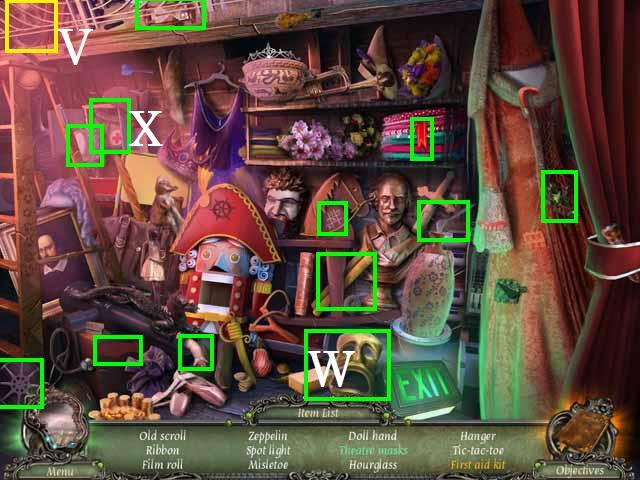
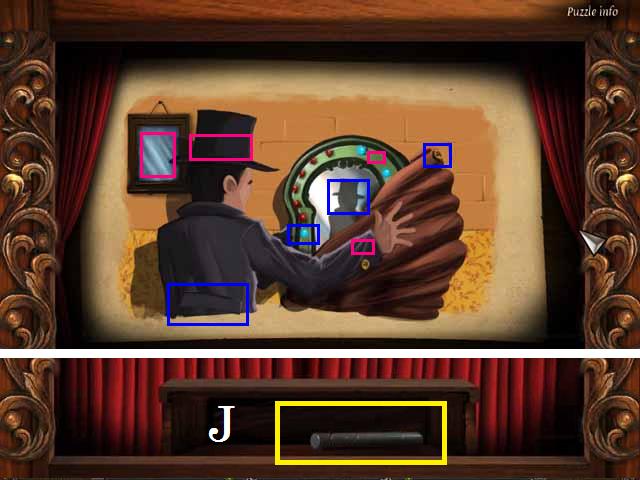
- Zoom into the sparkles to play a HOS.
- Place the mask (V) with its partner (W).
- Open the cabinet (X).
- Receive the DOLL HAND.
- Return to the Theater Basement.
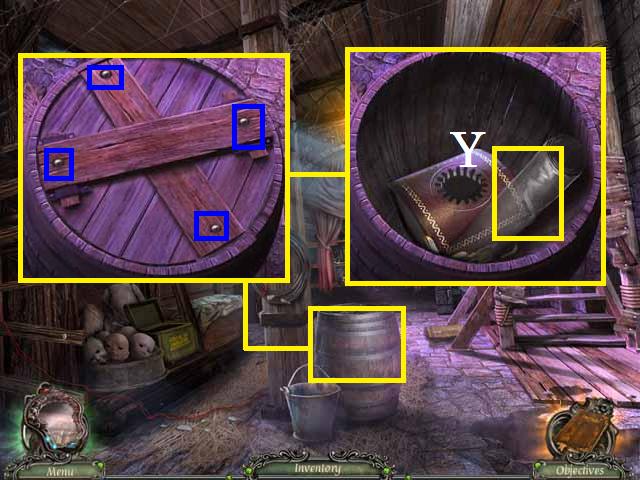
- Zoom into the cask; remove the four nails (blue) with the NAIL PULLER.
- Remove the wood and lid, then pick up the TRANSPARENT MUSIC SHEET (Y).
- Return to the Stage.

- Zoom into the rainbow scene; place the TRANSPARENT MUSIC SHEET on the chalkboard (Z).
- Play the windows in the following sequence: 2, 9, 8, 6, 7, 8, and 9.
- Pick up the MANAGER'S KEY (A).
- Exit back to the Backstage, take a left near the Stage to the Storage.
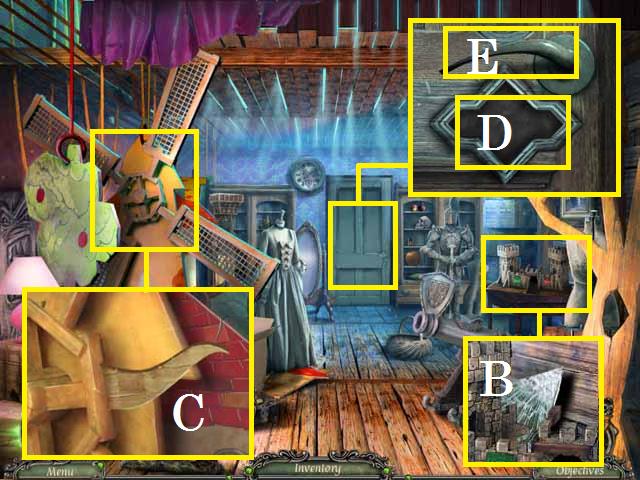
- Zoom into the castle; pick up the last MIRROR SHARD (B).
- Zoom into the windmill; pick up the first SUN RAY (C).
- Zoom into the door; place the MANAGER'S KEY in the lock (D) and press it, then pull the handle (E).
- Return to the Backstage.
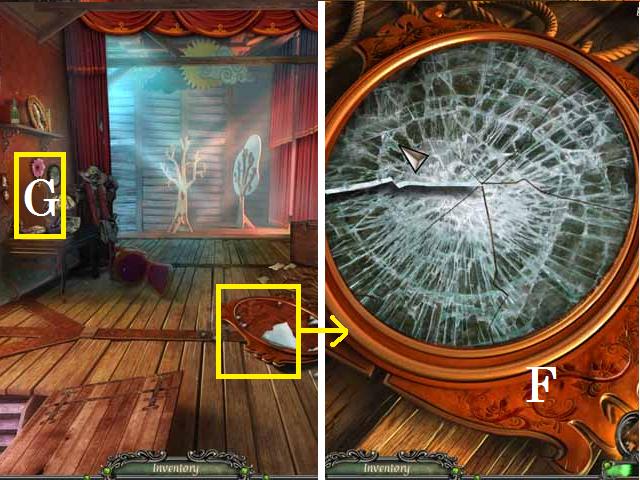
- Zoom into the make-up mirror; place all of the MIRROR SHARDS in the pop-up window and arrange them as shown in the screenshot (F). (Hint: to rotate a shard, hover over the outside rim and tap the piece).
- Place the completed MAKE-UP MIRROR on the wall (G).
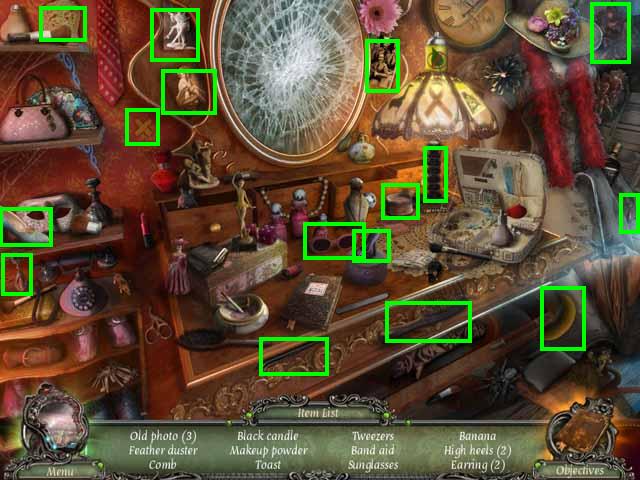
- Zoom into the sparkles to play a HOS.
- Pick up all the items marked in green to receive the TWEEZERS.
- Return to the Storage and enter the Manager's Office.
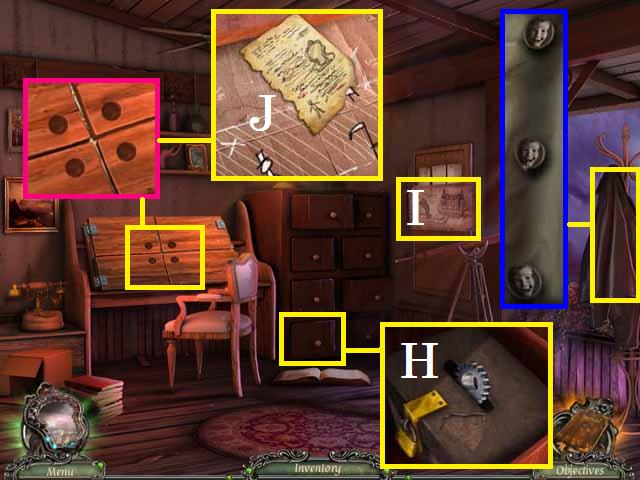
- Open and zoom into the drawer; use the TWEEZERS to pull out the GEAR (H).
- Zoom into the coat; remove the three BUTTONS (blue) with the SHARP STONE.
- Pick up the paper (I).
- Zoom into the table; place the three BUTTONS and the CLUE in the holes (pink).
- Open the doors, pick up the note (J), and place the two CARDBOARD FIGURES.
- Return to the Theater Basement.
- Zoom into the cask; place the GEAR in the box top and press until the lid opens. Pick up the LOCK PICK (K).
- Return to the backstage.
- Zoom into the door; place the LOCK PICK in the keyhole to activate a puzzle.
- The solution is random; our solution was: 6, 3, 2, 1, 5, and 4.
- Enter the Boiler Room.
- Pick up the third CARDBOARD FIGURE (L).
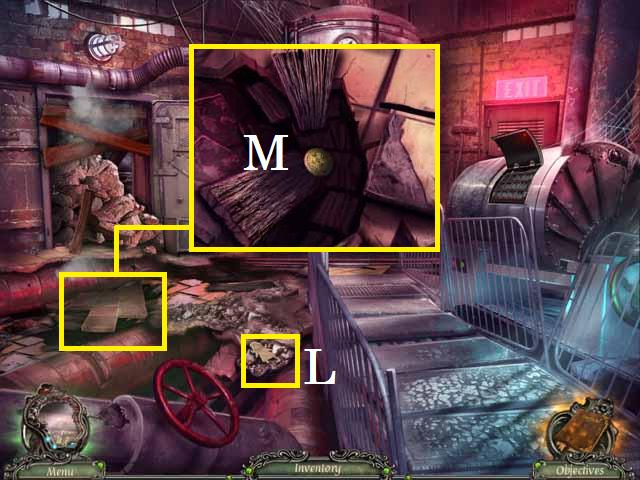
- Zoom into the floor; pick up the MEDALLION (M) with the DOLL HAND.
- Zoom into the box; open the doors and tap the picture.
- Place the items (blue) in the correct places (pink).
- Repeat until all of the slides are complete, then pick up the fourth PEARL (N).
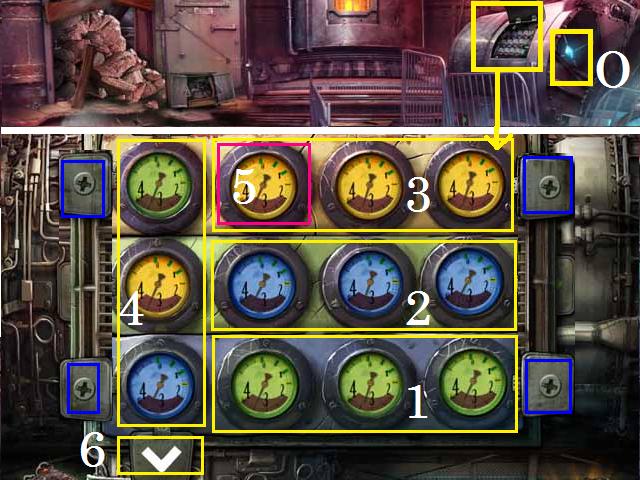
- Zoom into the tank; remove the four screws (blue) with the SCREWDRIVER and remove the grate.
- The beginning positions are random.
- Place three blue dials on the bottom right three spaces (1), three green dials on the second row far right (2) and yellow on the top (3). If your last three blue, green and yellow are out of order in the first column (4) move the blue dial to position (5) on the top row, move the first column using the down arrow (6), then place the blue dial back in the first column and rotate it down.
- Zoom into the side of the tank; pick up the blue jewel (O).
- Return to the Stage.
- Zoom into the chest; place the MEDALLION in the lock (P), press several times until the chest opens, remove the items and pick up the fourth CARDBOARD FIGURE (Q).
- Move to the Backstage.
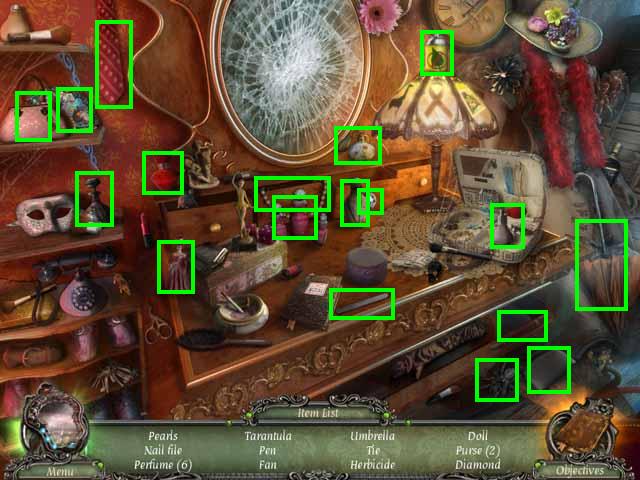
- Zoom into the sparkles to play a HOS.
- Find all the items marked in green to receive the HERBICIDE.
- Return to the Manager's Office.
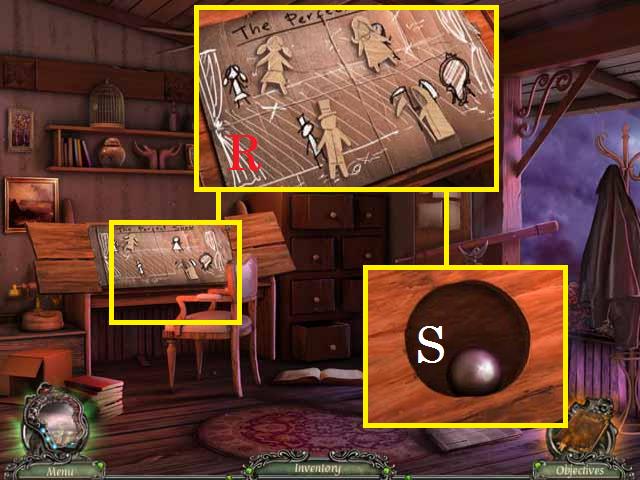
- Zoom into the table; place all of the CARDBOARD FIGURES as shown in the screenshot (R) and pick up the cardboard.
- Open the doors; pick up the last PEARL (S).
- Return to the Workshop.
- Zoom into the roof; place all of the PEARLS as shown in the screenshot (T).
Chapter 5: The Doll Manufacturing Room
- Enter the Doll Manufacturing Room.
- Pick up the CHARCOAL (U).
- Move forward to the Tree of Puppets.
- Zoom into the tree; remove the vines with HERBICIDE. Use the screenshot as a key to unscramble the leaves.
- Pick up the blue jewel (V).
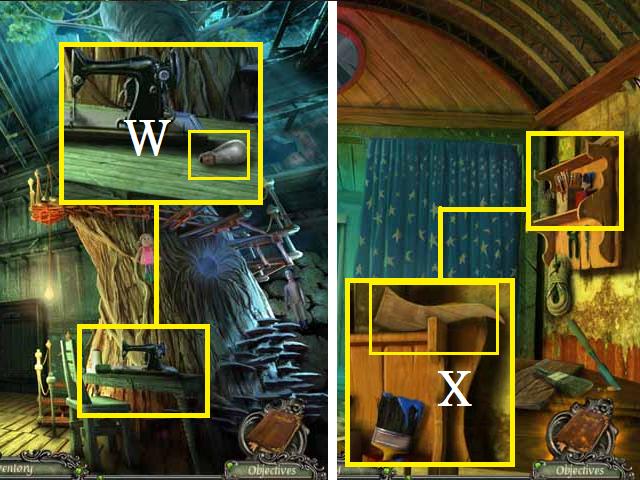
- Zoom into the sewing machine; pick up the FLASH BULB (W).
- Open the door to and enter the Scenography Workshop.
- Zoom into the shelf; pick up the second SUN RAY (X).
- Zoom into the sparkles to play a HOS.
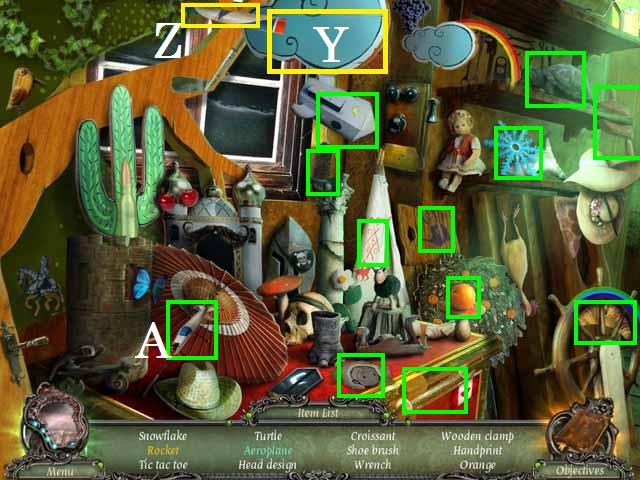
- Move the cloud (Y).
- Place the wings (Z) on the airplane (A).
- Receive the HEAD DESIGN.
- Return to the Doll Manufacturing Room.
- Zoom into the board; place the HEAD DESIGN (B), pull the handle (C), and pick up the DOLL DESIGN (D).
- Return to the Scenography Workshop.
- Place the DOLL DESIGN on the door (E) and enter the Atelier.
- Pick up the PESTLE (F) and the book (G).
- Zoom into the easel; pick up the PAINTING OF GRIM REAPER (H) and the PHOTO PAPER (I).
- Remove the sheet (J).
- Zoom into the camera: place the FLASH BULB (K), open the door , place the PHOTO PAPER (L), close the door, then press the button (M).
- Zoom back into the camera; open the door with the PHOTO PAPER and pick up the UNDEVELOPED PHOTOGRAPH.
- Open the door and pick up the BATTERY PACK (N).
- Flip the switch (O).
- Zoom into the table; place the UNDEVELOPED PHOTOGRAPH in the tray (P) then pick it back up as the PHOTO OF ME.
- Flip the switch again.
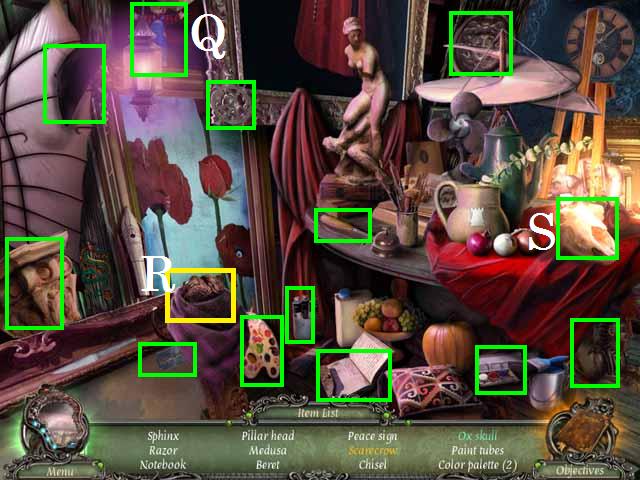
- Zoom into the sparkles to play a HOS.
- Move the paper to reveal the scarecrow (Q).
- Place the horns (R) on the skull (S).
- Receive the RAZOR.
- Return to the Tree of Puppets.
- Zoom into the tree; remove the three pieces of RESIN (blue) with the RAZOR.
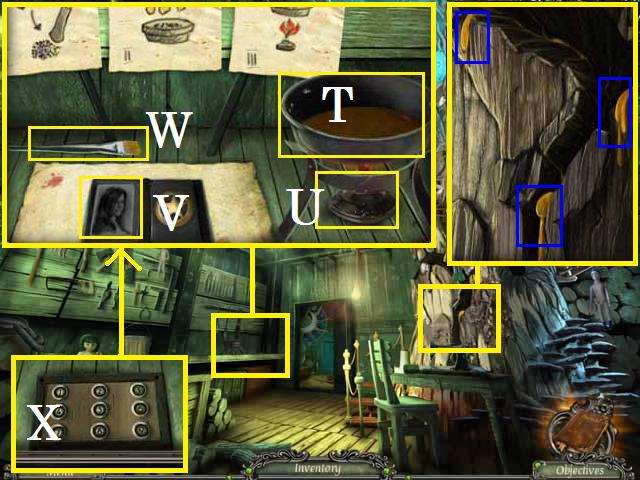
- Zoom into the table; place the BADGE as shown in the screenshot.
- Place the CHARCOAL in the bowl (T) followed by the PESTLE two times and the three pieces of RESIN.
- Tap the burner (U) to make the RESIN GLUE.
- Remove the old photo (V) with the RAZOR.
- Dip the paintbrush (W) in the RESIN GLUE and apply to the BADGE. Place the PHOTO OF ME.
- Pick up the RESIN GLUE and the BADGE.
- Move the paper and pick up the KEYPAD (X).
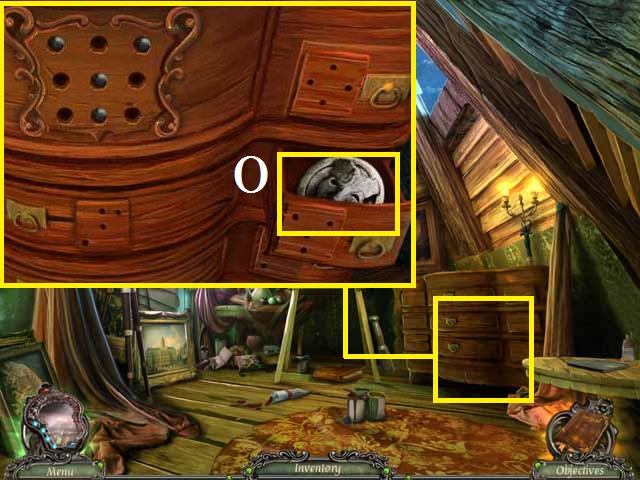
- Return to the Doll Manufacturing Room.
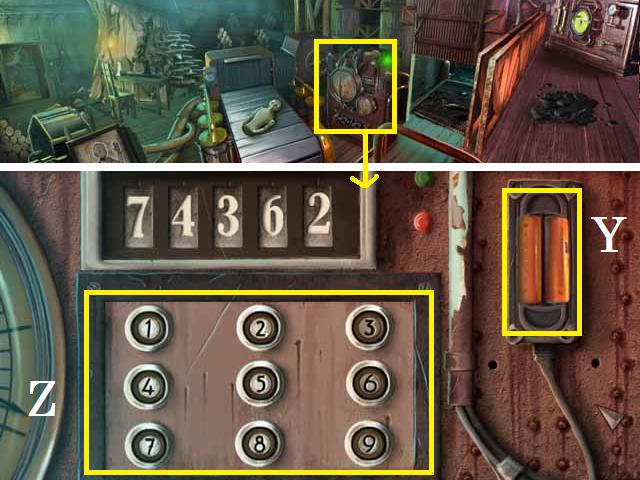
- Zoom into the machine; open the battery compartment (Y) with the SCREWDRIVER and then place the BATTERY PACK.
- Place the KEYPAD (Z), then enter the number 7 4 3 6 2.
- Take the Passage.
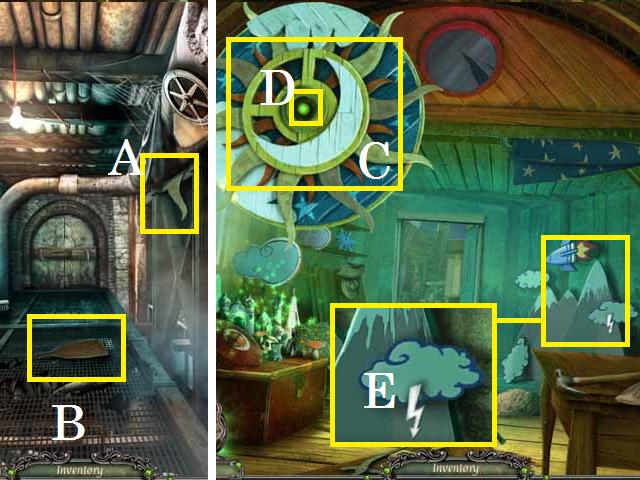
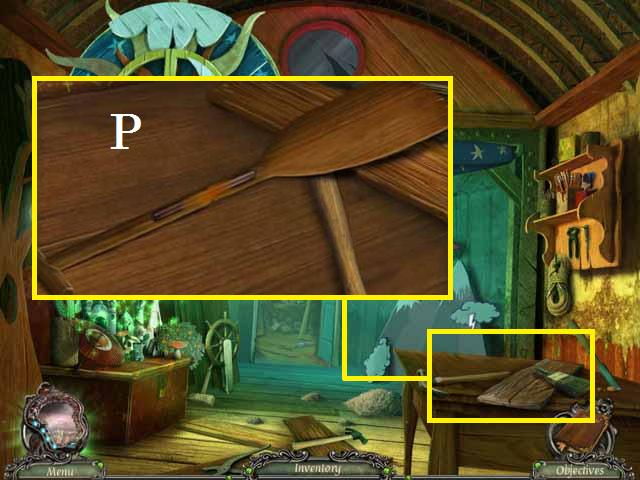
- Pick up the SUN RAY (A) and the BROKEN OAR (B).
- Return to the Scenography Workshop.
- Place the three SUN RAY (C) and press the button (D).
- Zoom into the rocket; pick up the LIGHTNING (E).

- Zoom into the sparkles to play a HOS.
- Tap the bird (F).
- Place the part of the rainbow (G) with the rest (H).
- Receive THE TALE OF A REWARD.
- Return to the Doll Manufacturing Room.
- Zoom into the box; place THE TALE OF A REWARD (I).
- Tap the picture and then place the (blue) items in the correct places (pink).
- Repeat until all of the slides are complete, then pick up the METAL BAR (J).
- Take the Passage.
- Zoom into the breaker box; place the LIGHTNING (K), open the door, and pick up the two MARBLES (pink).
- Return to the Atelier.
- Zoom into the dresser; place the two MARBLES.
- Arrange the MARBLES as shown in the screenshot, then pick up the GAUZE (L).
- Zoom into the sparkles to play a HOS.
- Open the flower (M).
- Cut the wing (N) with the knife (O).
- Receive the CHESS FIGURE.
- Exit to the Scenography Workshop.
- Zoom into the table; place the BROKEN OAR (P), METAL BAR, RESIN GLUE, and GAUZE, pick up the OAR.
Chapter 6: The Mansion
- Return to the Lake.
- Place the OAR in the boat (Q) and take it across the lake to the Mansion.
- Pick up the CHESS FIGURE (R).
- Zoom into the light; place the CHESS FIGURE and pick up the CHESS FIELD (S).
- Zoom into the other light; place the CHESS FIGURE and pick up the CHESS FIELD (T).
- Zoom into the gate (U); place the two CHESS FIELD pieces and match the pairs.
- The positions are random. (Hint: all spaces are always visible. When the bottom row moves, it only moves to the top).
- Enter the Mansion Entrance.
- Move the planters and zoom in; pick up the CAR KEYS (V).
- Zoom into the fountain; remove the BOLT (W).
- Back up one scene.
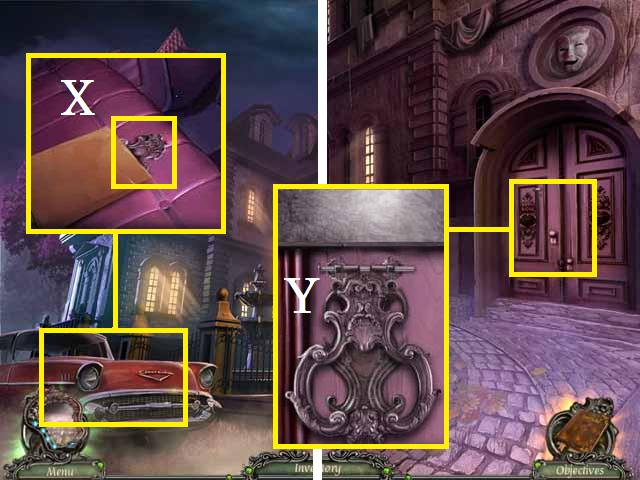
- Zoom into the car; place the CAR KEYS in the lock and open the door. Tap the bag and pick up the KNOCKER (X).
- Return to the Mansion Entrance.
- Zoom into the door; place the KNOCKER and BOLT (Y).
- Use the KNOCKER and show the woman the BADGE.
- Enter the Foyer, then enter the Basement Staircase.
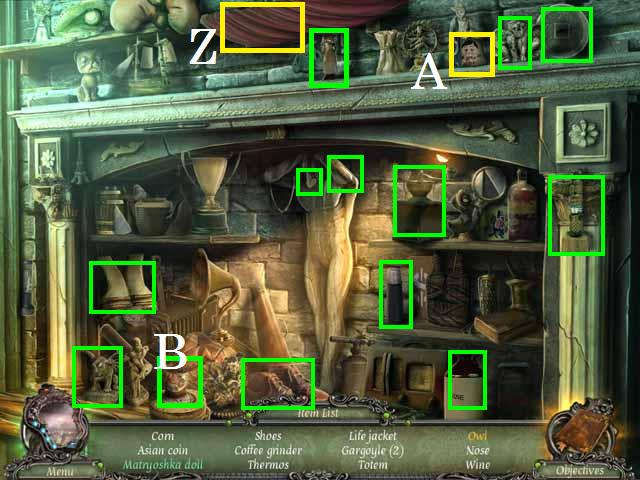
- Zoom into the sparkles to play a HOS.
- Open the curtain (Z).
- Place the doll head (A) with the body (B).
- Receive the NOSE.
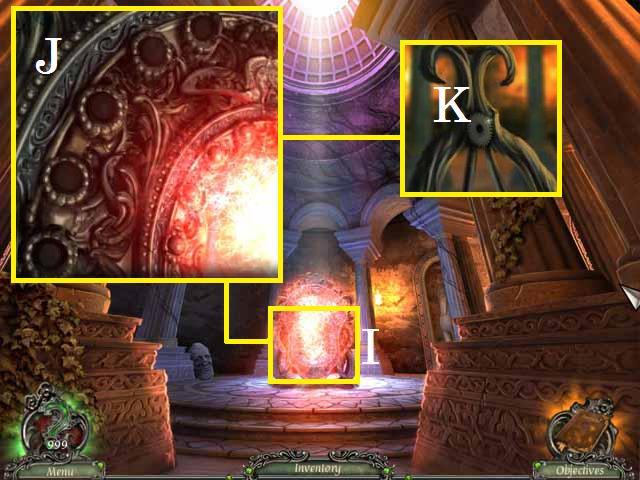
- Pick up the STONE ROD (D).
- Enter the Mansion Basement.
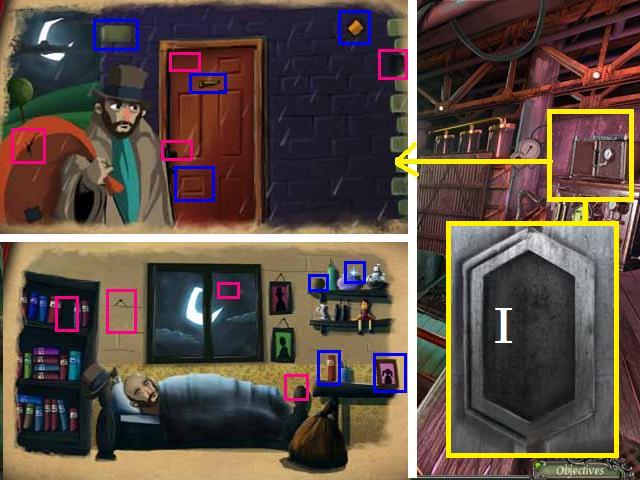
- Zoom into the statue; pick up the first LETTER (E), and tap the pattern (F).
- Pry the door (G) with the STONE ROD and open it all the way.
- Pick up the first EAR (H).
- Return to the Foyer.
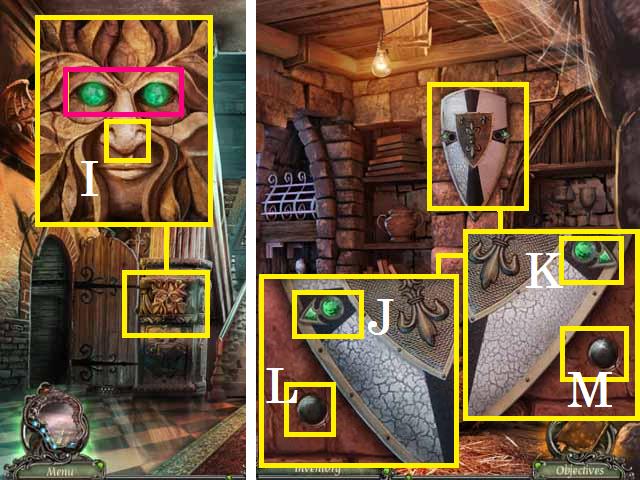
- Zoom into the pillar; place the NOSE (I) and pick up the two EMERALD EYES (pink).
- Return to the Mansion Basement.
- Zoom into the KNIGHT'S SHIELD; place the two EMERALD EYES (J and K). Move the KNIGHT'S SHIELD to one side and pick up the MARBLE (L). Move the KNIGHT'S SHIELD to the other side and pick up the MARBLE (M).
- Collect the KNIGHT'S SHIELD.
- Back up to the Basement Stairs.
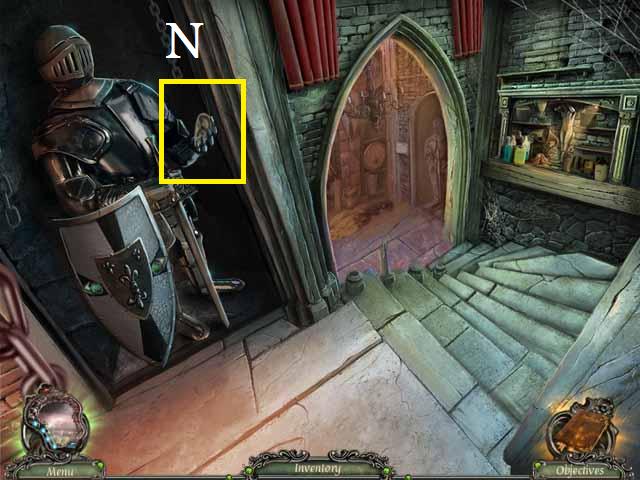
- Place the SHIELD with the knight; pick up the second EAR (N).
- Return to the Foyer.
- Show the man your BADGE.
- Return to the Atelier.
- Zoom into the dresser; place the two MARBLES and arrange them as shown in the screenshot.
- Pick up the MASK (O).
- Return to the Passage.
- Zoom into the door; remove the wood, then place and spin the MASK (P).
- Enter the Tunnel.
- Pick up the ten TANGRAM PIECES (blue).
- Zoom into the door; place the TANGRAM PIECES as shown in the screenshot (Q).
- Enter the Mansion Basement then back out to the Foyer.
- Zoom into the pillar; place the two EARS (R) and pick up the STONE TEETH (S).
- Enter the Upstairs.
- Zoom into the sparkles to play a HOS.
- Use the pliers (T) on the tooth (U).
- Open the present (V).
- Receive the second LETTER.
- Zoom into the Library Door.
- Place the STONE TEETH on the door (W) and enter the Library.
- Zoom into the contraption; pick up the CANDLE (X).
- Zoom into the desk; move the papers; pick up the CARVED BOARD (Y) and STRING (Z).
- Exit the Library.
- Zoom into the nook; place the CANDLE in the parachute (A) and pick up the third LETTER.
- Return to the Basement Stairs.
- Zoom into the sparkles to play a HOS.
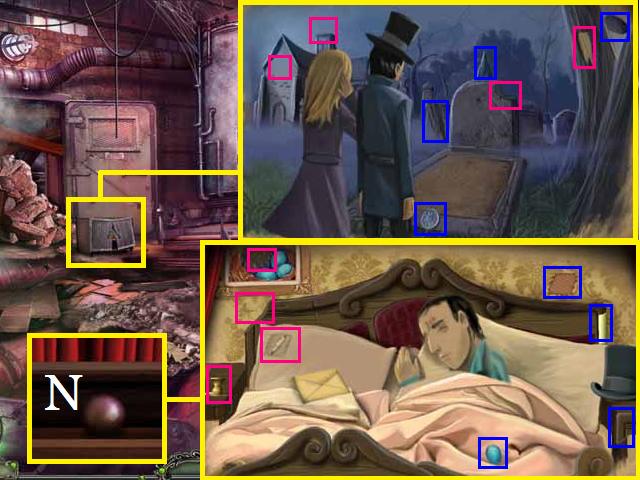
- Open the hidden door (B).
- Place the mirror piece (C) in the mirror (D).
- Receive the fourth LETTER.
- Enter the Mansion Basement.
- Zoom into the door; place the CARVED BOARD (E).
- Slide the top board (F) over and apply the RESIN GLUE to the middle board. Slide the top board back. Slide the top and middle boards over and apply the RESIN GLUE to the bottom board (G). Slide the top two boards back then all three boards to the left.
- Pick up the PLIERS (H).
- Return to the Upstairs.
- Zoom into the mirror; spin the fasteners (blue) using the PLIERS on the broken one (I) and pick up the SMALL MIRROR.
- Enter the Library.
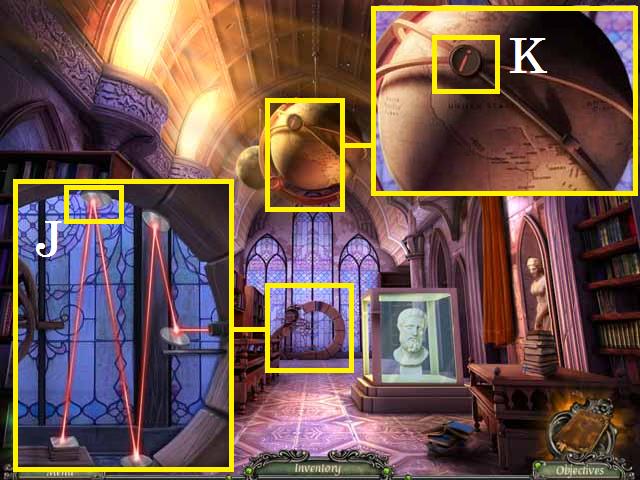
- Zoom into the contraption; place the mirror (J) and arrange the beam as shown in the screenshot.
- Zoom into the globe; pick up the last LETTER (K).
- Exit the Library.
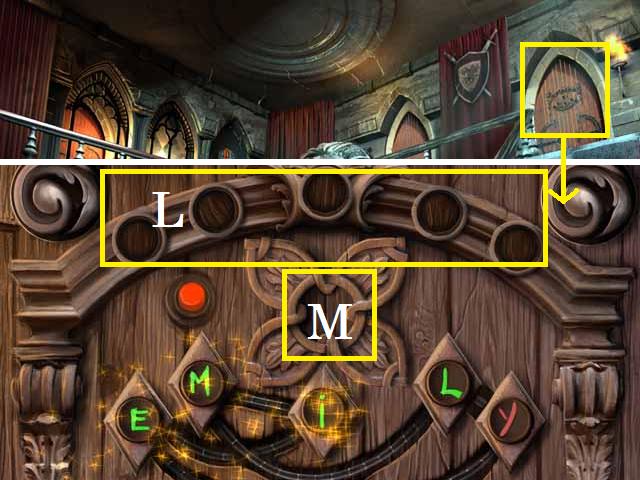
- Zoom into the door; place all of the LETTERS in the spaces (L).
- Place the letters in the hole (M) in the following order: I, E, Y, L, and M.
- Enter the Kid's Room.
Chapter 7: The Kid's Room
- Zoom into the sparkles to play a HOS.
- Open the door (N).
- Crack the egg (O) with the spoon (P).
- Receive the first HALF OF THE MASK.
- Zoom into the table; pick up the BASEBALL GLOVE (Q), and the TRIANGLE (R).
- Pick up the soldier (S); collect the clue and flip the soldier over.Pick up the CIRCLE (T).
- Pick up the BLANKET (U), then the SQUARE (V).
- Return to the Library.
- Zoom into the case; place the SQUARE, CIRCLE, and the TRIANGLE in the slot (W).
- Pick up the BEDROOM KEY (X).
- Exit the Library.
- Zoom into the door; place the BEDROOM KEY in the hole. Spin the KEY and pull the handle (Y).
- Enter the Bedroom.
- Zoom into the sparkles to play a HOS.
- Move the hat (Z).
- Place the slipper (A) with its mate (B).
- Receive the WEIGHT.
- Return to the Upstairs.
- Place the STRING, then the WEIGHT on the hook (C); pick up the second HALF OF THE MASK (D).
- Enter the Bedroom.
- Zoom into the door; place the two HALF OF THE MASKS on the door (E).
- Enter the Work Cabinet.
- Zoom into the sparkles to play a HOS.
- Place the medallion piece (F) with its match (G).
- Receive the DIAMOND.
- Zoom into the globe; press the button (H) twice.
- Return to the Upstairs.
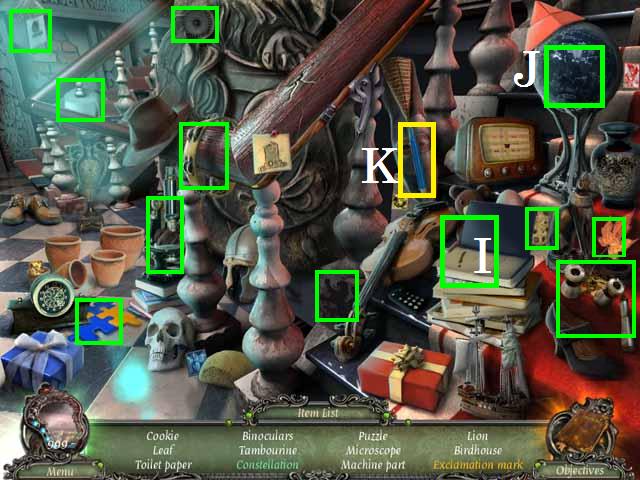
- Zoom into the sparkles to play a HOS.
- Open the book (I).
- Draw the constellation on the globe (J) with the pen (K).
- Receive the first GEAR.
- Back out to the Foyer and enter the Gallery.
- Move the ladder (L) to position (1).
- Pick up the PAINTING OF HENRY'S WIFE (M) and the PAINTING OF HENRY MASON (N).
- Move the ladder to position (2) and pick the PAINTING OF HENRY'S DAUGHTER (O).
- Zoom into the case; pick up the MEDALLION (P) and cut the glass with the DIAMOND.
- Zoom into the alcove; hang the four PAINTINGS as shown in the screenshot (Q).
- Enter the Hall of Secrets.
- Zoom into the spider web; pick up the WINDING KEY (R).
- Zoom into the wall; pick up the first METAL BUTTERFLY PART (S).
- Return to the Bedroom.
- Zoom into the box; place the MEDALLION in the cutout (T), tap the picture, then place the items (blue) in the correct places (pink).
- Repeat until all of the slides are complete then pick up the PLUSH DOLL (U).
- Return to the Kid's Room.

- Zoom into the sparkles to play a HOS.
- Open the door (V).
- Place the puzzle piece (W) with the other piece (X).
- Receive the second GEAR.
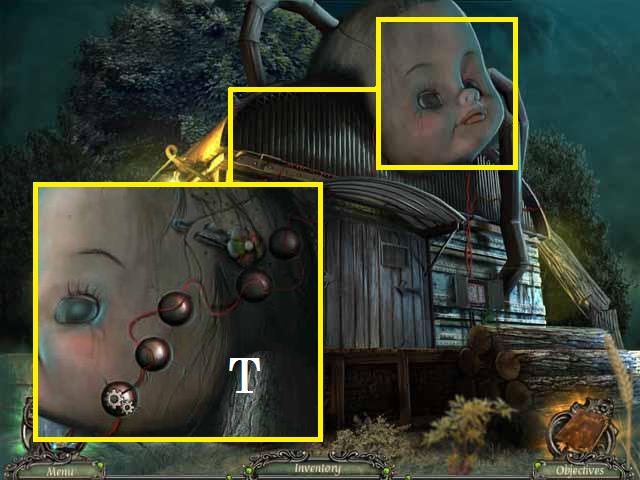
- Zoom into the table; place the WINDING KEY in the clock (Y). Spin the WINDING KEY and pick up the second METAL BUTTERFLY PART (Z).
- Return to the gallery.
- Zoom into the case; place the two METAL BUTTERFLY PARTS in the cutout (A). Open the lock, pick up the SCIENCE BOOK and open the glass.
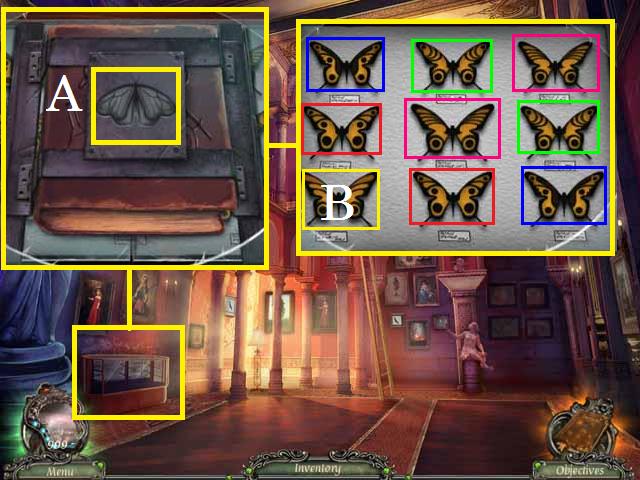
- Match the pairs (color coded in the screenshot), then pick up the last BUTTERFLY (B).
- Return to the Hall of Secrets.
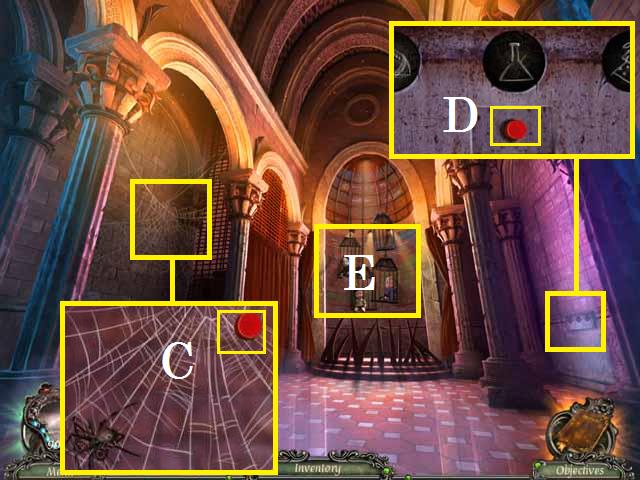
- Zoom into the spider web; place the BUTTERFLY in the web and pick up the MECHANISM BUTTON (C).
- Zoom into the wall; place the MECHANISM BUTTON (D) and press it.
- Zoom into the cages (E).
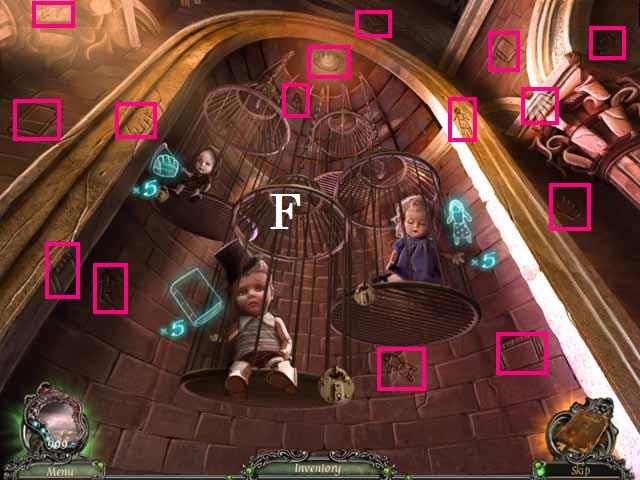
- Give the BASEBALL GLOVE, PLUSH DOLL, and SCIENCE BOOK to the kids as shown in the screenshot (F).
- Find all the matching items (pink) hidden in the wall.
- Exit back from the cages.
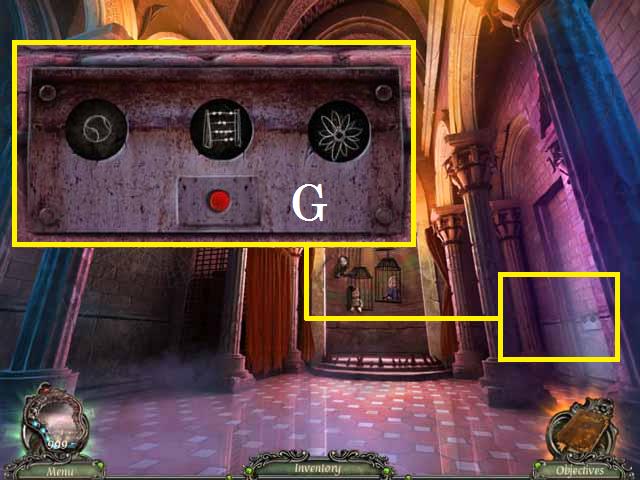
- Zoom into the wall; set the symbols as shown in the screenshot (G).
- Enter the Mirror Room.
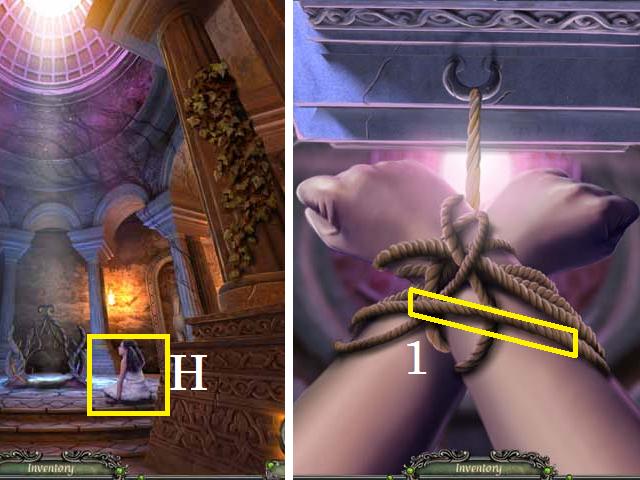
- Talk with the girl (H).
- Remove the ropes, starting with (1) and work your way from the top rope to the bottom rope.
- Return to the Work Cabinet.

- Zoom into the sparkles to play a HOS.
- Uncover and pick up the gems (green).
- Receive the five BLUE JEWELS.
- Return to the Mirror Room.
- Zoom into the mirror (I); place the five BLUE JEWELS (J), and pick up the MIRROR.
- Zoom into the stand; pick up the last GEAR (K).
- Enter the Hall of Secrets.
- Speak with the Man.
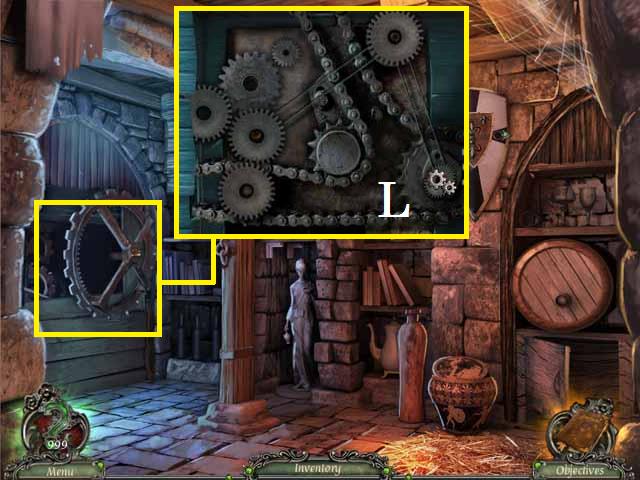
- Return to the Mansion Basement.
- Zoom into the wall; place the three GEARS as shown in the screenshot (L).
- Take the Tunnel.
- Return to the Stage through the Theater Basement.
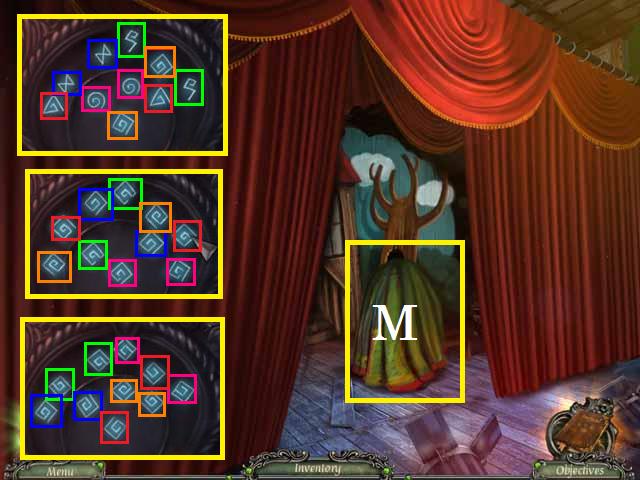
- Open the curtain; place the MIRROR on the bench (M) and cover it with the BLANKET and zoom in.
- After the curtain opens, pull the BLANKET off the MIRROR.
- Match the pairs (color coded) to fight back.
- Congratulations you have completed Rite of Passage: The Perfect Show.
Created at: 2012-07-06