

Walkthrough Menu
- General Tips
- Chapter 1: Subway
- Chapter 2: Cottage
- Chapter 3: Wellspring
- Chapter 4: Seventh Temple of the Stars
- Chapter 5: Domed Temple
- Chapter 6: The Great Forge
General Tips
- This is the official guide for Rite of Passage: The Sword and the Fury.
- This guide won't tell you when to zoom into a location; the screenshots show each zoom scene.
- Hidden-object puzzles are referred to as HOPs. Only the locations of the HOPs will be shown.
- Use the Map to fast travel to a location.
Chapter 1: Subway
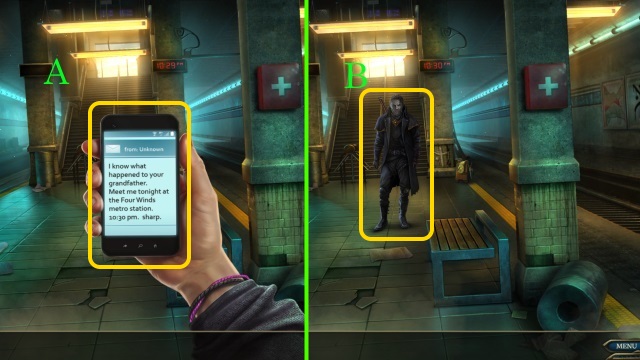
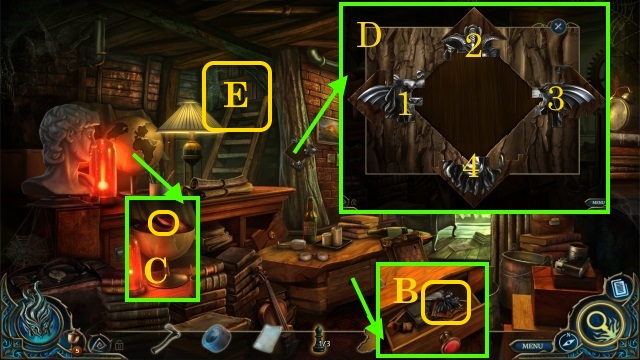
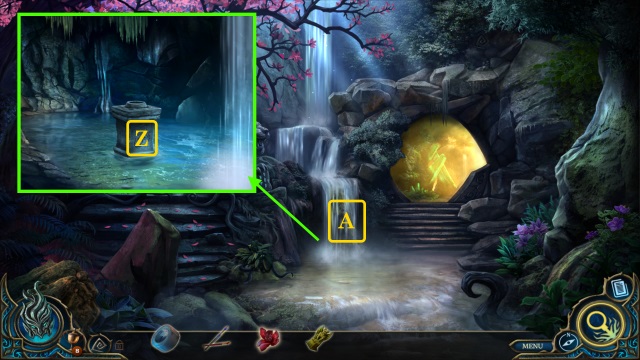
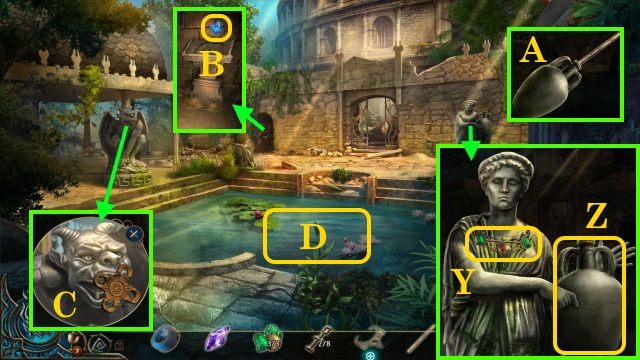
- Examine (A).
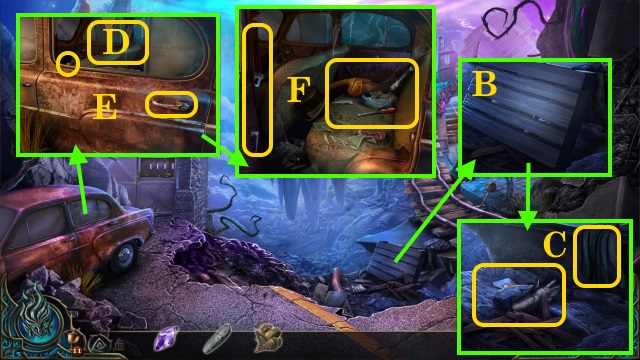
- Speak (B).
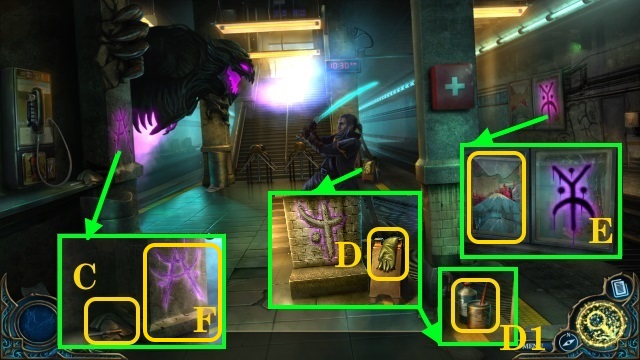
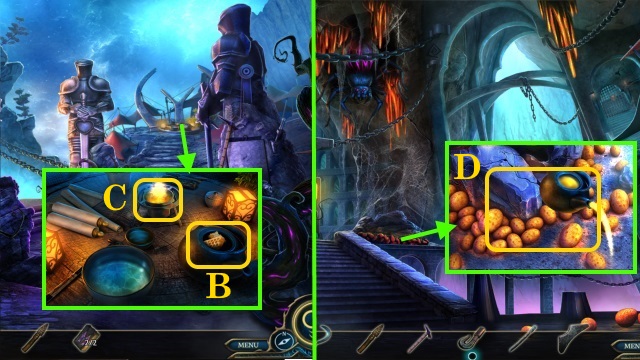
- Pick up CHISEL and RAG (C).
- Use CHISEL. Pick up RUBBER GLOVE (D). Move sign; take GLUE and PAINT THINNER (D1).
- PAINT THINNER on RAG; receive RAG WITH PAINT THINNER.
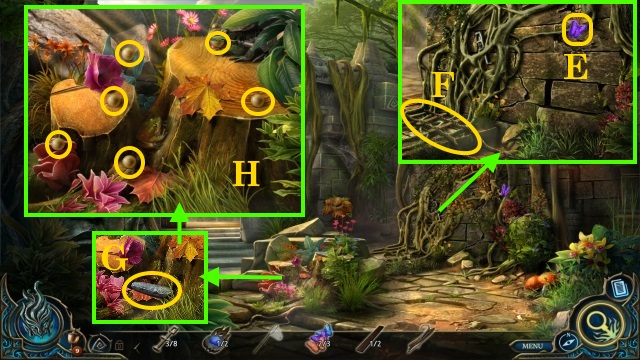
- Use RAG WITH PAINT THINNER. Remove glass; take POSTER (E).
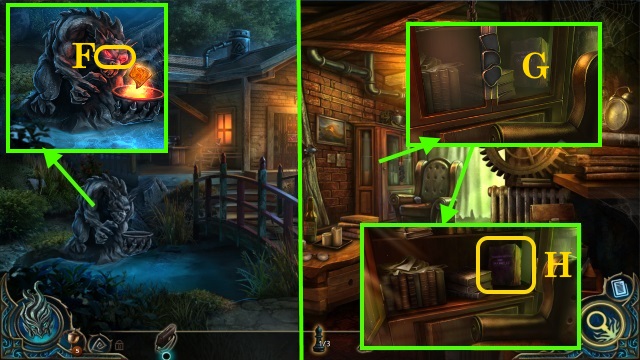
- Use GLUE and POSTER (F).
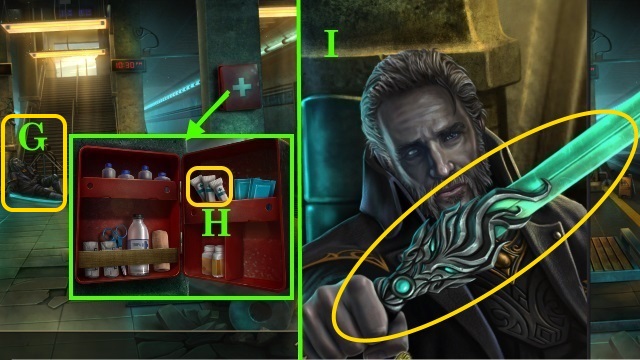
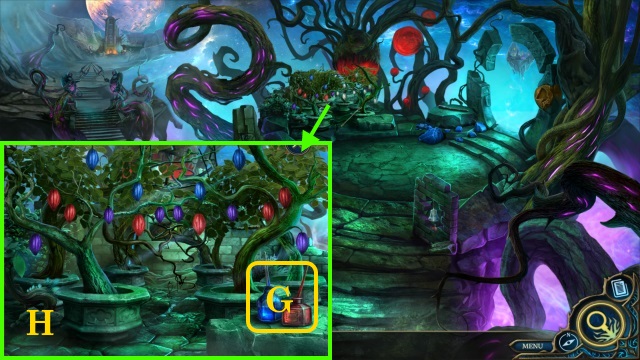
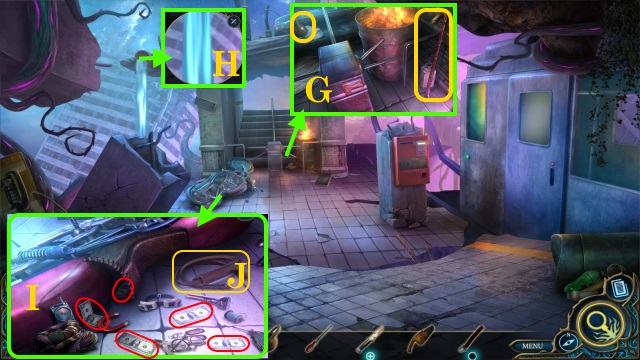
- Speak (G).
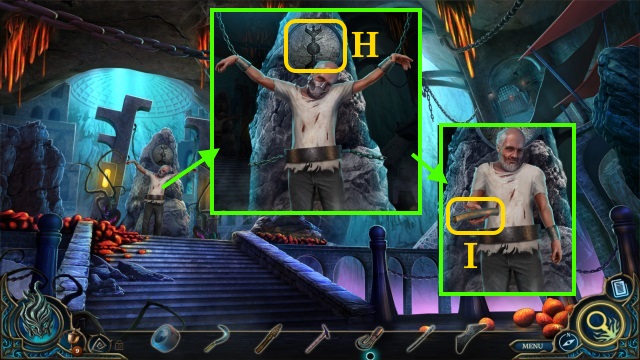
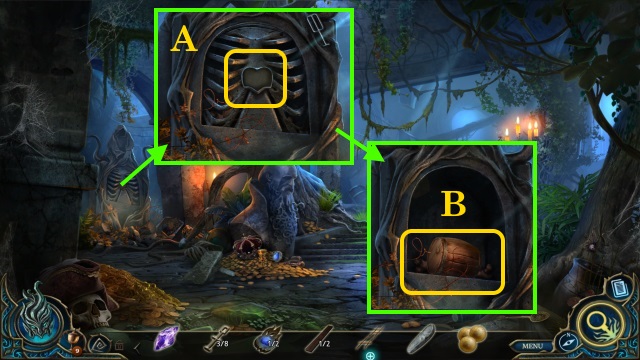
- Open (H); take SMELLING SALTS.
- Use SMELLING SALTS; Take sword (I).
- Enter train.
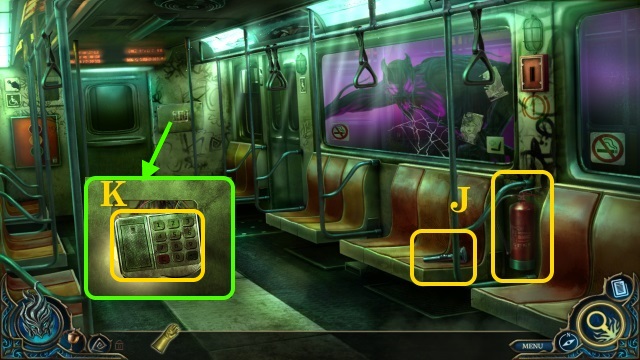
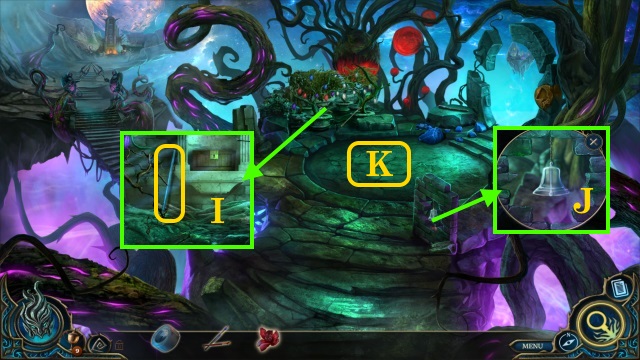
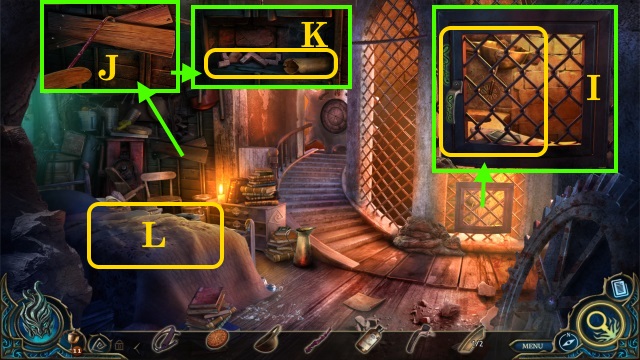
- Take FLASHLIGHT and FIRE EXTINGUISHER (J).
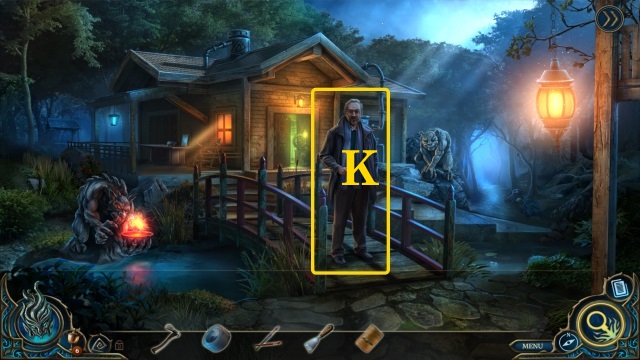
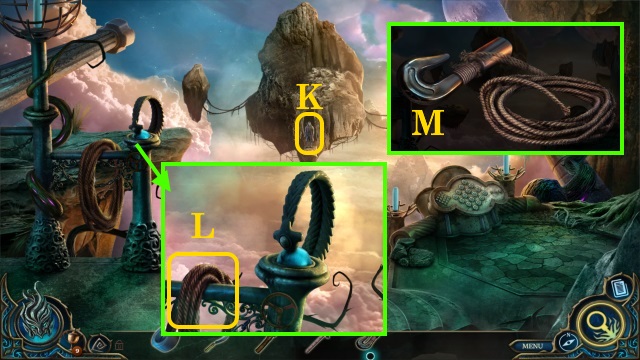
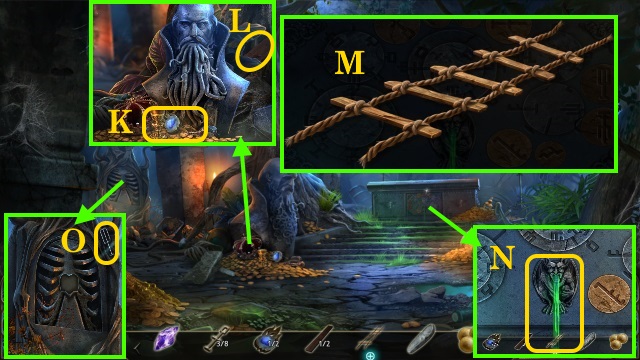
- Remove panel; use RUBBER GLOVE (K).
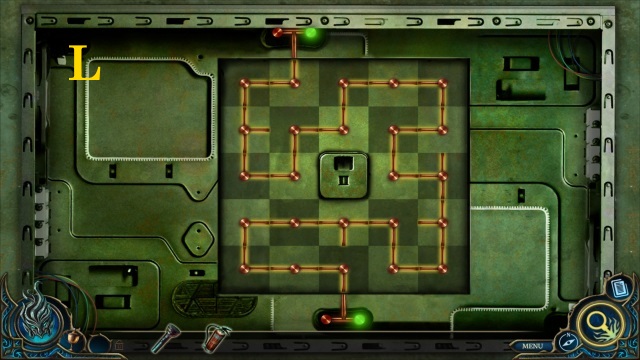
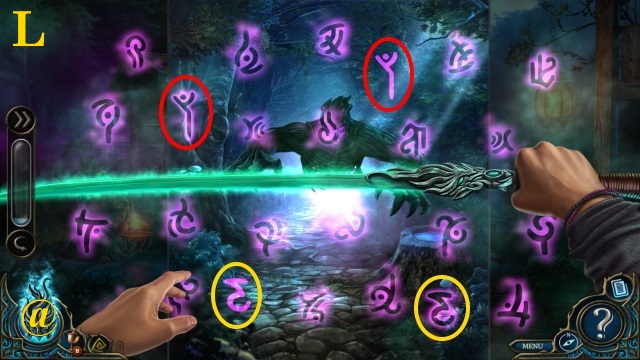
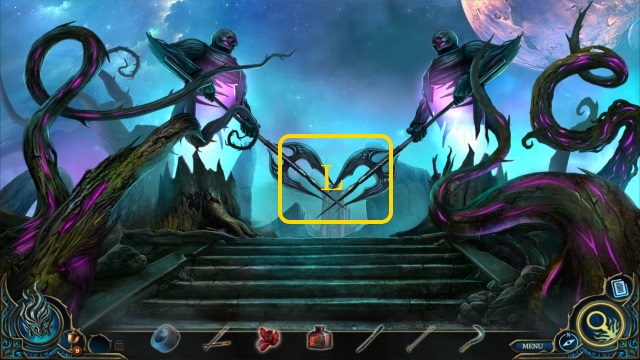
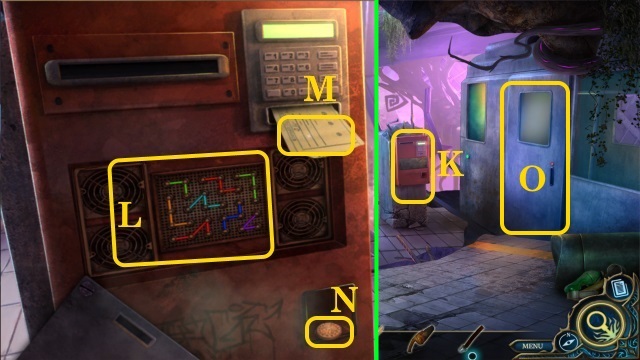
- Solution (L).
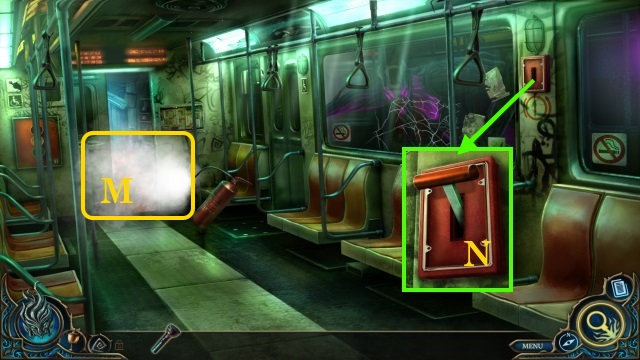
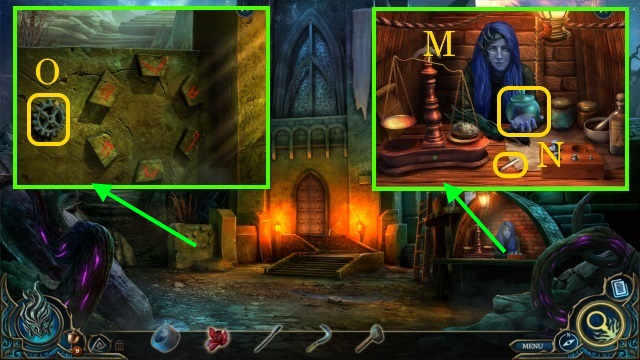
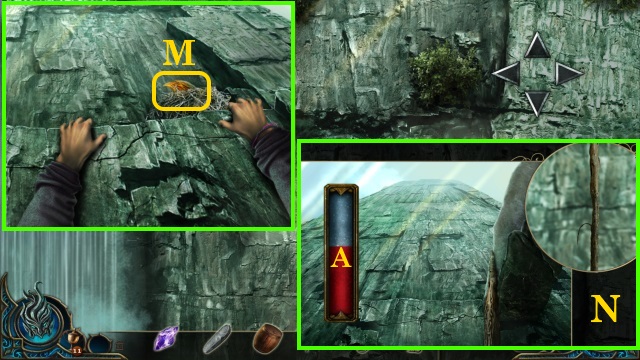
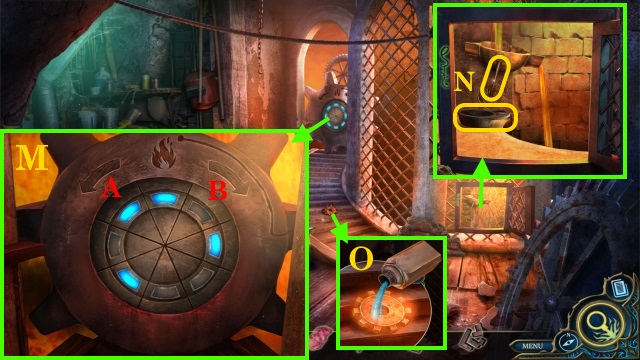
- Use FIRE EXTINGUISHER; complete HOP (M). Obtain BRAKE HANDLE.
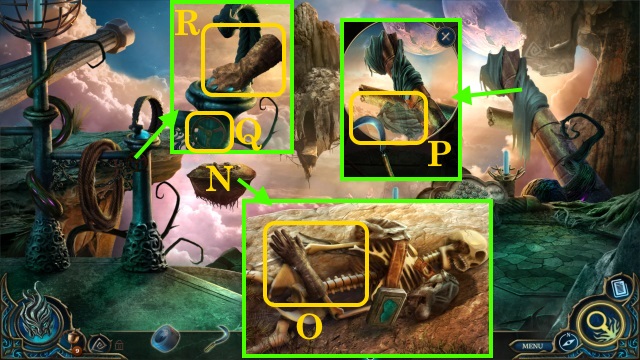
- Place BRAKE HANDLE; pull down (N).
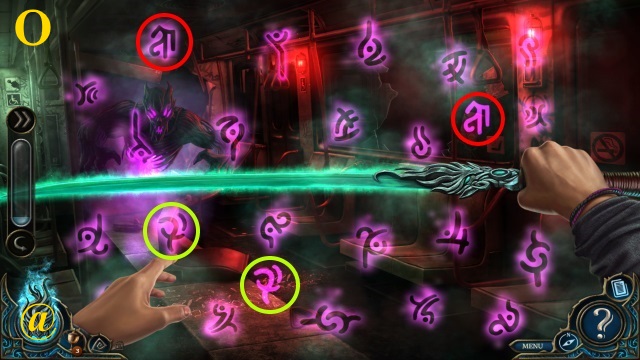
- Use (@). Solution: (O).
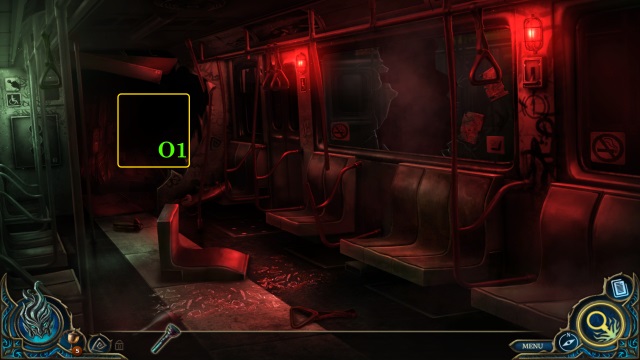
- Use FLASHLIGHT (O1); move forward.
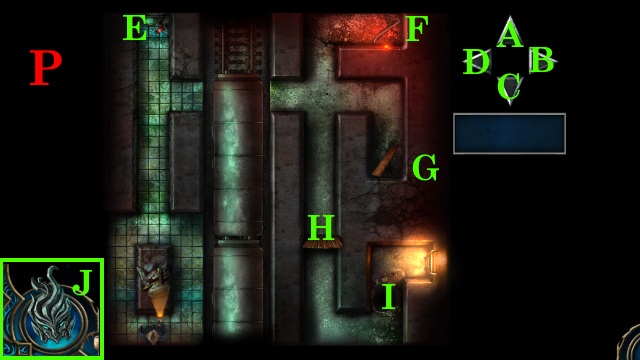
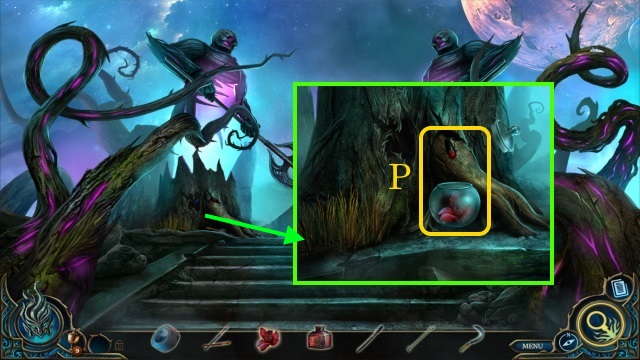
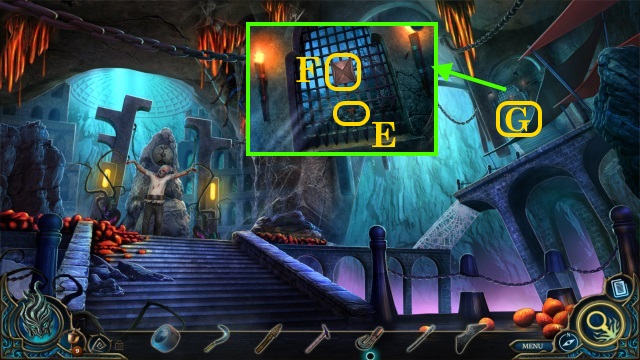
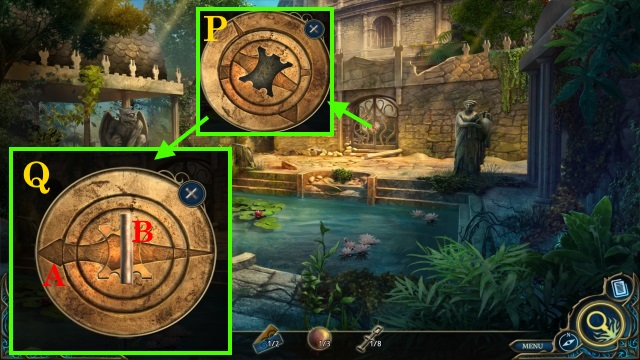
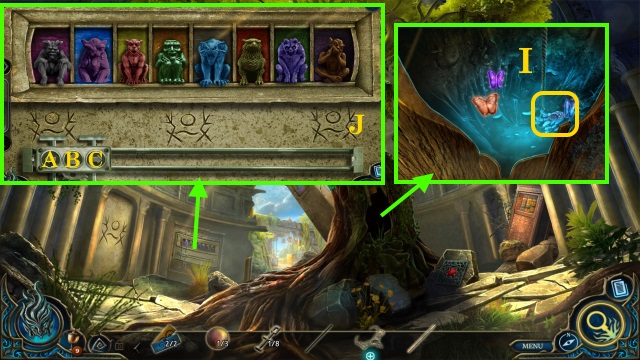
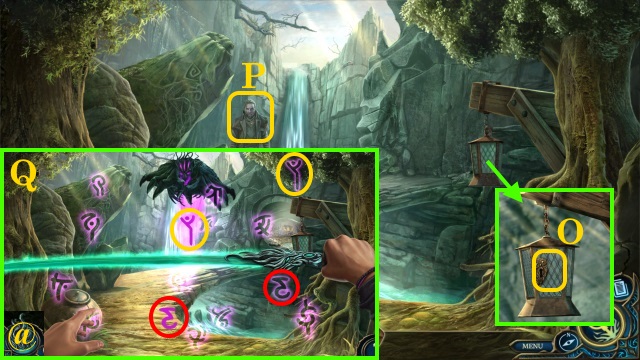
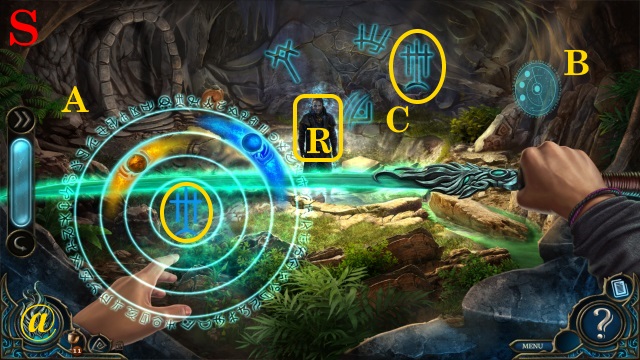
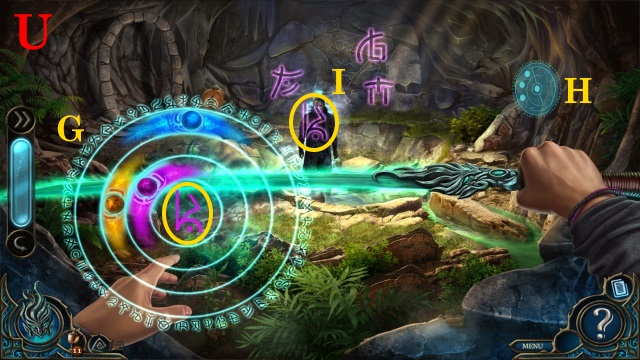
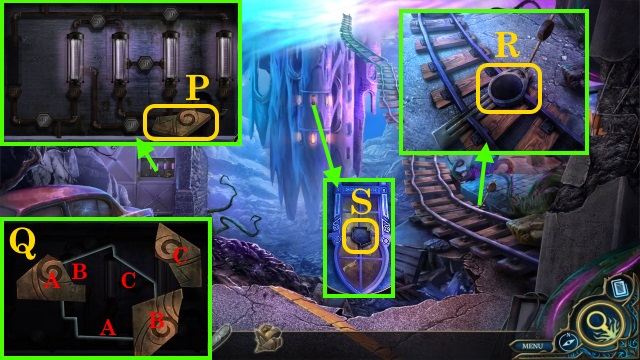
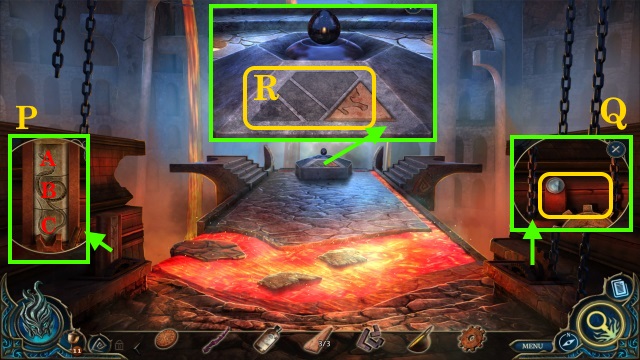
- Solution: (P) D-A-C-Bx2-A-D-Ax2-E-C-B-A-J-A-B-D-C-B-C-A-D-C. Use F on H. C-B. Use G on I. A-B.
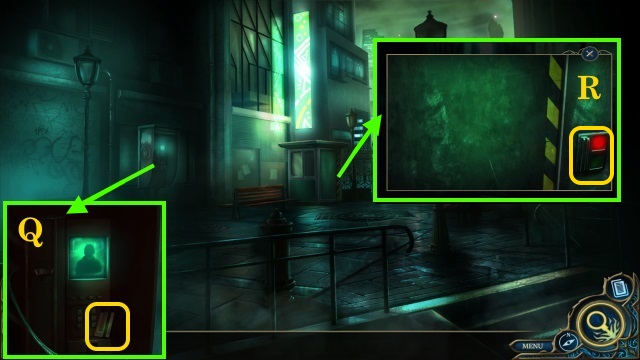
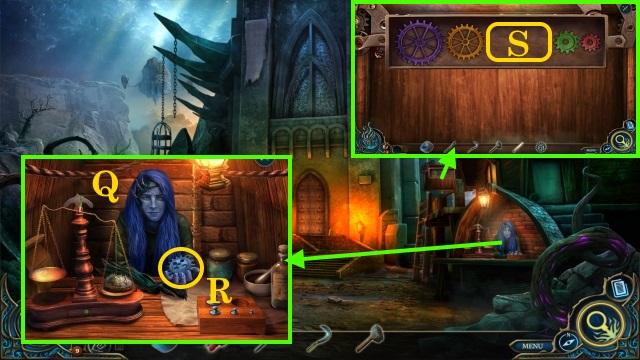
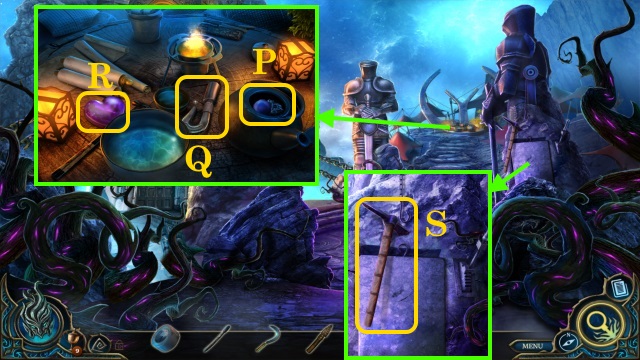
- Answer (Q); and pick up ID CARD.
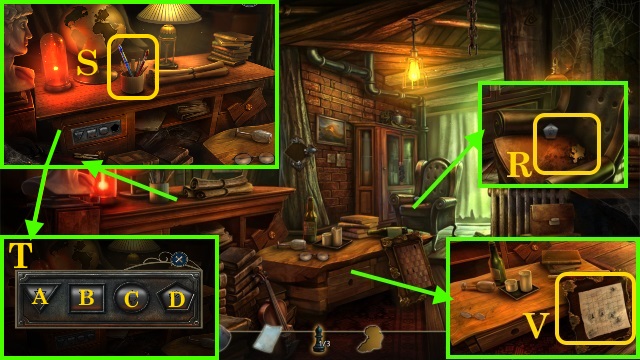
- Use ID CARD (R).
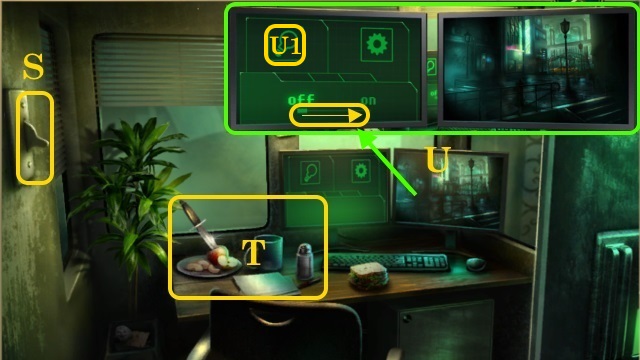
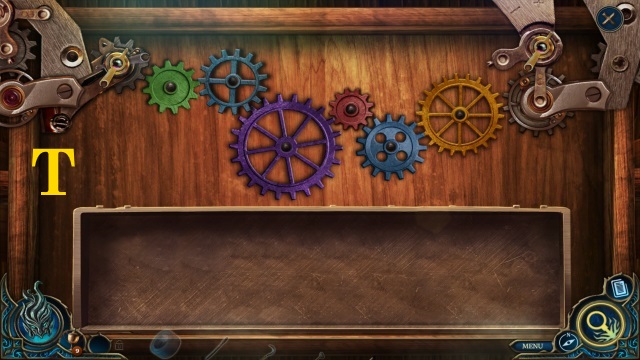
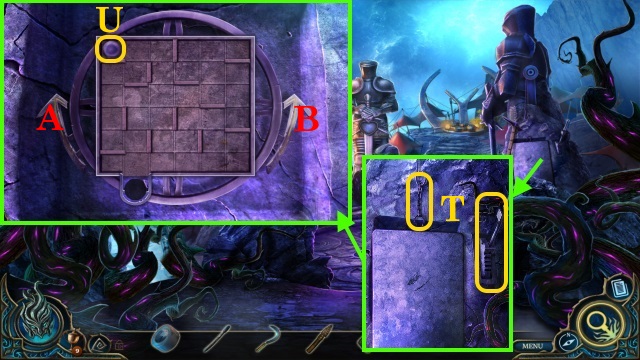
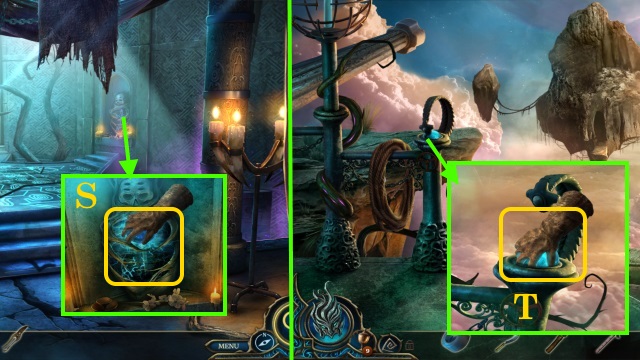
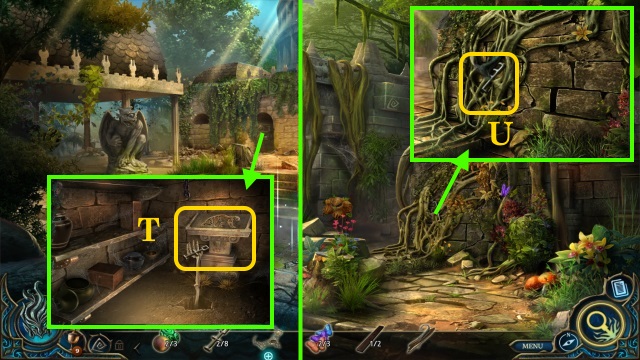
- Flip light switch (S); take PARING KNIFE and SALTSHAKER (T).
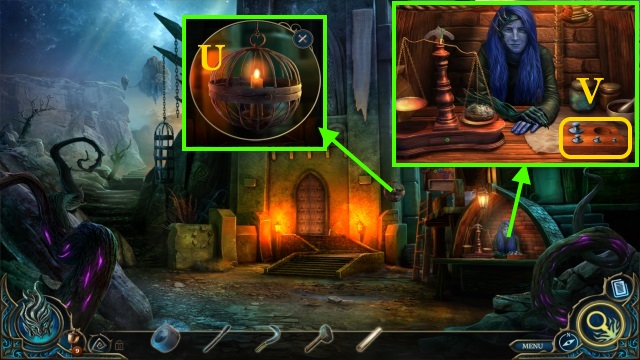
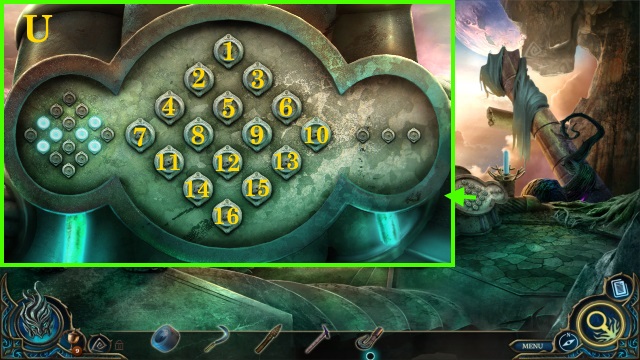
- View (U); Select (U1), toggle on.
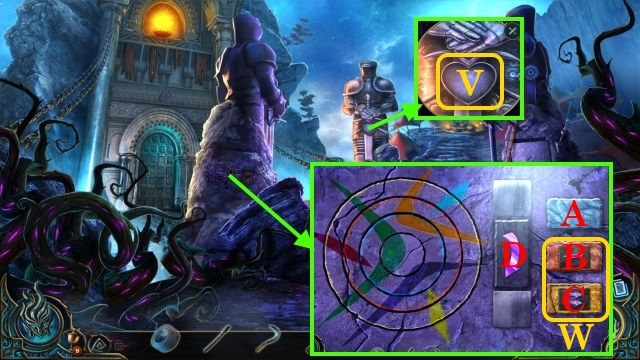
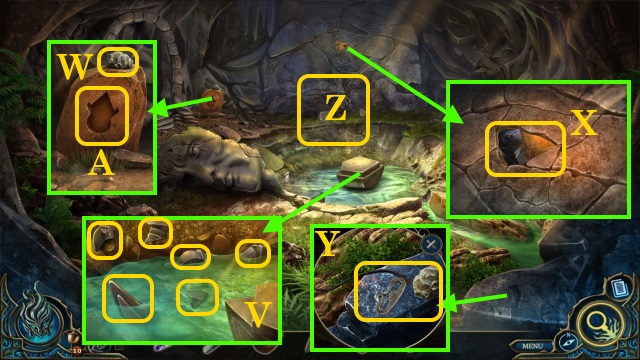
- Take MAGNET and BRIEFCASE (V). Remove LEATHER STRAP from BRIEFCASE.
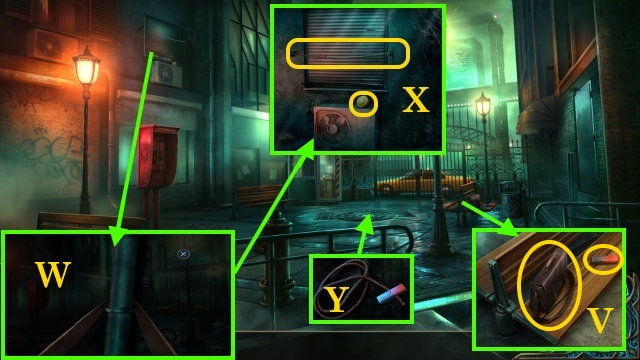
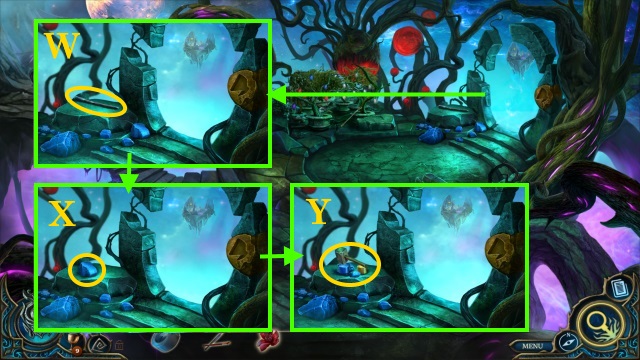
- Use LEATHER STRAP (W) and climb; take LEMON HALF and cut rope with PARING KNIFE (X).
- MAGNET on ROPE; receive ROPE WITH MAGNET.
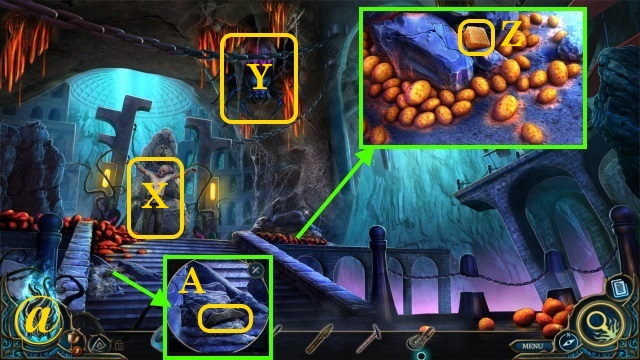
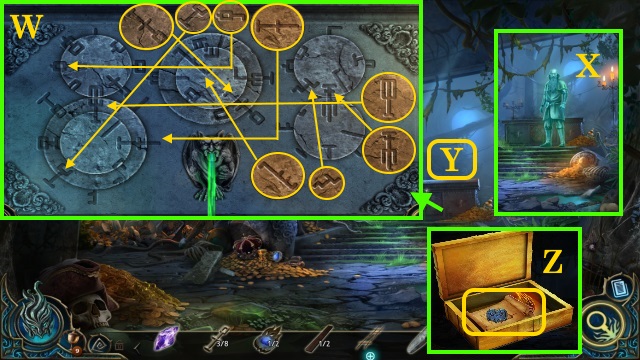
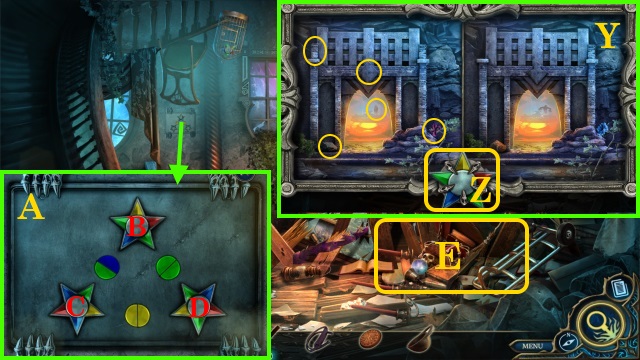
- Use ROPE WITH MAGNET (Y).
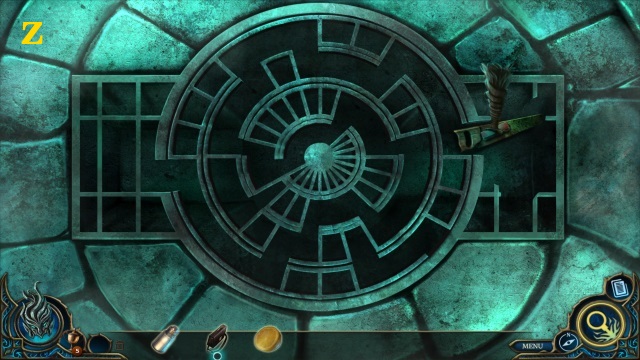
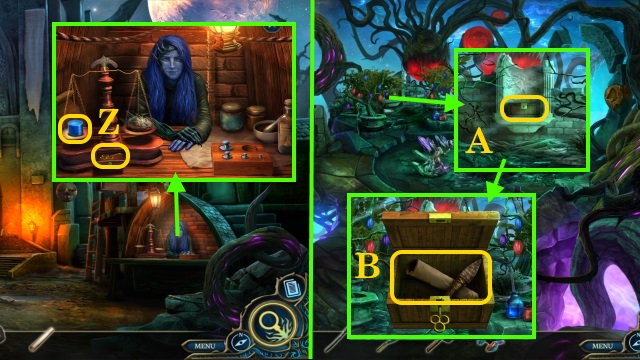
- Solution: (Z).
- Take RUSTY SAW; inspect.
- Use SALTSHAKER and LEMON HALF; obtain SAW.
- Use SAW; take WOODEN PLANK (A).
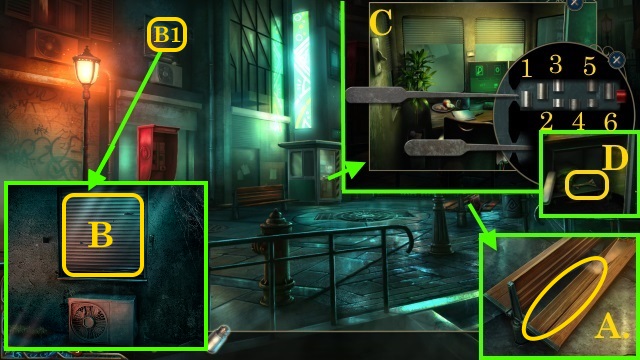
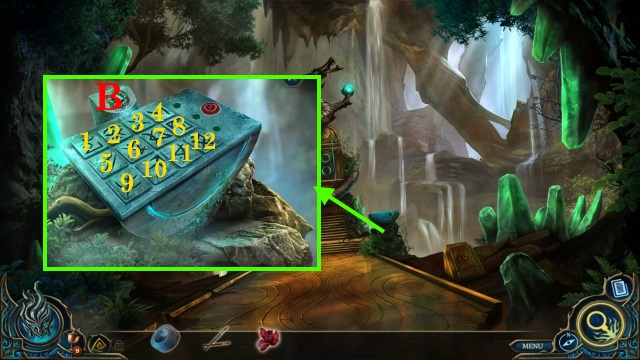
- Place WOODEN PLANK (B); Complete HOP (B1), receive LOCKPICK.
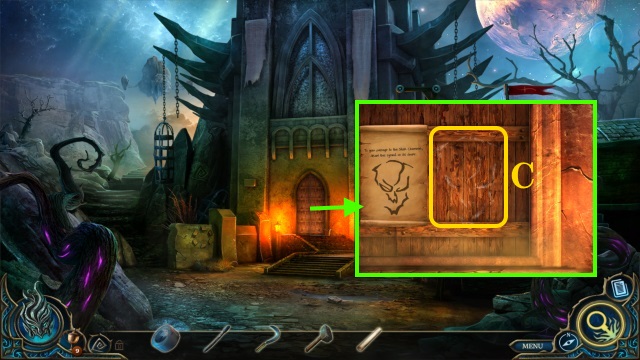
- Use LOCKPICK on lock (C).
- Solution: 1-1-3-3-5-5.
- Take GATE KEY (D).

- Unlock (E) with GATE KEY; enter taxi (F).
Chapter 2: Cottage
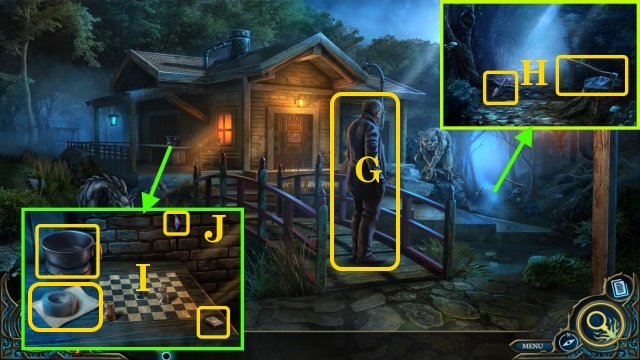
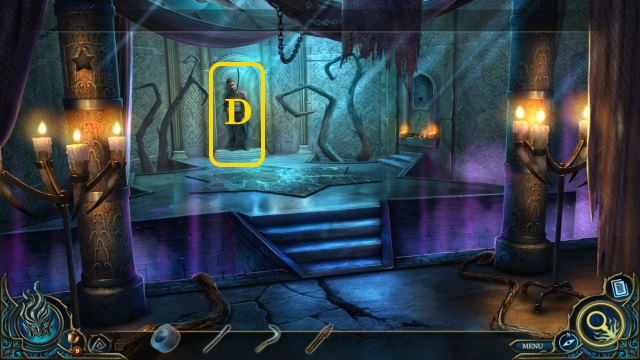
- Move forward; talk (G).
- Take HATCHET and TROWEL (H).
- Take EMPTY POT, DUCT TAPE, BUCKLE and BLANK PAPER (I).
- Place BUCKLE on BRIEFCASE; open and move items. Take PLIERS.
- Use PLIERS (J); get PURPLE TILE 1/3.
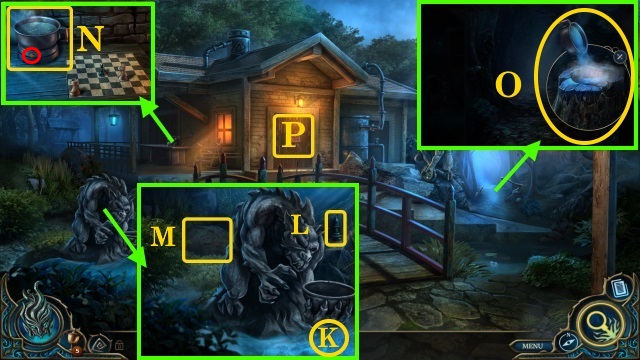
- Use EMPTY POT to gather POT OF WATER (K).
- Take CHESS PIECE 1/3 (L).
- Use TROWEL (M); get AFRICA and PURPLE TILE 2/3.
- Place POT OF WATER, press button (N); take BOILING WATER.
- Use BOILING WATER (O); take PURPLE TILE 3/3.
- Place PURPLE TILES (P); Solve puzzle.
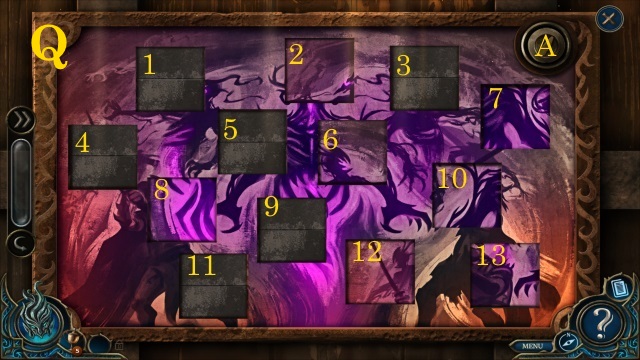
- Solution (Q): 6-7-A-1-2-8-9-3-7-A-7-12-8-13-10-13-7-13-A-4-11-4-7-A-7-13-A-7-4-7-5.
- Move forward.
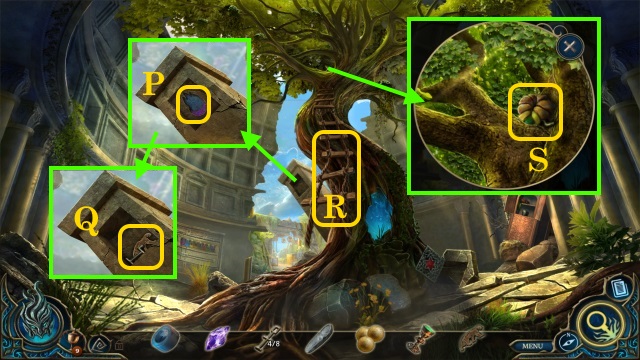
- Take PENTAGON and EUROPE (R).
- Take PAINTBRUSHES and PENCIL (S).
- Place PENTAGON (T).
- Solution: Ax2-Bx3-Cx3-Dx2.
- Take SCRAPER, CHESS PIECE 2/3 and CREEPY TILE 1/2.
- Place BLANK PAPER, use PENCIL (V); Take CHESSBOARD TRACING.
- Move down.
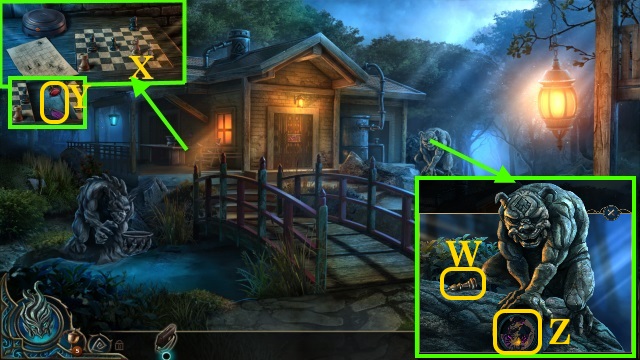
- Take CHESS PIECE 3/3 (W).
- Place CHESS PIECES and CHESSBOARD TRACING (X).
- Take CREEPY TILE 2/2 and DRAWER HANDLE (Y).
- Insert CREEPY TILES (Z).
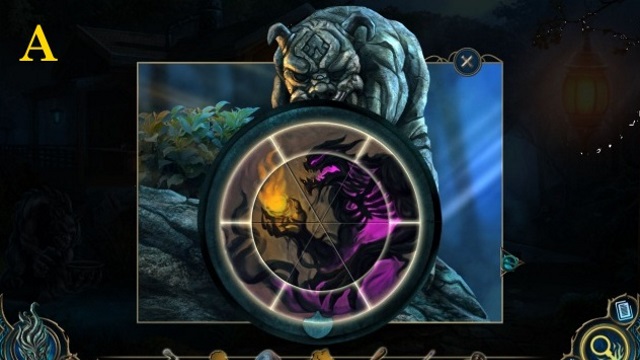
- Solution: (A).
- Take BIRD STONE.
- Move forward.
- Insert DRAWER HANDLE (B).
- Take WOODEN SEAL PIECE. Move items; take RUBY EYE 1/2 and NORTH AMERICA.
- Place NORTH AMERICA, EUROPE, AFRICA (C); Take RUBY EYE 2/2.
- Place WOODEN SEAL PIECE (D).
- Solution: 1-2-3-4. Push button.
- Complete HOP (E); Receive LIZARD STONE.
- Move back.
- Place RUBY EYES (F); Take LION STONE.
- Move forward.
- Place LION STONE, LIZARD STONE and BIRD STONE (G); Inspect book (H).
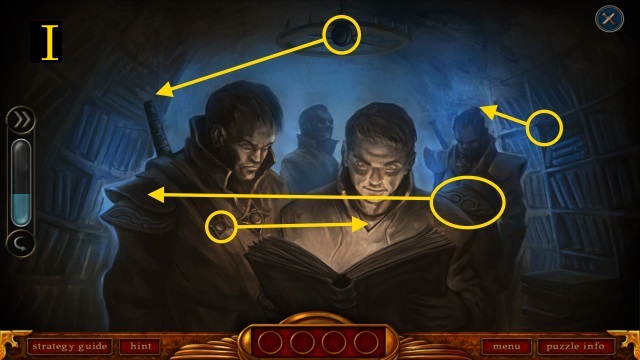
- Solution (I).
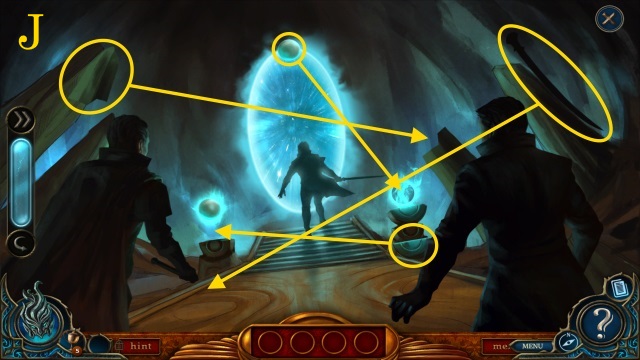
- Solution (J).
- Take MAP PAGE.
- Move down.
- Talk (K).
- Move Right.
- Use (@).
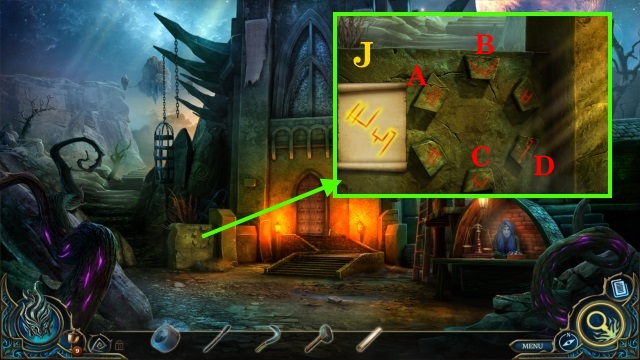
- Solution (L).

- Use MAP PAGE; Solution (M). Pick up A, B, and C; use at D.
Chapter 3: Wellspring
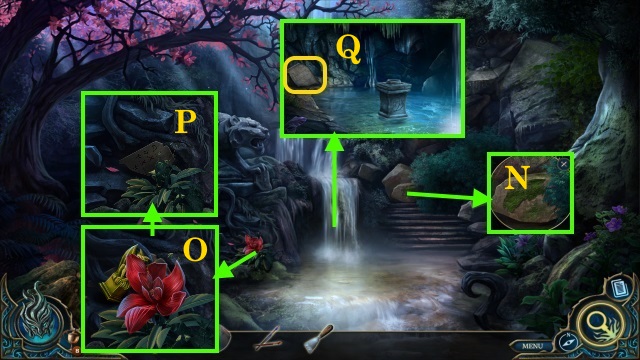
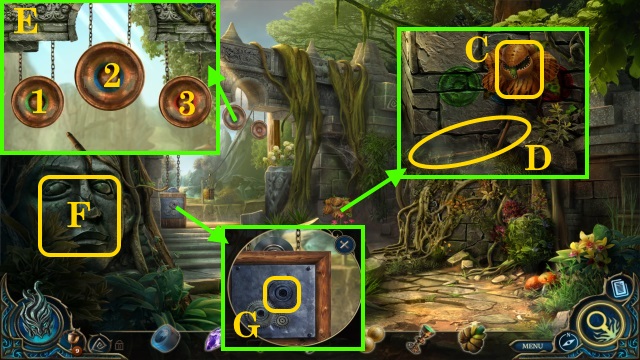
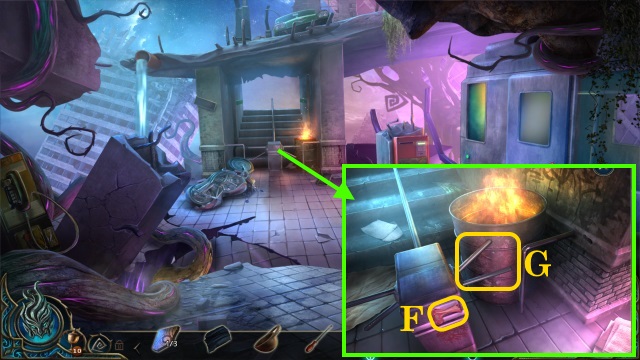
- Use SCRAPER (N); take STONE FRAGMENT 1/3.
- Take FIRE FLOWER and YELLOW FIGURINE (O); Use HATCHET, take STONE FRAGMENT 2/3 (P).
- Take STONE FRAGMENT 3/3 (Q).
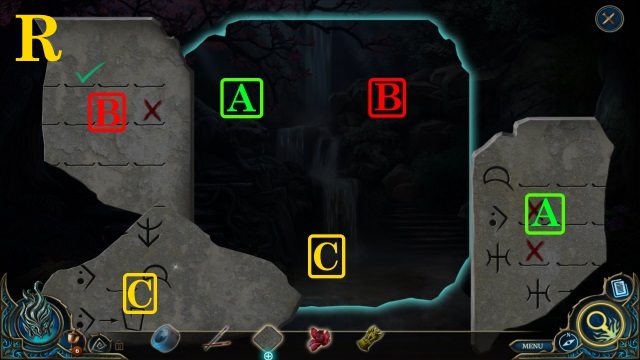
- Assemble STONE FRAGMENTS (R).
- Solution: A-B-C.
- Receive STONE SLAB.
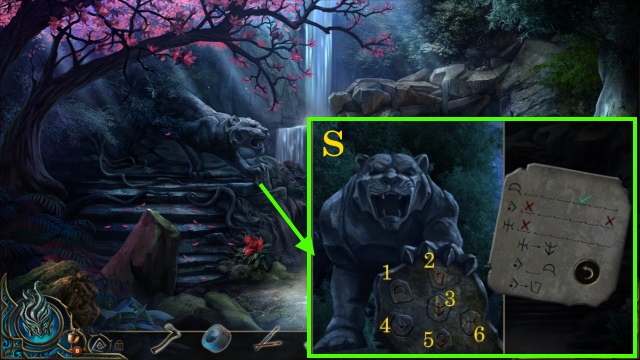
- Use STONE SLAB (S).
- Solution: 5-4-2-1-6-3.
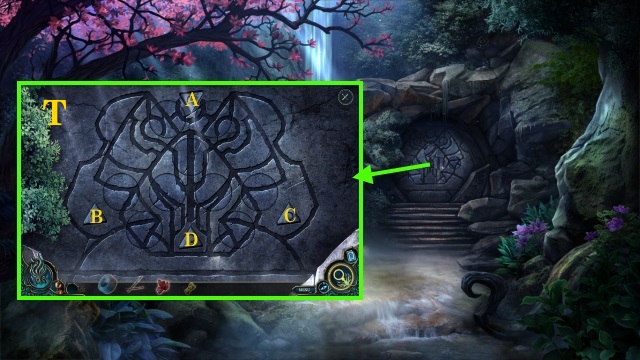
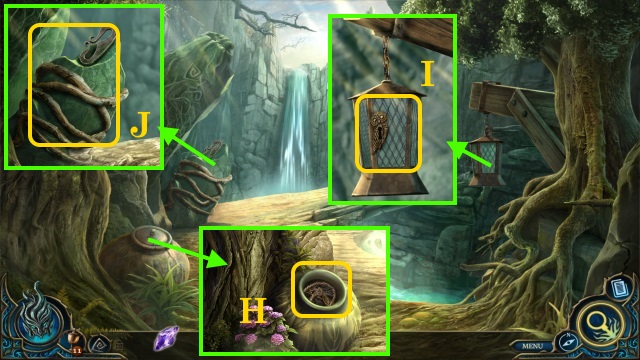
- Solution (T): D-A-C-Dx2-A-Bx2-Cx2-D-Bx2-D-Cx2-D-C.
- Walk right.
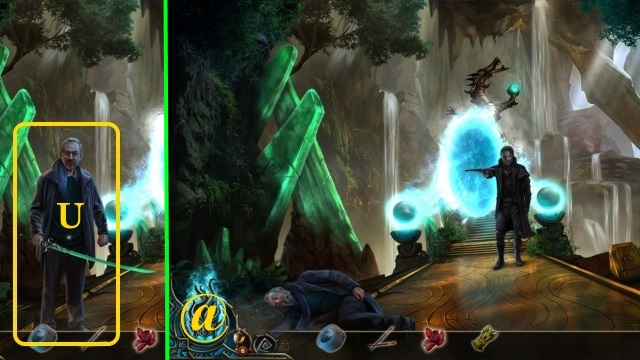
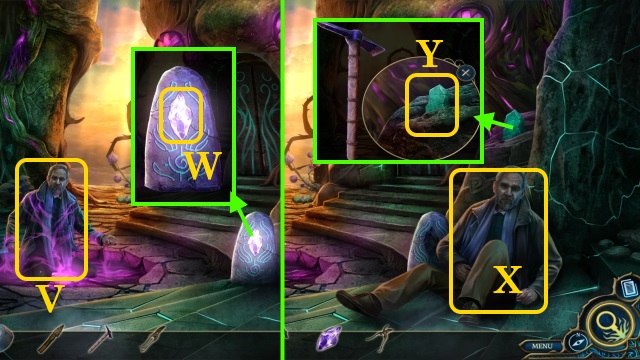
- Speak (U).
- Use (@).
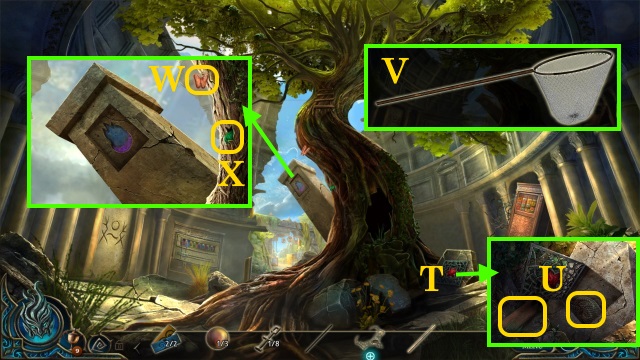
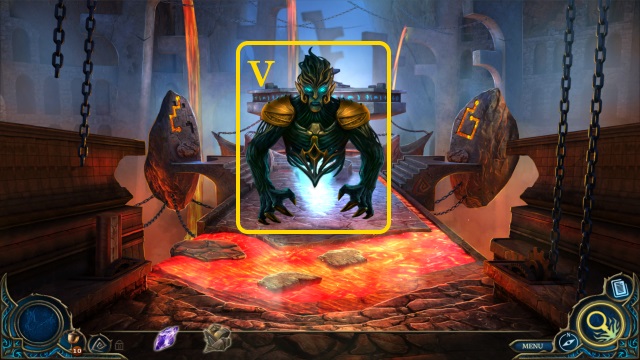
- Move forward; Retrieve sword (V).
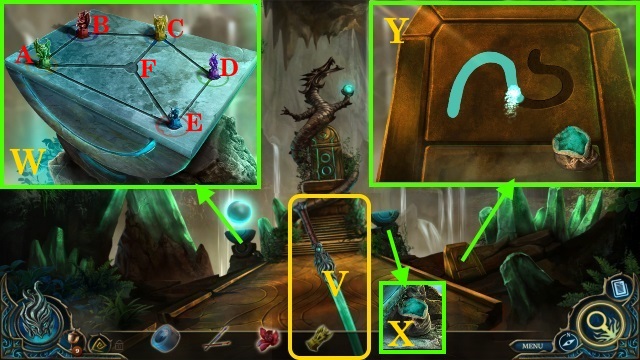
- Place YELLOW FIGURINE (W).
- Solution: A-B-C-D-E-F-A-B-C-D-E-F.
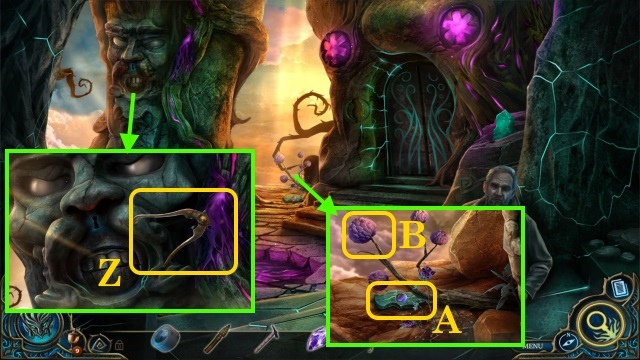
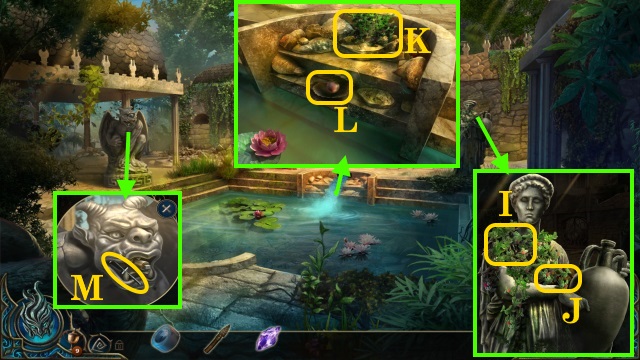
- Take MAGIC POWDER (X).
- Use MAGIC POWDER; Solution: (Y).
- Take GREEN CRYSTAL.
- Move down.
- Place GREEN CRYSTAL (Z).
- Complete HOP (A); receive FLOWER EMBLEM.
- Move right.
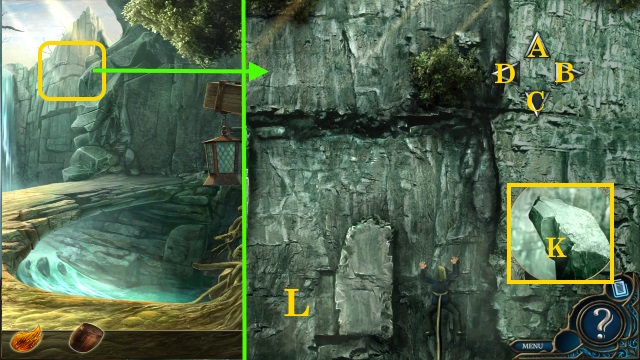
- Place FLOWER EMBLEM (B).
- Solution 1: 3-2-10.
- Solution 2: 1-4-6-11.
- Solution 3: 12-2-4-9-6.
- Move forward.
Chapter 4: Seventh Temple of Stars
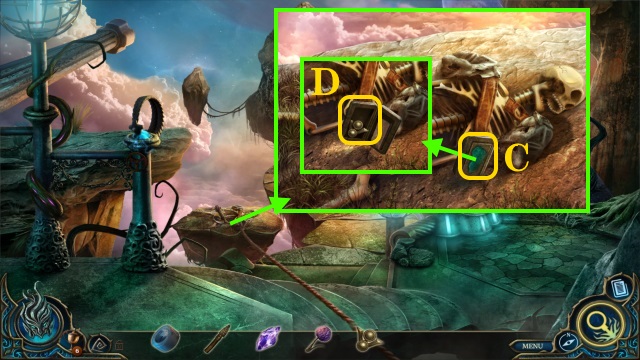
- Pick up RED INK (C).
- Take GRABBER CLAW, and SICKLE (D).
- Move left.
- Move forward.
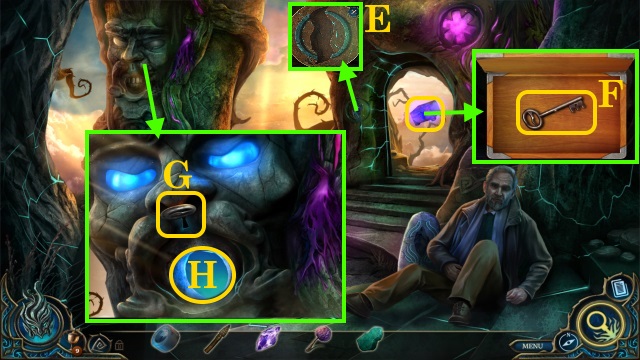
- Take STONE HAMMER (E); Use GRABBER CLAW (F); obtain BLUE INK.
- Walk down.
- Place RED and BLUE INKS; Use PAINTBRUSHES (G).
- Solution: (H).
- Take GLASS ROD (I).
- Use GLASS ROD (J).
- Complete HOP (K); Receive NIGHTCALLER HELMET.
- Move left.
- Use NIGHTCALLER HELMET (L).
- Walk forward.
- Talk (M); Take GLASS JAR and CHALK (N).
- Take METAL GEAR 1/2 (O).
- Move down.
- Use GLASS JAR and FIRE FLOWER (P); Receive BEETLE IN A JAR.
- Move forward.
- Give BEETLE IN A JAR (Q); Take METAL GEAR 2/2 (R).
- Place METAL GEARS (S).
- Solution: (T).
- Take LIT CANDLE (U).
- Use LIT CANDLE (V); take WAX MOLD.
- Walk back twice.
- Take STICK (W); move blue stone (X).
- Place WAX MOLD (Y); Use STONE HAMMER, take STONE WEIGHT.
- Move left, then forward.
- Use STONE WEIGHT; take SMALL KEY (Z).
- Walk back twice.
- Use SMALL KEY (A); Take STONE DAGGER and clue (B).
- Walk left then forward.
- Use CHALK (C).
- Move forward.
- Talk (D).
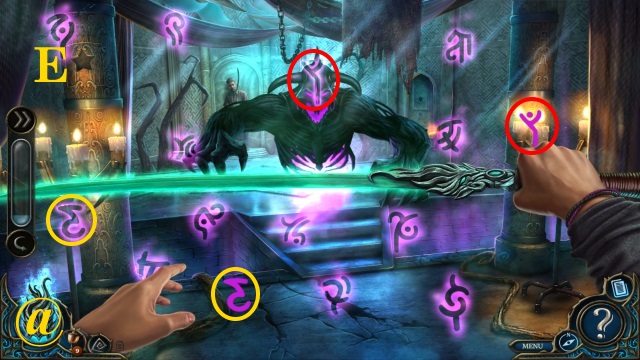
- Use sword (@).
- Solution: (E).
- Take STAR EMBLEM (F).
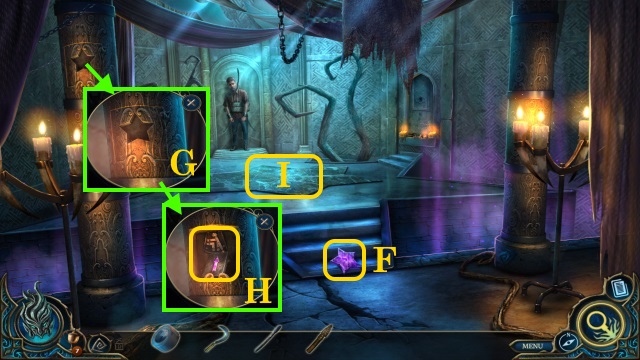
- Place STAR EMBLEM (G); Take STONE BLOCKS 1/2, and use switch (H).
- Complete HOP (I), receive ALCOVE INLAY.
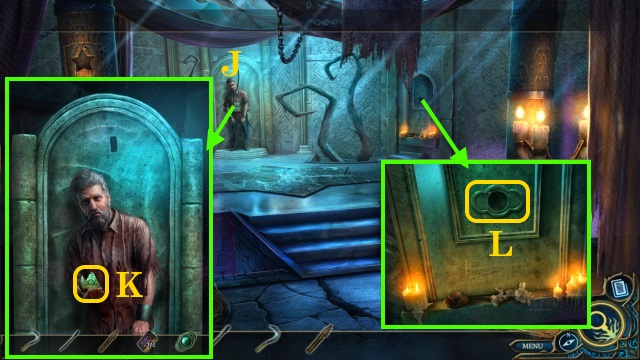
- Talk (J); Take SIGIL OF TRANSPORTATION (K).
- Use ALCOVE INLAY (L).
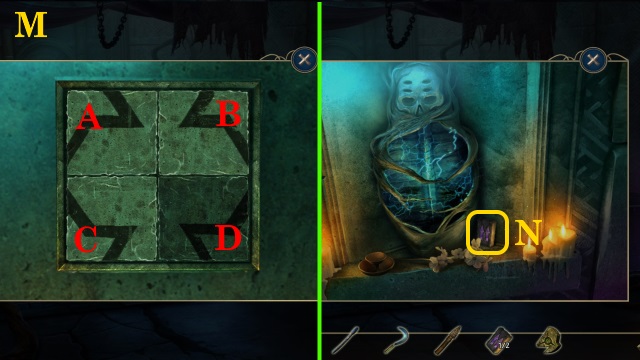
- Solution: (M) D-Cx2-Ax2-Bx2-Dx2-Cx2-A.
- Take STONE BLOCKS 2/2 (N).
- Return to Gardens of Reflection.

- Use SIGIL OF TRANSPORTATION (O).
- Go right.
- Remove lid, take GAME PIECE and CHAIN (P); Pick up METAL HOOK (Q) and HEART CRYSTAL (R).
- Take PICKAXE (S).
- Use CHAIN; depress lever (T).
- Place GAME PIECE (U); Solution: A-B-Ax3-B-A-B-Ax3-B.
- Press button.
- Place HEART CRYSTAL (V).
- Place STONE BLOCKS (W); Solution: Move B to A-D-A to B-Dx6-switch B and C-Dx5.
- Walk left.
- Check (X).
- Use sword (@); Talk (Y).
- Take CRYSTALLIZED HONEY (Z).
- Use STICK, receive STICKY STICK (A); Take DEMON INSET.
- Move back.
- Place CRYSTALLIZED HONEY (B); Move teapot, receive HONEYPOT (C).
- Walk left.
- Use HONEYPOT (D).
- Use STICKY STICK (E); receive HUMAN INSET.
- Use HUMAN and DEMON INSETS (F).
- Complete HOP (G). Receive DARK SCEPTER.
- Place DARK SCEPTER (H); Take SCROLL WITH SYMBOLS (I).
- Return to Seventh Temple of Stars.
- Use SCROLL WITH SYMBOLS (J); Solution: A-B-C-D.
- Walk left.
Chapter 5: Domed Temple
- Talk (K).
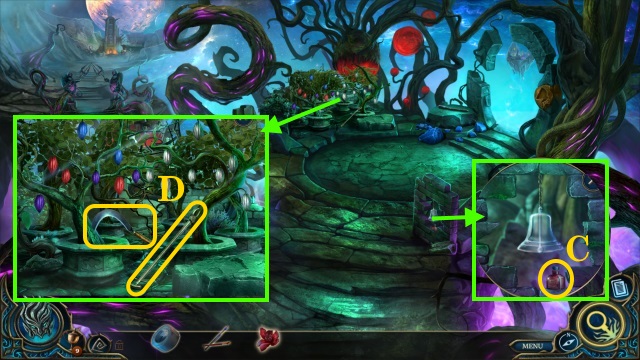
- Take ROPE (L); ROPE on METAL HOOK (M); receive GRAPPLING HOOK.
- Use GRAPPLING HOOK (N).
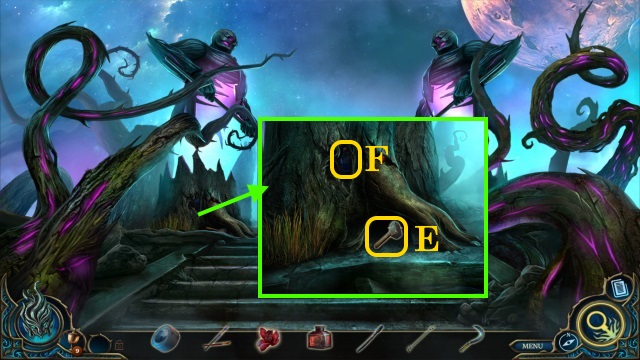
- Take LEATHER GLOVE and RUSTY PRUNING SHEARS (O).
- Use SICKLE (P); receive OLD RAG.
- Use OLD RAG (Q).
- Use LEATHER GLOVE (R); take BLUE BALL.
- Return to Star Chamber.
- Charge BLUE BALL (S); receive ELECTRIFIED BALL.
- Go to Precarious Terraces.
- Place ELECTRIFIED BALL (T).
- Complete puzzle (U); Solution one: 8-9.
- Solution two: 7-8-9-10-1-5-12-16.
- Solution three: 10-12-16-14-4.
- Walk forward.
- Talk (V); Take PURPLE CRYSTAL (W).
- Talk (X).
- Use PICKAXE (Y); take GREEN MARBLE INSET.
- Use RUSTY PRUNING SHEARS (Z); receive PRUNING SHEARS.
- Take ODD INSET (A).
- Use PRUNING SHEARS (B); Receive STRANGE FRUIT.
- Move back.
- Use GREEN MARBLE INSET (C); take clue and SMALL TRINKET (D).
- Move forward.
- Insert ODD INSET (E).
- Take MYSTERIOUS BOX, open; Take FIENDISH KEY (F).
- Use FIENDISH KEY (G); insert STRANGE FRUIT and SMALL TRINKET (H).
- Walk right.
- Take THICK MOSS (I) and WOODEN BLOCK 1/2 (J).
- Place THICK MOSS (K); Use STONE DAGGER, take GEMSTONE 1/3 (L).
- Take METAL SYMBOL 1/8 (M).
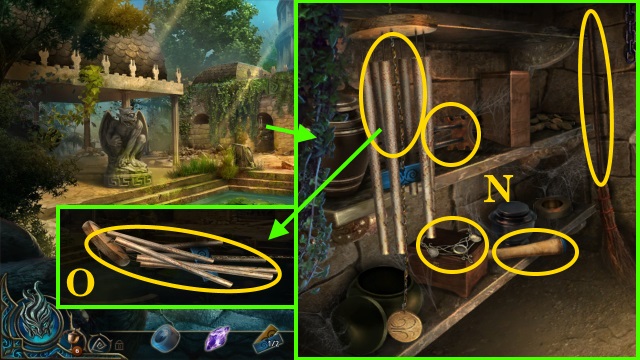
- Take BROOM HANDLE, BRONZE KEY, WIND CHIME, BROKEN NECKLACE, and clue (N).
- Take WOODEN BLOCK 2/2 and STEEL BAR from WIND CHIME (O).
- Use BRONZE KEY (P); Solution: Bx11, A (Q).
- Walk forward.
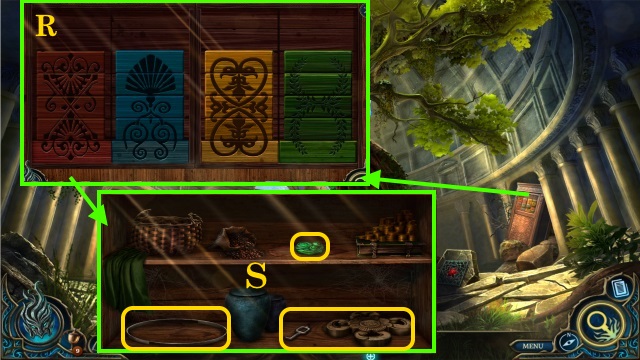
- Place WOODEN BLOCKS; Solution: (R).
- Take GEMSTONE 2/3, NET RIM, VALVE HANDLE and METAL SYMBOL 2/8 (S).
- Open (T). Take net, FLAME INSET and BOARD 1/2 (U). BROKEN BUTTERFLY NET is created.
- Assemble BUTTERFLY NET (V).
- Use BUTTERFLY NET (W); Receive GLOWING BUTTERFLY 1/3. Take GEMSTONE 3/3 (X).
- Walk down.
- GEMSTONES on BROKEN NECKLACE; assemble GEMSTONE NECKLACE.
- Place GEMSTONE NECKLACE (Y); take AMPHORA, (Z) shake.
- STEEL BAR on AMPHORA (A), receive HOOK AND LINE.
- Use BUTTERFLY NET (B). Receive GLOWING BUTTERFLY 2/3.
- Use VALVE HANDLE (C).
- Complete HOP (D). Receive METAL SYMBOL 3/8.
- Move forward 2x.
- Use BUTTERFLY NET (E); Receive GLOWING BUTTERFLY 3/3; Pick up BROKEN ROPE LADDER (F).
- Take WHETSONE (G); Find SMALL METAL BALLS (H).
- Walk down.
- Use GLOWING BUTTERFLIES, and HOOK AND LINE (I). Receive GARGOYLE FIGURINE.
- Place FIGURINE (J). Solution: C-B-A-B-Cx4-B-Ax3-B-Cx4-B-C-B-Ax3-B-Cx2-B-A-B.
- A-B-C-B-C-B-A-B-C-B-A-B-C-Bx2.
- Walk left.
- Take FLAME INSET 2/2, GOLDEN CHALICE (K) and BOARD 2/2 (L).
- BOARD on BROKEN ROPE LADDER; repair ROPE LADDER (M).
- Use GOLDEN CHALICE (N), obtain CHALICE OF ACID.
- Take METAL SYMBOL 4/8 (O).
- Walk down.
- Place FLAME INSETS (P), take METAL SYMBOL 5/8 and STONE JAGUAR (Q).
- Use ROPE LADDER (R). Take AVIAN FRUIT, and METAL SYMBOL 6/8 (S).
- Walk down. Use STONE JAGUAR (T); take METAL SYMBOL 7/8.
- Move forward 2x.
- Use CHALICE OF ACID (U); Take METAL SYMBOL 8/8.
- Walk down and left.
- Use METAL SYMBOLS; Solution: (W).
- Talk (X); Complete HOP (Y); Receive GOLDEN BOX.
- Open GOLDEN BOX; take STONE SEAL, clue, and CRYSTAL OF CLARITY (Z).
- Place STONE SEAL (A); take POWDER KEG and OLD BONE (B).
- Go to Ruined Sanctum.
- Give OLD BONE (C), take BROKEN BLOWPIPE (D).
- Fix, and use DUCT TAPE on BROKEN BLOWPIPE. RECEIVE BLOWPIPE.
- Use BLOWPIPE and SMALL METAL BALLS; Solution: (E) 1-2-3.
- Complete HOP (F); Receive CRANK HANDLE.
- Place CRANK HANDLE (G); Walk forward.
Chapter 6: The Great Forge
- Lift lid; take FUSE and OWL KEY (H).
- Use OWL KEY (I); Place CRYSTAL OF CLARITY.
- Take STEEL STRIKER and LONG VINE (J); Place AVIAN FRUIT.
- Use LONG VINE (K).
- Solution (L): A-Dx2-C-D-Ax2-Bx2-Ax2-B.
- Take CRYSTAL OF CLARITY (M).
- Solution (N): Press to fill A.
- Insert CRYSTAL OF CLARITY (O); close door.
- Talk (P).
- Use sword (@).
- Solution: (Q).
- Move right.
- Talk (R).
- Use sword (@).
- Solution (S): Stop (A); Block (B); Match (C).

- Solution (T): Stop (D); Block (E); Match (F).
- Solution (U): Stop (G); Block (H); Match (I).
- Gather (V); receive ORB PIECES.
- Pick up FLINT (W).
- View (X); use POWDER KEG and FUSE.
- Place FLINT and STEEL STRIKER (Y).
- Complete HOP (Z); Receive GATE STONE.
- Place GATE STONE (A).
- Walk left.
- Move (B); take GAUNTLET, HEAVY ROCK, NIGHTCALLER EMBLEM FRAGMENT 1/3 and BLUE CLOTH (C).
- Use HEAVY ROCK (D); unlock and open door (E); Take SCREWDRIVER, HANDHELD VACUUM, BLUNT KNIFE and SEATBELT BUCKLE (F).
- Use WHETSTONE on BLUNT KNIFE, get SHARP KNIFE.
- Walk right.
- Take CROWBAR, EMPTY BOTTLE and OIL CAN (G).
- Fill EMPTY BOTTLE (H), receive BOTTLE OF WATER.
- Use SHARP KNIFE and take CASH (I); pick up LEATHER STRAP (J).
- Use SCREWDRIVER (K); Solution: (L).
- Insert CASH; take METRO TICKET (M) and COIN (N).
- Use METRO TICKET, Play HOP (O); Receive NIGHTCALLER EMBLEM FRAGMENT 2/3.
- Walk down.
- Pick up NIGHTCALLER EMBLEM FRAGMENT 3/3 (P).
- Combine NIGHTCALLER ORNAMENT FRAGMENTS (Q); Solution: A-B-C. Receive NIGHTCALLER EMBLEM.
- Pick up CRUCIBLE, use OILCAN (R); press lever.
- Place NIGHTCALLER EMBLEM (S).
- Walk forward.

- Use GAUNTLET; take SHARP METAL SHARD (T).
- Open (U), use HANDHELD VACUUM. Take GUM REMOVER, PAINTING, and METAL HANDLE.
- Open (V), take IRON TILE 1/2, SHORT ROPE and clue.
- SHORT ROPE on SEATBELT BUCKLE; receive SEATBELT.
- Throw SEATBELT (W).
- Open (X), take COLORFUL STAR 1/2.
- BLUE CLOTH on PAINTING.
- Solution: (Y); Take COLORFUL STAR 2/2 (Z).
- Use COLORFUL STARS (A); Solution: Cx2-Dx3; Pull lever.
- Complete HOP (E); Receive PURPLE VIAL.
- Walk down and right.
- Use GUM REMOVER (F); get OLD GUM.
- Use COIN; get METAL ROD (G).
- Walk down.
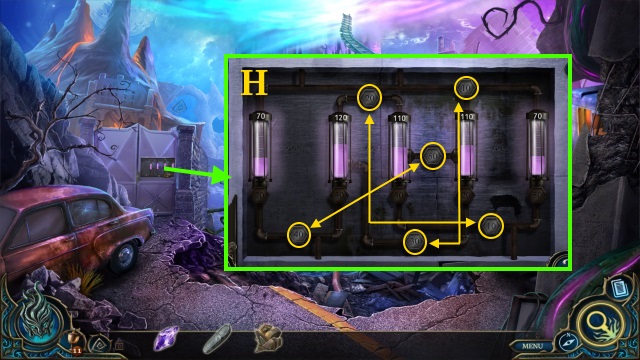
- Place PURPLE VIAL. Solution: (H).
- Walk left, then right.
- Use METAL HANDLE (I); Take IRON TILE 2/2, and RUNIC SHARD 1/3; Place CRUCIBLE.
- Use CROWBAR (J); Take clue, STONE SHAPES, and RUNIC SHARD 2/3 (K).
- Remove (L); Complete HOP; Receive RUNIC SHARD 3/3.
- Use IRON TILES (M). Solution: A-B-A-B-Ax2; Turn wheel.
- Pull lever; Use LEATHER STRAP (N); get HOT LAVA.
- Use BOTTLE OF WATER; take IRON GEAR (O).
- Walk down, then forward.
- Examine (P); Solution: Ax3-Bx3-Cx2.
- Place IRON GEAR, use METAL ROD (Q).
- Place RUNIC SHARDS (R); use OLD GUM.
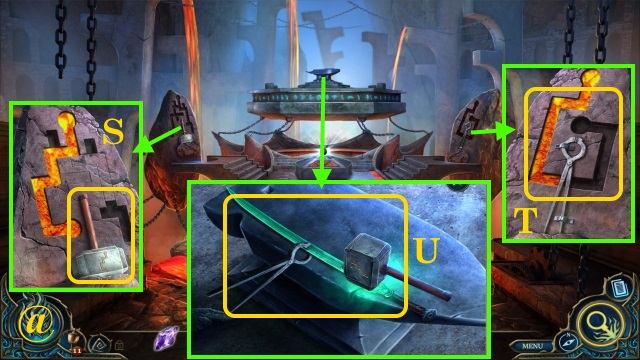
- Place STONE SHAPES (S); Use HOT LAVA; Take ARCANE HAMMER.
- Use SHARP METAL SHARD and HOT LAVA (T). Take ARCANE TONGS.
- Place sword (@); Use ARCANE TONGS and ARCANE HAMMER (U).
- Give ORB PIECES (V).
- Congratulations! You have completed Rite of Passage: Sword and the Fury.
Created at: 2017-10-15