
Walkthrough Menu
- General Tips
- Chapter 1:Back in England
- Chapter 2:A Rebel and His Men
- Chapter 3: A Secret Message
- Chapter 4: The Tournament
- Chapter 5: Fighting the Sheriff
General Tips
- You can change profiles by clicking on the profile name at the right side of the screen.
- In the options menu you can turn off the sound, turn on full screen mode or adjust sound effects and music volume.
- There is no time limit or score in this game.
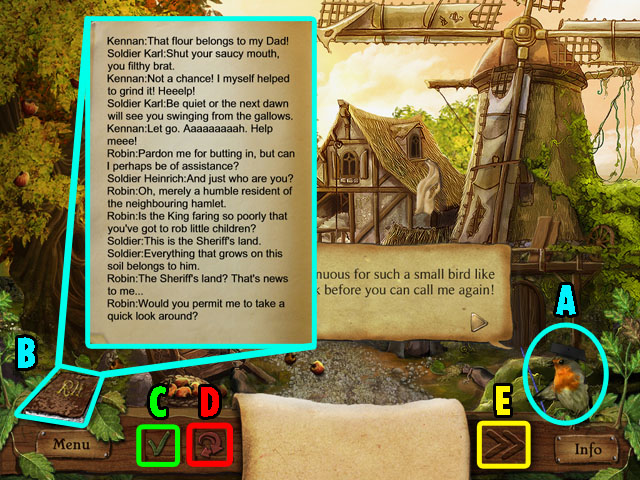
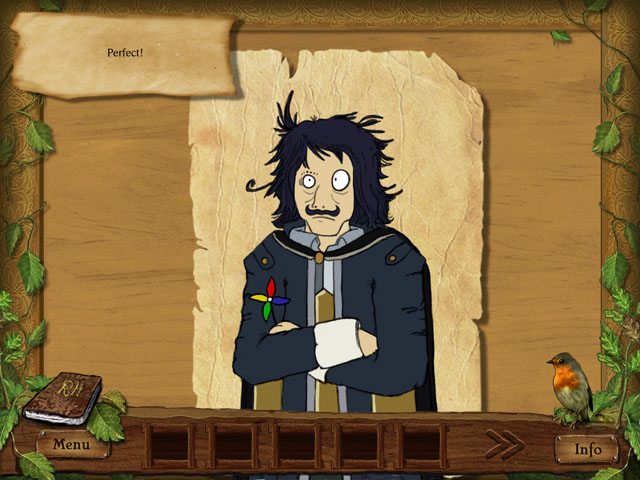
- The bird in the bottom right corner gives you a hint when you click it (A).
- The book in the bottom left corner shows all of the conversations and progress of the adventure (B).
- When you click on the info button in the bottom right corner, you will get some information about what you are supposed to be doing in the current scene.
- Sometimes there is green checkmark in the bottom when you are playing a puzzle (C). That tells you whether your solution for a game is correct or not.
- You can restart a puzzle by clicking the red arrows beside the green checkmark (D).
- You don't need to solve all puzzles in this game. When you want to skip a puzzle, click on the double arrows in the bottom UI (E).
Chapter 1: Back in England
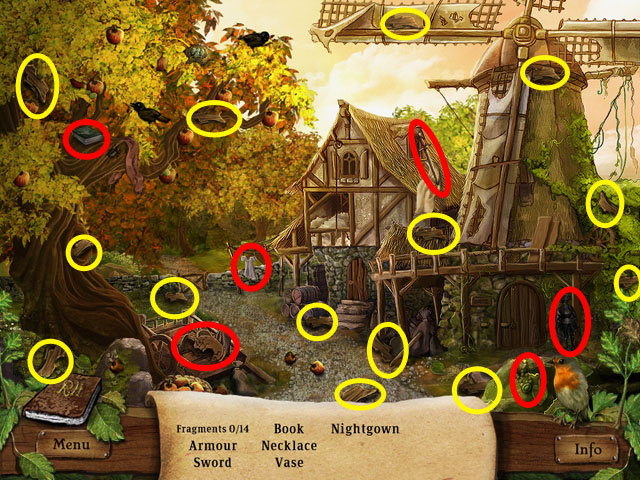
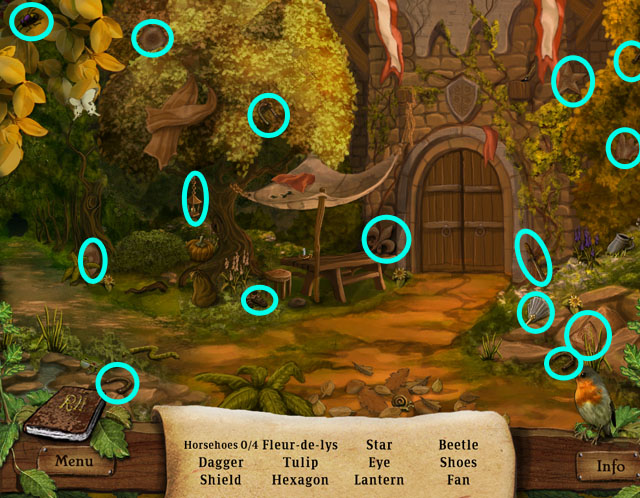
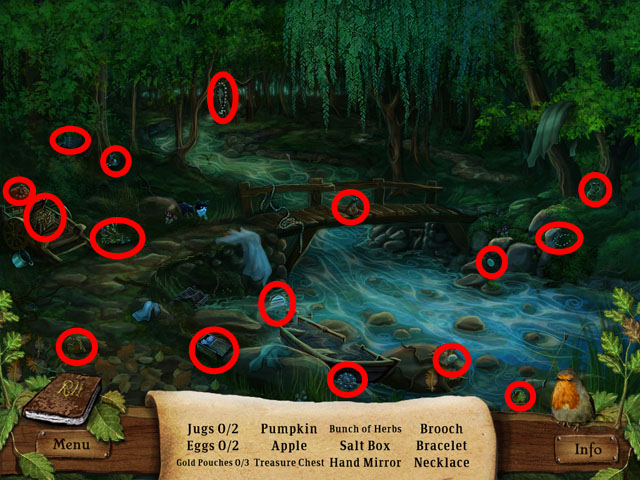
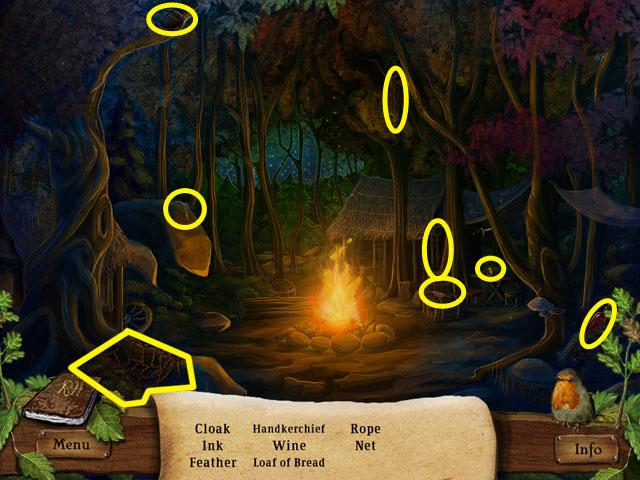
- Find the hidden objects listed at the bottom of the screen.
- Some of the items may be different in your playthrough.
- The fragments circled in yellow will always be the in the same place.
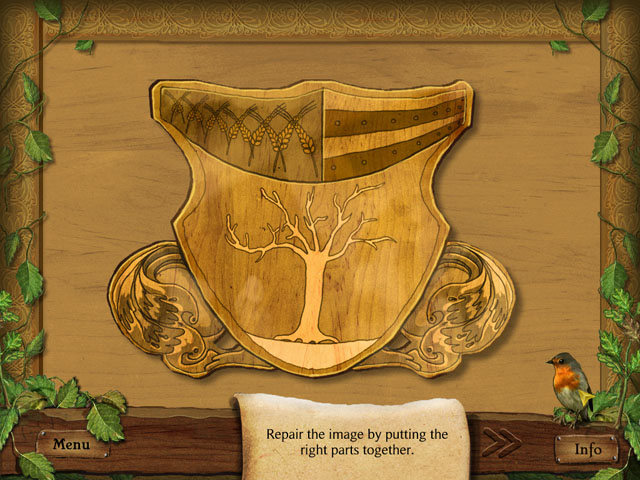
- Arrange the jigsaw puzzle by clicking on the pieces and dragging them in place.
- When you place a piece near the correct spot, the piece will snap in place.
- See the screenshot for the completed image.
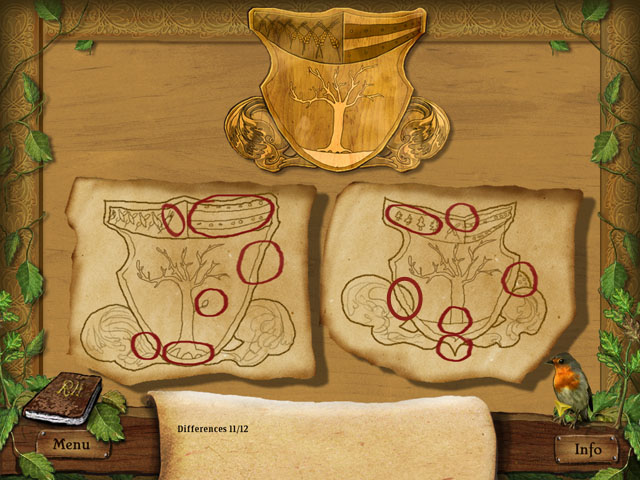
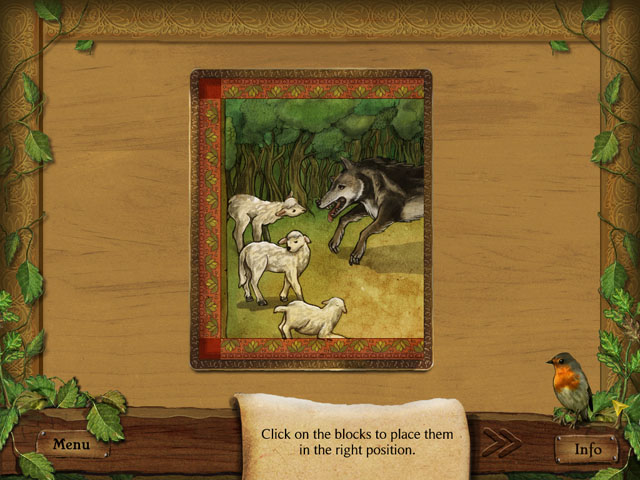
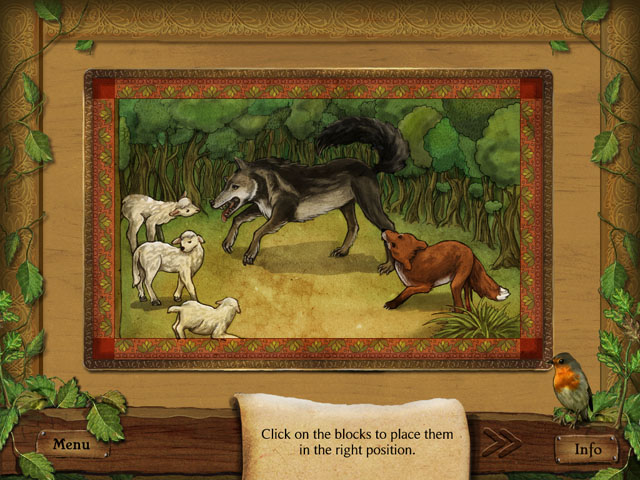
- Compare two drawings and the original crest on the top, and find 12 differences.
- Click on the differences on either side to circle them.

- Use the clues to rule out animal from the list.
- With the first clue, click three animals that do not have four legs (1) and then click on the checkmark at the bottom (T).
- With the next clue, click two animals that are reptiles (2) to remove them from the list and then click on the checkmark.
- With the next clue, click three animals that are not hunters (3) and click on the checkmark.
- With the last clue, click two animals that do not have tails and are not cats (4) and then click on the checkmark.
- You will then find out which animal the Sheriff's heraldic animal is: the wolf.
- If you want to restart the puzzle, click on the red arrows (R) beside the checkmark button.
- You can skip this puzzle by clicking the double arrows (S) in the bottom right corner.
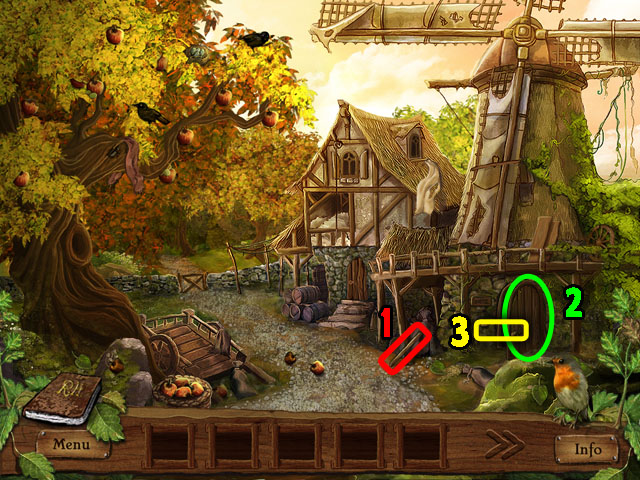
- Collect the STICK (1).
- Close the door by clicking (2).
- Use the STICK from the inventory to lock the door (3).
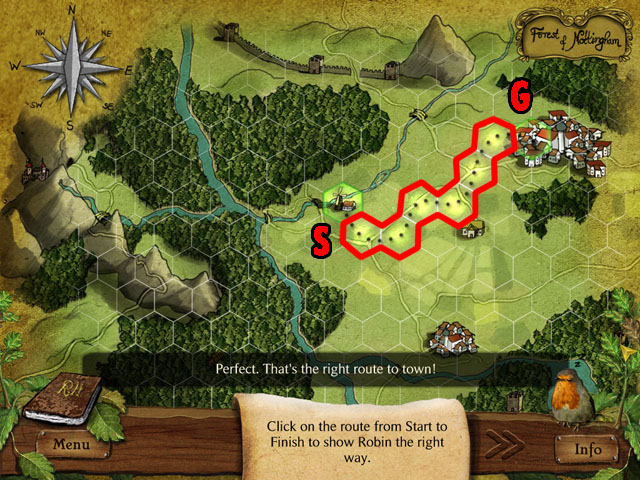
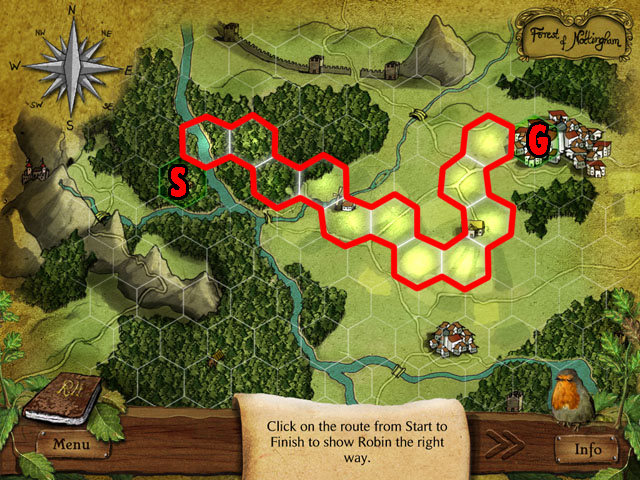
- When you start this puzzle, you have to memorize how the path is drawn across the hex board.
- First you click on a spot. If that is the correct spot, it will light up and you can continue, if not you must start from the beginning again.
- Click the hexes to select the correct path in order.
- The start is mill (S), and the goal is the town (G).
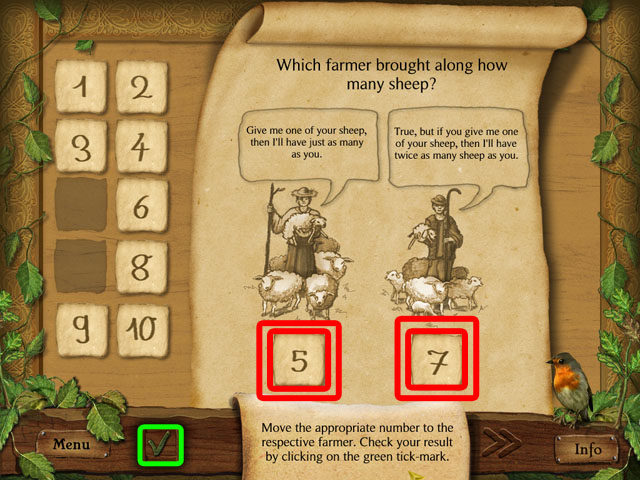
- This puzzle is a word puzzle.
- You need to find out how many sheep each of the farmers has, to match the speech bubbles above their heads.
- Drag the answers from the number list to the left into the boxes below each farmer.
- The solution is 5 in the left and 7 in the right box.
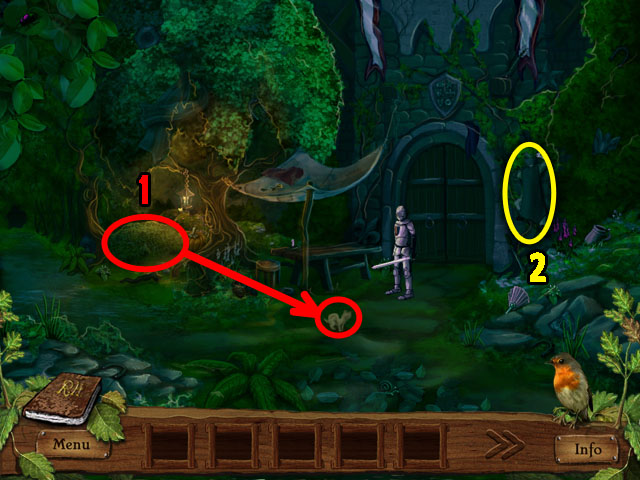
- Click on the bush (1).
- A small animal will appear in front of the guard.
- While the guard is watching the animal, click on the bush beside the gate.
- Click on Robin to climb up the side of the wall.
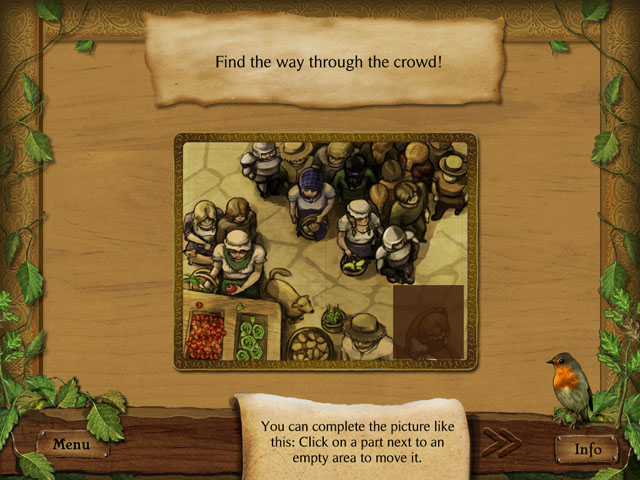
- Rearrange the boxes to recreate the image to solve this mini game.
- If you click on a box that is next to an empty area, that box will move into the empty area.
- At the very end, the empty space will be in the bottom right corner.
- See the screenshot for help with the completed image.
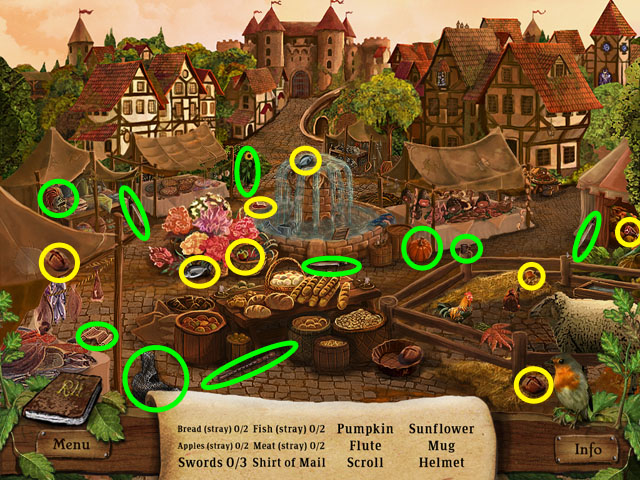
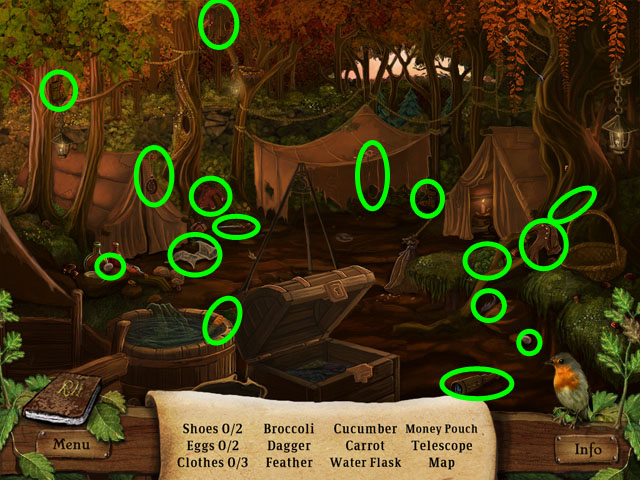
- Find the hidden objects listed at the bottom of the screen.
- Some of the items may be different in your playthrough.
- The bread, fish, meat and apples circled in yellow will always be in the same place.
- In this scene you are looking for these 4 things in the wrong places. There will be apples in a barrel and meat at the meat vender, but you are looking for ones on the ground.
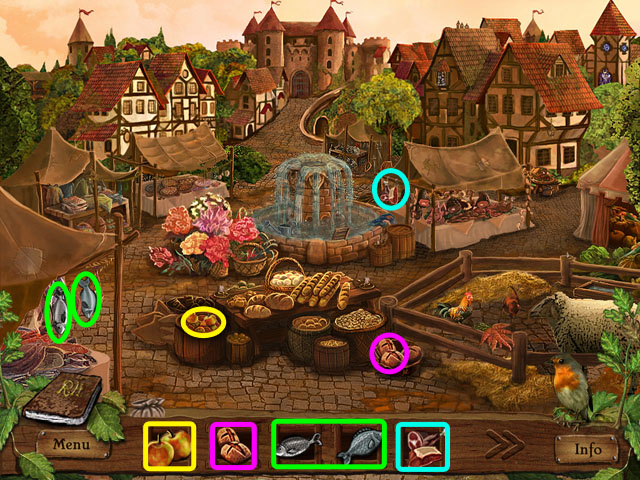
- Place the inventory items to the correct spots.
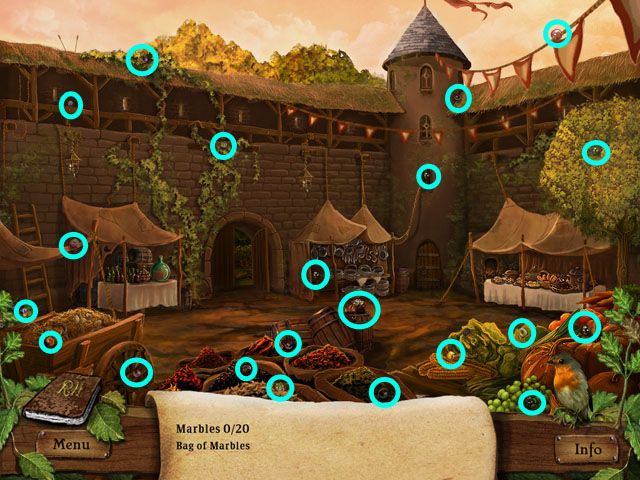
- Find 20 marbles and the bag of marbles circled in blue in the screenshot.
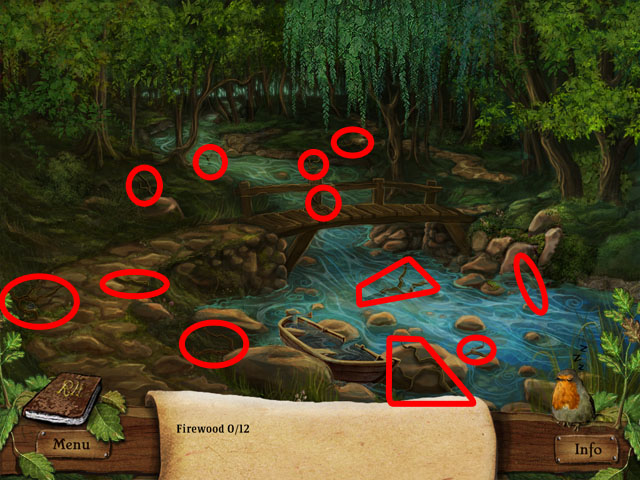
- Find 12 firewood circled in red in the screenshot.

- Find 8 items that are listed as silhouettes in the bottom.
- You will not be able to see the names of the items in this scene, but need to find them based on their shape alone.
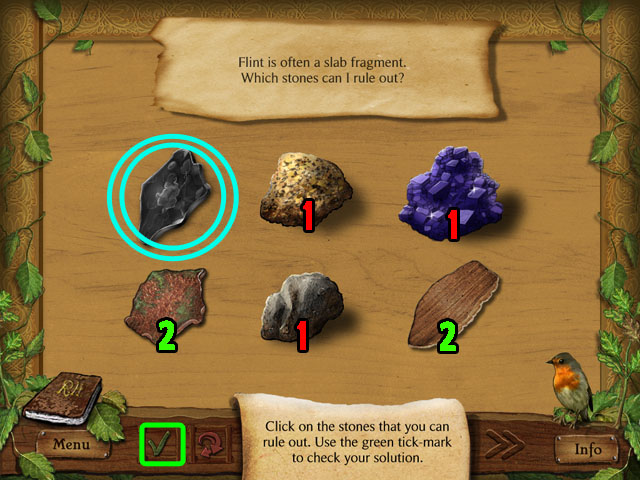
- Use the clues to rule out fragments from the list.
- With the first clue, click three fragments that are not flat slabs (1) and click on the checkmark in the bottom (T).
- With the next clue, click two fragments that are not black (2) and click on the checkmark.
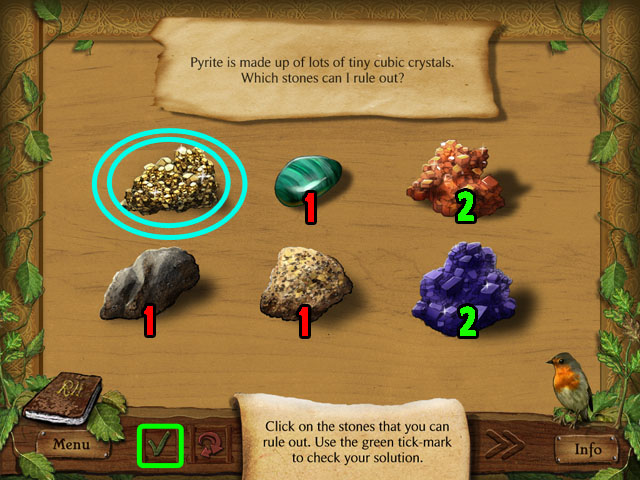
- With the first clue, click three fragments that do not have crystals (1) and click on the checkmark in the bottom (T).
- With the next clue, click two fragments that do not look like gold (2) and click on the checkmark.
- Rotate the tiles until you get the complete picture.
- Click on each tile to rotate it.
- The tiles on the outside have a border on them, so those are the easy ones to start with.
- Then match the inner tiles to the outside ones in the correct position.
- See the screenshot for the completed image.
- Rotate the tiles starting from the outside to complete the second half of the puzzle.
- See the screenshot for the completed image.
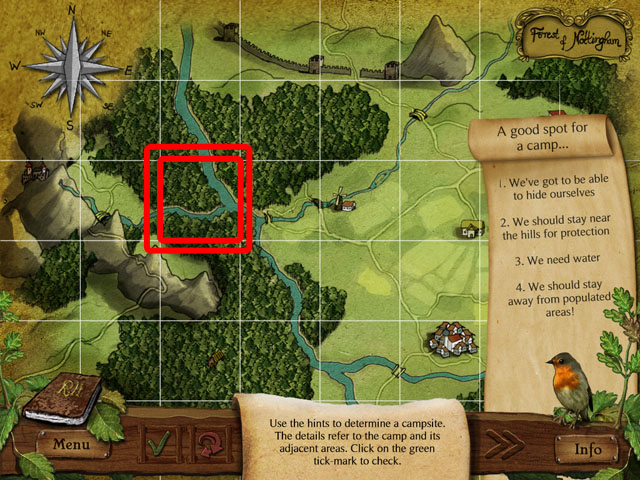
- Use four ideas for a good spot to camp in the right side to find only one spot in the map.
- The woods offer a good place to hide, the hills are on the left side of the map, and the populated areas are on the right.
- The red highlight is the best spot to camp, click on it to continue.
Chapter 2: A Rebel and His Men
- Find the hidden objects listed at the bottom of the screen.
- Some of the items may be different in your playthrough.
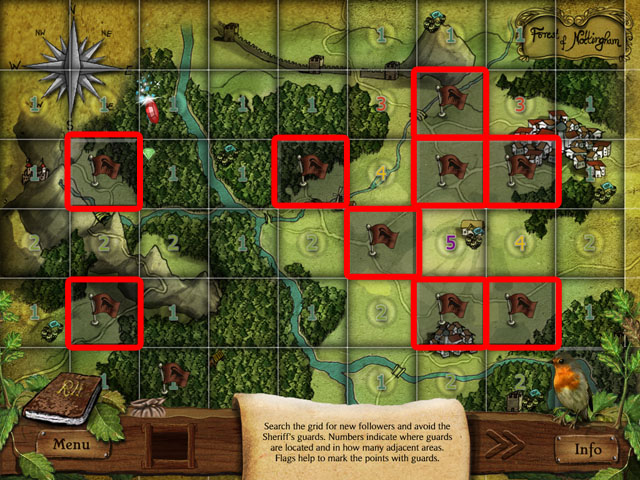
- Search the entire grid to find new followers and guards.
- This game is similar to Minesweeper.
- Click on a place on the map and it will show you a number.
- This is the number of squares that are touching this square that have guards in them.
- Squares in every direction, including diagonal, count towards this number.
- Using the numbers you can deduce which spots have a guard in them and then mark those spots with a flag.
- If you accidentally click a spot with a guard you can then mark it with a flag.
- See the screenshot for the solution. The places with the guards are not randomized.
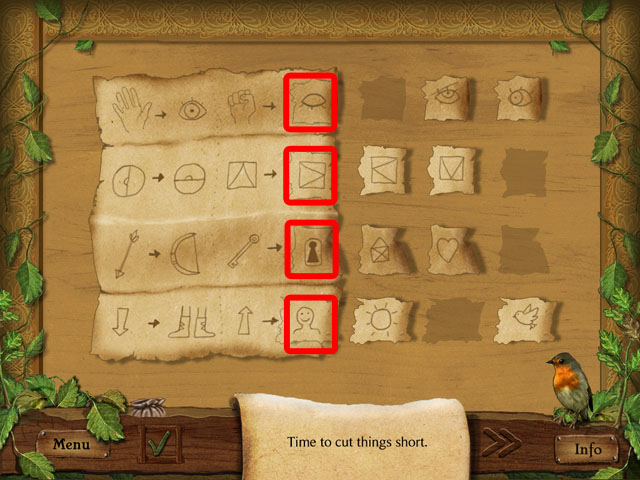
- Find the missing symbols to complete the sequence.
- First row from the top is about opening and closing. You want the closed eye.
- Second row is about the 90 degrees clockwise rotation. You want the symbol that is rotated the same way as the circle was.
- Third row is about things that go together. A key goes with a lock, so you must use the lock image.
- Last row is about the human body. The down arrow looks at your feet and so the up arrow must look at your head.
- Find the hidden objects listed at the bottom of the screen.
- Some of the items may be different in your playthrough.
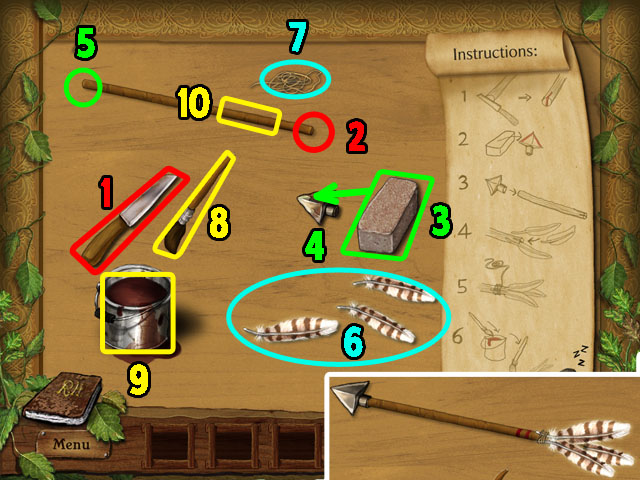
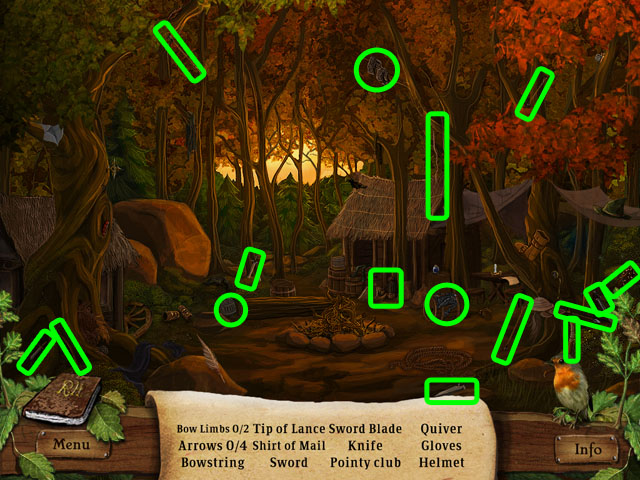
- Collect the KNIFE (1).
- Drag the KNIFE to the edge of the stick (2).
- Collect the BRICK (3).
- Drag the BRICK to the ARROW (4).
- Place the shiny ARROW on the edge of the stick (5).
- Collect the FEATHERS (6).
- Place the FEATHERS on to the right edge of the stick.
- Tie the FEATHER with the ROPE (7).
- Collect the BRUSH (8).
- Dip the BRUSH into the paint can (9).
- Make two lines on the stick (10).
- The completed image of the arrow is in the bottom right corner.
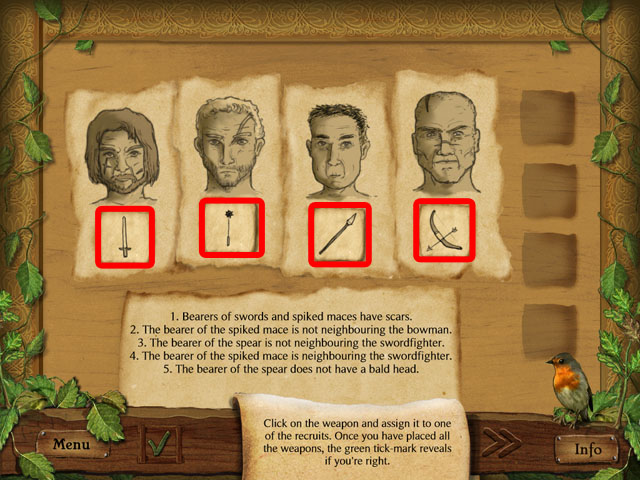
- Use five clues to figure out which guy is assigned which weapon.
- Use the process of elimination to figure out which weapon is the right choice.
- For example, the bearers of spiked swords and maces have scars, which rules out everyone but the third man.
- The bearer of the spiked mace is a neighbor to the swordfighter, which means the left two characters must have these two items (because the third man can't and the bald man isn't beside anyone who can).
- That means the bald man must be either the spearman or the bowman, but the 5th clue says the spear man does not have a bald head, so he is the bowman.
- Then that goes to reason that the 3rd man is the spear man, because it is the only weapon left.
- The spearman is not neighboring the swords man, so that solves the final puzzle: the swordsman is the 1st man and the 2nd man has the mace.
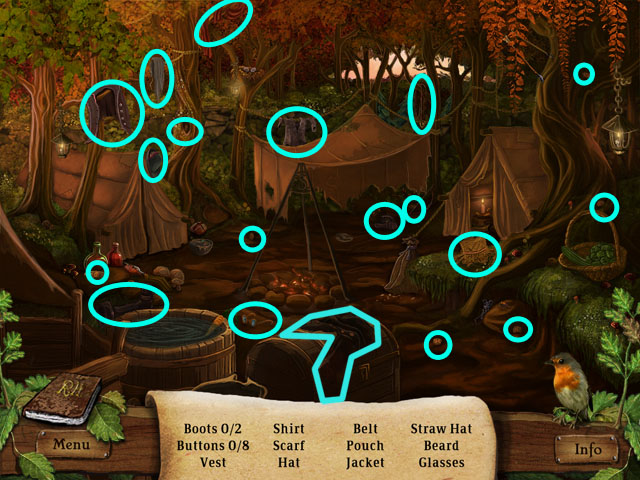
- Find the hidden objects listed at the bottom of the screen.
- Some of the items may be different in your playthrough.

- Find the matching pairs in this game of memory.
- Click on one box and then another. If you find a matched pair the boxes will be removed.
- Remove all of the boxes to finish this mini-game.
- The best strategy is to start from a corner and remember everything as you go across.
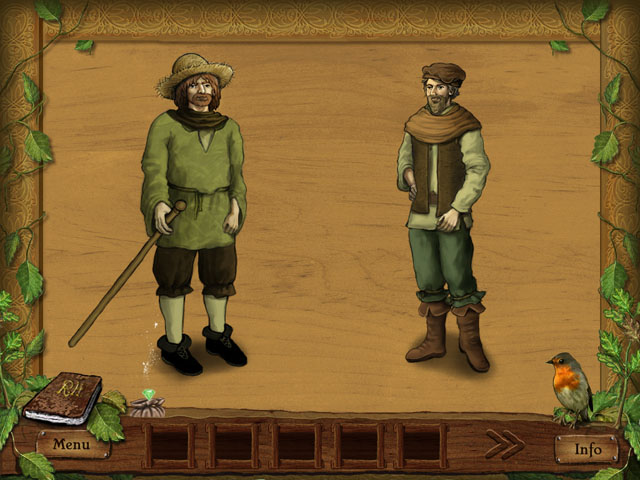
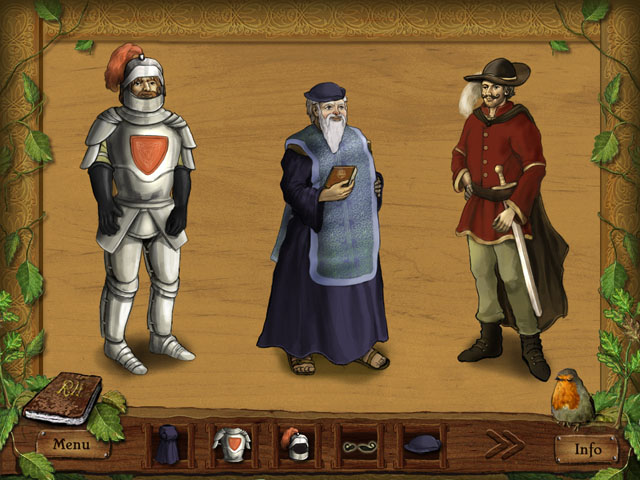
- Click on the clothes or accessories from the inventory to put them on the two men.
- You can't put belt or boots on before the clothes underneath them are on like socks and shirts.
- See the screenshot for the correct disguises.
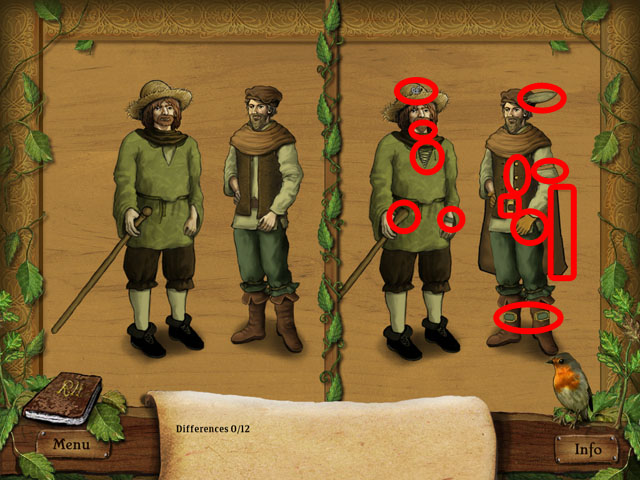
- Find 12 differences between two pictures.
- When you start this puzzle, you have to memorize how the path is drawn across the hex board.
- First you click on a spot. If that is the correct spot, it will light up and you can continue, if not you must start from the beginning again.
- Click the hexes to select the correct path in order.
- The start is house (S), and the goal is the town (G).
- Find the hidden objects listed at the bottom of the screen.
- Some of the items may be different in your playthrough.
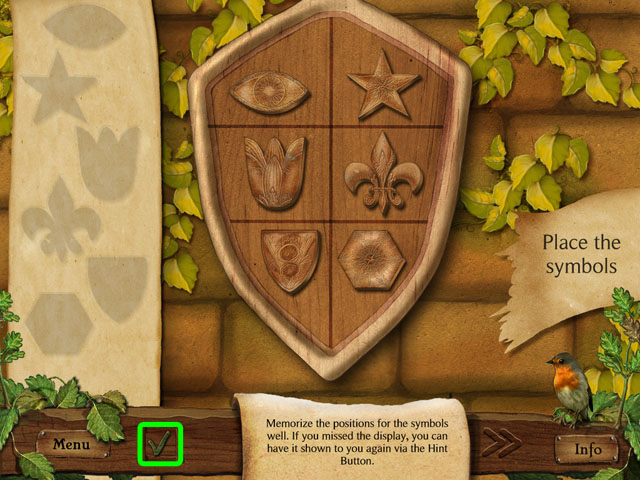
- Place all symbols inside the grids in the correct position.
- See the screenshot for the correct positions.
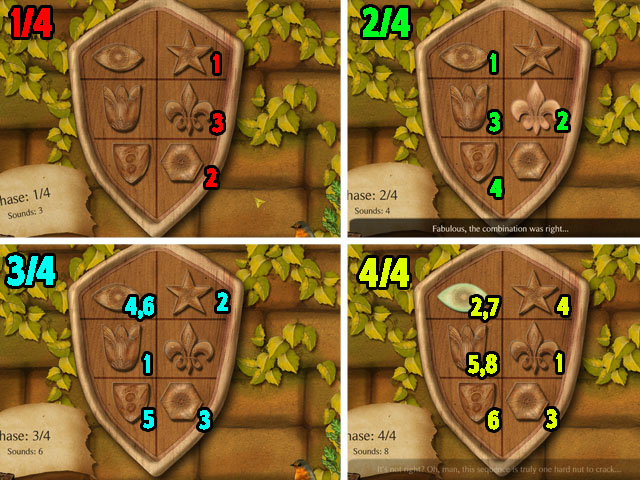
- Next the symbols will glow in an order.
- Click on the symbols in the correct order to repeat the pattern.
- You will need to do this 4 times, and each time the length of the pattern will get longer.
- Follow the numbers on the screenshot to find the correct order to click the symbols each time.
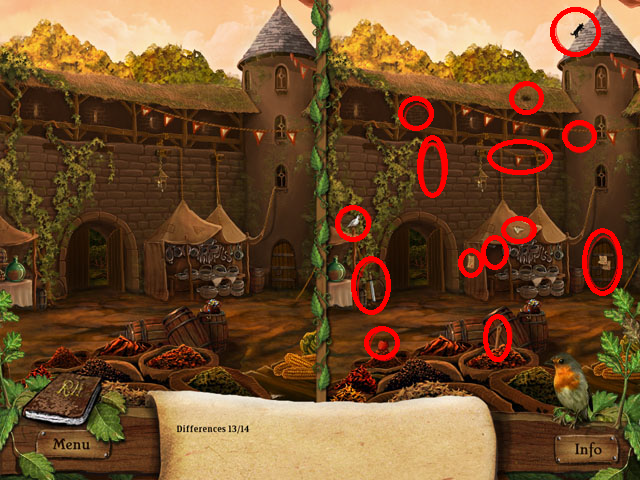
- Find 14 differences between two pictures.
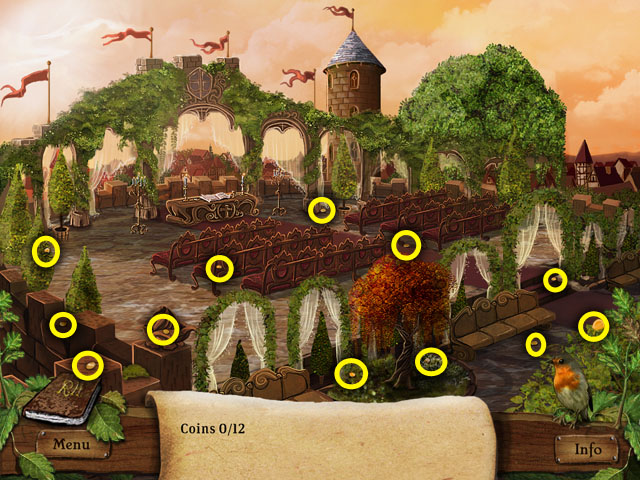
- Find 12 coins.
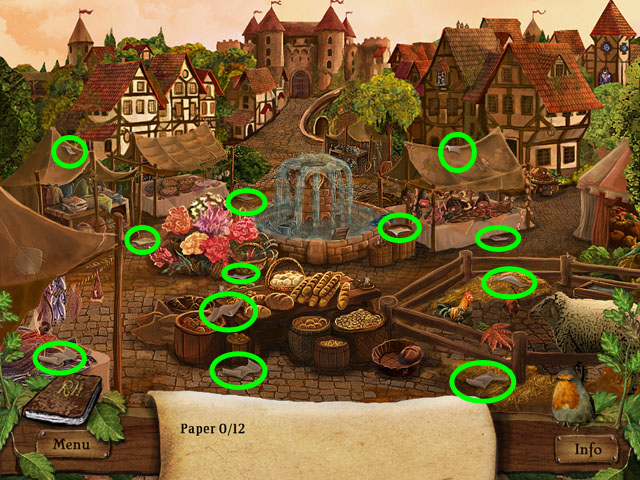
- Find 12 papers.
- Arrange the jigsaw puzzle by clicking on the pieces and dragging them in place.
- When you place a piece near the correct spot, the piece will snap in place.
- See the screenshot for the completed image.
- Find the hidden objects listed at the bottom of the screen.
- Some of the items may be different in your playthrough.
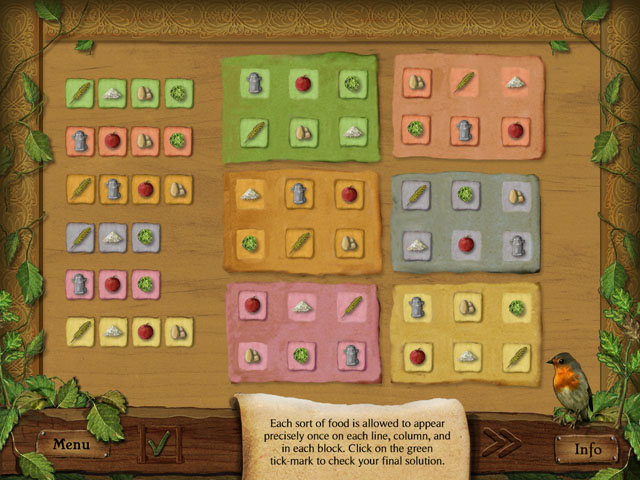
- You must arrange the food in the correct places in this puzzle.
- This puzzle is like Sudoku: each food item can only appear once in each row, column, and box.
- For example there is no salt in the top green box, but there is salt in the top row at the very right. That means the salt is not in the top row of the green box.
- There is salt in the first two columns as well. One in the orange box and on in the middle column of the pink box.
- That means the only place the salt can be in the green box is the bottom right corner.
- Continue like this filling out the rest of the puzzle.
- See the screenshot for the completed puzzle.
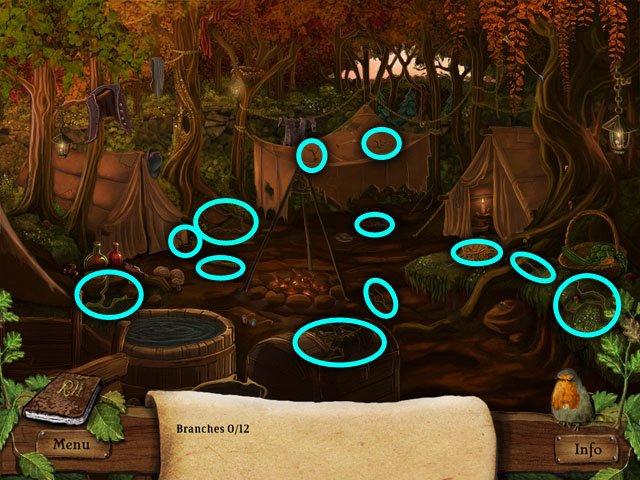
- Find 12 branches.
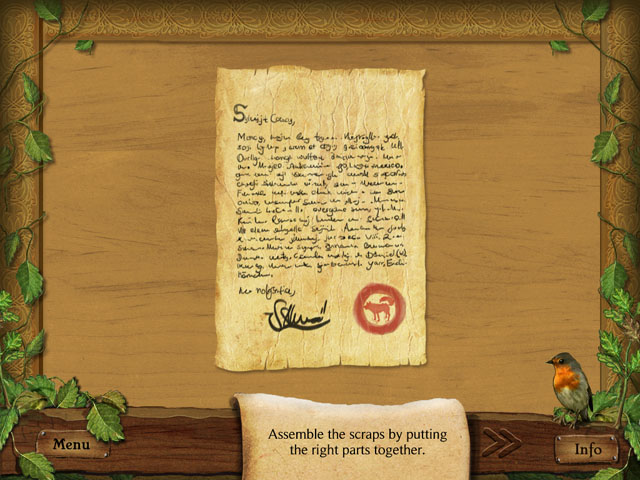
Chapter 3: A Secret Message
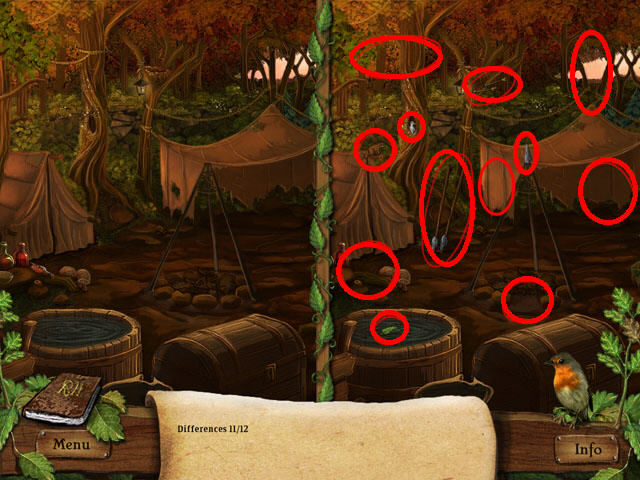
- Find 12 differences between two pictures.

- Find the hidden objects listed at the bottom of the screen.
- Some of the items may be different in your playthrough.
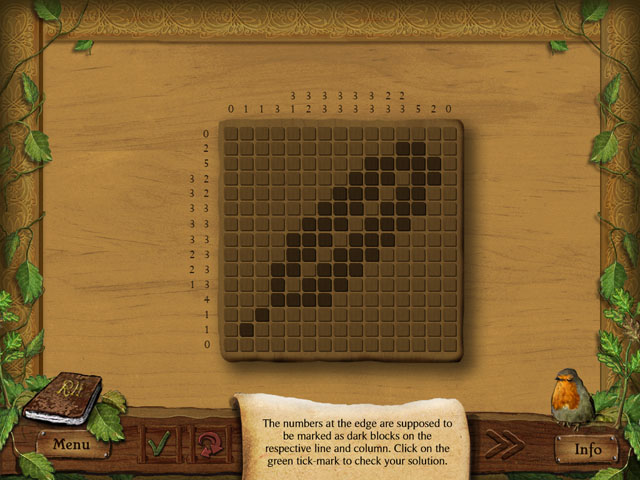
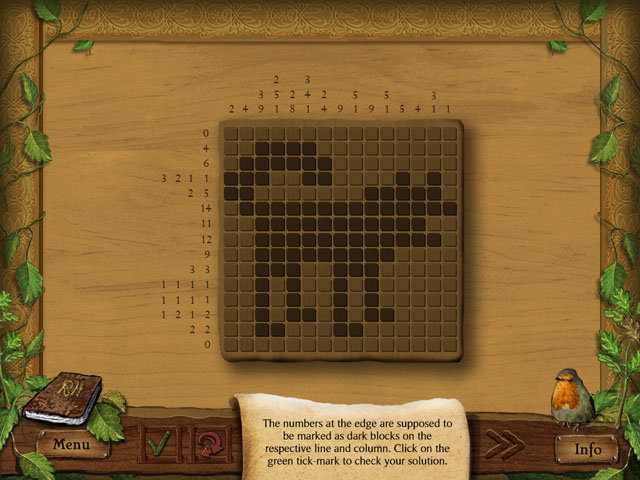
- This puzzle is a classic number puzzle.
- The numbers on the edge of the middle grid tell you how many boxes need to be marked in that row or column.
- If the number is more than one, the boxes must be drawn together in a line without spaces.
- If there are two numbers that means there is a space between the two lines of blocks.
- The blank spaces are not counted so you will need to figure out where to draw the correct blocks.
- Start with the edge rows and columns on each side because they have been completed for you.
- Then find any columns or rows that have been started but not finished, and add the pieces need to finish the line.
- For example if there is one block drawn but the number says 2, you know that you must draw a block beside that one.
- Continue this way until you have finished the puzzle like in the screenshot and drawn an image.
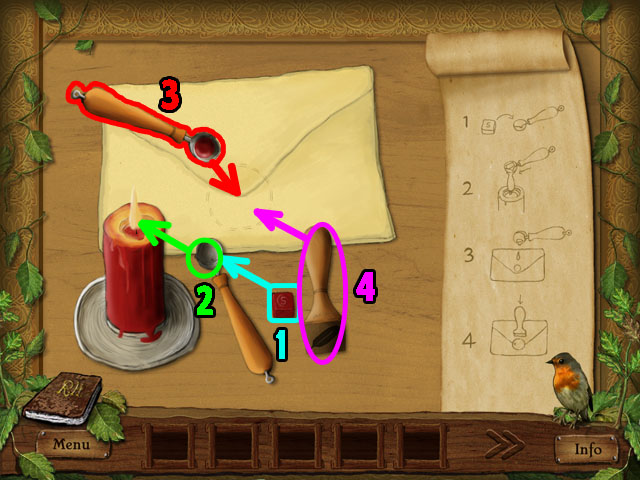
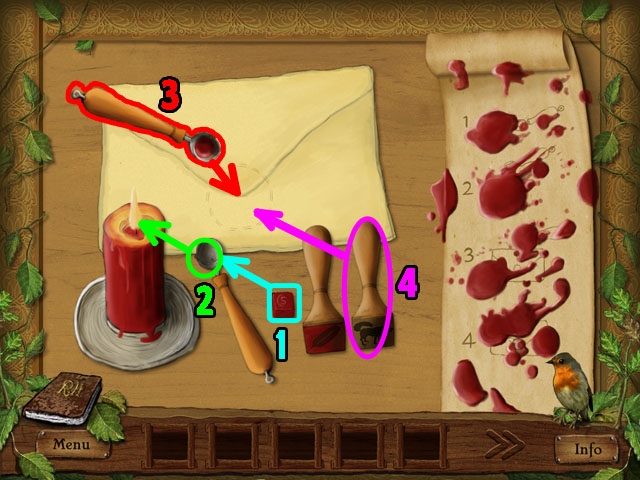
- Collect the red WAX (1).
- Place the WAX into the SPOON (2).
- Melt the WAX with the candle.
- Pour the melted wax on to the envelope (3).
- Use the STAMP (4).
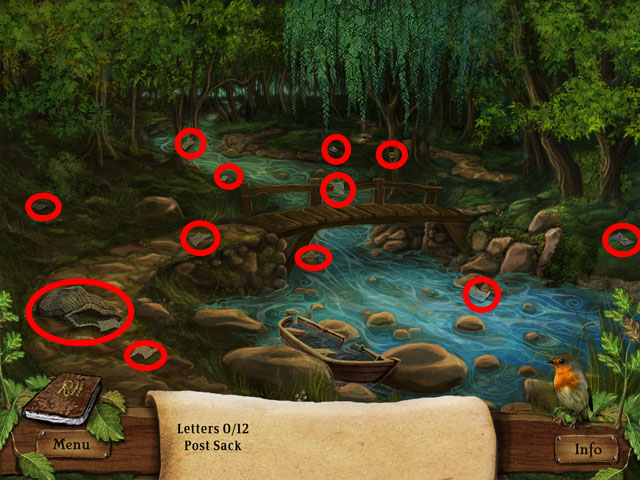
- Find 12 letters and the post sack (bag of letters).
- Arrange the jigsaw puzzle by clicking on the pieces and dragging them in place.
- When you place a piece near the correct spot, the piece will snap in place.
- See the screenshot for the completed image.
- This puzzle is a classic number puzzle like before, only some of the numbers are much longer than before.
- The numbers on the edge of the middle grid tell you how many boxes need to be marked in that row or column.
- If the number is more than one, the boxes must be drawn together in a line without spaces.
- If there are two numbers that means there is a space between the two lines of blocks.
- The blank spaces are not counted so you will need to figure out where to draw the correct blocks.
- Start with the edge rows and columns on each side because they have been completed for you.
- Then find any columns or rows that have been started but not finished, and add the pieces need to finish the line.
- For example if there is one block drawn but the number says 2, you know that you must draw a block beside that one.
- Continue this way until you have finished the puzzle like in the screenshot and drawn an image.
- Collect the red WAX (1).
- Place the WAX into the SPOON (2).
- Melt the WAX with the candle.
- Pour the melted wax on to the envelope (3).
- Use the right STAMP (4).
Chapter 4: The Tournament
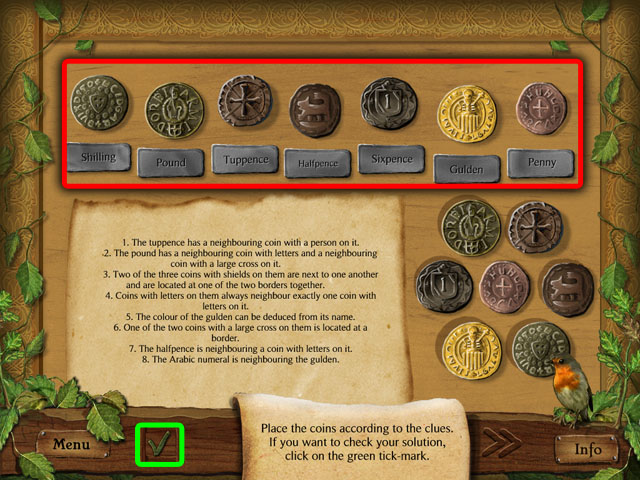
- Arrange the coins by using the clues at the bottom of the screen like you have done before.
- Some of the coins are easy. The Guilden can be told because of its color: it is gold.
- Two of the shielded coins are beside each other at the edge and since the Guilden is at the right edge they must be at the left edge. Also therefore a coin with a cross must be at the right edge and the sixpence must be the coin with the number on it.
- From there you know that what two coins are the coins with shields at the left, because the coin with the 1 was the only other coin with a shield.
- Two letter coins must be beside eachother, so the coin with the cross and the letters is to the right of the Guilden.
- The other cross goes to the right of the Pound.
- You can use the rest of the clues to find the correct order, as shown in the screenshot.
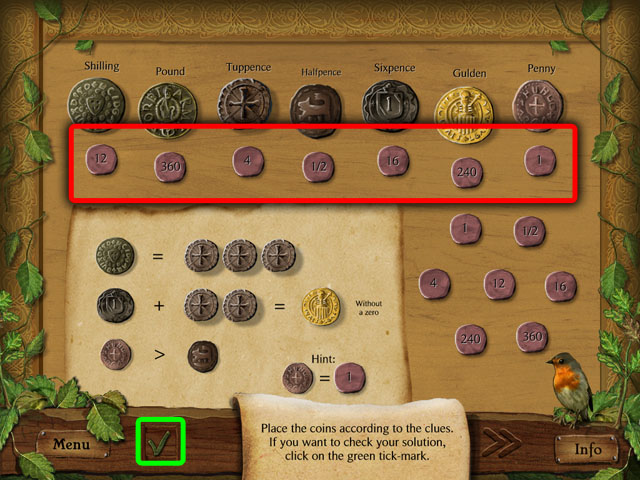
- This is another logic game to figure out how much each of the coins is worth.
- This can be solved with simple algebra.
- If the Shilling is A and the Tuppance is B: A = 3B.
- If the Sixpence is C and Guilden is D: C+2B = D/10.
- Then we have the Penny is greater than the Halfpence as the last clue.
- Also we have a hint that the Penny is 1.
- Since there are only two numbers that have a zero at the end, the Guilden is either 240 or 360.
- Since we can't find numbers that go together to make 36, the Sixpence must be 16 and the Tuppence 4, making the Guilden 240.
- Then you times the Tuppence by 3 and get the Shilling at 12.
- The rest can be filled in easily from here.
- See the screenshot for the correct solution.
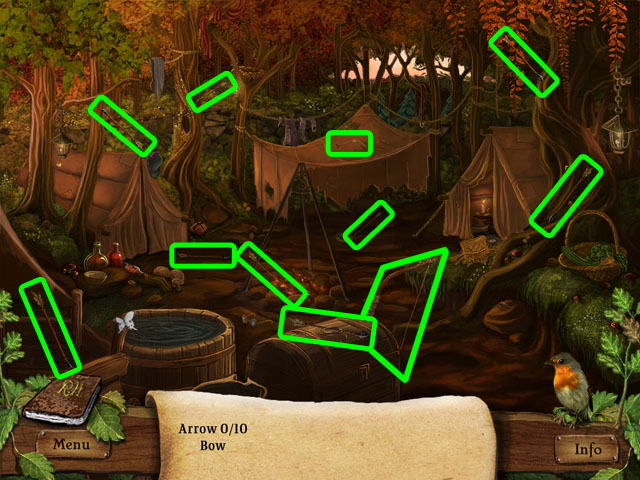
- Find the hidden objects listed at the bottom of the screen.
- Some of the items may be different in your playthrough.
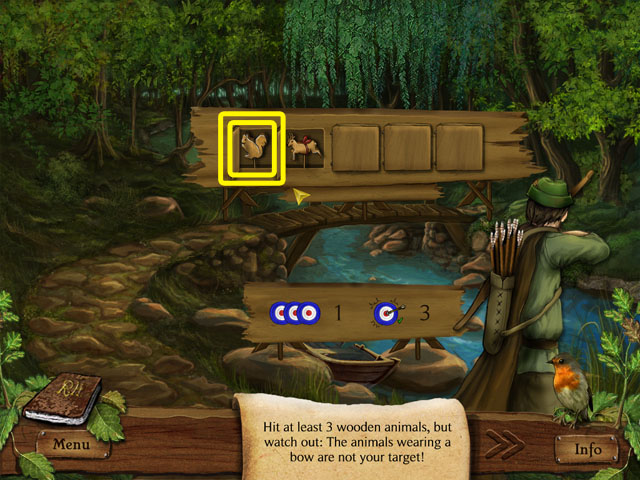
- Click on the wooden animals in the board in the middle to target them.
- When then animals pop up there will be one with a bow. Do not click the animals with bows.
- You have to get least five wooden animals to finish hunting.
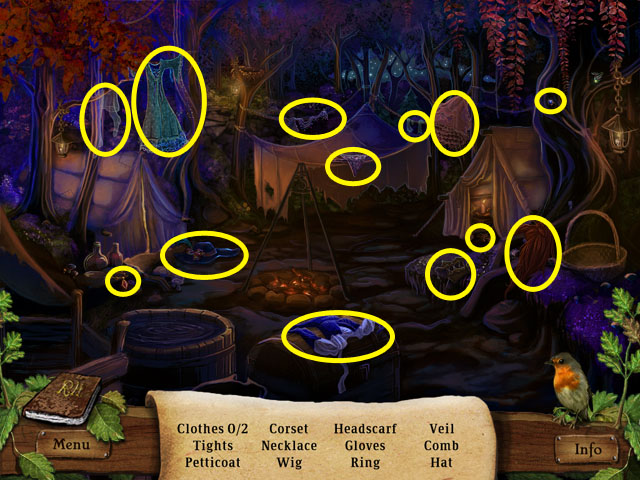
- Find the hidden objects listed at the bottom of the screen.
- Some of the items may be different in your playthrough.
- Find the matching pairs in this game of memory.
- Click on one box and then another. If you find a matched pair the boxes will be removed.
- Remove all of the boxes to finish this mini-game.
- The best strategy is to start from a corner and remember everything as you go across.
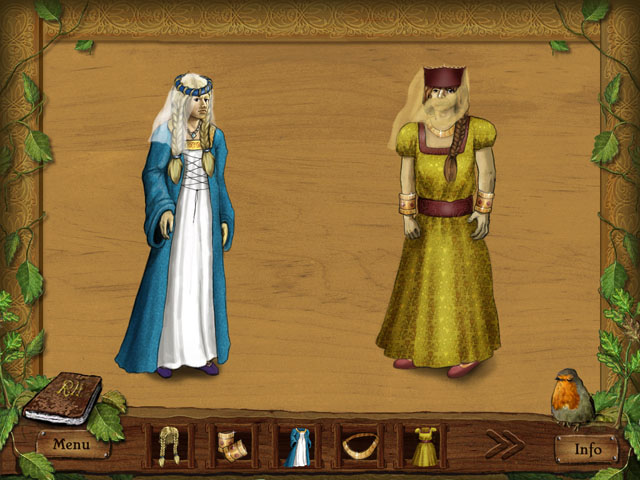
- Click on the clothes or accessories from the inventory to put them on the two men.
- You can't put belt or boots on before the clothes underneath them are on like socks and shirts.
- See the screenshot for the correct disguises.
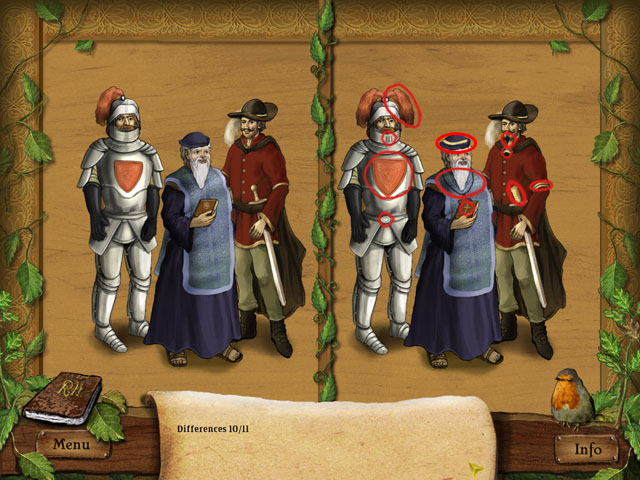
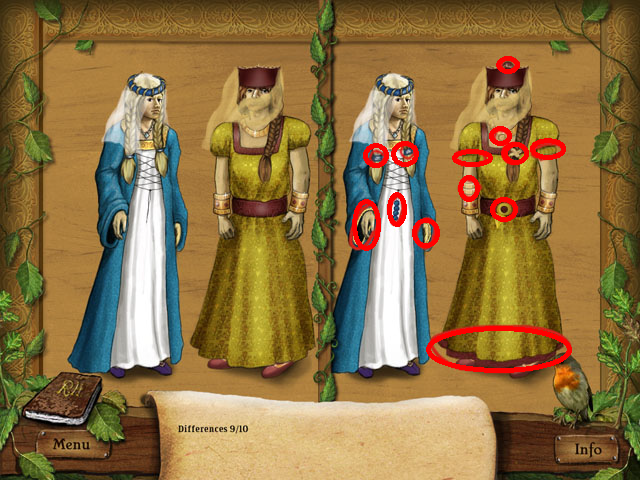
- Find 11 differences between two pictures.
- When you start this puzzle, you have to memorize how the path is drawn across the hex board.
- First you click on a spot. If that is the correct spot, it will light up and you can continue, if not you must start from the beginning again.
- Click the hexes to select the correct path in order.
- The start is Robin's camp (S), and the goal is the Nottingham (G).
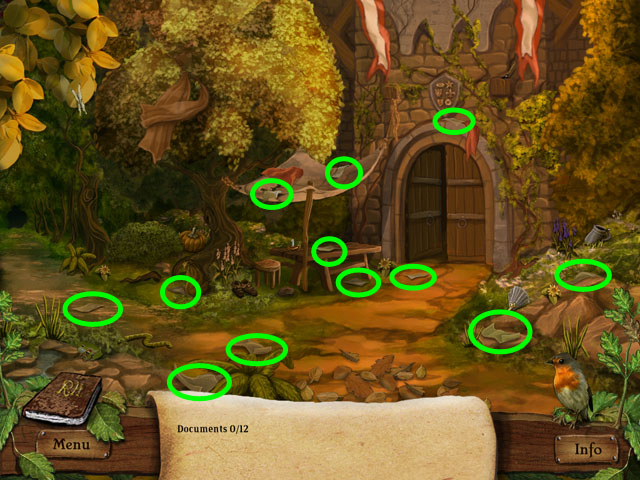
- Find 12 documents.
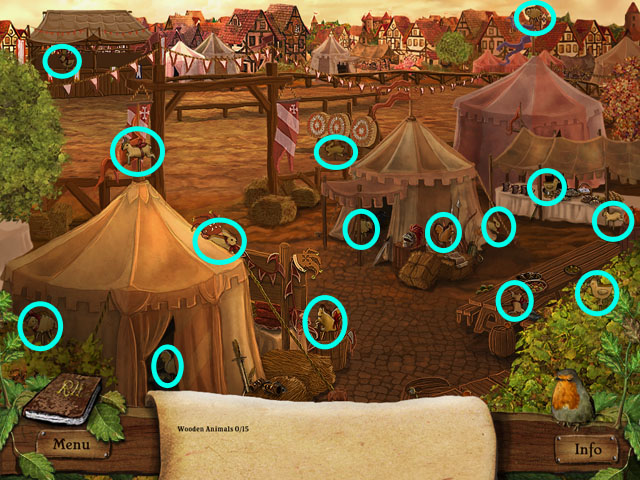
- Find 15 wooden animals.
- Click on 10 wooden animals in the board in the middle.
- You can't click on the wooden animals with bow as before.
- There will be three options instead of two in this version.
Chapter 5: Fighting the Sheriff
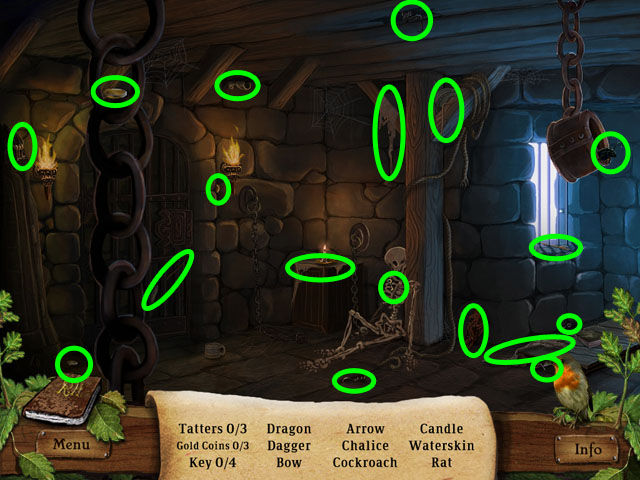
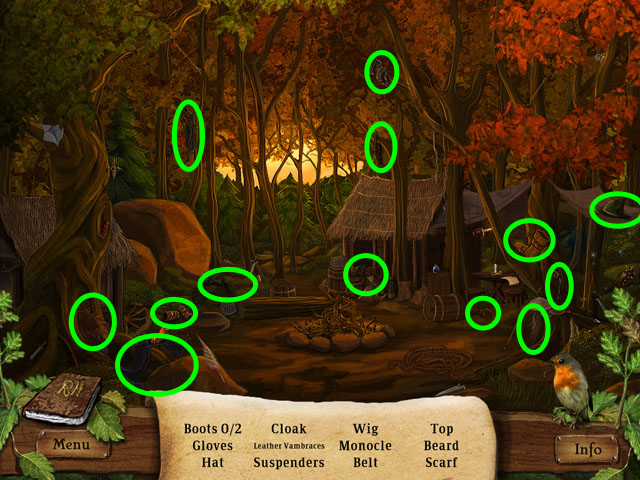
- Find the hidden objects listed at the bottom of the screen.
- Some of the items may be different in your playthrough.
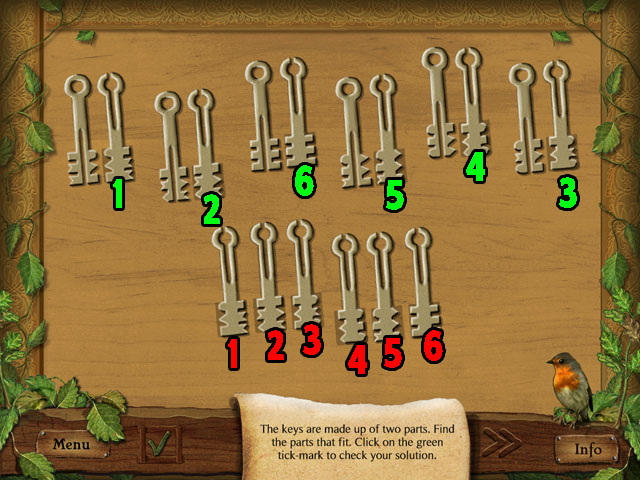
- Find the keys at the top that match the keys at the bottom and place them together.
- The bottoms and the tops won't match, but the number and shape of the teeth is what to look for.
- See the screenshot for the correct matches.
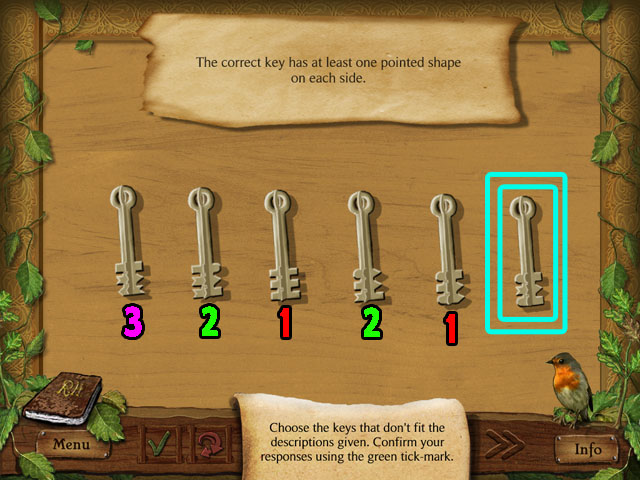
- The next puzzle has you find the correct key give 3 clues.
- First eliminate the keys without at least one pointed shape one each side (1).
- Next eliminate keys with identical shapes on one side (2).
- Lastly elimate the key that doesn't have 4 different shapes in the teeth (3).
- The last key will be the correct key.
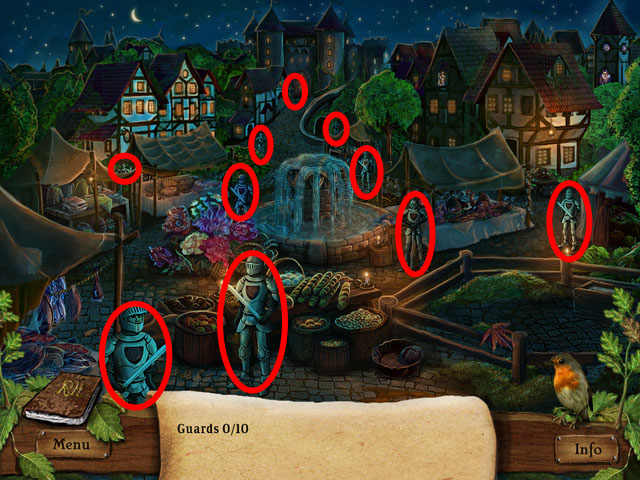
- Find 10 guards in the scene.
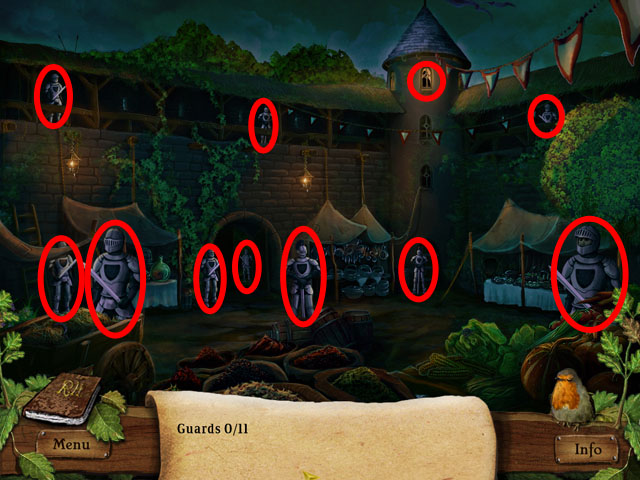
- Find 11 guards in the next scene.
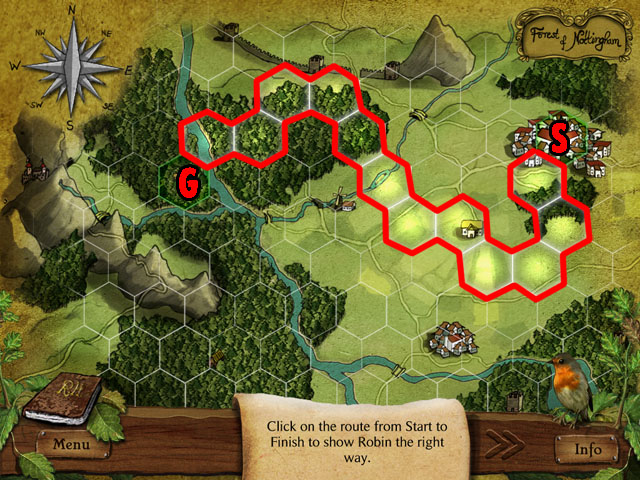
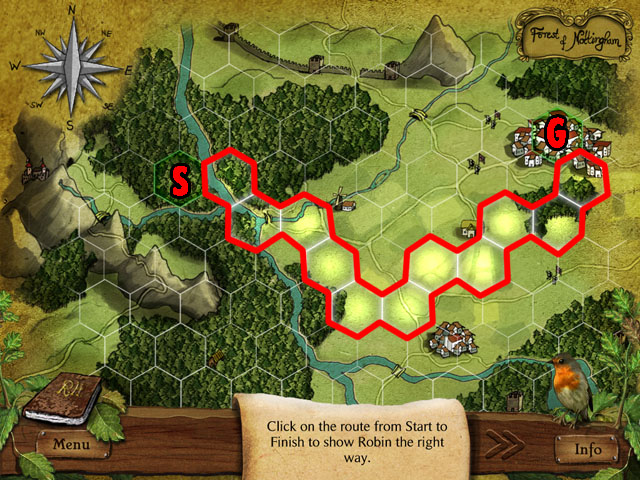
- When you start this puzzle, you have to memorize how the path is drawn across the hex board.
- First you click on a spot. If that is the correct spot, it will light up and you can continue, if not you must start from the beginning again.
- Click the hexes to select the correct path in order.
- The start is Robin's camp (S), and the goal is the Nottingham (G).
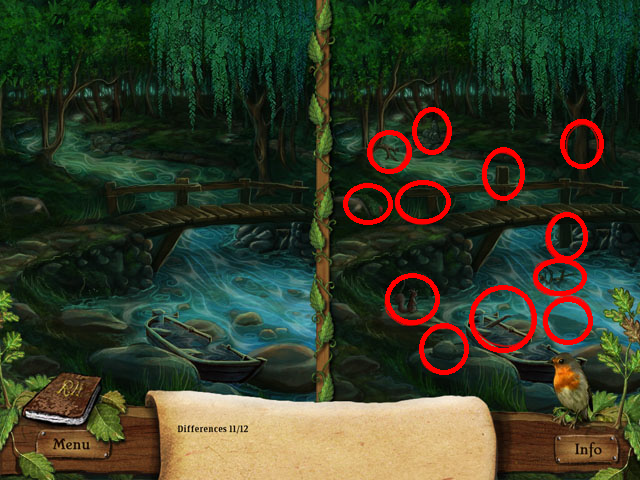
- Find 12 differences between two pictures.

- When you start this puzzle, you have to memorize how the path is drawn across the hex board.
- First you click on a spot. If that is the correct spot, it will light up and you can continue, if not you must start from the beginning again.
- Click the hexes to select the correct path in order.
- The start is Robin's camp (S), and the goal is the Nottingham (G).
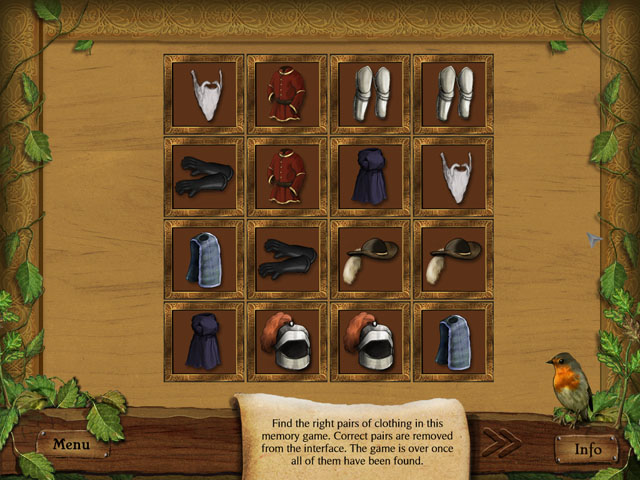
- Find the hidden objects listed at the bottom of the screen.
- Some of the items may be different in your playthrough.

- Find the matching pairs in this game of memory.
- Click on one box and then another. If you find a matched pair the boxes will be removed.
- Remove all of the boxes to finish this mini-game.
- The best strategy is to start from a corner and remember everything as you go across.
- Click on the clothes or accessories from the inventory to put them on the two men.
- You can't put belt or boots on before the clothes underneath them are on like socks and shirts.
- See the screenshot for the correct disguises.
- Find 10 differences between two pictures.
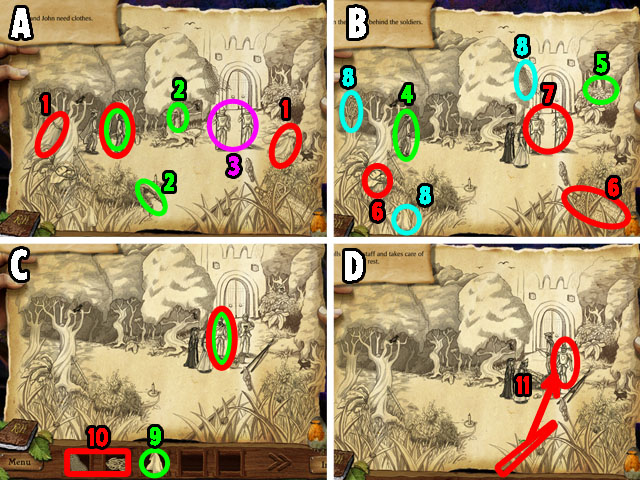
- Collect the two DRESSES (1).
- Put two DRESSES to two men highlighted in red.
- Collect the two WIGS (2).
- Put two WIGS on two men highlighted in green.
- Click on the TWO MEN.
- Click the guards (3).
- Collect ROBIN (4).
- Click on the bush to hide in there (5).
- Collect the GRAPES and WINE (6).
- Give the GRAPES and WINE to the guards (7).
- Collect the ROPE, NET and HANDKERCHIEF (8).
- Give the HANDKERCHIEF to the left guard (9).
- While he is taking the HANDKERCHIEF, use the ROPE and NET (10).
- Beat up another guard with the STICK (11).
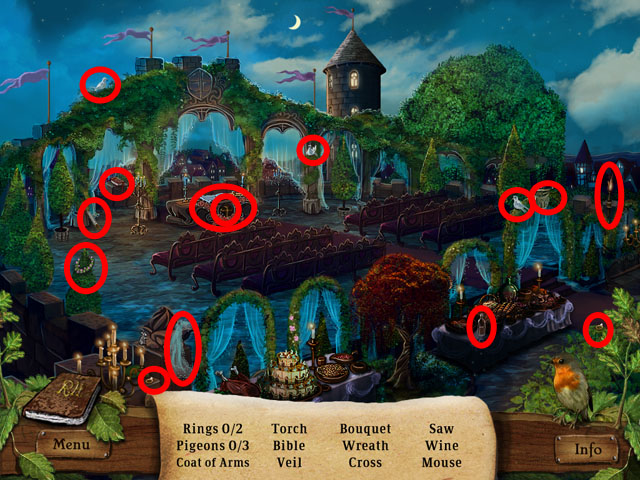
- Find the hidden objects listed at the bottom of the screen.
- Some of the items may be different in your playthrough.
- Find the hidden objects listed at the bottom of the screen.
- Some of the items may be different in your playthrough.
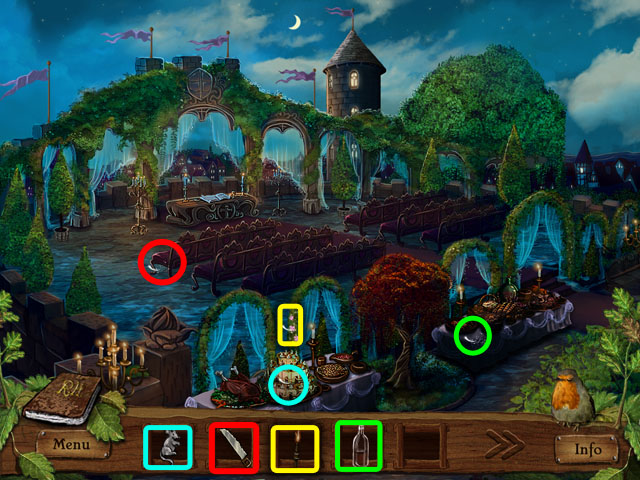
- Place the four items in the inventory.
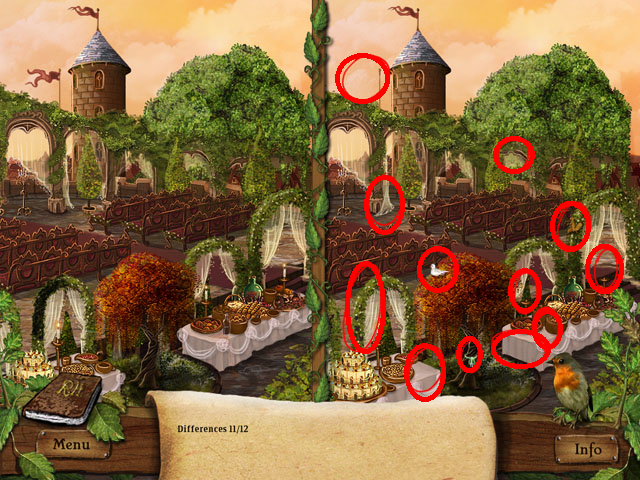
- Find 12 differences between two pictures.
- The last mini-game really isn't a puzzle at all.
- Use the different parts to make a face for the Sherriff of Nottingham during Robin's wedding.
- There is no incorrect answer.
- Congratulations! You Finished Robin Hood!
Created at: 2010-11-13