
Walkthrough Menu
General Tips
- This is the official guide for Royal Detective: Borrowed Life.
- This guide does not mention each time you have to zoom into a location; the screenshots show each zoom scene.
- Hidden-object puzzles are referred to as HOPs. This guide does not show screenshots of the HOPs, however, it will mention when a HOP is available and the inventory item collected.
- This guide gives solutions for all puzzles that are not random. Please read the instructions in the game for each puzzle.
Chapter 1: Find Tristan
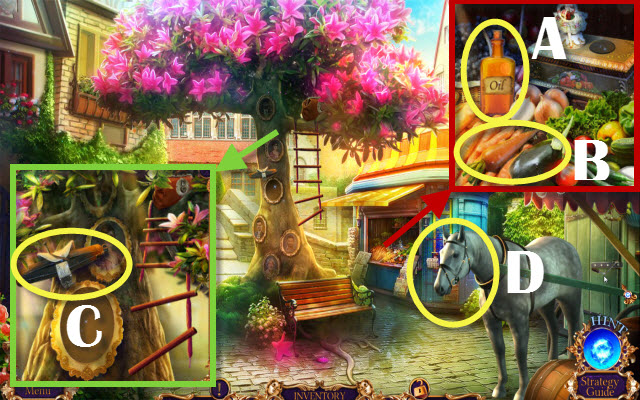
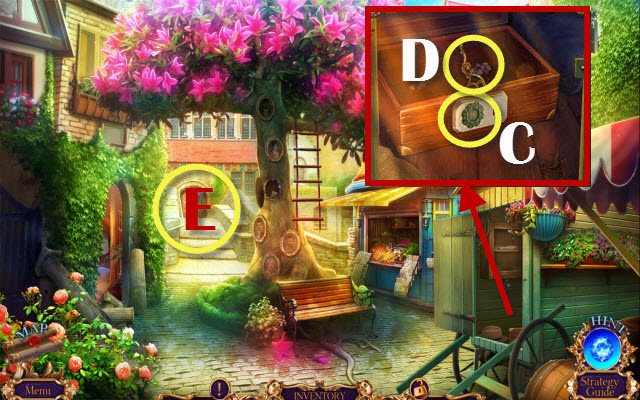
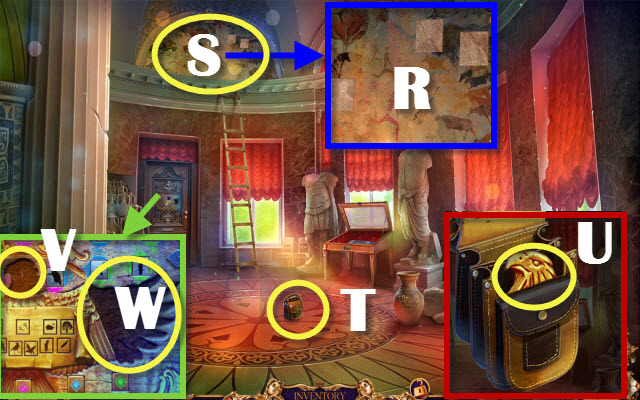
- Receive a DOVE.
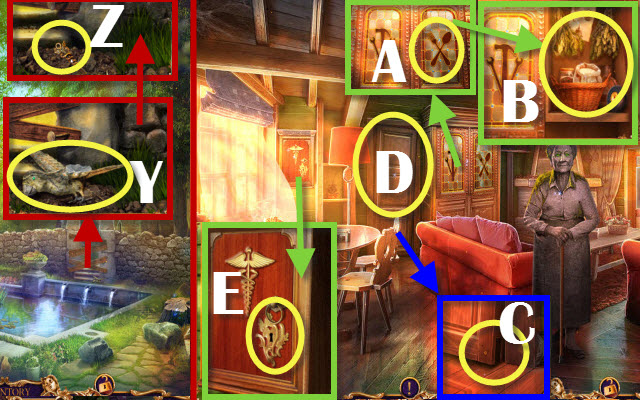
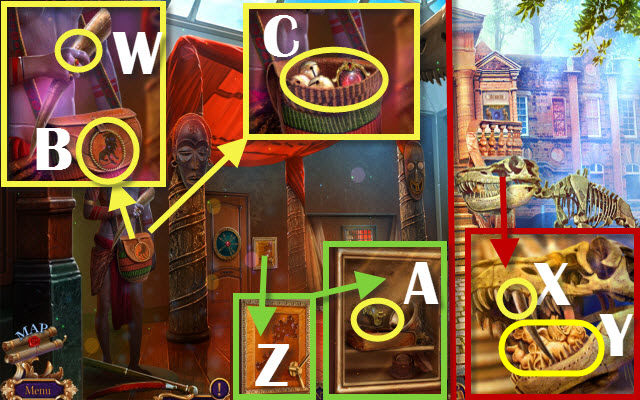
- Take the CLOSED BOTTLE (A), CARROT (B) and BROKEN JACK (C).
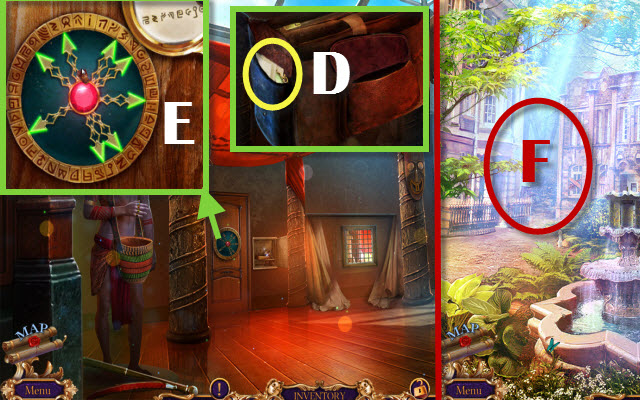
- Give the CARROT to the horse (D).
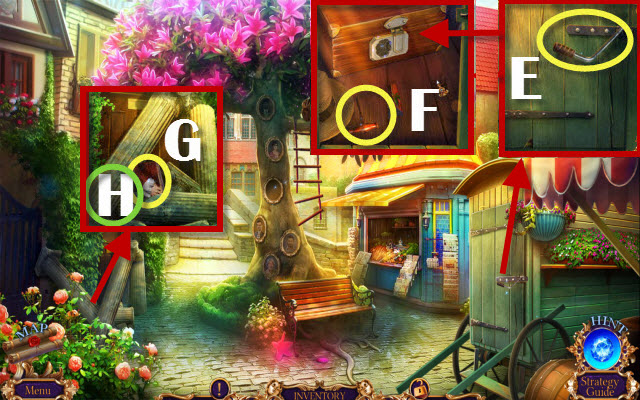
- Take the METAL ROD (E); move the hat and take the CORKSCREW (F).
- Combine the CLOSED BOTTLE with the CORKSCREW; create OIL (Inventory).
- Combine the BROKEN JACK with METAL ROD and OIL; create JACK (Inventory).
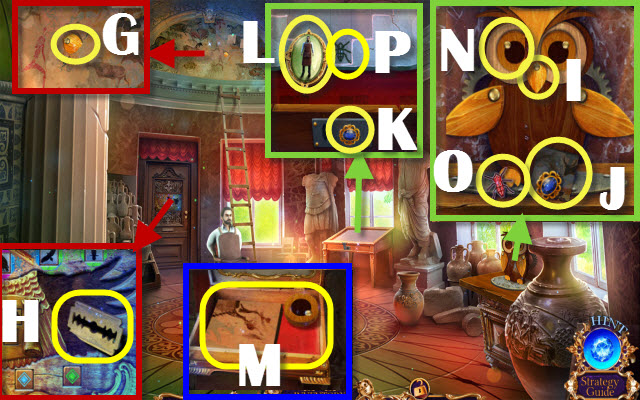
- Take the PORTRAIT PIECE (G).
- Use the JACK (H); remove the pillars.
- Enter the Mansion.
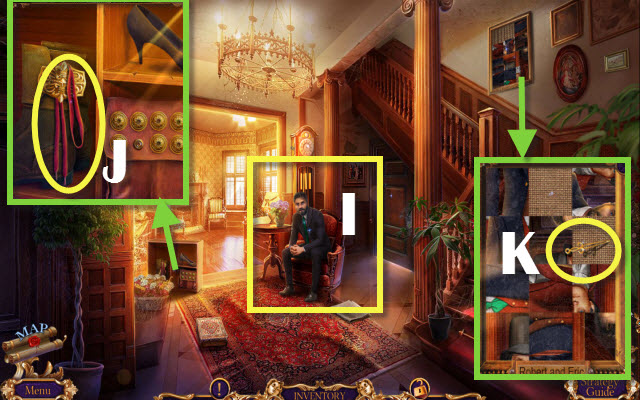
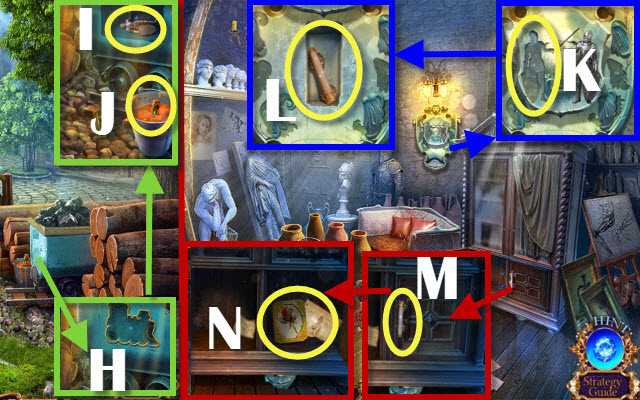
- Speak to Robert (I); receive ERIC'S MEDALLION.
- Take the SHOE LACES (J) and CLOCK HAND (K).
- Walk down.
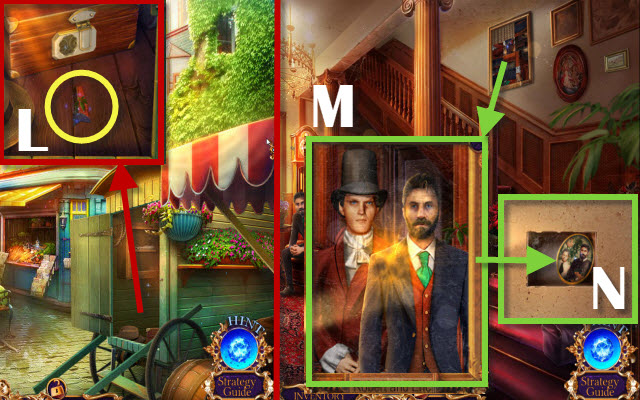
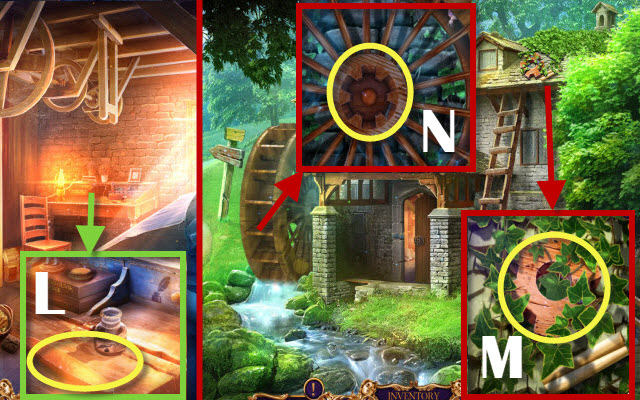
- Use the CLOCK HAND on the 2nd PORTRAIT PIECE (L); take it.
- Enter the Mansion.
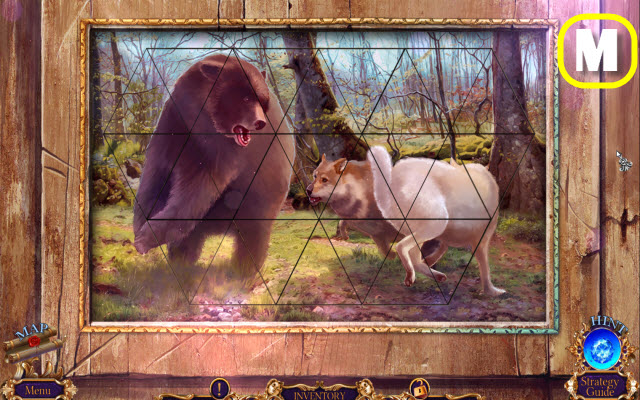
- Place the 2 PORTRAIT PIECES; complete the photo (M).
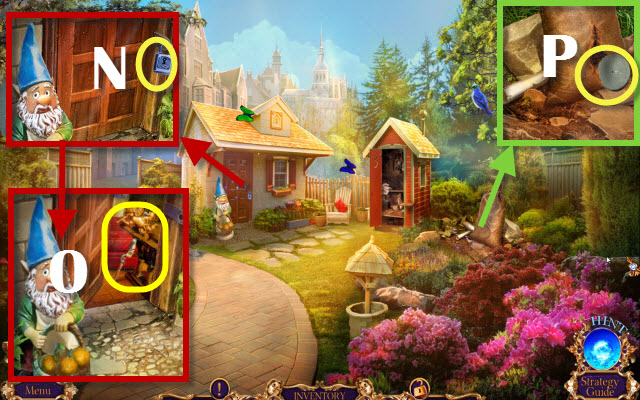
- Take the PORTRAIT (N).
- Walk down.
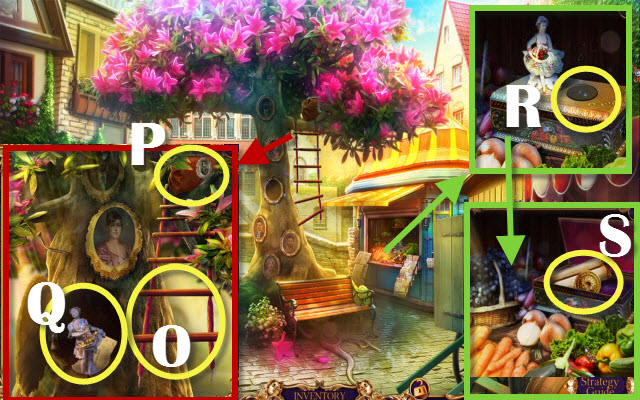
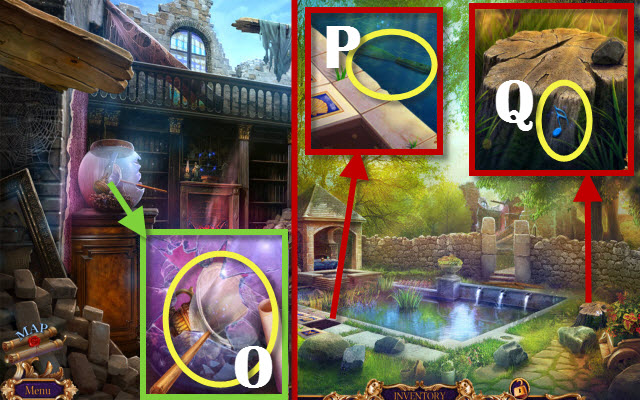
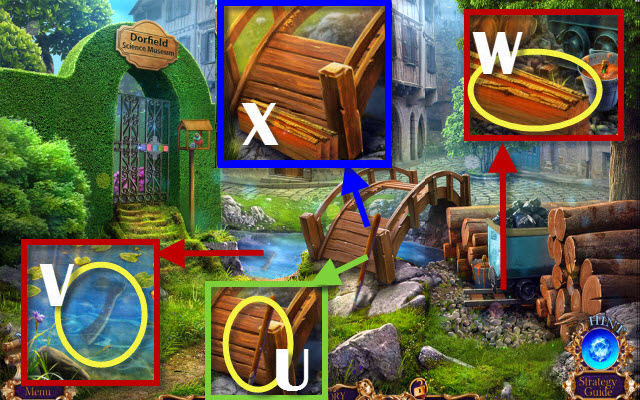
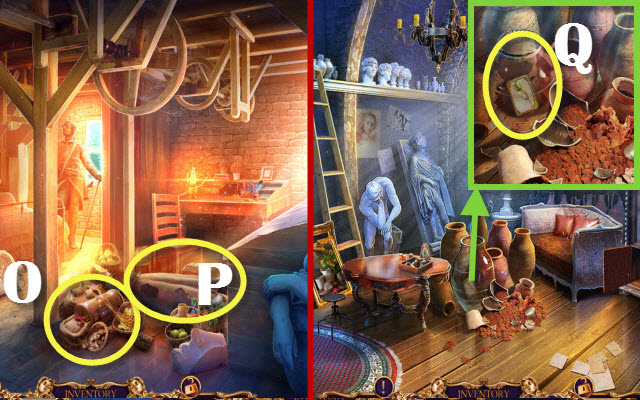
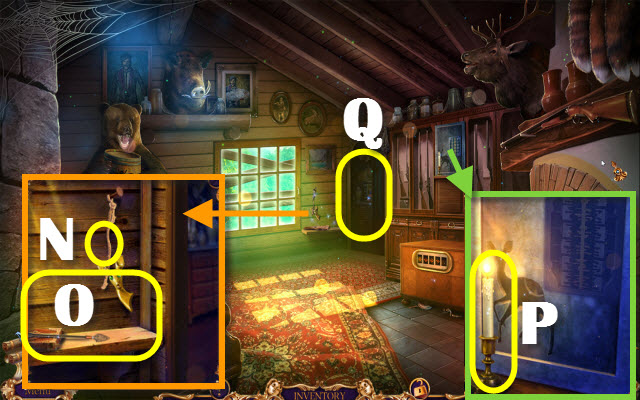
- Use the SHOE LACES (O); take ERIC'S BAG (P).
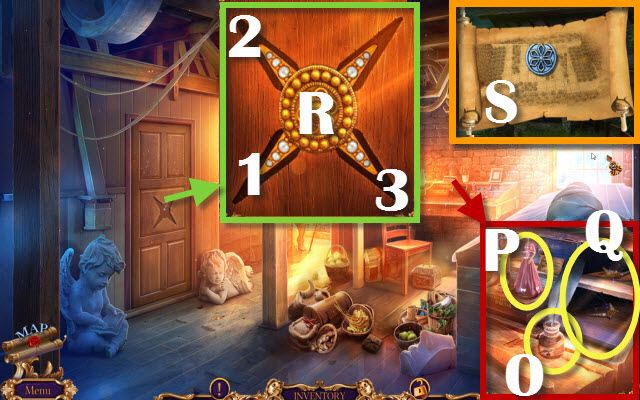
- Place the PORTRAIT and take the MAN FIGURINE (Q); and read the note.
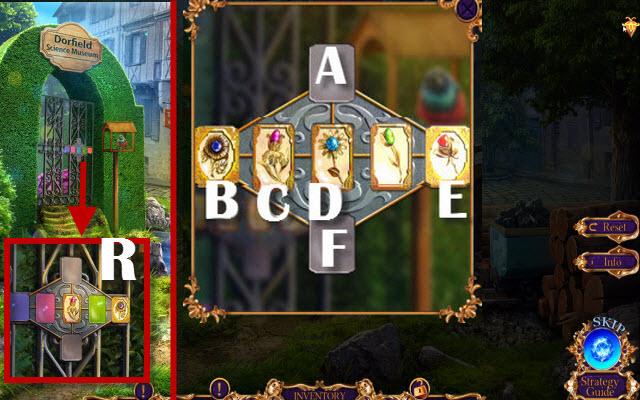
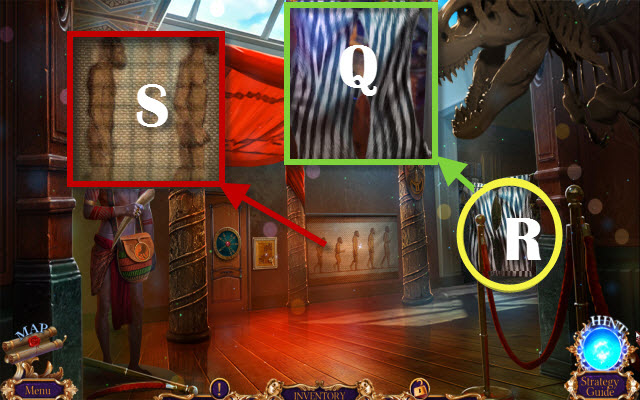
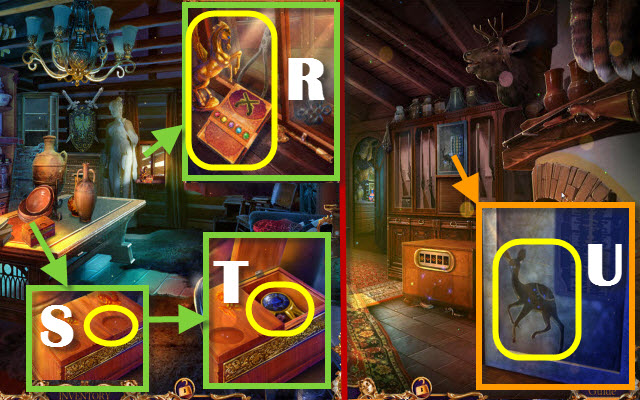
- Place the MAN FIGURINE (R); take the BAG CLASP (S) and read the scroll.
- Enter the Mansion.
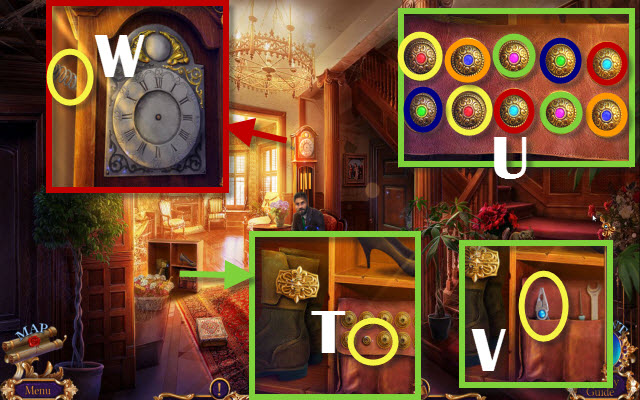
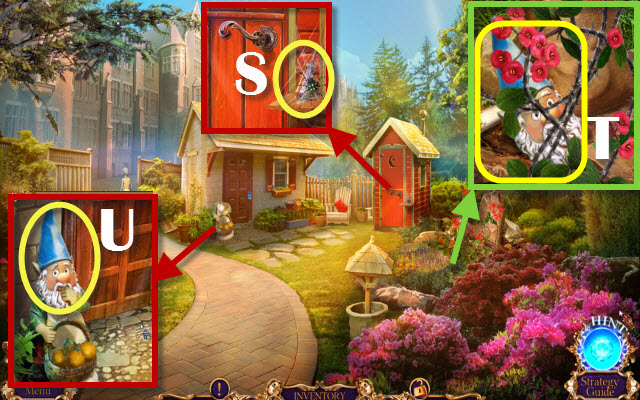
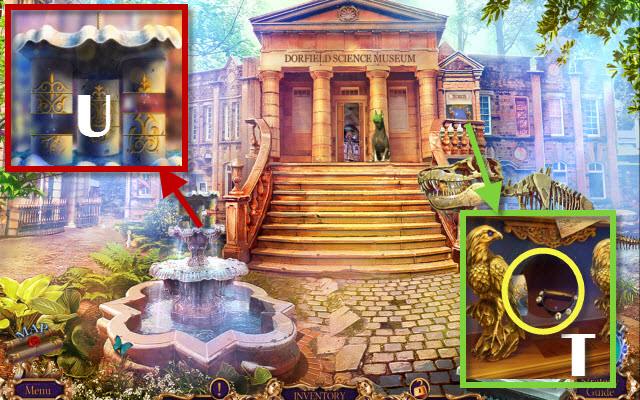
- Place the BAG CLASP (T).
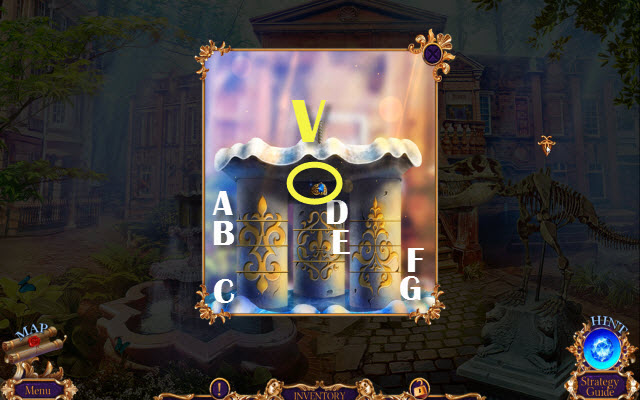
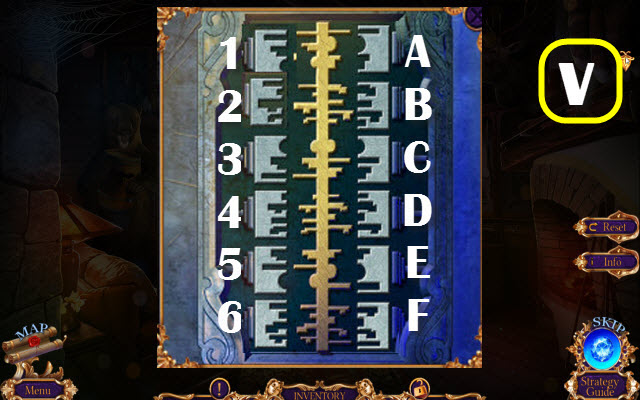
- Match the colors (U).
- Take the PLIERS (V).
- Use the PLIERS; take the SPRING (W).
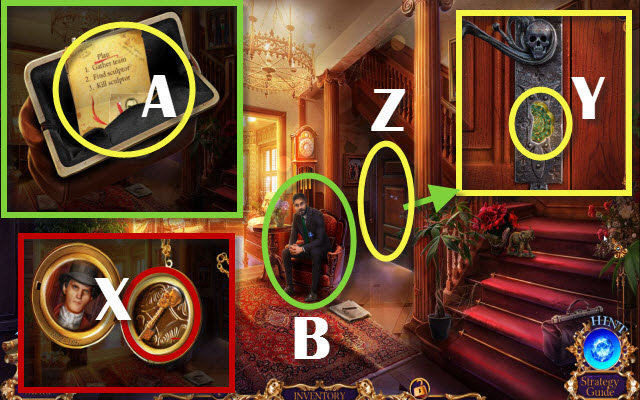
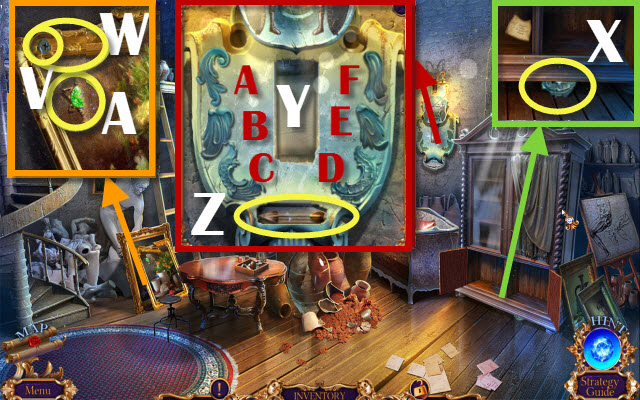
- Open ERIC'S MEDALLION (Inventory); select twice. Place the SPRING, select twice and take the SKULL KEY (X).
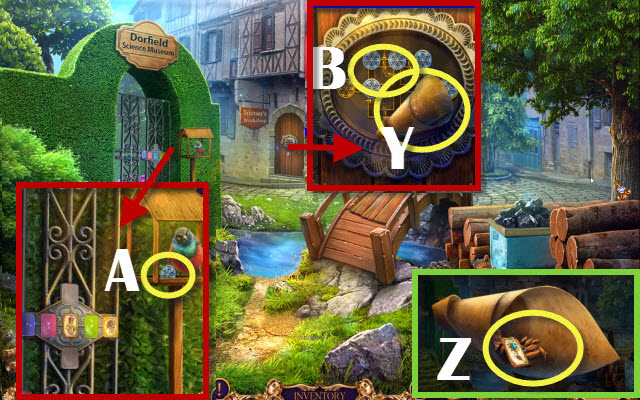
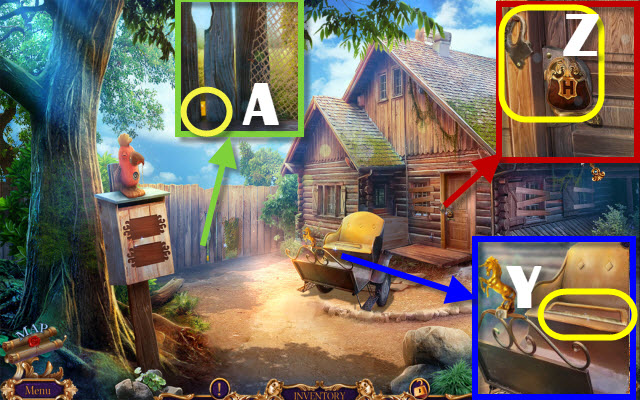
- Use the PLIERS to get the IRON BUTTON (Y); insert the SKULL KEY.
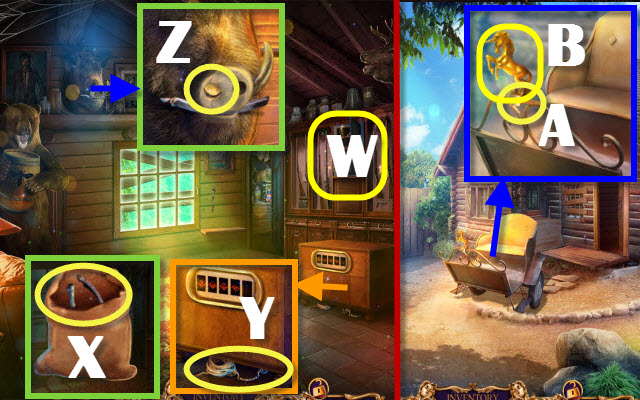
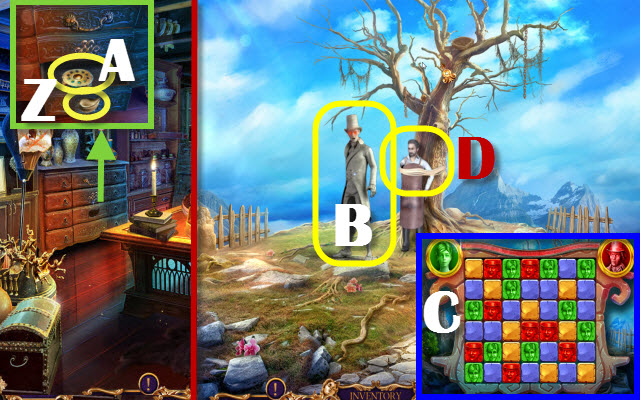
- Play the HOP (Z); receive a MONOGRAM E.
- Combine ERIC'S BAG and MONOGRAM E (Inventory); take ERIC'S NOTES and CLOCK PIECE 1/3 (A).
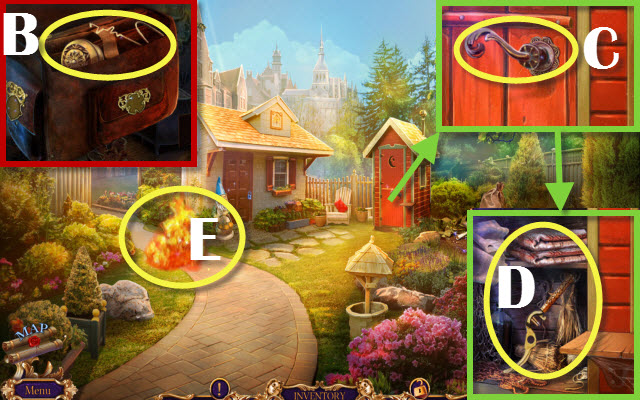
- Give ERIC'S NOTES to Robert (B); receive a STATUE SIGN.
- Walk down.
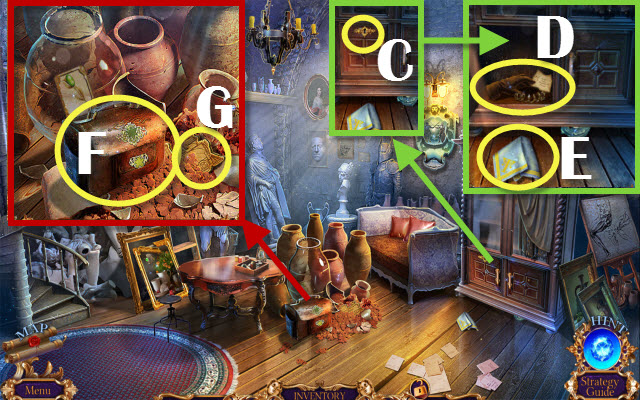
- Place the IRON BUTTON and push it (C); take the CLOCK PIECE 2/3 (D).
- Use the STATUE SIGN (E).
- Walk forward.
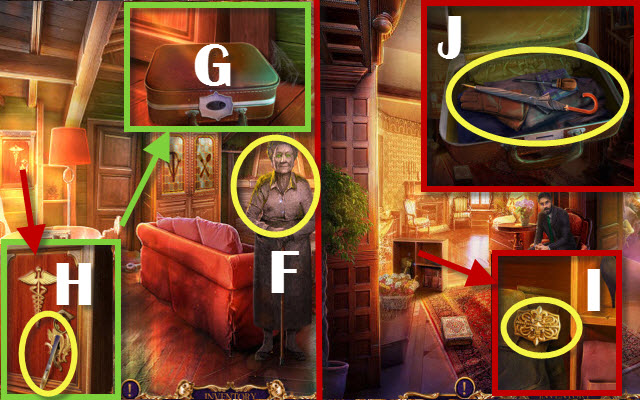
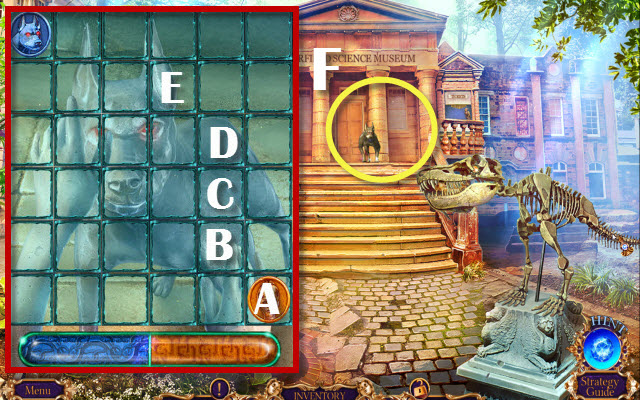
- Speak to Henrietta (F).
- Take the SUITCASE (G) and SCALPEL (H).
- Go to the Mansion.
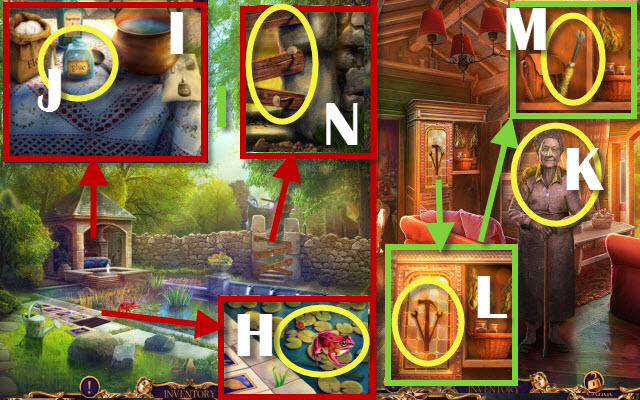
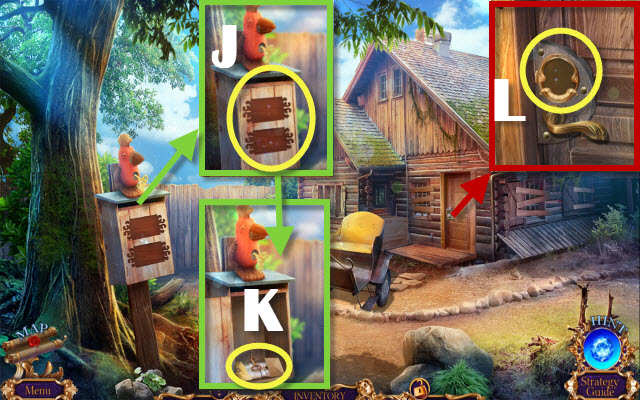
- Use the SCALPEL to get the CLASP (I).
- Combine the SUITCASE and CLASP (Inventory); read the note. Take the UMBRELLA and SCREWDRIVER (J).
- Return to Henrietta's House.
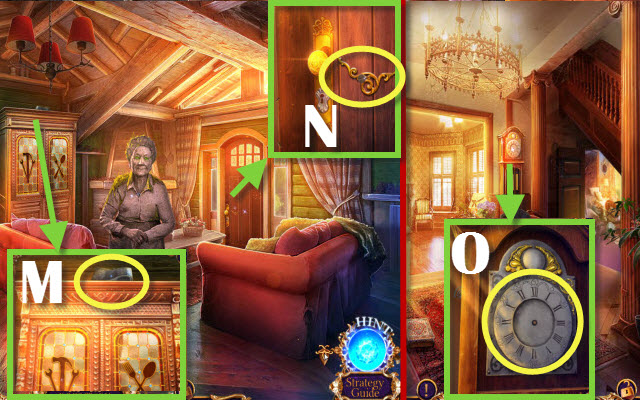
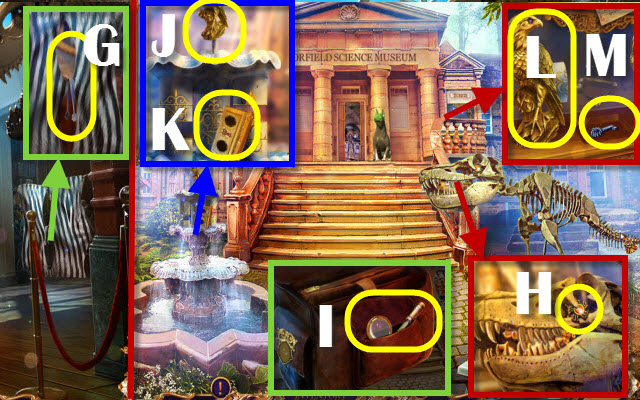
- Use the UMBRELLA to retrieve the WEDGE (M).
- Use the SCREWDRIVER to get the CLOCK PIECES (N).
- Return to the Mansion.
- Place the CLOCK PIECES (O).
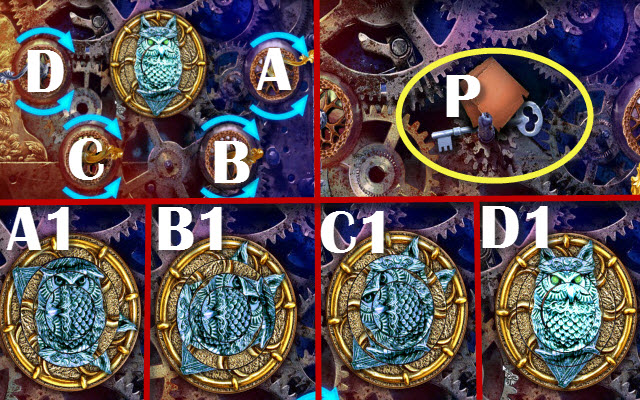
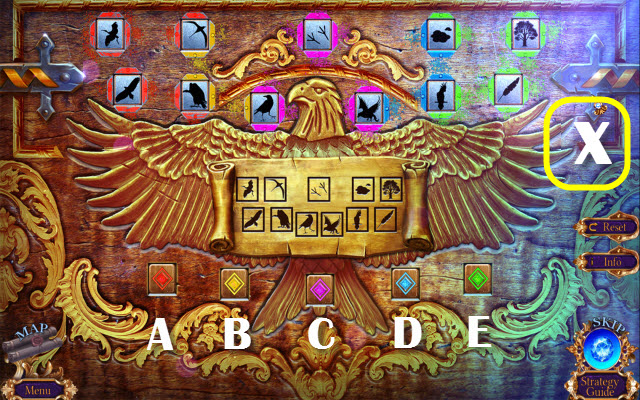
- Select arrows in order until it looks like its corresponding screen: A down until A1, B up until B1, C down until C1 and D up until D1.
- Read the note; take the SILVER KEY (P).
- Go to Henrietta's House.
- Insert the SILVER KEY; turn it (Q).
- Go to the Park.
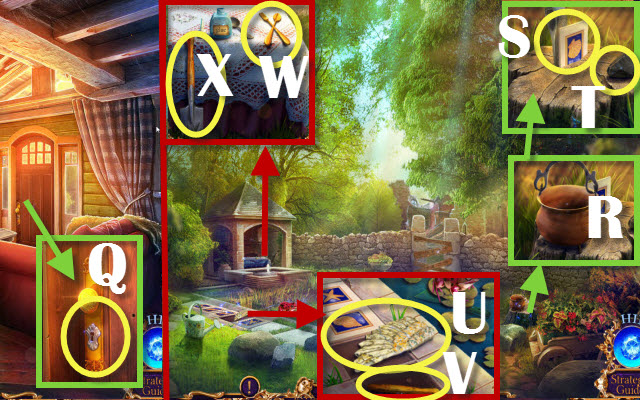
- Take the CAULDRON (R).
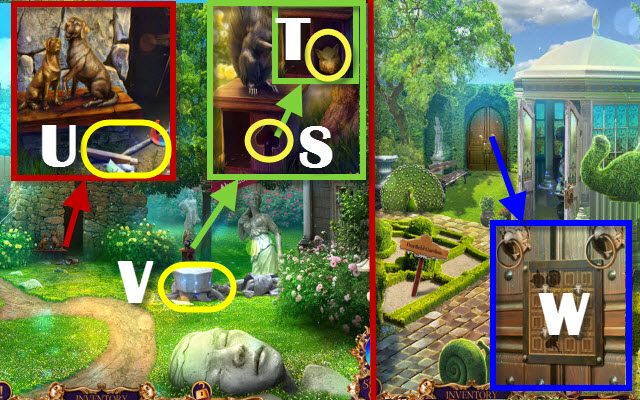
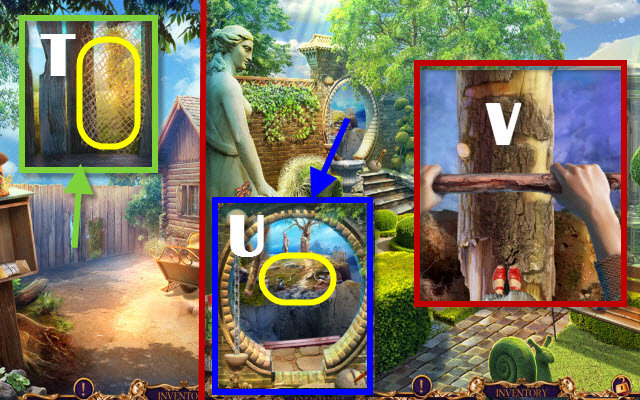
- Place the WEDGE (S); select the stone (T) and take the TILE (S).
- Take the PARROT WING and place the TILE (U); take the SPADE'S SHAFT (V).
- Take the FORK AND SPOON (W).
- Place the SPADE'S SHAFT; take the SPADE (X).
- Take the BROKEN PARROT (Y); use the SPADE to get the FIRST AID KEY (Z).
- Walk down.
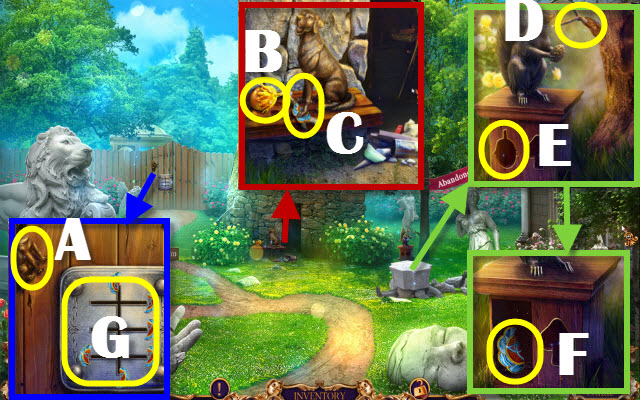
- Place the FORK AND SPOON (A); take the WHEEL, FLOUR and GLUE RECIPE (B).
- Place the WHEEL (C).
- Play the HOP (D); receive a RAKE.
- Use the FIRST AID KEY (E).
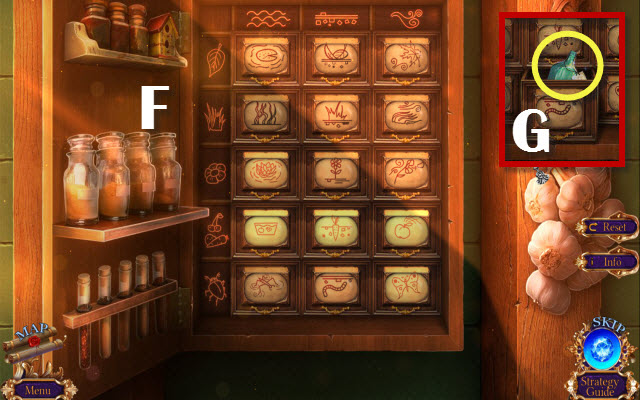
- Solution (F).
- Take the INGREDIENT J (G).
- Return to the Park.
- Use the RAKE and CAULDRON on the water (H); receive a CAULDRON WITH WATER.
- Place the GLUE RECIPE, CAULDRON WITH WATER, FLOUR and INGREDIENT J (I).
- Select the flour, cauldron and take the GLUE (J).
- Combine the BROKEN PARROT, GLUE and PARROT WING; receive HENRIETTA'S PARROT (Inventory).
- Walk down.
- Give HENRIETTA'S PARROT to Henrietta (K); receive WORKER FIGURINE.
- Place the WORKER FIGURINE (L); take the NAIL PULLER (M).
- Return to the Park.
- Use the NAIL PULLER 3x (N).
- Walk forward.
- Take the SCOOP NET (O); read the note.
- Walk down.
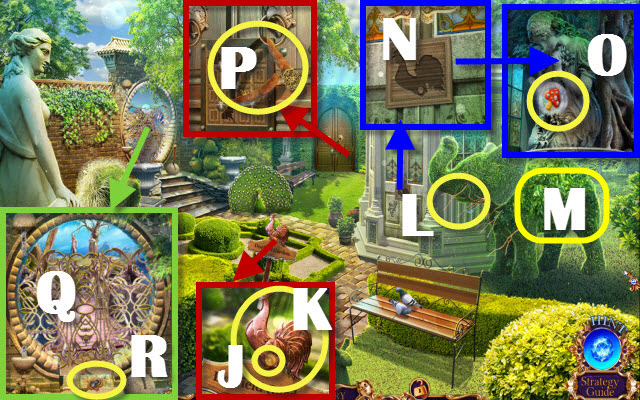
- Use the SCOOP NET (P); take the PALETTE KNIFE (P).
- Use the PALETTE KNIFE; take the MUSIC NOTE (Q).
- Walk forward.
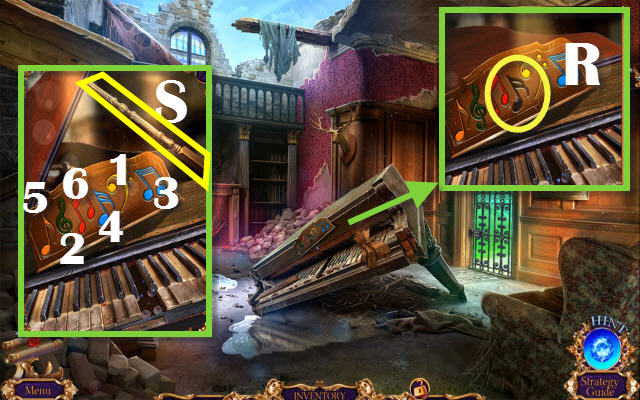
- Place the MUSIC NOTE (R).
- Solution (1-6); take the LID PROP (S).
- Use the LID PROP (T); take the MITTEN.
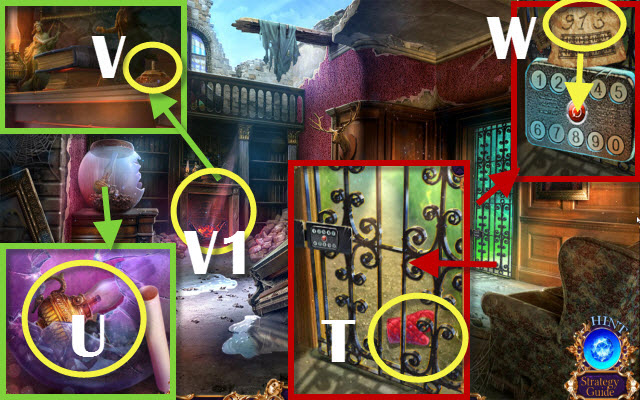
- Use the MITTEN to get the LAMP and PIANO KEY (U).
- Place the LAMP (V).
- Play the HOP (V1); receive a CODE.
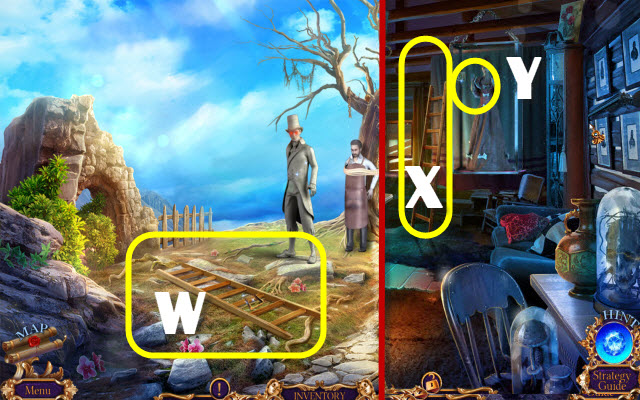
- Use the CODE; punch in 913 (W).
- Go to the Watermill.
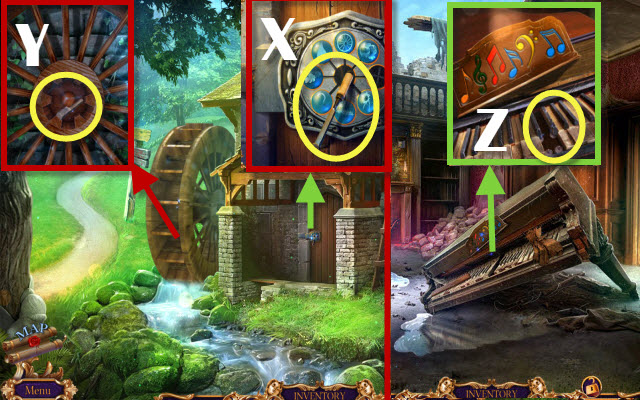
- Take the CHISEL (X) and 2nd PIANO KEY (Y).
- Walk down.
- Place the 2 PIANO KEYS (Z).
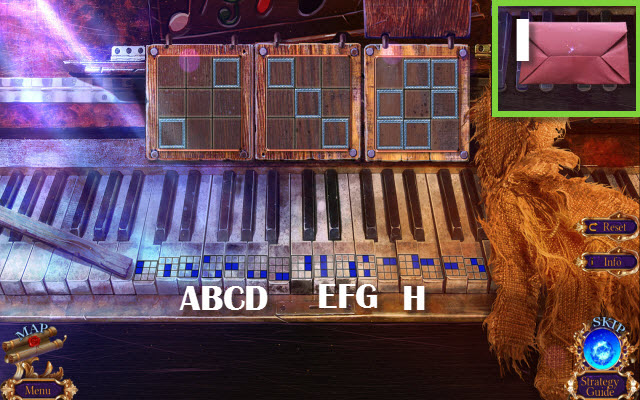
- Solution: D-F-H, B-E-G and H-D-C-G-A.
- Take the FOLDED PAPER (I).
- Go to the Watermill.

- Open the FOLDED PAPER (Inventory); take the STATUE PLAN, BLUNT KNIFE and MILL AMULET (J).
- Place the MILL AMULET (K).
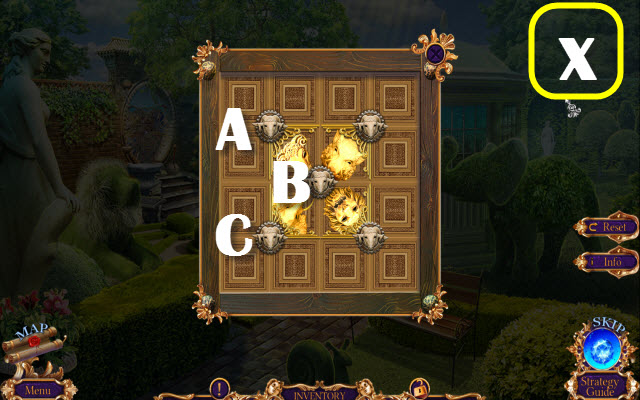
- Move the following: BIA-GIB-CIG-FIC-HIF-AIH-DIA-EID and AIE (K1).
- Walk forward.
- Use the BLUNT KNIFE (L); receive a KNIFE.
- Walk down.
- Use the KNIFE to get the MECHANISM PART (M); read the note.
- Place the MECHANISM PART (N); receive an OLIVIA FIGURINE.
- Walk forward.
- Combine the DOVE and STATUE PLAN; receive a FEATHER (Inventory).
- Place the FEATHER (O) and OLIVIA FIGURINE (P); take the 2 DOOR PIECES and OLIVIA SKETCH (Q).
- Place the 2 DOOR PIECES (R); select 1-2 and 3.
- Receive a PACKAGE.
- Open the PACKAGE (Inventory); get a KEY HALF and FOREST MAP (S).
- Walk down.
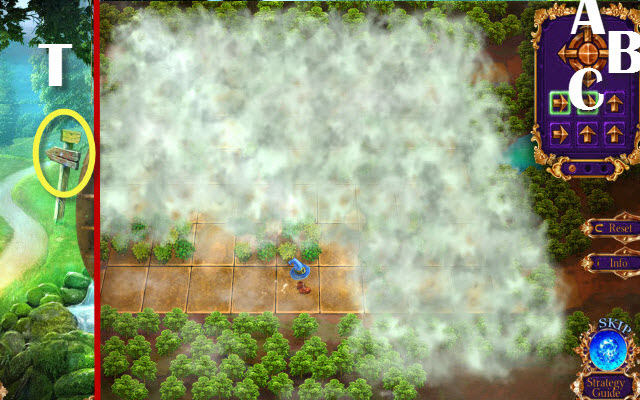
- Use the FOREST MAP (T).
- Select the arrows: A-B-B-C-B-B, B-B-A-B-A-A and B-C-B-B-C-B.
Chapter 2: Tristan's Workshop
- Take the BOATHOOK (U).
- Use the BOATHOOK to get the AXE (V).
- Use the AXE; take the PLANKS (W).
- Place the planks (X); select them.
- Take the BAG (Y).
- Open the BAG (Inventory); take the CAMOMILE, SEEDS and CLASP PIN (Z).
- Give the SEEDS; take the 2nd KEY HALF (A).
- Place the 2 KEY HALVES (B).
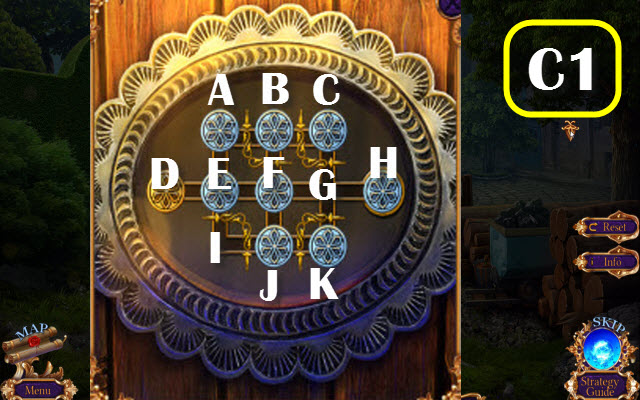
- Solution: F-G, E-F, J-I, A-E, I-J, E-I, D-E-A, F-E-D, B-F-E, A-B, E-A, G-F-E, B-F, C-B, H-G-C and F-G-H (C1).
- Enter the Workshop.
- Use the CLASP PIN on the lock (C); take LEATHER GLOVE, PRUNERS SPRING and read the note (D).
- Take TRISTAN'S SCARF (E) and TRISTAN'S CASE (F).
- Use the CHISEL; take the LOCOMOTIVE (G).
- Walk down.
- Place the LOCOMOTIVE (H); take the KNIGHT FIGURINE (I).
- Use the LEATHER GLOVE to get the CLOSED BOTTLE (J).
- Combine the CLOSED BOTTLE, TRISTAN'S SCARF and CORKSCREW; create a BOTTLE OF ACID (Inventory).
- Walk forward.
- Place the KNIGHT FIGURINE (K); take the WOODEN HANDLE (L).
- Pull the handle; replace the WOODEN HANDLE (M).
- Take the ROSE and 2nd OLIVIA SKETCH (N).
- Go to Inside Watermill.
- Receive a CHAIN.
- Place the 2 OLIVIA SKETCHES (O).
- Play the HOP (P); receive OLIVIA'S STATUE.
- Go to Workshop.
- Use the CHAIN to retrieve the TULIP (Q); take it.
- Walk down.
- Place the ROSE, CAMOMILE and TULIP (R).
- Move the following: D-A, C-D, B-F, A-B, B-C, E-A, A-B and F-E.
- Enter the Front Garden.
- Use the LEATHER GLOVE; take the CROSS SCREWDRIVER (S).
- Pour the BOTTLE OF ACID; take the GNOME HEAD (T) and read the note.
- Place the GNOME HEAD (U); receive a PATTERN PART.
- Go to the Workshop.
- Use the CROSS SCREWDRIVER (V); take the FRAME PIECE (W).
- Use the FRAME PIECE to get the 2nd PATTERN PART (X).
- Place the 2 PATTERN PARTS (Y).
- Select the following: E-C, E-A, B-D and F-E.
- Take the ARROW (Z).
- Use the ARROW; take the EMERALD CLASP (A).
- Go to the Front Garden.
- Combine TRISTAN'S CASE and EMERALD CLASP (Inventory); take the CABINET HANDLE and WIRE (B).
- Select the handle and place the CABINET HANDLE (C).
- Take the BROKEN PRUNERS and BED COVER (D).
- Use the BED COVER (E).
- Go to By the Museum.
- Use OLIVIA'S STATUE (F).
- Move as follows: AB-BC-BD and DE.
- Walk forward.
- Take the TONGS (G).
- Walk down.
- Use the TONGS; receive an EMBER CLASP (H).
- Combine TRISTAN'S CASE with EMBER CLASP (Inventory); take the MAGNIFYING GLASS and FILE (I).
- Use the FILE (J); receive the EAGLE FIGURINE.
- Take TRISTAN'S BOX (K).
- Place the EAGLE FIGURINE (L); take the GUARD'S KEY (M) and read the note.
- Walk down.
- Use the GUARD'S KEY (N); open the door.
- Take the PRUNERS PART and ANGEL FIGURINE (O).
- Combine BROKEN PRUNERS, PRUNERS PART and PRUNERS SPRING; create a PRUNER (Inventory).
- Use the PRUNER; take the DISK (P).
- Go to the Grand Hall.
- Use the PRUNER (Q).
- Play the HOP; receive a GLASS CUTTER (R).
- Use the PRUNER (S).
- Walk down.
- Use the GLASS CUTTER; take the JINGLE-BELLS WITHOUT BELLS and 2nd DISK (T).
- Place the 2 DISKS (U).
- Solution: C-Bx2-Ax3-Fx2-Gx3-Ex2 and D.
- Take the JEWELED RING (V).
- Walk forward.
- Place the JEWELED RING (W); receive a BONE.
- Walk down.
- Insert the BONE (X);take the 2nd ANGEL FIGURINE (Y).
- Go forward.
- Place the 2 ANGEL FIGURINES (Z); take the BROOCH (A).
- Place the BROOCH (B); take the RUBY CLASP and BELLS (C).
- Combine JINGLE-BELLS WITHOUT BELLS, BELLS and OLIVIA'S STATUE; receive OLIVIA'S STATUE WITH JINGLE-BELLS (Inventory).
- Combine TRISTAN'S CASE and RUBY CLASP (Inventory). Read the note; take the CYPHER and OLIVIA'S VIGNETTE (D).
- Place the CYPHER and MAGNIFYING GLASS; solution (E).
- Walk down.
- Use OLIVIA'S STATUE WITH JINGLE-BELLS (F).
- Go to Small Hall.
- Receive a MONOGRAM T.
- Use the TONGS to receive a BEAK (G).
- Take the BLADE (H).
- Place the BEAK (I); take the SHOP WINDOW CLASP and STAINED GLASS PIECE 1/3 (J).
- Insert the SHOP WINDOW CLASP (K); take TRISTAN'S VIGNETTE (L).
- Combine TRISTAN'S BOX, OLIVIA'S VIGNETTE, TRISTAN'S VIGNETTE and MONOGRAM T (Inventory); take the STAINED GLASS PIECE 2/3 and OWL EYE (M).
- Place the OWL EYE (N); take the BEETLE (O).
- Place the BEETLE (P).
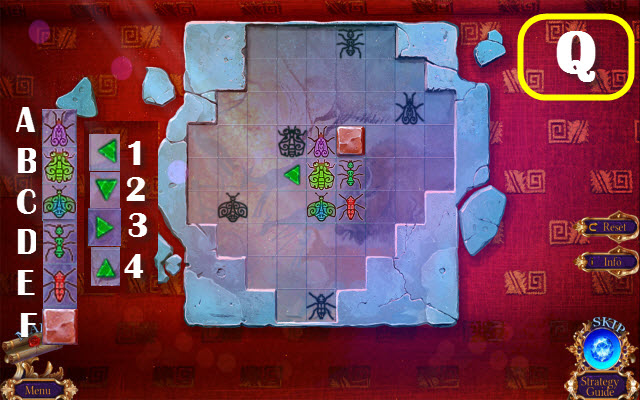
- Solution: B1-B2-C1-E1-E2-D2-E3-E2-B4-B3.
- F3-A3-D4-F2-F1-F4-F3-F2-F3-F4-F3 and A4 (Q).
- Receive a STAINED GLASS WINDOW.
- Place the STAINED GLASS WINDOW (R).
- Play the HOP (S); receive BIRD WINGS.
- Take the KNAPSACK (T).
- Combine the KNAPSACK and WIRE (Inventory); take the BIRD HEAD (U).
- Place the BIRD HEAD (V) and BIRD WINGS (W).
- Select the following: Ax3-D-C-B-A-Dx2-C-B-D-C-Dx2-Cx2-E-D-Ex2 and Dx2 (X).
- Go through the door.
Chapter 3: Save Tristan
- Receive a CODE.
- Use the TONGS; receive a DOG FIGURINE (A).
- Take the NUT and place the DOG FIGURINE (B); take the GOLDEN COIN and WRENCH (C).
- Use the BLADE; receive a SLINGSHOT WITHOUT BAND (D).
- Place the NUT (E); take the 2nd GOLDEN COIN (F).
- Place the 2 GOLDEN COINS (G).

- Matching halves: AE-BG-CH and DF (I).
- Walk forward.
- Use the WRENCH (J); take the ROOSTER (K).
- Use the TONGS; receive BRANCHES (L).
- Play the HOP (M); receive MASKS 1/3.
- Place the ROOSTER (N).
- Use the WRENCH; take the MUSHROOM (O).
- Take the BELT (P).
- Select the gates (Q); take the GORDON'S VIGNETTE (R).
- Walk down.
- Place the MUSHROOM (S); take the MASKS 2/3 (T).
- Combine the BRANCHES with BELT; create a DUSTER BRUSH (Inventory).
- Use the DUSTER BRUSH; take the TIRE LEVER and MAGNET (U).
- Use the TIRE LEVER (V); receive MASKS.
- Walk forward.
- Place the MASKS (W).
- Select the following: A-B-A-B and Cx3 (X).
- Walk forward.
- Take the BROKEN HACKSAW (Y).
- Take the HACKSAW PART and WALLET (Z).
- Combine the BROKEN HACKSAW and HACKSAW PART; create a HACKSAW (Inventory).
- Use the MAGNET (A); take the AMULET ENVELOPE.
- Walk down.

- Use the HACKSAW; take the CHAIN (B).
- Attach the CHAIN (C); take the WINDING KEY (D).
- Go to the Private Sector.
- Use the WINDING KEY (E); take the BAND (F).
- Combine the SLINGSHOT WITHOUT BAND and BAND; create a SLINGSHOT (Inventory).
- Walk down.
- Use the SLINGSHOT (G).
- Shoot 3x when green (H); take the 2nd AMULET ENVELOPE (I).
- Go forward.
- Place the 2 AMULET ENVELOPES (J); move the envelopes and take the HUNTER'S KEY (K).
- Use GORDON'S VIGNETTE and HUNTER'S KEY (L).
- Solution (M).
- Walk forward.
- Use the BLADE (N); take the BROKEN CROSSBOW and DEER HALF (O).
- Take the CANDLE (P).
- Use the CANDLE; enter (Q).
- Take GORDON'S NOTES and PEGASUS FIGURINE (R).
- Place the PEGASUS FIGURINE (S); take the 2nd DEER HALF (T).
- Walk down.
- Place the 2 DEER HALVES (U).
- Solution: BC-CD-DE-EF-B2-23-34-45-56.
- B2-23-34-45-4D-C3-34-12-23-AB-2B and 12 (V).
- Play the HOP (W); receive a SACK.
- Examine the SACK and untie it (Inventory); take the CROSSBOW PART 1/3 and AWL (X).
- Use the AWL; take the ROPE and CHEST OF DRAWERS HANDLE (Y).
- Use the AWL; take the COIN (Z).
- Walk down.
- Use the COIN (A); take the UNICORN FIGURINE (B).
- Go to the Collection Room.

- Place the CHEST OF DRAWERS HANDLE (C); take the MONOGRAM (D).
- Combine the WALLET and MONOGRAM (Inventory); examine the photo and take the DIAMOND (E).
- Place the UNICORN FIGURINE (F); take the DRUM WHEEL (G).
- Walk down.
- Place the DRUM WHEEL and CODE; set the code (H). Take the TWO GUNS and VINEGAR (I).

- Combine GORDON'S NOTES, DIAMOND and TWO GUNS (Inventory).
- Order is random (J); take the BOAR FANG (K).
- Use the BOAR FANG (L); take the CROSSBOW PART 2/3 (M).
- Walk forward.

- Pour the VINEGAR (N); take the AMULET INFINITY and NIPPERS (O).
- Place the AMULET INFINITY (P); take the BEE and BRONZE KEY (Q).
- Walk down.
- Place the BEE (R).
- Play the HOP (S) and receive a HOOK.
- Walk down.
- Combine the ROPE and HOOK; create a HOOK WITH ROPE (Inventory).
- Use the NIPPERS; receive a NET (T).
- Walk down.
- Use the HOOK WITH ROPE (U).
- Walk the log (V).
- Take the WOODEN LADDER and CROSSBOW PART (W).
- Go to the Collection Room.
- Place the WOODEN LADDER (X) and the BRONZE KEY (Y).
- Receive an AMULET DROPLET and OLIVIA'S STATUE.
- Place the AMULET DROPLET (Z); take the BOWSTRING (A).
- Combine the BROKEN CROSSBOW, CROSSBOW PART, BOWSTRING and NET to create a CROSSBOW WITH NET (Inventory).
- Go to the Precipice.
- Use the CROSSBOW WITH NET and OLIVIA'S STATUE (B).
- Play the Match 3 game (C).
- Use the BLADE (D).
Created at: 2017-03-19