
Walkthrough Menu
- General Tips
- Chapter 1: The Town
- Chapter 2: To the Castle
- Chapter 3: The Castle
- Chapter 4: Chasing Erin
- Chapter 5: The Museum
General Tips
- This is the official guide for Royal Detective: Legend of the Golem.
- This guide does not mention each time you have to zoom into a location; the screenshots show each zoom scene.
- Hidden-object puzzles are referred to as HOPs. This guide does not show screenshots of the HOPs, however, it is mentioned when a HOP is available and the inventory item collected.
- This guide gives solutions for all puzzles that are not random. Please read the instructions in the game for each puzzle.
Chapter 1: The Town
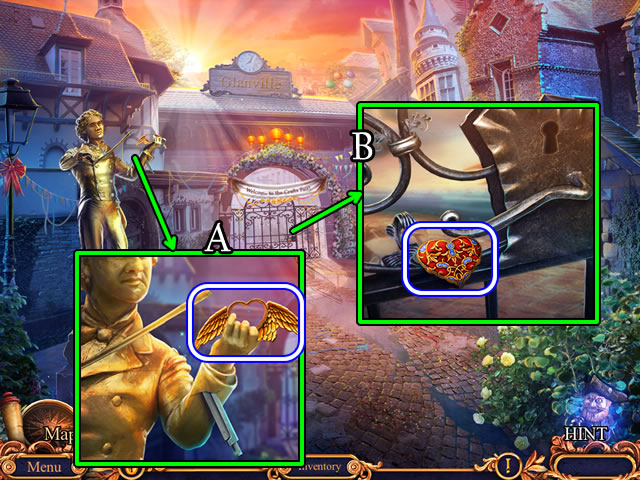
- Take the GOLDEN FRAME (A).
- Take the GLASS HEART (B).
- Combine the GOLDEN FRAME and GLASS HEART for a BUTTERFLY MEDALLION (Inventory).
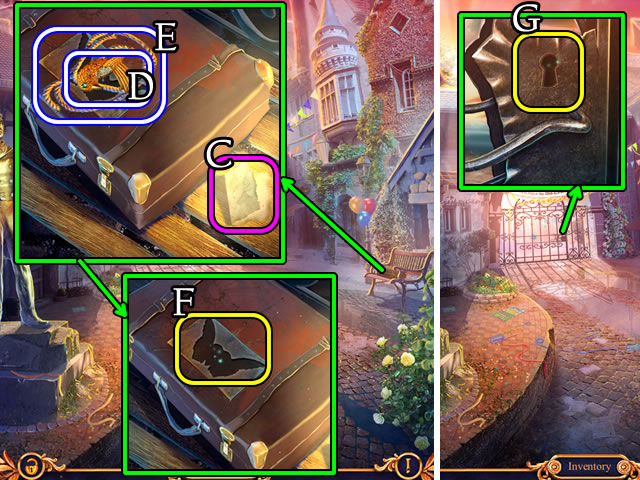
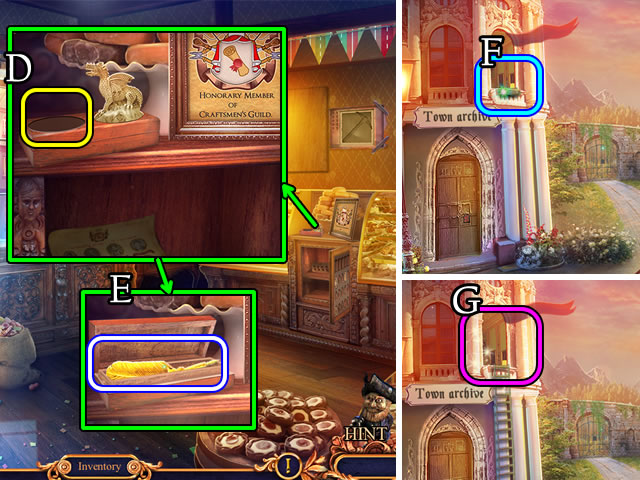
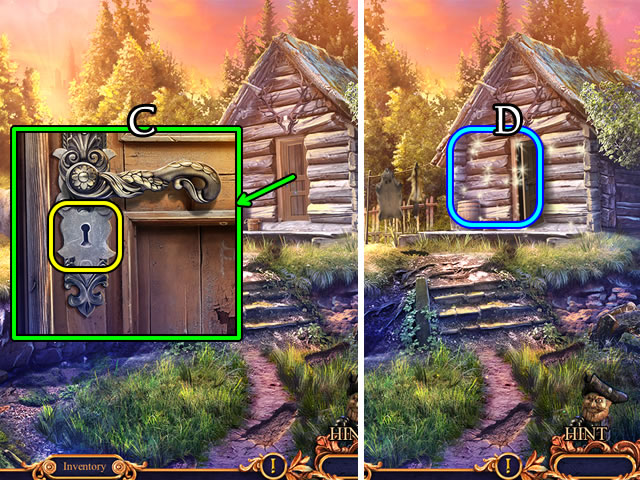
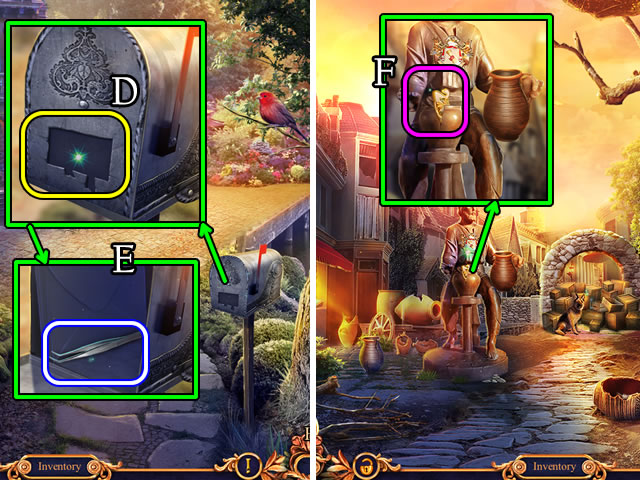
- Read the note (C); take the BIRD MEDALLION (D) and ROPE (E).
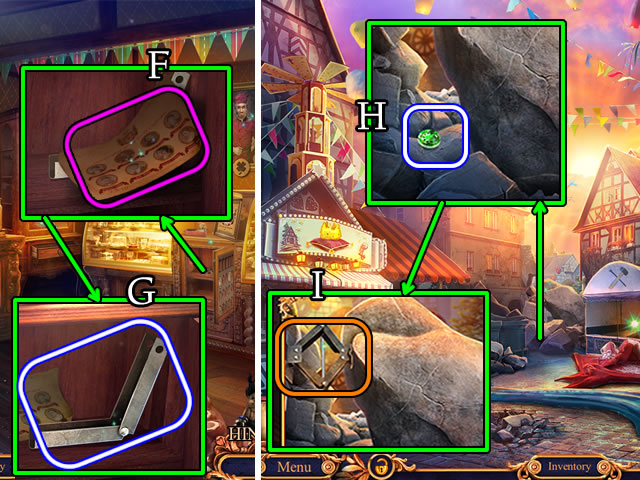
- Place the BUTTERFLY MEDALLION (F).
- Open the suitcase to play a mini-HOP for the TOWN KEY.
- Place and select the TOWN KEY (G).
- Walk forward.
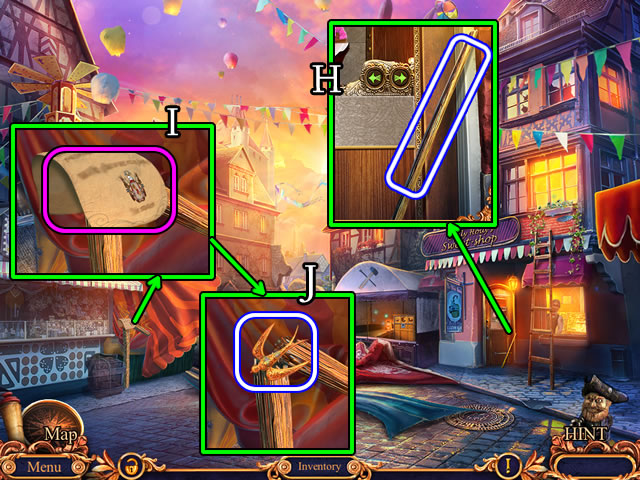
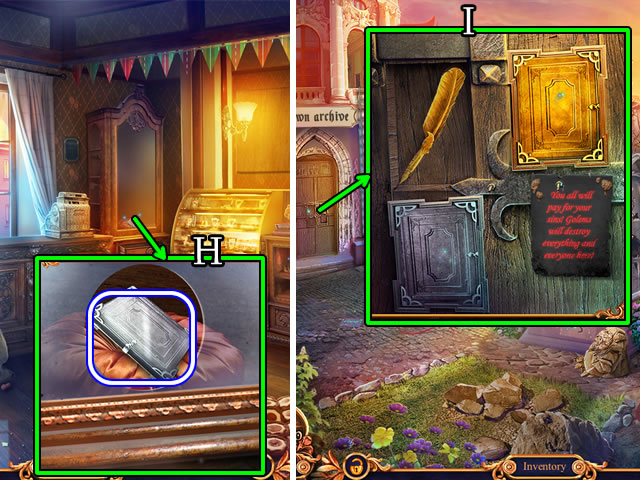
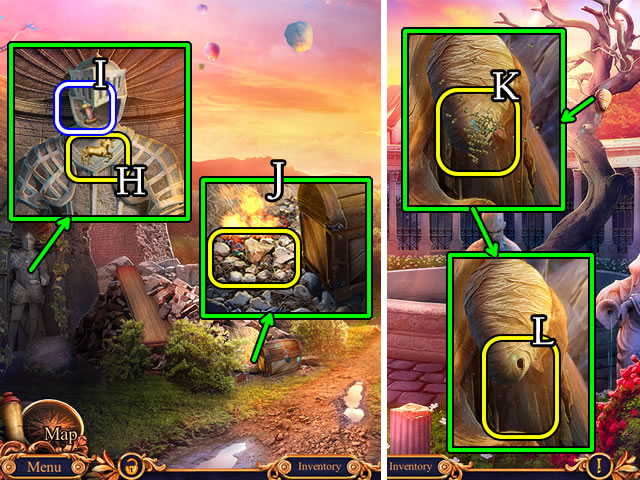
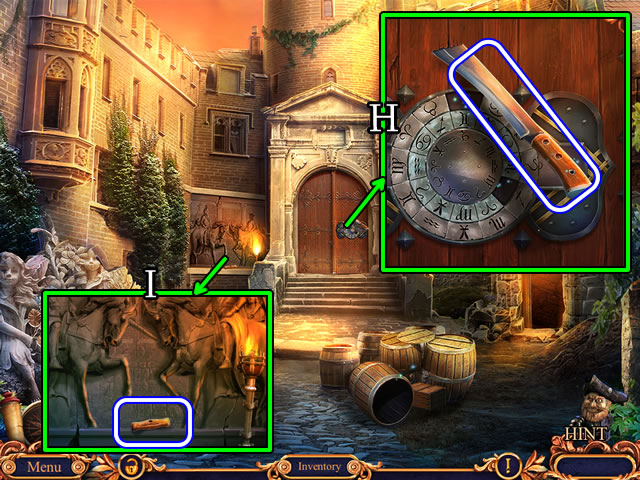
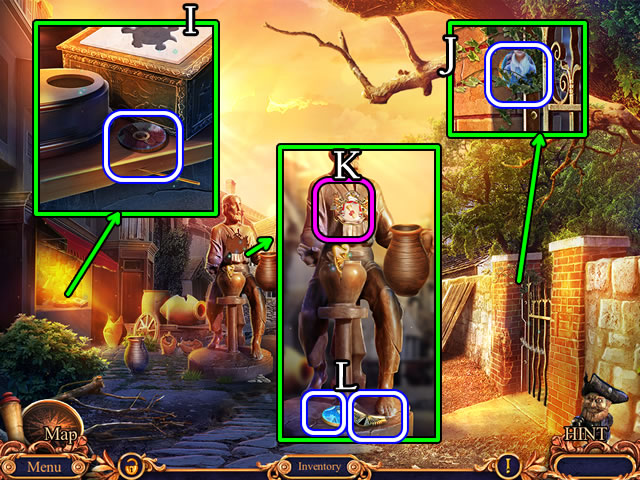
- Take the WOODEN STICK (H).
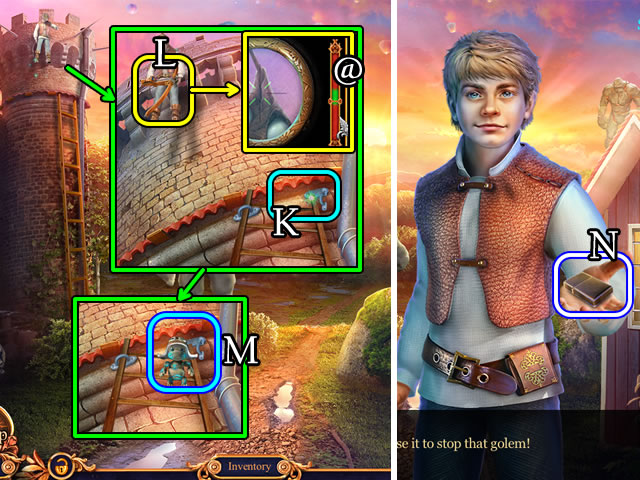
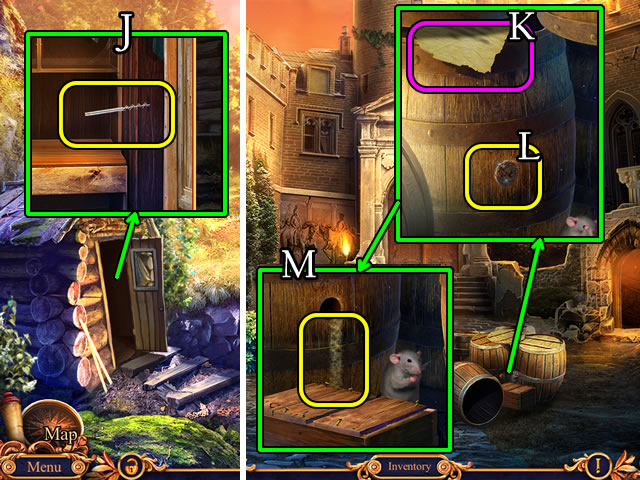
- Take the poster (I) and BIRD MEDALLION (J).
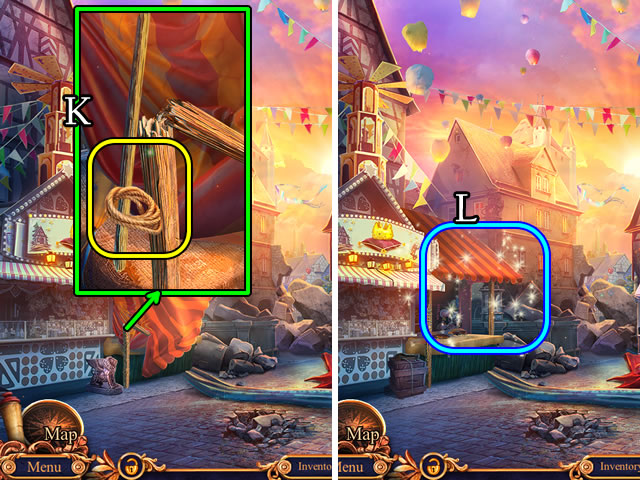
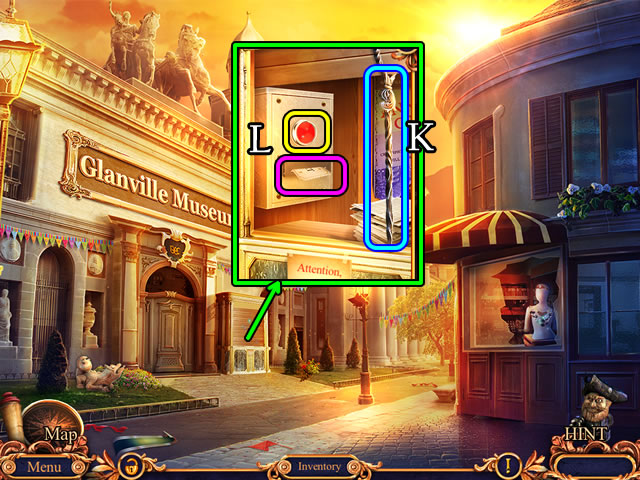
- Use the WOODEN STICK and ROPE (K).
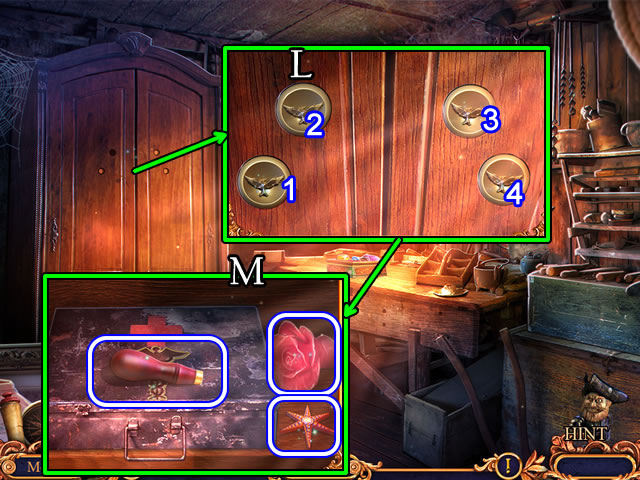
- Play the HOP (L); receive a GOLDEN VIOLIN.
- Walk down.
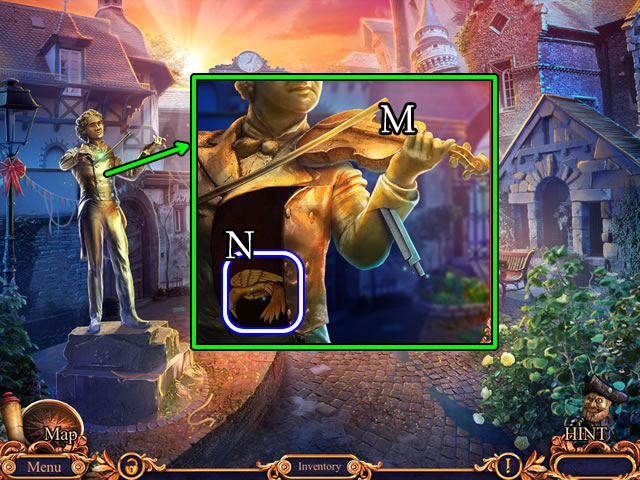
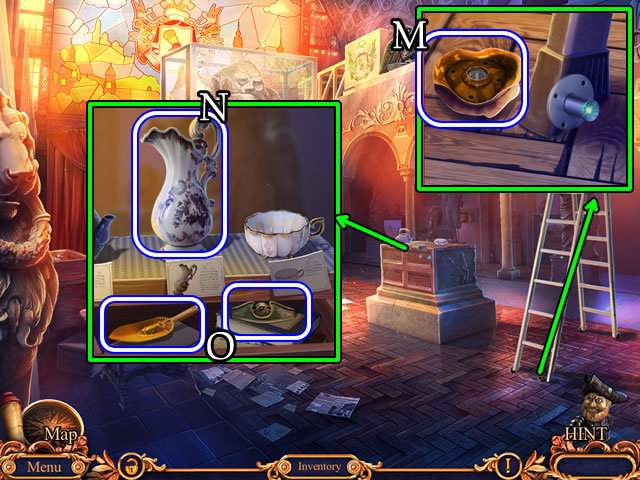
- Place the GOLDEN VIOLIN (M).
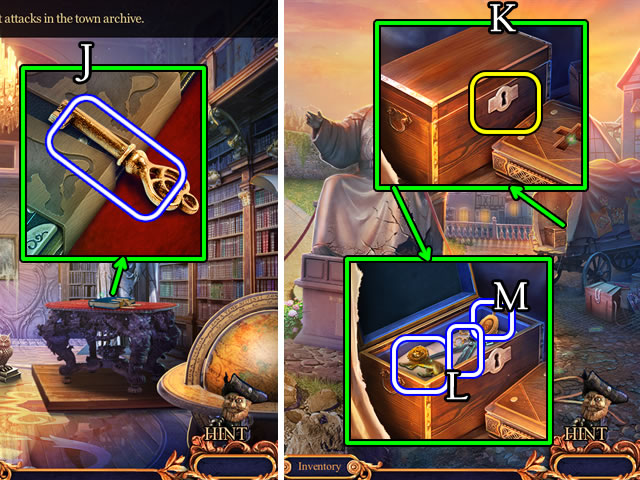
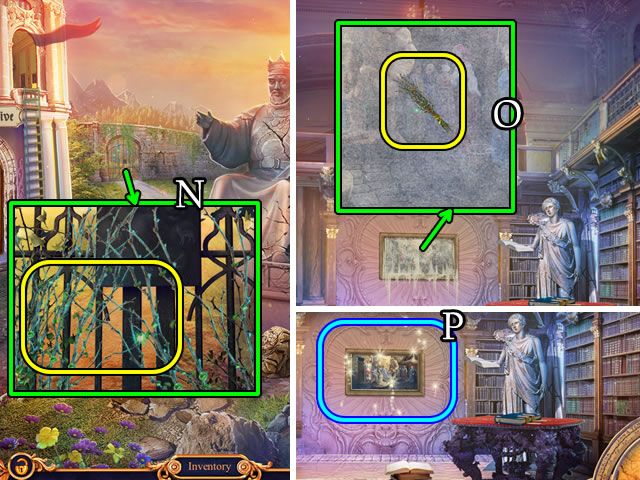
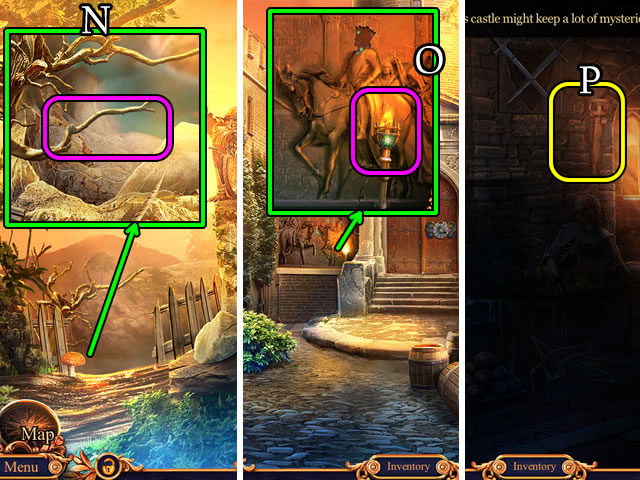
- Take the BIRD MEDALLION (N).
- Walk forward.
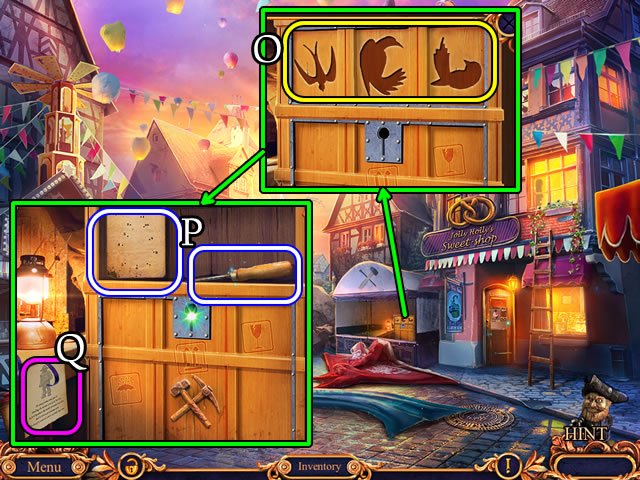
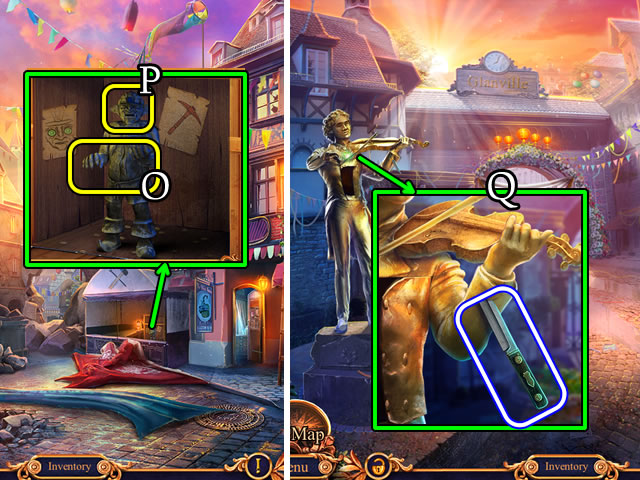
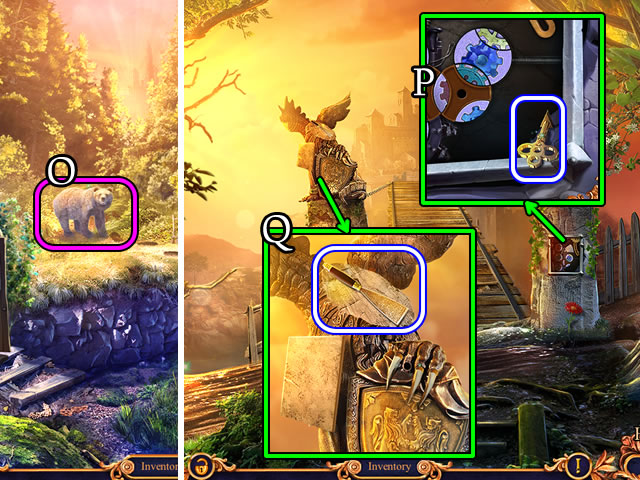
- Place the 3 BIRD MEDALLIONS (O).
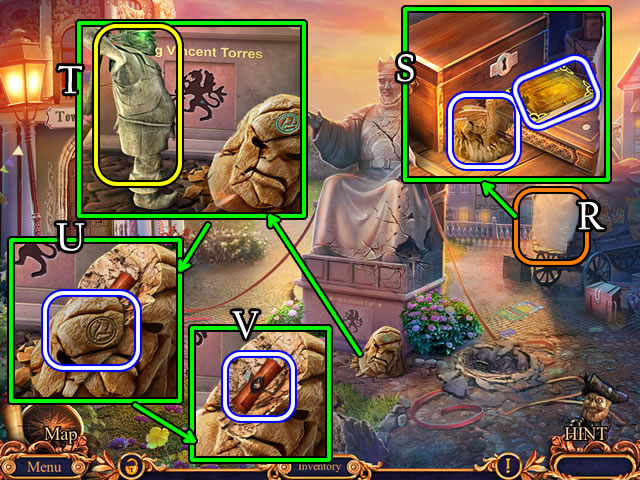
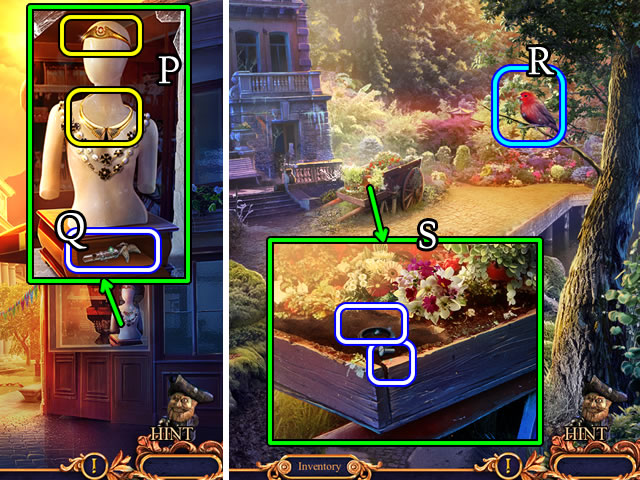
- Take the SCREWDRIVER and PAPER PUZZLE (P).
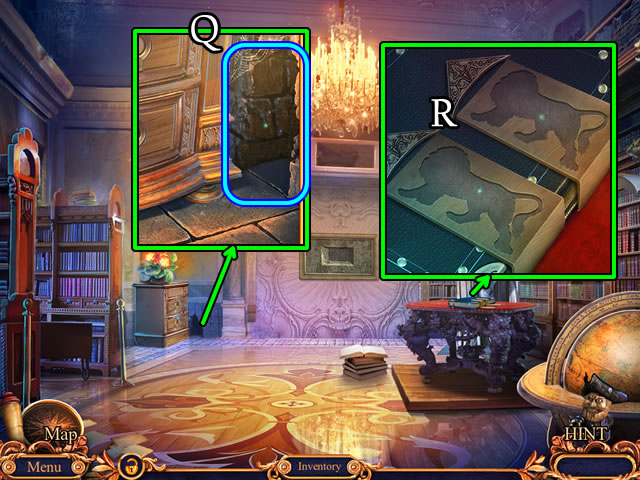
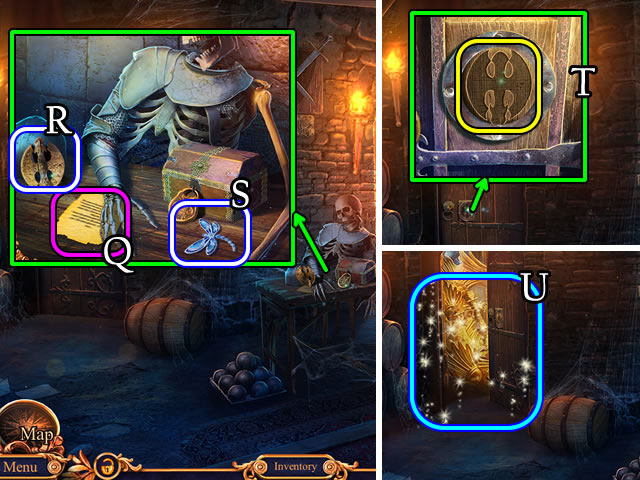
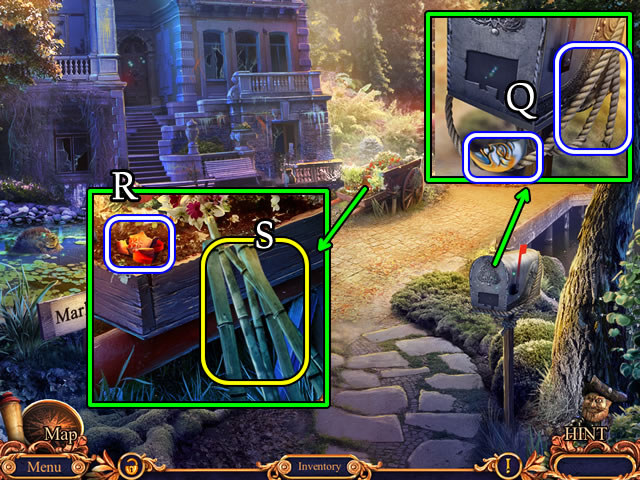
- Read the note (Q).
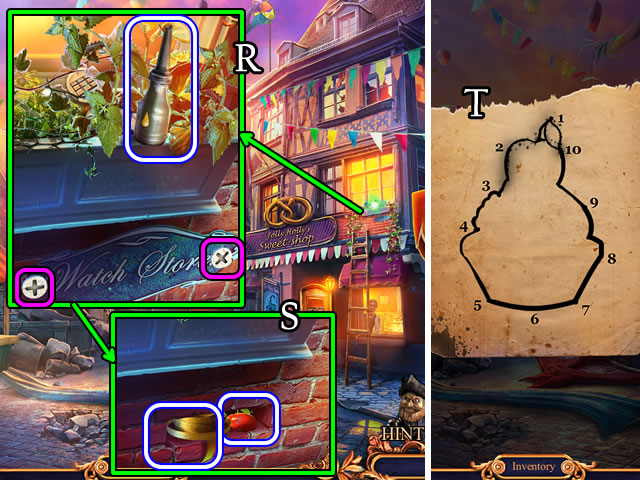
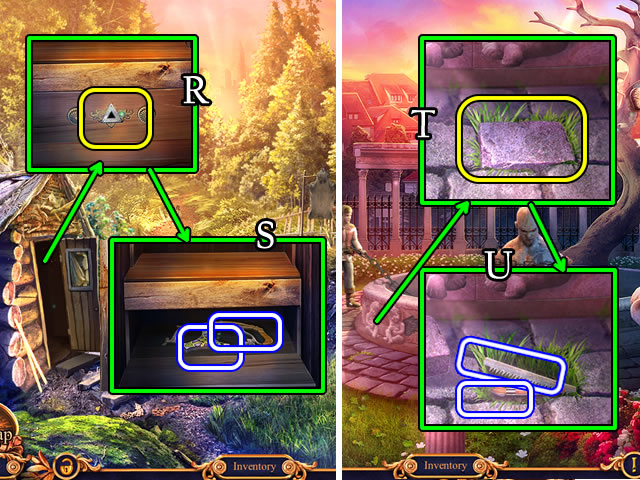
- Take the RUST REMOVER (R).
- Use the SCREWDRIVER (pink).
- Take the TAPE and CHERRY (S).
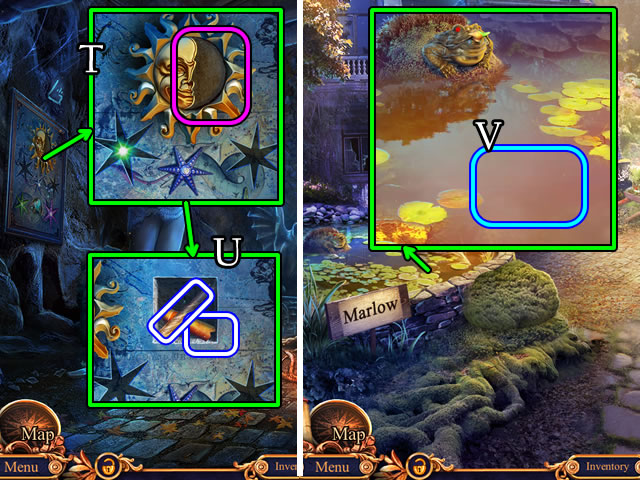
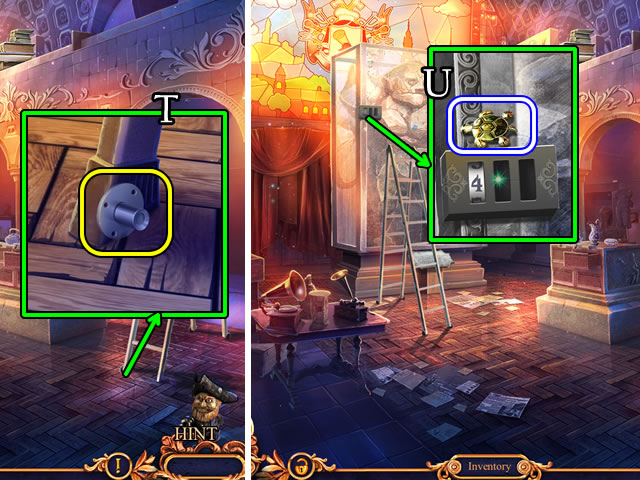
- Select the PAPER PUZZLE (Inventory) and connect the dots (T) for a CAKE SKETCH.
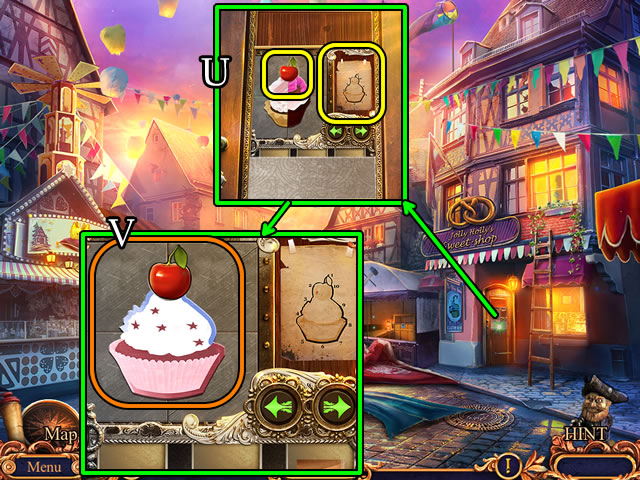
- Place the CHERRY and CAKE SKETCH (U).
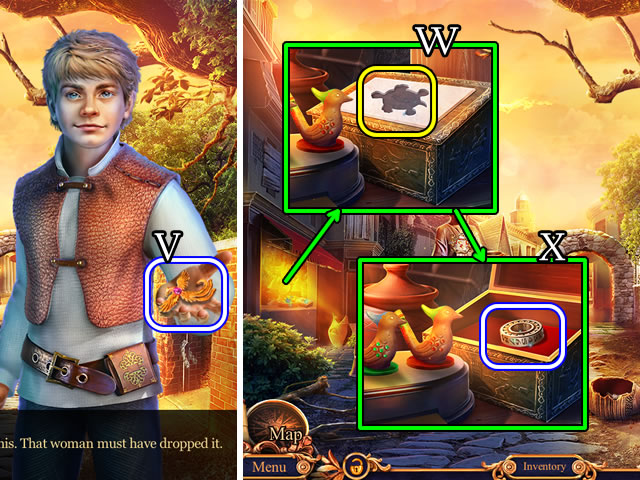
- Solution (V).
- Walk forward.
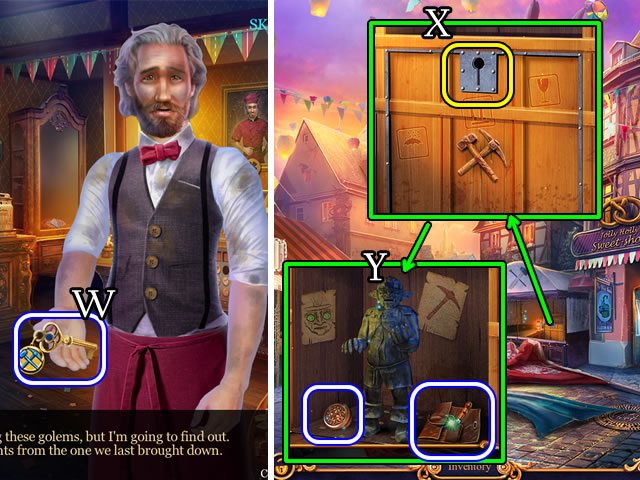
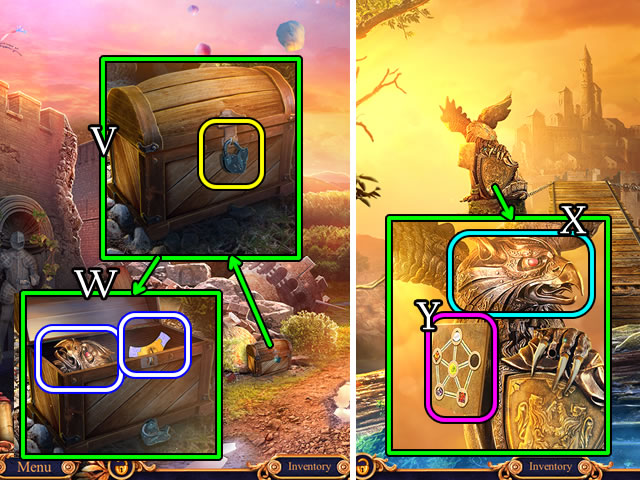
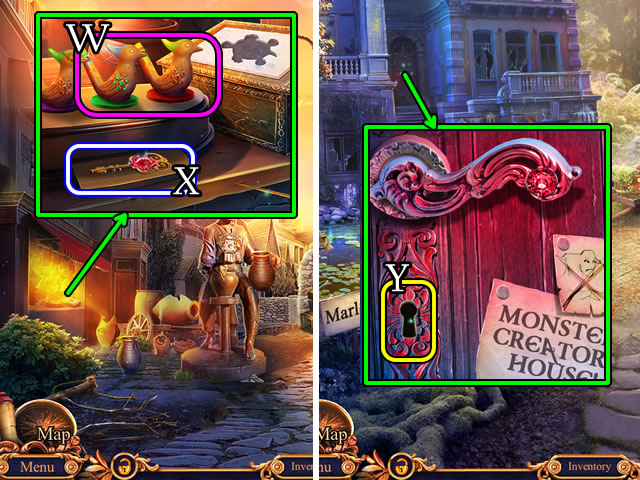
- Speak to the shop owner; take an IRON KEY (W).
- Walk down.
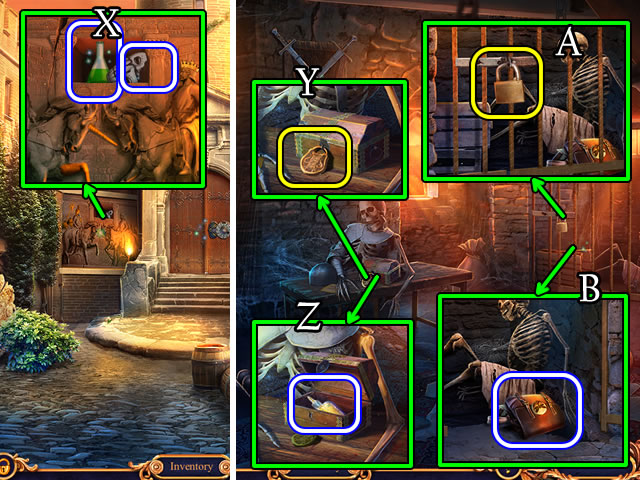
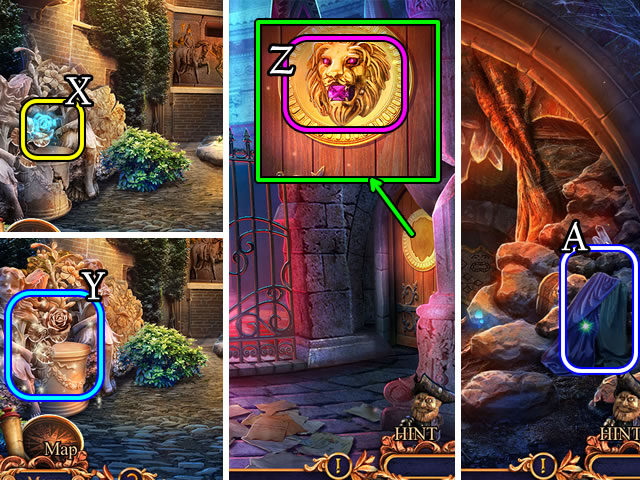
- Place and select the IRON KEY (X).
- Take the CARVED HANDLE and CRAFTSMAN'S SET (Y).
- Walk forward.
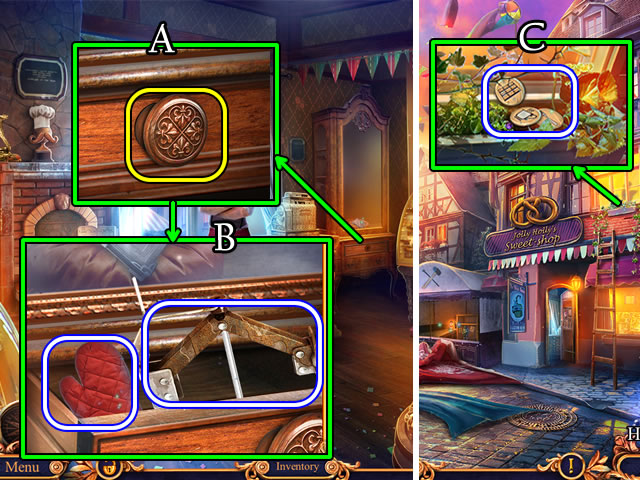
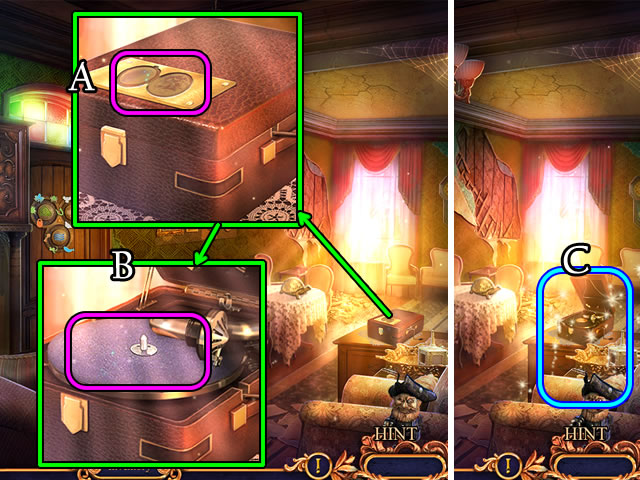
- Place the CARVED HANDLE (A).
- Take the JACK HALF and MITTEN (B).
- Walk down.
- Use the MITTEN; take 3 MOSAICS TOKENS (C).
- Walk forward.
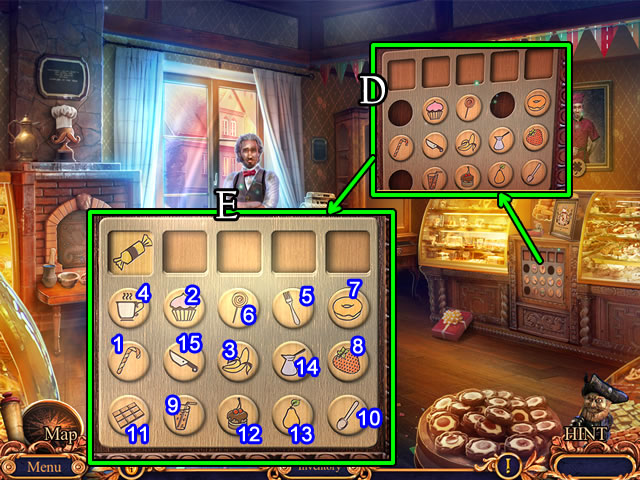
- Place the MOSAIC TOKENS (D).
- Solution (E). 1-15.
- Take and select the paper (F).
- Take the JACK HALF (G).
- Combine the JACK HALVES and RUST REMOVER for a JACK (Inventory).
- Walk down.
- Take the GREEN STONES 1/2 (H).
- Place and select the JACK 3x (I).
- Walk forward to the Street of History.
- Select the golem.
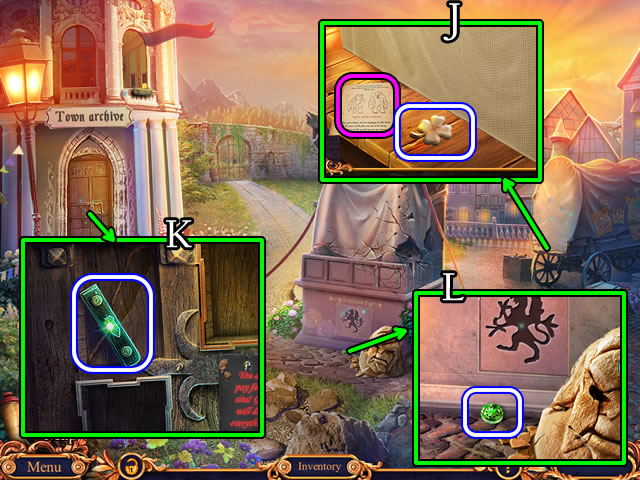
- Take the diagram and CLOVER AMULET (J).
- Take the KNIFE HANDLE (K).
- Take the GREEN STONES 2/2 (L).
- Return to Jolly's Candy Shop.
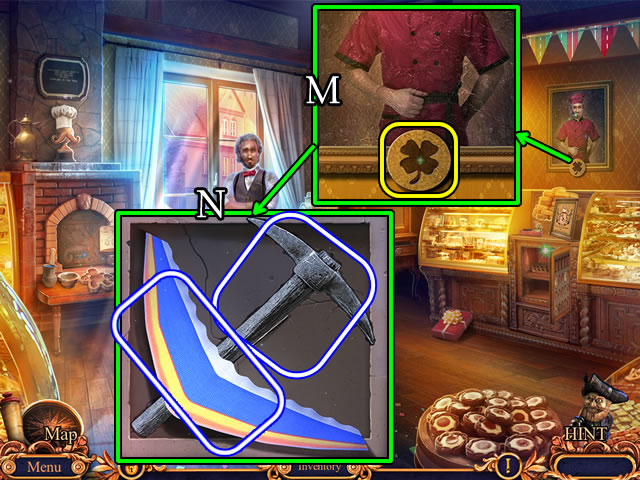
- Place the CLOVER AMULET (M).
- Puzzle solutions vary.
- Take the TOY HANG GLIDER and MAGIC PICKAXE (N).
- Walk down.
- Place the MAGIC PICKAXE (O) and GREEN STONES (P). Take the MINIATURE MINER.
- Walk down.
- Place the KNIFE HANDLE. Take the KNIFE (Q).
- Return to the Street of History.
- Use the KNIFE (R).
- Take the DRAGON STATUETTE and GOLDEN BOOK (S).
- Use the MINIATURE MINER (T).
- Take the GOLEM CLAY (U).
- Select and take the MYSTERIOUS PARCHMENT (V).
- Return to Jolly's Candy Shop.
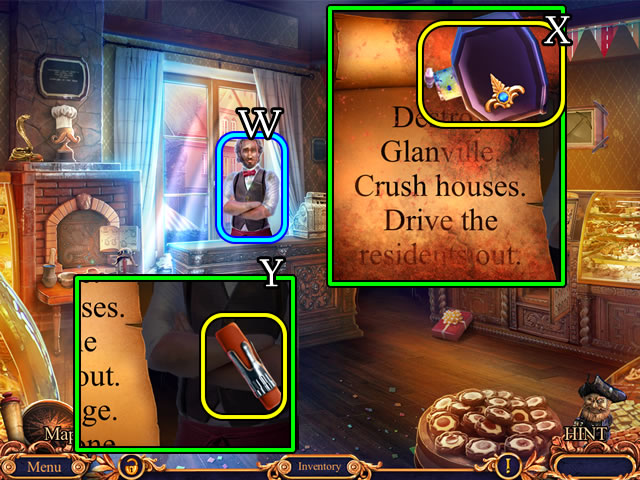
- Give the MYSTERIOUS PARCHMENT (W) for a parchment and bottle of solution.
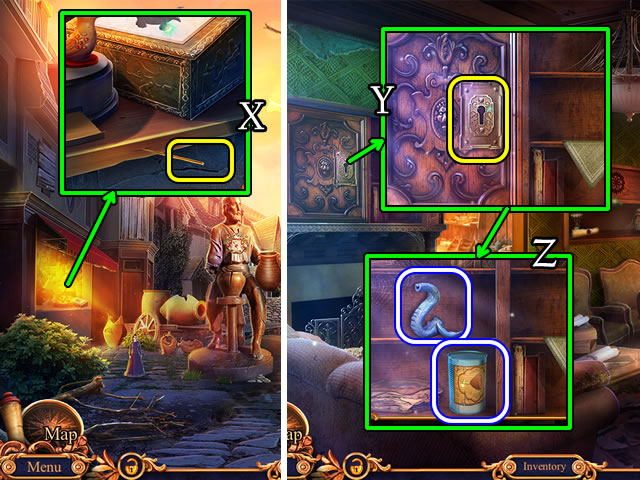
- Unseal the parchment and use the solution (X). Use the eraser on the parchment (Y).
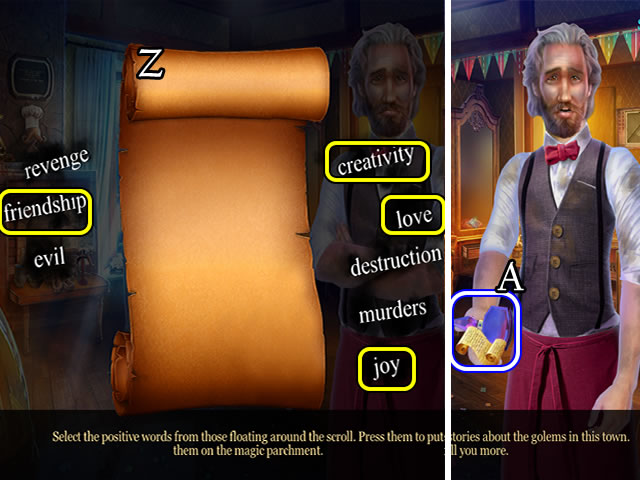
- Select the words (Z).
- Take the MAGIC PARCHMENT and DECODER SOLUTION (A).
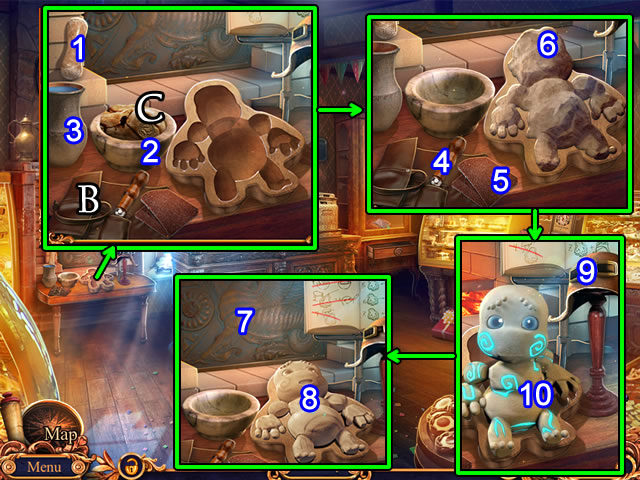
- Place the CRAFTSMAN'S SET (B) and GOLEM CLAY (C). Select the pestle (1), bowl (2) and water (3).
- Use the tool (4) and sandpaper (5). Place the MAGIC PARCHMENT (6).
- Open the kiln (7) and touch the figurine (8). Select the helmet (9). Take the GOLEM (10).
- Place the DRAGON STATUETTE (D).
- Take the GOLDEN FEATHER (E).
- Combine the TOY HANG GLIDER and GOLEM for a FLYING GOLEM (Inventory).
- Return to the Street of History.
- Place the FLYING GOLEM (F).
- Play the HOP (G) for a GLASS CUTTER.
- Return to Jolly's Candy Shop.
- Use the GLASS CUTTER. Take the SILVER BOOK (H).
- Return to the Street of History.
- Place, then select the GOLDEN FEATHER, GOLDEN BOOK and SILVER BOOK (I).
- Walk forward.
- Take the CHEST KEY (J).
- Walk down.
- Use the CHEST KEY (K).
- Take the PRUNERS. Uncover and take the LION MEDALLION (L).
- Take and select the FAMILY MEDALLION (M).
- Use the PRUNERS (N) to receive TWIGS.
- Combine the TWIGS and TAPE for a BROOM (Inventory).
- Walk forward.
- Use the BROOM (O).
- Play the HOP (P). Receive a TOY HELMET.
- Select the TOY HELMET (Inventory) and read the scroll. Combine the TOY HELMET and GOLEM for a SPELUNKER GOLEM.
- Use the SPELUNKER GOLEM (Q). Receive LOCK PIECES 1/2 and a LION MEDALLION.
- Place the 2 LION MEDALLIONS (R).
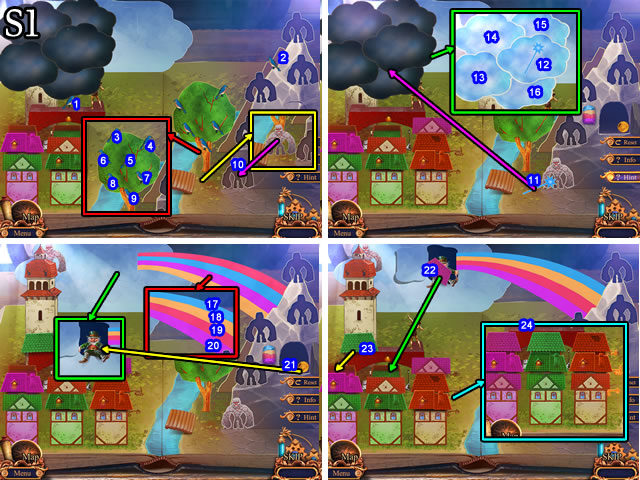
- Solution (S1). 1-24.
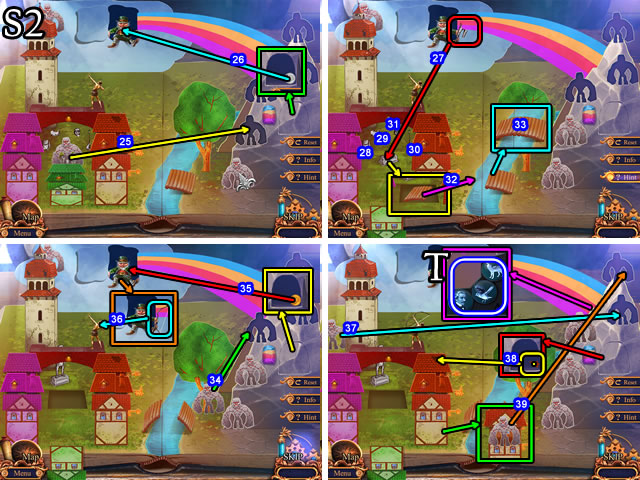
- Solution (S2). 25-39.
- Take the LOCK PIECES 2/2 (T).
- Walk down.
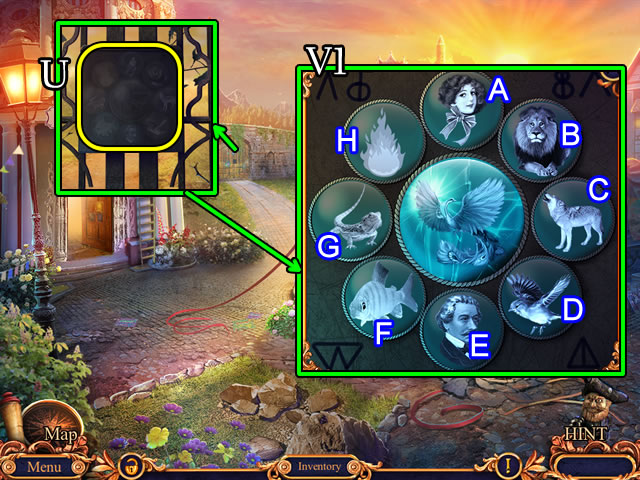
- Place the LOCK PIECES (U).
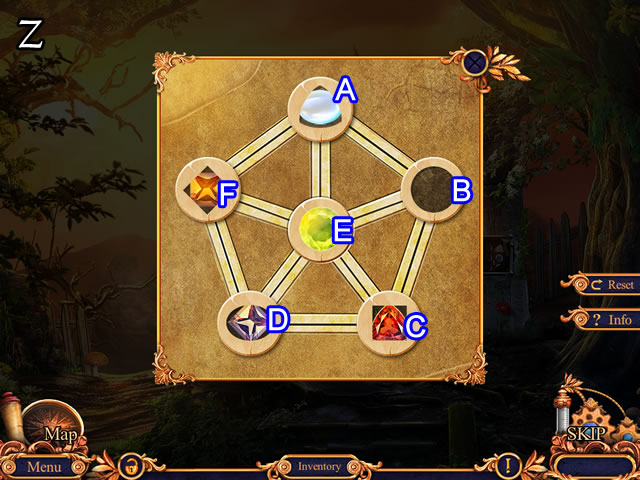
- Solution (V1). (D-H), (G-H), (C-E), (A-F), (B-D), (A-B).
- Walk to the City Outskirts.
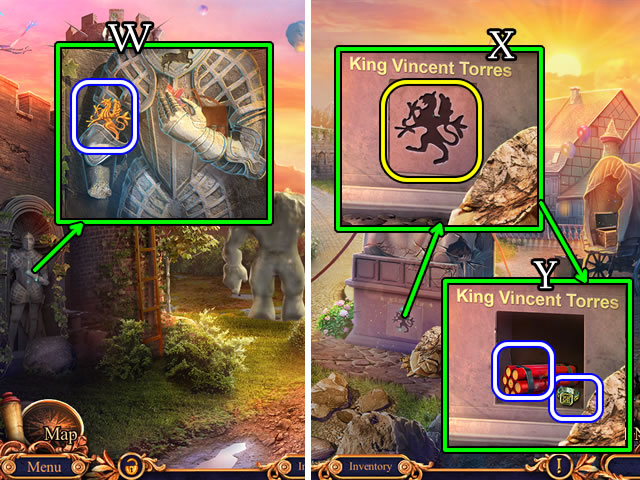
- Take the GRIFFIN MEDALLION (W).
- Walk down.
- Place the GRIFFIN MEDALLION (X).
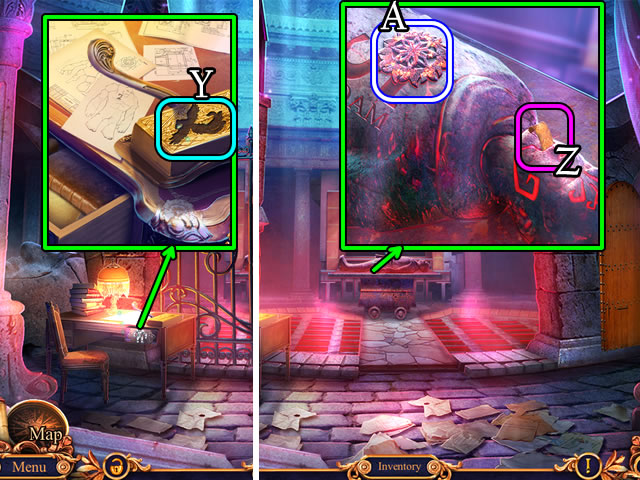
- Take the DYNAMITE and CHRONICLER'S SIGNET RING (Y).
- Walk to the Archive.
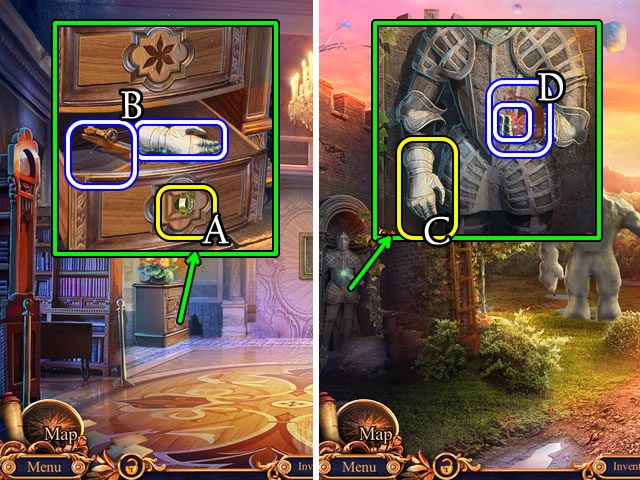
- Use the CHRONICLER'S SIGNET RING (A).
- Take the KNIGHT'S GLOVE and CROSSBOW (B).
- Return to the City Outskirts.
- Place the KNIGHT'S GLOVE (C).
- Take the STONE FLOWER and SMALL BAG (D).
- Return to the Archive.
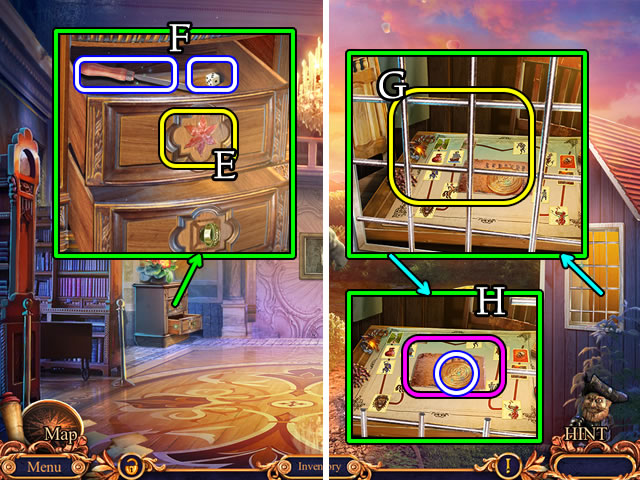
- Use the STONE FLOWER (E).
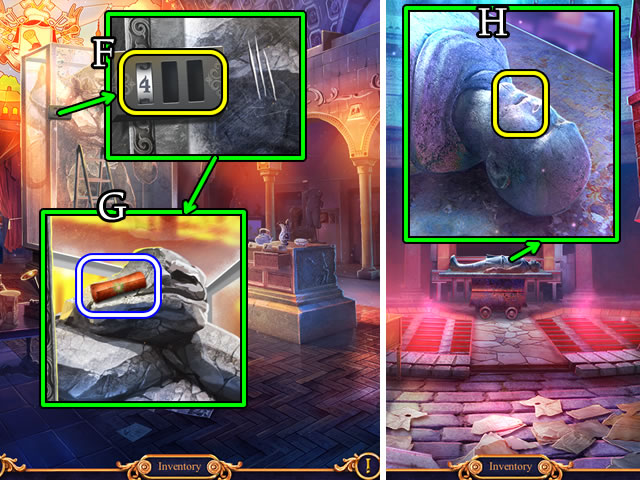
- Take the FILE and DIE (F).
- Return to the City Outskirts.
- Use the FILE (G).
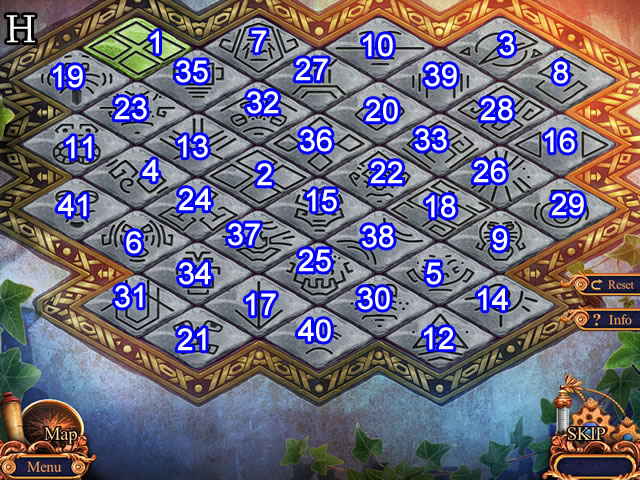
- Take the COIN and note (H). Place the DIE and GOLEM.
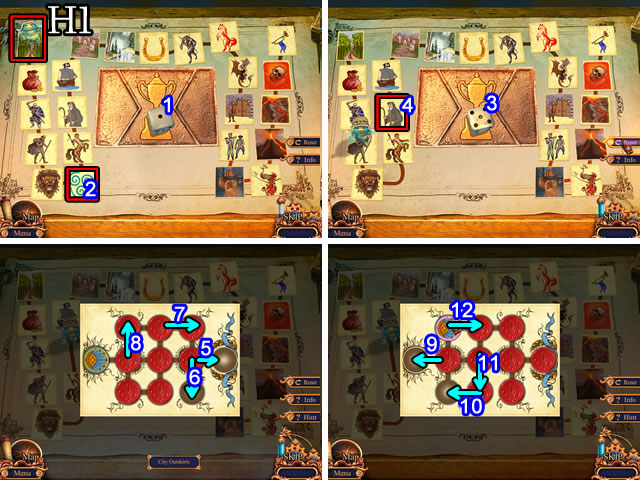
- Solution (H1). 1-12.
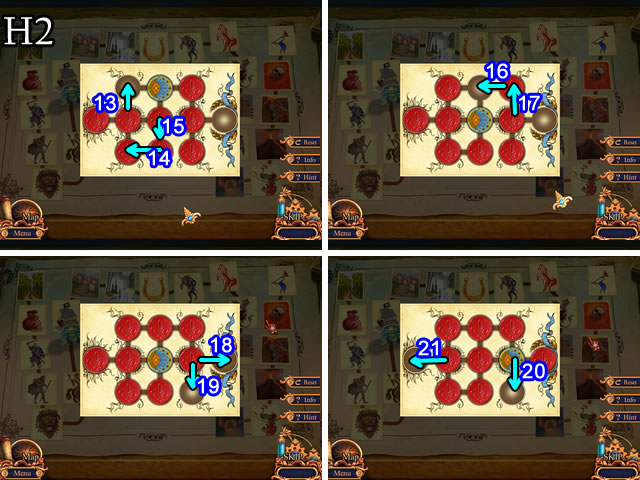
- Solution (H2). 13-21.
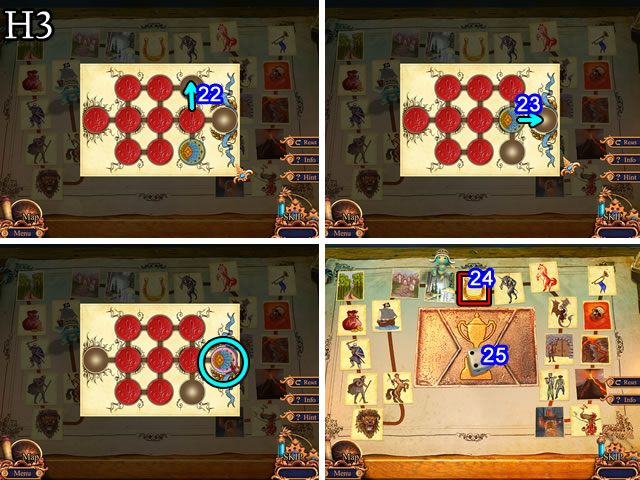
- Solution (H3). 22-25.
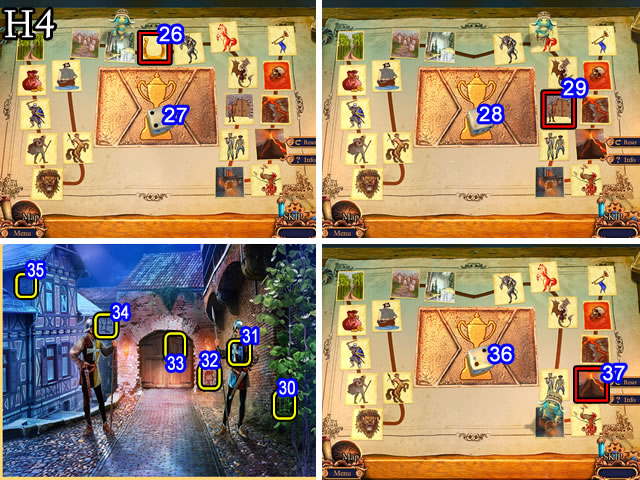
- Solution (H4). 26-37.
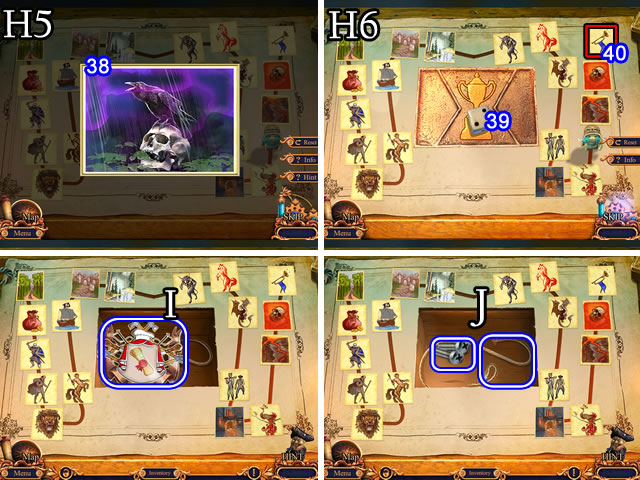
- Solution (H5). 38.
- Solution (H6). 39-40.
- Take the GUILD'S EMBLEM (I), BOLTS and FUSE (J).
- Combine the SMALL BAG, SCREWDRIVER, BOLTS and GOLEM for a BUILDER GOLEM (Inventory).
- Touch the ladder (K). Place (L) and aim (@) the CROSSBOW.
- Place the BUILDER GOLEM (M).
- Speak to the boy; take the LIGHTER (N).
Chapter 2: To the Castle
- Combine the DYNAMITE and FUSE for UNLIT DYNAMITE (Inventory).
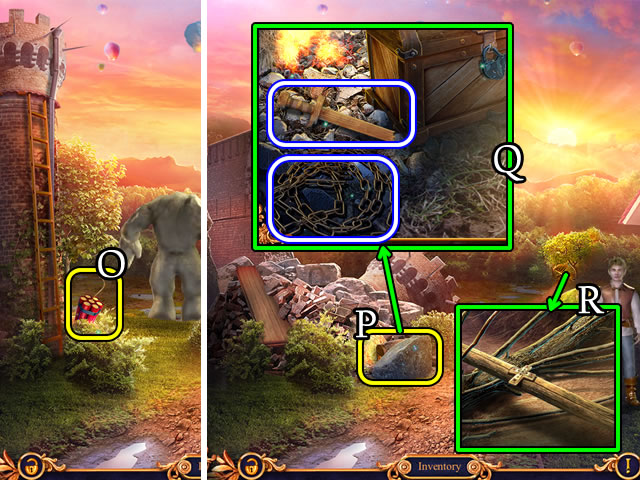
- Place the UNLIT DYNAMITE (O). Use the LIGHTER.
- Use the MINIATURE MINER (P).
- Take the WOODEN SWORD PART and CHAINS (Q).
- Take the JEWELED CROSS (R).
- Walk down.
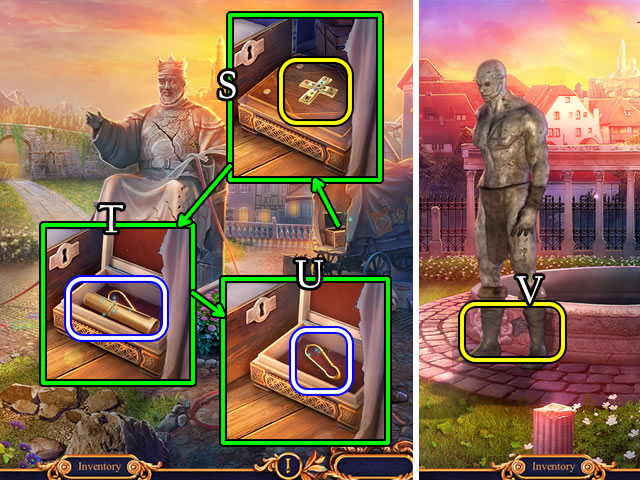
- Place the JEWELED CROSS (S).
- Take the FOREST MAP (T). Take the CARABINER (U).
- Combine the CHAINS, CARABINER and GOLEM for a CHAINED GOLEM (Inventory).
- Walk to the City Outskirts, then forward.
- Use the CHAINED GOLEM (V).
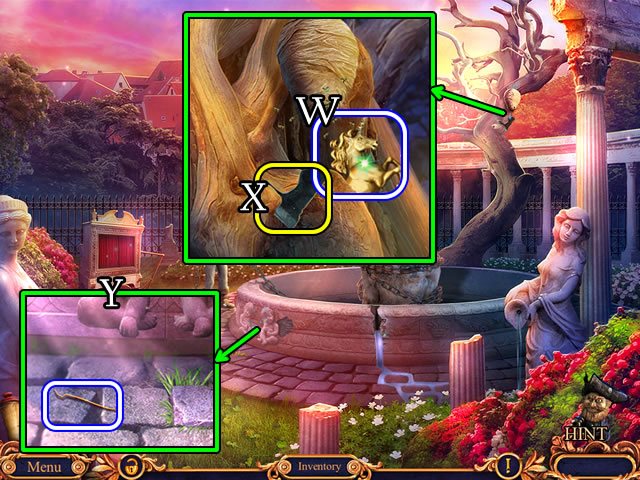
- Take the UNICORN HALF (W).
- Place the WOODEN SWORD PART (X); receive an AXE.
- Take the CURVED WIRE (Y).
- Walk down.
- Use the AXE (Z).
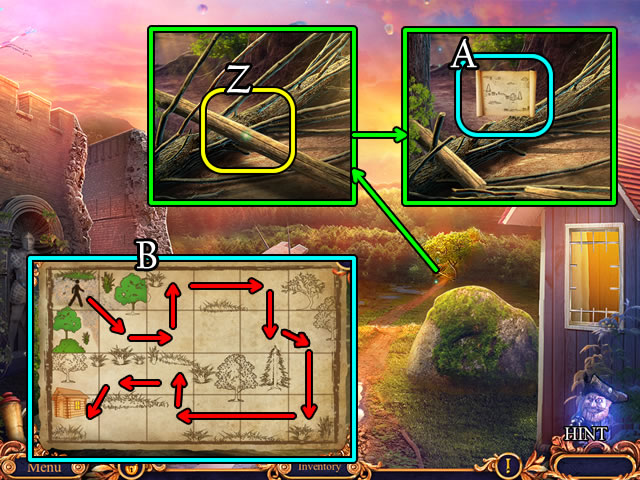
- Place the FOREST MAP (A).
- Solution (B).
- Walk to the Forest Edge.
- Use the CURVED WIRE (C).
- Play the HOP (D); receive a BARREL.
- Select the BARREL for a STONE, UNICORN HALF and EMPTY BARREL (Inventory).
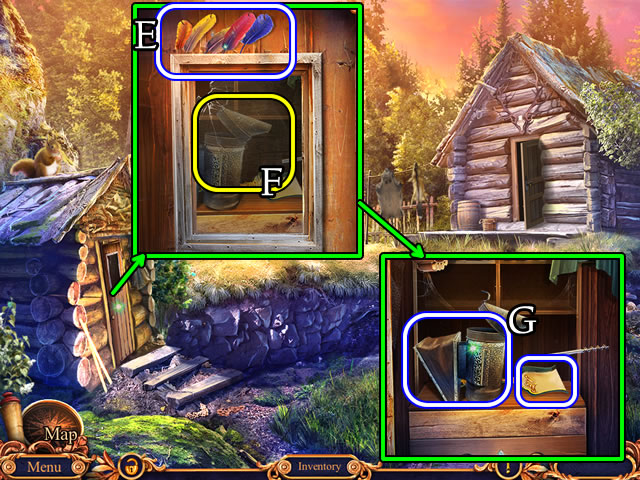
- Take the FEATHERS (E).
- Use the STONE (F).
- Open. Take the EMPTY SMOKER and SHOVEL (G).
- Walk down.
- Place the 2 UNICORN HALVES (H). Take the NEEDLE WITH THREAD (I).
- Use the SHOVEL to get SMOLDERING COAL (J).
- Combine the EMPTY SMOKER and SMOLDERING COAL for a SMOKER (Inventory).
- Walk to the Park of Fountains.
- Use the SMOKER (K). Place the EMPTY BARREL (L).
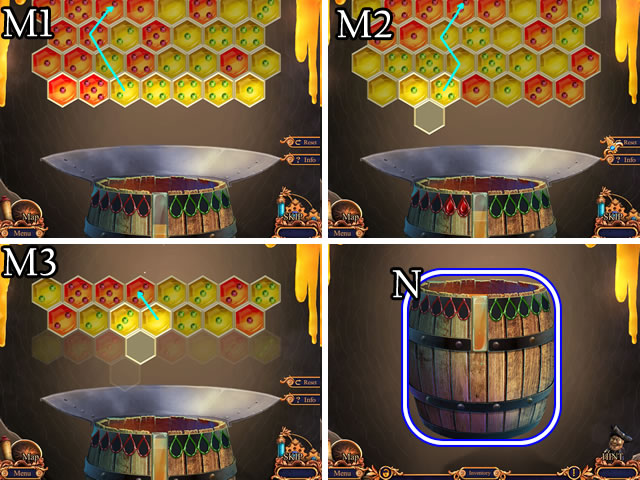
- Puzzle solutions vary. One possible solution (M1-M3).
- Take the BARREL WITH HONEY (N).
- Return to the Forest Edge.
- Give the BARREL WITH HONEY (O).
- Walk forward.
- Take the TRIANGULAR KEY (P).
- Take the PALETTE KNIFE (Q).
- Walk down.
- Place and select the TRIANGULAR KEY (R).
- Take the SAW HANDLE and COG 1/3 (S).
- Return to the Park of Fountains.
- Use the PALETTE KNIFE (T).
- Take the PAINTBRUSH and SAW BLADE (U).
- Combine the SAW HANDLE and SAW BLADE for a METAL SAW (Inventory).
- Walk down.
- Use the METAL SAW (V).
- Open and take the STONE GRIFFIN HEAD and COGS 2/3 (W).
- Return to Near Bridge.
- Place the STONE GRIFFIN HEAD (X).
- Select (Y).
- Solution (Z). E-C-D-F-A-E-C-D-F-E.
- Take the ROPE (A).
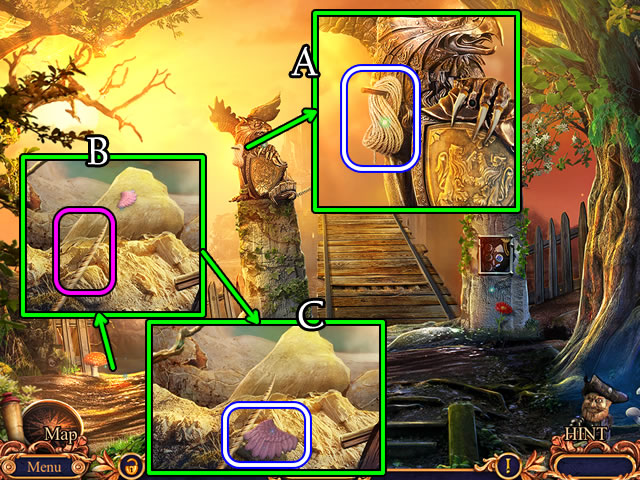
- Place the ROPE and GOLEM (B).
- Take the ANGEL WING (C).
- Return to the Park of Fountains.
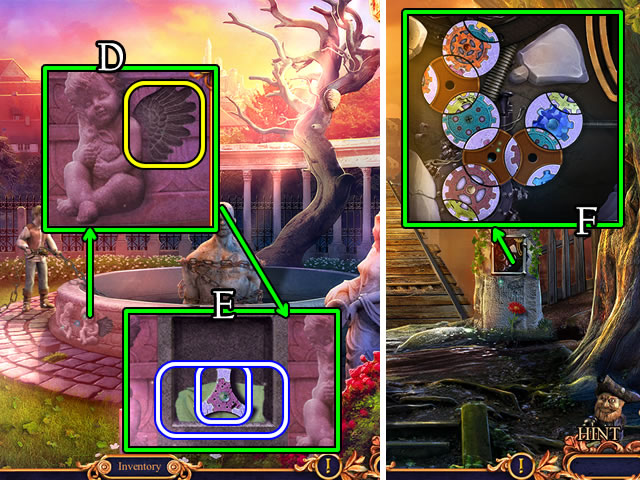
- Place the ANGEL WING (D).
- Take COGS 3/3 and the CLOTH (E).
- Return to Near Bridge.
- Place the 3 COGS (F).
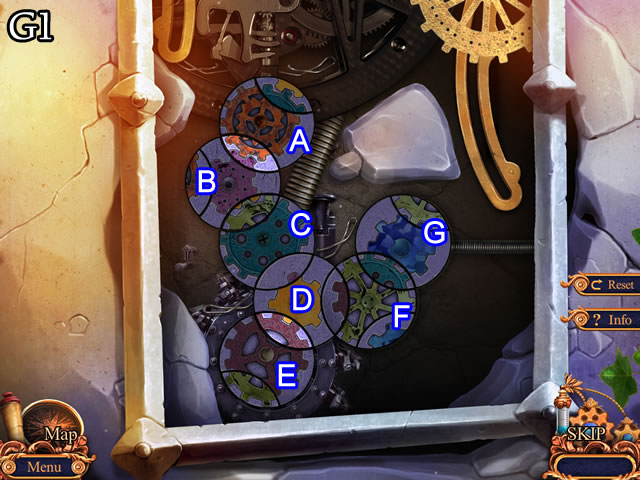
- Solution (G1). A-G-C-B-E-D-G-F-D-B-G-E-C-A.
- Walk forward.
Chapter 3: The Castle
- Take the MACHETE (H) and CORKSCREW HANDLE (I).
- Walk down 2x.
- Place the CORKSCREW HANDLE for a CORKSCREW (J).
- Walk forward 2x.
- Read the note (K). Place and select the CORKSCREW (L).
- Place the CLOTH (M). Receive an OILED CLOTH.
- Walk down.
- Use the MACHETE (N). Take the STICK.
- Combine the STICK and OILED CLOTH for a DOUSED TORCH (Inventory).
- Walk forward.
- Place the DOUSED TORCH (O) for a BLAZING TORCH.
- Walk forward.
- Place the BLAZING TORCH (P).
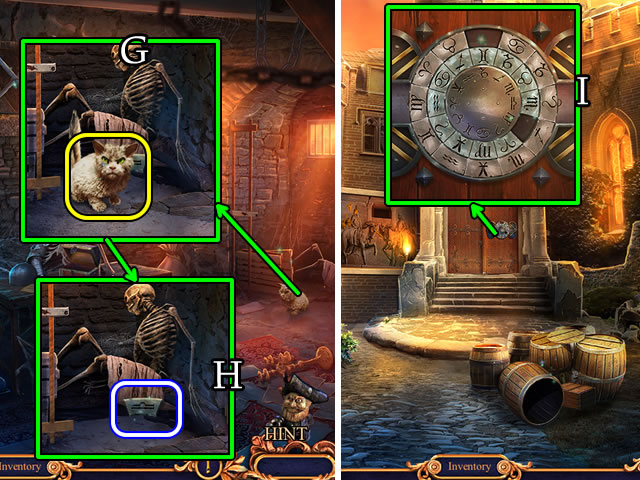
- Take the note (Q), GUARD INSIGNIA (R) and DRAGONFLY AMULET (S).
- Place the GUARD INSIGNIA (T).
- Play the HOP (U) for a GOLD CROWN.
- Walk down.
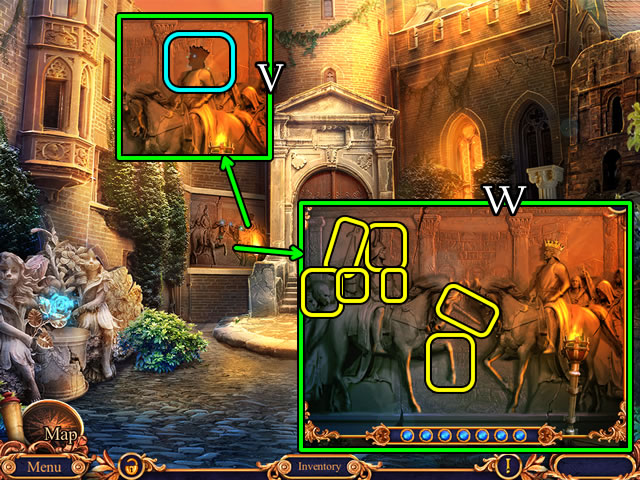
- Place the GOLD CROWN (V).
- Solution (W).
- Take the VIAL OF ACID and BROKEN MASK (X).
- Walk forward.
- Use the VIAL OF ACID (Y). Open. Take the GLUE (Z).
- Use the VIAL OF ACID (A). Open. Take the BAG (B).
- Combine the BAG and DRAGONFLY AMULET. Open and take the note, COIN and PAINTS. Unzip the pocket for a MECHANISM PART (Inventory).
- Return to the Park of Fountains.
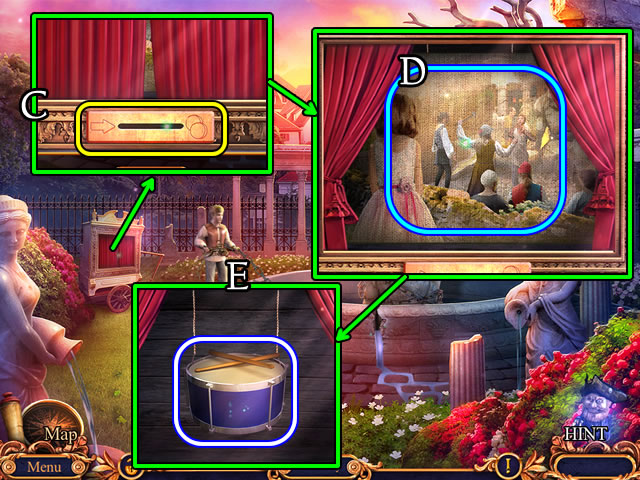
- Place the 2 COINS (C).
- Select (D).
- Take the DRUM (E).
- Combine the BROKEN MASK, GLUE, FEATHERS, PAINT and PAINTBRUSH (Inventory).
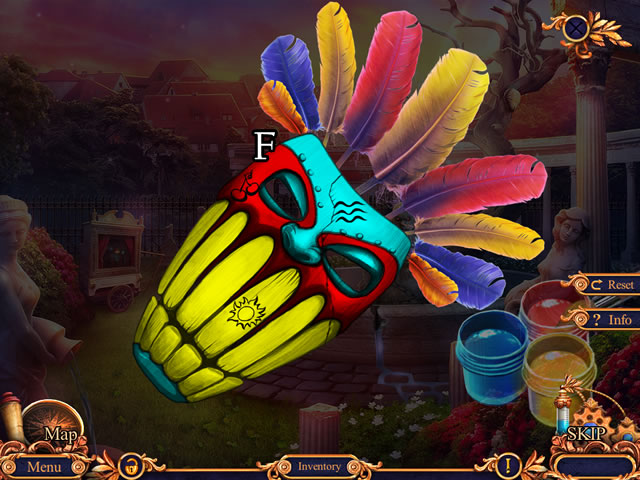
- Solution (F).
- Combine the MASK, GOLEM and DRUM for a MENACING GOLEM (Inventory).
- Return to the Dungeons.
- Place the MENACING GOLEM (G).
- Take the MECHANISM PART (H).
- Walk down.
- Place the 2 MECHANISM PARTS (I).
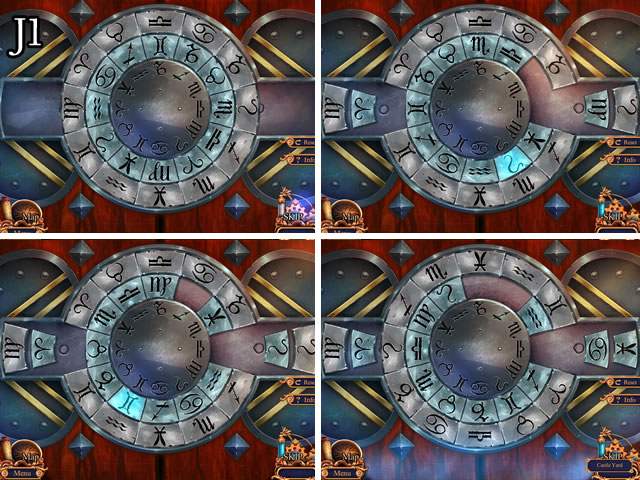
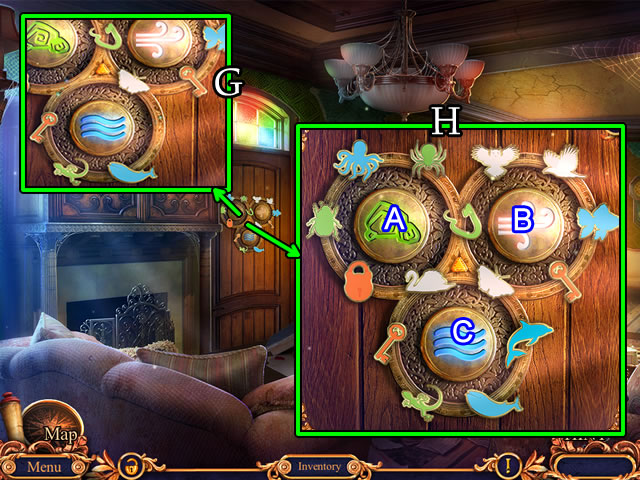
- Solution (J1).
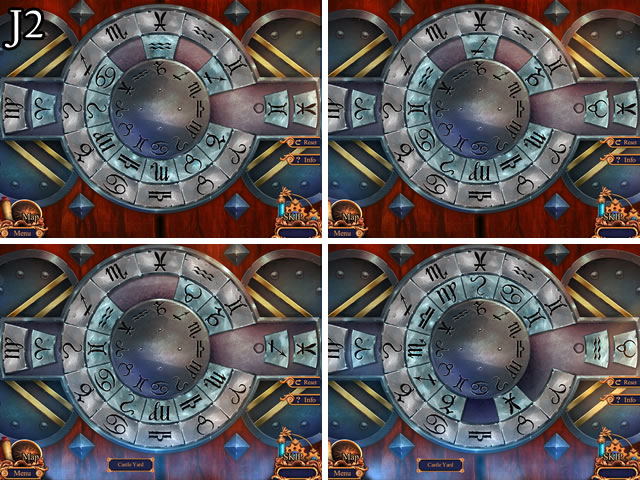
- Solution (J2).
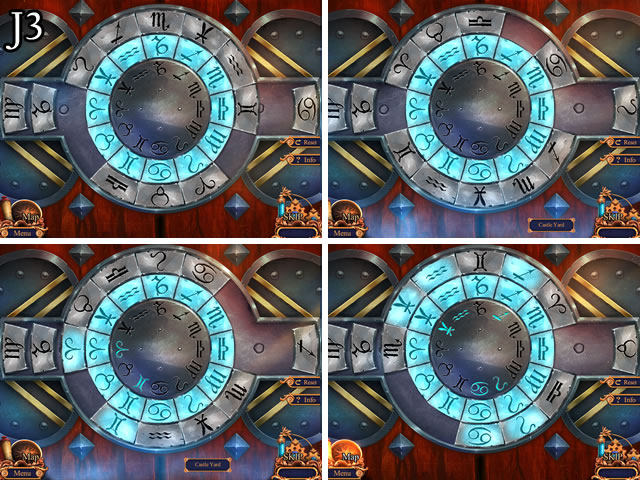
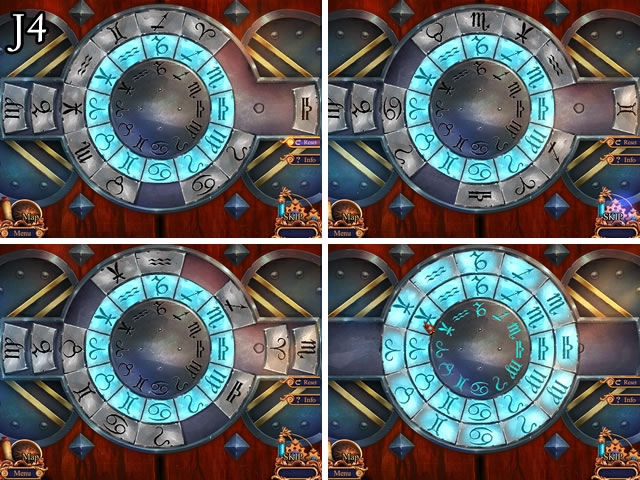
- Solution (J3).
- Solution (J4).
- Enter the Central Hall.
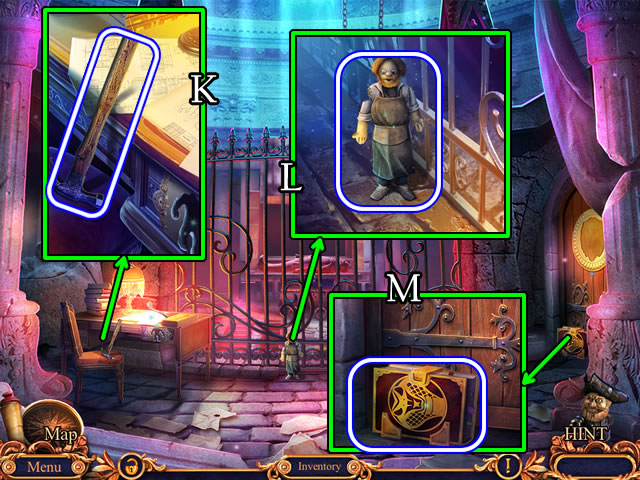
- Take the HAMMER (K), TORN DOLL (L) and ERIN'S DIARY (M).
- Walk down.

- Use the HAMMER. Take the TONGS and DOLL (N).
- Enter the Central Hall.
- Use the TONGS. Take the GRIFFIN CLAW (O).
- Return to the Park of Fountains.
- Combine the TORN DOLL and NEEDLE WITH THREAD for a DOLL (Inventory).
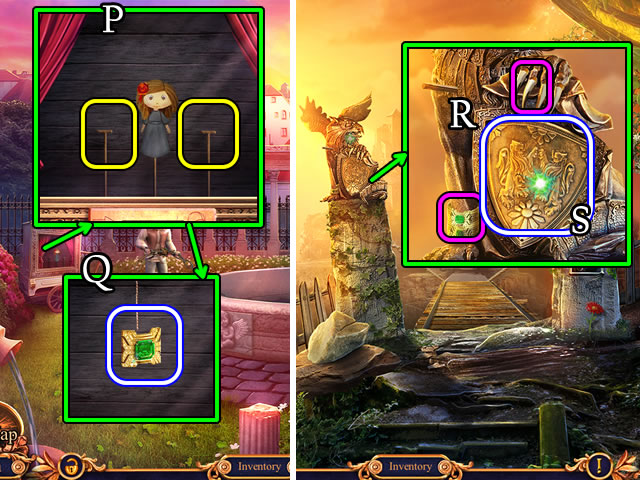
- Place 2 DOLLS (P).
- Take the BRACELET CLASP (Q).
- Return to Near Bridge.
- Place the BRACELET CLASP and GRIFFIN CLAW (R).
- Take the GRIFFIN SHIELD (S).
- Return to the Dungeons.
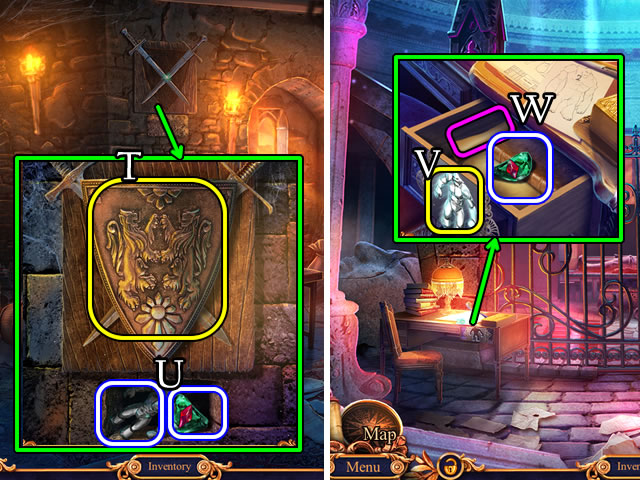
- Place the GRIFFIN SHIELD (T).
- Take the GOLEM STATUETTE and GEM EYE (U).
- Return to the Central Hall.
- Place the GOLEM STATUETTE (V). Take the GEM EYE and scroll (W).
- Combine ERIN'S DIARY and 2 GEM EYES for a STONE ROSE (Inventory).
- Walk down.
- Place the STONE ROSE (X) to play a HOP (Y). Receive a LION EMBLEM.
- Walk to the Central Hall.
- Place and select the LION EMBLEM (Z).
- Walk forward.
- Grab ERIN'S RAINCOAT (A).
- Place the MINIATURE MINER (B).
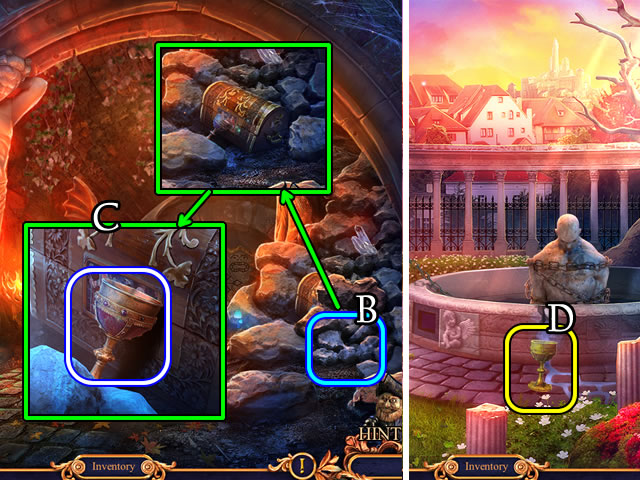
- Take the GRAIL (C).
- Return to the Park of Fountains.
- Place the GRAIL (D) to receive a GRAIL WITH WATER.
- Return to the Grotto.
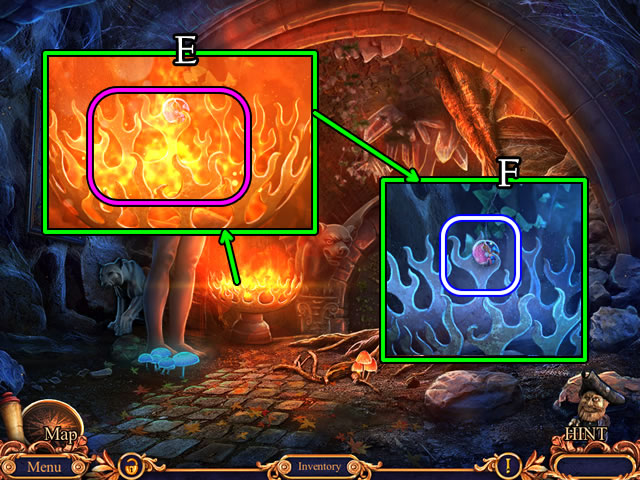
- Use the GRAIL WITH WATER (E).
- Take MOSAIC PARTS 1/4 (F).
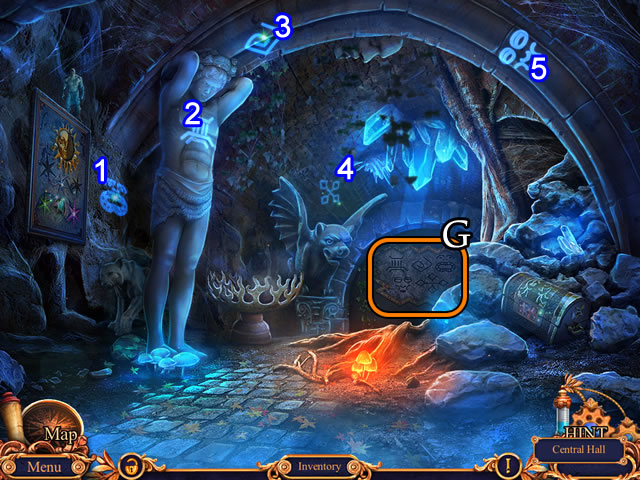
- Select the symbols (1-5).
- Select (G).
- Solution (H). 1-41.
- Walk forward.
Chapter 4: Chasing Erin
- Take MOSAIC PARTS 2/4 (I) and 3/4 (J).
- Place the GUILD'S EMBLEM (K).
- Take MOSAIC PARTS 4/4 and the NECKLACE (L).
- Walk down.
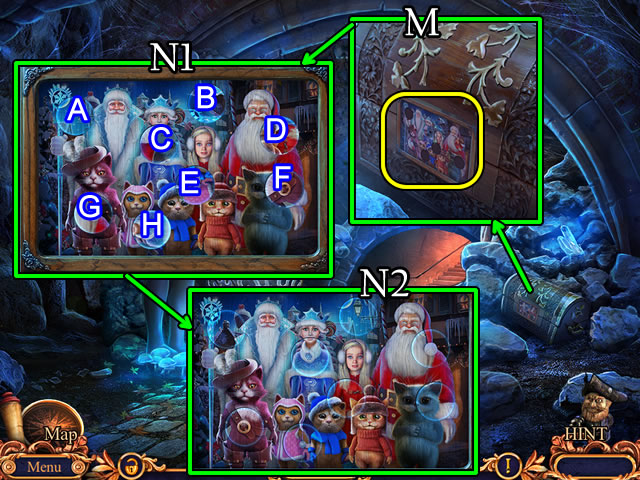
- Place MOSAIC PARTS (M).
- Solution (N1-N2). Part 1: (C-F)-(H-C)-(H-G)-(A-B)-(H-D)-(H-E). Part 2: Ax3, Cx3, E, Fx2, Gx3, Hx3.
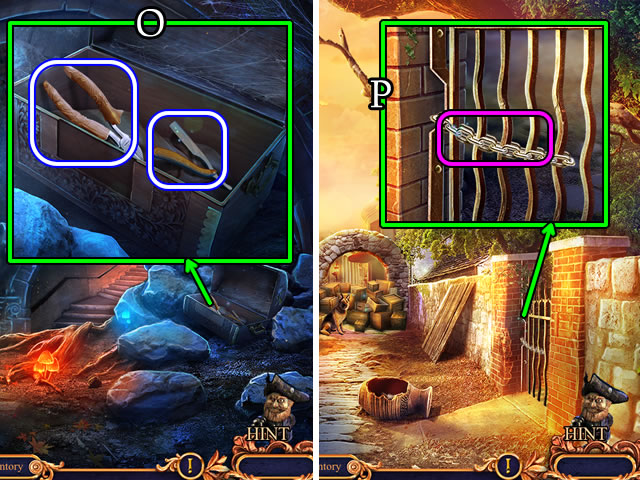
- Take the CHAIN CUTTERS and RAZOR (O).
- Combine ERIN'S RAINCOAT and RAZOR for a CLAY BIRD FIGURINE and a RECORD (Inventory).
- Walk forward.
- Use the CHAIN CUTTERS (P).
- Open and walk right.
- Use the RAZOR. Take the MOON and ROPE (Q).
- Take the WHISTLE PIECES (R).
- Use the ROPE (S). Take the RAFT.
- Walk down 2x.
- Place the MOON (T).
- Take the CLAY BIRD TAIL and STAFF FRAGMENT (U).
- Combine the RAFT, GOLEM and STAFF FRAGMENT for a GOLEM SAILOR (Inventory).
- Walk forward and right.
- Place the GOLEM SAILOR (V); receive a CLAY BIRD HEAD.
- Combine the WHISTLE PIECES, CLAY BIRD HEAD and CLAY BIRD TAIL for a CLAY BIRD FIGURINE (Inventory).
- Walk down.
- Place 2 CLAY BIRD FIGURINES (W).
- Take the OLD HOUSE KEY (X).
- Walk right.
- Place and select the OLD HOUSE KEY (Y). Pull the handle.
- Walk forward.
- Place the FAMILY MEDALLION (A).
- Place the RECORD (B) to play a HOP (C). Receive a GIRL'S ALBUM.
- Select and unwrap the GIRL'S ALBUM (Inventory). Take the DOLPHIN FIGURINE, LETTER EMBLEM and GIRL'S ALBUM.
- Walk down.
- Place the LETTER EMBLEM (D). Take the TWEEZERS (E).
- Walk down.
- Use the TWEEZERS (F). Receive a SWAN FIGURINE and BOW AMULET.
- Walk right and forward.
- Place the DOLPHIN and SWAN FIGURINES (G).
- Solution (H). B-Cx5-Bx2-Ax2-B-A-Cx2-Ax4-Cx3-Ax4.
- Walk forward.
- Take the LADYBUG AMULET (I).
- Combine the GIRL'S ALBUM, LADYBUG AMULET and BOW AMULET (Inventory).
- Solution (J1-J3).
- Take the ERASER and CABINET BUTTON (K).
- Place the CABINET BUTTON (L). Select (1-4).
- Take the AWL HANDLE, FLOWER HANDLE and CELESTIAL STARS 1/2 (M).
- Walk down.
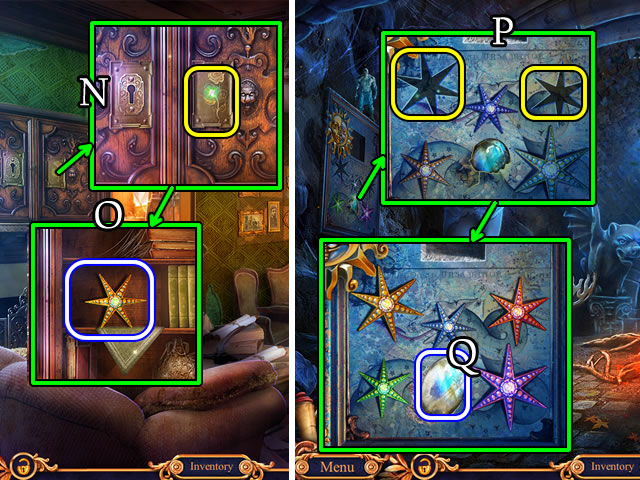
- Place the FLOWER HANDLE (N).
- Take CELESTIAL STARS 2/2 (O).
- Walk down 3x.
- Place the CELESTIAL STARS (P).
- Puzzle solutions vary.
- Take the MOONSTONE (Q).
- Return to the Workshop.
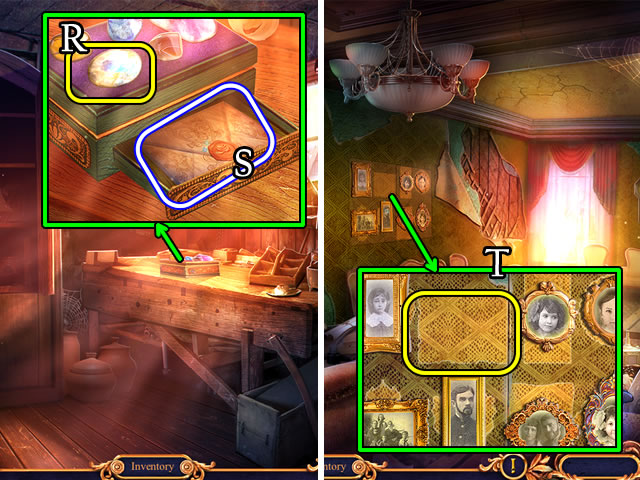
- Place the MOONSTONE (R). Take the LETTER TO LAUREN (S).
- Open the LETTER TO LAUREN (Inventory). Take the note, MUSEUM TICKET and RONALD'S PHOTO.
- Walk down.
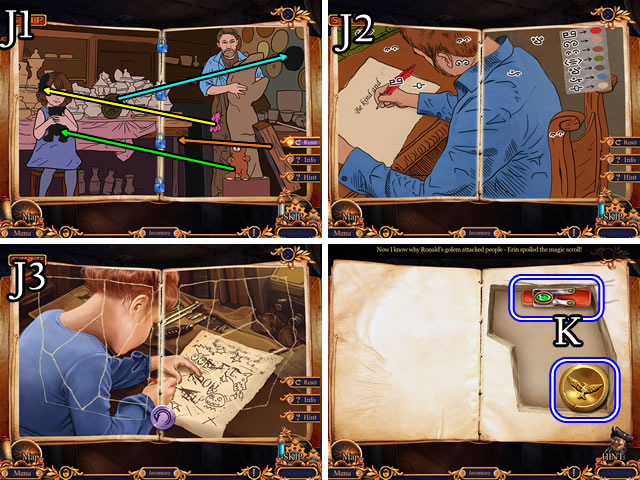
- Place RONALD'S PHOTO (T).
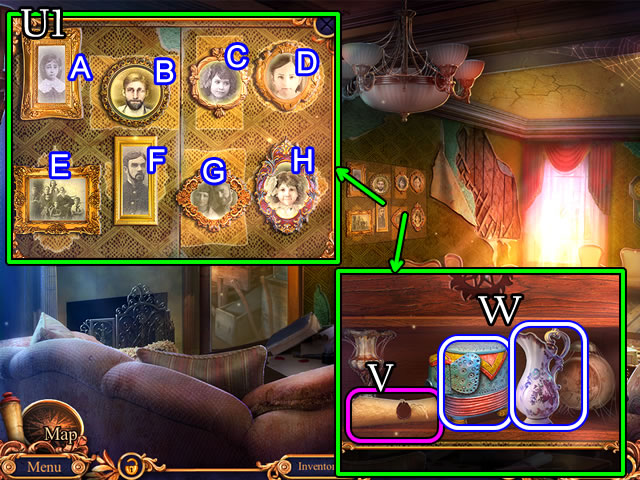
- Solution (U1). (F-C)-(A-G)-(E-B)-(H-E)-(A-H)-(D-A).
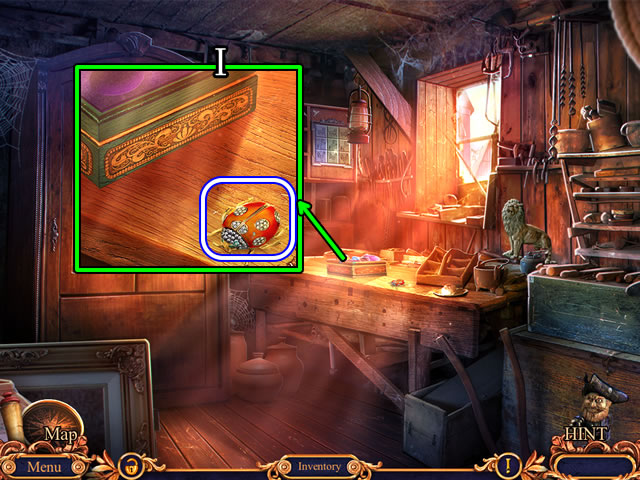
- Take the scroll (V), CLAY BOX and MUSEUM EXHIBIT (W).
- Walk down 2x.
- Place the AWL HANDLE (X) for an AWL.
- Walk right and forward.
- Use the AWL (Y).
- Take the ELEPHANT TRUNK and CANNED FOOD (Z).
- Combine the CLAY BOX and ELEPHANT TRUNK. Open to take the CAN OPENER and CADUCEUS (Inventory).
- Walk forward.
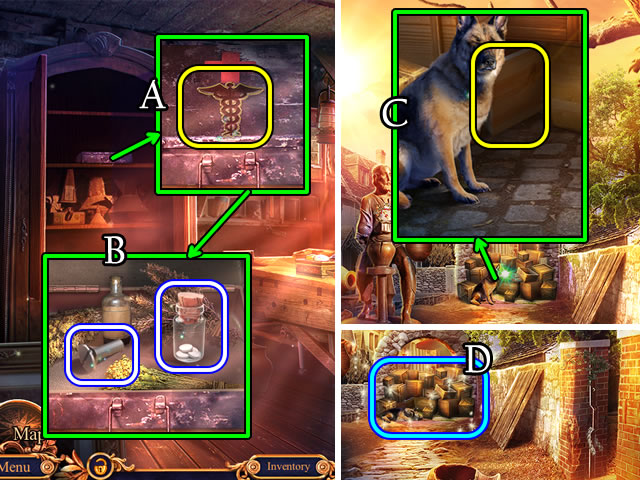
- Place the CADUCEUS (A).
- Take the SLEEPING PILLS and SCREWS 1/4 (B).
- Combine the CANNED FOOD, CAN OPENER, SLEEPING PILLS and GOLEM to get a GOLEM TAMER (Inventory).
- Walk down 3x.
- Place the GOLEM TAMER (C) to play a HOP (D). Receive a CLAY HORSE.
- Walk forward.
Chapter 5: The Museum
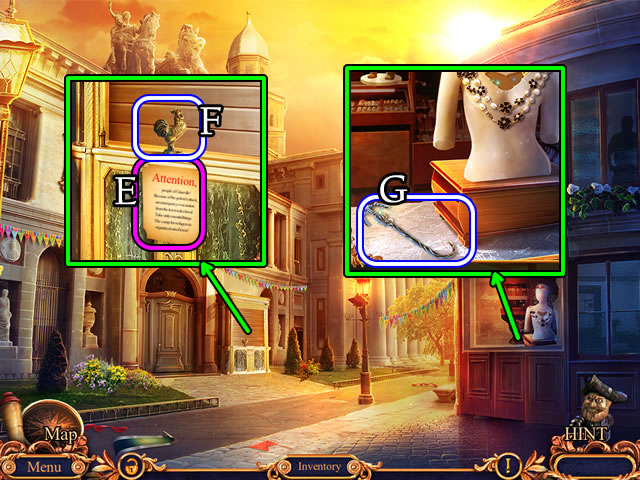
- Read the note (E); take the CLAY ROOSTER (F).
- Take the BENT FORK (G).
- Return to the Workshop.
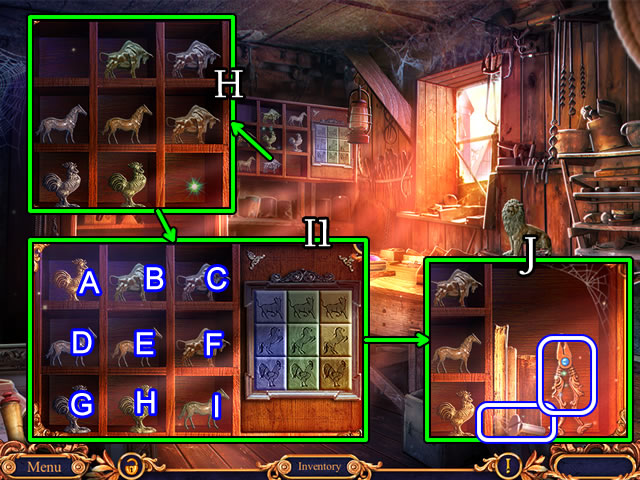
- Place the CLAY HORSE and CLAY ROOSTER (H).
- Solution (I1). (C-F)-(G-D)-(D-A)-(G-E)-(F-E)-(E-A)-(D-G)-(F-E)-(E-D)-(F-H)-(H-G)-(I-F)-(H-I)-(E-F).
- Take SCREWS 2/4 and the PLIERS (J).
- Combine the BENT FORK and PLIERS for a FORK (Inventory).
- Walk down 3x and forward.
- Use the FORK (K).
- Place the MUSEUM TICKET. Touch the button (L).
- Walk forward.
- Take the WRECKED WHEEL (M).
- Place the MUSEUM EXHIBIT (N). Take the TROWEL and TIARA (O).
- Walk down.
- Place the NECKLACE and TIARA (P).
- Take the BIRD DECOY (Q).
- Walk down and right.
- Use the BIRD DECOY (R); receive SCREWS 3/4.
- Use the TROWEL. Take SCREWS 4/4 and the RUBBER CIRCLE (S).
- Combine the WRECKED WHEEL, PLIERS and RUBBER CIRCLE for a WHEEL (Inventory).
- Walk down and forward 2x.
- Place the WHEEL and SCREWS (T).
- Select the ladder.
- Take the CLAY TURTLE (U).
- Walk down 2x.
- Speak to the boy; take the PHOENIX AMULET (V).
- Place the CLAY TURTLE (W). Open and take CODE WHEEL 1/2 (X).
- Return to Central Hall.
- Place the PHOENIX AMULET (Y). Pull the handle.
- Remove the scroll (Z). Take the CLAY AMULET (A).
- Return to Inside Erin's House.

- Place the CLAY AMULET (B).
- Take the CURTAIN TIE-BACKS and CODE WHEEL 2/2 (C).
- Return to the Museum.
- Place the CURTAIN TIE-BACKS (D) to play a HOP (E). Receive a CHISEL AND HAMMER.
- Place CODE WHEELS 2/2 (F).
- Set to 3-6-1.
- Use the CHISEL AND HAMMER. Take the SPOILED PARCHMENT (G).
- Combine the SPOILED PARCHMENT, DECODER SOLUTION and ERASER for RONALD'S PARCHMENT (Inventory).
- Return to the Central Hall.
- Place RONALD'S PARCHMENT (H).
- Puzzle solutions vary.
- Congratulations! You have completed playing Royal Detective: Legend of the Golem.
Created at: 2016-03-04