

Walkthrough Menu
- General Tips
- Chapter 1: The Tower Ruins
- Chapter 2: The Hall of Heroes
- Chapter 3: The Burial Mound
- Chapter 4: Back at the Tower Ruins
- Chapter 5: The Secret Passage
- Chapter 6: The Elvish Weaponry
General Tips
- This is the official guide for Royal Detective: Queen of Shadows.
- This guide will not mention each time you have to zoom into a location; the screenshots will show each zoom scene.
- We will use the acronym HOP for Hidden-object puzzles. Interactive items will be color-coded.
- Use the map to travel to a location.
Chapter 1: The Tower Ruins
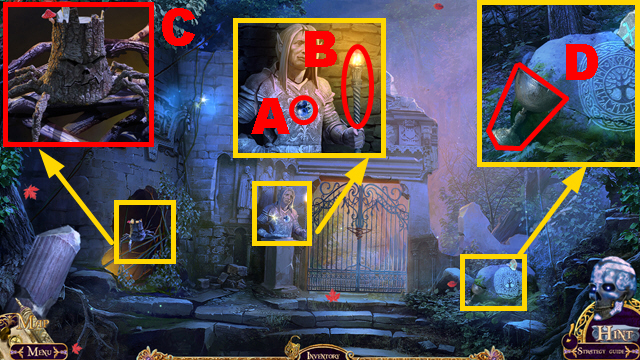
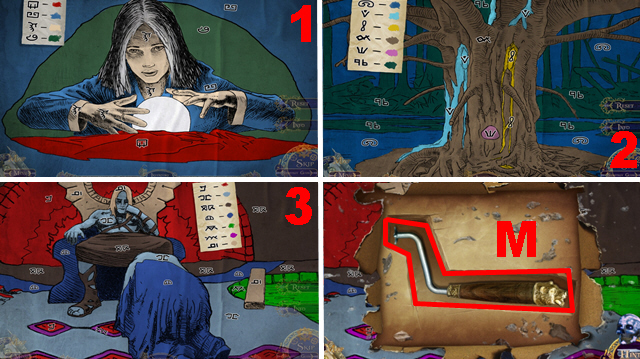
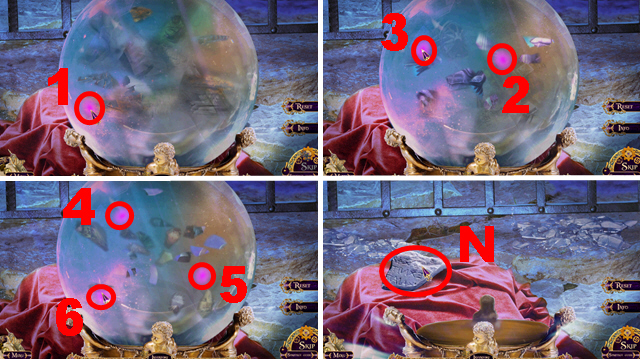
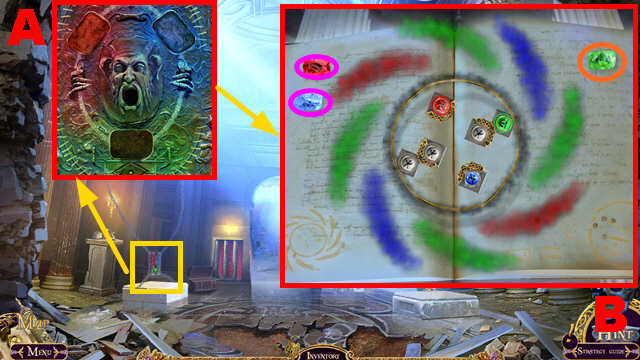
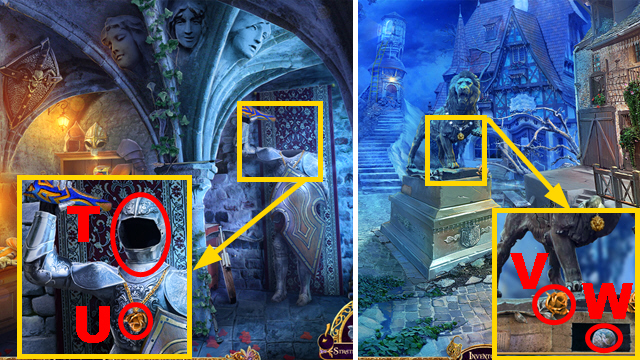
- Take the MOON AMULET (A) and TORCH (B).
- Use the TORCH (C).
- Take the BONE CUP (D).
- Turn left.
- Take the BONE KEY (E); place the MOON AMULET (F).
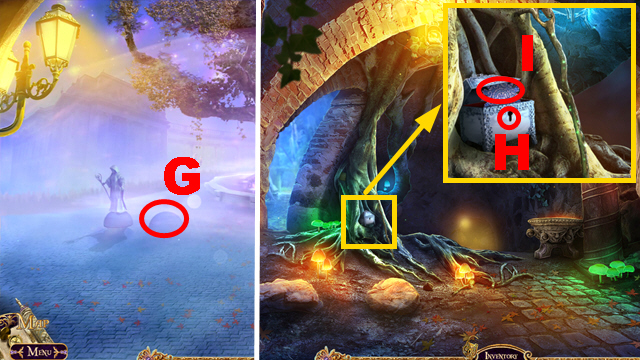
- Take the BOATHOOK (G).
- Use the BONE KEY (H); open the shelf.
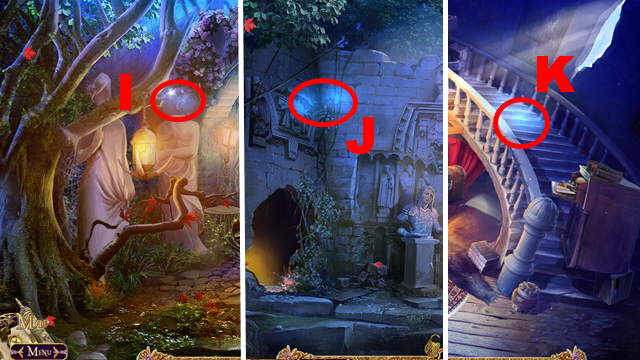
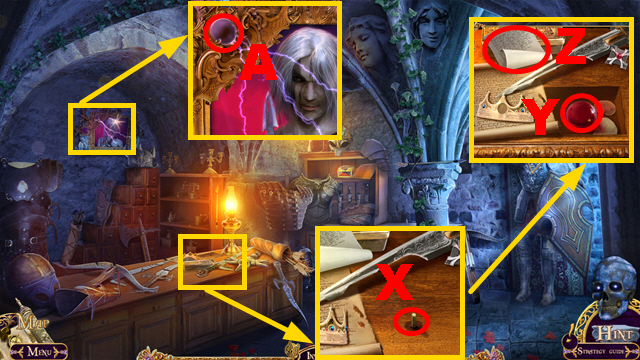
- Take the PAINT (I).
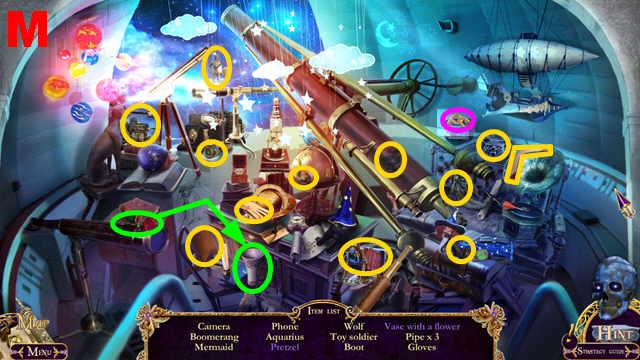
- Play the HOP.
- You receive the DULL DAGGER (J).
- Take OAR 1/2 (K).
- Place the PAINT (L).
- Examine the book (green).
- Play the mini-game.
- Solution: 1-3.
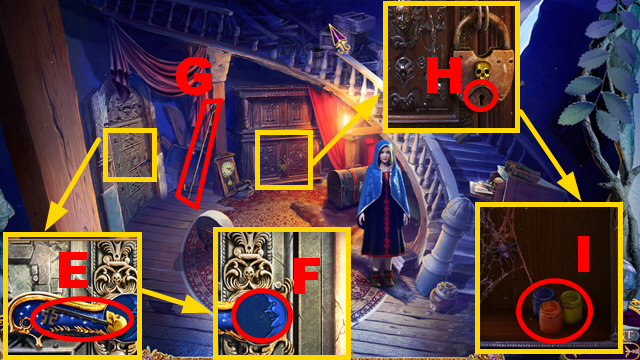
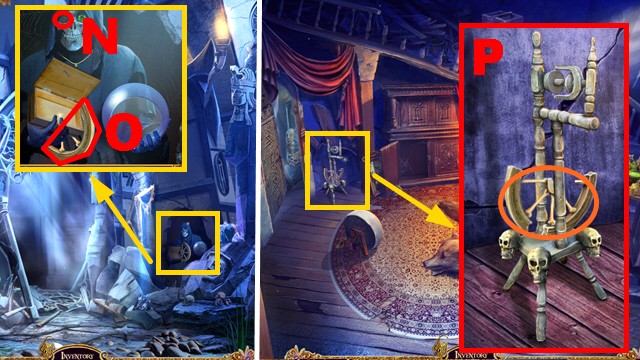
- Take the GRINDSTONE HANDLE (M).
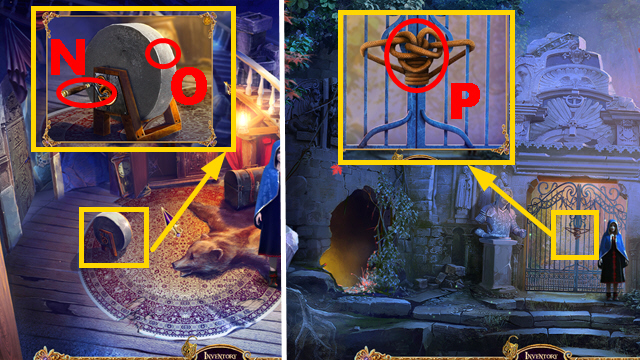
- Place the GRINDSTONE HANDLE (N).
- Hold down the DULL DAGGER (O) to acquire the FIRE DAGGER.
- Walk down.
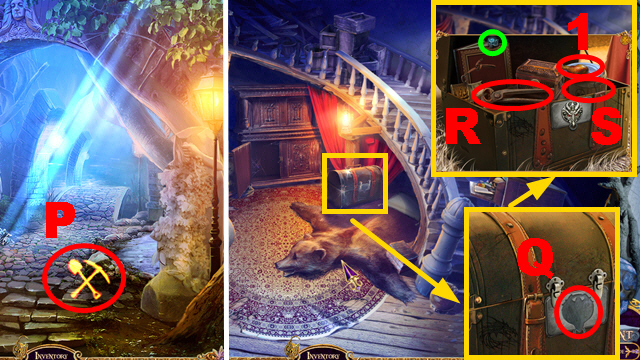
- Use the FIRE DAGGER (P).
- Open the gate.
- Move forward.
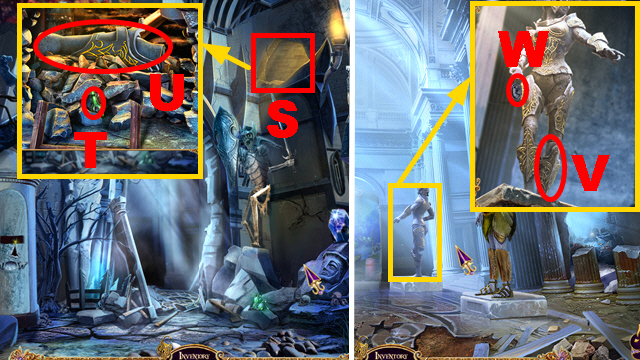
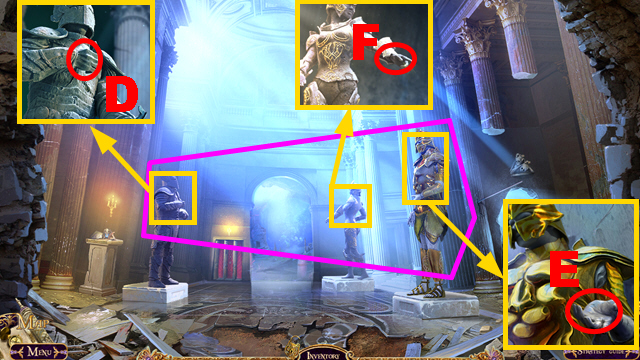
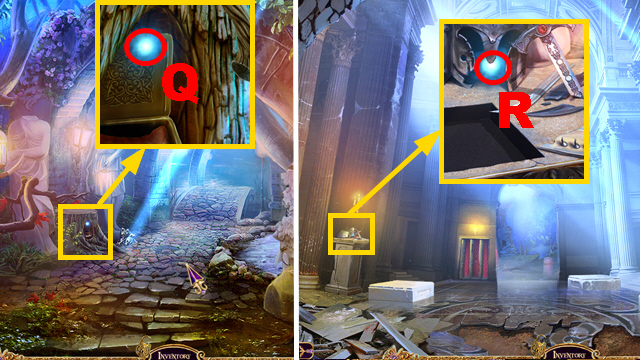
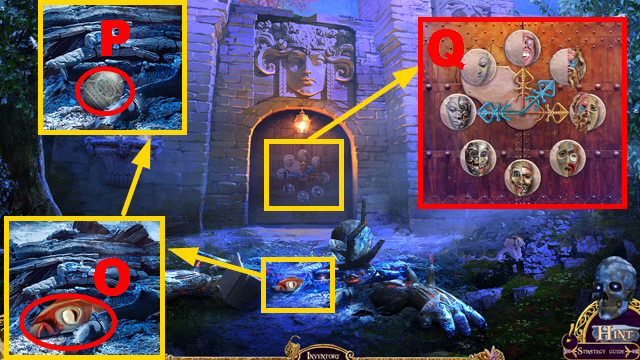
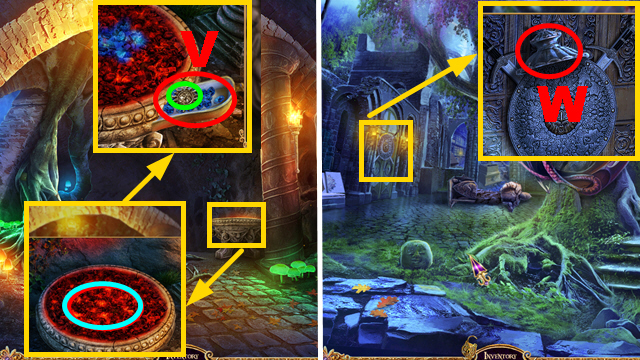
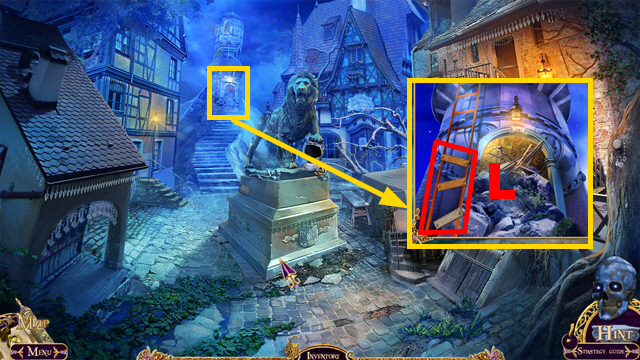
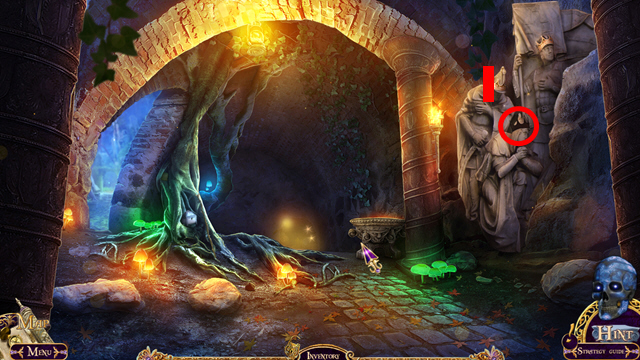
- Take the PICKAX (Q) and OAR 2/2 (R).
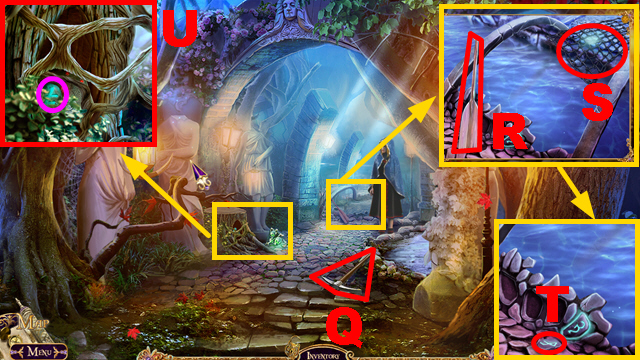
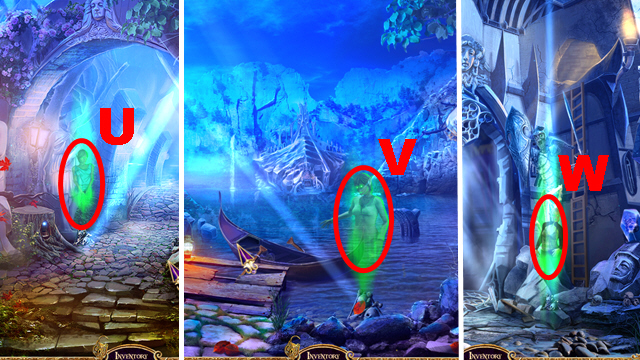
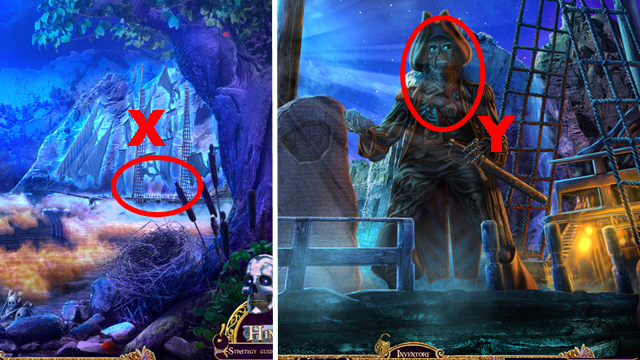
- Use the BOATHOOK (S); take RUNE 1/3 (T).
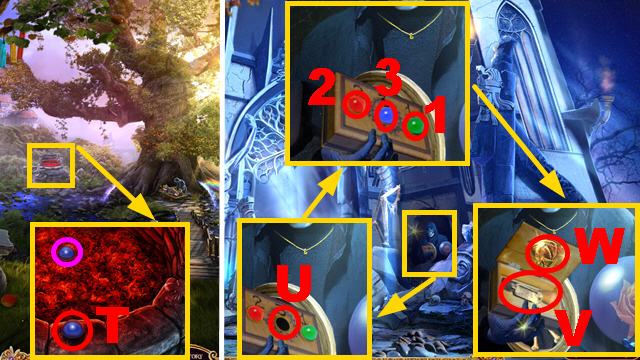
- Use the FIRE DAGGER (U); take RUNE 2/3 (purple).
- Walk down.
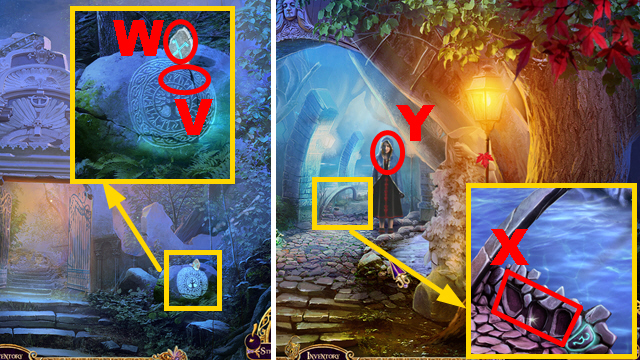
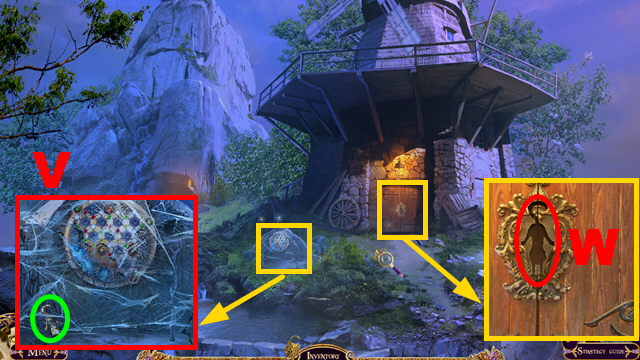
- Use the PICKAX (V); take RUNE 3/3 (W).
- Move forward.
- Place the RUNES (X).
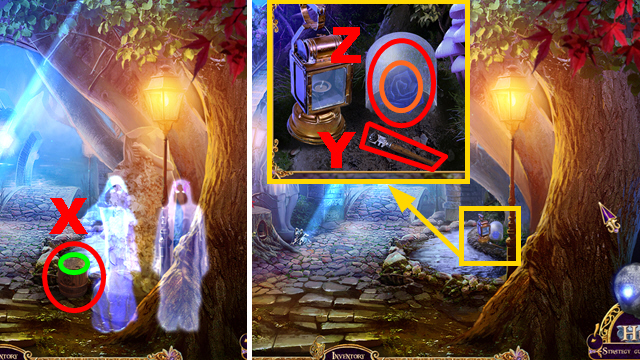
- Talk to the girl (Y).
- Move forward.
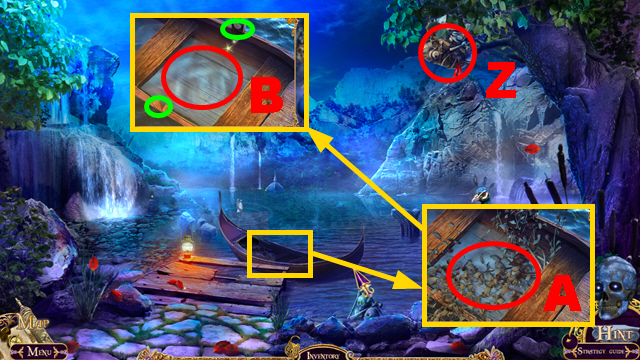
- Use the BOATHOOK (Z).
- Use the FIRE DAGGER (A) and BONE CUP (B).
- Place the OARS (green).
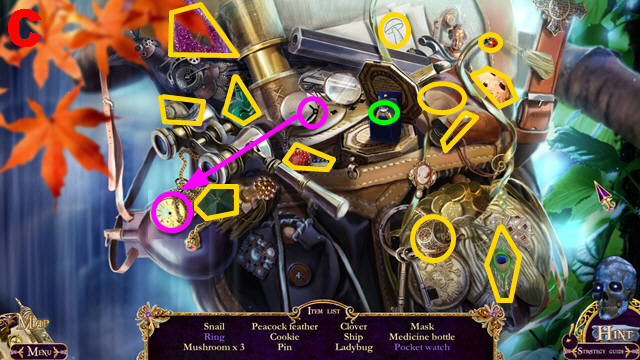
- Play the HOP.
- You receive the MEDICINE (C).
- Walk down.
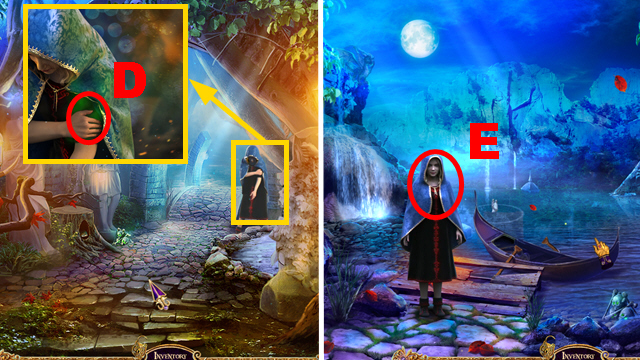
- Use the MEDICINE (D).
- Move forward.
- Talk to the girl (E).
- Move forward.
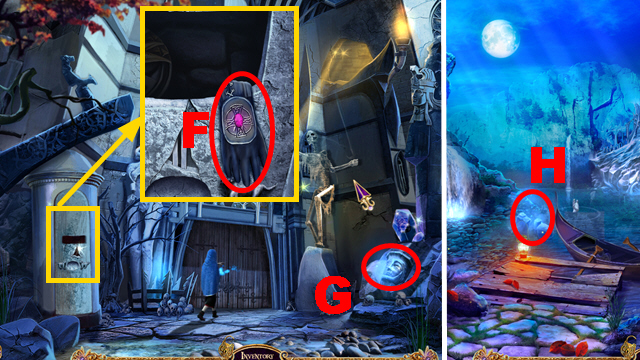
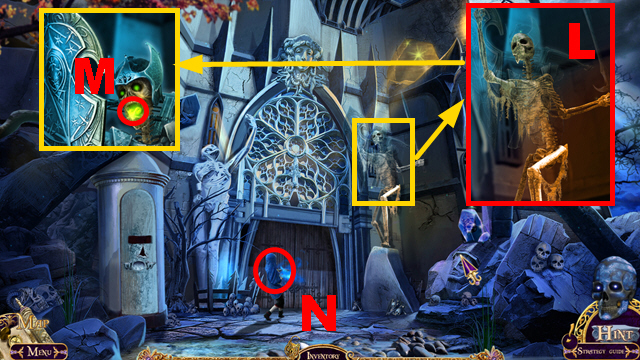
- Take the MAGIC GLOVE (F).
- Use the MAGIC GLOVE (G) to acquire the PHANTOM SHIELD.
- Walk down.
- Use the MAGIC GLOVE (H) to collect the PHANTOM CROSSBOW.
- Walk down.
- Use the MAGIC GLOVE (I) to collect the PHANTOM HELMET.
- Walk down.
- Use the MAGIC GLOVE (J) to collect the PHANTOM SWORD.
- Turn left.
- Use the MAGIC GLOVE (K) to collect the PHANTOM CUIRASS.
- Go to the Castle Gates.
- Place the PHANTOM SHIELD, PHANTOM CROSSBOW, PHANTOM HELMET, PHANTOM SWORD, and PHANTOM CUIRASS (L).
- Take the GEMS (M).
- Talk to the girl (N); you receive the MAGIC BOOK OF LIFE.
- Walk down.
- Place the GEMS (purple); use the MAGIC BOOK OF LIFE (O).
- Move forward twice.
Chapter 2: The Hall of Heroes
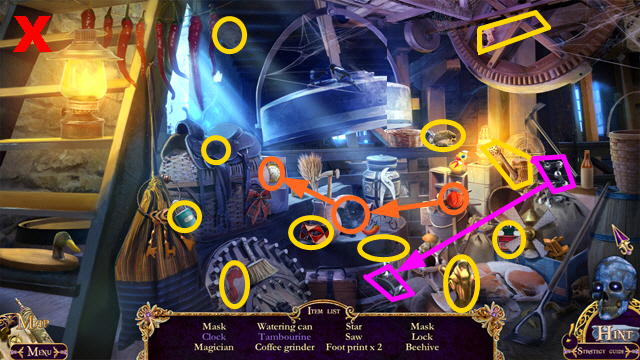
- Take the URN FOR SOULS (P).
- Move forward.
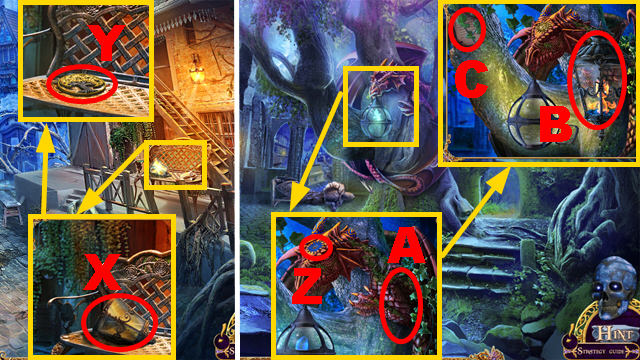
- Take the LADDER (Q) and HARP (R).
- Walk down twice.
- Place the LADDER (S).
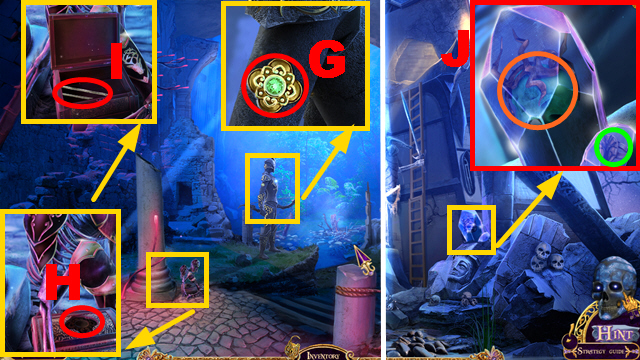
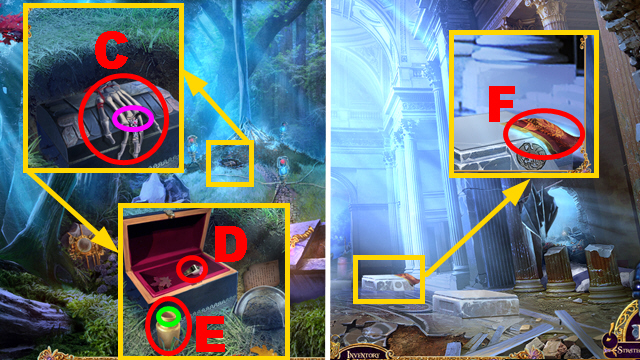
- Take the ACID (T) and STATUE'S LEG (U).
- Move forward.
- Place the STATUE'S LEG (V); take the DOG AMULET (W).
- Move forward.
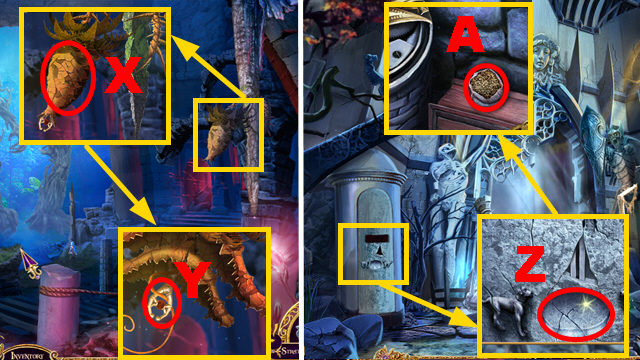
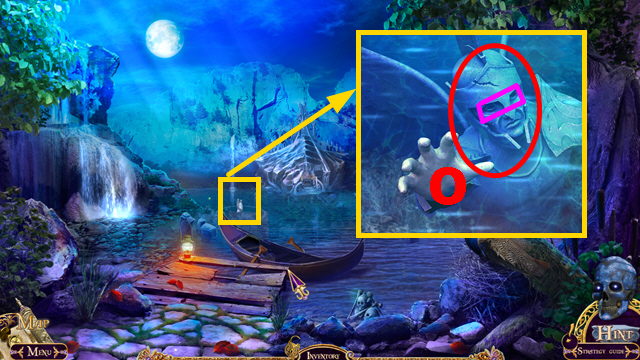
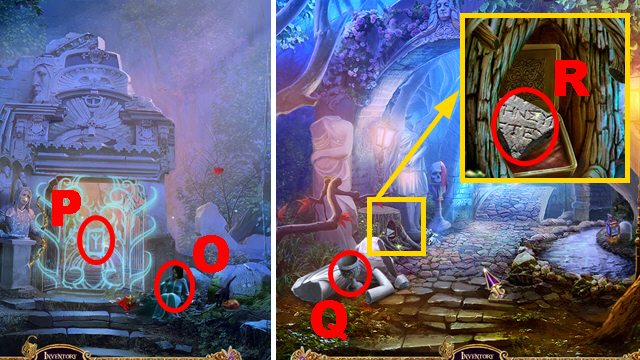
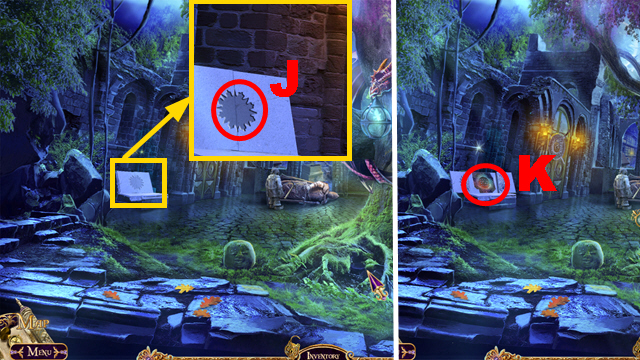
- Use the ACID (X); take the RUBY KEY (Y).
- Walk down twice.
- Place the DOG AMULET (Z); take the GRAIN (A).
- Walk down.
- Use the GRAIN (B); take the IRON KEY (C).
- Walk down.
- Use the RUBY KEY (D); open the box.
- Take the SCULPTOR'S KIT (E).
- Move forward twice.
- Use the IRON KEY (F); open the box.
- Take the SWORDSMAN'S HAND (G) and SIGN FRAGMENT (H).
- Move forward.
- Place the SWORDSMAN'S HAND (I); take the ICE STONE (J).
- Walk down twice.
- Use the ICE STONE (K); place the SIGN FRAGMENT (L).
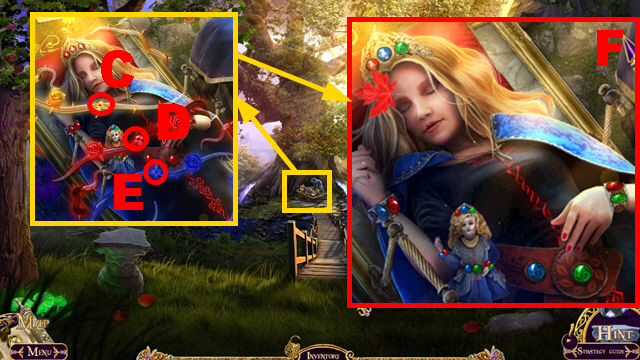
- Use the SCULPTOR'S KIT four times (M); use the MAGIC BOOK OF LIFE (N).
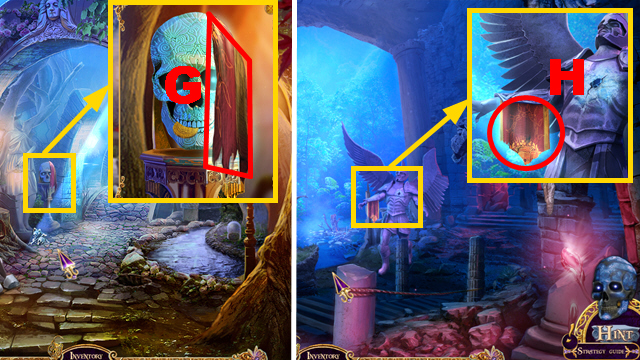
- Take the ICE LADY (O).
- Move forward twice.
- Examine the opening (green).
- Use the ICE LADY (P).
- Play the HOP.
- You receive the GENERAL'S HEAD (Q).
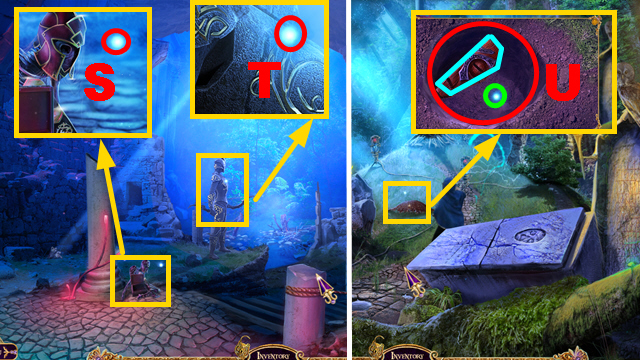
- Place the GENERAL'S HEAD (R); take the TIME AMULET (S).
- Walk down.
- Place the TIME AMULET (T); move the pointer (purple).
- Walk down twice.
- Use the URN FOR SOULS (U) to collect soul 1/5.
- Move forward.
- Use the URN FOR SOULS (V) to collect soul 2/5.
- Move forward.
- Use the URN FOR SOULS (W) to collect soul 3/5.
- Move forward twice.
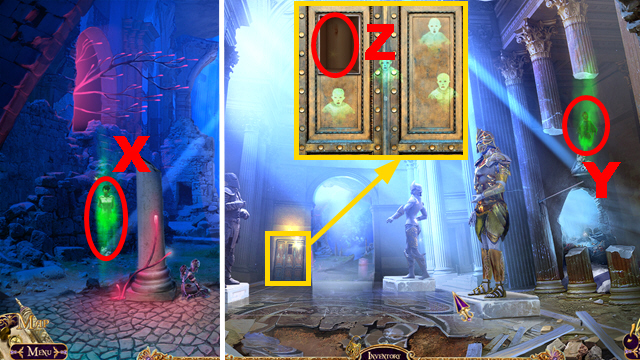
- Use the URN FOR SOULS (X) to collect soul 4/5.
- Walk down.
- Use the URN FOR SOULS (Y) to collect soul 5/5.
- Place the URN FOR SOULS (Z).
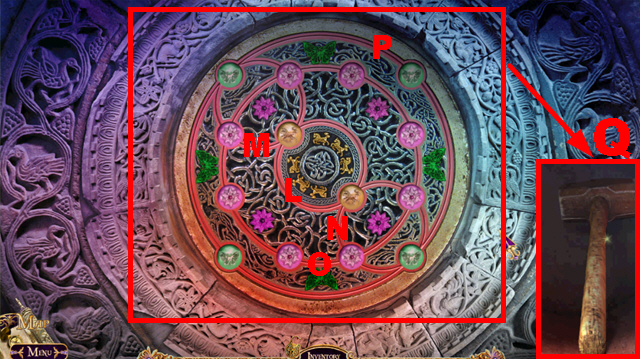
- Play the mini-game.
- Solution: 1-15.
- Play the second part of the mini-game.
- Solution: 1-16.
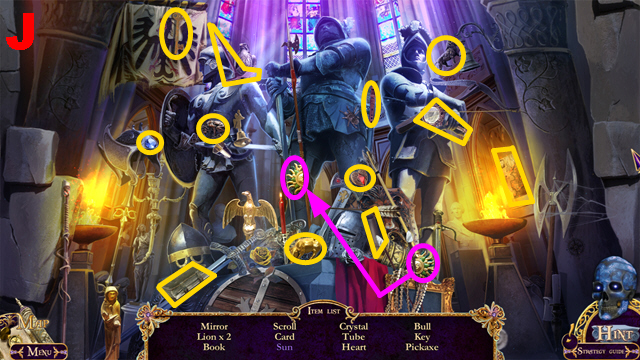
- Take the SPEAR (A), SWORD (B), and BOW (C).
- Place the SWORD (D), SPEAR (E), and BOW (F).
- Use the MAGIC BOOK OF LIFE (purple).
- Move forward.
- Take the GOLDEN AMULET (G).
- Place the GOLDEN AMULET (H); open the chest.
- Take the TUNING FORK (I).
- Walk down twice.
- Use the TUNING FORK (J); take the SKULL (orange) and SIGNET RING (green).
- Move forward.
Chapter 3: The Burial Mound
- Place the SIGNET RING (K); take ELF MASK 1/2 (L).
- Move forward twice.
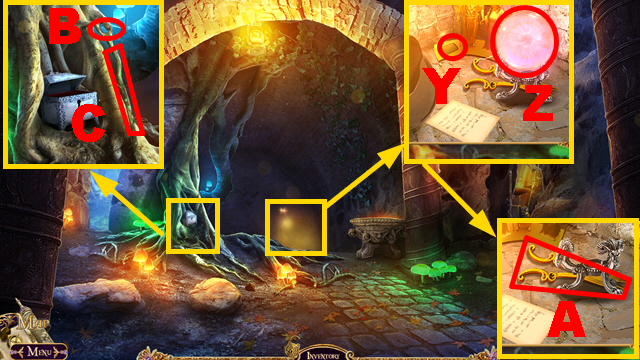
- Take the SPADE HANDLE (M).
- Walk down three times.
- Place the SPADE HANDLE (N); take the SPADE (O).
- Move forward three times.
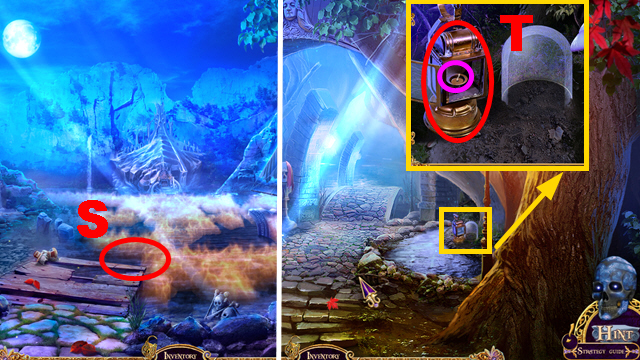
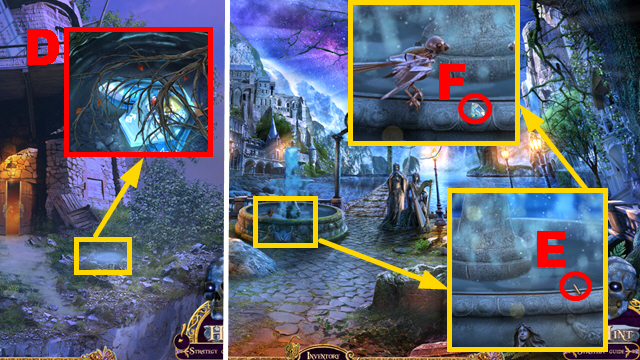
- Take the VIAL (P).
- Walk down five times.
- Collect wisp 1/7 with the VIAL (Q).
- Move forward three times.
- Collect wisp 2/7 with the VIAL (R).
- Move forward.
- Collect wisp 3/7 with the VIAL (S).
- Collect wisp 4/7 with the VIAL (T).
- Move forward.
- Use the SPADE (U); collect wisp 5/7 with the VIAL (green).
- Take ELF MASK 2/2 (blue).
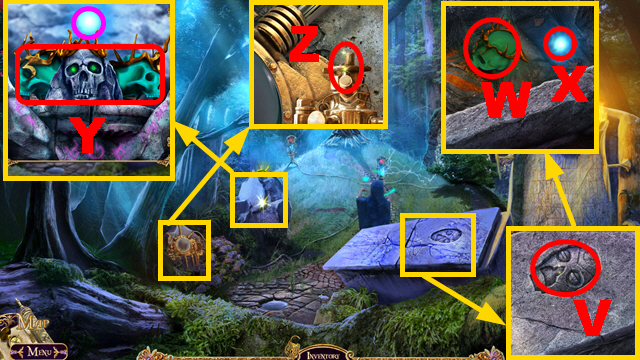
- Place the ELF MASK (V).
- Take the SKULL (W); collect wisp 6/7 with the VIAL (X).
- Place 2 SKULLS (Y); collect wisp 7/7 with the VIAL (purple).
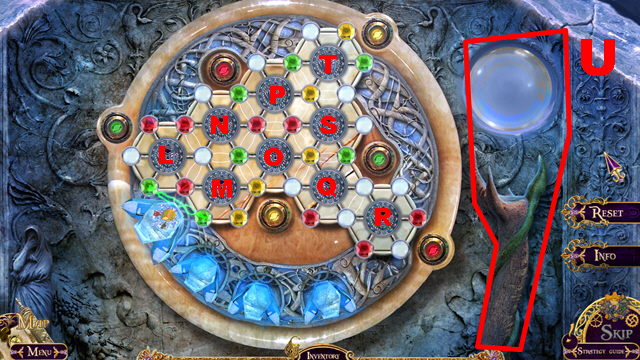
- Place the VIAL (Z).
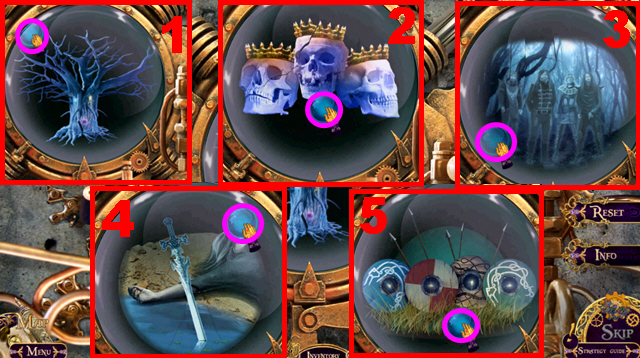
- Play the mini-game.
- Solution: 1-5.

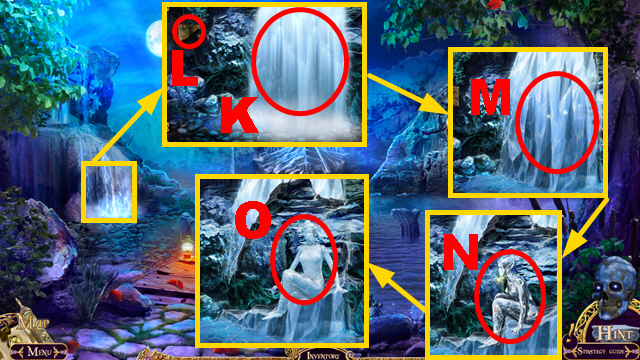
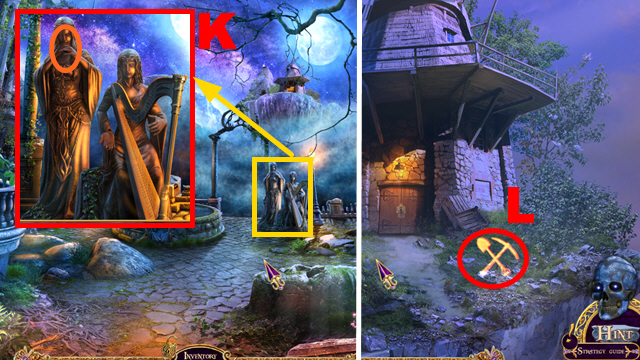
- Use the ICE LADY (A).
- Talk to the woman (B).
- Give the FIRE DAGGER to the woman (C); you receive the FIRE SWORD.
- Use the FIRE SWORD (D).
- Turn right.
- Activate symbols: 1-4.
- Talk to the woman (E); you receive the BIG IRON KEY.
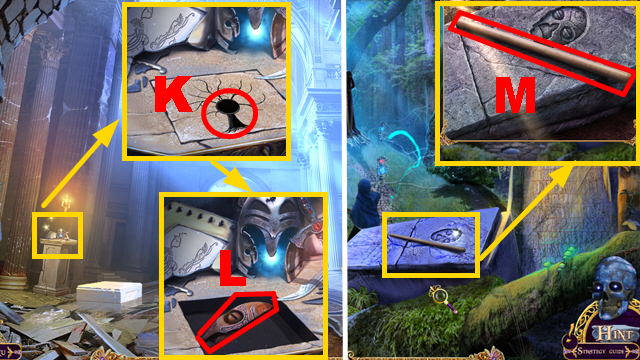
- Take the GLASS EYE (purple).
- Play the HOP.
- You receive the PICKAXE (F).
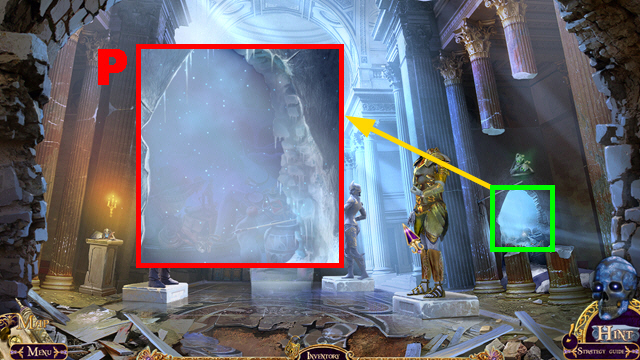
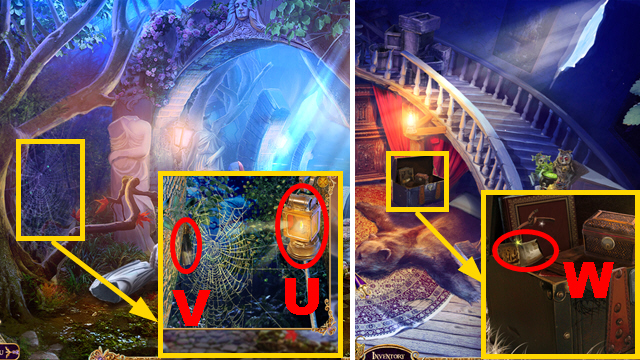
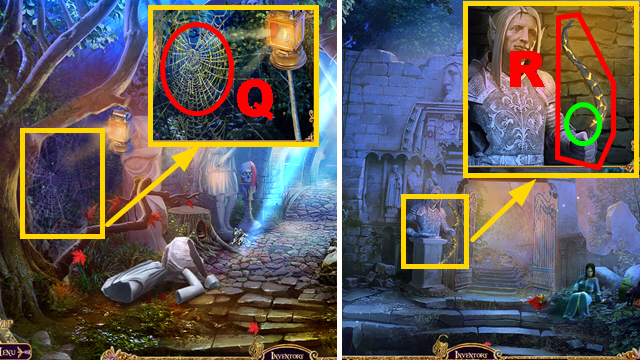
- Remove the cobwebs three times (G).
- Take the MAGIC CANDLE (H).
- Use the MAGIC BOOK OF LIFE (I).
- Place the GLASS EYE (J), PICKAXE (K), and MAGIC CANDLE (L).
- Remove the sign (purple).
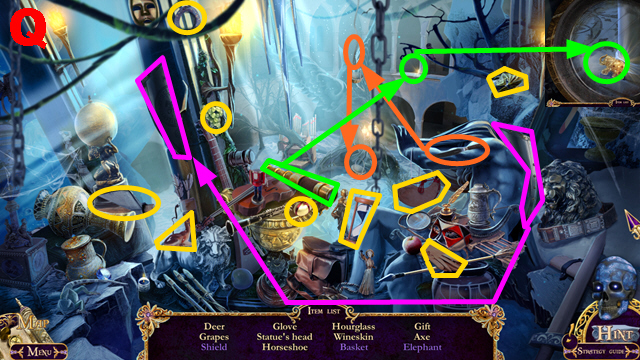
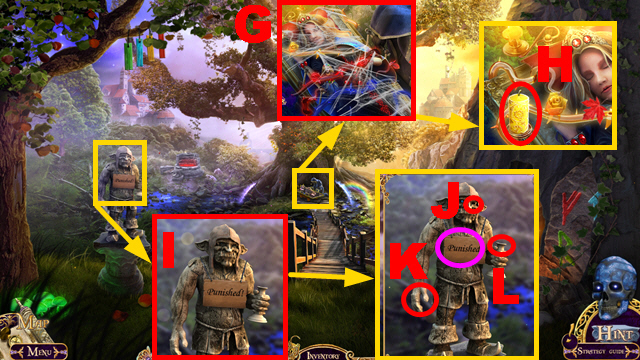
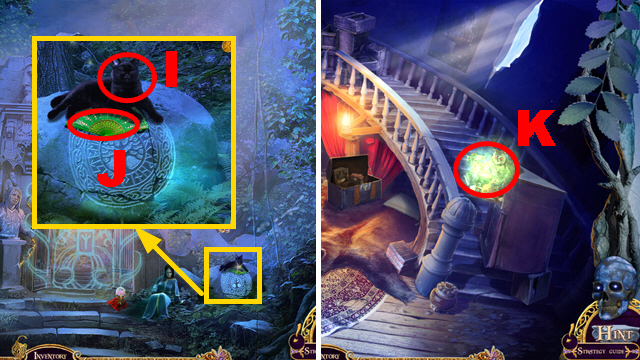
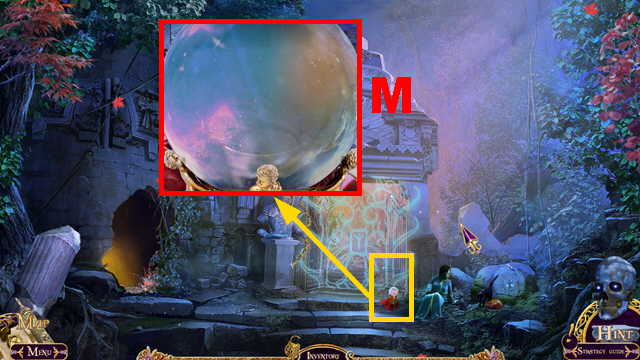
- Take the GOBLIN.
- Walk down.
- Use the GOBLIN (M).
- Read the note (N).
- Walk down three times.
- Use the GOBLIN (O).
- Walk down twice.
- Use the GOBLIN (P).
- Walk down, turn left.
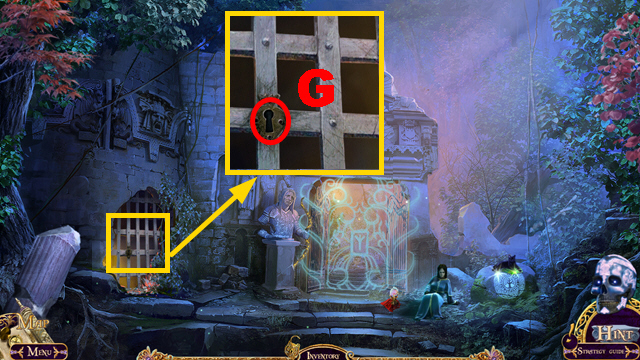
- Place the BIG IRON KEY (Q).
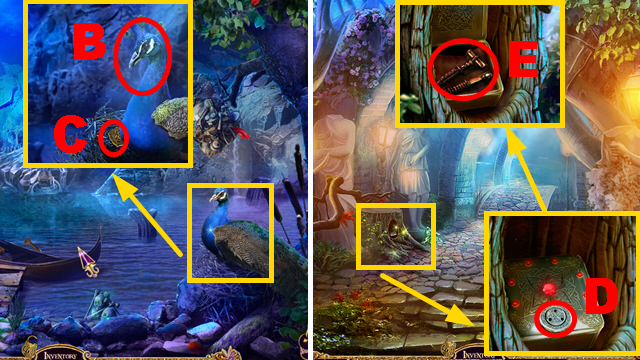
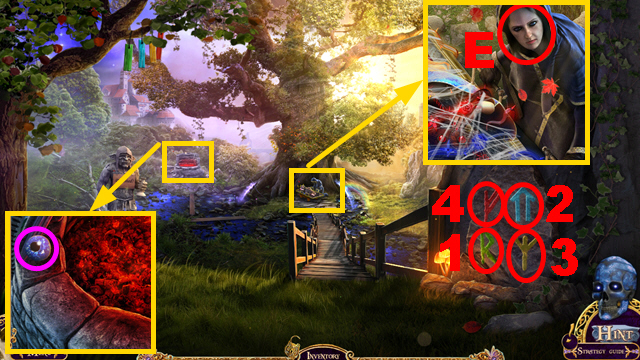
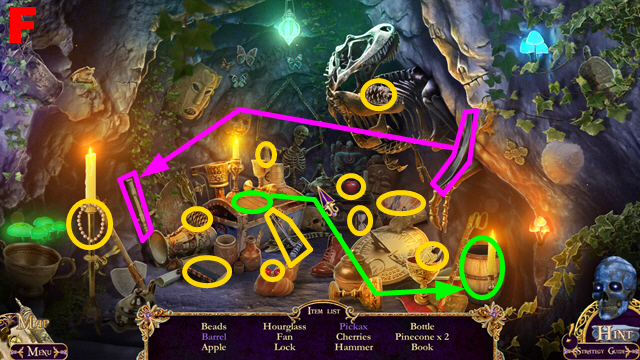
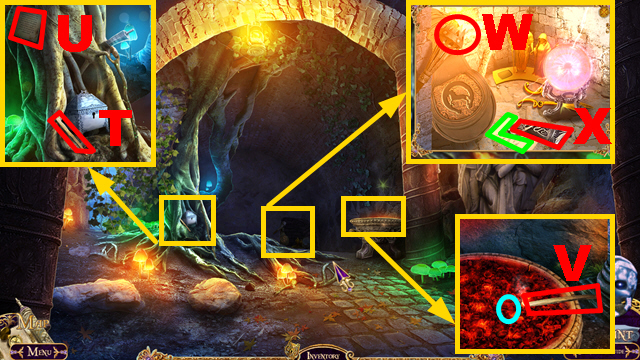
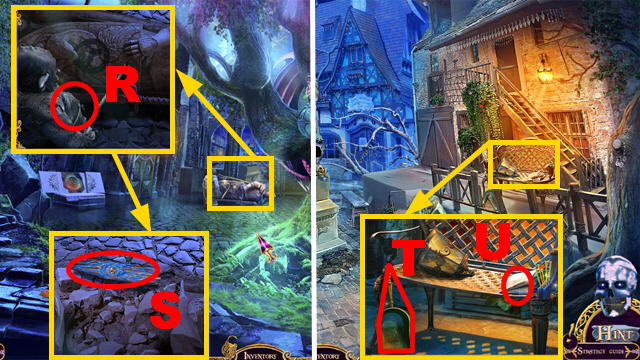
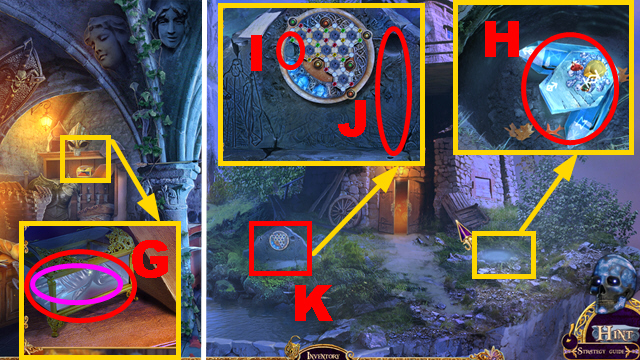
- Take the TONGS (R), FINGER RING 1/3 (green), PARTRIDGE (1), and GUNPOWDER KEG (S).
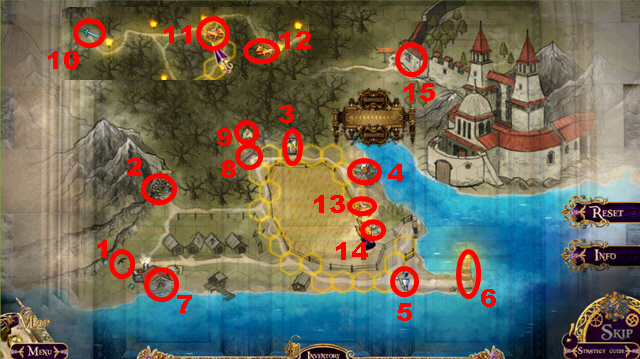
- Go to the Sacred Tree.
- Use the TONGS (purple); take the BLUE BUTTON (T).
- Walk down four times.
- Place the BLUE BUTTON (U); push the buttons (1-3).
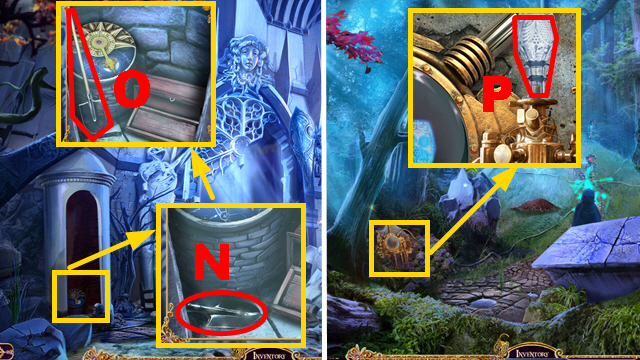
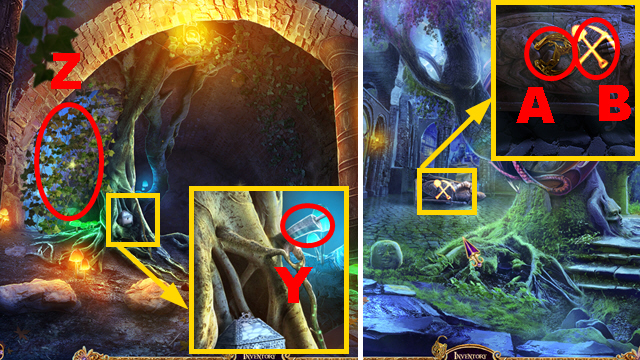
- Take the FLINT (V) and BAT PRINT (W).
- Walk down twice.
- Place the GUNPOWDER KEG (X); use the FLINT (green).
- Take the GLASS CUTTER (Y); use the GLASS CUTTER (Z).
- Take the DIAMOND ROSE (orange).
- Move forward twice.
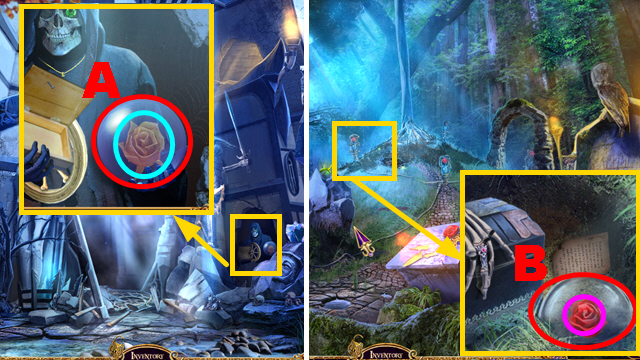
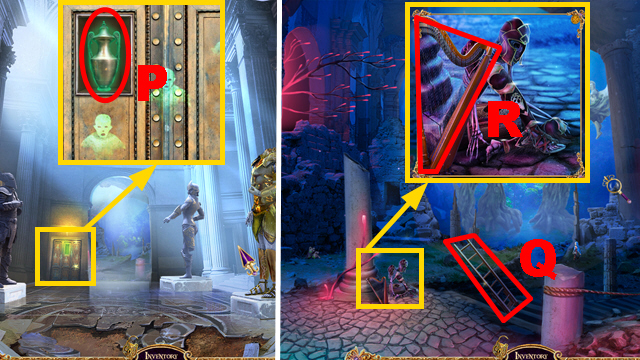
- Use the GLASS CUTTER (A); take the GOLD ROSE (blue).
- Move forward three times.
- Use the GLASS CUTTER (B); take the RUBY ROSE (purple).
- Move forward.
- Place the GOLD ROSE (C), RUBY ROSE (D), and DIAMOND ROSE (E).
- Choose the correctly colored gems (F).
Chapter 4: Back at the Tower Ruins
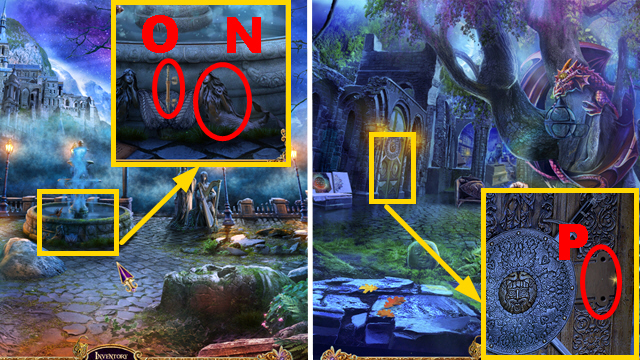
- Examine the gate; you receive the TOWER KEY.
- Place the TOWER KEY (G); turn it.
- Use the PARTRIDGE (I); take the FAN (J).
- Turn left.
- Use the FAN (K).

- Play the HOP.
- You receive the MAGIC DUST (L).
- Walk down.
- Use the MAGIC DUST (M).
- Play the mini-game.
- Solution: 1-6.
- Take TABLET 1/5 (N).
- Talk to the woman (O); you receive the PURPLE FLEECE.
- Place the PURPLE FLEECE (P).
- Move forward.
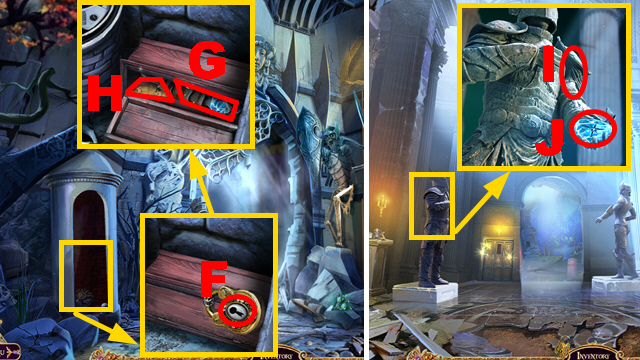
- Take the STONE CUP (Q) and TABLET 2/5 (R).
- Move forward.
- Use the STONE CUP (S) to acquire the FIRE OIL.
- Walk down.
- Open the lantern; use the FIRE OIL and FLINT (purple).
- Close the lantern; take the LANTERN (T).
- Place the LANTERN (U); take the HALF HORN (V).
- Walk down, turn left.
- Place the HALF HORN (W); take the HUNTING HORN.
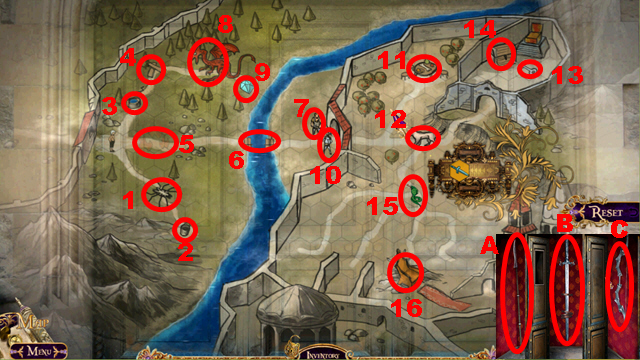
- Go to the Lake of Tears.
- Use the HUNTING HORN (X).
- Turn right.
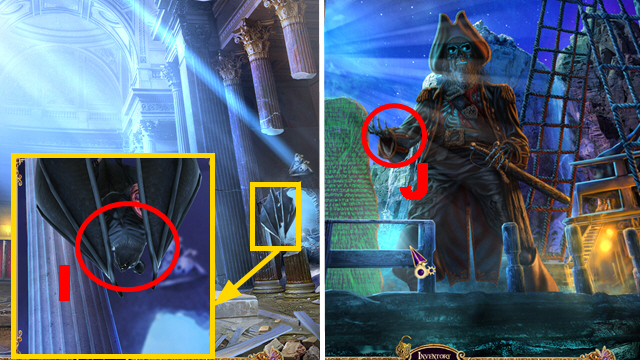
- Talk to the pirate (Y); you receive TABLET 3/5.
- Go to the Castle Gates.
- Take TABLET 4/5 (Z).
- Move forward.
- Take TABLET 5/5 (A).
- Go to the Ghost Ship.
- Place the TABLET (B).
- Talk to the pirate (C); take the BAT PRINT (D).
- Walk down, move forward twice.
- Take the FUR MITTEN (1).
- Place 2 BAT PRINTS (E); open the chest.
- Take the ENCHANTED ARROW (F) and PRECIOUS PIN (G).
- Collect FINGER RING 2/3 with the TONGS (H).
- Go to the Tower.
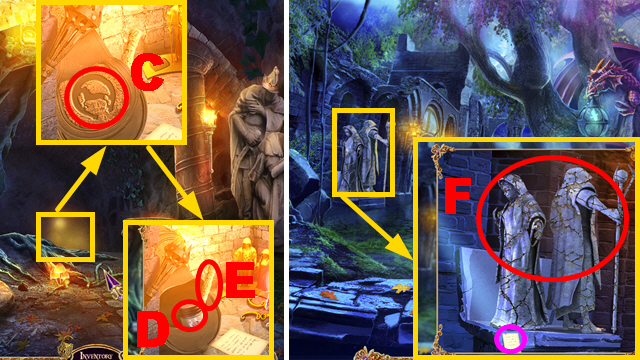
- Use the PRECIOUS PIN (I); take the COIN (J) and BRUSH (K).
- Walk down, move forward.
- Use the MAGIC BOOK OF LIFE (L); place the COIN (purple).
- Take the EMERALD EYE (M).
- Move forward twice.
- Place the EMERALD EYE (N); take the BONE WHEEL (O).
- Go to the Tower.
- Replace the broken wheel with the BONE WHEEL (orange).
- Take the SPINNING WHEEL (P).
- Walk down, move forward.
- Place the SPINNING WHEEL (Q) to acquire the BOWSTRING.
- Walk down.
- Place the BOWSTRING and ENCHANTED ARROW (green); take the ELF'S BOW (R).
- Move forward four times.
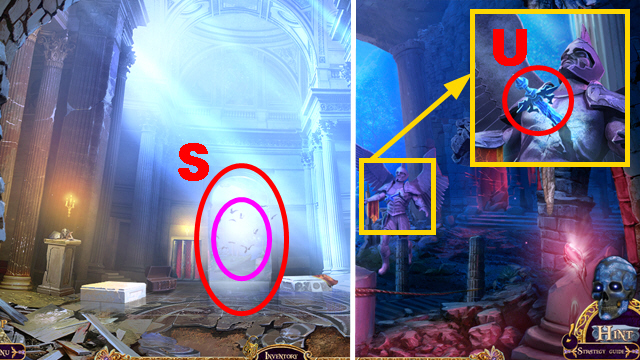
- Examine the doorway (S).
- Shoot the ELF'S BOW (purple).
- Move forward.
- Use the FUR MITTEN (U) to collect the ICE SWORD CHIP.
- Move forward.
- Use the TONGS to collect the FIRE SWORD CHIP (V).
- Move forward to the Bastille.
- Use the GOBLIN (W).
- Take MASK 1/3 (X) and EARTH SWORD CHIP (Y); read the note (Z).
- Walk down three times.
- Place the ICE SWORD CHIP, FIRE SWORD CHIP, and EARTH SWORD CHIP (A).
- Play the mini-game.
- Use the red and blue chip (purple) on lines of the same color to move the corresponding balls.
- Use the green chip (orange) on lines of the same color to move the board.
- Solution: (B).
- You receive FINGER RING 3/3.
- Move forward twice.
- Place the FINGER RINGS (purple); take the DEAD HAND (C).
- Take the WHISTLE (D); place the BRUSH (green).
- Take the GOLD PAINT (E).
- Walk down twice.
- Collect the GHOST FLAG 1/3 (F) with the DEAD HAND.
- Walk down three times.
- Collect GHOST FLAG 2/3 (G) with the DEAD HAND.
- Move forward four times.
- Collect GHOST FLAG 3/3 (H) with the DEAD HAND.
- Walk down.
- Use the WHISTLE (I); you receive MASK 2/3.
- Go to the Ghost Ship.
- Give the GHOST FLAG to the pirate (J).

- Play the HOP.
- You receive the PHOENIX AMULET (K).
- Walk down, move forward twice.

- Place the PHOENIX AMULET (L).
- Use the GOLD PAINT and MAGIC BOOK OF LIFE (M).
- Take the LIVING PHOENIX.
- Go to the Bastille.
- Use the LIVING PHOENIX (N).
- Take MASK 3/3 (O) and PHOENIX EGG (P).
- Place the MASKS (Q).

- Play the mini-game.
- Solution: 6, 9, 4, R, 15, S, 4, Sx2, 11, Sx2, R, S, R, 10, S, Rx3, 11, 12, S, R, 13.
- Move forward twice to the Secret Passage.
Chapter 5: The Secret Passage
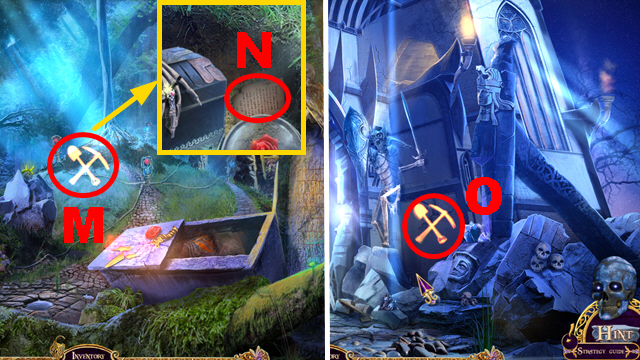
- Take the SPLINTER (T); read the note (U).
- Place the SPLINTER (blue); take the BURNING SPLINTER (V).
- Use the BURNING SPLINTER (W).
- Take the DAGGER HANDLE (X) and note (green).
- Place the DAGGER HANDLE (Y); take the OLD DAGGER.
- Use the OLD DAGGER (Z).
- Turn left.
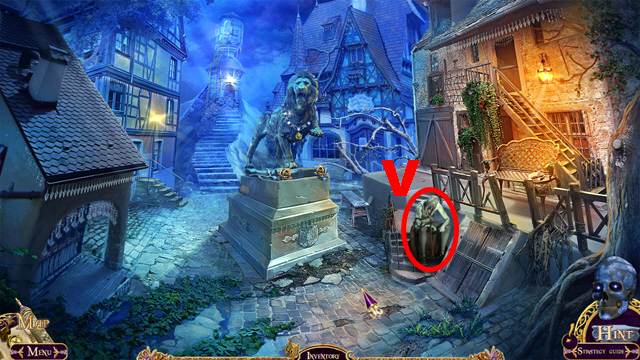
- Take the HORSE AMULET (A); use the GOBLIN (B).
- Walk down.
- Place the HORSE AMULET (C).
- Take the RENEWAL FLUID (D) and PALETTE KNIFE (E).
- Turn left.
- Read the note (purple).
- Use the RENEWAL FLUID, PALETTE KNIFE, and MAGIC BOOK OF LIFE (F); take the STATUES.
- Walk down twice.
- Place the STATUES (G); you receive CRYSTAL KEY.
- Move forward.
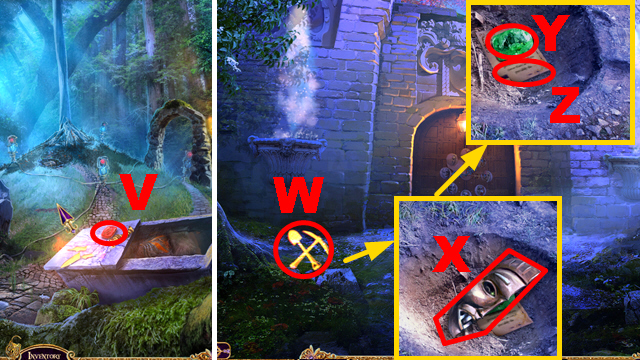
- Use the CRYSTAL KEY (H); take the STONE STAR (I).
- Turn left.
- Place the STONE STAR (J).
- Examine the secret stash (K).
- Play the mini-game.
- Solution: L, M, L, O, Mx2, P, Mx3, P, M, P, O, P, N, P, O, N.
- Take the SLEDGEHAMMER (Q).
- Use the SLEDGEHAMMER (R); take the FRAGMENT OF STAFF (S).
- Move forward.
- Take the FIREPLACE SHOVEL (T) and note (U).
- Walk down twice.
- Place the FRAGMENT OF STAFF and FIREPLACE SHOVEL (blue).
- Take the SUN AMULET (green) and SHOVEL WITH MAGIC EMBERS (V).
- Turn left.
- Take the PART OF MAGIC LANTERN (W).
- Move forward.
- Place the PART OF MAGIC LANTERN (X); take the LANTERN and TREE AMULET (Y).
- Walk down.
- Place the SUN AMULET (Z) and LANTERN (A); pour the SHOVEL WITH MAGIC EMBERS into the lantern.
- Take the MAGIC LANTERN (B) and note (C).
- Turn right.
- Use the MAGIC LANTERN (D).
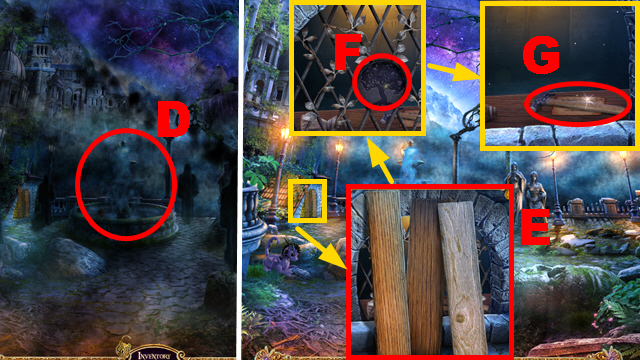
- Take 3 BOARDS (E); place the TREE AMULET (F).
- Take the CLAW HAMMER (G).
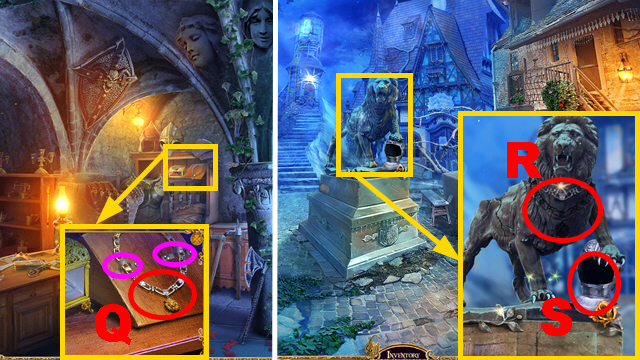
- Place the HARP (H); take the SCREWDRIVER (I).
- Walk down, move forward.
- Use the CLAW HAMMER (J); take the NAILS (K).
- Place the BOARDS and NAILS (L); fix them with the CLAW HAMMER.
- Play the HOP.
- You receive the MERMAID FIGURINE (M).
- Walk down, turn right.
- Place the MERMAID FIGURINE (N); take the DOOR HANDLE (O).
- Walk down.
- Place the DOOR HANDLE (P).
- Turn left.
Chapter 6: The Elvish Weaponry
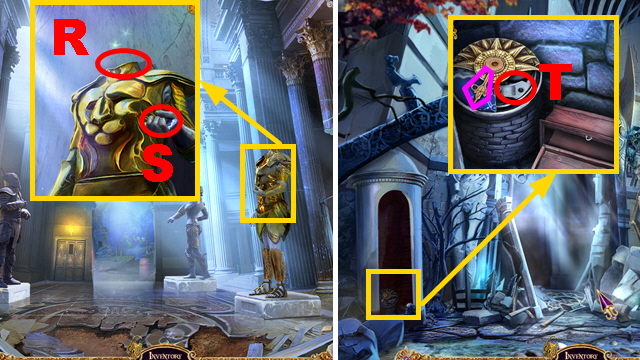
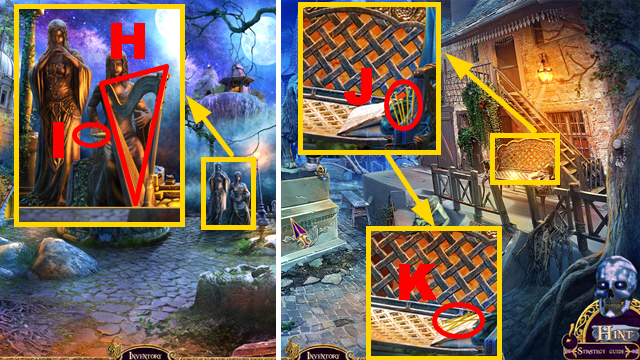
- Use the SCREWDRIVER (purple); take the LION NECKLACE (Q).
- Walk down, move forward.
- Place the LION NECKLACE (R); take the HELMET (S).
- Walk down, turn left.
- Place the HELMET (T); take the GOLDEN FLOWER (U).
- Walk down, move forward.
- Place the GOLDEN FLOWER (V); take the KNOB (W).
- Walk down, turn left.
- Place the KNOB (X); take the RED BUTTON (Y) and note (Z).
- Place the RED BUTTON (A).
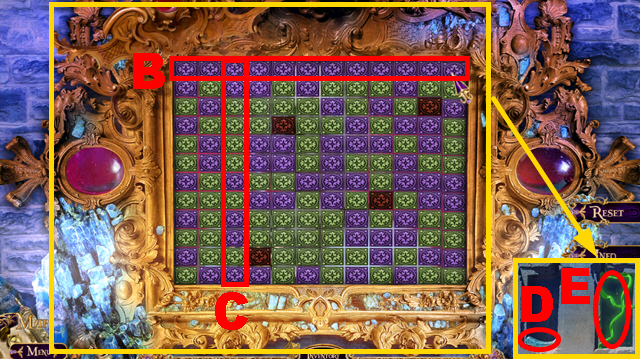
- Play the mini-game.
- To solve this puzzle, align blocks of the same color in one row (B) or column (C) until all are removed.
- Take the LION'S CLAW (D) and STAFF HEAD (E).
- Walk down, move forward.
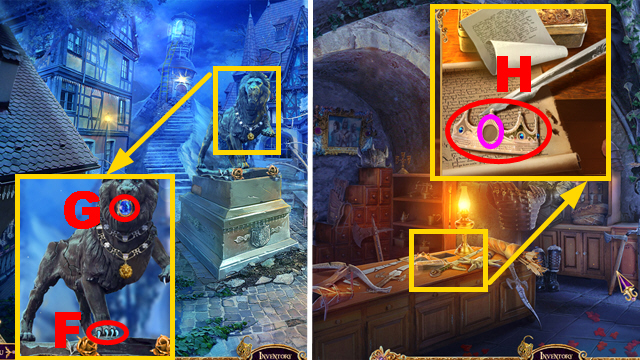
- Place the LION'S CLAW (F); take the SAPPHIRE DECORATION (G).
- Walk down, turn left.
- Place the SAPPHIRE DECORATION (purple).
- Take the CROWN FROM SCULPTURE (H).
- Walk down twice.
- Place the CROWN FROM SCULPTURE (I).
- Play the HOP.
- You receive the FLUTE (J).
- Turn left, turn right.
- Place the FLUTE (orange); use the MAGIC BOOK OF LIFE (K).
- Move forward.
- Use the GOBLIN (L).

- Use the MAGIC LANTERN (M); take the VISOR (N).
- Give the PHOENIX EGG to the phoenix (O); take the MECHANICAL BIRD (P).
- Walk down twice, turn left.
- Place the VISOR (Q); take the DRAGON'S HORN (R).
- Walk down.
- Place the DRAGON'S HORN (S); take the BRUSH HANDLE (T).
- Turn right.
- Place the BRUSH HANDLE (U); take the DUST BRUSH.
- Move forward.
- Use the DUST BRUSH (V); take the CAT AMULET (green).
- Place the CAT AMULET (W).
- Play the HOP.
- You receive the MAGICIAN STATUE (X).
- Walk down three times.
- Place the MAGICIAN STATUE (Y).
- Take the MAGIC SPHERE (Z) and STEEL PRUNING SHEARS (A).
- Use the STEEL PRUNING SHEARS (B); take the STAFF HANDLE (C).
- Go to the Melting Island.
- Use the MAGIC LANTERN (D).
- Walk down.
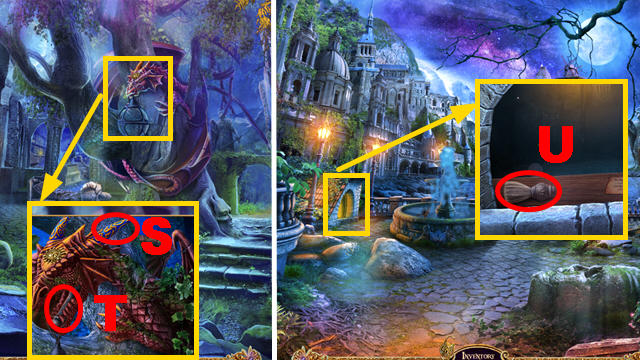
- Place the MECHANICAL BIRD (E); take the DIAMOND (F).
- Walk down, turn left.
- Use the DIAMOND (G); take the RUNE GLOVE (purple).
- Go to the Melting Island.
- Collect the STONE OF STRENGTH with the RUNE GLOVE (H).
- Place the STONE OF STRENGTH (I).
- Place the STAFF HANDLE, MAGIC SPHERE, and STAFF HEAD (J).
- Examine the stone (K).
- Play the mini-game.
- Solution: L, O, S, M, N, Q, P, R, T.
- Take the MAGIC STAFF (U).
- Walk down twice, move forward.
- Give the MAGIC STAFF to the man (V).
- Congratulations, you have completed Royal Detective: Queen of Shadows.
Created at: 2014-05-30