
Walkthrough Menu
- General Tips
- Chapter 1: Optics Workshop
- Chapter 2: The Mansion
- Chapter 3: The Tower
- Chapter 4: The Gallery of Statues
- Chapter 5: The Backyard House
- Chapter 6: The Wagon
- Chapter 7: The Finale
General Tips
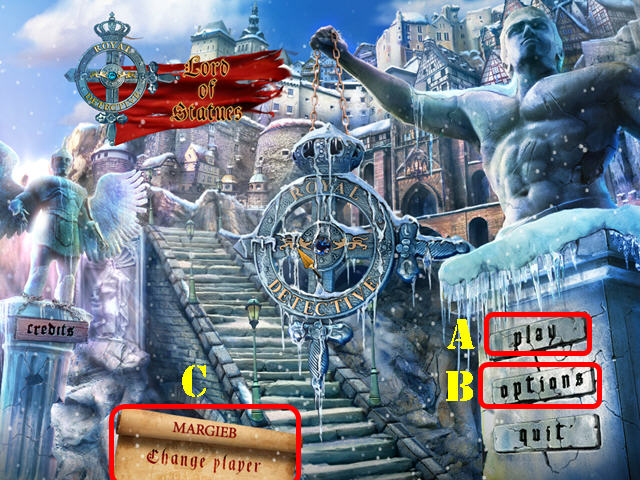
- Select 'play' (A) to begin the main quest.
- The 'options' (B) button allows you to adjust the screen, music, cursor, graphics, game mode, and sound.
- The 'change player' (C) button can be used to manage your profiles in the game.
- Use the ROOSTER to help you grab out of reach objects. Use the MINER to take care of tasks that require strength.
- This guide will refer to Hidden Object Scenes as 'HOS'. Items listed in yellow in a HOS require an extra step of interaction to find.
- Move your cursor to the bottom of the screen to access the Inventory Tray.
- All puzzles may be skipped and have a reset button; use the reset button to follow our step-by-step solutions.
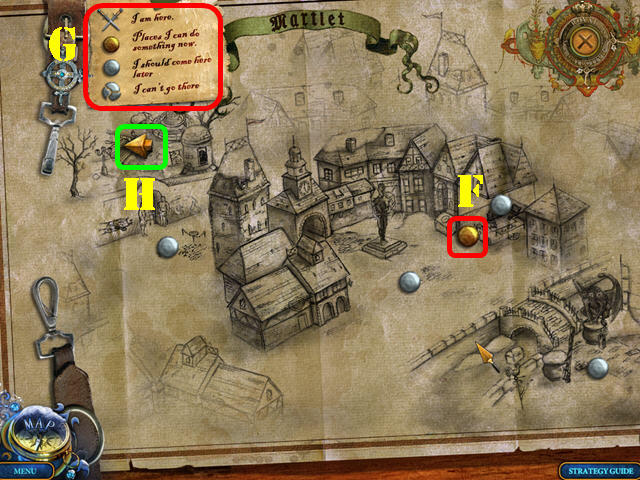
- Accessing the map and pressing on an unlocked location will allow you to travel there quickly. The gold buttons indicate locations in which a task can be accomplished (F). Look at the legend (G) to see what the other buttons are for.
- Use the Arrows (H) to move to a different part of the map.
- Select the Hint button in the lower right to get a hint in either the HOS or during the main quest.
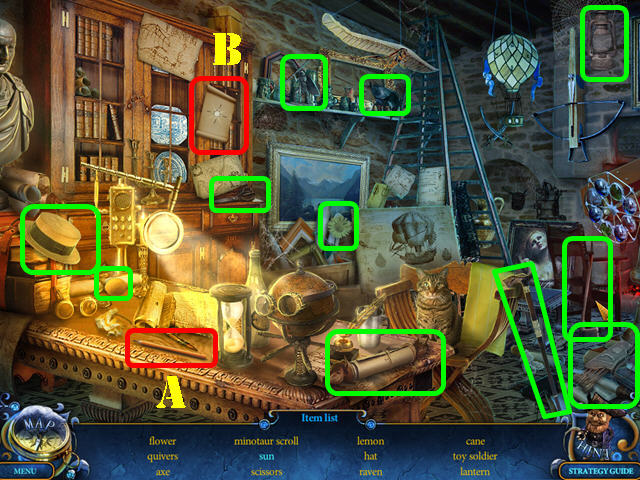
Chapter 1: Optics Workshop
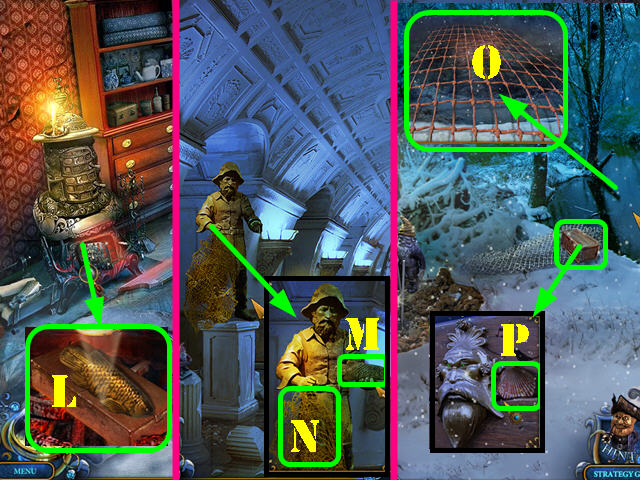
- Talk to Rupert.
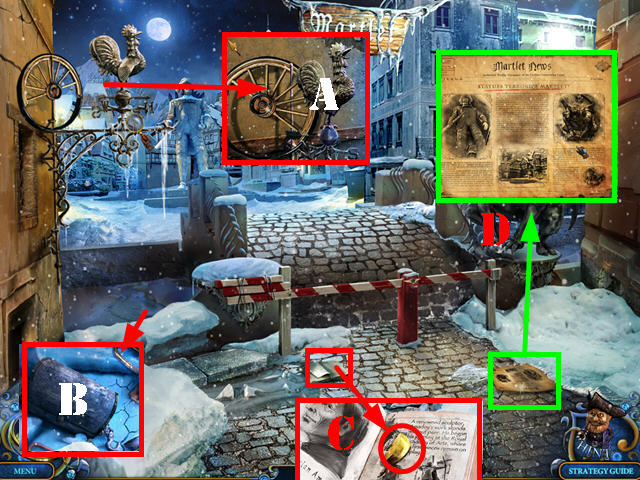
- Zoom into the rooster; take the ROOSTER (A).
- Examine the ground; use the ROOSTER on the chest to lift it up and activate a HOS (B).
- Look at the book and take the first APPLE PART (C).
- Look at the newspaper and touch the pages to flip them over (D).
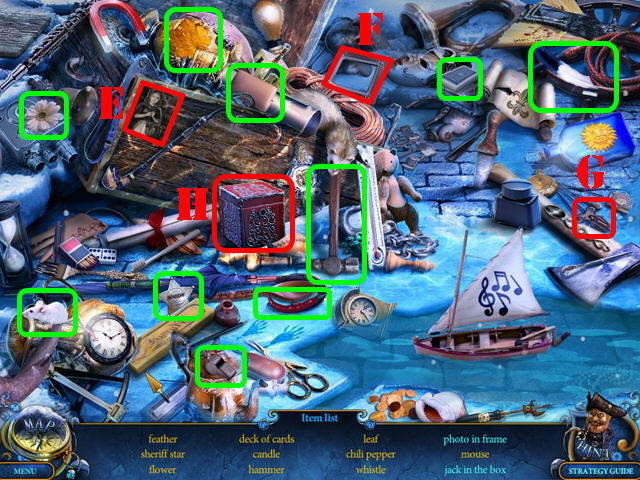
- Play the HOS.
- Drag the photo (E) to the frame (F) and take the photo in frame.
- Put the wind-up key (G) on the box (H) and take the jack in the box.
- The SHERIFF STAR will be added to inventory.
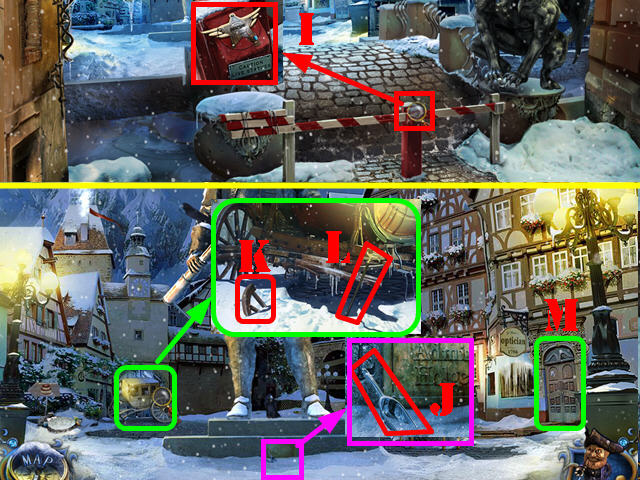
- Examine the center of the gate; put the SHERRIFF STAR in the indentation; turn the badge and go forward (I).
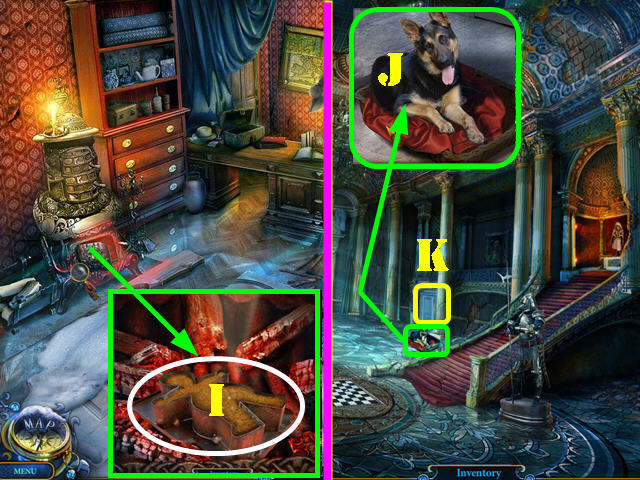
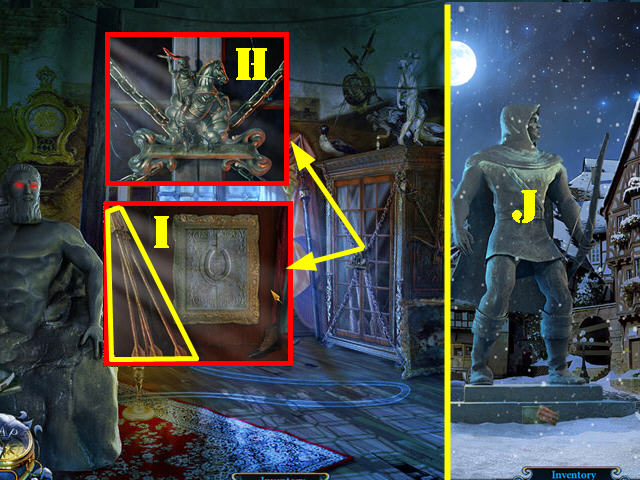
- Zoom into the plaque at the base of the statue; take the SCOOP (J).
- Use the SCOOP around the wheel part; take the first WHEEL PART (K).
- Zoom into the coach and take the CANE (L).
- Go to the store entrance (M).
- Examine the door; take the second WHEEL PART (N).
- Inspect the statue; take the GOLDEN COIN (O).
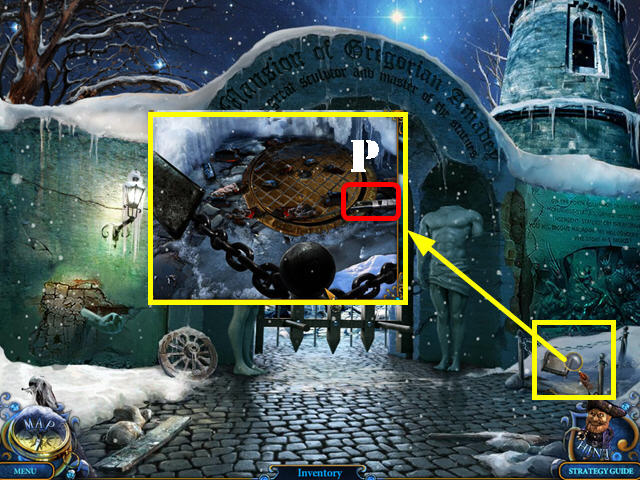
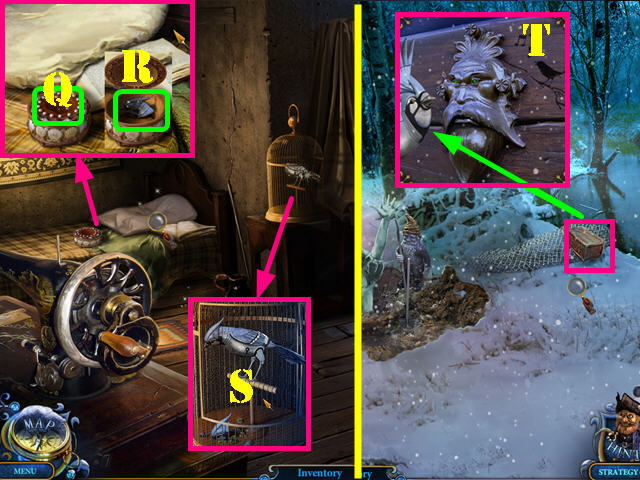
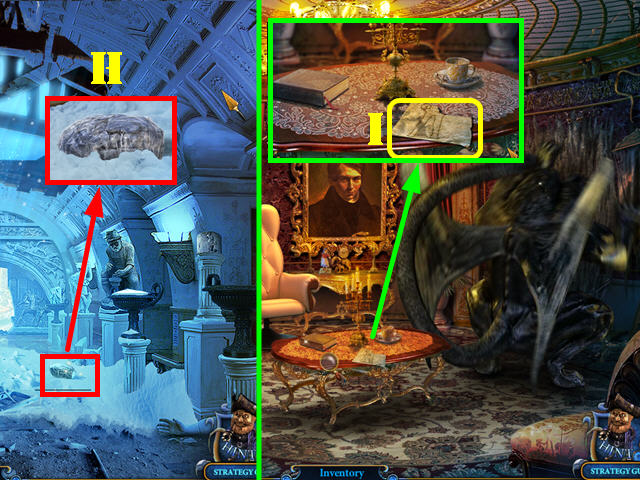
- Zoom into the window; remove the 5 icicles with the CANE to activate a HOS (P).
- Play the HOS.
- Put the trinket (Q) on the chain attached to the watch (R); take the pocket watch.
- The second APPLE PART will be added to inventory.
- Walk down twice.
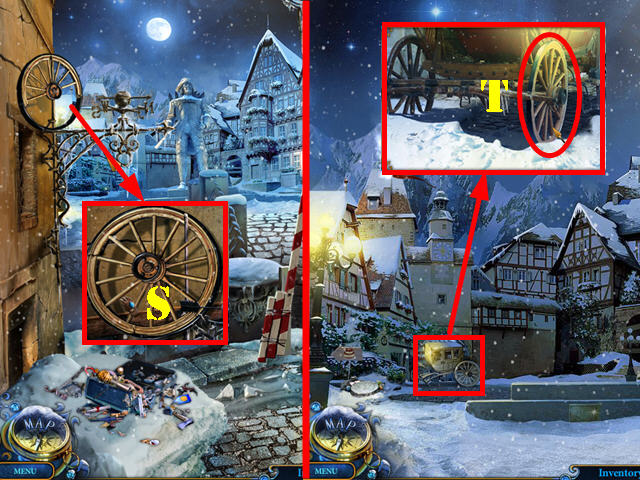
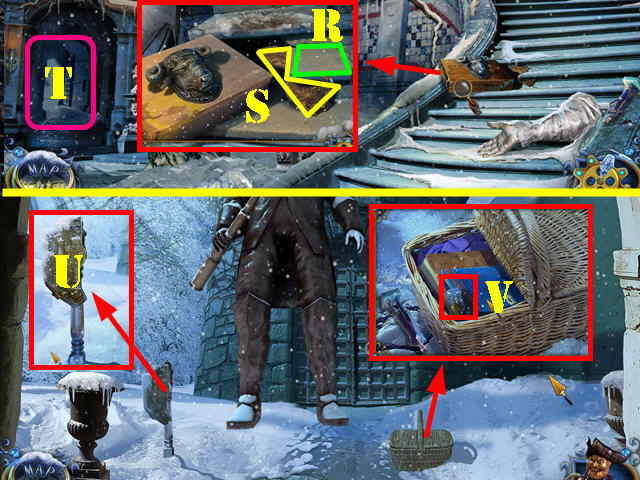
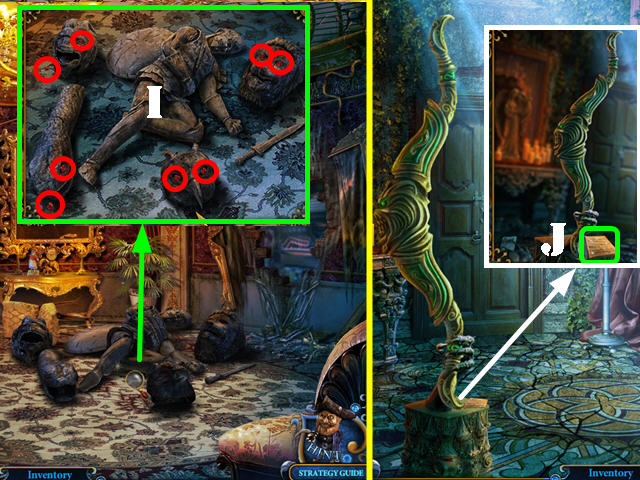
- Inspect the broken wheel; put the 2 WHEEL PARTS on the wheel and take the WHEEL (S).
- Go back to the square.
- Touch the scene and the statue will walk away.
- Zoom into the coach; put the WHEEL on it (T).
- Move the coach out of the way and go forward.
- Touch the gate.
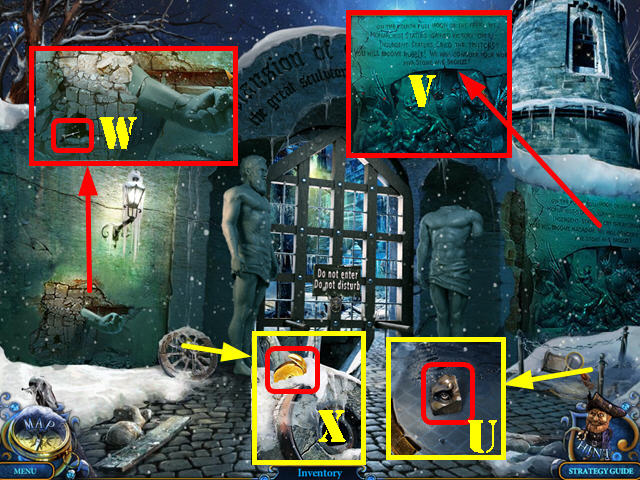
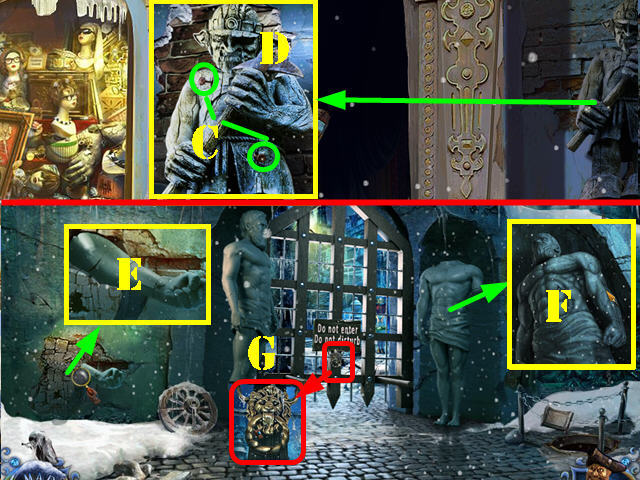
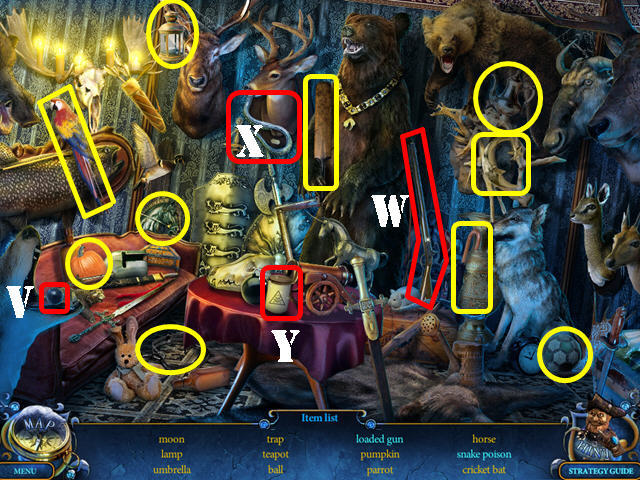
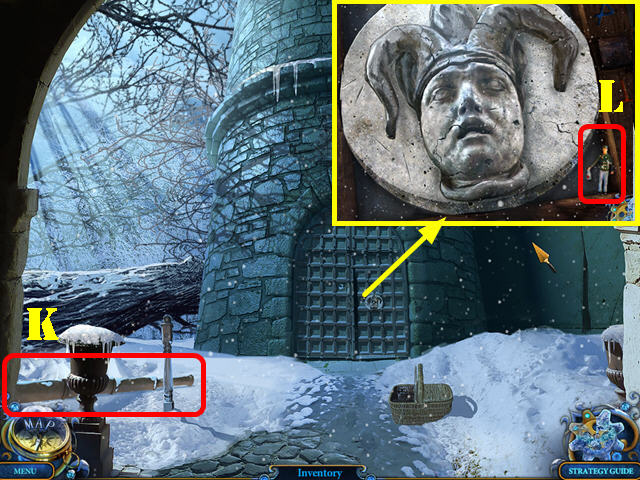
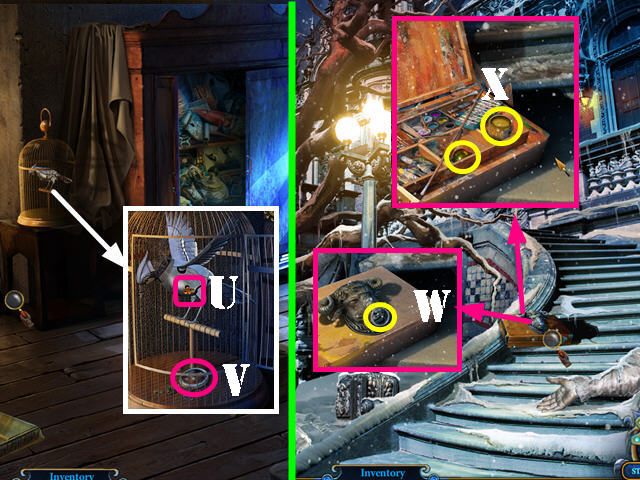
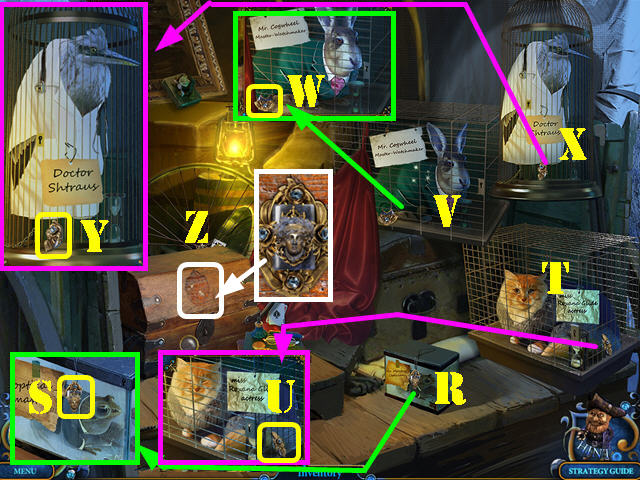
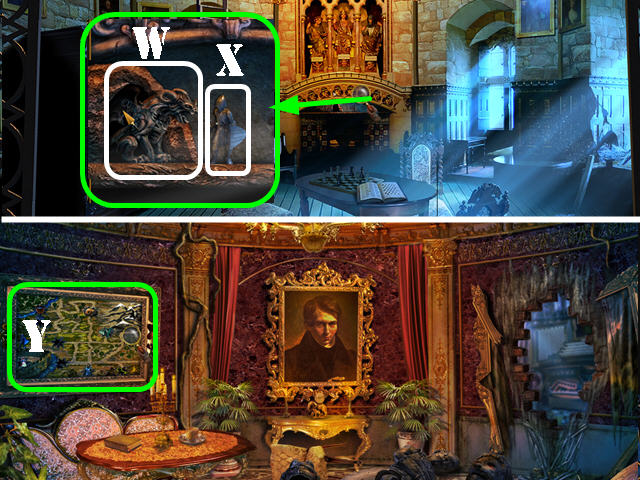
- Inspect the snow on the right; take the LION TILE (U).
- Look at the bas-relief (V).
- Inspect the left wall; take the NAIL (W).
- Examine the wheel; take the third APPLE PART (X).
- Walk down.
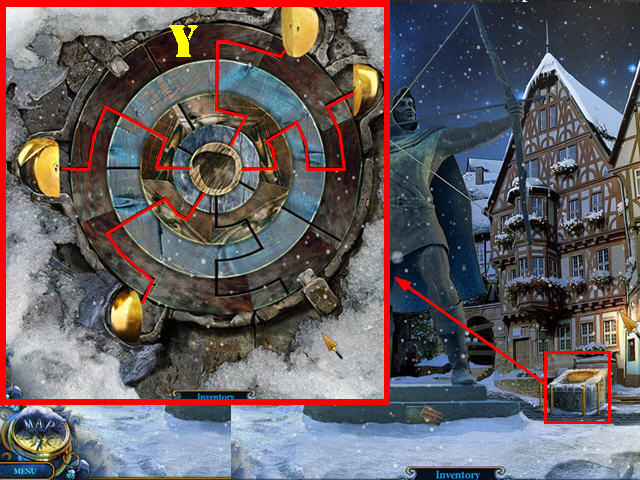
- Touch the statue; it wants the target.
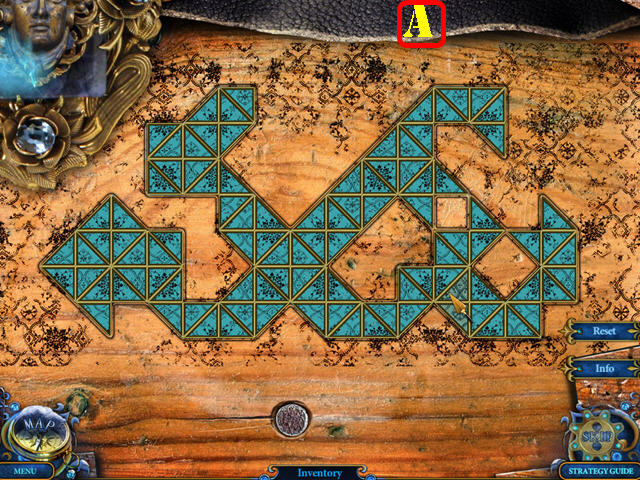
- Zoom into the target; put the 3 APPLE PARTS on the target to activate a puzzle.
- Align the rings properly so the 4 apple parts have a clear pathway to the center.
- Please look at the screenshot for the solution (Y).
- Take the TARGET.
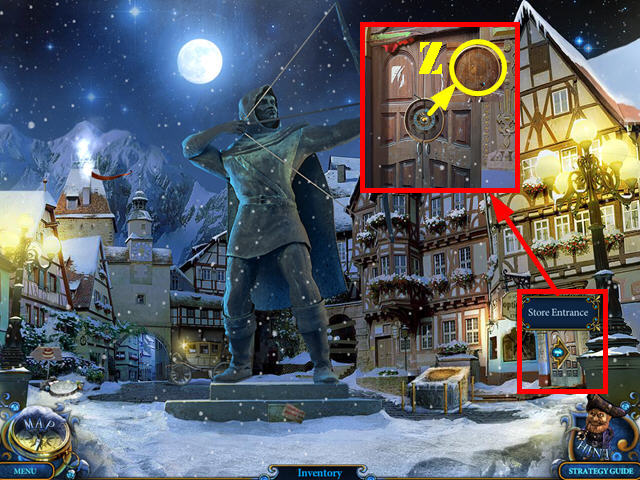
- Go to the store entrance.
- Examine the door and put the TARGET on the door (Z).
- Walk down.
- Once the archer hits the target, go back to the store entrance and then go through the door.
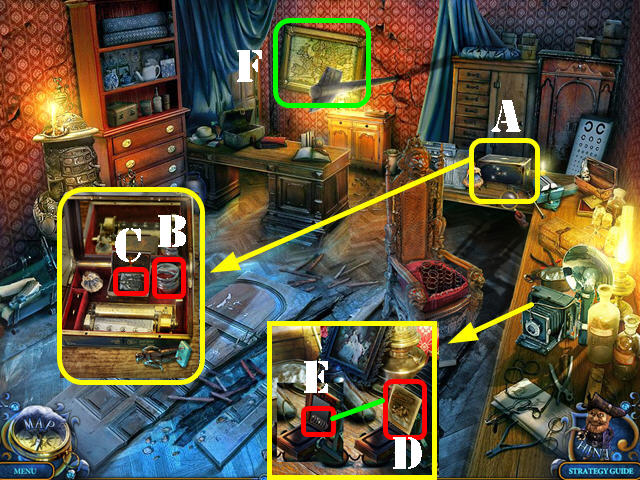
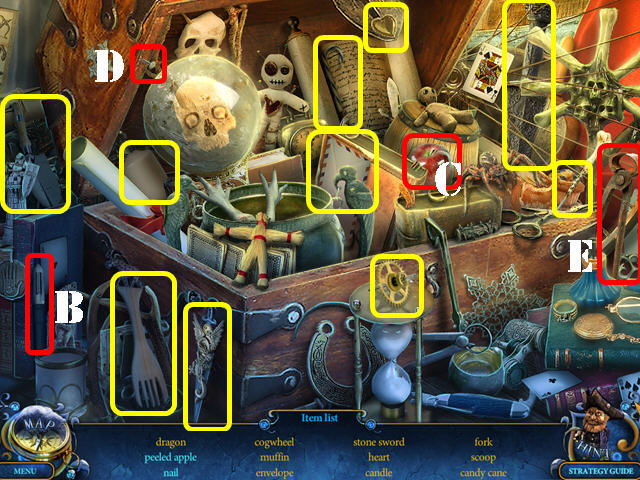
- Zoom into the box on the table; use the NAIL on the lock. Insert the GOLDEN COIN into the slot (A).
- Take the JAM (B); open the case and the VAMPIRE MAGNET (C).
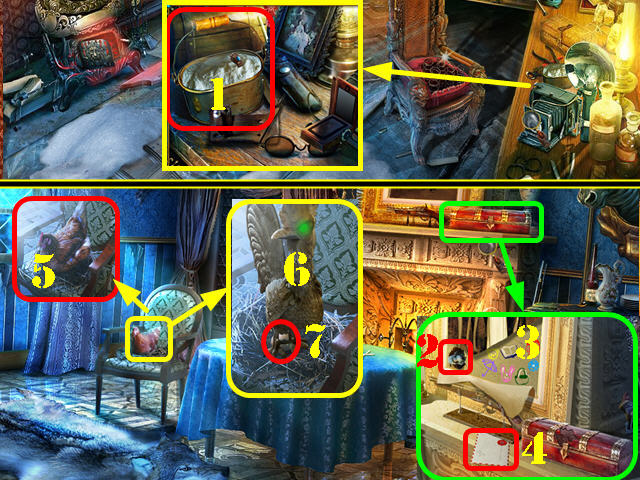
- Inspect the side table; open the camera and take the photo for a cut scene (D).
- Take the SPRING below the photo (E).
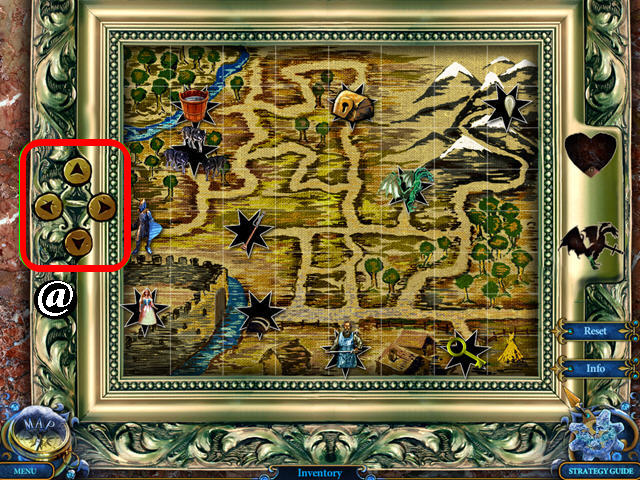
- Examine the map (F); add the VAMPIRE MAGNET to it to activate a puzzle.
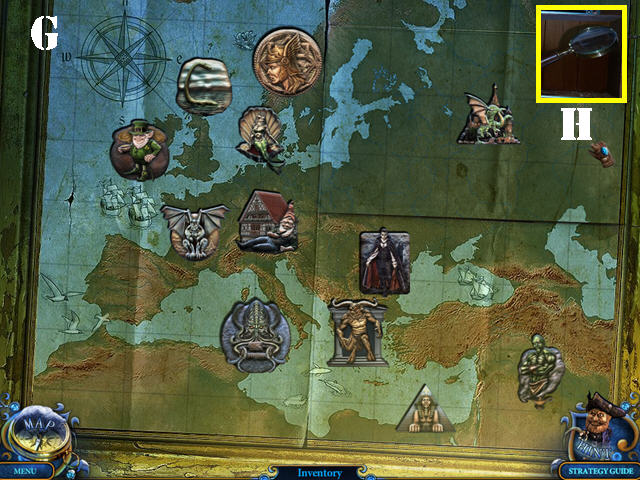
- Hover your mouse to read a description of each magnet. Select two magnets to swap their positions. Place the magnets into the right spots on the map according to their geographical location.
- The magnets will change colors when they are in the right spots.
- Please look at the screenshot for the solution (G).
- Take the MAGNIFYING GLASS (H).
- Go back to the square.
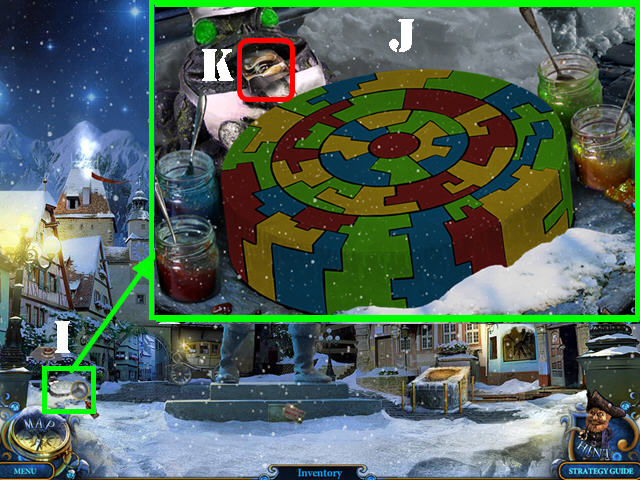
- Examine the cake on the ground (I); place the JAM on the ground to activate a puzzle.
- Select a spoon in one of the jars to add that color to your cursor; paint the cake in different colors so that the same colors never cross each other.
- If you need to paint a section with a different color, just put the right color over it.
- Please look at the screenshot for the solution (J).
- Take the LION TILE (K).
- Go back to the optics workshop.
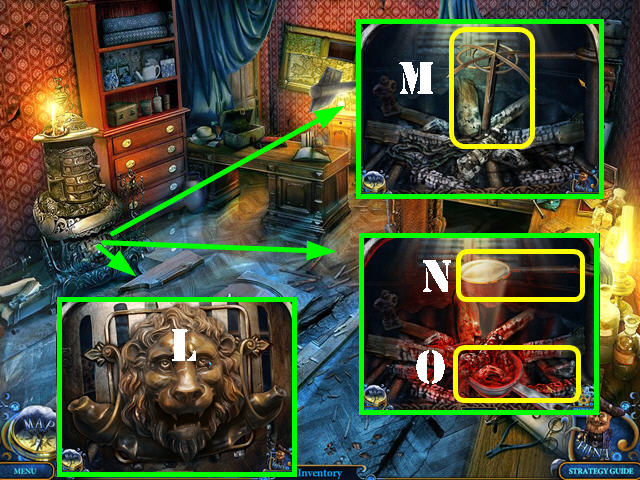
- Examine the oven; put the 2 LION TILES on the face and touch the face (L).
- Take the HOOK WITH CHAIN (M).
- Put the MAGNIFYING GLASS in the holder to activate the embers (N).
- Put the SCOOP in the fireplace and take the EMBERS (O).
Chapter 2: The Mansion
- Go back to the mansion gates.
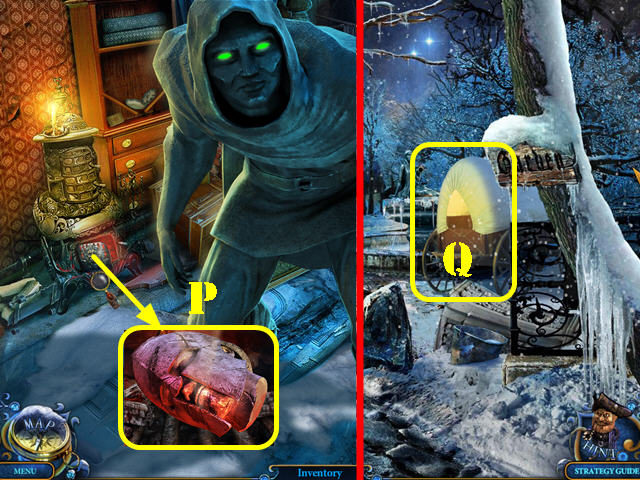
- Examine the snow on the right; use the EMBERS on the snow.
- Take the WRENCH (P). Taking the wrench activates a HOS.
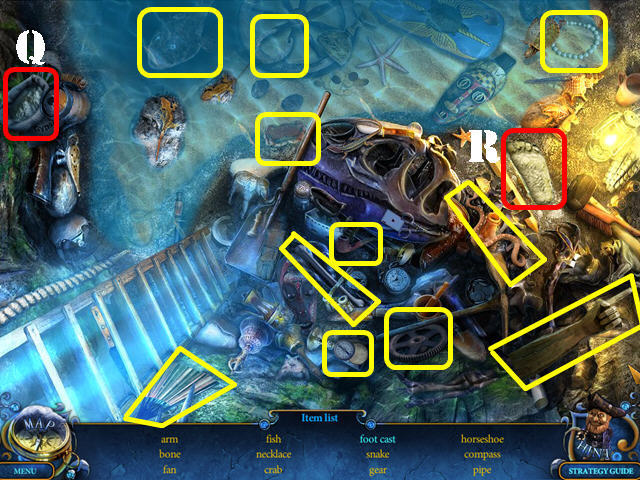
- Play the HOS.
- Drag the plaster (Q) to the foot silhouette; take the foot cast (R).
- The FOSSIL will be added to inventory.
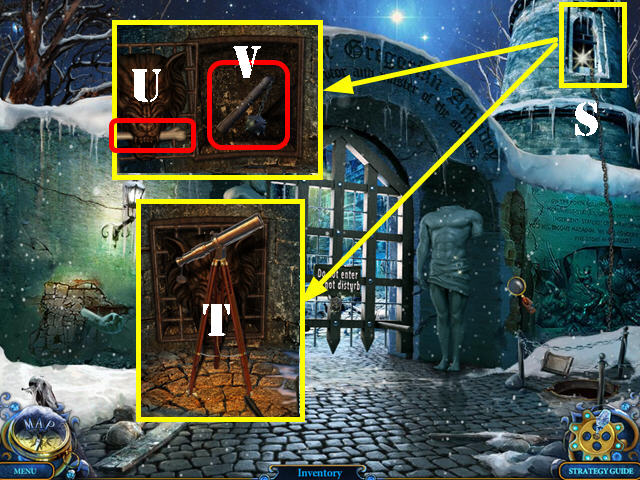
- Throw the HOOK WITH CHAIN onto the balcony (S).
- Zoom into the balcony; take the TELESCOPE (T).
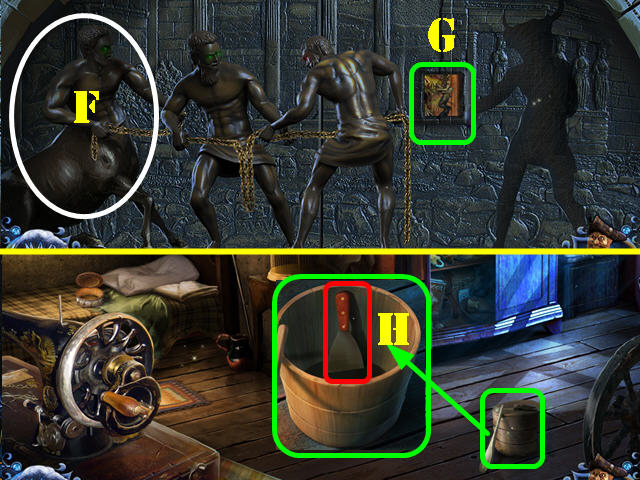
- Give the FOSSIL to the dog (U); take the FLAIL (V).
- Walk down twice.
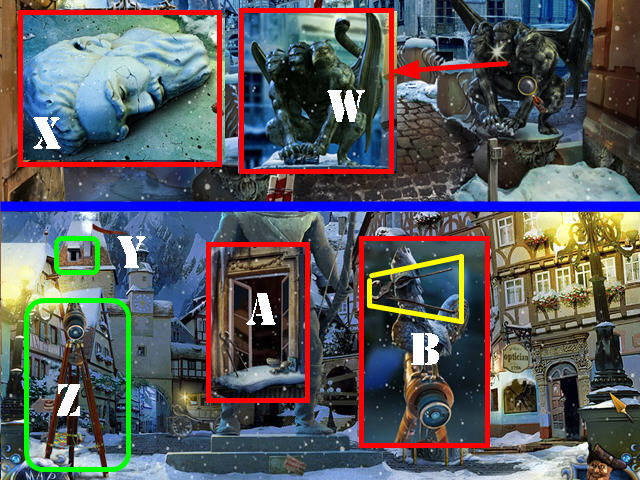
- Zoom into the chimera; use the FLAIL on the chimera (W).
- Examine the stand; take ATLAS'S HEAD (X).
- Go forward.
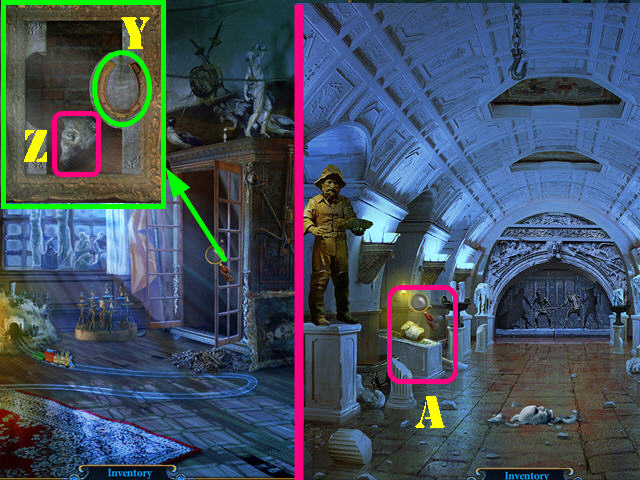
- Put the TELESCOPE on the window (Y) for the telescope to land on the ground; zoom into the telescope (Z).
- Put the ROOSTER on the window (A).
- Zoom into the rooster on top of the telescope; take the SMITH'S TONGS (B) and then take back the ROOSTER.
- Go to the store entrance.
- Zoom into the miner statue; remove the 2 nails with the SMITH'S TONGS (C) and take the MINER (D).
- Go back to the mansion gates.
- Inspect the left side of the wall; put the MINER on the wall and take ATLAS'S HAND (E).
- Zoom into the headless statue; put ATLAS'S HAND and ATLAS'S HEAD on the body (F).
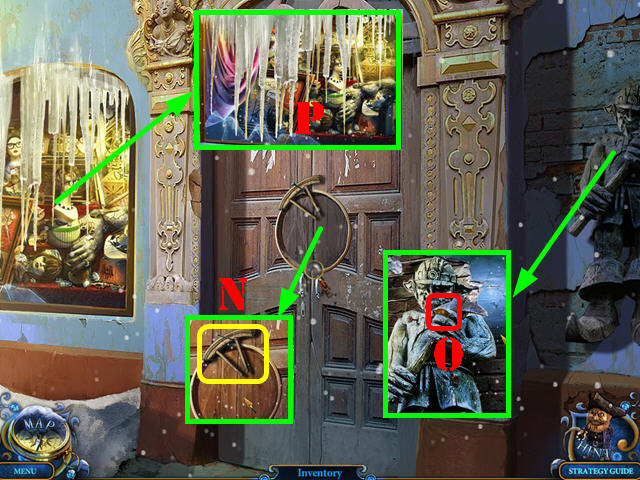
- Zoom into the door knocker and use it; go through the gates (G).
- Try to talk to the Princess; she will get kidnapped by one of the statues.
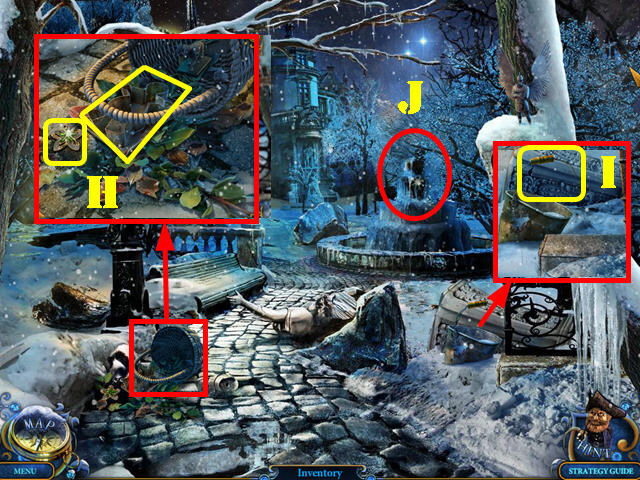
- Zoom into the basket; take the BAKING FORM and the FLOWER 1/2 (H).
- Inspect the bucket; take the HANDLE (I).
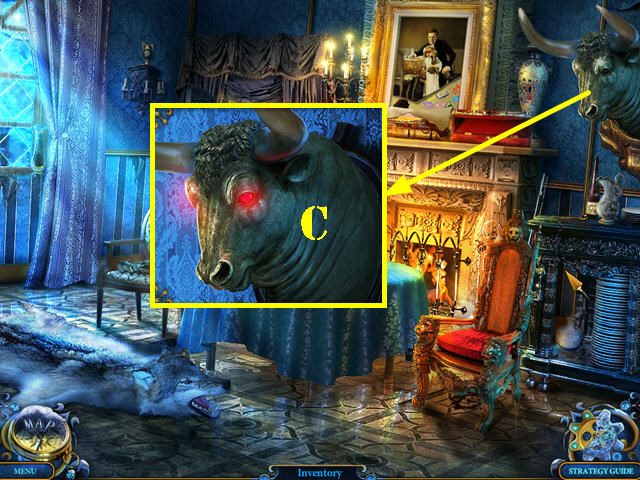
- Touch the ice around the statue to break it; zoom into the statue to activate a puzzle (J).
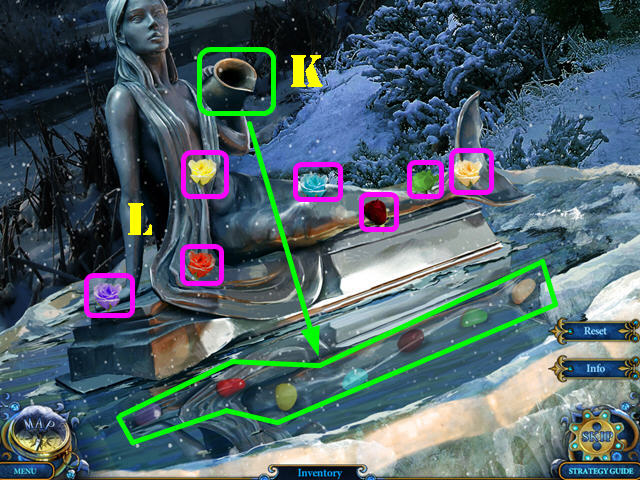
- Touch the water vase (K) to see the reflection of the roses in the water; recreate the order of the roses on the statue itself.
- Please look at the screenshot for the solution (L).
- Play the HOS.
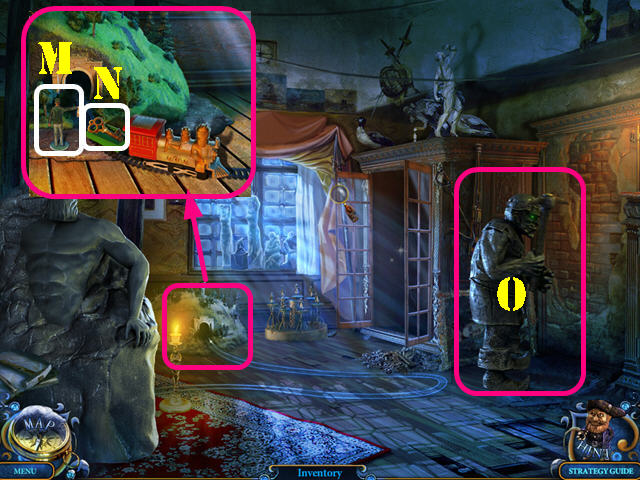
- Feed the dragonfly (M) to the frog (N); take the well-fed frog.
- Put the coffee beans (O) into the grinder (P); turn the handle and take the ground coffee (Q).
- The 1st PRINCESS FIGURE will be added to inventory.
- Go forward to the mansion entrance.
- Examine the steps; remove the broken step (R) and take the CREST PART (S).
- Go through the lower left door to access the tower entrance (T).
- Touch the statue.
- Examine the post; take the CREST PART (U).
- Look at the basket; open the left side and take GINGER (V).
- Go back to the optics workshop.
- Examine the side table; put the HANDLE on the can and take the CAN OF FLOUR (1).
- Go back to the mansion entrance; take the door in the upper right into the mansion hall. Then go through the lower right door to access the dining room.
- Examine the mantle; tear the picture and take the second PRINCESS FIGURE (2). Note the markings (3).
- Touch the letter for a cut scene (4).
- Zoom into the chair; put the ROOSTER on the chicken (5). Take the ROOSTER back (6) and then take the EGG (8).
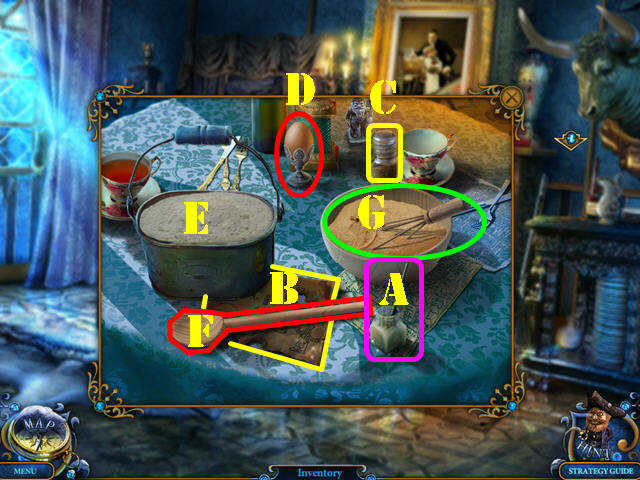
- Inspect the table; take the GLUE (A).
- Look at the instructions (B).
- Place the GINGER (C), EGG (D), and CAN OF FLOUR (E) on the table as shown in the screenshot.
- Put the SPOON (F) in the flour.
- Crack the EGG over the bowl (G).
- Add the GINGER to the mix and stir with the whisk that is already in the bowl.
- Take the DOUGH.
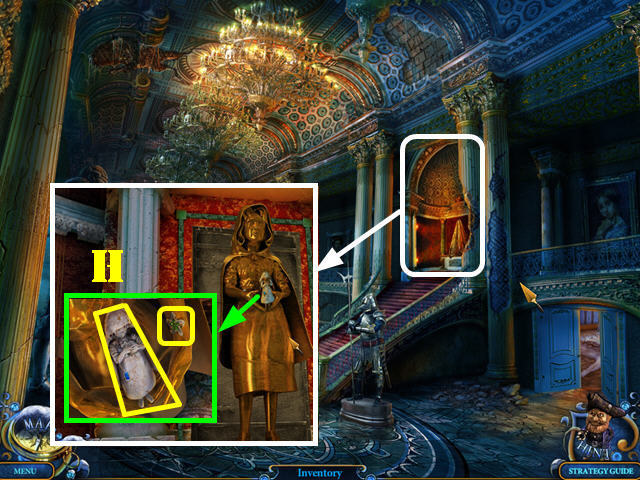
- Exit the dining room and go to the princess statue; remove the sheet over the statue.
- Zoom into the statue; take the 2/2 FLOWER and the third PRINCESS FIGURE (H).
- Go back to the optics workshop.
- Zoom into the stove; put the BAKING FORM into it and then add the DOUGH to the dish. Take the GINGERBREAD (I).
- Go back to the mansion hall.
- Zoom into the dog; give him the GINGERBREAD (J).
- Go through the small door behind the dog into the maid's room (K).
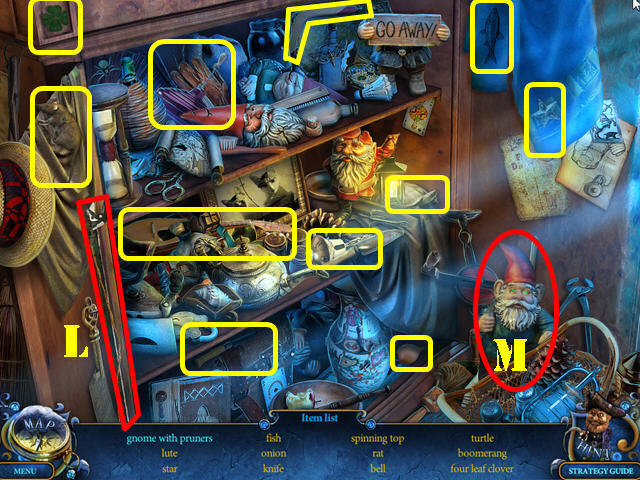
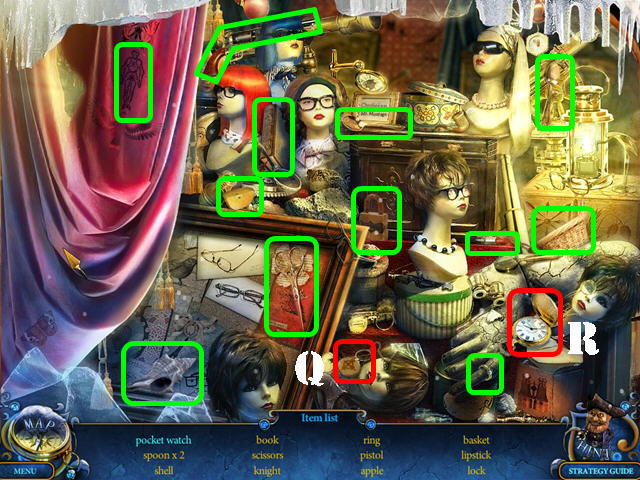
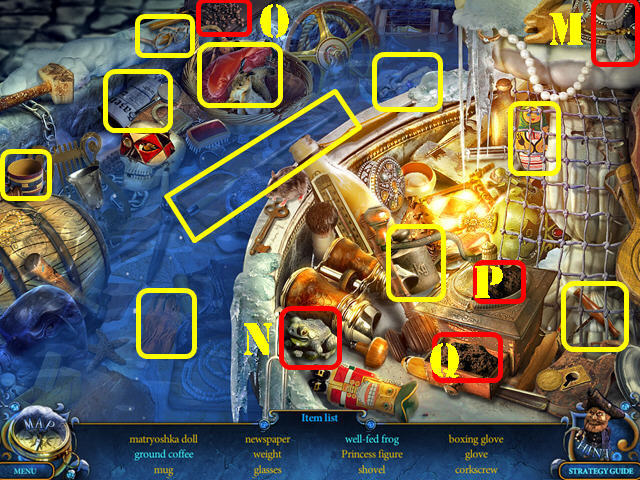
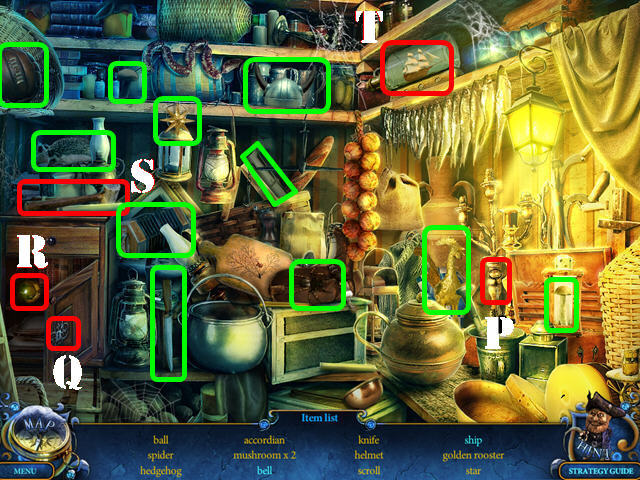
- Open the closet door to activate a HOS; play it.
- Give the pruners (L) to the gnome (M); take the gnome with pruners.
- The GNOME will be added to inventory.
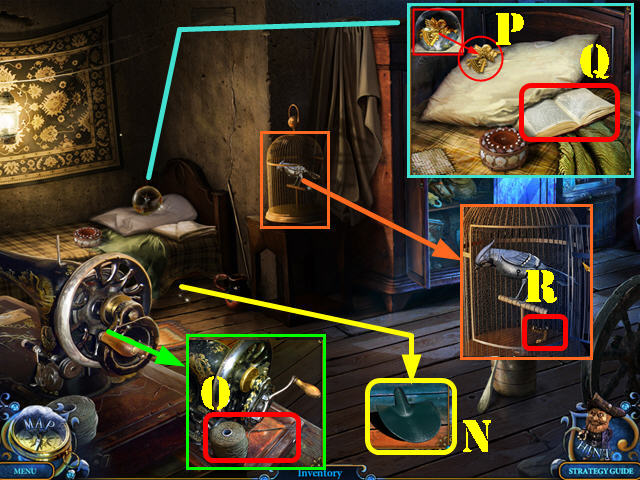
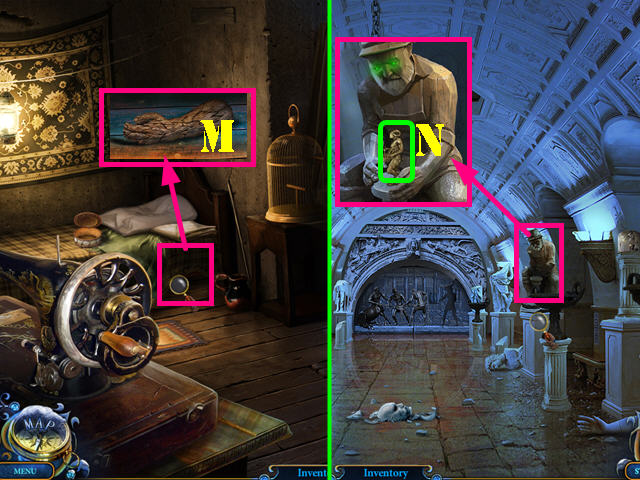
- Look under the bed and take the SHOVEL (N).
- Inspect the sewing machine; take the NEEDLE AND THREAD (O).
- Examine the pillow; touch the crystal ball and take the GOLDEN ANGEL (P).
- Move the pillow and touch the book for a cut scene (Q).
- Examine the birdcage; open the cage and take the HORSE'S LEG (R).
Chapter 3: The Tower
- Return to the store entrance.
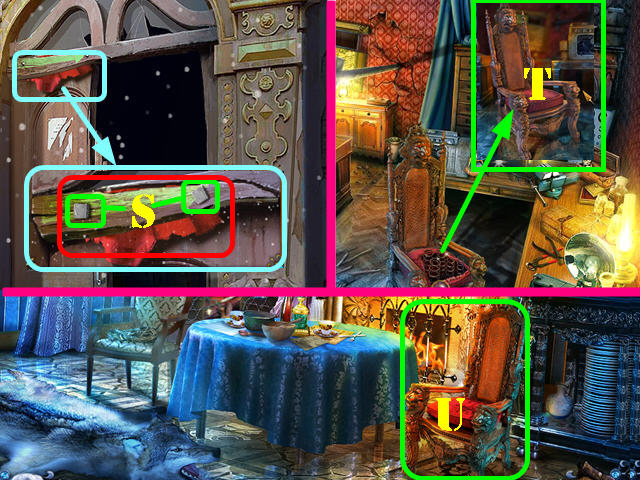
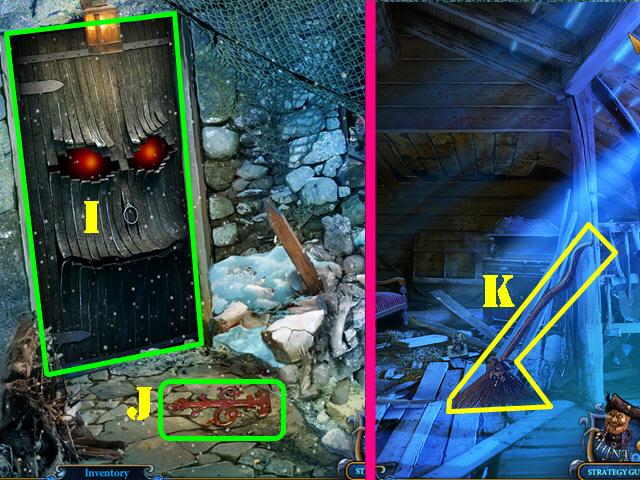
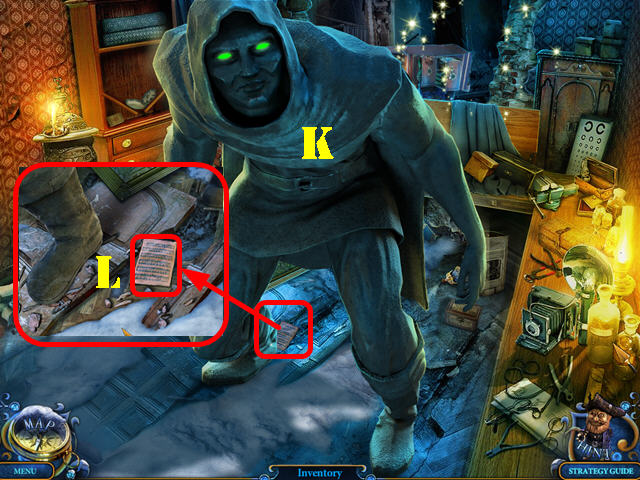
- Zoom into the top left side of the door; remove the bolts with the WRENCH (S) and take the RAG.
- Go into the optics workshop.
- Zoom into the chair; put the RAG on it, followed by the NEEDLE AND THREAD. Take the CHAIR (T).
- Go back to the dining room.
- Put the CHAIR on the floor (U) to activate a HOS.
- Play the HOS.
- Put the bullet (V) into the gun (W); take the loaded gun.
- Put the snake (X) on the jar (Y); take the snake poison.
- The HORSE HEAD will be added to inventory.
- Walk down to the mansion hall.
- Examine the double doors in the back; insert the 2 CREST PARTS on the lock and go through the door to access Amadey's workshop.
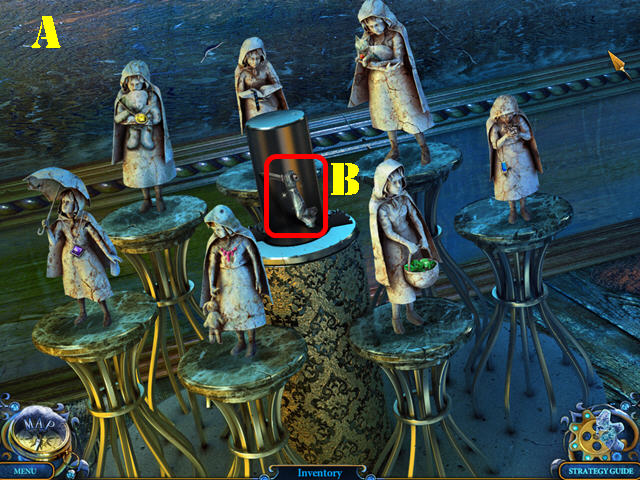
- Zoom into the statues on the floor; put the 3 PRINCESS FIGURES on the empty pedestals to activate a puzzle.
- Select two statues to swap their positions.
- Put the statues in the correct order.
- Please look at the screenshot for the solution (A).
- Take the KNIGHT'S HAND (B).
- Go back to the mansion entrance.
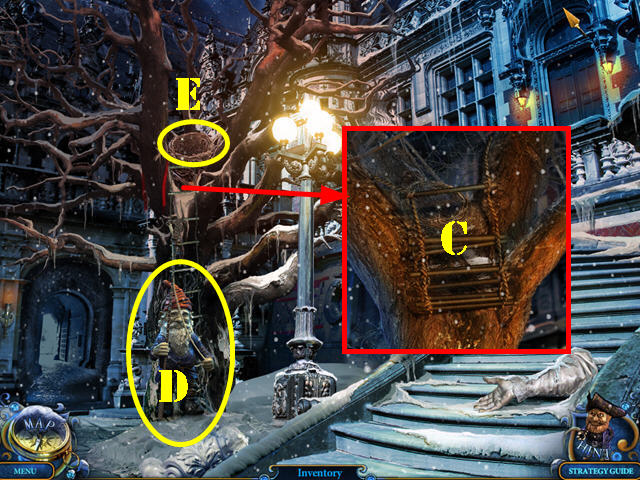
- Examine the tree and put the GNOME on it.
- Zoom back into the tree and put the ROOSTER on the ladder (C).
- Take the GNOME back (D).
- Zoom into the nest to activate a puzzle (E).
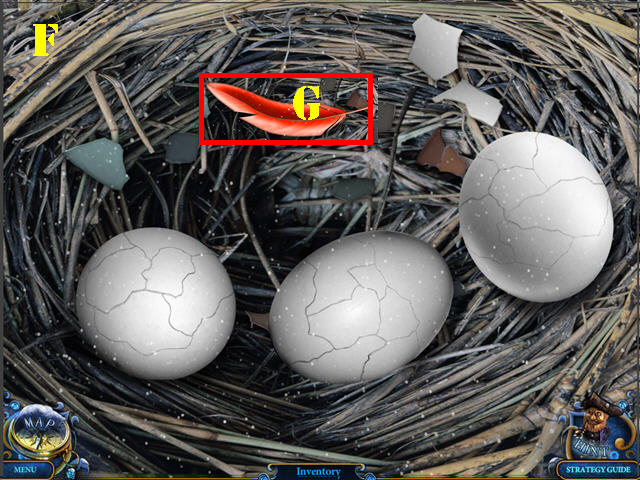
- Reassemble the 3 eggs by placing the correct pieces over them.
- Please look at the screenshot for the solution (F).
- Take the FEATHER (G).
- Go back to Amadey's workshop.
- Zoom into the closet; put the HORSE HEAD, HORSE'S LEG, KNIGHT'S HAND and the FEATHER on the statue (H).
- Zoom into the closet and take the GOLDEN ARROWS (I).
- Go back to the square.
- Give the GOLDEN ARROWS to the archer statue (J); he tells you to go to the tower. Go back to the tower entrance.
- Take the SPYGLASS (K).
- Zoom into the door; take the SIGNALMAN (L).
- Go back to Amadey's workshop.
- Zoom into the train; put the SIGNALMAN (M) down and take the KEY (N).
- Use the MINER to break down the wall on the right; after he fails to break the wall, give him the SPYGLASS (O). This action triggers a HOS.
- Play the HOS.
- Use the key (P) in the cabinet lock (Q); take the bell (R).
- Use the hammer (S) to break the bottle (T); take the ship.
- The BELL will be added to inventory.
- Walk down and go back to the maid's room.
- Examine the birdcage; put the KEY in the lock and turn the KEY (U).
- Take the BRONZE RING (V).
- Walk down twice.
- Examine the bull box on the steps; insert the BRONZE RING into the nose (W).
- Take the PAINT and the BELL (X).
- Go to the tower entrance.
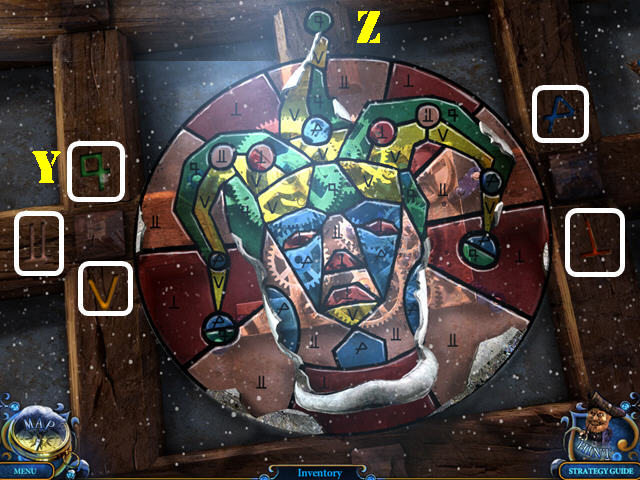
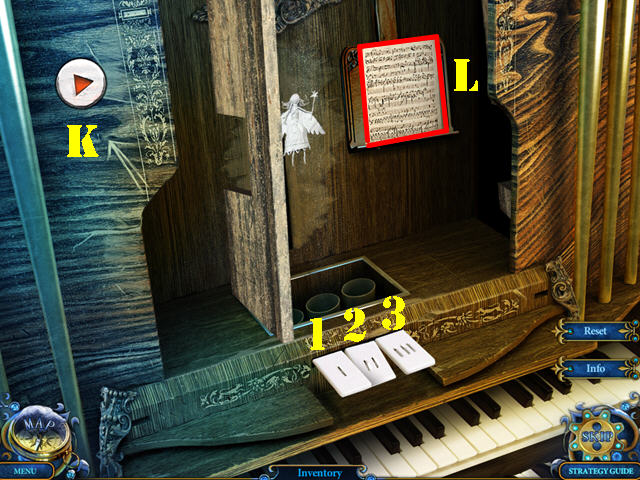
- Zoom into the door; put the 2 BELLS on the jester to activate a puzzle.
- You must paint the jester with the right colors; use the colored numbers etched around the door as a clue (white). For example, the 9 is green, so make sure you paint all areas marked with a 9 in green (Y).
- To paint a section in a particular color, just press on the area until the desired color appears.
- Please look at the screenshot for the solution (Z).
- Enter the tower.
- Touch anywhere on the scene.
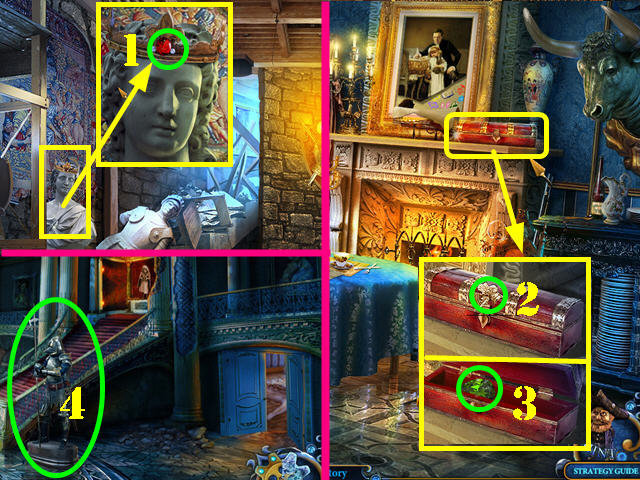
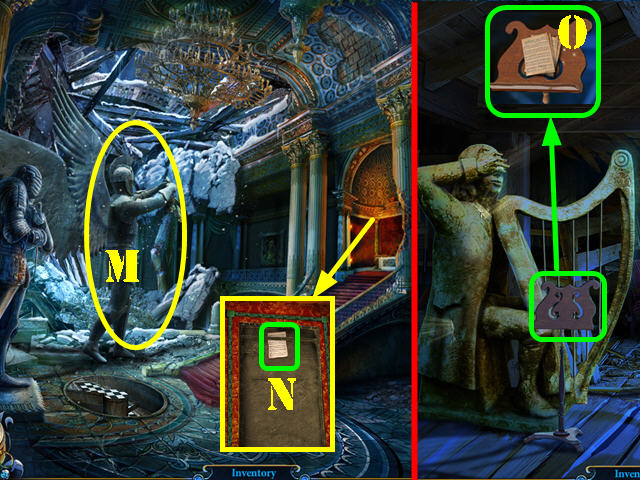
- Inspect the statue; take the RUBY on the crown (1).
- Go back to the dining room.
- Zoom into the mantle; put the GOLDEN ANGEL on the box (2).
- Open the box and take the EMERALD (3).
- Walk down.
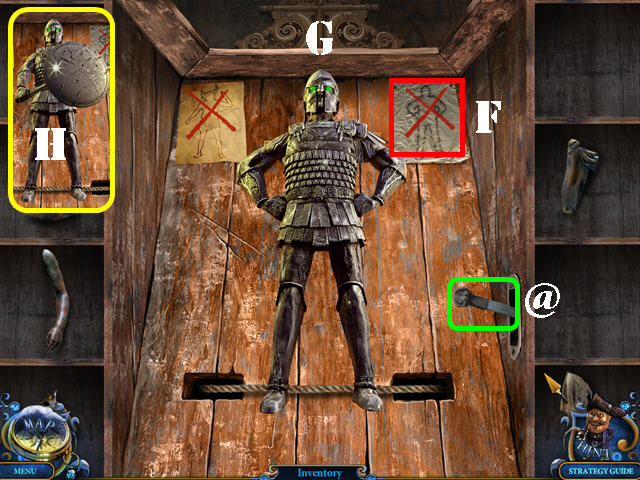
- Zoom into the armor suit (4); put the EMERALD and the RUBY into the slots to activate a puzzle.
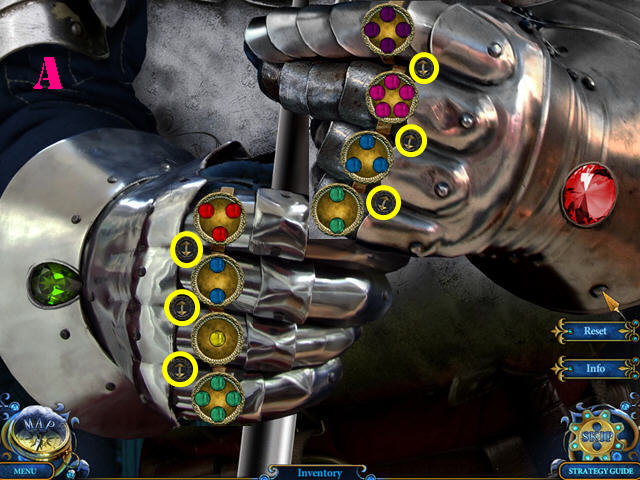
- Press on the rings to rotate them. Select the double arrows (yellow) to swap the jewels between adjacent rings.
- Please look at the screenshot for the solution (A).
- The HALBERD will go into inventory.
- Go back to the tower inside.
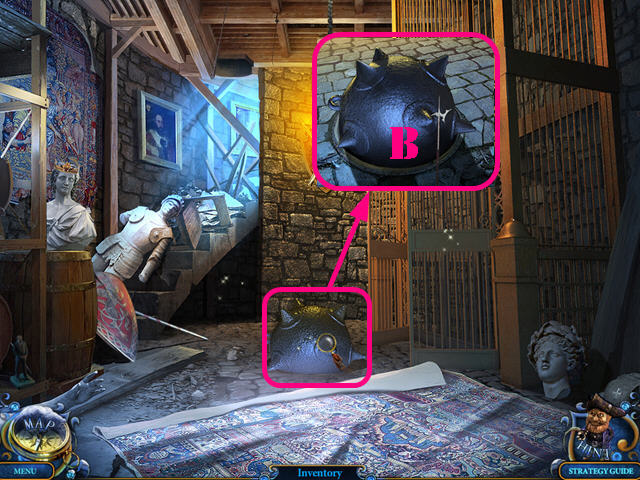
- Zoom into the ball on the ground and put the HALBERD on it to activate a HOS (B).
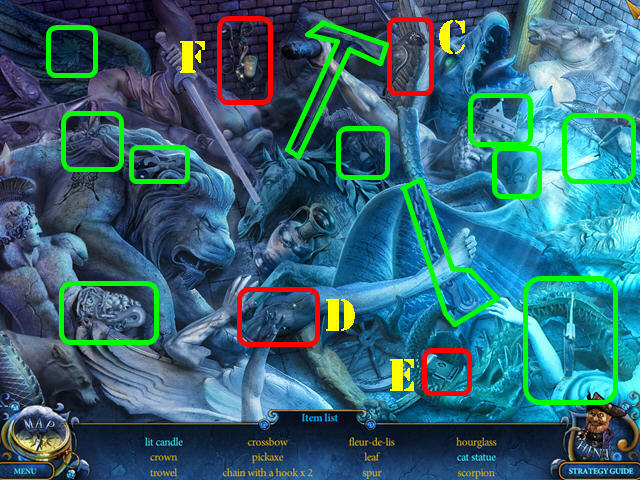
- Play the HOS.
- Drag the cat's head (C) to the cat's body (D); take the cat statue.
- Drag the matches (E) to the candle (F); take the lit candle.
- The CANDLE will be added to inventory.
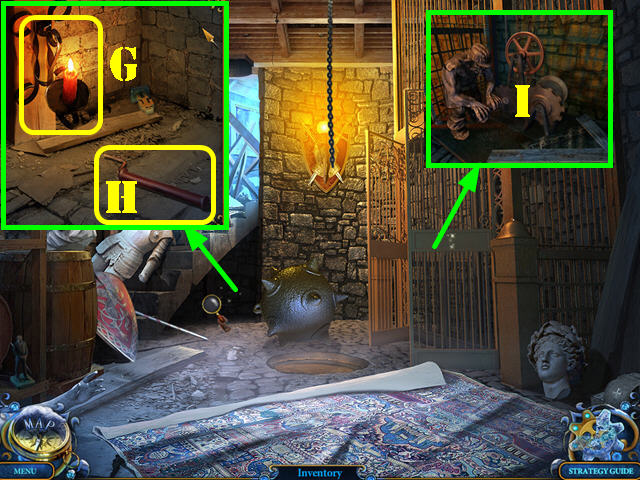
- Examine the area below the stairs; put the CANDLE on the hook (G).
- Take the CRANK HANDLE (H).
- Examine the elevator; put the CRANK HANDLE on the mechanism (I).
- Put the MINER on the controls and go up the elevator to reach the tower chamber.
Chapter 4: The Gallery of Statues
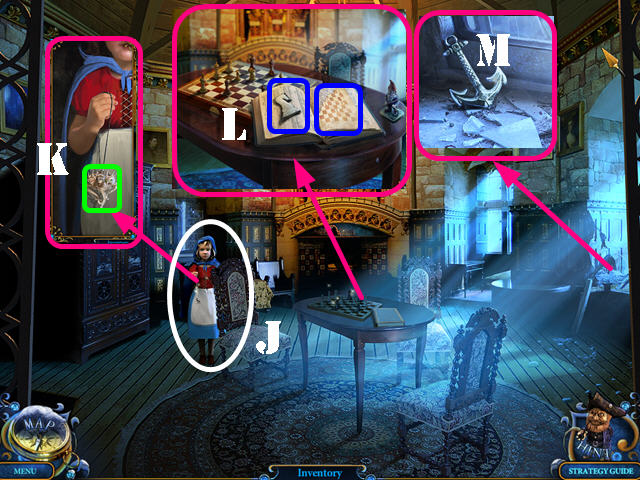
- Touch the scene and then talk to the Princess (J).
- Zoom into the Princess and take the AMULET (K).
- Inspect the table and open the book; take the CHESS DIAGRAM and the CHESS PIECE 1/2 (L).
- Examine the window sill; take the LITTLE ANCHOR (M).
- Go back to the square.
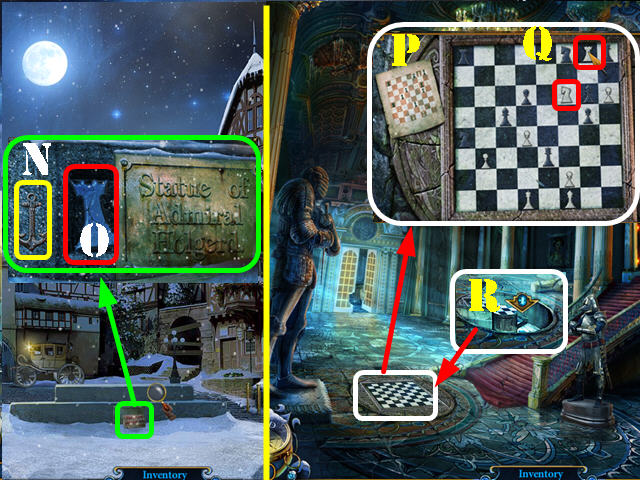
- Zoom into the base of the statue; put the LITTLE ANCHOR in the indentation (N).
- Take the 2/2 CHESS PIECE (O).
- Go back to the mansion hall.
- Examine the chessboard. Put the CHESS DIAGRAM on the torn paper (P) and put the 2 CHESS PIECES on the table.
- Look at the diagram and place the chess pieces into the right spots using the diagram as a clue (Q).
- Take the stairs down (R).
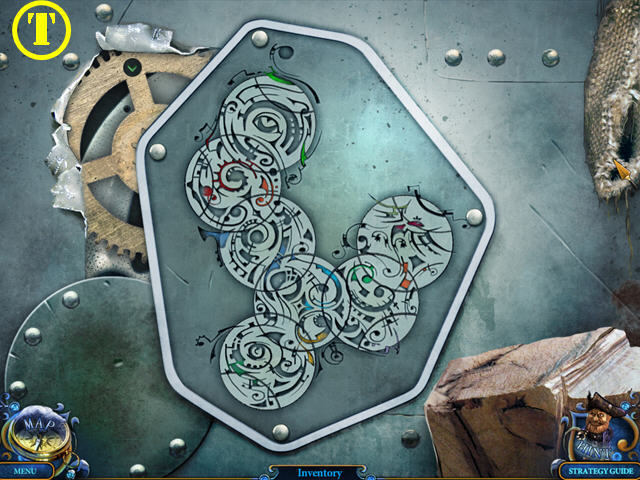
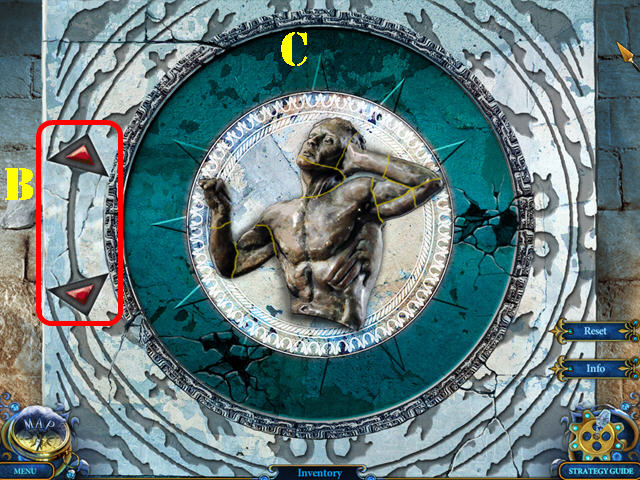
- Examine the door to activate a puzzle.
- Rotate the circles until you get the right image.
- Please look at the screenshot for the solution (T).
- Solving the puzzle activates a HOS.
- Play the HOS.
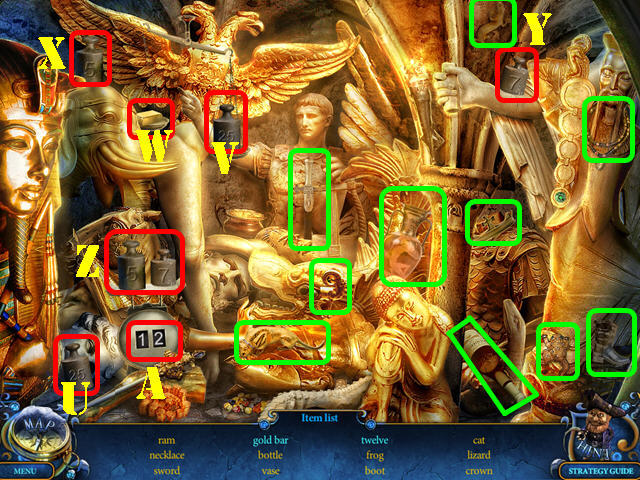
- Put the 25 weight (U) on the scale (V); take the gold bar (W).
- Put the 5 weight (X) and the 7 weight (Y) on the scale (Z) and take the twelve (A).
- The BAR OF GOLD will be added to inventory.
- Take the GNOME WITH SAW (B).
- Look at the chimera; use the AMULET on it (C).
- Go down the steps to reach the gallery of statues.
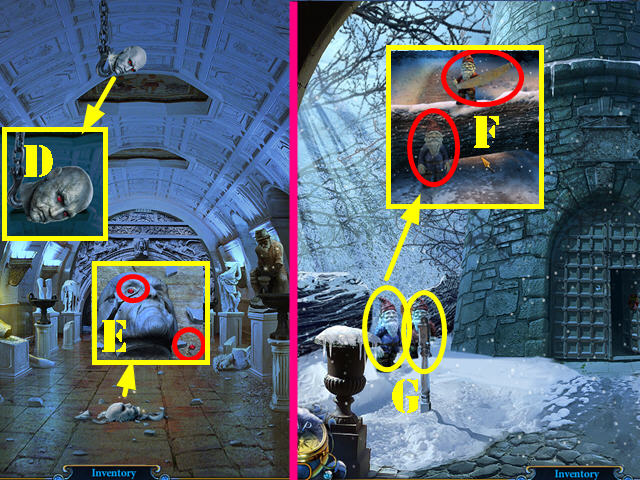
- Zoom into the stone head and use the ROOSTER to retrieve it (D).
- Zoom into the broken head and take the 2 RED EYES (E). The ROOSTER will automatically go back into inventory.
- Go back to the tower entrance.
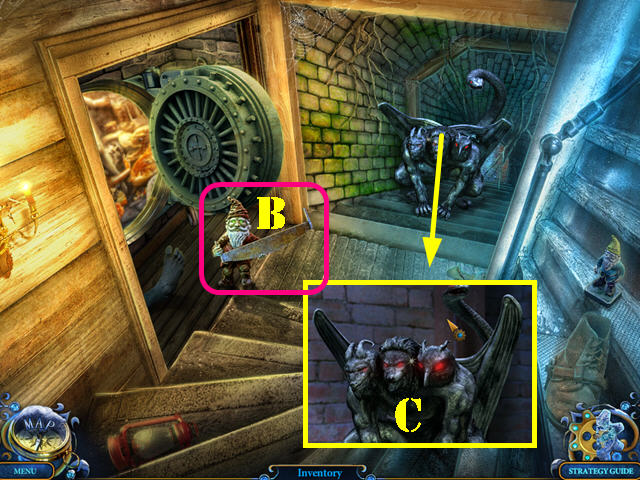
- Zoom into the fallen tree. Cut the fallen tree with the GNOME WITH SAW and the GNOME (F).
- Take back the GNOME WITH SAW and the GNOME as soon as they finish cutting the tree (G).
- Go into the backyard.
- Examine the pond; take the FISH MOLD (H).
- Go towards the house (I).
- Zoom into the horse's foot; take the HORSESHOE (J).
- Take a closer look at the hand; take the WOODEN HAND 1/2 (K).
- Go back to the optics workshop.
- Zoom into the oven; put the FISH MOLD on the embers. Put the BAR OF GOLD into the mold and take the GOLDEN CARP (L).
- Go back to the gallery of statues.
- Examine the fisherman statue; give him the GOLDEN CARP (M) and take the GOLDEN NET (N).
- Go to the backyard.
- Examine the pond and cast the GOLDEN NET on it (O).
- Put the MINER on the net. Zoom into the chest and take the SHELL (P).
- Go back to the maid's room.
- Inspect the bed; put the SHELL on the box (Q) and take the BIRD'S HEAD (R).
- Examine the birdcage; put the BIRD'S HEAD on the broken bird. Take the MECHANICAL BIRD (S).
- Go to the backyard.
- Zoom into the chest and use the MECHANICAL BIRD on it to activate a HOS (T).
- Play the HOS.
- Put the axe handle (U) on the axe head (V) and take the axe.
- Put the knight (W) on the horse (X) and take the mounted knight.
- The CENTAUR FACE PART 1/2 will be added to inventory.
- Go to Amadey's workshop.
- Zoom into the closet; use the HORSESHOE on the lock (Y).
- Take the CENTAUR FACE PART 2/2 (Z).
- Go back to the gallery of statues.
- Zoom into the broken torso and put down the 2 CENTAUR FACE PARTS to activate a puzzle (A).
- The pieces themselves cannot be rotated; you must use the arrows on the side to rotate the board (B) and then you can place the pieces to fit.
- Please look at the screenshot for the solution (C).
- Take the CENTAUR TORSO.
Chapter 5: The Backyard House

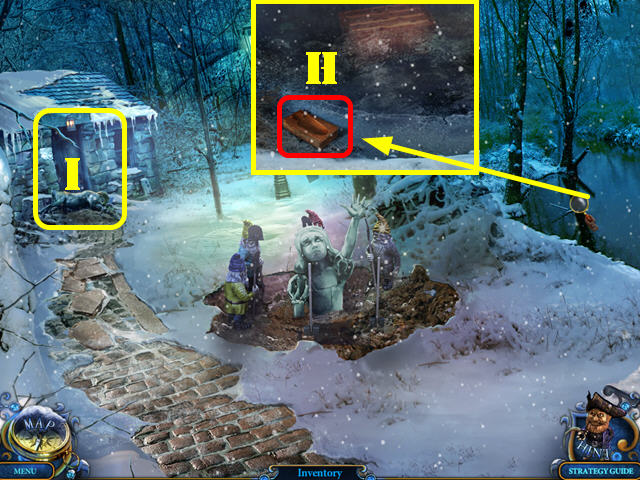
- Go to the backyard house.
- Put the CENTAUR TORSO on the horse (D) and take the CENTAUR.
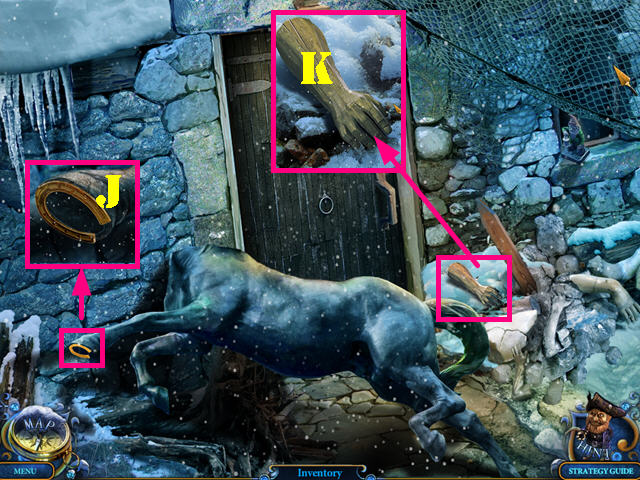
- Take the DOOR HANDLE (E); the door will begin to talk.
- Go to the gallery of statues and then go forward to Amadey's secret room.
- Put the CENTAUR in the left indentation (F); take the FAUN WITH BAGPIPES (G).
- Go to the maid's room.
- Inspect the bucket on the floor; put the DOOR HANDLE on the lid and take the PALETTE KNIFE (H).
- Go to the backyard house.
- Scrape the door with the PALETTE KNIFE (I).
- Use the PAINT on the door.
- Take the HINGE on the floor (J).
- Enter the backyard house entrance.
- Take the MAGIC BROOM (K).
- Go back to the maid's room.
- Look under the bed; use the MAGIC BROOM under the bed. Use the GLUE (from the dining room table) on the broken hand; take WOODEN HAND 2/2 (M).
- Go to the gallery of statues.
- Zoom into the potter statue; put the 2 WOODEN HANDS on it and take the FAUN WITH DRUM (N).
- Go to the tower chamber.
- Zoom into the hatch in the ceiling; put the ROOSTER on the hatch (O).
- Inspect the hatch and use the MAGIC BROOM to clean the cobwebs (P).
- Put the ROOSTER on the scene so it can scare the bats away. This action activates a HOS.
- Play the HOS.
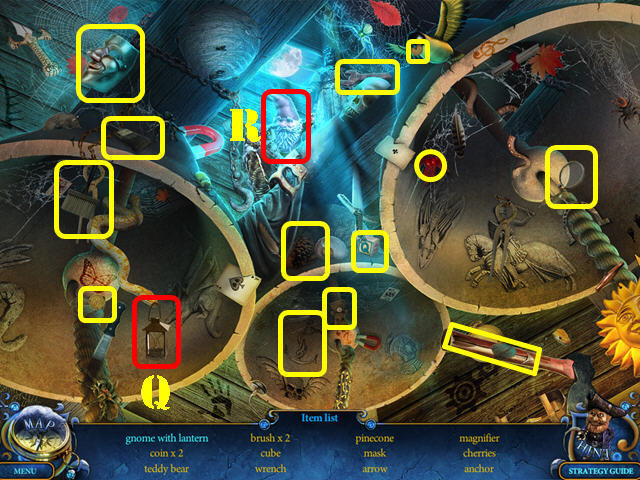
- Give the lantern (Q) to the gnome (R); take the gnome with lantern.
- The CHIEF GNOME will be added to inventory.
- Go to the backyard.
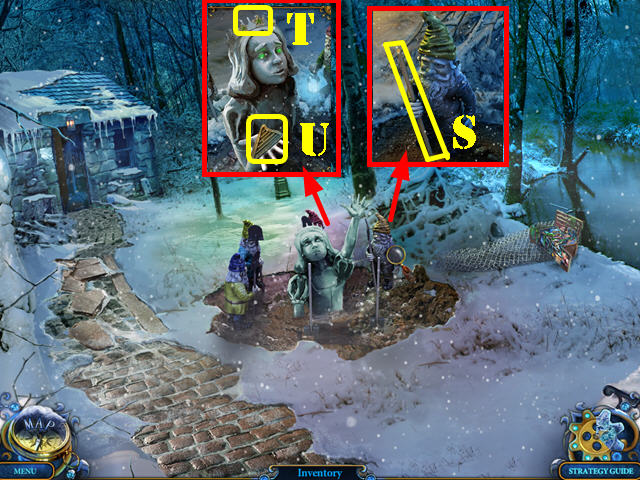
- Zoom into the gnome; put the SHOVEL on the stick (S).
- Put the CHIEF GNOME, GNOME WITH SAW, and the GNOME next to Snow White.
- Examine Snow White's crown and put the 2 FLOWERS on it (T).
- Take the LITTLE HARP (U).
- Go to the tower chamber.
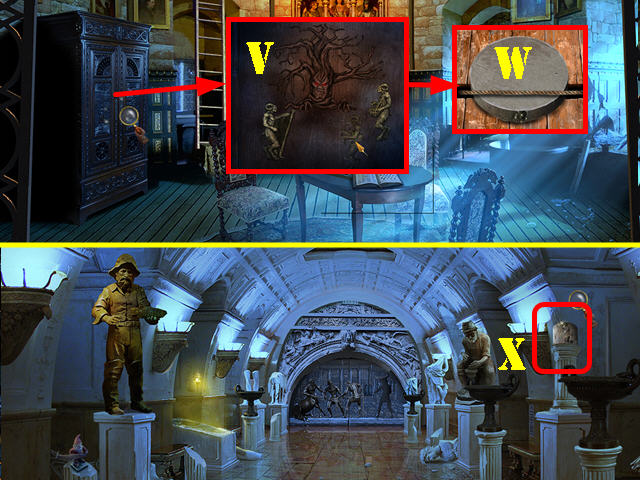
- Inspect the closet; insert the FAUN WITH DRUM, FAUN WITH BAGPIPES, and the LITTLE HARP into the indentations (V).
- Look into the closet and take the DISK (W).
- Go to the gallery of statues.
- Zoom into the column and add the DISK to activate a puzzle (X).
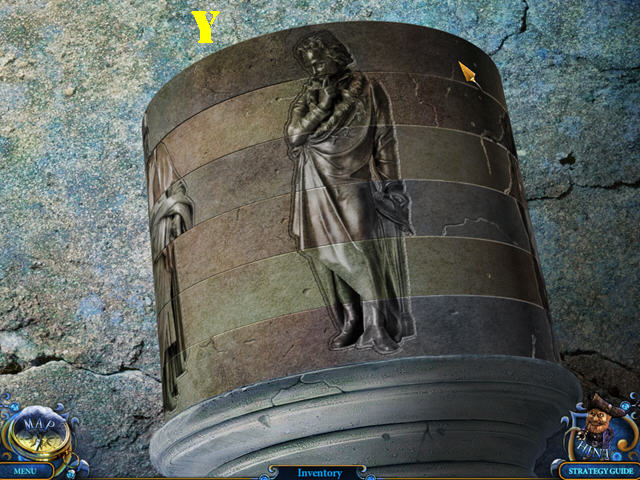
- Arrange the disks correctly.
- Please look at the screenshot for the solution (Y). Solving this puzzle activate a HOS.
- Play the HOS.
- Use the pencil (A) on the drawing (B) and take the sun.
- The MINOTAUR SCHEME will be added to inventory.
- Go to the dining room.
- Look at the bull head; put the 2 RED EYES in the eye sockets and take the MINOTAUR HEAD (C).
- Go to the tower chamber.
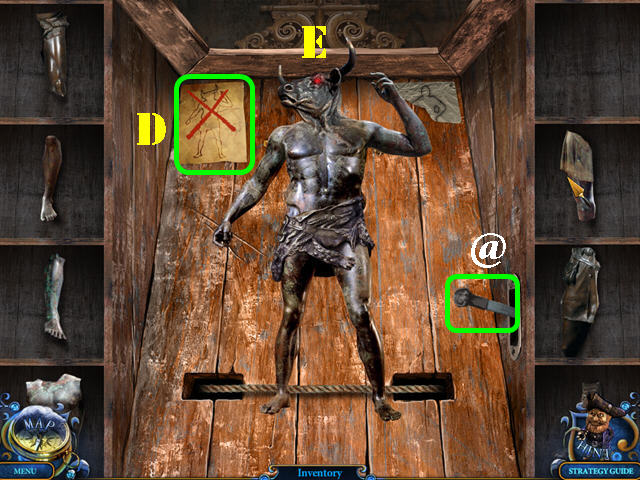
- Examine the closet; put the MINOTAUR SCHEME on the torn paper (D).
- Put the MINOTAUR HEAD on the shelf to activate a puzzle.
- Assemble the Minotaur by placing the right parts on the board. Use the sketch on the scheme as a clue.
- Use the lever (@) to move the shelves around. Not all parts will be used.
- Please look at the screenshot for the solution (E).
- Take the MINOTAUR.
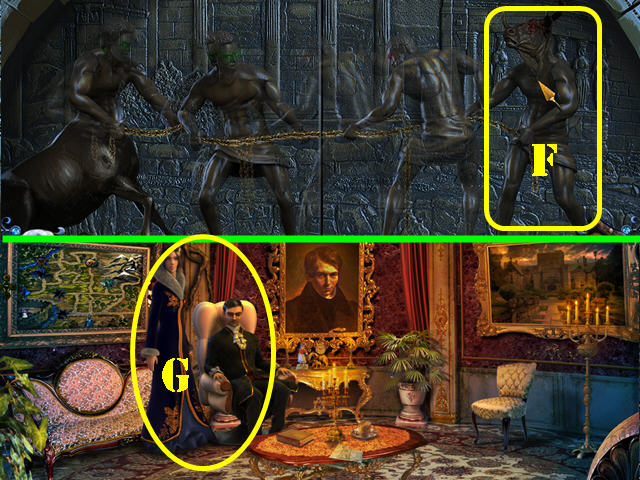
- Go to Amadey's secret room.
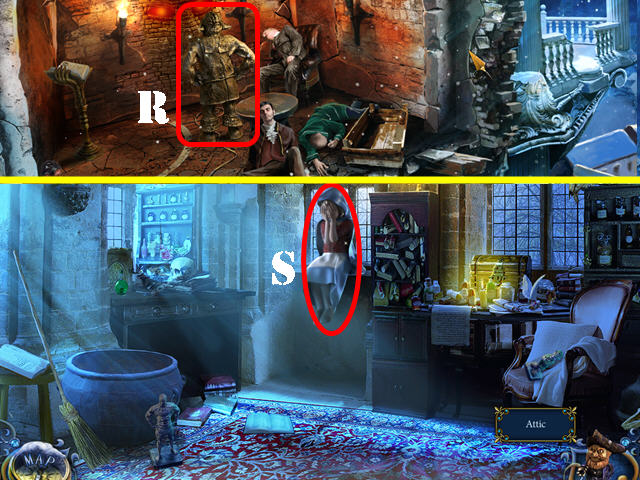
- Put the MINOTAUR on the wall (F).
- Talk to the couple (G) and then walk down to the gallery of statues.
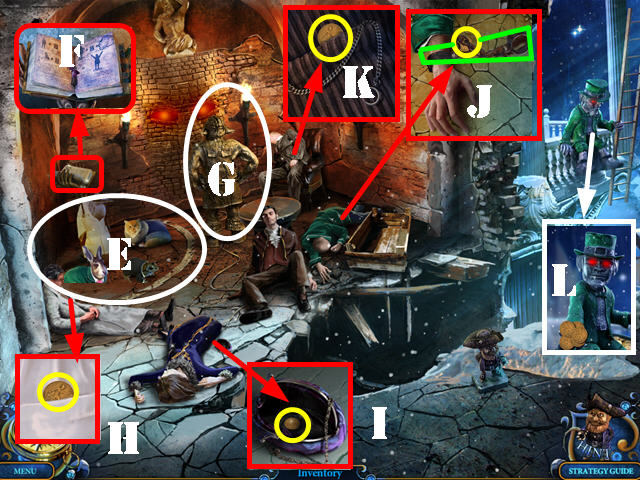
- Zoom into the ground after the cut scene ends and take the ICE HEAD (H).
- Go forward.
- Examine the table; take the HERO'S DIAGRAM (I).
Chapter 6: The Wagon
- Go to the optics workshop.
- Talk to the archer statue (K).
- Examine the ground; take the 1/4 NOTES (L).
- Play the HOS.
- Dip the paintbrush (M) into the paint (N) and use the paintbrush on the gun (O); take the golden gun.
- The HERO'S SHIELD will be added to the inventory.
- Zoom into the oven; put the ICE HEAD into it and take the HERO'S HEAD (P).
- Go to the garden and go into the wagon (Q).
- Touch anywhere on the scene.
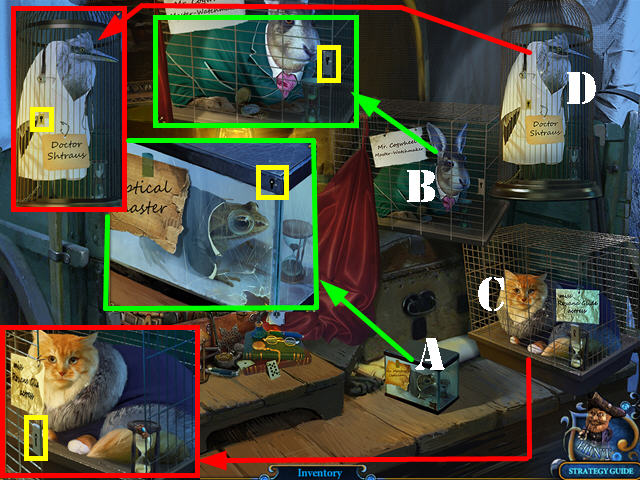
- Inspect the toad cage (R); take the first PENDANT PART (S).
- Examine the cat cage (T); take the second PENDANT PART (U).
- Zoom into the bunny cage (V); take the third PENDANT PART (W).
- Examine the heron cage (X); take the fourth PENDANT PART (Y).
- Take a closer look at the chest; put the four PENDANT PARTS on the chest to activate a puzzle (Z).
- Select the triangles and turn them all blue.
- If you make a mistake you can either reset the puzzle, or click on a piece again to change its color. It's best to start from a corner and work your way around the puzzle.
- Please look at the screenshot for the solution (A).
- Solving the puzzle activates a HOS.
- Play the HOS.
- Use the peeler (B) on the apple (C); take the peeled apple.
- Pull the nail out (D) with the nail puller (E); take the nail.
- The HERO'S SWORD will be added to inventory.
- Go to the tower chamber.
- Examine the closet; put the HERO 'S DIAGRAM on the torn paper (F).
- Put the HERO'S HEAD on the shelf to activate a puzzle.
- Assemble the hero by placing the right parts on the board. Use the sketch on the scheme as a clue.
- Use the lever (@) to move the shelves around; take parts from the shelves to assemble the puzzle. Not all parts will be used.
- Please look at the screenshot for the solution (G).
- Put the HERO'S SWORD and the HERO'S SHIELD on the statue; take the HERO (H).
- Go to Amadey's secret room.
- Put the HERO on the chimera.
- Zoom into the ground; take the 8 RED EYES marked in red (I).
- Go through the hole in the wall to reach the chapel.
- Examine the bow stand; take the 2/4 NOTES (J).
- Inspect the organ to activate a puzzle.
- Your goal is to make the angel jump to the correct height so you she can pass through the obstacle 15 times. Pressing on the top organ keys (1, 2, and 3) will adjust the angel's height.
- To solve the puzzle, press the keys in this order: Press play (K) to begin, 2, 1, 3, 2, 1, 2, 1 stay on 1, 3, 2, 3, 1, 2, 1, and 2.
- Take the 3/4 NOTES (L).
- Go to the mansion hall.
- Put the ROOSTER on the angel (M).
- Go to the princess statue; take the 4/4 NOTES (N).
- Go to the backyard house entrance.
- Take a closer look at the music stand; put the 4 NOTES on the stand to activate a HOS (O).

- Play the HOS.
- Cut the string on the harp (P) with the nippers (Q); take the harp string (R).
- The HARP STRING will be added to inventory.
- Go to the chapel.
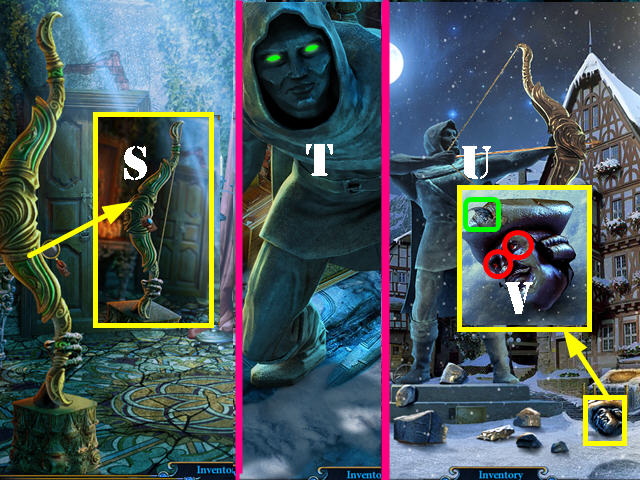
- Examine the bow; add the HARP STRING to it and take the BOW (S).
- Go to the optics workshop and give the BOW to the archer statue (T).
- Go to the square.
- Examine the head on the ground; take the METAL WING (U) and the 2 RED EYES (V).
Chapter 7: The Finale
- Go to the tower chamber.
- Zoom into the mantle; put the SPRING and the METAL WING on the dragon (W).
- Take the SILVER KNIGHT (X).
- Go to Amadey's secret room.
- Examine the tapestry; put the SILVER KNIGHT on it to activate a puzzle (Y).
- Move the hero around with the arrows on the left (@) to the right spots so it can pick up and then use a variety of items. The ultimate goal is for him to conquer the princess. The hero can only hold one item at a time.
- R is for right, L is for left, U is for up, and D is for down. Please follow the instructions below to solve the puzzle.
- Move the arrows: R, U, R, U, R, D, R, D x 3, R x 2, and D to grab the key. Move the arrows: L x 2, U x 6 to open the chest and take the coins.
- Move the arrows: D x 5 to give the coins to man at the bottom and get the dragon slayer sword.
- Move the arrows: U x 2, R, and U to slay the dragon with the sword.
- Move the arrows L x 3 to grab the lever from the castle gate. Move the arrows: D x 2, and L to put the lever on the bridge.
- Move the arrows: U x 2, R, U, L, U, L, U, and L to take the bucket of water. Move the arrows: D, R, D, R, D, R x 2, U, R, U, L, U, and R x 2 to water the sprout and take the flower.
- Move the arrows: D, R, D, L, D x 2, L, D, and L x 5 to give the flower to the Princess by passing through the bridge. Solving this puzzle activate a HOS.

- Play the HOS.
- Put the bottle (1) below the device (2); put the valve (3) on the device (4) and take the filled nitrogen.
- The NITROGEN will be added to inventory.
- Go back to the mansion hall.
- Throw the NITROGEN on the angel statue (5).
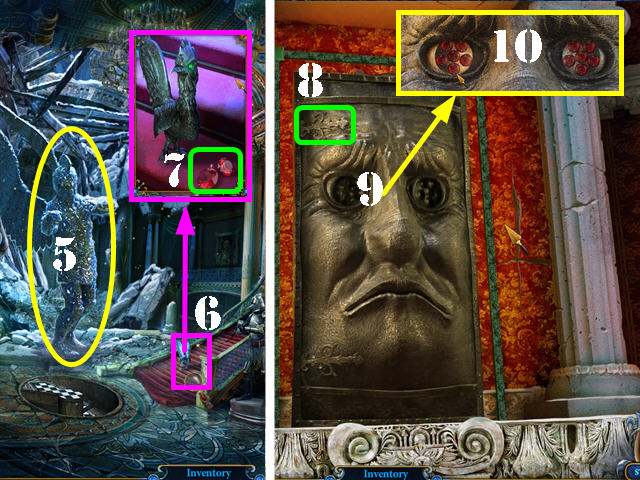
- Inspect the stairs (6) and take the 2 RED EYES (7).
- Go back to the princess statue; put the HINGE on the door (8).
- Zoom into the eyes (9) and insert the 12 RED EYES into the eye sockets (10). Note: 8 red eyes are in Amadey's secret room, 2 in the main hall, and 2 by the statue in the square.
- Go through the door to reach the attic.
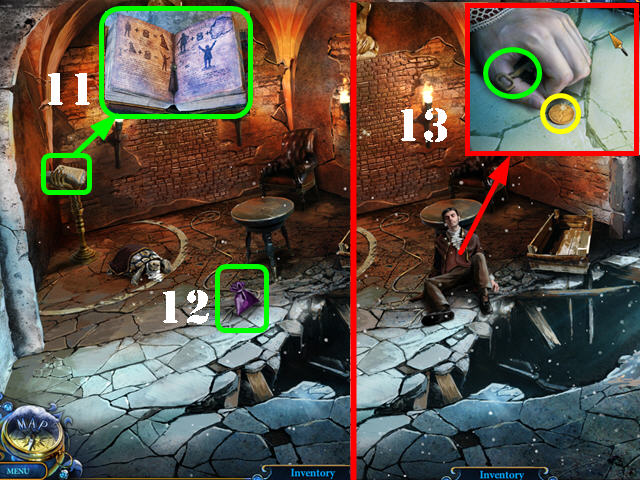
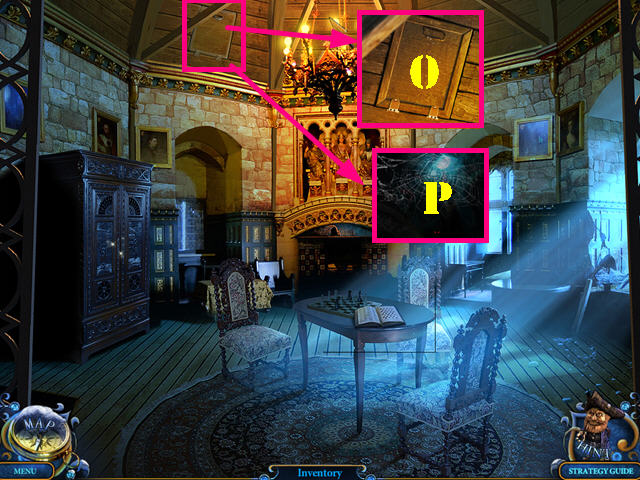
- Examine the bookstand and press on the book to activate a cut scene (11).
- Take the MAGIC POWDER (12). Zoom back into the book and put the MAGIC POWDER on the book again.
- Look at Amadey's hand; take the COIN 1/5 and the CAGE KEY (13).
- Go back to the wagon.
- Zoom into the toad cage (A), bunny cage (B), cat cage (C), and the heron cage (D); use the CAGE KEY in the 4 locks (yellow).
- Take the TOAD, BUNNY, HERON, and CAT from their cages.
- Go back to the attic.
- Put the TOAD, BUNNY, HERON, and CAT in the magic circle (E). Zoom into the book and add the MAGIC POWDER to the book (F).
- Examine the wall and use the MINER on it (G). The leprechaun will appear.
- Zoom into the man with the lab coat; take the 2/5 COIN (H).
- Zoom into the lady; take the 3/5 COIN (I).
- Zoom into the watchmaker; take the 4/5 COIN and the HANDCUFFS (J).
- Zoom into the man in the chair; take the 5/5 COIN (K).
- Take a closer look at the leprechaun; give him the 5 COINS (L). This action activates a HOS.
- Play the HOS.
- Put the carrot (M) on the snowman; take the happy snowman (N).
- Use the nail puller (O) on the nail (P) holding the shield; take the shield (Q).
- The CANNON will be added to inventory.
- Give the CANNON to the miner (R).
- Go through the hole in the wall to access the Princess' secret room.
- Talk to the Princess (S).
- At this point you can either give the MAGIC BROOM or the HANDCUFFS to the Princess. Whichever choice you make will bring forth a different outcome.
- Congratulations, you have completed Royal Detective: The Lord of Statues
Created at: 2012-07-13