

Walkthrough Menu
- General Tips
- Chapter 1: Granny's House
- Chapter 2: High School
- Chapter 3: College
- Chapter 4: Apartment
- Chapter 5: Village
- Chapter 6: Cemetery
General Tips
- This is the official guide for Sable Maze: Nightmare Shadows.
- This guide won't tell you when to zoom into a location; the screenshots show each zoom scene.
- Hidden-object puzzles are referred to as HOPs. Only the locations of the HOPs will be shown.
- Use the Map to fast travel to a location.
Chapter 1: Granny's House
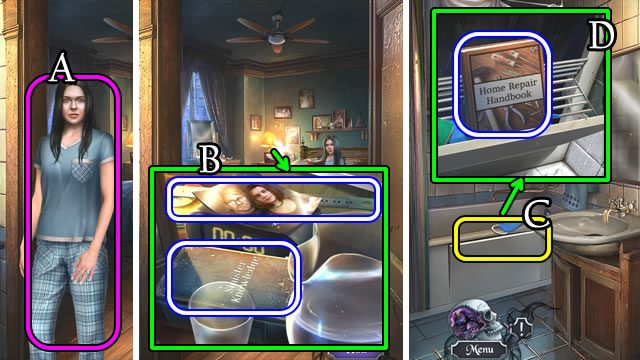
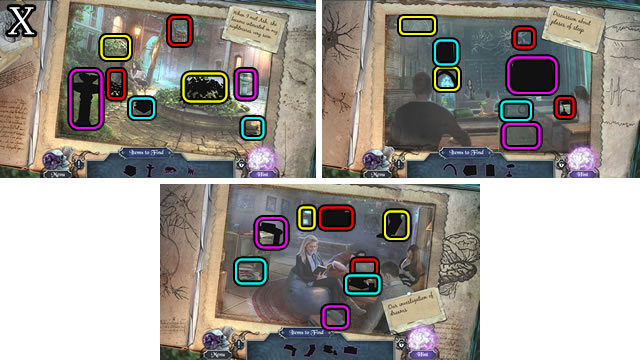
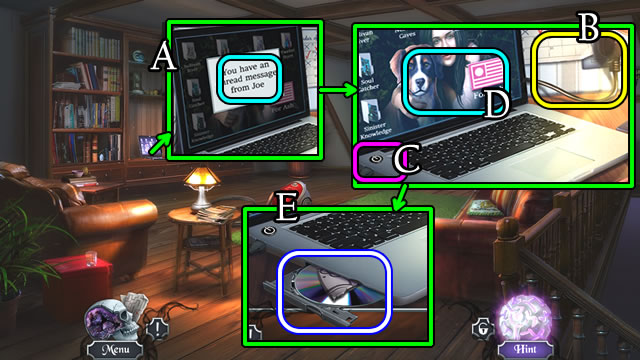
- Speak (A).
- Take 1/2 BOOK; photograph; RULER (B).
- Use RULER (C); take 2/2 BOOKS (D).
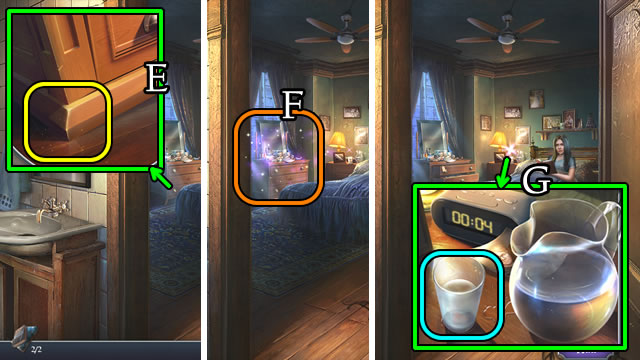
- Use 2/2 BOOKS (E) for a HOP (F); receive SLEEPING PILLS.
- Use pitcher on glass; add SLEEPING PILLS (G).
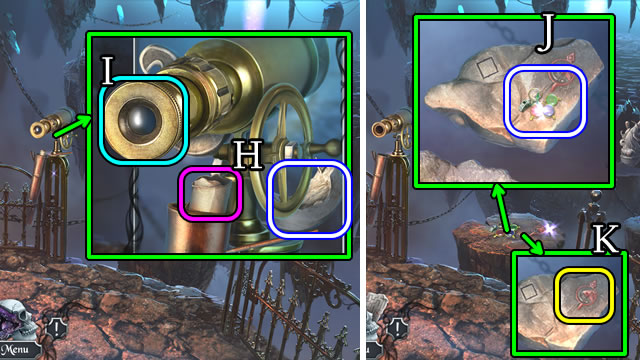
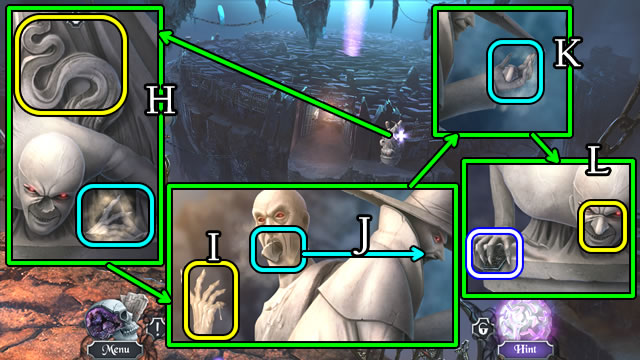
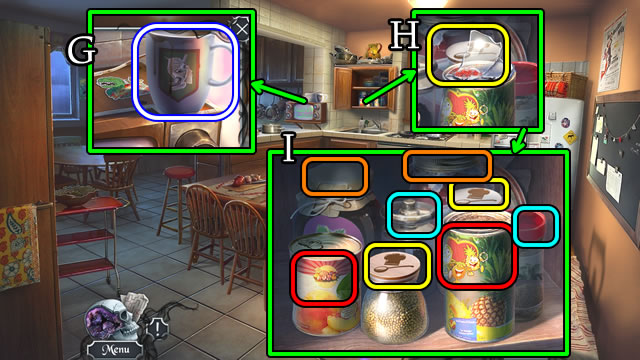
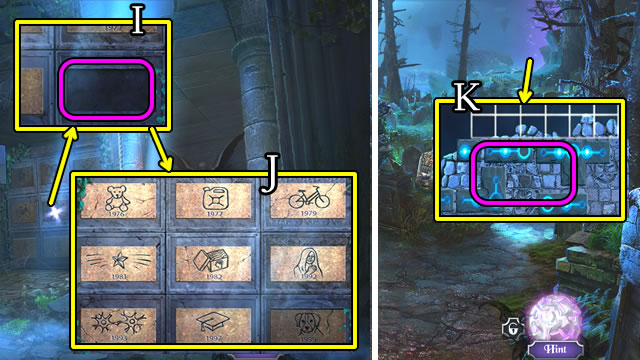
- Take Map and BROKEN STATUE DECORATION (H); remove cover, take LENS (I).
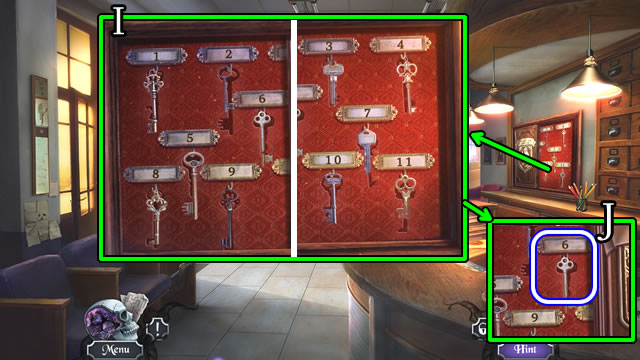
- Take BROKEN MONOCLE, FIGURINE and WHISTLE (J).
- LENS on BROKEN MONOCLE for MONOCLE.
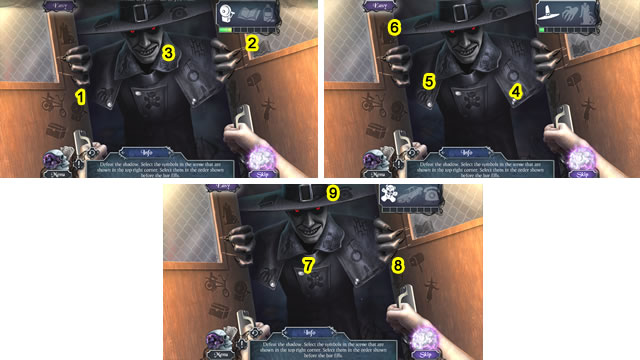
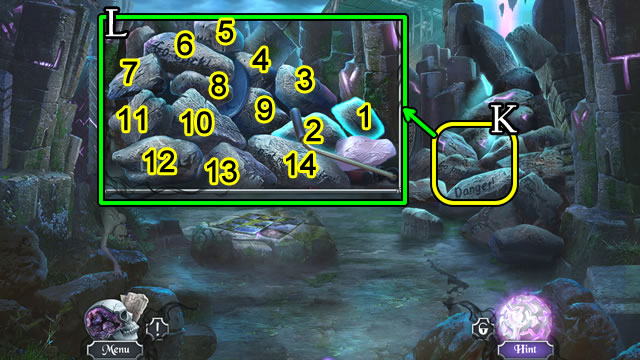
- Place MONOCLE (K).
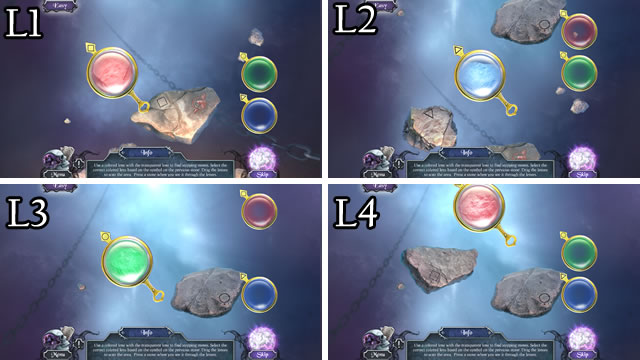
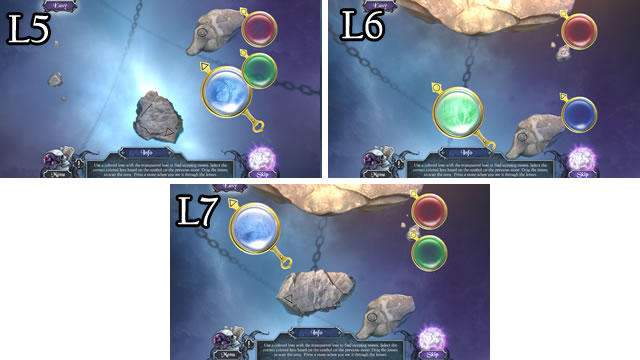
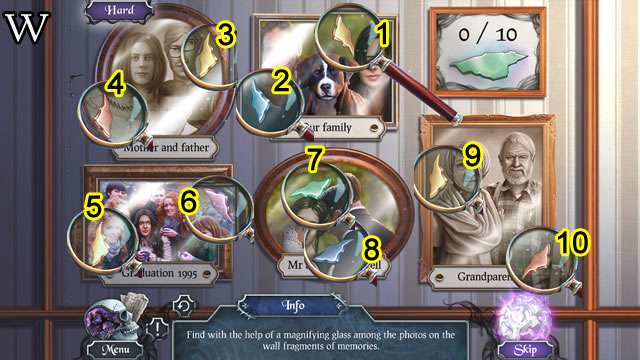
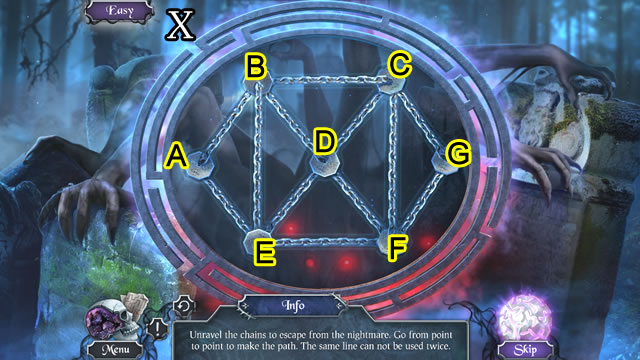
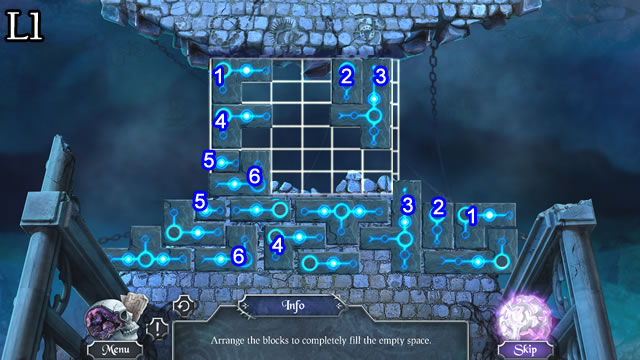
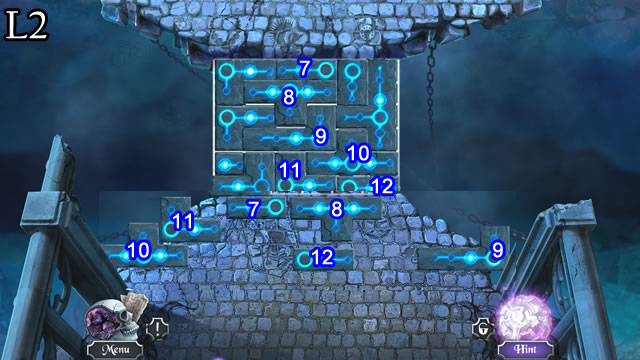
- Easy and hard solutions (L1-L7).

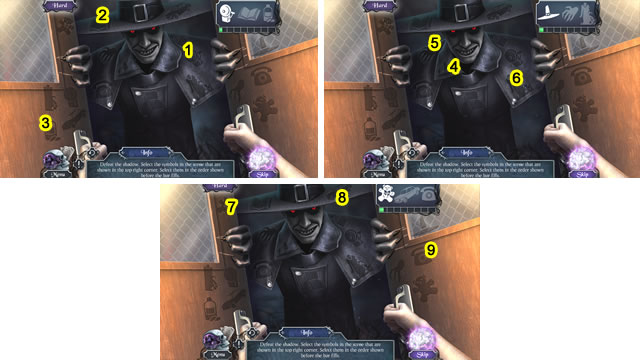
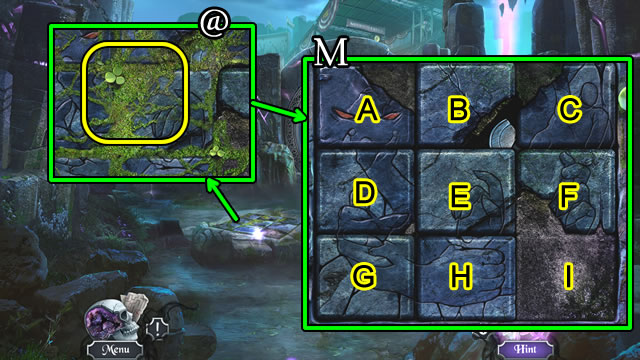
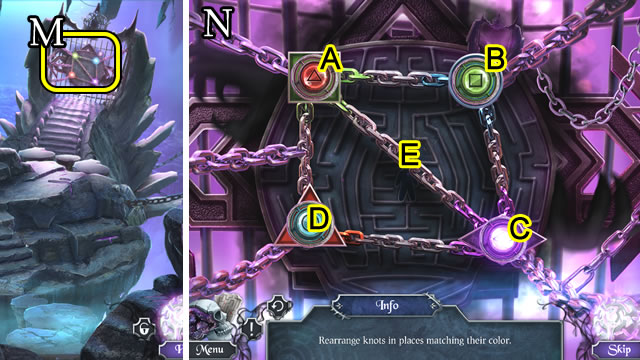
- Use FIGURINE (M).
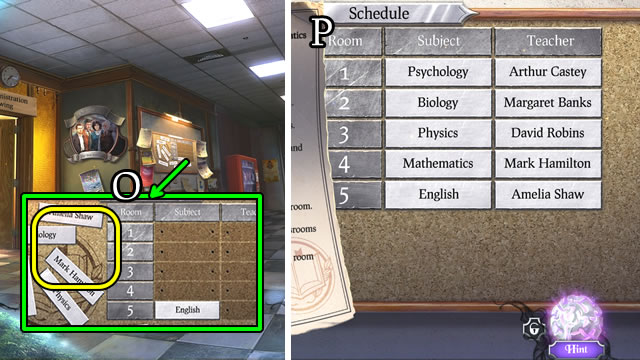
- Easy solution (N). 1-11.
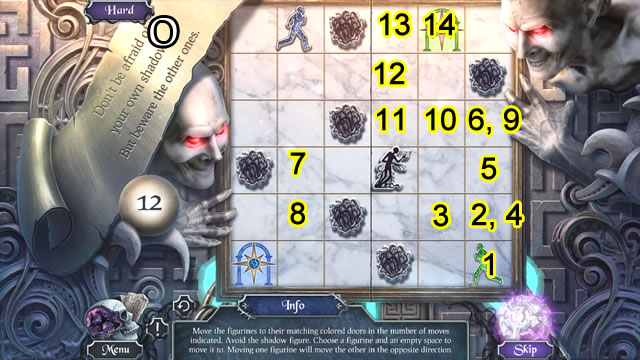
- Hard solution (O). 1-14.
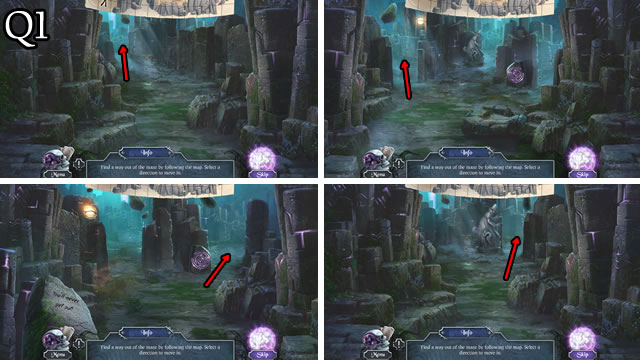
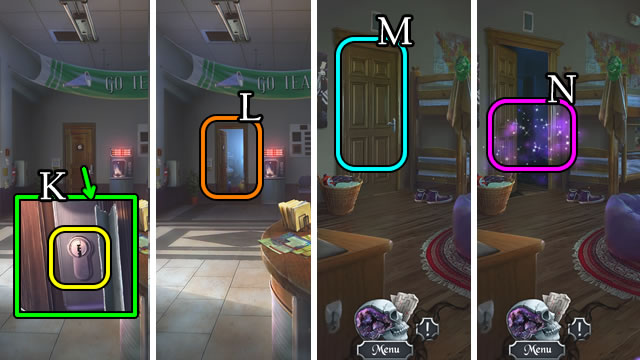
- Go forward.
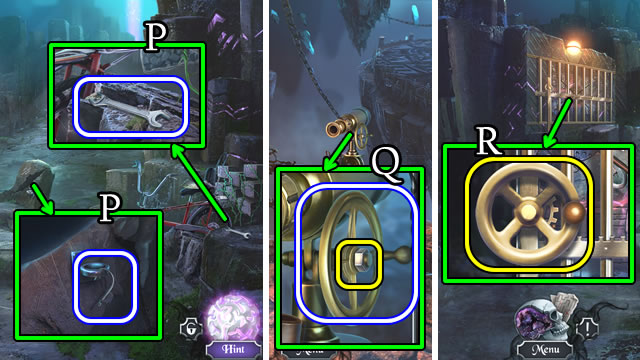
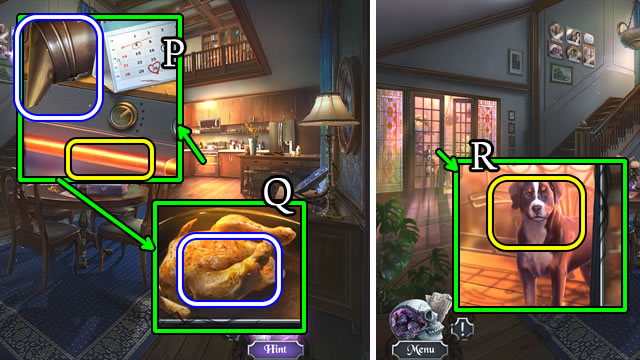
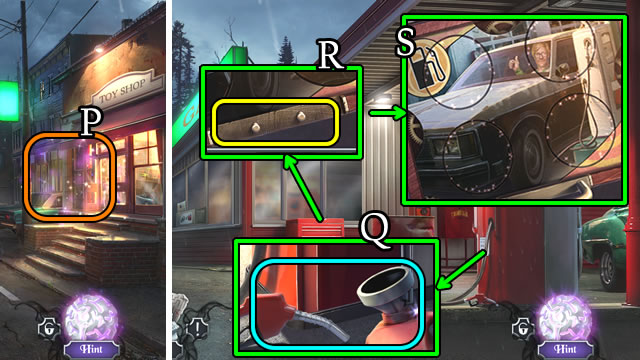
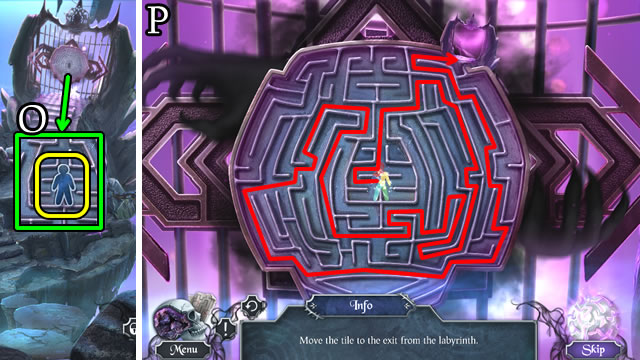
- Take WRENCH; HOOK (P).
- Go down.
- Use WRENCH; take ROTATING HANDLE (Q).
- Go forward.
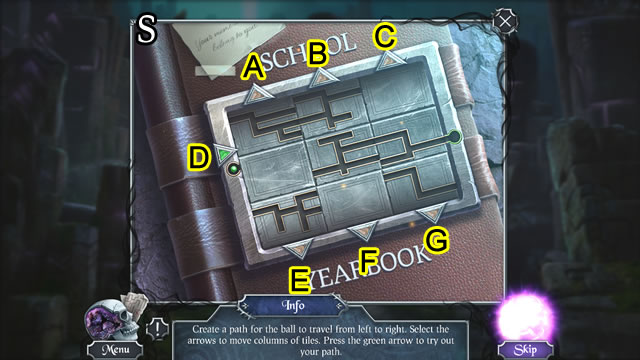
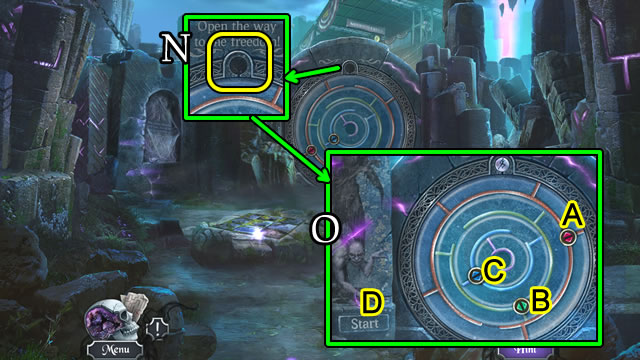
- Place and turn ROTATING HANDLE (R).
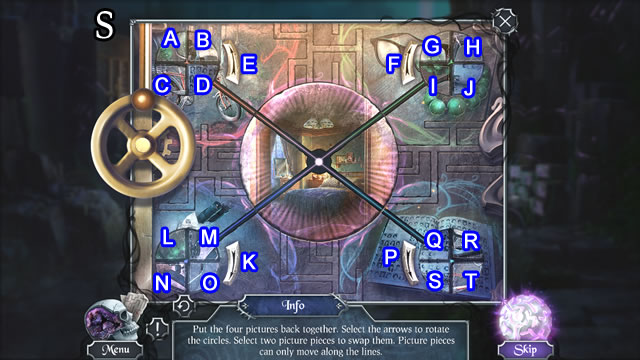
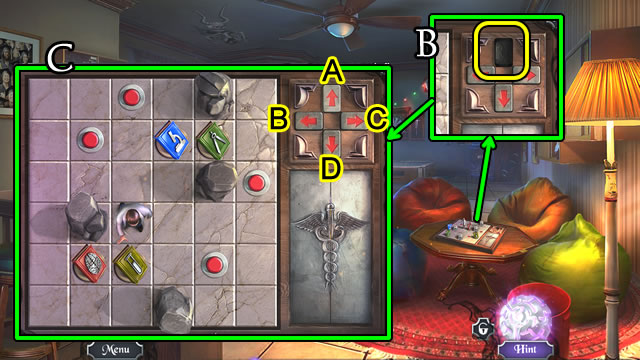
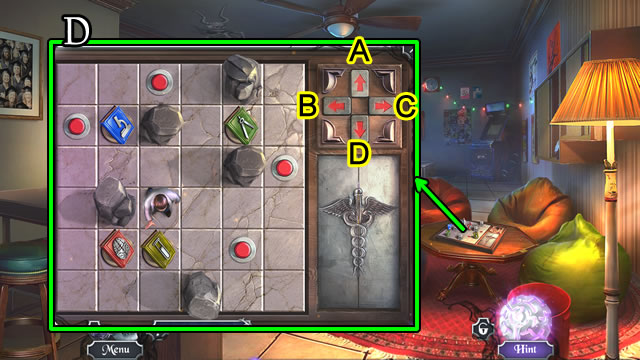
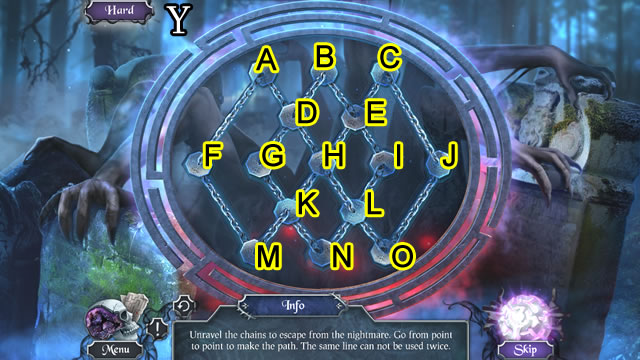
- Solution (S). D-P-F-Q-P-I-Q-P-Ex2-K-D-I-F-M-I-F-D-I-F-D-I-Fx3-D-I-Ex2-M-D-K-Ex3-M-D-Fx2-K-D-M-Kx2-M-D-Ex2-M-D-Ex2-M-D-Ex3.
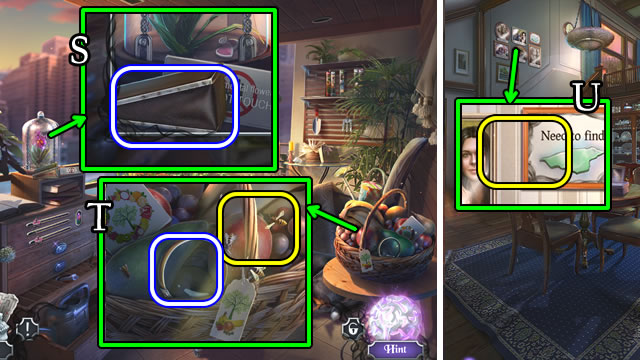
- Take GLOVES.
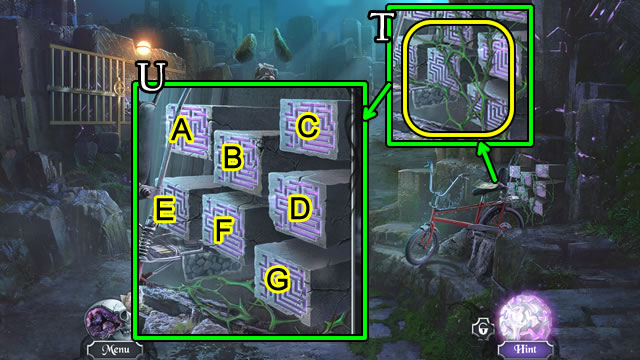
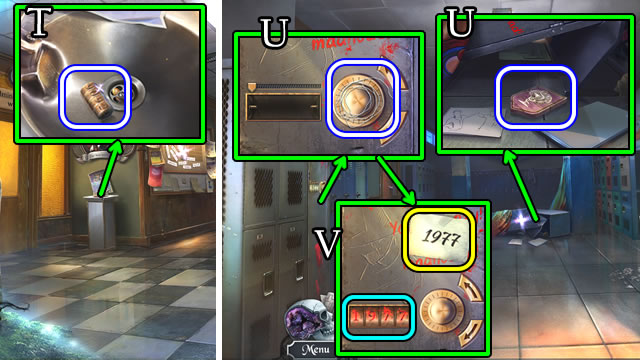
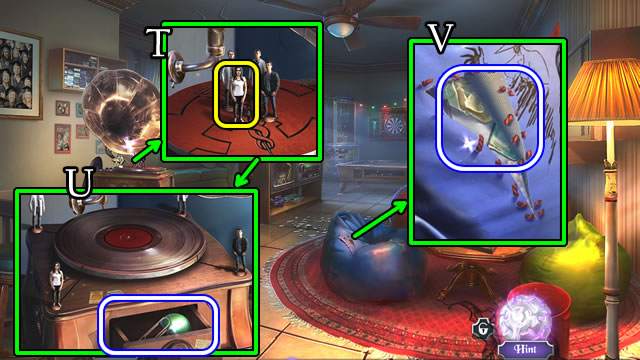
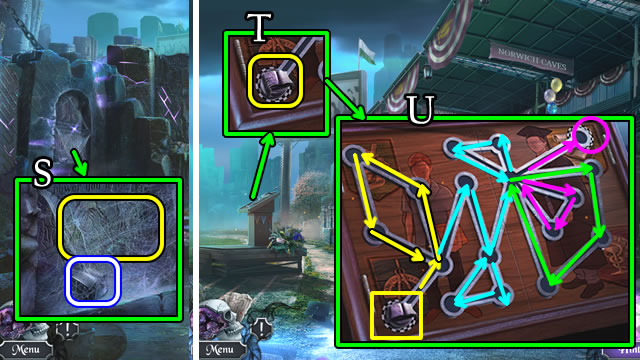
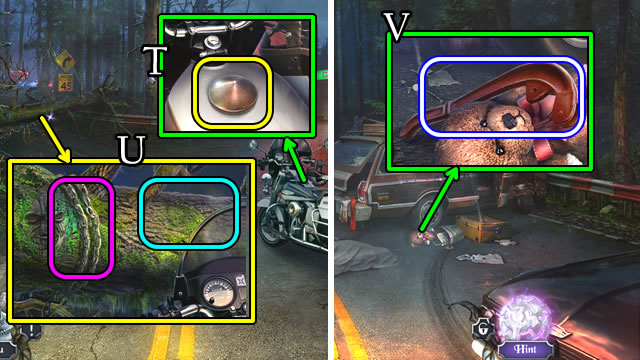
- Use GLOVES (T).
- Solution (U). C-G-F-D-A-B-E-C-G-F-A-E.
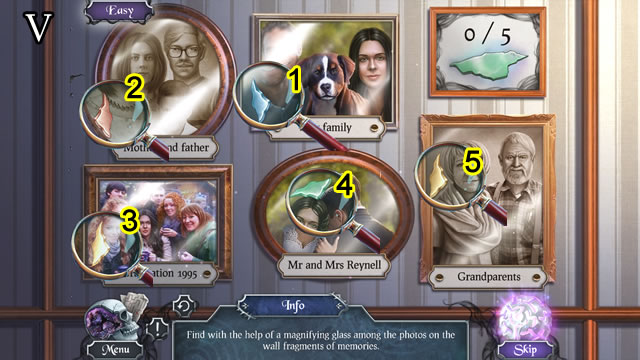
- Take LIGHTER.
- Go forward.
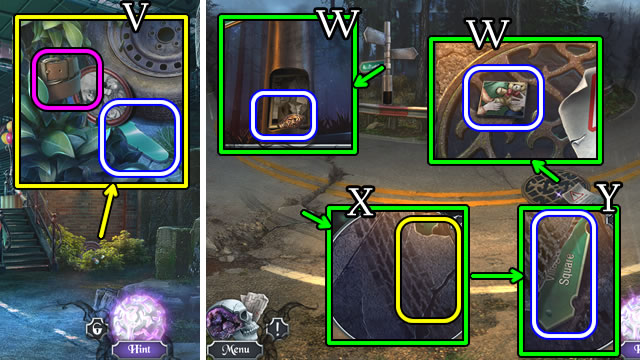
- Remove (V).
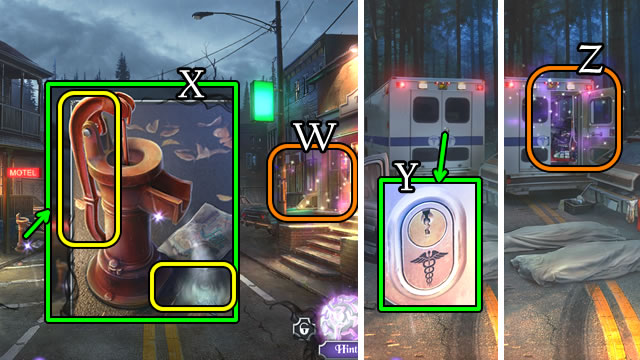
- Take TORCH; use HOOK; take BOOT (W).
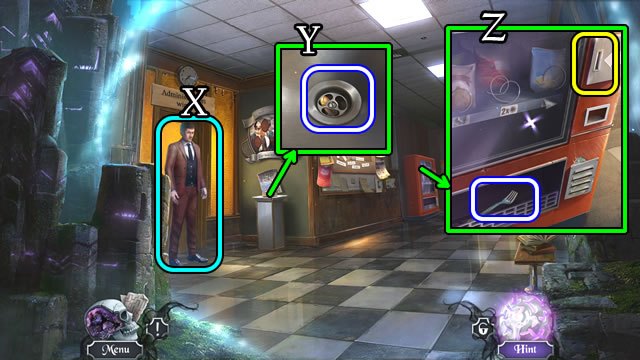
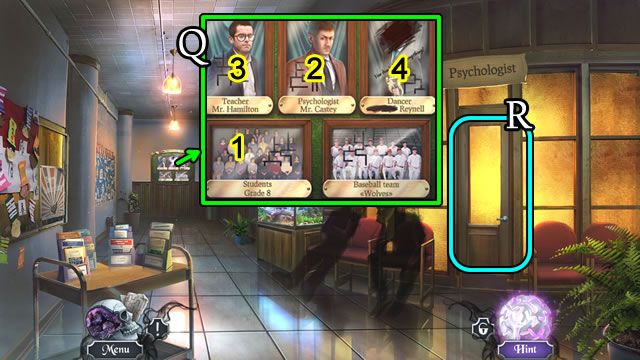
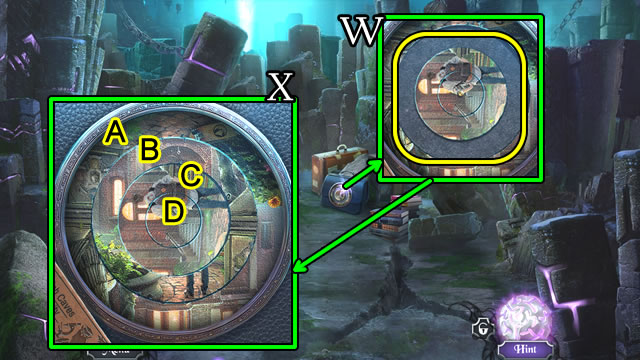
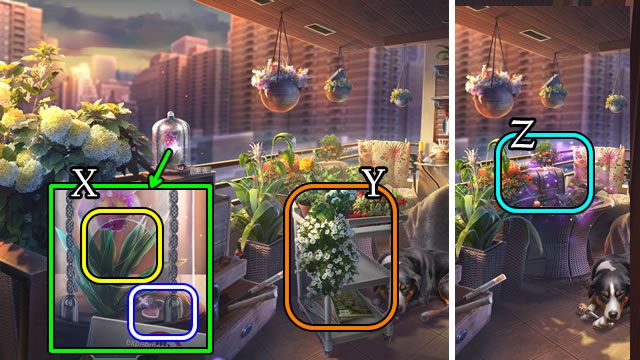
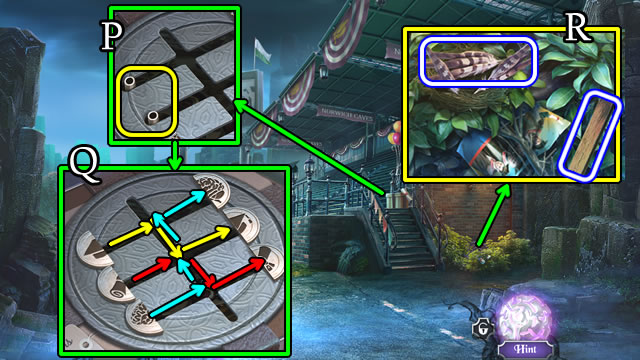
- Select (X), scroll up; use WHISTLE. Take STATUE DECORATION PART (Y).
- Use BOOT (Z); play HOP (A); receive an UMBRELLA.
- Go down.
- Use UMBRELLA for BOTTLE (B).
- BOTTLE for GLASS SHARD and OILY CLOTH.
- OILY CLOTH and LIGHTER on TORCH for LIT TORCH.
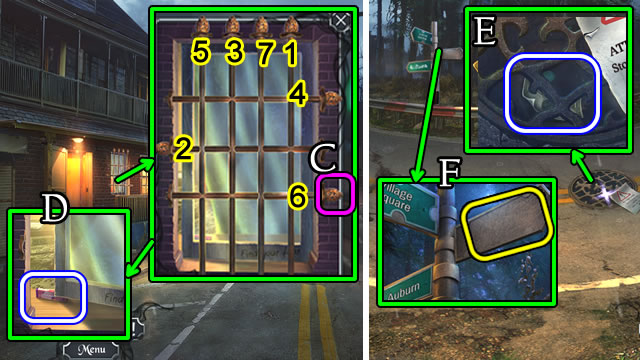
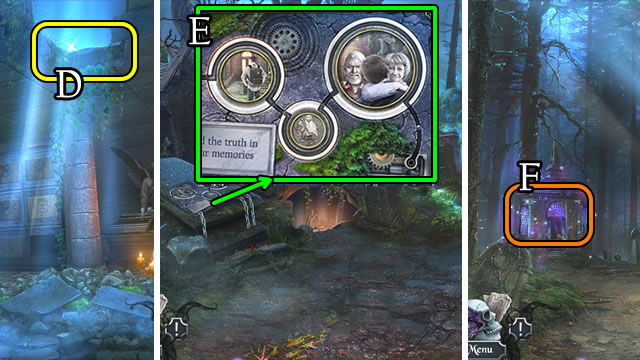
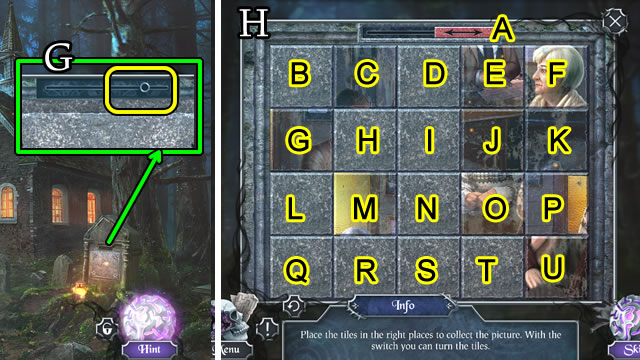
- Use LIT TORCH. Take MAGNET, MAILBOX PART and 1/4 BOX TILE (C).
- Go forward.
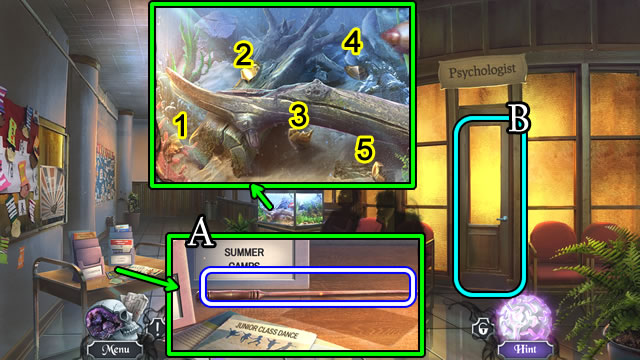
- Play HOP (D); receive 2/4 BOX TILE.
- Scroll down and use GLASS SHARD (E). Receive 3/4 BOX TILE.
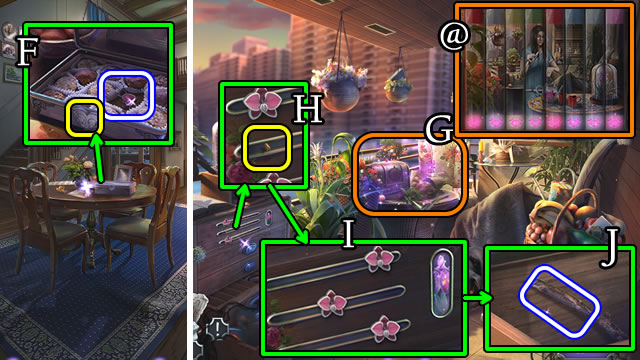
- Use MAILBOX PART (F).
- Solution (G).
- Take PACKAGE.
- PACKAGE for STRANGE BOOK and 1/2 LOCK PART.
- Go down 2x.
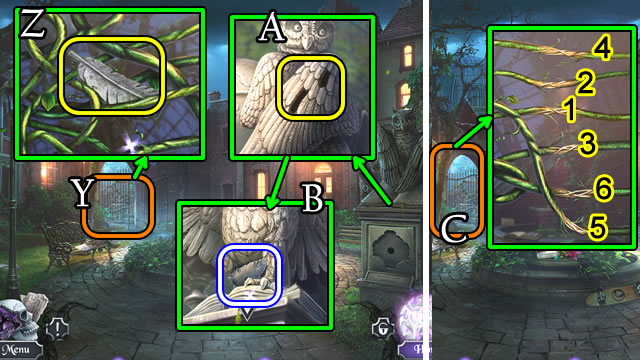
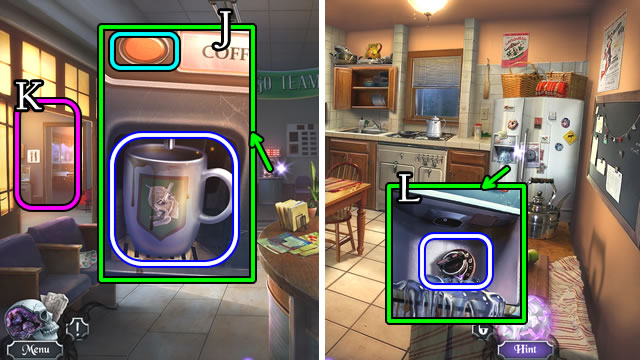
- STATUE DECORATION PART on BROKEN STATUE DECORATION for STATUE DECORATION.
- Place STATUE DECORATION; take hand (H). Scroll up, place hand (I); take, place jaw part (J). Take nose part (K). Scroll down; place nose part; take BOOK EMBLEM (L).
- BOOK EMBLEM on STRANGE BOOK.
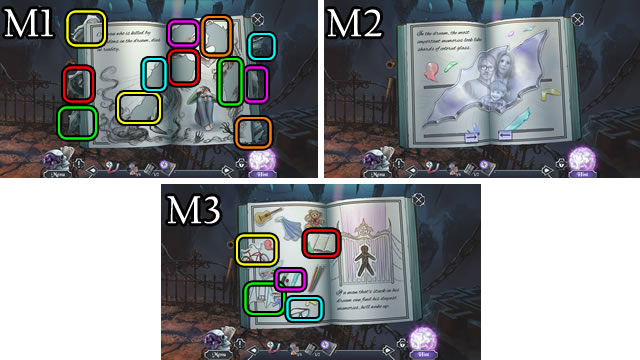
- Solution (M1-M3).
- Take 4/4 BOX TILE.
- Go forward 2x.
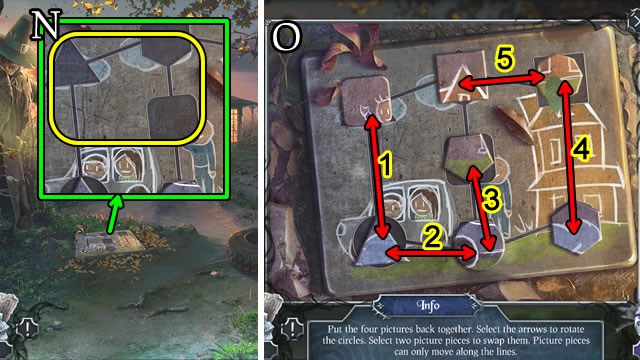
- Place 4/4 BOX TILES (N).
- Solution (O). 1-5.
- Take MEMORY FRAGMENTS, MAP and 2/2 LOCK PARTS.
Chapter 2: High School
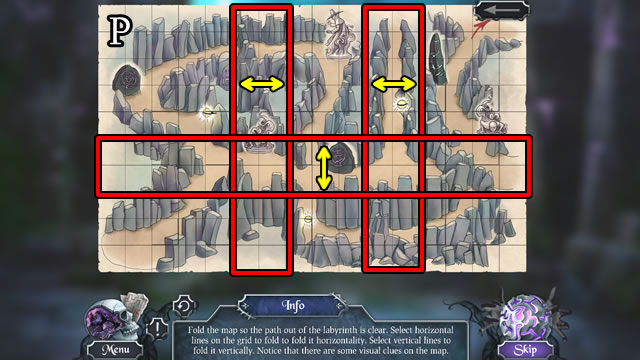
- Place MAP on scene.
- Solution (P).

- Solution (Q1-Q2).
- Take note; place 2/2 LOCK PARTS (R).
- Solution (S). C-E-Fx2-D.
- Take LOCKER CODE and 1/2 COINS.
- Take LOCK CYLINDER (T).
- Go forward.
- Take 1/2 COAT OF ARMS; FISHING STRING (U).
- Place LOCK CYLINDER and LOCKER CODE. Enter 1-9-7-7 (V).
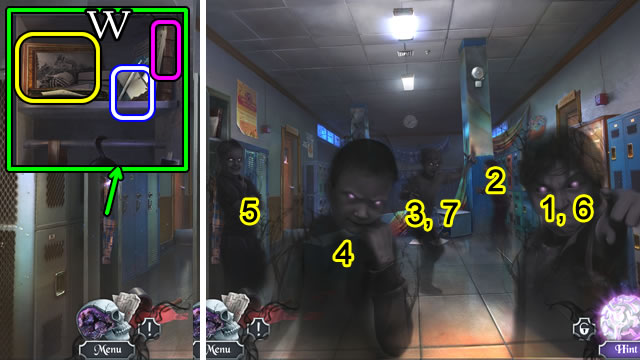
- Take TWEEZERS, 1/2 MOSAIC PARTS, note,Picture and notebook (W).
- Select 1-7.
- Go down.
- Speak (X).
- Use TWEEZERS for 2/2 COINS (Y).
- Use 2/2 COINS; take FORK (Z).
- Go left.
- FISHING STRING on MAGNET for MAGNET-ON-A-STRING.
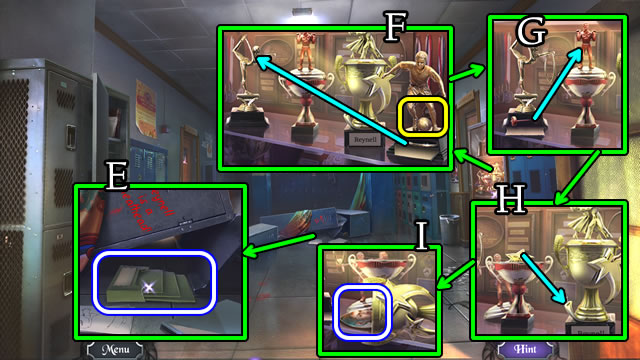
- Use MAGNET-ON-A-STRING, 1-5 for BROKEN TROPHY PART.
- Take POINTER (A).
- Go (B).
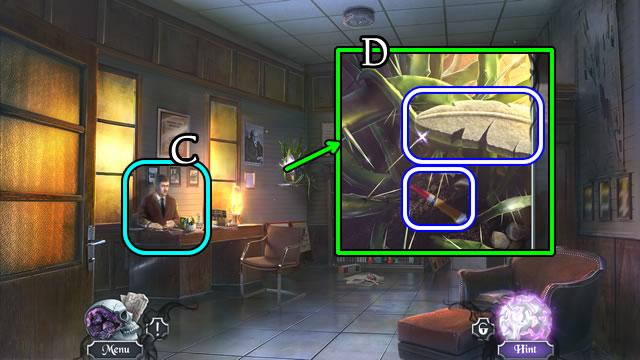
- Speak (C); receive BROKEN FAN.
- Take 1/2 STONE FEATHER; use FORK to receive GLUE (D).
- Return to School Hallway.
- Use POINTER for BROCHURE STAND (E).
- GLUE on BROKEN TROPHY PART for TROPHY PART.
- Use TROPHY PART (F-H). Take 2/2 MOSAIC PARTS (I).
- Go down.
- Easy solution (J1). 1-9.
- Hard solution (J2). 1-9.
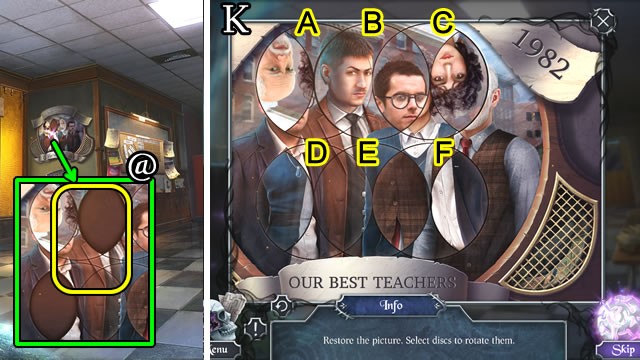
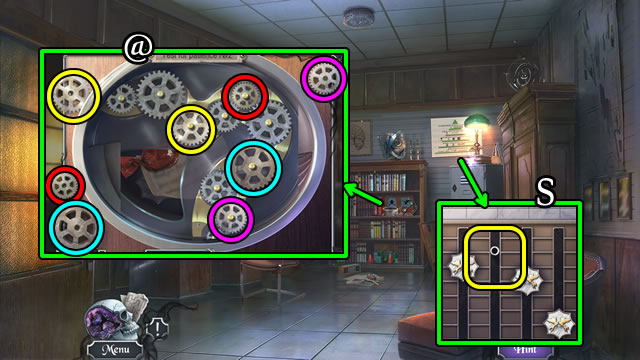
- Use 2/2 MOSAIC PARTS (@).
- Solution (K). A-C-B-C-B-A-E-F-E-F-E-D-E-D.
- Take LOCK PART and STAPLER.
- Go left.
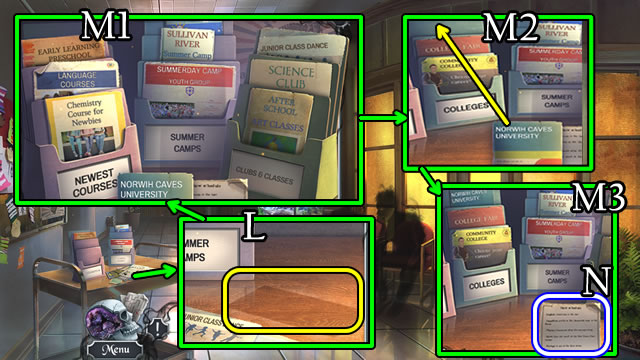
- Place BROCHURE STAND (L).
- Solution (M1-M3).
- Take TIMETABLE (N).
- Go down.
- Use TIMETABLE (O).
- Solution (P).
- Take PLASTIC PART.
- Go left.
- PLASTIC PART and STAPLER on BROKEN FAN for EDUCATIONAL FAN.
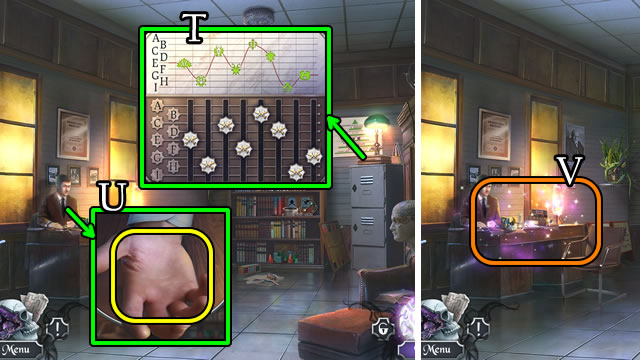
- Use EDUCATIONAL FAN (Q).
- Solution. 1-4.
- Take note and GEARS.
- Go (R).
- Select, use GEARS; solution (@).
- Take chocolate, note and BUTTON.
- Use BUTTON (S).
- Solution (T).
- Take note, chocolate and PERSONAL FOLDER.
- Give PERSONAL FOLDER (U).
- Play HOP (V); receive SECOND MEMORY FRAGMENT.
Chapter 3: College
- Place LOCK PART (W).
- Solution (X). Dx3-Cx3-Bx3-Cx3.
- Take WALLET.
- Go (Y).
- Take 2/2 STONE FEATHER (Z).
- Go down.
- Scroll up; use 2/2 STONE FEATHERS (A); take SHARP STONE (B).
- Go (C).
- Use SHARP STONE 1-6.
- Take TOKEN (D).
- Go down.
- Use TOKEN (E).
- Solution (F). A-F-B-D-H-A.
- Search WALLET for ELECTRONIC CARD.
- Take note (G).
- Use ELECTRONIC CARD (H).
- Solution (I). 8-11-10-1-9-8-5-2-3-6-4-7-5.
- Take ROOM KEY (J).
- Use ROOM KEY (K).
- Go (L).
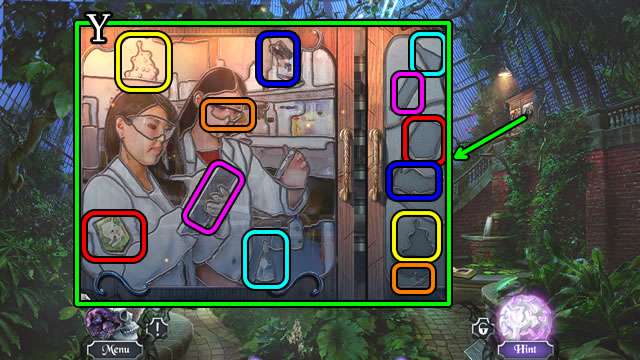
- Open (M); play HOP (N); receive ANTI-RUST SPRAY.
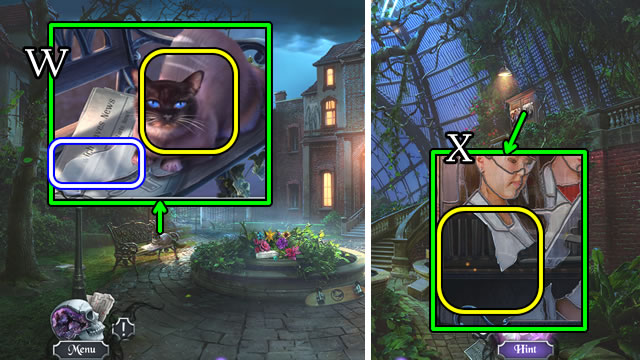
- Take PAPER, FLOWER and MATCH (O).
- Open (P); uncover, take VIDEOTAPE (Q).
- Go down.

- Open; use PAPER (R); close; print; take PHOTO HALF (S).
- Go down.
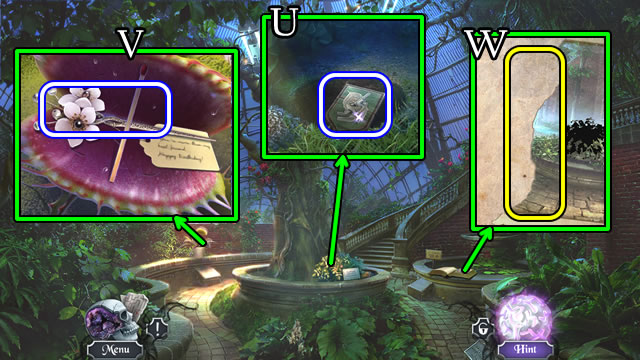
- Use FLOWER (T).
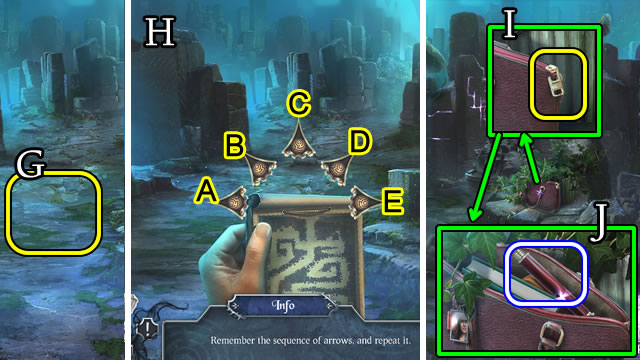
- Solution. 1-7.
- Take GARDENING SHOVEL.
- Return to Botanical Garden.
- Use GARDENING SHOVEL; take 2/2 COAT OF ARMS (U).
- Use MATCH; take HAIRPIN (V).
- Use PHOTO HALF (W).
- Solution (X).
- Take CAR TILE.
- Return to My Room.
- Use CAR TILE (Y).
- Solution (Z). Ax4-B-Cx3-E.
- Take LABORATORY KNIFE.
- Use HAIRPIN (A).
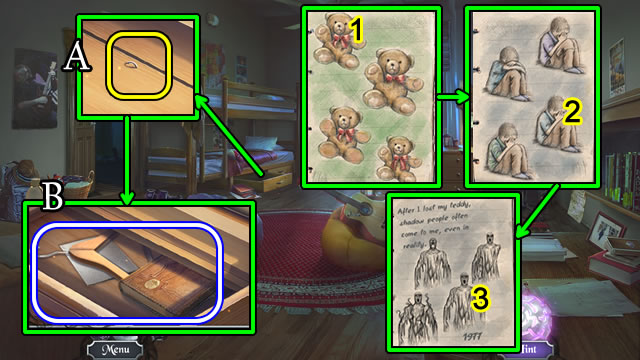
- Take DIARY, HANGER and TISSUE (B).
- DIARY; select 1-3; take NOTE.
- Go down.
- Use ANTI-RUST SPRAY and TISSUE (C).
- Take note, BRUSH and PLAQUE (D).
- Go (E).
- NOTE for TAPE.
- Use TAPE; open; select lever (F).
- Take CUP (G).
- Use BRUSH (H).
- Solution (I).
- Take note and SEALED SARDINES.
- Go down.
- Place CUP; press; take CUP OF HOT COFFEE (J).
- Go (K).
- Use CUP OF HOT COFFEE; take KNOB (L).
- Go to Common Room.
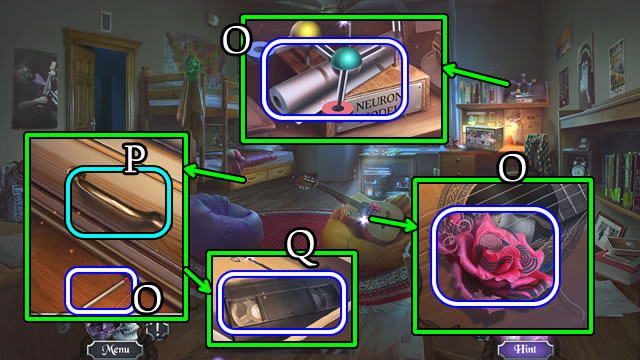
- Use VIDEOTAPE and KNOB (M).
- Take NEURON MODEL HALF (N).
- Return to Dormitory Yard.
- 2/2 COAT OF ARMS on PLAQUE.
- Solution for SCHOOL PLAQUE (O).
- Scroll down; use SCHOOL PLAQUE (P). Take PLIERS (Q).
- Return to My Room.
- Play HOP (R) for CAN OPENER.
- Use PLIERS; take ASH STATUETTE (S).
- Return to Common Room.
- Place ASH STATUETTE (T).
- Select statuettes; place record and needle. Take PAPER CLIP and NEURON MODEL BALL (U).
- Use LABORATORY KNIFE; take STAINED-GLASS PART (V).
- Return to Dormitory Yard.
- CAN OPENER on SEALED SARDINES for SARDINES.
- Give SARDINES; take STAINED-GLASS PART (W).
- Return to Botanical Garden.
- STAINED-GLASS PART on STAINED-GLASS PART.
- Place STAINED GLASS (X).
- Solution (Y).
- Take WALKIE-TALKIE and TONGS.
- Return to Kitchen.
- WALKIE-TALKIE for ANTENNA.
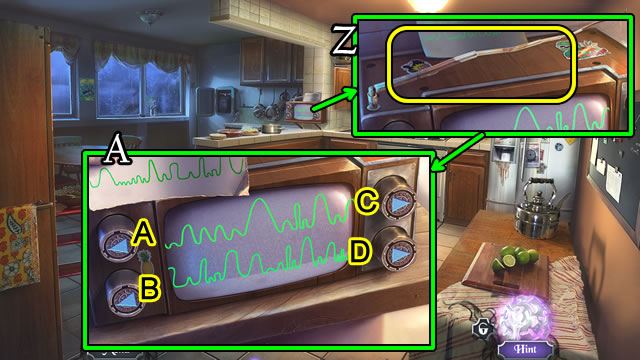
- Use ANTENNA (Z).
- Solution (A). Ax7-Dx4-B-Cx3.
- Take ARROW BUTTON.
- Return to Common Room.
- Use ARROW BUTTON (B).
- Easy solution (C). Ax3-C-Dx2-B-D-C-D-Cx2-Ax3-Bx3-Dx2-Cx2-D-C-A-Bx3-A-Bx2-Dx3-Cx2-Ax4-D-Bx2-Dx2-Cx3.
- Hard solution (D). Cx3-Ax2-B-C-Dx2-Bx3-A-Bx2-Ax2-Cx3-Dx2-B-D-Cx2-D-C-A-Bx3-A-B-A-B-A-C-B-Dx5-Cx2-Ax2-C-A-Bx2-C-Dx3-Bx2-Ax3-Dx2-Cx3.
- Take NEURON MODEL BALL HALF.
- Return to My Room.
- NEURON MODEL BALL and NEURON MODEL BALL HALF on NEURON MODEL PART for NEURON MODEL BALL.

- Use NEURON MODEL BALL (E).
- Solution (F). (F-E)-(H-F)-(J-H)-(L-J)-(B-L)-(D-B)-(F-D)-(H-F)-(J-H)-(L-J)-(B-L)-(D-B)-(B-A)-(F-D)-(D-C)-(E-F)-(F-D)-(D-B)-(H-F)-(F-E)-(J-H)-(H-G)-(L-J)-(J-I)-(B-L)-(L-K).
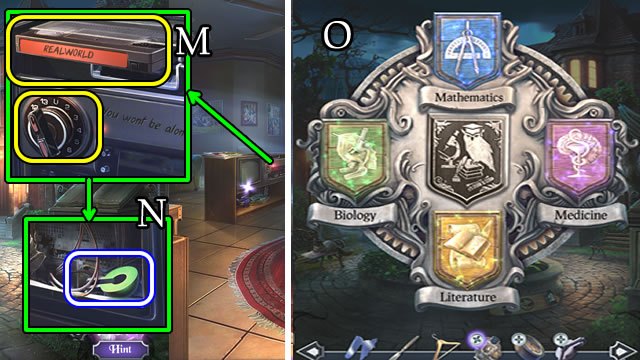
- Take MAP and THIRD MEMORY FRAGMENT.
- Use MAP (G).
- Solutions (H). B-E-C. C-D-A-C. E-C-A-C-D.
- Use PAPER CLIP (I); open; take MAGNIFIER HANDLE (J).
- Go forward.
Chapter 4: Apartment
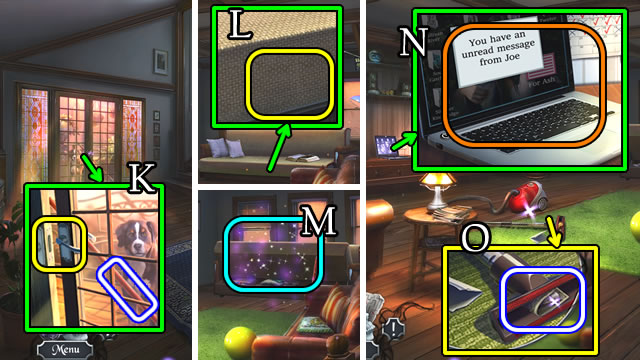
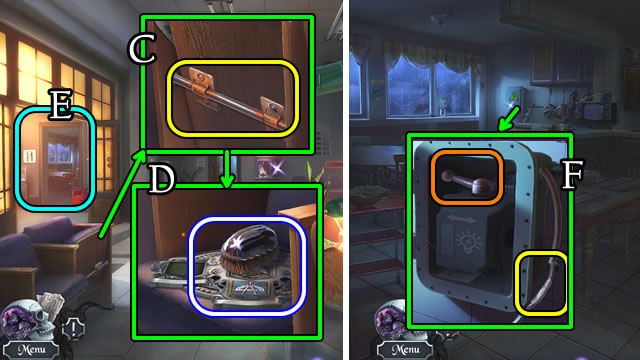
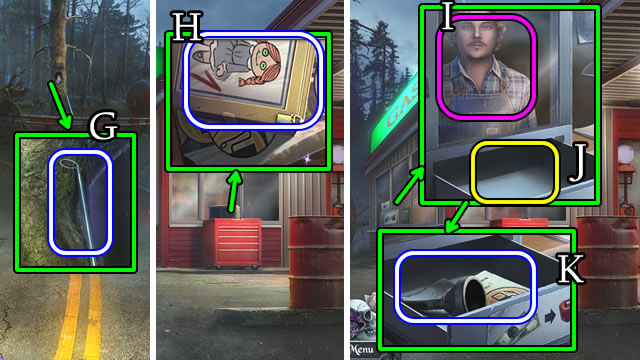
- Use Hanger; take MOP (K).
- Go right.
- Use MOP (L); play HOP (M); receive POTHOLDER.
- Select (N).
- Use TONGS; take BROKEN HEART and 1/2 MONEY (O).
- Go down.
- Take SMOKER; use POTHOLDER (P); take CHICKEN LEG (Q).
- Give CHICKEN LEG (R).
- Go left.
- Take BELLOWS (S).
- BELLOWS on SMOKER for BEE SMOKER.
- Use BEE SMOKER. Take MAGNIFIER LENS (T).
- Go down.
- MAGNIFIER LENS on MAGNIFIER HANDLE for MAGNIFIER.
- Use MAGNIFIER (U).
- Easy solution (V). 1-5.
- Hard solution (W). 1-10.
- Take DIAMOND RING.
- Go left.
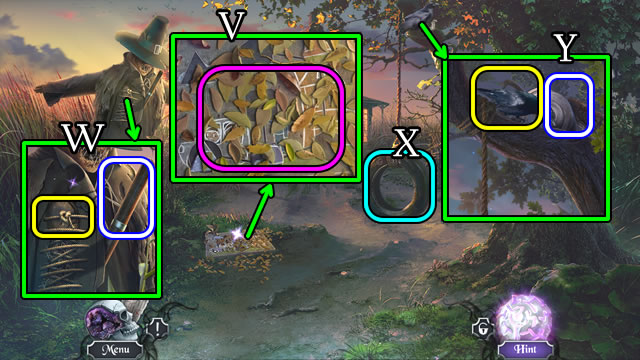
- Use DIAMOND RING: take BROKEN HANDLE (X).
- Move (Y); play HOP (Z); receive ELECTRICAL CORD.
- Return to Attic.
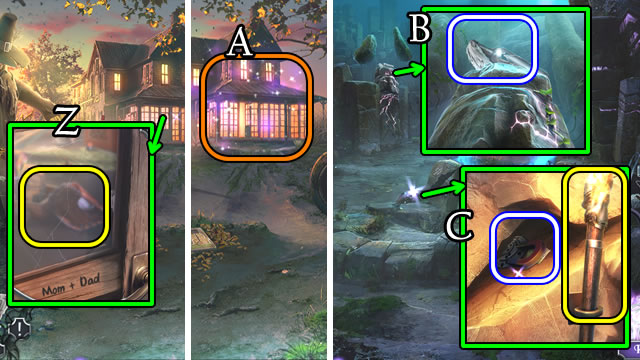
- Remove note; select screen (A); use ELECTRICAL CORD (B). Press (C). Scroll (D). Take BROKEN HEART and CD (E).
- Go down.
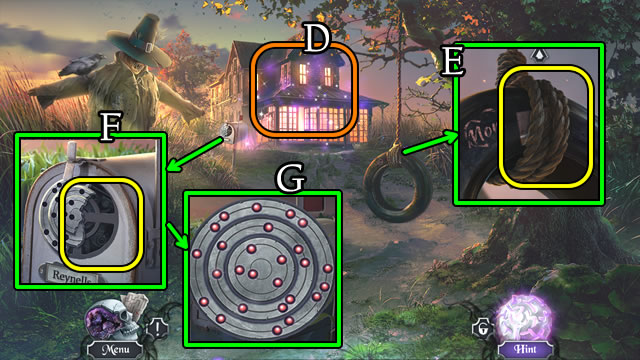
- BROKEN HEART on BROKEN HEART for HEART EMBLEM.
- Use HEART EMBLEM; take HANDLE PART (F).
- Go left.
- Play HOP (G); solution (@); receive JACK.
- HANDLE PART on BROKEN HANDLE for FLOWER HANDLE.
- Use FLOWER HANDLE (H).
- Scroll (I).
- Take STICK (J).
- Hard and easy solutions vary.
- Use JACK (K).
- Solution (L). 1-14.
- Take 1/2 PARCEL BUTTON HALF and DOOR TILE.
- CD for BROKEN CD.
- Use BROKEN CD (@).
- Solution (M). H-G-D-E-B-A-D-E-F-C-B-E-D-G-H-I-F-C-B-E-F.
- Take 2/2 PARCEL BUTTON HALF.
- Use DOOR TILE (N).
- Solution (O). Ax2-D.
- Go forward.
Chapter 5: Village
- Place 2/2 PARCEL BUTTON HALVES (P).
- Solution (Q).
- Take THIN WIRE.
- Take BOARD and PLUMAGE (R).
- Go down.
- PLUMAGE and THIN WIRE on STICK for FEATHER DUSTER.
- Use FEATHER DUSTER; take DAIS TILE (S).
- Go forward.
- Replace DAIS TILE (T).
- Solution (U).
- Take BELT.
- Use BELT; take FOURTH MEMORY FRAGMENT (V).
- Go forward.
- Open; take BRONZE ORNAMENT and 1/2 TILE (W).
- Use BOARD (X); take VILLAGE SIGN (Y).

- Place VILLAGE SIGN (Z).
- Go forward.
- Speak (A).
- Take GAS STATION SIGN and BRANCH (B).
- Place BRONZE ORNAMENT (C); select 1-7; open and take GUM (D).
- Go down.
- GUM for CHEWED GUM.
- CHEWED GUM on BRANCH for BRANCH WITH GUM.
- Use BRANCH WITH GUM; receive 2/2 MONEY (E).
- Place GAS STATION SIGN (F).
- Go right.
- Take HUNTING SNARE (G).
- Attempt to go right.
- Hard and easy solutions vary.
- Go right.
- Take BOX (H).
- Speak (I); give 2/2 MONEY (J).
- Take DISCOUNT and FUNNEL (K).
- Return to Village Square.
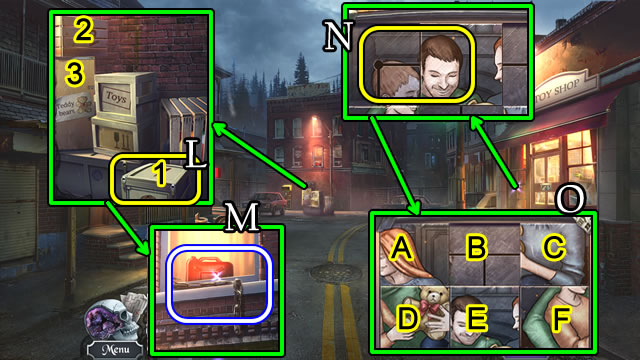
- Place BOX (L); select 1-3; take GAS CAN and CHAIN (M).
- DISCOUNT for 2/2 TILE.
- Place 2/2 TILES (N).
- Solution (O). A-D-E-F-C-B-A-D-E-B-A.
- Play HOP (P); receive HANDLE.
- Return to Gas Station.
- FUNNEL on GAS CAN for GAS CAN WITH FUNNEL.
- Place GAS CAN WITH FUNNEL; scroll right; take FULL GAS CAN (Q).
- Place HANDLE (R).
- Solution (S).
- Take CHAINSAW and SCRAPER.
- Go down.
- Use FULL GAS CAN (T).
- Place CHAIN; use CHAINSAW (U).
- Go forward.
- Take PUMP HANDLE (V).
- Return to Village Square.
- Play HOP (W); receive AMBULANCE KEY.
- Use PUMP HANDLE; take GUN TILE (X).
- Return to The Accident.
- Use AMBULANCE KEY (Y); play HOP (Z); receive NEEDLE.
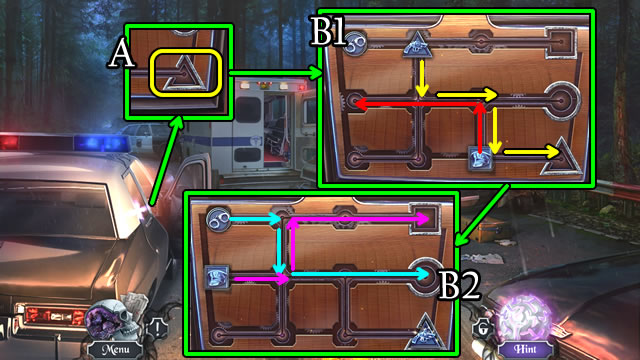
- Place GUN TILE (A).
- Solution (B1-B2).
- Take BAG OF NUTS.
- Go down.
- BAG OF NUTS for NUT.
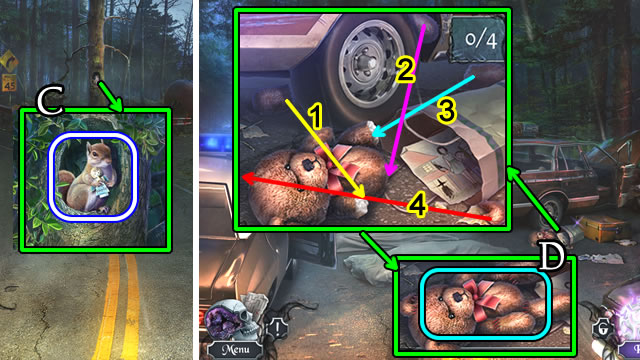
- Give NUT; receive THREAD and SQUIRREL (C).
- Go forward.
- NEEDLE on THREAD for THREAD WITH NEEDLE.
- Place 1-4; use THREAD WITH NEEDLE; select (D) for FIFTH MEMORY FRAGMENT. Uncover and take Picture in bag.
Chapter 6: Cemetery
- Take GRAPPLING CROSSBOW; use HUNTING SNARE (E).
- Solution (F).
- Take CLOSED BAG.
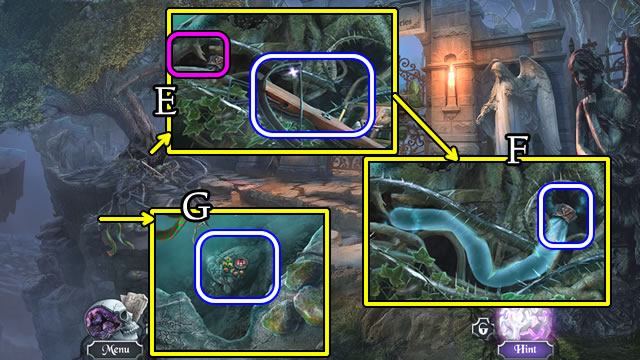
- Use SQUIRREL; receive GATE TILE (G).
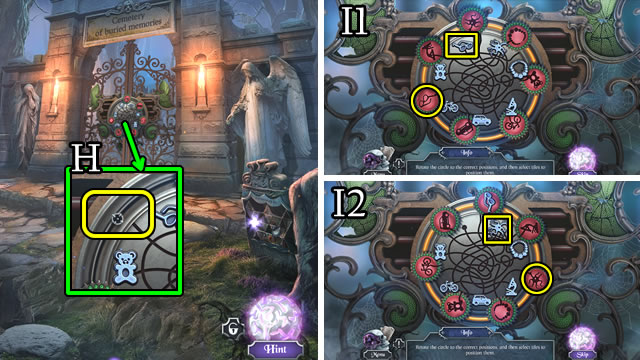
- Place GATE TILE (H).
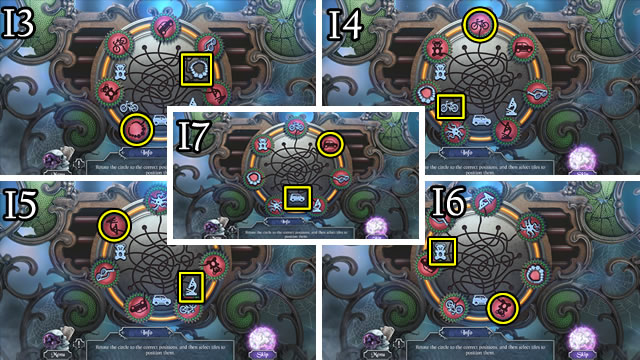
- Solution (I1-I7).
- Go forward, then left.
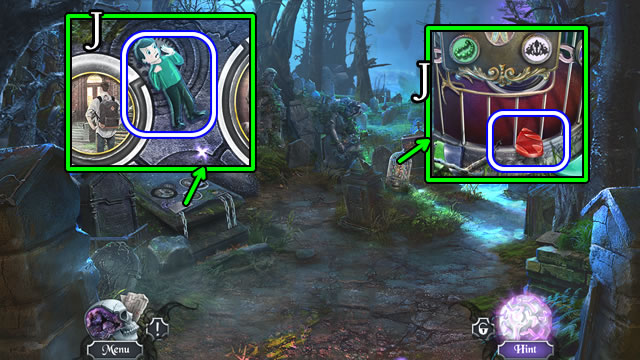
- Take BOY FIGURINE and MEDALLION PARTS (J).
- Go down.
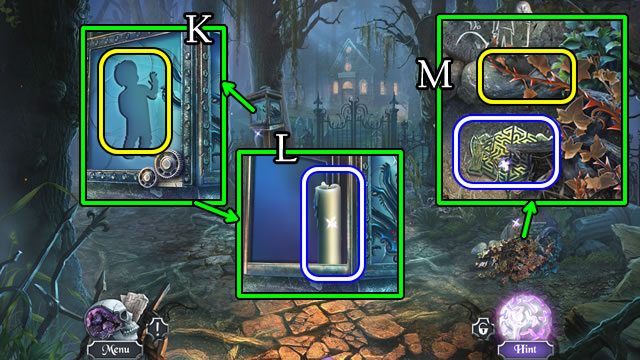
- Use BOY FIGURINE (K); take CANDLE (L).
- CLOSED BAG for FLINT.
- FLINT on CANDLE for LIT CANDLE.
- Use LIT CANDLE; take GATE EMBLEM (M).
- Go forward.
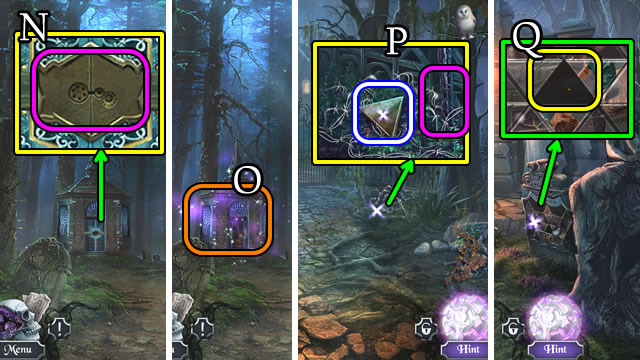
- Place GATE EMBLEM (N); play HOP (O); receive ACID.
- Go down.
- Use ACID; take PICTURE TILE (P).
- Go down.
- Place PICTURE TILE (Q).
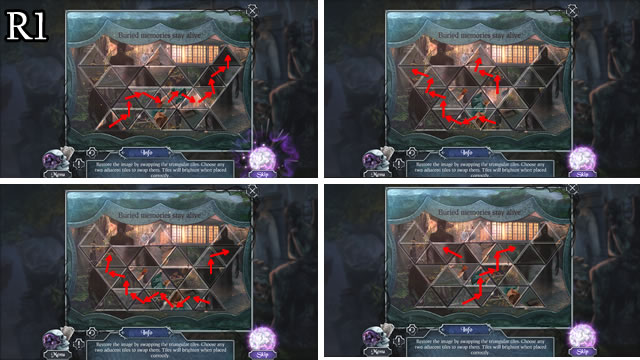
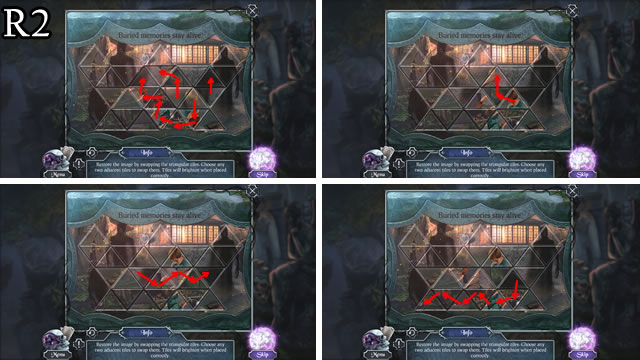
- Solution (R1-R2).
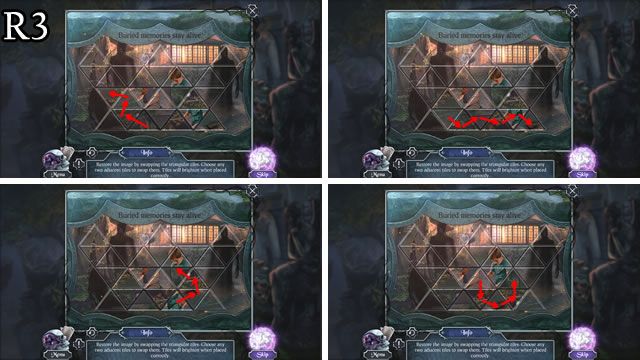

- Solution (R3-R4).
- Take BABY TOKEN.
- Return to Old Church.
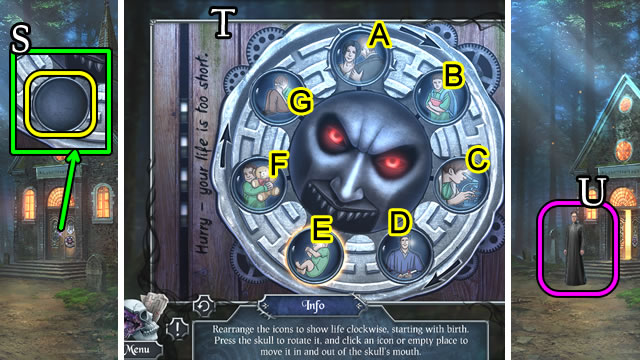
- Place BABY TOKEN (S).
- Solution (T). E-A-G-C-E-F-B-D-F.
- Speak (U); receive CAGE LOCK PART.
- Return to Cemetery.
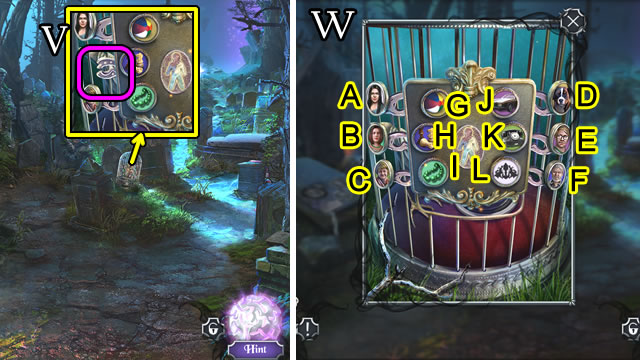
- Place CAGE LOCK PART (V).
- Solution (W). (I-B)-(G-D)-(H-F)-(K-C)-(L-A)-(J-E).
- Take METAL DISC.
- Easy solution (X). G-F-E-D-F-C-B-A-E-B-D-C-G.
- Hard solution (Y). G-D-H-L-I-E-H-K-M-F-A-D-B-E-C-J-O-L-N-K-G.

- Place MEDALLION PARTS (Z); select 1-5; take SLIDER (A).
- Use SCRAPER (B); play HOP (C); receive an ARROW.
- ARROW on GRAPPLING CROSSBOW for LOADED GRAPPLING CROSSBOW.
- Use LOADED GRAPPLING CROSSBOW (D).
- Go forward.
- Place METAL DISK; solution (E).
- Take 1/3 STONE CARVING.
- Return to Old Church.
- Play HOP (F); receive STONE PLATE.
- Place SLIDER (G).
- Solution (H). (F-K)-(E-M)-(J-S)-A-(L-H)-(N-F)-(Q-P)-(R-J)-A-(Q-R)-(N-Q)-(R-I).
- Take 2/3 STONE CARVING.
- Return to Crypt.
- Place STONE PLATE (I).
- Solution (J).
- Take 3/3 STONE CARVING.
- Go forward 2x.
- Place 3/3 STONE CARVINGS (K).
- Solution (L1-L2).
- Go forward.
- Select (M).
- Solution (N). C-D-A-B-C-E.
- SECOND, THIRD, FOURTH and FIFTH MEMORY FRAGMENTS on MEMORY FRAGMENTS.
- Place MEMORY FRAGMENTS (O).
- Solution (P).
- Congratulations. You've completed playing Sable Maze: Nightmare Shadows.
Created at: 2017-10-08