

Walkthrough Menu
- General Tips
- Chapter 1: University
- Chapter 2: Buildson's Office
- Chapter 3: Christine
- Chapter 4: Stadium
- Chapter 5: Bey Lee
- Chapter 6: Observatory
- Chapter 7: Alex
- Chapter 8: Buildson
General Tips
- This is the official guide for Sable Maze: Norwich Caves.
- This guide will not mention each time you have to zoom into a location; the screenshots will show each zoom scene.
- We will use the acronym HOP for Hidden-object puzzles. Interactive items will be color-coded and some will be numbered; please follow the numbers in sequence.
- The HOP lists may be random; our lists may vary from yours.
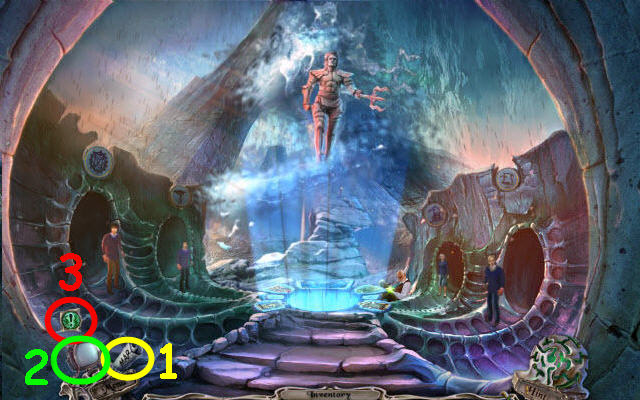
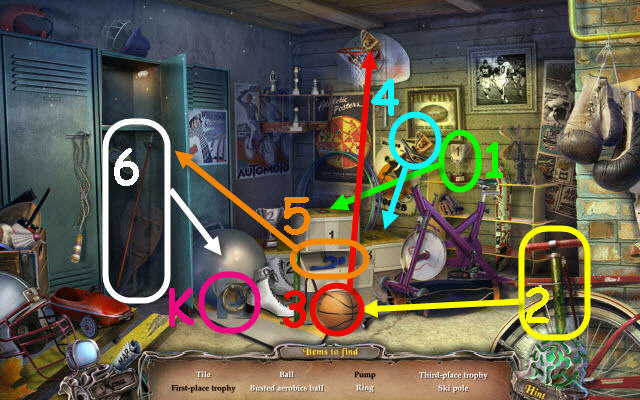
- Use the map (1) to travel to a location.
- You can view the videos from the game on the TV screen (2).
- Select the exclamation mark to see your current task (3).
Chapter 1: University
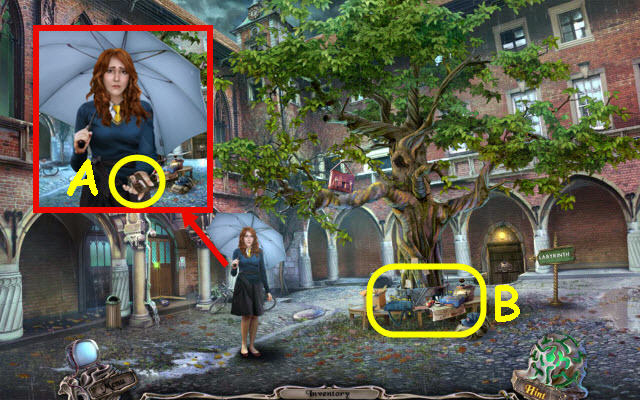
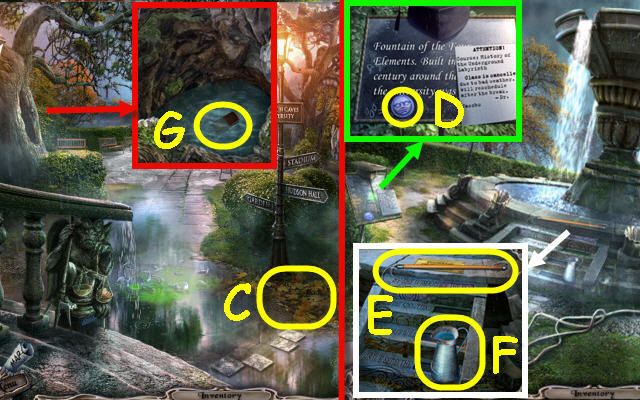
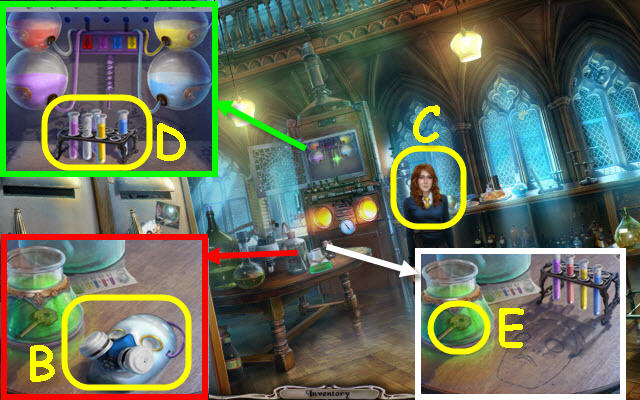
- Speak to Diana; take the PHOTO FRAGMENT (A).
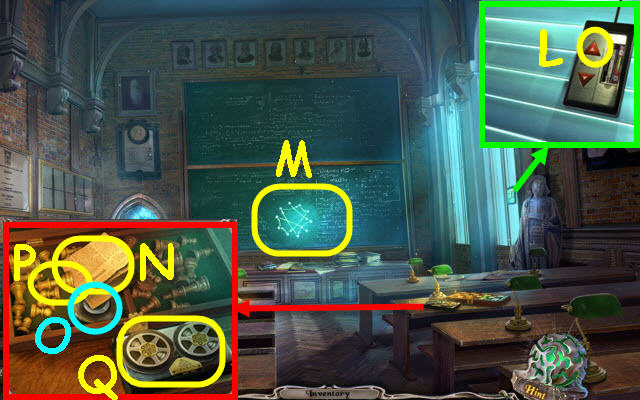
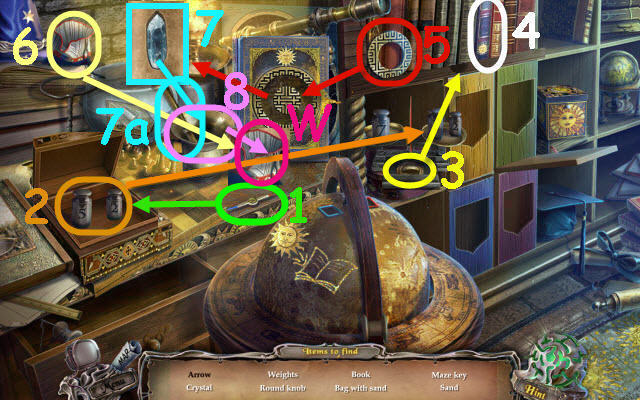
- Examine the bench to access a HOP (B).
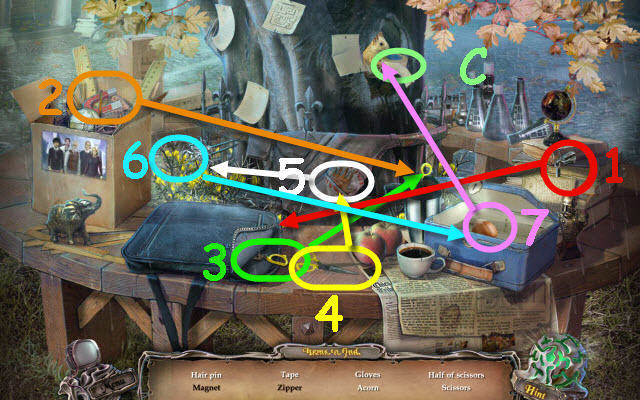
- Play the HOP.
- You receive a TAPE ROLL (C).
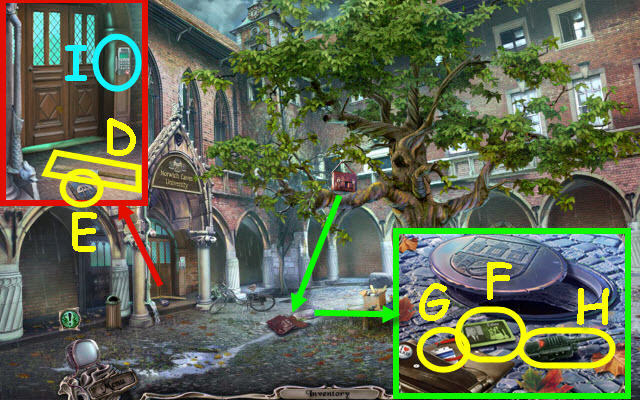
- Use the TAPE ROLL on the yardstick; take the YARDSTICK (D) and MATHEMATICS SHIELD (E).
- Use the YARDSTICK on the bag; take FABER'S CARD (F) and ID CARD (G).
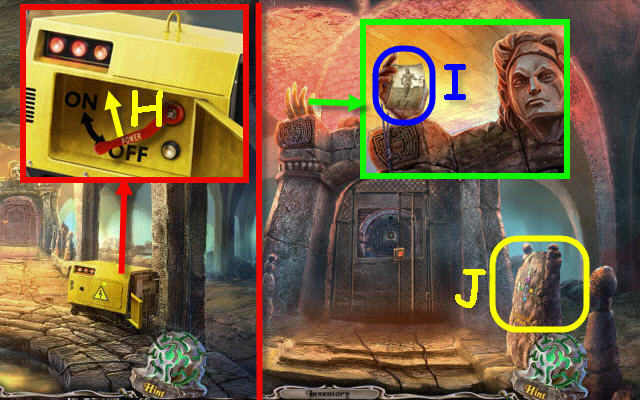
- Remove the manhole cover; select the walkie-talkie (H).
- Use the ID CARD on the panel (I).
- Enter the building.
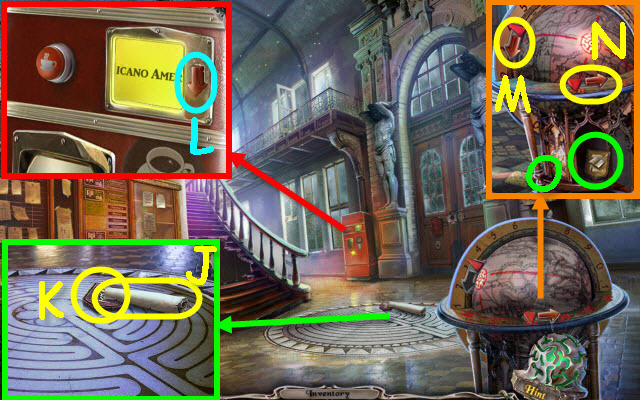
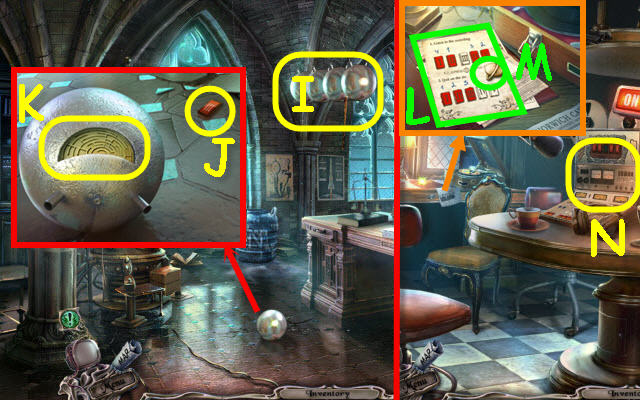
- Take the map (J), which will now be located on the bottom left of your toolbar.
- Take the MEDICINE SHIELD (K).
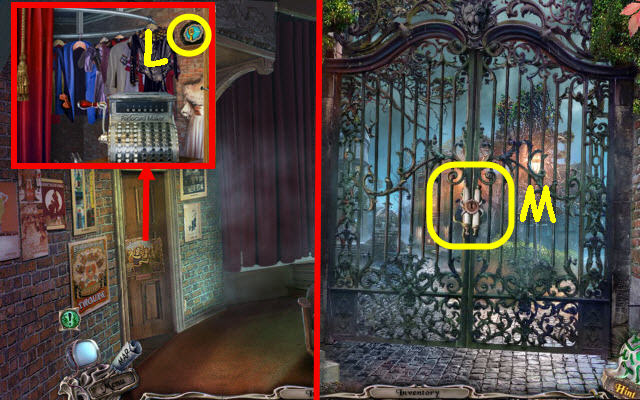
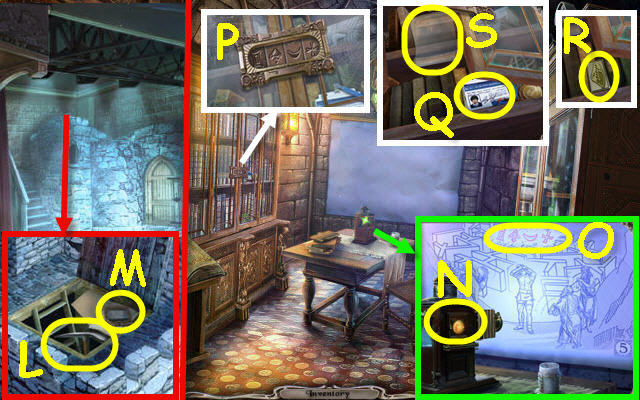
- Take the BUTTON (L).
- Place the BUTTON in the left slot. Select it twice (M) and the right facing arrow (N) once.
- Select the glowing area on the globe; take the LITERATURE SHIELD (O).
- Back out.
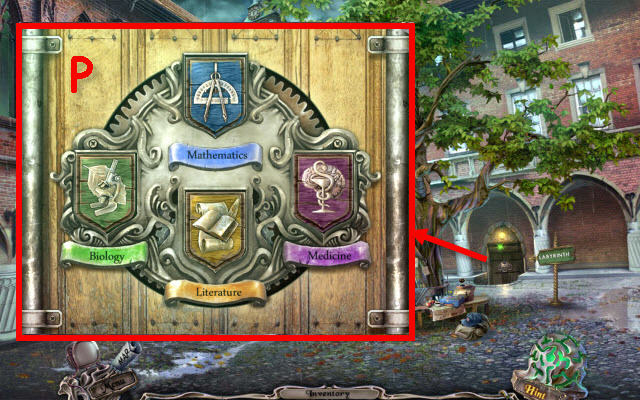
- Place the MATHEMATICS SHIELD, LITERATURE SHIELD and MEDICINE SHIELD in their matching slot (P).
- Enter the cellar.
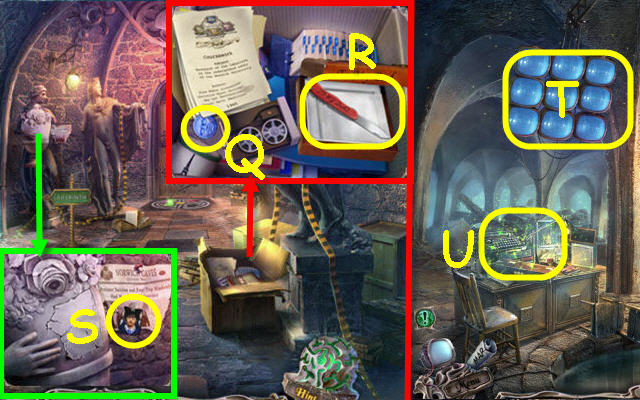
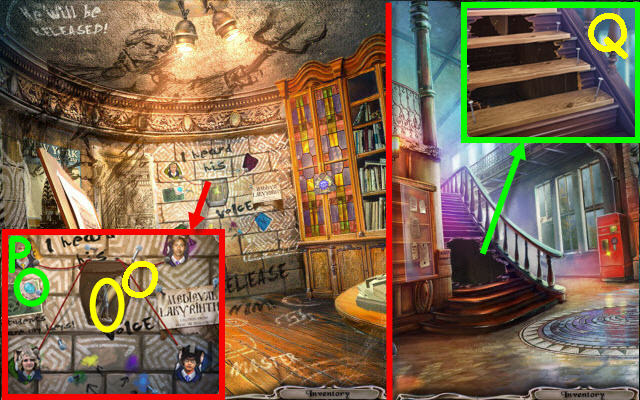
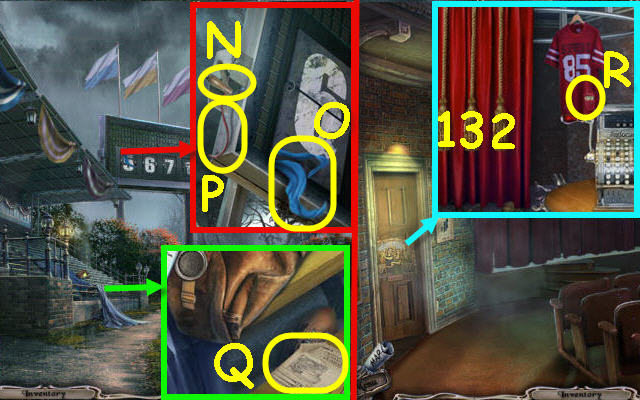
- Select the papers; take the FACE TOKEN 1/3 (Q).
- Place the PHOTO FRAGMENT on the box; take the KNIFE (R).
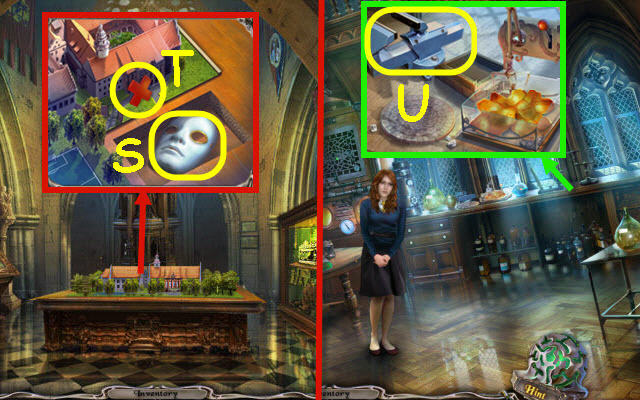
- Take the STUDENT PHOTOS 1/3 (S).
- Go left.
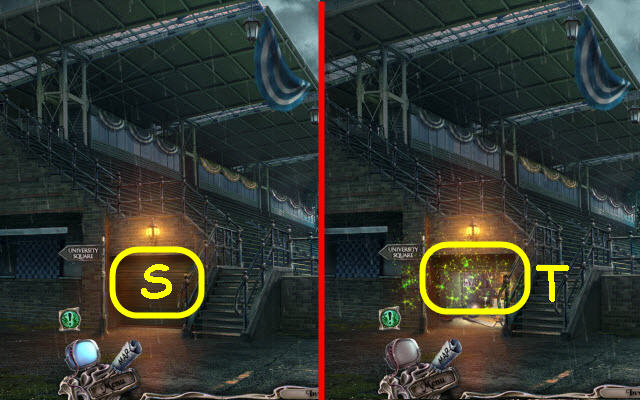
- Select the monitors twice (T).
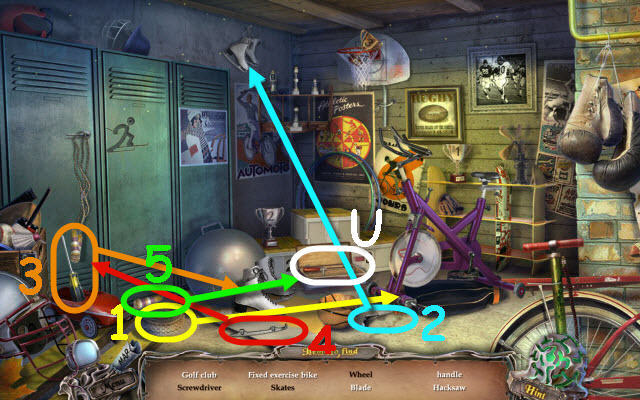
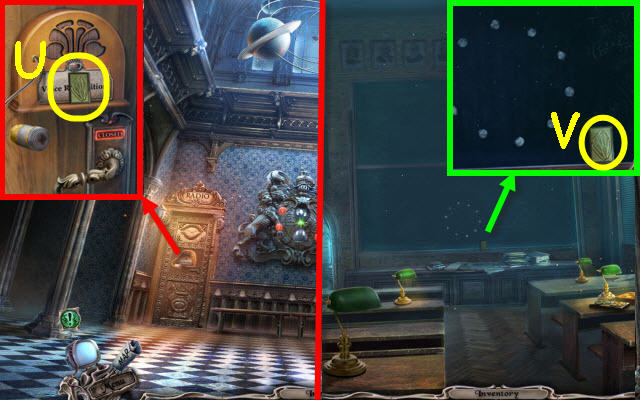
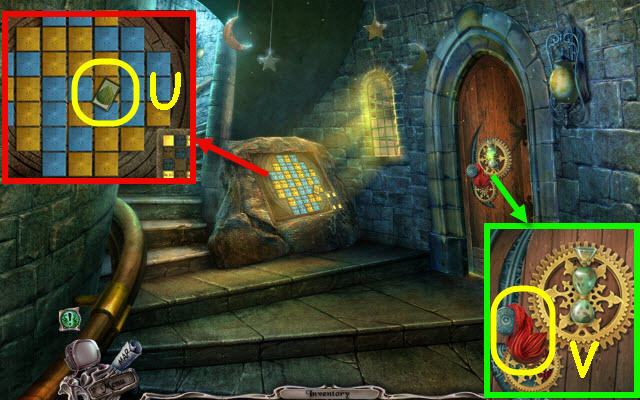
- Examine the desk to access a HOP (U).
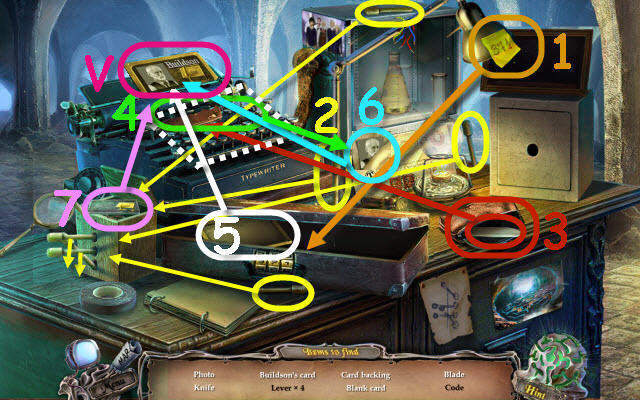
- Play the HOP.
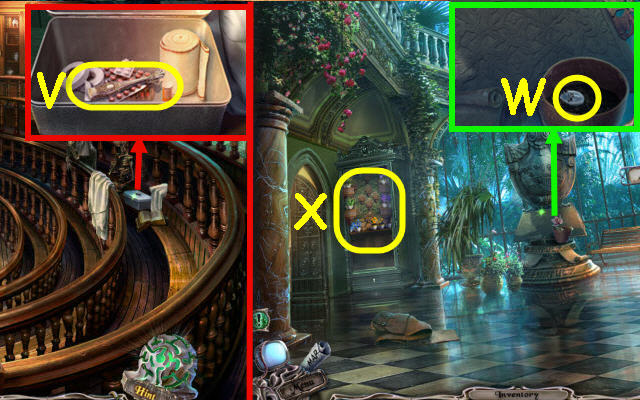
- You receive BUILDSON'S CARD (V).
- Go to Hudson Hall.
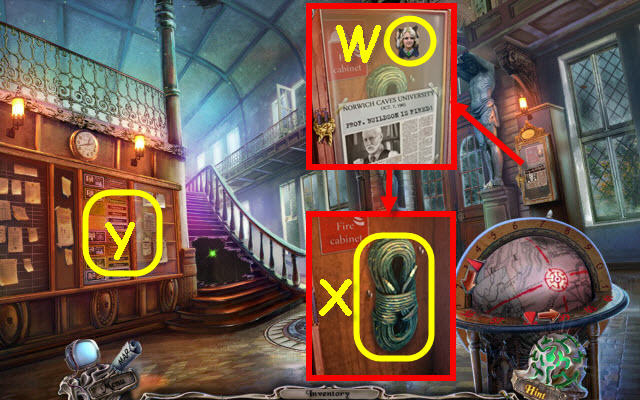
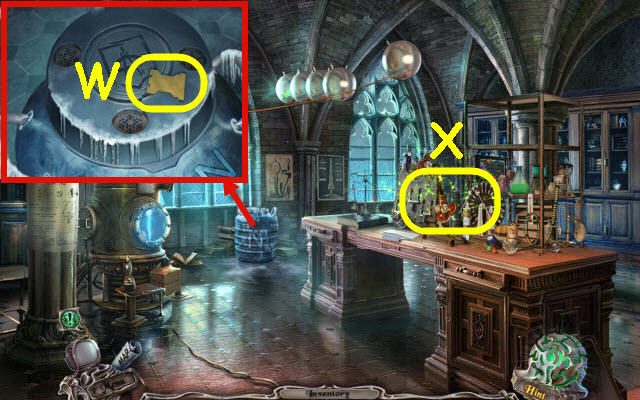
- Take the STUDENT PHOTOS 2/3 (W).
- Use the KNIFE on the rope and remove it; take the ROPE (X).
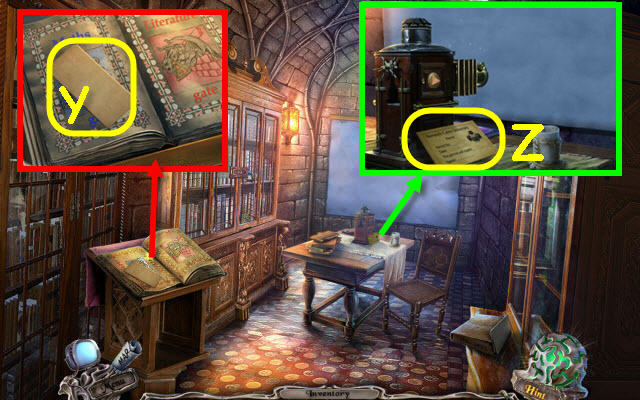
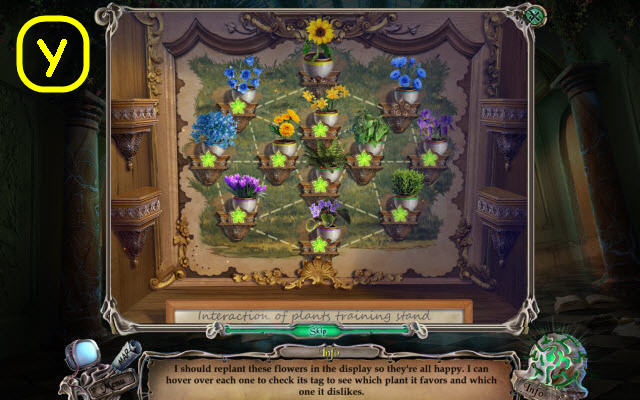
- Place FABER'S CARD and BUILDSON'S CARD on the board to trigger a puzzle (Y).
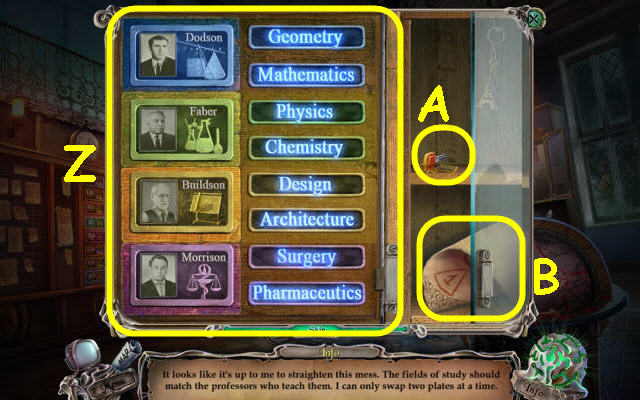
- Arrange the classes on the right to match the professor's on the left.
- The starting placement is random.
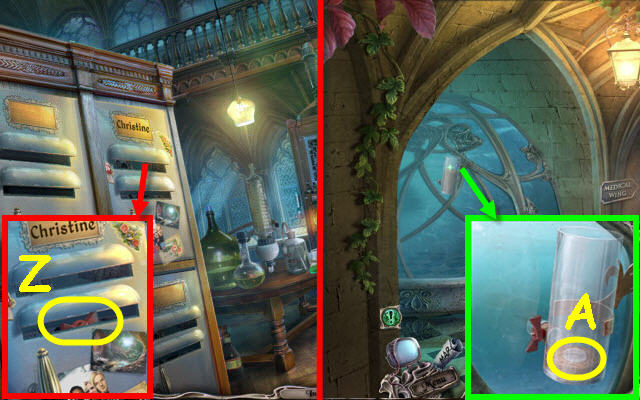
- See screenshot for solution (Z).
- Take the KEY (A) and PAPER (B).
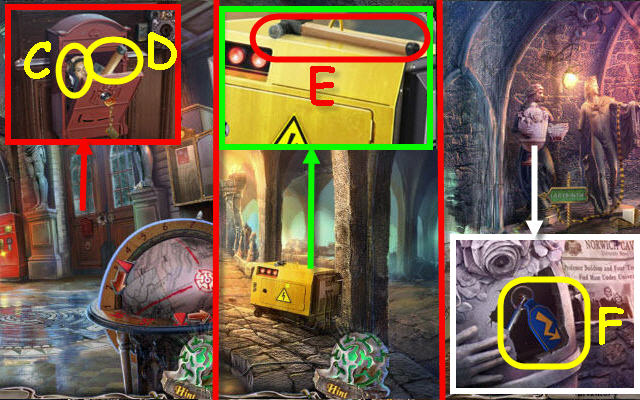
- Use the KEY on the mailbox and turn it. Take the STUDENT PHOTOS 3/3 (C) and HANDLE (D).
- Go to the basement.
- Place the HANDLE on the hammer head. Take the HAMMER (E).
- Back out.
- Use the HAMMER on the vase. Take the KEY (F).
- Go left.
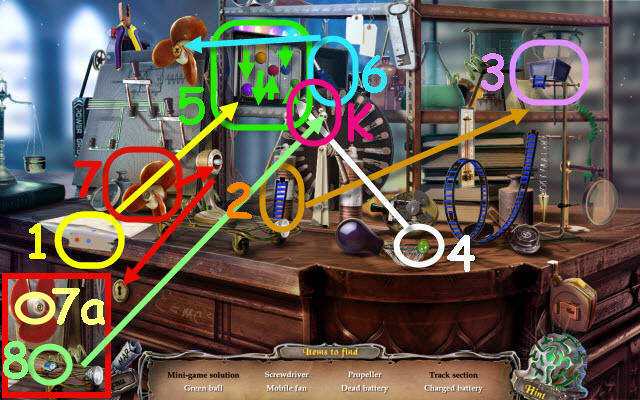
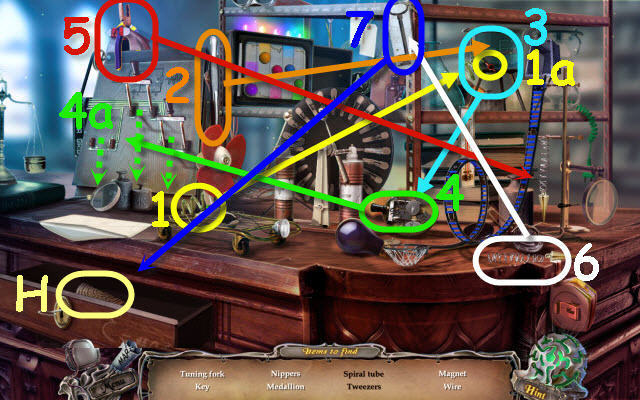
- Examine the desk to access a HOP.
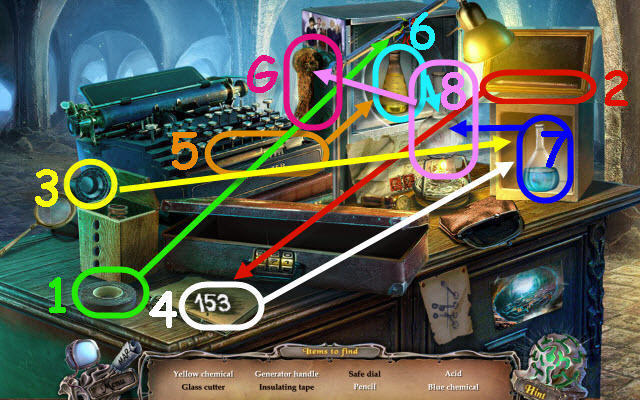
- Play the HOP.
- You receive a GENERATOR HANDLE (G).
- Use the KEY in the generator lock and turn it. Place the GENERATOR HANDLE on the stem and move it (H).
- Go forward.
- Use the ROPE on the hand; take the PHOTO (I).
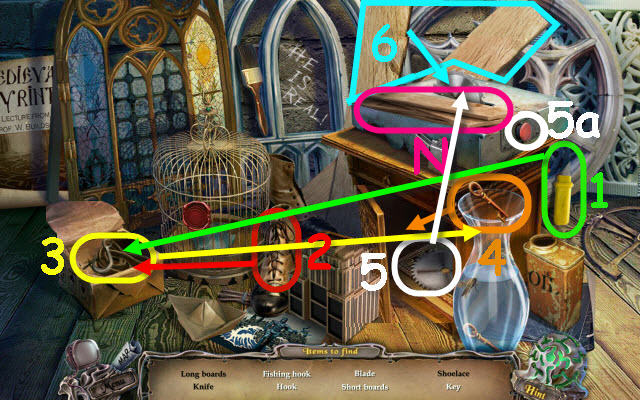
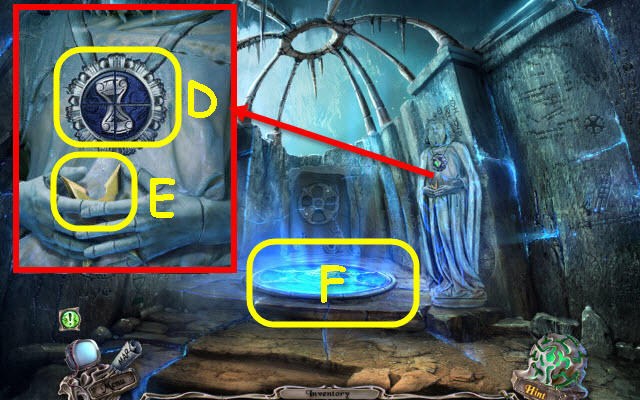
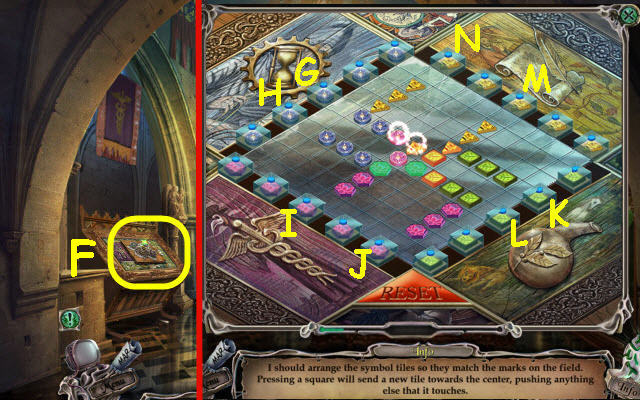
- Examine the stone to trigger a puzzle (J).
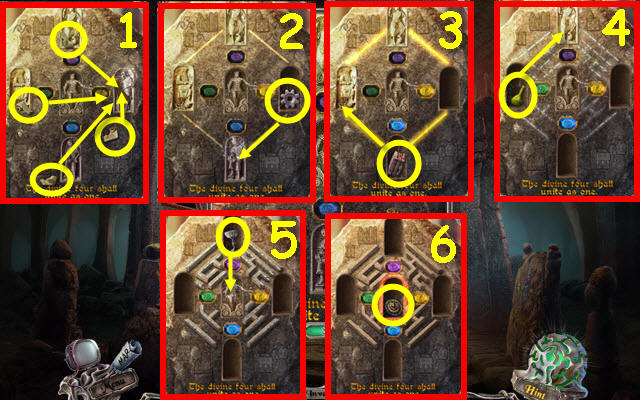
- Give the founder's the items they are missing.
- See screenshot for solution (1-6).
- You receive a TILE.
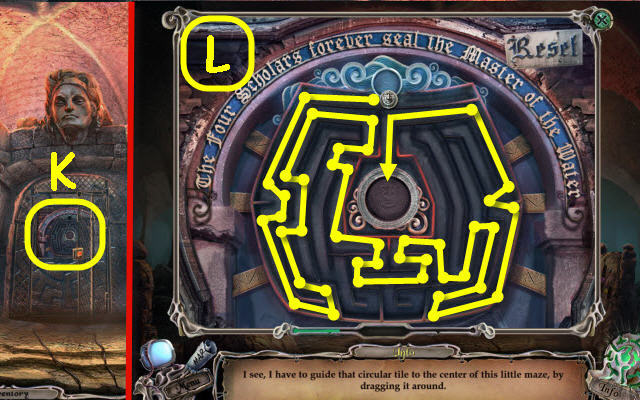
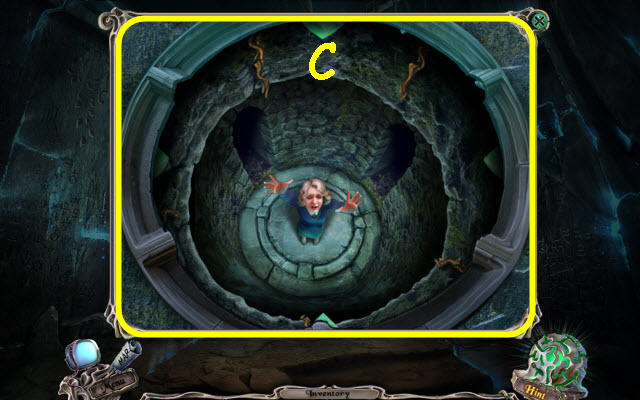
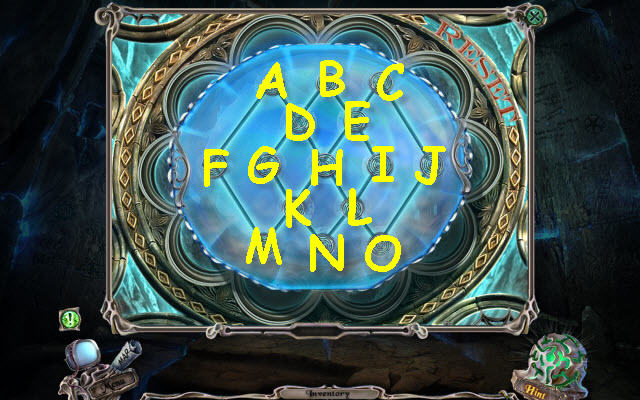
- Place the TILE on the door to trigger a puzzle (K).
- Guide the token to the center of the maze.
- See screenshot for solution (L).
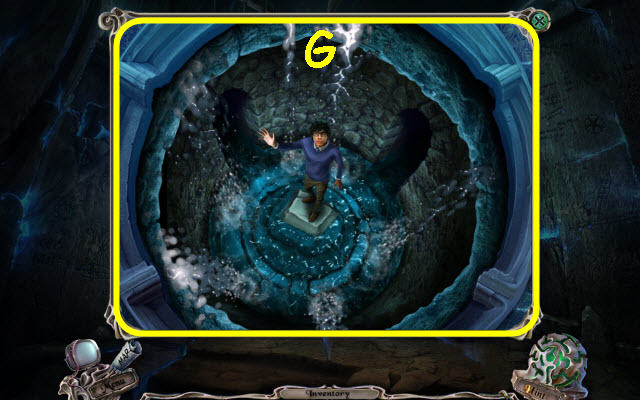
- Go forward.
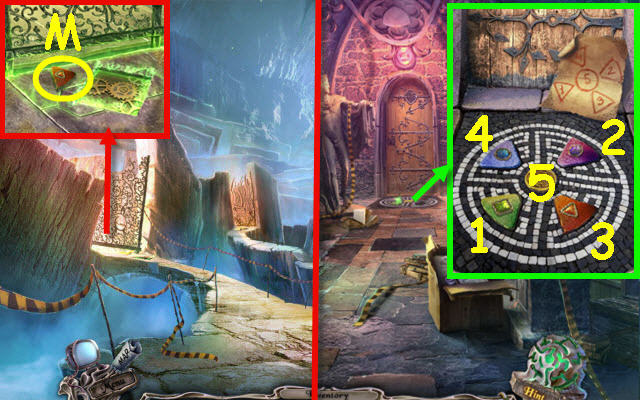
- Take the RED STONE (M).
- Go to the Cellar.
- Examine the tiles and the PAPER will automatically go on it. Place the RED STONE in the slot and select the stones as listed (1-5).
- Go forward.
Chapter 2: Buildson's Office
- Examine the window frames to trigger a HOP.
- Play the HOP.
- You receive BOARDS (N).
- Place the PHOTO in the master recess and 3 STUDENT PHOTOS on the sides; take the STATUETTE (O).
- Use the HAMMER on the wall to get the NAILS (P) and examine the scroll.
- Go to Hudson Hall.
- Use the BOARDS, NAILS and HAMMER on the stairs (Q).
- Go upstairs.
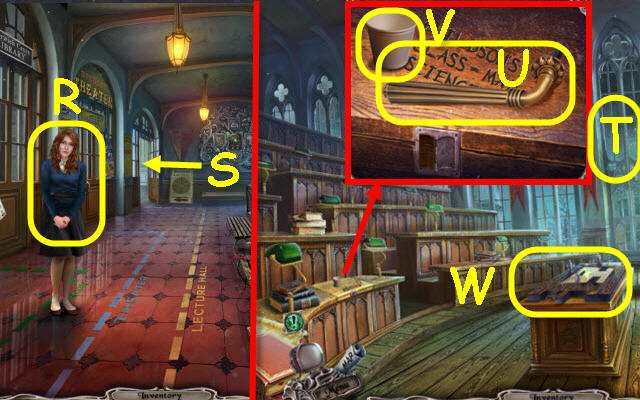
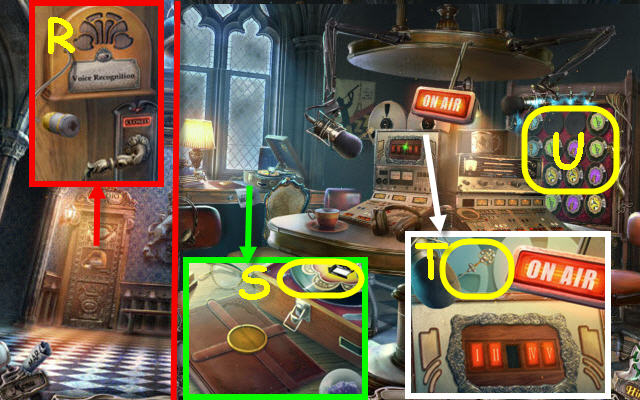
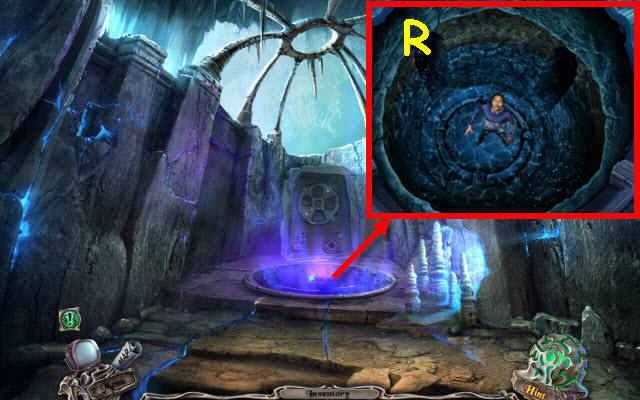
- Speak to Diana (R).
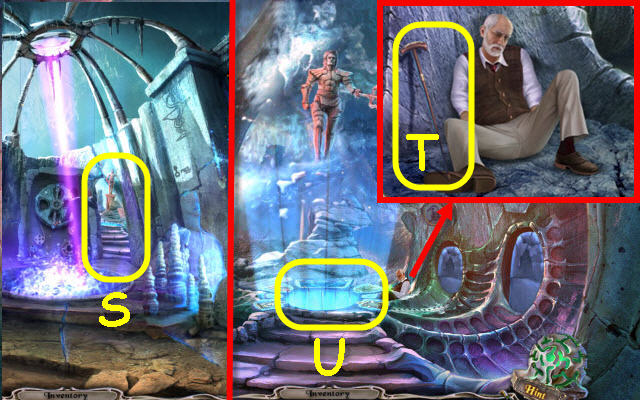
- Go through the door (S).
- Select the window (T).
- Take the BOLT HANDLE (U) and CUP (V).
- Place the STATUETTE on the table to trigger a puzzle (W).

- Cover all the squares with the statue.
- Select the squares in numerical order and by the following colors: Yellow, green, blue, red and cyan (X).
- Take the FACE TOKEN 2/3 and DIAMOND.
- Go to Hudson Hall.
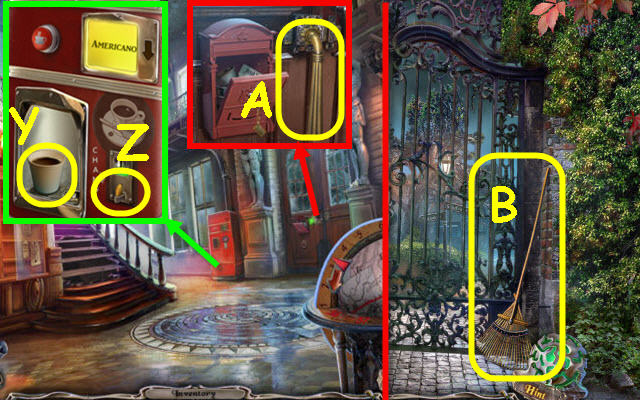
- Place the CUP in the holder; press the red button. Take the CUP OF COFFEE (Y) and QUARTER 1/2 (Z).
- Place the BOLT HANDLE on the door; turn it (A).
- Go through the door. Go forward up the right path.
- Take the RAKE (B).
- Back out.
- Use the RAKE on the leaves (C).
- Go up on the left path.
- Take the FACE TOKEN 3/3 (D).
- Take the LOOP GRABBER (E) and PITCHER OF WATER (F).
- Back out.
- Use the PITCHER OF WATER in the tree hollow; take the LOCK PART (G).
- Go to Lecture Hall.
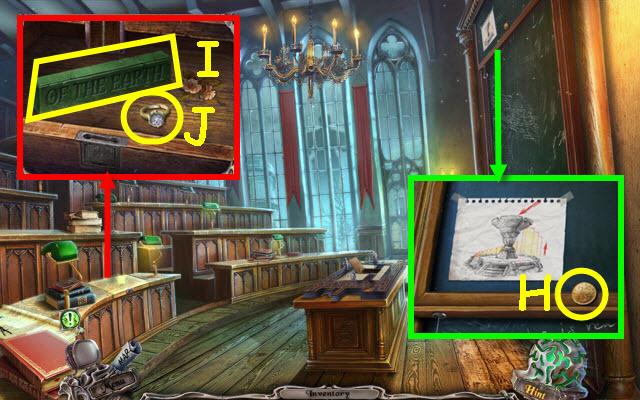
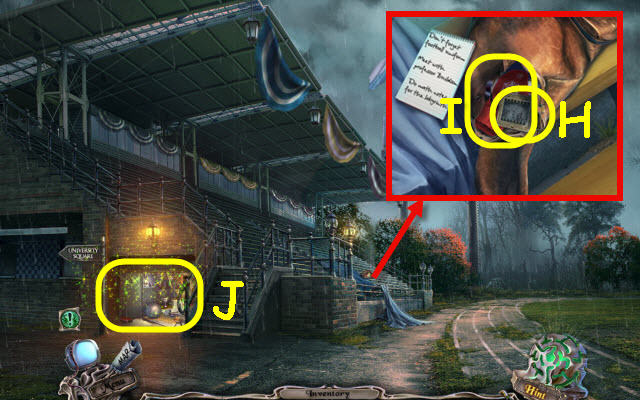
- Use the LOOP GRABBER on the hook. Take the QUARTER 2/2 (H) and examine the diagram.
- Use the LOCK PART on the desk and select it. Place the DIAMOND in the ring; take the EARTH TILE (I), and DIAMOND RING (J).
- Back out.
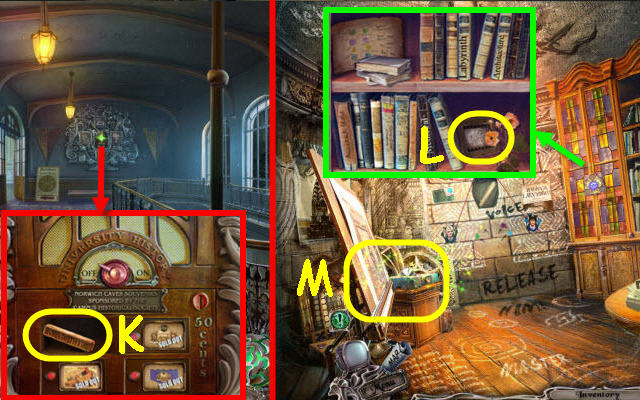
- Place the 2 QUARTERS in the coin slot. Open the upper left compartment. Take the FIRE TILE (K).
- Go to Buildson's Office.
- Place the 3 FACE TOKENS on the cabinet lock. Take the SLIDE 1/5 (L) and read the diagram.
- Examine the window frames to access a HOP (M).
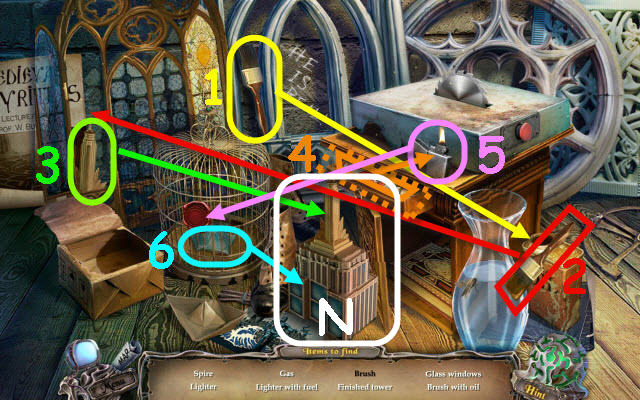
- Play the HOP.
- You receive the TOWER TOP (N).
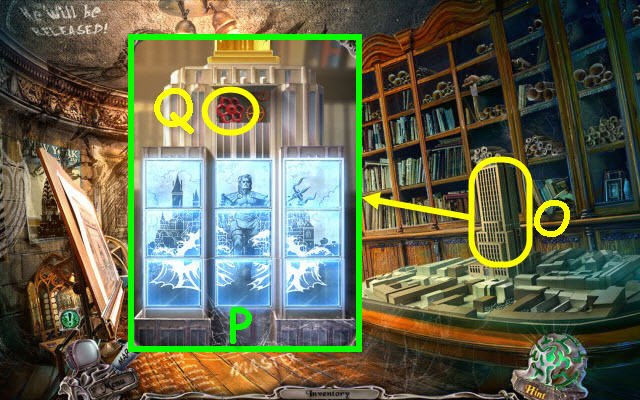
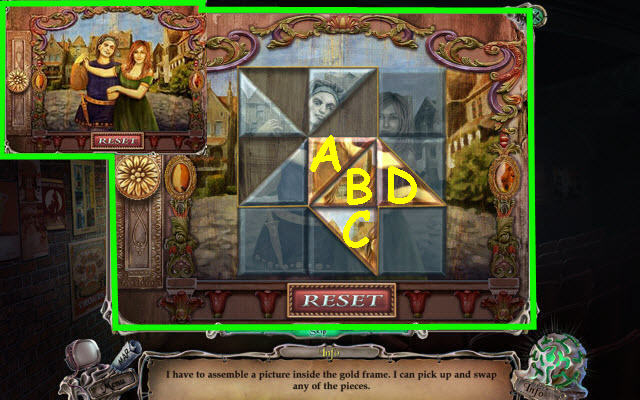
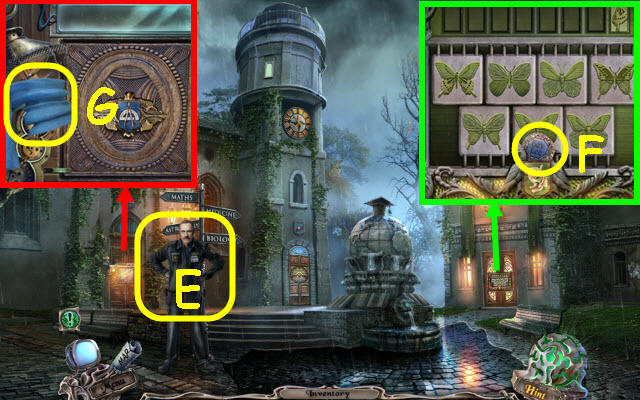
- Place the TOWER TOP on the building to trigger a puzzle (O).
- Swap the tiles to complete the image (P).
- Take the VALVE (Q).
- Go to the Fountain.
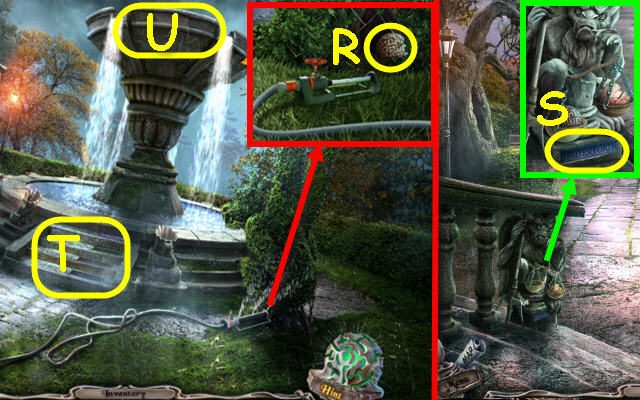
- Place the VALVE on the sprinkler stem and turn it. Take the STONE LABYRINTH (R).
- Back out.
- Place the STONE LABYRINTH on the scale; take the WATER TILE (S).
- Return to the Fountain.
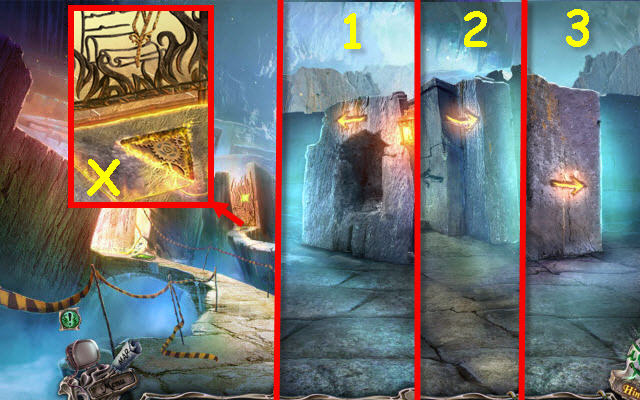
- Place the FIRE TILE, EARTH TILE and WATER TILE on the steps (T).
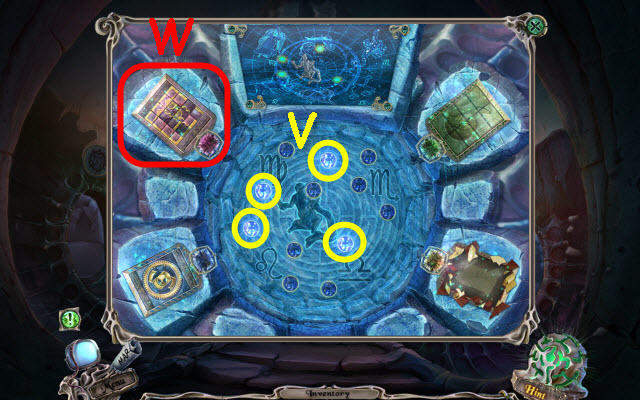
- Examine the fountain to trigger a puzzle (U).
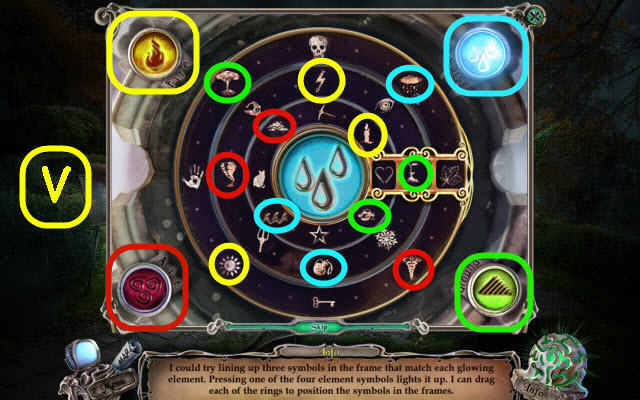
- Line up the correct symbols to match the lit element.
- See screenshot for matching elements (V).
- You receive an ORNATE TILE.
- Go to the Labyrinth.
Chapter 3: Christine

- Examine the left gate and place the ORNATE TILE in the recess (W).
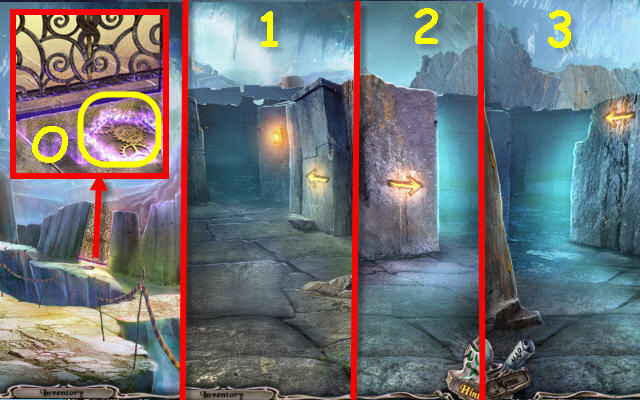
- Go left three times (1-3).
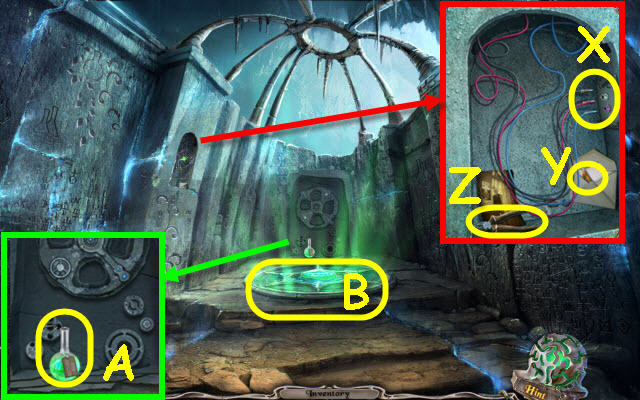
- Select the wires and connect them (X).
- Open the envelope; take the MOSAIC PART (Y) and read the note.
- Take the NIPPERS (Z) and examine the picture.
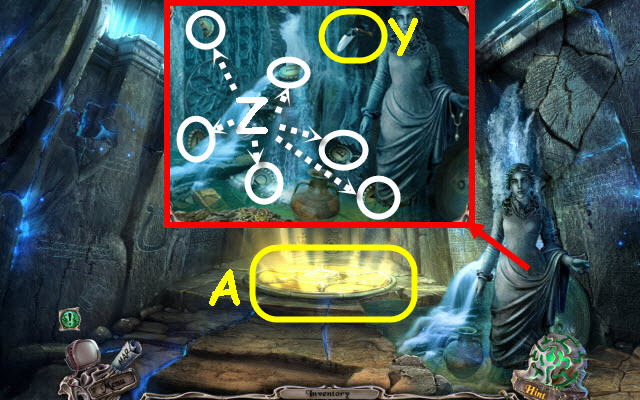
- Take the GROWTH FORMULA (A).
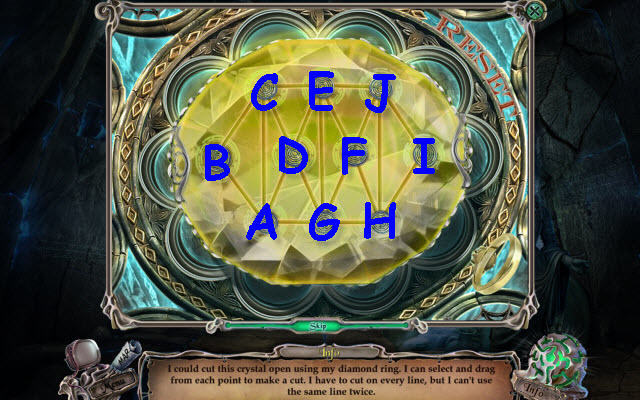
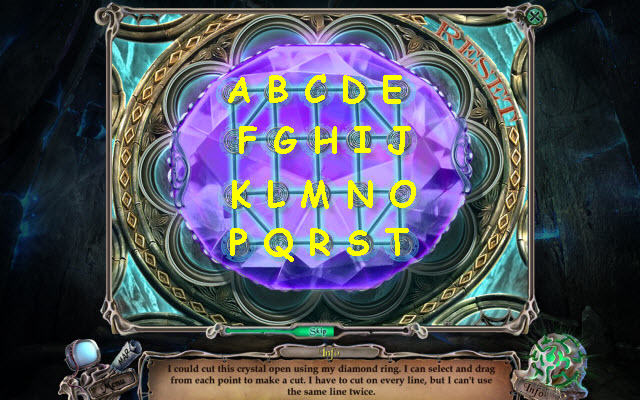
- Use the DIAMOND RING on the crystal to trigger a puzzle (B).

- Follow all the lines.
- Select the following connectors: C, A, B, C, D, B, E, D, F, E, G, F and C.
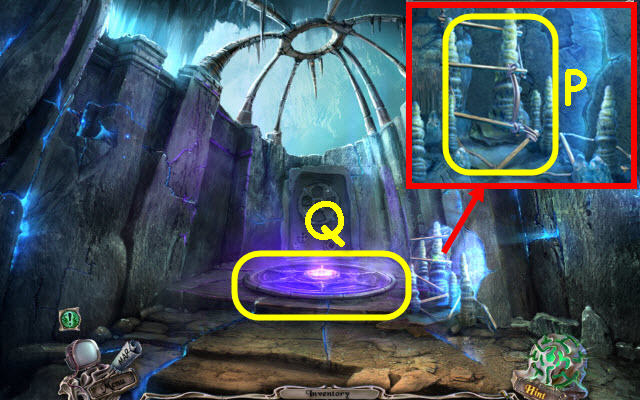
- Use the GROWTH FORMULA in the well (C).
- Go to the 2nd Floor.
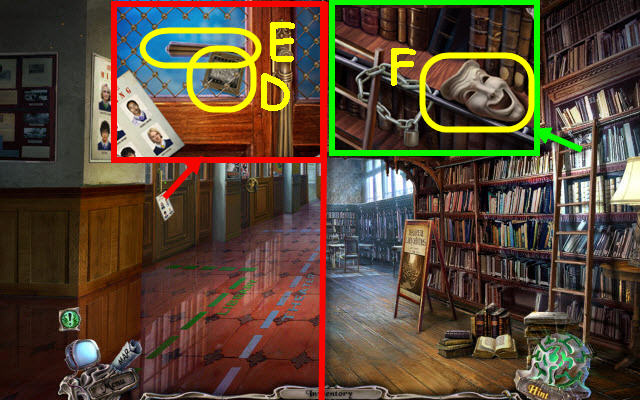
- Use the NIPPERS on the door wire and take the SLIDE 2/5 (D).
- Turn the handle (E).
- Enter the library.
- Take the MASK (F).
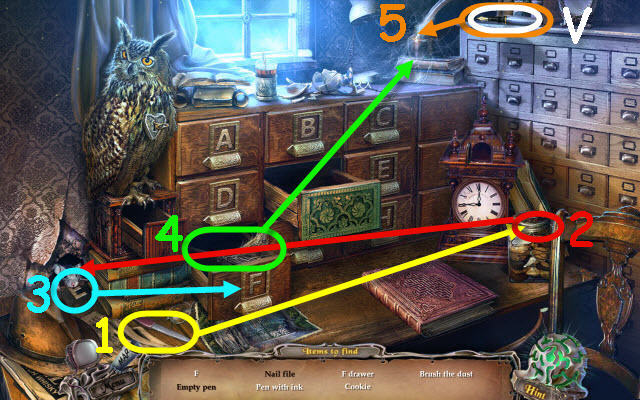
- Examine the desk to trigger a HOP.
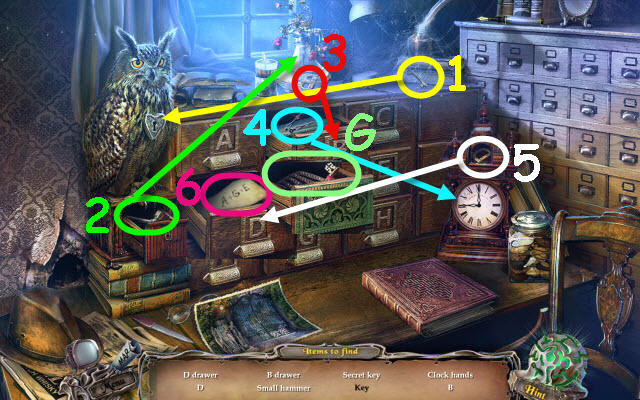
- Play the HOP.
- After you get the code (6) you need to close all the drawers and then open the A, G and E drawers.
- You receive the SCROLL KEY (G).
- Back out.
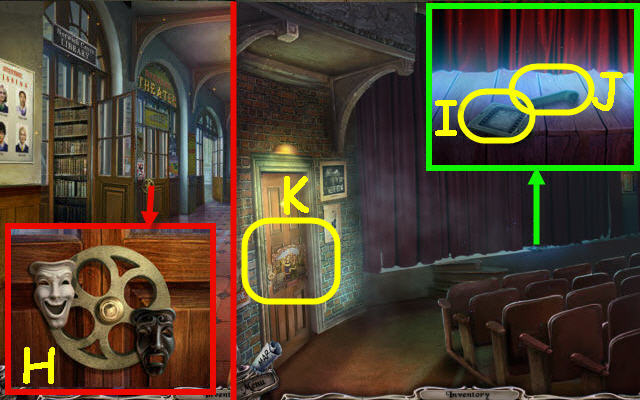
- Place the MASK on the door (H).
- Enter the Theater.
- Take the SLIDE 3/5 (I) and HANDLE (J).
- Place the MOSAIC PART on the door to trigger a puzzle (K).
- Move the puzzle pieces to their proper places.
- Select the following tiles and arrows: A, left, B, left, C, up, left, B, right, up, D and left.
- Take the RECORD (L).
- Go to the Yard.
- Use the SCROLL KEY in the lock; turn the key (M).
- Go forward to the stadium on the right.
Chapter 4: Stadium
- Place the HANDLE on the lever box and pull it (N).
- Take the SCARF (O).
- Use the NIPPERS to get the WIRE (P).
- Take the SCHEME (Q).
- Go to the Theater.
- Examine the door; you will automatically apply the SCHEME. Pull the ropes (1-3); take the CONTROL PANEL (R).
- Return to the Stadium.
- Use the CONTROL PANEL on the door (S).
- Examine the opened door to access a HOP (T).
- Play the HOP.
- You receive the HACKSAW (U).
- Go to the Library.
- Examine the desk to access a HOP.
- Play the HOP.
- Find and use the items in the order listed.
- You receive the PEN (V).
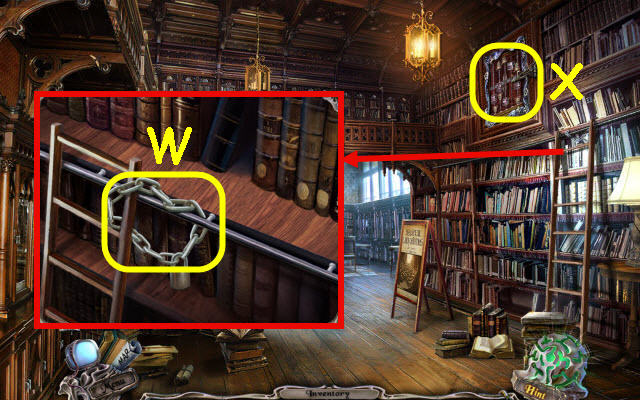
- Use the HACKSAW on the chain (W).
- Examine the door panel to trigger a puzzle (X).
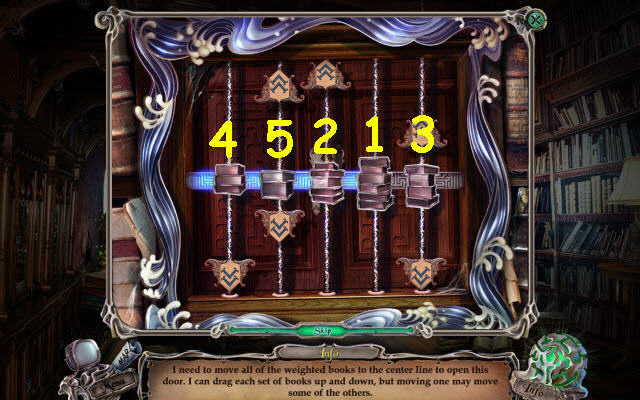
- Arrange all the books in a row.
- Move the books to the center bar in the order marked (1-5).
- Go through the secret door.
- Take the BLANK PUNCHCARD (Y).
- Select the blank pass and use the PEN on it to get a PASS (Z).
- Go to the Theater.
- Place the BLANK PUNCHCARD in the top of the maker. Pull the handle; take the PUNCHCARD (A).
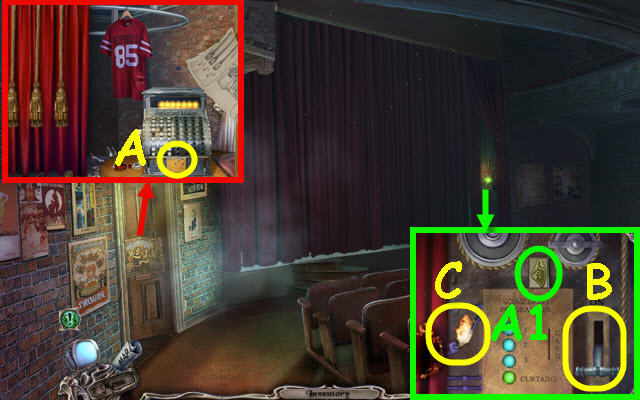
- Take the TILE 1/7 (A1).
- Place the PUNCHCARD in the card slot and pull up the lever (B).
- Use the CUP OF COFFEE on the fire (C). Use the WIRE on the burnt wire; pull up the lever.

- Take the TRIDENT (D).
- Go to the Yard. Go up the left path to the Square.
- Give the PASS to the officer (E).
- Take the TILE (F).
- Use the SCARF on the bulb. Take the LIGHT BULB (G).
- Go right to the Stadium.
- Place the Bey Lee TILE on the bag lock. Open the bag; take the SLIDE 4/5 (H) and MITTEN (I).
- Examine the locker room to access a HOP (J).
- Play the HOP.
- You receive a RING (K).
- Go to the Theater.
- Place the RING on the latch. Open the hatch; take the CLIMBING PICK (L).
- Open the book; take the SLIDE 5/5 (M).
- Go to the Hidden Niche.
- Open the side projector panel and place the LIGHT BULB inside (N).
- Place the 5 SLIDES on it and select the button to scroll through the 5 slides; observe the code (O).
- Enter the code from the slide on the cabinet lock (P).
- Take the ID CARD (Q), TILE 2/7 (R) and TRACING PAPER (S).
- Go to the Square.
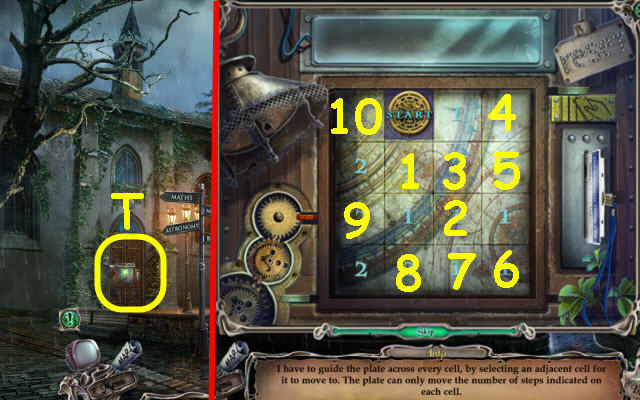
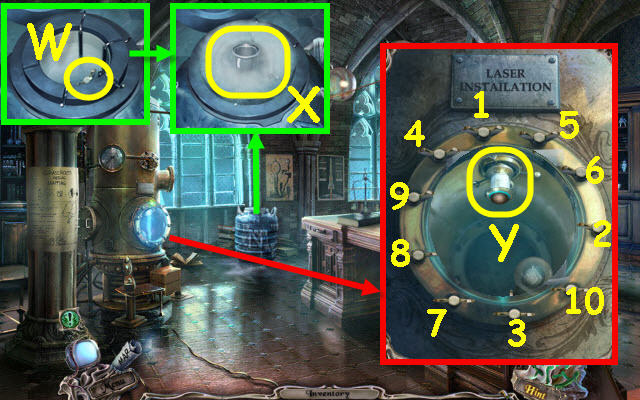
- Use the ID CARD in the slot of the door to trigger a puzzle (T).
- Move the plate across all the cells.
- Select the squares in the order listed (1-10).
- Go through the door.
Chapter 5: Bey Lee
- Take the TILE 3/7 (U).
- Go forward through the door on the right.
- Examine the chalkboard; take the TILE 4/7 (V).
- Go through the door on the rear left.
- Take the KEY (W).
- Examine the desk to access a HOP (X).
- Play the HOP.
- You receive a BATTERY (K).
- Back out.
- Place the BATTERY on the controls; push the up button (L).
- Place the TRACING PAPER on the chalkboard. Use the PEN on the paper to get INSTRUCTIONS (M).
- Use the KEY on the chessboard. Take the CHESS GAME (N), AUDIOTAPE (O) and CHESS PIECE (P).
- Place the AUDIOTAPE on the RECORDER (Q) and take it.
- Back out.
- Use the RECORDER on the door (R).
- Go through the door.
- Take the 2nd RECORD (S).
- Take the PIN (T).
- Place the 2 RECORDS on the wall to trigger a puzzle (U).
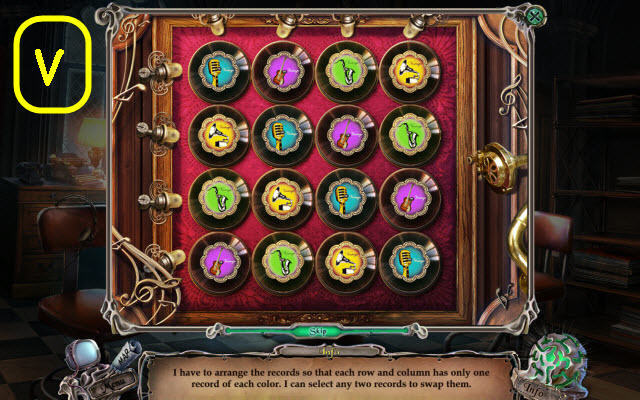
- Arrange the records so no two of the same are in a row or column.
- See screenshot for solution (V).
- Take the SNOWFLAKE KEY.
- Go to the Physics Classroom.
- Use the SNOWFLAKE KEY on the tank lid. Use the MITTEN to get the BULB WITH NITROGEN (W).
- Take the VALVE (X).
- Examine the portal and you will automatically place the INSTRUCTIONS on it. Place the VALVE on it and turn the valves as shown; take the LASER (Y).
- Go to Larner Hall.
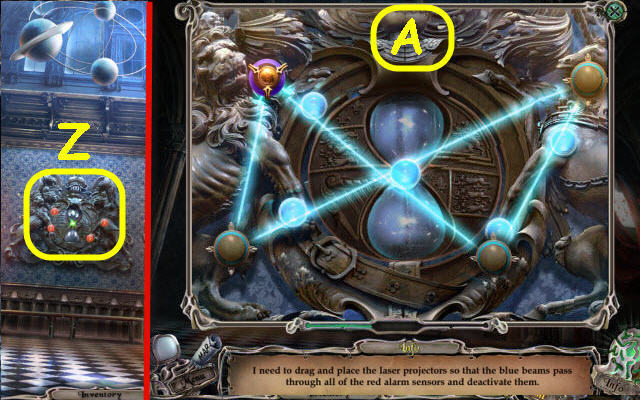
- Place the LASER on the coat of arms to trigger a puzzle (Z).
- Move the lasers so it passes through the sensors.
- See screenshot for solution (A).
- Take the ORNATE TILE.
- Go to the Labyrinth.
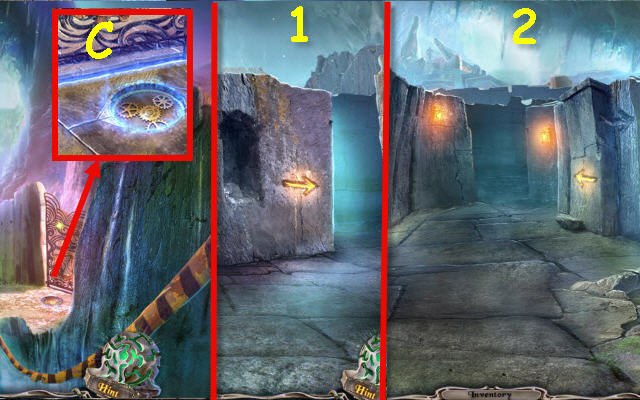
- Examine the right gate and place the ORNATE TILE in the recess (C).
- Enter the labyrinth.
- Go right and then straight (1-2).
- Select the medallion pieces to turn them and complete the image (D).
- Take the THROWING STAR (E).
- Use the DIAMOND RING on the crystal to trigger a puzzle (F).
- Follow all the lines once.
- To solve the puzzle, select the following connectors: A, F, M, K, G, D, H, K, N, L, H, E, I, L, O, J, C, E, B, D and A.
- Use the BULB WITH NITROGEN and then the CLIMBING PICK in the well (G); you will receive an AQUARIUS.
- Go to the Physics Classroom.
Chapter 6: Observatory
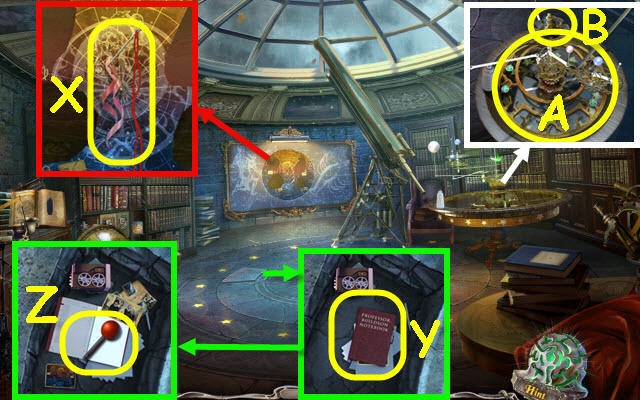
- Examine the desk to access a HOP.
- Play the HOP.
- You receive a MEDALLION 1/2 (H).
- Use the THROWING STAR on the balls (I).
- Take the BUTTON (J).
- Use the PIN to get the MEDALLION 2/2 (K).
- Go to the University Radio Station.
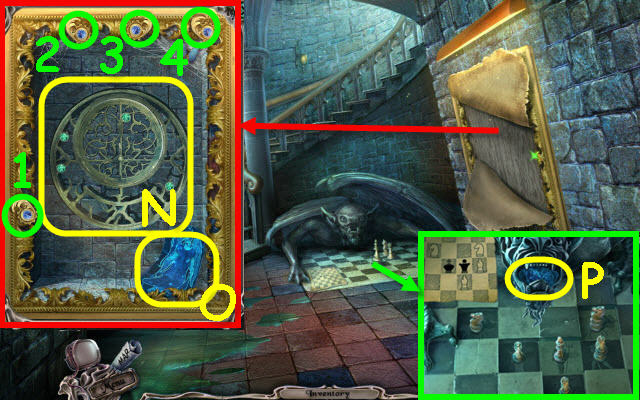
- Place the MEDALLION on the diary cover. Take the PAPER (L) and PLANET TILE (M).
- Examine the controls and you will automatically place the PAPER on it. Place the BUTTON on it to trigger a puzzle (N).
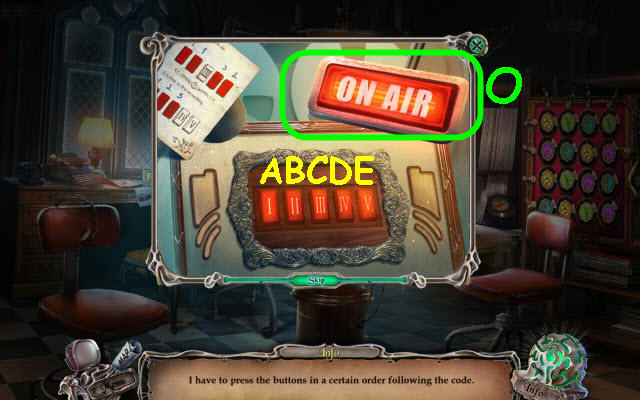
- Press the buttons in the correct order.
- Select the buttons in this order: B, E, D and A.
- Second set: A, B and C.
- Take the LAMP (O).
- Back out.
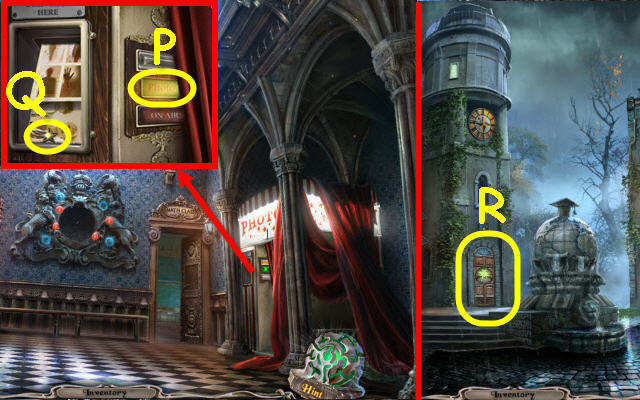
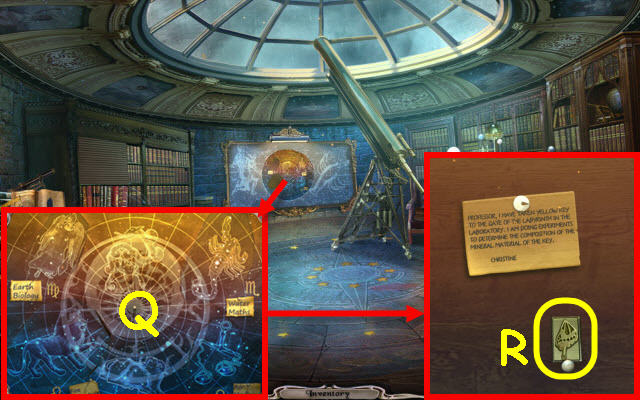
- Place the LAMP on the 'on air' button; press the photo button (P).
- Take the STAR (Q) and examine the photos.
- Back out.
- Place the STAR and PLANET TILE on the door (R).
- Go through the door.
- Examine the chessboard and you will automatically place the CHESS GAME on it; take the TILE 1/2 (S).
- Take the TILE 5/7 (T).
- Go upstairs.
- Take the TILE 6/7 (U).
- Take the STRING (V).
- Go upstairs.
- Examine the left bookcase to access a HOP.
- Play the HOP.
- You receive SAND (W).
Chapter 7: Alex
- Use the STRING on the needle and take the NEEDLE AND THREAD (X).
- Remove the loose stone and select the book (Y).
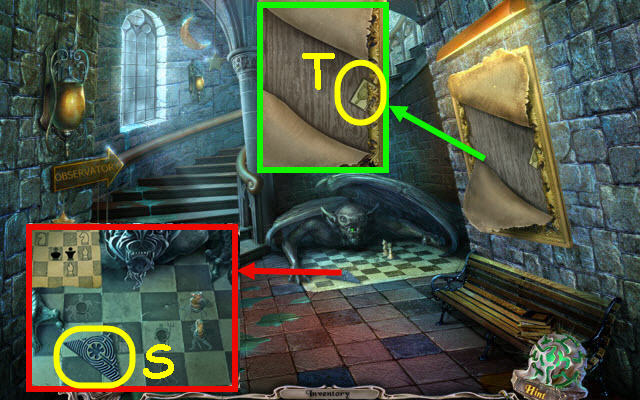
- Reexamine the removed tile; take the HANDLE (Z) and look at the pictures.
- Use the TRIDENT on the astrolabe; take the ASTROLABE (A).
- Open the sphere; take the 2nd CHESS PIECE (B).
- Back out.
- Place the SAND in the glass (C).
- Go through the door.
- Take the TILE 2/2 (D).
- Take the SPRAY BOTTLE PART (E).
- Back out.
- Place the 2 TILES on the tile board to trigger a puzzle (F).
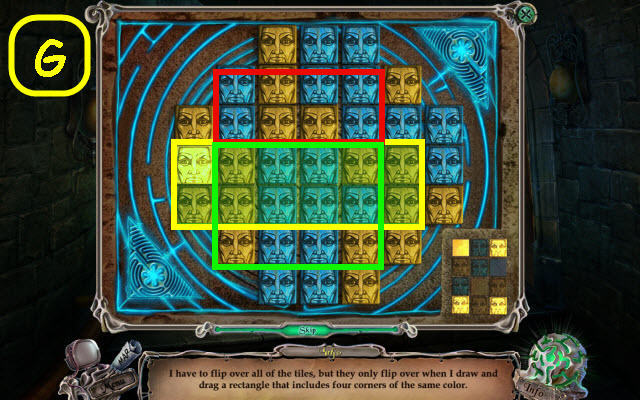
- Select areas that have matching colored corners until all tiles are turned over.
- Tip: Selecting areas that have already been turned will change their color.
- The starting layouts are random.
- See screenshot for examples (G).
- Take the OIL and SCORPIO SYMBOL.
- Go up the stairs.
- Place the SPRAY BOTTLE PART on the bottle; take the SPRAY BOTTLE (H).
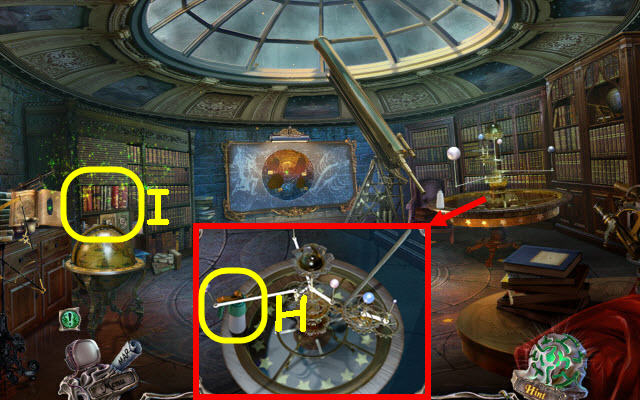
- Examine the bookshelf to access a HOP (I).
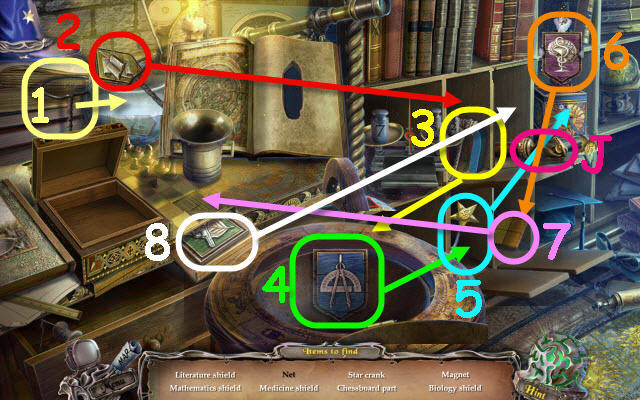
- Play the HOP.
- You receive the KNIGHT (J).
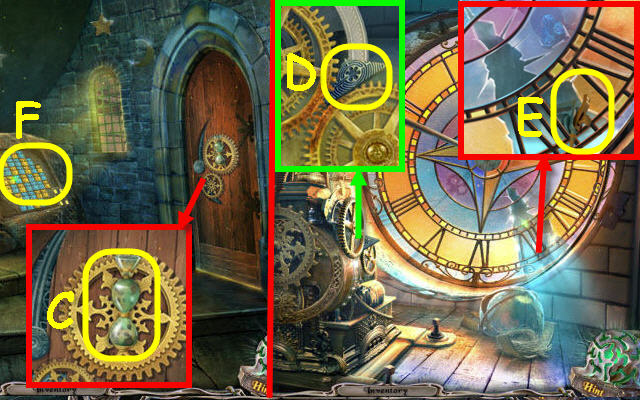
- Go to the Clocktower.
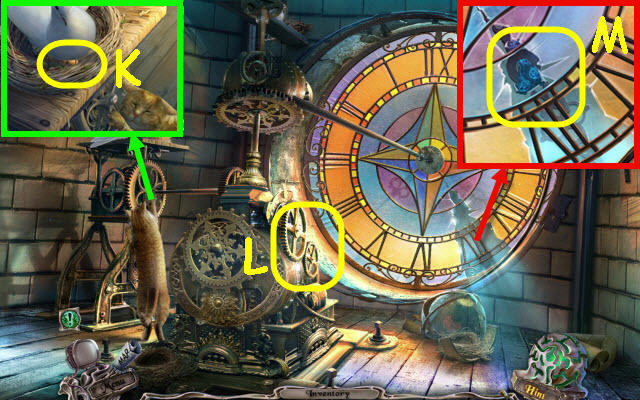
- Use the SPRAY BOTTLE on the cat; take the 3rd CHESS PIECE (K).
- Use the OIL on the gears (L).
- Take the LIBRA SYMBOL (M).
- Back out twice.
- Use the NEEDLE AND THREAD on the picture; select the four tabs to remove the picture (1-4).
- Place the ASTROLABE on the smaller astrolabe; take the ASTROLABE (N) and VIRGO SYMBOL (O).
- Place the 3 CHESS PIECES and KNIGHT on the chessboard. Take the LEO SYMBOL (P).
- Go upstairs twice.
- Place the SCORPIO SYMBOL, LIBRA SYMBOL, VIRGO SYMBOL, and LEO SYMBOL in their respective slots. Place the ASTROLABE and the AQUARIUS in the center and receive a STAR CHART (Q).
- Take the TILE 7/7 (R).
- Go to the Square.
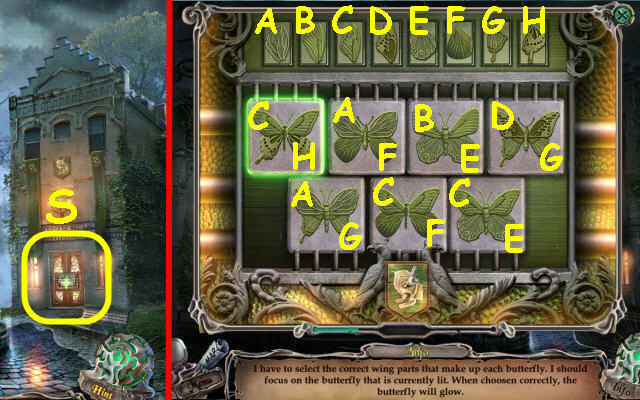
- Place the 7 TILES on the door to trigger a puzzle (S).
- Assemble the butterflies by choosing the matching wings.
- See screenshot for matching wings (A-H).
- Go through the door.
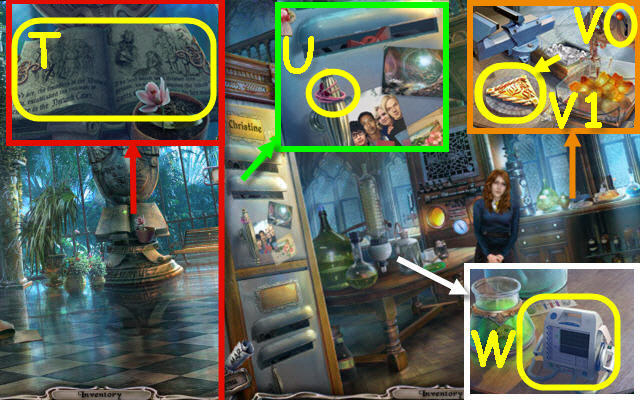
- Select the book twice to receive the STONE BOOK (T).
- Go left.
- Take the SCRUNCHY (U).
- Place the HANDLE on the crane and move it (V).
- Place the ice on the tile; take the ORNATE TILE (V1).
- Take the DEFIBRILLATOR (U).
- Go to the Labyrinth.
- Place the ORNATE TILE in the recess (X).
- Enter the labyrinth.
- Go left and then right two times (1-3).
- Take the BENT SPADE (Y) and the N, E, D, R, I, A (Z).
- Use the DIAMOND RING on the crystal to trigger a puzzle (A).
- Follow all the lines once.
- Select the following connectors: G, A, B, C, A, D, C, E, D, G, E, F, G, H, F, J, H, I, J and E.
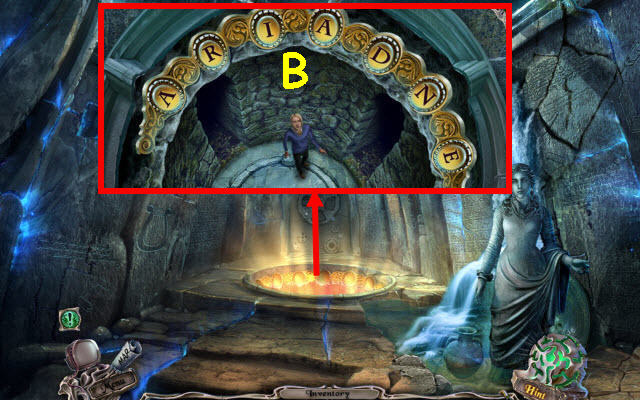
- From left; place the A, R, I, D, N and E (B).
- You receive a TILE.
- Go to the Smith Hall; go right.
Chapter 8: Buildson
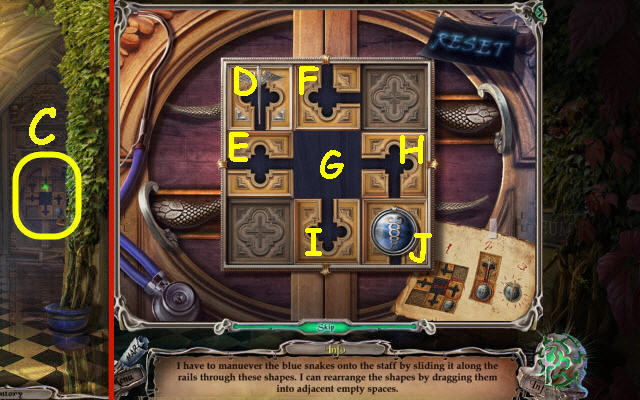
- Place the TILE on the door to trigger a puzzle (C).
- Move the snake tile to the winged rod.
- Move the following tiles: H, J, I, medallion down, J, medallion up and left, H, G, E, medallion right, G, F, D, medallion left and up.
- Go through the door.
- Examine the bookcase to access a HOP.

- Play the HOP.
- You receive a TICKET (K).
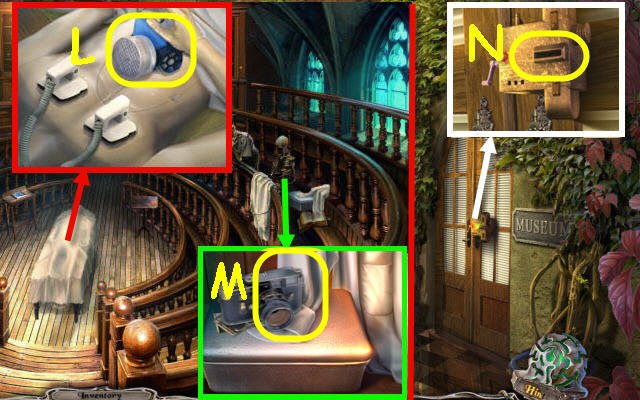
- Remove the sheet. Place the DEFIBRILLATOR on the dummy and select it; take the RESPIRATOR (L).
- Select the camera; take the SLEEVE (M).
- Back out.
- Use the TICKET in the slot (N).
- Go through the door.
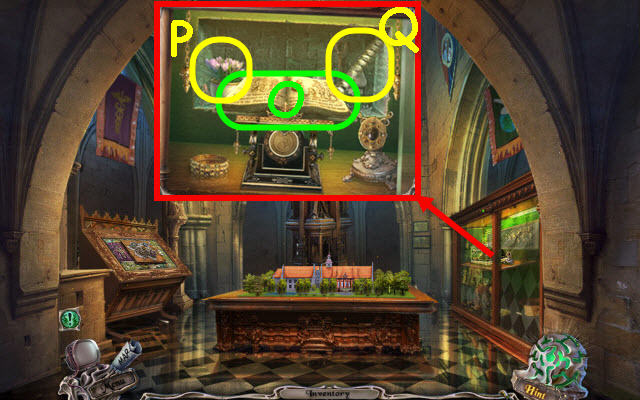
- Open the glass case; place the STONE BOOK on the holder (O).
- Open the back wall; take the FLOWERS (P) and TUBE (Q).
- Go to the Auditorium.
- Examine the bookcase to access a HOP.
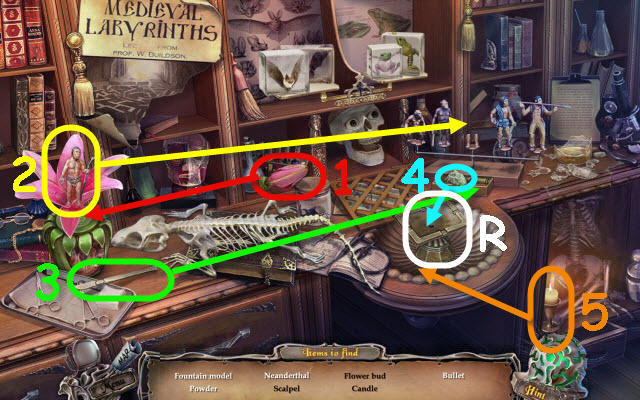
- Play the HOP.
- You receive a FOUNTAIN MODEL (R).
- Go to the History Exhibit.
- Place the FOUNTAIN MODEL on the base; take the MASK PART (S) and TILE (T).
- Go to the Laboratory.
- Place the BENT SPADE in the vise receive a SPADE (U).
- Go to the Auditorium.
- Place the TILE on the chest; take the TWEEZERS (V).
- Go to Smith Hall.
- Use the SPADE on the flower; take the LENSES 1/2 (W).
- Place the FLOWERS in the display to trigger a puzzle (X).
- Place the flowers in their correct locations.
- See screenshot for solution (Y).
- Take the TEST TUBES.
- Go left.
- Use the TWEEZERS to get the VALVE (Z).
- Go to the Medical Wing.
- Place the VALVE on the feeder; turn it. Take the LENSES 2/2 (A).
- Go to Laboratory.
- Place the MASK PART on the outline. Place the 2 LENSES, RESPIRATOR and SCRUNCHY on it; take the MASK (B).
- Use the MASK on the girl (C).
- Examine the chemicals; place the TEST TUBES on the shelf and the TUBE under the arrows. Press each of the arrows; receive the CHEMICALS (D).
- Place the CHEMICALS on the table and, in this order; add the yellow, blue, red and purple test tubes to the beaker. Take the PUZZLE KEY (E).
- Go to the History Exhibit.
- Use the PUZZLE KEY in the lock to trigger a puzzle (F).
- Place the symbols over the matching area.
- Select the following: Hx4, Ix3, Jx4, Lx3, Kx4, Mx3, Nx4 and Gx3.
- Receive the ORNATE TILE.
- Go to the Labyrinth.
- Place the ORNATE TILE in the recess (O).
- Enter the labyrinth.
- Go forward, right and left (1-3).
- Place the SLEEVE on the LADDER (P); take it.
- Use the DIAMOND RING on the crystal to trigger a puzzle (Q).
- Follow all the lines once.
- Select the following connectors: C, B, A, F, B, G, F, K, L, Q, K, P, Q, R, S, T, O, S, N, O, J, E, D, J, I, N, M, H, I, D, C, H, G, L, M and R.
- Use the LADDER in the well (R).
- You receive SMELLING SALTS.
- Go through the passage (S).
- Select anywhere.
- Use the SMELLING SALTS on the professor; take the STICK (T).
- Place the STAR MAP on the pool (U).
- Use the STICK on the stars matching the map (V).
- Select the medical emblem to trigger a puzzle (W).
- Move the tiles to complete the image.
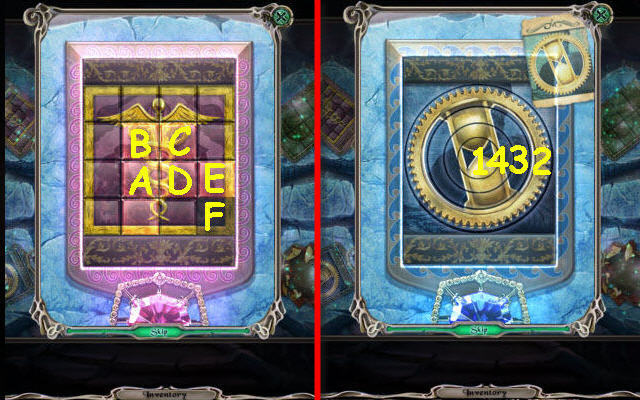
- Select the following: A, B, C D, E and F.
- Select the bottom left emblem to trigger a puzzle.
- Complete the image by rotating the disks.
- The starting layout is random.
- Set them in place in the order listed (1-4).
- Select the top right emblem to trigger a puzzle.
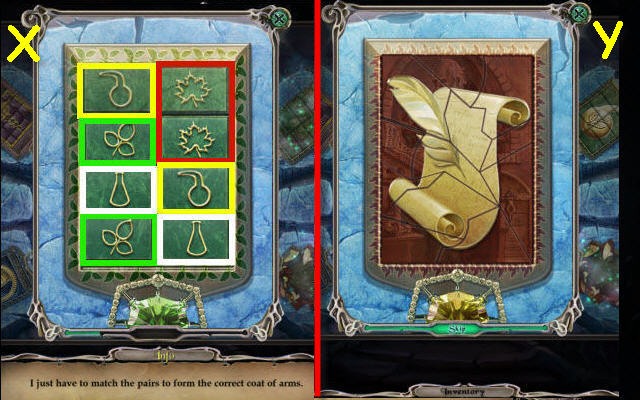
- Find the matching pairs.
- See screenshot for solution (X).
- Select the bottom right emblem to trigger a puzzle.
- Assemble the pieces to complete the image.
- See screenshot for solution (Y).
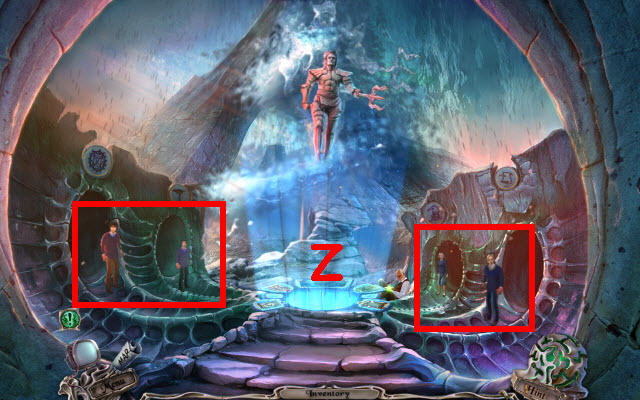
- You have released the students (Z).
- Congratulations! You have successfully completed Sable Maze: Norwich Caves.
Created at: 2013-09-27