

Walkthrough Menu
- General Tips
- Chapter 1: The Mansion
- Chapter 2: Fantasy Section
- Chapter 3: Horror Tome
- Chapter 4: Adventure World
- Chapter 5: Mystery Section
- Chapter 6: Grand Finale
General Tips
- This is the official guide for Sable Maze: Sinister Knowledge.
- This guide does not mention each time you have to zoom into a location; the screenshots show each zoom scene.
- Hidden-object puzzles are referred to as HOPs. This guide does not show screenshots of the HOPs, however, it is mentioned when a HOP is available and the inventory item collected.
- Use the Map to travel quickly to a location.
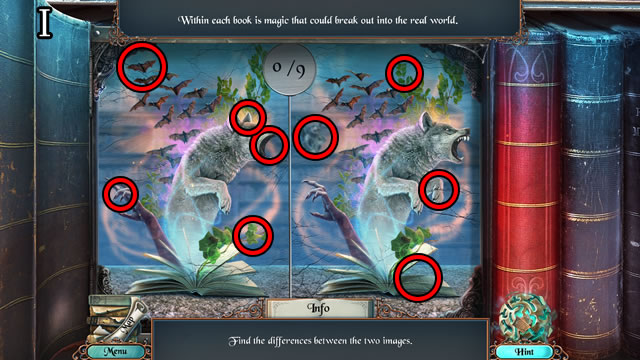
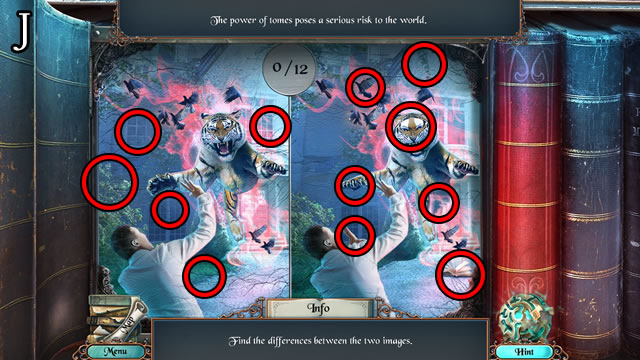
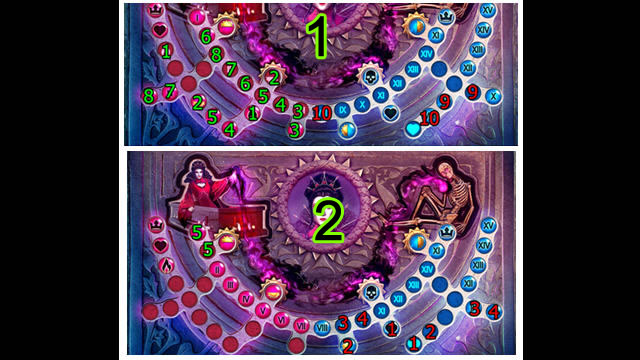
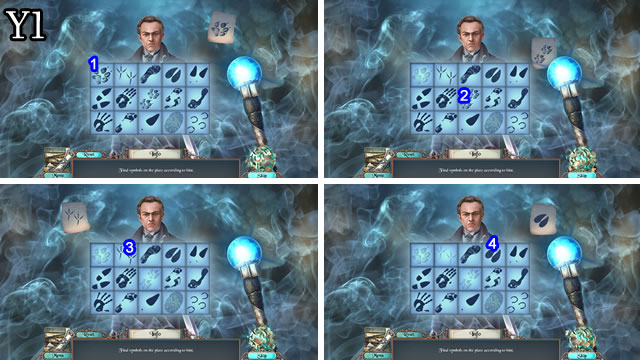
Chapter 1: The Mansion
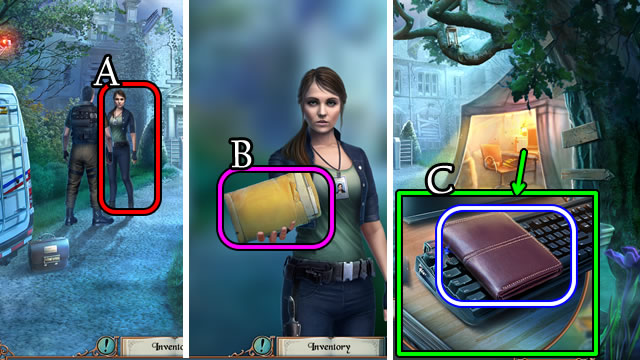
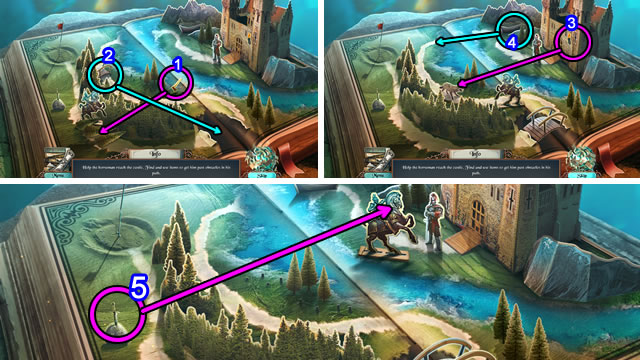
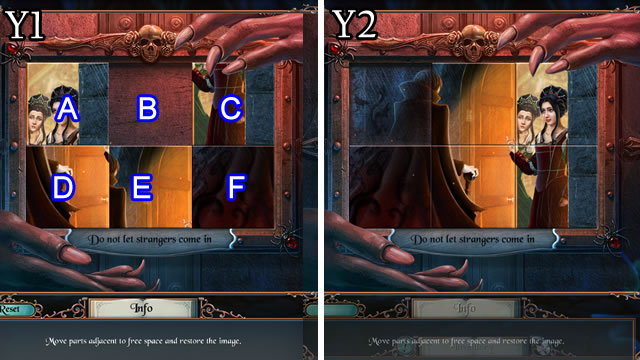
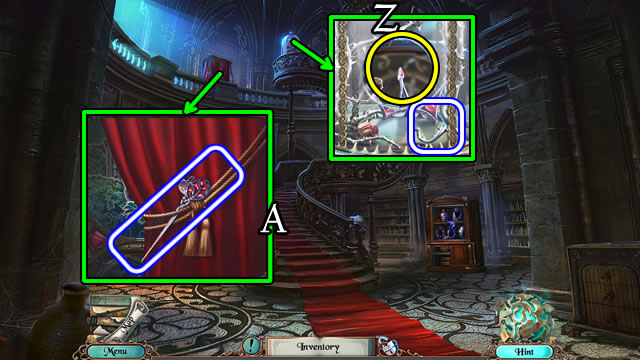
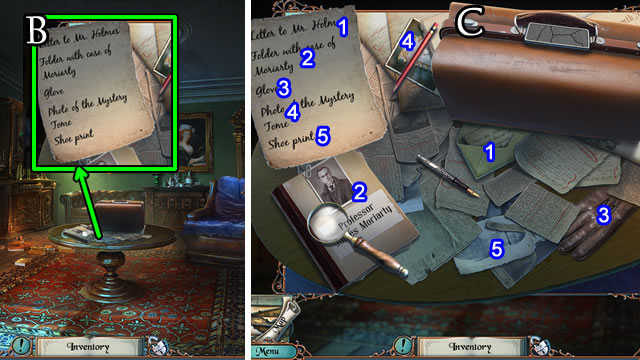
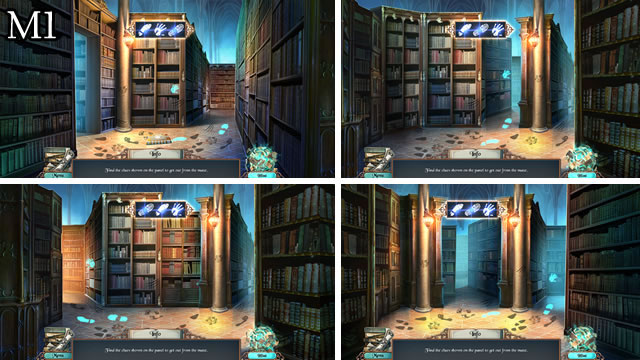
- Speak to the woman (A); take the envelope (B).
- Review the contents.
- Select the tent entrance 2x. Take the WALLET; read the note (C).
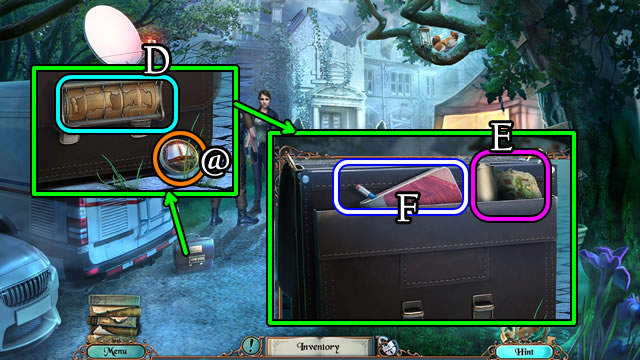
- Scroll the briefcase tabs to gold (D).
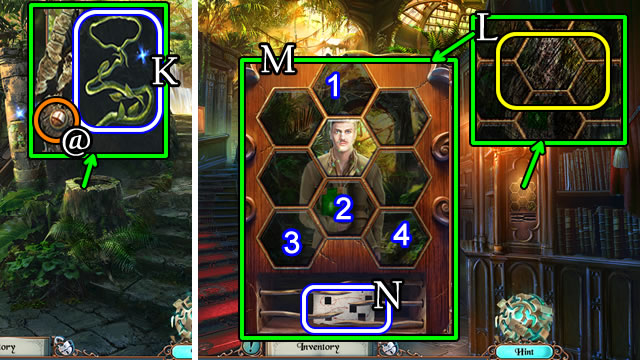
- Take the Coin (@).
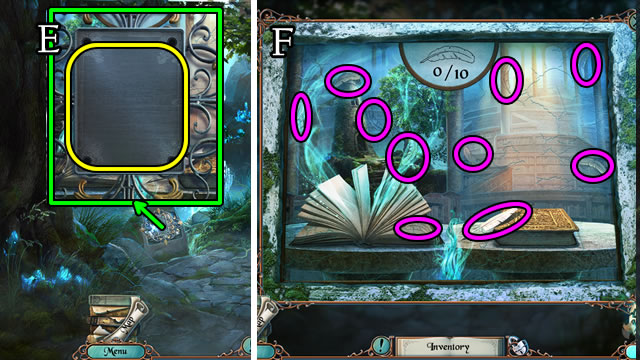
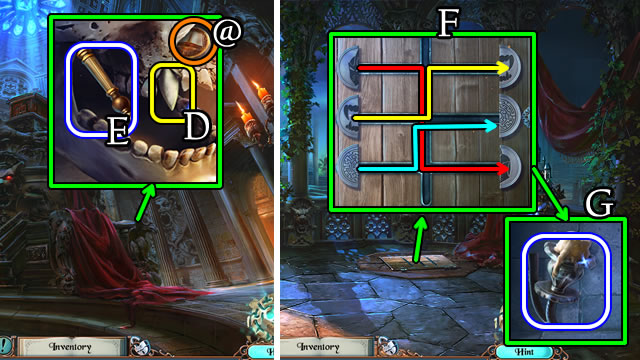
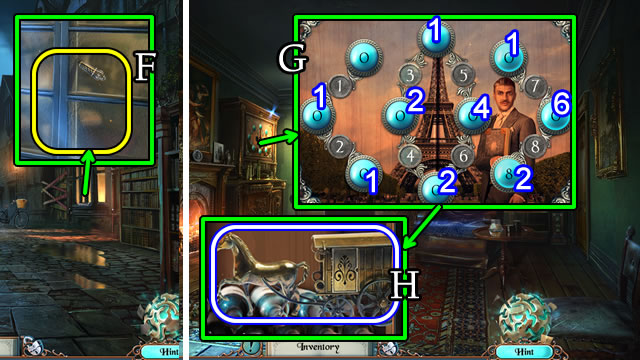
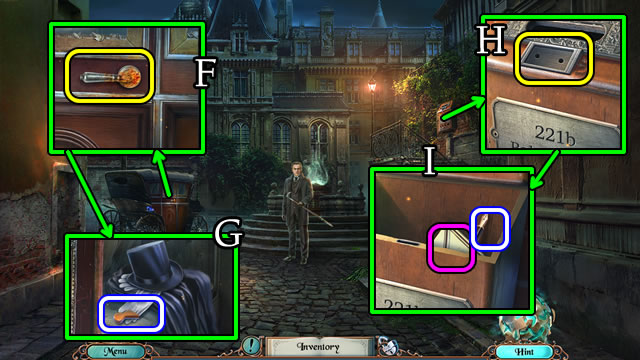
- Take the Map (E) and NOTES (F).
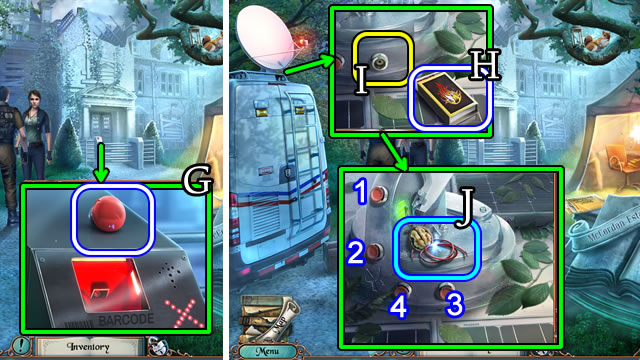
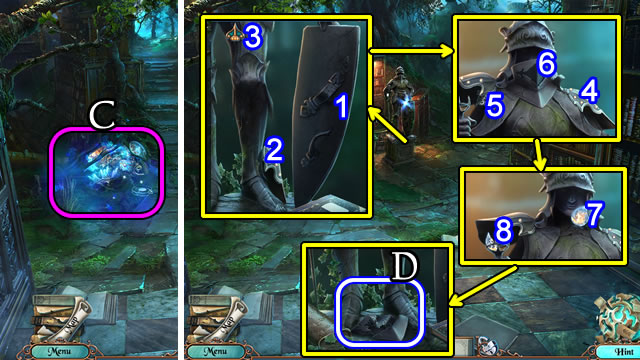
- Take the BUTTON (G).
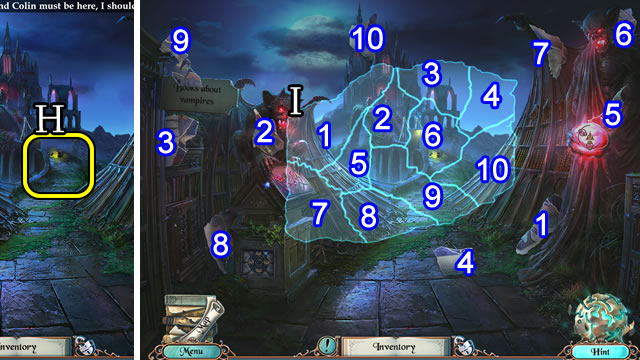
- Take the MATCHES (H). Place the BUTTON (I).
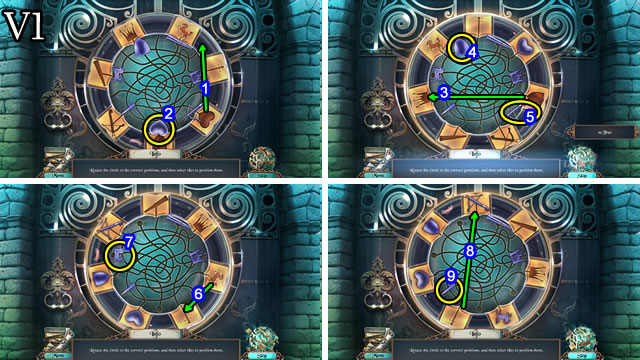
- Press 1-4.
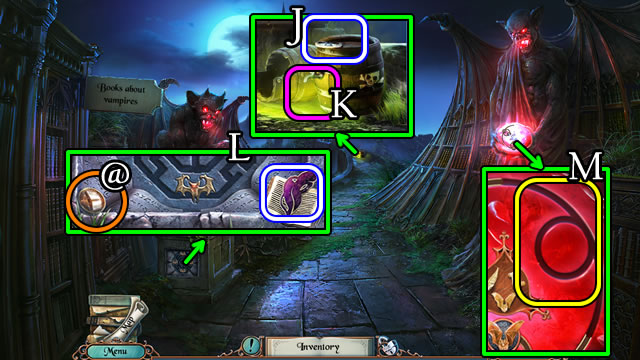
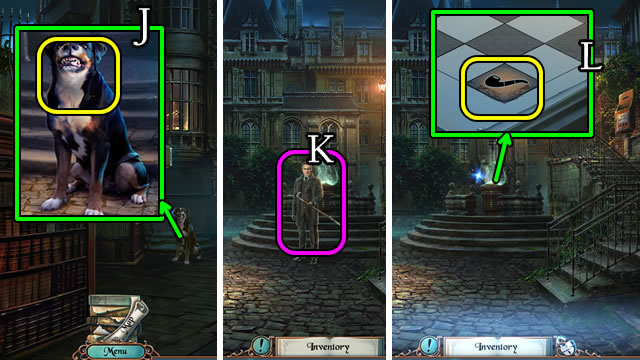
- Take the WIRE and NUT (J).
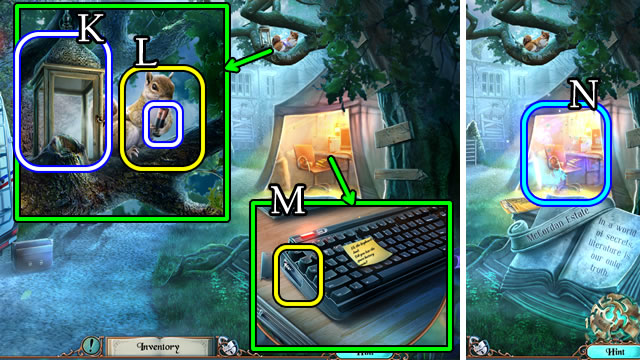
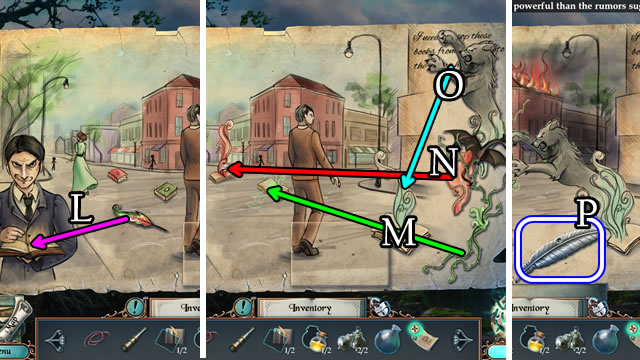
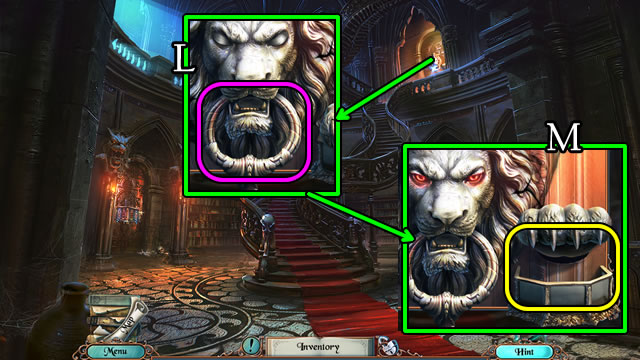
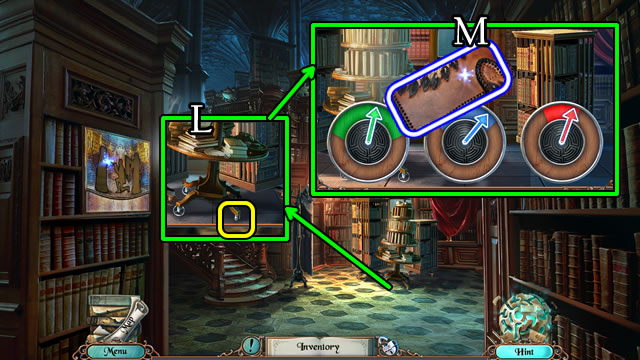
- Take the EMPTY LAMP (K). Give the NUT for a BATTERY (L).
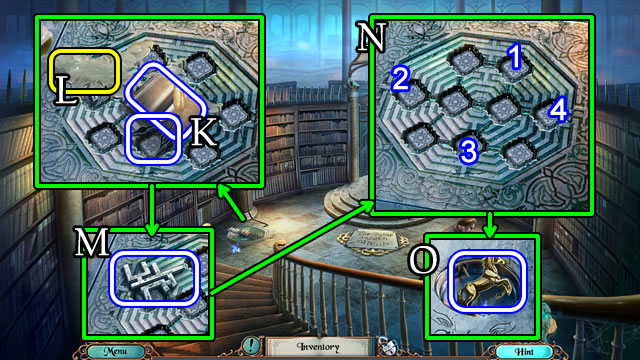
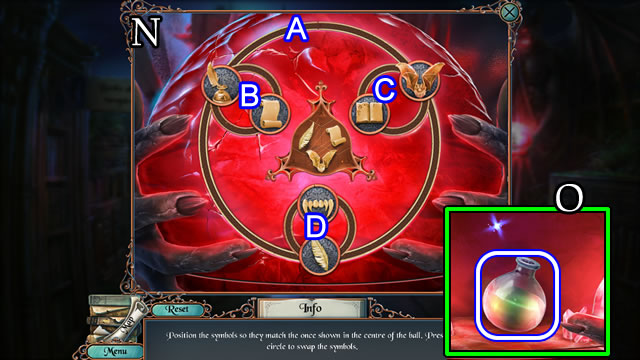
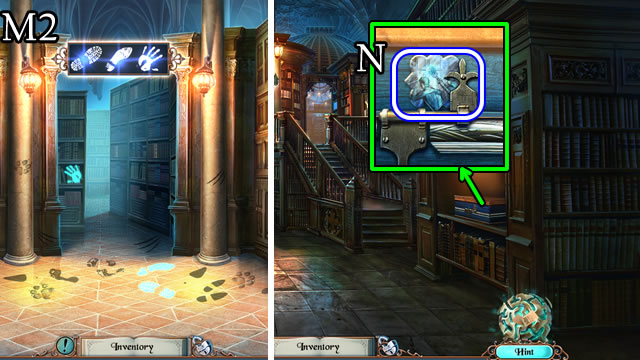
- Place the BATTERY (M) to play a HOP (N) for an ID.
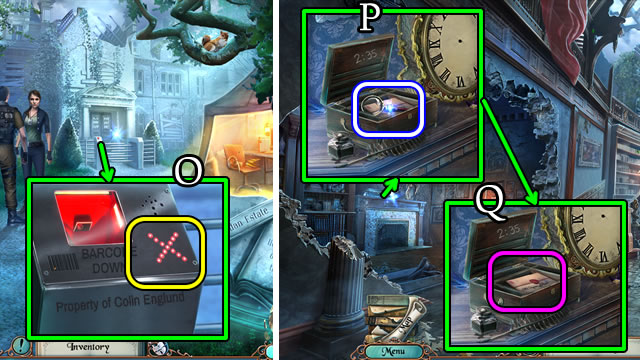
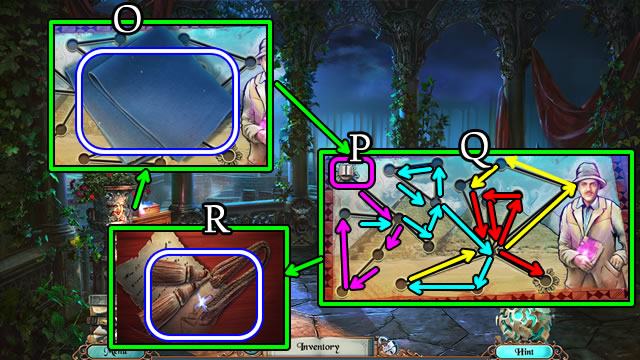
- Use the ID (O).
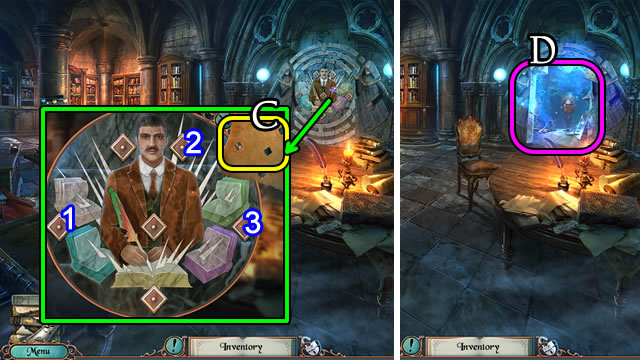
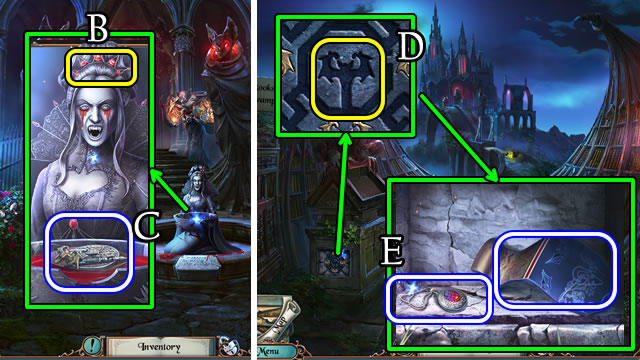
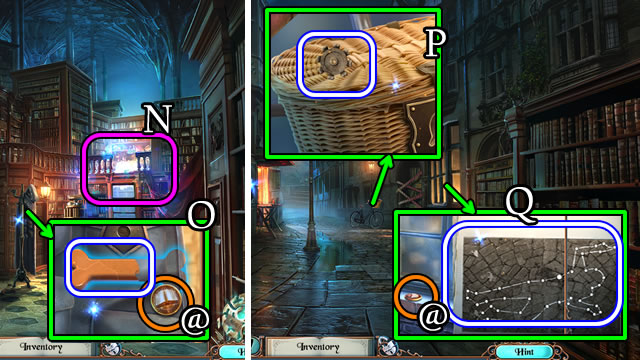
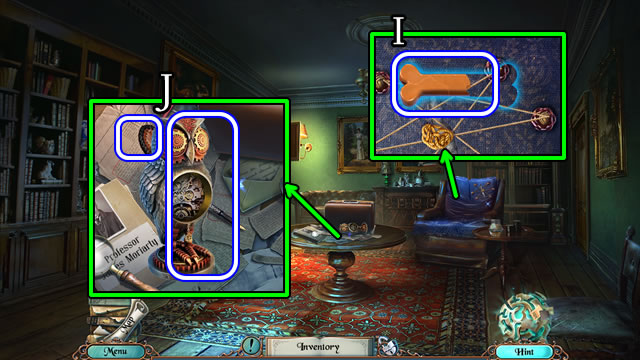
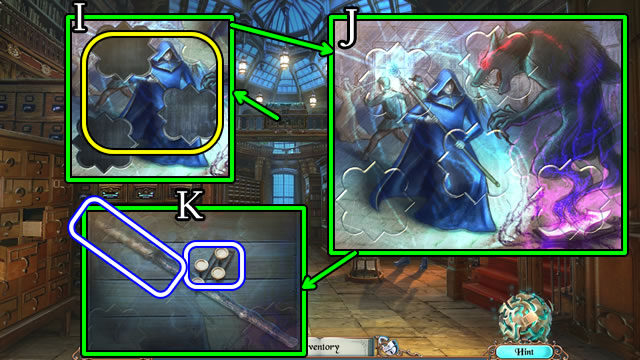
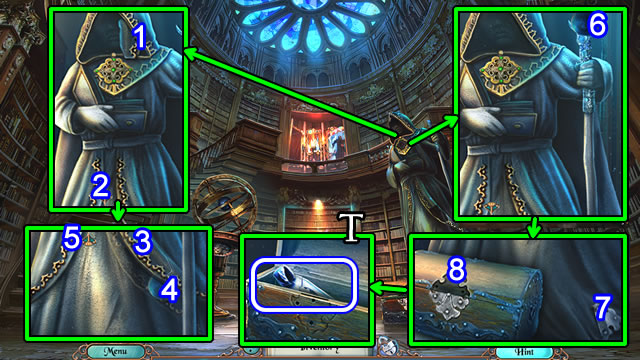
- Speak to the woman; walk forward; speak to the man, then woman. Receive BOOK EMBLEMS (1/3).
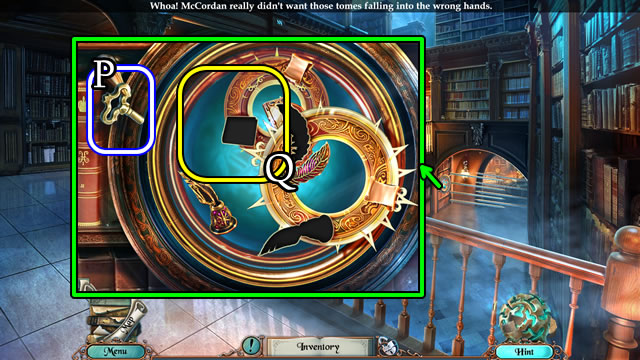
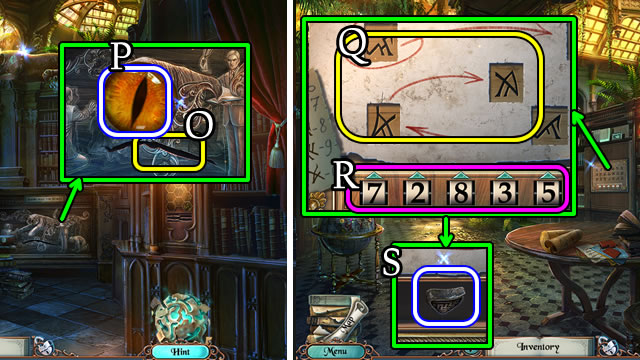
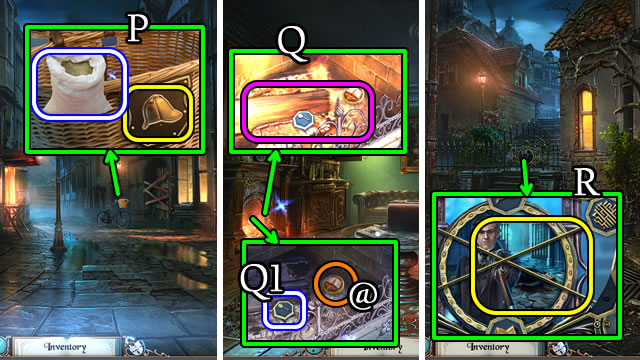
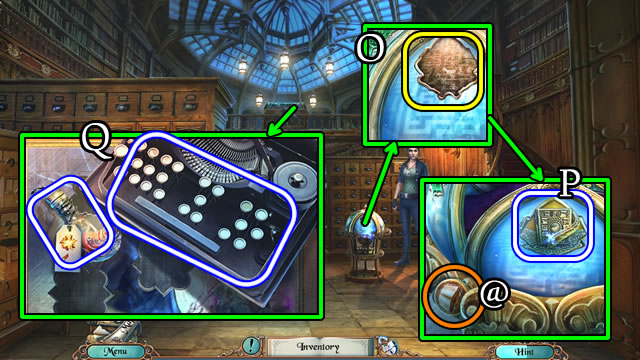
- Open the box; take the MAGNIFIER (P).
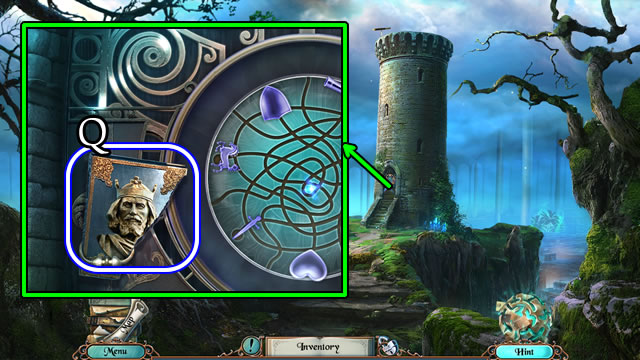
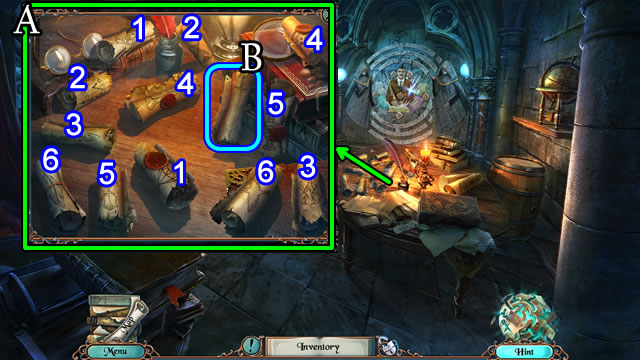
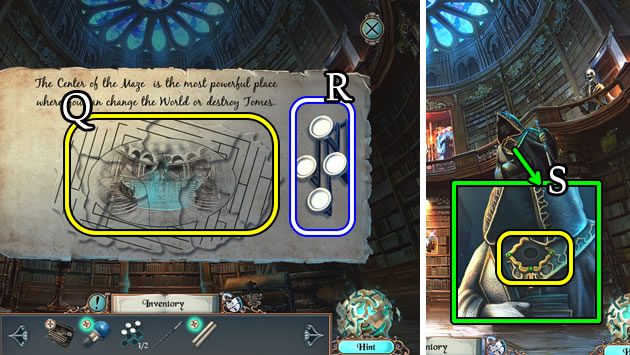
- Open the envelope and select 2x to receive a CLUE PART; read the note (Q).
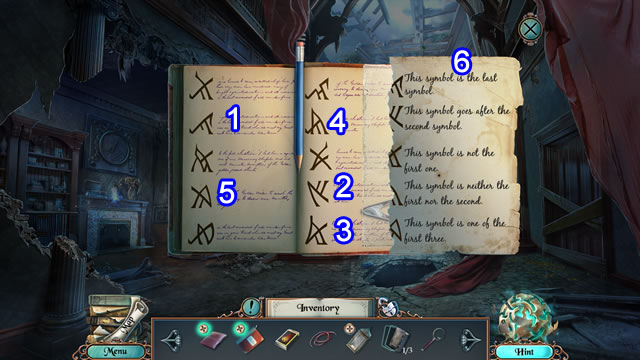
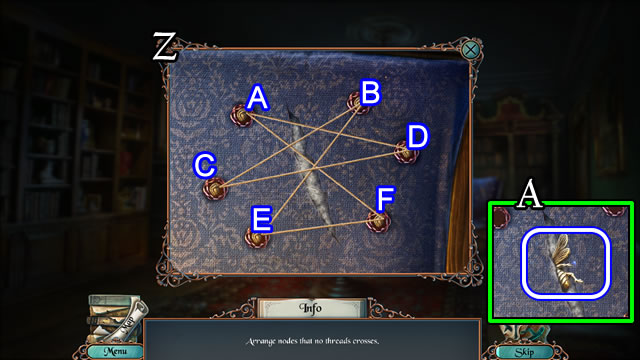
- Combine the NOTES and CLUE PART (Inventory). Select (1-6). Receive a CLUE.
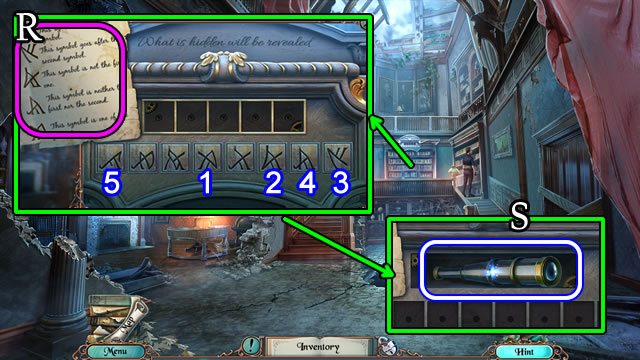
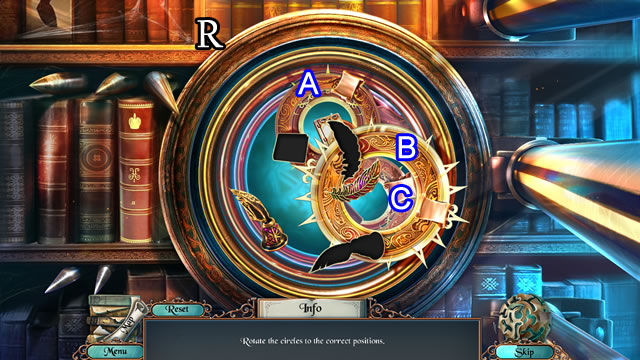
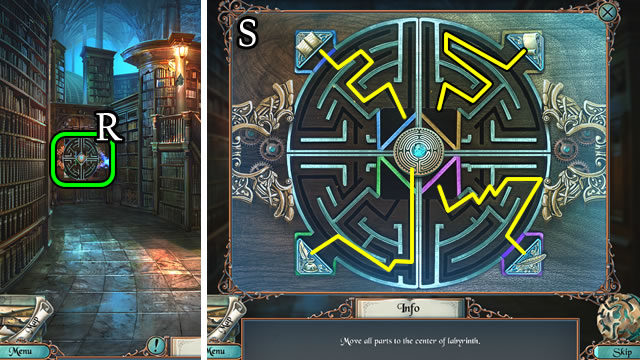
- Place the CLUE (R).
- Solution (1-5).
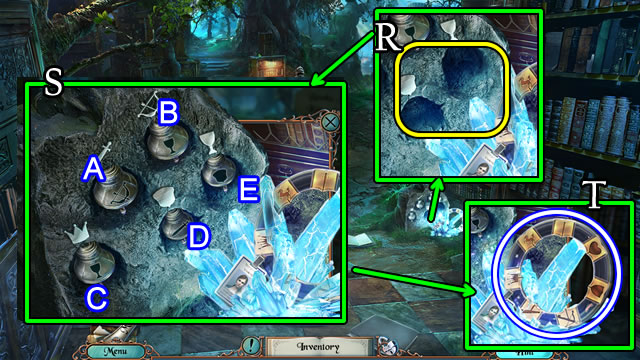
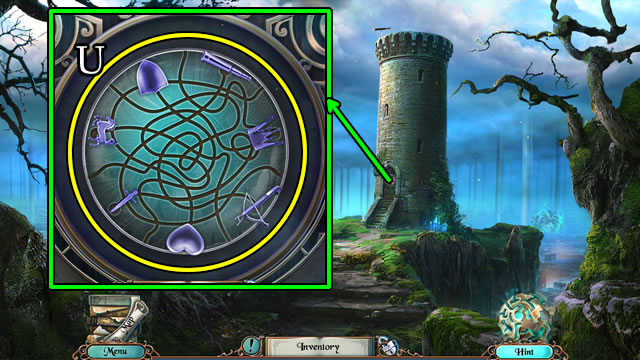
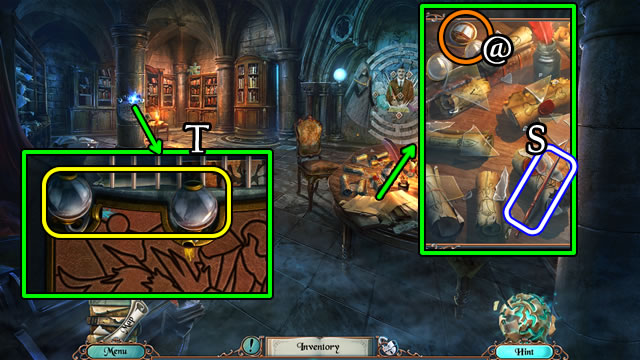
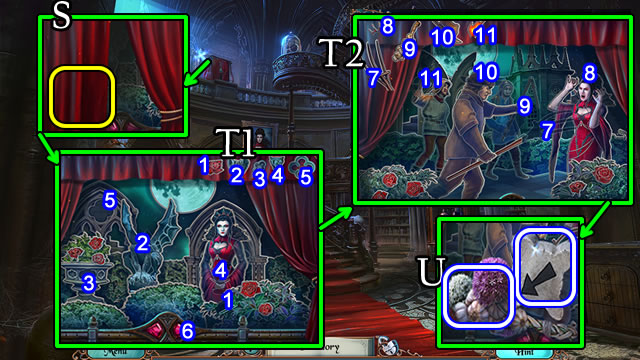
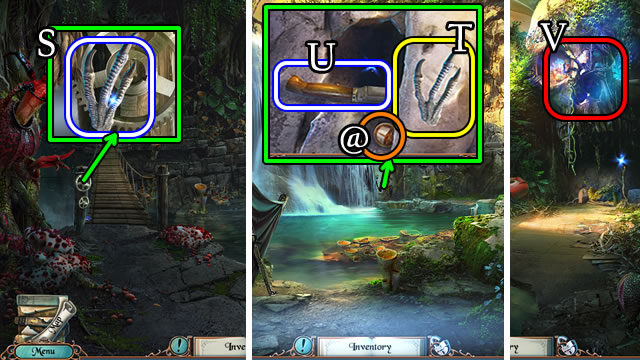
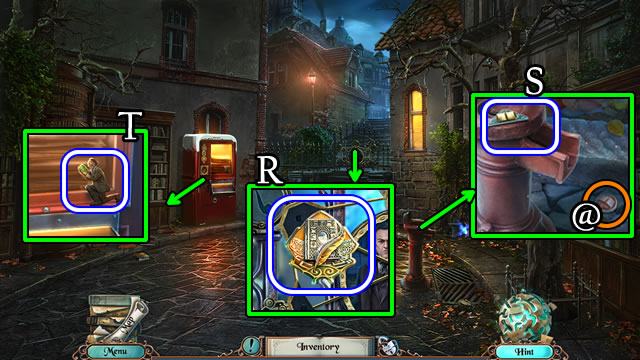
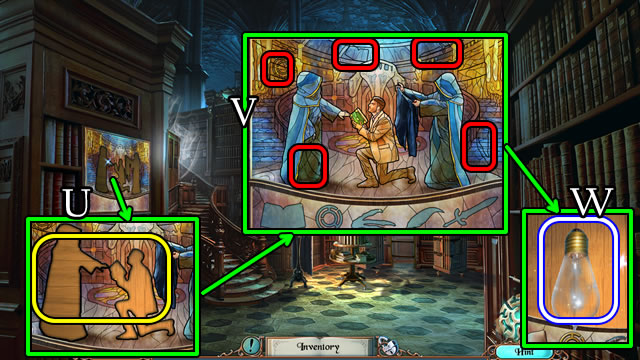
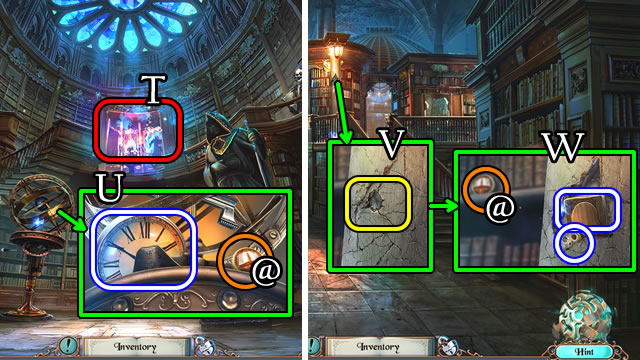
- Take the SPYGLASS (S).
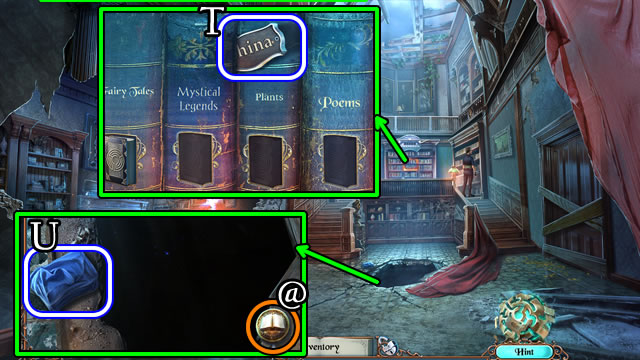
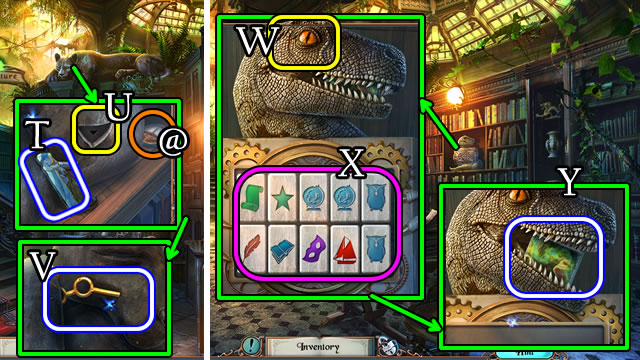
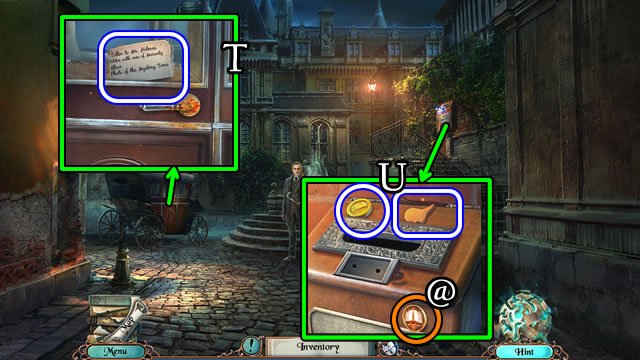
- Take the NAMEPLATE (T).
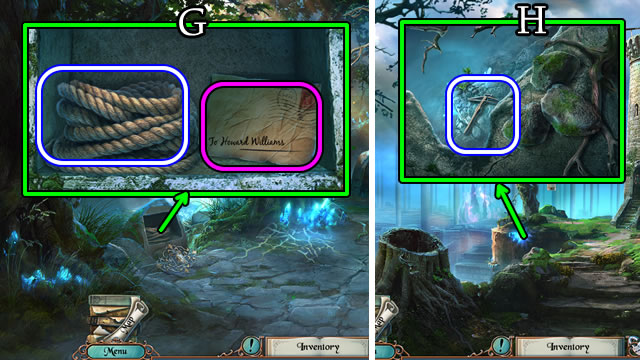
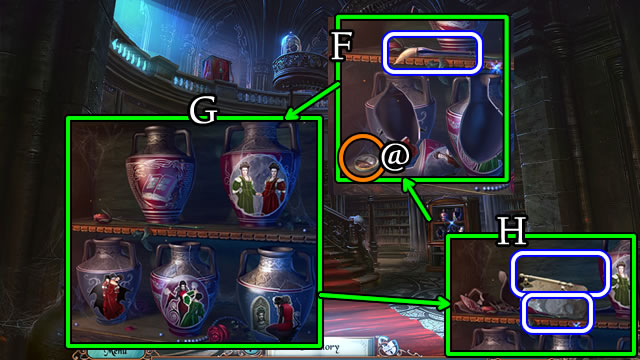
- Take the BUNDLE (U).
- Take the Coin (@).
- Open the BUNDLE (Inventory) for BOOK EMBLEMS (2/3).
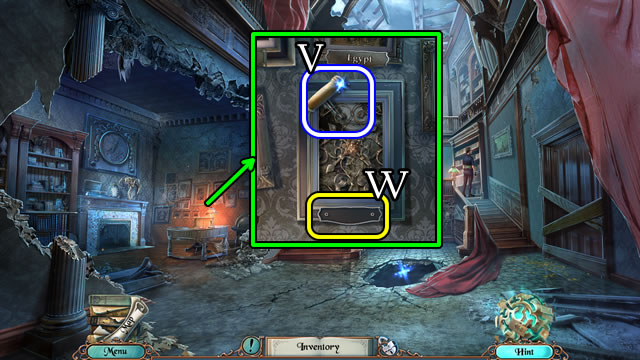
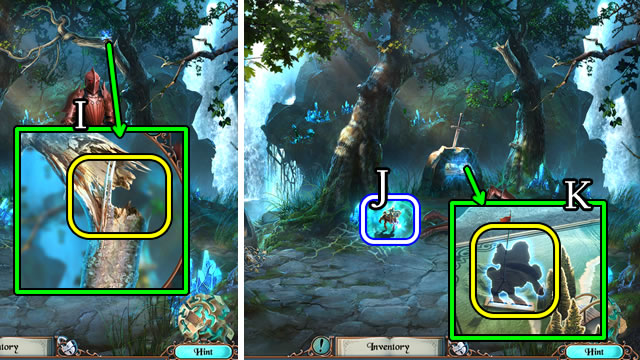
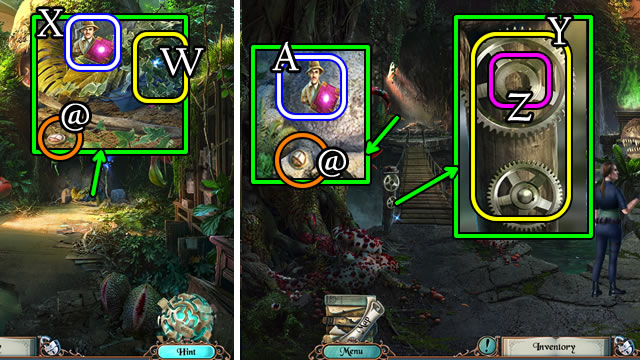
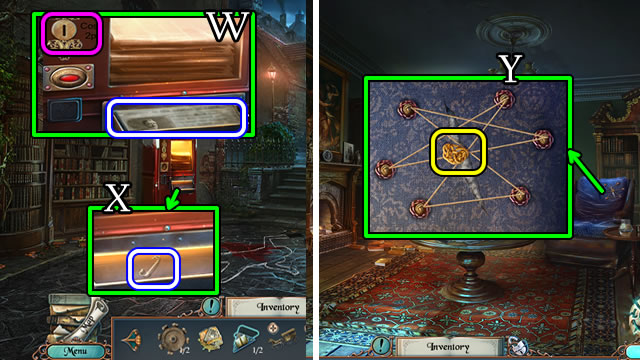
- Take the LEVER (V).
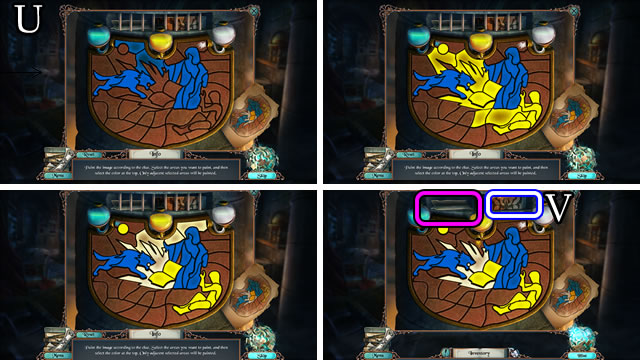
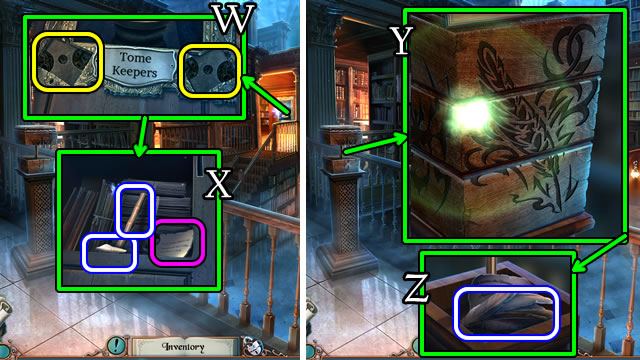
- Place the NAMEPLATE (W).
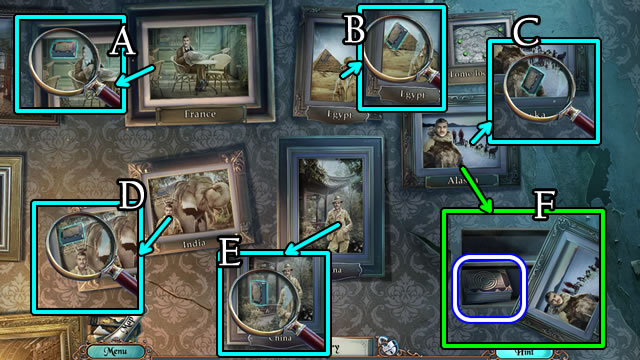
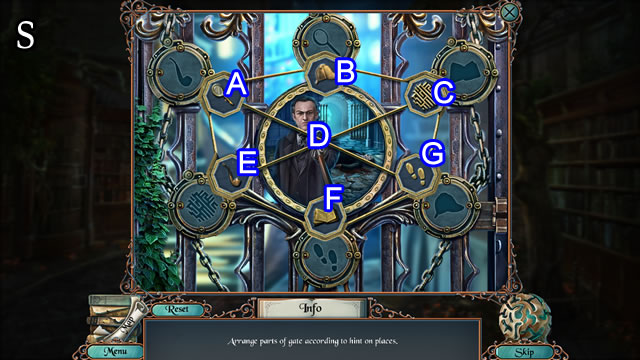
- Use the MAGNIFIER on each picture (A-E).
- Take BOOK EMBLEMS (3/3) (F).
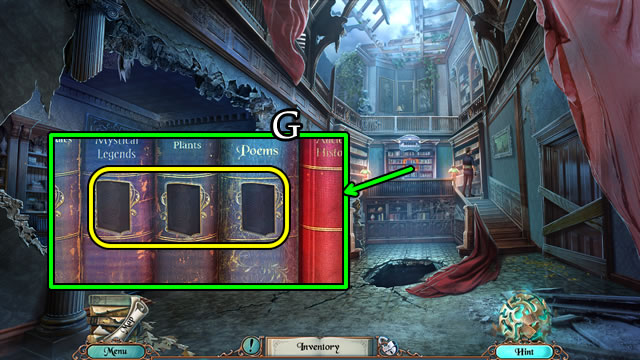
- Place the BOOK EMBLEMS (3/3) (G).
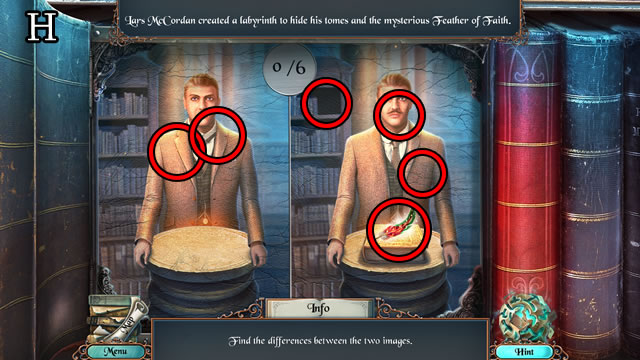
- Solution (H-J).
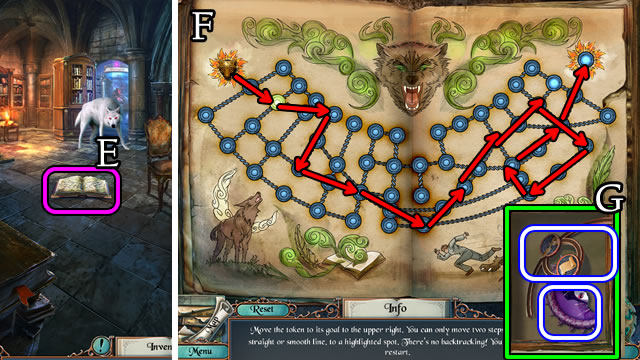
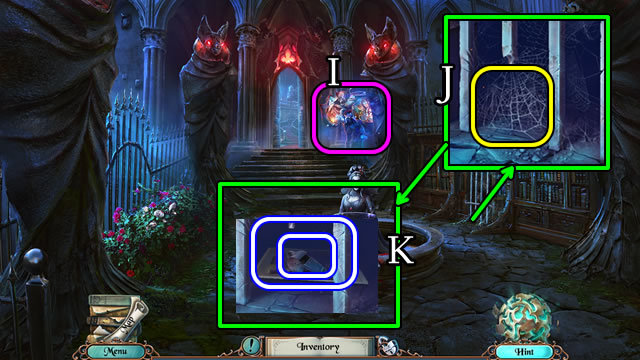
- Speak to the woman.
- Open the WALLET (Inventory) to take the CREDIT CARD.
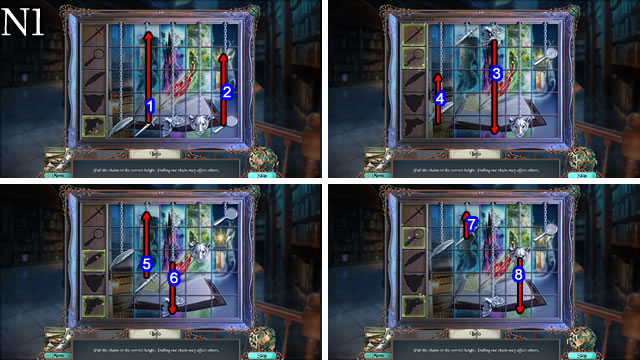
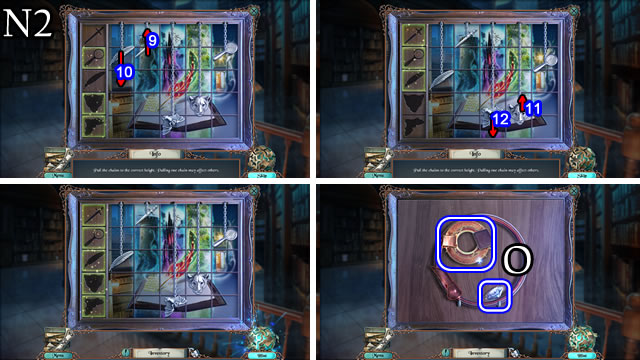
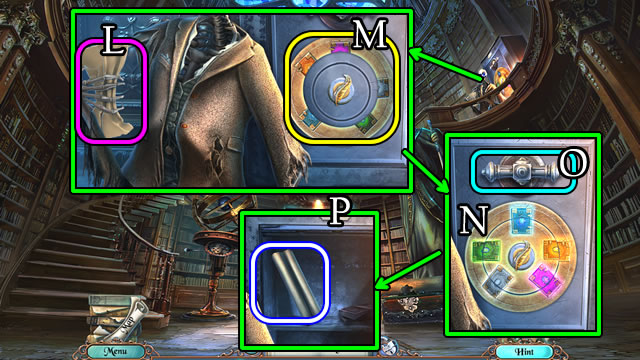
- Take BOOK TILE (1/2) and CLOCK HANDS (K).
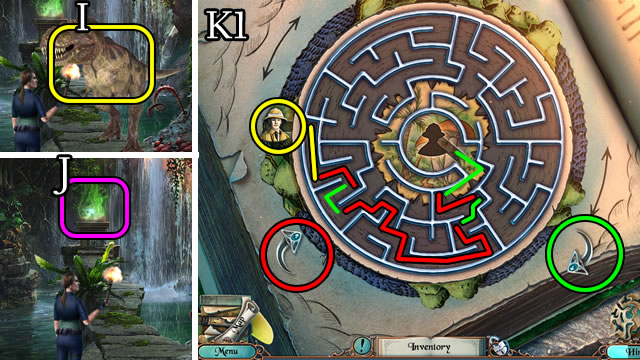
- Use the CREDIT CARD (L) to take the MAZE PART (M).
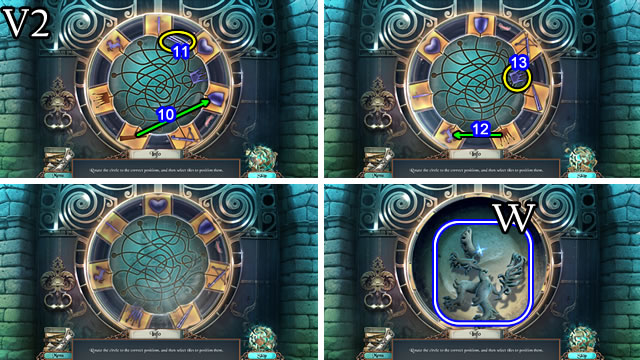
- Solution (N). 1-4.
- Take the DOOR PART (1/2) (O).
- Walk down.
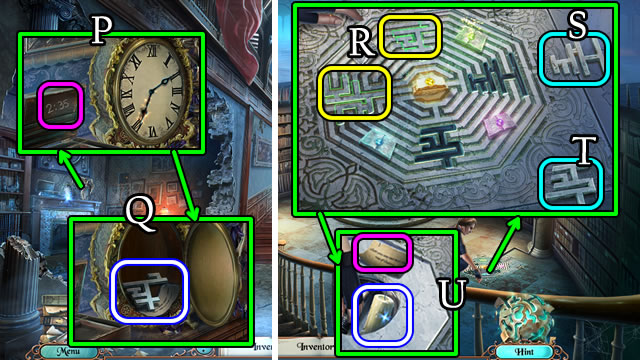
- Place the CLOCK HANDS. Set the hands to 2:35 (P).
- Take the note and MAZE PART (Q).
- Walk forward.
- Place the 2 MAZE PARTS (R). Select (S), then (T) 3x and place them in the slots.
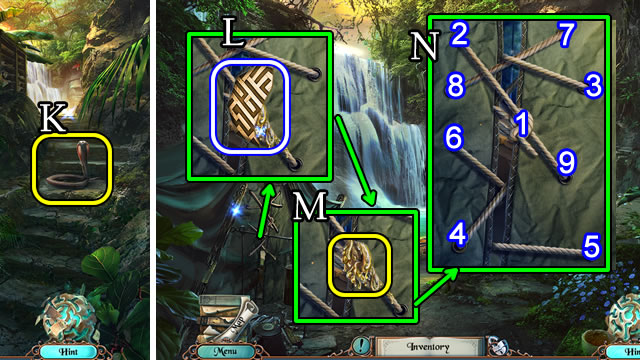
- Read the note. Take the CANDLE (U).
- Combine the EMPTY LAMP, CANDLE and MATCHES (Inventory) for a LAMP.
- Walk down.
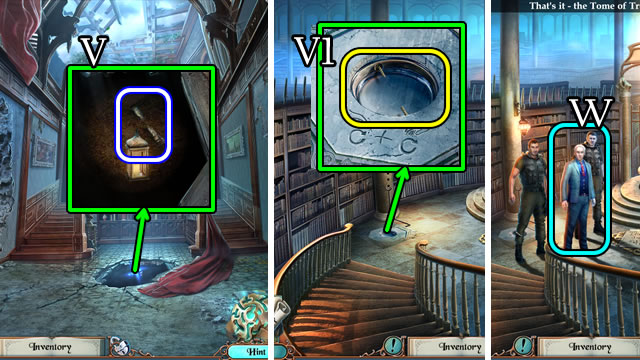
- Use the LAMP to take the TRAP HANDLE (V).
- Walk forward.
- Place the TRAP HANDLE (V1).
- Speak to the man (W).

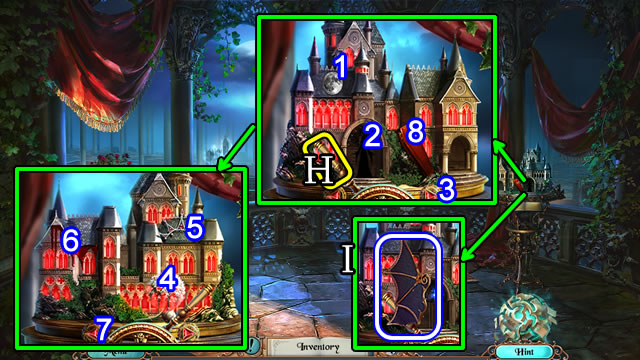
- Place the LEVER and align all 3 (X).
- Take the DOOR PART (2/2) (Y).
- Take the Coin (@).
- Read the note. Place the DOOR PART (2/2) (Z).
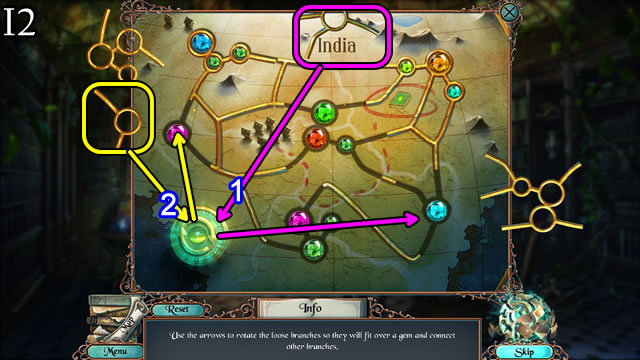
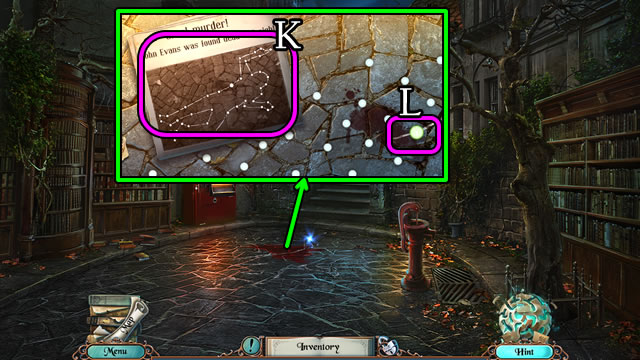
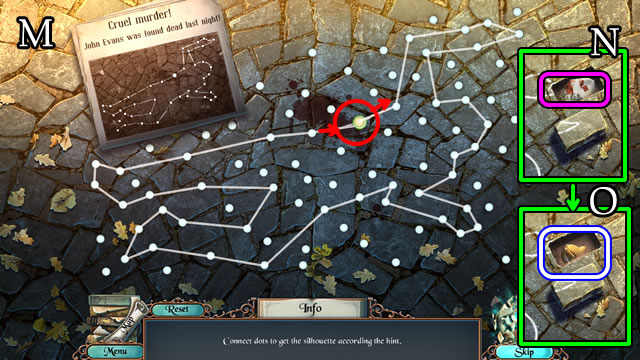
- Solution (A).
- Walk forward 2x.
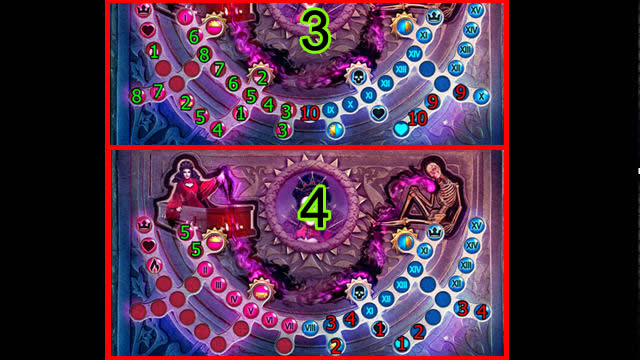
Chapter 2: Fantasy Section
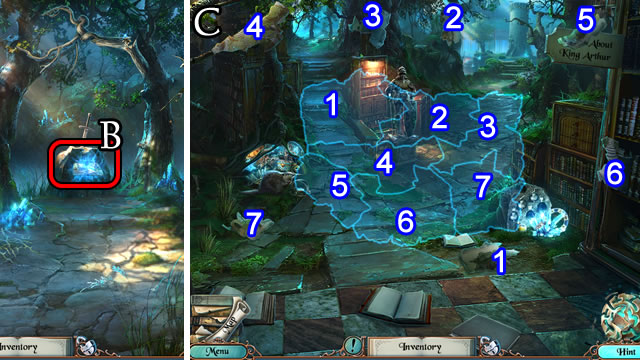
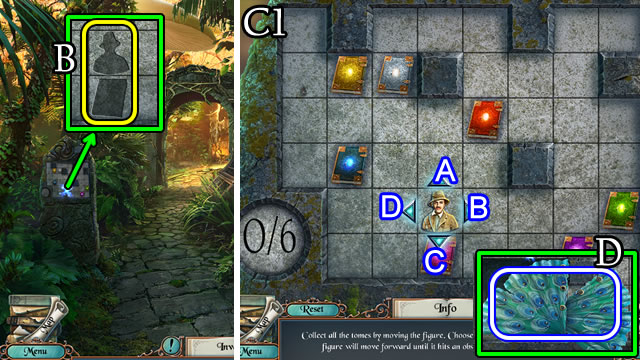
- Select (B).
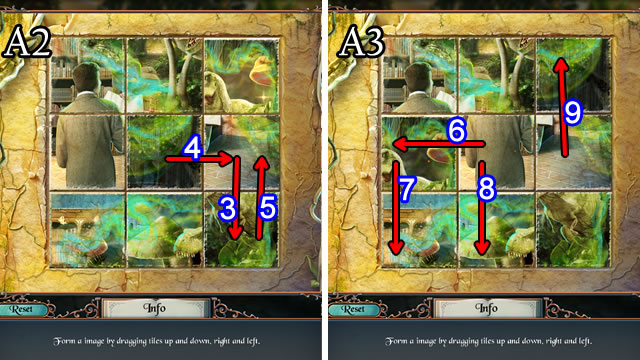
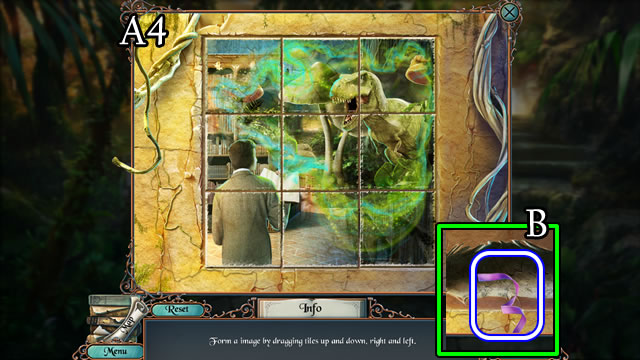
- Solution (C). 1-7.
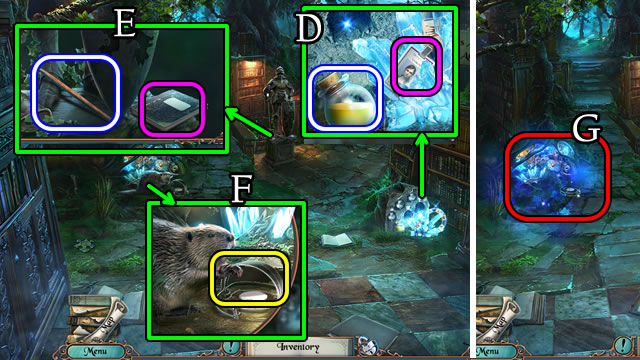
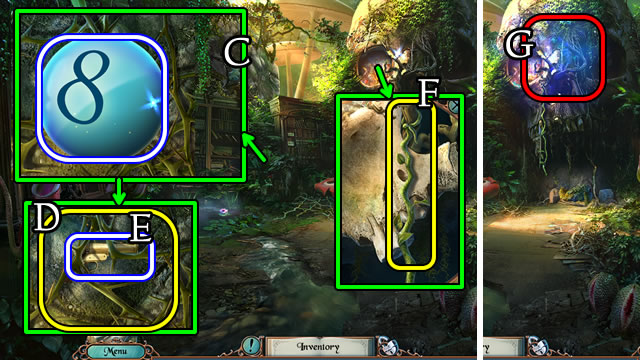
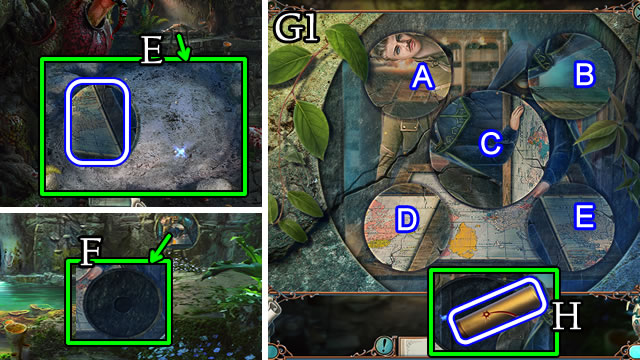
- Take PAINT (1/2); note the ID (D).
- Take the ROD. Read the diary (E).
- Use the ROD (F).
- Play the HOP to receive a BELL (1/2) (G).
- Take the path on the right.
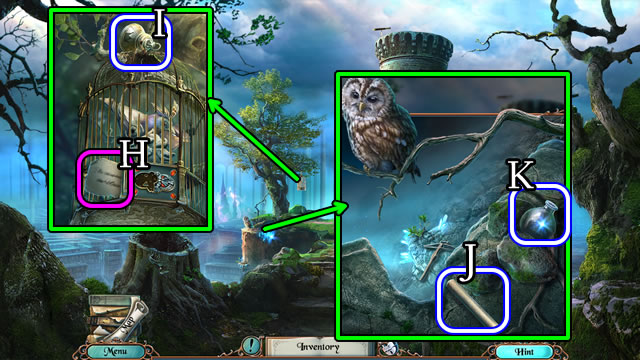
- Take the note (H) and BELL (2/2) (I).
- Select the owl; take the SCROLL (J) and EMPTY FLASK (K).
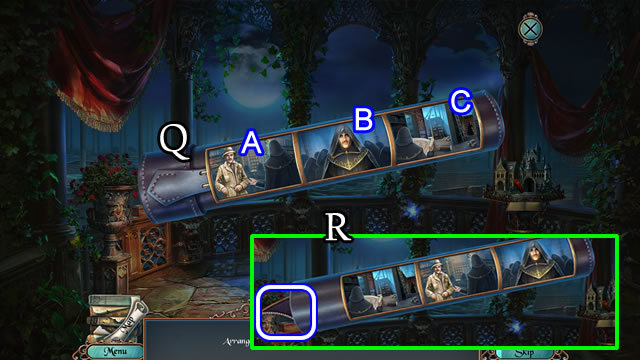
- Open the SCROLL (Inventory).
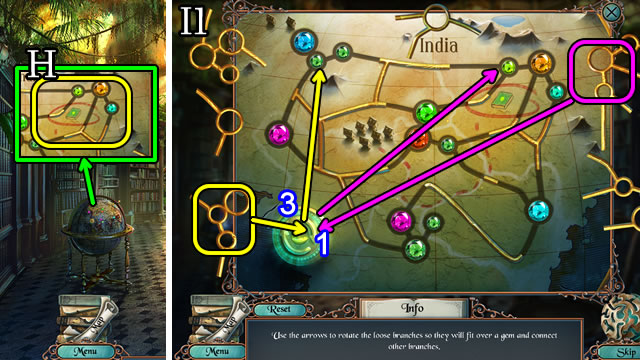
- Solution (L-O).
- Take the METAL FEATHER (P).
- Take the BOOK PART (Q).
- Walk down.
- Place the BELLS (2/2) (R).
- Solution (S). Cx3-Ex4-Bx2-A.
- Take the DOOR PART (T).
- Walk to the Tower.
- Take the BOOK PART; place the DOOR PART (U).
- Solution (V1-V2).
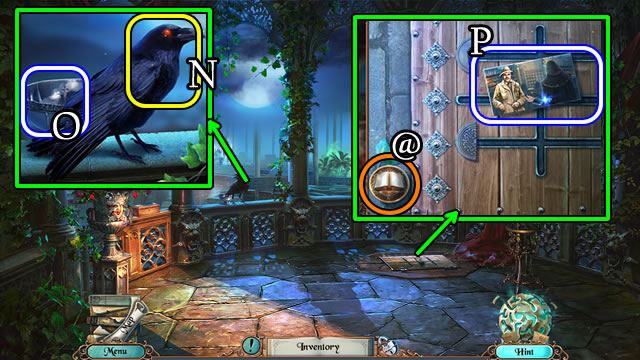
- Take the EMBLEM PART (W).
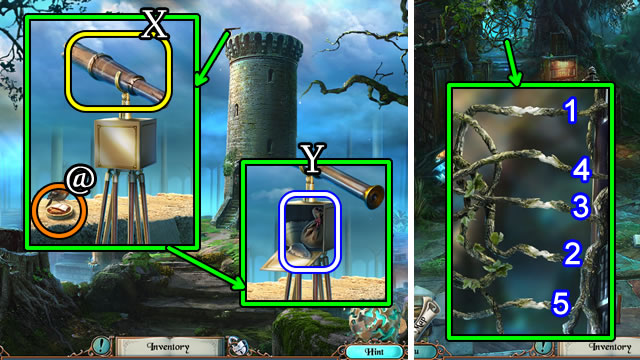
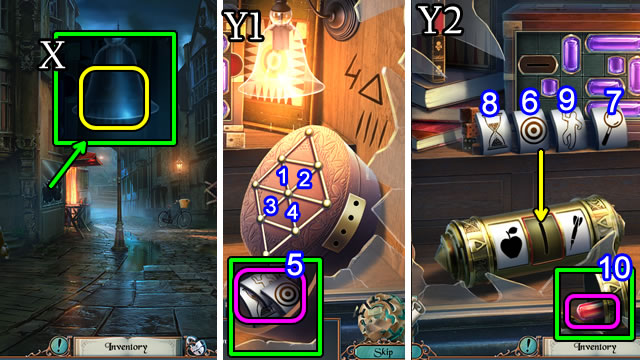
- Replace the SPYGLASS (X).
- Take the Coin (@).
- Take the note, SHARP STONE and CLOSED BAG (Y).
- Walk down.
- Attempt to take the left path.
- Use the SHARP STONE 1-5.
- Walk forward on the left path.
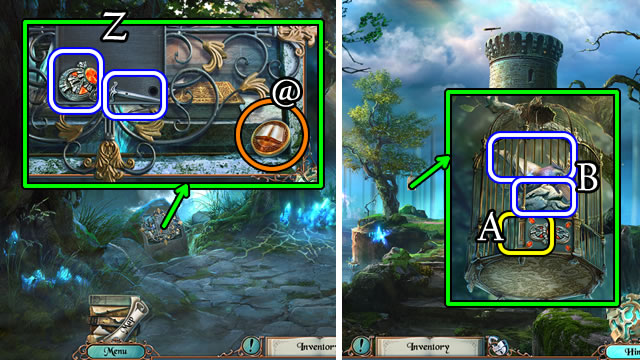
- Take the CAGE-LOCK PART and METAL SWORD (Z).
- Take the Coin (@).
- Return to the Tower.
- Place the CAGE-LOCK PART (A). Take the MECHANICAL BIRD and EMBLEM PART (B).
- Walk down.
- Play the HOP for a BOOK PART (C).
- Combine the 2 EMBLEM PARTS (Inventory) for a LION EMBLEM.
- Place the LION EMBLEM (1). Take and place the parts on the knight (2-8).
- Take the BOLT (D).
- Combine the 2 BOOK PARTS (Inventory) for a METAL BOOK.
- Walk forward on the left path.
- Place the METAL BOOK (E).
- Solution (F).
- Open and read the letter. Take the ROPE (G).
- Return to the Tower.
- Use the ROPE to get the UNLOADED CROSSBOW (H).
- Combine the UNLOADED CROSSBOW and BOLT (Inventory) for a LOADED CROSSBOW.
- Return to the Fantasy Tome Altar.
- Use the LOADED CROSSBOW (I).
- Take the HORSEMAN (J).
- Place the HORSEMAN (K).
- Solution (1-5).
- Speak to the woman.
- Take the FANTASY TOME (L).
- Walk forward.
- Place the METAL SWORD and METAL FEATHER (M).
- Solution (N1-N2).
- Take the GEM and CIRCLE (O).
- Attempt to walk forward.
- Take the WINDING KEY (P). Place the CIRCLE (Q).
- Solution (R). B-Ax5-Cx5.
- Walk forward.
- Take the CROCHET HOOK (S).
- Take the Coin (@).
- Combine the CLOSED BAG and CROCHET HOOK (Inventory) to get PAINT (2/2).
- Place the PAINTS (2/2) (T).
- Solution (U).
- Take the note and COLUMN PART (V).
- Walk down.
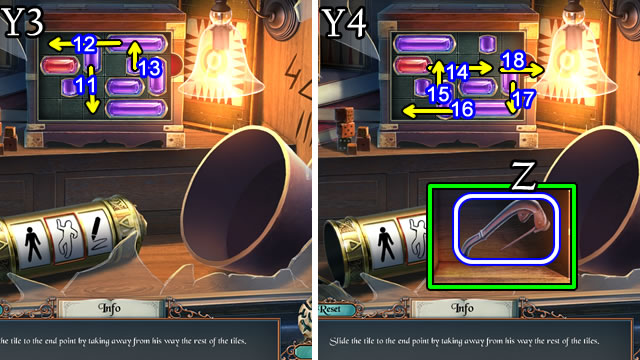
- Combine the MECHANICAL BIRD and WINDING KEY (Inventory). Select the key to take BOOK TILE (2/2).
- Place the BOOK TILES (2/2) (W).
- Take the note, FANG and DUSTER HANDLE (X).
- Place the COLUMN PART.
- Solution (Y).
- Take the note and FEATHER (Z).
- Combine the DUSTER HANDLE, FEATHER and WIRE for a DUSTER (Inventory).
- Walk forward.
- Use the DUSTER to clear the table.
- Solution (A).
- Take the SCROLL (B).
- Place the SCROLL (C). Select 1-3.
- Play the HOP to receive a FEATHER (D).
- Pick up the book (E).
- Solution (F).
- Take the STONE DECORATION PART and ORNAMENT PART (G).
- Walk forward.
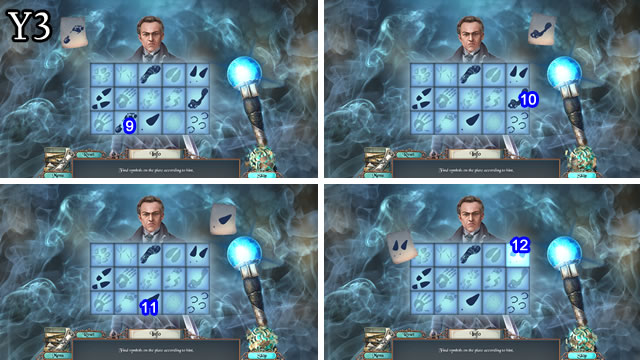
Chapter 3: Horror Tome
- Select (H).
- Solution (I). 1-10.
- Take the STEEL (J).
- Place the EMPTY FLASK for a FLASK WITH ACID (1/2) (K).
- Take the BOOK WITH FEATHER (L).
- Take the Coin (@).
- Place the ORNAMENT PART (M).
- Solution (N). B-A-B-C-D.
- Take FLASK WITH ACID (2/2) (O).

- Use the FLASKS WITH ACID (2/2) (P).
- Walk forward.
- Place the BOOK WITH FEATHER (Q) for a HOP (R). Receive a STONE DECORATION PART.
- Combine the 2 STONE DECORATION PARTS (Inventory) for a STONE DECORATION.
- Walk down.
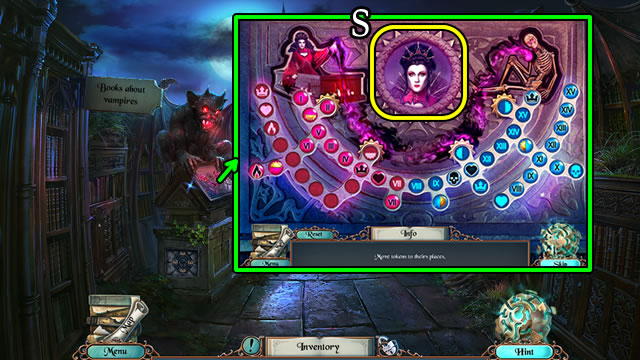
- Place the STONE DECORATION (S).
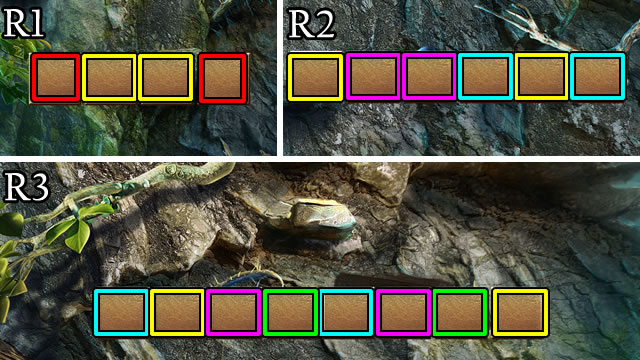
- Solution (1-6). Swap the stones in the order shown on each of the screenshots.
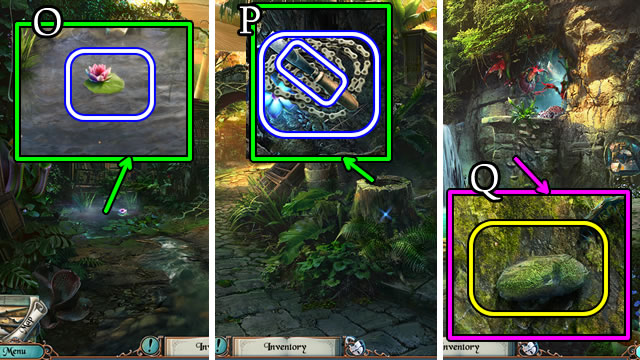
- Take the SOLVENT and RING (U).
- Walk forward.

- Take the TUBE (V).
- Take the VASE SHARDS (1/2) (W).
- Take the Coin (@).
- Place the RING (X).
- Solution (Y1-Y2). C-F-E-B-A-D-E-B-C-F-E-D-A-B-C-F-E-D-A.
- Walk forward.
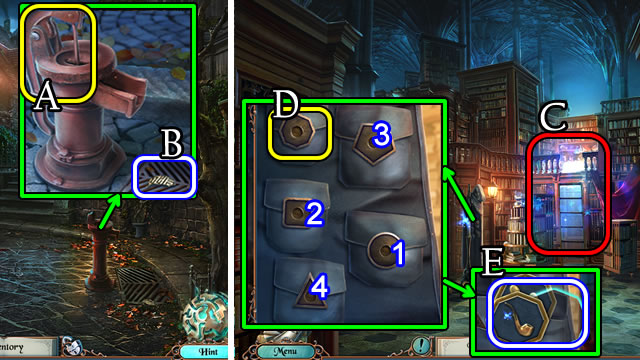
- Use the GEM; take the CROWN PART (Z).
- Take the HAIRPIN (A).
- Walk down.
- Place the CROWN PART (B).
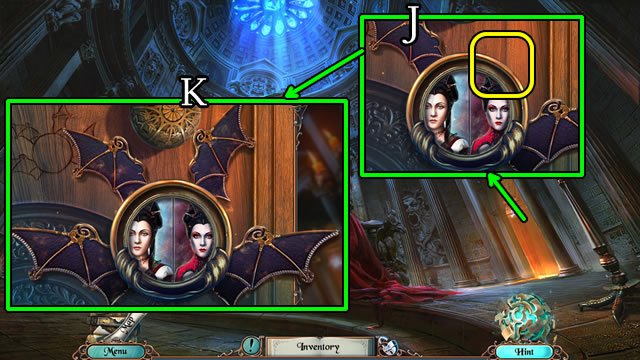
- Take the CASTLE and BAT FIGURES (C).
- Walk down.
- Place the BAT FIGURE (D).
- Take VASE SHARDS (2/2) and the MEDALLION (E).
- Combine the MEDALLION and HAIRPIN (Inventory) for CARMILLA'S MEDALLION.
- Walk forward 2x.
- Take the Coin (@).
- Take the BRUSH and place the VASE SHARDS (2/2) (F).
- Solution (G).
- Take the FLINT and COFFIN HANDLE (H).
- Combine the STEEL and FLINT (Inventory) for a FLINT AND STEEL.
- Walk down.
- Play the HOP for a METAL FIGURE PART (1/2) (I).
- Use the FLINT AND STEEL (J).
- Take the WHISTLE and HORROR TOME PHOTO (K).
- Walk forward.
- Attempt to enter the Balcony.
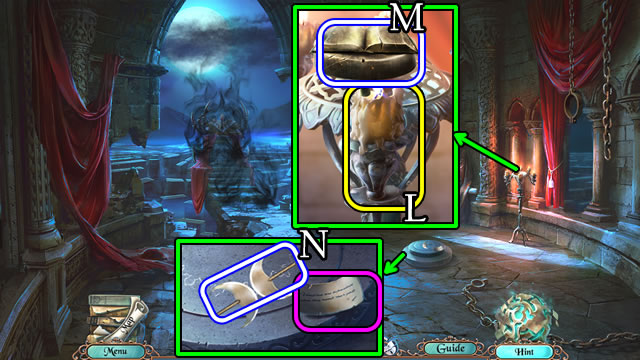
- Select the door knocker (L).
- Answer the questions by placing the CASTLE FIGURE, HORROR TOME PHOTO and then CARMILLA'S MEDALLION (M).
- Walk forward.
- Use the WHISTLE (N); take the BOWL (O).
- Take the TUBE PART (P).
- Take the Coin (@).
- Combine the TUBE and TUBE PART (Inventory) for a puzzle.
- Solution (Q). (A-C)-(B-C).
- Take the BAT WING (R).
- Walk down 2x.
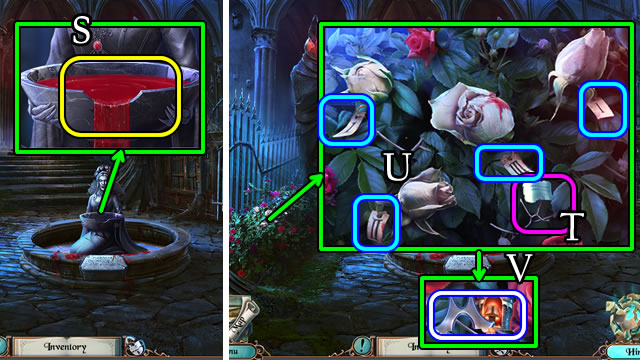
- Place the BOWL for a BOWL WITH BLOOD (S).
- Combine the BOWL WITH BLOOD and BRUSH (Inventory) for a BRUSH WITH BLOOD.
- Read the note (T). Use the BRUSH WITH BLOOD on the flowers the number of times indicated (U).
- Take the METAL FIGURE PART (2/2) (V).
- Walk forward.
- Place the METAL FIGURE PARTS (2/2) for a puzzle (W).
- Solution (X1). 1-5.
- Solution (X2). 6-9.
- Solution (X3). 10-14.
- Solution (X4). 15-19.
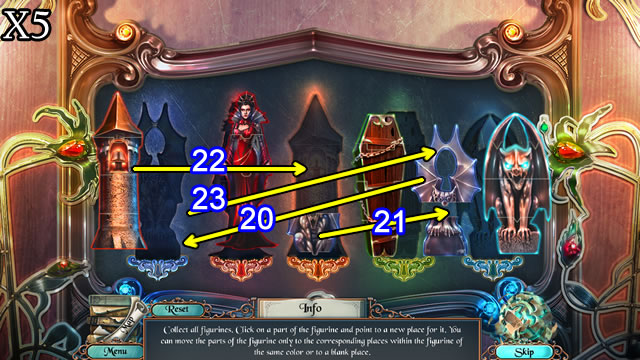
- Solution (X5). 20-23.
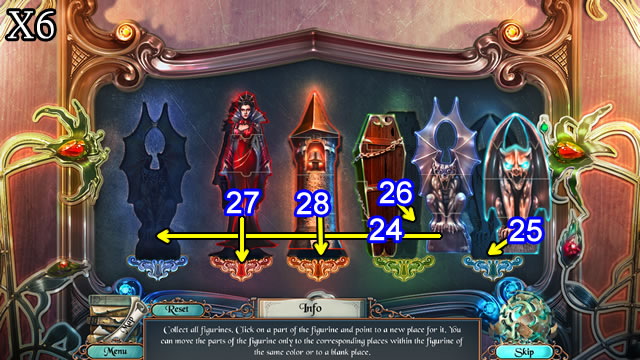
- Solution (X6). 24-28.
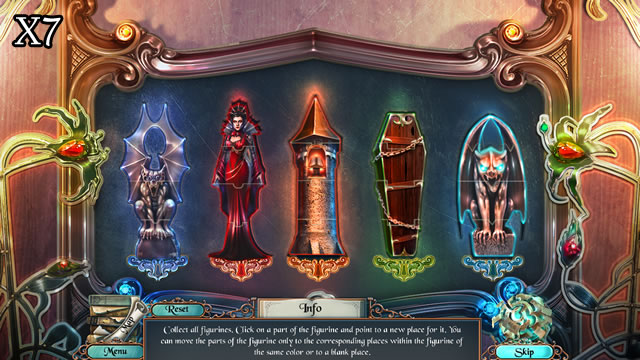
- Solution (X7).
- Walk left.
- Take the METAL PART (1/2) (Y).
- Take the GOLD DETAIL (1/3) (A).
- Place the COFFIN HANDLE (B).
- Play the HOP (C). Receive METAL PART (2/2).
- Take the Coin (@).
- Place the FANG (D). Take the LEVER (E).
- Walk down and forward.
- Place the METAL PARTS (2/2).
- Solution (F).
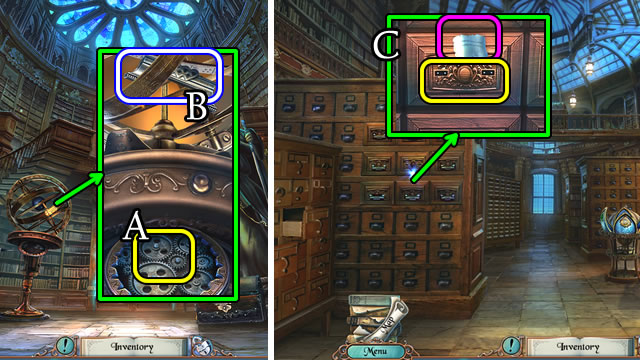
- Take the CHANDELIER PART (G).
- Place the LEVER for a puzzle (H).
- Solution (1-3, 4-7, 8).
- Take a SMALL BAT WING (I).
- Walk down and left.
- Place the BAT WING and SMALL BAT WING (J).
- Solution (K).
- Walk right.
- Select the scene.
- Place the CHANDELIER PART (L). Take the BOOK TOKEN (M).
- Take the note and GUILLOTINE AMULET (1/2) (N).
- Walk down 2x, then forward.
- Take the CLOTH (O).
- Place the BOOK TOKEN (P).
- Solution (Q).
- Take the note and TWINE (R).
- Walk down.
- Use the TWINE (S).
- Solution (T1-T2).
- Take the STONE BUTTON and GARLIC (U).
- Walk left, then right.
- Place the STONE BUTTON (V).
- Take the Coin (@).
- Select (1-5).
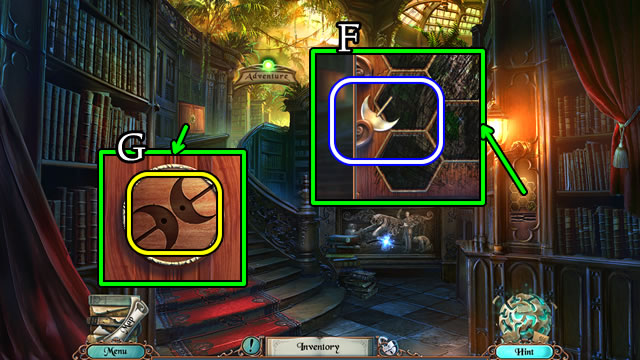
- Take the TAPESTRY PART (W).
- Walk down.
- Play the HOP to receive BATS (X).
- Place the TAPESTRY PART (Y).
- Solution (Z).
- Take the note and SISTERS' PORTRAIT (A).
- Walk right.
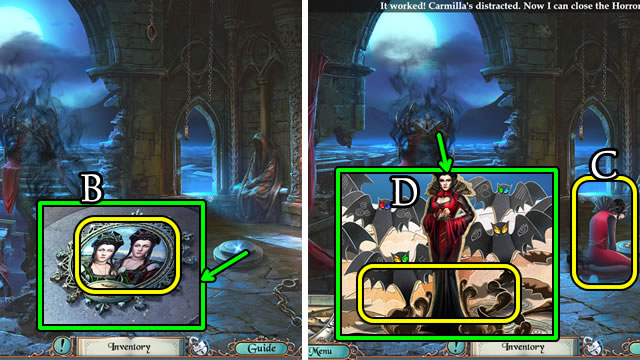
- Place the SISTERS' PORTRAIT (B).
- Place the GARLIC (C).
- Place the BATS (D).

- Solution (E).
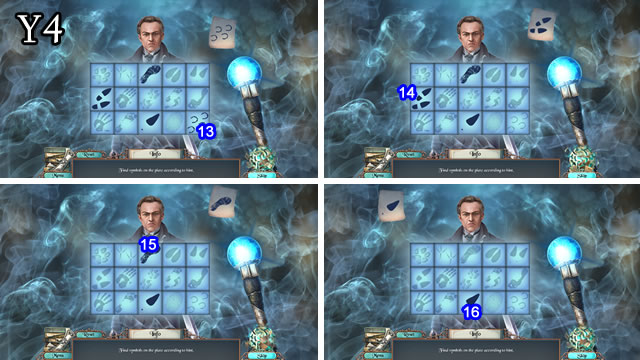
Chapter 4: Adventure World
- Take the GUILLOTINE AMULET (2/2) (F).
- Attempt to walk forward.
- Place the GUILLOTINE AMULET (2/2) (G).
- Solution (H1). E-Dx3-Cx2-Bx2-Ax2.
- Walk forward.
- Take the CIGARETTE CASE and ERASER (I).
- Take the Coin (@)
- Take the TWEEZERS (J).
- Walk forward; speak to the woman.
- Take the Coin (@).
- Take the VINE (K).
- Walk down 2x.
- Use the ERASER (L).
- Solution (M). 1-4.
- Take the RUNE DECODER (N).
- Use the TWEEZERS (O); take the DINOSAUR'S EYE (P).
- Walk forward.
- Place the RUNE DECODER (Q).
- Solution (R).
- Take the PANTHER NOSE (S).
- Walk down.
- Take the Coin (@).
- Take the GLASS FIGURE (T); place the PANTHER NOSE (U).
- Take GOLD DETAIL (2/3) (V).
- Walk forward.
- Place the DINOSAUR'S EYE (W).
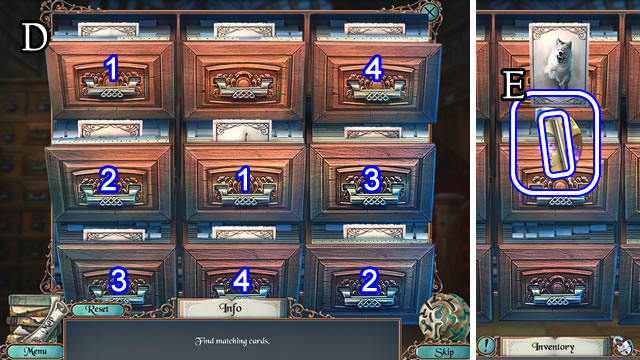
- Select the matching pairs of tiles (X). Take the PICTURE PART (Y).
- Walk forward.
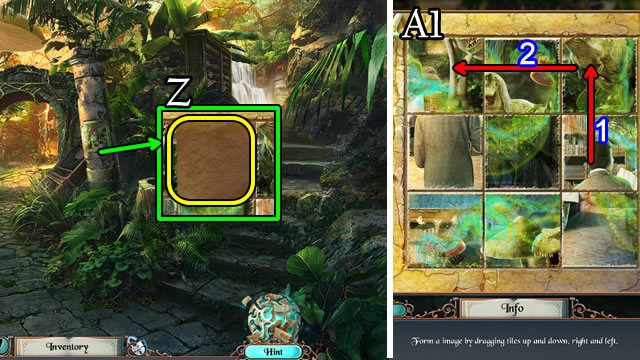
- Place the PICTURE PART (Z).
- Solution (A1). 1-2.
- Solution (A2-A3). 3-9.
- Solution (A4).
- Take the TAPE (B).
- Enter the Jungle.
- Take the BALL (C).
- Use the CLOTH (D); take the EMPTY FLARE GUN (E).
- Use the VINE (F).
- Play the HOP to receive GOLD DETAIL (3/3) (G).
- Walk down 2x.

- Place the GOLD DETAILS (3/3) (H).
- Solution (I1-I3).
- Take the note and the NET (J).
- Walk forward.
- Attempt to climb the steps to the Waterfall.
- Use the NET (K).
- Walk to the Waterfall.
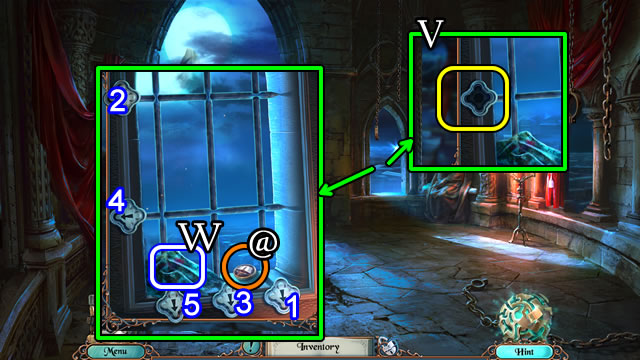
- Take the BROOCH (L).
- Use the SOLVENT (M).
- Solution (N). 1-9.
- Take the note and CANE.
- Return to the Jungle.
- Use the CANE; take the GLOWING FLOWER (O).
- Walk down.
- Use the GLOWING FLOWER. Take the CHAIN and CHISEL (P).
- Walk to the Waterfall.
- Use the CHISEL (Q).
- Solution (R1-R3).
- Take the TALON (S).
- Walk down.
- Place the TALON (T). Take the KNIFE (U) and Coin (@).
- Return to the Jungle.
- Play the HOP for a HANDLE (V).
- Use the KNIFE (W). Take STONE FIGURES (1/2) (X).
- Take the Coin (@).
- Return to the Cave.
- Place the CHAIN (Y) and HANDLE (Z).
- Take STONE FIGURES (2/2) (A).
- Take the Coin (@).
- Walk down 2x.
- Place the STONE FIGURES (2/2) (B).
- Solution (C1). A-B-C-D-A-B.
- Take the BROKEN FAN (D).
- Combine the BROKEN FAN and TAPE (Inventory) for a FAN.
- Return to the Cave.
- Use the FAN. Take the STONE CIRCLE (E).
- Walk down.
- Place the STONE CIRCLE (F).
- Solution (G1). Ax3-E-Dx2-C.
- Take the FLARE (H).
- Walk forward.
- Combine the EMPTY FLARE GUN and FLARE (Inventory) for a FLARE GUN.
- Use the FLARE GUN (I).
- Select (J).
- Solution (K1).
- Receive the ADVENTURE TOME.
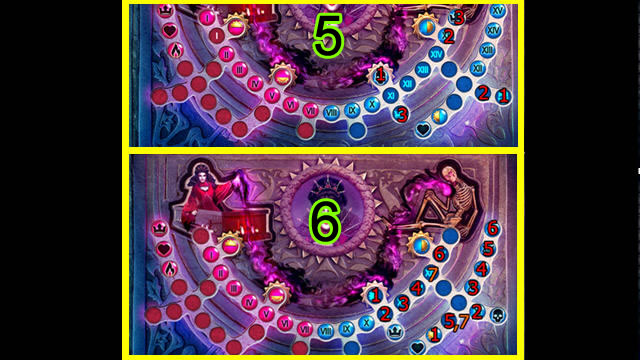
Chapter 5: Mystery Section
- Select the scene; speak to the woman; receive a WHEEL and TOKEN (1/3).
- Use the WHEEL (L).
- Stop the arrows while they are in the colored area. Take the WALLET (M).
- Play the HOP for GLASS FIGURE (2/3) (N).
- Take the DOG TOY PART (1/4) (O) and Coin (@).
- Walk left.
- Select the scene.
- Take the GEAR (1/2) (P).
- Take the CLIPPING (Q) and Coin (@).
- Walk forward.
- Take the METAL BADGE (R).
- Take LOCK PART (1/2) (S) and Coin (@).
- Take GLASS FIGURES (3/3) (T).
- Walk down 2x.
- Place the GLASS FIGURES (3/3) (U).
- Solution (V).
- Take the LIGHTBULB (W).
- Walk left.
- Place the LIGHTBULB (X).
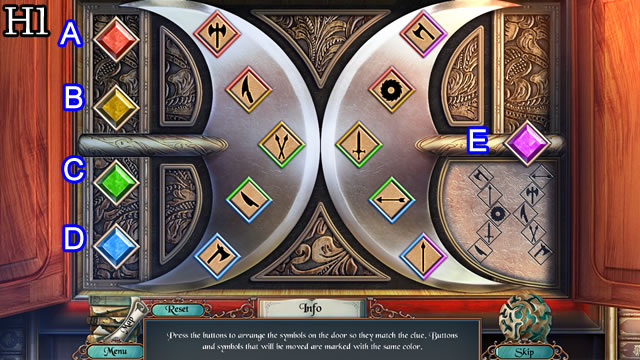
- Solution (Y1-Y2). 1-10.
- Solution (Y3-Y4). 11-18.
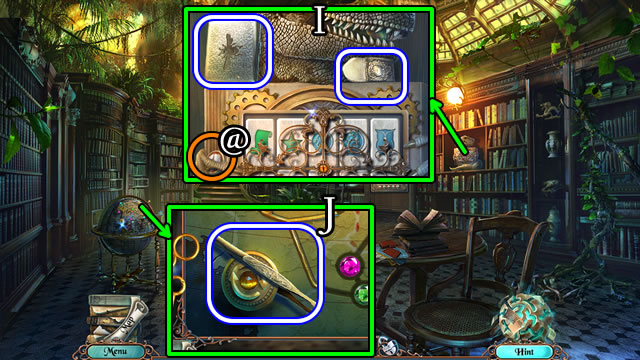
- Take the PUMP PART (Z).
- Walk forward.
- Place the PUMP PART (A); take the BROOCH PART (B).
- Combine the BROOCH and BROOCH PART (Inventory) for a BROOCH.
- Walk down 2x.
- Play the HOP for a HEAVY STATUETTE (C).
- Place the BROOCH (D). Match the pocket shapes (1-4).
- Take TOKEN (2/3) (E).
- Walk left.
- Use the HEAVY STATUETTE (F).
- Walk right.
- Place the BALL.
- Solution (G).
- Take the MODEL CAB (H).
- Take DOG TOY PART (2/4) (I).
- Take the OWL and WALLET PART (J).
- Combine the WALLET and WALLET PART (Inventory) and open to take CHALK and a COIN (1/2).
- Walk down, then forward.
- Place the CLIPPING (K) and CHALK (L).
- Solution (M).
- Remove the gold brick, take the handkerchief (N) and METAL HAT (O).
- Walk down.
- Place the METAL HAT. Take the SANDBAG (P).
- Walk right.
- Use the SANDBAG (Q). Take TOKEN (3/3) (Q1) and the Coin (@).
- Walk down, then forward.
- Place the TOKENS (3/3) (R).
- Solution (S). C-B-A-E-D-C-G-F-E-D-G-C-D-E-F-G-D.
- Walk forward.
- Select the scene. Speak to the man.
- Take the LIST OF EVIDENCE (T).
- Take DOG TOY PART (3/4) and COIN (2/2) (U).
- Take the Coin (@).
- Walk down.
- Use COINS (2/2). Select the newspaper 2x (W).
- Take the PIN (X).
- Walk down, then right.
- Use the PIN (Y).
- Solution (Z). (A-B)-(A-C)-(B-D).
- Take the CIGARETTE CASE PART (A).
- Place the LIST OF EVIDENCE (B).
- Solution (C). 1-5.

- Select the pieces (D).
- Take the VINEGAR (E).
- Walk down, then forward 2x.
- Combine the CIGARETTE CASE and CIGARETTE CASE PART (Inventory) for a MAIL AMULET.
- Use the VINEGAR (F). Take DOG TOY PART (4/4) (G).
- Place the MAIL AMULET (H).
- Open the envelope; read the letter; take the PEN (I).
- Walk down 2x.
- Combine the DOG TOY AND DOG TOY PARTS (Inventory) for a DOG TOY.
- Give the DOG TOY. Take the DOG (J).
- Walk forward 2x.
- Give the DOG (K).
- Combine the CAB MODEL and PEN (Inventory) for a PIPE AMULET.
- Place the PIPE AMULET (L).
- Puzzle solutions vary.
Chapter 6: Grand Finale
- Solution (M1-M2).
- Talk to the man
- Take PICTURE PART (1/3) (N).
- Walk forward; speak to the woman.
- Place the METAL BADGE (O).
- Take LOCK PART (2/2) (P) and Coin (@).
- Take the BROKEN TYPEWRITER and FLAMMABLE LIQUID (Q).
- Walk down.
- Place LOCK PARTS (2/2) (R).
- Solution (S).
- Enter the Hall of Memory.
- Play the HOP for a LIGHTER (T).
- Take the CLOCK FACE (U) and Coin (@).
- Walk down.
- Place the FLAMMABLE LIQUID and use the LIGHTER (V).
- Take the GEAR (2/2) and WOOD PANEL (W). Take the Coin (@).
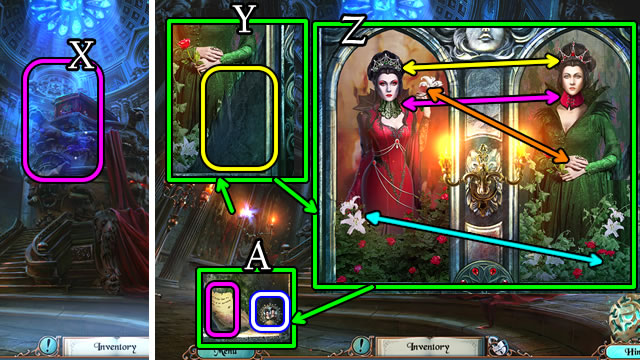
- Place the WOOD PANEL (X).
- Solution (Y).
- Take the CIRCLE PART (Z).
- Walk to the Hall of Memory.
- Place the GEARS (2/2) (A). Take the HANDLE (B).
- Return to the Card Catalog.
- Place the HANDLE (C).
- Solution (D).
- Take the NAIL and CIRCLE PART (E).
- Walk down.

- Use the NAIL (F).
- Take the GLUE and STAFF PART (G).
- Combine the 2 CIRCLE PARTS and GLUE (Inventory) for a METAL CIRCLE.
- Combine the OWL and CLOCK FACE (Inventory). Select for PICTURE PART (2/3).
- Return to the Hall of Memory.
- Play the HOP for PICTURE PART (3/3) (H).
- Return to the Card Catalog.
- Place PICTURE PARTS (3/3) (I).
- Solution (J).
- Take SET OF KEYS (1/2) and STAFF PART (K).
- Return to the Hall of Memory.
- Take the note (L). Place the METAL CIRCLE (M) and align (N).
- Open (O) and take the SCROLL (P).
- Open the SCROLL (Inventory) and select the paper pieces (Q) for a SET OF KEYS (2/2) (R).
- Combine the BROKEN TYPEWRITER and SET OF KEYS (2/2) (Inventory) for a KEEPER FIGURE (1/2) and a DECORATION.
- Place the DECORATION (S).
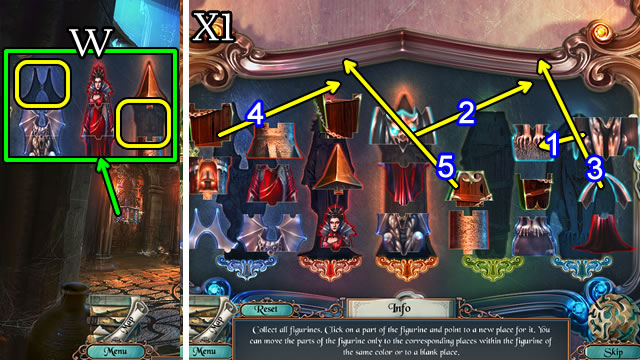
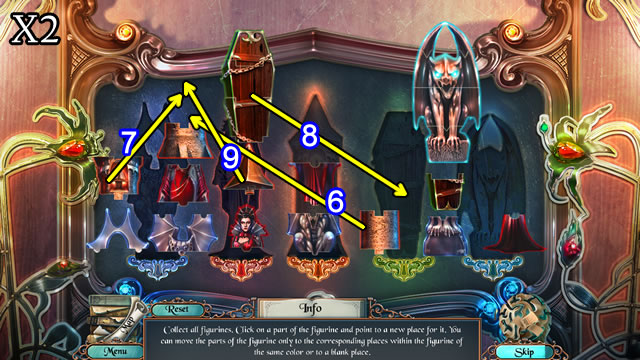
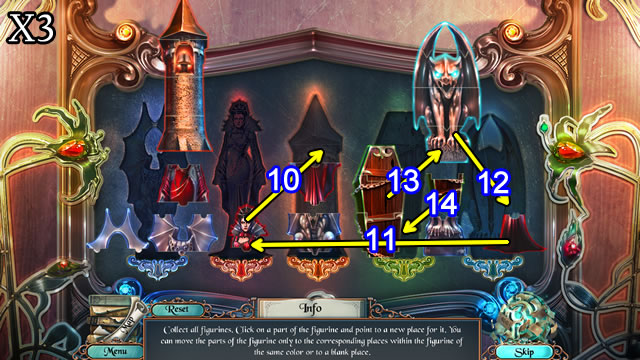
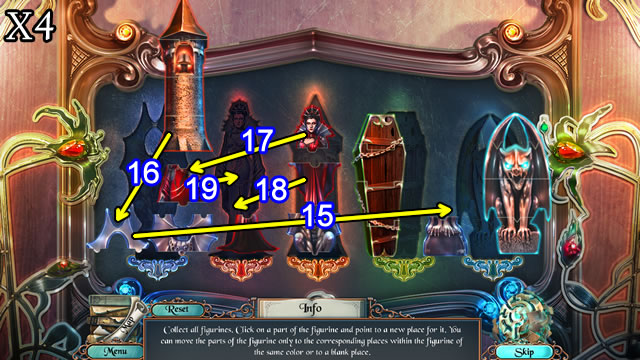
- Solution (1-8).
- Take KEEPER FIGURE (2/2) (T).

- Place the KEEPER FIGURES (2/2) (U).
- Solution (V).
- Walk forward.
- Select the scene.
- Combine the 2 STAFF PARTS (Inventory) for a STAFF.
- Place the STAFF for a puzzle.
- Solution (1-6).
- Solution (W).
- Solution (X).

- Solution (Y1-Y4). Order may vary.
- Congratulations. You have completed playing the bonus game of Sable Maze: Sinister Knowledge.
Created at: 2016-10-07