

Walkthrough Menu
- General Tips
- Chapter 1: The Memorial
- Chapter 2: Mary
- Chapter 3: The Druid
- Chapter 4: The Camp Director
- Chapter 5: Lucy
- Chapter 6: Darren
General Tips
- This is the official guide for Sable Maze: Soul Catcher.
- This guide will not show when you have to zoom into a location; the screenshots will show each zoom scene.
- Hidden-object puzzles are referred to as HOPs. This guide will not show screenshots of the HOPs, however, it will mention when an HOP is available and the inventory item you'll collect from it.
- Use the Map to fast travel to a location.
Chapter 1: The Memorial
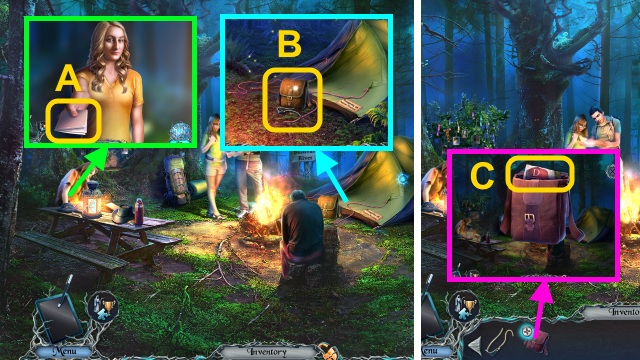
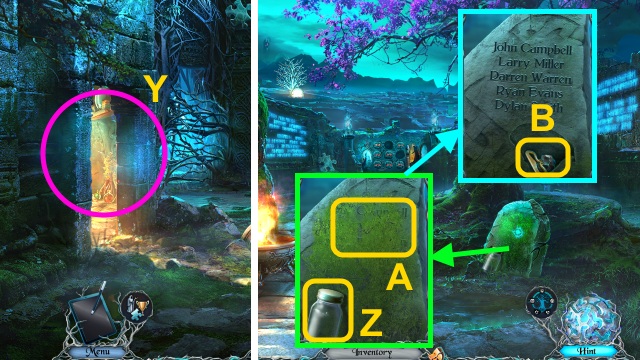
- Talk to the Woman; take the note (A).
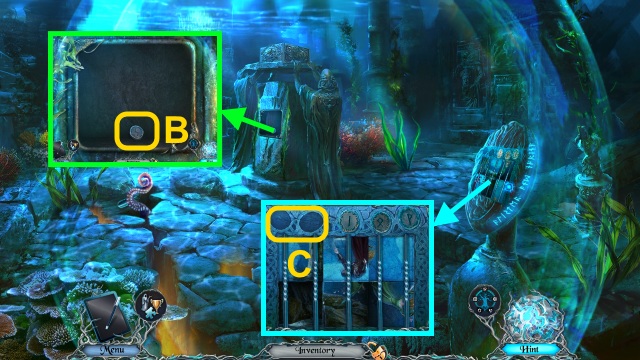
- Take the SLING and SATCHEL (B).
- Open the SATCHEL; take DARREN'S PHOTO (C).
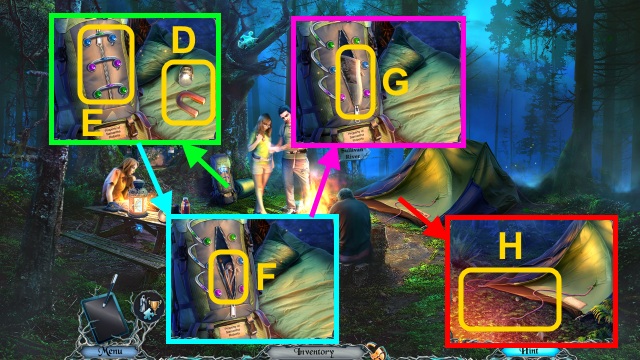
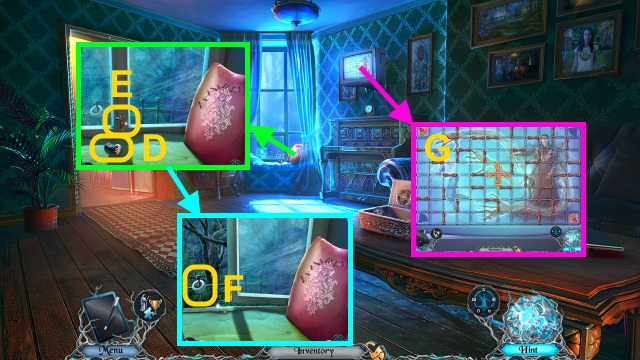
- Open the sleeping bag; take the MAGNET and PAINT (D).
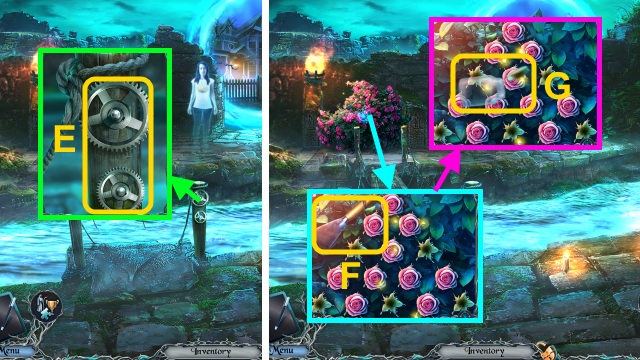
- Select each latch 2x (E).
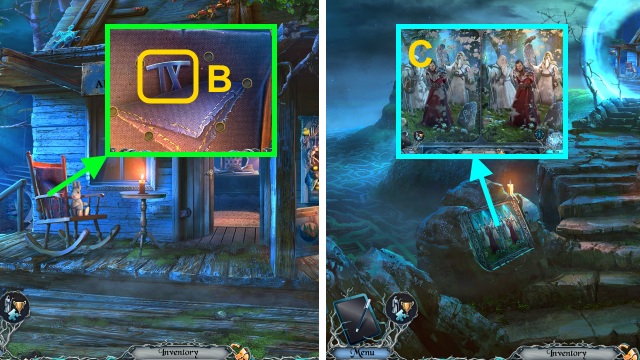
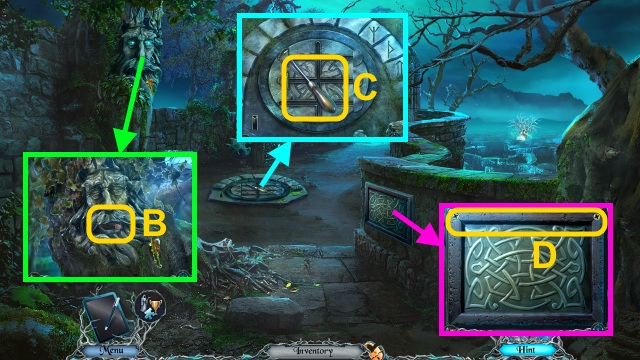
- Read the newspaper (F).
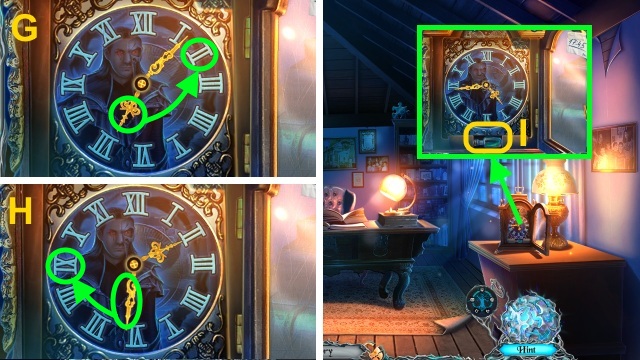
- Take the BRUSH, PEGS, and KNIFE (G).
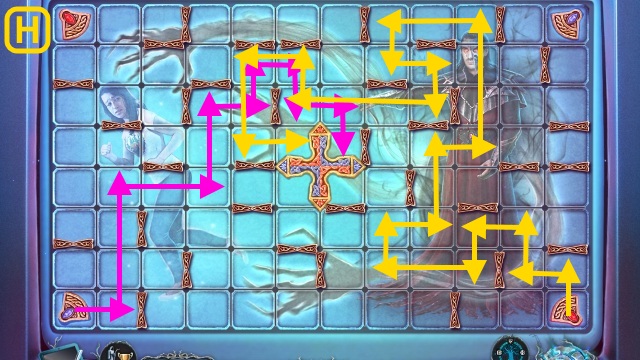
- Use the PEGS (H).
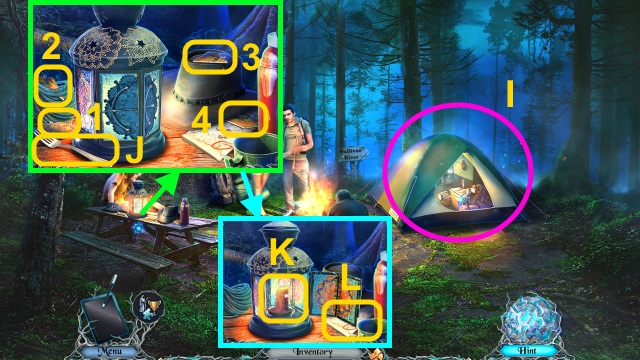
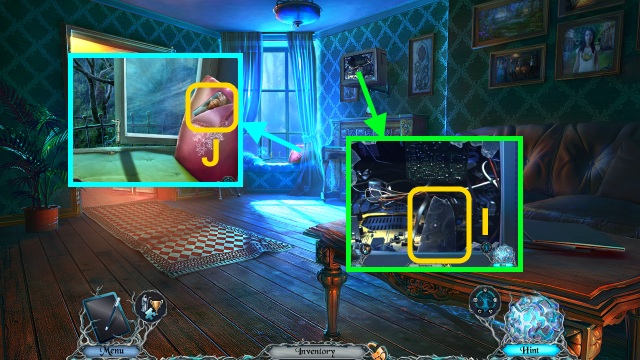
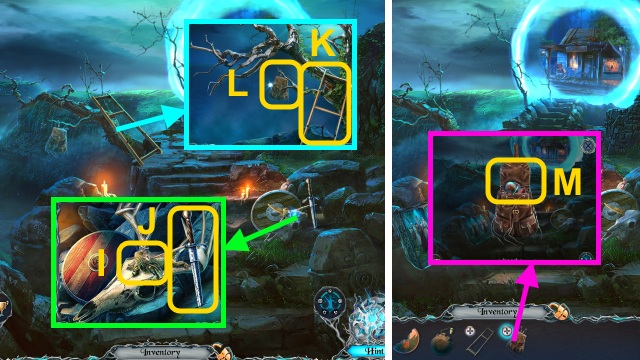
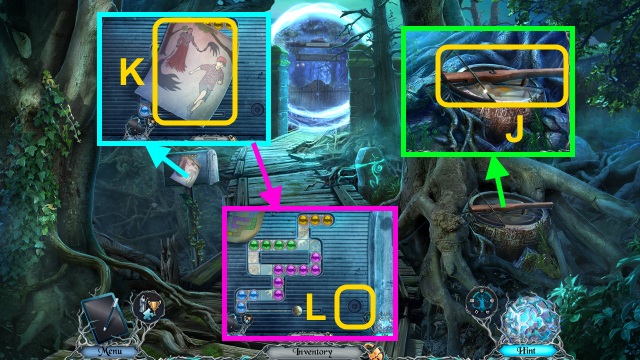
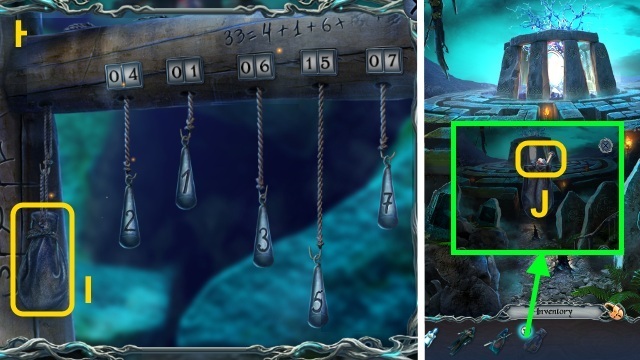
- Play the HOP to receive the UNLIT CANDLES (2/2) (I).
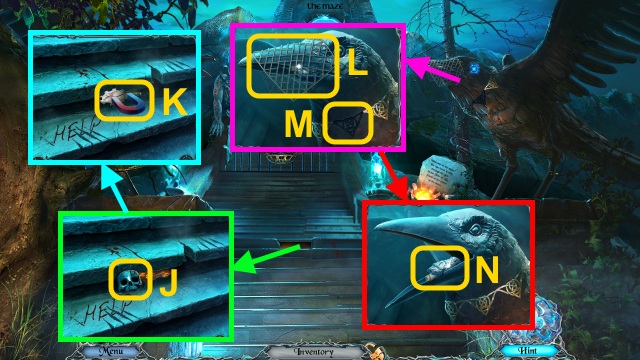
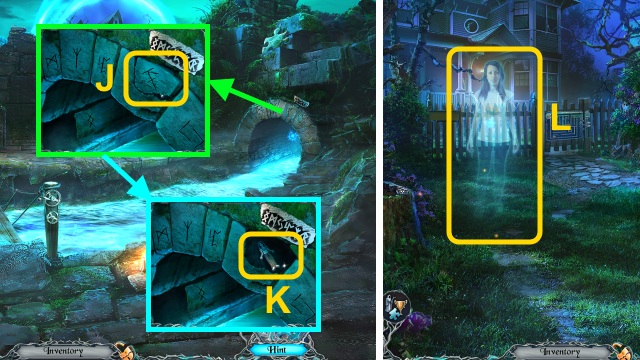
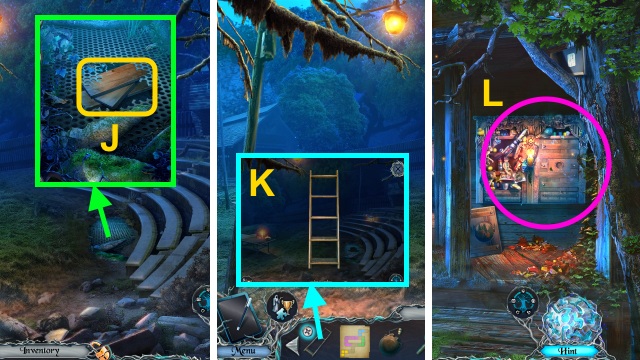
- Take the FORK (J); place the pieces (1-4) on the lantern.
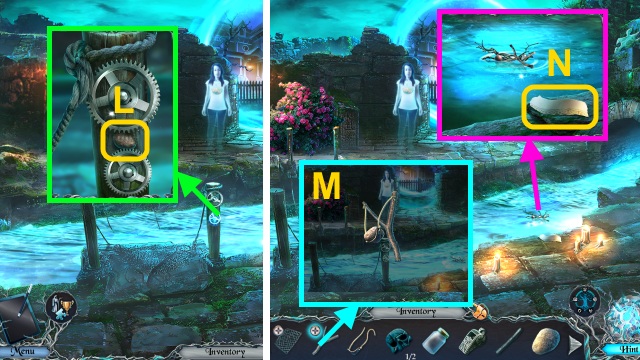
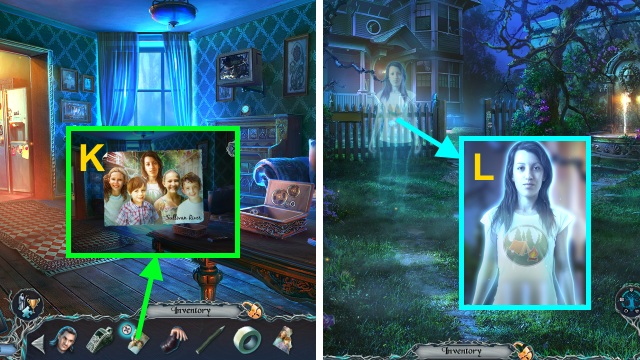
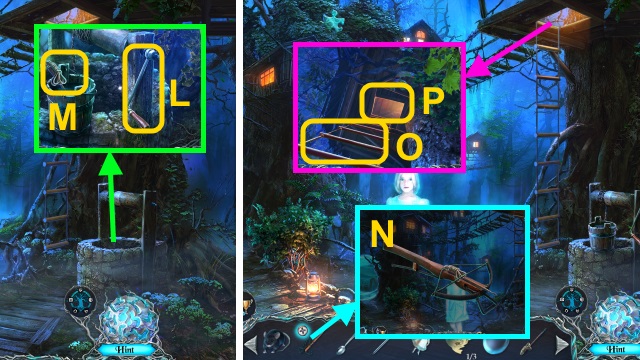
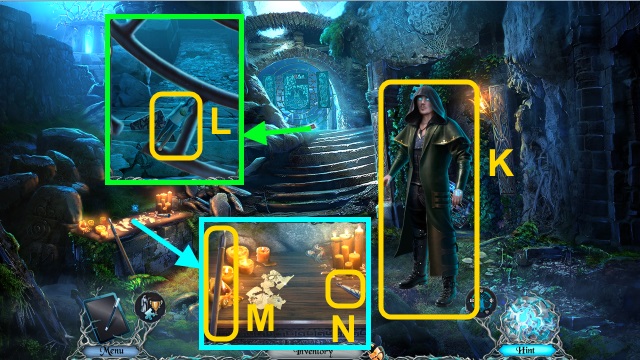
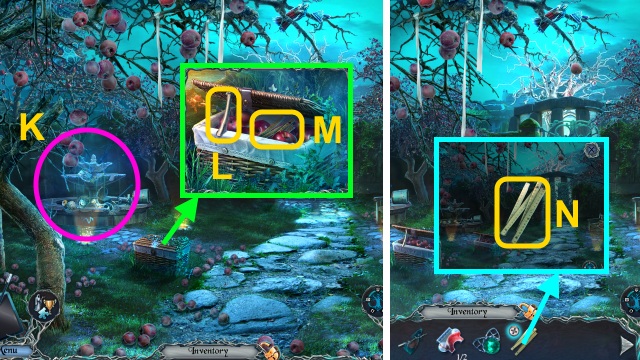
- Take the CANDLE (K) and Map (L).
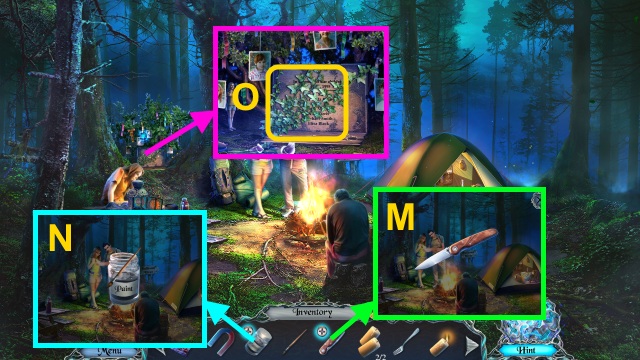
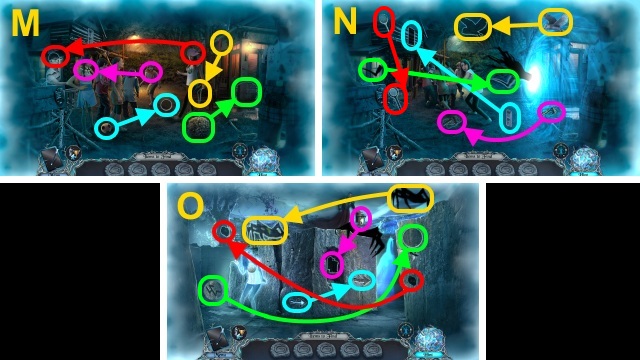
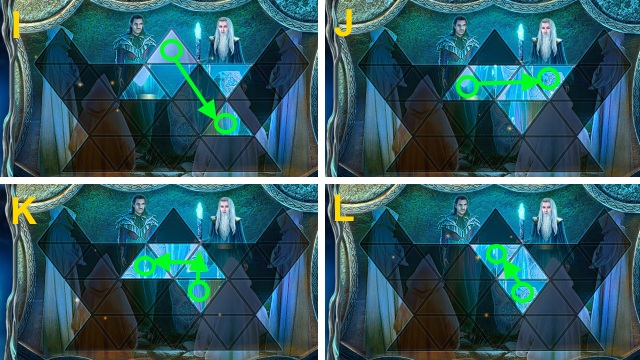
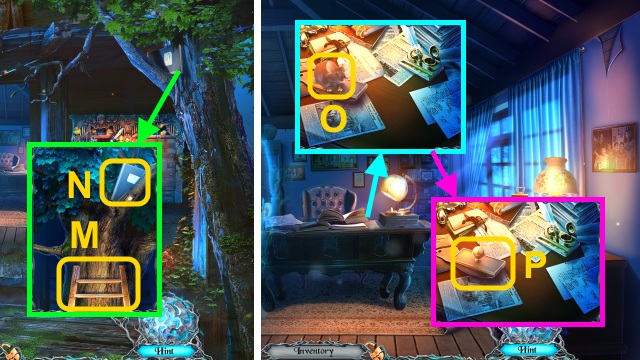
- Open the KNIFE (M).
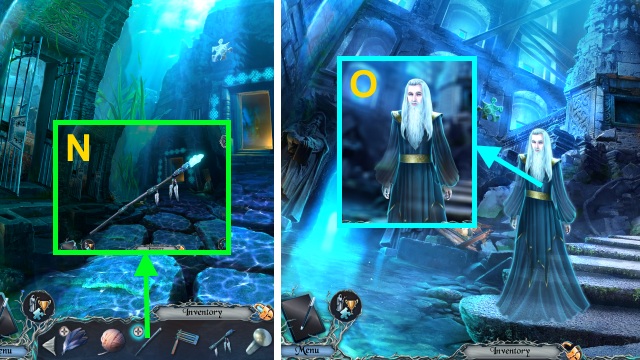
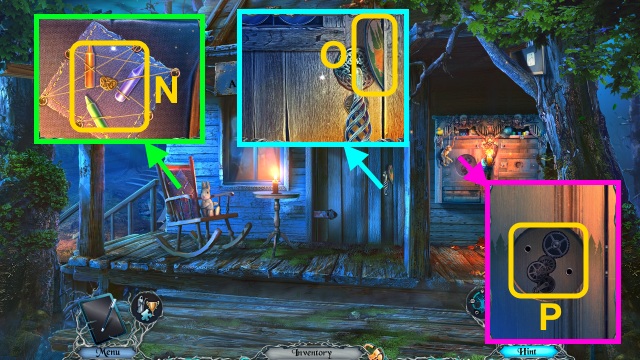
- Combine the PAINT and BRUSH (N); receive the PAINT WITH BRUSH.
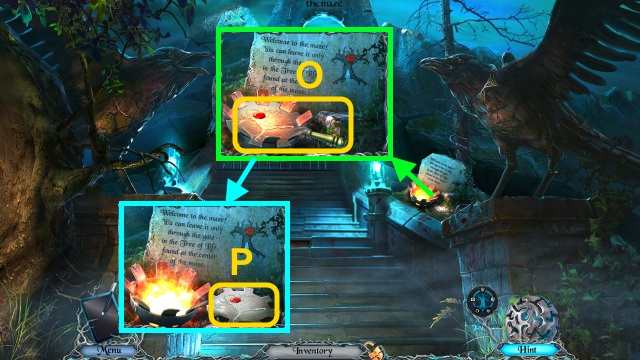
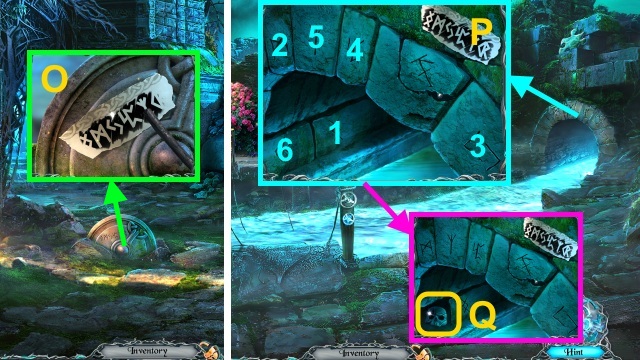
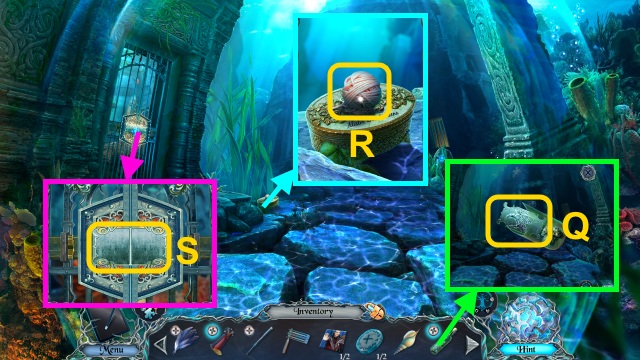
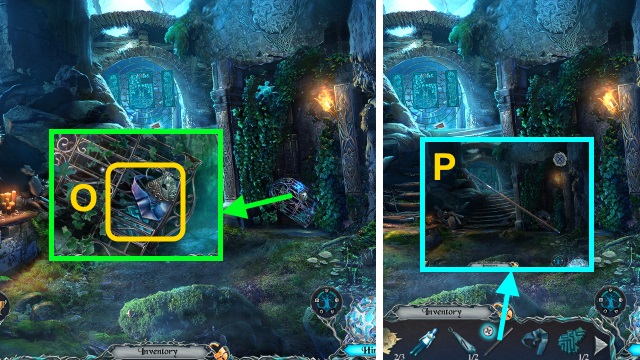
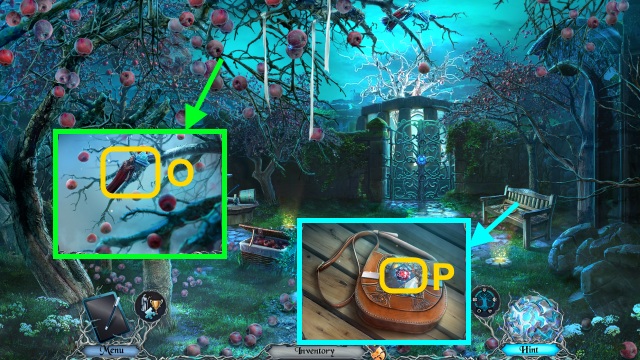
- Use the KNIFE (O).
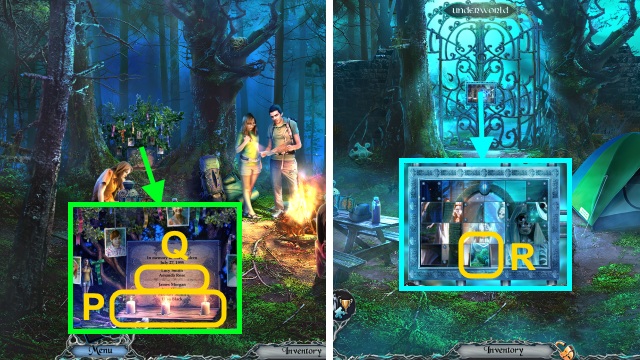
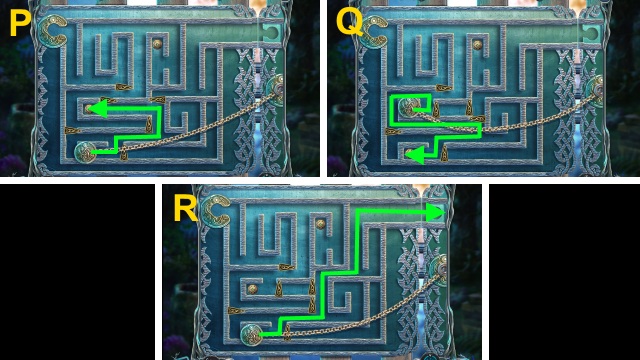
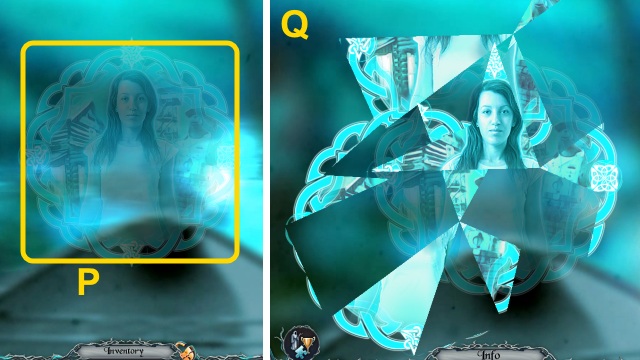
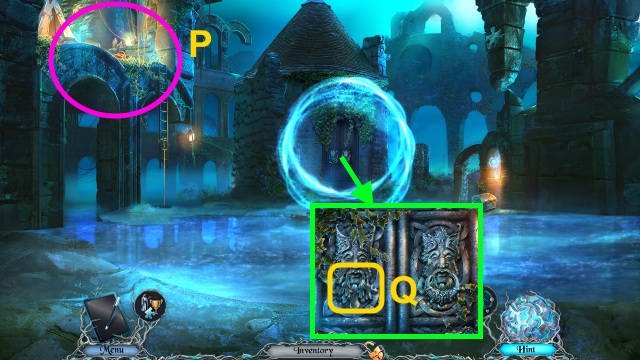
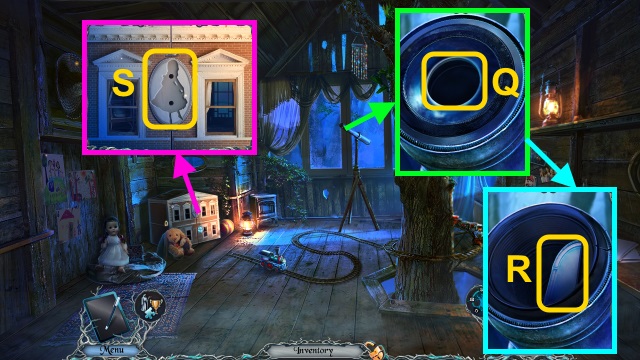
- Place the UNLIT CANDLES (2/2) and CANDLE (P).
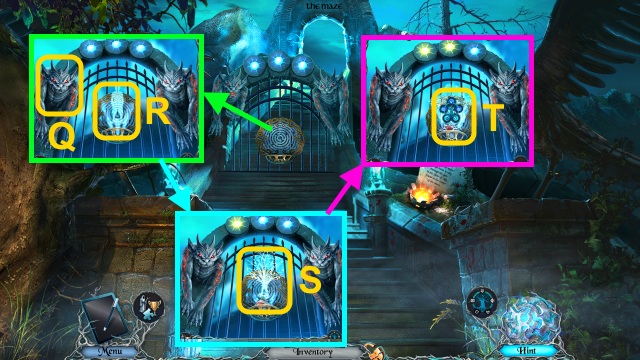
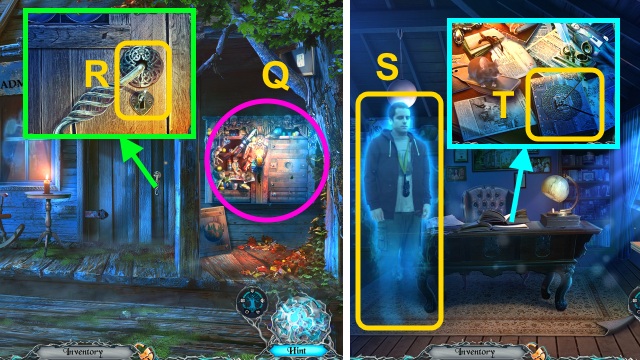
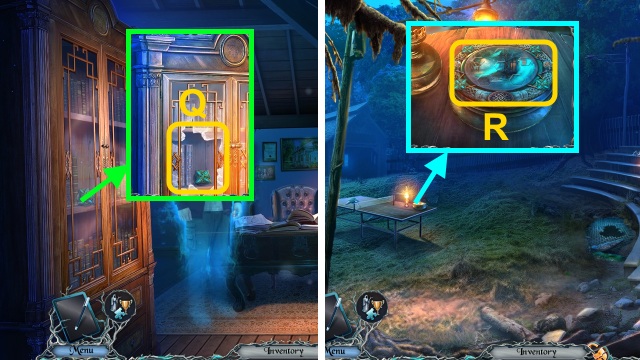
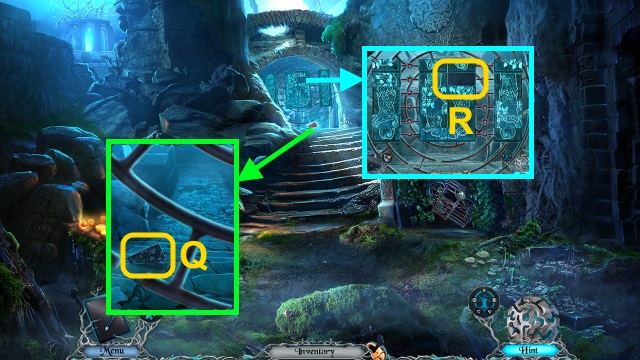
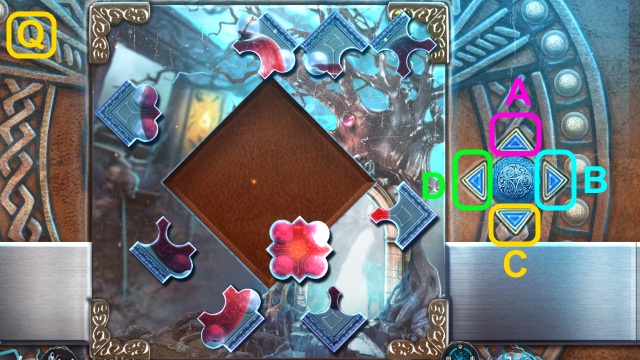
- Use the PAINT WITH BRUSH (Q).
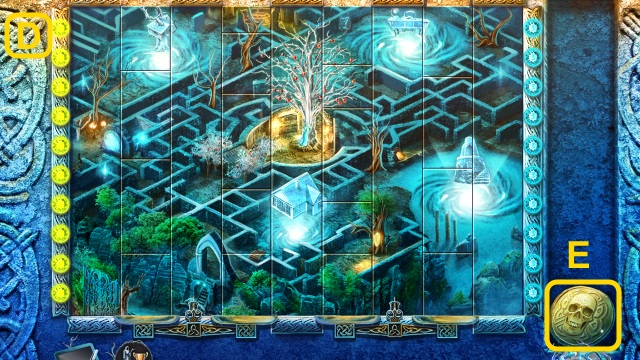
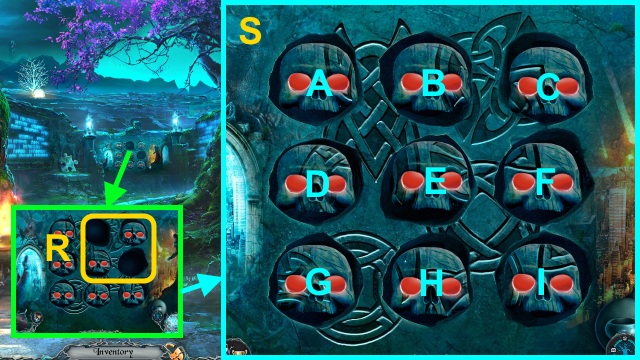
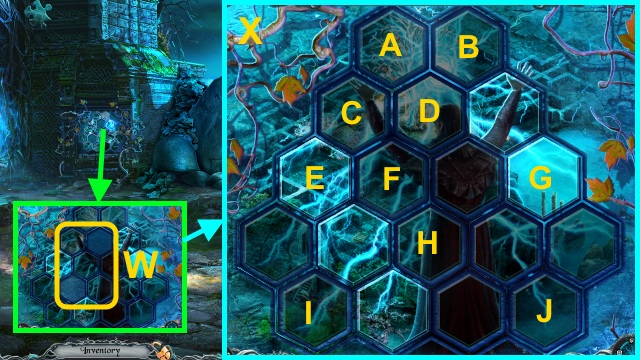
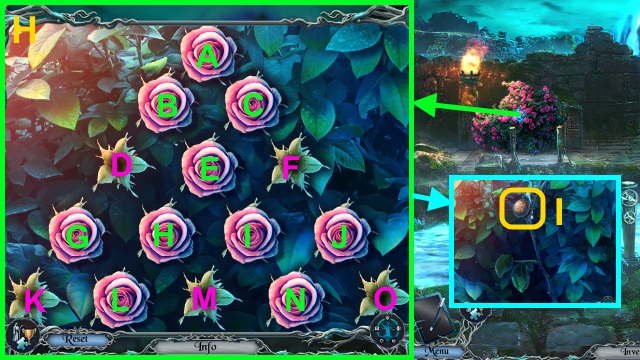
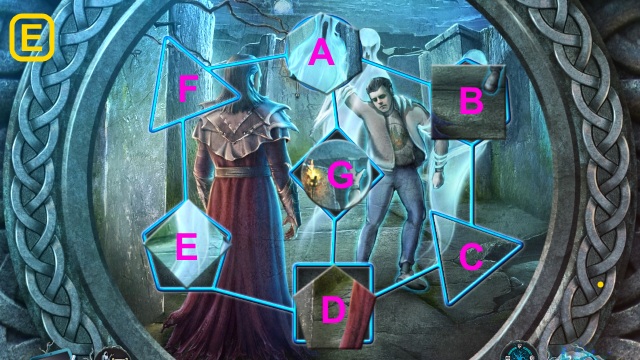
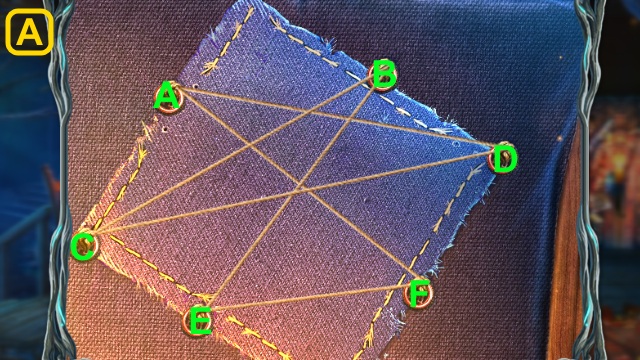
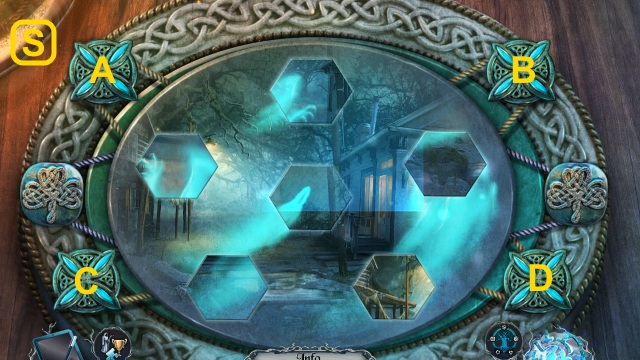
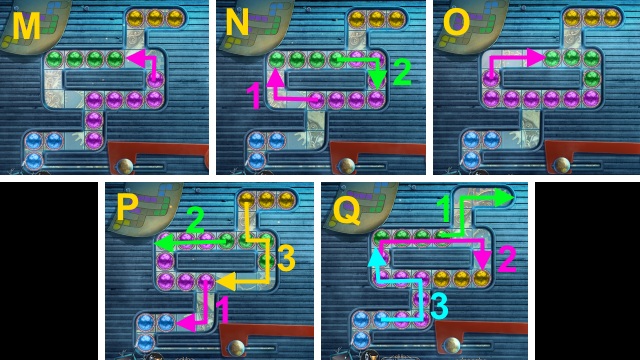
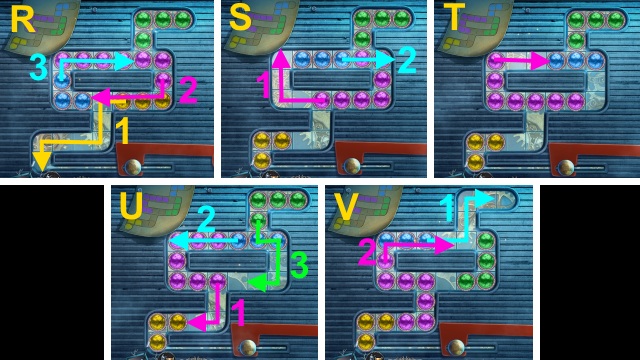
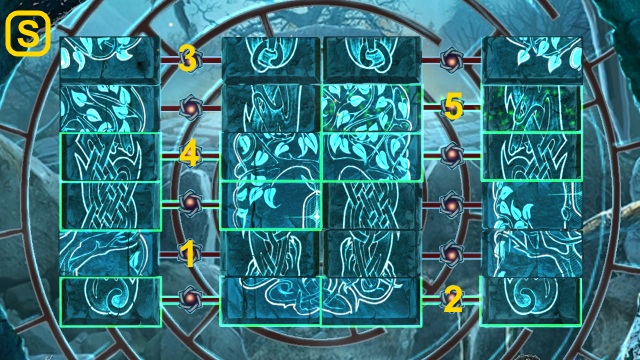
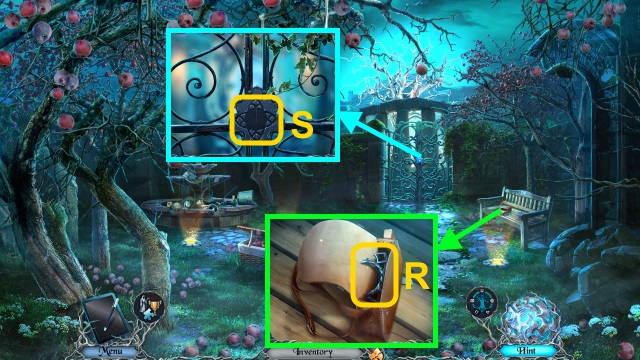
- Take the MAP TILE for a mini-game (R).
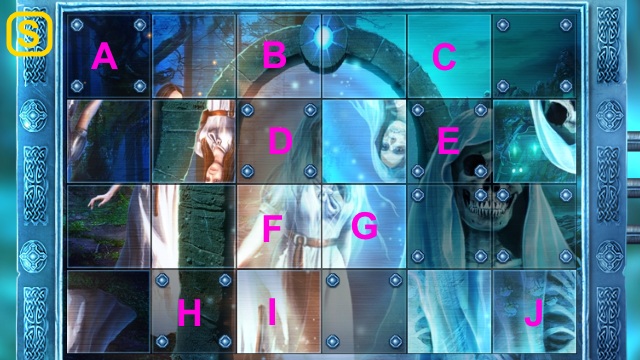
- Solution (S) Ax2-Bx2-Dx2-Hx2-Fx2-Ix2-Gx2-Ex2-Cx2-Jx2.
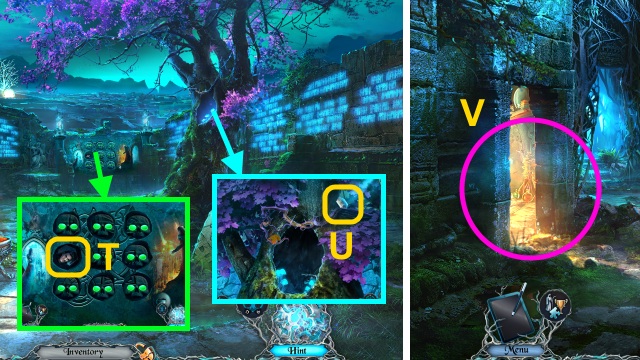
- Walk forward.
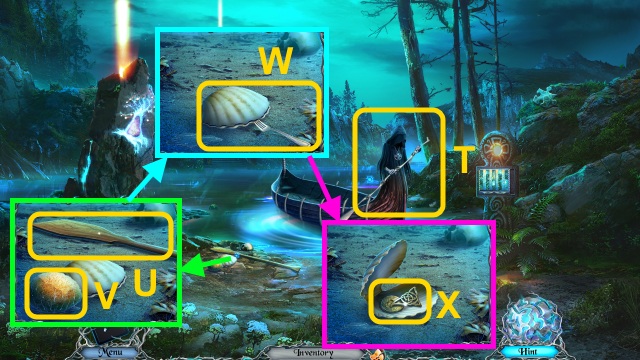
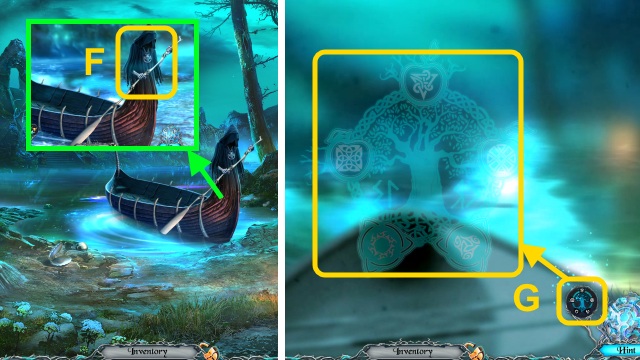
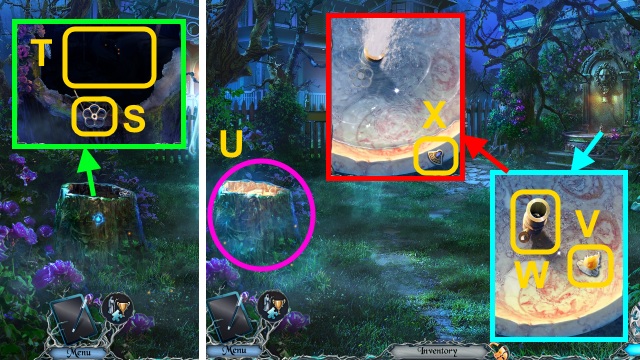
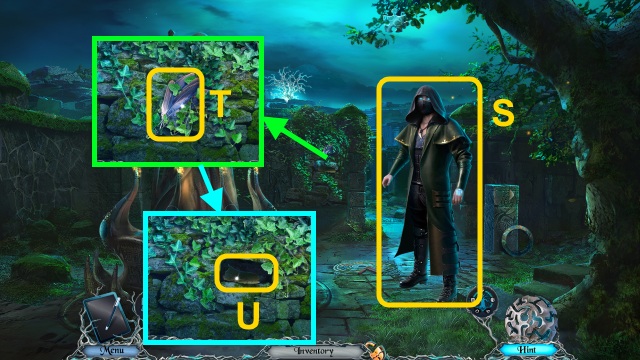
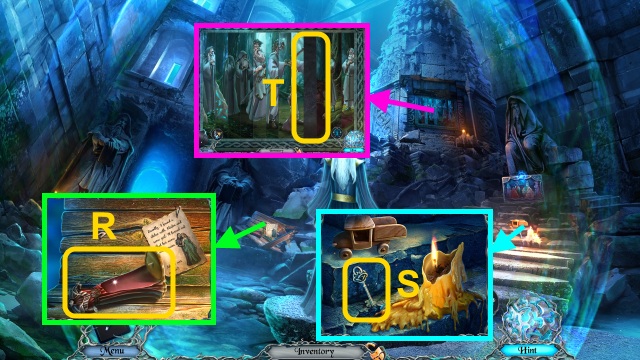
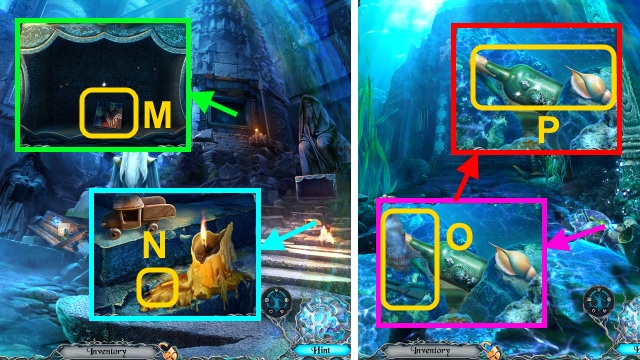
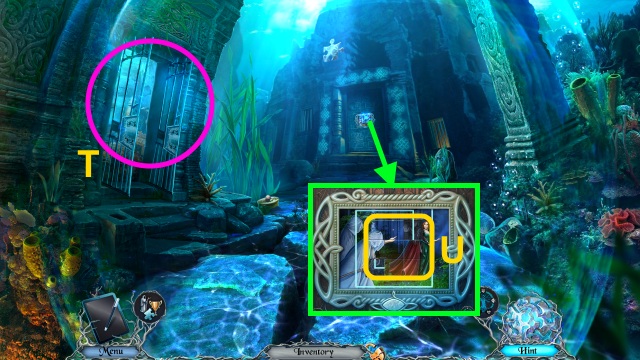
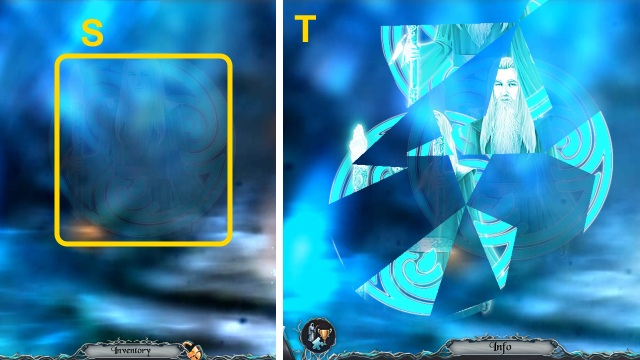
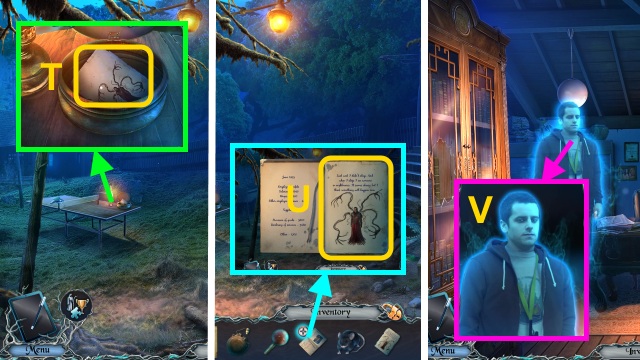
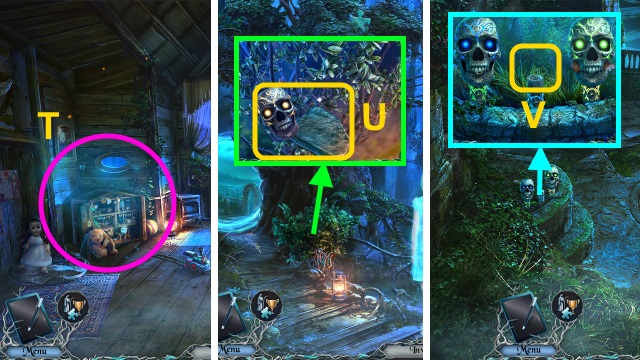
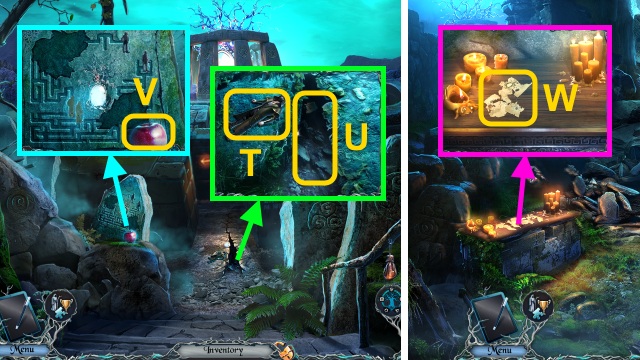
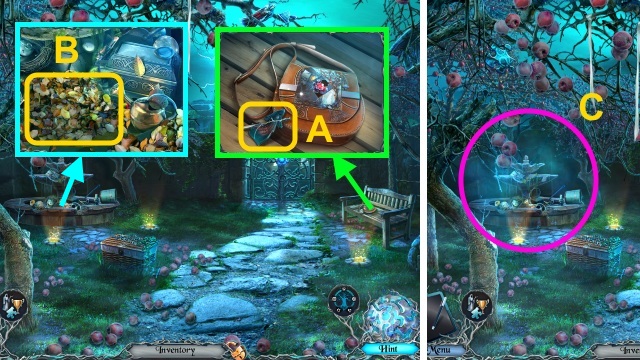
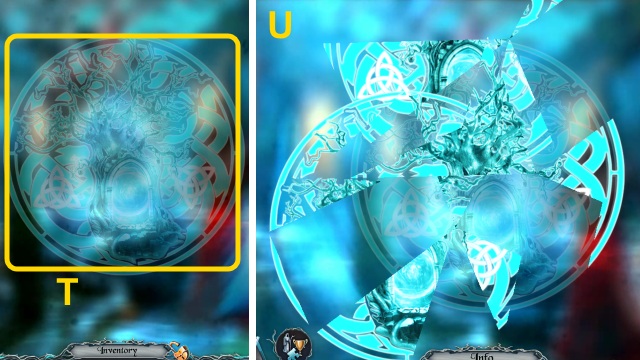
- Talk to the Ferryman (T).
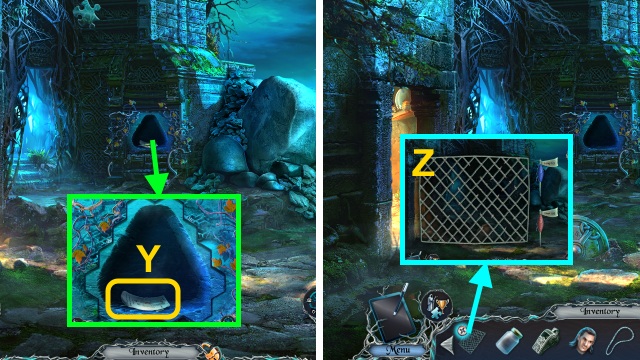
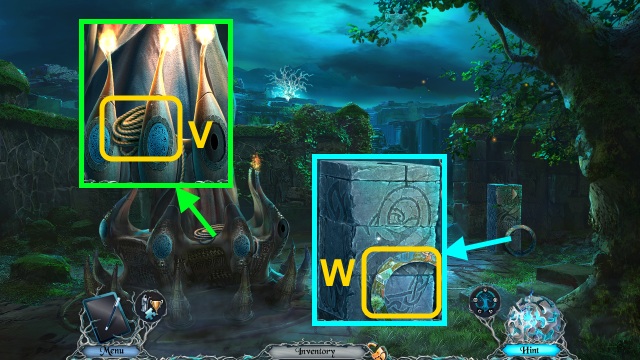
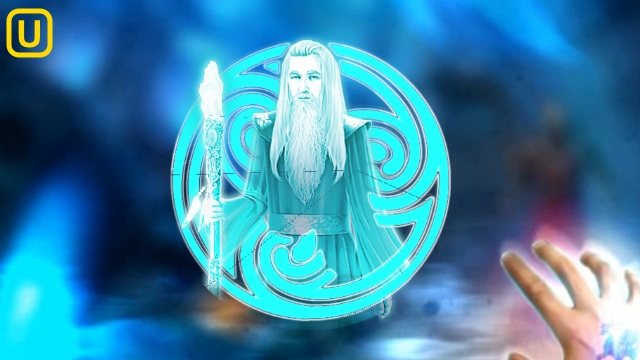
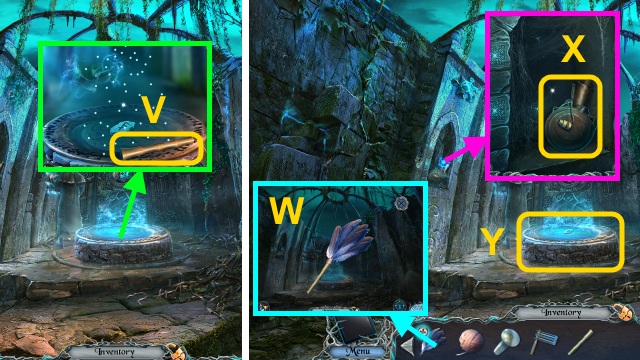
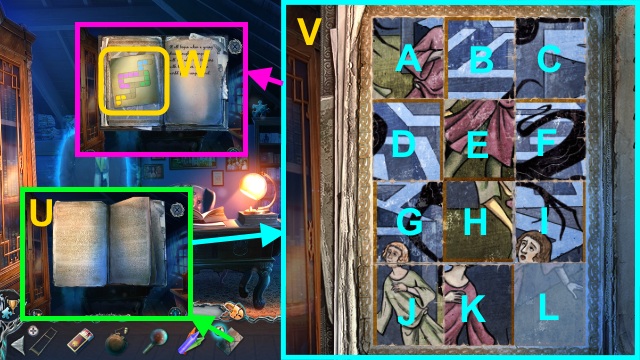
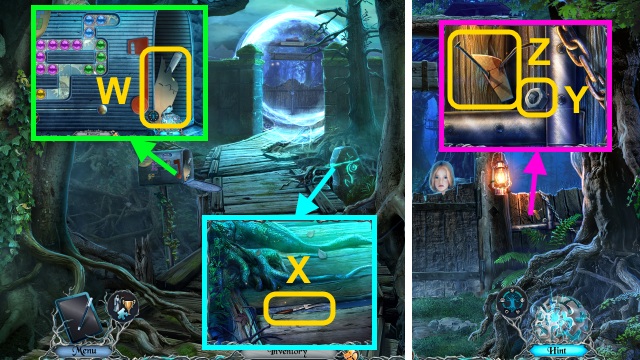
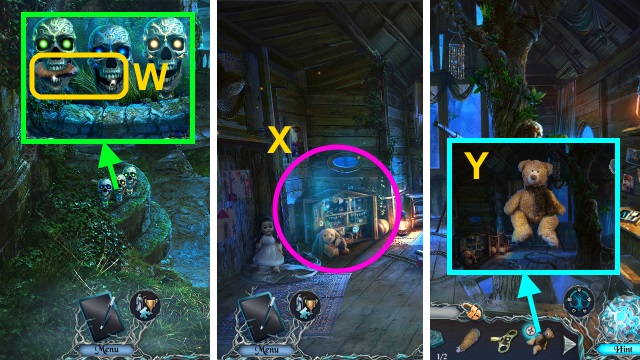
- Take the PADDLE (U) and WET SPONGE (V); use the FORK (W).
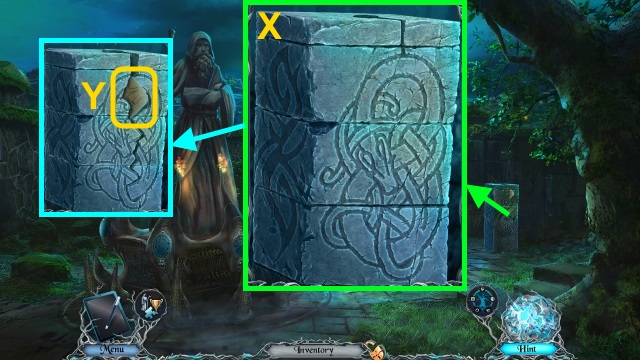
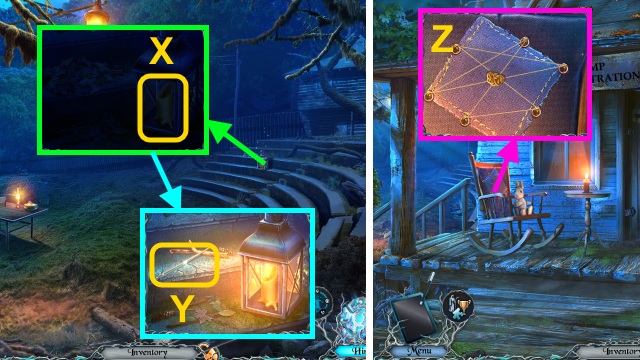
- Take the CELTIC EMBLEM and COINS (1/3) (X).
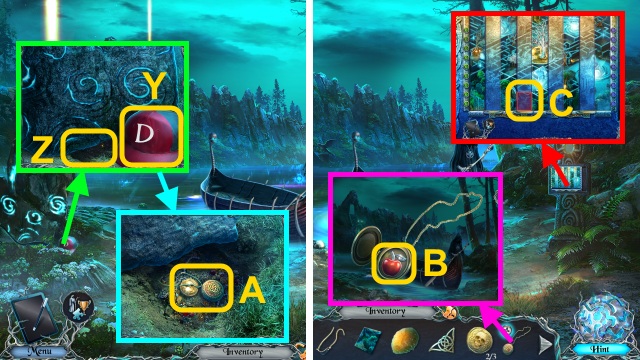
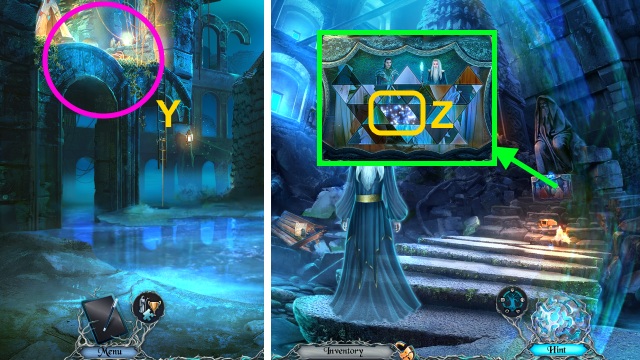
- Take the hat (Y); use the PADDLE (Z).
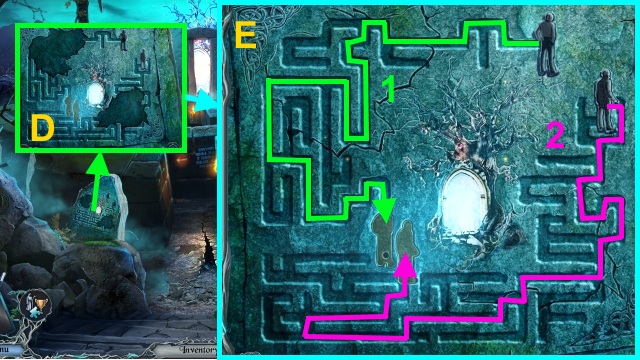
- Take the COINS (2/3) and LOCKET (A).
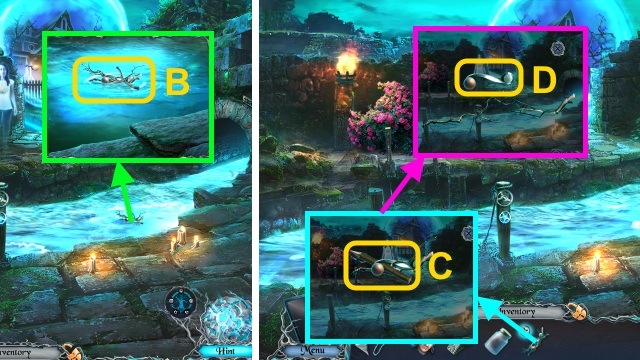
- Open the LOCKET; take the APPLE CHARM (B).
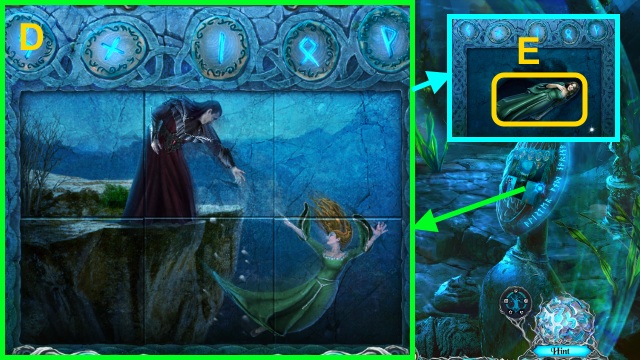
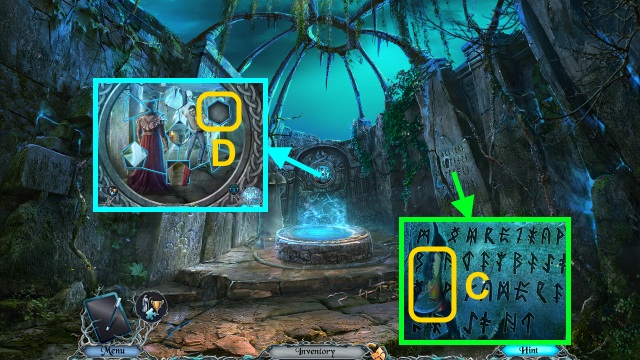
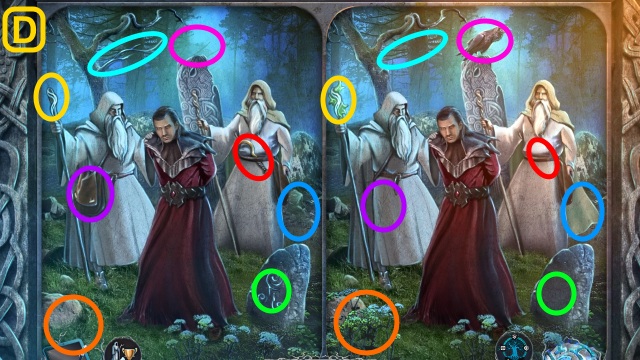
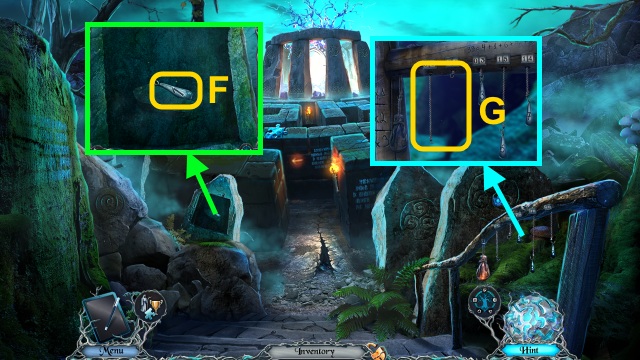
- Place the MAP TILE for a mini-game (C).
- Solution (D).
- Take the COINS (3/3) (E).
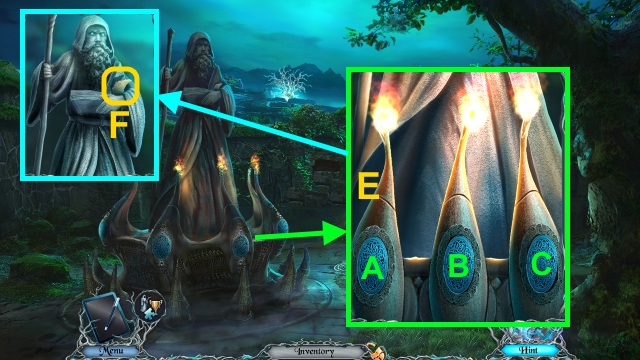
- Give the COINS (3/3) (F).
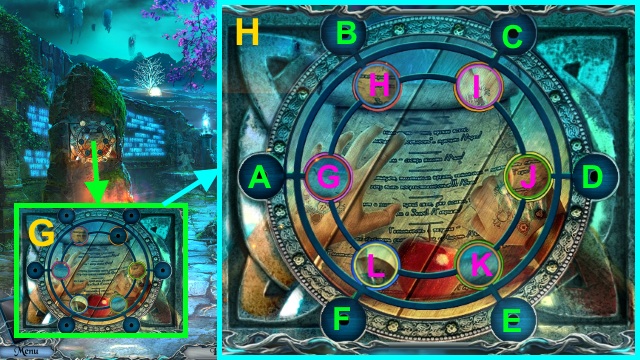
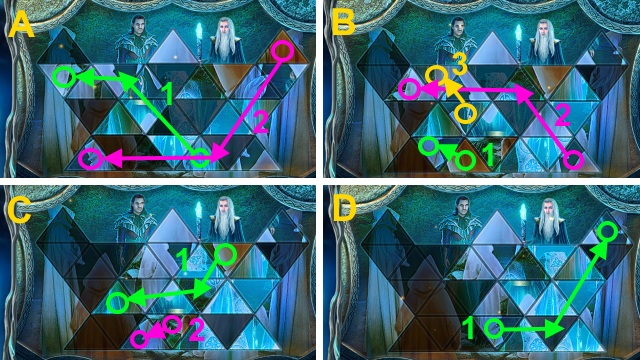
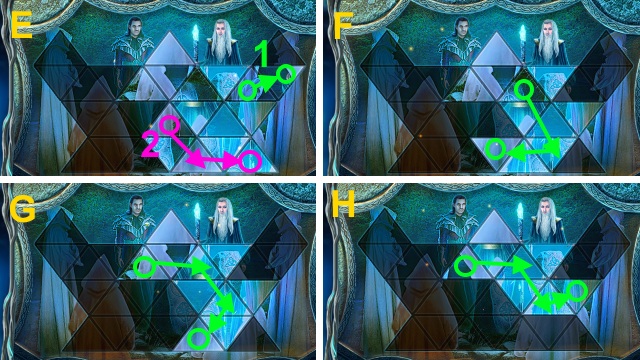
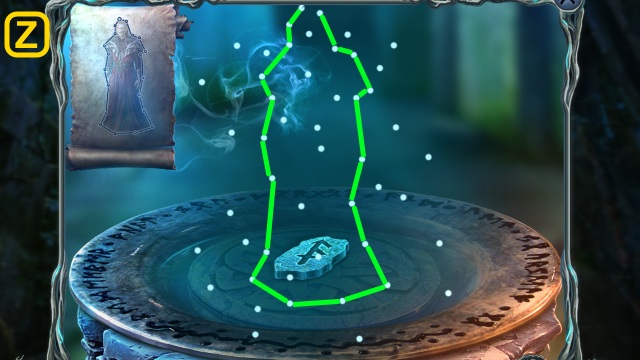
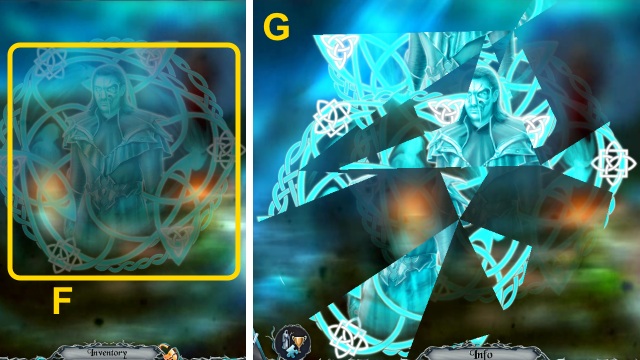
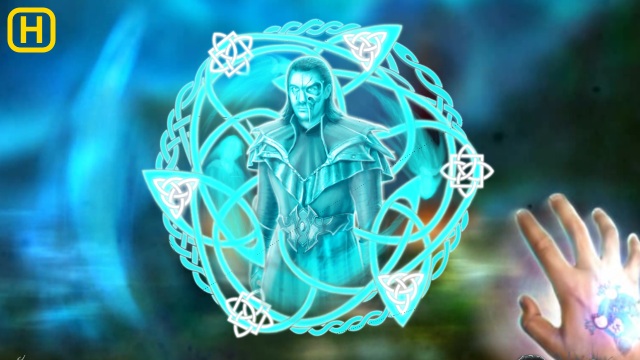
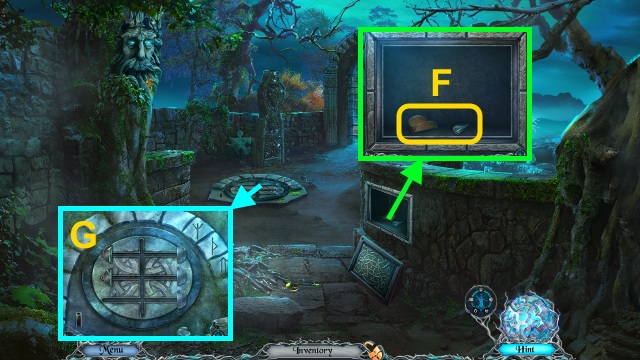
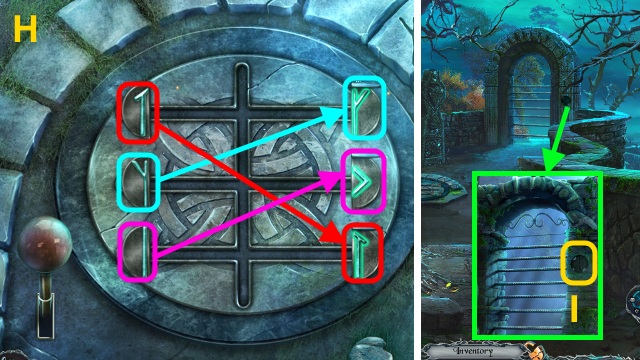
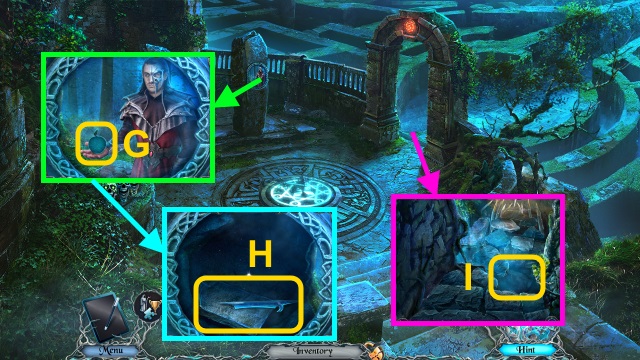
- Use the Magic Rune for a mini-game (G).
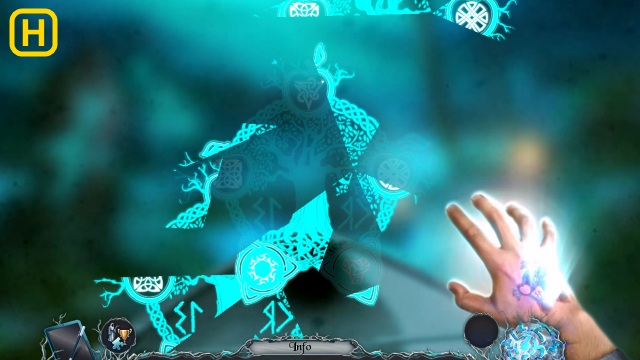
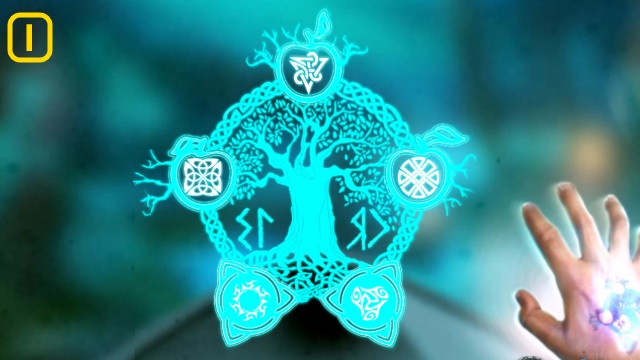
- Solution (H-I).
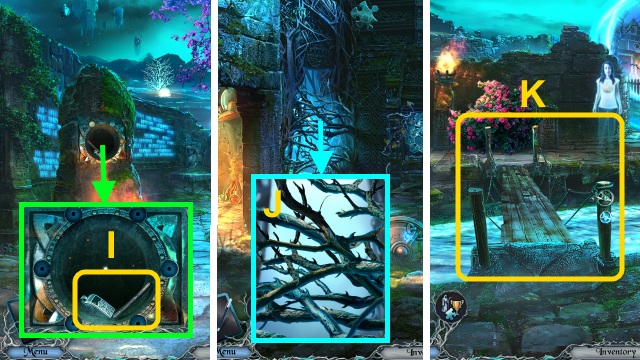
- Take the SKULL EMBLEMS (1/2) (J).
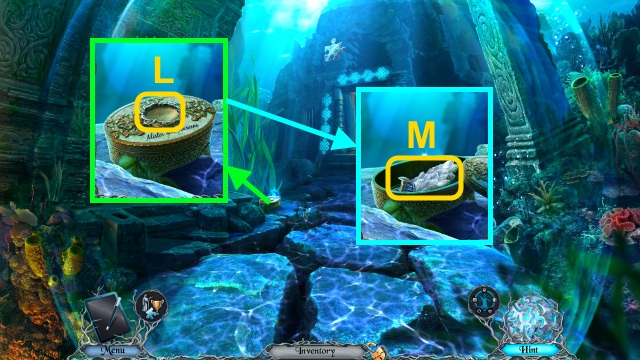
- Use the MAGNET (K); receive the MOLD.
- Take the TORN NET (L); place the CELTIC EMBLEM (M).
- Take the SILVER NUGGET and note (N).
- Place the MOLD, SILVER NUGGET, and APPLE CHARM (O); examine the mold.
- Take the TREE OF LIFE (P).
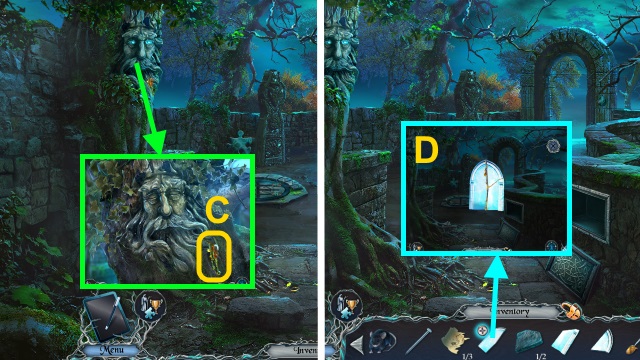
- Talk to the gargoyle (Q); place DARREN'S PHOTO (R).
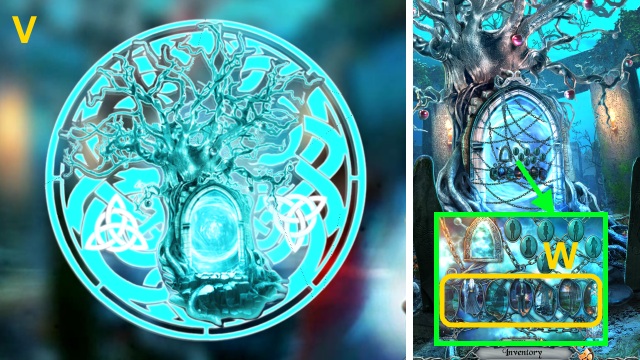
- Talk to the gargoyle; place the TREE OF LIFE (S).
- Talk to the gargoyle; use the Magic Rune (T).
Chapter 2: Mary
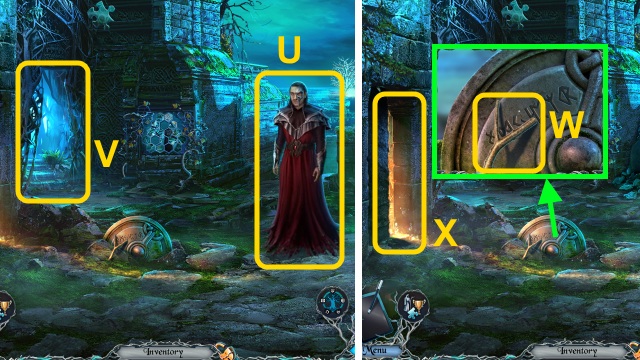
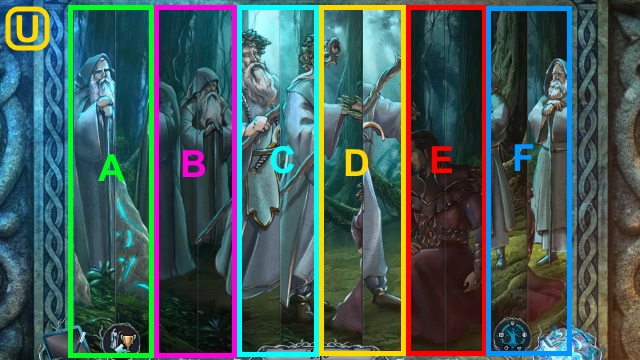
- Talk to Alister (U).
- Try to walk left (V).
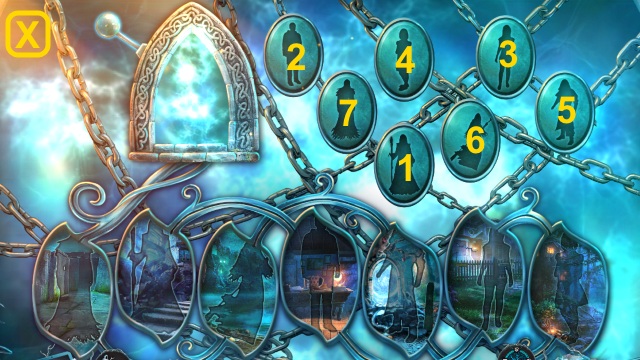
- Take the FORKED STICK (W).
- Open the door (X).
- Play the HOP to receive the RAG (Y).
- Walk right.
- Take the EMPTY JAR (Z).
- Use the WET SPONGE (A); take the FLINT (B).
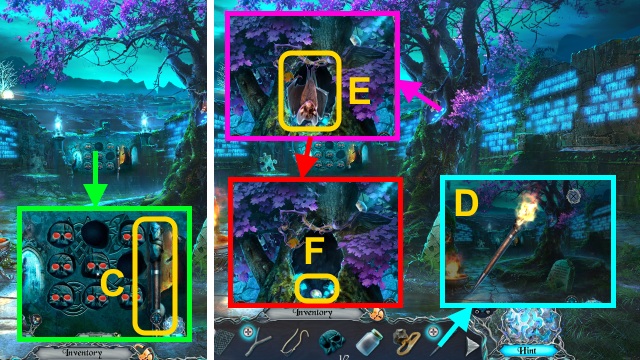
- Take the TORCH (C).
- Examine the TORCH; use the RAG and FLINT (D).
- Use the TORCH (E).
- Take the SHIELD PART (F).
- Place the SHIELD PART for a mini-game (G).
- Solution (H): (J-D)-(H-B)-(I-H)-(K-J-I)-(D-J-K-E)-(L-K-J)-(E-K).
- (G-A)-(I-C)-(H-I)-(B-H-G-L)-(A-G-H-B)-(I-H-G)-(C-I)-(B-H).
- Take the WHISTLE and CHARCOAL (I).
- Walk down.
- Use the TORCH (J).
- Walk left.
- Examine the bridge (K).
- Take the STONE (L).
- Combine the FORKED STICK, SLING, and STONE to make the SLINGSHOT (M).
- Take the PAPER (N).
- Walk down.
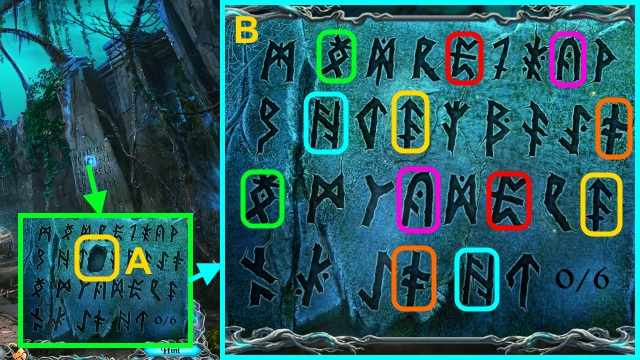
- Use the PAPER and CHARCOAL (O); receive the CLUE.
- Walk left.
- Press the symbols (P); take the SKULL EMBLEMS (2/2) (Q).
- Walk down, then right.
- Place the SKULL EMBLEMS (2/2) for a mini-game (R).
- Solution (S): A-B-D-G-H-I-B-E-F-I-D-E-F-C-E-C.
- Take the STATUETTE HEAD and HEXAGONAL TILES (1/2) (T).
- Use the SLINGSHOT (U); receive the HEXAGONAL TILES (2/2).
- Walk down.
- Play the HOP to receive the CHAIN (V).
- Place the HEXAGONAL TILES (2/2) for a mini-game (W).
- Solution (X): D-J-H-I-F-C-D-A-B-E-G.
- Take the Picture and THREAD (Y).
- Combine the TORN NET and THREAD for a mini-game (Z).
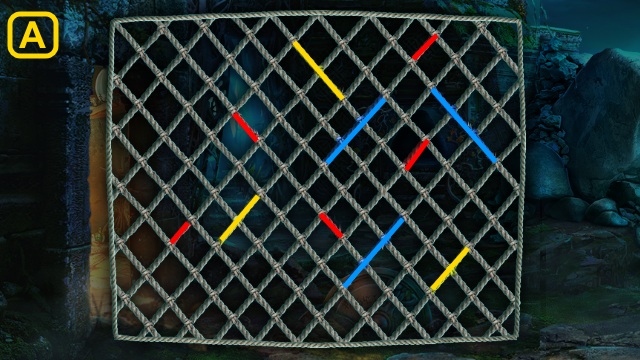
- Solution (A); receive the NET.
- Walk left.
- Use the NET (B); receive the DEBRIS.
- Examine the DEBRIS; take the POINTY STICK (C).
- Move the sticks; take the HANDLE (D).
- Place the CHAIN and HANDLE (E).
- Take the SCRAPER (F).
- Use the EMPTY JAR to receive the JAR WITH FIREFLIES (G).
- Play the mini-game; solution (H): (A-D)-(D-F)-(F-M)-(M-K).
- (K-D)-(D-M)-(M-O)-(O-F)-(F-A).
- Take the GATE KNOB (I).
- Use the SCRAPER (J); take the MARY EMBLEM (K).
- Walk forward.
- Talk to Mary (L).
- Place the GATE KNOB for a mini-game (M).
- Solution (N-R).
- Take the VALVE (S); use the JAR WITH FIREFLIES (T).
- Play the HOP to receive the OIL (U).
- Take the FRIDGE MAGNET (V); place the VALVE (W).
- Take the JEWELED TOKENS (1/2) (X).
- Walk forward.
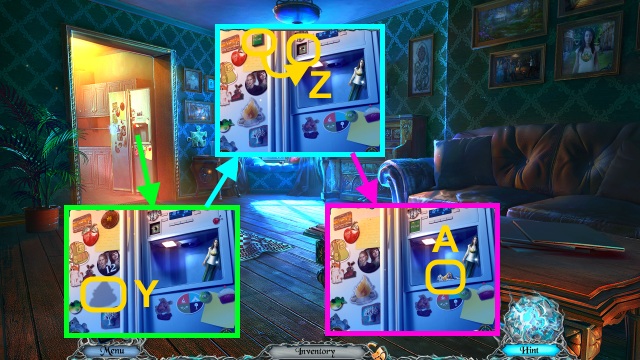
- Place the FRIDGE MAGNET (Y); play the HOP.
- Place the button (Z); press it.
- Take the JEWELED TOKENS (2/2) (A).
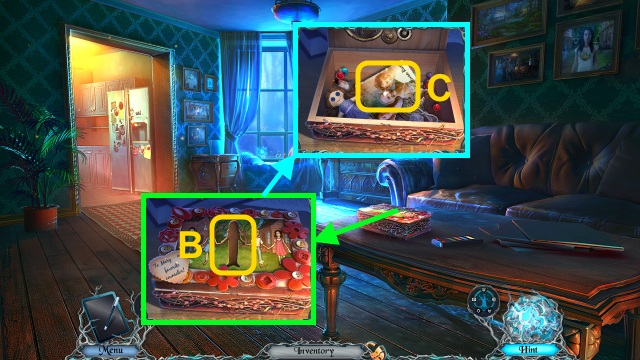
- Place the MARY EMBLEM (B).
- Take the TORN PHOTO (C).
- Take the STATUETTE ARM (D); use the OIL (E).
- Take the TAPE (F).
- Place the JEWELED TOKENS (2/2) for a mini-game (G).
- Solution (H).
- Take the SHARP SHARD (I).
- Use the SHARP SHARD; take the PHOTO FRAGMENT (J).
- Combine the PHOTO FRAGMENT and TORN PHOTO (K); use the TAPE.
- Receive MARY'S PHOTO.
- Walk down.
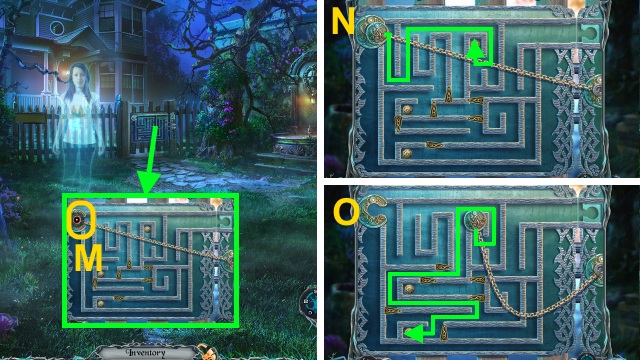
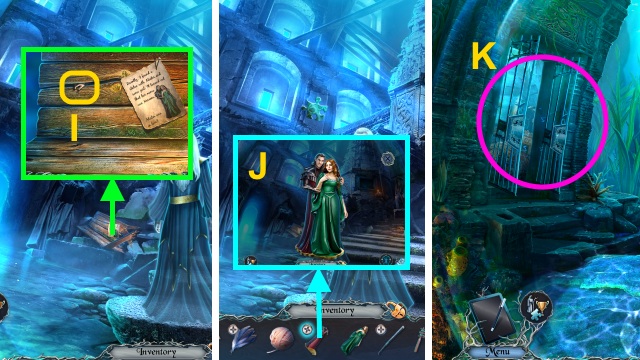
- Give MARY'S PHOTO for a mini-game (L).
- Solution (M-O).

- Use the Magic rune for a mini-game (P).
- Solution (Q-R).
Chapter 3: The Druid
- Talk to the man (S); receive the TORN MAP.
- Take the FEATHERS (T); move the vines.
- Use the POINTY STICK; take the MAP PART (U).
- Take the ROPE (V).
- Take the MOSAIC RING (W).
- Arrange the stones (X).
- Take the MAP PART (Y).

- Take the CLACKER (Z).
- Place the MOSAIC RING for a mini-game (A).
- Solution (B): Ax2-Bx3.

- Take the ETCHED OVAL (C).
- Place the ETCHED OVAL for a mini-game (D).
- Solution (E): B-A-C-B.
- Take the MAP PART (F).
- Combine the TORN MAP and 3 MAP PARTS (G); take the MAP TO DRUID'S HOUSE.
- Walk forward, left, right twice, then forward.
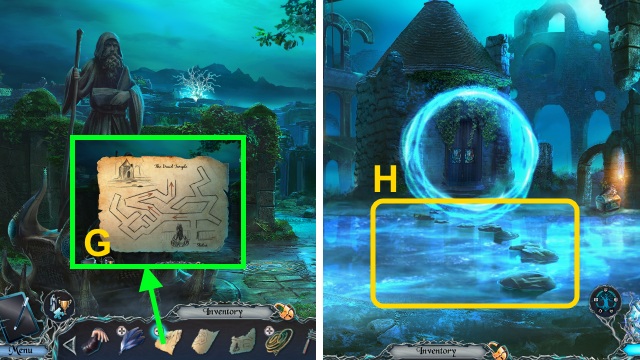
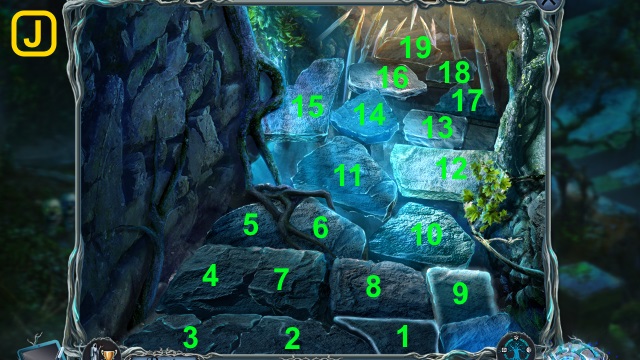
- Examine the lake for a mini-game (H).

- Solution (I-K).
- Take the PICTURE STRIP (L).
- Use the WHISTLE (M); take the HOOK.
- Combine the ROPE and HOOK (N); receive the ROPE WITH HOOK.
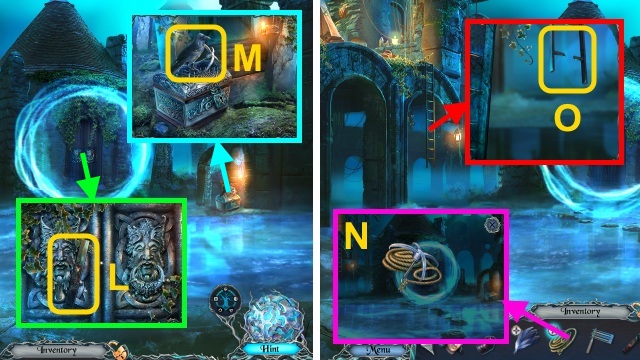
- Use the ROPE WITH HOOK (O).
- Play the HOP to receive the DOOR KNOCKER (P).
- Place the DOOR KNOCKER (Q).
- Walk forward.
- Take the STATUETTE BASE (R).
- Take the SILVER KEY (S).
- Place the PICTURE STRIP for a mini-game (T).
- Solution (U): A-C-D-E-A.

- Take the STAFF PART (V).
- Walk down.
- Use the SILVER KEY (W); take the FLASHLIGHT and TRIANGULAR TILES (X).
- Play the HOP to receive the FILE (Y).
- Walk forward.
- Place the TRIANGULAR TILES for a mini-game (Z).
- Solution (A-H).
- Solution (I-L).
- Take the PICTURE TILES (1/2) (M).
- Use the FILE; take the RUNE STONES (1/2) (N).
- Walk left.
- Use the FLASHLIGHT (O).
- Take the SHARP SHELL and BOTTLE (P).
- Examine the BOTTLE; take the RAVEN PLATE (Q).
- Take the YARN BALL (R).
- Place the RAVEN PLATE (S).
- Play the HOP to receive the PICTURE TILES (2/2) (T).
- Place the PICTURE TILES (2/2) for a mini-game (U).
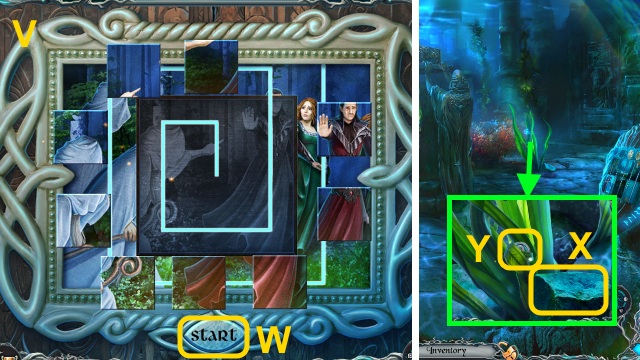
- Solution (V).
- Press Start (W).
- Walk forward.
- Take the STONE (X).
- Use the SHARP SHELL (Y); receive the KNOT TOKEN.
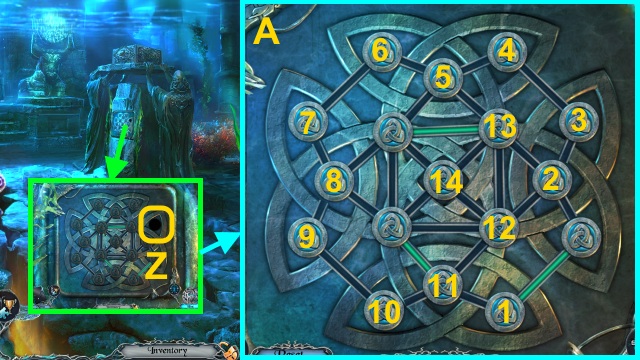
- Place the KNOT TOKEN for a mini-game (Z).
- Solution (A).
- Take the RUNE STONES (2/2) (B).
- Place the RUNE STONES (2/2) for a mini-game (C).
- Solution (D).
- Take the NAREENA STATUETTE (E).

- Place the STONE (F); receive the SHOVEL.
- Walk down.
- Move the plants (G).
- Use the SHOVEL; take the TONGS (H).
- Walk down.
- Use the TONGS (I); receive the STATUETTE ARM.
- Combine the STATUETTE BASE, 2 STATUETTE ARMS, STATUETTE HEAD and NAREENA STATUETTE (J); take the ALISTER AND NAREENA STATUETTE.
- Walk left.
- Play the HOP to receive the STAFF PART (K).
- Place the ALISTER AND NAREENA STATUETTE (L).
- Take the PIN and BROKEN STAFF (M).
- Combine the 2 STAFF PARTS and BROKEN STAFF (N); take the DRUID'S STAFF.
- Walk down.
- Give the DRUID'S STAFF (O) for a mini-game.
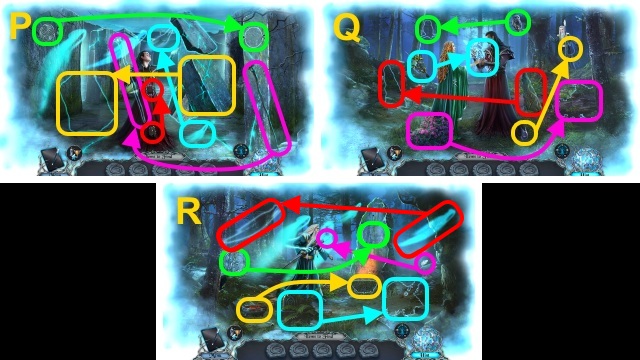
- Solution (P-R).
- Use the Magic Rune for a mini-game (S).
- Solution (T-U).
Chapter 4: The Camp Director
- Take the STICK (V).
- Combine the FEATHERS, STICK, and YARN BALL (W); take the DUSTER.
- Use the DUSTER; take the FLASK and ALISTER SKETCH (X).
- Examine the pool for a mini-game (Y).
- Solution (Z).
- Receive the RUNE STONE.
- Place the RUNE STONE for a mini-game (A).
- Solution (B).
- Take the BROKEN TILE and PENTAGONAL TILE (C).
- Place the PENTAGONAL TILE for a mini-game (D).
- Solution (E): (B-C)-(E-F)-(A-B)-(D-E)-(C-D)-(B-C).
- (F-A)-(A-B)-(G-A)-(A-F)-(B-A)-(A-G)-(C-B)-(F-A).
- Walk forward.
- Use the Magic Rune for a mini-game (F).
- Solution (G-H).
- Use the CLACKER (I); take the RUSTY SWORD (J).
- Take the BROKEN LADDER (K).
- Use the RUSTY SWORD (L); receive the BACKPACK.
- Open the BACKPACK; take the LEVER and MATCHES (M).
- Walk forward.
- Take the CRAYONS (N).
- Take the BROKEN TILE (O).
- Place the 2 BROKEN TILES (P).
- Play the HOP to receive the DIRECTOR'S KEY (Q).
- Use the PIN and DIRECTOR'S KEY (R).
- Walk forward.
- Talk to the man (S).
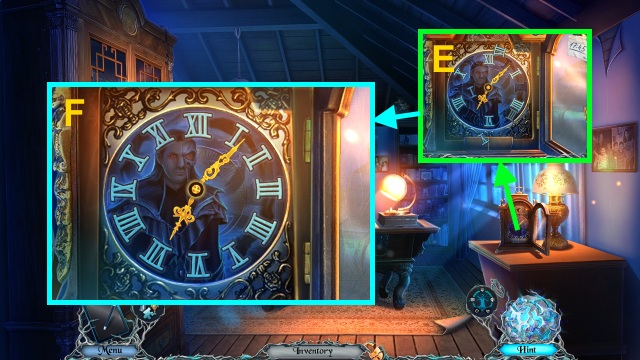
- Take the BOOK (T).
- Read the BOOK for a mini-game (U).
- Solution (V): K-H-E-B-A-D-E-B-A-D-G.
- J-K-H-E-B-C-F-E-B-C-F-I-L.
- Take the COLOR CODE (W).
- Walk down, then left.
- Use the MATCHES (X).
- Move the LEAVES; take the CROCHET HOOK (Y).
- Walk down.
- Use the CROCHET HOOK for a mini-game (Z).
- Solution (A): (A-D-A)-(C-B-C)-(A-B-A).
- Take the NUMBERS (1/2) (B).
- Walk down.
- Use the CRAYONS for a mini-game (C).
- Solution (D).
- Receive the NUMBERS (2/2).
- Walk forward twice.
- Place the NUMBERS (2/2) for a mini-game (E).
- Solution (F-H).
- Take the ACID (I).
- Walk down, then left.
- Pour the ACID; take the PLANKS (J).
- Combine the BROKEN LADDER and PLANKS (K); take the LADDER.
- Walk down.
- Play the HOP to receive the CHEESE (L).
- Place the LADDER (M); take the RIPPED JOURNAL (N).
- Walk forward.
- Give the CHEESE (O); receive the MOUSE.
- Take the PAPERWEIGHT (P).
- Use the PAPERWEIGHT; take the JEWELED BUTTON (Q).
- Walk down, then left.
- Place the JEWELED BUTTON; examine the box for a mini-game (R).
- Solution (S): B-C-Dx2-B-A-Bx2-Dx2.
- Take the JOURNAL PAGE (T).
- Read the RIPPED JOURNAL; place the JOURNAL PAGE (U).
- Take the JOURNAL.
- Walk down, then forward.
- Give the JOURNAL for a mini-game (V).
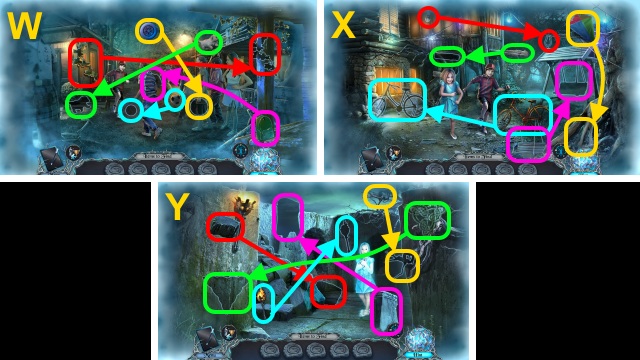
- Solution (W-Y).
- Walk down.
Chapter 5: Lucy
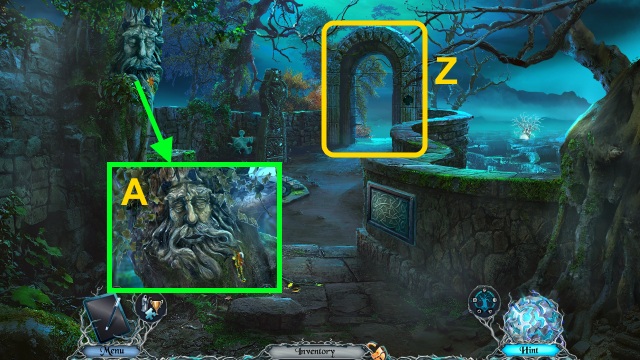
- Examine the gate (Z).
- Talk to the tree 2x for a mini-game (A).
- Solution: select ‘In the dark,' then ‘The road,' and then ‘Until the edge of the forest. Then the druid leaves it behind.'
- Take the CHECKBOX (B).
- Take the SCREWDRIVER (C).
- Use the SCREWDRIVER for a mini-game (D).
- Solution (E).
- Take the PUZZLE PIECES (1/2) and RUNE PART (F).
- Place the LEVER and RUNE PART for a mini-game (G).
- Solution (H).
- Receive the RUNE.
- Place the RUNE (I).
- Walk forward.
- Take the CROSSBOW (J); use the FLASK.
- Receive the FLASK OF WATER.
- Take the picture (K).
- Place the CHECKBOX for a mini-game (L).
- Solution (M-V).
- Take the TORN SKETCH (1/3), SPOON, and DOLL EMBLEM (W).
- Pour the FLASK OF WATER; take the FORK (X).
- Walk forward.
- Take the NUT (Y).
- Use the FORK to receive the NAIL; take the PUZZLE PEICES (2/2) (Z).
- Move the papers; place the PUZZLE PIECES (2/2) for a mini-game (A).
- Solution (B).
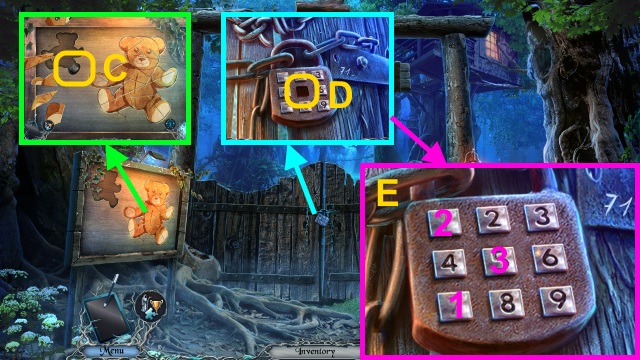
- Take the 5 BUTTON (C).
- Place the 5 BUTTON (D).
- Enter the code (E).
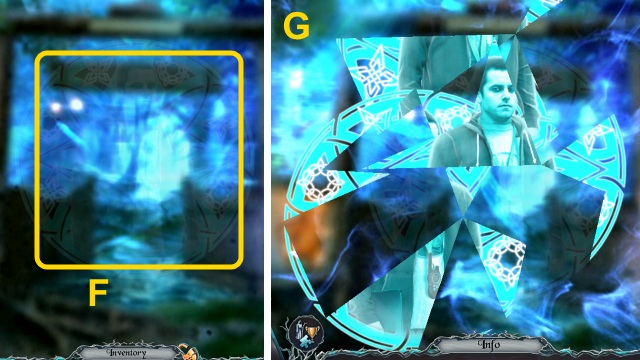

- Use the Magic Rune for a mini-game (F).
- Solution (G-H).
- Walk forward.
- Talk to Lucy (I).
- Take the LENS (J).
- Walk left.
- Take the CRANK (K).
- Walk down.
- Place the CRANK and NUT; turn the handle (L).
- Take the BOLT WITH ROPE (M).
- Combine the CROSSBOW and BOLT WITH ROPE (N); take the LOADED CROSSBOW.
- Examine the ladder (O); use the LOADED CROSSBOW (P).
- Go up.
- Place the LENS (Q).
- Take the BROKEN GATE (R).
- Place the DOLL EMBLEM (S).
- Play the HOP to receive the OVEN MITT (T).
- Walk down.
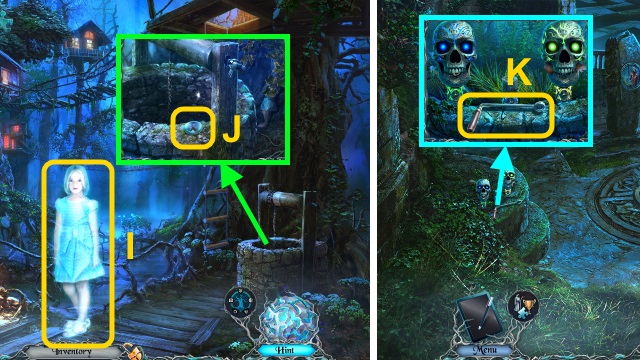
- Use the OVEN MITT; take the SKULL and STONES (1/2) (U).
- Walk left.
- Place the SKULL (V).
- Arrange the skulls; take the TRAIN KEY and TORN ARM (W).
- Walk down, then up.
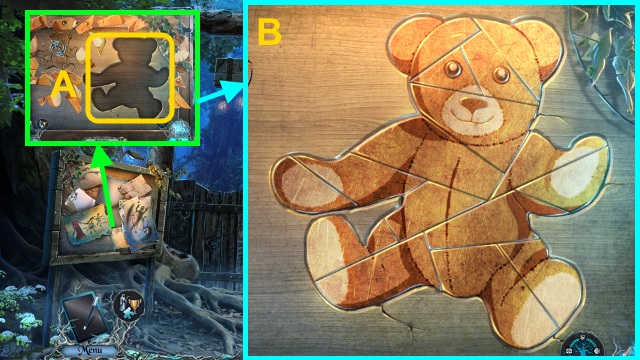
- Play the HOP to receive the BROKEN BEAR (X).
- Combine the BROKEN BEAR and TORN ARM (Y); take TED.
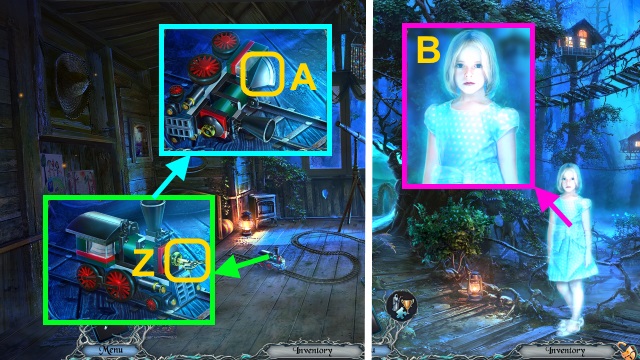
- Place the TRAIN KEY (Z).
- Take the GATE PART (A).
- Walk down.
- Give the TED (B); receive the GATE PART.
- Walk down three times.
- Use the SPOON (C); receive the RESIN.
- Combine the BROKEN GATE, 2 GATE PARTS and RESIN (D); take the GATE.
- Walk forward three times, then left.

- Place the GATE (E); find the symbols (1-4).
- Take the APPLE (F).
- Place the APPLE (G).
- Take the SPEARHEAD and STONES (2/2) (H).
- Place the STONES (2/2) for a mini-game (I).
- Solution (J).
- Walk forward.
Chapter 6: Darren
- Talk to Darren (K); receive the TORN SKETCH (2/3).
- Take MARY (L).
- Take the PLAIN STAFF (M) and WEIGHTS (1/2) (N).
- Use the NAIL; take the RIBBON and MAZE PARTS (1/2) (O).
- Combine the PLAIN STAFF, SPEARHEAD, and RIBBON (P); receive the SPEAR.
- Use the SPEAR (Q); receive the GLOWING TILE.
- Place the GLOWING TILE for a mini-game (R).
- Solution (S).
- Walk forward.
- Take DARREN (T); use the MOUSE (U).
- Receive the TORN SKETCH (3/3).
- Take the APPLE (V).
- Walk down.
- Place the TORN SKETCH (3/3) (W).

- Arrange the parts (X); receive the MAZE MAP.
- Walk forward twice, right, forward, right 4x, then forward.
- Talk to Darren (Y).
- Close the basket; take the RAKE (Z).
- Take THE FERRYMAN (A).
- Use the RAKE (B).
- Play the HOP to receive the MAZE PARTS (2/2) (C).
- Walk down.
- Place the MAZE PARTS (2/2) for a mini-game (D).
- Solution (E).
- Take the WEIGHTS (2/2) (F).
- Place the WEIGHTS (2/2) for a mini-game (G).
- Solution (H).
- Take the POUCH (I).
- Open the POUCH; take the BAG PARTS (1/2) and BONE (J).
- Walk forward.
- Play the HOP to receive the GATE PART (K).
- Place the BONE (L).
- Move the apples; take the FOLDED YARDSTICK (M).
- Unfold the FOLDED YARDSTICK; receive the YARDSTICK (N).
- Use the YARDSTICK (O); receive the BAG PARTS (2/2) and ALISTER.
- Place the BAG PARTS (2/2) (P); examine the bag for a mini-game.
- Solution (Q): Cx3-Dx4-Cx2-Dx2-Ax4-D.
- Cx5-Ax6-B-Cx4-Bx3-C-Ax4.
- Take the GATE PART (R).
- Place the 2 GATE PARTS (S).
- Use the Magic rune for a mini-game (T).
- Solution (U-V).
- Place MARY, DARREN, THE FERRYMAN, and ALISTER for a mini-game (W).
- Solution (X).
- Congratulations! You have completed Sable Maze: Soul Catcher.
Created at: 2016-01-29