

Walkthrough Menu
- General Tips
- Chapter 1: Forest
- Chapter 2: Sandfell
- Chapter 3: Lower City
- Chapter 4: Jotuneim
- Chapter 5: Altar
- Chapter 6: Harbor
General Tips
- This is the official guide for Saga of the Nine Worlds: The Gathering.
- This guide won't tell you when to zoom into a location; the screenshots show each zoom scene.
- Hidden-object puzzles are referred to as HOPs. Only the locations of the HOPs will be shown.
- Use the Map to fast travel to a location.
Chapter 1: Forest
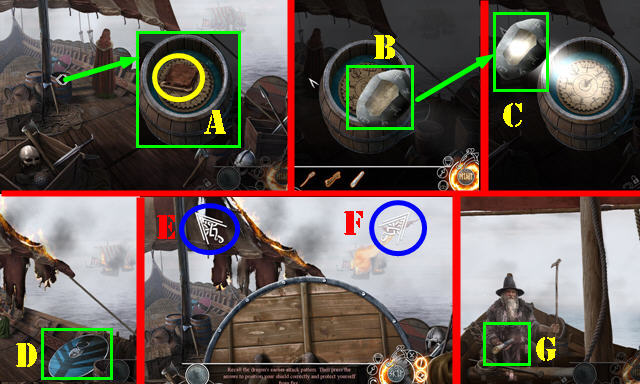
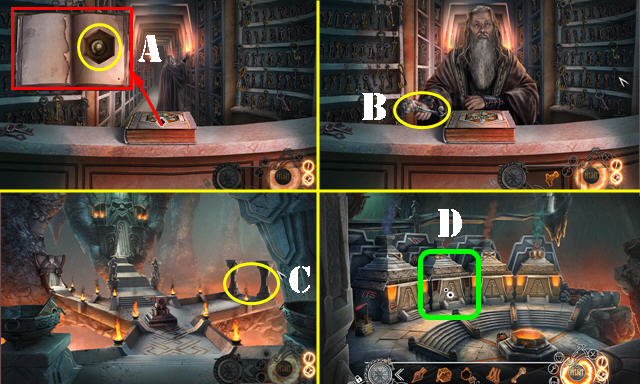
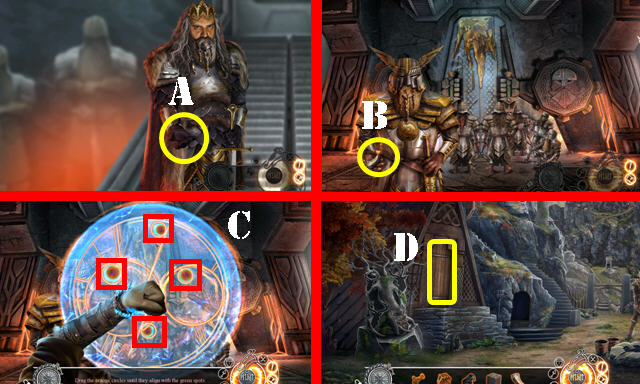
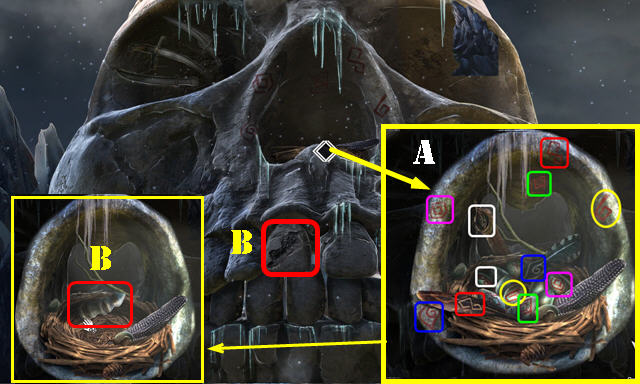
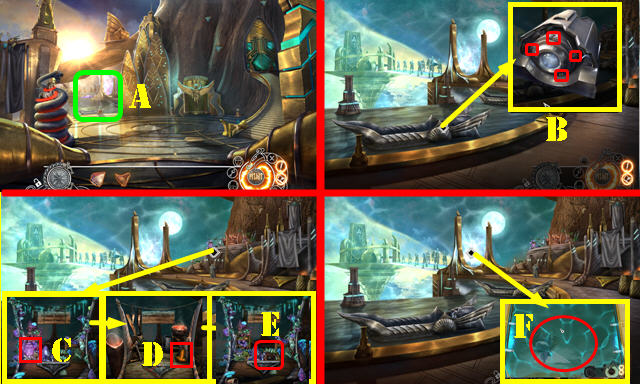
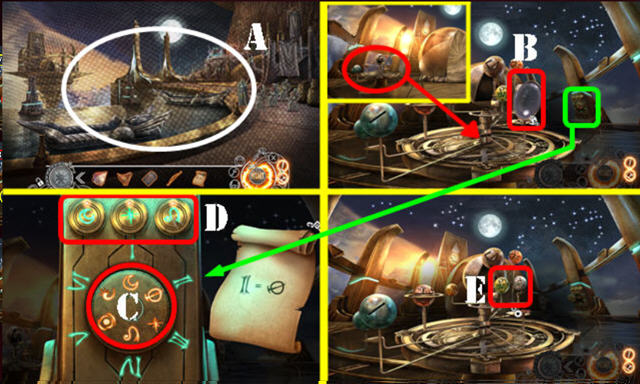
- Take POUCH (A).
- Take PIN, SUNSTONE, CLOTH, and CHALK from POUCH.
- Place SUNSTONE (B-C).
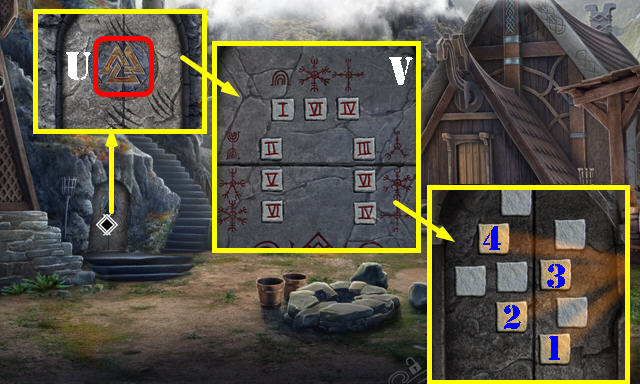
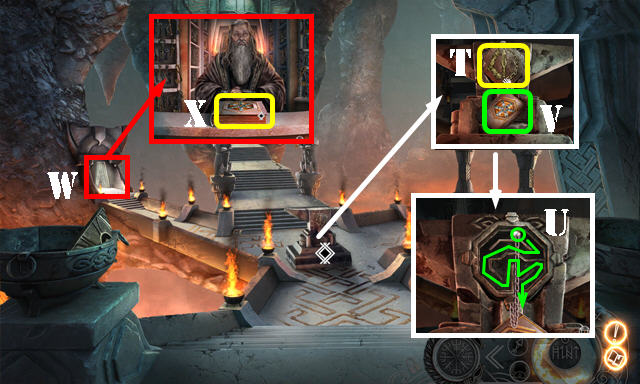
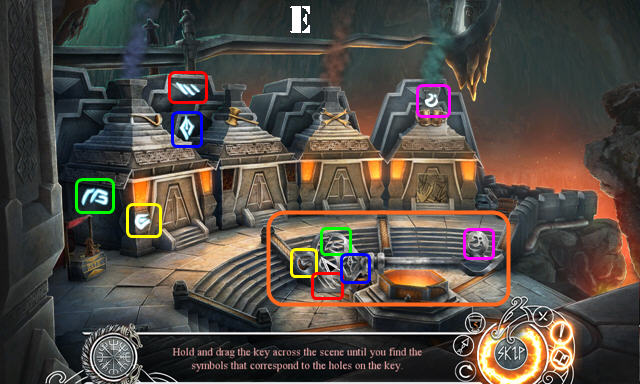
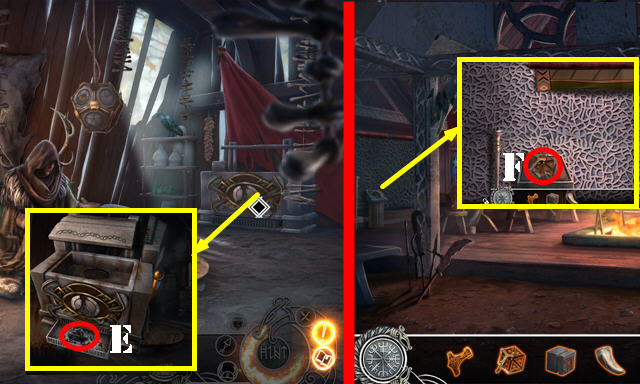
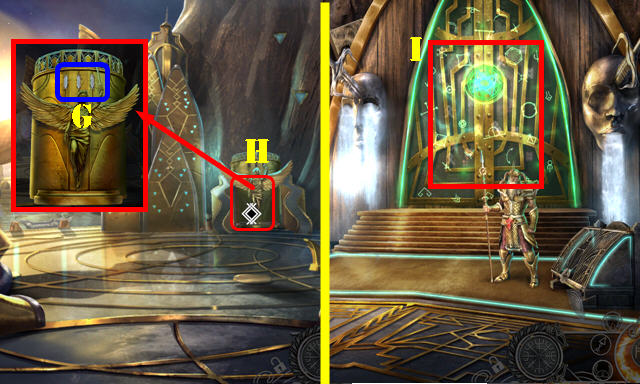
- Select shield (D). Solution: Fx2-E.
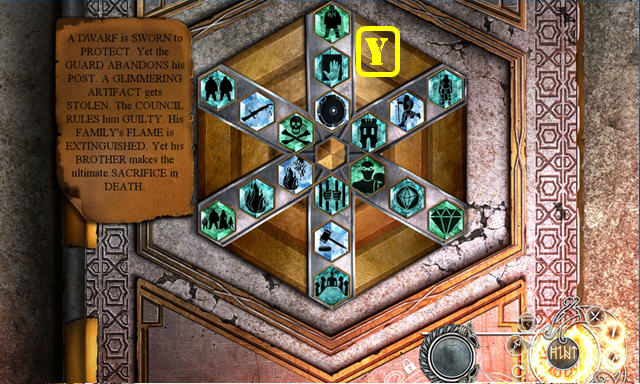
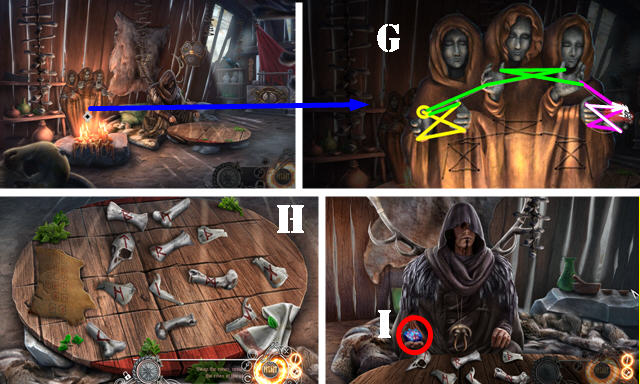
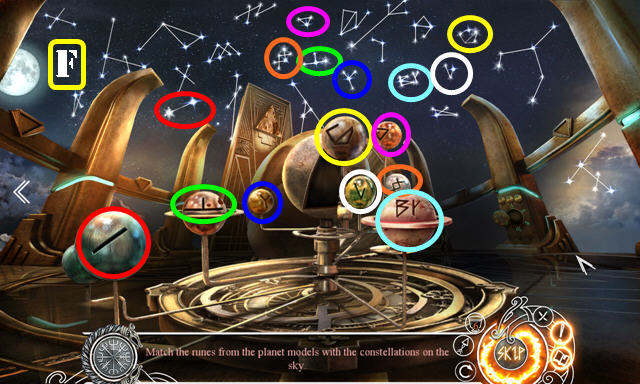
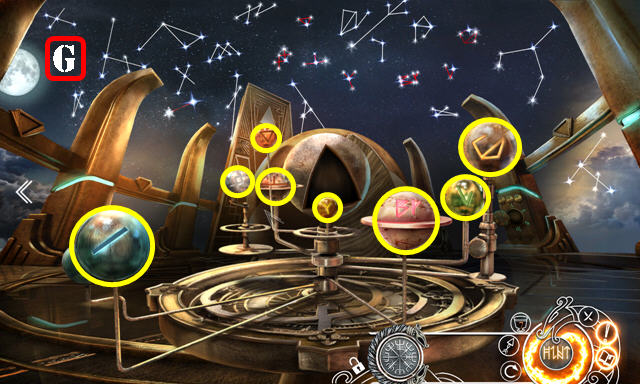
- Play HOP (G).
- HOP Solution (1-12).
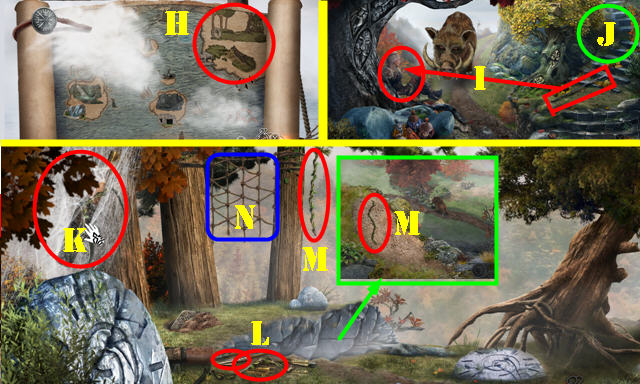
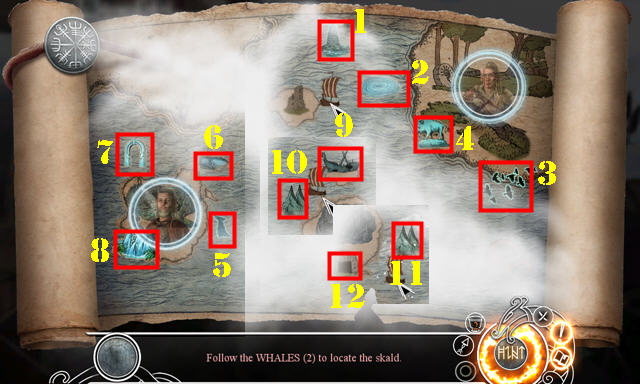
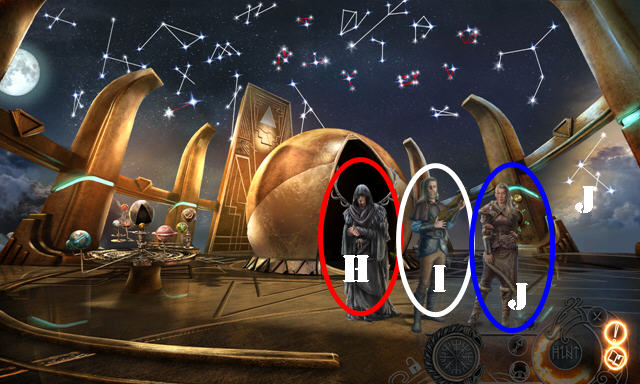
- Select 'The Huntress' (H).
- Give spear (I).
- Go (J).
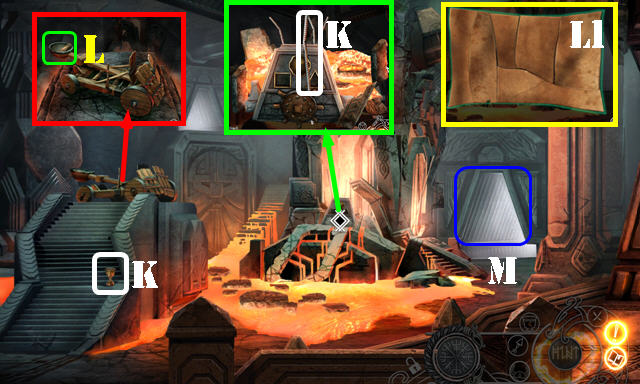
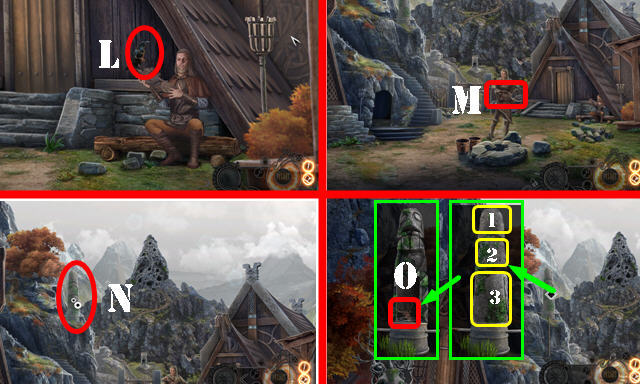
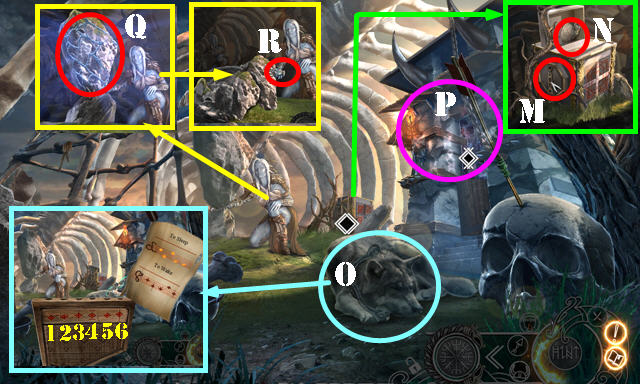
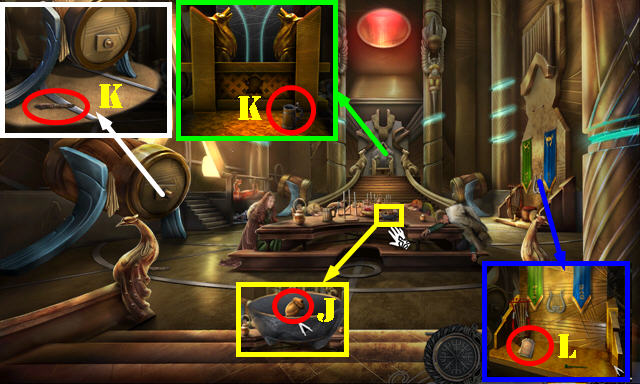
- Select cobweb 3x (K); take ARROWHEAD and VINE 1/3 (L).
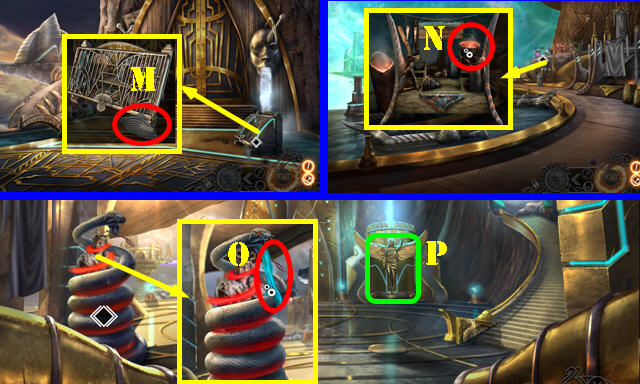
- Take VINE 2/3 and VINE 3/3 (M).
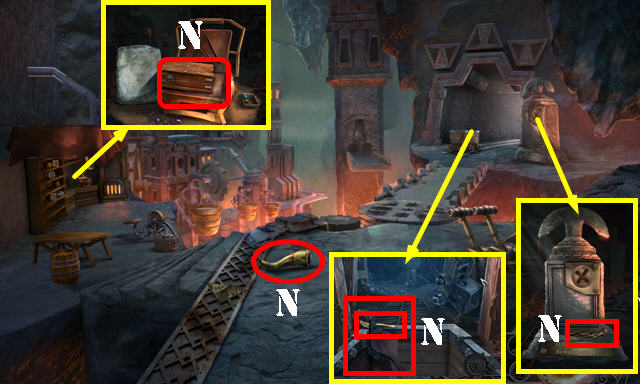
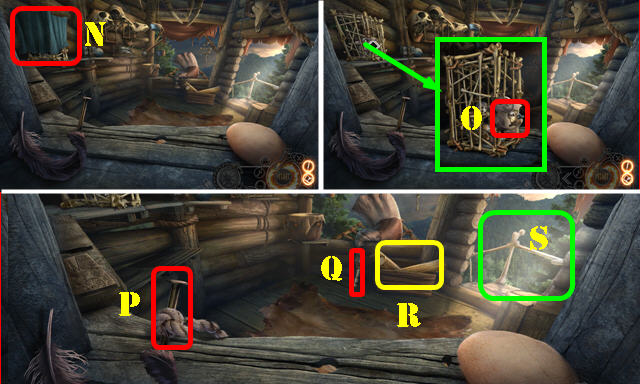
- Go (N).
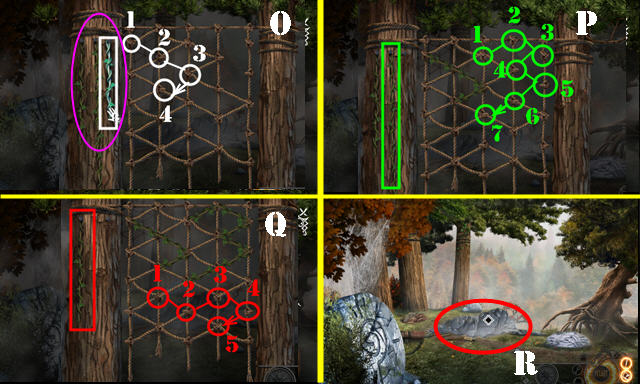
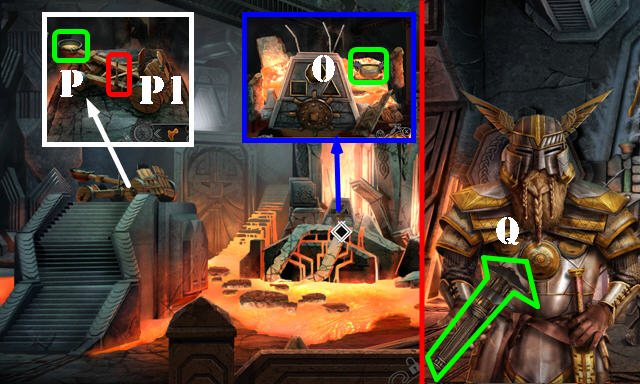
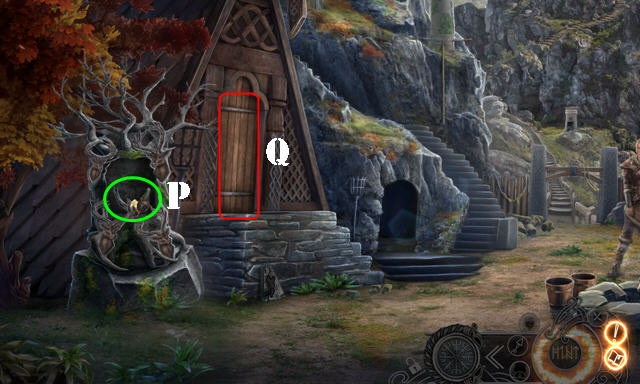
- Place VINE 3/3 (purple).
- Arrange vines (O-P-Q).
- Take NET.
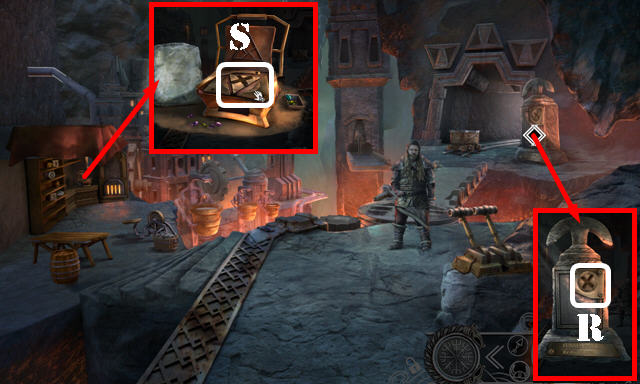
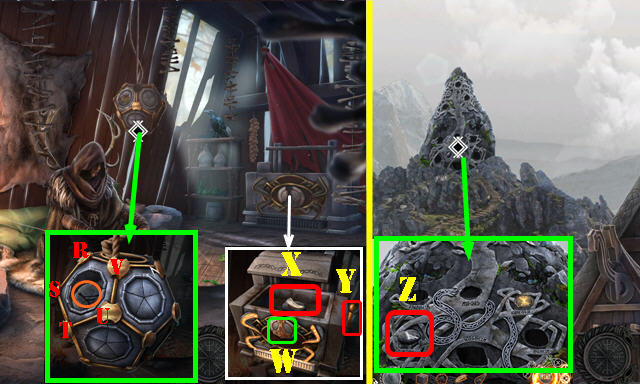
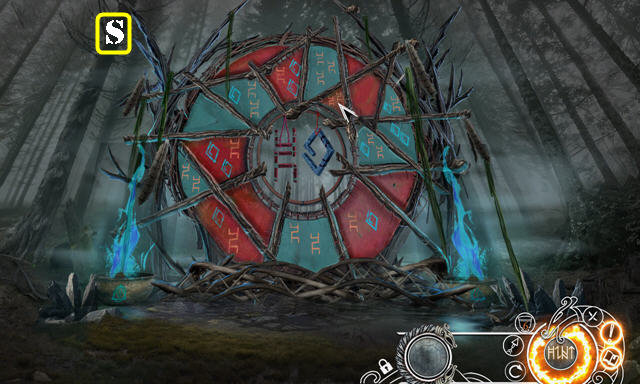
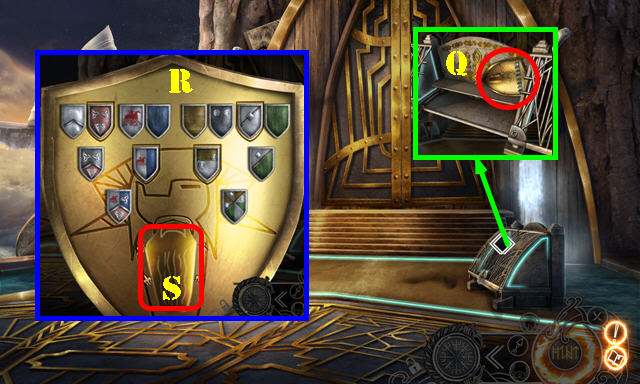
- Go (R).
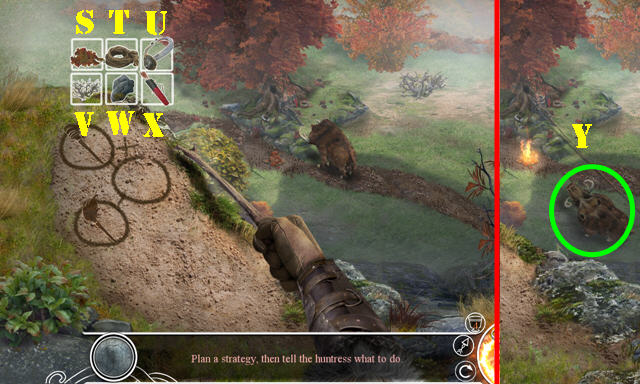
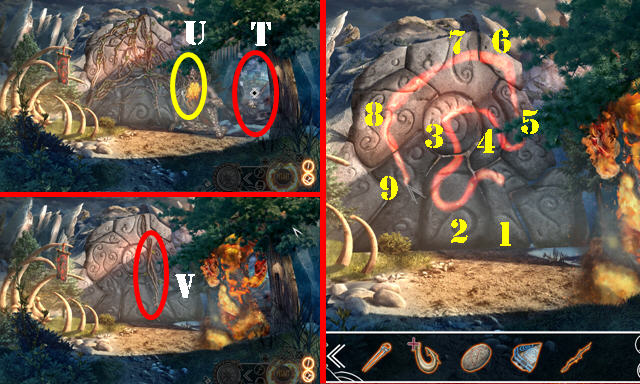
- Solution (U-S) (X-U-V)(T-W).
- Use NET (Y).
- Walk down.
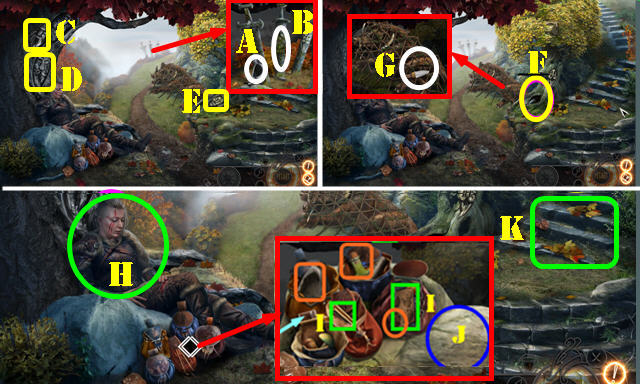
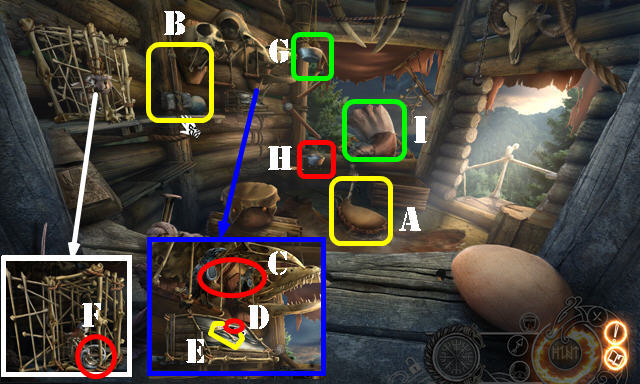
- Take OFFERING BOWL (A).
- Use ARROWHEAD (B).
- Select (C-D-E); take RITUAL DAGGER (F).
- Use RITUAL DAGGER (G); receive LOCK OF FUR.
- Use LOCK OF FUR (H).
- Take SAP SPILE and PLANT ETCHINGS (I). Select (orange). Place CLOTH (J).
- Go (K).
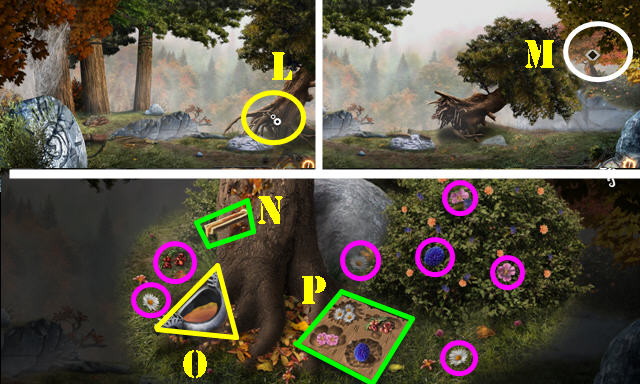
- Use RITUAL DAGGER 3x (L).
- Examine (M).
- Use SAP SPILE (N) and OFFERING BOWL (O); take TREE SAP.
- Place PLANT ETCHINGS; select flowers (purple); take PLANTS (P).
- Walk down.
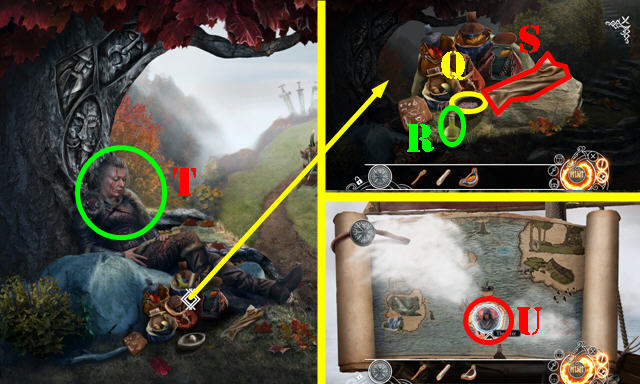
- Place PLANTS (Q).
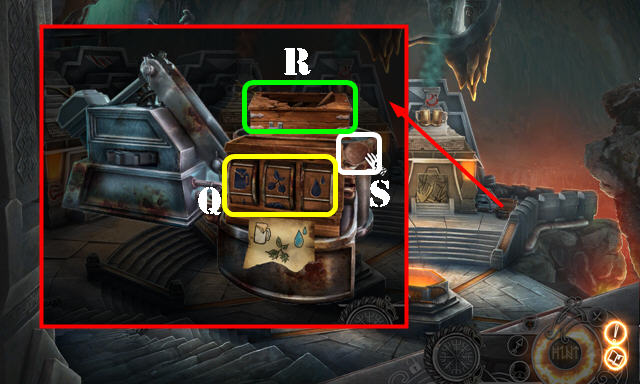
- Select bottle (R).
- Place TREE SAP and select (Q).
- Take HERBAL REMEDY (S).
- Use HERBAL REMEDY (T).
- Select 'The Seer' (U).
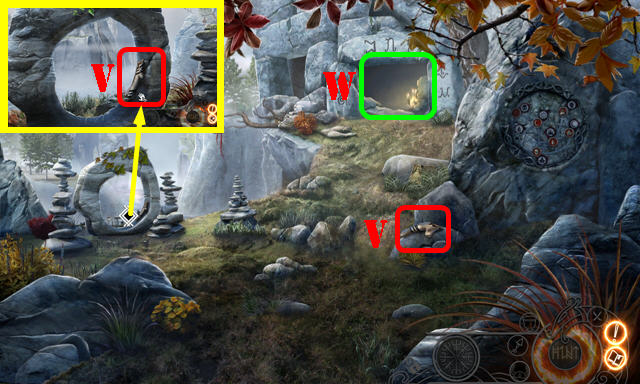
- Take STAFF FRAGMENT 1/3 and STAFF FRAGMENT 2/3 (V).
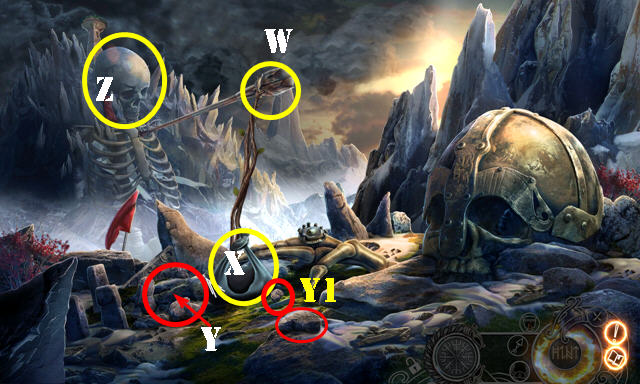
- Go (W).
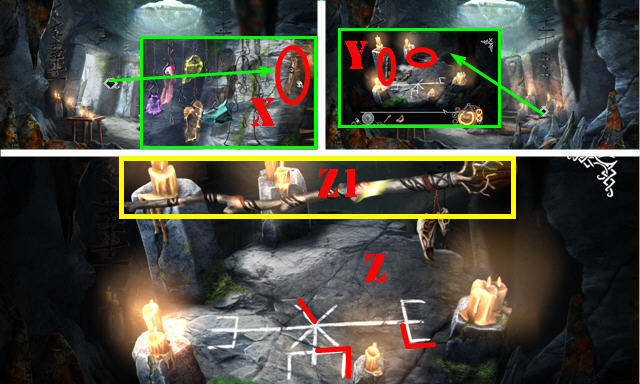
- Take STAFF FRAGMENT 3/3 (X).
- Select 2 fragments (Y).
- Put down STAFF FRAGMENT 3/3 and CHALK. Draw marked lines (Z).
- Take CRUDE STAFF (Z1).
- Walk down.
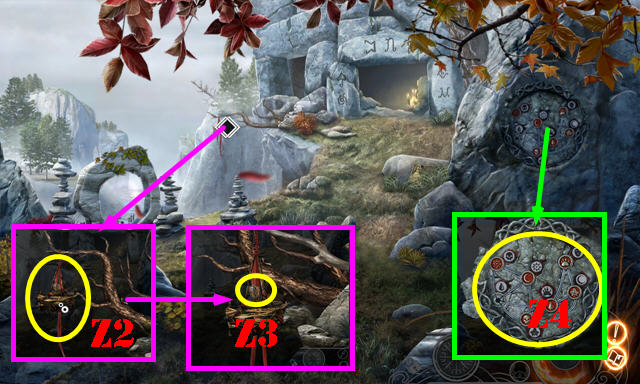
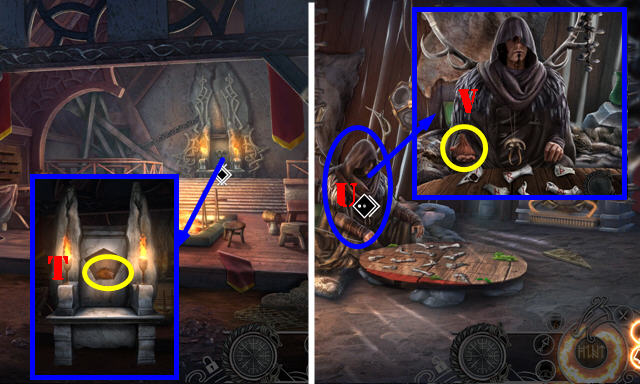
- Use CRUDE STAFF (Z2); take MASK TOKEN (Z3).
- Place MASK TOKEN (Z4).
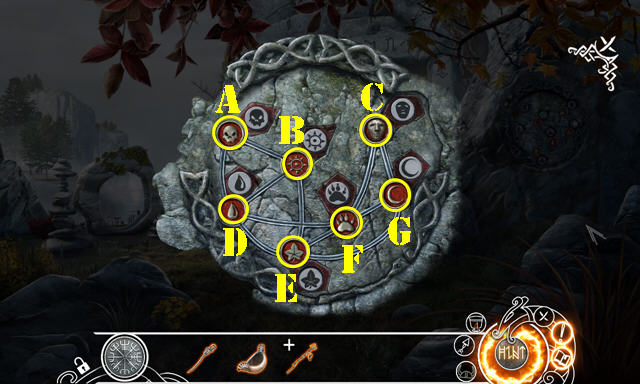
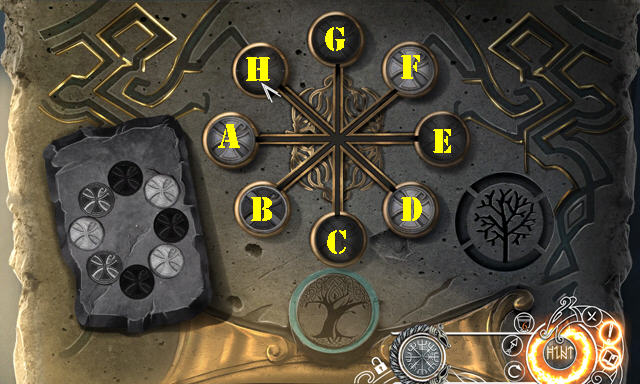
- Solution (B-E)-(A-B)-(D-F)-(E-G)-(F-C).
- Take SEER STONE.
- Go to Desolate Chamber.
- SEER STONE on CRUDE STAFF; receive SEER'S STAFF.
- Give SEER'S STAFF (H).
- Take WOODEN FIGURINE (I).
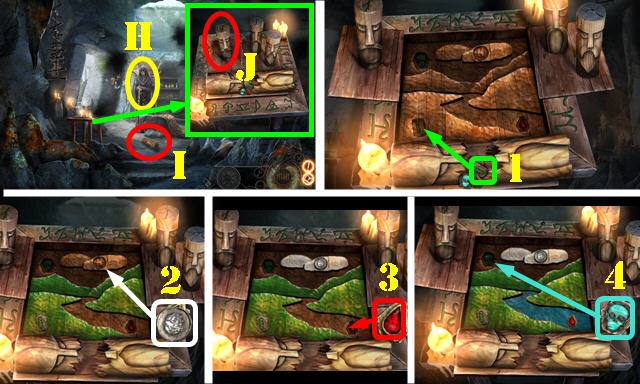
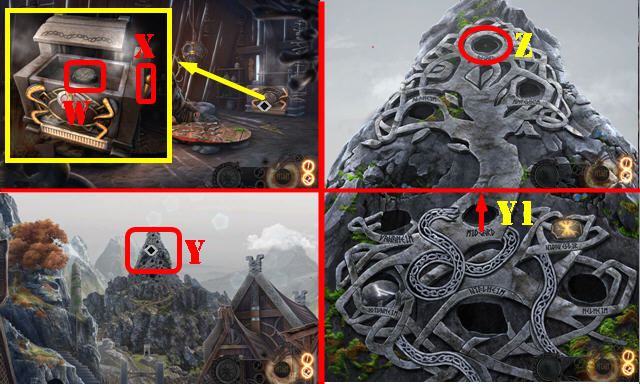
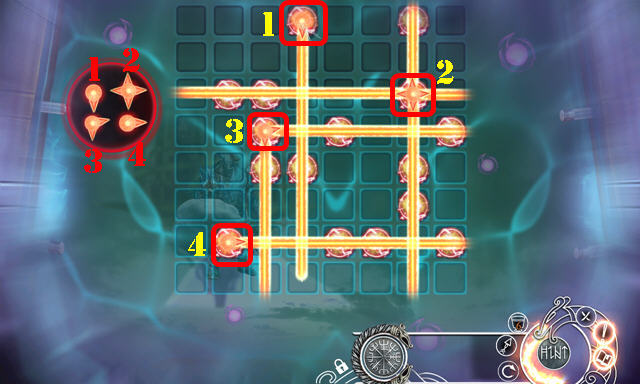
- Place WOODEN FIGURINE (J).
- Place as shown (1-4).
- Take ROUGH CRYSTAL.
- Walk down.
- Place ROUGH CRYSTAL (K).
- Solution (1-4).
- Take CRYSTAL.
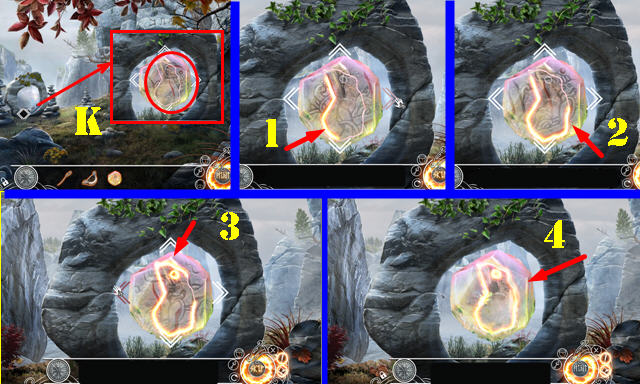
- Go forward.
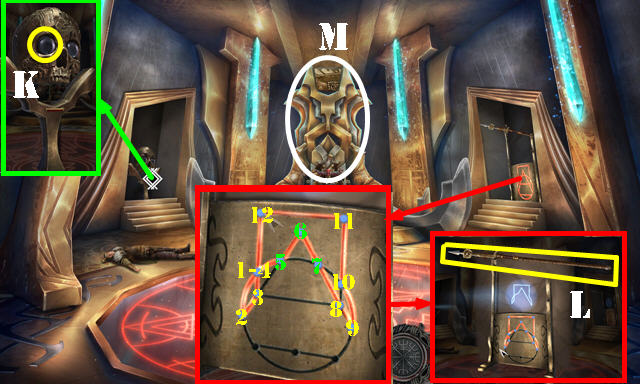
- Place CRYSTAL. Solution (L).
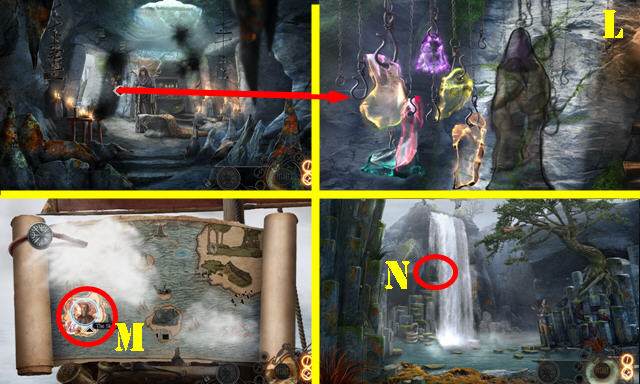
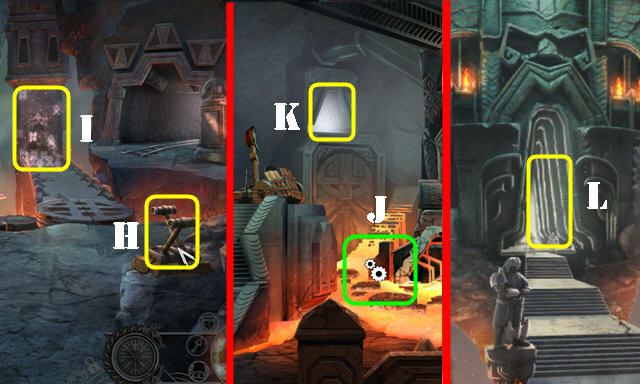
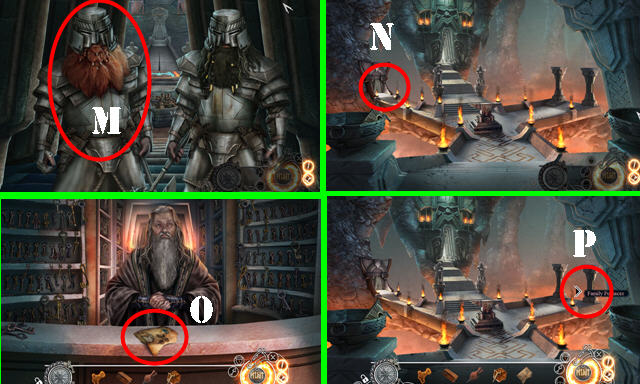
- Select 'The Skald' (M).
- Go (N).
- Take STONE CHUNK (O).
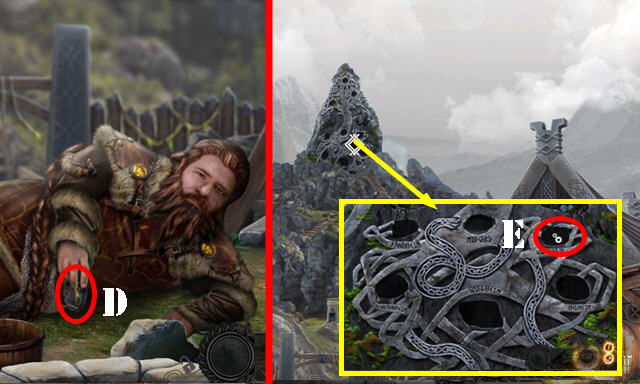
- Select hand; take BROKEN LYRE (P).
- Use PIN; take LEATHER WRIST GUARD (Q).
- STONE CHUNK on LEATHER WRIST GUARD; receive SLING.
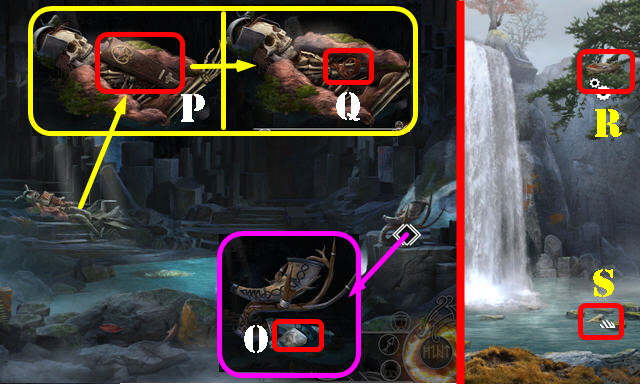
- Walk down.
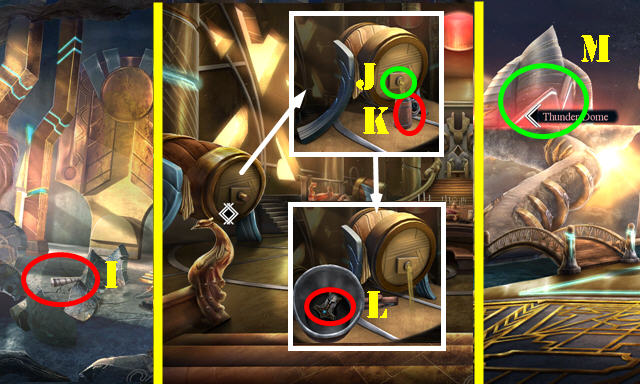
- Use SLING (R); take STURDY BONE and BIRD SKULL (S).
- Go forward.

- Use BIRD SKULL (T); take DECORATED HORN.
- Use STURDY BONE (U); take BASALT STICK (V).
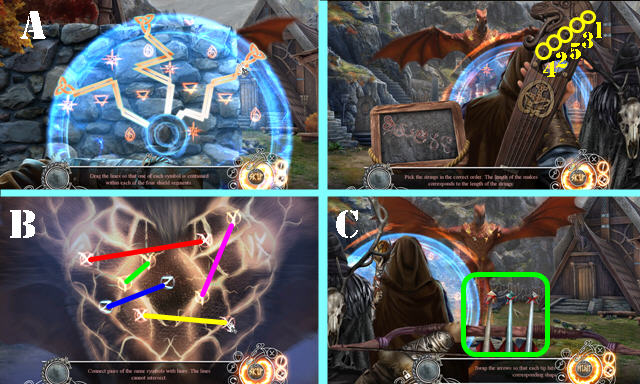
- Play HOP (W); receive LYRE COLUMN.
- Walk down.
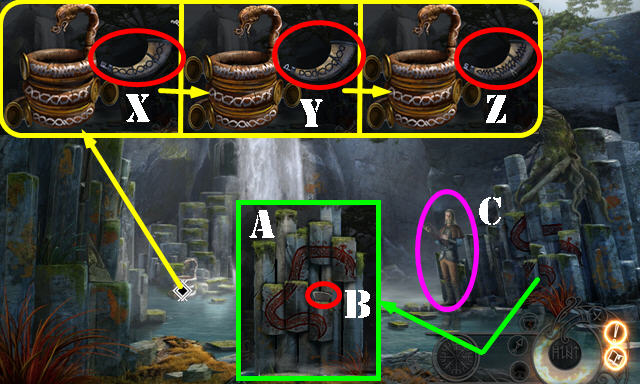
- Use DECORATED HORN. Arrange 3x (X-Y-Z); take MEAD.
- Place BASALT STICK; arrange snake (A); take ORNAMENTED COMB (B).
- Give MEAD (C).
- Place ORNAMENTED COMB. Select (blue); take STRINGS (D).
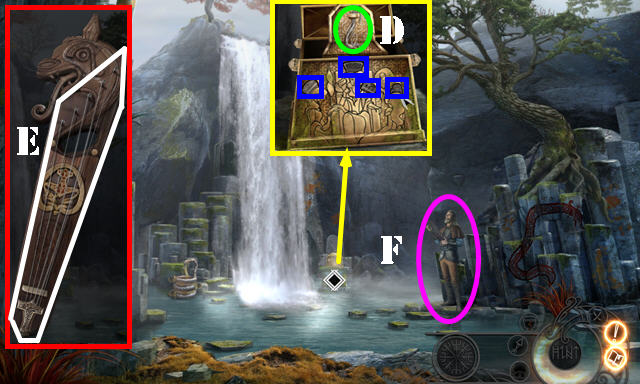
- LYRE COLUMN and STRINGS on BROKEN LYRE; arrange strings (E); receive LYRE.
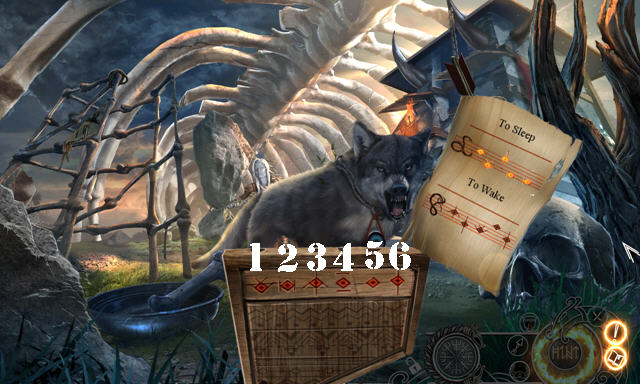
- Give LYRE (F) for HOP; play HOP.
- Select scene.
Chapter 2: Sandfell
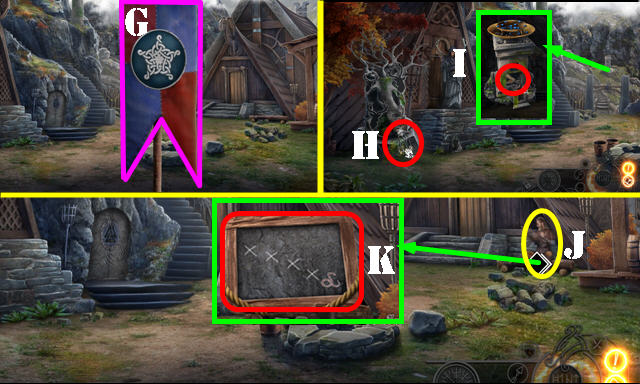
- Select flag (G).
- Take PENDANT (H).
- Select 3x; take MJOLNIR PENDANT (I).
- Go right.
- Talk (J); take SONG BOARD (K).
- Go right.

- Talk (L).
- Take GLUE (M).
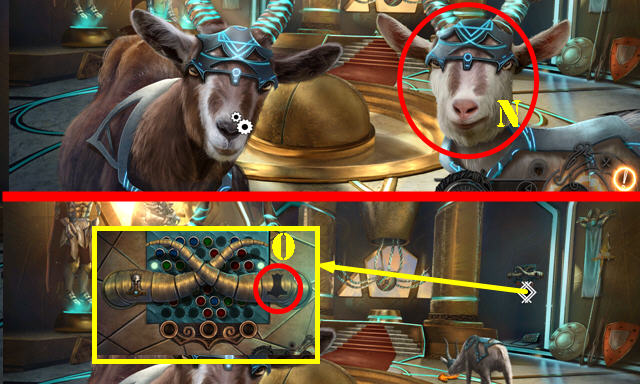
- Select symbol (N).
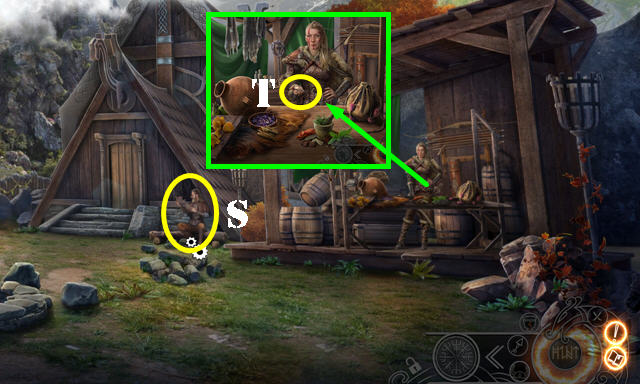
- Go (O).

- Select symbols (orange); receive COMPLETED SONG.
- Take ARROW MATERIAL 1/3, KING'S ARMOR, LEATHER PATCH, VALKNUT PART 1/3, and TORCH (P).
- Place TORCH; take LIT TORCH (Q).
- Place PENDANT and select; take ARROW MATERIAL 2/3 (R).
- Select all etched pieces on KING'S ARMOR; take ARROW MATERIAL 3/3 and VALKNUT PART 2/3.
- Walk down.
- Give COMPLETED SONG (S).
- Give ARROW MATERIAL 3/3; take VALKNUT PART 3/3 (T).
- Go left.
- Place VALKNUT PART 3/3 (U). Solution (V).
- Use LIT TORCH. Select 1-4. Play automatic HOP to trigger puzzle.
- Solution one (A).
- Solution two (1-5).
- Solutions three and four (B-C).
- Take NIDAVELLIR RUNE (D).
- Place NIDAVELLIR RUNE (E).
- Select scene.
Chapter 3: Lower City
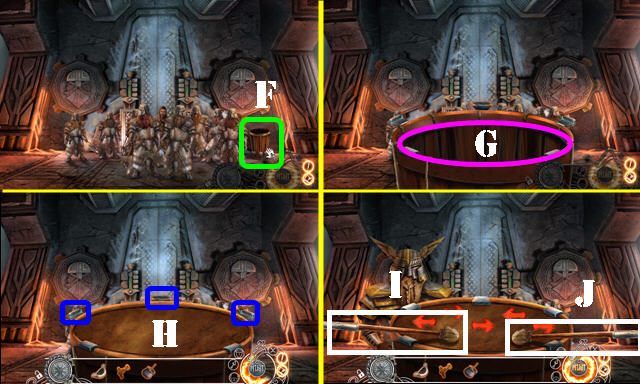
- Select drum shell (F).
- Place LEATHER PATCH (G).
- Select clasps (H).
- Select I-Jx2-I-J.
- Go left.
- Take GOLDEN OBJECT 1/4 and STEEL BAR (K).
- Take TOBACCO (L).
- Open TOBACCO; select and arrange. Use GLUE; take PAPER (L1).
- Go (M).
- Take GOLDEN OBJECT 2/4, GOLDEN OBJECT 3/4, GOLDEN OBJECT 4/4, BELLOWS, and SEALED BOX (N).
- Walk down.
- Place OFFERING BOWL and GOLDEN OBJECT 4/4; take MOLTEN GOLD (O).
- Place MOLTEN GOLD (P); pull handle (P1).
- Take GENERAL'S WRENCH (Q).
- Go to Lower City.
- Use GENERAL'S WRENCH 3x (R); receive METAL PLATE.
- Place METAL PLATE; select lid; take TRIANGULAR PIECE (S).
- Walk down.
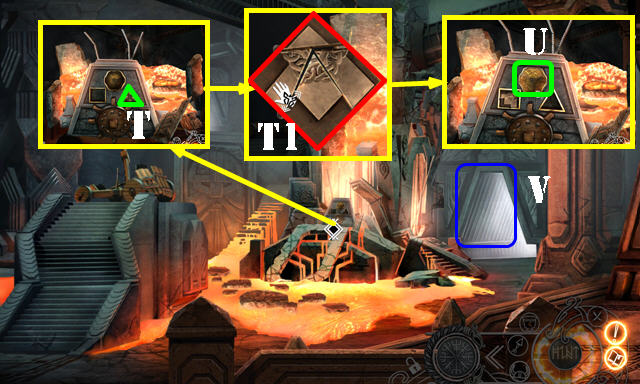
- Place TRIANGULAR PIECE (T) and select it; arrange as shown (T1).
- Take CONTROL CUBE and CHARCOAL (U).
- Go (V).
- Use PAPER and CHARCOAL. Rub charcoal; take MINES MAP (W).
- Give MINES MAP (X).
- Look (Y).
- Solution one (A).
- Go right. Solution two (B).
- Go left. Solution three (C).
- Go left. Pull lever (D); place STEEL BAR and pull.
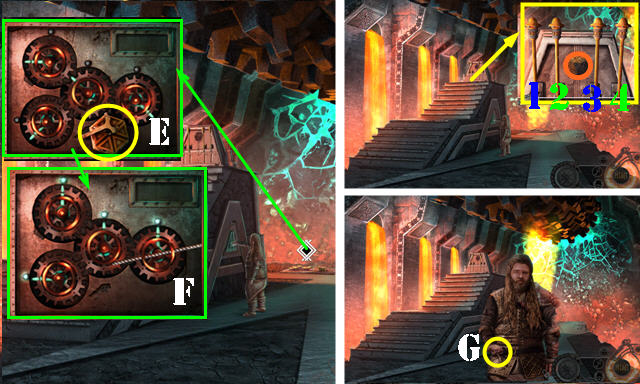
- Take CRANK (E).
- Use STEEL BAR on each gear; arrange as shown (F).
- Place CONTROL CUBE (orange); select 1-2-3-4. Select (4).
- Take GENERAL'S BADGE (G).
- Pull lever (H).
- Play HOP (I): receive ICE SHARDS.
- Walk down.
- Use ICE SHARDS (J).
- Go (K-L).
- Give GENERAL'S BADGE (M).
- Walk down and go (N).
- Take CODE (O).
- Go (P).
- Place CODE; arrange as shown (Q).
- Place SEALED BOX (R); pull handle (S). Take BROKEN BOX.
- Take FOUNDER'S EMBLEM PART 1/2 and MAGNET from BROKEN BOX.
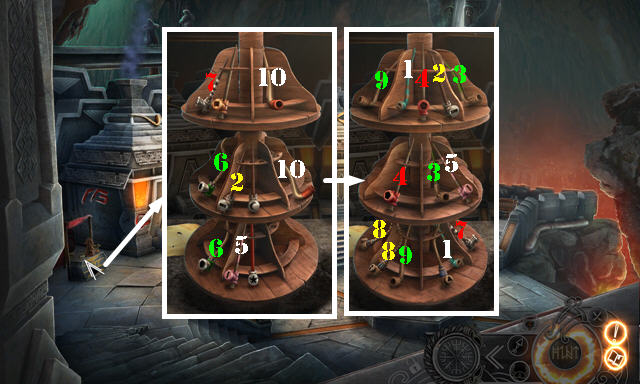
- Match pairs (1-10); receive SMOKING PIPES.
- Walk down.
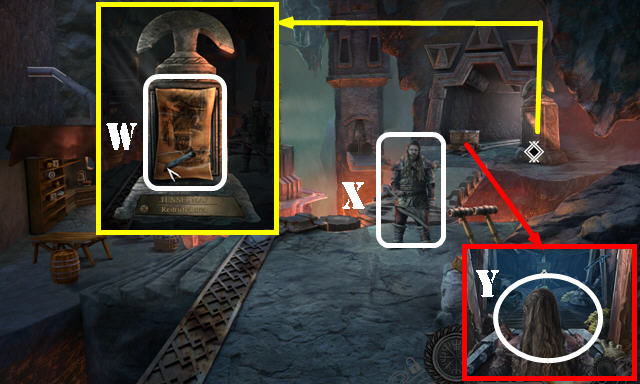
- Remove cover (T); use MAGNET. Solution (U).
- Take CODEX (V).
- Go (W).
- Place CODEX and open (X).
- Solution (Y).
- Open book; flip pages; select token (A).
- Take WARRIOR'S KEY (B).
- Go (C).
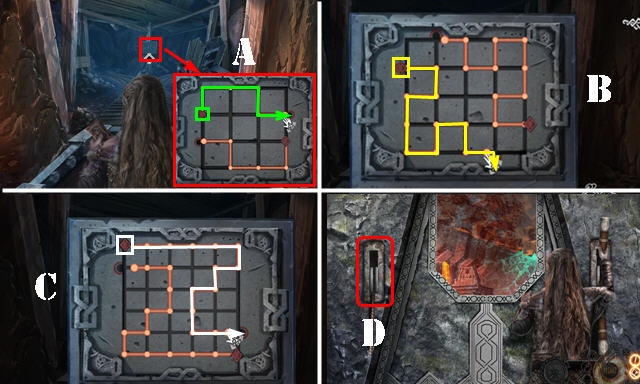
- Use WARRIOR'S KEY (D).
- Solution (E).
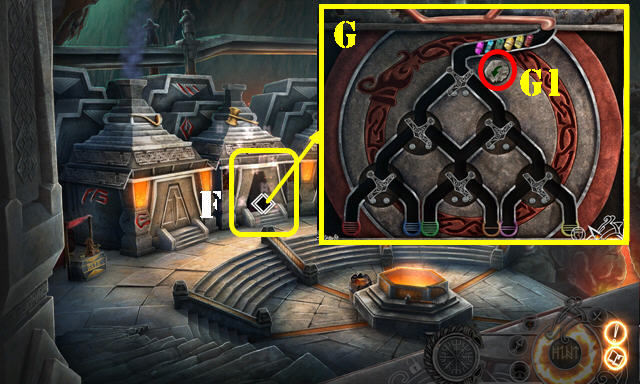
- Play HOP (F).
- HOP Solution (G). Press button (G1).
- Select scene.
- Go to Throne Room.
- Select scene.
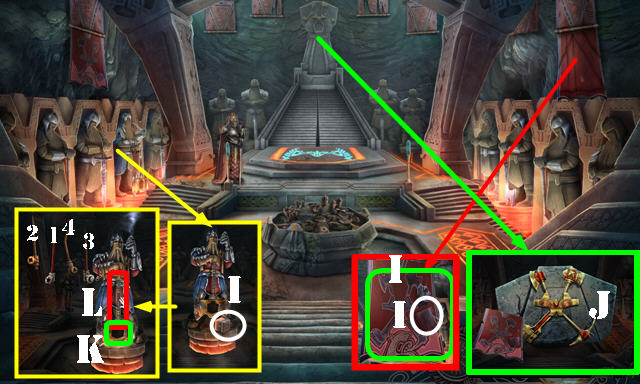
- Take CUBE, OBSIDIAN, and DWARVEN BANNER (I).
- Place DWARVEN BANNER; arrange parts (J). Take CROWN EMBLEM.
- Place SMOKING PIPES; use BELLOWS (K). Select 1-4. Take AXE (L).
- Walk down.

- Place CROWN EMBLEM and select; take KING FIGURINE (M).
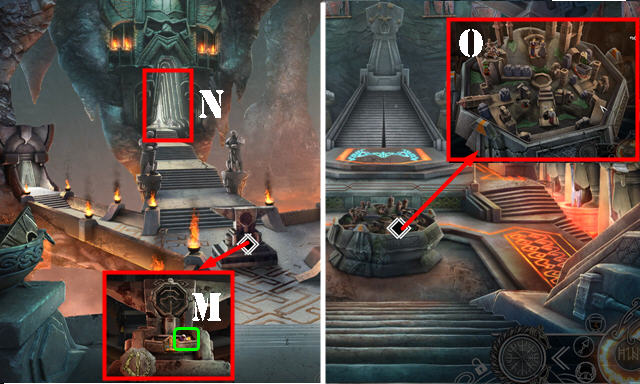
- Go (N).
- Place KING FIGURINE (O).
- Solution (P). Take FOUNDER'S EMBLEM PART 2/2 (Q).
- Go to Family Furnaces.
- Place FOUNDER'S EMBLEM PART 2/2 (R). Select 3x; receive FOUNDER'S EMBLEM.
- FOUNDER'S EMBLEM on AXE; receive FOUNDER'S AXE.
- Go to Throne Room.
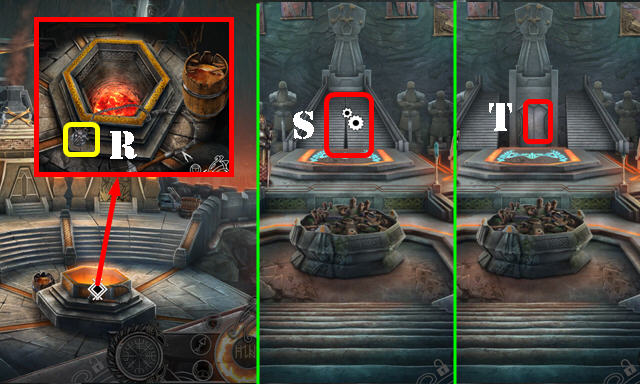
- Use FOUNDER'S AXE (S).
- Go (T).

- Solution one: U-X-V-W.
- Solution two: 1-3.
- Solution three (Y).
- Take FROZEN SOUL KEY (Z).
- Give FROZEN SOUL KEY (A).
- Take ICE GIANT'S TOOTH (B).
- Solution (C).
- Go left. Enter (D).
- Open tray; place OBSIDIAN and close (E).
- Go to Grand Hall.
- Place CRANK and select (F); play HOP; receive SILVER THREAD.
- Go to Seer's Hut.
- Place SILVER THREAD; arrange thread as shown: yellow-green-purple-white (G).
- Solution two (H).
- Take BURNING CRYSTAL and HERBAL MIXTURE (I).
- Walk down; go right.

- Place BURNING CRYSTAL (J).
- Solution (K).
- Take STAG 1/3.
- Take STAG 2/3 (L).
- Take BOW AND ARROW (M).
- Go up.
- Use BOW AND ARROW (N).
- Select 1-3; take STAG 3/3 and ELASTIC STRING (O).
- Go down.
- Place STAG 3/3; take PLANT POISON and GEOMETRIC TOKEN (P).
- Go (Q).
- Place GEOMETRIC TOKEN; select R-S-T-U-V; take DEPLETED RUNE (orange).
- Place MJOLNIR PENDANT (W).
- Place DEPLETED RUNE and ICE GIANT'S TOOTH (X).
- Pull handle (Y); take JOTUNHEIM RUNE.
- Walk down; go up and right.
- Place JOTUNHEIM RUNE (Z). Select scene.
Chapter 4: Jotunheim
- Select scene.
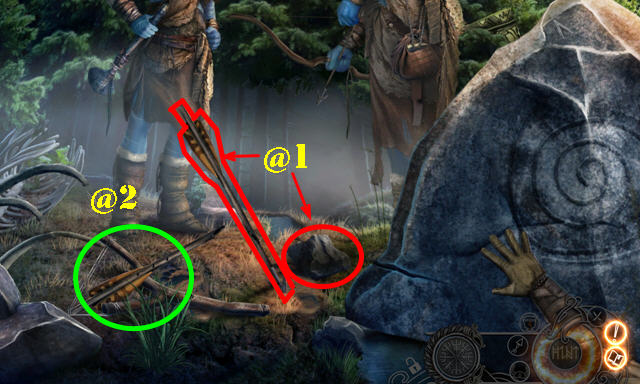
- Take SHARP ROCK and SHAFT (@1).
- SHARP ROCK 3x on SHAFT; receive HOLLOW TUBE.
- Place ELASTIC STRING and HOLLOW TUBE (@2); select.
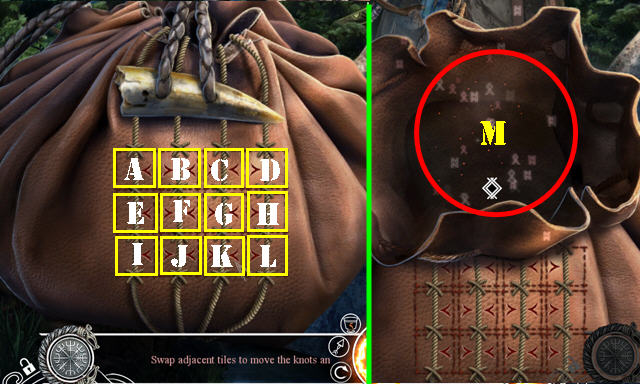
- Solution (A-B)-(B-C)-(C-D)-(G-F)-(I-J)-(K-J)-(L-K). Receive ROPE.
- Play HOP (M); receive LARGE PIPE.
- Take HUGE CLOTH (N).
- Take SANDFELL CREST and PANPIPES (O).
- Use ROPE (P) and LARGE PIPE (Q).
- Select logs 2x (R).
- Go (S).

- Place PANPIPES on scene; select 5-1-6-2-2.
- Take STONE EYE, EMPTY WATERSKIN, and RAVEN COMMUNICATORS 1/2 (T).
- Use PLANT POISON (U).
- Place CUBE. Swap as shown (V).
- Take RAVEN COMMUNICATORS 2/2 and HAIRPIN (W).
- Walk down.
- Place EMPTY WATERSKIN (A).
- Select sledgehammer (B).
- Place RAVEN COMMUNICATORS 2/2 (C) and STONE EYE (D).
- Remove bone (E); take FISHING HOOK and LARGE KEY.
- Use LARGE KEY; move items; take THROWING BLADE (F).
- Use THROWING BLADE (G); take WATER (H).
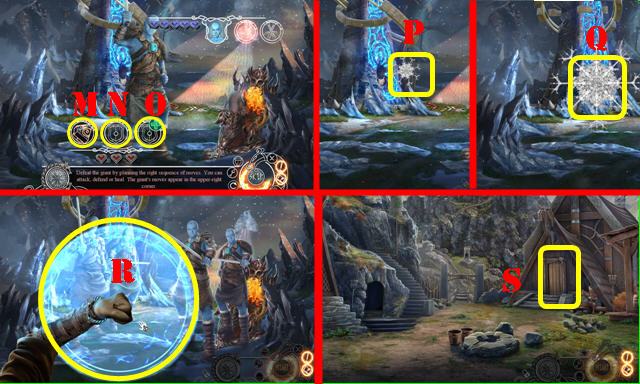
- Play puzzle (I).
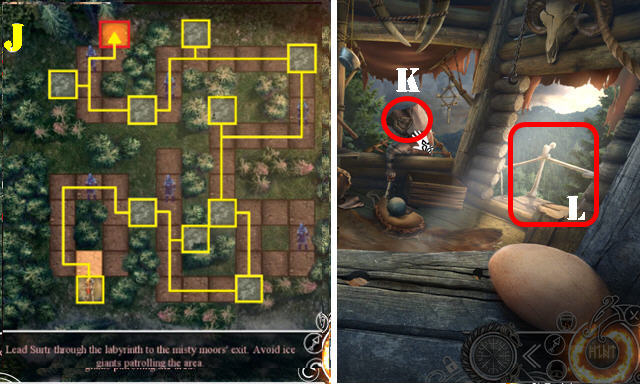
- Solution (J). The yellow boxes are safe zones you can use to hide.
- Take OCTAGON (K).
- Go (L).
- Place OCTAGON and select (M); take ASGARD EMBLEM and DRAUPNIR (N).
- Select DRAUPNIR several times until chain forms. Take GOLDEN CHAIN.
- Use GOLDEN CHAIN and PANPIPES (O).
- Select 3-6-1-5-6.
- Play HOP (P); receive ICE STAFF.
- Use HERBAL MIXTURE, WATER and ICE STAFF (Q).
- Take GRIDA'S HAND (R).
- Solution (S).
Chapter 5: Altar
- Use HAIRPIN (T); play HOP; receive FIRE SWORD.
- Use FIRE SWORD (U).
- Take VINE BRANCH (V).
- Select 1-9.
- Go forward.
- VINE BRANCH on FISHING HOOK; receive ROPE WITH HOOK.
- Use ROPE WITH HOOK (W) and HUGE CLOTH (X).
- Select stones (Y-Y1) and cloth (X).
- Go (Z).
- Find pairs (A).
- Take METAL CLAW 1/2 and TITAN'S TOOTH (B).
- Walk down twice.
- Use HAIRPIN (C); receive EMBERS.
- Use TITAN'S TOOTH (D); receive TREE BARK.
- Go (E).

- Use EMBERS and TREE BARK; take METAL CLAW 2/2 (F).
- Place METAL CLAW 2/2; select 1-3; take SCRATCHED EYE (G).
- Go (H).
- Place SCRATCHED EYE (I).
- Talk (J).
- Use GRIDA'S HAND (K); take GRIDA'S AMPLIFIED HAND.
- Use GRIDA'S AMPLIFIED HAND (L).
- Solution: M-Ox2-Mx2-O-M-N-O-M.
- Select (P-Q-R).
- Enter (S).
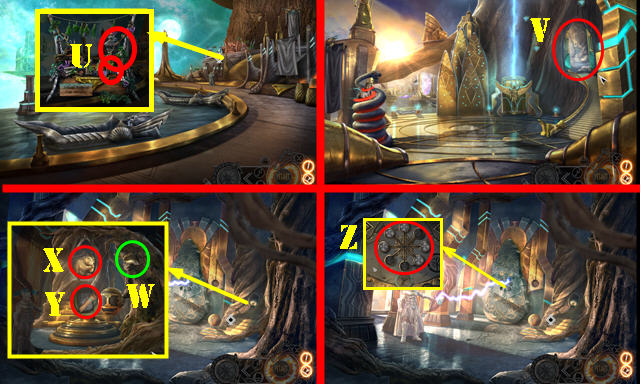
- Place SANDFELL CREST; read note; take DEPLETED RUNE (T).
- Go to Seer's Hut.
- Talk (U); play HOP.
- Take INCOMPLETE CONCOCTION (V).
- Place DEPLETED RUNE and ASGARD EMBLEM (W).
- Pull handle (X); take ASGARD RUNE.
- Walk down; go up; examine (Y) and go up again (Y1).
- Place ASGARD RUNE (Z); select scene.
Chapter 6: Harbor
- Go (A).
- Select clasps (B); remove lens; take POWER CORE 1/3.
- Remove cover; take POWER CORE 2/3 (C).
- Go left. Take LEAF 1/2 (D).
- Go right. Place INCOMPLETE CONCOCTION (E); play HOP; receive HERBAL CONCOCTION.
- Use HERBAL CONCOCTION (F).
- Solution (1-4).
- Receive POWER CORE 3/3.
- Walk down.
- Place POWER CORE 3/3 (G).
- Go (H).
- Play HOP (I).
- Select bowl 3x; take GOLDEN NUT and STONE BOWL (J).
- Take MUG and DULL KNIFE (K).
- Move items; take SONG TABLET and CANDLE behind it (L).
- Walk down.
- Take METAL NET (M).
- Go to Harbor.
- Go left. Use CANDLE (N); receive LIT CANDLE.
- Walk down.
- Use STONE BOWL (O); receive VENOM.
- Go (P).
- Use VENOM on lock and select it. Move items; take ODIN'S GUARD SHIELD and WHETSTONE behind it (Q).
- WHETSTONE on DULL KNIFE; take CARVING KNIFE.
- Arrange shields as shown on ODIN'S GUARD SHIELD (R); take ODIN'S SIGIL BEARD (S).
- Go to Harbor.
- Go right 2x. Use CARVING KNIFE; take ELVEN BOW and LEAF 2/2 (U).
- Walk down; go to Cave (V).
- Take ODIN'S SIGIL BASE (W).
- Use GOLDEN NUT (X); take REALMS SCROLL and GODSTONE PATTERN (Y).
- Place GODSTONE PATTERN (Z).
- Solution: (G-F)-(H-B)-(E-H).
- Select stones; take THIN SPIKE (I).
- Go to Hall of Valhalla.
- Use THIN SPIKE (J); place MUG (K).
- Use METAL NET on mug; take THOR'S SIGIL (L).
- Walk down and go (M).
- Use LEAF 2/2 (N).
- Place THOR'S SIGIL (O).
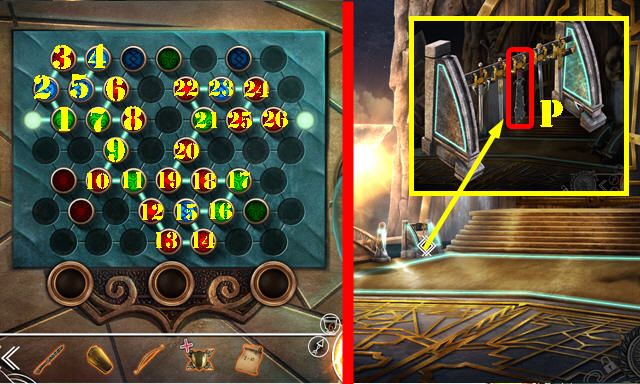
- Solution (1-26).
- Take SOLDIER RING.
- Walk down.
- Use SOLDIER RING; shift right; take LOKI'S DAGGER (P).
- Walk down.
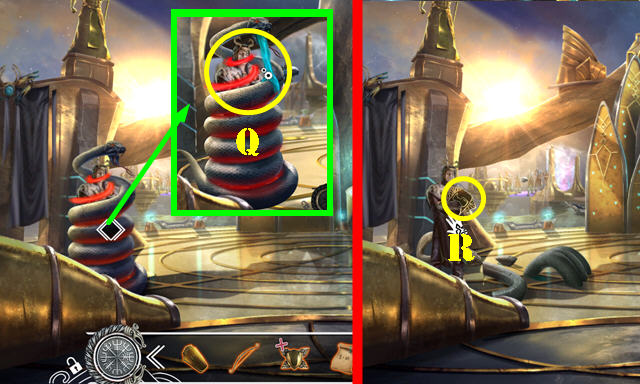
- Use LOKI'S DAGGER (Q).
- Take ODIN'S SIGIL HELM (R).
- Go to Hall of Valhalla.
- ODIN'S SIGIL BEARD, ODIN'S SIGIL HELM, and LIT CANDLE on ODIN'S SIGIL BASE; take ODIN'S SIGIL.
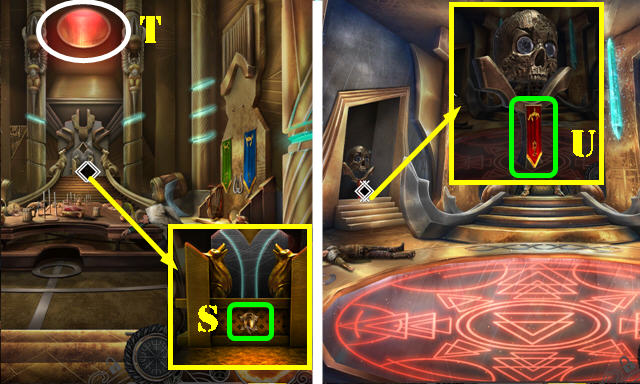
- Place ODIN'S SIGIL (S).
- Go (T).
- Use CARVING KNIFE (U); receive RED BANNER.
- Go to Thunder Dome.
- Use RED BANNER (V).
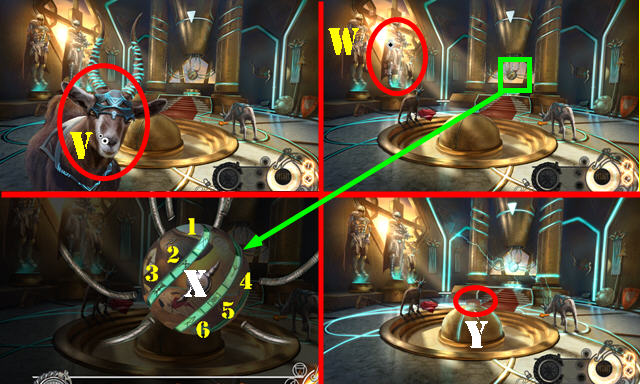
- Play HOP (W); receive ORB EMBLEM.
- Place ORB EMBLEM (X). Sequences (1-6)-(3-4-2)-(2-5-3-4).
- Take LOCKI'S BOX (Y).
- Open LOCKI'S BOX; take FLY POTION.
- Go to Harbor.
- Use FLY POTION on scene (A).
- Take LENS (B).
- Place REALMS SCROLL. Solution (C-D).
- Take MIDGARD TOKEN.
- Place MIDGARD TOKEN (E).
- Move right. Solution one (F).
- Solution two (G).
- Give HERBAL CONCOCTION (H), SONG TABLET (I), and ELVEN BOW (J).
- Go to Odin's Throne Room.
- Remove eye; place LENS (K).
- Duplicate pattern (1-12).
- Take GUNGNIR (L).
- GRIDA'S AMPLIFIED HAND on GUNGNIR; receive BURNING GUNGNIR.
- Play HOP (M).
- Use BURNING GUNGNIR (N).
- Congratulations, you've completed Saga of the Nine Worlds: The Gathering!
Created at: 2017-06-25