

Walkthrough Menu
- General Tips
- Chapter 1: The Huntress
- Chapter 2: The Skald
- Chapter 3: The Shield-Maiden
- Chapter 4: The Seer
General Tips
- This is the official guide for Saga of the Nine World: The Hunt.
- This guide won't tell you when to zoom into a location; the screenshots show each zoom scene.
- Hidden-object puzzles are referred to as HOPs. Only the locations of the HOPs will be shown.
- Use the Map to fast travel to a location.
Chapter 1: The Huntress
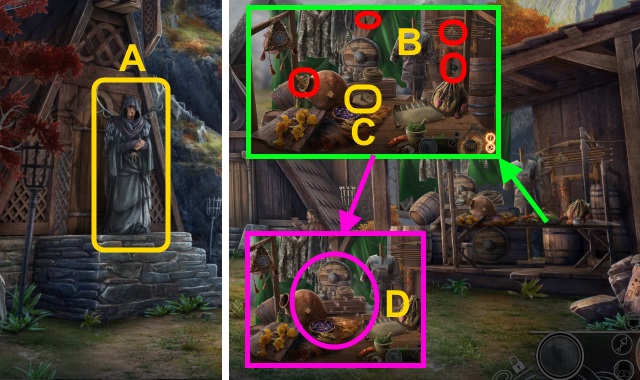
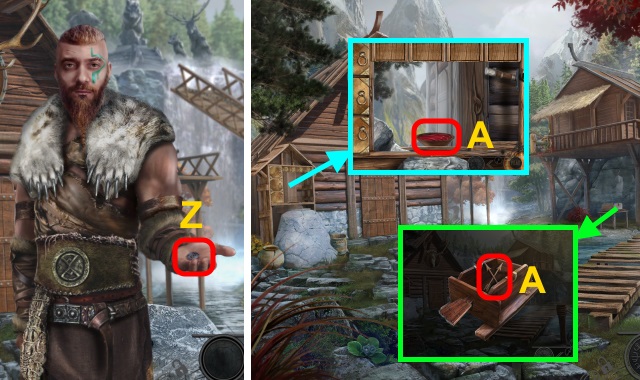
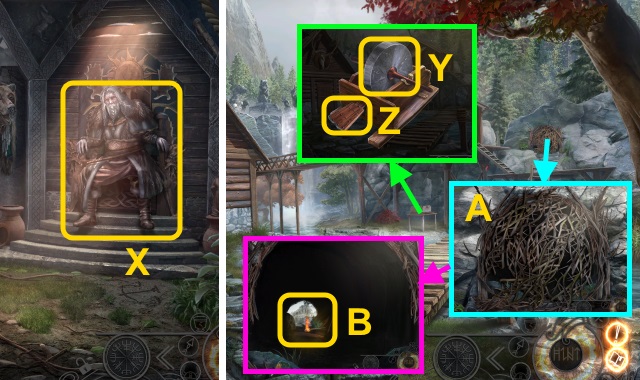
- Talk (A).
- Pan right.
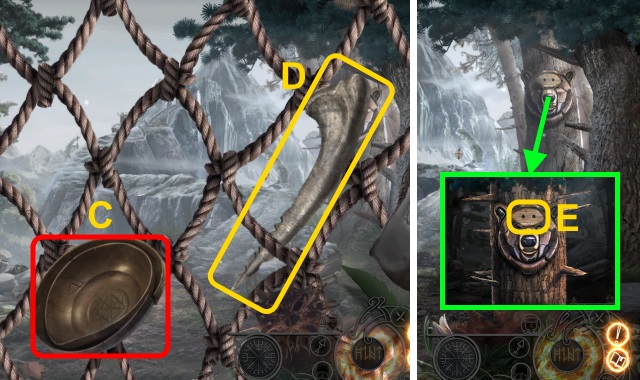
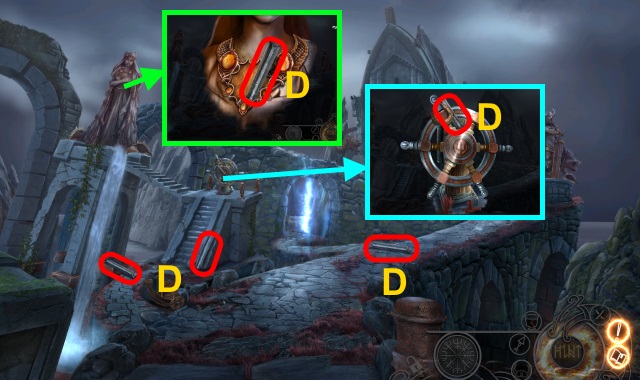
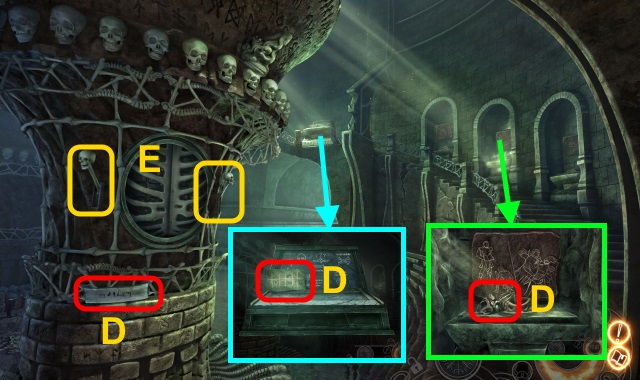
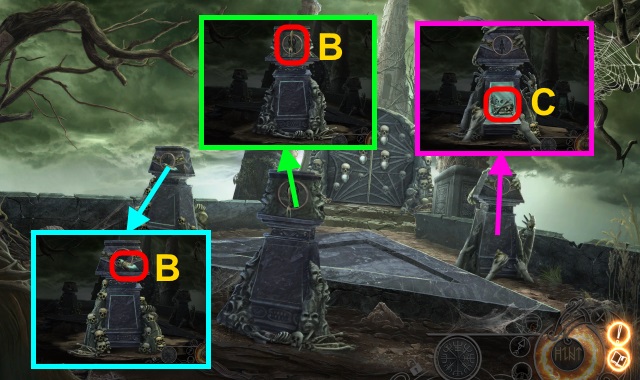
- Take STEEL COMB, LOCK OF FUR, and COMPASS FRAGMENTS (4/4) (B). Place COMPASS FRAGMENTS (C); take Map.
- Examine (D). Play HOP; receive FRAGMENTED MAP.
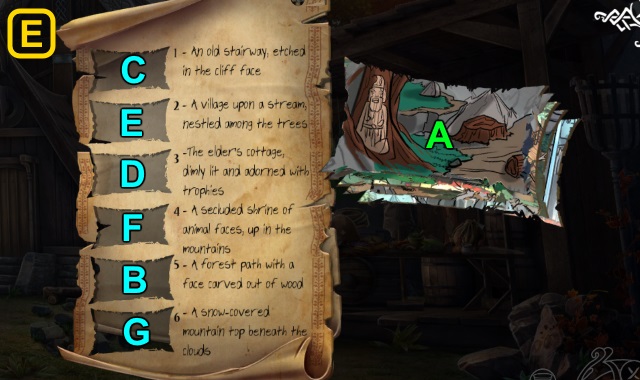
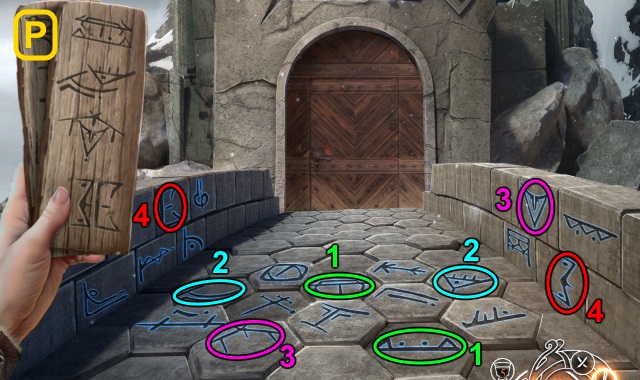
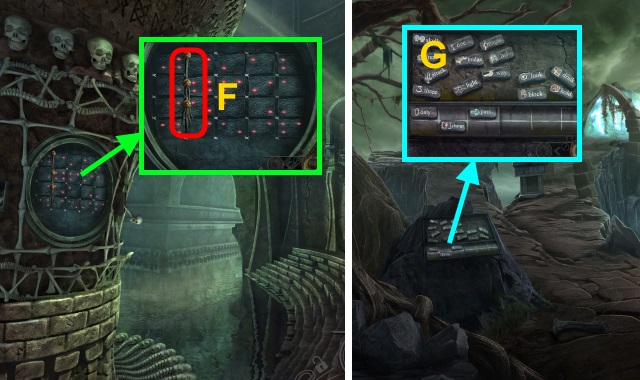
- Examine FRAGMENTED MAP; solution (E): (A-B)-(A-C)-(A-D)-(A-E)-(A-F)-(A-G).
- Examine paper; take ROCK SCREW.
- Walk left.
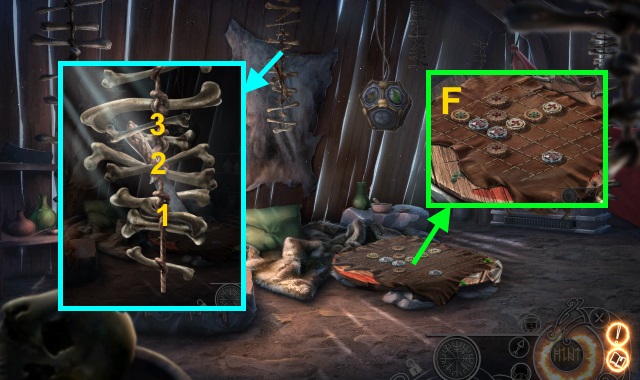
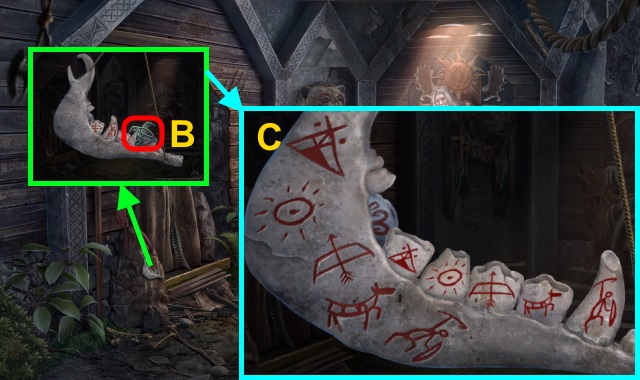
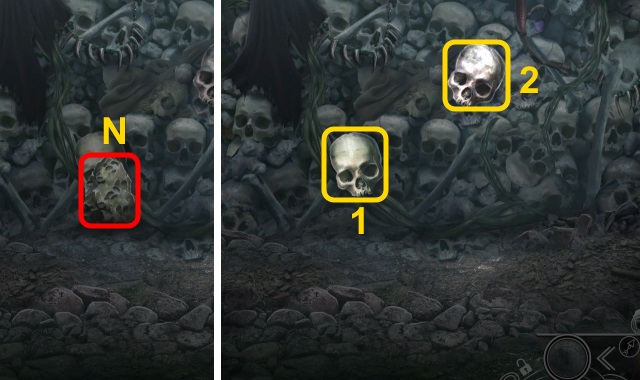
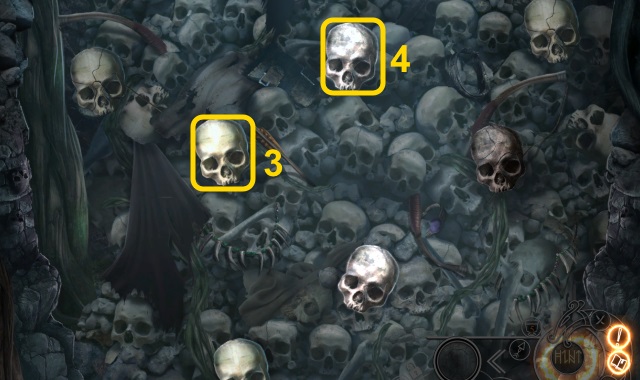
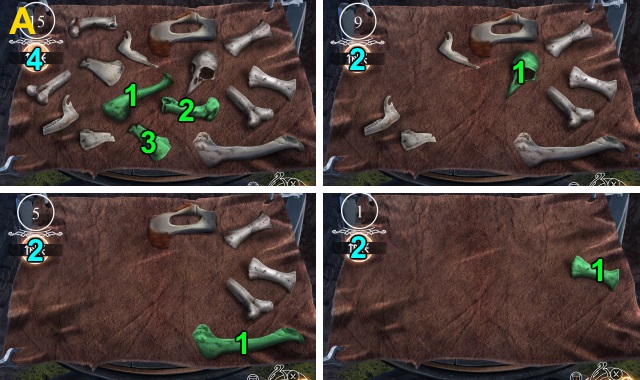
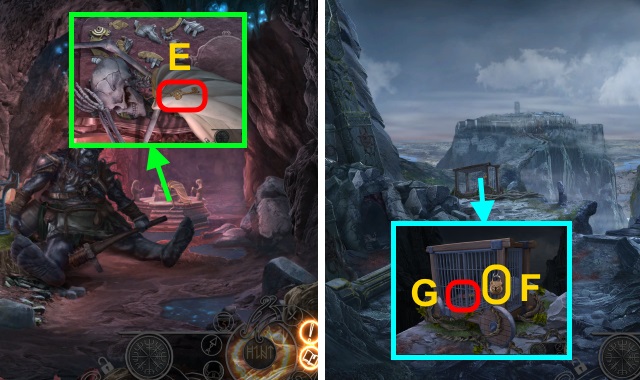
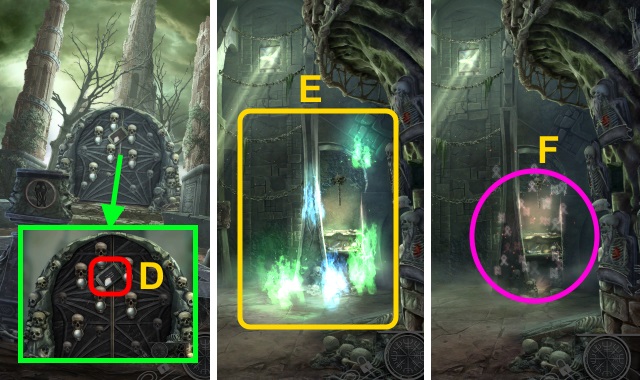
- Remove bones (1-3); receive KNIFE.
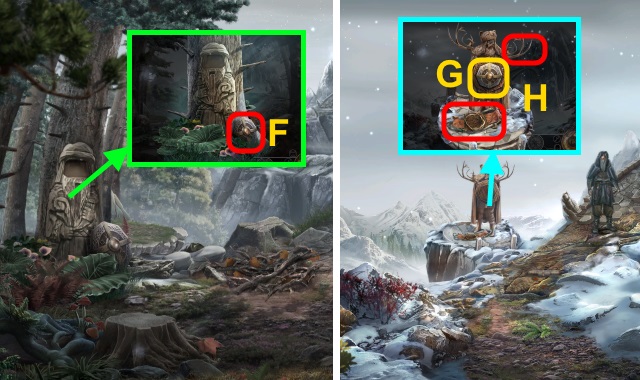
- Use KNIFE (F).
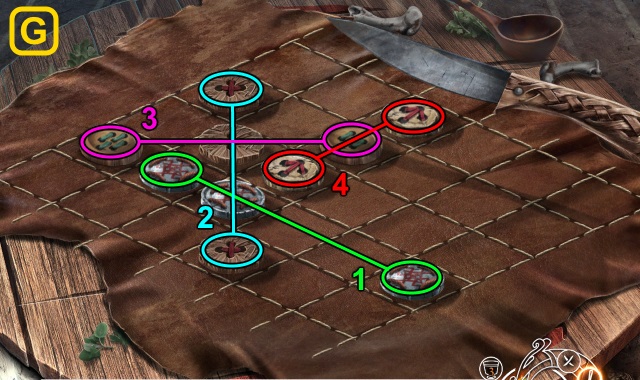

- Solution (G-H).
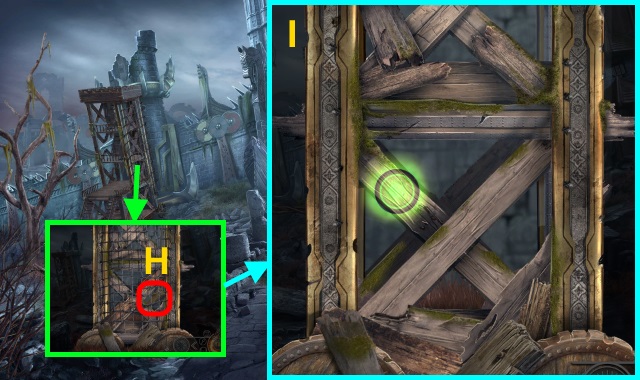
- Take PERFORATED LEATHER HIDE.
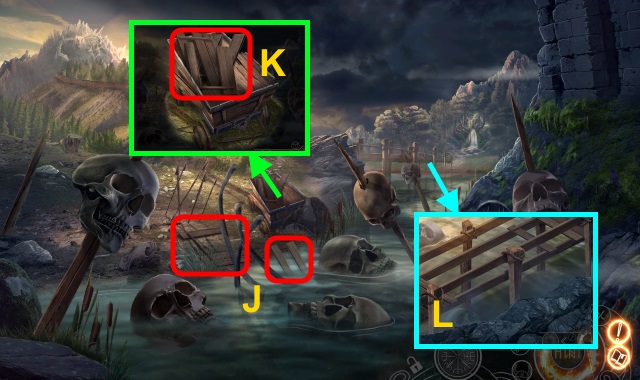
- Walk down; go forward.
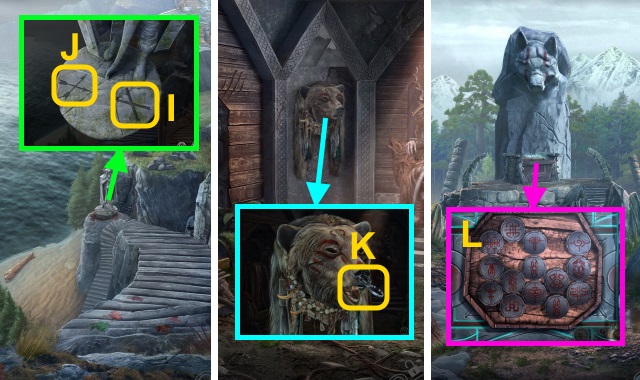
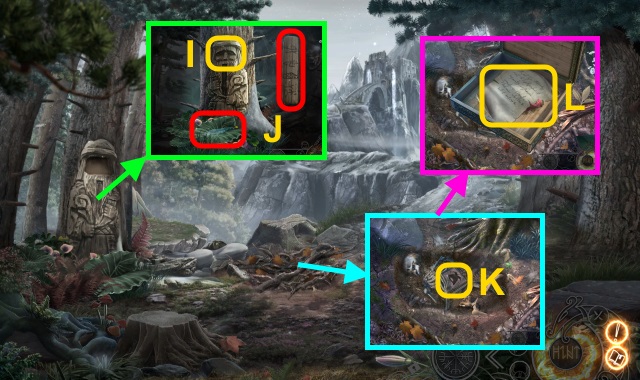
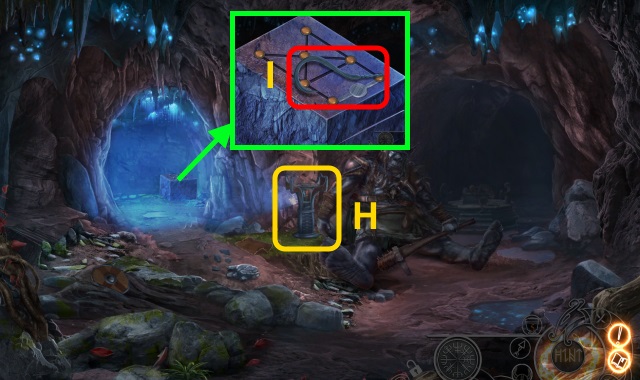
- Place PERFORATED LEATHER HIDE (I).
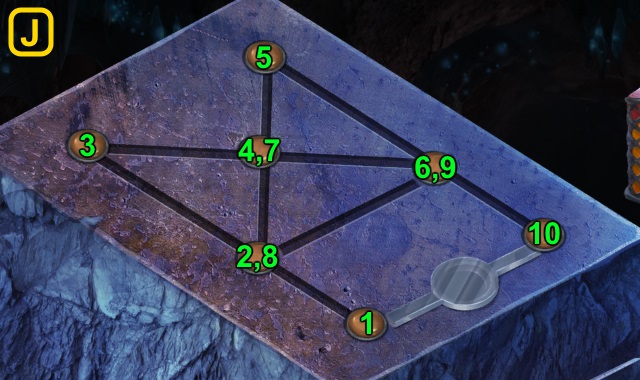
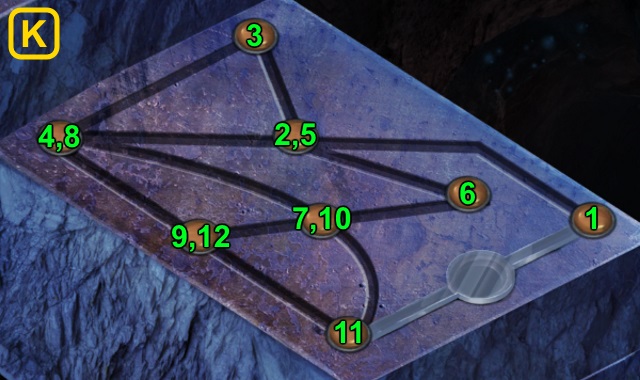
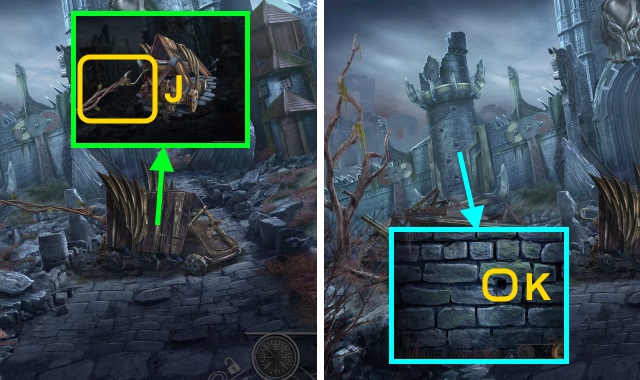
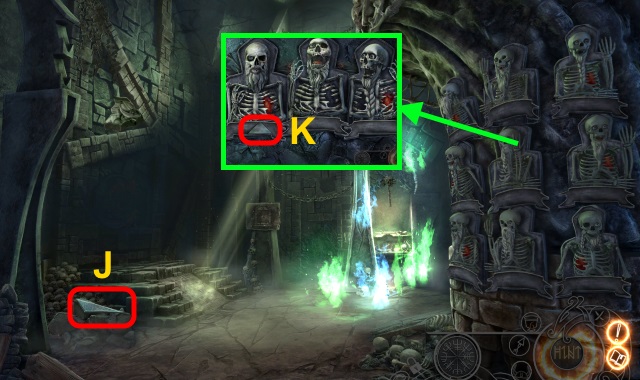
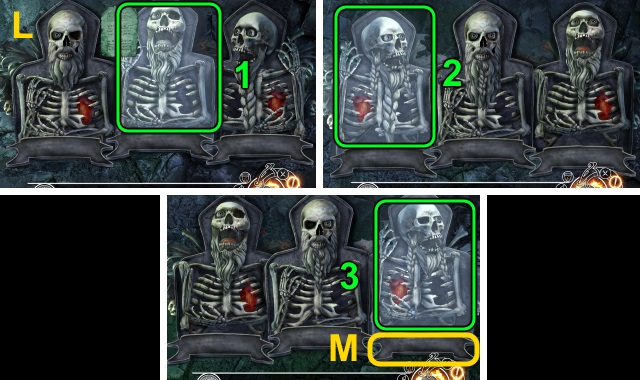
- Examine (J).
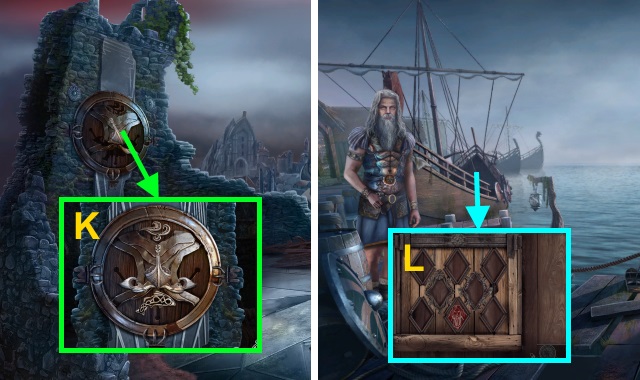
- Solution (K-L).
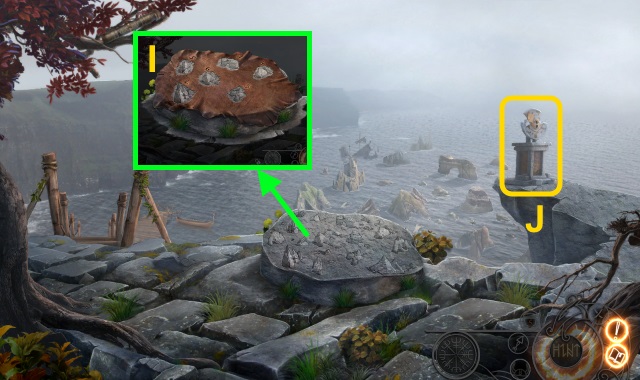
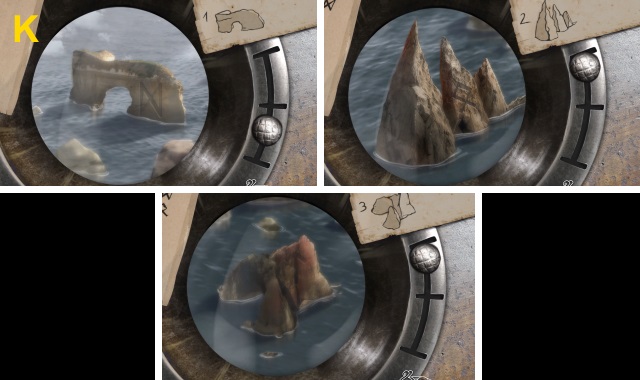
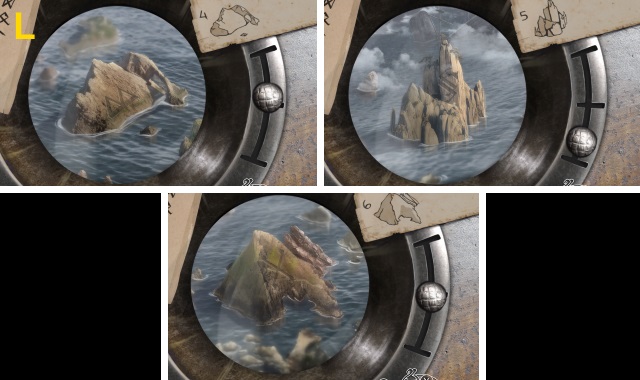
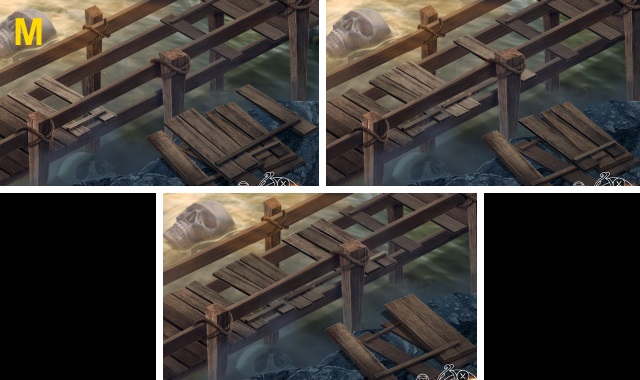
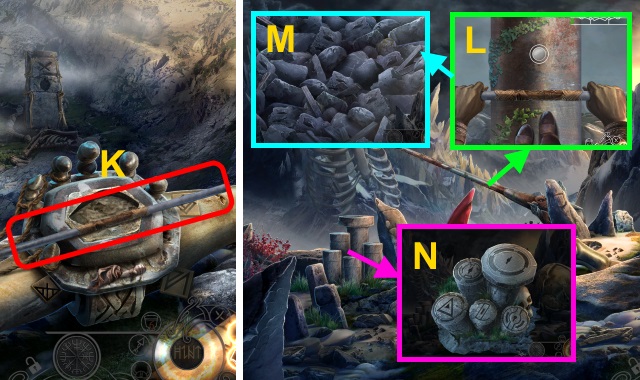
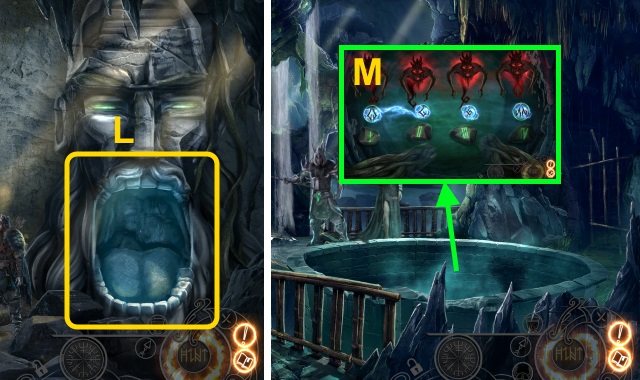
- Take ROCK FORMATION CHART.
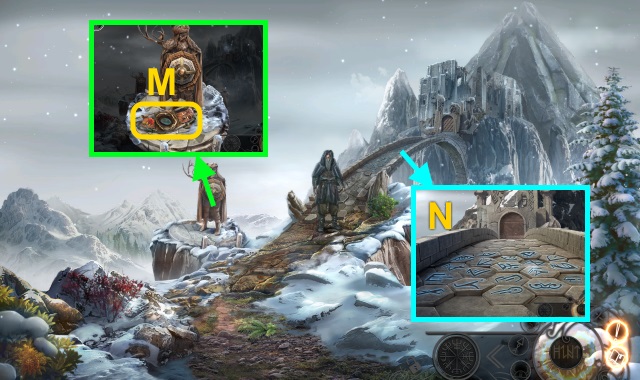
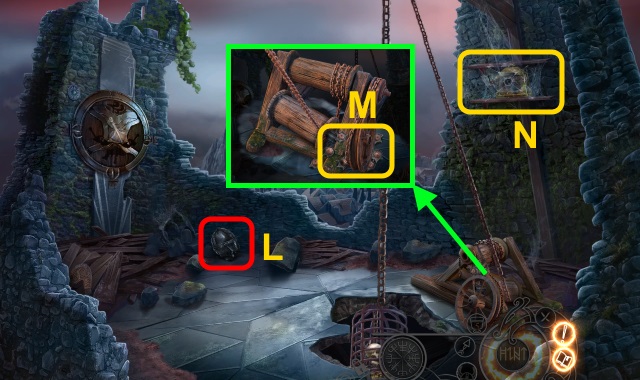
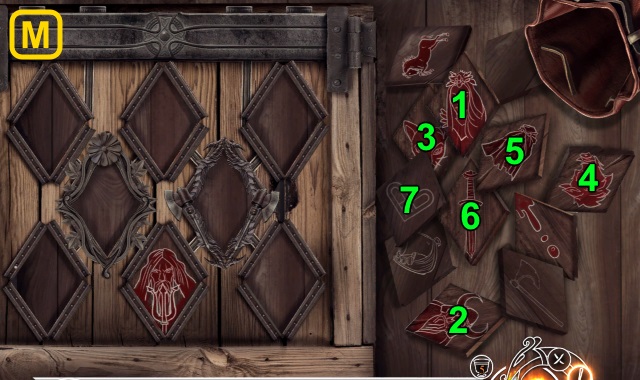
- Use ROCK FORMATION CHART (M).
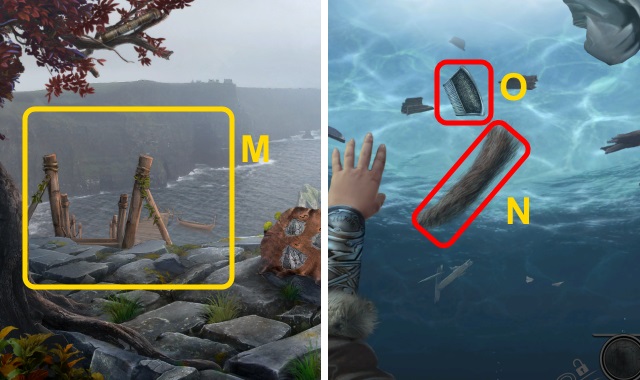
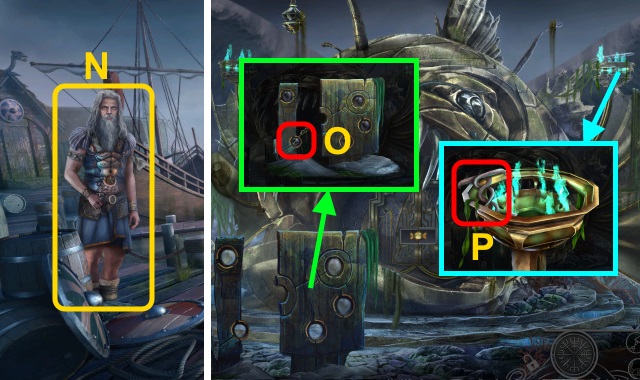
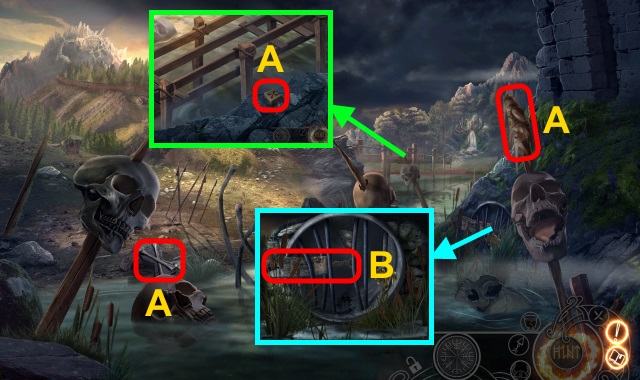
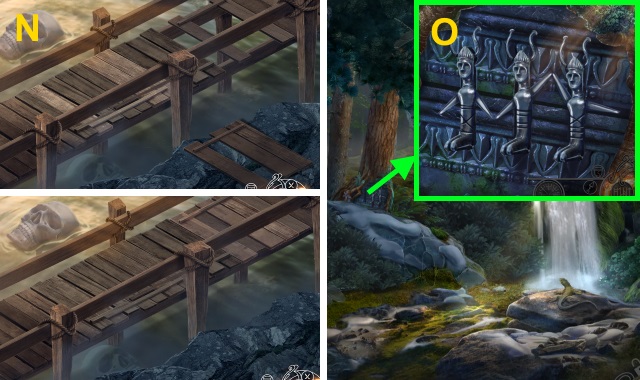
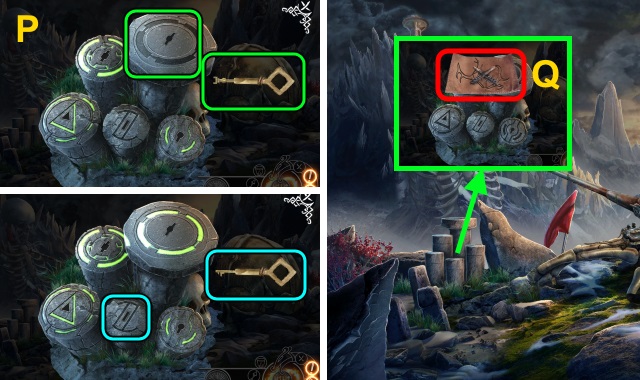
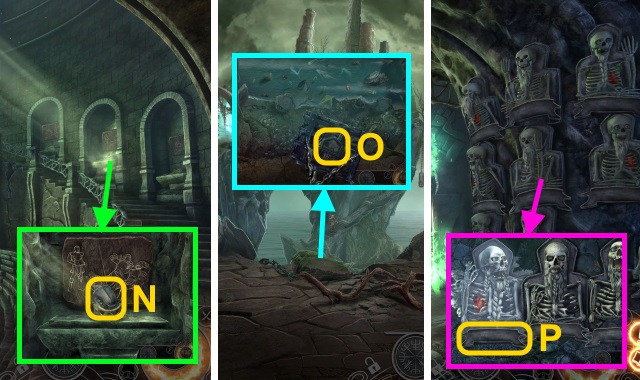
- Take LOCK OF FUR (N); take STEEL COMB (O).
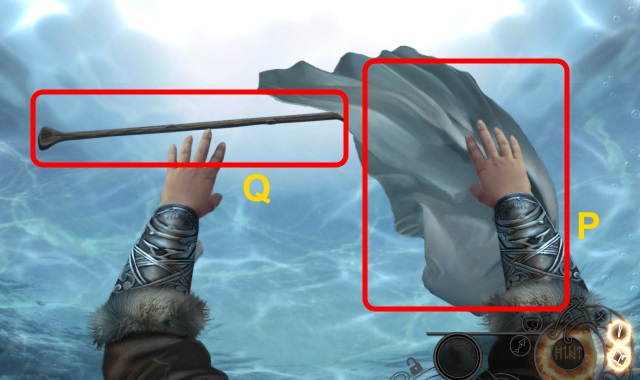
- Take SAILCLOTH (P); take OAR (Q).
- Go right.
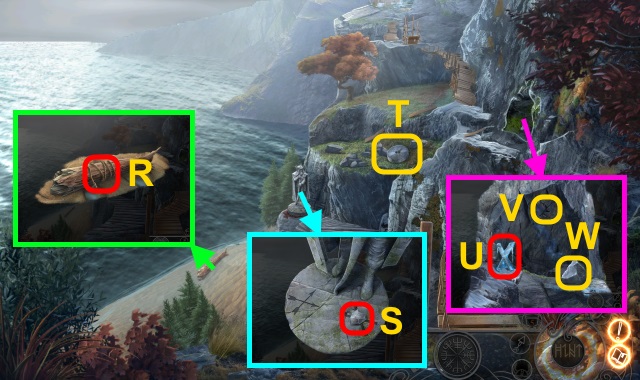
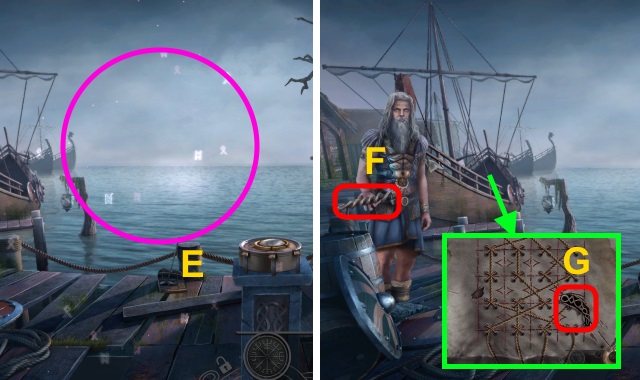
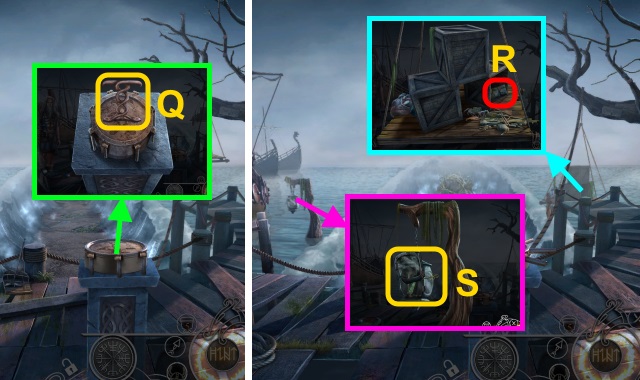
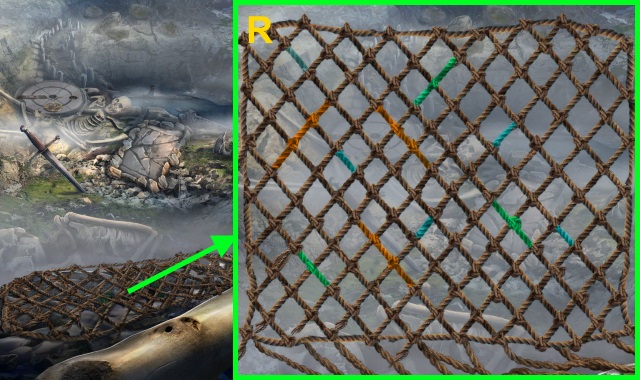
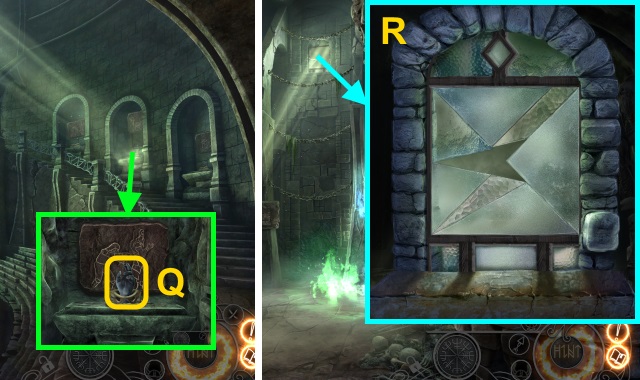
- Take ROPE (R).
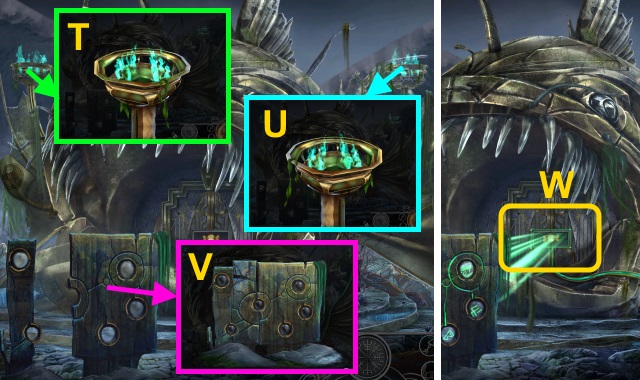
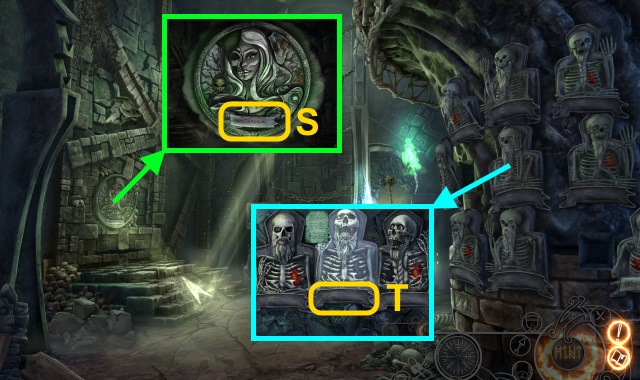
- Take QUARTZ STONE (S).
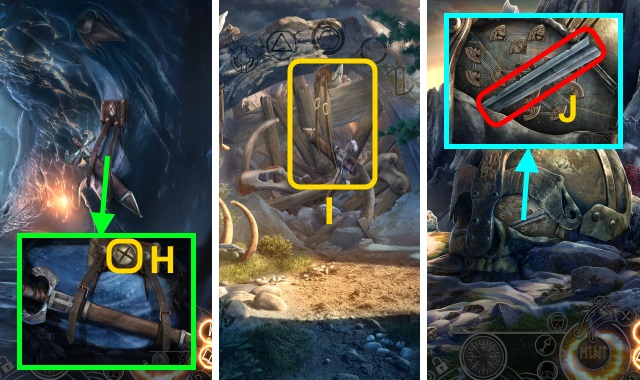
- Use OAR (T); receive WHETSTONE.
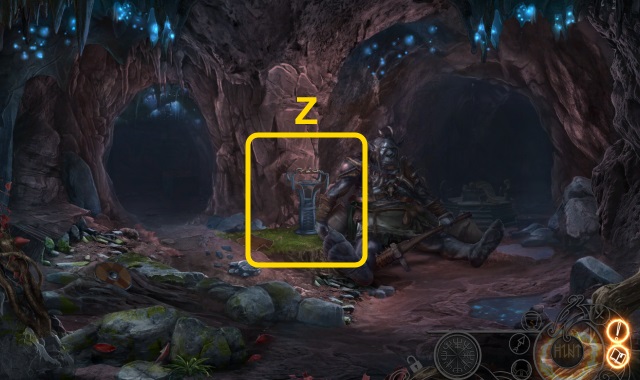
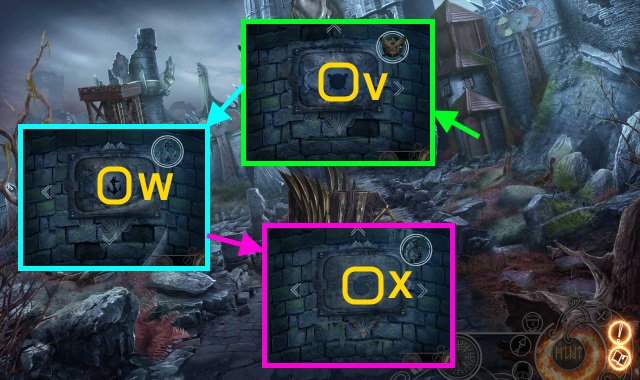
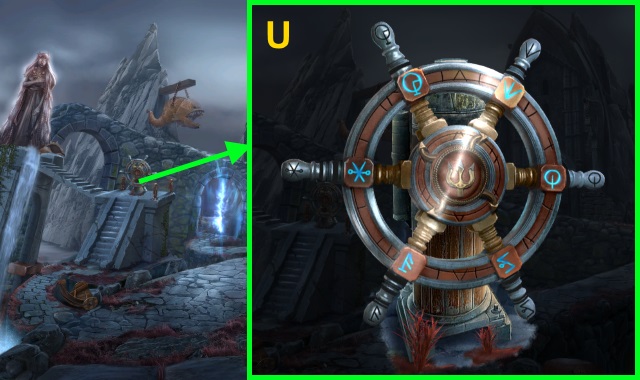
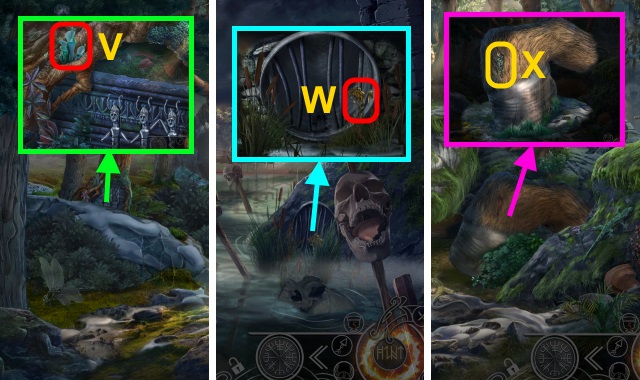
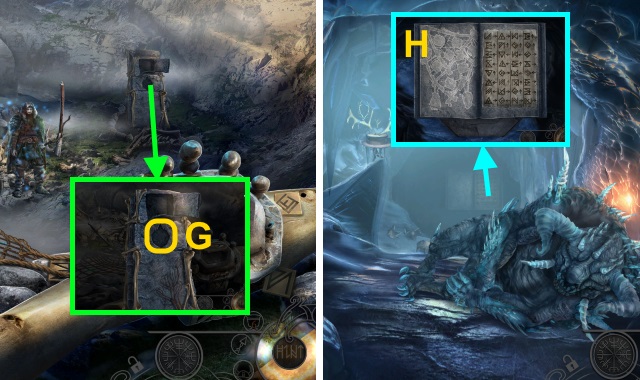
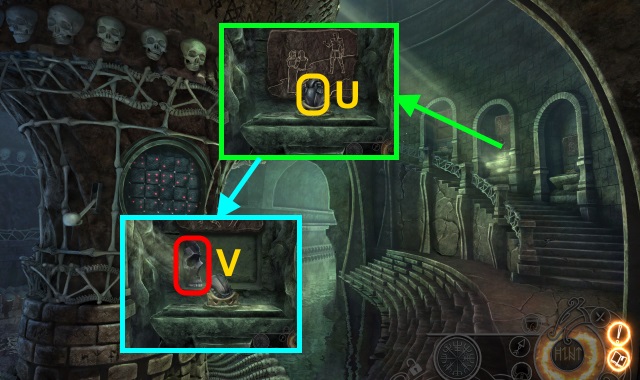
- Take FROSTED OBJECT (U). Place ROCK SCREW (V); use rock (W) and ROPE on screw.
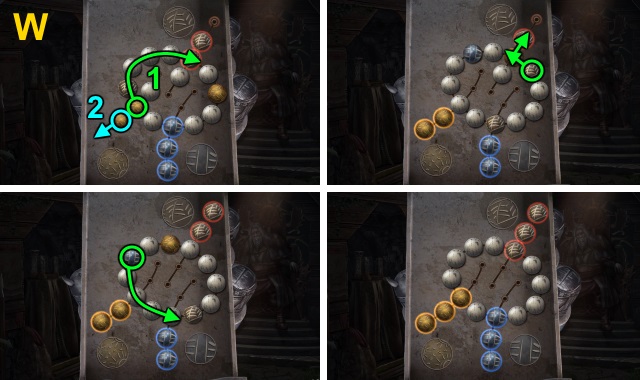
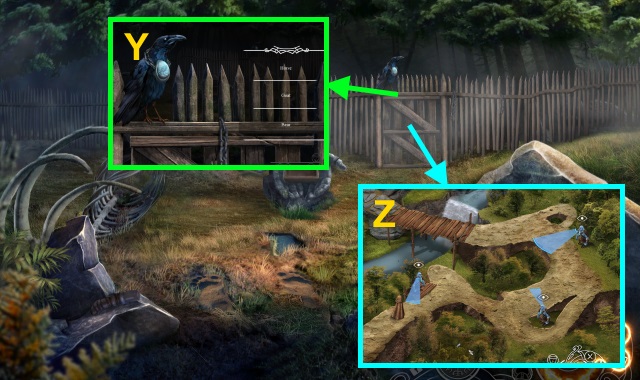
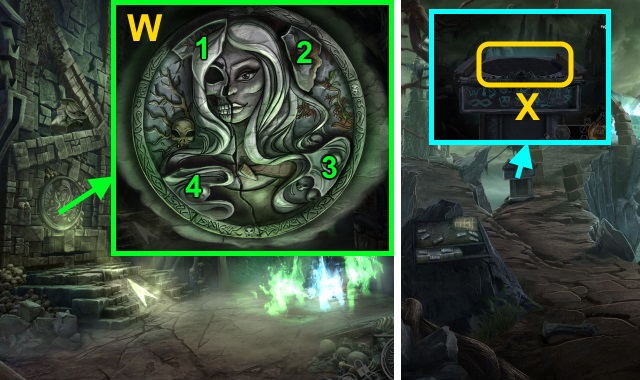
- Go forward.
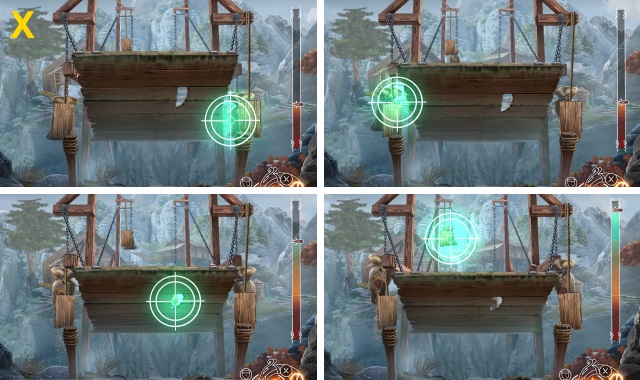
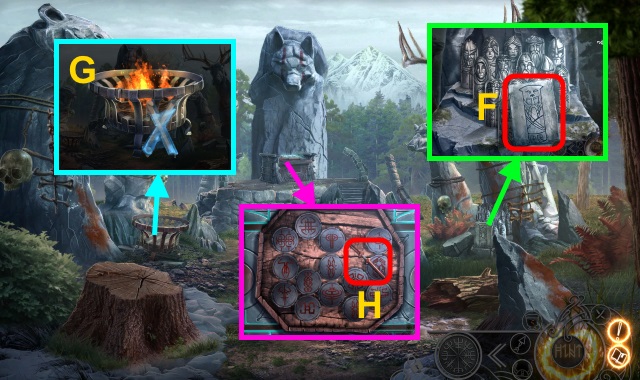
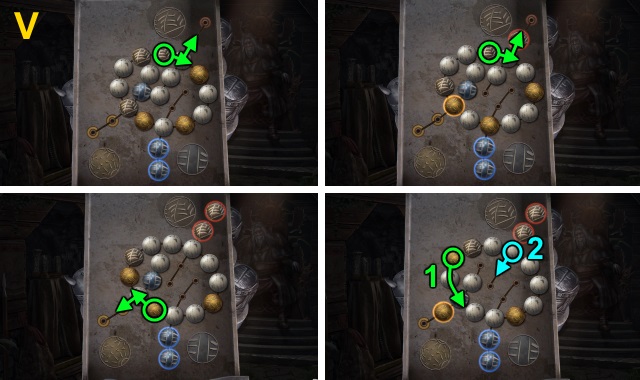
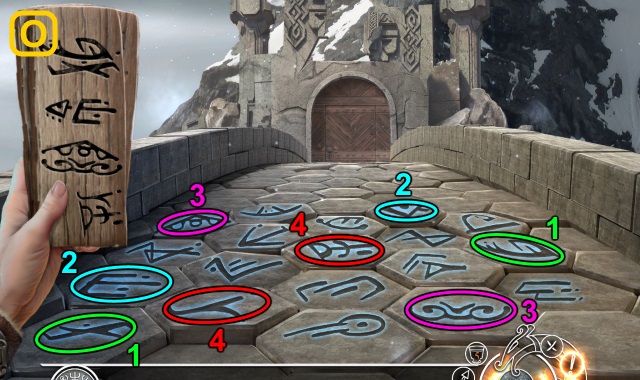
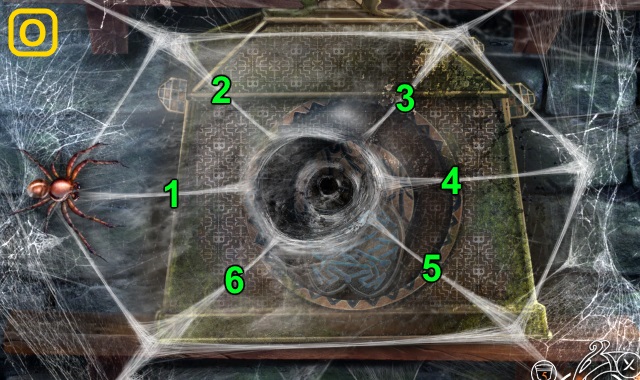
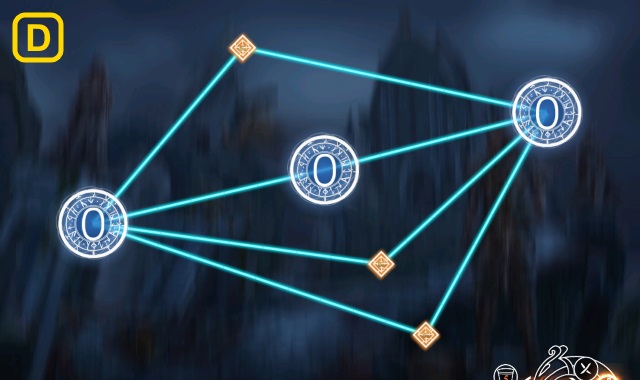
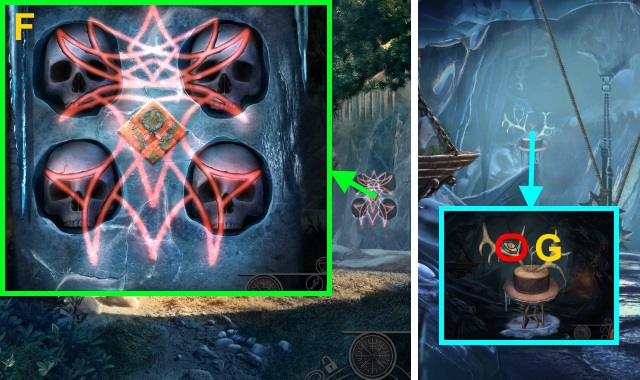
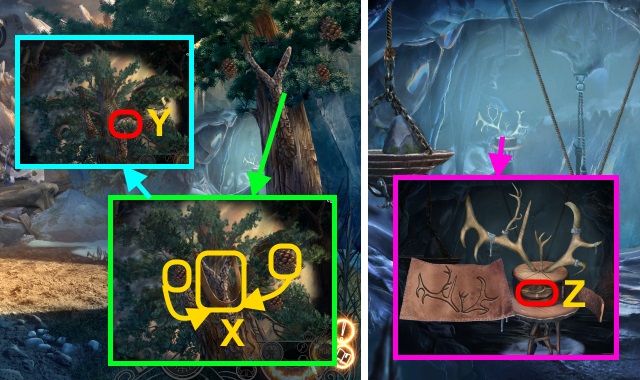
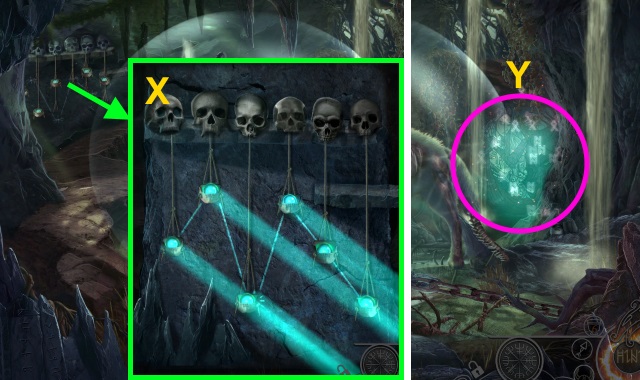
- Solution (X).
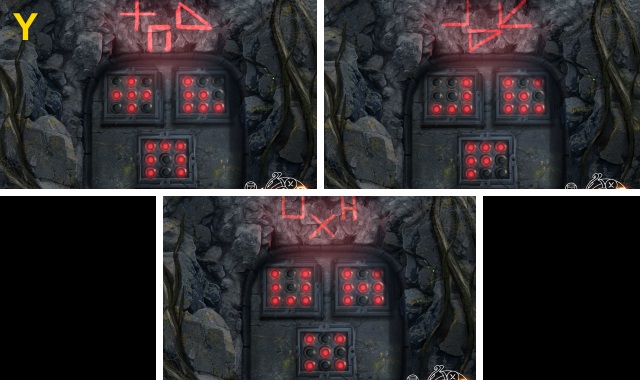
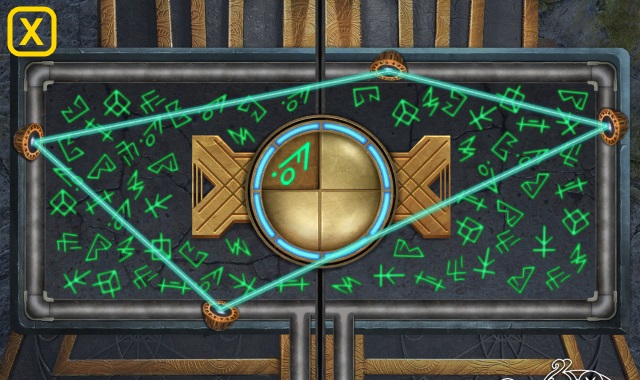
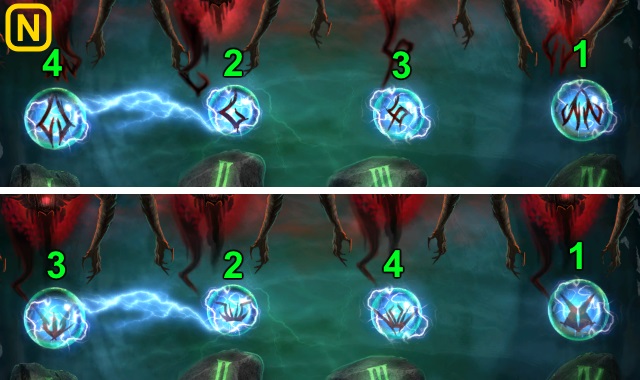
- Go forward.
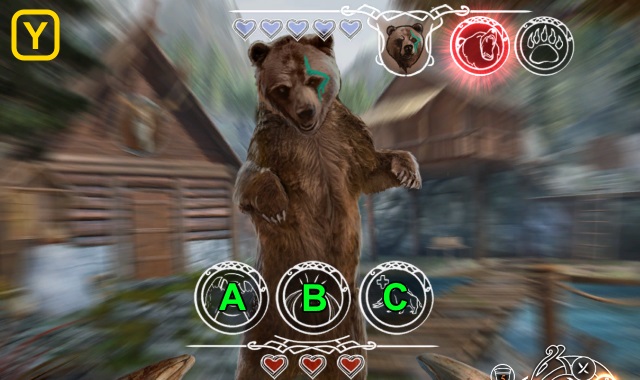
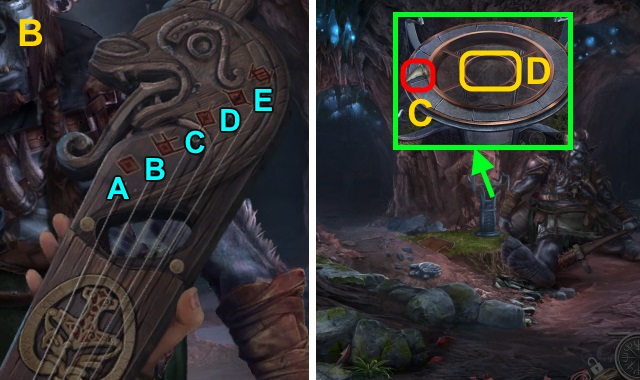
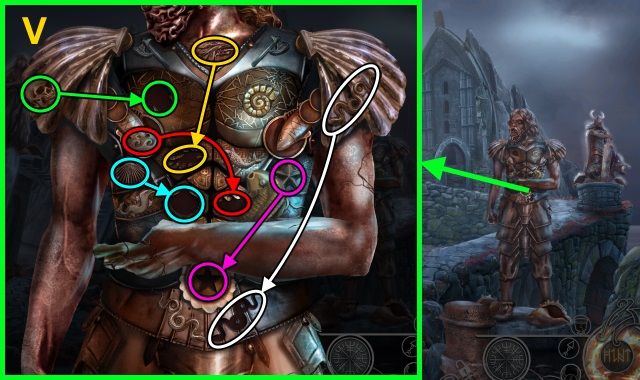
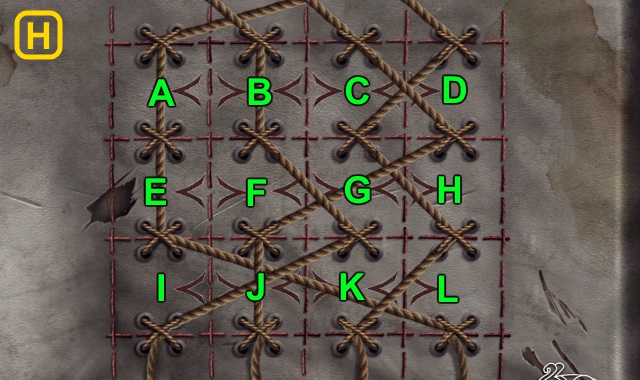
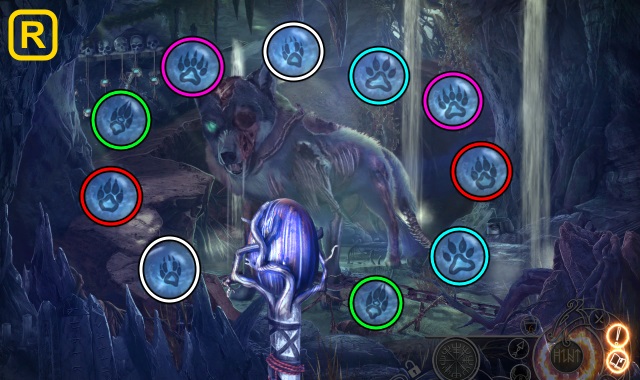
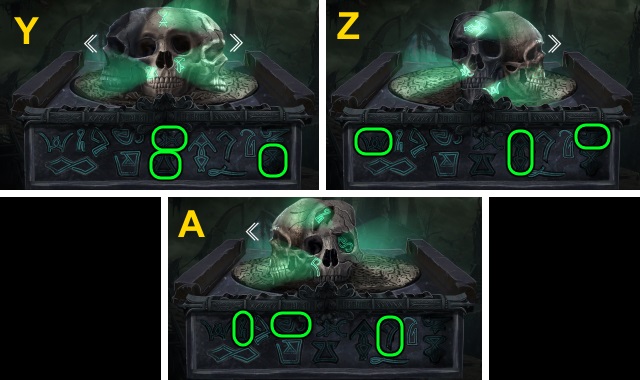
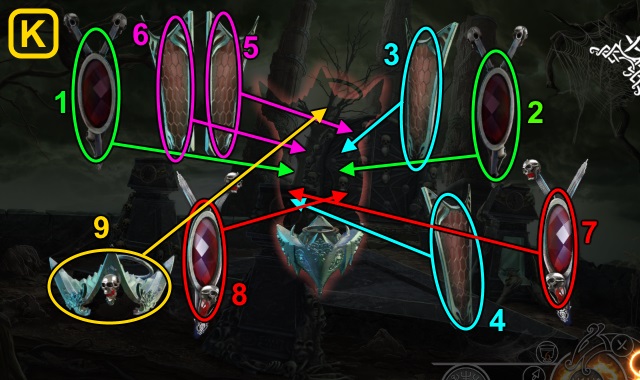
- Solution (Y): A-C-Ax3-C-A-B-C-A.
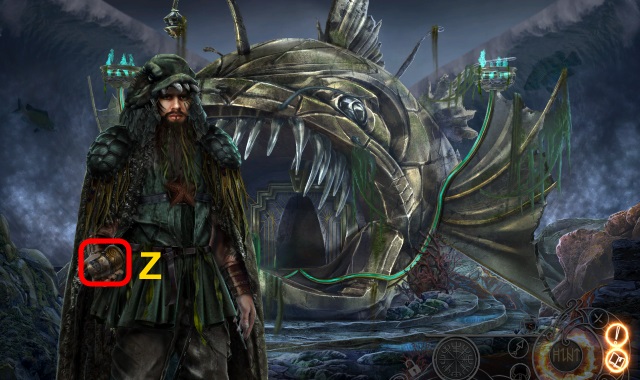
- Use LOCK OF FUR on scene.
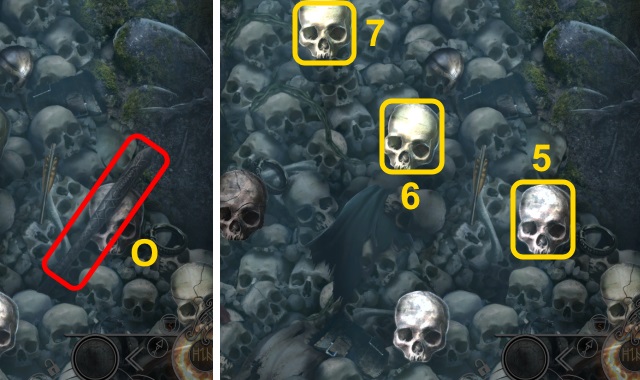
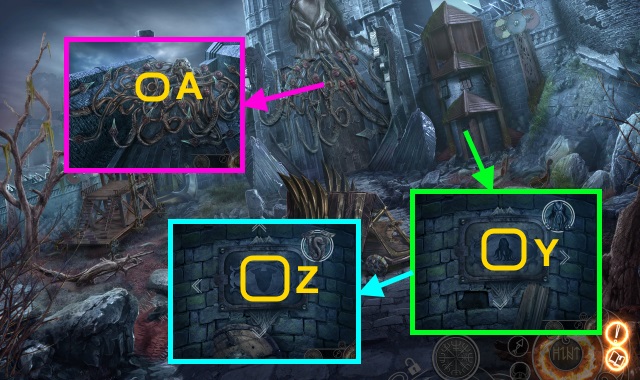
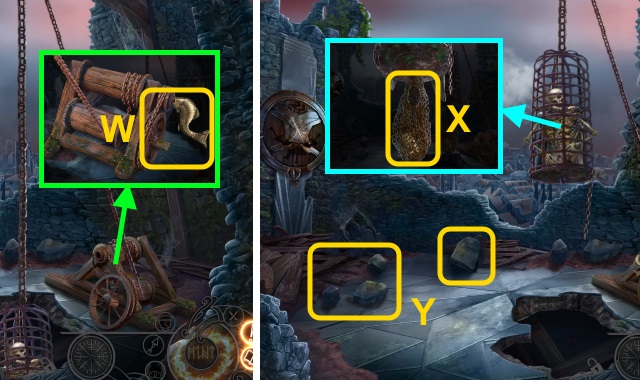
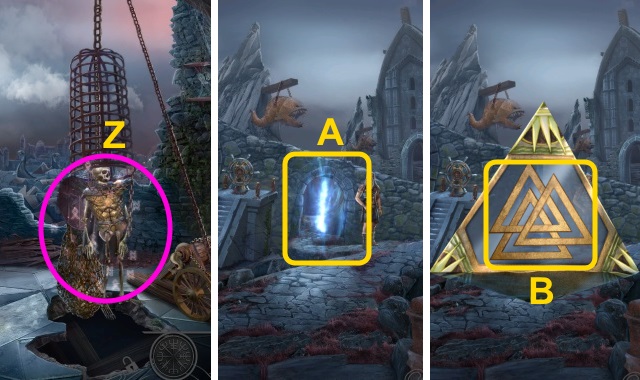
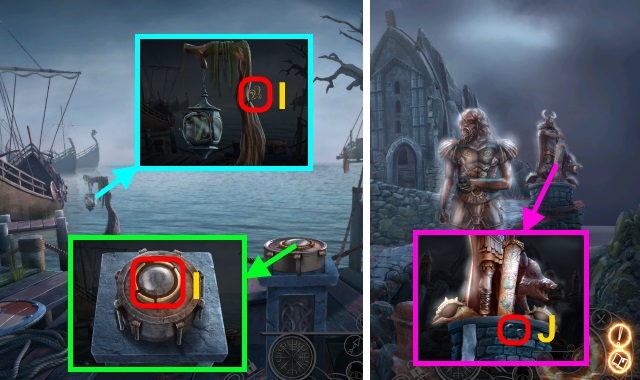
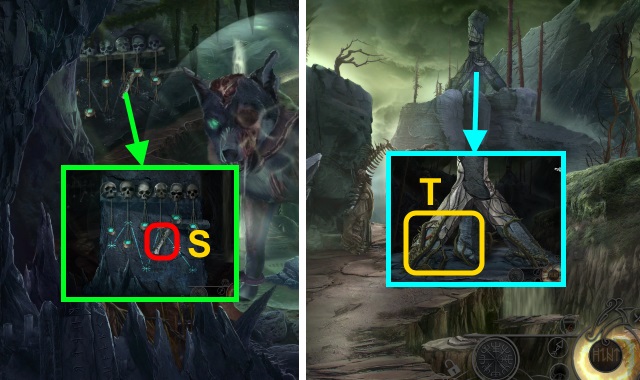
- Take AMBER TOKENS (1/3) (Z).
- Take ARROWS RELIEF and FACE PAINT (A).
- Walk left.
- Take CROSSED RAVENS (B); use FACE PAINT.
- Solution (C).
- Take AMBER TOKENS (2/3) and JAWBONE.
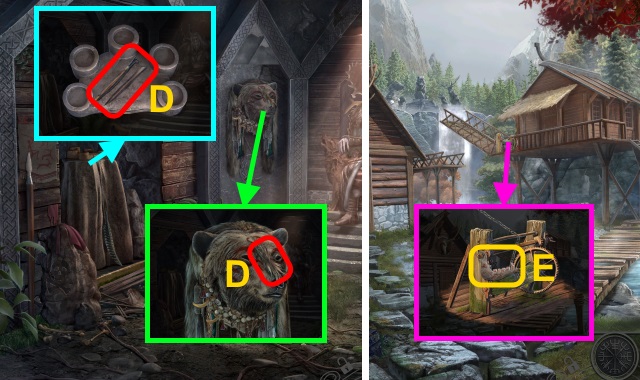
- Take FLAMMABLE FIBERS and SCULPTING TOOLS (D).
- Walk down.
- Use JAWBONE (E).
- Walk forward.
- Take FIGURE SKETCH (F). Play HOP; receive FIGURES.
- Use FLAMMABLE FIBERS, QUARTZ STONE, STEEL COMB, and FROSTED OBJECT (G); receive SKIS RELIEF.
- Take SMALL AXLE (H).
- Walk down twice.
- Place SKIS RELIEF (I) and ARROWS RELIEF (J); take AMBER TOKENS (3/3) and RING.
- Walk forward, then left.
- Use RING; take BEAR CARVING FRAGMENT (K).
- Walk down, then forward.
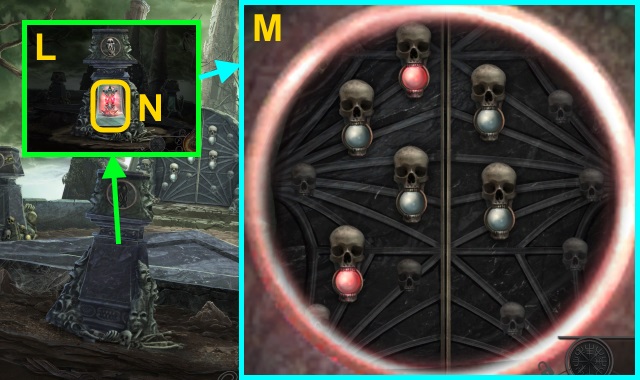
- Place AMBER TOKENS (3/3) (L).
- Solution (M).
- Take PURIFIED TOKENS.
- Take CLAY (N).
- Examine (1-2).
- Examine (3-4).
- Take CUDGEL (O).
- Examine (5-7).
- SAILCLOTH on CUDGEL; take UNLIT TORCH.
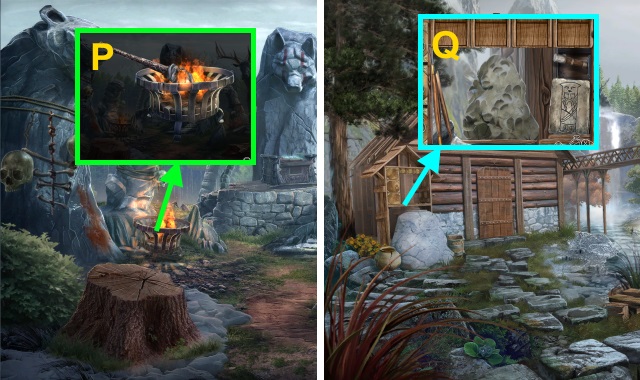
- Use UNLIT TORCH (P); receive LIT TORCH.
- Walk down.
- Place CLAY, FIGURE SKETCH, and SCULPTING TOOLS (Q).
- Solution (R).
- Take ULL FIGURE.
- Walk left.
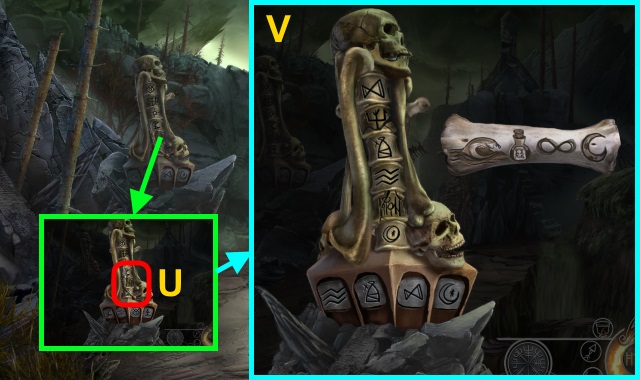
- Place FIGURES and ULL FIGURE (S); examine (T).
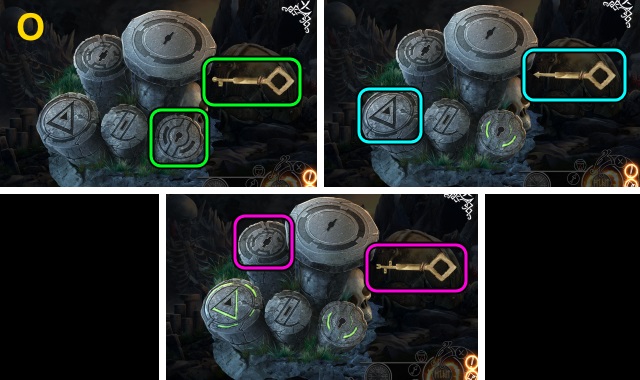
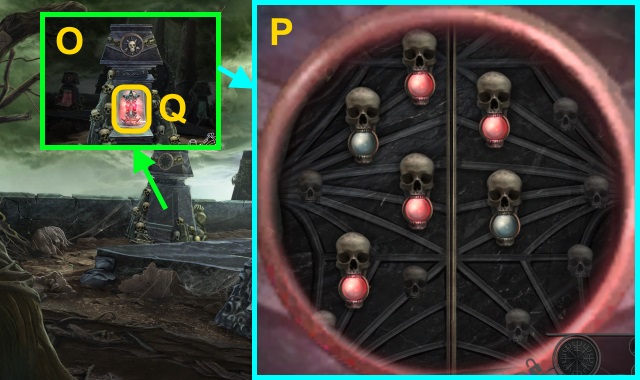
- Place PURIFIED TOKENS (U).
- Solution (V-W).
- Take BRACELET OF PURIFICATION.
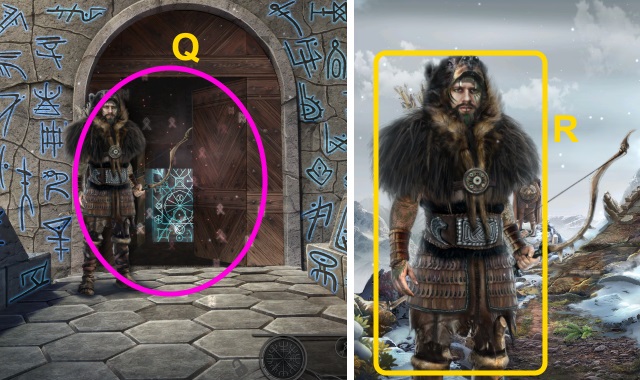
- Give BRACELET OF PURIFICATION (X). Play HOP; receive OLD BLADE.
- Walk down.
- SMALL AXLE on WHETSTONE; take WHETSTONE ON AXLE.
- Place WHETSTONE ON AXLE (Y); examine (Z). Use OLD BLADE; receive SHARPENED BLADE.
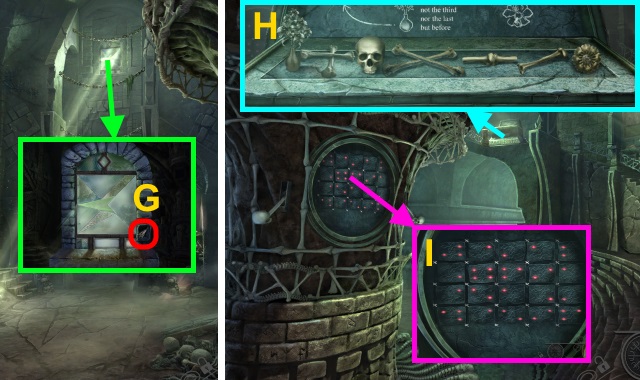
- Use SHARPENED BLADE (A).
- Use LIT TORCH. Examine; remove debris (B).
- Go to Forest Path.
- Remove plants; take SMALL BOWL (C). Use bone (D) on net; remove net.
- Place BEAR CARVING FRAGMENT (E); take BONE NECKLACE.
- Take MINIATURE SHIELD (F).
- Walk forward.
- Place MINIATURE SHIELD (G); take ANTLERS and CEREMONIAL PLATTER (H).
- Walk down.
- Examine CEREMONIAL PLATTER; take WOODEN EYES.
- Place WOODEN EYES (I); take LEAF WITH WATER and BARK WITH SYMBOLS (J).
- Use ANTLERS 3x; move dirt. Examine (K).
- Place CROSSED RAVENS. Read note (L); take ARCTIC ROSE.
- Walk forward.
- SMALL BOWL, LEAF WITH WATER, BONE NECKLACE, and ARCTIC ROSE on CEREMONIAL PLATTER; take FULL PLATTER.
- Place FULL PLATTER (M); examine bowl.
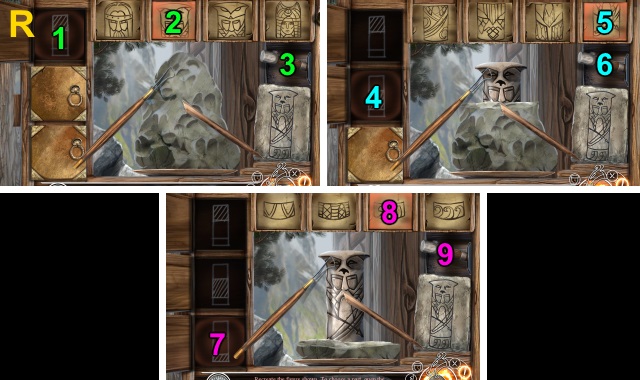
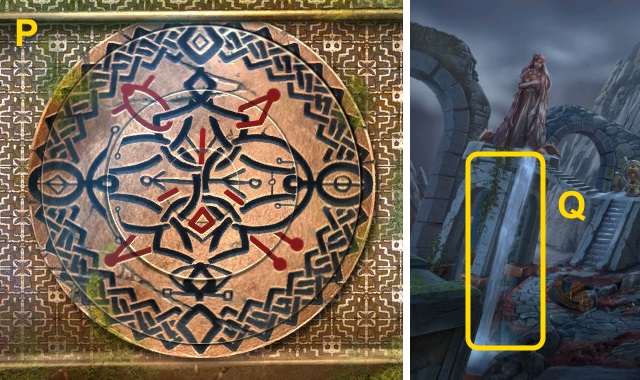
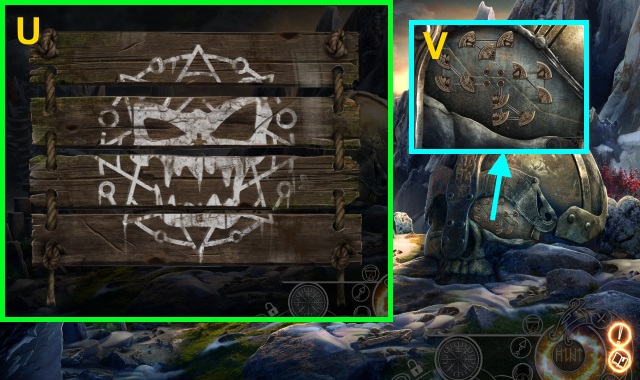
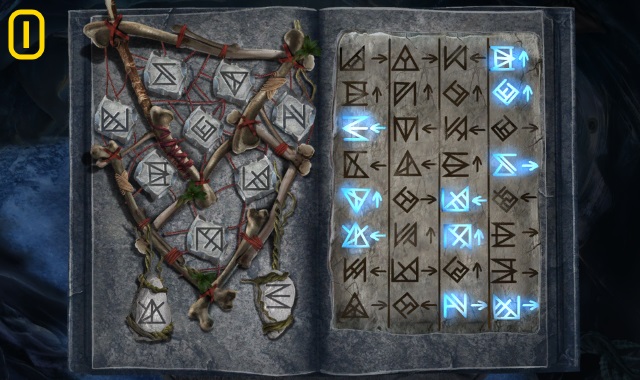
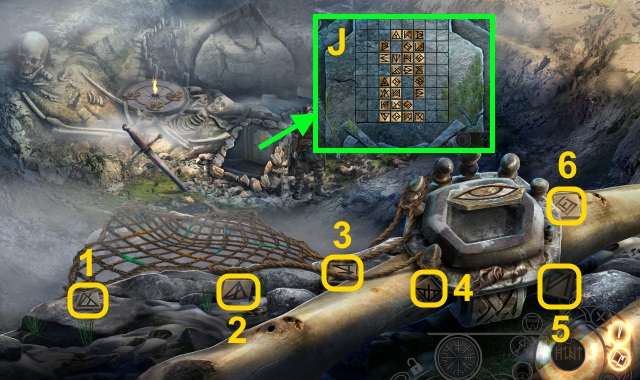
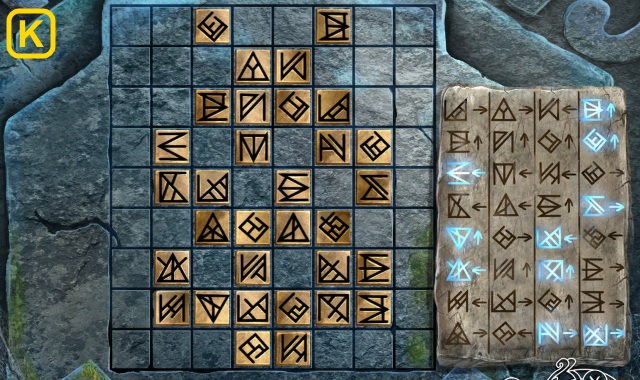
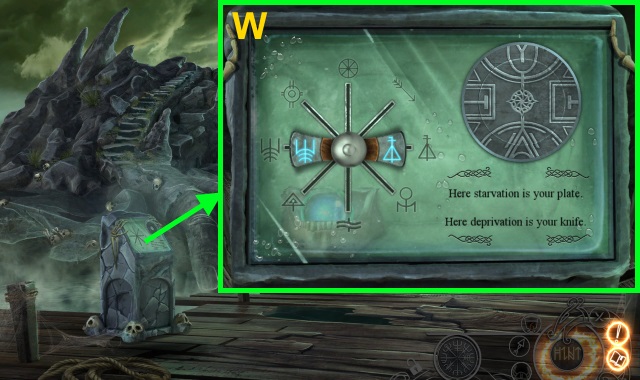
- Use BARK WITH SYMBOLS (N).
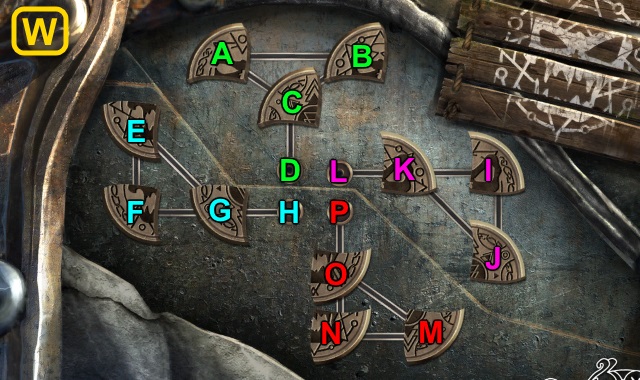
- Solution (O-P).
- Play HOP; receive HORN FRAGMENT (Q).
- Give HORN FRAGMENT (R).
Chapter 2: The Skald
- Take STONE PLATE, WHIP, and CLOTH (S).
- Use WHIP (T).
- Take MEMORIAL SKULL (U).
- Take WOOD PIECE (V). Place MEMORIAL SKULL; use CLOTH.
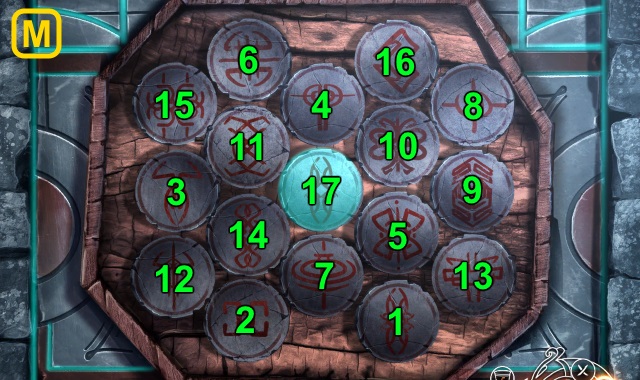
- Play HOP; arrange skulls (W).
- Place STONE PLATE (X).
- Solution (Y).
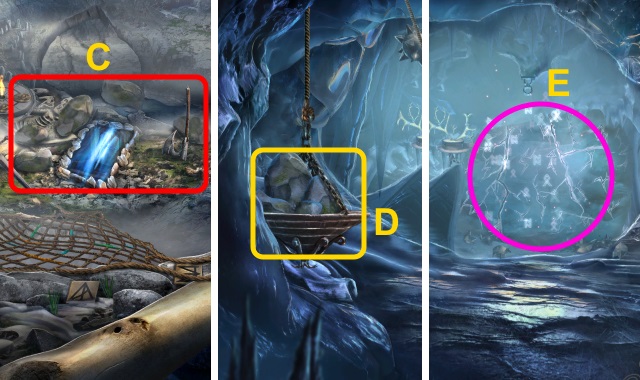
- Enter Cave.
- Examine (Z).
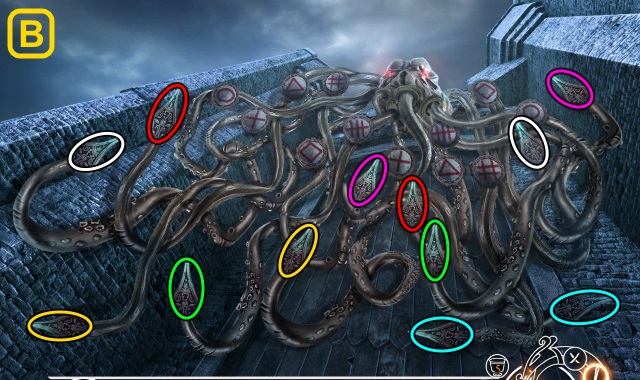
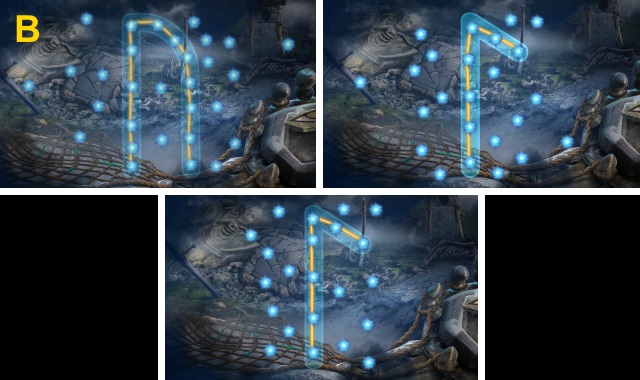
- Solution (A).
- Solution (B): (D-Cx2-A-B)-(B-C-E-Ax2).
- Take TOOTH (C).
- Examine WOOD PIECE; use TOOTH 2x. Take GLOWING WOOD.
- Place GLOWING WOOD (D).
- Take KEY (E). Examine cloak 5x; take IMPROVISED ROPE.
- Walk down.
- Use KEY (F); take VIAL (G).
- Walk left.
- Examine (H).
- Take LARGE HOOK (I); use VIAL.
- Solution (J-L).
- Take BLADE.
- Walk down.
- Use BLADE 2x on vines; use IMPROVISED ROPE. Examine (M); receive STRONG VINE.
- Walk forward.
- Take BADGE BASE (N).
- Walk down, then left.
- Examine (O).
- Move skeleton; place BADGE BASE (P). Play HOP; receive VANIR BADGE.
- Walk down, then forward.
- Place VANIR BADGE; examine key (Q).
- Scroll left; place key (R) on (S). Take note, SEASHELL RELIC, and key.
- Scroll right twice, then down. Place key (T); take key.
- Scroll up twice, then left. Place key (U); take key.
- Scroll left, then down twice. Place key (V); take key.
- Scroll right twice, then up twice. Place key (W); take WAVE RELIEF (1/2) and key.
- Scroll down twice, then left. Place key (X); take key.
- Scroll up twice, then left. Place key (Y); take key.
- Scroll down, then right twice. Place key (Z); take GATE PIECE.
- Place GATE PIECE (A).
- Solution (B).
- Walk forward.
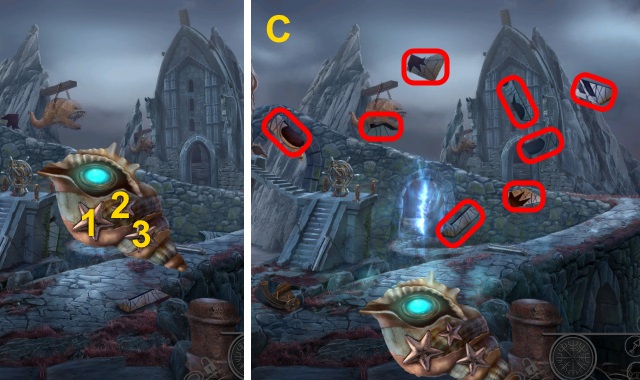
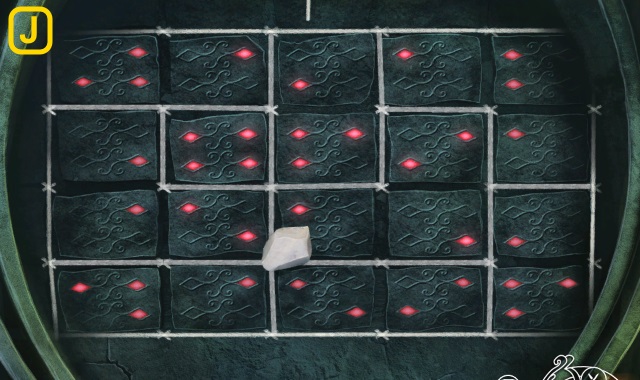
- Use SEASHELL RELIC on scene; select (1-3).
- Collect SWORD FRAGMENTS (1/8)-(8/8) (C).
- Take METAL RODS (1/5)-(5/5) and BOX RING (D).

- Take note and SPLINTERED SHIELD (E).
- Walk down.
- Place LARGE HOOK (F). Use piece (G) on hook; receive BATTERING RAM PIECE.
- Take NET and SPIKE (H); use STRONG VINE.
- Solution (I).
- Examine vine; pull 3x (J).
- Use METAL RODS (5/5) in each hole (K).
- Take HELMET (L).
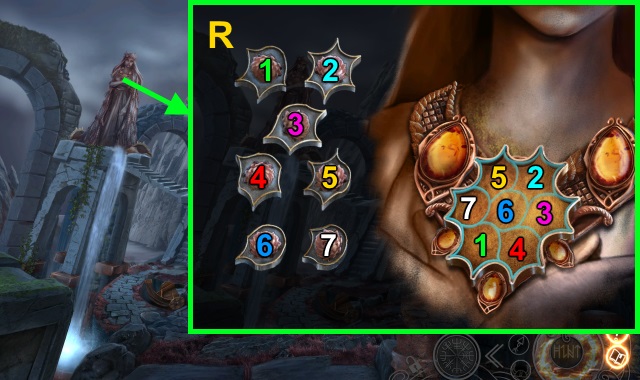
- Examine and gather parts (M); take NECKLACE PARTS.
- Examine (N).
- Solution (O).
- Take GOLDEN APPLE; place BOX RING. Solution (P).
- Take SUN AND MOON.
- Walk down, then forward.
- Use HELMET (Q); receive HELMET WITH WATER.
- Use NECKLACE PARTS; solution (R).
- Take MINIATURE TRIDENT.
- Walk down.
- Pour HELMET WITH WATER; use SPLINTERED SHIELD. Take RUNE (S).
- Walk forward.
- Place SWORD FRAGMENTS (8/8), GOLDEN APPLE, SUN AND MOON, and RUNE (T); receive WHEEL HANDLE.
- Place MINIATURE TRIDENT and WHEEL HANDLE; solution (U).
- Examine; arrange pieces (V). Take FISH HANDLE.
- Walk down, then left.
- Use SPIKE and FISH HANDLE (W).
- Use NET and BATTERING RAM PIECE (X).
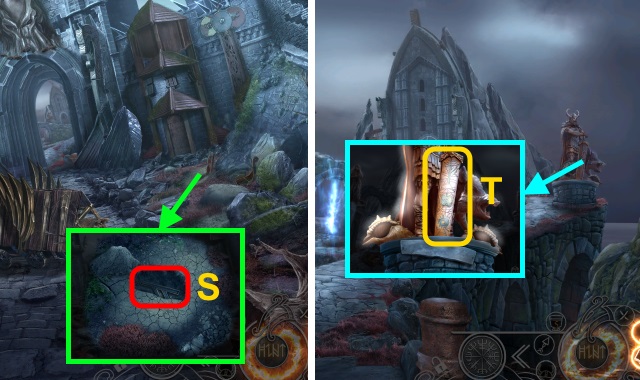
- Examine rocks (Y).
- Play HOP; receive ASGARDIAN ARTIFACT (Z).
- Walk down, then forward.
- Use ASGARDIAN ARTIFACT (A); examine triangles (B).

- Solution (C-D).
- Walk forward.
- Play HOP (E).
- Take NJORD'S OAR (F).
- Take FISH RELIEF (G).
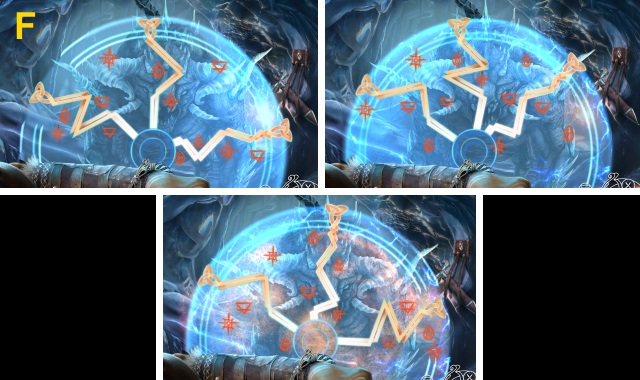
- Solution (H): (A-B)-(B-C)-(C-D)-(E-F).
- (F-G)-(G-H)-(F-G)-(I-J)-(J-K)-(K-L)-(I-J).
- Take SWORD HANDLE.
- Take LENS and WIND RELIEF (I).
- Walk down.
- Use SWORD HANDLE; take WAVE RELIEF (2/2) (J).
- Walk down, then left.
- Place WAVE RELIEF (2/2), WIND RELIEF, and FISH RELIEF; place pieces (K). Take TOKEN POUCH and SEA SERPENT TAIL.
- Go to Docks.
- Use TOKEN POUCH (L).
- Solution (M).
- Take SEA SERPENT HEAD.
- SEA SERPENT TAIL and SEA SERPENT HEAD on NJORD'S OAR; take CEREMONIAL OAR.
- Give CEREMONIAL OAR (N).
- Go forward.
- Take THIN PIN (O) and SNAKE LEVER (P).
- Walk down.
- Use SNAKE LEVER (Q); examine 4x.
- Move seaweed; take STONE SLAB (R).
- Examine; use THIN PIN (S). Take LANTERN CORE.
- Walk forward.
- Use LANTERN CORE (T-U).
- Use STONE SLAB and LENS (V).
- Examine (W).
- Solution (X-Y).
- Take HORN FRAGMENT (Z).
Chapter 3: The Shield-Maiden
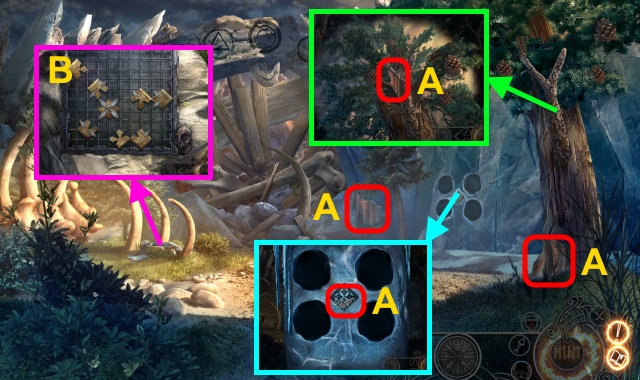
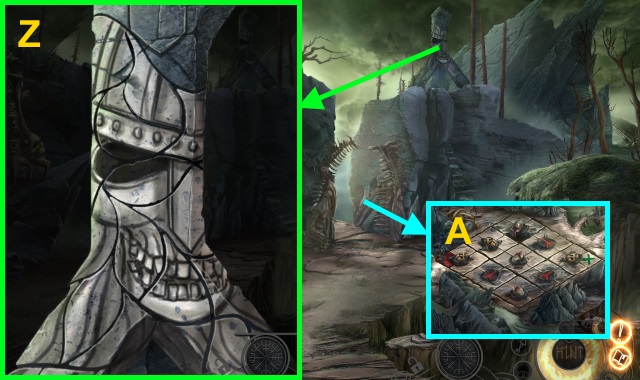
- Take RING EMBLEM, SLUDGE, and WOODEN TILE (A).
- Examine; take SPREADER (B).
- Walk left.
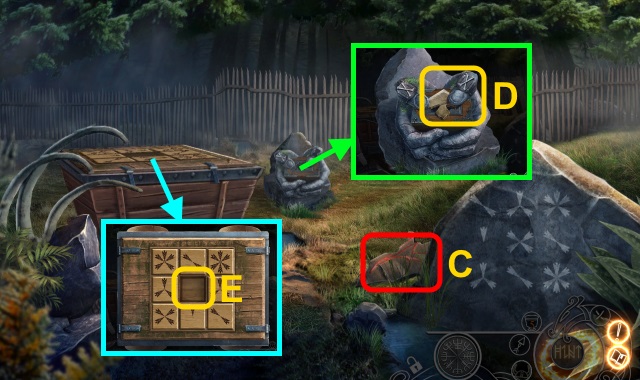
- Take BANNER SHREDS (1/4) (C).
- Place RING EMBLEM; take BONE PIECE (D).
- Place WOODEN TILE (E).
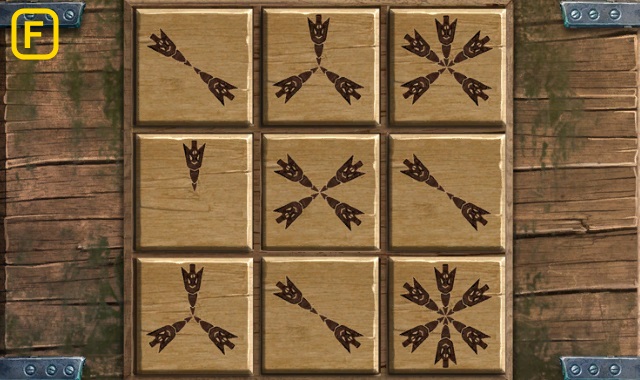
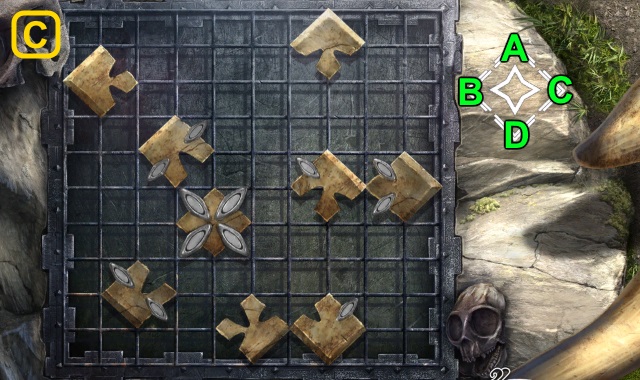
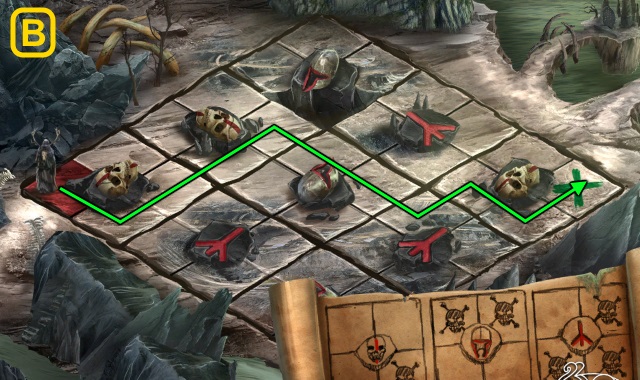
- Solution (F).
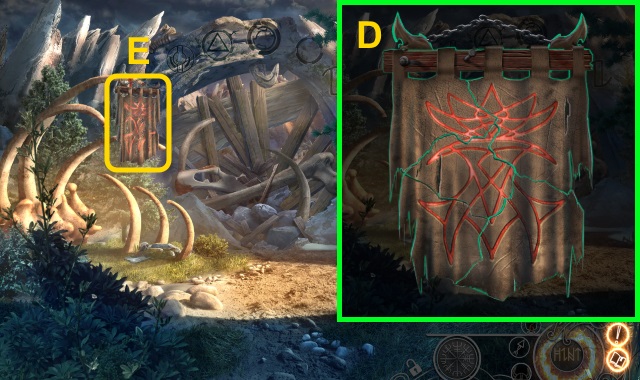
- Take TUSK.
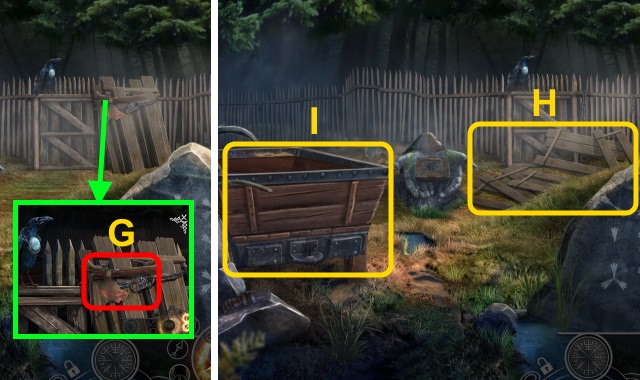
- Take TORN BANNER (G); use TUSK.
- Examine 3x (H).
- Examine cart (I).
- Walk down.
- Take WOODEN PLANKS (1/5)-(2/5) (J).
- Take WOODEN PLANKS (3/5)-(5/5) (K); use SPREADER. Take FIGURINE.
- Place WOODEN PLANKS (5/5) (L).
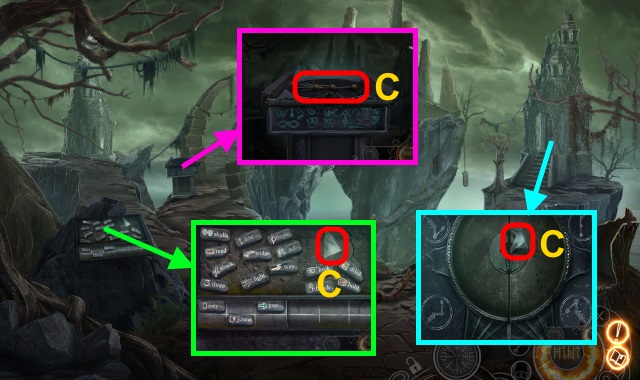
- Solution (M-N).
- Go right.
- Place FIGURINE; arrange (O). Take FOLDABLE STAFF.
- Walk down.

- Use FOLDABLE STAFF (P); take STONE EYES.
- Walk right.
- Take ANTLER; place STONE EYES (Q).
- Take SHAMAN'S SIGIL (R).
- Walk down, then left.

- Place SHAMAN'S SIGIL (S); take note and JAWS.
- Walk down, then right.
- Use JAWS (T); receive ARROWHEAD.
- Take PLANTS (1/3) (U).
- Take PLANTS (2/3) (V).
- Walk down.
- Take PLANTS (3/3) (W).
- Walk right.
- Place PLANTS (3/3) (X); use SLUDGE. Play HOP.
- Walk down, then left.
- Select Bear, Wolf, Owl, Lizard, and Dragonfly (Y).
- Solution (Z): avoid being seen.
- Take BANNER SHREDS (2/4)-(4/4) and WIRES (A).
- Place BONE PIECE (B).
- Solution (C): A-Dx2-B-C-D-Ax2-Cx2.
- Bx2-Ax4-B-Dx3-Cx4-Ax2-Dx4.
- Take BONE SLAB.
- BANNER SHREDS (4/4) on TORN BANNER (D); place WIRES. Take SMALL BANNER.
- Place SMALL BANNER; select 2x (E).
- Place BONE SLAB; arrange skulls (F).
- Walk right.
- Take EYE STONE (G).
- Use ARROW HEAD (H); receive SWORD HOLSTER.
- Walk down.
- Use SWORD HOLSTER (I); examine.
- Walk forward.
- Take BLADE (J).
- Walk forward.
- Take POLE (K). Place EYE STONE; take PILLAR KEY.
- Walk down.
- Use POLE. Solution (L): keep cursor over log.
- Use POLE (M). Play HOP; receive THREADS.
- Use PILLAR KEY (N).
- Solution (O-P).
- Examine drawing; take CROSSED CLUBS and ANTLER DRAWING (Q).
- Walk forward.
- Examine net; use THREADS. Solution (R).

- Examine note (S); take WOODEN TABLET.
- Place CROSSED CLUBS; take WOODEN TABLETS (T).
- Walk down.
- WOODEN TABLET on WOODEN TABLETS; solution (U). Take SKULL CLUE.
- Place SKULL CLUE (V).
- Solution (W): (B-C)-(C-D)-(K-L)-(N-O)-(O-P)-(E-G)-(G-H).
- Take ELASTIC STRING and SUMMONING POWDER.
- Walk down.
- Use ELASTIC STRING; move pinecone to elastic and shoot twice (X).
- Play HOP; take LEFT KNOB (Y).
- Walk right.
- Place ANTLER and ANTLER DRAWING. Arrange; take RIGHT KNOB (Z).
- Go to Cliff Edge.

- Place LEFT KNOB and RIGHT KNOB.
- Solution (A).
- Use SUMMONING POWDER.
- Solution (B).
- Take HEAVY ROCKS (C).
- Go to Frozen Cave.
- Place HEAVY ROCKS (D); use BLADE.
- Play HOP; receive MOUNTAIN EMBLEM (E).
- Solution (F).
- Go to Cliff Edge.
- Place MOUNTAIN EMBLEM (G); take GIANT'S TRINKET.
- Go to Frozen Cave.
- Use GIANT'S TRINKET (H).
- Solution (I).
- Take CODE PLATE.
- Go to Cliff Edge.
- Examine (J).
- Collect tiles (1-6).
- Use CODE PLATE (J).
- Solution (K).
- Walk forward.
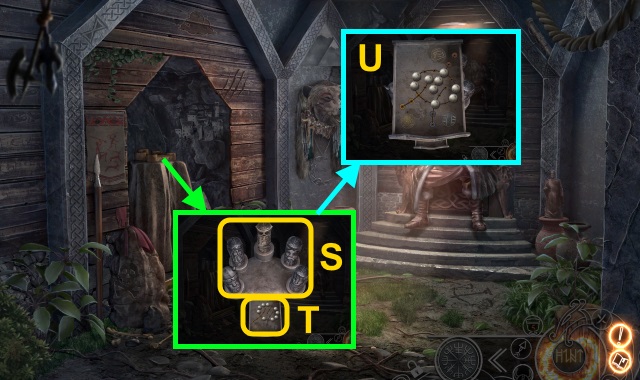
- Select any question; select either statue. Go right (L).
- Receive PURIFICATION AMULET.
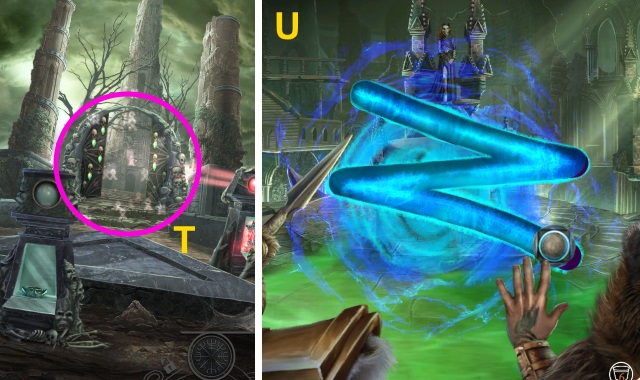
- Use PURIFICATION AMULET (M).
- Solution (N): Select creatures over symbols in order. Symbol locations are randomized.
Chapter 4: The Seer
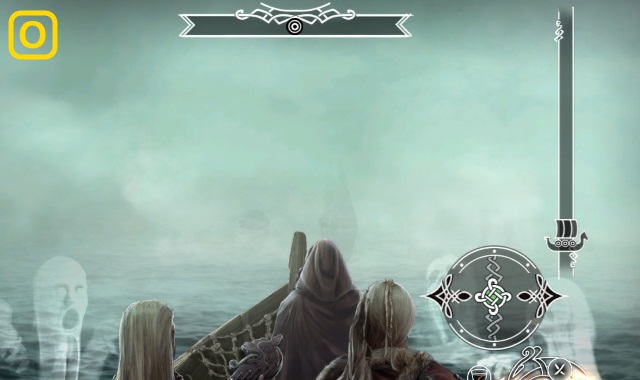
- Solution (O): steer boat to avoid obstacles.
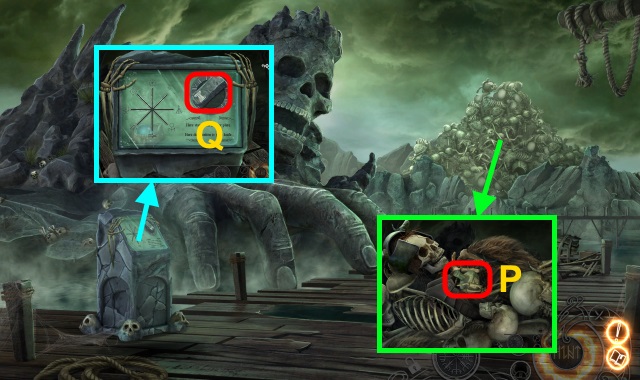
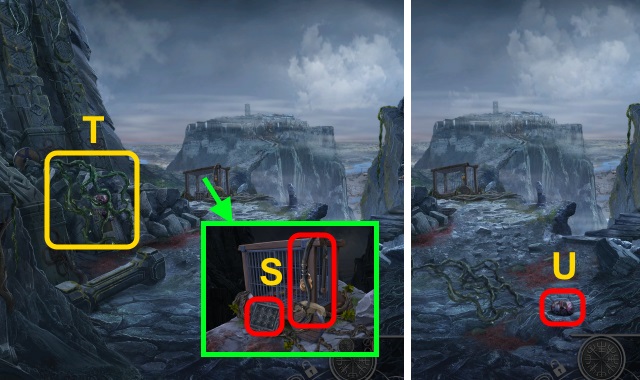
- Move skeletons; take ACID (P).
- Take STONE TILE (Q).
- Go to Gnipahellir.
- Solution (R).
- Take BONE WITH CARVINGS (S).
- Walk down, then left.
- Pour ACID (T); receive CEREMONIAL KNIFE.
- Take SKELETON LIMBS (1/4) (U); use BONE WITH CARVINGS.
- Solution (V).
- Take CEREMONIAL PLATE.
- Walk down.
- Use CEREMONIAL KNIFE and CEREMONIAL PLATE; Solution (W).
- Examine; take LAMP.
- Enter Gnipahellir.
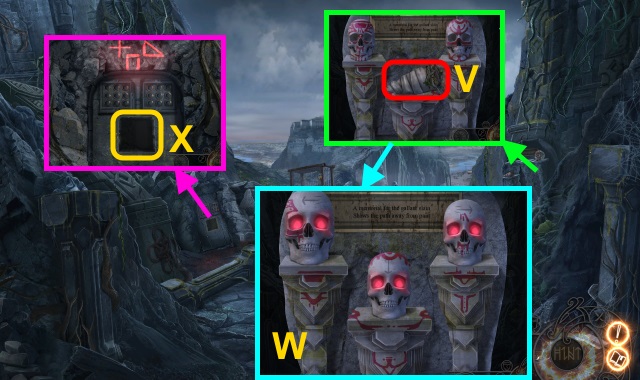
- Place LAMP; arrange (X).
- Play HOP; receive STATUE PIECES (Y).
- Walk down, then left.
- Place STATUE PIECES; arrange (Z).
- Take SCROLL CLUE.
- Use SCROLL CLUE (A).
- Solution (B).
- Take GLASS SHARDS (1/6)-(2/6) and SKELETON LIMBS (2/4) (C).
- Walk left.
- Take OATHBREAKER'S NAMEPLATE, SKELETON, and BOARD CLUE (D).
- Pull levers (E).
- Take SKELETON LIMBS (3/4) (F).
- Walk down.
- Place BOARD CLUE and STONE TILE (G).
- Solution (H).
- Take TRI-SKULL BASE and SKELETON LIMBS (4/4).
- Place SKELETON and SKELETON LIMBS (4/4); solution (I).
- Enter Hall of Decay.
- Take GLASS SHARDS (3/6) (J).
- Examine TRI-SKULL BASE; take POEM OF THE DEAD.
- Take GLASS SHARDS (4/6) (K); place POEM OF THE DEAD.
- Solution (L): select (1); scroll down. Select (2); scroll down. Select (3).
- Place OATHBREAKER'S NAME PLATE (M); take OATHBREAKER'S TONGUE.
- Walk down, then left.
- Place OATHBREAKER'S TONGUE (N); take SHACKLE EMBLEM.
- Walk down.
- Examine; place SHACKLE EMBLEM (O). Open; take GLASS SHARDS (5/6) and THIEF'S NAMEPLATE.
- Walk right.
- Scroll up; place THIEF'S NAMEPLATE (P). Take THIEF'S HAND.
- Walk down, then left.
- Scroll left; place THIEF'S HAND (Q). Take GLASS SHARDS (6/6); examine skull fragment.
- Walk down, then right.
- Place GLASS SHARDS (6/6); arrange (R).
- Take ADULTERER'S NAMEPLATE (S).
- Scroll up twice; place ADULTERER'S NAMEPLATE (T). Take ADULTERER'S HEART.
- Walk down, then left.
- Scroll right; place ADULTERER'S HEART (U). Take RELIEF PIECE; examine skull fragment.
- Take SKULL OF DEATH (V).
- Walk down, then right.
- Place RELIEF PIECE; select each part (W).
- Take SKULL Of DECAY.
- Walk down.
- SKULL OF DEATH and SKULL OF DECAY on TRI-SKULL BASE; take TRI-SKULL.
- Place TRI-SKULL (X).
- Select symbols (Y); rotate left.
- Select symbols (Z); rotate right 2x.
- Select symbols (A).
- Walk forward.
- Take FORK and FLAME ABSORBER (B).
- Open; take MACABRE ORNAMENTS (C).
- Take CHALK (D); examine note.
- Walk down, then right.
- Use FLAME ABSORBER on each flame (E); receive CHARGED FLAME ABSORBER.
- Play HOP; receive BROKEN DEATH LANTERN (F).
- Use FORK; take BADGE OF MALEFACTION (G).
- Walk down, then left.
- Use MACABRE ORNAMENTS; solution (H).
- Take MARK OF SHAME.
- Use CHALK (I).
- Solution (J).
- Take MEDAL Of DISHONOR.
- Walk down, then forward.
- Assemble BROKEN DEATH LANTERN (K). Use CHARGED FLAME ABSORBER; take DEATH'S LANTERN.
- Open; use DEATH'S LANTERN and MARK OF SHAME (L).
- Solution (M).
- Take DEATH'S LANTERN (N).
- Open; use DEATH'S LANTERN and MEDAL OF DISHONOR (O).
- Solution (P).
- Take DEATH'S LANTERN (Q).

- Use DEATH'S LANTERN and BADGE OF MALEFACTION (R).
- Solution (S).
- Play HOP (T).
- Walk forward.
- Solution (U): trace symbols 3x.
- Congratulations! You have completed Saga of the Nine Worlds: The Hunt.
Created at: 2018-06-17