

Walkthrough Menu
General Tips
- From the main menu you can change your profile, and adjust options like the sound volume and full screen mode.
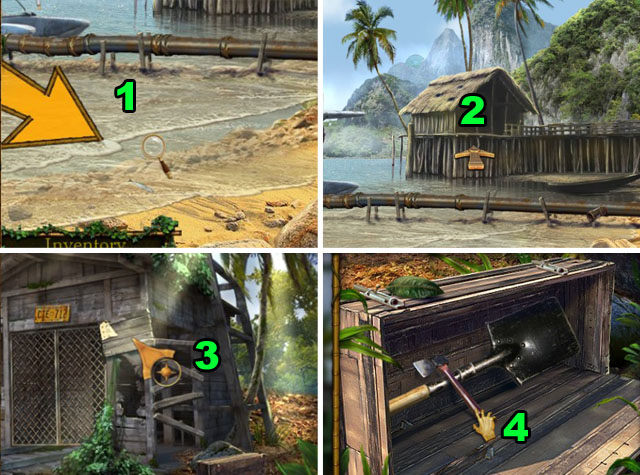
- There are 4 types of cursor in the game.
- The magnifying glass cursor means that you can zoom in on something and look at it in a closer scene (1).
- The arrow cursor shows you that you can move to the next scene (2). This cursor is also used in the very wide scenes so that you can scroll to the other side.
- The pointer cursor with the compass means that you can interact with something (3), like turning on a machine.
- The hand cursor means that you can pick up something (4).
- After the tutorial, the hidden objects are slightly randomized in this game.
- Some objects are colored in yellow in the list. This means that you have to do something to the environment – like open a door or use two objects in the scene together – to unlock this item before you find it. These objects are usually not randomized.
- The puzzles in the game are not randomized. So the complete solutions are available for each, but there is no reset button for any of them.
- If you get stuck in the game, go to every scene that you have available and click on all of the objects of interest, most of the time this will give you a hit about what you need to do next.
- Sometimes you cannot use an INVENTORY ITEM without first inspecting the place you will use it.
- Use your hints to find objects in a scene or to skip a puzzle once enough time has elapsed.
Chapter 1
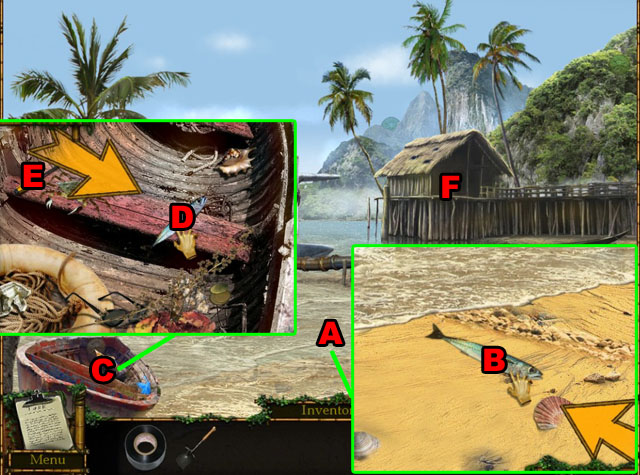
- Click on the water (A).
- Collect the FISH (B).
- Find the coin highlighted in red.
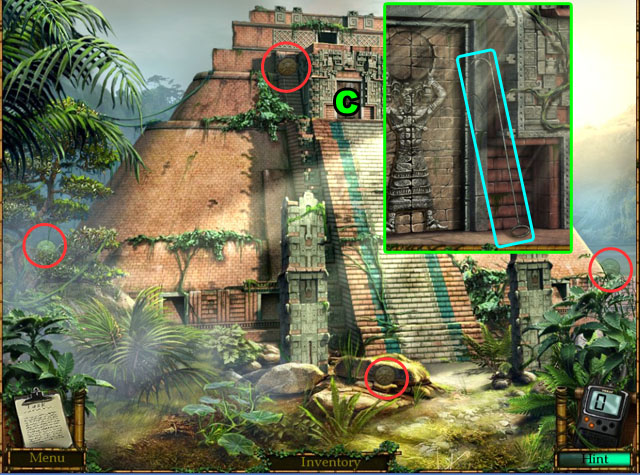
- Click on the row boat (C).
- Place the fish beside the crab to lure him away from the left side of the seat (D).
- Collect the SCREWDRIVER (E).
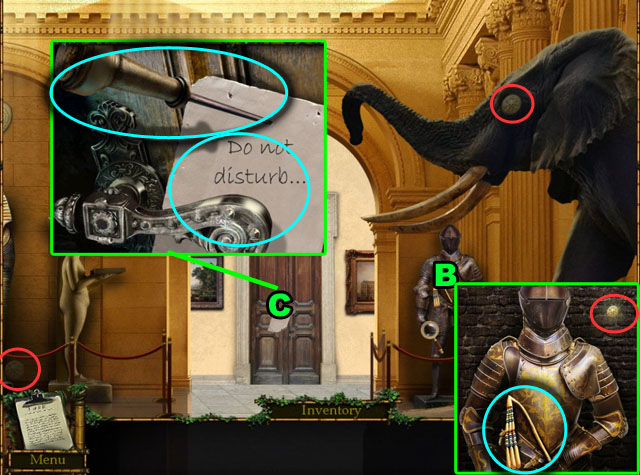
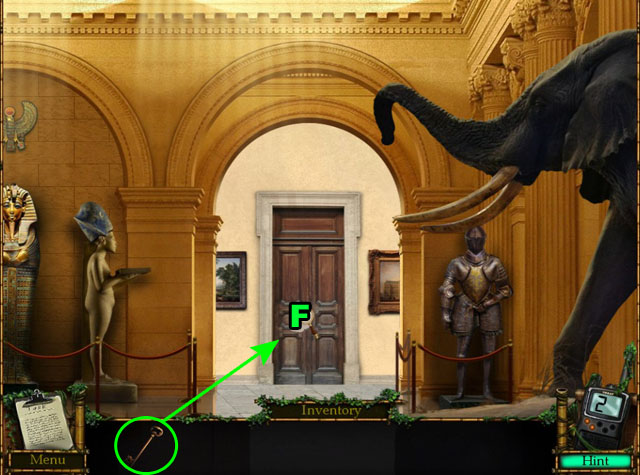
- Click on the hut (F).

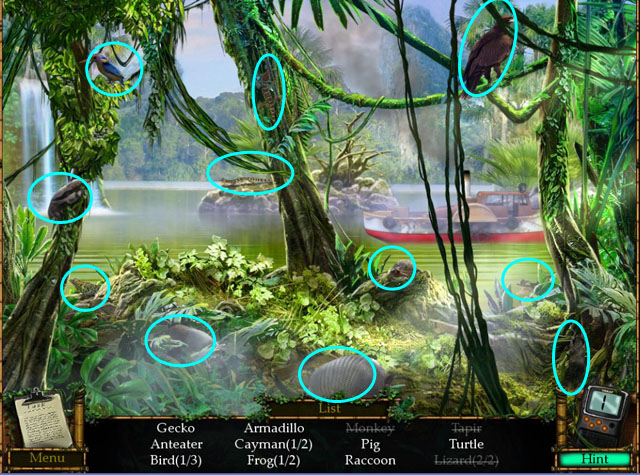
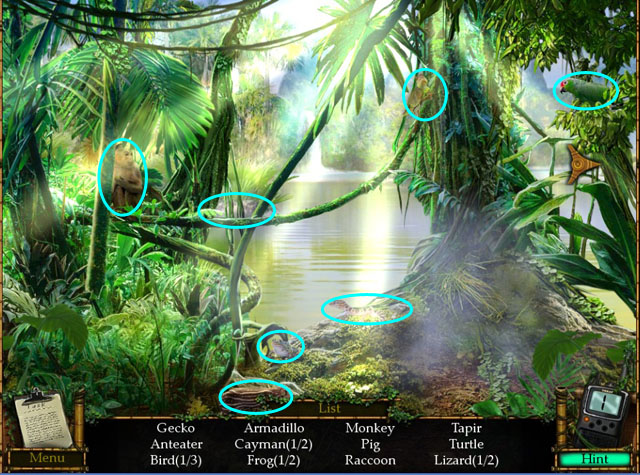
- Find the hidden objects.
- Find coins highlighted in red.
- Click on hook highlighted in yellow multiple times to get it to swing back and forth.
- There is an item behind the hook.
- Click on the block and then open the door to collect more items.
- You will receive the ELECTRIC TAPE.
- Click on the left side of the screen to move to a different scene.
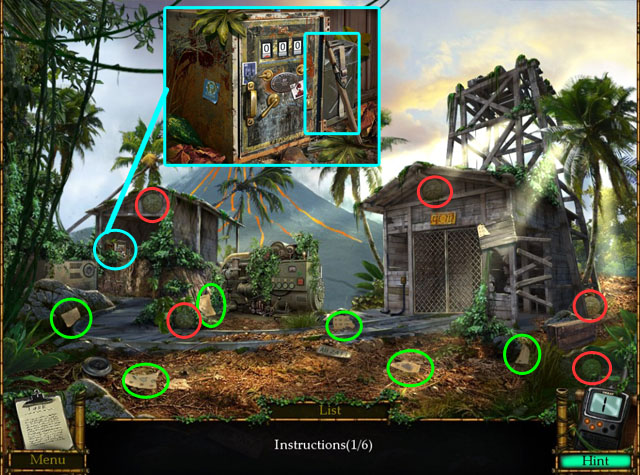
- Find 6 PAPER SCRAPS.
- Find coins highlighted in red.
- Click on the area highlighted in blue and collect the GAS CAN.
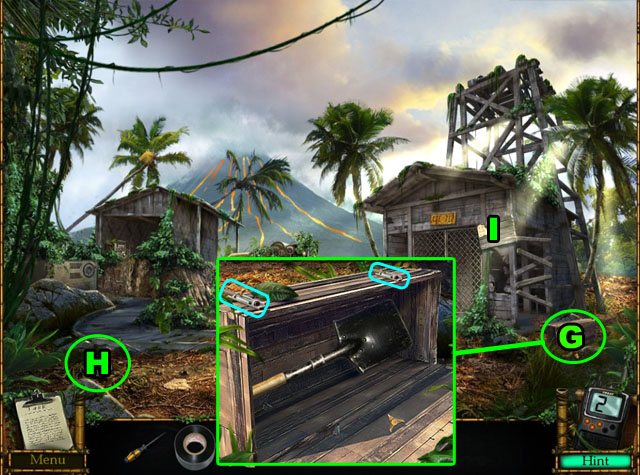
- Click on the wooden box (G).
- Open the locks on the top of the briefcase.
- Click on all of things in the box until you find the shovel.
- Collect the SHOVEL.
- Collect the STEEL WHEEL (H).
- Use the SCRAPS on the board on the shack (I).
- Reassemble the pieces.
- Click on the piece to pick it up and click again with the left button to place it.
- Click the right button to rotate the pieces.
- The pieces will turn dark and lock in place when they are correct.
- See the screenshot for the completed paper.
- Click on the path at the very left of the screen.
- Dig dirt with the SHOVEL (J).
- Collect the CRANK and the SHOVEL.
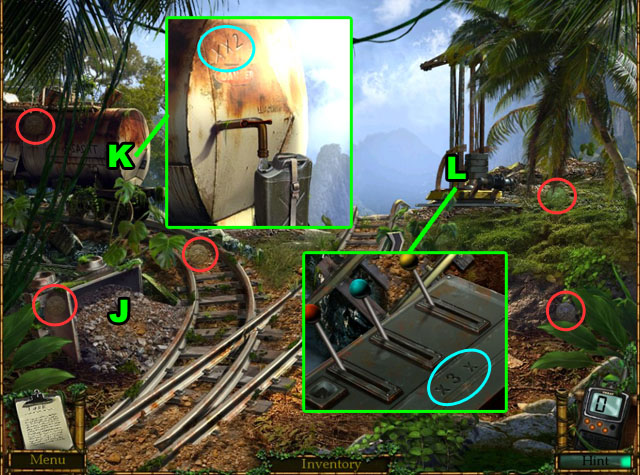
- Click on the tank (K).
- Set the empty GAS CAN in front of the fuel can and use the lever to fill the fuel.
- Take the FULL GAS CAN.
- Click the number on the tank: XX2. Remember this for later.
- Click on the broken crane (L).
- Note the number on the controller: X3X.
- Return to the beach.
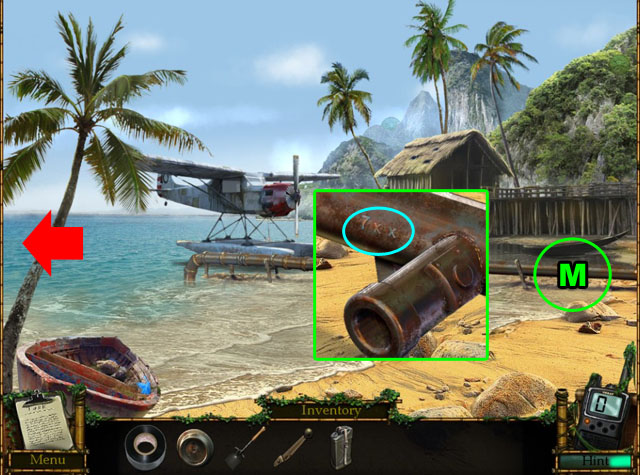
- Click on the pipe (M).
- Note the number on the pipe: 7XX.
- Return to the previous scene.
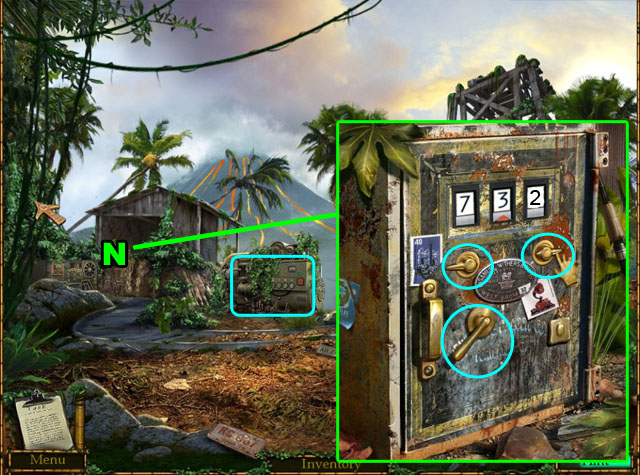
- Click on the safe (N).
- Enter the numbers that you gathered from the various places around this area: 732.
- The lever on the left raises the selected number by 1.
- The lever on the right changes the selected number.
- Be careful to not click too many times quickly as the numbers only go up and if you miss the number you are looking for you have to go all the way around again.
- Once you put the number in the safe will open.
- Collect the FUSE.
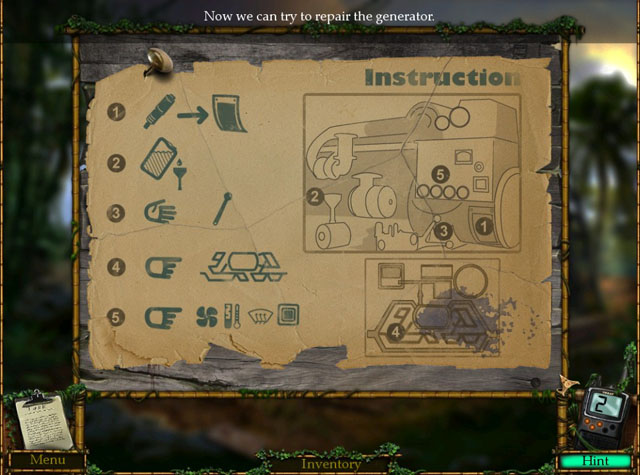
- Click on the radiator highlighted in light blue.
- Open the cover (1) to the right and place the FUSE inside.
- Pour the FUEL in to the funnel (2).
- Place the CRANK (3).
- Exit the scene.
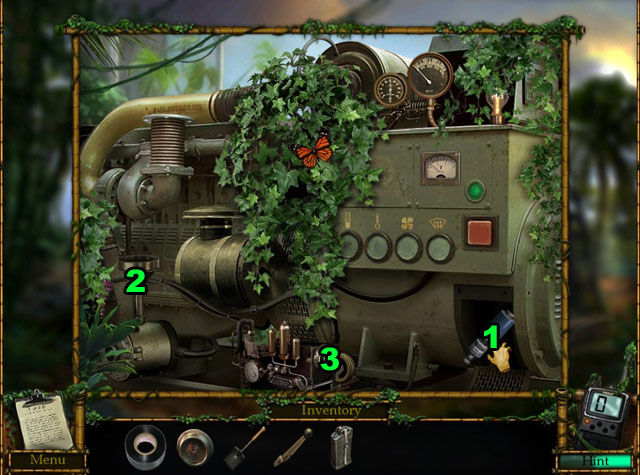
- Click on the machine (O).
- Open the cover by using the SCREWDRIVER on all of the 4 screws, on in each corner.
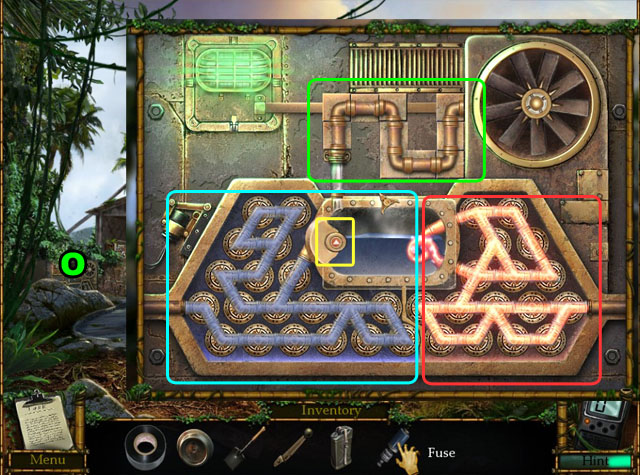
- Connect pipes first in the red area.
- The pipes must all connect to each other without any dead ends. Click them to rotate.
- The pipes in red must also match the middle pipes on the right.
- Next fix the blue pipes.
- There is a button highlighted in yellow. Click this two times in order to move the connection to the middle area until it is pointing towards the bottom.
- This rotation is the only way it is possible to fully connect the blue pipes.
- Last click and drag the pipes circled in green in order to connect the pipes at the top to the steam container in the middle.
- See the screenshot for the correct solution.
- Return to the radiator.
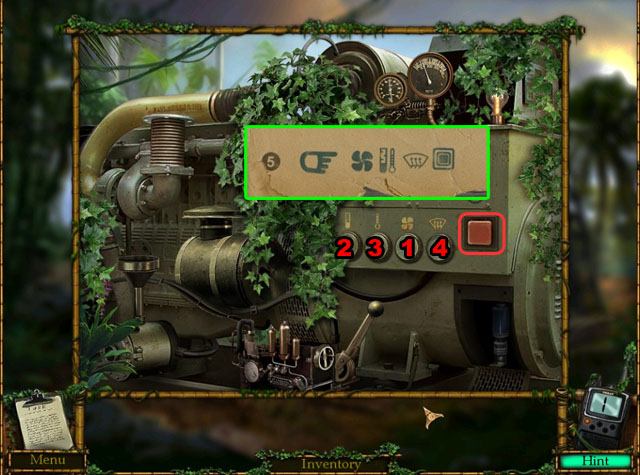
- Click on four buttons in the correct order as indicated in the paper you found before.
- The order is 3rd button, 1st button, 2nd button, then 4th button.
- Press the red button.
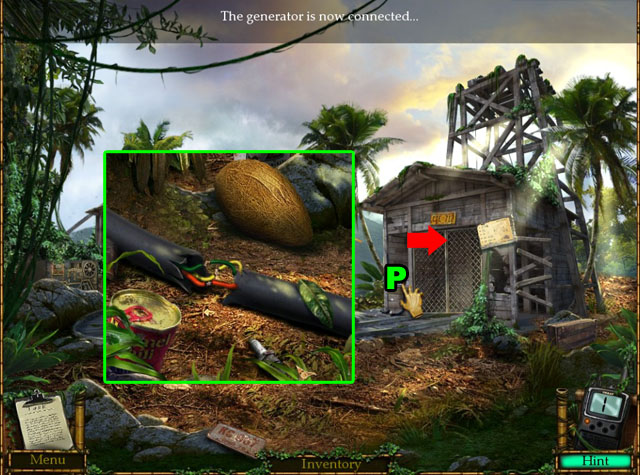
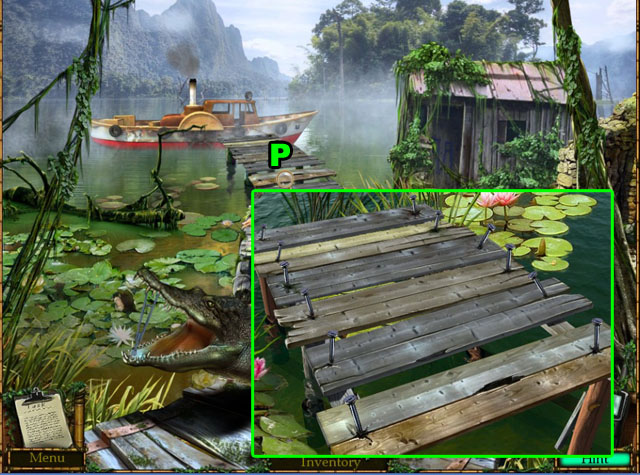
- Click on the cord near the elevator entrance (P).
- Connect the wires by first click on one color, and then the other wire of the same color.
- Repeat the 3 times, one for each color.
- Use the ELECTRICAL TAPE on the wires.
- Click on the button above (P) to call the elevator and enter.

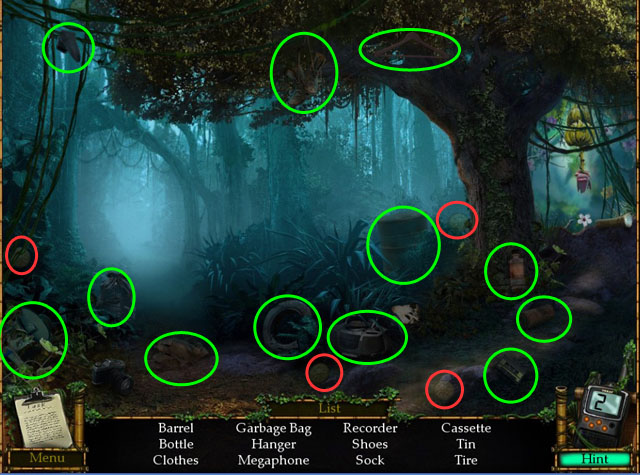
- Find the hidden objects.
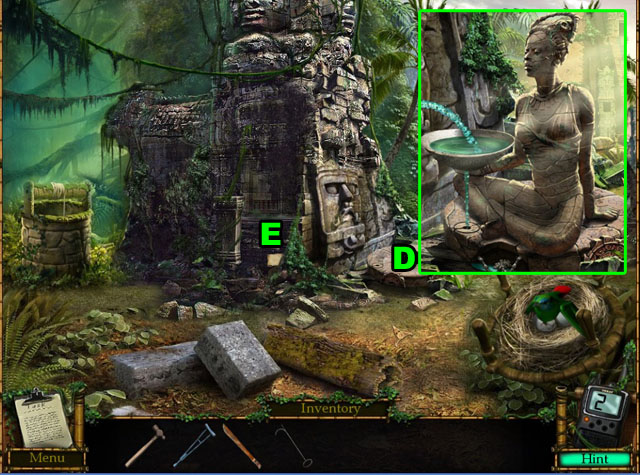
- Click on the helmet to scare away the bat and reveal a hidden object.
- Click and drag the ax on the stalactites to open the chest. Collect the valve inside.
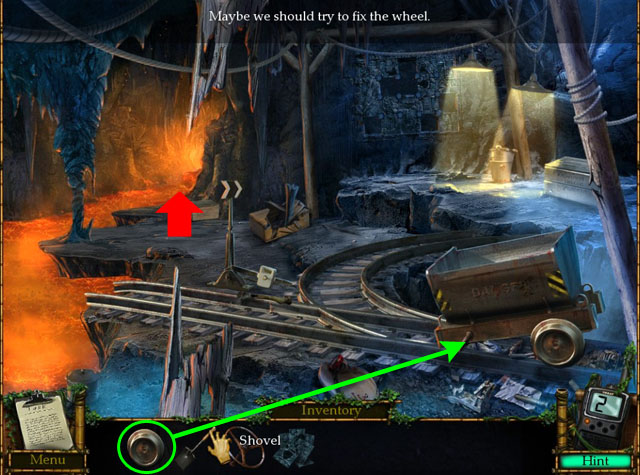
- Place the wheel to fix the cart (Q).
- Enter the next scene from the left side.
- Collect the rope.
- Return to the beach and enter the hut.
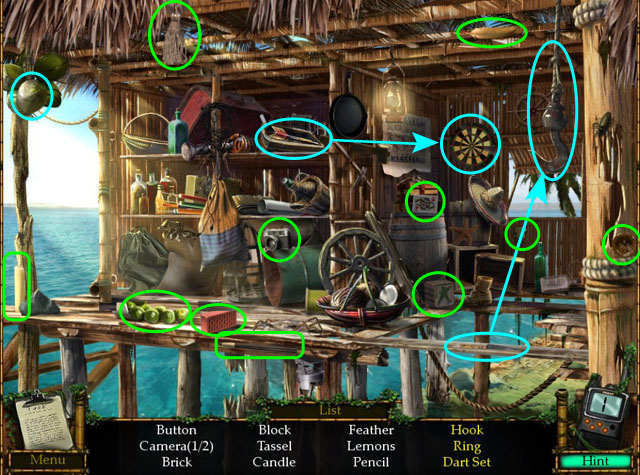
- Find the hidden objects.
- Click on the coconut to break it apart and get the ring.
- Find the arrow and use the bulls-eye to hit the dartboard and then collect it.
- Click and drag the knife to cut the rope above the hook.
- The objects in your play through may be slightly randomized.
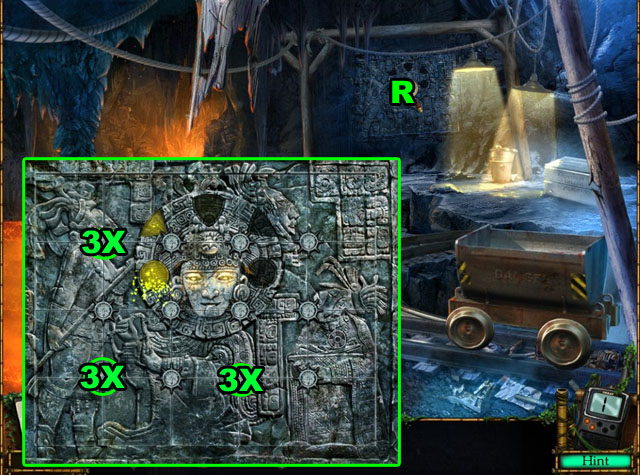
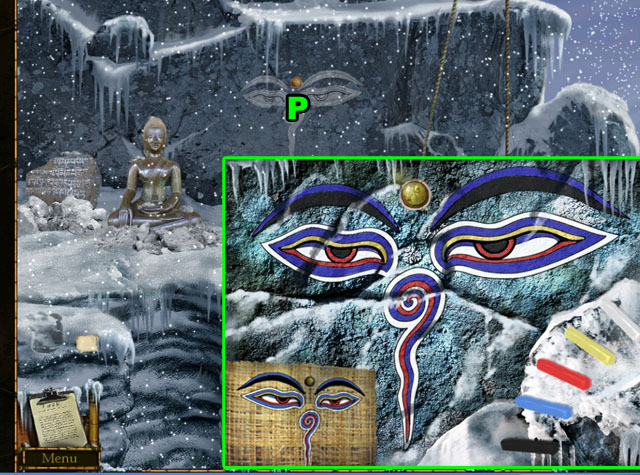
- Return to the mine and place the TILES on the wall (R).
- Rearrange the tiles to complete the picture.
- Clicking on any of the stone button on the picture will rotate the location of the 4 tiles surrounding the button.
- To solve the puzzle with the least clicks, click the buttons highlighted in the screenshot 3 times each.
- See the screenshot for the completed puzzle.
- Return to the beach.
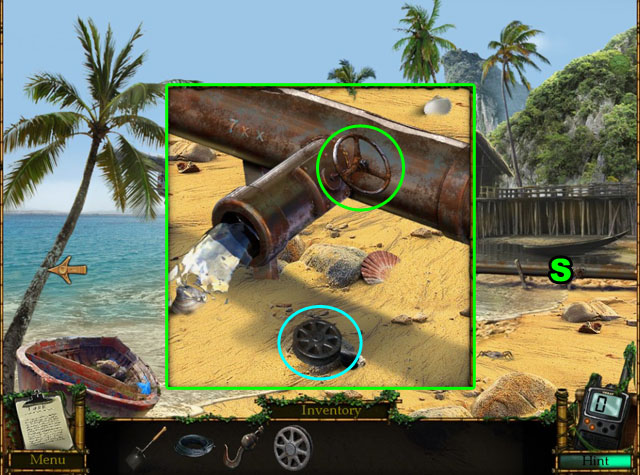
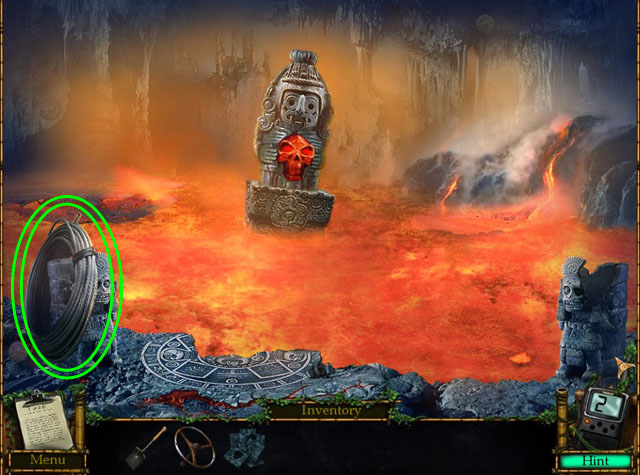
- Zoom in on the pipe (S).
- Place the VALVE and click it again.
- Collect the REEL.
- Return to the previous scene.
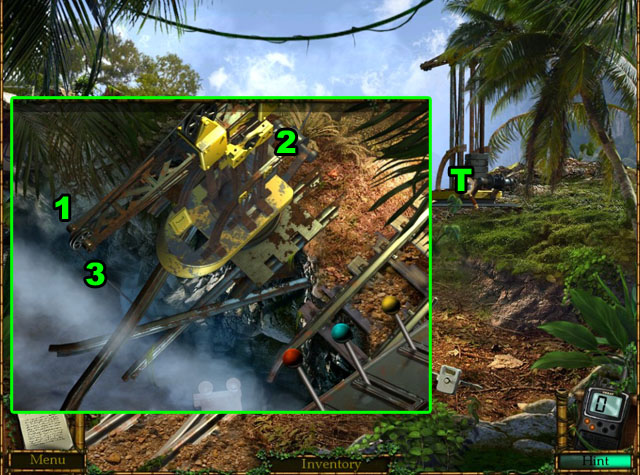
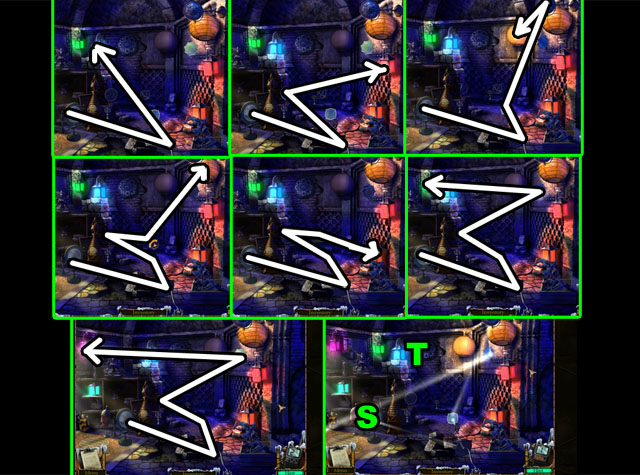
- Click on the broken crane (T).
- Place the REEL (1).
- Place the ROPE (2).
- Place the HOOK (3).
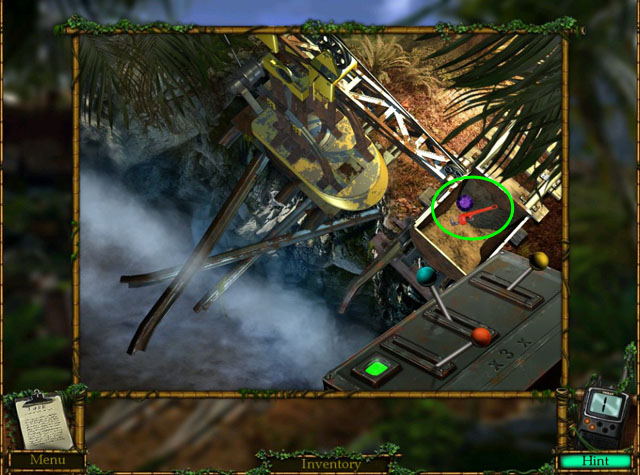
- Use the crane to get the mine cart at the bottom of the screen.
- The blue lever will lower and raise the hook.
- The red lever will swing the crane left and right.
- The yellow lever will swing the crane back and forward.
- You must navigate the hook around the obstacles in the scene.
- Click blue, red, yellow, then blue to solve the puzzle.
- Collect the DIAMOND and WRENCH.
- Exit the crane scene.
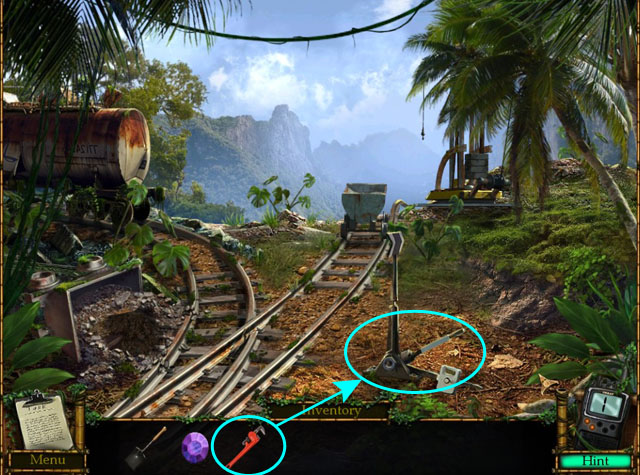
- Take the LEVER with the WRENCH.
- Return to the mine and place the LEVER and use it.
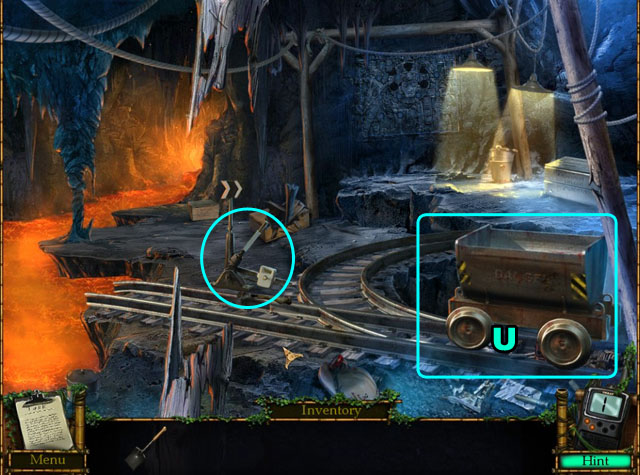
- Click on the cart to move it.
- Click on the spot that was underneath the cart (U).
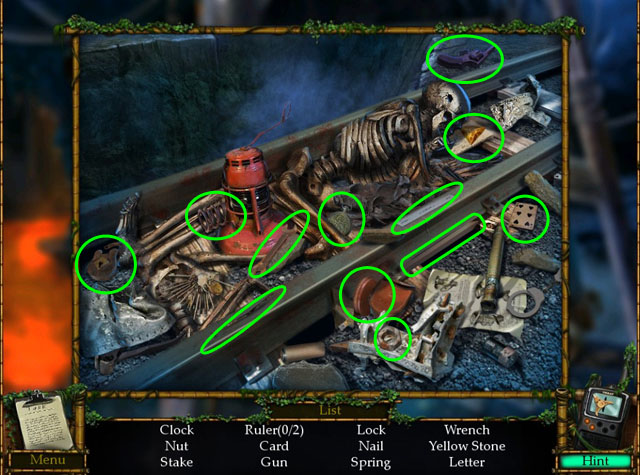
- Find the hidden objects.
- You will receive 3 MAPS and a GEM.
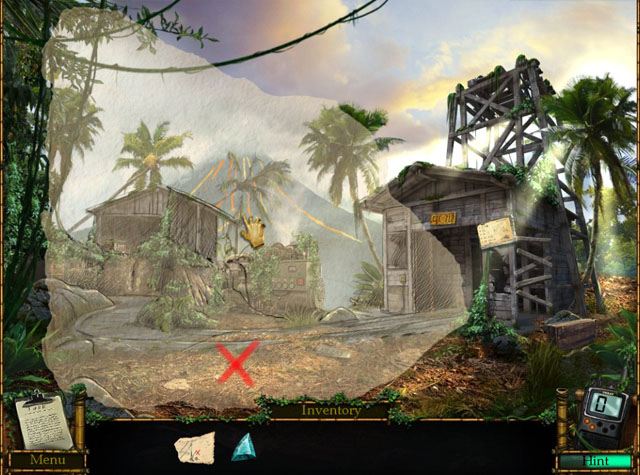
- Return to the beach.

- Click on the map in your inventory that matches with this scene.
- Move the map around until it lines up with the background and disappears.
- Dig the spot marked with X with the SHOVEL.
- Collect the GEM and the SHOVEL.
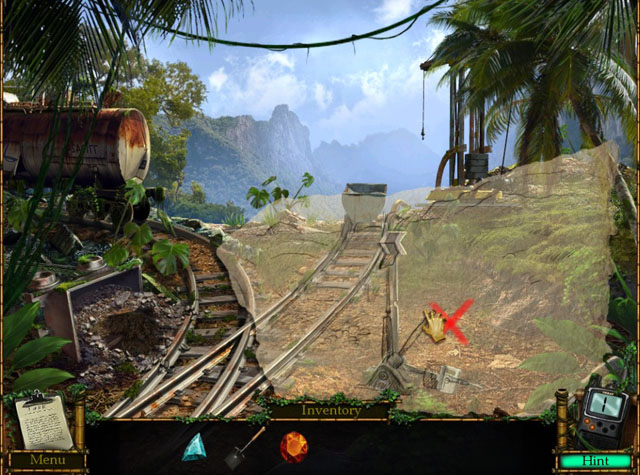
- Travel to the left.
- Click on the map in your inventory that matches with this scene.
- Move the map around until it lines up with the background and disappears.
- Dig the spot marked with X with the SHOVEL.
- Collect the GEM and the SHOVEL.
- Travel to the left.
- Click on the map in your inventory that matches with this scene.
- Move the map around until it lines up with the background and disappears.
- Dig the spot marked with X with the SHOVEL.
- Collect the GEM and the SHOVEL.
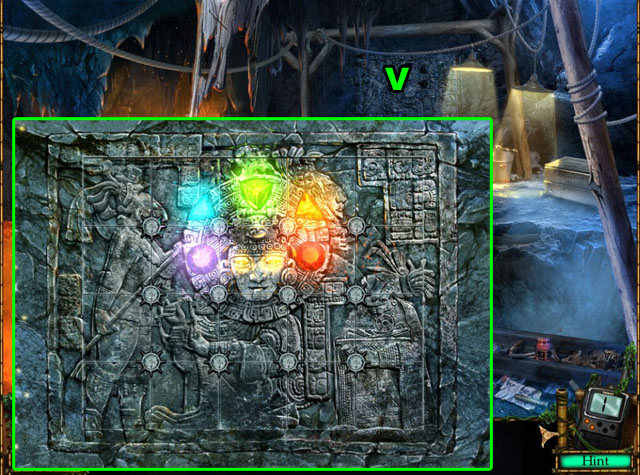
- Return to the mine and zoom in on the wall (V).
- Place all of GEMS into the correctly sized holes. They only fit one way.
- Enter the next room in the back.
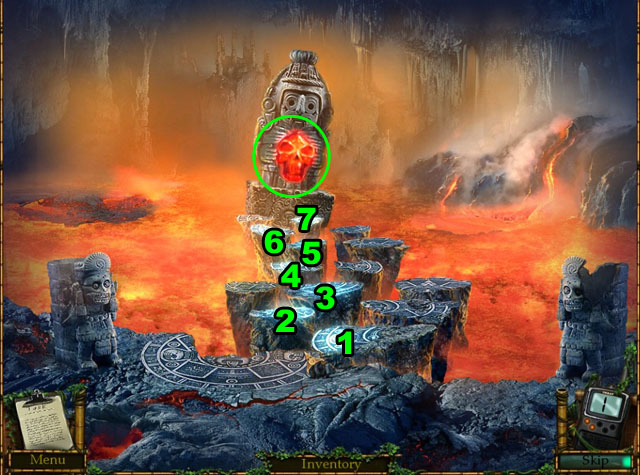
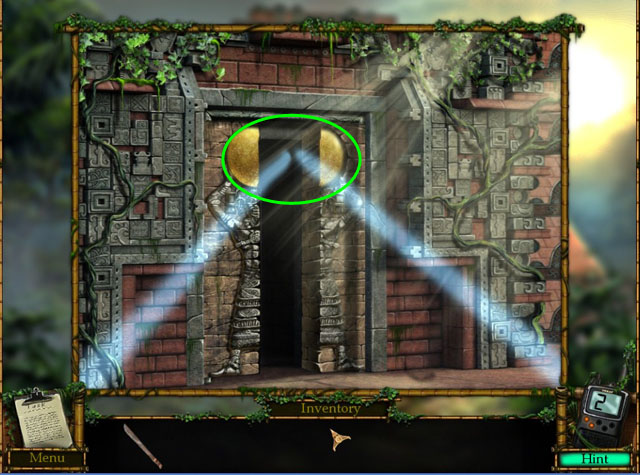
- Click on the stone steps in the correct order to make it to the next side.
- You will have to start over if you make a mistake.
- See the screenshot for the correct order.
- Collect the CRYSTAL SKULL.
Chapter 2
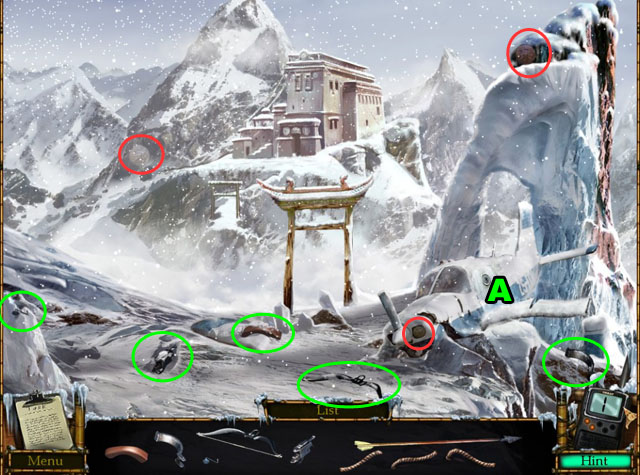
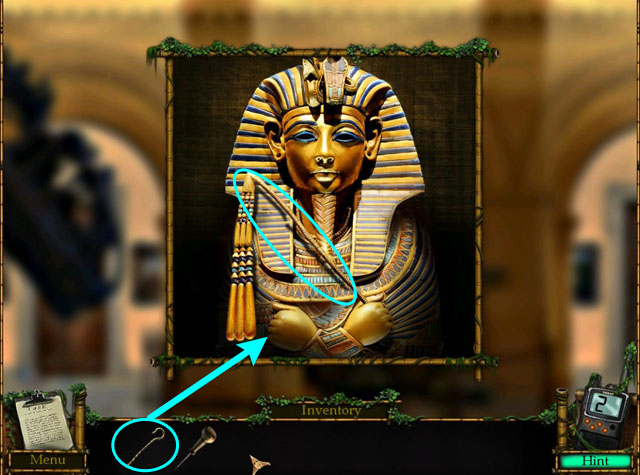
- Find the parts of the crossbow.
- Collect coins.
- Zoom in on the plane (A).
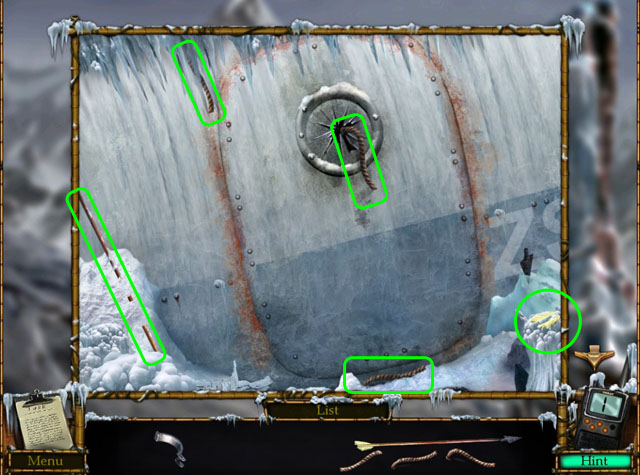
- Find last parts of the crossbow.
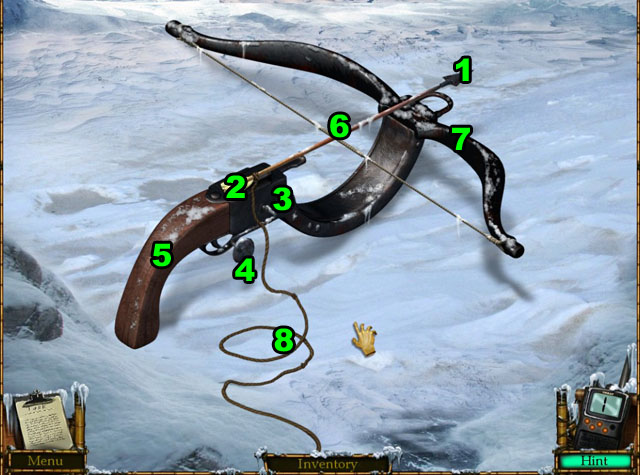
- Put the arrow head on the shaft (1).
- Put the feather on the back of the shaft (2).
- Set the arrow on the base (3).
- Put the trigger on the base (4).
- Put the crank on the trigger base (5).
- Place the wooden handle (6).
- Place the front piece (7).
- Connect the rope to the back (8).
- Collect the CROSSBOW.
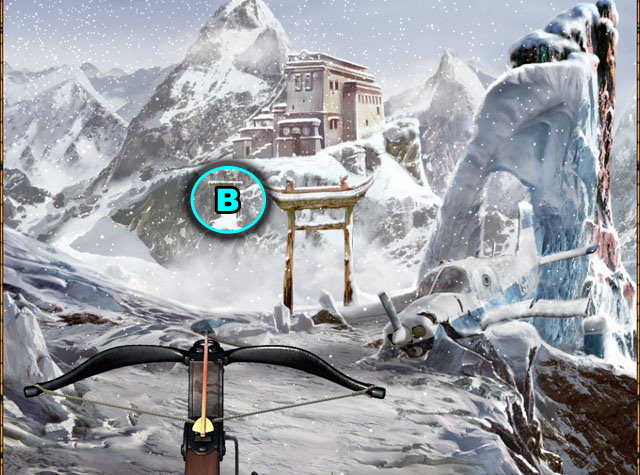
- Use the CROSSBOW for the gate (B).
- Enter the other side of the cliff.
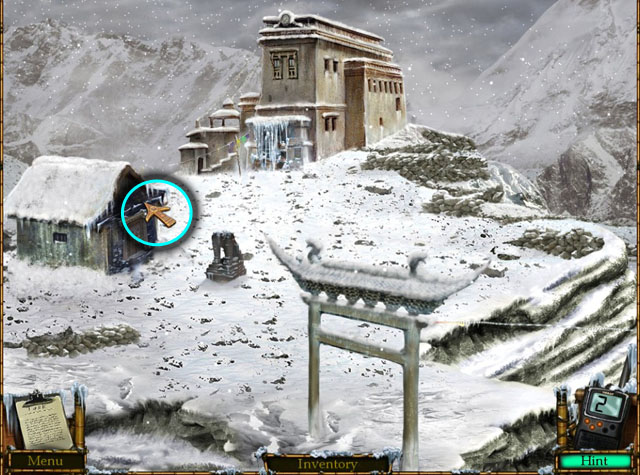
- Enter left side of the screen.
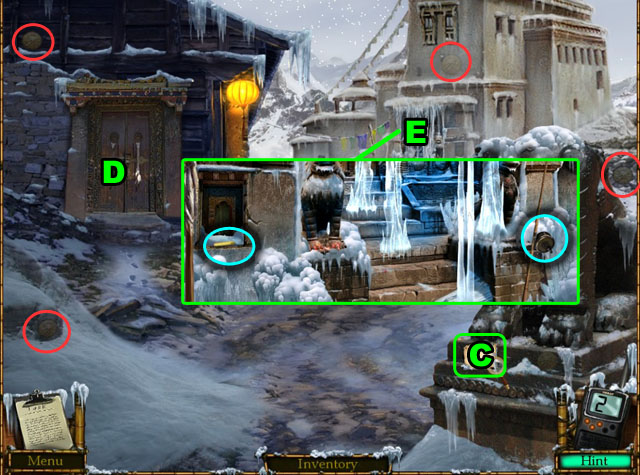
- Collect coins circled in red.
- Zoom in on the letter (C) and collect the BLUE CHALK.
- Zoom in on the door (D) and collect the CRANK.
- Click on the door (E).
- Collect the YELLOW CHALK and the REEL.
- Return to the previous scene and then move to the area to the right.
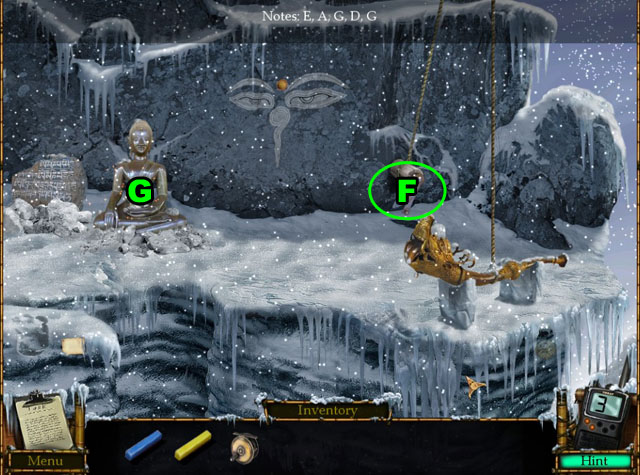
- Place the CRANK (F) and click on it.
- Click on the gold fish.
- Note the musical notes that are played: E, A, G, D,G.
- You can click on the fish again to play them as much as you need.
- Click on the sculpture (G).
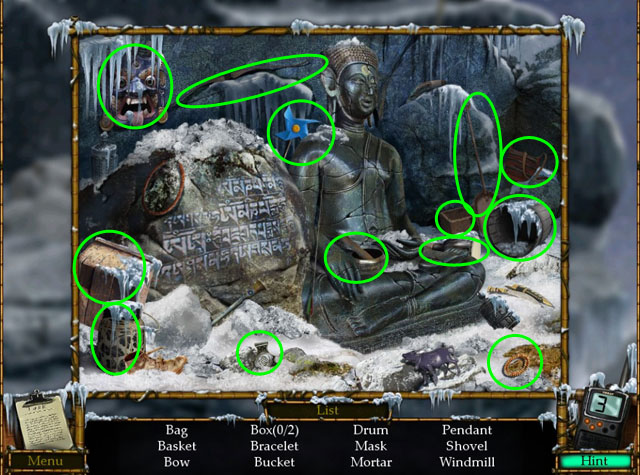
- Find the hidden objects.
- You will receive a WINDMILL.
- Return to the previous scene.
- Click on the left side of the screen.

- Click on the door (H).
- Click on the icicle in correct order: E, A, G, D,G.
- Each icicle when clicked will play the note and display the note played at the top of the screen.
- The correct order is 1st, 5th, 4th, 3rd, and then 4th.
- Enter the door.
- Collect coins.
- Collect the LION HEAD (J).
- Open the shelf (K) and find the WHITE CHALK.
- Return to the previous scene.
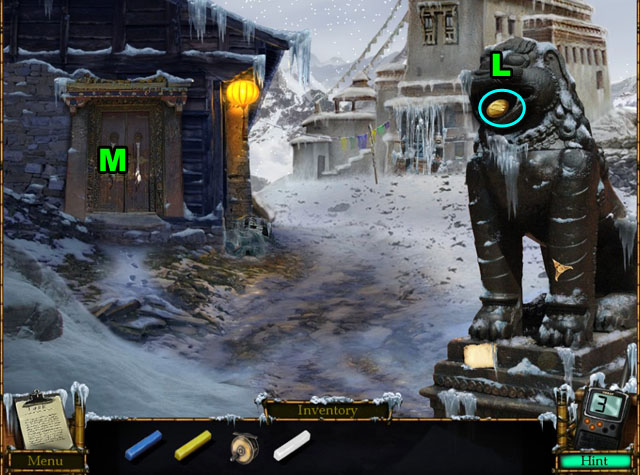
- Place the lion head on the sculpture (L).
- Collect the BIRD COIN.
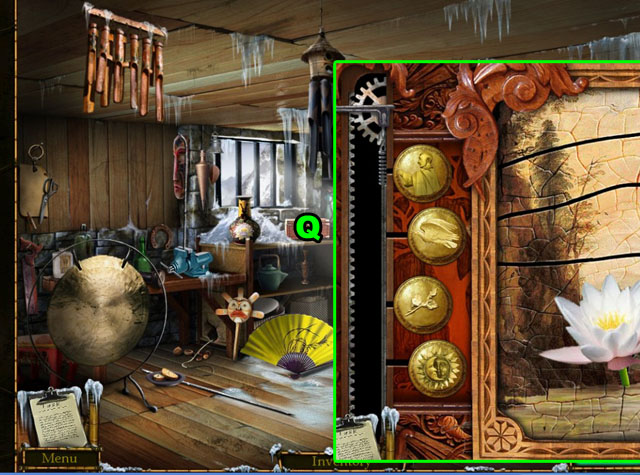
- Click on the door (M).
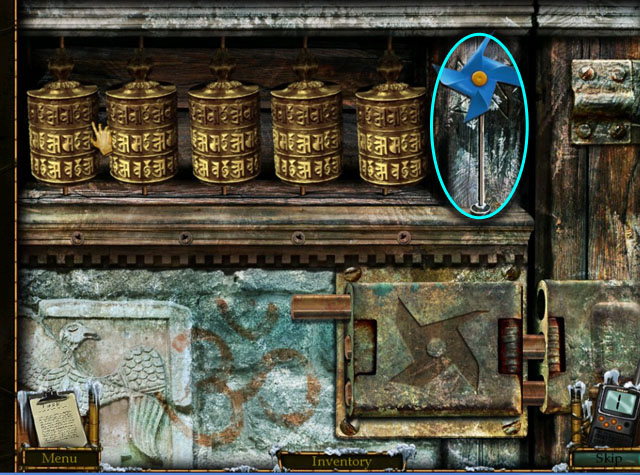
- Place the WINDMILL in the space to the left of the cylinders (N).
- Get all of the cylinders spinning at the same time to open the lock.
- As they all spin they will slowly undo each of the 3 latches.
- To accomplish this, start the first one spinning by rapidly clicking as fast as you can on it.
- Next start clicking the one to the right of the first one and when you are done click on the first one again to make sure they are both spinning.
- Continue this way down the line, making sure to click all of the cylinders that are still spinning to keep them going as you go across the line.
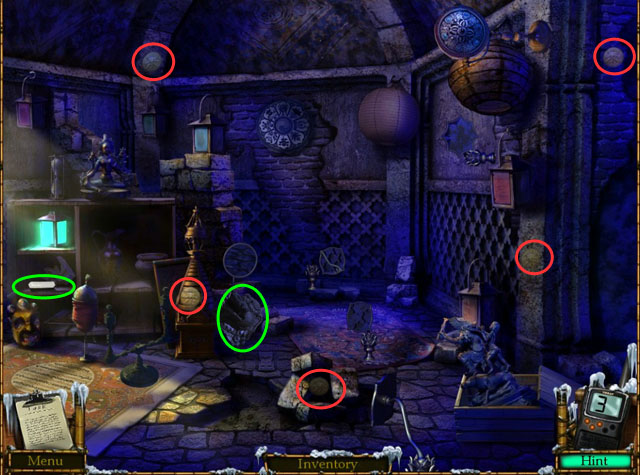
- Enter the room.
- Collect coins.
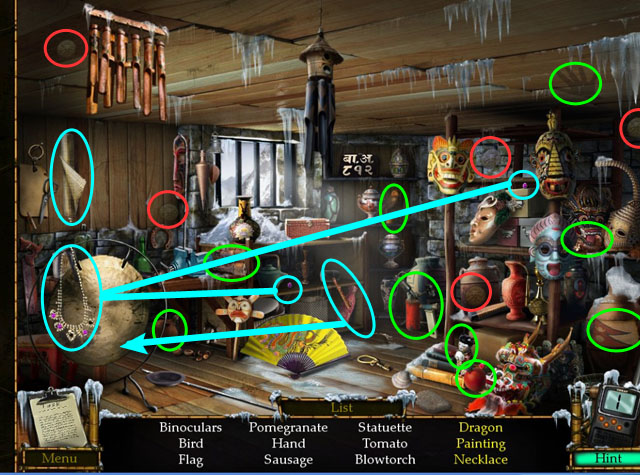
- Find the hidden objects.
- Play the drum with stick to collect the painting.
- Open the fan to collect the dragon.
- Find two purple jewels and place them on the necklace to collect it.
- You will receive the PICTURE and the BLOWTORCH when you finish this scene.
- Return to the crashed airplane across the bridge.
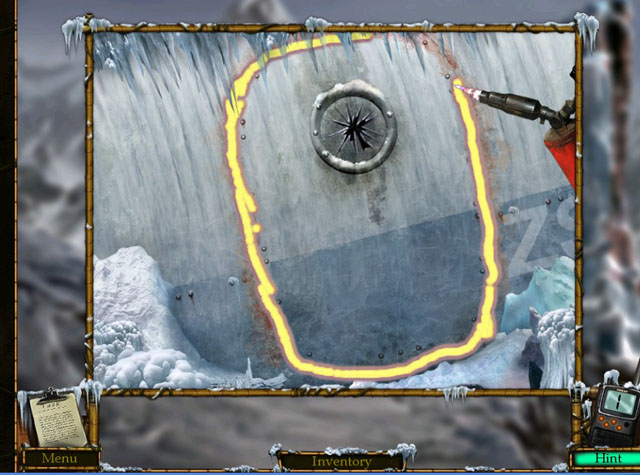
- Open the door with BLOWTORCH.
- Draw an uninterrupted line around the edge of the door and then click on the center.
- Enter the inside of the plane.
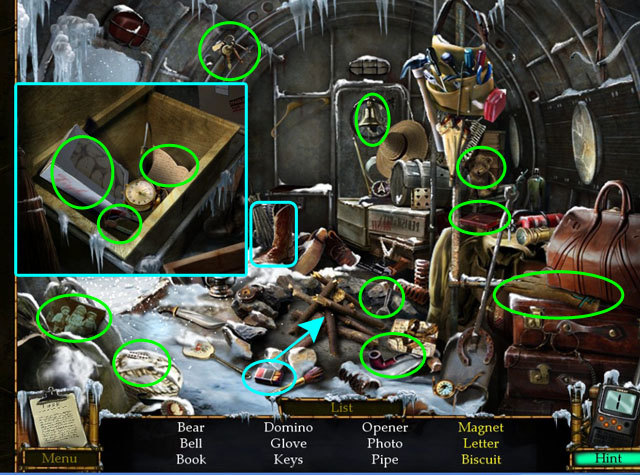
- Find the hidden objects.
- Zoom in on the chest behind the boot to find the letter, magnet and biscuit.
- You will receive the BISCUIT after finishing this scene.
- Place the BISCUIT on the plate in the small cottage.
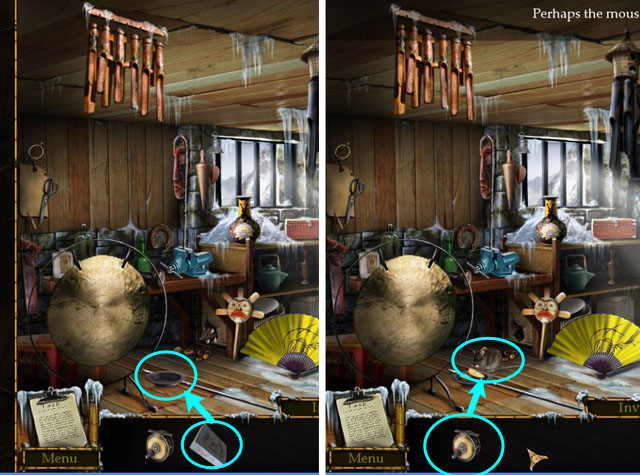
- Click the REEL AND HOOK and place it on the mouse that is eating the biscuit.
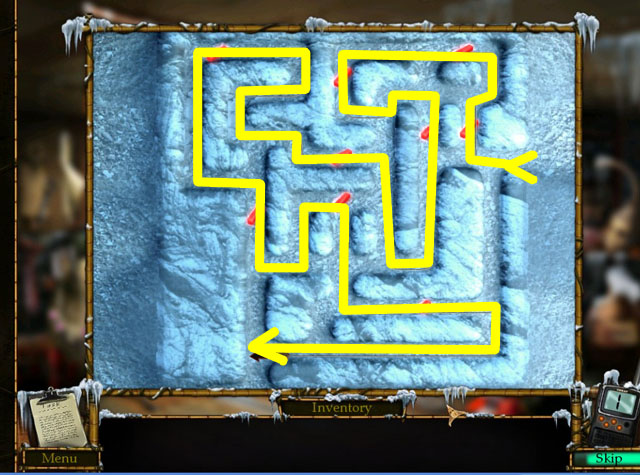
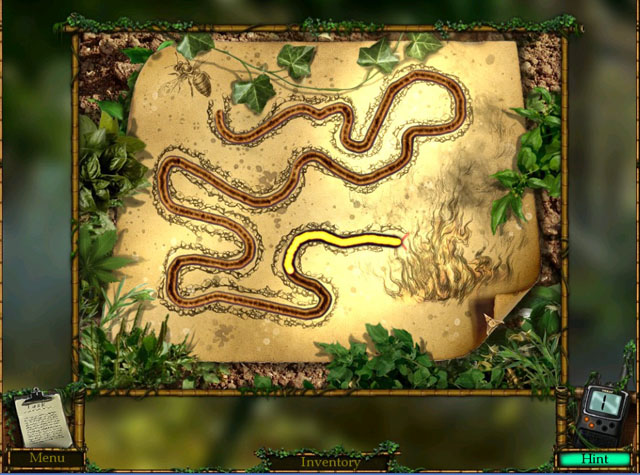
- Solve the maze by walking the mouse over all of the red chalks, without going over the same area twice.
- Click on the arrows beside the mouse to move him.
- You cannot exit the way you came into the maze. You will need to have the mouse exit on the bottom of the screen. Use this to help you find the right path.
- See the screenshot for the answer.
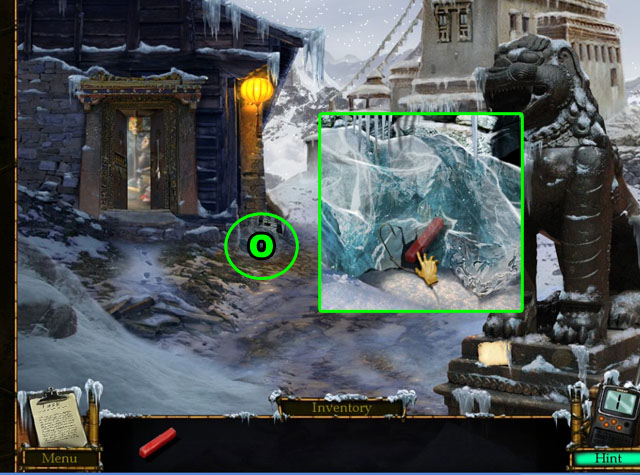
- Exit the house and zoom in on the ice (O) beside it.
- Click on the rope to take the RED CHALK.
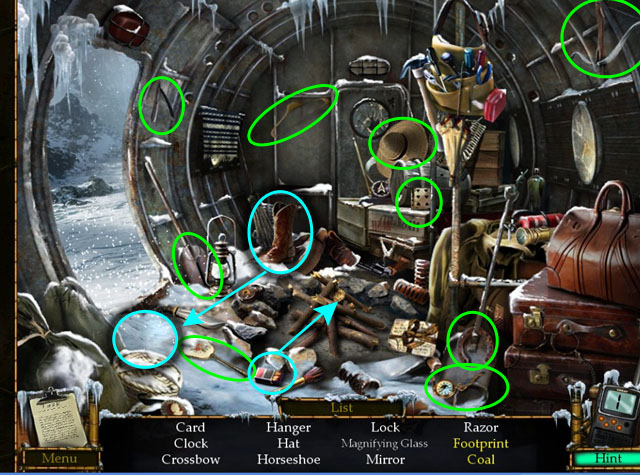
- Return to the plane again and find more hidden objects.
- Light the wood with the matches to collect the coal.
- Pick up the boot and place it on the floor to make a footprint.
- You will receive the CHARCOAL from the scene.
- Travel across the bridge and go to the right.
- Zoom in on the wall (P) with the face.
- Place all of the CHALKS and CHARCOAL in the bottom right corner.
- Paint the wall with chalks to match the color on the painting from your inventory.
- Take the MONK COIN on the forehead.
- Return to the small cottage to the left.
- Zoom in on the box (Q).
- Add the BIRD COIN and MONK COIN to the side and then rearrange the coins to solve the puzzle.
- After you rearrange the coins, pull the lever at the very left all the way to the bottom to test out the scene.
- Once the lever crosses a coin, that coin's figure will start moving across the scene until the lever is back up to the top again. Find the correct order to solve the puzzle.
- In the correct order the bird picks up the lotus and drops it in the monk's hand.
- Have the figures with the shorter paths at the top and the longer paths at the bottom.
- The correct order from the top is monk, bird, lotus and then sun.
- Take the LOTUS.
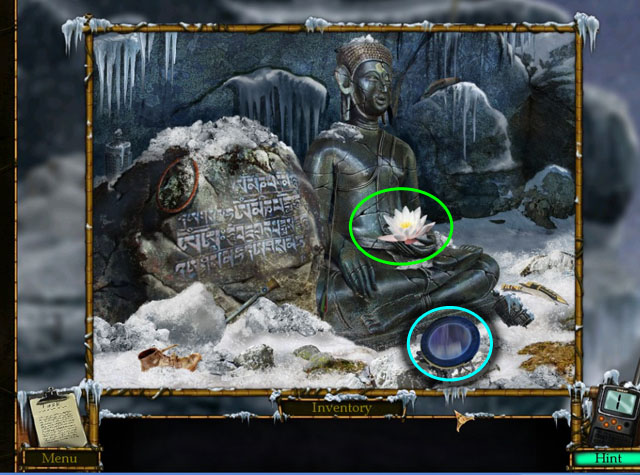
- Place the LOTUS on the hands of the statue on the cliff (R).
- Collect the MIRROR.
- Return to the left side and enter the area with the musical icicle door.
- Place the mirror on the stand (S).
- Arrange all of the mirrors in 7 different ways so that all of the lamps in the scene have been lit up at least once.
- One lamp in the very left has already been lit.
- Each mirror has 3 different setting, except for the first mirror which cannot be moved.
- Start from the first mirror and work your way from simplest line to most complicated.
- See the screenshot for all of the answers.
- Click on the wall (T) and then click on the strange machine.
- Collect the CRYSTAL SKULL.
Chapter 3
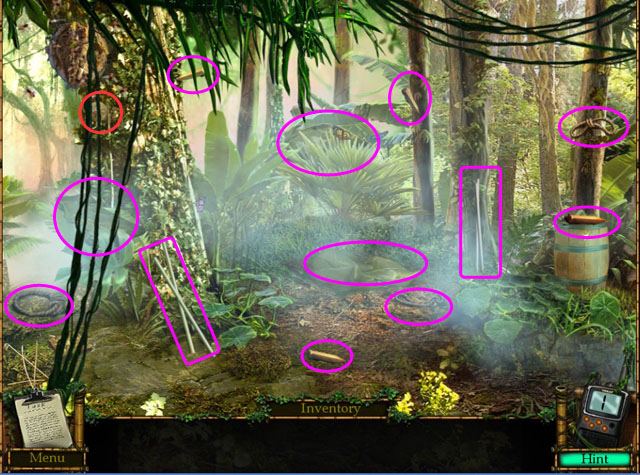
- Click on the leaves in the middle of the screen (A) to get your next task.
- Collect the coins.
- Collect all of the materials to make a tent.
- Set up the tent by using the STAKES on the ground.
- Then place the LEAVES.
- Then use the STICKS and finally the ROPE.
- Collect the coins.
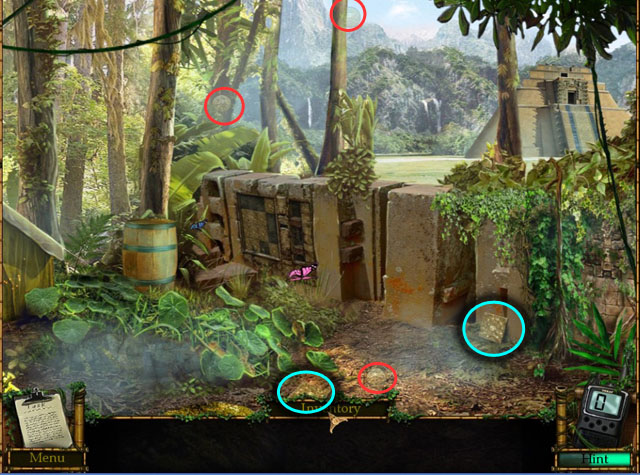
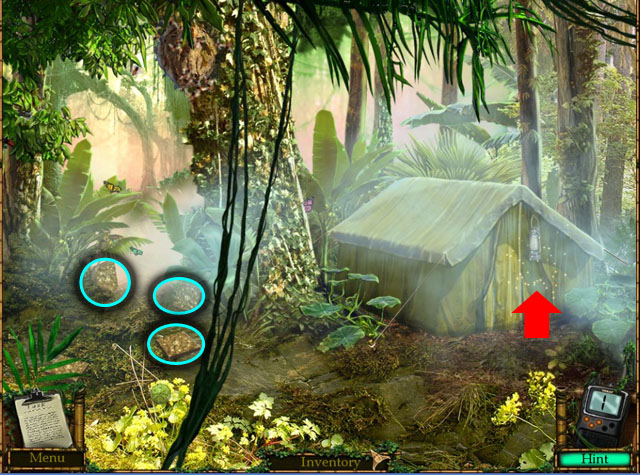
- Collect STONE puzzle pieces.
- This scene is twice as wide as a normal scene.
- Click and hold to move the scene around or click towards the edges to go all the way to the right or left.
- Go all the way to the left side and collect the coins.
- Collect STONE puzzle pieces.
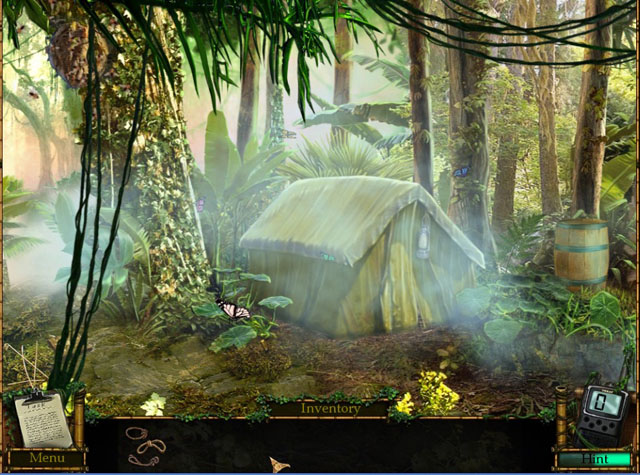
- Enter the tent.
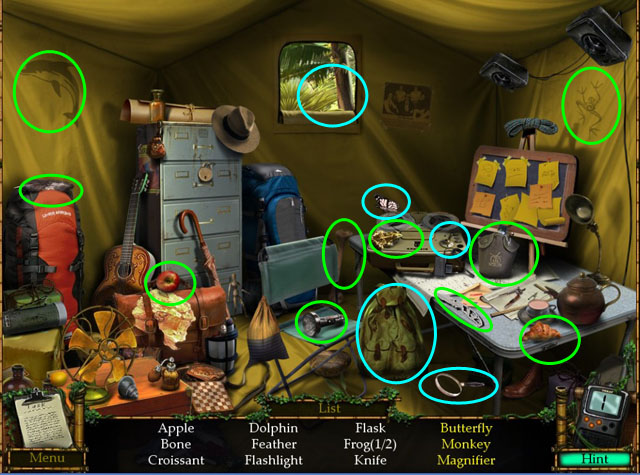
- Find the hidden objects.
- Open the window to find the monkey.
- Click on the backpack to find the magnify glass.
- Turn on the speaker to find the butterfly.
- You will receive a MAGNIFYING GLASS from this area.
- Exit the tent and move to the next scene from the left side of the screen.
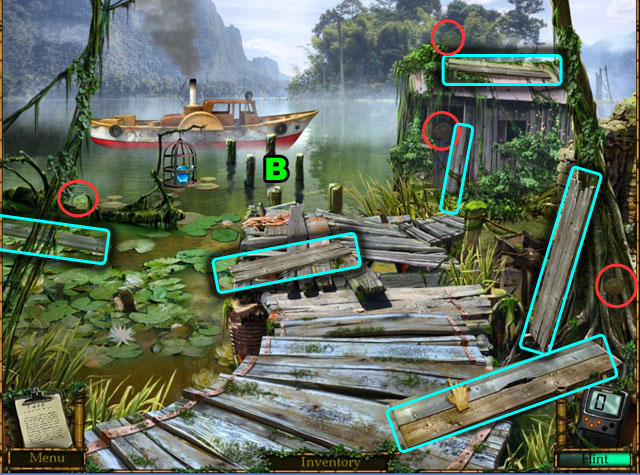
- Collect the BOARDS.
- Collect the coins.
- Zoom in on the bridge (B) and place all of the BOARDS.
- Zoom out and then click on the structure to the right.
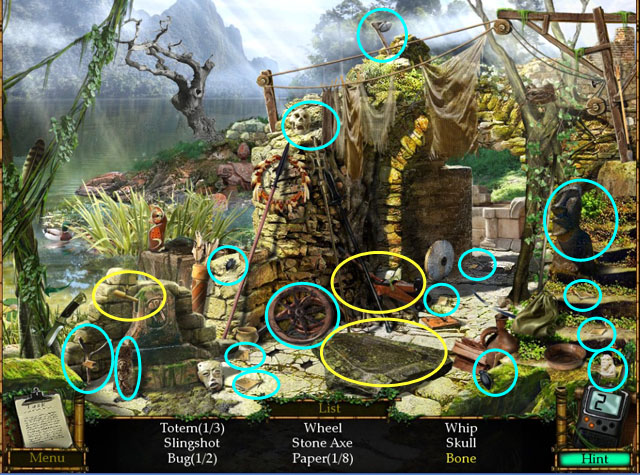
- Find the hidden objects.
- Click on the lever to fill the basin with water.
- Place the crank under the stone to find the bone.
- You will receive a ball of PAPER.
- Return to the first scene.
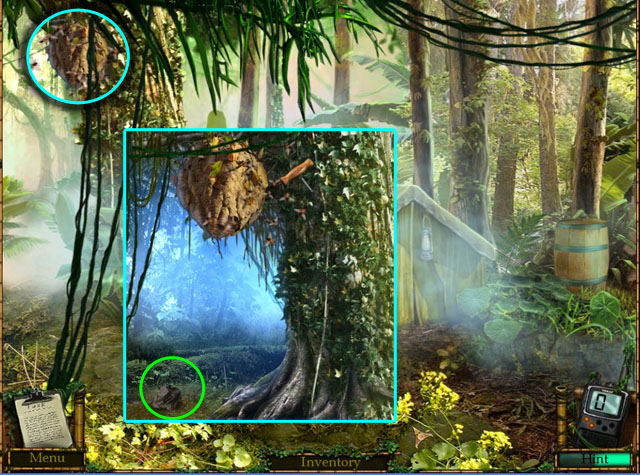
- Zoom in on the bees nest and place the PAPER.
- Use the MAGNIFYING GLASS on the paper.
- Click, hold and follow the route on the paper without going outside the lines.
- If you go outside the lines you will have to start over again.
- The yellow line shows you your progress.
- Once you have successfully traced the line, the paper will be on fire and drive the bees away.
- Take the CORKSCREW once the bees have gone.
- Zoom in on the barrel to the right side of the wide scene.
- Take out the cork with the CORKSCREW.
- Collect the HAMMER.
- Zoom out and then inspect the tiles on the wall.
- Place the all STONES from your inventory on the puzzle.
- The first part of the puzzle is a memory game.
- Click one tile and then another to find matches.
- If the tiles match the other will flip over, if not the first tile will flip over.
- Once all of the matches have been found, the next puzzle will start.
- See the screenshot for the matches (1).
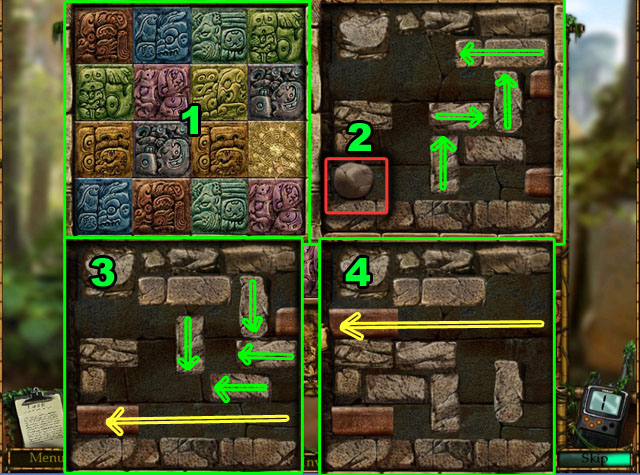
- The next puzzle is a slider puzzle.
- First break the stone with the HAMMER (2).
- Then set the puzzle so that the metal bar on the bottom has nothing in it's way to move to the left.
- Bring the bar all the way to the left, until you can't move it anymore (3).
- Set up the top bar so it is free to move (4) and move it all the way to the left as well to unlock the gate.
- Enter through the gate.

- Collect the coins.
- Zoom in on the well and collect the CRUTCH.
- Move to the next scene from the right side of screen.
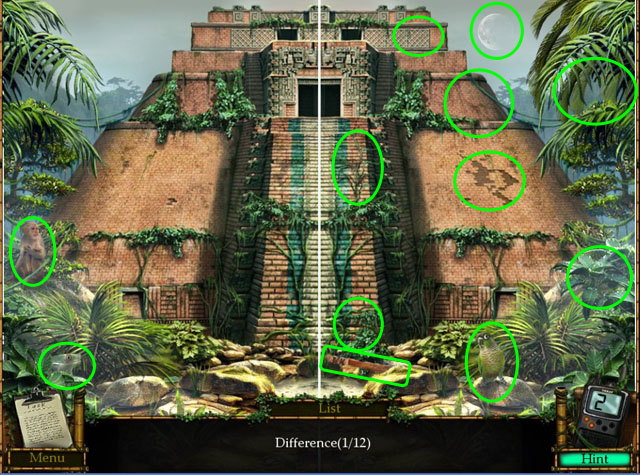
- Find 12 differences.
- You will receive a MACHETE.
- Collect the coins.
- Click on the door at the top (C) and collect the STICK.
- Return to the previous scene.
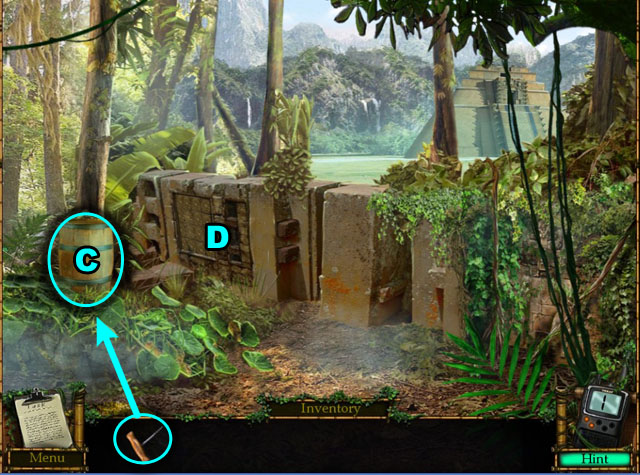
- Zoom in on the stone base (D).
- Reassemble the sculpture as shown in the screenshot. Start with the legs as a base.
- Collect the FIGURE.
- Read the letter (E).
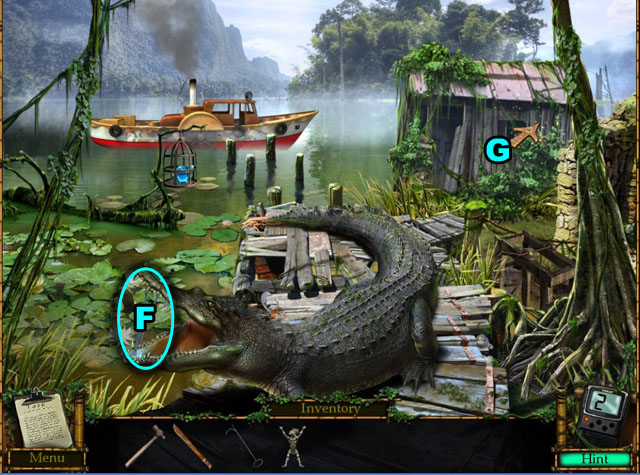
- Travel to the left at the dock.
- Place the CRUTCH in the crocodile's mouth (F).
- Click on the structure to the right again (G).

- Find the hidden objects.
- Click on the clothes on the rope and find the horns behind it.
- Cut the grass with the SICKLE to collect the duck.
- You will receive a WHETSTONE.
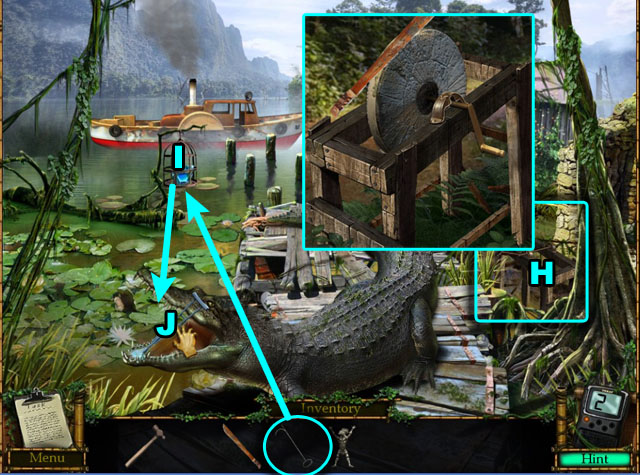
- Zoom in on the sharpening device (H) and use the WHETSTONE on it.
- Grind the MACHETE to sharpen it.
- Collect the DIAMOND in the cage with the STICK (I).
- Take out the CRUTCH from the crocodile's mouth (J).
- Place the DIAMOND in the cage in the crocodile's mouth and collect the DIAMOND that comes out.
- Replace the CRUTCH in the crocodile's mouth.
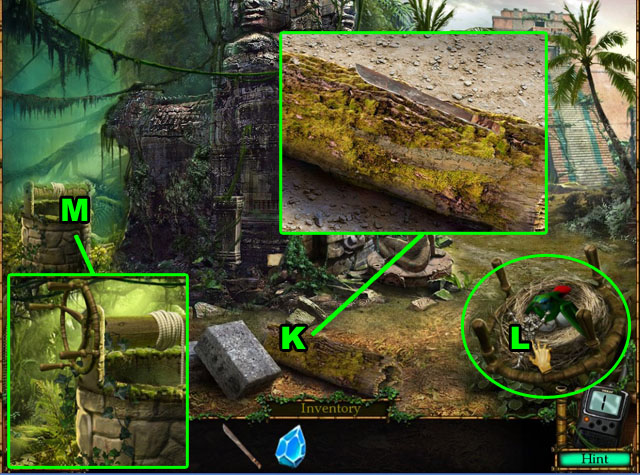
- Return to the area in front of the temple and zoom in on the log (K).
- Take off the moss with sharpened MACHETE.
- When the bird flies away, collect the HANDLE in it's nest (L).
- Zoom in on the well (M) and use the HANDLE on it to get another DIAMOND.
- Return to the previous scene.
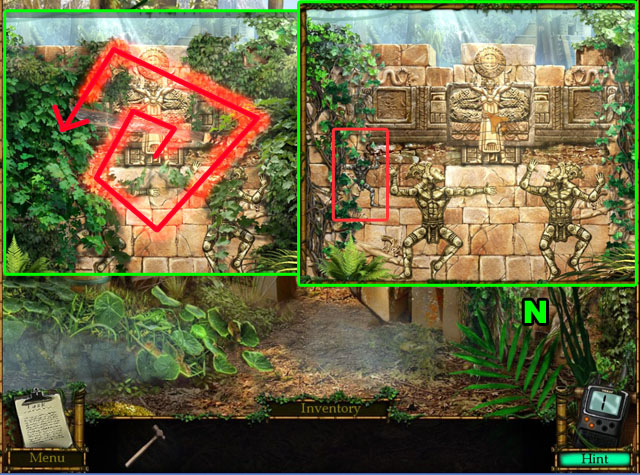
- Zoom in on the wall (N).
- Cut the ivy with the MACHETE.
- The game will ask you to trace a pattern multiple times to cut away the ivy.
- Begin where the pattern starts and click. Then follow the line, not letting go of the mouse button the whole time until you are past the end of the pattern.
- After completing the patterns collect the FIGURE on the left side.
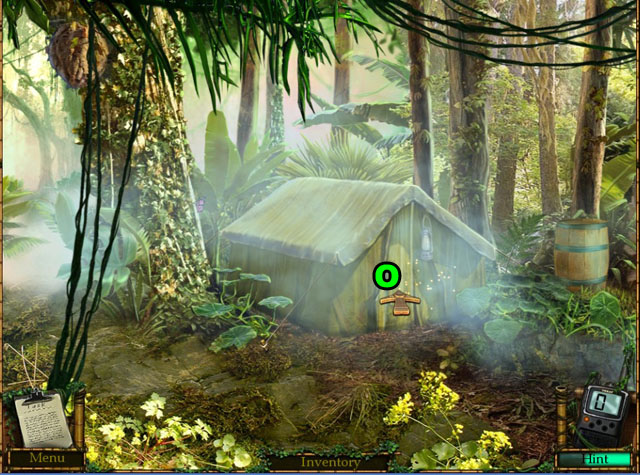
- Return to the tent (O).
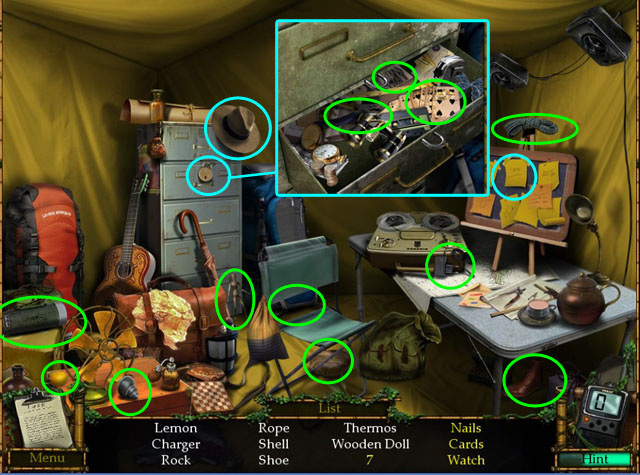
- Find the hidden objects.
- Take off the note highlighted in light blue on the board to collect the number 7.
- Click on the hat to collect the key on the floor.
- Open the drawer with the key.
- Find three hidden objects in the drawer.
- You will receive the NAILS from this scene.
- Return to the docks and zoom in on the broken bridge (P).
- Place NAILS on both sides of the 6 boards one at a time.
- Hit the nails in with the HAMMER one at a time.
- Find the hidden objects on the left side of this wide scene.
- Find the hidden objects on the right side of the wide scene.
- Go to the right when you are finished.
- Find the hidden objects.
- Collect coins.
- Continue forward once you have finished.
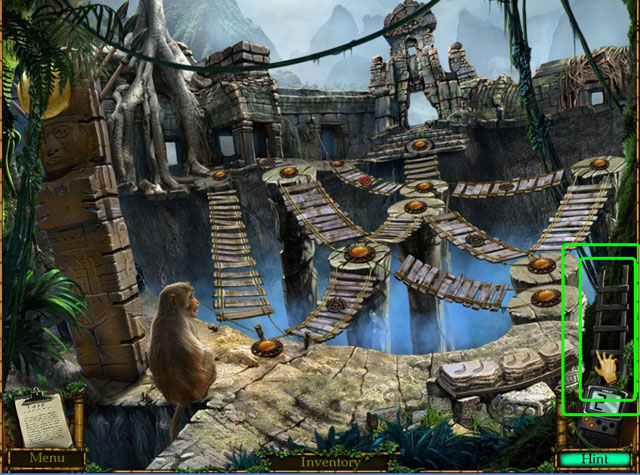
- Collect the LADDER.
- Return to the previous scene.
- Use the LADDER on the tree base (Q) and then click the bananas.
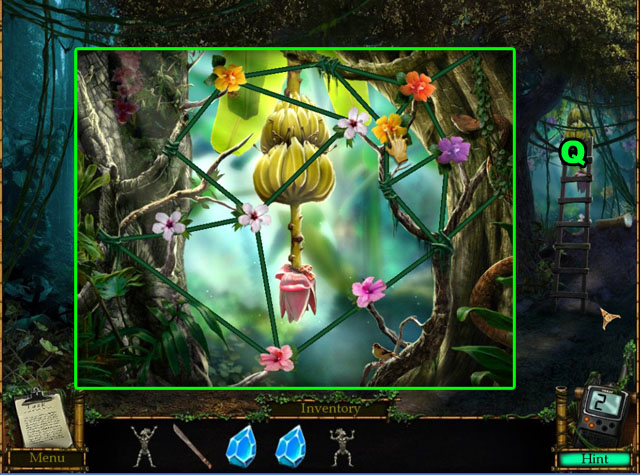
- Solve the puzzle by switching the places of the flowers until none of the roots cross over each other.
- You cannot move the position of the flowers, but you can switch their places.
- Start with flowers that are overlapping each other and try to simplify their positions. Work from right to left, since the right side is more complicated.
- See the screenshot for the answer.
- Collect the BANANAS.
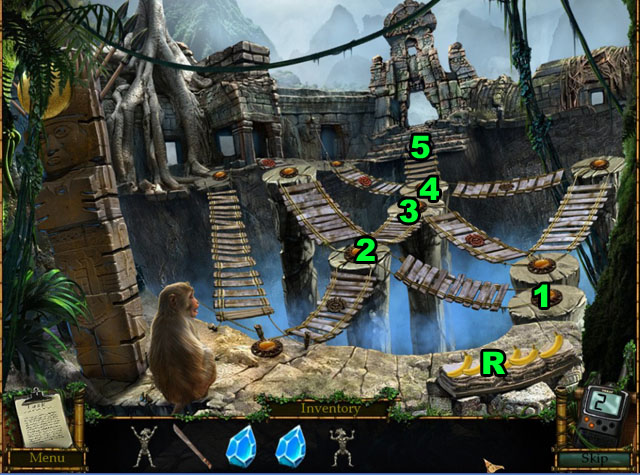
- Place BANANAS on the basin (R).
- Use the bananas from the basin on the buttons in front of the monkey.
- He will walk towards the bananas that are right next to him.
- If he steps on the button the totem will go down one click, if he steps on the red symbol it will go back up.
- Make a path that has the totem go down 5 clicks with only 5 bananas.
- The trick is that the monkey cannot go over any red symbols.
- See the screenshot for the answer.
- Take the SUN DISK from the top of the now lowered totem pole.
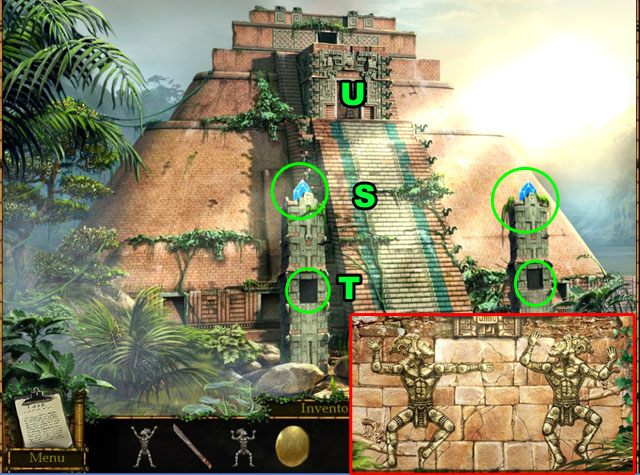
- Return to the temple and place two DIAMONDS at the top of the totems (S).
- Place FIGURES and change the postures to match the sculpture that you found the last figure at (T).
- Click on any part of the figure to rotate that part.
- Take care to look at their feet and hands, because even those need to have the right rotation.
- Zoom in on the door (U).
- Place the SUN DISK above the door.
- Enter the room.
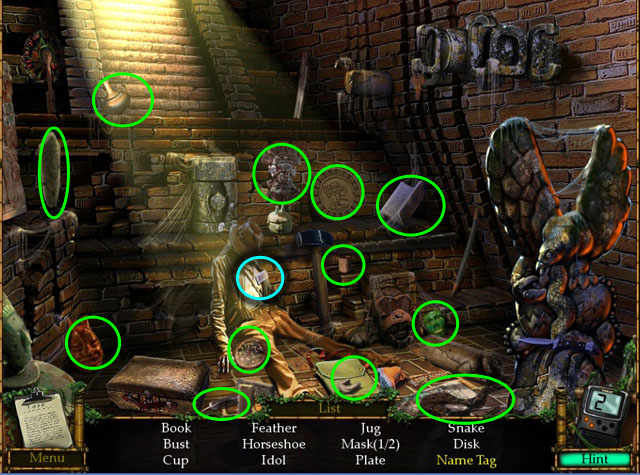
- Find the hidden objects.
- Zoom in on the name tag highlighted in light blue.
- Clean up the spider web with the brush that is above the name tag.
- Collect the cleaned name tag.
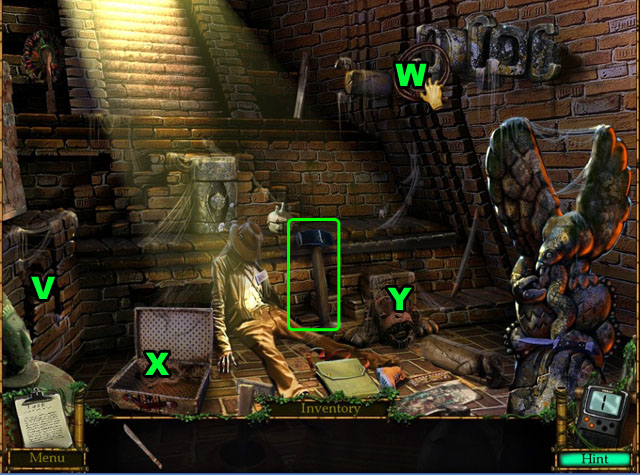
- Break the bricks with HAMMER highlighted in green (V).
- Collect the whip.
- Collect the key with whip (W).
- Open the trunk with the key (X) and collect the monkey's eyes.
- Place the monkey's eyes on the sculpture (Y).
- Collect the CRYSTAL SKULL.
Chapter 4
- Collect the coins.
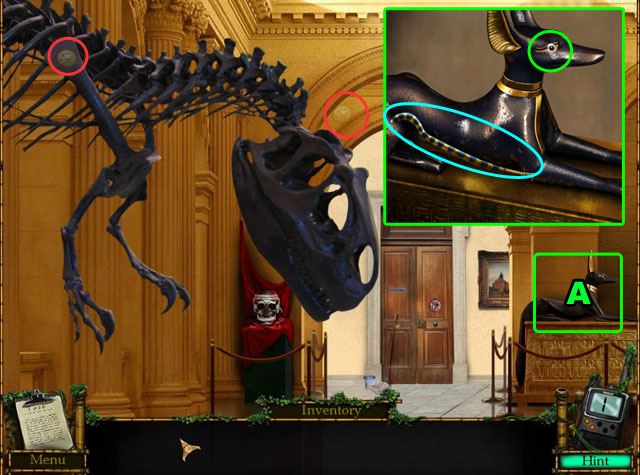
- Zoom in on the dog statue (A).
- Collect the STAFF and EYE BALL.
- Pan over to the right side of this large room.
- Collect the coins.
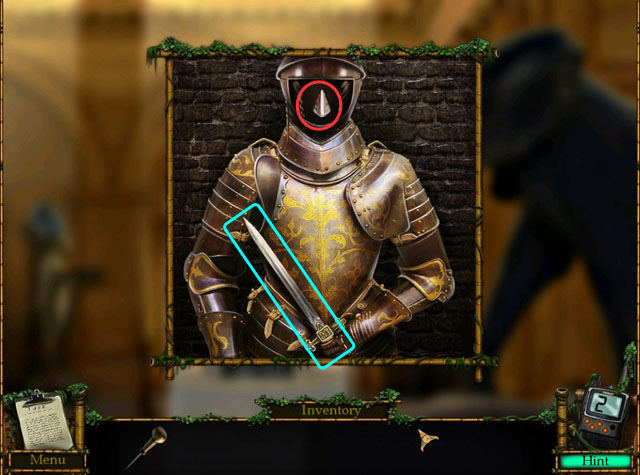
- Zoom in on the armor (B).
- Collect the coins and WHIP.
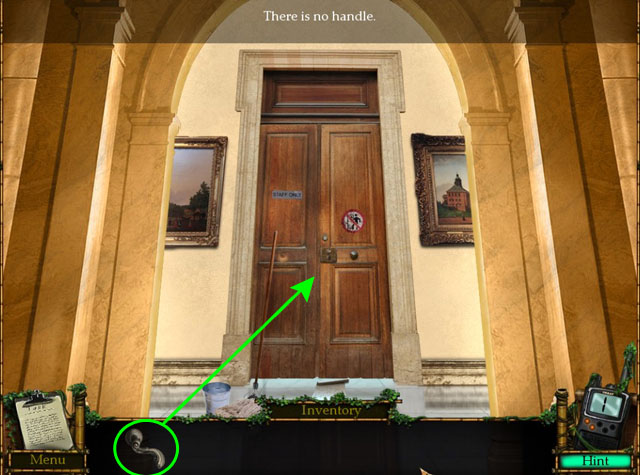
- Zoom in on the door (C).
- Collect the PICK and the PAPER once it hits the ground.
- Move to the middle of the room.
- Zoom in on the coffin and click on it once.
- Place the WHIP and the STAFF in its hands.
- Collect the SWORD from the mummy.
- Zoom in on the armor and click on the armor once.
- Place the SWORD in his hand.
- Collect the NOSE highlighted in red.

- Zoom in under the door (D) to the very left.
- Place the PAPER in front of the door and push it under.
- Zoom in on the door knob (E).
- Push the eyeball above the door knob with PICK and it will fall behind to door.
- Zoom in on the spot under the door again and click on the paper to collect the EYEBALL.
- Return to the previous scene.
- Zoom in on the skull in the very left corner.

- Place the NOSE and EYES.
- Collect the KEY in the mouth.
- Zoom in on the door (F) to the right.
- Open the door with the KEY.
- Enter the room.

- Collect coins highlighted in red.
- Collect two books highlighted in green.
- Zoom in on the desk (G).
- Turn on the lights highlighted in light blue on the globe.
- The order that the lights need to be highlighted is the order in which the person traveled to them.
- Rip off dates from the calendar to the right and push the button for every place that is written on the calendar.
- The correct order is Cairo, Istanbul, Mecca, Ndjamena, Brazzaville, and then Maputo.
- Collect the HANDLE from inside the globe.
- Return to the previous scene.
- Place the HANDLE on the door to the left.
- Enter the room.
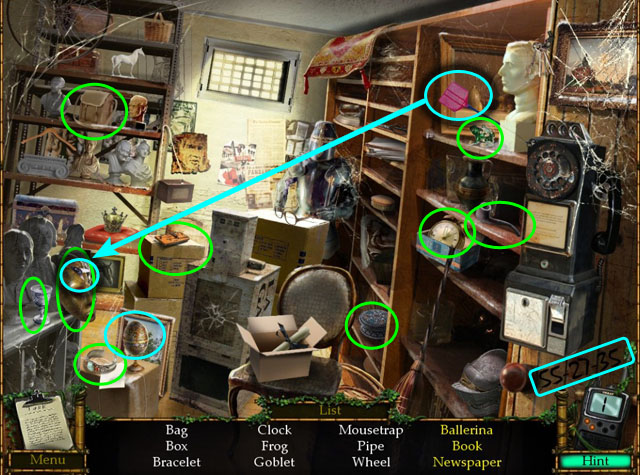
- Find the hidden objects.
- Open the egg to collect the ballerina.
- Use the fly swatter to catch the fly.
- Click on the mask and collect the book.
- Note the number in the bottom right corner by the phone: 55-27-35.
- Exit to the room with the globe.
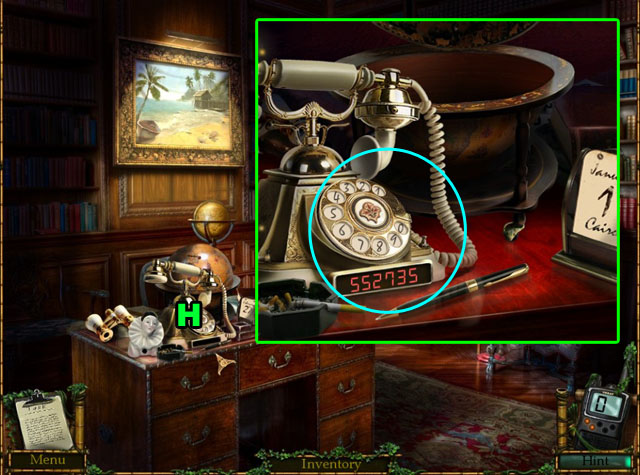
- Zoom in on the desk (H).
- Call 55-27-35 with the phone. The numbers will clear every time you get six, so start fresh from the first 5.
- Return to the previous room.
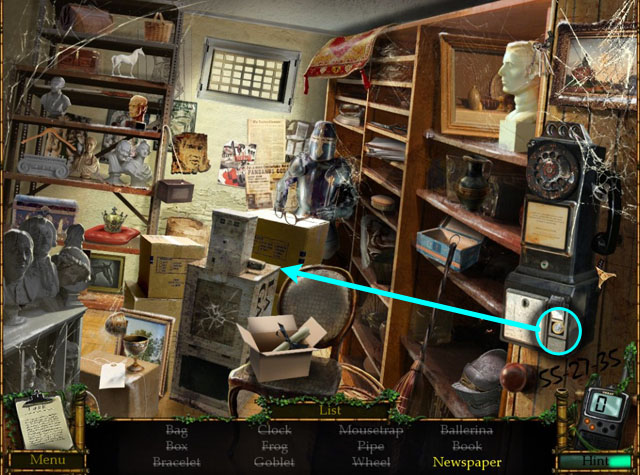
- Collect the coin in the phone and insert the coin in the newspaper machine.
- Collect the newspaper.
- You will receive one last BOOK from this room.
- Return to the previous room.
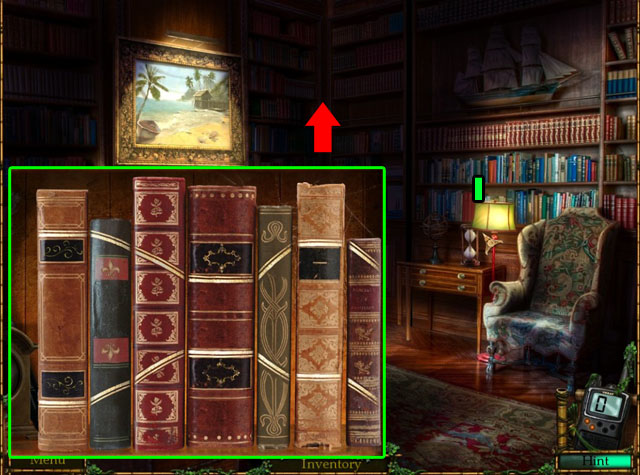
- Zoom in on the bookshelf (I) in back of the room with the globe.
- Place three BOOKS in empty spaces on the shelf.
- Rearrange the books so that the lines of the pattern are not broken.
- Click on one book and then another to switch their places.
- Enter the next room once you have solved the puzzle.
- Congratulations! You have finished Sandra Fleming Chronicles: The Crystal Skull game!
Created at: 2011-06-26