

Walkthrough Menu
- General Tips
- Chapter 1: The Shore
- Chapter 2: The Tavern
- Chapter 3: Burial Chamber
- Chapter 4: Underground Complex
- Chapter 5: Cliffside Platform
- Chapter 6: Volcano Shore
General Tips
- This is the official guide for Sea of Lies: Beneath the Surface.
- This guide will not tell you when you have to zoom into a location; the screenshots will show each zoom scene.
- Hidden-object puzzles are referred to as HOPs. This guide will not show screenshots of the HOPs, however, it will mention when an HOP is available and the inventory item you'll collect from it.
- Use the Map to fast travel to a location.
- Use the reset button (arrows) in the upper-right corner of each puzzle scene.
Chapter 1: The Shore
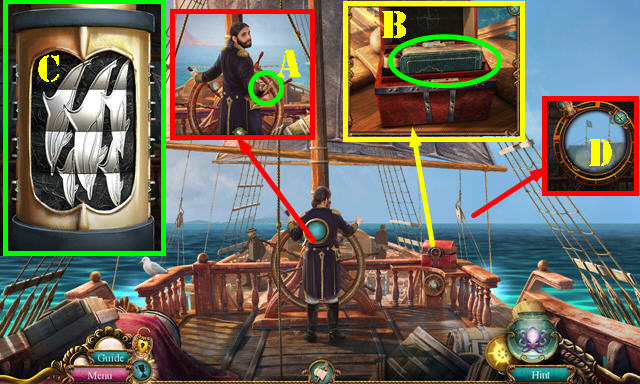
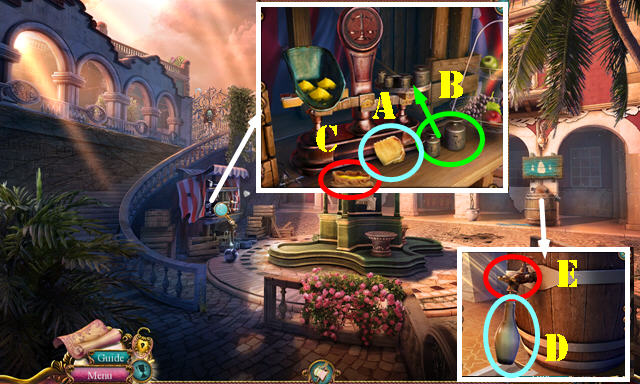
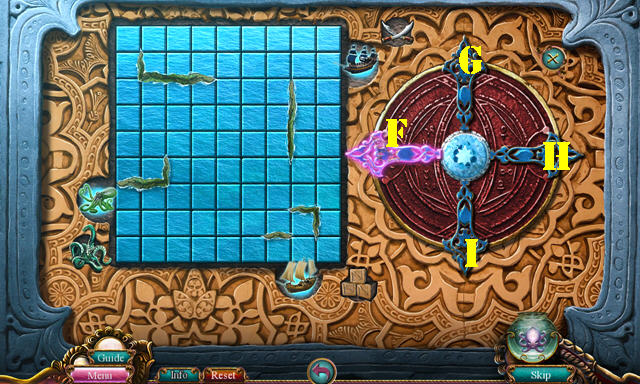
- Talk to the captain; take the PENDANT (A).
- Use the PENDANT; take the SHIP'S LOG and WORKING SPYGLASS (B).
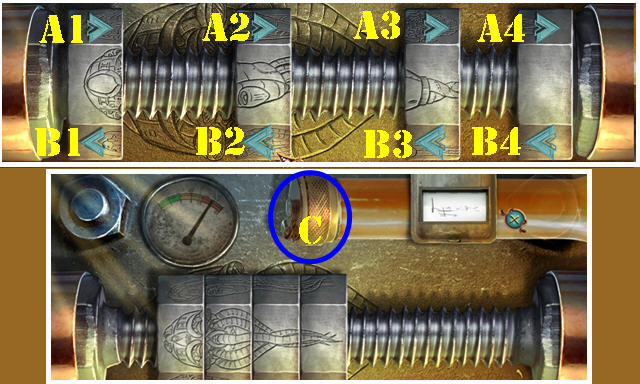
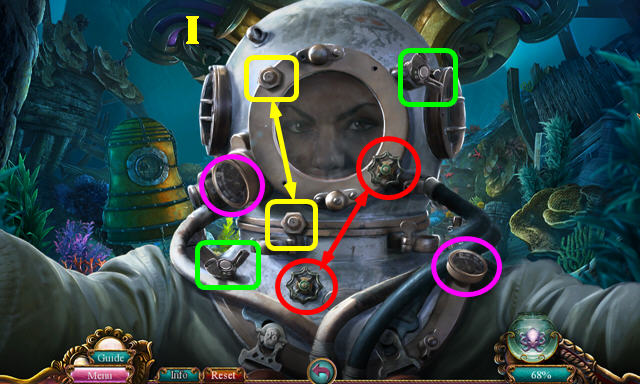
- Look at the note on the WORKING SPYGLASS and solve the puzzle (C) to get the SPYGLASS.
- Use the SPYGLASS (D). Focus it for a puzzle.
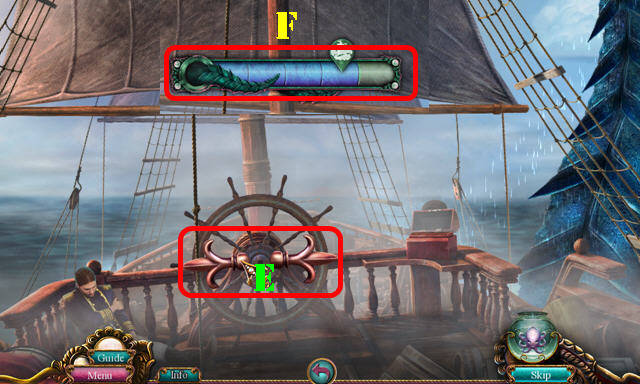
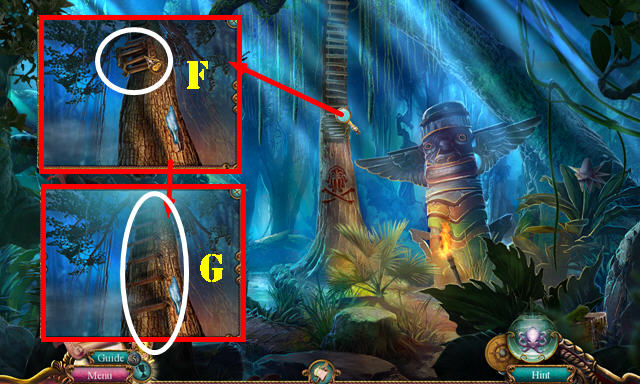
- Press the arrows (E) to go the opposite way of the tentacles to avoid them. Fill the bar (F) to beat the game.
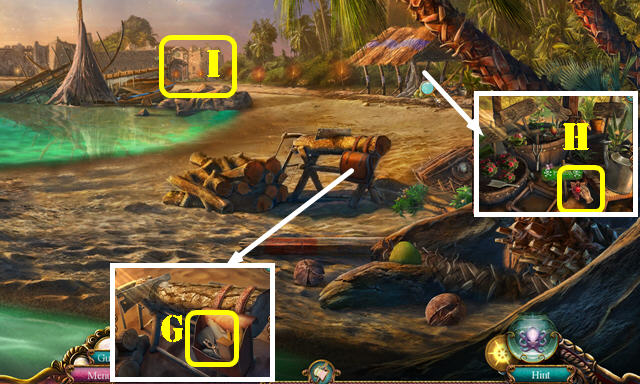
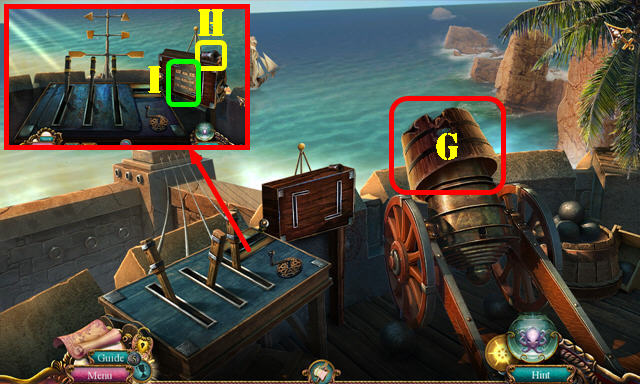
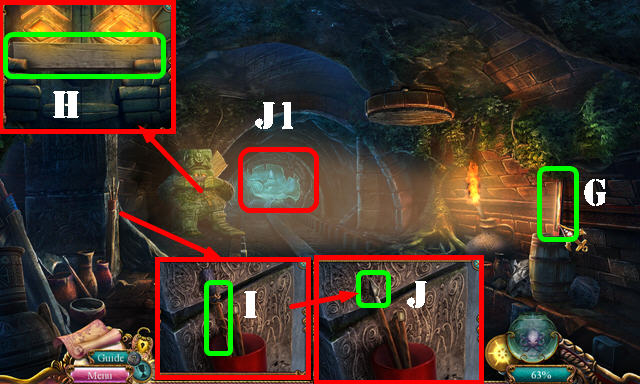
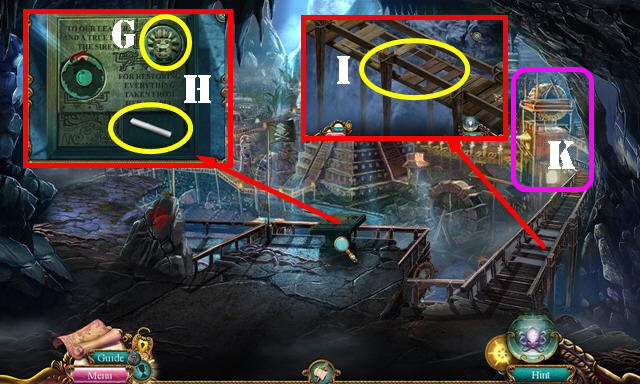
- Open the bag; take the WEIGHT BOX and PLIERS (G).
- Open the WEIGHT BOX; take the WEIGHTS (inventory).
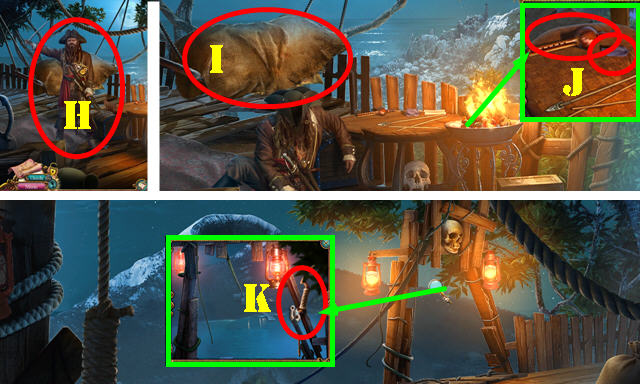
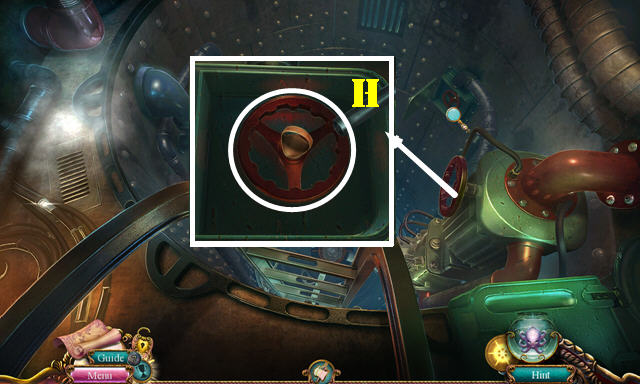
- Take the BROOCH (H).
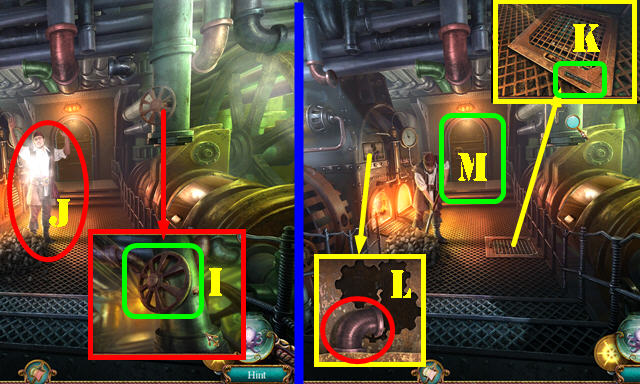
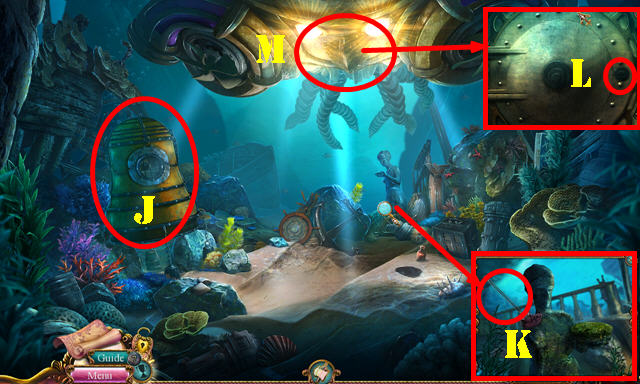
- Go to the Town Entrance (I).
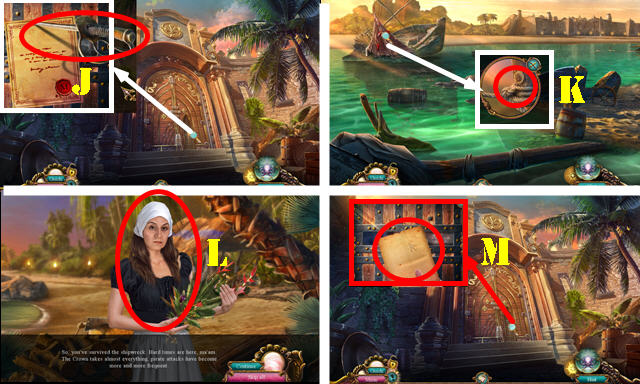
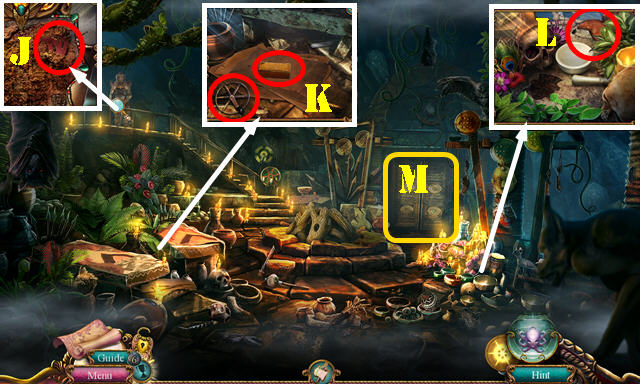
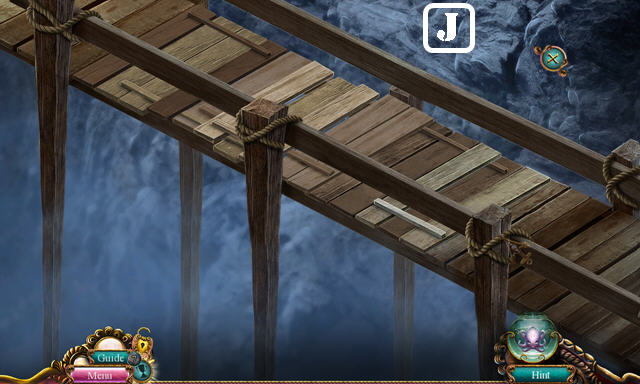
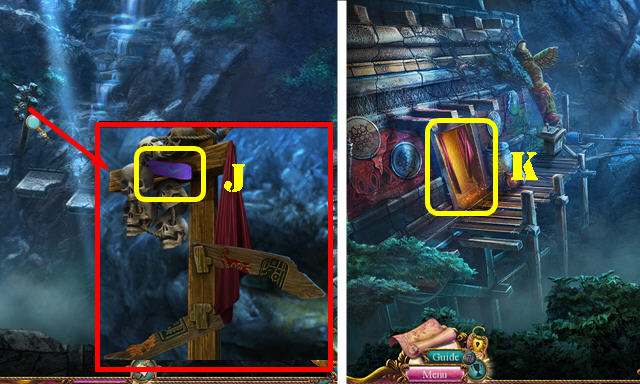
- Look at the note to get the BROKEN SABER (J).
- Walk down and pan left.
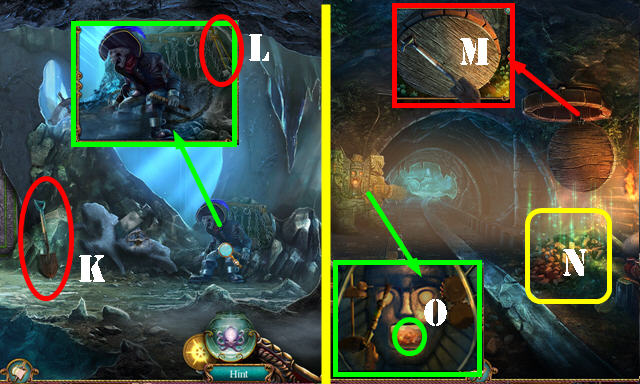
- Use the BROKEN SABER (K) for an HOP; play it to get the MEDICAL LICENSE.
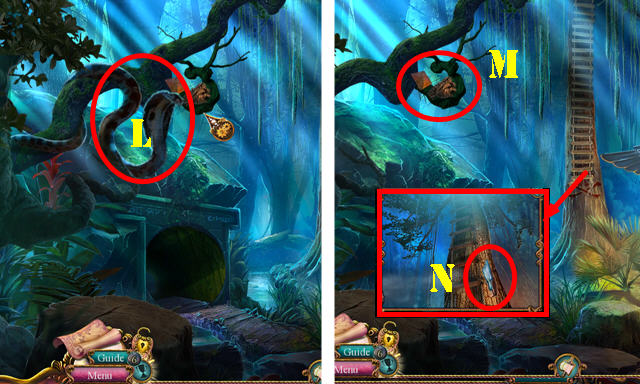
- Pan right and then return to the Town Entrance after the lady is done talking (L).
- Use the MEDICAL LICENSE (M).
- Go through the door.
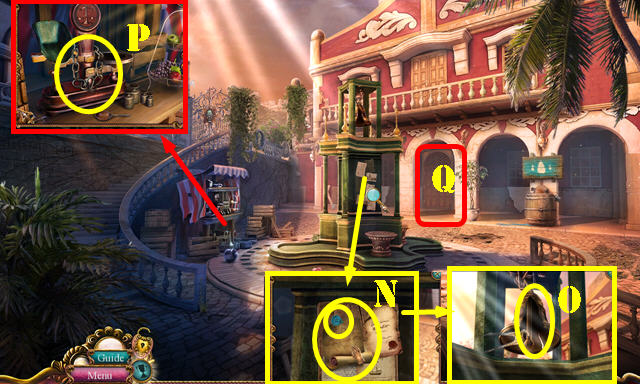
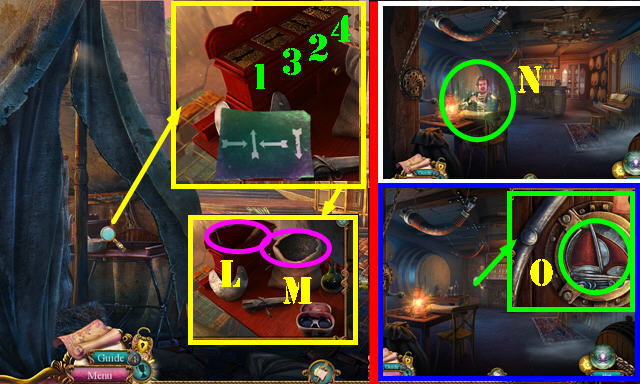
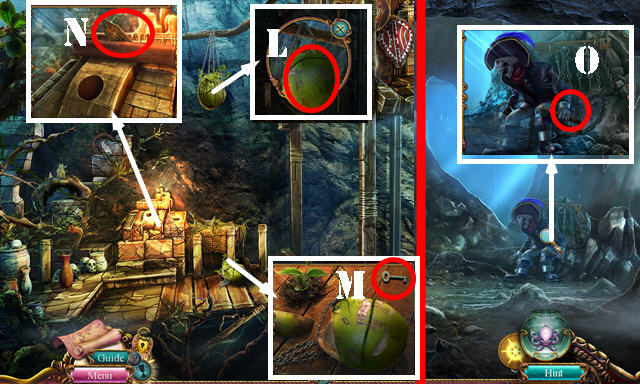
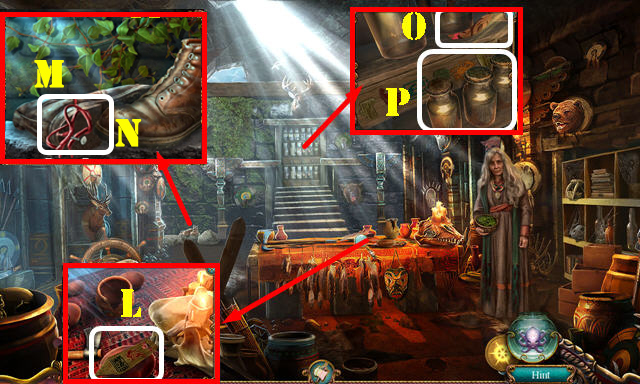
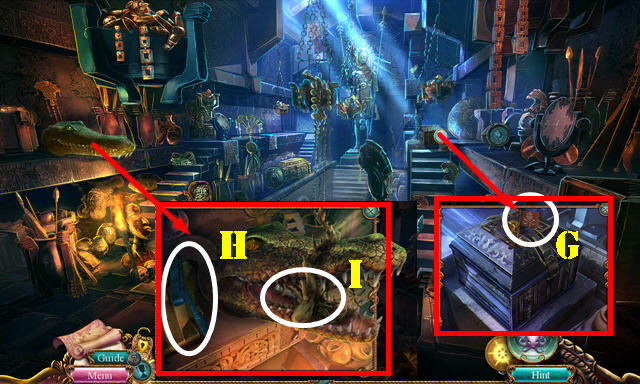
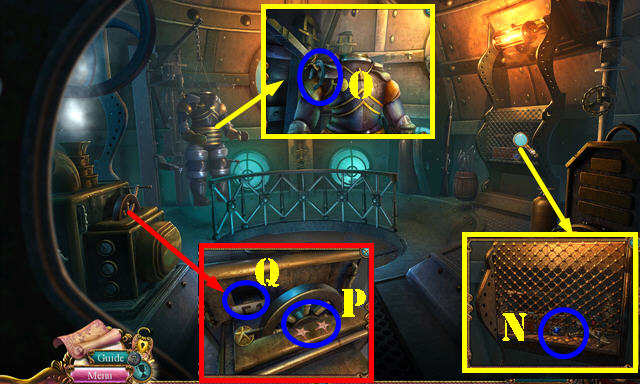
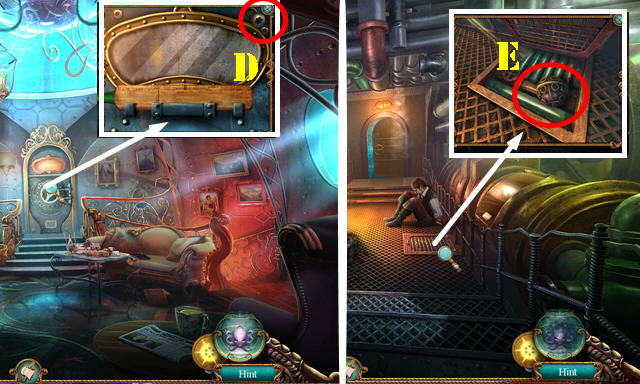
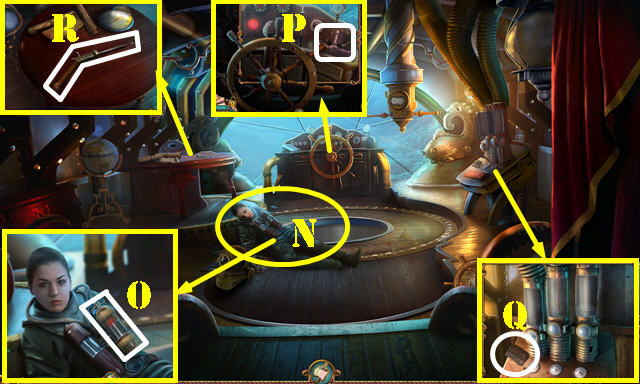
- Look at the note; take the Map and MAYOR'S PIN (N). Pan up; use the PLIERS to get the BELL CLAPPER (O).
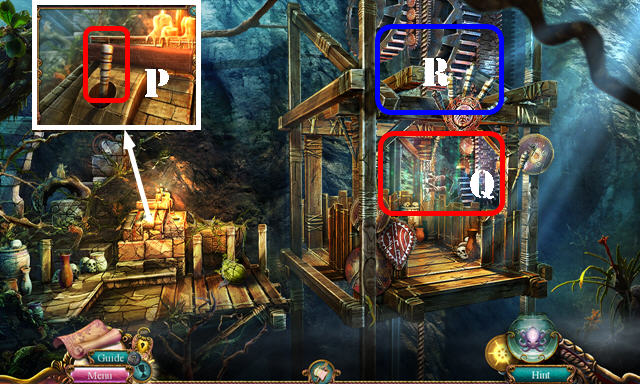
- Take the CHAIN (P).
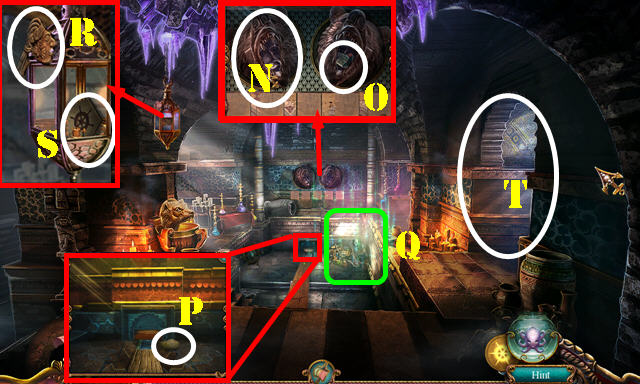
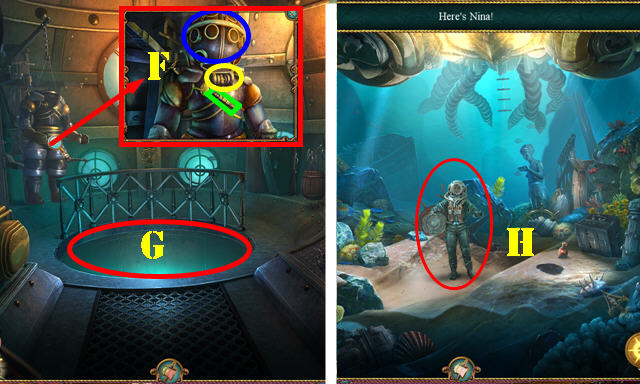
- Enter the Mayor's Suite (Q).
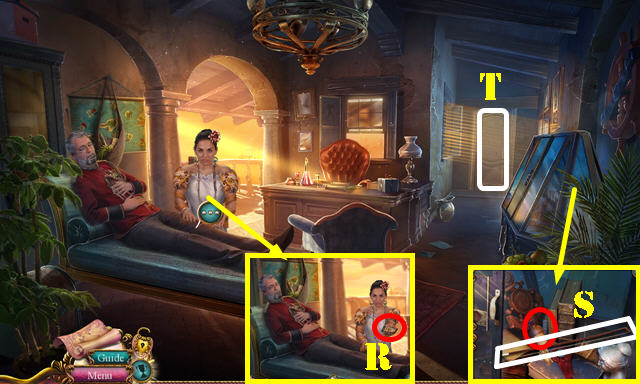
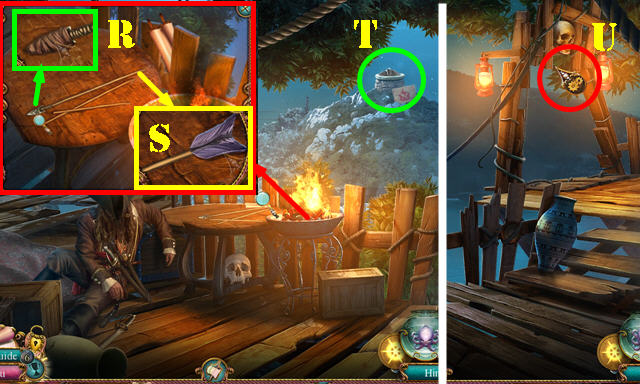
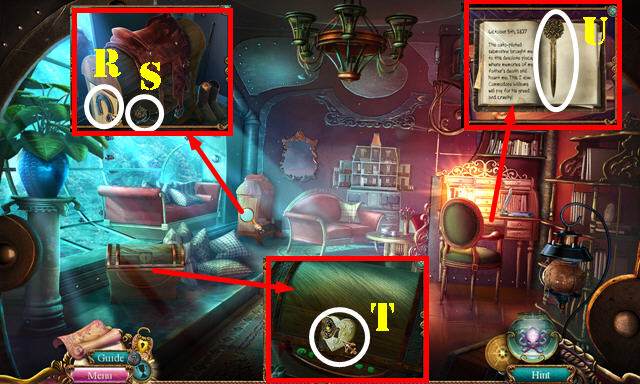
- Talk to Nina; take the HERBARIUM (R).
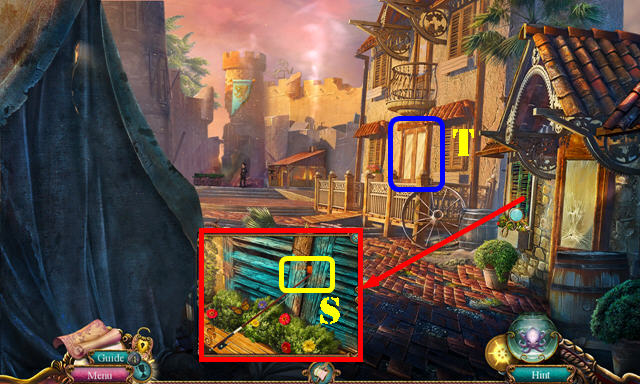
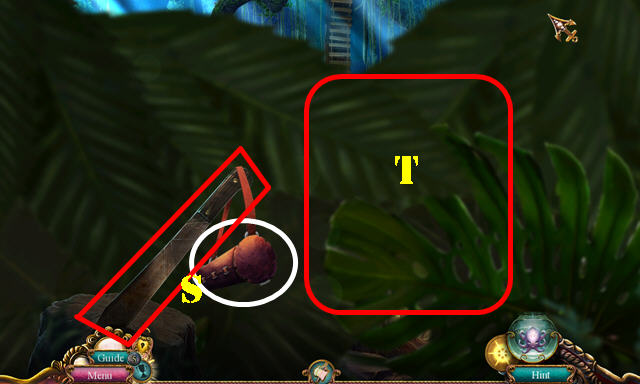
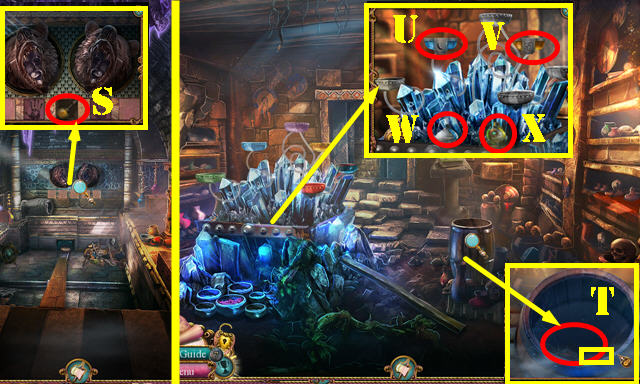
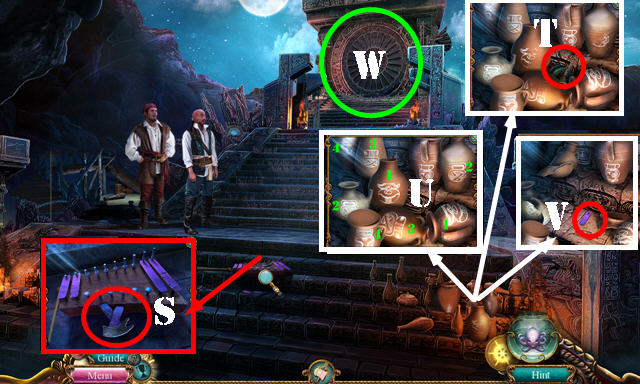
- Place the MAYOR'S PIN; take the VIOLIN BOW and ACID (S).
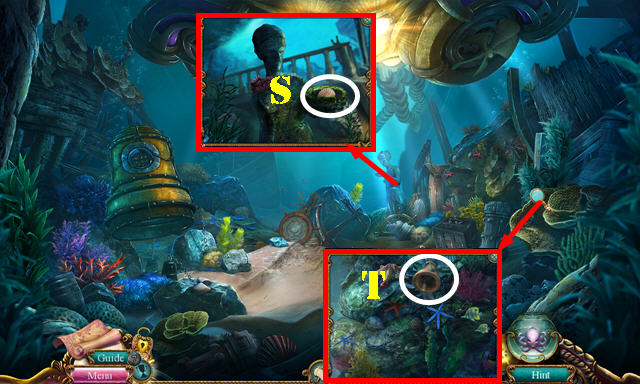
- Go to Nina's Room (T).
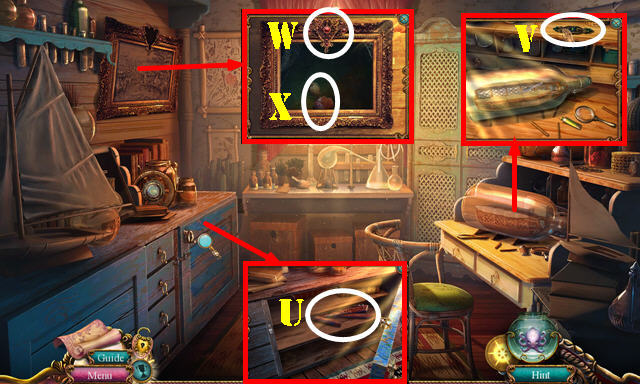
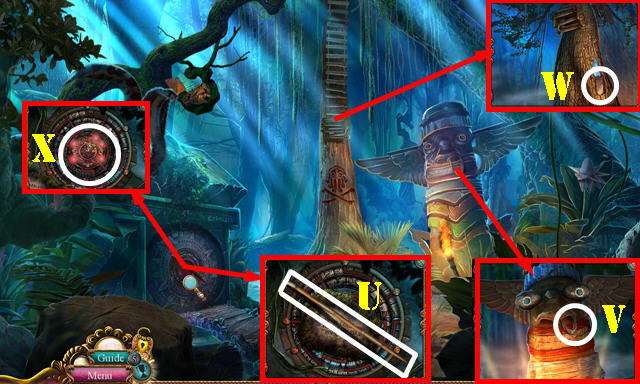
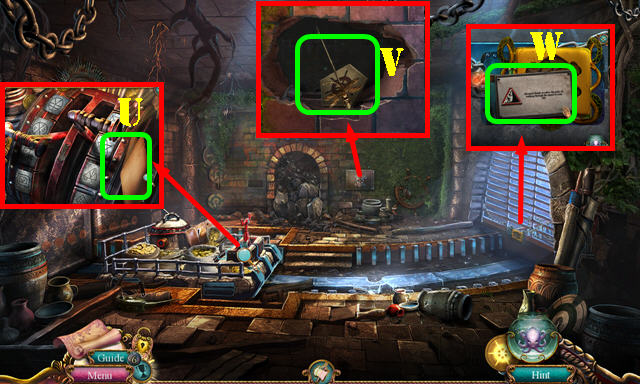
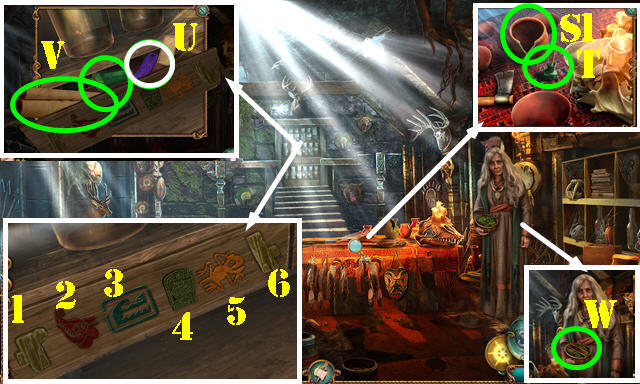
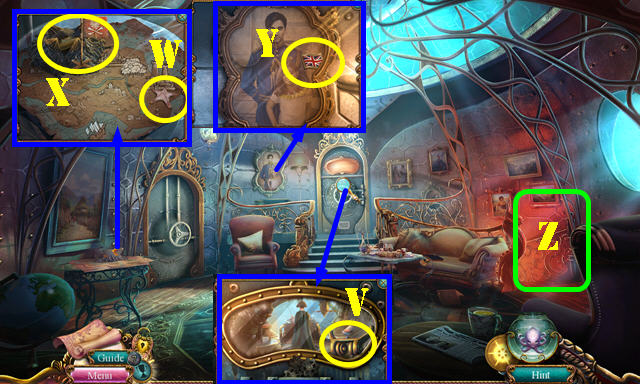
- Use the ACID on the latch and slide it; take the JACK (U).
- Take the ORGAN PART 1/3 (V).
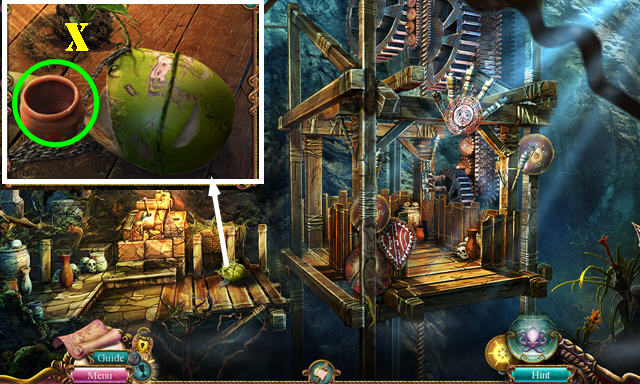
- Place the BROOCH (W); take the WOODEN DOLL (X).
- Return to the Shore.
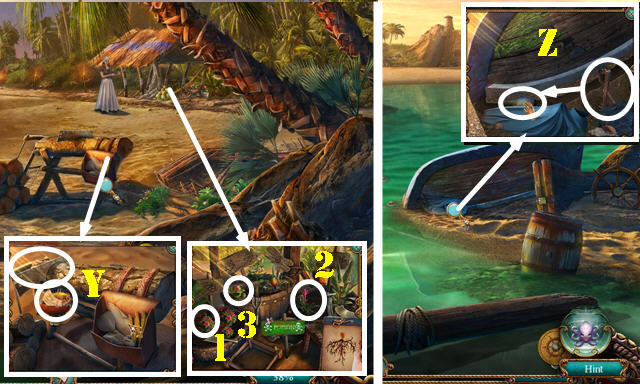
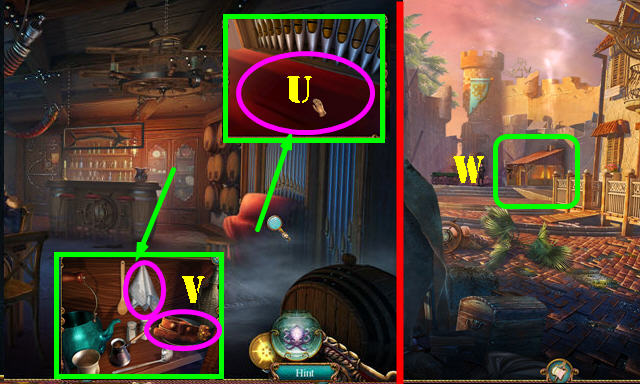
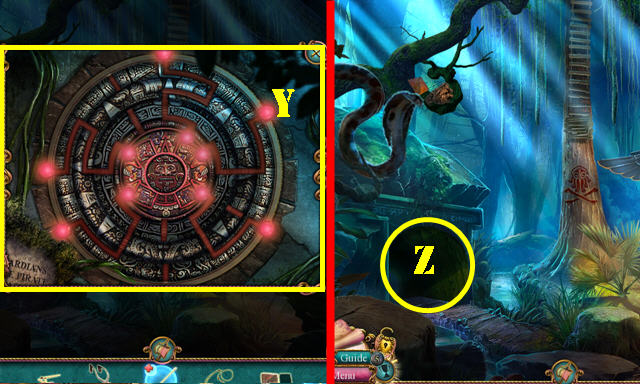
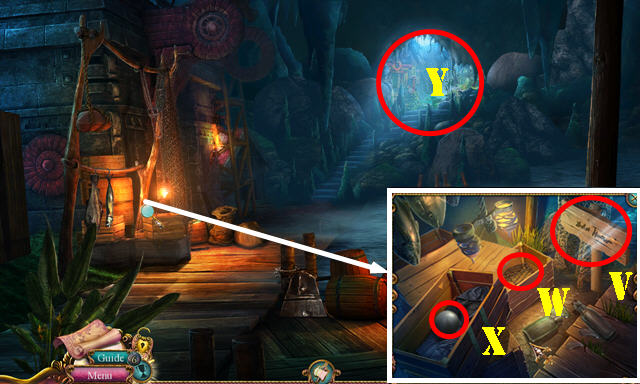
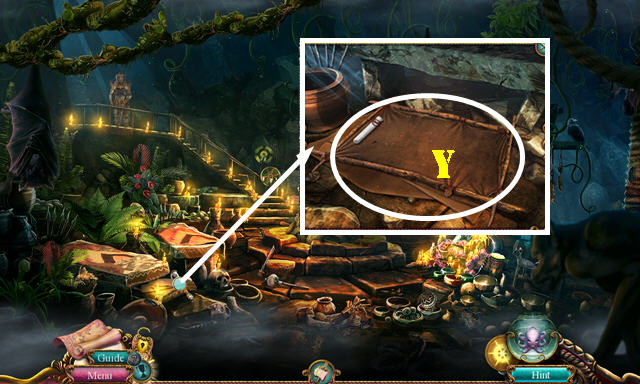
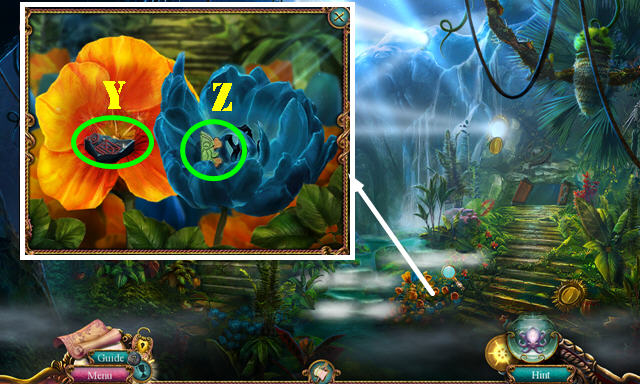
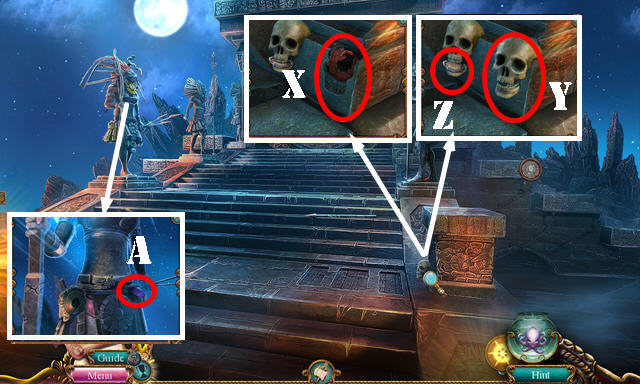
- Use the WOODEN DOLL; look at the note; take the CARBON SHAVINGS and TUNING FORK (Y).
- Place the HERBARIUM; select 1-3. You receive the ISLAND ROOTS.
- Pan left.
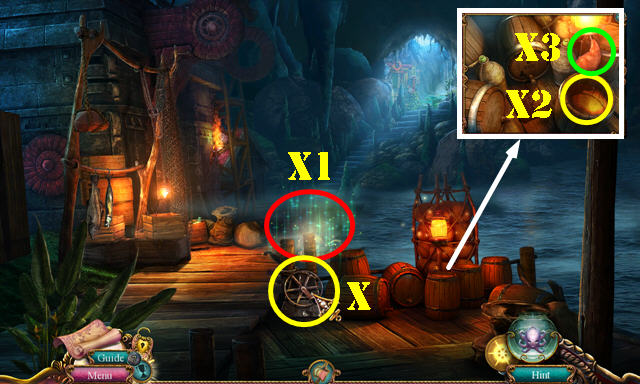
- Use the JACK; take the BOTTLE (Z).
- Return to the Town Square.
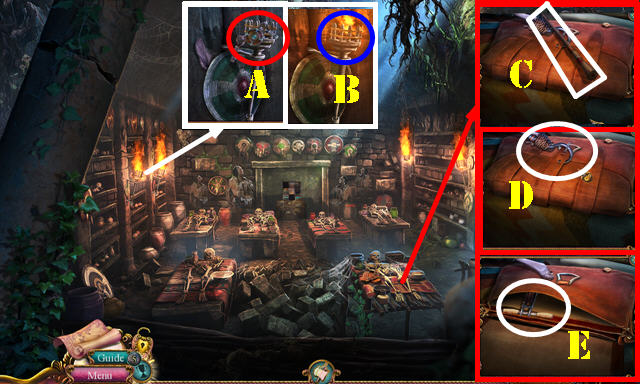
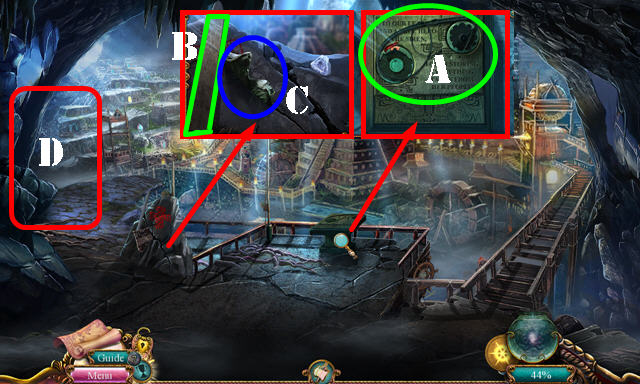
- Put down the WEIGHTS and the CARBON SHAVINGS. Look at the note (A). Select weights 7-4-2-2 (B). Select the carbon shavings 3x (C) to get the ACTIVATED CARBON.
- Put down the BOTTLE (D); select the spigot (E) to get the WATER.
- Return to Nina's Room.
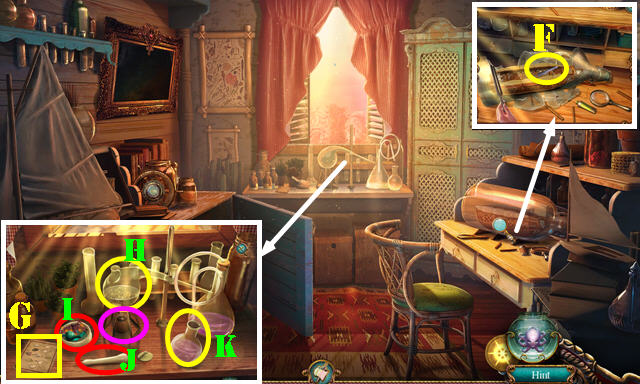
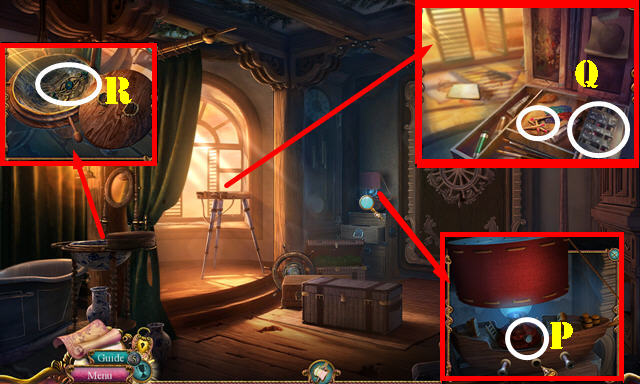
- Use the TUNING FORK; take the TWEEZERS (F).
- Look at the instructions (G). Pour the WATER and ACTIVATED CARBON (H). Place the ISLAND ROOTS (I). Select the pestle (J), bowl (I), and burner (purple). Take the HEALING POTION (K).
- Walk down.
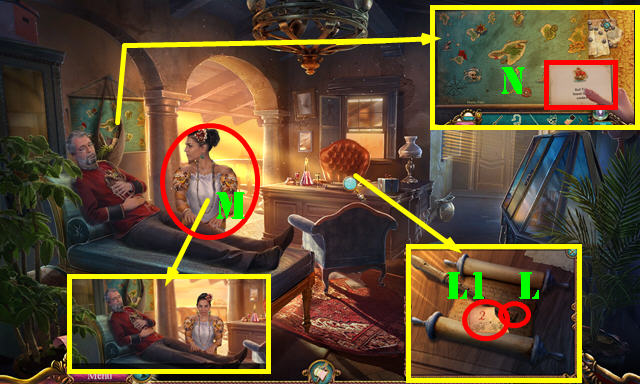
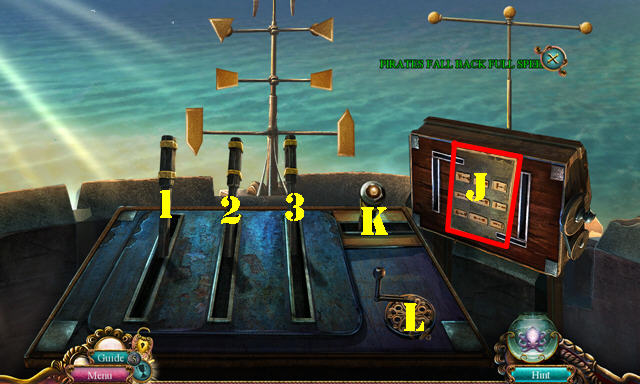
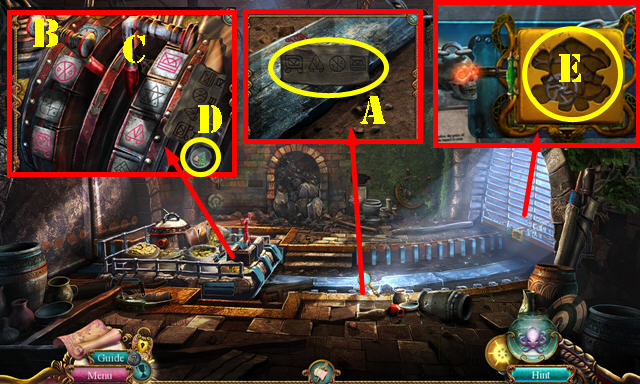
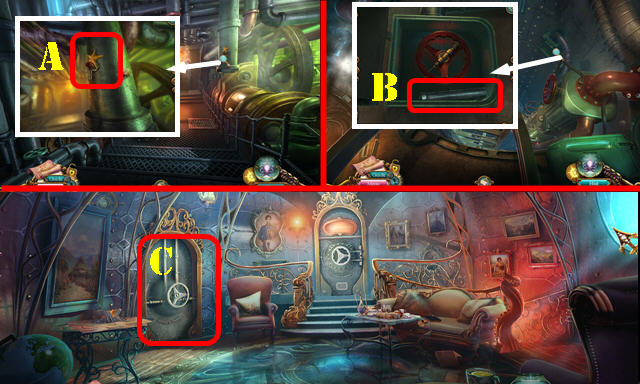
- Use the TWEEZERS (L); take the CANNON COMBINATION 1/2 (L1).
- Give the HEALING POTION (M).
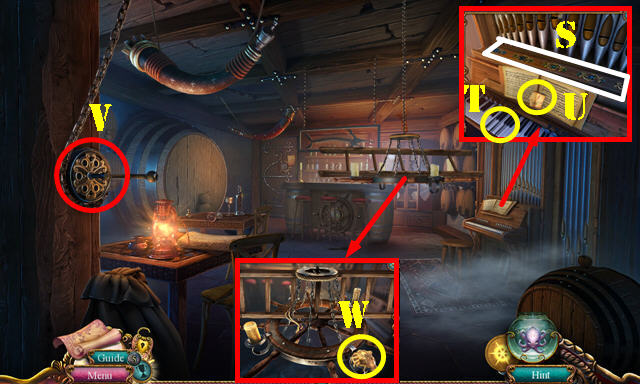
- Place the SHIP'S LOG for a puzzle (N).
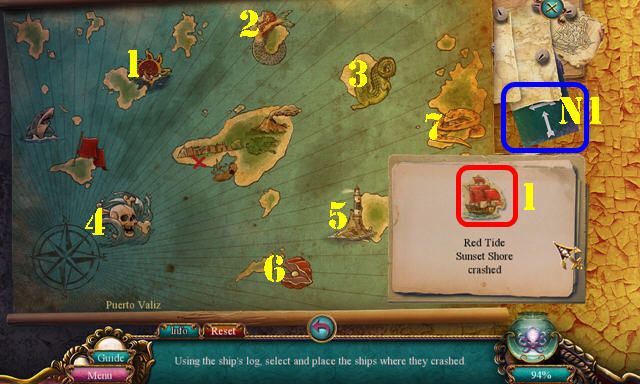
- Solution (1-7).
- Take the ARROW SYMBOLS (N1).

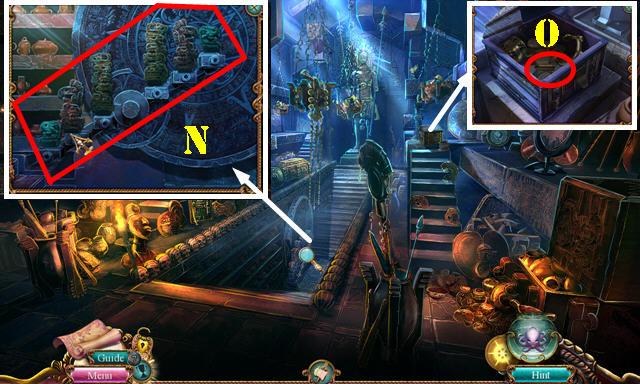
- Talk to the Mayor; take the NAVY CREST (O).
- Walk down.
- Open the mouth and pull the chain. Place the NAVY CREST (P).
- Go to the Fort (R).
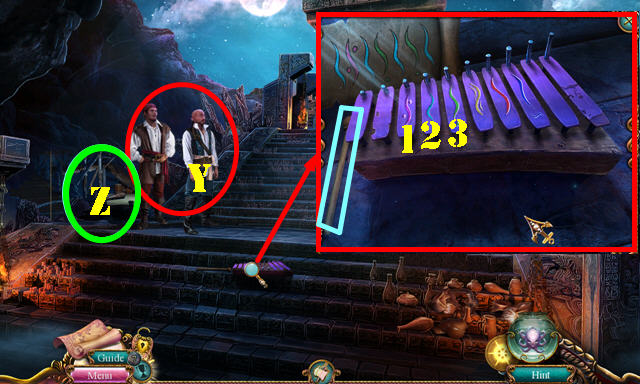
- Use the VIOLIN BOW (S) for a HOP; play it to get the SPOON SYMBOL.
- Enter the Tavern (T).
Chapter 2: The Tavern
- Remove the cloth (U).
- Use the SPOON SYMBOL; take the CLOTH and BELT (V).
- Walk down and go to the Smithy (W).
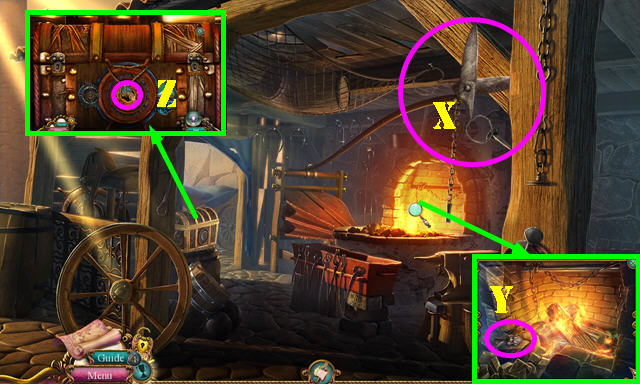
- Take the SCISSORS (X) and HEX KEY (Y).
- Use the HEX KEY on the BELT; receive the LATCH PIN (inventory).
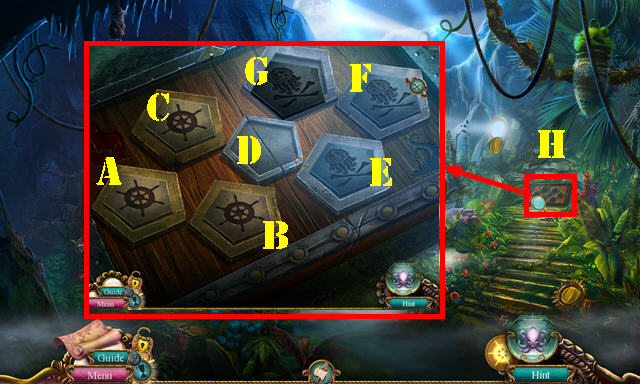
- Take the NAVY BADGE and place the LATCH PIN for a puzzle (Z).
- Solution: (E-I)-(A-E)-(E-B)-(F-E)-(E-A)-(G-F)-(F-E)-(B-C)-(E-B)-(H-G)-(G-F)-(F-E)-(C-F)-(F-G)-(G-H).
- Take the ORGAN PART 2/3 and METAL SHIP.
- Walk down.
- Use the SCISSORS; place the ARROW SYMBOLS; SELECT 1-4. Take the NAVAL PLANS (L).
- Open the bag (M).
- Return to the Tavern.
- Give the NAVAL PLANS (N) for an HOP; play it to get the SIGNAL FLAGS SYMBOL.
- Look at the note; place the METAL SHIP (O). Enter the Admiral's Room.
- Use the CLOTH to get the OILED CLOTH (P).
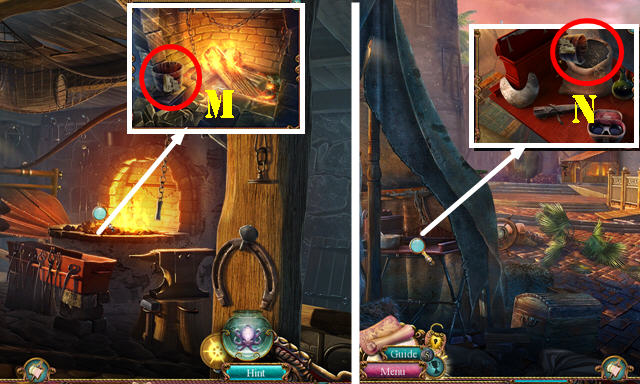
- Place the NAVY BADGE; look at the note; take the MATCHES and SIGNAL FLAGS KEY (Q).
- Take the ORGAN PART 3/3 (R).
- Walk down.
- Place the 3 ORGAN PARTS (S); select the keys (T); take the CANNON COMBINATION 2/2 (U).
- Use the OILED CLOTH (V); select the crank. Take the WAX (W).
- Walk down.
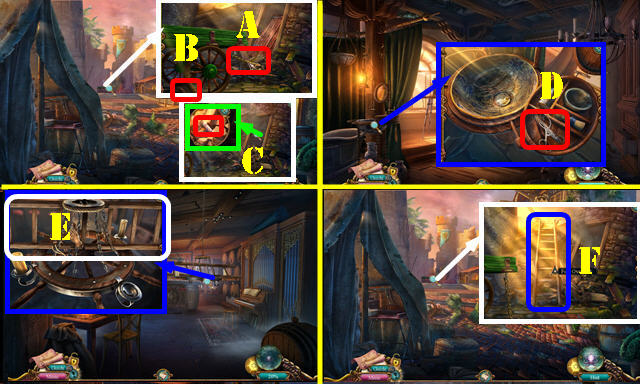
- Place the CHAIN (A) and BELL CLAPPER (B). Move the stone; take the BARBER'S POLE (C).
- Return to the Admiral's Room.
- Place the BARBER'S POLE; take the MEDICAL RETRACTOR and RAZOR (D).
- Walk down.
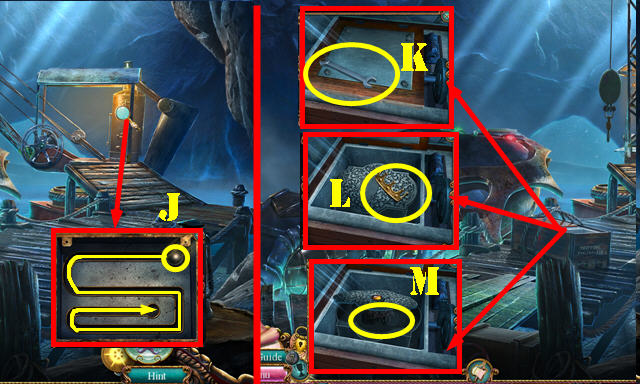
- Use the RAZOR; take the LADDER (E).
- Walk down.
- Place the LADDER and go up the ladder to Fort Overlook (F).
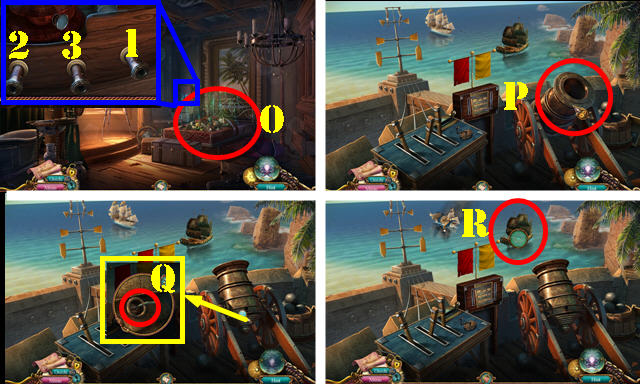
- Take the BROKEN BUCKET (G).
- Take the CANNON (H).
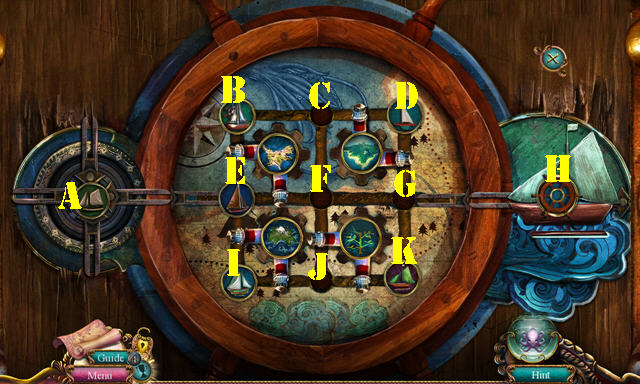
- Place the SIGNAL FLAGS KEY on the SIGNAL FLAGS SYMBOL; take the FLAG SIGNAL MANUAL (inventory).
- Place the FLAG SIGNAL MANUAL for a puzzle (I).
- Look at the manual (J).
- Solution: 3-K-3-2-2-K-2-K-1-1-L.
- Return to the Smithy.
- Place the BROKEN BUCKET; put the WAX on it; take the REPAIRED BUCKET (M).
- Walk down.
- Open the bag; use the REPAIRED BUCKET to get the GUNPOWDER (N).
- Return to the Admiral's Room.
- Place the CANNON and the 2 CANNON COMBINATIONS; select 1-2-3 for an HOP. Play the HOP (O) to get the SANDPAPER.
- Return to the Fort Overlook.
- Pour the GUNPOWDER (P); place the SANDPAPER and use the MATCHES (Q). Select the target (R) when it's on the ship.
Chapter 3: Burial Chamber
- Take the TUBE and MACHETE (S).
- Use the MACHETE 3x (T).
- Take the BROKEN SPEAR (U); look at the note.
- Take the VINE (V).
- Open the TUBE to get the Map; take the INFINITY TOKEN (inventory).
- Take the MOSAIC PIECE 1/2 (W).
- Place the INFINITY TOKEN for a puzzle (X).
- Solution (Y).
- Enter the Burial Chamber (Z).
- Take the MEDALLION and FEATHER 1/3 (A). Use the MATCHES (B).
- Take the BLOWGUN (C).
- Use the MEDICAL RETRACTOR to get the PIRATE HOOK (D). Open the bag; take the ROPE PULLEY (E).
- Walk down.
- Place the PIRATE HOOK on the BROKEN SPEAR to get the LONG HOOK (inventory).
- Use the LONG HOOK (F).
- Go to the Tree Platform (G).
- Select the dart on the BLOWGUN to get the LOADED BLOWGUN (inventory).
- Use the LOADED BLOWGUN (H).
- Remove the sheet (I) for an HOP; play it to get the SPOON.
- Look at the scroll; take the COBRA FLUTE and FEATHER 2/3 (J).
- Pan right.
- Take the BOW and FISHHOOK PLATE (K).
- Walk down.
- Use the COBRA FLUTE (L); take the MOSAIC PIECE 2/2 and RAG (M).
- Use the SPOON to get the SAP (N).
- Go to the Burial Chamber.

- Place the 2 MOSAIC PIECES for a puzzle. Solution (O); take the TOTEM CODE.
- Walk down.
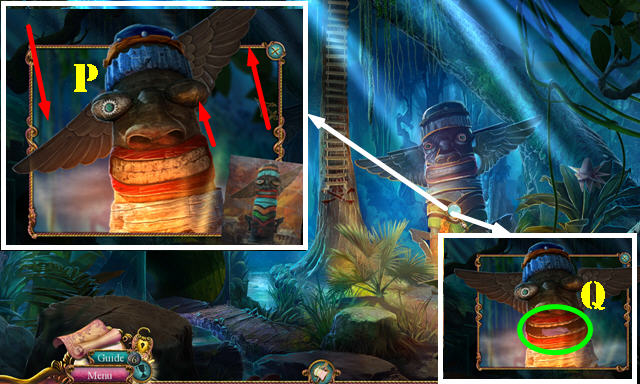
- Place the TOTEM CODE; arrange the wings and eye as shown (P). Take the FEATHER 3/3 (Q).
- Return to the Tree Platform; pan left.
- Wrap the RAG (R). Use the SAP and place the 3 FEATHERS (S). Select the arrow to get the FLAMING ARROW.
- Use the VINE on the BOW. Select the vine and attach the loose end to the opposite side. Place the FLAMING ARROW to get the BOW AND FLAMING ARROW (inventory).
- Use the BOW AND FLAMING ARROW (T).
- Place the ROPE PULLEY and go to the Docks (U).
- Read the sign (V). Open the box; take the TORN NET (W).
- Place the FISHHOOK PLATE; take the BIG PEARL (X).
- Go to the Pirate Gardens (Y).
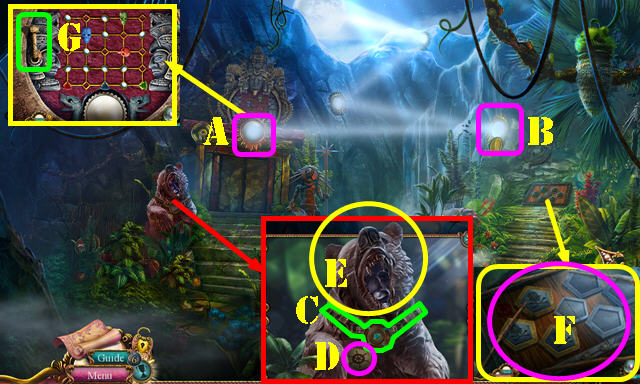
- Place the BIG PEARL (A). Open the cover (B).
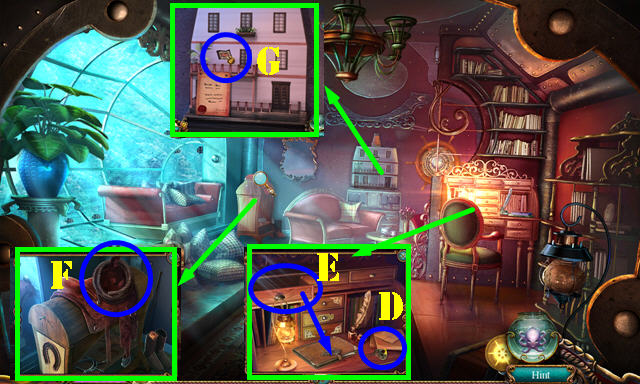
- Place the MEDALLION (C); take the TILE 1/3 (D) and BEAR HEAD (E).
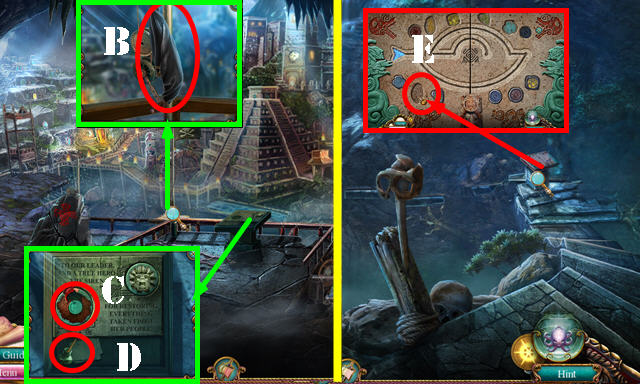
- Select the sticks (F); take the FRAME PIECES.
- Pull the lever (G) for a puzzle.
- Solution (H).
- Enter the Secret Hall (I).
- Look at the note; take the FIRE SYMBOL (J).
- Take the MILLSTONE and CRANK (K).
- Take the POUCH (L).
- Go to the Underground Complex (M).
Chapter 4: Underground Complex
- Place the BEAR HEAD (N); take the RAIL PIECE 1/4 (O).
- Place the MILLSTONE; take the CLAY (P).
- Play the HOP (Q) to get the MAYAN COIN.
- Take the RELIEF PIECE (R); place the FIRE SYMBOL; take TILE 2/3 (S).
- Go to the Railway Station (T).
- Look at the note (U).
- Use the MAYAN COIN and remove the cobwebs; take the HAIRPIN and TILE 3/3 (V).
- Look at the sign (W).
- Return to the Docks.
- Place the CRANK (X). Play the HOP (X1) to get the THREAD.
- Remove the top and dip the POUCH (X2); take the RUM POUCH (X3).
- Return to the Secret Hall.
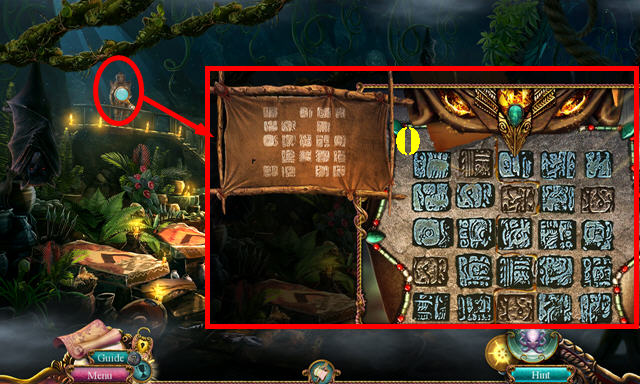
- Place the FRAME PIECES; use the THREAD. Take the PARCHMENT FRAME (Y).
- Walk down.
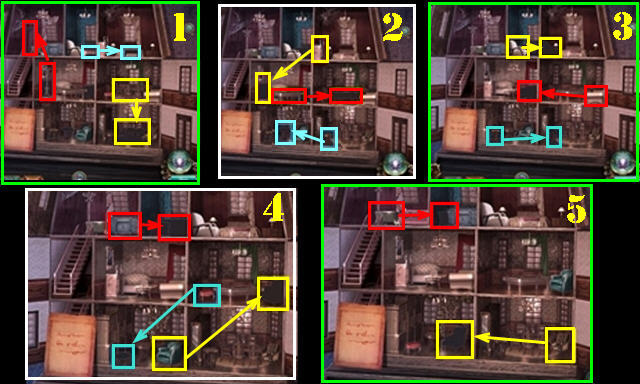
- Place the 3 TILES for a puzzle. Solution: E-C-A-B-D-C-A-B-G-F-E-D-C-A-B-G-D.
- Enter the Crystal Room (H).

- Look at the book; place the RELIEF PIECE (I) and PARCHMENT FRAME (J). Take the SYMBOL INSTRUCTIONS.
- Play the HOP (K) to get the MAYAN MASK.
- Take the MIRROR and remove the skulls (L).
- Take the CRYSTAL PIECE (M); open the locket (N) and look at the note.
- Return to Secret Hall.
- Use the RUM POUCH and place the SYMBOL INSTRUCTIONS for a puzzle. Solution (O).
- Take the RAIL PIECE 2/4 and OARLOCK.
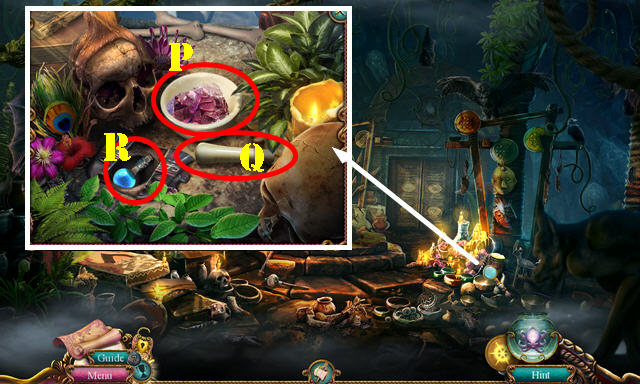
- Place the CRYSTAL PIECE (P). Use the pestle (Q). Take the CRYSTAL POWDER.
- Place the MAYAN MASK; take the MOONLIGHT SERUM (R).
- Place the OARLOCK on the TORN NET to get the IMPROVISED NET (inventory).
- Go to the Underground Complex.
- Use the CRYSTAL POWDER; select the three hands; take the HONEY SERUM (S).
- Return to the Crystal Room.
- Use the IMPROVISED NET to get the RAIL PIECE 3/4 (T).
- Use the MOONLIGHT SERUM (U) and HONEY SERUM (V); take the BLUE BLOOMING LIQUID (W) and YELLOW BLOOMING LIQUID (X).
- Walk down.
- Use the YELLOW BLOOMING LIQUID; take the RAIL PIECE 4/4 (Y).
- Use the BLUE BLOOMING LIQUID; take the SIREN'S FLAG SYMBOL (Z).
- Return to the Railway Station.
- Place the 4 RAIL PIECES; select all four pieces. Place the CLAY and take the IGNITION SEQUENCE (A).
- Place the IGNITION SEQUENCE for a puzzle. Solution: Bx5-Cx3-Bx2-Cx4. Take the SIREN'S FLAG SYMBOL 2/2 (D).
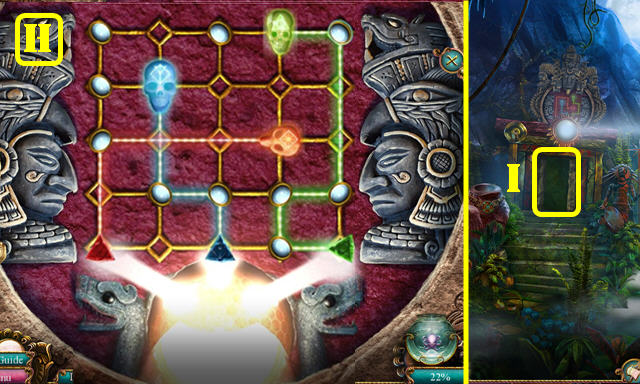
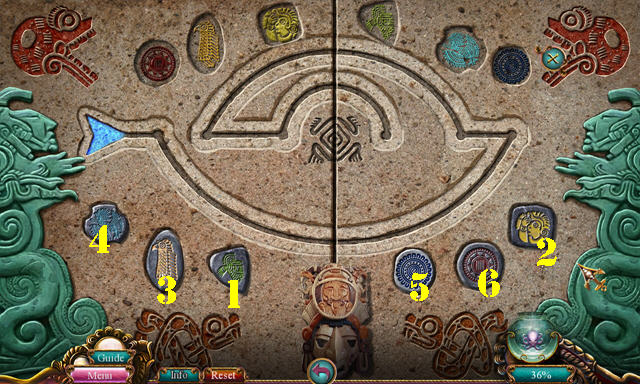
- Place the 2 SIREN'S FLAG SYMBOLS for a puzzle (E).
- Solution (1-26).
- Enter the Tunnel (F).
- Use the MIRROR (G).
- Take the PLANK 1/4 (H).
- Use the HAIRPIN to get the LEATHER STRING (I). Take the ARROWHEAD (J).
- Go forward (J1).
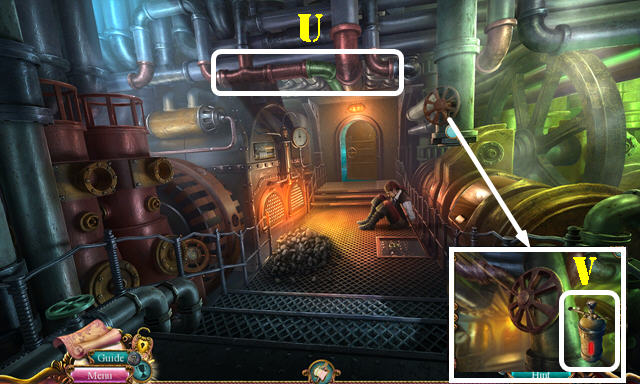
- Take the SHOVEL (K) and TONGS (L).
- Walk down.
- Use the SHOVEL (M). Play the HOP (N) to get the RITUAL PEG.
- Place the RITUAL PEG. Use the TONGS to get the HOT COALS (O).
- Go forward.

- Use the HOT COALS; take the PLANK 2/4 and WOODEN COG (P).
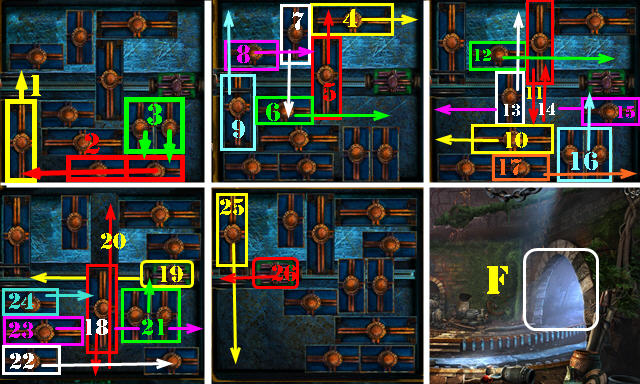
- Place the WOODEN COG for a puzzle (Q).
- Solution: (A)-(B)-(slide W)-(A)-(B)-(C)-(F)-(slide X)-(I)-(slide Z)-(D)-(E)-(F)-(G)-(H)-(I)-(slide Y).
- Take the stairs to the Volcano Overlook.
- Take the WHIP (A) and PLANK 3/4 (B).
- Use the ARROWHEAD; take the OBSIDIAN GLASS (C).
- Go to the Cliffside Platform (D).
Chapter 5: Cliffside Platform
- Take the SUN LION (E).
- Pan right.
- Take the PLANK 4/4 (F).
- Walk down.
- Place the SUN LION (G); take the CHALK (H).
- Place the 4 PLANKS for a puzzle (I).
- Solution (J).
- Go to the Elevator (K).
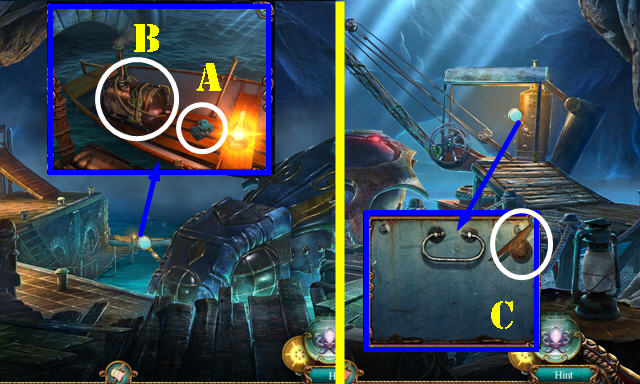
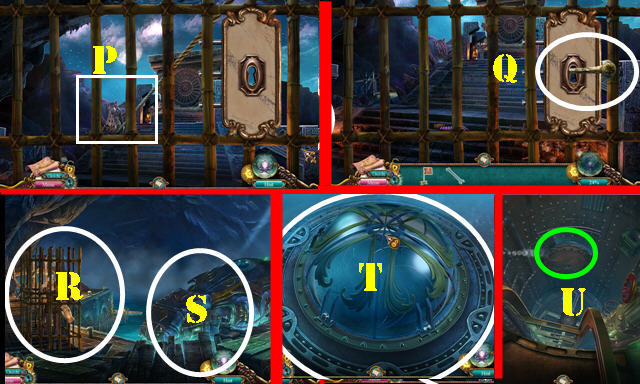
- Use the WHIP (L); take the SHACKLES KEY (M).
- Take the LEFT DIRECTION SIGN (N).
- Return to the Stairway.
- Use the SHACKLES KEY to get the ELEVATOR LEVER (O).
- Return to the Elevator.
- Place the ELEVATOR LEVER; pull it (P). Play the HOP (Q) to get the SKULL.
- Go to the Xibalba Plateau (R).
- Take the METAL SHARD and select the pieces (S).
- Take the FLAG MECHANISM (T). Use the CHALK; select matching pairs (U). Take the PLATE 1/4 (V).
- Go to the Treasury Entrance (W).
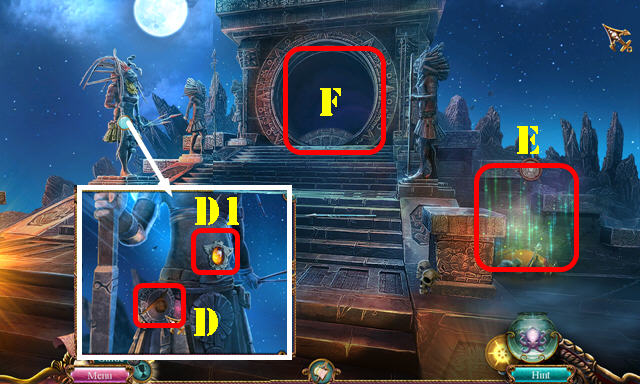
- Take the OUROBOROS (X). Place the SKULL (Y); take the STONE RUNE (Z).
- Take the PLATE 2/4 (A).
- Return to the Volcano Overlook.
- Use the FLAG MECHANISM; take the PIRATE FLAG (B).
- Place the OUROBOROS (C); take the GLUE (D).
- Go to the Cliffside Platform.
- Place the STONE RUNE for a puzzle (E).
- Solution one: place the runes into the puzzle in numerical order: 1-6.
- Solution two: H-I-H-G-H-I-F-G-F.
- Take the PLATE 3/4 (J).
- Pan left and enter the Wise Woman's Hut (K).
- Take the RIGHT DIRECTION SIGN (L).
- Take the LACE (M). Use the METAL SHARD; take the NAIL (N).
- Take the FEATHER TOKEN (O). Move the jars (P).
- Walk down.

- Place the FEATHER TOKEN; take the POT SHARD (Q).
- Place the LEFT DIRECTION SIGN; tie the LEATHER STRING on it (R). Place the RIGHT DIRECTION SIGN; use the LACE (S).
- Return to the Wise Woman's Hut.
- Put down the GLUE (S1) and select the brush (T); place the POT SHARD on the pot; take the POT.
- Select 6-2-4-1-3-5. Take the PLATE 4/4 (U). Look at the note; take the PLANT POTION and TUNE SCROLL (V).
- Give the TUNE SCROLL; take the SIREN'S SONG (W).
- Return to the Elevator.
- Place the POT to get the PLANT (X).
- Go to the Xibalba Plateau.
- Place the SIREN'S SONG and the 4 PLATES for a puzzle. Use the hammer (light blue) to play the tunes. Solution: 2-1-2-3-2-3-2.
- Give the PIRATE FLAG (Y).
- Go to the Volcano Shore (Z).
Chapter 6: Volcano Shore
- Take the FIGURINE 1/3 (A).
- Use the OBSIDIAN GLASS to get the CONQUISTADOR GAUNTLET (B).
- Pan right.
- Take the GUARDIAN ORNAMENT (C).
- Return to the Treasury Entrance.
- Place the GUARDIAN ORNAMENT (D); take the GEM (D1).
- Play the HOP (E) to get the FIGURINE 2/3.
- Enter the Treasury (F).
- Take the MODEL FLAG (G) and PISTON (H).
- Place the PLANT and use the PLANT POTION. Use the CONQUISTADOR GAUNTLET to get the SCREWDRIVER (I).
- Return to the Volcano Shore and pan right.
- Use the SCREWDRIVER for a puzzle. Solution (J).
- Take the WRENCH (K). Place the PISTON; take the CROWN (L). Place the GEM; take the FIGURINE 3/3 (M).
- Return to the Treasury.
- Put down the 3 FIGURINES; arrange as shown (N). Play the HOP to get the REVOLVER.
- Place the CROWN; take the BULLET (O).
- Go to the Volcano Shore.
- Place the BULLET in the REVOLVER to get the LOADED REVOLVER (inventory).
- Use the LOADED REVOLVER (P) and NAIL (Q).
- Open the cage (R).
- Swim to the Submarine (S).
- Use the WRENCH (T) for an HOP. Go to the Grand Hall (U).
- Look at the door; take the HELMET SAFETY LATCH (V).
- Take the STARFISH 1/2 (W). Place the MODEL FLAG; take the SUBMARINE (X).
- Pan up; take the UNION JACK (Y).
- Go to the Engine Room (Z).
- Take the STARFISH 2/2 (A).
- Walk down twice.
- Place the SUBMARINE; open the door; take the PRESSURE REGULATOR (B).
- Go to the Grand Hall and then enter the Captain's Quarters (C).
- Take the KEY BASE (D).
- Open the drawer; select the book (E).
- Look at the note; take the ROPE (F).
- Look at the note; place the UNION JACK for a puzzle (G).
- Solution (1-5). Take the SIGNET RING.
- Return to the Ballast Tank.
- Use the SIGNET RING; take the VALVE (H).
- Return to the Engine Room.
- Place the VALVE (I).
- Use the ROPE (J).
- Take the KEY SHANK (K).
- Take the PIPE 1/3 (L).
- Go to the Diving Chamber (M).
- Take the BUCKLE PIECE (N) and HORSESHOE (O).
- Place the 2 STARFISH (P); turn the wheel and take the KEY BIT (Q).
- Return to the Captain's Quarters.
- Place the HORSESHOE (R); take the MEDAL (S).
- Select the KEY BASE; place the KEY SHANK and KEY BIT on it to get the HEART KEY (inventory).
- Use the HEART KEY (T) for an HOP; play it to get the CRICKET BAT.
- Place the BUCKLE PIECE; open the book and take the LETTER OPENER (U).
- Walk down.

- Use the CRICKET BAT to get the COGS SYMBOL (W).
- Use the LETTER OPENER; take the AIMING GLASS (X). Pan down. Place the MEDAL; take the NAVIGATION DIVIDER (Y).
- Return to the Diving Chamber.
- Use the NAVIGATION DIVIDER; take the SMELLING SALTS and FILE (Z).
- Walk down.
- Place the COGS SYMBOL for a puzzle (Z1).
- Solution: A1-B2-B3x3-B4x4.
- Open the capsule (C); take the SIREN'S MESSAGE.
- Walk down.
- Use the SIREN'S MESSAGE; take the BOLT (D).
- Go to the Engine Room.
- Use the BOLT; take the HELMET (E).
- Go to the Diving Chamber.
- Place the HELMET SAFETY LATCH, PRESSURE REGULATOR and HELMET (F).
- Go to the Sea Floor (G).
- Play the puzzle (H).
- Solution (I).
- Use the FILE for an HOP (J); play it to get the MANHOLE KEY.
- Take the HARPOON (K).
- Use the MANHOLE KEY (L).Go to the Captain's Bridge (M).
- Use the SMELLING SALTS (N). Take the EMPTY AIR CANISTER (O).
- Take the PIPE 2/3 (P) and METAL BRUSH (Q).
- Place the HARPOON; take the HARPOON GUN (R).
- Walk down.
- Use the METAL BRUSH; take the SHELL (S).
- Use the HARPOON GUN to get the PIPE 3/3 (T).
- Return to the Engine Room.
- Place the 3 PIPES (U).
- Use the SHELL; place the EMPTY AIR CANISTER; take the COMPRESSED AIR CANISTER (V).
- Return to the Captain's Bridge.
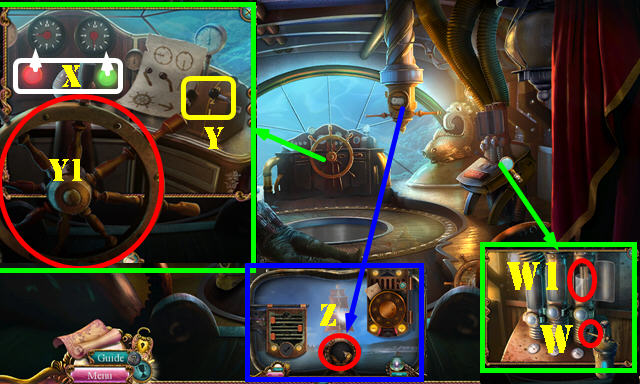
- Use the COMPRESSED AIR CANISTER (W); take the ENGINE SEQUENCE (W1).
- Place the ENGINE SEQUENCE; turn the dials as shown by using the red button (3x) and green button (2x)(X). Lift the levers (Y). Select the wheel (Y1).
- Place the AIMING GLASS (Z) for a puzzle.
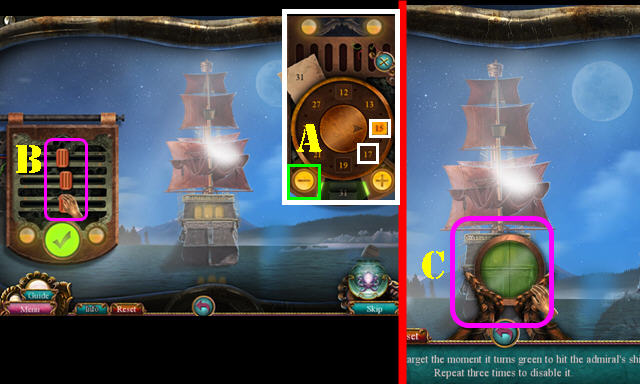
- Solution: 15-A-17-A. Align the sliders in the middle as shown (B).
- Hit the target once it turns green (C). Hit the target three times to beat the game.
- Congratulations, you've completed Sea of Lies: Beneath the Surface.
Created at: 2016-03-06