

Walkthrough Menu
- General Tips
- Chapter 1: Dr. Griffin
- Chapter 2: Wellport
- Chapter 3: Town Hall
- Chapter 4: The Train
- Chapter 5: The Fortress
- Chapter 6: Quarantine
- Chapter 7: The Mansion
General Tips
- This is the official guide for Sea of Lies: Burning Coast.
- This guide will not show when you have to zoom into a location; the screenshots will show each zoom scene.
- Hidden-object puzzles are referred to as HOPs. This guide will not show screenshots of the HOPs, however, it will mention when an HOP is available and the inventory item you'll collect from it.
- Use the Map to fast travel to a location.
Chapter 1: Dr. Griffin
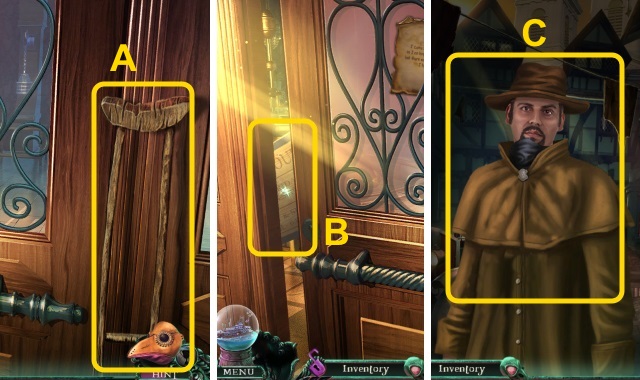
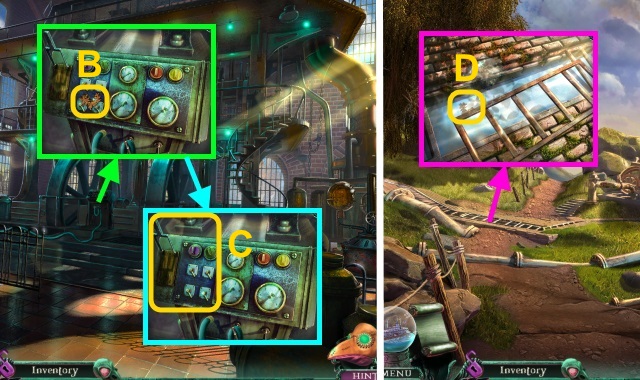
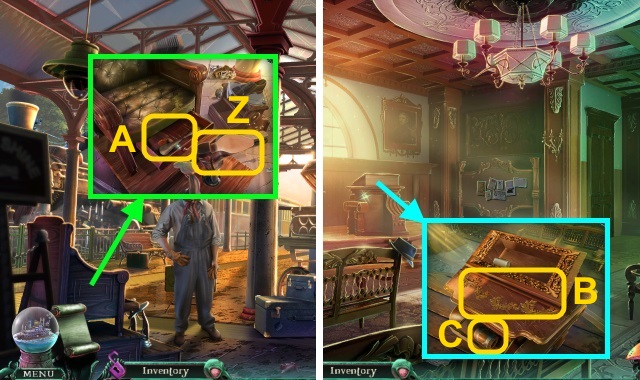
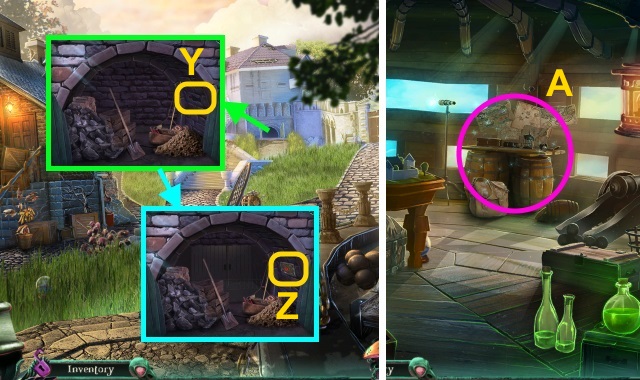
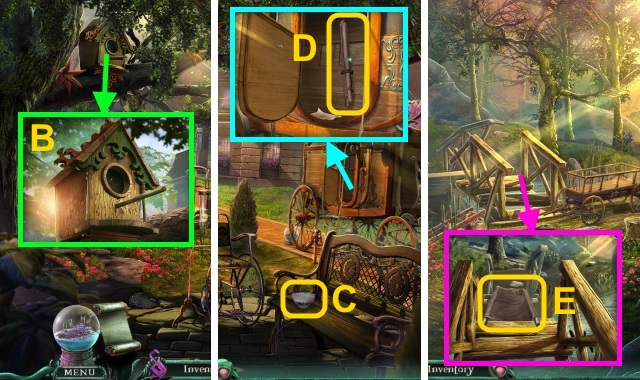
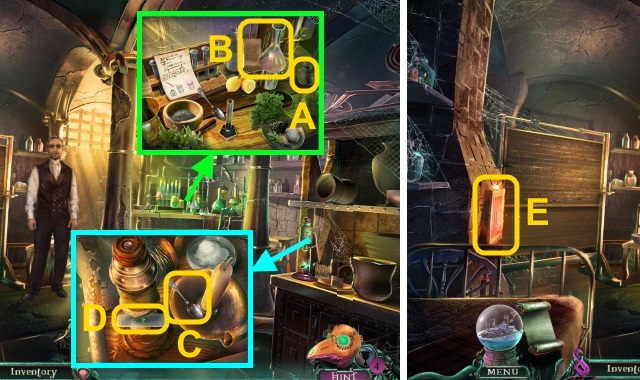
- Take the CRUTCH (A).
- Try to open the door; use the CRUTCH (B).
- Talk to Adam (C).
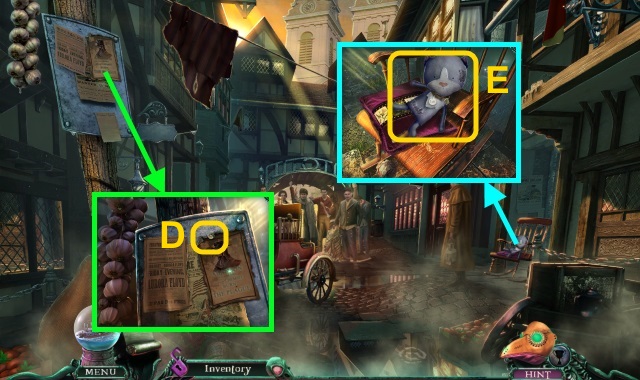
- Take the LOOSE NAIL (D); read the poster.
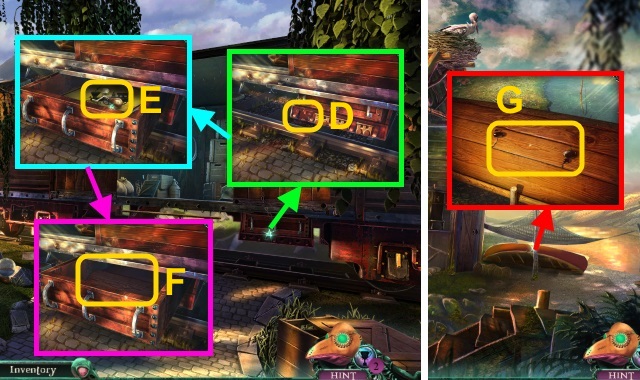
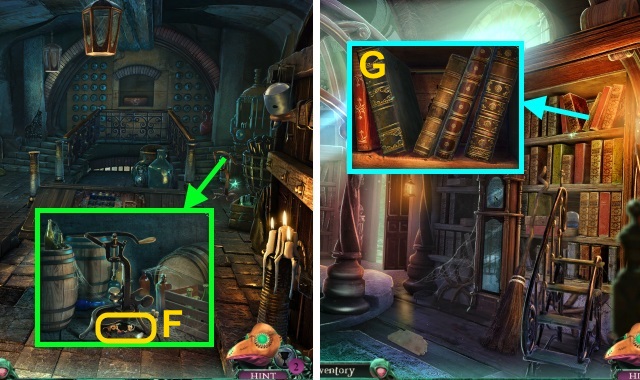
- Take TIMMY THE CAT (E).

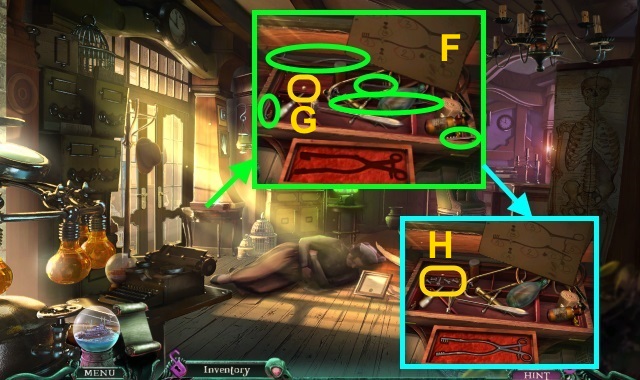
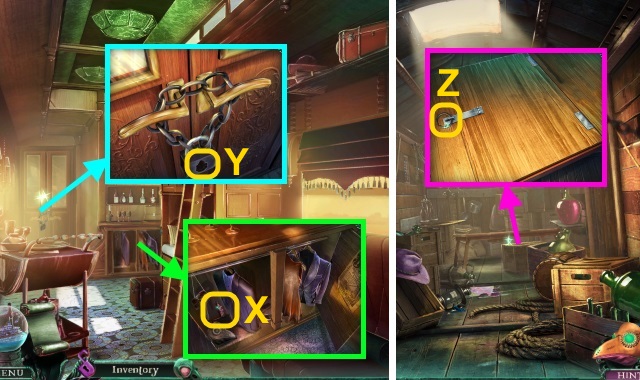
- Use the LOOSE NAIL on TIMMY THE CAT to take the LATCH (F).
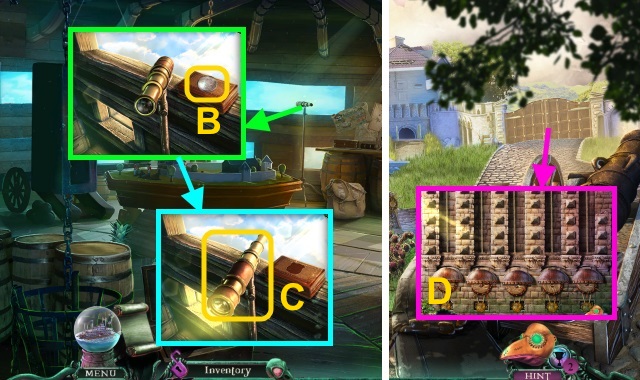
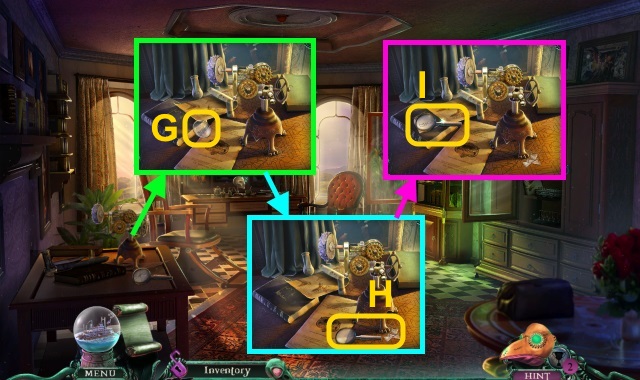
- Take the RAILWAY GOGGLES (G).
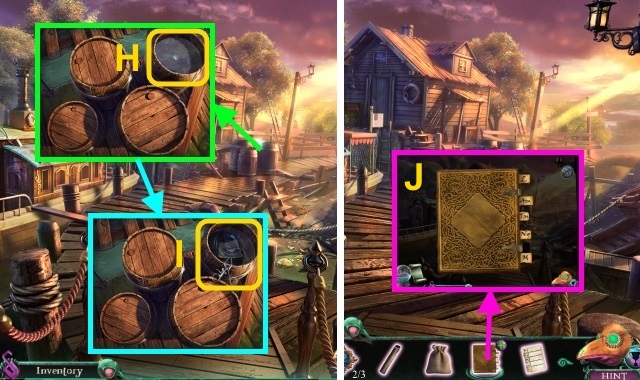
- Move the cloth; place the LATCH (H).
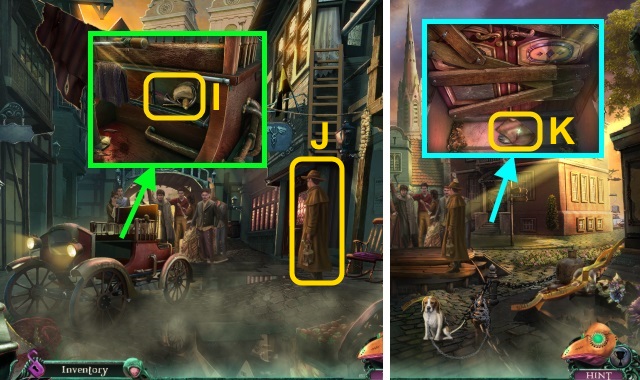
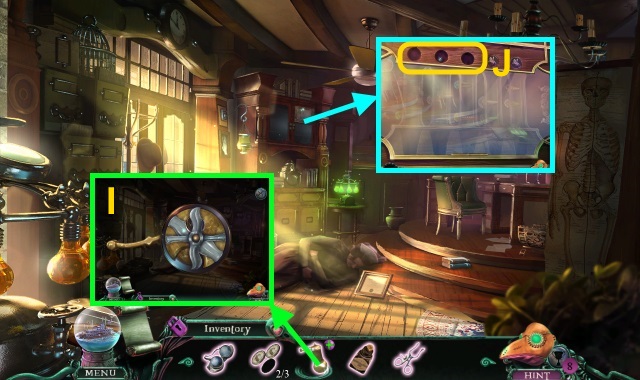
- Take the LANTERN KNOB (I).
- Read the note; take the SPEAKING TRUMPET.
- Give the SPEAKING TRUMPET (J).
- Walk forward.
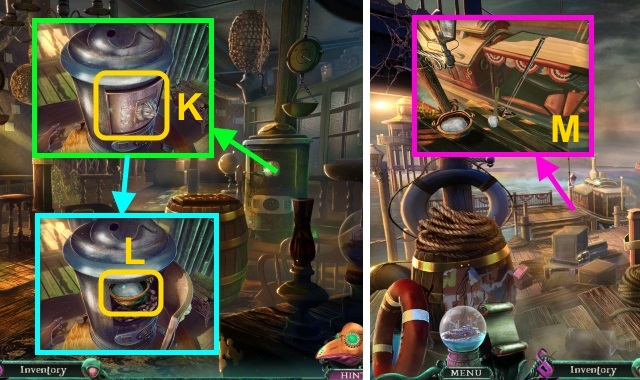
- Read the note; take the SHARP SEASHELL (K).
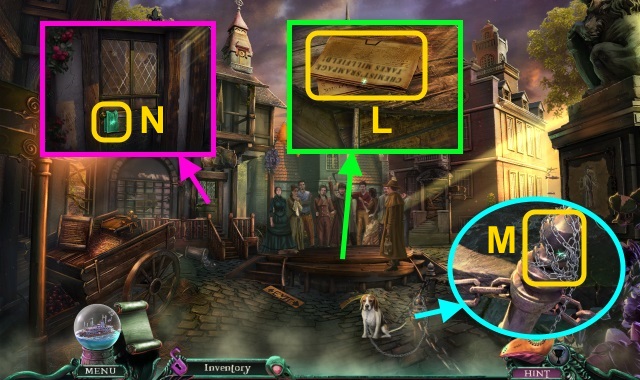
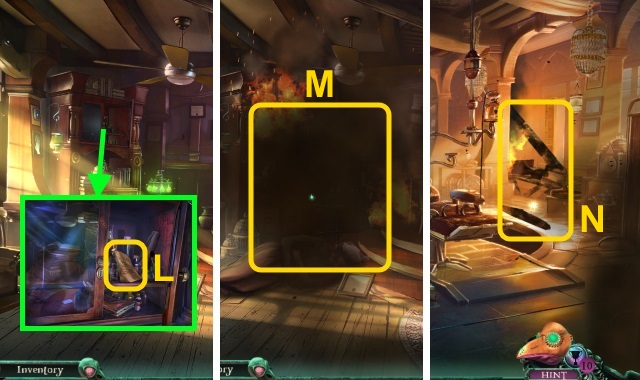
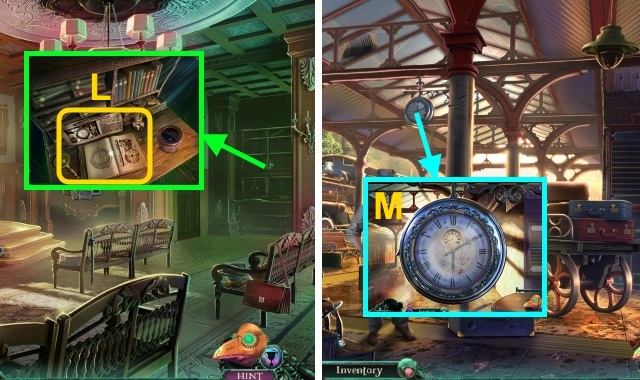
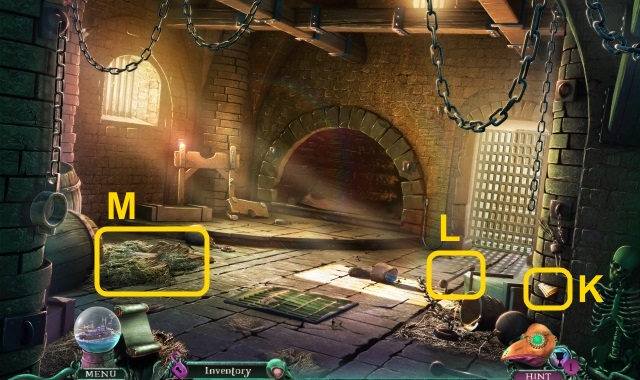
- Take the newspaper and SILVER COINS (1/3) (L).
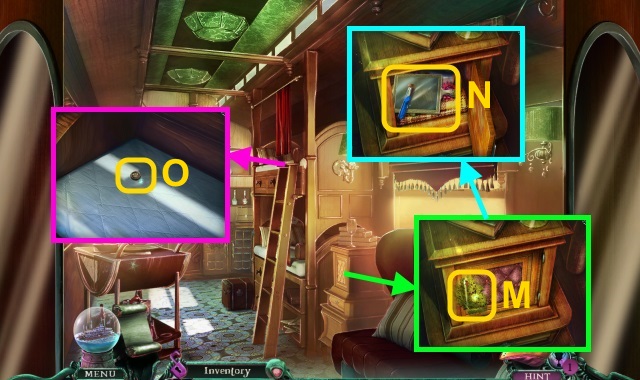
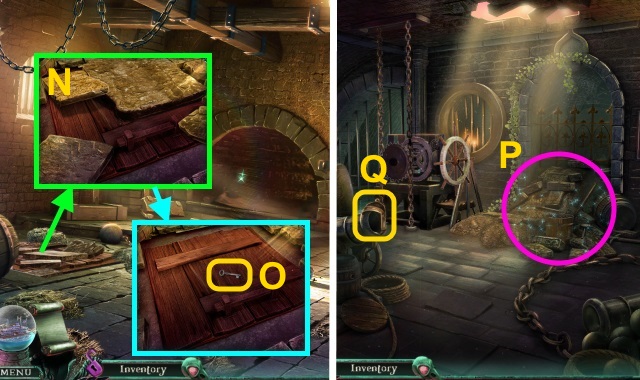
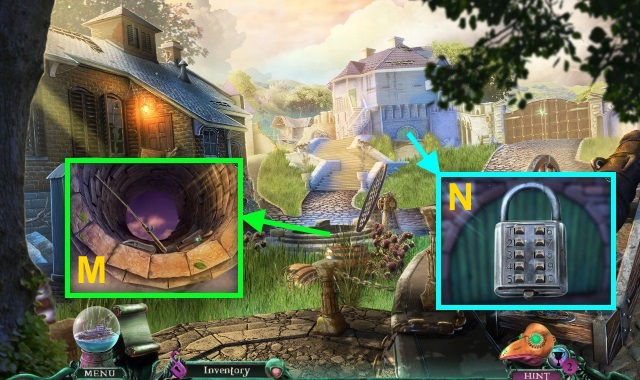
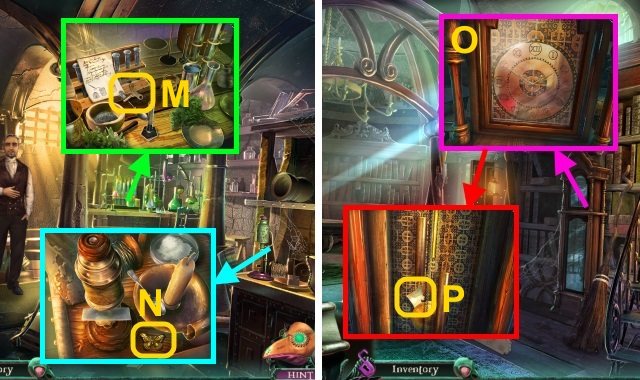
- Move the chain (M).
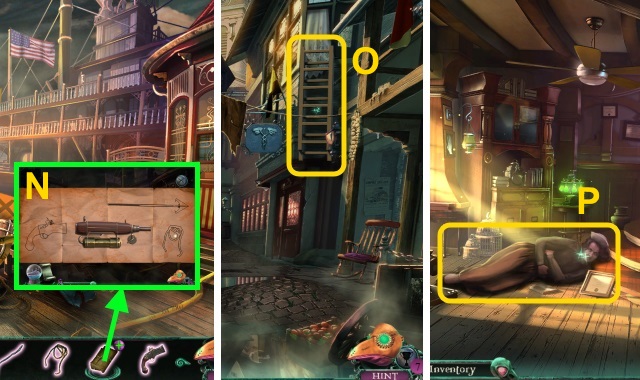
- Take the CLOTH (N).
- Walk right.
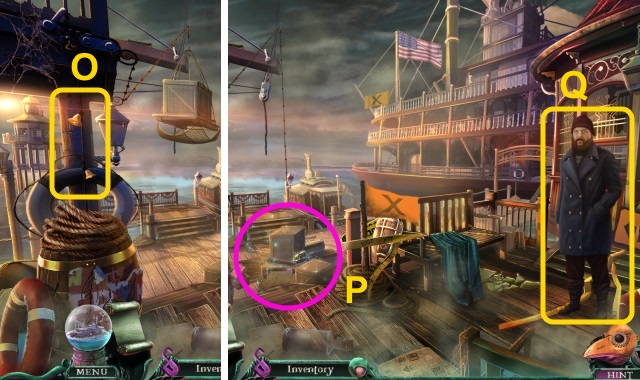
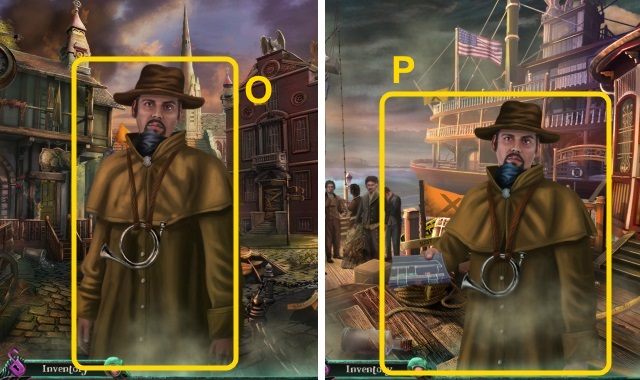
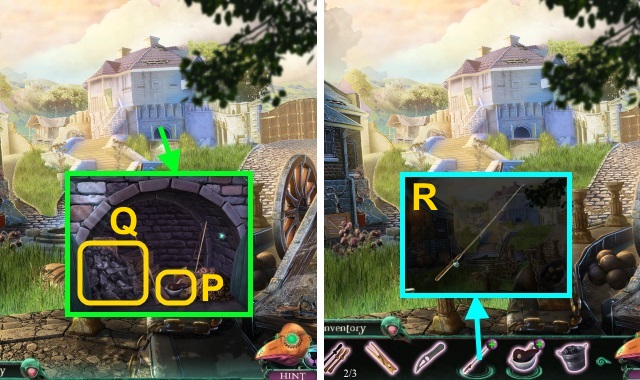
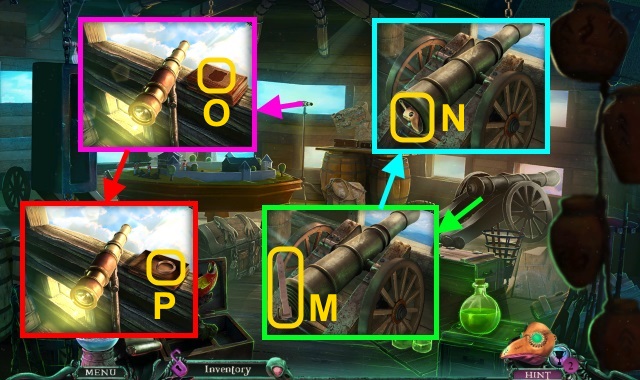
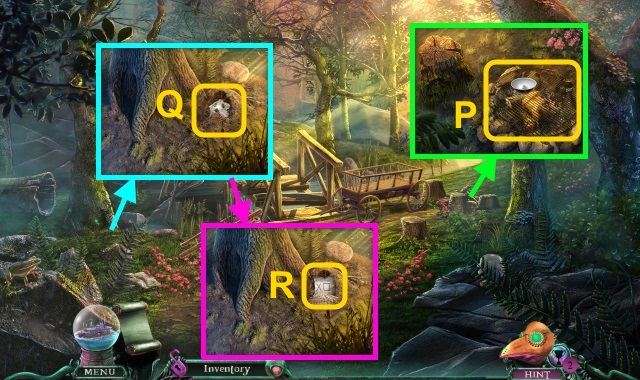
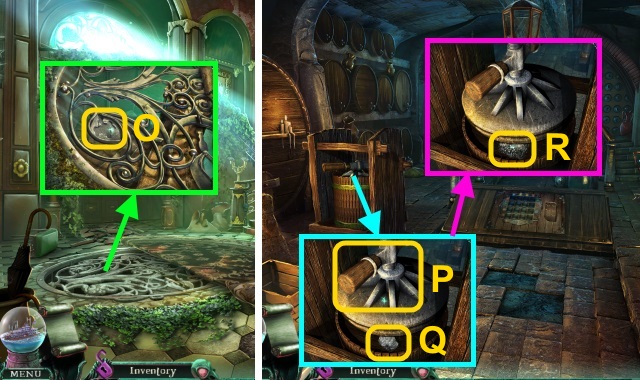
- Use the SHARP SEASHELL (O).
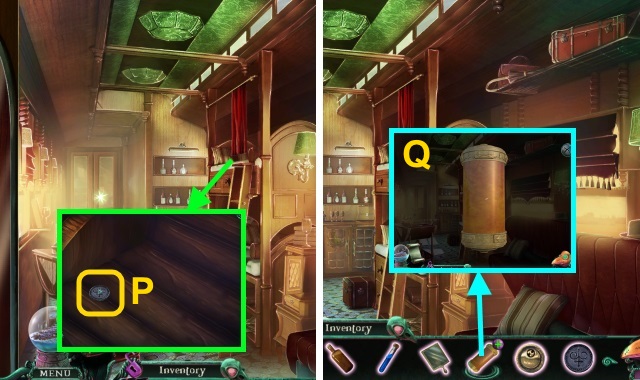
- Play the HOP to receive the DIBBER (P).
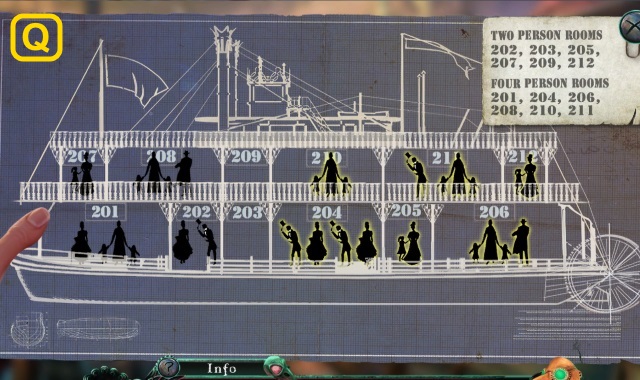
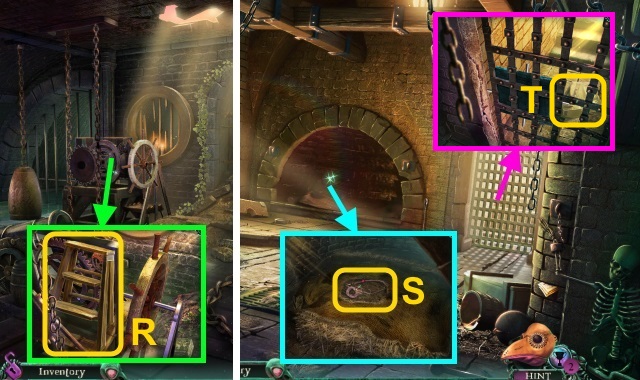
- Talk to the man (Q).
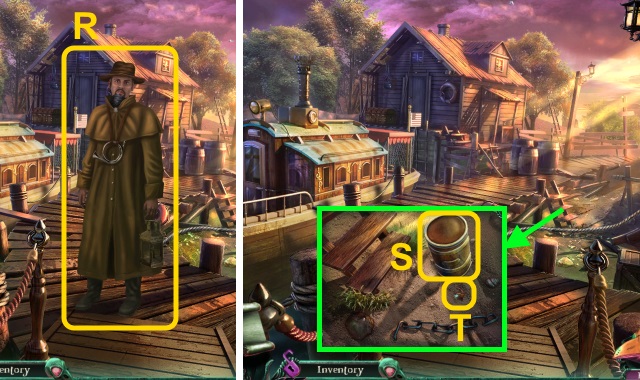
- Take the GLASS APPLE (R).
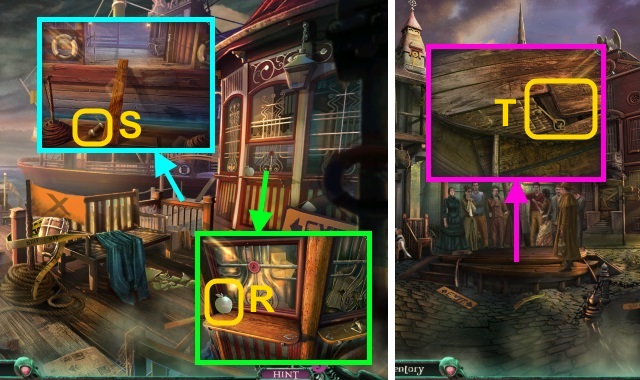
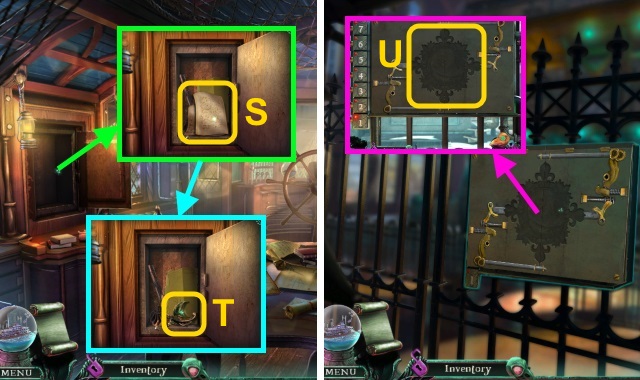
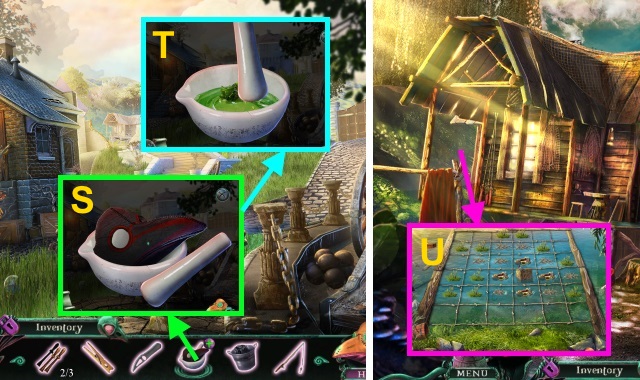
- Take the COFFEE GRINDER (S).
- Walk down.
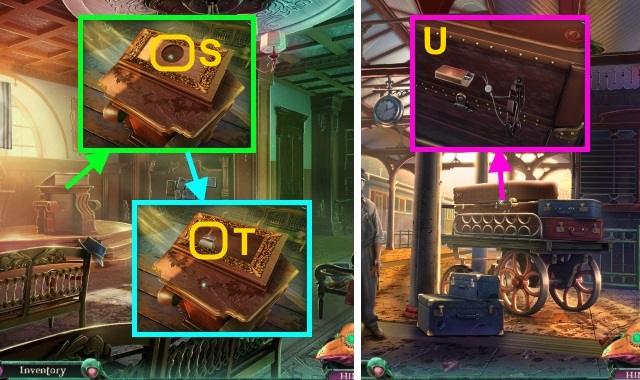
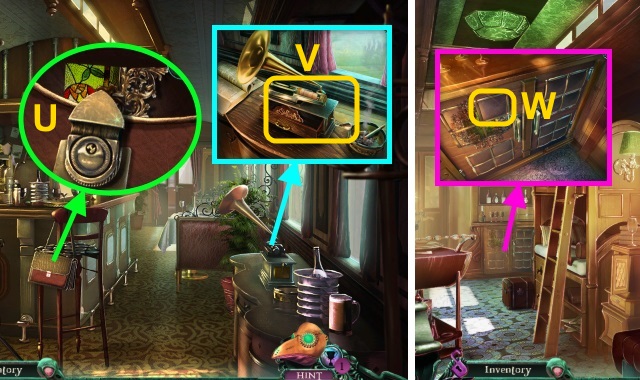
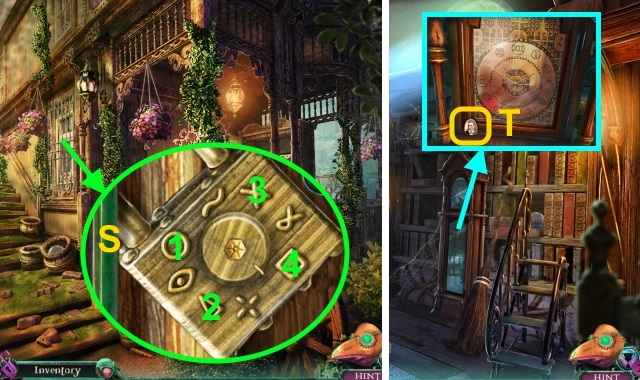
- Use the DIBBER; take the GENERAL-STORE KEY (T).
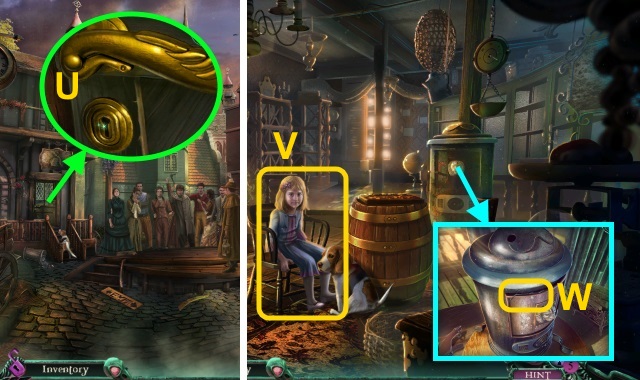
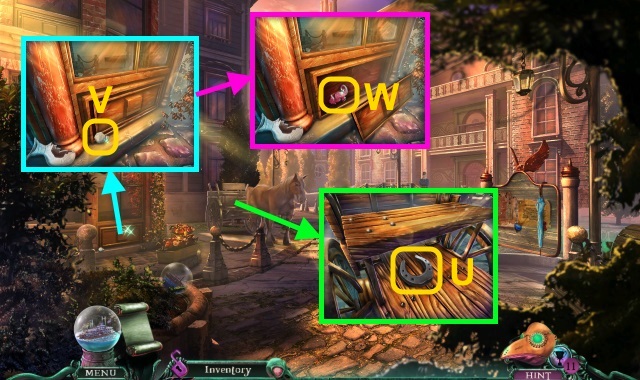
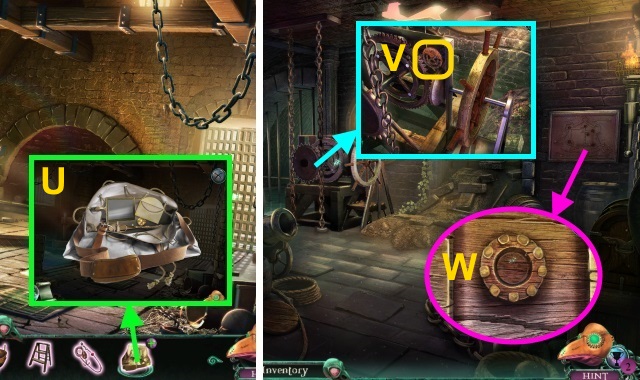
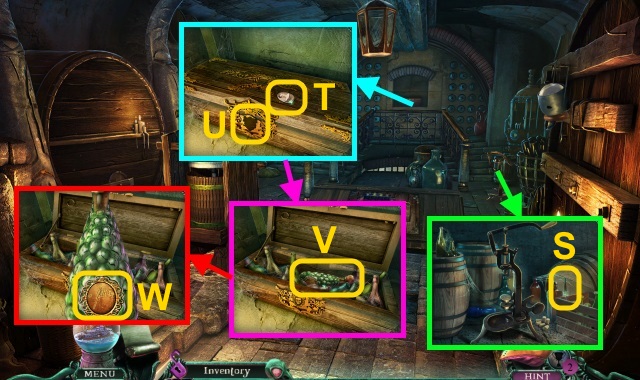
- Use the GENERAL-STORE KEY (U).
- Walk left.
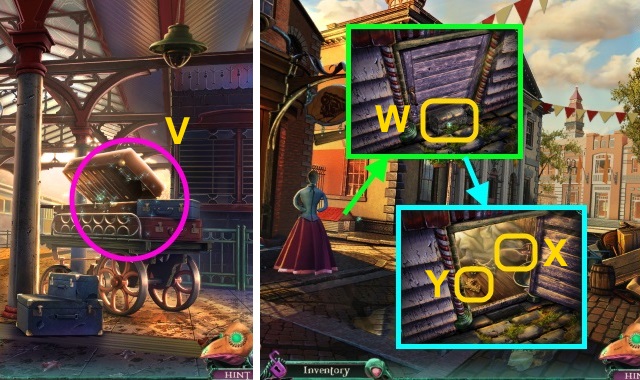
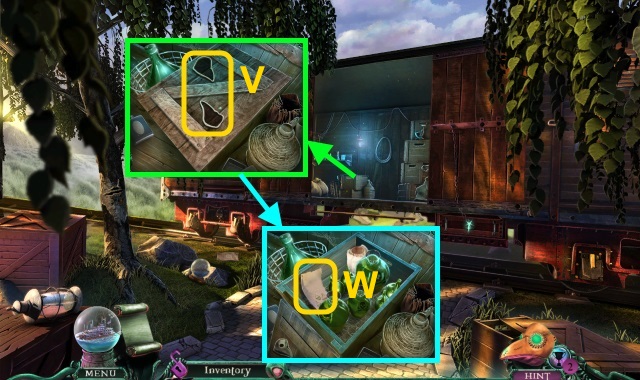
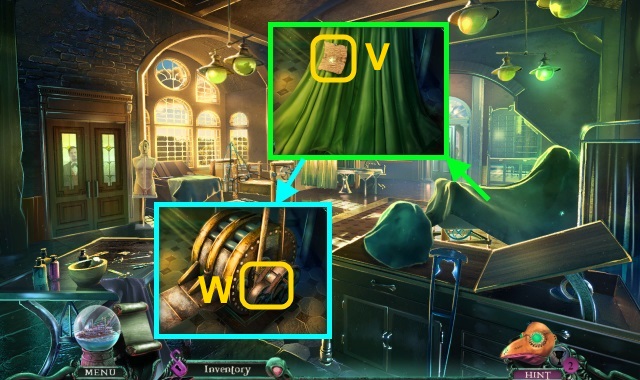
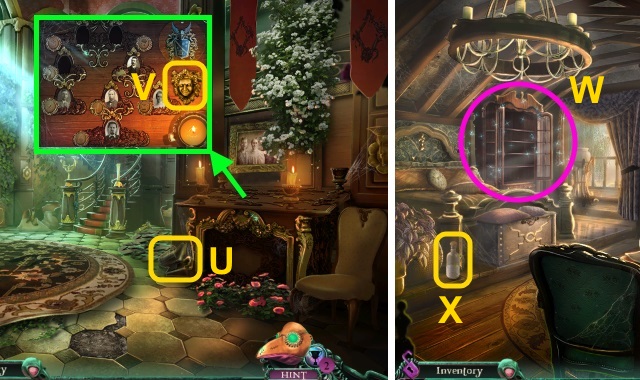
- Give TIMMY THE CAT (V).
- Take the METAL WIRE (W).
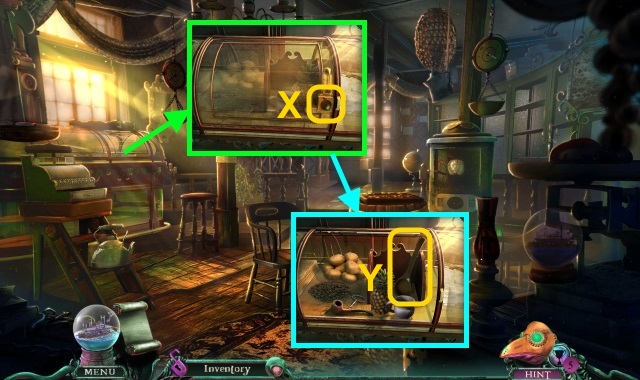
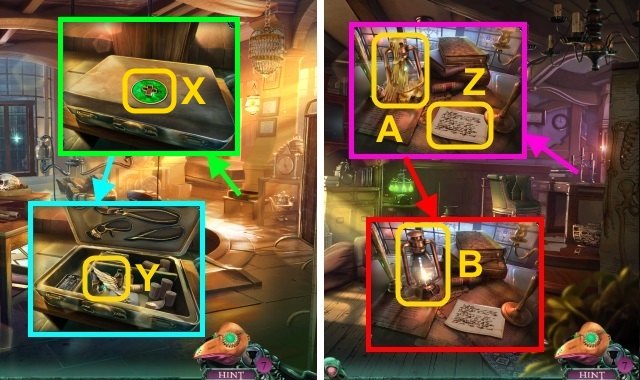
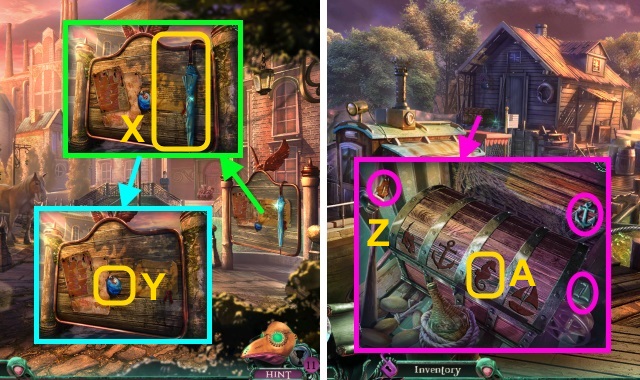
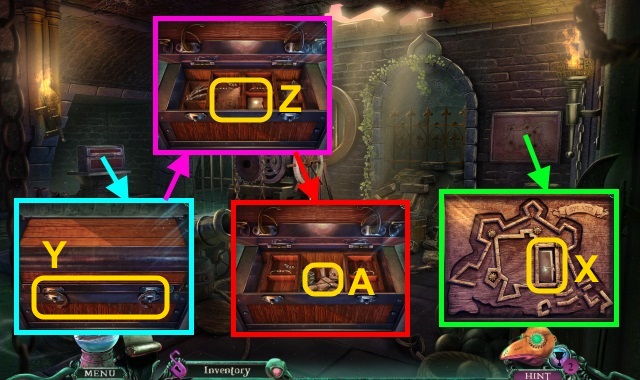
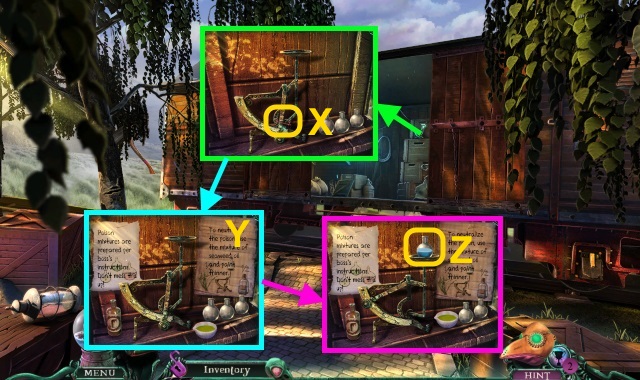
- Place the GLASS APPLE (X).
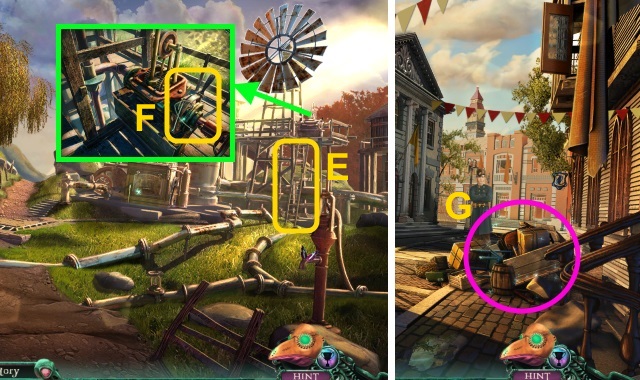
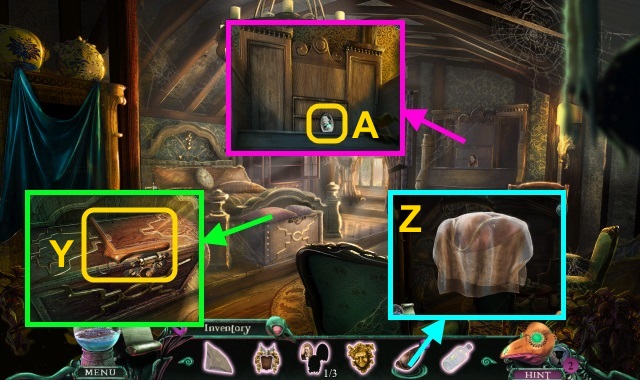
- Move the objects; take the WOODEN SCOOP (Y).
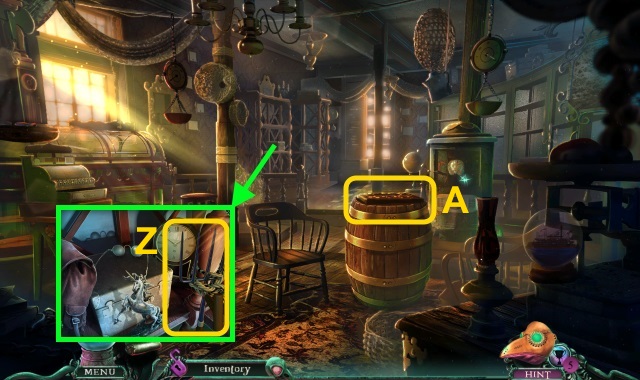
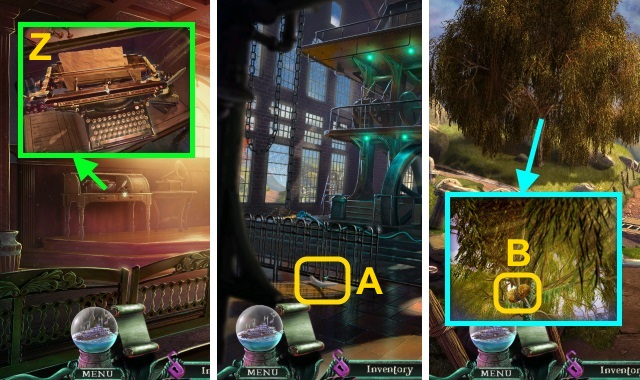
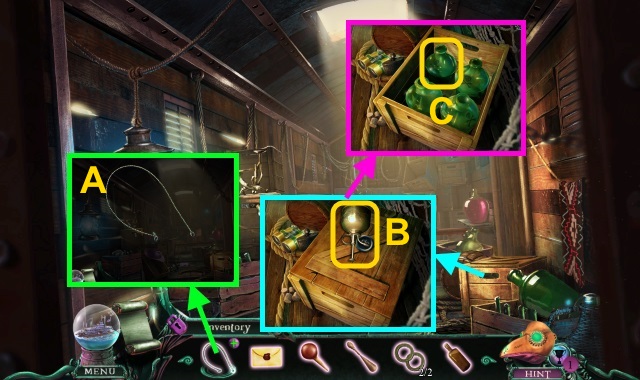
- Use the DIBBER; take the ROPE and PITCHFORK (Z).
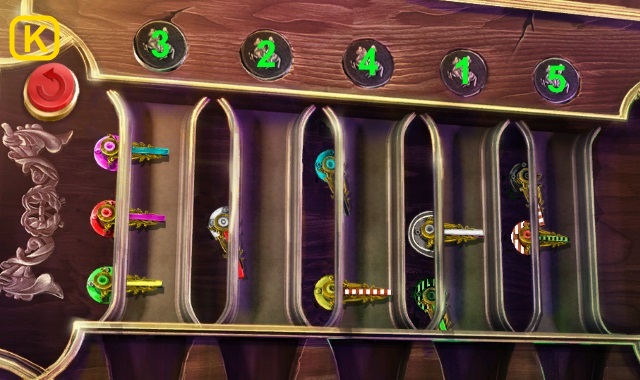
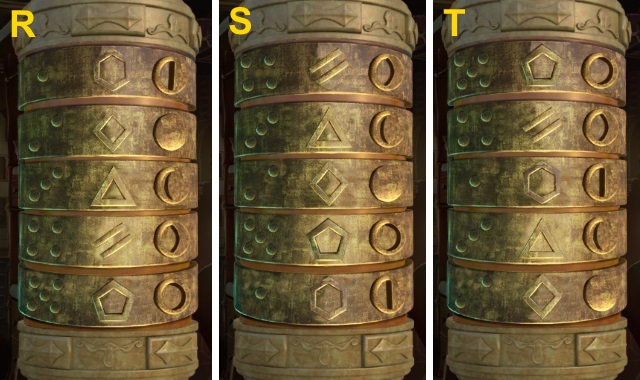
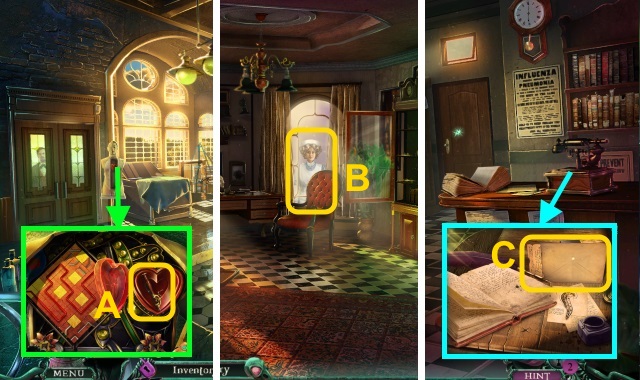
- Examine the board for a mini-game (A).
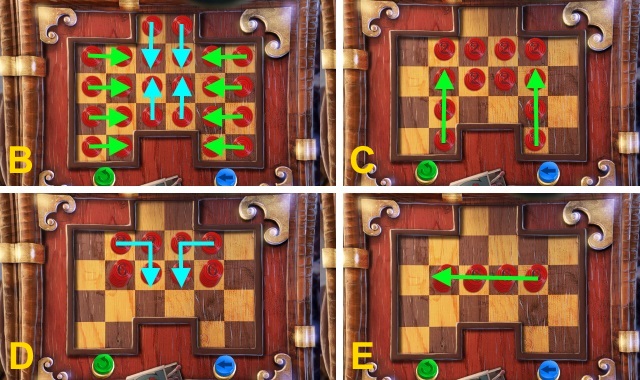
- Solution (B-E).
- You receive the FAKE CHECKER.
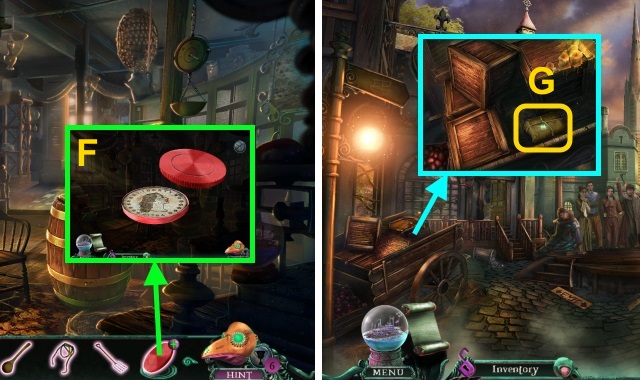
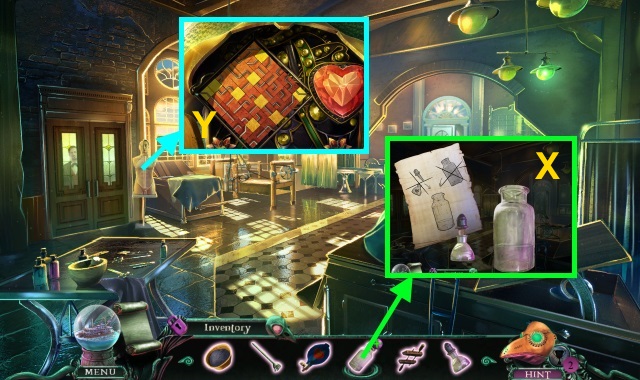
- Use the CLOTH on the FAKE CHECKER; take the SILVER COINS (2/3) and BOAT EMBLEM (F).
- Walk down.
- Use the PITCHFORK; take the PACKAGE (G).
- Walk right.
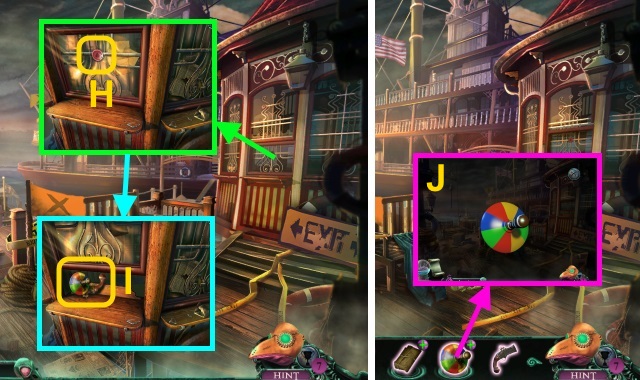
- Place the BOAT EMBLEM (H); take the SPINNING TOP and HARPOON FIRING MECHANISM (I).
- Spin the SPINNING TOP to receive the SPINNING TOP TIP (J).
- Walk down, then left.
- Use the SPINNING TOP TIP (K); take the LARD (L).
- Walk down, then right.
- Use the LARD and WOODEN SCOOP to take the HARPOON (M).
- Open the PACKAGE; place the ROPE, HARPOON FIRING MECHANISM, and HARPOON to receive the HARPOON GUN (N).
- Walk down twice.
- Use the HARPOON GUN (O).
- Go up.
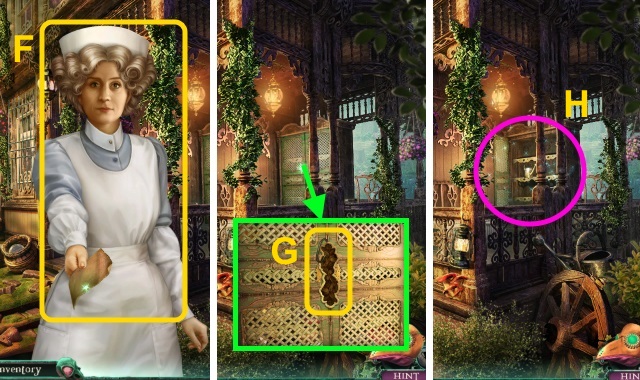
- Talk to Dr. Griffin (P).
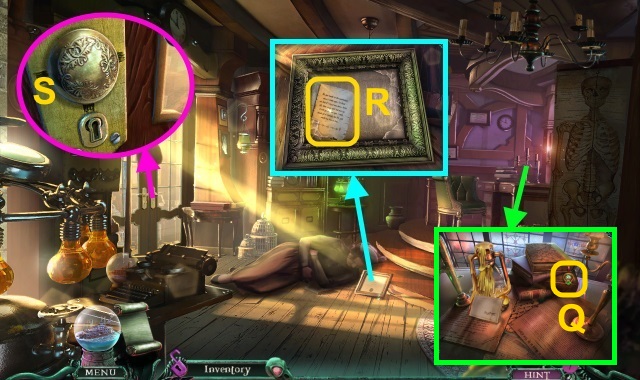
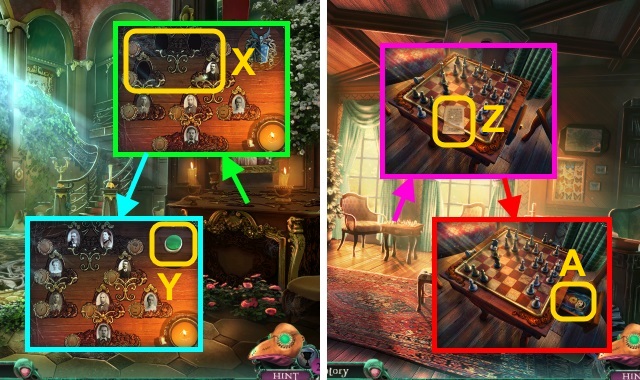
- Take the CROSS SIGNET (Q).
- Take the photo and OFFICE DOOR NOTE (R).
- Place the OFFICE DOOR NOTE (S).
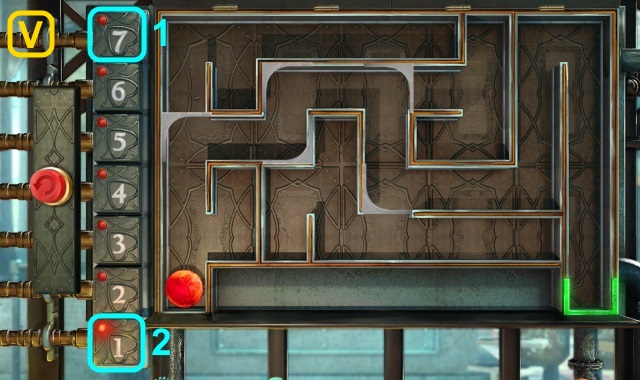
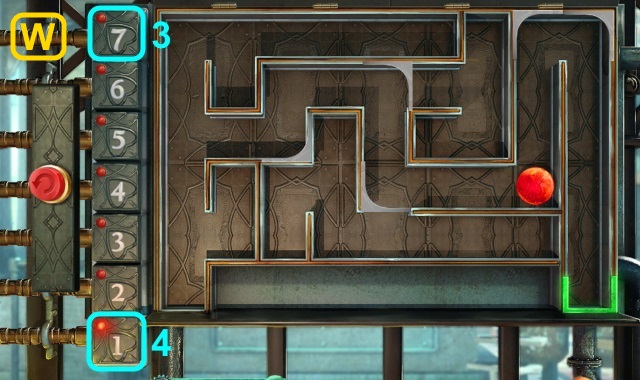
- Press the arrows in order: down, left x2, right x3, up.
- Walk left.
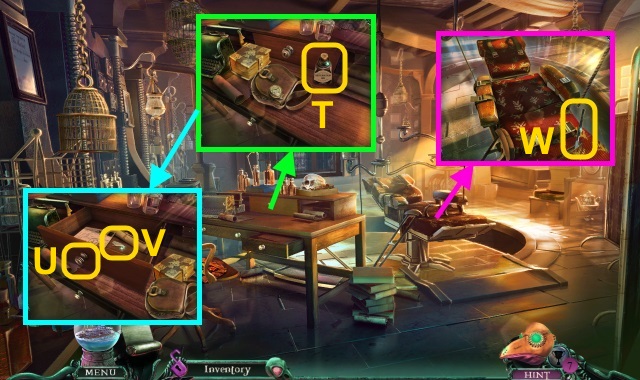
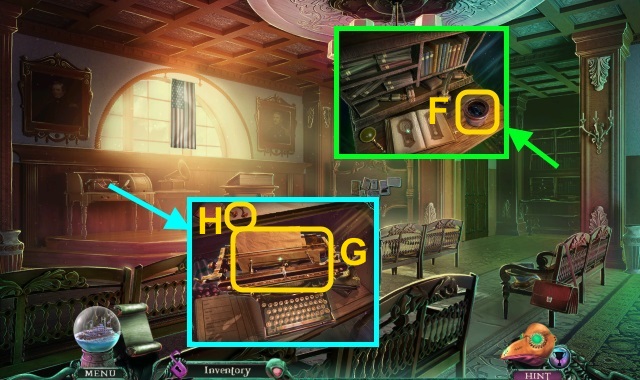
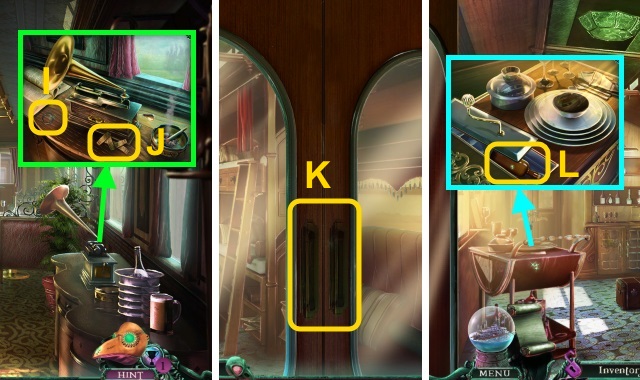
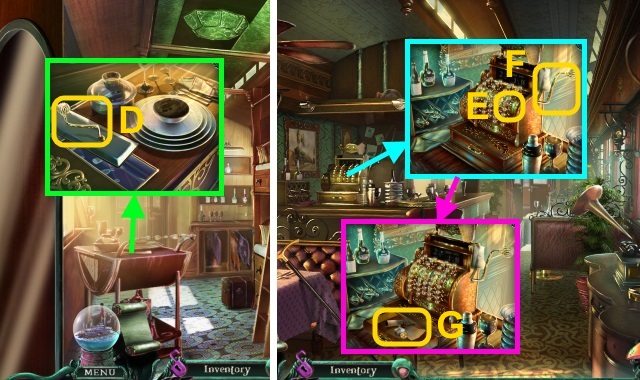
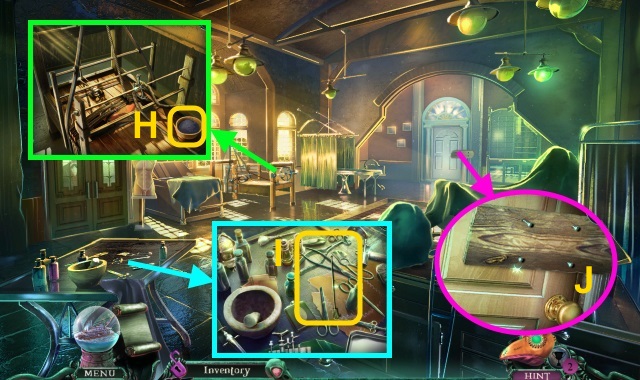
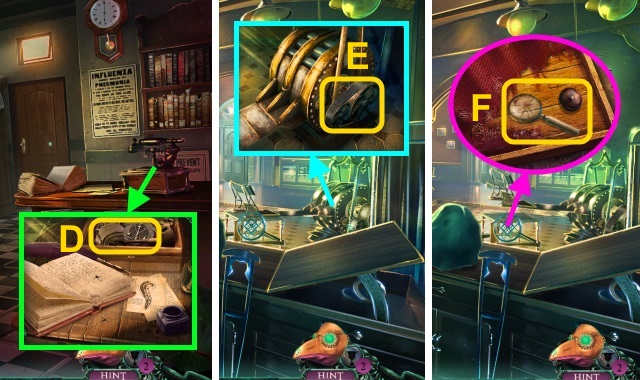
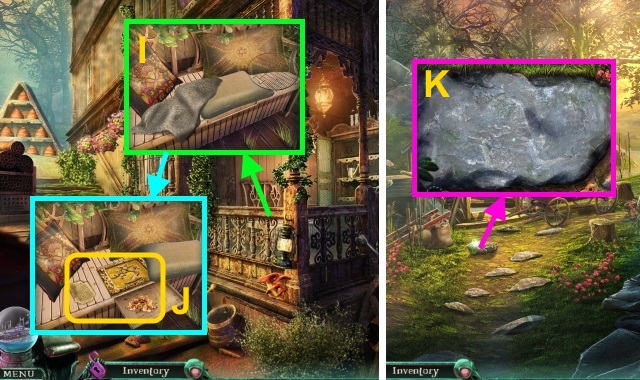
- Take the RESTORATION INK (T); move the objects.
- Use the METAL WIRE (U); take the CADUCEUS (1/3) (V).
- Take the SCALPEL (W).
- Use the CROSS SIGNET (X); take the CADUCEUS (2/3) (Y).
- Walk down.
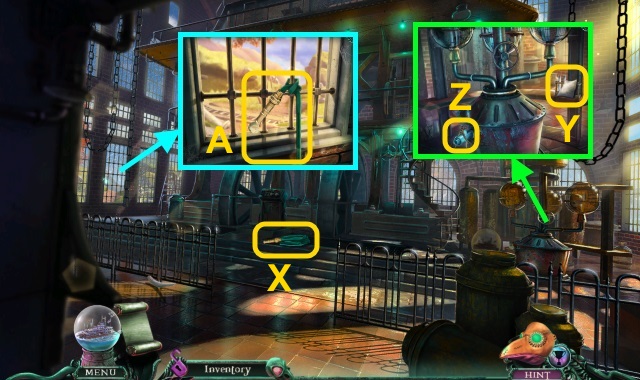
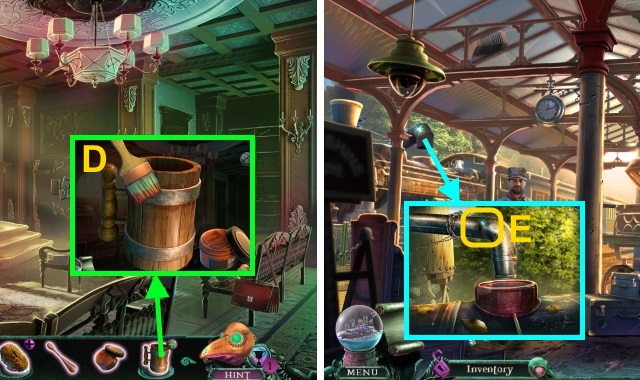
- Read the note (Z); use the SCALPEL (A).
- Place the LANTERN KNOB; take the LANTERN (B).
- Walk left.

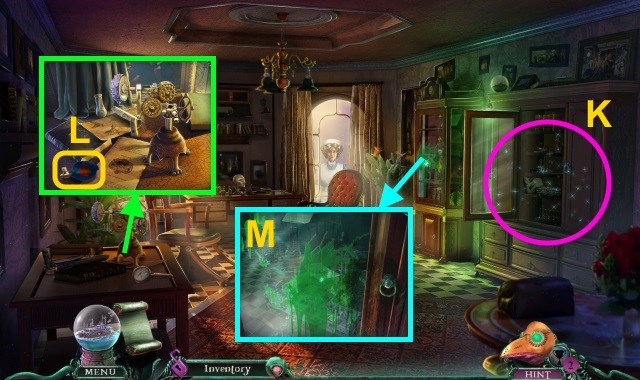
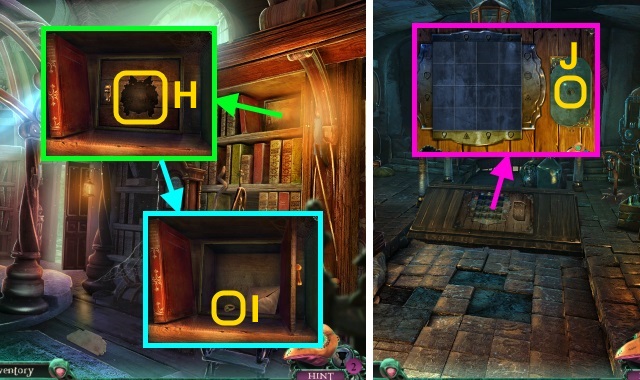
- Open the cabinet; use the LANTERN (C).
- Play the HOP to receive the CADUCEUS (3/3) (D).
- Walk down.
- Place the CADUCEUS (3/3) (E).
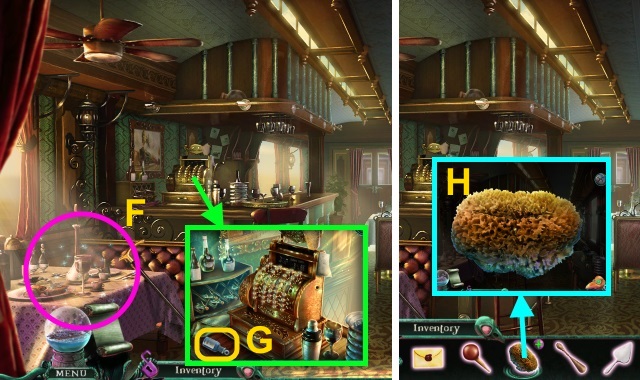
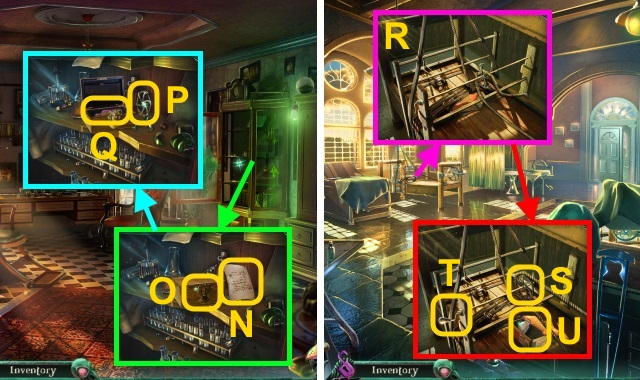
- Find the parts (F); open the case (G).
- Take the screws to receive the SURGICAL TONGS (H).
- Open the COFFEE GRINDER; use the SURGICAL TONGS to receive the SILVER COINS (3/3) and CONTAINER (I).
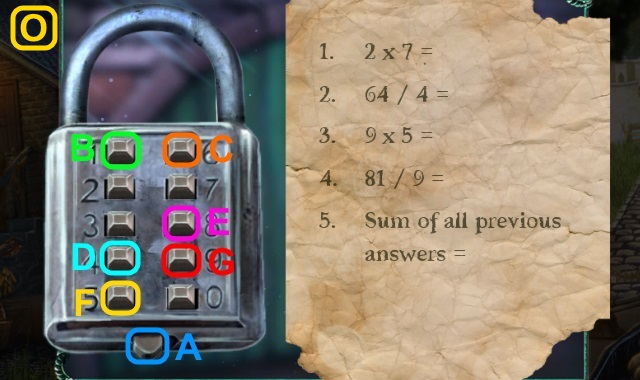
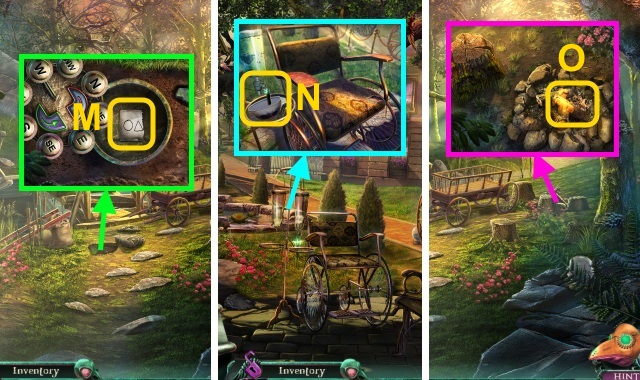
- Place the SILVER COINS (3/3) for a mini-game (J).
- Solution (K).
- Read the note (L); take the ACID.
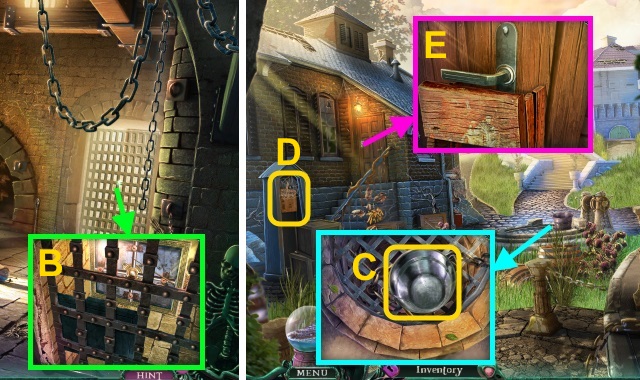
- Use the RAILWAY GOGGLES (M).
- Walk left.
- Use the wooden plank (N).
- Walk right, then forward.
- Talk to Adam (O).
- Walk right.
- Talk to Adam; examine the paper for a mini-game (P).
- Solution (Q).
Chapter 2: Wellport
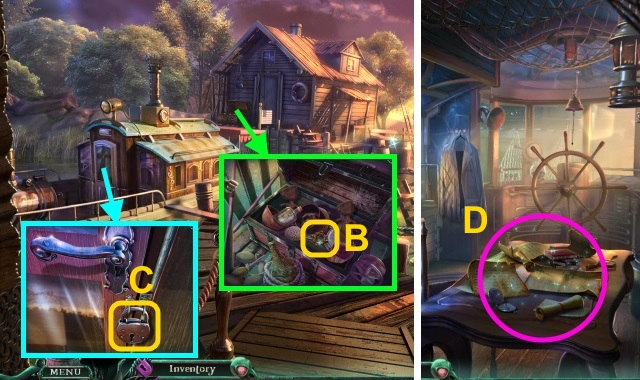
- Talk to Adam (R).
- Use the CONTAINER (S); take the CRAB CLAW (T).
- Walk right.
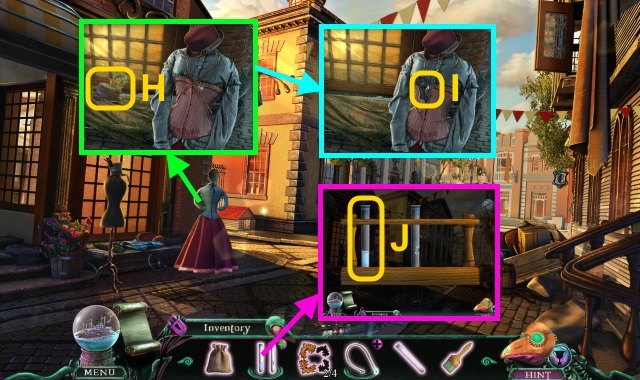
- Take the HORSESHOE (U).
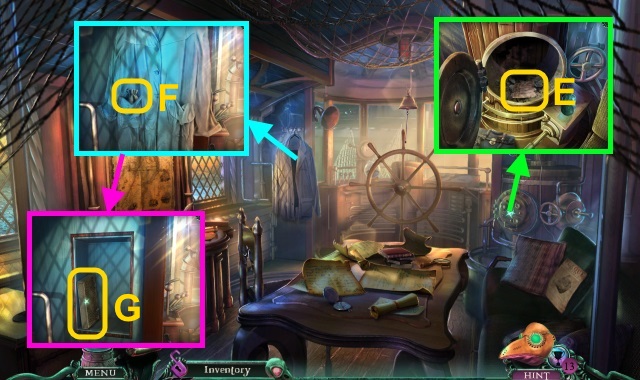
- Take the GLASS CORK (V); move the panel.
- Take the SEA HORSE CARVING (W).
- Take the UMBRELLA (X); read the note.
- Use the CRAB CLAW to take the WELLPORT EMBLEM (1/3) (Y).
- Walk down.
- Move the symbols (Z); place the SEA HORSE CARVING (A).
- Move the objects; take the WELLPORT EMBLEM (2/3) (B).
- Use the ACID and HORSESHOE (C).
- Walk left.
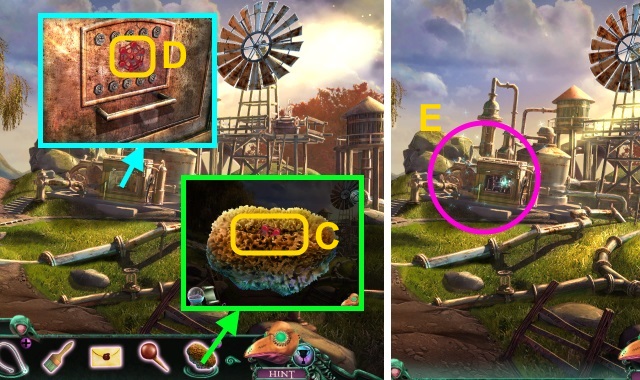
- Play the HOP to receive the CHARCOAL STICK (D).
- Open the hatch; use the SURGICAL TONGS to take the CHARRED NOTE (E).
- Take the WASHING SODA (F).
- Move the shirt; take the DECODER BOOK (G).
- Walk down.
- Open the barrel; use the RESTORATION INK and CHARRED NOTE (H).
- Use the SURGICAL TONGS; take the CODED NOTE (I).
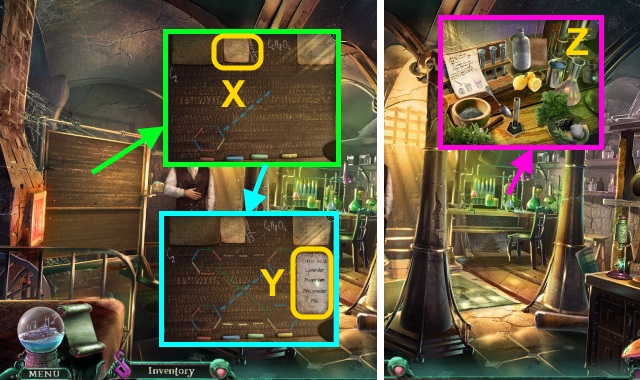
- Use the CODED NOTE and CHARCOAL STICK on the DECODER BOOK for a mini-game (J).
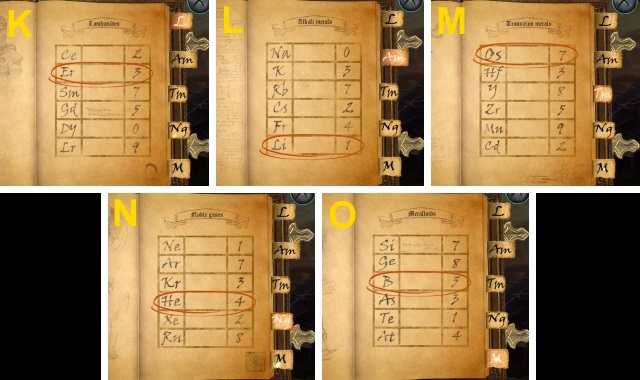
- Solution (K-O).
- You receive the SAFE CODE.
- Walk left.
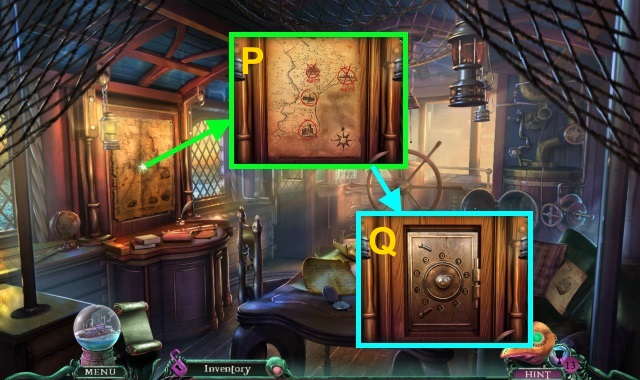
- Examine the map (P); move it.
- Place the SAFE CODE for a mini-game (Q).
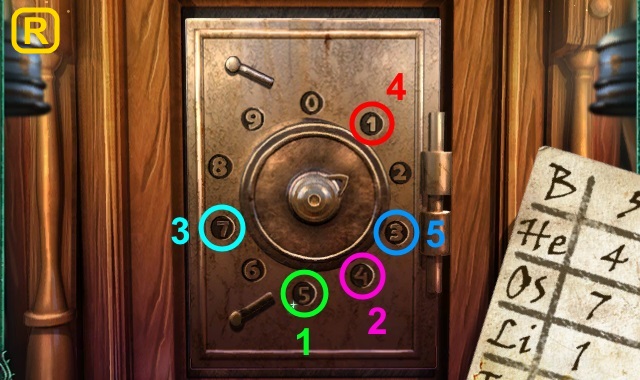
- Solution (R).
- Take the note and photo (S); Take the WELLPORT EMBLEM (3/3) (T).
- Walk down, right, then forward.
- Use the WELLPORT EMBLEM (3/3) for a mini-game (U).
- Solution (V, W).
Chapter 3: Town Hall
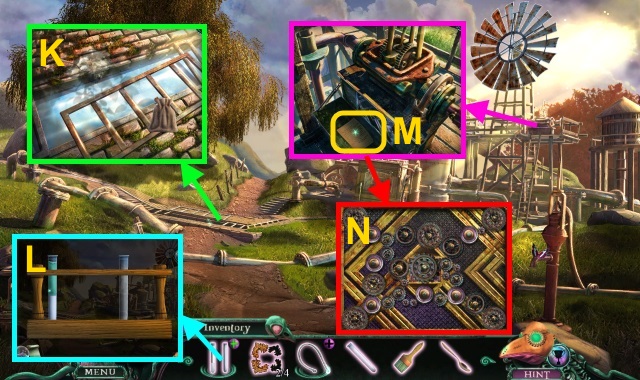
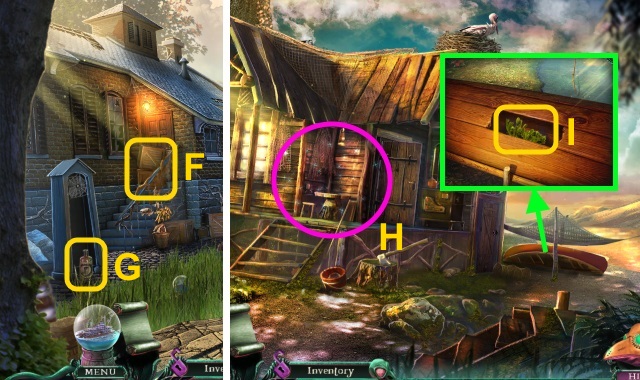
- Take the HOSE (X).
- Read the note (Y); take the WIRE CUTTERS and CHEMISTRY SET (Z).
- Use the HOSE and GLASS CORK (A).
- Take the WELLPORT INSIGNIA (1/4) (B).
- Flip the switches (C).
- Walk left.
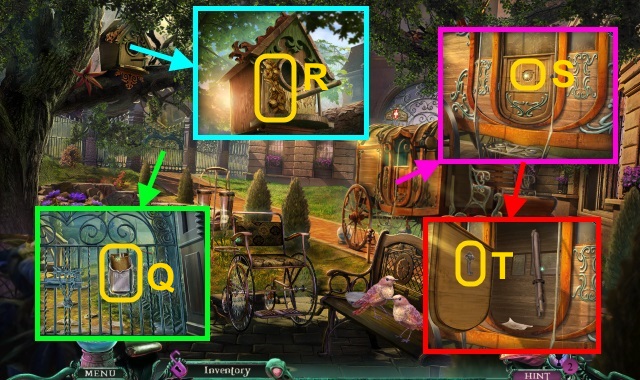
- Move the grate; use the UMBRELLA to take the WELLPORT INSIGNIA (2/4) (D).
- Use the UMBRELLA (E).
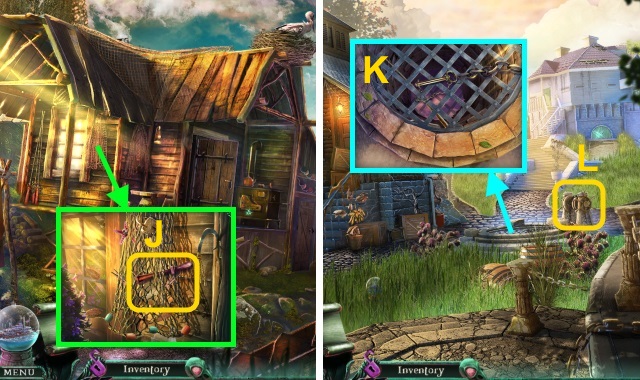
- Take the WIRE SAW (F); flip the switch.
- Walk forward.
- Move the cloth; play the HOP to receive the EMPTY TEST TUBE (G).
- Move the hat; take the PAINTBRUSH (H).
- Use the WIRE CUTTERS; take the METAL SPOON (I).
- Use the WASHING SODA on the CHEMISTRY SET to receive the EMPTY POUCH; place the EMPTY TEST TUBE (J).
- Walk down.
- Use the METAL SPOON to scrape the lime; collect the SLAKED LIME using the EMPTY POUCH (K).
- Use the SLAKED LIME on the CHEMISTRY SET (L); pour the test tube to make the CORROSIVE LIQUID.
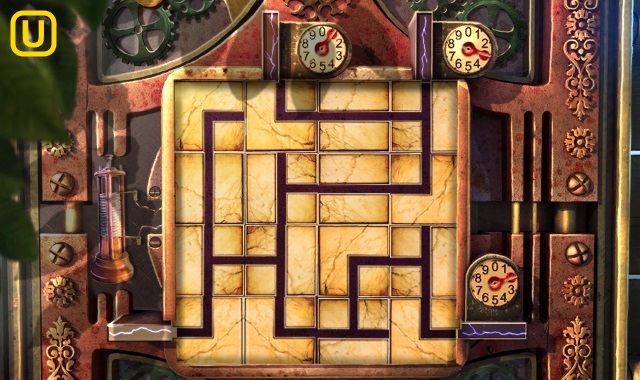
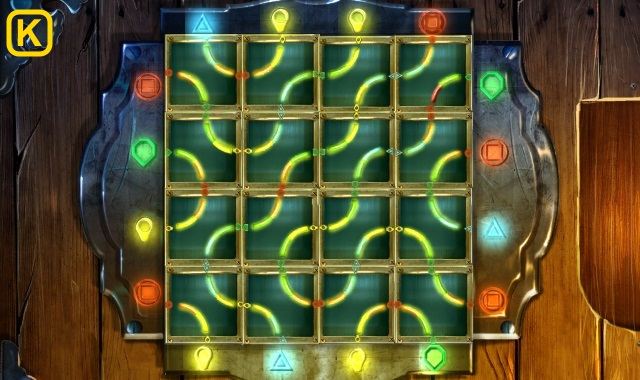
- Read the note (M); use the CORROSIVE LIQUID for a mini-game (N).
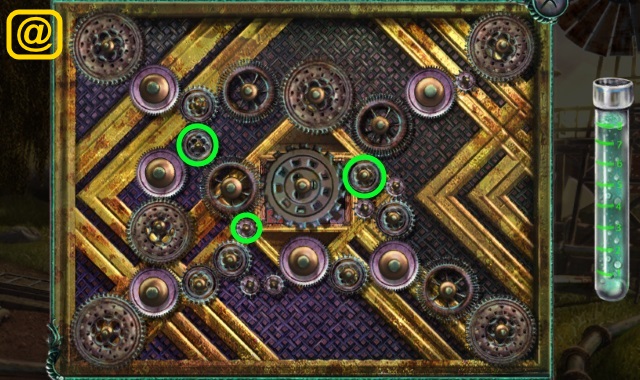
- Solution: (@-V).
- Take the METAL WELLPORT PIN and WOODEN HANDLE (W).
- Walk forward.
- Use the METAL WELLPORT PIN (X).
- Walk left.
- You receive the SEALED LETTER.
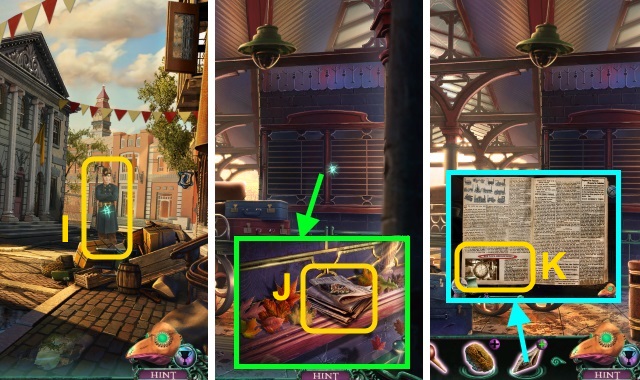
- Take the METAL PIN and TRAIN SCHEDULE (Y).
- Place the paper in the typewriter (Z); Use the TRAIN SCHEDULE.
- Go to the Water Supply.
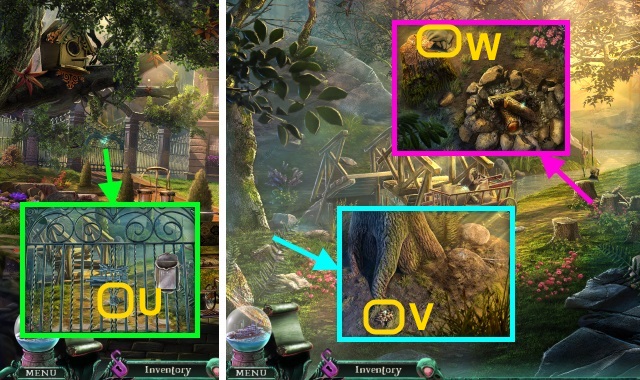
- Use the WOODEN HANDLE to take the GARDEN SICKLE (A).
- Walk left.
- Use the GARDEN SICKLE to take the SPONGE (B).
- Open the SPONGE; take the VALVE (C).
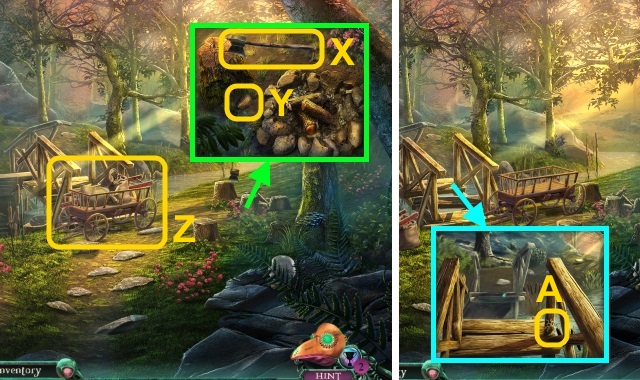
- Place the VALVE (D).
- Play the HOP to receive the DRIED INK RIBBON (E).
- Go to the Town Hall.
- Use the DRIED INK RIBBON to make the INK RIBBON (F).
- Place the INK RIBBON (G); use the stamp (H).
- Take the TRAIN PASS.
- Walk down.
- Give the TRAIN PASS (I).
- Walk right.
- Take the WELLPORT INSIGNIA (3/4) and WELLPORT STATION NEWS (J).
- Open the WELLPORT STATION NEWS; take the NEW CLOCK ANNOUNCEMENT (K).
- Walk down, then left.
- Place the NEW CLOCK ANNOUNCEMENT; flip the pages.
- Take the CLOCK MANUAL (L).
- Walk down, then right.
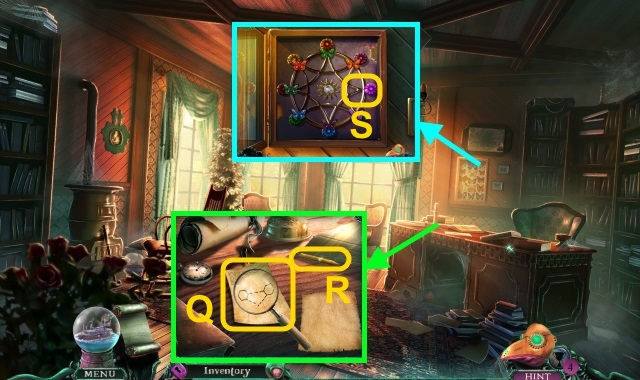
- Use the CLOCK MANUAL for a mini-game (M).
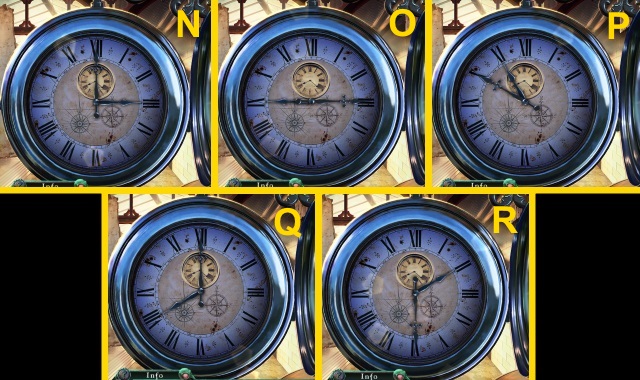
- Solution (N-R).
- You receive the CLOCK TOKEN.
- Walk down, then left.
- Place the CLOCK TOKEN (S); take the MATCHES (T).
- Walk down, then right.
- Use the MATCHES (U).
- Play the HOP to receive the STONE LIFTER (V).
- Walk down.
- Use the STONE LIFTER (W).
- Move the bowl and bone; take the OLD SHOE (X) and WELLPORT INSIGNIA (4/4) (Y).
- Walk right.
- Place the OLD SHOE (Z); take the SHOEHORN and SHOE POLISH (A).
- Walk down, then left.
- Place the WELLPORT INSIGNIA (4/4) (B); take the WOODEN KEG (C).
- Use the SHOE POLISH and PAINTBRUSH on the WOODEN KEG to receive the IRON BARREL RINGS (D).
- Walk down, then right.
- Place the IRON BARREL RINGS (E).
- Walk forward.
Chapter 4: The Train
- Play the HOP to receive the CAKE SHOVEL (F).
- Take the CLEANING SOLUTION (G).
- Use the CLEANING SOLUTION on the TORN SPONGE to receive the SPONGE WITH CLEANING SOLUTION (H).
- Take the SILVER RINGS (1/2) (I) and CYLINDER WRITERS (J).
- Walk forward.
- Walk forward again and use the CAKE SHOVEL (K).
- Move the cover; take the MEDICAL ALCOHOL (L).
- Use the SPONGE WITH CLEANING SOLUTION (M); open the cupboard.
- Take the REAGANT, HAND MIRROR, and PHONOGRAPH CYLINDER (N).
- Move the bedding; take the BUCKLE BUTTON (O).
- Use the HAND MIRROR; take the CHEMIST CREST (P).
- Use the CYLINDER WRITERS on the PHONOGRAPH CYLINDER for a mini-game (Q).
- Solution (R-T).
- You receive the PHONOGRAPH CYLINDER.
- Walk down.
- Place the BUCKLE BUTTON; take the ORNATE PANEL (U).
- Place the PHONOGRAPH CYLINDER; turn the handle.
- Take the TRAIN SIGIL (1/2) (V).
- Walk forward.
- Place the ORNATE PANEL (W).
- Move the mask; take the TRAIN SIGIL (2/2) (X).
- Place the TRAIN SIGIL (2/2) (Y).
- Walk forward.
- Take the SILVER RINGS (2/2) (Z).
- Place the SILVER RINGS (2/2) on the WIRE SAW (A).
- Take the OIL CANISTER (B); place the CHEMIST CREST.
- Take the CATALYST (C).
- Walk down.
- Use the WIRE SAW; take the HANDLE (D).
- Walk down.
- Place the METAL PIN (E) and HANDLE (F); turn it.
- Take the OLD DOUBLOON and TINDERBOX (G).
- Walk forward twice.
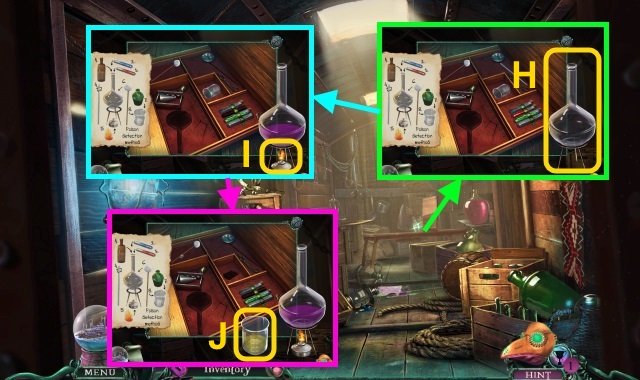
- Place the stand and bottle; use the MEDICAL ALCOHOL and REAGENT (H).
- Follow the directions; use the TINDERBOX (I).
- Place the beaker; use the CATALYST (J).
- Follow the directions.
Chapter 5: The Fortress
- Read the note (K).
- Take the METAL BAR (L).
- Move the hay (M).
- Use the METAL BAR (N).
- Take the CHEST KEYS (1/2) (O); open the hatch.
- Go left.
- Play the HOP to receive the RUSTY RAZOR (P).
- Take the HELMET (Q).
- Take the STEPLADDER (R).
- Walk down.
- Use the RUSTY RAZOR; take the FISHING LINE (S).
- Use the METAL BAR to take the SHOULDER BAG (T).
- Open the SHOULDER BAG.
- Read the letter; take the HAND MIRROR, SHOEHORN, OLD DOUBLOON, and OIL CANISTER (U).
- Go left.
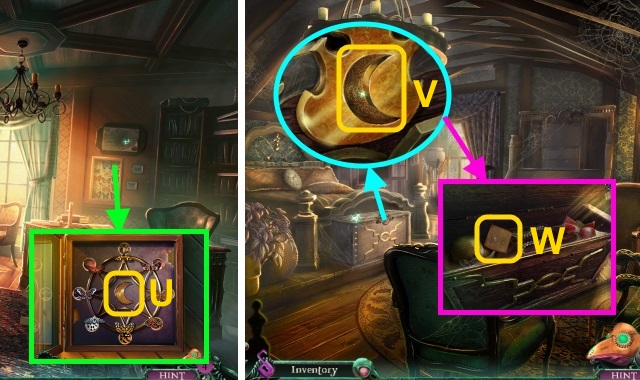
- Use the OIL CANISTER (V).
- Use the OLD DOUBLOON (W).
- Read the book (X); take the CHEST KEYS (2/2).
- Use the CHEST KEYS (2/2) (Y).
- Take the note and POISON RECIPE (Z); take the VOODOO PINS (A).
- Walk down.
- Use the SHOEHORN, HAND MIRROR, and VOODOO PINS (B).
- Walk right.
- Take the BUCKET (C).
- Read the note (D); take the CLOTHESPIN.
- Use the STEPLADDER (E).
- Move the boxes (F); take the PAINT THINNER (G).
- Walk forward.
- Play the HOP to receive the LINCHPIN (H).
- Take the SEAWEED (I).
- Move the objects; take the CODE and GATE BARS (1/3) (J).
- Walk down.
- Use the LINCHPIN (K); open the grate (L).
- Take the FISHING POLE, GATE BARS (2/3), and PENKNIFE (M).
- Examine the lock (N); place the CODE for a mini-game.
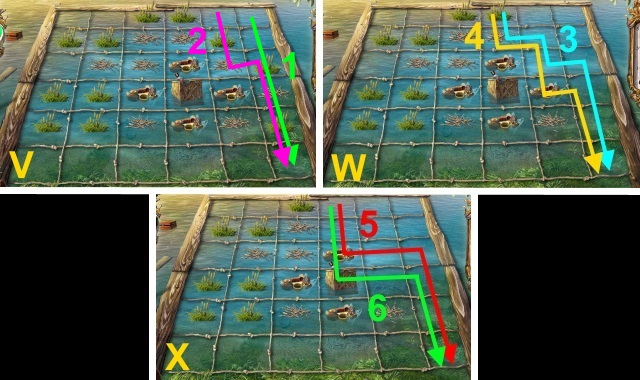
- Solution (O): B, D, A, B, C, A, D, F, A, G, A, E, D, A.
- Take the MORTAR (P); use the BUCKET to receive the COAL (Q).
- Use the FISHING LINE on the FISHING POLE to make the FISHING ROD (R).
- Examine the MORTAR; take the SMALL MASKS (1/2) (S).
- Use the SEAWEED in the MORTAR to make SEAWEED OIL (T).
- Walk forward.
- Use the FISHING ROD for a mini-game (U).
- Solution (V-X).
- You receive the SOLDIER FIGURINE.
- Walk down.
- Place the SOLDIER FIGURINE (Y); press the button (Z).
- Play the HOP to receive the GATE BARS (3/3) (A).
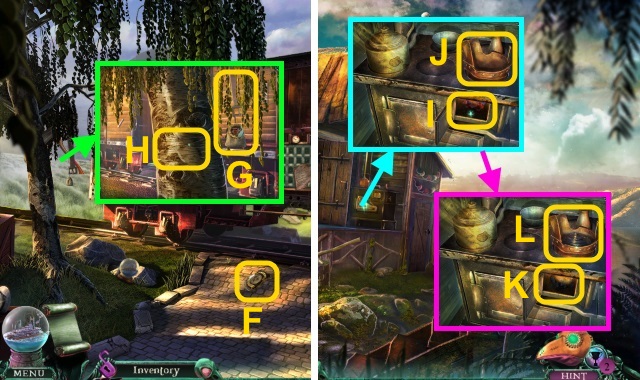
- Take the SCRATCHED LENS (B).
- Look in the telescope; move it (C).
- Walk down.
- Place the GATE BARS (3/3) for a mini-game (D).

- Solution (E).
- Walk right.
- Take the GUARD BADGE (F).
- Open the bag; take the ARTILLERY MINIATURE and LEATHER BELT (G).
- Use the PENKNIFE to take the BIRCHBARK (H).
- Walk down, then forward.
- Open the oven (I); place the HELMET (J).
- Use the COAL (K).
- Place the BIRCHBARK; take the HELMET WITH TAR (L).
- Go to the Lookout.
- Use the LEATHER BELT (M); take the SMALL MASKS (2/2) and BOTTLE OPENER (N).
- Place the GUARD BADGE (O); take the COPPER CABLE (P).

- Move the canons; place the ARTILLERY MINIATURE (Q).
- Take the GODDESS EMBLEM, note, and ELECTRICAL BATTERY (R).
- Walk down, then right.
- Read the note (S); place the ELECTRICAL BATTERY and COPPER CABLE for a mini-game (T).
- Solution (U).
- Place the SMALL MASKS (2/2) (V); take the GUARD NOTE (W).
- Take the SMALL CLAMP (X); place the GUARD NOTE, POISON RECIPE, SEAWEED OIL, and PAINT THINNER (Y).
- Place the bottles on the scale; pour the paint thinner and oil into each bottle to receive the SOLVENT BOTTLES (3/3) (Z).

- Use the SOLVENT BOTTLES (3/3) (A); move the bottles.
- Take the WAXED JAR (B); use the CLOTHESPIN to make the IMPROVISED BRUSH.
- Go to the Lookout.
- Place the WAXED JAR; open the lid (C).
- Take the TOY TRAIN.
- Walk down, then right.
- Place the TOY TRAIN (D); take the CRANK (E).
- Use the BOTTLE OPENER; move the sign.
- Take the BIRCH PLANK (F).
- Walk down, then left.
- Place the BIRCH PLANK and HELMET WITH TAR (G); use the IMPROVISED BRUSH.
- Go right.
Chapter 6: Quarantine
- Take the POLISHING DUST (H).
- Move the tools; take the CLAW RETRACTOR (I).
- Move the tools; take the FORCEPS.
- Use the FORCEPS (J).
- Walk forward.
- Open the cupboard; play the HOP to receive the EYE DROPS (K).
- Take the SMALL PUMP (L).
- Open the cupboard (M).
- Take the note (N); place the GODDESS EMBLEM (O).
- Take the WHEEL (P) and ACETONE BOTTLE (Q).
- Walk down.
- Move the handle and rope (R).
- Place the WHEEL (S) and CRANK; turn it (T).
- Open the box; take the INCOMPLETE REAGENT (U).
- Read the note (V); move the cloth.
- Take the CARPENTRY VISE (W).
- Use the EYE DROPS and ACETONE BOTTLE on the INCOMPLETE REAGENT to receive the REAGENT (X).
- Open the mannequin; place the SMALL PUMP for a mini-game (Y).

- Solution (Z).
- Take the BROKEN BRACE (A).
- Walk forward.
- Give the REAGENT (B).
- Walk left.
- Take the note and UNREADABLE NOTE (C); open the box.
- Take the LOREDGE CREST and TRANSMISSION BELT (D).
- Walk down.
- Place the TRANSMISSION BELT (E).
- Take the BLACK GEMS (1/2) and BROKEN MAGNIFIER (F).
- Walk forward.
- Place the SCRATCHED LENS (G); use the POLISHING DUST.
- Place the BROKEN MAGNIFIER; remove the cracked lens (H).
- Place the UNREADABLE NOTE; take the MAGNIFYING GLASS and DRAWER CLUE (I).
- Walk down, then left.

- Place the DRAWER CLUE (J); open the drawer.
- Take the file and BLACK GEMS (2/2) (K).
- Walk down, then right.
- Place the BLACK GEMS (2/2) (L); take the TONGUE DEPRESSOR and DRILL PART (M).

- Place the DRILL PART and SMALL CLAMP on the BROKEN BRACE to receive the BRACE DRILL (N).
- Walk down, then left.
- Use the BRACE DRILL (O).
- Walk right.
- Play the HOP to receive the WALKING CANE (P).
- Use the TONGUE DEPRESSOR; open the envelope (Q).
- Take the GARDEN CLIPPERS.
- Take the GILDED ORNAMENT (R).
- Place the LOREDGE CREST (S).
- Read the note; take the GATE KEY (T).
- Use the GATE KEY (U).
- Walk left.
- Take the SEEDS (V).
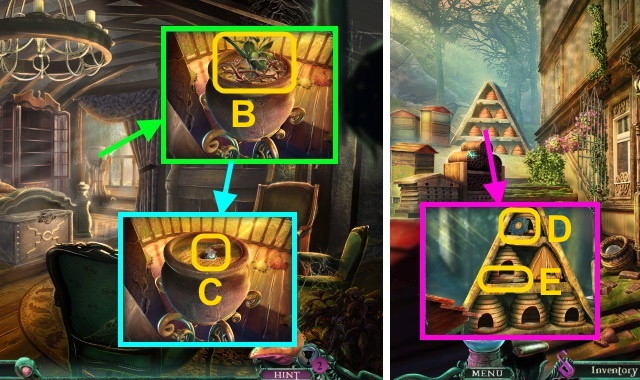
- Take the BEEKEEPER'S SET (1/3) (W).
- Place the WALKING CANE (X); use the stone (Y).
- Take the IMPROVISED AXE.
- Move the debris (Z).
- Take the TREE BADGE (A).
- Walk down.
- Place the SEEDS (B).
- Take the CUP (C).
- Use the IMPROVISED AXE to take the MEDICAL STRETCHER (D).
- Walk left.
- Place the MEDICAL STRETCHER (E); use the CARPENTRY VISE.
- Walk forward.
Chapter 7: The Mansion
- Talk to your mother; take the note (F).
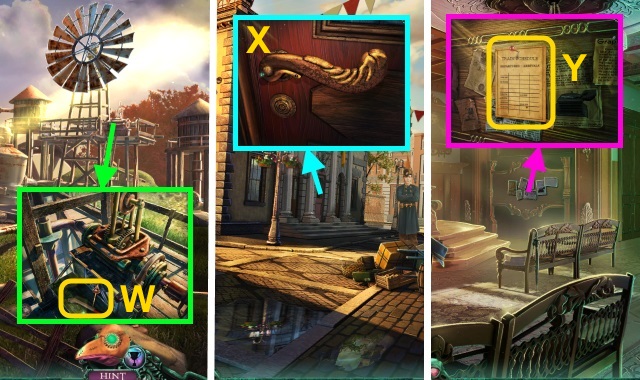
- Take the FIRE STRIKER; place the GILDED ORNAMENT (G).
- Play the HOP to receive the VALVE (H).
- Take the MOSQUITO NET and GRILL (I).
- Move the pillow; read the note.
- Place the TREE BADGE; take the SAWDUST (J).
- Walk down.
- Move the stone for a mini-game (K).

- Solution (L).
- Take the LOCK CODE (1/2) (M).
- Walk down.
- Move the valve; place the VALVE and CUP (N).
- Turn the handle to receive the SALT WATER.
- Walk left.
- Use the SAWDUST and FIRE STRIKER (O).
- Place the GRILL and SALT WATER; take the CUP OF SALT (P).
- Use the CLAW RETRACTOR and CUP OF SALT (Q).
- Open the note (R); take the LOCK CODE (2/2) and BADGE FRAME.
- Walk forward.
- Place the LOCK CODE (2/2); press the symbols in order (S).
- Go forward.
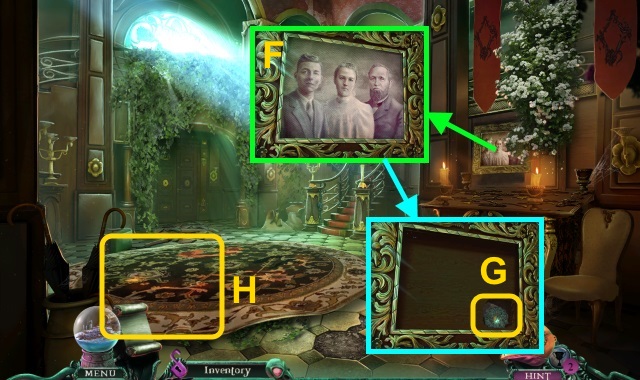
- Take the BANKS' FAMILY PHOTOS (1/3) (T).
- Walk forward.
- Take the BEEKEEPER'S SET (2/3) (U).
- Take the GOLDEN MASK (V).
- Walk forward.
- Play the HOP to receive the HAT (W).
- Take the BOTTLE OF MILK (X).
- Move the pillows; take the COAT HANGER (Y).
- Place the MOSQUITO NET on the HAT to receive the BEEKEEPER'S SET (3/3) (Z).
- Take the BANKS' FAMILY PHOTOS (2/3) (A).
- Use the GARDEN CLIPPERS (B); move the plant.
- Take the ZINC CRYSTAL (C).
- Walk down three times.
- Use the BEEKEEPER'S SET (3/3); take the MOSAIC TILES (1/3) (D) and PALETTE KNIFE (E).
- Walk forward twice.
- Use the PALETTE KNIFE (F); take the MOSAIC TILES (2/3) (G).
- Move the rug (H).
- Take the MOSAIC TILES (3/3) (I).
- Walk down.
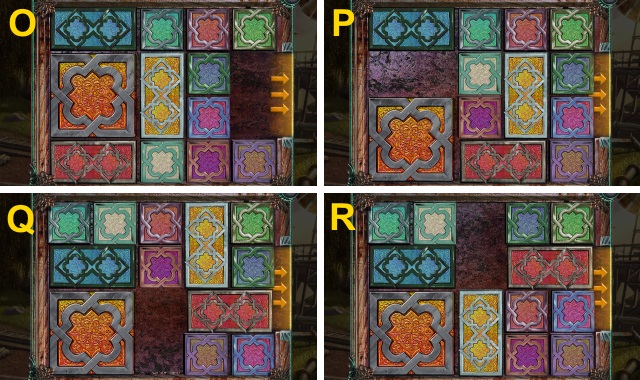
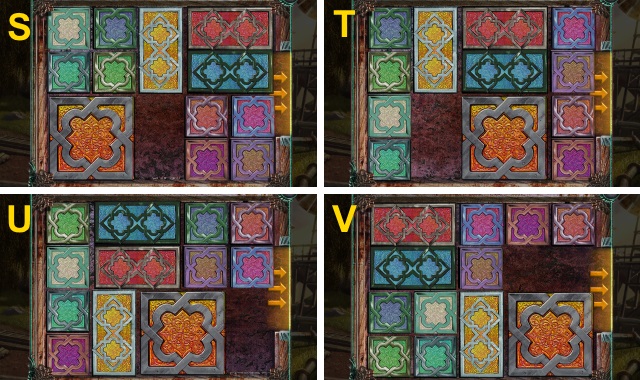
- Place the MOSAIC TILES (3/3) for a mini-game (J).

- Solution (K).
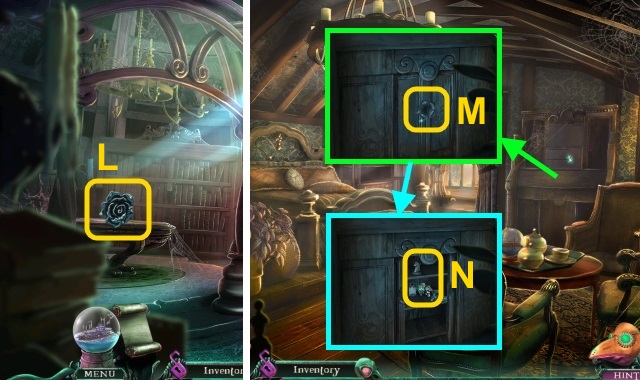
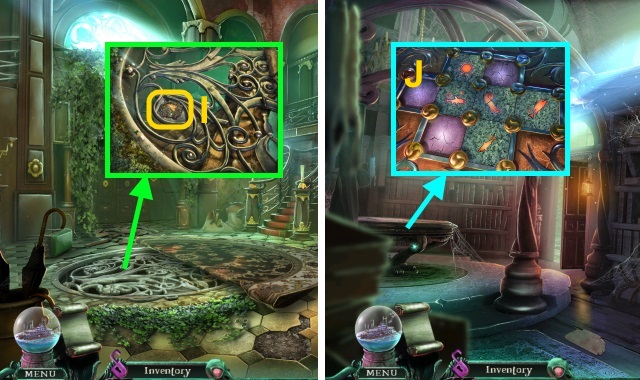
- Take the METAL ROSE (L).
- Walk forward twice.
- Place the METAL ROSE (M).
- Move the objects; take the GRAPE FIGURINE and WHITE KNIGHT (N).
- Walk down.
- Place the GRAPE FIGURINE (O).
- Go downstairs.
- Turn the handle (P); place the ZINC CRYSTAL (Q).
- Turn the handle; take the ZINC POWDER (R).
- Take the PINCERS (S).
- Take the BANKS' FAMILY PHOTOS (3/3) (T); place the GOLDEN MASK (U).
- Move the bottles (V); examine the bottle.
- Take the TOKEN (W).
- Walk down.
- Place the BANKS' FAMILY PHOTOS and TOKEN (X).
- Read the note; press the button (Y).
- Walk left.
- Read the note (Z); place the WHITE KNIGHT.
- Take the HOLLOW DOLL (A).
- Take the BANKS' FAMILY BADGE (B).
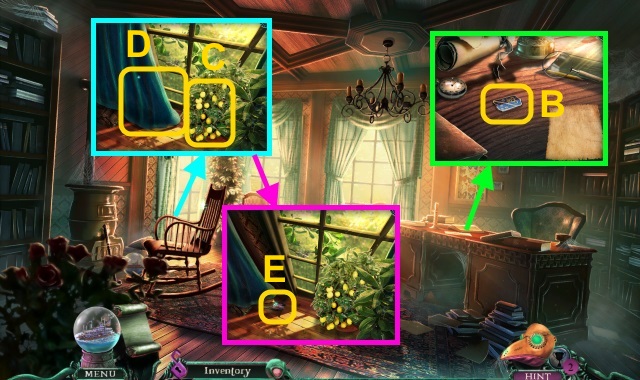
- Take the LEMONS (C); move the cloth (D).
- Use the COAT HANGER; take the LAVENDER LEAVES (E).
- Go to the Wine Cellar.
- Place the HOLLOW DOLL; take the MAGNESIUM (F).
- Walk down twice.
- Move the books (G).
- Place the BADGE FRAME and BANKS' FAMILY BADGE (H).
- Read the letter; take the BANKS' SIGNET RING (I).
- Go to the Wine Cellar.
- Use BANKS' SIGNET RING for a mini-game (J).
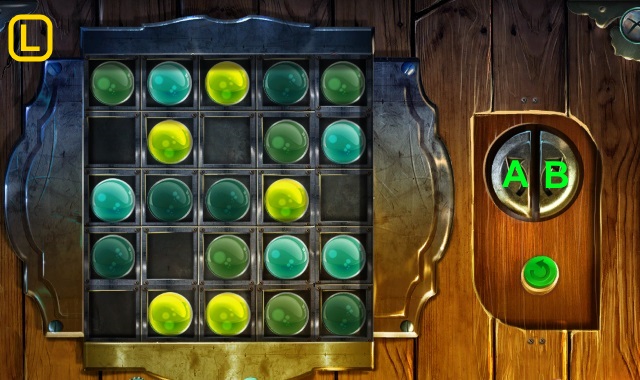
- Solution (K).
- Solution (L): Bx2, Ax3, Bx4, Ax3, Bx3, Ax4, Bx4, Ax5.
- Walk forward.
- Read the note; take the CLOCK WINDER (M).
- Take the BUTTERFLY (N).
- Go to the Library.
- Use the CLOCK WINDER (O); turn the clock hands.
- Take the BLURRY NOTE (P).
- Go to the Study.
- Place the BLURRY NOTE; use the magnifier (Q).
- Use the PENCIL (R) to receive the ANTIDOTE FORMULA (1/2).
- Place the BUTTERFLY for a mini-game (S).

- Solution (T): Ax2, C, A, Cx2, C, Bx3, Ax3, Bx3.
- Take the MOON FIGURINE (U).
- Go to the Bedroom.
- Place the MOON FIGURINE (V).
- Take the ANTIDOTE FORMULA (2/2) (W).
- Go to the Laboratory.
- Place the ANTIDOTE FORMULA (2/2) (X); use the chalk.
- Take the ANTIDOTE RECIPE (Y).
- Place the ANTIDOTE RECIPE, LEMONS, LAVENDER, MAGNESIUM, ZINC POWDER, and BOTTLE OF MILK (Z); read the notes.
- Use the PINCERS (A); take the ANTIDOTE and ANTIDOTE RECIPE (B).
- Use the spoon (C); pour the ANTIDOTE (D).
- Place the ANTIDOTE RECIPE (E).
- Congratulations! You have completed Sea of Lies: Burning Coast.
Created at: 2015-02-27