

Walkthrough Menu
- General Tips
- Chapter 1: Piano Bar
- Chapter 2: Gambling Salon
- Chapter 3: Island Oasis
- Chapter 4: The Mansion
- Chapter 5: The Front Gate
- Chapter 6: The Finale
General Tips
- This is the official guide for Sea of Lies: Tides of Treachery.
- This guide will not tell you when you have to zoom into a location; the screenshots will show each zoom scene.
- Hidden-object puzzles are referred to as HOPs. This guide will not show screenshots of the HOPs, however, it will mention when an HOP is available and the inventory item you'll collect from it.
- Use the Map to fast travel to a location.
Chapter 1: Piano Bar

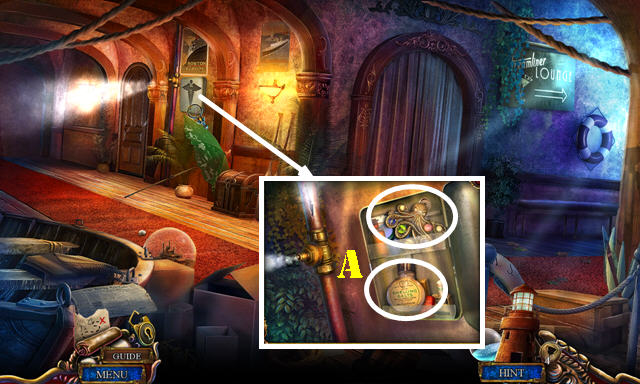
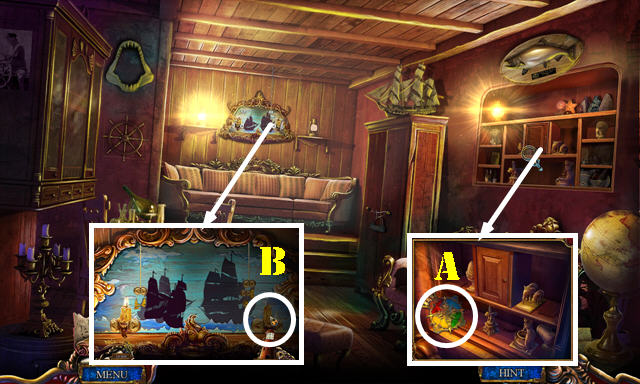
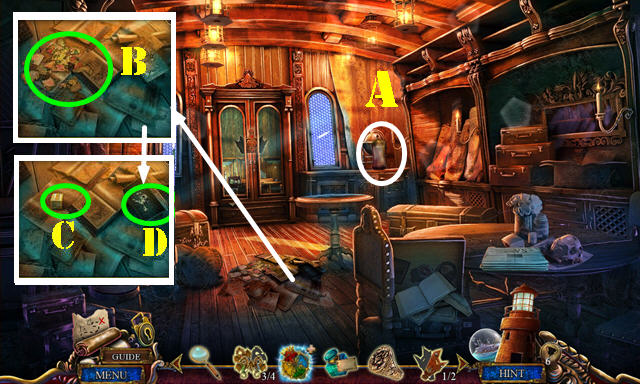
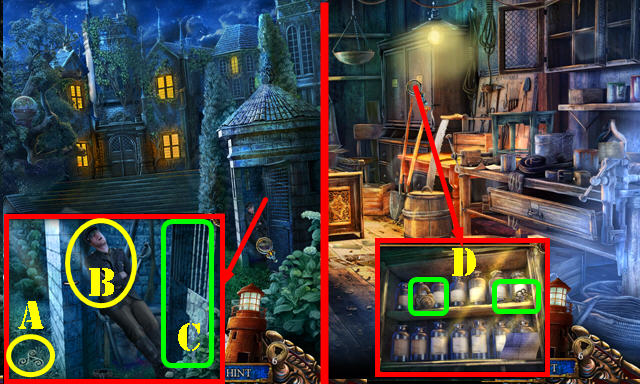
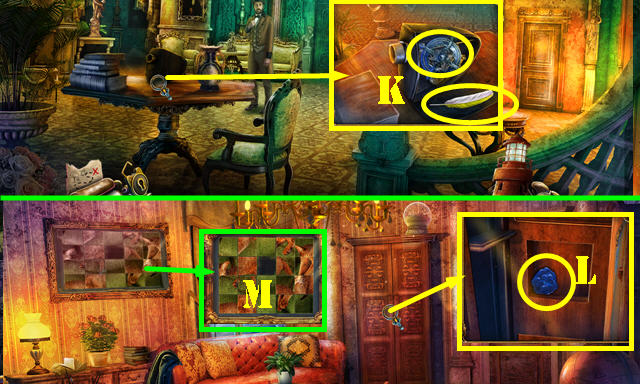
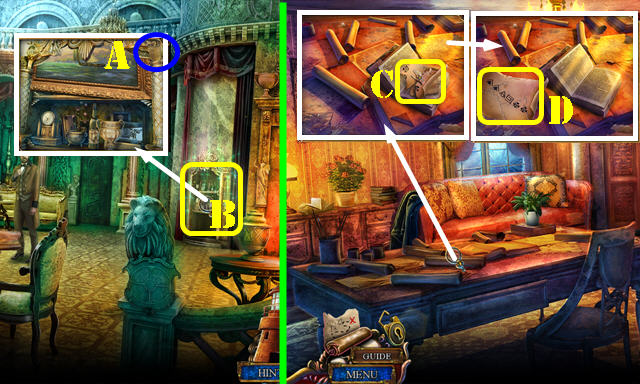
- Talk to Gregory; take the FILE FOLDER (A).
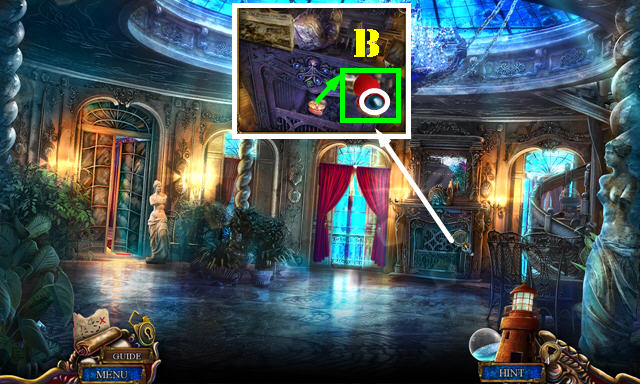
- Open the FILE FOLDER; remove the page; take the DOUBLOON. Select two more pages and take the SHIP'S CREST (inventory).
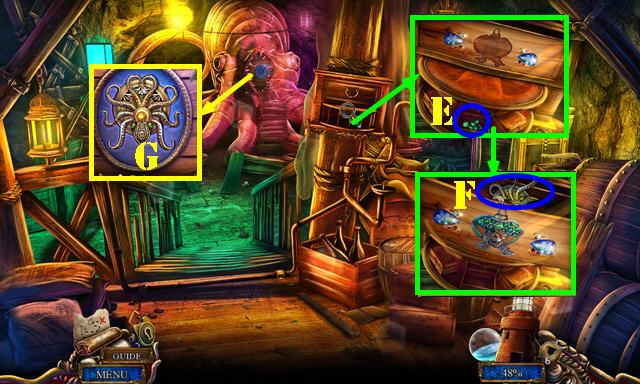
- Place the SHIP'S CREST; take the DARK PEARL 1/3 and MERMAID (B).
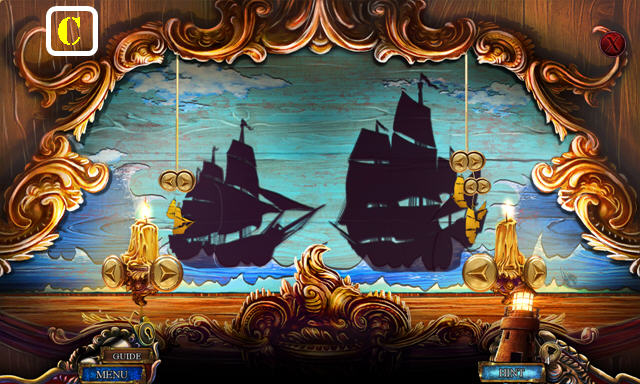
- Enter (C).
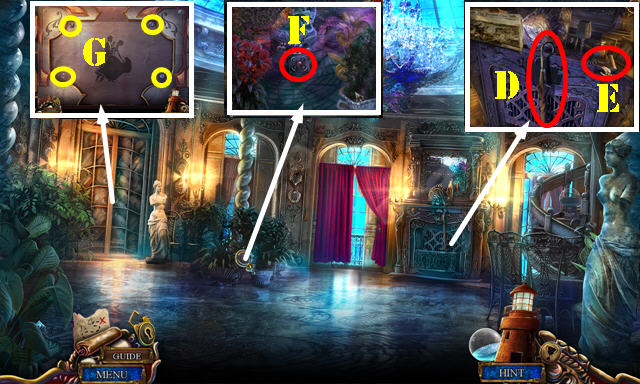
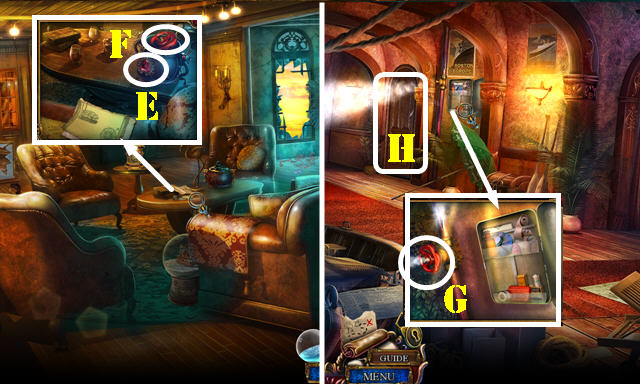
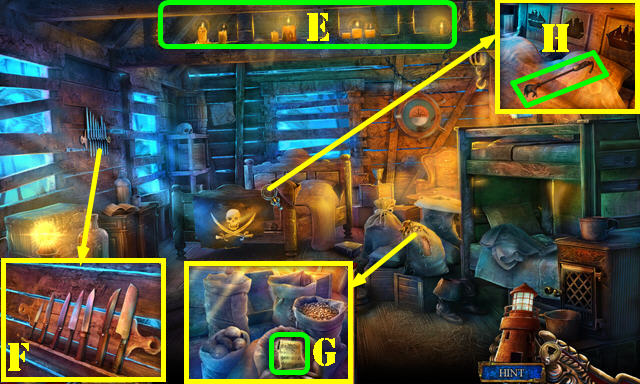
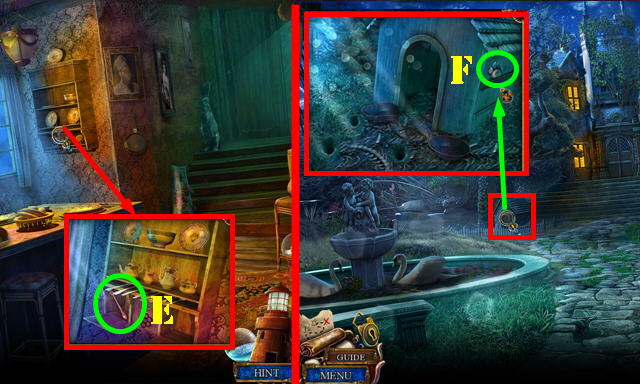
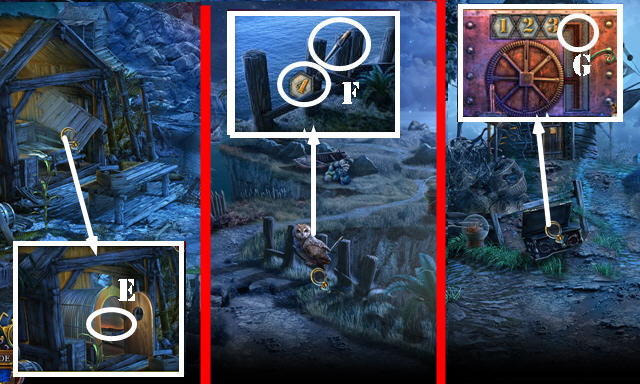
- Take the UMBRELLA (D). Move the newspaper; take the CORKSCREW (E).
- Move the two pots; take the GAME TILE 1/4 (F).
- Use the DOUBLOON 4x (G).
- Walk down.
- Use the UMBRELLA to get the ROPE (H).
- Return to the Ballroom.
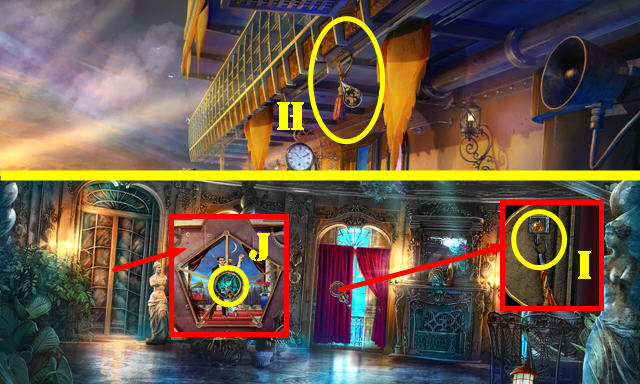
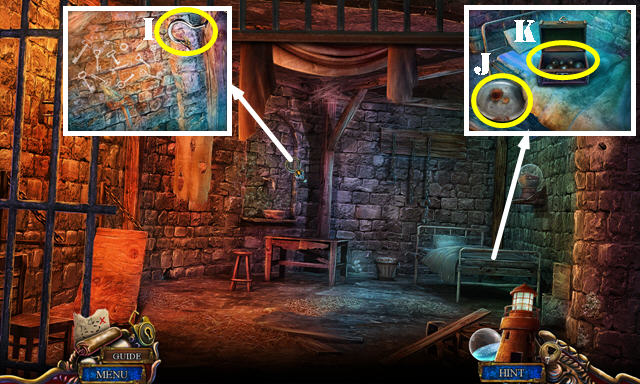
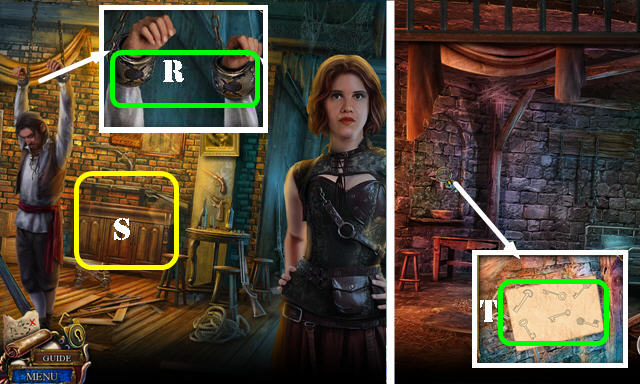
- Replace the ROPE (I) for a HOP; play it to get the CORKED BOTTLE.
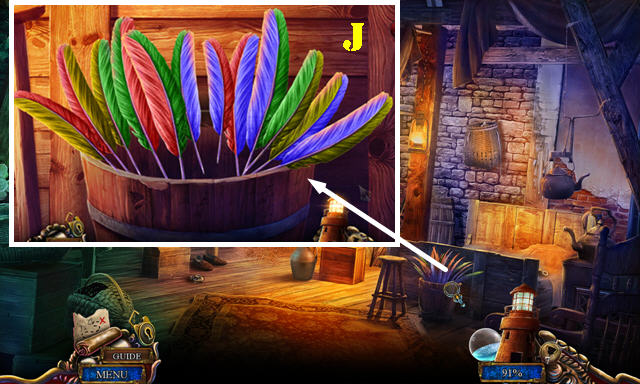
- Use the CORKSCREW on the CORKED BOTTLE; read the note and take the MECHANISM PART (inventory).
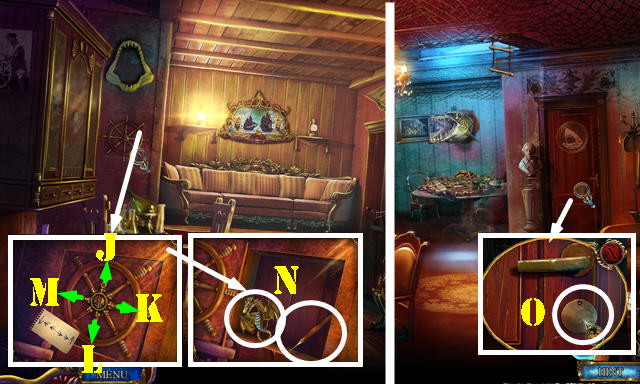
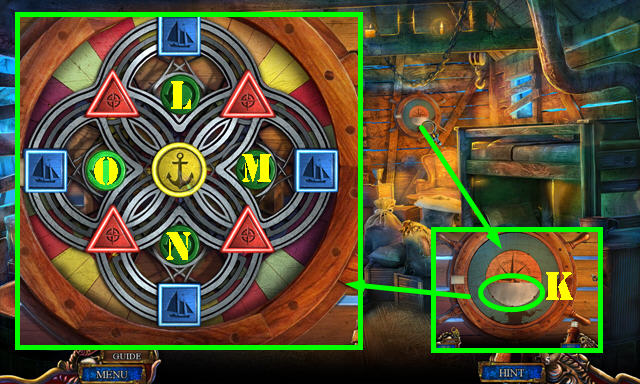
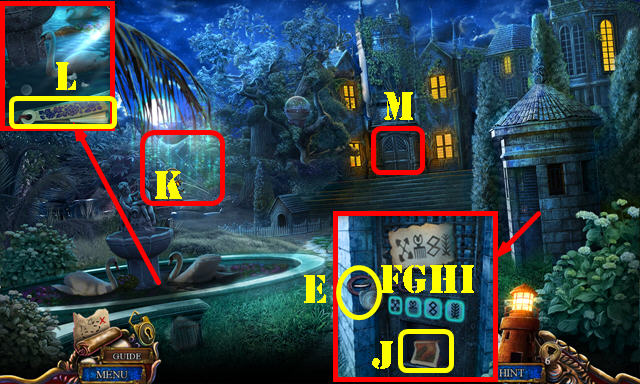
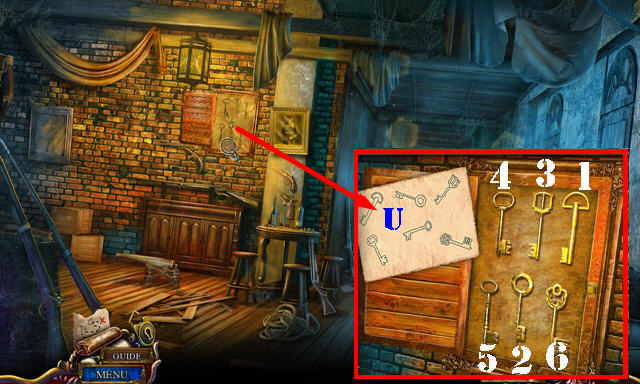
- Place the MECHANISM PART (J) for a puzzle.
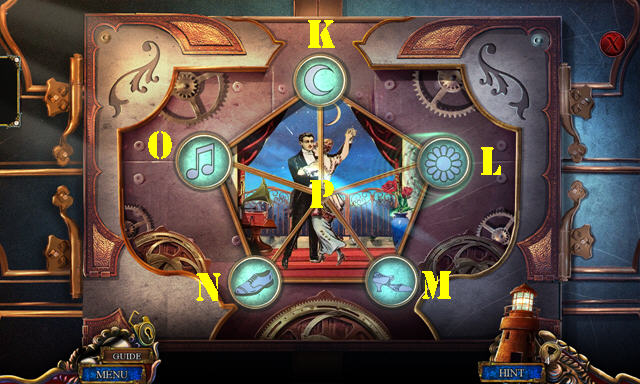
- Solution: L-K-P-M-N-O-K-P-M-L-P.
- Go through the door and then through the curtains.
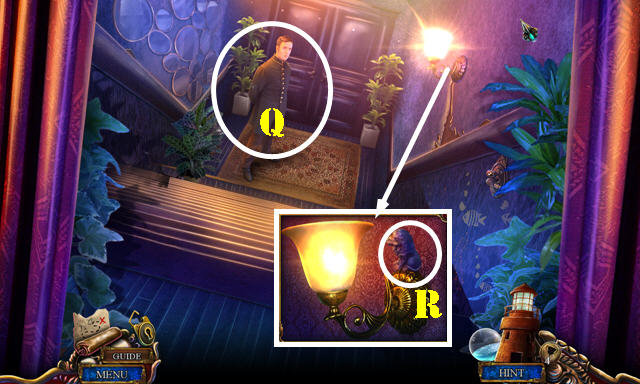
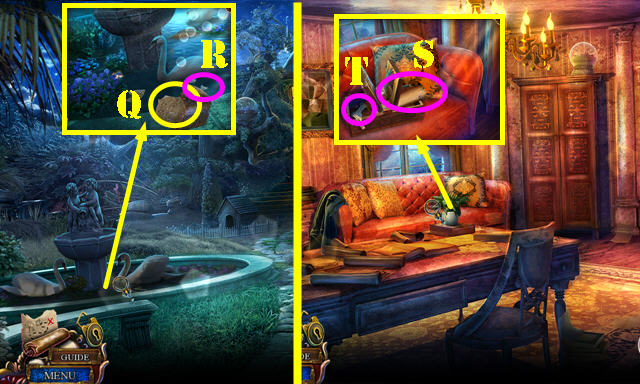
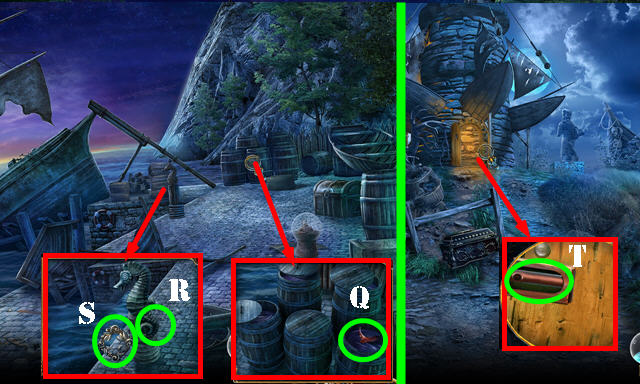
- Talk to the employee (Q).
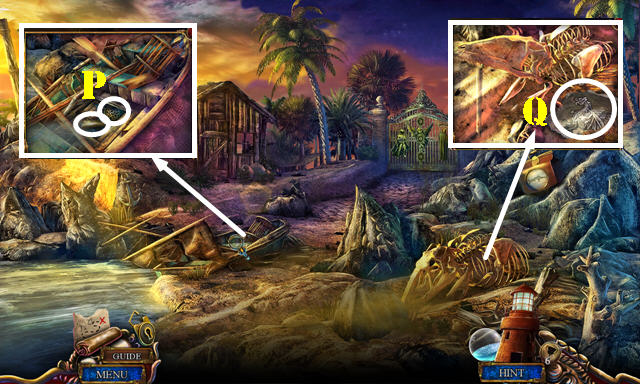
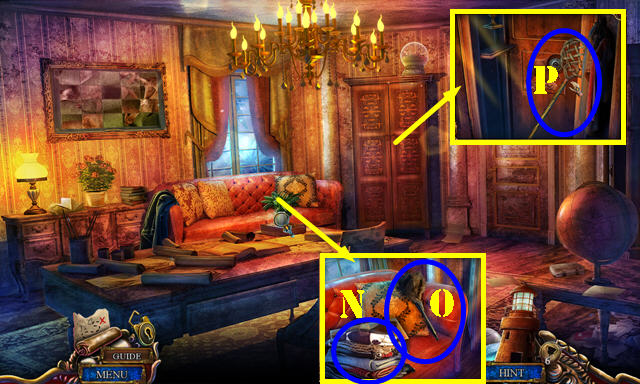
- Take the SCULPTURE 1/3 (R).
- Walk down and go right.
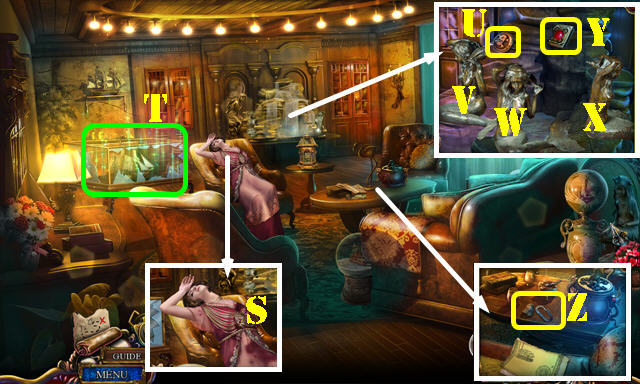
- Talk to the Duchess (S).
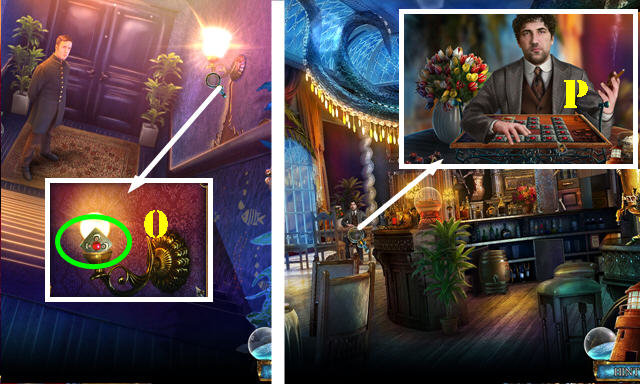
- Play the HOP (T) to get the CADUCEUS.
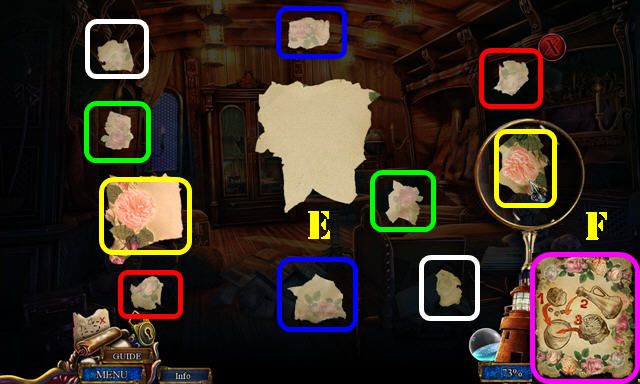
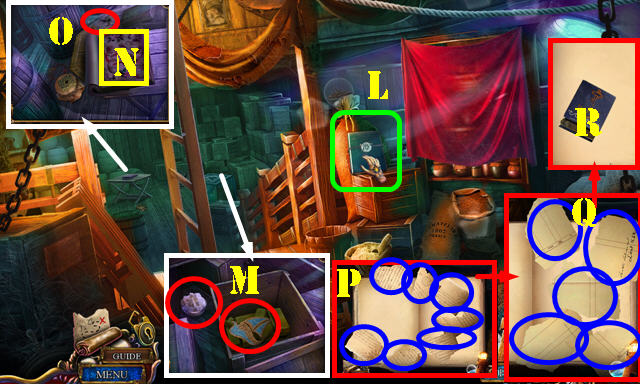
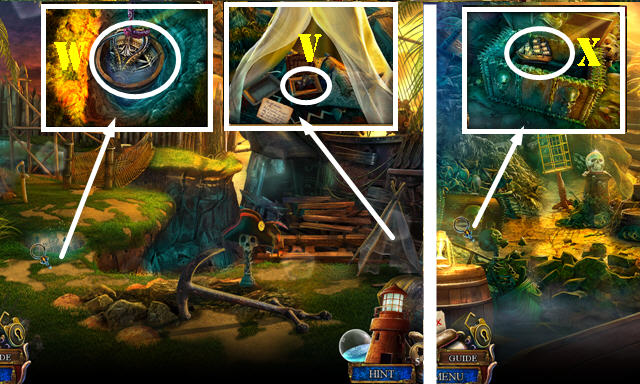
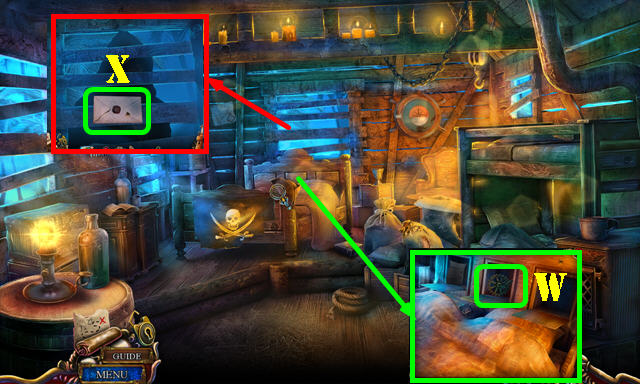
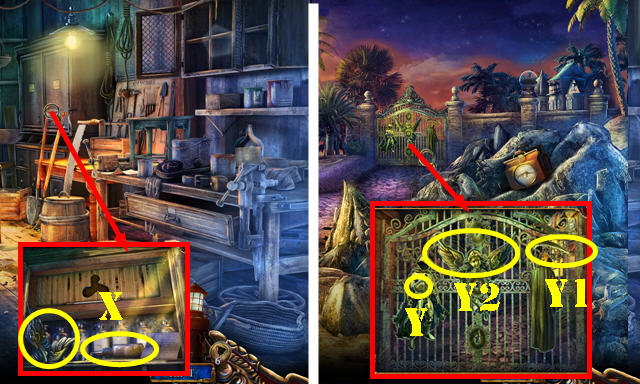
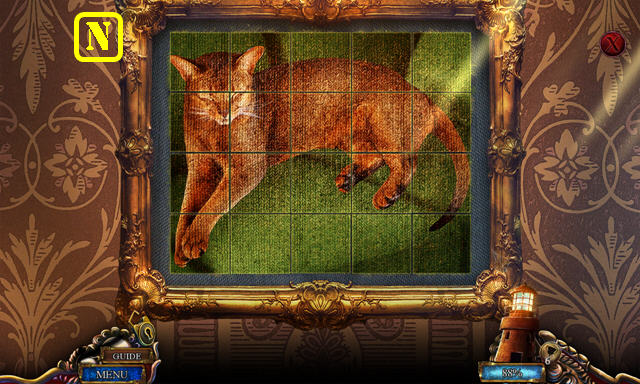
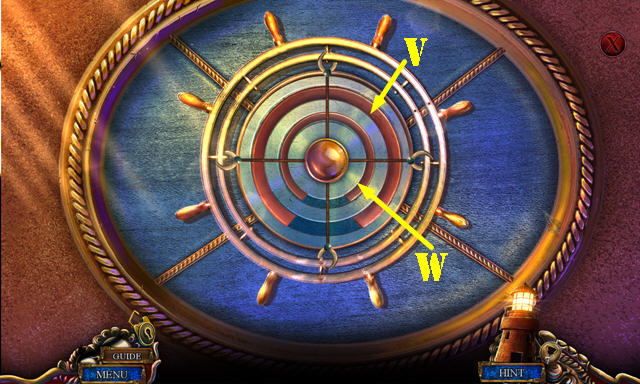
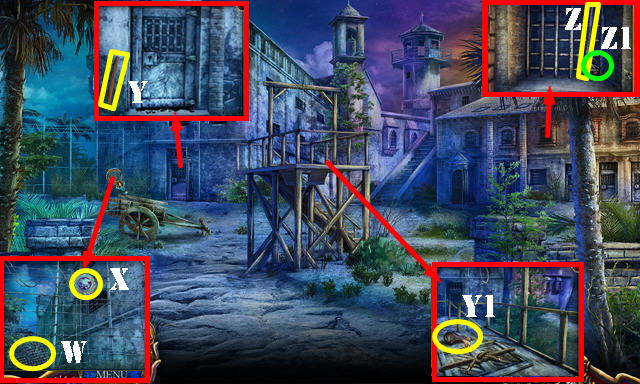
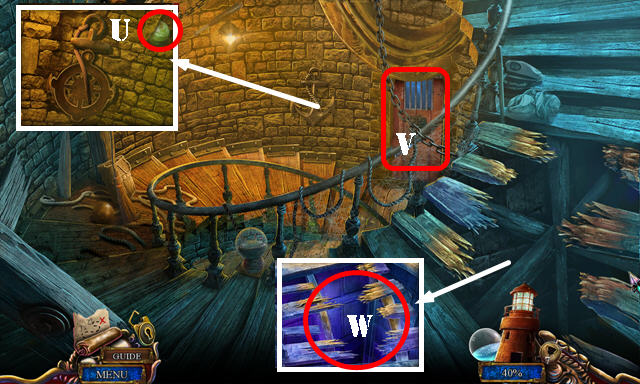
- Take the COAT BUTTON (U).Place the MERMAID. Select V-V-X-X-X-W. Take the GAME TILE 2/4 (Y).
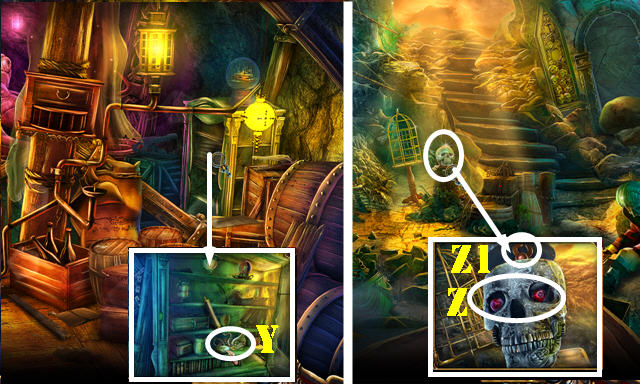
- Remove the note; take the FLINT (Z).
- Walk down.
- Place the CADUCEUS; take the OCTOPUS and SMELLING SALTS (A).
- Walk down.
- Place the OCTOPUS; open the box and take the DARK PEARL 2/3 (B).
- Return to the Lounge.
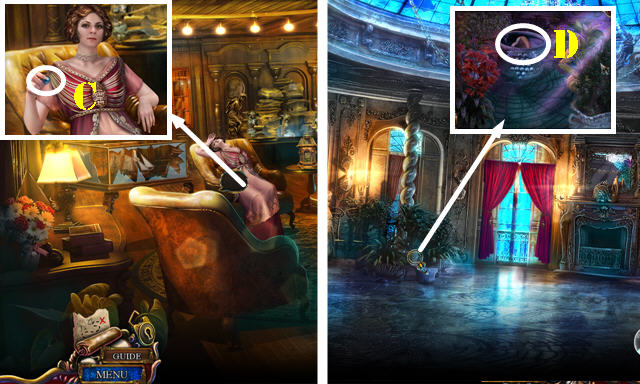
- Use the SMELLING SALTS on the Duchess; take the DARK PEARL 3/3 (C).
- Return to the Ballroom.
- Place the 3 DARK PEARLS; take the HEART (D).
- Return to the Lounge.
- Place the HEART (E); take the VALVE KNOB (F).
- Walk down.
- Place the VALVE KNOB (G).
- Enter (H).
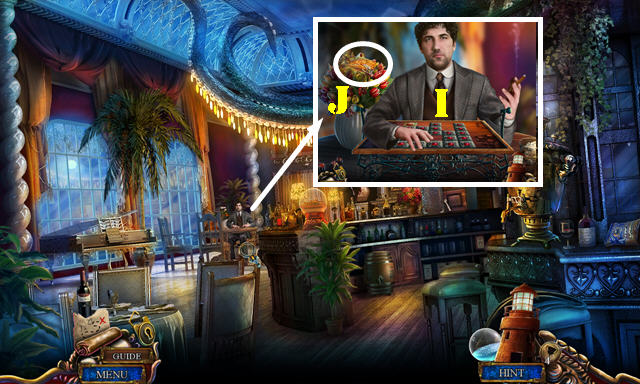
- Talk to the man (I).
- Take the SPHINX (J).
- Walk down.
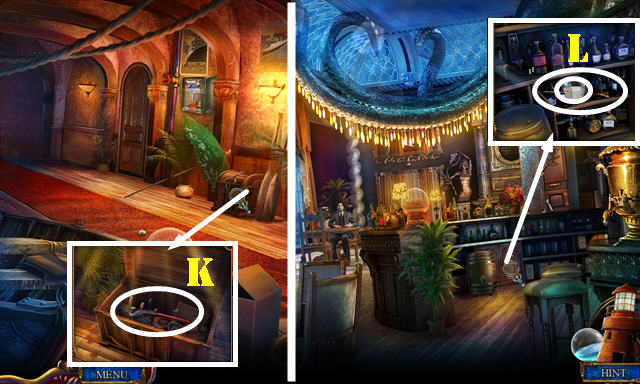
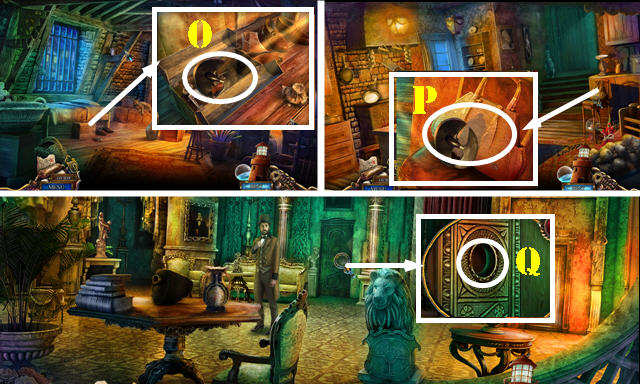
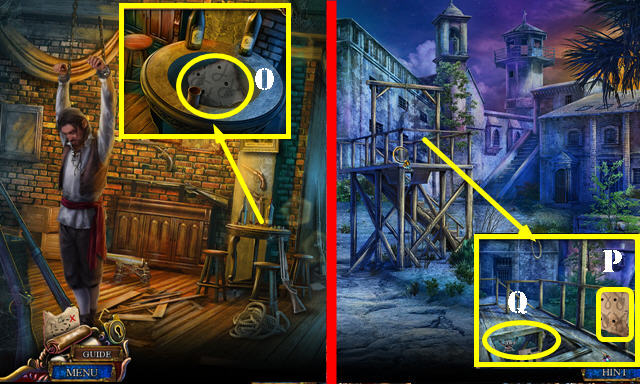
- Place the SPHINX; take the NIPPERS (K).
- Return to the Piano Bar.
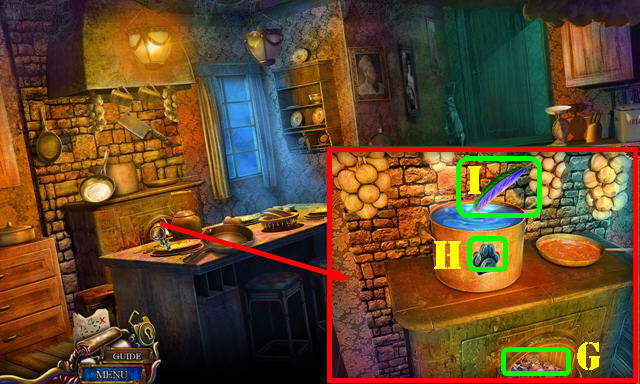
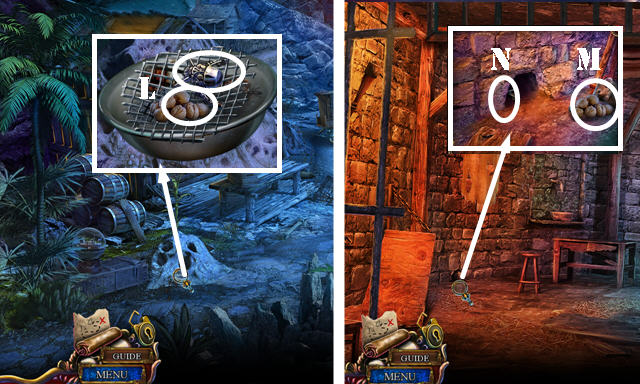
- Use the NIPPERS; touch the JAR OF SALT and take it. Take the SHUFFLEBOARD STICK (L).
- Return to the Lounge.
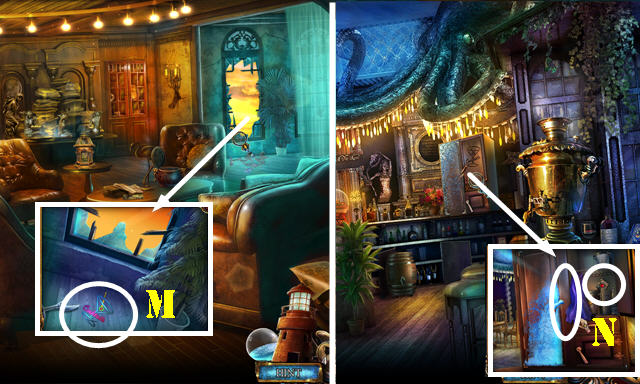
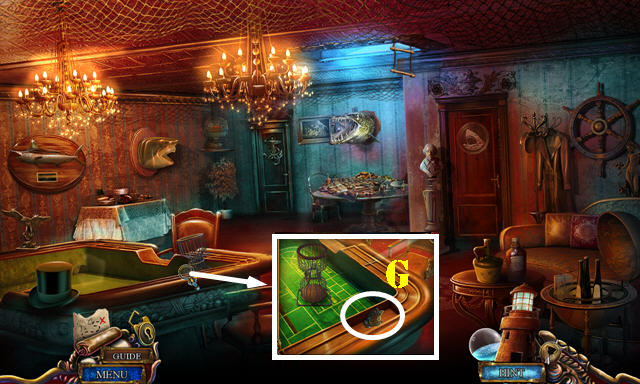
- Open the curtain. Use the SHUFFLEBOARD STICK 3x; take the COCKTAIL SYMBOL (M).
- Return to the Piano Bar.
- Place the COCKTAIL SYMBOL; take the SCARF and GAME TILE 3/4 (N).
- Return to the Stairs.
- Use the SCARF; take the GAME TILE 4/4 (O).
- Return to the Piano Bar.
- Place the 4 GAME TILES for a puzzle (P).
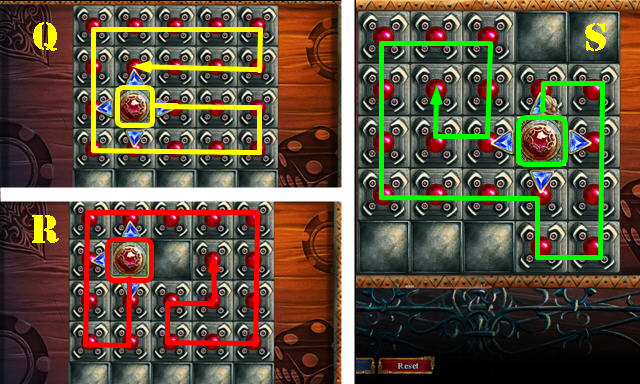
- Touch the game tile to begin and place as shown in each level.
- Solution one (Q).
- Solution two (R).
- Solution three (S).
- Take the BLACK SHELL.
- Return to the Stairs.
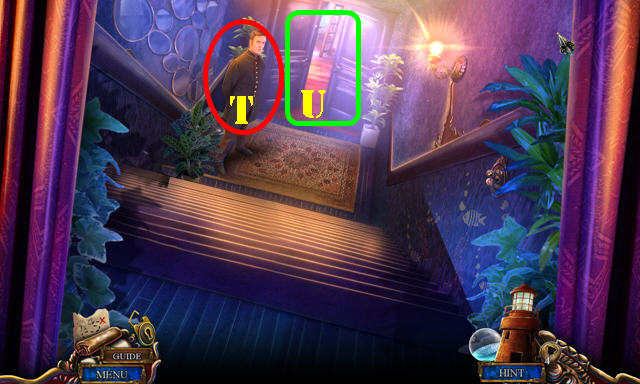
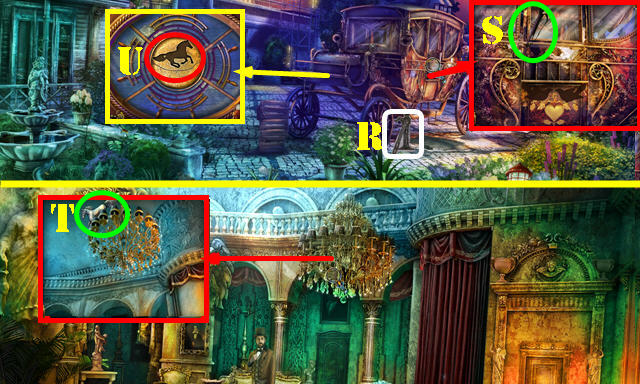
- Give the BLACK SHELL (T).
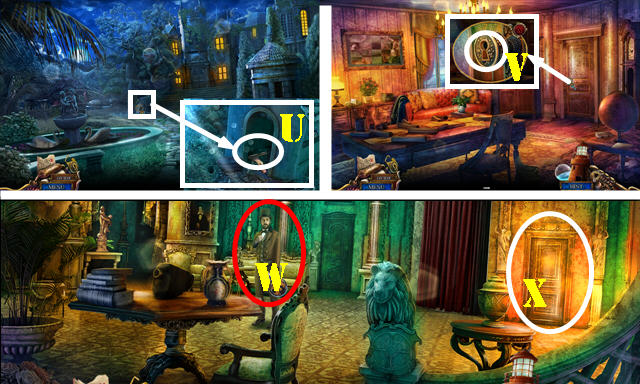
- Enter the Gambling Salon (U).
Chapter 2: Gambling Salon
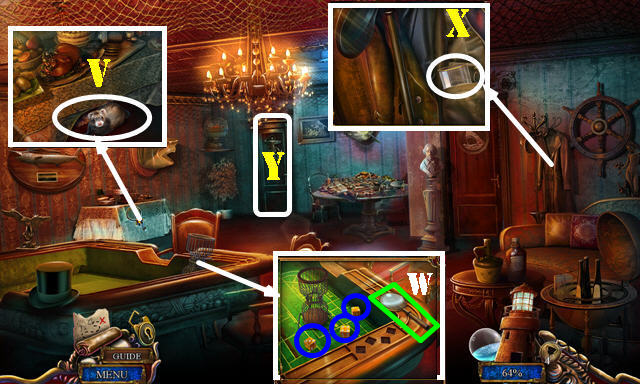
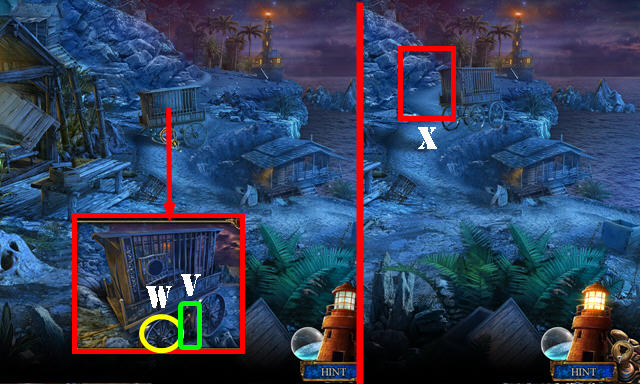
- Lift the skirt (V).
- Take the MAGNIFYING GLASS (W). Touch the cup and select the three dice (blue).
- Place the COAT BUTTON; take the CUP (X).
- Enter (Y).
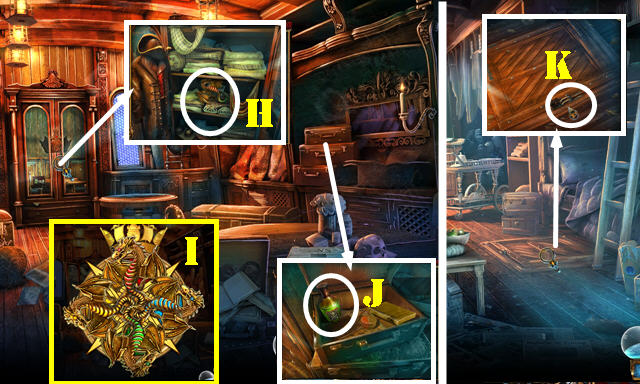
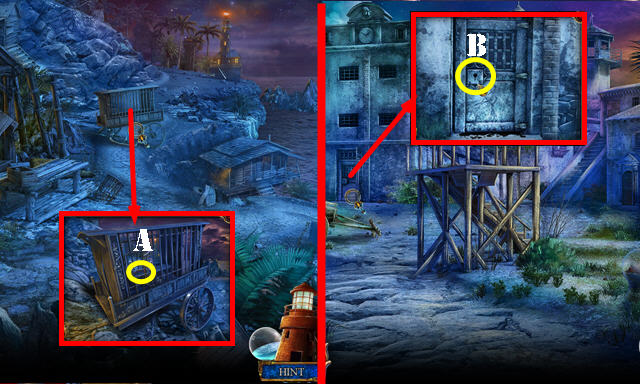
- Take the SHIP'S CREST (A).
- Use the FLINT for a puzzle (B).
- Solution (C).
- Take the DRAGON 1/4.
- Walk down twice.
- Turn off the lights (D).
- Take the COMBINATION (E).
- Turn the lights back on.
- Return to the Piano Bar.
- Use the CUP (F) to get the HOT TEA.
- Use the HOT TEA and pull the handle; take the RETRACTOR and ICE PICK (G).
- Return to the Gambling Salon.
- Use the RETRACTOR; try to take the wheel insert (H).
- Play the HOP (I) to get the WHEEL INSERT.
- Go to the Cabin.
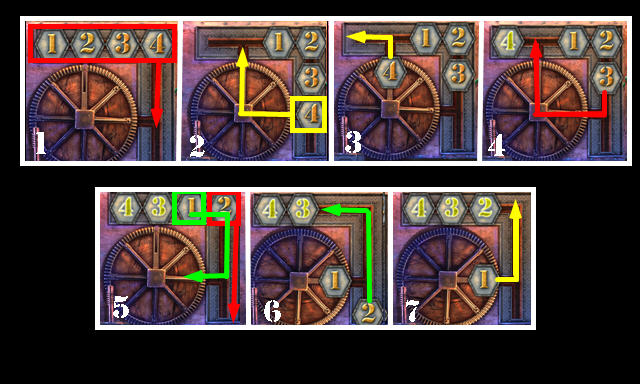
- Place the WHEEL INSERT and COMBINATION. Enter L-M-M-K-K-J. Take the DRAGON 2/4 and LOCKPICK (N).
- Walk down.
- Use the LOCKPICK (O).
- Enter the Waiters' Quarters.
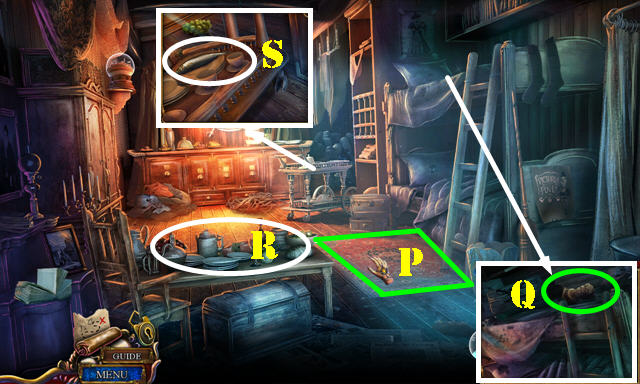
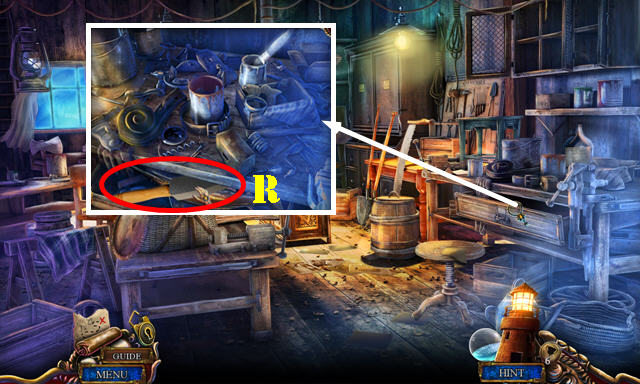
- Remove the rug (P).
- Move the clothes; take the SCULPTURE 2/3 (Q).
- Play the HOP (R) to get the DRAGON 3/4.
- Take the FISH (S).
- Walk down.
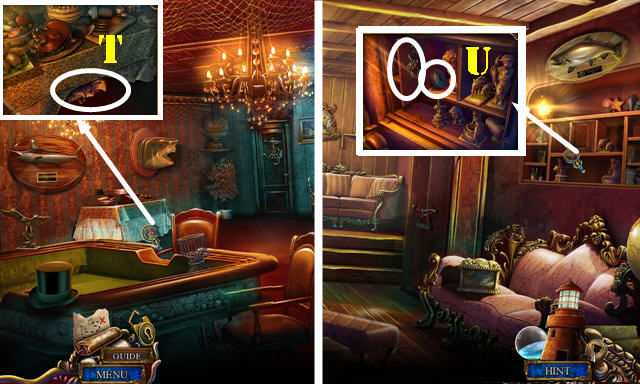
- Give the FISH; take the SCULPTURE 3/3 (T).
- Go to the Cabin.
- Place the 3 SCULPTURES; take the WHEEL and PIRATE SYMBOL (U).
- Return to the Waiters' Quarters.
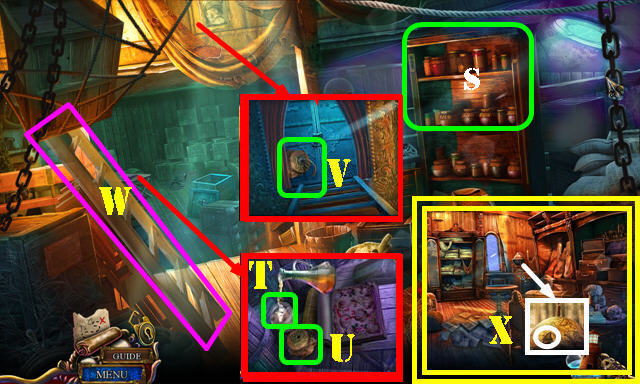
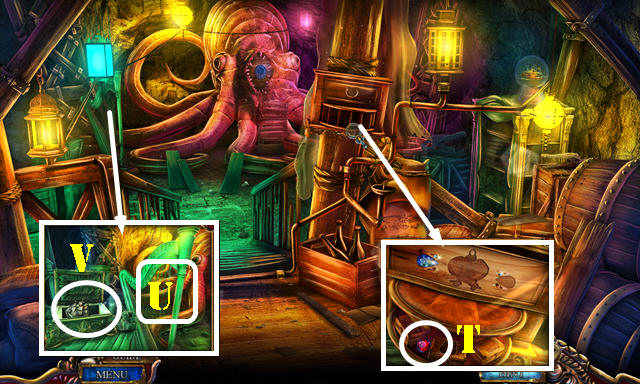
- Place the PIRATE SYMBOL; take the CROWN SYMBOL 1/2 (V).
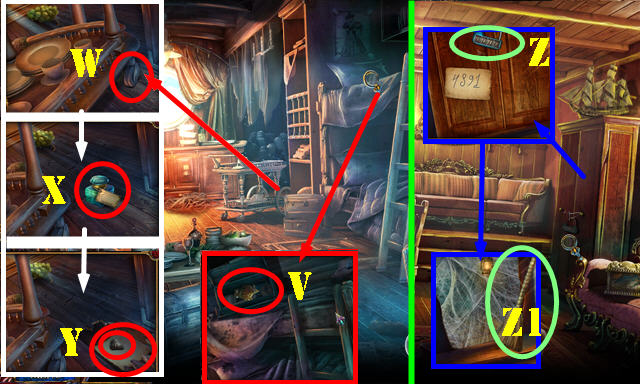
- Place the WHEEL (W) and touch it; take the INK REVEALER (X). Use the ICE PICK; take the CABINET COMBINATION and SIGNET RING (Y).
- Return to the Cabin.
- Place the CABINET COMBINATION (Z); change to 4891. Use the broom (Z1) 3x; enter the Secret Room.
- Take the SODA SYPHON (A).
- Take the RIPPED PAPER (B) and DIE (C).
- Open the box; take the SKULL EMBLEM (D).
- Use the MAGNIFYING GLASS on the RIPPED PAPER (inventory) for a puzzle. Matching pairs (E). Use the INK REVEALER to get the BOMB INSTRUCTIONS (F).
- Return to the Gambling Salon.
- Place the DIE; slide the compartment and take the CROWN SYMBOL 2/2 (G).
- Return to the Secret Room.
- Place the 2 CROWN SYMBOLS; take the DRAGON 4/4 (H).
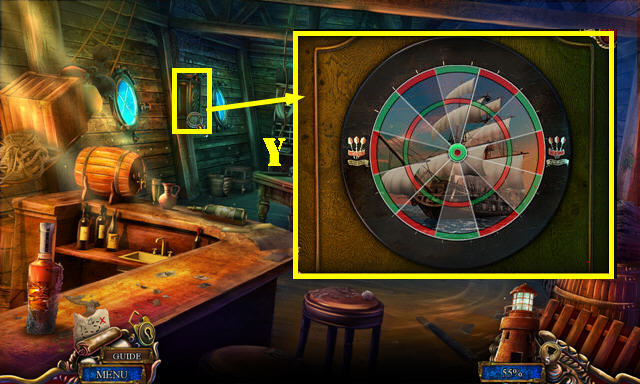
- Place the 4 DRAGONS on the SHIP'S CREST (inventory) for a puzzle. Solution (I).
- Place the SHIP'S CREST; take the ACID (J).
- Return to the Waiters' Quarters.
- Use the ACID (K); go down to the Cargo Hold.
- Take the SHIP'S LOG (L).
- Place the SKULL EMBLEM; take the GLOBE INSERT and SUGAR (M).
- Open the book and place the BOMB INSTRUCTIONS (N) and look at it; take the FUSE (O).
- Use the SIGNET RING on the SHIP'S LOG; select the 7 pieces (P). Flip the page and select the 5 scraps (Q). Flip the page and take the MATCHES (R) (inventory).
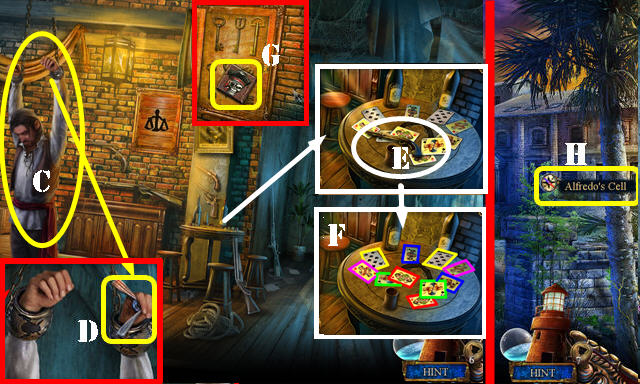
- Talk to the Duke.
- Play the HOP (S) to get the VINEGAR.
- Place the JAR OF SALT; add SUGAR and VINEGAR to it (T). Select the LID (U) to get the EXPLOSIVE.
- Place the EXPLOSIVE and the FUSE (V); use the MATCHES. Select the ladder (W); go up the ladder, and then return to the Secret Room.
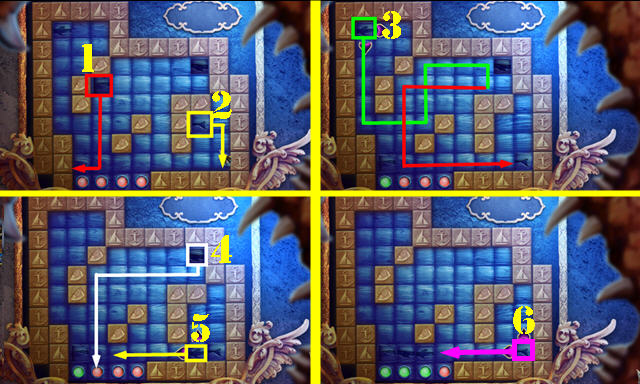
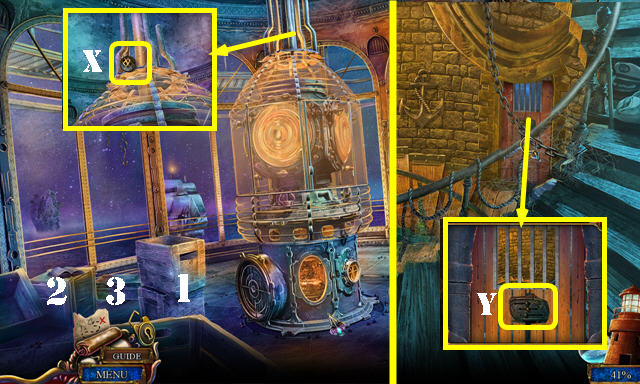
- Place the GLOBE INSERT for a puzzle (X).
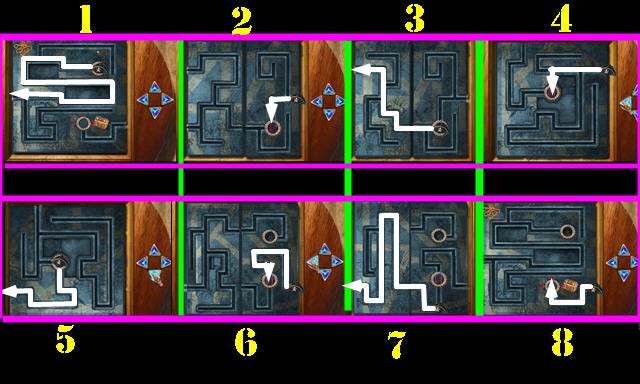
- Solution (1-8).
- Take the FIN.
- Return to the Gambling Salon.
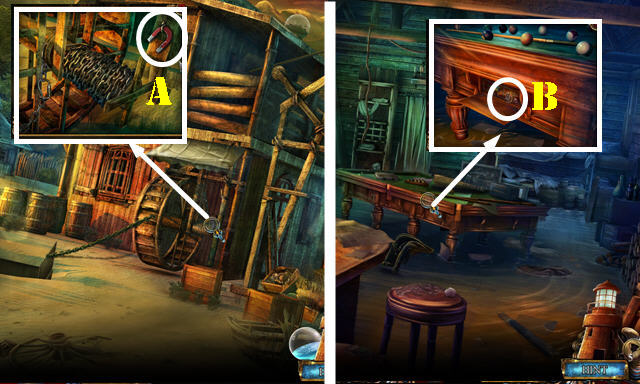
- Insert the FIN and pull it (A).
- Go up the ladder (B).
Chapter 3: Island Oasis

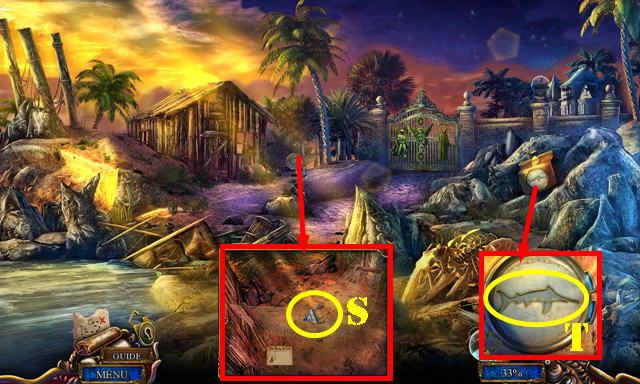
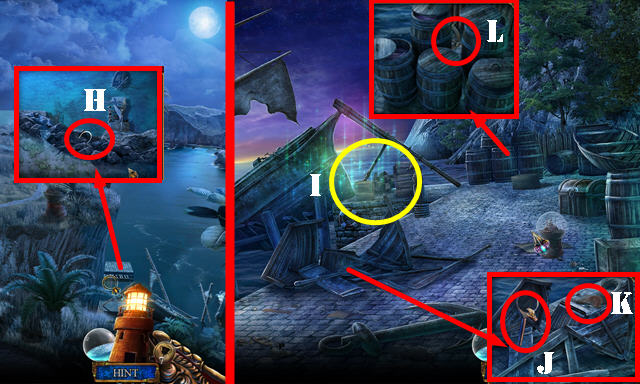
- Use the SODA SYPHON on the fire and talk to the lady.
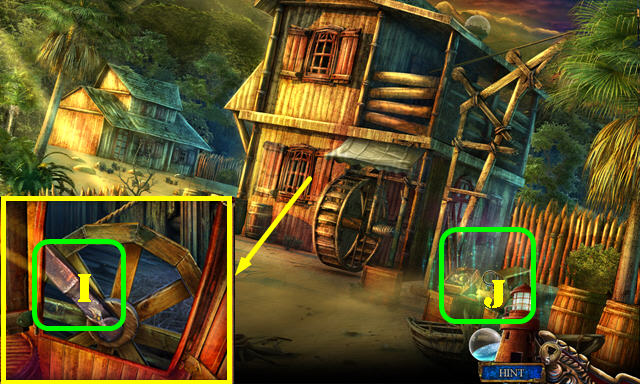
- Take the LADLE (C); remove the board and take the CRANK HANDLE (D).
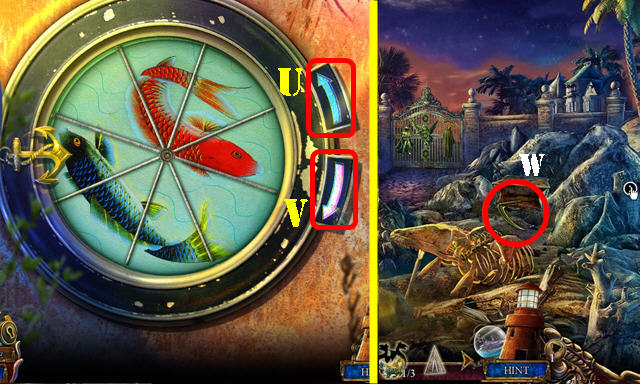
- Take the BANDANA (E). Place the CRANK HANDLE (F).
- Play the puzzle (G).
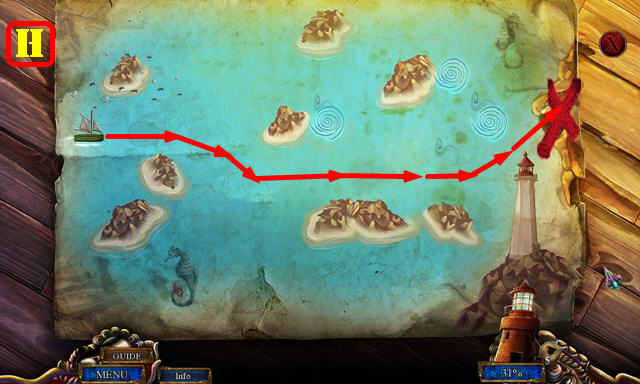
- Solution (H).
- You will be taken to the Pirate's Cave.
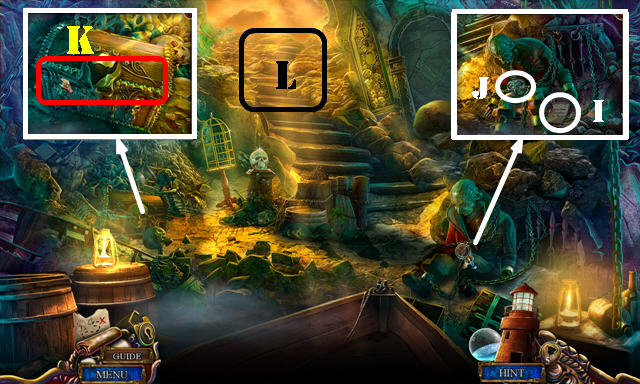
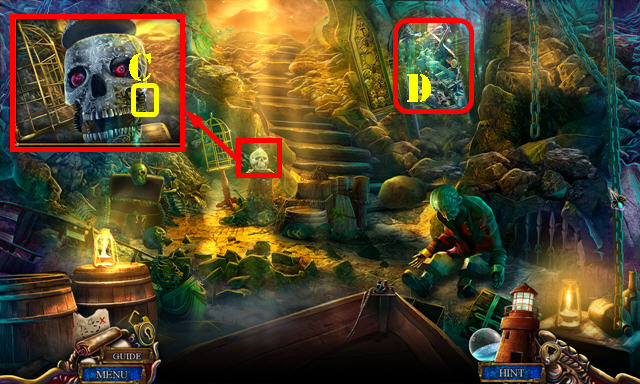
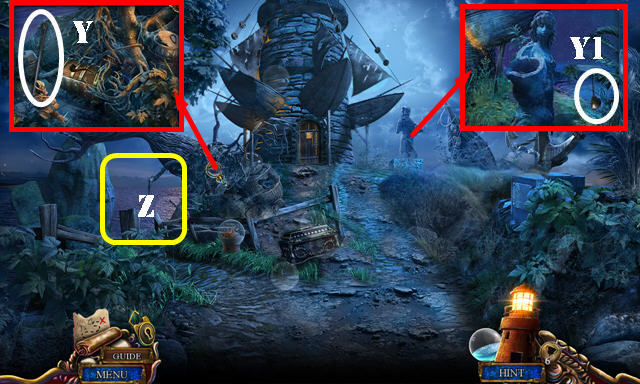
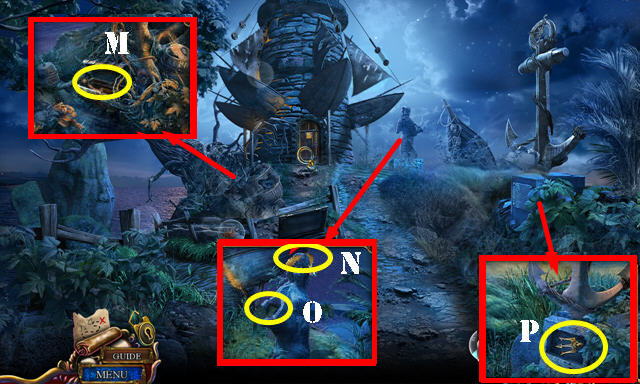
- Read the note (I); take the PIRATE PENDANT (J).
- Take the CROSSED SWORDS (K).
- Go up the stairs (L).
- Open both curtains; move two pillows; read the note (M).
- Remove the lid and use the LADLE (N); take the FISH BONES.
- Take the SPADE (O) and open the doors.
- Enter (P).
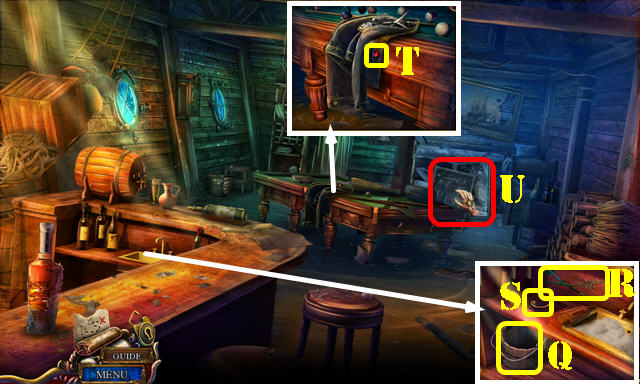
- Take the BUCKET (Q). Move all the bottles; place the CROSSED SWORDS (R) and take the HANDLE (S).
- Place the FISH BONES; take the RUBY EYES 1/2 (T).
- Select the items 2x (U) for a HOP; play it to get the CHEST TRINKET.
- Walk down.
- Place the HANDLE; take the PICTURE PIECE (V).
- Place the BANDANA and put the BUCKET on it; take the KRAKEN EMBLEM 1/3 (W).
- Walk down.
- Place the CHEST TRINKET; read the note and take the SHIP FIGURE 1/3 (X).
- Return to the Lower Deck.
- Place the PICTURE PIECE for a puzzle. Solution (Y).
- Open and look at the locket; take the DOOR MECHANISM PART.
- Talk to the Duke.
- Walk down.

- Place the DOOR MECHANISM PART for a puzzle.
- Solution (Z).
- Go forward.
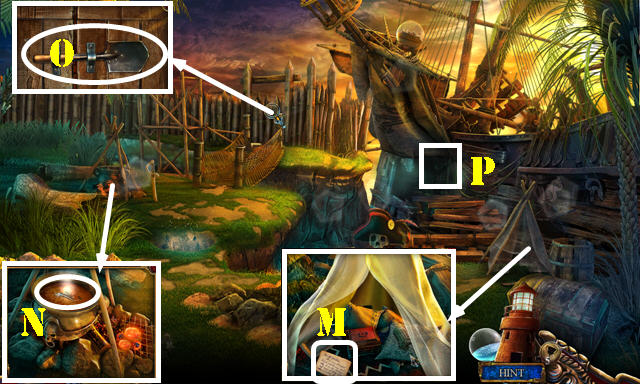
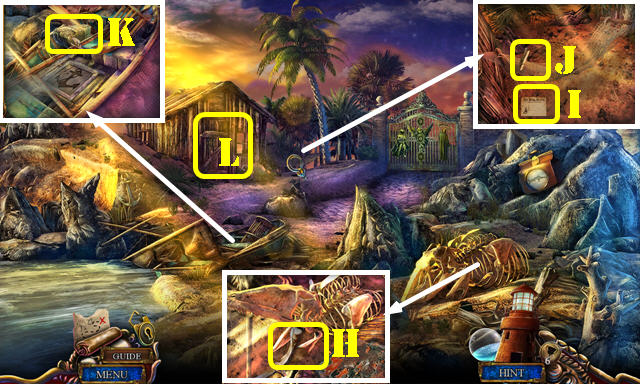
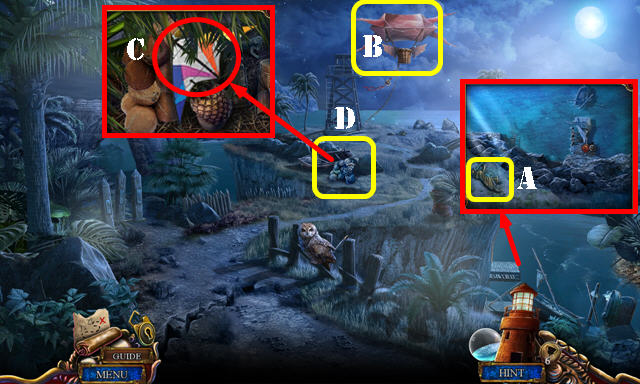
- Open the door; take the COAL GRABBER (A).
- Use the SPADE; read the note and take the SHIP FIGURE 2/3 (B).
- Walk down.
- Use the COAL GRABBER to get the BURNING EMBERS (C).
- Go forward and then enter the Shack (D).
- Use the BURNING EMBERS (E).
- Swap the knives as shown (F); take the KNIFE.
- Use the KNIFE; take the SHEET MUSIC and EMERALD STAR (G).
- Take the BACKSCRATCHER (H).
- Walk down.
- Use the KNIFE; pull the lever (I) for a HOP (J); play it to get the COMPASS PLATE.
- Return to the Shack.
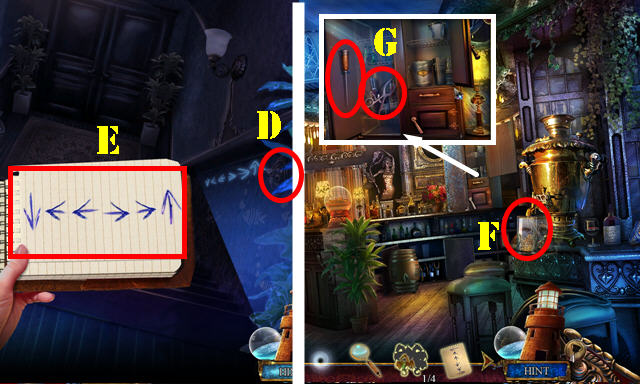
- Place the COMPASS PLATE (K) for a puzzle.
- Solution: Lx2-M-O.
- Take the SHACKLES KEY.
- Return to the Pirate's Cave.

- Use the SHACKLES KEY; take the CHAIN and the SAPPHIRE (P).
- Return to the Fortress.
- Place the CHAIN (Q) and attach it (R).
- Go to the Secret Cellar (S).
- Place the EMERALD STAR; take the RUBY EYES 2/2 (T).
- Place the SHEET MUSIC (U); take the SHIP FIGURE 3/3 (V).
- Return to the Shack.
- Place the 3 SHIP FIGURES; look at the note and take the CRANK HANDLE (W).
- Take the LETTER (X).
- Return to the Secret Cellar.
- Place the CRANK HANDLE; look at the scroll; take the SLEEPING POWDER and KRAKEN EMBLEM 2/3 (Y).
- Return to the Pirate's Cave.
- Place the 2 RUBY EYES (Z); take the PLIERS (Z1).
- Return to the Fortress.
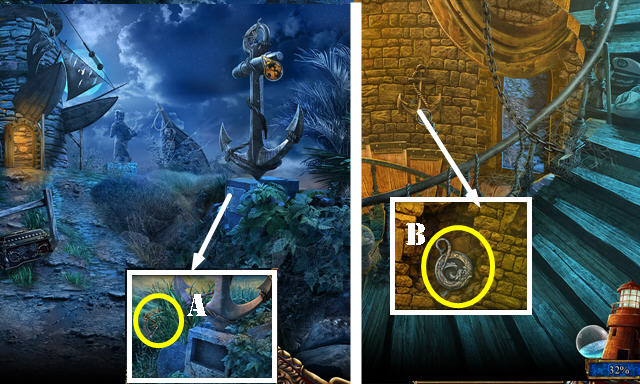
- Use the PLIERS; take the MAGNET (A).
- Return to the Lower Deck.
- Use the MAGNET; take the COG (B).
- Return to the Pirate's Cave.
- Place the COG (C) to get the OIL CAN.
- Play the HOP (D) to get the GOLD TOOTH.
- Go to the Secret Cellar.
- Place the GOLD TOOTH; take the PENDANT GEMS (E).
- Place the PENDANT GEMS on the PIRATE PENDANT (inventory).
- Place the PIRATE PENDANT and SAPPHIRE; take the KRAKEN EMBLEM 3/3 (F).
- Place the 3 KRAKEN EMBLEMS (G) for a puzzle.
- Solution (1-6).
- Move forward.
Chapter 4: The Mansion
- Select the bone and use the BACKSCRATCHER; take the WHALE BONE (H).
- Read the note (I); take the CLOTHESPIN (J).
- Take the ROCK (K).
- Enter the Shed (L).
- Play the HOP (M) to get the ANCHOR.
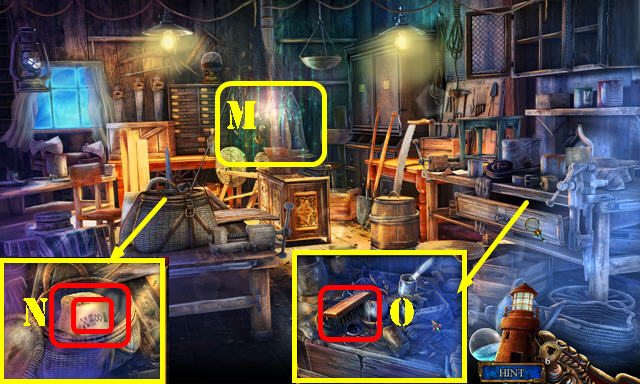
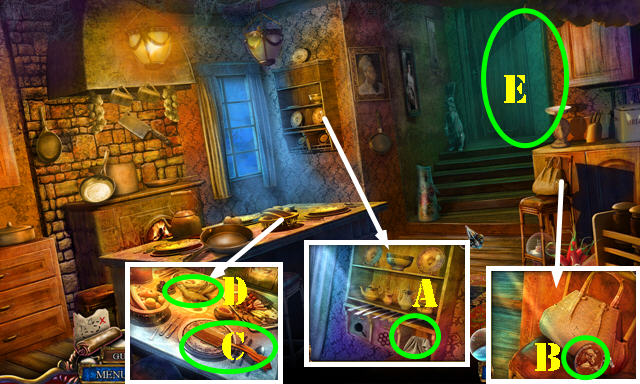
- Use the OIL CAN; take the CLUE and BREAD (N).
- Take the WIRE BRUSH (O).
- Walk down.
- Place the ANCHOR; take the BRONZE HEART and WHALE TOOTH (P).
- Use the WIRE BRUSH; take the DRAGON PART 1/3 (Q).
- Return to the Shed.
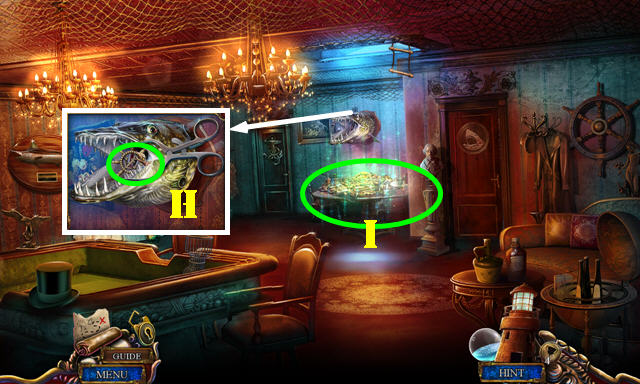
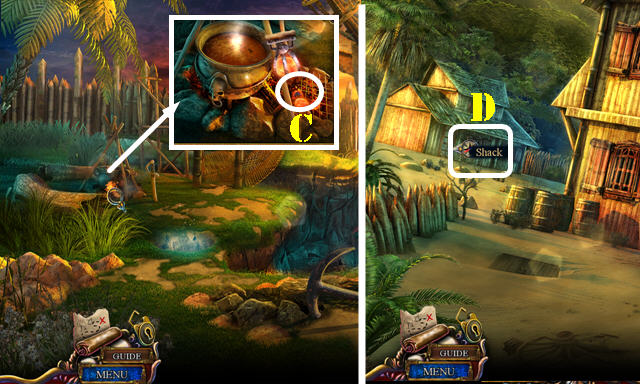
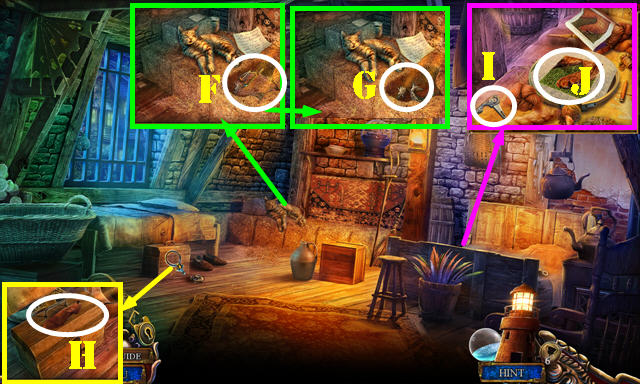
- Place the WHALE TOOTH and use the ROCK; take the SHARPENING STONE and SWORDFISH (R).
- Use the SHARPENING STONE on the WHALE BONE to get the BONE KNIFE (inventory).
- Walk down.
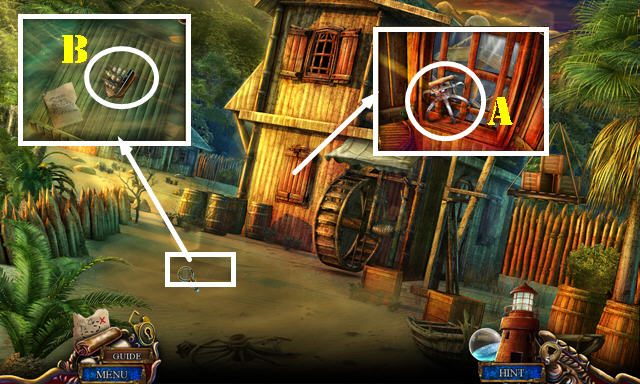
- Use the BONE KNIFE; take the CALIPER EMBLEM (S).
- Place the SWORDFISH for a puzzle (T).
- Solution: V-U-V-Ux2-V.
- Take the SILVER SCYTHE (W).
- Return to the Shed.
- Place the CALIPER EMBLEM; read the note. Take the WINGS and GLUE (X).
- Walk down.
- Place the BRONZE HEART (Y), SILVER SCYTHE (Y1) and WINGS (Y2).
- Go through the gates.
- Take the WHIRL (A).
- Use the SLEEPING POWDER (B) and close the door (C).
- Return to the Shed.
- Place the WHIRL; take the PADLOCK and INCOMPLETE KEY (D).
- Return to the Courtyard.
- Place the PADLOCK (E) and CLUE. Solution: Fx7-Gx6-Hx5-Ix4. Take the MOSAIC PICTURE (J).
- Play the HOP (K) to get the BEE.
- Take the FAN (L).
- Enter (M).
- Move the items (N); take the FEATHER DUSTER (O).
- Open the door; move 6 shirts; take the RUG BEATER (P).
- Walk down.
- Place the BREAD (Q).Use the RUG BEATER to get the BIRD WING (R).
- Return to the Study.
- Place the BIRD WING; look at the scroll (S); take the DOG BONE SHAPE (T).
- Walk down.
- Place the DOG BONE SHAPE; take the KEY PART (U).
- Place the KEY PART on the INCOMPLETE KEY to get the KEY (inventory).
- Return to the Study.
- Use the KEY (V); go through the door.
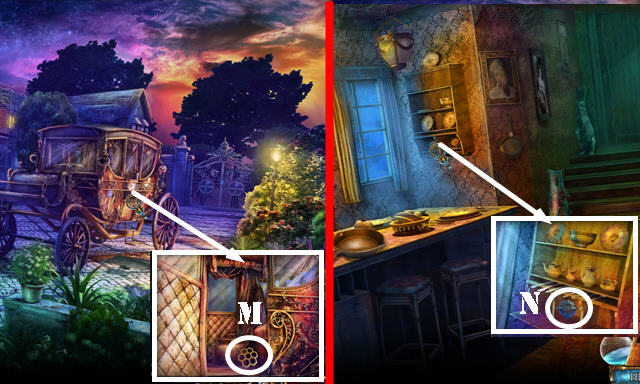
- Give the LETTER to the governor and talk to him (W).
- Enter (X).
- Place the BEE; take the TAPESTRY CANVAS (A).
- Take the BEAR EMBLEM (B) and DOUGH SCRAPER (C).
- Use the CLOTHESPIN; take the DOVE 1/2 (D).
- Go (E).
- Look at the note and touch the hay; take the SCALES 1/2 (F). Touch the hay again; take the DRAGON PART 2/3 (G).
- Take the SHOE TREE (H) and NEEDLE THREADER (I).
- Place the MOSAIC PICTURE and TAPESTRY CANVAS; take the MOSAIC PART (J).
- Walk down twice.
- Use the NEEDLE THREADER and FEATHER DUSTER; take the GATE LOCK 1/2 and FEATHER (K).
- Walk down.
- Place the BEAR EMBLEM; select it 3x and take the PIGMENT (L).
- Place the MOSAIC PART for a puzzle (M).
- Solution (N).
- Take the BOOT.
- Return to the Servants' Quarters.
- Place the BOOT; take the SHOEMAKER'S KNIFE (O).
- Walk down.
- Use the SHOEMAKER'S KNIFE (P) for a HOP; play it to get the KNOB.
- Walk Down.
- Place the KNOB (Q); go through the door.
Chapter 5: Front Gate
- Take the JACK LIFT (R).
- Use the SHOE TREE; take the RIDING CROP (S).
- Walk down.
- Use the RIDING CROP; take the HORSE (T).
- Go to the Front Gate.
- Place the HORSE (U) for a puzzle.
- Solution: V-Wx3-V-Wx2-V-Wx3.
- Take the ORNAMENT.
- Walk down.
- Place the ORNAMENT (A) for a HOP (B); play it to get the STAR MEDAL.
- Walk down.
- Place the STAR MEDAL; select two papers (C); take the HONEY DIPPER. Select two more papers. Use the GLUE on the papers to get the LOCK COMBINATION (D).
- Return to the Scullery.
- Place the HONEY DIPPER; take the OLIVE FORK (E).
- Return to the Courtyard.
- Use the OLIVE FORK (F); take the DOG DECORATION.
- Return to the Scullery.
- Use the FAN (G); place the DOG DECORATION (H). Put the PIGMENT and FEATHER; take the BLUE FEATHER (I).
- Go to the Servants' Quarters.
- Place the BLUE FEATHER for a puzzle. Solution (J).
- Take the GOLDEN QUILL.
- Go to the Front Gate.

- Use the DOUGH SCRAPER and place the GOLDEN QUILL; take the DRAGON PART 3/3 (K).
- Walk down.
- Place the 3 DRAGON PARTS; take the DOVE 2/2 (L).
- Go to the Front Gate.
- Place the 2 DOVES; read the note and take the HONEYCOMB (M).
- Return to the Scullery.
- Place the HONEYCOMB; take the GATE LOCK 2/2 (N).
- Return to the Front Gate.
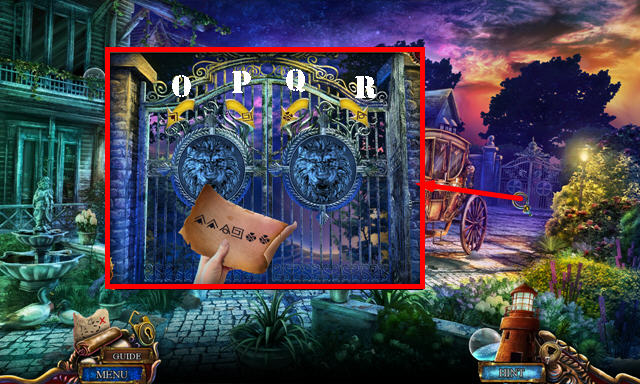
- Place the 2 GATE LOCKS and the LOCK COMBINATION. Solution: Ox2-R-P-Qx2.
- Go through the gate.
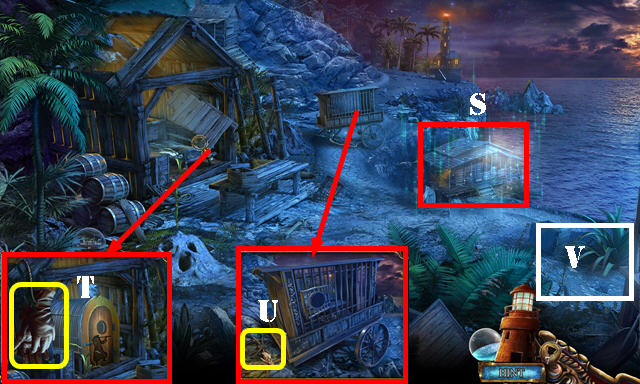
- Select the shack for a HOP (S); play it to get the TWEEZERS.
- Take the GLOVES (T).
- Take the BROKEN WHEEL (U).
- Go right (V).
- Take the WIRE MESH (W). Use the GLOVES (X); take the POLICE EMBLEM.
- Take the WHEEL SPOKE (Y) and GUNPOWDER FLASK (Y1).
- Select the bar (Z); use the TWEEZERS to get the SCALES 2/2 (Z1).
- Walk down.
- Place the POLICE EMBLEM; take the KEY (A).
- Return to the Prison Yard.
- Use the KEY (B); go through the door.
Chapter 6: The Finale
- Talk to Alfredo (C). Take the CROSSED OARS (D).
- Take the EMPTY PISTOL (E). Select the matching pairs (F).
- Place the 2 SCALES; take the PUZZLE TILE (G).
- Walk down and go to Alfredo's Cell (H).
- Place the PUZZLE TILE for a puzzle.
- Solution 1-5.
- Take the SCREW HOOK (I) and PUNCTURED PLATE (J).
- Place the CROSSED OARS; look at the note; take the LEAD BULLETS (K).
- Talk to the Duke.
- Return to Hill Road.
- Use the WIRE MESH on the PUNCTURED PLATE; take the SIEVE (inventory).
- Use the SIEVE; take the NUTS and PIRATE TOKEN 1/2 (L).
- Return to Alfredo's Cell.
- Put down the NUTS (M); use the TWEEZERS (N) and take the CROSSED REVOLVERS.
- Return to the Guard House.
- Place the CROSSED REVOLVERS; take the KNOT INSTRUCTIONS (O).
- Walk down.
- Place the KNOT INSTRUCTIONS (P); take the PUNCHED PAPER and PIRATE TOKEN 2/2 (Q).
- Return to the Guard House.
- Place the 2 PIRATE TOKENS (R). Play the HOP (S) to get the POLICE BATON.
- Return to Alfredo's Cell.
- Place the PUNCHED PAPER; select twice and take the CODE (T).
- Return to the Guard House.
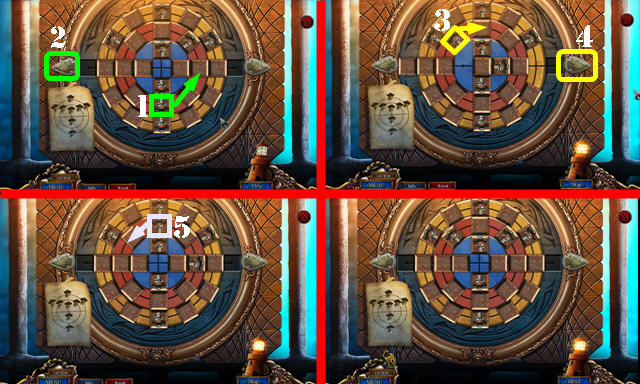
- Place the CODE for a puzzle (U).
- Solution (1-6).
- Take the WHEEL RIM.
- Return to Hill Road.
- Place the WHEEL SPOKE, WHEEL RIM and POLICE BATON on the BROKEN WHEEL; take the REPAIRED WHEEL (inventory).
- Use the JACK LIFT (V). Place the REPAIRED WHEEL (W).
- Go forward (X).
- Take the RAMROD (Y) and EYE PATCH (Y1).
- Go to the Cliffside (Z).
- Take the SAILOR (A).
- Place the GUNPOWDER FLASK, RAMROD, LEAD BULLETS in the EMPTY PISTOL; take the LOADED PISTOL (inventory).
- Use the LOADED PISTOL (B); select the kite (C) for a HOP (D); play it to get the CAN OPENER.
- Return to Hill Road.
- Place the SAILOR; take the POLICE RATTLE (E).
- Return to the Cliffside.
- Use the POLICE RATTLE on the owl; take the PUZZLE PIECE and ROPE SPLICING TOOL (F).
- Walk down.
- Place the PUZZLE PIECE for a puzzle (G).
- Solution (1-7).
- Take the ROPE LADDER.
- Return to the Cliffside.
- Place the SCREW HOOK (H); attach the ROPE LADDER and go to the Docks.
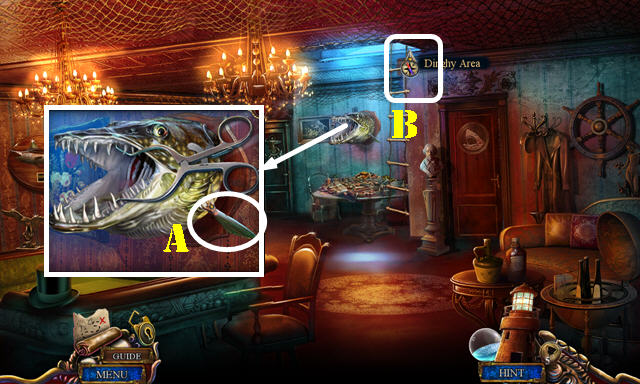
- Play the HOP (I) to get the HALO.
- Take the OARLOCK (J).
- Use the ROPE SPLICING TOOL; take the PIPE (K).
- Take the WIND ROSE EMBLEM 1/2 (L).
- Return to the Lighthouse Path.
- Place the PIPE; take the SAILMAKER'S TOOL (M).
- Place the HALO (N); take the SEAHORSE TAIL (O).
- Use the CAN OPENER; take the OBELISK PARTS 1/3 (P).
- Return to the Docks.
- Use the SAILMAKER'S TOOL to get the WOODEN BOARDS; take the MOON SCEPTER (Q).
- Place the SEAHORSE TAIL (R); take the OBELISK PARTS 2/3 (S).
- Return to the Lighthouse Path.
- Use the MOON SCEPTER (T); go through the door.
- Take the MARBLE (U).
- Place the EYE PATCH and MARBLE on the OARLOCK; take the LOADED SLINGSHOT (inventory).
- Talk to the man (V).
- Place the WOODEN BOARDS (W).
- Go up the stairs.
- Select the crates (1-2-3). Take the LOCK PART (X).
- Walk down.
- Place the LOCK PART (Y).
- Return to the Lighthouse Path.
- Use the LOADED SLINGSHOT; take the WIND ROSE EMBLEM 2/2 (A).
- Return to the Lighthouse Stairs.
- Place the 2 WIND ROSE EMBLEMS; take the OBELISK PARTS 3/3 (B).
- Return to the Cliffside.
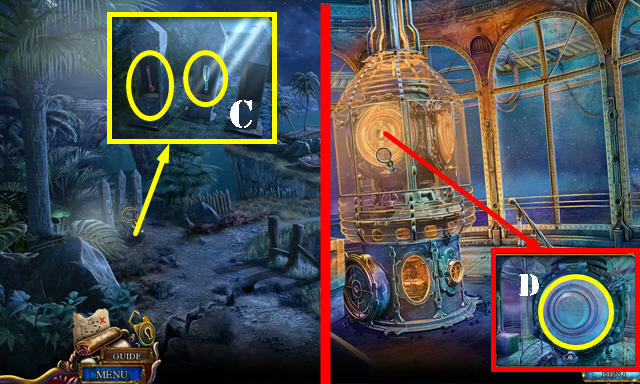
- Place the 3 OBELISK PARTS; take the WRENCH and ARC LIGHT FILAMENT (C).
- Return to the Lantern Room.
- Use the WRENCH for a puzzle (D).
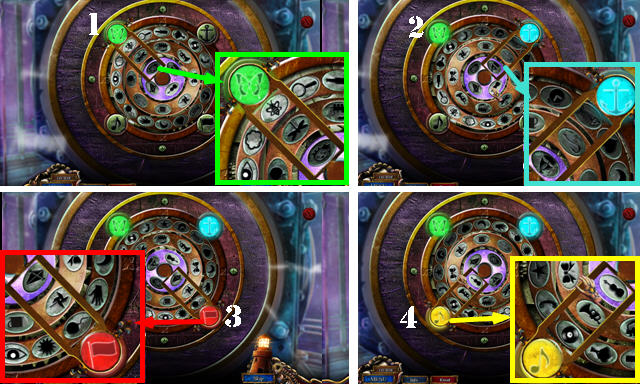
- Solution (1-4).
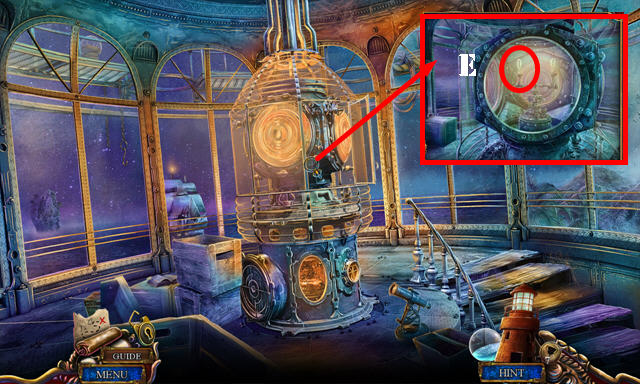
- Use the ARC LIGHT FILAMENT (E).
- Congratulations, you've completed Sea of Lies Tide of Treachery.
Created at: 2015-08-28