

Walkthrough Menu
- General Tips
- The Beginning
- Quicksand Woods
- Wizard’s House
- Hobbit’s Village
- Cable Car Station
- Eternity Falls
- Death Valley
- Entrance to Night Elf Fort
- The Cave of the Hidden Rocks
- Entrance to the Underwater World
- Sea Elf Palace
- The Beach
- Centaurs’ Village
- The Grand Elf Gate
- The Tree of Life
- The Floating Light Elf Palace
General Tips
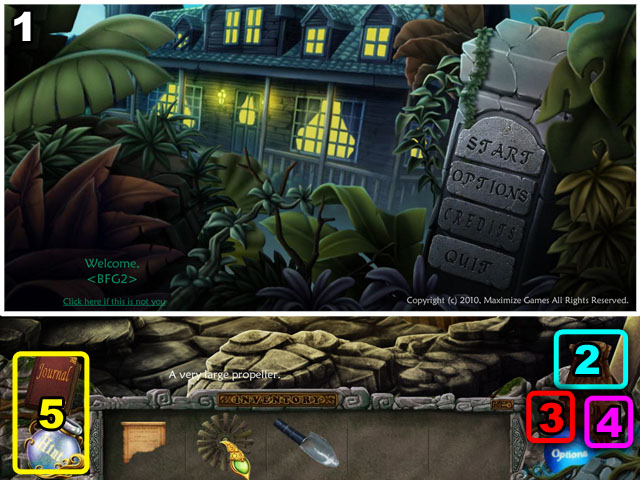
- You can change players by clicking on your username in the bottom left corner of the screen.
- From the options menu on the right side of the screen you can adjust the volume of the music and the sound. You can also set the full screen settings (1).
- In the inventory at the bottom of the screen there is an inventory bag on the right.
- The top of the bag is your normal inventory items that you collect and use (2).
- The part on the left of the bag is where your keep your tools. These are inventory items that you can use over and over again (3).
- The compartment on the right side of the bag is where you keep the ruby pieces that you find throughout the game (4).
- At first you will only start with a one compartment bag.
- On the left side you can see a journal where the story is written down for you and the hint jar that you can click to get more hints from.
- The inventory panel when you first enter a screen will show what you need to find in the scene.
- Each item is made of small pieces that are scattered around the room.
- When you find all the pieces the item will go into the inventory.
- You can lock and unlock the inventory by clicking on the key in the upper right corner.
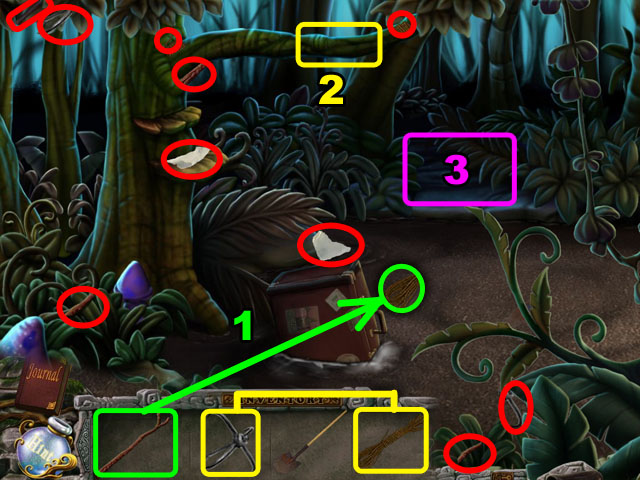
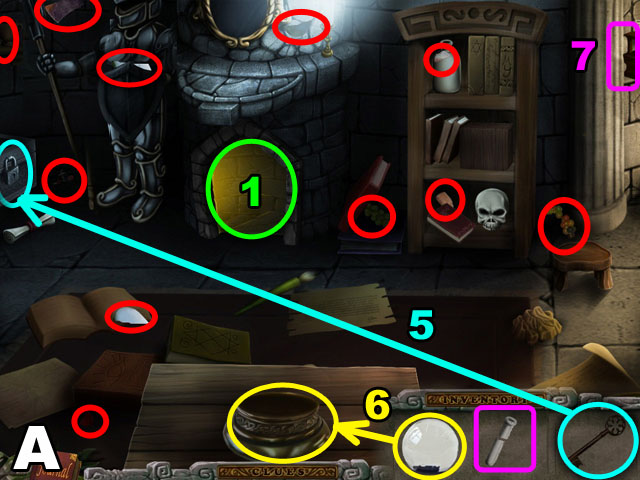
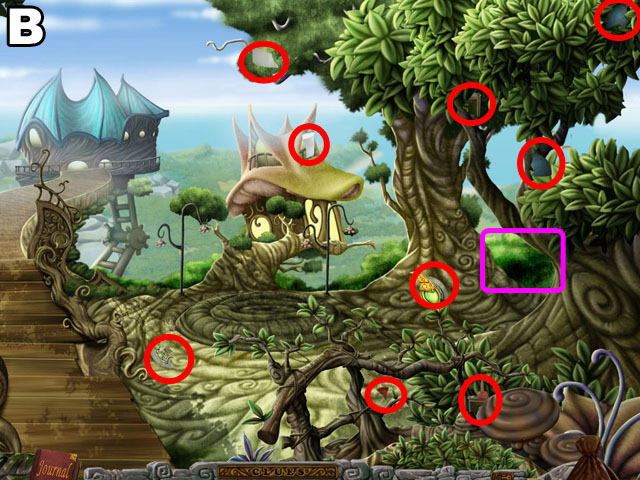
The Beginning
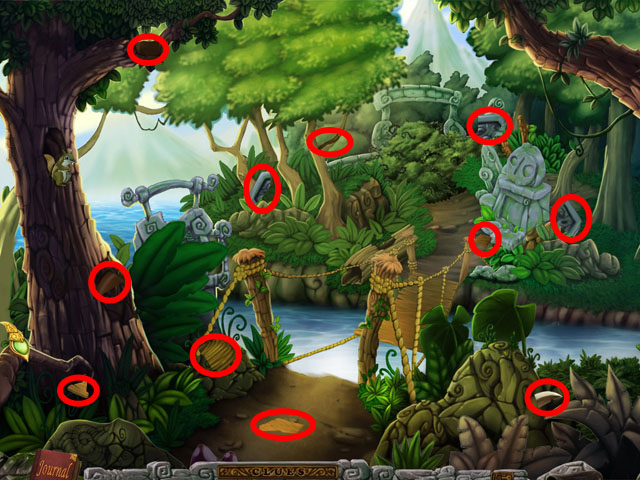
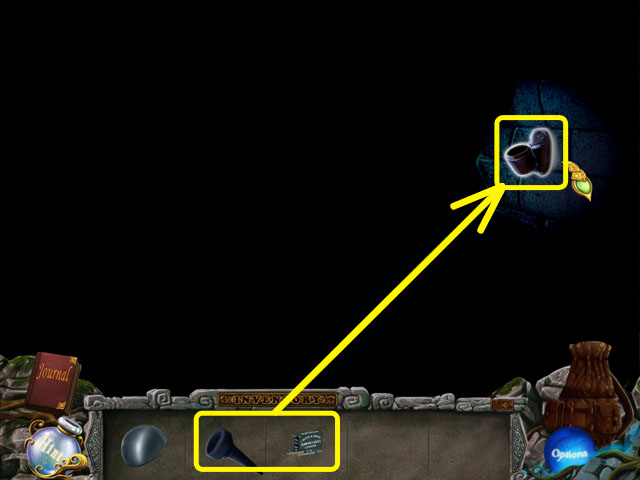
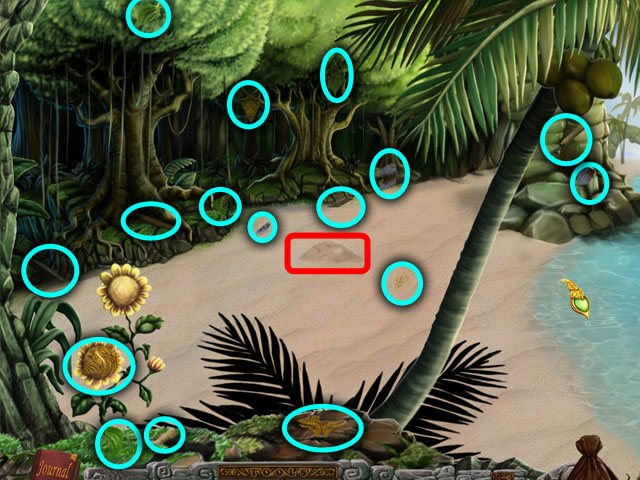
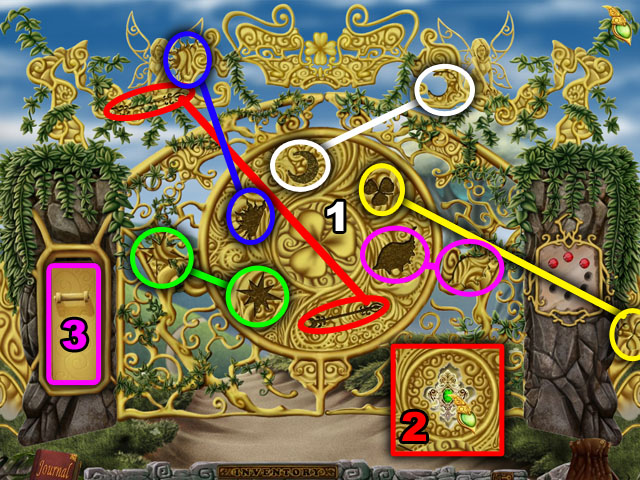
- Collect the pieces of BOARD, CURVED ROCK, ACORN, ROPE and the KNIFE circled in red in the image.
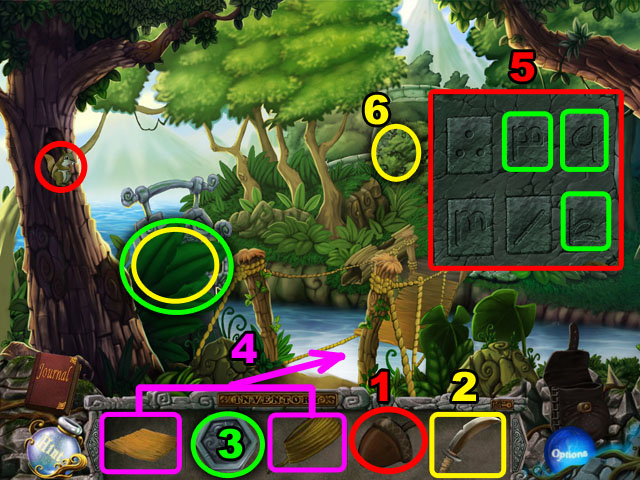
- Click on the bag in the bottom right corner to open the inventor.
- Give the acorn to the squirrel (1) and collect the last piece of the knife.
- Cut the bush with the knife (2).
- Place the curved rock in the behind the bush (3).
- Combined the boards and the rope in the inventory. Place them to fix the bridge (4).
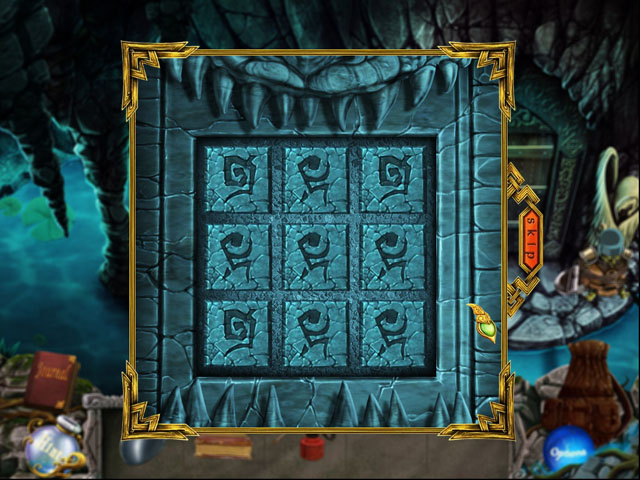
- Click on the statuette and push the three buttons highlighted in green to open another path in the middle (5).
- The solution is randomized.
- Click on the path to move next scene (6).
Quicksand Woods
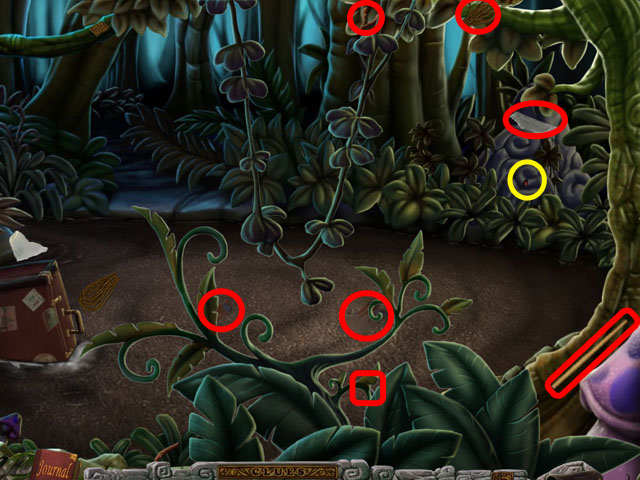
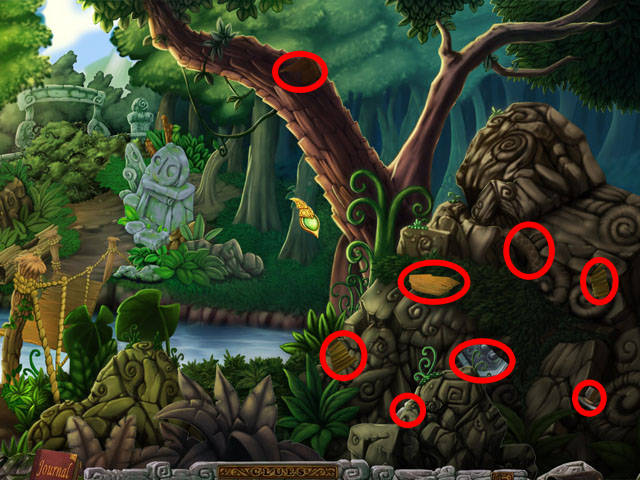
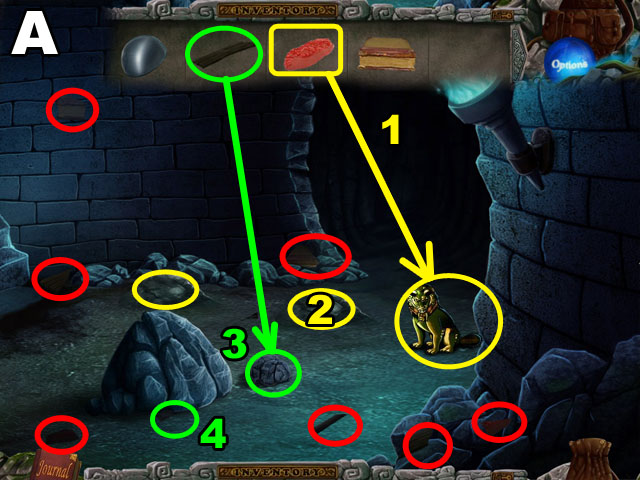
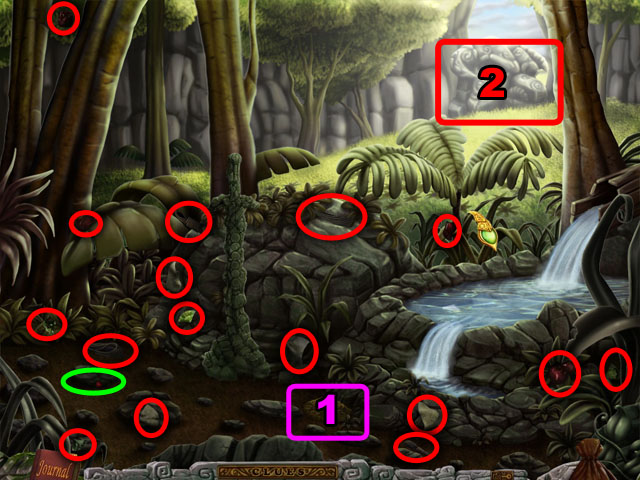
- Collect all the pieces of STICK, FLINT, HOOK, ROPE and the SHOVEL highlighted in red.
- Use the stick in the inventory to get the piece of the rope highlighted in green (1).
- Combine the rope and the hook highlighted in yellow. Hook it to the branch (2).
- Move to the next scene by the path highlighted in purple (3).
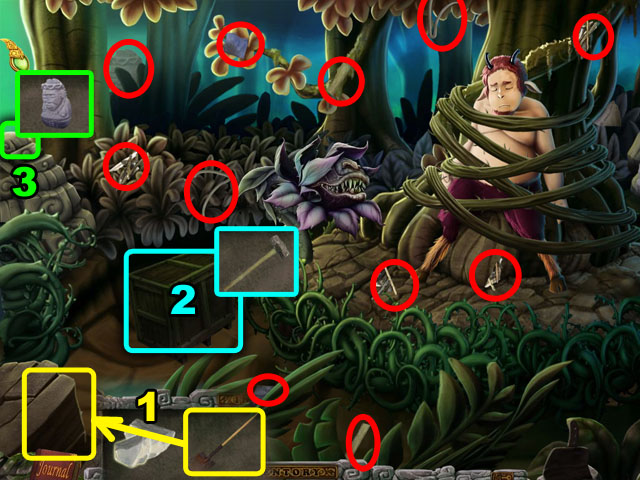
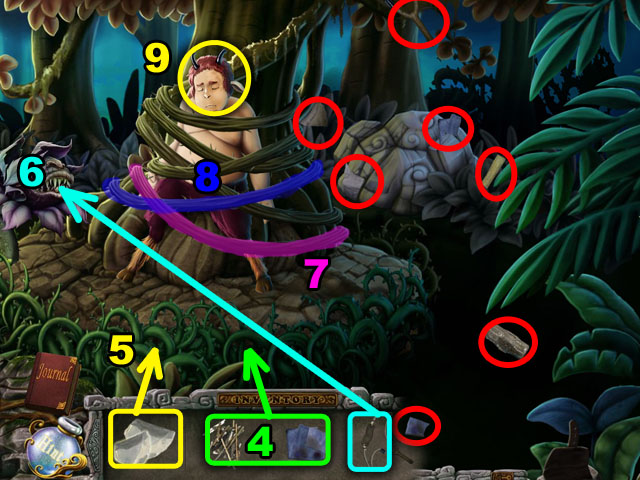
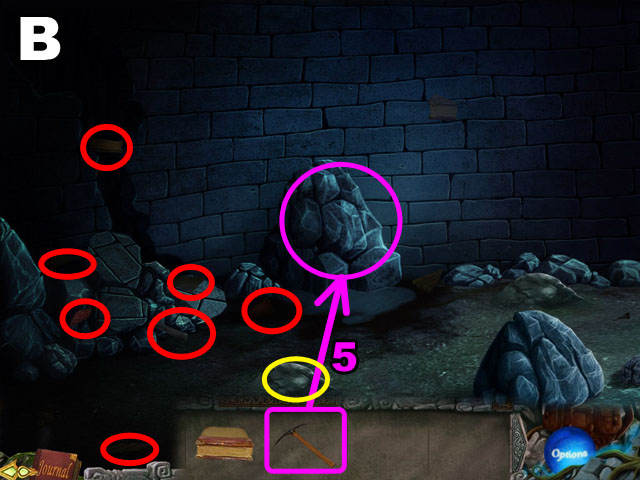
- Make a hole in the bottom left corner of the screen with the shovel (1).
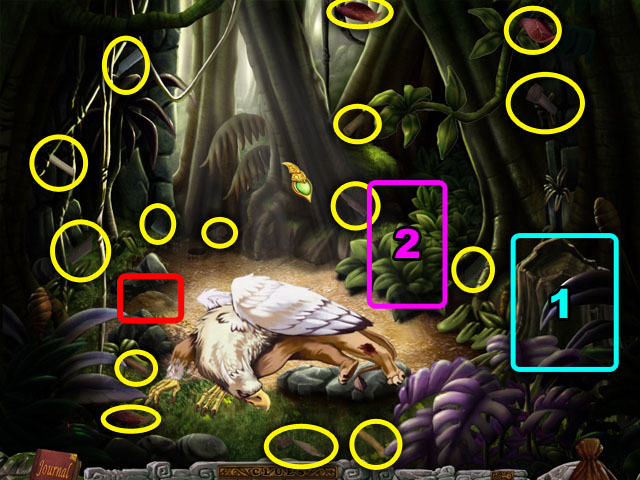
- Collect all the piece of HAMMER, FIGURINE, STICKS, and the SLING highlighted in red in the two images.
- Return to the previous scene and use the HAMMER to get the ruby circled in yellow on the far right side.
- Break the wooden box in the left with the HAMMER (2) and collect the piece of cloth.
- Place the FIGURINE on the rock highlighted in green (3).
- Combine the STICKS and the CLOTH in your inventory. Place them on the underbrush (4).
- Light the underbrush with the FLINT (5).
- Use the SLING on the evil plant (6).
- Click on the line highlighted in purple (7) then click on the line highlighted in blue to untie your friend (8).
- Click on the man in the middle to talk to him (9).
Wizard’s House
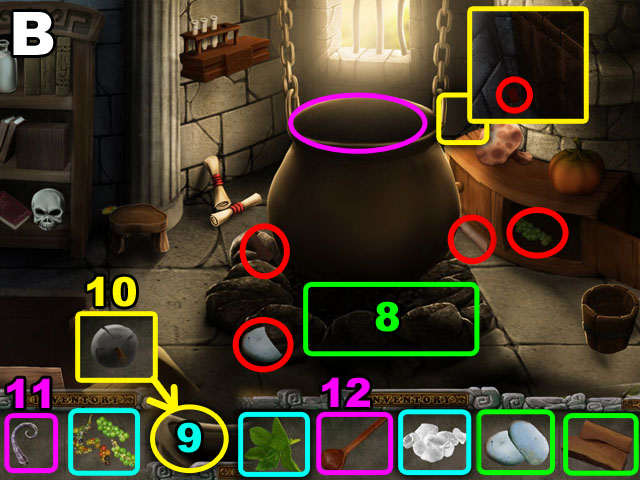


- You will receive the HAMMER to break hard objects like rocks or small creates and see what may be hidden in them.
- You will receive the three compartment bag that keeps more items.
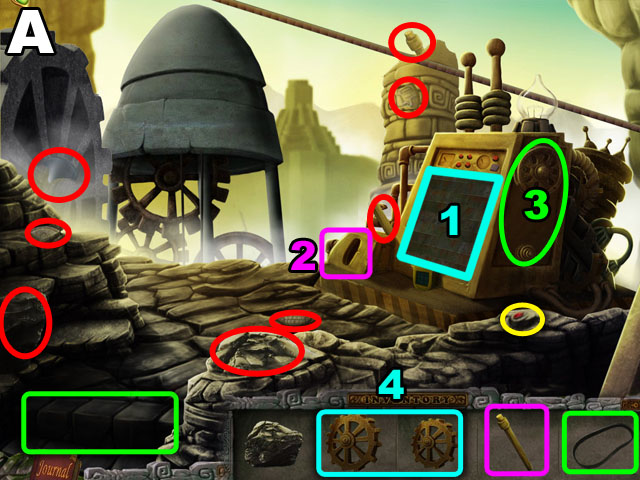
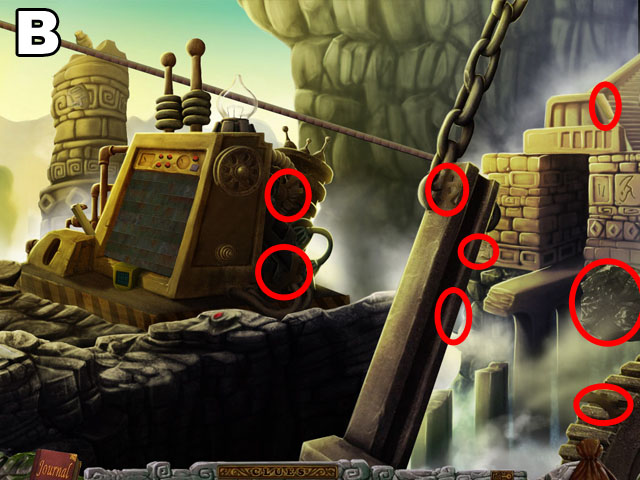
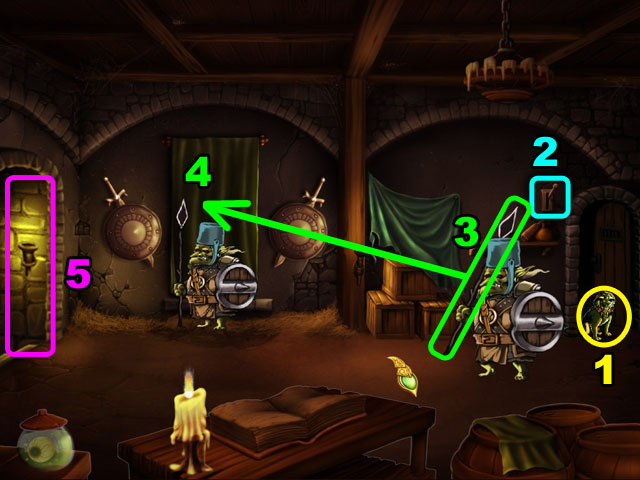
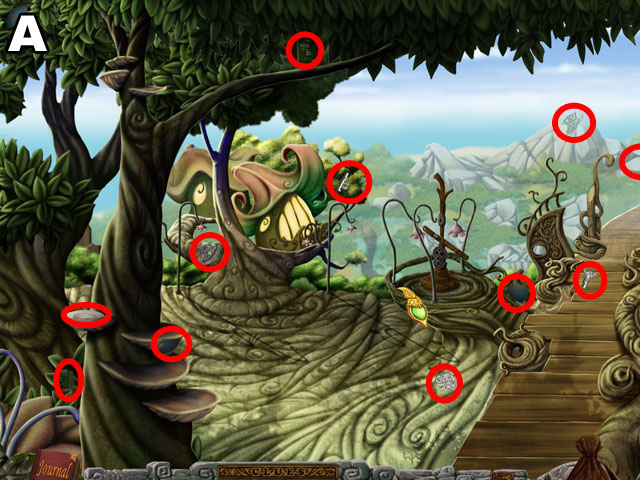
- Collect the pieces of RUBY, AIR HORN, BLACK PEPPER, FLINT, and AXE highlighted in red in images A and B.
- Sometimes you need to click a spot to move something out of the way or zoom in to find the hidden objects.
- Move downstairs by the door highlighted in green in image A (1).
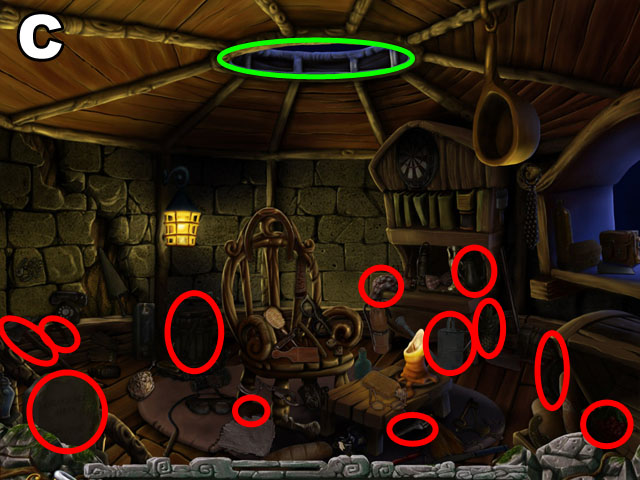
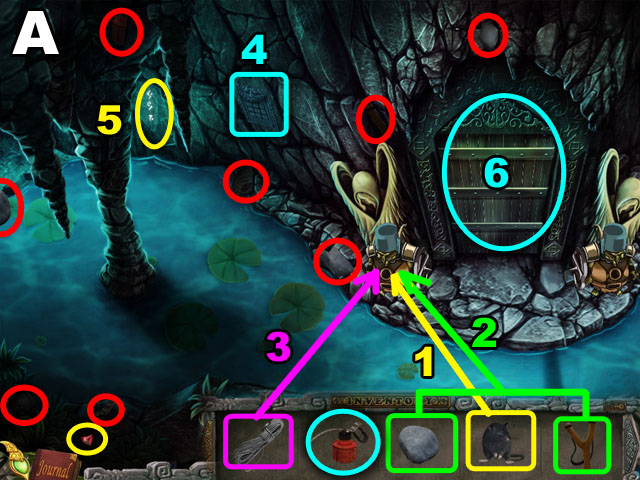
- Collect the pieces of the PESTLE, LIZARD’S TAIL, TEST TUBE and the KEY highlighted in red in image C.
- Use the small AIR HORN to scare the lizard. After the lizard moves, collect the tail (2).
- Return to the upstairs from the stairs in the left.
- Move to the garden from the door in the left.
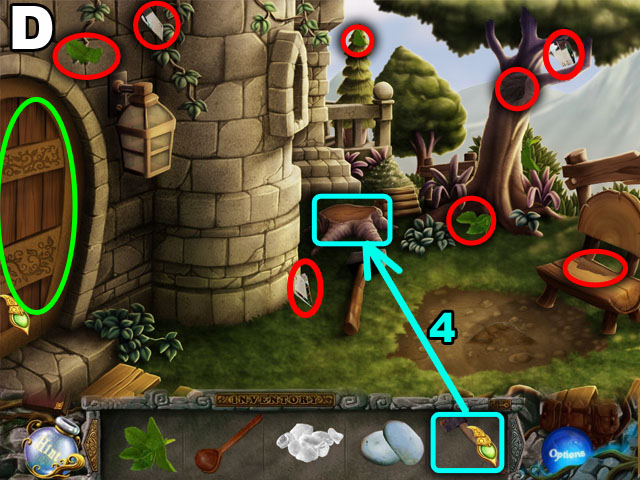
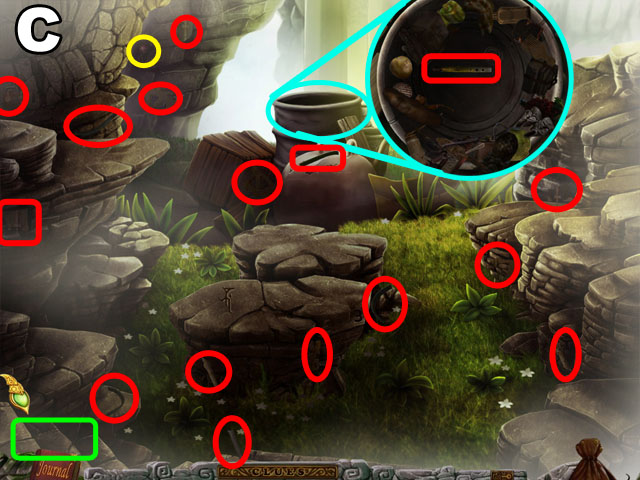
- Collect the pieces of MINT, the wizard’s CRYSTAL BALL, BROOM, and CYRSTAL highlighted in red in the image D and E.
- Return to the main room and go to the downstairs.
- Clean the spider web with the BROOM (3) in the image C. This gives you the WOODEN SPOON.
- Return to the upstairs and move to the garden.
- Cut the wood with the AXE and collect it (4) in the image C. This gives you the WOOD.
- Return to the main room.
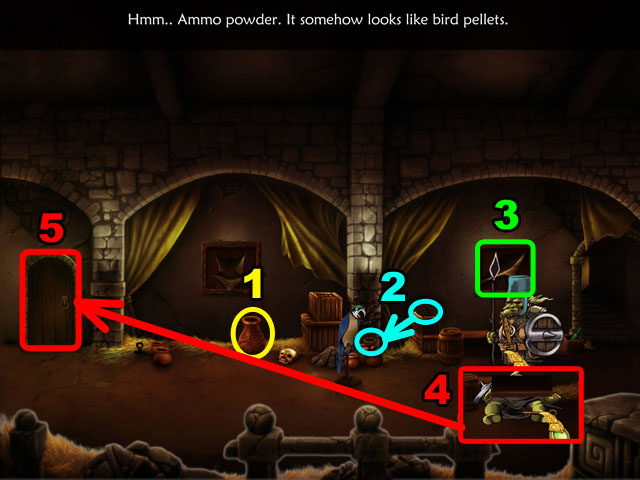
- Open the box with the key and collect the piece of SALT (5) in image A.
- Place the Wizard’s CRYSTAL BALL on to the stand and collect the piece of SALT (6).
- Place the TEST TUBE in the holder and collect the last piece of SALT (7).
- Place the FIREWOOD and next light fire on the stove (8) in image B.
- Put the BLACK PEPPER, fresh lizard’s tail, crystallized SALT and the mint HERBS to the bowl at the bottom of the screen (9). The bowl is hidden when your inventory is up.
- Crush the ingredients in the bowl with the PESTLE (10).
- Put the PASTE that you made and the fresh LIZARD’S TAIL into the pot highlighted in purple (11).
- Mix them with the WOODEN SPOON (12).
- Click on the potion to move to the next scene.
Hobbit’s Village

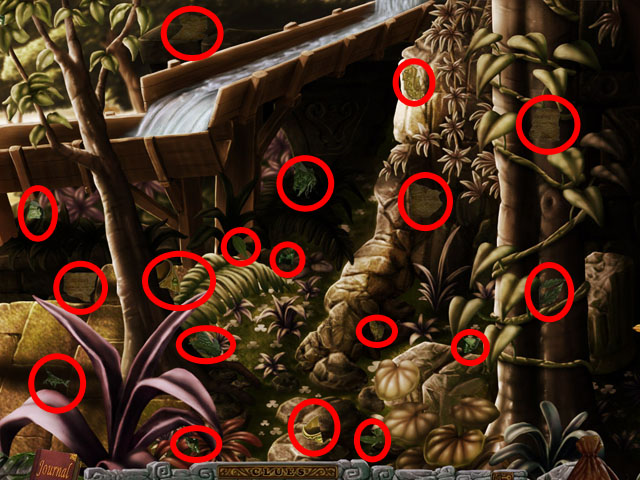
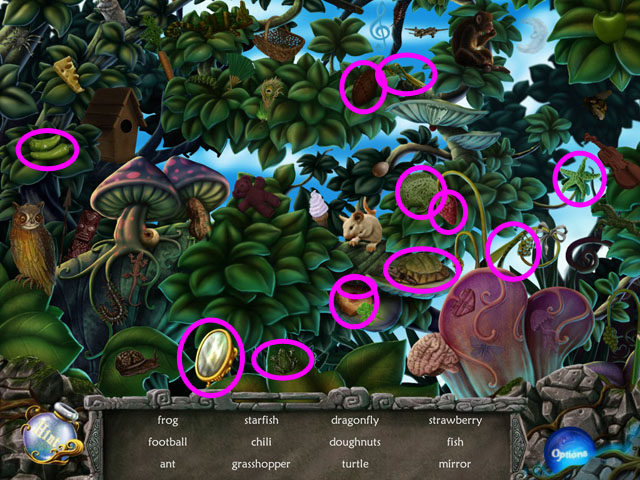
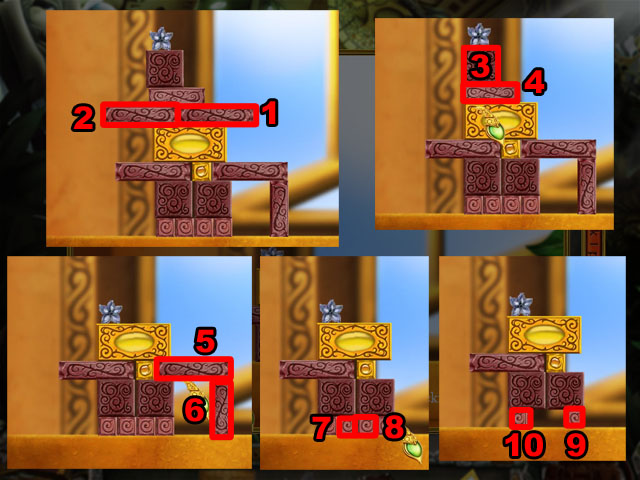
- Collect the pieces of SHOVEL, MUSHROOM, HANDLE, and FULL BAG of SEEDS highlighted in red in the image A and B.
- Use the HAMMER to get the ruby highlighted in yellow in the image A.
- The HAMMER is a special inventory item that doesn’t go away. Find it in your tool bag.
- Move to inside the house from the door highlighted in green in the image B.
- Find 12 objects highlighted in red that are listed in the bottom of image C.
- You can move the view vertically by holding your mouse near the bottom side of the screen.
- The hidden objects are randomized and may be different in your play-through.
- Return to the outside by clicking the hole highlighted in green on the ceiling.
- You will receive the WATERING CAN after finding all the objects.
- Attach the water pump HANDLE to the pump in the bottom right corner of the image B (1).
- Click on the pump to get water.
- Dig the ground with the SHOVEL (2) in the image B.
- Put the seeds from the SEED BAG into the hole in the ground (3) in the image B.
- Put water over the seeds with the WATERING CAN.
- Place the MUSHROOM in between the other mushrooms in the middle of the screen.
- Click on the paper highlighted in purple in the image A that is clue to solve this mushroom puzzle.
- The paper gives you hints to the correct order of the mushrooms.
- See the solution highlighted in green in image A.
- After solving the puzzle, you will receive the MAP. Use it to take you to any place that you’ve already been instantly.
Cable Car Station

- Collect the pieces of HEAVY BOLDER, STATUE HEAD, GEAR, and LEVER highlighted in red in the image A and B.
- Move to another part of this scene by clicking the stairs in the bottom left corner.
- Collect the pieces of Cyclops’s HARD CLUB, GEAR, Valley Guard’s WHISTLE, RUBBER BAND and mantra BOX highlighted in red in the image C.
- There is one piece of RUBY highlighted in yellow.
- Click on the trash can in the middle to zoom in.
- In the trash can, you have to move away all the trash until you find the Valley Guard’s WHISTLE.
- Click on the WHISTLE to collect it.
- Return to the other part of the scene by clicking the stairs in the bottom left corner of the screen.
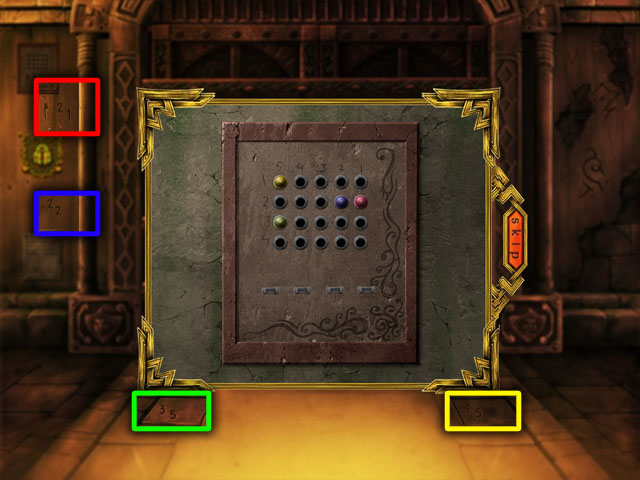
- Click on the machine with panel in the middle to start the puzzle (1) in the image A.
- In order to solve this puzzle, you need to click each four circles to rotate the tiles until the image is arranged correctly.
- Each circle when clicked will rotate the 4 circles around it.
- To finish the puzzle, complete the left side first and then try to finish the right side.
- After trying to finish the right side, if you have two pieces that are still in the wrong place, mix up the pieces by clicking on the circles randomly and try again.
- See the screenshot D for the final image.
- Attach the lever to the missing position (2) in the image A.
- Place the rubber belt to the side of the machine (3).
- Place the two gears into the machine (4).
- Turn on the machine by clicking on the lever.
- Get on the cable car by clicking it.
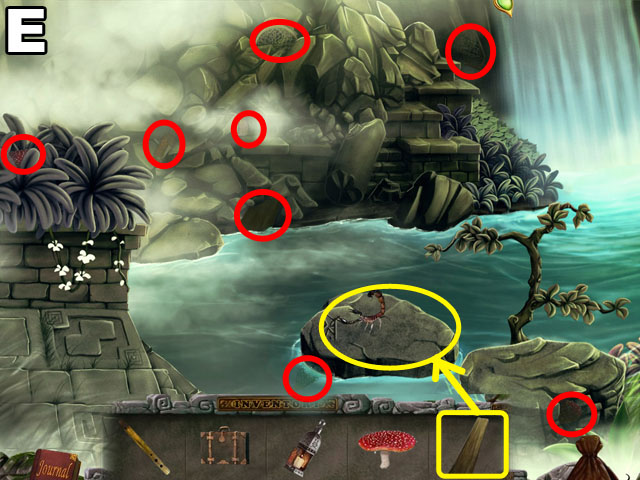
- Collect the pieces of LANTERN, MUSHROOM, and NET highlighted in red in image E and F.
- There is the piece of RUBY highlighted in yellow in the image F. You can collect it with the HAMMER from your tool bag.
- Collect the piece of BOARD with the NET highlighted in purple in image F.
- Place the BOARD highlighted in yellow in image E to the rock with the SCORPIAN and click to collect it.
- Move to the next scene by clicking the bottom right corner of the screen highlighted in green in the image F.
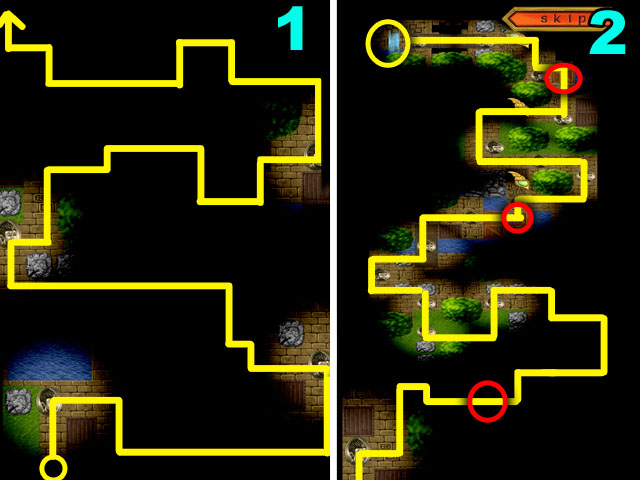
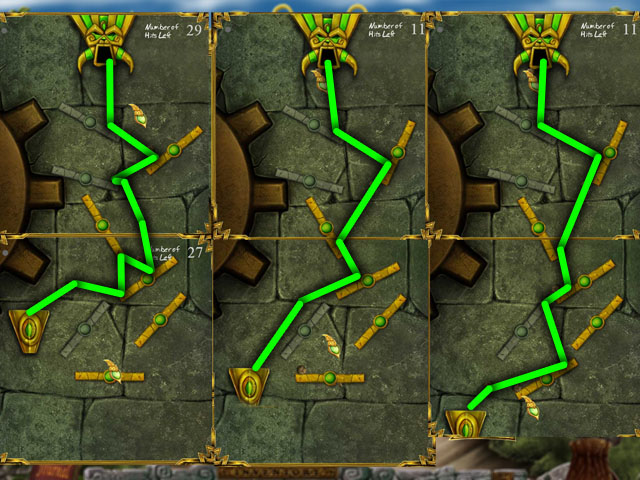
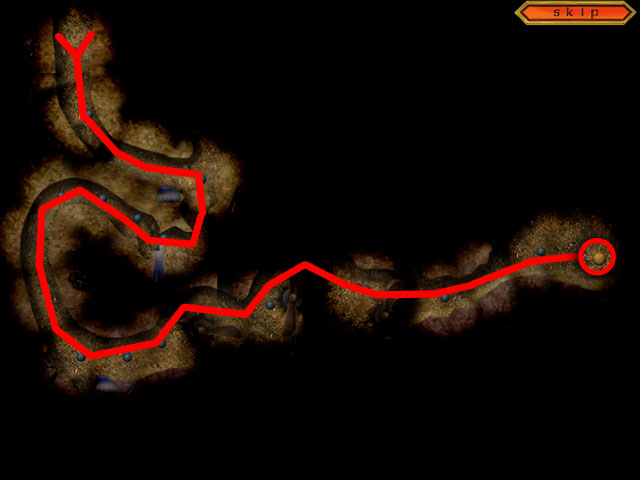
- You have only 200 steps to get from the start to the end of the maze.
- In some places you need to push crates into the water. These are marked with red circles in the screenshot.
- Follow the yellow path in screenshot to find the finish.
- If you get stuck, you can skip the puzzle by clicking the skip button in the upper right corner.
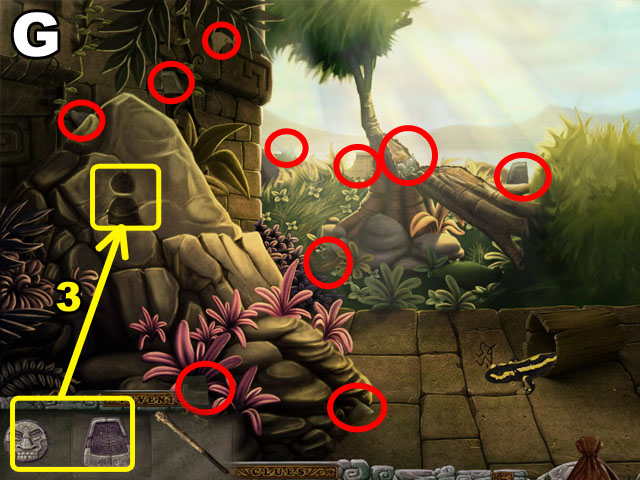
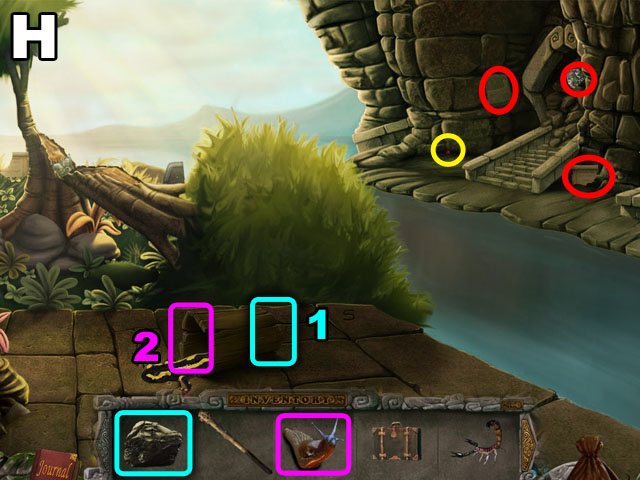
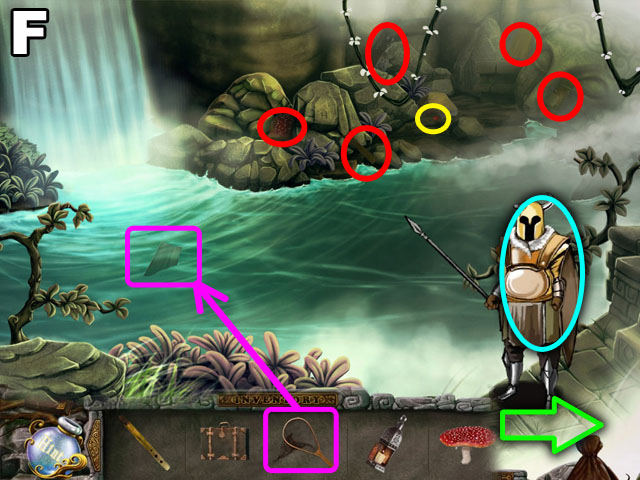
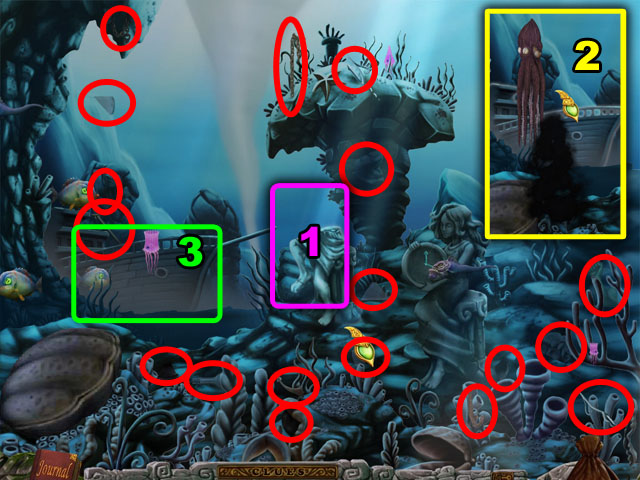
- Collect the odd STATUE BODY, HALF SCRIPT, and the SNAIL highlighted in red in the image.
- Place the ROCK on the other side of the log (1) in image H.
- Place the SNAIL in the middle (2) of image H and collect the LIZARD.
- Place the ODD STATUE HEAD and then the BODY into the hole highlighted in yellow in image G (3).
- Return to the previous screen.
- Give the WHISTLE, SCORPION, MUSHROOM and the LIZARD to the guard highlighted in light blue in image F.
- Move to the next level by clicking the upper side water fall.
Eternity Falls
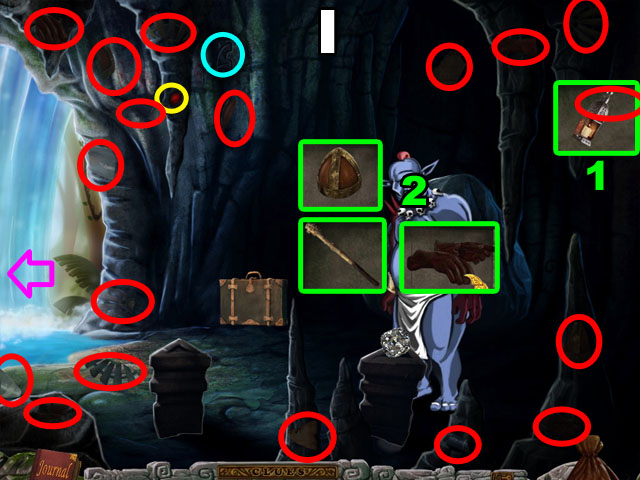
- Collect the pieces of Cyclopes’ GLOVES and the PROPELLOR highlighted in red in the image.
- Collect the RUBY highlighted in yellow in the image with the HAMMER.
- Place the lantern behind the Cyclopes (1) to get the last piece of the HELMET.
- Give the Cyclopes his war HELMET, GLOVES and WAR CLUB (1).
- Leave this location by clicking the left side of the screen.
- Return to the cable car station by going to the left again.
- Place the propeller on the machine to the left of where the cable car parks and collect the last piece of the SUMBARINE HATCH.
- Return to the location H, to the right of the waterfall area.
- Collect the piece of PRISM by using the SHOVEL on the mound (1).
- Return to the cave with the Cyclopes.
- Place the prism on the stand on the left of the screen.
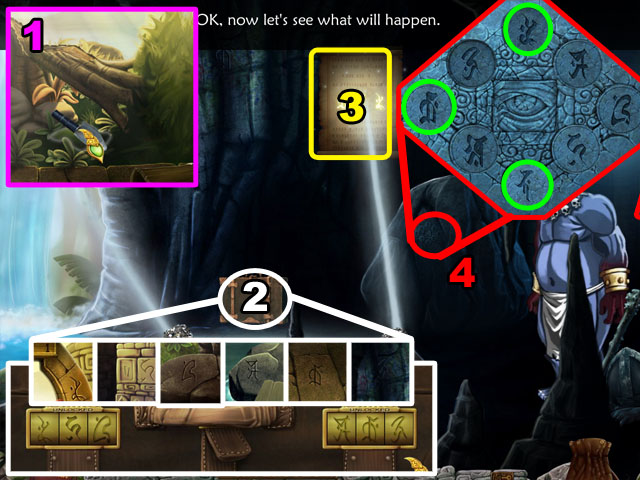
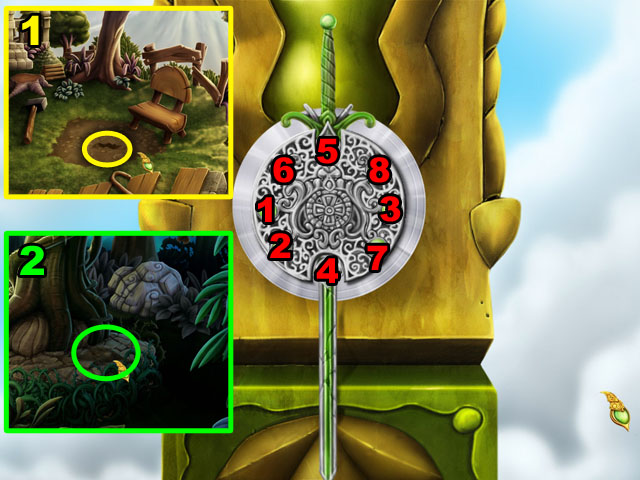
- Click on the suitcase on the back of the screen (2). The combination to the suitcase is hidden around the last 5 screens.
- See the screenshot for the solution.
- Get a HALF SCRIPT after it opens and combine it with the other HALF SCRIPT in your inventory.
- Place the SCRIPT on the wall (3) above the large rock.
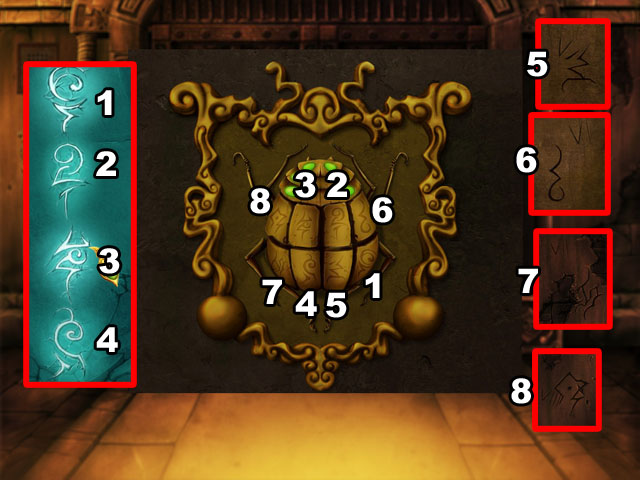
- Open the enhanced puzzle in the right side.
- Click on the three symbols in correct order by following the script on the wall (4). The three symbols are randomized every time.
- Click on the path behind the enhanced rock.
Death Valley
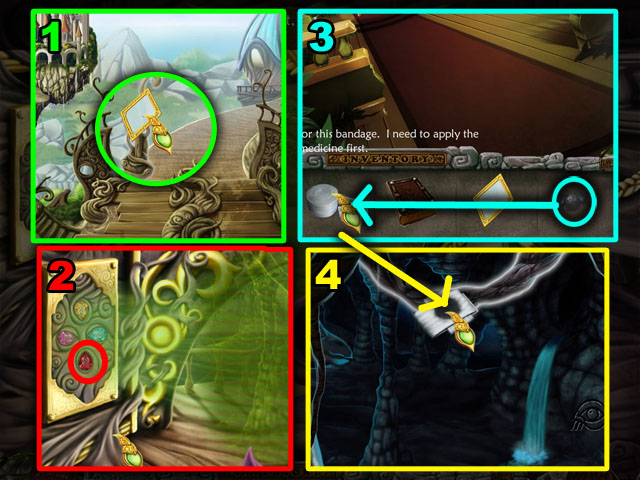
- When you first enter the room it will be completely dark. Use the CRYSTAL from your inventory to be able to see a small area.
- Move your mouse to the very right of the scene and click on the cave opening to go to the next room.
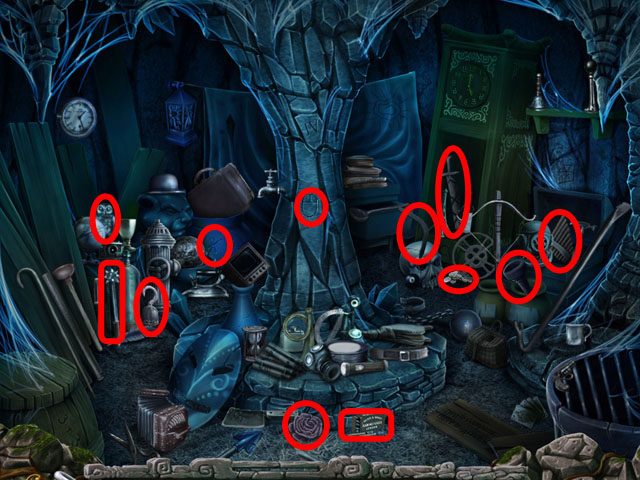
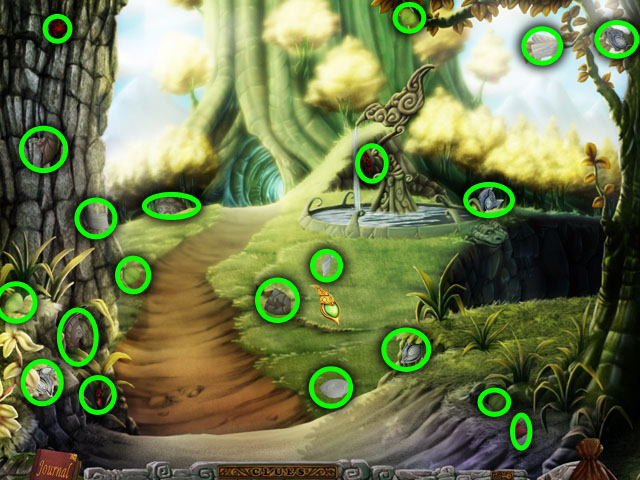
- Find the 12 hidden objects listed in the bottom of the screen, in any order, circled in red in the image.
- The hidden objects are randomized and may be different in your play-through.
- Your view can move vertically.
- You will receive the TORCH and the MATCHBOX in your inventory.
- Click on the screen to the right to move back to the previous room.
- Open the tool and use the small CRYSTAL again to light up the mouse cursor.
- Open the inventory and combine the TORCH and the MATCHES.
- Place the BURNING TORCH to the holder highlighted in yellow in the image.
- Collect the pieces of FOOD, THICK BOARD and the SUBMARINE MANUAL in red in the image.
- Give the food to the LION (1) in the image A. It might be on the left or the right side depending on how many times you clicked on it.
- Collect the LION. It can be used to dig hard surfaces and find hidden objects.
- Open the tool pouch. Click the two spots highlighted in yellow with the LION to dig out (2) in the image A.
- Collect the piece of RUBY and PICK.
- Open the inventory and use the THICK BOARD on the small rock (3).
- Click on the BOARD with the rock to lift the big rock beside them.
- Collect the last piece of the PICK under the big rock.
- Move your view to the left.
- Crack the rocks in the middle with the PICK (5) in the image B.
- Click on the hole to move to the next scene.
Entrance to Night Elf Fort

- Collect the pieces of SLING, OIL CAN, ROPE, ROCK and RAT highlighted in red in the two images.
- Collect the ruby highlighted in yellow in the left side of the scene.
- Distract the guards with the RAT (1).
- Next combine the SLING and the ROCK in the inventory. Attack one of the guards with the sling (2).
- Finally tie the guards with the ROPE (3).
- Click on the key pad on the wall (4).
- Solve the puzzle by making all of the symbols the same on one side.
- Click any symbol to rotate it and all of the symbols connected to it.
- Try to look for patterns that can be removed with one click and save those.
- If you get stuck with one symbol, try to solve for the opposite symbol and see if that helps.
- Once solved the symbols to the left of the key pad will light up (5) in image A.
- Look at the symbols closer and the click them to open up the gate slightly.
- Use the OILCAN to open the gate completely (6) in image A.
- Enter the next room through the gate.
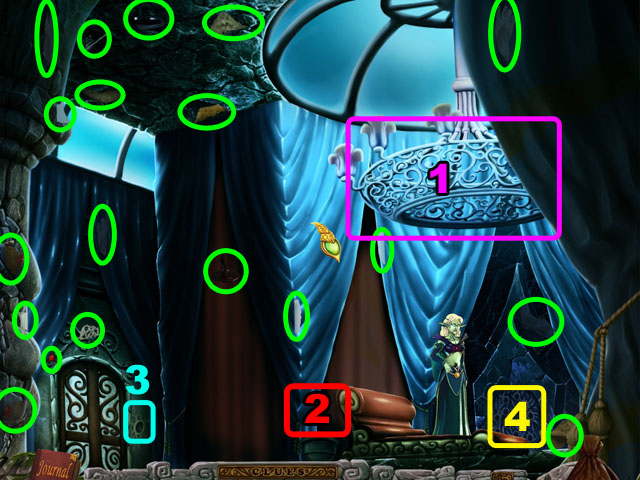
- After watching the guards talk, drag the lion to the right guard to distract him (1).
- Click on the lever on the right to drop the chandelier on his head when he is under it (2).
- Collect the spear from the knocked out guard (3).
- Cut the curtain with the spear to knock out the other guard (4).
- Move to the next room (5).
- After listening to the guard, click on the vase highlighted in yellow (1).
- Place the food for the bird into the dish to kill the bird (2).
- After the guard in standing under the picture frame, click on the picture frame to knock him out (3).
- Click on the door to the left three times and then click on the guard many times until the key appears under his leg (4).
- Open the door in the left side with the key (5).
- Click on the upper panel in the left side to start the puzzle.
- The answers to this puzzle are written around the previous scene.
- You must put the 4 pegs in the correct positions.
- The upper left is for the red peg, the lower left for the blue peg, the bottom left for the green peg and the bottom right for the yellow peg.
- See the screenshot for a possible solution.
- The solution to this puzzle is randomized.
- See the image for the final solution.
- Click on the middle panel in the left side of the screen.
- You need to click the symbols in the correct order to open the door.
- The symbols are written around the area using roman numerals to show you what order they go in: I, II, III, IV, V, VI, VII, VII, and VIII.
- There are two hints to the right of the door, two on the plaque and the first four symbols are written in blue in the cave.
- Once clicking the correct order in the screenshot, go through the large doors.
- The order of the buttons is randomized.
The Cave of the Hidden Rocks
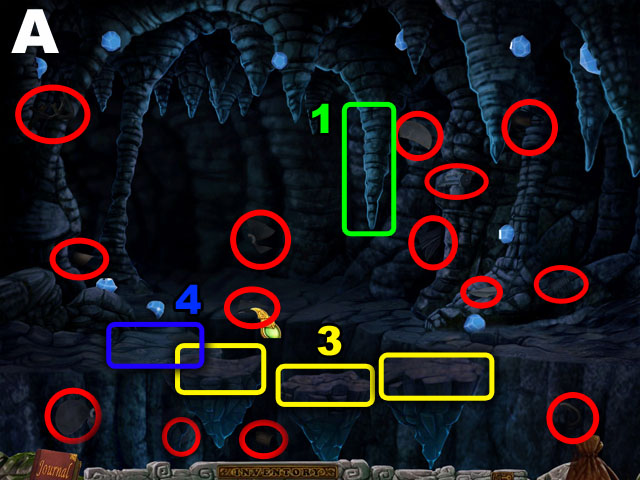
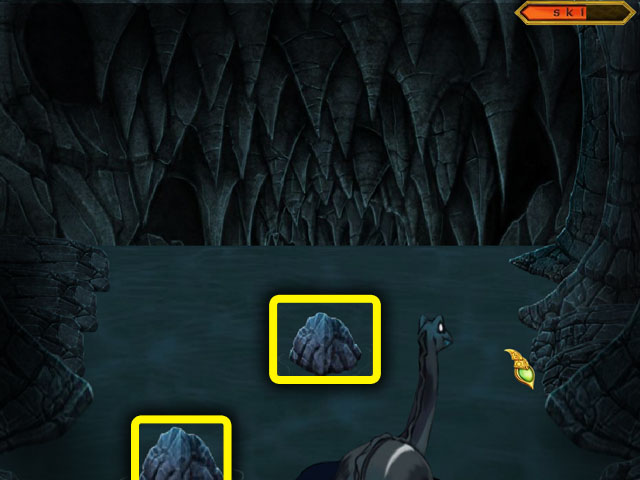
- Find the 12 hidden objects listed in the bottom of the screen, in any order, circled in red in the image.
- The hidden objects are randomized and may be different in your play-through.
- Your view can move vertically.
- You will receive the KEY in your tool bag.
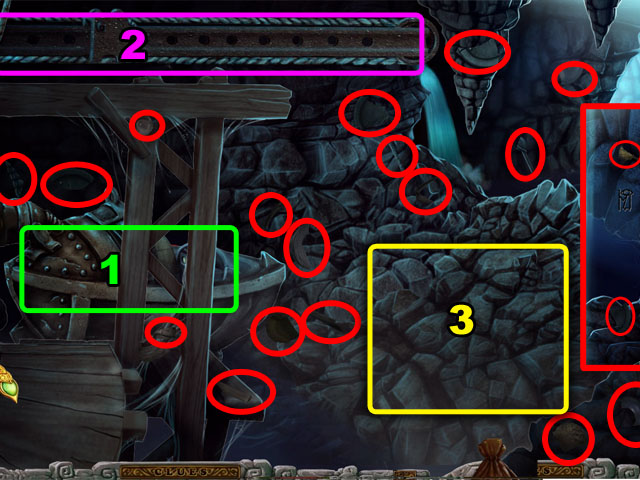
- The view can move vertically in this area. Collect the pieces circled in red in scene A to get the DYNAMITE, KNIFE and the ROPE.
- The pieces of clues are randomized and may be different in your play-through.
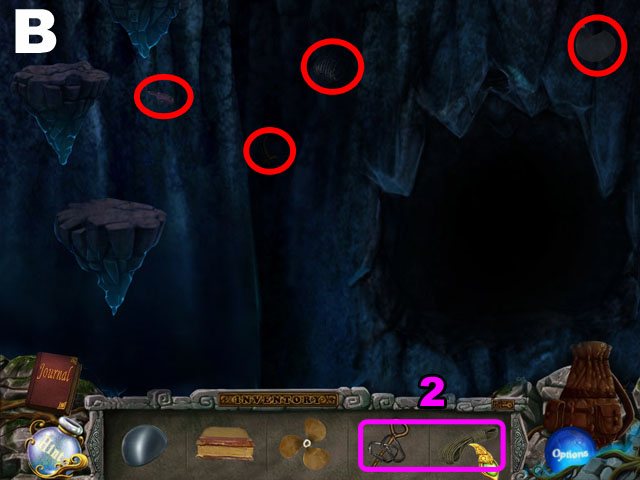
- Collect the pieces in scene B circled in red to get the PROPELLER.
- Use the DYNAMITE from your inventory on the stalactite circled in green and pick up the CLIMBING TOOLS (1).
- Combine the ROPE and the CLIMBING TOOLS in your inventory (2).
- Drag the rocks to the middle of the top of scene A (3).
- Use the CLIMBING TOOLS on the ground to the left of the floating rocks to secure them (4).
- Now you can destroy all of the gems with the HAMMER and find another RUBY PIECE.
- Leave the scene to the right of the top section.
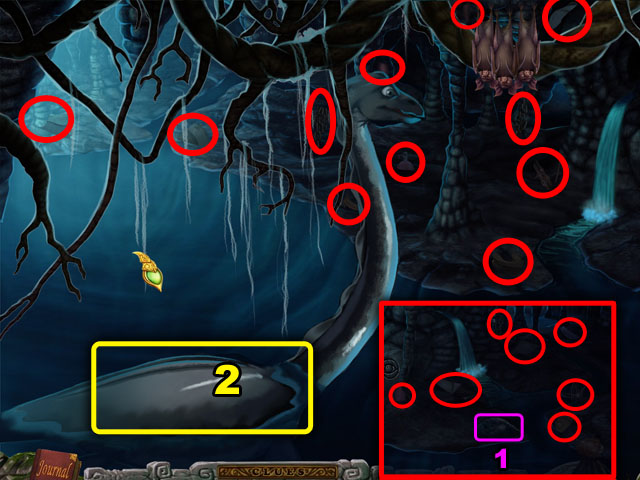
- The view can move horizontally in this area. Collect the pieces circled in red to get the SADDLE, CANTEEN, CHAIN, TANK and STRAP.
- Use the LION on the ground in scene B to dig up another RUBY PIECE (1).
- Use the STRAP and the SADDLE on the sea dragon to be able to leave to the right of the scene (2).
- Click the arrow to the right to start the next minigame.
- Use the left and right arrow keys to control the sea dragon as it swims down the river.
- Steer around the bolders. If they hit you, you will slow down.
- Stay in the middle and go around the rocks. If you stay near the edge sometimes the rocks can hit you.
- You can hit the skip button at any time to skip this action scene.
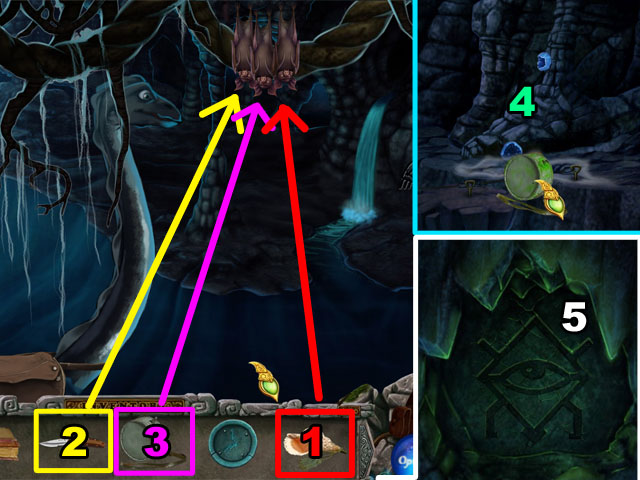
- The view can move horizontally in this area. Collect the pieces circled in red to get the STONE CLOCK, LAMP, PICKAXE, JAVALIN and SHELL.
- Use the LAMP, TANK, SUMBARINE HATCH, and PROPELLER on the submarine in the corner (1).
- Use the PICKAXE on the pile of rocks to the right of the submarine (2).
- Then use the chain on the pulley above the submarine and click the pulley again to lower the chain into the water (3).
- Pick up the RUBY PIECE that was behind the submarine.
- Click in the water to the right of the submarine to go inside it and travel down to the next scene.
- Once down in the water use the JAVELIN on the left statue to open up the next puzzle.
- Go back up to find hints about how to solve this puzzle.
- The first symbol is on the right side of the submarine cave and the second symbol is on the back of the submarine.
- Go to the left one screen and the third symbol is near the waterfall in the middle of the room.
- Use the SHELL on the bats in this room (1) and they will fly away.
- Use the KNIFE on the plant that they were in front of (2) and collect that green liquid with the CANTEEN (3).
- Go the left one more time and use the CANTEEN of green liquid on the hole you saw before (4).
- Scroll down to the bottom of the scene to see the last symbol (5).
- Return to the underwater scene and put in the 4 symbols that you saw from before.
- The order that you need to push them is in the order of the rooms that they are in from left to right.
- The symbol from the cave wall is first, the symbol by the waterfall is second, the symbol on the ship is third and the last is on the right side of the submarine cave.
- See the screenshot for the solution.
- Click on the center of the wall and you will play another mini-game.
- This mini-game is similar to a Rubik’s cube.
- Press the arrows to rotate that row or column one time. If you rotate any row or column four times you will spin it all the way around to the front again.
- To finish the puzzle you have to make the front face all the same color. You do not have to match the colors of the other faces.
- Look at the other two faces that you can see, above and to the right for solid lines of color.
- By putting colors together, other colors will also be grouped. Look for the largest grouped color and try to solve it with that color.
- See the screenshot for a possible solution.
Entrance to the Underwater World
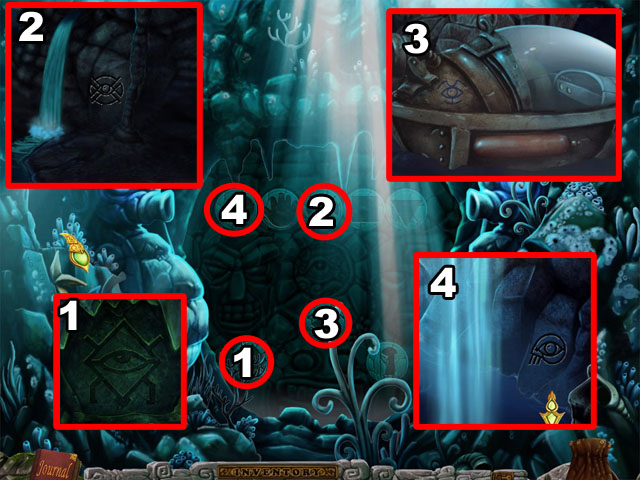
- Collect the pieces circled in red to get the STATUE, BOTTLE and ANCHOR.
- Use the STATUE on the statue base in the middle of the screen and the STONE CLOCK on his hands. You do not have enough information to solve this puzzle yet (1).
- Click on one of the squids floating around the screen and use the BOTTLE to capture his ink (2).
- Next use the ANCHOR on the sunken ship. A treasure chest will become visible and the time for the woman statue will be written on the deck (3) – IX 15 or 9:15. This time may be randomized in your play through.
- The time for the man statue is in the previous scene – 3:30. This may also be randomized in your play through.
- Set the clocks on the two statues and go to the castle that appears in the top right corner.
Sea Elf Palace
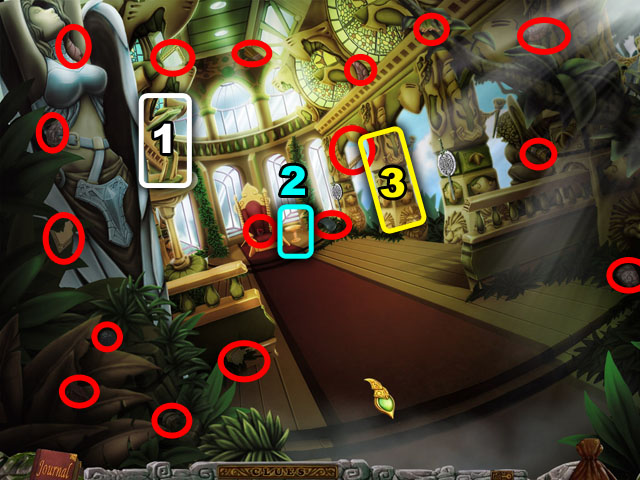
- Collect the pieces circled in green to the GOBLET, GLOVES, CANDLE, and SHELL.
- Use the CANDLE on the chandelier to receive the last piece of the KEY (1).
- Return to the previous scene and use the GLOVES on the electric eel that is swimming around sometimes.
- Use the eel on the large shell to open it. Use the KEY on the chest.
- Take the last two pieces of the TRIDENT and BLACK ORB return to the queen’s room.
- Use the GOBLET on the space just above the short table (2) to place it there.
- Use the SHELL on the key hole to the left (3). The key hole is very small so you may have to try multiple times to get it correctly.
- Now you can go through the door in the left.

- Find the 12 hidden objects listed in the bottom of the screen, in any order, circled in blue in the image.
- The hidden objects are randomized and may be different in your play-through.
- You will receive the COIN in your tool bag.
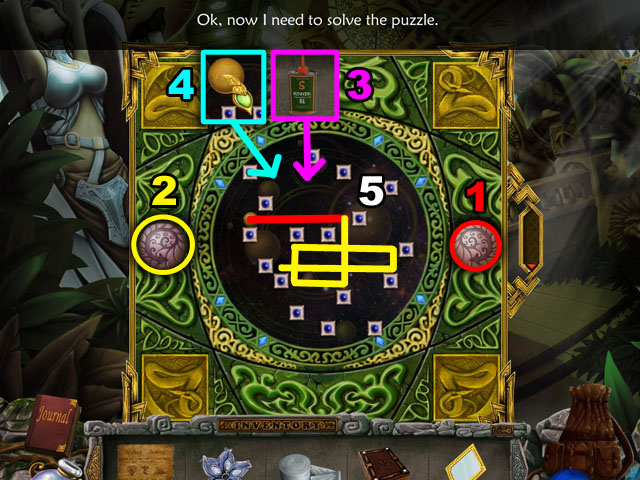
- Use the coin on the door to the right of the queen to open a new puzzle (4) labeled in the previous screenshot.
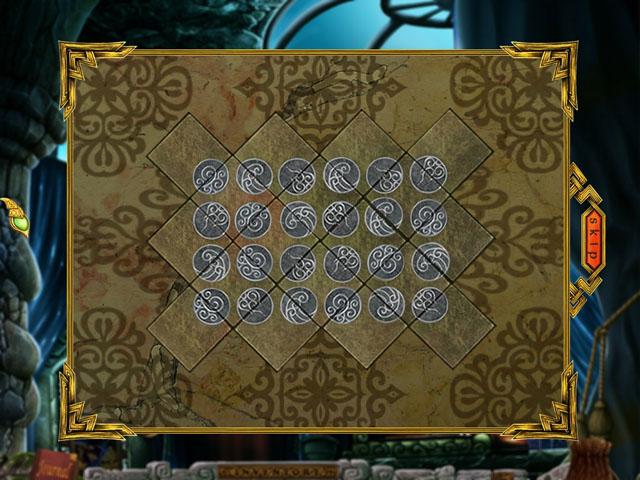
- Complete the image correctly to finish this mini-game.
- Click the tiles to turn them in one of four directions.
- Start with the tiles on the outside. They all have only one correct position, with the circles facing toward the inside.
- Then work on the tiles that touch the other tiles, and make sure the symbols on the circles match.
- Continue on like this until the circles all match. See the screenshot for the completed puzzle.
- After finishing the puzzle return all of the Elf Queen’s items to her – the TRIDENT, the BLACK ORB, and the BOTTLE OF INK.
- You will be returned to the sea. Click the top of the screen to go to the next chapter.
The Beach
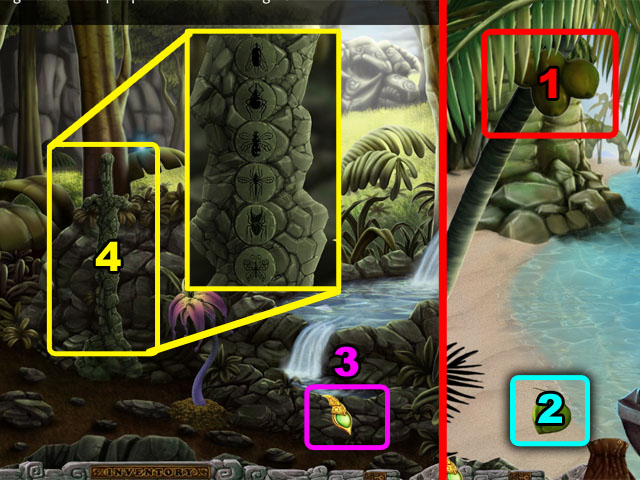
- Collect the pieces circled in blue to get the HEALING HERB, GARDEN SHEARS, and SHOVEL.
- Use the LION to dig the mound circled in red to get another RUBY PIECE.
- Click to the left to go to the next scene.
- Collect the pieces circled in yellow to get the AXE, MACHETE, and HAMMER.
- Use the LION to dig the mound circled in red to get another RUBY PIECE.
- Use the AXE on the tree stump to collect the last piece for the ODD LEAVES (1).
- Use the GARDEN SHEARS on the bushes to open up a new path (2).
- Collect the pieces circled in red to get the ROCKS, GREEN GEM, STRANGE SEED, and ROPE.
- Collect the piece of RUBY highlighted in green with the hammer in the tool.
- Use the SHOVEL on the mound of dirt in the middle of the screen, circled in purple.
- After using the SHOVEL on the dirt, use the STRANGE SEED on the hole. A large plant will grow there.
- You will then be able to travel to the village in the middle of the field at the top of the screen.
Centaurs’ Village
- Collect the pieces circled in red to get another GREEN GEM, two MEDICAL HERBS, a RECIPE, and a STRANGE TRUMPET.
- The scene scrolls horizontally but all of the hidden objects can be found on the right side of the scene except one piece of MEDICAL HERBS.
- Use the HAMMER in the inventory on the water trough to break it and put out the fire in the village.
- Collect the RUBY PIECE on top of the hut afterwards.
- Click to the right side of the scene to go to the gate.
The Grand Elf Gate
- Drag the symbols hidden around the gate to the holes circling the middle clover leaf (1).
- Once all the symbols are replaced, the clover will open up and you can put the INSIGNIA you got from the Elvin queen in the hole (2).
- The panel on the left of the gate will open up when the gate gets stuck, click on the panel to continue.
- At this time you can also put whatever RUBIES you have collected in the right side of the gate but you won’t have all of them yet.
- Bounce 29 balls from the top of the machine to the collector at the bottom of the machine.
- Every time a ball goes inside the collector it will move down a little bit. You will then have to readjust the turners to hit it again.
- You will have to readjust the turners at least 3 times.
- Click on a golden turner to rotate it around. You can’t move the gray ones, so you will have to work around them.
- See the screenshot for three possible paths to the end.
- After the game is finished, click the top of the screen to go through the gate.
- Collect the pieces circled in green to get the BUTTON, ELVIN STAR, CLOVER and BANDAGES.
- Once you find these things go up again to the next scene.
The Tree of Life
- Collect the pieces circled in red in both scene A and screen B to get the KEY, MAGNETIC BALL, OIL, SHIELD, and PLASTER.
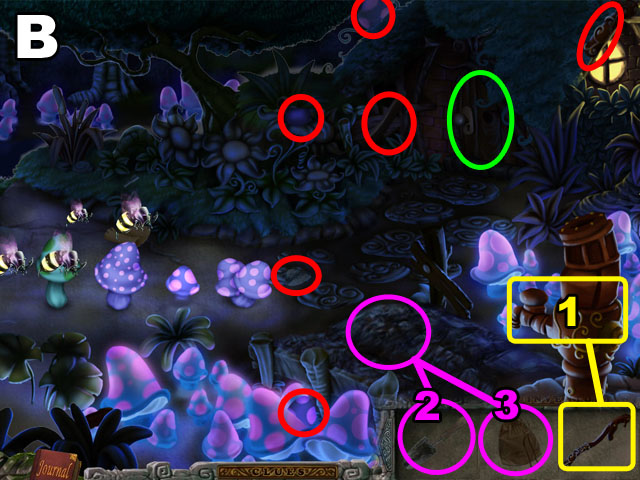
- Once you find all the pieces you can go to a hidden object scene by clicking the bushes circled in purple in scene B.
- Find the 12 hidden objects listed in the bottom of the screen, in any order, circled in purple in the image.
- The hidden objects are randomized and may be different in your play-through.
- Your view can move vertically.
- You will receive the ROUND MIRROR in your tool bag.
- After finding all of the objects continue on towards the castle by clicking at the top of the screen.
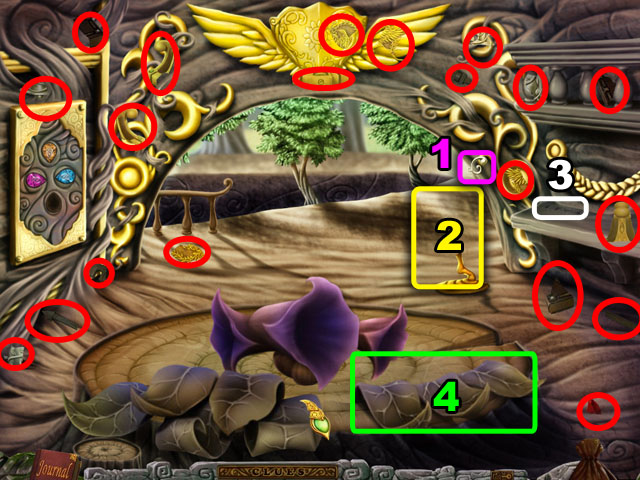
- Collect the pieces circled in red to get the ELVEN BELL, TRUMPET STAND, EMBLEM and WRENCH.
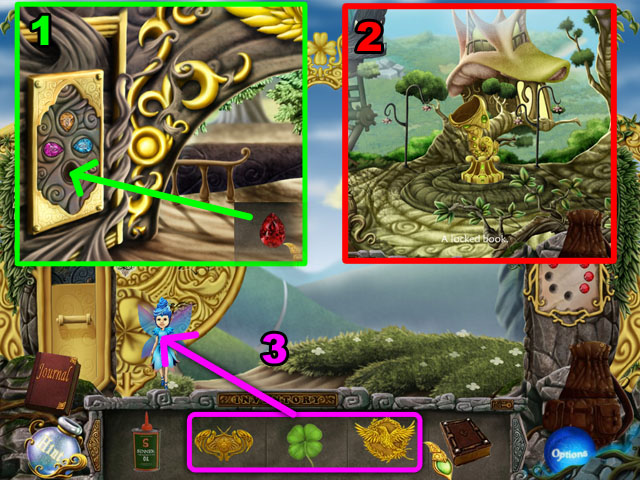
- Use the GOLDEN ELF STYLE BELL on the stand marked in purple to get the last piece of the LOCKED BOOK (1).
- Set up the ROUND MIRROR on the stand below the BELL (2).
- Click on the bench to the right of the mirror. This has the answer key to the bug puzzle on the sword that you saw before to burning village (3).
- Next add the strange leaves to the leaves circled in green at the bottom of the screen.
- You will need to play a little memory game to complete this task. Click the skip button if it’s too hard.
- Depending on the level a certain number of leaves will glow in order. Click on the leaves to match that order.
- The game has 4 levels – first 4 leaves, then 5, then 6 and finally 7.
- Once you pass on level you can’t go back, you will always restart on the same level after you make a mistake.
- If you make a mistake click the flowers in the middle to play again.
- Every time you play the combinations will be different. So you will have to memorize the order in one try.
- Return outside after you are done and see the new castle that has been called into the sky by the music.
- Go back one more screen to the scene with the fountain.
- Click on the top of the fountain and use the wrench on the two green nuts that control the water flow (1).
- Put the two GREEN GEMS from your inventory into the alligator’s eyes (2). You will need to put the GEMS directly on his eyes. It’s a small area and you may not get it at first.
- Lastly click the base and use the ELVISH KEY on the lock to find the last piece of the LARGE RUBY.
- Return to the house with the memory game.
- Put the LARGE RUBY in the hole with the other gems in the wall (1). Go back outside.
- To the right of the bridge is a small circle on the ground. Use the TRUMPET STAND and then the TRUMPET on the stand (2).
- Go back one more time to the golden gate and after the cut scene give the fairy the two EMBLEMS and a CLOVER (3).
- She will then help you go back to the previous locations.
- Use your MAP from your tools inventory to return to the Beach.
- Click on the coconut in the tree multiple times to have it fall on the ground (1).
- Use the MACHETE on the coconut to get the SPLIT COCONUT (2).
- Go to the left and then go into the jungle cave on the right.
- Use all three of your MEDICAL HERBS on the rock highlighted in purple in the screen shot. Then use the ROCKS in your inventory to make a HEALING PASTE (3).
- Click the sword and change the combination to the combination that you saw on the bench previously (4).
- See the screenshot for the solution.
- Go back to the jungle clearing with the Griffin.
- Use the COCONUT on the Griffin, then the HEALING PASTE, then the BANDAGES.
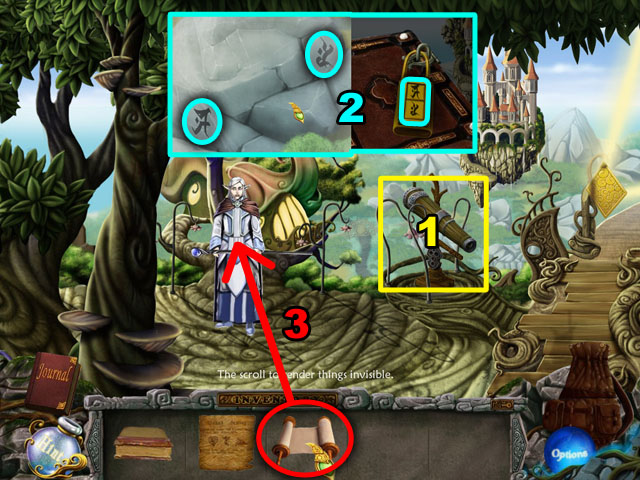
- Use the MAGNET and the ROPE together in your inventory, then use the ROPE on the hole in the top left of the screen.
- This will start the next mini-game where you have to roll the magnet through a maze.
- If you touch the side of the maze you will have to start over.
- There are checkpoints in the maze, so that once you get to one of them you can start over from the checkpoint each time.
- Look at the screenshot for a possible path through the dark maze.
- After finishing all of this, walk back to the bridge with the floating castle in the distance.
- Click on the horn again and the Griffin should come to take you to the castle.
- If the Griffin doesn’t come leave the scene to the house and come back, and click the horn again.
The Floating Light Elf Palace
- Click on the Griffin to go to the castle in the sky. You can return here afterwards using the map any time or click on the Griffin again in the bridge scene.
- Collect the pieces circled in red to get the BUTTON, FLOWER and the SQUARE MIRROR. There will be one piece missing for the other object.
- Click on the pedestal to the left to put together the machine for the first puzzle (1).
- Put the ELVIN STAR on the table beside the thrown to start the second puzzle (2).
- Place the sword and shield in the third position to open that puzzle (3). This puzzle can’t be solved yet.
- First before you can solve the left puzzle you need to put the base together.
- Put the clockwise BUTTON in your inventory on the right side and the counterclockwise BUTTON on the left (1, 2).
- Next add the OIL from your inventory to the board (3).
- Finally add the yellow BALL to the middle of the game to start the puzzle (4).
- In this puzzle you need to rotate the board using the button on the left and the right to get the yellow ball into the hole.
- Every time you rotate the board the ball will fall with gravity towards the bottom.
- If there is no block for the ball to fall onto it will fall of the board and you will need to restart the puzzle.
- Solve the puzzle with the following order of turns: RIGHT, LEFT, LEFT, LEFT, LEFT, LEFT and LEFT.
- You will receive the last piece of the PLANT MEDICINE from the puzzle.
- Add the PLANT MEDICINE to the BANDAGE in your inventory.
- Using the EVLIN STAR beside the throne will start the middle puzzle.
- The object of the puzzle is to remove 10 of the purple bricks without letting the star touch the ground.
- Click on a brick to remove it. The yellow bricks are impossible to remove.
- Take the first bricks from under the star and then work on the bricks from the right side that can be removed without pushing over the tower.
- Lastly, take bricks slowly from the bottom until you have reached 10.
- Follow the order in the screenshot to finish this puzzle.
- Collect the piece that you get from finishing the puzzle.
- Next leave the castle by clicking on the back button.
- In the bridge scene place the square mirror on the pedestal to the left of the bridge (1).
- Go across the bridge to the house and click on the large red ruby on the wall to get a clue about the root in the underground level that needs to be healed (2).
- Combine in your inventory the PLANT MEDICINE and the BANDAGES (3).
- Use the MAP from your tools menu you go to the Cave of Hidden Rocks and go to the right once at the top of the screen.
- Use the BANDAGES on the root that you cut here earlier (4).
- Before you can finish this task you need to go back to a couple earlier scenes to collect the rest of the RUBY pieces.
- Return to the wizard’s house, go outside and use the LION on the ground marked (1).
- Return to the quick sand woods and use the LION on the ground marked (2).
- Once this is finished go to the Grand Elf Gate with your map and place all of the RUBIES in the right side of the gate.
- The rubies will start to glow in a specific order, write this order down or memorize it. Each of the rubies will glow exactly once.
- Return to the castle and click on the sword and shield puzzle to the right.
- Click the buttons on the puzzle in the same order that you saw on the gate.
- See a possible solution in the screenshot. The order of the buttons may be different in your play through.
- After clicking the correct sequence you will see the last piece of the TELESCOPE in the same place as the puzzle was. Click it to pick it up.
- Take the telescope and return to the bridge scene. Use the FLOWER and the TELESCOPE on the base to the right of the Elf wizard (1).
- Look through the telescope to get the combination to the ELVIN BOOK (2).
- Click on the two icons until they match what you saw through the telescope.
- You will receive the final SCROLL from the book. Give the SCROLL to the Elvin wizard to finish the game (3).
- Congratulations! You Finished The Seawise Chronicles: Untamed Legacy!
Created at: 2010-08-30