

Walkthrough Menu
- General Tips
- Chapter 1: The Bank
- Chapter 2: Westminster Station
- Chapter 3: Buckingham Palace
- Chapter 4: University
General Tips
- This is the official guide for Secret City: The Human Threat.
- This guide won't tell you when to zoom into a location; the screenshots show each zoom scene.
- Hidden-object puzzles are referred to as HOPs. Only the locations of the HOPs will be shown.
- Use the Map to fast travel to a location.
Chapter 1: The Bank
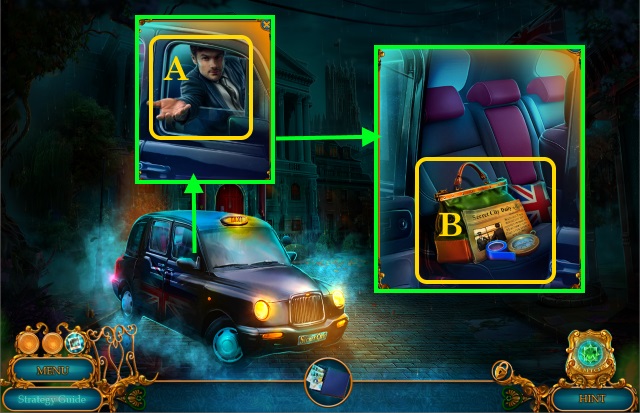
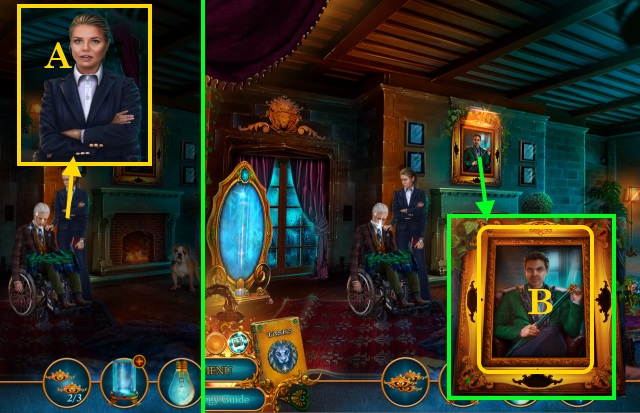
- Give MONEY (A).
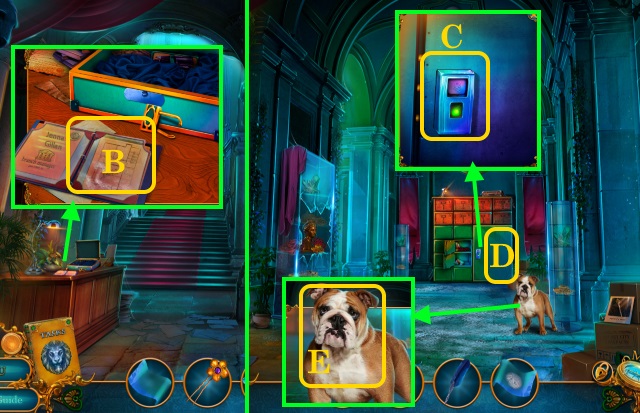
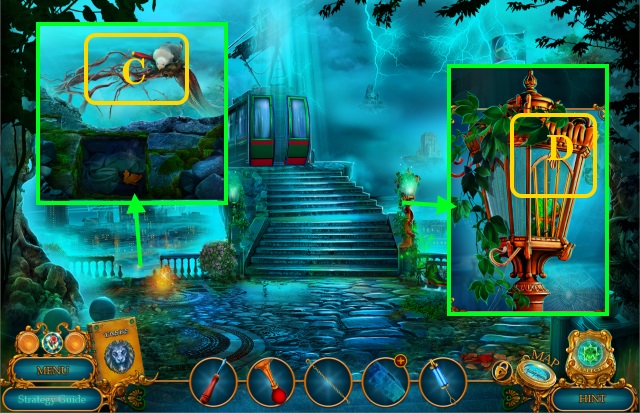
- Inspect (B); pick up map, TAPE, SOLVENT, ELECTRIC SAW and MAGIC GLASSES.
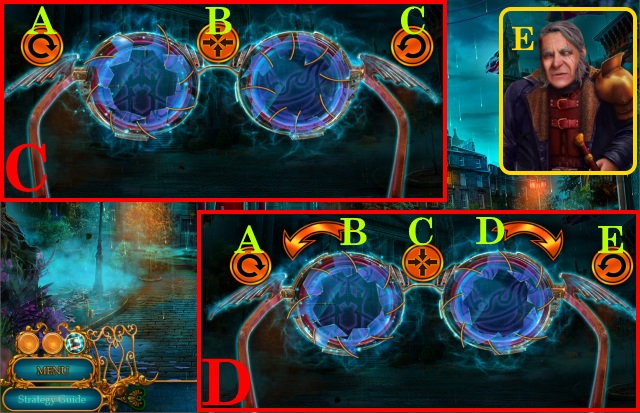
- Inspect MAGIC GLASSES.
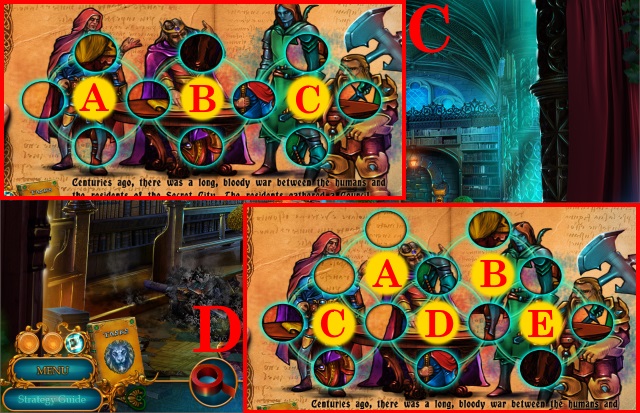
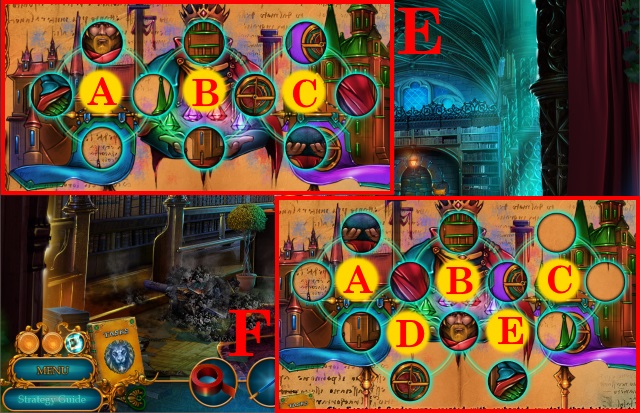
- Easy solution (C): Cx4-Ax5-C-B.
- Hard solution (D): Dx2-Bx4-Ax5-Ex5-C.
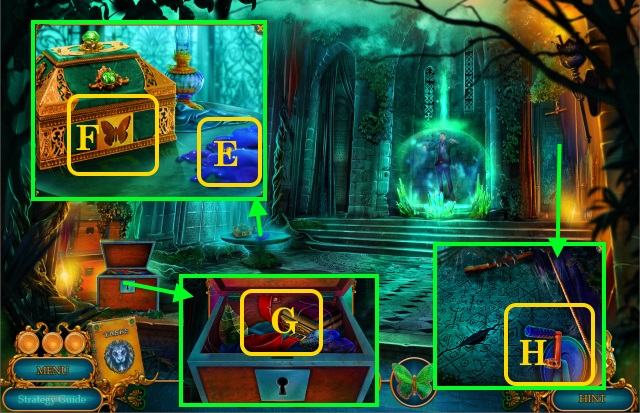
- Speak (E).

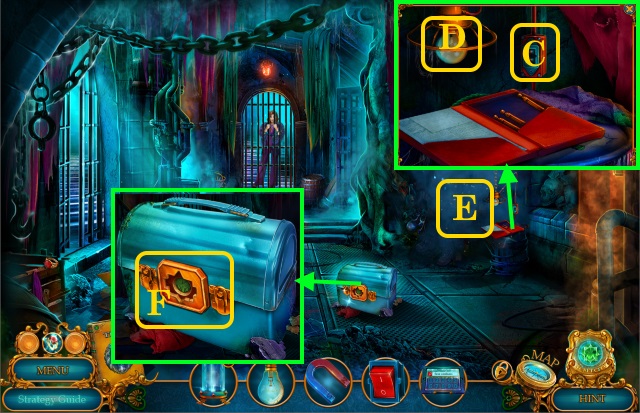
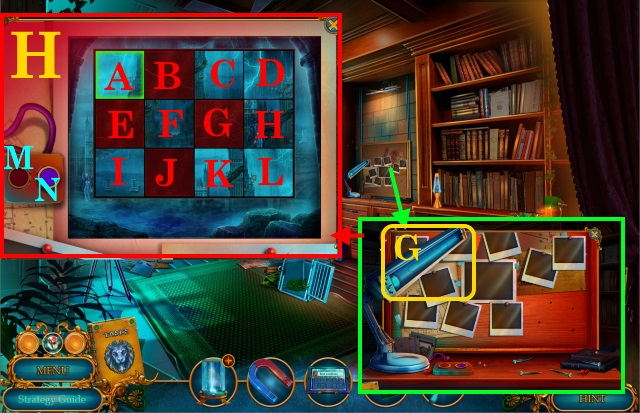
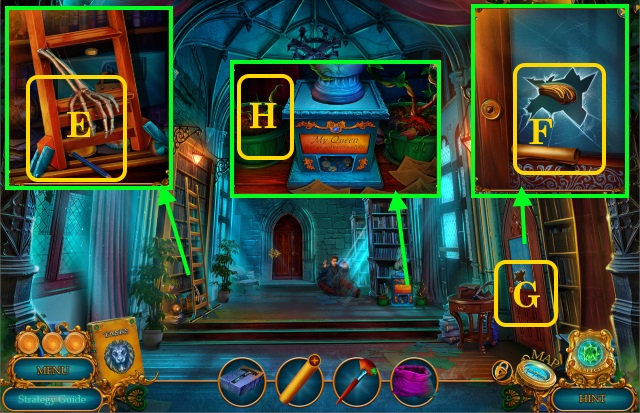
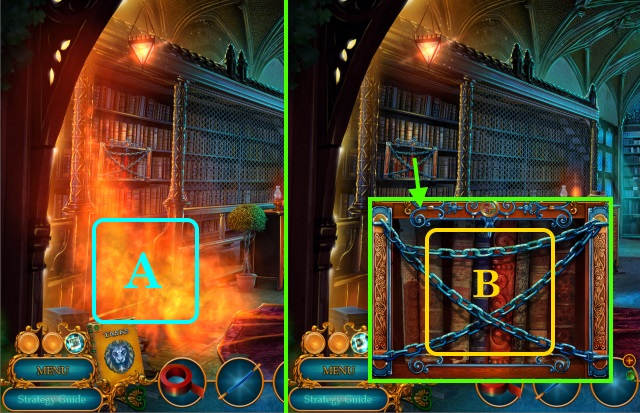
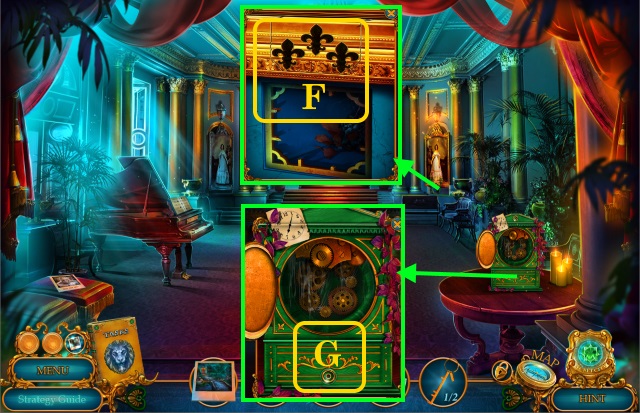
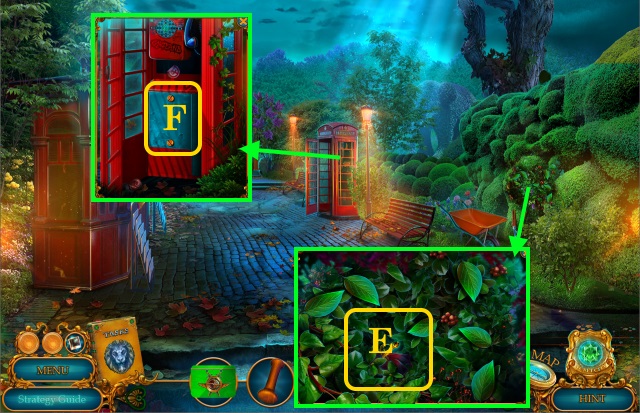
- Pick up WIRE and RAG (F); take notebook and POKER (G).
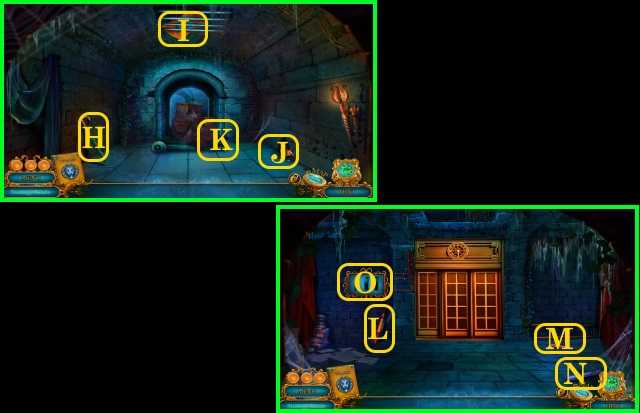
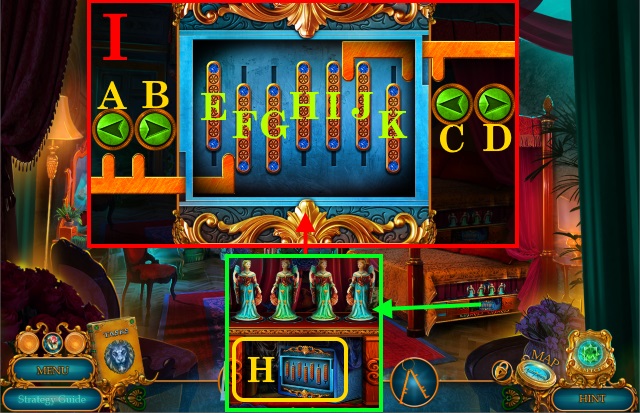
- Use POKER (H).
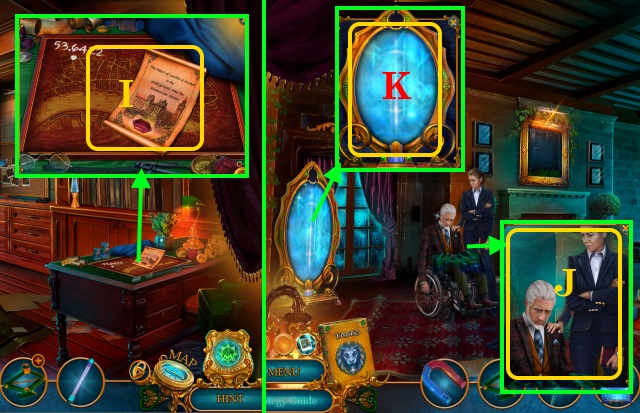
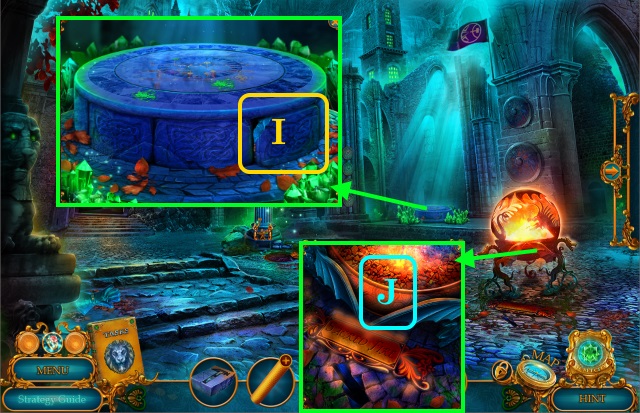
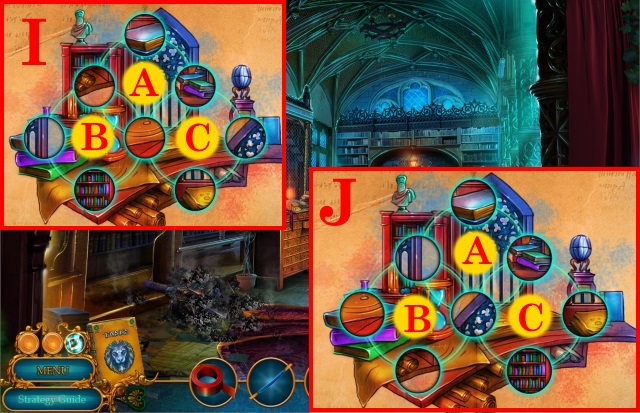
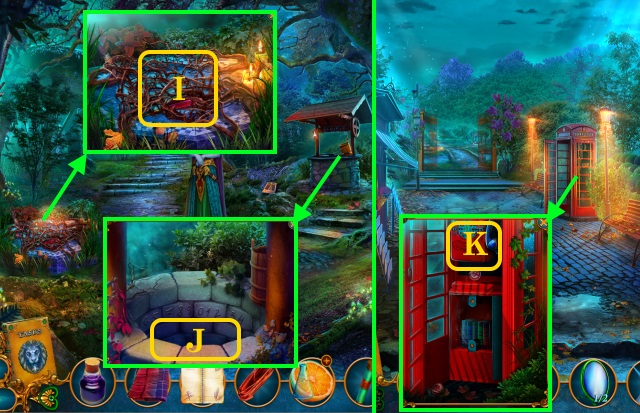
- Complete HOP (I); receive BANK KEYCARD.
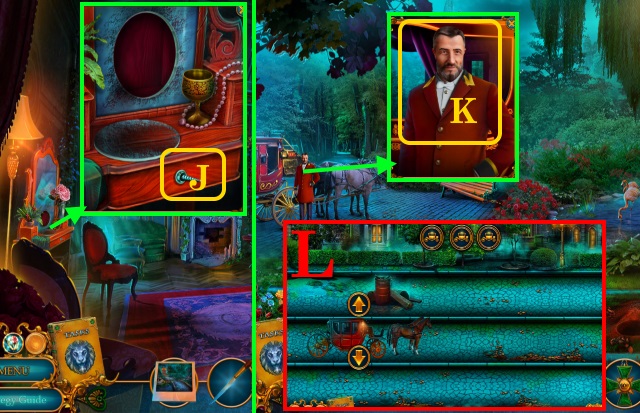
- Use BANK KEYCARD (J).
- Walk forward.
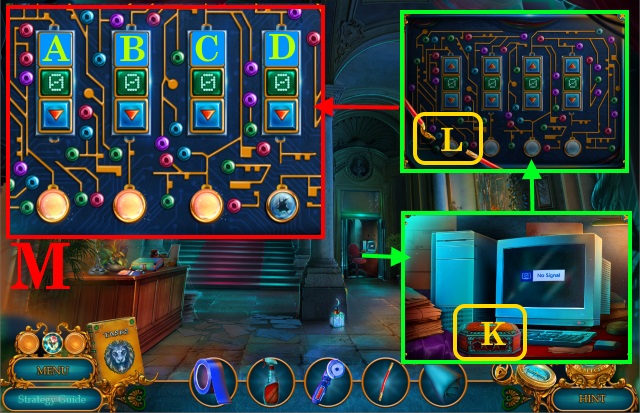
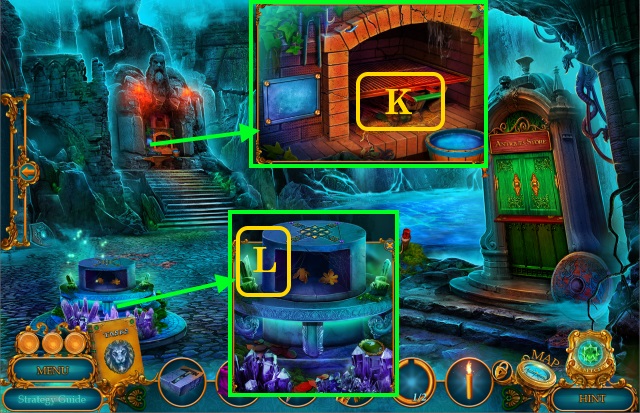
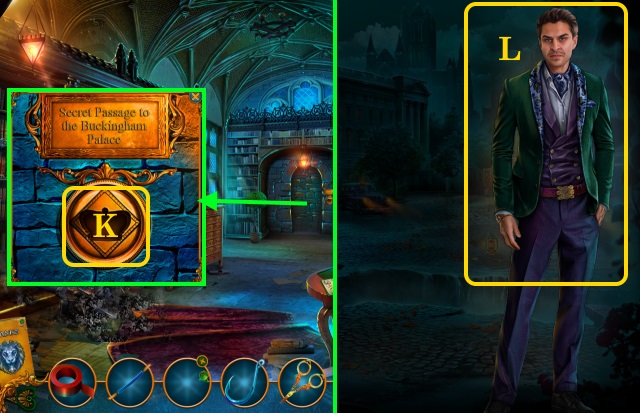
- Pick up SEALED CHEST (K).
- Use WIRE and TAPE (L).
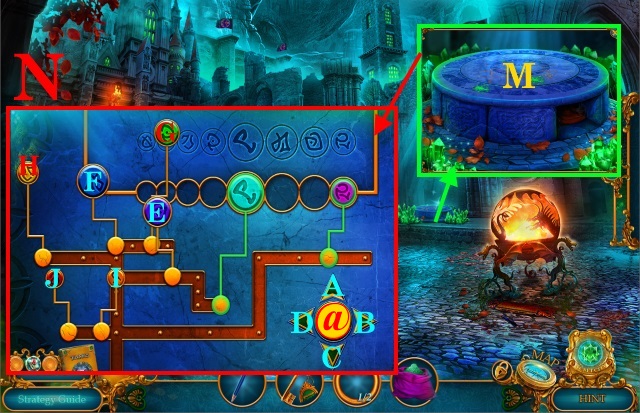
- Solution (M): Ax5-Bx4-Cx6-Dx7.
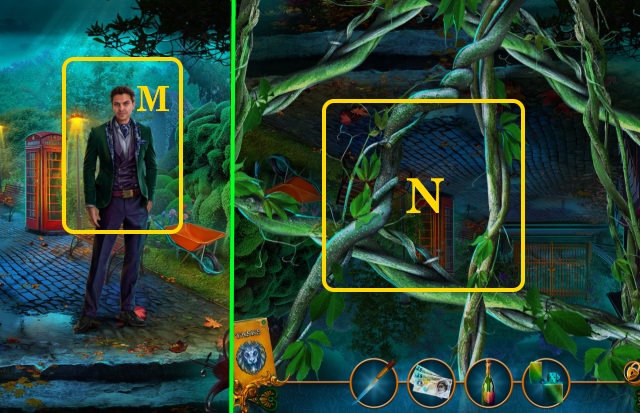
- Pick up SECURITY CARD and PICTURE TILES 1/3.
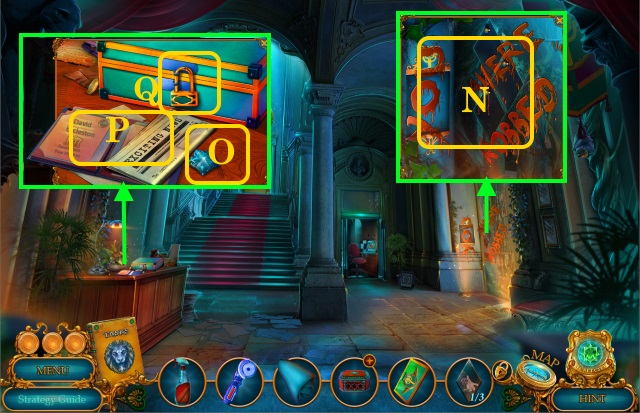
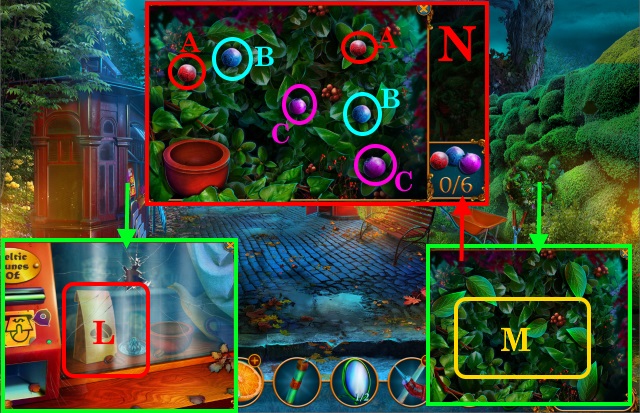
- Use SOLVENT and RAG (N); pick up LIGHTER.
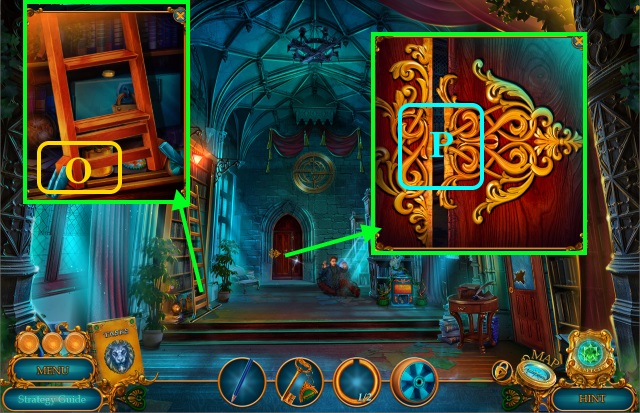
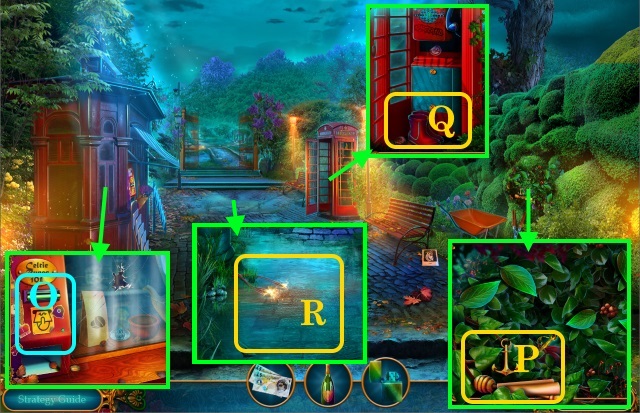
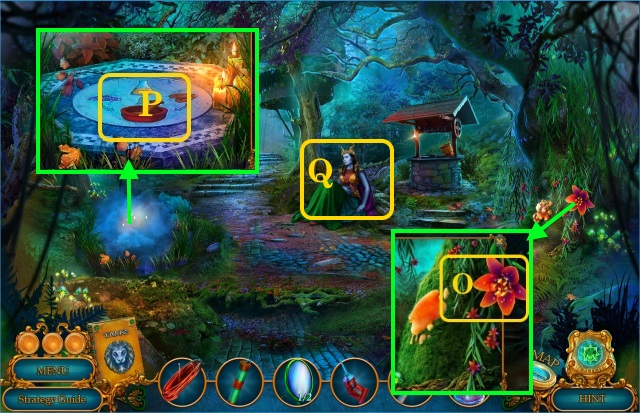
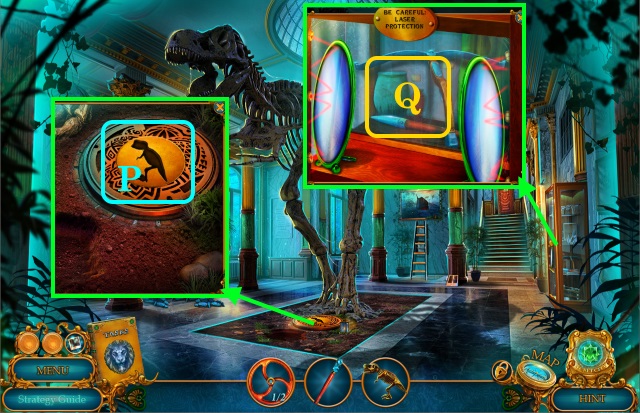
- Pick up GEMSTONES 1/3 (O); inspect (P).
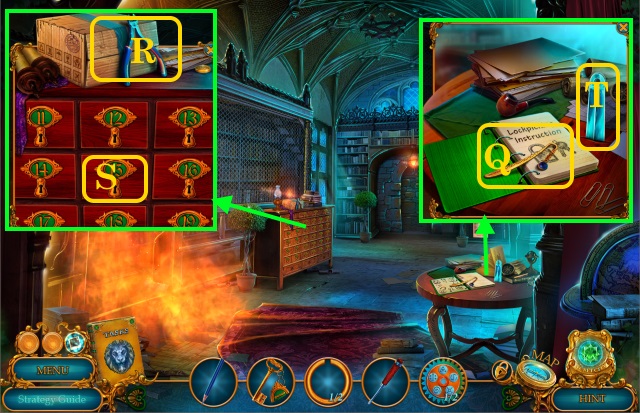
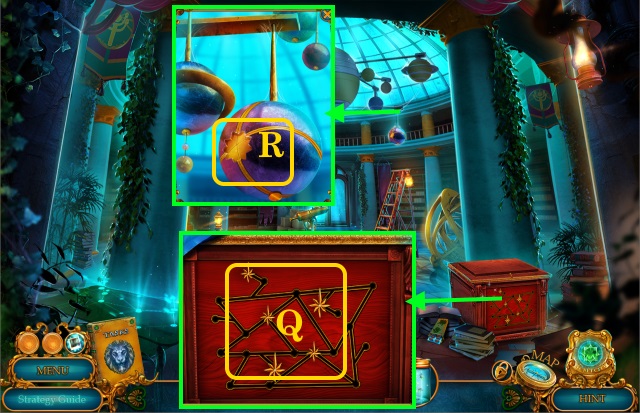
- Use ELECTRIC SAW (Q); find PICTURE TILES 2/3 and GLOVE.
- Walk down.
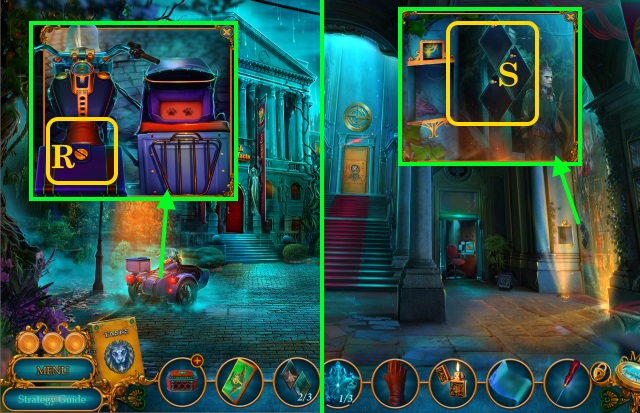
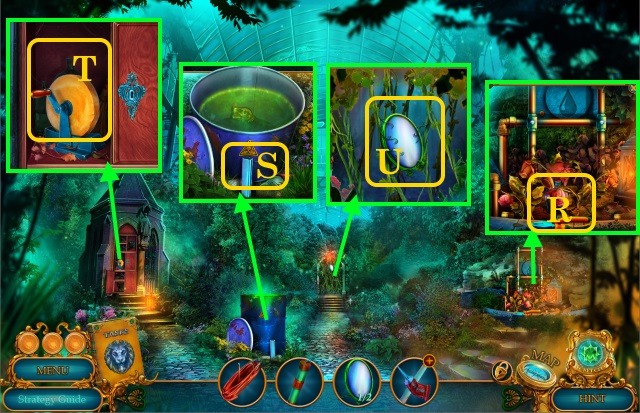
- Use SECURITY CARD (R); take TAPE, AWL and PICTURE TILES 3/3.
- Walk forward.
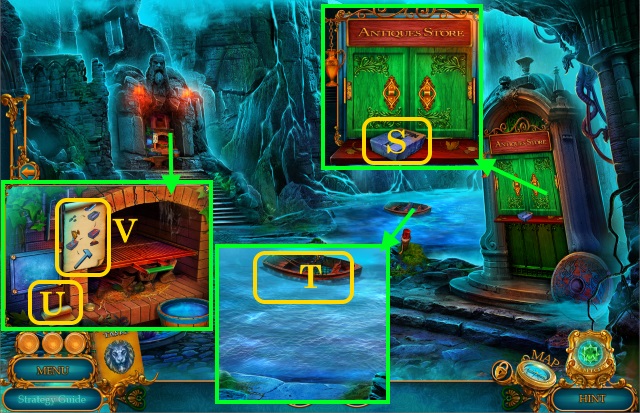
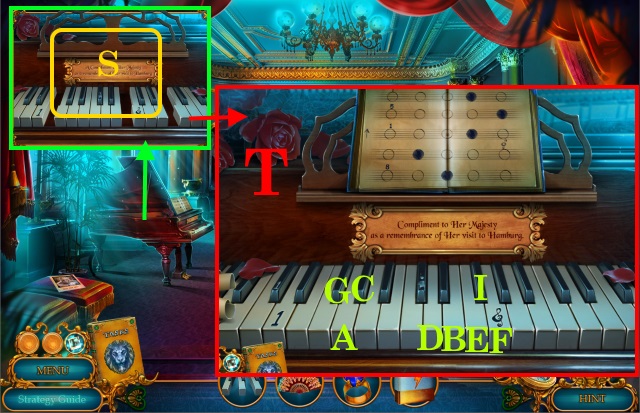
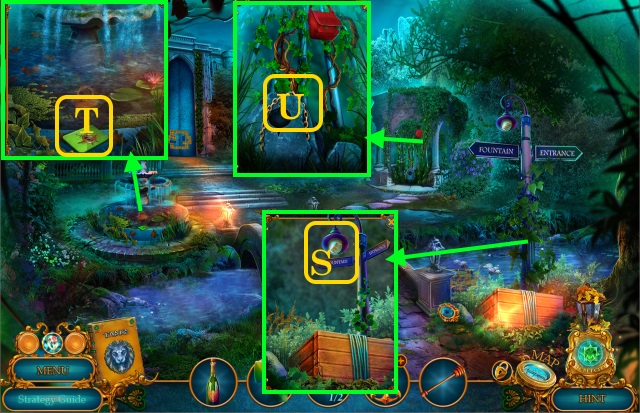
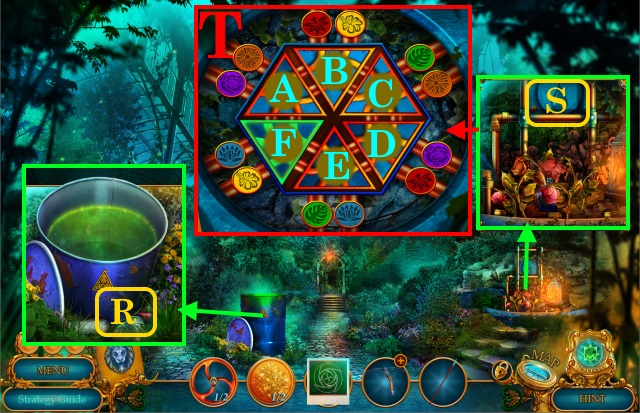
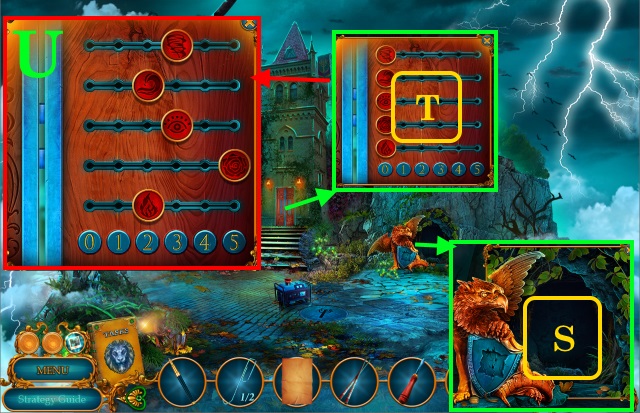
- Place PICTURE TILES (S).
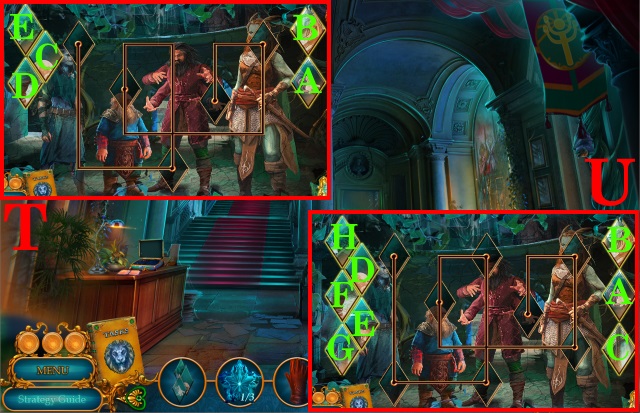
- Easy solution (T): A-E.
- Hard solution (U): A-H.
- Pick up VAULT KEY.
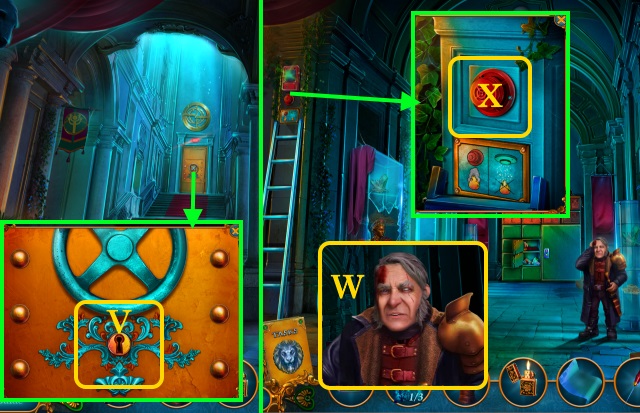
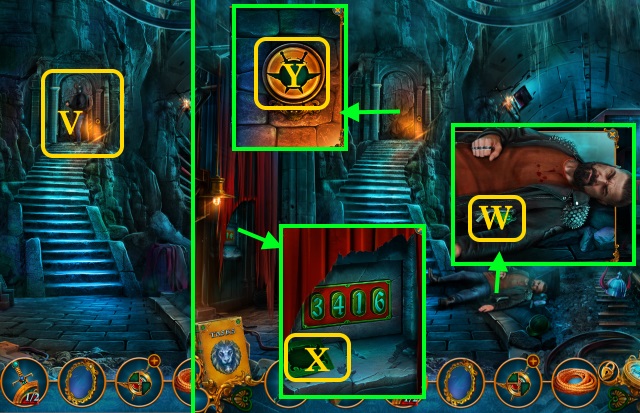
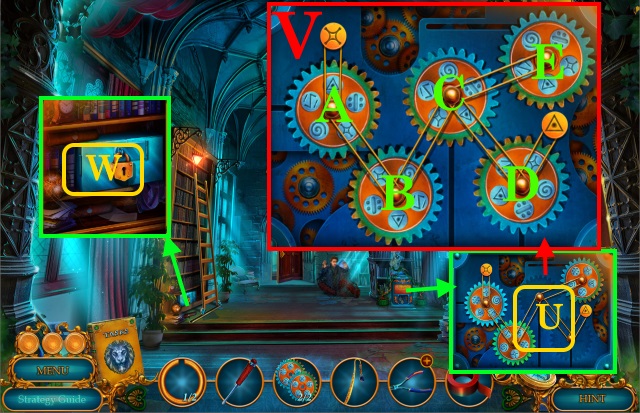
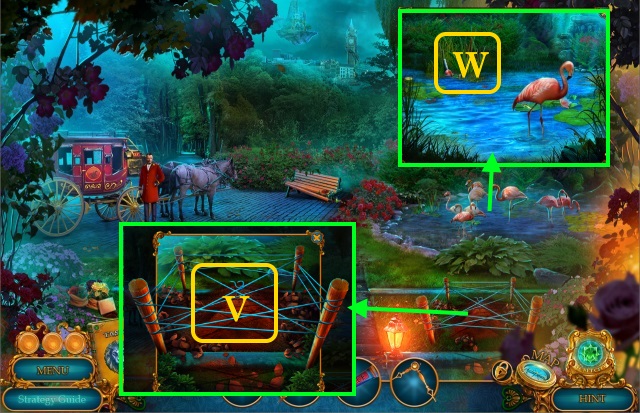
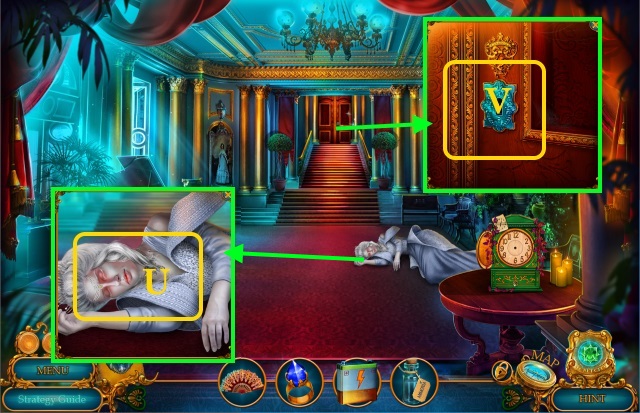
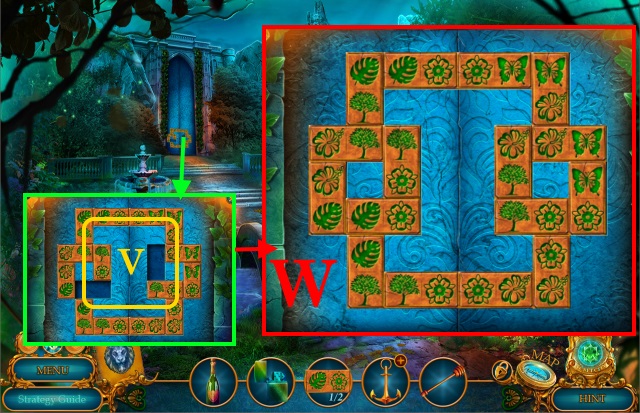
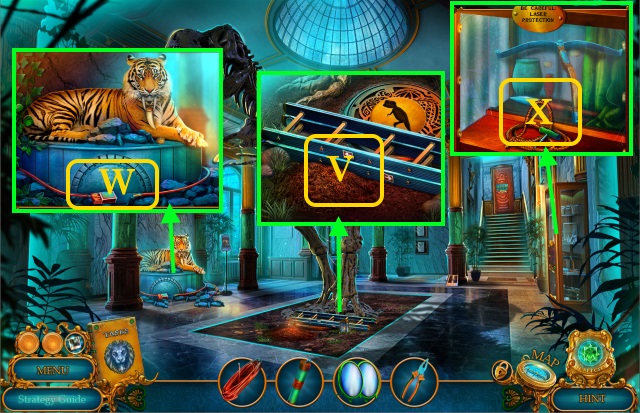
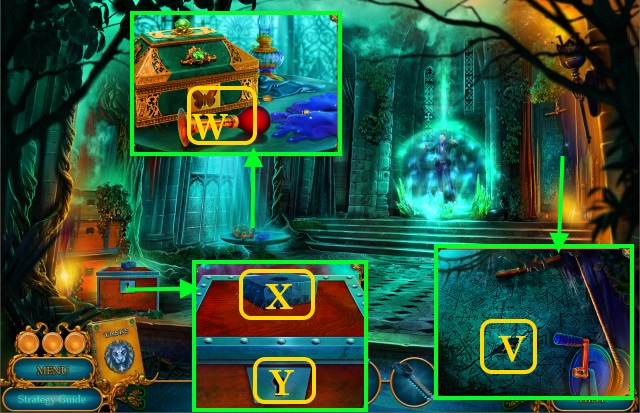
- Use VAULT KEY (V).
- Walk forward.
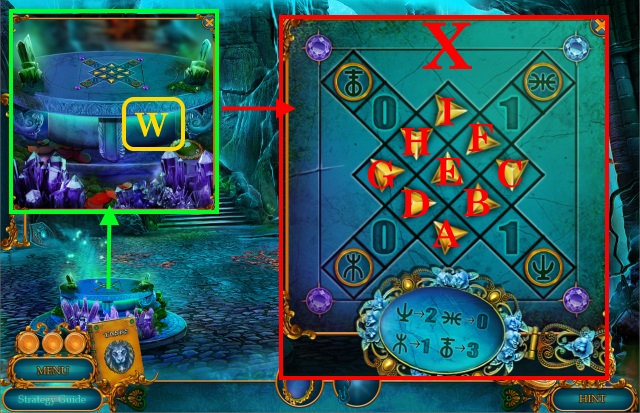
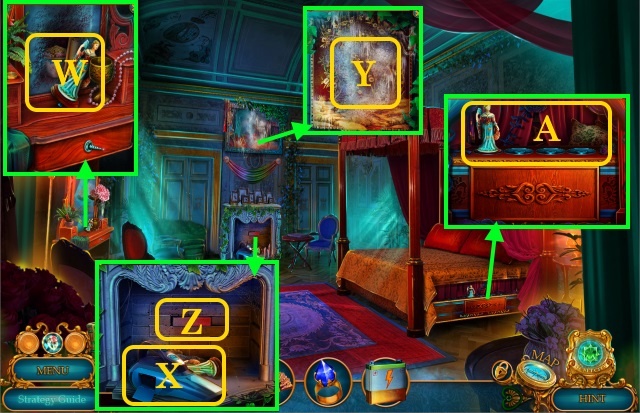
- Speak (W).
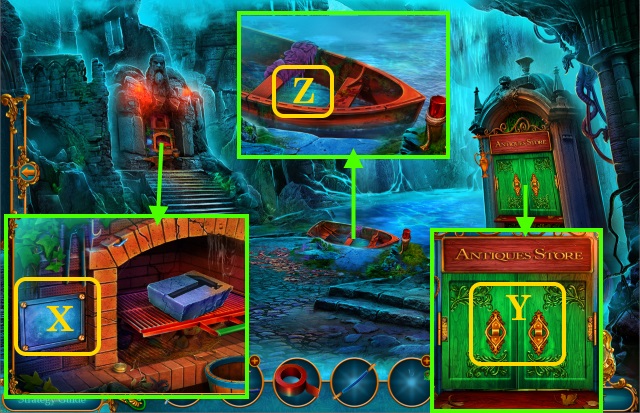
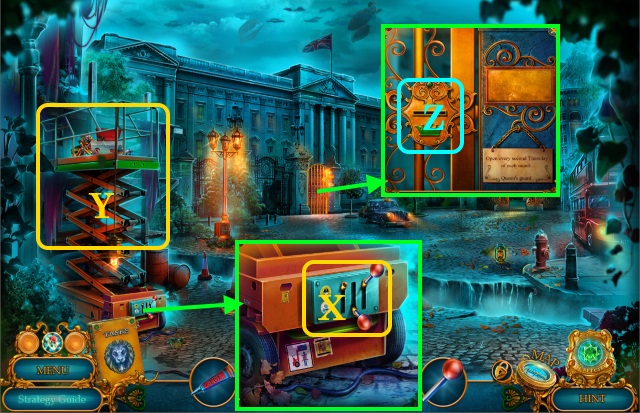
- Use LIGHTER (X).
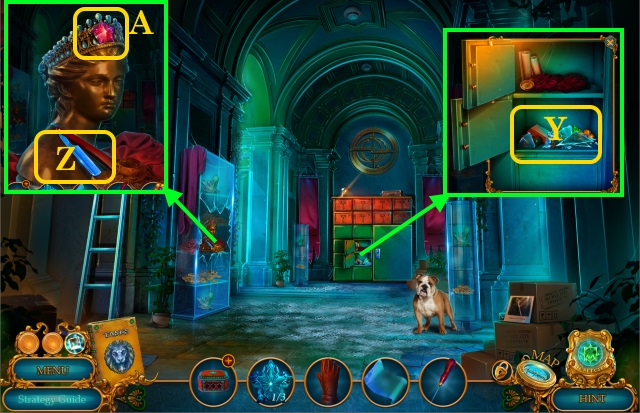
- Use GLOVE (Y); pick up HAIRPIN and GEMSTONES 2/3.
- Take RAZOR BLADE (Z); use AWL (A); receive GEMSTONES 3/3.
- GEMSTONES on SEALED CHEST; find QUILL and POWDER.
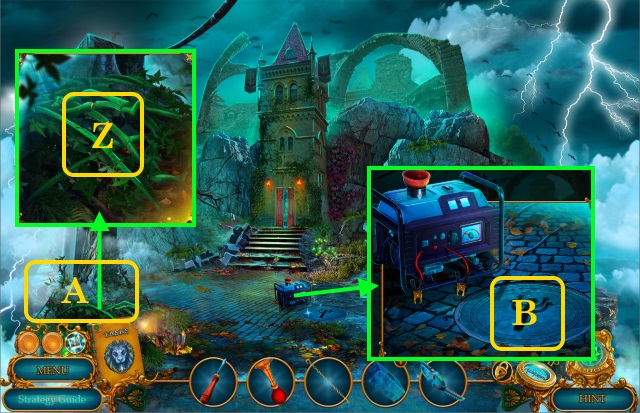
- Walk down.
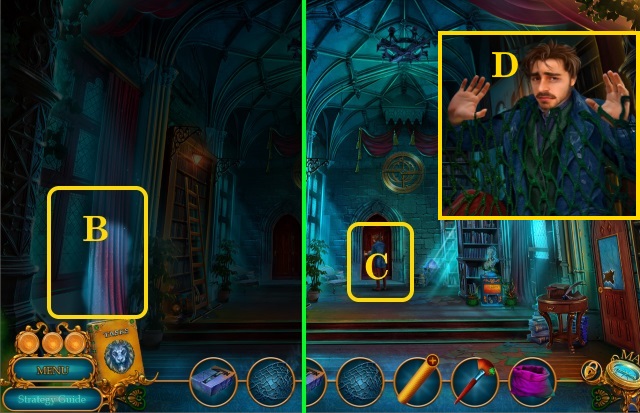
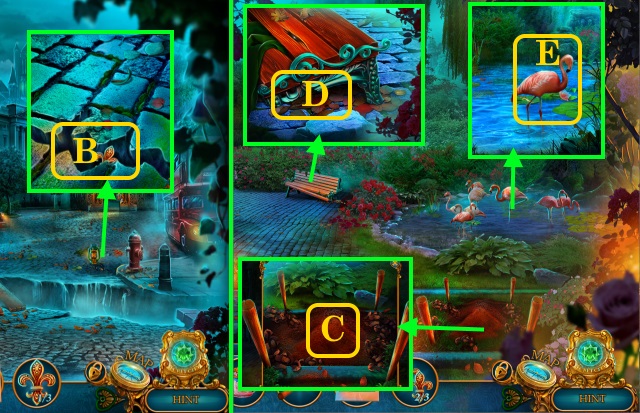
- Use POWDER and TAPE (B); receive FINGERPRINT.
- Walk forward.
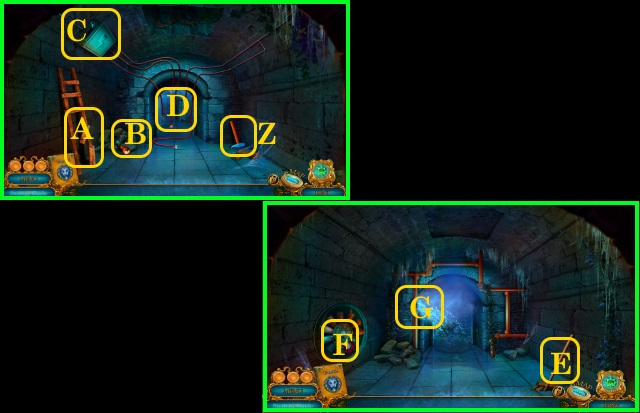
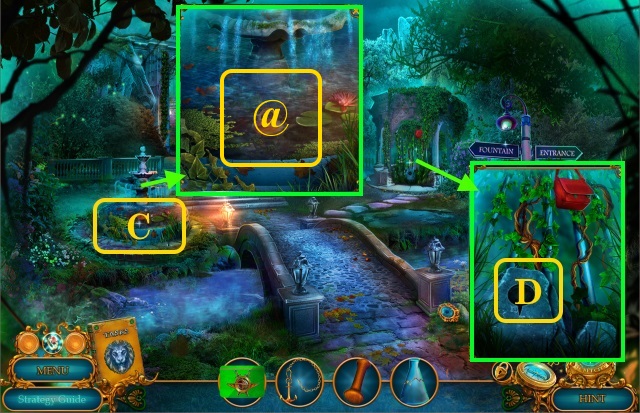
- Use FINGERPRINT (C).
- Complete HOP (D); receive ANIMAL TRANSLATOR.
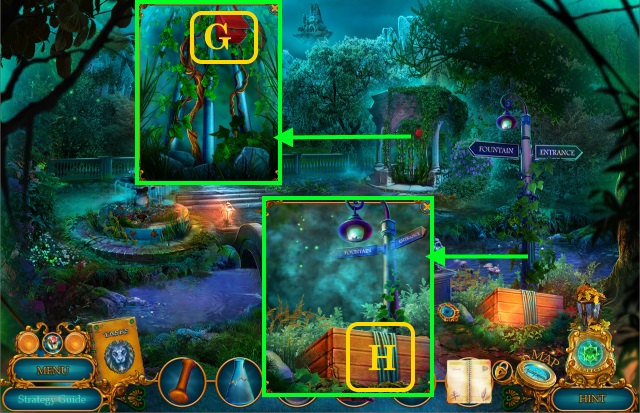
- Use ANIMAL TRANSLATOR (E); speak; receive HANRAGUILD.
- Walk down twice.
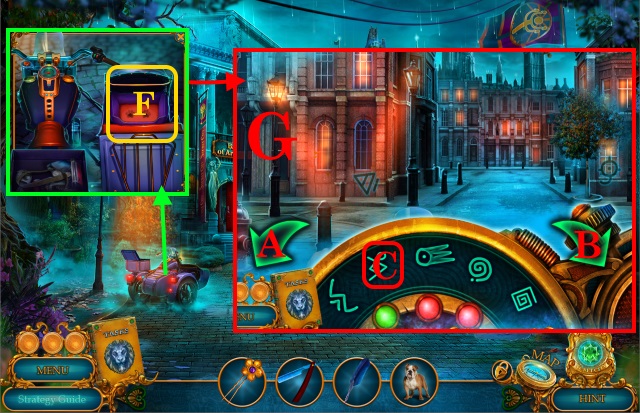
- Place HANRAGUILD (F).
- Solution (G): Bx4-C-Bx5-C-Ax13-C-Bx2-C-Bx10-C-Bx4-C.
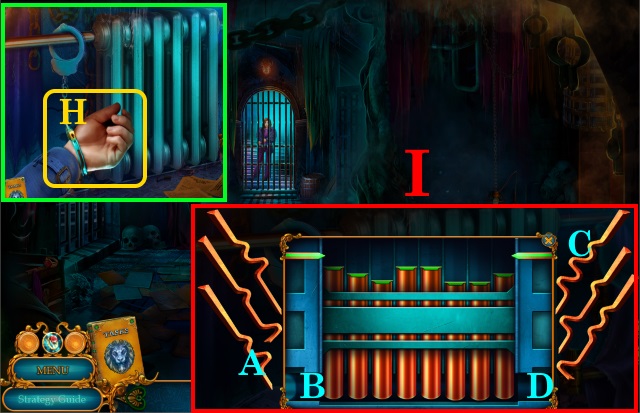
- Use HAIRPIN (H).
- Solution (I): A-B; C-D.
- Receive HANDCUFFS.
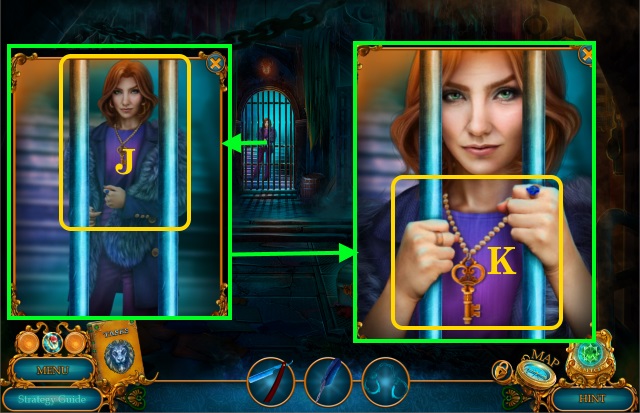
- Speak (J).
- Use HANDCUFFS (K); speak.
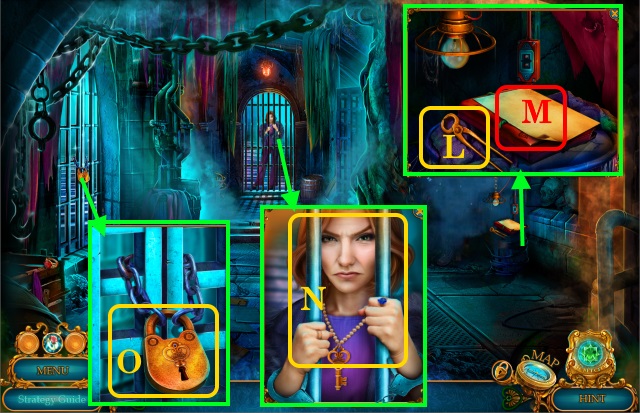
- Pick up PINCERS (L) and PAPER (M); use RAZOR BLADE; find TRUTH SERUM.
- Use TRUTH SERUM (N); speak; take CELL KEY.
- Use CELL KEY (O).
- Walk left.

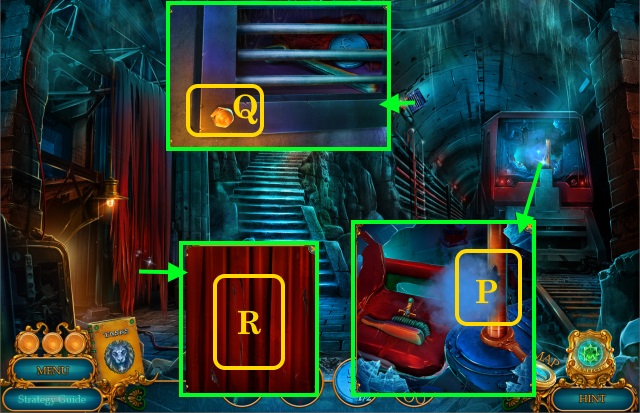
- Pick up FRAME DECORATIONS 1/3 (P).
- Take ARTIFACT ENERGY EXTRACTOR (Q); use PAPER and QUILL; pick up DOOR CODE.
- View DOOR CODE (R).
- Solution (S): Dx3-C.
- Walk right.
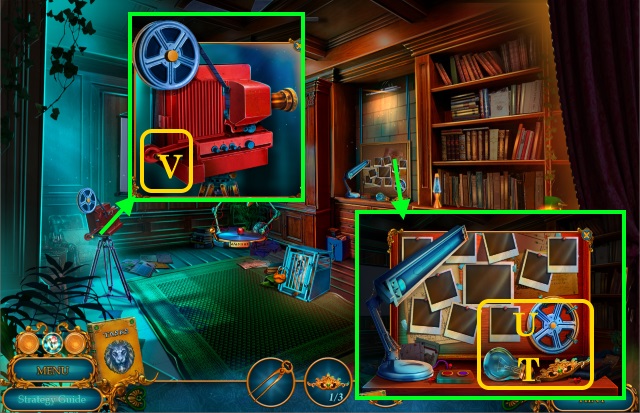
- Take LIGHTBULB and FRAME DECORATIONS 2/3 (T).
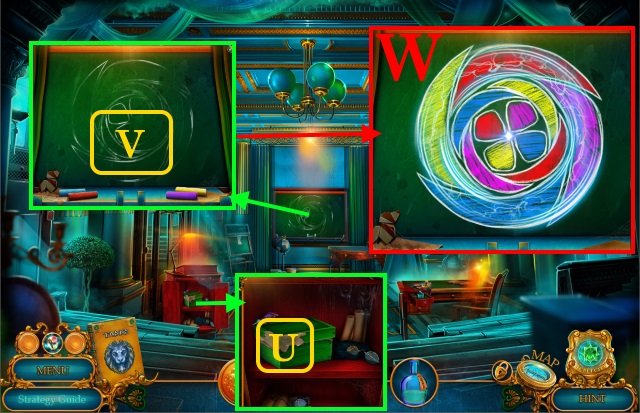
- Use PINCERS (U); pick up FILM REEL.
- Place FILM REEL (V).
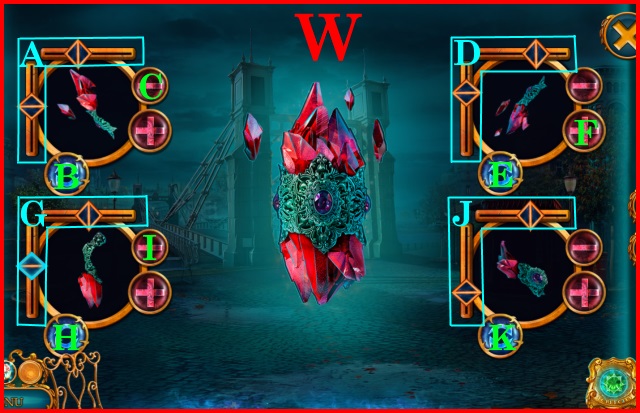
- Solution (W).
- Recommended strategy shown (A): Bx3-Cx3.
- Recommended strategy shown (D): Ex5-Fx3.
- Recommended strategy shown (G): Hx5-Ix3.
- Recommended strategy shown (J): Kx7.
- Pick up BLOWTORCH.
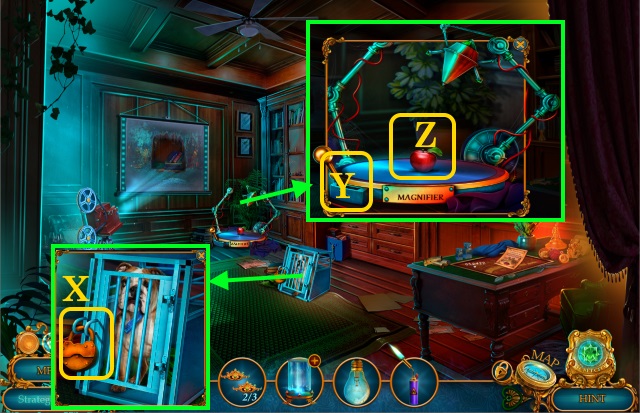
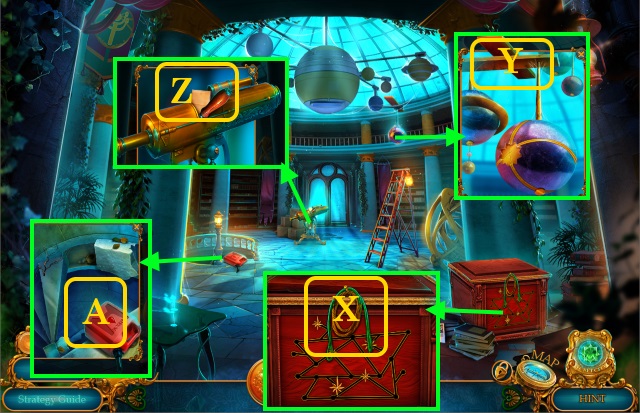
- Use BLOWTORCH (X); take MAGNET and HANRAGUILD.
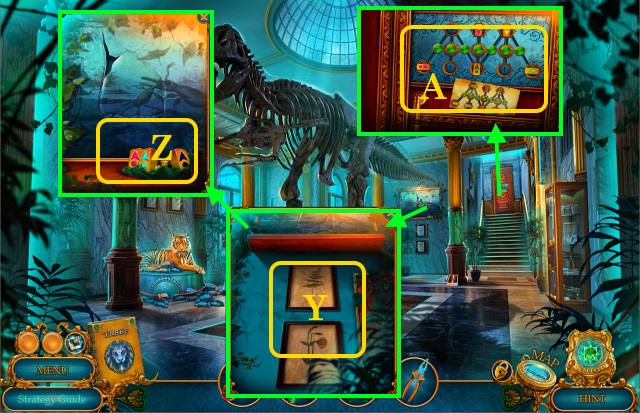
- Pull (Y); inspect (Z).
- Place HANRAGUILD (Z).
- Speak (A); receive FRAME DECORATIONS 3/3.
- Place FRAME DECORATIONS (B); pick up SWITCH and GPS.
- Walk down.
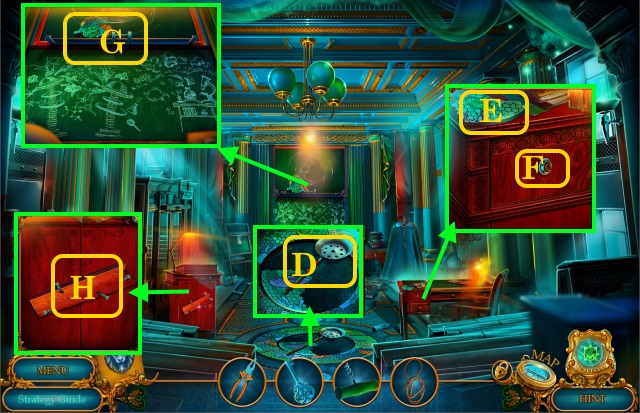
- Place SWITCH (C); clear (D); use LIGHTBULB.
- Complete HOP (E); receive SIGNET RING.
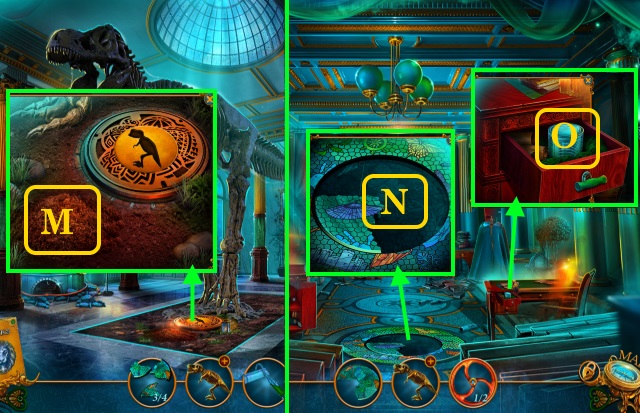
- Use SIGNET RING (F); find BROKEN JACK and UV LIGHTBULB.
- Move to Mortymer's Study.
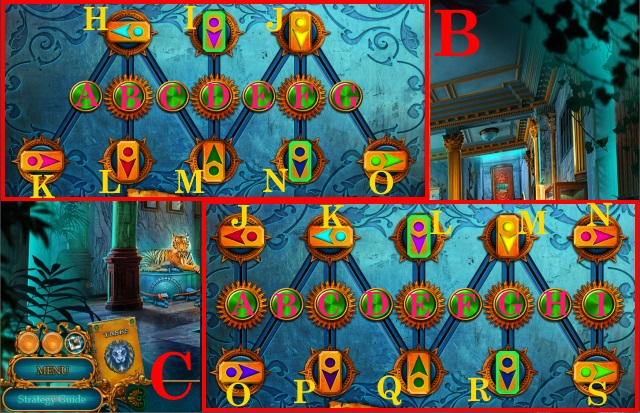
- Place UV LIGHTBULB (G).
- Solution (H).
- Easy: C-F-I-K-N-I-E-M-C-D-N-D-J-M-H-I-N-B-L-G-L-D-L-G-L-M-K-L-H-L.
- Hard: E-L-B-E-N-E-K-C-F-C-I-H-I-M-H-J-N-C-H-M-D-H-N-C-H-M-D-H-D-G.
- Pick up WRENCH and MYSTERIOUS ARTIFACT.
- MYSTERIOUS ARTIFACT on ARTIFACT ENERGY EXTRACTOR; receive ARTIFACT ENERGY.
- Inspect (I); place GPS; receive PORTAL COORDINATES.
- Walk down.
- Give ARTIFACT ENERGY (J); speak; receive PORTAL ACTIVATOR.
- Use PORTAL COORDINATES and PORTAL ACTIVATOR (K).
Chapter 2: Westminster Station
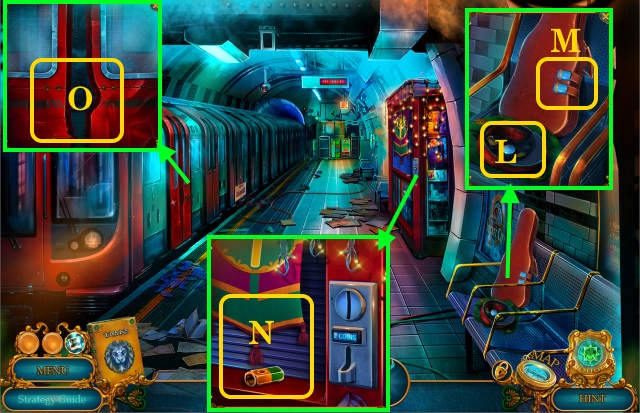
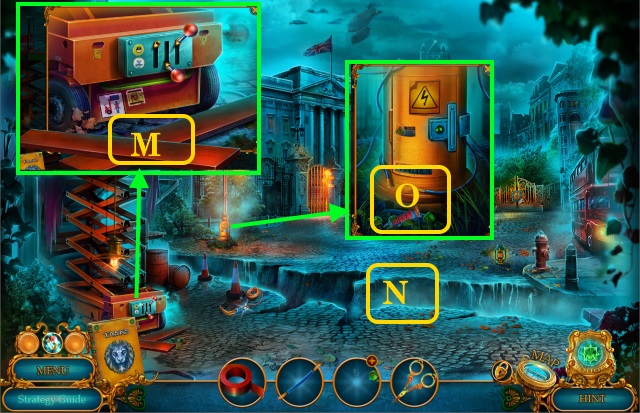
- Pick up COINS 1/2 (L); use MAGNET (M); find JACK LEVER and SCISSORS.
- Take FLAG and JACK NUT (N).
- JACK LEVER and JACK NUT on BROKEN JACK; receive JACK.
- Use JACK (O).
- Walk left.
- Use FLAG (P); pick up BRUSH and SEAL PARTS 1/2.
- Use WRENCH (Q); take TONGS and COINS 2/2.
- Use SCISSORS (R); find MIRROR and BROKEN SEAL.
- Walk down.

- Spend COINS (S).
- Complete HOP (T); receive LOCKER CARD.
- Use LOCKER CARD (U); pick up ROPE and OIL.
- Walk left.
- Pour OIL (V).
- Take WALL CODE (W).
- Place WALL CODE (X); pick up SEAL PARTS 2/2.
- SEAL PARTS on BROKEN SEAL; receive SECRET CITY SEAL.
- Use SECRET CITY SEAL (Y).
- Walk forward.
- Pick up HAMMER (Z); use HAMMER (A).
- Take LEVER (B); use LEVER (C).
- Clear (D); walk forward.
- Pick up STICK (E); use STICK (F); take RAG.
- Use RAG (G); walk forward.
- Pick up UMBRELLA (H); use UMBRELLA (I); take MOUSE FOOD.
- Pour MOUSE FOOD (J); find WHEEL.
- Place WHEEL (K); walk forward.
- Pick up CANE (L), PIPE (M) and TUBE (N).
- Place CANE, PIPE and TUBE (O); walk forward.

- Use TONGS (P); receive VINEGAR.
- Pick up HOOK (Q); use BRUSH and VINEGAR; find ENGRAVING NEEDLE.
- ROPE on HOOK; receive GRAPPLING TOOL.
- Take CRAFTED LEATHER (R).
- Walk right.
- Pick up HAMMER MOLD (S).
- Throw GRAPPLING TOOL (T); find FISHING NET and DWARF FIGURINES 1/2.
- Take RAW BEESWAX (U); inspect (V).
- Place MIRROR (W).
- Solution (X): Ax3-Ex7-Gx5-Hx3-Ix4.
- Pick up DWARF FIGURINES 2/2 and PAINTBRUSH.
- Walk left.

- Place DWARF FIGURINES (Y); pick up POUCH and AWL.
- Inspect (Z); use CRAFTED LEATHER and AWL.
- Move (Z-A).
- Walk left.
- Hide (B).
- Throw FISHING NET (C).
- Speak (D).
- Take SKELETON ARM and PENCIL (E).
- Inspect (F); use SKELETON ARM.
- Complete HOP (G); receive GROWING POTION.
- Pour GROWING POTION (H); find HEAVY HORSESHOE.
- Walk down.
- Use ENGRAVING NEEDLE and HEAVY HORSESHOE (I); pick up CABINET KEY, KNOCKERS 1/2 and WICK.
- WICK on RAW BEESWAX; receive CANDLE.
- Place CANDLE (J); receive LIT CANDLE.
- Walk right.
- Use LIT CANDLE and HAMMER MOLD (K); pick up HAMMER.
- Use POUCH and HAMMER (L); receive CRYSTAL POWDER.
- Walk left.
- Place PAINTBRUSH and CRYSTAL POWDER (M).
- Solution (N): E-D-Cx3-Bx3-A-B-@.
- F-Cx5-Bx3-A-@.
- G-Dx2-Cx2-Bx2-Cx2.
- H-Bx2-C-B-@.
- I-B-Ax5-Bx2-J-Bx2-Ax5-B-@.
- Pick up WHEEL.
- Walk left.
- Place WHEEL (O); find BLOWTORCH, SCREWDRIVER and GEARS 1/2.
- Use BLOWTORCH (P); walk forward.
- Pick up METAL BOOKMARK (Q).
- Inspect (Q); use PENCIL; receive LOCK CLUE.
- Take BROKEN CUTTERS (R).
- Use CABINET KEY and LOCK CLUE (S); find SHOELACE.
- Tie SHOELACE (T); receive KNIFE.
- Use KNIFE (R); pick up INSULATING TAPE and GEARS 2/2.
- Walk down.
- Place GEARS (U).
- Solution (V).
- Easy: Ax3-Bx3-C-Dx2-Ex4.
- Hard: Dx2-Ex2-Cx2-A.
- Pick up WIRE, BROOCH and FISHING ROD COIL.
- Use METAL BOOKMARK and BROOCH (W); find HOOK, SCISSORS and SCREW.
- Walk down and right.
- Use SCREWDRIVER (X); take WRENCH and KNOCKERS 2/2.
- SCREW and WRENCH on BROKEN CUTTERS; receive BOLT CUTTERS.
- Place KNOCKERS (Y); complete HOP; receive EMPTY VASE.
- Use EMPTY VASE (Z); receive VASE WITH WATER.
- Move to Restricted Section.
- Throw VASE WITH WATER (A).
- Use BOLT CUTTERS (B).
- Easy solution (C): A-Bx2-Cx2-Ax3.
- Hard solution (D): C-E-A-B-Dx2-E-C-Ax2.
- Easy solution (E): B-C-A-B-A-C.
- Hard solution (F): C-B-C-E-C-B-A-D.

- Easy solution (G): C-Bx2-C-Ax2.
- Hard solution (H): Ax3-D-C-Bx3-D-Ex2.
- Easy solution (I): Ax2-B-Cx2-Ax2-B.
- Hard solution (J): A-C-Bx2-Cx2-Ax2-Cx2-B.
- Pick up CROWN EMBLEM.
- Place CROWN EMBLEM (K).
- Walk forward.
- Speak (L).
Chapter 3: Buckingham Palace
- Pick up WOODEN BOARDS (M).
- Place WOODEN BOARDS (N).
- Take GLUE (O); use WIRE and INSULATING TAPE; find GATE CODE.
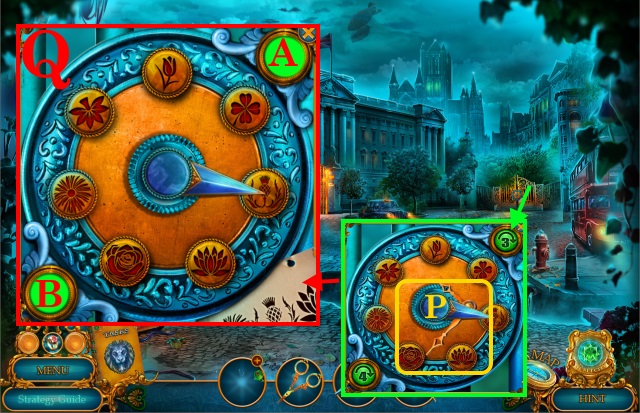
- Pick up CLOCK HANDS (P); view GATE CODE.
- Solution (Q).
- Easy: A-Bx3-A.
- Hard: B-Ax4-B-Ax4.
- Walk right.
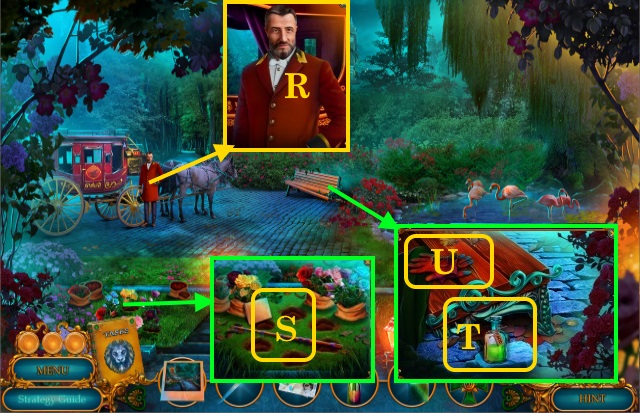
- Speak (R).
- Inspect (S); pick up FISHING ROD.
- Take ACID (T) and TORN GLOVES (U).
- Use SCISSORS (V); receive FISHING LINE.
- HOOK, FISHING LINE and FISHING ROD on FISHING ROD COIL; receive FISHING ROD.
- Cast FISHING ROD (W); receive LEVER and THREAD.
- Walk down.
- Use LEVER (X).
- Complete HOP (Y); receive ACCESS CARD.
- Place ACCESS CARD (Z); walk forward.
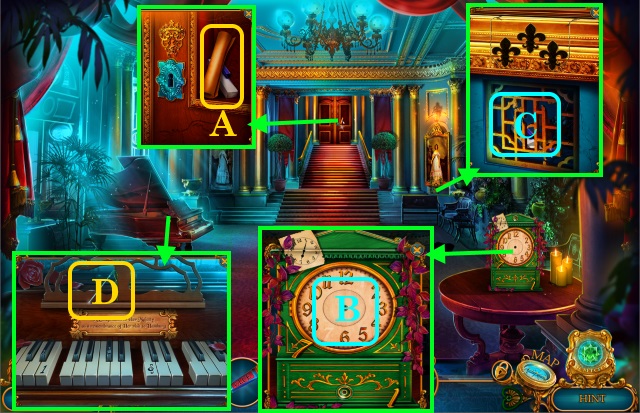
- Inspect (A); pick up PIANO KEYS 1/3.
- Use GLUE and CLOCK HANDS (B); find FAN and SHEET MUSIC.
- Use ACID (C); pick up PIANO KEYS 2/3 and DIAMOND RING.
- Take NEEDLE (D).
- NEEDLE and THREAD on TORN GLOVES; receive GARDEN GLOVES.
- Move to Buckingham Gardens.
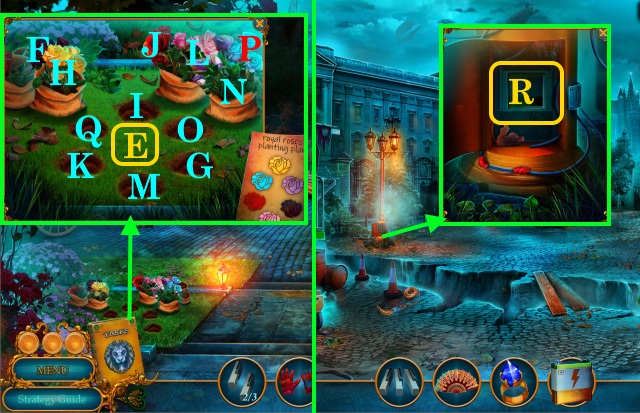
- Use GARDEN GLOVES (E).
- Move: F-G; H-I; J-K; L-M; N-O; P-Q.
- Find DEAD BATTERY and PIANO KEYS 3/3.
- Walk down.
- Place DEAD BATTERY (R); pick up CHARGED BATTERY.
- Walk forward.
- Place SHEET MUSIC and PIANO KEYS (S).
- Solution (T): A-B-C-D-E-F-G-I-Dx2.
- Pick up AMMONIA.
- Give AMMONIA (U); speak; receive CHAMBER KEY.
- Use CHAMBER KEY (V).
- Walk forward.
- Pick up MAIDS OF HONOR 1/3 (W); use DIAMOND RING; find SEAWEED.
- Take UNCHARGED VACUUM CLEANER and MAIDS OF HONOR 2/3 (X); use FAN; pick up TONGS.
- CHARGED BATTERY on UNCHARGED VACUUM CLEANER; receive VACUUM CLEANER.
- Use VACUUM CLEANER (Y); complete HOP; receive POKER.
- Use POKER (Z); find GARDEN SHOVEL and MAIDS OF HONOR 3/3.
- Place MAIDS OF HONOR (A); pick up PARK PHOTO and DECORATIVE AMULETS 1/3.
- Walk down twice.
- Use TONGS (B); pick up DECORATIVE AMULETS 2/3.
- Walk right.
- Use GARDEN SHOVEL (C); take KNIFE and CANE.
- Use CANE (D); find MONEY and DECORATIVE AMULETS 3/3.
- Give SEAWEED (E); pick up LOCKPICK SET 1/2.
- Move to Great Hall.
- Place DECORATIVE AMULETS (F); take WINDING KEY.
- Use WINDING KEY (G); pick up LOCKPICK SET 2/2.
- Walk forward.
- Use LOCKPICK SET (H).
- Solution (I).
- Easy: F-Bx2-G-Bx2-H-Bx2-F-Bx4-H-K-Bx2-I-J-K-Cx2-H-Cx4-E-F-H-Cx4.
- Hard: F-Bx8-J-G-Bx2-I-Bx2-J-I-Cx6-F-E-F-Cx4.
- Pick up CHAMPAGNE and CORK.
- Use CORK (J); find LIGHTER and SYMBOL OF ROYAL ORDER.
- Move to Buckingham Gardens.
- Give SYMBOL OF ROYAL ORDER (K); speak.
- Give PARK PHOTO (K); speak.
- Solution (L): Solution is random.
- Speak (M).
- Use KNIFE (N).
- Spend MONEY (O); pick up CELTIC RUNES 1/2.
- Search (P); find HONEY DIPPER and ANCHOR PENDANT.
- Take RUBBER BOOTS (Q).
- Use RUBBER BOOTS (R).
- Use CHAMPAGNE (S); pick up CELTIC RUNES 2/2.
- Take PLASTIC CARD (T).
- Pick up GOLDEN CHAIN (U).
- Place CELTIC RUNES (V).
- Solution (W).
- Walk forward.

- Speak (X).
- Take CARABINER (Y).
- GOLDEN CHAIN and CARABINER on ANCHOR PENDANT; receive ANCHOR ON CHAIN.
- Inspect (Z); receive PESTLE.
- Use LIGHTER and HONEY DIPPER (A); receive HONEY DIPPER WITH RESIN.
- Use HONEY DIPPER WITH RESIN (B); pick up EMPTY FLASK.
- Walk down.
- Use ANCHOR ON CHAIN (@).
- Complete HOP (C); receive SWORD AMULET.
- Place SWORD AMULET (D); find INK and MAGNET WITH ROPE.
- Walk down.
- Use MAGNET WITH ROPE (E); receive HANDKERCHIEF and SWORD.
- Use PLASTIC CARD (F); pick up NOTEBOOK.
- Walk forward.
- Use SWORD (G); find LEMON, WIRE and SHEARS.
- Use SHEARS (H); take FIRECRACKER, MIRRORS 1/2, COLD WELDING and DROPPER.
- Walk forward.
- Use HANDKERCHIEF (I); pick up QUILL and BROKEN KNIFE.
- Place NOTEBOOK, INK and QUILL (J); receive PHONE CODE.
- Walk down twice.
- View PHONE CODE (K).
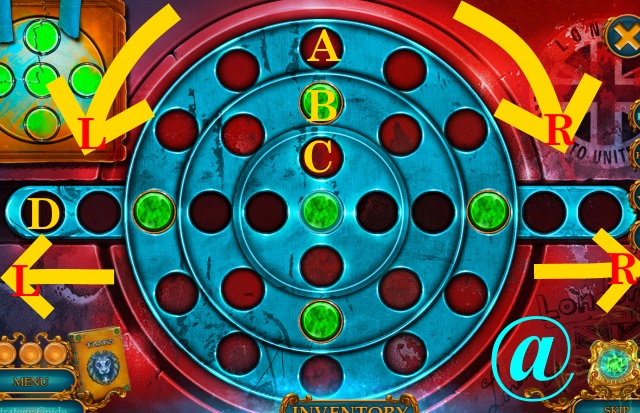
- Solution (@): DRx2-CR-DLx3-BLx2-DR-ARx6-DR-BL-DL-BL-DR-CR-DL-BRx2-DR-CL..
- Pick up HEAVY HANDSET.
- Use HEAVY HANDSET (L); pick up JUICER, COFFEE BEANS and EMPTY MORTAR.
- EMPTY FLASK and JUICER on LEMON; receive FLASK WITH LEMON JUICE.
- Place EMPTY MORTAR (M).
- Solution (N): Match A-B-C; select Ax2-Bx2-Cx2.
- Take MORTAR WITH BERRIES.
- Walk forward twice.
- Use FLASK WITH LEMON JUICE and DROPPER (O); receive FLASK WITH POLLEN JUICE.
- Place PESTLE, COFFEE BEANS, MORTAR WITH BERRIES and FLASK WITH POLLEN JUICE (P); complete HOP; receive SUMMONING POTION.
- Give SUMMONING POTION (Q).
Chapter 4: University
- Pick up PLIERS (R).
- Take TUBE HANDLE (S).
- TUBE HANDLE and COLD WELDING on BROKEN KNIFE; receive DULL KNIFE.
- Use DULL KNIFE (T); receive SHARP KNIFE.
- Take MIRRORS 2/2 (U); use SHARP KNIFE.
- Walk forward.
- Pick up LADDER (V).
- Take MATCHES (W); use WIRE; find CABINET KEY.
- Use FIRECRACKER, MATCHES and MIRRORS (X); pick up LASSO and CORKSCREW.
- Place LADDER (Y).
- Take LOCK BUTTONS (Z).
- Use LOCK BUTTONS (A).
- Easy solution (B): E-C-A-C-B-C-E-G-E-C-Hx2-K-Lx2-Mx3-Ox3.
- Hard solution (C): C-B-A-F-D-B-H-F-D-I-H-F-I-H-Kx2-Nx2-O-Px2-Qx3-Sx2.
- Walk right.
- Take STRAINER (D).
- Pick up FRESCO FRAGMENTS 1/4 (E); use CORKSCREW (F); find FRETSAW.
- Throw LASSO (G); pick up FRESCO FRAGMENTS 2/4 and BROKEN SKELETON.
- Use PLIERS (H); find HEAVY IRON.
- Walk down.

- Use FRETSAW (I); receive SHARP FANG.
- Place SHARP FANG and HEAVY IRON (J); pick up SKELETON PART and FRESCO FRAGMENTS 3/4.
- Walk down.

- Use CABINET KEY (K); pick up HOE.
- Use STRAINER (L); receive SKELETON HEAD.
- Walk forward.
- Use HOE (M); pick up VALVES 1/2 and FRESCO FRAGMENTS 4/4.
- Walk forward.
- Place FRESCO FRAGMENTS (N); complete HOP; pick up CAN OPENER.
- Use CAN OPENER (O); find GLASS CUTTER and GLUE.
- SKELETON PART, SKELETON HEAD and GLUE on BROKEN SKELETON; receive DINOSAUR SKELETON EMBLEM.
- Walk down.
- Place DINSOAUR SKELETON EMBLEM (P); pick up COINS 1/2 and PORTAL PICTURE.
- Use GLASS CUTTER (Q); take BROKEN CROSSBOW and SPEAR.
- Walk down.
- Use SPEAR (R); find ARROW and VALVES 2/2.
- Place VALVES (S).
- Solution (T).
- Easy: C-B-A-B-Ex2-A-B.
- Hard: E-A-C-F-B-D-Ax2.
- Pick up SOLVENT.
- Move to Auditorium.
- Pour SOLVENT (U); find DEAD ACCUMULATOR and WHITE CHALK.
- Place PORTAL PICTURE and WHITE CHALK (V).
- Solution (W).
- Take BOWSTRING (X).
- ARROW and BOWSTRING on BROKEN CROSSBOW; receive LOADED CROSSBOW.
- Shoot LOADED CROSSBOW (Y); receive BOARD.
- Search (Z); receive AWL.
- Pick up GASOLINE (A); place BOARD.
- Walk left.
- Pick up UNCHARGED MOTOR PUMP (B).
- Take COINS 2/2 (C).
- Spend COINS (D).
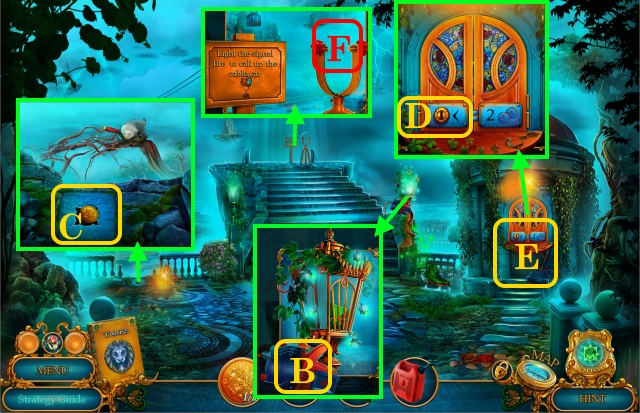
- Complete HOP (E); receive SIGNAL LAMP.
- Place SIGNAL LAMP (F).
- Walk forward.
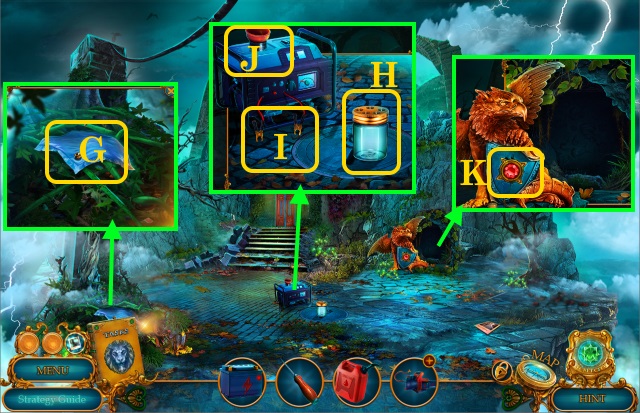
- Pick up AIR PILLOW (G).
- Take EMPTY JAR (H).
- Place DEAD ACCUMULATOR (I); pour GASOLINE (J); pick up CHARGED ACCUMULATOR.
- Inspect UNCHARGED MOTOR PUMP; use CHARGED ACCUMULATOR, receive MOTOR PUMP.
- Use AWL (K); receive RUBY.
- Walk down.
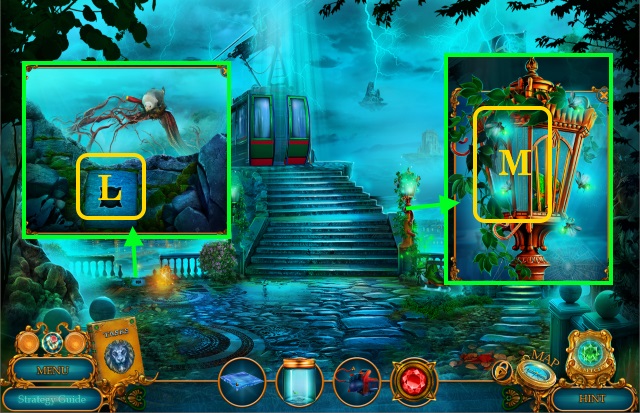
- Place RUBY (L); take SUN AMULET.
- Use EMPTY JAR (M); collect; receive JAR WITH FIREFLIES.
- Walk down.
- Use AIR PILLOW and MOTOR PUMP (N); find PEN and TELESCOPE LENS.
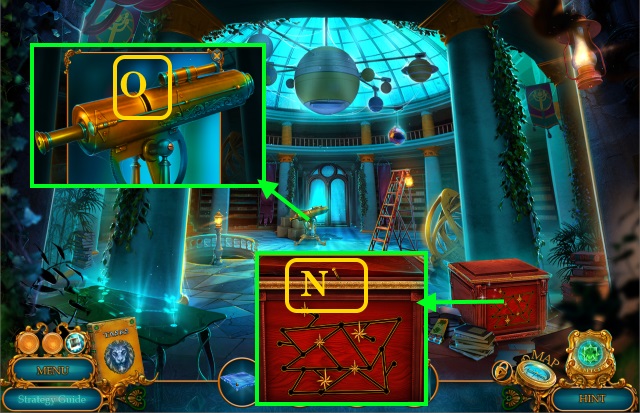
- Place TELESCOPE LENS (O).

- Solution (P): C-Bx6-C-Bx2-C; slide E.
- Take STAR MAP.
- View STAR MAP (Q); find PAPER CLIPS 1/2 and SCROLL.
- Use SUN AMULET (R); take CHOPSTICKS, SCREWDRIVER and TRIMMER BLADE.
- Move to Island.
- Use JAR WITH FIREFLIES, SCROLL and PEN (S); receive DOOR CODE.
- View DOOR CODE (T).
- Solution (U).
- Walk forward.
- Use CHOPSTICKS (V); receive HOOK ON CHAIN.
- Take HORN and PAPER CLIPS 2/2 (W).
- Pick up BROKEN HAMMER (X); use PAPER CLIPS (Y); find BROKEN TRIMMER.
- TRIMMER BLADE on BROKEN TRIMMER; receive TRIMMER.
- Walk down.
- Use TRIMMER (Z).
- Complete HOP (A); receive LAKRIAN AMULET.
- Place LAKRIAN AMULET (B); find SYRINGE.
- Walk down.
- Use HORN and HOOK ON CHAIN (C); receive FILE.
- Use FILE (D); take BUTTERFLY EMBLEM.
- Move to Magic Energy Source.
- Use SYRINGE (E); pick up SCREW.
- Place BUTTERFLY EMBLEM (F); take SCISSORS.
- Use SCISSORS (G); receive BELT.
- Use SCREW and SCREWDRIVER (H); take BRANCH.
- BRANCH and BELT on BROKEN HAMMER; receive IMPROVISED SLEDGEHAMMER.

- Use IMPROVISED SLEDGEHAMMER (I).
- Solution (J): Solution is random.
- Congratulations! You have completed Secret City: The Human Threat!
Created at: 2019-08-09