

Walkthrough Menu
- General Tips
- Chapter 1: Soul of the Island
- Chapter 2: Love of the Island
- Chapter 3: Danger of the Island
- Chapter 4: Fate of the Island
- Chapter 5: Regret of the Island
- Chapter 6: Sin of the Island
- Chapter 7: Science of the Island
General Tips
- You can choose to play in Easy or Hard Mode at the beginning of the game.
- There are 7 Chapters in the game: over 20 locations to explore, and 15 mini-games to play.
- You must collect 7 Gems to complete the game. The Gems must be placed on the Crystal Tree location.
- There are no timers in the game; take your time and play at your own pace.
- The mini-games can be skipped.
- Your Task Panel is located in the lower right corner of each scene. It tells you which tasks to perform next.
- There are some inventory items that you can pick up on the island. A Hand Icon will appear when an inventory item can be picked up.
- Your inventory items will be stored in the tray at the bottom of the scene. The Inventory Tray will not be visible in Hidden Object Scenes.
- The Wrench Icon appears in areas in which an inventory item needs to be used. Drag an Inventory Item over that area to use it.
- When your cursor changes into an Eye Icon in a sparkly area, click it to trigger a Hidden Object Scene.
- The game will display a message letting you know when a location has been completed.
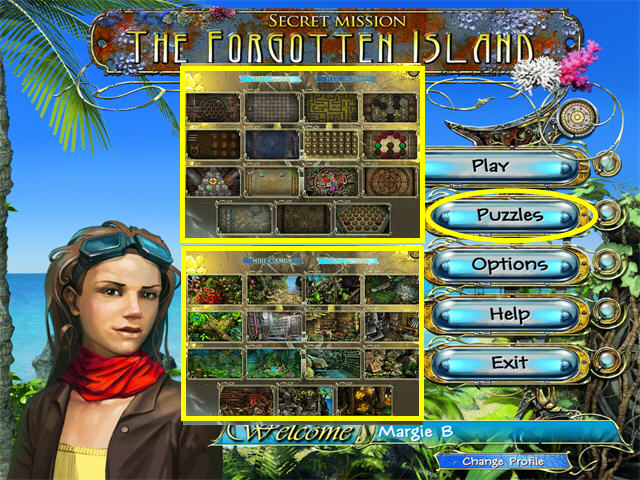
- In the Main Menu section you can replay all the mini-games and Hidden Object Scenes you’ve unlocked during the game. Click on “Puzzles” to access this section.
Hint Beacon
- The Hint Beacon is the blue crystal located in the lower left corner of the scene.
- You can use the Hint Beacon as often as you like, but it has to recharge between uses.
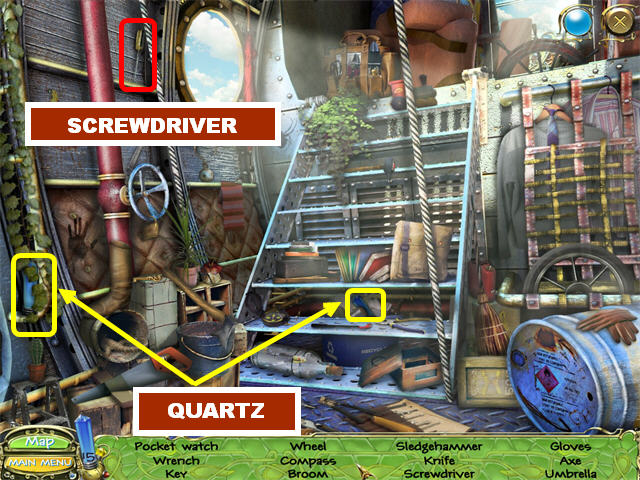
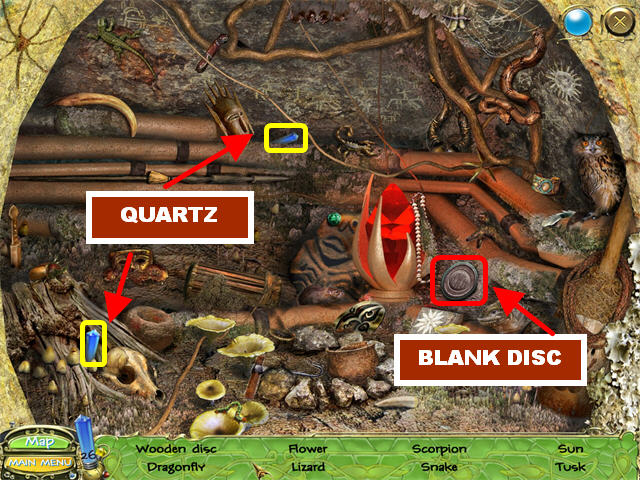
- Each Hidden Object Scene contains 2 blue quartz crystals; find them to recharge the Hint Beacon instantaneously! The quartz crystals you collect in one Hidden Object Scene will roll over to the next Hidden Object Scenes.
- Click on a hint in a Hidden Object Scene to view a random item from the list.
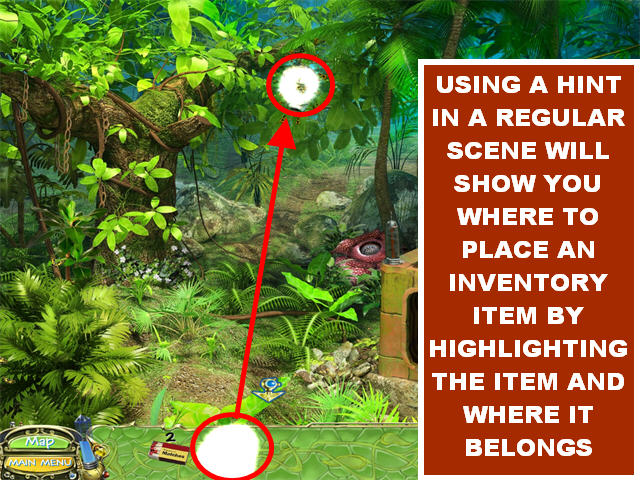
- In regular scenes, the Hint Beacon will highlight your task list if there’s nothing to do in that scene. If this happens, move on to another scene.
- In regular scenes, the hint will highlight an Inventory Item along with the spot to which it belongs.
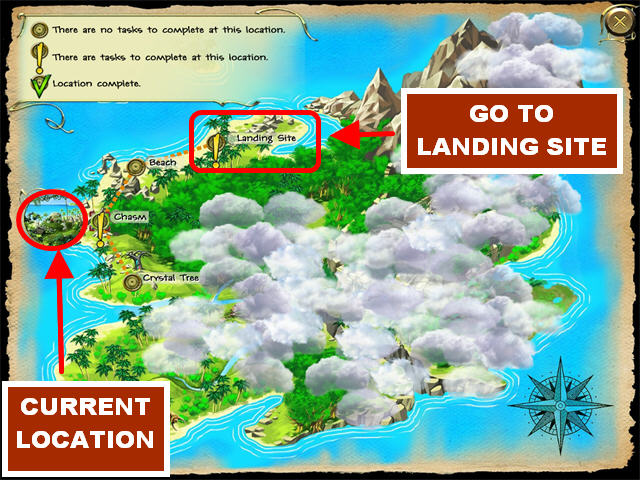
Island Map
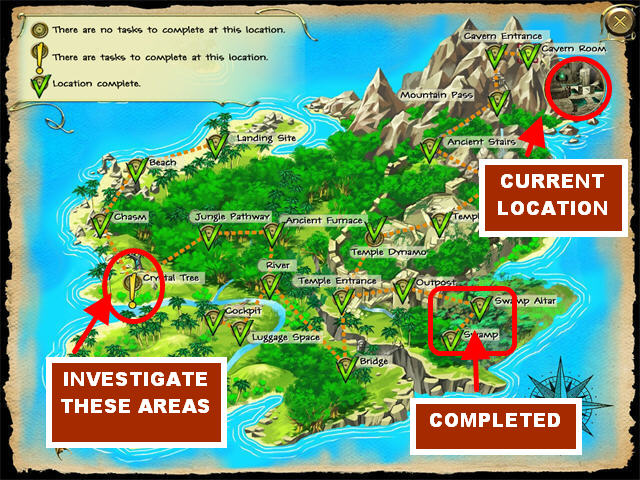
- The game provides a great map that gives you access to all the scenes in the game. You don’t need to use the map to access all areas of the island, but it’s a good tool to use if you can’t find your way around.
- The Map Button is located in the lower left corner of the scene.
- Click on the Map Button to view all available spots. A Yellow Exclamation Point will appear over an area that needs to be explored.
- Areas that display a Green Checkmark have been completed.
- Hover your mouse over an area on the map to see a thumbnail of it.
Mini-games
- There are 15 assorted mini-games in total. Each mini-game will have 1 - 3 rounds to complete before you can move on.
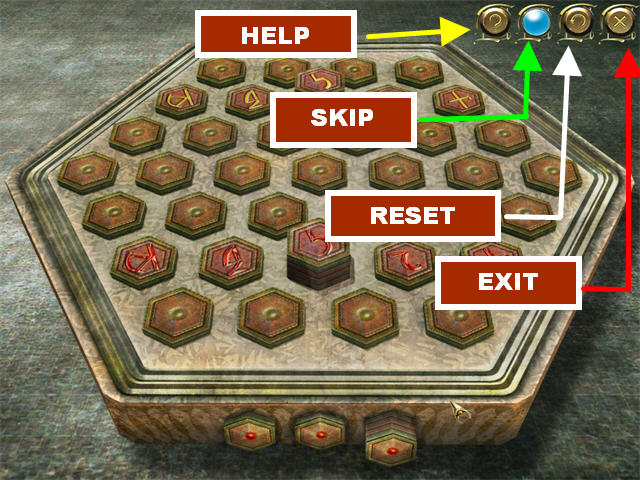
- Click on the first arrow button to read instructions for each mini-game.
- Clicking on the second arrow button resets that puzzle to its original state for that particular round.
- Click on the “X” button to exit the game.
- You can skip a mini-game once the Skip Button has been charged.
Walkthrough
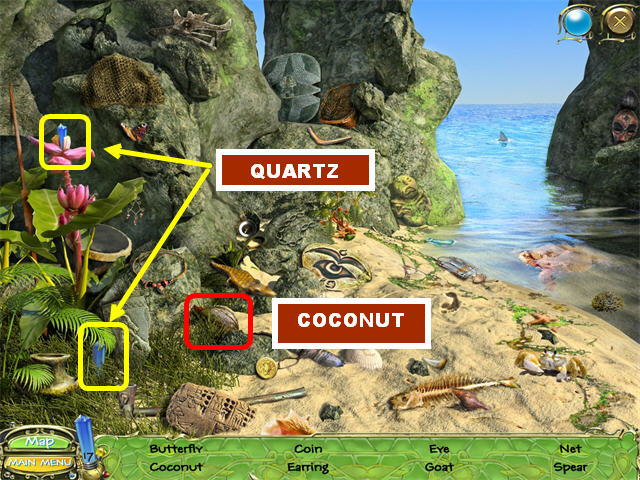
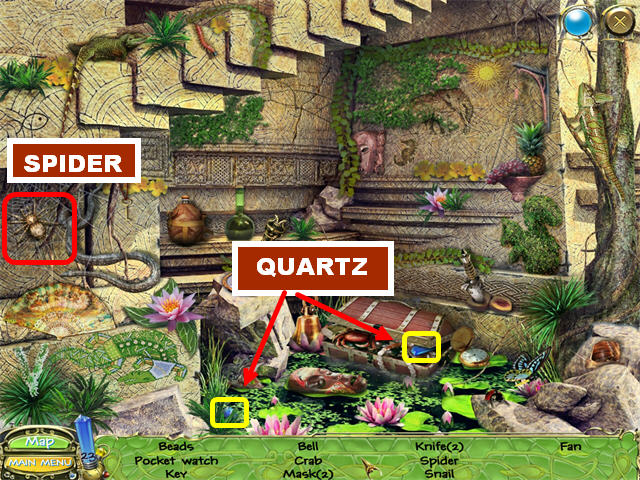
- The items in the Hidden Object Scenes are random. In this walkthrough only the Quartz Crystals that are needed, and the Inventory Items that you will receive at the end of your search are highlighted.
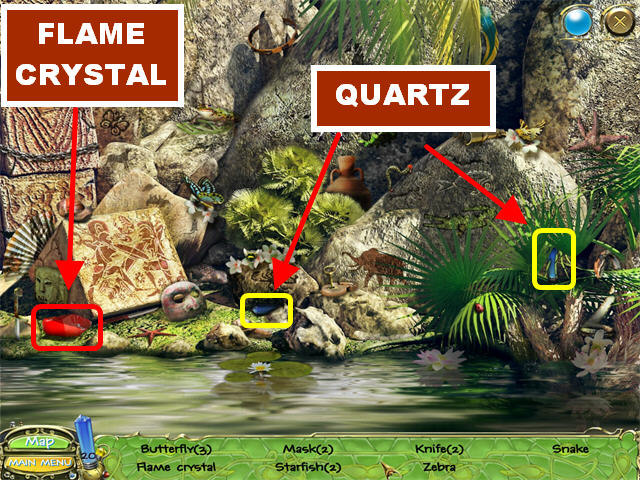
- The Inventory Items will always be marked in RED in the Hidden Object Scenes.
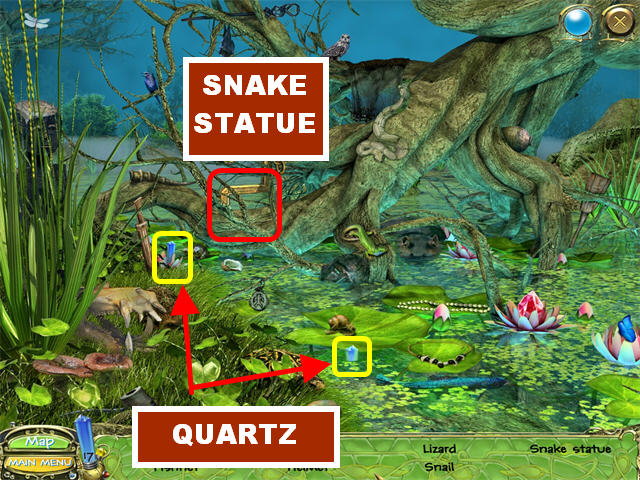
- The Quartz Crystals will always be marked in YELLOW in the Hidden Object Scenes.
- You can use the Map Button to help you navigate through the island.
Chapter 1: Soul of the Island
Landing Site

- Pick up the BROKEN BEACON in the lower left corner.
- Pick up the QUARTZ in the lower right corner.
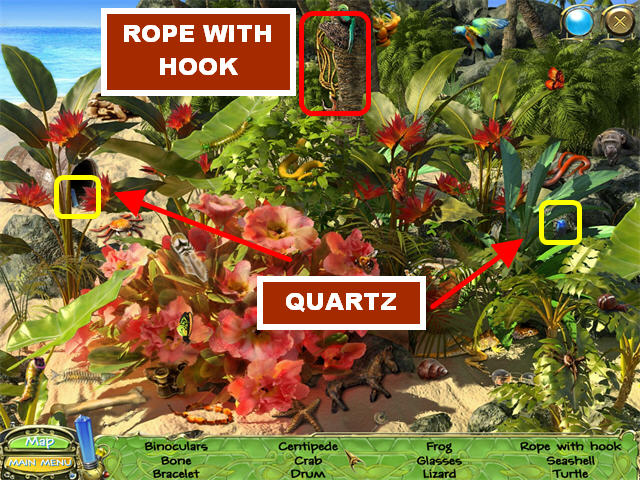
- Click on the sparkly bushes on the right to trigger a Hidden Object Scene.
- The ROPE WITH HOOK will be added to your inventory at the end of your search.
- Click on the arrow that is pointing left on your screen to reach the Beach.
Beach
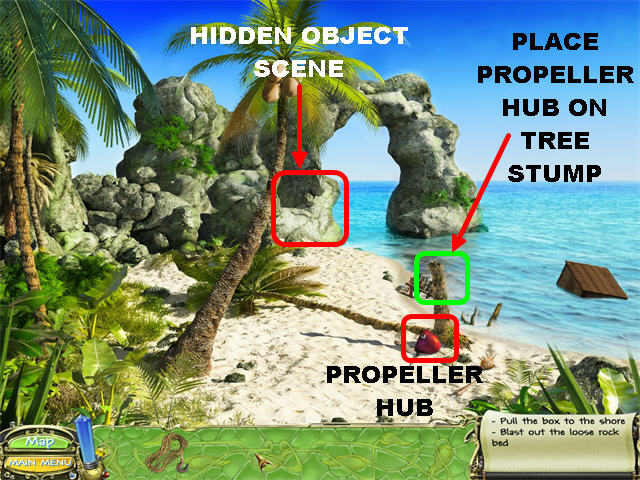
- Pick up the PROPELLER HUB on the right side of the sand.
- Place the PROPELLER HUB on the tree stump on the right to activate a Hidden Object Scene.
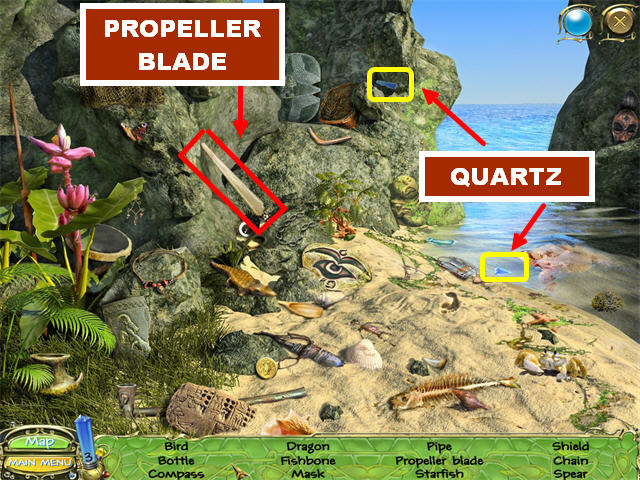
- Click on the Hidden Object Scene close to the coconut tree.
- The PROPELLER BLADE will be added to your inventory at the end of your search.
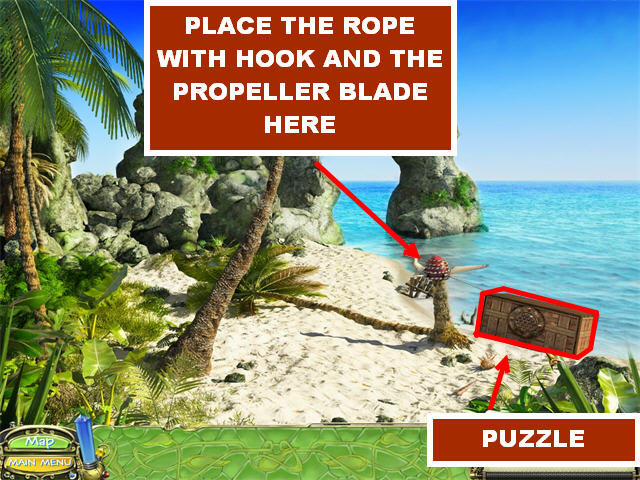
- Place the ROPE WITH HOOK on the Propeller Hub.
- Place the PROPELLER BLADE on the Propeller Hub to reel the box in the water closer to the shore.
- Click on the box to trigger a puzzle.
Screws Puzzle
- Your goal is to rotate the screws until the screw in the upper lock is in the same position as the example shown in the smaller lock at the bottom.
- Hover your mouse over the circles and all the circles it can rotate will be highlighted. Click on the configuration you want to use and all the items that were highlighted will rotate.
- Make sure that one of the screws is included in the circle you are trying to rotate.
- You have to beat 3 rounds of this puzzle in order to win the game.
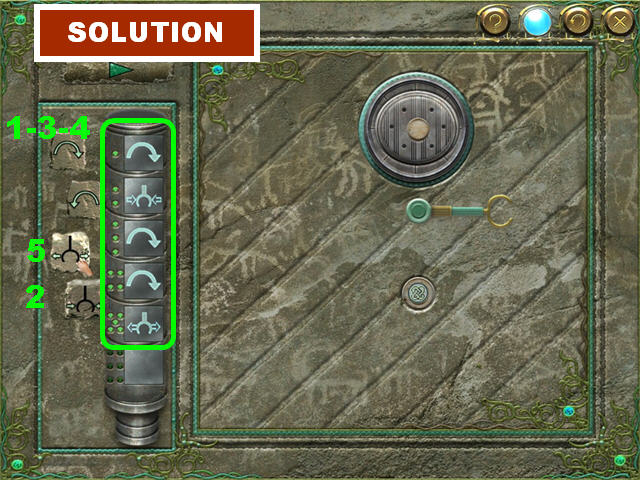
- Please look at the next set of screenshots for the solutions for each puzzle.
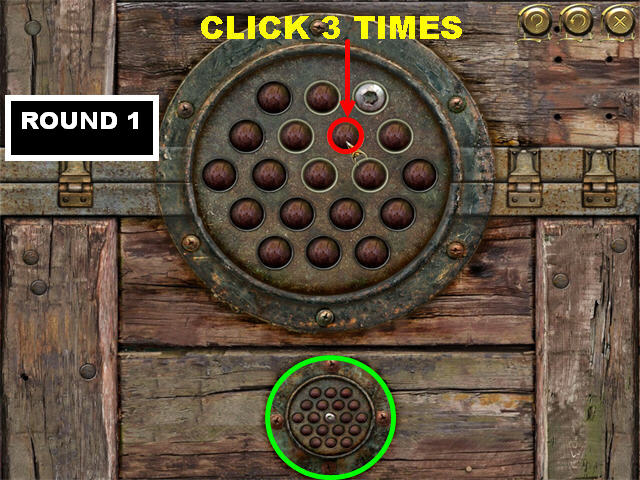
- Click on the Button shown in the screenshot 3 times to solve this round.
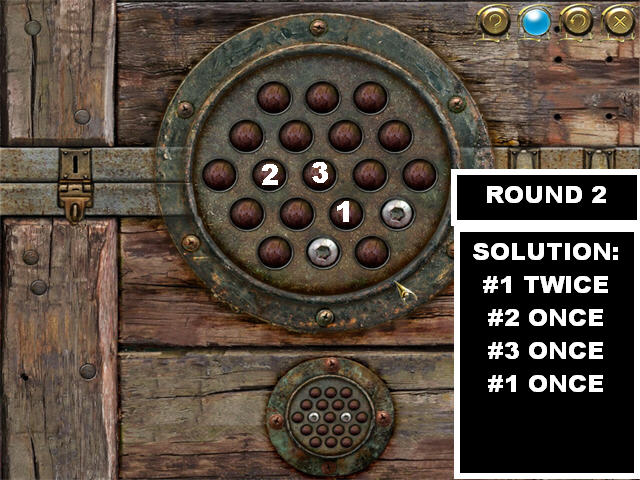
- For this solution, click on Button 1 twice, Button 2 one time, Button 3 one time, and Button 1 one time.

- For this solution, click on Button 3 one time, Button 1 three times, Button 2 five times, and Button 4 two times.
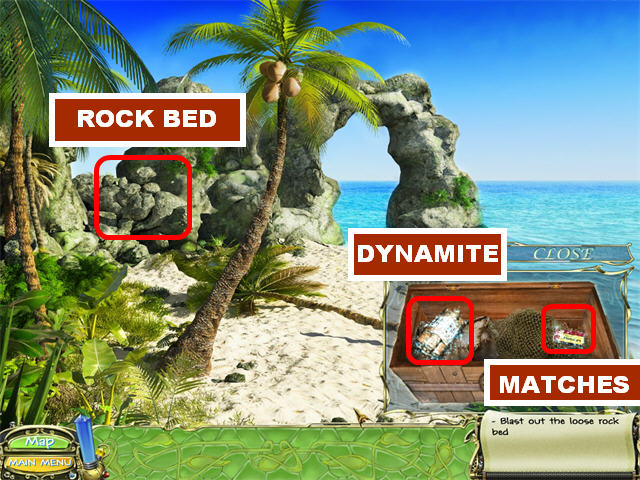
- Pick up the DYNAMITE inside the box after the puzzle has been solved.
- Pick up the MATCHES inside the box; you will be able to use them 4 separate times around the island.
- Place the DYNAMITE on the rock bed on the left.
- Place the MATCHES on the Dynamite you placed on the rock bed; this last action gives you access to a new part of the island.
- Click on the arrow pointing upwards to reach the next area.
Chasm
- Make note of the basket and the axe blade in this location. You will need those items later.
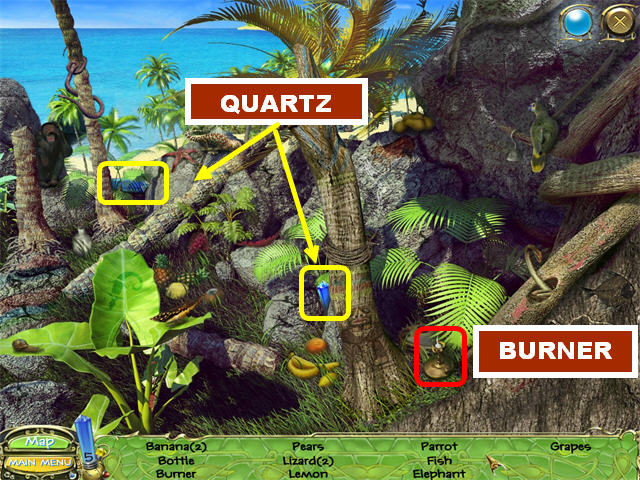
- Click on the sparkly bushes, in the lower right, to trigger a Hidden Object Scene.
- The BURNER will be added to your inventory at the end of your search.
- You can use the map to navigate through all the parts of the island.
- Click on the Map Button in the lower left side of the scene.
- Areas that need exploring will have a Yellow Exclamation Point next to them.
- Your current location will have a round thumbnail next to it.
- Click on the Landing Site location to return to that area.
Landing Site
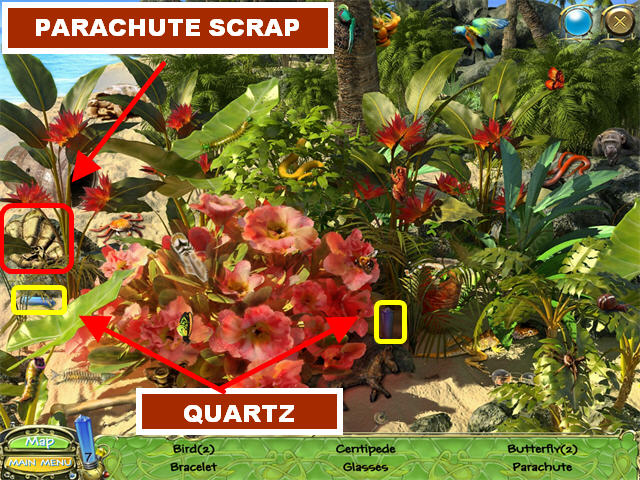
- Click on the Hidden Object Scene on the right.
- The PARACHUTE SCRAP (RAG) will be added to your inventory at the end of your search.
- A Green Checkmark will appear on this location in the map, showing it to have been completed.
- Go to the Chasm.
Chasm
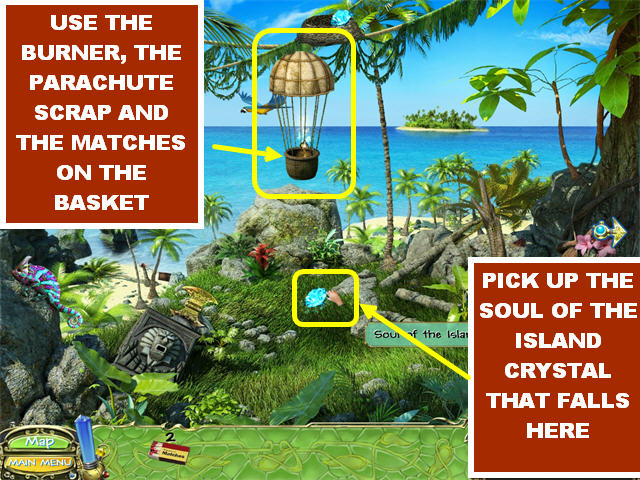
- Place the BURNER in the basket.
- Place the PARACHUTE SCRAP (RAG) on the basket.
- Place the MATCHES on the Burner.
- The hot air balloon will float away, dropping a blue crystal on the ground.
- Pick up the SOUL OF THE ISLAND (Light Blue Crystal) that landed on the ground.
- Go to the right, or click on the Crystal Tree location on the map.
Crystal Tree
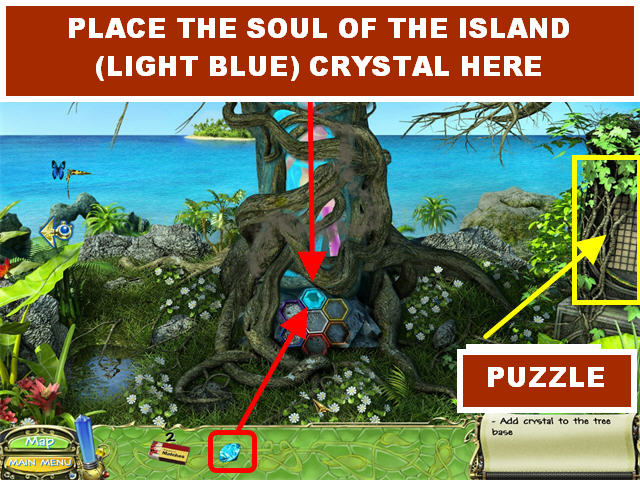
- Make note of the puddle of water in the lower left corner.
- Place the SOUL OF THE ISLAND (Light Blue Crystal) on the light blue empty slot on the tree.
- Click on the sparkly gate in the lower right to trigger a puzzle.
Golden Coin Puzzle
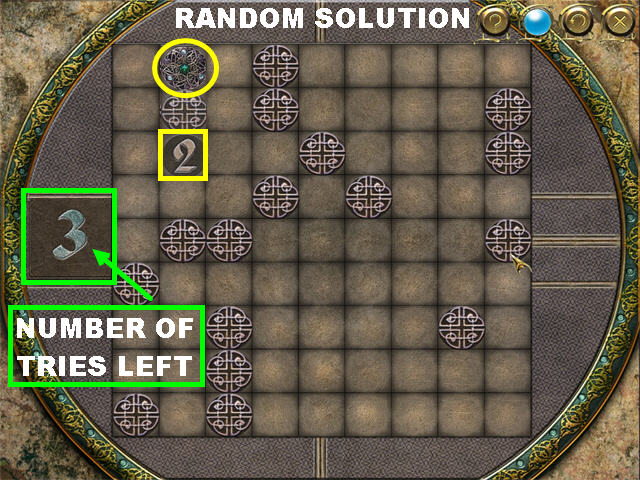
- Your goal in this puzzle is to find the Golden Coin.
- Click on any coin on the board and a number will appear on the selected section. This number tells you how many squares you are away from finding the Golden Coin.
- Count the number of spaces in either direction to figure out where the Golden Coin is located.
- You are given 4 chances to guess the location of the Golden Coin. If you fail to find it in time, the puzzle will reset. The large number on the left tells you how many chances remain. The solution to this puzzle is random.
- Click on the scene’s right arrow after you’ve completed the puzzle.
Chapter 2: Love of the Island
Jungle Path
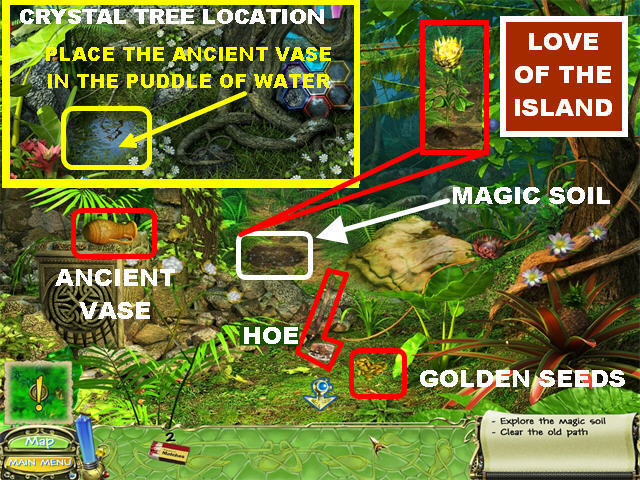
- Pick up the ANCIENT VASE on the left.
- Pick up the HOE in the lower center.
- Pick up the GOLDEN SEEDS in the lower center, close to the HOE.
- Go back to the Crystal Tree location; use the Map to get there, or click at the bottom of the scene.
- Place the ANCIENT VASE in the puddle of water, in the lower left, to fill it with water. You now have the VASE WITH WATER in your inventory.
- Go back to the Jungle Path.
- Place the HOE on the Magic Soil in the center.
- Place the GOLDEN SEEDS in the Magic Soil.
- Place the VASE WITH WATER on the seeds.
- Place the HOE on the soil to make the plant grow.
- Pick up the LOVE OF THE ISLAND (Yellow Crystal) from the plan; this is the second gem.
- Go back to the Crystal Tree.
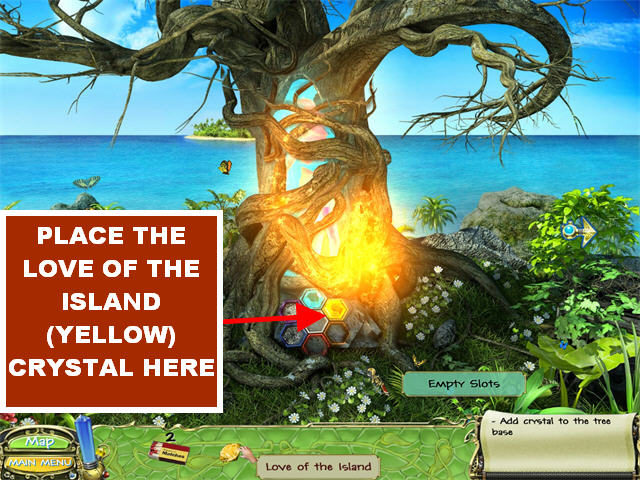
- Place the LOVE OF THE ISLAND (Yellow Crystal) on the empty yellow spot on the Crystal Tree.
- Go right to access the Jungle Path.
Chapter 3: Danger of the Island
Jungle Path
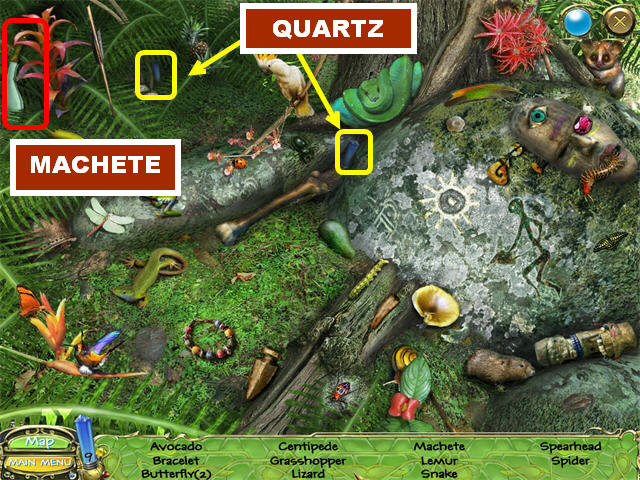
- Click on the Hidden Object Scene on the right side of the screen.
- The MACHETE will be added to your inventory at the end of your search.
- Place the MACHETE on the Old Jungle Path that sparkles in the back of the scene to trigger a puzzle.
Jungle Maze Puzzle
- Your goal in this puzzle is to drag the character token to the exit in the upper right corner.
- You have to pick up the 3 machetes and cut the 3 bushes in the scene before you can reach the exit.
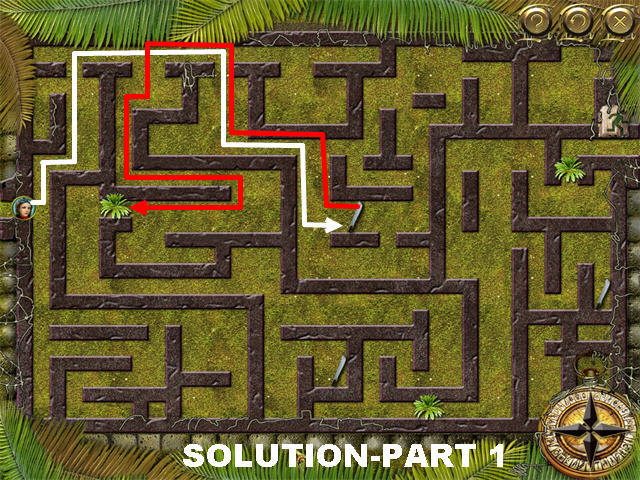
- Follow the WHITE line first.
- Pick up the MACHETE and use the RED line to trace your way back to the bushes.
- Once the MACHETE cuts that bush, that side of the maze will become navigable.
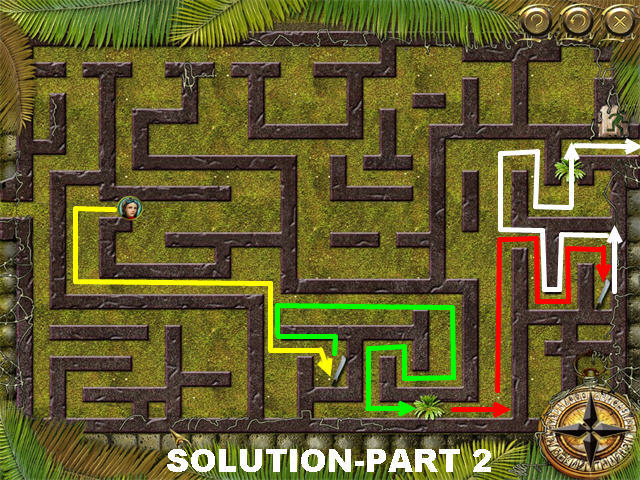
- In this section you want to start with the YELLOW line first.
- Drag the character icon to the MACHETE in the lower center.
- Follow the GREEN line once you’ve picked up the MACHETE.
- Cut the bush in the lower center and follow the RED line.
- Pick up the MACHETE at the end of the red line.
- Follow the WHITE line to the last bush in the upper right.
- Proceed to the exit in the upper right.
Ancient Furnace
- You will be taken to this location after you complete the maze.
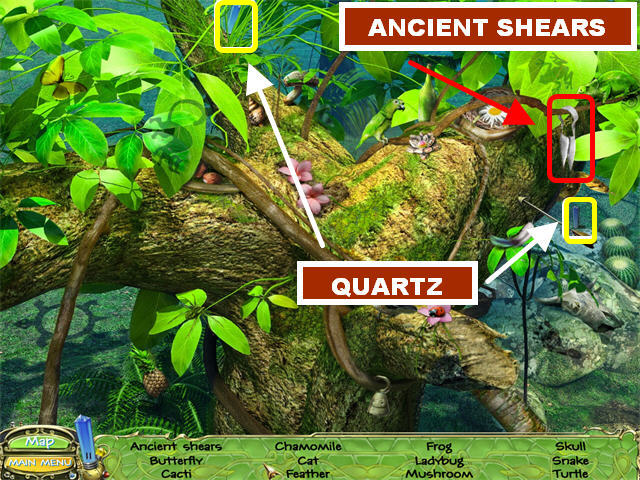
- Click on the Hidden Object Scene in the upper left.
- You will obtain the ANCIENT SHEARS once you complete this search.
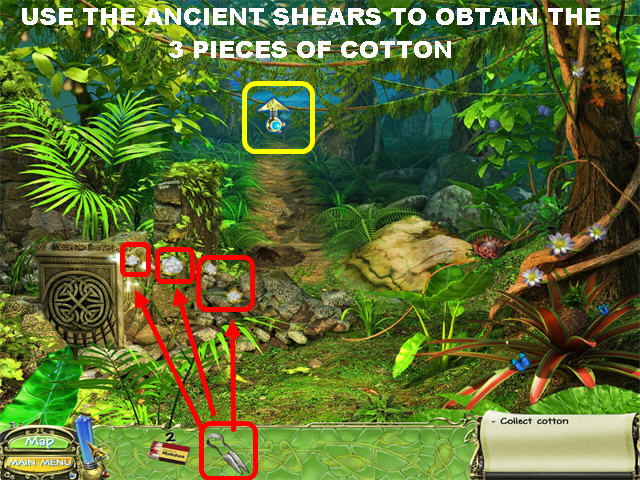
- Go back to the Jungle Path.
- Place the ANCIENT SHEARS on the 3 pieces of COTTON, on the left side of the scene.
- Go back to the Ancient Furnace.
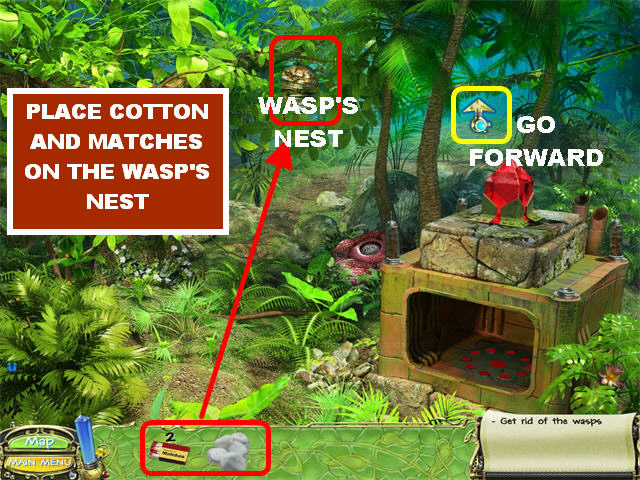
- Place the COTTON on the wasp’s nest.
- Place the MATCHES on the wasp’s nest.
- Click on the forward arrow in the upper right corner.
The River
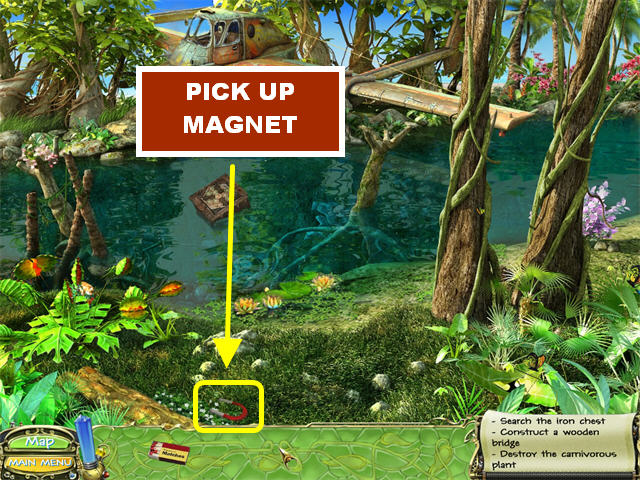
- Pick up the MAGNET in the lower left.
- Go back to the Ancient Furnace.
Ancient Furnace
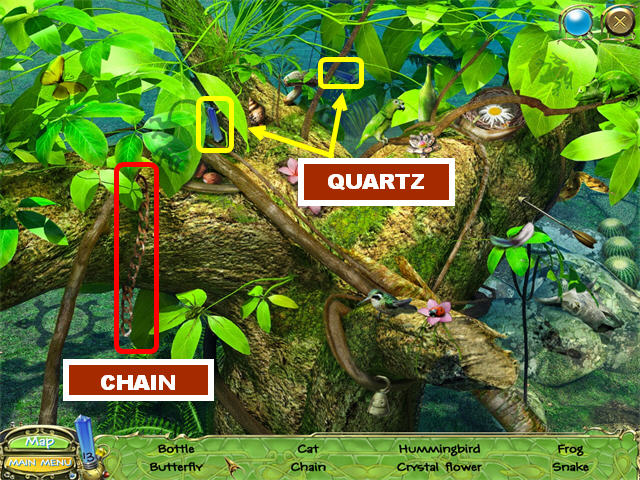
- Click on the Hidden Object Scene in the upper left.
- You will obtain the CHAIN in your inventory once you complete your search.
- The CHAIN will merge with your MAGNET, from inventory, to form a CHAIN WITH MAGNET.
- Go back to the Chasm.
Chasm
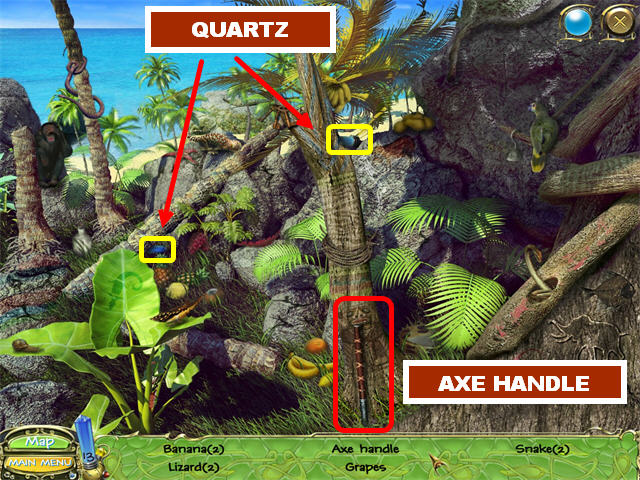
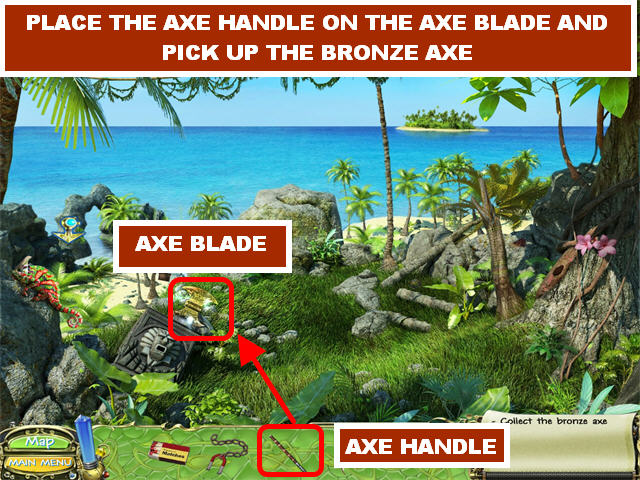
- Click on the Hidden Object Scene on the right.
- You will obtain the AXE HANDLE in your inventory once you complete your search.
- Place the AXE HANDLE on the AXE BLADE in the lower left. Both pieces will combine to form a BRONZE AXE.
- Click on the BRONZE AXE on the left side of the scene to add it to your inventory.
- This location is now completed. Go back to the River.
The River

- Place the CHAIN WITH MAGNET on the iron chest in the water.
- Click on the chest to trigger a puzzle.
Lighted Tiles Puzzle

- Your goal in this puzzle is to arrange the tiles so that no unmatched connections remain.
- Drag the tiles to the empty spots.
- The connected tiles will light up when positioned correctly.
- You have to solve one round of this puzzle to beat the game.
- Hint: The blue lights will be at the bottom, and the yellow lights will be mostly on top.
The River
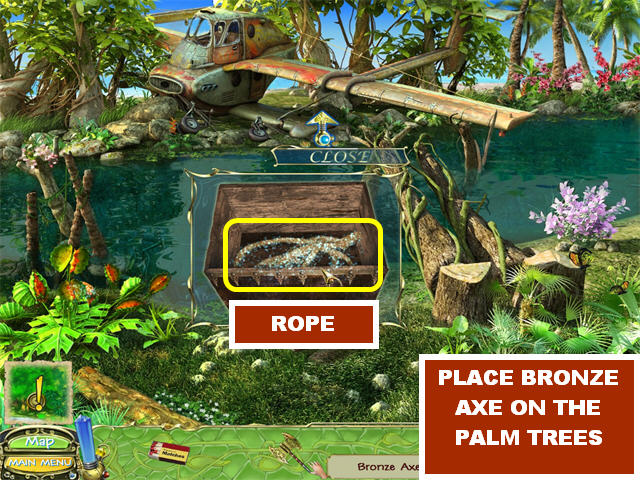
- Pick up the ROPE inside the chest.
- Place the BRONZE AXE 2 times on the palm trees on the right to make the logs fall into the water.
- Place the ROPE on the fallen logs.
- Go to the airplane by clicking the forward arrow.
Luggage Space
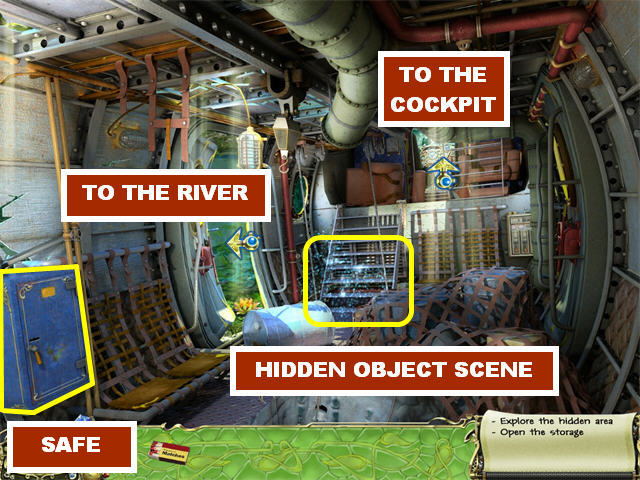
- From this location you can go back to the River by clicking the open door on the left.
- Make note of the blue safe in the lower left.
- Click on the sparkly steps to access a Hidden Object Scene.
- You will obtain the SCREWDRIVER once you complete your search.
- Click on the upper right to reach the Cockpit.
Cockpit
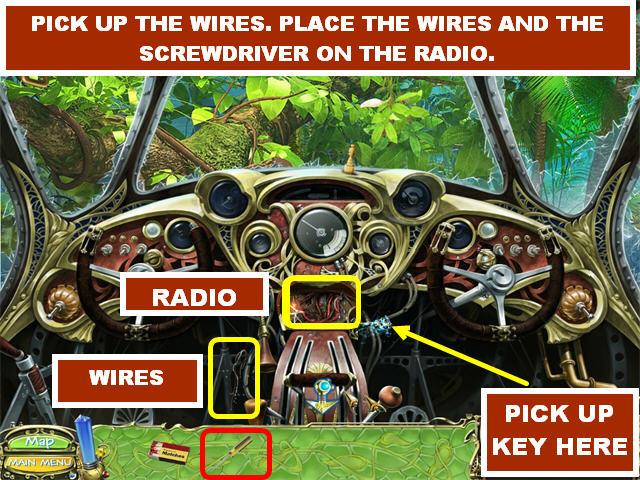
- Pick up the WIRES on the left.
- Place the WIRES on the radio.
- Place the SCREWDRIVER on the radio to trigger a puzzle.
Radio Gear Puzzle
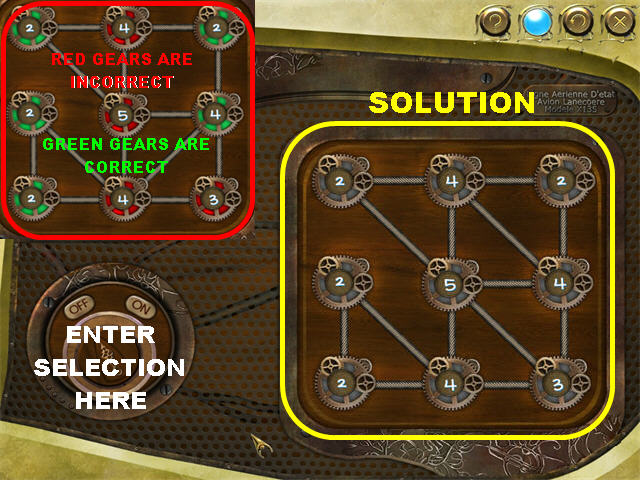
- Your goal is to connect the correct number of wires to each radio gear.
- The number in the center of each radio gear represents the number of wires that need to be connected to it.
- Wires cannot cross each other.
- You only need to solve one round of this puzzle to beat the game.
- Once you think you have the correct connections, click the “ON” button in the lower left corner. If your selection is incorrect, you must alter the red gears. The green gears have been correctly placed.
- If one of your guesses is incorrect, one of the fuses in the upper left will burn out. You have 3 chances to find the correct selection.
- Pick up the STORAGE KEY on the right side of the radio after the puzzle has been completed.
- This location is now complete. Go back to the Luggage Space.
Luggage Space
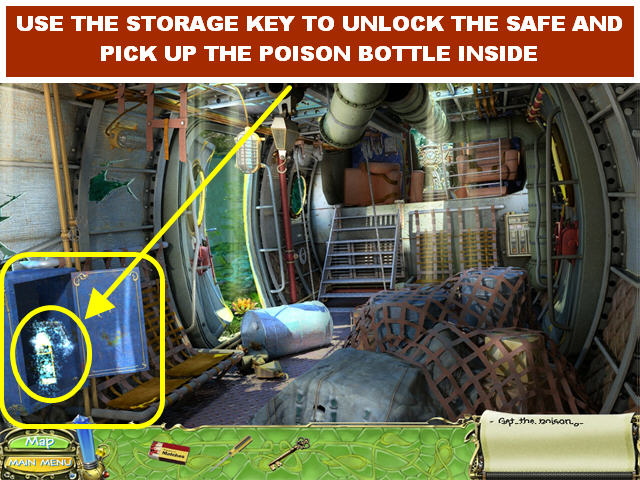
- Place the STORAGE KEY on the blue safe in the lower left to unlock it.
- Pick up the POISON BOTTLE inside the safe.
- Go back to the River.
River
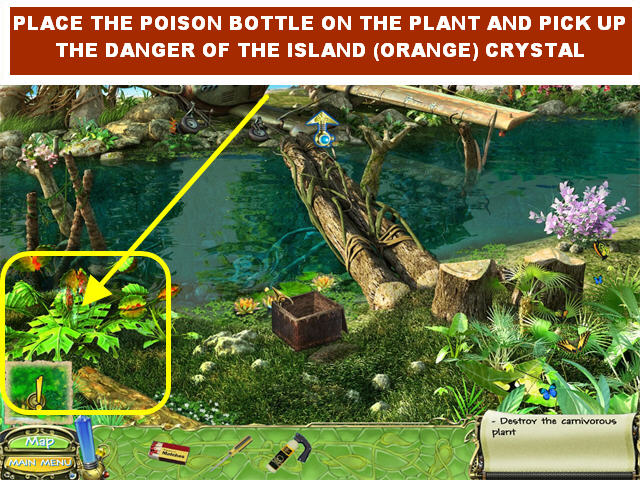
- Place the POISON BOTTLE on the carnivorous plant in the lower left corner.
- Pick up the DANGER OF THE ISLAND (Orange Crystal) in the center of the plant.
- This location is now complete. Return to the Crystal Tree.
Crystal Tree
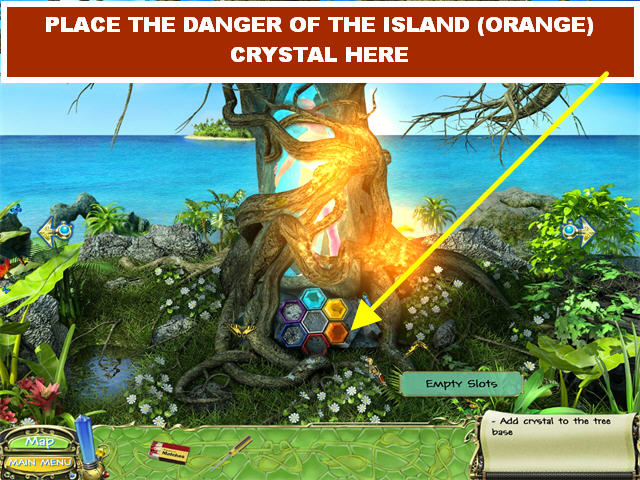
- Place the DANGER OF THE ISLAND (Orange Crystal) in the empty orange slot on the tree.
- Go to the Bridge.
Chapter 4: Fate of the Island
The Bridge
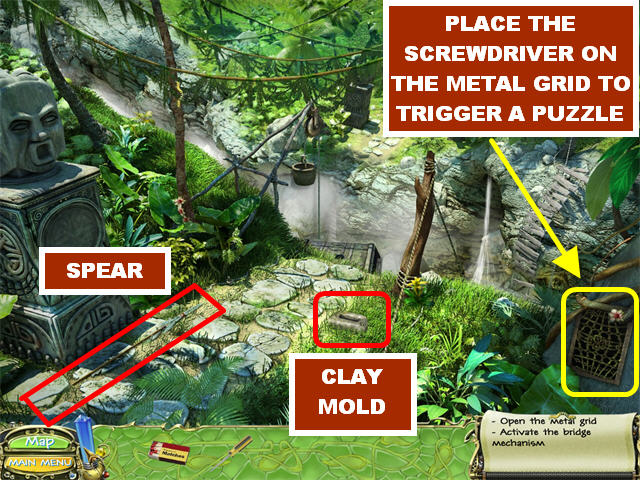
- Pick up the CLAY MOLD in the center of the ground.
- Pick up the SPEAR in the lower left.
- Place the SCREWDRIVER on the metal grid in the lower right corner.
- Click on the metal grid to trigger a puzzle.
Colored Chips Puzzle
- You have to place the colored chips in their matching colored holes.
- Click and hold the chip you want to move and drag it to the direction in which you want it to move. An arrow will appear in the direction you select, and the chip will move to that spot.
- You have to successfully complete 3 rounds to beat this game.
- As you progress through the rounds, you will have to block with some of the colored chips to get other chips in the correct holes.
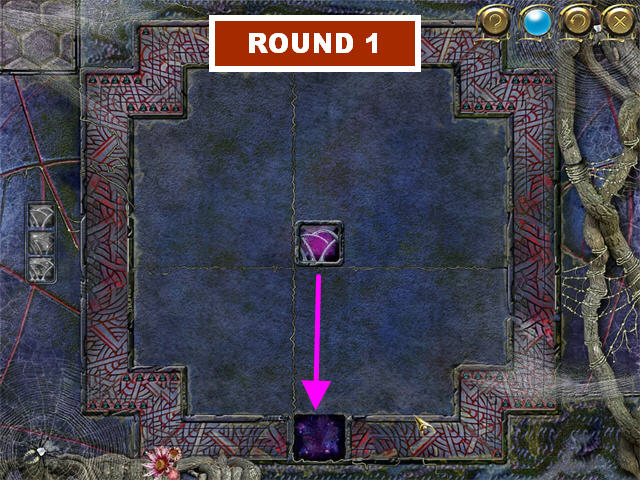
- Drag the purple chip downwards to solve the first round.
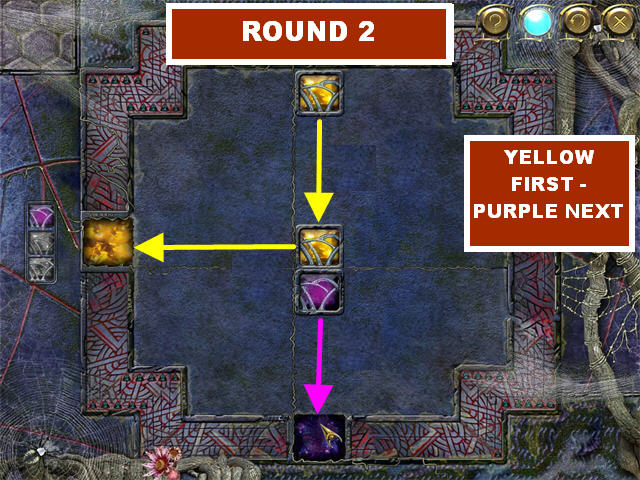
- Drag the yellow chip downwards.
- Drag the yellow chip to the left.
- Drag the purple chip downwards to solve the second round.
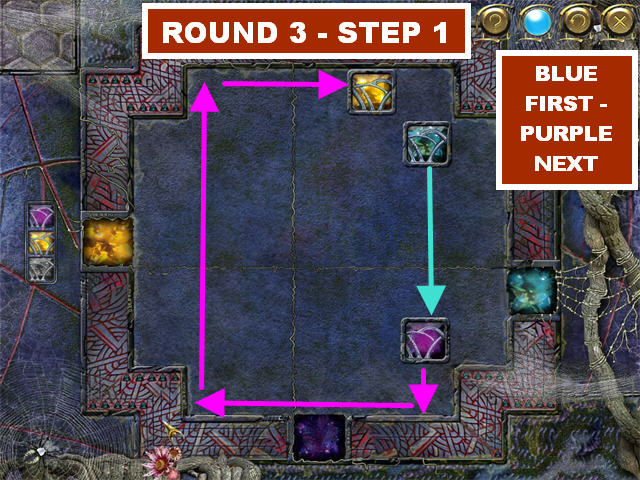
- Drag the blue chip downwards.
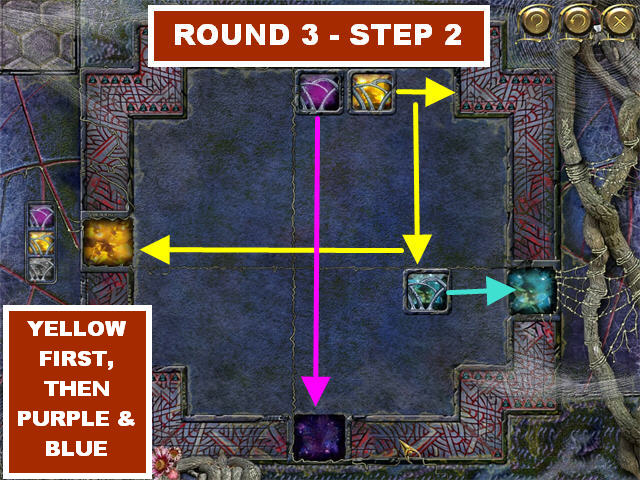
- Drag the purple chip down, left, up, and then right.
- Drag the yellow chip right, down, and then left.
- Drag the blue chip to the right.
- Drag the purple chip down.
- After you solve the puzzle, pick up the ROUND CLAY SHAPE inside the metal grid.
- Go to the Beach.
Beach
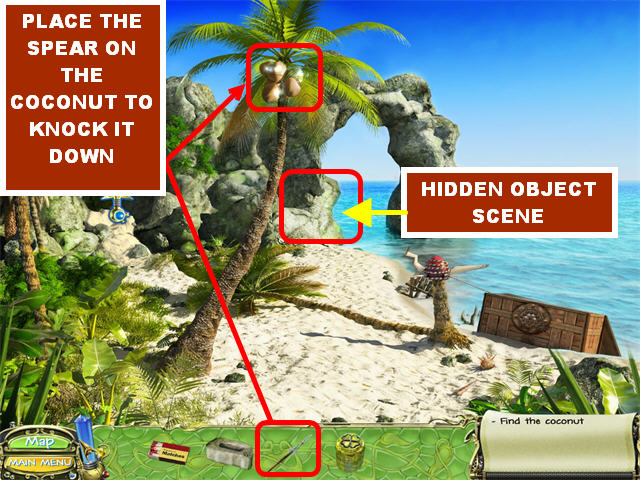
- Place the SPEAR on the coconut tree to knock a coconut down.
- Once the coconut is knocked off the tree, it disappears and a Hidden Object Scene is triggered on the right side of the scene; click on it to activate it.
- You will receive the COCONUT in your inventory at the end of this search.
- This location is now complete. Go to the Jungle Path.
Jungle Path
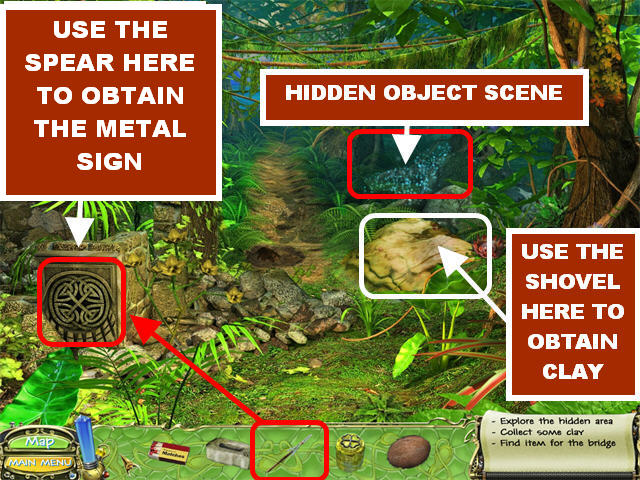
- Use the SPEAR to obtain the METAL SIGN in the lower left corner.
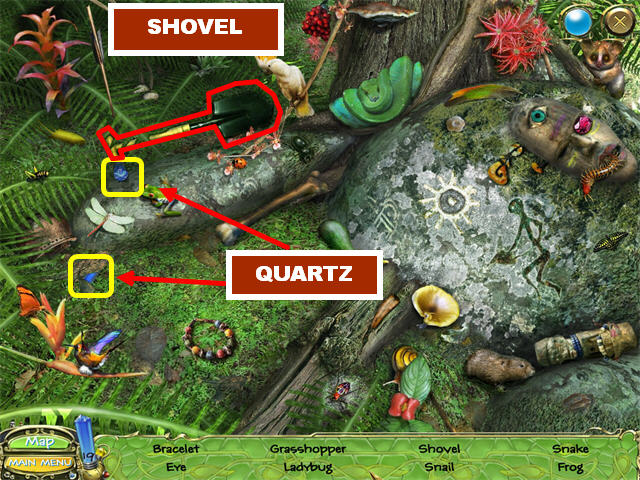
- Click on the Hidden Object Scene on the far right.
- You will obtain the SHOVEL at the end of your search.
- Place the SHOVEL on the clay, on the right side of the ground. The GOLDEN CLAY will go be added to your inventory.
- This location is complete. Go to the Ancient Furnace.
Ancient Furnace
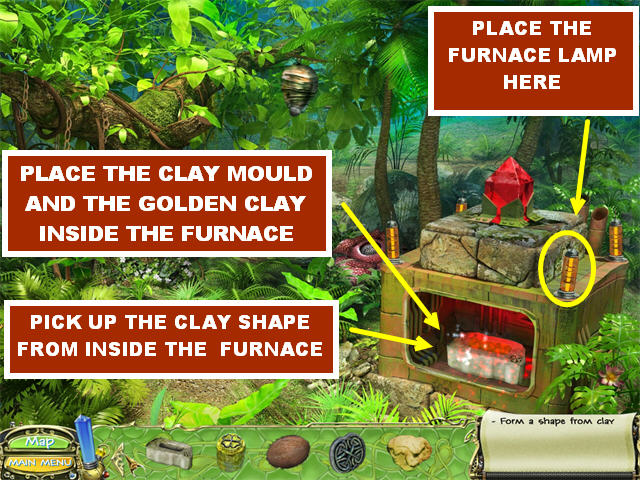
- Place the CLAY MOLD inside the furnace.
- Place the GOLDEN CLAY inside the furnace.
- Go back to the Luggage Space.
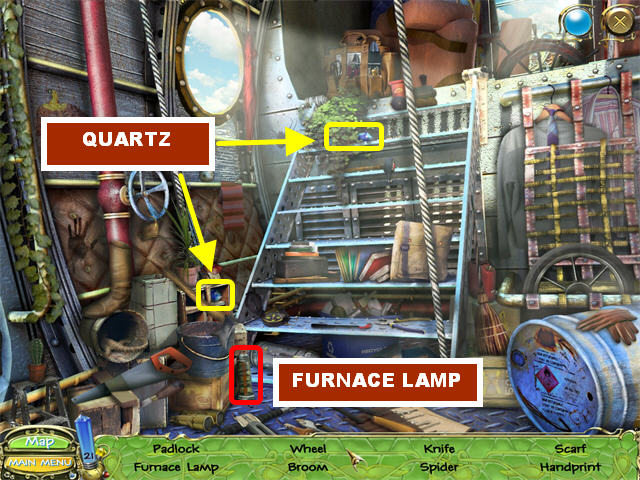
- Click on the Hidden Object Scene.
- The FURNACE LAMP will be added to your inventory at the end of your search.
- This location is now complete. Go back to the Ancient Furnace.
- Place the FURNACE LAMP on the top right side of the furnace.
- Take the TRIANGULAR CLAY SHAPE from the furnace.
- This location is now complete. Go back to the Bridge.
The Bridge
- Place the COCONUT in the scale, in the back of the scene.
- The scale sinks into the water and resurfaces with something inside of it.
- Pick up the SQUARE CLAY SHAPE inside the basket.
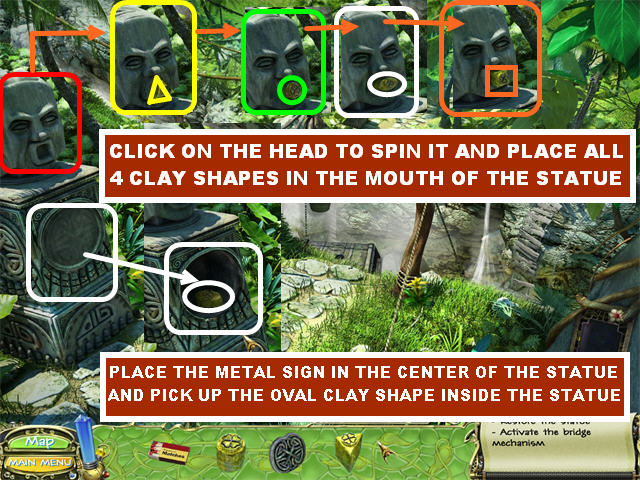
- Place the METAL SIGN on the statue, on the left, and a panel in the center will open up.
- Pick up the OVAL CLAY SHAPE inside the statue.
- Now you have to place all the Clay Shapes into the head of the statue. To do that, you must spin the statue’s head by clicking on it.
- Place the TRIANGULAR CLAY SHAPE into the correct slot in the statue’s head.
- Place the ROUND CLAY SHAPE into the correct slot in the statue’s head.
- Place the OVAL CLAY SHAPE into the correct slot in the statue’s head.
- Place the SQUARE CLAY SHAPE into the correct slot in the statue’s head.
- The bridge appears after all the CLAY SHAPES have been placed correctly.
- This location is complete. Go forward.
Temple Entrance
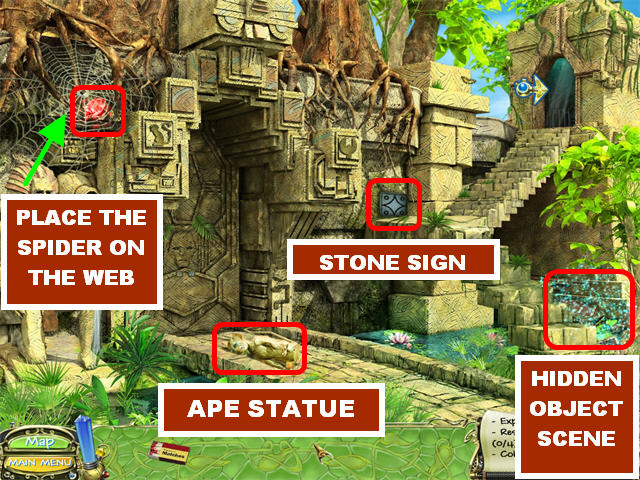
- Pick up the FIRST STONE SIGN on the right side of the scene.
- Pick up the APE STATUE on the ground.
- Click on the Hidden Object Scene in the lower right.
- You will obtain a SPIDER at the end of your search.
- Place the SPIDER on the spider web in the upper left corner.
- The spider will knock a red gem from the web onto the ground.
- Pick up the FATE OF THE ISLAND (Red Crystal) on the ground.
- Go to the Crystal Tree.
Crystal Tree
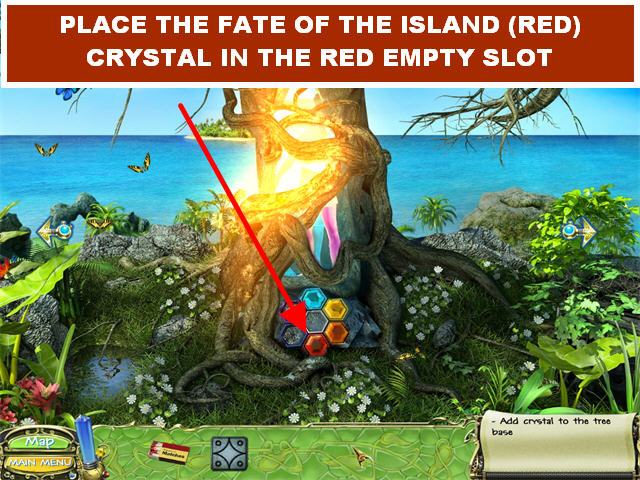
- Place the FATE OF THE ISLAND (Red Crystal) in the empty red slot on the tree.
- Go to the Outpost.
Chapter 5: Regret of the Island
The Outpost
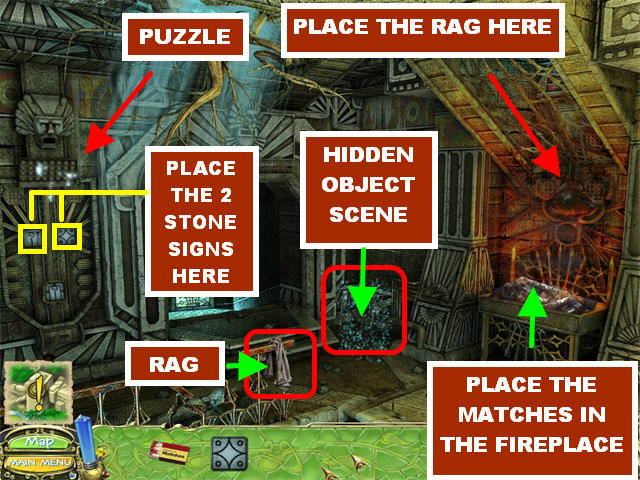
- Pick up the RAG in the lower center.
- Place the MATCHES in the fireplace.
- Clean the sooty eye above the fireplace by clicking the RAG on it 3 times.
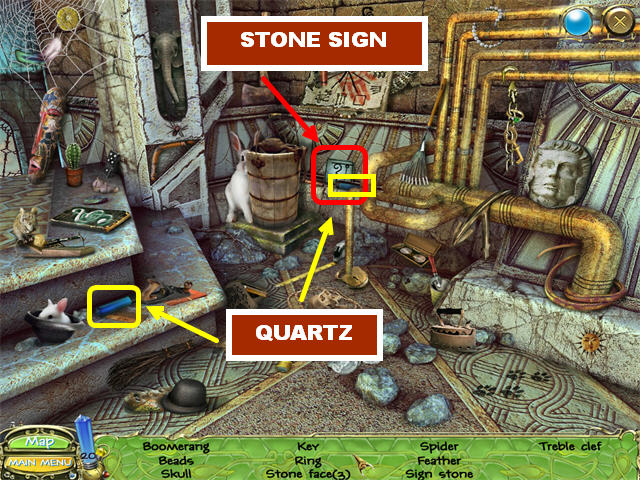
- Click on the Hidden Object Scene in the lower center.
- You will obtain the SECOND STONE SIGN after your search is over.
- Place the 2 STONE SIGNS on the sign mechanism, on the left side of the scene.
- Click on the puzzle that appears above the mechanism.
Secret Code Puzzle
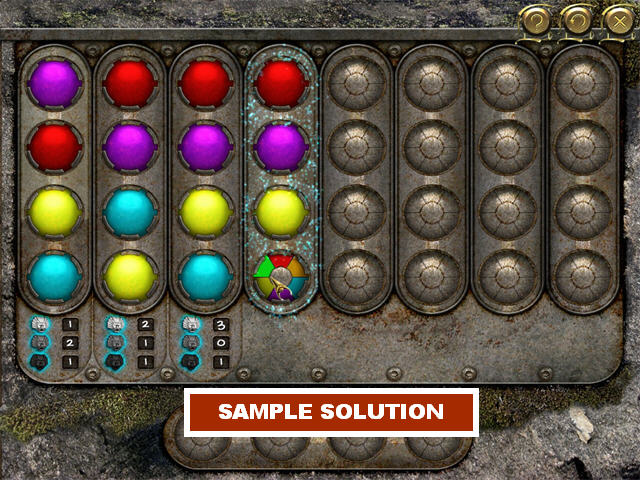
- Your goal in this puzzle is to discover the correct color combination.
- You have 8 chances to beat this game, but you only have to complete a single round.
- There are 8 columns in this puzzle; each column represents one chance to figure out the puzzle.
- The available column will sparkle when ready. Click on one of the holders to view all the available colors.
- Select a color and it will appear on the holder.
- Follow the same steps until you’ve selected 4 different colors for that column.
- After all the selections have been made, some stone heads will appear at the bottom of the column. Those heads will tell you how many items are correct, but won’t identify those items.
- The white head means you’ve selected the correct colors and they are in the right holder.
- The gray head means that you’ve selected the correct colors, but placed them in the wrong holder.
- The black head means that a color you’ve included is not part of the solution.
- The solution to this puzzle is random.
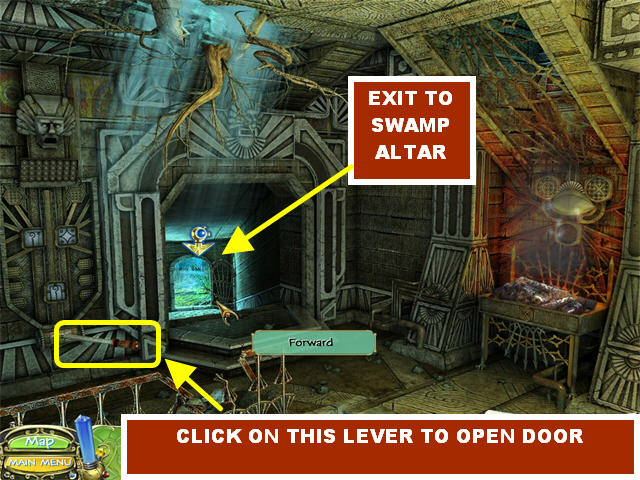
- Click on the door lever at the bottom of the sign mechanism.
- Exit through the door.
Swamp Altar
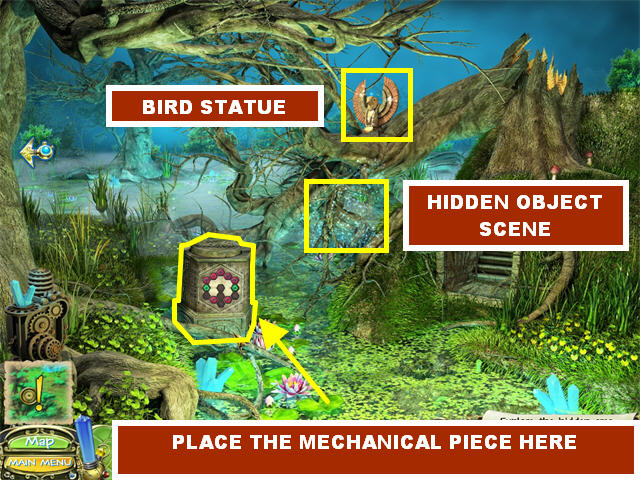
- Pick up the BIRD STATUE in the upper center.
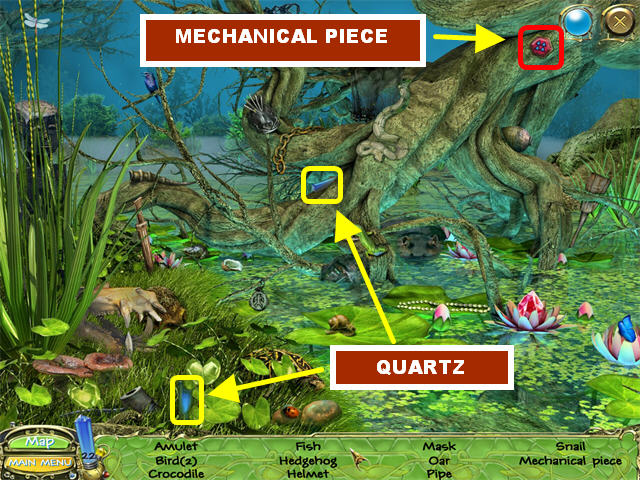
- Click on the Hidden Object Scene in the center.
- The MECHANICAL PIECE will be added to your inventory at the end of your search.
- Place the MECHANICAL PIECE on the altar, in the center of the scene, to trigger a puzzle.
Symbol Tiles Puzzle
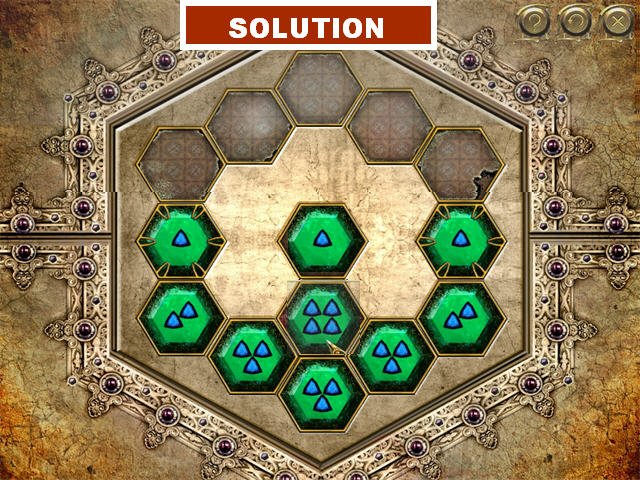
- Your goal in this puzzle is to arrange the tiles so each is adjacent to a number of tiles equal to the blue triangle symbols on it
- Drag the tiles into the empty slots.
- You have to complete one round of this game.
- Tiles that are placed correctly will turn green.
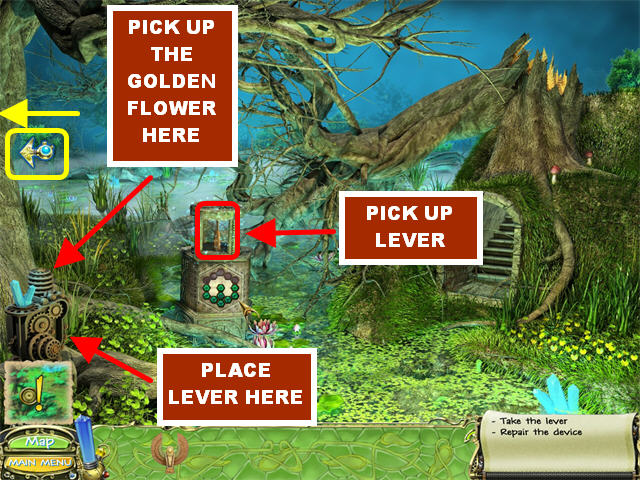
- Pick up the LEVER that appears above the altar.
- Place the LEVER on the device in the lower left.
- Pick up the GOLDEN FLOWER above the device on the left.
- Click on the left to reach the Swamp.
Swamp
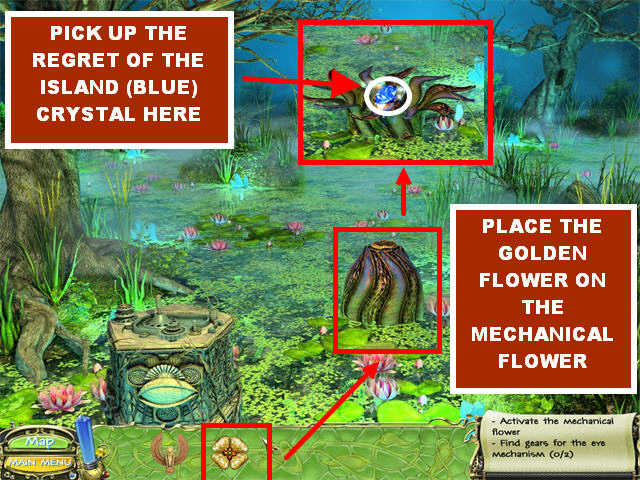
- Place the GOLDEN FLOWER on the mechanical flower in the lower center to trigger a puzzle.
Golden Flower Puzzle
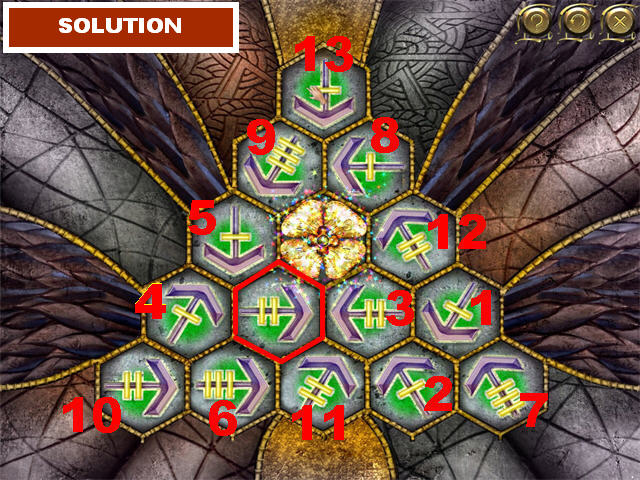
- Your goal in this section is to click on the arrows that will point to the Golden Flower in the middle.
- All arrows must be pressed in the right order to successfully complete the game.
- Arrows that have been incorrectly pressed will turn red; if this happens, click on the RESET button and try again.
- Each arrow has a gold bar attached to it. The gold bars represent the number of spaces in your next move.
- Pick up the REGRET OF THE ISLAND (Blue Crystal) inside the Mechanical Flower after you solve the puzzle.
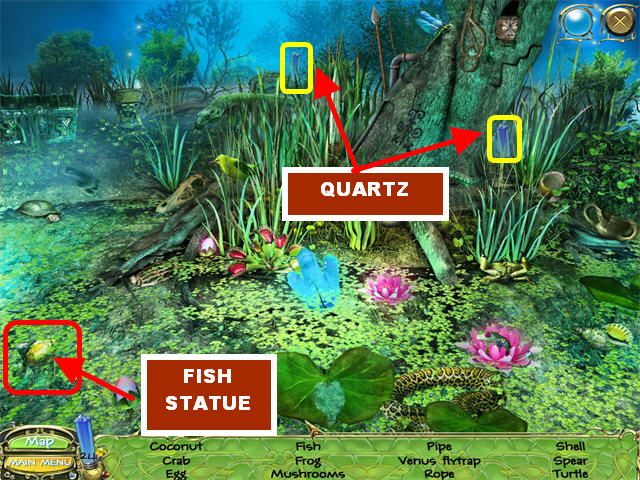
- Click on the Hidden Object Scene in the upper right side of the screen.
- The FISH STATUE will be added to your inventory at the end of your search.
- Go back to the Crystal Tree.
Crystal Tree
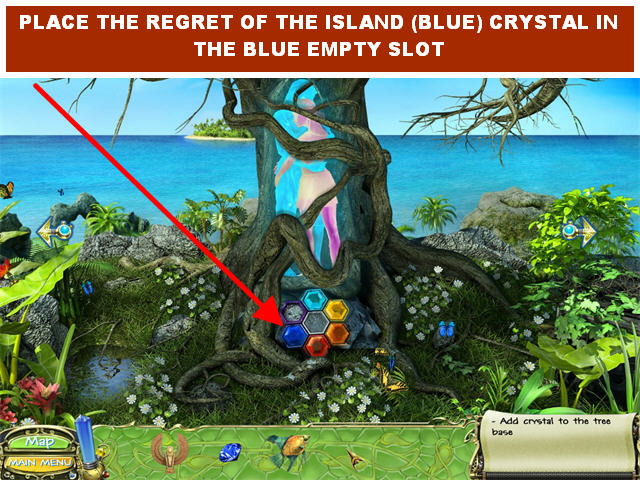
- Place the REGRET OF THE ISLAND (Blue Crystal) in the blue empty slot in the tree.
- Go to the Swamp Altar.
Chapter 6: Sin of the Island
Swamp Altar
- Click on the Hidden Object Scene in the center.
- The SNAKE STATUE will be added to your inventory after your search has been completed.
- This location is complete. Go to the Temple Entrance.
Temple Entrance
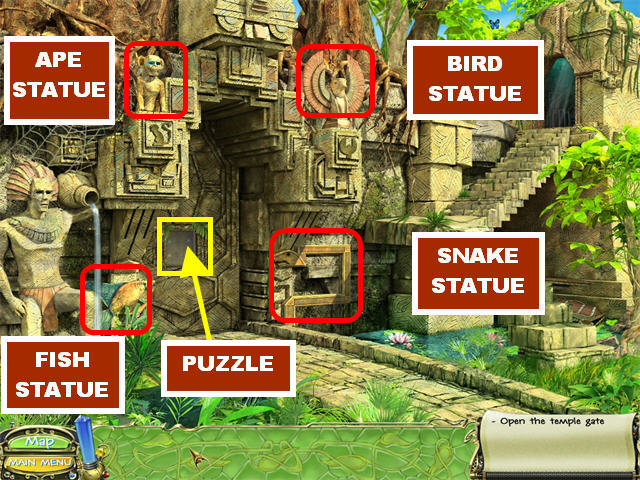
- Place the APE STATUE on the upper left side of the wall.
- The FISH STATUE goes in the lower left.
- Place the BIRD STATUE in the upper center.
- The SNAKE STATUE belongs in the lower center of the wall.
- Click on the puzzle that appears on the wall.
Crystal Puzzle
- Your goal in this puzzle is to click on the blue lines so that the lights cross all the gems at once.
- The blue light on the left makes the light go upwards.
- The blue light on the right makes the light branch out in different shapes.
- You have to successfully complete 3 rounds to beat this puzzle.
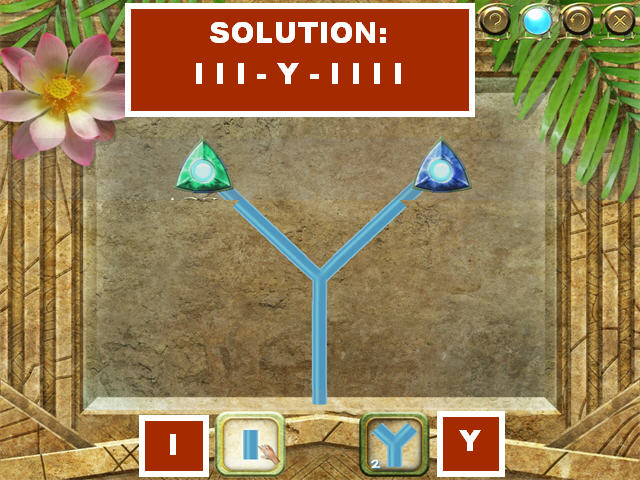
- Click on the symbols I, I, I, Y, I, I, I, I.
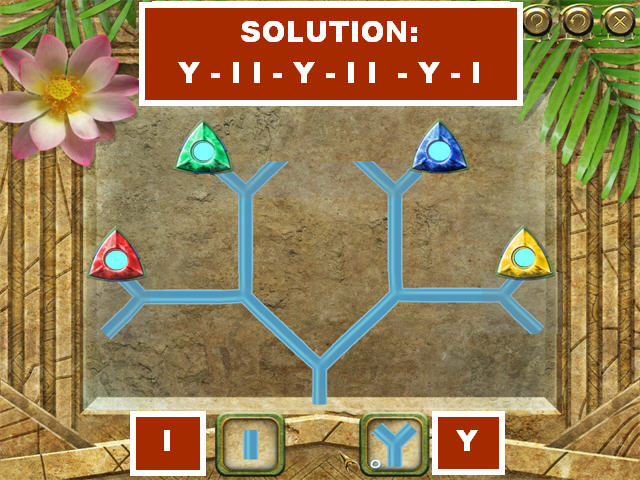
- Click on the symbols Y, I, I, Y, I, I, Y, I.
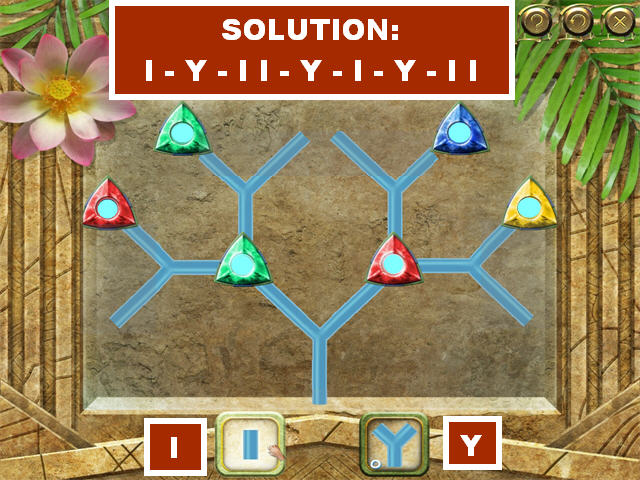
- Click on the symbols I, Y, I, I, Y, I, Y, I, I.
- Enter the door once you complete the puzzle.
Temple Dynamo
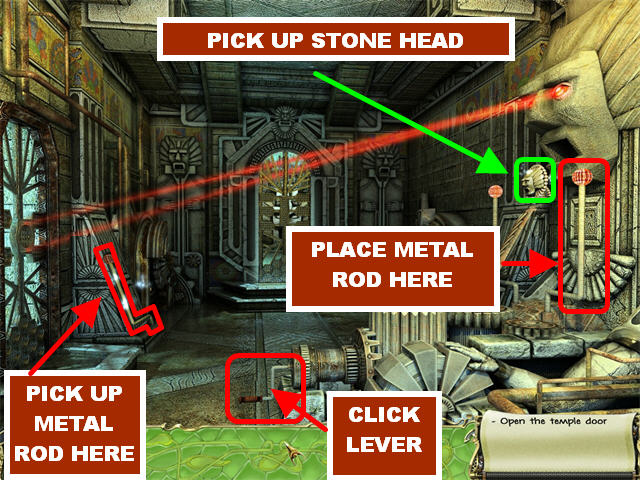
- Pick up the METAL ROD on the left.
- Place the METAL ROD on the mechanism on the right.
- Click on the LEVER in the lower center.
- This activates the laser beams on the right statue’s head.
- Pick up the STONE HEAD below the large statue head on the right.
- Place the STONE HEAD on the locked left door to unlock it.
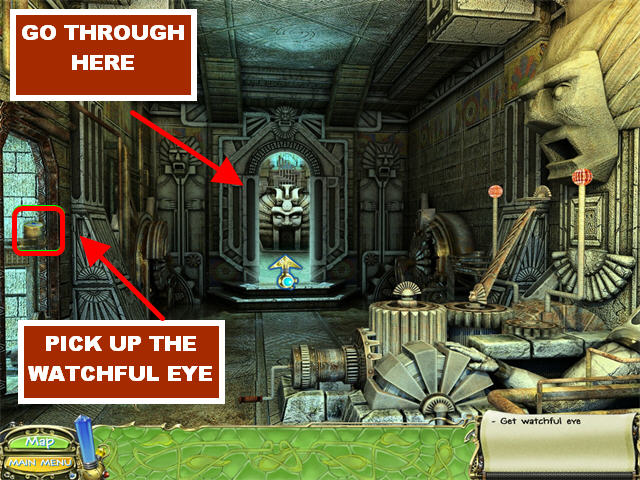
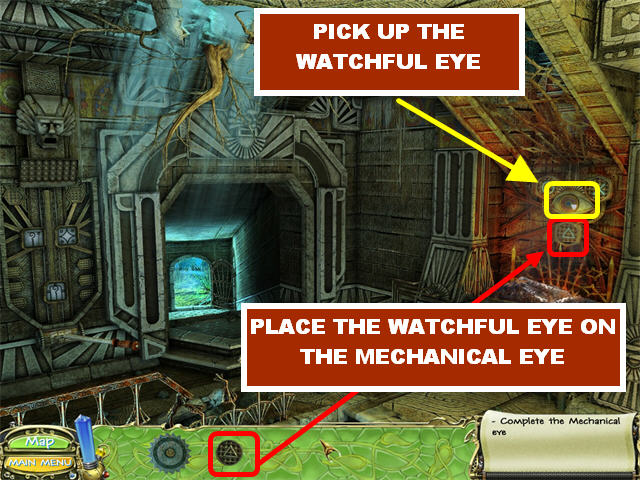
- Click on the door to open it.
- Pick up the FIRST WATCHFUL EYE from the open doorway on the left.
- This location is completed. Go through the recently opened door in the back.
Temple Hall
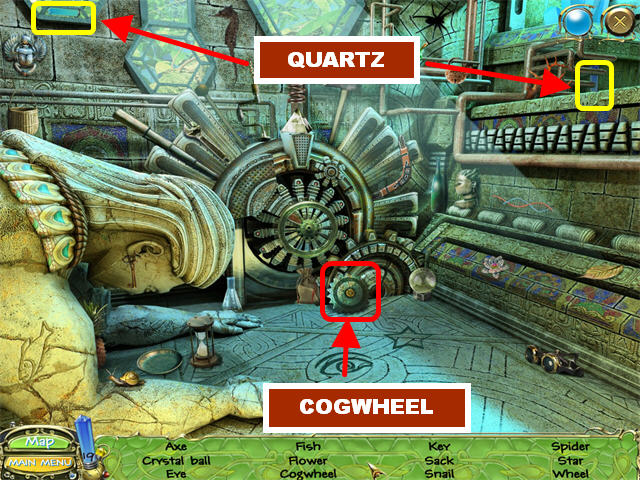
- Click on the Hidden Object Scene.
- The FIRST COGWHEEL will be added to your inventory once you’ve completed your search.
- Go to the Outpost.
Outpost
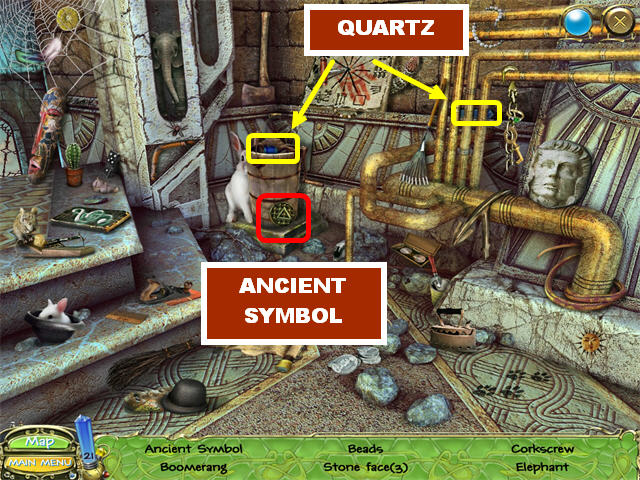
- Click on the Hidden Object Scene.
- The ANCIENT SYMBOL will be added to your inventory after your search.
- Place the ANCIENT SYMBOL on the mechanical eye on the right.
- Pick up the SECOND WATCHFUL EYE from the mechanical eye.
- This location has been completed. Go to the Swamp.
Swamp
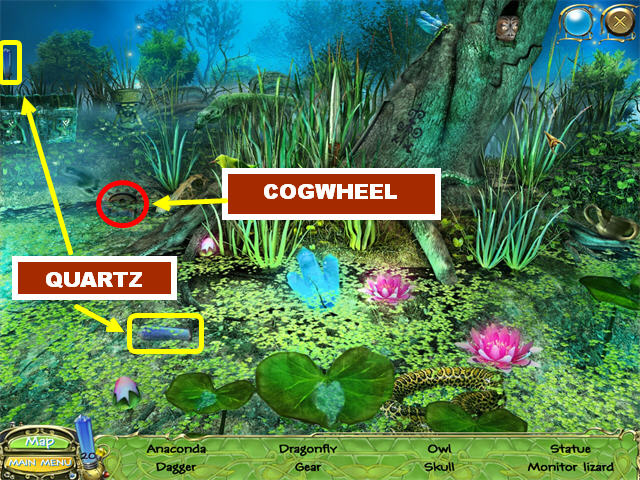

- Click on the Hidden Object Scene on the right.
- The SECOND COGWHEEL will be added to your inventory at the end of this search.
- Place the 2 COGWHEELS in the eye mechanism, in the lower left.
- Pick up the THIRD WATCHFUL EYE from the eye mechanism.
- This location is completed. Go to the Temple Entrance.
Temple Entrance
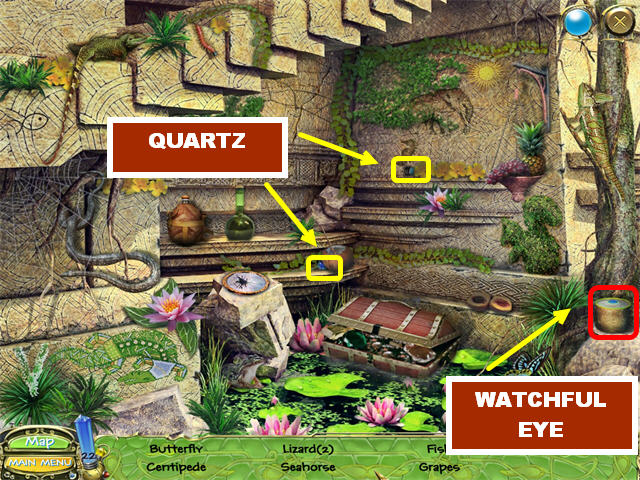
- Click on the Hidden Object Scene on the right.
- The FOURTH WATCHFUL EYE will be added to your inventory at the end of your search.
- This location has been completed. Go back to Temple Hall.
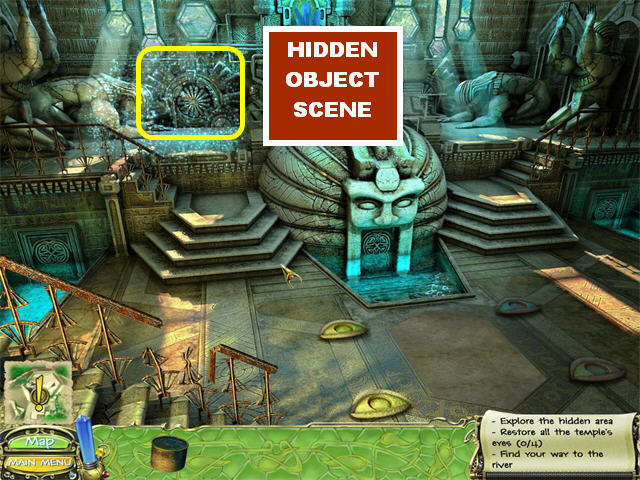
Temple Hall
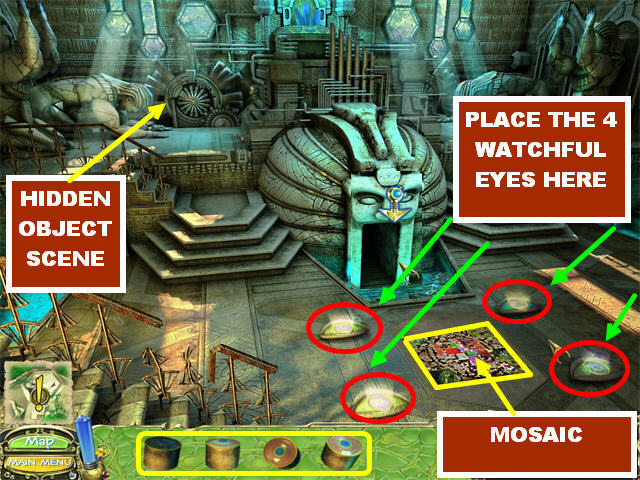
- Place the 4 WATCHFUL EYES on the 4 empty eyes on the ground to trigger a puzzle.
Mosaic Puzzle
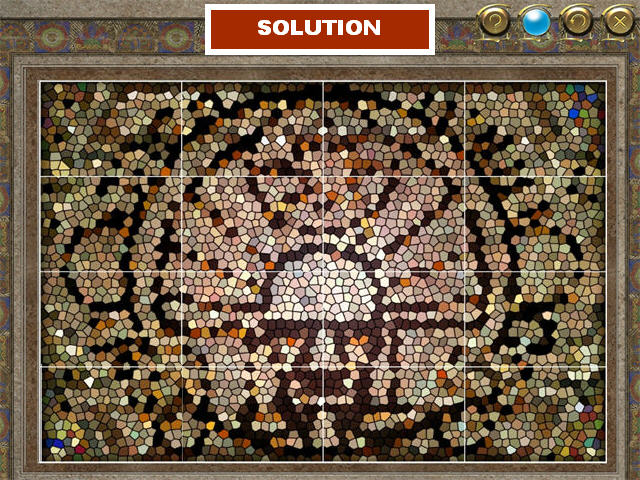
- Your goal is to recover the full image of the picture.
- Click the images on the rectangles to change them.
- Keep clicking until you think you have the correct overall image.
- The correct tiles do not lock into place when correct! A note will appear on the screen once the puzzle has been completed correctly.
- You only have to successfully complete one round to beat this puzzle.
- Hint: The majority of the background will be brown mosaics tiles.
- A new doorway, and a Hidden Object Scene, appears after the puzzle has been solved.
- Click on the Hidden Object Scene in the upper left.
- The FIRST GATE STONE will be added to your inventory after you’ve completed your search.
- This location is complete. Go to the Gates.
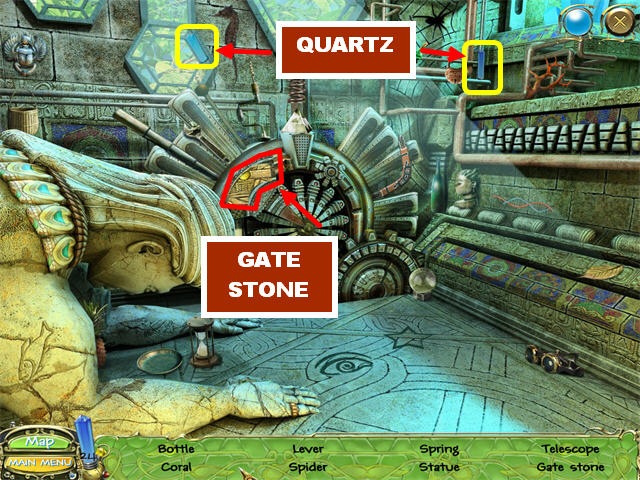
Gates
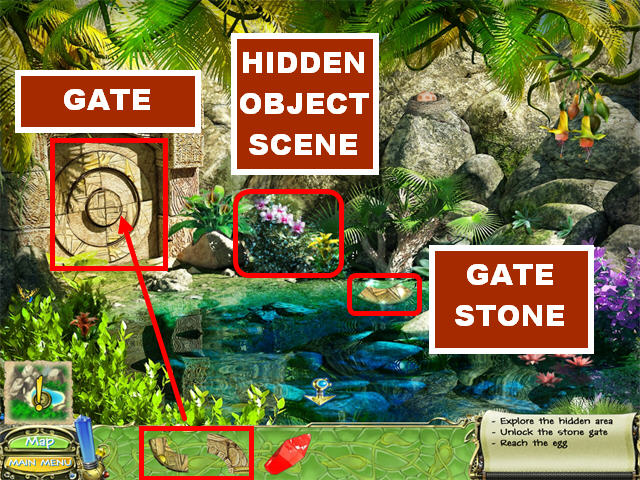
- Pick up the SECOND GATE STONE from the ground.
- Click on the Hidden Object Scene close to the wall.
- The FLAME CRYSTAL will be added to your inventory after all the items have been found.
- Place the 2 GATE STONES on the locked gate on the left. Click on the gate to trigger a puzzle.
Puzzle
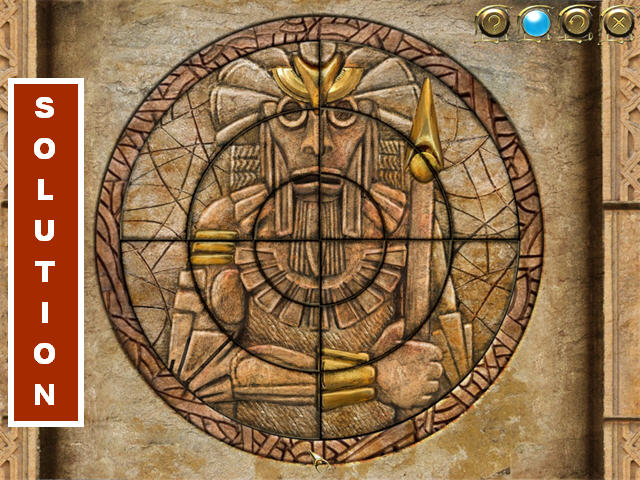
- Drag your mouse over the puzzle to change different areas.
- Go through the gate, once you’ve discovered the correct overall image.
Ancient Stairs
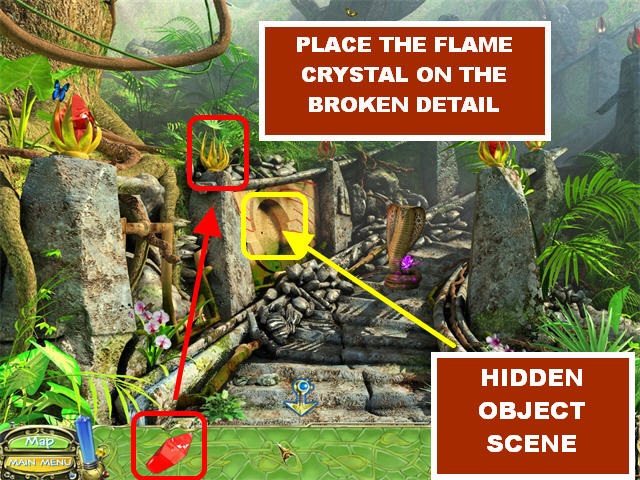
- Place the FLAME CRYSTAL on the broken detail in the upper left.
- Click on the Hidden Object Scene that appears below the fixed detail.
- The SLINGSHOT will be added to your inventory at the end of your search.
- Go back to the Temple Hall.
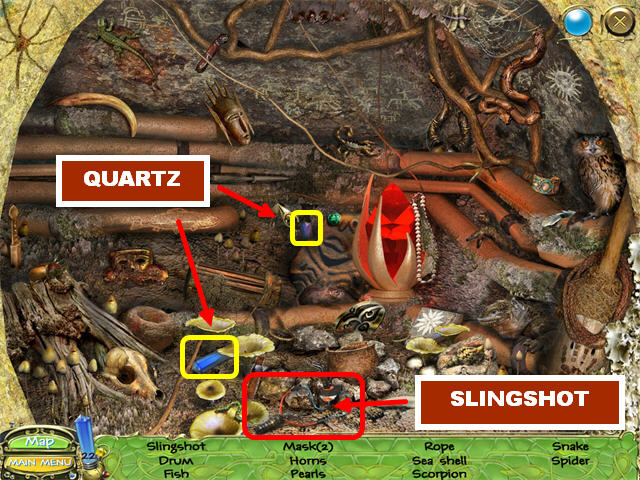
Temple Hall
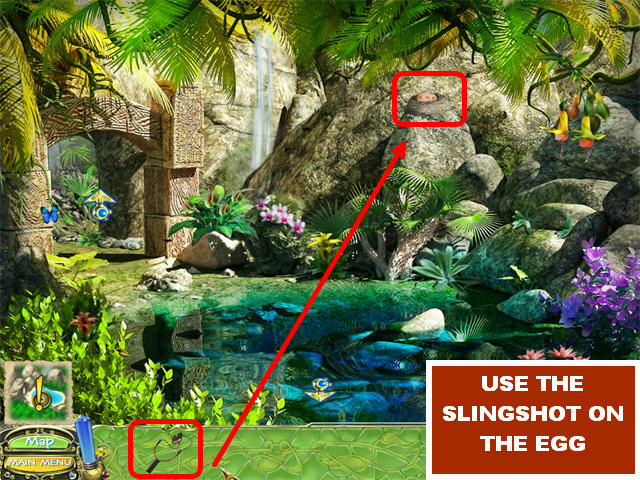
- Place the SLINGSHOT on the BIG EGG in the upper center.
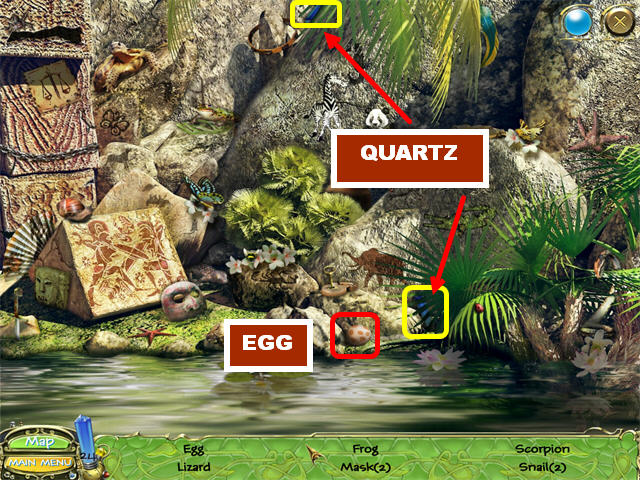
- The EGG falls into the bushes and triggers a Hidden Object Scene. Click on the Hidden Object Scene to recover the EGG.
- The EGG will be added to your inventory after your search has been completed.
- This location is complete. Go back to the Ancient Stairs.
Ancient Stairs
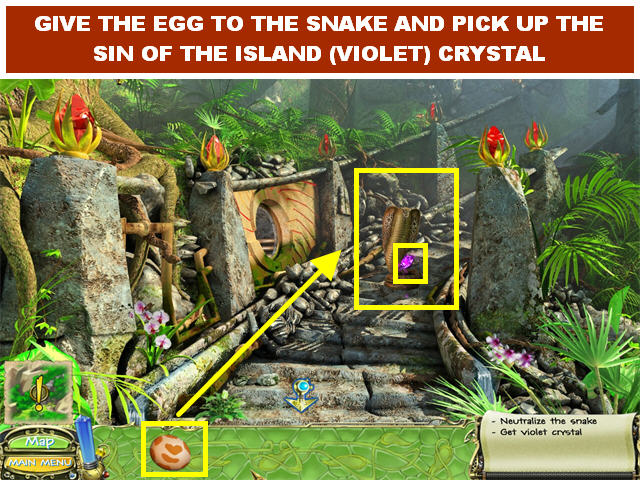
- Give the EGG to the venomous snake on the stairs.
- Pick up the SIN OF THE ISLAND (Violet Crystal) the snake leaves behind.
- Click the Hidden Object Scene on the left.
- The BLANK DISC will be added to your inventory after your search has been completed.
- Go back to the Crystal Tree.
Crystal Tree
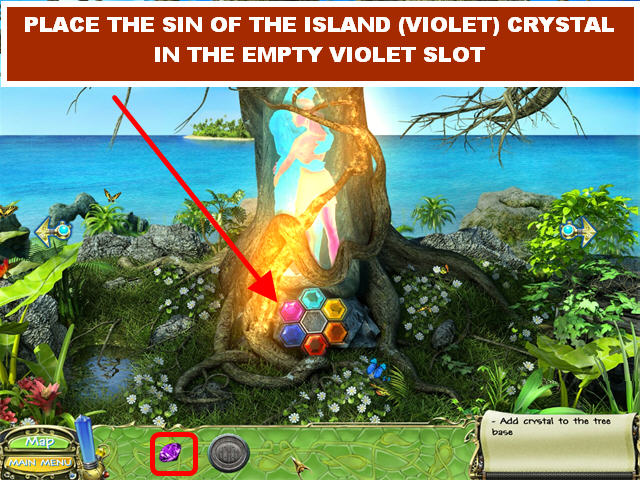
- Place the SIN OF THE ISLAND (Violet Crystal) in the empty violet slot at the bottom of the tree.
- Go to the Mountain Pass.
Chapter 7: Science of the Island
Mountain Pass
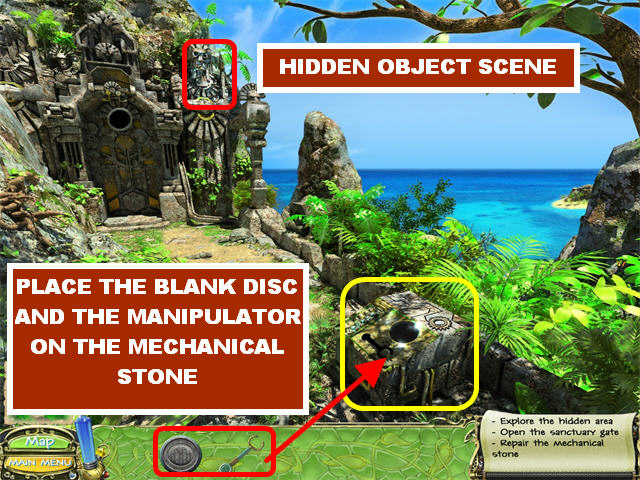
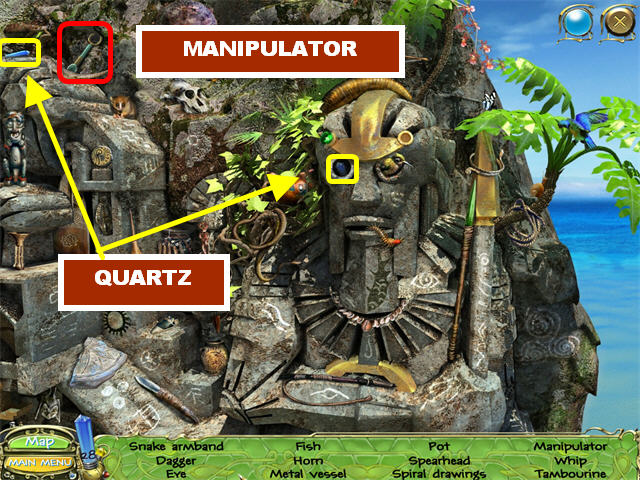
- Click on the Hidden Object Scene above the statue.
- The MANIPULATOR will be added to your inventory after your search has been completed.
- Place the MANIPULATOR on the slot in the mechanical stone on the right.
- Place the BLANK DISC on the round slot in the mechanical stone on the right to trigger a puzzle.
Mechanical Arm Puzzle
- Your goal is to control the mechanical arm by pushing the correct controls on the left side of the puzzle.
- Each button performs a different function.
- The Clockwise Arrow Button at the top moves the mechanical arm clockwise.
- The Counterclockwise Arrow Button moves the mechanical arm counterclockwise.
- The Bar with Arrows Out Button releases the small disk from the mechanical arm.
- The Bar with Arrows In Button grabs the small disk with the mechanical arm.
- The Arrow Pointing Right Button moves the mechanical arm to the right.
- Arrow Pointing Left Button moves the mechanical arm to the left.
- To solve the first round of this puzzle, press the Clockwise Arrow, Bar with Arrows In, Clockwise Arrow, Clockwise Arrow, and the Bar with Arrows Out.
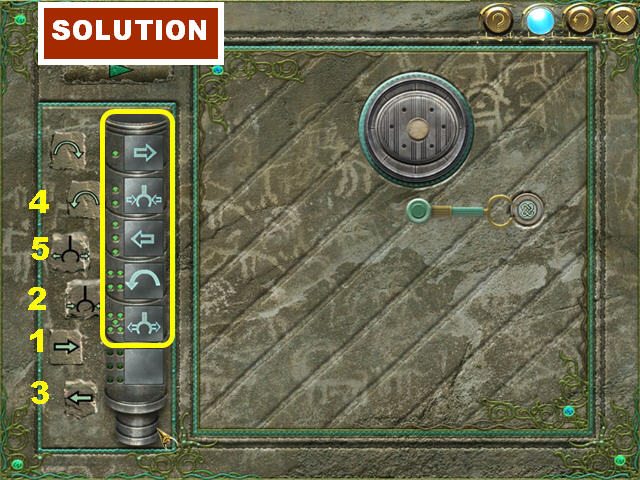
- To solve the second round of this puzzle, press the Arrow Pointing Right, Bar with Arrows In, Arrow Pointing Left, Counterclockwise Arrow, and the Bar with Arrows Out.
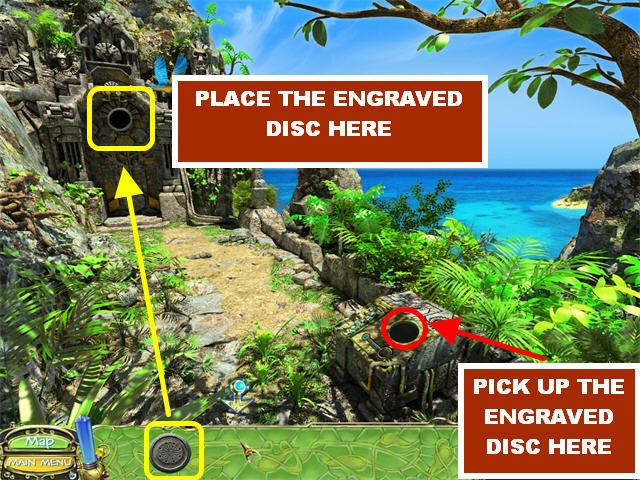
- Pick up the ENGRAVED DISC on top of the mechanical stone.
- Place the ENGRAVED DISC on the sanctuary gate.
- Go through the gate.
Cavern Entrance
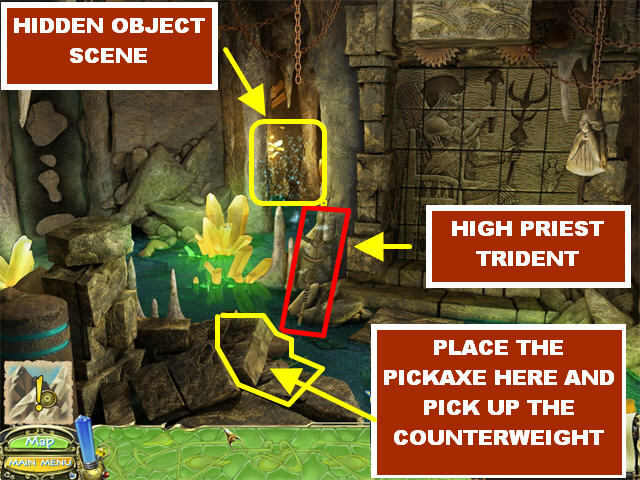
- Pick up the HIGH PRIEST TRIDENT on the wall.
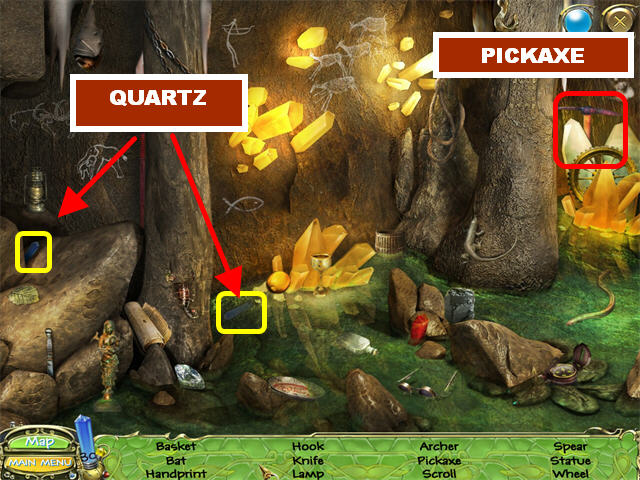
- Click on the Hidden Object Scene in the back.
- The PICKAXE will go into your inventory.
- Place the PICKAXE on the pile of stones in the lower center.
- Pick up the COUNTERWEIGHT below the pile of stones.
- Place the COUNTERWEIGHT on the chain hanging from the ceiling.
- Click on the Bas-relief that appears on the left side of the wall to trigger a puzzle.
Stone King Puzzle
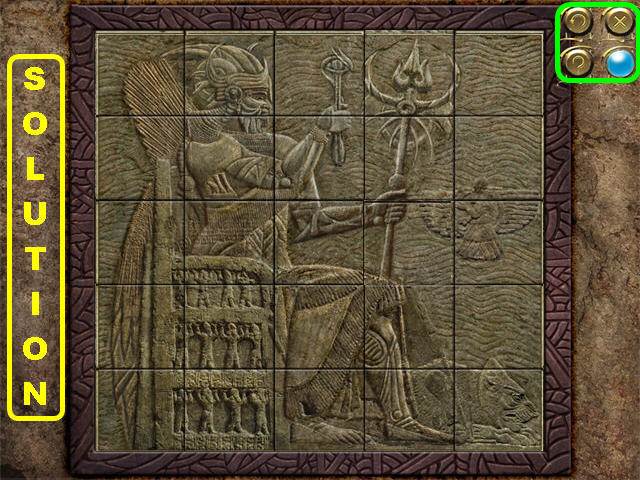
- Your goal is to restore the image on the stone wall.
- Click on two adjacent tiles to swap their positions.
- You can see a faint white outline for the edges of the puzzle. Use that outline to guide you to the solution.
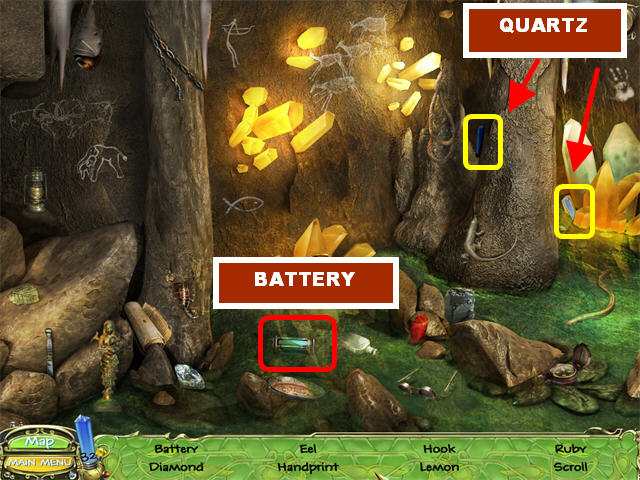
- Click on the Hidden Object Scene in the back.
- The BATTERY will be added to your inventory at the end of your search.
- Go back to the Mountain Pass.
Mountain Pass
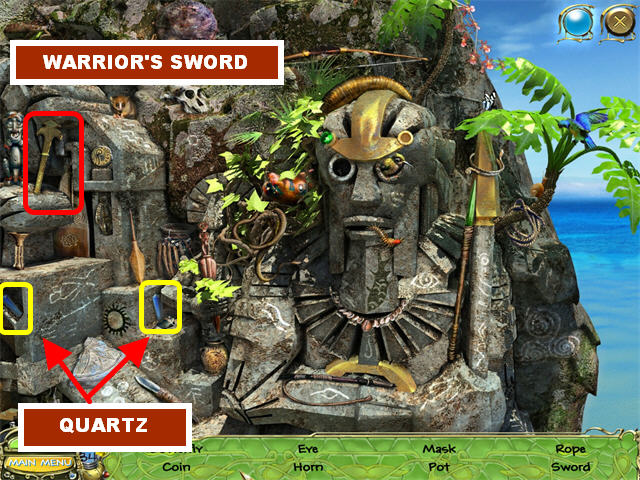
- Click on the Hidden Object Scene.
- The WARRIOR’S SWORD will be added to your inventory once your search has been completed.
- This location has been completed. Go to the Ancient Stairs.
Ancient Stairs
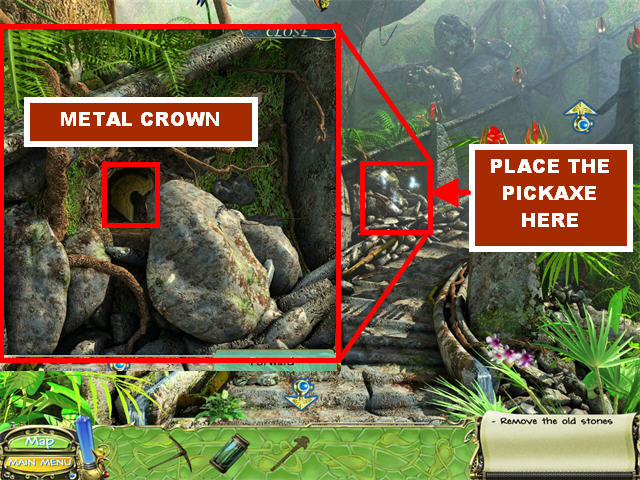
- Place the PICKAXE on the stones on the steps for a closer view.
- Pick up the METAL CROWN in the pop-up window.
- This location is now completed. Go to the Cavern Entrance.
Cavern Entrance
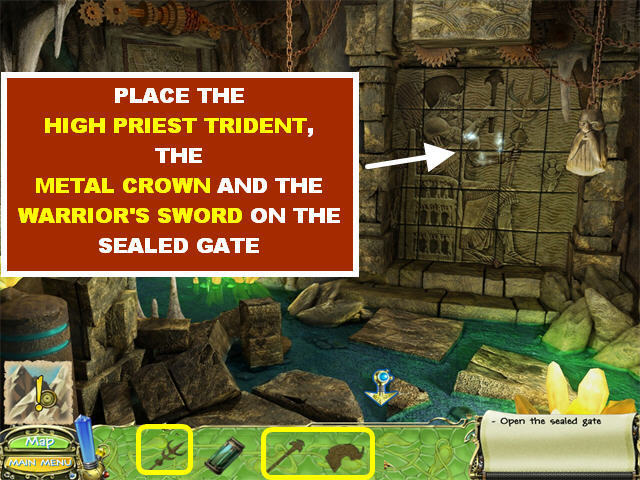
- Place the HIGH PRIEST TRIDENT on the sealed gate on the right wall.
- Place the METAL CROWN on the sealed gate on the right wall.
- Place the WARRIOR’S SWORD on the sealed gate on the right wall.
- This location is now completed. Go through the gate.
Cavern Room
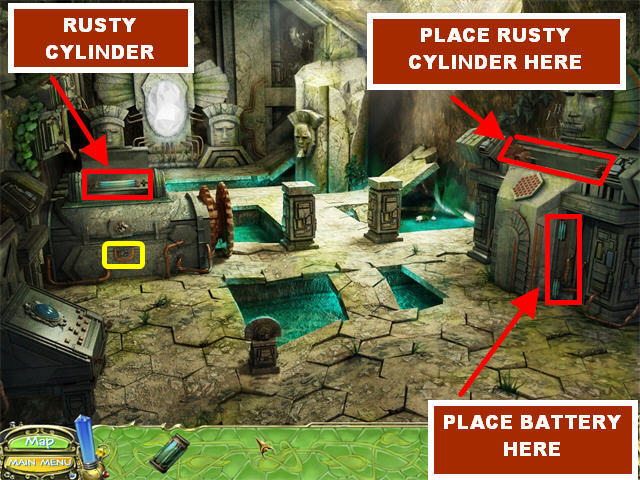
- Click on the brown handle at the bottom of the sign mechanism, on the left, to open the cover.
- Grab the RUSTY CYLINDER from inside the sign mechanism.
- The BATTERY goes at the bottom of the strange machinery on the right.
- Place the RUSTY CYLINDER on the top slot of the strange machinery on the right.
- Click on the strange machinery to trigger a puzzle.
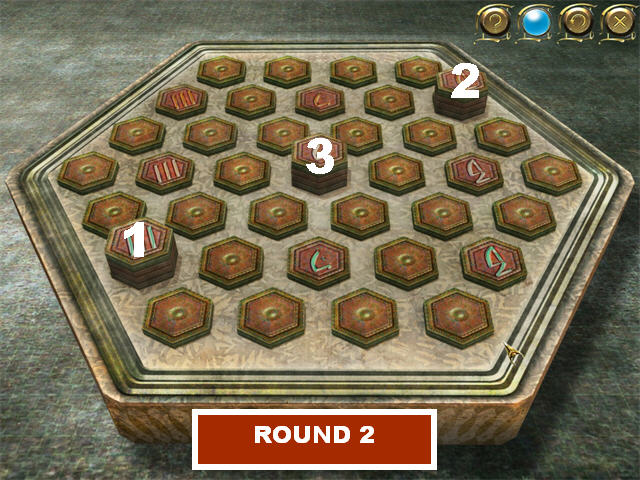
Hexagon Puzzle
- Your goal is to push all the hexagons in the down position.
- When you click on a hexagon, all the hexagons of that color will change their states. If they were raised, they will all go down; if they were pressed, they will all rise.
- You have to successfully complete 3 of these rounds to beat the game. Please see the following screenshots for the solutions.
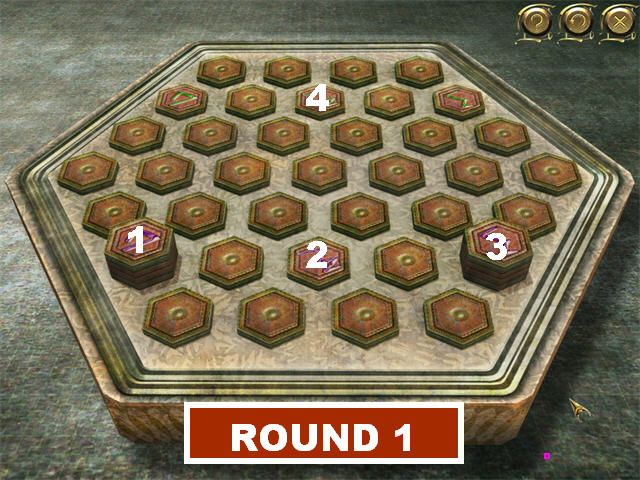
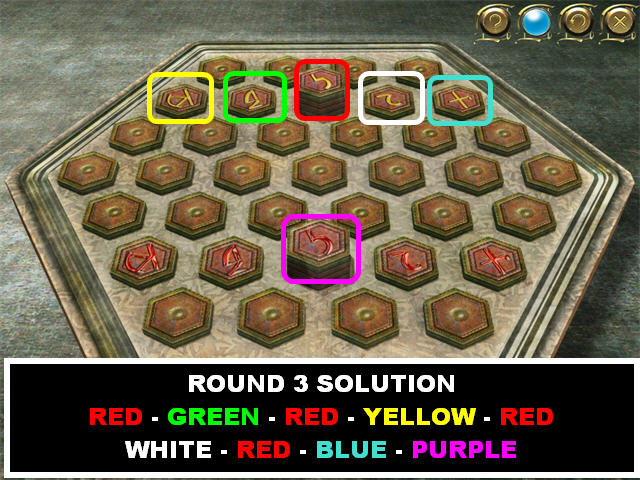
- For the final round, the hexagons have been color coordinated. Please click on the Red, Green, Red, Yellow, Red, White, Red, Blue, and Purple hexagons.
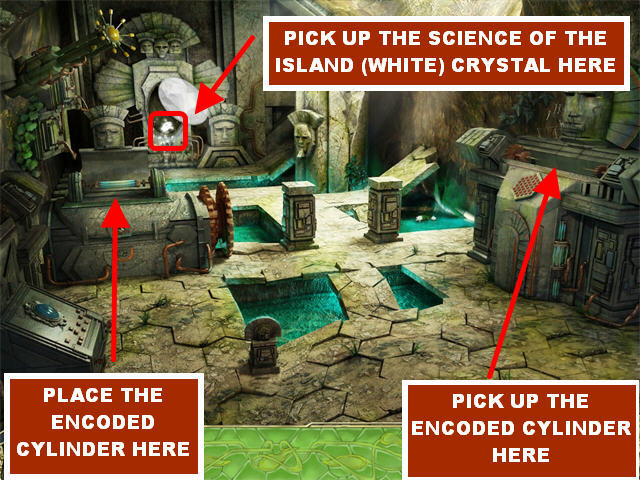
- Pick up the ENCODED CYLINDER from the machine after the puzzle has been solved.
- Place the ENCODED CYLINDER on the sign mechanism on the left.
- Pick up the SCIENCE OF THE ISLAND (White Crystal) in the upper left side.
- This location has been completed. Go back to the Crystal Tree.
Crystal Tree
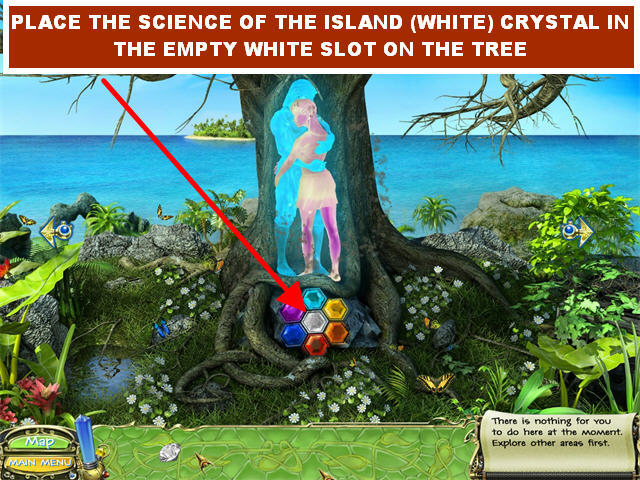
- Place the SCIENCE OF THE ISLAND (White Crystal) in the empty white slot at the base of the tree.
Created at: 2010-02-24