

Welcome to the Secrets of the Dark: Eclipse Mountain Walkthrough
Challenge yourself in the role of the scientist-historian-scholar of ancient civilizations and mystical legends and save your friend from the Demon of Darkness!
Whether you use this document as a reference when things get difficult or as a road map to get you from beginning to end, we’re pretty sure you’ll find what you’re looking for here.
This document contains a complete Secrets of the Dark: Eclipse Mountain game walkthrough featuring annotated screenshots from actual gameplay!
We hope you find this information useful as you play your way through the game. Use the walkthrough menu below to quickly jump to whatever stage of the game you need help with.
Remember to visit the Big Fish Games Forums if you find you need more help. Have fun!
This walkthrough was created by BrownEyedTigre, and is protected under US Copyright laws. Any unauthorized use, including re-publication in whole or in part, without permission, is strictly prohibited.
Walkthrough Menu
- General Tips
- Chapter 1 – Arrival
- Chapter 2 – Town
- Chapter 3 – Peter
- Chapter 4 – Temple Lock Plates
- Chapter 5 – The Temples
- Chapter 6 – Temple Two
- Chapter 7 – Temple Three
General Tips
- Select Options to adjust the Music and Sound Effects.You may also adjust Full Screen, Wide Screen and Custom Cursor.
- Select the Help button to view general information tips for playing the game. You can choose between Regular, Advanced or Hardcore mode.
- In several rooms you will have to change the illumination of the room by turning on lamps, turning valves or flipping switches.This allows you to view the room in a previous era.
- Throughout the guide, we will use the acronym ‘HOS’ for Hidden Object Scenes.The items listed in yellow in the find lists require extra steps to locate.
- In a HOS, you can hover your mouse over an inventory item to read its description.
- This game contains reverse HOS.Take the objects from the Inventory tray and place them into the correct spots in the scene.
- Select the Instruction tab on the top of the toolbar to get directions for the puzzles.
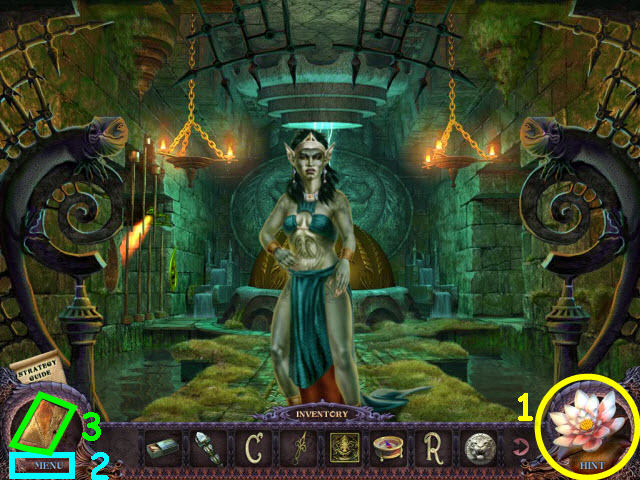
- Select the Lotus Blossom (1) in the lower right to get a hint in either the HOS or regular gameplay.Select Menu (2) to exit or access options.Select the diary (3) to access story updates and puzzle clues you have discovered.
- This game is not linear and you may do things in a different order than the guide.If you cannot do an action when stated in the guide, please check the previous entries to see if you missed something.
Chapter 1 – Arrival
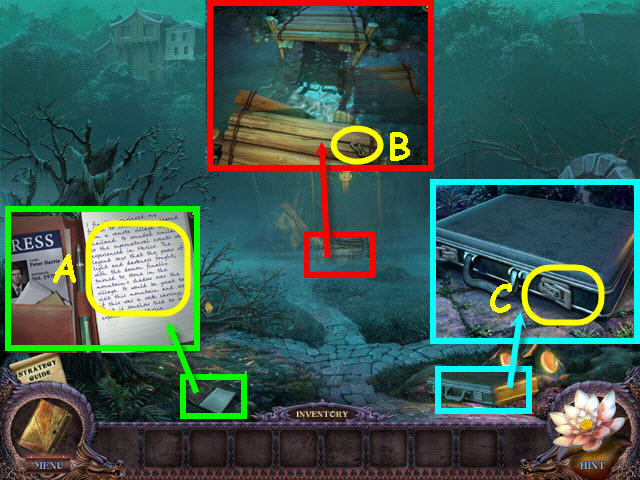
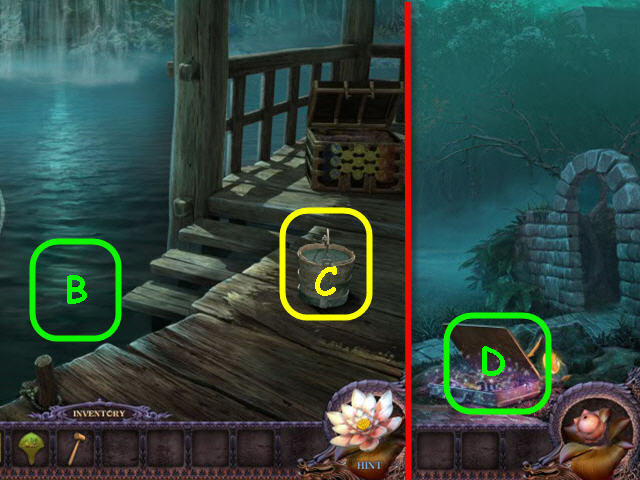
- Examine the notebook; take the page (A).
- Examine the bridge; take the LATCH (B).
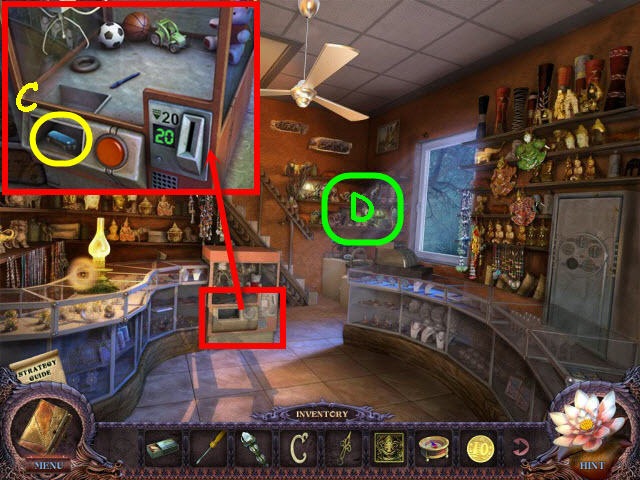
- Examine and place the LATCH on the suitcase (C).
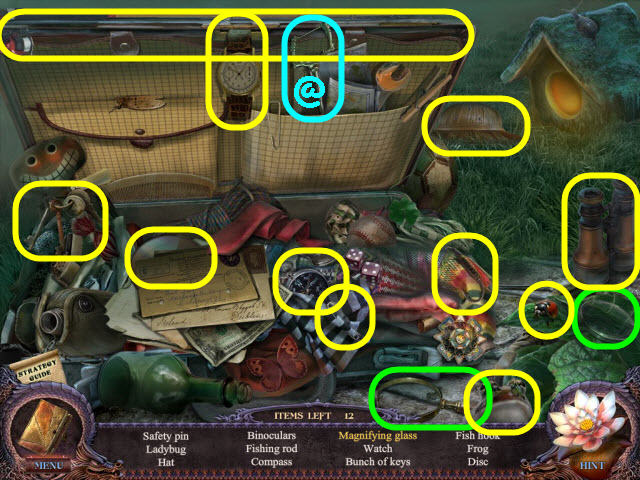
- Examine the suitcase to access a HOS.
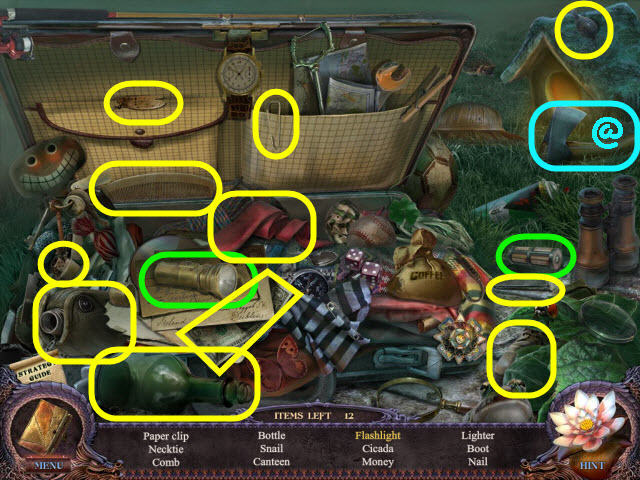
- Find the items listed.
- Marked in green: place the battery in the flashlight to get a flashlight.
- Find the AXE (@).
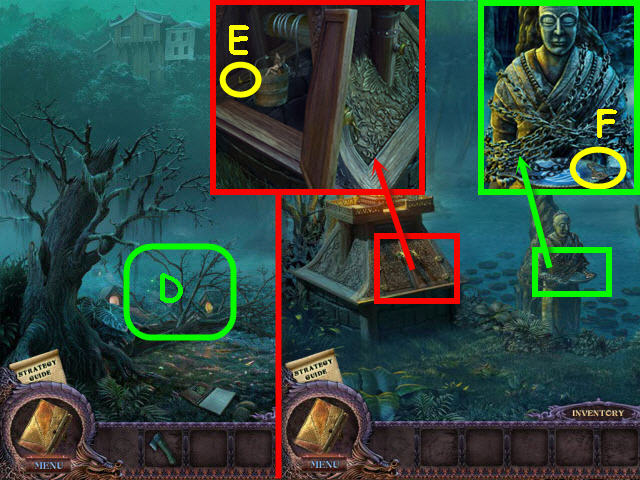
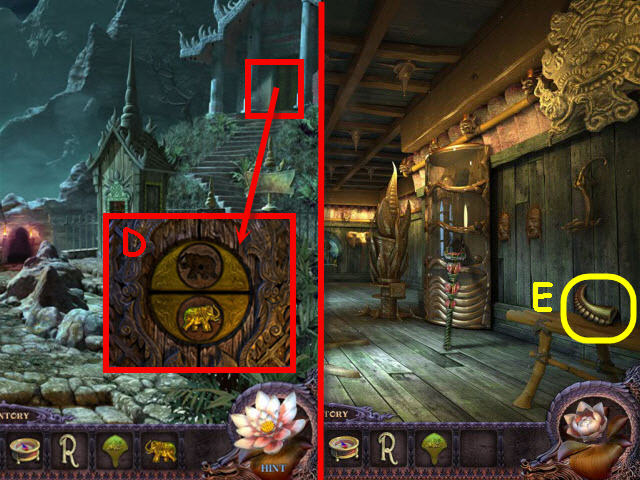
- Use the AXE on the bushes (D).
- Go left.
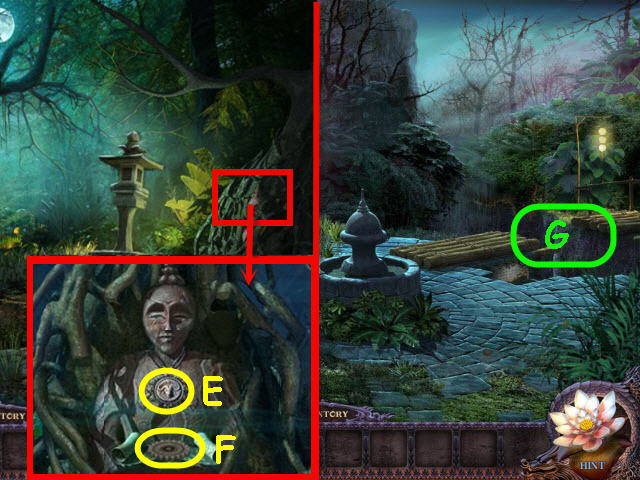
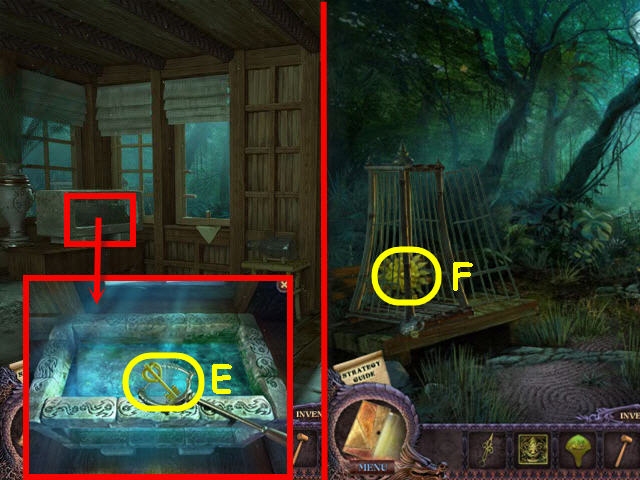
- Examine the well; open the doors, move the bucket and take the DRAWER HANDLE (E).
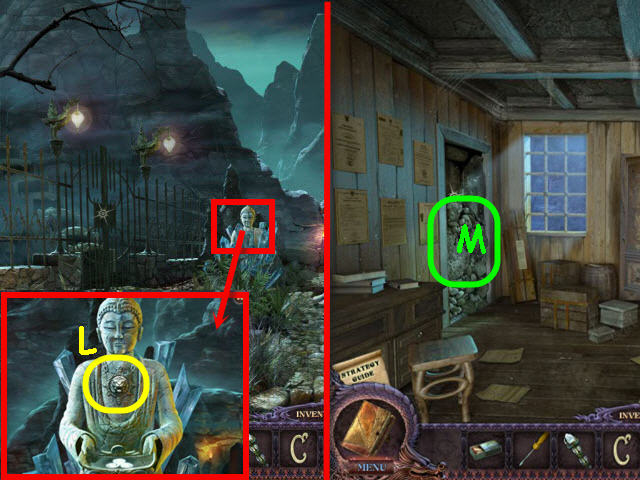
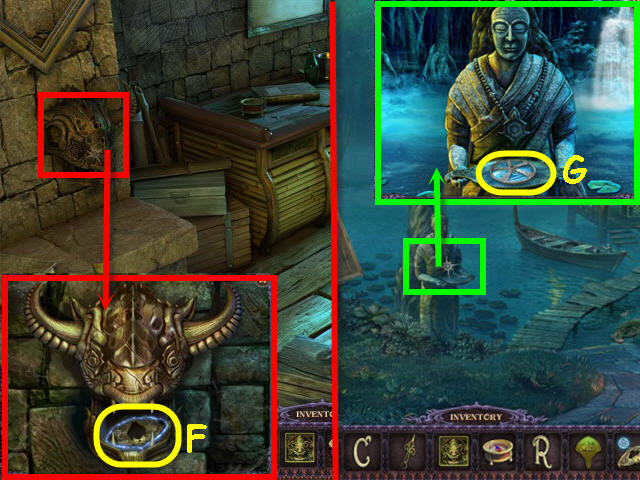
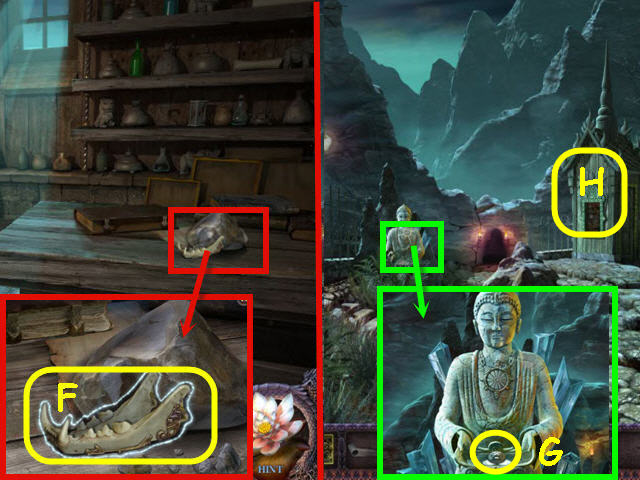
- Examine the statue; take the GATE KEY (F).
- Back out.

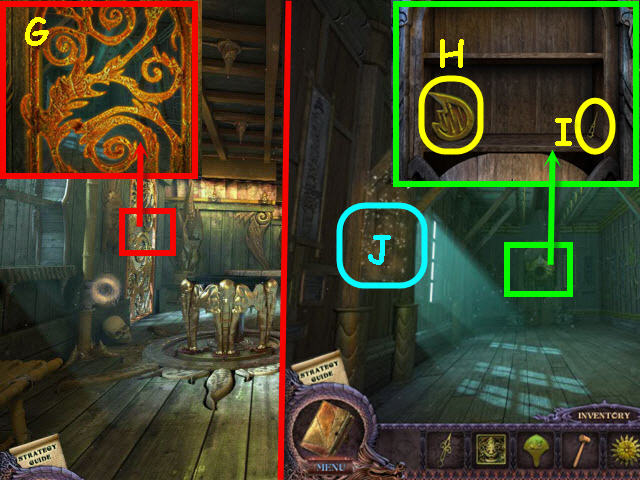
- Examine and use the GATE KEY on the gate; turn the key and slide the bolt (G).
- Go right.
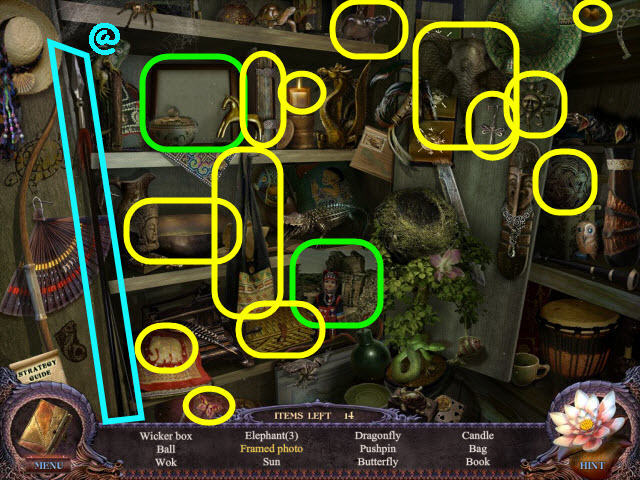
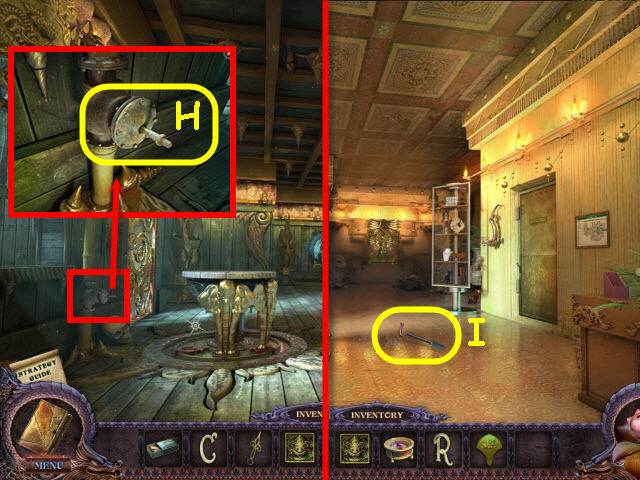
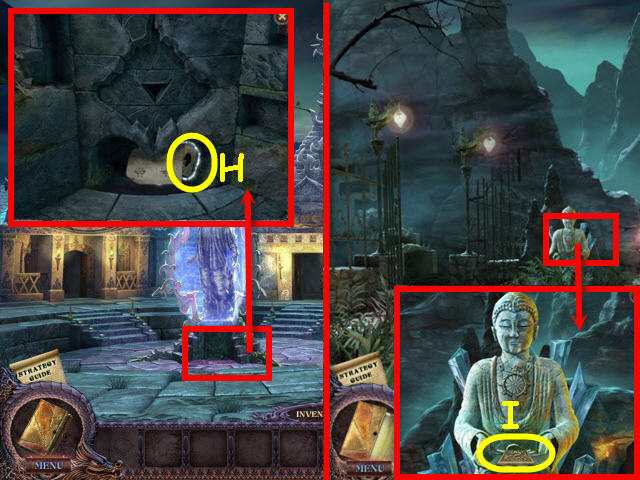
- Take the MUSHROOMS (H).
- Examine the barrel; take the MATCHES (I).
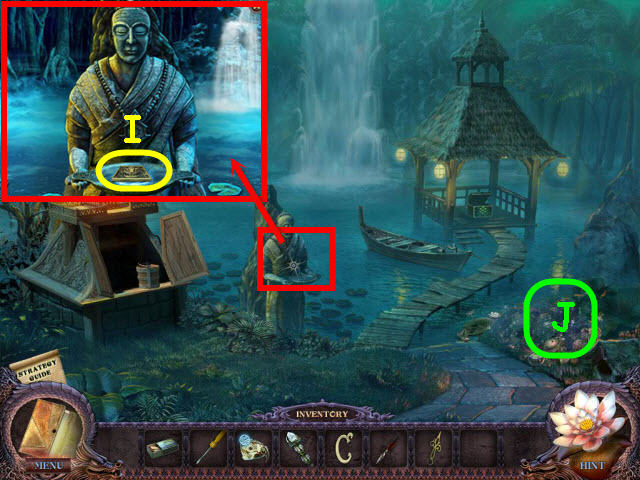
- Enter the house.
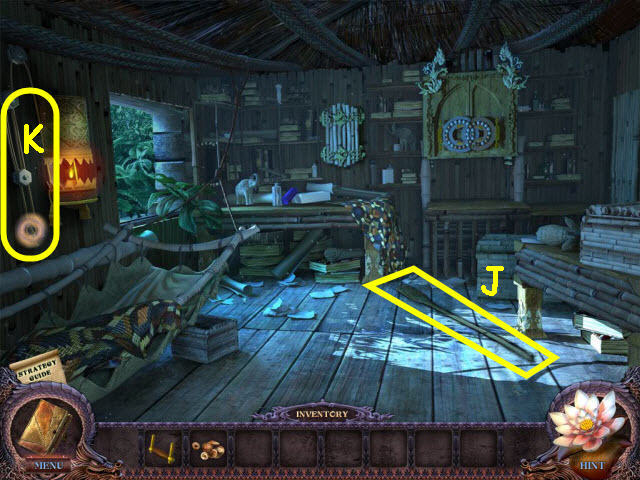
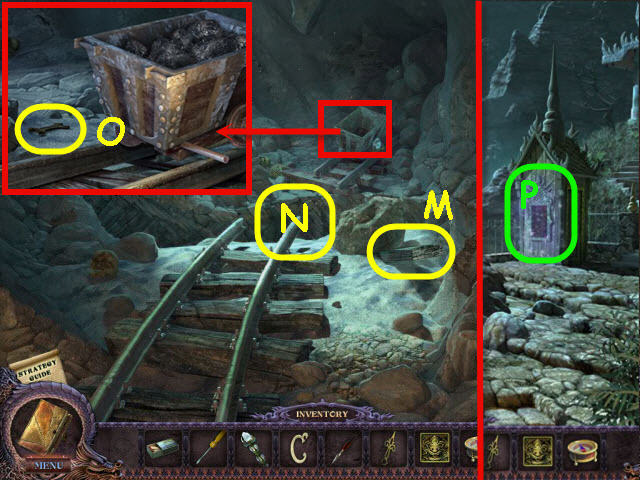
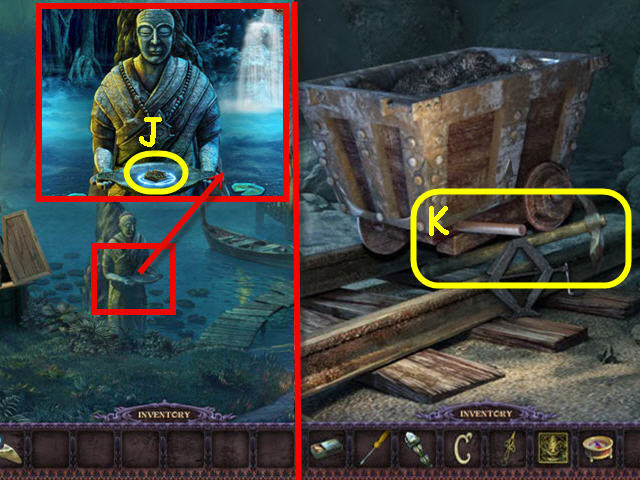
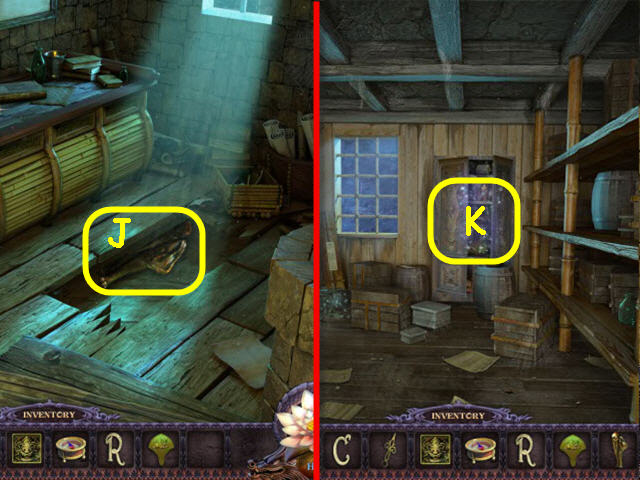
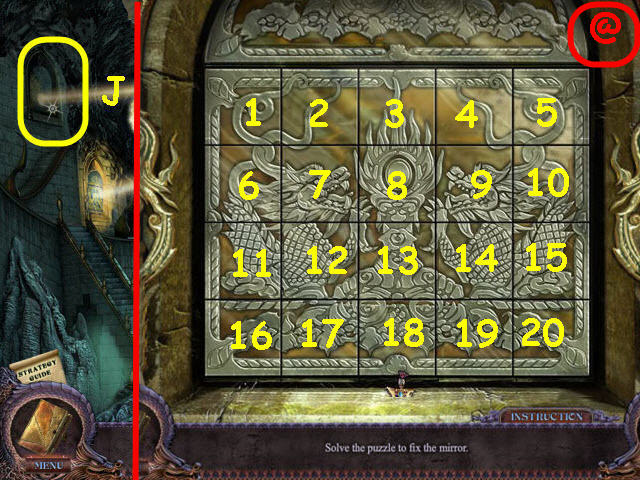
- Take the OAR (J).
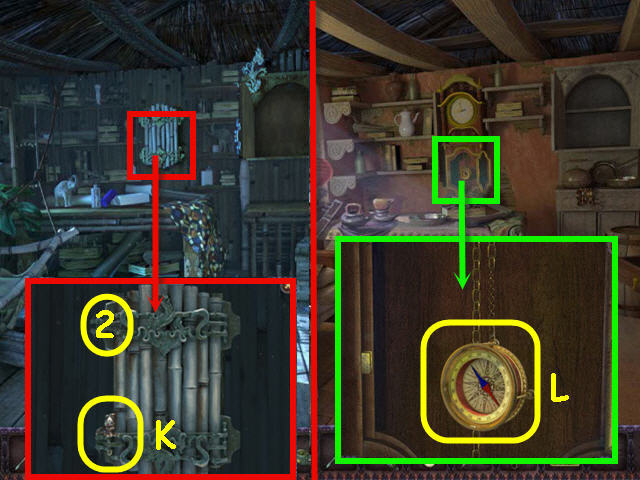
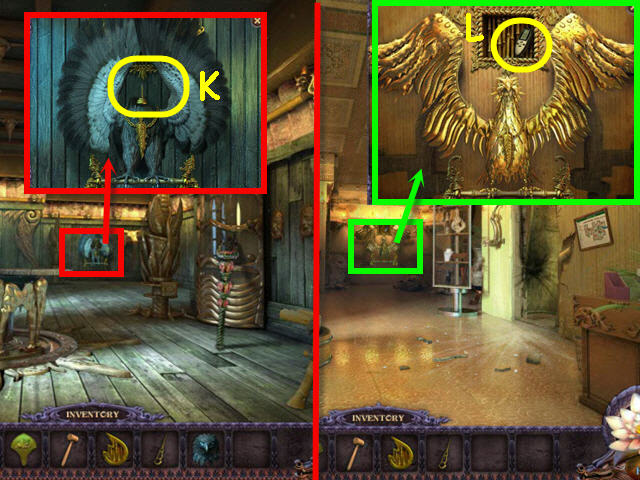
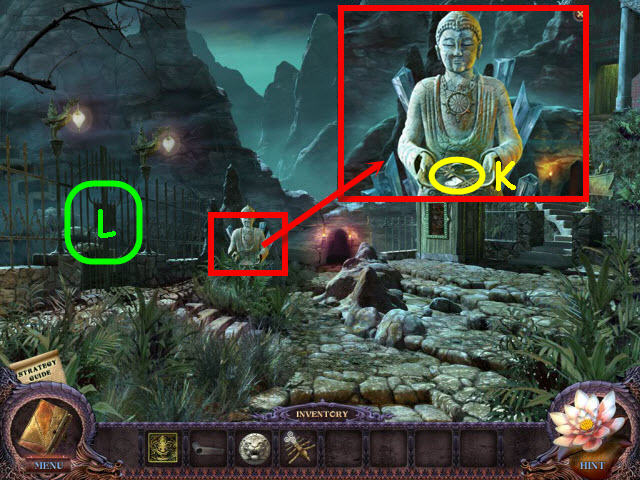
- Pull the illuminator (K).
- Take the SAW BAND (L).
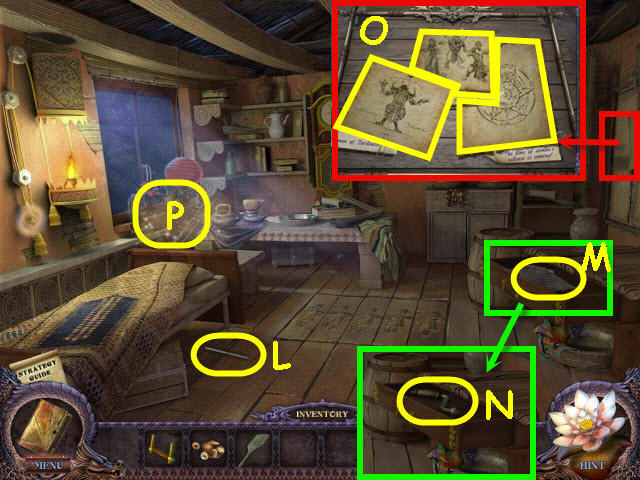
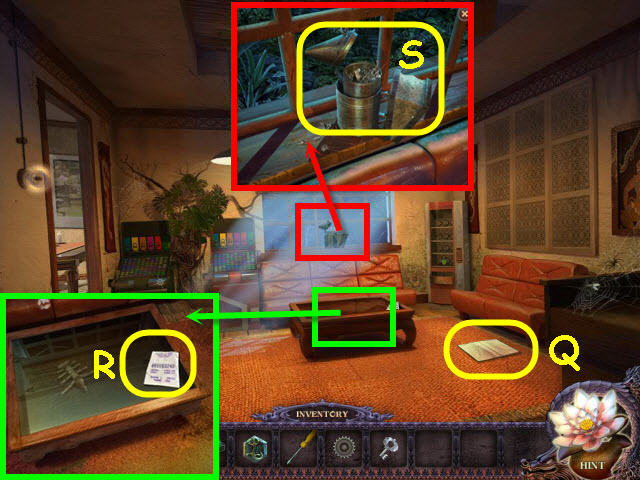
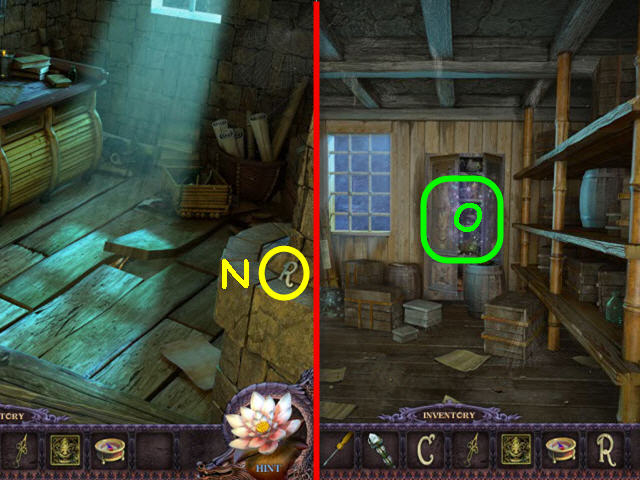
- Place the DRAWER HANDLE on the drawer; take the note (M) and the WELL HANDLE (N).
- Examine the bulletin board; take the three notes (O).
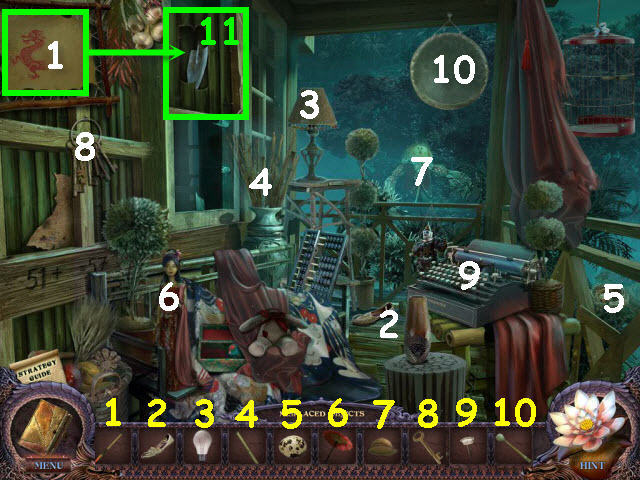
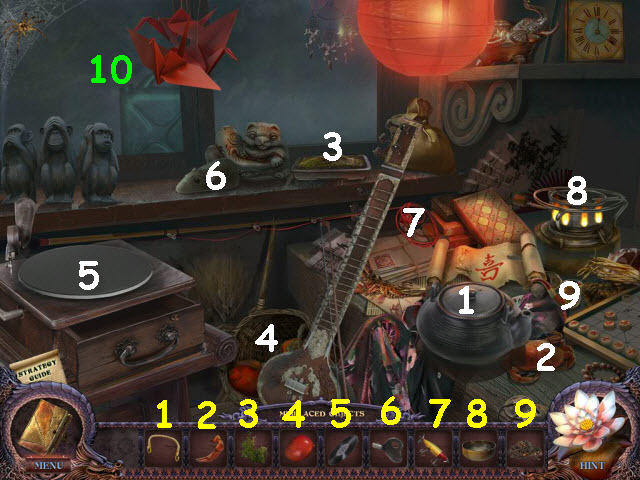
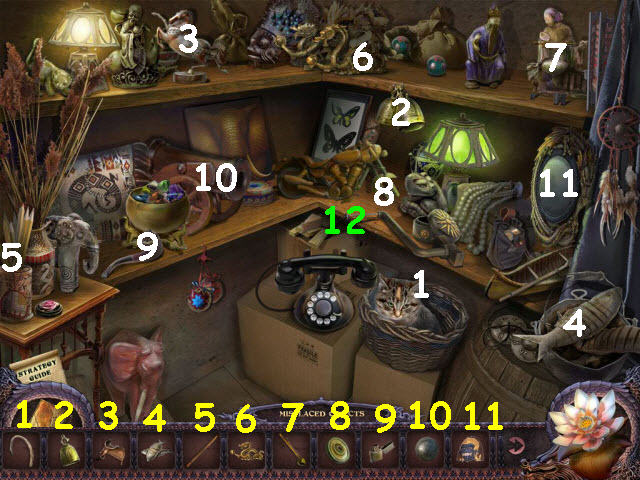
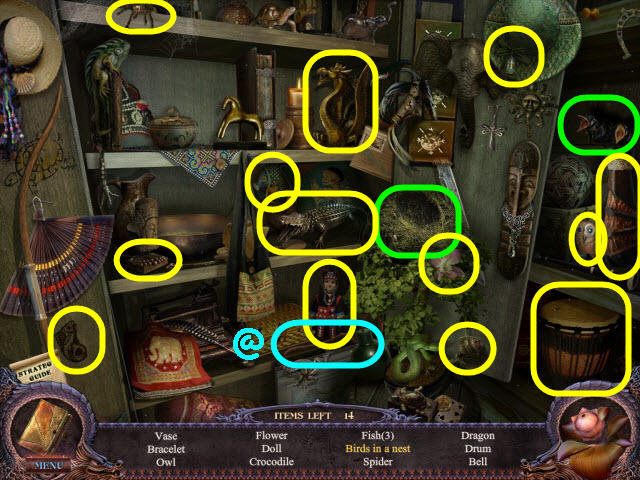
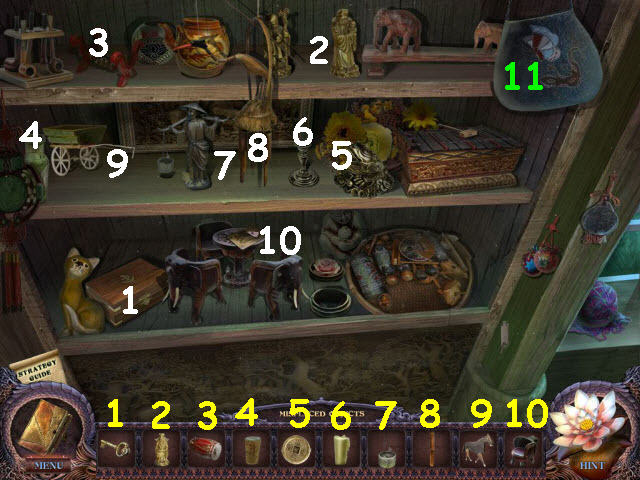
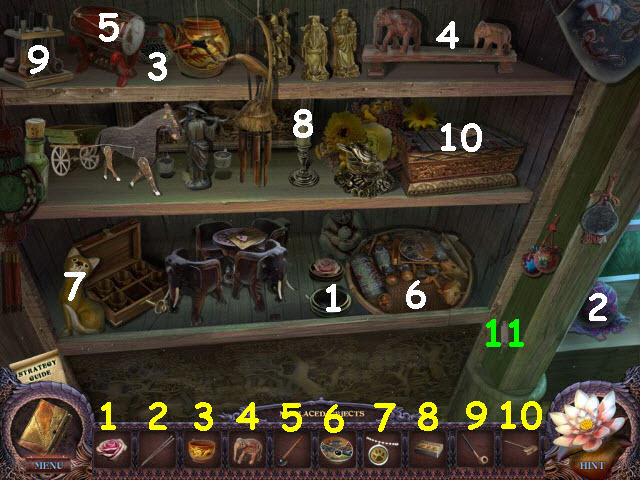
- Examine the window sill (P) to access a HOS.
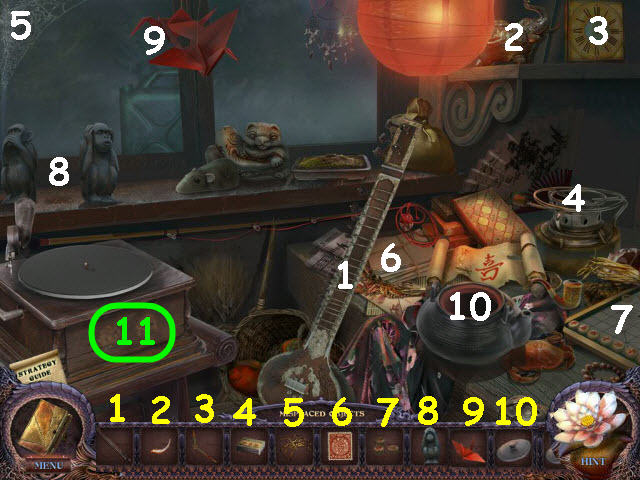
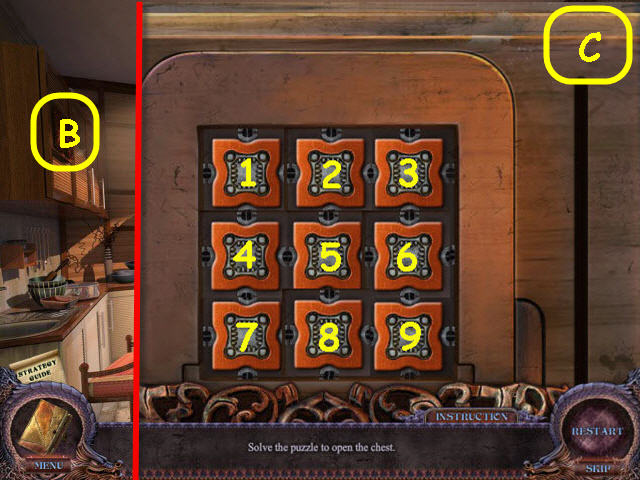
- Place the items back in their correct locations (1-10).
- Place the handle on the phonograph (11); get a RING BUTTON.
- Pull the illuminator.
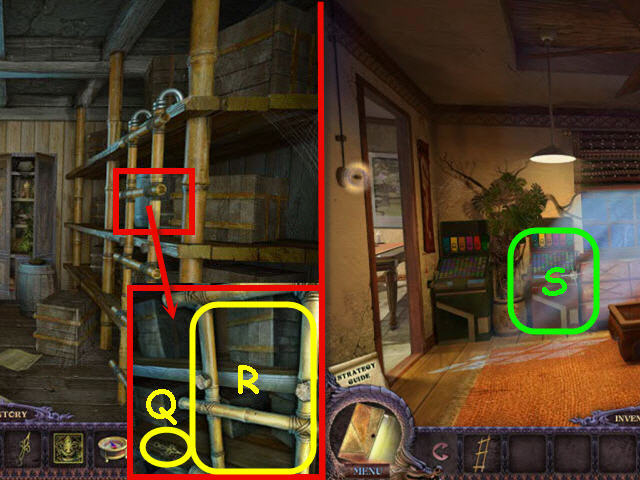
- Examine the cabinet.
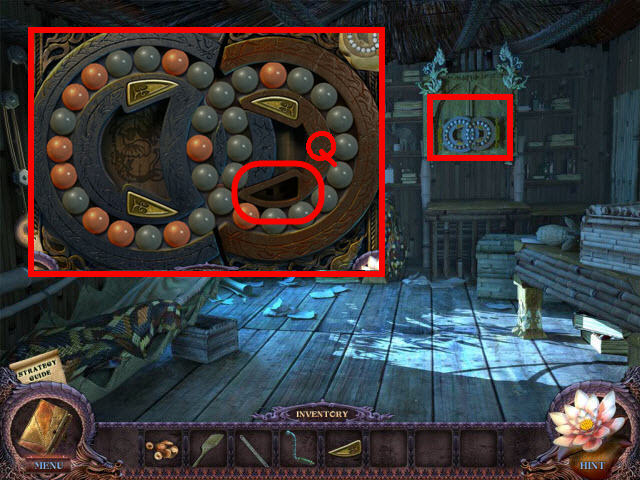
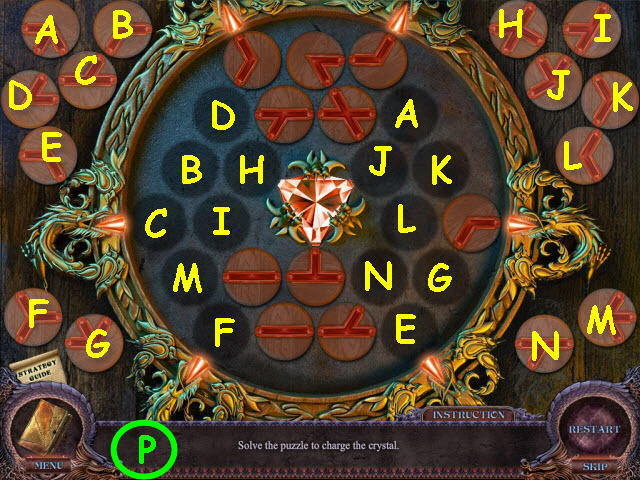
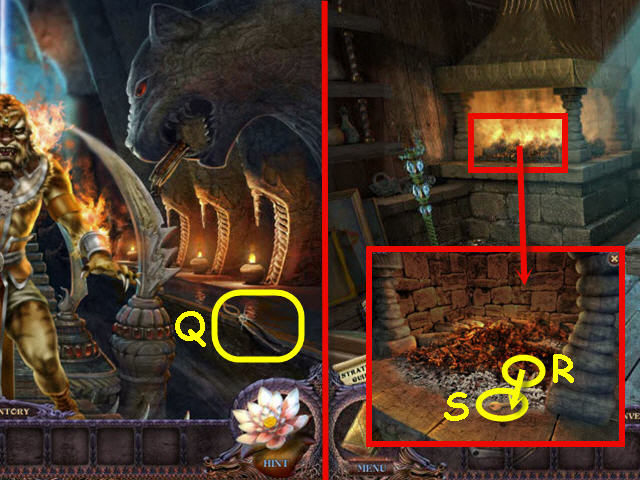
- Place the RING BUTTON in the slot (Q) to trigger a puzzle.
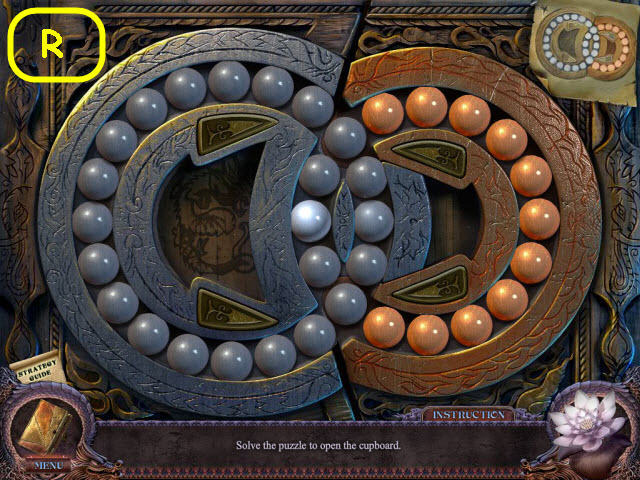
- Move all the orange balls to the right side using the arrows.
- UL = upper left, UR = upper right, LL = lower left, and LR = lower right.
- To solve the puzzle, press the arrows in the following order: LL 2x, UR, LL 2x, UR 2x, LL, UR, LL 2x, UR, LL, UR 2x, LL 2x, UR, LL, UR, LL 3x, and UR.See screenshot (R).
- Pull the illuminator.
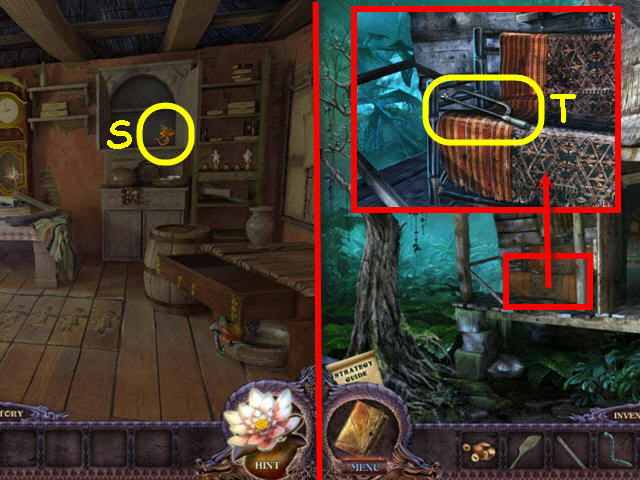
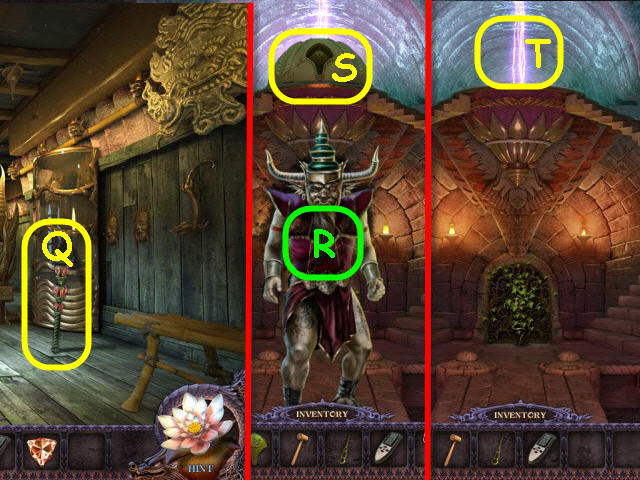
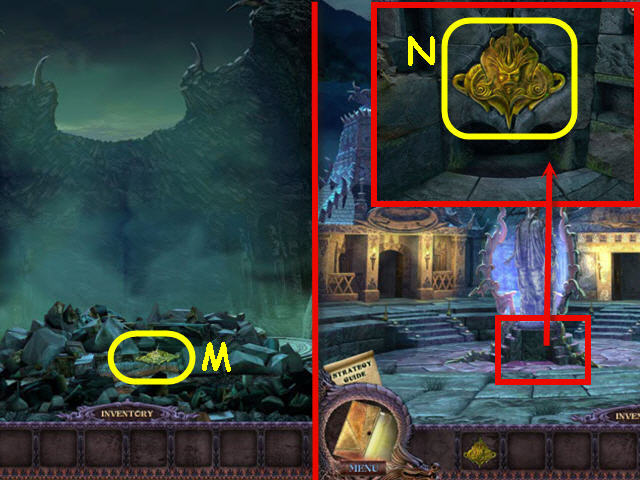
- Take the DRAGON (S).
- Back out.
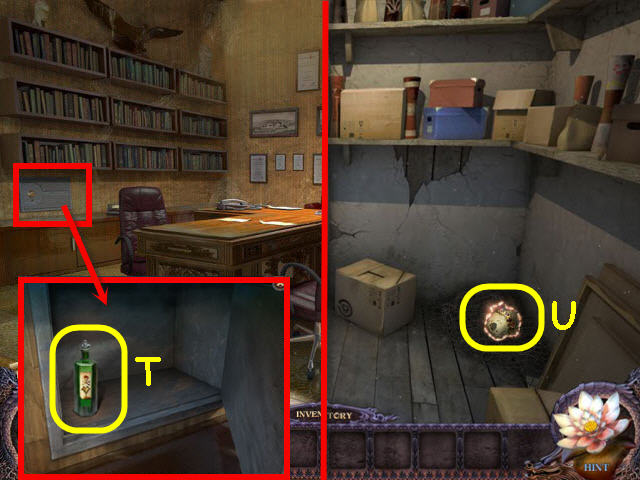
- Examine the bench; place the SAW BAND on the saw; take the SAW (T).
- Back out and go left.
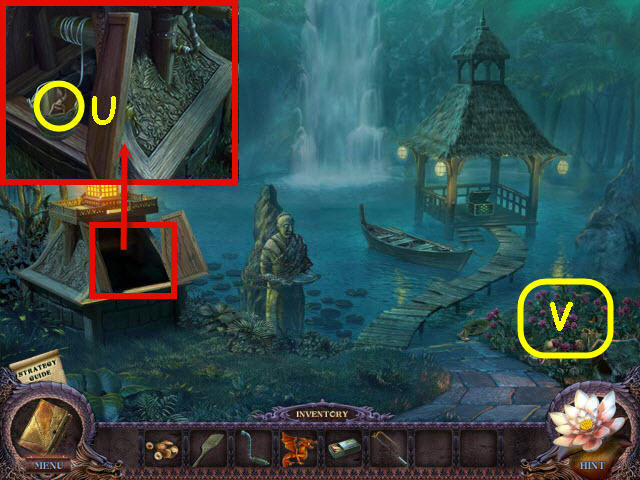
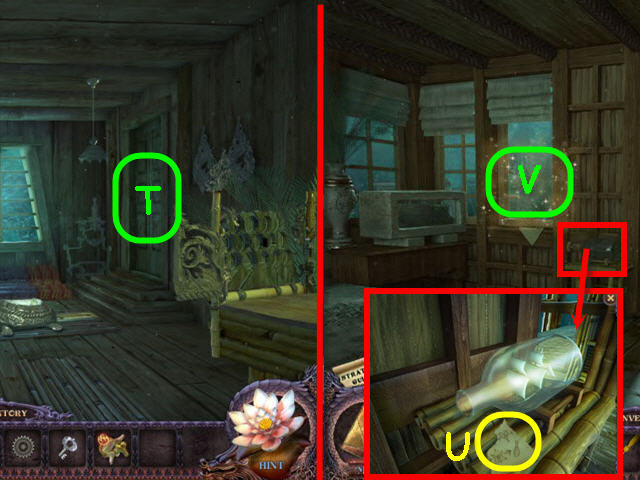
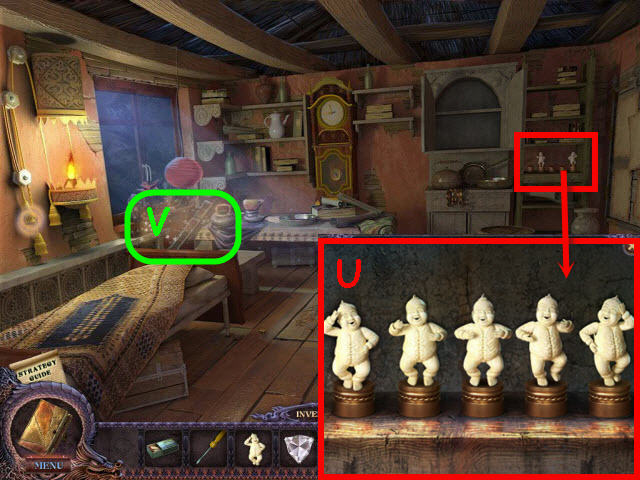
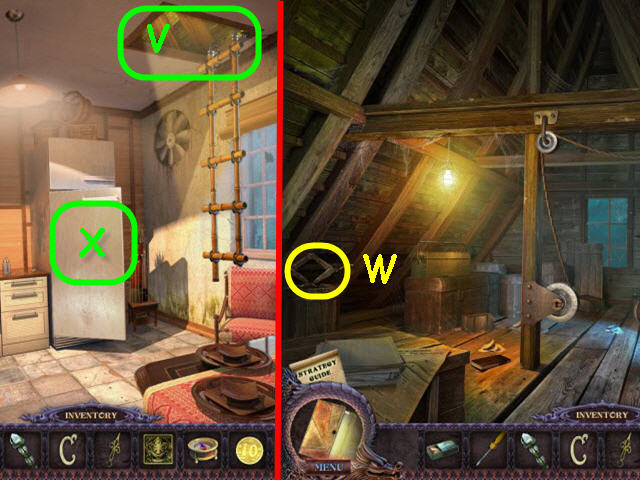
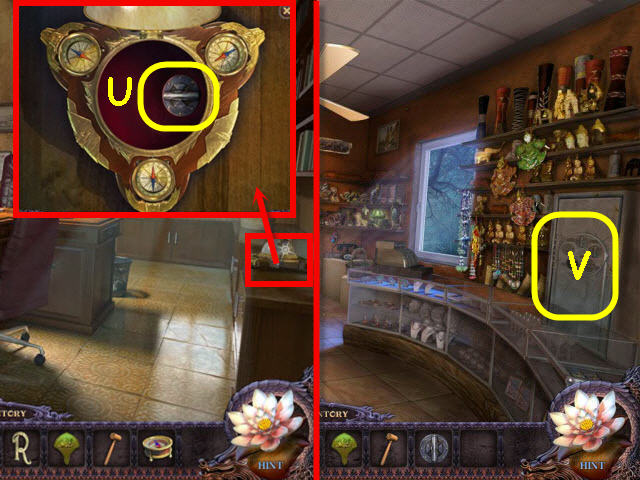
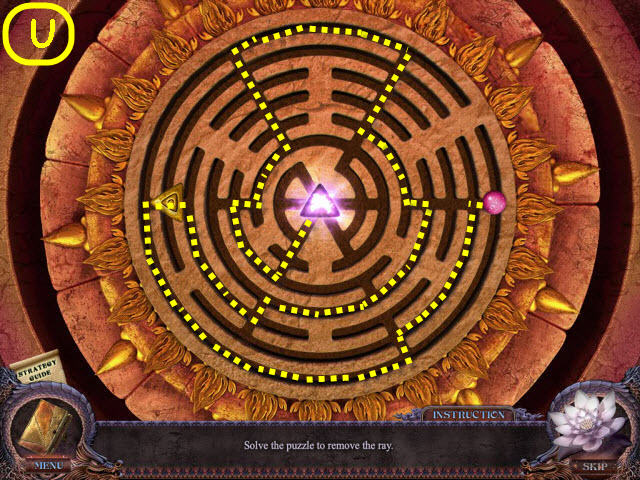
- Examine and place the WELL HANDLE on the well; turn the WELL HANDLE three times and take the GARDEN PRUNER (U).
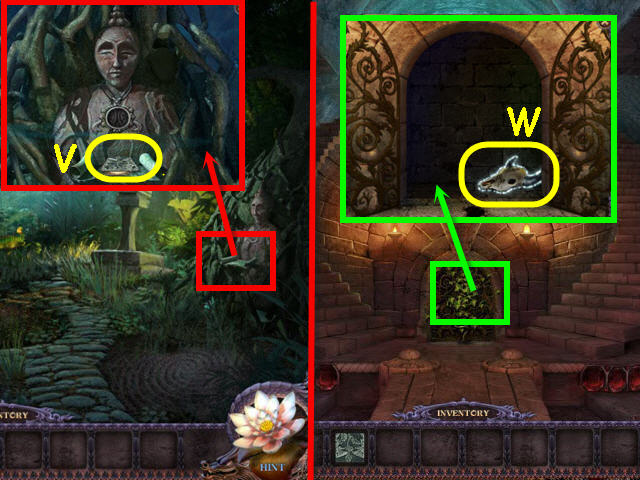
- Use the GARDEN PRUNER on the bushes (V).
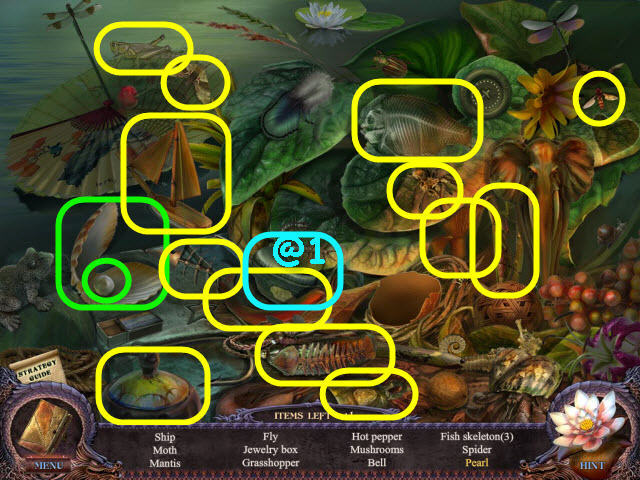
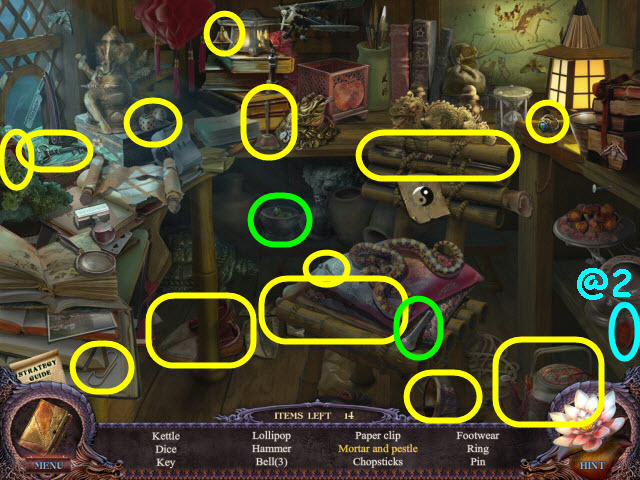
- Examine the pruned area to access a HOS.
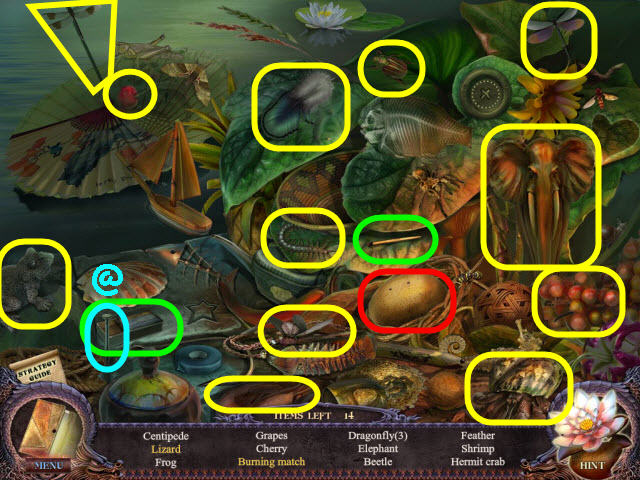
- Find the items listed.
- Marked in green: strike the match on the matchbook to get a burning match.
- Marked in red: crack the egg twice to get the lizard.
- Find the NAIL (@).
- Go forward on the dock.
- Examine the chest.
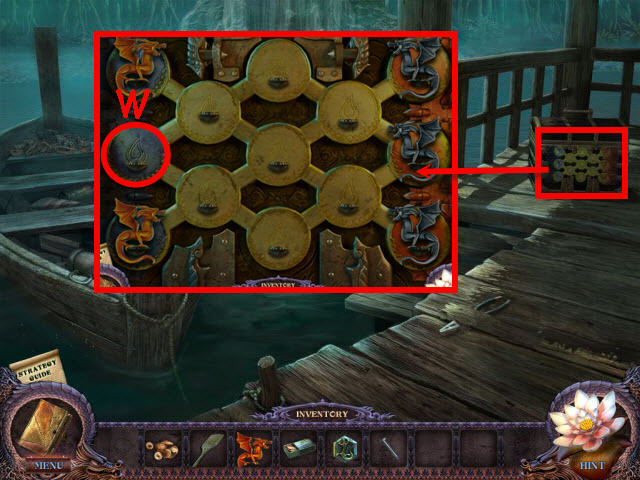
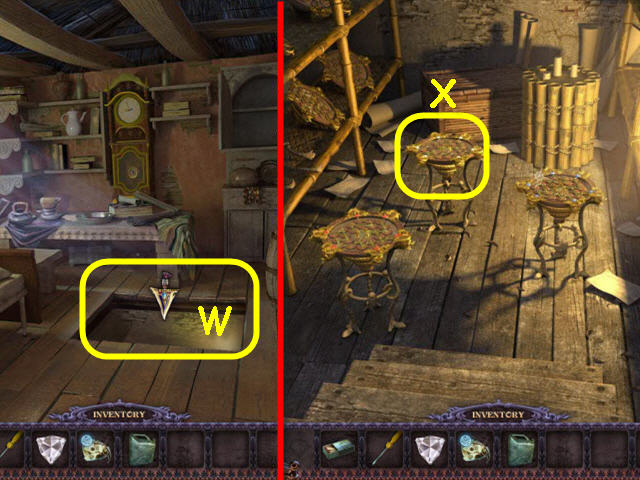
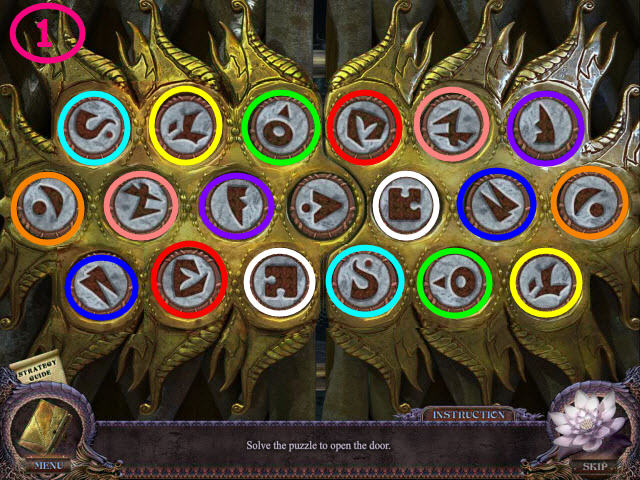
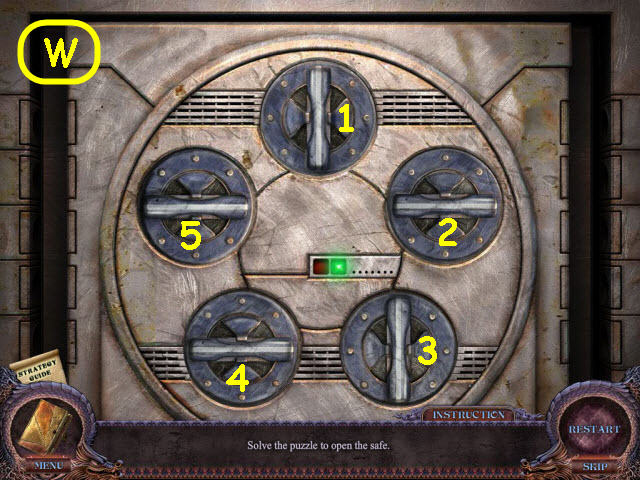
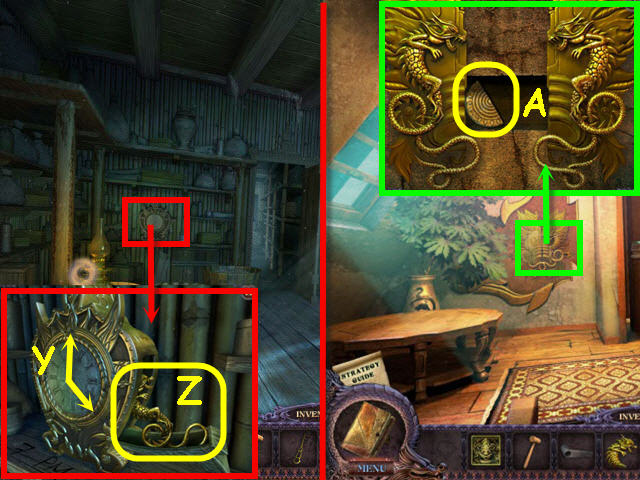
- Place the DRAGON on the lock (W) to trigger a puzzle.
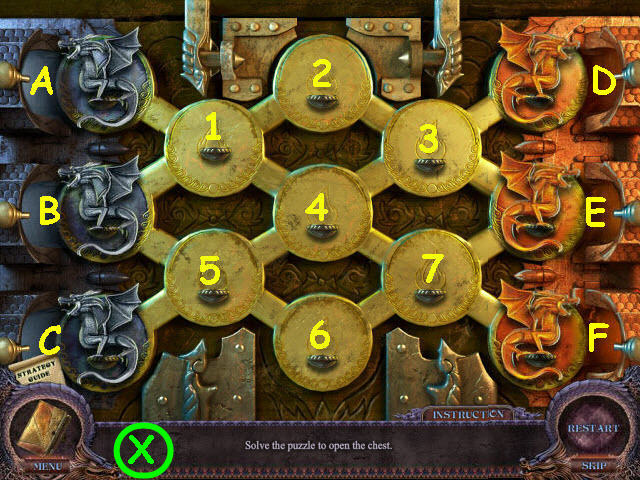
- Switch the dragons to the opposite sides without letting them meet.
- To solve the puzzle, move the dragons to the following locations: F-7-4-3, B-5-6, A-1-B-5, 3-2-1-A, E-3-2-1, 6-7-F, 5-6-7, C-5-6, 1-B, D-3-2-1, 7-E-3-D, 6-7-E, and 1-4-5-C.See screenshot (X).
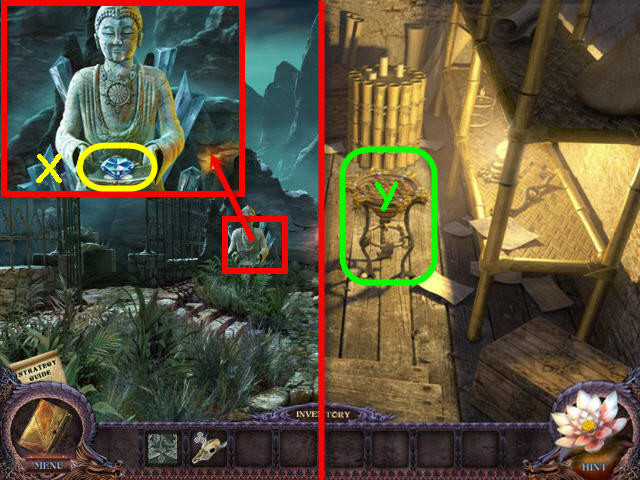
- Take the water SPECIAL ITEM.
- Back out.
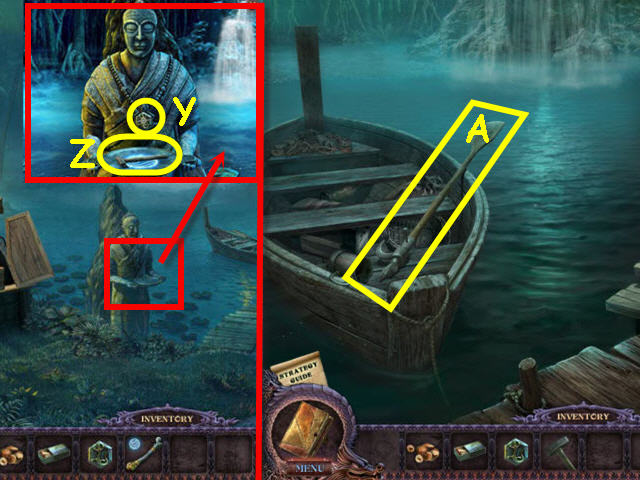
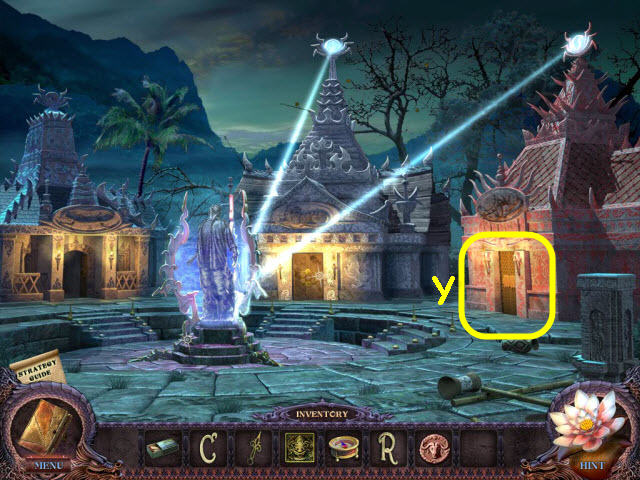
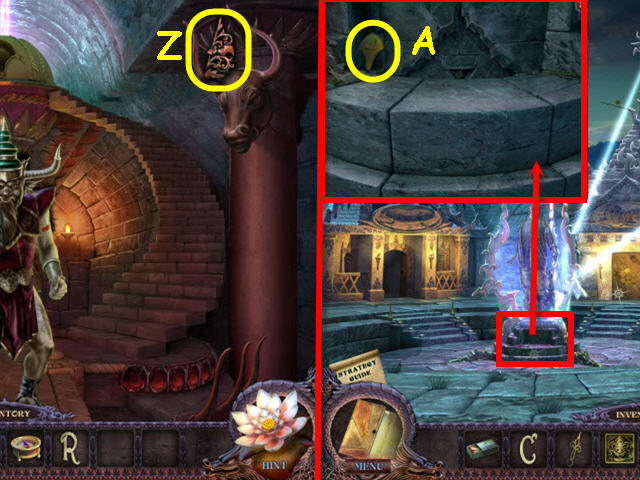
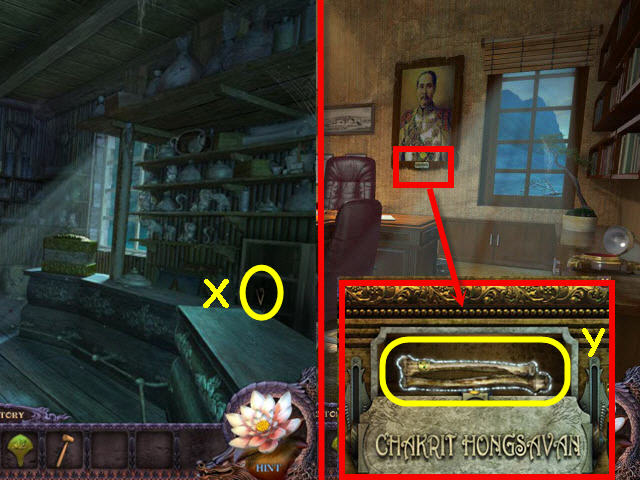
- Examine and use the SAW on the statue; take the LIZARD PLATE (Y).
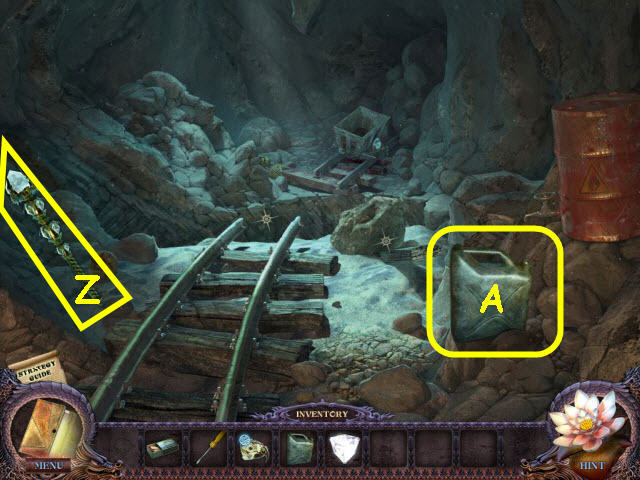
- Place the water SPECIAL ITEM on the plate; take the HAMMER (Z).
- Go forward.
- Place the OAR on the boat; place the NAIL on the OAR and use the HAMMER.Take the GAFF (A).
- Back out twice.
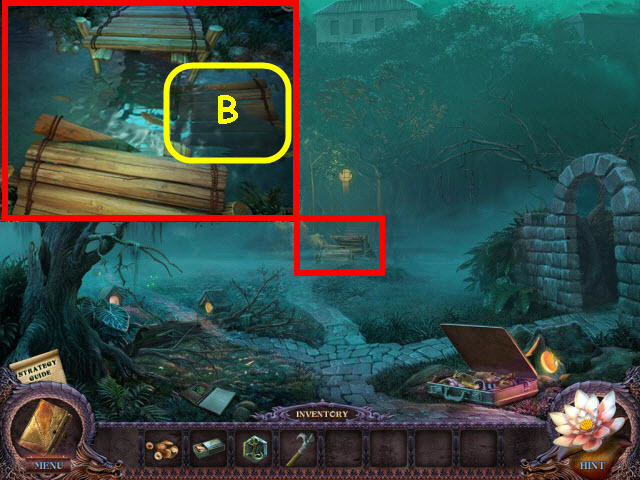
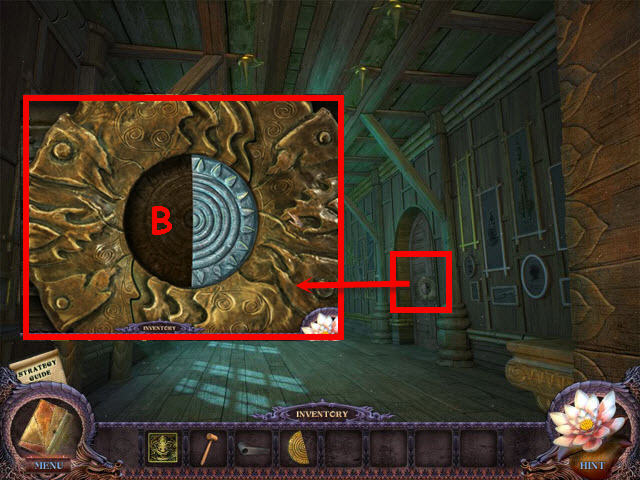
- Examine and use the GAFF on the bridge (B).
- Go forward.
Chapter 2 – Town
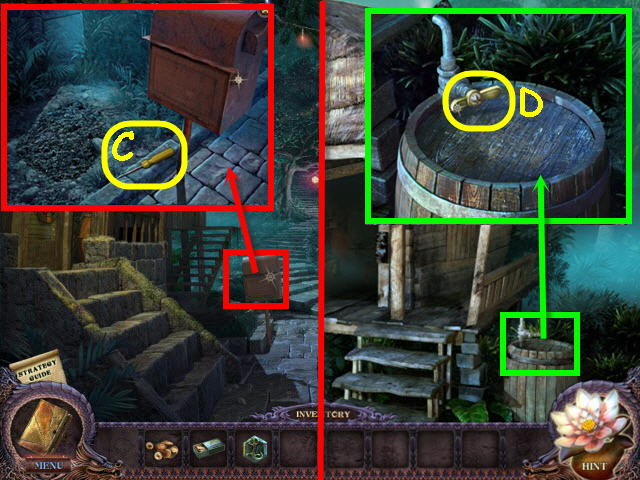
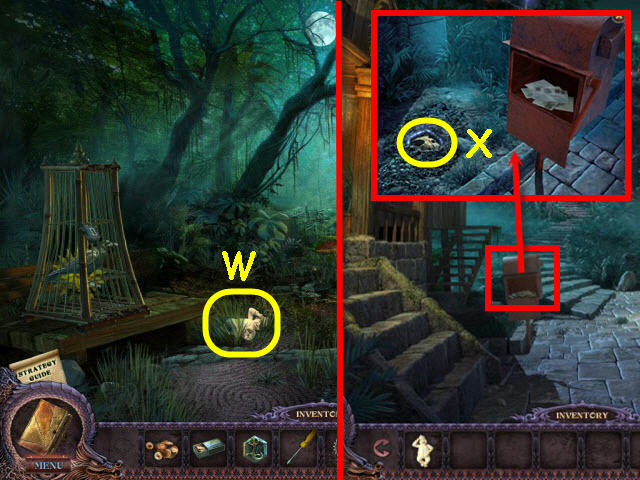
- Examine the mailbox; take the SCREWDRIVER (C).
- Back out and go right.
- Examine the barrel; use the SCREWDRIVER on the screw and take the VALVE (D).
- Back out and then go forward twice.
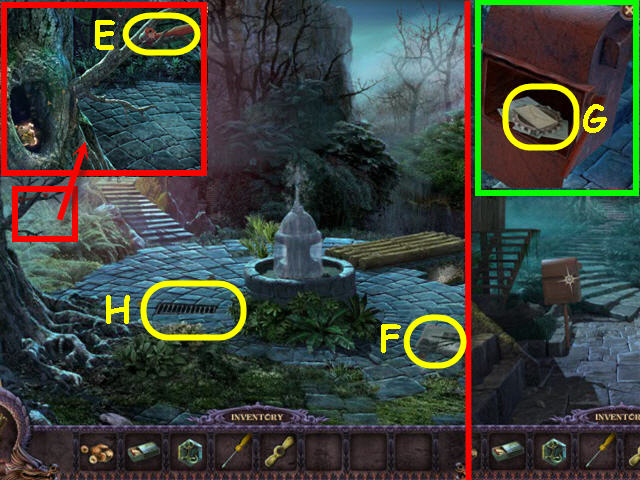
- Examine the tree branch; take the MAILBOX HANDLE (E).
- Read the newspaper (F).
- Back out.
- Examine and use the MAILBOX HANDLE on the mailbox; pull the handle.Read the letter and take the GEAR (G).
- Go forward.
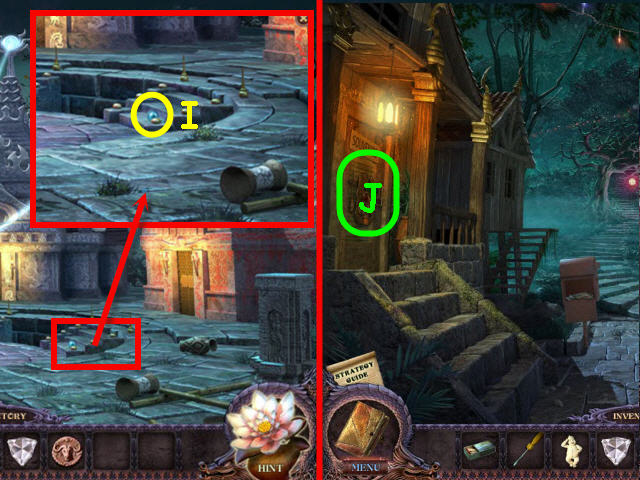
- Move the grate (H) and examine the hole.
- Place the VALVE on the pipes to trigger a puzzle.
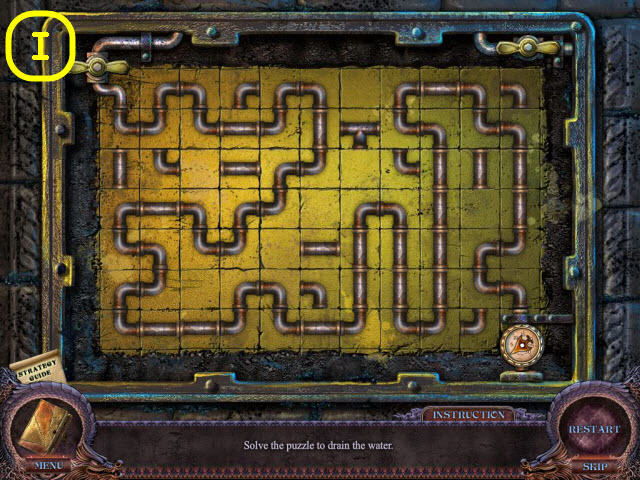
- Rotate the pipes to make a continuous connection.
- See screenshot (I) for solution.
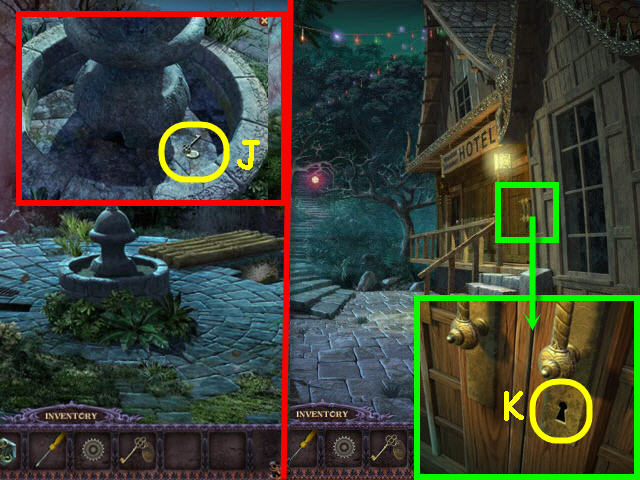
- Take the HOTEL KEY (J).
- Back out.
- Examine and use the HOTEL KEY on the hotel door (K).
- Enter the hotel.
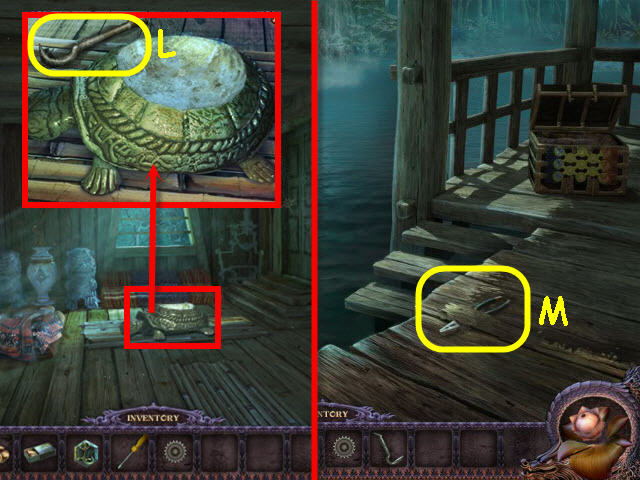
- Examine the turtle; take the CROWBAR (L).
- Go to the well and go forward.
- Examine and use the CROWBAR on the deck; take the PLIERS (M).
- Back out.
- Examine the area right of the path to access a HOS.
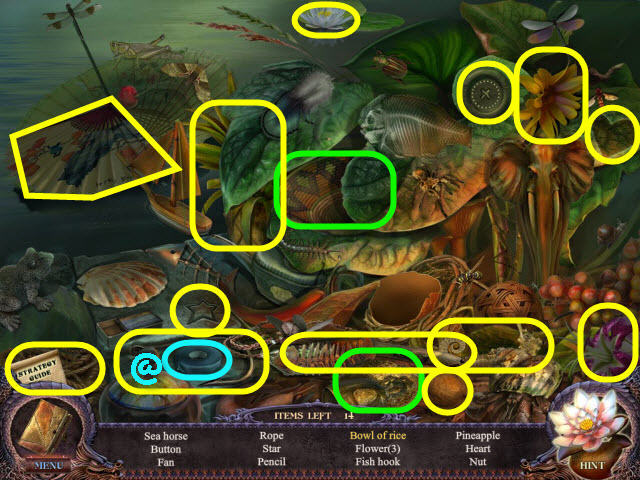
- Find the items listed.
- Marked in green: put the rice in the bowl to get a bowl of rice.
- Find the INSULATING TAPE (@).
- Go into the hotel.
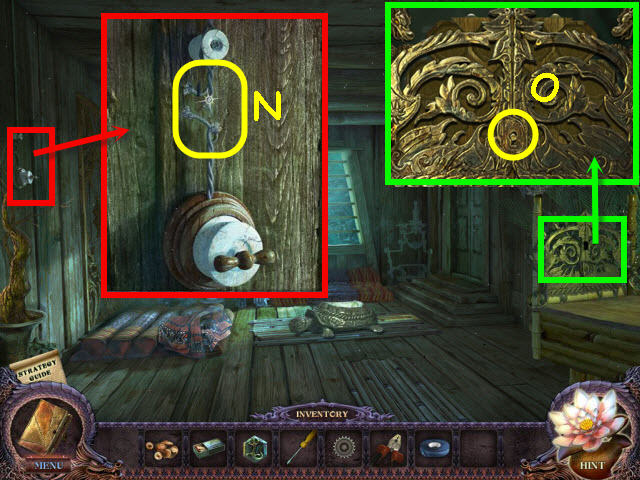
- Examine the switch; use the INSULATING TAPE on the wires (N) to get the illuminator for the room.
- Examine the sideboard; attempt to turn the key (O).
- Use the PLIERS on the broken key to trigger a puzzle.
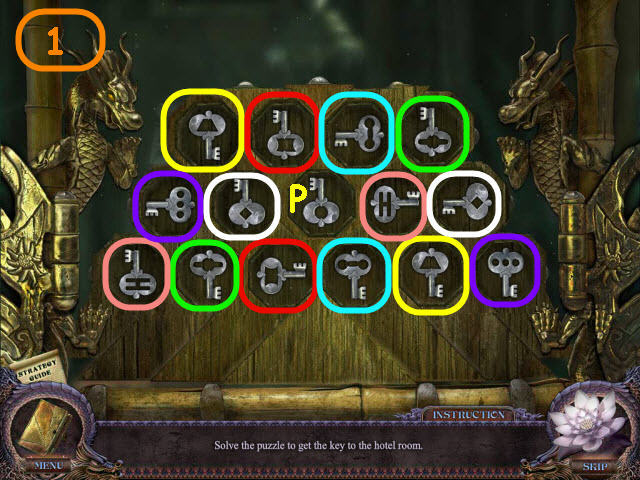
- Find the matching pairs.
- The selected keys will turn after every attempt.The matching pairs must be turned the same way like the yellow circled pair in the screenshot.
- See screenshot (1) for matching pair location; note that they will need to be turned.
- Select the center slot when complete; take the HOTEL ROOM KEY (P).
- Flip the illuminator switch.
- Read and take the guest log (Q).
- Examine the table; take the note (R) to get a clue in your diary.
- Examine the window sill; use the MATCHES on the smoker; take the BEE SMOKER (S).
- Go left into the kitchen.
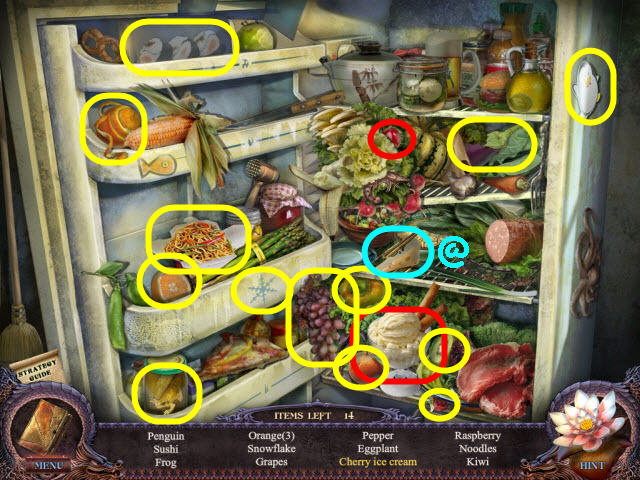
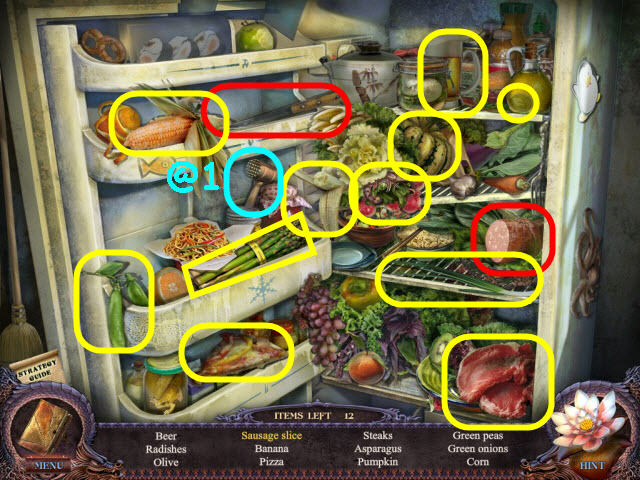
- Open the refrigerator door and examine it to access a HOS.
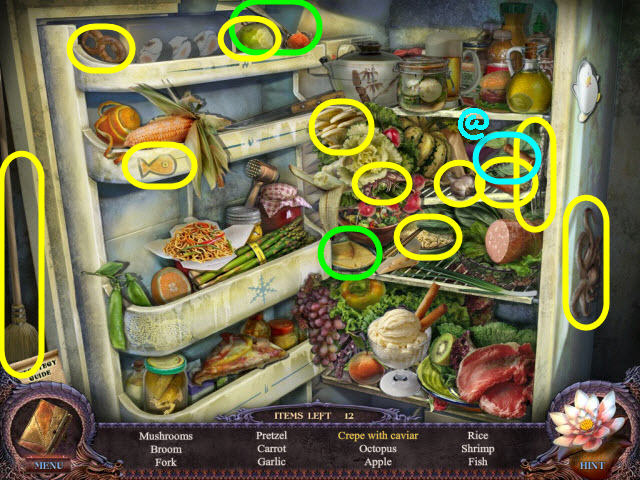
- Find the items listed.
- Marked in green: put the caviar on the crepe to get a crepe with caviar.
- Find the CORKSCREW (@).
- Back out.
- Flip the illuminator switch.
- Examine and use the HOTEL ROOM KEY on the door (T).
- Go right through the door.
- Examine and use the CORKSCREW on the bottle; take the RECIPE HALF (U).
- Examine the windows (V) to access a HOS.
- Place the items back in their correct locations (1-10).
- Place the handle on the blade (11) to get a TROWEL.
- Go forward through the door.
- Take the STATUETTE (W).
- Exit the hotel.
- Examine the mailbox; use the TROWEL on the dirt; take the water SPECIAL ITEM (X).
- Go forward.

- Examine and use the BEE SMOKER on the tree; take the fire SPECIAL ITEM (Y).
- Back out twice.
- Examine the suitcase (Z) to access a HOS.
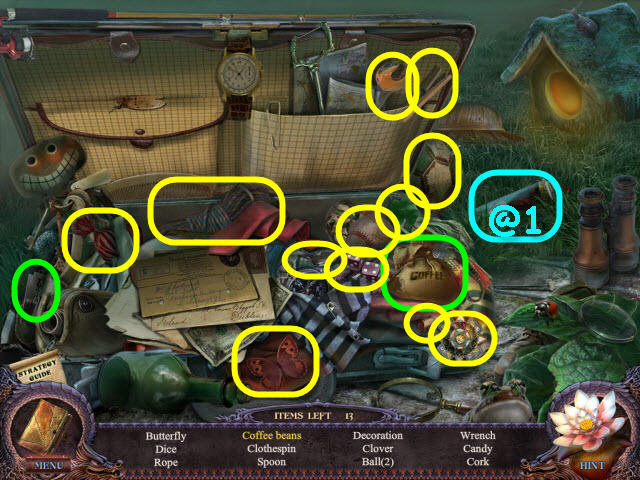
- Find the items listed.
- Marked in green: use the razor blade on the coffee bag to get coffee beans.
- Find the INSECTICIDE (@1).
- Go left.
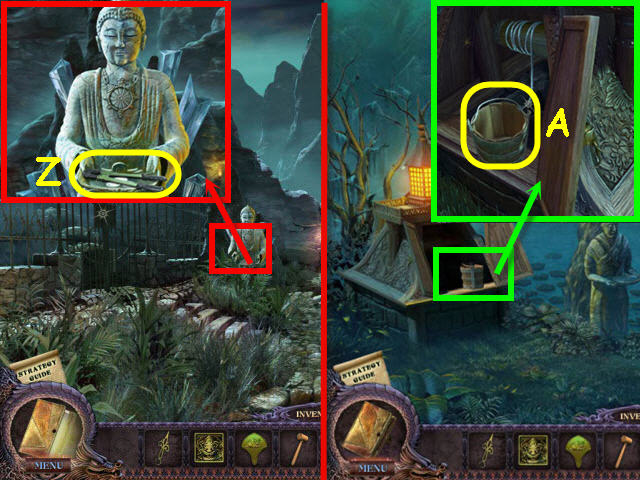
- Examine the statue; place the water SPECIAL ITEM on the plate and take the UNCHARGED WHITE CRYSTAL (A).
- Go into the hotel.
- Flip the illuminator switch.
- Use the INSECTICIDE on the spider; take the FLY (B).
- Flip the illuminator switch.
- Go right and straight.

- Examine and give the FLY to the man-eating plant; take the 2nd GEAR (C).
- Back out.
- Examine the window (D) to access a HOS.
- Place the items back in their correct locations (1-10).
- Place the tassel on the curtain (11) to get a MACHETE.
- Go forward.
- Examine and use the MACHETE on the statue; take the BUFFALO PLATE (E).
- Place the fire SPECIAL ITEM on the plate; take the 3rd GEAR (F).
- Exit the hotel and go forward to the fountain.
- Examine and place the 3 GEARS on the bridge mechanism (G) to trigger a puzzle.
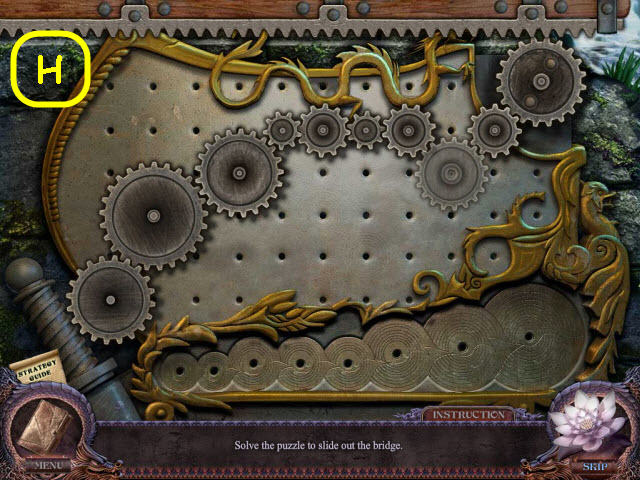
- Place the GEARS so that they are all turning.
- See screenshot (H) for solution.
- Cross the bridge to the temple square.
Chapter 3 – Peter
- Examine the stairs; take the MAGIC BALL (I).
- Back out twice.
- Examine and place the MAGIC BALL on the souvenir shop door (J) to trigger a puzzle.
- Slide the balls so they are all in the same colored slots.
- Select the balls in the following order to solve the puzzle: purple, blue, green, red, green, blue, purple, yellow, green, red, blue, purple, yellow, green, red, purple, yellow, green, red, purple, blue, yellow, green, red, purple, blue, green, red, purple, blue, green, yellow, red, purple and blue (K).
- Go left into the souvenir shop.
- Take the BANK NOTE (L).
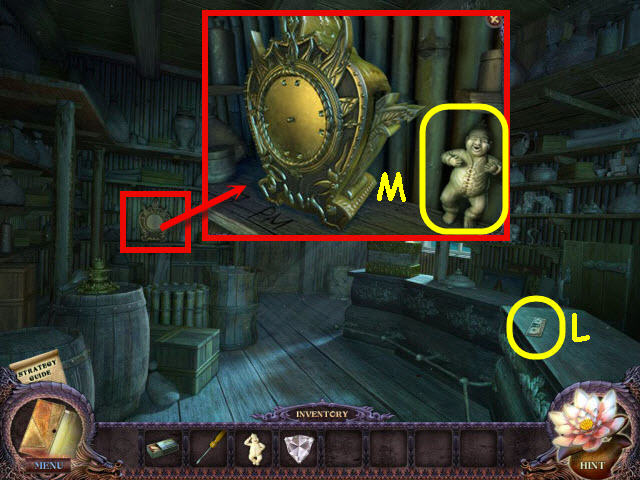
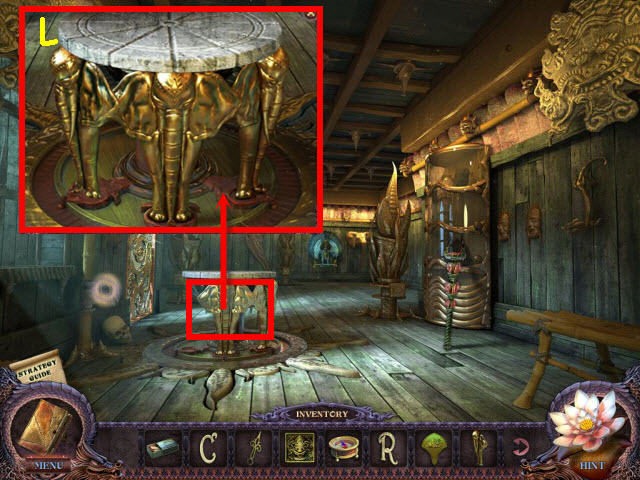
- Examine the clock; take the 2nd STATUETTE (M).
- Go into the hotel.
- Flip the illuminating switch.
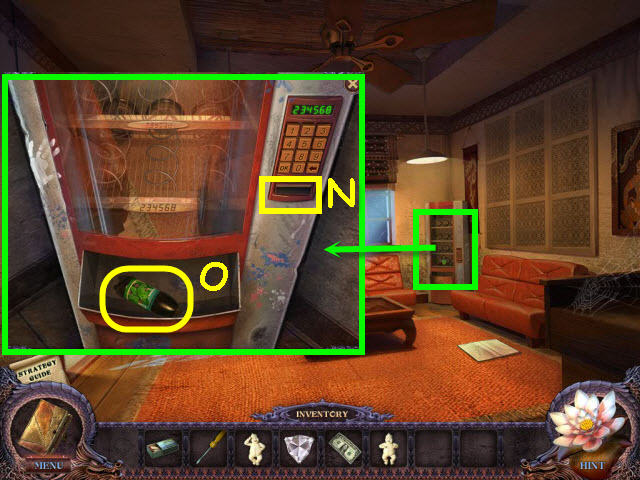
- Examine and place the BANK NOTE in the vending machine (N).
- Punch in the code from under the bottle; 234568 and press OK.Take the MINT JUICE (O).
- Go left into the kitchen.
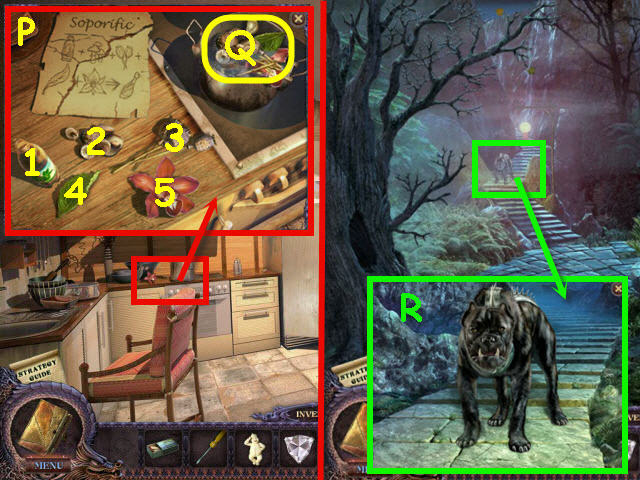
- Examine the stove; place the RECIPE HALF, MUSHROOMS and MINT JUICE on the counter (P).
- Place the MINT JUICE (1), MUSHROOMS (2), seed pods (3), leaf (4) and flower (5) in the pot; take the SOPOROFIC MEAT (Q).
- Go to the fountain.
- Examine and give the SOPORIFIC MEAT to the animal (R).
- Go forward twice into the cave.

- Take the water SPECIAL ITEM (S).
- Back out.
- Examine the small hut to access a HOS (T).
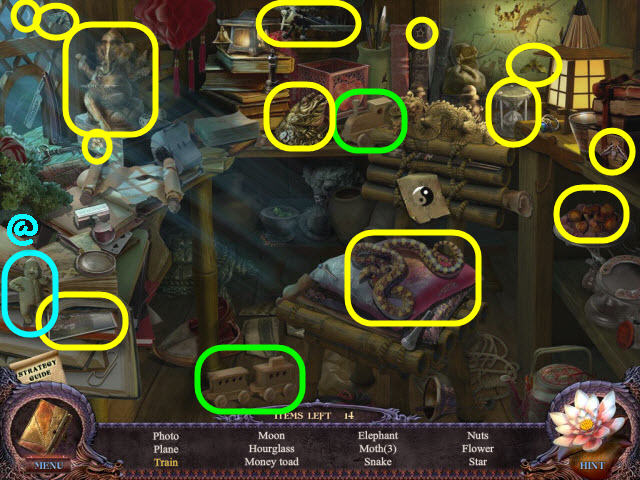
- Find the items listed.
- Marked in green: place the train engine on the train cars to get a train.
- Find the 3rd STATUETTE (@).
- Back out three times; go right and into the house.
- Examine and place the 3 STATUETTES on the bookshelf (U) to open the hatch.
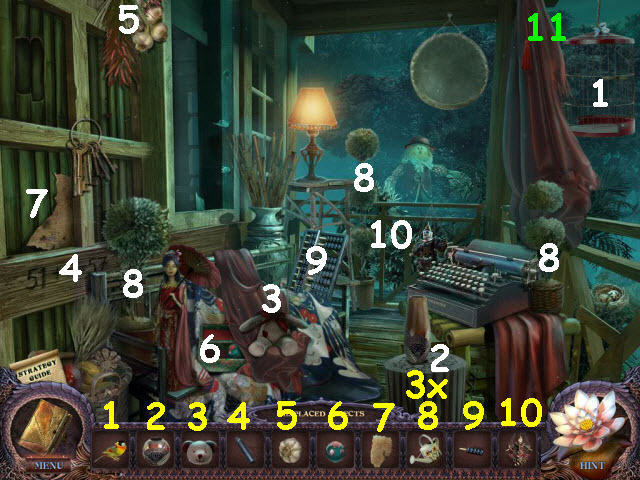
- Examine the window sill (V) to access a HOS.
- Place the items back in their correct locations (1-9).
- Place the glass-cutter on the glass (10) to get the EMPTY GAS CAN.
- Go down the hatch (W).
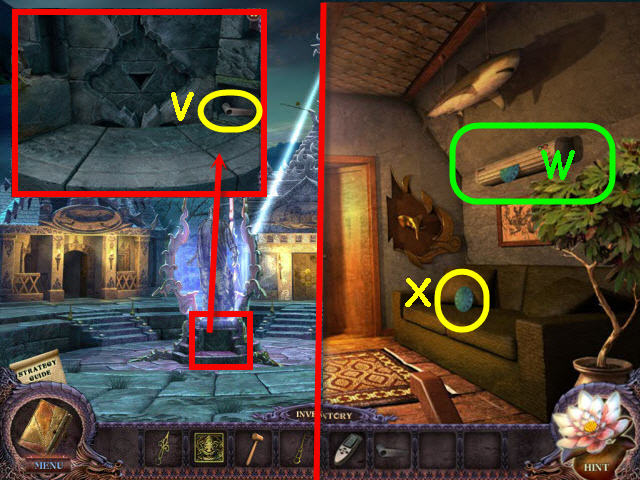
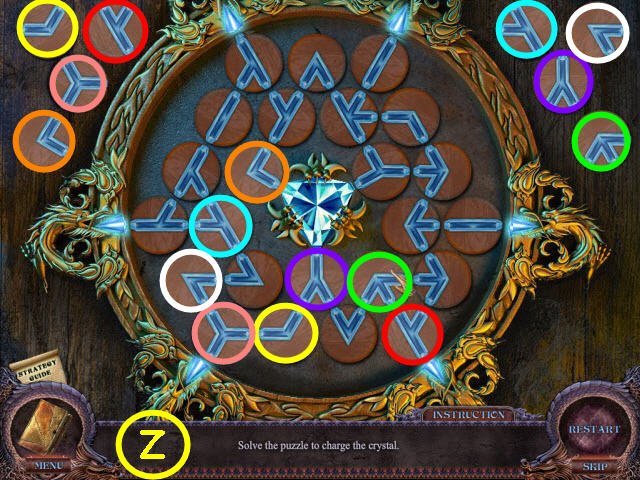
- Examine and place the UNCHARGED WHITE CRYSTAL on the center table (X) to trigger a puzzle.
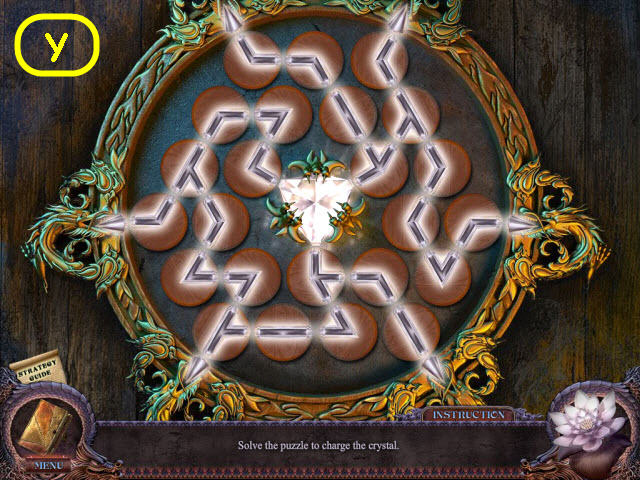
- Connect the circuits to charge the crystal.
- See screenshot (Y) for solution.
- Take the CHARGED WHITE CRYSTAL.
- Go into the cave.
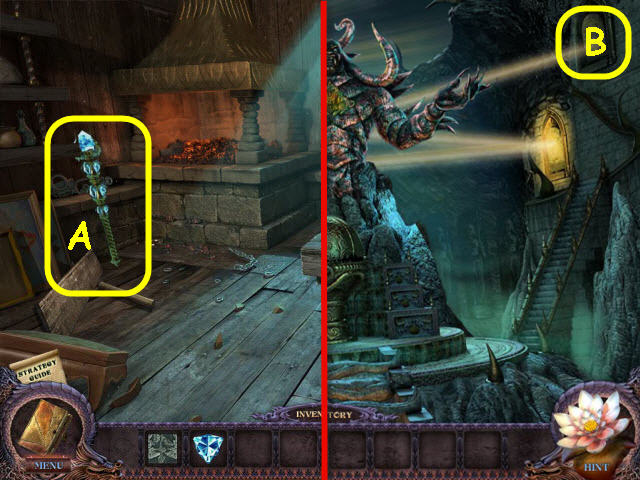
- Place the CHARGED WHITE CRYSTAL on the staff; take the WHITE STAFF (Z).
- Use the EMPTY GAS CAN on the barrel; turn the spigot and take the FULL GAS CAN (A).
- Go into the souvenir shop.
- Examine and use the FULL GAS CAN and MATCHES on the lantern (B) to activate the illuminator.
- Turn on the illuminator lamp.
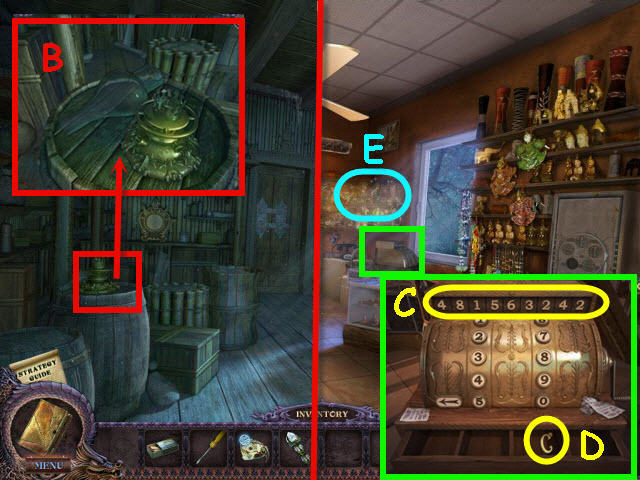
- Examine the cash register; punch in the code from the coffee table in the hotel that is in your journal: 481563242 (C).
- Turn the register handle and take the LETTER (D).
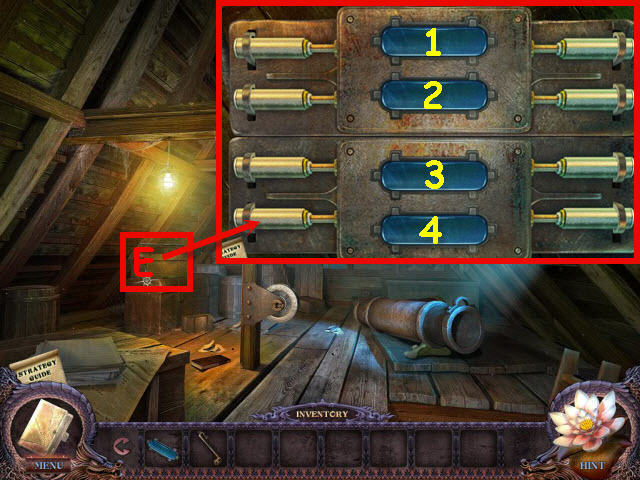
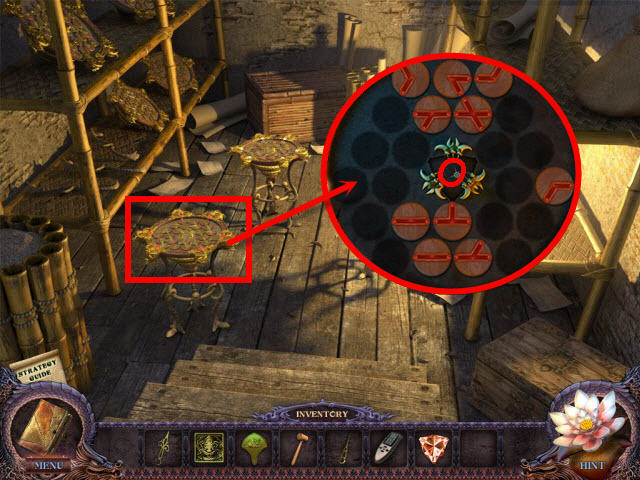
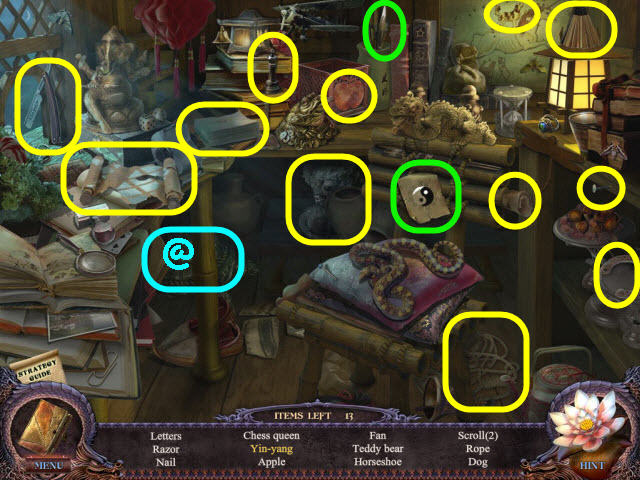
- Examine the corner shelves (E) to access a HOS.
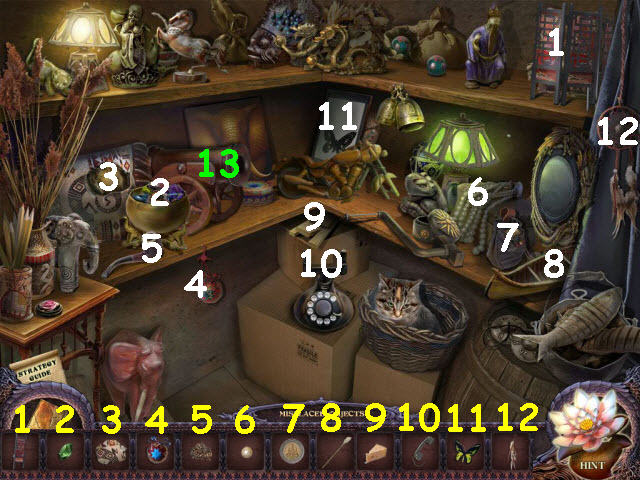
- Place the items back in their correct locations (1-12).
- Use the cleaning rod on the cannon (13) to get a LEVER.
- Turn off the illuminator lantern.
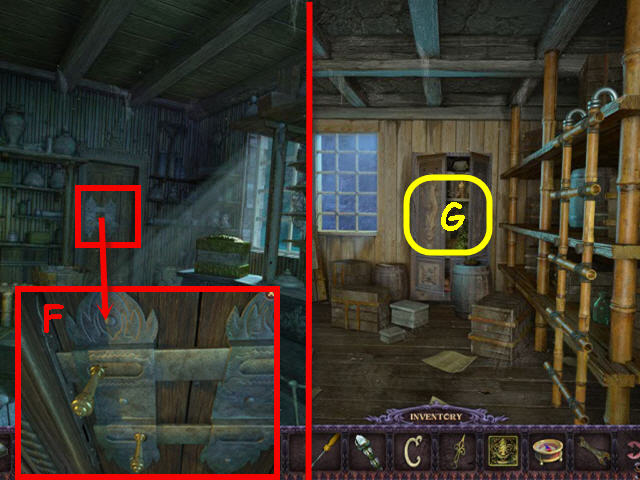
- Examine and place the LEVER on the door (F); slide the levers over.
- Go straight through the door.
- Examine the cupboard (G) to access a HOS.
- Find the items listed.
- Marked in green: place the photo in the frame to get a framed photo.
- Find the SPEAR (@).
- Go to the well.
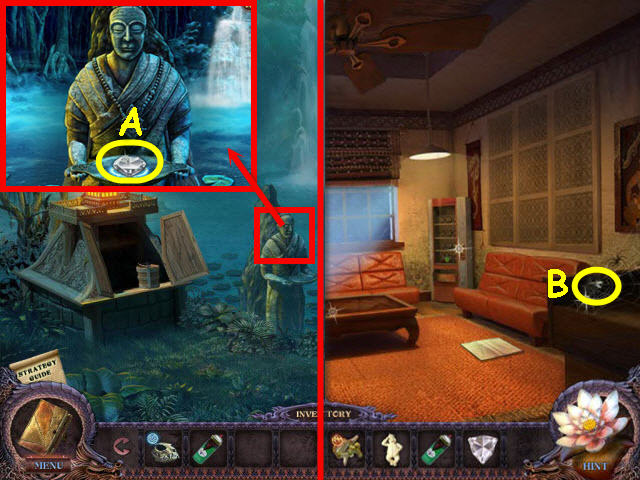
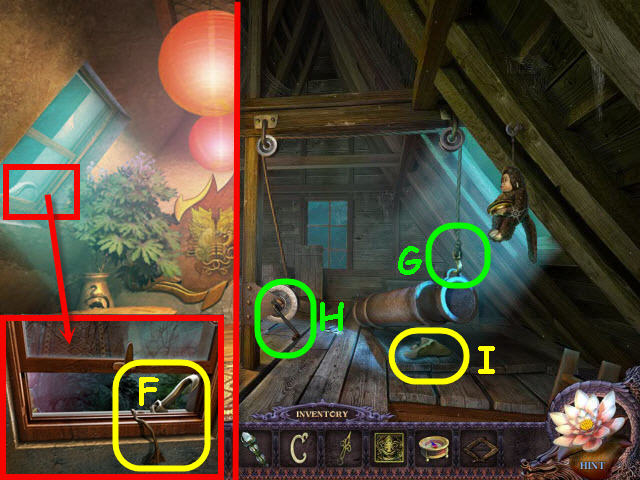
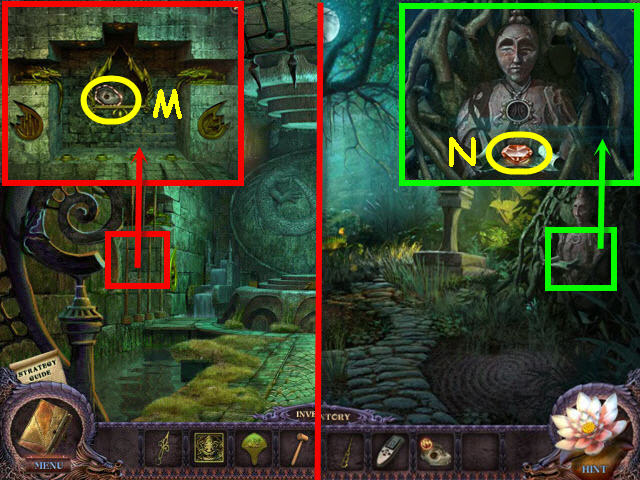
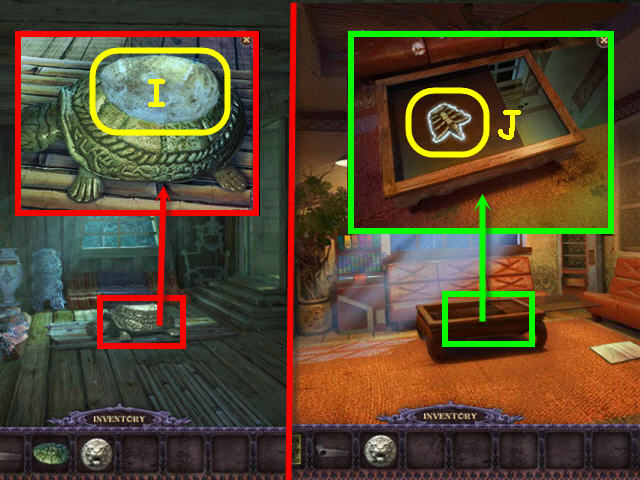
- Examine the statue; place the water SPECIAL ITEM on the plate and take the MIRROR PART (I).
- Examine the ground (J) to access a HOS.
- Find the items listed.
- Marked in green: open the shell to get the pearl.
- Find the OILCAN (@1).
- Go into the house.
Chapter 4 – Temple Lock Plates
- Pull the illuminator cord.
- Examine the cabinet; use the OILCAN on the rusty bolt (K) and pull the upper bolt (2).
- Pull the illuminator cord.
- Examine the clock pendulum; take the COMPASS (L).
- Go into the cave.
- Use the SPEAR on the boulder; take the RAILROAD TIE (M).
- Place the RAILROAD TIE across the chasm (N).
- Go straight.
- Take the WRENCH (O).
- Back out twice.
- Examine the small hut (P) to access a HOS.
- Find the items listed.
- Marked in green: place the pestle on the mortar to get the mortar and pestle.
- Find the red chip to get the red PLAYING CHIP (@2).
- Go to the back room of the souvenir shop.
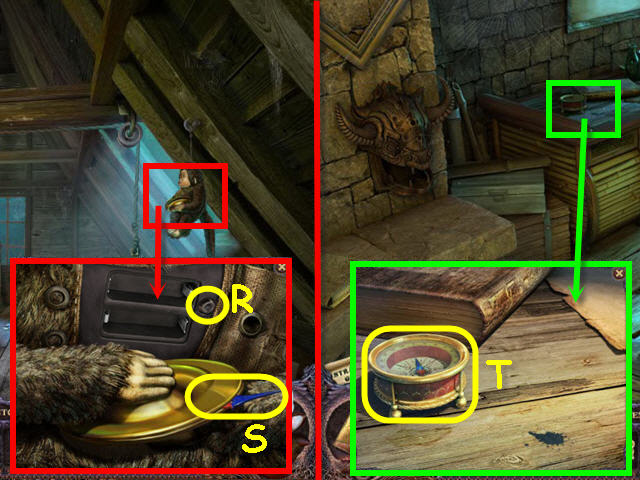
- Examine the ladder; take the CLOCK HAND (Q).
- Use the WRENCH twice on the bolts; take the LADDER (R).
- Go into the hotel.
- Examine and place the red PLAYING CHIP in the red game machine (S) to trigger a puzzle.
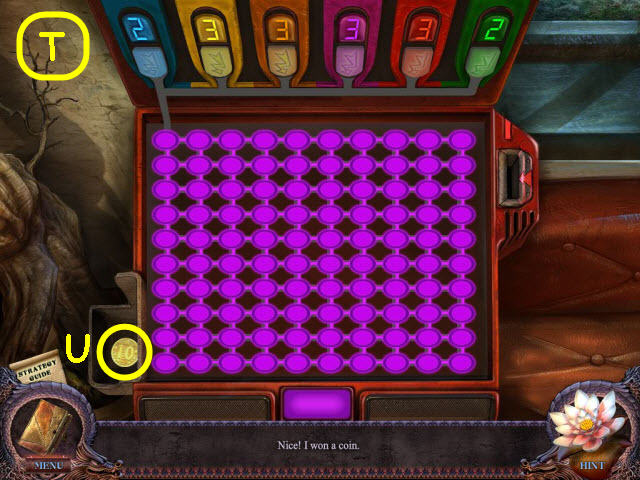
- Turn all the lights purple.
- To solve the puzzle, push the buttons in the following order: orange, blue, green, yellow, red, orange, green, purple, red, blue, yellow, green, purple.See screenshot (T).
- Take the COIN (U).
- Go left.
- Use the LADDER on the attic hatch (V).
- Go up.
- Take the JACK (W).
- Back out.
- Examine the refrigerator to access a HOS (X).
- Find the items listed.
- Marked in red: place the cherry on the ice cream to get the cherry ice cream.
- Find the CHEESE (@).
- Back out.
- Flip the illuminator switch.
- Go right.
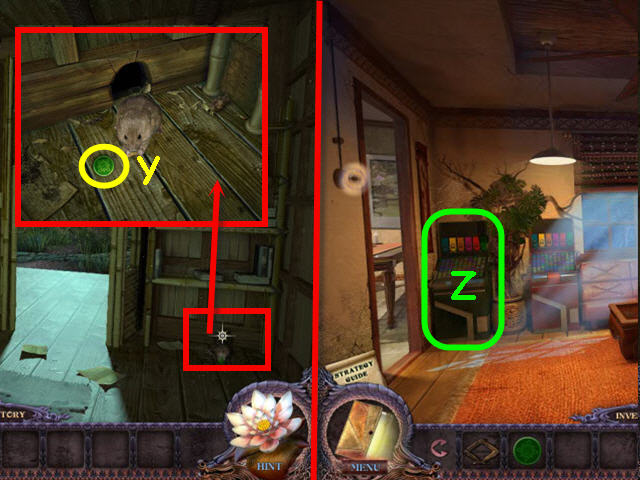
- Examine and give the CHEESE to the mouse; take the green PLAYING CHIP (Y).
- Back out.
- Flip the illuminator switch.
- Examine and use the green PLAYING CHIP on the green game machine (Z) to trigger a puzzle.
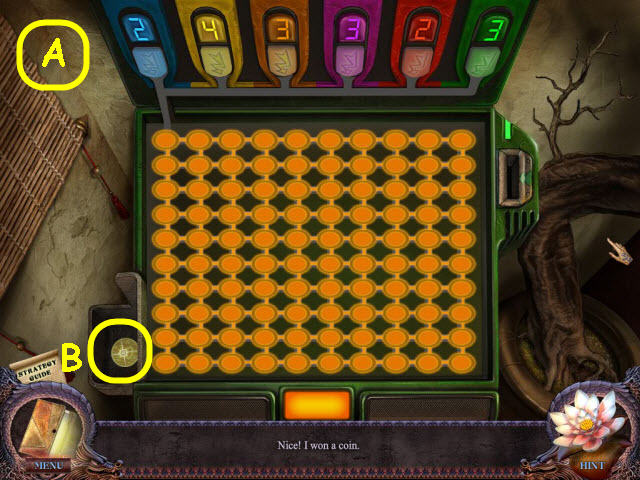
- Your goal is to turn all the lights orange.
- To solve the puzzle, push the buttons in the following order: red, purple, blue, green, orange, red, blue, purple, yellow, green, red, and orange (A).
- Take the 2nd COIN (B).
- Go into the souvenir shop.
- Turn on the illuminator lamp.
- Examine and place the 2 COINS in the toy claw machine; press the red button and take the BUTTON (C).
- Examine the corner shelves (D) to access a HOS.
- Place the items back in their correct locations (1-11).
- Use the handle on the handle (12) to get a HANDLE.
- Go to the hotel kitchen and up to the attic.
- Examine the chest (E); place the BUTTON on the lock to trigger a puzzle.
- Push the buttons to move all the bars in.
- To solve the puzzle, press the buttons in this order: 4-3-2-1-2.
- Take the WINDOW HANDLE.
- Go to the second floor of the souvenir shop.
- Examine and place the WINDOW HANDLE on the window; take the GRABHOOK (F).
- Go back to the hotel attic.
- Place the GRABHOOK on the rope (G).
- Place the HANDLE on the pulley; turn the HANDLE (H).
- Take the water SPECIAL ITEM (I).
- Go to the well.
- Examine the statue; place the water SPECIAL ITEM on the plate; take the 2nd LIZARD PLATE (J).
- Go into the cave and then go forward.
- Examine and place the JACK on the mine car; raise the JACK and take the PICKAXE (K).
- Back out twice.
- Examine and use the PICKAXE on the statue; take the TIGER PLATE (L).
- Go into the souvenir shop.
- Use the illuminator lantern.
- Go into the back room.
- Use the PICKAXE on the stones (M).
- Go left through the doorway.
- Take the 2nd LETTER (N).
- Back out.
- Examine the cupboard (O) to access a HOS.
- Find the items listed.
- Marked in green: place the cup on the saucer to get a cup and saucer.
- Find the INK (@).
- Go left.
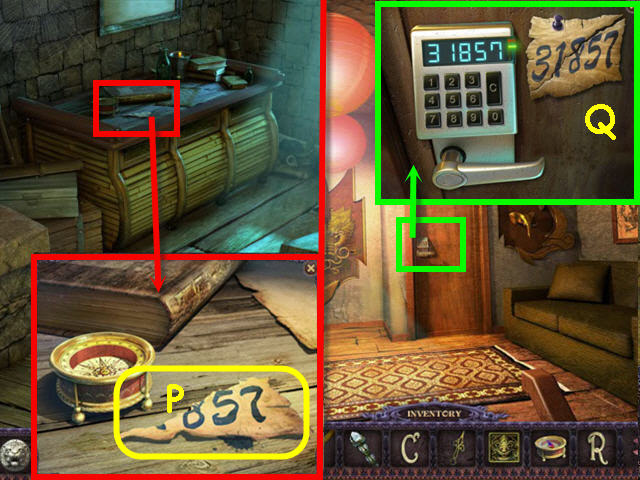
- Examine the desk; use the INK on the paper and take the CODE (P).
- Back out twice.
- Use the illuminator lantern.
- Go upstairs.
- Examine the door; place the CODE on the door (Q).
- Enter the code; 31857 on the keypad and turn the handle.
- Go through the door.

- Examine and use the SCREWDRIVER on the vent; take the fire SPECIAL ITEM (R).
- Go into the hotel.
- Flip the illuminator switch.
- Go right and straight.
- Examine the statue; place the fire SPECIAL ITEM on the plate and take the 2nd BUFFALO PLATE (S).
- Go to the temple square.
Chapter 5 – The Temples
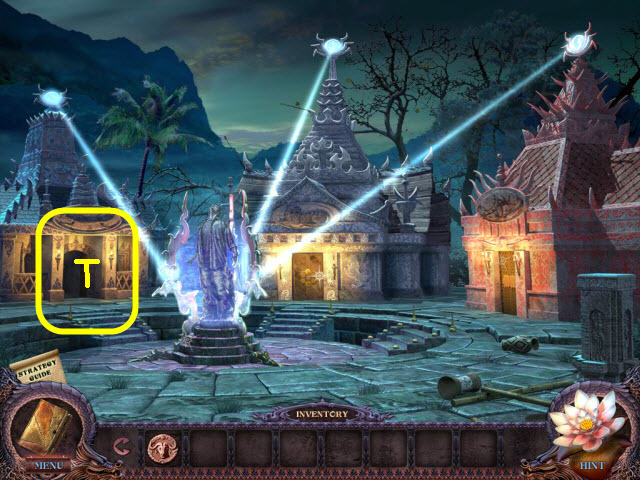
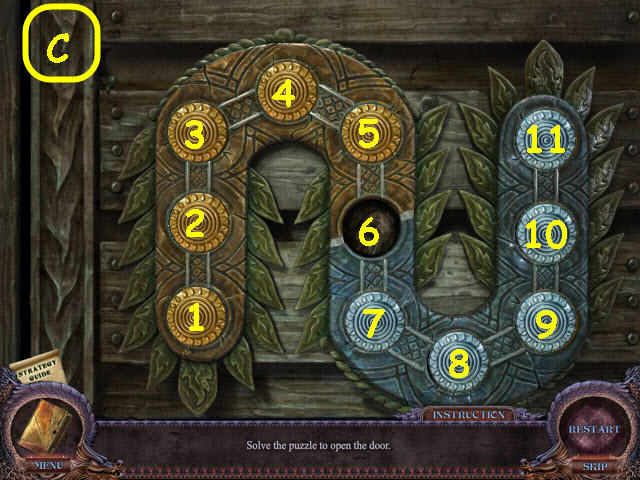
- Examine the left doorway (T).
- Place the 2 LIZARD PLATES on the lock to trigger a puzzle.
- Turn all the tiles so that the brown side is up.
- To solve the puzzle, select the following tiles: 8, 11, 3, 15, 2, and 14 (U).
- Enter the temple on the left.
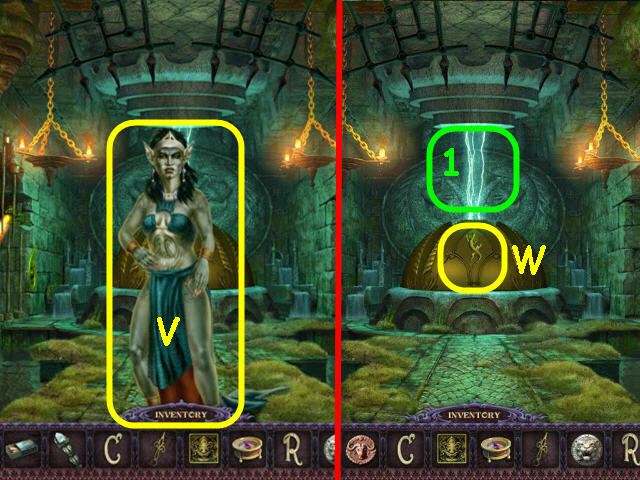
- Use the WHITE STAFF on the werecreature (V).
- Examine the dome; press the button (W).
- Examine the beam (1) to trigger a puzzle.

- Your goal is to move the ball to guide the cap to the center.
- See screenshot (X) for solution.
- Back out.
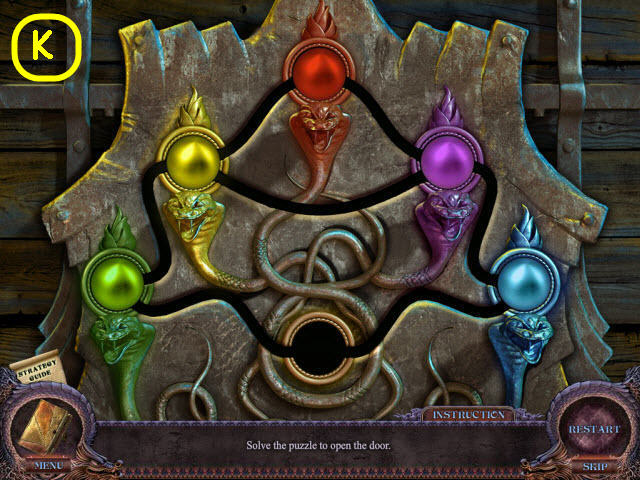
- Examine the right temple door (Y).
- Place the 2 BUFFALO PLATES on the lock.
- Find the matching pairs.
- The selected disks will turn after every attempt.The matching pairs must be turned in the same direction like the yellow circled pair in the screenshot in order to remove them.
- See screenshot (1) for matching pair location; note that they will need to be turned.
- Enter the temple on the right.
- Take the DÉCOR HALF (Z).
- Back out.
- Examine the pedestal; take the BUFFALO PUSH BUTTON (A).
- Go into the hotel. Turn on the illuminator switch. Go into the hotel kitchen.
- Examine the cabinet (B).
- Place the DÉCOR HALF on the lock to trigger a puzzle.
- Turn the squares so they are all red.
- To solve the puzzle, select the following tiles: 5, 2, 8, 6, and 4 (C).
- Take the ELEPHANT.
- Go to the fountain and up the stairs.
- Examine and place the ELEPHANT on the door lock (D).
- Enter the museum.
- Take the HORN (E).
- Go into the souvenir shop.
- Turn off the illuminator lantern.
- Go straight and left into the office.
- Examine and place the HORN on the creature (F); take the water SPECIAL ITEM.
- Go to the well.
- Examine the statue; place the water SPECIAL ITEM on the plate and take the GAS VALVE (G).
- Go into the museum.
- Examine and place the GAS VALVE on the pipe (H) to activate the illuminator.
- Turn the GAS VALVE to turn on the illuminator.
- Take the CROWBAR (I).
- Go into the souvenir shop office.
- Use the CROWBAR on the floorboard; take the ELEPHANT (J).
- Back out.
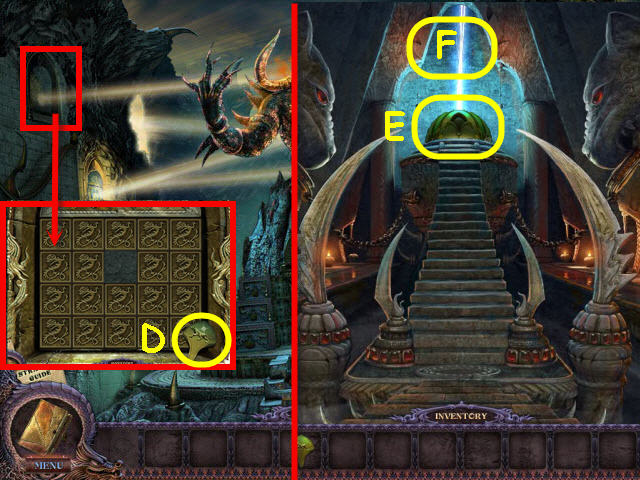
- Examine the cabinet (K) to access a HOS.
- Find the items listed.
- Marked in green: place the birds in the nest to get birds in a nest.
- Find the SAFETY FUSE (@).
- Go into the hotel kitchen.
- Examine the refrigerator to access a HOS.
- Find the items listed.
- Marked in red: use the knife on the sausage to get a sausage slice.
- Find the MALLET (@1).
- Go into the museum.
- Turn the illuminator valve.
- Examine and place the ELEPHANT on the table (L).
- Turn the illuminator valve.

- Examine the table; take the DYNAMITE (M).
- Examine and place the DYNAMITE, SAFETY FUSE and MATCHES on the door (N).
- Go right through the newly-opened door.

- Examine the safe; take the CHARGER CORD (O).
- Go into the souvenir shop.
- Turn on the illuminator.
- Go up the stairs and then go straight.
- Examine and remove the batteries from the radio (P); place them in the charger.
- Place the CHARGER CORD on the charger; take the BATTERIES (Q).
- Go into the hotel attic.
- Examine and place the BATTERIES in the monkey; press the green button (R) and take the COMPASS NEEDLE (S).
- Go to the souvenir shop. Turn off the illuminator lantern. Go forward and then left to the back office.
- Examine the desk; place the COMPASS NEEDLE on the compass and take the 2nd COMPASS (T).
Chapter 6 – Temple Two
- Go to the museum office.
- Examine and place the 2 COMPASSES on the lizard dome; take the SAFE HANDLE (U).
- Go into the souvenir shop.
- Turn on the illuminator.
- Examine and place the SAFE HANDLE on the safe (V) to trigger a puzzle.
- Turn the correct handles to unlock the bolts.
- To solve the puzzle, turn the following handles: 5, 4, and 2 (W).
- Change the illumination.
- Take the 3rd LETTER (X).
- Go to the museum office.
- Examine and place the 3 LETTERS on the picture nameplate; take the air SPECIAL ITEM (Y).
- Exit the museum by backing out twice.
- Examine the statue; place the air SPECIAL ITEM on the plate; take the BOLT CUTTER (Z).
- Go to the well.
- Examine the well; use the BOLT CUTTERS on the cord and take the BUCKET (A).
- Go forward.
- Use the BUCKET on the water (B); take the FILLED BUCKET (C).
- Back out twice.
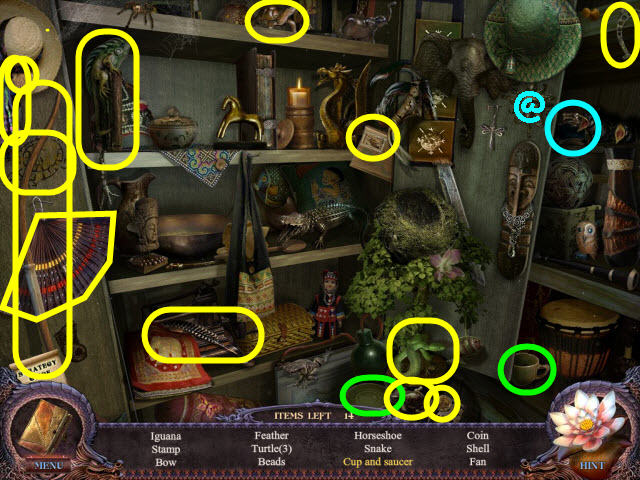
- Examine the suitcase (D) to access a HOS.
- Find the items listed.
- Marked in green: place the lens in the holder to get a magnifying glass.
- Find the LANDING NET (@).
- Go into the hotel.
- Flip the illuminator switch.
- Go right.
- Examine and use the LANDING NET in the tank; take the CAGE KEY (E).
- Go straight.
- Use the CAGE KEY on the cage; take the SUN (F).
- Go into the museum.
- Turn the illuminator valve.
- Examine and use the FILLED BUCKET on the door (G).
- Go left through the newly-opened door.
- Examine and place the SUN on the rear door; take the METAL ELEMENT (H) and 2nd CLOCK HAND (I).
- Examine the left cubby (J) to access a HOS.
- Place the items back in their correct locations (1-10).
- Place the lizard on the pouch (11); get an EAGLE HEAD.
- Back out.
- Examine and place the EAGLE HEAD on the eagle (K).
- Turn the illuminator valve.
- Examine the eagle; take the REMOTE CONTROL (L).
- Go to the temple square and into the left temple.
- Examine the bars; place the METAL ELEMENT in the left slot; push in both the elements and take the fire SPECIAL ITEM (M).
- Go to the garden in the rear of the hotel.
- Examine the statue; place the fire SPECIAL ITEM on the plate and take the UNCHARGED RED CRYSTAL (N).
- Go into the house and down the hatch.
- Examine the red table.
- Place the UNCHARGED RED CRYSTAL in the center (O) to trigger a puzzle.
- Place the circuits in the correct spots to complete the circuit.
- See screenshot (P) for solution.
- Take the CHARGED RED CRYSTAL.
- Go into the museum.
- Turn the illuminator valve.
- Place the CHARGED RED CRYSTAL on the staff; take the RED STAFF (Q).
- Go to the temple square and into the right temple.
- Use the RED STAFF on the werecreature (R).
- Examine and place the BUFFALO PUSH BUTTON on the dome (S); push the button.
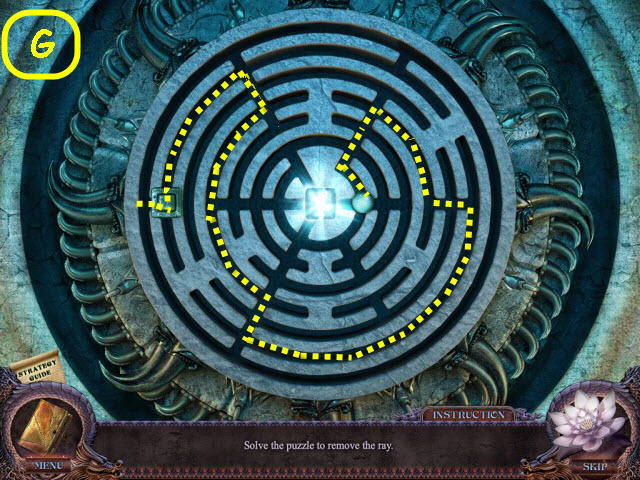
- Examine the light beam (T) to trigger a puzzle.
- Move the ball to guide the cap to the center.
- See screenshot (U) for solution.
- Back out.
- Examine the pedestal; take the HANDLE (V).
- Go into the souvenir shop.
- Turn on the illuminator lamp.
- Go upstairs.
- Use the REMOTE CONTROL on the air conditioner (W); take the CLOCK FACE (X).
- Back out.
- Turn off the illuminator lamp.
- Examine and place the CLOCK FACE and 2 CLOCK HANDS on the clock.
- Set the clock to the time written in front of the clock: 7PM (Y). Note that the clock face is reversed.
- Take the GOLDEN DRAGON (Z).
- Turn on the illuminator lamp.
- Go upstairs.
- Examine and place the GOLDEN DRAGON on the dragon lock; take the MOON HALF (A).
- Go into the museum and through the left door.
- Examine the door.
- Place the MOON HALF on the lock (B) to trigger a puzzle.
- Switch the positions of the blue and silver disks.
- To solve the puzzle, select the disks in the following order: 5, 7, 8, 6, 4, 3, 5, 7, 9, 10, 8, 6, 4, 2, 1, 3, 5, 7, 9, 11, 10, 8, 6, 4, 2, 3, 5, 7, 9, 8, 6, 4, 5, 7, and 6 (C).
- Go right into newly-opened room.
- Move the boards three times; take the LOCKER KEY (D).
- Back out twice.
- Change the illumination.
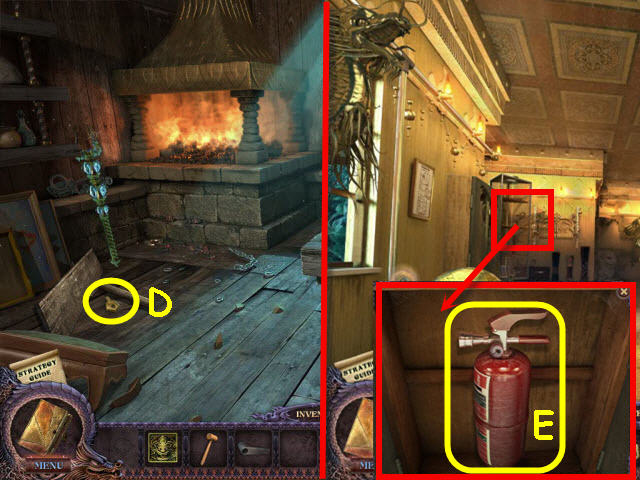
- Examine and use the LOCKER KEY on the cabinet; take the EXTINGUISHER (E).
- Change the illumination.
- Go left.
- Examine the left cubby to access a HOS.
- Place the items back in their correct locations (1-10).
- Place the handle on the chisel (11); get a CARVING CHISEL.
- Go right.
- Examine and use the CARVING CHISEL and MALLET on the jaw; take the air SPECIAL ITEM (F).
- Exit the museum.
- Examine the statue; place the air SPECIAL ITEM on the plate and take the 2nd TIGER PLATE (G).
- Examine the hut (H) to access a HOS.
- Find the items listed.
- Marked in green: use the paintbrush on the unfinished drawing to get a yin-yang.
- Find the TURTLE PLATE (@).
- Go into the hotel.
- Examine and place the TURTLE PLATE on the turtle (I).
- Flip the illuminator switch.
- Examine the coffee table; take the air SPECIAL ITEM (J).
- Go back to the museum entrance.
- Examine the statue; place the air SPECIAL ITEM on the plate; take the GATE KEY (K).
- Examine and use the GATE KEY on the gate (L).
- Go left through the newly-opened gate.
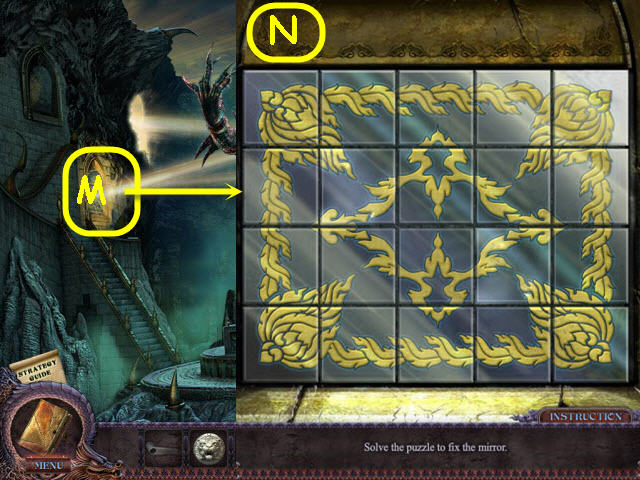
- Examine and place the MIRROR PART in the frame (M) to trigger a puzzle.
- Swap any two tiles to complete the picture. The tiles will stay face up when correct.
- See screenshot (N) for solution.
Chapter 7 – Temple Three
- Examine the upper right frame; take the KNIFE (O).
- Go to the temple square.
- Examine the center doorway (2).
- Place the 2 TIGER PLATES on the lock to trigger a puzzle.
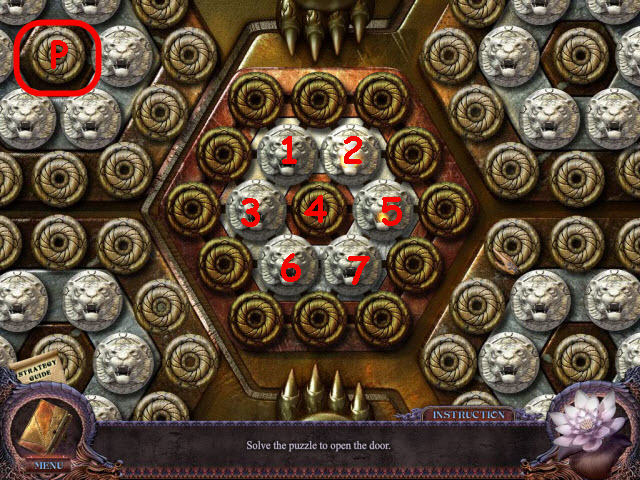
- Arrange the lion heads to the middle white ring.
- To solve the puzzle, press the buttons in the following order: 1 x 2, 6 x 3, 5 x 5, 3 x 2, 6, 7, and 6 (P).
- Enter the center temple.
- Take the TONGS (Q).
- Go into the museum; go left and then right.
- Examine and use the EXTINGUISHER in the fireplace; use the TONGS on the KEY (R); take the SAFE KEY (S).
- Back out twice.
- Turn the illuminator valve.
- Go right into the office.
- Examine and use the SAFE KEY and HANDLE on the safe; turn the handle; take the PLANT POISON (T).
- Go to the souvenir shop; go upstairs and straight.
- Use the KNIFE on the net; take the fire SPECIAL ITEM (U).
- Go to the hotel; change the illumination; go to the garden.
- Examine the statue; place the fire SPECIAL ITEM on the plate; take the MIRROR PART (V).
- Go to the temple square; enter the temple on the right.
- Examine and use the PLANT POISON on the ivy; open the gate and take the air SPECIAL ITEM (W).
- Go to the museum entrance.
- Examine the statue; place the air SPECIAL ITEM on the plate and take the UNCHARGED BLUE CRYSTAL (X).
- Go to the house and down the hatch.
- Examine and place the UNCHARGED BLUE CRYSTAL on the blue table (Y) to trigger a puzzle.
- Place the circuits in the correct spots to complete the circuit.
- Turn and place the circuits as shown in the screenshot (Z).
- Take the CHARGED BLUE CRYSTAL.
- Go into the museum; change the illumination; go left and then right.
- Place the CHARGED BLUE CRYSTAL on the staff; take the BLUE STAFF (A).
- Exit the museum and go left.
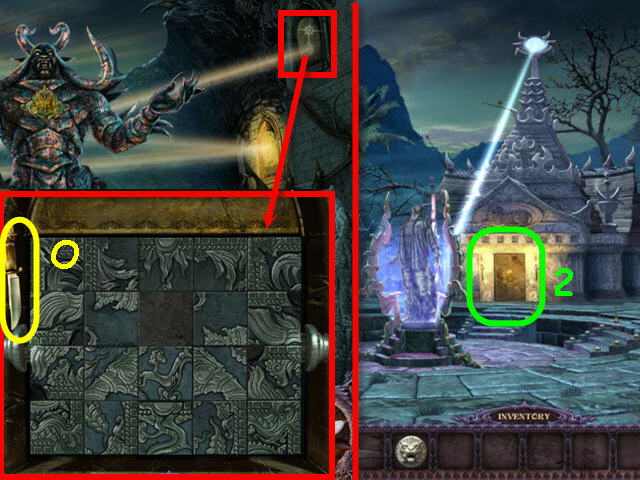
- Examine and place the MIRROR PART in the top right frame (B) to trigger a puzzle.

- Turn the tiles to complete the picture.
- To solve the puzzle, turn the tiles in this order: 7, 10, 13, 16, and 19 (C).
- Examine the upper left frame; take the TIGER PUSH BUTTON (D).
- Go to the temple square and enter the center temple.
- Use the BLUE STAFF on the werecreature.
- Examine and place the TIGER PUSH BUTTON on the dome (E); push the button.
- Examine the beam (F) to trigger a puzzle.
- Move the ball to guide the cap to the center.
- See screenshot (G) for solution.
- Back out.
- Examine the pedestal; read the note and take the air SPECIAL ITEM (H).
- Go to the museum entrance.
- Examine the statue; place the air SPECIAL ITEM on the plate and take the MIRROR PART (I).
- Go left.
- Examine and place the MIRROR PART in the upper left frame (J) to trigger a puzzle.
- Turn over the tiles to complete the picture.
- To solve the puzzle, turn the tiles in the following order: 2, 3, 4, 7, 9, 12, 14, 17, 19 and 18 (@).
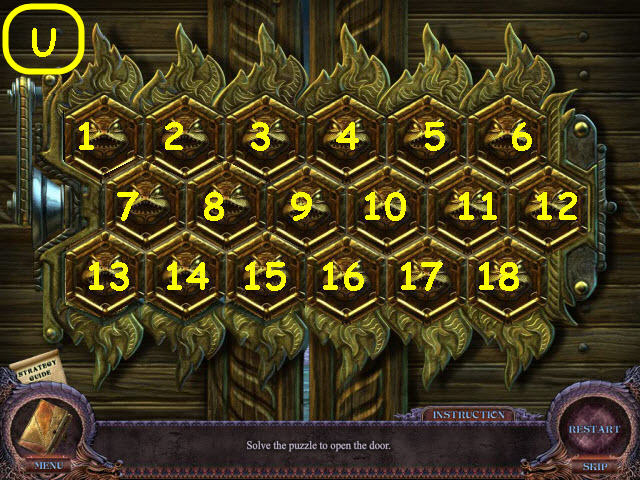
- Examine the opened dome to trigger a puzzle (K).
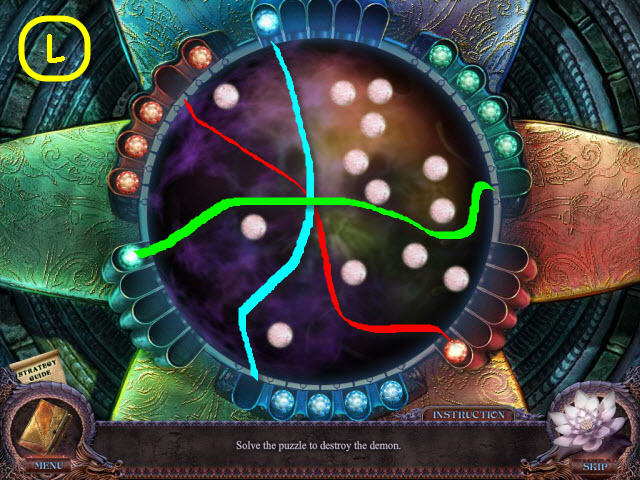
- Drag the colored balls in between the floating balls from one side to the other.
- See screenshot (L) for examples.
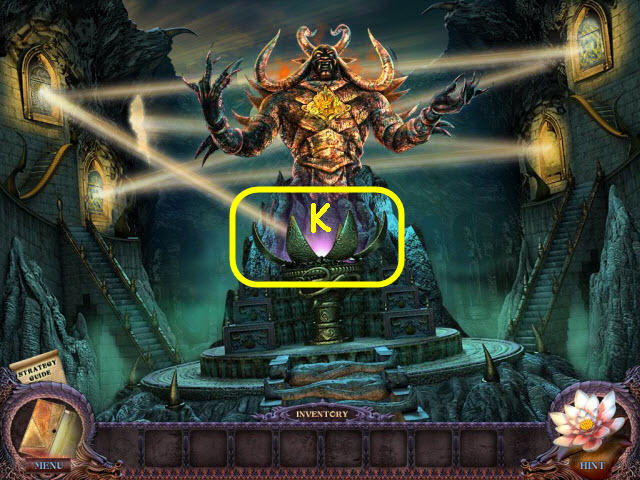
- Take the DEMONIC HEART (M).
- Go to the temple square.
- Examine and place the DEMONIC HEART on the pedestal (N).
- Congratulations! You have successfully completed the Secrets of the Dark: Eclipse Mountain.