
Walkthrough Menu
- General Tips
- Chapter 1 – Shipwreck
- Chapter 2 – The Flying Dutchman
- Chapter 3 – The Captain's Mirror
- Chapter 4 – Break the Spell
- Chapter 5 – Mysterious Island
- Chapter 6 – The Mansion
- Chapter 7 – The Girl
- Chapter 8 – Save the Souls
General Tips
- Select Options to adjust the Music and Sound Effects. You may also adjust Full Screen, System Cursor, Low Quality, and Widescreen.
- You can choose between Casual, Advanced or Hard mode.
- Throughout the guide, we will use the acronym 'HOS' for Hidden Object Scenes. The items listed in blue in the find lists require extra steps to locate.
- Some of the puzzles are random and are marked as such throughout the guide. You can reset a puzzle by backing out.
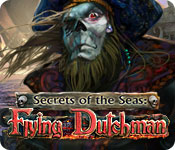
- Select the Hint button, or the shrimp (1), in the lower right to get a hint in either the HOS or regular gameplay.
- You will collect pearls (2) throughout a section of the game.You can select the individual pearls anytime to replay the different cutscenes.
- Select Menu (3) to exit or access options.
- Select the diary (4) to access story updates and puzzle clues you have discovered.
- This game is not linear and you may do things in a different order as the guide. If you cannot do an action when stated in the guide, please check the previous entries to see if you missed something.
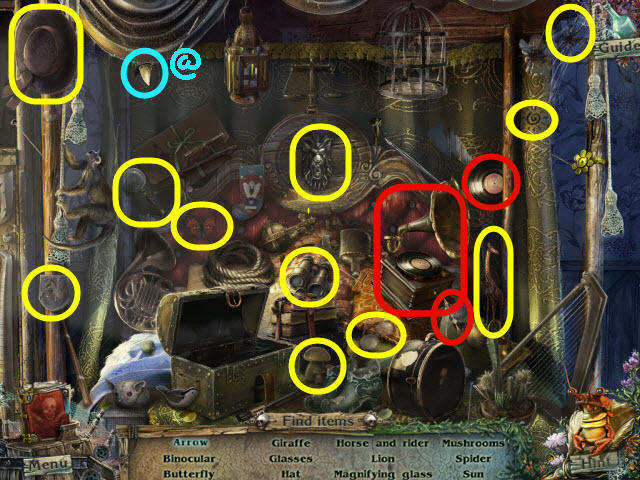
Chapter 1 – Shipwreck
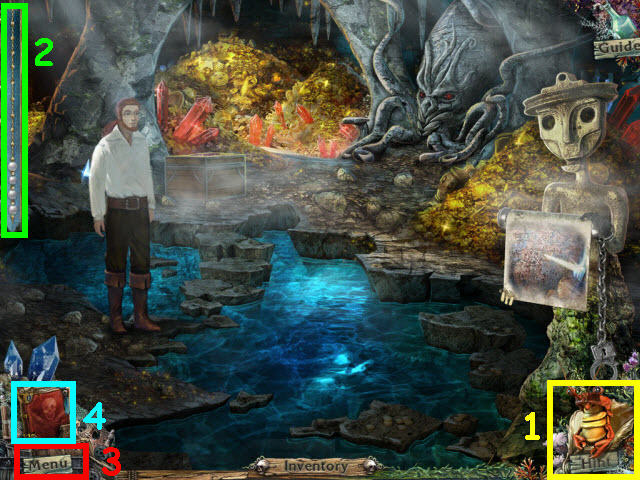
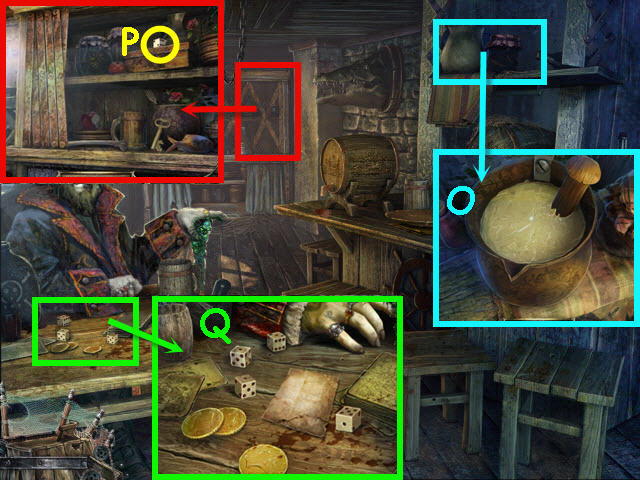
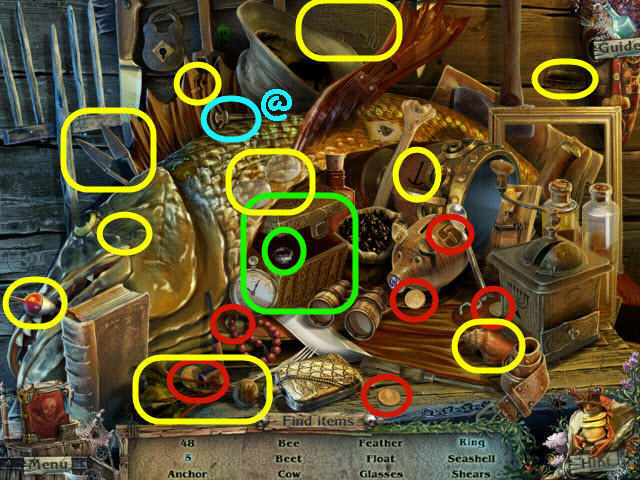
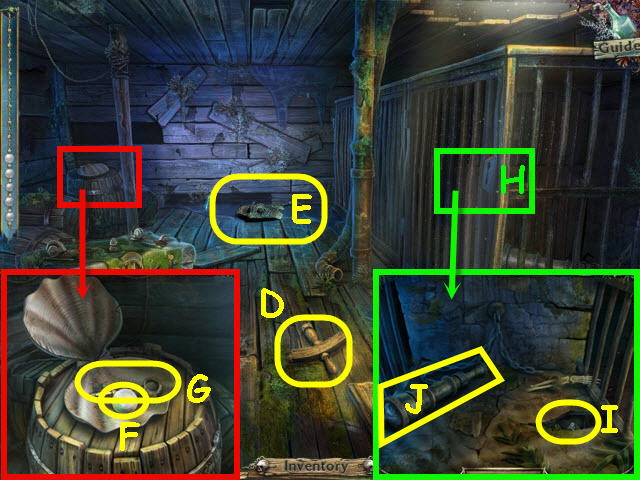
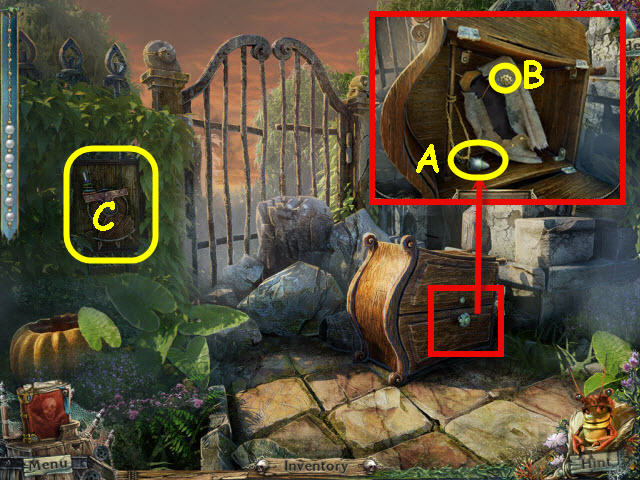
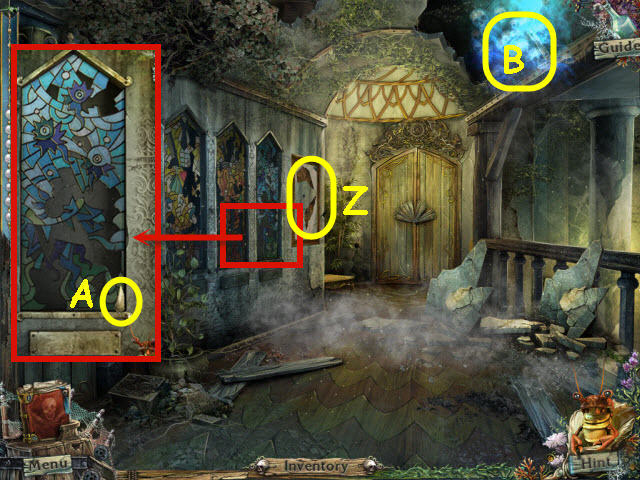
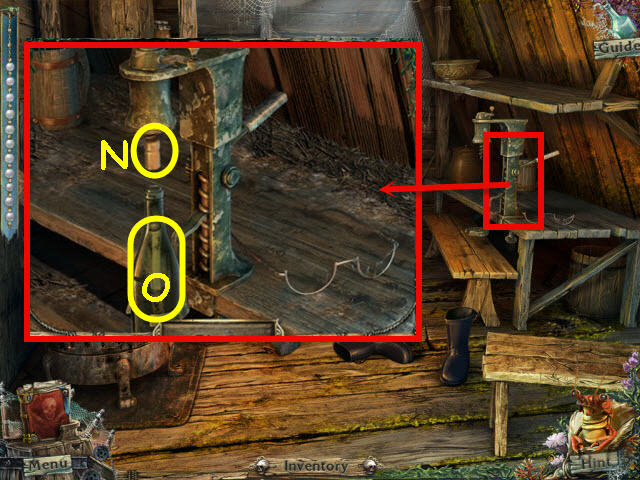
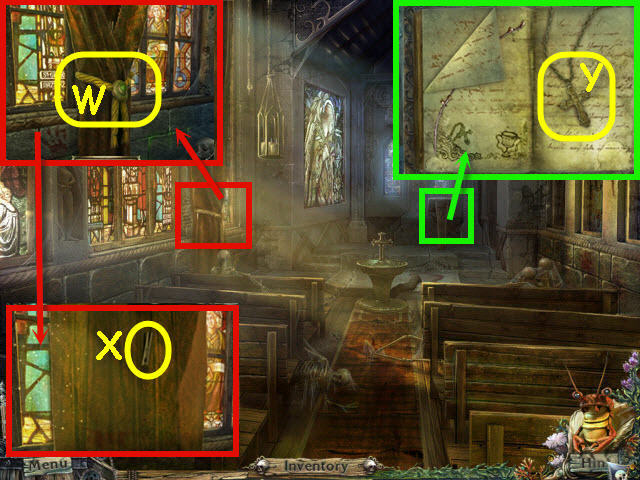
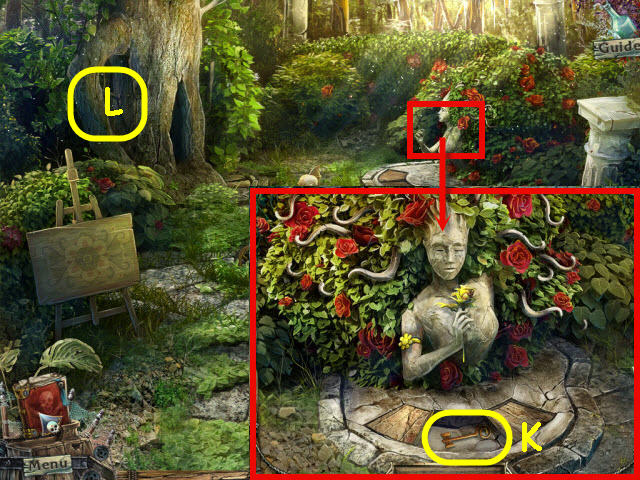
- Examine the bulletin; take the CLOTH (A).
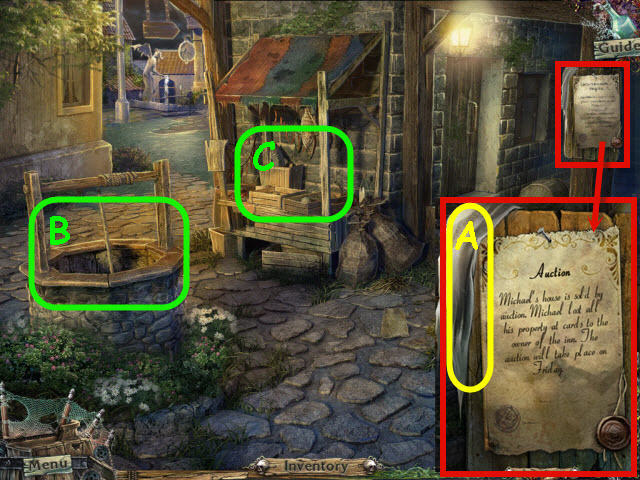
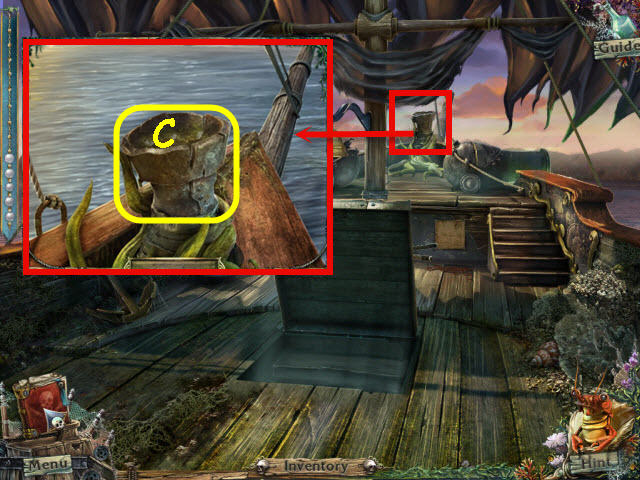
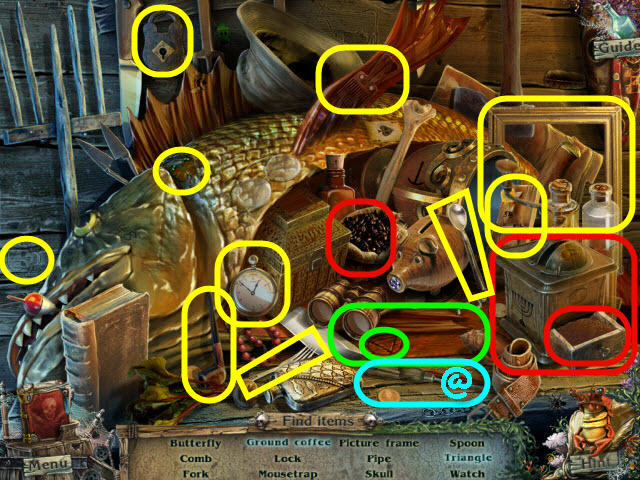
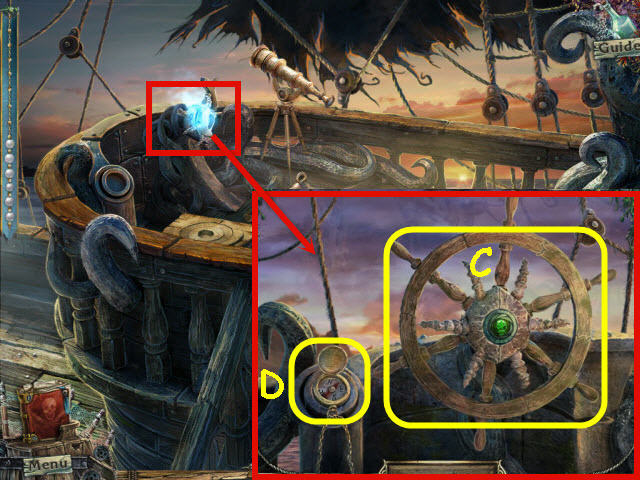
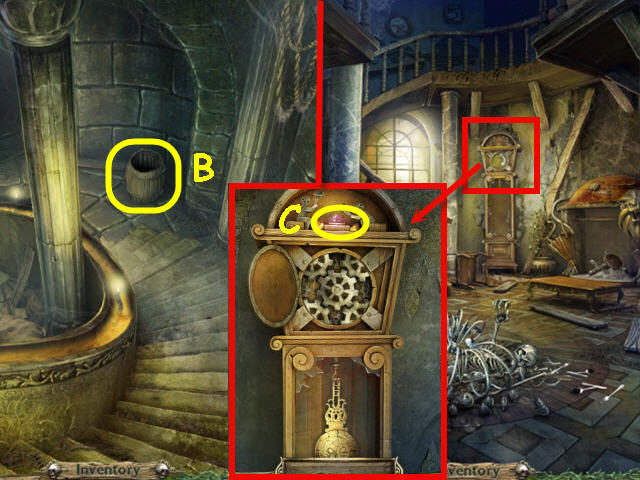
- Examine the well (B) and the stand (C) to access a HOS.
- Find the items listed.
- Marked in red: move the hay to find the needle.
- Marked in green: take the quill, dip in the inkpot, and use the inked quill on the bottle label to get the water.
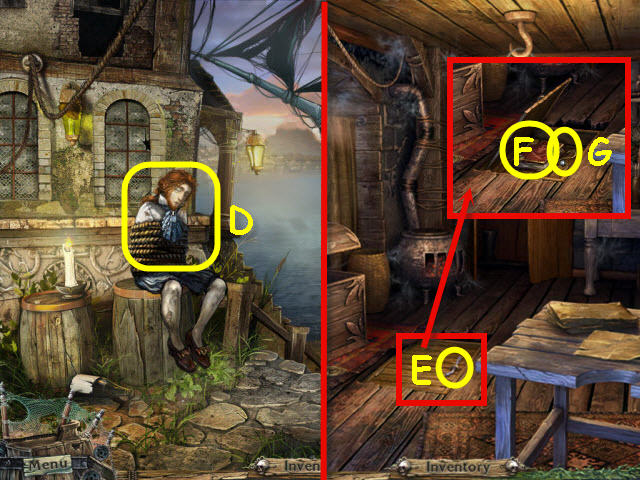
- Find the WINCH (@).
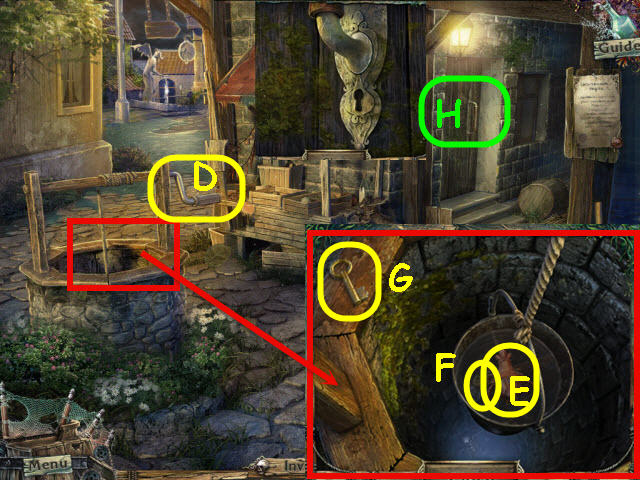
- Place the WINCH on the well; crank the handle (D).
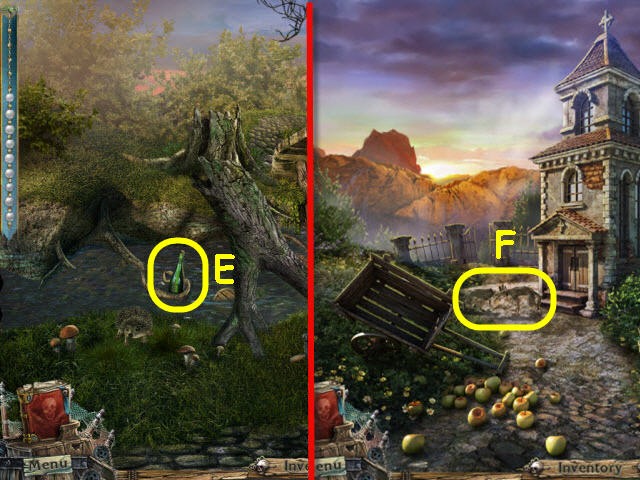
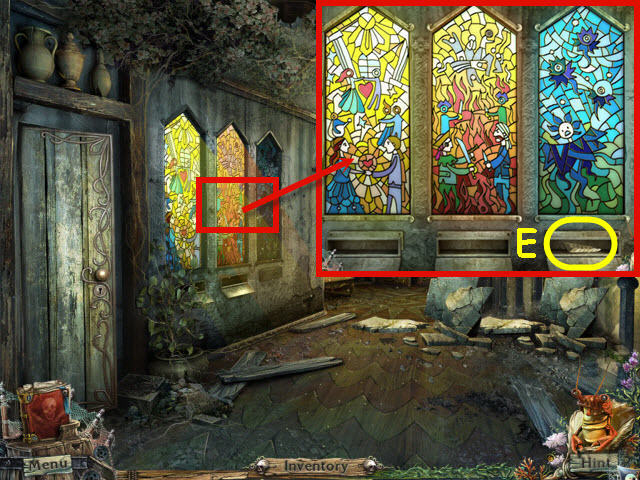
- Examine the well; take the shrimp (E) which will position itself above the hint button and can now be selected when you want a hint.
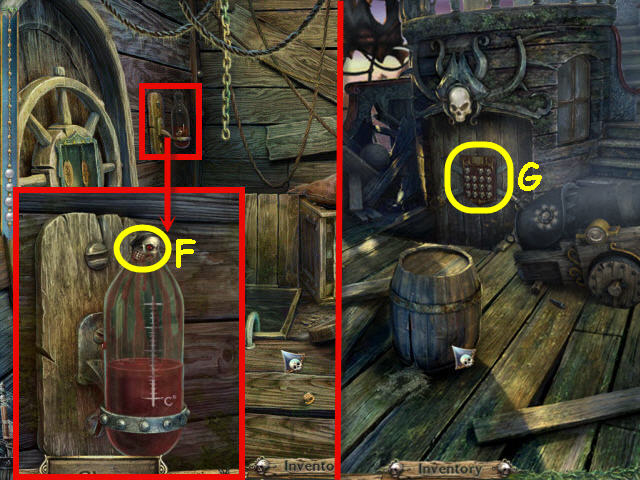
- Take the key (F); use the CLOTH on the key; take the KEY (G).
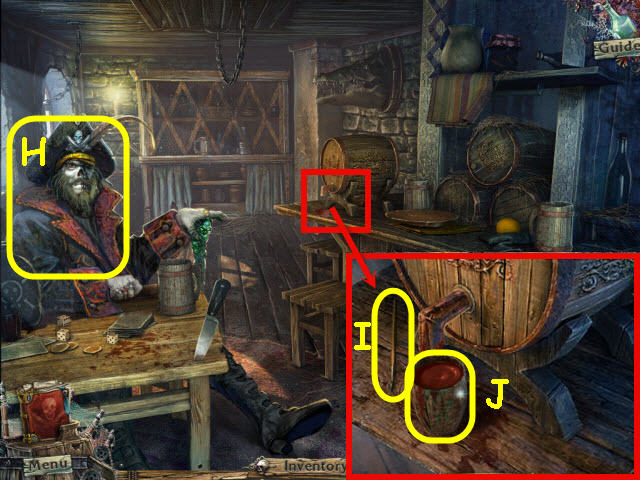
- Examine and use the KEY on the door (H); turn the KEY.
- Go through the newly-opened door into the house.
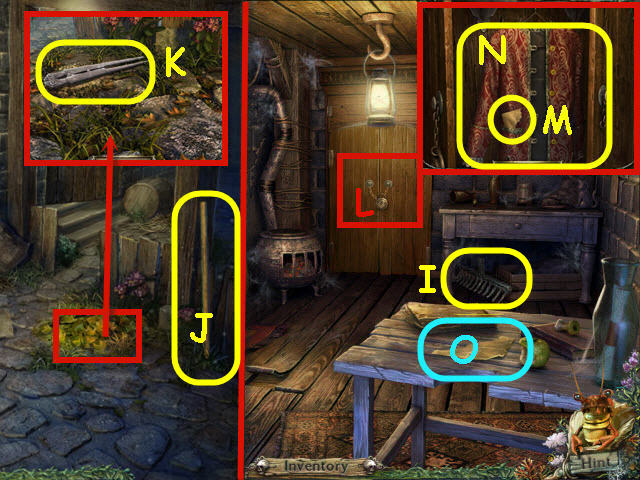
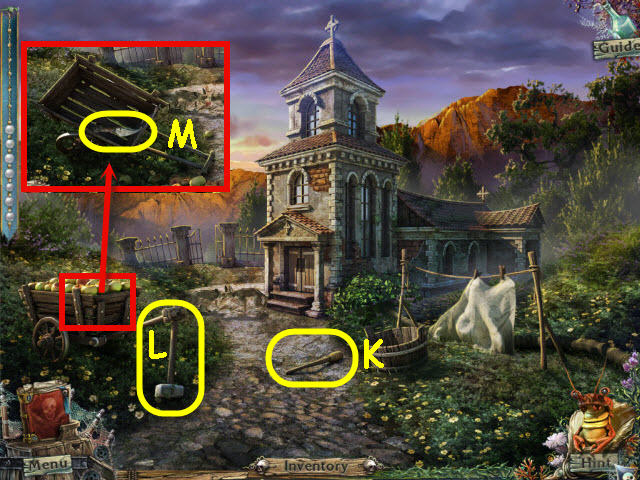
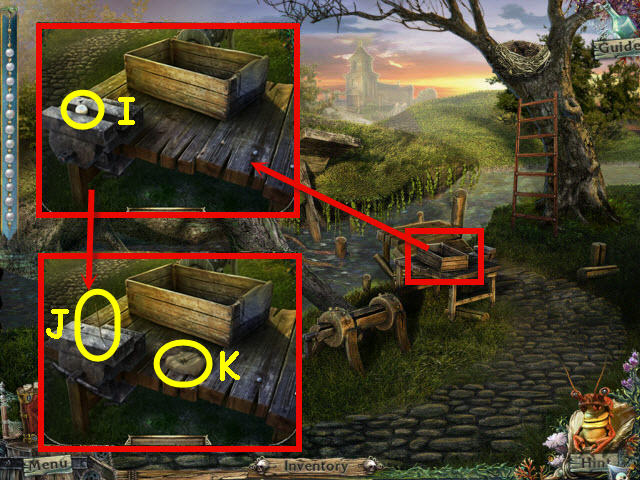
- Take the RAKE HEAD (I).
- Back out.
- Place the RAKE HEAD on the handle; get a RAKE (J).
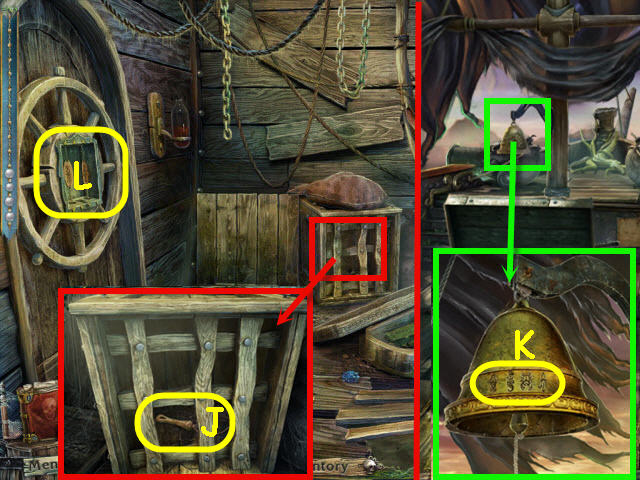
- Examine and use the RAKE on the leaves; take the SHEARS (K).
- Go into the house.
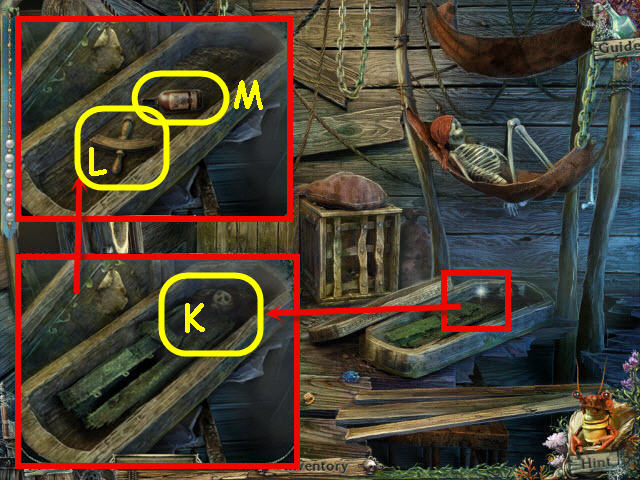
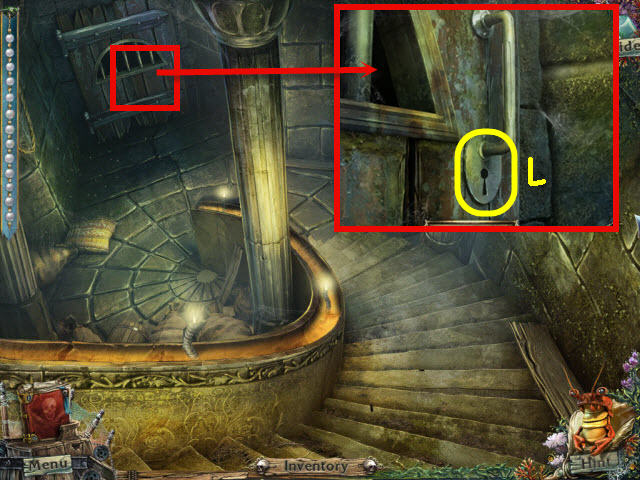
- Use the SHEARS on the chains (L).
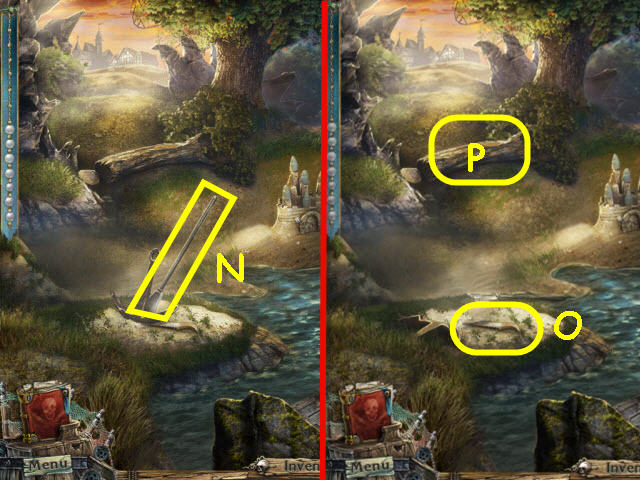
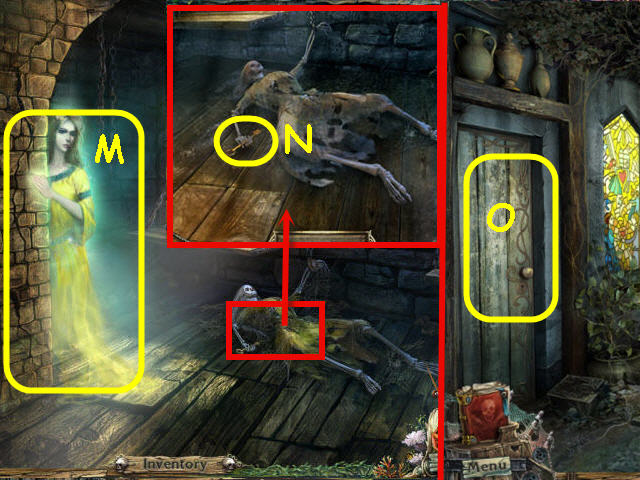
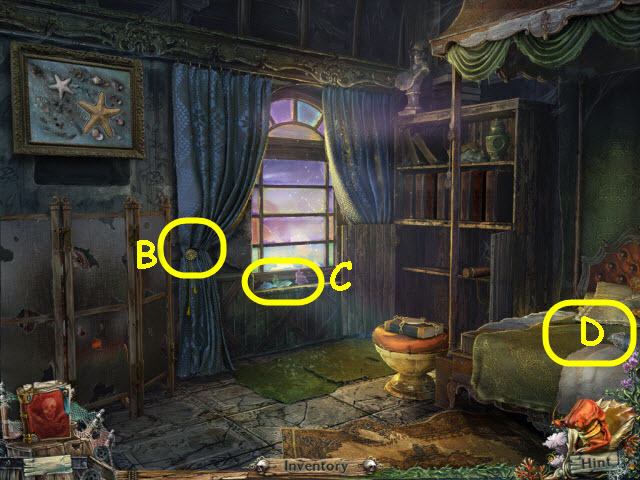
- Examine the closet; take the HALF OF NOTE (M) and JACKET (N).
- Examine and place the HALF OF NOTE on the note; read the note (O).
- Back out.
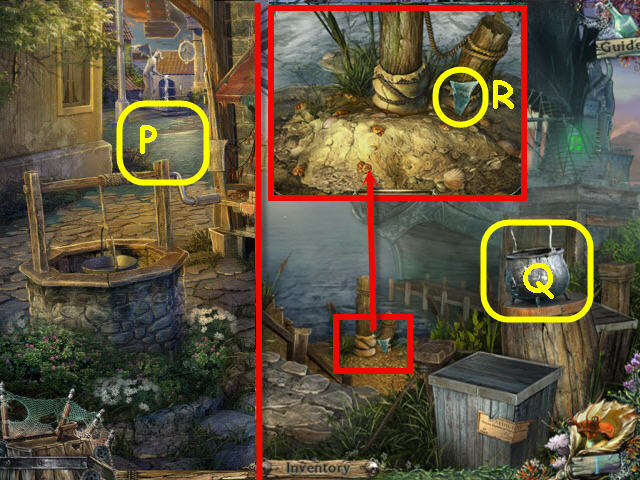
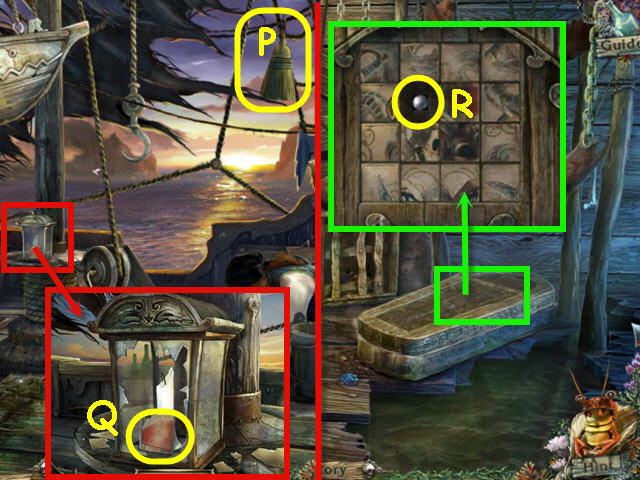
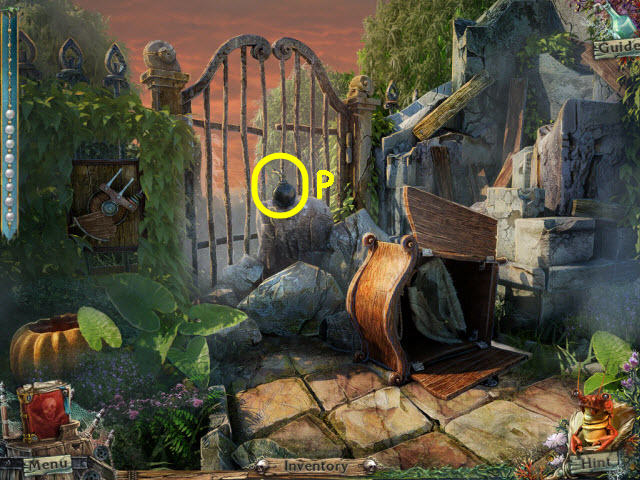
- Place the JACKET on the puddle (P).
- Go up the left path twice.
- Take the KETTLE (Q).
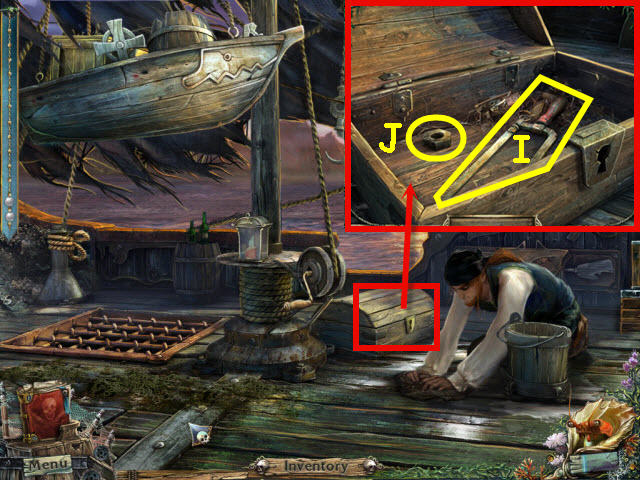
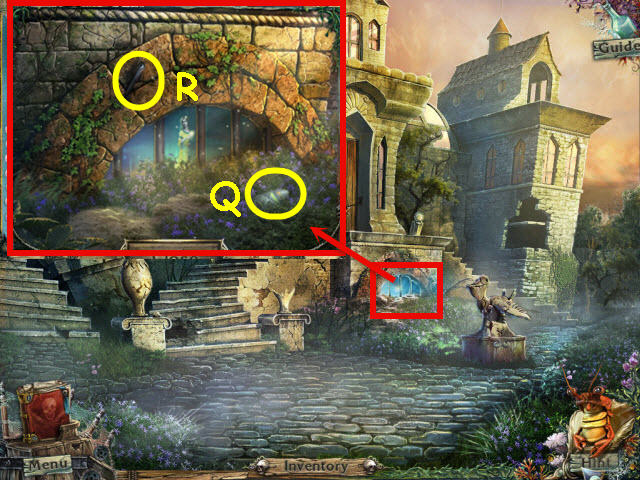
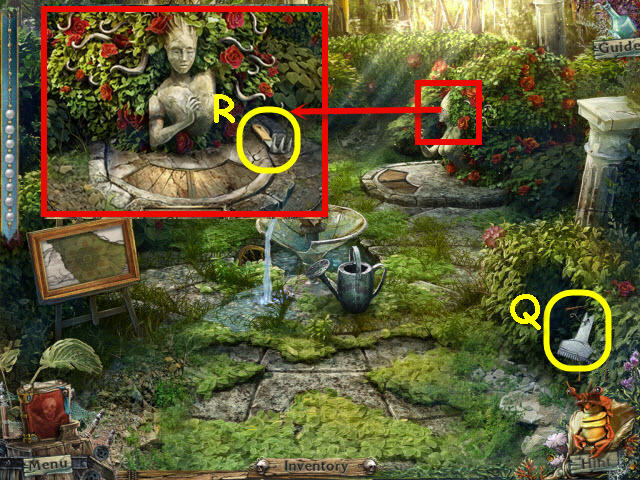
- Examine the post; take the PIECE OF GLASS (R).
- Back out.

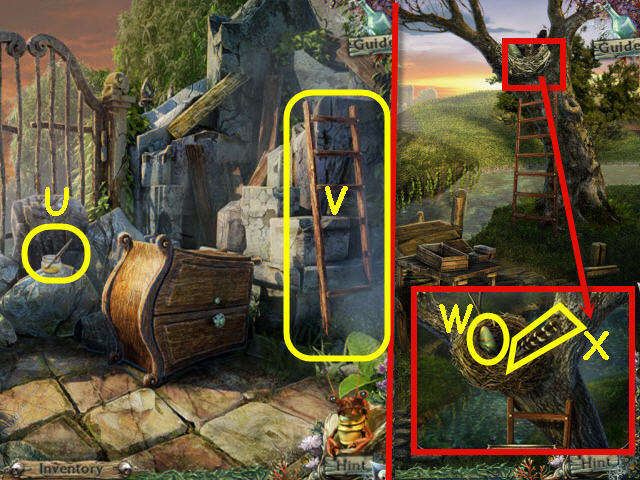
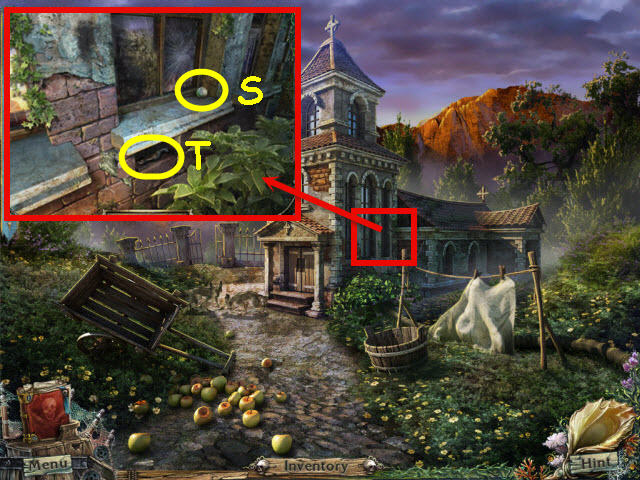
- Take the CROWBAR (S).
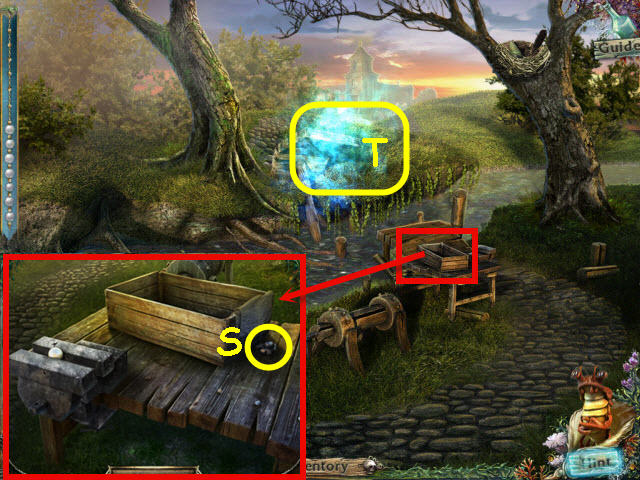
- Use the KETTLE on the fountain (T); get a KETTLE WITH WATER.
- Back out.
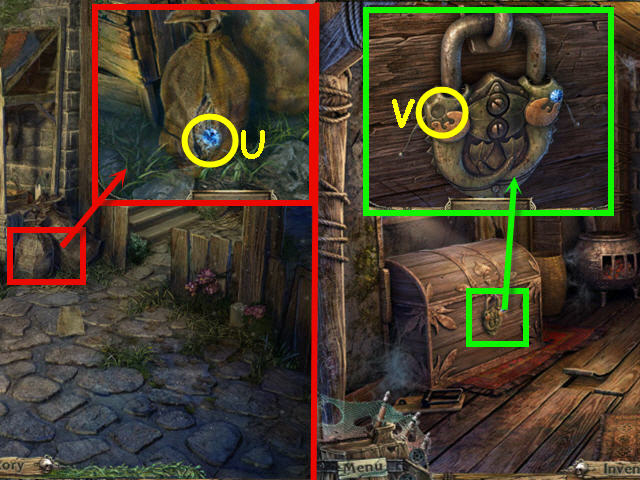
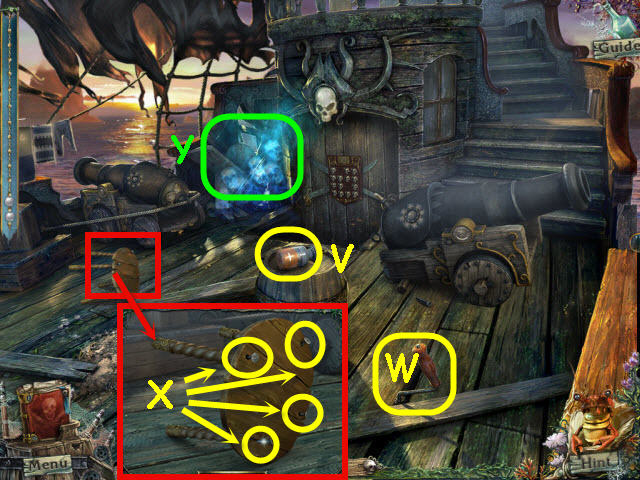
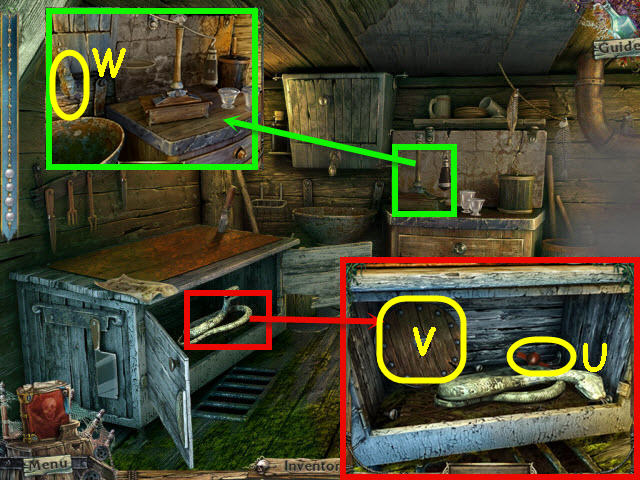
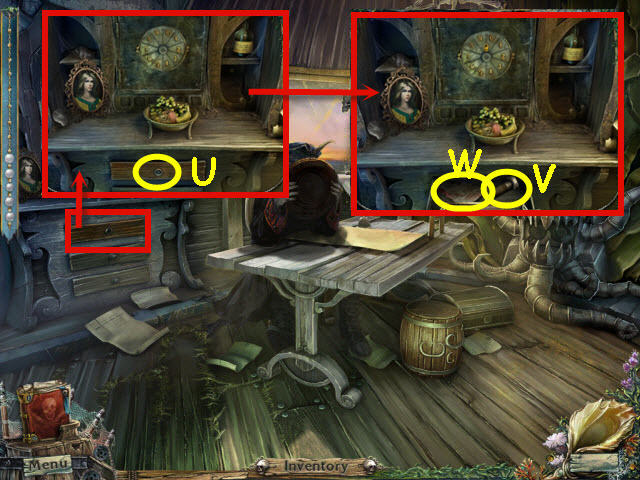
- Examine and use the PIECE OF GLASS on the sack; take the GEM (U).
- Enter the house.
- Examine and place the GEM on the chest lock (V) to trigger a puzzle.
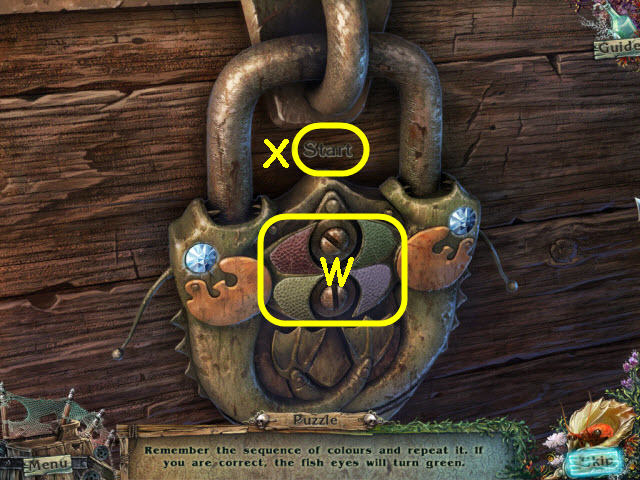
- Repeat the sequence of flashing colors by selecting the matching colored buttons (W).
- Select Start (X) when ready.
- The solution is random, however, the pattern repeats by adding one additional at the end of a sequence each time.
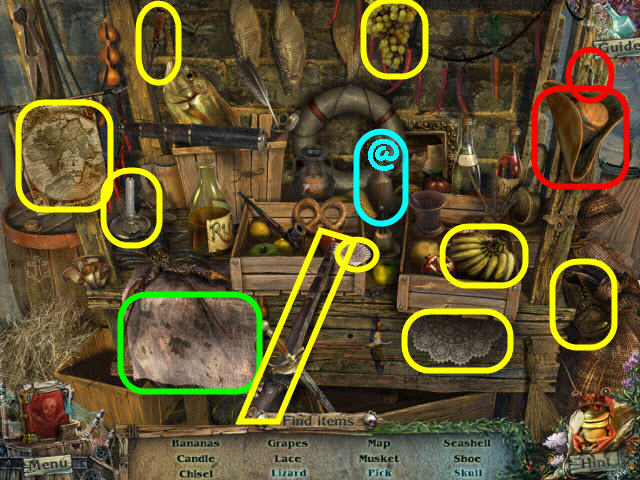
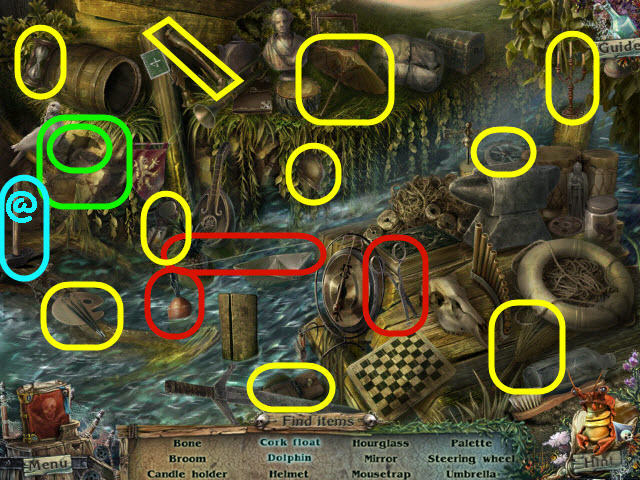
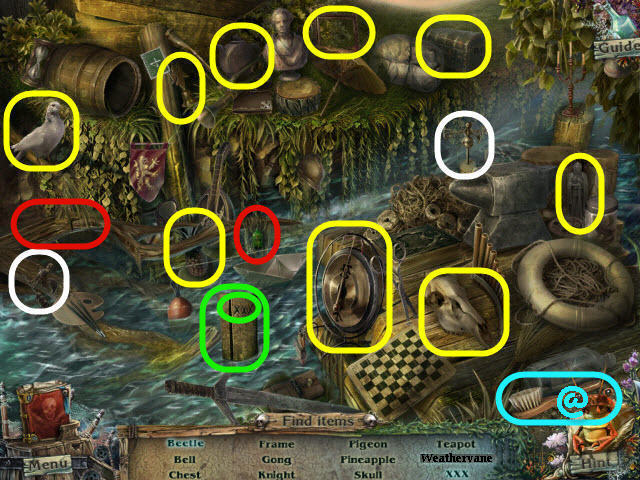
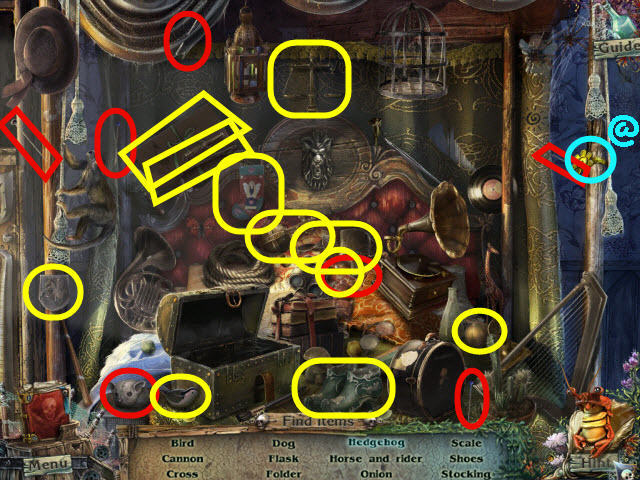
- Examine the chest to access a HOS.
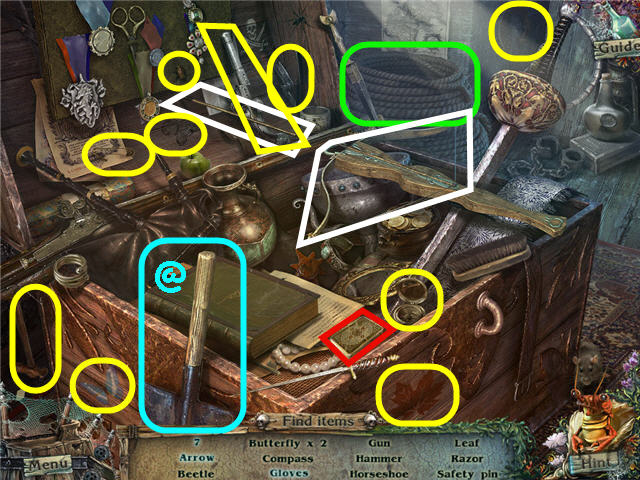
- Find the items listed.
- Marked in red: flip over the top card of the deck to get a 7.
- Marked in green: move the rope to get the gloves.
- Marked in white: shoot the crossbow and get the arrow.
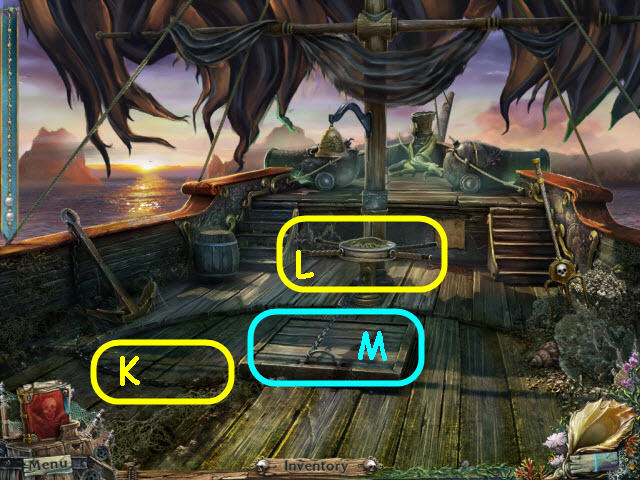
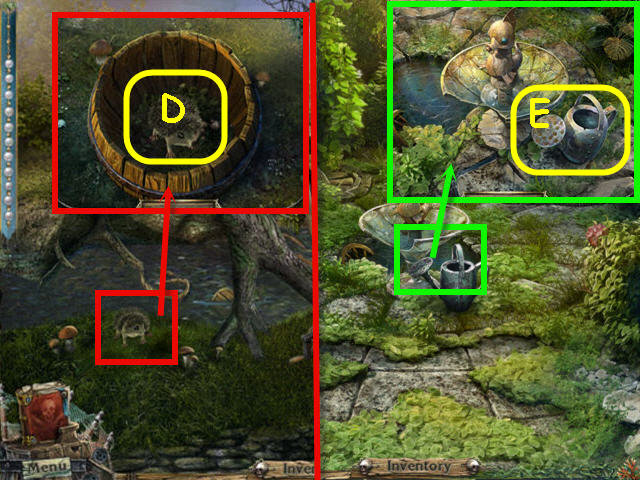
- Find the SHOVEL (@).
- Back out; go up the left path twice to the dock.
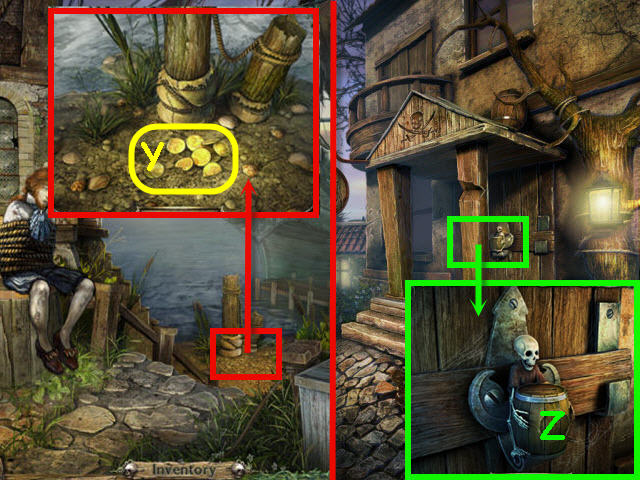
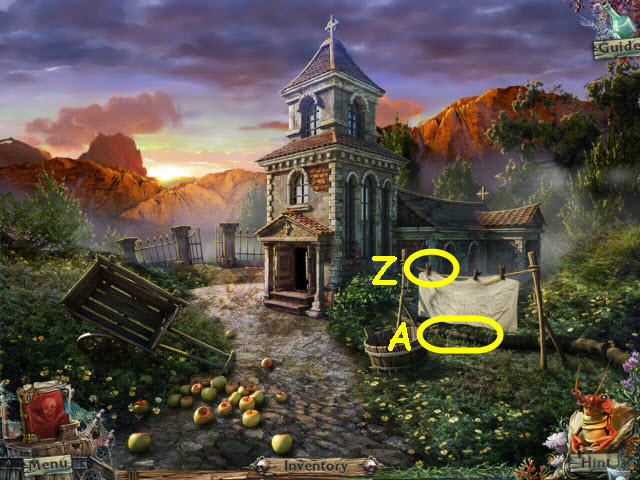
- Examine the post; use the SHOVEL on the ground; take the COINS (Y).
- Back out.
- Examine the pub door; place the COINS in the lock (Z).
- Enter the pub.
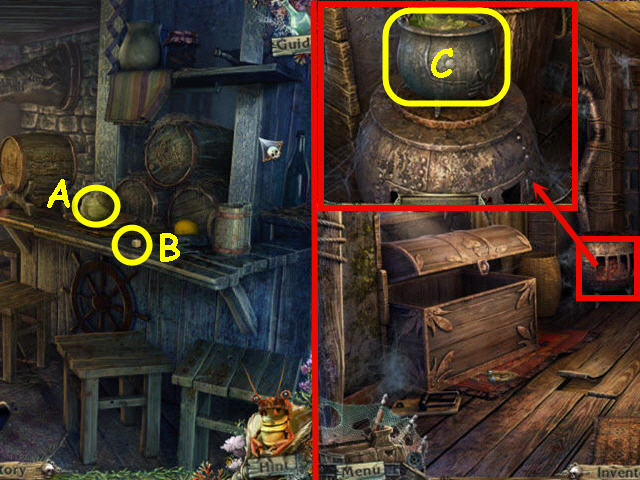
- Take the CABBAGE (A) and WHITE DIE (B).
- Back out twice and enter the house.
- Examine and place the KETTLE WITH WATER on the stove.
- Place the CABBAGE in the KETTLE OF WATER; take the SOUP (C).
- Go to the dock.
- Give the SOUP to Michael (D); get the RING FOR THE HIDING PLACE.
- Go into the house.
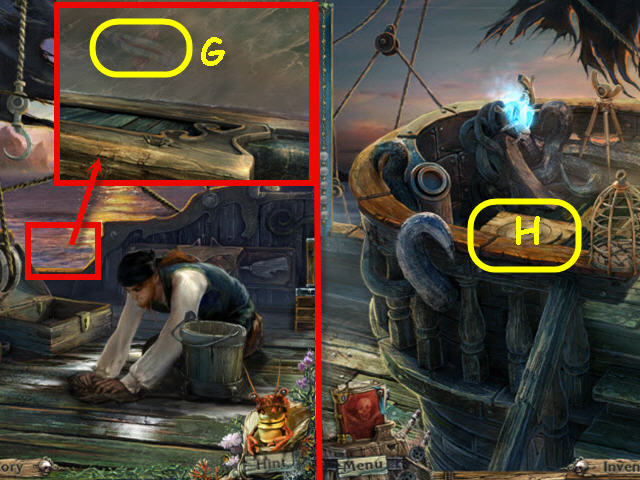
- Use the CROWBAR on the floorboard; take the WIRE (E).
- Place the RING FOR THE HIDING PLACE on the hatch and pull.
- Take the diary (F) which will be added to the toolbar and then take the NECKLACE (G).
- Go into the pub.
- Give the NECKLACE to the captain (H); get a MUG.
- Examine the keg; take the BRUSH (I).
- Place the MUG under the tap; take the MUG WITH PAINT (J).
- Back out twice.
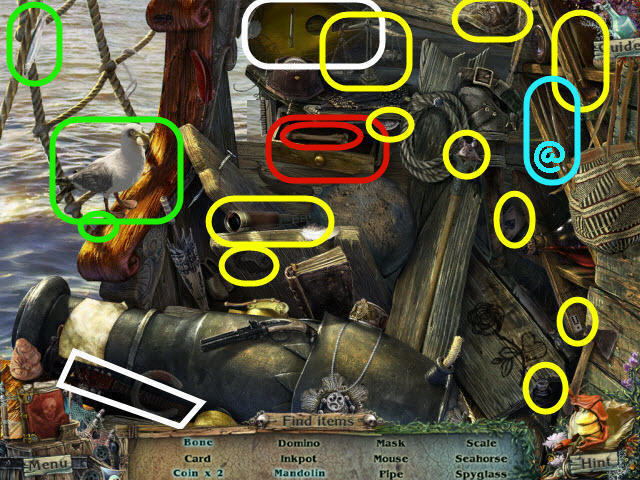
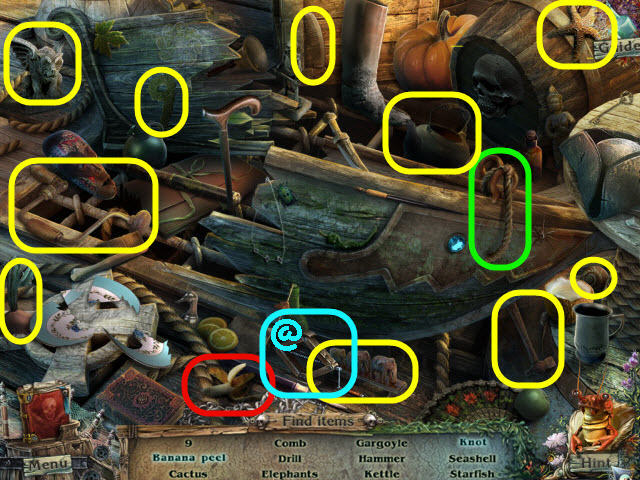
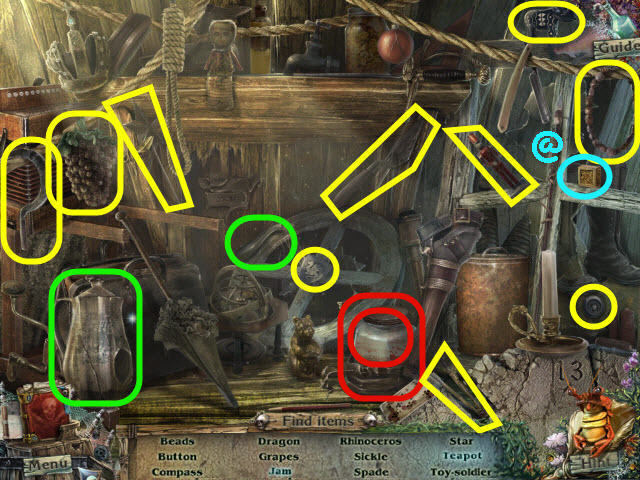
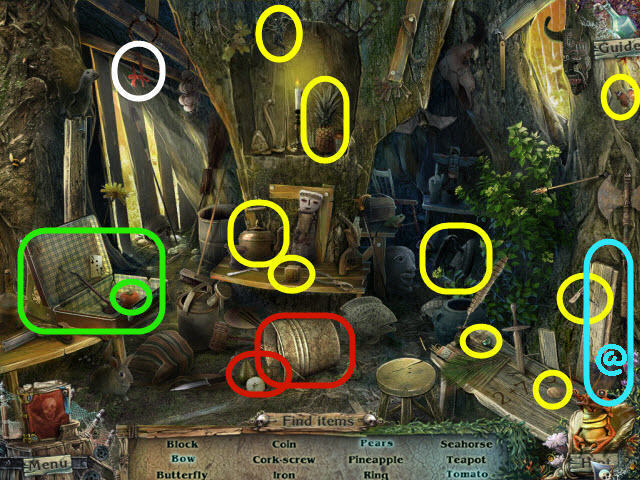
- Examine the stand to access a HOS.
- Find the items listed.
- Marked in red: move the hat to get the lizard.
- Marked in green: move the cloth to get the skull and pick.
- Find the MASHER (@).
- Enter the house.

- Examine and place the WHITE DIE, BRUSH and MUG WITH PAINT on the table.
- Dip the BRUSH (K) in the MUG WITH PAINT (L).
- Use the dipped BRUSH on the WHITE DIE three times; take the DIE (M).
- Examine the chest (N) to access a HOS.
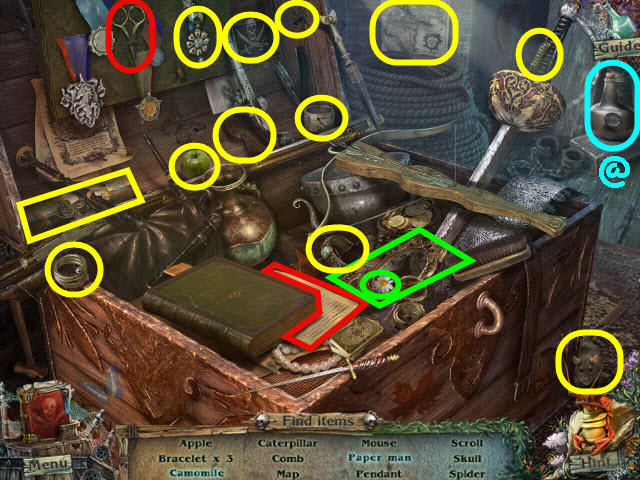
- Find the items listed.
- Marked in red: use the scissors on the paper to get a paper man.
- Marked in green: move the mirror to get a chamomile.
- Find the BOOZE (@).
- Go into the pub.
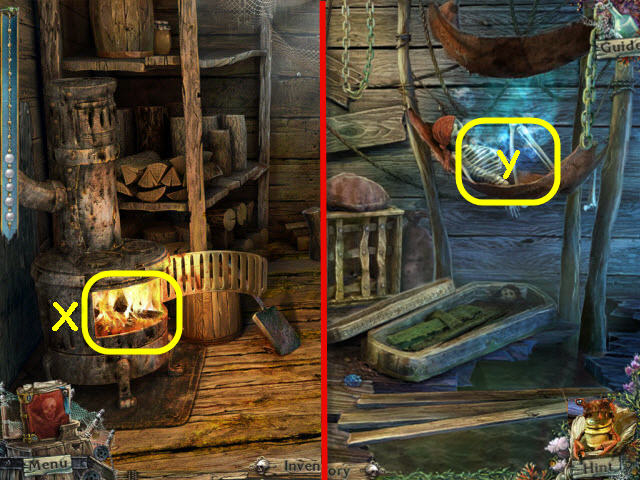
- Examine and use the MASHER on the jug; press on the cream twice to get OIL (O).
- Examine and use the OIL on the grating; open the grating and take the 2nd DIE (P).
- Give the BOOZE to the captain.
- Examine and place the 2 DIE on the table (Q) to trigger a puzzle.
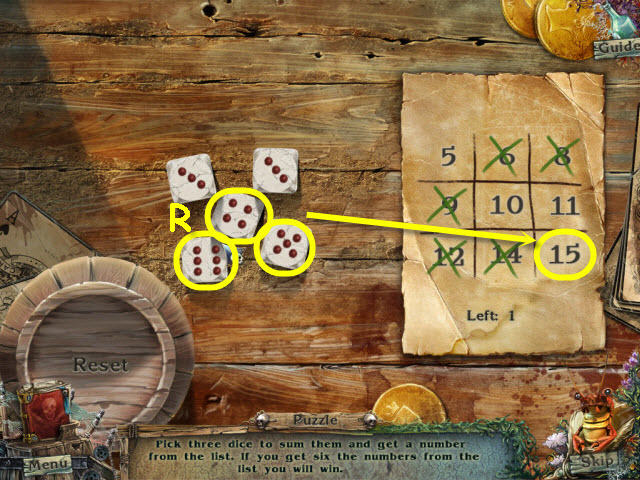
- Pick three dice that can be added together to match a number on the right.
- You will need to do that six times.
- The solutions are random; see screenshot (R) for example.
- Back out and go forward; go up the ladder to enter the ship.
Chapter 2 – The Flying Dutchman
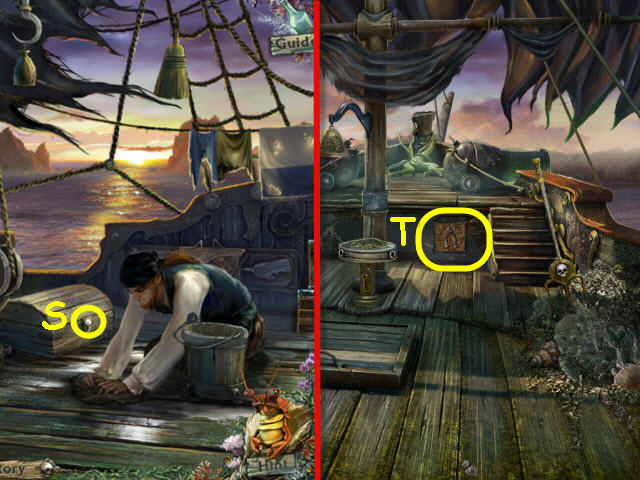
- Take the pearl (S) which will be added to the necklace on the left of the screen.
- Go left.
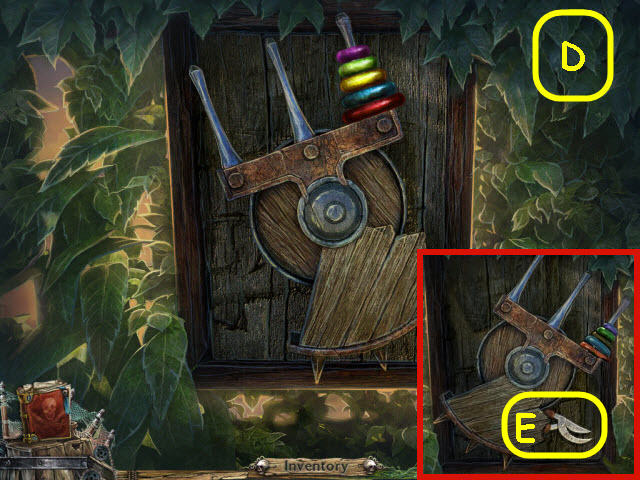
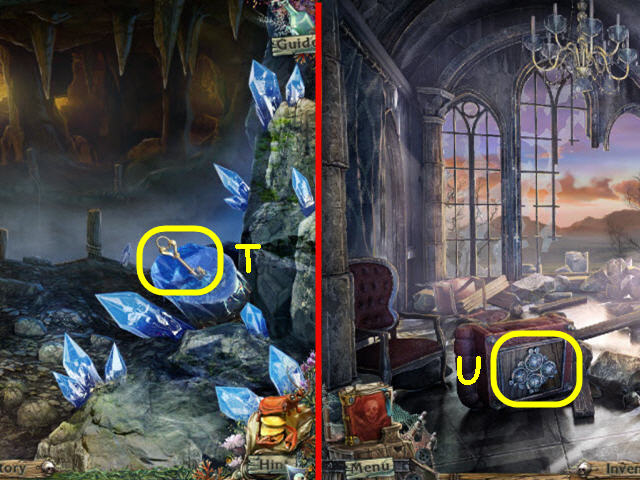
- Examine the net (T) to trigger a puzzle.
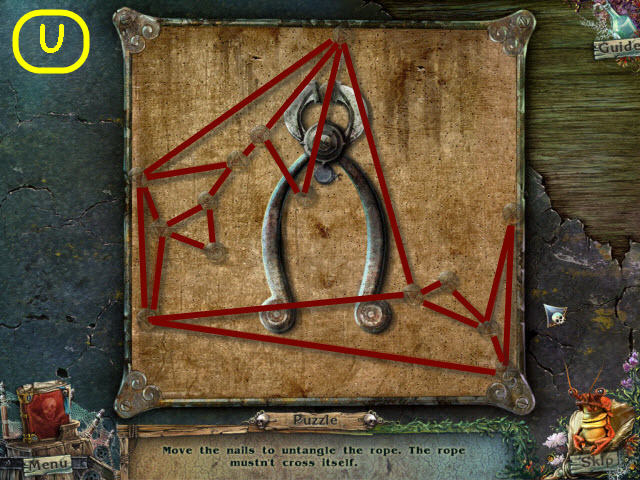
- Move the nails to untangle the ropes.
- See screenshot (U) for one solution.
- Take the NAIL PULLER.
- Back out and go right.
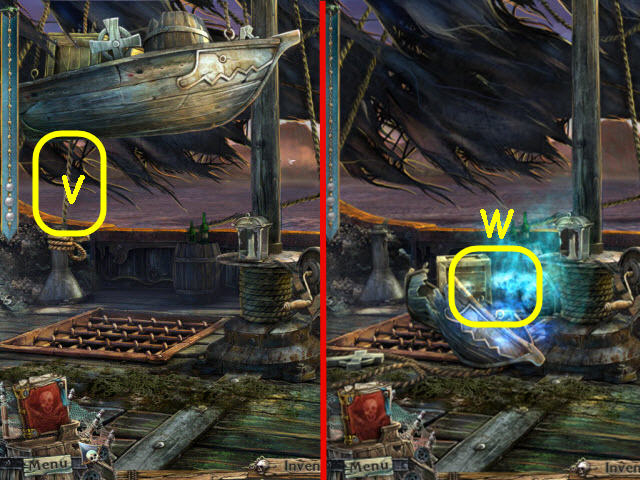
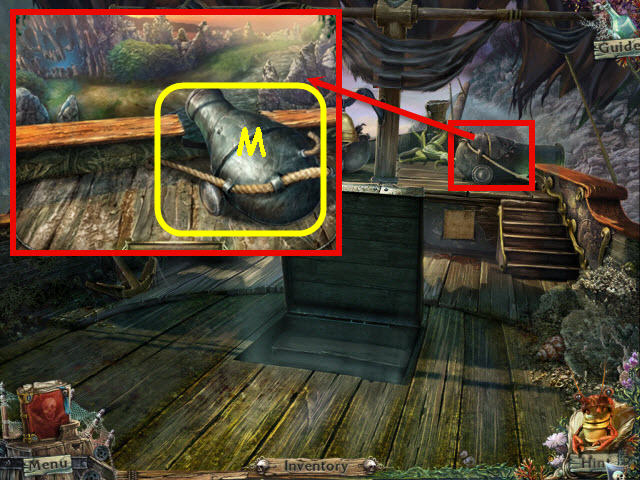
- Take the DISCHARGED BATTERY (V) and WINCH (W).
- Examine the stool; use the NAIL PULLER on all four nails (X); get CHAIR LEGS.
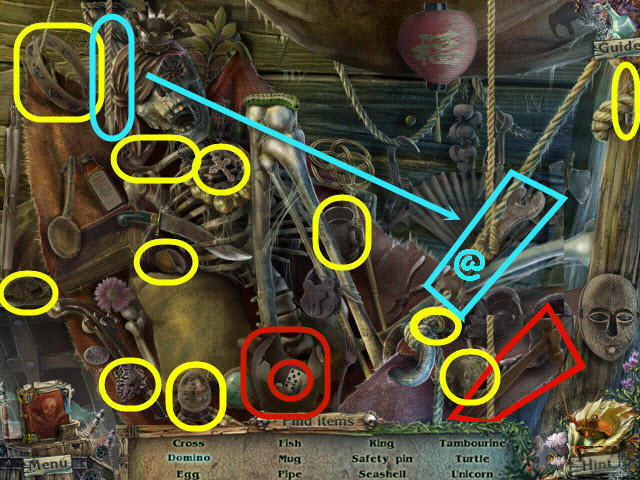
- Examine the boards (Y) to access a HOS.
- Find the items listed.
- Marked in red: open the drawer to get the bone.
- Marked in green: give the fish to the seagull to get a coin.
- Marked in white: place the neck of the mandolin on the body to get a mandolin.
- Find the TWEEZERS (@).
- Back out.

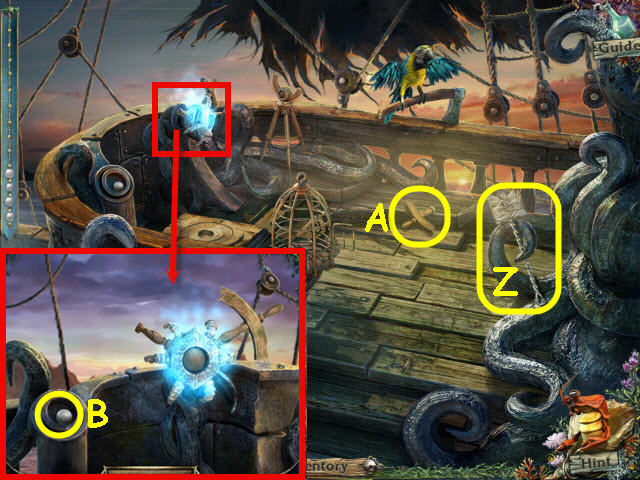
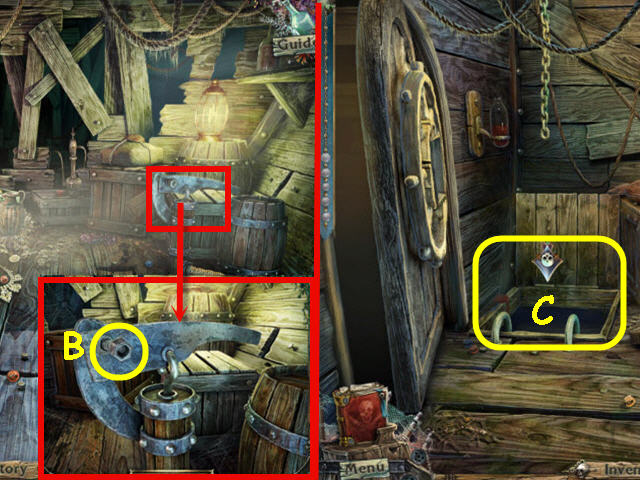
- Place the WINCH on the hoist; crank the WINCH (Z); take the EMPTY POUCH (A).
- Look over the ship side; use the TWEEZERS to get the BULLET 1/3 (B).
- Go right.
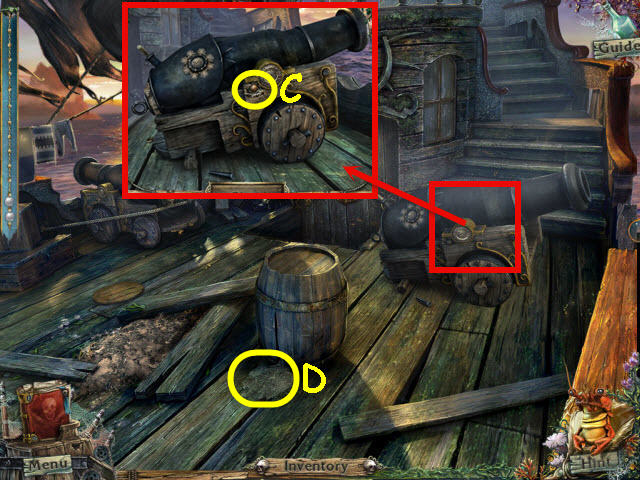
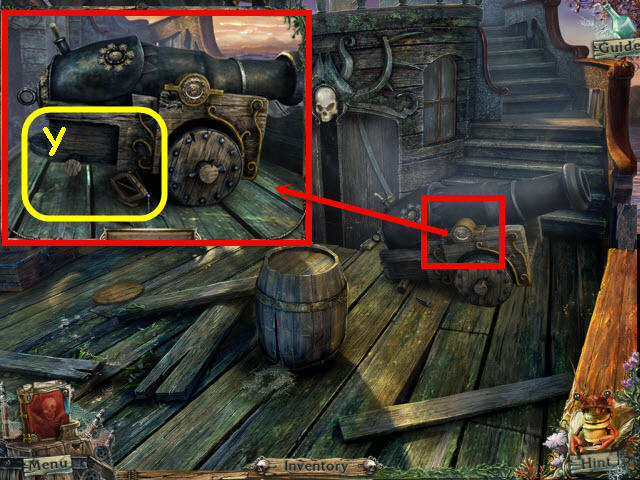
- Examine the cannon; use the TWEEZERS to get the BULLET 2/3 (C).
- Use the EMPTY POUCH on the gunpowder (D) to get a SACK OF POWDER.
- Back out and go left.
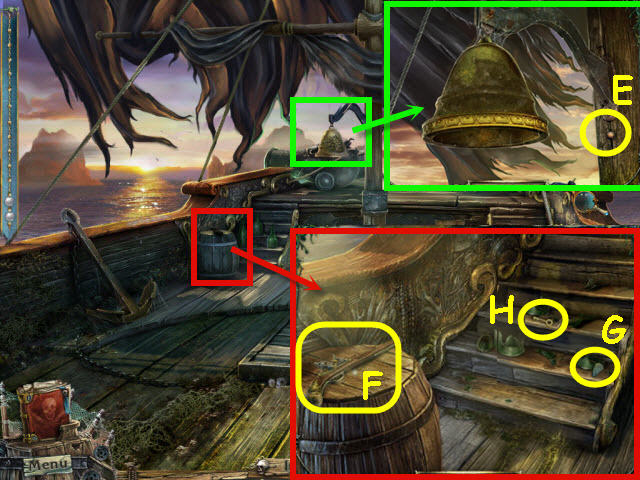
- Examine the bell; use the TWEEZERS to get the BULLET 3/3 (E).
- Examine the barrel; place the BULLETS 3/3 and the SACK OF POWDER on the gun; get a LOADED MUSKET (F).
- Use the LOADED MUSKET on each of the three bottles; take the SEMICIRCLE (G) and KEY (H).
- Back out.
- Use the KEY and examine the chest; take the HACKSAW (I) and NUT (J).
- Go left.
- Use the HACKSAW to get the CHAIN (K).
- Place the CHAIR LEGS and CHAIN on the wheel; turn the wheel (L).
- Go down the hatch (M).
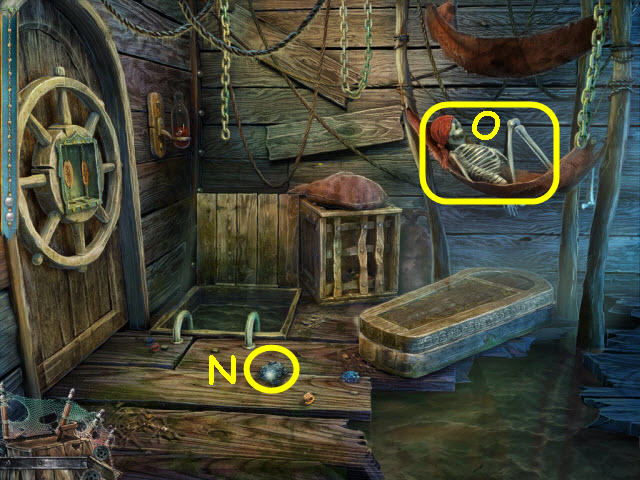
- Take the ROCK (N).
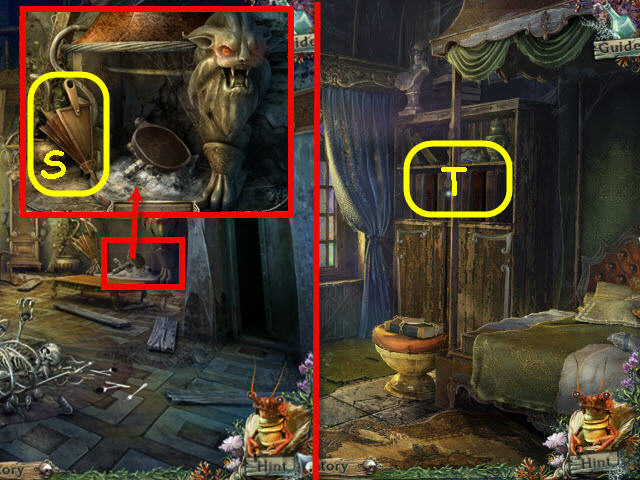
- Examine the skeleton (O) to access a HOS.
- Find the items listed.
- Marked in red: use the paddle duster on the pillow to get a feather.
- Marked in green: move the do-rag to get the eye.
- Find the LONG HOOK (@).
- Back out twice.
- Use the LONG HOOK to get the BROOM (P).
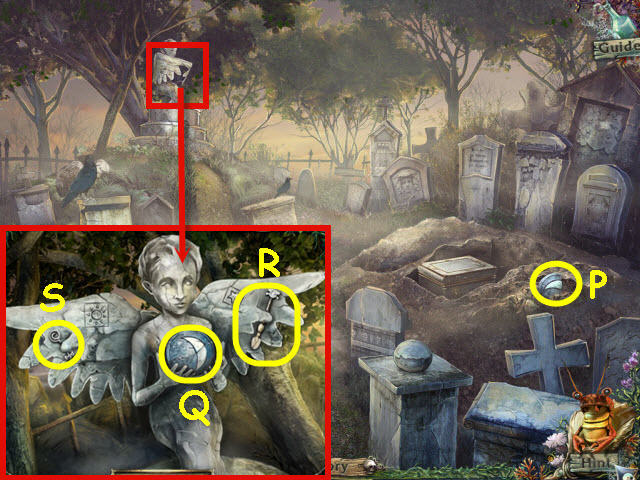
- Examine and use the ROCK on the lantern; take the SQUARE TILE (Q).
- Go left and down the hatch.
- Examine the coffin; take the pearl (R).
- Place the SQUARE TILE in the empty slot to trigger a puzzle.
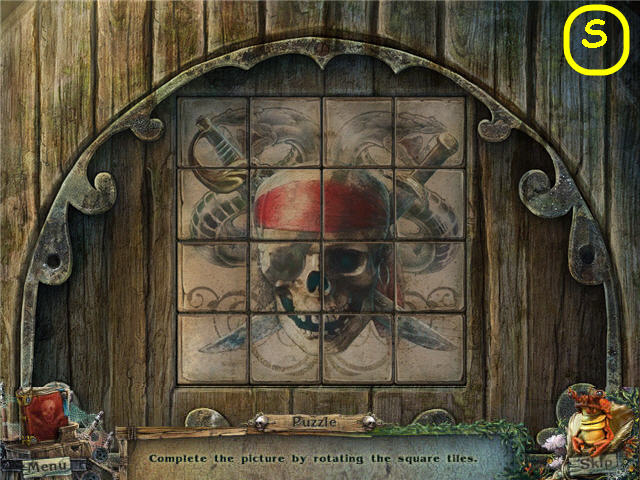
- Rotate the squares to complete the picture.
- See screenshot (S) for solution.
- Examine the coffin; read the note (T).
- Take the DAGGER (U).
- Back out twice.
- Use the DAGGER on the rope; get a ROPE (V).
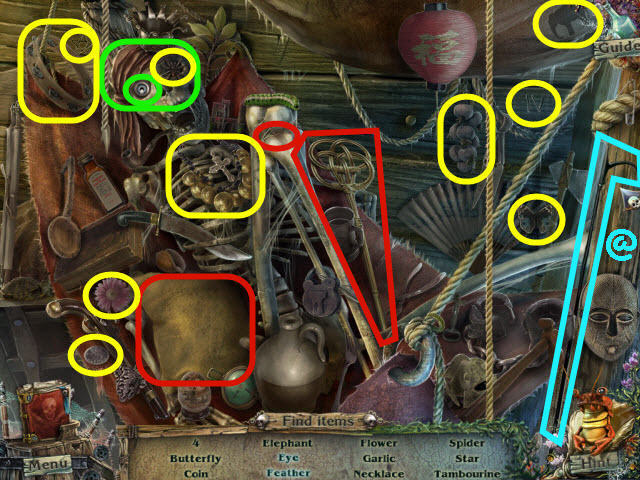
- Examine the crashed boat (W) to access a HOS.
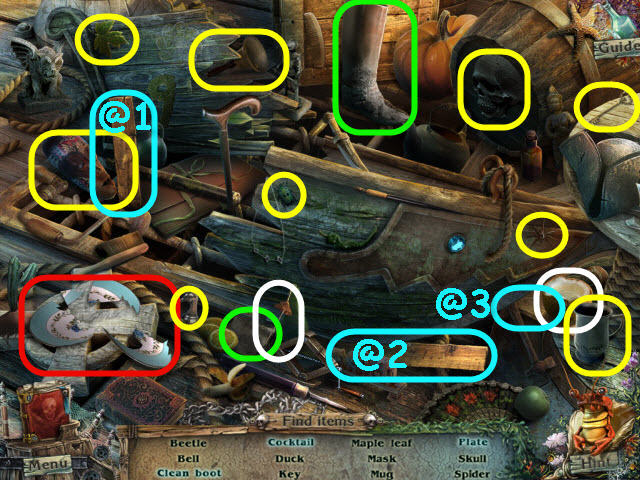
- Find the items listed.
- Marked in red: select the pieces of the plate to assemble them and get the plate.
- Marked in green: use the rag on the boot to get a clean boot.
- Marked in white: place the cocktail umbrella in the coconut to get a cocktail.
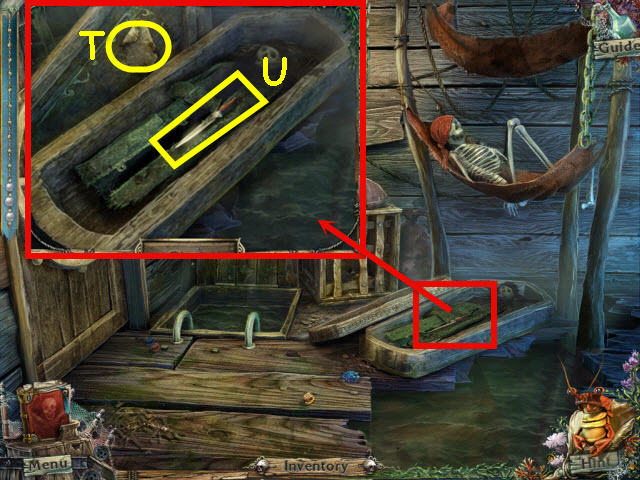
- Find the PLANKS (@1-@2-@3).
- Go right.
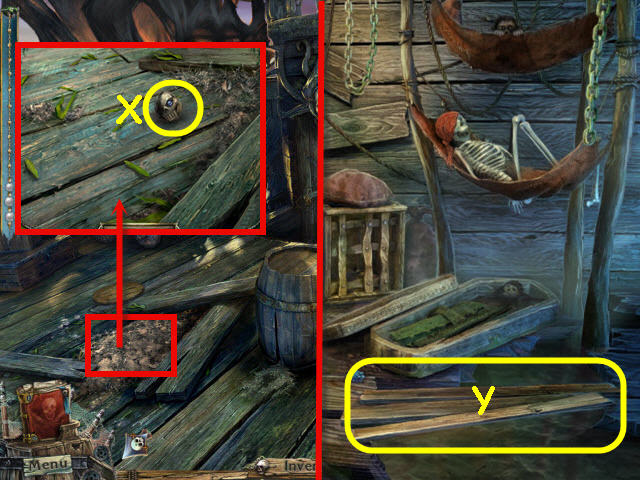
- Examine and use the BROOM on the dirt pile; take the SKULL (X).
- Back out; go left and down the hatch.
- Place the PLANKS on the gap (Y).
- Go right.
- Take the PICK (Z).
- Back out twice.
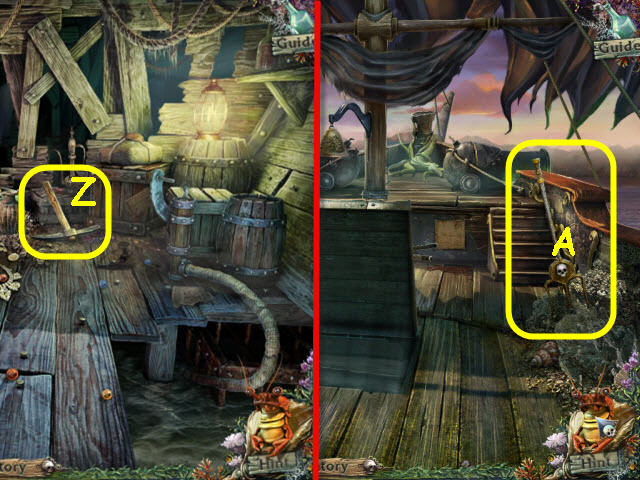
- Use the PICK to get the TRIDENT (A).
- Go down the hatch and go right.
- Place the TRIDENT on the totem (B); take the MATCHES (C).
- Examine the turtle; use the MATCHES on the wick; use the DAGGER to get the WAX (D).
- Back out three times.
- Examine the lantern: use the MATCHES on the candle; take the CANDLE (E).
- Go left and down the hatch.
- Examine and use the CANDLE on the thermometer; take the 2nd SKULL (F).
- Back out twice; go right.
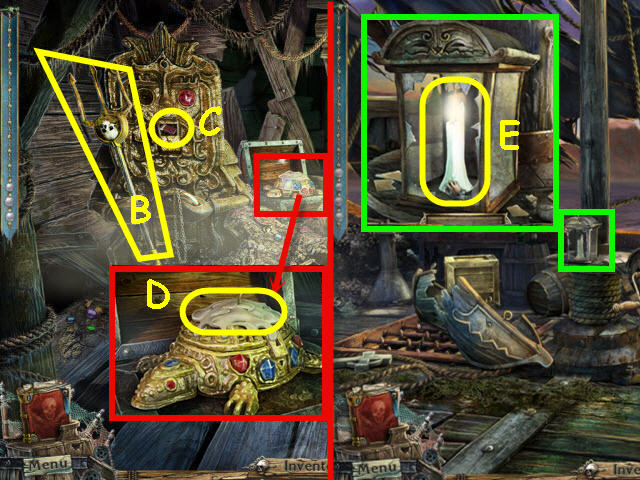
- Examine and place the 2 SKULLS on the door lock (G) to trigger a puzzle.
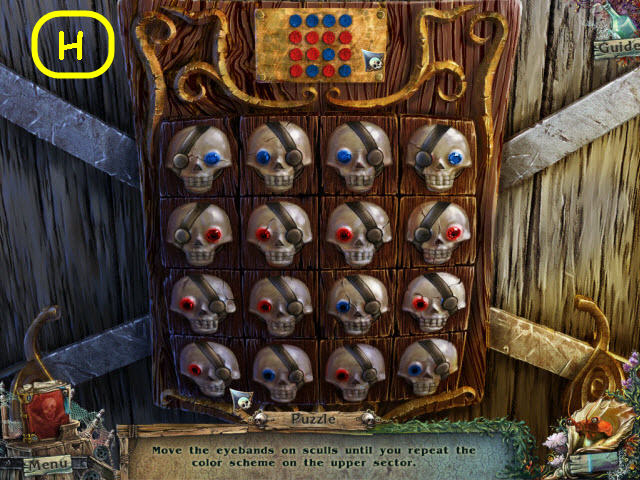
- Match the bottom skulls with the top layout by changing the eye patches to match.
- Hover your cursor over the top and bottom panels to view your layout.
- The layouts are random; yours may be different from ours.
- See screenshot (H) for my solution.
- Enter through the newly-opened door.
Chapter 3 – The Captain's Mirror
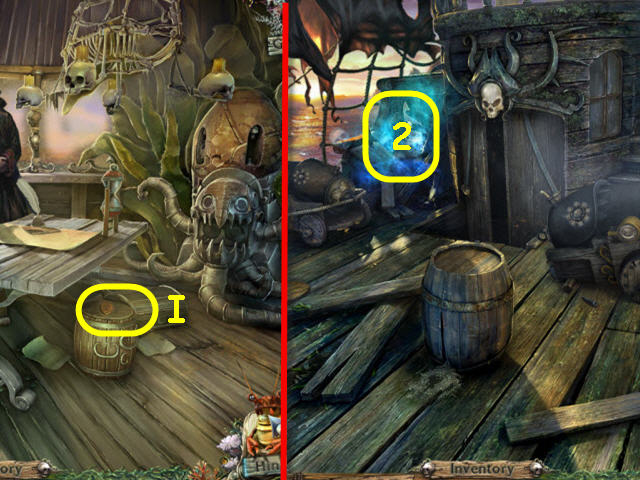
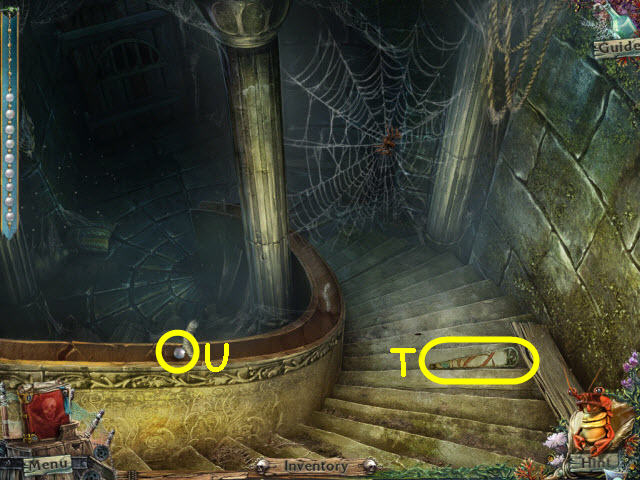
- Take the IRON TABLET (I).
- Back out.
- Examine the planks (2) to access a HOS.
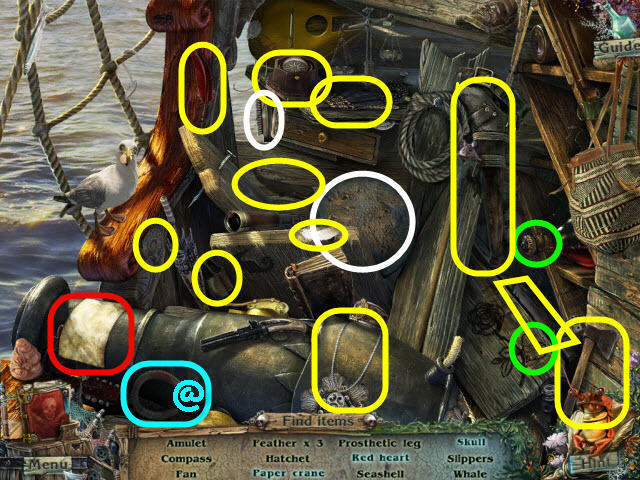
- Find the items listed.
- Marked in red: fold the paper twice to get a paper crane.
- Marked in green: pull the cork to get a red heart.
- Marked in white: use the brush on the ball to get a skull.
- Find the MAGNET (@).
- Back out; go left and down the hatch.
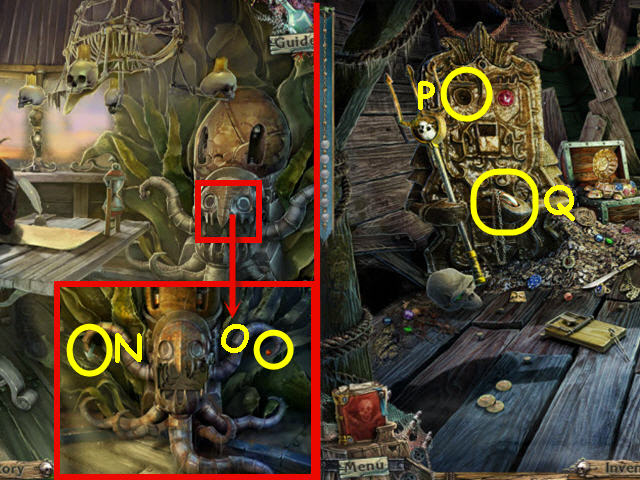
- Examine and use the MAGNET on the cage; get a CLAPPER (J).
- Back out.
- Examine and place the CLAPPER on the bell; ring the bell; note the clue (K) which has been added to your diary.
- Go down the hatch.
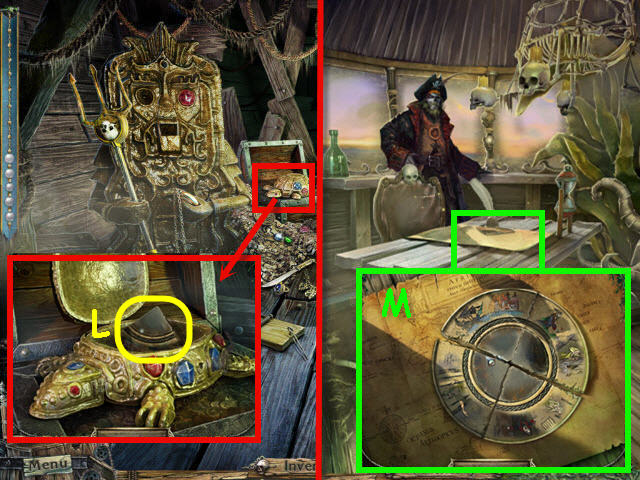
- Examine and place the IRON TABLET on the door lock (L) to trigger a puzzle.
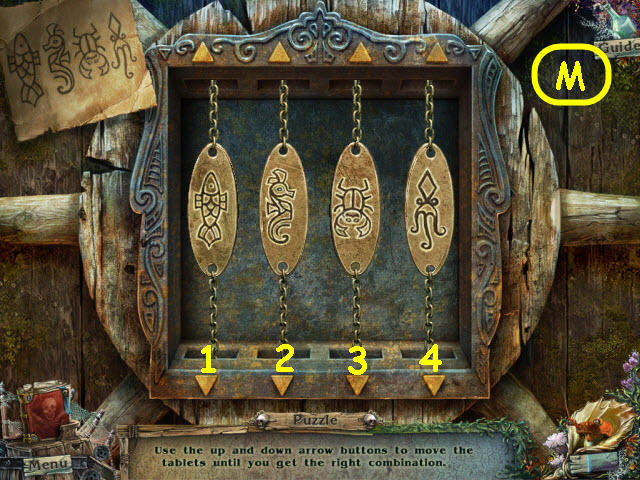
- Use the arrows to get the matching combination of tablets from the bell clue.
- See screenshot (M) for the solution.
- Solution: 2nd down arrow 2x, 4th down arrow 1x and 1st down arrow 3x.
- Go left into the newly-opened door.
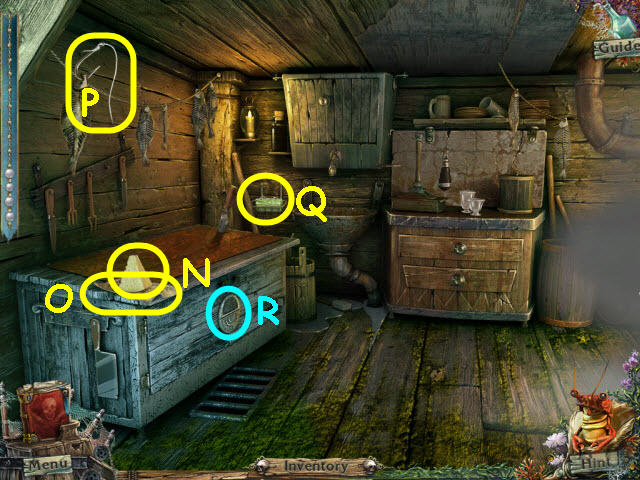
- Unwrap and take the CHEESE (N).
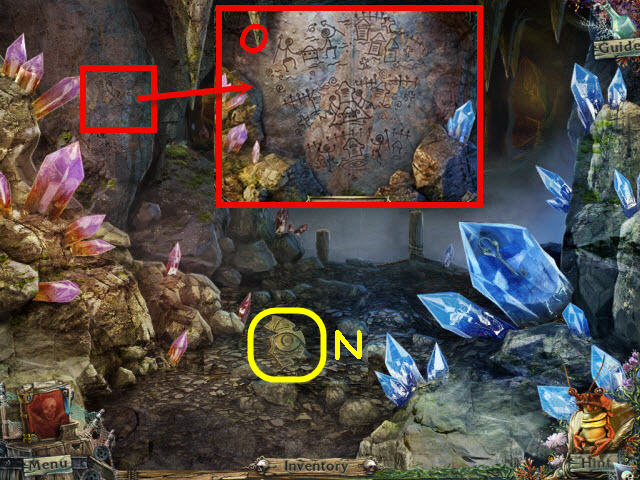
- Examine the paper (O) to get a clue in the diary.
- Take the FISH HOOK ON A LINE (P) and the SOAP (Q).
- Place the SEMICIRCLE on the lock (R) and examine the cupboard.
- Back out and go right.
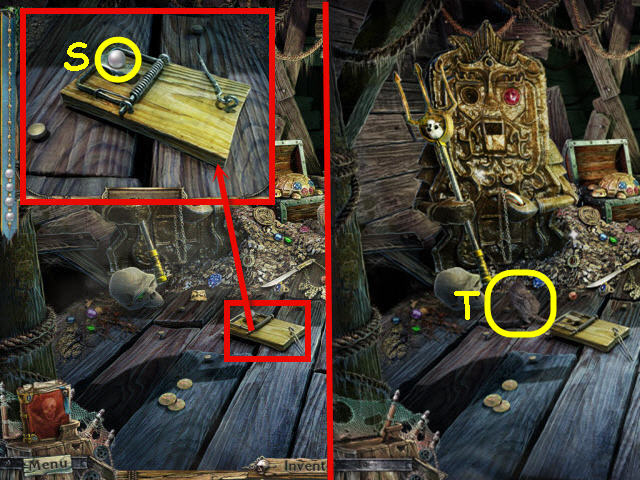
- Examine the mousetrap; take the pearl (S).
- Place the CHEESE in the trap; take the MOUSE (T).
- Back out and go left.
- Examine and give the MOUSE to the snake; take the VALVE (U) and WHEEL (V).
- Examine the sink; place the VALVE on the tap (W) to trigger a puzzle.

- Use the two beakers and the water from the tap to get .4 water.
- Solution: Fill the .5 beaker and pour into the .3 beaker. Dump the .3 water out in the sink and dump the remaining .2 that is in the .5 beaker into the .3 beaker. Fill the .5 beaker and pour into the .3 beaker leaving .4 in the beaker. Place the .5 beaker with the .4 water on the left scale plate.
- Take the PIECE OF MIRROR (X).
- Back out three times.
- Examine the crashed boat to access a HOS.
- Find the items listed.
- Marked in red: take a couple bites out of the banana to get a banana peel.
- Marked in green: tie the rope twice to get a knot.
- Find the JACK (@).
- Go right.
- Examine and use the JACK and WHEEL on the cannon (Y).
- Use the ROPE on the cannon.
- Go straight up the stairs.
- Take the BRUSH (Z) and PIECE OF STEERING WHEEL 1/5 (A).
- Examine the helm; take the pearl (B).
- Back out twice; go left.
- Examine the bow; use the BRUSH on the chimney (C).
- Go down the hatch; go left and then right to the storeroom.

- Knock over the boot; take the SHIP TOY (D).
- Take the FISHNET (E) and PIECE OF STEERING WHEEL 2/5 (F).
- Back out four times.
- Examine and use the FISHNET on the water; get a FISH (G).
- Go right and up the stairs.
- Examine and place the SHIP TOY on the map (H) to trigger a puzzle.
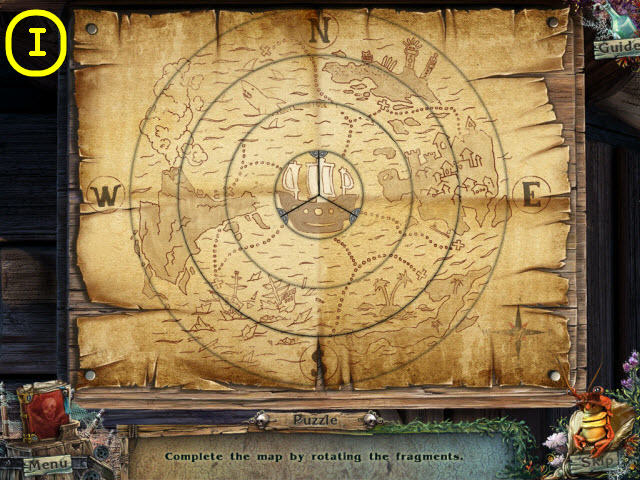
- Rotate the rings to complete the map.
- Solution: The starting positions are random; line up the outer ring to have N on top, line up the middle ring, line up the inner ring, line up the outer ring again and finish with the middle ring. See screenshot (I) for completed map.
- Take the 2nd PIECE OF MIRROR.
- Back out twice; go left and down the hatch and go left.
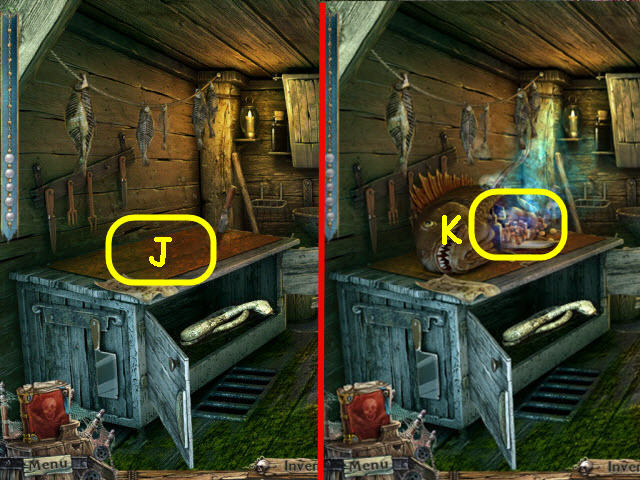
- Place the FISH on the counter (J); use the DAGGER on the fish.
- Examine the fish (K) to access a HOS.
- Find the items listed.
- Marked in red: place the 5 coins in the piggy bank to get 5.
- Marked in green: open the jewelry box to get the ring.
- Find the KEY (@).
- Back out and go right.
- Examine and use the KEY on the golden turtle; turn the KEY and take the 3rd PIECE OF MIRROR (L).
- Back out three times; go right and enter the captain's quarters.
- Examine and place the 3 PIECES OF MIRROR on the map (M); select the mirror four times to turn the mirror and hear the full story.
Chapter 4 – Break the Spell
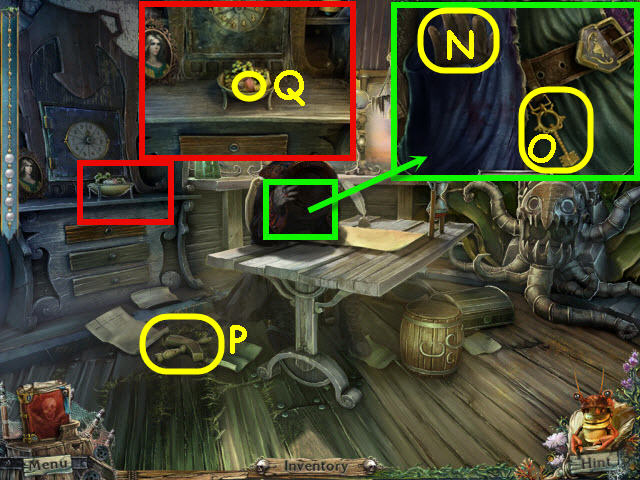
- Examine the captain; take the GLOVE (N).
- Use the WAX on the key (O) to get a KEY MOLD.
- Take the 3rd PIECE OF STEERING WHEEL (P).
- Examine the safe; take the WORM (Q).
- Back out and go forward up the stairs.
- Place the WORM in the cage (R).
- Take the HATCHET (S).
- Go to the storeroom.
- Examine and use the HATCHET on the log; take the DRAWER HANDLE (T).
- Go to the captain's quarters.
- Examine and place the DRAWER HANDLE on the drawer; pull the DRAWER HANDLE (U).
- Take the BRAND (V) and read the note (W).
- Go to the storeroom.
- Use the GLOVE to open the furnace (X).
- Place the BRAND in the furnace to get a SCORCHING BRAND.
- Back out twice.
- Examine the skeleton (Y) to access a HOS.
- Find the items listed.
- Marked in red: use the hammer on the vase to get the domino.
- Pull the rope to find the WRENCH (@).
- Go right.

- Examine and use the SCORCHING BRAND on the package; note the combination code (Z).
- Go to the captain's quarters.
- Examine the safe; press on the hour numbers (A) to match the code; 15093 from the package which is now in your diary.
- Take the PUMP LEVER.
- Go to the treasure room.
- Examine and place the PUMP LEVER on the pump; place the NUT on the bolt and use the WRENCH on the NUT (B).
- Pump the handle.
- Back out.
- Go down the hatch (C).
- Take the PIECE OF STEERING WHEEL 4/5 (D).
- Examine and use the DISCHARGED BATTERY on the shockfish (E); get a CHARGED BATTERY.
- Examine and use the DAGGER on the clamshell; take the pearl (F) and KEY (G).
- Use the KEY on the cell door (H); examine the cell.
- Use the FISH HOOK ON A LINE in the crack to get a PIRATE HAT (I).
- Use the SOAP on the left shackle; take the SPYGLASS (J).
- Back out.
- Examine the coffin; give the PIRATE HAT to the pirate (K).
- Take the PIECE OF STEERING WHEEL 5/5 (L) and the RUM (M).
- Go to the captain's quarters.
- Examine the place the CHARGED BATTERY on the mechanism; take the ANCHOR (N) and GEM (O).
- Go to the treasure room.
- Place the GEM on the totem (P); take the COMPASS (Q).
- Back out and go down the hatch.
- Pour the RUM on the snails (R).
- Examine and place the ANCHOR on the chest lock (S).
- Examine the opened chest; take the PLIERS (T).
- Go to the storeroom.

- Examine and use the PLIERS on the glasses; get a LENS (U).
- Back out.
- Examine the fish (V) to access a HOS.
- Find the items listed.
- Marked in red: place the coffee beans in the grinder to get ground coffee.
- Marked in green: move the cloth to get the triangle.
- Find the SCREWDRIVER (@).
- Go to the captain's quarters.
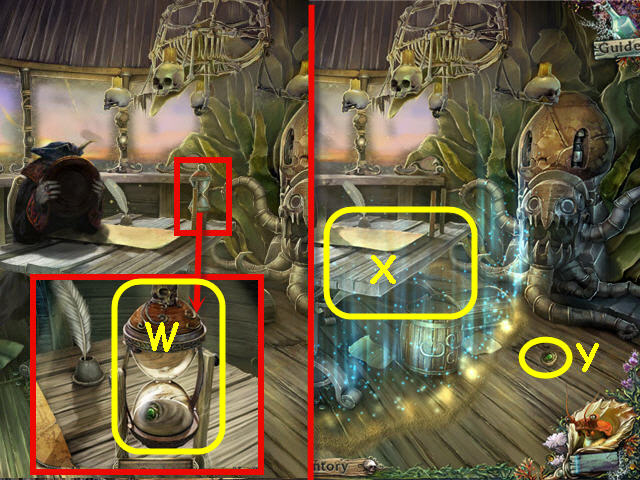
- Examine and use the SCREWDRIVER on the hourglass; get the HOURGLASS (W).
- Use the HOURGLASS on the area in front of the captain (X).
- Take the MEDALLION (Y).
- Back out and go up the stairs.
- Place the SPYGLASS on the tripod (Z).
- Examine and place the LENS on the SPYGLASS (A) to trigger a puzzle.
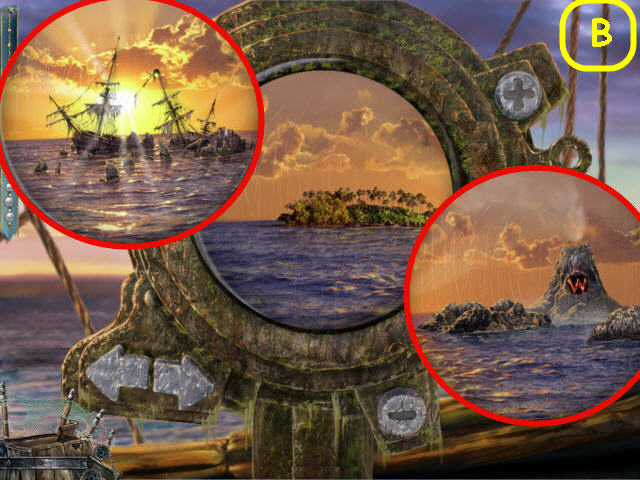
- Adjust the spyglass to focus in on the three scenes.
- Use the arrows to change the scenes and use the (+/-) to adjust the focus.
- Solution: Island – select the +2x; right arrow, shipwreck – select +2x; right arrow, volcano select +2x. See screenshot (B).
- Examine and place the 5 PIECES OF STEERING WHEEL and the MEDALLION on the helm (C).
- Place the COMPASS in the slot (D).
Chapter 5 – Mysterious Island
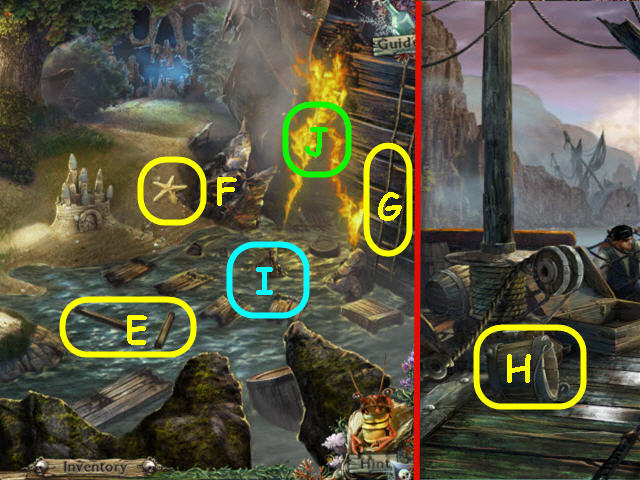
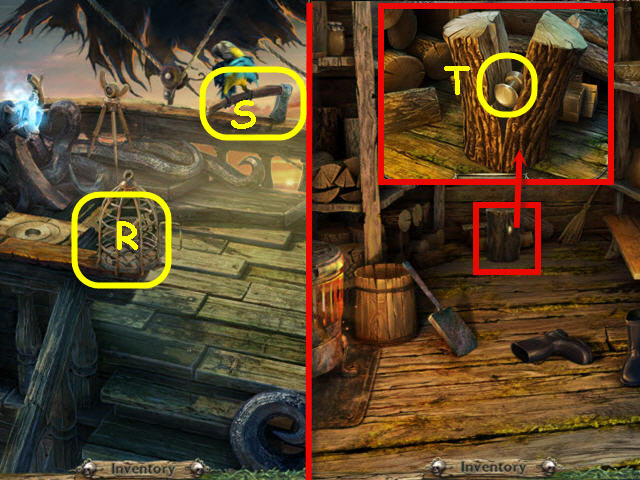
- Take the BOARDS (E) and the STARFISH (F).
- Go right up the ladder (G).
- Take the BUCKET (H).
- Back out.
- Dip the BUCKET in the water (I); get a BUCKET OF WATER.
- Use the BUCKET OF WATER on the flames (J).
- Examine the extinguished area to access a HOS.
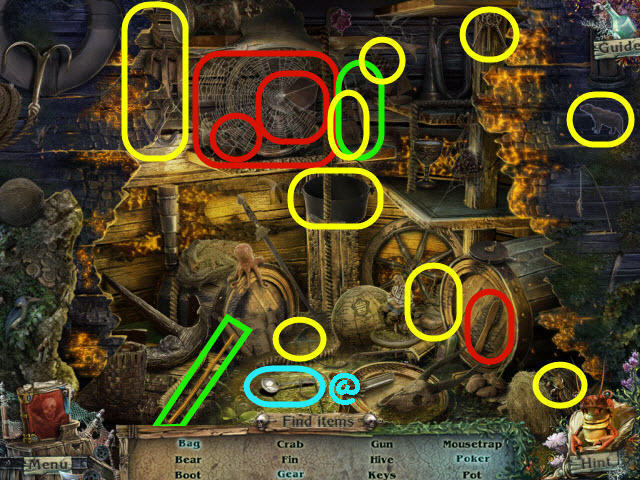
- Find the items listed.
- Marked in red: use the brush on the spider web to get the gear and bag.
- Marked in green: use the hammer on the hot iron three times to get the poker.
- Find the SPOON (@).
- Go to the storeroom.
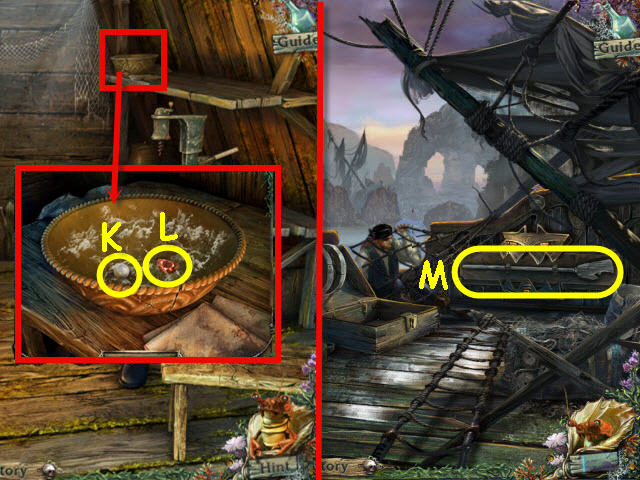
- Examine and use the SPOON on the bowl of porridge two times; take the pearl (K) and EYE (L).
- Back out four times.
- Place the EYE on the lock; take the OAR (M).
- Back out.
- Use the OAR on the anchor; pull the OAR (N).
- Take the SAW (O).
- Use the SAW on the fallen tree (P).
- Go up the newly-opened path.
- Examine the basement window; take the SHELL 1/3 (Q).
- Use the PLIERS to get the DOWEL 1/2 (R).
- Go up the right path.
- Examine the table; move the cloth; take the HALF OF THE HANDLE (S).
- Examine the bridge (T) to access a HOS.
- Find the items listed.
- Marked in red: use the scissors on the line to get a cork float.
- Marked in green: move the weeds to get the dolphin.
- Find the HAMMER (@).
- Back out and go left.
- Take the GLUE (U).
- Use the BOARDS and HAMMER on the ladder; take the LADDER (V).
- Back out and go right.
- Place the LADDER against the tree.
- Examine the nest; take the SHELL 2/3 (W) and the FEATHER (X).
- Back out.
- Examine and place the FEATHER on the right statue; take the DOWEL 2/2 (Y).
- Examine the left statue; place the GLUE and HALF OF THE HANDLE on the half of the handle; take the HANDLE (Z).
- Go left.
- Examine and place the HANDLE on the wardrobe; pull to open; take the SHELL 3/3 (A) and GEAR (B).
- Examine and place the DOWEL 2/2 on the mechanism (C) to trigger a puzzle.
- Move the stack of disks from the left to right.
- Select the ring you wish to move and then select the stack you wish to move it to. You cannot place a larger disk on top of a smaller disc.
- Solution: Move the purple disk to the right stack, move the green disk to the center stack, move the purple disk to the center stack, move the yellow disk to the right stack, and move the purple disk to the left stack.
- Move the green disk to the right stack, move the purple disk to the right stack, move the blue disk to the center stack, move the purple disk to the center stack, and move the green disk to the left stack.
- Move the purple disk to the left stack, move the yellow disk to the center stack, move the purple disk to the right stack, move the green disk to the center stack, and move the purple disk to the center stack.
- Move the red disk to the right stack, move the purple disk to the left stack, move the green disk to the right stack, move the purple disk to the right stack, move the yellow disk to left stack, and move the purple disk to the center stack.
- Move the green disk to the left stack, move the purple disk to the left stack, move the blue disk to the right stack, move the purple disk to the right stack, and move the green disk to the center stack.
- Move the purple disk to the center stack, move the yellow disk to the right stack, move the purple disk to the left stack, move the green disk to the right stack, and move the purple disk to the right stack.
- See screenshot (D) for solution.
- Take the GARDEN PRUNER (E).
- Back out twice.
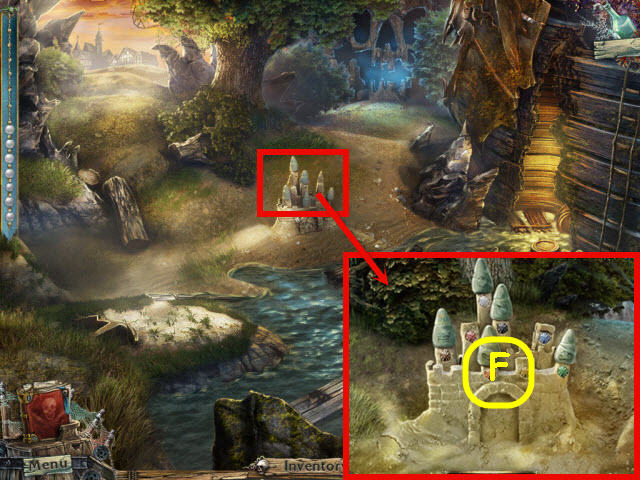
- Examine the sandcastle.
- Examine and place the SHELL 3/3 on the sandcastle (F) to trigger a puzzle.
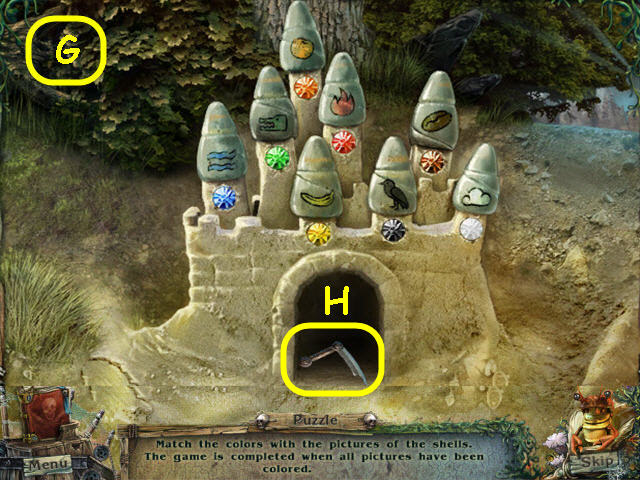
- Arrange the gems to match the pictures on the shells.
- See screenshot (G) for solution.
- Take the CRAB'S LEG 1/3 (H).
- Examine the hole in the side of the ship to access a HOS.
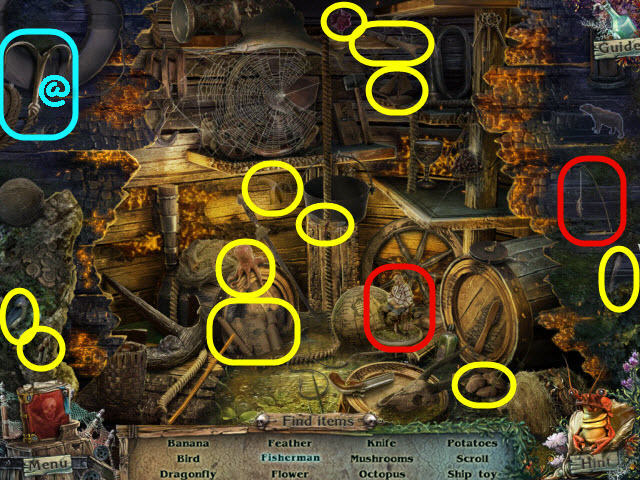
- Find the items listed.
- Marked in red: place the fishing pole in the fisherman's hands to get a fisherman.
- Find the CRAMPON (@).
- Go up the left path and then right.
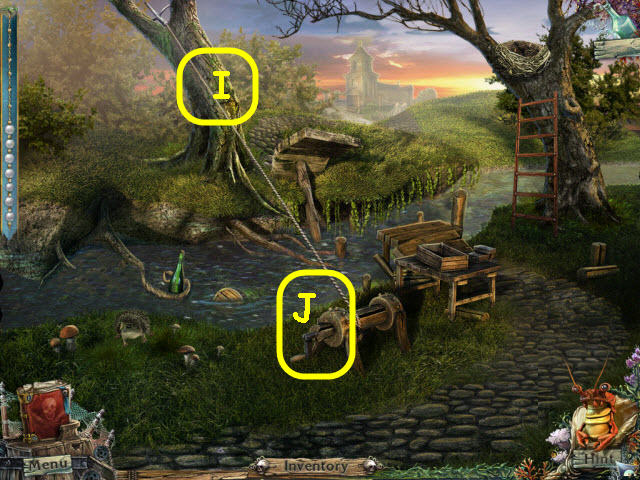
- Use the CRAMPON on the tree (I); crank the winch (J).
- Cross the creek to the church.
- Take the TORCH (K) and the SLEDGEHAMMER (L).
- Take the CRAB'S LEG 2/3 (M).
- Back out twice.

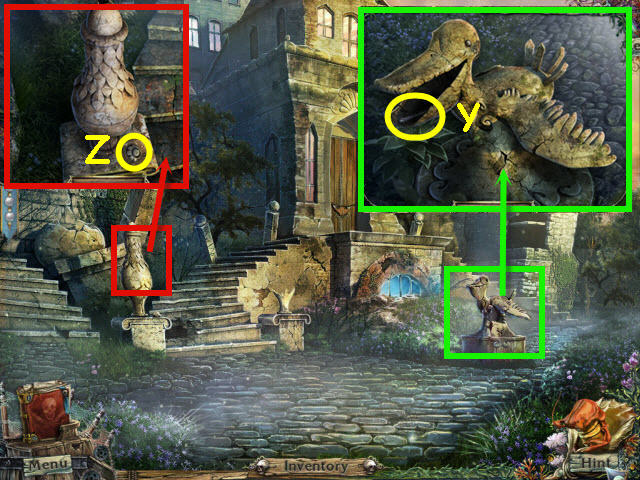
- Examine and use the SLEDGEHAMMER on the vase statue; take the BOMB (N).
- Go to the ship storeroom.
- Light the TORCH on the furnace (O); get a LIT TORCH.
- Go to the mansion and then go left.
- Place the BOMB on the rocks (P); light with the LIT TORCH.
- Go forward to the garden.
- Use the GARDEN PRUNER on the bushes; take the SCRUBBER (Q).
- Examine the statue; take the RAKE (R).
- Go to the church.
- Examine the windows; take the pearl (S).
- Use the SCRUBBER on the wall; take the CRAB'S LEG 3/3 (T).
- Back out.
- Examine the broken bridge to access a HOS.
- Find the items listed.
- Marked in red: pick up the branch to get the beetle.
- Marked in green: turn the log to get the xxx.
- Marked in white: place the rooster on the vane to get a weathercock.
- Find the BRUSH (@).
- Go forward.
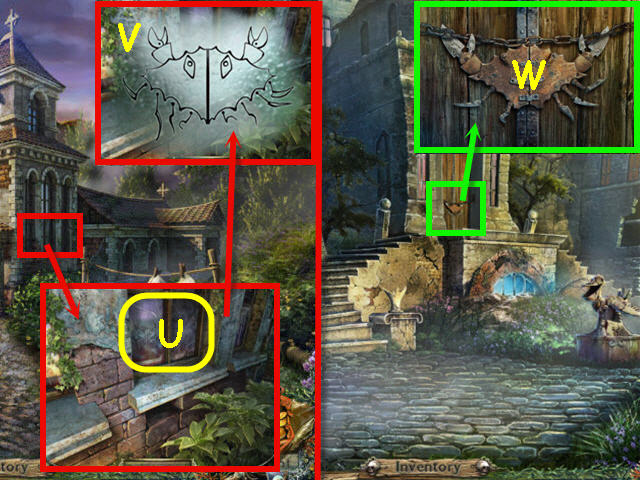
- Examine and use the BRUSH on the windows (U); examine the crab (V) to get a clue added to your diary.
- Back out twice.
- Examine and place the 3 CRAB'S LEGS on the mansion door (W) to trigger a puzzle.
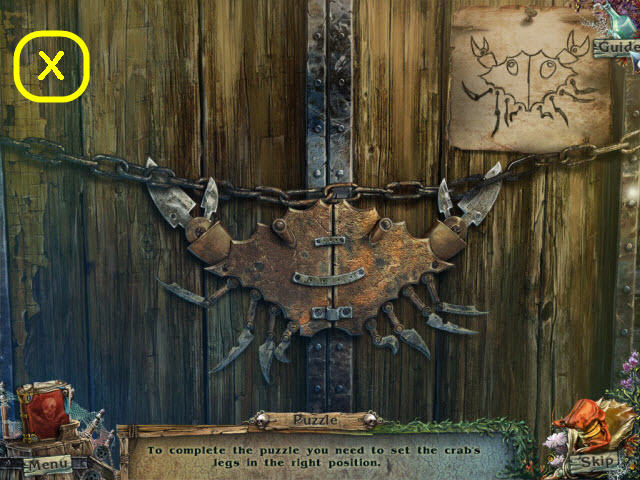
- Adjust the crab legs to match the clue from the church window.
- See screenshot (X) for solution.
- Enter the mansion.
Chapter 6 – The Mansion
- Take the EMPTY BAG (Y).
- Go upstairs.
- Take the PIECE OF A PICTURE (Z).
- Examine the stained glass; take the FOSSIL TOOTH (A).
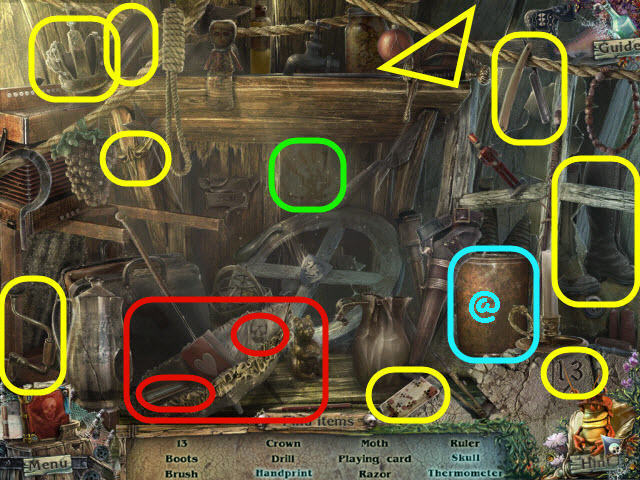
- Examine the broken ceiling (B) to access a HOS.
- Find the items listed.
- Marked in red: pull down the sack to expose the jam.
- Marked in green: place the spout on the pot to get a teapot.
- Find the SQUARE LOCKET (@).
- Go to the garden.
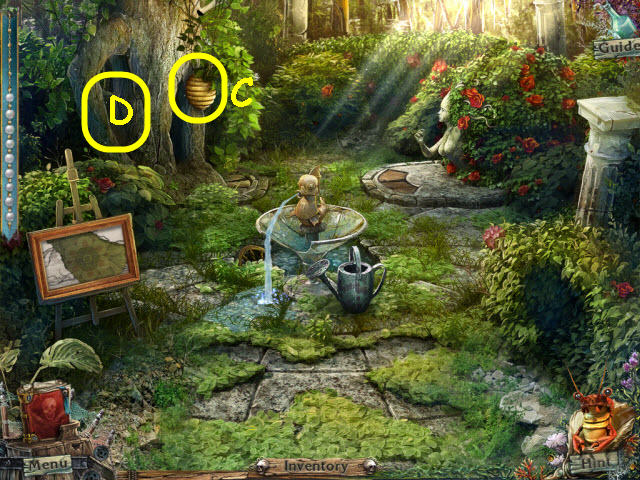
- Use the EMPTY BAG on the beehive (C) to get a BAG WITH HIVE.
- Examine the bend in the tree (D) to access a HOS.
- Find the items listed.
- Marked in red: use the knife on the equation to get 9.
- Marked in green: open the toe of the shoe to get the mouse.
- Find the FISHING ROD (@1).
- Go to the creek.
- Use the FISHING ROD to get the SEALED BOTTLE (E).
- Go to the church.
- Use the BAG WITH HIVE on the coyotes (F).
- Go straight.
- Open the bag; take the PENCIL (G).
- Examine the statue; take the PART OF A FAN (H).
- Go to the garden.
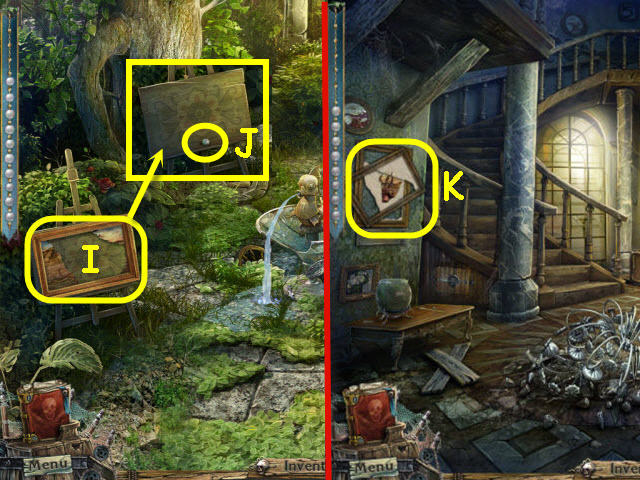
- Use the PENCIL on the picture (I); take the 2nd PIECE OF A PICTURE.
- Take the pearl (J).
- Go into the mansion.
- Examine and place the 2 PIECES OF A PICTURE on the picture (K) to trigger a puzzle.
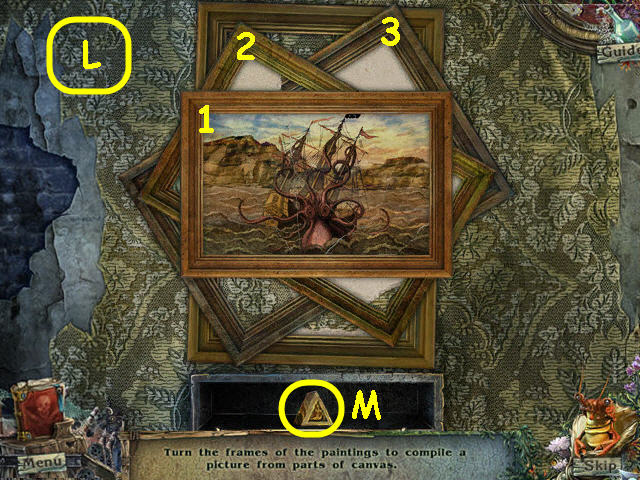
- Rotate the picture frames to complete the picture.
- Solution: The starting layout is random; turn the frames into their correct position in the order of 3 - 1 - 2 to solve. See screenshot (L).
- Take the TRIANGLE LOCKET (M).
- Go to the ship storeroom.
- Examine and place the SEALED BOTTLE on the opener; select the SEALED BOTTLE three times; take the CORK (N).
- Select the bottle again to read the message (O).
- Go to the garden.
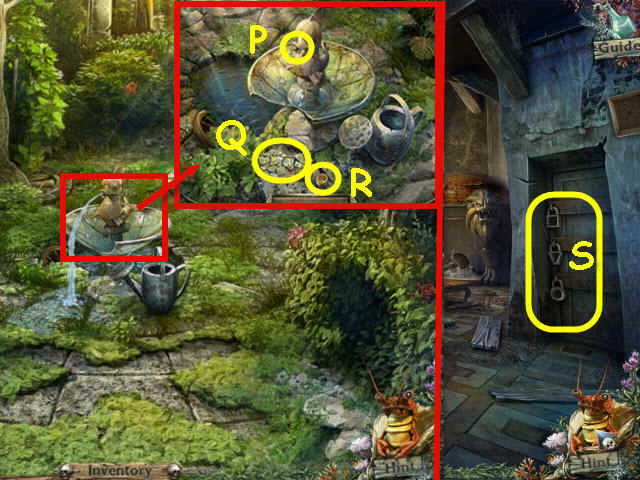
- Examine and place the CORK in the fountain (P).
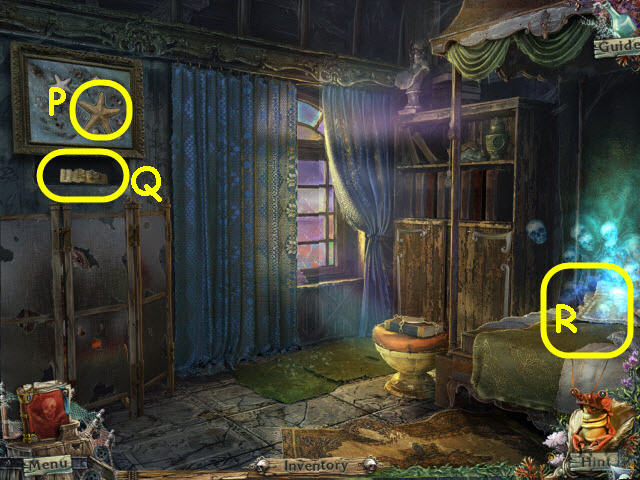
- Take the FRAGMENT OF A STAINED GLASS (Q) and ROUND LOCKET (R).
- Go into the mansion.
- Place the SQUARE LOCKET, TRIANGLE LOCKET and ROUND LOCKETS on the matching shaped locks (S).
- Go right through the newly-opened dungeon door.
- Take the 2nd PART OF A FAN (T) and pearl (U).
- Back out and go up the stairs.
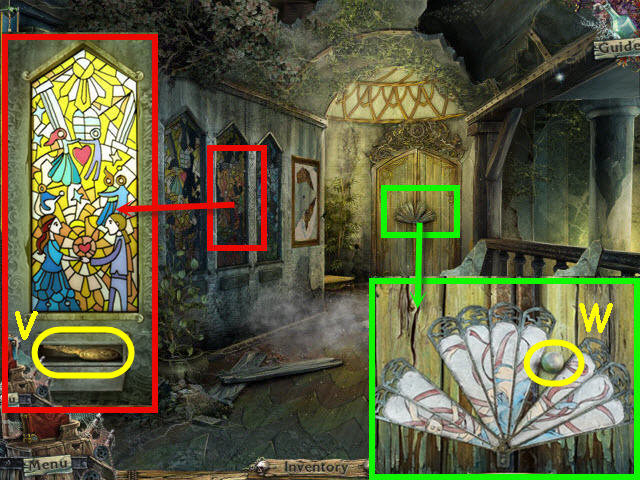
- Examine and place the FRAGMENT OF A STAINED GLASS on the left stained glass panel; take the PENDULUM (V).
- Examine the door; take the pearl (W).
- Place the 2 PARTS OF A FAN on the fan to trigger a puzzle.
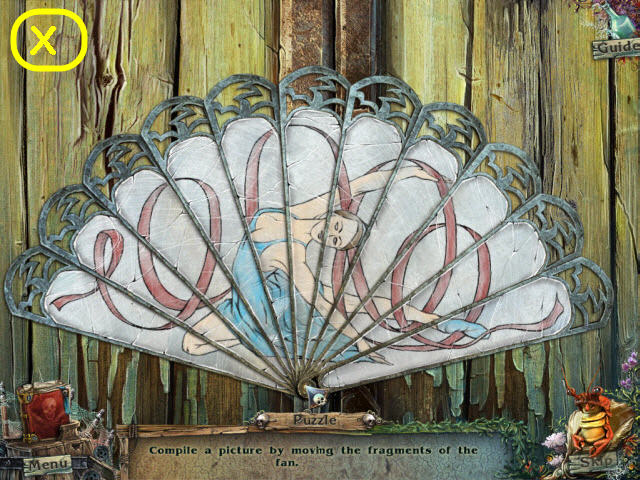
- Move the pieces of the fan to complete the picture.
- Solution: The starting placement is random; see screenshot (X) for completed picture.
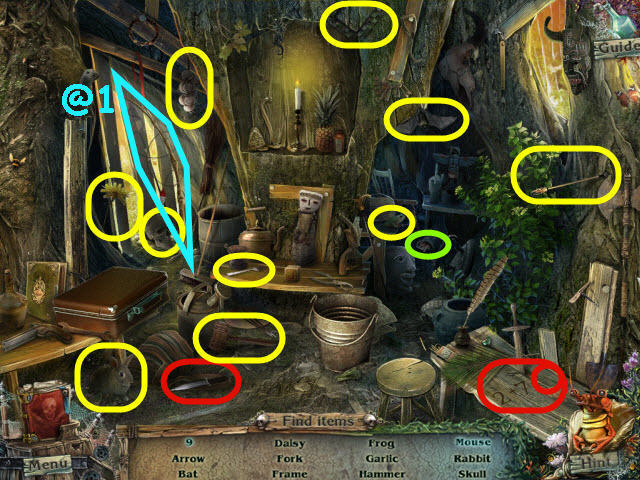
- Examine the broken ceiling to access a HOS.
- Find the items listed.
- Marked in red: open the umbrella to get the skull and thermometer.
- Marked in green: touch the wall to get a handprint.
- Find the jerry can with oil to get a CAN OF OIL (@).
- Go straight to the piano room.

- Examine the piano; take the pearl (Y).
- Go to the dungeon.
- Use the CAN OF OIL and LIT TORCH on the left railing (Z).
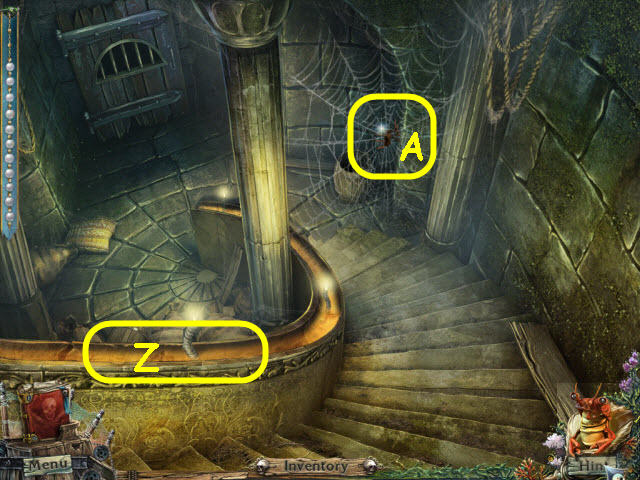
- Examine the spider (A) to trigger a puzzle.
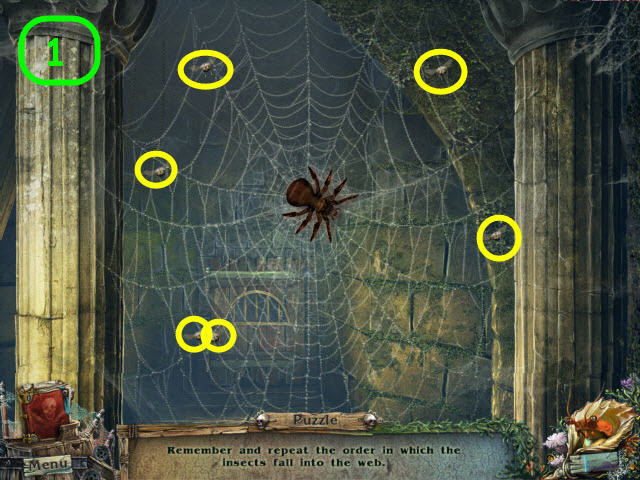
- Select the flies (circled in yellow) in the order that they land on the web.
- The landing order of the flies is random. See screenshot (1).
- Take the BARREL WITHOUT THE BOTTOM (B).
- Back out.
- Examine the clock; open the face; place the GEAR inside and hang the PENDULUM; take the SEED CRYSTAL (C).
- Go to the creek.
- Place the BARREL WITHOUT THE BOTTOM on the hedgehog; examine and select the hedgehog (D) to get a NEEDLE.
- Go to the garden.
- Examine the fountain; use the NEEDLE on the head of the WATERING CAN; take the WATERING CAN WITH WATER (E).
- Back out.
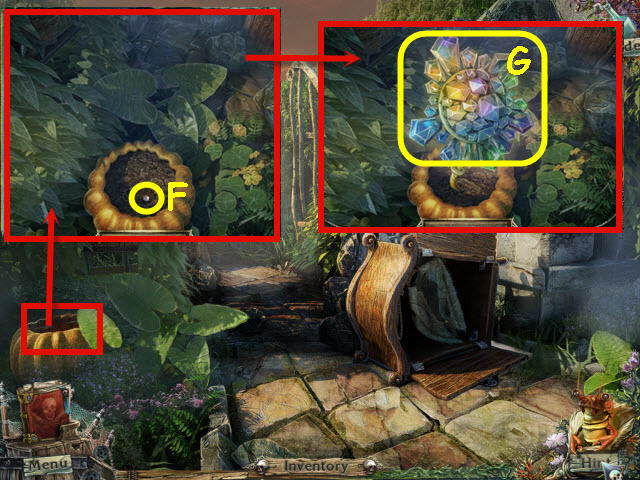
- Examine the planter; use the RAKE on the dirt; take the pearl (F).
- Plant the SEED CRYSTAL; use the WATERING CAN WITH WATER on the dirt and take the FRAGMENT OF A STAINED GLASS (G).
- Go to the upper balcony of the mansion.
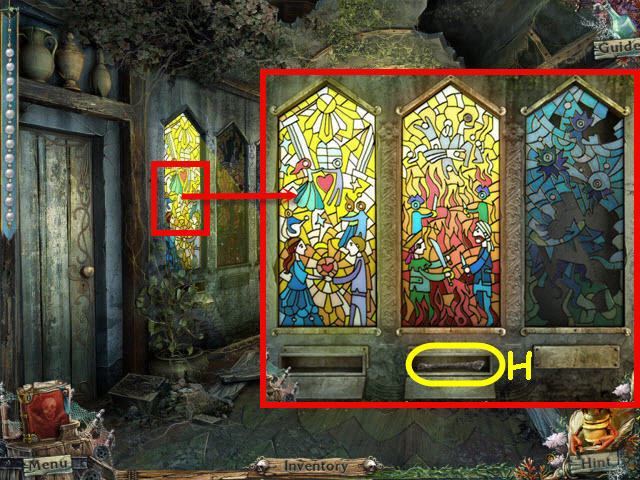
- Examine and place the FRAGMENT OF A STAINED GLASS on the middle stained glass panel; take the VICE HANDLE (H).
- Go to the creek.
- Examine the table; place the VICE HANDLE on the vise; get the pearl (I).
- You should now have all the pearls and you will get BEADS in your inventory.
- Place the WIRE on the vise (J); place the KEY MOLD on the table (K).
- Use the PLIERS on the WIRE; get a LOCKPICK.
- Go into the dungeon.
Chapter 7 – The Girl
- Examine and use the LOCKPICK on the door (L); turn to open.
- Enter the dungeon cell.
- Give the BEADS to the girl (M).
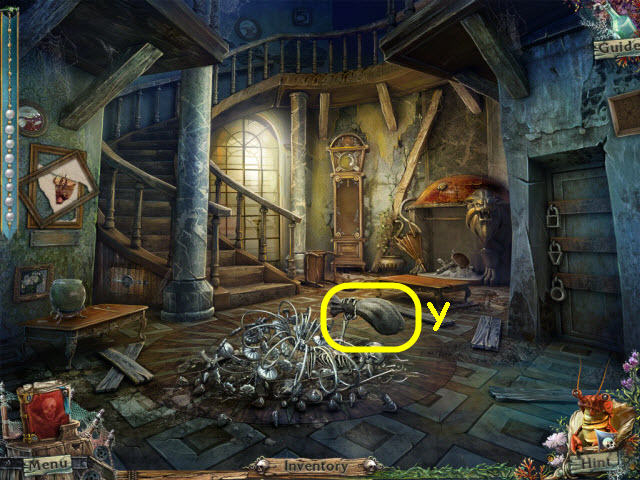
- Examine her remains; open her hand and take the KEY (N).
- Go to the upper balcony.
- Use the KEY on the door (O).
- Enter the newly-opened bedroom door.
- Place the STARFISH on the shell collage (P); take the FRAGMENT OF SHEET MUSIC (Q).
- Examine the bed (R) to access a HOS.
- Find the items listed.
- Marked in red: place the record on the gramophone to get the arrow.
- Find the 2nd FOSSIL TOOTH (@).
- Back out twice.
- Examine the fireplace; place the 2 FOSSIL TEETH on the lion; take the BELLOWS (S).
- Go into the bedroom.
- Examine and use the BELLOWS on the bookcase (T) to trigger a puzzle.
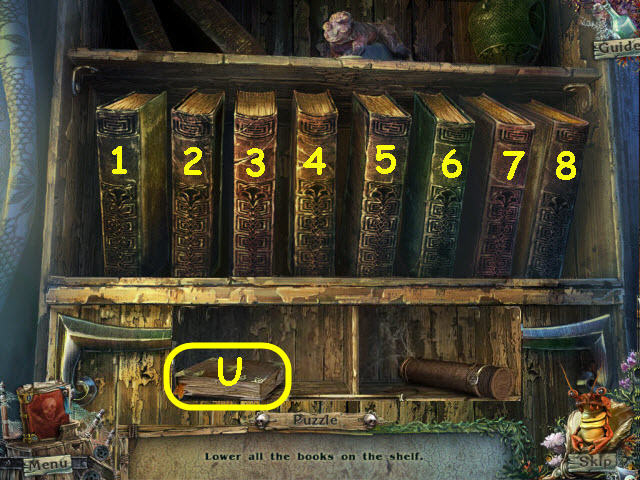
- Pull all of the books forward.
- Pulling one book can move others.
- Solution: Pull 5, 3, 1, 7.
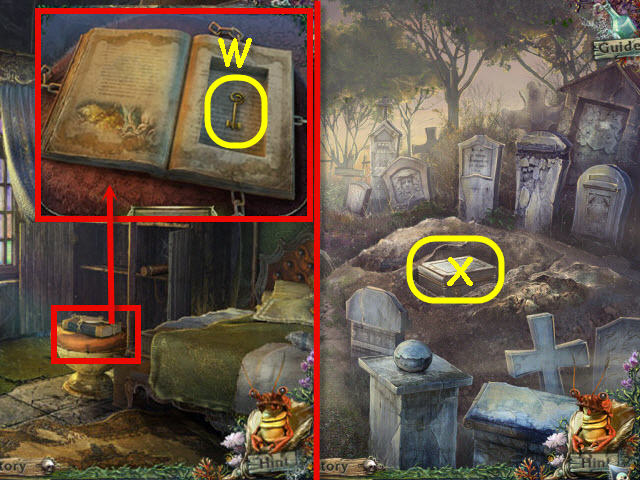
- Take the HOLY BOOK (U).
- Go to the church.
- Examine and place the HOLY BOOK on the church door (V).
- Enter the church.
- Examine the curtain; take the STRING (W).
- Take the CLOTHESPIN (X).
- Examine and place the HOLY BOOK on the lectern; take the CROSS (Y) and read the book.
- Back out.
- Use the CLOTHESPIN on the sheet (Z).
- Use the GLUE on the hose (A).
- Go into the mansion bedroom.
- Use the STRING on the left curtain (B).
- Take the FRAGMENT OF STAINED GLASS (C).
- Examine the bed (D) to access a HOS.
- Find the items listed.
- Marked in red: place the needles in the pincushion to get a hedgehog.
- Find the BRACELET (@).
- Back out.
- Examine and place the FRAGMENT OF STAINED GLASS on the right stained glass window; take the 2nd FRAGMENT OF SHEET MUSIC (E).
- Go into the piano room.
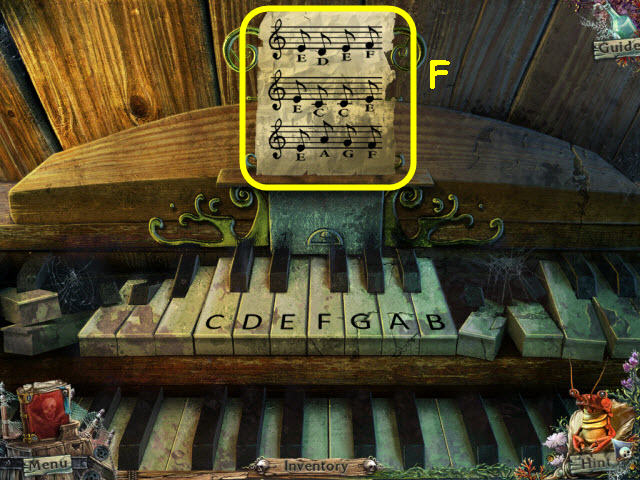
- Examine and place the 2 FRAGMENTS OF SHEET MUSIC on the organ to trigger a puzzle.
- Press the keys in the order on the sheet music (F).
- Solution: E-D-E-F-E-C-C-E-E-A-G-F.
- Examine the broken window; take the CANNONBALL (G) and examine the skull shaped garden.
- Examine the heater; remove the lid and take the SCREWS (H).
- Go to the bedroom.
- Examine and use the SCREWS and SCREWDRIVER on the screen (I).
- Take the FLOWER (J).
- Go to the garden.
- Examine and place the BRACELET and FLOWER on the statue; take the BRONZE KEY (K).
- Examine the tree (L) to access a HOS.
- Find the items listed.
- Marked in red: knock over the bucket to get the pears.
- Marked in green: open the suitcase to get the tomato.
- Marked in white: tie the ribbon twice to get a bow.
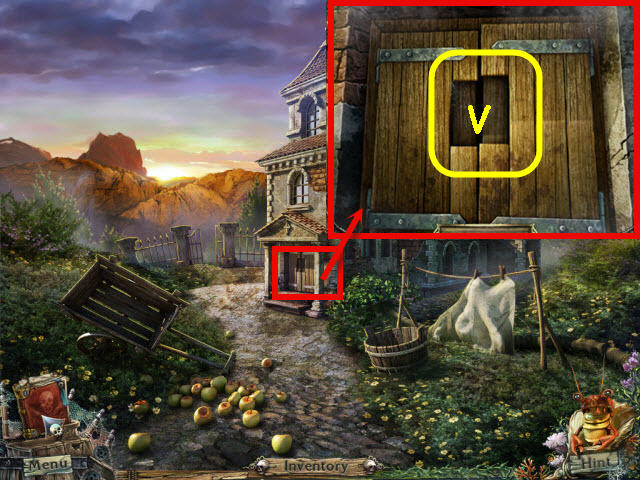
- Find the SHOVEL (@).
- Go on the ship and go left.
Chapter 8 – Save the Souls
- Examine and use the CANNONBALL and LIT TORCH on the cannon (M).
- Exit the ship and go toward the skull cave.
- Move the rocks; take the HALF OF A LOCKET (N).
- Examine and use the PENCIL on the etching (O) and examine it.
- Go to the graveyard left of the church.
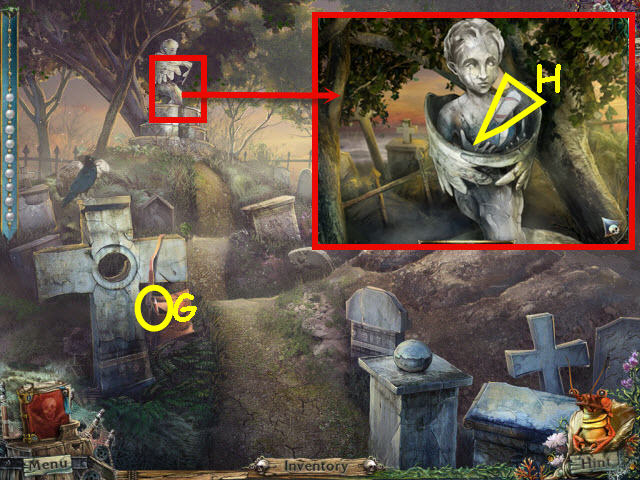
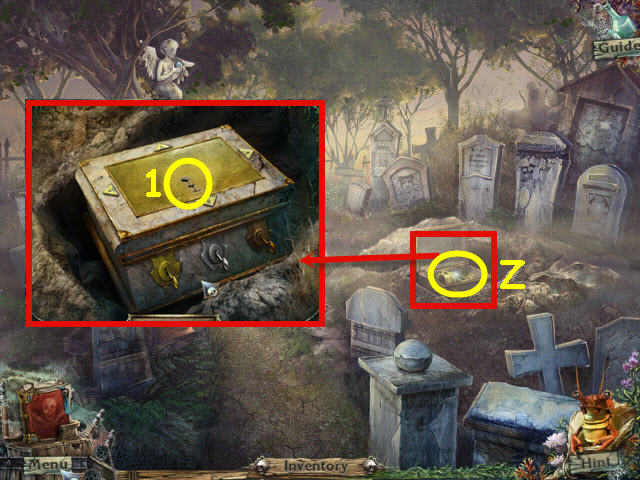
- Use the SHOVEL on the grave; take the PIECE OF A MOON (P).
- Examine the statue; place the PIECE OF A MOON on the half of moon (Q).
- Take the GLASS-CUTTER (R) and SILVER KEY (S) and get a diary update with a puzzle clue.
- Go to the skull cave.
- Use the GLASS-CUTTER on the crystal; take the EXOTIC KEY (T).
- Go to the mansion piano room and then left.
- Examine the ottoman (U) to trigger a puzzle.
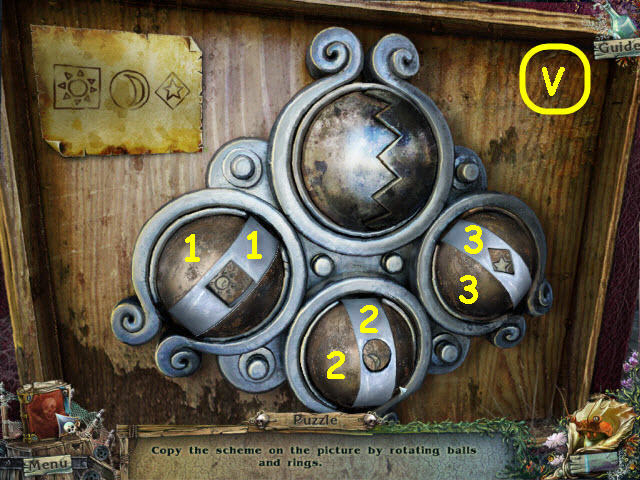
- Rotate the balls and rings to match the clue.
- Select the rings to change the shapes; select the balls to rotate the symbols.
- Solution: Rotate ball 1 until you get a sun, rotate ball 2 until you get a moon, the 3rd should be a star. Rotate ring 2 until you get a circle, rotate ring 1 until you get square, rotate ring 3 until you get a diamond. See screenshot (V).
- Take the 2nd HALF OF A LOCKET.
- Go into the bedroom.
- Examine and place the 2 HALVES OF A LOCKET on the book; take the GOLDEN KEY (W).
- Read the left page of the book.
- Go to the graveyard.
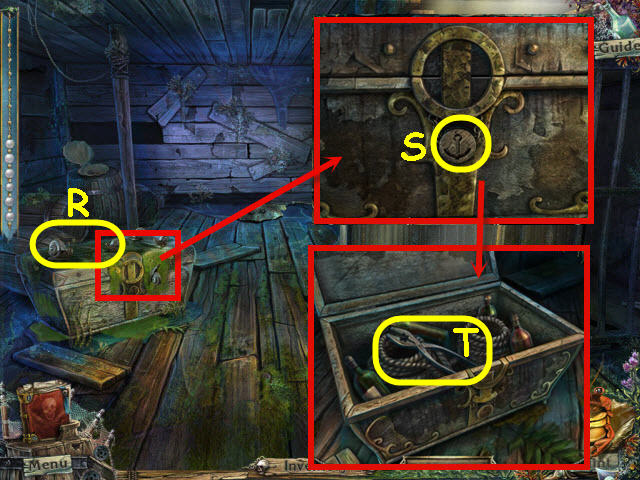
- Examine and use the GOLDEN KEY, SILVER KEY, and BRONZE KEY on the corresponding keyholes on the chest (X) to trigger a puzzle.
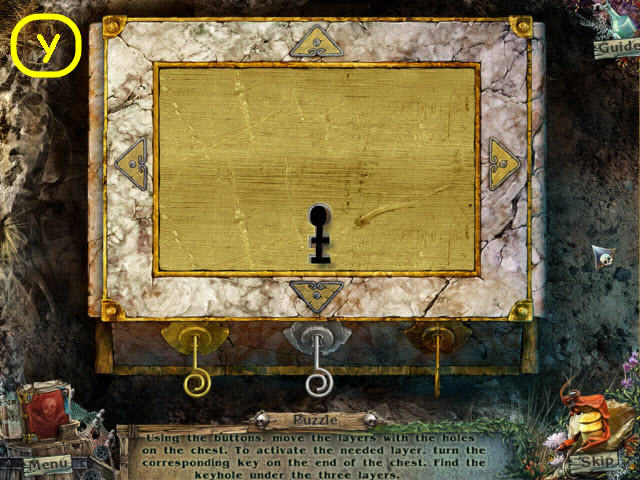
- Use the arrows to move the keyhole around to find the keyhole.
- Solution: Press the arrows in the following order; down, turn the silver key, left, down 2x, turn the copper key, and right arrow. See screenshot (Y).
- Use the EXOTIC KEY on the chest (1); turn the key.
- Take the CUP (Z).
- Back out and enter the church.
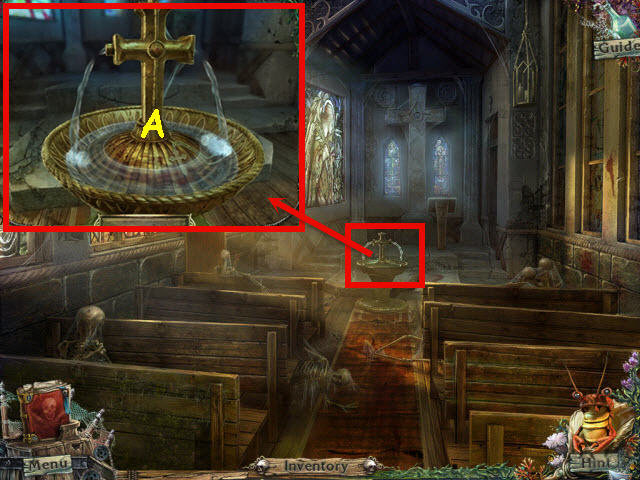
- Examine and place the CROSS in the ablution fountain (A); use the CUP on the water; get a HOLY CUP.
- Go to the dungeon cell.

- Examine and use the HOLY CUP on the girl's remains (B).
- Congratulations! You have successfully completed the Secrets of the Seas: Flying Dutchman Standard Edition.
Created at: 2012-05-12