

Walkthrough Menu
- General Tips
- Chapter 1: At Home
- Chapter 2: The Village
- Chapter 3: The Forest
- Chapter 4: The Mountains
- Chapter 5: The Caves
General Tips
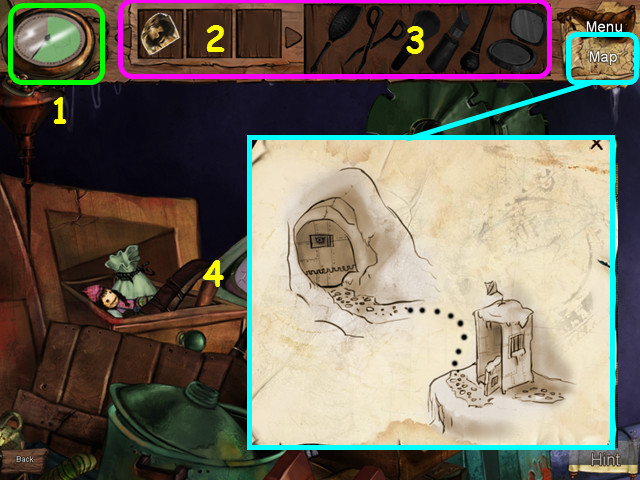 • Hints are unlimited, but you must wait for the meter to
refill (1). • Your inventory (2) and fragmented items (3) to
find are located in the upper panel – move your cursor up to
lower your inventory. • You can use the map (4) to travel to
locations you have already visited.
• Hints are unlimited, but you must wait for the meter to
refill (1). • Your inventory (2) and fragmented items (3) to
find are located in the upper panel – move your cursor up to
lower your inventory. • You can use the map (4) to travel to
locations you have already visited.
Chapter 1: At Home
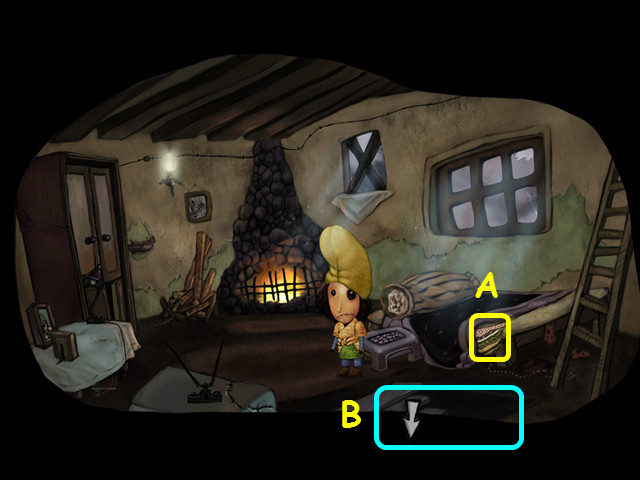 • You will have the option of a brief tutorial. • Take the
KNAPSACK (A). • Walk down the stairs (B).
• You will have the option of a brief tutorial. • Take the
KNAPSACK (A). • Walk down the stairs (B).
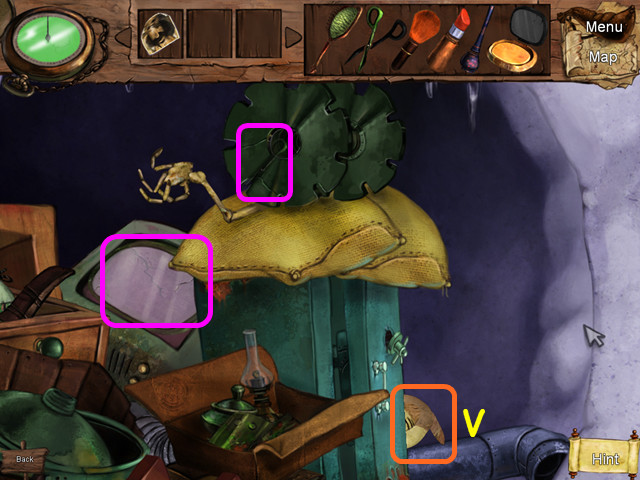
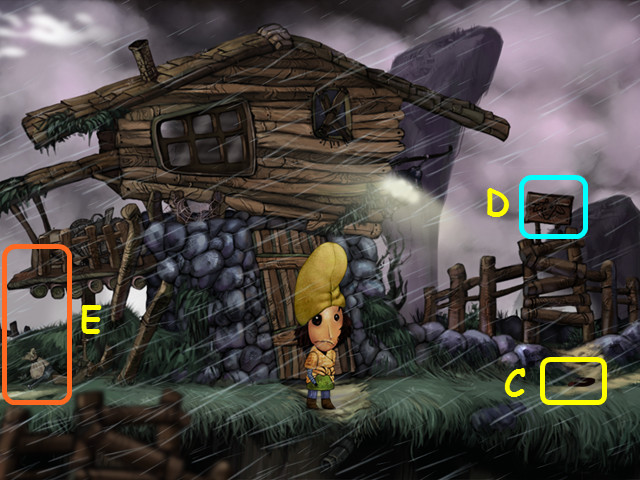 • Take the MAGNET (C). • Look at the sign over the stall (D).
• Walk all the way to the left (E).
• Take the MAGNET (C). • Look at the sign over the stall (D).
• Walk all the way to the left (E).
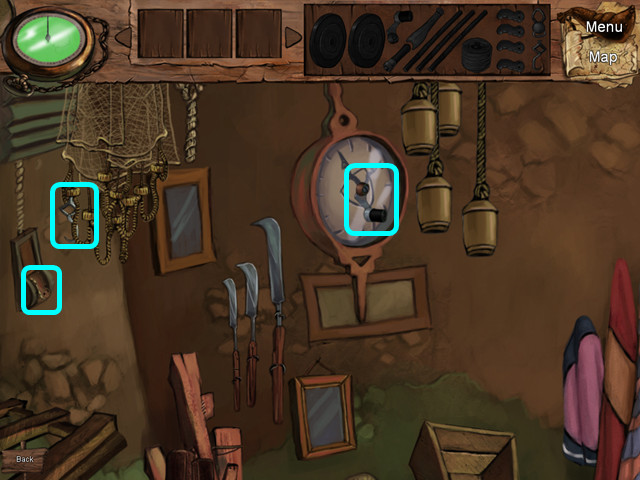
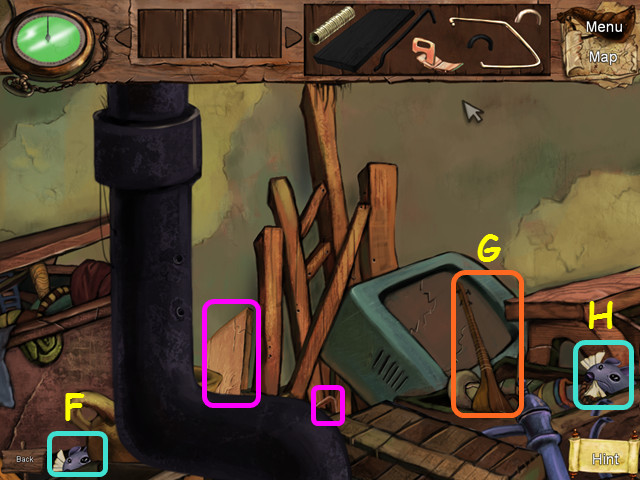
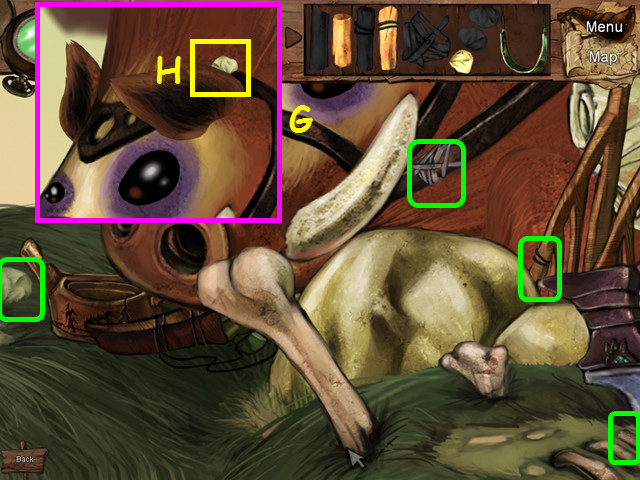
 • Look at the transporter control panel (F). • Note the upper
left dial is broken and set to 35 (G). • Take the TRANSPORTER
MANUAL (H). • Walk left until you see the cuckoo clock on the
tree. • Select the clock (I).
• Look at the transporter control panel (F). • Note the upper
left dial is broken and set to 35 (G). • Take the TRANSPORTER
MANUAL (H). • Walk left until you see the cuckoo clock on the
tree. • Select the clock (I).
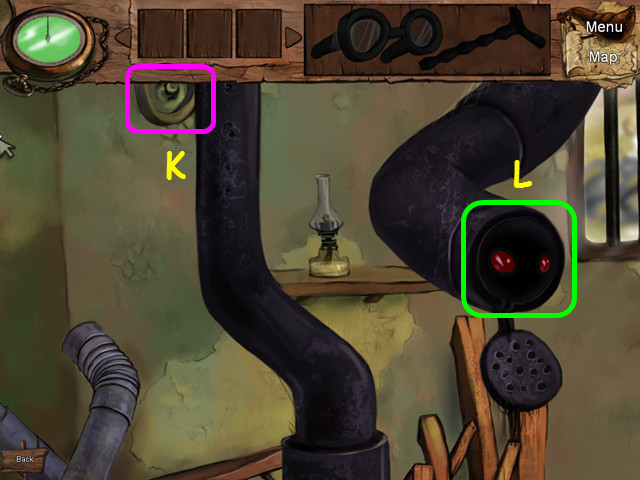
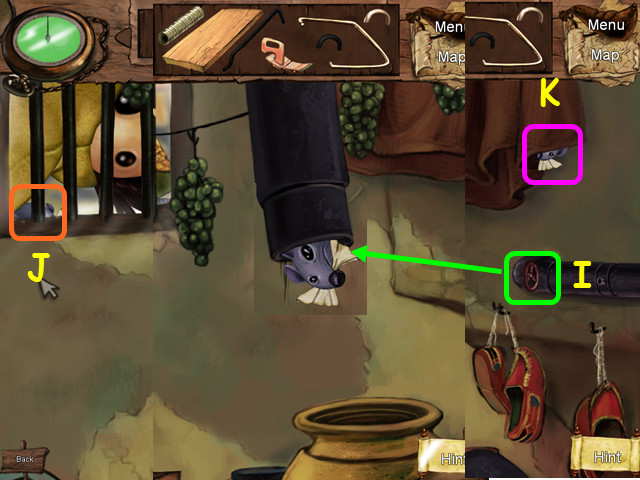
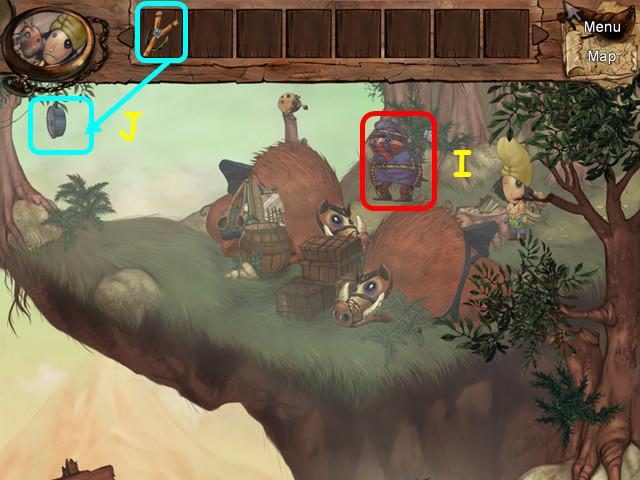
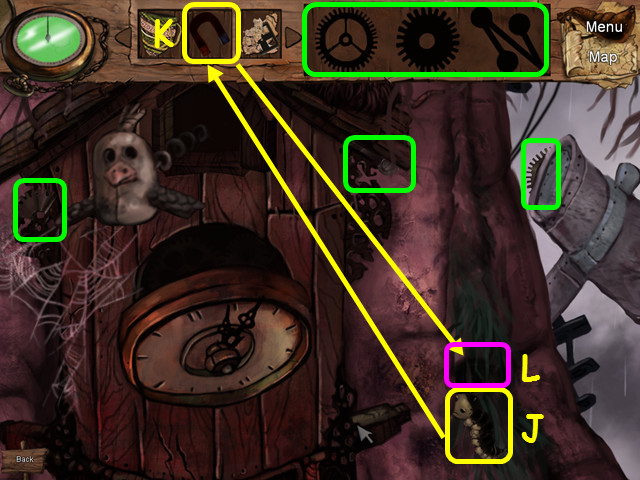 • Navigate the screen by moving your mouse in the direction
you want the screen to move. • Start by moving it so the clock
face is centered on your screen. • Find 3 pieces of the clock
(green). • Capture the WORM (J). • Combine the WORM with the
MAGNET (K), then use the WORM+MAGNET on the hole in the tree
(L). • As the worm crawls by, take another clock piece from
him.
• Navigate the screen by moving your mouse in the direction
you want the screen to move. • Start by moving it so the clock
face is centered on your screen. • Find 3 pieces of the clock
(green). • Capture the WORM (J). • Combine the WORM with the
MAGNET (K), then use the WORM+MAGNET on the hole in the tree
(L). • As the worm crawls by, take another clock piece from
him.
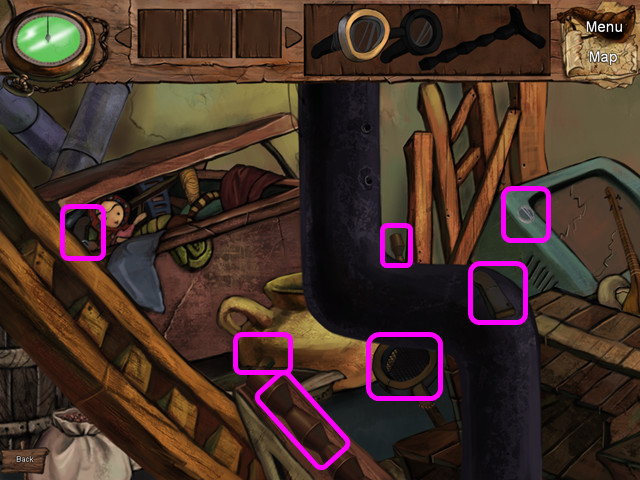
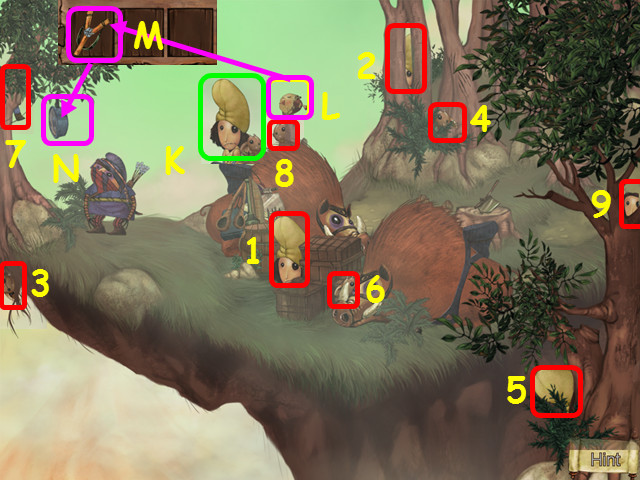
 • Move the screen to the bottom left area. • Find the 3 clock
pieces (green). • Note that one piece is hiding behind the
pendulum.
• Move the screen to the bottom left area. • Find the 3 clock
pieces (green). • Note that one piece is hiding behind the
pendulum.
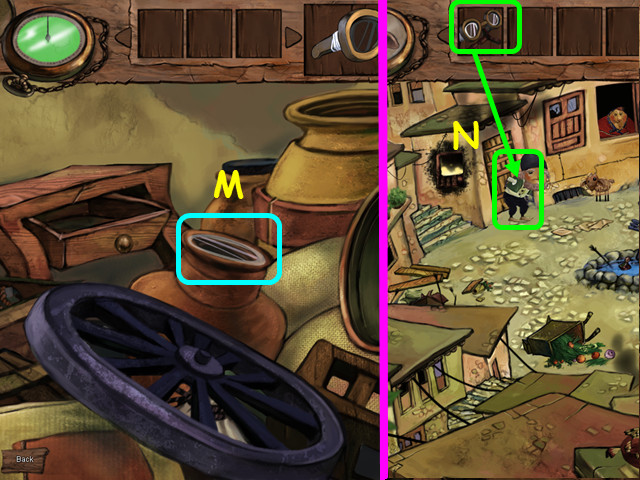
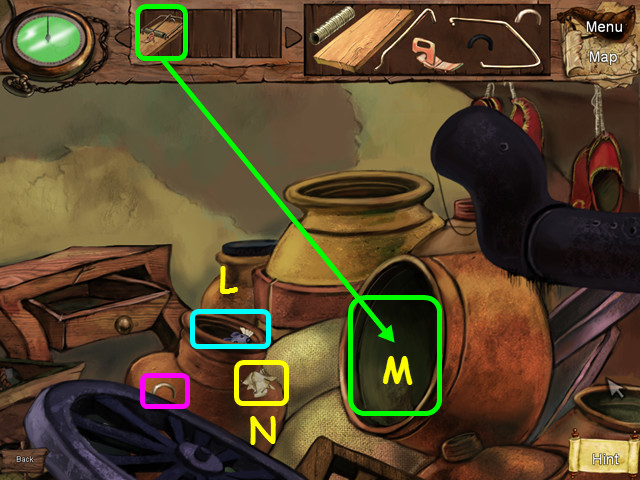
 • Move the screen so the clock face is in the upper left. •
Collect the final 2 clock pieces to get A PIECE OF CLOCK
(green). • Place A PIECE OF CLOCK in the hole behind the clock
face (M).
• Move the screen so the clock face is in the upper left. •
Collect the final 2 clock pieces to get A PIECE OF CLOCK
(green). • Place A PIECE OF CLOCK in the hole behind the clock
face (M).
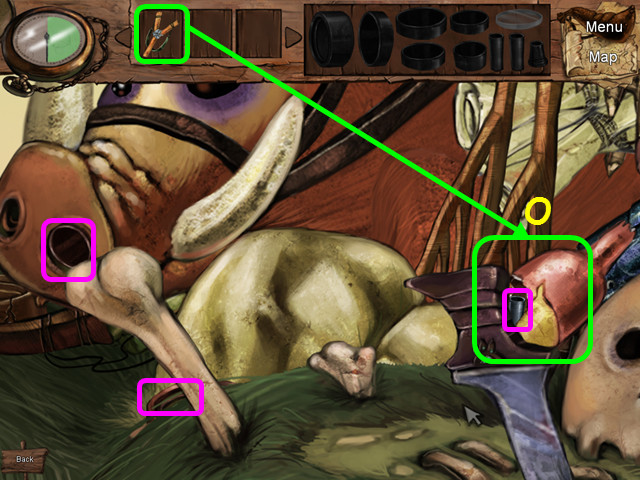
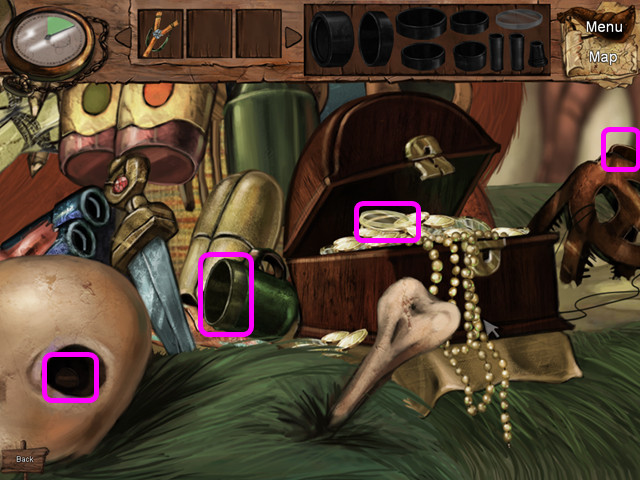
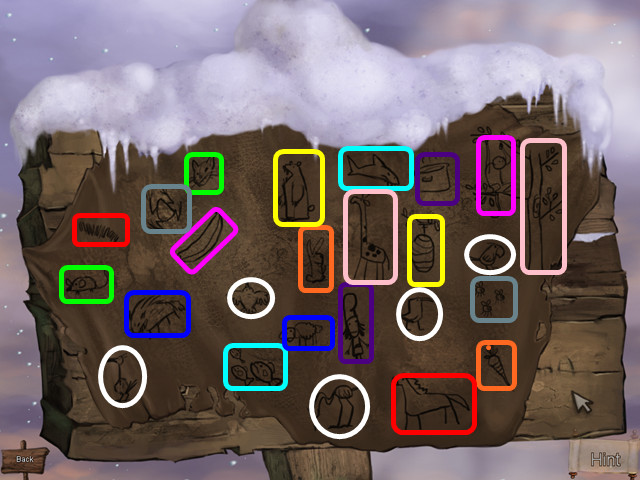
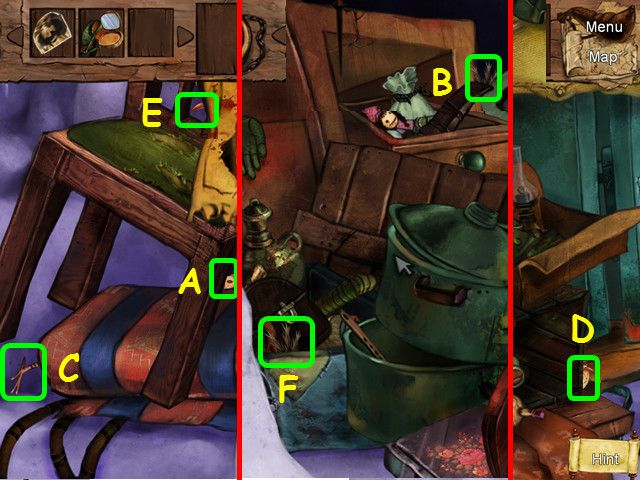
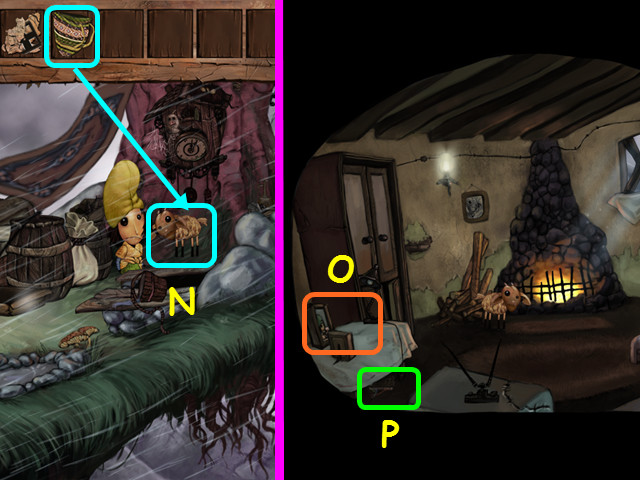 • Use the KNAPSACK on the lamb (N). • After the cut-scene, you
will go automatically to the cottage. • Note the tabletop (O).
• Look under the table for a mini-game (P).
• Use the KNAPSACK on the lamb (N). • After the cut-scene, you
will go automatically to the cottage. • Note the tabletop (O).
• Look under the table for a mini-game (P).
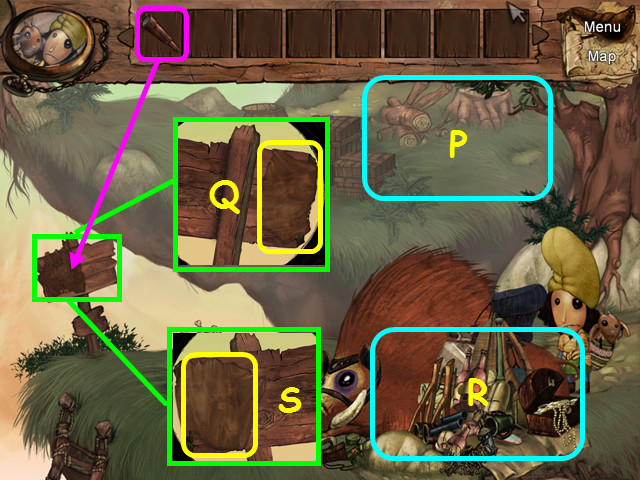
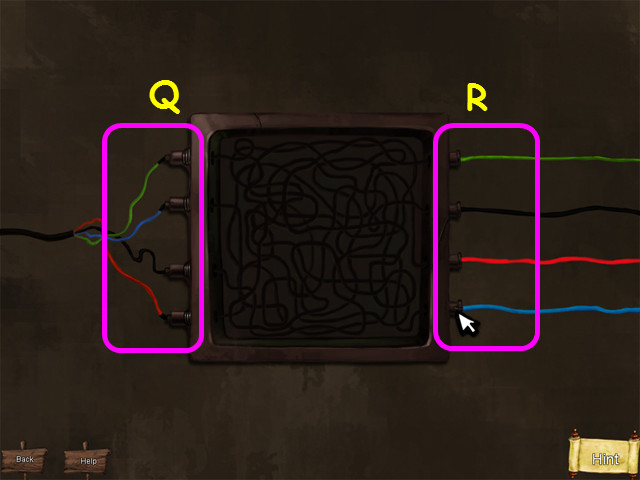 • Follow each wire on the left (Q) to a point on the right
(R). • Place the same colored wire on the end point;
left-click to take or place a wire. • The cottage and the
transporter now have power. • Place the TRANSPORTER MANUAL on
the tabletop for a mini-game.
• Follow each wire on the left (Q) to a point on the right
(R). • Place the same colored wire on the end point;
left-click to take or place a wire. • The cottage and the
transporter now have power. • Place the TRANSPORTER MANUAL on
the tabletop for a mini-game.
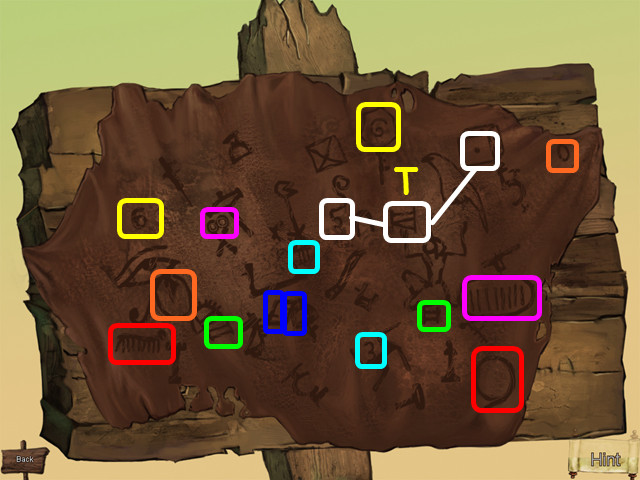
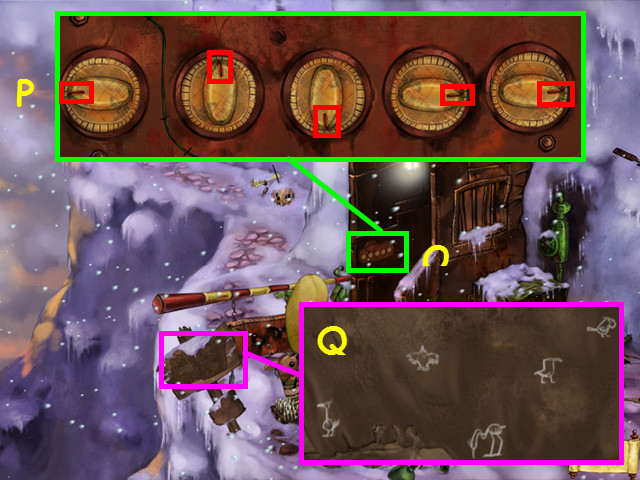
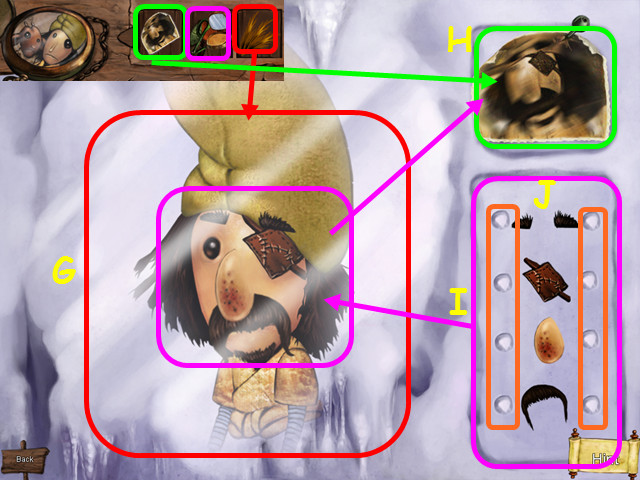
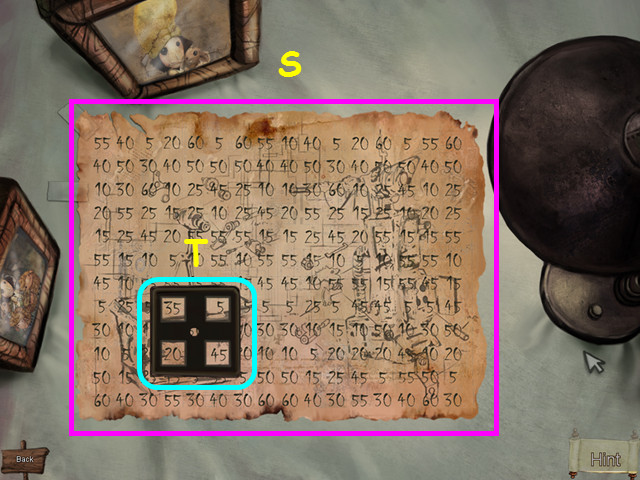 • Restore the page by placing the pieces in the correct
position (S). • Pieces will lock in place when correct. •
Next, place the grid piece on the page to determine the
transported settings. • Since we saw earlier that the upper
left dial on the transporter is set to 35, place the grid so
35 is in the upper left box. (T). • Note the numbers in the
other boxes. • Exit the page and the cottage, then walk left
and look at the transporter.
• Restore the page by placing the pieces in the correct
position (S). • Pieces will lock in place when correct. •
Next, place the grid piece on the page to determine the
transported settings. • Since we saw earlier that the upper
left dial on the transporter is set to 35, place the grid so
35 is in the upper left box. (T). • Note the numbers in the
other boxes. • Exit the page and the cottage, then walk left
and look at the transporter.
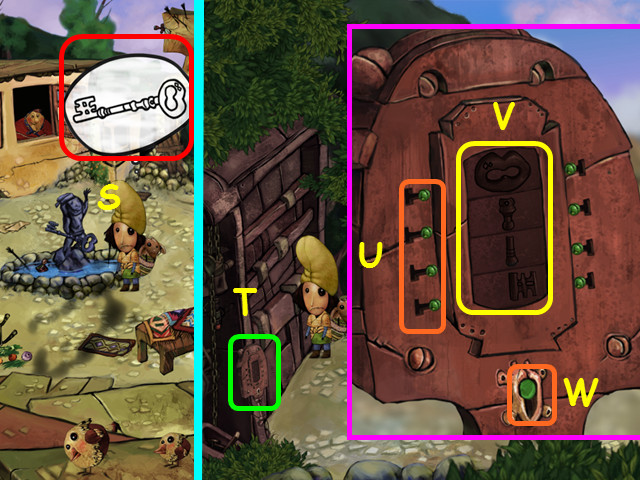
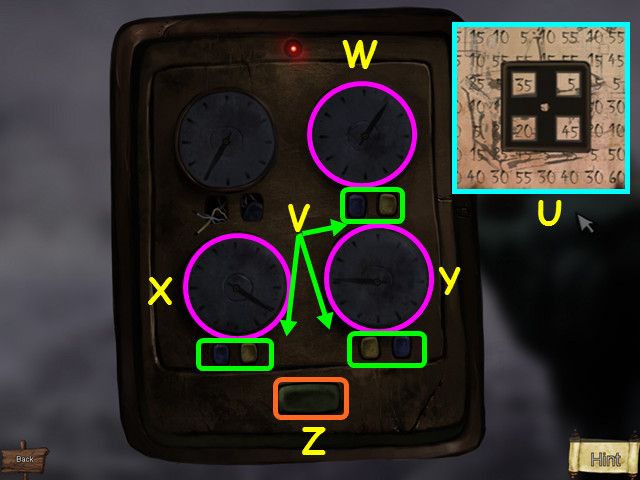 • Set the dials to match the numbers from the manual (U). •
Press the blue buttons to rotate the dial needle
counterclockwise and press the yellow button to rotate the
dial needle clockwise (V). • Set the upper right dial to 5
(W). • Set the lower left dial to 20 (X). • Set the lower
right dial to 45 (Y). • Press the green button (Z).
• Set the dials to match the numbers from the manual (U). •
Press the blue buttons to rotate the dial needle
counterclockwise and press the yellow button to rotate the
dial needle clockwise (V). • Set the upper right dial to 5
(W). • Set the lower left dial to 20 (X). • Set the lower
right dial to 45 (Y). • Press the green button (Z).
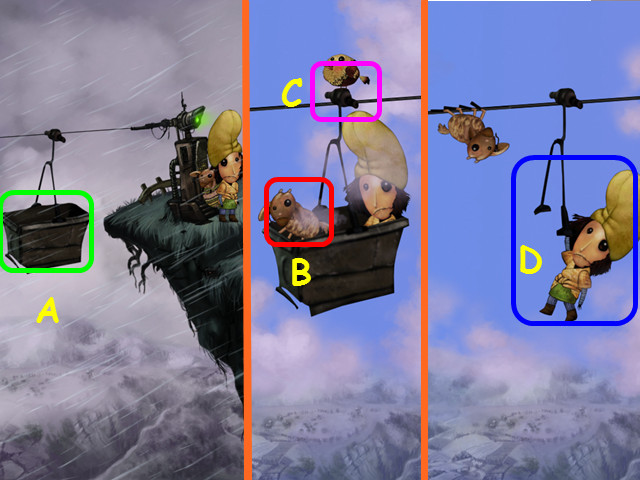 • Select the bucket to use the transporter (A). • After the
transporter stops working, select the lamb twice so he ends up
on the wire (B). • Next select where the bucket is hanging
from the wire (C). • Shaban should be hanging by one hand now
(D). • Travel to the left.
• Select the bucket to use the transporter (A). • After the
transporter stops working, select the lamb twice so he ends up
on the wire (B). • Next select where the bucket is hanging
from the wire (C). • Shaban should be hanging by one hand now
(D). • Travel to the left.
Chapter 2: The Village
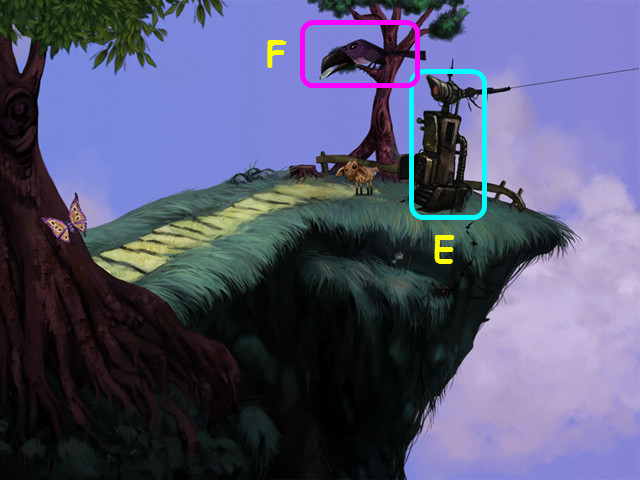 • Look at the transporter to learn it needs a part (E). • Talk
to the crow; he wants a fish for the part (F). • Walk left, go
over the bridge to the village; continue left past the burning
building.
• Look at the transporter to learn it needs a part (E). • Talk
to the crow; he wants a fish for the part (F). • Walk left, go
over the bridge to the village; continue left past the burning
building.
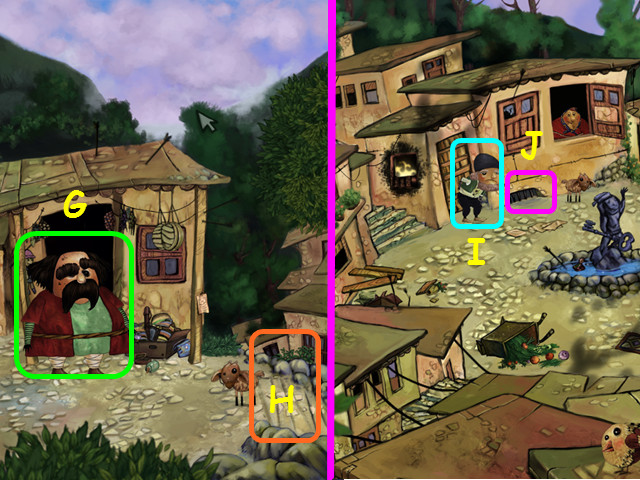 • Ask the merchant about a fishing pole (G). • Walk right to
return to the village (H). • Talk to the old man to learn he
wants his walking stick and glasses (I). • Look in the cellar
window (J).
• Ask the merchant about a fishing pole (G). • Walk right to
return to the village (H). • Talk to the old man to learn he
wants his walking stick and glasses (I). • Look in the cellar
window (J).
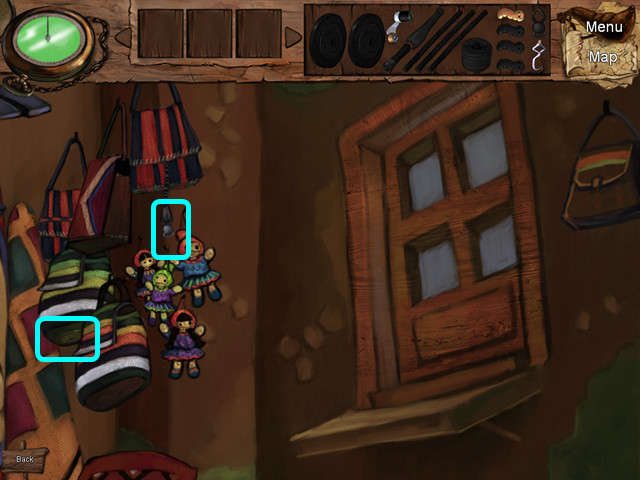
 • Move the screen to look at the upper left corner. • Take the
piece of the glass + walking stick (K). • Startle the critter
in the pipe; he will drop a needed piece (L).
• Move the screen to look at the upper left corner. • Take the
piece of the glass + walking stick (K). • Startle the critter
in the pipe; he will drop a needed piece (L).
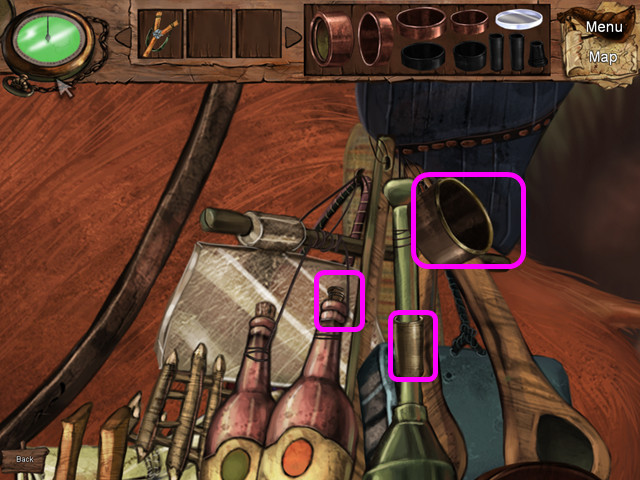
 • Move the screen to view the lower left. • Find 7 more pieces
of the glass + walking stick (pink).
• Move the screen to view the lower left. • Find 7 more pieces
of the glass + walking stick (pink).
 • Move the screen to view the lower right area. • Take the
final piece of the GLASS + WALKING STICK (M). • Give the GLASS
+ WALKING STICK to the old man and he will give you a COIN
(N). • Walk to the left.
• Move the screen to view the lower right area. • Take the
final piece of the GLASS + WALKING STICK (M). • Give the GLASS
+ WALKING STICK to the old man and he will give you a COIN
(N). • Walk to the left.
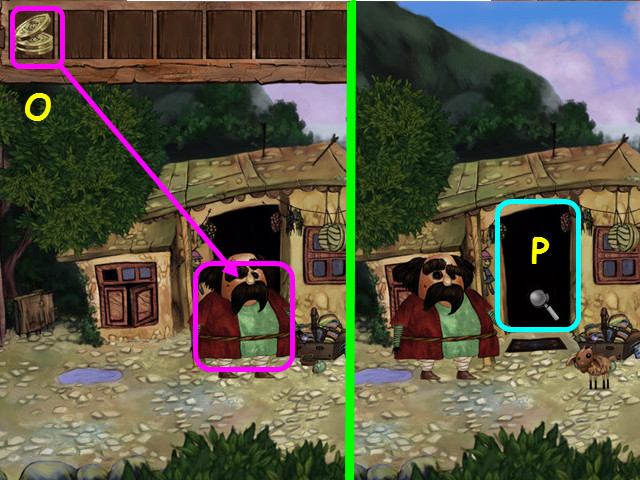 • Give the COIN to the merchant (O). • Enter the shop (P).
 • Move the screen to the upper left. • Locate the 3 pieces of
the fishing rod (aqua).
• Move the screen to the upper left. • Locate the 3 pieces of
the fishing rod (aqua).
 • Move the screen to the upper right. • Locate the 2 pieces of
the fishing rod (aqua).
• Move the screen to the upper right. • Locate the 2 pieces of
the fishing rod (aqua).
 • Move the screen to the lower left. • Locate the 5 pieces of
the fishing rod (aqua).
• Move the screen to the lower left. • Locate the 5 pieces of
the fishing rod (aqua).
 • Move the screen to the lower right. • Locate the final 4
pieces of the FISHING ROD (aqua). • Walk to the right until
you are on the bridge.
• Move the screen to the lower right. • Locate the final 4
pieces of the FISHING ROD (aqua). • Walk to the right until
you are on the bridge.
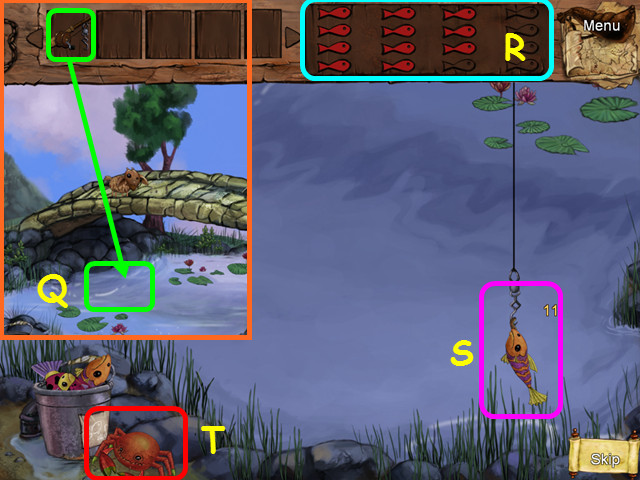 • Use the FISHING ROD on the water for a mini-game (Q). • You
must capture 16 fish (R); click on a fish when it jumps out of
the water (S). • Do not capture the crabs jumping out of the
water. Doing so will deduct one fish from your total. • Watch
your bucket in the lower left; hit the crabs that try to steal
more fish (T).
• Use the FISHING ROD on the water for a mini-game (Q). • You
must capture 16 fish (R); click on a fish when it jumps out of
the water (S). • Do not capture the crabs jumping out of the
water. Doing so will deduct one fish from your total. • Watch
your bucket in the lower left; hit the crabs that try to steal
more fish (T).
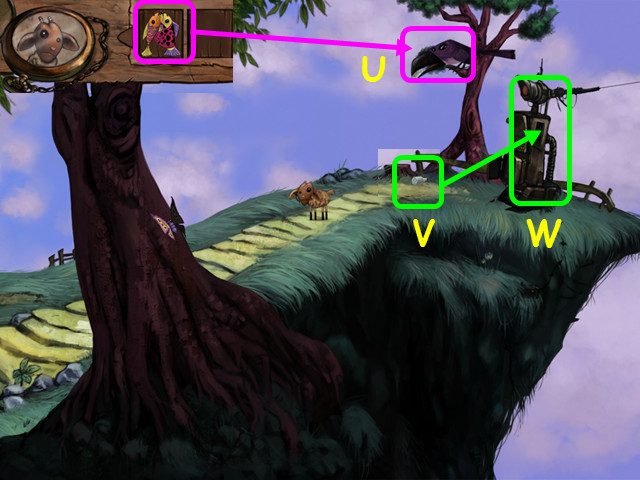 • Give the FISH to the crow (U). • Take the FUSE the crow
drops (V), then use the FUSE on the transporter (W).
• Give the FISH to the crow (U). • Take the FUSE the crow
drops (V), then use the FUSE on the transporter (W).
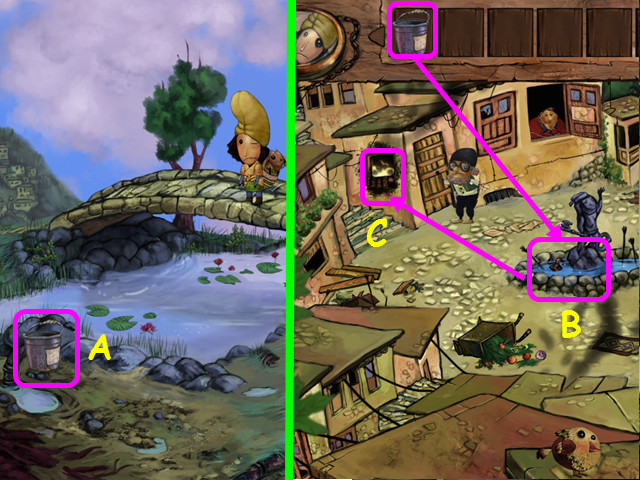 • Walk left to the bridge; take the EMPTY BUCKET (A). • Walk
left to the village. • Use the EMPTY BUCKET on the fountain to
get the BUCKET FILLED (B). • Use the BUCKET FILLED on the
flames (C). • You will go automatically back to the cellar.
• Walk left to the bridge; take the EMPTY BUCKET (A). • Walk
left to the village. • Use the EMPTY BUCKET on the fountain to
get the BUCKET FILLED (B). • Use the BUCKET FILLED on the
flames (C). • You will go automatically back to the cellar.
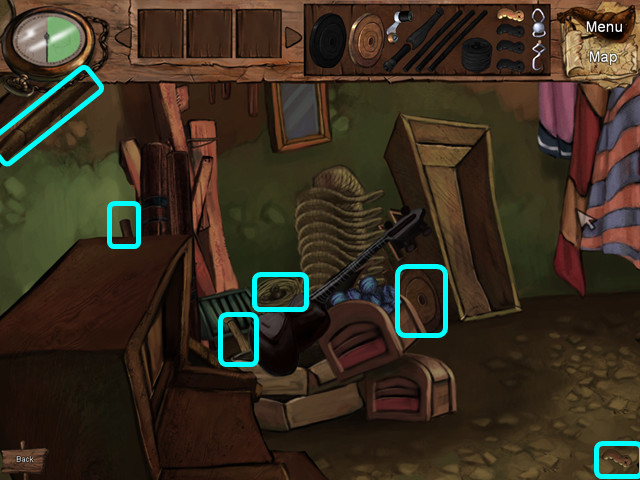
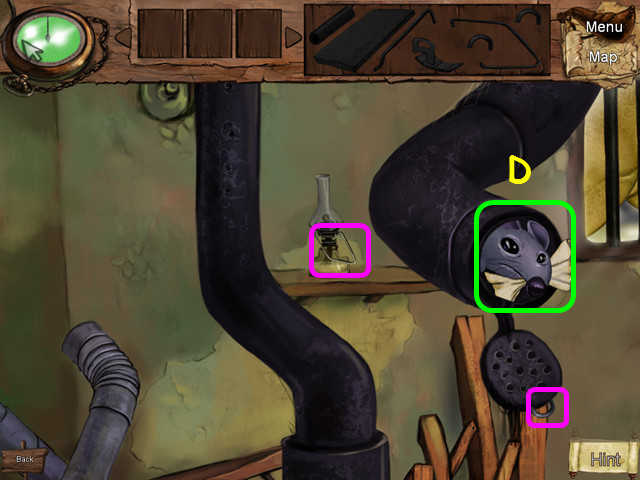 • Move the screen to the upper left. • Find the 2 pieces of
the rattrap (pink). • Try to catch the rat (D).
• Move the screen to the upper left. • Find the 2 pieces of
the rattrap (pink). • Try to catch the rat (D).
 • Move the screen to the upper right. • Find the 2 pieces of
the rattrap (pink). • Try to catch the rat (E).
• Move the screen to the upper right. • Find the 2 pieces of
the rattrap (pink). • Try to catch the rat (E).
 • Move the screen to the lower left, then toward the center a
bit. • Find the 2 pieces of the rattrap (pink). • Try to catch
the rat (F). • Strum the lute (G), then try to grab the rat
when he shows his head (H).
• Move the screen to the lower left, then toward the center a
bit. • Find the 2 pieces of the rattrap (pink). • Try to catch
the rat (F). • Strum the lute (G), then try to grab the rat
when he shows his head (H).
 • Move to the upper right and turn on the red valve to flush
the rat from the pipe (I). • Move to the upper center and try
to catch the rat in the window (J). • Move back to the upper
right and try to catch the rat in the cloth (K).
• Move to the upper right and turn on the red valve to flush
the rat from the pipe (I). • Move to the upper center and try
to catch the rat in the window (J). • Move back to the upper
right and try to catch the rat in the cloth (K).
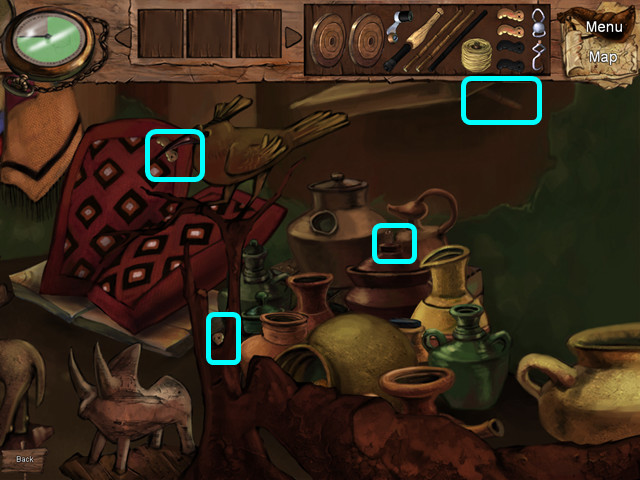
 • Move the screen to the lower right. • Take the final piece
of the RATTRAP (pink). • Try to catch the rat (L). • Use the
RATTRAP on the pot (M). • Take the ROAD MAP (N). • Walk to the
left.
• Move the screen to the lower right. • Take the final piece
of the RATTRAP (pink). • Try to catch the rat (L). • Use the
RATTRAP on the pot (M). • Take the ROAD MAP (N). • Walk to the
left.
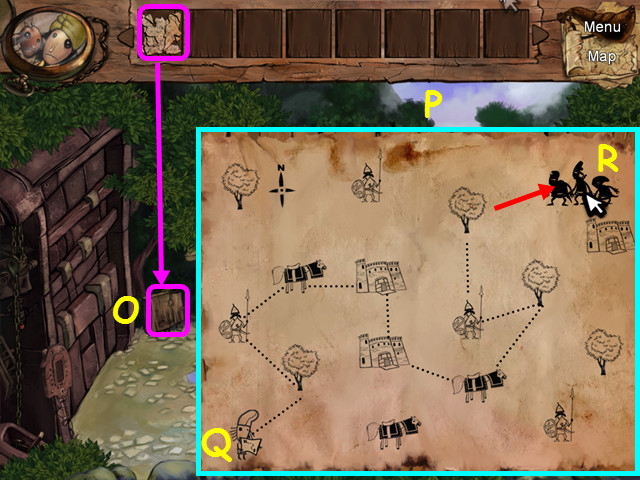 • Place the ROAD MAP on the sign for a mini-game (O). •
Restore the map jigsaw style; left-click to take/place and
right-click to rotate a piece. • Pieces will lock into place
when correct (P). • Once the map is whole, determine the path
from Shaban (Q) to the bandit's hideout (R). • Select icons on
the map to form the path; if you choose incorrectly, you must
restart the path. • Walk to the right.
• Place the ROAD MAP on the sign for a mini-game (O). •
Restore the map jigsaw style; left-click to take/place and
right-click to rotate a piece. • Pieces will lock into place
when correct (P). • Once the map is whole, determine the path
from Shaban (Q) to the bandit's hideout (R). • Select icons on
the map to form the path; if you choose incorrectly, you must
restart the path. • Walk to the right.
 • Look at the statue's key and note the pattern (S). • Walk
back to the left and look at the gate control (T). • Use the
small green buttons (U) to change the key pieces until it
matches the statue's key (V). • Press the large green button
(W).
• Look at the statue's key and note the pattern (S). • Walk
back to the left and look at the gate control (T). • Use the
small green buttons (U) to change the key pieces until it
matches the statue's key (V). • Press the large green button
(W).
Chapter 3: The Forest
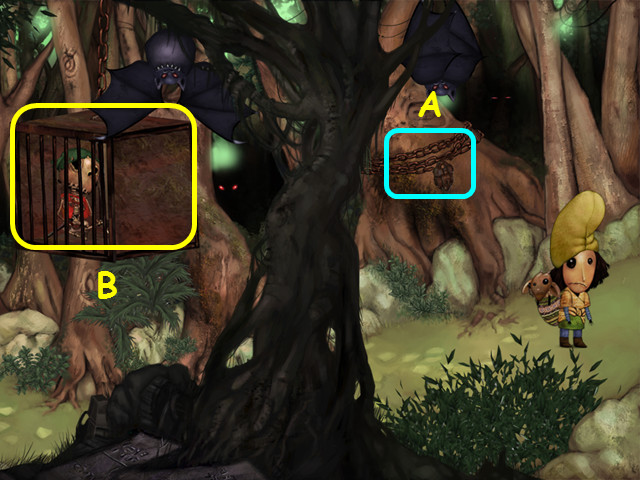 • Note the lock on the tree (A). • Note the hanging cage (B).
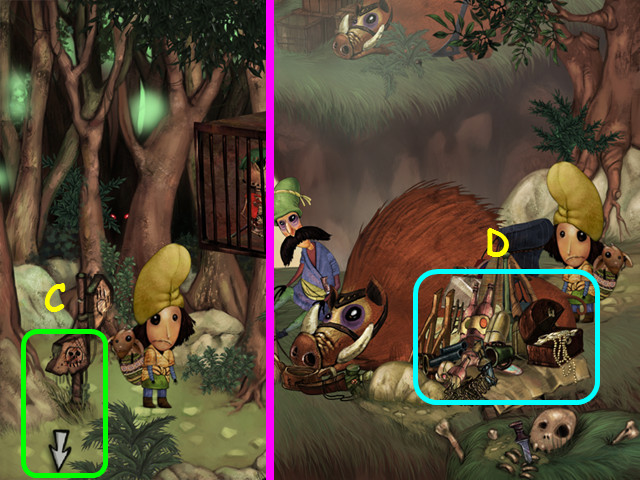 • Walk left until you see a road sign, then walk down to the
lower camp (C). • Look at the junk pile next to the beast (D).
• Walk left until you see a road sign, then walk down to the
lower camp (C). • Look at the junk pile next to the beast (D).
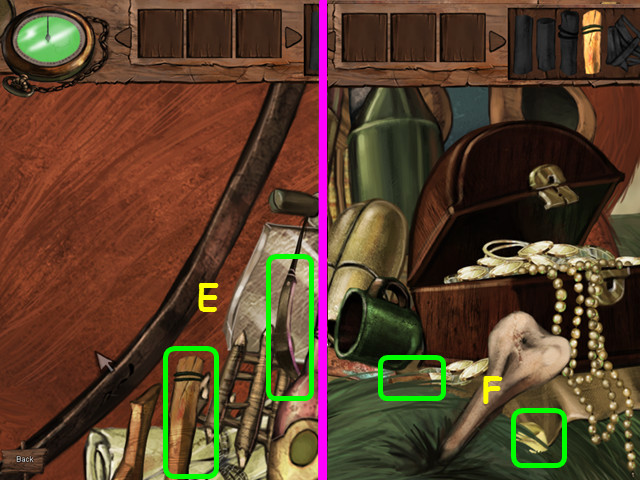 • Move the screen to the upper right. • Find the 2 pieces of
the slingshot (E). • Move the screen to the lower right. •
Find the 2 pieces of the slingshot (F).
• Move the screen to the upper right. • Find the 2 pieces of
the slingshot (E). • Move the screen to the lower right. •
Find the 2 pieces of the slingshot (F).
 • Move the screen to the lower left. • Find the 4 pieces of
the slingshot (green). • Move the screen up to look at the
ears (G). • Move the ear and quickly take the final piece of
the SLINGSHOT (H). • Walk to the right, then walk up at the
signpost to the upper camp.
• Move the screen to the lower left. • Find the 4 pieces of
the slingshot (green). • Move the screen up to look at the
ears (G). • Move the ear and quickly take the final piece of
the SLINGSHOT (H). • Walk to the right, then walk up at the
signpost to the upper camp.
 • Note the rustler you want to distract (I). • Use the
SLINGSHOT on the pan (J).
• Note the rustler you want to distract (I). • Use the
SLINGSHOT on the pan (J).
 • Shaban must sneak to the bird; select his hiding places in
numerical order (1-9). • Once Shaban is standing close (K),
take the BIRD (L). • Combine the BIRD and the SLINGSHOT (M),
then use the SLINGSHOT+BIRD on the pan (N). • After the
cut-scene, select the junk pile next to the beast at the lower
camp.
• Shaban must sneak to the bird; select his hiding places in
numerical order (1-9). • Once Shaban is standing close (K),
take the BIRD (L). • Combine the BIRD and the SLINGSHOT (M),
then use the SLINGSHOT+BIRD on the pan (N). • After the
cut-scene, select the junk pile next to the beast at the lower
camp.
 • Move the screen to the lower left. • Use the SLINGSHOT on
the bottle (O). • Find the 3 pieces of the telescope (pink).
• Move the screen to the lower left. • Use the SLINGSHOT on
the bottle (O). • Find the 3 pieces of the telescope (pink).
 • Move the screen to the lower right. • Find the 4 pieces of
the telescope (pink).
• Move the screen to the lower right. • Find the 4 pieces of
the telescope (pink).
 • Move the screen to the upper right. • Find the 3 final
pieces of the TELESCOPE (pink).
• Move the screen to the upper right. • Find the 3 final
pieces of the TELESCOPE (pink).
 • Walk up to the upper camp (P). • Use the TELESCOPE on the
back of the sign and take the 1st TORN PAPER (Q). • Walk down
to the lower camp (R). • Use the TELESCOPE on the front of the
sign and take the 2nd TORN PAPER (S). • Combine the 2 pieces
of TORN PAPER to get the PAPER. • Exit the close-up of the
sign. • Use the PAPER on the sign for a mini-game.
• Walk up to the upper camp (P). • Use the TELESCOPE on the
back of the sign and take the 1st TORN PAPER (Q). • Walk down
to the lower camp (R). • Use the TELESCOPE on the front of the
sign and take the 2nd TORN PAPER (S). • Combine the 2 pieces
of TORN PAPER to get the PAPER. • Exit the close-up of the
sign. • Use the PAPER on the sign for a mini-game.
 • Select matching pairs of numbers. • The solution will show
in white: 5 – IV – 1 die (T). • Walk right until you can see
the lock.
• Select matching pairs of numbers. • The solution will show
in white: 5 – IV – 1 die (T). • Walk right until you can see
the lock.
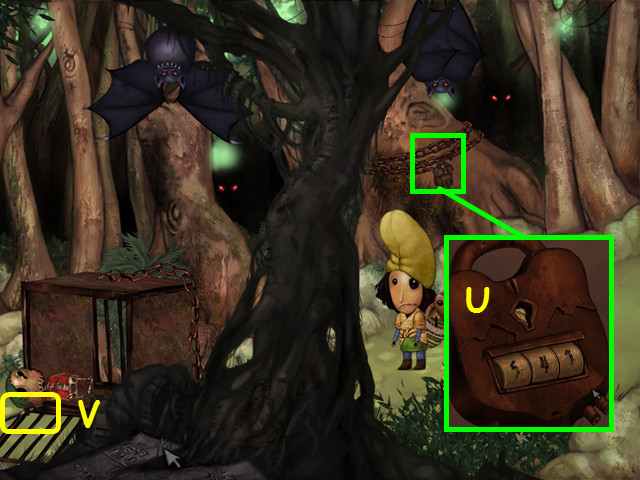 • Look at the lock and enter the combination: 5-4-1 (U). •
After the cage falls, take the SWORD (V). • Walk down to the
lower part of the camp.
• Look at the lock and enter the combination: 5-4-1 (U). •
After the cage falls, take the SWORD (V). • Walk down to the
lower part of the camp.
 • Use the SWORD on the rope to cut the beast free (W).
 • Shoot down the bats as they appear to fill up the meter at
the top (X). • Move your cursor (Y) over each bat and click to
fire. • If you miss the bats you will lose some ground on the
progress meter.
• Shoot down the bats as they appear to fill up the meter at
the top (X). • Move your cursor (Y) over each bat and click to
fire. • If you miss the bats you will lose some ground on the
progress meter.
Chapter 4: The Mountains
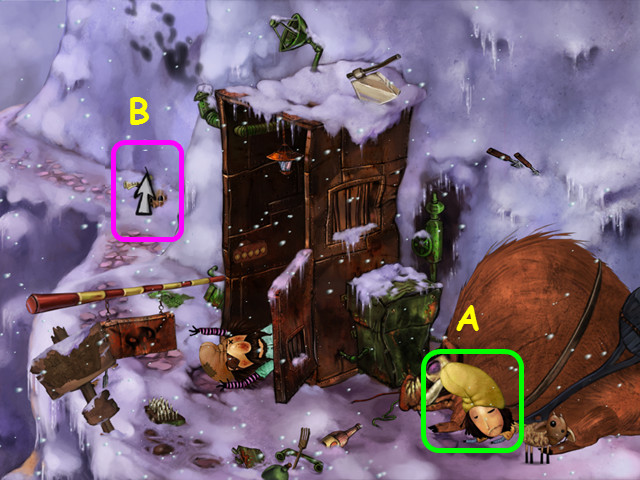 • See that Shaban is stuck under the beast (A). • Walk up the
mountain (B).
• See that Shaban is stuck under the beast (A). • Walk up the
mountain (B).
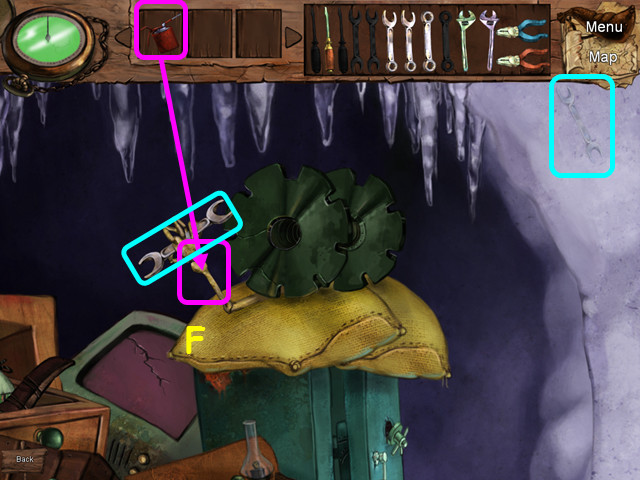
 • Note the ice (C). • Select the junk pile (D).
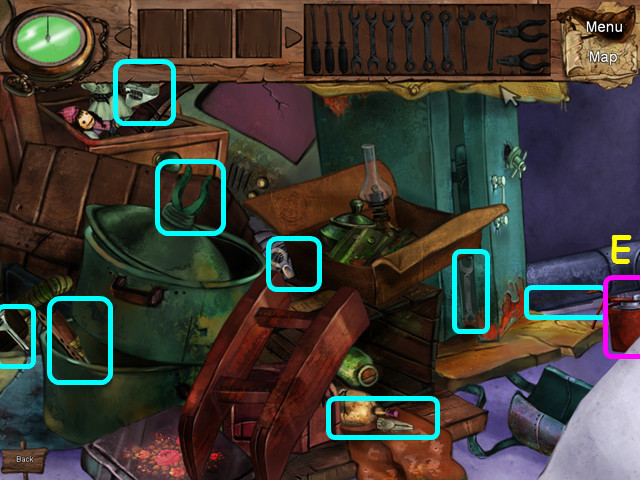 • Move the screen to the lower right. • Take the SAUCEPAN (E).
• Find the 8 pieces of the toolbox (aqua).
• Move the screen to the lower right. • Take the SAUCEPAN (E).
• Find the 8 pieces of the toolbox (aqua).
 • Move the screen to the upper right. • Use the SAUCEPAN on
the skeleton hand (F). • Take the 2 pieces of the toolbox
(aqua).
• Move the screen to the upper right. • Use the SAUCEPAN on
the skeleton hand (F). • Take the 2 pieces of the toolbox
(aqua).
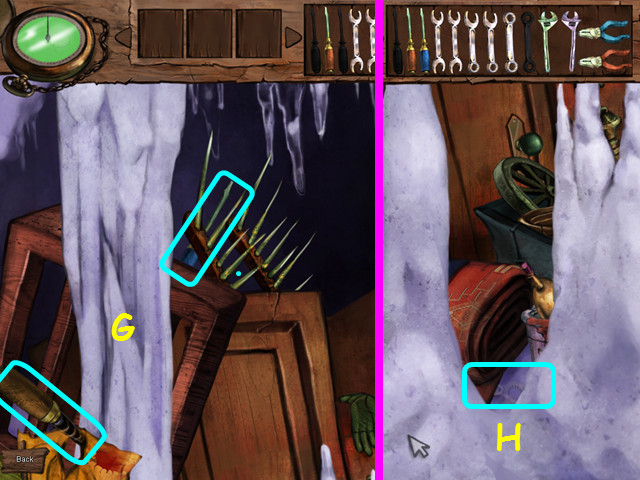 • Move the screen to the upper left. • Take the 2 pieces of
the tool box (G). • Move the screen down so you can see the
right end of the rug. • Take the final piece of the TOOL BOX
(H). • Walk up on the right to return to where Shaban is
trapped.
• Move the screen to the upper left. • Take the 2 pieces of
the tool box (G). • Move the screen down so you can see the
right end of the rug. • Take the final piece of the TOOL BOX
(H). • Walk up on the right to return to where Shaban is
trapped.
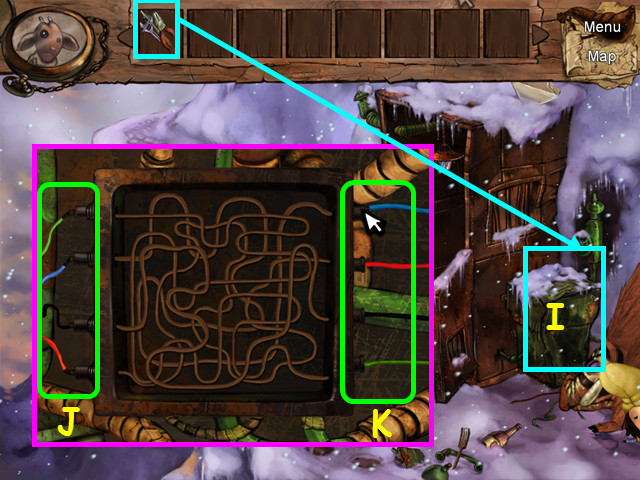 • Use the TOOL BOX on the generator for a mini-game (I). •
Follow each wire on the left (J) to a point on the right (K).
• Place the same colored wire on the end point; left-click to
take or place a wire.
• Use the TOOL BOX on the generator for a mini-game (I). •
Follow each wire on the left (J) to a point on the right (K).
• Place the same colored wire on the end point; left-click to
take or place a wire.
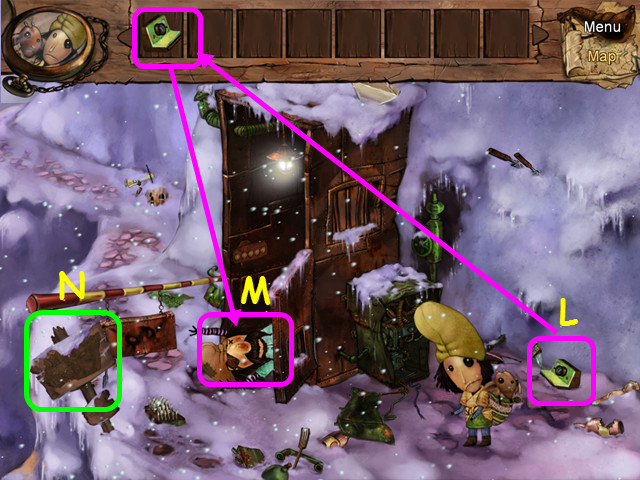 • Take the CAMERA (L) and use it on the unconscious man (M) to
get the THIEF PHOTO. • Look at the road sign for a mini-game
(N).
• Take the CAMERA (L) and use it on the unconscious man (M) to
get the THIEF PHOTO. • Look at the road sign for a mini-game
(N).
 • Restore the page jigsaw-style. • Right-click to rotate a
piece, left-click to take or place. • Pieces will lock into
place when correct. • Find pairs of items that go together
like cat and mouse or giraffe and tree. • The remaining 5
birds are a clue (white).
• Restore the page jigsaw-style. • Right-click to rotate a
piece, left-click to take or place. • Pieces will lock into
place when correct. • Find pairs of items that go together
like cat and mouse or giraffe and tree. • The remaining 5
birds are a clue (white).
 • Look at the controls in the sentry hut (O). • Turn the knobs
(P) so they point in the same direction as the birds in the
clue (Q). • Walk up the mountainside.
• Look at the controls in the sentry hut (O). • Turn the knobs
(P) so they point in the same direction as the birds in the
clue (Q). • Walk up the mountainside.
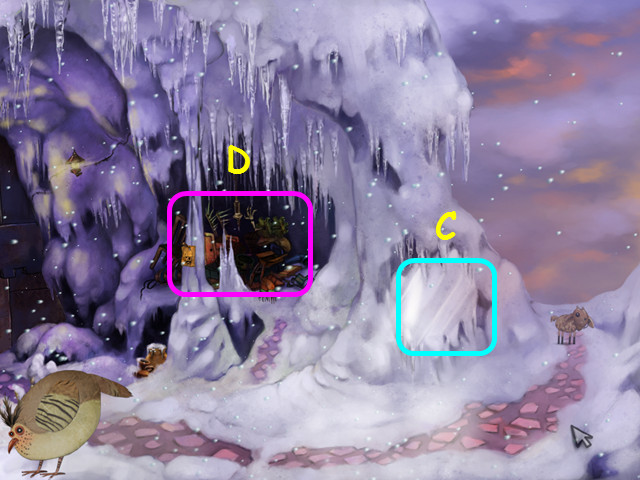
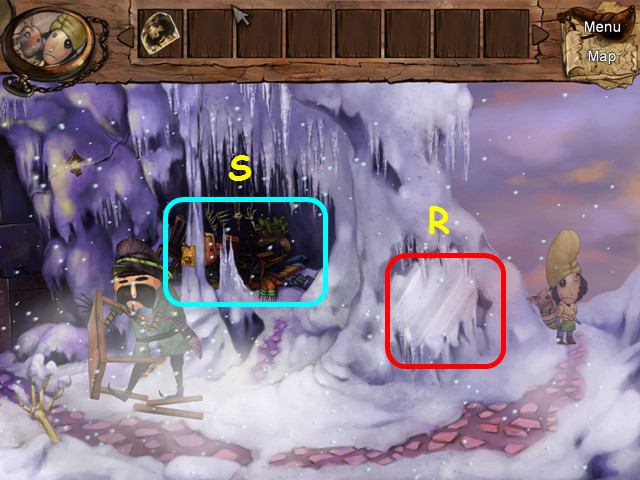 • Look at the ice to learn you need to wipe it clean (R). •
After the cut-scene, select the junk pile (S).
• Look at the ice to learn you need to wipe it clean (R). •
After the cut-scene, select the junk pile (S).
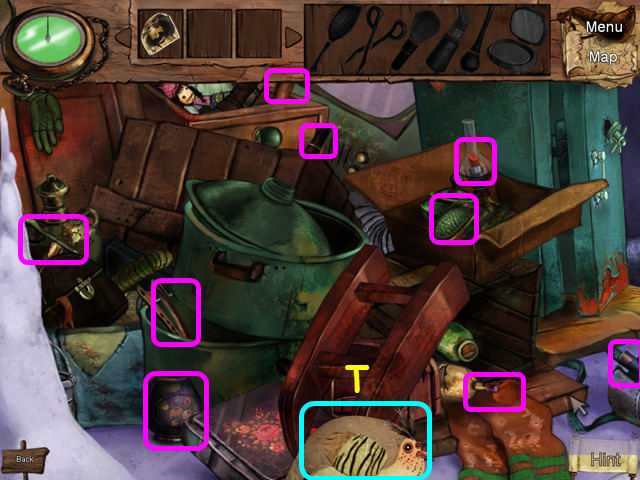 • Move the screen to the lower right. • Try to catch the bird
(T). • Find the 9 pieces of cosmetics (pink).
• Move the screen to the lower right. • Try to catch the bird
(T). • Find the 9 pieces of cosmetics (pink).
 • Move the screen to the upper left. • Try to catch the bird
(U). • Find the piece of cosmetics (pink).
• Move the screen to the upper left. • Try to catch the bird
(U). • Find the piece of cosmetics (pink).
 • Move the screen to the upper right. • Try to catch the bird
(V). • Find the final 2 pieces of COSMETICS (pink).
• Move the screen to the upper right. • Try to catch the bird
(V). • Find the final 2 pieces of COSMETICS (pink).
 • You must now continue chasing the bird. • Try to catch the
bird lower left area, behind the chair (A). • Look upper
right, by the TV; try to catch the bird (B). • Try to grab the
bird in the lower left at the end of the rug (C). • Move to
the lower right and try to catch the bird (D). • Look behind
the back of the chair on the right; try to catch the bird (E).
• Try to catch the bird bottom center (F). • You will earn the
FEATHERS.
• You must now continue chasing the bird. • Try to catch the
bird lower left area, behind the chair (A). • Look upper
right, by the TV; try to catch the bird (B). • Try to grab the
bird in the lower left at the end of the rug (C). • Move to
the lower right and try to catch the bird (D). • Look behind
the back of the chair on the right; try to catch the bird (E).
• Try to catch the bird bottom center (F). • You will earn the
FEATHERS.
 • Select the ice to the right of the junk pile. • Use the
FEATHERS to clear the ice (G). • Place the THIEF PHOTO in the
upper right square (H). • Place the COSMETICS below the photo
(I). • Use the buttons in the cosmetics to change Shaban's
appearance to match the photo (J).
• Select the ice to the right of the junk pile. • Use the
FEATHERS to clear the ice (G). • Place the THIEF PHOTO in the
upper right square (H). • Place the COSMETICS below the photo
(I). • Use the buttons in the cosmetics to change Shaban's
appearance to match the photo (J).
Chapter 5: The Caves
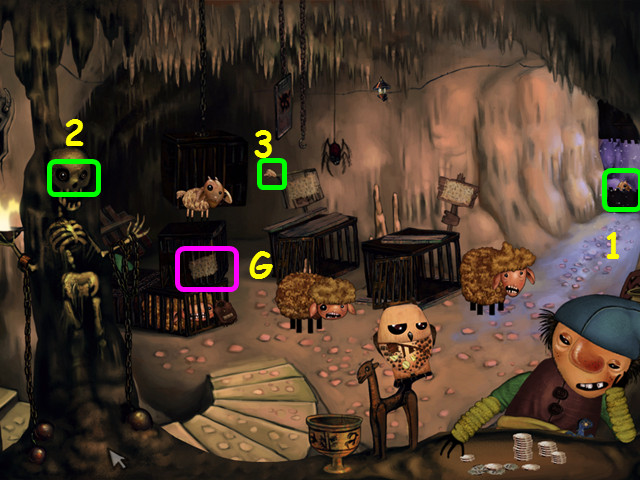
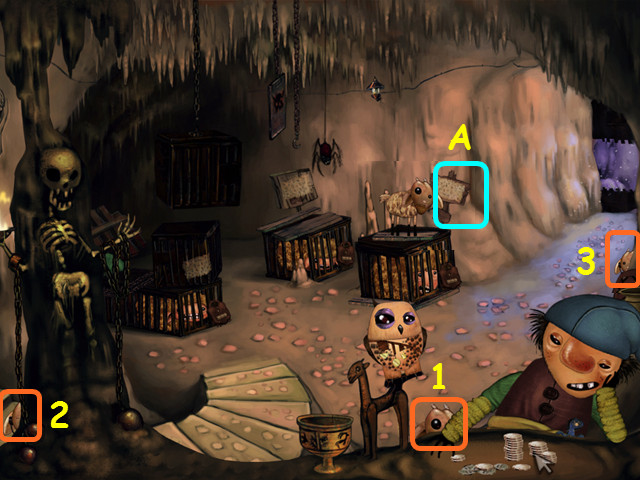 • Chase the lamb around until he lands on the 1st cage (1-3).
• Look at the sign on the cage for a mini-game (A).
• Chase the lamb around until he lands on the 1st cage (1-3).
• Look at the sign on the cage for a mini-game (A).
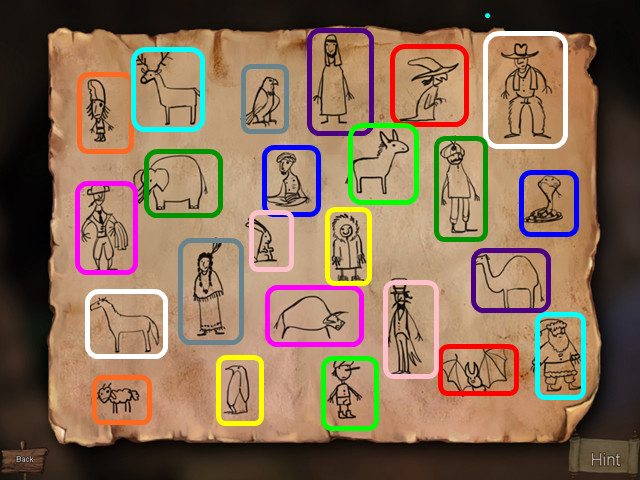
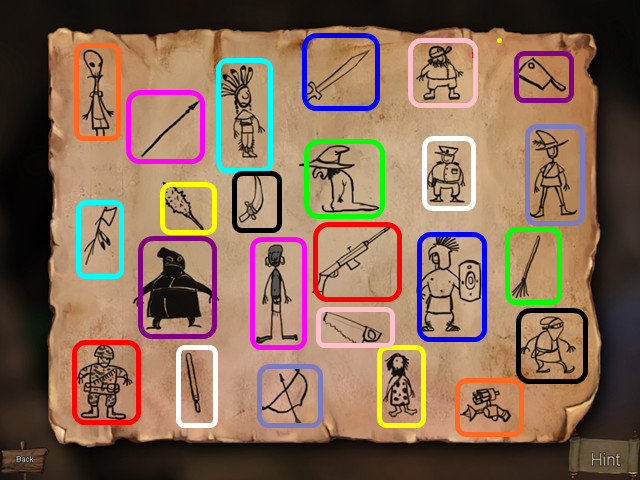 • Match people to the weapons they would use. • Find all the
pairs to get the combination clue.
• Match people to the weapons they would use. • Find all the
pairs to get the combination clue.
 • Count the number of bullets on the clue to get 7-9-3 (B). •
Look at the padlock and enter the code to free the sheep (C).
• Count the number of bullets on the clue to get 7-9-3 (B). •
Look at the padlock and enter the code to free the sheep (C).
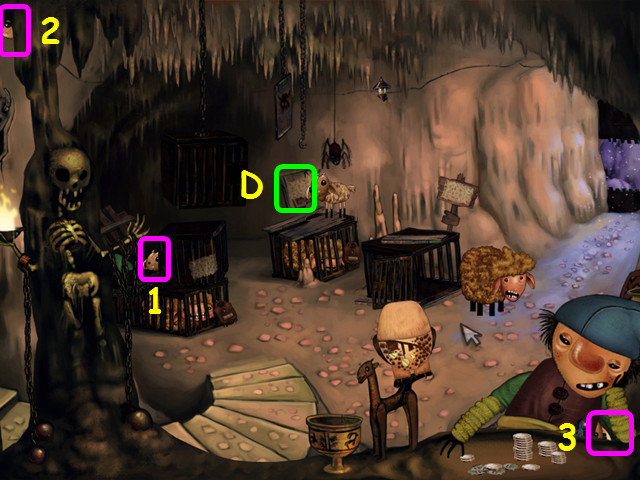 • Chase the lamb around until he lands on the 2nd cage (1-3).
• Look at the sign on the cage for a mini-game (D).
• Chase the lamb around until he lands on the 2nd cage (1-3).
• Look at the sign on the cage for a mini-game (D).
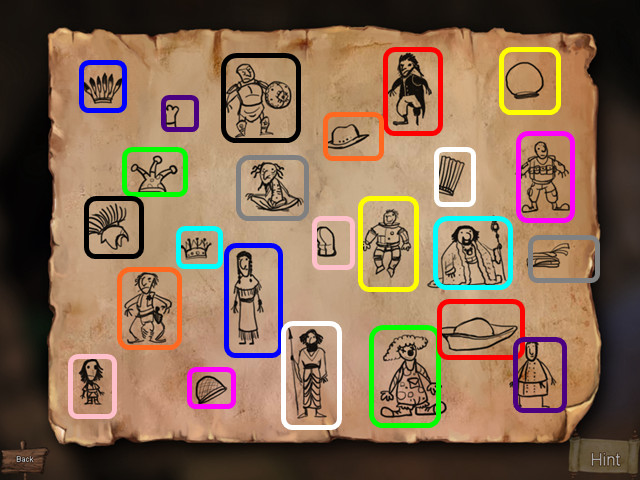 • Match people to the headgear they would wear. • Find all the
pairs to get the combination clue.
• Match people to the headgear they would wear. • Find all the
pairs to get the combination clue.
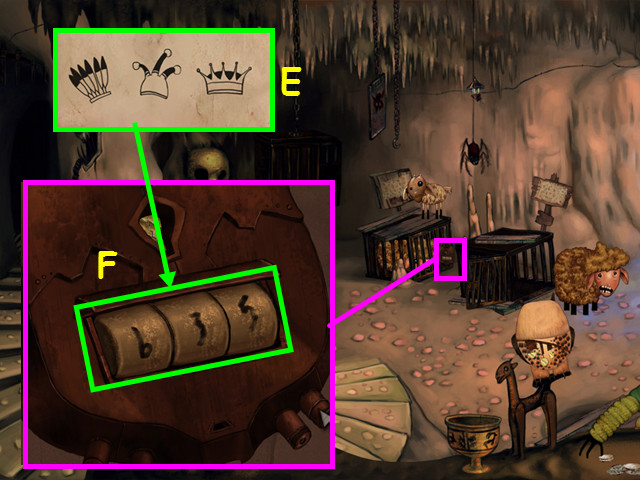 • Count the number of decorations on each hat to get on the
clue to get 6-3-5 (E). • Look at the padlock and enter the
code to free the sheep (F).
• Count the number of decorations on each hat to get on the
clue to get 6-3-5 (E). • Look at the padlock and enter the
code to free the sheep (F).
 • Chase the lamb around until he lands on the third cage
(1-3). • Look at the sign on the cage for a mini-game (G).
• Chase the lamb around until he lands on the third cage
(1-3). • Look at the sign on the cage for a mini-game (G).
 • Match people to the animal they would be associated with. •
Find all the pairs to get the combination clue.
• Match people to the animal they would be associated with. •
Find all the pairs to get the combination clue.
 • Count the number of horns on the clue to get 1-4-2 (H). •
Look at the padlock and enter the code to free the sheep (I).
• Count the number of horns on the clue to get 1-4-2 (H). •
Look at the padlock and enter the code to free the sheep (I).
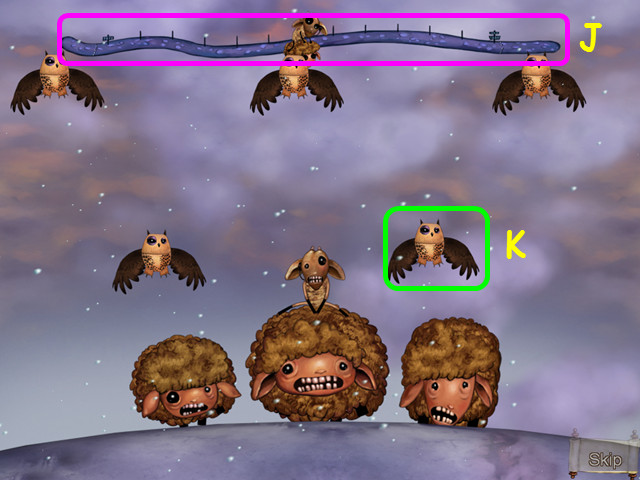 • Shoot down the owls as they appear and fill up the meter at
the top (J). • Move your cursor over each owl and click to
fire (K). • If you miss the owls you will lose some ground on
the progress meter.
• Shoot down the owls as they appear and fill up the meter at
the top (J). • Move your cursor over each owl and click to
fire (K). • If you miss the owls you will lose some ground on
the progress meter.
 • Note the spider legs blocking the way (L). • Walk down (M).
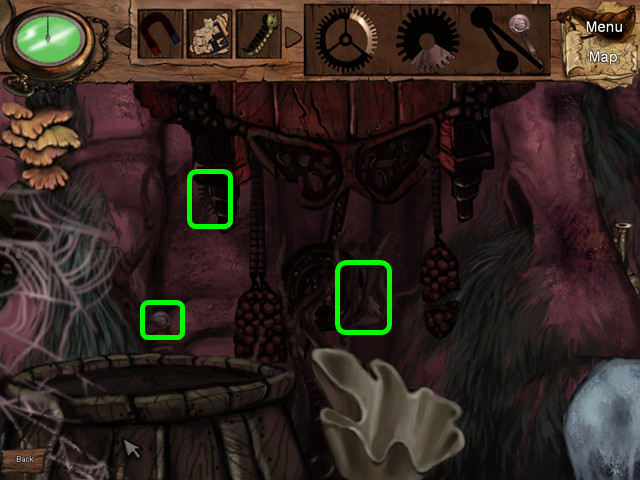
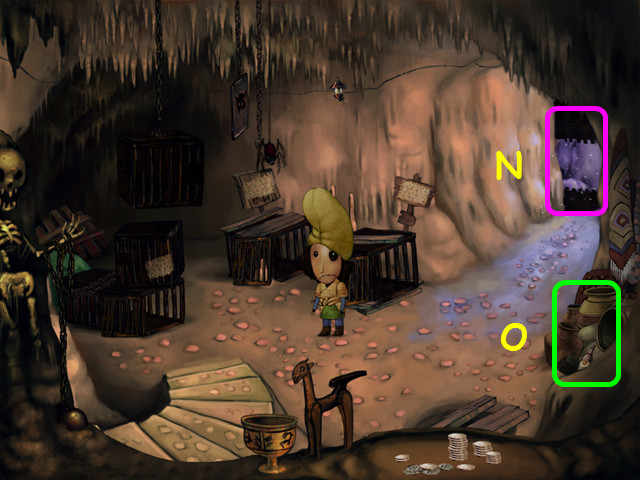 • Note the cave entrance (N). • Select the pots (O).
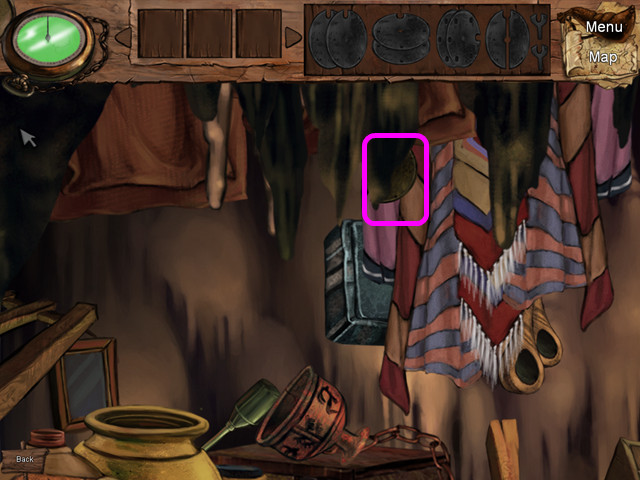 • Move the screen to the upper left and take the piece of
plates (pink).
• Move the screen to the upper left and take the piece of
plates (pink).
 • Move the screen to the lower left and take the 2 pieces of
plates (pink).
• Move the screen to the lower left and take the 2 pieces of
plates (pink).
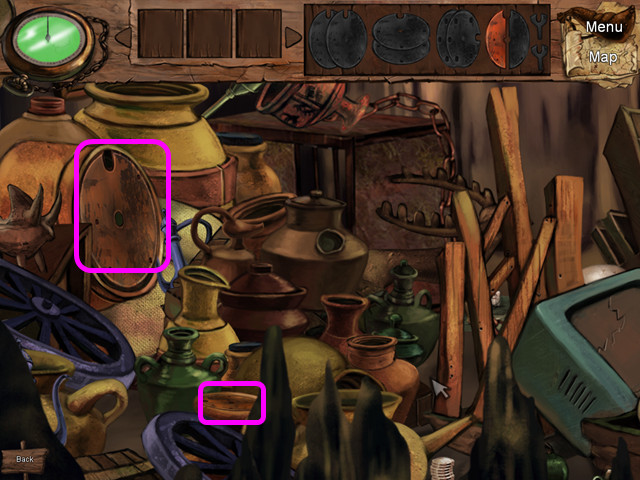
 • Move the screen to the lower right and take the 5 pieces of
plates (pink).
• Move the screen to the lower right and take the 5 pieces of
plates (pink).
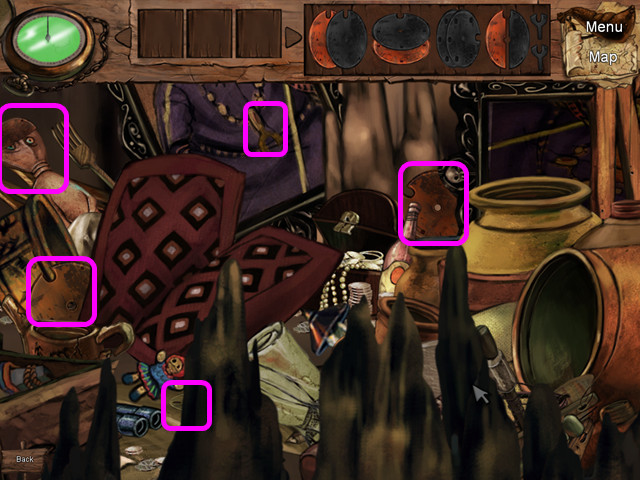
 • Move the screen to the upper right and take the final 2
pieces of plates (pink). • Walk to the left and go up the
stairs.
• Move the screen to the upper right and take the final 2
pieces of plates (pink). • Walk to the left and go up the
stairs.
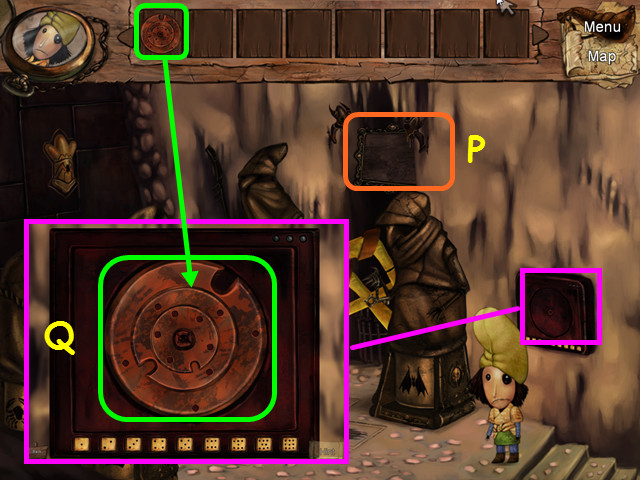 • Note the empty frame (P). • Look at the control panel and
use the PLATES on the center for a mini-game (Q).
• Note the empty frame (P). • Look at the control panel and
use the PLATES on the center for a mini-game (Q).
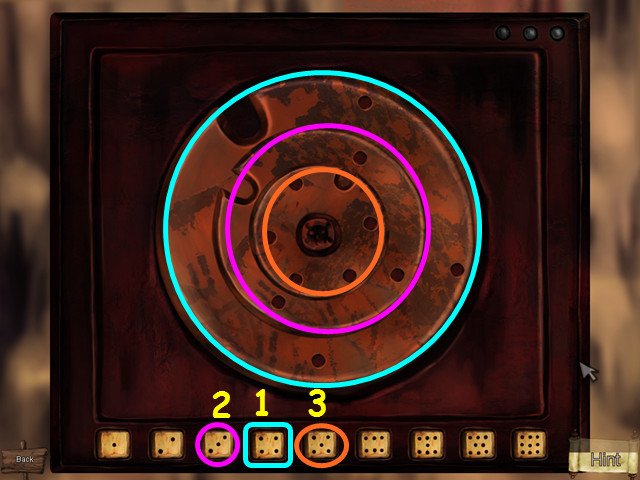 • Press the dice that have the same number of dots as the dice
(1-3). • Note that the outer plate actually has 4 holes; one
is only visible when the 2nd plate spins the notch over the
hole. • You have received a ROYAL PICTURE; place the ROYAL
PICTURE in the frame for a mini-game.
• Press the dice that have the same number of dots as the dice
(1-3). • Note that the outer plate actually has 4 holes; one
is only visible when the 2nd plate spins the notch over the
hole. • You have received a ROYAL PICTURE; place the ROYAL
PICTURE in the frame for a mini-game.
 • Restore the picture in this jigsaw style mini-game (R). •
Left-click to take or place a piece, and right click to rotate
a piece.
• Restore the picture in this jigsaw style mini-game (R). •
Left-click to take or place a piece, and right click to rotate
a piece.
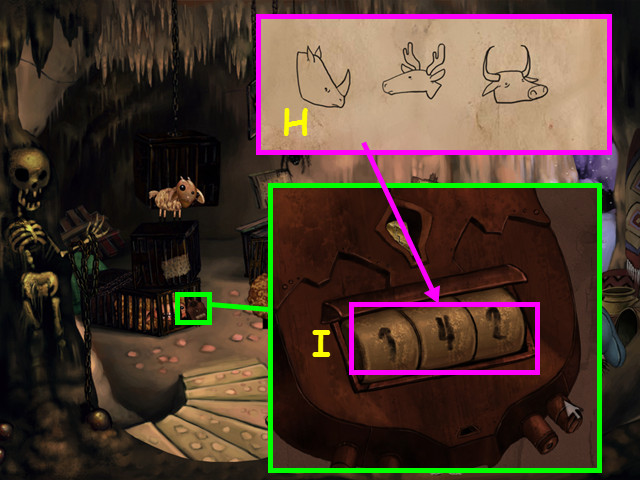
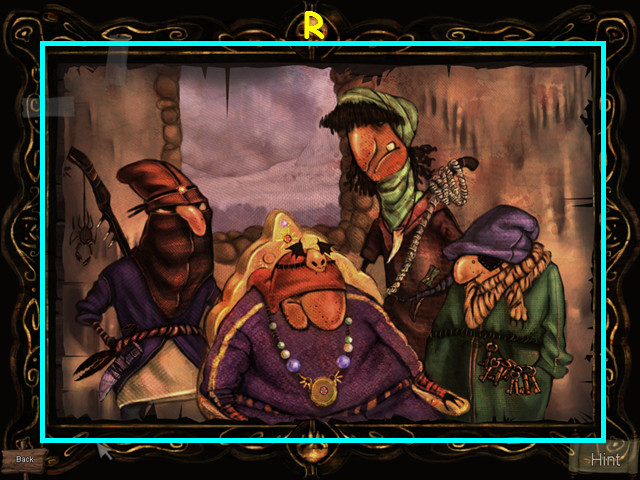
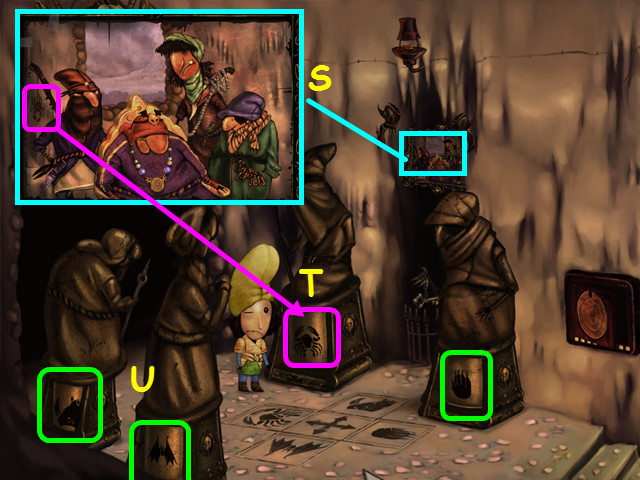 • Refer to the Royal Picture (S). • Turn the statue bases to
reflect its owner (T). • Note the 2 statues on the left face
away from you, so you must put their symbol on the other side
(U). • From left to right the symbols should be:
rhino-bat-crab-claws. • Walk left through the now open door.
• Refer to the Royal Picture (S). • Turn the statue bases to
reflect its owner (T). • Note the 2 statues on the left face
away from you, so you must put their symbol on the other side
(U). • From left to right the symbols should be:
rhino-bat-crab-claws. • Walk left through the now open door.
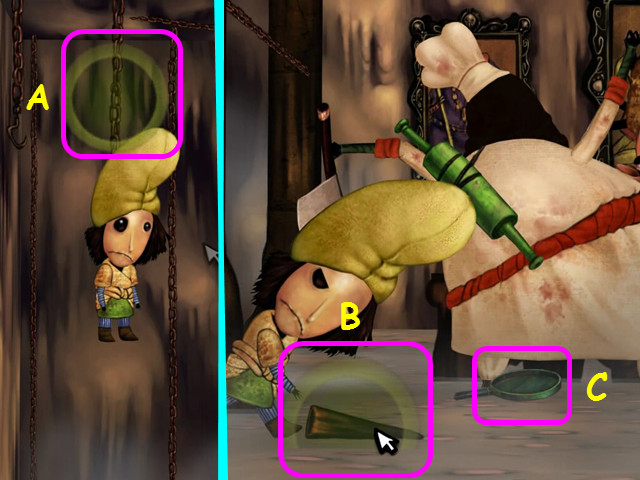 • Select the green circles as they appear to do battle. •
Missing the green circles in a sequence will cause it to
restart. • Select the chain overhead (A). • Select the stake
(B). • Next, select the pan (C).
• Select the green circles as they appear to do battle. •
Missing the green circles in a sequence will cause it to
restart. • Select the chain overhead (A). • Select the stake
(B). • Next, select the pan (C).
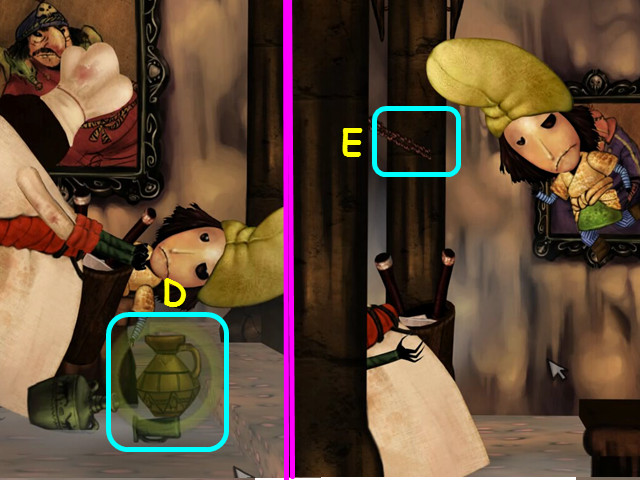 • Select the vase (D). • Select the chain (E).
 • Select the column (F). • Select the chain (G).
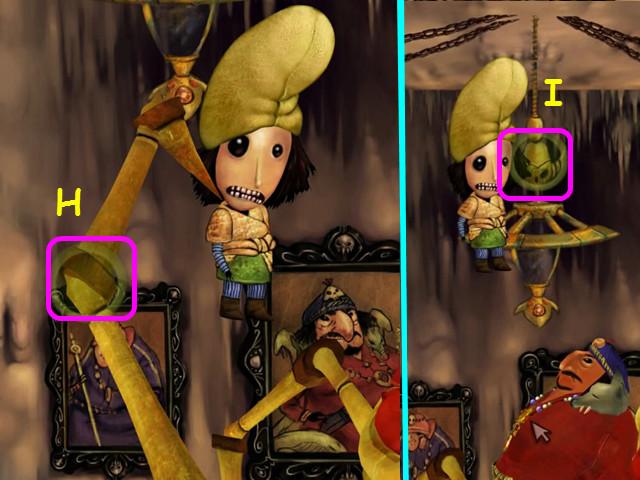 • Select the joint in the leg (H). • Select the chandelier
(I).
• Select the joint in the leg (H). • Select the chandelier
(I).
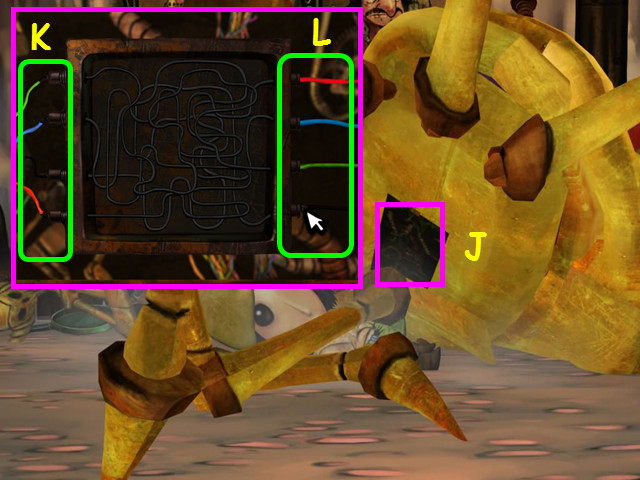 • Look inside the mechanical spider for a mini-game (J). •
Follow each wire on the left (K) to a point on the right (L).
• Place the same colored wire on the end point; left-click to
take or place a wire. • Congratulations! You have completed
Shaban!
• Look inside the mechanical spider for a mini-game (J). •
Follow each wire on the left (K) to a point on the right (L).
• Place the same colored wire on the end point; left-click to
take or place a wire. • Congratulations! You have completed
Shaban!
Created at: 2012-06-21