

Walkthrough Menu
- General Tips
- Chapter 1: Pierre
- Chapter 2: The Countess
- Chapter 3: The Library
- Chapter 4: The Vault
- Chapter 5: The Square
- Chapter 6: The Forest
General Tips
- This is the official guide for Shadow Wolf Mysteries: Tracks of Terror.
- This guide will not mention each time you have to zoom into a location; the screenshots will show each zoom scene.
- Hidden-object puzzles are referred to as HOPs. This guide will not show screenshots of the HOPs, however, it will mention when an HOP is available and the inventory item you'll collect from it.
- Some inventory items require further actions.
- This guide will give step-by-step solutions for all puzzles which are not random. Read the instructions in the game for each puzzle.
Chapter 1: Pierre
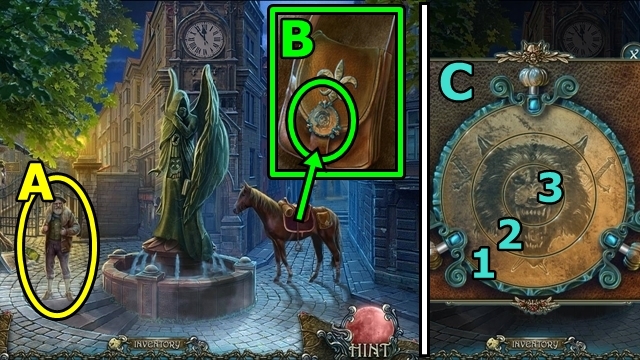
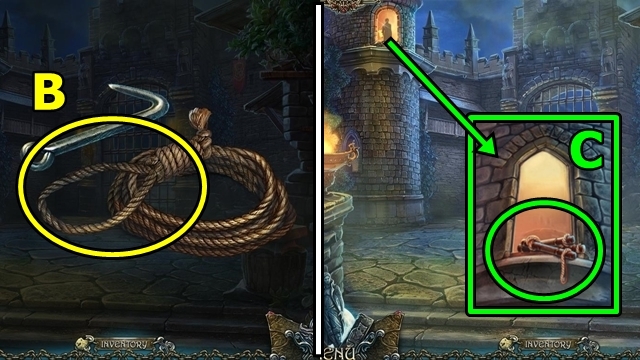
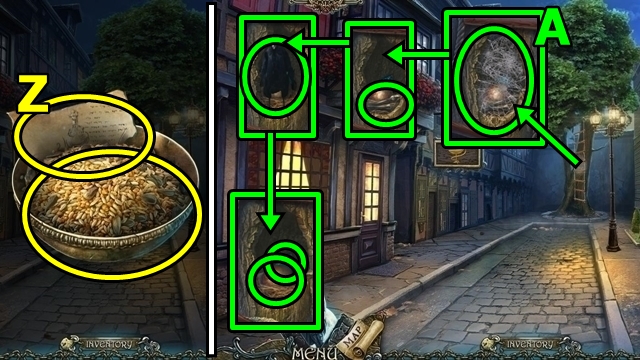
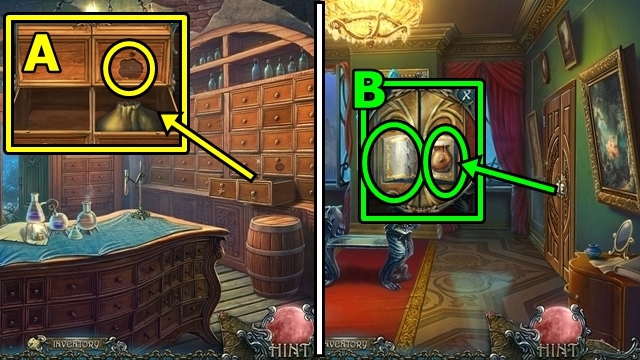
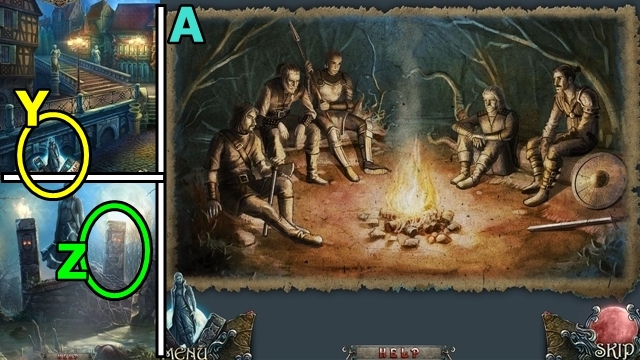
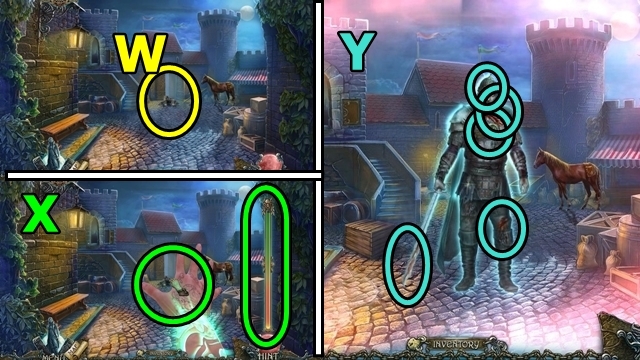
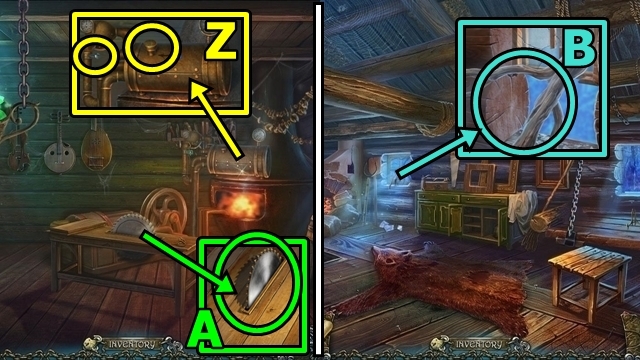
- Talk to the man (A). Examine the lock (B); play the mini-game.
- Solution: First arrange the outer ring (1), then the middle ring (2), then the inner ring (3) (C).
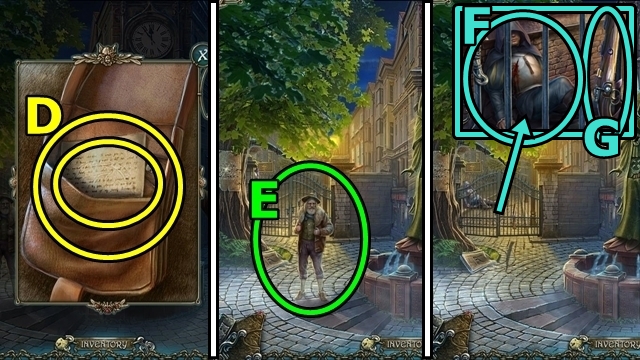
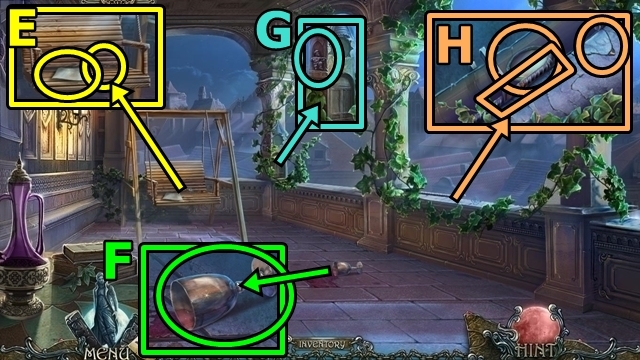
- Read the COUNT'S LETTER (D); take the GUN.
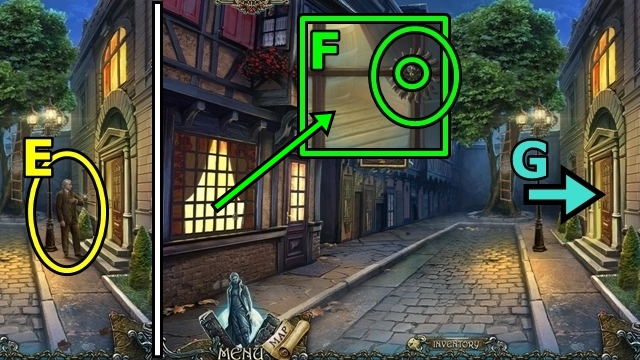
- Offer the COUNT'S LETTER (E).
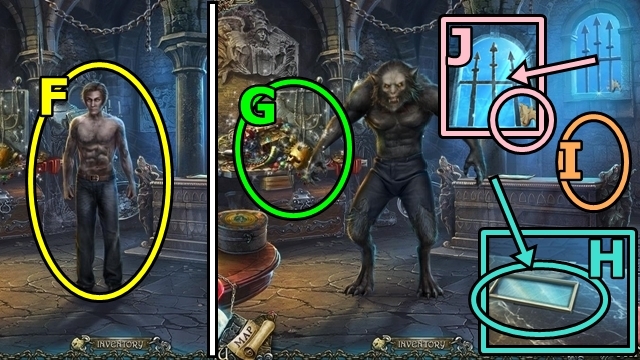
- Talk to the man (F). Examine the rifle (G); take the SILVER BULLETS.
- Go to the East Gate.
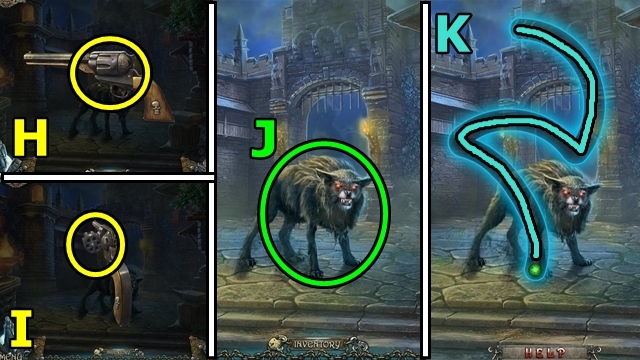
- Open the gun's (H) cylinder (inventory); insert the SILVER BULLETS (I); take the LOADED GUN.
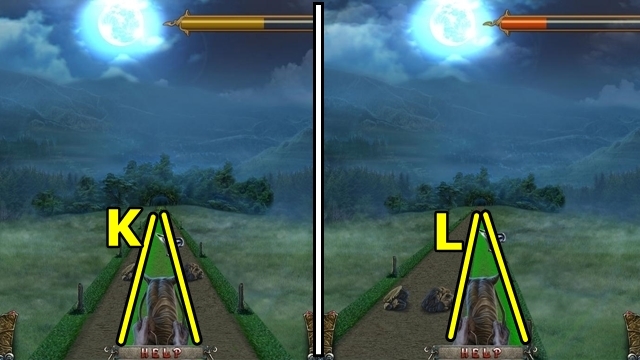
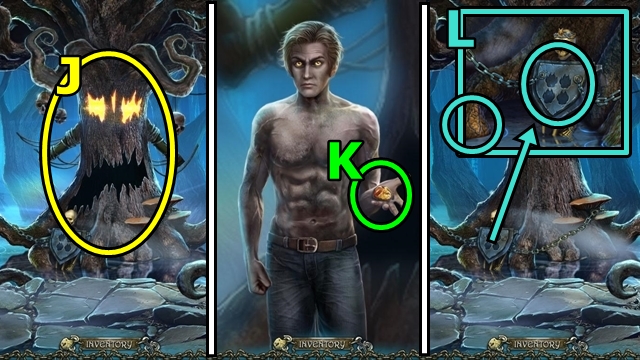
- Use the LOADED GUN (J) to play the mini-game.
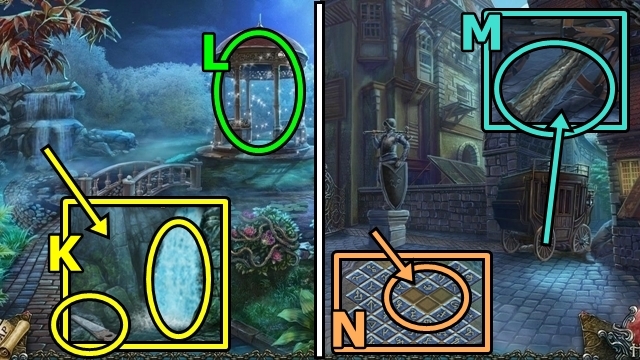
- Solution: (K).
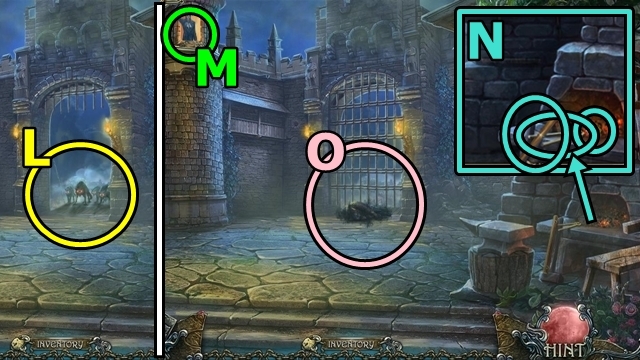
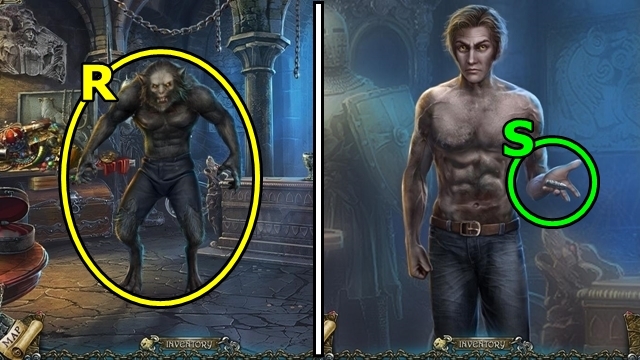
- Move towards the werewolves (L).
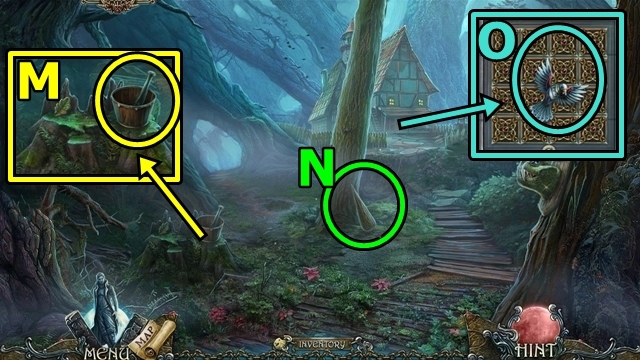
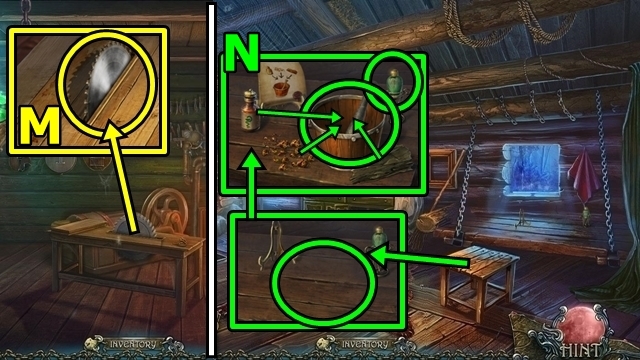
- Talk to Pierre (M).
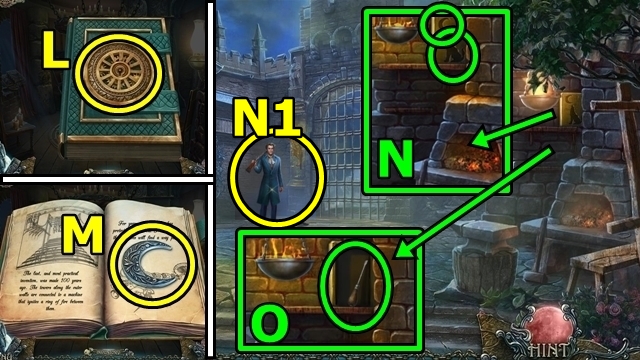
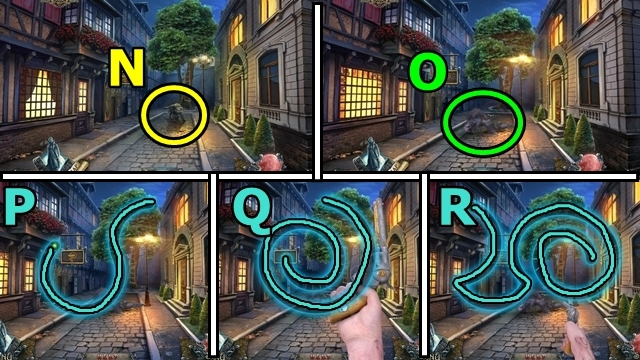
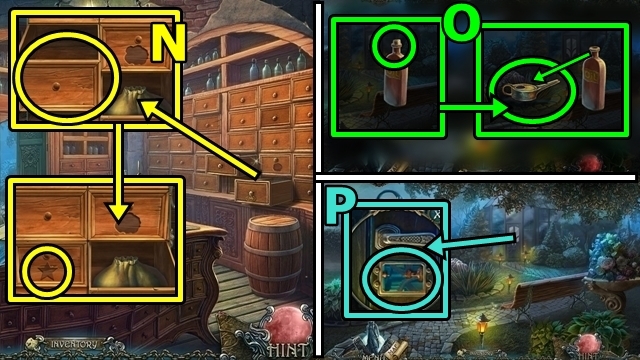
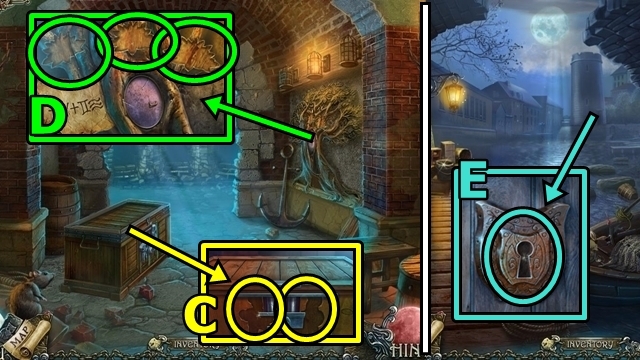
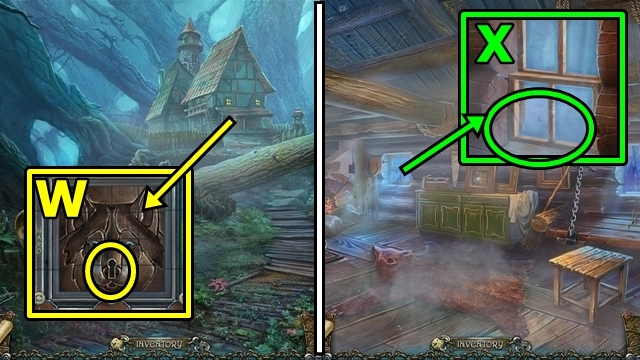
- Take the DOWEL, WIRECUTTERS and HANDLE BASE (N).
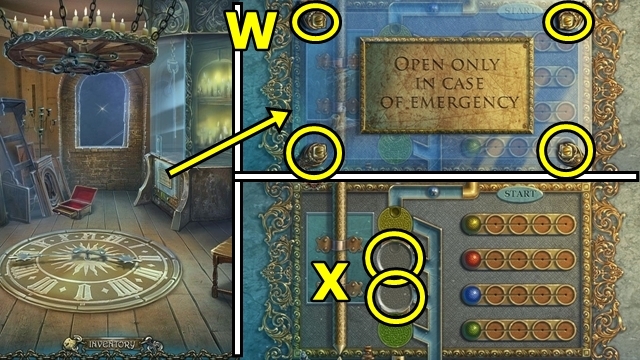
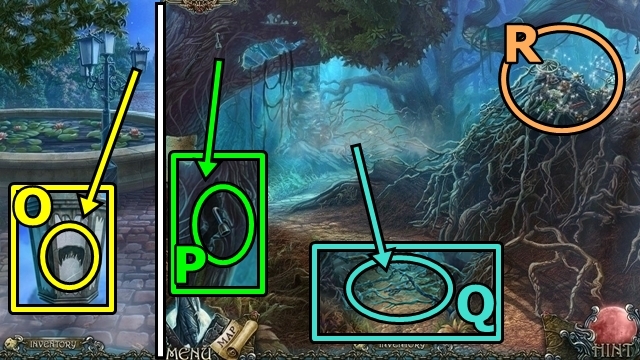
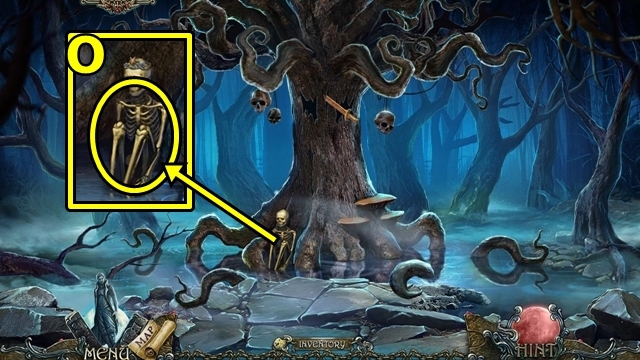
- Examine the gate (O).
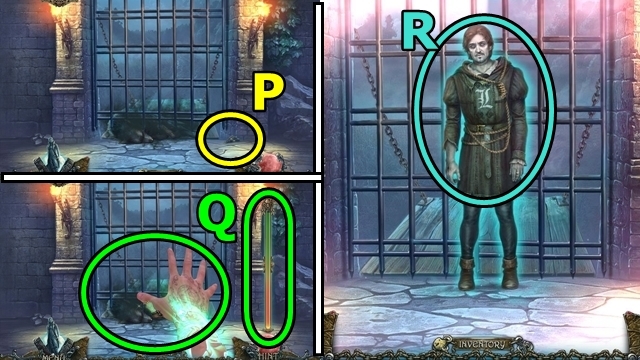
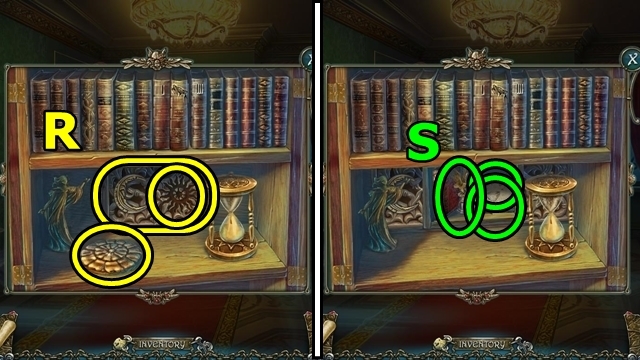
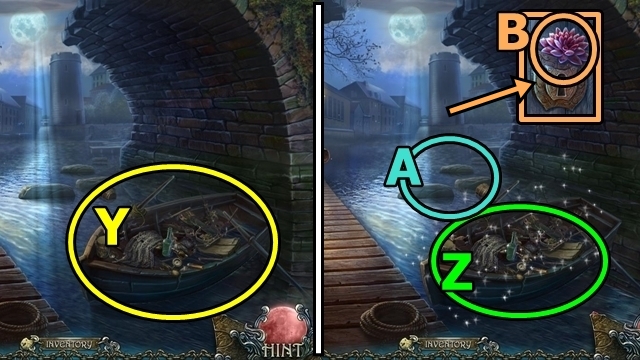
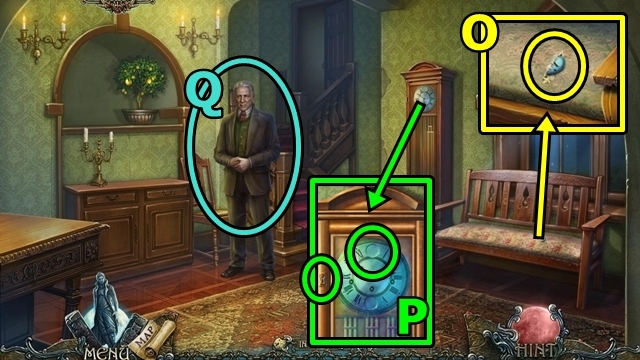
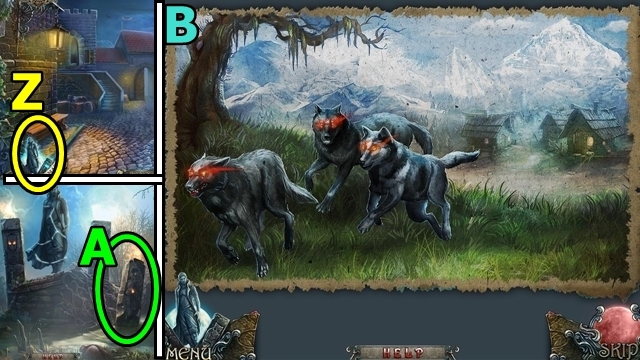
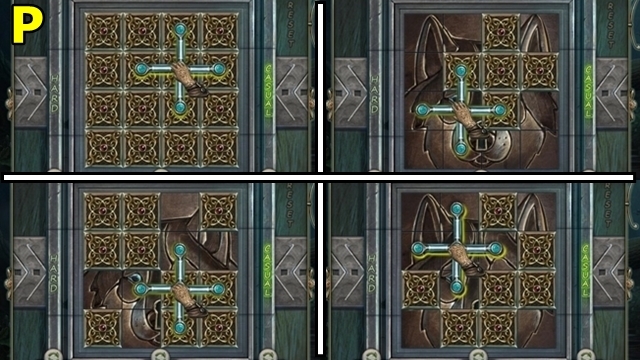
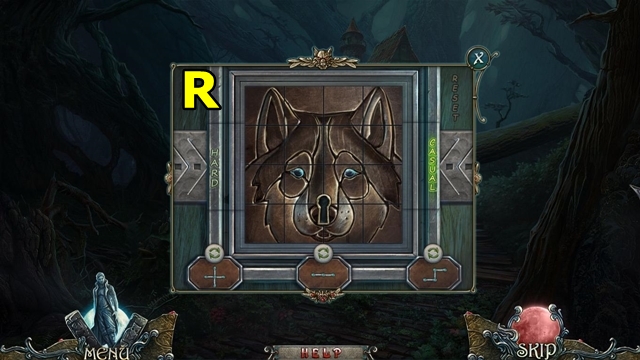
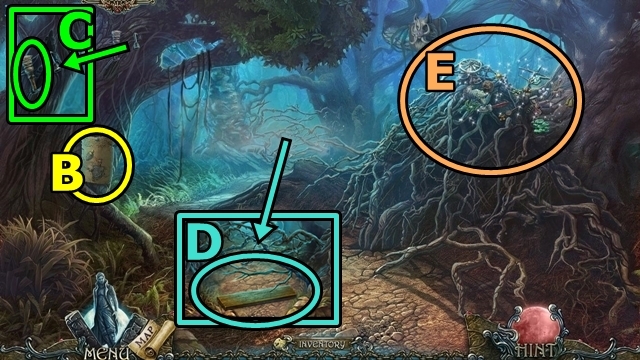
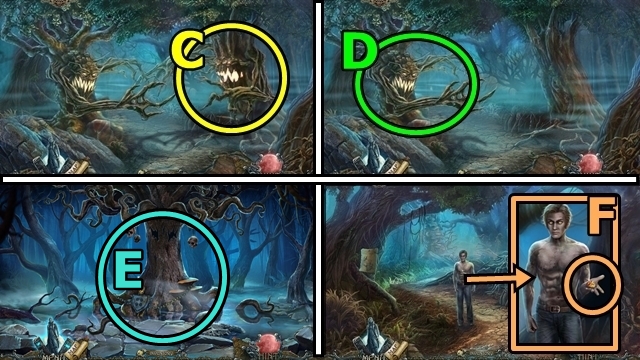
- Take the WOLF'S HEAD (1/2) (P). Examine the body; press and hold to fill the meter (Q). Talk to the spirit (R).
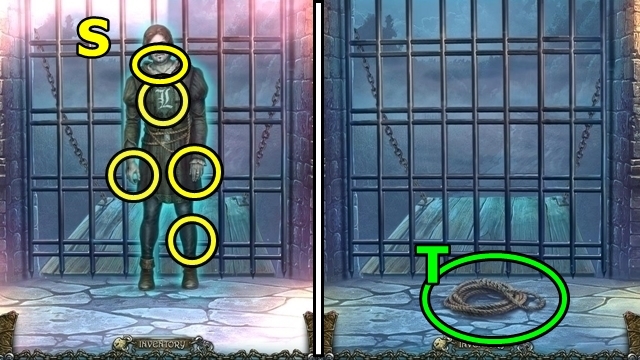
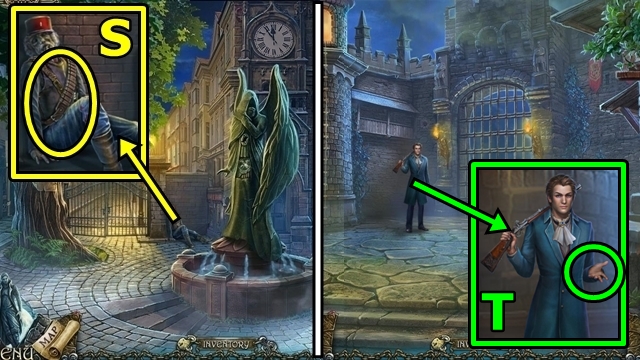
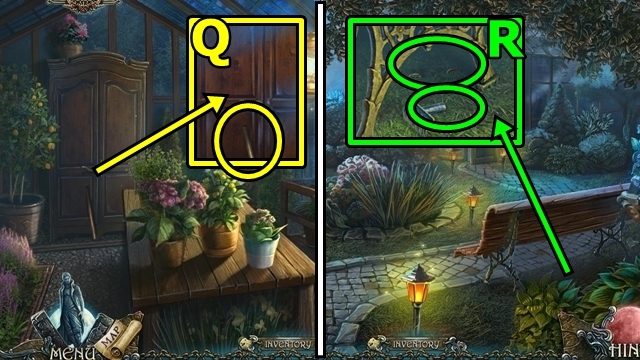
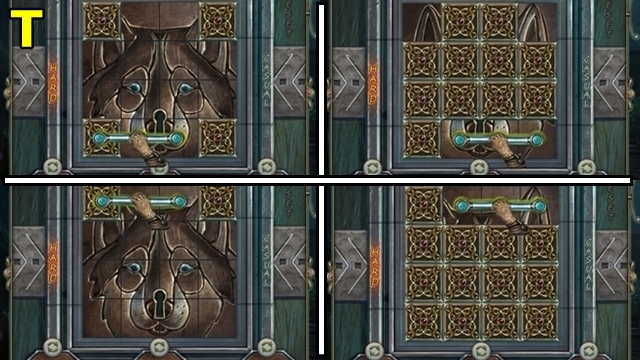
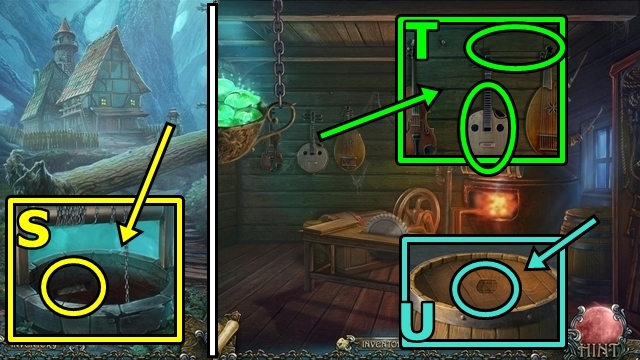
- Find the five clues (S). Take the ROPE (T).
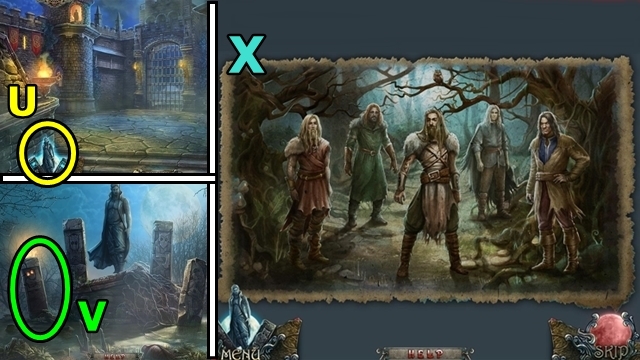
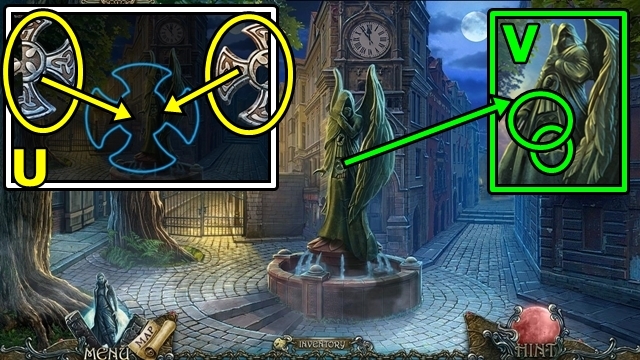
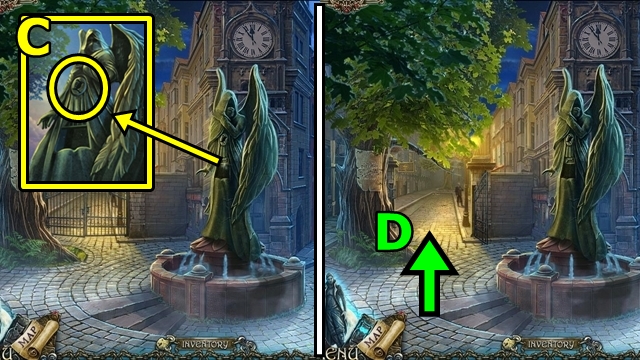
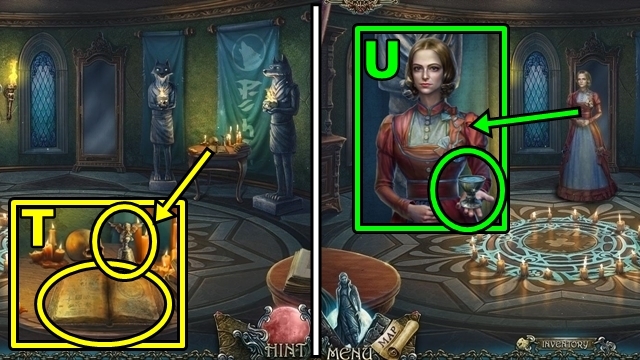
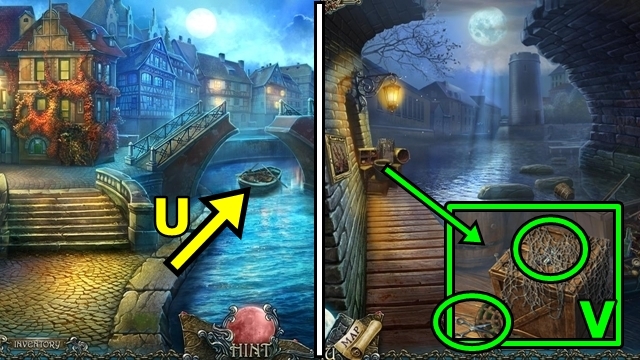
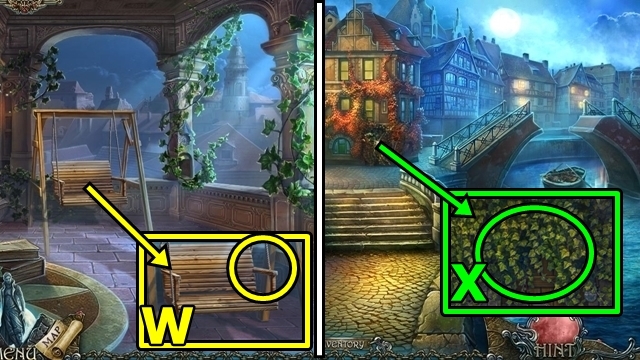
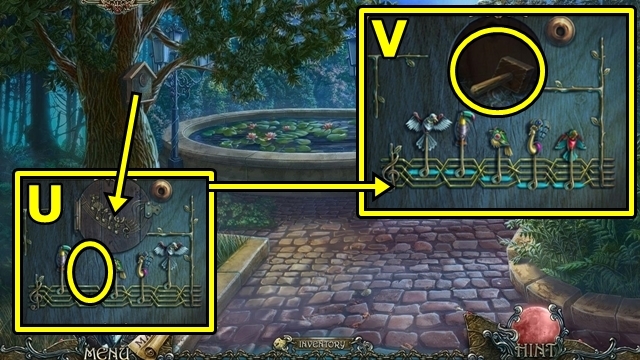
- Examine the statue (U).
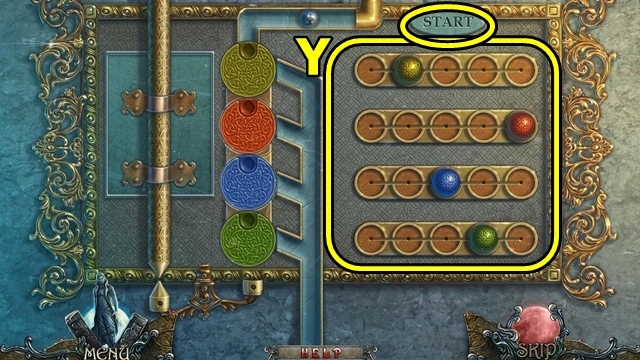
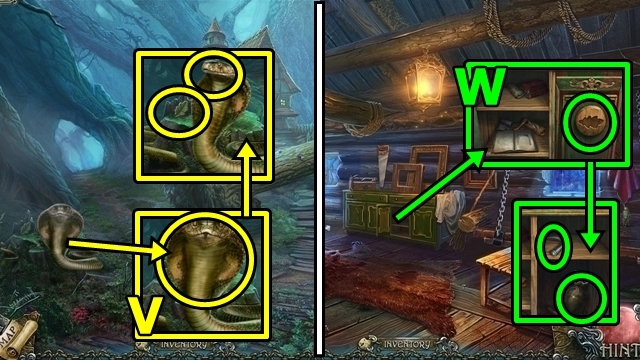
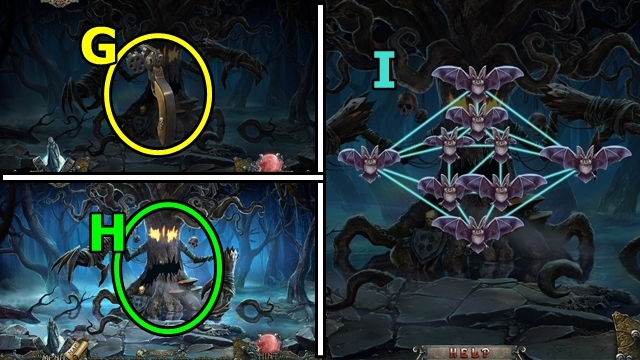
- Examine the pillar (V); play the mini-game.
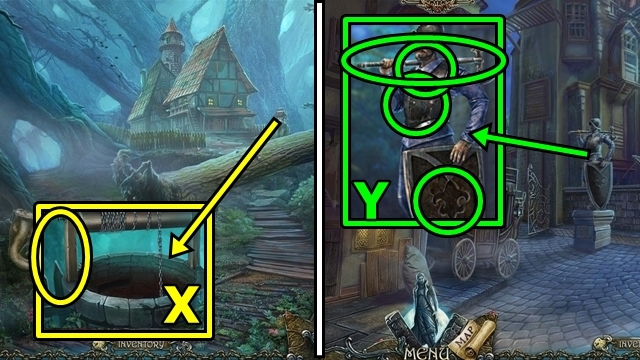
- Solution: (X).
- Move down.
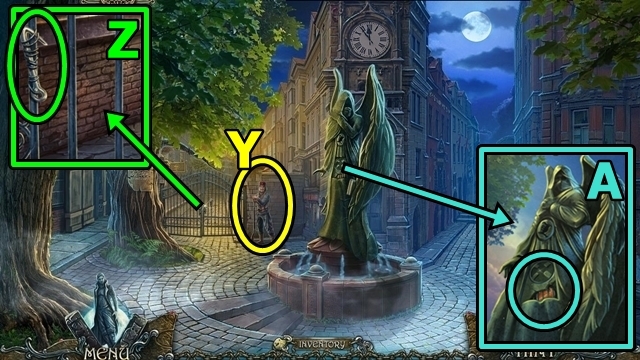
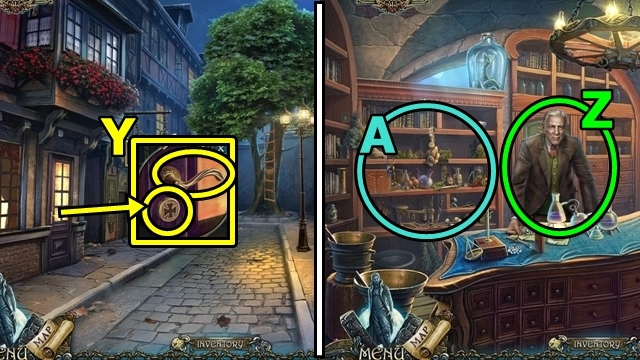
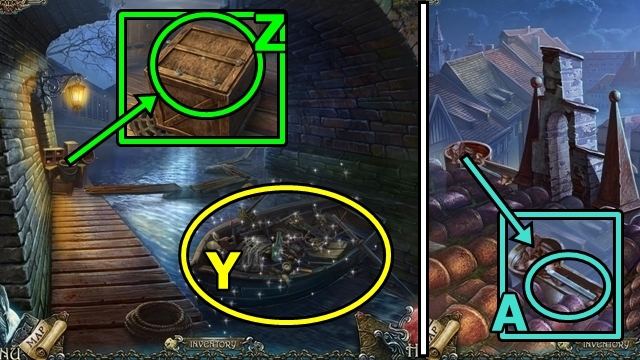
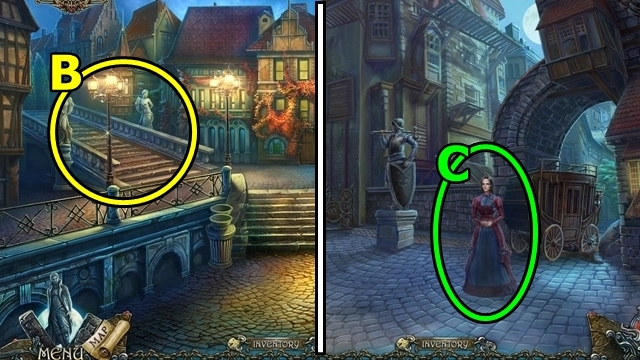
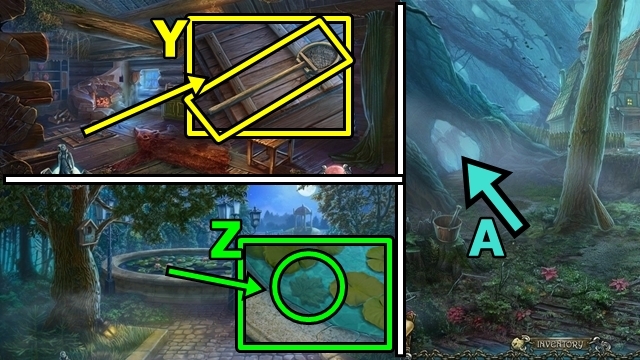
- Talk to the guard (Y). Use the WIRECUTTERS (Z); receive the HOOK.
- Take the BOOK (A).
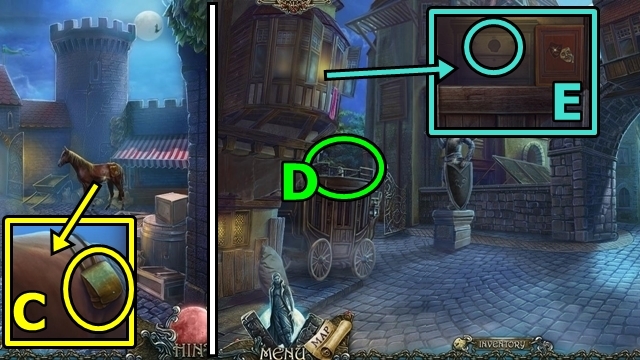
- Return to the East Gate.
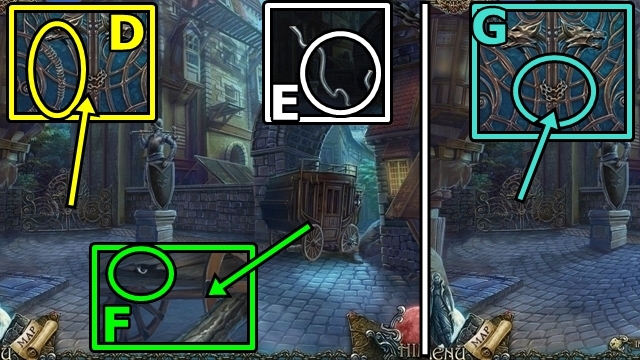
- Add the HOOK (B) to the ROPE (inventory); attach the hook; take the ROPE WITH HOOK.
- Use the ROPE WITH HOOK (C); pull the ladder down.
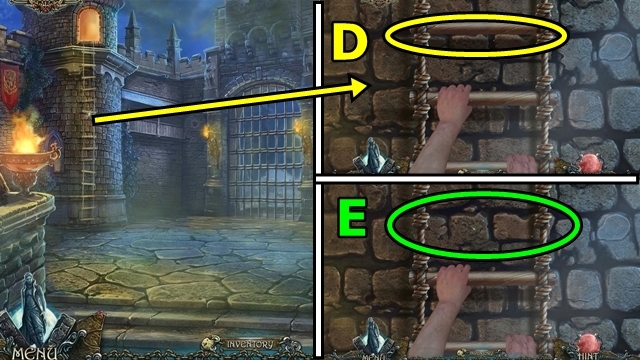
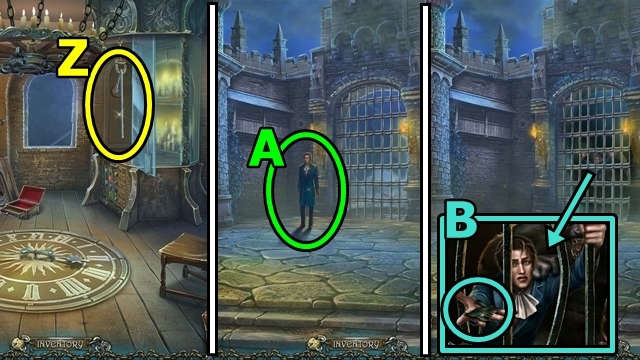
- Climb the ladder (D). Insert the DOWEL (E); continue up.
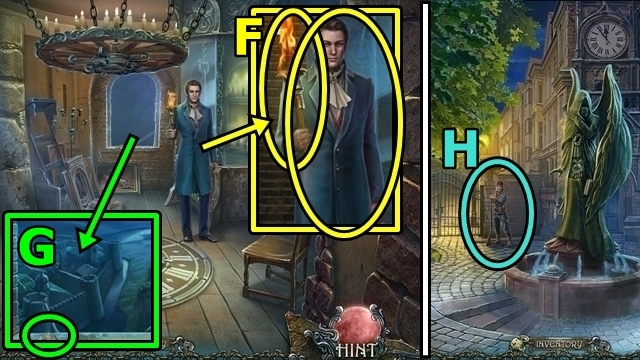
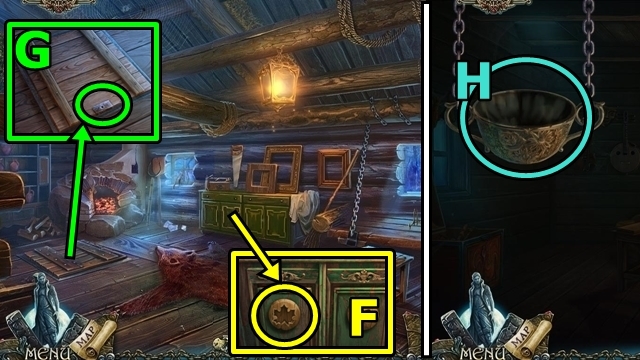
- Talk to Pierre; take the TORCH (F).
- Take the GEAR KEY (G).
- Return to the Small Square.
- Try to talk to the guard (H).
- Move forward.
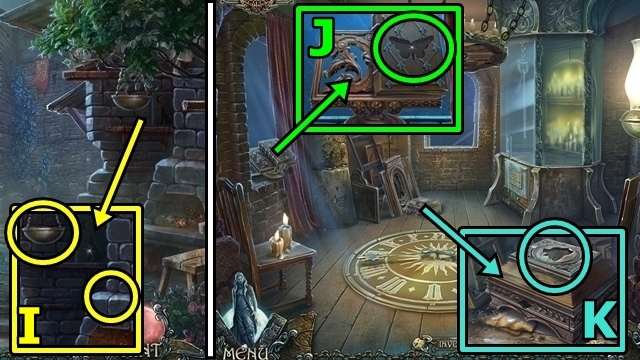
- Use the TORCH (I). Take the BUTTERFLY AMULET.
- Return to the Secret Room.
- Insert the BUTTERFLY AMULET (J); open the book; play the HOP; take the WOLF'S HEAD (2/2).
- Insert the WOLF'S HEADS (K); take the WOLF EMBLEM and BLUE TOKEN.
- Move down.
- Insert the GEAR KEY (L) into the BOOK (inventory); turn the key, open the book; turn the pages; take the SILVER MOON (M).
- Talk to Pierre (N1).
- Insert the SILVER MOON and WOLF EMBLEM (N). Unfold the map.
- Take the SCREWDRIVER (O).
- Return to the Secret Room.
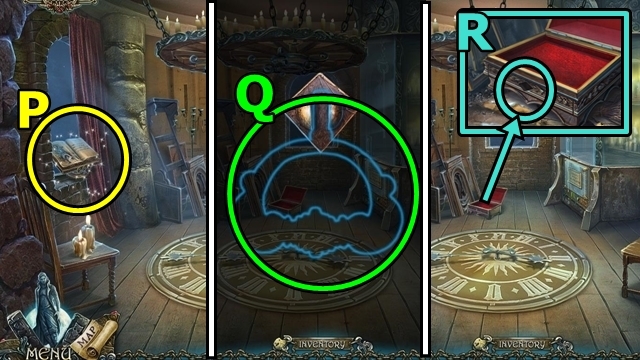
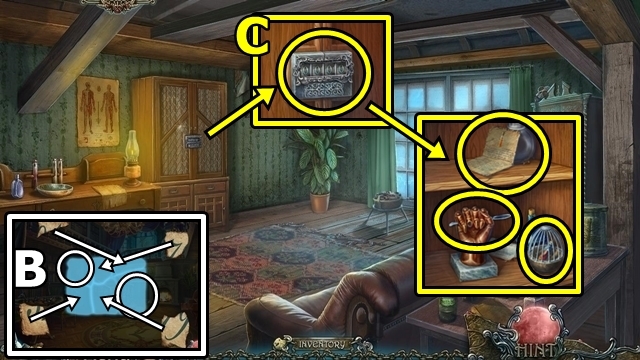
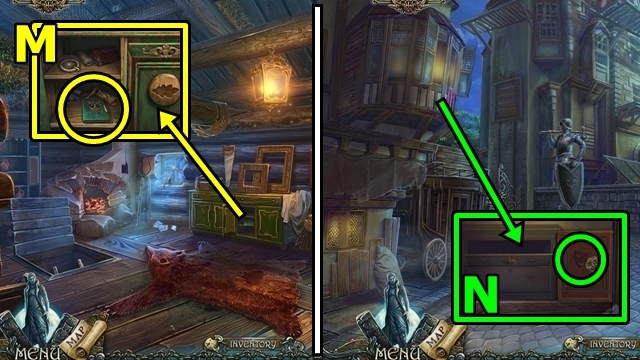
- Examine the book (P); play the HOP. Take the HANDLE.
- Add the HANDLE (Q) to the HANDLE BASE (inventory); take the DRAWER HANDLE.
- Insert the DRAWER HANDLE (R); open the drawer; take the CROSS PART (1/2).
- Return to the Small Square.
- Take the BUCKSHOT (S).
- Return to the East Gate.
- Offer the BUCKSHOT (T), take the CROSS PART (2/2).
- Move down.
- Reattach the two CROSS PARTS (inventory); take the CROSS (U).
- Insert the CROSS (V); take the ORANGE TOKEN.
- Return to the Secret Room.
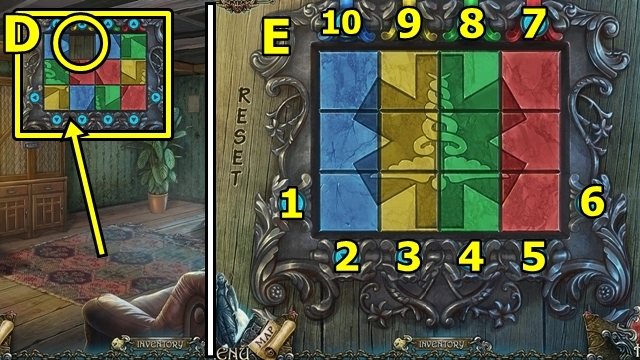
- Use the SCREWDRIVER (W). Add the BLUE TOKEN and ORANGE TOKEN (X); play the mini-game.
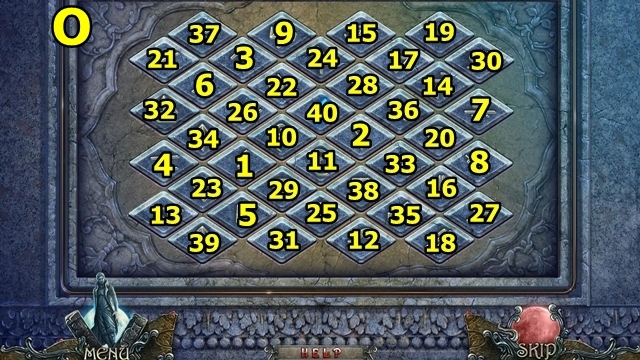
- Solution: (Y).
- Use the TORCH (Z).
- Move down.
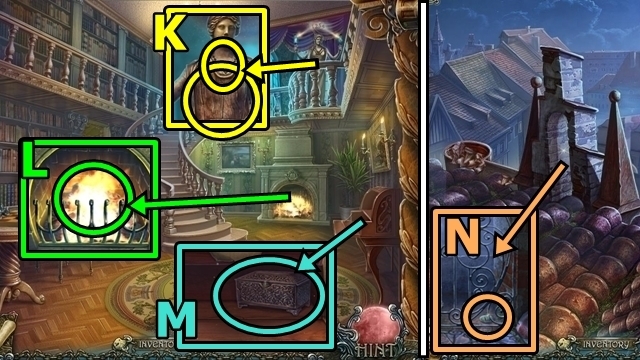
- Talk to Pierre (A).
- Take the FAMILY SEAL (B).
- Move down.
- Insert the FAMILY SEAL (C).
- Move towards the street (D).
Chapter 2: The Countess
- Talk to the doctor (E).
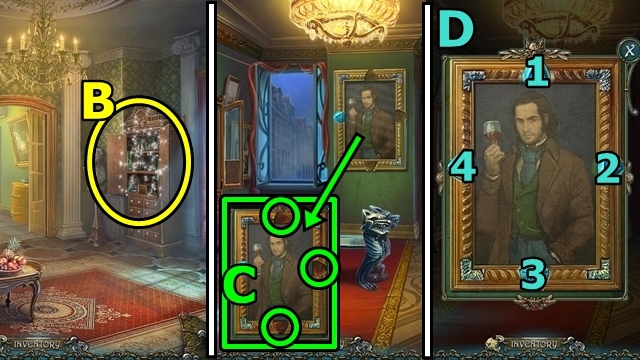
- Use the SCREWDRIVER (F); take the BOLT and SUN EMBLEM.
- Enter the Hall (G).
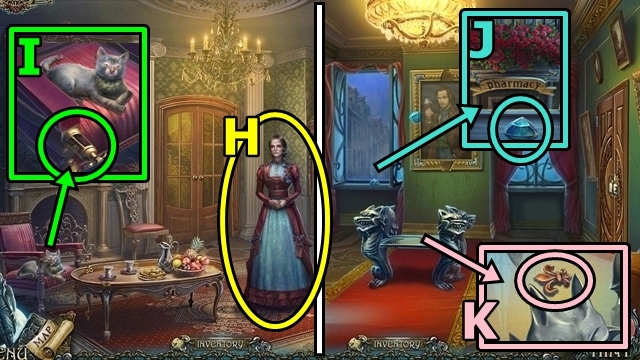
- Talk to the Countess (H). Offer the FAMILY SEAL.
- Take the CORKSCREW (I).
- Enter the Gallery.
- Take the BLUE CRYSTAL (1/3) (J).
- Take the FLEUR-DE-LIS (K).
- Move down.
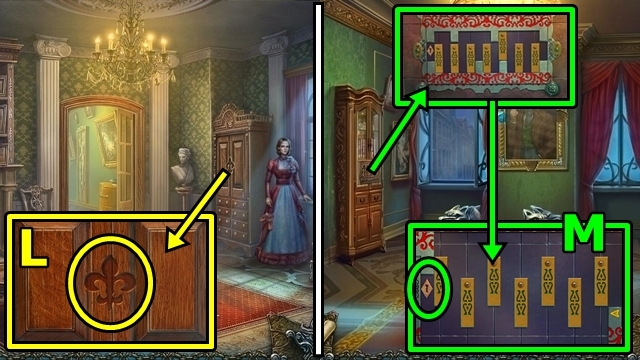
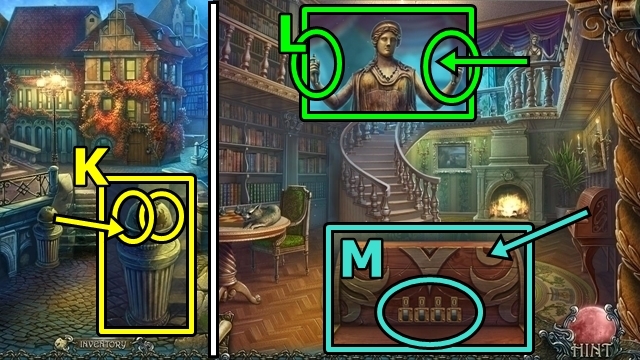
- Insert the FLEUR-DE-LIS (L); open the cupboard; play the HOP; receive the LOCKPICK.
- Return to the Gallery.
- Insert the LOCKPICK (M); play the mini-game.
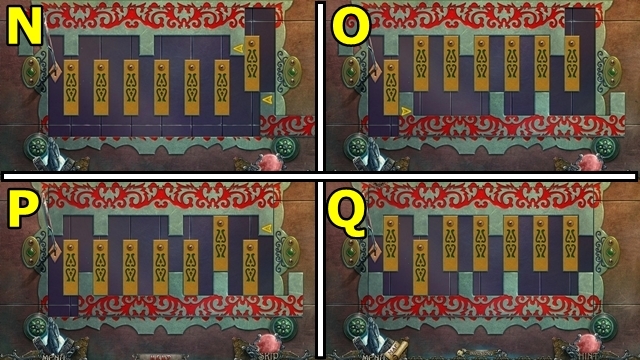
- Solution: (N-Q).
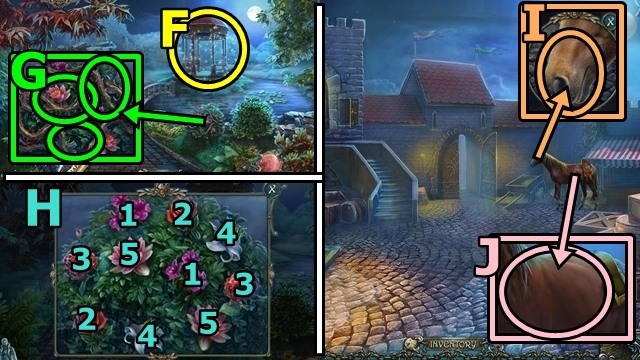
- Take the WOODEN ROSETTE (R). Insert the SUN EMBLEM. Open the panel; take the RECIPE HALF (1/2) and EAGLE FIGURINE (S). Pull the lever.
- Enter the Altar.
- Take the ANGEL FIGURINE (T); examine the book; turn the pages.
- Talk to the Countess; take the RITUAL GOBLET (U).
- Return to the Hall.
- Insert the WOODEN ROSETTE (V); take the BLUE CRYSTAL (2/3).
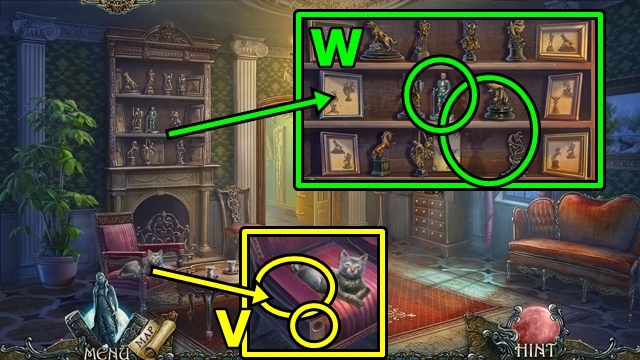
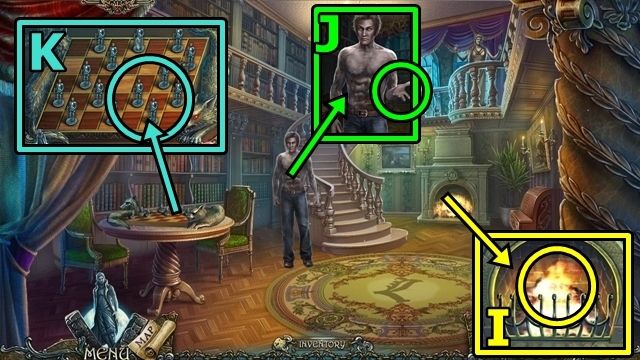
- Take the CHESS PIECE (W). Add the EAGLE FIGURINE and the ANGEL FIGURINE; play the mini-game.
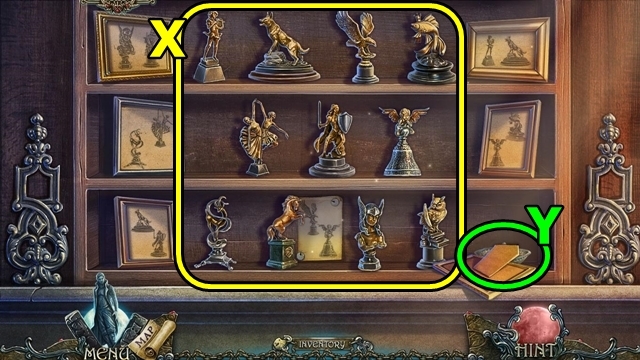
- Solution: (X). Take the BOWL OF SEEDS (Y).
- Move down.
- Take the RECIPE (2/2) (Z) from the BOWL OF SEEDS (inventory). Take the BOWL OF SEEDS.
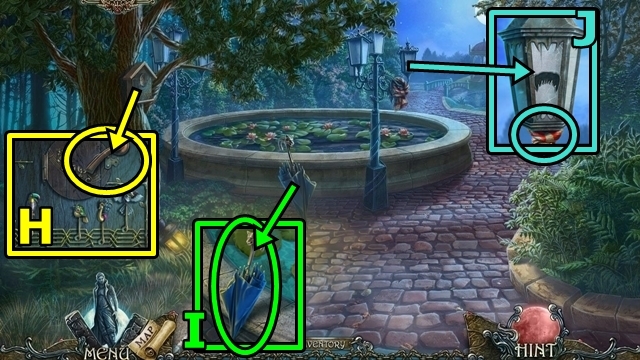
- Use the TORCH (A); take the BROKEN PLIERS. Offer the BOWL OF SEEDS; take the EGG and the BLUE CRYSTAL (3/3).
- Go right.
- Play the HOP (B); take the BLOOD KNIFE.
- Move forward.
- Insert the three BLUE CRYSTALS (C); play the mini-game.
- Solution: 1-2-4-3, 1-4-1-2-4, 2-3-3-1-2-4, 4-4-2-3-2-1-3 (D). Take the SECRET ELIXIR.
- Enter the Altar.
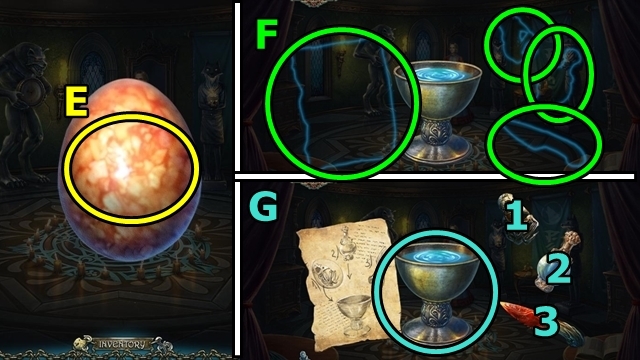
- Crack the EGG (E) (inventory); take the CHICK SKELETON.
- Add the two RECIPE HALVES (F), CHICK SKELETON, SECRET ELIXIR and the BLOOD KNIFE to the RITUAL GOBLET (inventory). In this order, put the chick skeleton, secret elixir and blood knife into the goblet (G). Take the RITUAL GOBLET.
- Place the RITUAL GOBLET (H).
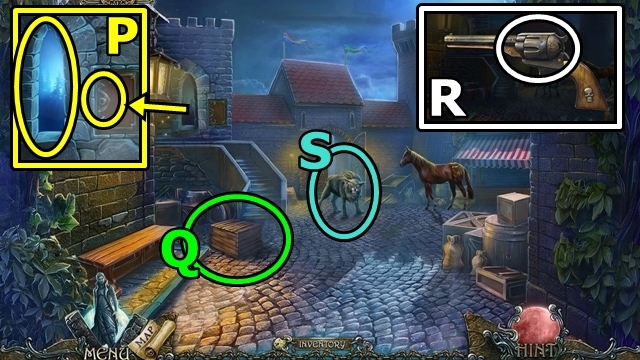
- Talk to Pierre (I). Take the SPARE KEY (J).
- Return to the Street.
- Insert the SCREW (K) into the BROKEN PLIERS (inventory), use the SCREWDRIVER; take the PLIERS.
- Take the CYLINDER (L) from the JAMMED GUN (inventory); use the PLIERS (M); add the CYLINDER; take the GUN.
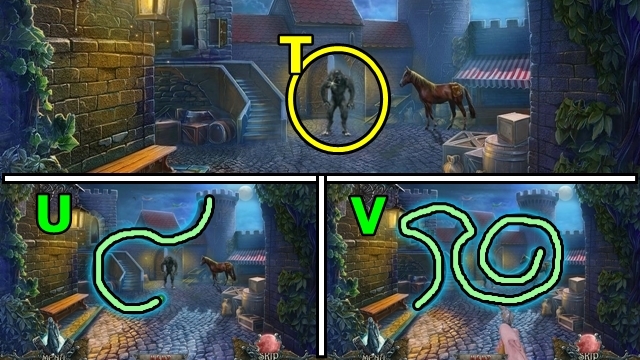
- Approach the werewolf (N).
- Use the GUN (O); play the mini-game.
- Solution: (P-R).
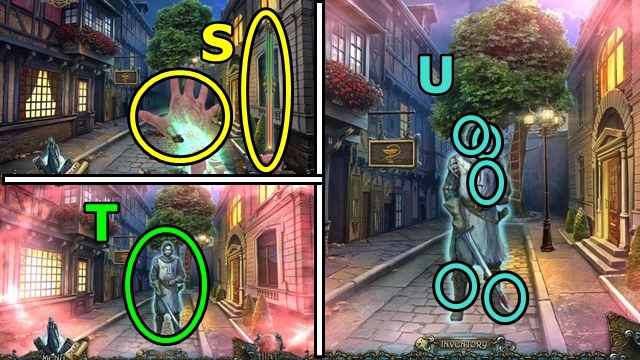
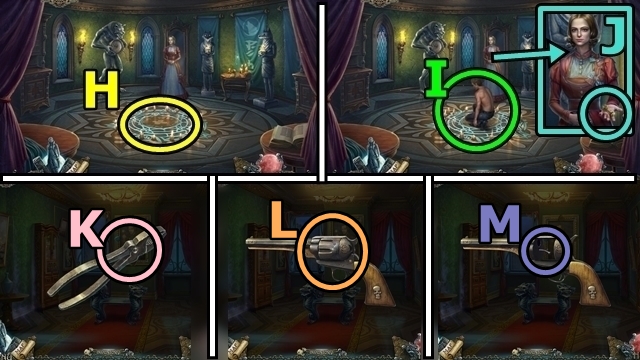
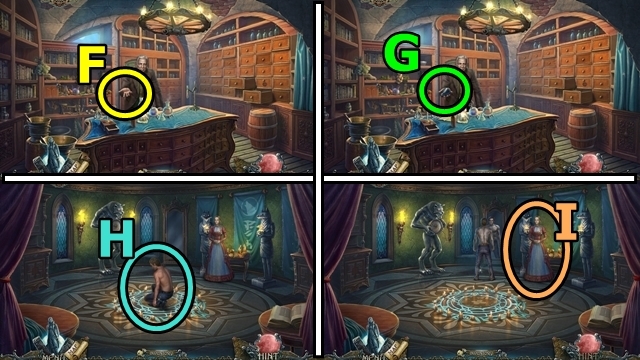
- Examine the body; press and hold to fill the meter (S). Talk to the spirit (T).
- Find the five clues (U).
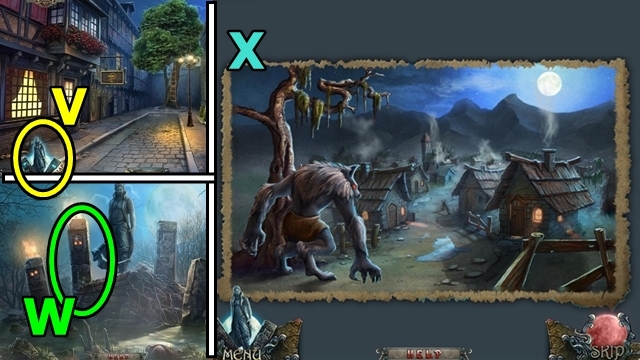
- Examine the statue (V).
- Examine the pillar (W); play the mini-game.
- Solution: (X).
- Use the SPARE KEY (Y); open the door. Enter the Lab.
- Talk to the doctor (Z).
- Play the HOP (A); take the GREEN BOTTLE.
- Offer the GREEN BOTTLE (B).
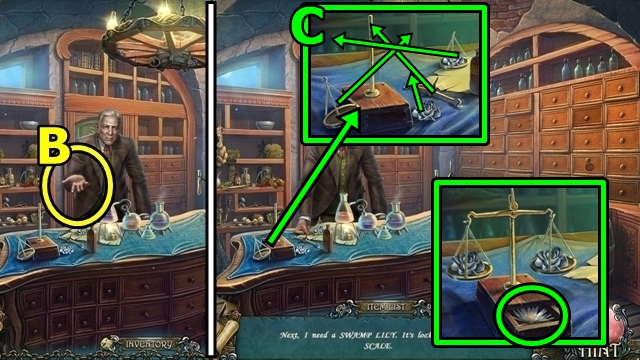
- Reassemble the scale (C); take the LOTUS.
- Offer the LOTUS (D).
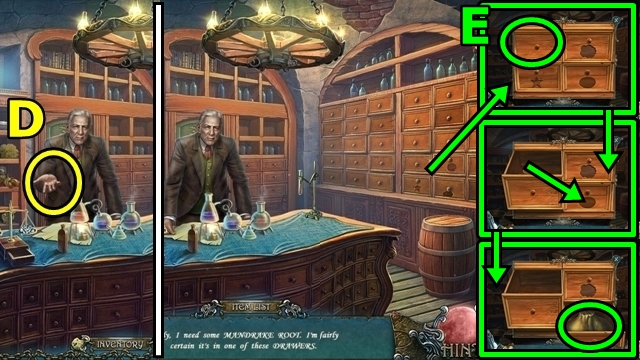
- Open the drawer (E); move the disk to the insert. Examine the bag. Play the HOP; take the MANDRAKE ROOT.
- Offer the MANDRAKE ROOT (F).
- Take the WEREWOLF CURE (G).
- Return to the Altar.
- Offer the WEREWOLF CURE (H).
- Talk to the Countess (I).
- Return to the Lab.
- Take the BOTTLE WITH OIL (J).
- Open the door (K); enter the Backyard.
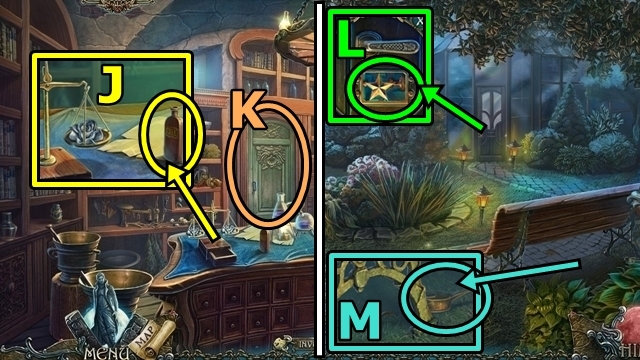
- Take the STAR (L).
- Take the EMPTY OILER (M).
- Move down.
- Close the top drawer (N). Insert the STAR; open the drawer; take the GREENHOUSE SPRING.
- Move up.
- Use the CORKSCREW on the BOTTLE OF OIL (inventory); add the EMPTY OILER (O); pour the oil into the oiler; take the OILER.
- Insert the GREENHOUSE SPRING (P); then use the OILER; pull the handle.
- Enter the Greenhouse.
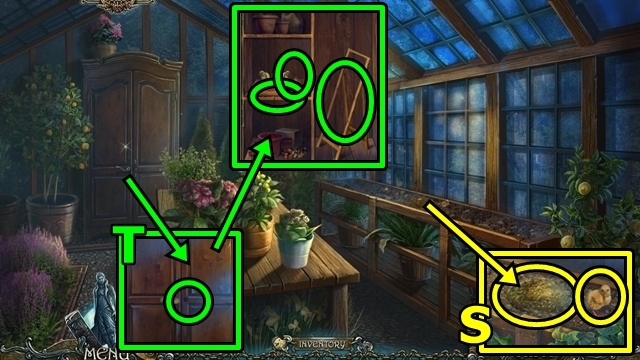
- Take the RAKE HANDLE (Q).
- Move down.
- Add the RAKE HANDLE (R); take the RAKE. Use the RAKE; take the ARMOIRE HANDLE.
- Enter the Greenhouse.
- Take the CHICK (S). Use the RAKE; take the STEPS.
- Insert the ARMOIRE HANDLE (T); turn the handle. Add the CHICK; open the drawer; take the QUILL. Add the STEPS; take the LADDER.
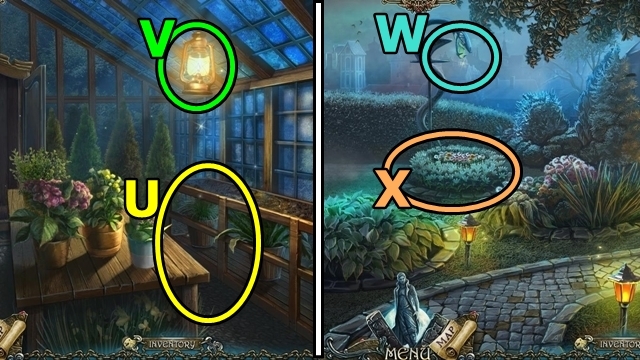
- Place the LADDER (U); take the LAMP (V).
- Move down.
- Add the LAMP (W); play the mini-game (X).
- Solution: Screenshots edited to simplify the solution (Y-Z). Take the FLOWER SHAPE.
- Move down.
- Insert the FLOWER SHAPE (A); open the drawer; take the BOOK INLAY.
- Return to the Gallery.
- Add the BOOK INLAY (B) and the QUILL; pull the quill; enter the Library.
Chapter 3: The Library
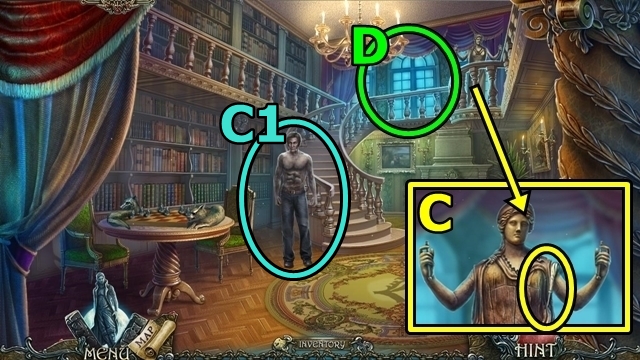
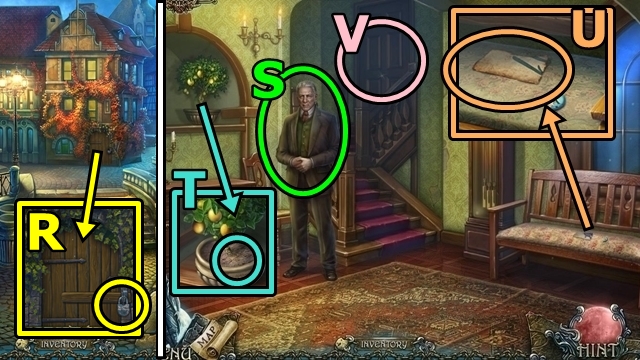
- Talk to Pierre (C1).
- Take the AWL (C).
- Open the doors (D); go on the Balcony.
- Take the BLANK PAPER (E). Use the AWL; take the CHESS PIECE (2/3).
- Take the SILVER GOBLET (F).
- Take the LUTE PLAYER (G).
- Move the bar (H); take the MIRROR. Use the AWL; take the METAL TALON.
- Move down.
- Use the BLANK PAPER (I); take the RITUAL DESCRIPTION.
- Offer the RITUAL DESCRIPTION (J); take the CHESS PIECE (3/3).
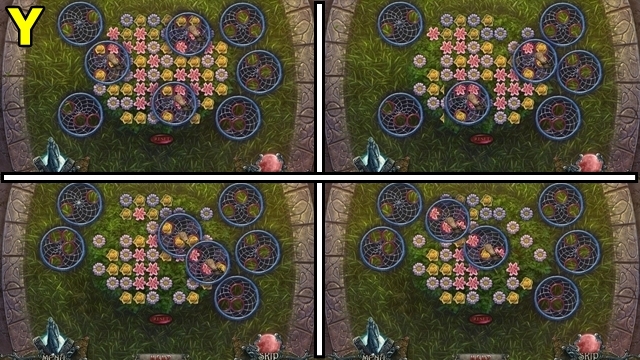
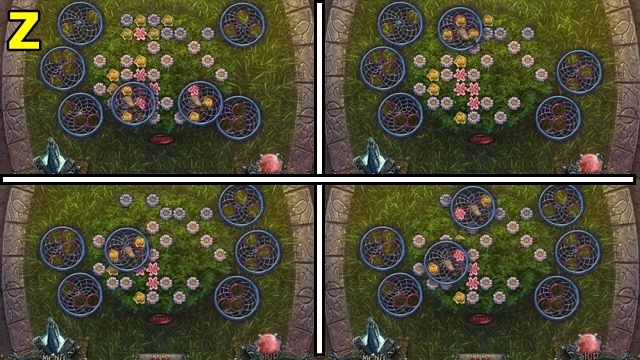
- Add the three CHESS PIECES (K); play the mini-game.

- Solution: (L). Take the FLOWER CHARM (M).
- Enter the Passage.
- Take the CLOCK (N).
- Take the three PLANKS (O) (3/5).
- Return to the Balcony.
- Insert the CLOCK (P); take the LEVER and DOVE CHARM (1/2).
- Return to the Passage.
- Insert the LEVER (R); pull the lever.
- Look at the code (S).
- Move forward.
- Play the mini-game.
- Solution: (T).
Chapter 4: The Vault
- Go right to the Waterfront (U).
- Take the SCISSORS (V). Use the SCISSORS; take the DRUMMER.
- Return to the Balcony.
- Use the SCISSORS (W); take the ROPE and the two PLANKS (5/5).
- Return to the Crossroads.
- Use the ROPE (X); take the GAFF.
- Go right.
- Use the GAFF (Y).
- Play the HOP (Z); receive the LADDER.
- Lay the five PLANKS (A). Take the FLOWER CHARM (2/3) (B).
- Return to the Passage.
- Place the LUTE PLAYER (C) and the DRUMMER. Take the FLOWER CHARM (3/3).
- Insert the FLOWER CHARMS (D); take the TREASURE VAULT KEY.
- Return to the Waterfront.
- Insert the TREASURE VAULT KEY (E); turn the key; enter the Vault.
- Talk to Pierre (F).
- Play the HOP (G); take the DUSTER.
- Take the MIRROR (H).
- Place the LADDER (I); take the DOVE CHARM (2/2) (J).
- Return to the Crossroads.
- Insert the two DOVE CHARMS (K); lift the top; take the ACID.
- Return to the Library.
- Add the two MIRRORS (L); note the code 1259.
- Enter the code 1259 (M); take the HAIRPIN and HANDKERCHIEF.
- Return to the Vault.

- Use the ACID (N). Go on the Roof.
- Take the PICKLOCK (O).
- Take the DUSTPAN (P).
- Take the STATUE PENDANT (Q); use the HANDKERCHIEF; take the PUZZLE PART (1/3).
- Return to the Crossroads.
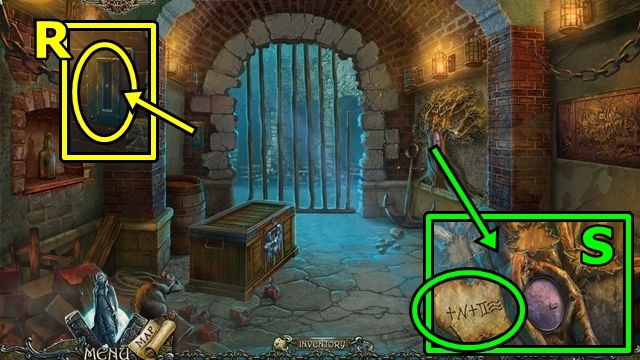
- Use the PICKLOCK (R); open the door. Enter the Foyer.
- Talk to the Doctor (S).
- Use the DUSTPAN (T); receive the DUSTPAN WITH SAND.
- Take the CODE PART (U).
- Open the door (V); enter the Room.
- Take the TAPE (W). Pour the DUSTPAN WITH SAND; take the CODE PART.
- Take the NAIL PULLER (X). Pull the wallpaper; use the DUSTER; take the CODE PART.
- Return to the Waterfront.
- Play the HOP (Y); receive the RASP HANDLE.
- Use the NAIL PULLER (Z); remove the lid; take the MOSAIC PIECE.
- Go to the Roof.
- Add the RASP HANDLE (A); take the RASP.
- Return to the Room.
- Reassemble the CODE PARTS (inventory) (B); add the two CODE PARTS; use the TAPE. Take the CODE.
- Place the CODE (C); enter 3791; open the armoire. Use the RASP; take the COUNT'S BLOOD. Add the METAL TALON; take the SCALPEL.
- Lift the rug (D); insert the MOSAIC PIECE. Play the mini-game.
- Solution: 6-5-1-7-1-1-4-6-5-4-4-3-2-6-6-8-1-5-6-7-6-6 (E). Take the COUNT'S CROWN and the SILVER NECKLACE.
- Return to the Vault.

- Read the note (F); place the SILVER GOBLET, COUNT'S CROWN and the SILVER NECKLACE; take the PEARL.
- Add the PEARL (G); play the mini-game.
- Solution: (H).
- Take the SEALED SCROLL (I). Play the HOP (J); take the CASKET RING.
- Return to the Library.
- Add the STATUE PENDANT (K); take the MAGNET.
- Place the SEALED SCROLL (L); take the TRANSFORMATION POTION RECIPE.
- Add the CASKET RING (M); open the casket; take the CYLINDER.
- Return to the Roof.
- Use the MAGNET (N); receive the ROMAN NUMERAL (1/2).
- Return to the Foyer.
- Use the SCALPEL (O); take the ROMAN NUMERAL (2/2).
- Use the HAIRPIN (P); insert the two ROMAN NUMERALS; take the PUZZLE PART (2/3).
- Offer the TRANSFORMATION POTION RECIPE (Q), then the COUNT'S BLOOD. Take the TRANSFORMATION POTION.
- Return to the Vault.
- Throw the TRANSFORMATION POTION (R).
- Take the SILVER BULLET (S).
- Return to the Crossroads.
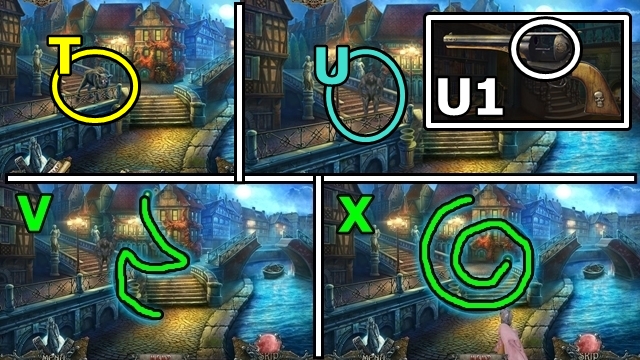
- Move towards the wolf (T).
- Add the CYLINDER (U1) to the GUN (inventory); insert the SILVER BULLET; take the LOADED GUN.
- Use the LOADED GUN (U); play the mini-game.
- Solution: (V-X).
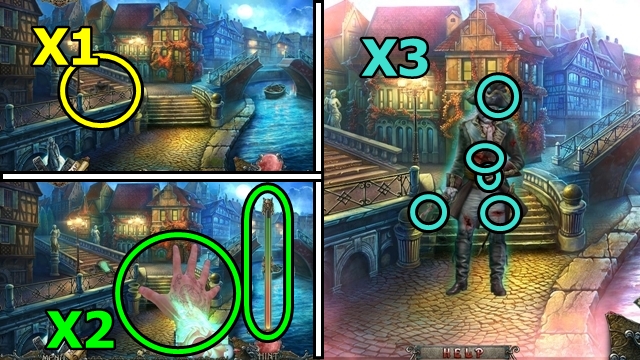
- Examine the body (X1). Press and hold to fill the meter (X2). Talk to the spirit.
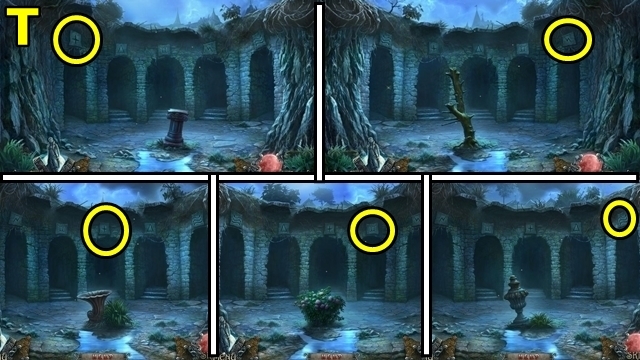
- Find the five clues (X3).
- Examine the statue (Y).
- Examine the pillar (Z); play the mini-game.
- Solution: (A).
Chapter 5: The Square
- Go to the Square (B).
- Talk to the Countess (C).
- Take the WIRE (D).
- Straighten the WIRE (inventory) (E); take the TONGS.
- Use the TONGS (F); take the WIRECUTTERS.
- Use the WIRECUTTERS (G), remove the chains.
- Go through the gate.
- Take the HANDLE (H).
- Take the UMBRELLA (I).
- Take the SCARF (J).
- Move forward.
- Use the SCARF (K); take the SAW. Use the UMBRELLA; take the SHELL.
- Play the HOP (L); receive the PUZZLE PART (3/3).
- Return to the Square.
- Use the SAW (M).
- Add the three PUZZLE PARTS (N); play the mini-game.
- Solution: (O). Take the SILVER BULLET; read the note.
- Go right.
- Attach the HANDLE (P); open the panel; take the GLOVE.
- Take the BOX (Q).
- Insert the SILVER BULLET (R) into the GUN (inventory); take the LOADED GUN.
- Try to examine the wolf (S).
- Use the LOADED GUN (T); play the mini-game.
- Solution: (U-V).
- Examine the body (W). Press and hold to fill the meter (X). Talk to the spirit.
- Find the five clues (Y).
- Examine the statue (Z).
- Examine the pillar (A); play the mini-game.
- Solution: (B).
- Open the pouch (C); take the HUNTING KNIFE.
- Move down.
- Place the BOX (D).
- Insert the SHELL (E); open the panel; take the BRIDLE.
- Return to the Park.
- Play the HOP (F); receive the KEY.
- Use the HUNTING KNIFE three times (G); use the GLOVES. Play the mini-game.
- Solution: (H). Move the leaves, take the SADDLE.
- Return to the Gatehouse.
- Place the BRIDLE (I). Place the SADDLE (J).
- Move forward.
- Play the mini-game.
- Solution: Avoid the obstacles (K-L).
Chapter 6: The Forest
- Take the MORTAR (M).
- Take the WEDGE (N). Receive the SHIELD PART (1/4).
- Take the BIRD FIGURINE (O); play the mini-game.
- Solution: Casual (P-Q), Hard (S-T).

- Return to Lily Pond Lane.
- Add the BIRD FIGURINE (U); play the mini-game.
- Solution: (V).Take the MALLET.
- Return to the House Exterior.
- Use the KEY (W); turn it; enter the House Interior.
- Insert the WEDGE (X); use the MALLET.
- Take the FISHING NET (Y).
- Return to Lily Pond Lane.
- Use the FISHING NET (Z); receive the MAPLE LEAF SHAPE.
- Return to the House Exterior; go left (A).
- Read the note (B).
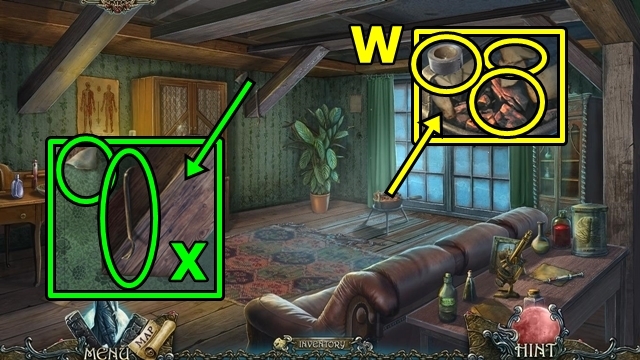
- Take the TORCH (C).
- Take the BOARD (D).
- Play the HOP (E); take the GLOWING MUSHROOMS.
- Return to the House Interior.
- Insert the MAPLE LEAF SHAPE (F); take the HATCH HANDLE.
- Attach the HATCH HANDLE (G); lift the hatch, go down the ladder.
- Place the GLOWING MUSHROOMS (H).

- Take the COMEDY MASK (I).
- Read the note (J); take the GLASSES CHARM.
- Take the GLOVE (K); use the TORCH; receive the LIT TORCH.
- Take the HOOK HANDLE (L).
- Go up.
- Insert the GLASSES CHARM (M); open the book; take the TEETH CHARM.
- Return to the Square.
- Place the COMEDY MASK (N); open the panel; take the STRINGS.
- Go left.
- Insert the TEETH CHARM (O); take the BOTTLE.
- Return to the Forest.
- Attach the HOOK HANDLE (P); take the STICK WITH HOOK.
- Use the LIT TORCH (Q); take the WRENCH.
- Play the HOP (R); receive the BARREL CHARM.
- Move down.
- Use the STICK WITH HOOK (S); unfold the cloth; take the KNIGHT'S PENDANT.
- Go to the Workshop.
- Add the STRINGS (T); take the FLUTE.
- Add the BARREL CHARM (U); lift the lid; take the LADLE.
- Go to the House Exterior.
- Use the FLUTE (V); take the OAK LEAF SHAPE. Place the BOTTLE; receive the SNAKE'S VENOM.
- Move forward.
- Insert the OAK LEAF SHAPE (W); take the WELL HANDLE. Use the HUNTING KNIFE; take the FLEUR-DE-LIS.
- Move down.
- Attach the WELL HANDLE (X); turn the handle; use the LADLE; receive the LADLE WITH WATER.
- Return to the Square.
- Insert the FLEUR-DE-LIS (Y); take the SILVER AXE. Add the KNIGHT'S PENDANT; open the panel; take the MAGIC POWDER RECIPE.
- Return to the Workshop.
- Remove the plug (Z); pour the LADLE WITH WATER. Use the WRENCH.
- Place the BOARD (A); take the WOODEN SWORD.
- Move up.
- Use the SILVER AXE (B); use the GLOVE; receive the SHIELD PART (2/4).
- Return to the Forest and move forward.
- Use the SILVER AXE (C); receive the SHIELD PART (3/4).
- Use the SILVER AXE (D); receive the SHIELD PART (4/4).
- Move forward.
- Examine the tree. Use the SILVER AXE (E).
- Move down.
- Talk to Pierre; take the SILVER BULLETS (F).
- Move forward.
- Load the SILVER BULLETS (G) into the GUN (inventory); take the LOADED GUN.
- Use the LOADED GUN (H); play the mini-game.
- Solution: (I). The second and third puzzles are random.
- Use the WOODEN SWORD (J).
- Take the AMBER (K).
- Insert the four SHIELD PARTS (L). Use the HUNTING KNIFE; receive the ENCHANTED TREE BARK.
- Return to the Workshop.
- Add the AMBER (M); take the AMBER DUST.
- Move up.
- Place the MAGIC POWDER RECIPE (N) and the MORTAR; then add the SNAKE'S VENOM; AMBER DUST and ENCHANTED TREE BARK. In the mortar, add the snake's venom, amber dust and enchanted tree bark. Pour the mixture and take the MAGIC POWDER.
- Return to the Tree.
- Use the MAGIC POWDER (O).
- Congratulations! You've completed Shadow Wolf Mysteries: Tracks of Terror.
Created at: 2015-08-14