

Walkthrough Menu
- General Tips
- Chapter 1: Wolves and Werewolves
- Chapter 2: Martha's Yard
- Chapter 3: Notes from a Mysterious Friend
- Chapter 4: The Undertaker's Secret
- Chapter 5: Curly and the Werewolf
- Chapter 6: Macabre Experiments
- Chapter 7: The Antidote
General Tips
- This is the official guide for Shadow Wolf Mysteries: Under the Crimson Moon.
- This guide will not mention each time you need to zoom into a scene; the screenshots will show each zoom scene.
- We will use the acronym HOP for Hidden-object puzzles. Interactive items will be color-coded and some will be numbered; please follow the numbers in order.
- HOPs may be random: our lists may vary from yours.
- The Map is interactive and can be used to travel to locations.
Chapter 1: Wolves and Werewolves

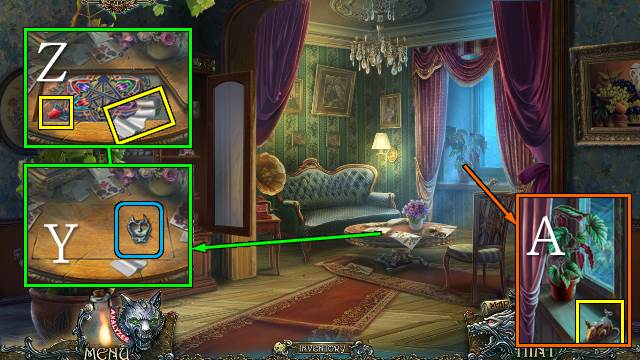
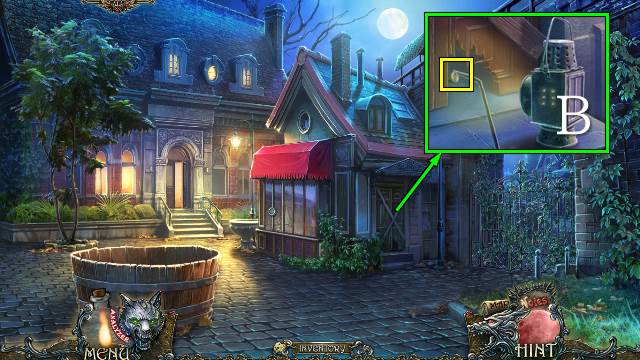
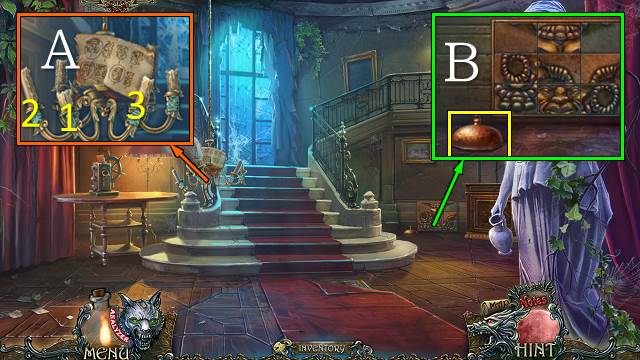
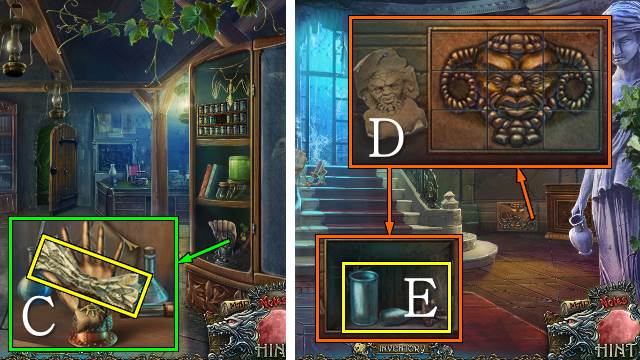
- Take the BUCKET (A) and RING (B).
- Guide the frog to the jar; take the CAPTURED FROG (C).
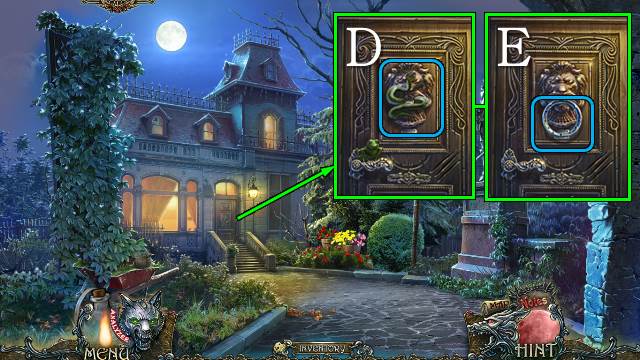
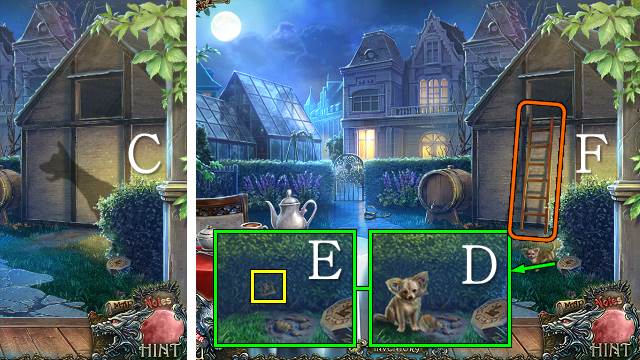
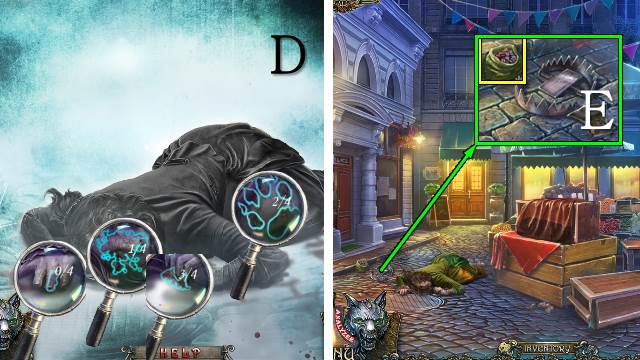
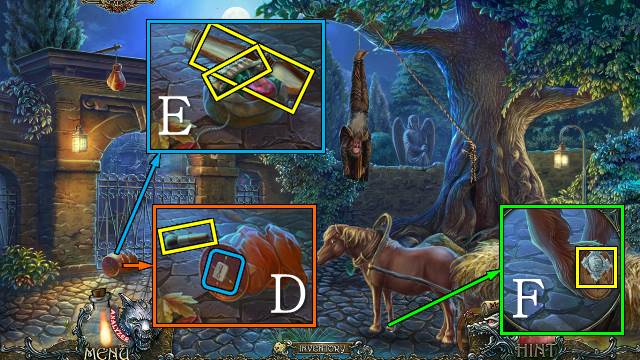
- Release the CAPTURED FROG on the snake (D); put the RING on the knocker and knock (E).
- Walk forward.
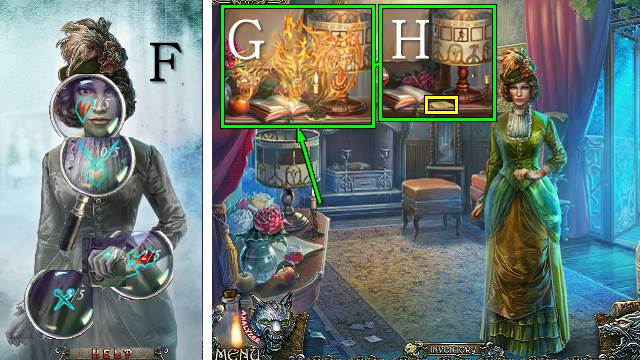
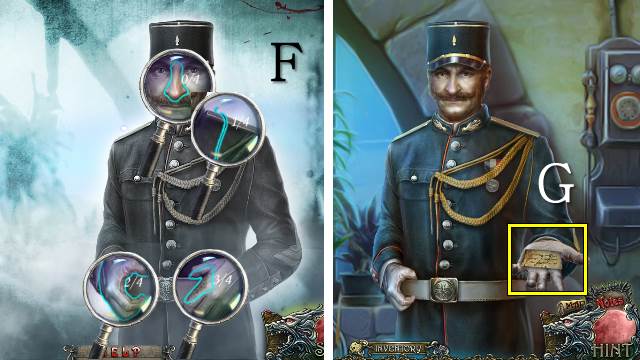
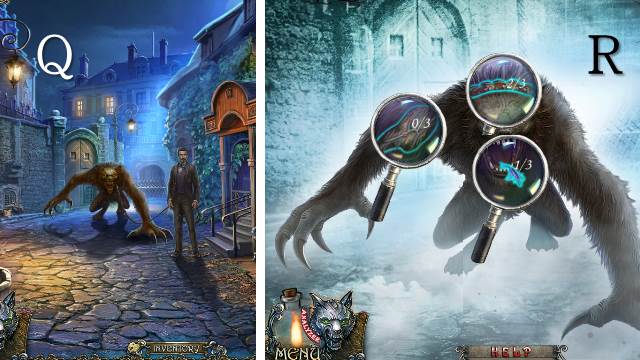
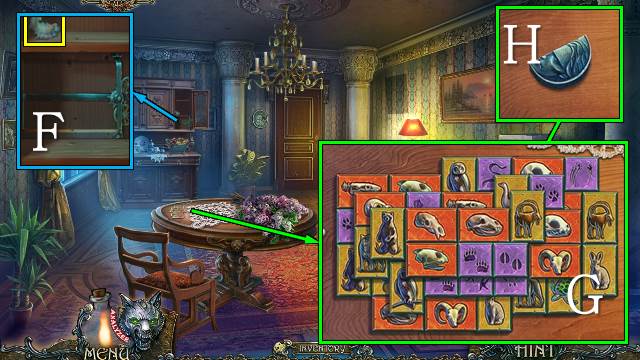
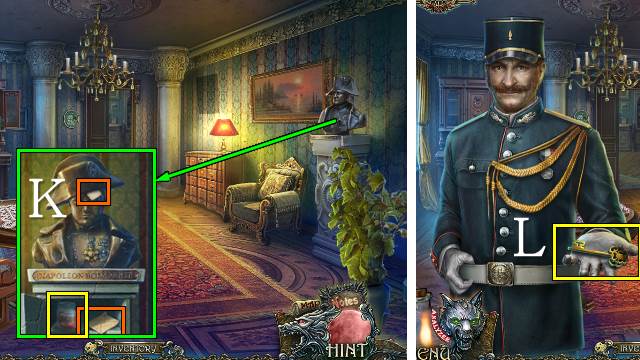
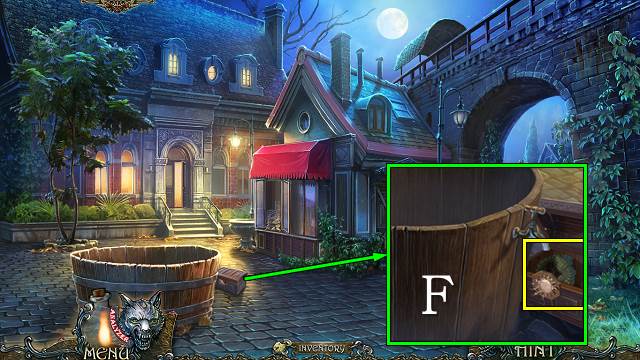
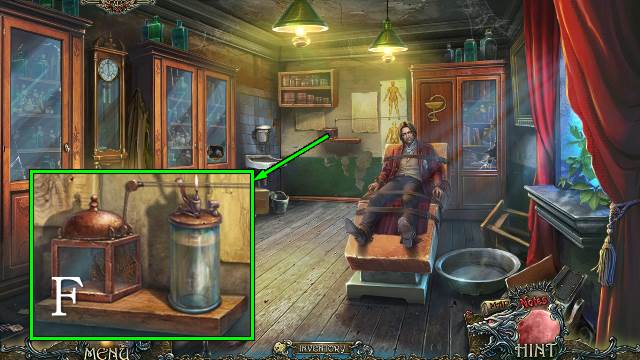
- Pick up the magnifier to find the hidden clues (F).
- Talk to Ellis.
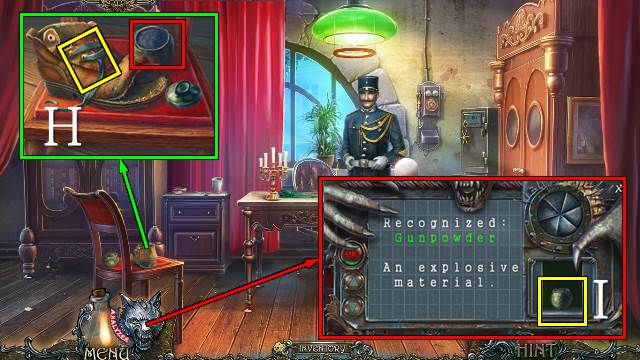
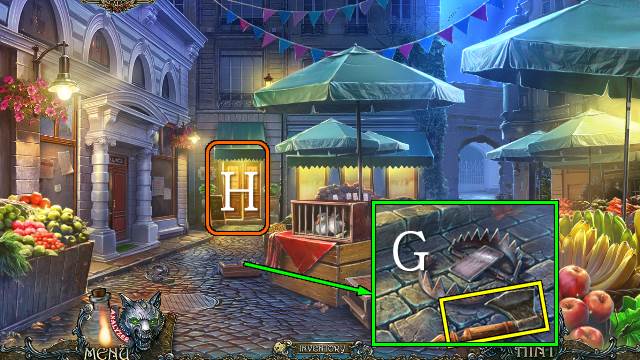
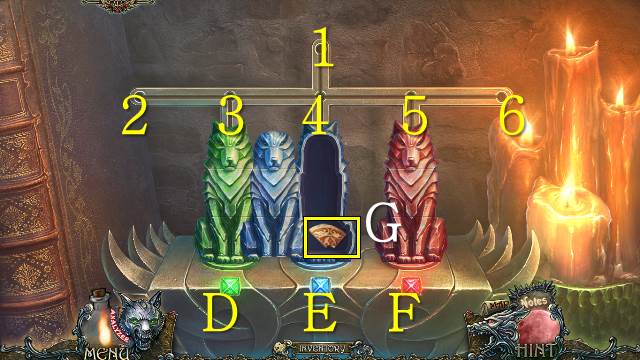
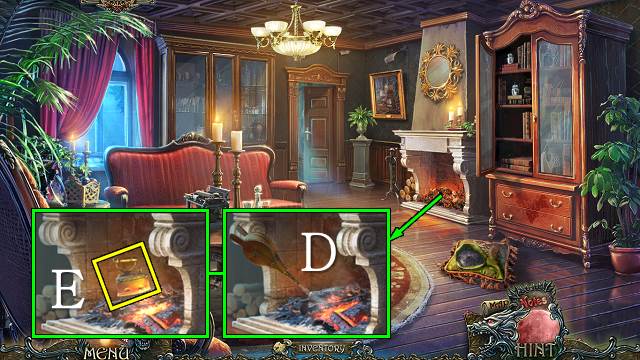
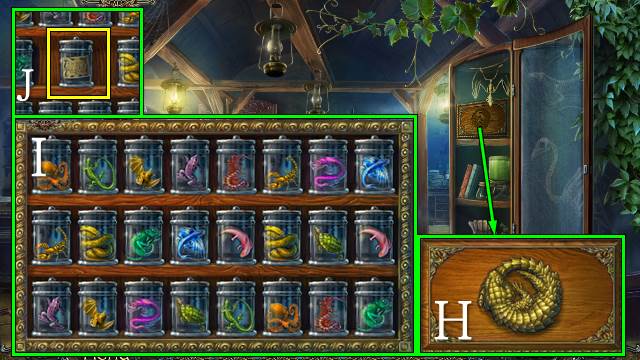
- Release the fire from the candle (G).
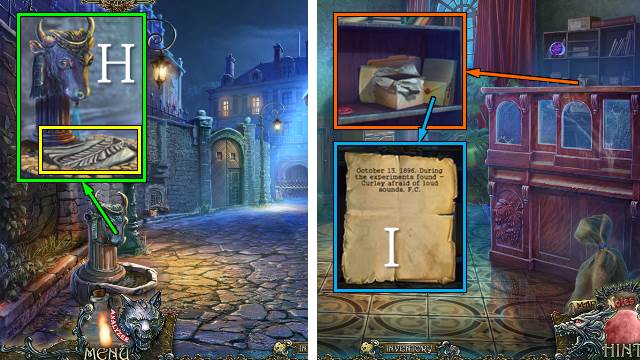
- Move the candle and take the clue (H).
- Go right.
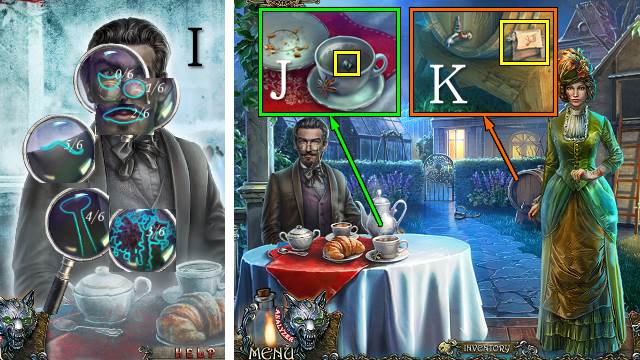
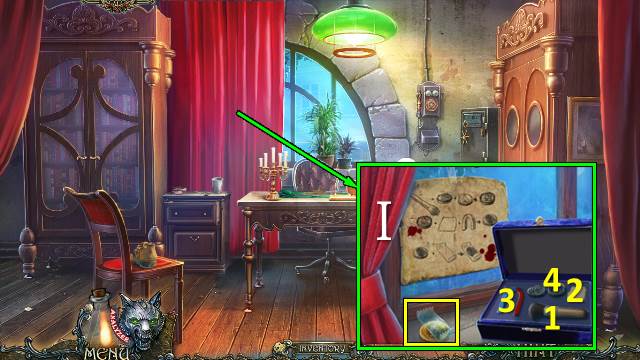
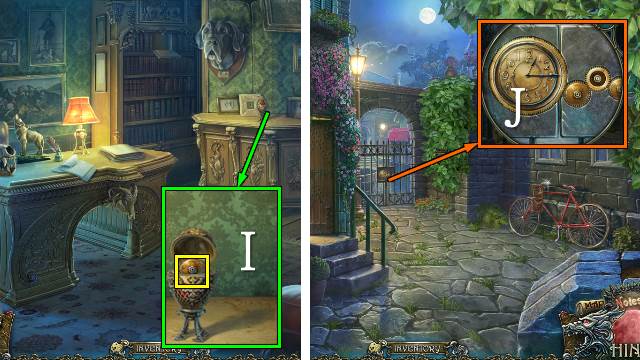
- Find the clues (I).
- Talk to Ellis.
- Talk to Francois.
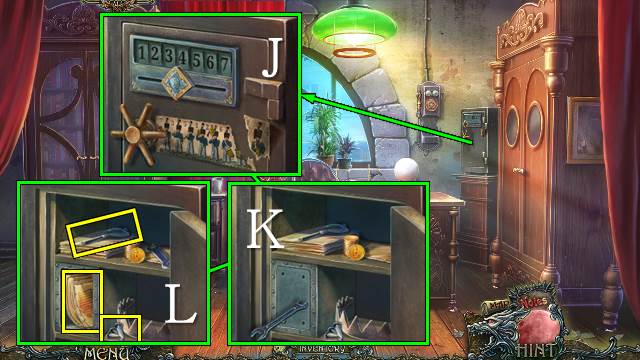
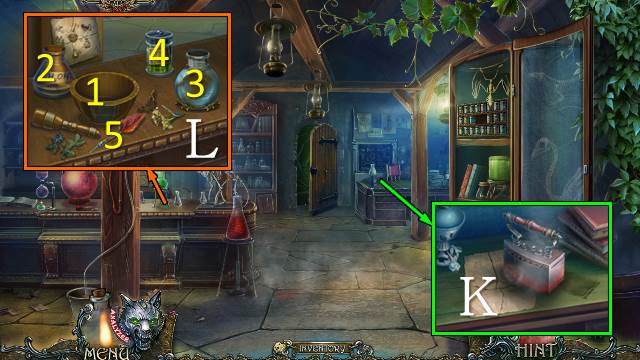
- Eat the croissant, drink the coffee and take the BRIEFCASE LOCK PART (J).
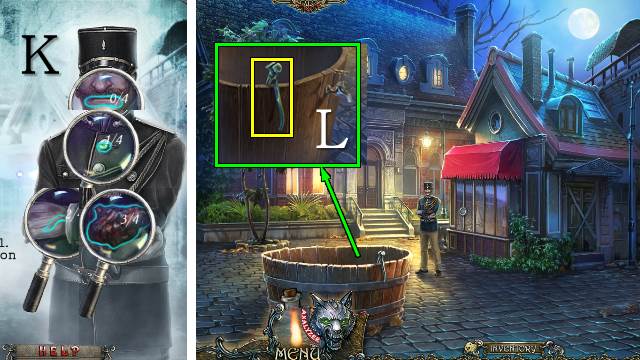
- Take the note and POCKETKNIFE (K).
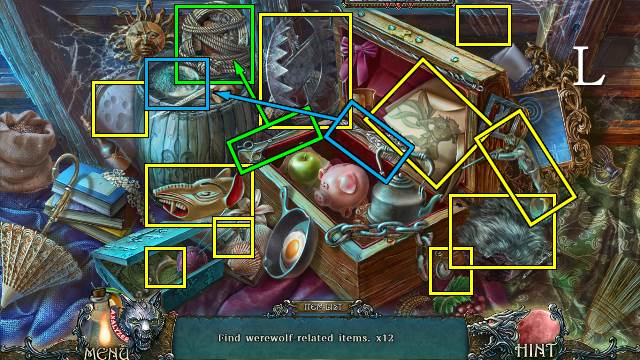
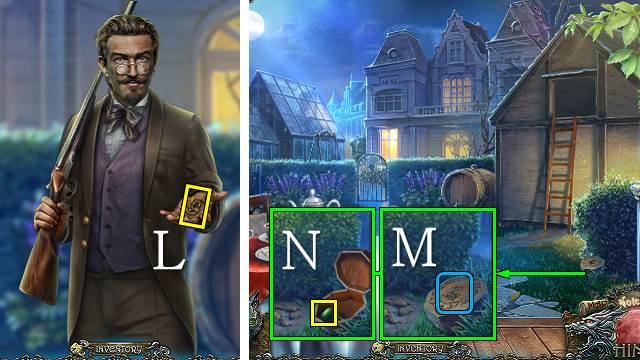
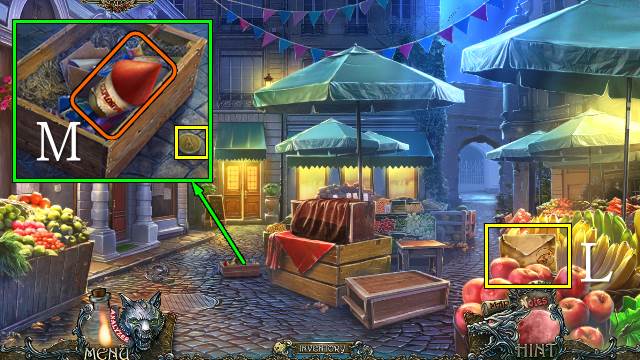
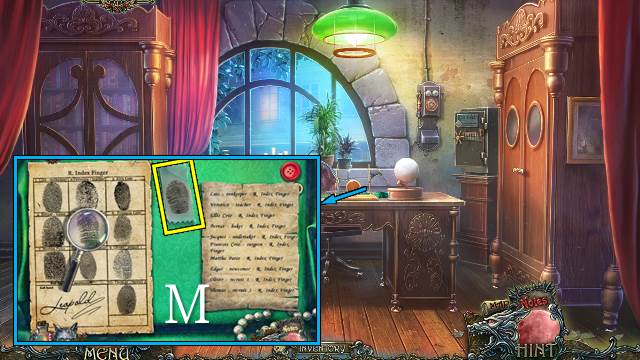
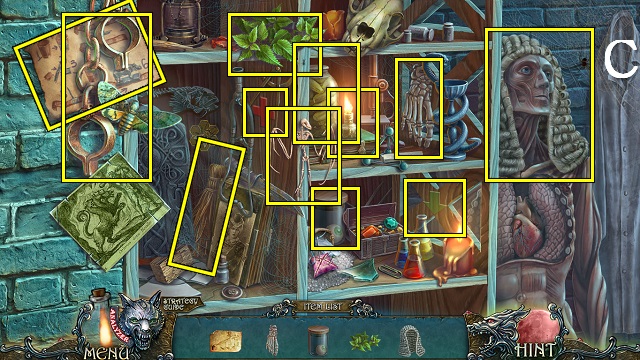
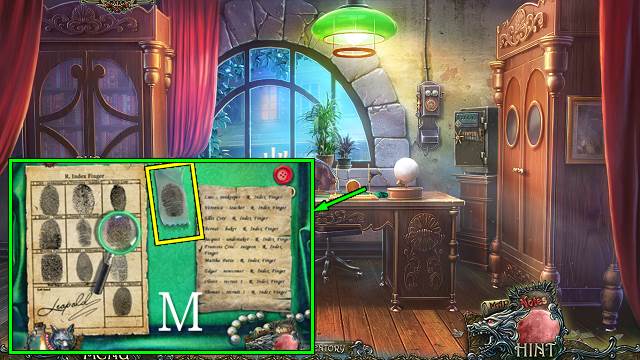
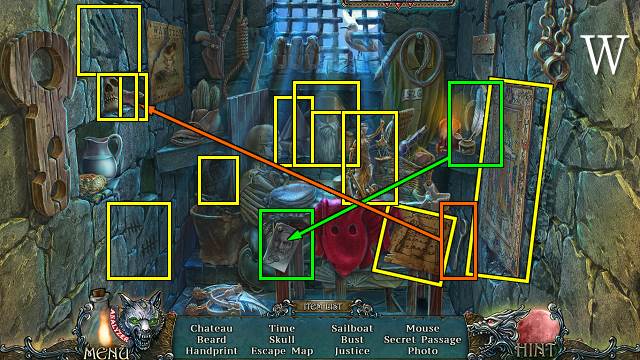
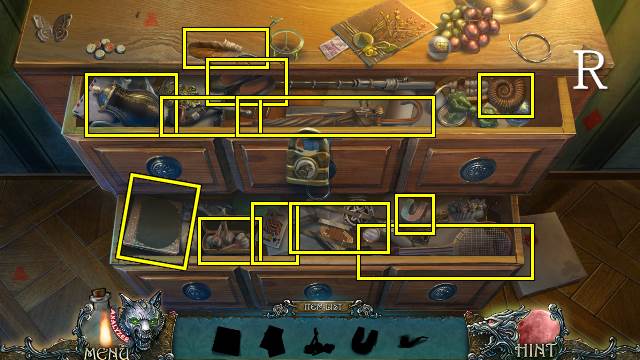
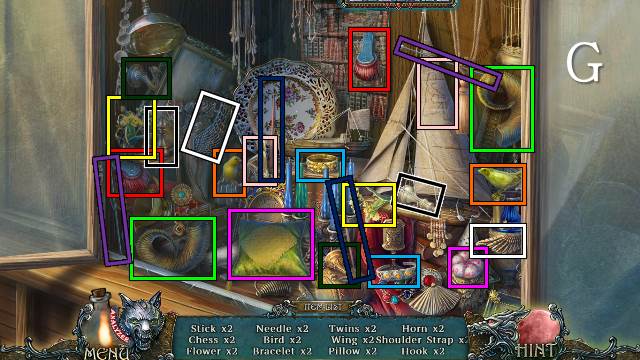
- Play the HOP (L).

- Alternatively, you may play a mini-game.
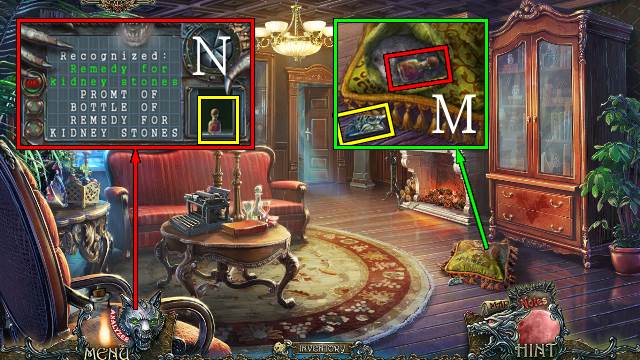
- Find matching pairs on the edges of each field (M); one item is taken off the HOP list for each set of three matching pairs.
- You receive the BRUSH.
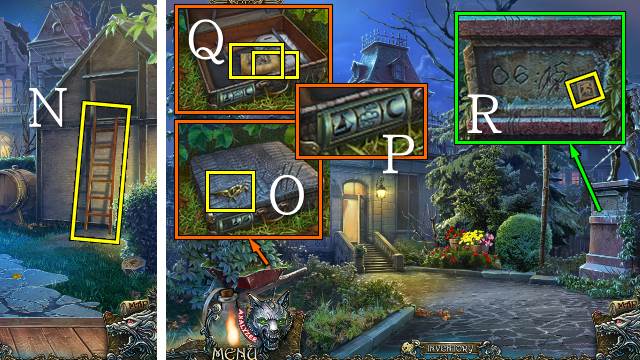
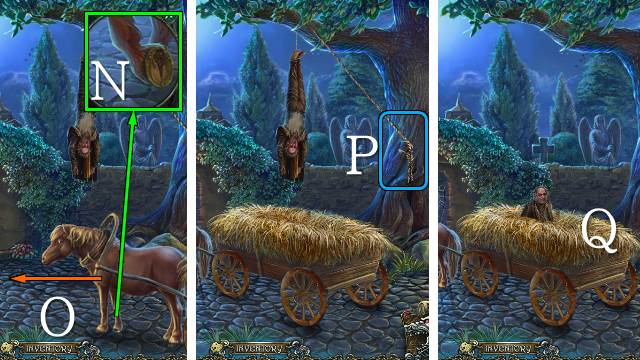
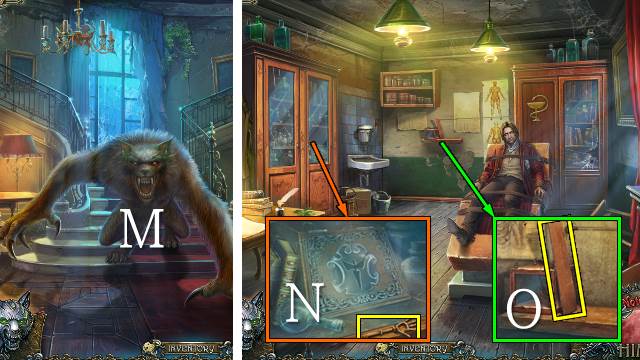
- Take the LADDER (N).
- Walk down twice.
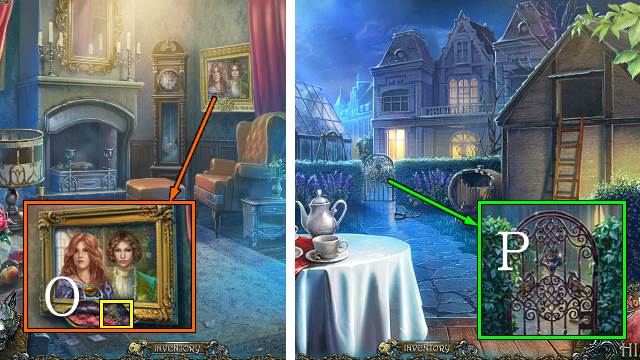
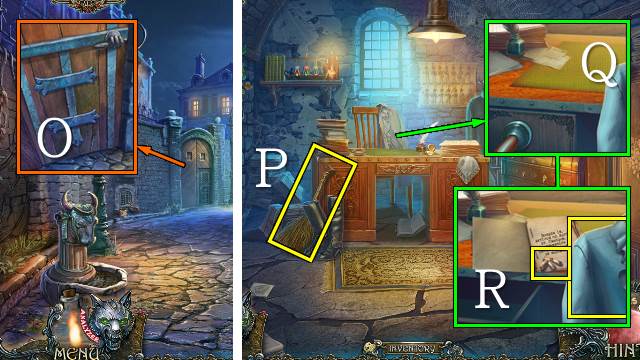
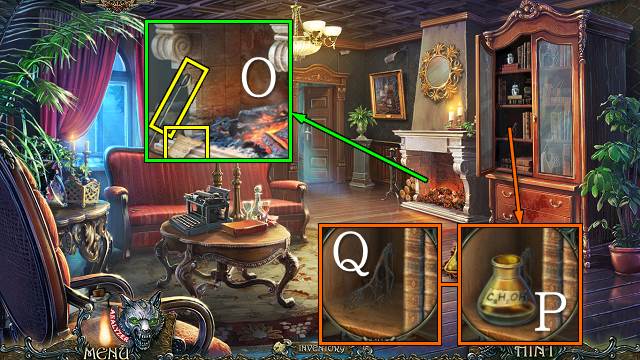
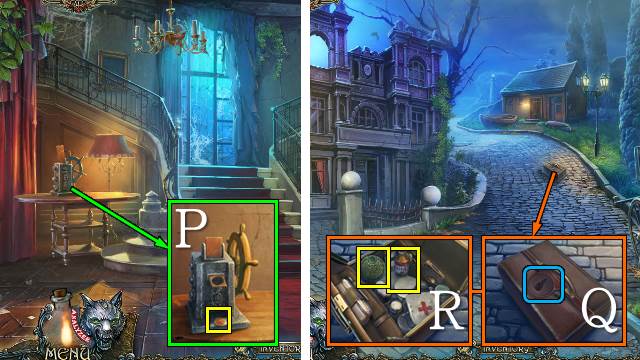
- Cut the shrubs with the POCKETKNIFE and take the MANTIS (O); put the BRIEFCASE LOCK PART on the briefcase (P), enter the code you found and take the note and CLOCK HANDS (Q).
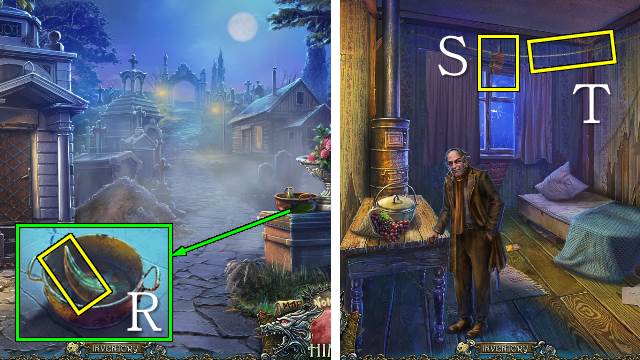
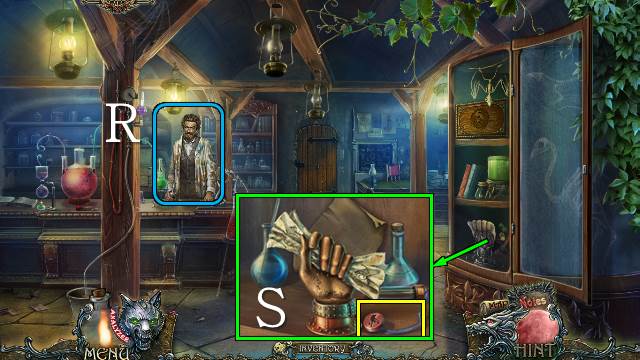
- Clean the plaque with the BRUSH; note the time and take SLIDE 1/3 (R).
- Walk forward.
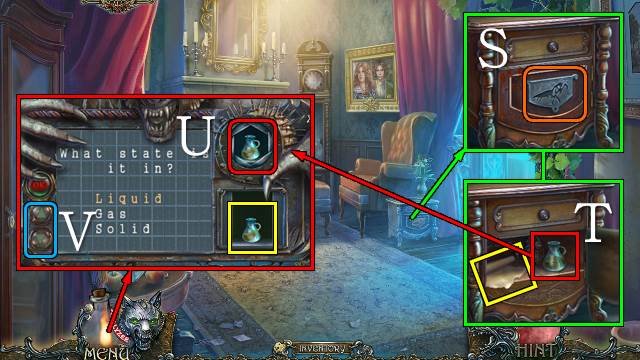
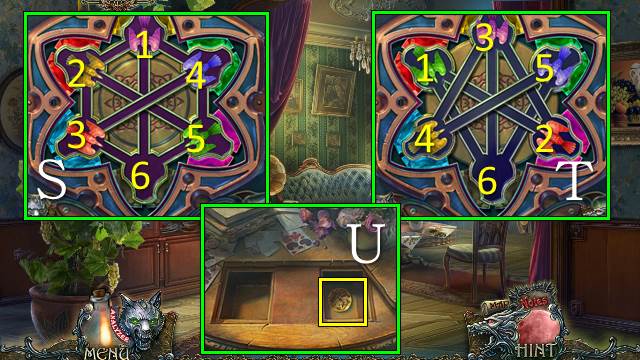
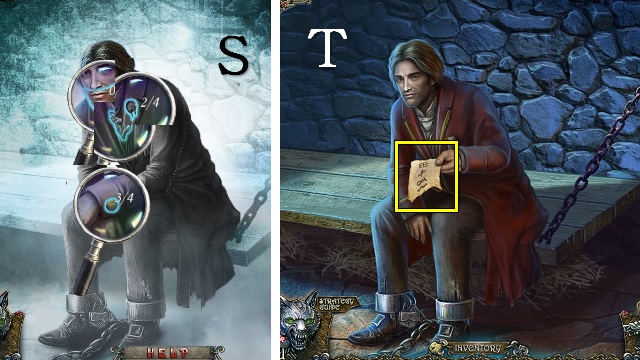
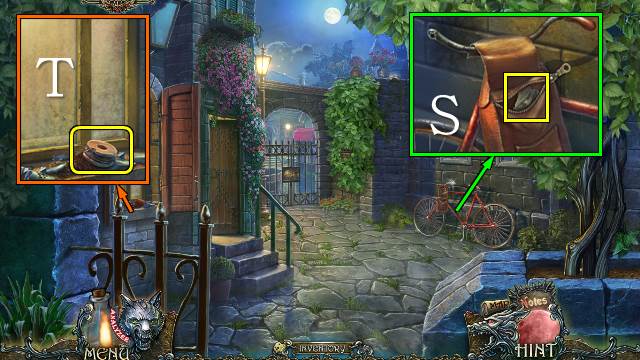
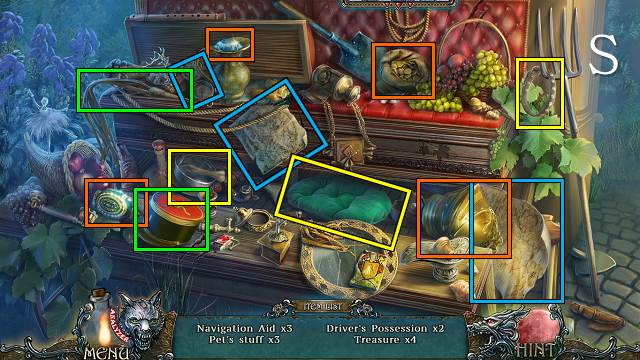
- Open the drawer with the MANTIS (S); take the note and the UNKNOWN substance (T).
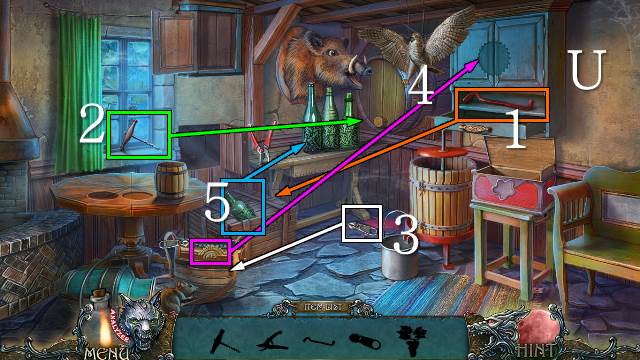
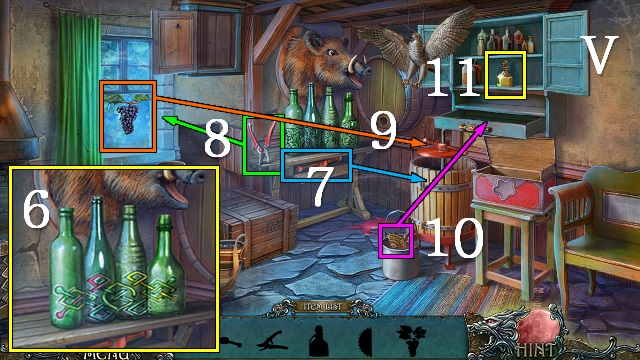
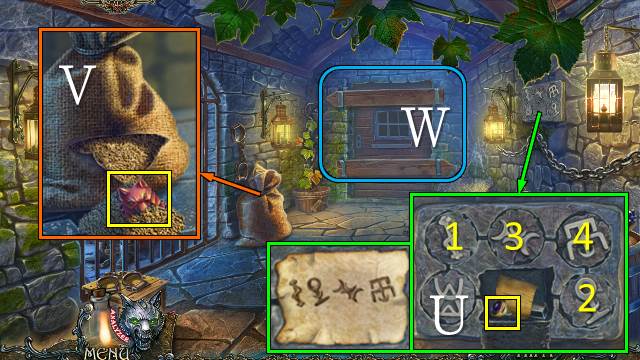
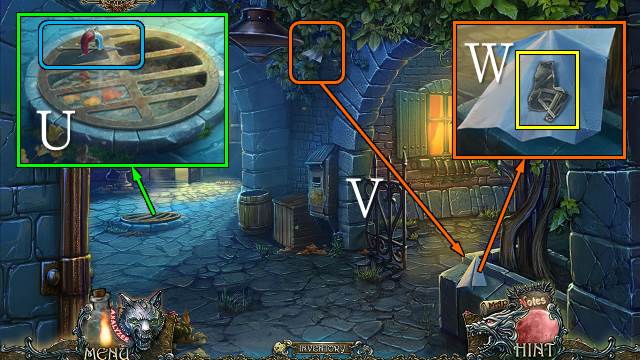
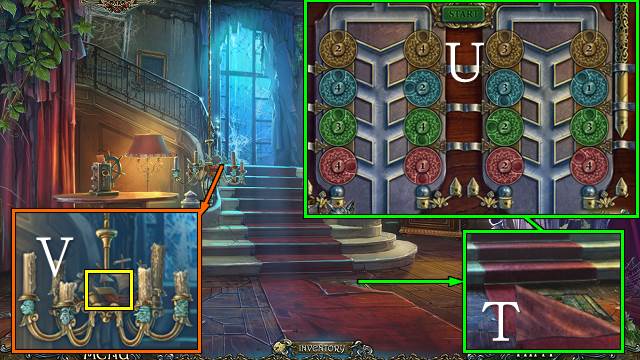
- Open the analyzer and place the UNKNOWN substance in the hole (U).
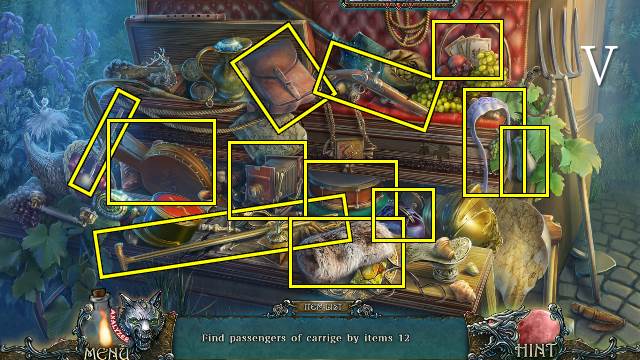
- Use the arrows (V) to select 'liquid', then select 'OK'; select 'no' and 'OK'.
- Take the OIL.
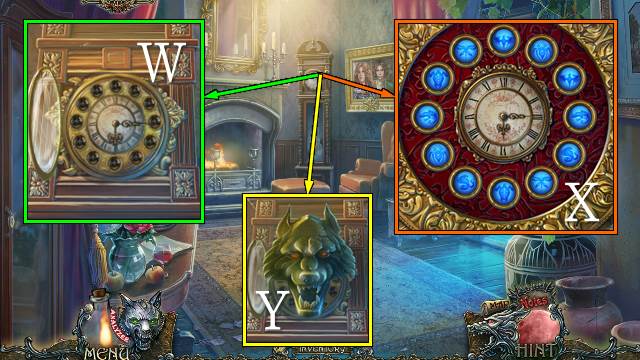
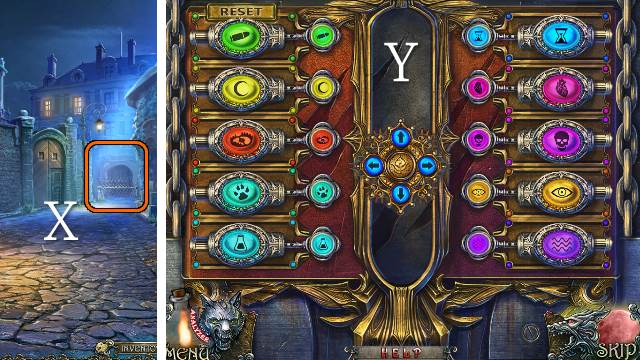
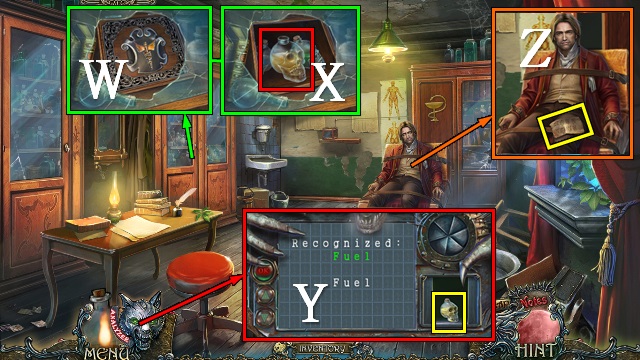
- Open the clock and place the CLOCK HANDS on it; set the time to 6:15 for a mini-game (W).
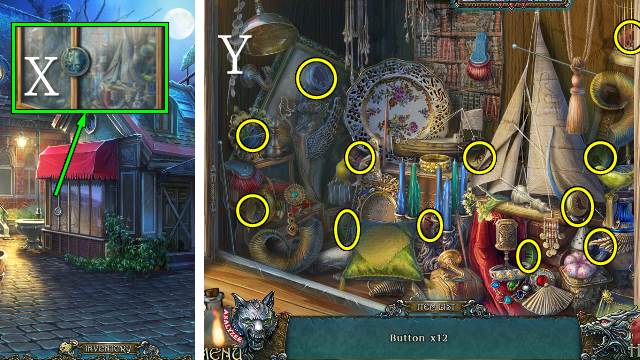
- Find matching pairs of symbols; when symbols don't match they will swap places (X).
- The solution is random.
- Take the WOLF HEAD (Y).
- Walk down.
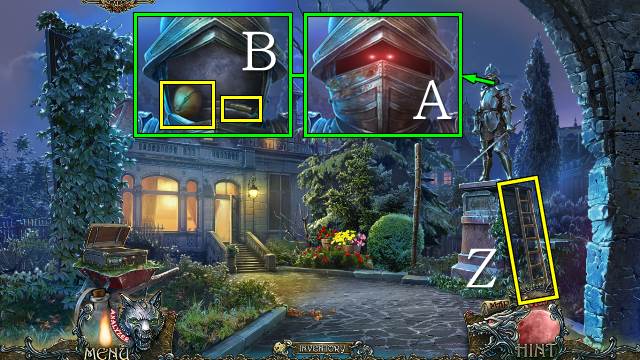
- Place the LADDER against the statue (Z).
- Pour the OIL on the visor (A); scare off the owl and take the BALL and VALVE (B).
- Take the LADDER (Z).
- Walk forward and right.
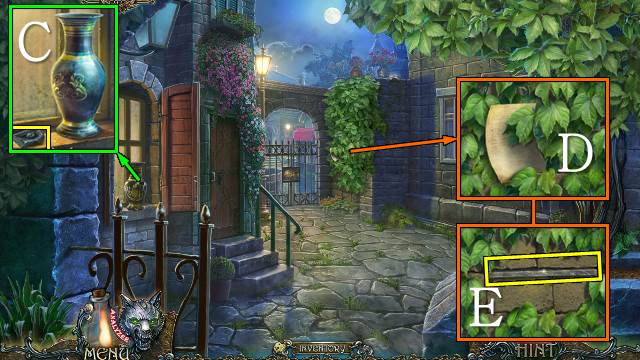
- Interact with the shadow (C).
- Give the BALL to the puppy (D); take SLIDE 2/3 (E).
- Put the LADDER against the wall (F).
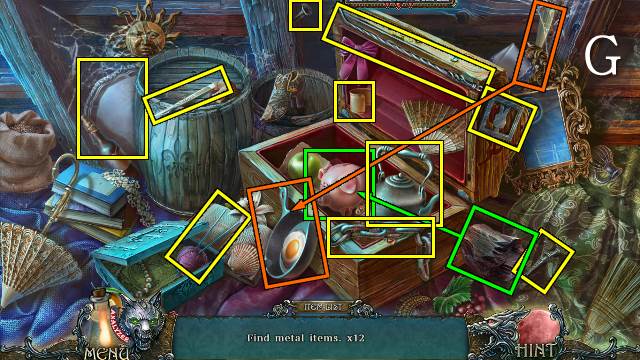
- Play the HOP (G).
- You receive SLIDE 3/3.

- Put the BUCKET under the tap and the VALVE on the tap; turn the valve and take the BUCKET OF WATER (H).
- Walk down.
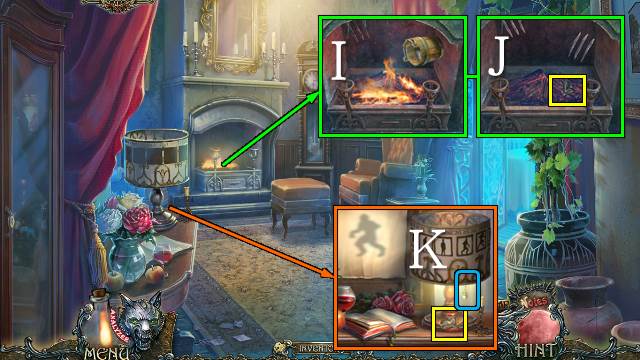
- Interact with the fire and pour the BUCKET OF WATER on it (I); take the FIGURINE (J).
- Put the SLIDES on the lamp and pull the cord; take PEACOCK FIGURE 1/2 (K).
- Go right.
- Take the EMPTY PENDANT (L).
- Open the box with the FIGURINE (M); take the GREEN GEM (N).
- Walk down.
- Put the GREEN GEM on the flower; take PEACOCK FIGURE 2/2 (O).
- Go right.
- Put the WOLF HEAD and PEACOCK FIGURES on the gate (P).
- Walk forward.
Chapter 2: Martha's Yard
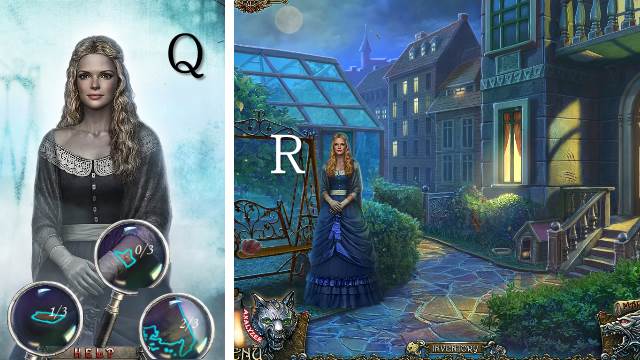
- Find the hidden clues (Q).
- Talk to Martha (R).
- Go right.
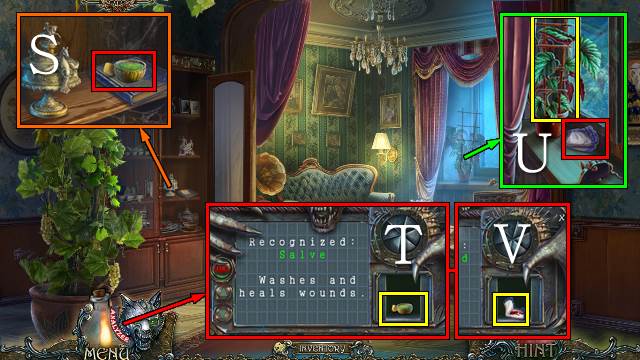
- Open the cabinet; take the note and UNKNOWN substance (S).
- Analyze the UNKNOWN substance as before; select 'liquid,' 'no,' and 'natural'.
- Take the SALVE (T).
- Take the PLANT HOLDER and UNKNOWN item (U).
- Analyze the UNKNOWN item as before; select 'liquid', and 'no'.
- Take the WOLF BLOOD-EVIDENCE (V).
- Walk down and forward.
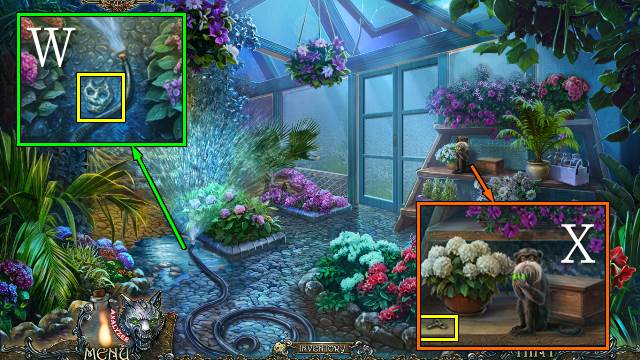
- Take the SILVER FACE (W).
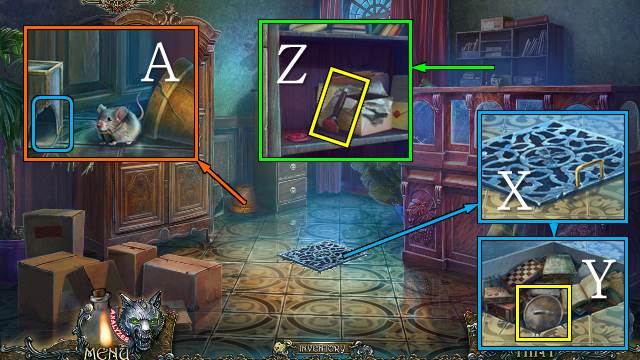
- Take the WIND-UP KEY (X).
- Walk down and right.
- Move the papers and put the SILVER FACE in the slot (Y); take the GARNET and BANDAGE (Z).
- Put the WIND-UP KEY on the mouse; take the WIND-UP MOUSE (A).
- Walk down.
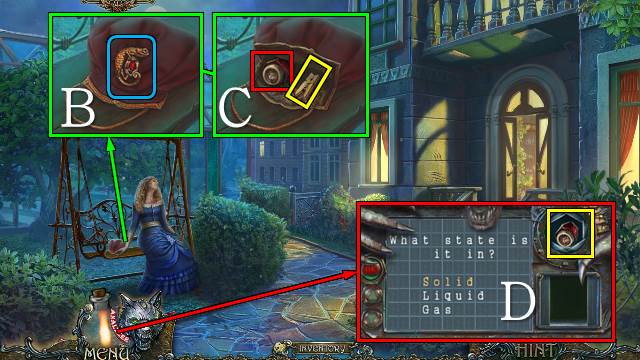
- Put the EMPTY PENDANT on the bag, followed by the GARNET (B); take the CLOTHESPIN and UNKNOWN substance (C).
- Analyze the UNKNOWN substance; select 'solid,' 'no,' and 'natural'.
- Take the SMELLING SALTS (D).

- Put the SALVE and BANDAGE on Martha's injuries; revive her with the SMELLING SALTS (E).
- Give the WOLF BLOOD-EVIDENCE to Martha (F); take the WOLF PROFILE (G).
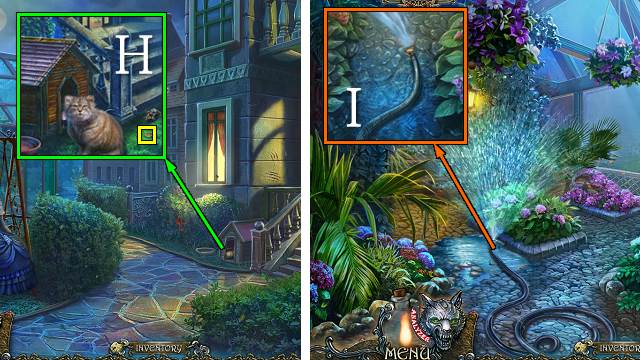
- Give the WIND-UP MOUSE to the cat; take the PART (H).
- Walk forward.
- Put the CLOTHESPIN on the hose (I).
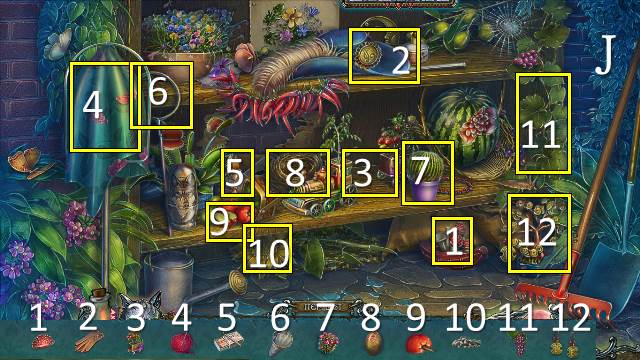
- Play the reverse HOP: put the items back into the scene (J).
- You receive the GLOVE.
- Walk down.
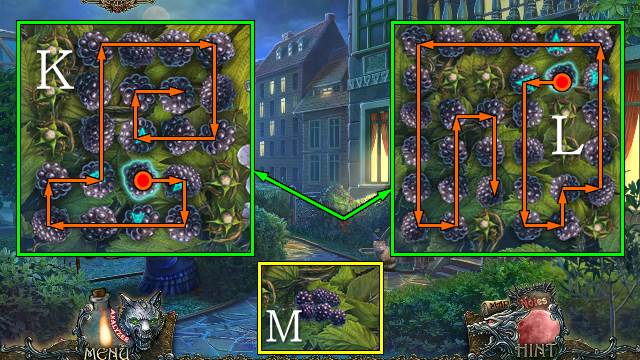
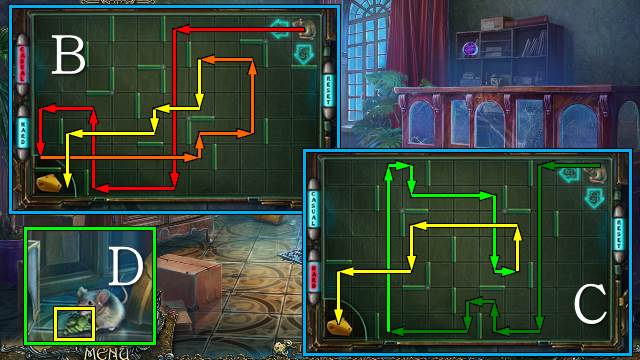
- Remove the shrub with the GLOVE for a mini-game.
- Remove all berries from the shrub by selecting a berry and then removing all berries in a straight line from the selected one; Casual (K) and Hard (L) solutions are shown.
- Take the BLACKBERRIES (M).
- Walk forward.
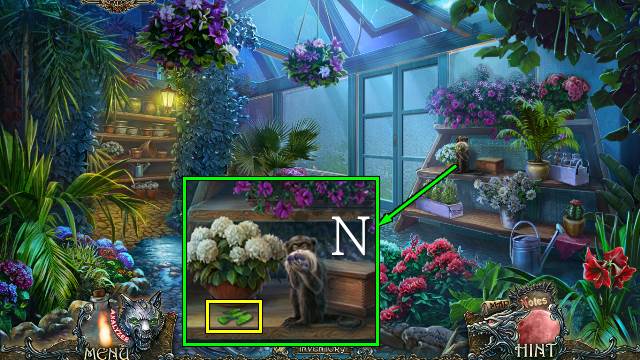
- Give the BLACKBERRIES to the monkey; take the GREEN BIRD (N).
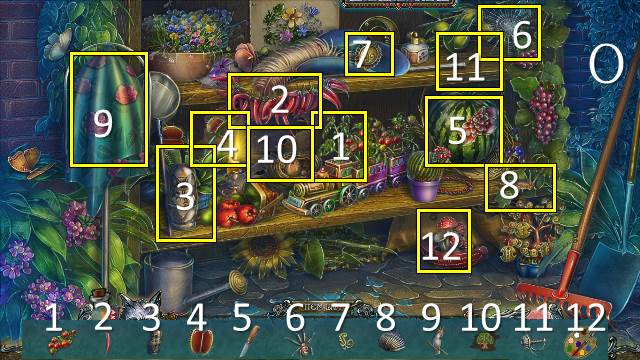
- Play the reverse HOP (O).
- You receive a PART.
- Go down and right.
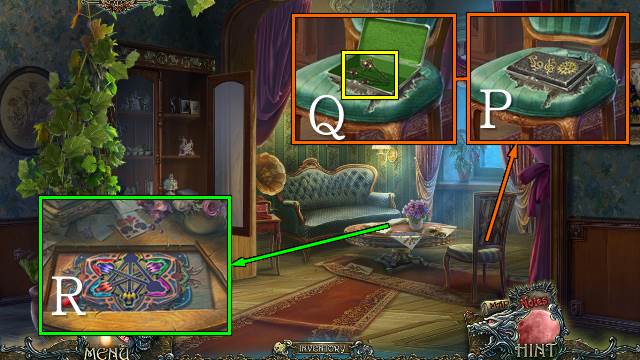
- Tear the fabric and put the two PARTS on the box (P); take the HAIRPIN (Q).
- Put the GREEN BIRD on the table and zoom in for a mini-game (R).
- Move the birds to the perches of the same color by selecting them in numerical order; Casual (S) and Hard (T) solutions are shown.
- Take the note and DISC (U).
- Walk down and forward.
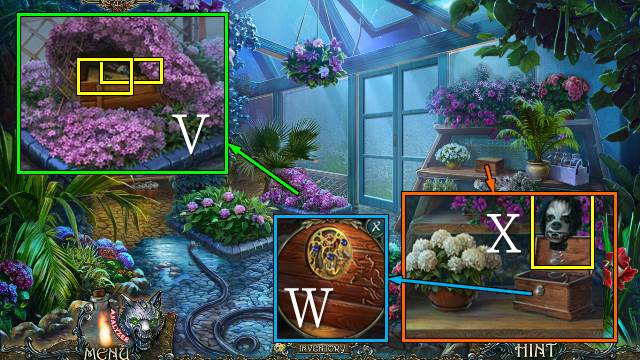
- Put the PLANT HOLDER under the plant and pick the lock with the HAIRPIN; take the TILE and PHONOGRAPH NEEDLE (V).
- Open the box with the DISC (W); take the HEAD (X).
- Walk down.
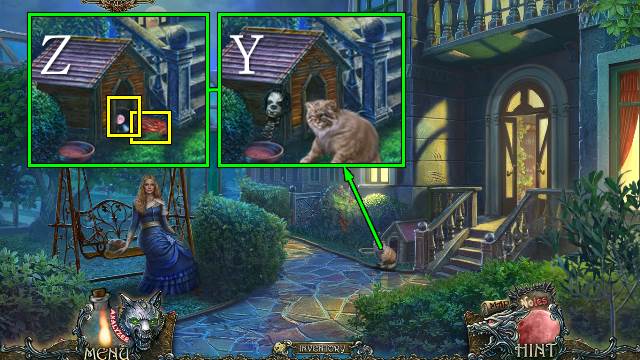
- Scare the cat with the HEAD (Y); take the MEAT and PHONOGRAPH RECORD (Z).
- Go right.
- Give the MEAT to the wolf (A).
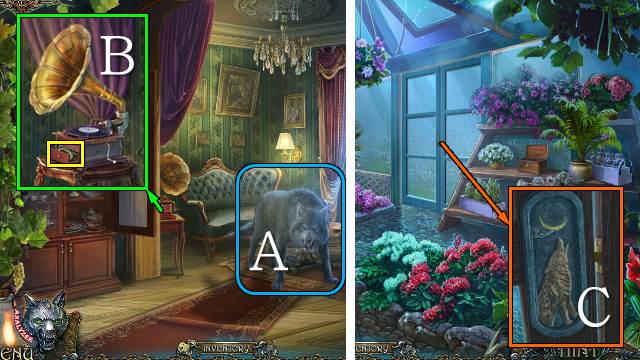
- Put the PHONOGRAPH NEEDLE and PHONOGRAPH RECORD on the phonograph; swing the handle and take the CRESCENT MOON (B).
- Walk down and forward.
- Put the WOLF PROFILE and CRESCENT MOON on the door (C); push the moon.
- Walk forward.
Chapter 3: Notes from a Mysterious Friend
- Find the hidden clues (D).
- Take the COFFEE BEANS (E).
- Go left.
- Find the hidden clues (F).
- Talk to the Commandant (G).
- Take the permit.
- Open the jar and take the UNKNOWN substance and LACE (H).
- Analyze the UNKNOWN substance; select 'solid,' 'artificial,' and 'yes'.
- Take the GUNPOWDER (I).

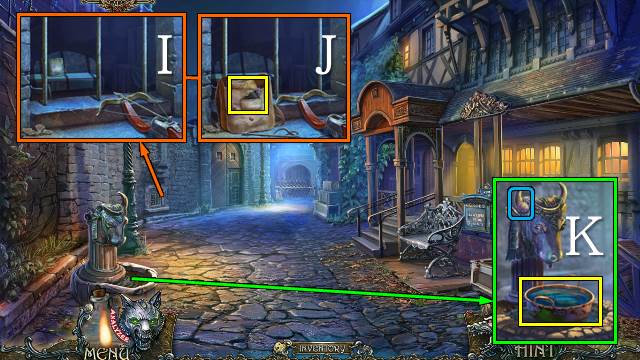
- Open the drawer; take the note, HORSESHOE and HAMMER (J).
- Move the curtain; take the COFFEEPOT (K).
- Walk down.
- Take the note (L).
- Put the GUNPOWDER in the can and close it with the cap; move the note and take the WOLF COIN (M).
- Go into the Bar.
- Talk to Francois.
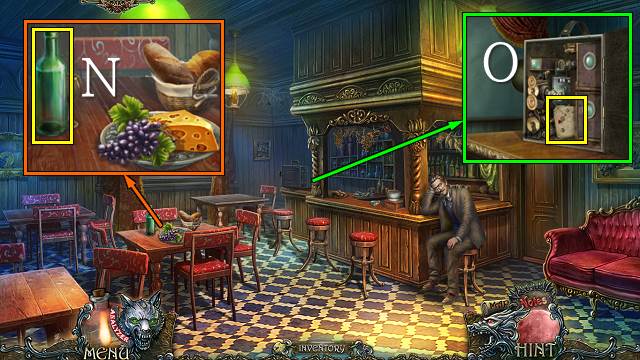
- Take the BOTTLE (N).
- Open the projector; take the FINGERPRINTING INSTRUCTIONS (O).
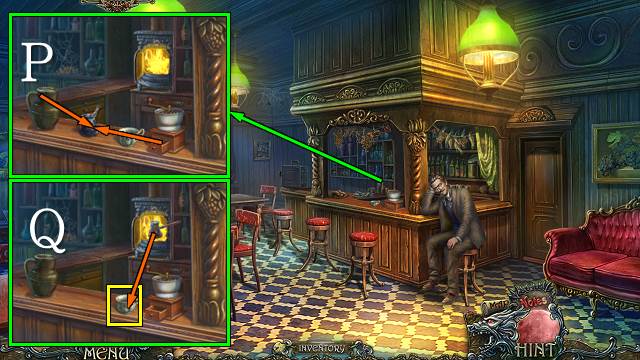
- Put the COFFEE BEANS in the grinder and grind them, put the COFFEEPOT on the counter and put the ground coffee in it, pour water into the pot (P); open the stove, put the pot on the fire, pour the coffee into the cup and take the CUP OF COFFEE (Q).
- Give the CUP OF COFFEE to Francois.
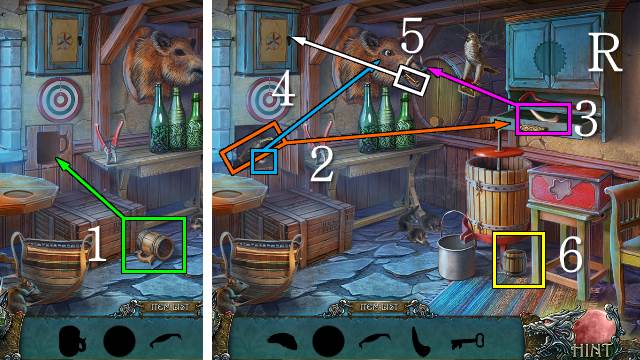
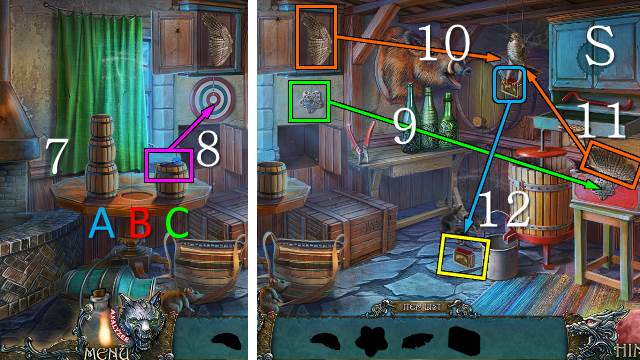
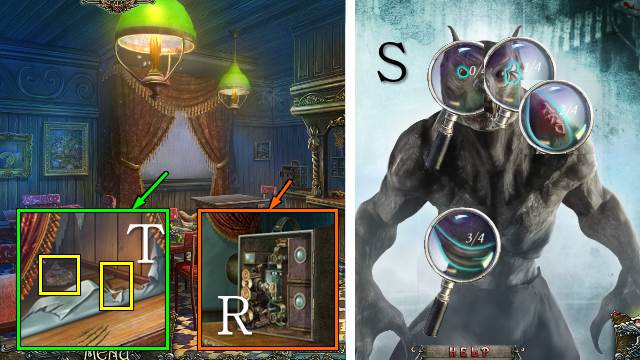
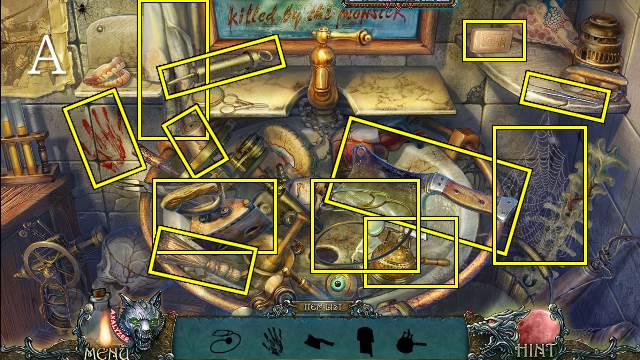
- Play the HOP (R, S).
- Mini-game: A-C, A-B, C-B, A-C, B-A, B-C, A-C.
- You receive the MATCHES.
- Walk down.
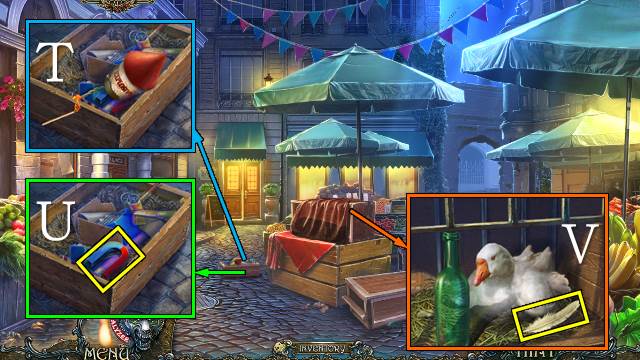
- Light the rocket with the MATCHES (T).
- Take the MAGNET (U).
- Remove the cover and prop the cage open with the BOTTLE; take the FEATHER (V).
- Enter the Bar.
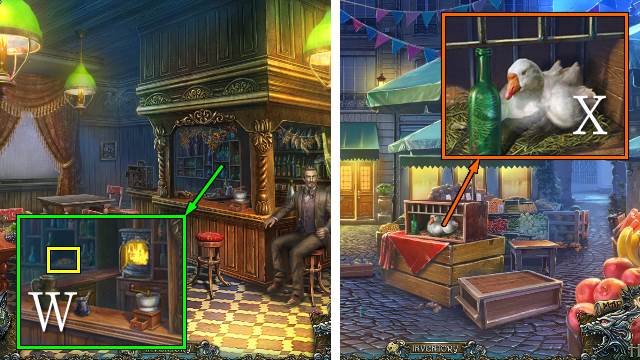
- Remove the cobwebs with the FEATHER; take the SEEDS (W).
- Walk down.
- Give the SEEDS to the goose for a mini-game (X).
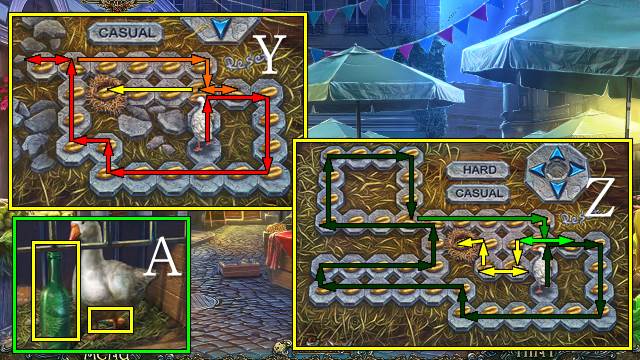
- Remove all seeds and guide the goose to the nest; one seed will be taken off a tile each time the goose crosses it; Casual (Y) and Hard (Z) solutions are shown.
- Take the AWL and BOTTLE (A).
- Go left.
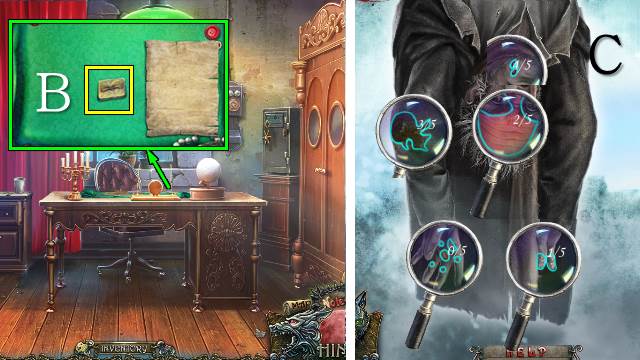
- Inspect the desk. Take the BURNER (B).
- Go down and right.
- Find the hidden clues (C).
- Talk to the undertaker.
- Take the BRUSH; put the BURNER under the lantern and light it with the MATCHES (D).
- Talk to the undertaker again.
- Open the bag; take the CODE and TABLE LEG (E).
- Move the pony's foot and take the MEDAL with the AWL (F).
- Walk down.
- Put the TABLE LEG on the blade and take the AXE (G).
- Look through the keyhole (H).
- Go left.
- Put the WOLF COIN on the window sill, the FINGERPRINTING INSTRUCTIONS on the window and the BRUSH and MAGNET in the box (I).
- Put some powder on the coin with the brush (1), put the paper on it (2), then the magnet (3), then the tape (4); take the UNKNOWN FINGERPRINT and FINGERPRINT KIT.
- Put the MEDAL and CODE on the safe, move the slider to the numbers in order of the code, releasing it at each correct number and turn the handle (J); remove the bolts with the wrench (K) and take the MAGNIFIER, NAILS, note and TOWNSPEOPLE FINGERPRINTS (L).
- Put the TOWNSPEOPLE FINGERPRINTS, MAGNIFIER and UNKNOWN FINGERPRINT on the desk; pick up the magnifier, select the undertaker's fingerprint and pick up the UNDERTAKER'S FINGERPRINT (M).
- Walk down and right.
- Talk to the undertaker.
- Put the HORSESHOE, NAILS and HAMMER on the hoof (N).
- Move the pony (O).
- Cut the rope with the AXE (P).
- Talk to the undertaker and show him the UNDERTAKER'S FINGERPRINT (Q).
- Walk forward.
Chapter 4: The Undertaker's Secret
- Take the HORN (R).
- Go right.
- Talk to the undertaker.
- Take the SOCKS (S).
- Take the CLOTHESLINE (T).
- Go to the Bar.
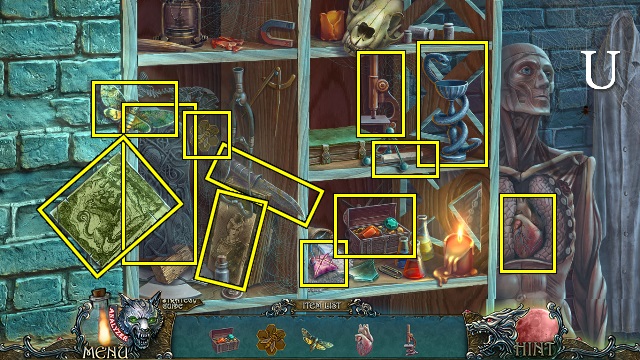
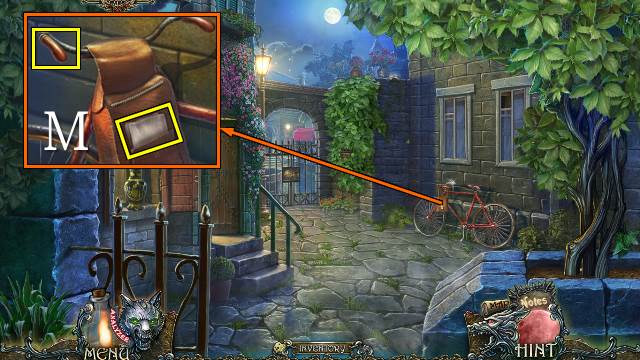
- Play the HOP (U, V).
- You receive the OIL.
- Walk down.
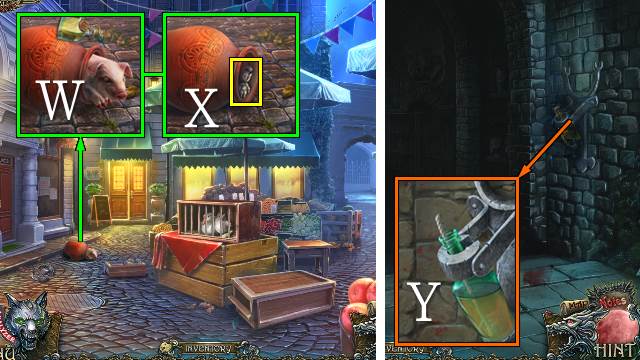
- Pour the OIL on the piglet (W); take the HANDLE (X).
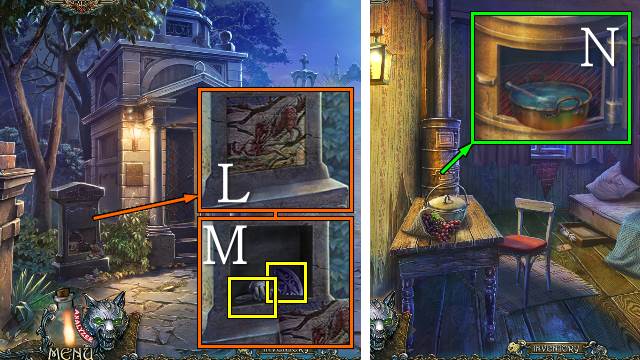
- Go right and into the tomb.
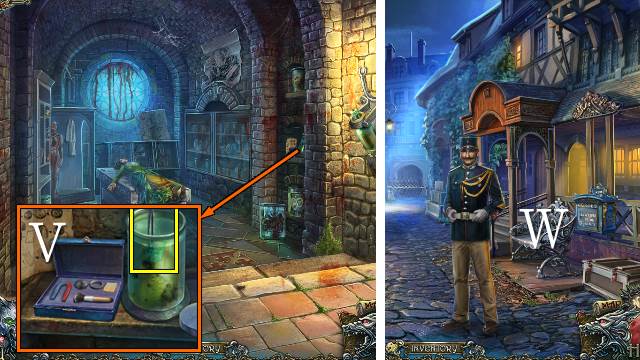
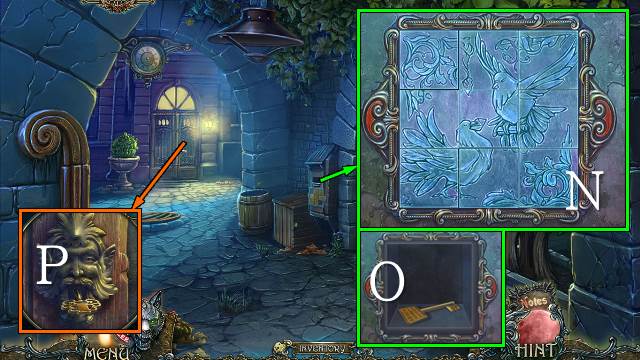
- Remove the broken lamp, put the BOTTLE down, put the OIL and LACE in it and light with the MATCHES (Y).
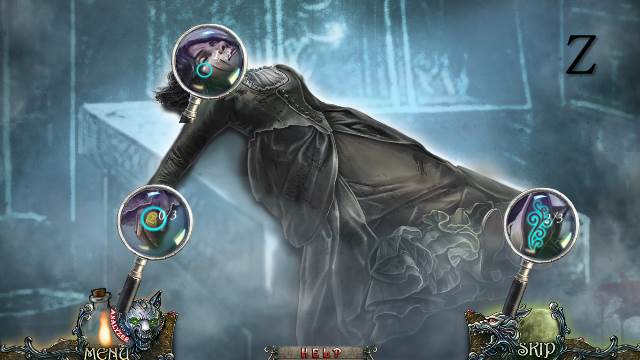
- Find the hidden clues (Z).
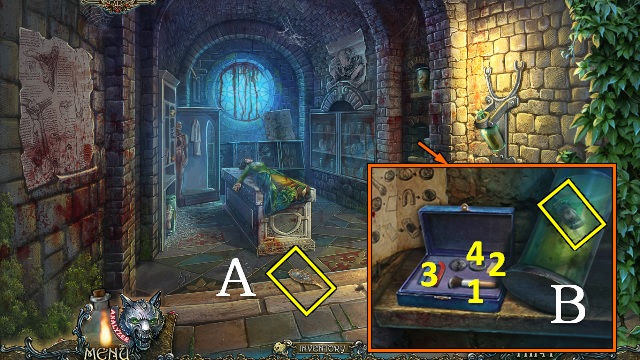
- Select the MIRROR and pick it up (A).
- Put the FINGERPRINT KIT by the jar, tilt the jar, put powder on it with the brush (1), then use the paper (2), magnet (3) and tape (4) in order; take the FINGERPRINT (B).
- Play the HOP (C).
- You receive the SOLUTION.
- Walk down and forward.
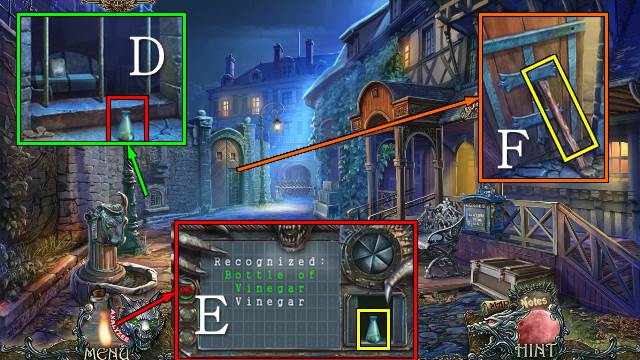
- Take the UNKNOWN substance (D).
- Analyze the UNKNOWN substance; select 'liquid,' 'no,' and 'natural'.
- Take the BOTTLE OF VINEGAR (E).
- Take the STICK (F).
- Go right.
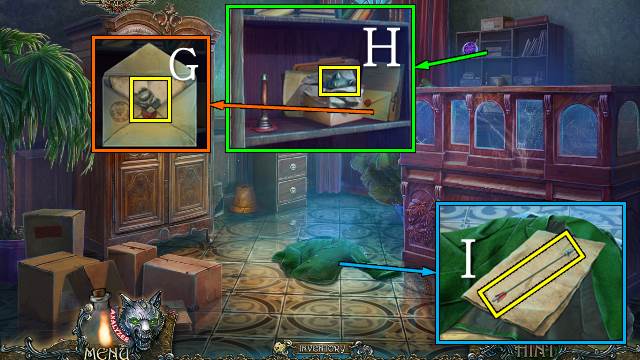
- Open the envelope and take PHOTO SCRAP 1/6 (G); open the box and take WOLF 1/3 (H).
- Open the coat and paper and take the ARROW (I); remove the coat.
- Go to the Undertaker's Cabin.
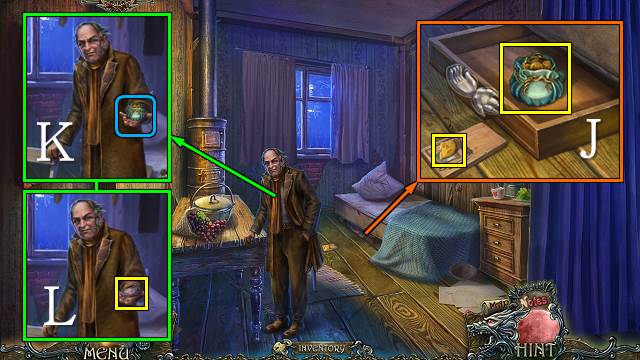
- Spring the trap with the STICK and take the CHEESE; put the HANDLE on the drawer and take the COINS (J).
- Give the COINS to the undertaker (K); take the FILM SECTION (L).
- Go to the Police Station.
- Put the FINGER PRINT on the desk and select Francois's print with the magnifying glass; take FRANCOIS'S FINGERPRINT (M).

- Put the SOLUTION on the wall, pour the BOTTLE OF VINEGAR in the glass, move the rhino and the film.
- Put the FILM SECTION on the table (N), trim both the film section and main film with the scissors.
- Put the film section in the glass with the tweezers (O), then put it between the other pieces and put the rhino on it (P); take the rhino off and take the FILM and TWEEZERS (Q).
- Go to the Bar.
- Put the FILM in the projector, close the cover and turn the handle (R).
- Find the clues (S).
- Take PIECE 1/2 and the HANDLE (T).
- Go to the Tomb.
- Play the HOP (U).
- You receive a RUSTY DAGGER.
- Open the jar and take ELEMENT 1/3 with the TWEEZERS (V).
- Go down and forward.
- Talk to the Commandant (W).
- Go right.
- Put the HANDLE on the hatch and lift the hatch (X); take the PAN LID (Y).
- Remove the seal with the RUSTY DAGGER and take the SEAL WITH WAX (Z).
- Move the flower pot; put the CHEESE in the box for a mini-game (A).
- Use the arrows to move the mouse to the cheese; the mouse will keep moving until he hits a barrier.
- Casual (B) and Hard (C) solutions are shown.
- Take WOLF 2/3 (D).
- Walk down twice.

- Dig through the dirt with the PAN LID (E); find the three wolf silhouettes (F) and take PHOTO SCRAP 2/6 and the CROSSBOW (G).
- Put the PAN LID in the pan and take the EMPTY PAN (H).
- Walk forward.
- Put the CROSSBOW by the bars, put the ARROW and CLOTHESLINE on it and shoot at the bag (I); pull the rope, remove the arrow, open the bag and take PIECE 2/2 (J).
- Put the HORN on the pump and the EMPTY PAN under it; pull the horn and take the PAN WITH WATER (K).
- Walk down.
- Put the loose piece in the gap and the two PIECES in the other gaps (L); open the panel and take the DOOR HANDLE and ELEMENT 2/3 (M).
- Go right.
- Open the burner and put the POT WITH WATER and SEAL WITH WAX inside; take the SEAL (N).
- Walk down and forward.
Chapter 5: Curly and the Werewolf
- Put the DOOR HANDLE on the door and turn it (O).
- Walk forward.
- Take the BROOM (P).
- Open the compartment with the SEAL (Q); take and open the folder and take the BULLETS and SHIRT (R).
- Go left.
- Find the hidden clues (S).
- Talk to Edgar and take the CODE (T).
- Put the CODE on the wall and push the tiles in the order shown on the code; take the RING and the note and sharpen the RUSTY DAGGER to get a SHARP DAGGER (U).
- Cut the sack with the SHARP DAGGER; move and take WOLF 3/3 (V).
- Remove the boards and open the door (W).
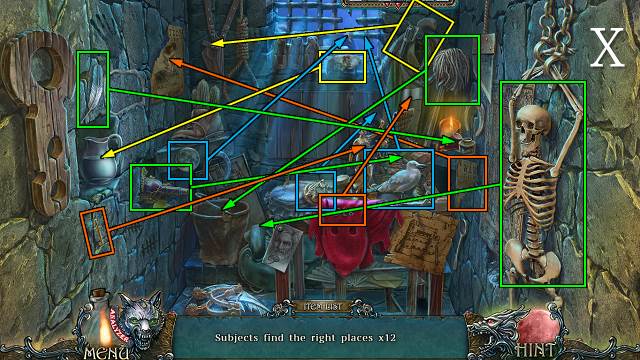
- Play the HOP: find objects and put them in their correct place (X).
- You receive the HANDLE.
- Walk down.

- Open the cabinet with the HANDLE (Y); remove the cork and take the UNKNOWN substance and PUZZLE PIECE (Z).
- Analyze the UNKNOWN substance; select 'liquid,' 'yes,' and 'artificial'.
- Take the REAGENT (A).
- Remove the nails with the SHARP DAGGER (B); remove the sole and take PHOTO SCRAP 3/6 (C).
- Put the WOLVES on the statuettes for a mini-game.
- Move the statuette parts to the pedestal with the same color.
- Solution: D-6, D-5, D-1, E-D, E-2, E-D, 5-E, F-E, F-D, F-E, 1-F, 2-F, 6-F, E-1, E-3, E-5, 1-E, 5-E, 3-E, D-2, D-1, D-5, 1-D, 2-D, 5-D.
- Take ELEMENT 3/3 (G).
- Walk down.
- Put the SHIRT under the pump and pull the horn; take the WET SHIRT (H).
- Go right.
- Open the envelope and put the REAGENT on the paper; take the note (I).
- Go to the Undertaker's Cabin.
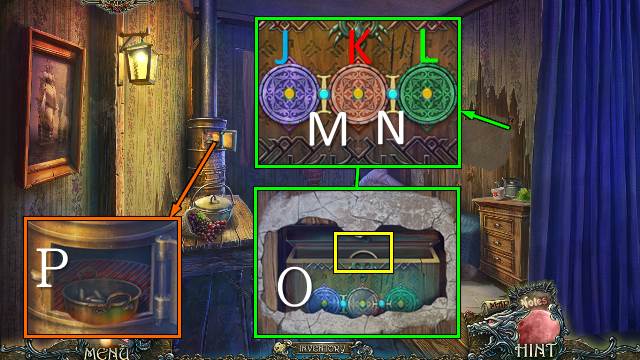
- Break the wall with the HAMMER and use the FEATHER on the dust; put the ELEMENTS on the box for a mini-game.
- Use the buttons to rotate discs and swap pieces between discs; move all elements to the circle of the same color.
- Solution: K-M-J-K-M-Jx2-L-Kx2-N-Kx2-M-Kx2-L-N-K-L-N.
- Take the KEYS (O).
- Put the BULLETS in the pan and take the PAN WITH BULLETS with the SOCKS (P).
- Walk down and forward.
- Give FRANCOIS'S FINGERPRINT to Francois (Q).
- Find the hidden clues (R).
- Throw the PAN WITH BULLETS at the creature.
- Go left twice.

- Put the WET SHIRT and STICK on the bars and turn the stick twice (S).
- Pour the GUNPOWDER on the shackles and light it with the MATCHES (T).
- Show Edgar the MIRROR (U).
- Take PHOTO SCRAP 4/6 (V).
- Play the HOP (W).
- You receive the BUST.
- Walk down twice.
- Put the KEYS on the door for a mini-game (X).
- Move the keys to their matching locks.
- Use the arrows to move up and down, or to pick up and replace sets of two keys; if the center unit holds a set of keys on both sides, it will turn 180 degrees.
- Solution: Up-Left-Down-Right-Up x3-Left-Down-Right-Down-Left (Y).
- Walk forward.
Chapter 6: Macabre Experiments

- Give the RING to the Commandant (Z).
- Take the TOOTH (A).
- Move the dart rapidly until you receive the DART (B).
- Go right.
- Take the EYE (C).
- Take the note (D); remove the leaves and remove the NAMEPLATE with the SHARP DAGGER (E).
- Open the door and go left.
- Take the CANDLE (F).
- Put the TILE on the table for a mini-game (G).
- Match the animals with their tracks; for level 2, match the animals with their tracks and skulls.
- Take the HUMAN FACE (H).
- Open the door and go forward.

- Take PUZZLE PIECE 2/2 (I).
- Put the EYE on the dog bust and take the MEDAL (J).
- Walk down.
- Put the BUST and NAMEPLATE on the pedestal and the MEDAL on the bust; take the two notes and HUMAN HEART (K).
- Give the HUMAN HEART to the Commandant.
- Take the MORGUE KEY (L).
- Walk down.
- Select the handlebar twice to get a REVOLVER; open the bag and take the PAPER (M).
- Walk down.
- Put the PUZZLE PIECES on the mailbox for a mini-game.
- Hover your cursor over the intersection between two tiles and then select to swap those tiles to restore the picture; correctly placed tiles will turn blue (N).
- Take the KEY (O).
- Open the door with the MORGUE KEY (P).
- Walk forward.
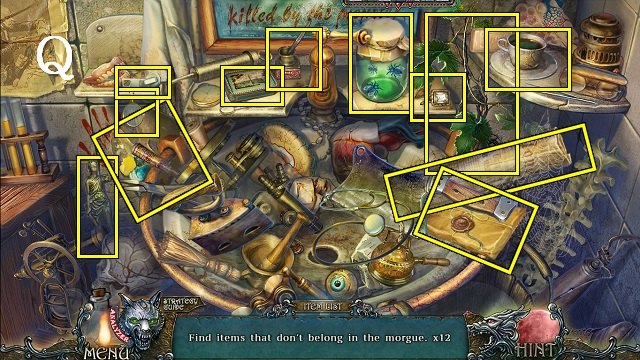
- Play the HOP (Q).
- You receive the ZIPPER PULL.
- Go to the Living Room.
- Open the cabinet with the KEY.
- Play the HOP (R).
- You receive a MAGNET.
- Walk down.
- Put the ZIPPER PULL and CANDLE on the zipper; open the zipper and take PHOTO SCRAP 5/6 (S).
- Attach the MAGNET to the string to get a MAGNET (T).
- Walk down.
- Take the CLOCK HANDS with the MAGNET (U).
- Remove the paper plane with the BROOM (V).
- Open the plane and take PHOTO SCRAP 6/6 (W).
- Go to the Office.
- Put the PHOTO SCRAPS in the frame for a mini-game.
- Drag-and-drop the pieces into place (X).
- Back out and take the PHOTO.
- Walk down.

- Hang the PHOTO from the wall and pull it down (Y).
- Take the LEAD and PAGE SCRAP 1/3 (Z).
- Go to the Morgue.
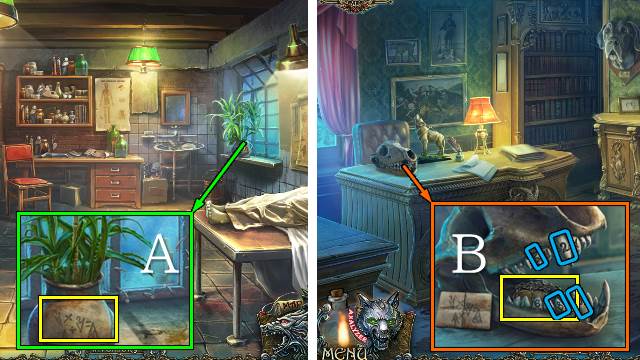
- Put the PAPER and LEAD on the vase; take the CODE (A).
- Go to the Office.
- Put the TOOTH in the skull and the CODE next to it; select 5, 2, 8 and 10 and take the SCALES PART (B).
- Go to the Morgue.
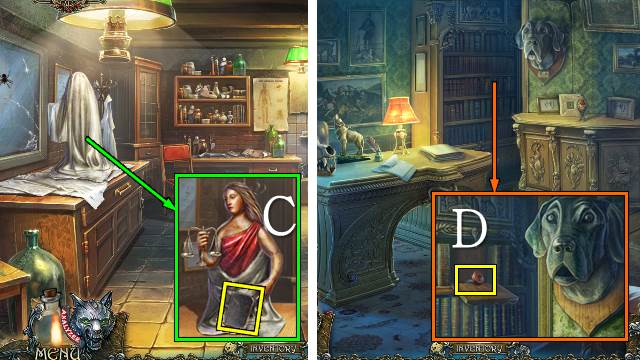
- Remove the sheet and put the SCALES PART on the mannequin; take the BOOK (C).
- Go to the Office.
- Put the BOOK on the shelf; take TYPEWRITER KEY 1/4 (D).
- Walk down.
- Play the HOP; move items to their correct places (E).
- You receive the SYMBOL.
- Go to the Morgue.
- Remove the poster (F).
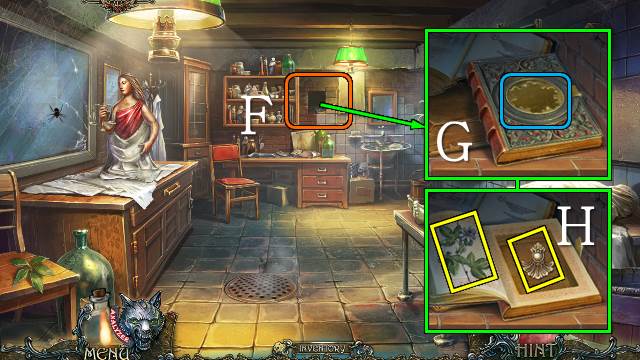
- Put the SYMBOL on the book (G); take the FLOWER, note and DECORATION (H).
- Go to the Office.
- Open the egg with the DECORATION and take the GEAR (I).
- Walk down twice.
- Put the GEAR and CLOCK HANDS on the door (J).
- Walk forward.
Chapter 7: The Antidote
- Find the hidden clues (K).
- Talk to the Commandant.
- Take the NAIL PULLER (L).
- Walk forward.
- Take the WOLF HEAD, rip the cushion and take the UNKNOWN substance (M).
- Analyze the UNKNOWN substance; select 'liquid,' 'yes,' and 'artificial'.
- Take the KIDNEY STONE REMEDY (N).
- Take the POKER and PAGE SCRAP 2/3 (O).
- Open the cabinet.
- Take the ETHANOL (P) and VALERIAN ROOT (Q).
- Walk forward.
- Give the KIDNEY STONE REMEDY to Francois (R).
- Open the cabinet.
- Take TYPEWRITER KEY 2/4 (S).
- Walk forward.

- Talk to Edgar.
- Open the trap with the POKER (T).
- Cut the lines with the bottle; take the SHIP'S WHEEL and BROKEN BOTTLE (U).
- Play the HOP (V).
- You receive the BELLOWS.
- Walk forward.

- Take the PAGE SCRAP 3/3 (W).
- Try to go right.
- Walk down four times.
- Put the HUMAN HEAD and WOLF HEAD on the lock (X).
- Play the HOP (Y).
- You receive TYPEWRITER KEY 3/4.
- Go to the Morgue.

- Remove all nails with the NAIL PULLER; open the window and take the LANTERN (Z).
- Play the HOP (A).
- You receive an IRON.
- Go to the Archway Square.
- Put the LANTERN by the door and retrieve TYPEWRITER KEY 4/4 with the POKER (B).
- Walk forward.
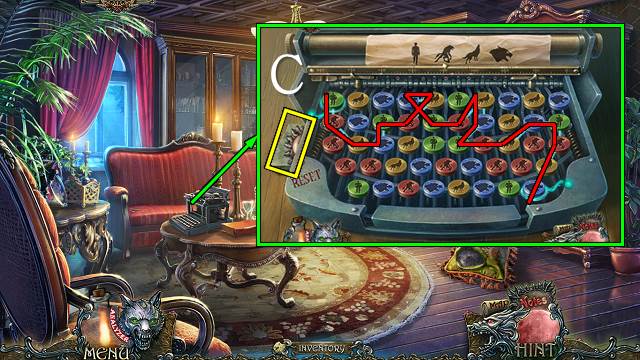
- Put the TYPEWRITER KEYS on the typewriter for a mini-game.
- Connect the top left of the typewriter with the bottom right by pushing the keys in the order shown (C).
- You receive a note; take the SUN'S PART.
- Put the BELLOWS on the fire (D); heat the IRON and take the HOT IRON (E).
- Walk down.
- Open the box with the SUN'S PART; take the REPTILE (F).
- Play the match-two HOP (G).
- You receive a FLOWER.
- Walk forward twice.
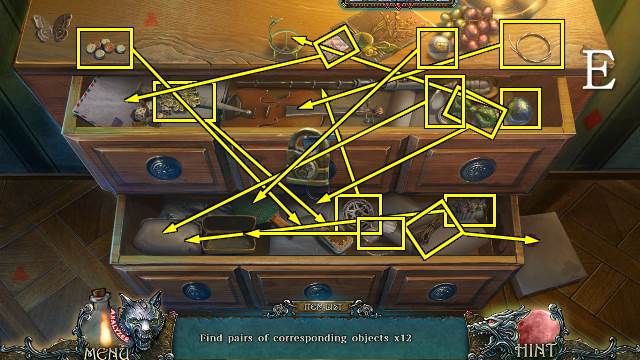
- Open the box with the REPTILE for a mini-game (H).
- Find pairs of identical objects (I).
- Take the POISON (J).
- Put the PAGE SCRAPS on the table, rearrange them and put the HOT IRON on them; turn over the page and take the RECIPE (K).
- Put the RECIPE, VALERIAN ROOT, two FLOWERs, DART, ETHANOL and POISON on the table.
- Put the plants in the mortar (1) and pound them. Put the ethanol (2) in the vial (3), open the poison bottle (4) and pour the poison and powder in the vial. Swirl the vial, dip the dart (5) in the vial and collect the dart with the REVOLVER to get a REVOLVER WITH ANTIDOTE (L).
- Walk forward twice.
- Shoot the beast with the REVOLVER WITH ANTIDOTE (M).
- Open the door and go right.
- Take the WINDING KEY (N).
- Take the COPPER STRIP (O).
- Walk down.
- Put the SHIP'S WHEEL on the object and the COPPER STRIP in the slot; turn the wheel and take the COIN (P).
- Walk down.
- Open the bag with the COIN (Q); take the GEAR and the AMMONIA (R).
- Play the HOP (S).
- You receive a DIAMOND.
- Walk forward.
- Move the carpet (T) and place the GEAR on the board for a mini-game.
- Change the rotating speed of the discs so the ball drops from disc to disc when you push the Start button (U).
- Take the CADUCEUS (V).
- Go right.
- Cut the glass with the DIAMOND and open the box with the CADUCEUS (W); take the UNKNOWN substance (X).
- Analyze the UNKNOWN substance; select 'liquid,' 'yes,' and 'artificial'.
- Take the FUEL (Y).
- Revive Edgar with the AMMONIA; take the SOLUTION (Z).
- Walk down.
- Place the SOLUTION on the chandelier; pull the candles in the order on the note (A).
- Take the ALARM BELL (B).
- Walk down twice.
- Cut the hand with the BROKEN BOTTLE, then open it with the WINDING KEY; take the SOLUTION (C).
- Walk forward twice.
- Put the SOLUTION next to the puzzle for a mini-game.
- Swap tiles to recreate the image (D).
- Pour the FUEL in the cylinder and close it; take the LIGHTER (E).
- Go right.
- Put the ALARM BELL on the box and the LIGHTER underneath (F).
- Congratulations, you've completed Shadow Wolf Mysteries: Under the Crimson Moon.
Created at: 2014-07-04