

Walkthrough Menu
- General Tips
- Chapter 1: Ring the Bell
- Chapter 2: Cross the Bridge
- Chapter 3: The Shaolin Temple
- Chapter 4: The 4 Guardians
- Chapter 5: The Old Palace
- Chapter 6: The Mausoleum Temple
- Chapter 7: The Secret Room
- Chapter 8: The Song of Freedom
- Chapter 9: The Two Orbs
- Appendix: Key to the Map
General Tips
- This is a Hidden Object Puzzle Adventure game. Throughout the guide, we will use the acronym 'HOS' for Hidden Object Scene.
- There is no timer.
- Use the Main Menu icon in the lower left to return to the Main Menu.
- When the cursor turns to a magnifying glass, click to zoom in. If there's nothing to do there yet, check your Journal — you may have a new Task to complete.
- The Journal in the lower right has a diary, a list of current Tasks, and a Map. When a Shovel appears on the Map, there is a new HOS in that location.
- Click on the red X in the top right corner to close the Map or a zoom scene.
- Click on the HELP button in the mini-games to read the instructions.
- You must move your cursor around the scene in order to find all the active areas.
- Some items are Key Objects. When you click on a Key Object, small circles will appear around it. Look around the scene for the objects that appear in the small circles. Pick up these objects and put them in the center of the Key Object. We have marked these in green in the walkthrough.
- Blue sparkles indicate a HOS. Pink sparkles indicate something to read. After you click on an area with pink sparkles, read your Journal to see what it said.
- Most inventory items must be used three times. For example, if you are using a SAW to cut down a Tree, you will probably have to click three times to complete the task.
- When a hidden object item is written in purple, you will have to do something in the scene to reveal it. For example, if 'cooked egg' was written in purple, you would probably have to find an egg in the HOS and drag it to a pan to cook it, then click on the cooked egg to collect it.
- Many of the mini-games have more than one possible solution. All have a SKIP button at the bottom of the screen. Many have a RESET button in the top right. If you want to use the solution in the walkthrough, first press the RESET button so you have the same starting position we used.
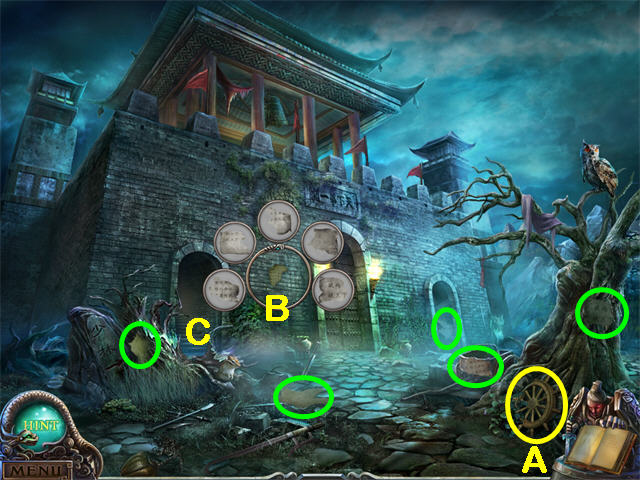
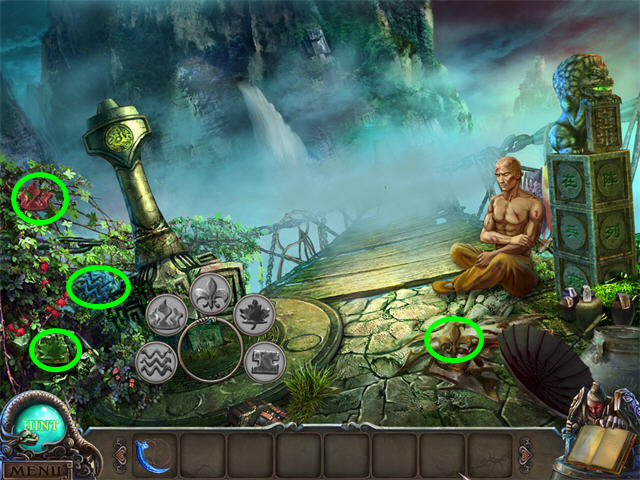
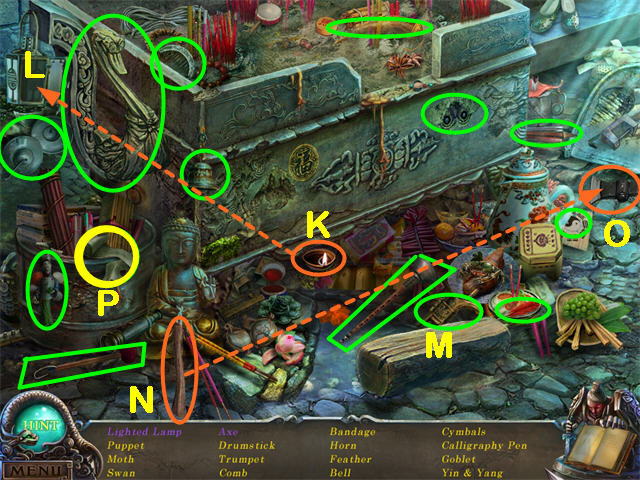
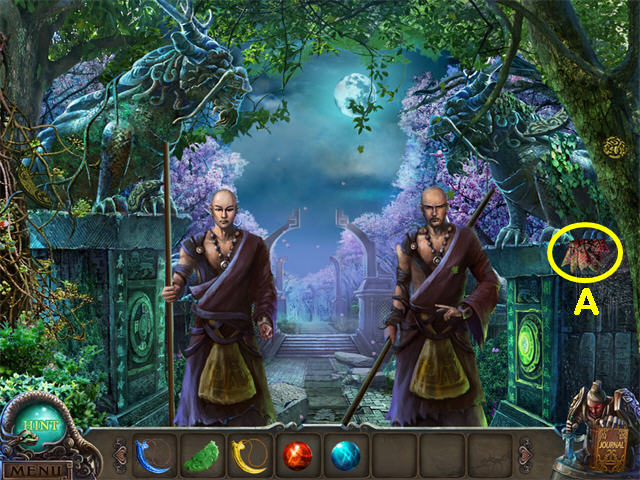
Chapter 1: Ring the Bell
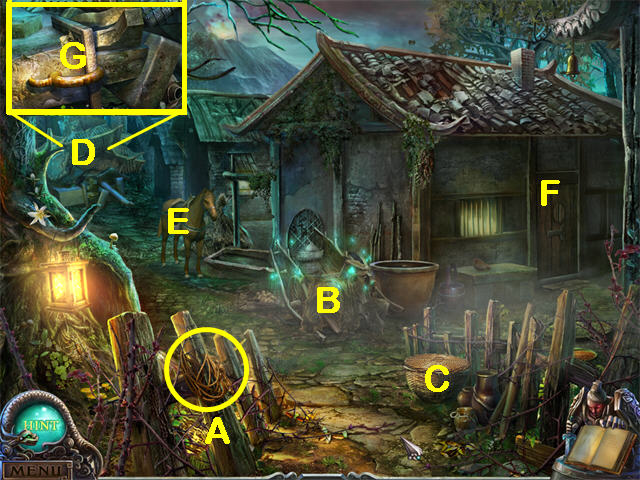
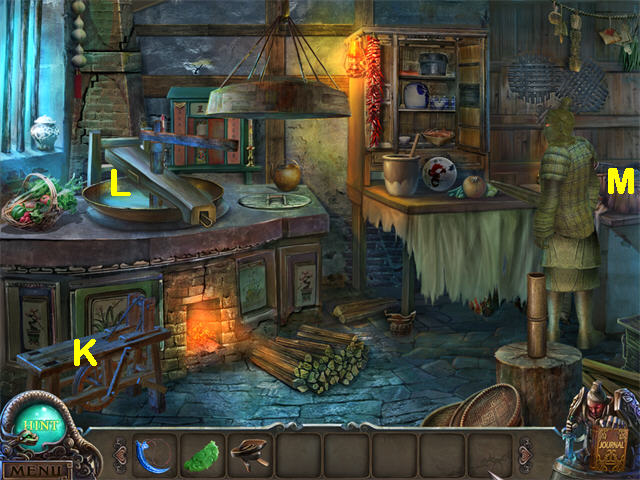
- Collect the ROPE (A).
- Examine the Basket (C) and the House Door (F).
- Zoom in on the Cart (B) for a HOS; find the listed items including the CARROT (L).
- Use the SHOVEL (H) on the Dirt (J) to reveal the Ginseng.
- Open the Box (K) to reveal the Cotton.
- Zoom in on the Gate (D); put the ROPE (A) on the Stone Ring (G).
- Give the CARROT (from the HOS at the Cart) to the Horse (E). The Gate (D) will open.
- Go through the Gate (D) to the Mountain Shrine.

- Examine the Statue (Q). You need a fish-shaped object.
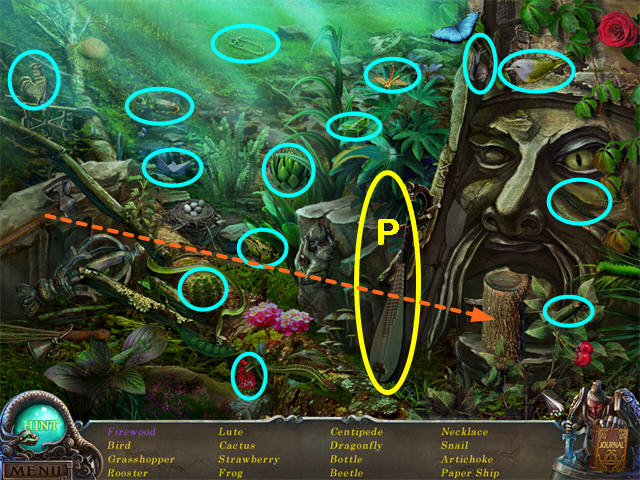
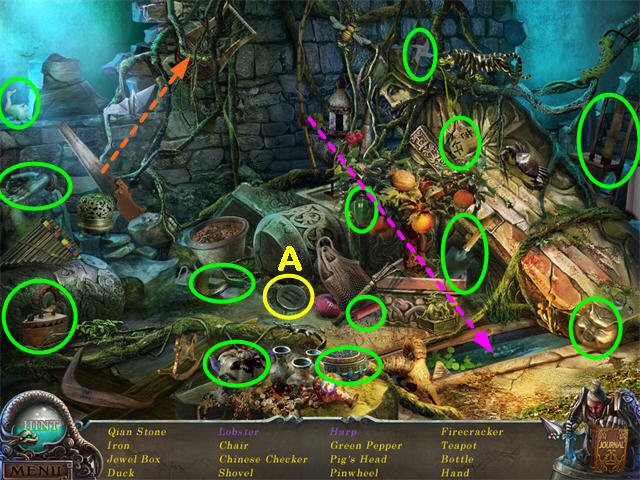
- Collect the HAMMER (M).
- Click on the Shrine Bowl Key Object (B).
- Collect the items marked in green and put them on the Shrine Bowl (B).
- Zoom in on the Chest at the back of the Shrine. It is locked.
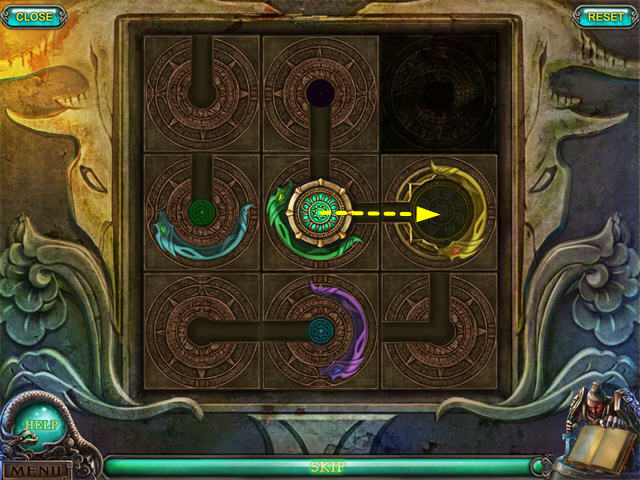
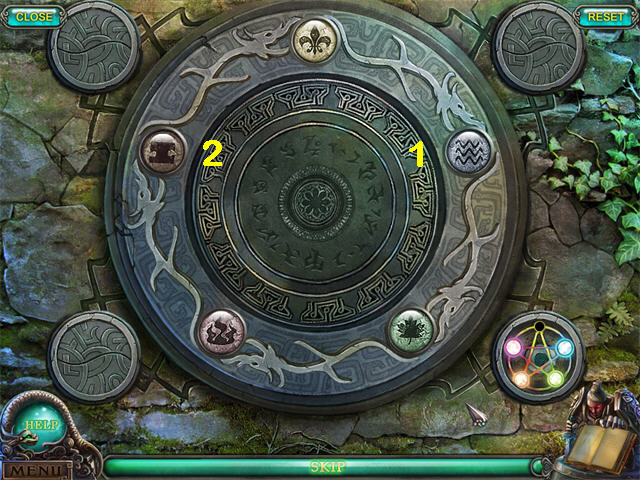
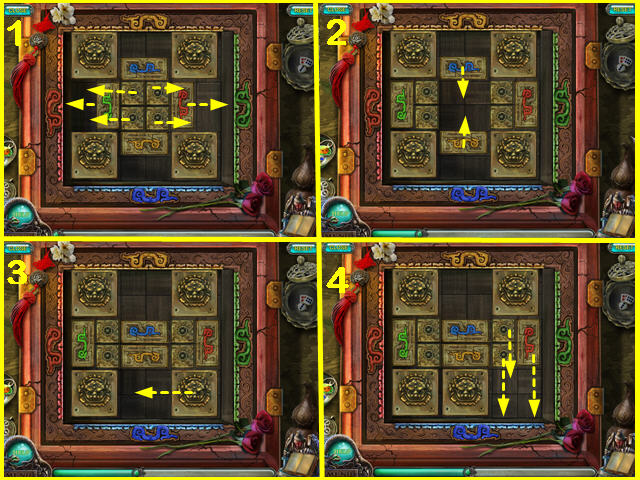
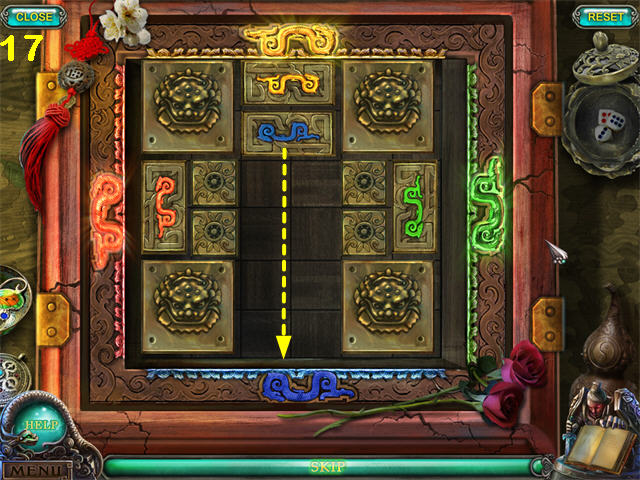
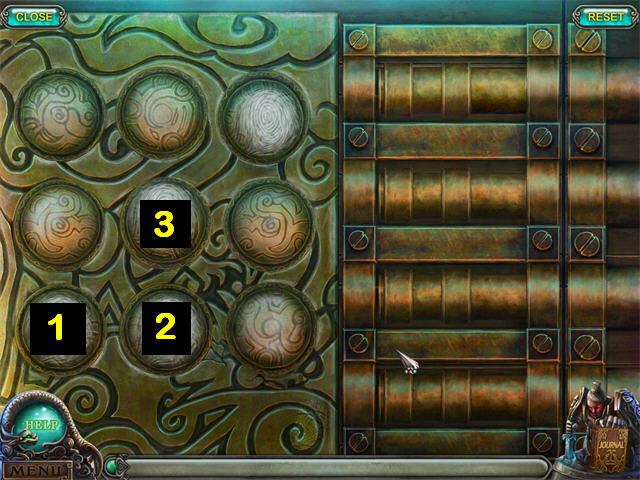
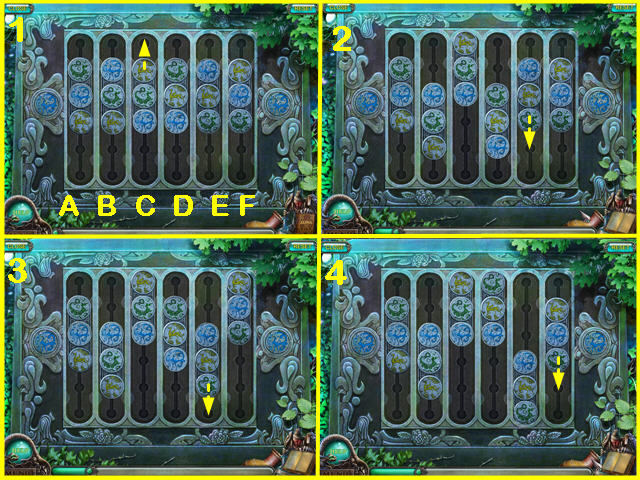
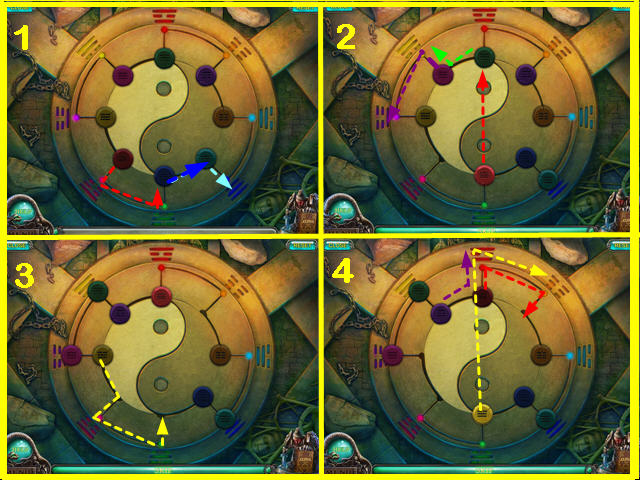
- Zoom in on the Column (P) for a mini-game.
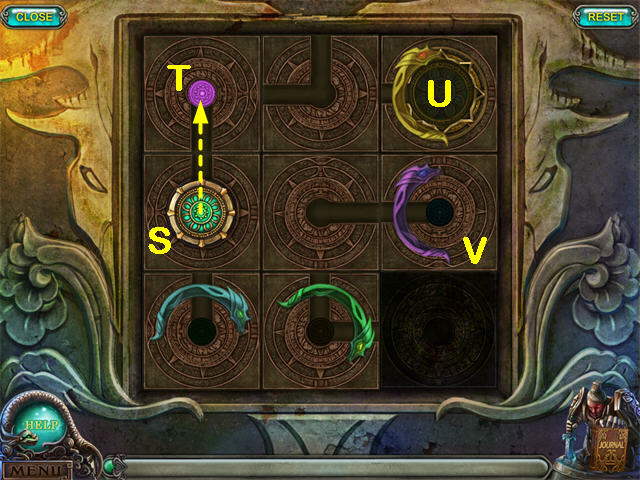
- There are 9 positions on the board: Row 1 Left, Row 1 Center, Row 1 Right, Row 2 Left, Row 2 Center, Row 2 Right, Row 3 Left, Row 3 Center, and Row 3 Right.
- Your goal is to move the Big Button (S) to the Gold Square (U).
- The Big Button can move whenever there is a track connecting it to another tile. However, colored markings block tracks on 4 of the tiles.
- You may slide tiles to reposition them.
- You may slide the BIG BUTTON along any unblocked connecting paths.
- When you move the Big Button onto one of the small Buttons, you unlock the tile with that color.
- You will have to unlock each of the 4 colored tiles by moving the Big Button onto the small buttons.
- Begin by moving the Big Button on top of the small purple button (T). This unlocks the purple tile (V) and reveals the small blue button.
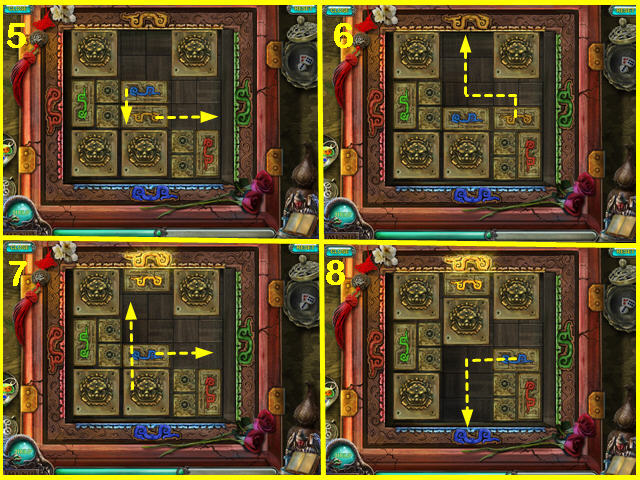
- Now move the tiles so you can move the BIG BUTTON onto the small blue button. This will take several steps.
- Move the Row 3 Center tile to the Row 3 Right position. Move the Row 2 Center tile to the Row 3 Center position. Move the Row 1 Center tile to the Row 2 Center position.
- Move the Row 1 Left tile to the Row 1 Center position. Move the Row 2 Left tile to the Row 1 Left position. Move the Big Button down so it is on the Row 2 Center tile.
- Move the Row 3 Left tile to the Row 2 Left position. Move the Row 3 Center tile to the Row 3 Left position. Move the Row 2 Center tile to the Row 3 Center position.
- Move the Big Button left so it is on the Row 3 Left tile. Move the Row 3 Center tile to the Row 2 Center position. Move the Row 3 Right tile to the Row 3 Center position.
- Move the Row 2 Right tile to the Row 3 Right position. Move the Row 2 Center tile to the Row 2 Right position. Move the Row 3 Center tile to the Row 2 Center position. Move the Row 3 Right tile to the Row 3 Center position.

- Move the Big Button onto the small blue button. This will unlock the blue tile and reveal the small green button. Move the Row 2 Right tile to the Row 3 Right position. Move the Row 2 Center tile to the Row 2 Right Position.
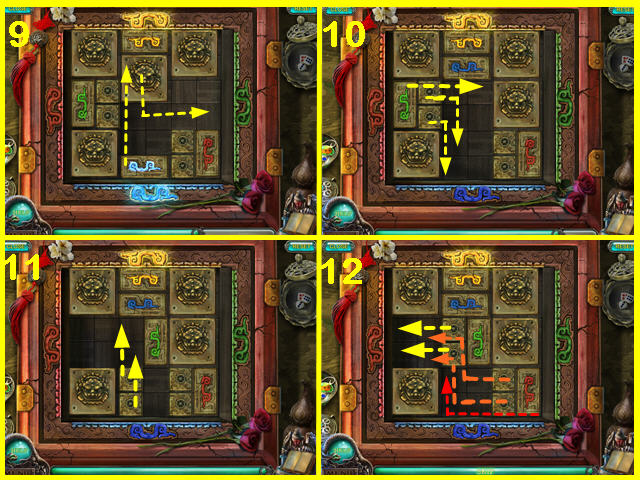
- Move the Big Button onto the Row 3 Left tile. Move the Row 3 Center tile to the Row 2 Center position. Move the Row 3 Right tile to the Row 3 Center position.
- Move the Row 2 Right tile to the Row 3 Right position. Move the Row 2 Center tile to the Row 2 Right position. Move the Big Button onto the Row 3 Center tile.
- Move the Row 3 Center tile to the Row 2 Center position. Move the Big Button onto the Row 1 Center tile. Move the Row 2 Center tile to the Row 3 Center position. Move the Row 2 Left tile to the Row 2 Center position.
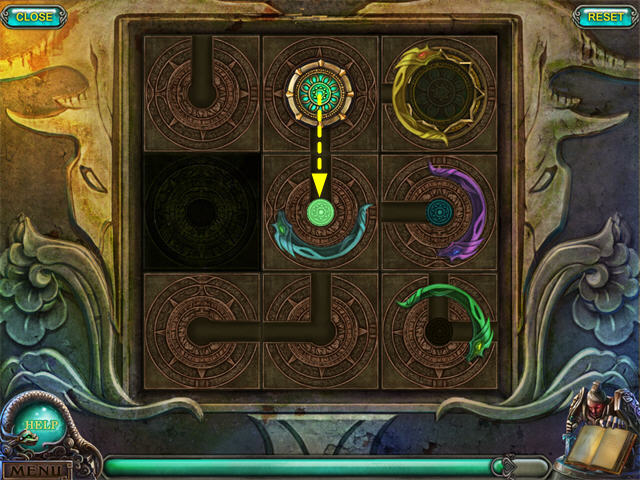
- Put the BIG BUTTON on the small green button. This unlocks the green tile and reveals the Small Gold Button.
- Move the BIG BUTTON onto the Row 1 Center tile. Move the Row 2 Center tile to the Row 2 Left position. Move the Row 2 Right tile to the Row 2 Center position.
- Move the Row 3 Right tile to the Row 2 Right position. Move the Row 3 Center tile to the Row 3 Right position. Move the Row 2 Center tile to the Row 3 Center position.
- Move the Row 2 Right tile to the Row 2 Center position. Move the Row 1 Right tile to the Row 2 Right position.
- Move the Big Button onto the small gold button. This will unlock the gold tile.
- Move the Big Button onto the Row 2 Right tile to complete the mini-game. This will drain the lava from the path.
- Go Up the Steps (R) to the Bell Tower.
- Collect the Wheel (A).
- Zoom in on the Parchment Key Item (B).
- Collect the Parchment pieces and put them on the Key Item (B).
- Zoom in on the completed Parchment to read the message.
- Enter the left Doorway (C).
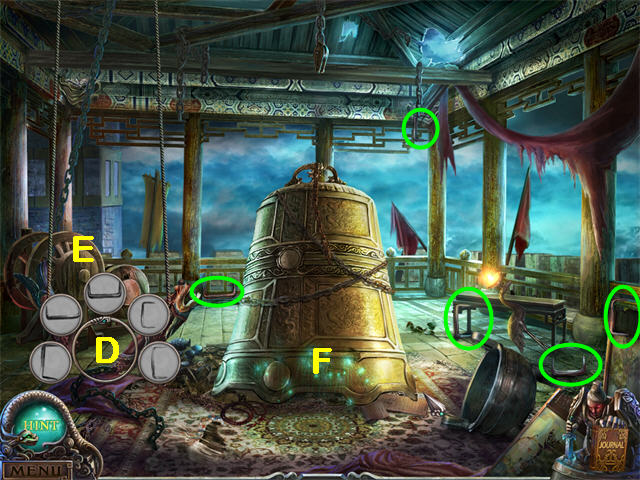
- Read your Journal. The Bell, the Ringer, and the Winch are all broken.
- Zoom in on the Ringer Key Item (D).
- Collect the Ringer Parts and put them on the Ringer (D).
- Use the HAMMER (from the Mountain Shrine) to repair the Ringer.
- Put the WHEEL (from the front of the Bell Tower) on the Winch (E).
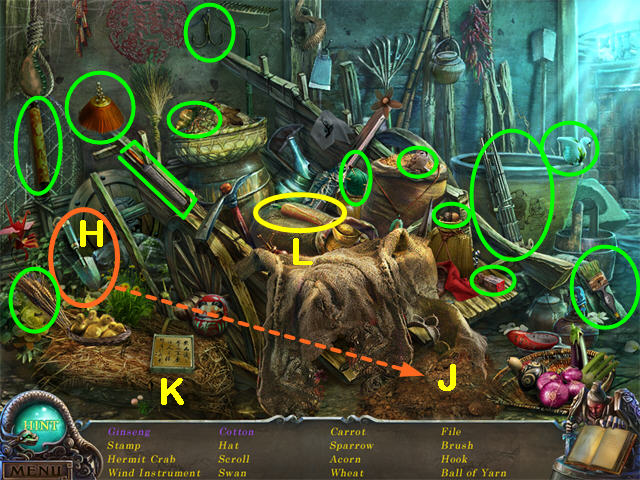
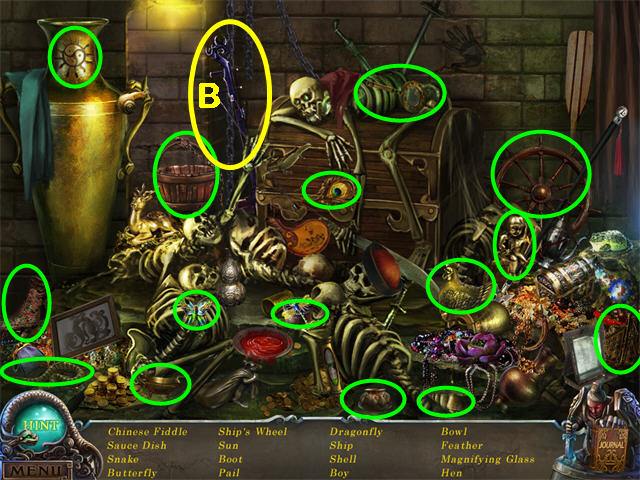
- Zoom in on the Bell (F) for a HOS; collect the listed objects including the PLIERS (G).
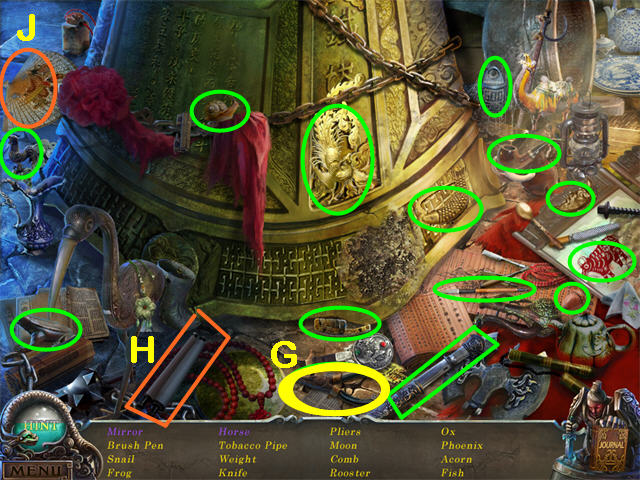
- Open the Scroll (H) and collect the Horse.
- Move the Fan (J) and collect the Mirror.
- Go Down 3 times to return to the Village.
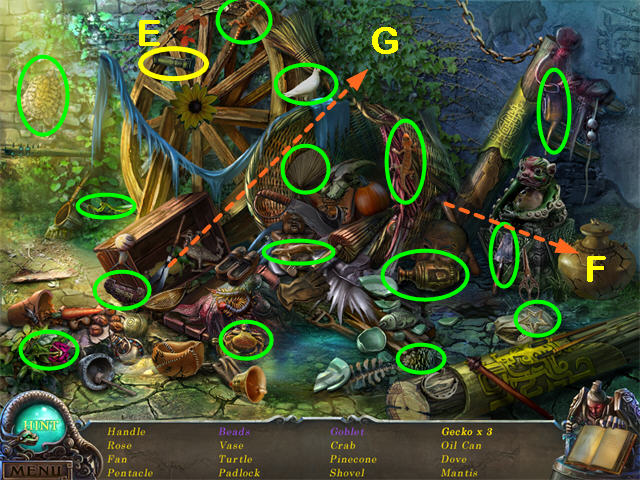
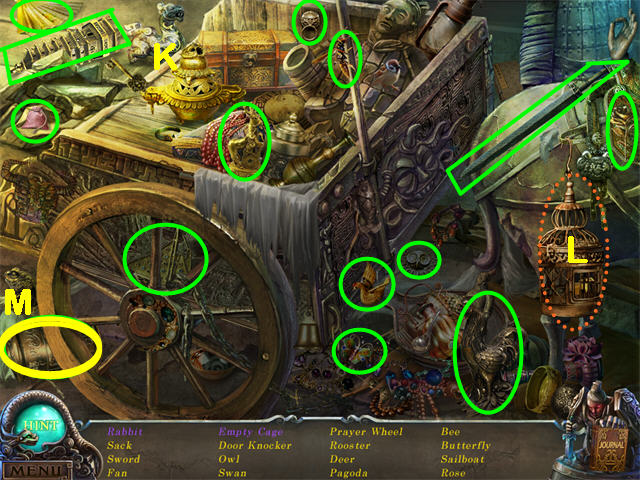
- Zoom in on the Cart for a HOS; collect the listed items including the FISH (K).
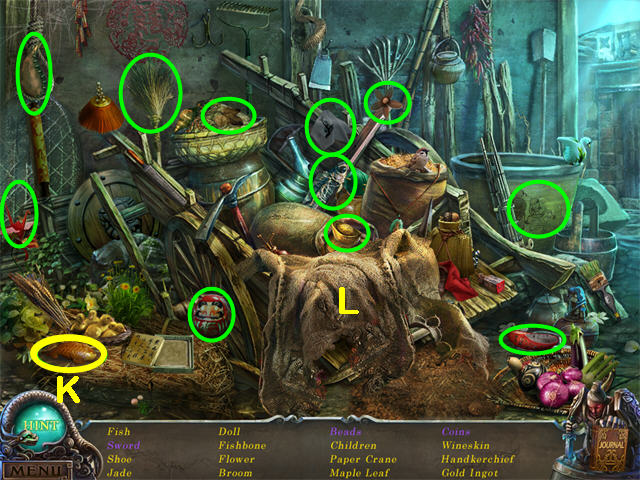
- The only Flower that counts is between the Sparrow and the Rake.
- Move the Rag (L) to reveal the Sword, Beads, and Coins.
- The Gold Ingot is just above the Rag. It is elliptical.
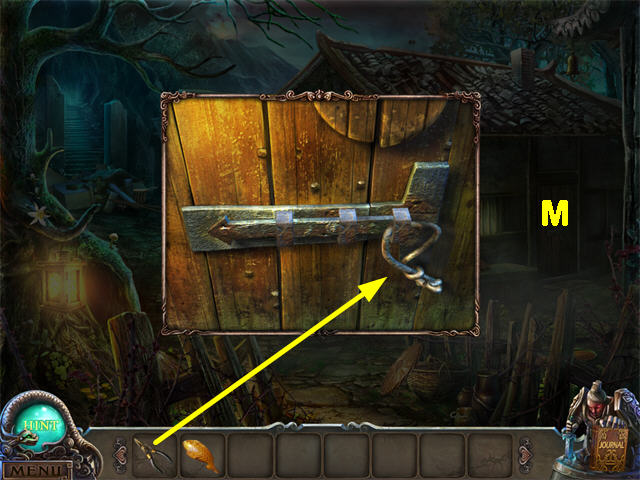
- Zoom in on the Door (M); Use the PLIERS (from the HOS at the Bell in the Bell Tower) three times on the Wire.
- Collect the LADDER.
- Go Up to the Mountain Shrine.
- Put the FISH (from the second HOS at the Cart in the Village) on the Statue.
- Collect the SMALL KEY from the Statue. Use it to open the Chest on the Shrine.
- Collect the PULLEY from the Chest.
- Go Up the Stairs to the Bell Tower.
- Enter the left Doorway to the Belfry.
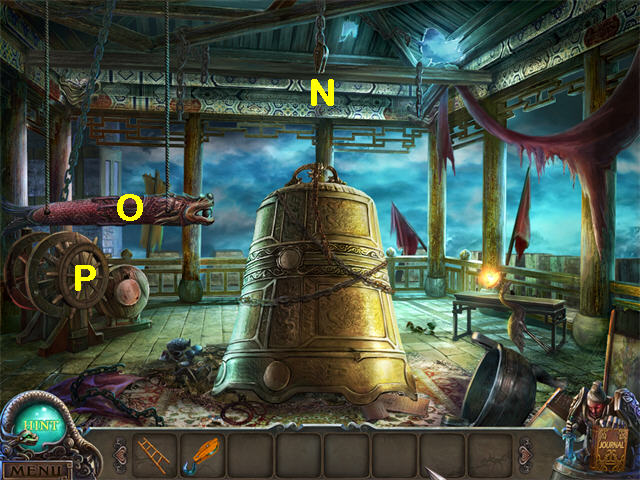
- Put the LADDER (from inside the House in the Village) on the Broken Pulley (N).
- Put the PULLEY (from the Shrine Chest) on the Broken Pulley (N).
- You should have already repaired the Ringer (O) using the HAMMER (from the Mountain Shrine). If not, do so now.
- Turn the Wheel on the Winch (P).
- Pull the Ringer (O) three times to ring the Bell.
- Watch the cut scene. You will receive the BLUE CLAW TALISMAN.
Chapter 2: Cross the Bridge
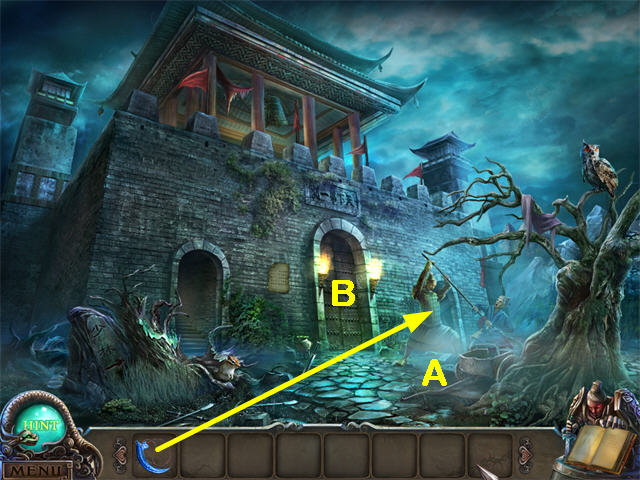
- Use the BLUE CLAW TALISMAN (from the cut scene at the end of Chapter 1) on the Terracotta Warrior (A). He will disappear.
- Talk to the monk. He will tell you to enter the Temple and find the Abbot.
- The Main Door (B) is now open. Go through to the Bridge.
- Talk to the monk. He will tell you to repair the 5 Elements Circle.
- Collect the parts and put them on the 5 Elements Circle. Move the Umbrella to reveal the last piece.
- Zoom in on the 5 Elements Circle for a mini-game.
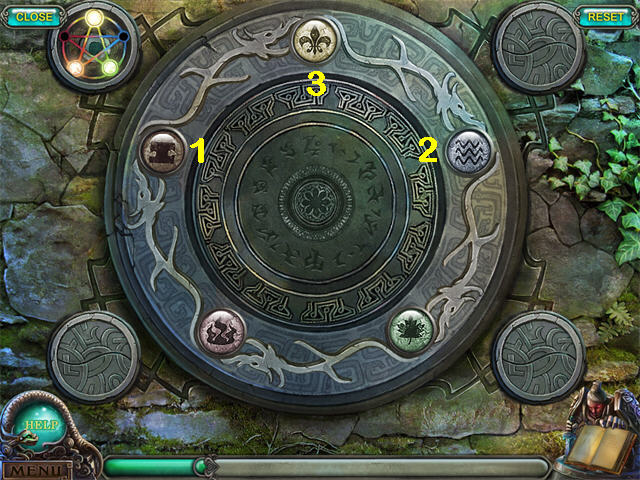
- The five Lights can be on or off.
- Clicking on a light changes it and the two lights on each side of it.
- At the start of each pattern, all five lights are off.
- Match the pattern shown in the small circle by clicking the lights in the sequence shown in the screen shot.
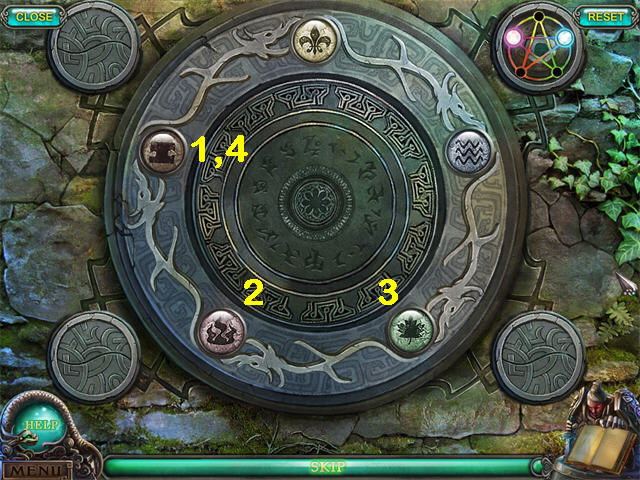
- Match the second pattern.
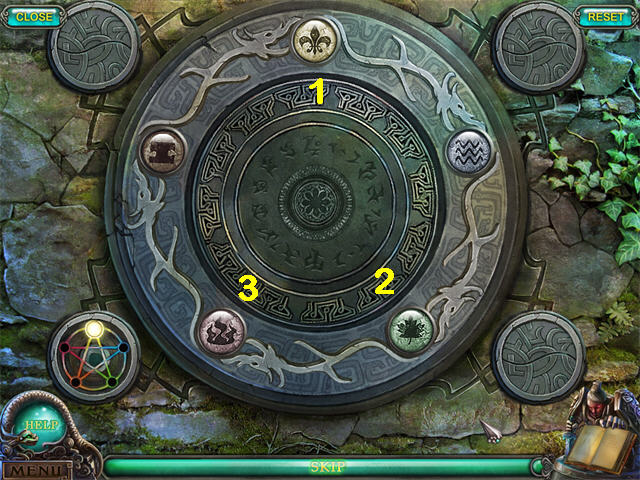
- Match the third pattern.
- Match the fourth pattern.
- Go Down to the Bell Tower, then enter the left Doorway to go to the Belfry.
- Zoom in on the Bell for a HOS; collect the items listed, including the BOARDS (C).
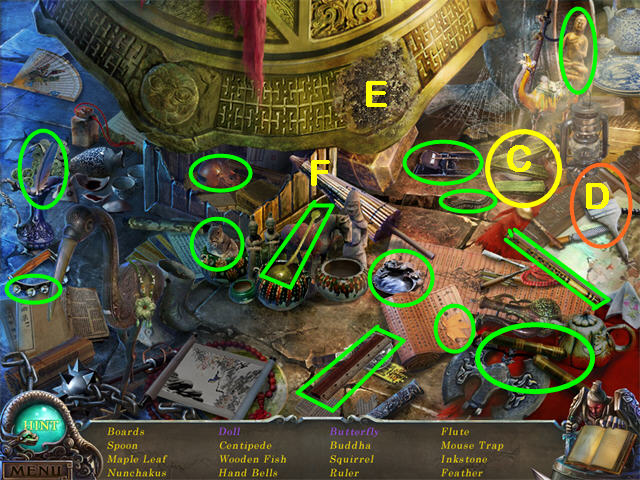
- Open the Parasol (F) to find the Doll.
- The Spoon that counts is in a bowl near the Parasol (F).
- The 'inkstone' is a bowl with ink near the Parasol handle.
- Use the Paintbrush (D) to brush away the dirt from the Butterfly (E).
- Go Down to the front of the Bell Tower, then through the Main Door to return to the Bridge.
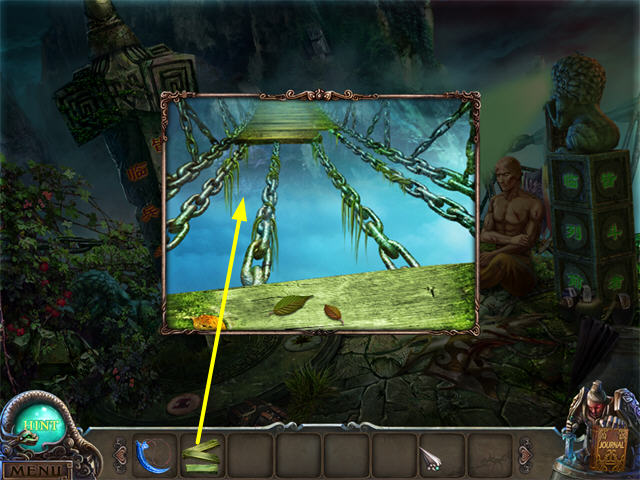
- Zoom in on the Bridge; use the BOARDS (from the 2nd HOS at the Belfry) three times.
- Cross the Bridge to the Shaolin Temple.
- Watch the cut scene. The Bridge has been destroyed, so you can no longer go back to the Bell Tower.
Chapter 3: The Shaolin Temple
- Talk to the Ghost (A) twice. You will need to find a spell to remove the vines.
- Collect the Yellow Ribbon (D) and the Ghost will be freed.
- Talk to the Ghost again. She will drop half of a JADE AMULET. Collect it.
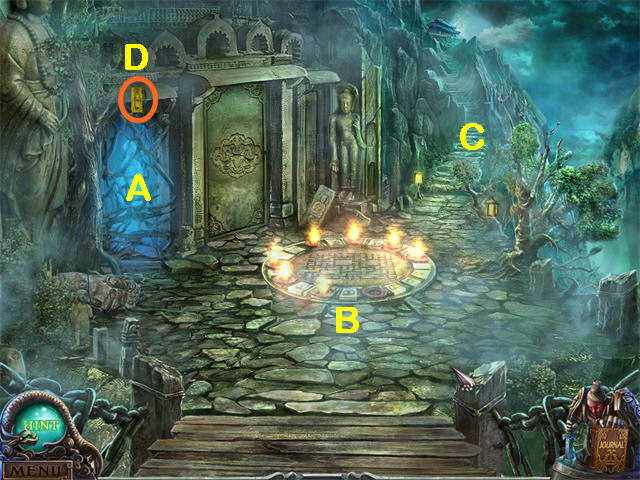
- Zoom in on the Fire Circle (B). A Seal is missing.
- Go Up the Stairs (C).

- Zoom into the Statue's Mouth (F). You can see an object, but you can't collect it yet.
- Examine the Lantern (G). You can use this fire later.
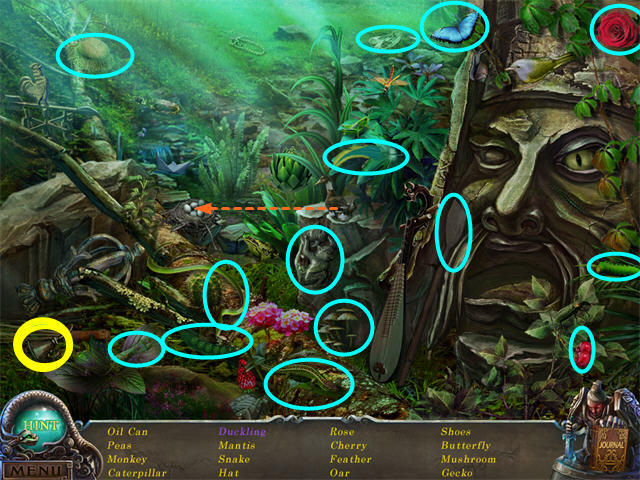
- Zoom into the Bench (H) for a HOS; collect the listed items including the BANDAGE (P).
- The 'Goblet' (M) looks like a lampbase.
- Put the lit candle (K) into the Lamp (L), then collect the Lighted Lamp.
- Put the Axe Handle (N) on the Axe Head (O), then collect the Axe.
- Enter the Shaolin Temple (J).
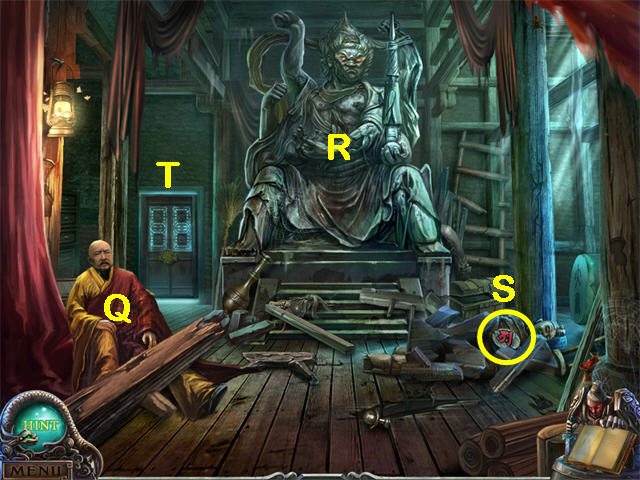
- Talk to the Abbot (Q). He is trapped under the beam.
- Examine the Statue (R). It has turned evil.
- Collect the SEAL (S).
- Zoom in on the Back Door (T); the lock is missing a piece.
- Go Down twice to the Shaolin Temple Entrance.
- Zoom in on the Flaming Circle. Put the SEAL (from the Temple) in place.
- Zoom in on the Flaming Circle for a mini-game.
- You start with 8 units of energy, one for each flame.
- Each step requires one unit of energy.
- Count the flames to see how much energy you have left.
- You will get 8 new units of energy whenever you reach a blue dot and you have 0 units of energy left. If you have more than 0 left, you just continue with what you have.
- You may not cross over your trail or back up along it.
- You may enter the same intersection from two different directions as long as you don't cross over your trail.
- The screenshot shows one solution.
- When you complete the puzzle, the Door will open. Go through it.
- Move the Helmet (U) and collect the METAL BAR (V).
- Examine the Statue (W). It is missing a glass ball.
- There are two places to zoom into the Snake Statue in the back.
- Zoom into the Snake's Head; you can see a DISK but you cannot collect it until the Snake's mouth opens.
- Zoom into the Snake's center for a Key Item.
- Collect the Buddha Statues and put them on the Snake Statue.
- The Snake's mouth will open. Zoom in; collect the DISK.
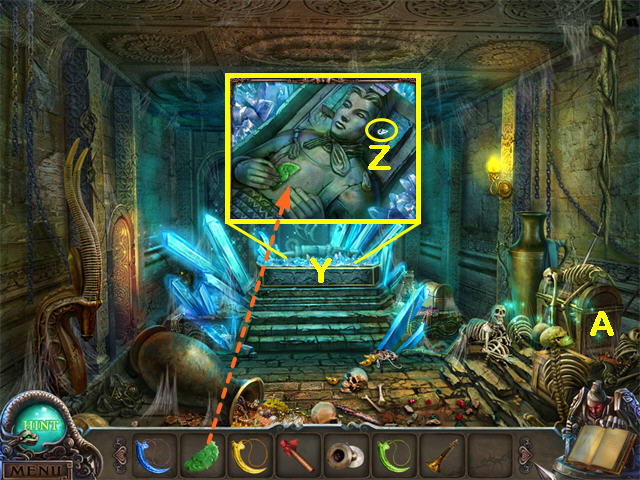
- Zoom into the right side (X) for an HOS; collect the listed items including the CANDLE (Y).
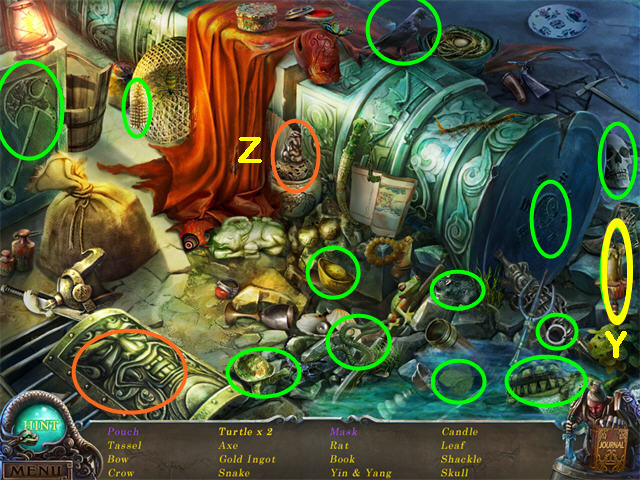
- Move the Shield to reveal the Mask.
- Remove the top of the Jar (Z) to reveal the Pouch.
- Return to the top of the Shaolin Temple.
- Zoom in on the Back Door; put the DISK (from the Snake's Mouth in the Shaolin Temple Pool) on the door lock.
- This will trigger a mini-game.
- Move the disks so that they add up to an equal weight on each side.
- The total is 56. You need 28 on each side. There are four slots on each side.
- The disks are 1, 3, 5, 7, 8, 9, 10, 13.
- Our solution: 1, 8, 9, 10 on one side and 3, 5, 7, 13 on the other.
- When you complete the puzzle, the Back Door will open.
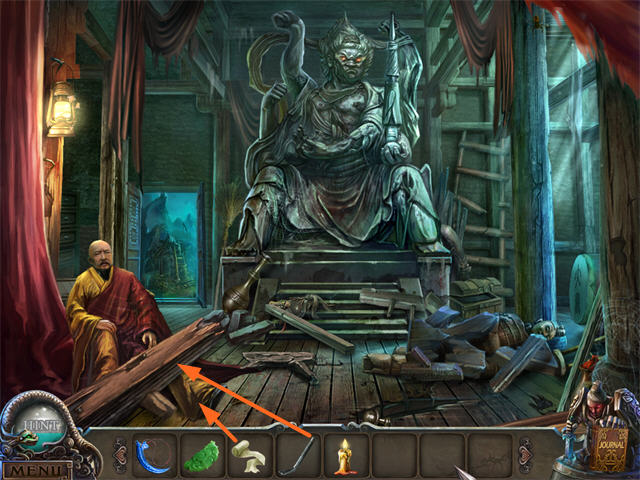
- Use the METAL BAR (from the Shaolin Temple Pool) three times on the Beam that is on the Abbot's leg.
- Use the BANDAGE (from the HOS ) on his leg.
- Go through the Back Door.
- Note: if you try to give the TALISMAN to the Abbot he will not accept it and you will just go through the Back Door anyway.
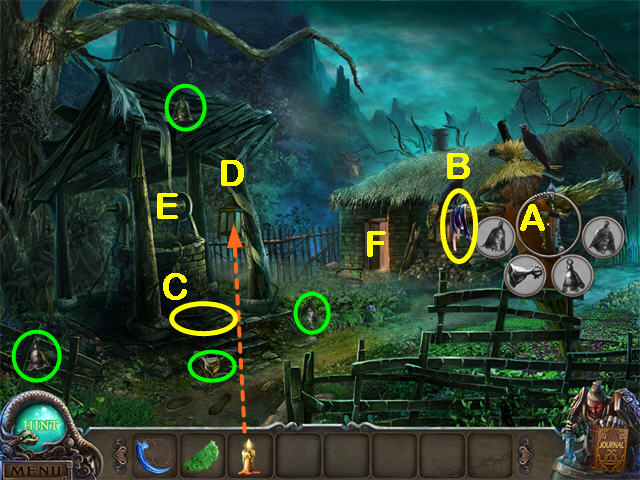
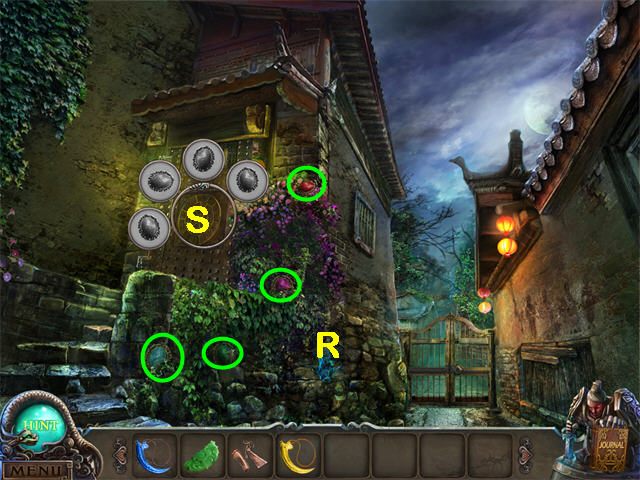
- Zoom in on the Bells Key Item (A).
- Collect the BELLS and put them on the Scarecrow (A).
- Once the Crows are gone, collect the BELT (B).
- Zoom in on the Well (E). It is too dark to see.
- Put the LIT CANDLE (from the HOS ) in the Lantern (D).
- Zoom in on the Well (E). You will need to find a way down later.
- Collect the PEDAL (C).
- Enter the House (F).
- Use the BLUE CLAW AMULET to destroy the Terracotta Warrior. Collect the DULL SWORD that he drops on the ground.
- Examine the Whetstone (K).
- Examine the Potion Maker (L).
- Put the PEDAL (from the ground by the Well) on the Whetstone (K).
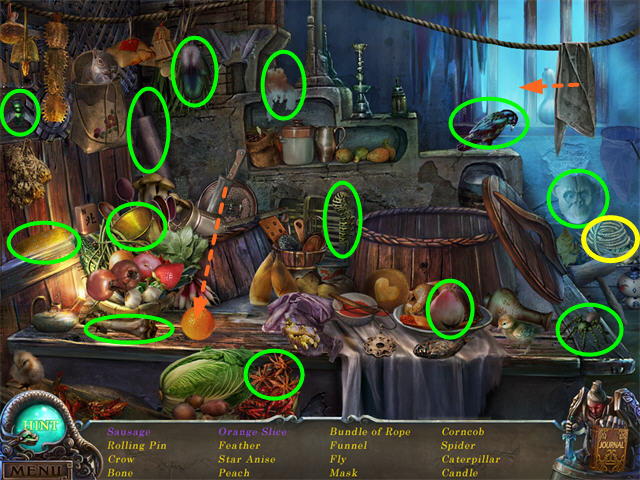
- Zoom in on the Wooden Pot (M) for a HOS; collected the listed items including the GOBLET (G).

- The Bamboo Shoots are in the center just above the Ginger.
- Open the Bag (H) and collect the Pinecone.
- Move the Wooden Lid (J) and collect the Sponge Cakes.
- Go Down 3 times to the Shaolin Temple Stairs.
- Zoom in on the Bench for a HOS; collect the listed items including the KEY.
- Move the Plane (O) onto the piece of Wood to create the Wood Curls.
- Open the Yellow Box (P) and collect the KEY.
- Go Down twice and enter the Shaolin Temple Pool.
- Use the GOBLET (from the HOS in the House behind the Shaolin Temple) to get Water from the Pool.
- Return to the Shaolin Temple Stairs.
- Zoom in on the Statue; put the WATER (from the Shaolin Temple Pool) in the Statue's Mouth.
- Collect the GLASS BALL.
- Return to the Shaolin Temple Pool.
- Put the GLASS BALL (from the Shaolin Temple Stairs) in the Statue (Q).
- Zoom in on the Shield (R) for a HOS; collect the listed items including the FLINT (S).
- Open the Bag (T) to reveal the Keys.
- Use the Bucket (U) to get Water (V).
- Pour the Water into the Grate (W).
- The Paper Boat (X) will float to the top. Collect it.
- Zoom in on the Pool to trigger a mini-game.
- The goal is to match the dots in the center row with the color of the rings around them.
- You can change the position of two lights by clicking on the button in between them.
- You can rotate a light by clicking on it.
- Blue + Green = Turquoise. Blue + Red = Magenta. Red + Green = Yellow.
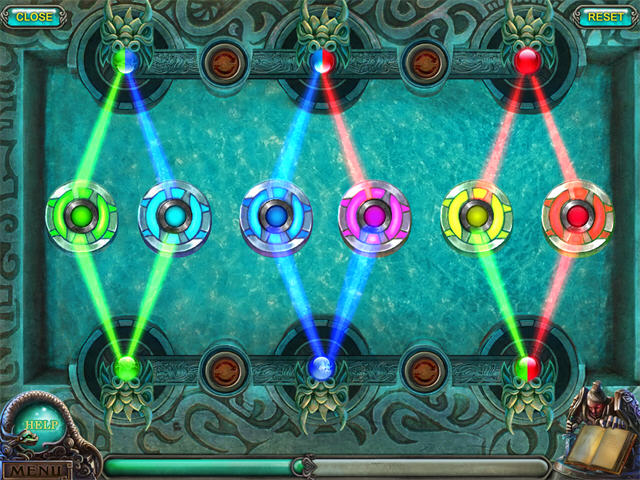
- The screenshot shows the solution.
- The Pool will drain. Collect the GRINDING WHEEL.
- Return to the House behind the Shaolin Temple.
- Put the GRINDING WHEEL (from the Shaolin Temple Pool) on the Whetstone (Y).
- Put the PEDAL (from the ground by the Well) on the Whetstone (Y) if you haven't done that already.
- Sharpen the DULL SWORD (from the floor in this room).
- Use the SWORD to cut the Bamboo (Z). Collect the BAMBOO STRIPS.
- Go Down twice to the Shaolin Temple.
- Use the BAMBOO STRIPS (from the House behind the Shaolin Temple) and the BELT (from the Scarecrow) to make a splint for the Abbot.
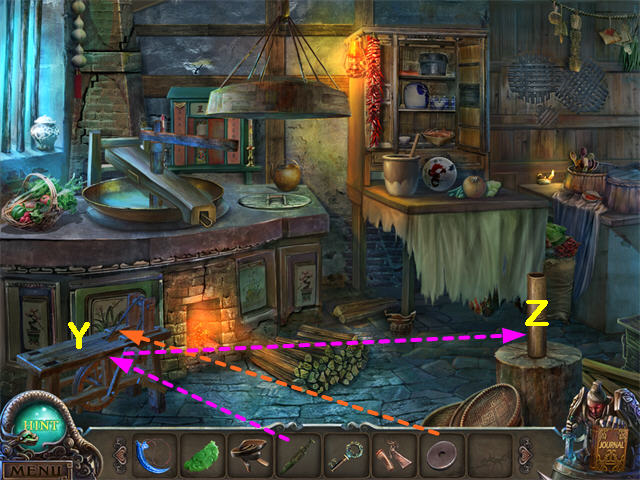
- Return to the House behind the Shaolin Temple and do the HOS there.
- Collect the listed items including the BUNDLE OF ROPE.
- Use the Knife to cut the Orange.
- Move the Dish Towel to reveal the Sausage.
- Go Down to the Backyard.
- Put the BUNDLE OF ROPE (from the HOS inside the House behind the Shaolin Temple) on the Well.
- Climb down into the Well.
- Watch the Cut scene. The Rope has been cut, so you cannot return to the Shaolin Temple.
Chapter 4: The 4 Guardians
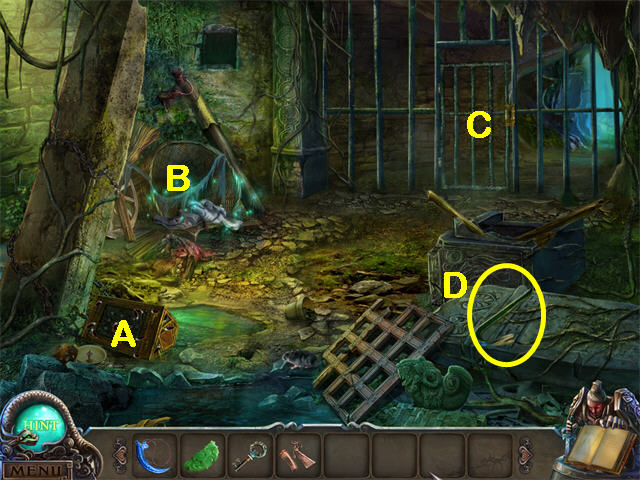
- You are in a Sewer. Zoom in on the Box (A). You will need incense to get rid of the bugs.
- Collect the CROWBAR (D).
- Zoom in on the Basket (B) for a HOS; collect the listed items, including the HANDLE (E).
- Use the Hammer to break open the Cracked Pot (F) revealing the Beads.
- Use the Clippers to cut away the Ivy (G) revealing the Goblet.
- Use the KEY (from the Shaolin Temple Stairs) to open the Gate (C). Go through the Gate to the Cavern.
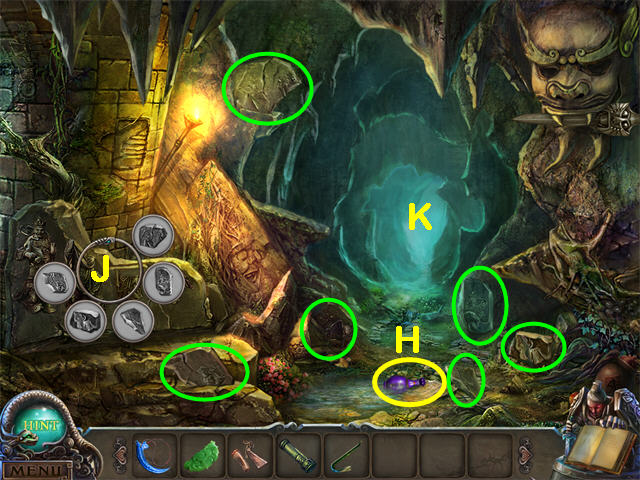
- Collect the IODINE (H).
- Zoom in on the Picture Key Item (J).
- Collect the Picture Pieces and put them on the Key Item (J).
- Exit through the tunnel (K) to the Cliff.
- Examine the Coffin (L). Use the CROWBAR (from the Sewer) on it.
- Zoom in on the Scrolls Key Item (M).
- Collect the Scrolls and put them on the Key Item (M).
- Zoom in on the Scrolls (M) again. You will see a large scroll. Collect the YELLOW CLAW TALISMAN from the right side.
- The writing on the left side is too faint to read. Use the IODINE (from the Cavern) on it. Watch the Cut Scene. Now you know that there are four talismans and that you must find the Great Dragon.
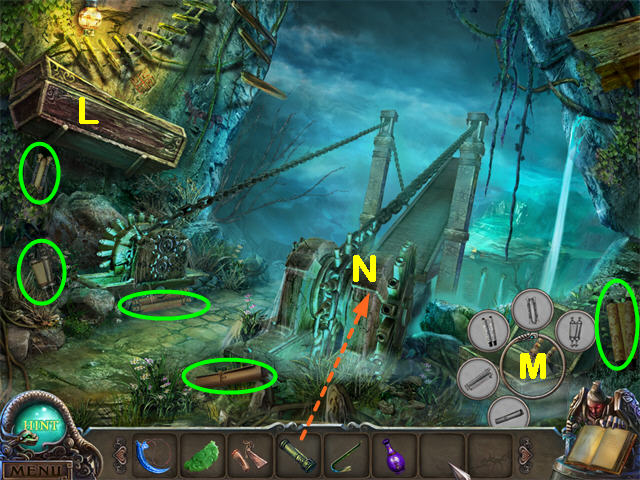
- Use the HANDLE (from the Basket HOS in the Sewer) on the Drawbridge (N). Pull the Handle 3 times to lower the Drawbridge. Cross over the Drawbridge to the 4 Guardians.
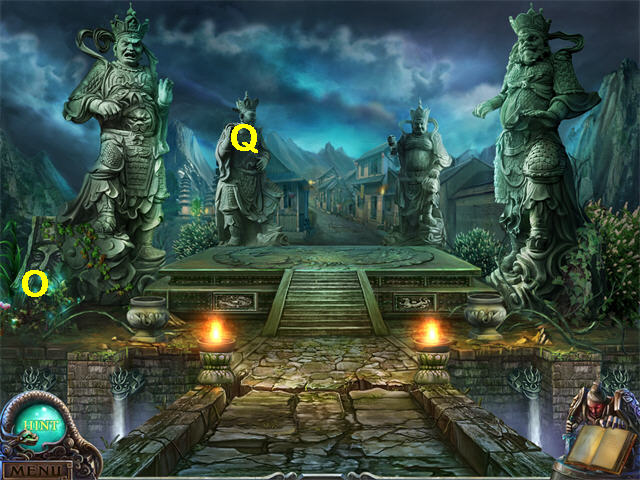
- Examine the 4 Guardian Statues. Each is missing something when compared with the picture in your Journal.
- Zoom in on the HOS (O); collect the listed items, including the STONE LUTE (P).
- Use the Axe to cut the Wood to get the Firewood.
- Put the STONE LUTE on the Guardian Statue (Q).
- Go forward to the Alley.
- Examine the glowing blue stone (R). There is an item there, but you need something to pry it out.
- Zoom in on the Door Key Item (S).
- Collect the Jewels and place them on the Door (S).
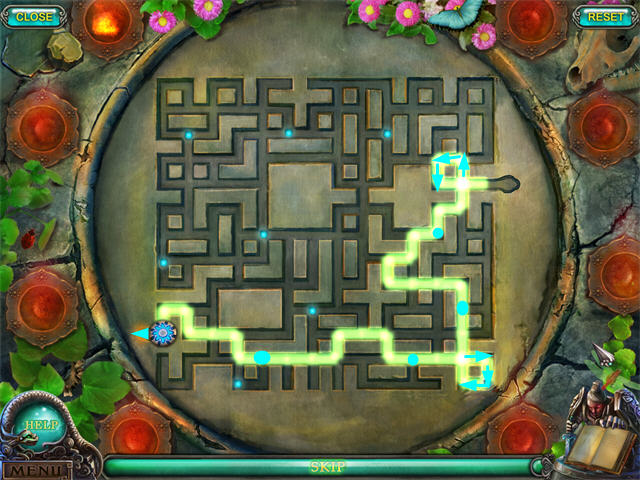
- Click on the Door to trigger a mini-game.
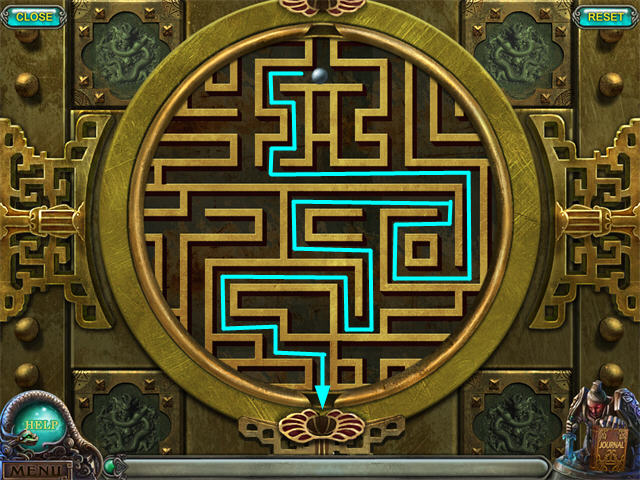
- Drag the outer ring left or right to turn the maze.
- When the puzzle is complete the Door will open. Enter the Storeroom.
- Collect the AWL (U) and the MIRROR (V).
- Examine the Mouse. Notice the MIRROR turned him into stone.
- Zoom in on the Small Chest Key Item (T).
- Collect the Tiles and put them on the Small Chest (T).
- Zoom in on the Small Chest (T) to trigger a mini-game.
- Move each Dragon Tile to the matching color symbol.
- Begin by exchanging the positions of the Yellow and the Blue Dragon Tiles.
- Now exchange the Red and the Green.
- Leave the Blue at the top where it is out of the way.
- Finally move the Blue back into place.
- When the puzzle is complete, the Small Chest will open. Collect the INCENSE.
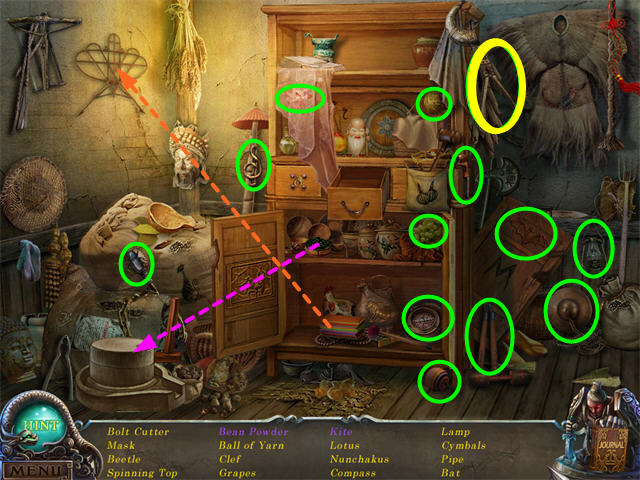
- Zoom in on the Shelves (W) for a HOS; collect the listed items including the TALCUM POWDER.
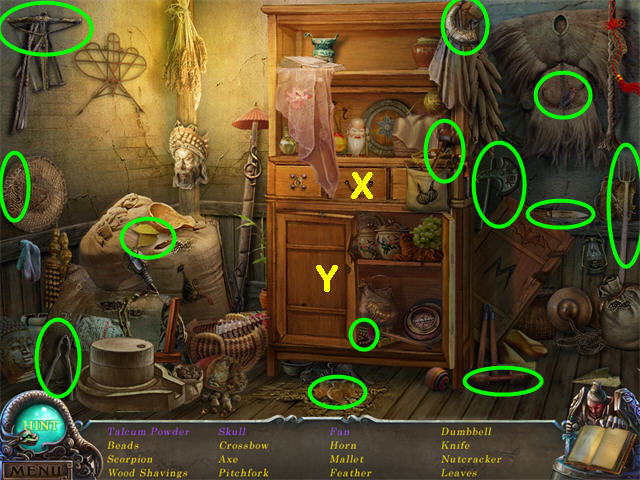
- Open the Drawer (X) for the Skull.
- Open the Cabinet (Y) for the Fan and the TALCUM POWDER.
- Go Down to the Alley.
- Use the AWL (from the Storeroom) 3 times on the glowing Blue Stone, then collect the STONE EYE.
- Go Down twice to the Cliff.
- Use the MIRROR (from the Storeroom) on the Ferret. It will turn to stone. Collect the STONE FERRET.
- Go Down once to the Cavern.
- Put the STONE EYE (from the Alley) on the Lion Statue. It needs another Eye.
- Go Down once to the Sewer.
- Zoom in on the Basket for a HOS; collect the listed items including the STONE EYE.
- Use the Air Pump on the uninflated Ball to get the INFLATED BALL.
- Put the Flute on the Statue of the Snakecharmer. The Snake (Z) will come up out of the ground so you can catch it.
- Zoom in on the Box; put the INCENSE (from the Small Chest in the Storeroom) in the Bowl.
- Use the FLINT (from the Shaolin Temple Pool HOS) to light the Incense.
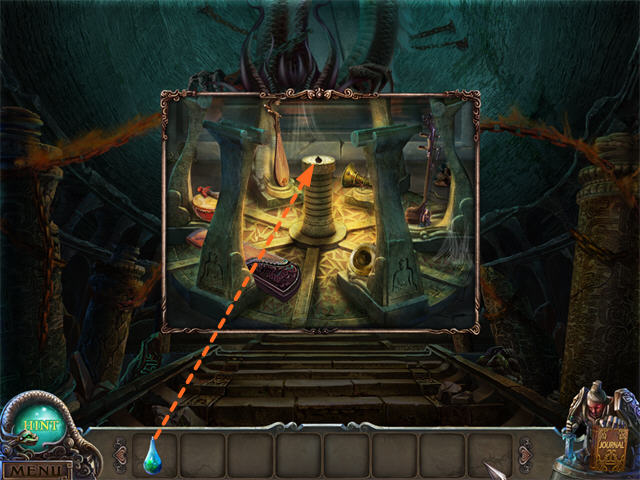
- Use the TALCUM POWDER (from the Storeroom HOS) to trigger a mini-game.
- Push the Buttons in the sequence shown in the screenshot. The box will open and you will receive the HANDLE.
- Go through the Gate to the Cavern.
- Put the second STONE EYE on the Statue. It will drop the STONE SWORD. Collect it.
- Go Up twice to the 4 Guardian Statues.
- Give the STONE FERRET (from the Cliff) to the Statue on the left.
- Give the STONE SWORD (from the Cavern) to the Statue on the right.
- Zoom in on the HOS; collect the listed items including the OIL CAN.
- Put the Mother Duck on the Nest, then click twice to collect the Duckling.
- Go forward to the Alley.
- Go Down to the Alley.
- Zoom in on the Gate.
- Use the OIL CAN (from the 4 Guardian Statues HOS) to clean off the rust.
- Use the HANDLE (from the insect Box in the Sewer) to open the Gate. Go through to the Crossroads.
- Collect the STONE UMBRELLA that is next to the Gate.
- Go Down twice to the Four Guardian Statues.
- Give the STONE UMBRELLA (from the Crossroads) to the last Statue.
- You have now used the STONE SWORD (from the Cavern), the STONE LUTE (from the 4 Guardians HOS), the STONE FERRET (from the Cliff), and the STONE UMBRELLA (from the Crossroads).
- The right Column will rise up out of the ground.
- Collect the BLUE CRYSTAL from the left Column and the RED CRYSTAL from the right Column.
- Go Up to the Alley.
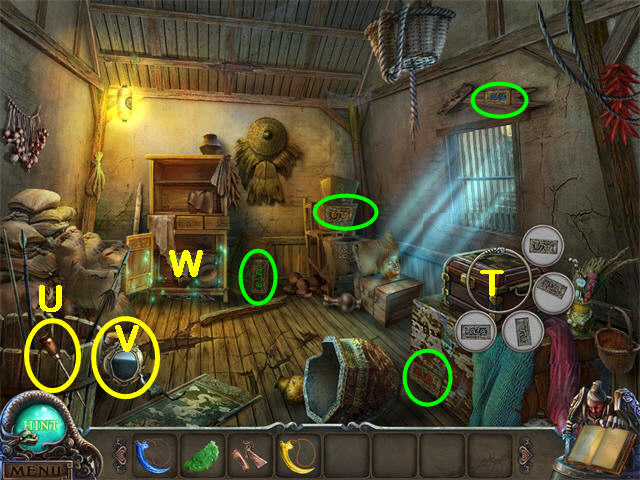
- Enter the Storeroom to find another HOS; collect the listed items, including the BOLT CUTTER.
- Put the Paper on the Kite Frame on the wall to make the Kite, then collect it.
- Put the Beans in the Grinder. The Bean Powder will be green at the bottom of the Grinder.
- Go Up to the Crossroads.
Chapter 5: The Old Palace
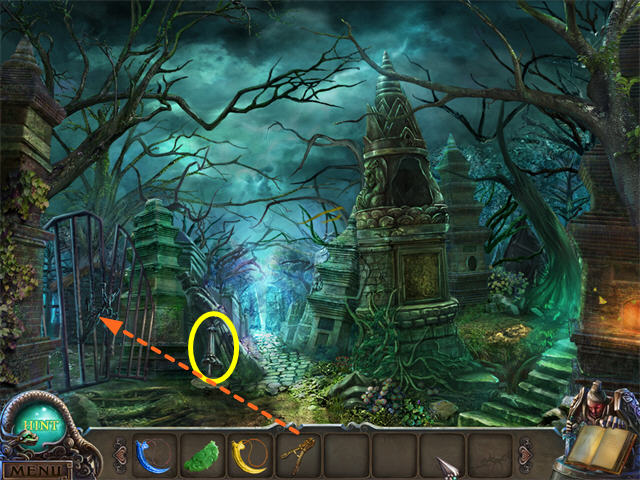
- Use the BOLT CUTTERS (from the Storeroom HOS) to open the Gate.
- Go through the left gate to the Backyard of the Shaolin Temple.
- Talk to the Abbot. This is all you can do here now.
- Go through the Gate to the Crossroads.
- Go forward to the Mausoleum Temple Entrance.
- Talk to the Guards. You need an Abbot's Badge.
- Collect the HANDKERCHIEF (A).
- Go Down to the Crossroads.
- Go right to the Old Palace.
- Put the BLUE CRYSTAL (from the Four Guardians) in the Left Statue (B) and the RED CRYSTAL in the Right Statue (C). The Old Palace Door will open.
- Zoom in on the Statue for a HOS (D); collect the items listed including the BRUSH.
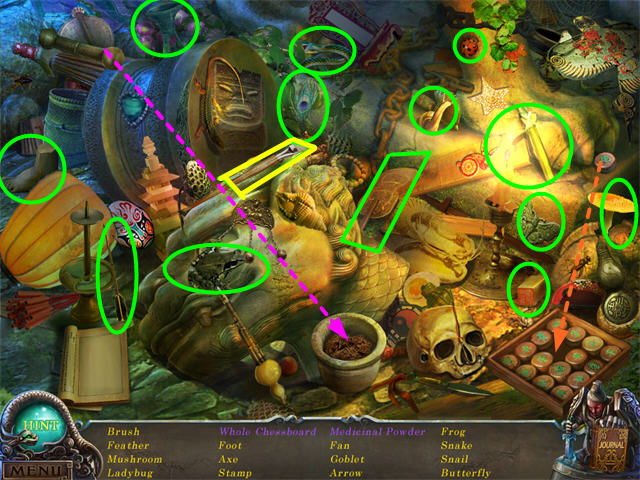
- Use the Pestle to grind the herbs in the Mortar, then collect the MEDICINAL POWDER.
- Put the Game Piece back in the box with the other pieces, then collect the Set.
- Collect the Journal Page (E). This is a clue to a mini-game you will play later.
- Go forward into the Old Palace.
- Zoom in on the Mask (F).
- Zoom in on the Horse Key Item (G).
- Collect the Wheel Pieces and put them on the Horse (G). The Horse will move out of the way of the Door (J).
- Zoom in on the HOS (H); collect the listed items including the PRAYER WHEEL (M).
- Open the lid of the Gold Box to reveal the Rabbit.
- Open the door of the Bird Cage (L). After the Bird flies out, collect the Empty Cage.
- Zoom in on the Mask (F) several times until you see the close-up of the eyes; use the BRUSH (from the HOS at the Old Palace Entrance) to paint in the eyes. The Mask will reveal a Switch. Pull the Switch to open the Door (J).
- Go through the Door to the Inner Chamber.
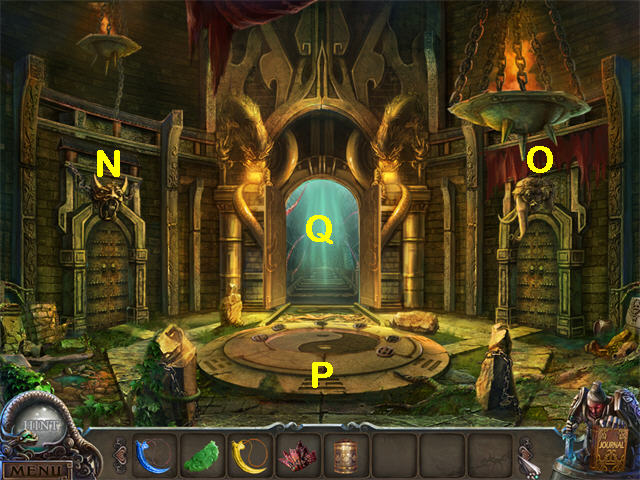
- Examine the left Door (N). You need a Ring handle.
- Examine the right Door (O). It needs another Tusk.
- Examine the Yin Yang (P). It is missing two symbols.
- Go through the open Door (Q).
- Watch the Cut Scene. The Terracotta General is holding the Great Dragon captive.
- Examine the closed Door (Q). You will need all four Claw Talismans to open it.
Chapter 6: The Mausoleum Temple
- Check the Task List in your Journal — there is a new task to tell the Abbot about the General's plans.
- Go Down until you get to the Crossroads, then go left into the Shaolin Temple gate.
- Talk to the Abbot. He will give you the BADGE you need to get past the Guards on the way to the Mausoleum Temple.
- Go out through the Gate, then forward to the Guards.
- Give the Guards the BADGE and they will let you through.

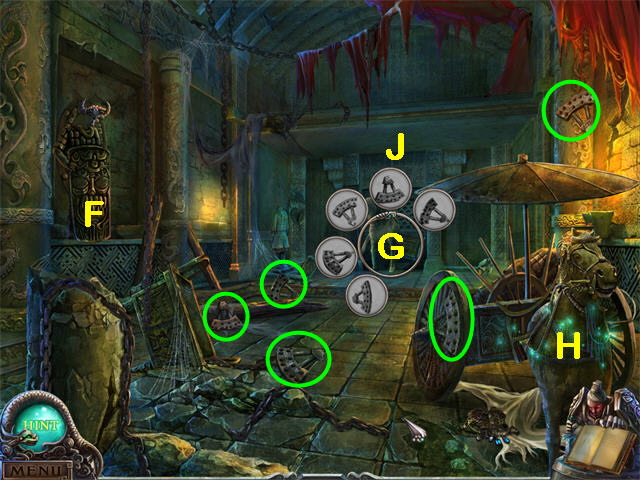
- Zoom in on the Pillar Key Item (A).
- Collect the Pieces and put them on the Pillar (A). The Statue's mouth will open, and the TARNISHED RING will fall down. Collect it.
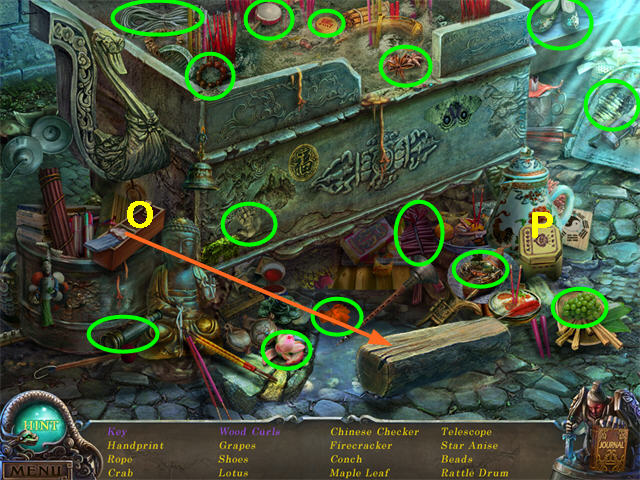
- Zoom in on the HOS (B); collect the listed items including the DAGGER (C).
- Use the Needle and Thread on the torn bag to get the Stitched Hole.
- Use the Hammer and Chisel on the Stone Pillar to get the Engraved Sign.
- Go forward to the Mausoleum Temple Steps.

- Examine both Statues; each is missing a Ring.
- Collect the FLOWER (E).
- Zoom in on the right Shelves (F); put the PRAYER WHEEL (from the HOS in the Old Palace Outer Chamber) there.
- Zoom in on the Shelves (F) again.
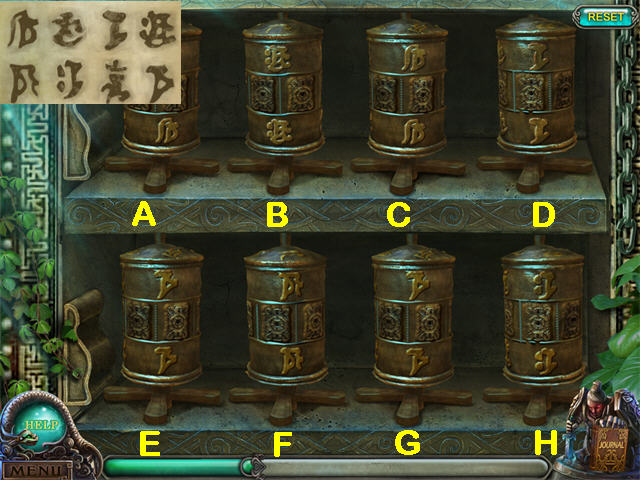
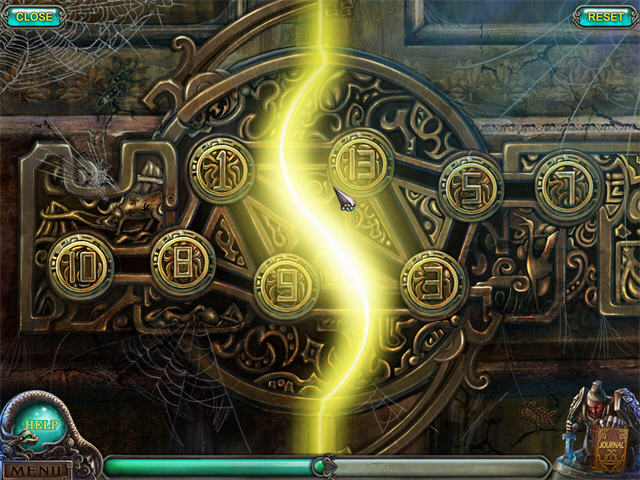
- Turn the cylinders so the symbols match the symbols in your journal. The screenshot shows the starting position and the Journal entry.
- Solution: 1. Turn E one time. 2. Turn B two times. 3. Turn G two times. 4. Turn H three times. 5. Turn C one time. 6. Turn G three times. 7. Turn D one time. 8. Turn H three times.
- The path lights will come on.
- Go Up the steps into the Mausoleum Temple.
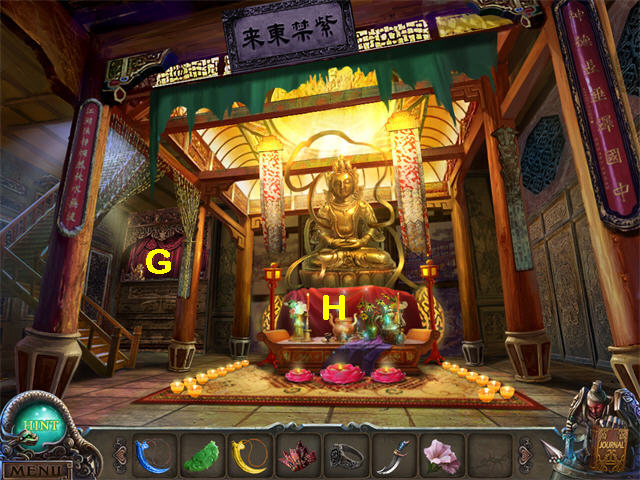
- Zoom in on the red curtain (G); you will need two COINS to start.
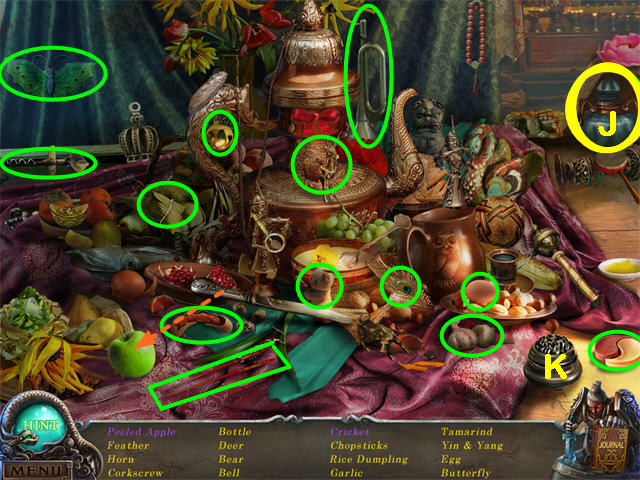
- Zoom in on the HOS by the Statue (H); collect the listed items including the BOTTLE (J).
- Use the Knife to peel the Apple.
- Open the Silver Box (K) to reveal the Cricket.
- Go Upstairs to the Drum Room.
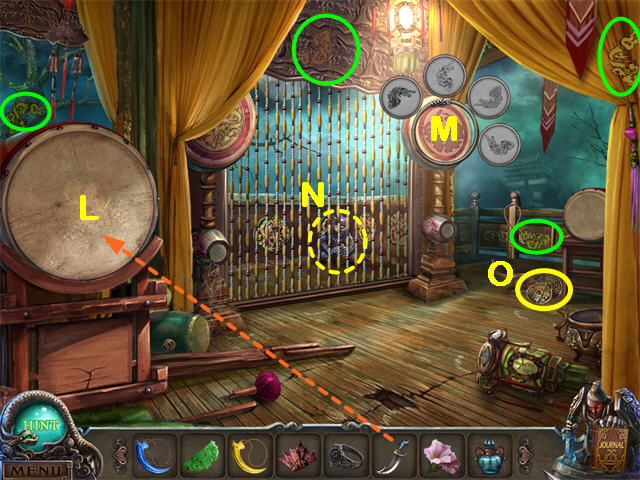
- Zoom in on the Big Drum (L); use the DAGGER (from the HOS at the Mausoleum Temple entrance) three times to cut it open revealing a large spider. Read your journal — you will need a potion for the spider.
- Zoom in on the Decorated Drum Key Item (M).
- Collect the decorations and put them on the Decorated Drum (M).
- The beaded curtain will open. Collect the MONKEY STATUE (N).
- Collect the COINS (O).
- Go Downstairs.
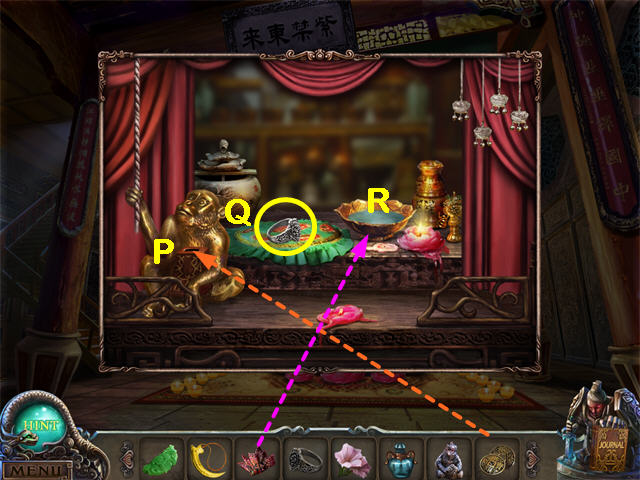
- Zoom in on the red curtain; put the COINS (from the Drum Room) in the box (P) by the brass monkey. The curtain will open.
- Take the SECOND RING from the pad (Q).
- Put the TARNISHED RING (from the Statue's mouth at the Entrance to the Mausoleum Temple) on the pad where the first ring was (Q).
- Put the HANDKERCHIEF (from the entrance to the Mausoleum Temple) into the Silver Cleaner (R).
- Use the WET HANDKERCHIEF three times on the RING on the pad (Q).
- Collect the clean RING from the Pad (Q).
- Go Down to the Mausoleum Temple Stairs.
- Put one RING on each Statue.
- The base of each Statue will open.
- Collect the Scroll on the left, then read your Journal to see what it said.
- Collect the DRUMSTICK on the right. This will count as the Drum for the Musical Instruments in your Journal.
- Go Down to the Mausoleum Temple Entrance.
- Zoom in on the HOS; collect the listed items, including the TONGS (S).
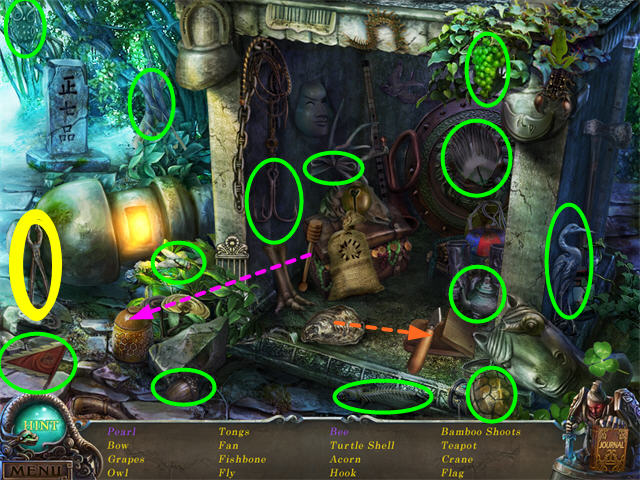
- Put the Oyster on the Cutting Board and it will be opened so you can collect the Pearl.
- Put the Honey Dipper into the Honeypot. Some honey will spill and a Bee will fly in.
- Go Down to the Crossroads.
- Place the MONKEY STATUE (from the Drum Room) in the hole in the center Monument. A compartment will open.
- Click on the Scroll in the compartment, then read your Journal. Now you know how to make Sleeping Potion.
- Go left to the Shaolin Temple Backyard.
- Go into the House behind the Shaolin Temple.
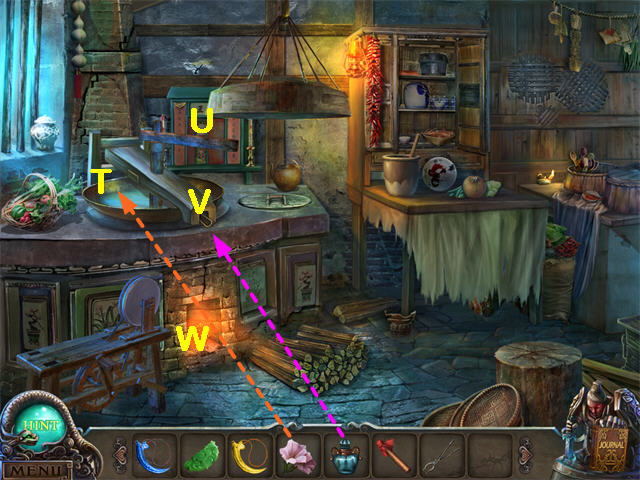
- Put the FLOWER (from the Mausoleum Temple Stairs) into the Basin on the Potion Maker (T).
- Turn the Handle (U).
- Use the BOTTLE (from the Mausoleum Temple HOS) at the bottom of the Potion Maker (V) to collect the POTION.
- Zoom in on the Fire (W) below the Potion Maker; Use the TONGS (from the HOS at the Entrance to the Mausoleum Temple) to take the METAL RING out of the Fire, then click on it to collect it.
- Go Down to the Shaolin Temple Backyard.
- Go out the Gate to the Crossroads.
- Go Up until you come to the Statue inside the Mausoleum Temple.
- Zoom in on the HOS; collect the listed items including the CYMBALS (X).
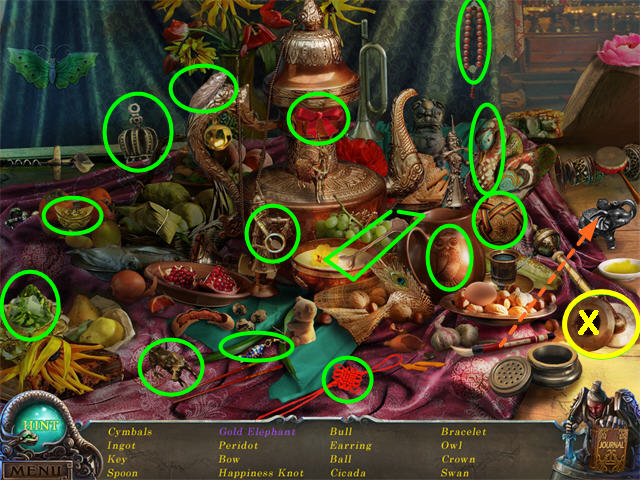
- Use the Paintbrush on the Elephant to make it gold.
- Go Upstairs to the Drum Room.
- Use the SLEEPING POTION (from the House behind the Shaolin Temple) on the Spider.
- Collect the GREEN CLAW TALISMAN.
- Go Down until you get to the Crossroads.
- Go right to the Old Palace.
Chapter 7: The Secret Room
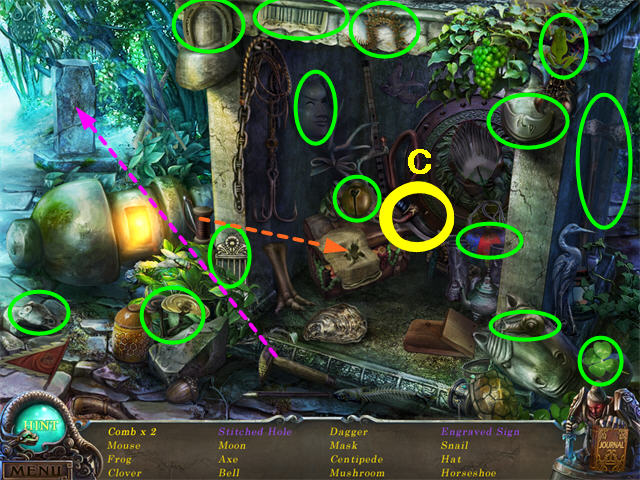
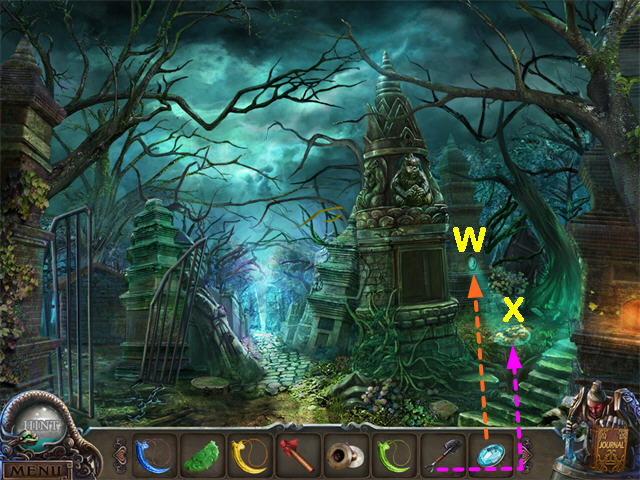
- Zoom in on the right Statue for a HOS; collect the listed items including the LI STONE .
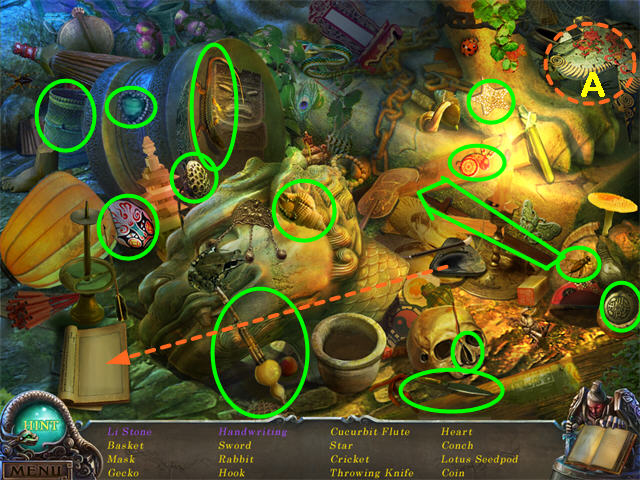
- The Sword is a wooden practice sword near the center of the scene.
- Use the Brush and Ink on the Notebook to get the Handwriting.
- Open the Painted Box (A) to reveal the LI STONE.
- Go through the Tunnel to the Outer Chamber.
- Zoom in on the right Horse Statue for a HOS; collect the listed items including the SUONA HORN (D).
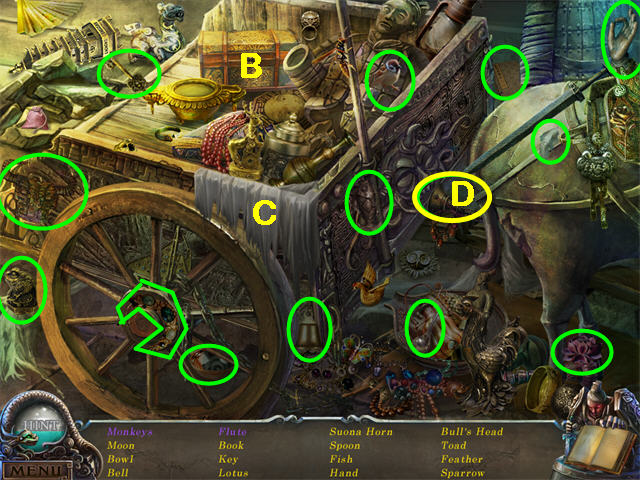
- The Moon is the jeweled crescent on the cart wheel.
- Open the Chest (B) to reveal the Monkeys.
- Move the Rag (C) to reveal the Flute.
- Go forward to the Inner Chamber.
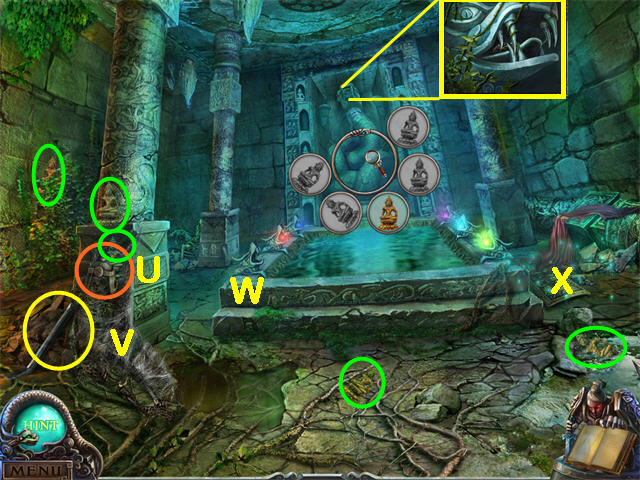
- Put the LI STONE (from the Old Palace Entrance HOS) on the Yin Yang (E).
- Zoom in on the Bull Door (F); put the METAL RING (from the Fire in the House behind the Shaolin Temple) in place.
- Pull on the Ring to open the Bull Door. Go through.
- Zoom in on the Stone Bench and collect the LEVER (G).
- Examine the Statue (L). It matches the page in your Journal (collected in the Tunnel), but you need to wait to open it until you know more about it.
- Zoom in on the Shelf (H) for a HOS; collect the items listed including the IVORY (J).
- Open the Book (K) to reveal the Eagle.
- Put the Dart on the Target, then collect the Bullseye.
- Exit to the Inner Chamber.
- Zoom in on the Elephant Door; place the IVORY (from the HOS in the Bull Room). Click once to turn the IVORY and open the door. Go through into the Elephant Room.
- Collect the SHOVEL (M).
- Examine the Fountain (N). The water is blocked.
- Zoom in on the Stones (O) for a HOS; collect the listed items including the GEM (Q).
- Use the Watering Can on the Flower Pot (R) to reveal the Flower.
- Go through the Door (P) to the Old Temple Pool.
- Put the LEVER (from the Bull Room) in the Slot (T). Pull the Lever. Steps will appear in the Pool.
- Examine the Bas Relief (U). It is missing a LEAF.
- Examine the Water Wheel (V). Rubble is blocking it. You can try the SHOVEL, but it will not work.
- Go Down until you reach the Crossroads.
- Put the GEM (from the Elephant Room HOS) into the round hole (W).
- Use the SHOVEL (from the Elephant Room) to dig on the indicated spot (X), revealing a Box.
- Examine the Box to trigger a mini-game.
- The goal is to put each blue stone in the 3rd row.
- Moving one stone moves the stone on each side of it one row in the opposite direction.
- Some blue stones can move all the way to the top, others all the way to the bottom.
- When a stone goes as far as it can, it then reverses direction on the next move.
- Our solution: 1. Stone C Up (moves B and D down). 2. Stone E Down (moves D and F up). 3. Stone E Down (moves D up and F down since F is already at the top). 4. Stone F Down (moves E up).
- 5. Stone F Down (moves E up). 6. Stone E Up (moves D down and F up since F is already at the bottom). 7. Stone E Down (moves D and F up). 8. Stone E Down (moves D down since it already at the top and F up).

- 9. Stone F Down (moves E up). 10. Stone D Up (moves C and E down). 11. Stone B Down (moves A and C up). 12. Stone A Down (moves B up).
- When you complete the puzzle, collect the GOLD LEAF.
- Return to the Old Palace Pool.
- Zoom in on the Bas Relief on the back wall; put the GOLD LEAF (from the Crossroads) in place.
- Enter the Secret Room.
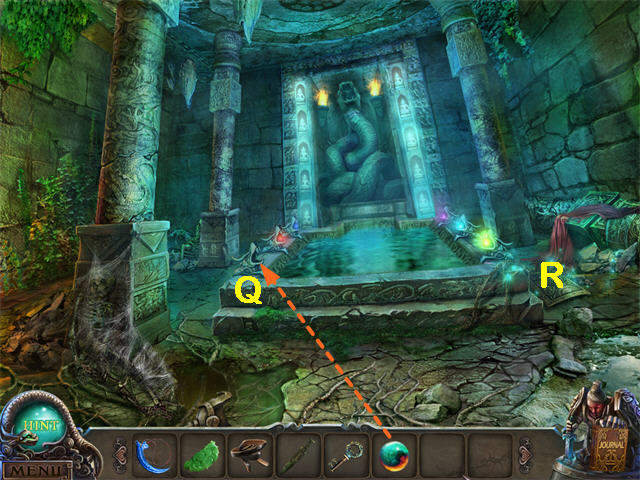
- Examine the Tomb (Y).
- Put the JADE (from the Ghost at the Shaolin Temple Entrance) on the Tomb.
- The Statue will cry one TEAR (Z). Collect it.
- Zoom in on the Chest (A) for a HOS; collect the listed items, including the RED CLAW (B).

- Use the Red Brush on the Dragon Stencil (C) to produce a Red Dragon.
- Move the Curtain (D) to reveal the Oar.
- Go Down until you reach the Inner Chamber.
Chapter 8: The Song of Freedom
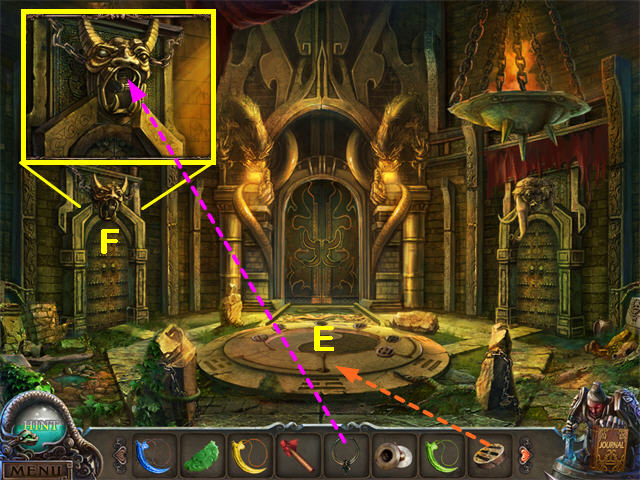
- Zoom in on the Dragon Door; place the BLUE CLAW (from the cut scene in Chapter 1), the YELLOW CLAW (from the Scroll at the Cliff), the GREEN CLAW (from the Spider in the Drum Room), and the RED CLAW (from the Secret Room).
- The Door will open. Go through into the Dragon Room.
- Talk to the Great Dragon. The magical song will release him.
- Examine the Orchestra Pit (the small Door beyond the Dragon). The Lute is in place, but you need the other Instruments.
- Go Down to the Inner Chamber.
- Go into the Elephant Room.
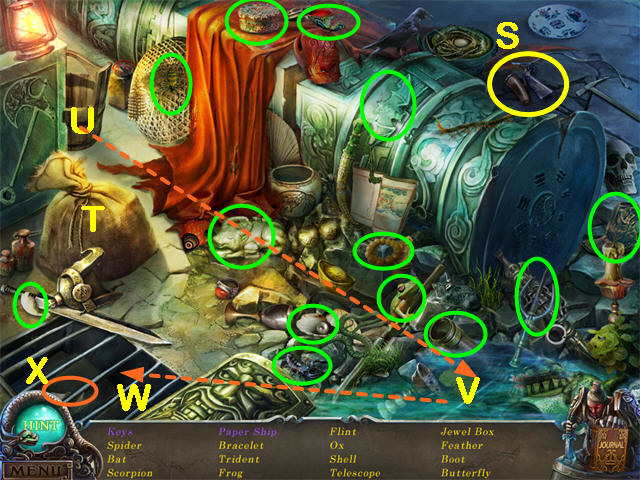
- Zoom in on the Stones for a HOS; collect the listed items, including the QIAN STONE (A).
- Use the Saw on the Vines to reveal the Harp.
- Use the Fishing Pole in the Water to catch the Lobster. (Some Find Lists may say Shrimp instead, but it's the same object).
- Go forward twice to the Secret Room.
- Zoom into the Chest for a HOS; collect the listed items, including the CHINESE FIDDLE (B).
- Go Down 3 times to the Inner Chamber.
- Zoom in on the Yin Yang in the center; place the QIAN STONE (from Elephant Room HOS).
- Zoom in again for a mini-game.
- The goal is to place each tile next to its matching color symbol. The symbol lights up when the correct tile is next to it.
- Tiles can travel along the center line as well as around the edges.
- Click on a tile, then on an empty slot to move it.
- 1. Begin by moving the Aqua and the Blue tiles over one to make space. Then move the Red to the bottom of the center line.
- 2. The Red should come right after the Orange. So move the Magenta, Green, and Purple to the left to make room. Move the Red up.
- Now Blue, Aqua, Orange, and Red are in the correct sequence. But we need to put Yellow after the Red.
- 3. Move the Yellow to the bottom of the center line.
- 4. Move the Red to the right to make space for the Yellow. Move the Yellow up and then right so it's behind the Red. Move the Purple right and then up so it's behind the Yellow.

- Now we need to switch the Magenta and the Green and all the tiles will be in the right sequence.
- 5. Move the Magenta all the way around so that it is between the Purple and the Green.
- 6. and 7. Now move all the tiles counterclockwise until each is in its correct position.
- 8. When the puzzle is complete, the Yin Yang symbol will open, revealing the ZITHER (C).
- You should now have all the musical instruments: the DRUMSTICK (from the Mausoleum Temple Steps), the SUOMA HORN (from the Old Palace Outer Chamber HOS), the CYMBALS (from the Mausoleum Temple HOS), the FIDDLE (from the Secret Room HOS), and the ZITHER (from the Yin Yang in the Inner Chamber). The LUTE is already in place in the Dragon's Orchestra Pit.
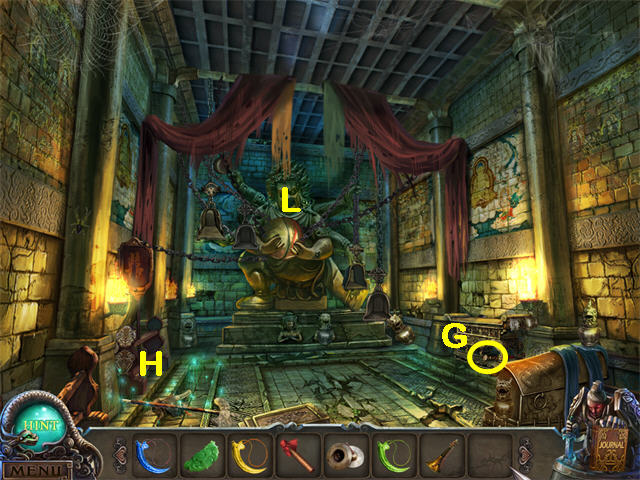
- Enter the Dragon Room.
- Zoom in on the Dragon's Orchestra Pit; place the five instruments.
- Put the TEAR (from the Secret Room) on the top of the Column. This will trigger a mini-game.
- Click once on the top of the Column to start the mini-game.
- Each instrument is associated with a color. FIDDLE = dark blue, CYMBALS = orange, ZITHER = purple, DRUM = light blue, and LUTE = red. The HORN = aqua, but may look green or neon blue depending on your video settings.
- The column will display colored stripes for a few seconds, then go blank. Match the pattern from top to bottom by clicking on the instruments that match those colors. If you make a mistake the pattern will display again.
- When you have finished playing the instruments, click on the top of the column to submit your solution.
- If your solution is correct, the column will display the next pattern. There are four patterns altogether.
- Pattern 1: Cymbals, Zither, Horn, Cymbals.
- Pattern 2: Drum, Zither, Fiddle, Zither, Drum.
- Pattern 3: Lute, Cymbals, Fiddle, Lute, Cymbals, Horn
- Pattern 4: Drum, Lute, Drum, Horn, Cymbals, Fiddle, Zither.
- When the puzzle is complete, the Dragon will be freed. Watch the Cut Scene.
- The Dragon will help you restore your village if you find the SUNLIGHT ORB and the RAINDROP ORB.
- Go Down to the Inner Chamber.
Chapter 9: The Two Orbs
- Enter the Bull Room.
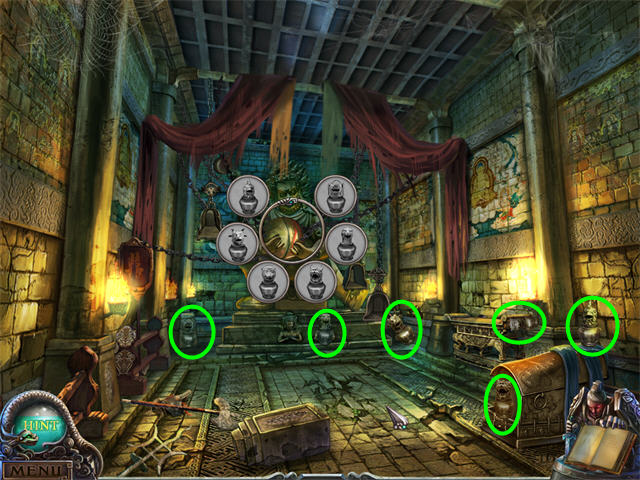
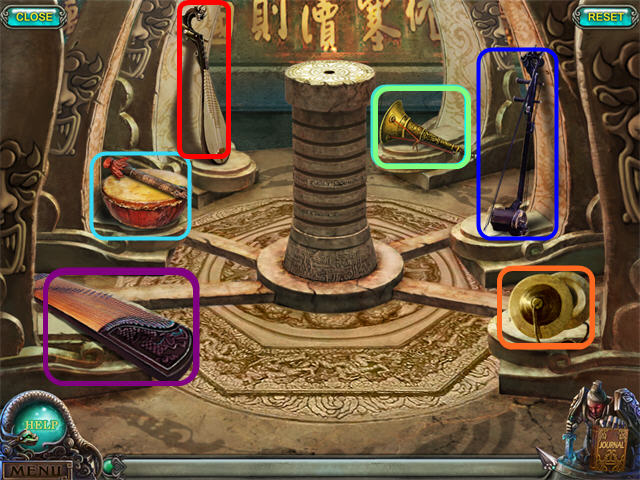
- Zoom in on the Statue Key Item.
- Collect the Urns and place them on the Statue.
- Zoom in on the Statue to trigger a mini-game.
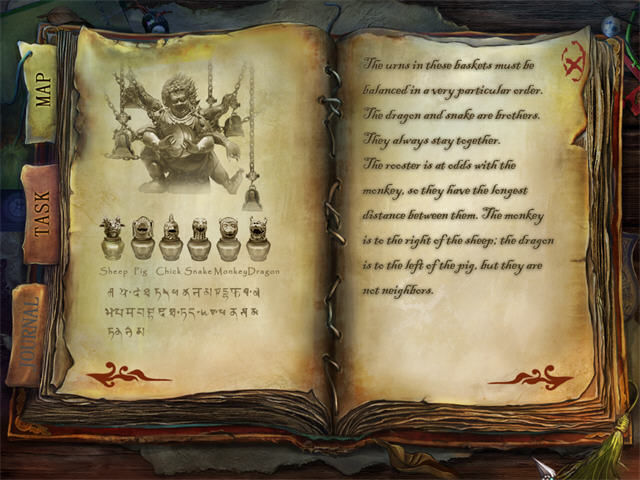
- The clues are in your journal.
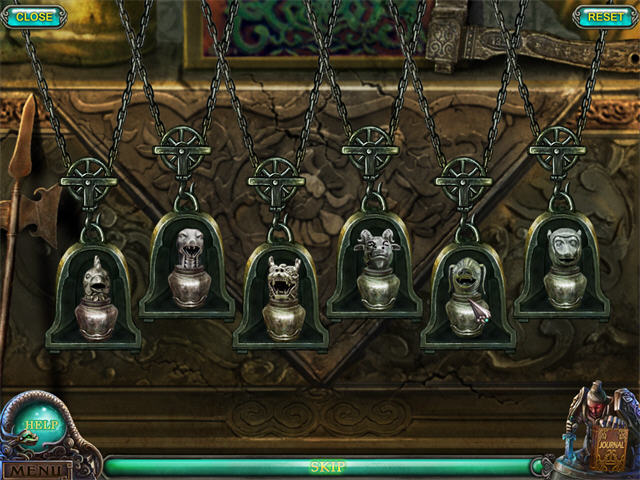
- Solution: Rooster, Snake, Dragon, Sheep, Pig, Monkey.
- When the puzzle is complete, the Statue will drop the red SUNLIGHT ORB. Collect it.
- Zoom in on the Chest for a HOS; collect the listed items, including the CHISEL (A).
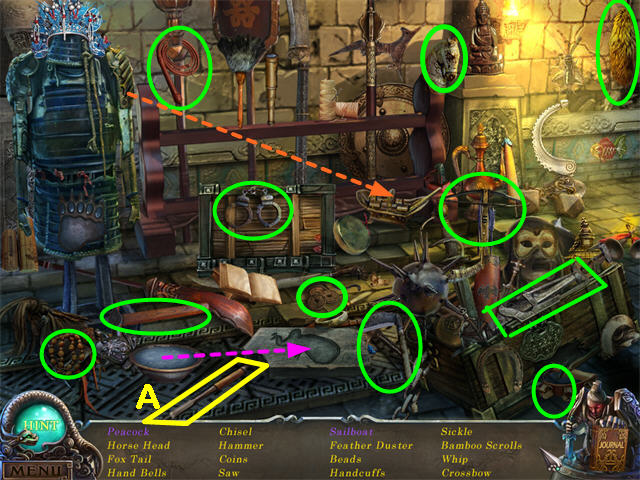
- Pour the liquid Metal into the Mold for the Peacock.
- Take the Epaulet off the Armor and use it as the Sail for the Sailboat.
- Go Down to the Inner Chamber.
- Enter the Elephant Room.
- Go forward to the Old Palace Pool.
- Zoom in on the Waterwheel; use the CHISEL (from the Bull Room HOS) three times to remove the Rubble.
- Go Down to the Elephant Room.
- Water will begin flowing into the Fountain. When the blue RAINDROP ORB appears at the top of the Fountain, collect it.
- Return to the Dragon Room.
- Give the Dragon the red SUNLIGHT ORB (from the mini-game in the Bull Room) and the blue RAINDROP ORB (from the Fountain in the Elephant Room).
- Watch the ending.
Appendix: Key to the Map
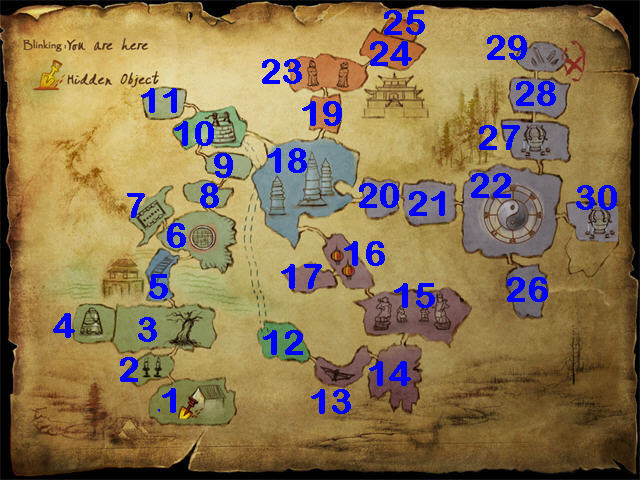
- Chapter 1 Locations:
- 1. Village.
- 2. Mountain Shrine.
- 3. Bell Tower.
- 4. Belfry.
- Chapter 2 Locations:
- 5. Bridge.
- Chapter 3 Locations:
- 6. Shaolin Temple Entrance (with Flaming Circle).
- 7. Shaolin Temple Pool.
- 8. Shaolin Temple Steps.
- 9. Shaolin Temple.
- 10. Shaolin Temple Backyard (with Well and Gate to Crossroads).
- 11. House in back of Shaolin Temple.
- Chapter 4 Locations:
- 12. Sewer.
- 13. Cavern.
- 14. Cliff (with Drawbridge).
- 15. Four Guardians.
- 16. Alley (with Gate to Crossroads).
- 17. Storeroom.
- 18. Crossroads (with roads to Shaolin Temple Backyard, Mausoleum Temple, Old Palace, and Alley).
- Chapter 5 Locations:
- 19. Mausoleum Temple Entrance.
- 20. Old Palace Entrance (with Tunnel).
- 21. Old Palace Outer Chamber.
- 22. Old Palace Inner Chamber (with Yin Yang).
- Chapter 6 Locations:
- 23. Mausoleum Temple Stairs (with two Statues).
- 24. Mausoleum Temple (with Gold Statue Altar).
- 25. Mausoleum Temple Drum Room.
- Chapter 7 Locations:
- 26. Old Palace Bull Room.
- 27. Old Palace Elephant Room (with Fountain).
- 28. Old Palace Pool.
- 29. Old Palace Secret Room.
- 30. Old Palace Dragon Room.
Created at: 2012-01-17