
Walkthrough Menu
- General Tips
- Chapter 1: A Chance Encounter
- Chapter 2: The Road Ahead
- Chapter 3: The Dragon Staff
- Chapter 4: The Forest of Spirits
- Chapter 5: The Dragon King
- Chapter 6: The Hidden Temple
- Chapter 7: The Tree of Ages
General Tips
- This is an Interactive Hidden Object Game.
- Click on the Options button to adjust the Music Volume, Effects, Custom Cursor, and Display.
- You can choose to do a tutorial after the beginning intro.
- When your cursor changes to an arrow, you can travel in that direction.
- When your cursor changes to a hand, you can pick that item up.
- When your cursor changes to a magnifying glass, you can take a closer look at that item.
- There are hotspots that will not sparkle until you place your cursor over them. Be sure to check all areas!
- You will need to find pieces of some items in order to complete them.
- A ring of items around the incomplete item will show you the pieces required.
- Click and drag the found item to the main circle. The circle around the piece will turn blue when you place it in the ring.
- Hints replenish quickly.
- All puzzles can be skipped eventually.
- There are no penalties for random clicking.
- You can interact with the animals in the scene by clicking on them.
- The items to find in each scene are random.
- Press the “Esc” key, or menu, to exit game.
Chapter 1: A Chance Encounter
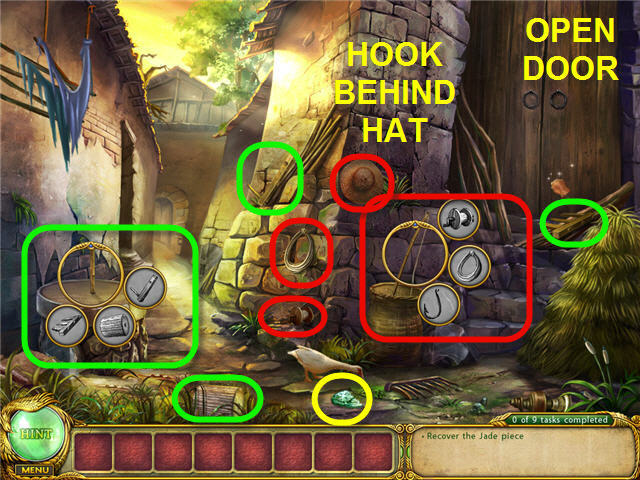
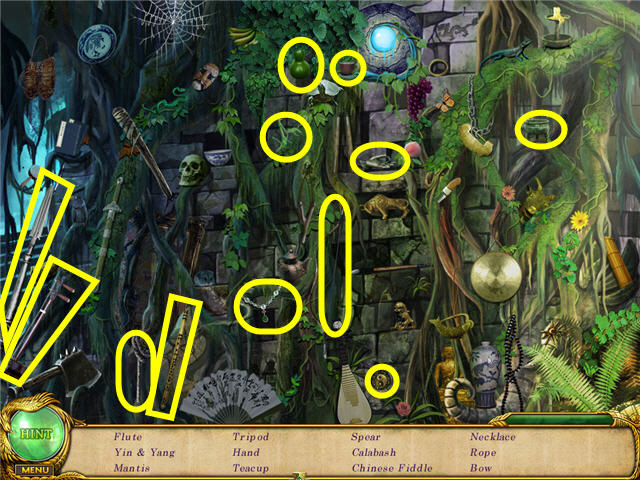
- Find the JADE PIECE.
- Click on the pole in the basket and find the items needed.
- You will need to drag the pieces into the big circle. A FISHING ROD will be added to inventory.
- Click on the mill on the left and find the items needed.
- Click on the door to find the dog (note that another task is added).
- Go through the passage on the left and head to the pier.
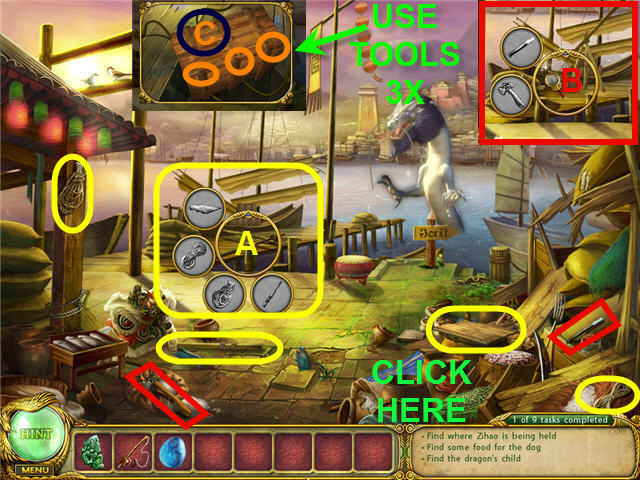
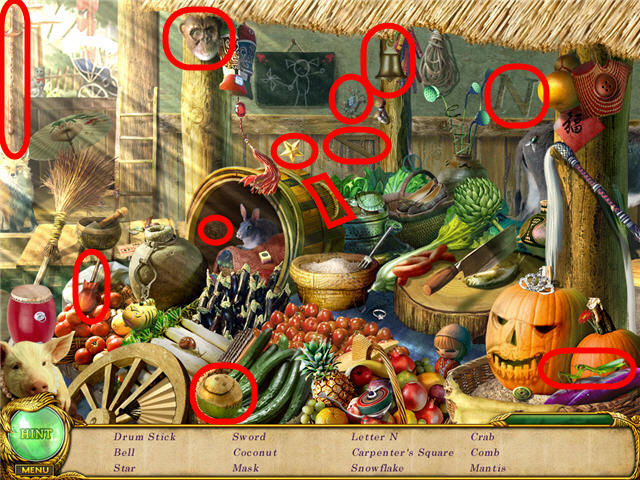
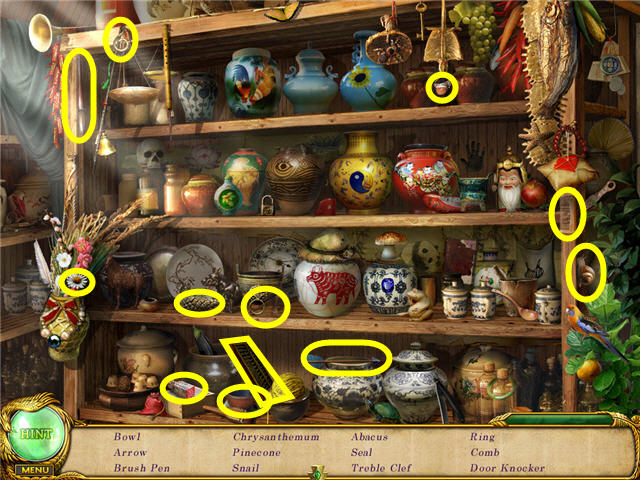
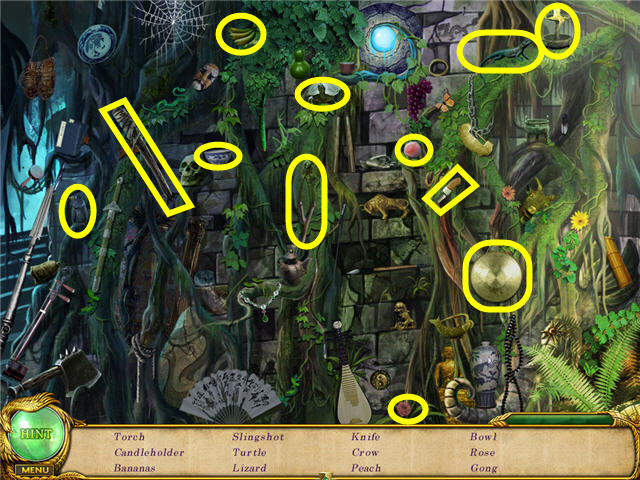
- Click on the hotspot on the pier to get the first set of items (A).
- After finding all the parts, click on another hotspot (inset B) in the same area. TOOLS will be added to inventory.
- Use the TOOLS three times on the crate, on the pier, to open it (inset C) and then click on the lid to remove it.
- Get the ALCOHOL from the open crate.
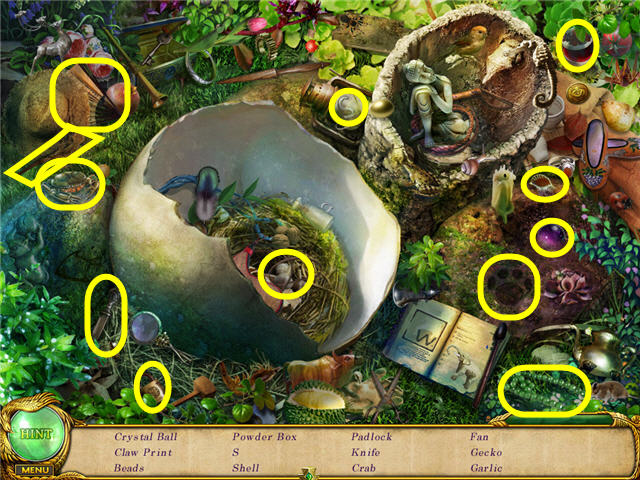
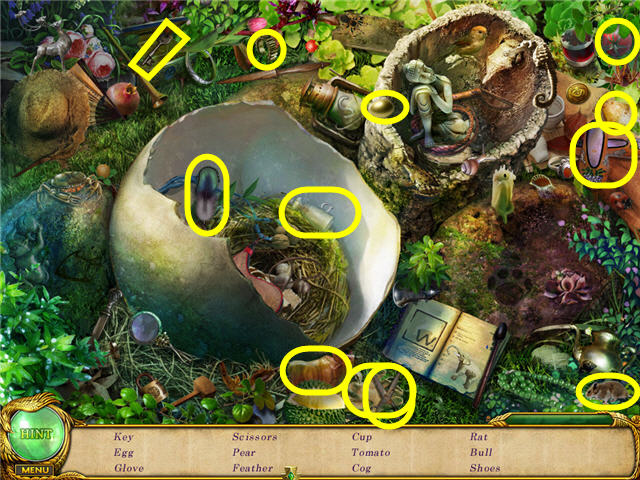
- Click on the sparkling area in the bottom right for a close-up.
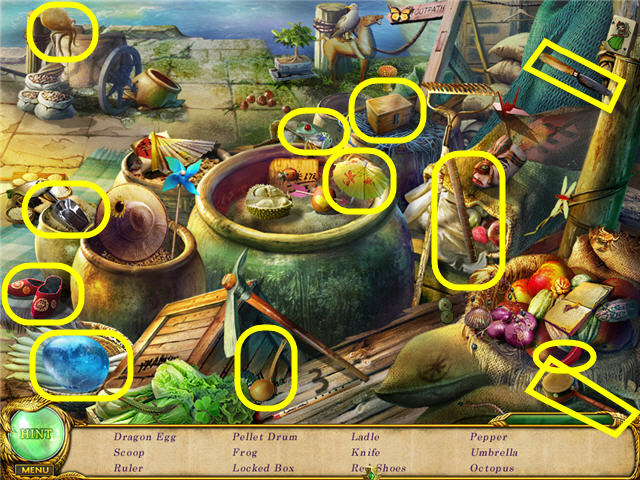
- Find all the items on the list.
- A DRAGON EGG will be added to your inventory.
- Give the DRAGON EGG to the DRAGON.
- You can now head toward the jail to the right.
- Click on the hotspot to the left, by the wheel, and get the STONE and the DOG BISCUIT.
- Give the ALCOHOL from inventory to the vagrant and get the GUARD’S BADGE.
- Use the FISHING POLE in inventory on the green bottle in the water; it will be reeled to the left bank.
- Use the STONE twice on the bottle to open it and take the DRIED BLACK BEANS.
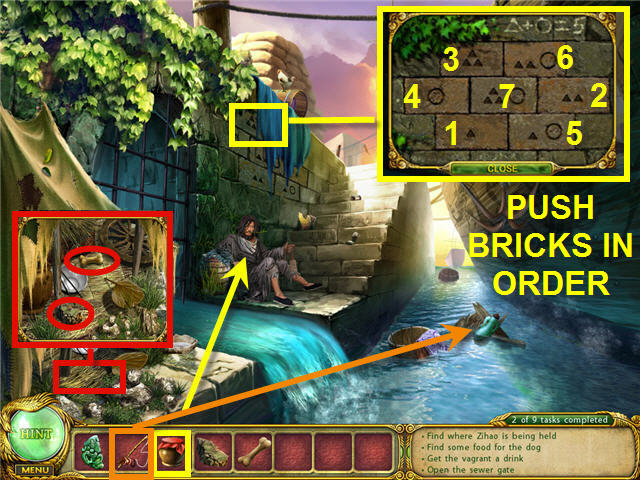
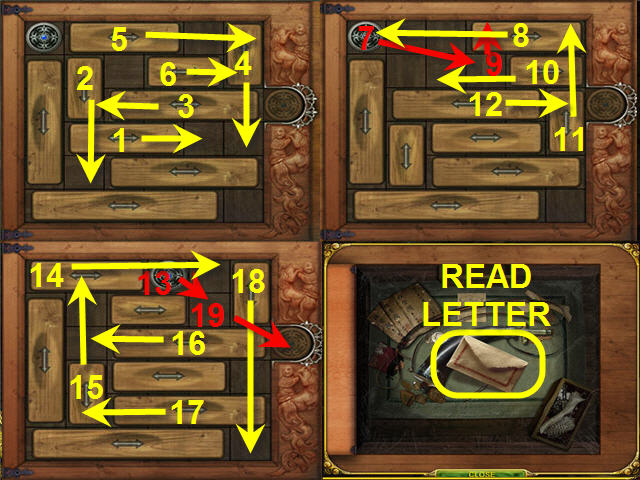
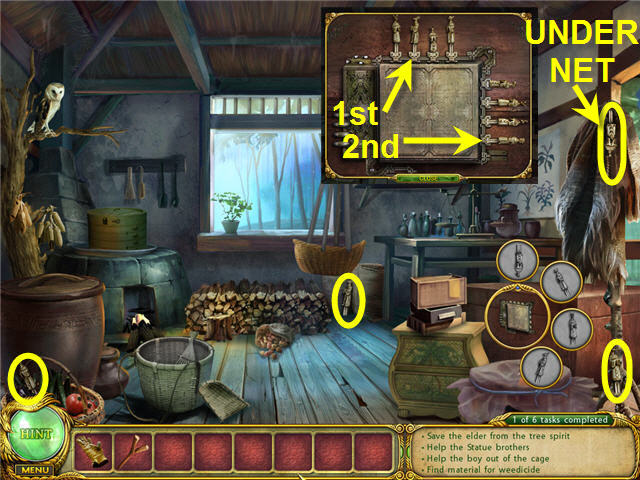
- Click on the blue cloth, on the wall to the left of the stairs, to get the lock puzzle.
- The clue is written above the bricks. See the screenshot for the solution.
- Head up the stairs and click on the sparkling area.
- Find all the items on the list.
- A GUARD’S UNIFORM will be added to inventory.
- Click on the bottom of the screen to return to the dog.
- Give the DOG BISCUIT in inventory to the dog.
- Pick up the GUARD’S HAT from the stairs.
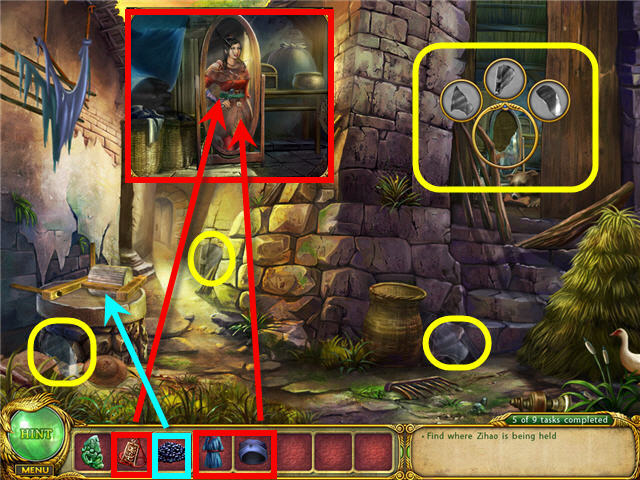
- Click on the broken mirror behind the dog.
- Find the pieces and then click on the completed mirror to get a close-up.
- Use the GUARD’S UNIFORM, GUARD’S HAT, and GUARD’S BADGE on your reflection in the mirror.
- Use the DRIED BLACK BEANS on the mill. Click the mill to roll it over the DRIED BLACK BEANS. Take the BLACK BEAN POWDER from the mill.
- Go back down the passageway to the pier and over to the jail on the right.
- Head left into the jail.
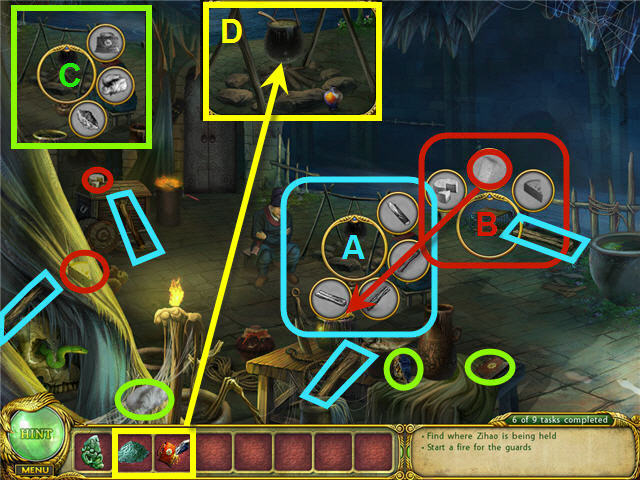
- Click on the fire pit (A) and the cage (B) and find the items needed.
- Close the rat maze for now.
- Click on the fire pit after you have added the wood (inset C) to get another set of items.
- FLINT will be added to your inventory.
- Click on the fire pit to get a close-up (inset D).
- Use the FLINT on the wood to get the fire started; then add the BLACK BEAN POWDER to the kettle. Click the top of the kettle to get the SLEEPING POTION.
- Click on the cage to get a rat maze puzzle.
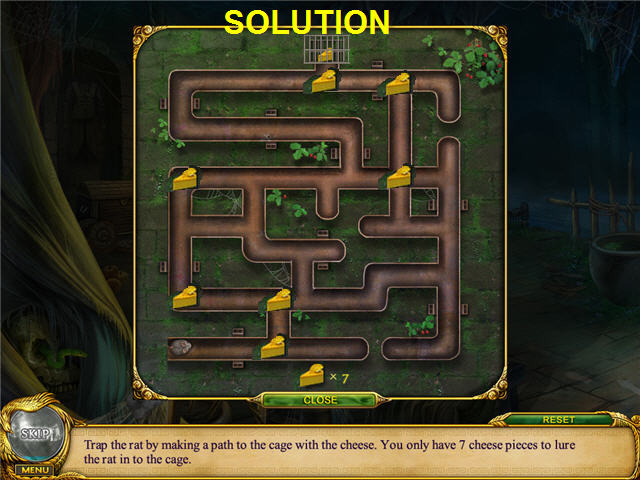
- Lure the rat to the cage on the top by leaving a trail of seven pieces of cheese. See the screenshot for the solution.
- Test the SLEEPING POTION on the rat.
- Enter the jail.
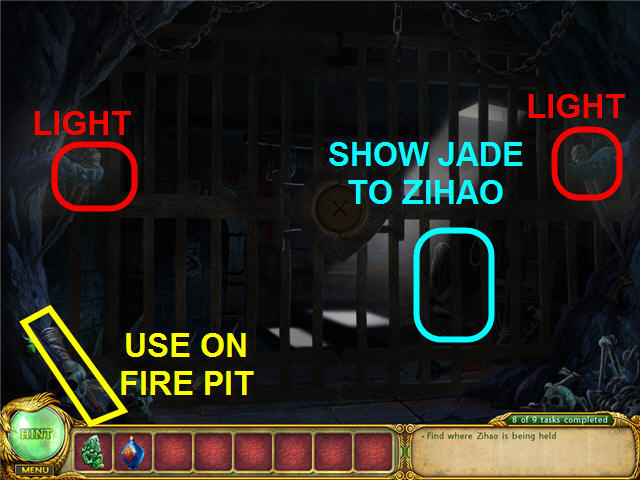
- Take the TORCH on the skulls on the left.
- Exit the jail and light the TORCH on the fire to get a LIT TORCH.
- Enter the jail and use the LIT TORCH on the two torches on both sides of the jail cell.
- Show the JADE in inventory to Zihao.
Chapter 2: The Road Ahead
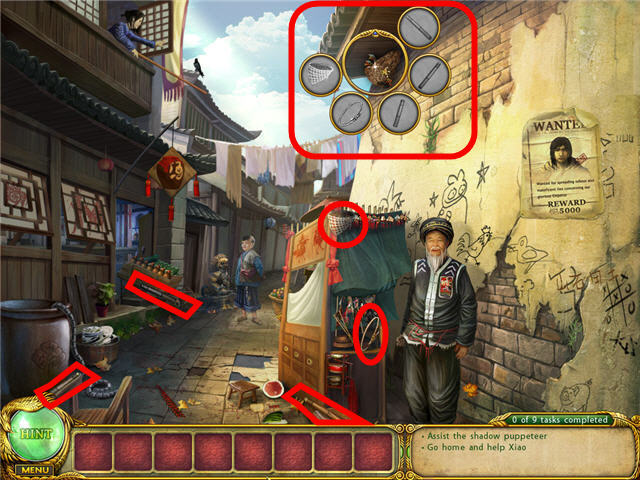
- Click on the shadow puppeteer on the right to get a task.
- Click on Xiao to get a task.
- Click on the girl in the window on the left.
- Look at the wanted poster on the wall.
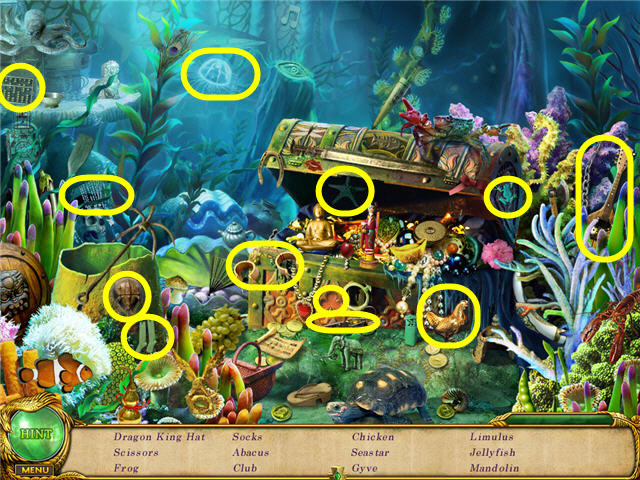
- Click on the birds nest hotspot area and find the items needed. A NET will be added to inventory.
- Use the NET on the bird nest to get the HAIRPIN.
- Give the HAIRPIN to the girl in the upper left.
- Take the HANDKERCHIEF that she drops.
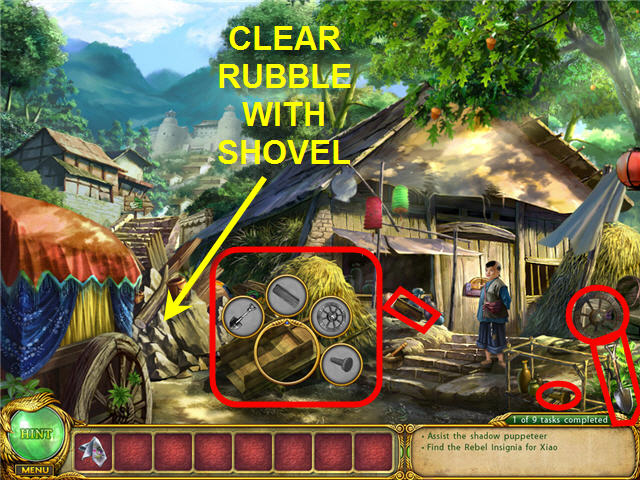
- Head straight to go home and see Xiao.
- Click on Xiao to get a task.
- Click on the rubble and then click on the hotspot by the broken cart to fix it.
- Once you’ve finished, click three times on the SHOVEL leaning against the rubble until the cart rolls away.
- Head up the stairs to the left to go to the market.
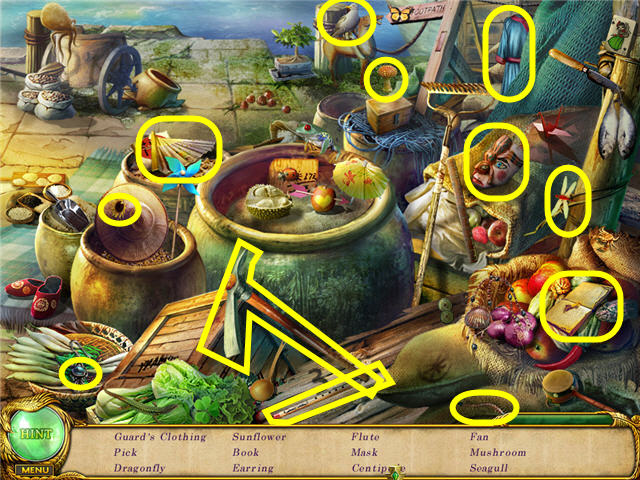
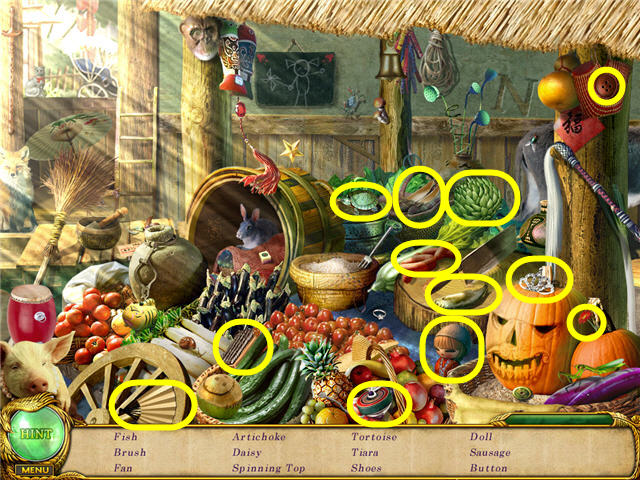
- Click on the hotspot in the produce stall on the lower right.
- Find the items on the list.
- A DRUMSTICK will be added to your inventory.
- Click on the merchant in the lower right.
- Use the DRUMSTICK on the gong.
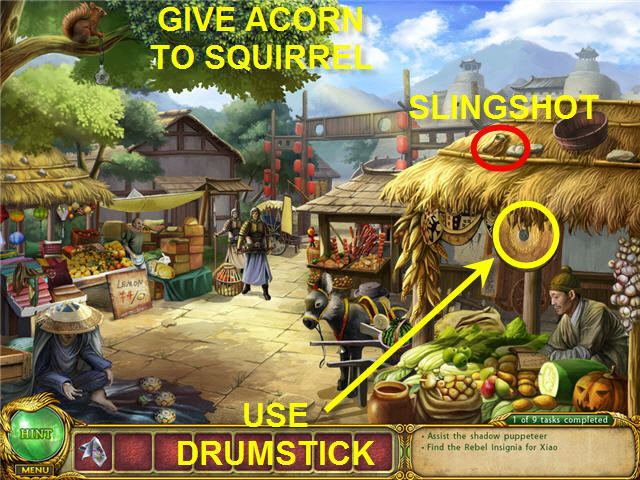
- Pick up the SLINGSHOT from the roof.
- Go back down the stairs via the bottom of the screen.
- Use the SLINGSHOT on the acorns in the tree above Xiao to knock an ACORN down.
- Pick up the ACORN from the ground.
- Head back up the stairs and use the ACORN on the squirrel in the tree on the left.
- Get the REBEL INSIGNIA that the squirrel drops on the ground.
- Head back down the stairs via the bottom of the screen.
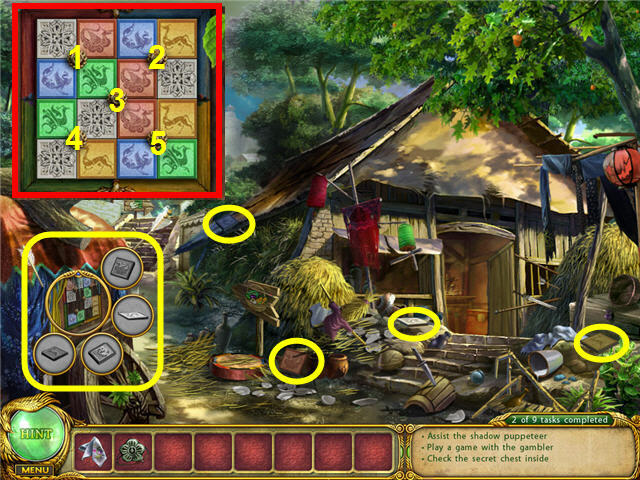
- Click on the curtain in the caravan on the left to get a hotspot; find the items listed.
- Click on the area when completed to get a tile puzzle.
- Get all the colored tiles in the matching corners and the silver in the middle.
- See the screenshot for numbered dials and click in the order below to solve. If you make a mistake you can close the game to reset it.
- Click on dials 3, 3, 1, 1, 3, 1, and 5.
- Click on dials 3, 2, 3, 3, 3, 4, and 4.
- Click on dials 4, 5, 3, 5, 5, 5, and 4.
- Click on dials 4, 4, 5, 3, 3, 5, and 5.
- Click on dials 2, 3, 5, 3, 3, 3, 2, 2, and 2.
- Click the middle of the tiles when completed to open the container; take the PUPPET STICKS.
- Enter the house.
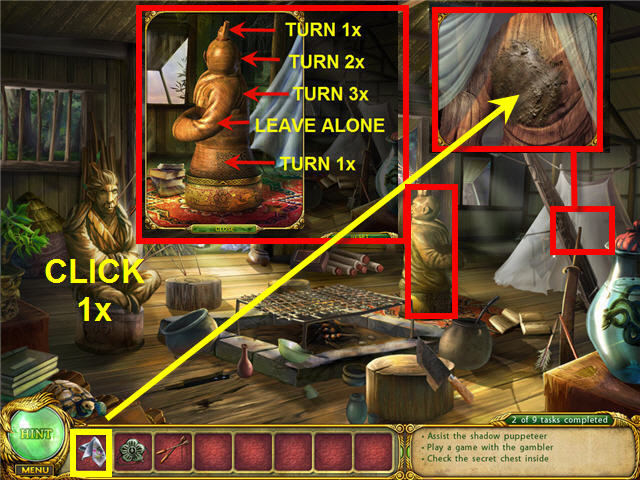
- Click on the statue on the right to get a close-up.
- Rotate the sections to line them up. Starting at the top section of the statue as number 1, click 1 once, 2 twice, 3 three times, and 5 once.
- Click on the statue on the left. It will turn and bring up a chest through the floor.
- Click on the tent in the corner.
- Use the HANDKERCHIEF three times on the mud covered torso of the statue until the message can be read.
- Click on the chest in front of the left statue and use the REBEL INSIGNIA on the lock.
- Click on the open chest to get a grid lock puzzle.
- Move the medallion from the upper left corner to the exit on the right. See the screenshot for the solution. Be sure to stop on the squares that the arrow stops on in the screenshot.
- Get the LETTER from the completed puzzle and click on it three times to read it.
- Exit the house and go up the stairs to the market square.
- Click on the hotspot in the produce stall on the bottom right.
- Find the items on the list.
- RAW FISH will be added to inventory once the items are all found.
- Click on the down arrow twice to get back to the area with the puppeteer.
- Go left into the inn.
- Go through the inn to the room in the back.
- Pick up the PIGMENT by the abacus.
- Click on the bird and the locked door on the right.
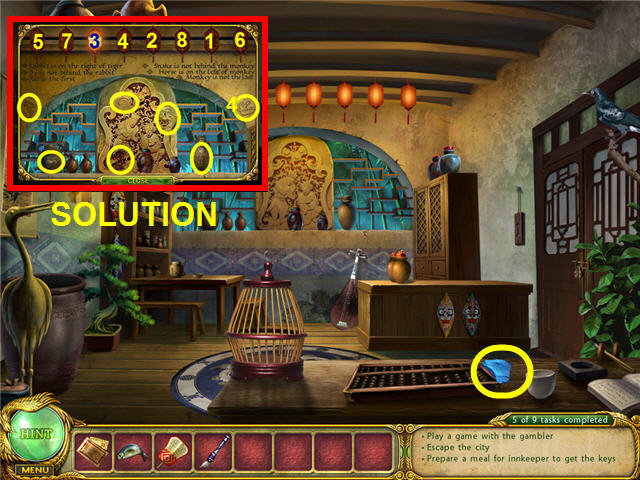
- Click on the hotspot on the stone tablet in the window to get a puzzle.
- First you will need to find all the animals in the scene.
- The solution to the puzzle is, from left to right: Rat, Ox, Tiger, Rabbit, Snake, Horse, Monkey, and Rooster. They do not move once they’re in the right spot. See the screenshot for the solution.
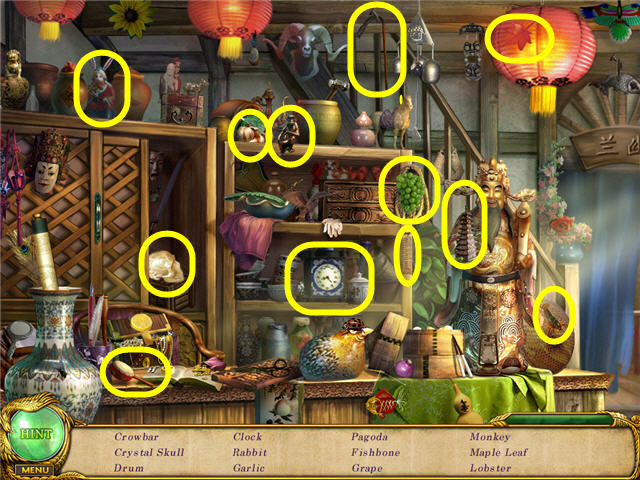
- Head back into the main room of the inn and click on the hotspot behind the innkeeper.
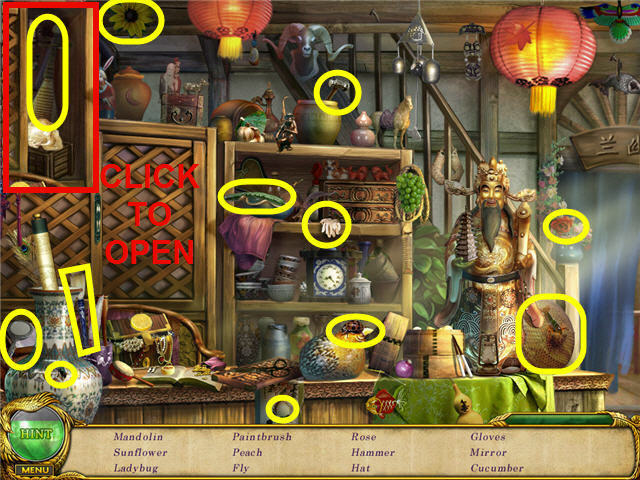
- Find the items on the list.
- A BRUSH will be added to inventory once you’ve found all the items.
- Take the CANDLE from the stand.
- Try and take the keys on the counter to get a task.
- Put the PIGMENT on the mortar and pestle in the table and get a bowl of paint on the table.
- Click on the lion dancer to get a list of items needed.
- Use the BRUSH on the paints on the floor once you’ve found them all.
- Paint the right side of the costume head to match the right by dipping the brush in the color of the paint you want to use.
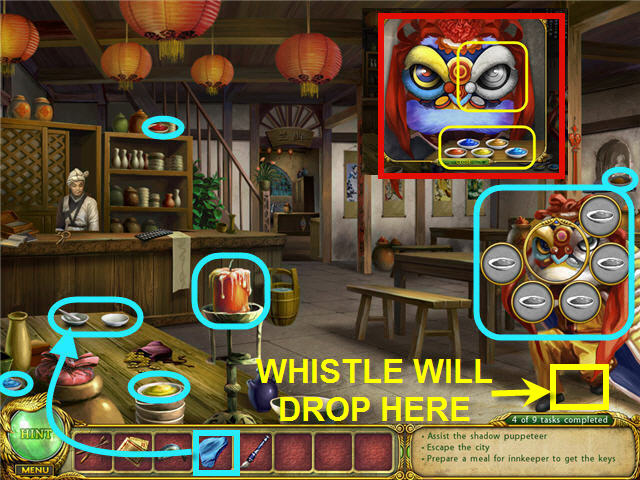
- Pick up the WHISTLE from the floor, by the feet of the lion dancer, when you have finished painting.
- Go into the back room of the inn and use the WHISTLE on the bird.
- Pick up the LOTUS JADE that is on the table when the bird knocks over the bird cage.
- Use the LOTUS JADE on the stone tablet in the window and take the ONE COIN from in front of the tablet.
- Exit via the bottom of the screen twice.
- Give the CANDLE and PUPPET STICKS to the Puppeteer.
- Watch a show and take the FAN.
- Head up to the house and then up the stairs to the market.
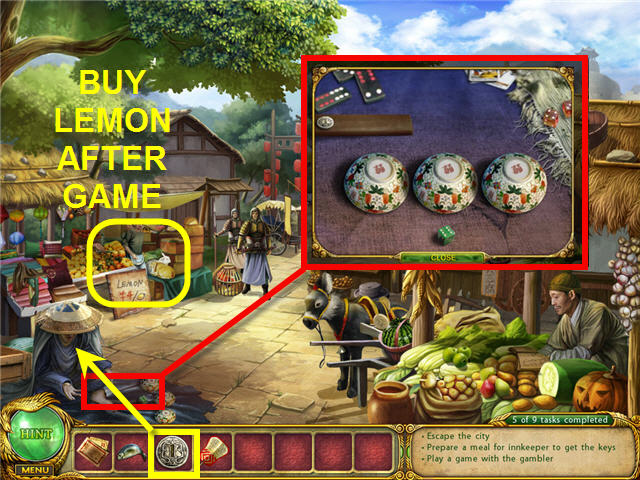
- Give the coin to the hustler on the ground to the left.
- Click on the die and watch it get covered by the middle bowl. Follow the middle saucer with your mouse to keep track of it. Win three times to get 4 COINS.
- Give the 4 COINS to the lemon merchant for a LEMON.
- Exit the area via the bottom of the screen and go into the house.
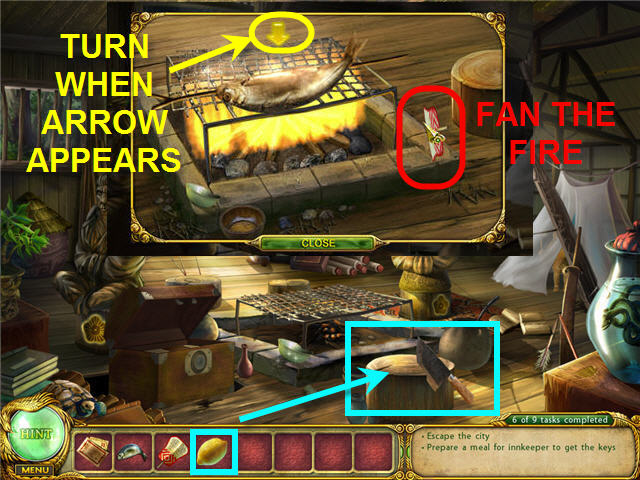
- Put the LEMON on the chopping block to cut it.
- Take the LEMON HALF from the chopping block.
- Put the RAW FISH on the grill and use the FAN to heat up the fire.
- Fan the fish until you get an arrow. When the arrow appears, click on the fish to turn it. Keep fanning and turning until you back out of the screen.
- You will need to start over if you let the fire die or burn the fish. If you don’t keep fanning the fish, you will not get an arrow.
- Put the CUT LEMON on the GRILLED FISH when it’s done.
- Take the GRILLED FISH off the grill.
- Take the GRILLED FISH to the Innkeeper.
- Take the ROOM KEY from the counter.
- Click on the hotspot behind the Innkeeper.
- Find the items on the list.
- A CROWBAR will be added to inventory once you’ve found all the items.
- Head to the backroom of the Inn.
- Use the ROOM KEYS on the locked door to the right.
- Enter the room.
- Click on the hotspot by the armoire and find the items on the list.
- Click on the letter on the table and find the items on the list.
- Unwrap the green linen from around the box; receive a piece of the letter.
- Click on the LETTER when complete and compare it to the one in inventory.
- Click on the two letters; they will turn over and you will get a new task.
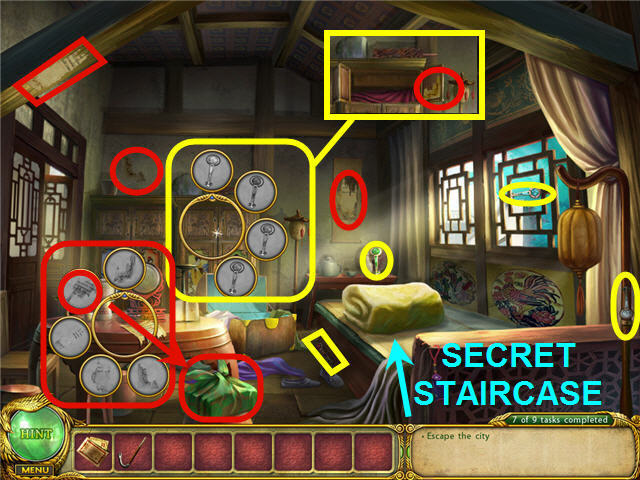
- Use the CROWBAR on the secret staircase under the blanket on the right.
Chapter 3: The Dragon Staff

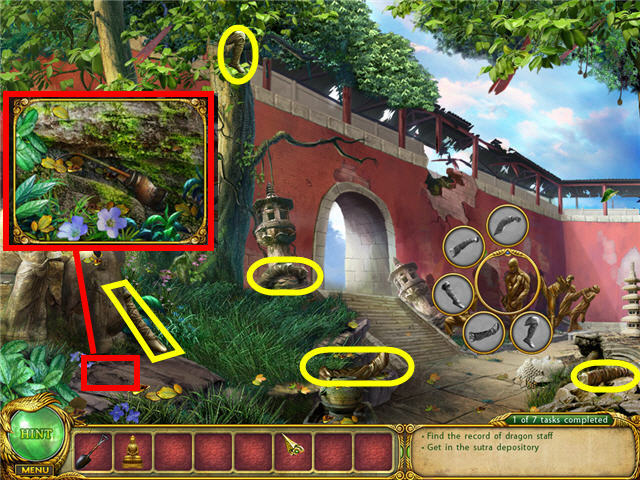
- Click on the torn poster on the wall above the well to get a list of items.
- Take the KUNG FU PICTURE off the wall once you’ve found all the items.
- Take the SHOVEL leaning against the tree.
- Click on the statue toes to open a compartment; take the BUDDHA statue therein.
- Head to the left. into the area of ruins.
- Click on the hotspot on the bottom right to get a list of items to find.
- SHEARS will be added to your inventory once you’ve found all the items.
- Exit the area via the bottom of the screen.
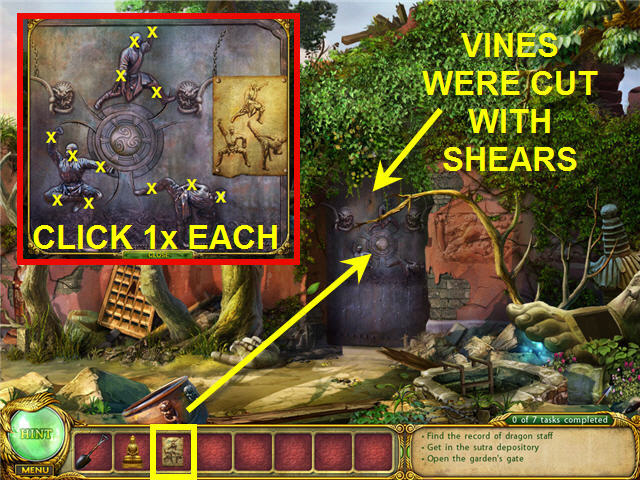
- Use the SHEARS on the vines on the wall.
- Use the KUNG FU PICTURE on the gate.
- Adjust the heads, arms, and legs to match the picture (see screenshot for the solution).
- Click on the hotspot on the statue and find the items on the list.
- Click on the hotspot on the lower left to get an OIL CAN.
- Head up the stairs into the next area.
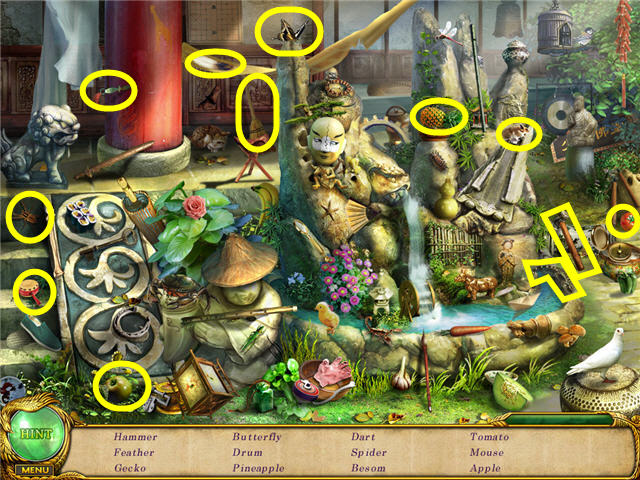
- Click on the hotspot by the waterfall on the right and find the items on the list.
- A HAMMER will be added to inventory once you’ve found all the items.
- Click on the swinging sign in the doorway to make it fall.
- Use the OIL CAN on the sign and click on it to open a compartment.
- Find the items listed.
- Click on the tiles on the sign after each piece is located.
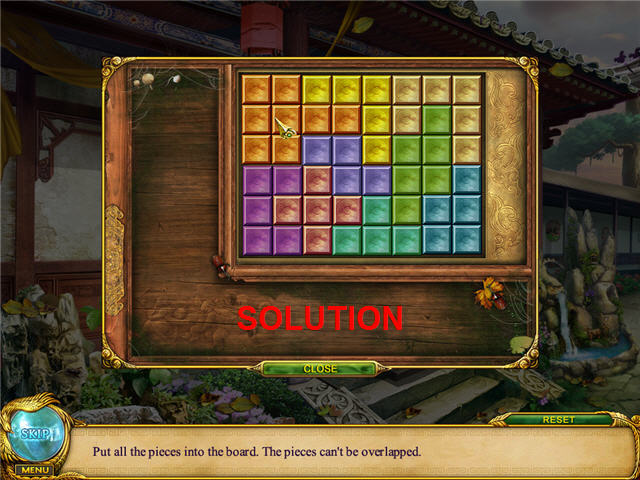
- Place all the tiles on the board, leaving no spaces or overlapping any tiles (see the screenshot for the solution).
- Click on the map uncovered after completing the tile puzzle to see the treasure location.
- Leave the area via the bottom of the screen.
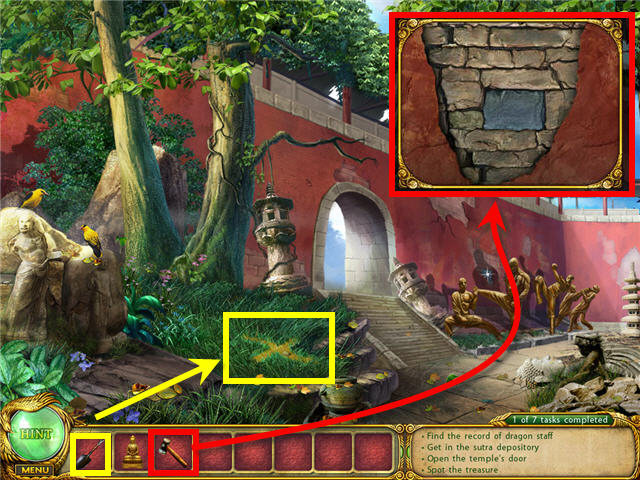
- Use the SHOVEL on the X.
- Take the GOLDEN COSTREL from the treasure spot.
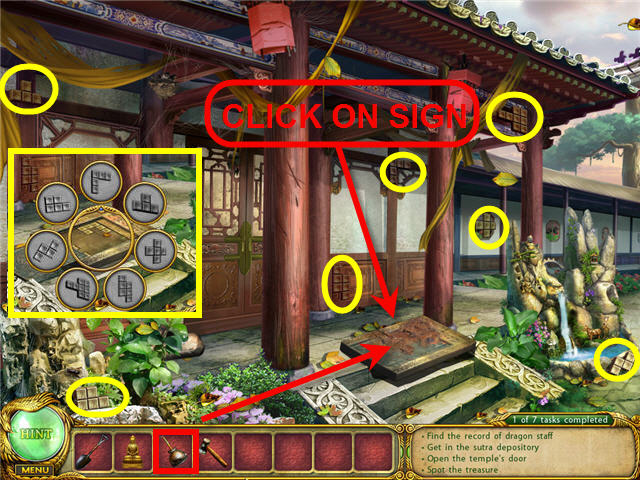
- Click on the hotspot on the wall by the statues.
- Use the HAMMER on the strange brick four times to discover a treasure chest.
- Go back up the steps and click on the fountain hotspot.
- Find the items on the list.
- A KEY will be added to your inventory once you’ve found all the items.
- Exit the scene via the bottom of the screen.
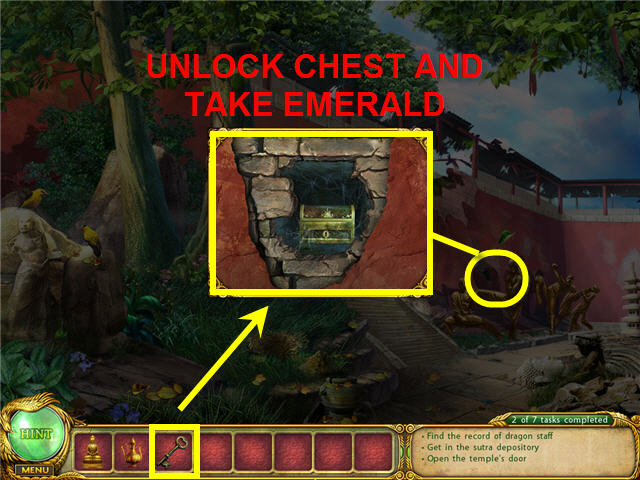
- Head over to the treasure chest in the wall and use the KEY on it.
- Take the EMERALD from the treasure chest.
- Exit via the bottom of the screen and head left.
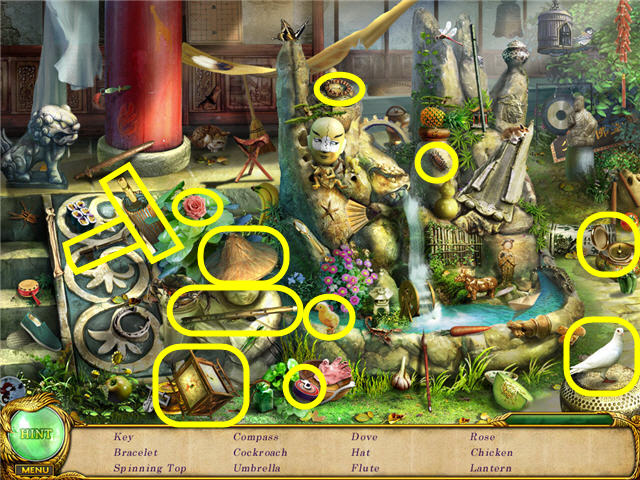
- Click on the hotspot on the right.
- Find the items on the list.
- An AXE will be added to inventory once you’ve found all the items.

- Use the EMERALD on the forehead of the large statue head lying on the ground, on the left.
- Get the INLAY OF MALACHITE from the statue’s mouth.
- Head to the door up the path; click on it to get a close-up.
- Use the INLAY OF MALACHITE on the hole in the peacock feather on the door lock.
- Head through the now opened door.
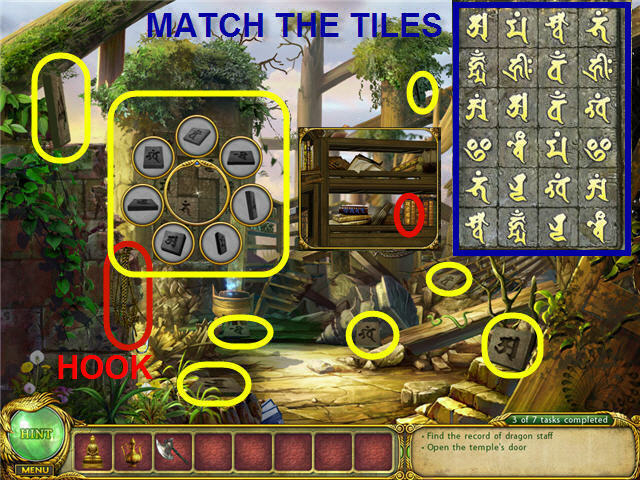
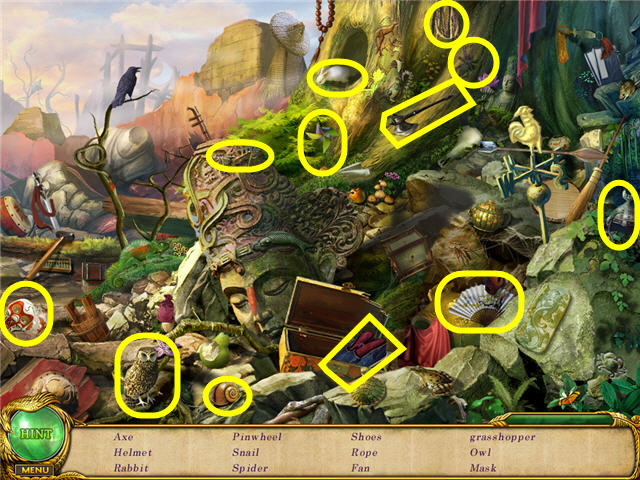
- Take the HOOK on the bricks to the left.
- Click on the tile wall and find all the missing tiles.
- Click on the completed wall to get a tile matching puzzle (see the screenshot for tile locations).
- Click on the bookshelf and get a close-up. Click on the book that matches the flashing symbols on the tile wall.
- Use the AXE on the gold powder in the book to get a GOLDEN AXE.
- Back out of the area via the bottom of the screen twice.
- Go forward twice to get to the temple.
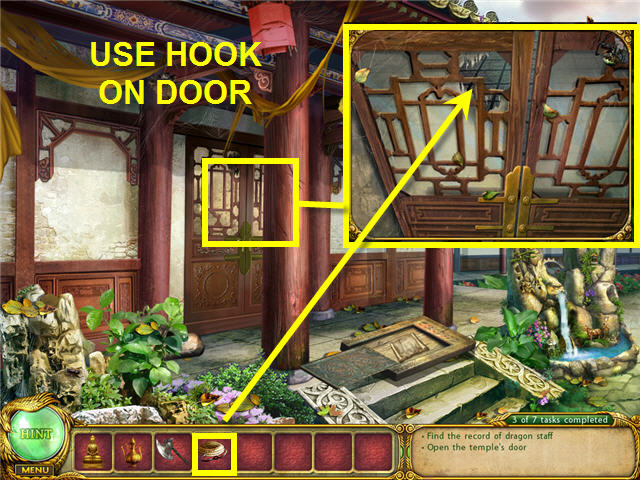
- Click on the temple door to get a close-up.
- Use the HOOK on the door to open the latch.
- Enter the temple.
- Click on the monk to get another task.
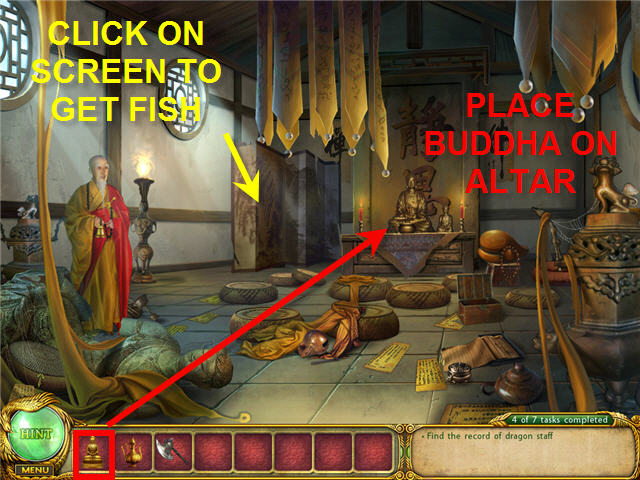
- Click on the screen in the left corner of the room to move it and pick up the FISH.
- Use the BUDDHA on the altar. The wall will get stuck.
- Go back to the crow holding the staff by exiting the area three times via the bottom of the screen and then going left one time.
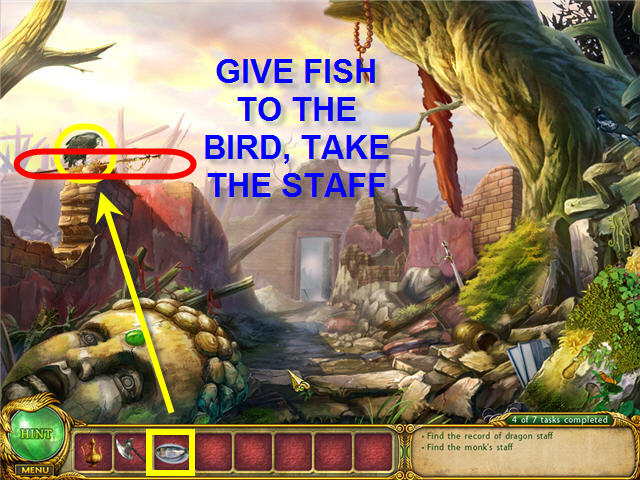
- Give the FISH from inventory to the bird.
- Take the STAFF.
- Head back to the temple.
- Give the STAFF to the monk and get a GOLDEN BELL and another task.
- Step outside the temple and click on the hotspot in the fountain.
- Find the items on the list.
- A METAL BAR will be added to inventory once you’ve found all the items.
- Head back into the temple.
- Use the METAL BAR three times on the stuck wall.
- Click on the center statue to get a close-up.
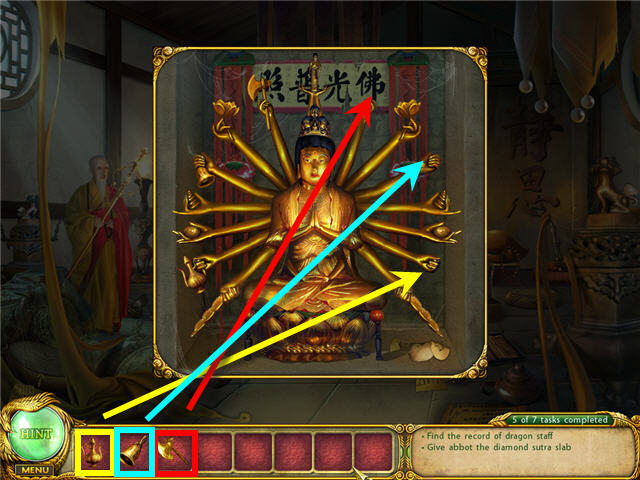
- Give the GOLDEN AXE, GOLDEN BELL, and GOLDEN COSTREL to the statue (see the screenshot for the locations).
- Take the DIAMOND SUTRA from the niche in the wall.
- Give the DIAMOND SUTRA to the monk.
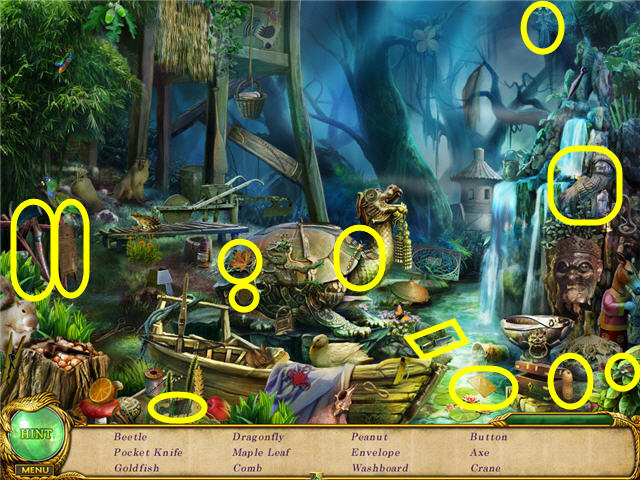
Chapter 4: The Forest of Spirits
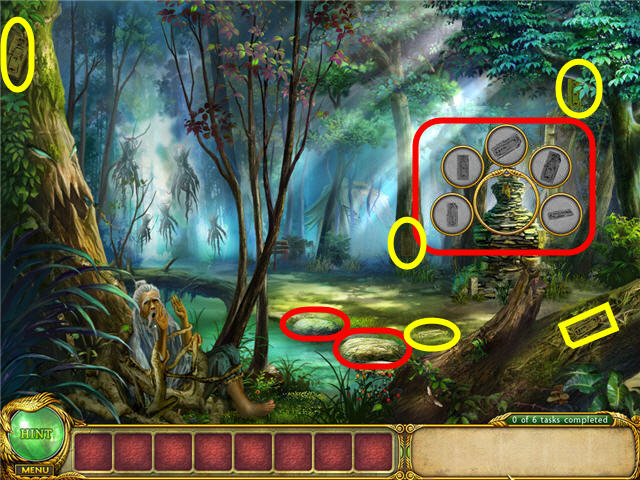
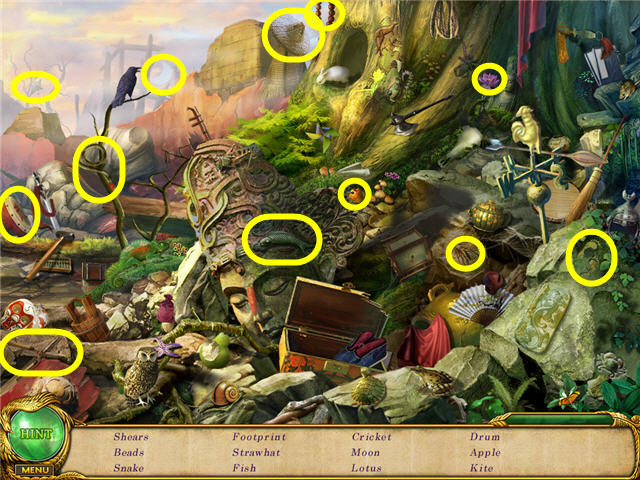
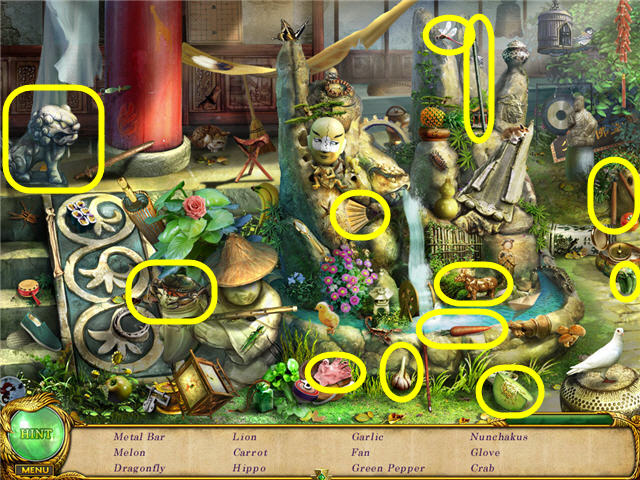
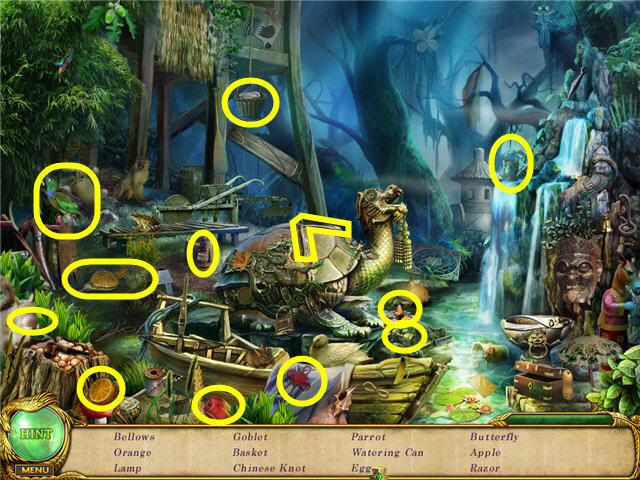
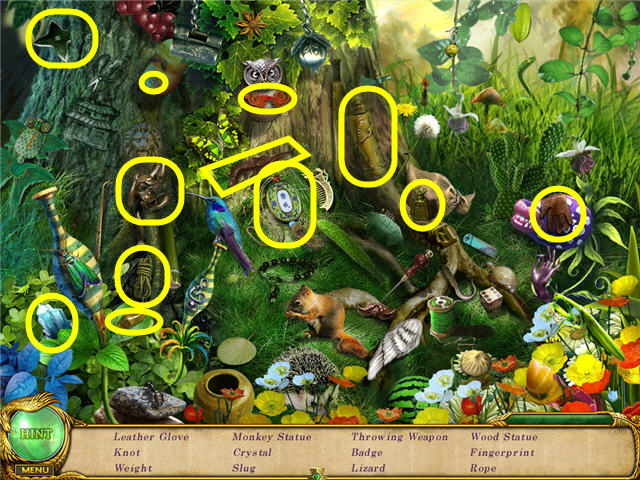
- Click on the stone structure and locate the items listed.
- Collect the two stones on the bank.
- Click on the elder caught by the tree to get a task.
- Head up into the forest.
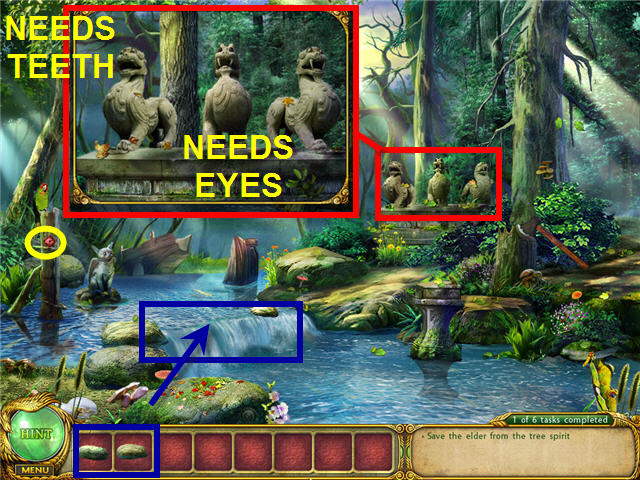
- Take the GARNET in the stump on which the parrot is sitting.
- Place the two STONES on the top of the waterfall so you can cross.
- Click on all three of the gargoyles to get a task.
- Head up the path to the right.
- Move across the bridge.
- Click the hotspot on the lower right.
- Find the items on the list.
- A CANDLEHOLDER will be added to inventory once you’ve found the items.
- Collect the SAPPHIRE from the top of the lamp on the left (see inset in the screenshot).
- Go back across the bridge via the bottom of the screen.
- Collect the AGATE on the shore on the right side of the bridge.
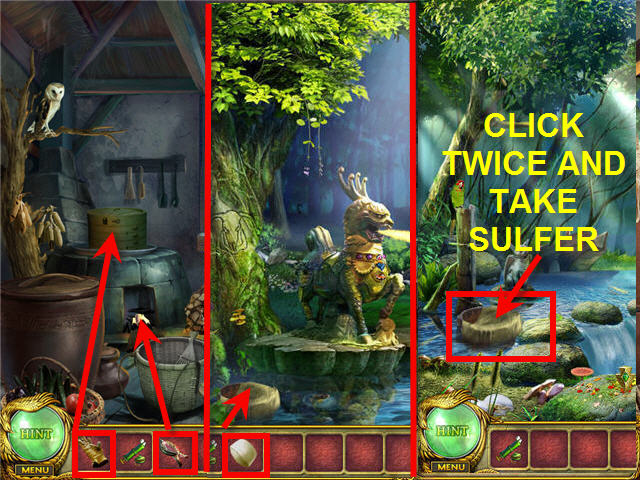
- Click on the dragon statue and place the SAPPHIRE, AGATE, and GARNET in the slots matching the shapes to get a fire breathing dragon.
- Use the CANDLEHOLDER on the flame of the fire breathing dragon statue to get a LIT CANDLE.
- Use the LIT CANDLE on the hole in the twice and then take the HORN.
- Look at the bull carved into the tree.
- Head back over the bridge.
- Place the HORN on the bull skull on the tree.
- Click the skull to get a close-up.
- Adjust the horns on the skull to match the bull horns on the tree before the bridge. Click the left horn one time and the right horn four times.
- Pick up the KEY that drops from the skull.
- Use the KEY on the door of the house on the top of the stairs.
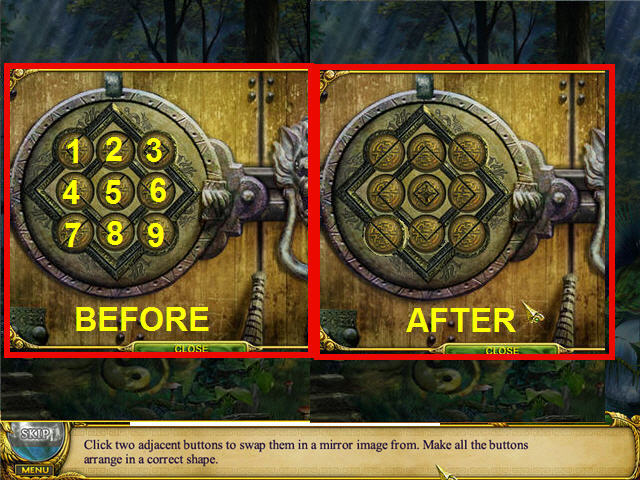
- Swap adjacent pieces to complete the design. The spaces have been numbered 1 to 9, from the upper left.
- and swapped spaces as follows:
- Swap pieces 3 and 6.
- Swap pieces 6 and 5.
- Swap pieces 1 and 4.
- Swap pieces 2 and 3.
- Swap pieces 7 and 8.
- Swap pieces 9 and 8.
- Swap pieces 7 and 8.
- Enter the house.
- Walk through the first room into the back room.
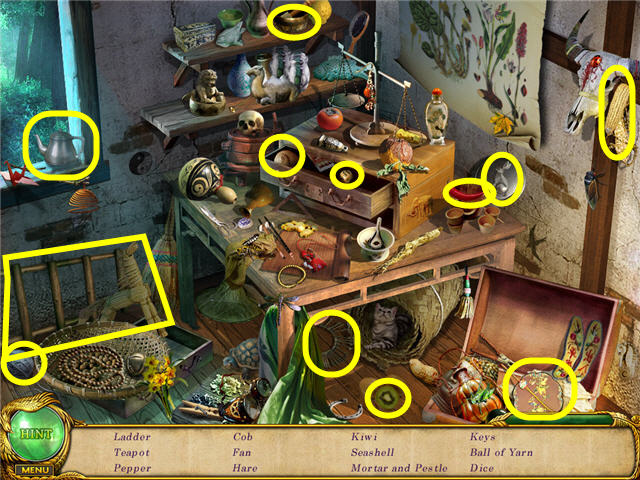
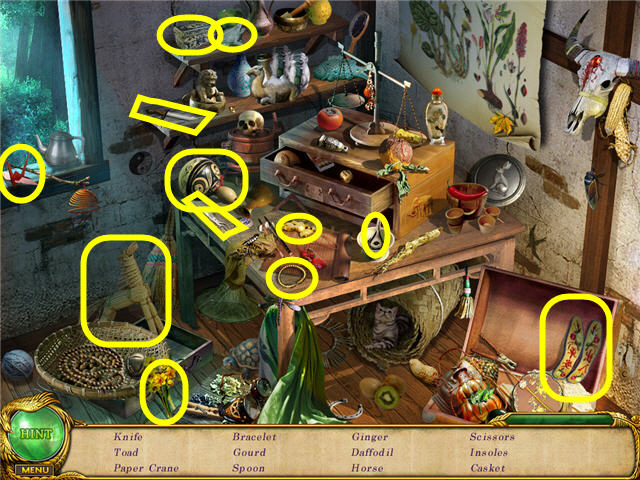
- Click on the hotspot on the shelves.
- Find the items on the list.
- A ROD will be added to inventory once you’ve found all the items.
- Click on the trunk on the right and find the items on the list.
- Get a lock puzzle after finding the items.
- Get all eight men around the lock down at one time. Click on the second man and then the eighth man to solve the puzzle (see the screenshot for clarification).
- Get the NEBULIZER from the trunk.
- Back out of the room via the bottom of the screen.

- Take the LADLE hanging on the wall to the right of the doorway.
- Click on the suitcase in the floor to open it up.
- Click on the upper left cabinet in the upper right of the room to open it.
- Use the ROD on the high basket hanging on the right.
- Click on the barrel to the right of the doorway two times to remove debris; click again to get a close-up.
- Use the LADLE on the barrel three times and take the GLOVE.
- Click on the scroll on the table to get the recipe for the Weedicide.
- Click on the gear box to the left of the door and find the items.
- Click on the finished mechanism to get a gear puzzle.
- Set all the gears so that they turn each other (see the screenshot for the solution).
- Exit the house and click on hotspot on the bottom right.
- Find the items on the list.
- A BELLOWS will be added to inventory once you’ve found all the items.
- Head back into the house and go into the backroom.
- Use the BELLOWS on the logs in the fireplace.
- Use the GLOVE on the steamer on the wood stove and take the STEAMED BREAD.
- Go down to the bridge by the fire breathing dragon.
- Use the STEAMED BREAD on the container floating in front of the dragon.
- Go down the river via the bottom of the screen.
- Click on the container stuck on the second rock from the left two times to get the SULFUR.
- Head back into the house to the backroom and click on the hotspot in the upper right.
- Find the items on the list.
- A LADDER will be added to inventory once you’ve found all the items.
- Head back into the main room and use the LADDER on the cage with the boy.
- Talk to the boy completely and get the STONE EYEBALLS from his hands.
- Head outside the house and click on the hotspot on the lower right.
- Find the items on the list.
- A BEETLE will be added to inventory once you’ve found all the items.
- Go back into the house and the backroom.
- Click on the hotspot in the upper right.
- Find the items on the list.
- A KNIFE will be added to your inventory once you’ve found all the items.
- Use the KNIFE on the cheese cloth covered barrel, on the bottom right, and the owl will fly over to it.
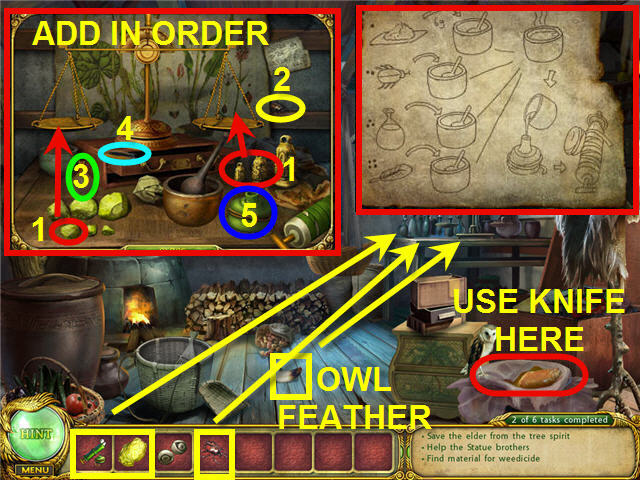
- Pick up the OWL FEATHER that landed on the floor.
- Place the OWL FEATHER, BEETLE, SULFUR and NEBULIZER on the table.
- Measure 6 grams of sulfur (1) on the scale using the 5 and 1 gram weights on one side of the scale, and the front left piece of sulfur on the left side of scale (see screenshot for details).
- Take the 6 gram piece of SULFUR from the scale and add it to the mortar and pestle.
- Add the beetle (2) to the mortar and pestle.
- Add the liquid in the orange vial (3) to the mortar and pestle.
- Add the owl feather (4) to the mortar and pestle.
- Pick up the mortar and pestle and pour the mixture into the container (5) to the right.
- WEEDICIDE will be added to inventory.
- Head to the main room of the house.
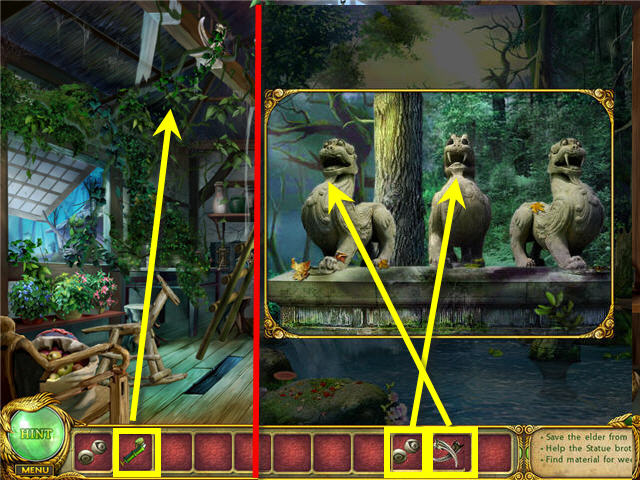
- Use WEEDICIDE on the ivy and pick up the STONE TEETH that fall to the ground.
- Exit via the bottom of the screen three times to get back to the gargoyles.
- Give the STONE EYEBALLS to the middle gargoyle and the STONE TEETH to the left gargoyle.
- The gargoyles will open the tomb; you can click on it to get a close-up.
- Take the COIN-SWORD TALISMAN from inside the tomb.
- Go back to the elder caught by the spirit tree.
- Use the COIN-SWORD TALISMAN on the tree.
Chapter 5: The Dragon King
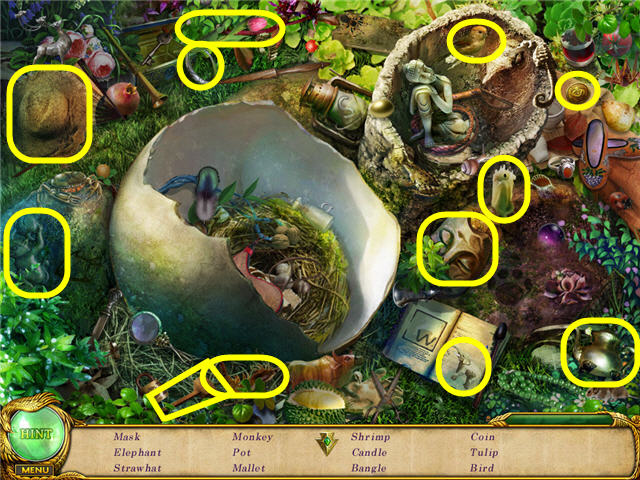
- Click on the fish soldier on the right of the entrance and find the items listed.
- Take the LIGHTER from the fish soldier’s mouth when complete.
- Click on the rocks in the entrance and find the list of items.
- Use the LIGHTER on the dynamite in the entrance.
- Head into the cave.
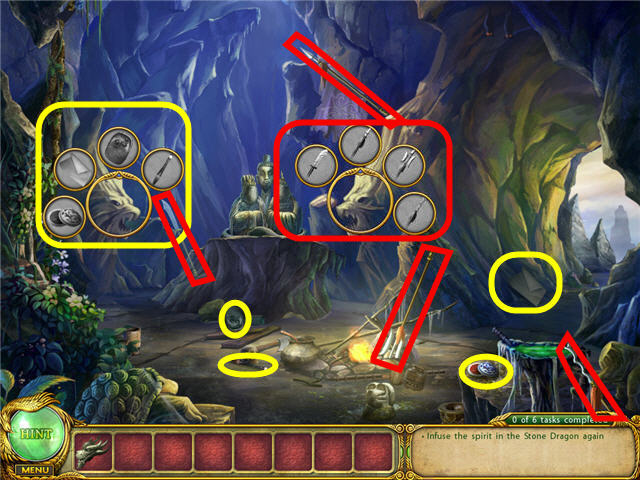
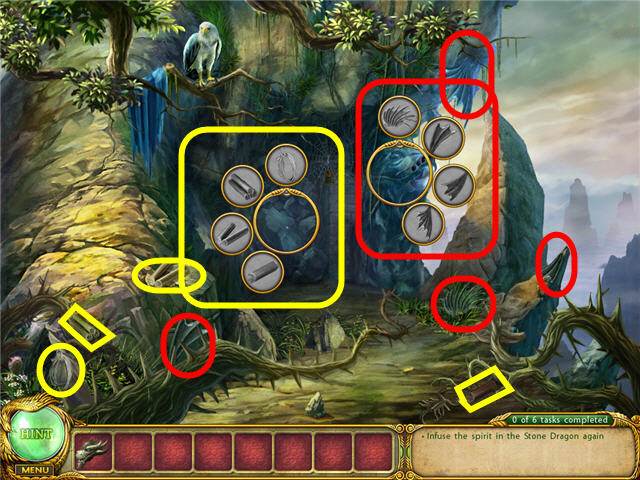
- Click on the stone trio in the center.
- Click on the lion head on the left and find the items.
- Click on the lion head on the right and find the items.
- Click on the fire pit to get a close-up and click a few times to clear the wood off the SADNESS FACE.
- Take the SADNESS FACE.
- Get the SWORD from the right lion head’s mouth.
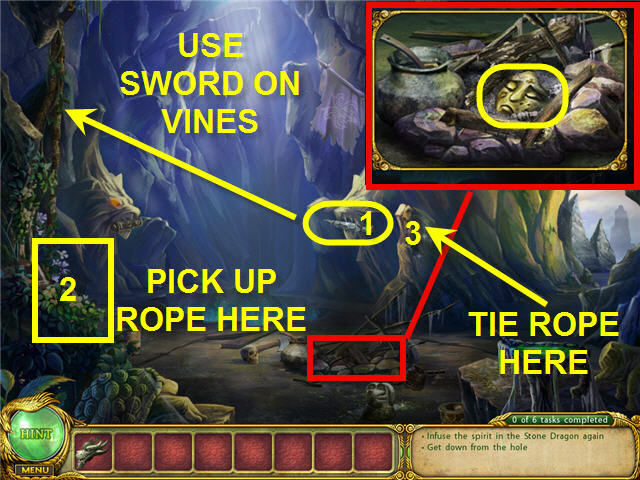
- Use the SWORD on the vines (1) in the upper left to get a ROPE (2).
- Tie the ROPE on the rock (3) to the right of the right lion head.
- Head down the hole.
- Click on the hotspot in the foliage behind the whirlpool.
- Find the items on the list.
- The GLADNESS FACE will be added to your inventory once you’ve found all the items.
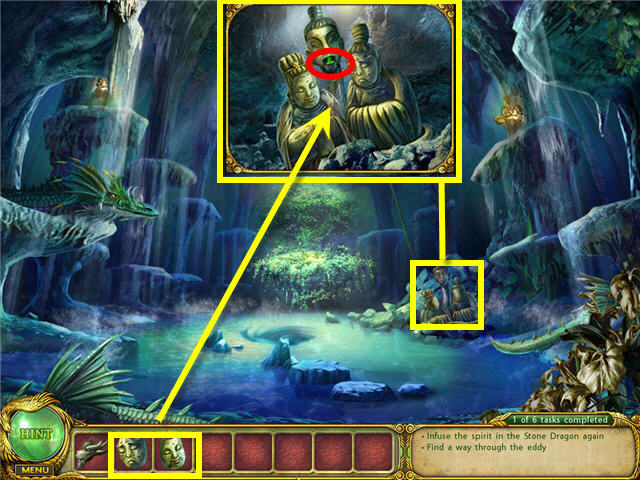
- Click on the stone trio and place the SADNESS FACE on the right and the GLADNESS FACE on the left.
- Take the LUMINOUS PEARL from the mouth of the middle statue.
- Click on the dragon on the left and the plant on the lower right to get a task.
- Use the LUMINOUS PEARL on the whirlpool in the middle of the pool of water.
- Go down the whirlpool.
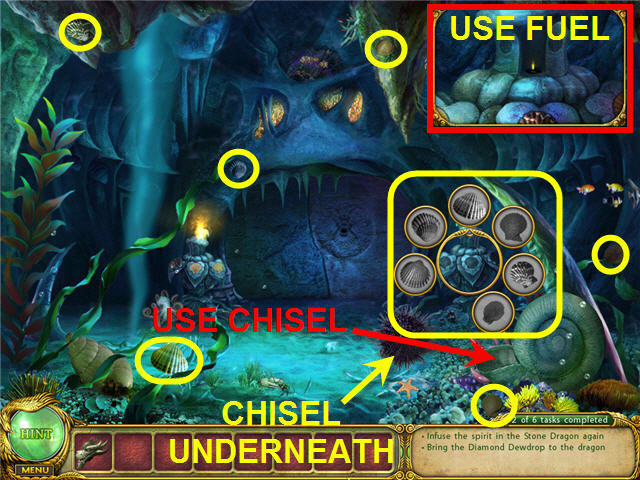
- Click on the purple sea urchin to move him; take the CHISEL before he comes back.
- Use the CHISEL five times on the opening of the large green nautilus to get FUEL.
- Click on the hotspot on the right of the door and find the items listed.
- Click on the hotspot and click to open the compartment.
- Use the FUEL on the close-up.
- Go through the opened passage and click on the hotspot on the bottom.
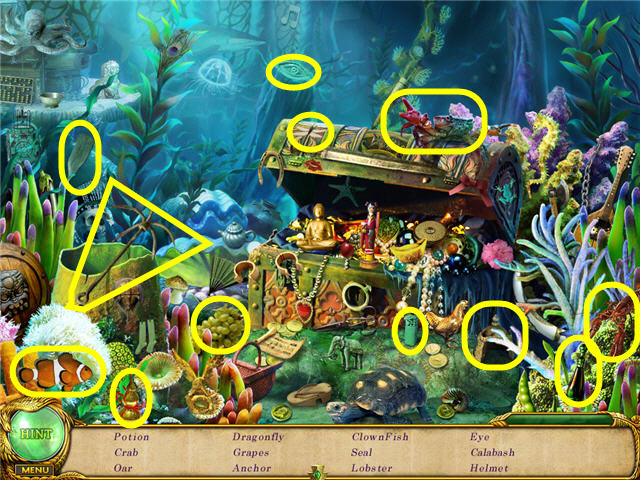
- Find the items on the list.
- A REJUVENATION POTION will be added to inventory once you’ve found all the items.
- Head back out via the bottom of the screen and go up through the whirlpool.
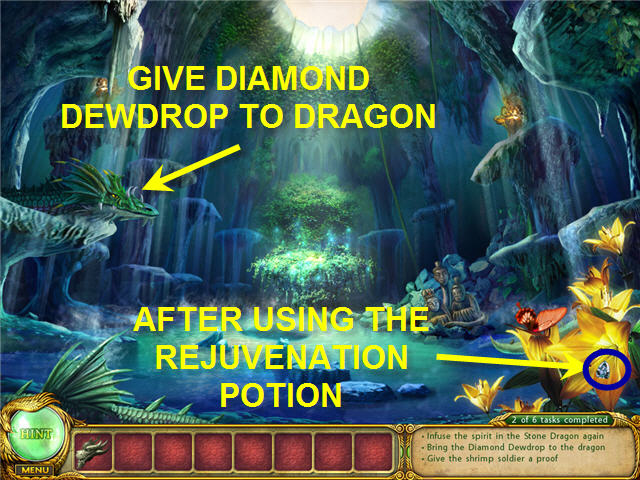
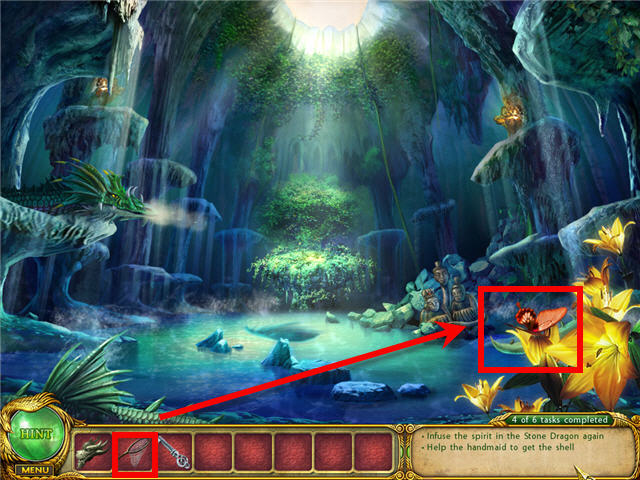
- Give the REJUVENATION POTION to the plant on the lower right.
- Take the DIAMOND DEWDROP from the Lily.
- Give the DIAMOND DEWDROP to the dragon.
- Receive a DRAGON SCALE.
- Click on the hotspot in the foliage behind the whirlpool.
- Find the items on the list.
- A CRYSTAL BALL will be added to inventory once you’ve found all the items.
- Go down the whirlpool and through the passage, toward the shrimp soldier area.
- Click on the hotspot on the bottom.
- Find the items on the list.
- The DRAGON KING’s CROWN will be added to your inventory.
- Give the DRAGON SCALE to the shrimp soldier.
- Head straight up the path into the undersea pagoda.
- Place the CRYSTAL BALL on the center stand.
- Click the spiny unlit guava lamp on the right and find the items needed.
- Use the DRAGON KING’S CROWN on the Dragon King statue.
- Head through the newly opened passageway.
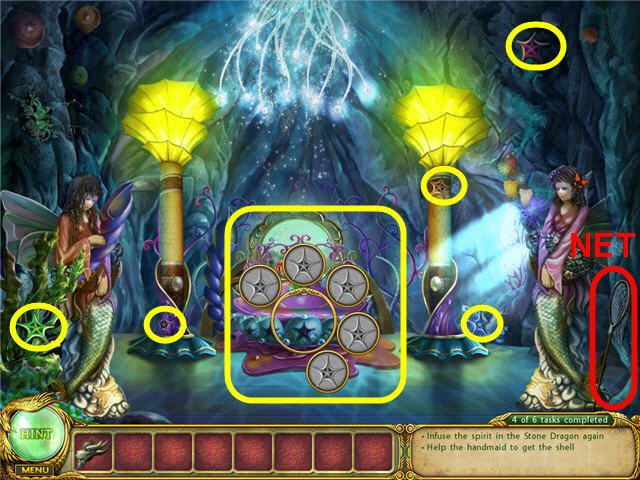
- Take the NET from the lower right of the screen.
- Click on the table between the two light pillars and find the items.
- Back out via the bottom of the screen three times.
- Go up the whirlpool.
- Click on the hotspot in the foliage behind the whirlpool.
- Find the items on the list.
- You will get a KEY in inventory when complete.
- Use the NET on the butterfly on the Lily, on the right, to get the GOLDEN BUTTERFLY.
- Head down the whirlpool and through the passage to the shrimp soldier area.
- Click on the hotspot on the bottom of the scene.
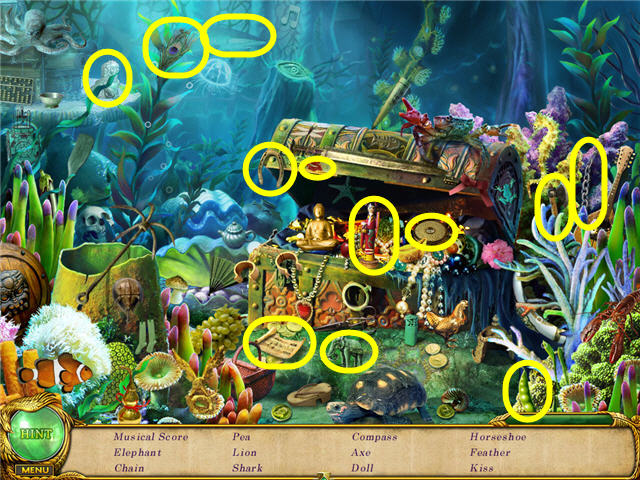
- Find the items on the list.
- The MUSICAL SCORE will be added to inventory after you’ve found all the items.
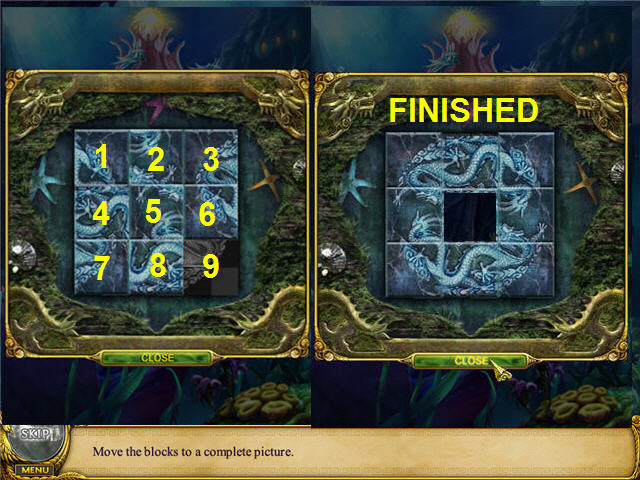
- Use the KEY on the locked chest in the bottom right corner.
- Move the squares around to complete the picture. Numbering them from 1 to 9, starting on the upper left.
- Click squares 8, 5, 2, 3, 6, 9, 8, 7, 4, and 5.
- Click squares 6, 9, 8, 5, 6, 3, 2, 1, 4, and 5.
- Click squares 6, 3, 2, 5, 6, 3, 2, 1, 4, and 7.
- Click squares 8, 5, 2, 3, 6, 5, 8, 7, 4, and 5.
- Click squares 2, 1, 4, 5, 8, 7, 4, 1, 2, and 5.
- Click squares 8, 7, 4, 1, 2, 5, 8, 7, 4, and 1.
- Click squares 2, 5, 4, 7, 8, 5, 2, 1, 4, and 7.
- Click squares 8, 5, 2, 1, 4, 7, 8, 5, 4, and 7.
- Click squares 8, 5, 2, 1, 4, 7, 8, 5, 4, and 1.
- Click squares 2, 5, 8, 7, 4, and 5.
- Take the COMB from the chest upon completion of the puzzle.
- Go forward twice to the room with the handmaids.

- Use the COMB on the handmaid’s hair on the left.
- Use the GOLDEN BUTTERFLY on the handmaid’s hair on the left.
- Take the large purple SHELL from the handmaid’s arms.
- Place the SHELL on the right side of the music table.
- Place the MUSICAL SCORE on the table.
- Duplicate the music as it is played.
- You can do this by tone or color. You must wait until all the notes are cleared before you can start clicking the shells.
- Follow the directions below to solve by color:
- First Set: Green, Yellow, Purple, Red.
- Second Set: Yellow, Green, Yellow, Blue, Purple.
- Third Set: Red, Yellow, Green, Red, Yellow, Blue.
- Fourth Set: Yellow, Purple, Red, Yellow, Yellow, Green, Blue.
- Fifth Set: Green, Yellow, Purple, Red, Yellow, Purple, Red, Red.
- Place the STONE DRAGON HEAD on the table.
Chapter 6: The Hidden Temple
- Click on the training dummies on the left.
- Click on the monk.
- Go up the path to the right into the thatched roof hut.
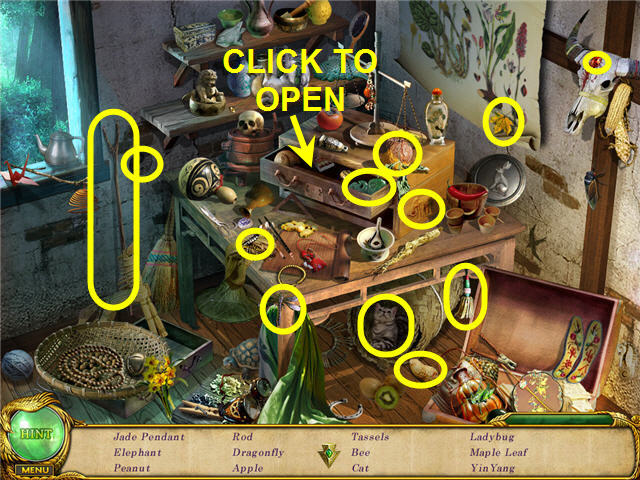
- Click on the hotspot and find all the items listed.
- A BOWL will be added to your inventory.
- Head to the left and click on the hotspot on the apothecary drawers.
- Find all the items.
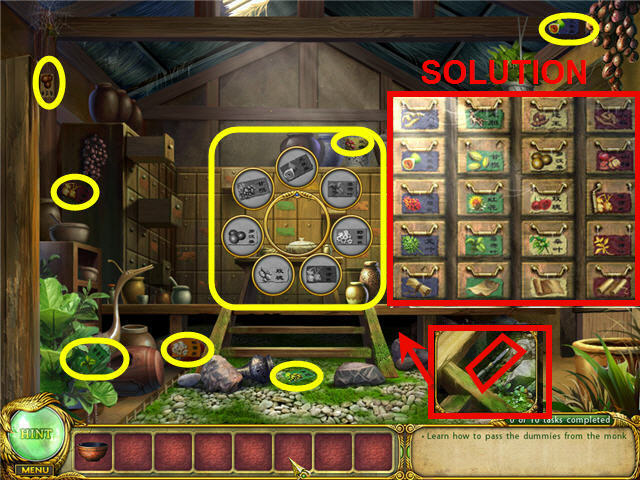
- Click on the apothecary drawers and attach the labels on the correct drawers. Match the ones that are already in place to see what the rows and columns have in common (see the screenshot for the solution).
- The FORMULA will be added to your inventory.
- Click on the rocks to the right of the stairs and take the FILE from the close-up.
- Exit the room via the bottom of the screen.

- Use the FILE on the top of the glass jar to the right.
- Use the BOWL on the opened jar to get the MEDICINAL LIQUOR.
- Head back to the monk via the bottom of the screen.
- Pick up the TOP OF PAGODA from the water under the monk.
- Give the MEDICINAL LIQUOR to the monk.
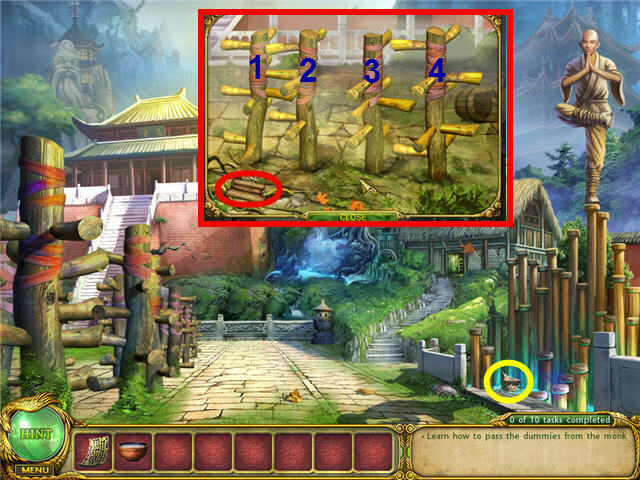
- Click on the dummies to the left and move them to create a passage.
- Click on the scroll on the ground in the close-up to get the correct position of the dummies.
- From left to right, click on 1, 3, 2, 1, 2, 4, 4, 4, 3, 3, and 2.
- Go up the stairs to the pagoda.
- Get the LADDER from the side of the pagoda.
- Put the TOP OF PAGODA on the post on the right.
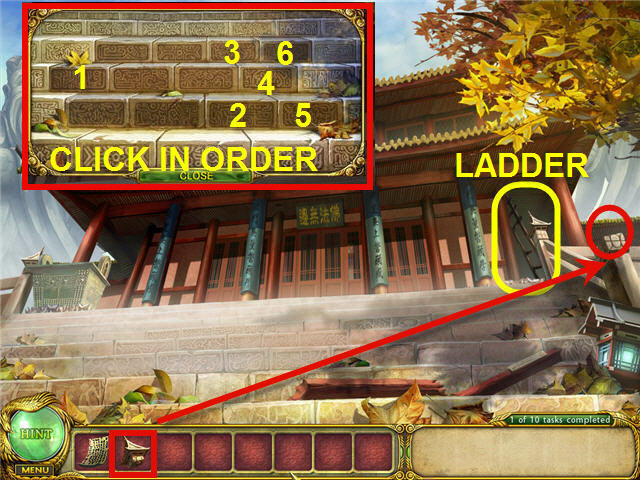
- Click on the stairs to get a puzzle (ee the screenshot for the solution).
- Go up the stairs into the pagoda.
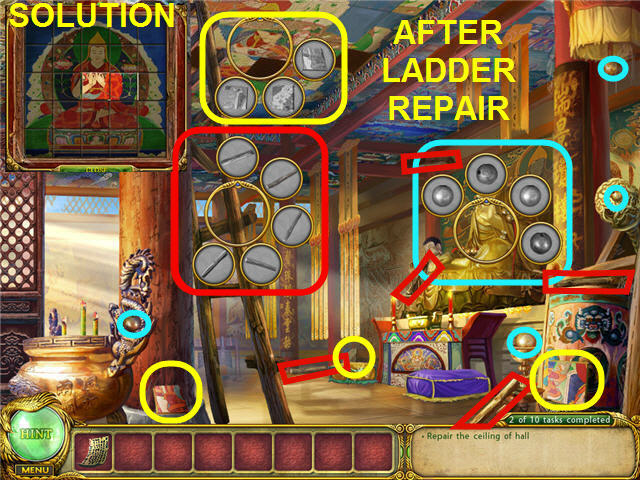
- Click on the ceiling by the missing tiles.
- Place the LADDER on the pillar.
- Click on the bottom rung and find the items on the list.
- Click on the large statue on the altar on the right to get a list of items.
- After the LADDER is repaired, click on the ceiling and find the items listed.
- Click on the repaired tile ceiling to get a tile puzzle.
- Swap the tiles to complete the picture. See the screenshot for the completed picture.
- Pick up a HANDLE from the ground after completion of the puzzle.
- Back out of the pagoda and into the thatched roof hut.
- Click on the hotspot on the shelves to the right.
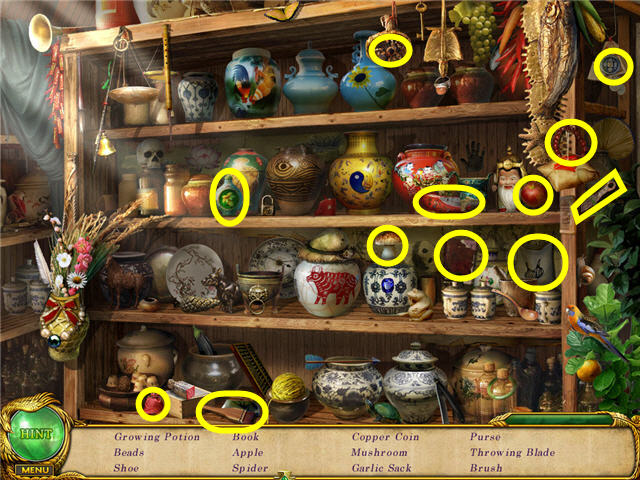
- Find the items on the list.
- The GROWING POTION will be added to your inventory.
- Go into the pagoda and go through the passage above the altar.
- Click on the hotspot on the bottom right.
- Find the items on the list.
- A HAMMER will be added to your inventory.
- Click on the water left of the bridge, the stone wall to the left, and the general’s spirit guarding the passage.
- Head back to the hut.
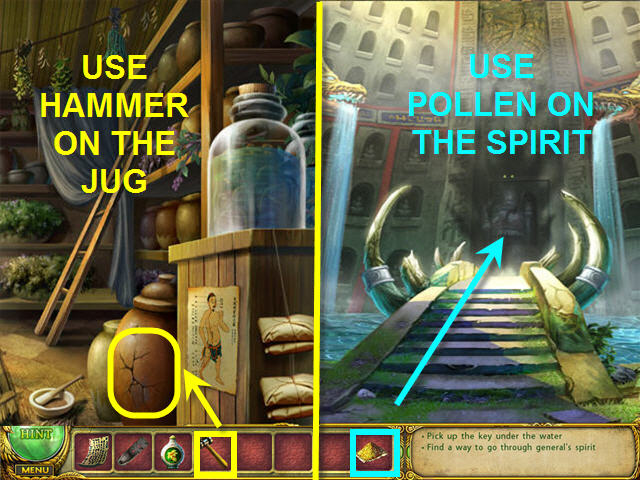
- Use the HAMMER on the cracked jug on the floor.
- Take the POLLEN from the bottom of the broken jug.
- Head back to the pagoda and use the POLLEN on the spirit.
- Go through the open door to the room of the dead.
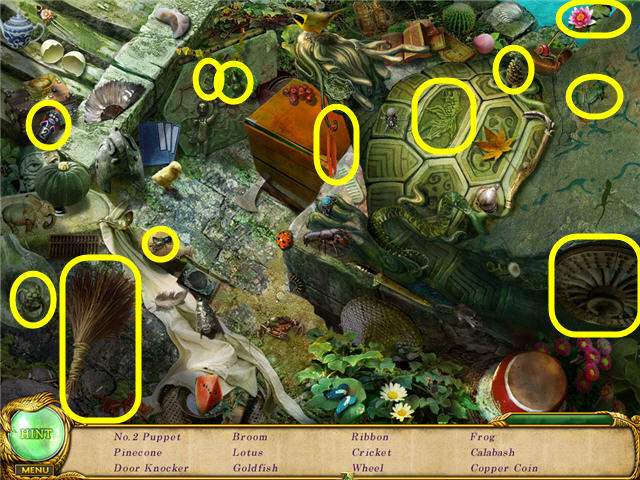
- Click on the coffin on the right and find the items listed.
- Click on the coffin after finding all the items and take the YANG-STONE.
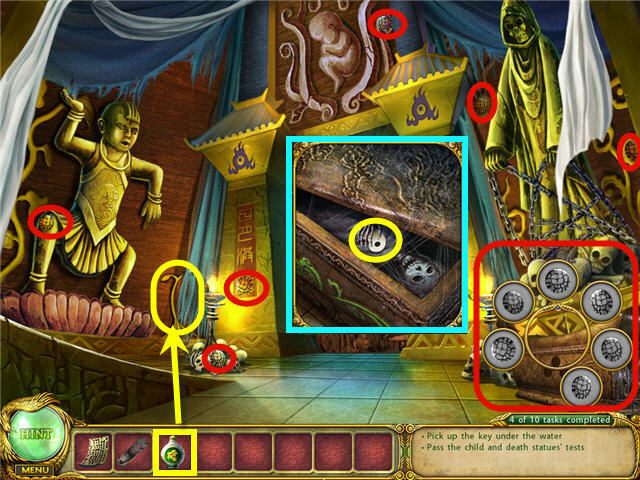
- Click on the large golden child on the left.
- Click on the death statue on the right.
- Use the GROWING POTION on the seed on the left.
- Leave the area via the bottom of the screen.
- Click on the hotspot on the bottom right.
- Find the items on the list.
- A HASSOCK will be added to your inventory.
- Back out of the room via the bottom of the screen.
- Place the HASSOCK on the floor in front of the altar.
- Click on the new hotspot by the hassock and take the RITES OF THE DEAD.
- Head into the room of the dead and give the RITES OF THE DEAD to the death statue.
- Leave the pagoda and go to the hut.
- Click on the hotspot in the shelves on the right.
- Find the items on the list.
- A YIN-STONE will be added to your inventory.
- Head back to the room of the dead.
- Place the YIN-STONE and the YANG-STONE on the door.
- Head up into the warrior room and click on each of the three warriors to get tasks.
- Back out of the area two times via the bottom of the screen back to the dragon fountains.
- Click on the hotspot on the lower right of the screen.
- Find the items on the list.
- A PUPPET will be added to your inventory.
- Head back to the apothecary room in the hut.
- Place the PUPPET on the wall on the right.
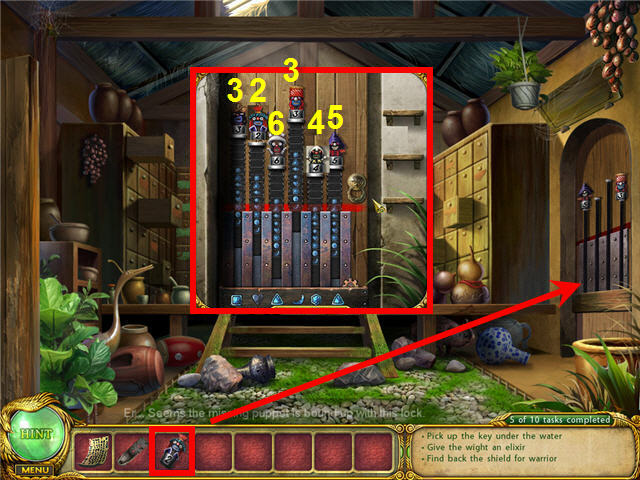
- Click on the hotspot by the puppets to get a weights puzzle.
- Place the weights on the columns, adjusting the symbols to match the bottom. The weights should be, from left to right, 3, 2, 6, 3, 4, and 5.
- Head to the room to the right and click on the hotspot in the back of the room.
- Find the items on the list.
- A SHIELD will be added to your inventory.
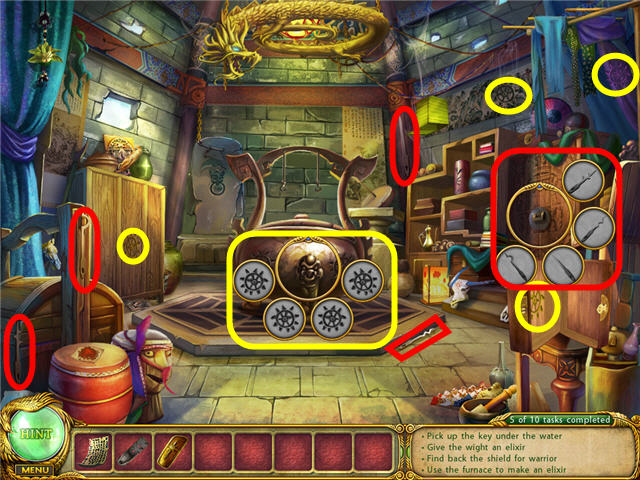
- Click on the wooden box on the right chair to open it.
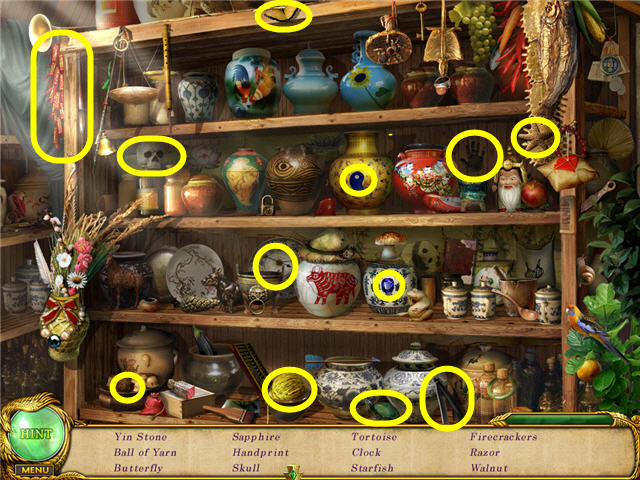
- Click on the large kettle in the middle of the room and find the items listed.
- Click on the locked cupboard on the right and find the items listed.
- Click on the door lock and use the LOCKPICKS on the lock.
- Get the BOILER from the cupboard you just unlocked.
- Hang the BOILER above the large kettle.
- Use the FORMULA on the BOILER and find the items on the list.
- Click on the panel in the left rear corner of the room to expose a mechanism.
- Use the HANDLE on the mechanism.
- Turn the HANDLE.
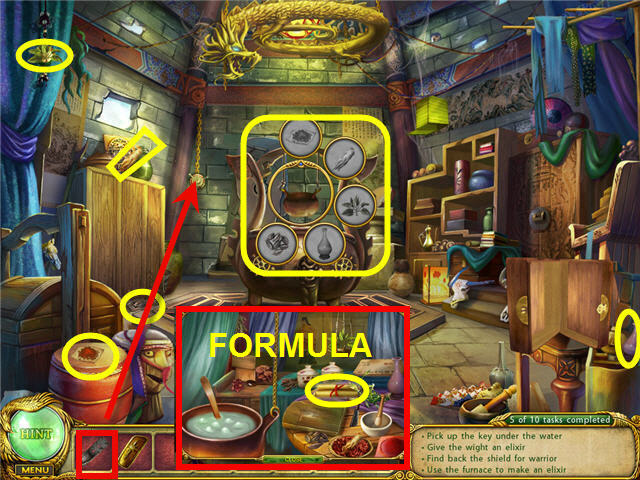
- Click on the BOILER to get a close-up. Click on the scroll to find out how to make the elixir.
- Place the seeds in the mortar and pestle.
- Pour the liquid from the purple vase in the mortar and pestle and pour that mixture into the boiler.
- Click on the spoon to stir the concoction.
- Place the root on the cutting board and click on the knife to chop it.
- Place the cut roots in the mortar and pestle.
- Take the greenery in the hanging planter and put it on the cutting board.
- Click on the knife to chop the plant.
- Add the chopped greens to the mortar and pestle. Place the mixture into the boiler.
- Stir and pick up the spoon and dip it into the elixir.
- Pour the elixir onto the red plate.
- The ELIXIR will be added to your inventory.
- Head to the warrior room.
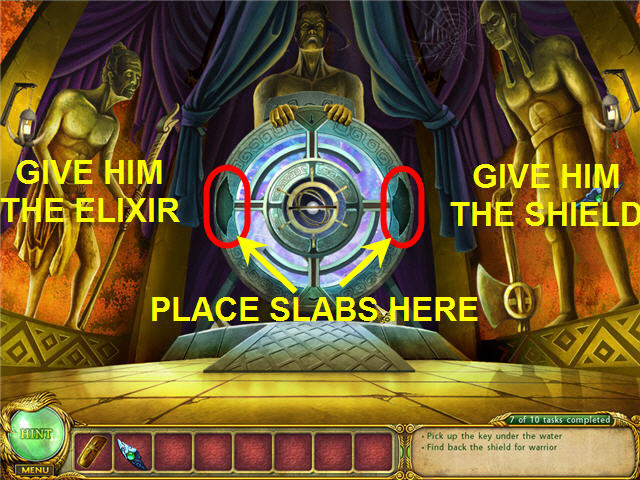
- Give the ELIXIR to the wight on the left.
- Give the SHIELD to the warrior on the right.
- Pick up the two SLABS that were dropped on the floor.
- Place the SLABS on the spaces in the disk held by the middle warrior.
- Pick up the VALVE on the floor under the large disk.
- Exit out two times via the bottom of the screen, to the dragon fountains.
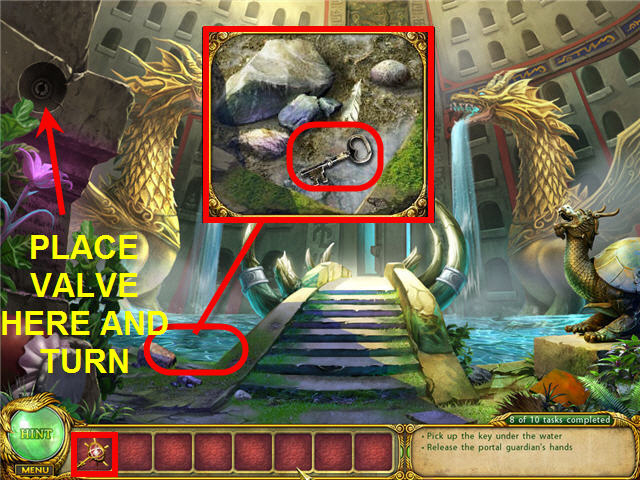
- Place the VALVE in the hole in the wall, on the left.
- Turn the valve to drain the water.
- Click on the water on the left side to get a close-up; take the KEY.
- Take the KEY to the warrior room.
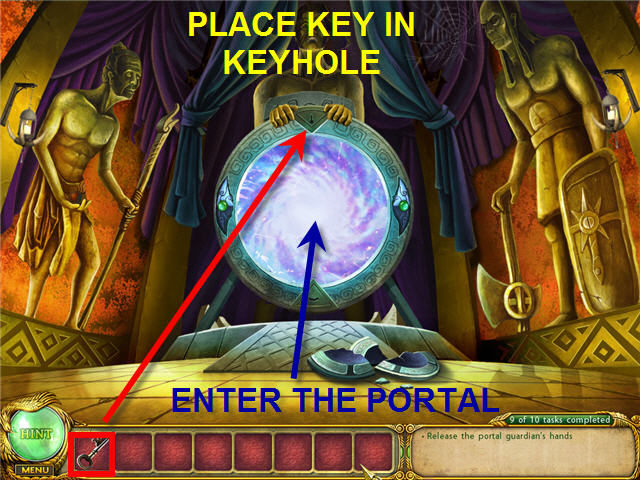
- Place the KEY in the keyhole on the top of the portal.
- Click on the portal to pass through.
Chapter 7: The Tree of Ages
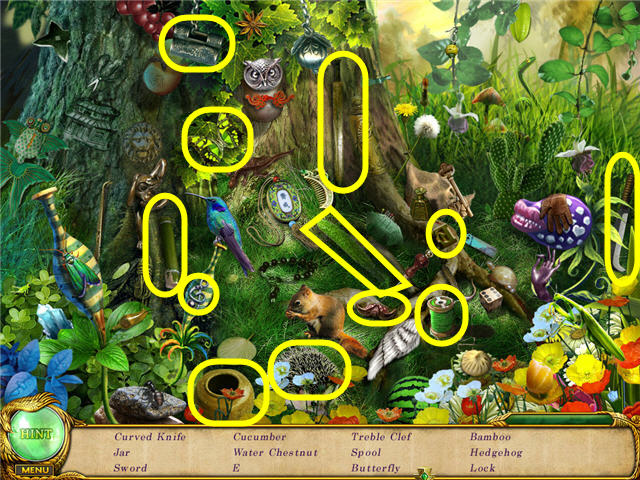
- Click on the hotspot on the lower left.
- Find the items on the list.
- A CURVED KNIFE will be added to inventory.
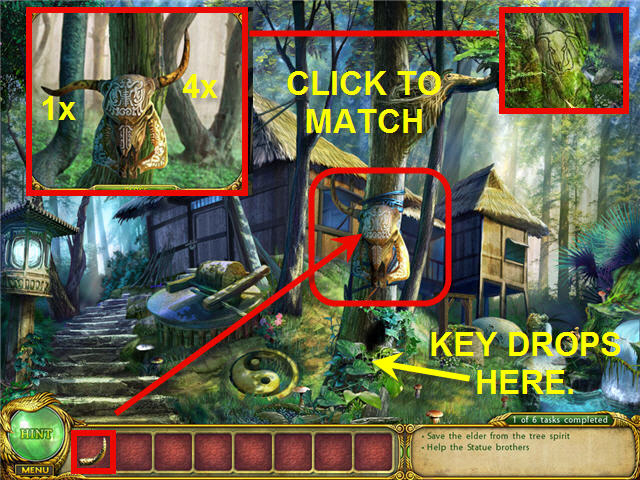
- Click on the sprite in the leaves on the right and find the items.
- Take the STATUE’S HEAD from the sprite.
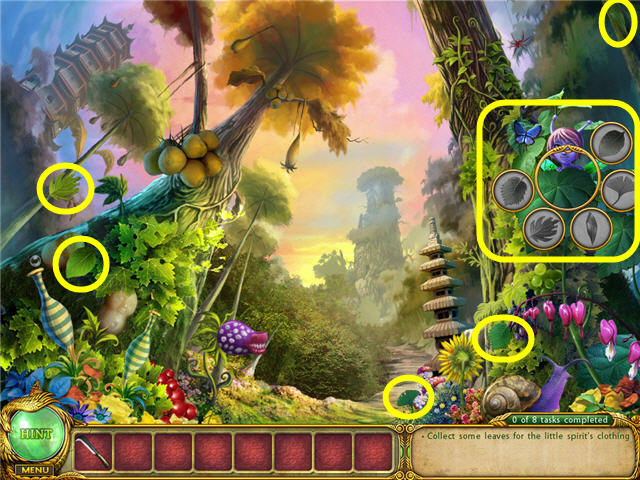
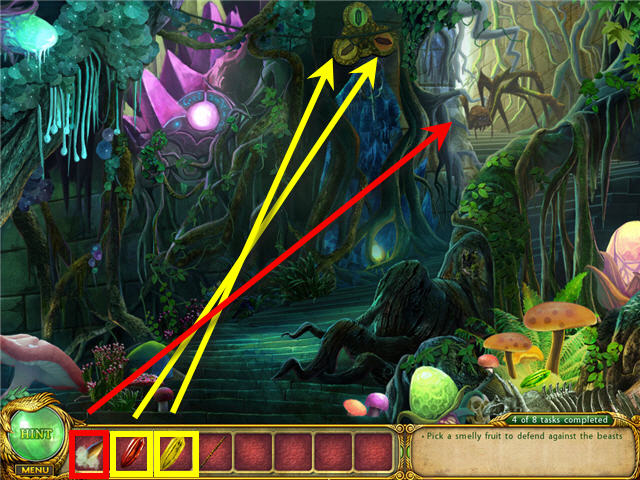
- Click on the snail in the lower right and the smelly fruit hanging from the tree on the left.
- Go forward down the path to the firefly area.
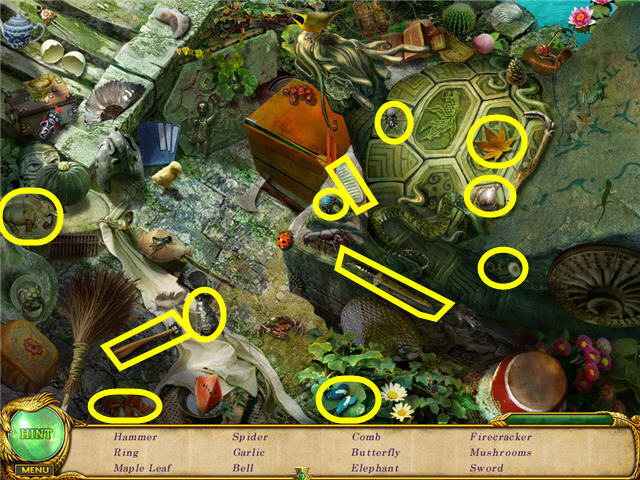
- Click on the hole on the banks and find the items listed.
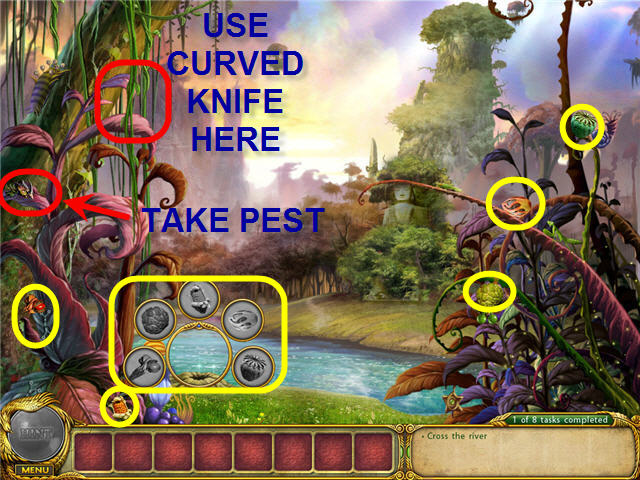
- Take the PEST from the middle leaf on the left.
- Use the CURVED KNIFE on the vine .
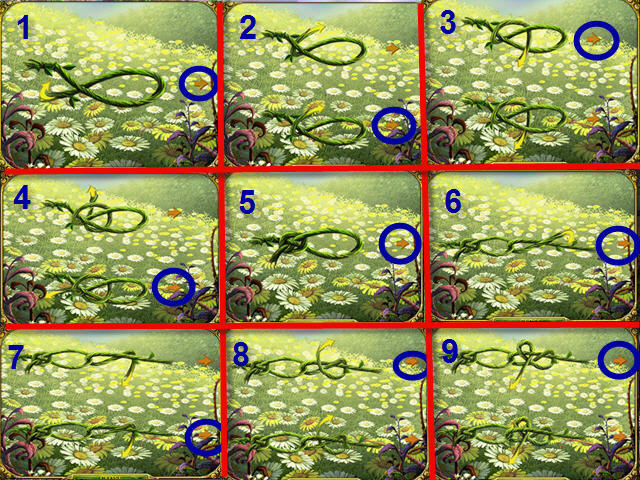
- Click on the vine to get a rope puzzle.
- Choose the next step correctly in order to make a rope ladder (see the screenshot for the solution).
- Take the ROPELADDER from the left pink leaves.
- Head back via the bottom of the screen to the smelly fruit.
- Use the ROPELADDER on the left tree and get the SMELLY FRUIT.
- Go forward two times to the broken bridge.
- Give the PEST to the carnivorous plant on the right.
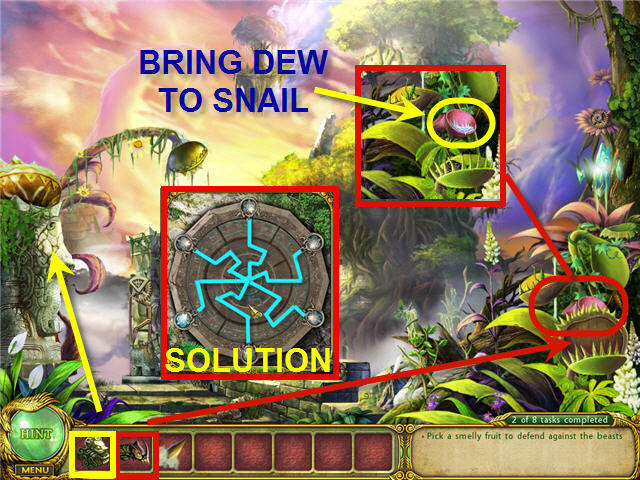
- Take the DEW in the pink plant and go back two times via the bottom of the screen to the snail.
- Give the snail, in the bottom right corner under the sprite, the DEW.
- Pick up the STONE BALL left by the snail.
- Head back to the broken bridge and put the STATUE’S HEAD on the statue on the left.
- Take the RED CRYSTAL from the opening in the left statue under the head.
- Click on the wheel on the right of the bridge.
- Place the STONE BALL in the empty slot and get a ring puzzle.
- Arrange the rings so that all the paths to the light are lit.
- Click the outer ring nine times.
- Click the next inner ring seven times.
- Click the third ring eight times.
- Click the innermost ring nine times.
- Click on the middle pillar on the bridge and find the list of items.
- Go forward across the bridge and click on the hotspot on the upper right.
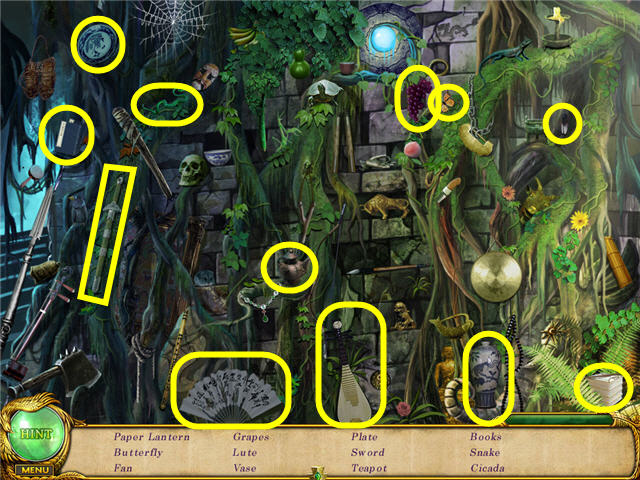
- Find the items on the list.
- A PAPER LANTERN will be added to your inventory.
- Back out of the area two times via the bottom of the screen.
- Use the PAPER LANTERN on the fireflies on the right to get FIREFLIES in inventory.
- Go back one more time to the Sprite and click on the hotspot to the bottom left.
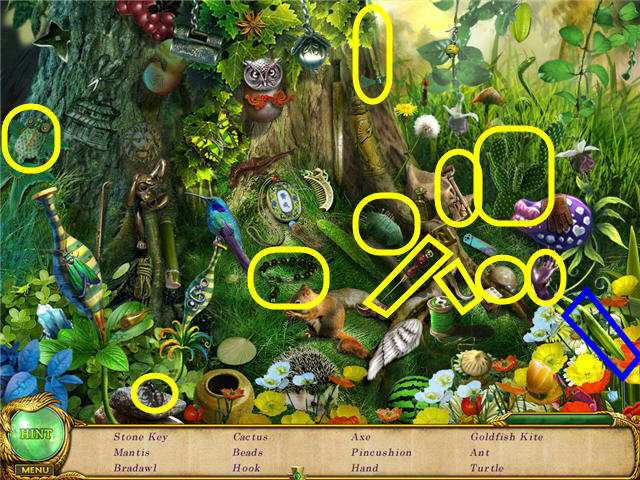
- Find the items on the list.
- A STONE KEY will be added to your inventory.
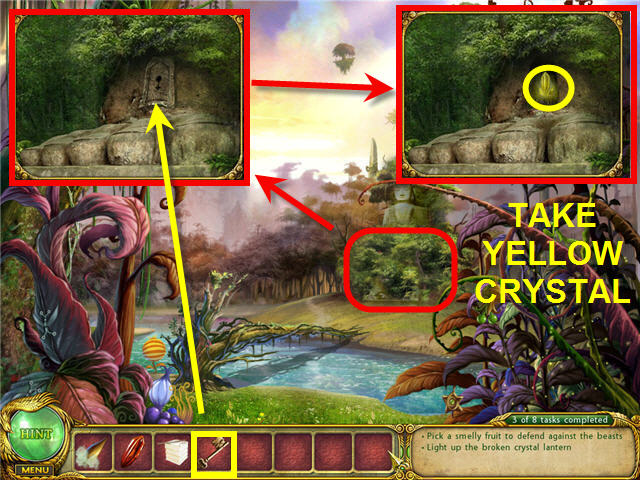
- Go forward one time and click on the hotspot in the bushes surrounding the large stone statue across the waterway.
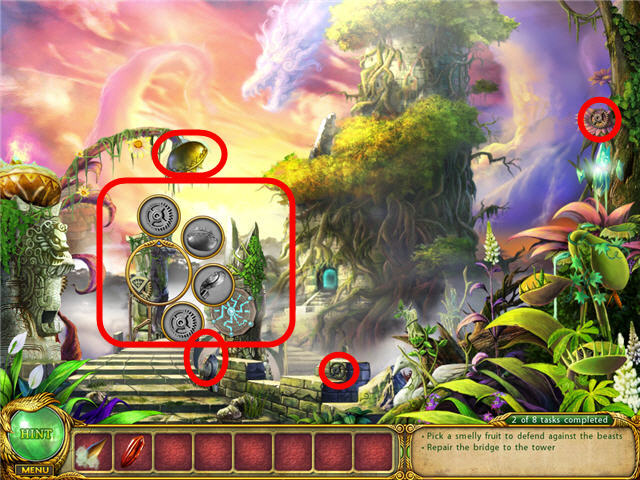
- Use the STONE KEY on the keyhole and take the YELLOW CRYSTAL.
- Go forward two times and click on the hotspot on the upper right.
- Find the items on the list.
- A FLUTE will be added to your inventory.
- Click on the lower right and place the FIREFLIES on the broken crystal lantern.
- Click on the panel with the trident on the left of the lantern.
- Head up the stairs.
- Click on the frozen statue.
- Place the YELLOW CRYSTAL and the RED CRYSTAL in the slots above the frozen statue.
- Click on the green crystal in the lower right.
- Use the SMELLY FRUIT on the spider to scare him away.
- Head back to the area with the sprite.
- Find the items on the list.
- A LEATHER GLOVE will be added to your inventory.
- Go back up to the stairway with the frozen statue and use the LEATHER GLOVE on the GREEN CRYSTAL on the lower right.
- Use the GREEN CRYSTAL on the slot above the frozen statue.
- Take the TRIDENT from the thawed statue.
- Go down the stairs and use the TRIDENT on the door to the right with the trident slot etched in it.
- Take a POT OF POWDER from the opened compartment.
- Click on the new hotspot above the opened compartment.
- Find the items on the list.
- A TORCH will be added to your inventory.
- Go up the stairs two times and use the FLUTE on the sleeping tree.
- Go back three times to the carnivorous plants.
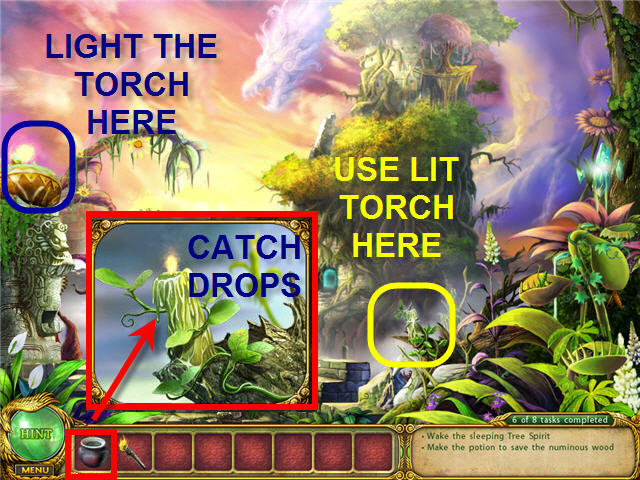
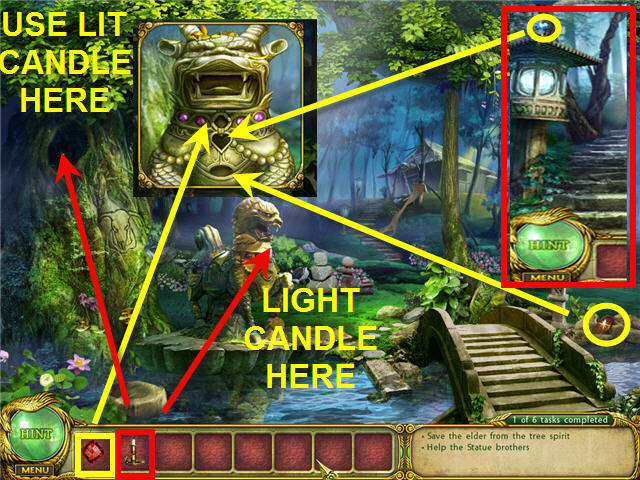
- Light the torch on the left lion pillar.
- Use the LIT TORCH on the candle like plant on the right.
- Use the POT OF POWDER on the dripping candle to get NUTRITION in inventory.
- Head back up to the sleeping tree.
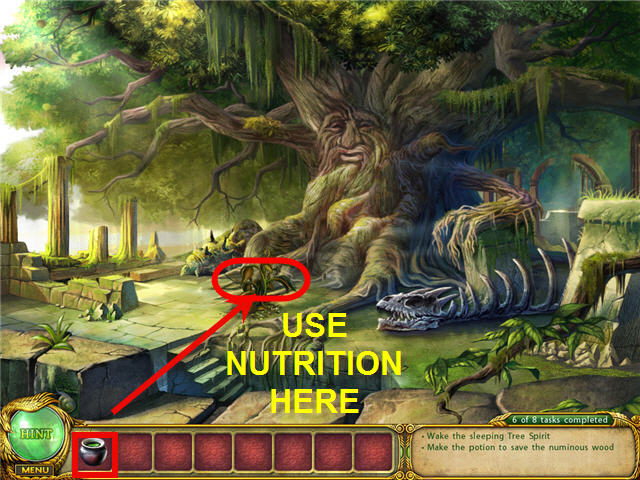
- Use the NUTRITION on the numinous wood.
- Congratulations! You’ve completed Shaolin Mystery: Tale of the Jade Dragon Staff.
Created at: 2010-08-12