

Walkthrough Menu
General Tips
- From the options menu you can adjust the audio settings, cursor, and screen mode.
- There are three levels of game play; casual, advanced, and extreme.
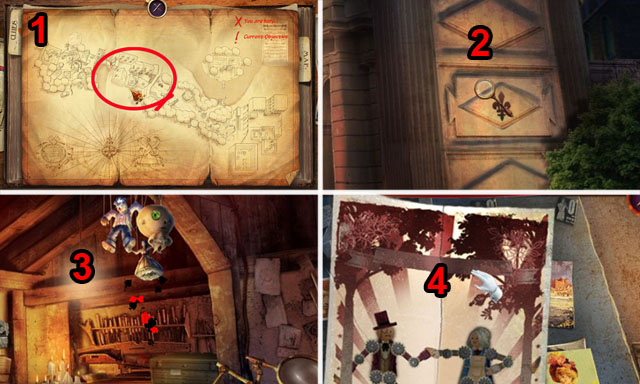
- You can check the map from the journal book in the lower left corner of the screen (1).
- In this guide, we will use the acronym 'HOS' for Hidden Object Scenes.
- There are three main cursors in the game. You can take a closer look at something with the magnifying glass (2). The Hidden Object Scenes are indicated with sparkles (3). The hand cursor allows you to take an inventory item (4).
- Items written in green and yellow in Hidden Object Scenes need an additional step before they can be collected.
- The hint button in the right corner slowly charges up as you play. You can use it during any scene to get a hint of what to do next or for the location of a hidden object.
Chapter 1: The Village
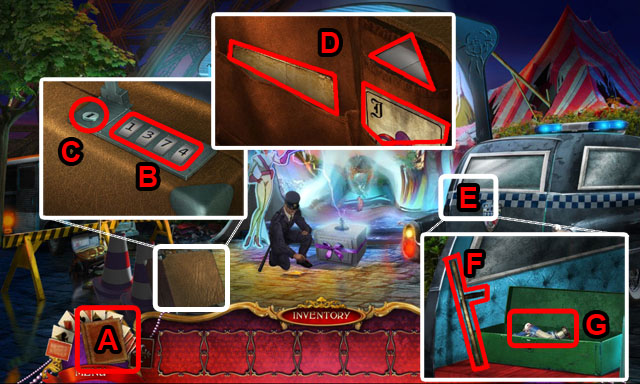
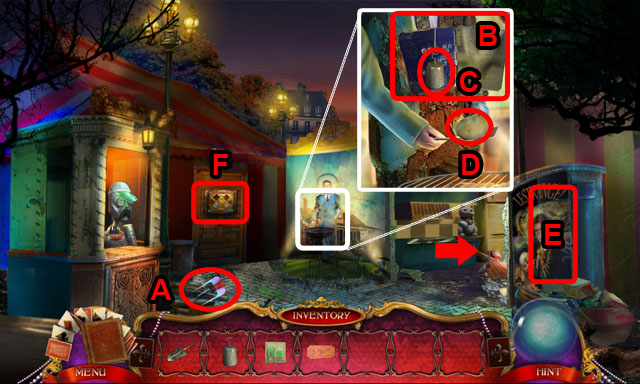
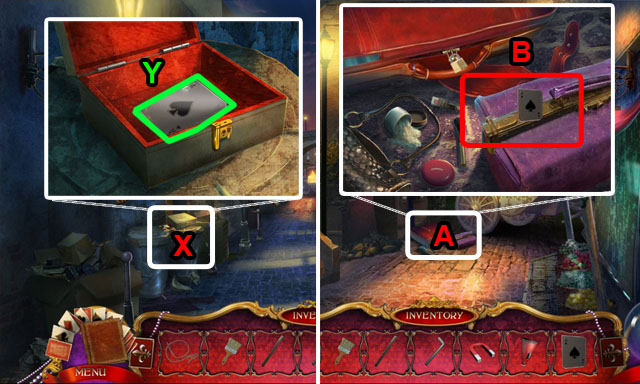
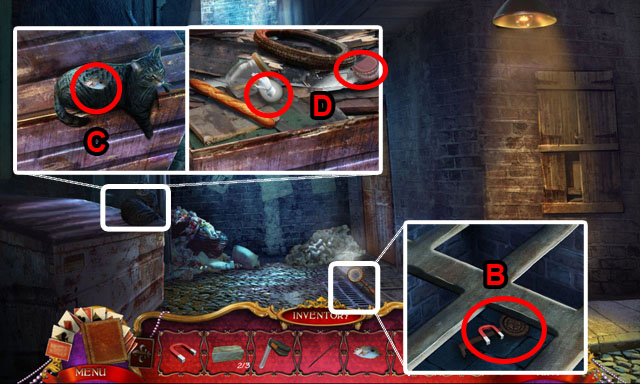
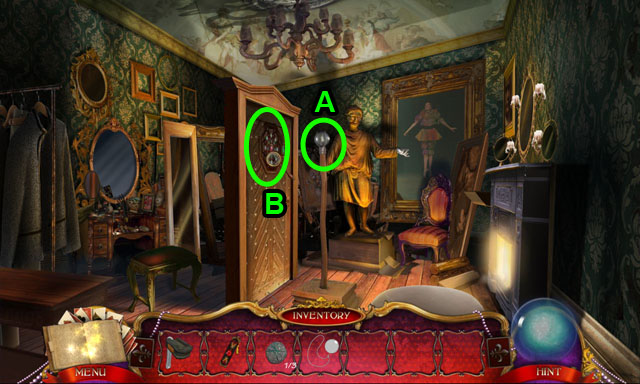
- After finishing the conversation with the investigator, open the Journal book in the bottom left to check the 4 digits, 1374 (A).
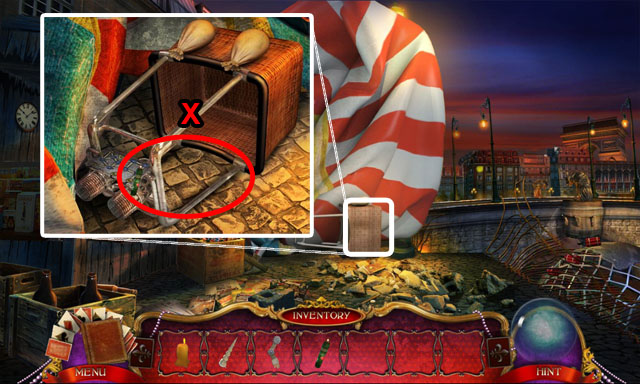
- Investigate the suitcase and enter the combination numbers that you noted in the journal book (B). Push the keyhole button to open the suitcase (C).
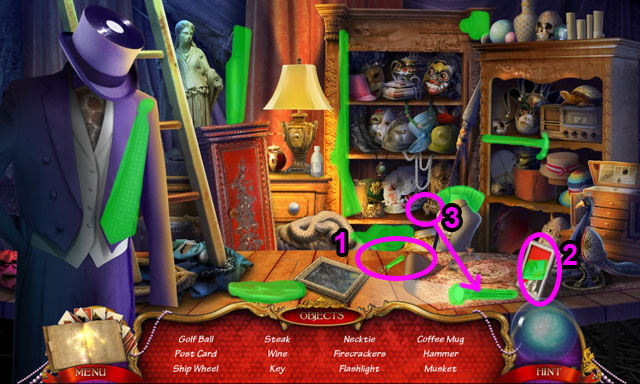
- Collect the LIGHTER, note and the card (D).
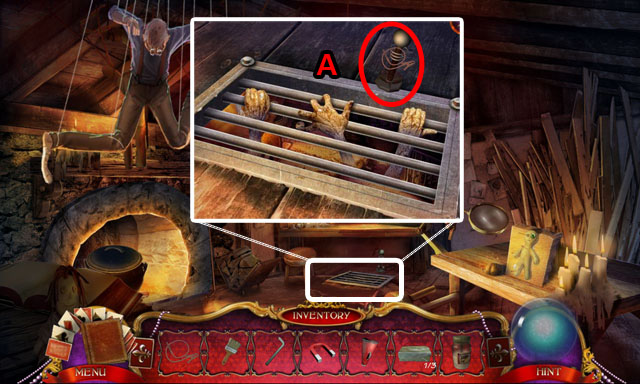
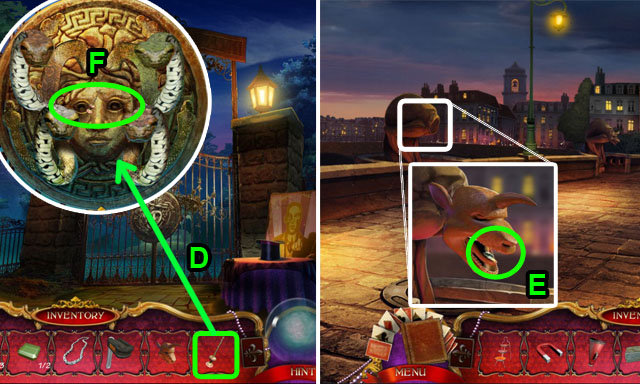
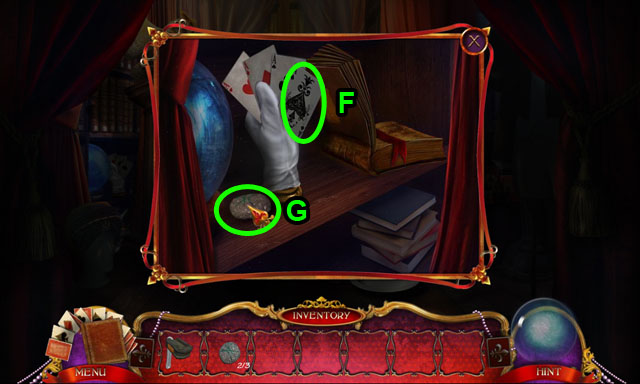
- Open the hatchback on the car (E). Collect the BATON (F) and JACK (G) in the toolbox.
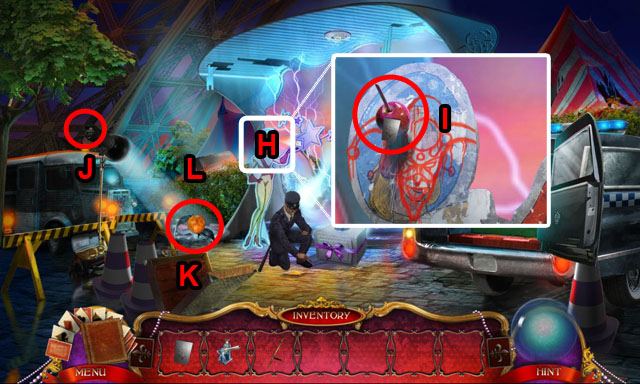
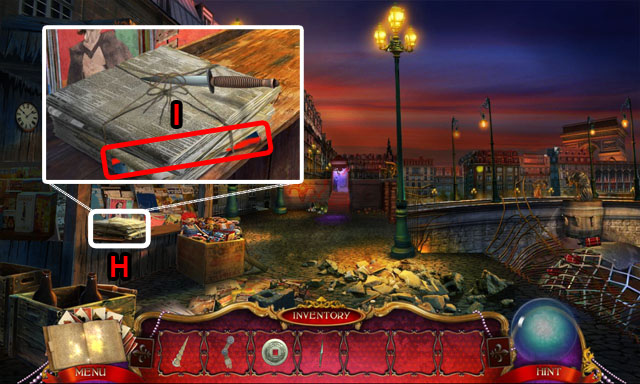
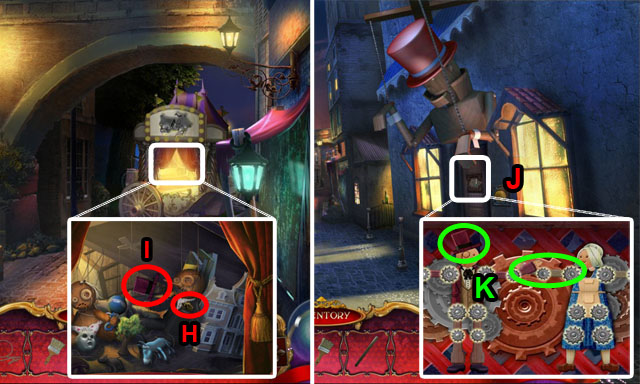
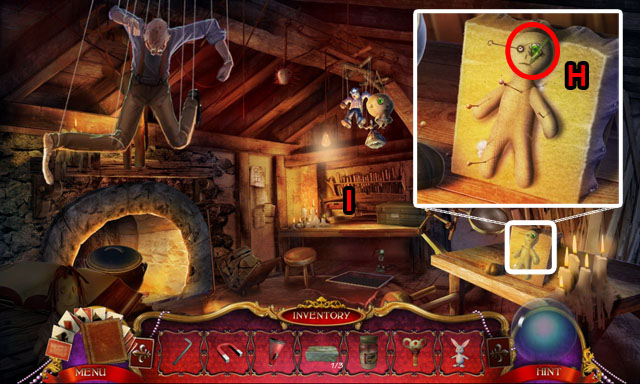
- Zoom into the board (H) and melt the candy coating on the apple with the LIGHTER (I). Collect the APPLE.
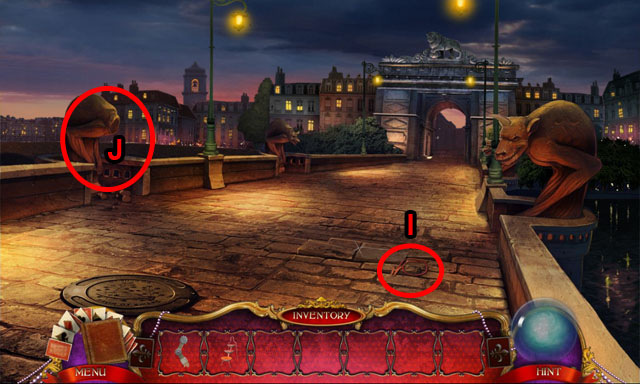
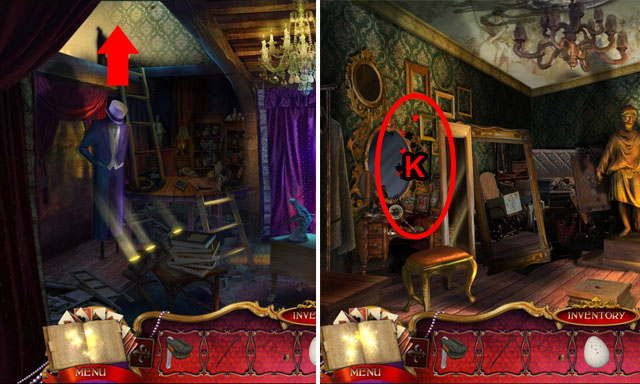
- Turn on the light (J) and throw the APPLE to scare the crows (K).
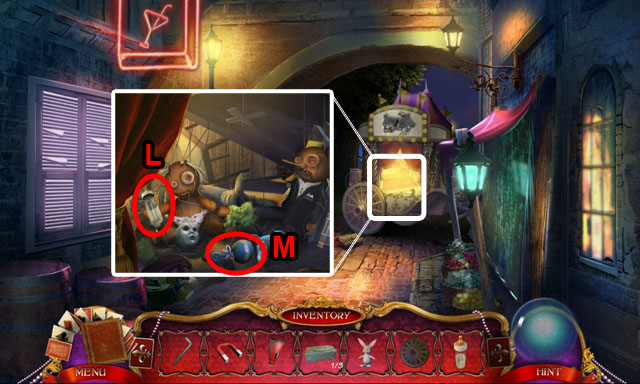
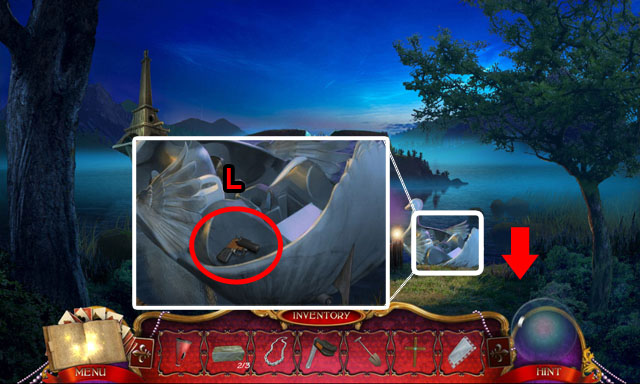
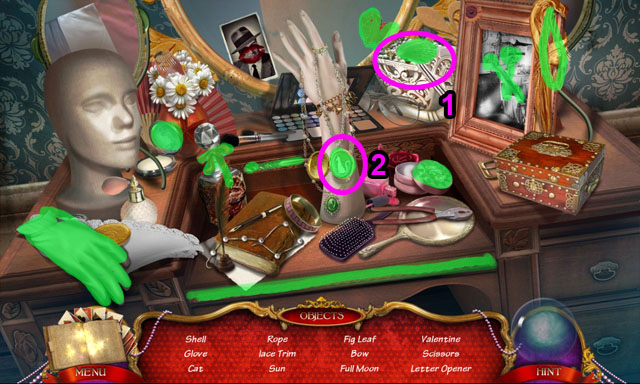
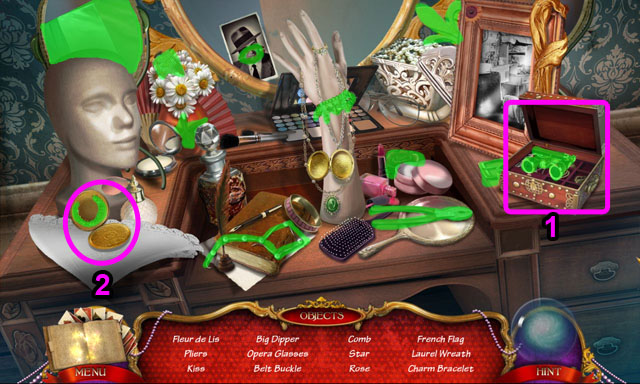
- Enter the HOS in the bush (L).
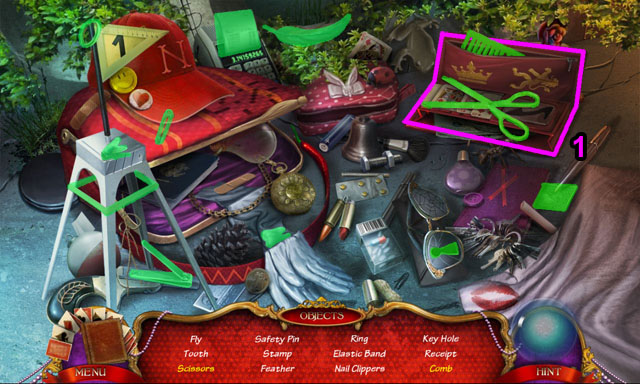
- Find all the Hidden Objects.
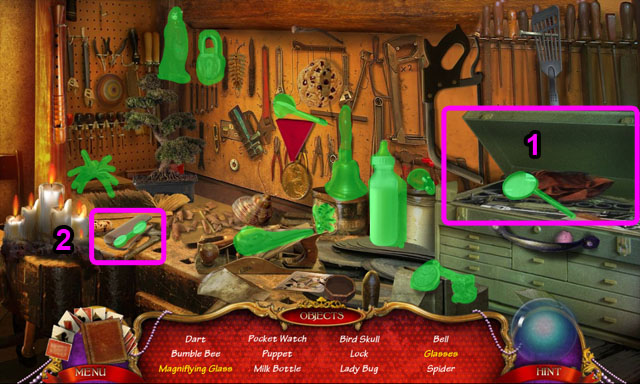
- Open the case to find the comb and scissors (1).
- You will receive the SCISSORS.
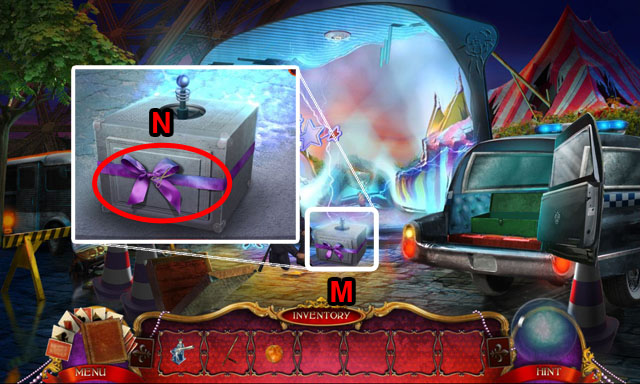
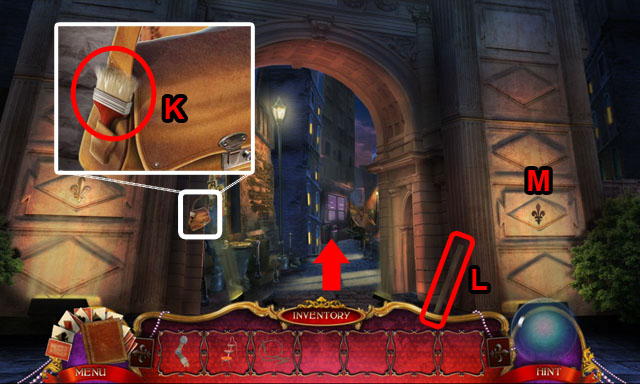
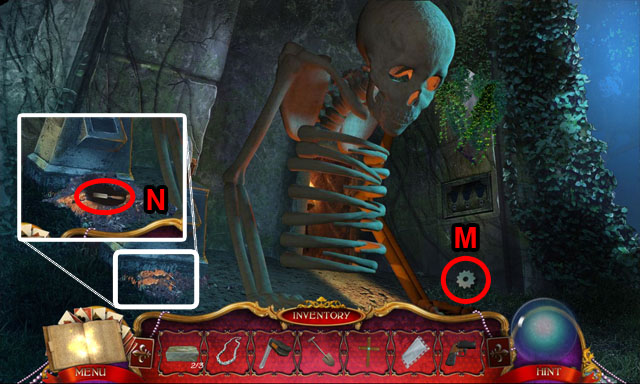
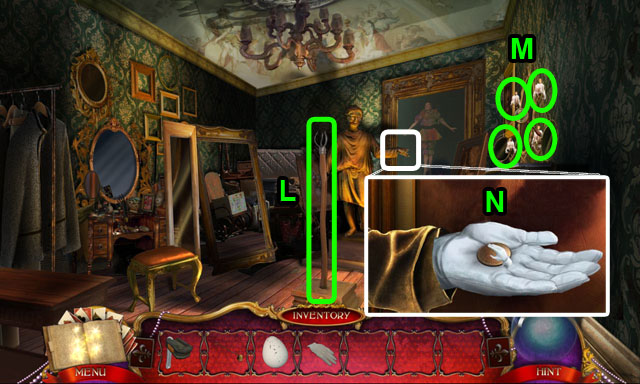
- Zoom into the box (M); cut the ribbon with the SCISSORS and open the box (N).
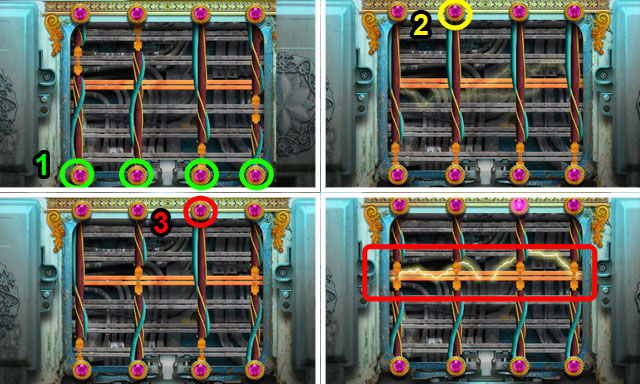
- Investigate the circuit board to start the mini-game.
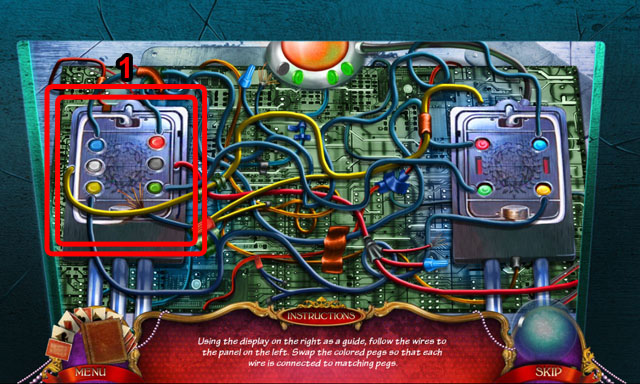
- Switch the places of the lights on the left side to connect to the correct lights on the right side.
- Press one light and then another to switch their places.
- The lights connected to the red and the yellow wires do not need to be lit up, only the lights connected to the blue wires.
- Follow the blue wires from left to right to see what color they connect to.
- See the screenshot for the solution (1).
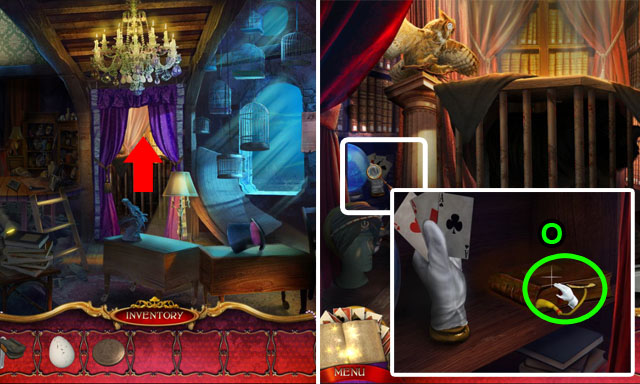
- Walk forward through the gate.

- Try to talk with the thief in the middle of the scene.
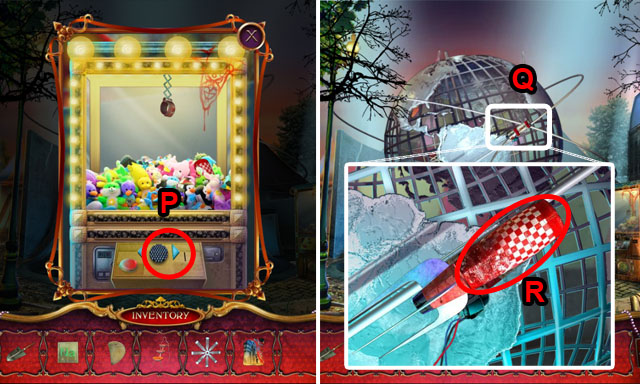
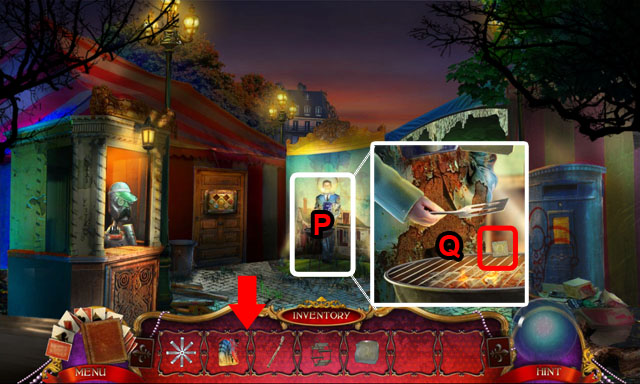
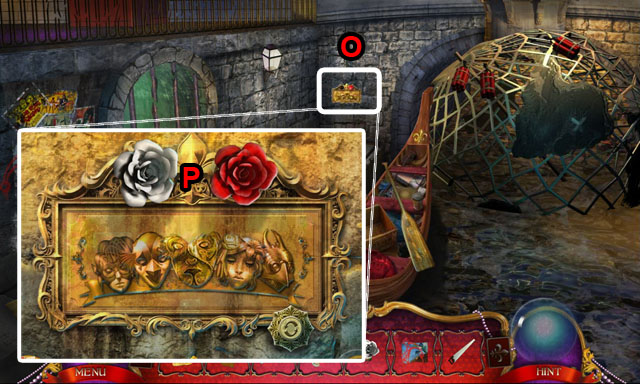
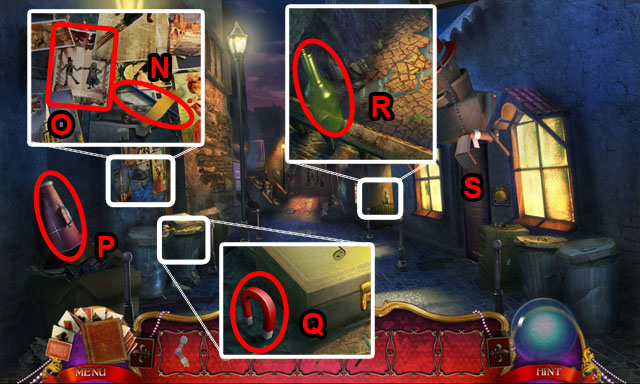
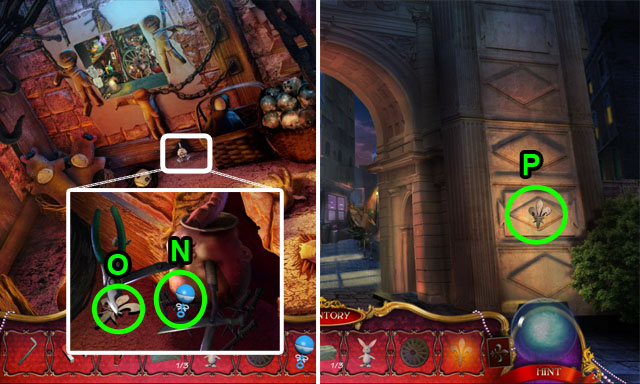
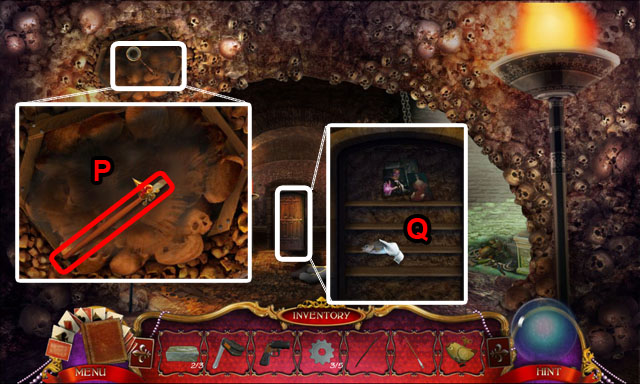
- Investigate the dynamite (P).
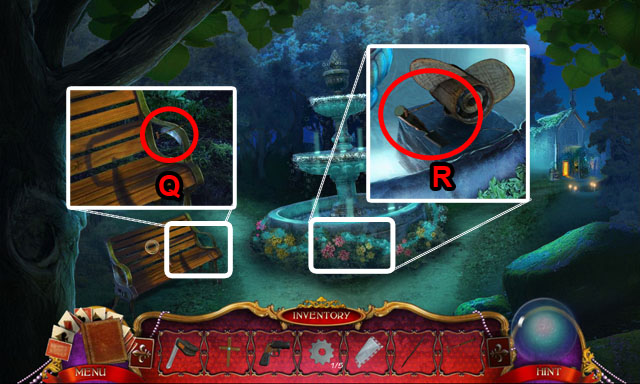
- Zoom into the sign (Q).
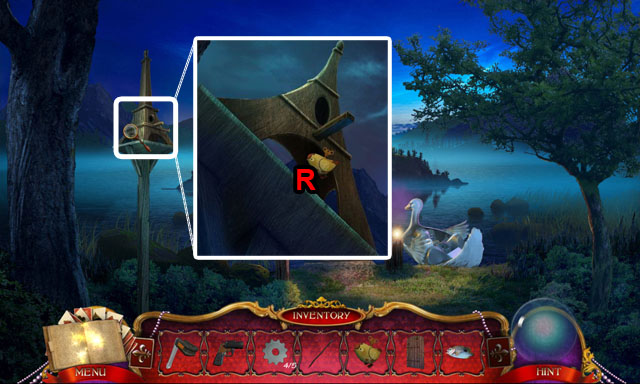
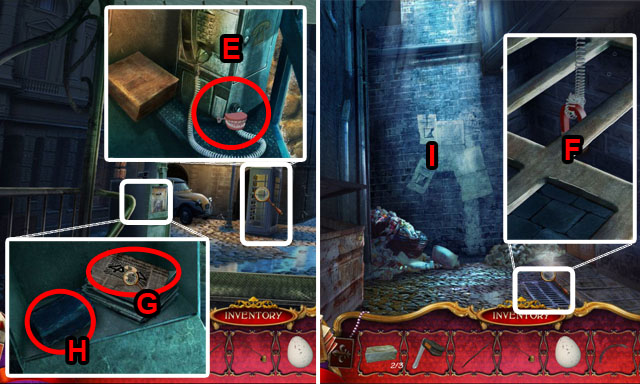
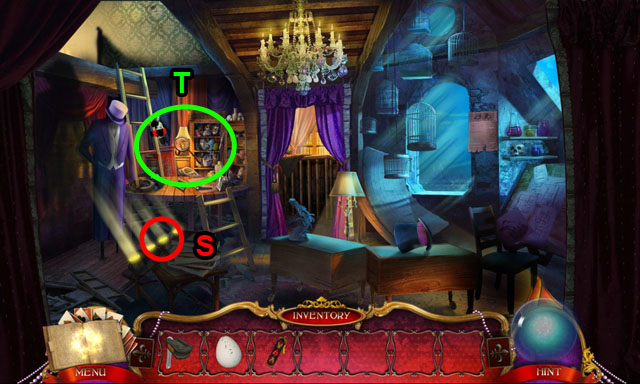
- Collect the GARDEN SPADE (R) and check the diagram for making the rocket.
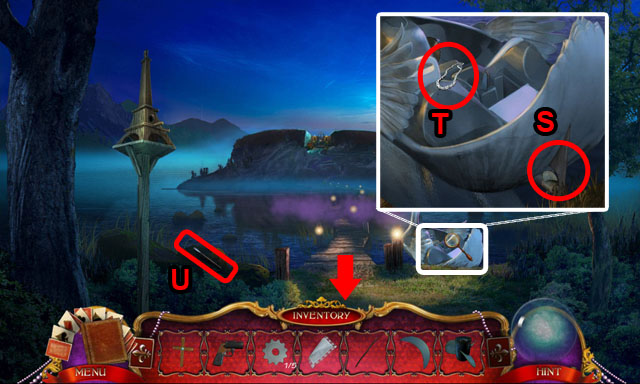
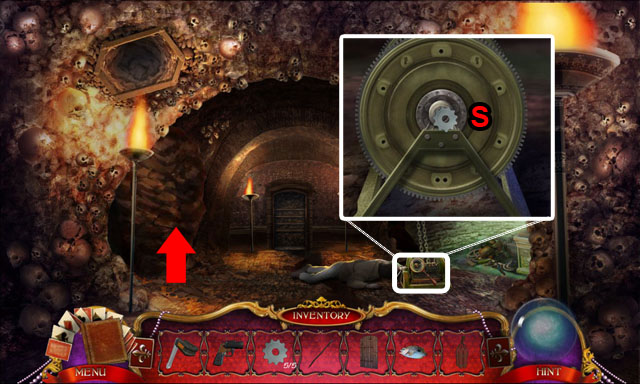
- Collect the WEIGHT (S) beside the base of globe.
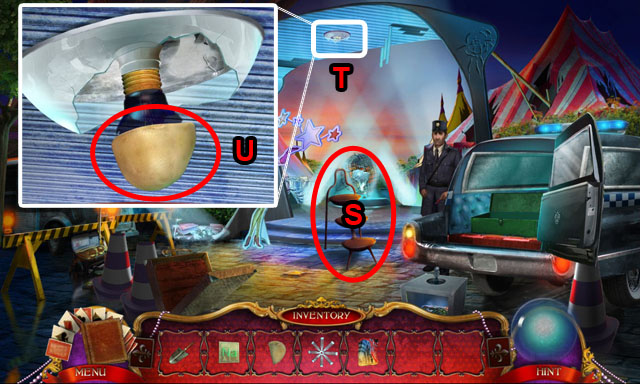
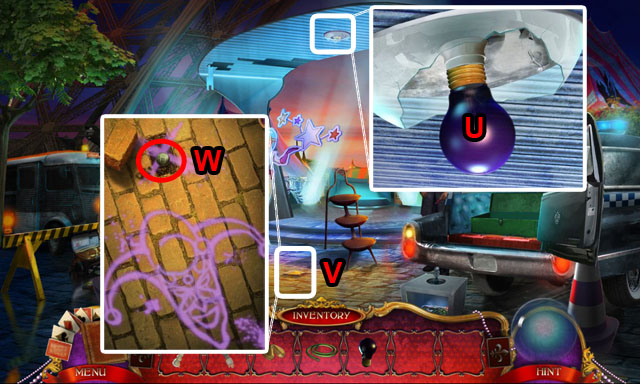
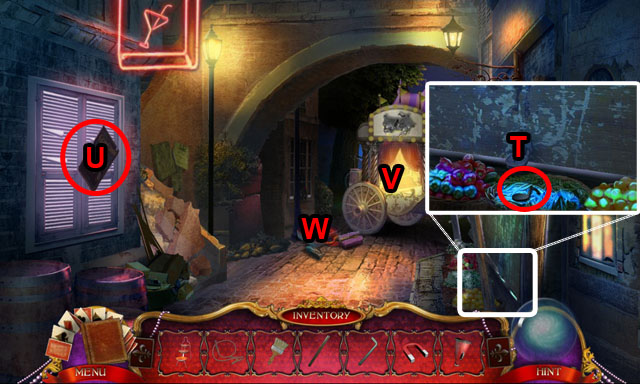
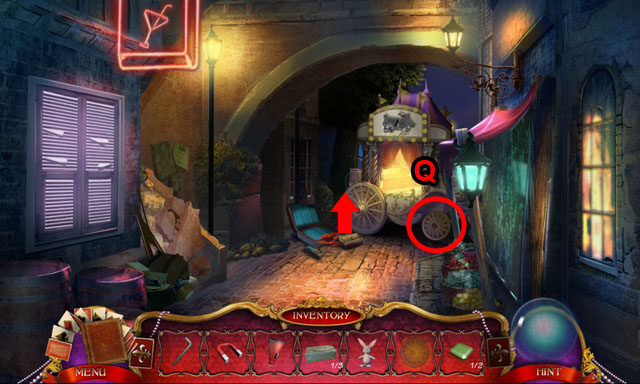
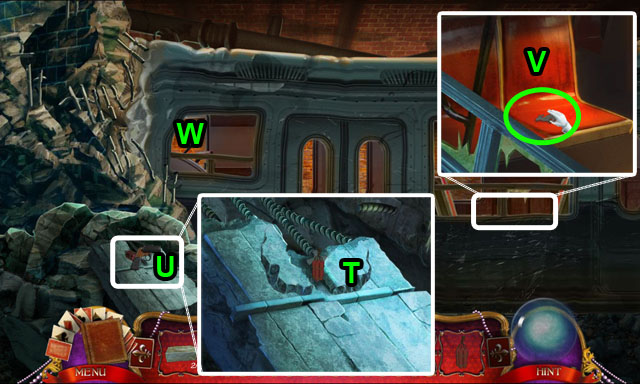
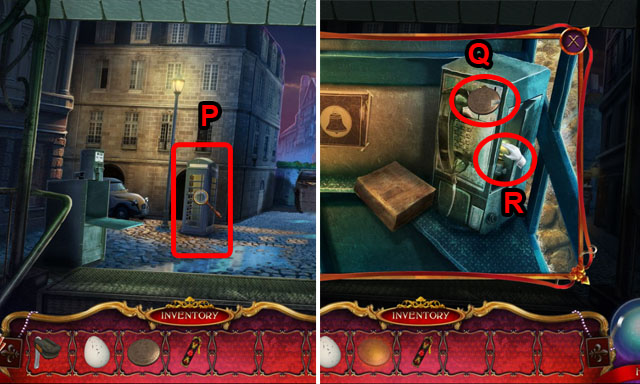
- Investigate the sign (T) and walk forward on the left.
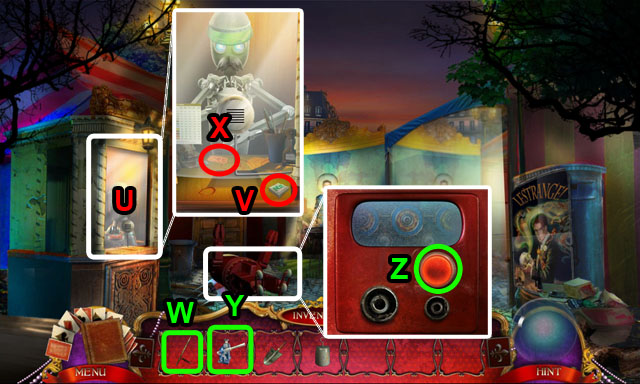
- Zoom into the ticket counter (U).
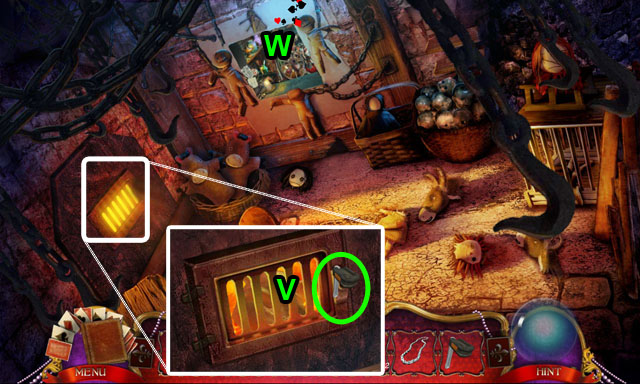
- Collect the SODIUM BUTTON (V).
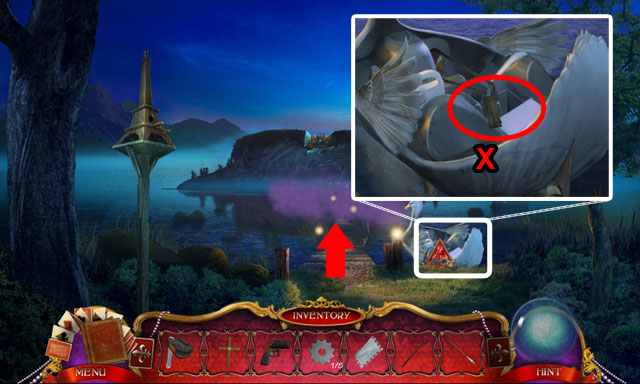
- Break the glass with the BATON (W) and collect the TICKET (X).
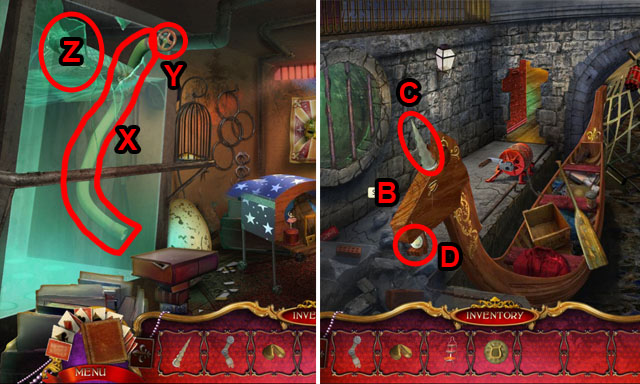
- Use the JACK to push the red robot on the ground (Y).
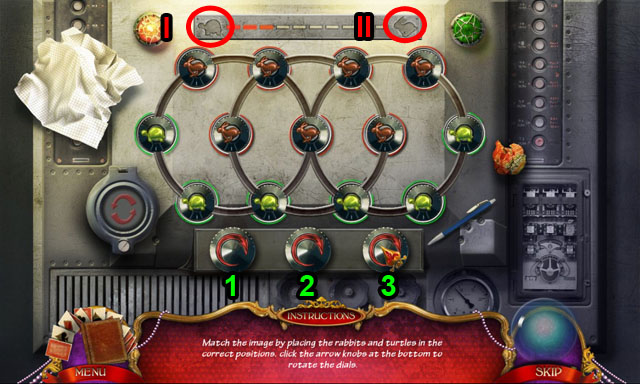
- Zoom into the robot and push the red button to open its chest (Z).
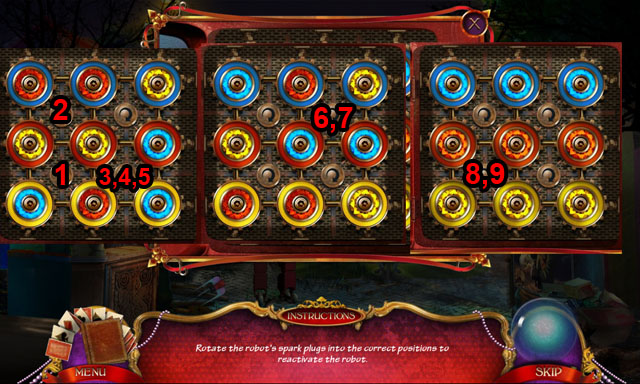
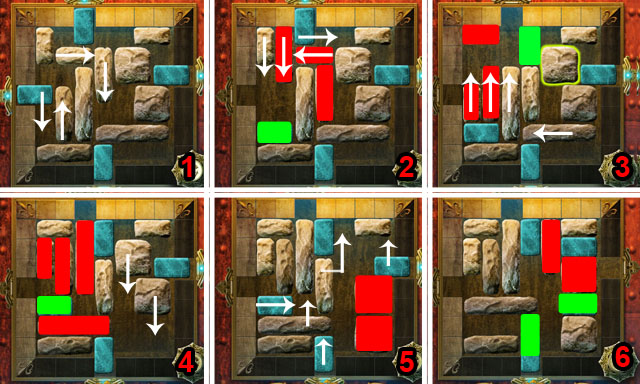
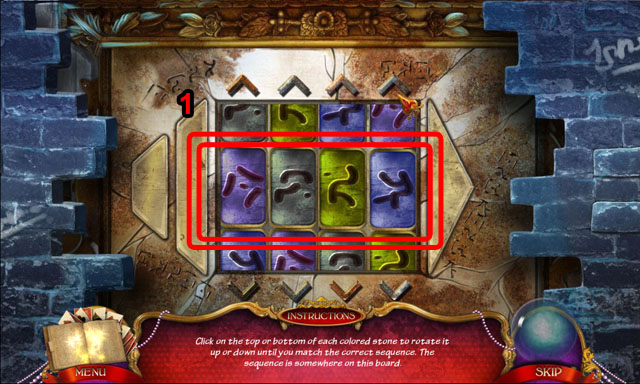
- Press the turn buttons in the middle of the puzzle to rotate the outer buttons clockwise.
- Put the blue buttons inside the blue rings, the yellow inside the yellow rings, and the red buttons inside the red rings to complete the puzzle.
- Work from the top to the bottom, first fixing the blue then the yellow then the red.
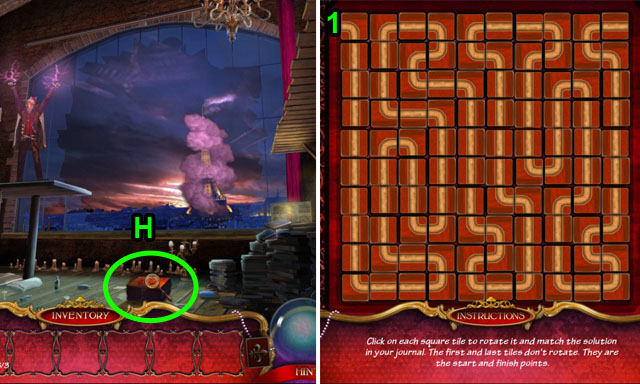
- Follow the instruction in the screenshot to finish the puzzle (1-9).
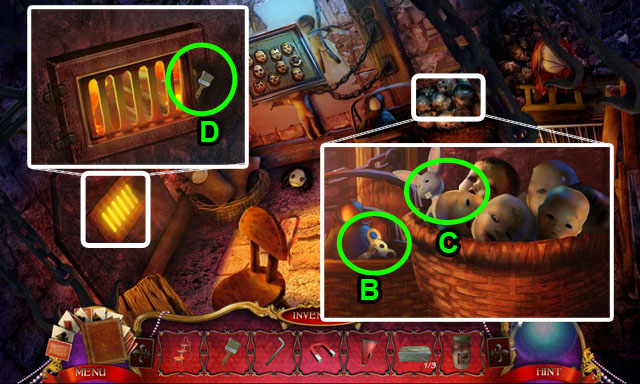
- Collet the ROCKET TAIL (A).
- Zoom into the barbeque grill and open the cover (B). Place the WEIGHT (C).
- Take the POTATO (D).
- Investigate the poster (E).
- Zoom into the door (F).
- Move to the next scene on the right.
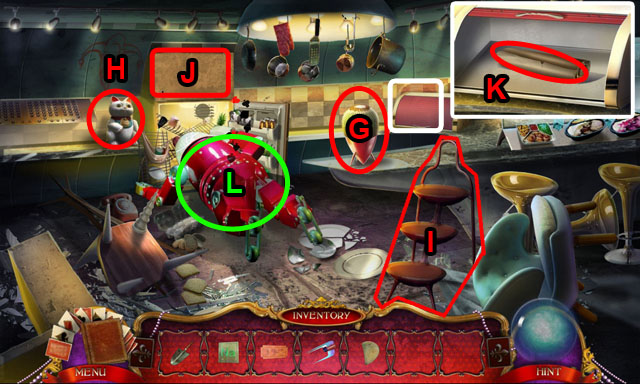
- Investigate the cactus (G).
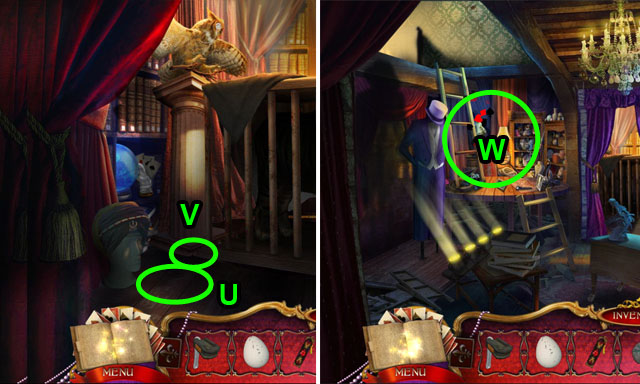
- Investigate the cat statue (H).
- Collect the STEPLADDER (I).
- Investigate the refrigerator (J).
- Open the bread keeper and collect the DEFACED FLYER (K).
- Enter the HOS (L).
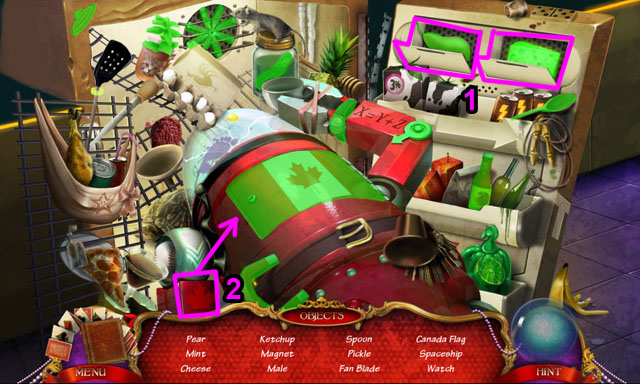
- Find all the Hidden Objects.
- Open the shelves to find the pear and cheese (1).
- Place the maple leaf on the flag to find the Canadian flag (2).
- You will receive the FAN BLADE.
- Walk back twice.
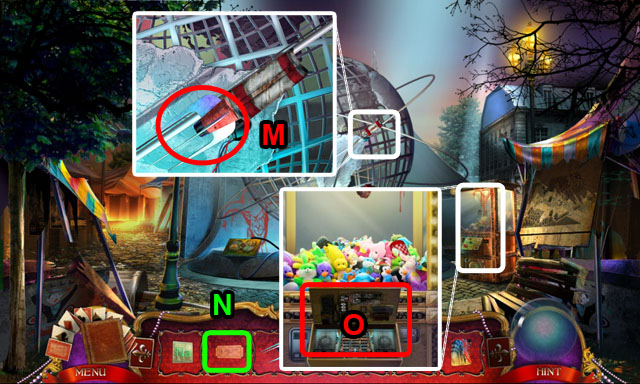
- Zoom into the rocket piece and connect the ROCKET TAIL (M).
- Use the TICKET to play the crane game (N).
- Open the door and zoom into the board (O).
- The object of this mini-game is to get all of the metal strips connected to the wires in order for them to line up with the electrified band in the middle of the screen.
- Line up all the strips in the bottom by pressing the bottom 4 buttons (1).
- Move the second and forth strips by pressing the second button at the top. Line the strips up with the band in the middle. (2).
- Do the same with the first and third strips by pressing the third button at the top (3).
- You have to control the crane in order to get the next rocket part.
- Push the right button twice and then push the red button to catch the ROCKET BODY (P).
- Zoom into the rocket (Q).
- Place the ROCKET BODY (R).
- Walk back to the first scene.
- Place the STEPLADDER on the ground (S).
- Zoom into the socket (T).
- Use the POTATO to take the broken light bulb off (U).
- Walk down twice to move to the previous scene.
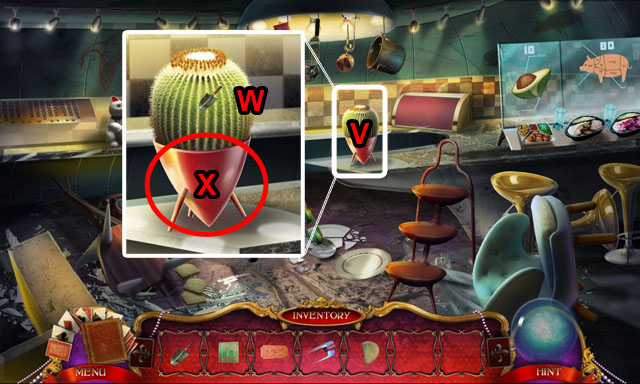
- Zoom into the cactus (V). Use the GARDEN SPADE to take the cactus off (W).
- Collect the ROCKET CONE (X).
- Walk back one scene.

- Zoom into the rocket (Y).
- Place the ROCKET CONE (Z).
- Zoom into the panel (A).
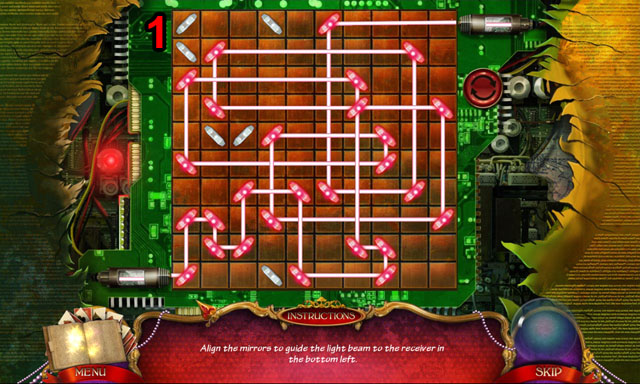
- Use the mirrors to guide the light beam from the top left corner to the bottom right corner of the screen.
- Start from the end and work your way back to the middle to find the solution, or work from both ends at once.
- The final solution does not use all of the mirrors. See the screenshot for the solution (1).
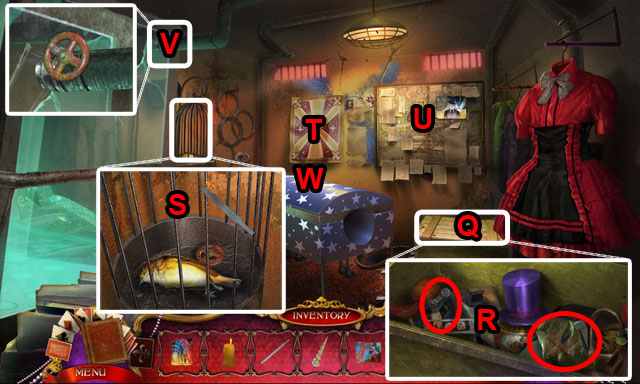
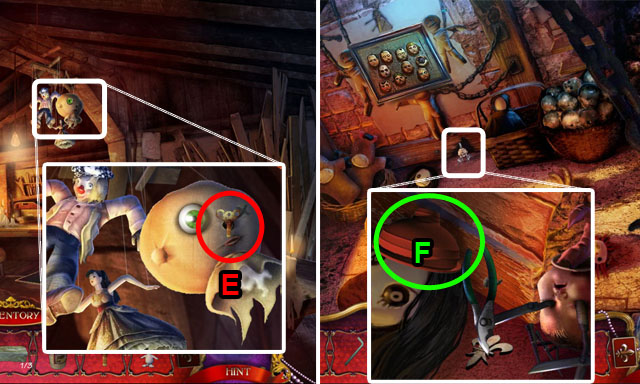
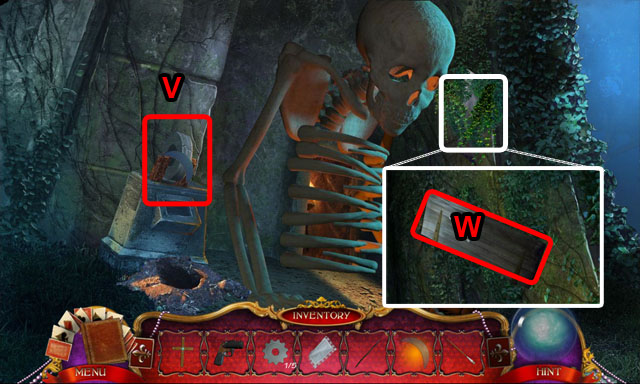
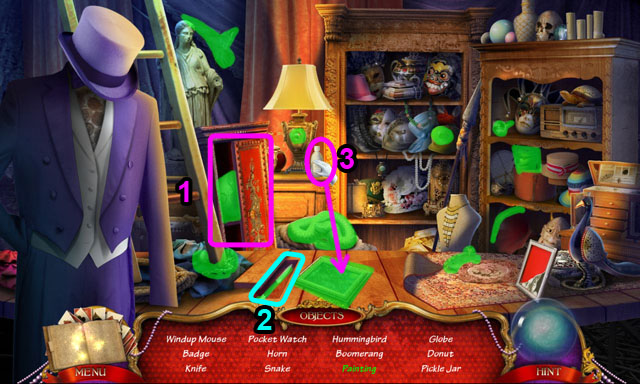
- Zoom into the base of the globe (B).
- Collect the BENT STEEL PIPE (C).
- Walk to the right side.
- Investigate the globe (D).
- Read the poster (E).
- Investigate the basket of the hot balloon (F).
- Check the poster (G) and collect the ROPE LADDER (H).
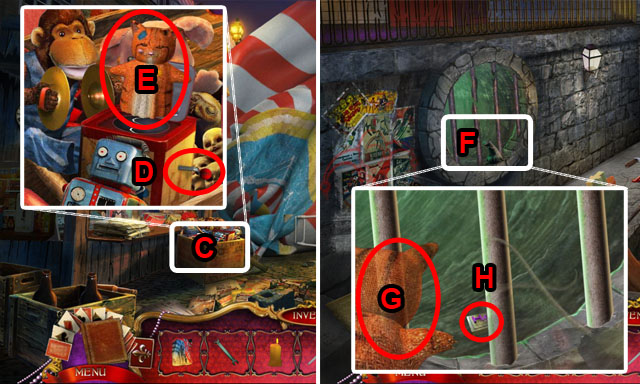
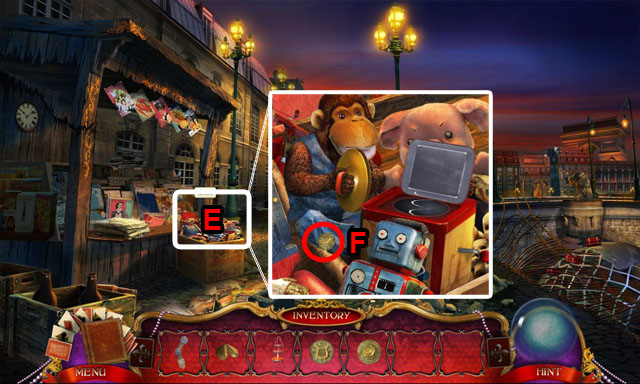
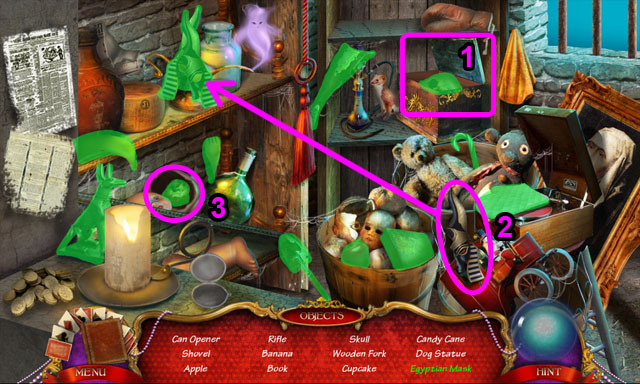
- Investigate the toy box to find the toy monkey with the cymbals to break something (I).
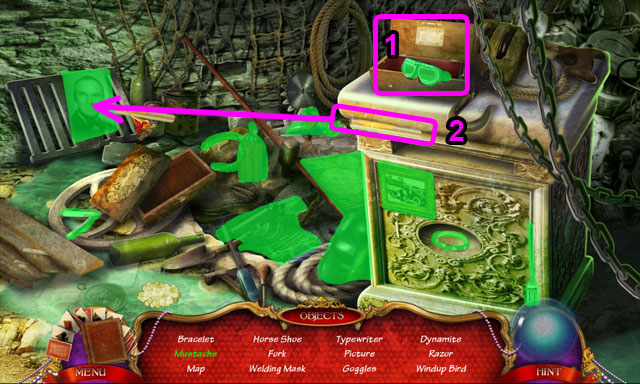
- Zoom into the counter (J); check the flyer (K) and collect the FRIDGE HANDLE (L).
- Move back to the kitchen.
- Place the FREEZER HANDLE on the freezer (M).
- Open the freezer and take off the icicles (N).
- Collect the ICE BLOCK (O).
- Walk back to previous scene.
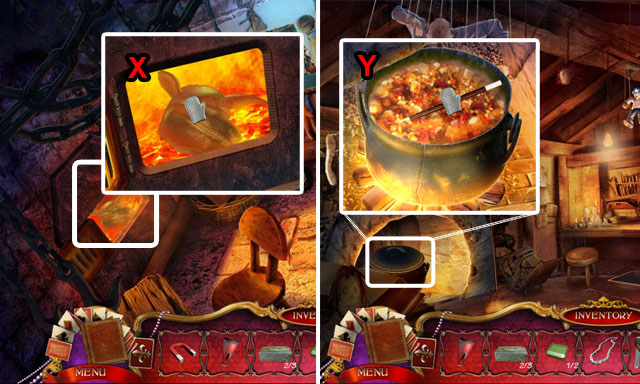
- Zoom into the barbeque grill (P).
- Place the ICE BLOCK on the grill and collect the OXYGEN BUTTON (Q).
- Return to the bridge scene.

- Place the BENT STEEL PIPE underneath the globe (R).
- Zoom into the bridge (S).
- Place the ROPE LADDER (U) and collect the WRENCH (T).
- Move under the bridge.
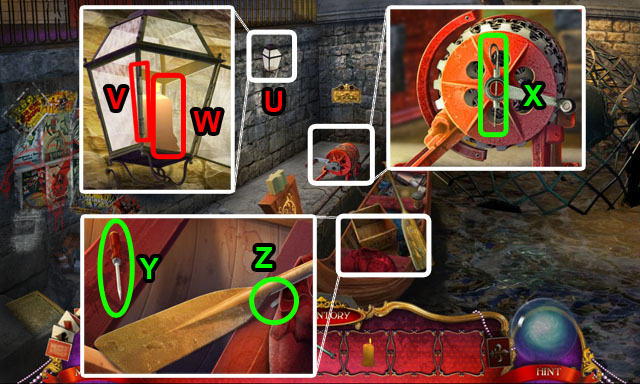
- Zoom into the lantern (U).
- Unscrew the bolt with the WRENCH and take the PIN off (V).
- Collect the CANDLE (W).
- Zoom into the wheel hose and place the PIN into the missing spot (X).
- When the boat shows up, zoom into the seat.
- Collect the SCREWDRIVER (Y) and FILE (Z).
- Return to the kitchen.
- Zoom into the chair (A). Take the CHAIR LEG off with the SCREWDRIVER (B).
- Return to the first scene.
- Enter the HOS in the bush on the left side of the screen.
- Find all of the Hidden Objects.
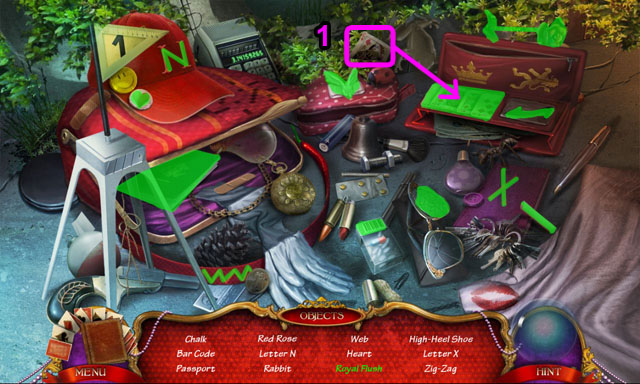
- Place the card to find the Royal Flush (1).
- You will receive the RED ROSE.
- Return to the bridge scene.
- Zoom into the toy box (C). Crank the handle of the jack in the box (D) and collect the CAT PUPPET (E).
- Go down the rope ladder.
- Zoom into the rat (F) and use the CAT PUPPET (G).
- Collect the MERCURY BUTTON (H).
- Return to the ticket counter.
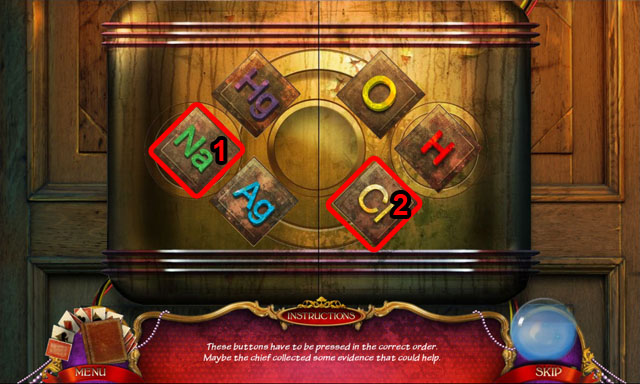
- Place all of the BUTTONS (H, O, Hg, and Na) on the puzzle.
- Press the button Na (1) and then Cl (2) to open the door.
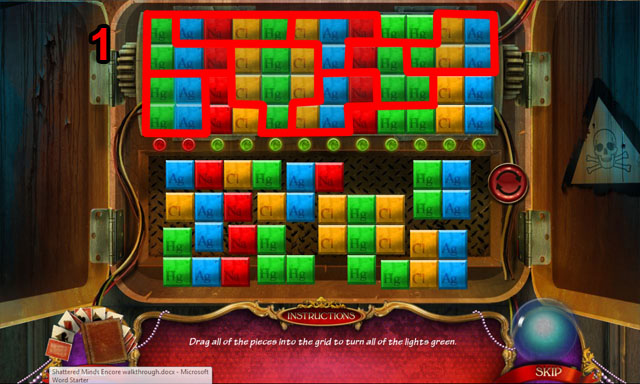
- Place all of the pieces from the bottom of the screen to the top of the screen so that all of them fit.
- The squares line up by color: green, blue, red, yellow, green, yellow, blue, red, green, green, yellow and then blue.
- A green light will light up when you have the correct placement of the line above it.
- See the screenshot for the finished puzzle (1).
- Enter the room.
- Collect the WHITE ROSE (I).
- Open the face cover with the SCREWDRIVER (J) and collect the DEFACED FLYER (K).
- Check the button (L).
- Place the FAN and screw with the WRENCH (M).
- The SAW will fall off. Collect the SAW and check the poster (N).
- Return to the under bridge scene.
- Zoom into the door plate (O).
- Place the WHITE ROSE and the RED ROSE (P) to activate a puzzle.
- Drag and slide the stone pieces around the puzzle until no pieces are protruding from outside the area.
- At the beginning, the 4 blue pieces will be outside the area.
- You can drag pieces up, down, left, or right as long as you have room to move them there.
- Lights will light up on the edge if there is a piece sticking out.
- Follow the directions to finish the puzzle (1-6).
- Enter the room.
- Zoom into the box (Q).
- Collect the MASK and the DOLL ARM (R).
- Zoom into the birdcage. Use the FILE to take the bars off (S). Collect the VALVE.
- Zoom into the wall and place the MASK PIECE (T).
- Zoom into the map and place the DEFACED FLYER (U).
- Zoom into the pipe and place the VALVE (V).
- Use the SAW to cut the box in the middle (W).
- Enter the HOS.
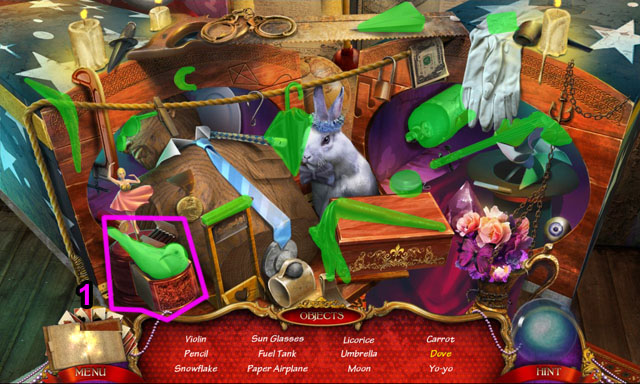
- Find all the Hidden Objects.
- Open the box highlighted in purple to find the dove (1).
- You will receive the FUEL TANK.
- Return to the bridge scene.
- Zoom into the basket and place the FUEL TANK to activate a puzzle (X).
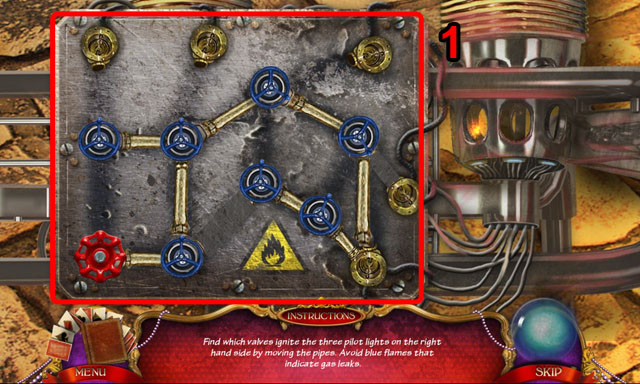
- Arrange the pipes to light three pilot lights on the right.
- Press the connecting pipes to move them between valves.
- All the pipes must be connected to the red handle on the left.
- When you see a blue flame in the burner it means you are connected to the wrong value.
- See the screenshot for the solution (1).
- Walk forward.
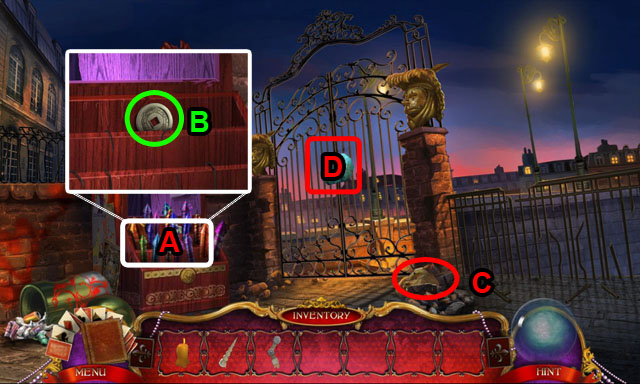
- Zoom into the fireworks (A) and light them by using the CANDLE on the wick.
- Collect the LUCKY COIN (B).
- Collect the MASK PIECE (C).
- Check the gate (D).
- Return to the previous room.
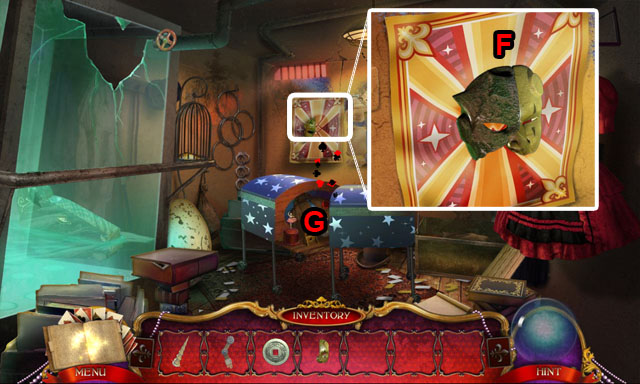
- Place the MASK (F).
- Enter the HOS (G).

- Find all the Hidden Objects.
- Open the box highlighted in purple to find the goggles and wings (1).
- Place the wings highlighted in light blue on the figure to get the angel (2).
- You will receive the KNIFE.
- Return to the bridge scene.
- Zoom into the newspapers and cut the rope with the KNIFE (H).
- Collect the DEFACED FLYER (I).
- Return to the previous room.
- Place the DEFACED FLYER (J). Arrange the flyers to make a face (K) and collect the MASK PIECE.
- Zoom into the wall poster and use the MASK PIECE (L).
- Collect the BOW RELIEF (M).
- Return to the kitchen.
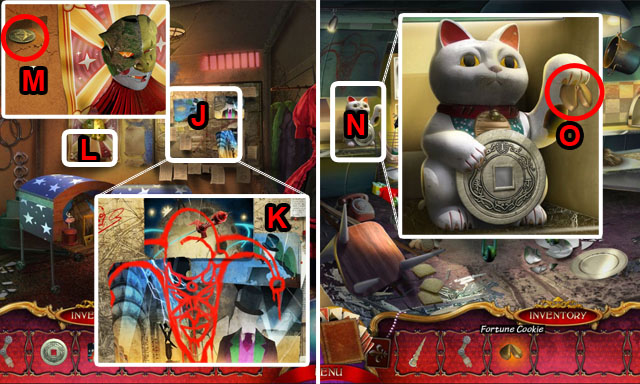
- Place the LUCKY COIN in the cart statue’s hand (N).
- Collect the FORTUNE COOKIE (O).
- Enter the HOS in the refrigerator.
- Find all the Hidden Objects.
- Open the robot to find the floppy disc and battery (1).
- Move the tea bag to the tea cup to get the tea (2).
- You will receive the BATTERY.
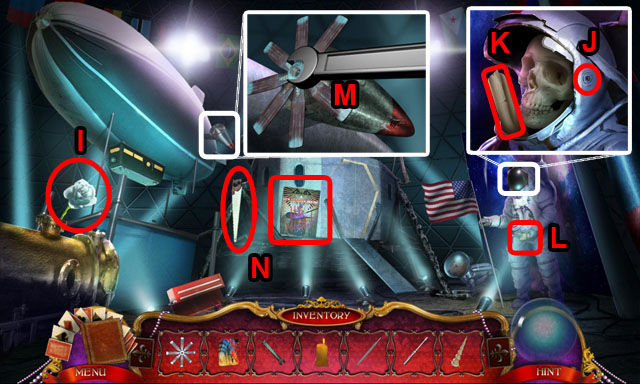
- Return to the space room.

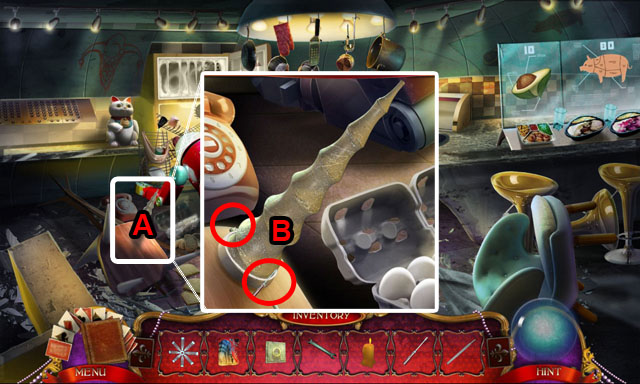
- Zoom into the controller and place the BATTERY (P).
- Close the cover and push the red button.
- Zoom into the space ship ad collect the HOSE (Q).
- Zoom into the panel (R).
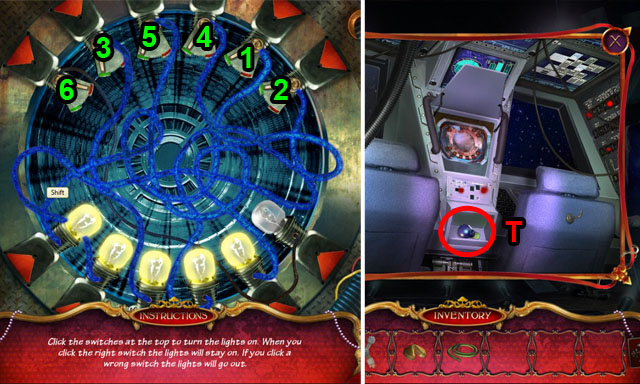
- Turn on the lights in correct order.
- If you press the light in the wrong order, they will all shut off.
- Find the correct sequence by process of elimination (1-6).
- Collect the BLACK LIGHT BULB (T).
- Return to the first scene.
- Place the BLACK LIGHT BULB (U).
- Zoom into the picture on the ground (V). Take the brick off and collect the HARP RELIEF (W).
- Return to the magician’s room.
- Connect the HOSE into the pipe (X).
- Open the valve (Y).
- Collect the WOODEN CARVING (Z).
- Walk back once.
- Place the WOODEN CARVING on the boat (B) and place the CHAIR LEG on the head (C).
- Collect the CORNUCOPIA RELIEF (D).
- Return to the bridge scene.
- Zoom into the toy box and place the FORTUNE COOKIE (E) between the monkey’s cymbals.
- Collect the HORN RELIEF (F).
- Return to the gate scene.
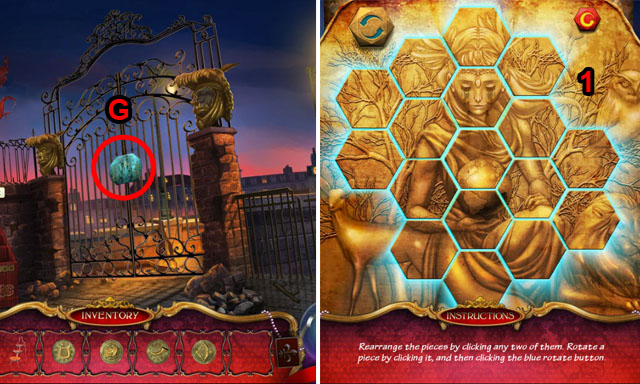
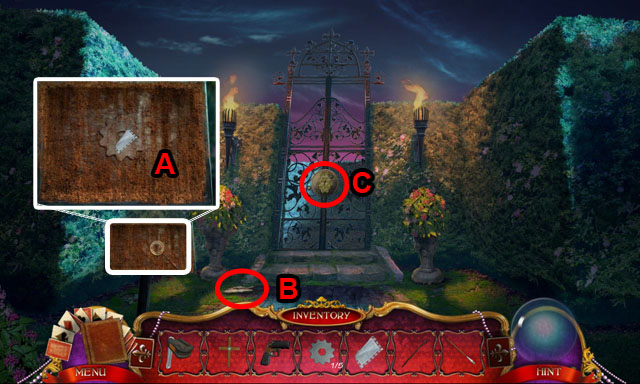
- Place all of the RELIEFS (G) on the gate.
- Arrange the blocks in the puzzle by switching their places.
- Press the large rotation button to rotate the piece in place.
- Press the red restart button in the top right to restart from the beginning.
- Use the edges to line up the blocks first and then work into the middle.
- The pieces that are correct will lock in place and will be highlighted in purple.
- See the screenshot for the full solution (1).
Chapter 2: The Town
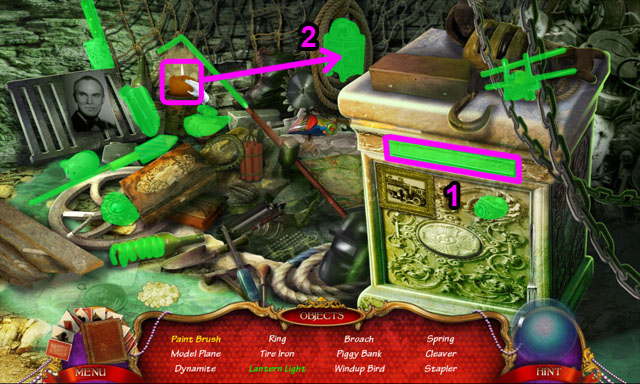
- Collect the WIRE CLAMPS (I).
- Check the statue (J) and then walk forward.
- Collect the PAINT BRUSH in the bag (K).
- Collect the WOODEN POLE (L).
- Check the wall that has missing piece (M) and then walk forward.
- Zoom into the poster wall and collect the HEX KEY (N).
- Check the PUPPET POSTER (O).
- Collect the MEGAPHONE (P).
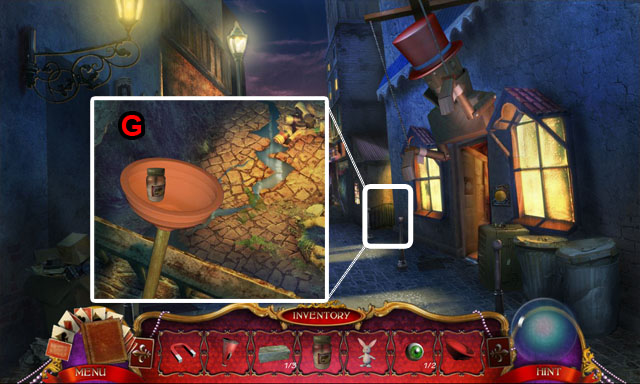
- Zoom into the trashcan and collect the MAGNET (Q).
- Zoom into the fence and drop the glass bottle (R).
- Check the door underneath the puppet (S).
- Walk forward.
- Zoom into the door and collect the MUSIC NOTE (T).
- Read the poster (U).
- Check the wagon (V) and then check the bags (W).
- Walk back to the previous scene.
- Zoom into box (X) and place the MUSIC NOTE.
- Collect the SHARP CARD (Y).
- Return to the ally and zoom into the bags (A).
- Use the SHARP CARD to open the bag and collect the CROWBAR (B).
- Return to the bridge.

- Zoom into the brick (C). Use the CROWBAR to take the brick off.
- Collect the HAIRPIN (D) and the BRICK (E).
- Return to the entrance and use the HAIRPIN to open the bag (F).
- Collect the CLOCKWORK FLOWER (G).
- Return to the ally.
- Zoom into the figures and place the CLOCKWORK FLOWER on the male figure (H).
- Collect the TINY TOP HAT (I).
- Return previous scene and zoom into the door (J).
- Place the TINY TOP HAT and the DOLL ARM on the dolls (K).
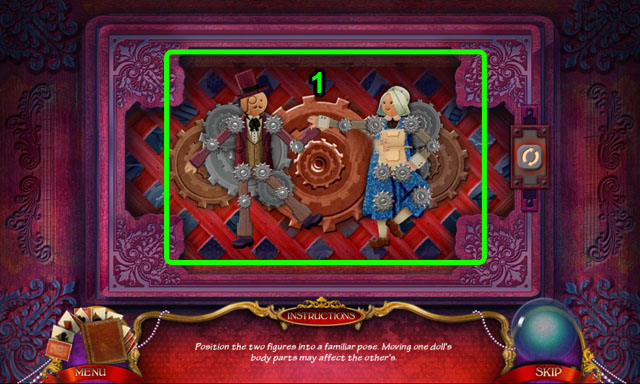
- Pressing the joints of the figures will reposition them.
- Moving the base of the arm or leg will move the entire arm or leg, you want to move the base to the correct position first and then move the elbows and knees to match.
- Arrange the figure position by following the clue in the journal book (1).
- Enter the building.

- Zoom into the voodoo doll and collect the GLUE (M).
- Flip the rug and zoom into the vent hole (N).
- Read the newspaper (O).
- Check the pot (P), check the dead body (Q) and check the mechanical dolls (R).
- Read the poster (S).
- Enter the HOS (T).

- Find all the Hidden Objects.
- Open the wooden box to find the wooden ring (1).
- Use the chisel to make the woodblock (2).
- You will receive the HAMMER.
- Return to the ally.
- Zoom into the bags (U).
- Use the HAMMER to break the key (V).
- Collect the TESLA COIL (W).
- Zoom into the vent hole; use the Tesla Coil and place the WIRE CLAMS (A).
- Go downstairs.
- Zoom into the basket.
- Collect the WIND-UP KEY (B).
- Take the doll from the basket. You will receive the RABBIT TOY (C).
- Zoom into the fire.
- Use the BRUSH to dust off (D) the fireplace.
- Walk back once.
- Use the WIND-UP KEY (E).
- Collect the PLUNGER HEAD (F).
- Walk back twice.
- Place the WOODEN POLE, connect the PLUNGER HEAD, and use the GLUE to collect the SHARP GLASS (G).
- Enter the building.
- Use the SHARP GLASS to take the EYEBALL off (H).
- Enter the HOS (I).
- Find all the Hidden Objects.
- Open the toolbox to find the magnifying glass (1).
- Open the case to get the glasses (2).
- You will receive the MILK BOTTLE.
- Go back downstairs again.
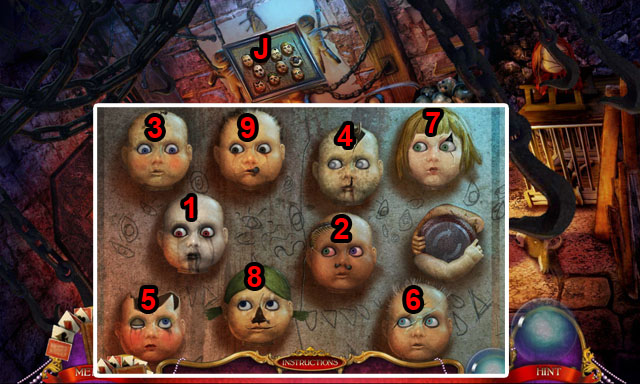
- Place the EYEBALLS onto the doll (J).
- In this mini-game you need to select the one doll that all of the other dolls are looking at.
- The doll that they are all looking at will be looking in another direction.
- Once you select it, it will close its eyes and then you need to find the next doll.
- Solution is randomized. See the screenshot for one possible solution (1-9).
- Enter the HOS.
- Find all objects.
- Take the newspaper off to find the bracelet (1).
- Use the chisel to find the statue (2).
- Open the case to find the ring (3).
- You will receive the CART WHEEL.
- Return to the ally.
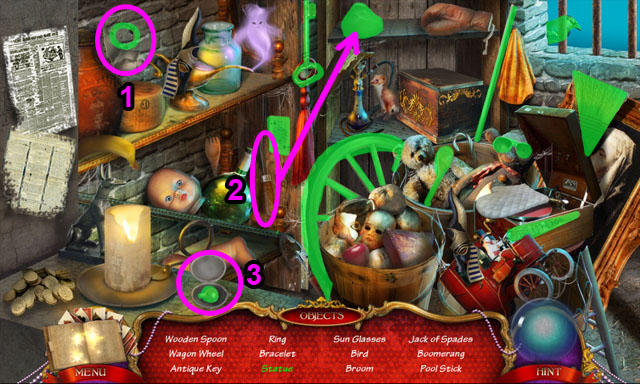
- Zoom into the cart and place the MILK BOTTLE (L).
- Collect the BABY RATTLE (M).
- Use the BABY RATTLE (N).
- Collect the FLEUR-DE-LYS (O).
- Walk back to the entrance.
- Place the FLEUR-DE-LYS (P) and collect the EMERALD EYE.
- Place the CART WHEEL (Q).
- Walk forward.
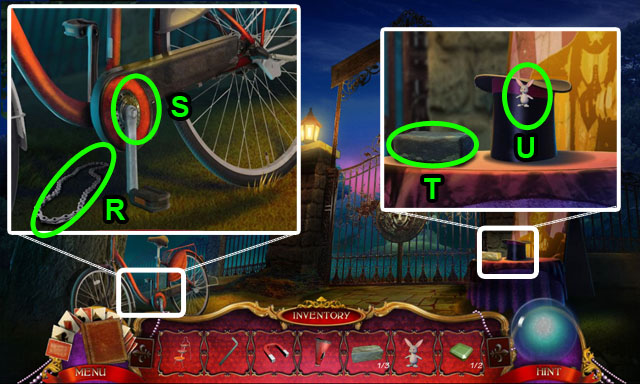
- Collect the BIKE CHAIN (R).
- Use the HEX KEY (S) to collect the PEDAL CRANK.
- Collect the BRICK (T).
- Put the RABBIT TOY inside the top hut (U).
- Return to the toy room.
- Use the PEDAL CRANK (V) to open the oven.
- Enter the HOS (W).
- Open the box to find the skull (1).
- Place the mask piece on the other one to get the Egyptian mask (2).
- Move the doll to find the cupcake (3).
- You will receive the OVEN MITT.
- Zoom into the oven and use the OVEN MITT to collect the GARGOYLE HEAD (X).
- Return upstairs.
- Use the OVEN MITT to open the pot and take the MAGIC WAND (Y).
- Return to the entrance.
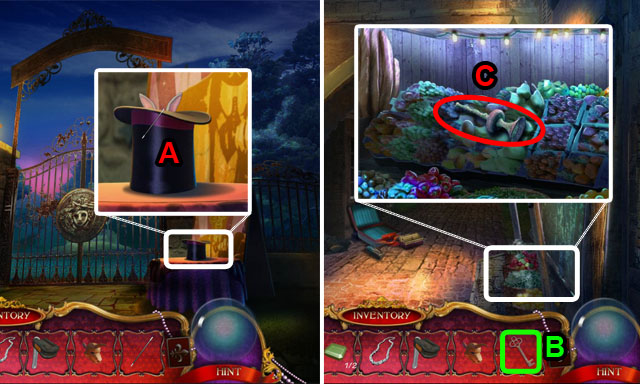
- Use the MAGIC WAND for the top hut to collect the VENDOR KEY (A).
- Return to the ally.
- Open the shutter with the VENDOR KEY (B).
- Collect the SNAKE CHARMER’S FLUTE (C).
- Walk forward.
- Use the SNAKE CHARMER’S FLUTE on the snakes (D).
- Return to the bridge.
- Place the GARGOYLE HEAD and collect the EMERALD EYE (E).
- Return to the gate again.
- Place the EMERALD EYE on the statue’s eyes (F).
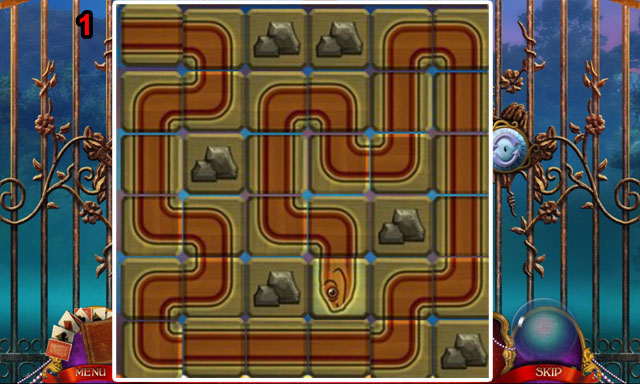
- Draw the snake through all of the open areas without rocks.
- The snake cannot go through the same area more than once.
- Press the reset button if you have no more moves left.
- See the screenshot for the correct solution (1).
- Walk forward.
Chapter 3: The Forest
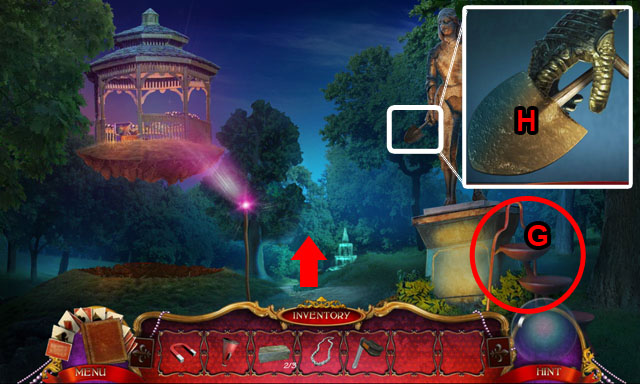
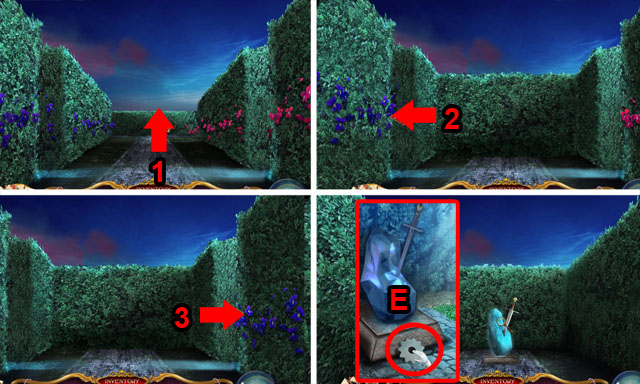
- Place the STEPLADDER (G) and collect the SHOVEL (H).
- Walk forward.
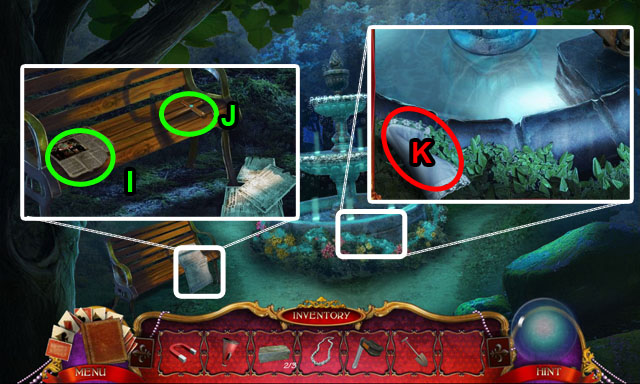
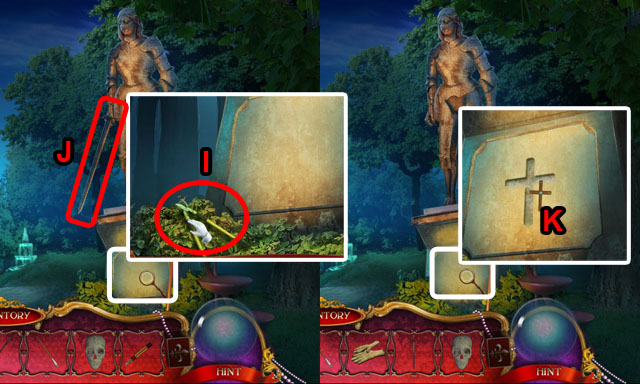
- Zoom into the bench; check the newspaper (I) and collect the cross (J).
- Zoom into the fountain and collect the HANDKERCHIEF (K).
- Walk to the left side to the deck.
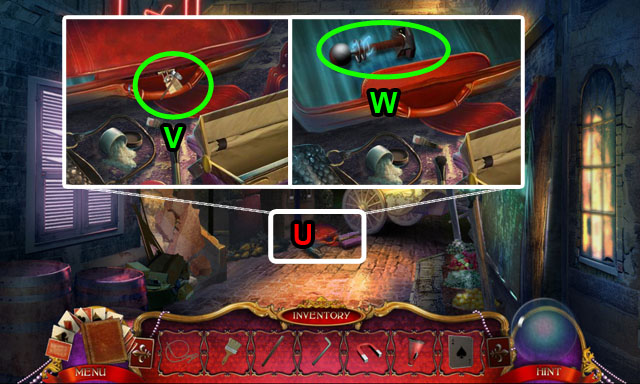
- Zoom into swan boat and collect the FLARE GUN (L).
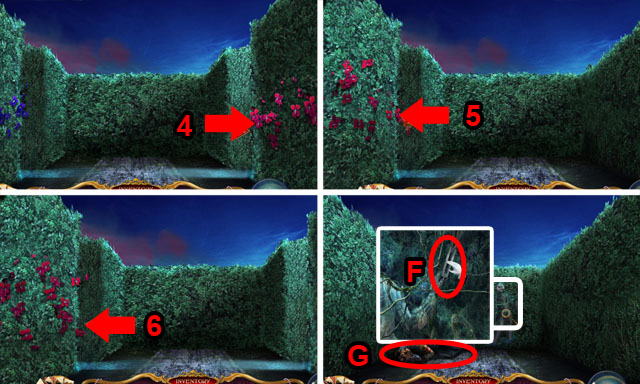
- Return to the fountain scene and walk to the church from the right side.
- Collect the COG (M).
- Use the SHOVEL to find the CHISEL (N).
- Return to the previous scene with the statue.

- Use the HANDKERCHIEF to cover the light. Collect the STICK (O).
- Enter the HOS (P).
- Collect all objects.
- Use the knife to make apple slices (1).
- Open the door to find the lighter (2).
- You will receive the CROQUET MALLET.
- Return to the previous scene with the fountain.
- Collect the DULL MOON with the CROQUET MULLET (Q).
- Zoom into the fountain and place the CHISEL. Use the CROQUET MULLET to take the PROPELLER (R).
- Return to the deck.
- Fix the swan boat with PROPELLER (S) and the BIKE CHAIN (T).
- Collect the DOCK BRUSH (U).
- Return to the church.
- Place the DULL MOON on the grindstone to make the SHARP MOON (V).
- Cut the bush with the SHARP MOON. Collect the RUDDER (W).
- Return to the dock.
- Place the RUDDER on the swan boat (X).
- Move forward.
- Remove the dust with the HANDKERCHIEF and collect the COG (A).
- Collect the GARDENING GLOVES (B).
- Zoom into the gate (C).
- Arrange the blocks in the puzzle by switching their places.
- Press the large rotation button to rotate the piece in place.
- Use the edges to line up the blocks first, and then work your way into the middle.
- The pieces that are correct will lock in place and will be highlighted.
- See the screenshot for the solution (1).
- Enter the garden.
- Follow the blue path (1-3).
- Collect the COG (E).
- Return to scene 1 again.
- Follow the red path (4-6).
- Collect the TUNING FORK (F) and check the victim (G).
- Return to the previous scene with the rock.
- Place the MEGAPHONE and use the TUNING FORK to collect the SWORD (H).
- Return to the previous scene with the statue.
- Enter the HOS.
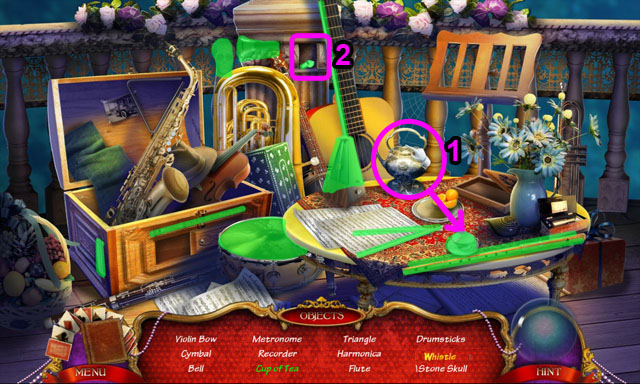
- Find the objects.
- Pour the tea into the tea cup to get the cup of tea (1).
- Open the box to find the whistle (2).
- You will receive the STONE SKULL.
- Return to the previous scene with the statue.
- Zoom into the bush and use the GARDEN GLOVES (I) to find the SHEARS.
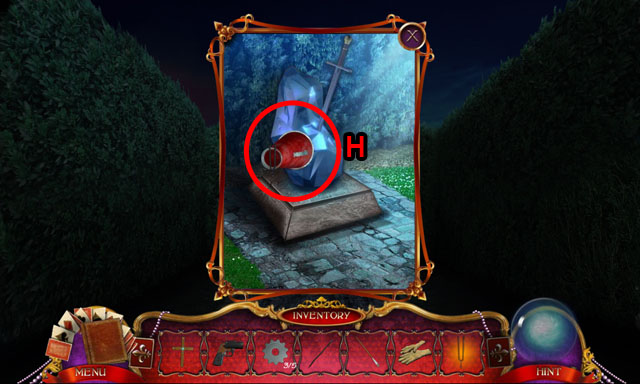
- Place the SWORD on the statue’s hand (J).
- Place the CROSS on the statue base (K) and collect the DIAMOND SKULL.
- Return to the garden.

- Use the SHEARS to cut the vines (L).
- Collect the ONYX SKULL (M).
- Return to the church.
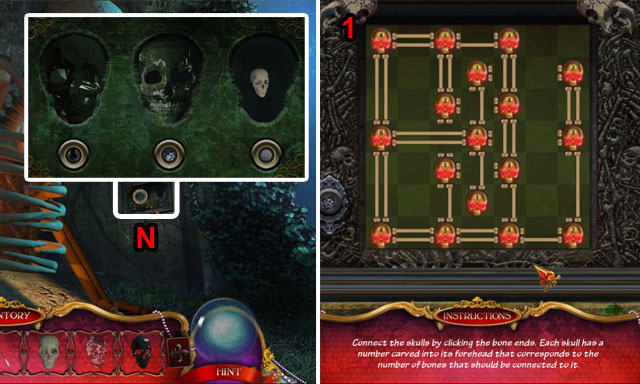
- Place three SKULLS on the wall (N) above their correct materials.
- In this mini-game you must connect the skulls so they are next to the amount of bones stamped on their foreheads.
- Pressing the buttons on the edges of the skulls will connect them to the neighboring skulls.
- When the number of connections is correct, the skull will light up.
- See the screenshot for the solution (1).
- Enter the church.
Chapter 4: The Church
- Find all the Hidden Objects.
- Open the box to find the paint brush (1).
- Use the candle on the lantern to find the lantern light (2).
- You will receive the WIND-UP BIRD.
- Use the DOCK BRUSH to find the COG (P).
- Collect the DOOR, TOY FISH, and check the poster (Q).
- Return to the dock.
- Place the WIND-UP BIRD on the nest, and collect the COG (R).
- Return to the church.
- Enter the HOS on the right side.
- Find the objects.
- Open the box to find the goggles (1).
- Draw the mustache on the picture with the pen to get the mustache (2).
- You will receive the FIRECRACKER.
- Place the five COGS on the crank (S).
- Move to the next room.
- Zoom into the rubble and place the FIRECRACKER (T).
- Use the FLARE GUN to light it (U) and collect the TURTLE EMBLEM.
- Zoom into the seats and collect the RABBIT EMBLEM (V).
- Enter the mini-game (W).
- Place the TURTLE EMBLEM (I) and the RABBIT EMBLEM (II) on the top.
- The purpose of this mini-game is to get all of the turtles on the left side and all of the rabbits on the right side with one rabbit in the middle.
- Restart the game at any time with the restart button in the bottom left corner.
- To solve the puzzle, press the buttons in this order: 2 once, 3 times three, 1 times five, and 3 times five.
- Place the DOOR (Z).
- Go outside.
- Zoom into the telephone and collect the SNUFFER (A).
- Move to the right.
- Zoom into the hole and place the MAGNET to take the KEY (B).
- Give the TOY FISH to the cat (C) and open the dump star.
- Collect the EGG and the RAZOR TEETH (D).
- Return to the previous scene.
- Zoom into the telephone again; place the RAZOR TEETH to collect the PHONE CODE (E).
- Return to the alley.
- Use the PHONE CODE to take the NEWS KEY (F).
- Return to previous scene.
- Use the KEY to open the newspaper box. Collect the NEWSPAPER (G) and the BRICK (H).
- Return to the alley again and place all three BRICKS (I).
- Set the combination by using the up and down keys to the top and the bottom.
- The answer to the combo is written in the top left corner of the screen.
- See the screenshot for the solution (1).
- Walk forward.
- Move upstairs.
- Enter the HOS (K).
- Find all of the objects.
- Open the jewelry box to find the shell (1).
- Open the rocket pendant to find the cat (2).
- You will receive the GLOVE.
- Place the STAFF in the middle (L).
- Extinguish the candles with the SNUFFER (M).
- Put the GLOVE on and collect the COIN (N).
- Move to the previous room.
- Move to the next room.
- Zoom into the bookshelf and collect the BOOKMARK (O).
- Return to the ally.
- Zoom into the telephone booth (P) and insert the COIN (Q).
- Collect the LIGHT BULB (R).
- Place the LIGHT BULB (S).
- Enter the HOS (T).
- Find all of the objects.
- Flip the rug to find the key (1).
- Take the picture to find the post card (2).
- Put the batteries in the flashlight (3).
- You will receive the MEAT.
- Move to the lion room.
- Place the MEAT on the plate (U) and collect the RUNE TABLET (V).
- Return to the next room.
- Enter the HOS (W).
- Find all of the objects.
- Open the shelf to find the globe (1).
- Remove the piece of wood to find the knife (2).
- Use the bottle to make the painting (3).
- You will receive the MOUSE FIGURE.
- Move upstairs and enter the HOS on the left side.
- Open the box to find the opera glasses (1).
- Open the rocket pendant to find the Laurel Wreath (2).
- You will receive the WIRE CUTTERS.

- Cut the wire with the WIRE CUTTERS and place the EGG (X).
- You will receive the CRYSTAL BALL.
- Move to the next room.
- Place the MOUSE FIGURE and collect the MONOCLE (Y).
- Go upstairs.
- Place the CRYSTAL BALL (A).
- Enter the mini-game (B).
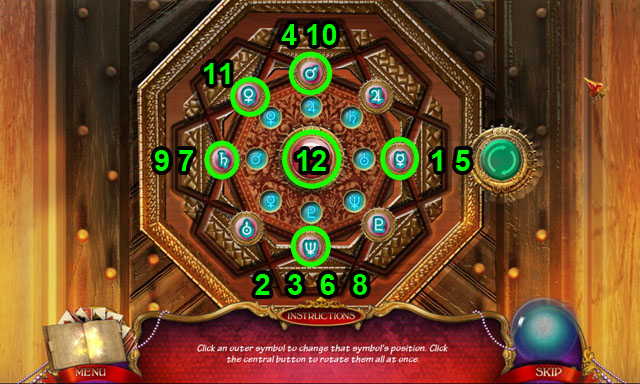
- Arrange the symbols in the outer ring to match those in the middle ring.
- Pressing a symbol will move it along the track clockwise and move the next two symbols back counterclockwise.
- Press the green button on the right to restart.
- Follow the directions by pressing the symbols in each highlighted area in order to arrange them correctly (1-11).
- Rotate with the button in the middle until the inner and outer rings line up (12).
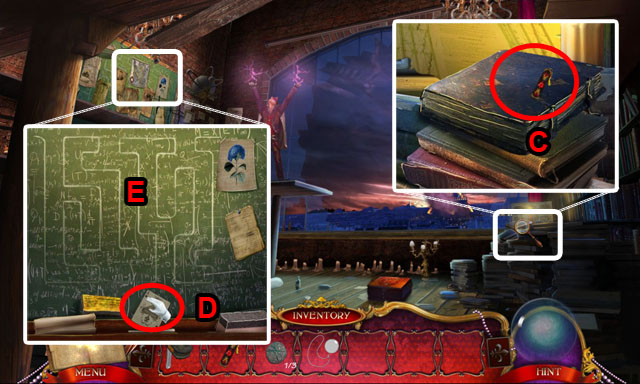
- Put the MAGIC BOOKMARK (C) on the book.
- Collect the RUNE TABLET.
- Zoom into the wall and collect the CARD (D).
- Use the MONOCLE (E).
- Return to the lion room.
- Zoom into the bookshelf and place the CARD (F).
- Collect the RUNE TABLET (G).
- Zoom into the box and place all 3 RUNE TABLETS (H).
- Solve the last mini-game by rotating the pieces to make a correct maze.
- There may be multiple solutions but you need to use your journal to find the correct one.
- See the screenshot for the finished puzzle (1).
- Congratulations, you have completed Shattered Minds: Encore!
Created at: 2012-07-01