

Walkthrough Menu
- General Tips
- Chapter 1: Blackwill
- Chapter 2: Rivendale
- Chapter 3: Peter's House
- Chapter 4: The Library
- Chapter 5: The Moon Pool
General Tips
- This is the official guide for Shiver: The Lily's Requiem.
- This guide will not mention each time you have to zoom into a location; the screenshots will show each zoom scene.
- Hidden-object puzzles are referred to as HOPs. This guide will not show screenshots of the HOPs, however, it will mention when an HOP is available and the inventory item you'll collect from it.
- Some inventory items require further actions; these items are noted with an eye symbol in your inventory. The guide will not instruct you to take the item from your inventory, it will only refer to the item.
- This guide will give step-by-step solutions for all puzzles which are not random. Please read the instructions in the game for each puzzle.
Chapter 1: Blackwill
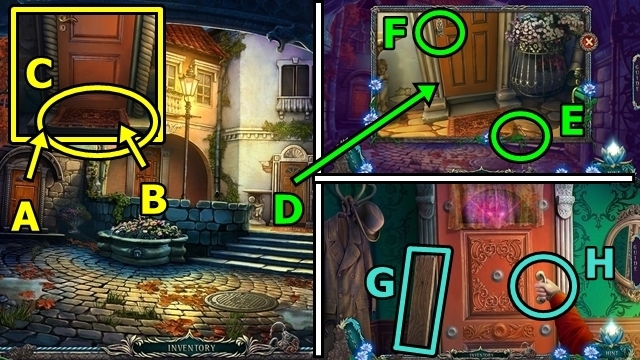
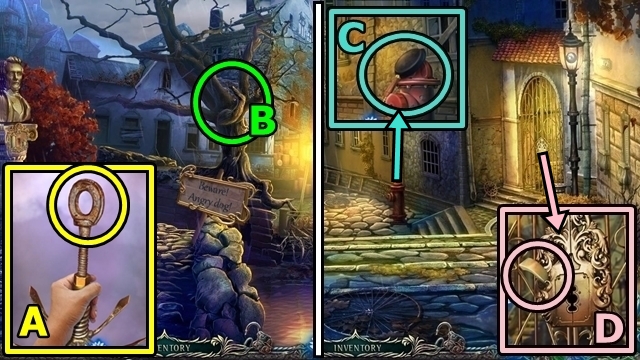
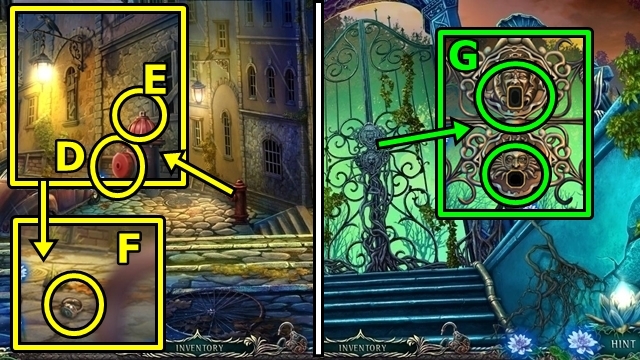
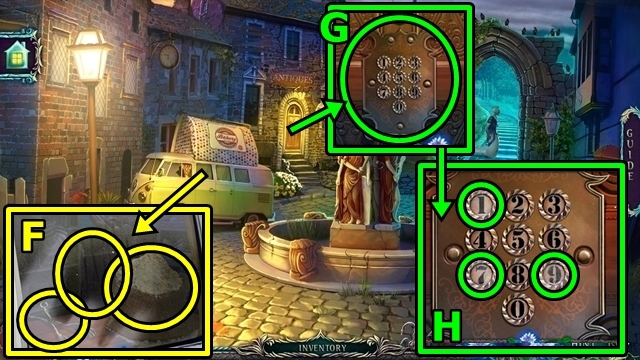
- Knock on two doors (A, B); lift the door mats (C). Knock on the third door (D). Lift the doormat (E); take the HOUSE KEY. Use the HOUSE KEY (F). Enter the house.
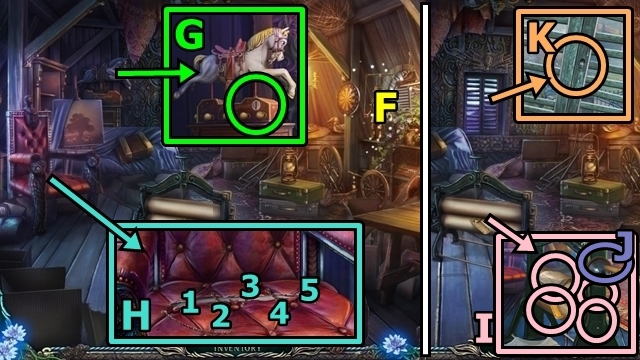
- Take the PLANK (G). Insert the PLANK (H).
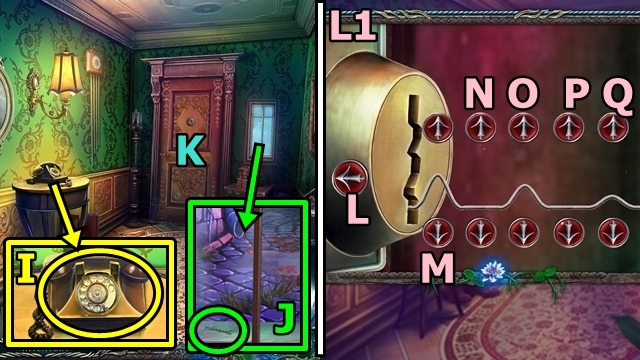
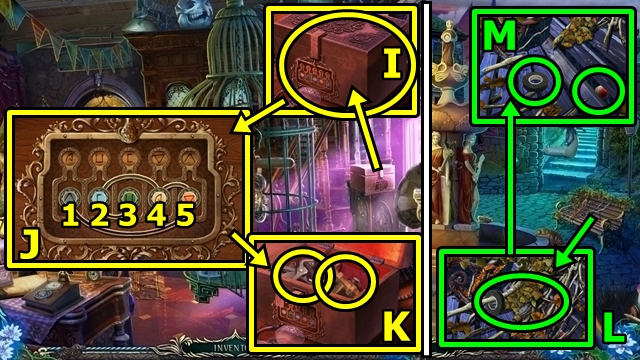
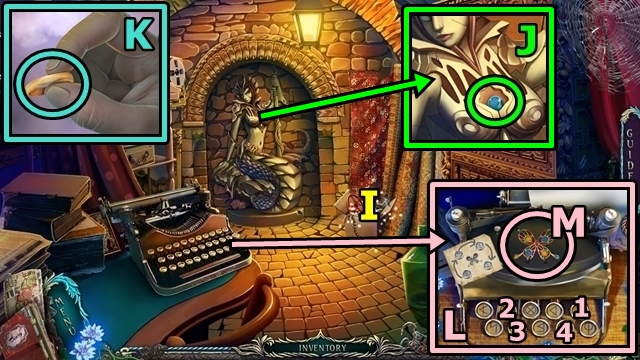
- Try the phone (I); take the MAGNET.
- Look out the window; use the MAGNET; take the HAIRPIN (J).
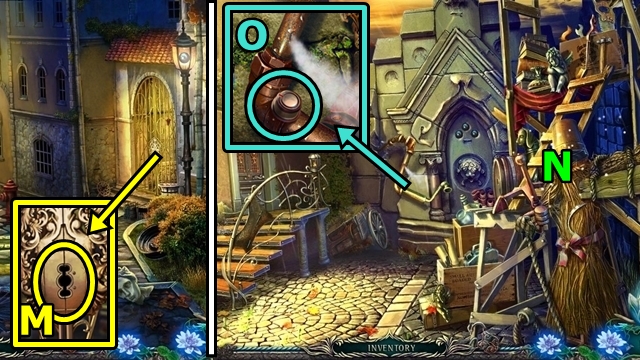
- Examine the door (K).
- Put the HAIRPIN in the lock to trigger a mini-game.
- Solution: Mx2-Nx3-Ox2-Px2-Qx3-L (L1).
- Go out the door.
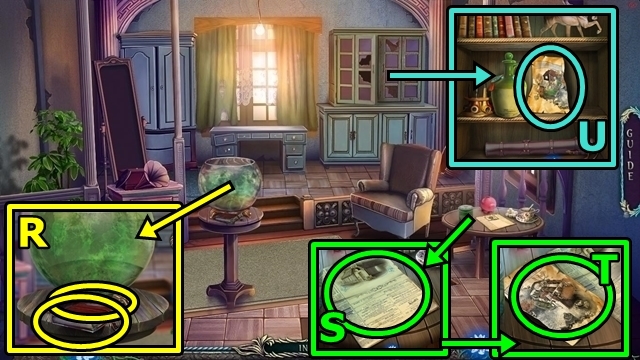
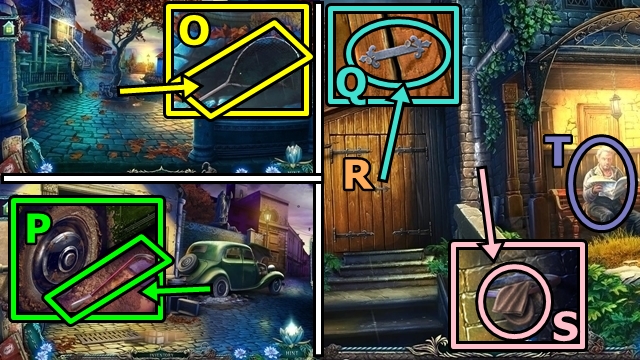
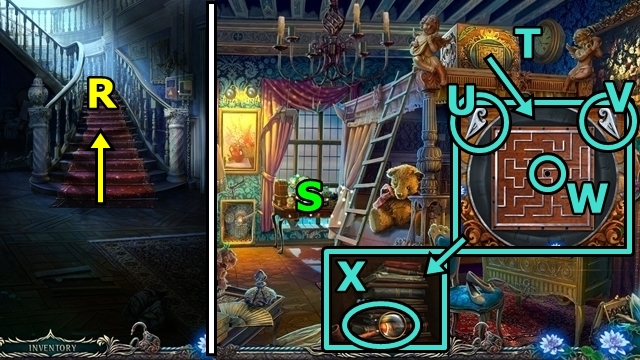
- Take the diary and TAPE (R).
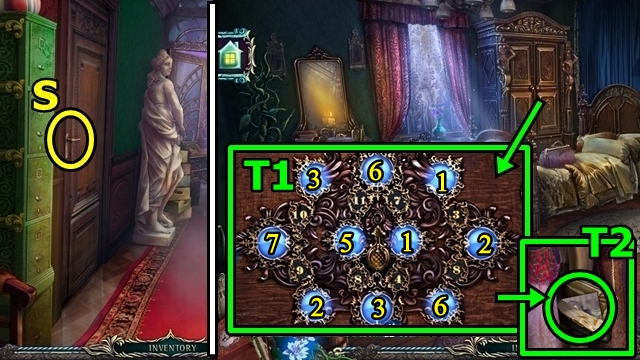
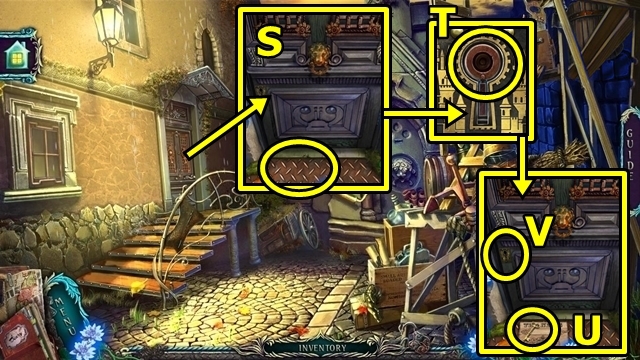
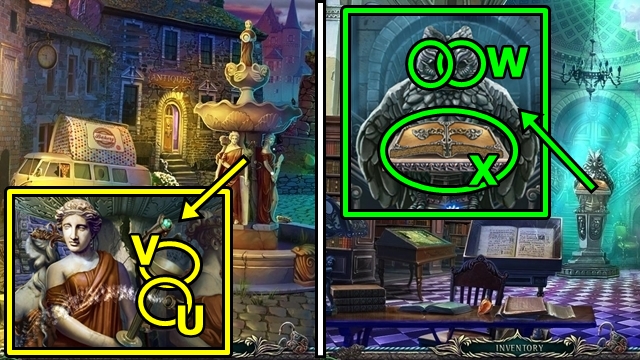
- Read the article (S); take the MAP PIECE (T).
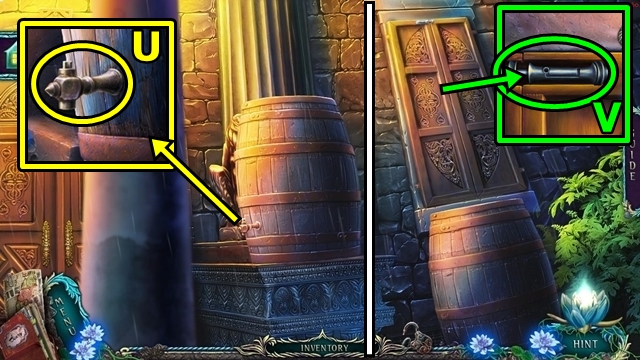
- Add the MAP PIECE (U); seal with the TAPE; take the map. Examine the map.
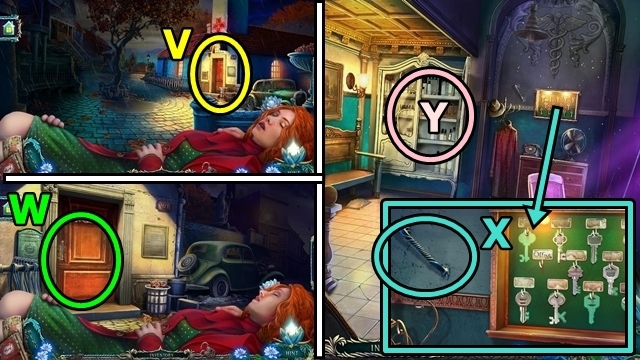
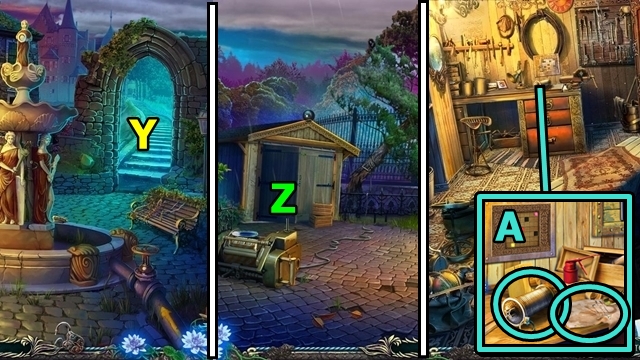
- Move towards the hospital (V).
- Enter the hospital (W).
- Talk to Nurse Abigail; receive the GIRL'S DIARY.
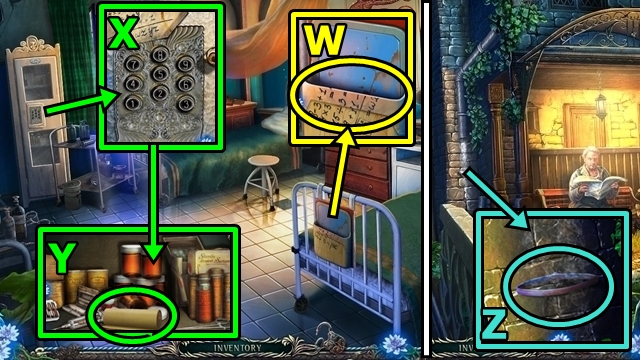
- Take the BRACKET (X).
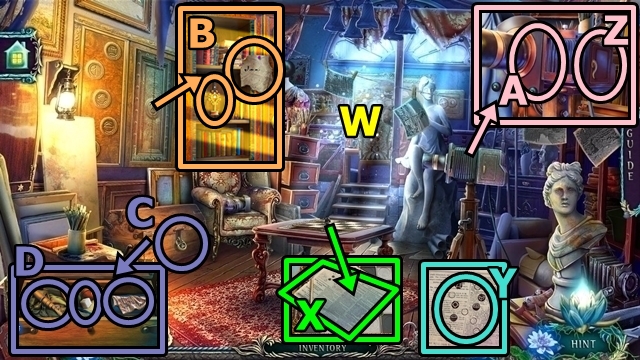
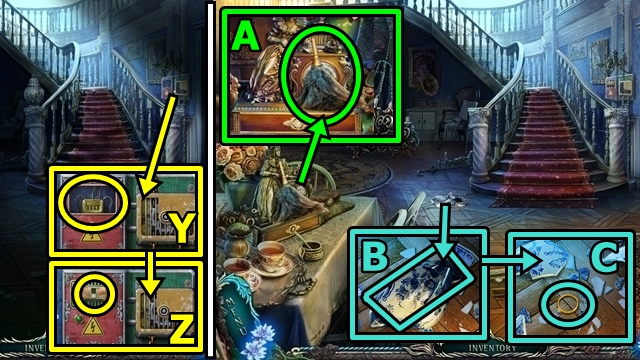
- Examine the armoire (Y) to trigger a mini-game.
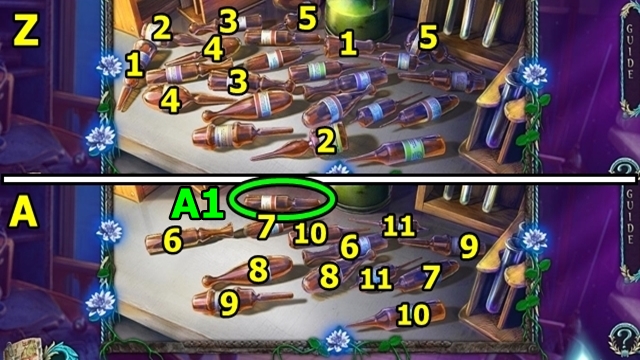
- Solution: (Z, A). Take the ADRENALINE (A1).
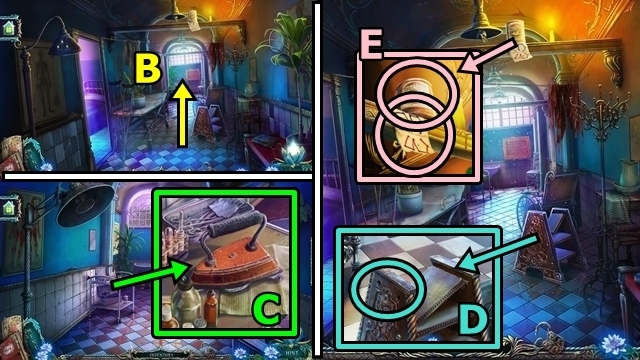
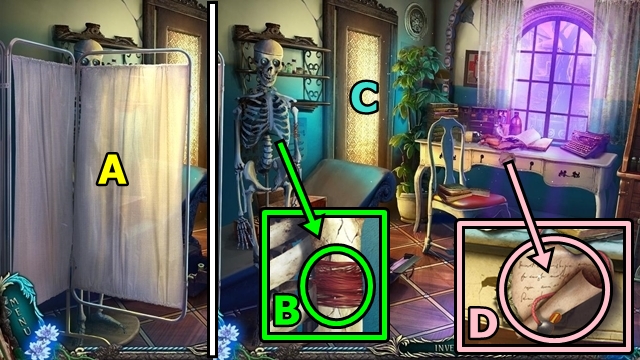
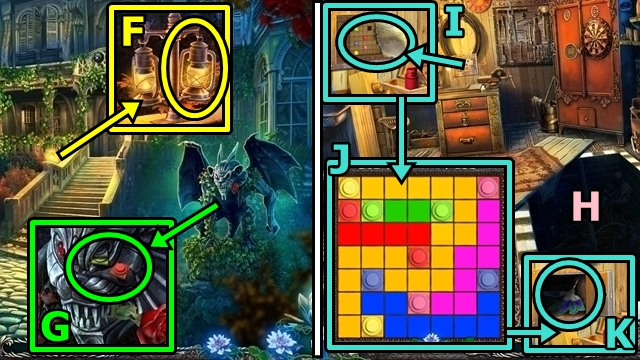
- Go through the doorway; move forward (B).
- Take the IRON (C).
- Move down.
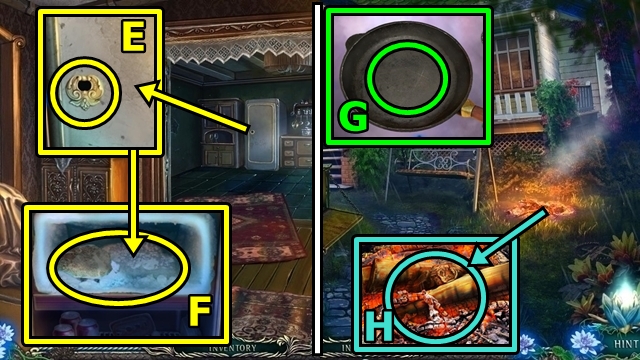
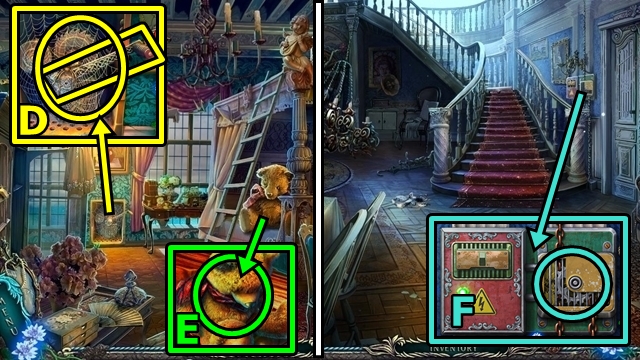
- Add the BRACKET; use the IRON (D).
- Take the SEALED CAN (E); examine the diagram (diary).
- Enter the hospital room.
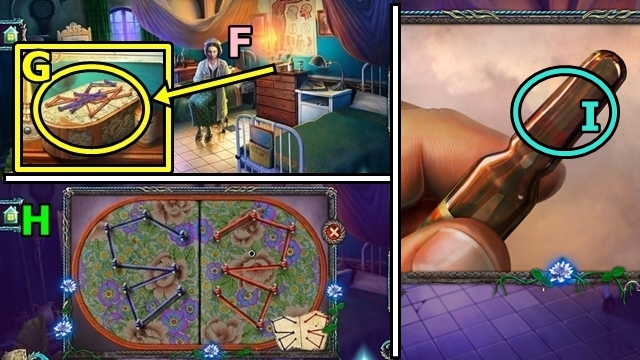
- Talk to Nurse Abigail (F).
- Take the ROPE CHEST (G).
- Examine the ROPE CHEST (inventory) to trigger a mini-game.
- Solution: (H). Take the SYRINGE.
- Select the ADRENALINE (inventory); add the SYRINGE (I); receive the SYRINGE WITH ADRENALINE.
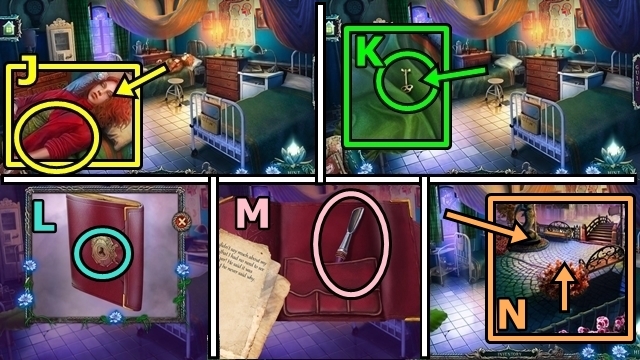
- Administer the SYRINGE WITH ADRENALINE (J).
- Talk to Beatrice.
- Take the DIARY KEY (K).
- Examine the GIRL'S DIARY (inventory); insert the DIARY KEY (L); read all the notes; take the NAIL FILE (M).
- Climb out the window (N).
- Take the SCOOP NET (O).
- Move towards the hospital.
- Take the CROWBAR (P).
- Move down, then left.
- Use the CROWBAR (Q); receive the BENT NAIL.
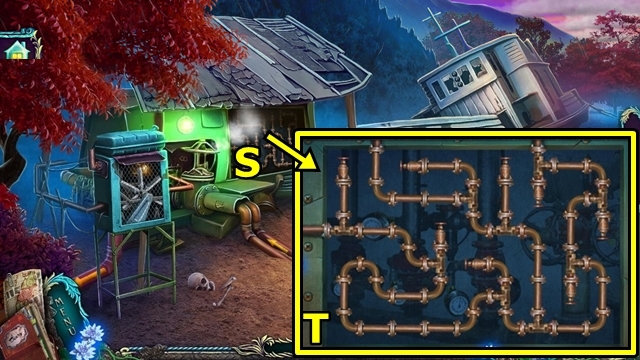
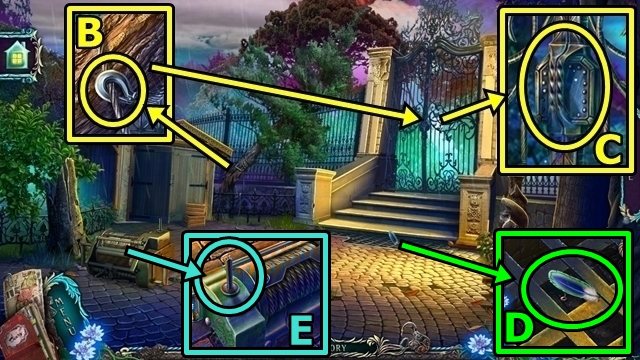
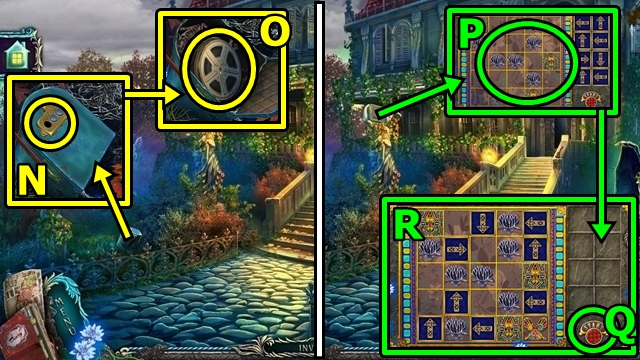
- Open the shed; play the HOP (R); receive PLIERS.
- Take the MITTEN (S).
- Talk to the mechanic (T) to trigger a mini-game.

- Solution is random. One possible set-up is shown. Press Play to start. (T1).
- Receive the CAR REPAIR MANUAL. Continue to talk to the mechanic.
- Move down twice, then enter the hospital.
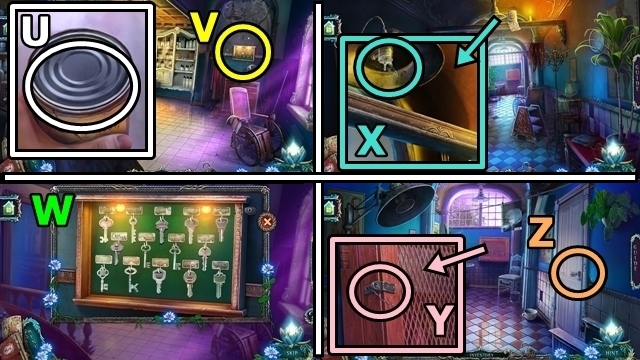
- Examine the SEALED CAN (inventory); use the NAIL FILE (U). Take the KEYS.
- Add the KEYS (V) to trigger a mini-game.
- Solution: (W). Take the OFFICE KEY.
- Go through the doorway.
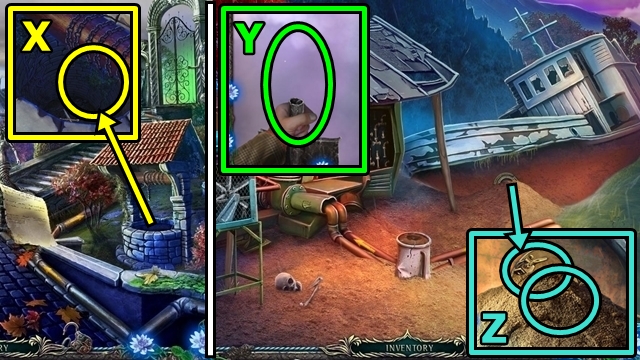
- Use the MITTEN; take the SMASHED LIGHT BULB (X).
- Move forward.
- Use the PLIERS (Y); take the BUCKET and THICK CARDBOARD.
- Use the OFFICE KEY (Z); enter the office.
- Move the screen (A).
- Use the SMASHED LIGHT BULB (B); take the THREAD and the CAN OPENER.
- Open the door; play the HOP (C); receive the WRENCH.
- Take the NUMBERED WIRE (D).
- Move down four scenes.
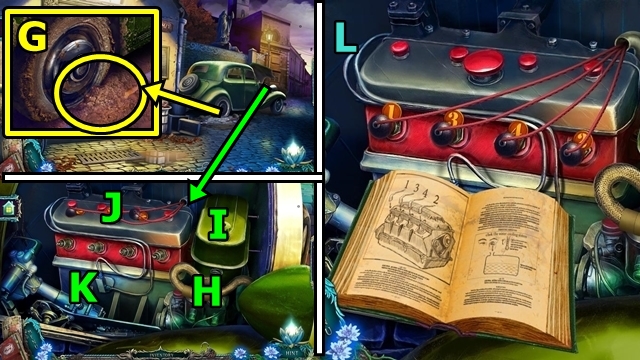
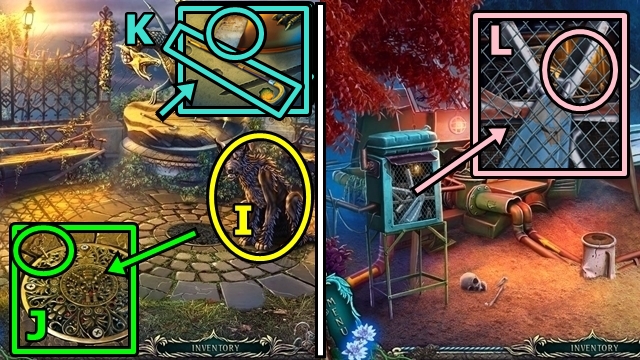
- Use the WRENCH (E) to trigger a mini-game.
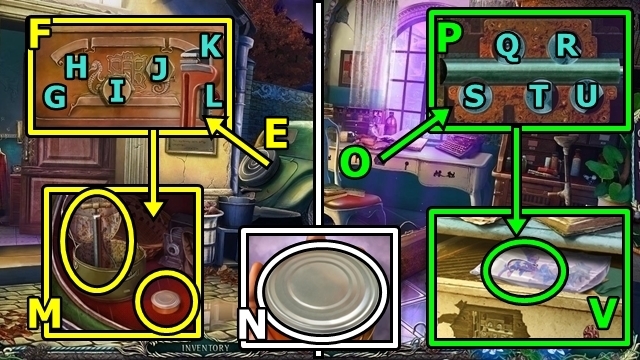
- Solution: Kx3-G-Kx2-H-Kx3-I-Lx2-J (F).
- Take the SARDINES and PUMP (M).
- Return to the office.
- Select the SARDINES (inventory); use the CAN OPENER (N); receive the FISH OIL.
- Remove the plate. Add the FISH OIL (O) to trigger a mini-game.
- Solution: Qx6-Rx3-Tx2 (P).
- Take the BENT NEEDLE (V); read the files; receive the MEDICAL CHART.
- Return to the hospital room.
- Insert the MEDICAL CHART (W); receive the code (diary).
- Select the cabinet to trigger a mini-game.
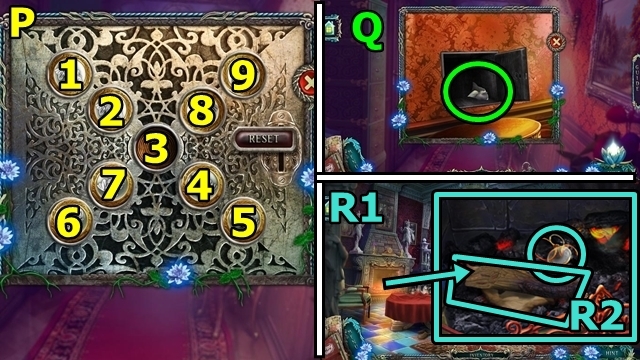
- Solution: 6-1-2-5-1-6 (X).
- Take the BANDAGE (Y).
- Move down four scenes, then left.
- Use the BUCKET (Z); receive the BUCKET OF WATER.
- Move down, then forward.
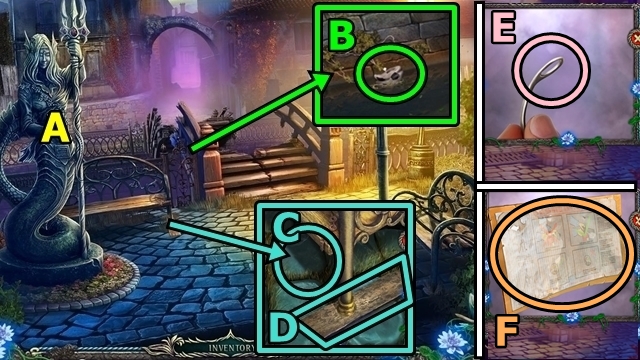
- Read the statue's sign (A).
- Use the SCOOP NET; take the DEFLATED BALL (B).
- Add the DEFLATED BALL, then the PUMP (C). Use the pump. Take the PLANK (D).
- Select the BENT NEEDLE (inventory); insert the THREAD (E); receive the THREADED NEEDLE.
- Select the THICK CARDBOARD (inventory); use the THREADED NEEDLE (F); receive the FUNNEL.
- Return to the car.
- Insert the PLANK (G).
- Add the BANDAGE (H). Remove the cap (I); insert the FUNNEL, then add the BUCKET OF WATER. Add the NUMBERED WIRE (J) and CAR REPAIR MANUAL (K) to trigger a mini-game.
- Solution: (L).
- Get in the car.
Chapter 2: Rivendale
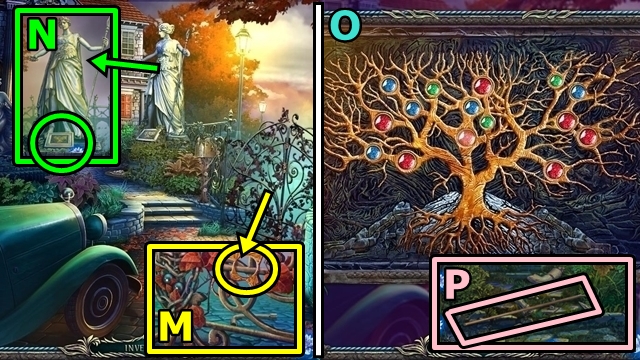
- Take the PUZZLE PIECE (M).
- Add the PUZZLE PIECE to trigger a mini-game (N).
- Solution: (O).
- Pick up the POLE (P).
- Move forward.

- Try to open the door (Q).
- Take the RAKE HEAD (R).
- Move down.
- Select the RAKE HEAD (inventory); add the POLE (S); receive the RAKE.
- Use the RAKE; take the WRENCH (T).
- Move forward.
- Add the WRENCH (U).
- Use the BENT NAIL (V).
- Climb through the window.
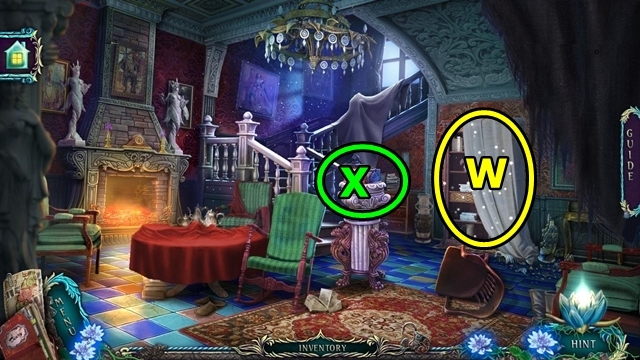
- Play the HOP (W); receive the FROG.
- Examine the box (X) to trigger a mini-game.
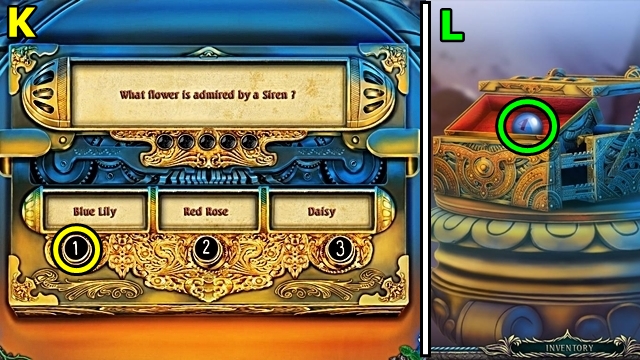
- Solution (in no particular order): Blue Lily, Bottle, Siren, A Fish Tail, Letter M, Singing, Staircase, Twelve, Rivendale, Tomorrow, Gloves, Corn, and Stanley (K).
- Take the PUZZLE PIECE (L).
- Go upstairs.

- Take the PHOTO FRAGMENT (M).
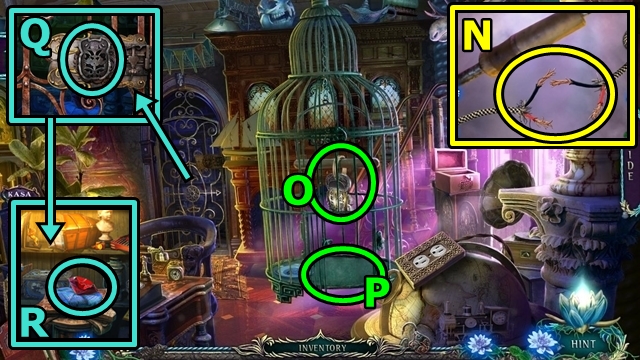
- Read the note; remove the flowers; take the VASE WITH WATER (N).
- Insert the FROG (O) to trigger a mini-game.
- Solution: 2-3, 4-2, 5-4, 3-5, 1-3, 2-1, 4-2, 3-4, 8-3, 7-8, 6-7, 3-6, 9-3, 8-9, 7-8, 3-7 (P).
- Take the PHOTO FRAGMENT (Q).
- Go downstairs.
- Use the VASE WITH WATER (R1). Read the note; take the LENS (R2).
- Go upstairs.
- Open the door; enter the bedroom (S).
- Add the PUZZLE PIECE to trigger a mini-game.
- Solution: (T1). Take the PHOTO FRAGMENT (T2).
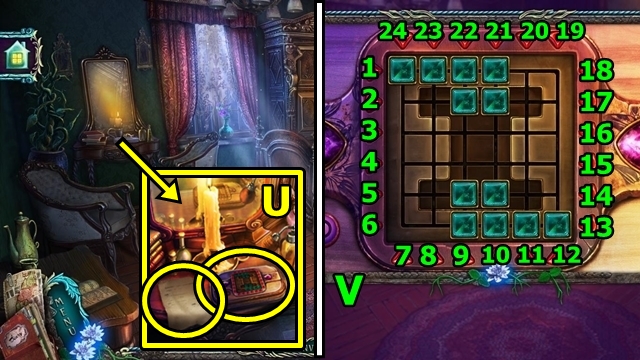
- Read the note; take the MANICURE SET (U).
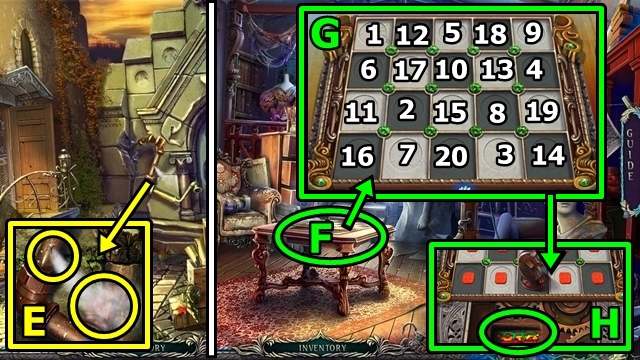
- Examine the MANICURE SET (inventory) to trigger a mini-game.
- Solution: 11x2, 12x2, 15x2, 24x2, 23x2, 3x2, 18, 23, 1x2, 20, 6, 11x2, 20, 13x2, 8x2, 23 (V).
- Take the TWEEZERS (W).
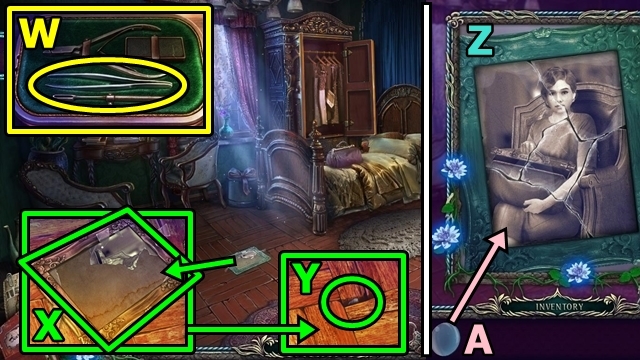
- Take the PHOTO FRAME (X). Use the TWEEZERS; take the PHOTO FRAGMENT (Y).
- Examine the PHOTO FRAME (inventory); add the four PHOTO FRAGMENTS to trigger a mini-game.
- Solution: (Z).
- Examine the PHOTO FRAME (inventory); use the LENS (A); note the code (diary).
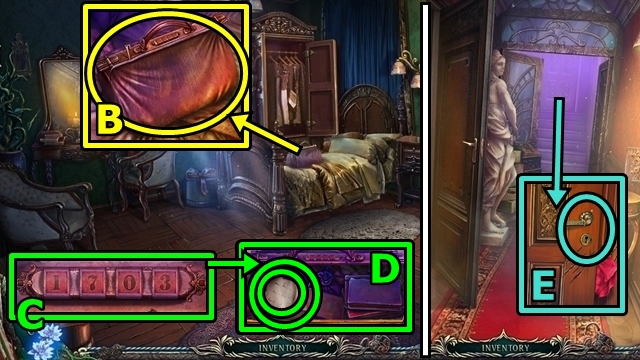
- Take the SUITCASE (B).
- Examine the SUITCASE (inventory) to trigger a mini-game.
- Solution: (C).
- Read the note; take the ATTIC KEY (D).
- Move down.
- Use the ATTIC KEY (E); enter the attic.
- Play the HOP (F); receive the COIN.
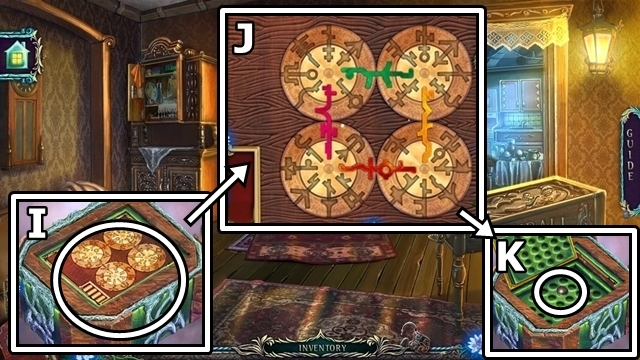
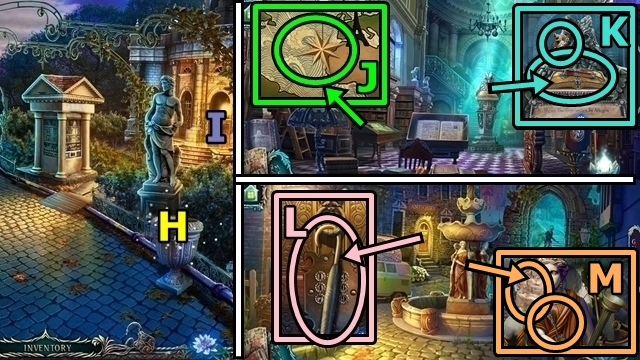
- Insert the COIN (G); take the COGWHEEL.
- Examine the chair to trigger a mini-game.
- Solution: 2-1-4-3-5 (H). Take the COGWHEEL.
- Read the notes; add the two COGWHEELS (I); turn the lever (J); take the HANDLE.
- Add the HANDLE (K).
- Go out the window, then through the gate.
Chapter 3: Peter's House
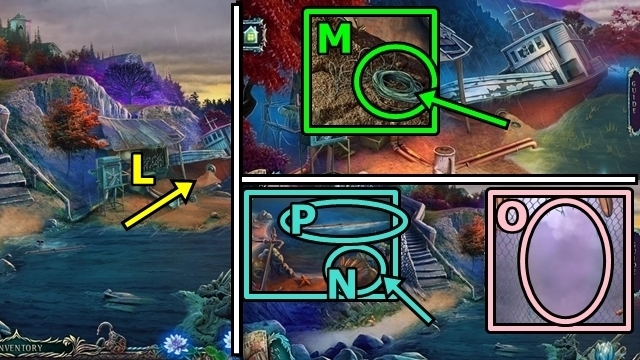
- Move up the beach (L).
- Take the ROPE (M).
- Move down.
- Take the DAMAGED NET (N).
- Examine the DAMAGED NET (inventory); add the ROPE (O). Take the NET.
- Use the NET (P); take the BROKEN OAR.
- Go up the stairs.

- Move forward (Q1).
- Take the WIRE CUTTERS (Q2).
- Move down, then left.
- Enter Peter's house (Q3).
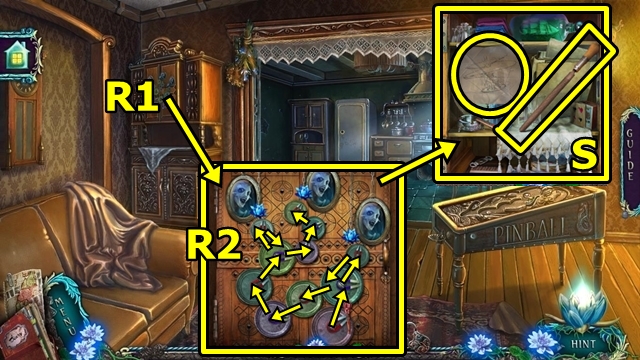
- Examine the armoire (R1) to trigger a mini-game.
- Solution: Position the torch, then move the accepting magnet to take it (R2).
- Take the FILE and the TRACING PAPER (S).
- Move down.
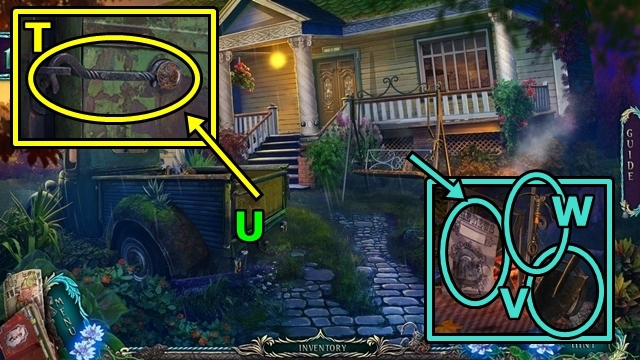
- Use the FILE (T); receive the STEEL HOOK.
- Play the HOP (U); receive the PUZZLE PIECE.
- Take the BROKEN SHOVEL and the DRAWING (V). Use the WIRE CUTTERS; take the GRAPPLING HOOK (W).
- Move down.
- Use the STEEL HOOK (X); take the SWORD.
- Move down, then right to the beach.
- Examine the BROKEN SHOVEL (inventory); add the BROKEN OAR (Y); receive the SHOVEL.
- Use the SHOVEL (Z); open the porthole; take the ROPE.
- Move down, up the stairs, then forward.
- Examine the GRAPPLING HOOK (inventory); add the ROPE (A); receive the ROPE FOR GRAPPLING HOOK.
- Throw the ROPE FOR GRAPPLING HOOK (B).
- Move forward.
- Take the PAN (C).
- Take the REFRIGERATOR DOOR HANDLE (D).
- Return to Peter's house.
- Insert the REFRIGERATOR DOOR HANDLE (E); open the refrigerator.
- Take the FROZEN STEAK (F).
- Move down.
- Examine the PAN (inventory); add the FROZEN STEAK (G); receive the PAN WITH STEAK.
- Place the PAN WITH STEAK (H); take the STEAK.
- Move down, then forward three scenes.
- Offer the STEAK (I).
- Take the KEY FOR GATE (J).
- Read the note; take the CANE (K).
- Move down four scenes, then right to the beach.
- Insert the CANE (L); take the PROJECTOR LAMP.
- Move down, then forward three scenes.
- Insert the KEY FOR GATE (M).
- Enter the alley.
- Play the HOP (N); receive the GARDEN HOSE.
- Take the RADIO TUNER KNOB (O).
- Move down.
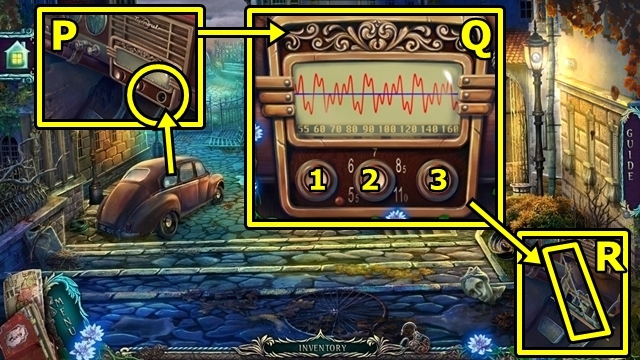
- Insert the RADIO TUNER KNOB (P). Examine the radio to trigger a mini-game.
- Solution: 1x6, 2x2, 3x3 (Q).
- Take the KNITTING NEEDLE (R).
- Go right.
- Place the DRAWING (S); insert the KNITTING NEEDLE (T). Take the STUDIO KEY (U). Insert the STUDIO KEY (V). Enter the studio.
- Play the HOP (W); receive the CHEST.
- Take the NEWSPAPER (X).
- Examine the NEWSPAPER (inventory); add the TRACING PAPER (Y); receive the TRACING PAPER.
- Open the panel (Z); insert the PROJECTOR LAMP; insert the TRACING PAPER (A).
- Read the note; take the CHEST KEY (B).
- Insert the CHEST KEY (C); take the SCREWDRIVER, SUGAR and the SHAWL (D).
- Move down.
- Use the SHAWL (E); take the KNIGHT.
- Enter the studio.
- Add the KNIGHT (F) to trigger a mini-game.
- Solution: (G).
- Take the KEYS (H).
- Return to Peter's house.
- Examine the CHEST (inventory); insert the KEYS (I) to trigger a mini-game.
- Solution: (J).
- Take the BALL FOR PINBALL (K).
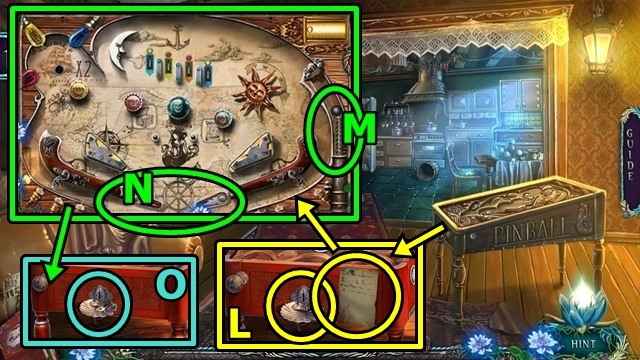
- Read the note; add the BALL FOR PINBALL (L) to trigger a mini-game.
- Solution: This mini-game is random. Pull the spring (M) down to launch the pinball. Press anywhere in the game to activate the flippers (N). Score 7000 points.
- Take the DUBLOON (O).
- Move down twice, then right.
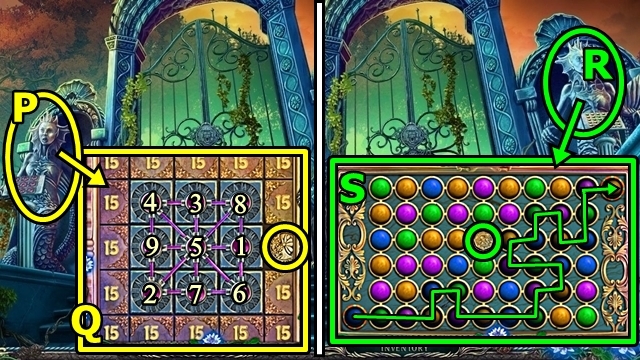
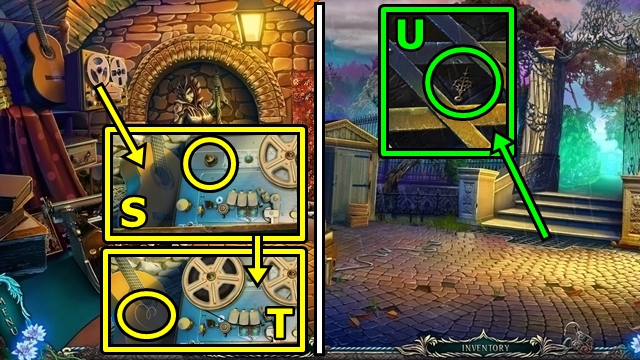
- Trigger the mini-game (P).
- Solution: (Q).
- Take the DUBLOON.
- Add the PUZZLE PIECE (R) to trigger a mini-game.
- Solution: (S).
- Take the DUBLOON.
- Move down two scenes.
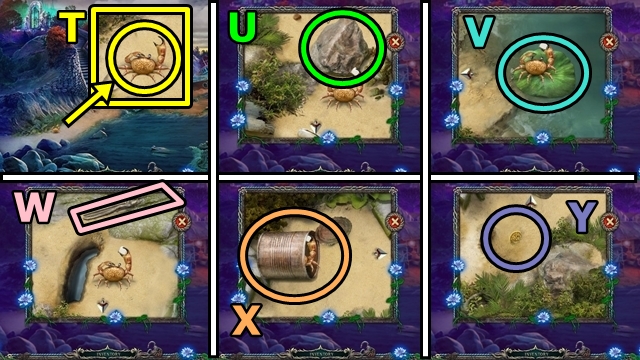
- Give the SUGAR (T). Follow the crab; move the rock (U); push the lily pad (V); move the sticks (W); flip the can (X); take the DUBLOON (Y).
- Move forward four scenes.
- Use the SCREWDRIVER (Z); take the FAUCET HANDLE (A).
- Add the SWORD and the four DUBLOONS (B). Take the RING (C).
- Move down.
- Add the GARDEN HOSE (D) and FAUCET HANDLE (E).
- Take the RING (F).
- Move down twice, then right.
- Insert the two RINGS (G); go through the gate.
Chapter 4: The Library
- Play the HOP (H); receive the CHEST.
- Enter the library (I).
- Take the KEY FOR BASEMENT (J).
- Read the note; take the BROKEN SOLDERING IRON (K).
- Move down, then forward.
- Take the UMBRELLA (L).
- Read the note; take the SCOOP (M).
- Move down.
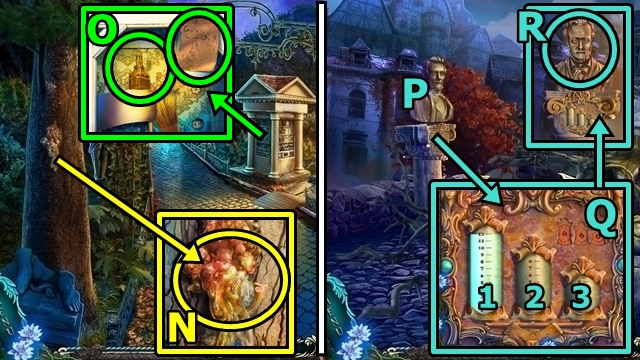
- Use the SCOOP (N); take the VIAL; add the UMBRELLA; receive the STICKY UMBRELLA.
- Read the note; add the STICKY UMBRELLA; receive the KREMLIN (O).
- Move down twice, then forward.
- Insert the VIAL (P) to trigger a mini-game.
- Solution: 1-2, 2-3, 3-1, 2-3, 1-2, 2-3, 3-1 (Q).
- Take the BUST (R).
- Return to the Peter's house.
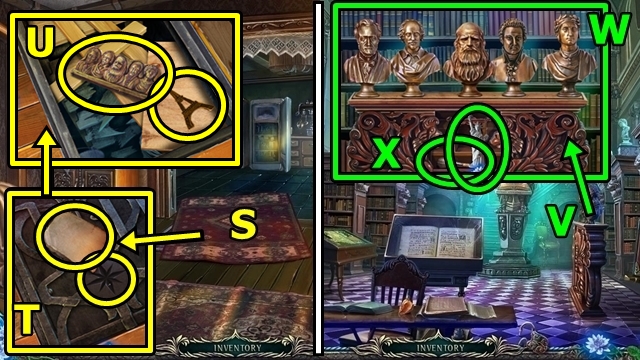
- Move the rug (S); read the note; insert the KEY FOR BASEMENT (T).
- Take the bust diagram (diary) and the EIFFEL TOWER (U).
- Return to the library.
- Add the BUST (V) to trigger a mini-game.
- Solution: (W).
- Take the STATUE OF LIBERTY and POWDER BRUSH (X).
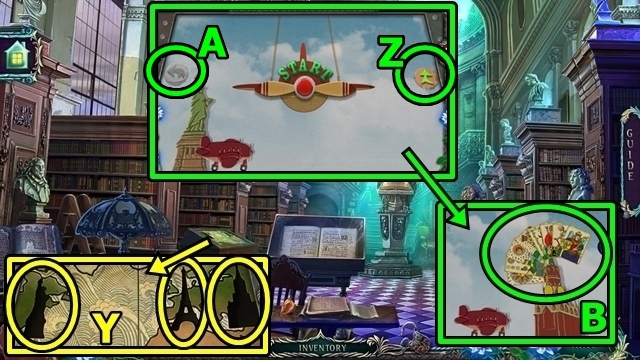
- Insert the STATUE OF LIBERTY, EIFFEL TOWER and KREMLIN (Y) to trigger a mini-game.
- Solution: Press the arrow (Z) to raise the plane, depress to lower the plane. Avoid all obstacles. Press the rounded arrow (A) to reset.
- Take the TAROT CARD (B).
- Move down, then forward.
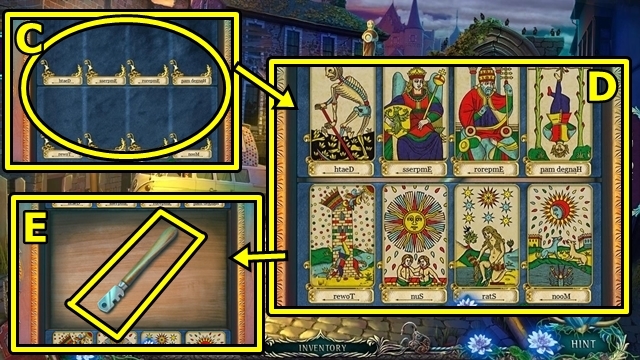
- Examine the CHEST (inventory); add the TAROT CARD (C) to trigger a mini-game.
- Solution: (D). Take the GLASS CUTTER (E).
- Use the GLASS CUTTER (F); take the FLOUR and TONGS.
- Add the FLOUR; then the POWDER BRUSH (G) to trigger a mini-game.
- Solution: 9-1-7 (H).
- Enter the antiques store.
- Examine the box (I) to trigger a mini-game.
- Solution: 4-5, 5-1, 2-3 (J).
- Take the PUMP PART and the GARDEN SHEARS (K).
- Move down.
- Use the GARDEN SHEARS (L).
- Take the INSULATION TAPE; use the TONGS; take the BALL (M).
- Enter the antiques store.
- Examine the BROKEN SOLDERING IRON (inventory); add the INSULATION TAPE (N); receive the SOLDERING IRON.
- Use the SOLDERING IRON (O); take the SCARAB (P).
- Insert the SCARAB (Q).
- Take the RUBY (R).
- Move down five scenes, then right to the beach.
- Add the PUMP PART (S) to trigger a mini-game.
- Solution: (T).
- Return to the fountain.
- Insert the BALL (U); take the EMERALD (V).
- Return to the library.
- Add the RUBY and the EMERALD (W). Read the book (X).
- Move down, then up.
Chapter 5: The Moon Pool
- Go through the gate (Y).
- Enter the shed (Z).
- Read the note; take the WINCH STARTER (A).
- Move down.
- Take the hook (B); insert it on the gate (C).
- Take the FEATHER (D).
- Add the WINCH STARTER (E); pull the starter.
- Go through the gates.
- Take the LANTERN (F).
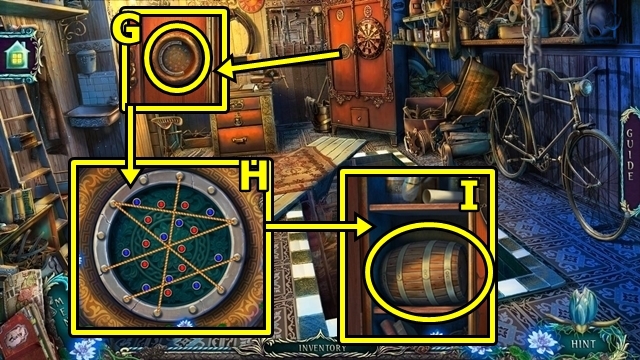
- Take the CUBE PUZZLE (G).
- Return to the shed.
- Add the LANTERN (H); play the HOP; receive the GARGOYLE'S EYE.
- Add the CUBE PUZZLE (I) to trigger a mini-game.
- Solution: (J).
- Take the BROKEN FAN (K).
- Move down, then right.

- Add the GARGOYLE'S EYE (L); take the ROSE (M).
- Examine the BROKEN FAN (inventory); add the FEATHER (N) to trigger a mini-game.
- Solution: (O). Receive the FAN.
- Add the FAN (P) and the ROSE (Q).
- Enter the mansion.
- Go upstairs (R).
- Play the HOP (S); receive the RELAY.
- Examine the box (T) to trigger a mini-game. Take the drawing (diary).
- Solution: Use the left (U) and right (V) buttons to get the ball in the hole (W).
- Take the MAGNIFYING GLASS (X).
- Move down.
- Insert the RELAY (Y); flip the switch (Z).
- Take the FEATHER DUSTER (A).
- Take the VASE PIECE (B); move the pieces; take the OLD RING (C).
- Go upstairs.
- Use the FEATHER DUSTER (D); take the HANDLE.
- Use the VASE PIECE (E); take the STATUE'S BALL.
- Move down.
- Insert the HANDLE (F); turn the handle.

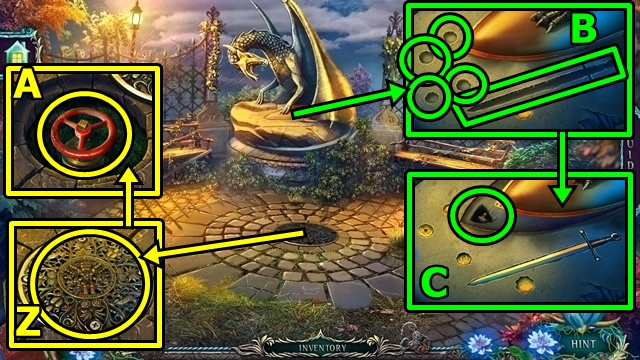
- Add the STATUE'S BALL (G) to trigger a mini-game.
- Solution: (H).
- Go through the entrance.
- Play the HOP (I); receive the CORKSCREW.
- Take the BUTTON (J).
- Examine the OLD RING (inventory); use the MAGNIFYING GLASS (K); take the code (diary).
- Examine the typewriter to trigger a mini-game.
- Solution: (L). Take the BUTTERFLY (M).
- Move down twice.
- Add the BUTTON (N). Press 2-3-4-1. Take the FILM REEL (O).
- Add the BUTTERFLY (P) to trigger a mini-game.
- Solution: Press Start (Q) to move the butterfly (R). Take the clock diagram (diary).
- Enter the mansion; go down to the cellar.
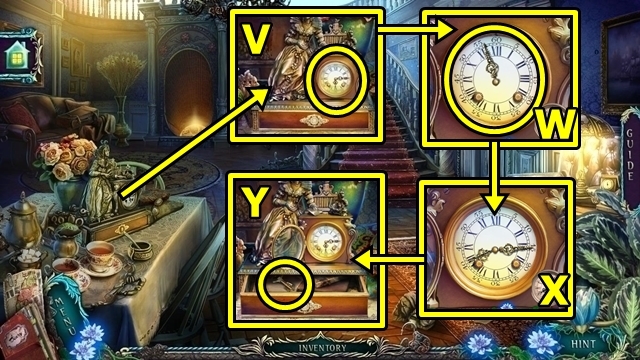
- Add the FILM REEL (S). Take the GUITAR STRING (T).
- Move down three scenes.
- Use the GUITAR STRING (U); take the CLOCK HAND.
- Return to the mansion.
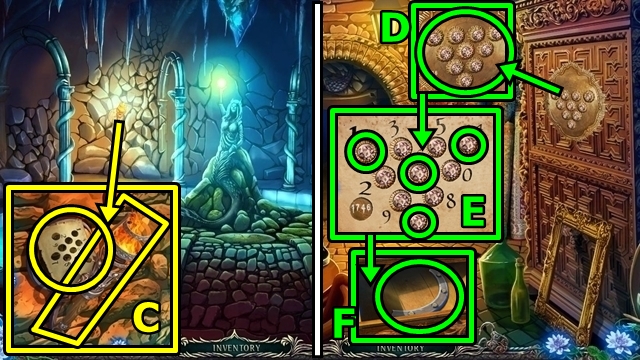
- Examine the clock (V); add the CLOCK HAND (W). Set the time for 8:15 (X). Take the KEY (Y).
- Go upstairs.

- Insert the KEY (Z). Read the note; take the SHELL KEY (A).
- Return to the cellar.
- Insert the SHELL KEY (B).
- Go through the doorway.
- Take the CODE STENCIL and the TORCH (C).
- Move down.
- Read the note; add the CODE STENCIL (D). Press 1-7-4-6 (E). Take the CLIP (F).
- Return to the shed.
- Add the CLIP (G) to trigger a mini-game.
- Solution: (H).
- Take the SEALED BARREL (I).
- Return to the Moon Pool.
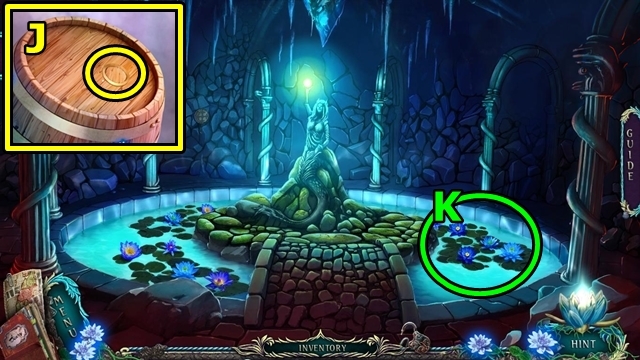
- Examine the SEALED BARREL (inventory); use the CORKSCREW (J); receive the FUEL BARREL.
- Pour the FUEL BARREL; then use the TORCH (K).
- Congratulations! You've completed Shiver: The Lily's Requiem.
Created at: 2015-03-01