

Walkthrough Menu
- General Tips
- Chapter 1: Repairing the Portal
- Chapter 2: Volarden
- Chapter 3: Old Town
- Chapter 4: The Tech District
- Chapter 5: The Oasis District
General Tips
- This is the official guide for Shrouded Tales: Revenge of Shadows.
- This guide does not mention each time you have to zoom into a location; the screenshots show each zoom scene.
- Hidden-object puzzles are referred to as HOPs. This guide does not show screenshots of the HOPs. However, it is mentioned when a HOP is available and the inventory item collected.
- This guide gives step-by-step solutions for all puzzles that are not random. Please read the instructions in the game for each puzzle.
Chapter 1: Repairing the Portal
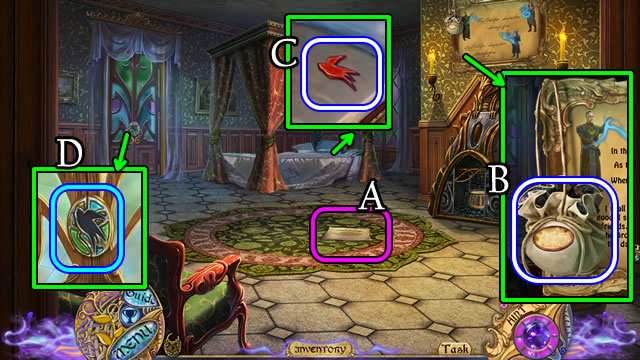
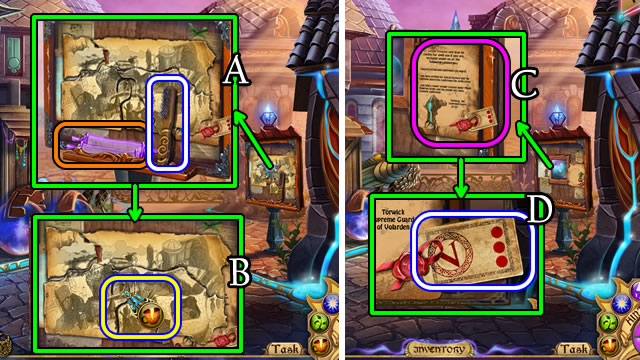
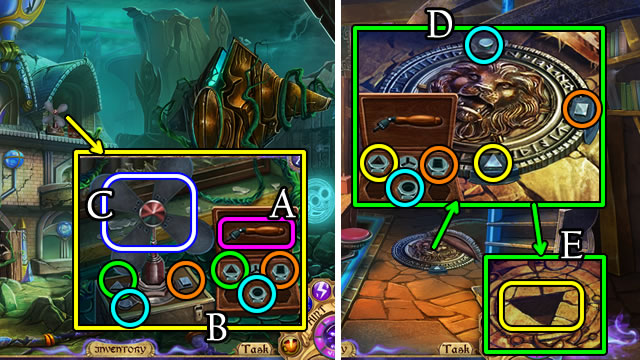
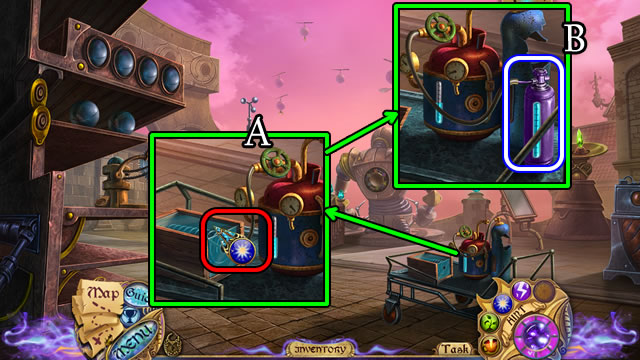
- Read the note (A).
- Take the SEEDS (B).
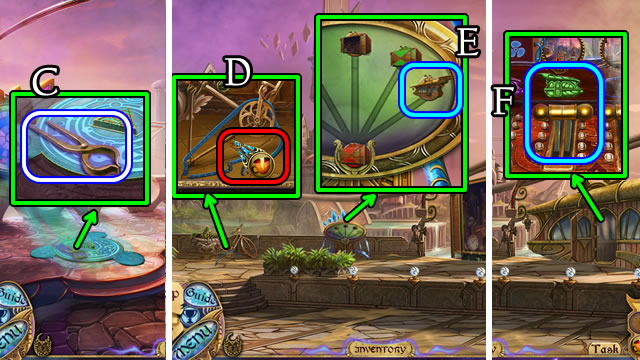
- Move the blanket; take the BIRD EMBLEM (C).
- Place the BIRD EMBLEM (D).
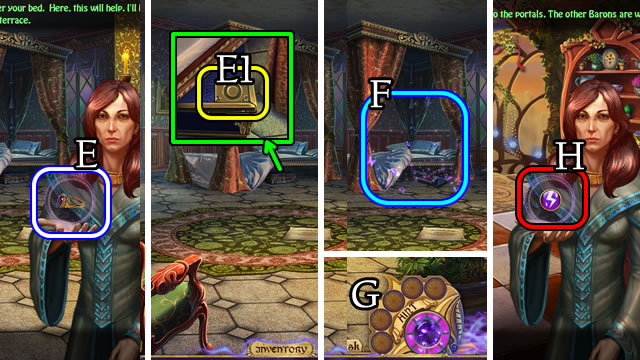
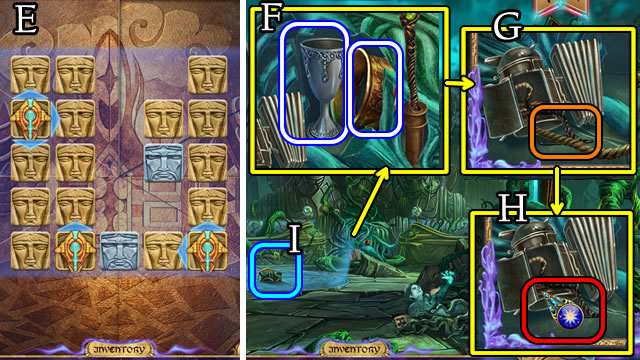
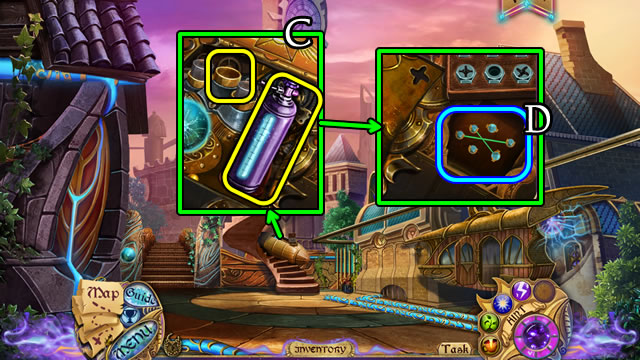
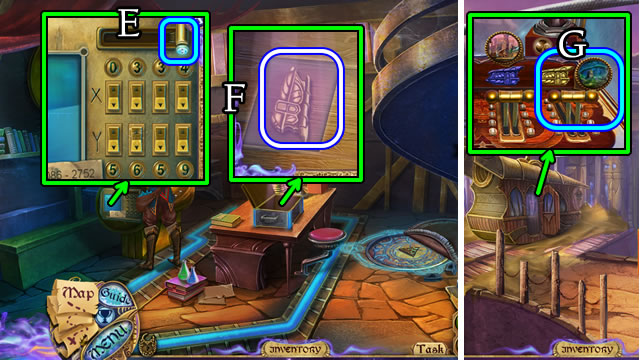
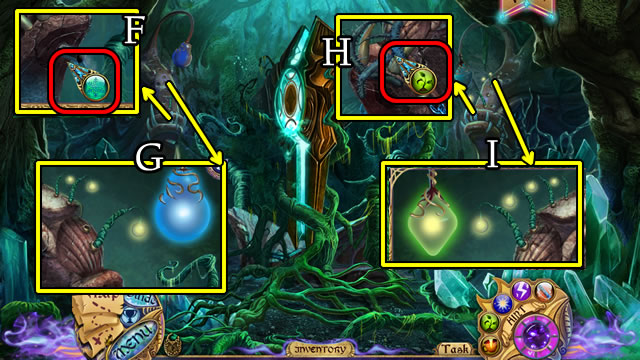
- Take MOTHER'S RING (E).
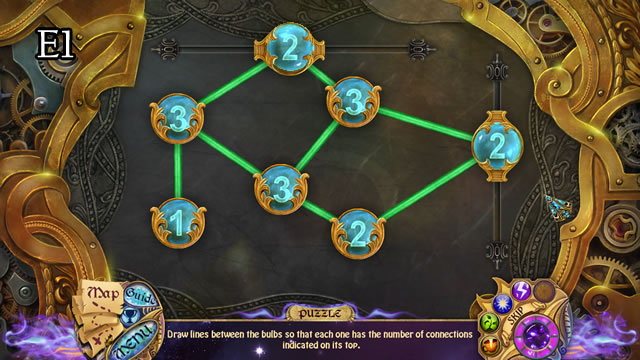
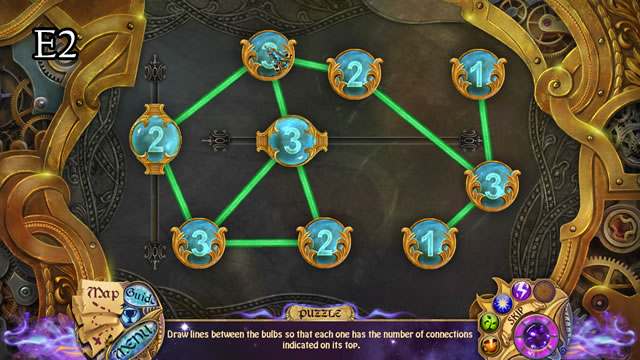
- Place MOTHER'S RING (E1); play the HOP (F) to receive the Amulet (G).
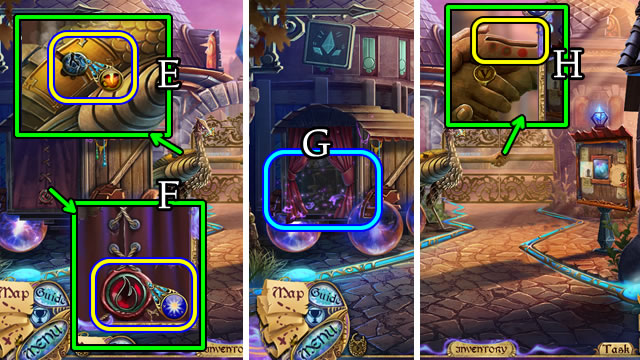
- Walk left.
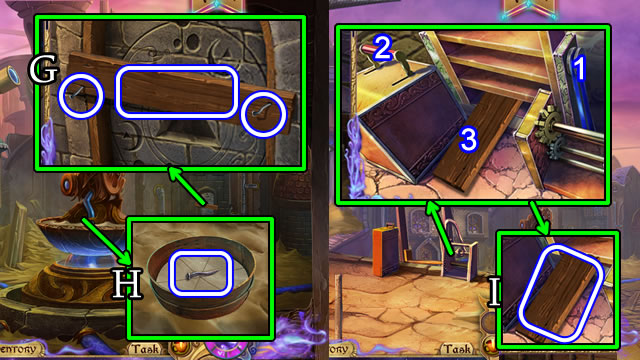
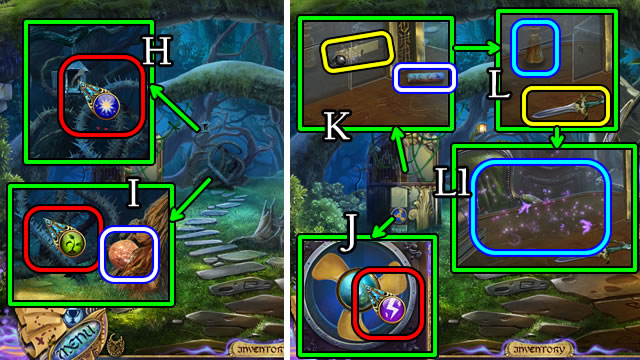
- Speak to your mother; receive the Electra spell (H).
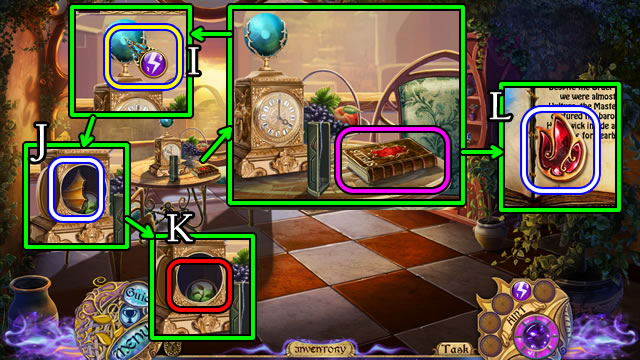
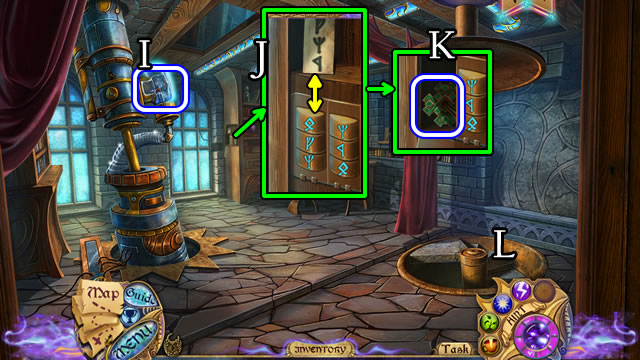
- Use the Electra spell (I).
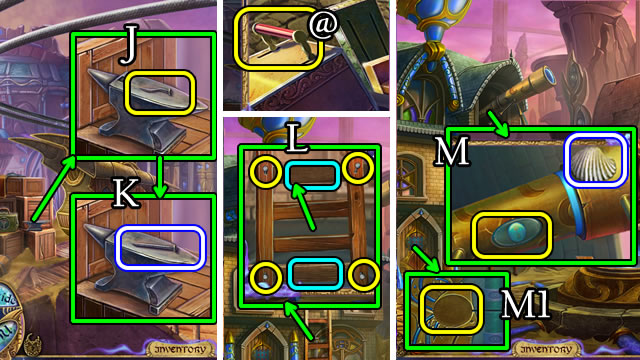
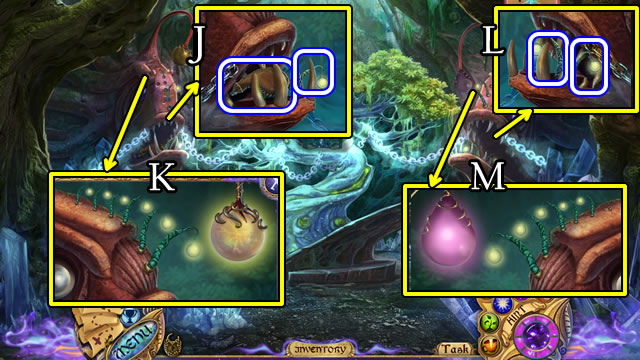
- Take the DRAGON WING (J) and Germina spell (K).
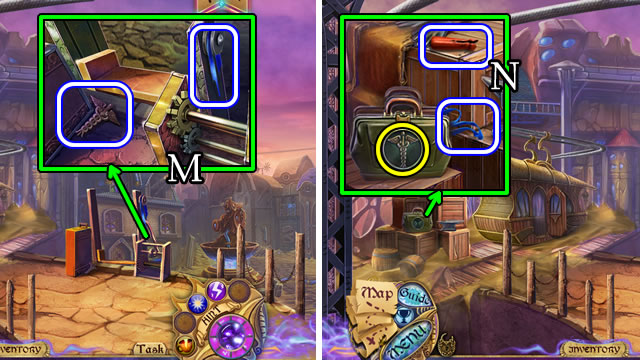
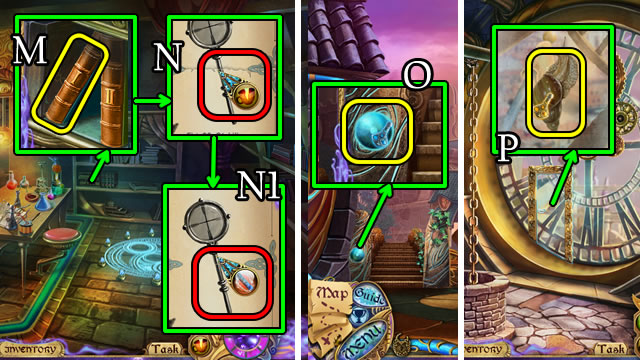
- Read the book; take the FIRE EMBLEM (L).
- Place the FIRE EMBLEM (M); take the RED CANDLE.
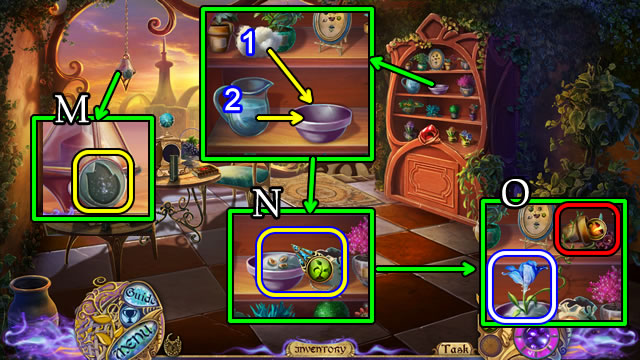
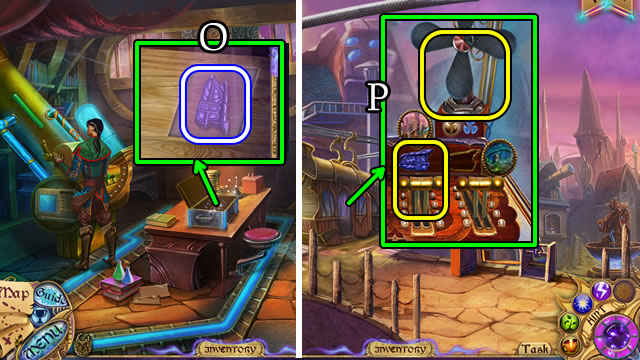
- Place the cotton (1) and water (2); add SEEDS. Use the Germina spell (N); take the BLUE FLOWER and Restora spell (O).
- Walk right.
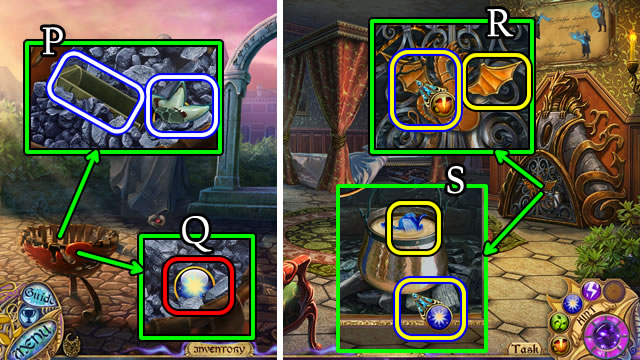
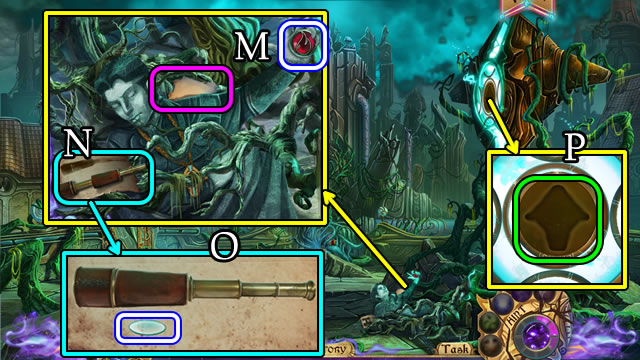
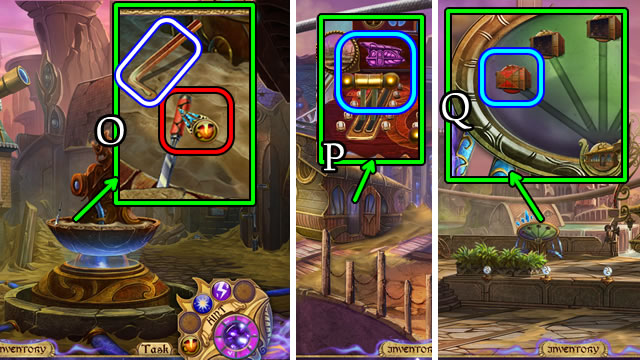
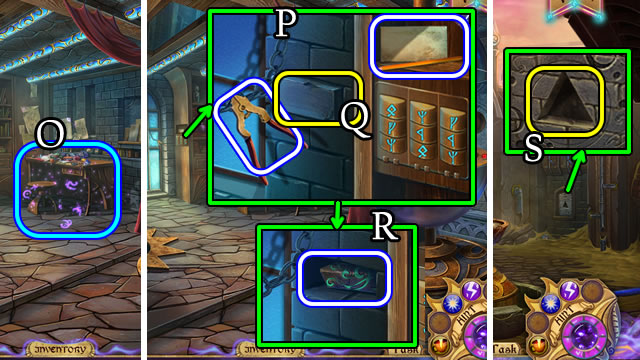
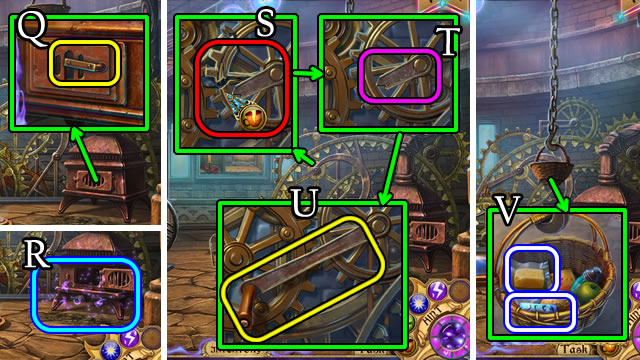
- Take the MOLD HALF and STAR HALF (P). Uncover and take the Combusta spell (Q).
- Walk down 2x.
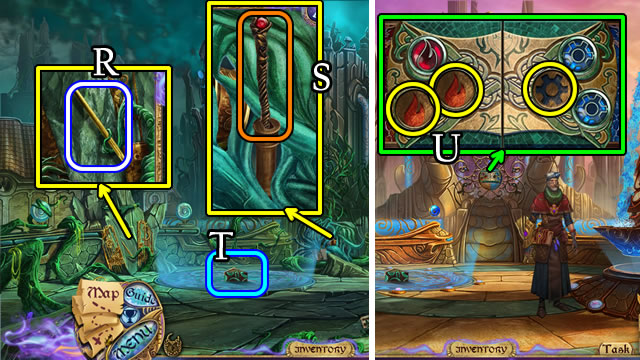
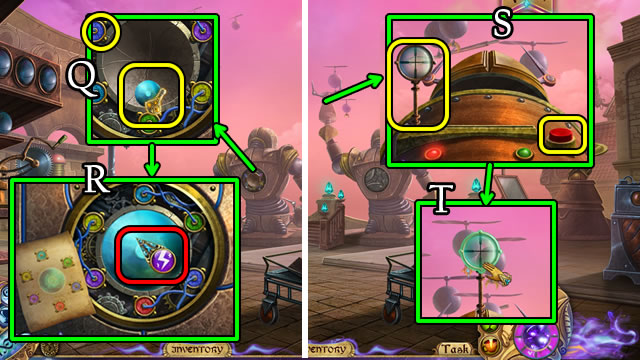
- Select the grate, place the DRAGON WING; use the Restora spell (R).
- Place the BLUE FLOWER; use the Combusta spell (S). Take the BLUE WAX.
- Walk left.
- Place the MOLD HALF (T); add the BLUE WAX; take the BLUE CANDLE.
- Walk right.
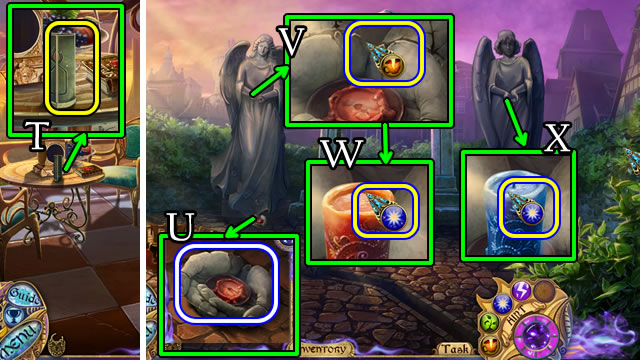
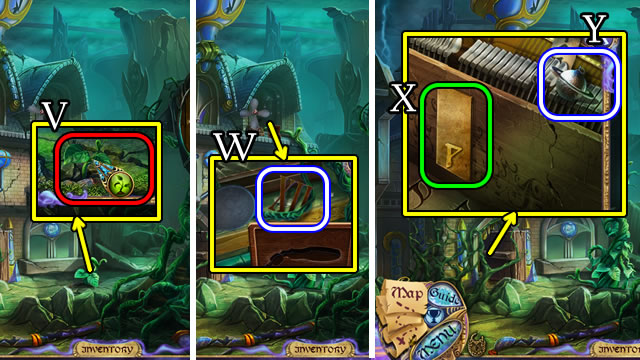
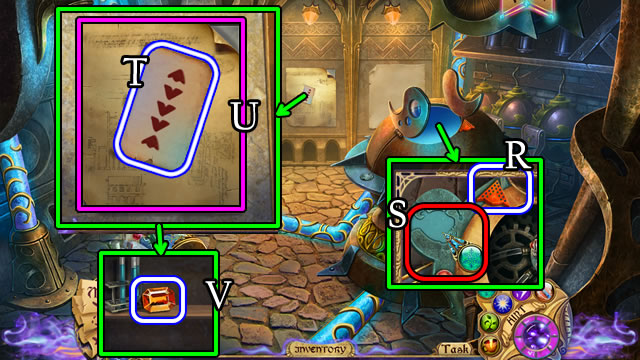
- Take the STATUE HANDS (U). Place the STATUE HANDS; use the Restora spell (V).
- Place the RED CANDLE; use the Combusta spell (W).
- Place the BLUE CANDLE; use the Combusta spell (X).
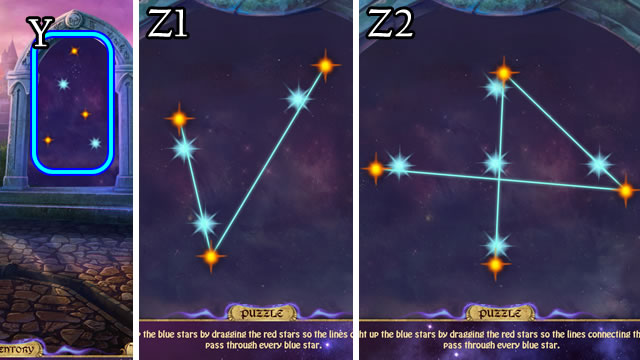
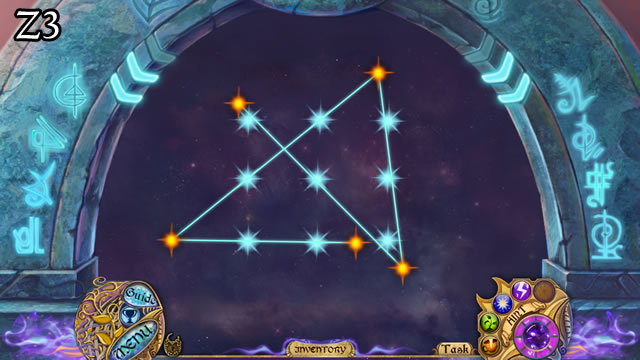
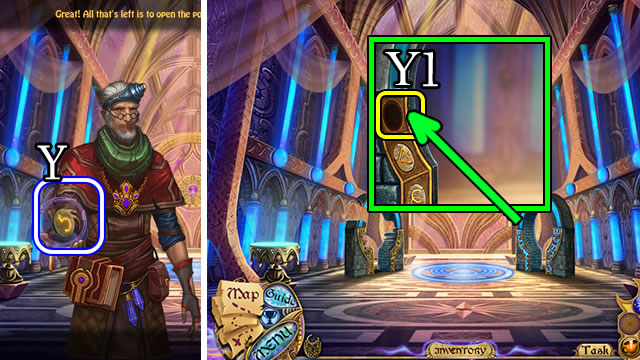
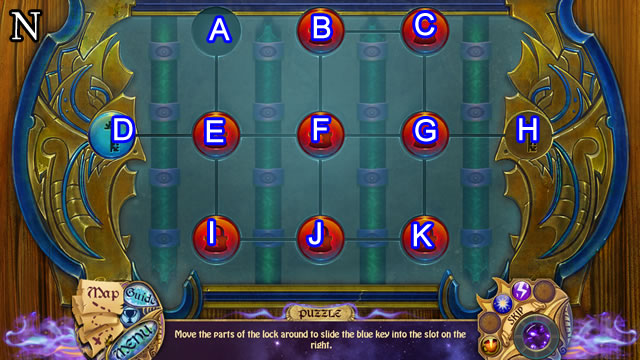
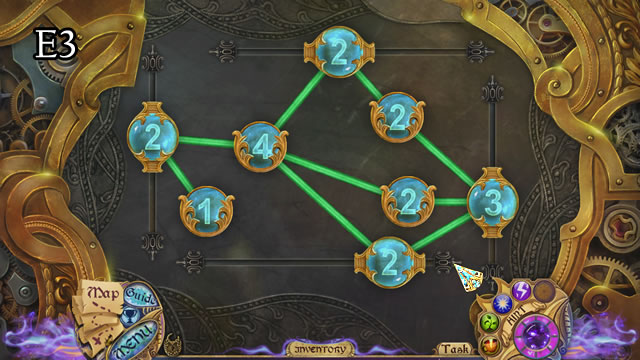
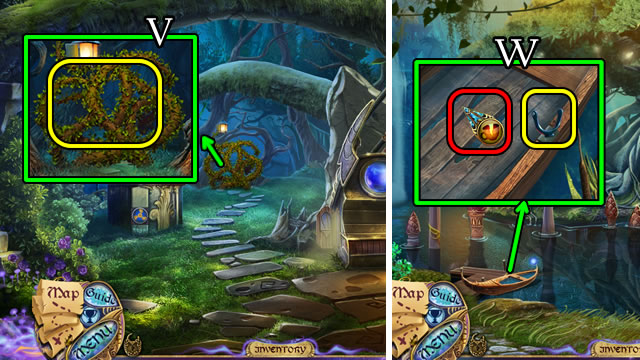
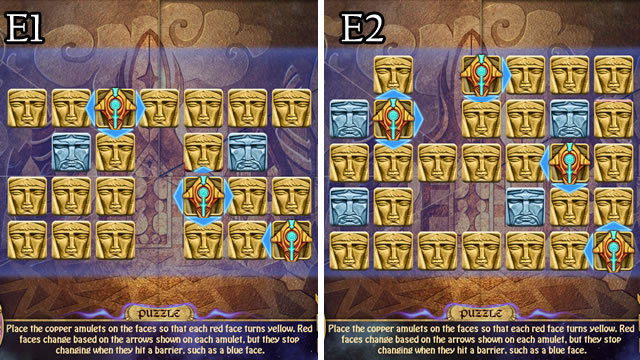
- Select (Y).
- Solution (Z1-Z2-Z3).
- Walk forward.
Chapter 2: Volarden
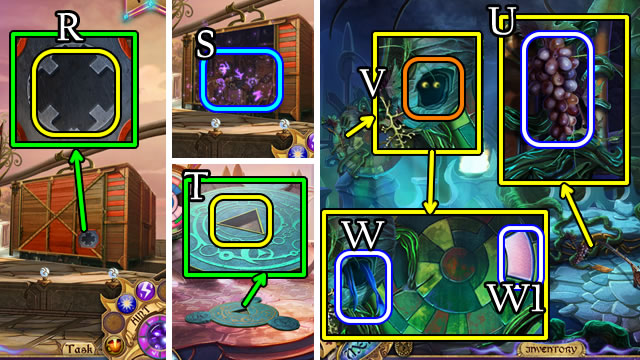
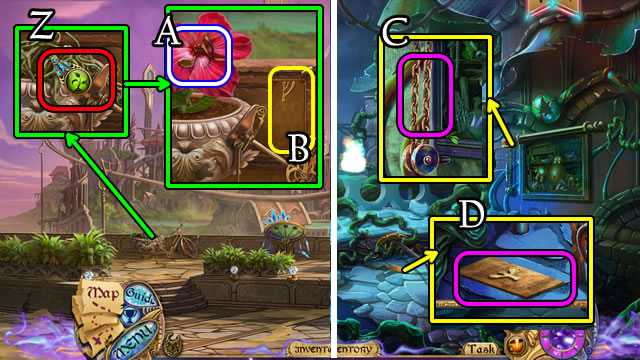
- Select each paper piece; take the BRUSH and Scroll (A).
- Use the Restora spell (B); take the Map.
- Read the notice (C); take the UNPUNCHED CARD (D).
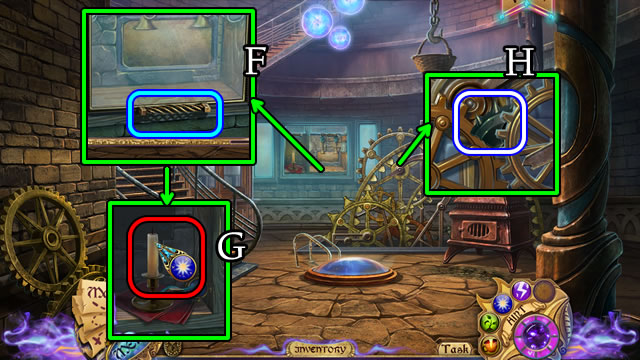
- Use the Restora spell (E); take the GEAR EMBLEM.
- Use the Combusta spell (F); take the FIRE EMBLEM.
- Open the laces; play the HOP (G) to receive a PUNCHED PASS.
- Place the PUNCHED PASS (H).
- Walk forward.

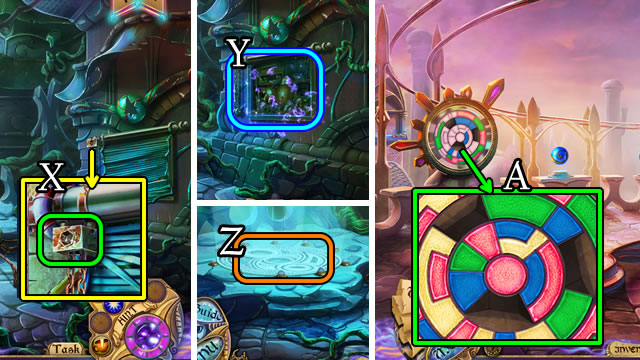
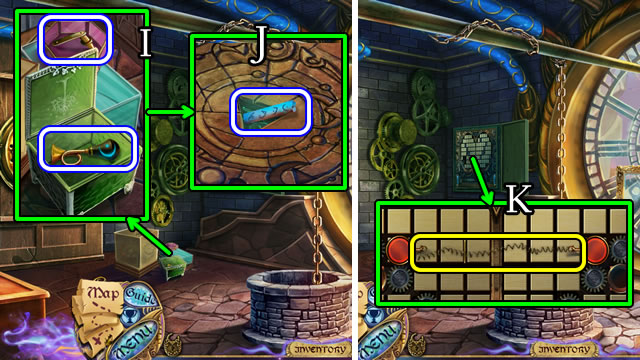
- Play the HOP (I) to receive a SHADOW STONE.
- Take the MAGNET (J).
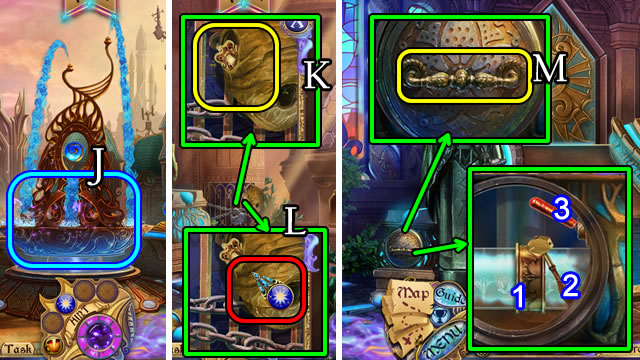
- Take the COPPER AMULET (K); use the BRUSH; place the SHADOW STONE (L). Touch the Shadow Stone.
- Take FIRE EMBLEM 2 and read the note (M); assemble the spyglass (N); take the LENS (O).
- Place the COPPER AMULET (P).
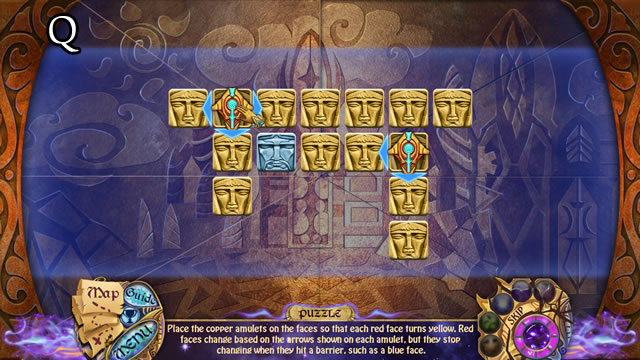
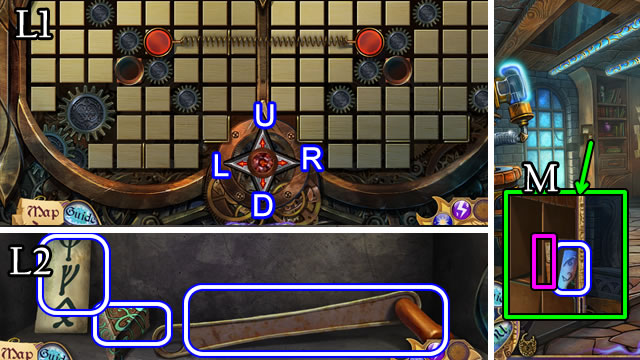
- Solution (Q).
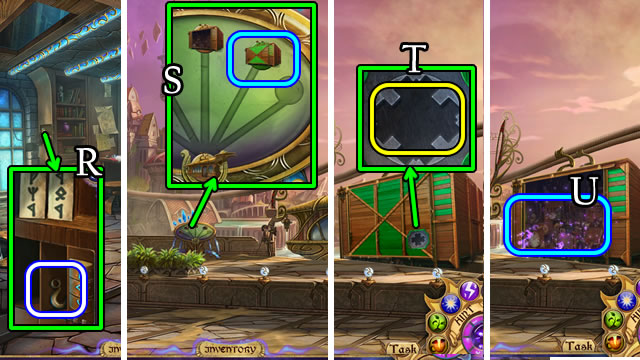
- Take the METAL ROD (R).
- Pull the lever (S); touch the Shadow Stone (T).
- Place both FIRE EMBLEMS and GEAR EMBLEM (U).
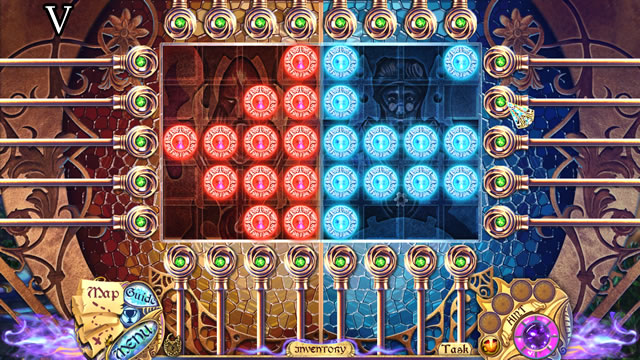
- Solutions vary. One possible solution (V).
- Walk forward.
- Attempt to walk forward.
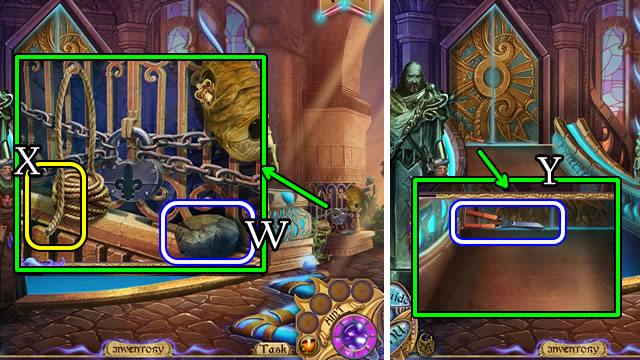
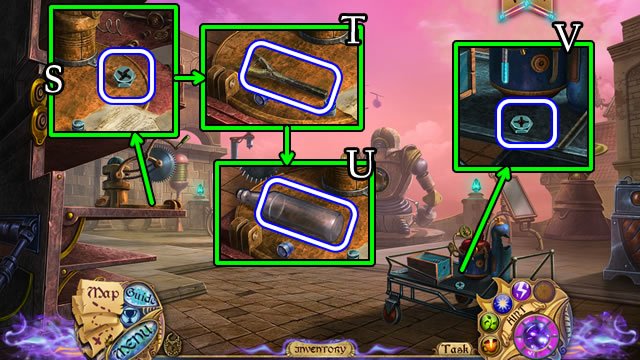
- Take the ROCK (W).
- Place the MAGNET (X) to receive a ROPE WITH MAGNET.
- Use the ROPE WITH MAGNET to receive PRUNERS (Y) and ROPE.
- Walk down.
- Place the ROPE (A) to receive a ROPE WITH OIL.
- Touch the Shadow Stone (B).
- Use the PRUNERS; take the COPPER AMULET (C).
- Place the COPPER AMULET (D).
- Solution (E).
- Use the PRUNERS; take the GOBLET and COPPER HOOP (F).
- Open the smoker; place the ROPE WITH OIL; use the PRUNERS (G). Use the Combusta spell (H). Take the SMOKER.
- Touch the Shadow Stone (I).
- Play the HOP (J) to receive a GOBLET OF WATER.
- Walk forward.
- Place the SMOKER (K); use the Combusta spell (L). Take the HANDLE.
- Place the METAL ROD (M); place the COPPER HOOP (1), take the GLASS CUTTER (2), use the GOBLET OF WATER (3); pull the lever.
- Walk forward.

- Take the BENT NAIL and RAG (N).
- Walk down 3x.
- Play the HOP (O) to receive an ENERGY CORE.
- Place the HANDLE (P); use the RAG to take ENERGY CORE 2 (Q). Take the COPPER AMULET (R).
- Use the GLASS CUTTER (S); take ENERGY CORE 3.
- Walk forward. Touch the Shadow Stone (T).
- Place the COPPER AMULET (U).
- Solution (V).
- Touch the Shadow Stone; walk forward 2x.
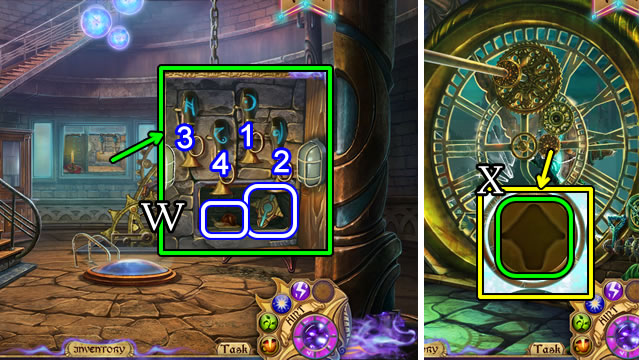
- Place the three ENERGY CORES (1-2-3). Use the Electra spell (W).
- Solution (X).
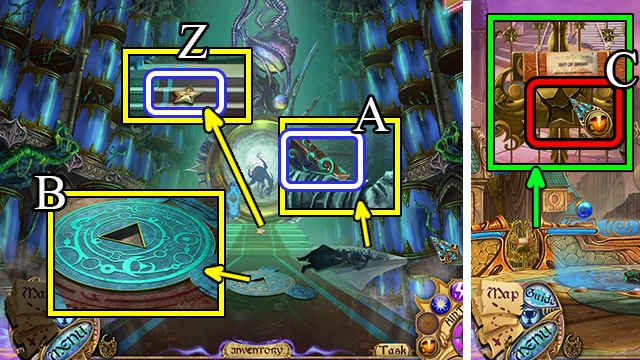
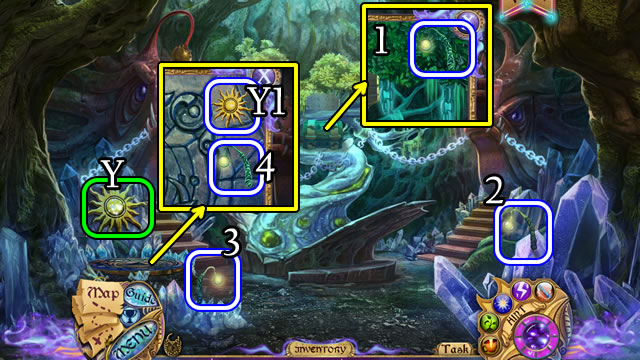
- Take the PORTAL STONE (Y).
- Place the PORTAL STONE (Y1).
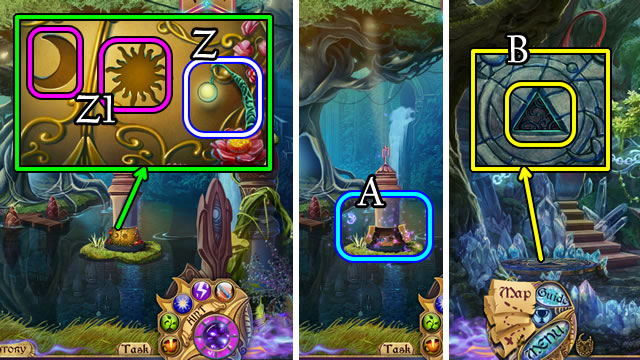
- Take the STAR CREST (Z).
- Take (A), then place (B) the SHADOW STONE. Touch the Shadow Stone.
- Walk down 2x.
- Use the Restora spell (C); place the STAR CREST.
- Walk left.
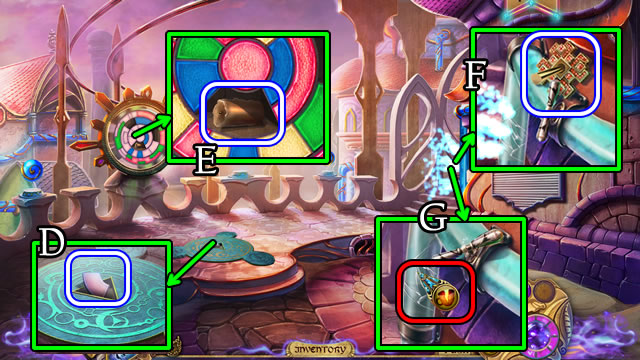
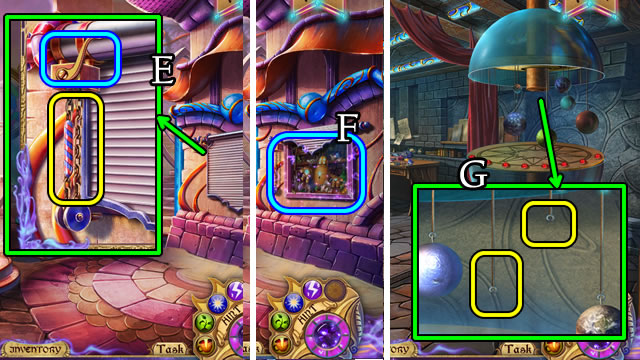
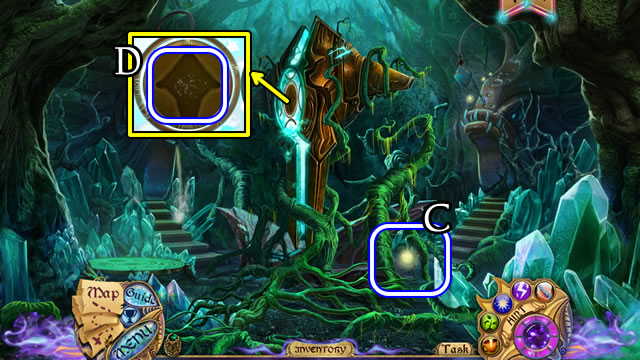
- Take the STAINED GLASS (D).
- Take the CANDLE (E).
- Take the RED KEY (F); turn the handle; use the Restora spell (G); select the handle.
- Walk right.
- Grab the BLUE KEY (H).
- Place the CANDLE and use the Combusta spell (I). Take STAINED GLASS 2 (J).
- Use the BLUE KEY (K). Pull the green symbol handle (L).
Chapter 3: Old Town
- Take the CADUCEUS and BELT PART (M).
- Remove the cover. Take the BROKEN HANDLE; place the CADUCEUS; take BELT PART 2 (N).
- Climb down the ladder.
- Place the BROKEN HANDLE; use the Restora spell; take the CHISEL. Grab the HEX KEY (O).
- Walk down.
- Select the pink symbol handle (P).
- Select the red box (Q).
- Use the RED KEY (R).
- Play the HOP (S) to receive the SHADOW STONE.
- Walk down.
- Place (T), then touch the SHADOW STONE.
- Take (U), then place (V) the GRAPES; Take BELT PART 3 (W).
- Use the CHISEL to receive STAINED GLASS 3 (W1).
- Use the HEX KEY (X); play the HOP (Y) to receive a SIEVE.
- Touch the portal (Z).
- Place (A) the 3 STAINED GLASS pieces.
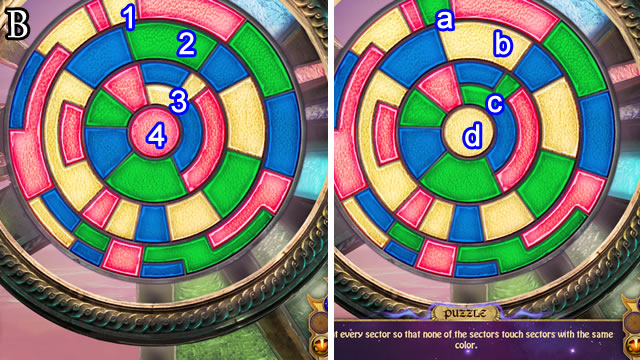
- Solution (B). 1-a, 2-b, 3-c, 4-d.
- Take the PLIERS (C).
- Walk right.
- Place the 3 BELT PARTS; use the Restora spell (D); take the BELT.
- Select the Skytram symbol (E).
- Select the green symbol handle (F).
- Climb down the ladder.
- Use the PLIERS 2x to receive BENT NAIL 2 and BENT NAIL 3; take the LONG PLANK (G).
- Use the SIEVE; take BENT NAIL 4 (H).
- Walk down.
- Place the BELT (1); pull the lever (2); place the LONG PLANK (3). Pull the lever; take a SMALL PLANK (I). Select the lever; take SMALL PLANK 2.
- Place a BENT NAIL (J); use the ROCK; take the NAIL (K). Repeat 3x to make NAIL 4.
- Select the lever (@); climb down the ladder.
- Place the 2 SMALL PLANKS and 4 NAILS (L). Use the ROCK on the nails 4x.
- Select the ladder; take the SHELL. Use the ROCK to take TORWICK'S HOUSE KEY (M).
- Place TORWICK'S HOUSE KEY in the door slot (M1).
- Solution (N). G-H, E-A, E-D, E-I, G-H, E-A, J-I, G-K, B-C, F-B, K-J, G-K, B-C, E-D, F-B, K-J, G-K, G-H.
- Walk left.
- Play the HOP (O) to receive a COPPER AMULET.
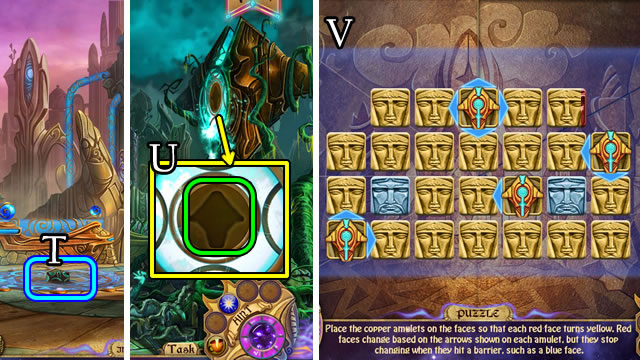
- Take the LINK SPREADER and PAPER AND PENCIL (P). Use the CHISEL (Q); take the SHADOW STONE (R).
- Walk down.
- Place (S), then touch the SHADOW STONE.
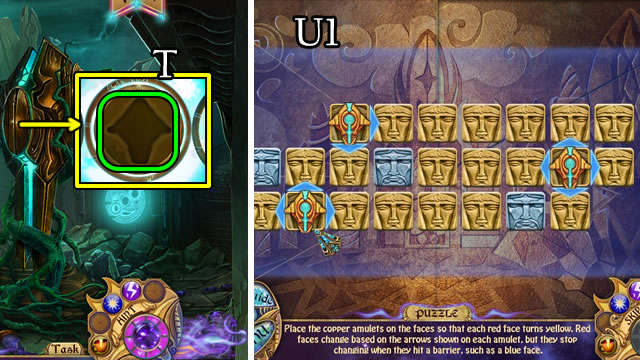
- Place the COPPER AMULET (T).
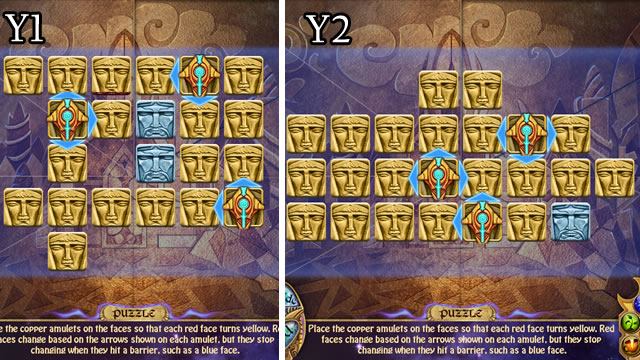
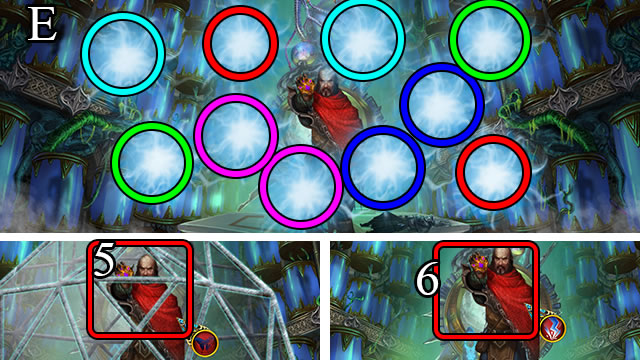
- Solution (U1-U2).
- Use the Germina spell (V); take the TWELVE (W).
- Place the PAPER AND PENCIL (X) for a SYMBOLS SKETCH. Use the CHISEL; take SATURN (Y).
- Return to the Skytram Station.
- Use the Germina spell (Z).
- Take the NOTE (A). Place the SYMBOLS SKETCH (B); receive an updated SYMBOLS SKETCH.
- Walk down; touch the Shadow Stone.
- Use the LINK SPREADER (C) to receive a CHAIN.
- Place the SYMBOLS SKETCH (D); receive SYMBOLS.
- Touch the portal.
- Place the CHAIN, pull the lever (E) to play a HOP (F). Receive VENUS.
- Return to the Torwick's House.
- Place VENUS and SATURN (G).
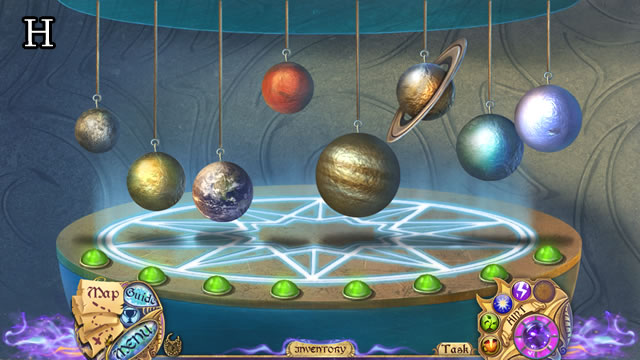
- Solution (H).
- Take NOTE 2 (I).
- Match the SYMBOLS and runes (J); take the GREEN KEY (K).
- Enter the Basement (L).

- Grab the PINCERS (M).
- Move the carpet; take the PALETTE KNIFE (N).
- Walk down 2x; touch the Shadow Stone.
- Place 2 NOTES (O); use the PALETTE KNIFE (P); take the SYMBOLS (Q).
- Touch the portal; walk left.
- Match the SYMBOLS and runes; take the HOOK (R).
- Return to the Skytram Station.
- Slide the green box (S).
- Use the GREEN KEY (T); play the HOP (U) to receive a TOOL HANDLE.
- Walk down and touch the Shadow Stone.
- Use the Germina spell (V). Take, then place the GRAPES (W); take the FISHING LINE (X).
- Place the FISHING LINE and HOOK (Y).
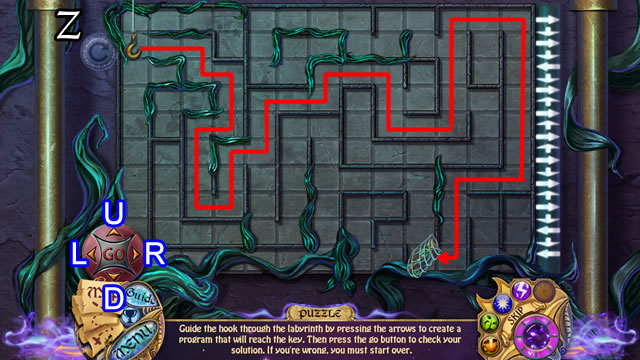
- Solution (Z). R-D-R-D-L-D-R-U-R-U-R-U-R-D-R-U-R-D-L-D-L. Press Go.
- Take a SHADOW STONE.
- Return to shadow Old Town.
- Place the TOOL HANDLE (A); use the wrench heads (B); to receive the FAN (C). Take the WRENCH SET.
- Return to the Basement.
- Place the WRENCH SET. Use the wrench heads (D).
- Place, then touch the SHADOW STONE (E).
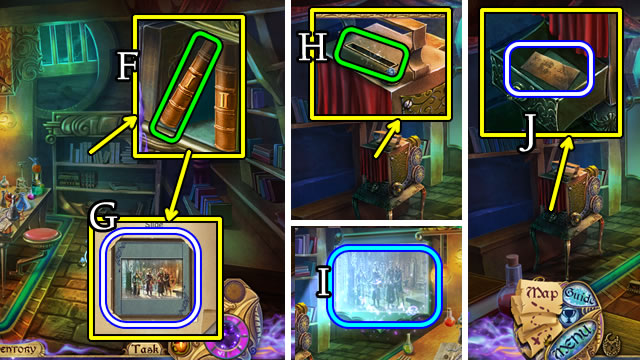
- Select book I (F); turn the pages 2x; take the SLIDE (G).
- Place the SLIDE (H) to play a HOP (I); take the COORDINATES (J).
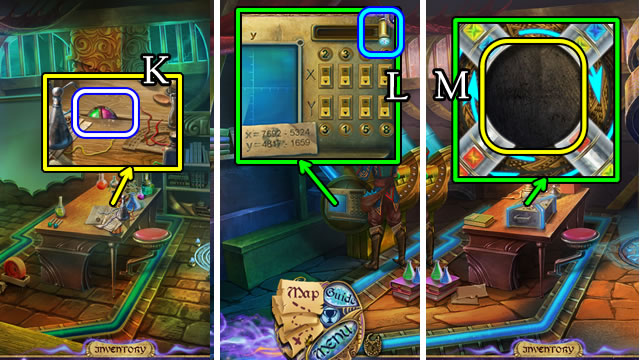
- Uncover the crack; use the PINCERS to receive a COLOR LOCK PIECE (K).
- Touch the portal.
- Enter coordinates. X: 2368 and Y: 3158. Slide the lever (L).
- Place the COLOR LOCK PIECE (M).
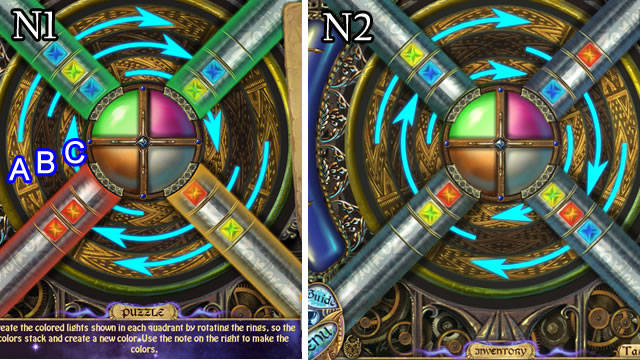
- Solution (N1-N2). Ax2-Bx3-C.
- Take the TECH DISTRICT KEY (O).
- Walk down 3x.
- Place the FAN. Place TECH DISTRICT KEY; pull the handle (P).
Chapter 4: The Tech District

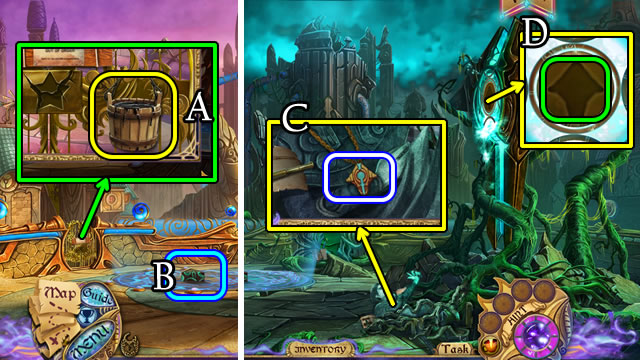
- Take the FORKED BRANCH. Use the Germina spell; receive a POWER CORE (Q).
- Grab the BOTTLE (R).
- Walk forward.
- Take the WRENCH HEAD (S).
- Place the FORKED BRANCH; take the BRACE (T). Place the BOTTLE; take the GLASS TUBE (U).
- Grab another WRENCH HEAD (V).
- Walk down.
- Place the WRENCH SET. Add the two WRENCH HEADS. Select and use the wrench heads 2x (W).
- Place the POWER CORE. Use the Electra Spell (X).
- Use the Restora spell (Y). Take the EMPTY TANK.
- Raise the window; place the BRACE (1). Place the EMPTY TANK (2). Select the tube (3); turn the valve (4); select the tube (5), turn the valve (6). Take the HALF-EMPTY TANK (Z).
- Walk forward.
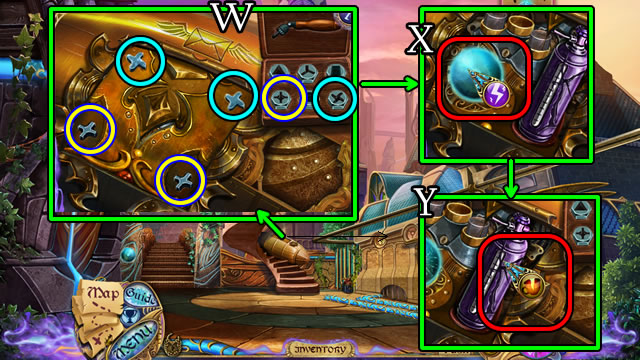
- Select the tube; turn the valve; use the Combusta spell (A); take the SPRING.
- Place the HALF-EMPTY TANK, select the tube; turn the valve. Take the FULL TANK (B).
- Walk down.
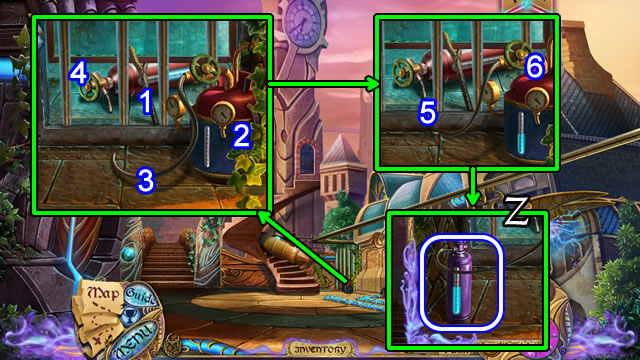
- Place the FULL TANK and GLASS TUBE (C). Select (D).
- Solution (E1-E2-E3).
- Walk to the Control Tower Basement.
- Open (F), use the Combusta spell (G); take the WIRE.
- Take the BROKEN GEAR (H).
- Walk up the stairs.
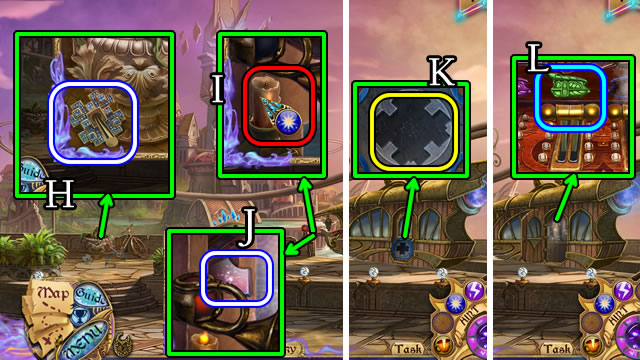
- Open and take the DOOR HANDLE, open and take the HORN (I); move all boxes to take the MAGIC CHALK (J).
- Remove and replace the SPRING (K).
- Solution (L1). Lx2-Dx3-Rx2-Dx3-Lx3-Ux2-Rx2-Ux2.
- Take SYMBOLS, SHADOW STONE and the CRANK (L2).
- Return to Torwick's House.
- Match the SYMBOLS and runes; take MAGIC CHALK 2; read the note (M).
- Return to the Control Tower.

- Place and touch the SHADOW STONE (N).
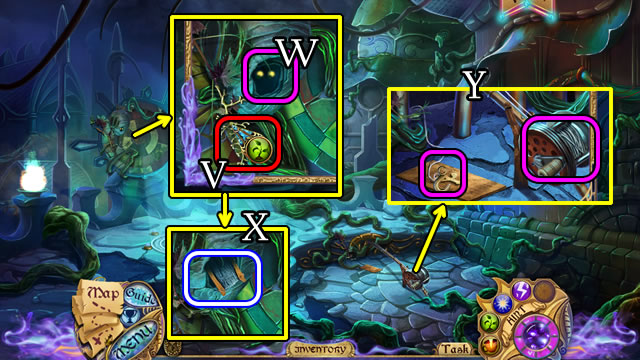
- Select the chain (O). Place the BROKEN GEAR; use the Restora spell (P). Select the chain; pull the lever.
- Take MAGIC CHALK 3 (P1).
- Touch the portal.
- Walk down.
- Place the DOOR HANDLE (Q) to play a HOP (R). Receive another HORN.
- Use the Restora spell (S). Remove (T), then place the CRANK (U). Select the handle. Take MAGIC CHALK 4 and BUTTER (V).
- Place both HORNS. Select 1-2-3-4. Take the COPPER AMULET; place the BUTTER; take the SNAIL (W).
- Walk forward; touch the Shadow Stone.
- Place the COPPER AMULET (X).
- Solution (Y1-Y2).
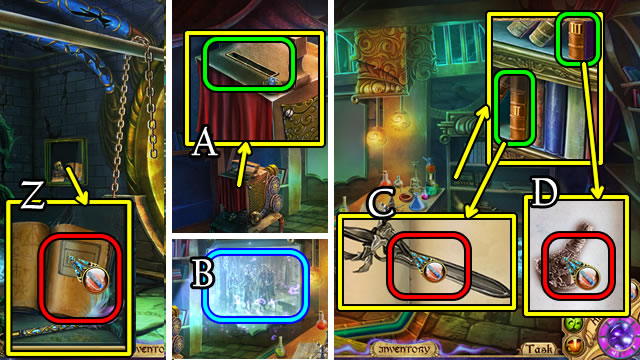
- Use the Vivida spell (Z); take the SLIDE.
- Return to the shadow Basement.
- Place the SLIDE (A).
- Play the HOP (B); take the COORDINATES.
- Select Book II. Turn the page. Use the Vivida spell (C); take the DAGGER.
- Select Book III. Use the Vivida spell (D); take the SHRINKING POTION. Turn the page. Use the Vivida spell; take the GROWTH POTION.
- Touch the portal.
- Enter coordinates. X: 0334 and Y: 5659. Slide the lever (E).
- Take the OASIS DISTRICT KEY (F).
- Walk down 3x.
- Place the OASIS DISTRICT KEY; pull the handle (G).
Chapter 5: The Oasis District
- Use the Combusta spell (H).
- Use the Germina spell; take the COCONUT (I).
- Use the Electra spell (J). Place the COCONUT; receive BLUE INK.
- Grab the MAGIC CHALK. Use the DAGGER (K).
- Use the GROWTH POTION; take the SWORD. Pull the cord (L).
- Play the HOP (L1); receive a PAPER HALF.
- Return to the shadow Basement.
- Select Book I (M). Turn back 1 page. Place the PAPER HALF. Use the Restora spell (N) Use the Vivida spell (N1). Take the SCOPE.
- Return to the Tech District Station.
- Use the SHRINKING POTION (O) to receive a TINY POWER CORE.
- Return to the Control Tower.
- Place the SNAIL; use the GROWTH POTION (P). Take the MANUAL.
- Go to the Tech District.
- Place the WIRE and TINY POWER CORE; Use the GROWTH POTION (Q).
- Match the wire colors to the manual. Use the Electra spell (R).
- Place the SCOPE and touch the red button (S).
- Touch the scope when it turns green (T) to shoot down, then take the OAR, COPPER AMULET and MOON.
- Return to the Oasis Station.
- Use the SWORD (V).
- Walk forward.
- Use the Restora spell. Place the OAR (W).

- Solution (X).
- Collect ANGLER LIGHTS 1-2-3.
- Use the SHRINKING POTION (Y).
- Take ANGLER LIGHTS 4 and the SUN (Y1).
- Walk down.
- Grab ANGLER LIGHTS 5 (Z). Place the MOON and SUN (Z1) for a HOP (A). Receive a SHADOW STONE.
- Walk forward.
- Place (B) and touch the SHADOW STONE.
- Take ANGLER LIGHTS 6 (C).
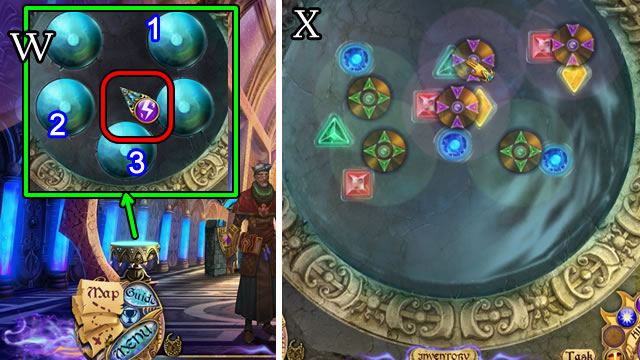
- Place the COPPER AMULET (D).
- Solution (E1-E2).
- Use the Glacia spell (F).
- Place 2 ANGLER LIGHTS (G).
- Use the Germina spell (H).
- Place 1 ANGLER LIGHT (I).
- Touch the portal.
- Take the WINESKIN and ANGLER LIGHTS 4 (J).
- Place 4 ANGLERS LIGHT (K).
- Take 2 ANGLERS LIGHT (L).
- Place 2 ANGLERS LIGHT (M).

- Take the FLEUR-DE-LIS EMBLEM and GLASS CUTTER (N).
- Walk down.
- Place the WINESKIN (1) to receive a FULL WINESKIN. Place the FULL WINESKIN (2). Use the Glacia spell (O); take the OCTOPUS EMBLEM.
- Return to the Outside Planar Chamber.
- Place the FLEUR-DE-LIS EMBLEM (P).
- Enter the Chamber Basement; play the HOP (Q) to receive a DOWN ARROW.
- Take the UP ARROW (R).
- Place the FULL WINESKIN; use the Glacia spell (S); take the FISH EMBLEM.
- Take the COMBINATION (T) and remove the paper (U).
- Use the GLASS CUTTER; take the ORANGE GEM (V).
- Return to the Lake.
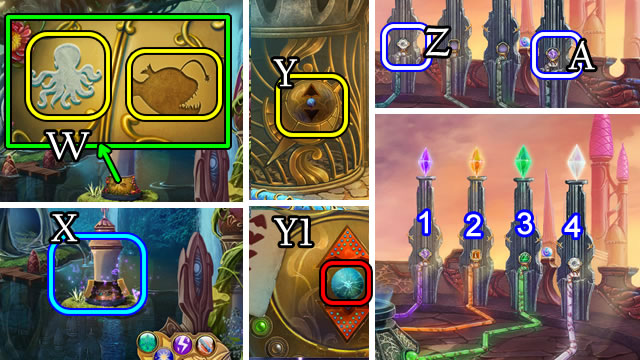
- Place the OCTOPUS EMBLEM and FISH EMBLEM (W) to play a HOP (X). Receive a GREEN GEM.
- Return to the Chamber Basement.
- Place the UP ARROW and DOWN ARROW (Y).
- Use the Electra spell (Y1). Touch the up arrow, down arrow 3x and up arrow.
- Walk forward.
- Take the WHITE GEM (Z) and PURPLE GEM (A).
- Place the PURPLE GEM (1), ORANGE GEM (2), GREEN GEM (3) and WHITE GEM (4).
- Walk down.
- Pull the lever (B).
- Walk down, then enter the Inside Planar Chamber; touch the Shadow Stone.
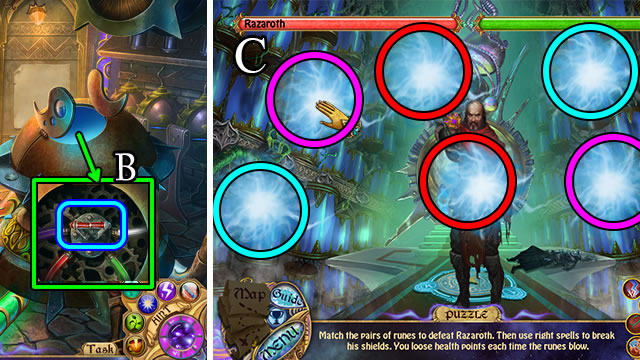
- Solution (C).
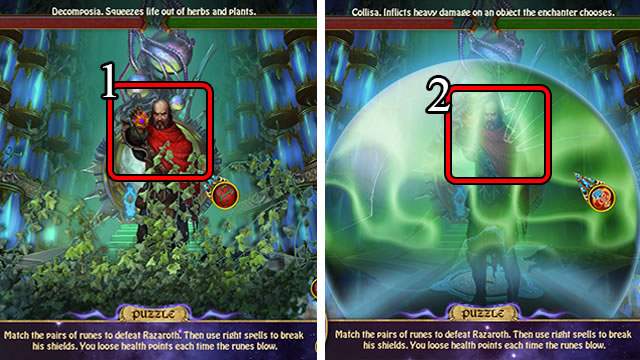
- Use Decomposia spell (1), then Collisa spell (2).
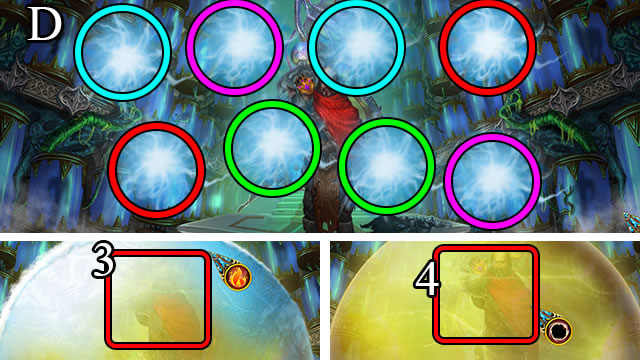
- Solution (D).
- Use Arsonia spell (3) and Absorba spell (4).
- Solution (E).
- Use the Envoida spell (5), then Ice Arrow spell (6).
- Congratulations! You have completed Shrouded Tales: Revenge of Shadows.
Created at: 2015-08-16