

Walkthrough Menu
- General Tips
- Chapter 1: The Bedroom
- Chapter 2: The Fountain
- Chapter 3: The Gas Station
- Chapter 4: The Bowling Alley
- Chapter 5: The Basement
- Chapter 6: The Bus
- Chapter 7: The Diner
- Chapter 8: The Theatre
- Chapter 9: The Red Lettered Ring
- Chapter 10: The Castle, Red Puzzle
- Chapter 11: The Office
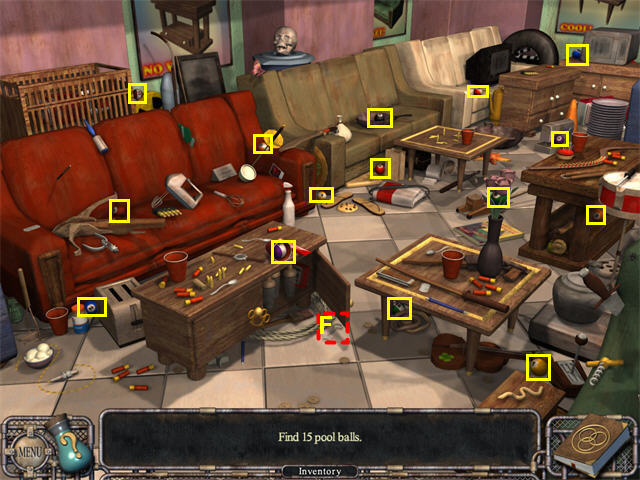
- Chapter 12: Billiards
- Chapter 13: The Newsstand
- Chapter 14: The Hardware Store
- Chapter 15: The Bar
- Chapter 16: Another Fountain
- Chapter 17: The Green Lettered Ring
- Chapter 18: The Castle, Green Puzzle
- Chapter 19: The Museum
- Chapter 20: The Sofa Store
- Chapter 21: Sporting Goods
- Chapter 22: The Construction Site
- Chapter 23: The Bucket Room
- Chapter 24: The Furnace Room
- Chapter 25: The Blue Lettered Ring
- Chapter 26: The Castle, Blue Puzzle
General Tips
- This is a Hidden Object Adventure game. In addition to the items on the Find List, you must find Key Items that go into your Inventory Tray so they can be used later.
- There is no timer.
- Use the MENU tab in the lower left and then choose "Go to the Title Screen" to return to the Main Menu.
- The game autosaves automatically.
- One of the OPTIONS is to adjust the brightness of a scene. This can be useful in a few of the darker chapters. To access this, choose OPTIONS from the Menu. The normal brightness is half-way on the bar.
- Most locations have a main scene and 2 or more additional zoom scenes. The zoom scenes will sparkle. When you click on the sparkles the zoom scene will open, but only if your character can get to that spot in the scene.
- Sometimes a zoom scene will be in an inaccessible area, like across a river or on top of a roof. You will first have to figure out how to get your character to that spot. For example, if the zoom scene is on a roof, you might have to build a ladder or find a hidden staircase.
- Many zoom scenes do not sparkle until you have completed other tasks, so be alert to new sparkles during a chapter.
General Tips for the Inventory Tasks
- This game has many adventure elements where you must complete tasks important to the story, like opening a locked chest.
- Inventory tasks cannot be skipped.
- You will get hints about inventory tasks in four ways: 1) from the text at the top of the screen; 2) from the text in the Find List area; 3) from the Magic Journal in the lower right of the screen, which may include a drawing of the Key Item; 4) from a single sparkle on an item in the scene.
- If you get stuck, check the Magic Journal and review your Inventory Tray for ideas. We also provide complete solutions for all tasks in the spoiler section of this walkthrough.
- Key Items are items you will need to complete the inventory tasks. Key Items do not appear on the Find List.
- Key items may be used in the scene where they are found or later in the game.
- Some Key Items can be used more than once. If a Key Item can be used again, it will automatically return to your Inventory Tray.
- The first two chapters are introductory. After that your main task in each chapter will be to collect the Spirit Stone. This will often be locked in a box or behind a door, so you will have to do multiple tasks to figure out how to release it.
- The Spirit Stone itself is indestructible, so you could, for example, drive a truck into a box to smash the box and release the Spirit Stone, which will not be damaged.
- Some Key Items will have to be combined before you can use them. For example, if you had matches and a candle in your Inventory Tray, you can try using the matches on the candle to see if you can get a lighted candle.
- If you pick up an item from your Inventory Tray and then decide you don’t want to use it, click on any empty space in the tray to put it back.
- If there is a spot in the scene where you can use a Key Item, the cursor will change to gears. Watch the text at the top of the scene for hints about what you might need there.
- When there is new information in the Magic Journal, the icon will be an open book. When you have looked at the available pages, the icon will be a closed book. Click on the book if you want to look at it again.
- In some scenes you must look at the Magic Journal in order to unlock the next task.
- To open the Inventory Tray, move your cursor over the word INVENTORY at the bottom of the screen. The tray will also sometimes open if you hover your cursor over the Find List.
- To use a Key Item, click on it in the Inventory Tray, move the cursor to where you want to use it, then click again.
- To close the Inventory Tray, move your cursor off the Inventory Tray area and wait a second or two.
- In most zoom scenes you will have to complete the Hidden Object tasks before you can collect or use any Key Items there.
- You may have to revisit zoom scenes multiple times to collect or use Key Items.
- When you have done everything you can in a zoom scene, you will hear a musical tone and it will close automatically.
- If you want to leave a zoom scene on your own, move the cursor into the lower right corner of the screen until the BACK icon appears, then click to return to the main scene.
General Tips for the Hidden Object Scenes
- There are different kinds of Hidden Object tasks. You may get a standard Find List. You may be told to collect all of one kind of item, like "Find 25 Batteries." You may be told to collect a particular category of item, like "Find 10 Gardening Tools." You may be asked to find matching pairs.
- The matching pair items are usually identical, but may appear slightly different because they are at different angles. For example, one knife might be flat on a table while another is stuck in a roast. In a few scenes the matching pairs are related, but not identical, like an orange and an orange segment.
- When you click on an object which is one of a matching pair, it will glow. Then click on its match to collect them both.
- All objects are generally the right color, but may be larger or smaller than real life. Some may be an unusual color, like a blue arrow.
- You may only be able to see a small part of an object.
- Click on the HINT bottle in the lower left if you need a hint in a Hidden Object Scene. This will shoot glowing light towards one of the items from the Find List. The item will then glow slightly and you will see its full outline even if it is behind something else.
- The hint will recharge after you use it.
- If you have too many incorrect clicks in a row the scene blurs for a few seconds, but there is no other penalty.
- If you click on the HINT bottle in a "find the matching pairs" scene, it will highlight one item of a pair. If you first highlight one item on your own and then click on the HINT bottle, it will highlight the matching item for you.
Chapter 1: The Bedroom
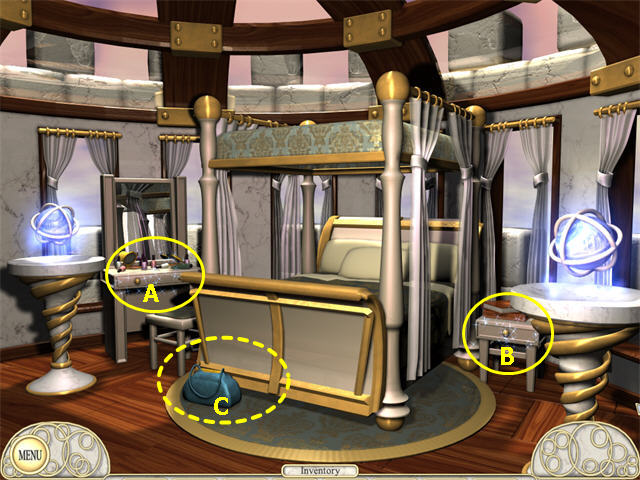
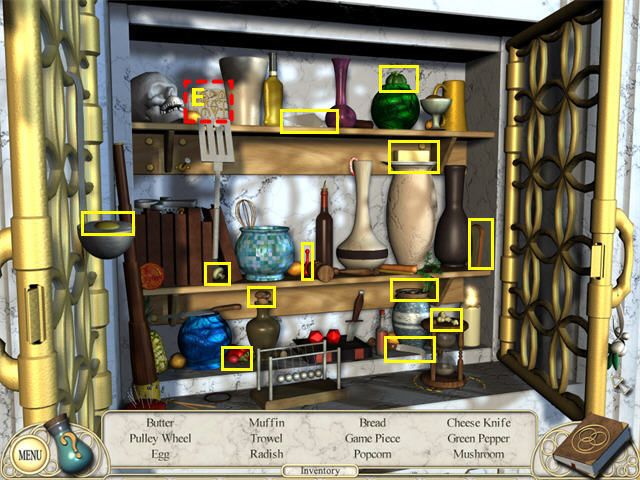
- The Princess asks you to put her LIPSTICK and BLUSH into her Purse. These are Key Items, so they will not appear on the Find List in the Hidden Object Scenes.
- Complete the Hidden Object Scene by the Dressing Table (A) and collect the LIPSTICK (D).
- Complete the Hidden Object Scene by the Nightstand (B) and collect the BLUSH (E).
- Put the LIPSTICK and the BLUSH in the Purse (C).
Dressing Table Zoom Scene
- Collect the items on the Find List, then the LIPSTICK.
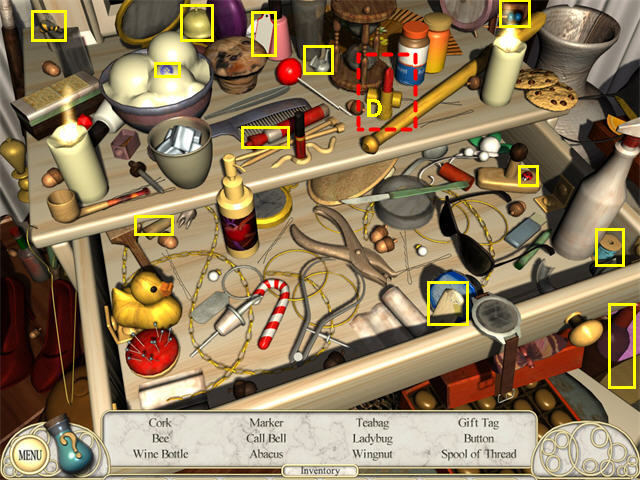
Nightstand Zoom Scene
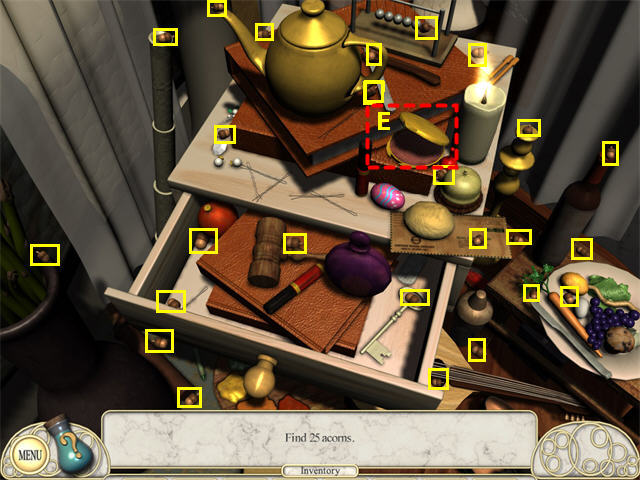
- Collect 25 Acorns, then the BLUSH COMPACT.
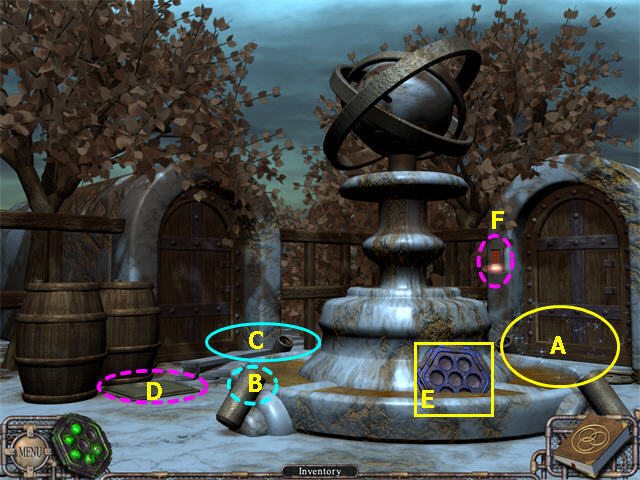
Chapter 2: The Fountain
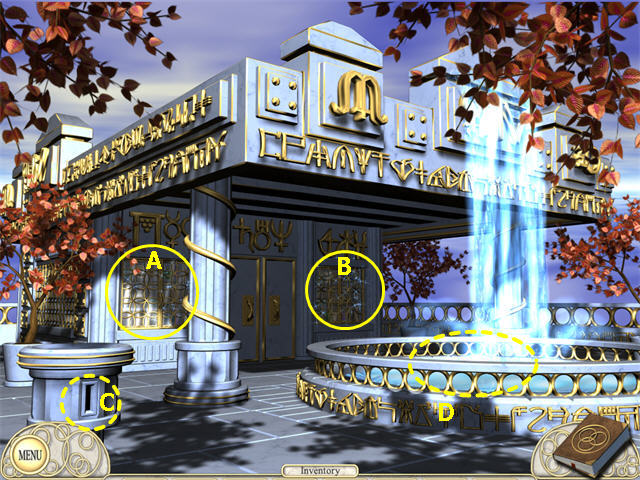
- The Magic Journal is now available in the lower right corner. If the icon is an open book, there are hints there that you haven’t read yet.
- Complete the Hidden Object Scene by the Left Panel (A) and collect the MYSTERIOUS GOLDEN TABLET (E).
- Complete the Hidden Object Scene by the Right Panel (B) and collect the FOUR MAGIC VIALS (F).
- Put the MYSTERIOUS GOLDEN TABLET in the Keyhole (C) in the Column on the left.
- Take the GLASS JAR from the Column. Put it in the Fountain (D) to fill it with water to get the JAR FILLED WITH WATER. Put it back in your Inventory Tray.
- Combine the JAR FILLED WITH WATER and the FOUR MAGIC VIALS to get a JAR WITH PURPLE GOO. Put it back on the Column.
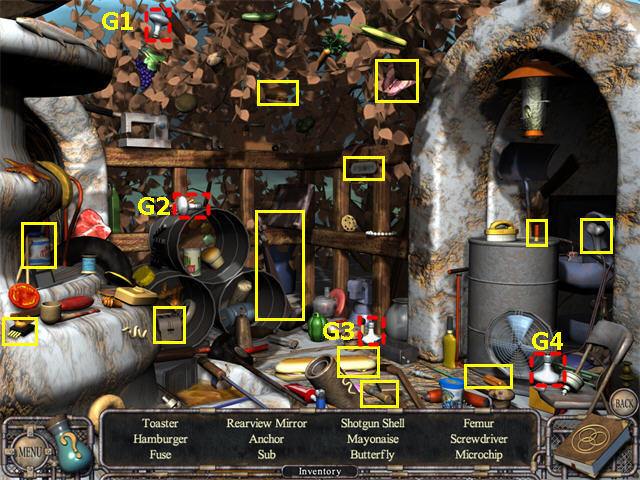
Left Panel Zoom Scene
- Collect the items on the Find List, then the MYSTERIOUS GOLDEN TABLET.
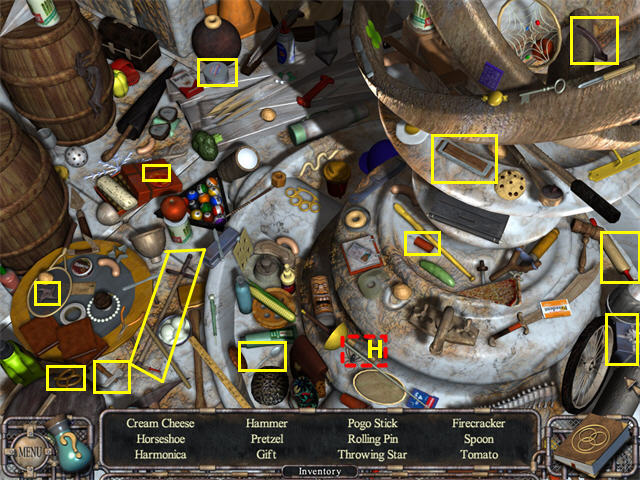
Right Panel Zoom Scene
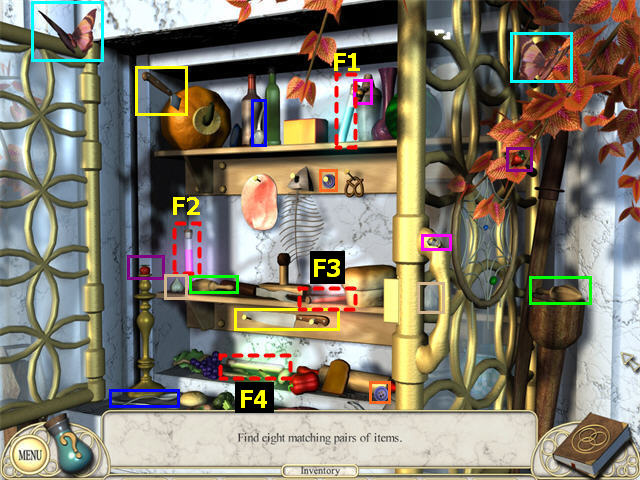
- Collect 8 matching pairs as shown, then the FOUR MAGIC VIALS.
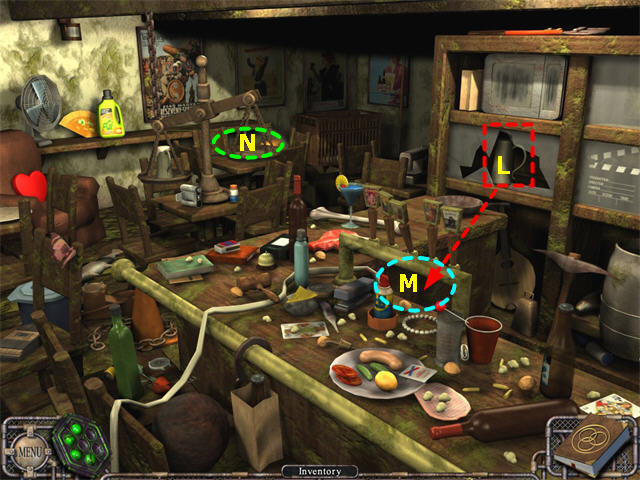
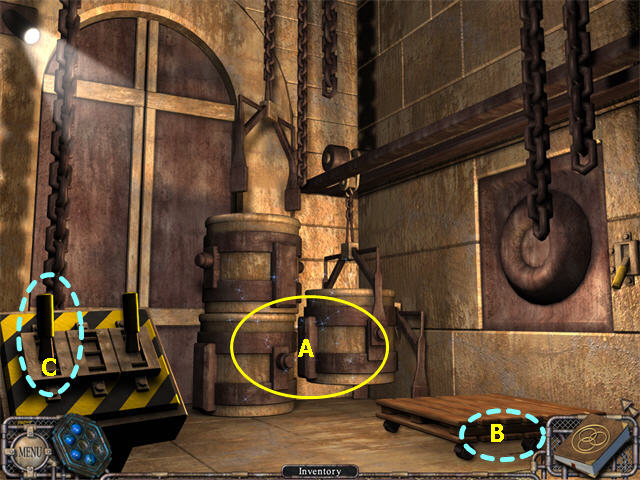
Chapter 3: The Gas Station
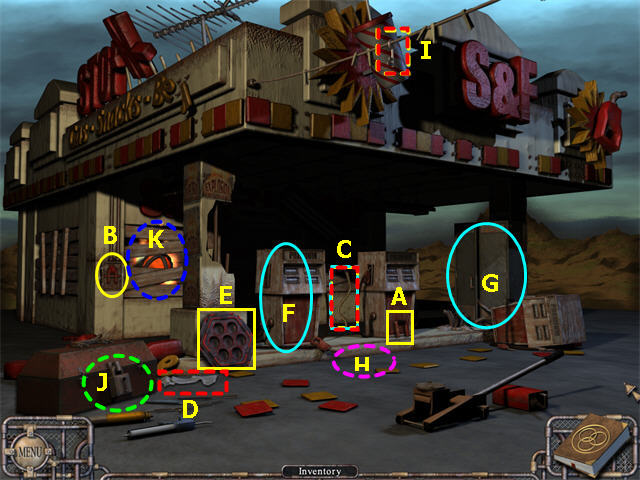
- You must turn on the lights before the zoom scenes will become available. Collect the BREAKER HANDLE (A) and put it on the Light Switch (B). Turn on the lights.
- Collect the RAG (C) and the LONG STICK (D) after you turn on the lights.
- Collect the RED SPIRIT STONE HOLDER (E).
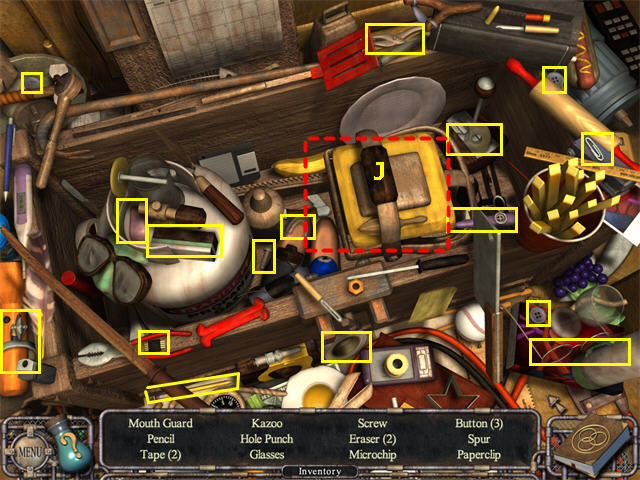
- Complete the Hidden Object Scene by the Gas Pump (F) and collect the PUMP HANDLE (L).
- Complete the Hidden Object Scene by the Storage Cabinet (G) and collect the MATCH (M).
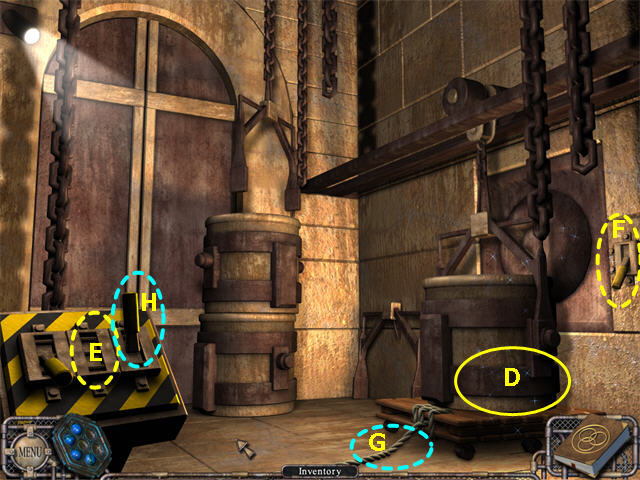
- Combine the LONG STICK and the RAG in your inventory to create a DRY TORCH.
- Put the PUMP HANDLE into the Socket on the post (E) right behind where the SPIRIT STONE HOLDER was. Click it to start pumping gas.
- Put the DRY TORCH into the gas (H), then put the TORCH back into your Inventory Tray.
- Combine the MATCH and the TORCH to get a FLAMING TORCH.
- Use the FLAMING TORCH on the Rope just above the KEY (I). The Rope will burn and the KEY will fall down so you can collect it.
- Use the KEY to open the Toolbox (J). This will reveal a new zoom scene.
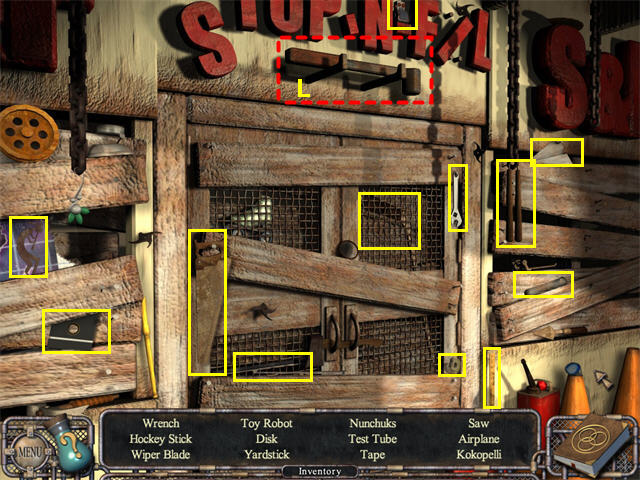
- Complete the Hidden Object Scene by the Toolbox and collect the CROWBAR (N).
- Use the CROWBAR to remove the Slats from in front of the SPIRIT STONE (K) and collect it. It will go into the SPIRIT STONE HOLDER in the lower left.
Gas Tank Zoom Scene
- Collect the items on the Find List, then the PUMP HANDLE.
Storage Cabinet Zoom Scene

- Collect the items on the Find List, then the MATCH.
Toolbox Zoom Scene
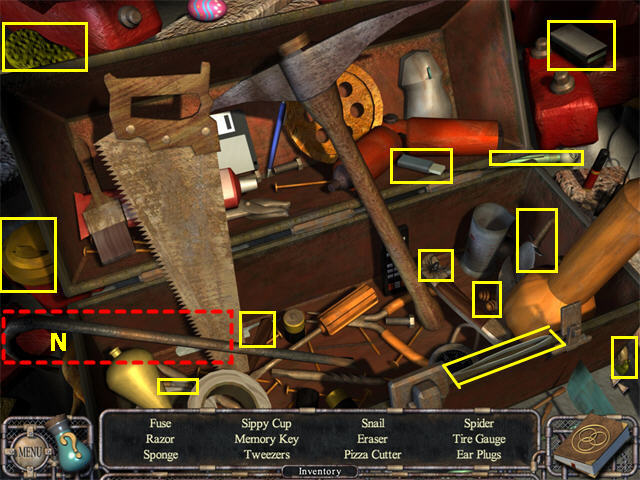
- Collect the items on the Find List, then the CROWBAR.
Chapter 4: The Bowling Alley
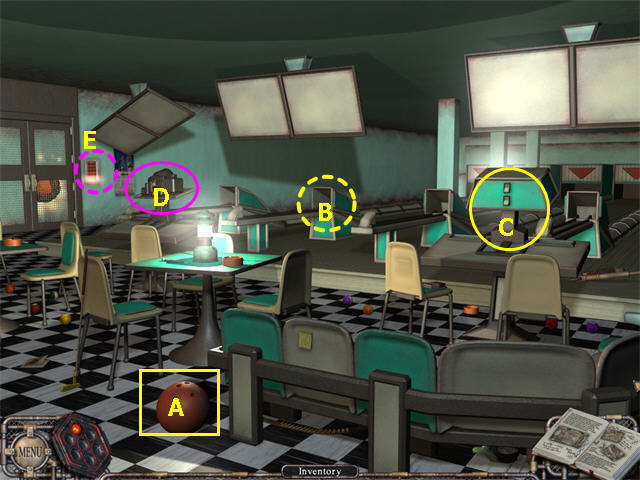
- You have to complete an inventory task before the zoom scenes become available. Collect the BOWLING BALL (A) and put it in the 2nd Chute (B). It will roll back up the next chute.
- Collect the GUM off the BOWLING BALL. The zoom scene by the Right Projector will become available.
- Start the Hidden Object Scene by the Right Projector.
- Collect the SCREWDRIVER (F). Use it to unscrew each of the Screws (G) on the top of the Projector.
- This will reveal 3 more items from the Find List. Collect them.
- Collect the SLIDE (H) and the WORKING PROJECTOR BULB (I).
- When you return to the main scene, the zoom scene by the Left Projector (D) will be available.
- Complete the Hidden Object Scene by the Left Projector and collect the FUSE (J).
- Put the FUSE in the Fuseholder (K).
- Combine the GUM and the SLIDE in your inventory to create a STICKY SLIDE and put it in the Slideholder (L).
- Put the PROJECTOR BULB in place (M). This will cause the Lock Combination to appear on the overhead screen in the main scene.
- Click on the Lock (E) to open it and collect the SPIRIT STONE.
Right Projector Zoom Scene
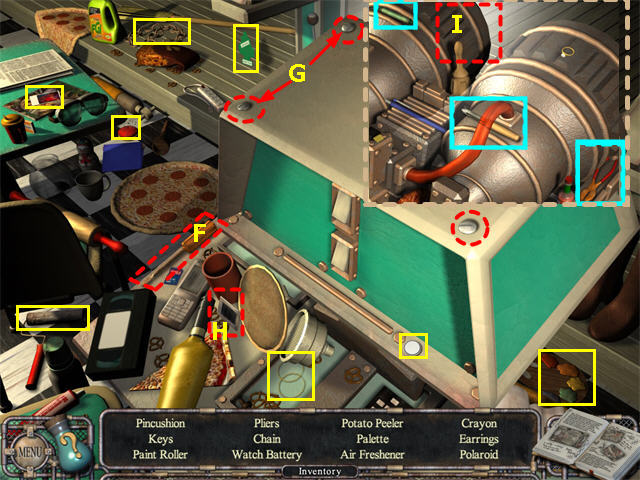
- Collect all the items on the Find List that you can.
- Collect the SCREWDRIVER and use it to unscrew the projector and collect the remaining items from the Find List.
- Collect the SLIDE and the WORKING PROJECTOR BULB.
Left Projector Zoom Scene
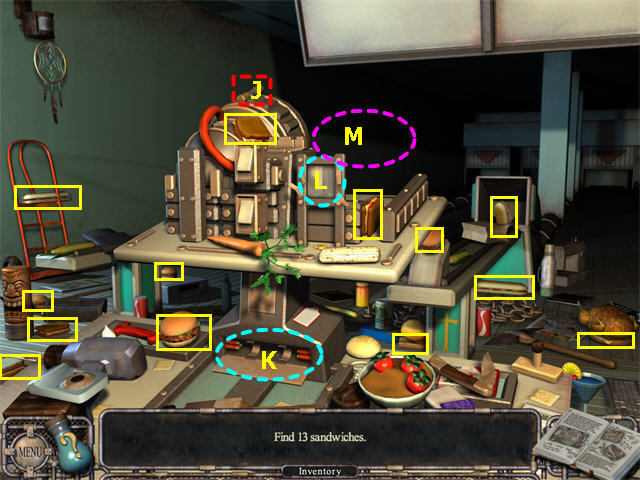
- Collect the Sandwiches. The Burrito does not count.
- Collect the FUSE.
- Put the FUSE in the Fuseholder, the STICKY SLIDE in the Slideholder, and the Bulb on the right side of the Projector.
Chapter 5: The Basement
- Collect the CAN OF GAS (A) and the COPPER WIRE (B). You can try the Switch (C), but you need power to make it work.
- Complete the Hidden Object Scene by the Newspaper (D) and collect the two parts of the BOLT CUTTER (H and I).
- Complete the Hidden Object Scene by the Generator (E).
- Use the COPPER WIRE on the Broken Wire (J).
- Use the CROWBAR to open the Gas Cap (K). The CROWBAR will go back into your inventory.
- Pour the CAN OF GAS into the open Gas Tank (K).
- Pull the Generator Cord (L) 3 times to start the generator.
- Once the power is on, pull the Switch (C). A large beam will lower.
- Combine the BOLT CUTTER HEAD and BOLT CUTTER ARMS in your inventory if you didn’t already. Use the BOLT CUTTER on the Beam (F) to drop it onto the crate holding the SPIRIT STONE (G).
Newspaper Zoom Scene
- Collect the objects in pairs as marked, then the BOLT CUTTER ARMS and BOLT CUTTER HEAD.
Generator Zoom Scene
- Collect the items on the Find List.
- "Radiation" is a yellow radiation sign that looks like a yellow film rule in one of the chain links at the top of the scene.
- "Snowflake" is a pattern etched on the wall to the right of the bicycle tire.
- Use the COPPER WIRE on the Broken Wire.
- Use the CROWBAR to open the Gas Cap and pour in the CAN OF GAS.
- Pull the Generator Cord 3 times to start the generator.
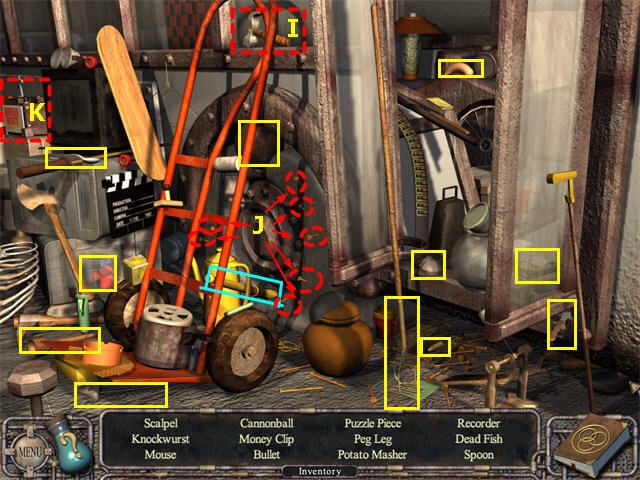
Chapter 6: The Bus
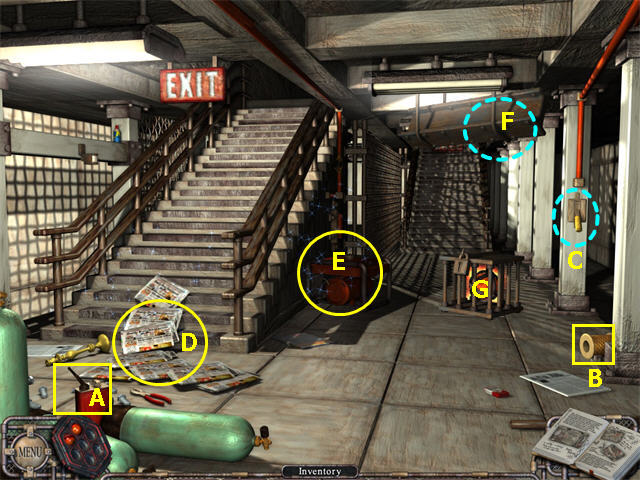
- Complete the Hidden Object Scene by the Bus Door (A) and collect the BUS BATTERY (K), the HAMMER(I), and the NAILS (J).
- Collect the HAND TRUCK (B), the PILE OF BOARDS (C), and the PUMP (D).
- Use the PUMP to pump up the Tire (E).
- Use the CROWBAR to remove the Grate (F) on the front of the Bus, revealing the Battery Compartment. You have to charge the BATTERY.
- Combine the NAILS and the PILE OF BOARDS, then combine that with the HAMMER to create a LADDER.
- Place the LADDER on the ground (G) below the Wheelbarrow to get access to the roof.
- Complete the Hidden Object Scene by the Wheelbarrow (H) and collect the BUS KEYS (L).
- Charge the BATTERY by putting it on the Sparking Wires (M)..
- Put the CHARGED BATTERY into the Battery Compartment (F).
- Use the BUS KEYS on the Bus (A). The Bus will roll backward, revealing the SPIRIT STONE in a Crate.
- Use the HAND TRUCK on the Crate and it will automatically move next to the LADDER.
- Zoom in on the Wheelbarrow (H) again. This time click on the Wheelbarrow to tip the Bricks (N) onto the Crate, smashing it and releasing the SPIRIT STONE.
Bus Door Zoom Scene
- Collect the items on the Find List.
- The Puzzle Piece is the large red object inside a suitcase.
- Use the HAMMER to take all of the NAILS out of the Tire.
- Collect the BUS BATTERY.
Wheelbarrow Zoom Scene
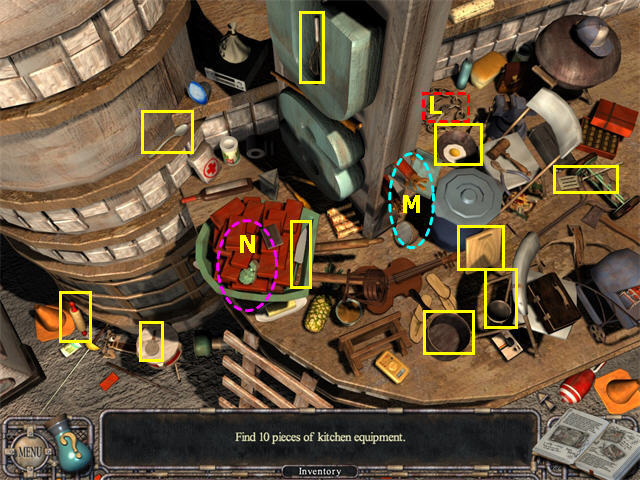
- Collect the Kitchen Equipment as shown.
- Collect the BUS KEYS.
- Put the BUS BATTERY on the sparking Electric Wires to charge it.
Chapter 7: The Diner

- Try the Switch (A). The KEY (B) will lower, but go back up before you can get it.
- Complete the Hidden Object Scene by the Back Table (C) and collect the DUMBBELL (F).
- Complete the Hidden Object Scene by the Kitchen (D) and collect the PLASTIC PIPE (G).
- Combine the PLASTIC PIPE and the DUMBBELL to get the TIED DUMBBELL.
- Use the TIED DUMBBELL on the Switch and get the KEY (B).
- Use the KEY to unlock the Lockbox (E) and collect the SPIRIT STONE.
Back Table Zoom Scene
- Collect the items on the Find List.
- The Power Strip is on the floor under the table.
- The Mailbox is outside. You can see it through the window.
- Collect the DUMBBELL.
Kitchen Zoom Scene
- Collect the items on the Find List.
- The Waffle is behind the Toy Robot.
- The Rice Cake is the round white object on the counter below the Toy Robot.
- Collect the PLASTIC PIPE.
Chapter 8: The Theatre
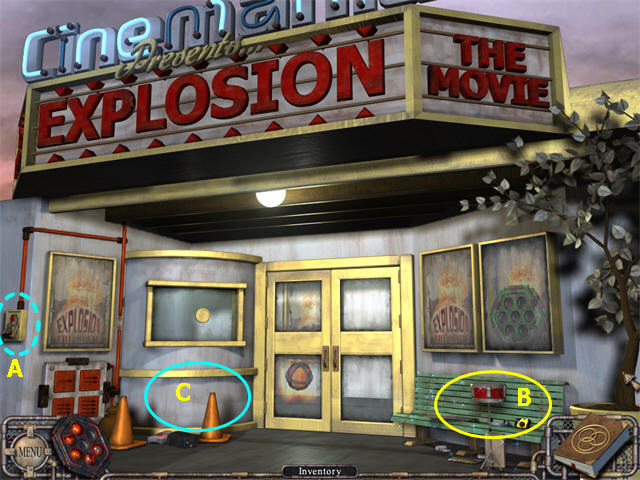
- Try the Switch (A). Nothing happens.
- Complete the Hidden Object Scene by the Right Bench (B) and collect the ELECTRICAL TAPE (D) and the GREEN SPIRIT STONE HOLDER (E).
- Complete the Hidden Object Scene by the Ticket Office (C) and repair the electrical circuit.
- Turn on the Switch (A). This will send power to the Sign.
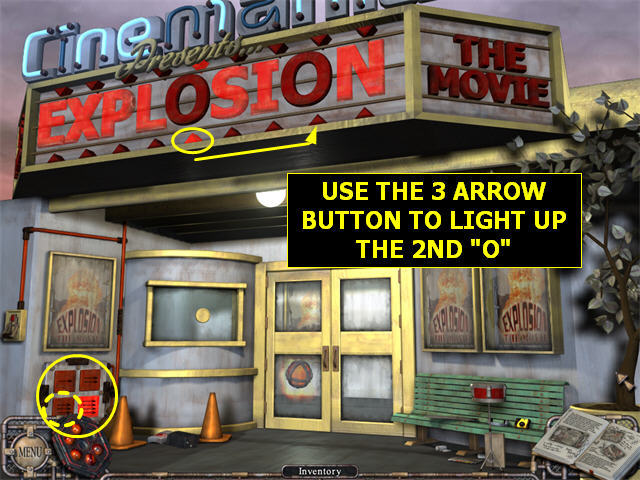
- Now you have to light up all the letters in the word EXPLOSION on the sign. Notice which red triangle is lit up by the letters. You can now press the arrow buttons to move the current 1, 2, 3, or 4 letters over. That letter will light up.
- The circuit wraps around, so that the E is one after the N.
- You can only press each button once until you have pressed all of them or you have flipped the Switch to reset to the first triangle.
- There are many different solutions. Just notice which arrow buttons are not lit up, and then figure out which letters they will light up. Use the Switch when you need to go back to position 1.
- Once you have all the letters lit up, the door will open and you can collect the SPIRIT STONE.
- If you get stuck, keep pressing arrow buttons until the SKIP button on the left above the arrow buttons lights up completely, then press it to skip the remainder of the puzzle. Note that this button will not light up until after you turn on the power and have tried several letter combinations.
Right Side Bench Zoom Scene
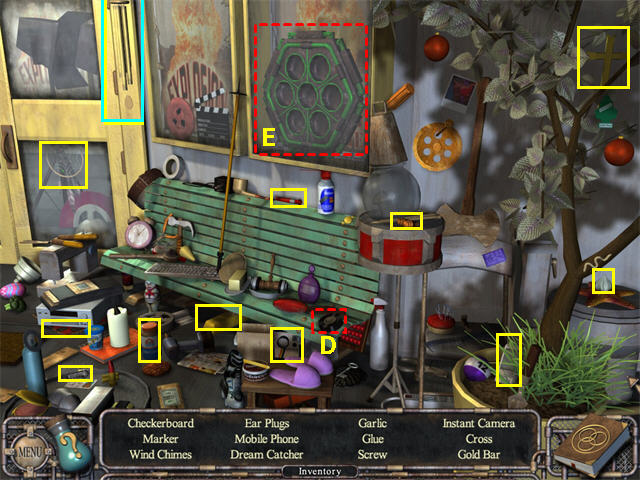
- Collect the items on the Find List, then the ELECTRICAL TAPE.
- Use the CROWBAR to smash the Glass and collect the GREEN SPIRIT STONE HOLDER.
Ticket Office Zoom Scene
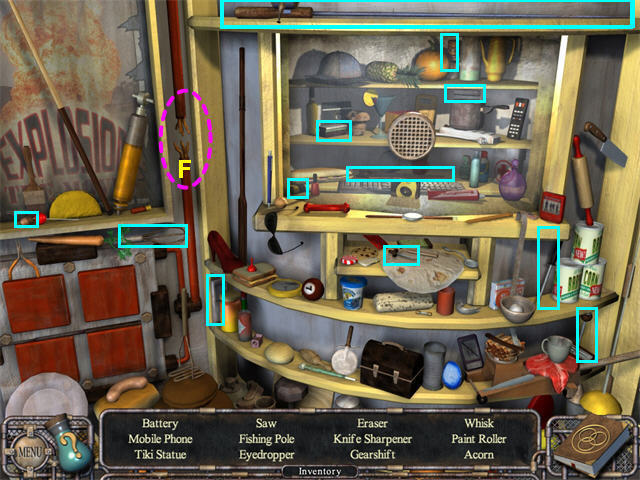
- Collect the items on the Find List.
- Use the ELECTRICAL TAPE to repair the Broken Wire (F).
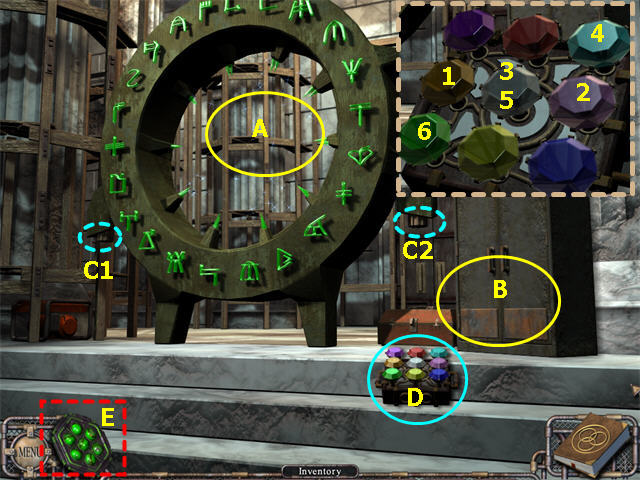
Chapter 9: The Red Lettered Ring
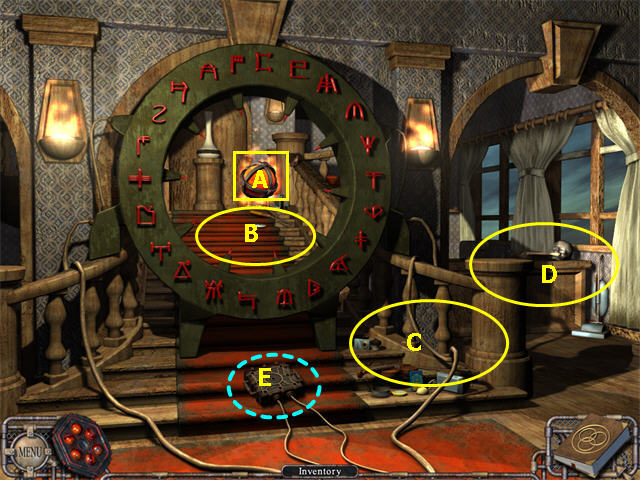
- Collect the Spirit Stone (A) from the center of the Ring.
- Three zoom scenes will become available: Through the Ring, the Stairs, and the Workbench.
- Complete the Hidden Object Scene through the Ring (B) and collect the CONTROL GEMS (F).
- Complete the Hidden Object Scene on the Stairs (C) and collect the CONTROL GEMS (G).
- Complete the Hidden Object Scene on the Workbench (D) and collect the last 3 CONTROL GEMS (H).
- Click on the Control Matrix (E) on the ground in front of the Ring and it will expand. Put all the Control Gems there.

- Now you have to find the right sequence. The instructions are in the Magic Journal.
- Click on Red (1), White (2), Green (3). The Ring will light up.
- Click on Purple (4), White (5), Blue (6). Part of the Ring will fill in.
- Once the doors inside the Ring are closed, click once in the center of the Ring and the SPIRIT STONE HOLDER will be placed there automatically.
- Click on Red, White, Green again. The SPIRIT STONES will be restored from red to white. Collect the PURIFIED SPIRIT STONE HOLDER from the center of the Ring and it will go into your Inventory Tray.
Through the Ring Zoom Scene
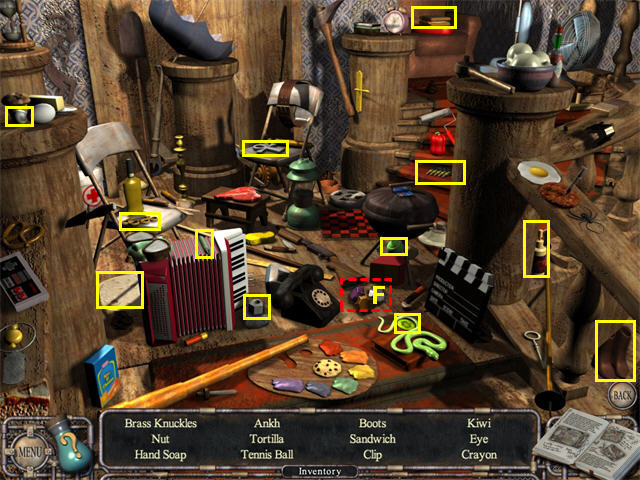
- Collect the items on the Find List.
- The "Clip" is a clip of bullets on the Stairs.
- Collect the CONTROL GEMS.
The Stairs Zoom Scene
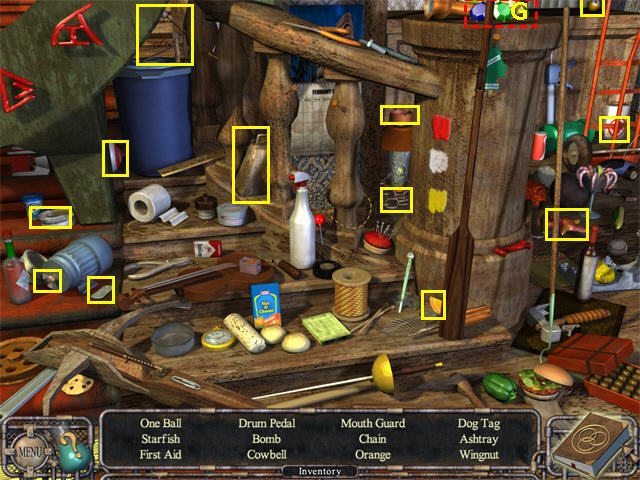
- Collect the items on the Find List, then the CONTROL GEMS.
The Workbench Zoom Scene
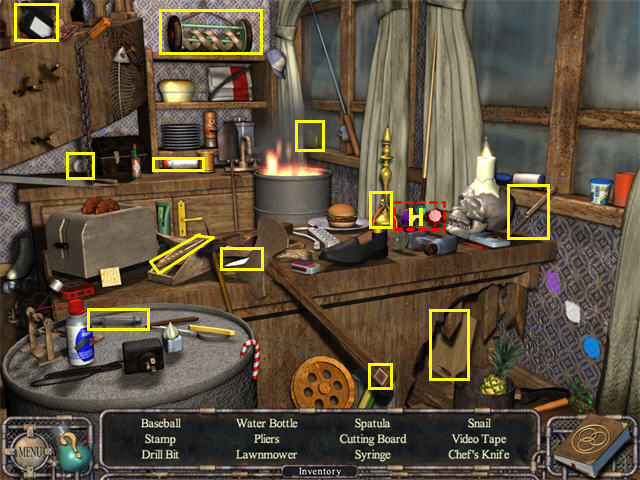
- Collect the items on the Find List, then the CONTROL GEMS.
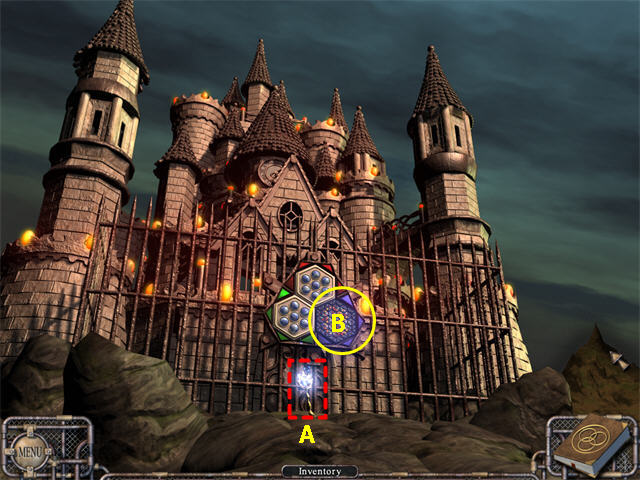
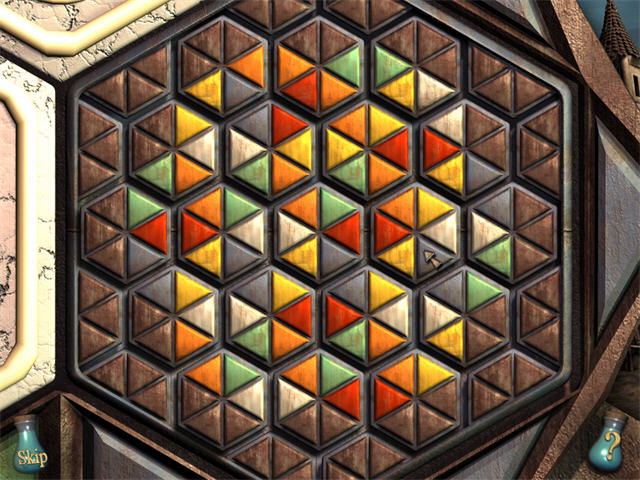
Chapter 10: The Castle, Red Puzzle
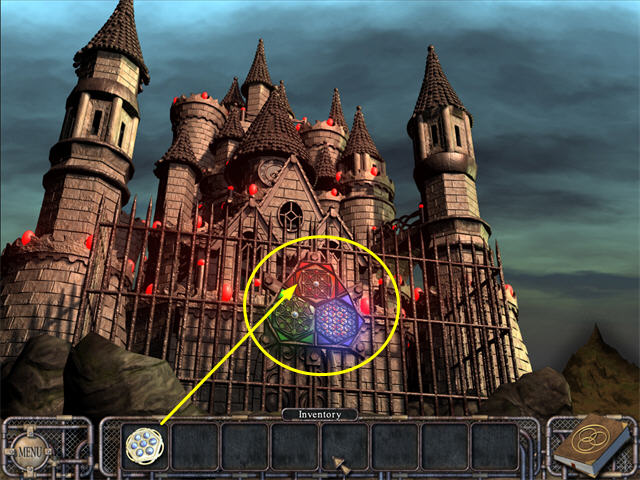
- Click once on the Red Lock to trigger a mini-game.
- Click on the ? bottle for the instructions.
- Click on the SKIP bottle to skip the mini-game if preferred.
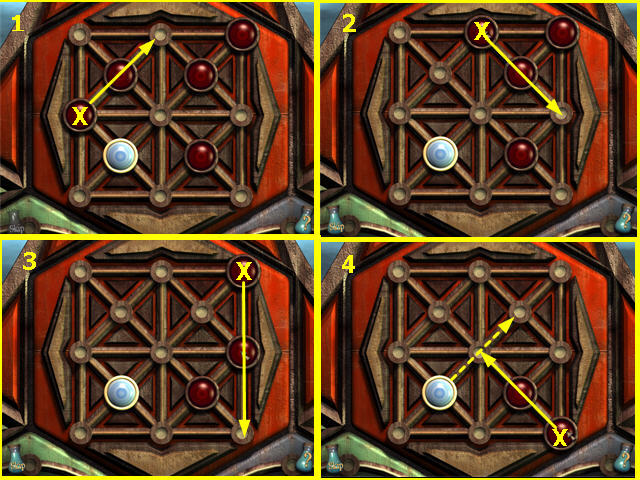
- Our solution is in the screenshot.
- Once you have unlocked the red portion of the lock, place the PURIFIED SPIRIT STONEHOLDER there.
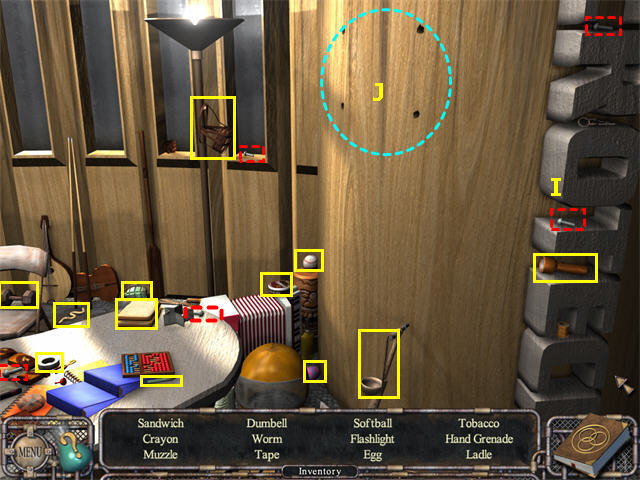
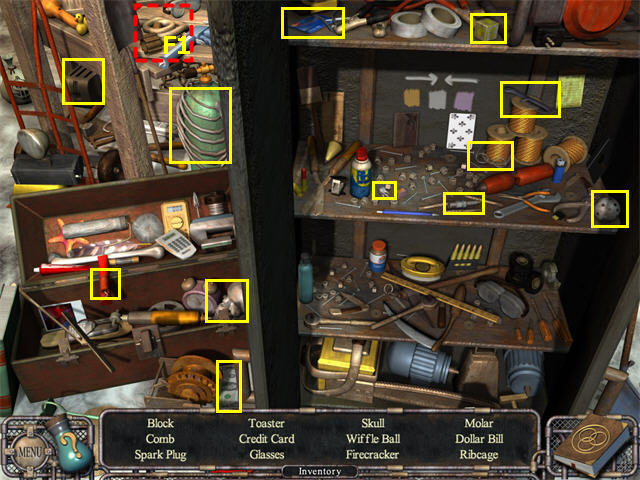
Chapter 11: The Office
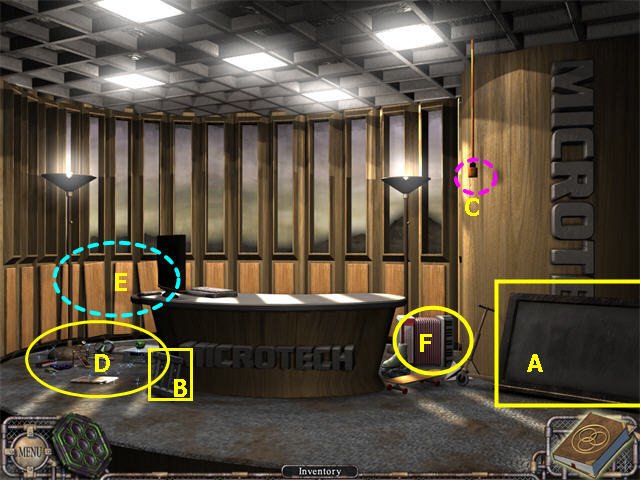
- Collect the MONITOR (A) and the MONITOR HOLDER (B).
- Try the Cord (C). There is nothing to plug it into.
- Complete the Hidden Object Scene left (D) of the Desk and collect the SAW (G) and the POWER DRILL (H).
- Use the SAW on the loose PANELS (E) to the left of the Desk and collect the PILE OF WOOD.
- Complete the Hidden Object Scene Right (F) of the Desk.
- Collect the SCREWS (I).
- Use the PILE OF WOOD on the Wall (J).
- Use the POWER DRILL on the Wall.
- Use the MONITOR HOLDER on the Wall.
- Use the SCREWS on the Wall.
- Use the MONITOR on the Wall.
- Click on the Cord (C) hanging down and it will plug into the MONITOR.
- A green SPIRIT STONE will appear on the MONITOR. Click on it until it goes into the SPIRIT STONE HOLDER.
Left of the Desk Zoom Scene
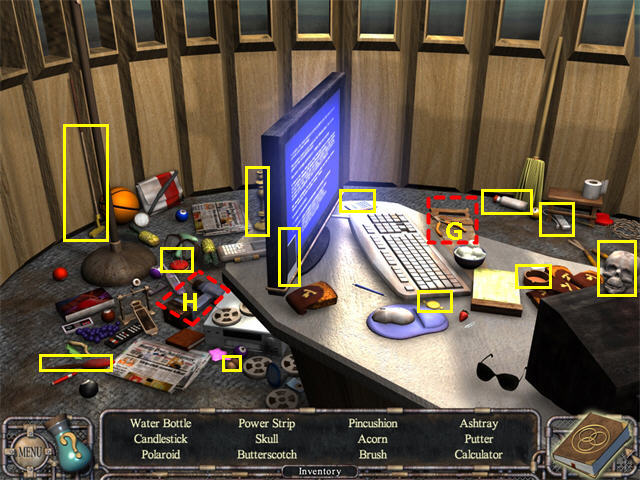
- Collect the items on the Find List.
- Collect the SAW and the POWER DRILL.
Right of the Desk Zoom Scene
- Collect the items on the Find List.
- Collect the 5 SCREWS.
- Mount the MONITOR by using the PILE OF WOOD, POWER DRILL, MONITOR HOLDER, SCREWS, and MONITOR.
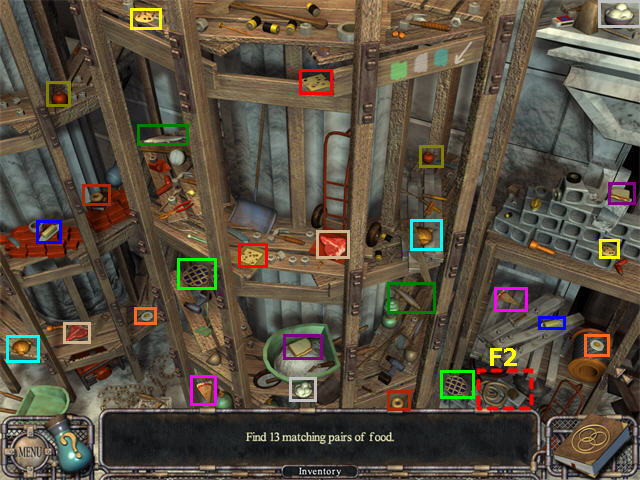
Chapter 12: Billiards
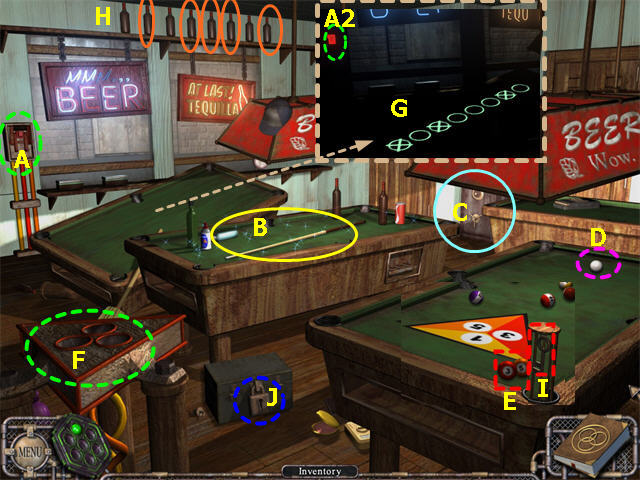
- You can try the Switch (A), but it doesn’t do anything.
- Complete the Hidden Object Scene for the Billiard Table (B) and collect the POOL CUE (K) and the POWER DRILL (L).
- Complete the Hidden Object Scene by the Safe (C). Use the POWER DRILL on the Safe Lock (M) to open the Safe and complete the Find List and collect the 1 BALL (N).
- Use the POOL CUE on the solid white Cue Ball (D) on the table. It will hit the other balls, revealing a diagram.
- Collect the 3 BALL and the 5 BALL (E) from the Table.
- Combine the BILLIARD BALLS in your Inventory Tray and put them in the Triangle Holder (F).
- Turn on the Switch (A). The lights will go out and reveal a glowing pattern (G) on one of the Billiard Tables. This pattern is the code for the 8 Bottles high up on the wall. You need to click any Bottle that does not have an X on it.
- Use the Switch (A2) to the turn the lights back on. Click on the Bottles (H) to match the pattern: 2, 4, 5, 6, and 8.
- A KEY (I) will rise up out of the far right Billiard Table. Use the KEY to open the Lockbox (J) and collect the SPIRIT STONE.
Billiard Table Zoom Scene

- Collect the matching pairs. For the first time in the game, some of the pairs are not identical, so that the Block of Cheese matches with the Slice of Cheese.
- The Pineapple matches with the Pineapple Ring.
- Collect the POOL CUE and the POWER DRILL.
The Safe Zoom Scene
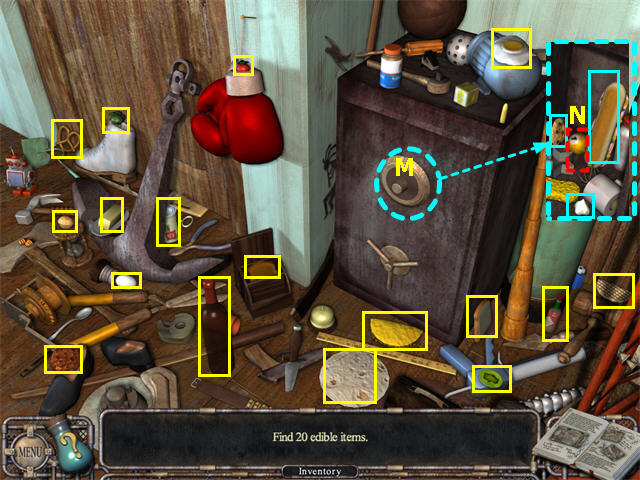
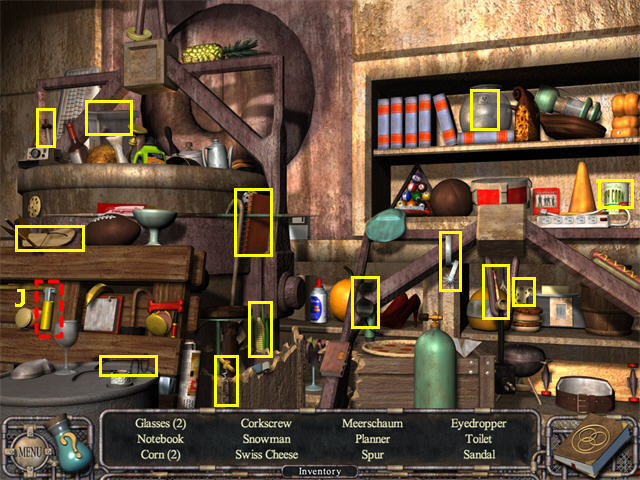
- Collect the edible items you can see: Pretzel, Egg, Green Pepper, Strawberry, Wine, Hot Sauce, Tortilla, Taco, Cookie, Walnut, Canned Vegetables, 2 slices of Bread, Butter, Kiwi, Waffle, Fried Egg.
- Use the POWER DRILL on the Safe Lock to open the Safe.
- Collect the Sandwich, Cookie, and Garlic from inside the Safe.
- Collect the 1 BALL from inside the Safe.
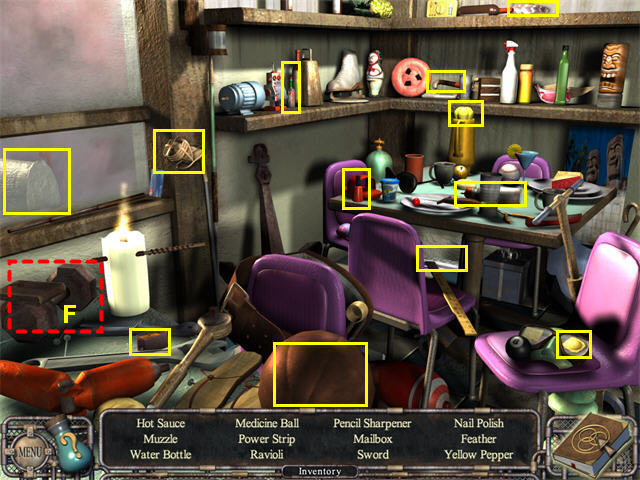
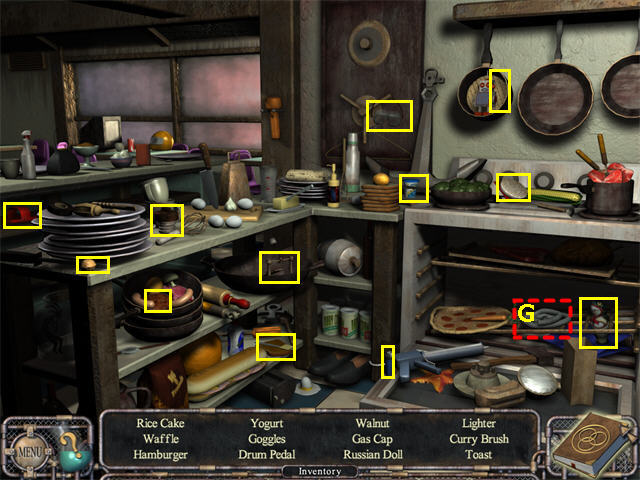
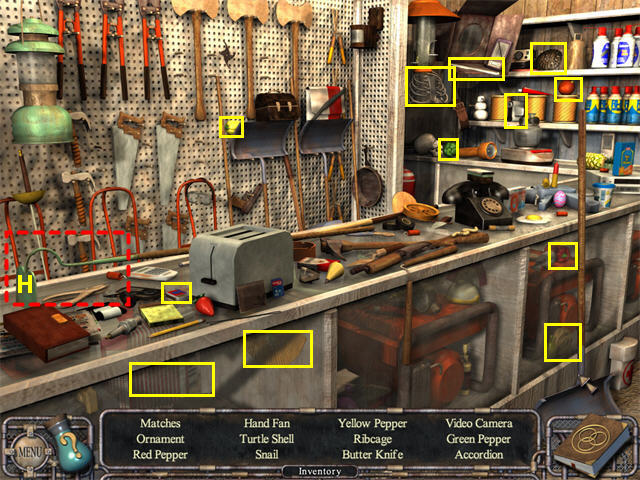
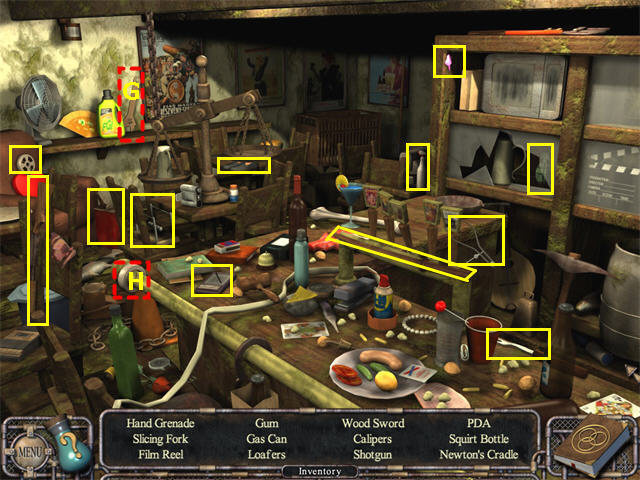
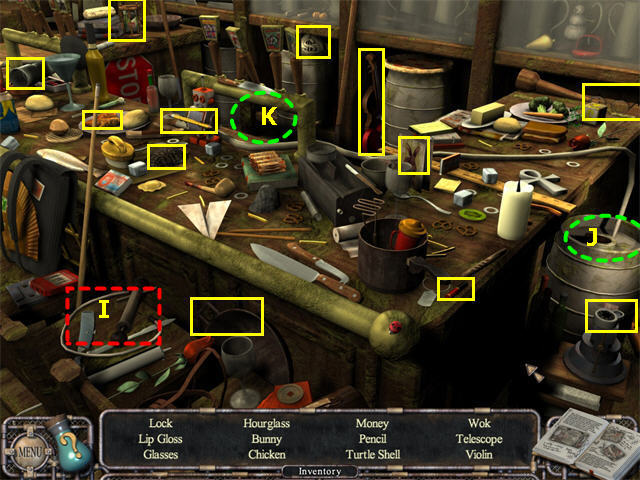
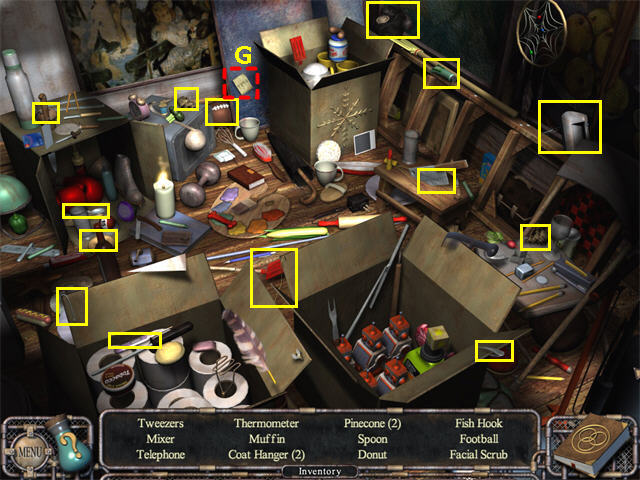
Chapter 13: Newsstand
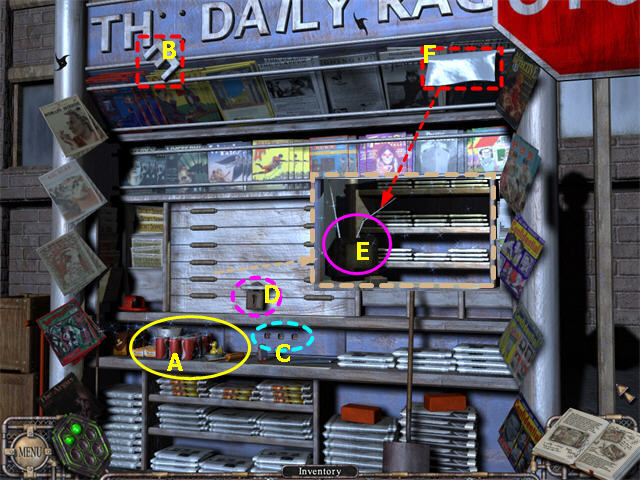
- Complete the Hidden Object Scene for the Front of the Stand (A) and collect the REMOTE CONTROL (G) and the WRENCH (H).
- Use the WRENCH on the dangling LETTER E (B) at the top of the stand.
- Use the LETTER E on the 3 slots (C) below the Padlock. It will become a drawer handle. Open the Drawer and collect the KEY.
- Use the KEY on the Padlock (D) revealing a zoom scene by the TV.
- Complete the Hidden Object Scene by the TV (E) and collect the BATTERY (I).
- Combine the BATTERY and the REMOTE CONTROL.
- Use the REMOTE CONTROL on the TV. It turns on, but no picture.
- Collect the ALUMINUM FOIL (F) from the top of the scene. Use it on the TV Antenna to improve reception.
- The SPIRIT STONE appears on the TV. Click it until it goes into the SPIRIT STONE HOLDER.
Front of Stand Zoom Scene
- Collect the items on the Find List.
- Collect the WRENCH and the REMOTE CONTROL.
The TV Zoom Scene
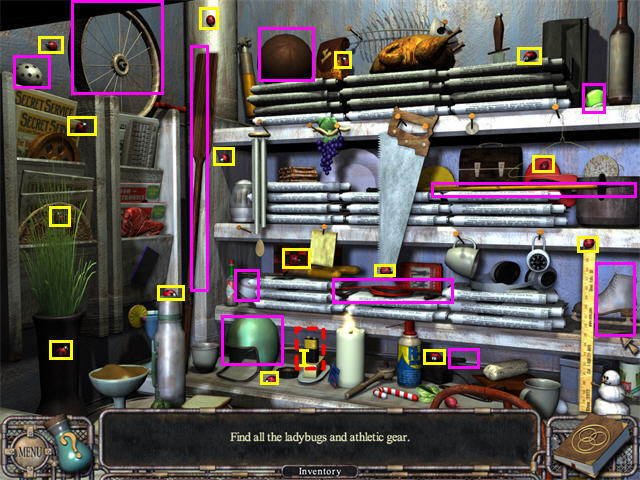
- Collect15 Ladybugs and 10 pieces of Athletic Equipment.
- The Golf Club is on the bottom shelf, mostly hidden behind other things. It will be easier to see once you collect the Helmet.
- Collect the BATTERY.
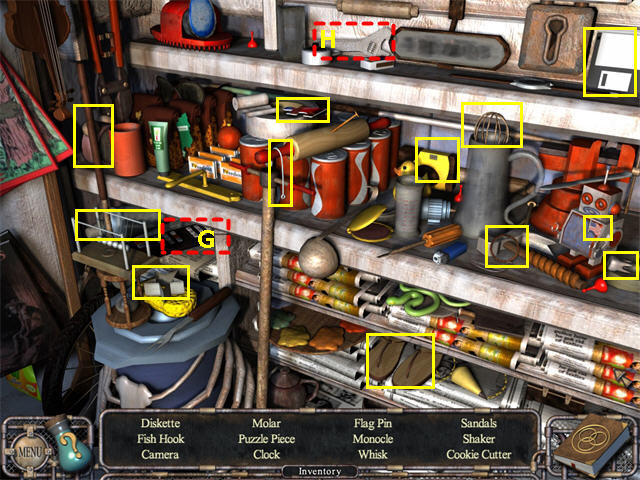
Chapter 14: Hardware Store
- Complete the Hidden Object Scene for the Left Wall (A) and collect the HOE (H).
- Use the HOE on the Ropes (B) at the top of the scene. One Rope will fall down.
- Complete the Hidden Object Scene by the Back Wall (C) and collect the BIG RUBBER BAND (I).
- Collect the AIR TANK (D) and the METAL RING (E).
- Tie the METAL RING to the Rope (F) that is hanging down, then tie the BIG RUBBER BAND to the METAL RING.
- Put the AIR TANK into the BIG RUBBER BAND.
- Click on the HANGING AIR TANK (G) to swing it into the glass case and release the SPIRIT STONE.
Left Wall Zoom Scene
- Collect the items on the Find List, then the HOE.
Back Wall Zoom Scene
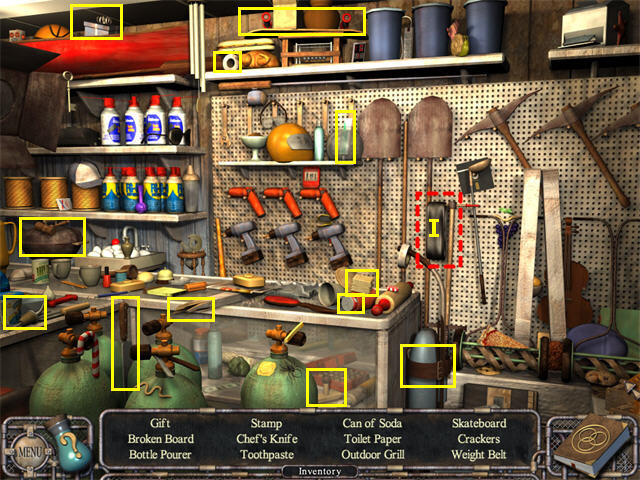
- Collect the items from the Find List.
- The Stamp is a rubber stamp in the display case.
- Collect the BIG RUBBER BAND.
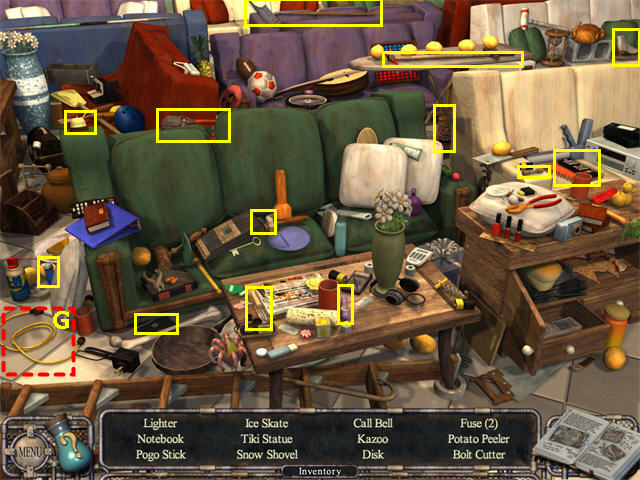
Chapter 15: Bar
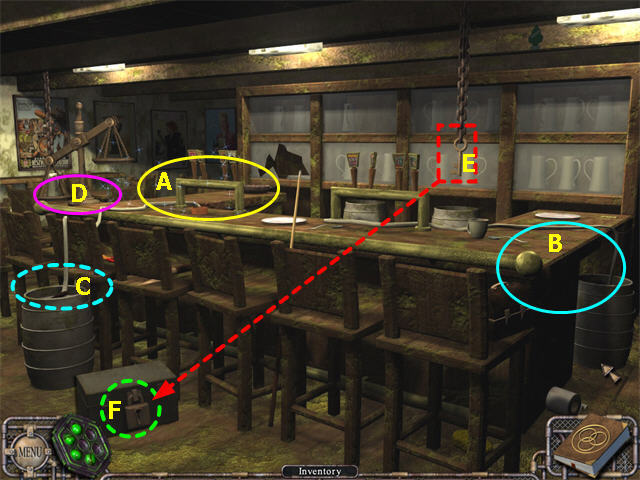
- You will go back and forth between the left and right sides of the Bar several times. The game is somewhat arbitrary in which tasks you can complete in the main scene and which ones you have to do in the zoom scenes.
- If you know what you want to do but it’s not working, try switching to another perspective and see if it works there.
- Complete the Hidden Object Scene for the Left Side (A) and collect the WRENCH (G) and the TAPE (H).
- Complete the Hidden Object Scene for the Right Side (B) and collect the KEG PUMP (I).
- Now you have one KEG PUMP and two Kegs. Put the KEG PUMP on the Left Keg (C).
- Zoom in by the Scale (D).
- Collect the MUG (L) from behind the bar.
- Put the MUG under the Taps (M) and it will fill half-way.
- The Left Keg (C) is now empty. Try to remove the KEG PUMP. It’s stuck. Use the WRENCH to remove it and it will go back into your Inventory Tray.
- Zoom in on the Right Side (B) of the bar again. Put the KEG PUMP on the Right Keg (J). Note that you cannot do this in the main scene, you have to zoom in first.
- The tube is leaking. Use the TAPE on the leaking spot.
- Put the HALF-FULL MUG under the Tap (K) and you will get a FULL MUG.
- Zoom in on the Scale (D). Put the FULL MUG on the Scale (N).
- The KEY (E) will lower from the Ceiling on the right side of the bar.
- Use the KEY to open the Lockbox (F) and collect the SPIRIT STONE.
Left Side Zoom Scene
- Collect the items on the Find List.
- Collect the WRENCH and the TAPE.
Right Side Zoom Scene
- Collect the items from the Find List, then the KEG PUMP.
Scale Zoom Scene
- Put the MUG under the Tap so you have a HALF-FULL MUG.
Chapter 16: Another Fountain
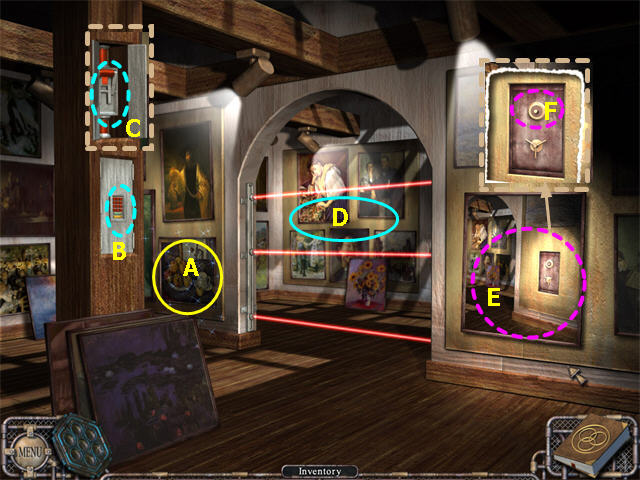
- Collect the BLUE SPIRIT STONE HOLDER (E) from the Fountain.
- Complete the Hidden Object Scene by the Right Side (A) and collect the FOUR LIGHT BULBS (G).
- The LIGHT BULBS will combine automatically. Put them in the Lamp (B) on the left side of the Fountain and they will all install. Still no light, though.
- Complete the Hidden Object Scene by the Left Side (C) and collect the FUSE.
- Click on the Metal Tile (D) on the ground to the left of the Fountain and a Control Box will rise up.
- Put the FUSE (H) into the Control Box and turn it on.
- Now turn the Control Box off again, and you will see glowing numbers on the top of the Fountain. This is the combination for the Keypad (F) on the right side of the Fountain.
- Click once on the Keypad (F) and the combination will be entered automatically. The Door will open and you can collect the SPIRIT STONE.
Right Side Zoom Scene
- Collect the items on the Find List, then the 4 LIGHT BULBS.
Left Side Zoom Scene
- Collect the items from the Find List, then the FUSE.
Chapter 17: The Green Lettered Ring
- Collect the Spirit Stone from the center of the Ring.
- Complete the Hidden Object Scene through the Ring (A) and collect the CONNECTOR CABLE (F1).
- Complete the Hidden Object Scene by the right Cabinet (B) and collect the CONNECTOR CABLE (F2).
- Put one CONNECTOR CABLE on the peg (C) on each side of the Ring.
- Click on the Control Matrix (D) and it will expand.
- Now you have to find the right sequence. The instructions are in the Magic Journal.
- Click on Orange, Purple, White. The Ring will light up.
- Click on Turquoise, White, Green. Part of the Ring will fill in.
- Once the doors inside the Ring are closed, click once in the center of the Ring and the SPIRIT STONE HOLDER will be placed there automatically.
- Click on Turquoise, White, Green again. The SPIRIT STONES will be restored from green to white. Collect the PURIFIED SPIRIT STONE HOLDER.
Through the Ring Zoom Scene
- Collect the matching pairs, then the tan CONNECTOR CABLE.
Cabinet Zoom Scene
- Collect the items on the Find List, then the CONNECTOR CABLE.
Chapter 18: The Castle, Green Puzzle
- Click once on the Green Lock to trigger a mini-game.
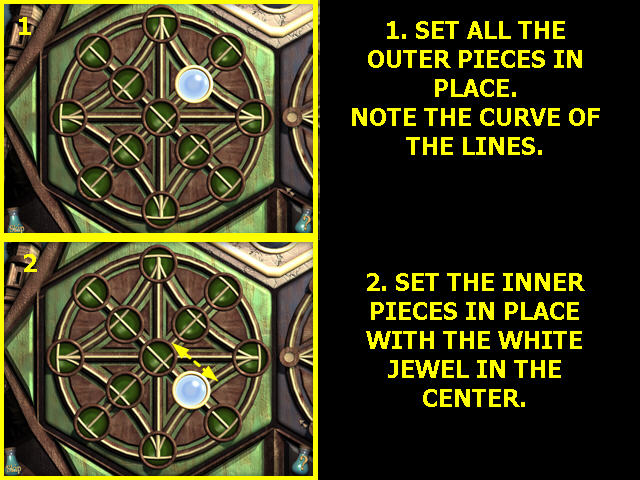
- Click on the ? bottle for the instructions.
- Click on the SKIP bottle once it has charged to skip the mini-game if preferred.
- To reconstruct the pattern, do the outer ring first. Note the curve of the lines.
- Now put the inner pieces in place, with the white jewel in the center.
- Once you have unlocked the green portion of the lock, place the PURIFIED SPIRIT STONEHOLDER there.
Chapter 19: Museum
- Some players may want to use the OPTIONS to increase the Brightness Level for this Chapter, as it is fairly dark.
- Complete the Hidden Object Scene by the Fruitbowl Painting (A) on the left of the Archway and collect the STICKY NOTE (G).
- Use the STICKY NOTE on the Keypad (B) to open the Panel. Flip the Switch (C) inside the Panel to turn off the laser barrier.
- Complete the Hidden Object Scene by the Sunflower Painting (D) through the Archway and collect the 2nd STICKY NOTE (H) and the BOX CUTTER (I).
- Use the BOX CUTTER on the Safe Painting (E) to reveal a real Safe.
- Use the 2nd STICKY NOTE on the Safe Lock (F) to open it and reveal the SPIRIT STONE.
Fruitbowl Painting Zoom Scene
- Collect the items on the Find List.
- One of the Hangers is in between the two cardboard boxes. It is quite hard to see.
- Collect the STICKY NOTE.
Sunflower Painting Zoom Scene
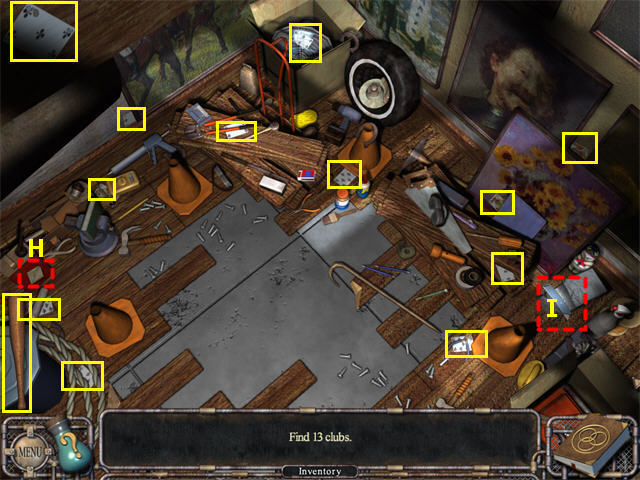
- Collect the Clubs. Most of these are playing cards, but the Baseball Bat on the left also counts.
- Collect the 2nd STICKY NOTE and the BOX CUTTER.
Chapter 20: Sofa Store
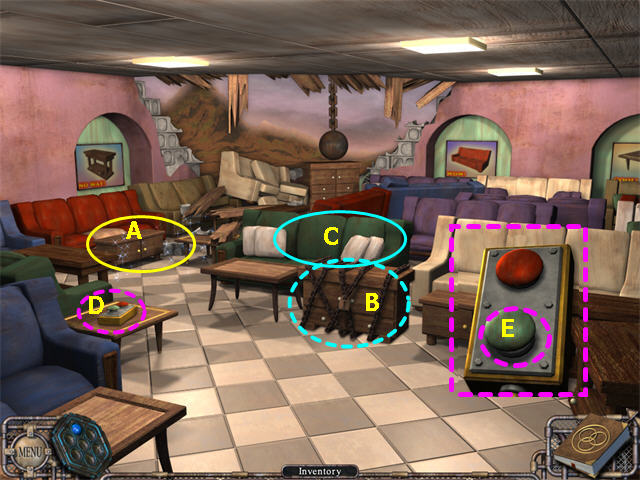
- Complete the Hidden Object Scene by the Red Sofa (A) on the left and collect the KEY (F).
- Use the KEY on the Chest (B) by the Green Sofa to open it.
- Complete the Hidden Object Scene by the Green Sofa (C) and collect the YELLOW CONNECTOR CABLE (G).
- Use the YELLOW CONNECTOR CABLE on the Controller (D).
- Click on the Controller to enlarge it.
- Press the GREEN BUTTON (E) to smash the chest and reveal the SPIRIT STONE.
Red Sofa Zoom Scene
- Collect the Billiard Balls, then the KEY.
Green Sofa Zoom Scene
- Collect the items on the Find List.
- The only Notebook that counts is the orange spiral notebook on the right..
- Collect the YELLOW CONNECTOR CABLE.
Chapter 21: Sporting Goods
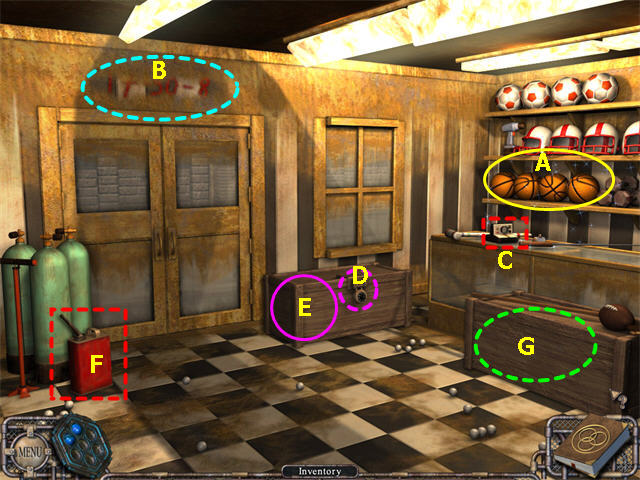
- Complete the Hidden Object Scene by the Back Shelves (A) and collect the DRILL (H) and SANDING BIT (I).
- Combine the DRILL and the SANDING BIT in your inventory, then use them on the Numbers (B) above the Door.
- The Light will break and it will be too dark to read the Numbers.
- Collect the FLASH CAMERA (C) and use it to take a PICTURE of the Combination Numbers (B).
- Use the COMBINATION PICTURE on the Lock (D) and it will open. You just have to touch the picture to the lock.
- Complete the Hidden Object Scene for the Chest (E) and collect the CHAINSAW (J).
- Collect the CAN OF GAS (F) and combine it with the CHAINSAW.
- Use the FUELED CHAINSAW to cut open the Chest (G) on the right and reveal the SPIRIT STONE.
Back Shelves Zoom Scene
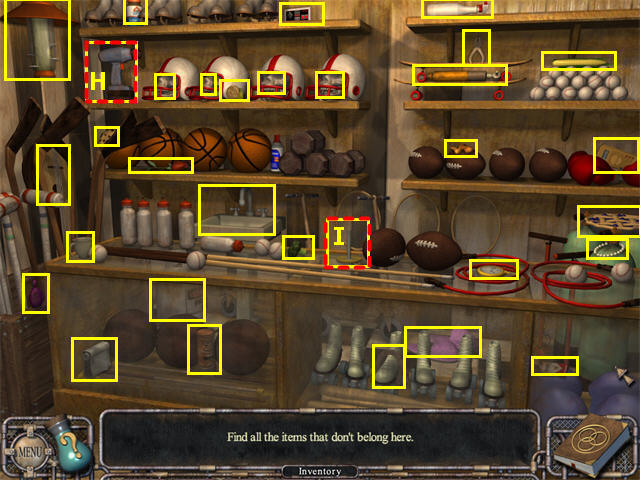
- Click on any item that doesn’t belong in a sporting goods store. This will include the POWER DRILL and SANDING BIT.
- Note that there is a Skull inside each Football Helmet—click on each Skull individually. Make sure you click on the Skull, not the Helmet or it won’t count.
Locked Chest Zoom Scene
- Collect the items on the Find List.
- One of the Erasers is for a blackboard and one is a pink eraser.
- Collect the CHAINSAW.
Chapter 22: Construction Site
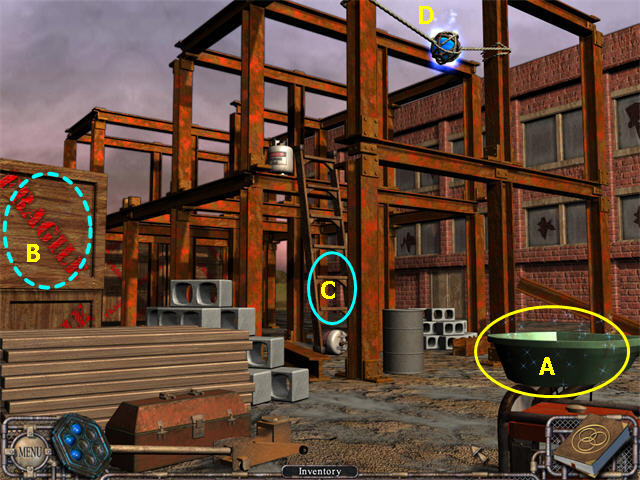
- Complete the Hidden Object Scene (A) by the Wheelbarrow and collect the CROWBAR (E).
- Use the CROWBAR to open the Crate (B) on the left and collect a PROPANE TANK.
- Complete the Hidden Object Scene at the base of the Ladder (C).
- The Fish Bowl is an empty glass bowl on the lower left.
- Collect two PROPANE TANKS (F) and the GRENADE (G).
- Put the PROPANE TANKS one by one into the Wheelbarrow, then click on it and it will automatically move near the supporting Girder.
- Use the GRENADE on the Wheelbarrow. The PROPANE TANKS will explode, knocking down the SPIRIT STONE (D) so you can collect it.
Wheelbarrow Zoom Scene
- Collect the items on the Find List, then the CROWBAR.
Ladder Zoom Scene
- Collect the items on the Find List.
- Collect two PROPANE TANKS and the GRENADE.
Chapter 23: The Bucket Room
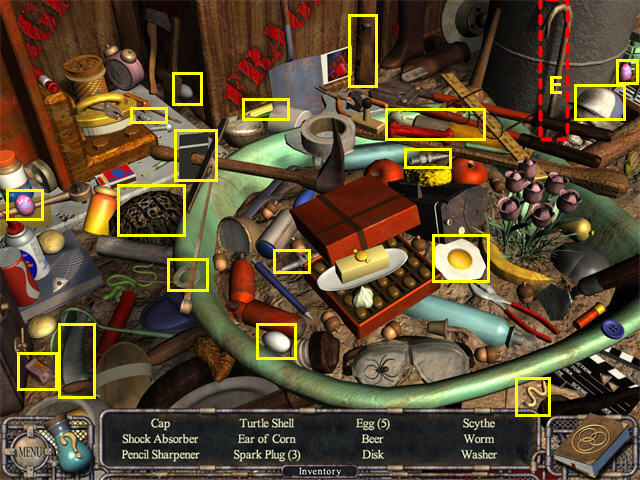
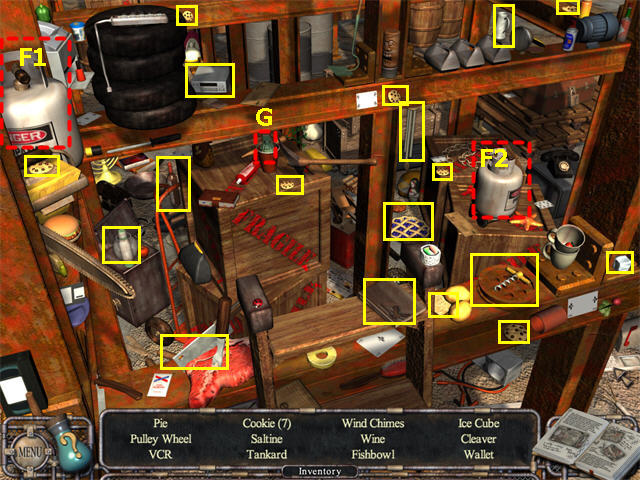
- Complete the Hidden Object Scene for the Bucket (A) and collect the COILED ROPE (I).
- Attach the ROPE to the wooden Dolly (B). You will need to click along the right edge, so you may want to move an empty cursor there first to find the place where it turns into gears.
- Pull the far left Control Lever (C). The Bucket will move onto the Dolly.
- Complete the Hidden Object Scene for the Dolly (D) and collect the CONTROL LEVER (J).
- Put the CONTROL LEVER in place in the middle slot (E).
- Pull the Switch (F) on the right wall to fill the Bucket with molten metal.
- Pull the ROPE (G) to move the Dolly in front of the Door.
- Pull the middle Control Lever (E) to lift the Bucket.
- Pull the right Control Lever (H) to smash the Bucket into the Door, revealing the SPIRIT STONE.
Bucket Zoom Scene
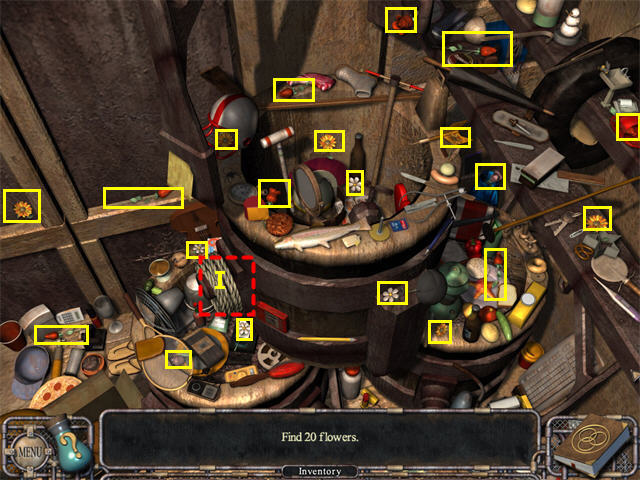
- Collect the 20 Flowers, then the COILED ROPE.
Dolly Zoom Scene
- Collect the items on the Find List, then the CONTROL LEVER.
Chapter 24: Furnace Room
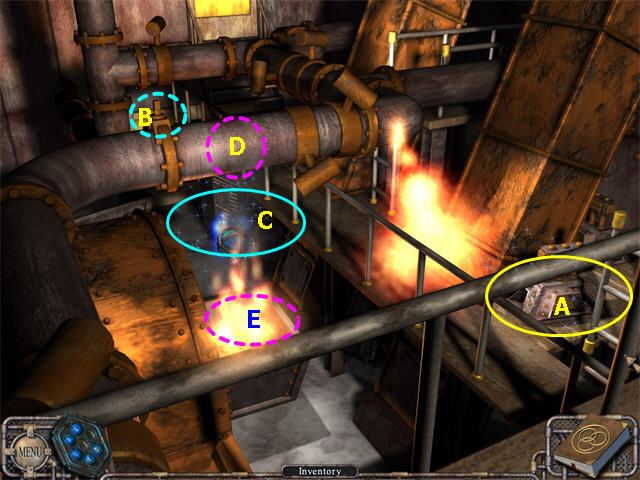
- Complete the Hidden Object Scene on the Right Side (A) and collect the VALVE WHEEL (F).
- Put the VALVE WHEEL on the Valve Stem (B) and click again to turn it. This will shut off the flame coming out of the Pipe.
- Complete the Hidden Object Scene for the Back of the Room (C) and collect the ROPE (G) and the FIRE EXTINGUISHER (H). Note that the sparkles for this scene are right near the Spirit Stone, so click there.
- Use the FIRE EXTINGUISHER on the fire (D) below the SPIRIT STONE.
- Tie the ROPE on the Pipe (E) above the SPIRIT STONE. You will see the ROPE lower down and you will be able to collect the SPIRIT STONE.
Right Side Zoom Scene

- Collect the items on the Find List.
- One of the Screwdrivers is electric.
- Collect the VALVE WHEEL from the base of the Ladder.
Back of the Room Zoom Scene
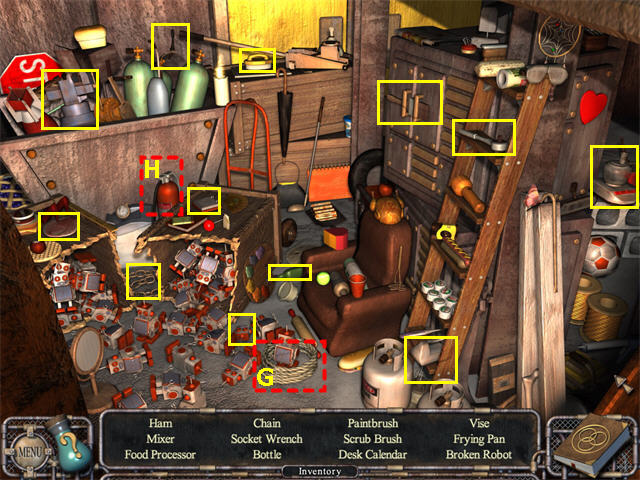
- Collect the items on the Find List.
- The Broken Robot has its head broken off.
- Collect the ROPE and the FIRE EXTINGUISHER.
Chapter 25: The Blue Lettered Ring
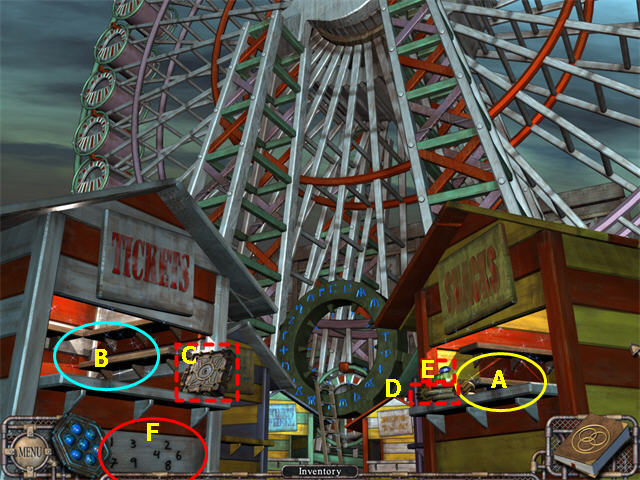
- Collect the Spirit Stone from the center of the Ring.
- There are CONTROL BUTTONS and a CONNECTOR on the right, but you will not be allowed to collect them yet.
- Complete the Hidden Object Scene at the Snack Bar (A) and collect 3 CONTROL BUTTONS (G).
- Complete the Hidden Object Scene at the Ticket Booth (B) and collect 3 CONTROL BUTTONS (H).
- Now collect the CONNECTOR (D) and CONTROL BUTTONS (E) in the main scene.
- Put the CONNECTOR on the CONTROL MATRIX (C) and click.
- The CONTROL MATRIX will expand. Add the 3 sets of CONTROL BUTTONS.
- Now you have to find the right sequence. The instructions are written on the Ticket Booth (F). You will not be able to see them unless you close the Inventory Tray.
- Click on 1,3,7,9. Part of the Ring will fill in.
- Once the doors inside the Ring are closed, click once in the center of the Ring and the SPIRIT STONE HOLDER will be placed there automatically.
- Click on 2, 4, 6, 8. The SPIRIT STONES will be restored from blue to white. Collect the PURIFIED SPIRIT STONE HOLDER from the center of the Ring.
Snack Bar Zoom Scene
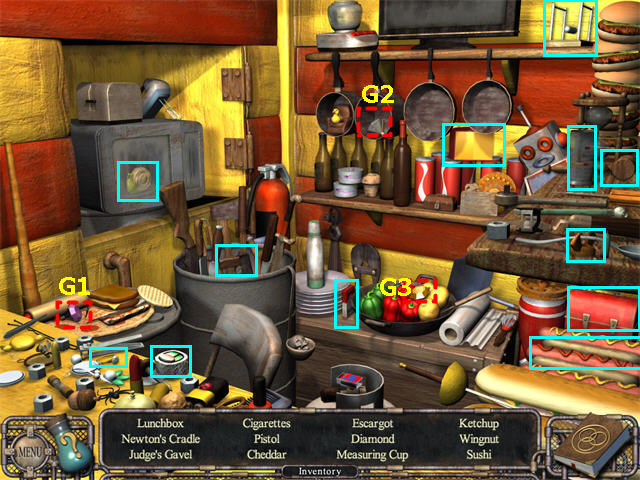
- Collect the items on the Find List.
- The Ketchup is a line of Ketchup on the Hot Dog on the right.
- The Diamond is a Ring.
- Collect the 3 CONTROL BUTTONS.
The Ticket Booth Zoom Scene

- Collect the items on the Find List, then the 3 CONTROL BUTTONS.
Chapter 26: The Castle, Blue Puzzle
- Collect the WAND (A).
- Click once on the Blue Lock (B) to trigger a mini-game.
- Click on the ? bottle for the instructions.
- Click on the SKIP bottle to skip the mini-game if preferred.
- To reconstruct the pattern, do the outer ring first. Note that some of the edge pieces cannot be moved.
- Now put the inner pieces in place, working one line at a time.
- Although the instructions say you can only swap two adjacent pieces, you can actually swap any two pieces, which makes the puzzle easier to solve.
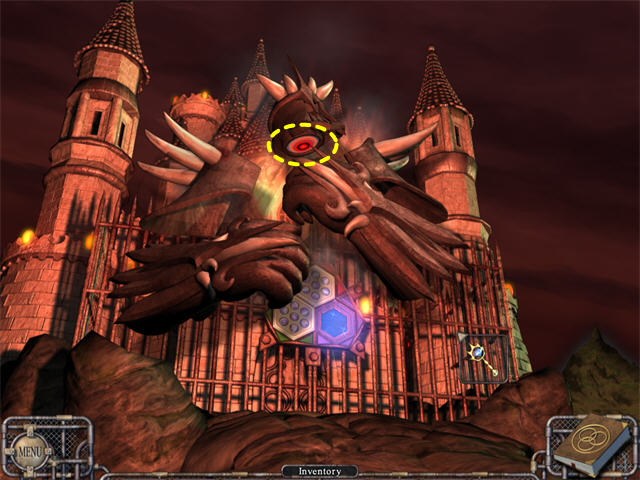
- Once you have completed the blue puzzle, the Monster will appear.
- As the Monster opens its arms, you will see bull’s-eye targets on its vulnerable spots. Using the WAND, click on any bullseye target that is glowing yellow. You will have to score several times to defeat the Monster, but you can have some misses in between, so just keep trying. There is no timer.
- Place the PURIFIED SPIRIT STONEHOLDER on the Blue Lock. You have restored Skymist!
Created at: 2010-07-05