

Walkthrough Menu
- General Tips
- Chapter One: Parking
- Chapter Two: Dock
- Chapter Three: Atrium
- Chapter Four: Cabin
- Chapter Five: Navigation
- Chapter Six: The Bridge
- Chapter Seven: Pool
- Chapter Eight: Deck
- Chapter Nine: Bow
- Chapter Ten: Outside Casino
- Chapter Eleven: Casino
- Chapter Twelve: Vault
- Chapter Thirteen: Fitness Room
- Chapter Fourteen: Captain's Quarters
- Chapter Fifteen: Computer Room
- Chapter Sixteen: Outside Mona's Hideout
- Chapter Seventeen: Mona's Hideout
- Chapter Eighteen: Mona's Closet
- Chapter Nineteen: Performer's Room
- Chapter Twenty: Backstage
- Chapter Twenty-one: Ballroom
- Chapter Twenty-two: Jail
- Chapter Twenty-three: Storage
- Chapter Twenty-four: Fortune Slingo Room
- Chapter Twenty-five: Stern
- Chapter Twenty-six: Outside Piratron Control
- Chapter Twenty-seven: Piratron Control
- Chapter Twenty-eight: Outside Owner's Room
- Chapter Twenty-nine: Owner's Room
- Chapter Thirty: Escape Boat
General Tips
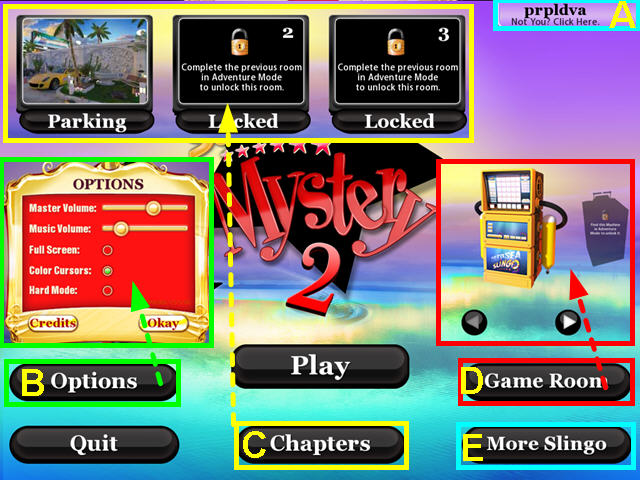
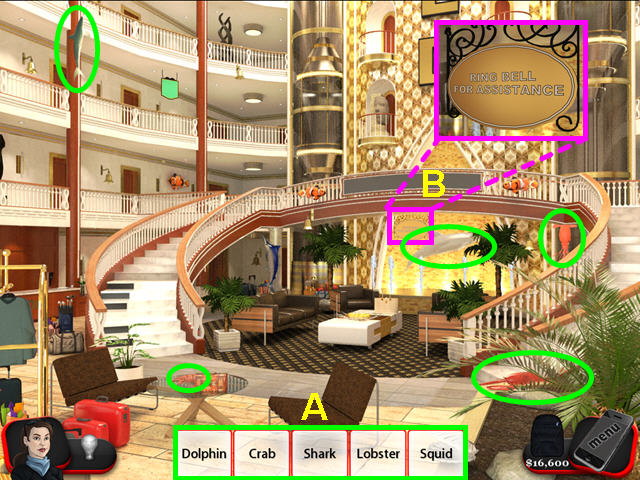
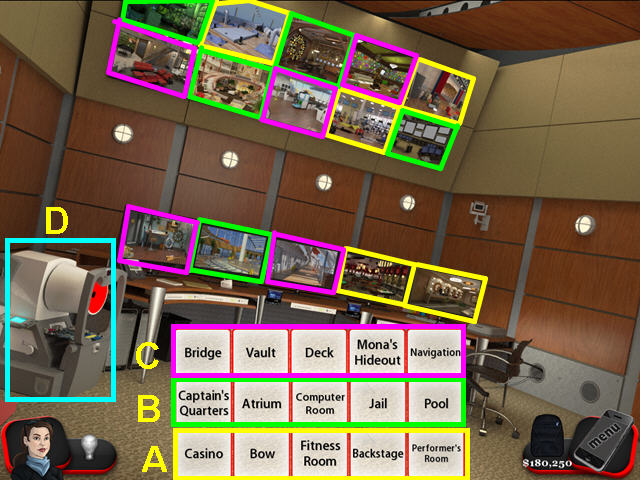
- Select “Not You?” on the main screen to add or delete player profiles (A).
- When you initially set up your profile, select the difficulty level you would like.
- Playing Normal mode will have the cursor change when you point to something usable.
- Playing Hard mode will give you no cursor hints.
- You and change difficulty level at any time in the options menu.
- You may play this game in full screen or windowed mode by changing the settings in the options menu (B).
- You may adjust the volume of sounds, music, and turn off the custom cursor in the options menu.
- The options menu is accessible from both the main screen and the in-game menu.
- Select the “Chapters” button to replay any previously played chapters (C).
- Chapters you have not completed will be locked.
- Select the “Gameroom” button to replay any previously found Slingo machines (D).
- Slingo machines you have not found will be locked.
- Select “More Slingo” to find links to more games in the series (E).
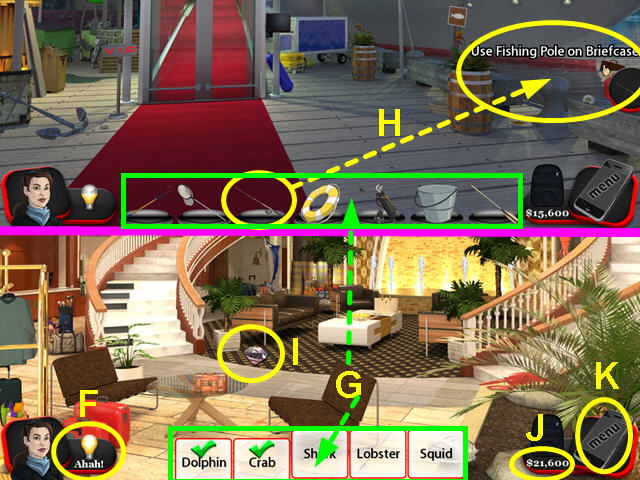
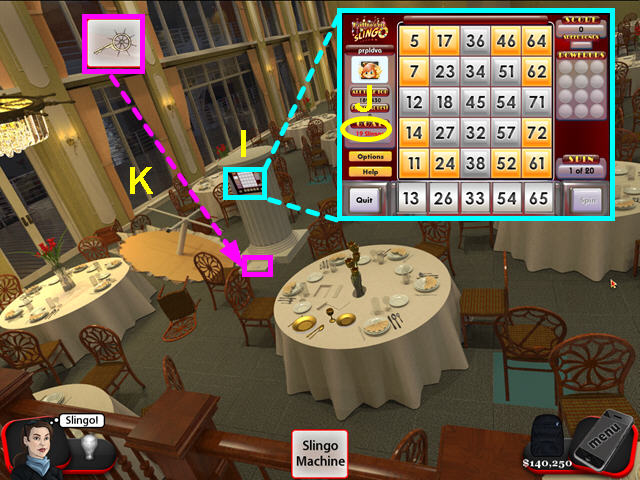
- Hints are unlimited, but you must wait for the meter to fill (F).
- You will see “Ahah!” under the lightbulb when the hint is ready.
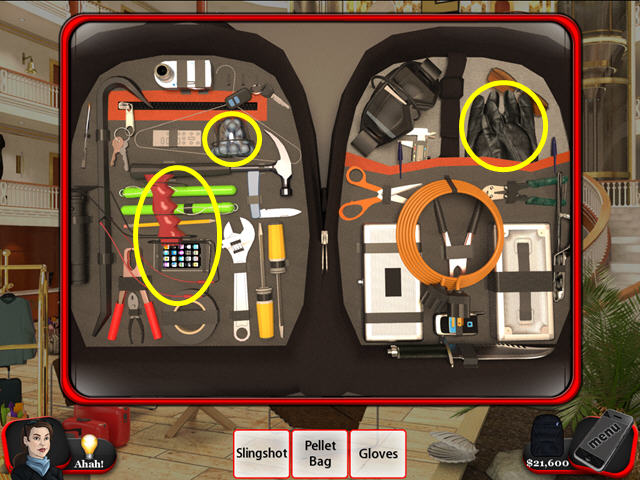
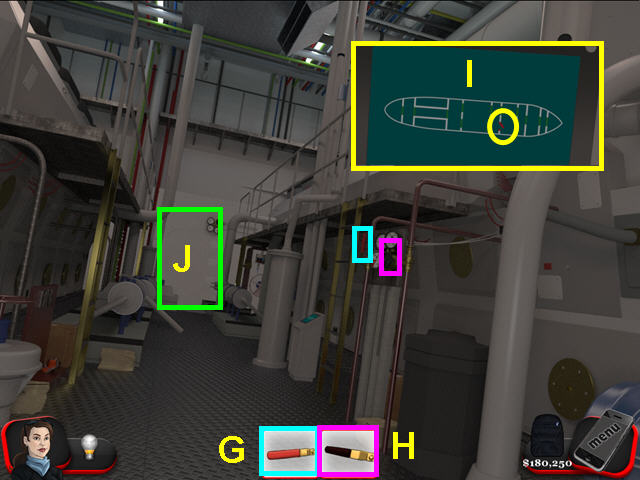
- Your inventory/hidden object list is at the bottom center (G).
- Select an inventory item and click it on the item you want to interact with (H).
- When locating hidden objects, gems and coins will appear- collect them to raise your score (I).
- Your score is in the lower right and shows coins earned in the game and Slingo(J).
- Click the menu button to return to the main menu (K).
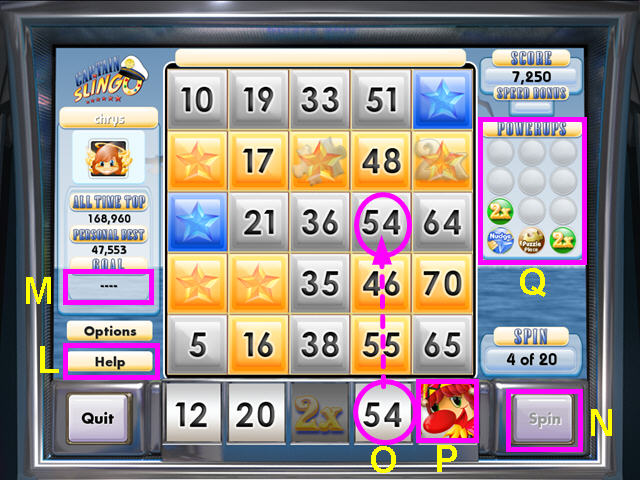
- Select the “Help” button for detailed instructions (L).
- Should the game require you to make a certain number of points or Slingos, it will appear here (M).
- Press the “Spin” button in the lower right to start your game (N).
- Find matching numbers in the columns above (O).
- Jokers are wild but are played in the column above except Super Jokers, which are played anywhere (P).
- Power-ups earned during the game are stored on the right (Q).
- Click on a power-up for a description.
Chapter One: Parking
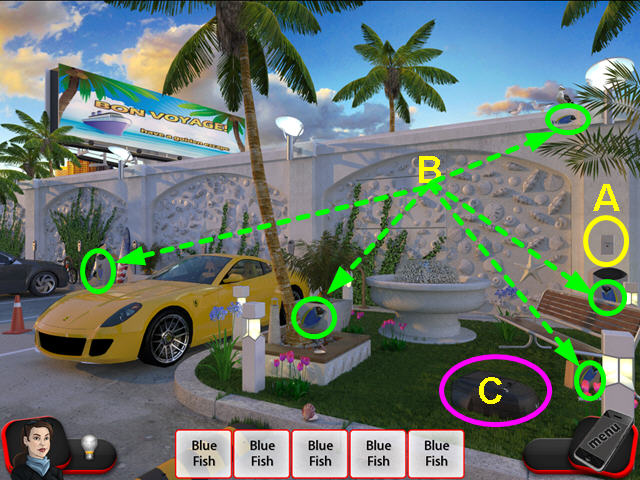
- Select the light-switch to signal you are in place (A).
- Locate the 5 blue fish (B).
- Select the black backpack (C).
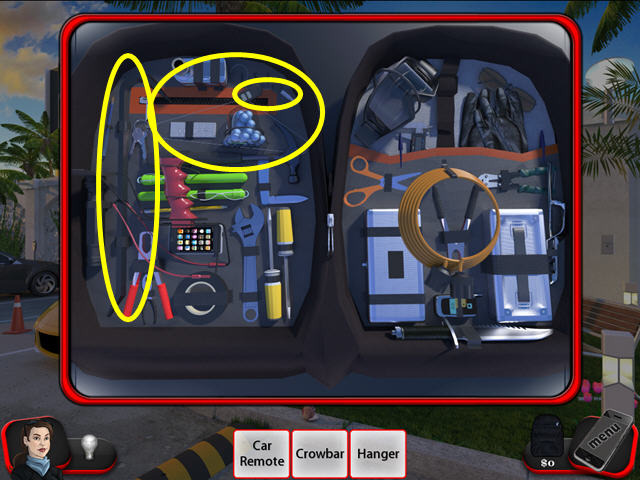
- Locate the items on the list.
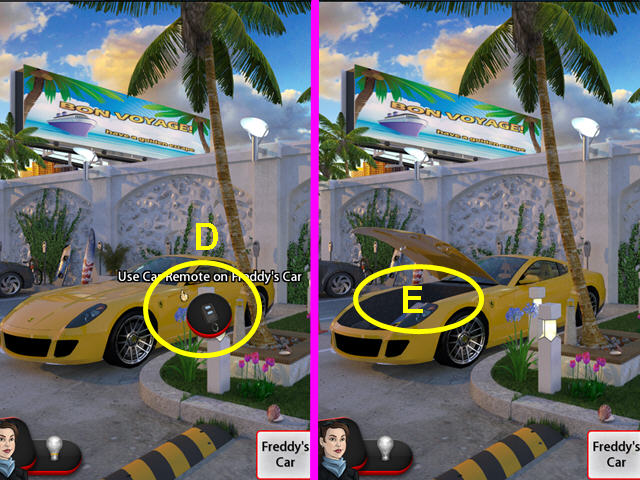
- The car remote will go automatically into your hand.
- Use the car remote on Freddy's car (D).
- Look in the trunk (E).
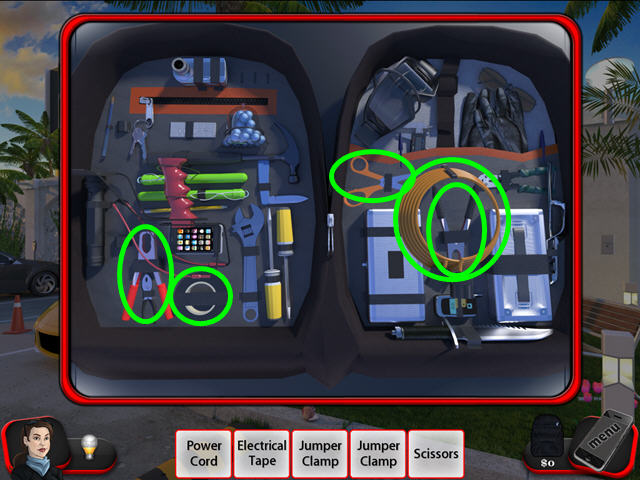
- Locate the items on the list.
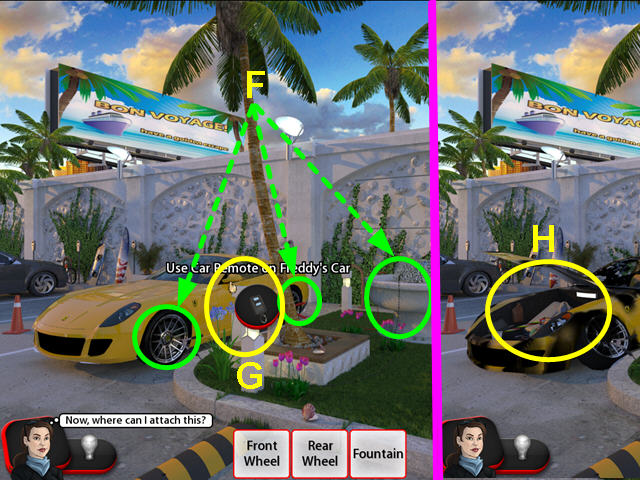
- Attach the cables to the fountain, rear wheel and the front wheel (F).
- Use the car remote on the car (G).
- Look in the trunk of the car (H).
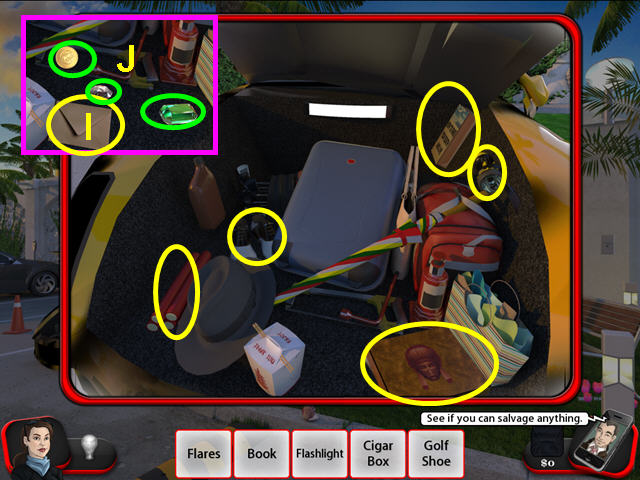
- Locate the items on the list.
- Read the clue that appears (I).
- Remember to collect the coins and gems to increase your score (J).
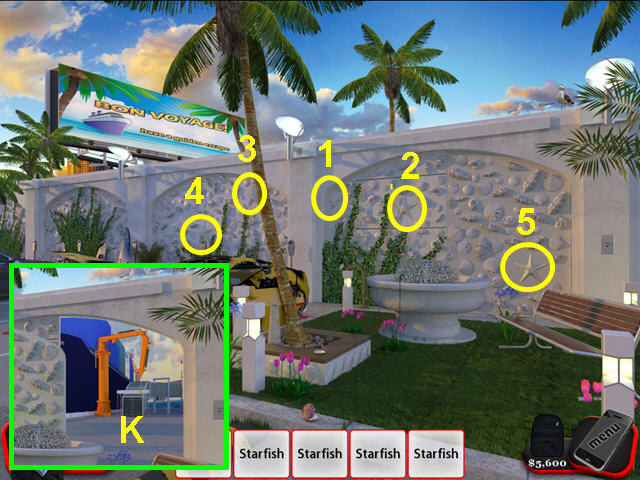
- Press on the starfish in numerical order (1-5).
- Enter the doorway that appears (K).
Chapter Two: Dock
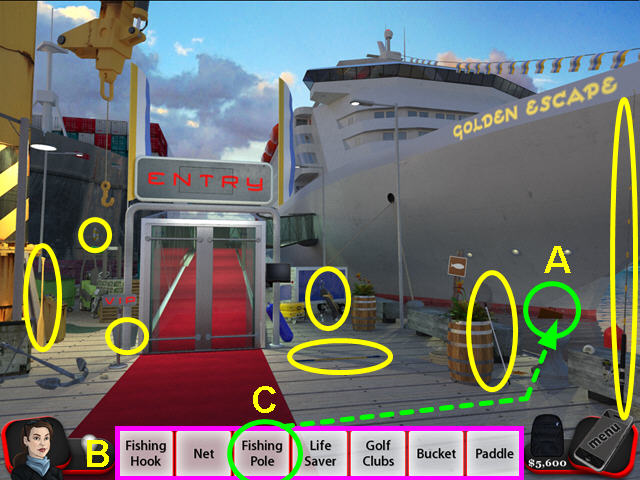
- Look at the briefcase floating in the water (A).
- Collect the objects on the list (B).
- Use the fishing pole on the briefcase (C).
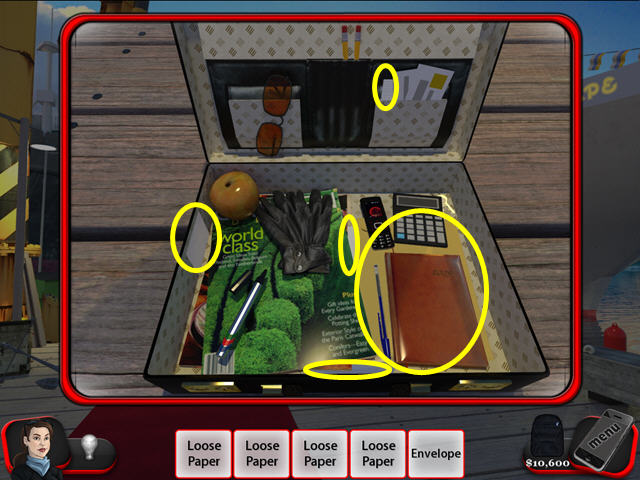
- Find the items on the list.
- You will get a clue to a mini-game here- there is no need to write it down.

- Look at the door control panel (D).
- Collect the items on the list (E).
- Use the anchor on the hook (F).
- Look at the crane control panel (G).
- Click on the controls in numerical order (1-5).
- Look at the door control panel again.
- The object is to find the shapes from the note found in the briefcase.
- Click on each shape to complete the mini-game.
- Enter the doorway.
Chapter Three: Atrium
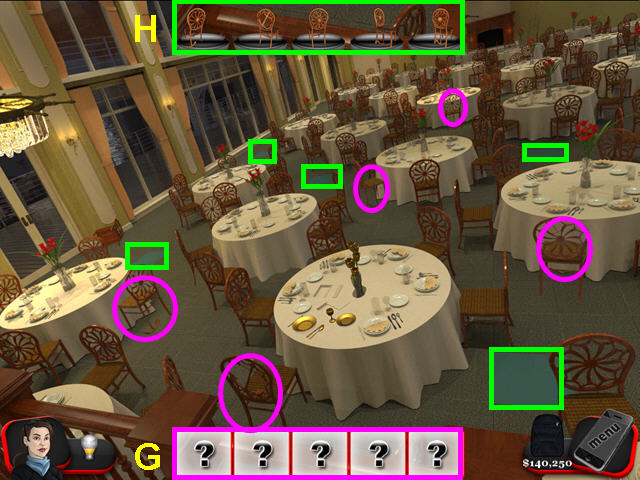
- Locate the items on the list (A).
- Look at the close-up of the sign that appears (B).
- Locate all the items on the list.
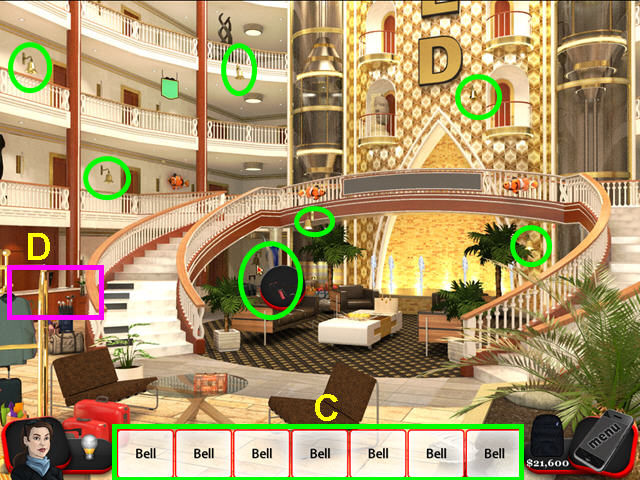
- Use the slingshot on all the bells (C).
- Select the reception desk (D).
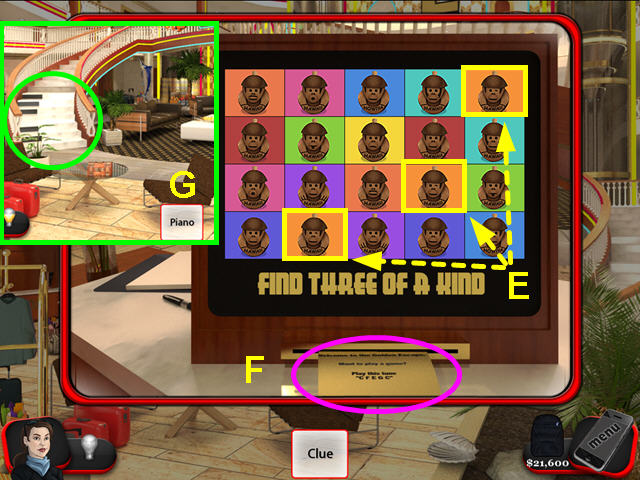
- Find the three monkeys that are identical (E).
- Take the clue that appears at the bottom (F).
- Select the left staircase that looks like piano keys (G).
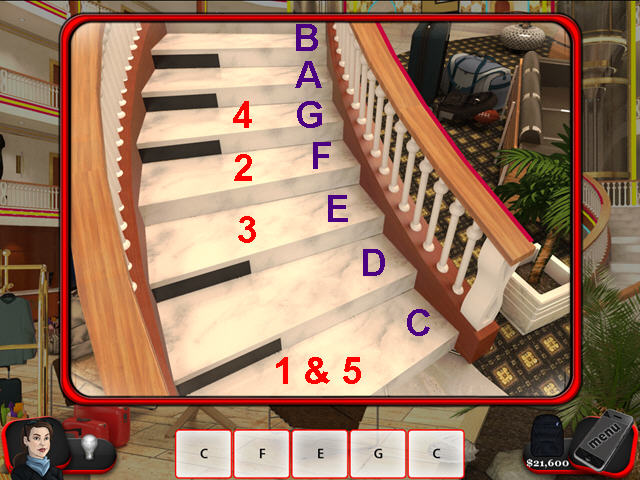
- Play the notes from the clue.
- Click on the stairs in numerical order (1-5).
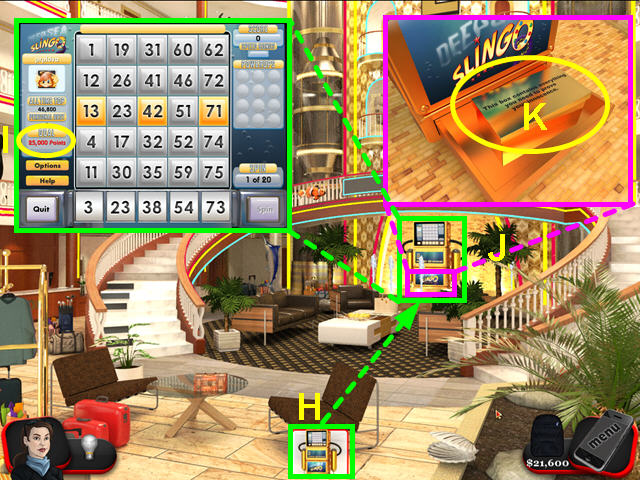
- Select the Slingo machine that appears (H).
- Play the Slingo machine to earn the goal of 25,000 points (I).
- There is a tutorial if you are unfamiliar with Slingo.
- Exit the slingo machine once you make your goal, then look in the tray of the machine (J).
- Take the gold box that proves your innocence (K).
Chapter Four: Cabin
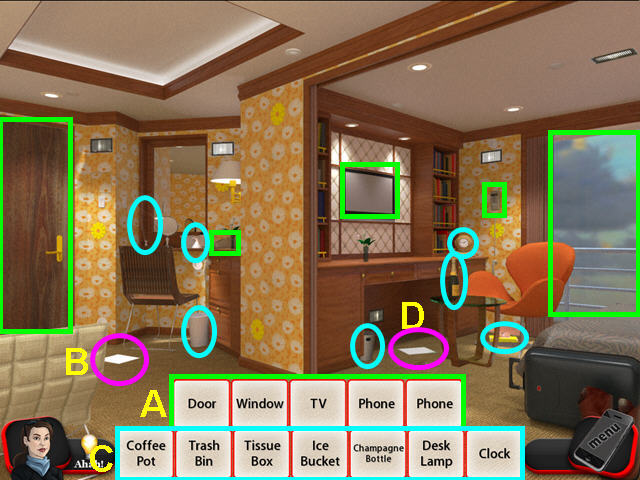
- Locate the items on the list (A).
- Read the note that is slid under the door (B).
- Find all the items on the list (C).
- Take the pamphlet that appears (D).
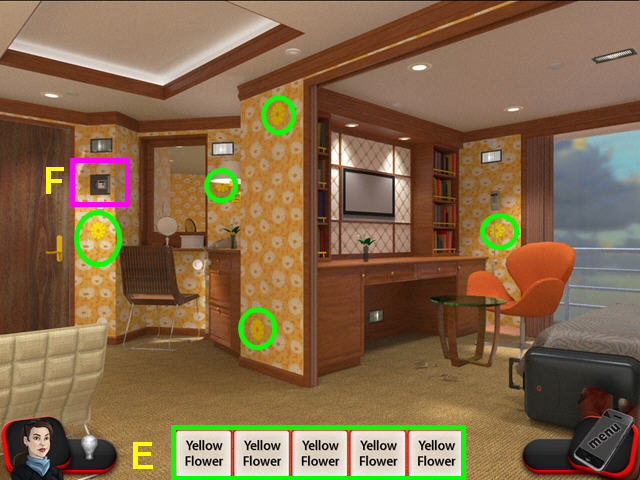
- Locate all the yellow flowers (E).
- Look at the safe that is revealed (F).
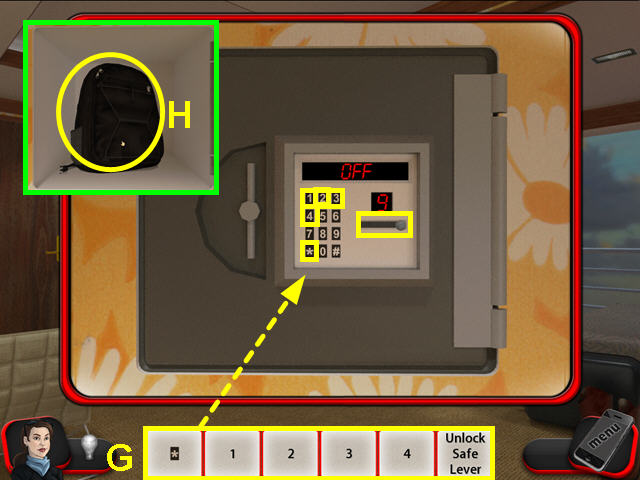
- Per the pamphlet, press *, 1, 2, 3, 4, and pull the lever on the safe (G).
- Take the pack from the safe (H).
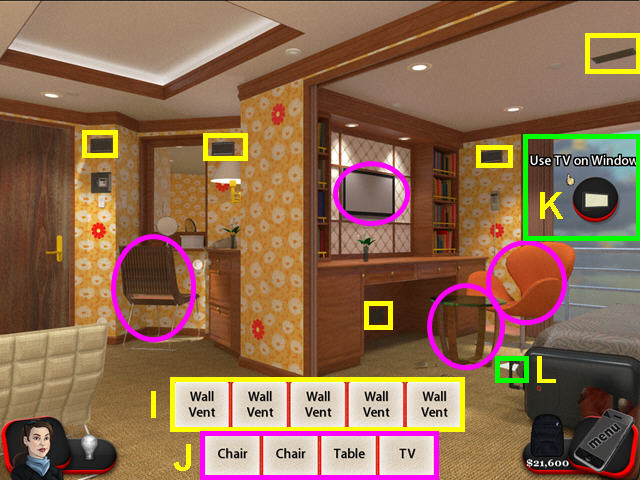
- Locate the 5 wall vents (I).
- Find the 4 items (J).
- Throw each item at the window (K).
- Read the pamphlet that appears (L).
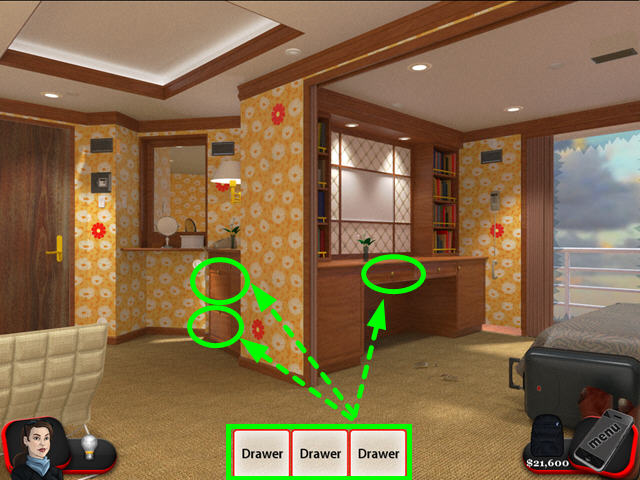
- Locate the 3 drawers.
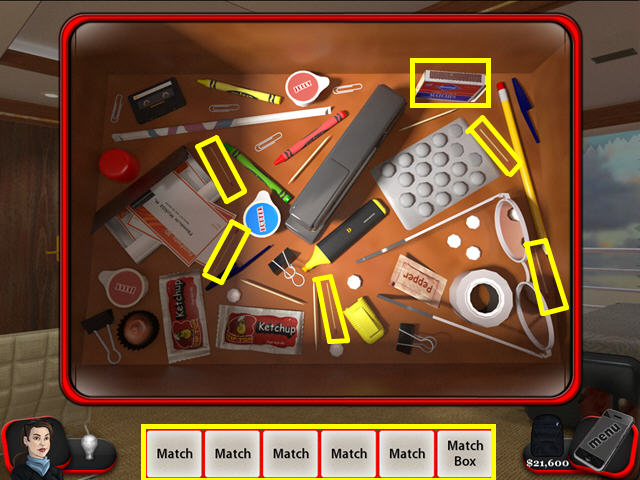
- Find all the items on the list.
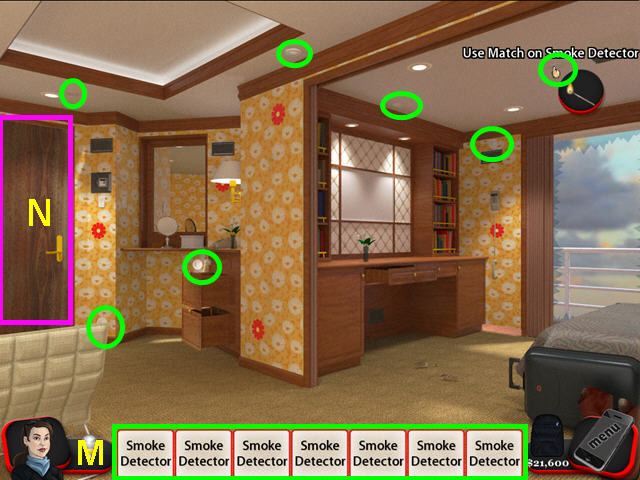
- Use the match on all the smoke alarms (M).
- Select the door to exit the room (N).
Chapter Five: Navigation
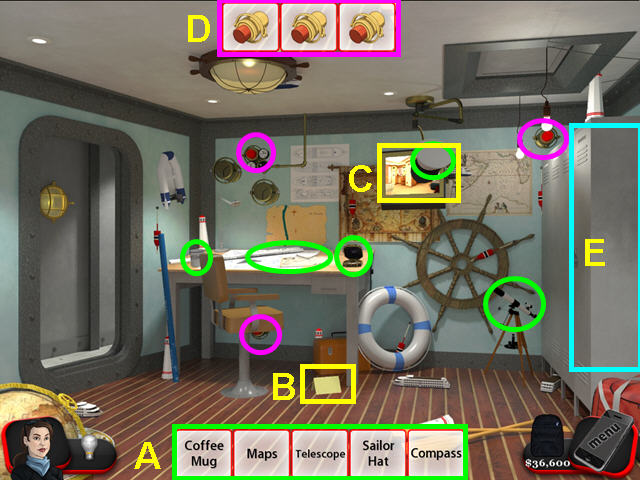
- Locate the items on the list (A).
- Read the note that appears (B).
- Look at the video monitor (C).
- Press the 3 red buttons (D).
- Look at the locker on the right (E).
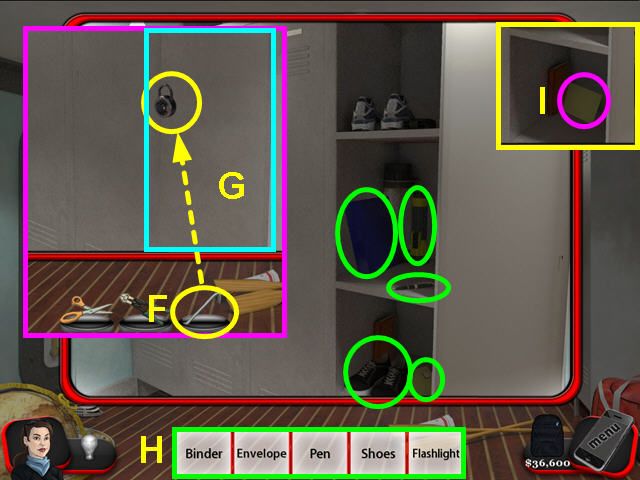
- Use the crowbar to break open the lock (F).
- Click on the locker door (G).
- Collect the items on the list (H).
- Read the clue that appears behind the shoes (I).
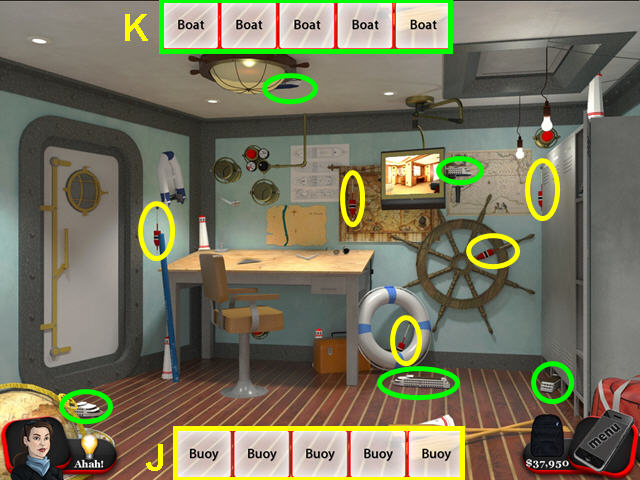
- Locate the 5 buoys (J).
- Find the 5 boats (K).
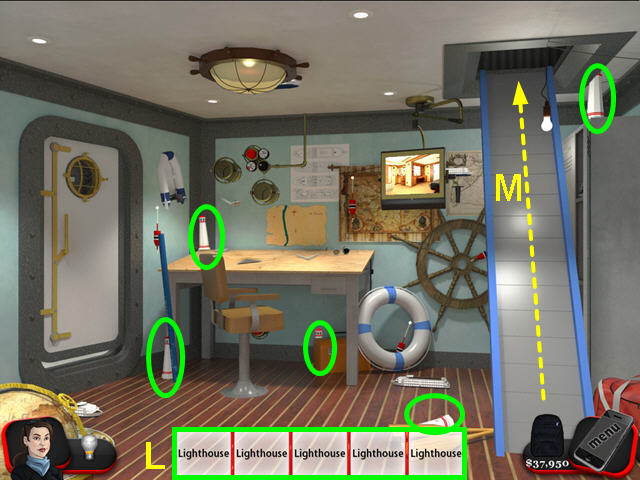
- Locate the 5 lighthouses (L).
- Exit up the ladder (M).
Chapter Six: The Bridge
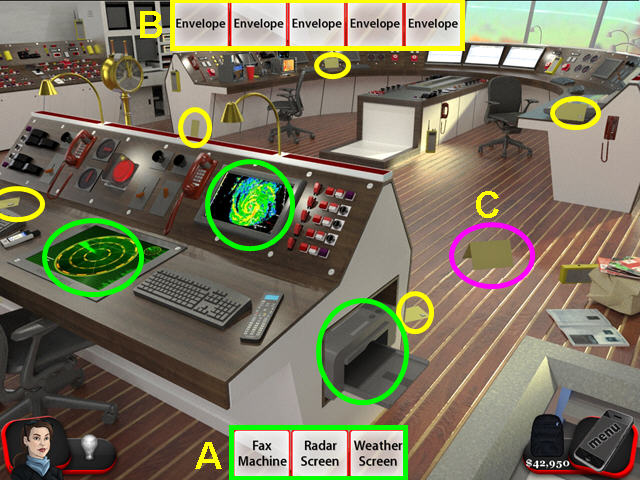
- Locate the 3 items (A).
- Find the 5 envelopes (B).
- Read the note that appears (C).
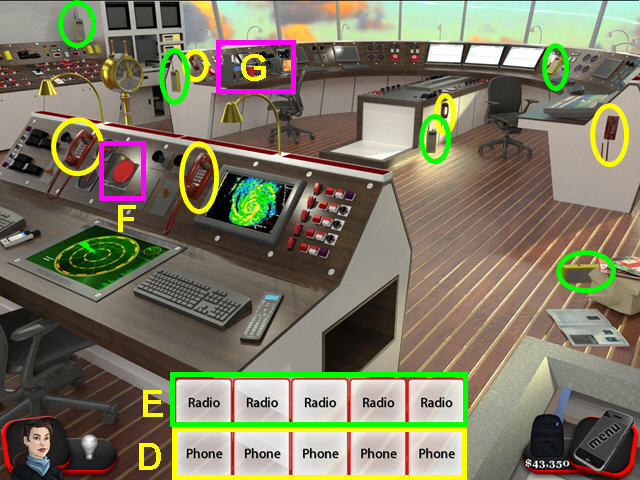
- Locate the 5 phones (D).
- Locate the 5 radios (E).
- Press the emergency beacon button (F).
- Look at the control station (G).
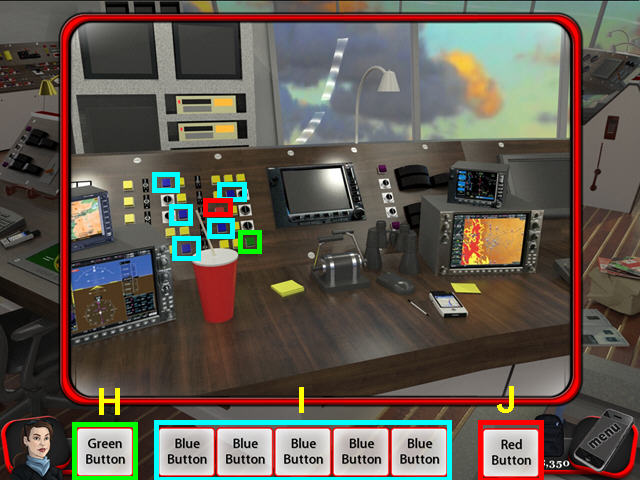
- Press the green button (H).
- Press the 5 blue buttons (I).
- Press the red button (J).
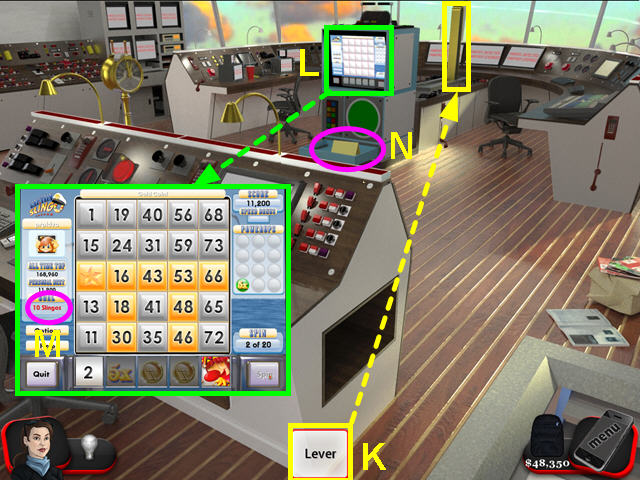
- Pull the large lever (K).
- Select the Slingo machine (L).
- You will need to earn 10 Slingos to earn the clue (M).
- Take the clue from the hopper (N).
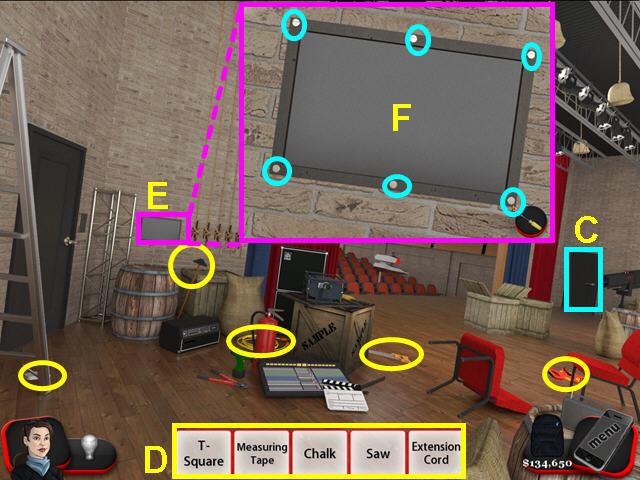
Chapter Seven: Pool

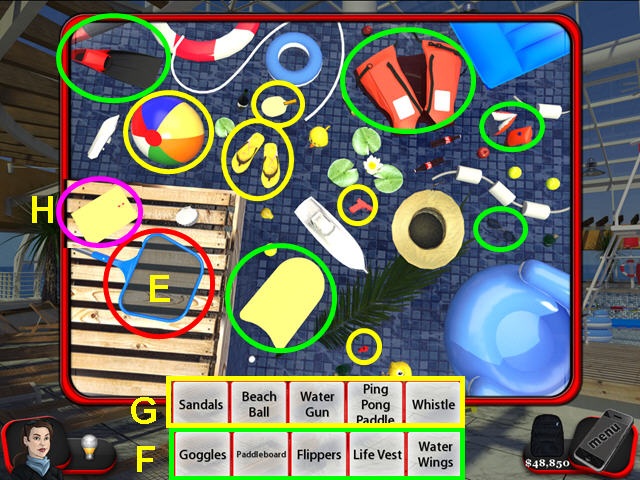
- Locate all the items (A).
- Find all the chairs (B).
- Read the note that appears near the door (C).
- Look at the pool (D).
- Take the pool net (E).
- Collect all the items on the list (F).
- Collect all the items on the list (G).
- Read the clue that appears (H).
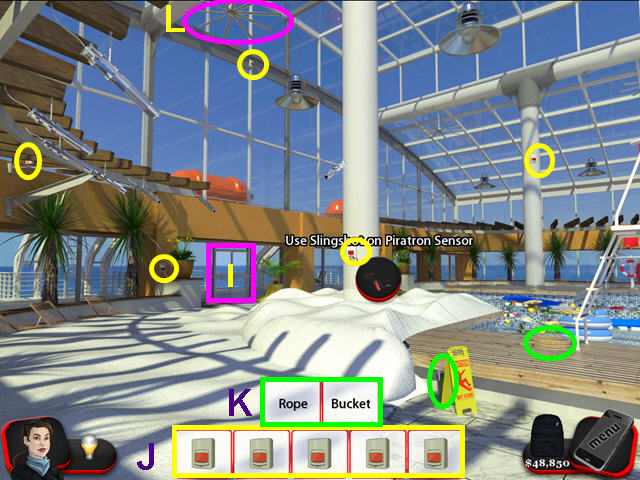
- Try the door to the deck (I).
- Use the slingshot to hit the 5 sensors (J).
- Find the rope and bucket (K).
- Use the rope and bucket on the ceiling fan (L).
Chapter Eight: Deck
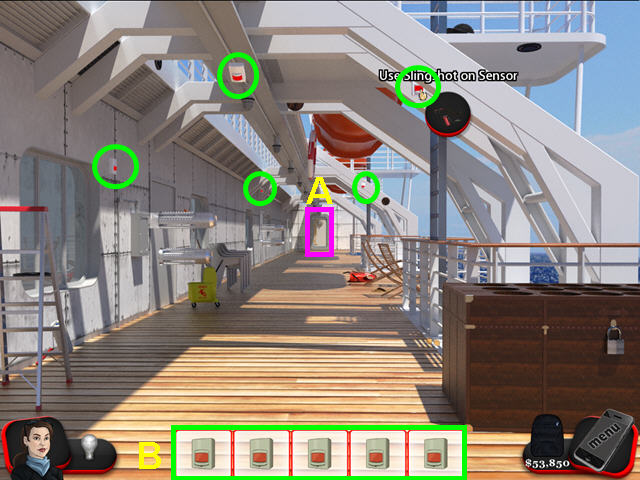
- Try to open the door (A).
- Use the slingshot on the 5 sensors (B).
- Use the slingshot on the 5 shielded sensors (C).
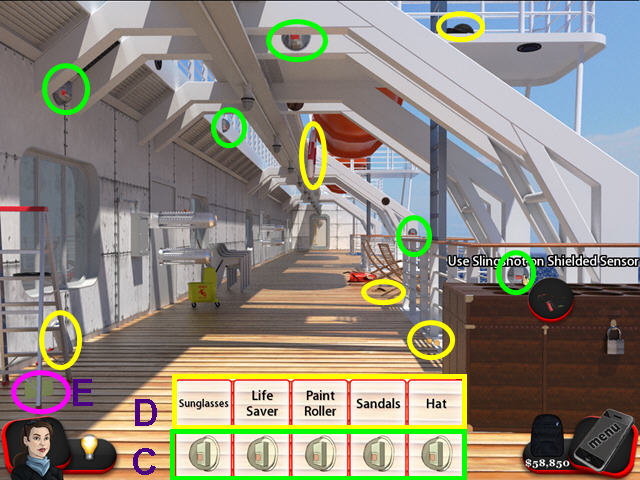
- Locate the 5 items (D).
- Read the clue that appears under the ladder (E).
- Locate the 5 animal discs (F).
- Look at the chest (G).
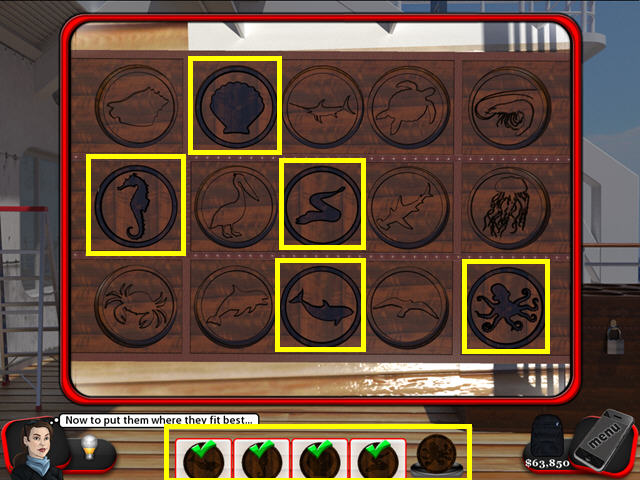
- Place the animal discs on their matching spot.
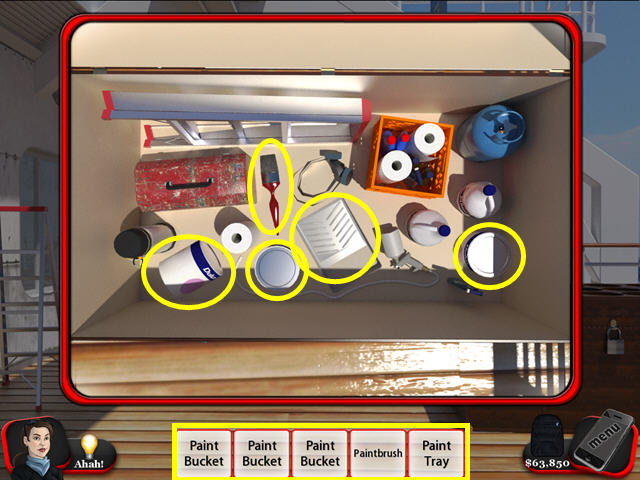
- Locate all the items on the list.
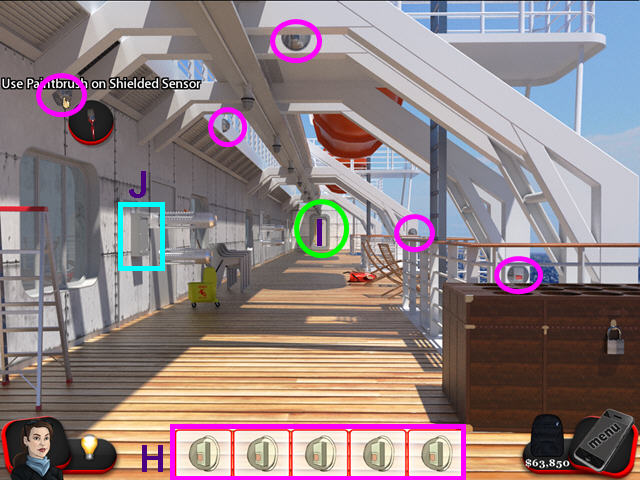
- Use the paintbrush on the 5 shielded sensors (H).
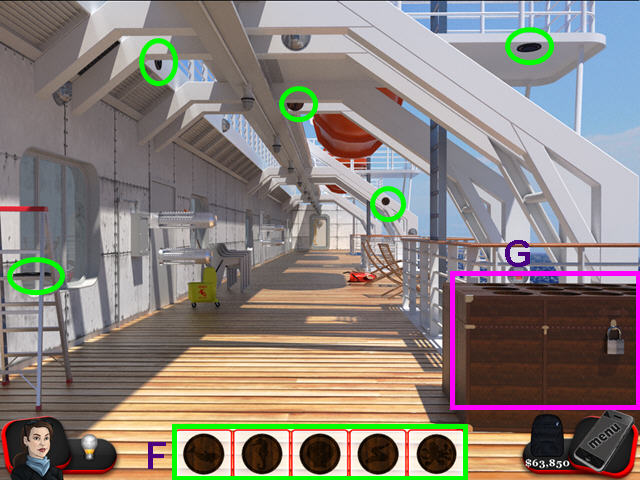
- Try to open the door (I).
- Look at the electrical panel (J).
- Locate all the items on the list.
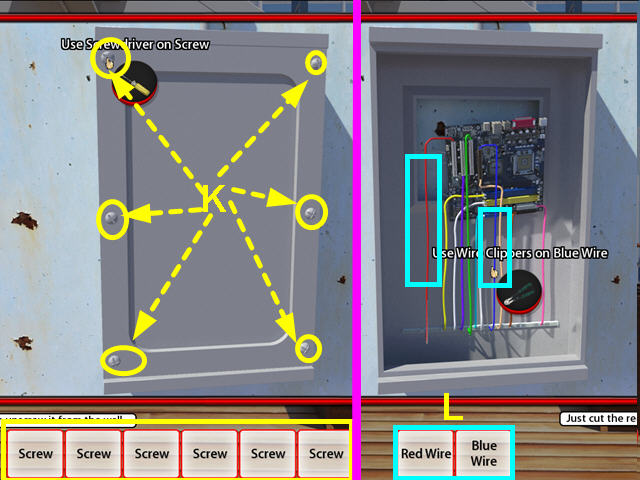
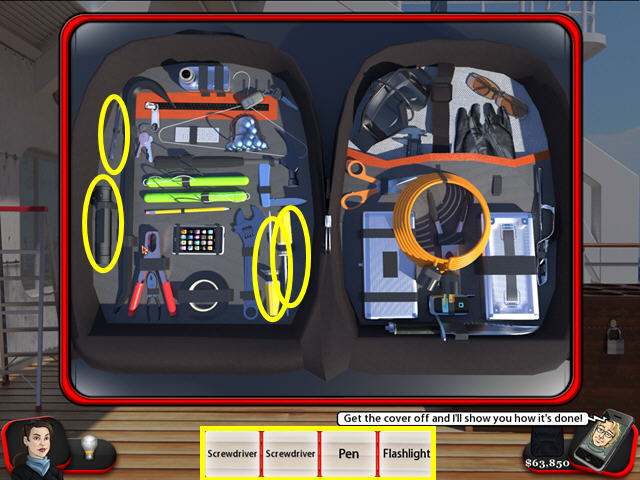
- Use the screwdriver to remove the 6 screws (K).
- Use the wire clippers to cut the red and blue wires (L).
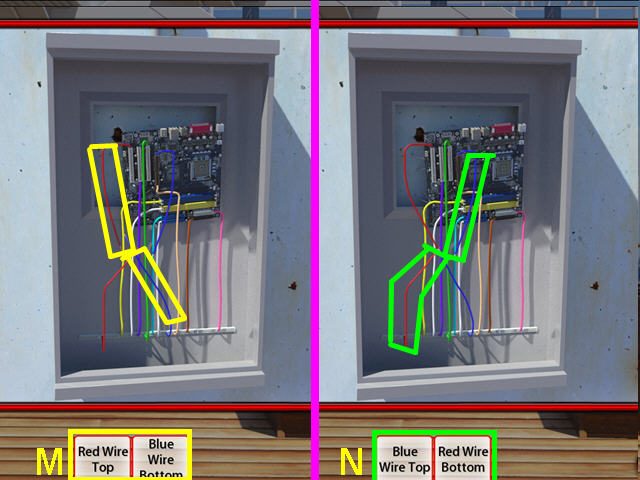
- Select the top red wire and the lower blue wire to attach them with electrical tape (M).
- Select the top blue wire and the lower red wire to attach them with electrical tape (N).
- Select the door to leave the deck.
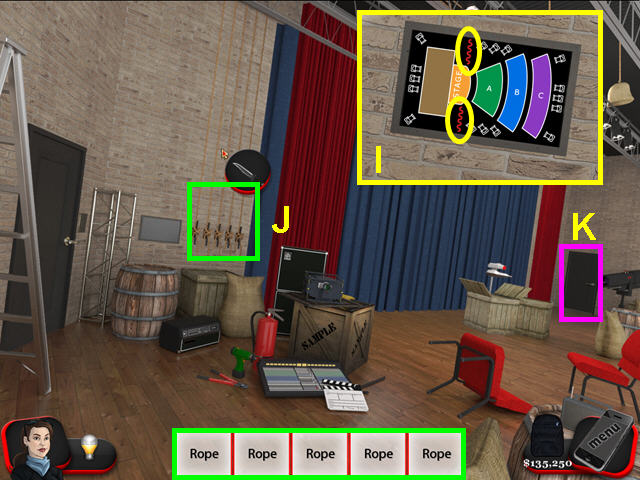
Chapter Nine: Bow
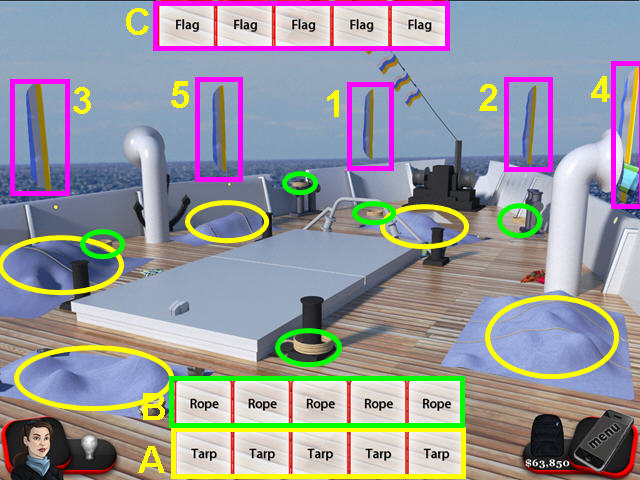
- Locate the 5 blue tarps (A).
- Collect the 5 ropes (B).
- Click on the flags (C).
- They must be clicked on in the correct order (1-5).
- The flag will stay down if clicked in the correct order.
- Pull the lever (D).
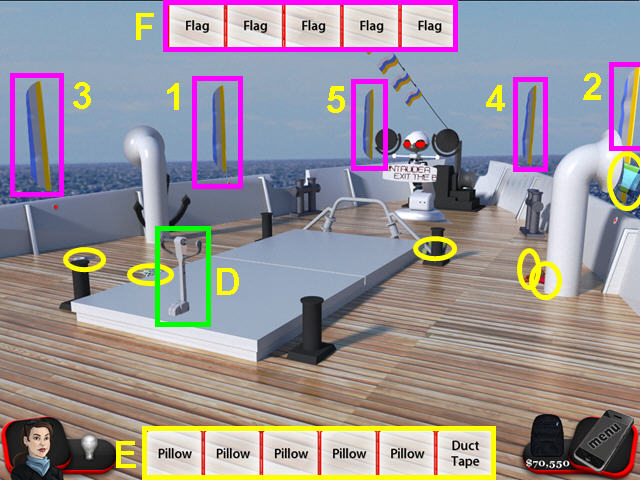
- Locate all the items (E).
- Click on the flags (F).
- They must be clicked on in the correct order (1-5).
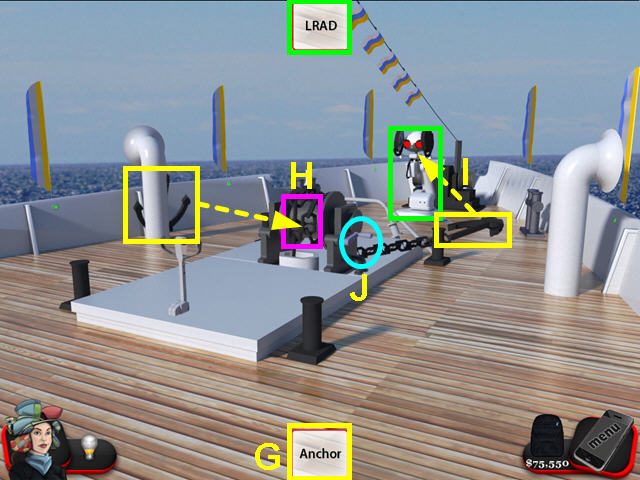
- Collect the anchor (G).
- Use the anchor on the chain (H).
- Take the anchor and chain and use it on the LRAD (I).
- Use the switch (J).
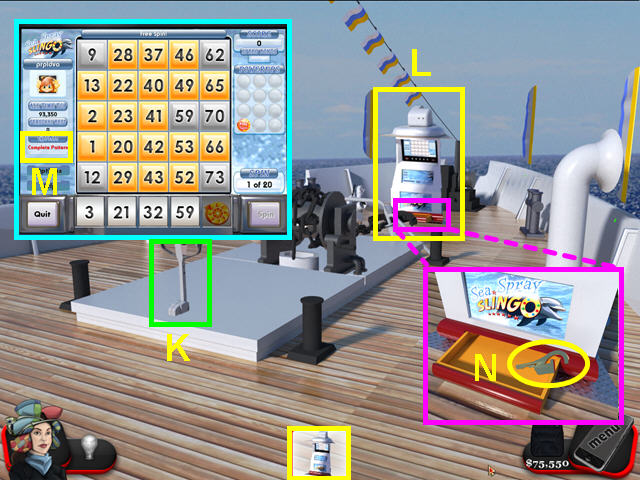
- Click on the lever to raise the Slingo machine (K).
- Select the Slingo machine to play (L).
- Your goal is to complete the yellow pattern (M).
- Look in the Slingo hopper and take the vault key (N).
Chapter Ten: Outside Casino
- Try the doors (A).
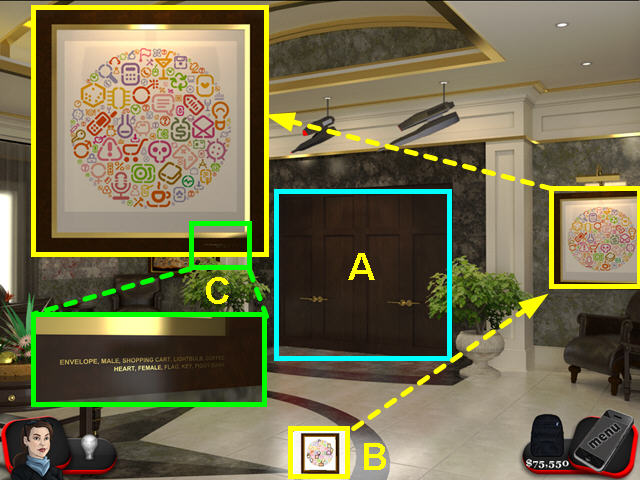
- Look at the strange painting (B).
- Look at the writing (C).
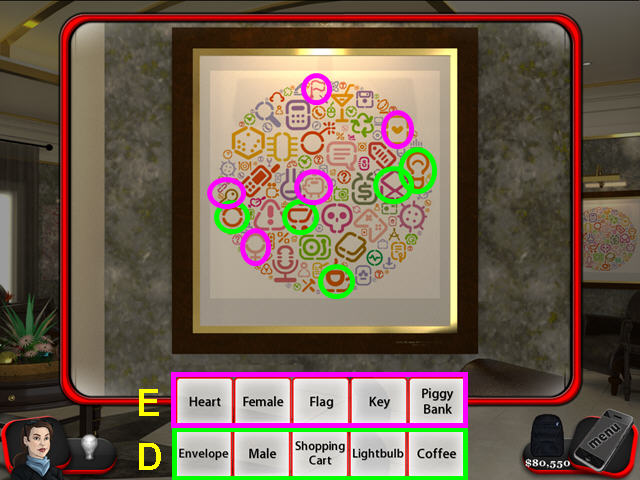
- Find the items from the first list (D).
- Locate the items on the second list (E).
- Read the clue that fell to the floor (F).
- Look at the left painting (G).
- Locate the items on the list (H).
- Look at the painting that appears to the left (I).
- Locate the numbers on the first list (J).
- Find the numbers on the second list (K).
- Enter the now open doors (L).
Chapter Eleven: Casino
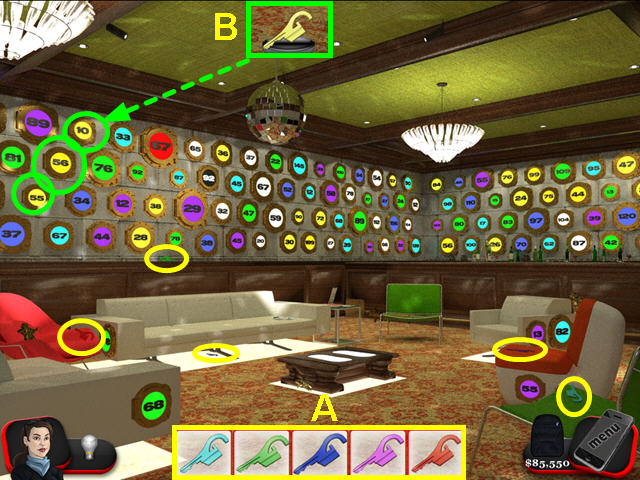
- Look at the cashier cages (A).
- Use 4 tools on the cages (B).
- Look at the roulette table (C).
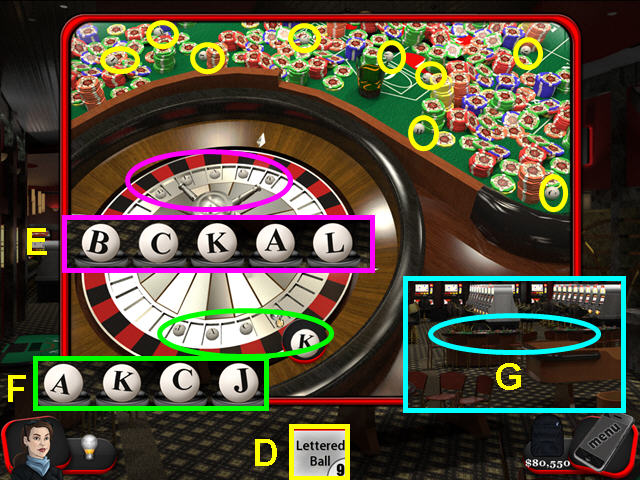
- Find the 9 letter balls among the chips (D).
- Use the balls to spell out BLACK on the upper half of the wheel (E).
- Use the balls to spell JACK on the lower half (F).
- Look at the blackjack tables (G).
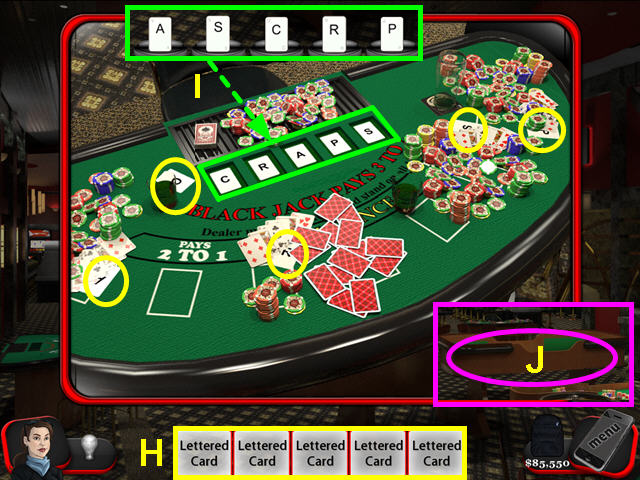
- Locate the lettered cards (H).
- Place the cards in the trays to spell CRAPS (I).
- Look at the craps table (J).
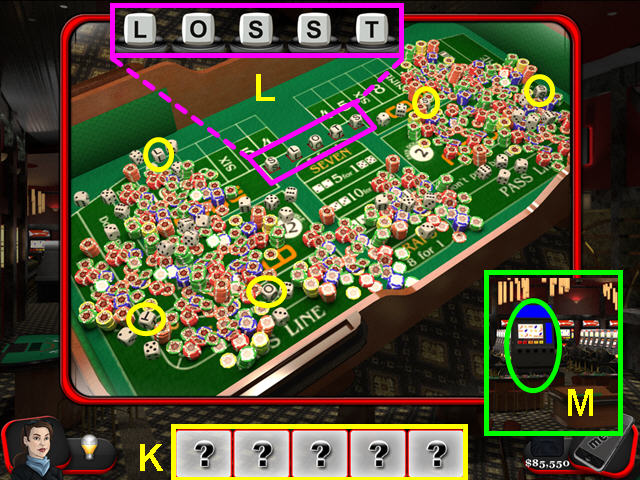
- Locate the letter dice on the table (K).
- Use the dice to spell SLOTS (L).
- Look at the the slot machine (M).
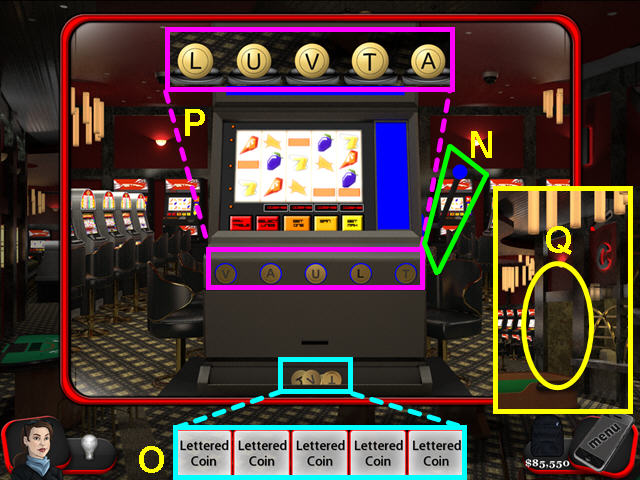
- Pull the lever on the slot machine (N).
- Take the 5 letter coins from the hopper (O).
- Use the coins to spell VAULT (P).
- Enter the vault (Q).
Chapter Twelve: Vault
- Locate the 5 keys (A).
- Try the yellow key on one of the left yellow safes (B).
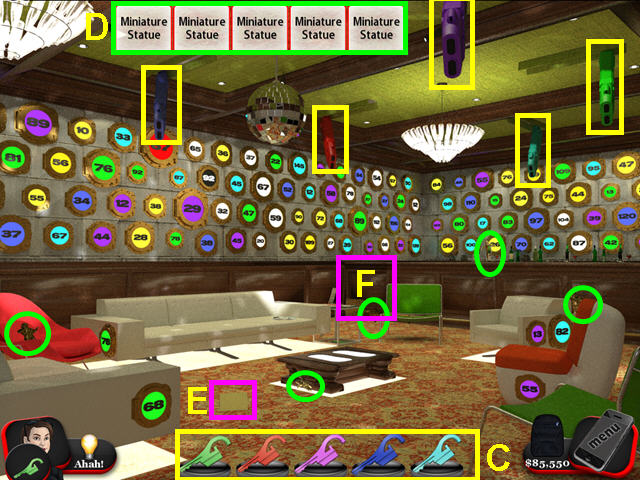
- Place the keys in the corresponding color gun (C).
- Find the 5 miniature statues (D).
- Look at the clue that appears (E).
- Look at the bar (F).
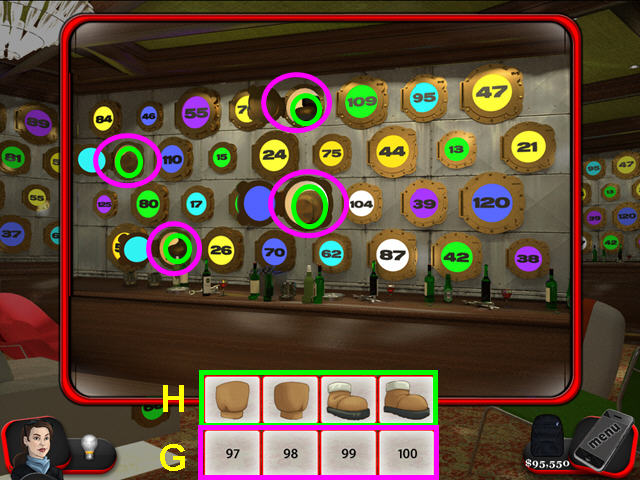
- Open the lockers numbered 97-100 (G).
- Take the 2 feet and legs (H).

- Place the 2 feet on the table (I).
- Place the legs over the feet (J).
- Read the clue that appears (K).
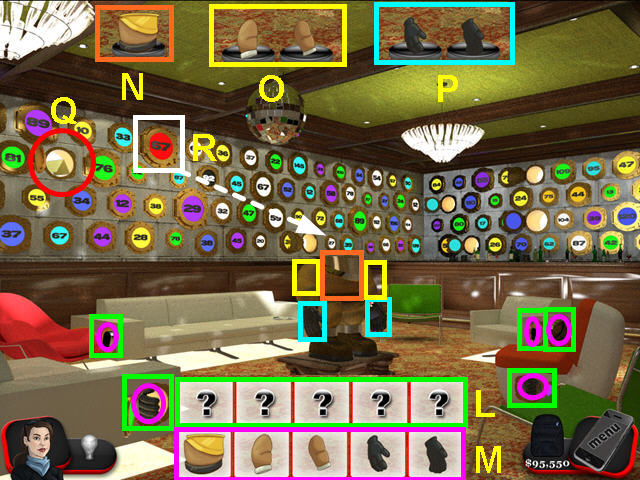
- Use the yellow key on the 5 lockers on the furniture (L).
- Take the 5 robot parts from the lockers (M).
- Place the torso on the robot (N).
- Place the arms on the robot (O).
- Place the hands on the robot (P).
- Look at the clue that is revealed (Q).
- Use the key on the red locker (R).
- Place the head on the robot.
- Take the extension cord that fell from the disco ball and use it on the robot's head (S).
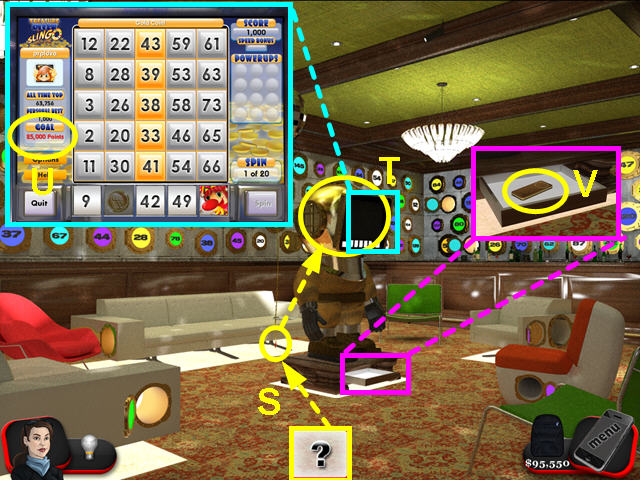
- Click on the head to play Slingo (T).
- Your goal is 25,000 points (U).
- Look in the hopper and take the Swiss bank key (V).
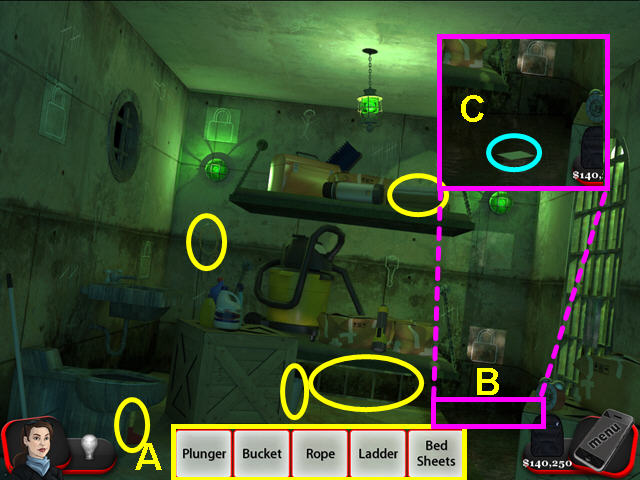
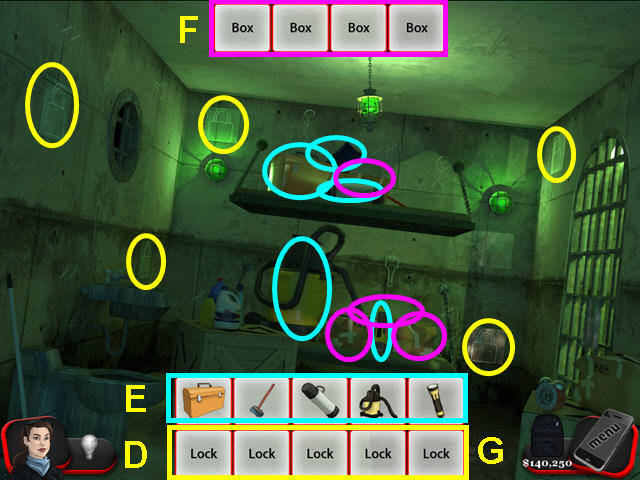
Chapter Thirteen: Fitness Room

- Try the door (A).
- Collect the 45lb weights (B).
- Throw the weight at the door (C).
- Collect the dumbbells (D).
- Look at the plumbing (E).
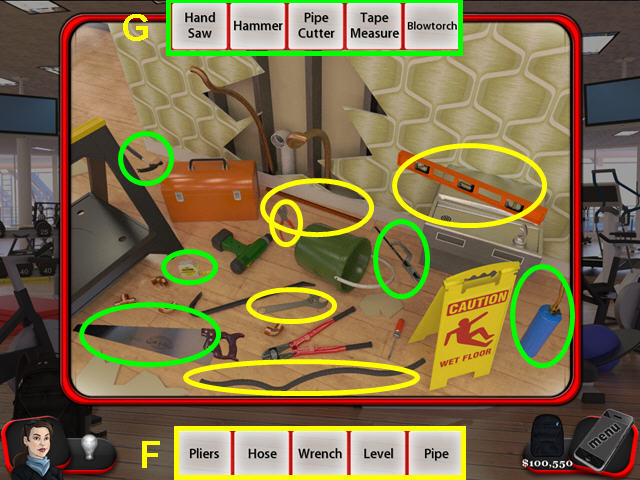
- Locate the 5 items (F).
- Locate the next 5 items (G).
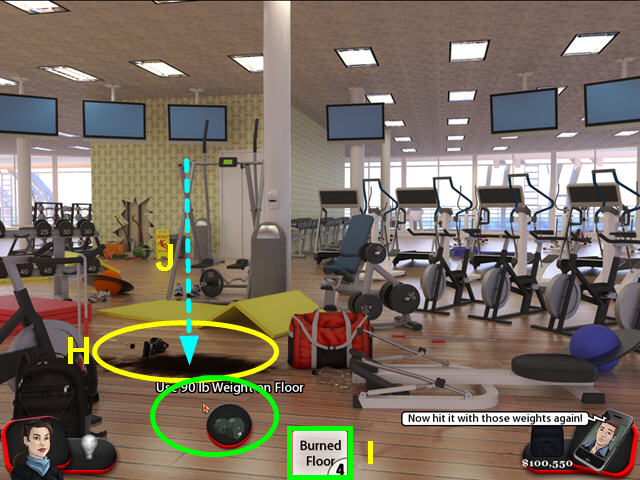
- Use the blowtorch on the wooden floor (H).
- Throw the 4 dumbbells at the burned floor (I).
- Climb down the hole in the floor (J).
Chapter Fourteen: Captain's Quarters

- Turn all the valves (A).
- Remove the debris (B).
- Find the red button that appeared (C).
- Place the red button in the slot on the ceiling (D).
- Press the 5 red buttons (E).

- Pull the 5 levers (F).
- Look at the computer that appears (G).
- Select “OFF” on the screen (H).
- Look at the bulletin board (I).
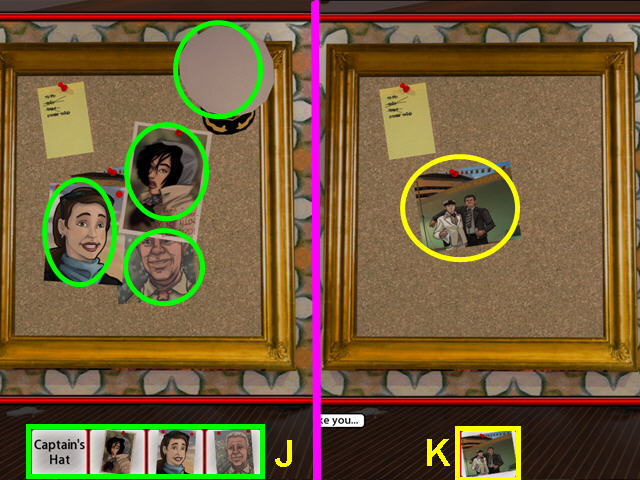
- Locate the hat and 3 photos (J).
- Take the remaining photo (K).
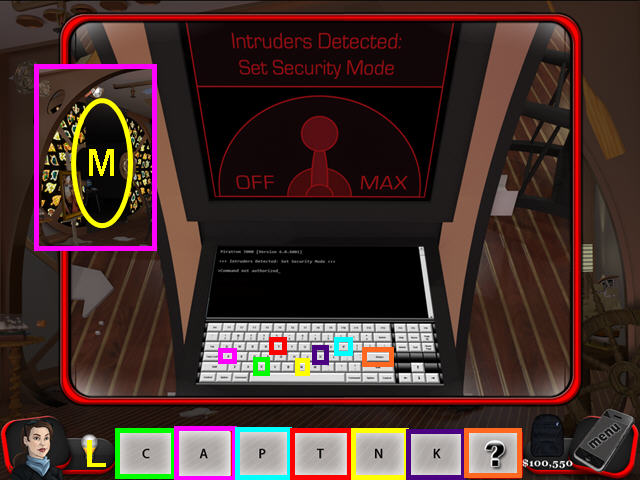
- Look at the computer again.
- Type C-A-P-T-N-K-Enter (L).
- Walk through the door that opens (M).
Chapter Fifteen: Computer Room
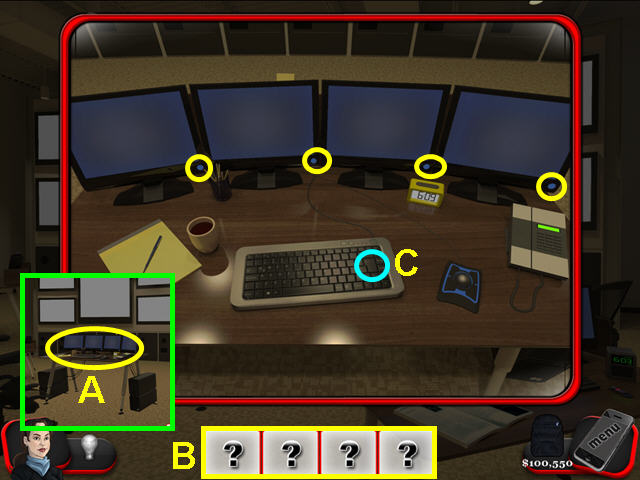
- Look at the computer station in the center of the room (A).
- Turn on the 5 monitors (B).
- Press “Enter” (C).

- Click on the monitors to duplicate the 4-part pattern (D).
- Click on the monitors to duplicate the 5-part pattern (E).
- Click on the monitors to duplicate the 6-part pattern (F).
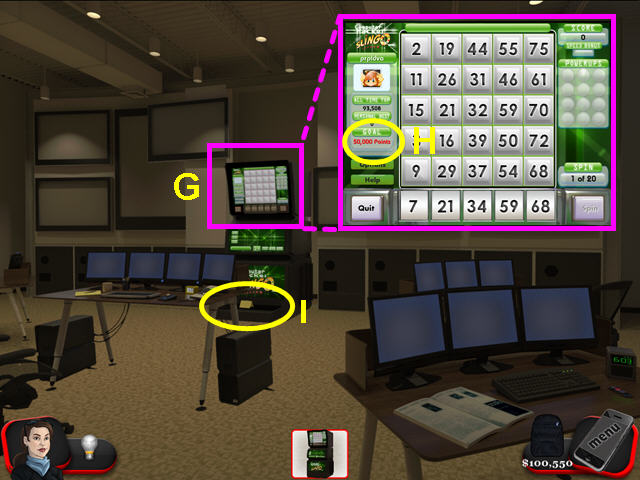
- Select the Slingo machine (G).
- Play Slingo to make the goal of 50,000 points (H).
- Look in the hopper and read the note (I).
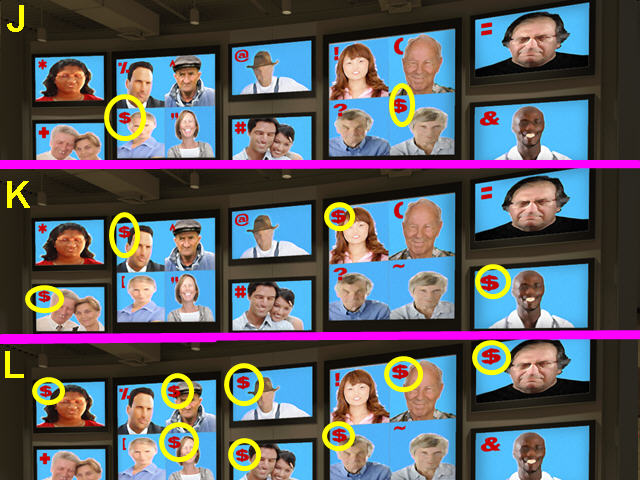
- Find the 2 dollar signs (J).
- Find the 4 dollar signs (K).
- Find the 8 dollar signs (L).
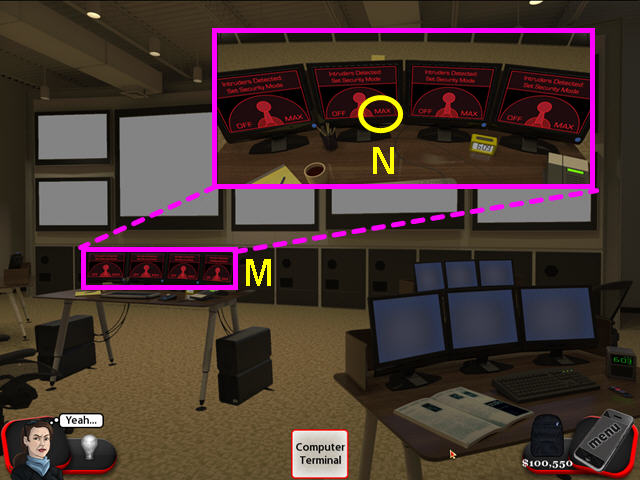
- Look at the computer station on the left (M).
- Press “MAX” on any of the screens (N).
Chapter Sixteen: Outside Mona's Hideout
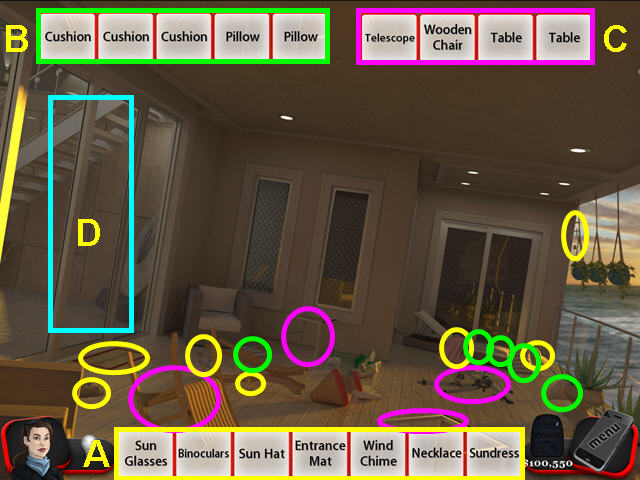
- Locate the items on the list (A).
- Find the items on the next list (B).
- Locate all the items (C).
- Throw the telescope at the door (D).
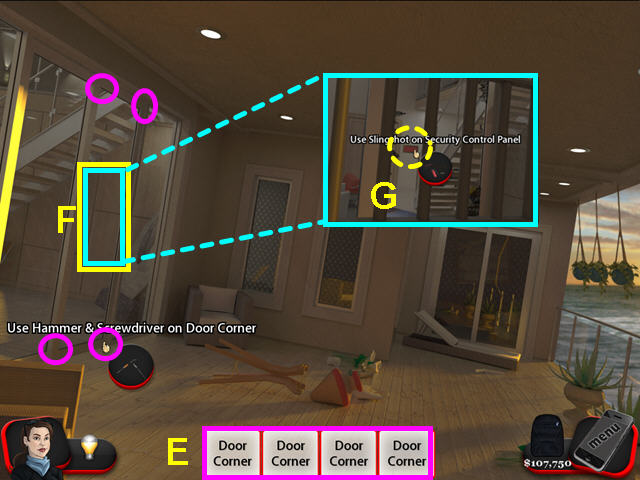
- Use the hammer and screwdriver on the 4 corners of the door (E).
- Throw items at the door until it breaks (F).
- Look at the broken door through the bars.
- Use the slingshot on the control panel (G).
- Enter the open door.
Chapter Seventeen: Mona's Hideout
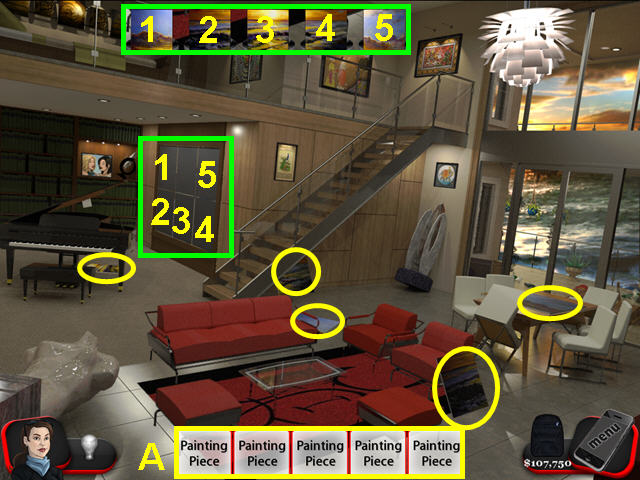
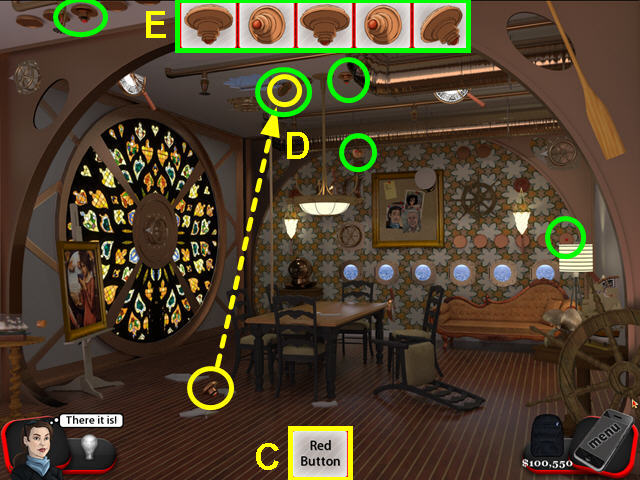
- Locate the painting pieces (A).
- Place the painting pieces into the frame (1-5).
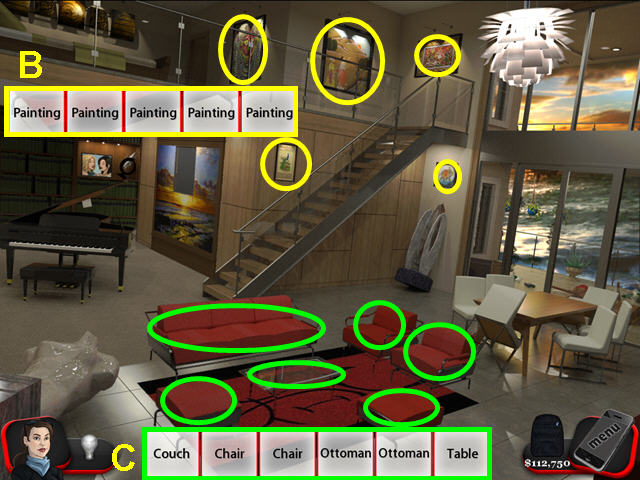
- Locate the 5 paintings (B).
- Find the 5 furniture pieces (C).
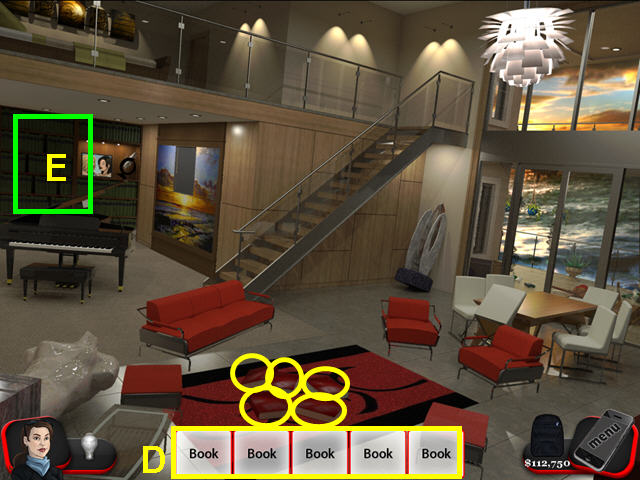
- Collect the 5 books (D).
- Look at the bookshelf (E).
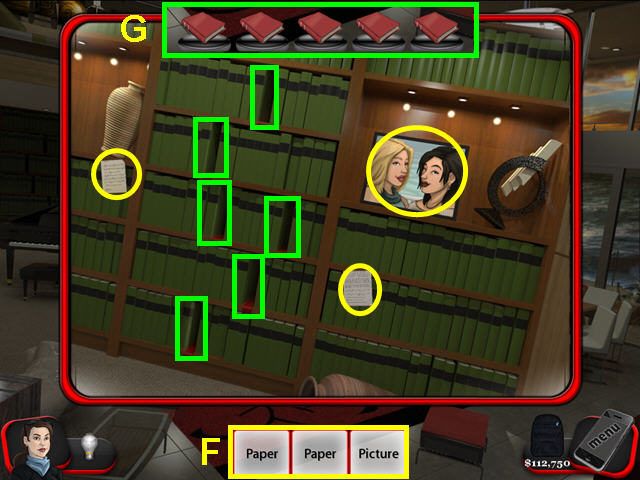
- Find the 2 notes and the photo (F).
- Place the 5 books in any of the 6 openings (G).
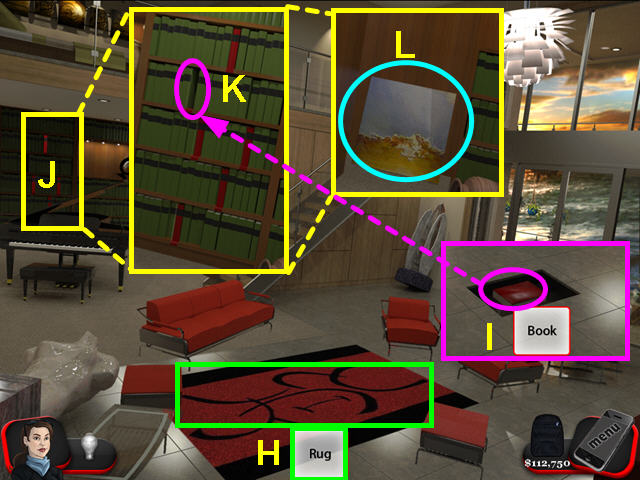
- Take the rug (H).
- Take the 6th book (I).
- Look at the bookcase (J).
- Place the book in the empty slot (K).
- Take the painting piece that is revealed (L).
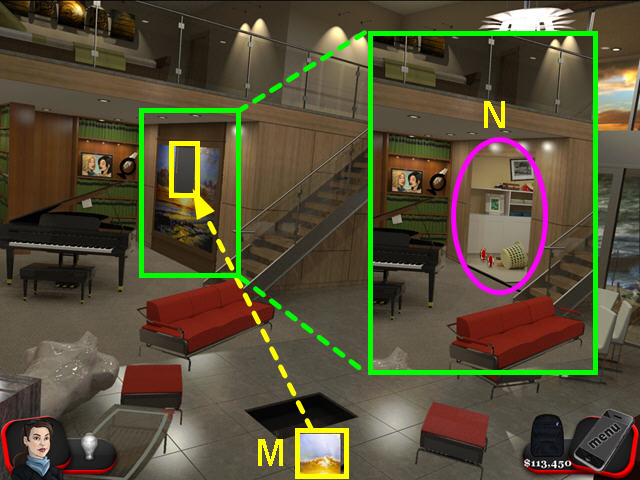
- Place the painting piece in the empty slot (M).
- Enter the secret room (N).
Chapter Eighteen: Mona's Closet
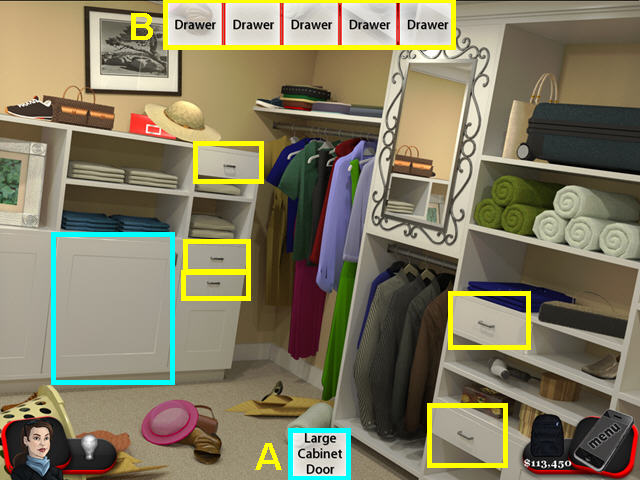
- Find the large cabinet door (A).
- Locate the 5 drawers (B).
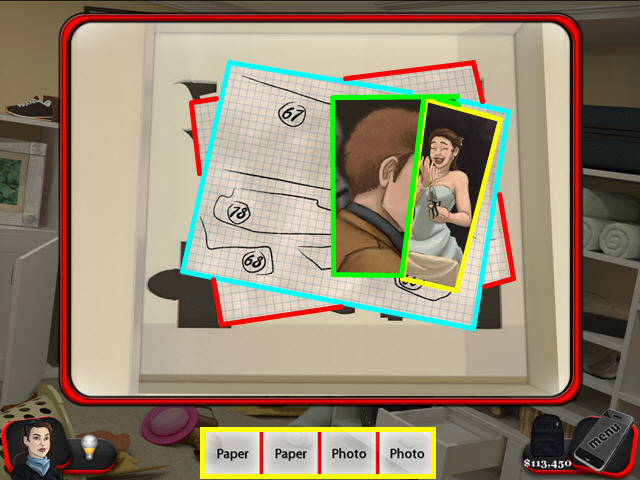
- Find the 2 papers and 2 photos.
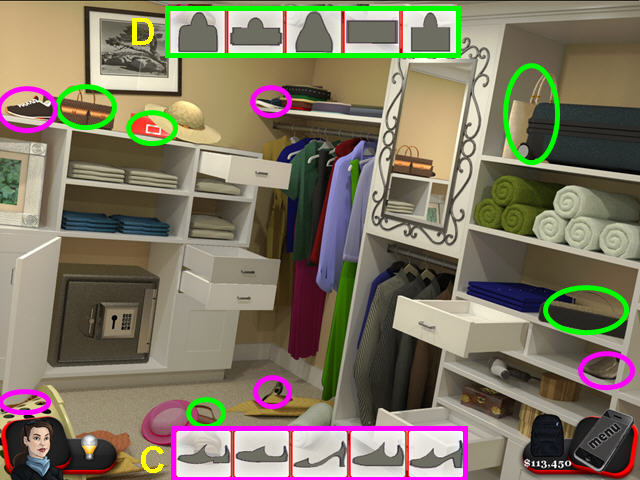
- Locate the 5 shoes (C).
- Locate the 5 handbags (D).

- Place the 5 shoes into the matching slots (E).
- Place the 5 handbags into the matching slots (F).
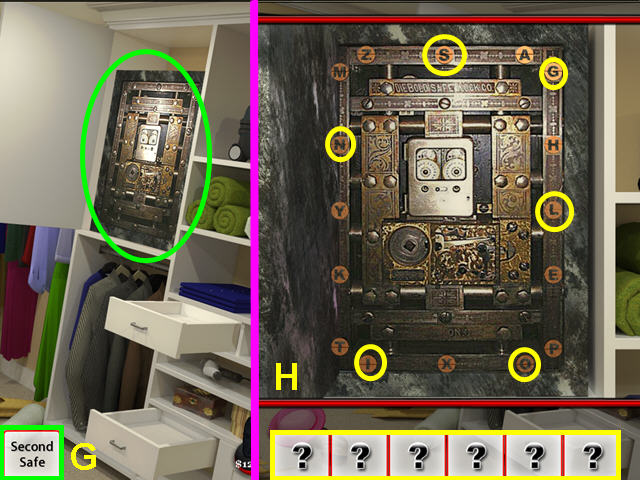
- Look at the second safe that appears on the right (G).
- Press the letters S-L-I-N-G-O (H).
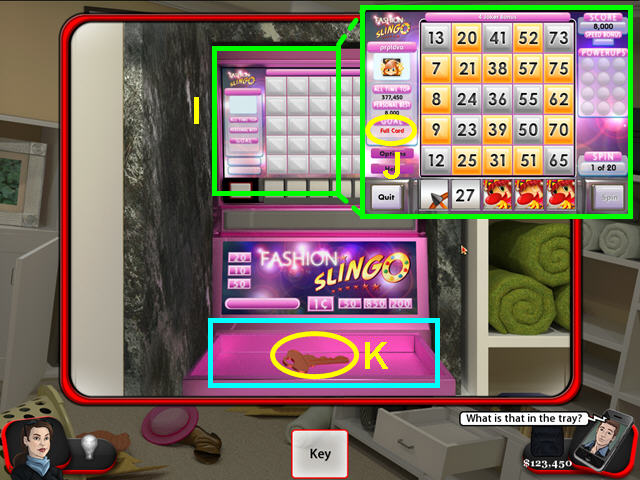
- Click on the Slingo machine to play (I).
- Your goal is a full card (J).
- Take the key from the hopper (K).
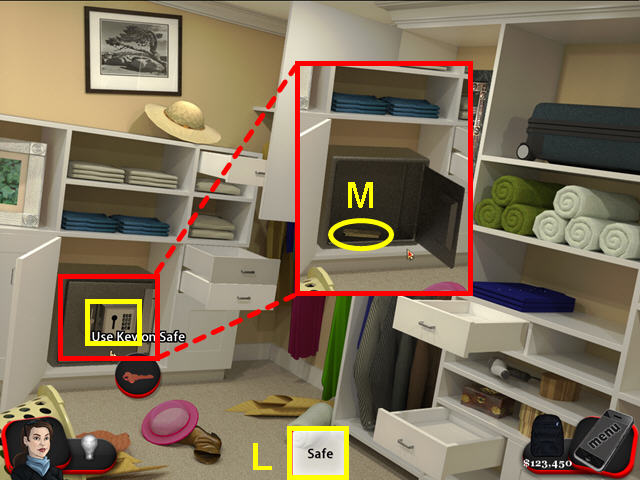
- Use the key on the small safe (L).
- Take the Swiss bank key (M).
Chapter Nineteen: Performer's Room
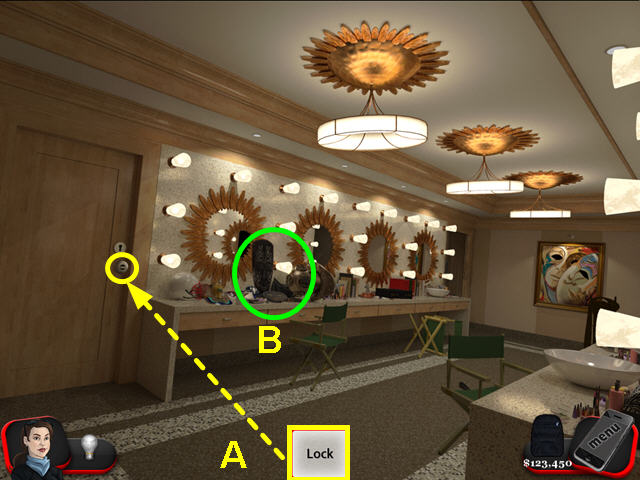
- Lock the door (A).
- Look at the masks on the dressing table (B).
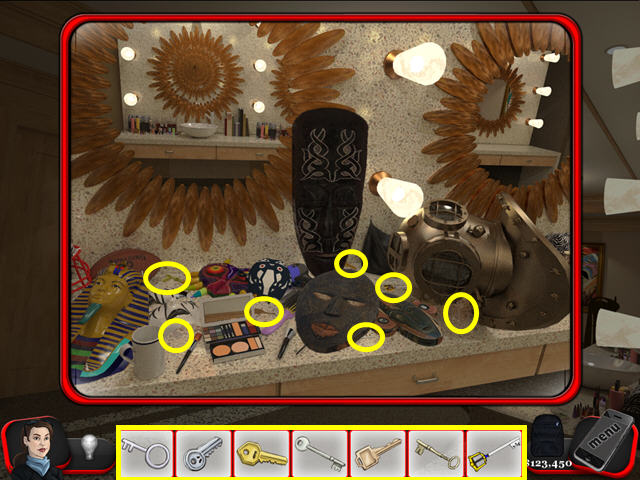
- Locate all the keys.
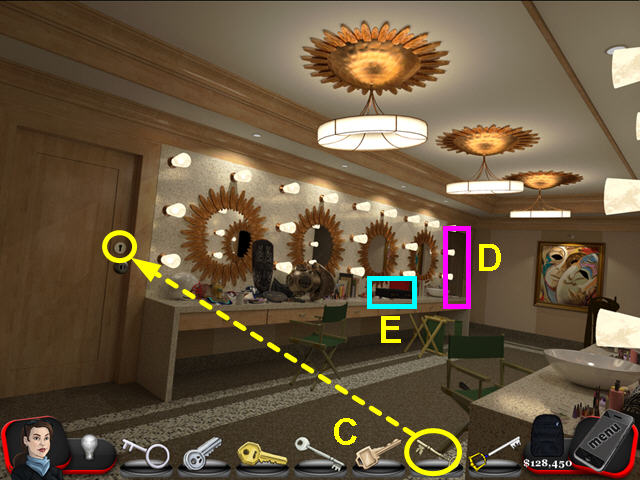
- Lock the deadbolt with the correct key (C).
- Try the back door (D).
- Look at the briefcase (E).
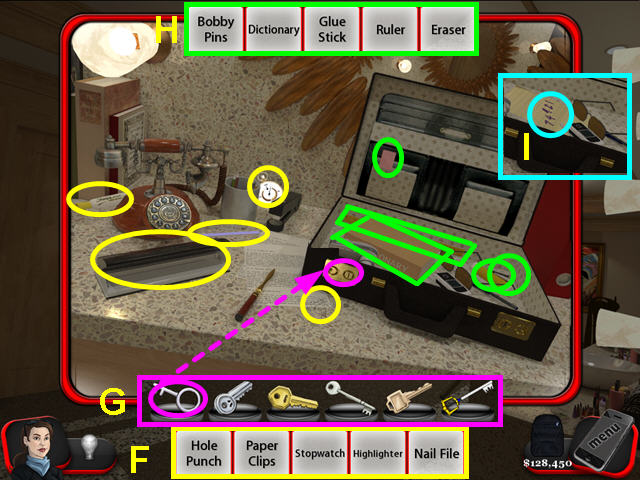
- Find the items on the list (F).
- Open the briefcase with the correct key (G).
- Locate the items (H).
- Take the code that appears (I).
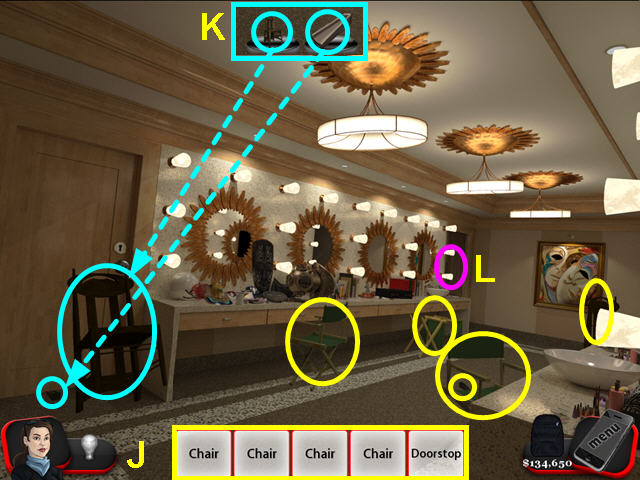
- Locate the chairs and doorstop (J).
- Place the doorstop and chair on the door (K).
- Look at the rear door's control panel (L).
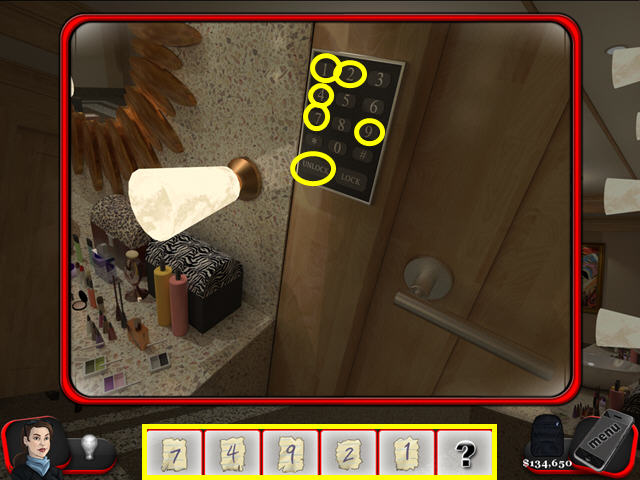
- Press the numbers and unlock.
- Exit through the rear door.
Chapter Twenty: Backstage
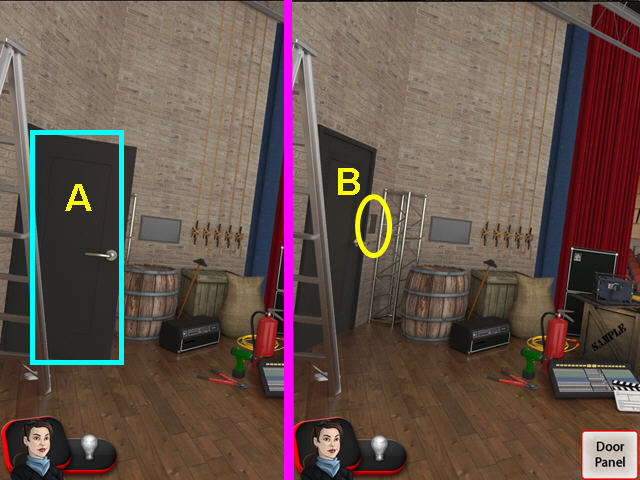
- Close the door on the left (A).
- Look at the control panel (B).
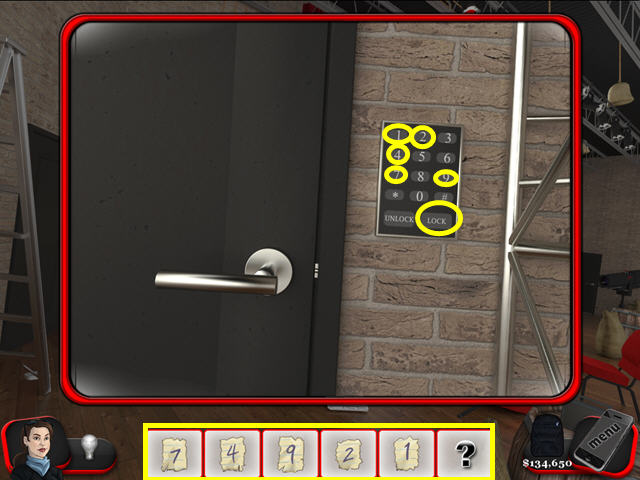
- Press the numbers and lock.
- Try the door on the right (C).
- Locate the items on the list (D).
- Look at the curtain control panel (E).
- Use the screwdriver to remove the 6 screws (F).

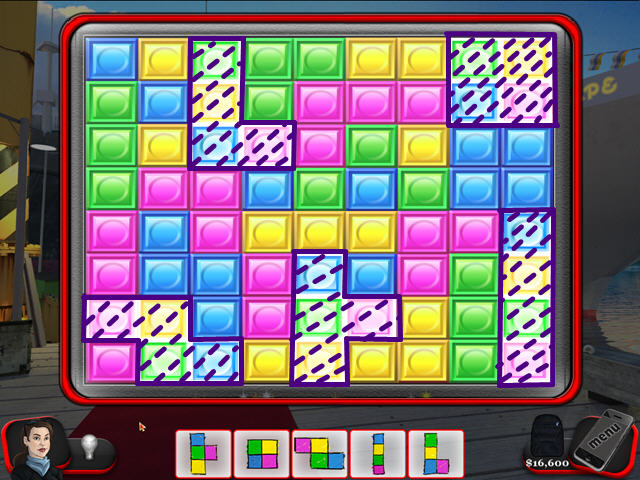
- Find the 5 puzzle pieces (G).
- Place the pieces into the grid (H).
- Click on the completed puzzle to replace the panel cover.
- Click on the red line to close the curtain (I).
- Use the knife to cut the 5 ropes (J).
- Exit through the door on the right (K).
Chapter Twenty-one: Ballroom
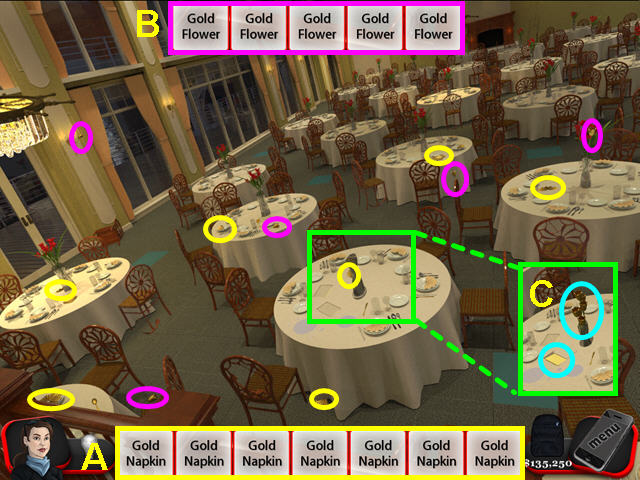
- Find all the gold napkins (A).
- Locate the gold flowers (B).
- Place the 5 flowers in the empty vase and read the clue that appears (C).
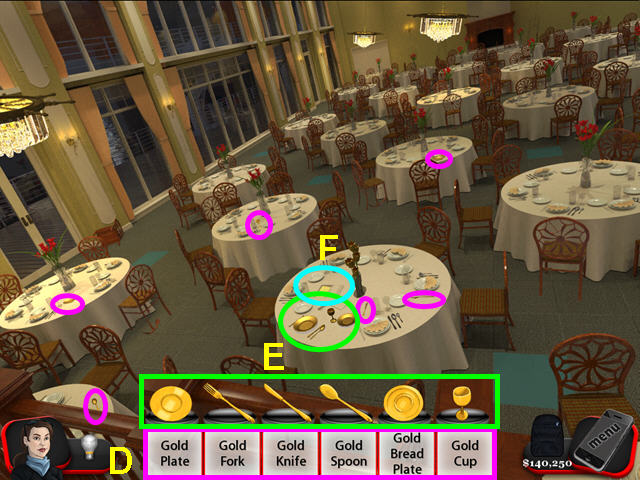
- Find the gold dinnerware (D).
- Place the dinnerware in the empty place setting (E).
- Read the clue that appears (F).
- Find the 5 anchor chairs (G).
- Place the chairs on the blue squares (H).
- Select the Slingo machine to play (I).
- Your goal is 19 Slingos (J).
- Take the launch key from the hopper (K).
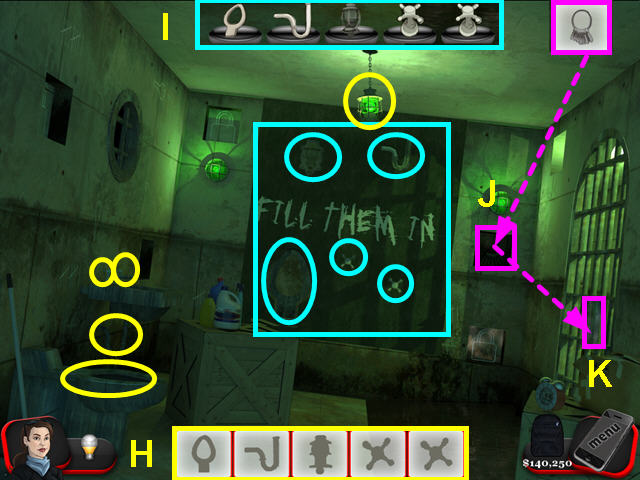
Chapter Twenty-two: Jail
- Locate the items on the list (A).
- Use the bucket on the water on the right (B).
- Read the clue that appears (C).
- Press the 5 locks on the walls (D).
- Remove the items from the cots (E).
- Take the 4 boxes (F).
- Press the 5 locks on the walls again (G).
- Locate the 5 items (H).
- Place the items in the holes under the cots (I).
- Take the keys from the new compartment (J).
- Look at the jail door lock (K).
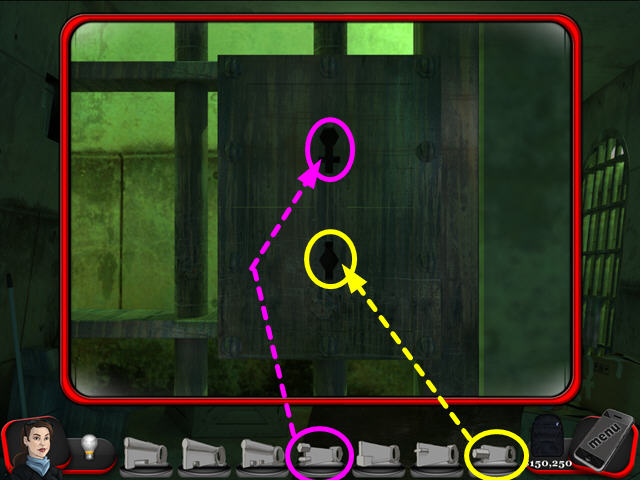
- Find the two keys to unlock the jail door.
- Exit through the door.
Chapter Twenty-three: Storage

- Move the 5 boxes (A).
- Look a the 2 portholes (B).
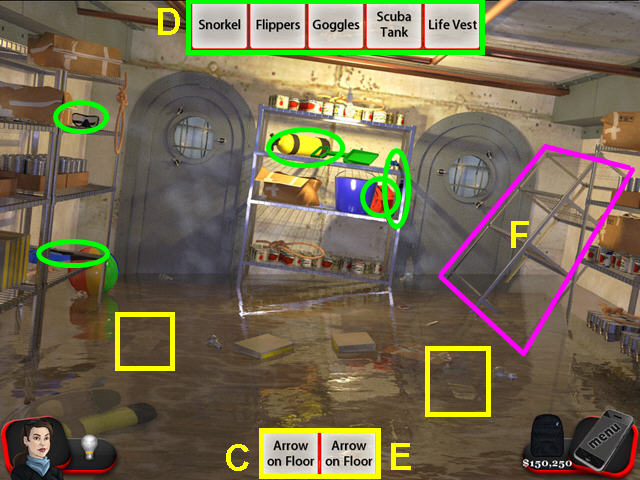
- Look at the 2 arrows on the floor (C).
- Collect the equipment (D).
- Look at the 2 arrows again (E).
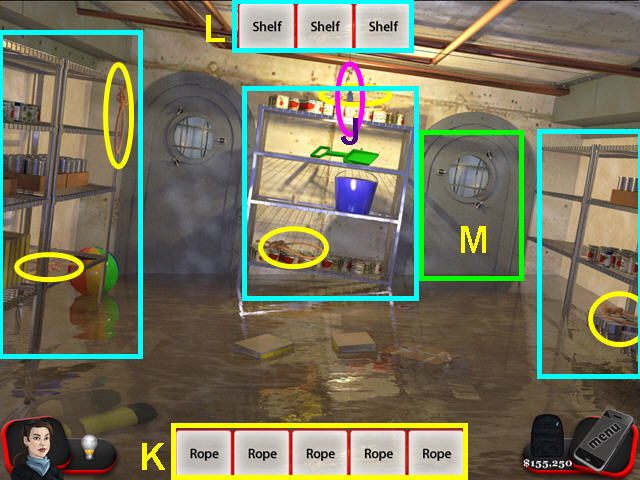
- Move the toppled shelving (F).
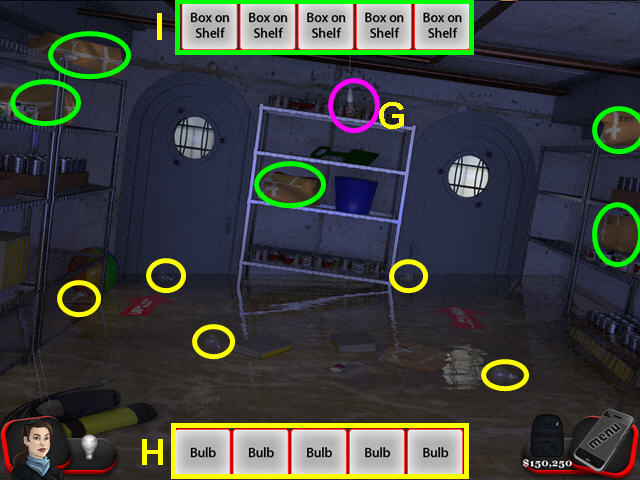
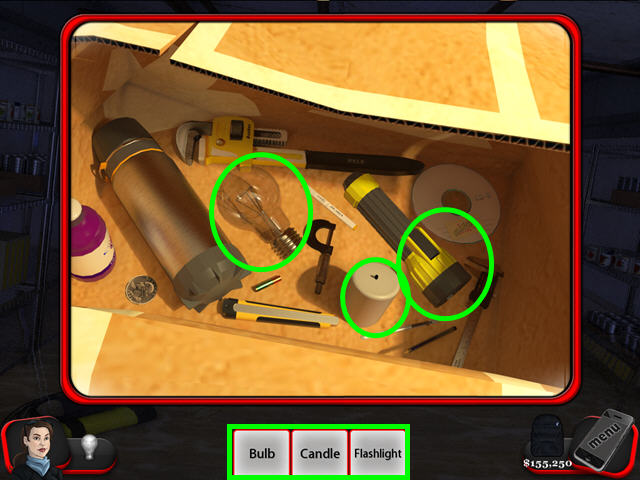
- Take the burnt-out bulb (G).
- Find the 5 light bulbs (H).
- Look at the 5 boxes (I).
- Find the 3 items in the box.
- Replace the bulb (J).
- Find all the ropes (K).
- Tie the ropes to the 3 shelves (L).
- Open the right door (M).
- Exit through the door.
Chapter Twenty-four: Fortune Slingo Room
- Look at the control panel (A).
- Press the buttons in order (B).
- Once the water recedes, press the open button (C).
- Enter the next room.
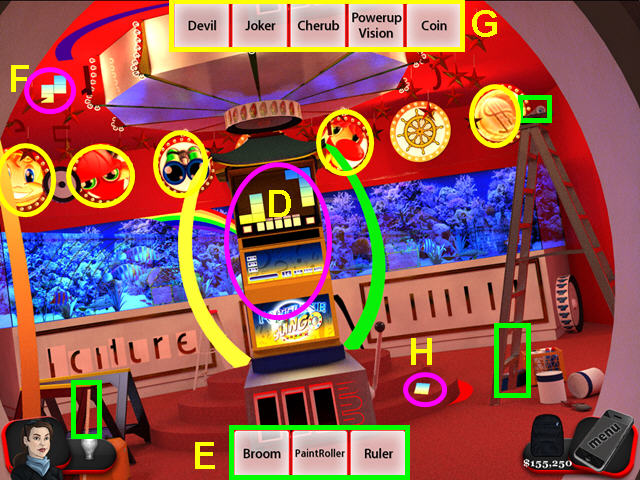
- Look at the Slingo machine (D).
- Collect the tools (E).
- Use the broom to get the piece on the ceiling (F).
- Find the images (G).
- Take the piece that fell to the floor (H).
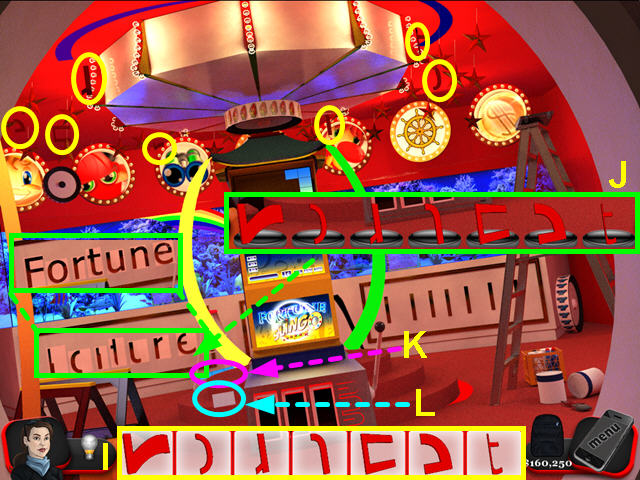
- Collect the shapes hanging from the ceiling (I).
- Use the shapes to complete the letters and spell FORTUNE (J).
- Take the piece that falls to the floor (K).
- Read the clue (L).
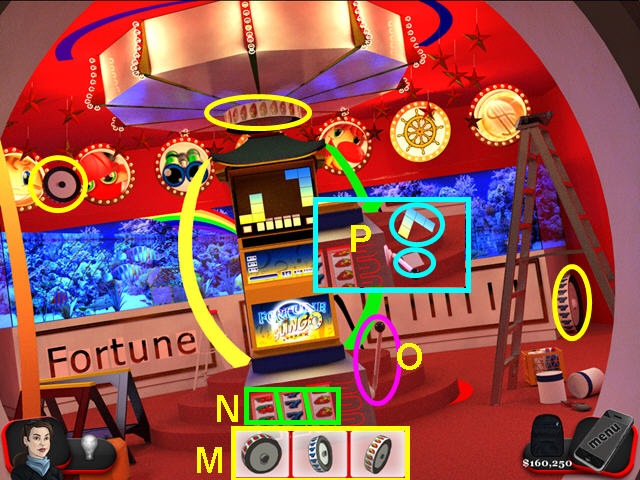
- Find the 3 wheels (M).
- Place the 3 wheels in the slot machine (N).
- Pull the lever (O).
- Take the piece and clue that fall to the floor (P).
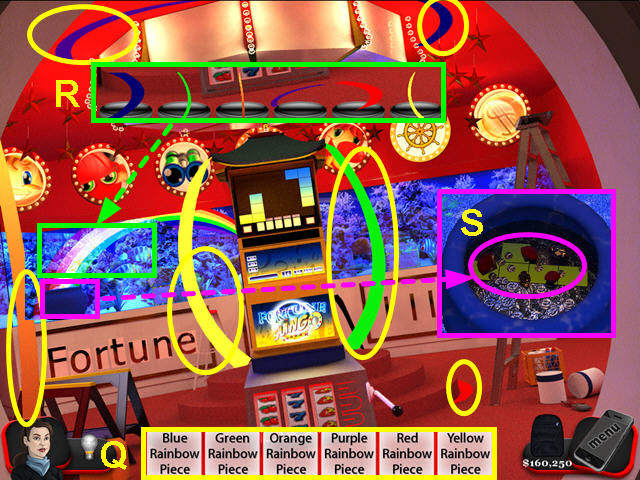
- Find the rainbow pieces (Q).
- Place the rainbow pieces into the rainbow (R).
- Look into the pot of gold and take the puzzle piece (S).
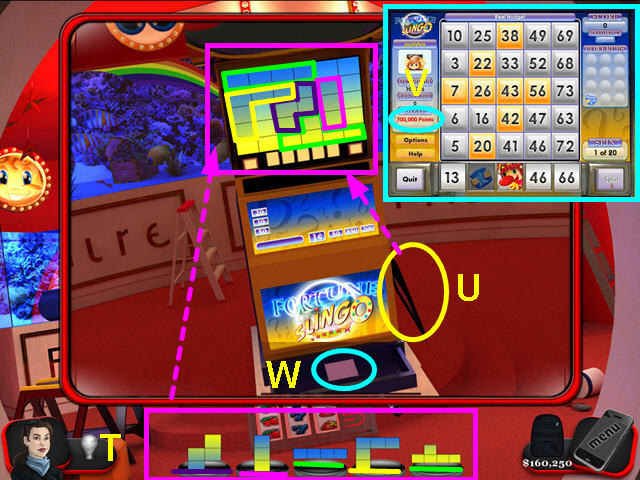
- Place the puzzle pieces into the grid (T).
- Take the cover and place it over the grid (U).
- Play Slingo to get your goal of 700,000 points (V).
- Take the clue from the hopper (W).
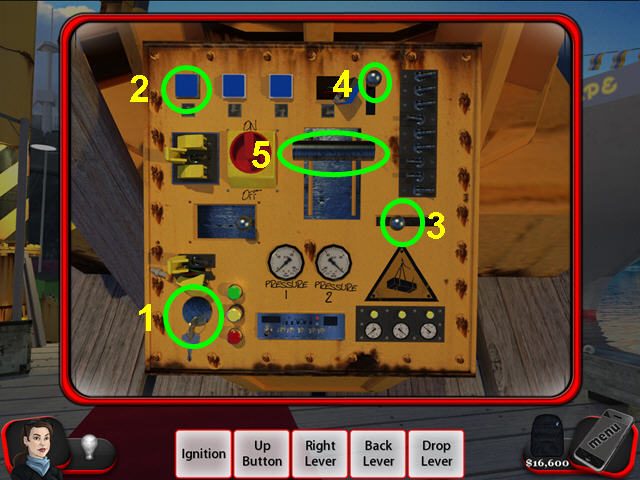
Chapter Twenty-five: Stern
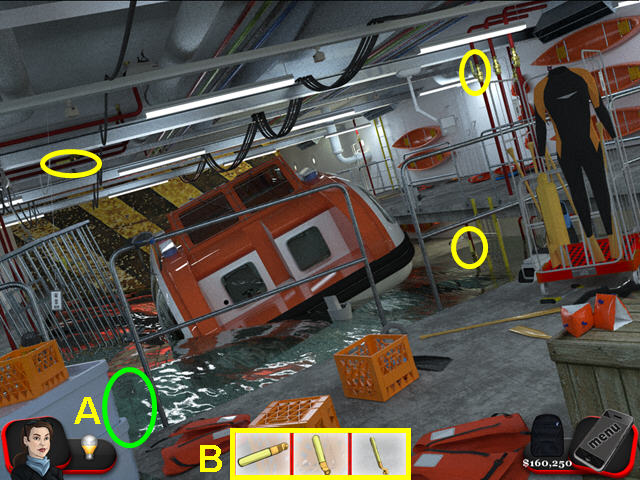
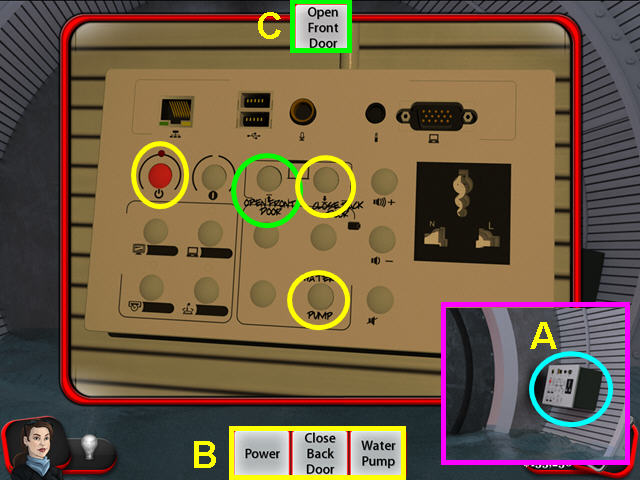
- Look at the door control panel (A).
- Flip the 3 manual releases (B).
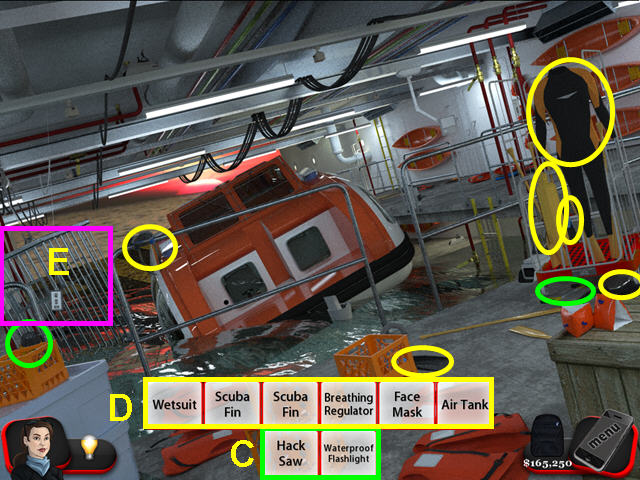
- Locate the saw and flashlight (C).
- Find the diving gear (D).
- Look at the shark cage (E).
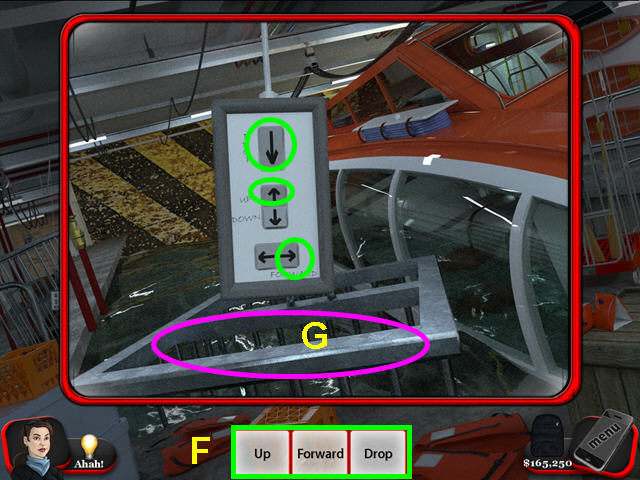
- Press the buttons “Up”, “Forward”, and “Drop” (F).
- Enter the shark cage (G).
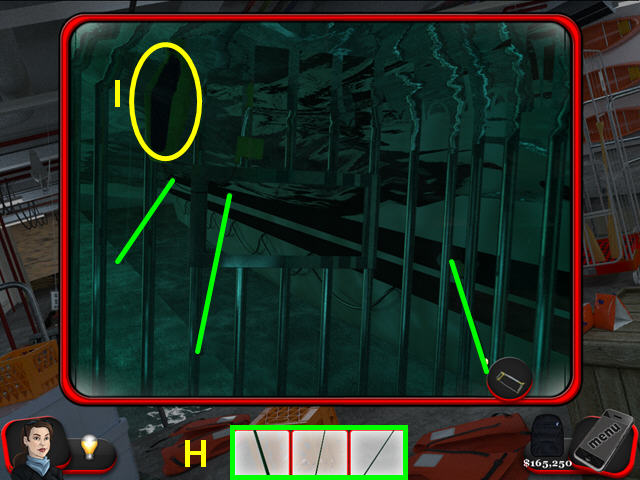
- Cut the 3 ropes (H).
- Use the shark repellant (I).
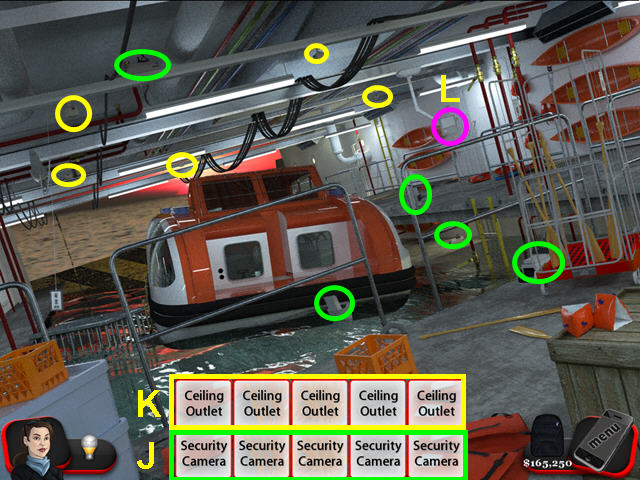
- Locate the security cameras (J).
- Find the ceiling outlets (K).
- Look at the Pitatron control panel (L).
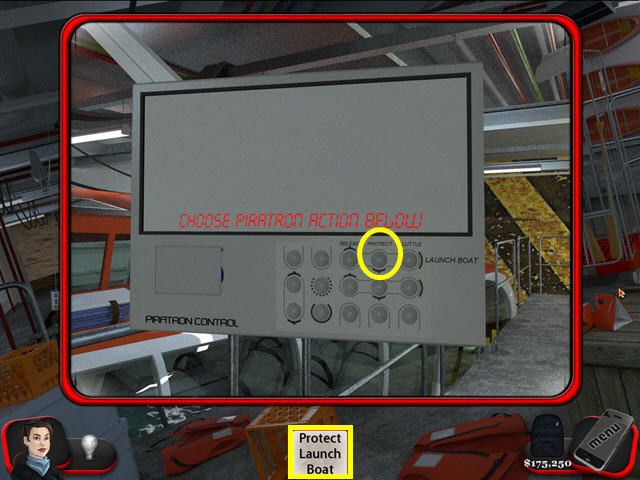
- Press the “Protect launch boat” button.
Chapter Twenty-six: Outside Piratron Control
- Pull the black lever (A).
- Pull the red lever (B).
- Locate all the items (C).
- Look at the control console (D).
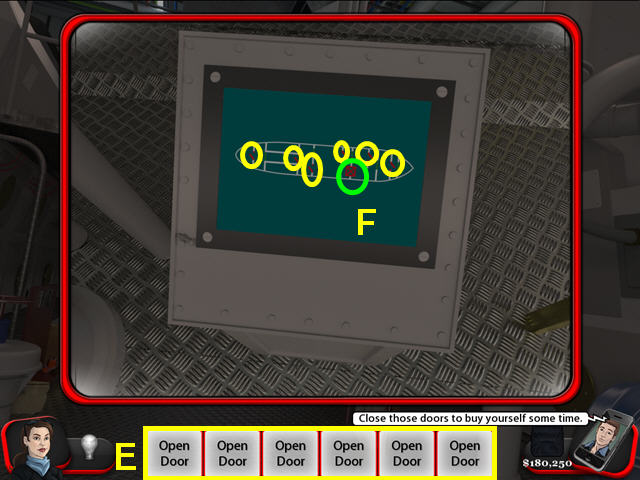
- Click on all the doors to open them (E).
- Click on the obstructed door (F).
- Pull the red lever (G).
- Pull the black lever (H).
- Click on the red door (I).
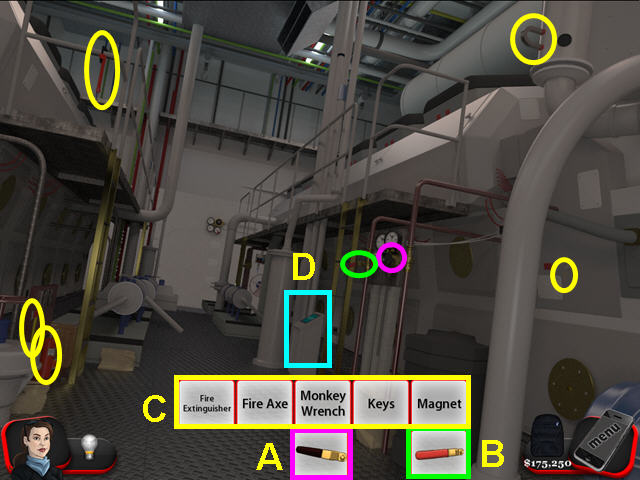
- Use the axe on the back wall (J).
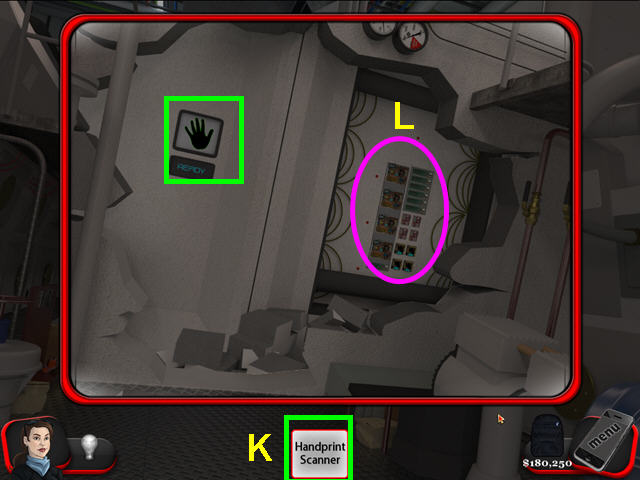
- Look at the hole in the wall.
- Use the hand scanner (K).
- Use the extinguisher on the circuitry (L).
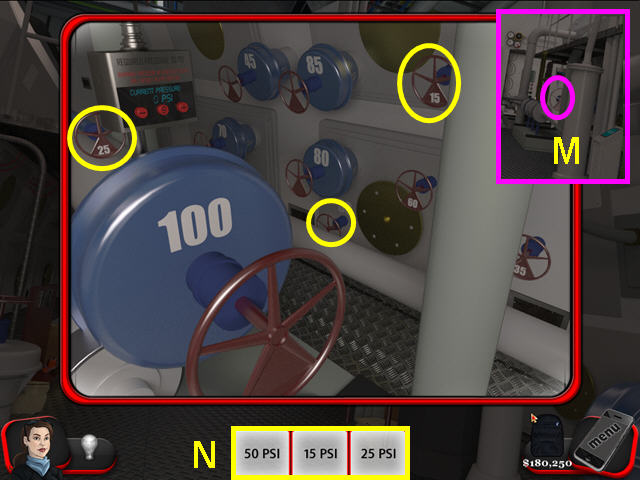
- Turn the valve (M).
- Turn the three pressure valves (N).
- Walk through the door.
Chapter Twenty-seven: Piratron Control
- Find the 5 locations on the screens (A).
- Find the next 5 locations (B).
- Find the final 5 locations (C).
- Look at the Piratron brain on the left (D).
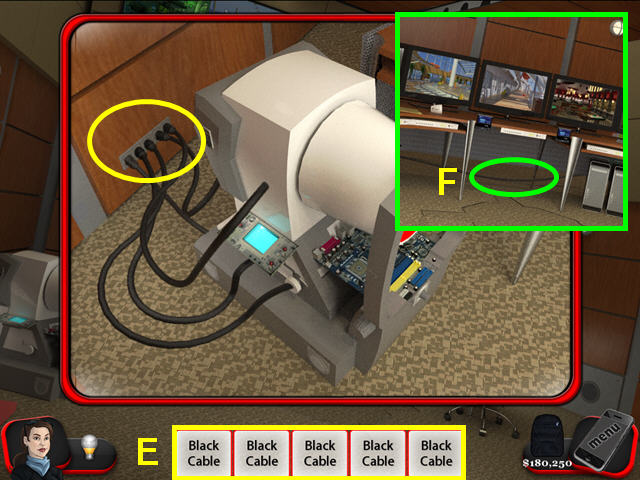
- Pull each of the 5 cables from the wall (E).
- Look at the suspicious wire under the desk (F).
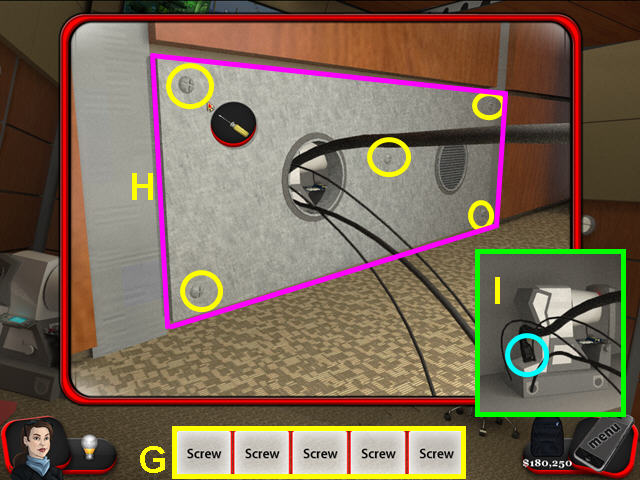
- Use the screwdriver to remove the 5 screws (G).
- Use the crowbar to open the panel (H).
- Pull the large plug from the brain, then replace the plug (I).
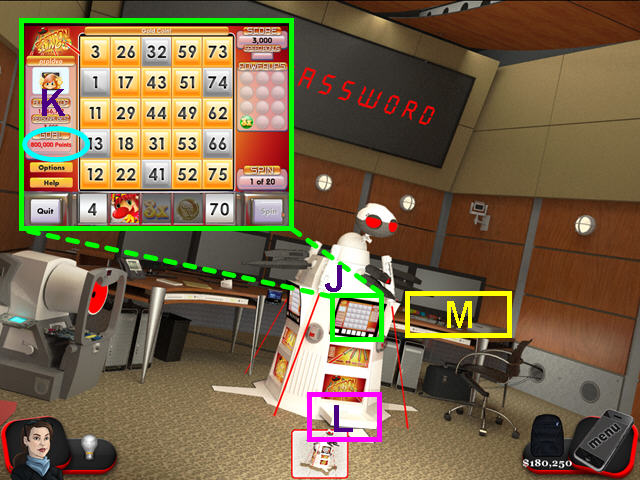
- Select the machine to play Slingo (J).
- Earn 800,000 points to win the clue (K).
- Read the clue in the hopper (L).
- Look at the keyboard (M).
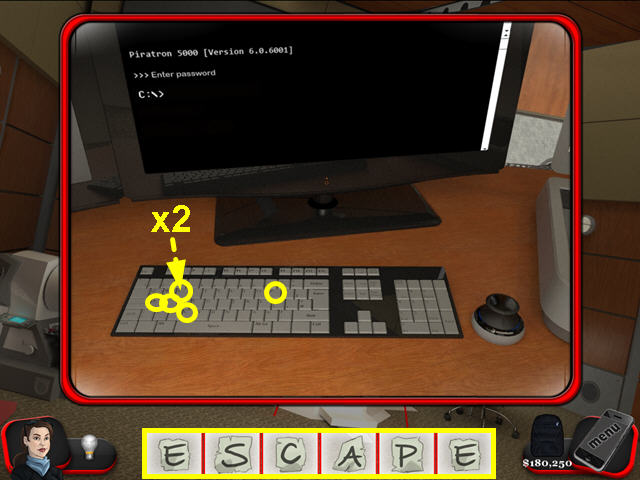
- Type E-S-C-A-P-E.
Chapter Twenty-eight: Outside Owner's Room
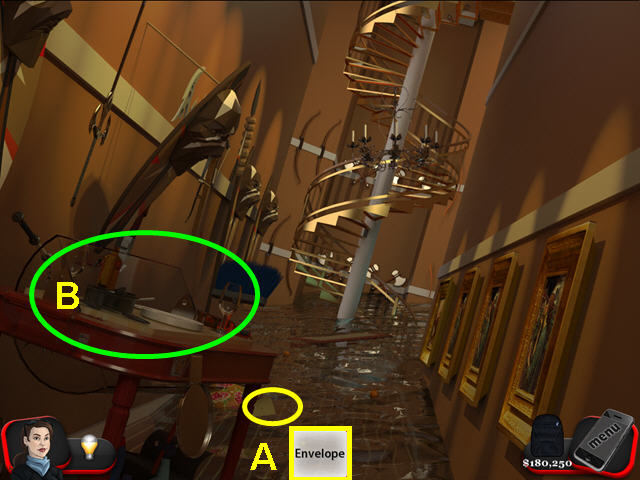
- Try to take the envelope, but a shark nears (A).
- Look at the serving station (B).
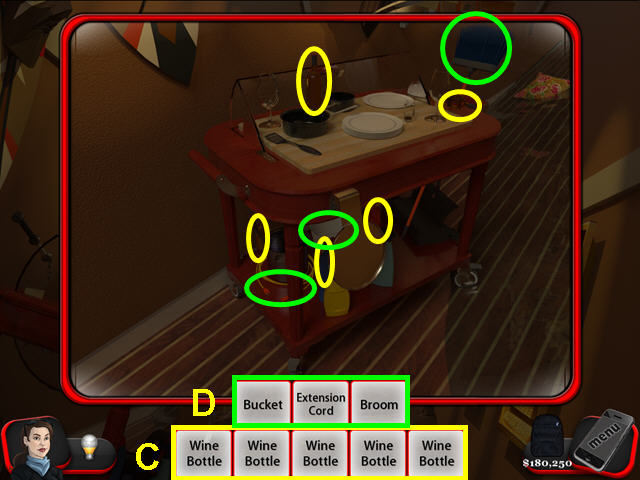
- Locate all the wine bottles (C).
- Find the 3 items (D).
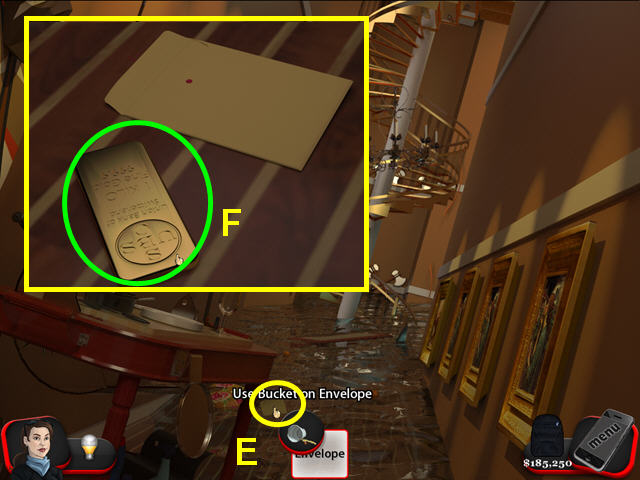
- Use the bucket on the envelope (E).
- Take the Swiss bank key (F).
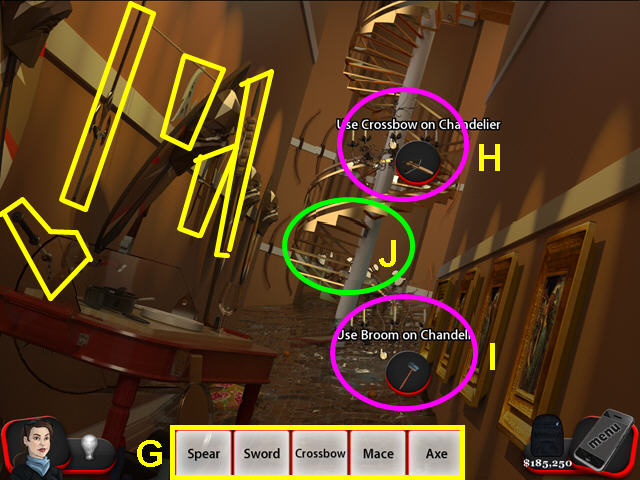
- Locate the 5 weapons (G).
- Use the crossbow on the hanging chandelier (H).
- Use the broom on the fallen chandelier (I).
- Walk to the stairs (J).
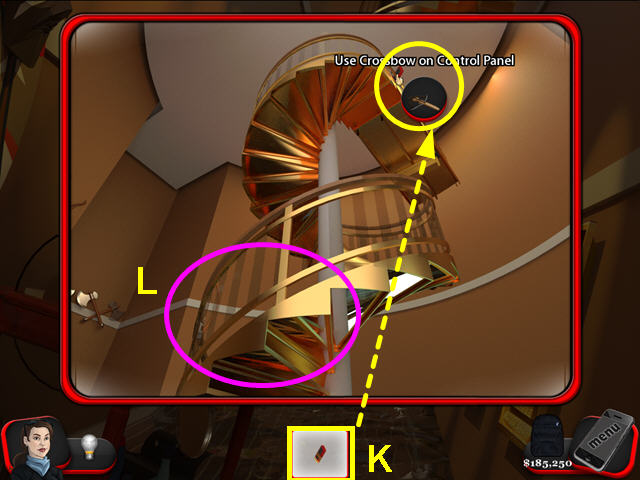
- Use the crossbow on the control panel (K).
- Walk up the stairs (L).
Chapter Twenty-nine: Owner's Room
- Flip the switch to turn on the interior lights (A).
- Flip the switch again to signal your location (B).
- Open the balcony door (C).
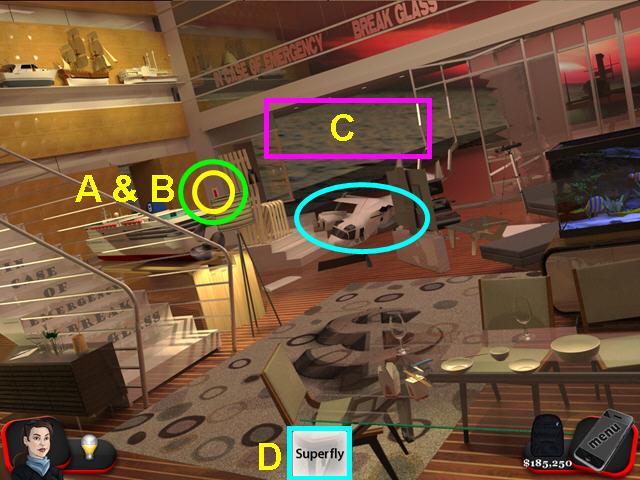
- Look at the Superfly remote plane (D).
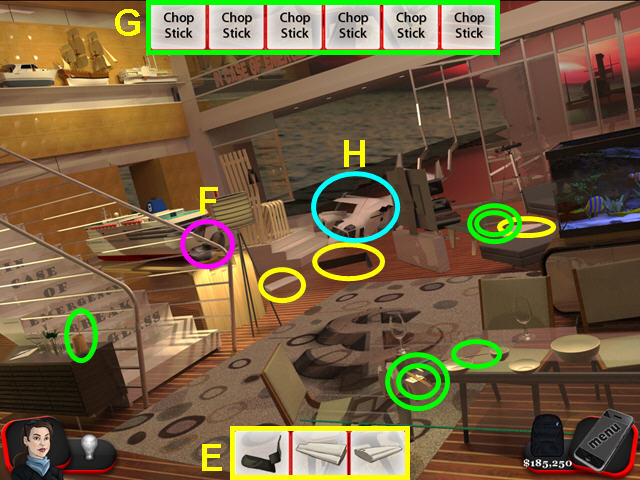
- Locate the 3 plane parts (E).
- Take the boat propeller (F).
- Find the chopsticks (G).
- Place the 3 repair parts on the plane (H).
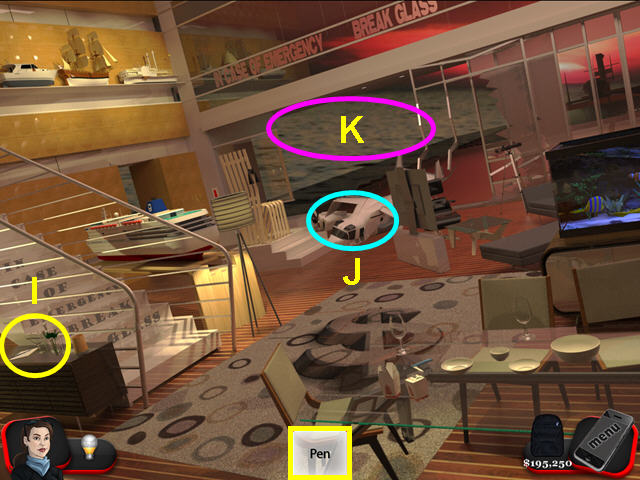
- Pick up the pen and use it on the paper (I).
- Use the note and the Swiss Bank key on the plane (J).
- Use the plane on the balcony (K).
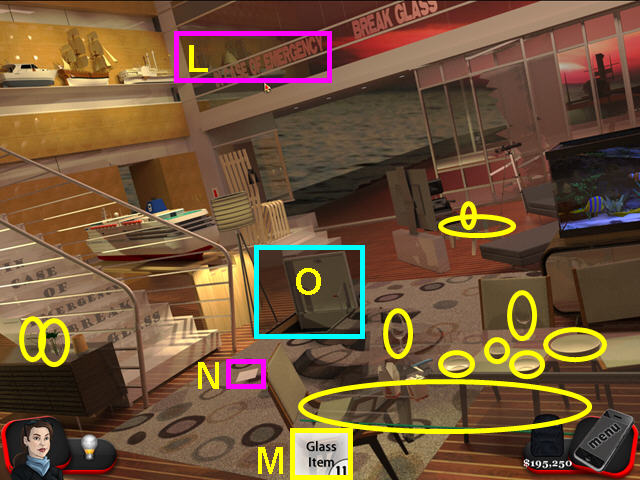
- Select the “In case of emergency” sign (L).
- Break the 11 glass items (M).
- Read the clue that appears (N).
- Look at the carpet and cut open the escape hatch (O).
Chapter Thirty: Escape Boat
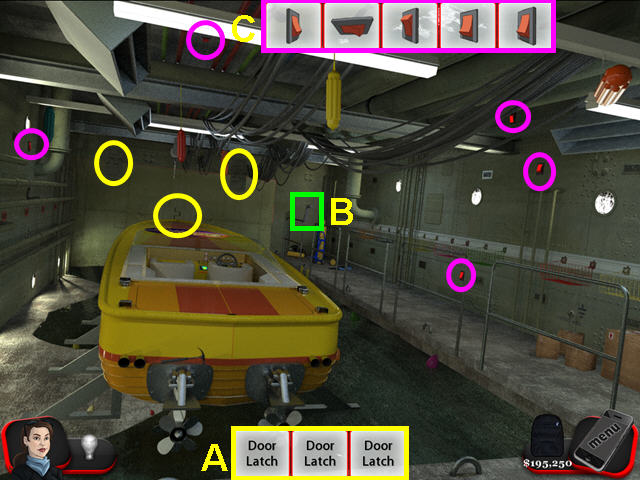
- Open the 3 door latches (A).
- Pull the lever (B).
- Press the 5 switches (C).
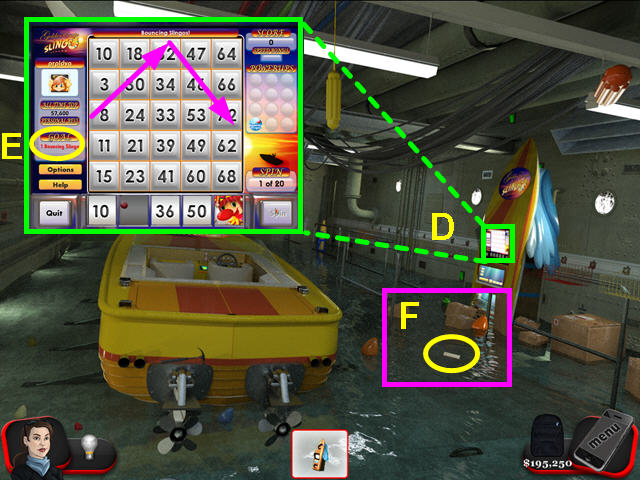
- Select the Slingo machine to play (D).
- Your goal is 1 bouncing Slingo (E).
- Take the clue that floats out of the hopper (F).
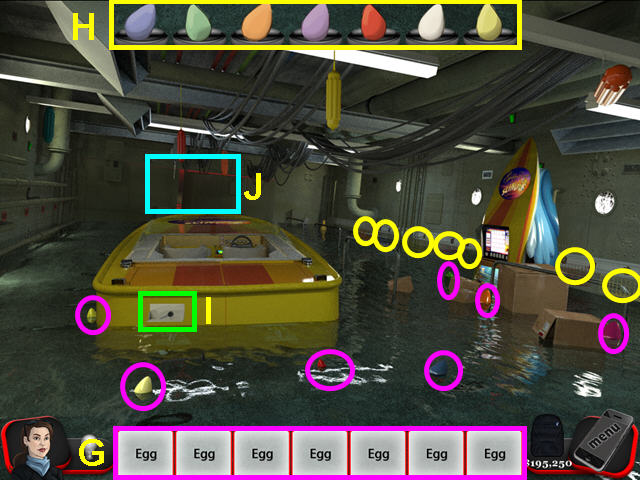
- Locate the 7 eggs (G).
- Place the eggs in the basket of matching color (H).
- Take the key from the secret compartment (I).
- Bang on the doors twice (J).
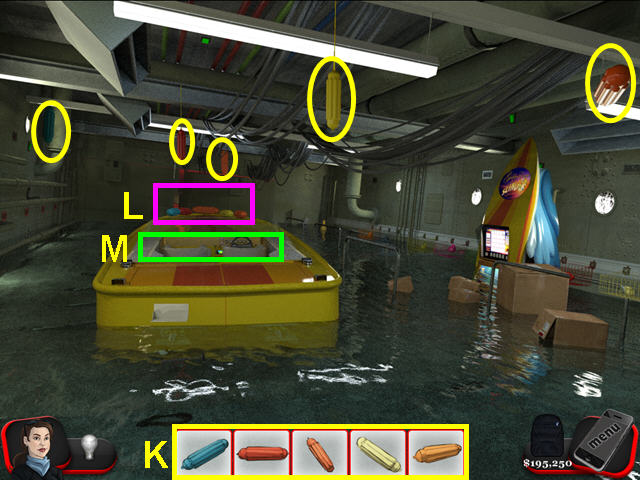
- Find all the fenders (K).
- Put the 5 fenders on the bow of the boat (L).
- Get in the boat (M).
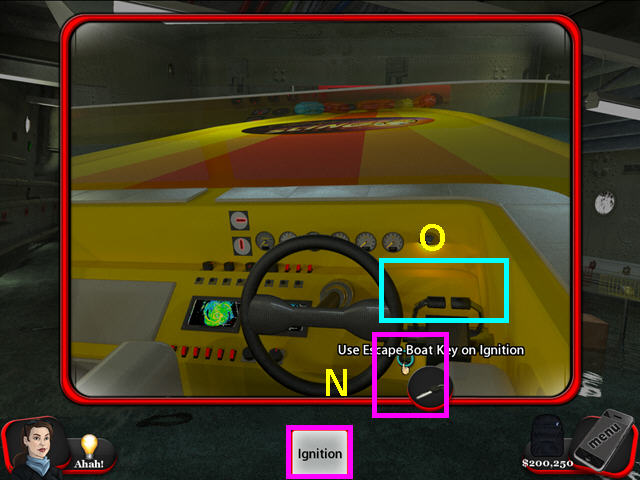
- Use the key in the ignition (N).
- Use the throttle (O).
- Congratulations! You have completed Slingo Mystery 2: The Golden Escape!
Created at: 2010-12-15