

Walkthrough Menu
General Tips
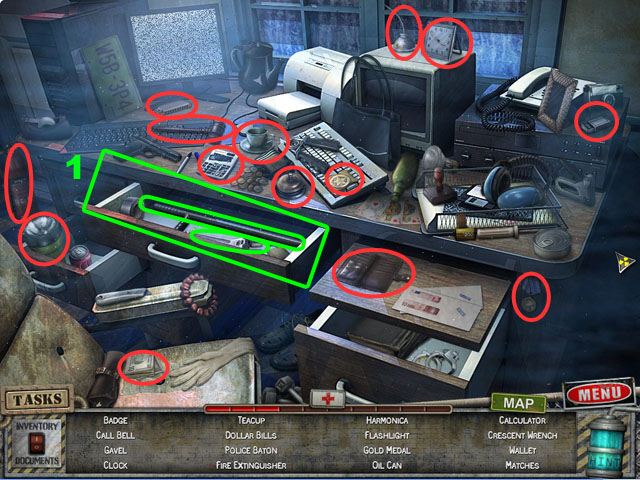
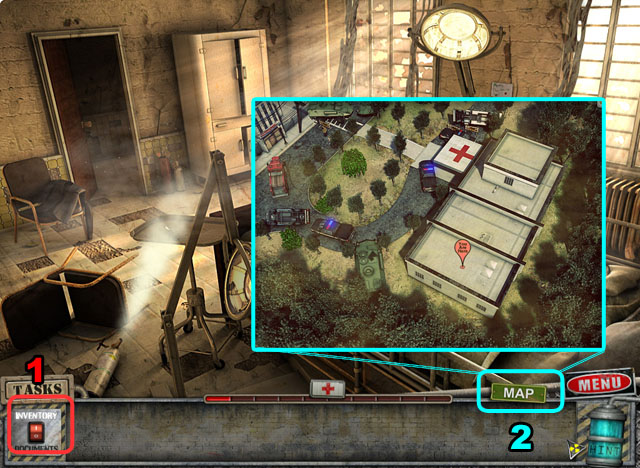 • Press on the Inventory/Documents Button to toggle between
inventory and document views (1). • Health packs increase your
overall health level and allow you to perform certain actions
requiring physical strength. • The Health Packs/First-aid Kits
in the guide will be marked with the ‘@’ symbol in the
screenshots. • In this guide, we will refer to Hidden Object
Scenes as HOS. • Use the Map to view your current location
(2).
• Press on the Inventory/Documents Button to toggle between
inventory and document views (1). • Health packs increase your
overall health level and allow you to perform certain actions
requiring physical strength. • The Health Packs/First-aid Kits
in the guide will be marked with the ‘@’ symbol in the
screenshots. • In this guide, we will refer to Hidden Object
Scenes as HOS. • Use the Map to view your current location
(2).
Chapter 1: The Hospital
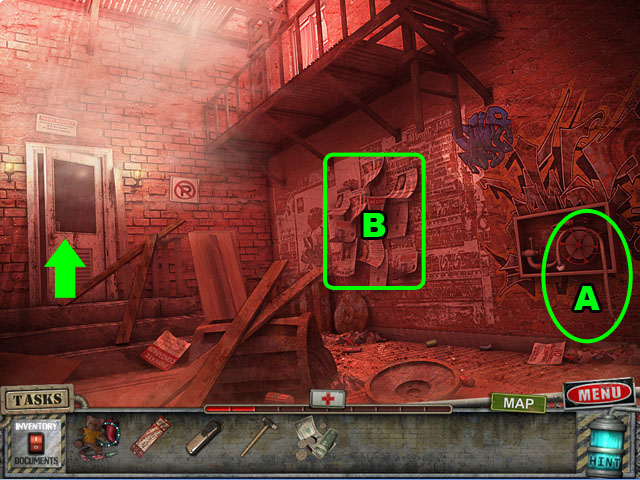
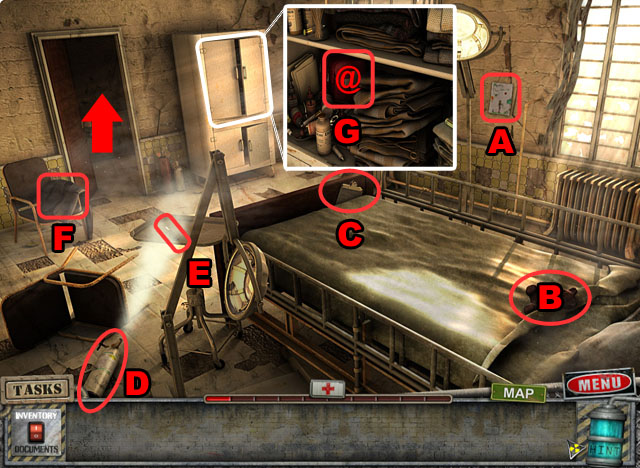 • Take a closer look at the picture (A). • Take the STUFFED
BEAR (B). • Look at and take the Chart (C). • Take a closer
look at the tank; turn the valve to shut it off (D). • Grab
the SCALPEL (E). • Look at the jacket and take the MOVIE
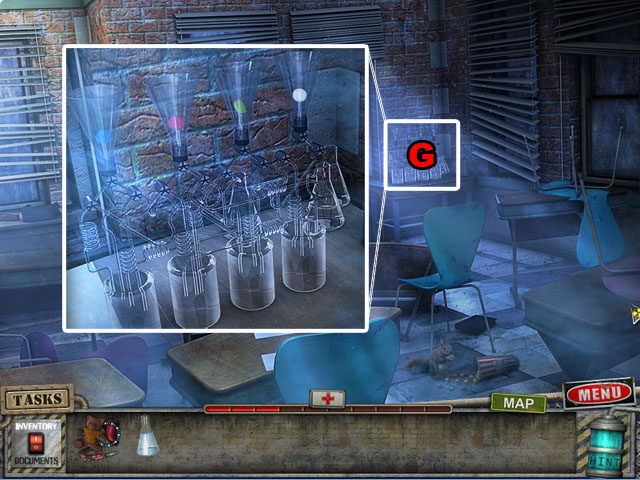
TICKET (F). • Open the cabinet door and look inside it; take
the Health Pack (G). • Go through the door.
• Take a closer look at the picture (A). • Take the STUFFED
BEAR (B). • Look at and take the Chart (C). • Take a closer
look at the tank; turn the valve to shut it off (D). • Grab
the SCALPEL (E). • Look at the jacket and take the MOVIE
TICKET (F). • Open the cabinet door and look inside it; take
the Health Pack (G). • Go through the door.
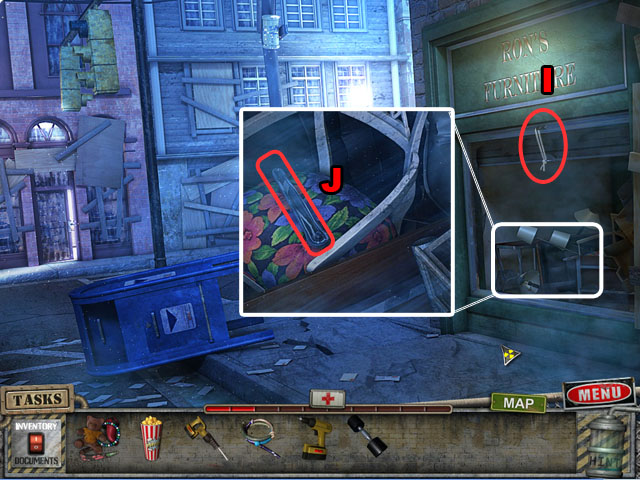
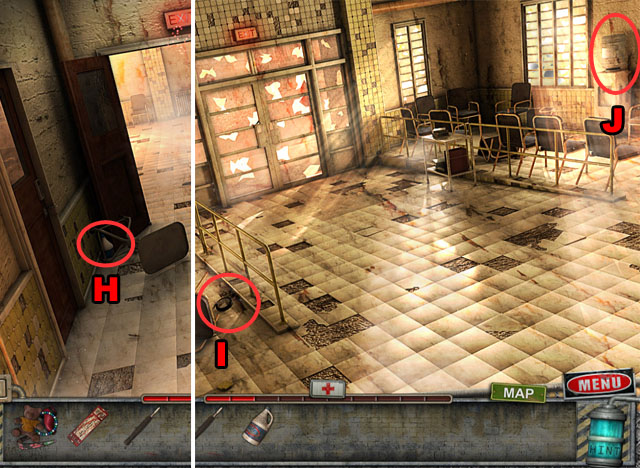 • Take the BLEACH (H). • Go forward. • Take the STRETCHER
WHEEL (I). • Grab the WATER BOTTLE (J).
• Take the BLEACH (H). • Go forward. • Take the STRETCHER
WHEEL (I). • Grab the WATER BOTTLE (J).
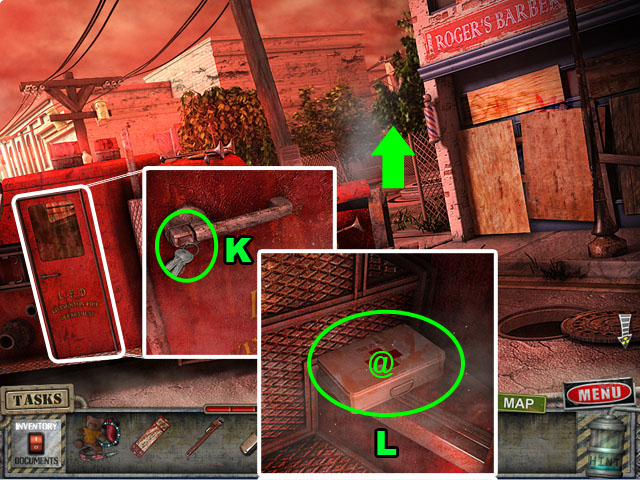
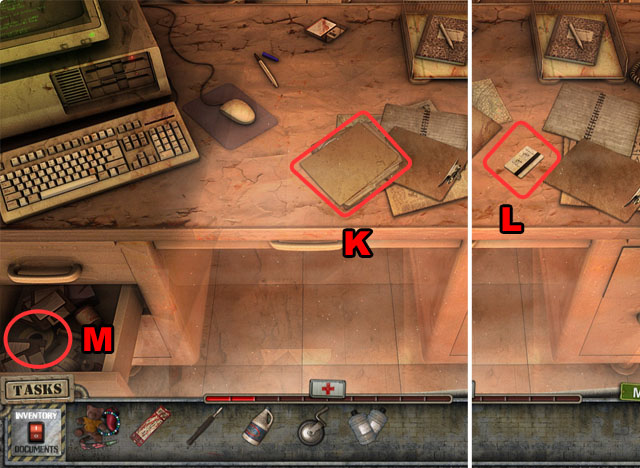 • Zoom into the desk; look at and take the Memo (K). • Move
all the papers out of the way and take the KEYCARD (L). • Open
the drawer and take the MEDICAL TAPE (M). • Exit the desk and
walk down.
• Zoom into the desk; look at and take the Memo (K). • Move
all the papers out of the way and take the KEYCARD (L). • Open
the drawer and take the MEDICAL TAPE (M). • Exit the desk and
walk down.
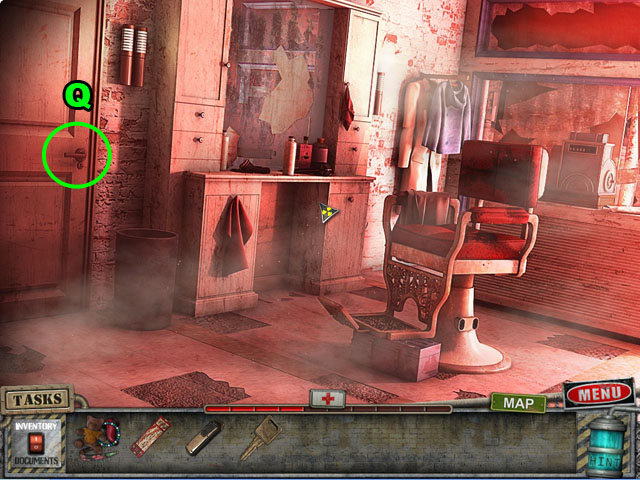
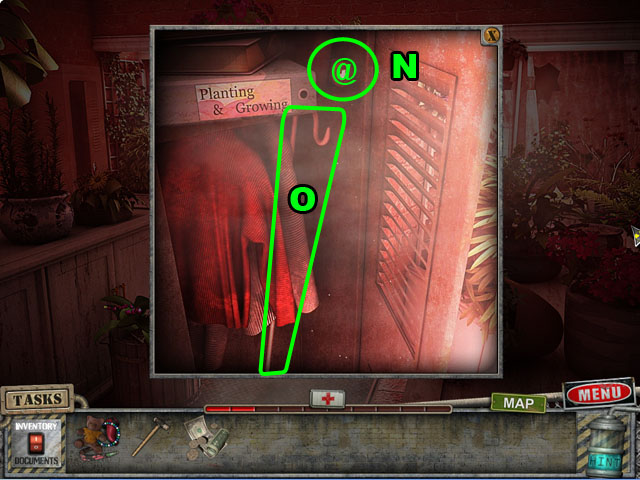
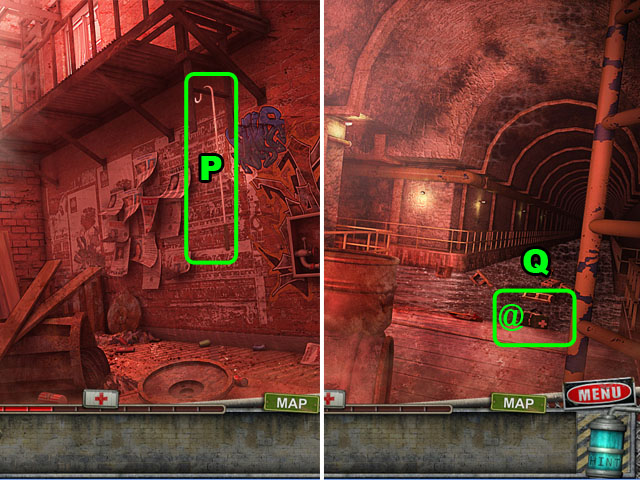
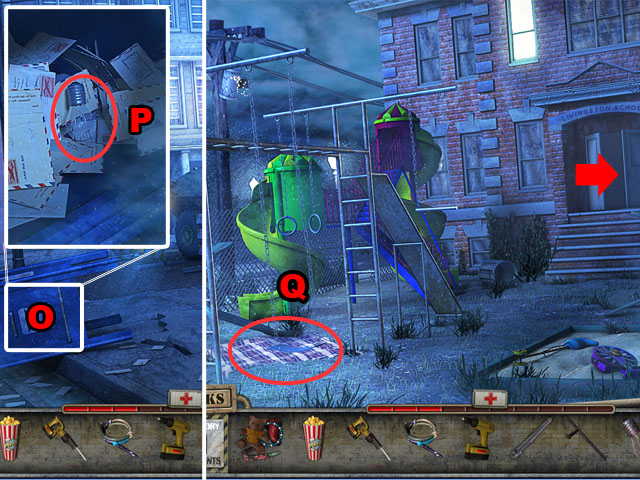
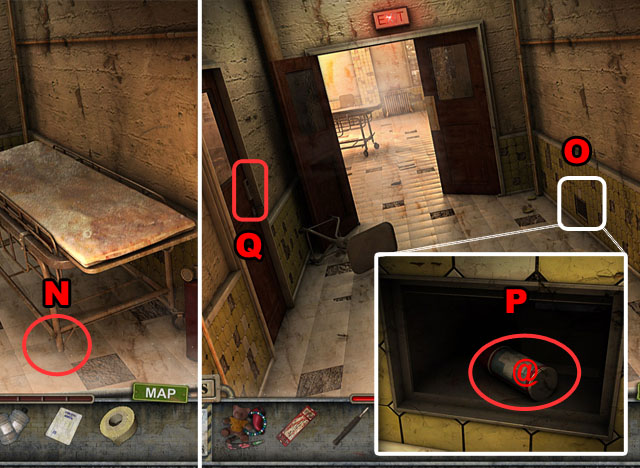 • Put the STRETCHER WHEEL on the stretcher (N). • Push the
stretcher and zoom into the vent. • Remove the screws with the
SCALPEL (O). • Try to take the item in the vent and a hand
will reach out from inside (P). • Look at the keypad; put the
KEYCARD in it to activate a puzzle (Q). • Input any number
onto the keypad and a sign will appear letting you know if the
solution is higher or lower than what you entered. • Keep
making guesses until you find the correct one. • The correct
number is randomized. • You have 10 chances to enter numbers.
• Solving the keypad puzzle activate a HOS; play it.
• Put the STRETCHER WHEEL on the stretcher (N). • Push the
stretcher and zoom into the vent. • Remove the screws with the
SCALPEL (O). • Try to take the item in the vent and a hand
will reach out from inside (P). • Look at the keypad; put the
KEYCARD in it to activate a puzzle (Q). • Input any number
onto the keypad and a sign will appear letting you know if the
solution is higher or lower than what you entered. • Keep
making guesses until you find the correct one. • The correct
number is randomized. • You have 10 chances to enter numbers.
• Solving the keypad puzzle activate a HOS; play it.
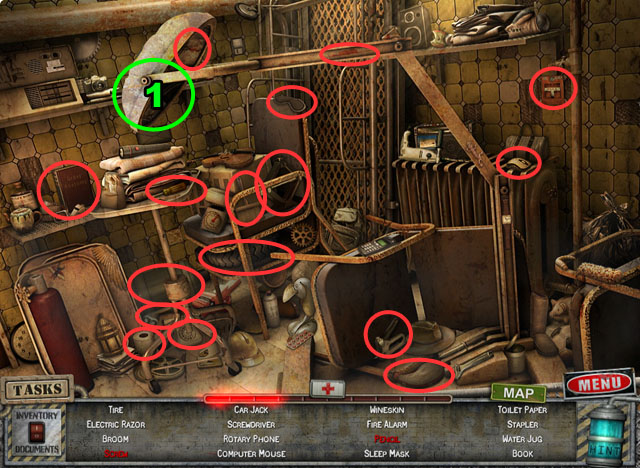 • Move the desk lamp (1) and take the PENCIL. • The WATER
BOTTLE will be added to inventory. • Go forward.
• Move the desk lamp (1) and take the PENCIL. • The WATER
BOTTLE will be added to inventory. • Go forward.
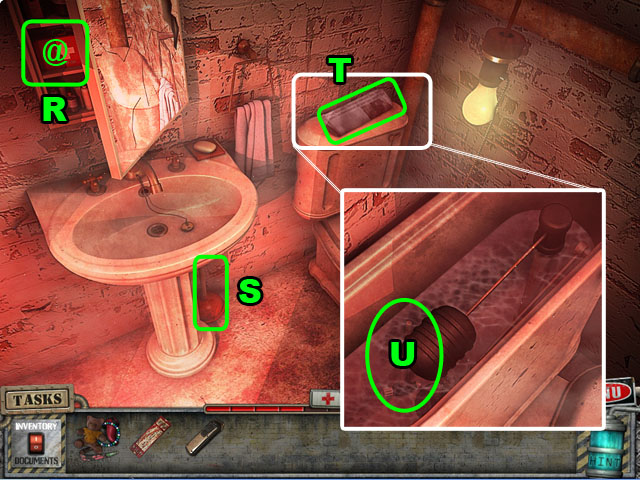
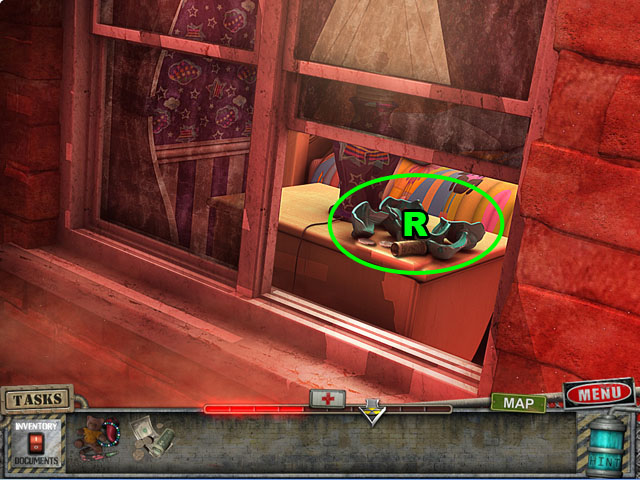
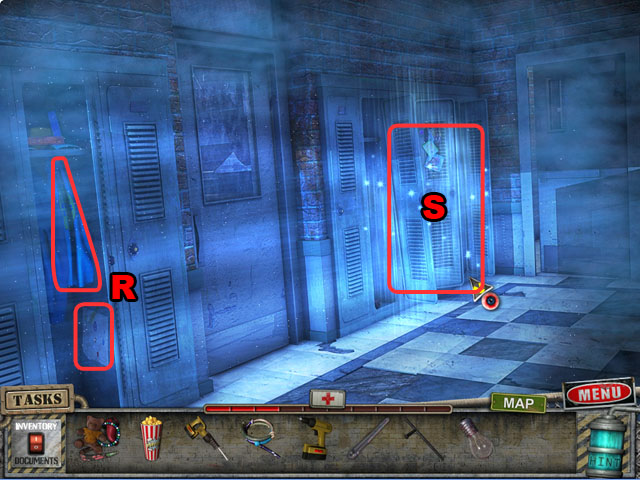
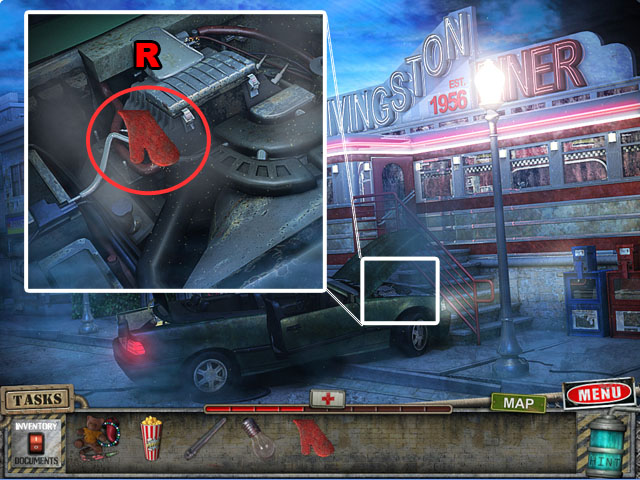
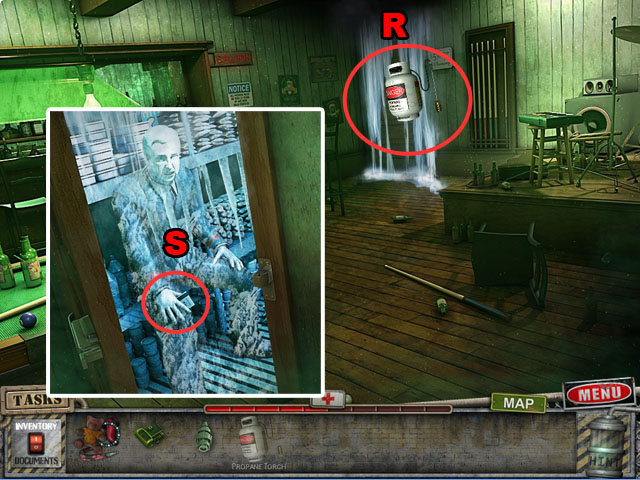
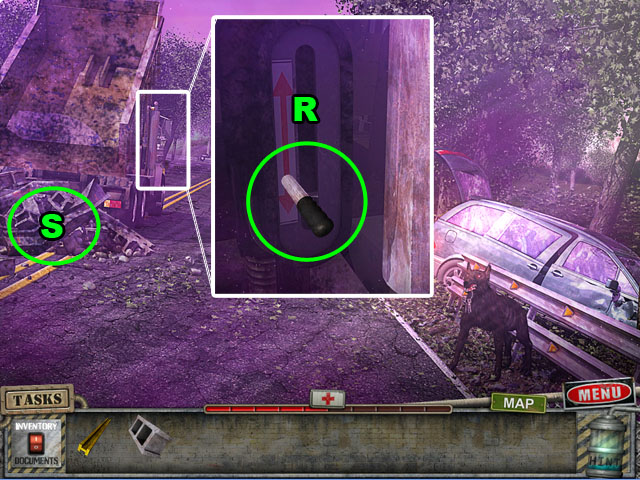
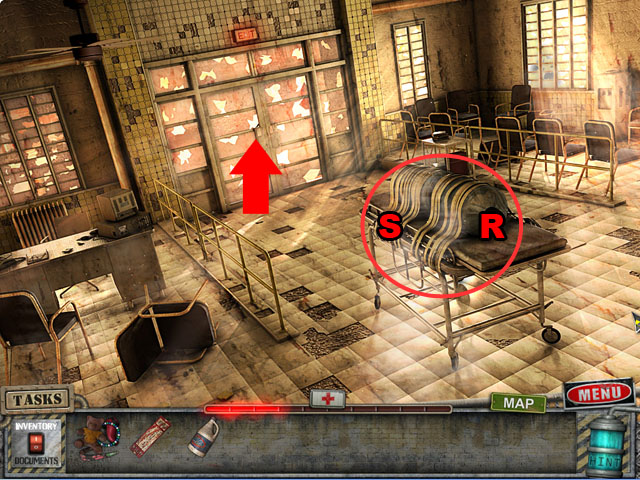 • Put the WATER BOTTLES on the stretcher (R). • Attach the
bottles to the stretcher with the MEDICAL TAPE (S). Pushing
the stretcher will lower your health level. • Go through the
door.
• Put the WATER BOTTLES on the stretcher (R). • Attach the
bottles to the stretcher with the MEDICAL TAPE (S). Pushing
the stretcher will lower your health level. • Go through the
door.
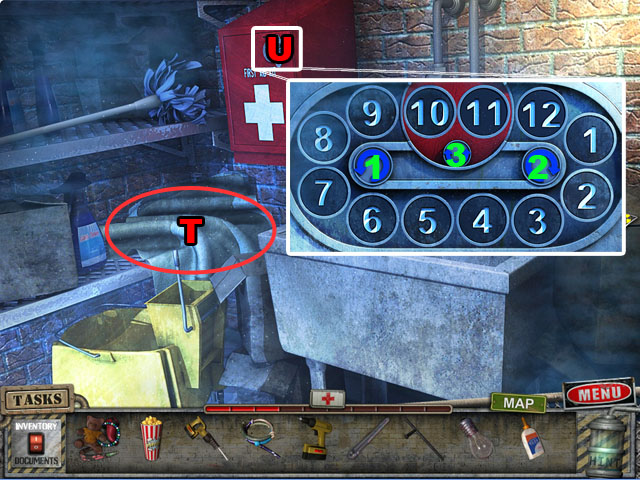
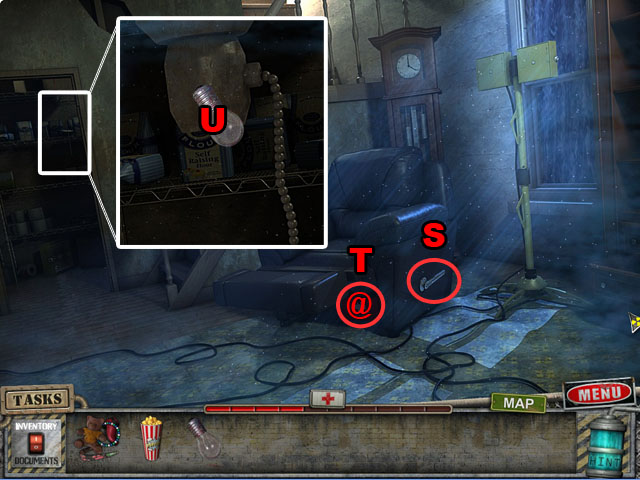
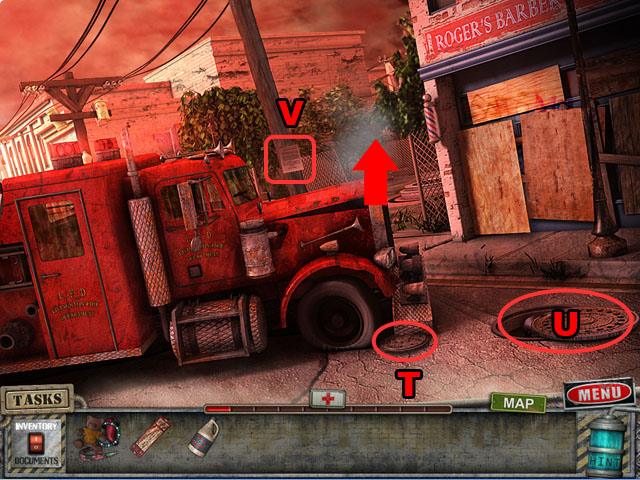 • Take the HUBCAP (T). • Touch the manhole cover and it will
close (U). • Read the note (V). • Go forward.
• Take the HUBCAP (T). • Touch the manhole cover and it will
close (U). • Read the note (V). • Go forward.
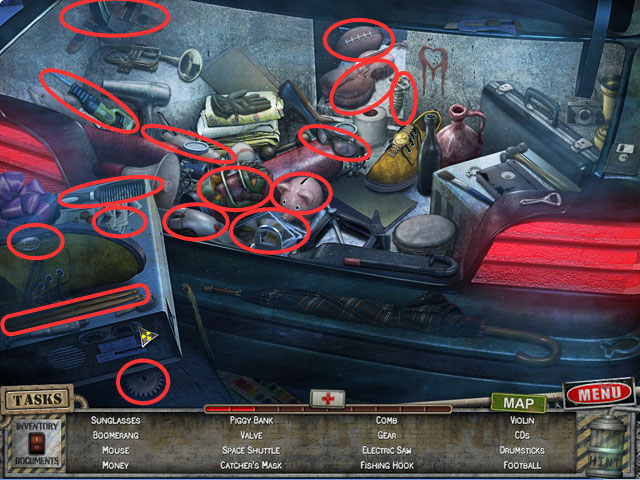
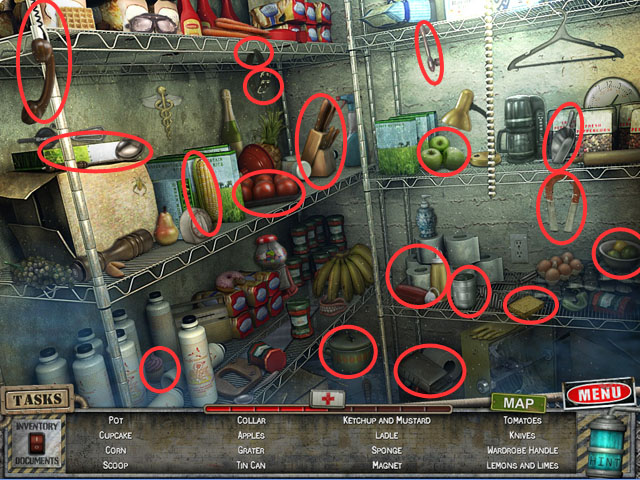
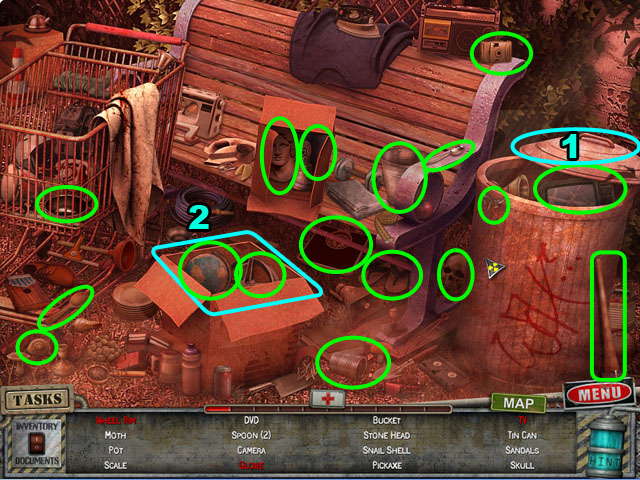 • Play the HOS. • Open the box (1); take the globe. • Open the
trashcan (2); take the TV. • The PICKAXE will be added to
inventory.
• Play the HOS. • Open the box (1); take the globe. • Open the
trashcan (2); take the TV. • The PICKAXE will be added to
inventory.
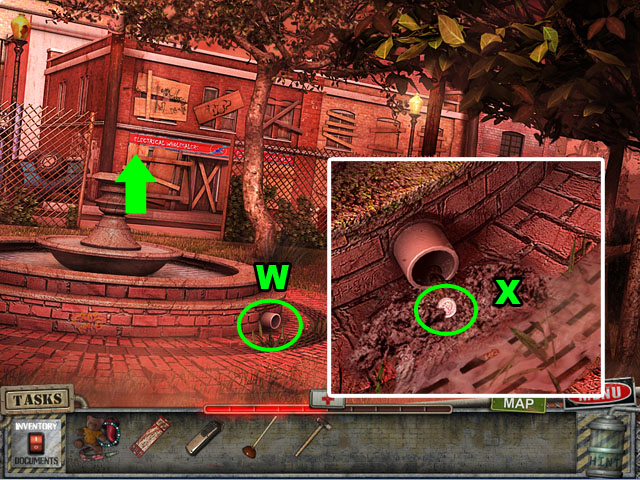
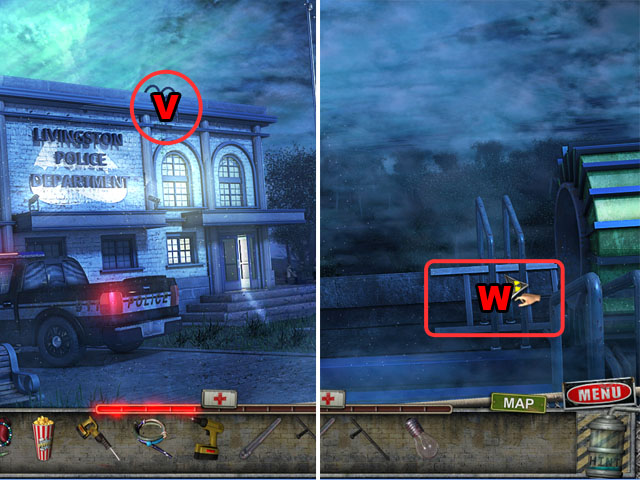
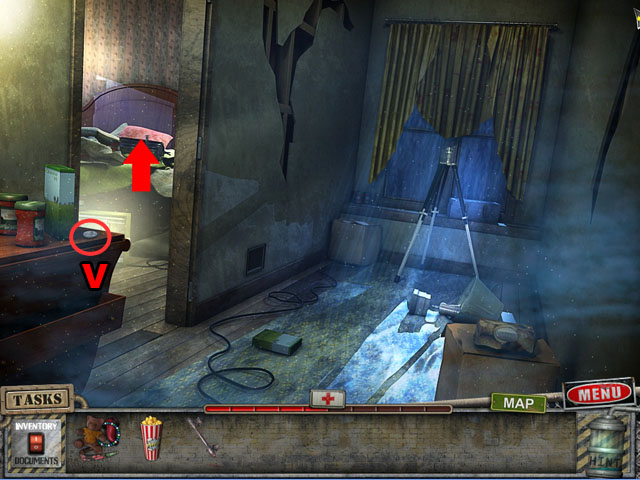
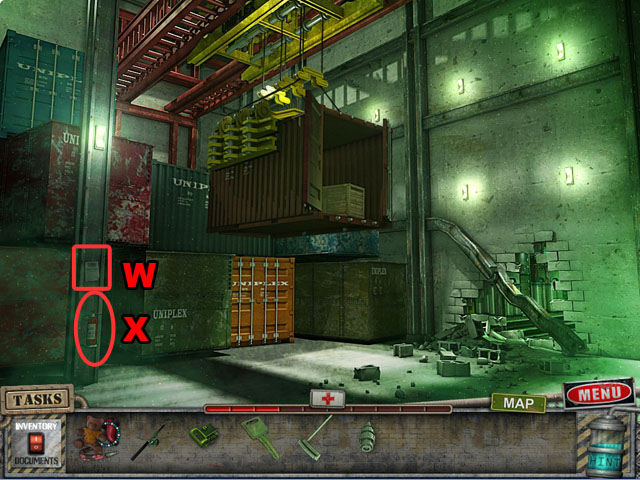
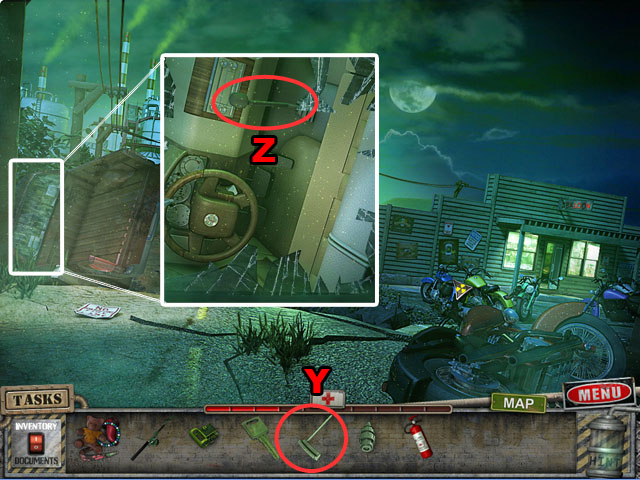
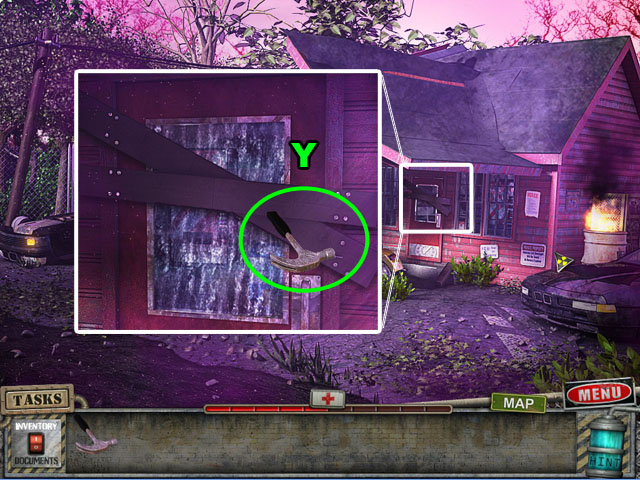
 • Zoom into the fountain (W); pour the BLEACH in it and take
the Health Pack (X). • Throw the HUBCAP on the crowbar on the
tree (Y); take the CROWBAR on the ground (Z). • Go left.
• Zoom into the fountain (W); pour the BLEACH in it and take
the Health Pack (X). • Throw the HUBCAP on the crowbar on the
tree (Y); take the CROWBAR on the ground (Z). • Go left.
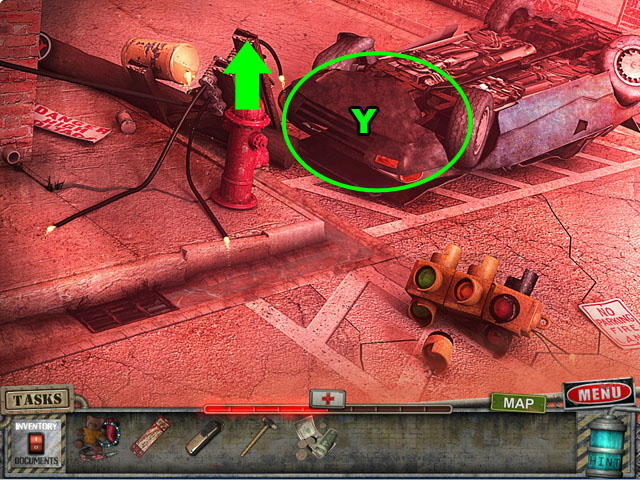
 • Look at and take the NASA Contract (A). • Walk down twice. •
Zoom into the manhole cover; use the CROWBAR to lift the
manhole cover (B). You will use 10 % of your health in this
task. • Go down into the manhole.
• Look at and take the NASA Contract (A). • Walk down twice. •
Zoom into the manhole cover; use the CROWBAR to lift the
manhole cover (B). You will use 10 % of your health in this
task. • Go down into the manhole.
 • Go up the ladder. • Open the back of the pickup truck and
take the PIPE WRENCH (C). • Open the garbage lid; take the
Health Pack (D). • Break the wall with the PICKAXE; take the
VALVE HANDLE (E). • Go through the door to access the barber
shop.
• Go up the ladder. • Open the back of the pickup truck and
take the PIPE WRENCH (C). • Open the garbage lid; take the
Health Pack (D). • Break the wall with the PICKAXE; take the
VALVE HANDLE (E). • Go through the door to access the barber
shop.
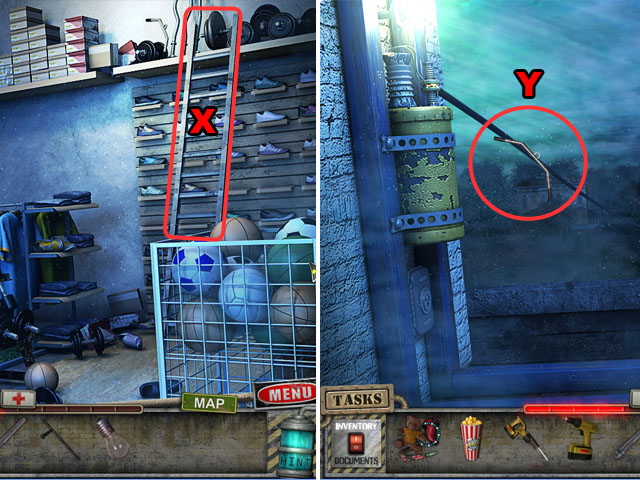
 • Take the HAIR CLIPPERS (F) • Take the HAIRBAND (G). • Take a
closer look at the clothes; take the WIRE HANGER (H). • Walk
down twice.
• Take the HAIR CLIPPERS (F) • Take the HAIRBAND (G). • Take a
closer look at the clothes; take the WIRE HANGER (H). • Walk
down twice.
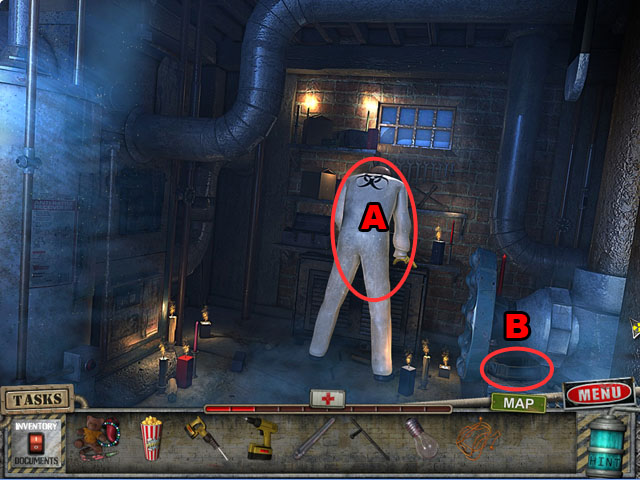
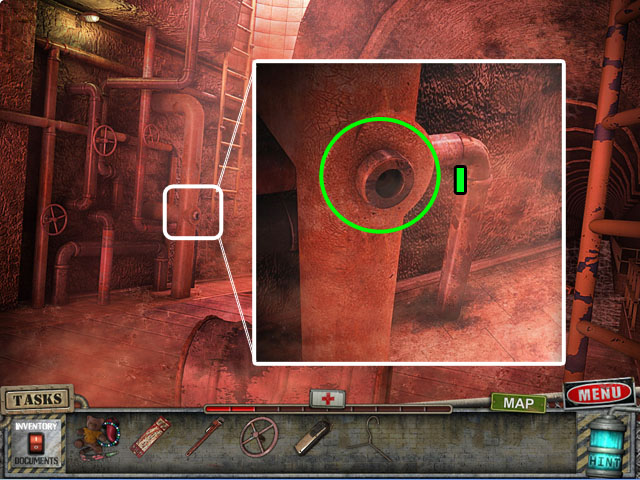 • Examine the pipe; put the VALVE HANDLE on it to activate a
puzzle (I).
• Examine the pipe; put the VALVE HANDLE on it to activate a
puzzle (I).
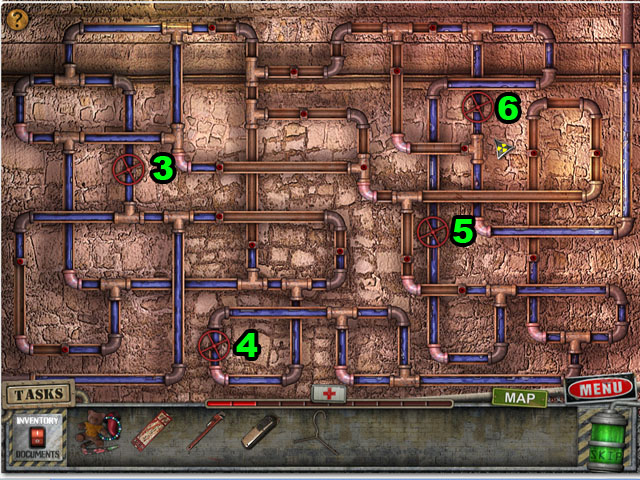 • Your goal is to make the water flow from the lower left
corner to the upper right corner. The water can only flow
through the valves that have a handle. • Arrange the 4 valve
handles in the right posts. Pick up a valve and put it into
one of the holes. • In order to solve the puzzle you must find
the correct 4 valves to open. • Please look at the screenshot
for the solution (3, 4, 5, 6). Solving this puzzle restores
the water flow. • Walk down to go back outside.
• Your goal is to make the water flow from the lower left
corner to the upper right corner. The water can only flow
through the valves that have a handle. • Arrange the 4 valve
handles in the right posts. Pick up a valve and put it into
one of the holes. • In order to solve the puzzle you must find
the correct 4 valves to open. • Please look at the screenshot
for the solution (3, 4, 5, 6). Solving this puzzle restores
the water flow. • Walk down to go back outside.
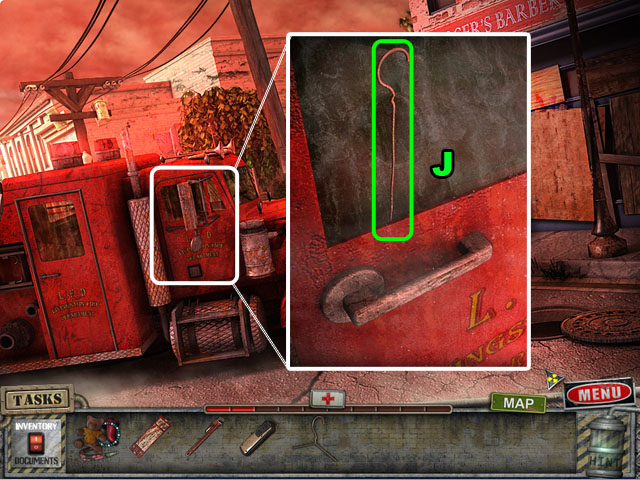 • Zoom into the front door; use the WIRE HANGER on the window
(J) twice to activate a HOS; play it.
• Zoom into the front door; use the WIRE HANGER on the window
(J) twice to activate a HOS; play it.
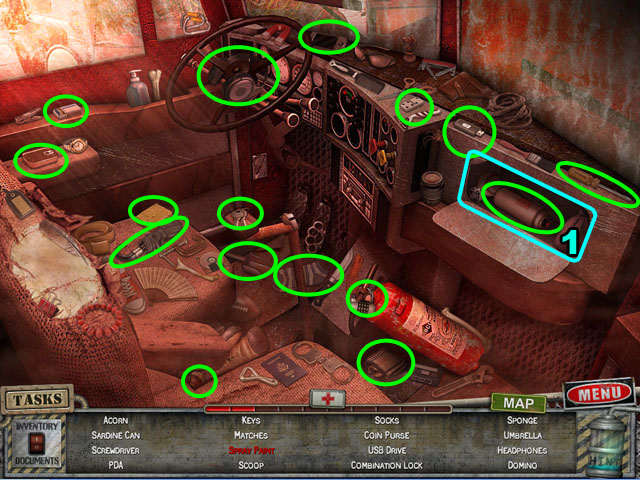 • Play the HOS. • Open the glove compartment (1); take the
spray paint. • Find the rest of the listed items to obtain the
KEYS.
• Play the HOS. • Open the glove compartment (1); take the
spray paint. • Find the rest of the listed items to obtain the
KEYS.
 • Zoom into the back door; put the KEYS (K) in the keyhole and
take the Health Pack (L). • Go forward and then through the
gate.
• Zoom into the back door; put the KEYS (K) in the keyhole and
take the Health Pack (L). • Go forward and then through the
gate.
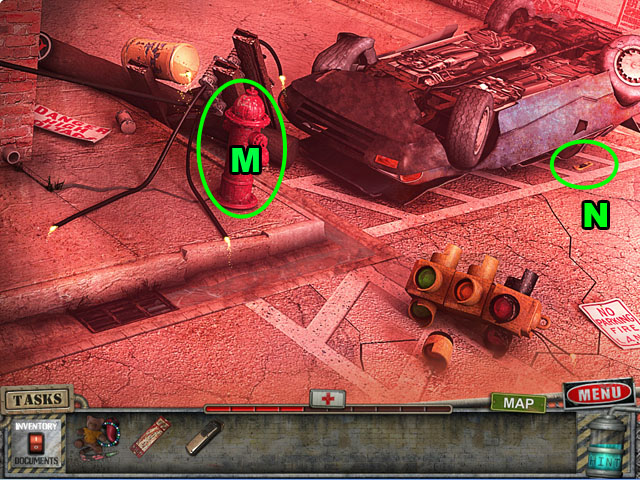 • Examine the fire hydrant (M); put the PIPE WRENCH on the cap
and turn it once. The water will flow out of the hydrant and
extinguish the fire. • Close the car door and take the BOX
CUTTER (N). • Go back into the manhole cover and then go up
the ladder.
• Examine the fire hydrant (M); put the PIPE WRENCH on the cap
and turn it once. The water will flow out of the hydrant and
extinguish the fire. • Close the car door and take the BOX
CUTTER (N). • Go back into the manhole cover and then go up
the ladder.
 • Zoom into the box; cut it with the BOX CUTTER twice. Open
the box; move the items aside and take the REMOTE CONTROL (O).
• Walk down.
• Zoom into the box; cut it with the BOX CUTTER twice. Open
the box; move the items aside and take the REMOTE CONTROL (O).
• Walk down.
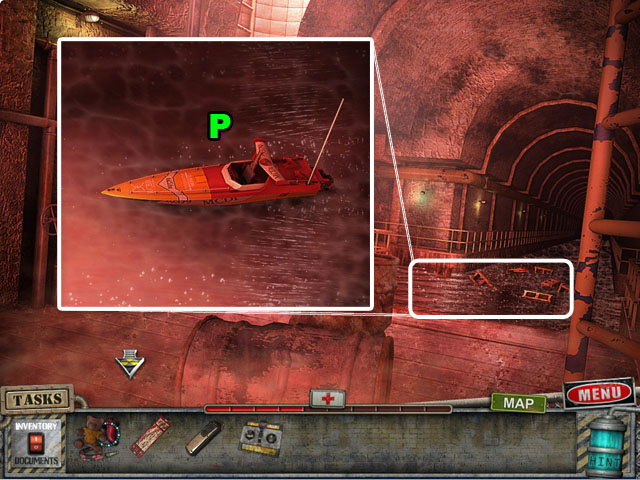 • Examine the water; put the REMOTE CONTROL on the boat to
activate a puzzle (P).
• Examine the water; put the REMOTE CONTROL on the boat to
activate a puzzle (P).
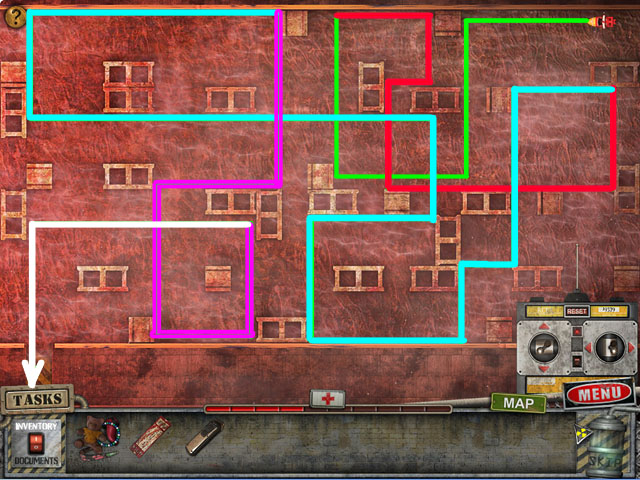 • Navigate the boat across the water and bring it shore to the
yellow and black stripes. • You cannot hit any dead ends (off
the screen) or you’ll have to start over. • See the screenshot
for the correct path; follow the lines in this order: green,
red, blue, purple, and then white. • After you solve the
puzzle, zoom into the boat and collect the KEY.
• Navigate the boat across the water and bring it shore to the
yellow and black stripes. • You cannot hit any dead ends (off
the screen) or you’ll have to start over. • See the screenshot
for the correct path; follow the lines in this order: green,
red, blue, purple, and then white. • After you solve the
puzzle, zoom into the boat and collect the KEY.
 • Climb the ladder and enter to the barber shop again. • Open
the door with the KEY (Q). • Enter the bathroom.
• Climb the ladder and enter to the barber shop again. • Open
the door with the KEY (Q). • Enter the bathroom.
 • Open the shelf and take the Health Pack (R). • Collect the
PLUNGER (S). • Collect the UNIPLEX (T). • Take off the tank
lid and collect the BALL-PEEN HAMMER (U). • Return to the
previous place with fountain.
• Open the shelf and take the Health Pack (R). • Collect the
PLUNGER (S). • Collect the UNIPLEX (T). • Take off the tank
lid and collect the BALL-PEEN HAMMER (U). • Return to the
previous place with fountain.
 • Zoom into the pipe and set the PLUNGER; pull the PLUNGER
once (W). • Collect the COIN (X). • Go forward.
• Zoom into the pipe and set the PLUNGER; pull the PLUNGER
once (W). • Collect the COIN (X). • Go forward.
 • Move the car and go through the road next the upside down
car (Y).
• Move the car and go through the road next the upside down
car (Y).
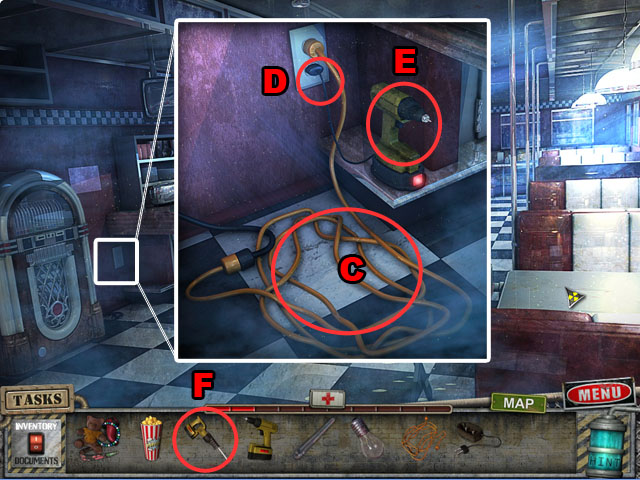
 • Move the right side of the screen to go the back door of the
building. • Collect the HOSE (A). • Look at the posts (B). •
Enter the building.
• Move the right side of the screen to go the back door of the
building. • Collect the HOSE (A). • Look at the posts (B). •
Enter the building.
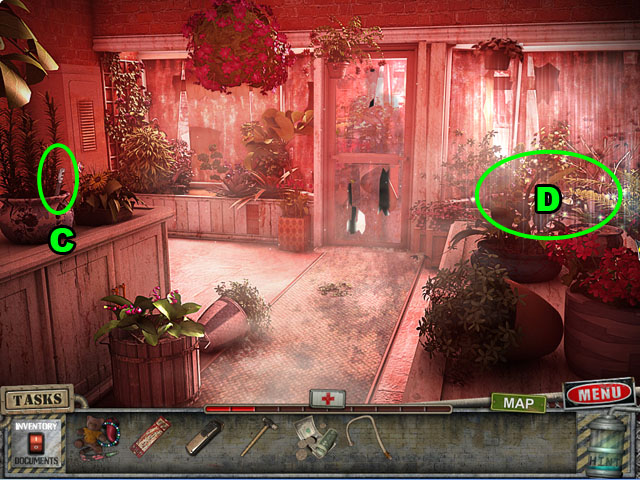 • Collect the GLASS CUTTER (C). • Play the HOS (D).
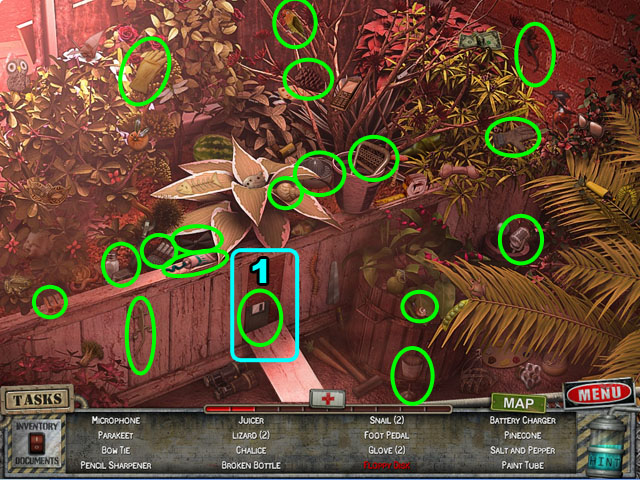 • Take off the piece of a wood (1); take the floppy disk. •
The FOOT PEDAL will be added to inventory. • Return to the
entrance of the movie theater.
• Take off the piece of a wood (1); take the floppy disk. •
The FOOT PEDAL will be added to inventory. • Return to the
entrance of the movie theater.
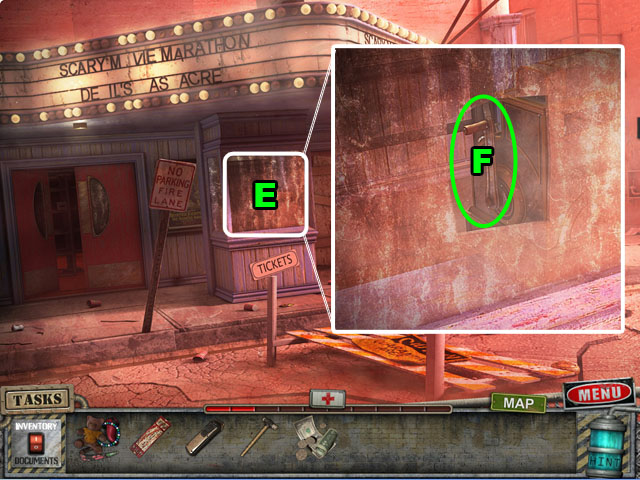 • Zoom into the counter and use the GLASS CUTTER (E). •
Collect the CASH REGISTER LEVER (F). • Return to the barber
shop again.
• Zoom into the counter and use the GLASS CUTTER (E). •
Collect the CASH REGISTER LEVER (F). • Return to the barber
shop again.
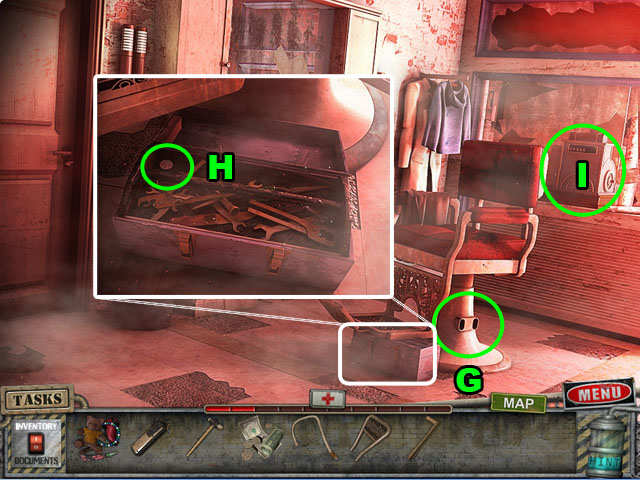 • Set the FOOT PEDAL and push it once (G). • Zoom into the
toolbox and open it; collect the COIN (H). • Place the CASH
REGISTER LEVER on the cash register to activate the puzzle
(I).
• Set the FOOT PEDAL and push it once (G). • Zoom into the
toolbox and open it; collect the COIN (H). • Place the CASH
REGISTER LEVER on the cash register to activate the puzzle
(I).
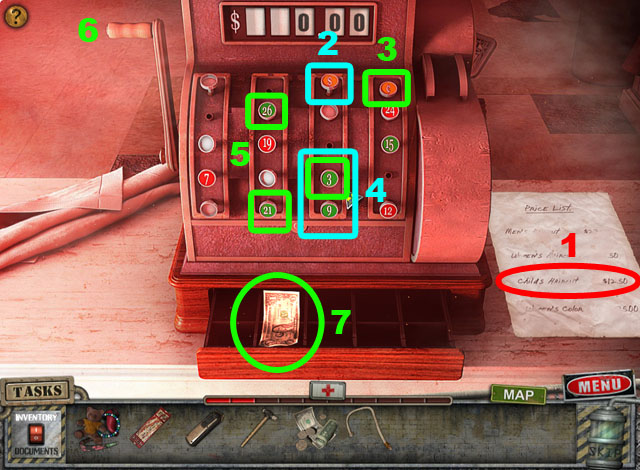 • Type in the amount written for the child’s haircut, $12.50
to open the cash register (1). • Press the dollar button to
adjust the dollars (2) and the cents button to adjust the
cents (3). • Red buttons will subtract numbers and green
buttons will add to the total. • To solve the puzzle press the
dollar button and then the 3 and the 9 buttons (4). Then press
the cents button and then press the 26, 21 and 3 buttons once
each (5). • Press the handle to open the register (6). • You
will receive a DOLLAR (7).
• Type in the amount written for the child’s haircut, $12.50
to open the cash register (1). • Press the dollar button to
adjust the dollars (2) and the cents button to adjust the
cents (3). • Red buttons will subtract numbers and green
buttons will add to the total. • To solve the puzzle press the
dollar button and then the 3 and the 9 buttons (4). Then press
the cents button and then press the 26, 21 and 3 buttons once
each (5). • Press the handle to open the register (6). • You
will receive a DOLLAR (7).
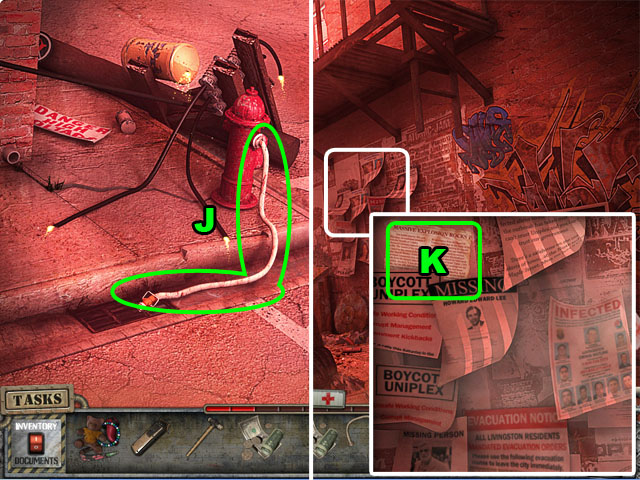 • Return to the corner street. • Place the HOSE onto the fire
extinguisher. • Zoom into the drain and pull the handle of the
hose (J). • Move to the back door of the movie theater again.
• Zoom into the wall and collect the EXPLOSION (K). • Enter
the next door.
• Return to the corner street. • Place the HOSE onto the fire
extinguisher. • Zoom into the drain and pull the handle of the
hose (J). • Move to the back door of the movie theater again.
• Zoom into the wall and collect the EXPLOSION (K). • Enter
the next door.
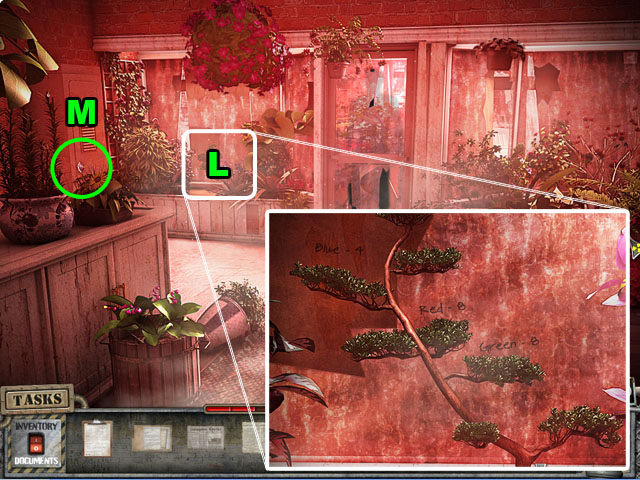 • Use the HAIR CLIPPERS to clip the bonsai tree (L). You will
see the code to open the locker; Blue- 4, Red-8, and Green-8.
• Close the locker to activate the puzzle (M).
• Use the HAIR CLIPPERS to clip the bonsai tree (L). You will
see the code to open the locker; Blue- 4, Red-8, and Green-8.
• Close the locker to activate the puzzle (M).
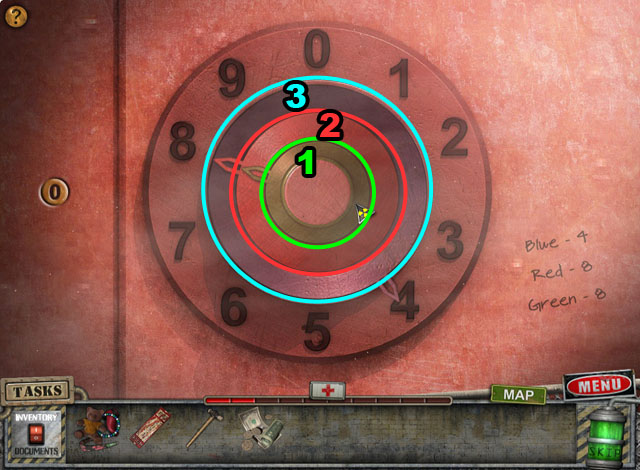 • Set the lock rings to 8 green, 8 red and 4 blue • Using the
green ring will move the green and red rings once. • Using the
red ring will move the red ring once and the blue ring three
times. • Using the blue ring will move the green ring three
times and the blue ring once. • Pressing the 0 button will
reset the puzzle. • Press all 3 rings (1, 2, and 3) 4 times
each to solve the puzzle.
• Set the lock rings to 8 green, 8 red and 4 blue • Using the
green ring will move the green and red rings once. • Using the
red ring will move the red ring once and the blue ring three
times. • Using the blue ring will move the green ring three
times and the blue ring once. • Pressing the 0 button will
reset the puzzle. • Press all 3 rings (1, 2, and 3) 4 times
each to solve the puzzle.
 • Collect the Health Pack (N) and the HIGH HOOK (O). • Walk
down once.
• Collect the Health Pack (N) and the HIGH HOOK (O). • Walk
down once.
 • Place the HIGH HOOK on the ladder and pull it once (P). •
Walk down to the underground. • Collect the health pack (Q). •
Return to the back door of the movie theater and climb up the
ladder.
• Place the HIGH HOOK on the ladder and pull it once (P). •
Walk down to the underground. • Collect the health pack (Q). •
Return to the back door of the movie theater and climb up the
ladder.
 • Open the window. • Break the piggy bank with the BALL- PEEN
HAMMER and take the MONEY (R). • Return to the entrance of the
movie theater.
• Open the window. • Break the piggy bank with the BALL- PEEN
HAMMER and take the MONEY (R). • Return to the entrance of the
movie theater.
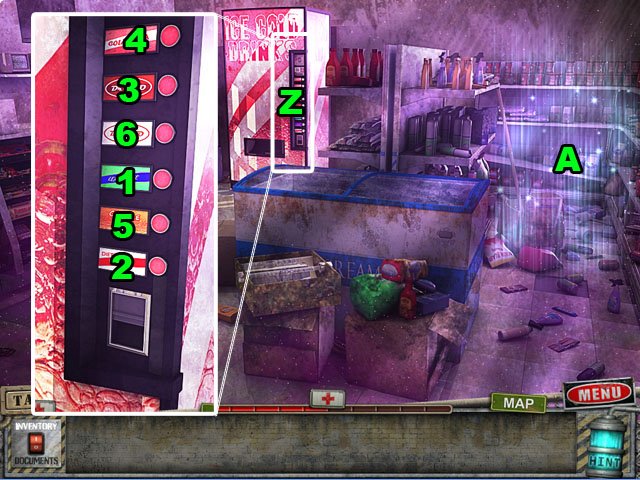
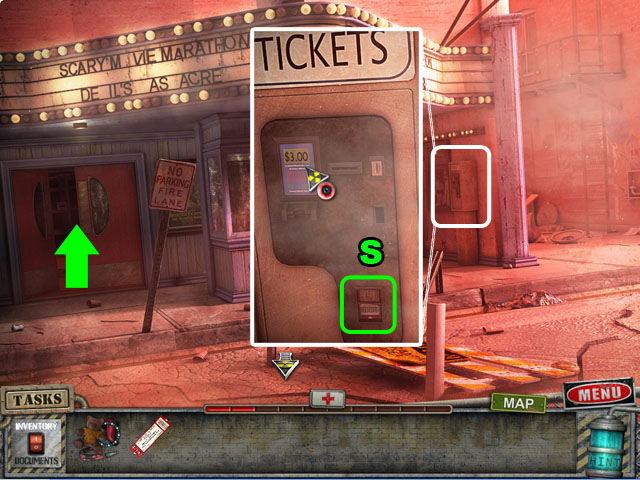 • Enter the movie theater and try to use the ticket that you
have already. You will not able to use it. Exit the movie
theater again. • Zoom into the ticket vending machine; insert
the MONEY and buy a TICKET (S). • Enter the entrance.
• Enter the movie theater and try to use the ticket that you
have already. You will not able to use it. Exit the movie
theater again. • Zoom into the ticket vending machine; insert
the MONEY and buy a TICKET (S). • Enter the entrance.
 • Use the new TICKET on the gate and enter the building (T).
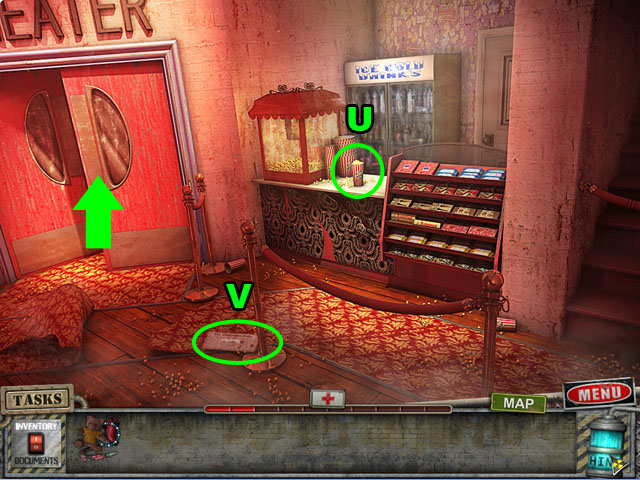 • Grab the popcorn (U). • Pick up the EVACUATION (V). • Move
to the theater room.
• Grab the popcorn (U). • Pick up the EVACUATION (V). • Move
to the theater room.
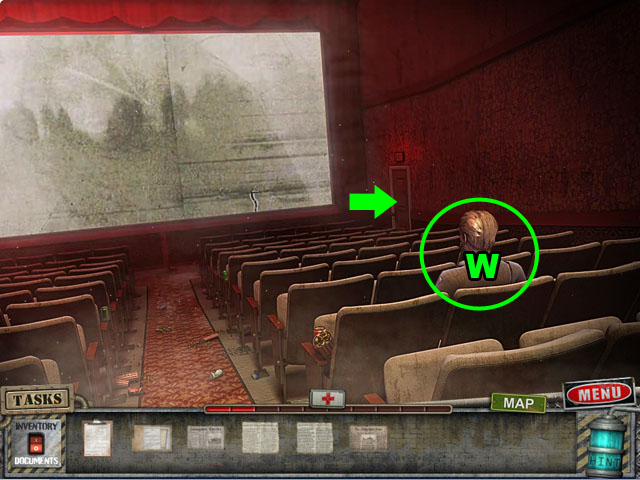 • Talk with the man (W). • Exit the movie theater.
Chapter 2: The Diner
 • Open the front and back hatch (A). • Zoom into the magazine
box and collect the crank handle (B). • Play the HOS (A).
• Open the front and back hatch (A). • Zoom into the magazine
box and collect the crank handle (B). • Play the HOS (A).
 • The ELECTRIC SAW will be added into your inventory. • Enter
the diner.
• The ELECTRIC SAW will be added into your inventory. • Enter
the diner.
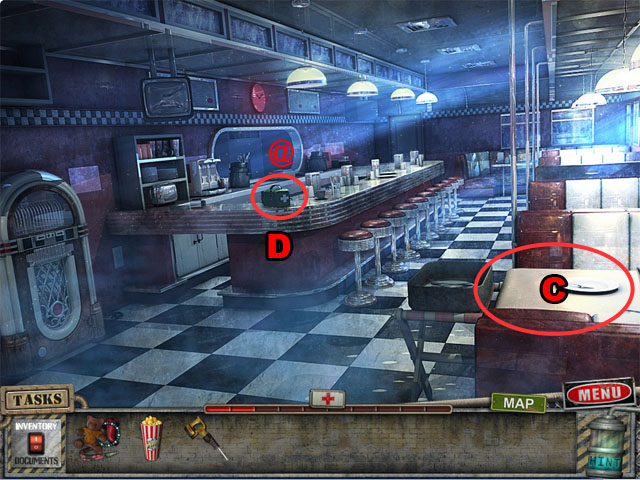 • Zoom into the table; bus the table and take the tablecloth
(C). • Take the Health Pack (D).
• Zoom into the table; bus the table and take the tablecloth
(C). • Take the Health Pack (D).
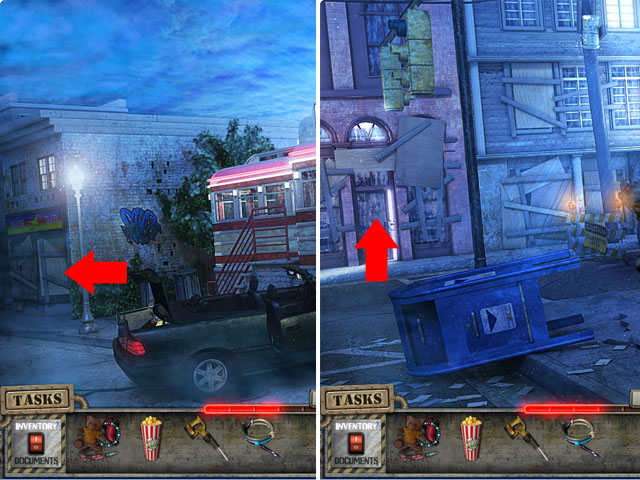 • Exit the diner and go to the left. • Enter the store.
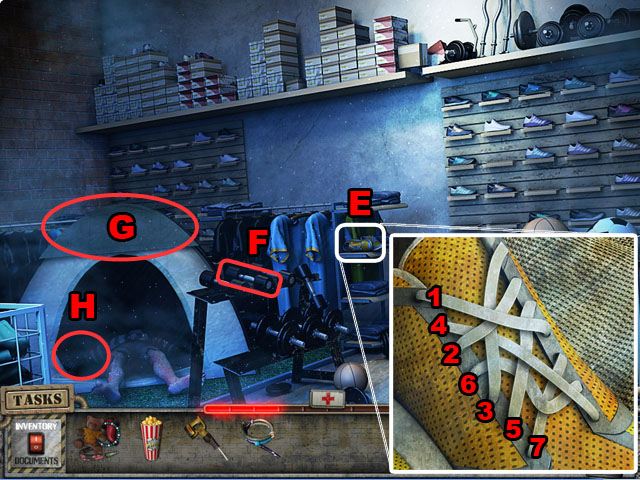 • Zoom into the shoes (E). • Pull on the topmost shoelace to
remove it. Repeat this action 6 times to get the LACES. • See
the screenshot for the correct order. • Collect the DUMBBELL
(F). • Collect the cloth (G). • Look at inside the tent and
try to take the screwdriver (H). After the zombie has passed
out, take the ELECTRIC SCREWDRIVER. • Exit the store.
• Zoom into the shoes (E). • Pull on the topmost shoelace to
remove it. Repeat this action 6 times to get the LACES. • See
the screenshot for the correct order. • Collect the DUMBBELL
(F). • Collect the cloth (G). • Look at inside the tent and
try to take the screwdriver (H). After the zombie has passed
out, take the ELECTRIC SCREWDRIVER. • Exit the store.
 • Use the SHOELACE to hold the shudder up (I). • Zoom into the
shuddered shop and collect the RECLINING CHAIR LEVER (J).
• Use the SHOELACE to hold the shudder up (I). • Zoom into the
shuddered shop and collect the RECLINING CHAIR LEVER (J).
 • Return to the diner. • Zoom into the door behind the
counter. • Hit the padlock with the dumbbell three times to
open the door (K). • Enter the door.
• Return to the diner. • Zoom into the door behind the
counter. • Hit the padlock with the dumbbell three times to
open the door (K). • Enter the door.
 • Open the front door; zoom into the seat. • Move three boxes
and a letter until you find the KEY (L). • Walk to the left.
• Open the front door; zoom into the seat. • Move three boxes
and a letter until you find the KEY (L). • Walk to the left.
 • Zoom into the front seat. • Find the Health Pack underneath
the console between the seats (M). • Zoom into the flag; place
the CRANK HANDLE (N). Crank the handle to take the FLAG. •
Enter the police department.
• Zoom into the front seat. • Find the Health Pack underneath
the console between the seats (M). • Zoom into the flag; place
the CRANK HANDLE (N). Crank the handle to take the FLAG. •
Enter the police department.
 • Play the HOS on the desk. • Open the drawer (1) to find the
police baton and the crescent wrench. • You will receive the
POLICE BATON.
• Play the HOS on the desk. • Open the drawer (1) to find the
police baton and the crescent wrench. • You will receive the
POLICE BATON.
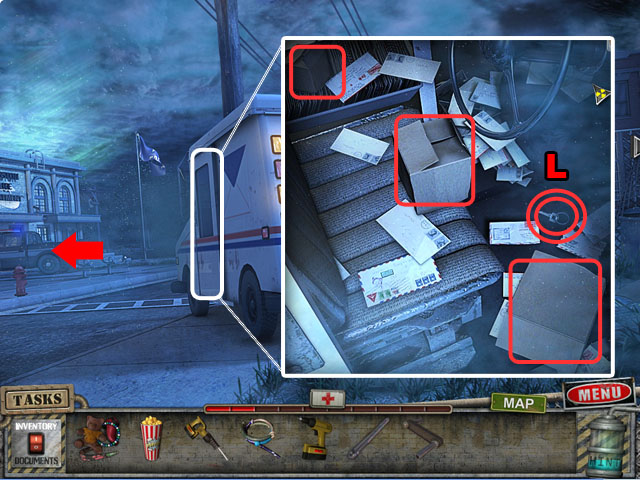
 • Walk back 4 times and go to the left. • Zoom into the
mailbox (O). • Use the MAILBOX KEY on the lock; move the
letters out of the way and take the LIGHTBULB (P). • Go back
through the diner’s back door and go to the right. • Collect
the BLANKET (Q).
• Walk back 4 times and go to the left. • Zoom into the
mailbox (O). • Use the MAILBOX KEY on the lock; move the
letters out of the way and take the LIGHTBULB (P). • Go back
through the diner’s back door and go to the right. • Collect
the BLANKET (Q).
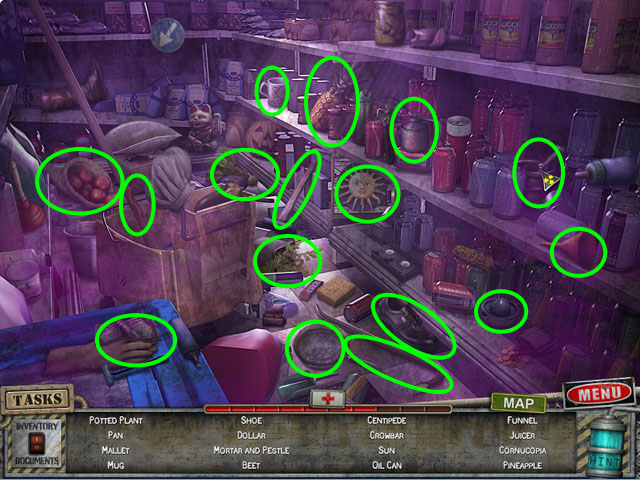
 • Enter the school. • Open the locker (R); take the TREASURE
MAP and the COAT. • Play the HOS (S).
• Enter the school. • Open the locker (R); take the TREASURE
MAP and the COAT. • Play the HOS (S).
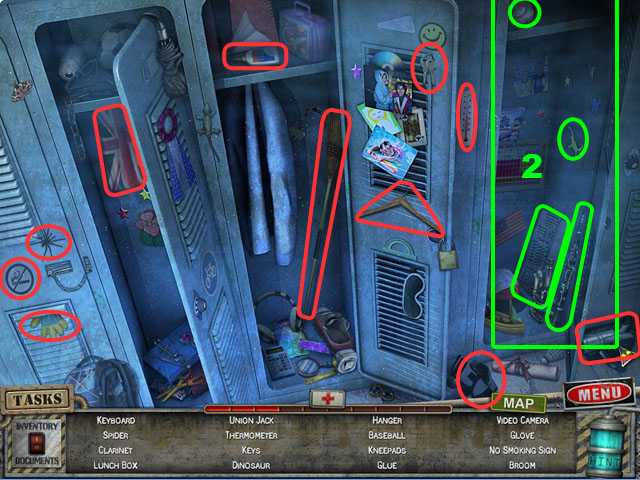 • Open the locker (2) to find the keyboard, dinosaur,
baseball, and clarinet. • You will receive the GLUE. • Go to
the right.
• Open the locker (2) to find the keyboard, dinosaur,
baseball, and clarinet. • You will receive the GLUE. • Go to
the right.
 • Take the BLANKET (T). • Zoom into the first-aid lock (U). •
You must line up all of the numbers in a row from 1-12
clockwise in order to solve this puzzle. • Use the left (1)
and right keys (2) to spin all of the numbers. Use the middle
key to switch just the 2 numbers in the red circle (3). •
Start with the numbers 1 and 2; get them in order first. •
Next work on 3, moving it from the right to the left until it
is in the correct position. • Repeat until all of the numbers
are lined up correctly like in the screenshot. • Take the
FIRST-AID SPRAY.
• Take the BLANKET (T). • Zoom into the first-aid lock (U). •
You must line up all of the numbers in a row from 1-12
clockwise in order to solve this puzzle. • Use the left (1)
and right keys (2) to spin all of the numbers. Use the middle
key to switch just the 2 numbers in the red circle (3). •
Start with the numbers 1 and 2; get them in order first. •
Next work on 3, moving it from the right to the left until it
is in the correct position. • Repeat until all of the numbers
are lined up correctly like in the screenshot. • Take the
FIRST-AID SPRAY.
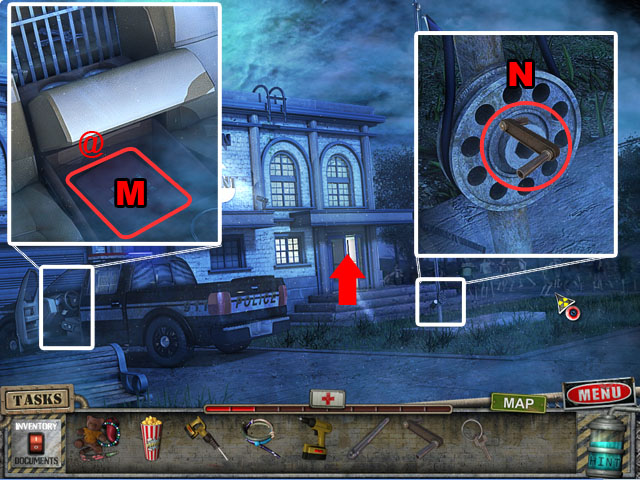
 • Return to the police department exterior. • Use the
MAKESHIFT ROPE on the ladder (V). • Take the LADDER (W).
• Return to the police department exterior. • Use the
MAKESHIFT ROPE on the ladder (V). • Take the LADDER (W).
 • Return to the sports store and use the LADDER to get the
EXERCISE BAR (X). • Go to the police building roof and use the
EXERCISE BAR on the wire (Y).
• Return to the sports store and use the LADDER to get the
EXERCISE BAR (X). • Go to the police building roof and use the
EXERCISE BAR on the wire (Y).
 • Take the EXTENSION CORD (Z). • Enter the basement.
 • Talk to the man (A). • Take the BATTERY CHARGER (B). • Exit
the basement. Return to the back of the police station. •
Remove the board and go through the door. • Exit at the bottom
of the screen.
• Talk to the man (A). • Take the BATTERY CHARGER (B). • Exit
the basement. Return to the back of the police station. •
Remove the board and go through the door. • Exit at the bottom
of the screen.
 • Return to the diner. • Zoom into the outlet; use the
EXTENSION CORD on the outlet (C). • Use the BATTERY CHARGER on
the outlet (D). • Use the ELECTRIC DRILL on the battery
charger (E). • Exit the area and come back. • Take the CHARGED
DRILL. • Use the ELECTRIC SAW on the charger (F). • Exit the
area and come back. • Take the CHARGED SAW.
• Return to the diner. • Zoom into the outlet; use the
EXTENSION CORD on the outlet (C). • Use the BATTERY CHARGER on
the outlet (D). • Use the ELECTRIC DRILL on the battery
charger (E). • Exit the area and come back. • Take the CHARGED
DRILL. • Use the ELECTRIC SAW on the charger (F). • Exit the
area and come back. • Take the CHARGED SAW.
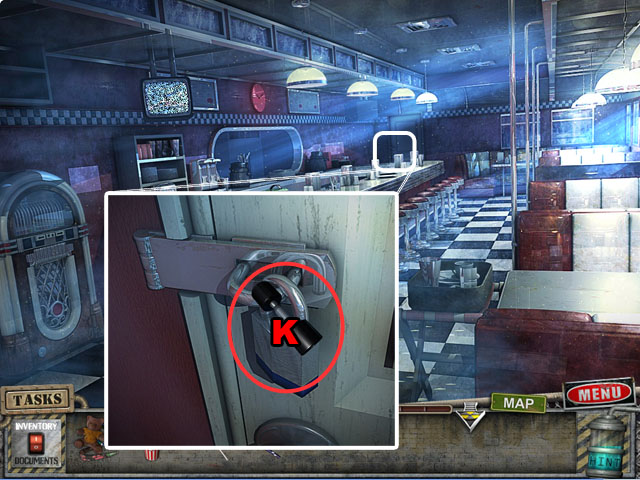
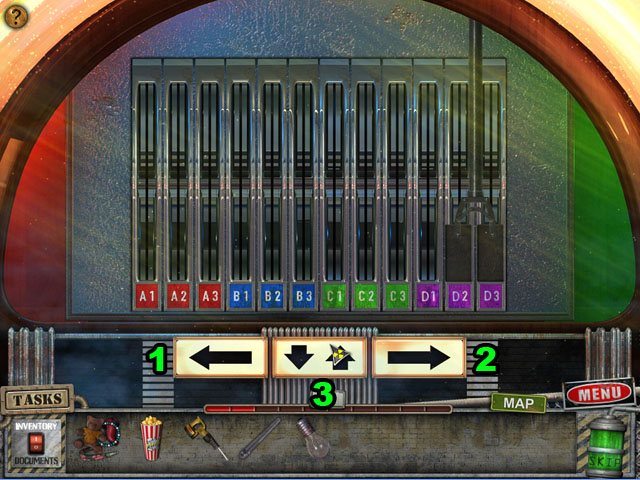 • Zoom into the jukebox. • Organize the letters and numbers on
the discs to solve the puzzle. • Use the arrow keys (1 and 2)
to move the picker from left to right. • Press the middle
button to lift the selected two discs up (3), and press it
again to put the numbered discs down. If there is a disc in
the spot already it will be switched with the discs on the
picker. • If there is no disc when you place the picker back
down, it will drop the discs you have selected. • See the
screenshot for the correct order of the discs.
• Zoom into the jukebox. • Organize the letters and numbers on
the discs to solve the puzzle. • Use the arrow keys (1 and 2)
to move the picker from left to right. • Press the middle
button to lift the selected two discs up (3), and press it
again to put the numbered discs down. If there is a disc in
the spot already it will be switched with the discs on the
picker. • If there is no disc when you place the picker back
down, it will drop the discs you have selected. • See the
screenshot for the correct order of the discs.
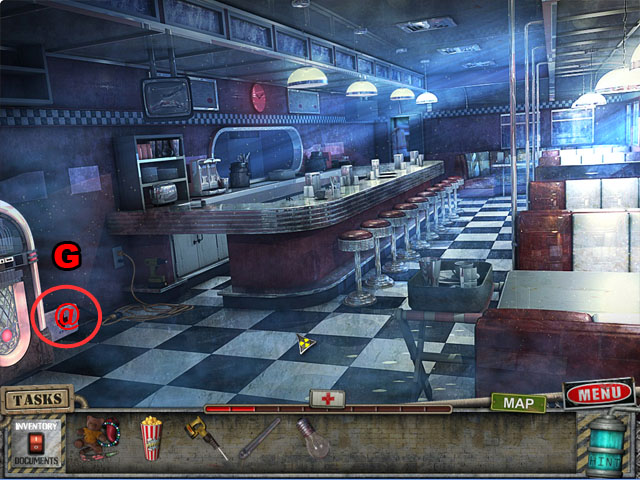 • Take the Health Pack once the jukebox shakes out of the way
(G).
• Take the Health Pack once the jukebox shakes out of the way
(G).
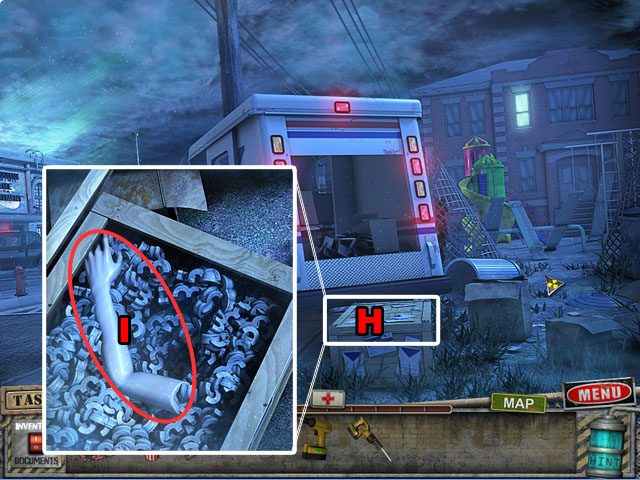 • Return to the mail truck. • Use the CHARGED DRILL on the
crate (H). • Take the MANNEQUIN ARM (I). • Go through the
police station’s back door.
• Return to the mail truck. • Use the CHARGED DRILL on the
crate (H). • Take the MANNEQUIN ARM (I). • Go through the
police station’s back door.
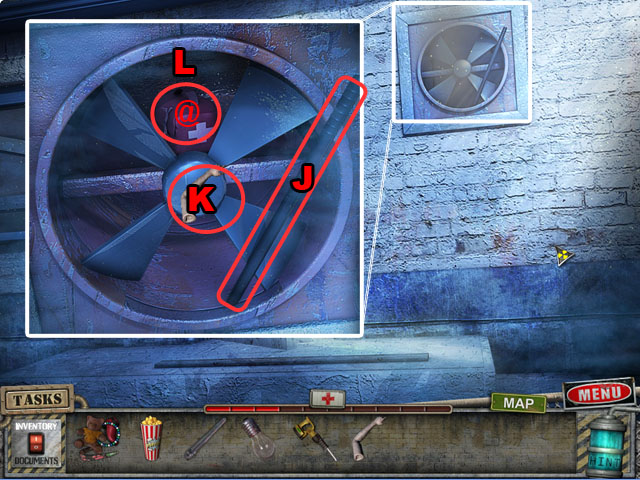 • Zoom into the fan. • Use the POLICE BATON to stop the fan
(J). • Use the MANNEQUIN ARM (K) to get the Health Pack (L). •
Go back to the police truck.
• Zoom into the fan. • Use the POLICE BATON to stop the fan
(J). • Use the MANNEQUIN ARM (K) to get the Health Pack (L). •
Go back to the police truck.
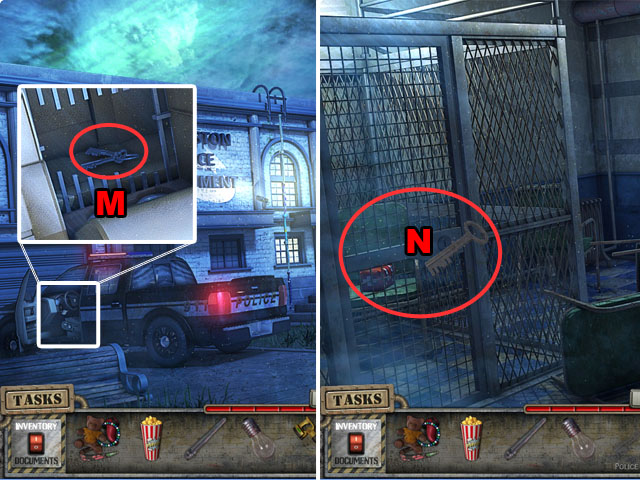 • Cut the bars with the CHARGED SAW. • Take the KEYS (M). • Go
inside the station. • Use the KEY on the evidence locker (N)
and take the Health Pack. • Go through the door and go down
once.
• Cut the bars with the CHARGED SAW. • Take the KEYS (M). • Go
inside the station. • Use the KEY on the evidence locker (N)
and take the Health Pack. • Go through the door and go down
once.
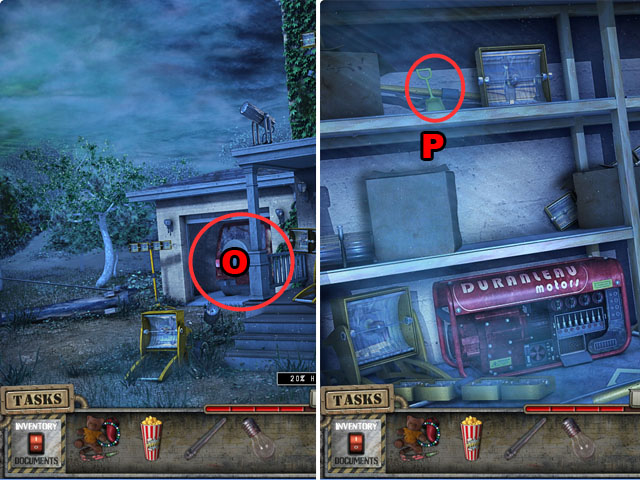 • Open the garage (O); you will lose some health. • Enter the
garage and move the boxes and the lights until you find the
PLASTIC SHOVEL (P). • Go to the schoolyard.
• Open the garage (O); you will lose some health. • Enter the
garage and move the boxes and the lights until you find the
PLASTIC SHOVEL (P). • Go to the schoolyard.
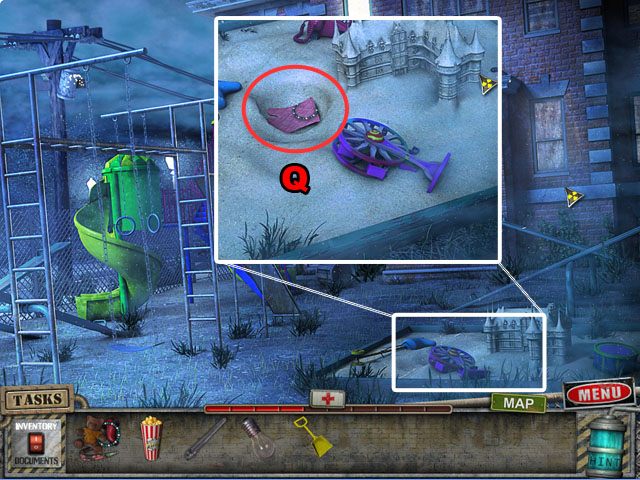 • Use the PLASTIC SHOVEL on the sandbox 3 times. • Take the
BRACELET (Q). • Take the OVEN MIT after watching the cut
scene.
• Use the PLASTIC SHOVEL on the sandbox 3 times. • Take the
BRACELET (Q). • Take the OVEN MIT after watching the cut
scene.
 • Return to the crashed car in the first scene. • Zoom into
the hood and use the OVEN MIT to get the SPARKPLUG (R). •
Return to the garage and use the FUSE on the motor.
• Return to the crashed car in the first scene. • Zoom into
the hood and use the OVEN MIT to get the SPARKPLUG (R). •
Return to the garage and use the FUSE on the motor.
 • The solution to this puzzle has 6 parts. Each part you get
correct will light up another light at the bottom right. • Set
the bottom fan to OPEN, HI, and IN (1). • Use the SPARKPLUG on
the hole and press on all the arrows to show all sparkplug
numbers. Line up the numbers as shown in the screenshot and
press the arrows again to put all of the sparkplugs back (2).
• Turn the dials at the top to the correct positions as
indicated by the letters on them (3). • Press all 4 buttons to
the right (4). • Put the wires in the correct hole, depending
on the colors of the buttons on the right (5). • Lastly, pull
the lever (6) to start the motor. • Go inside the house.
• The solution to this puzzle has 6 parts. Each part you get
correct will light up another light at the bottom right. • Set
the bottom fan to OPEN, HI, and IN (1). • Use the SPARKPLUG on
the hole and press on all the arrows to show all sparkplug
numbers. Line up the numbers as shown in the screenshot and
press the arrows again to put all of the sparkplugs back (2).
• Turn the dials at the top to the correct positions as
indicated by the letters on them (3). • Press all 4 buttons to
the right (4). • Put the wires in the correct hole, depending
on the colors of the buttons on the right (5). • Lastly, pull
the lever (6) to start the motor. • Go inside the house.
 • Use the LEVER on the chair (S) and pull it. • Take the
Health Pack (T). • Zoom in on the closet and use the LIGHTBULB
(U).
• Use the LEVER on the chair (S) and pull it. • Take the
Health Pack (T). • Zoom in on the closet and use the LIGHTBULB
(U).
 • Start the HOS. • You will receive the WARDROBE handle. • Go
upstairs.
• Start the HOS. • You will receive the WARDROBE handle. • Go
upstairs.
 • Take the QUARTER (V) and enter the bedroom.
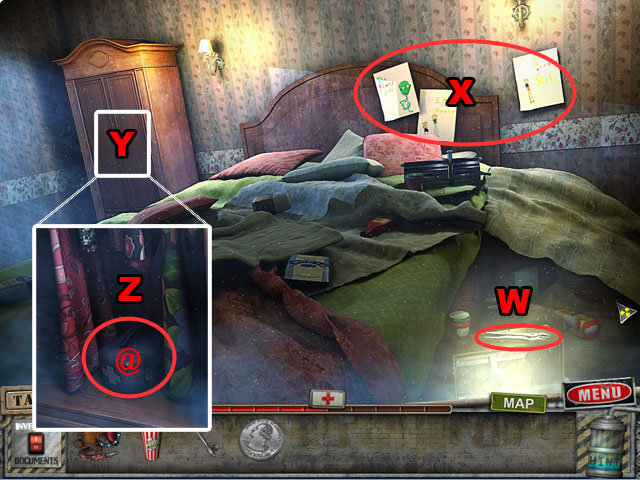 • Look at the drawings (X). • Take the VICE GRIPS (W). • Use
the HANDLE on the wardrobe (Y) and open it to find another
Health Pack (Z).
• Look at the drawings (X). • Take the VICE GRIPS (W). • Use
the HANDLE on the wardrobe (Y) and open it to find another
Health Pack (Z).
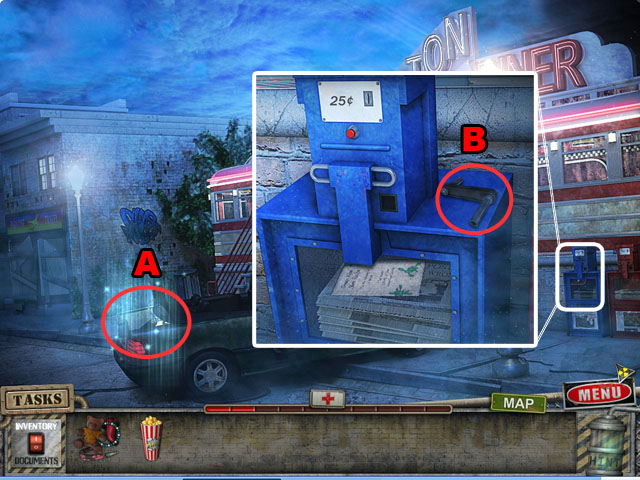
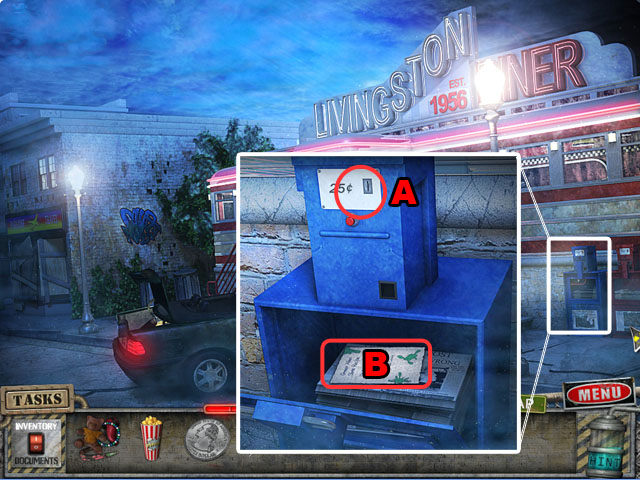 • Return to the outside of the diner and use the QUARTER on
the newspaper machine (A) to get the SLIM RECIPE (B).
• Return to the outside of the diner and use the QUARTER on
the newspaper machine (A) to get the SLIM RECIPE (B).
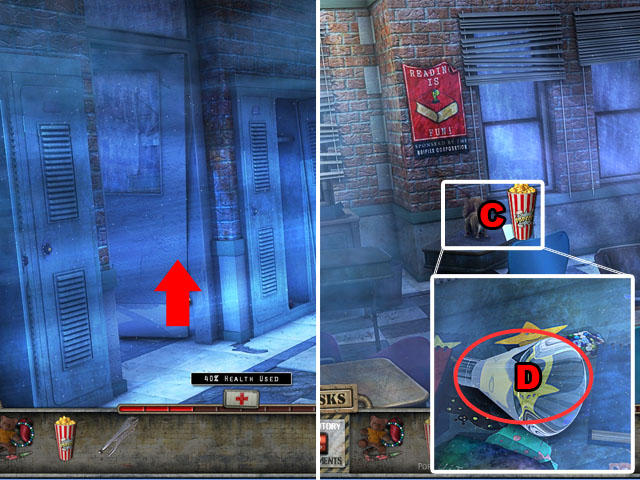 • Return to the school hallway and open to door. • Place the
POPCORN on the squirrel (C). • Open the desk and take the
BEAKER (D). • Go back and then right to the janitor’s closet.
• Return to the school hallway and open to door. • Place the
POPCORN on the squirrel (C). • Open the desk and take the
BEAKER (D). • Go back and then right to the janitor’s closet.
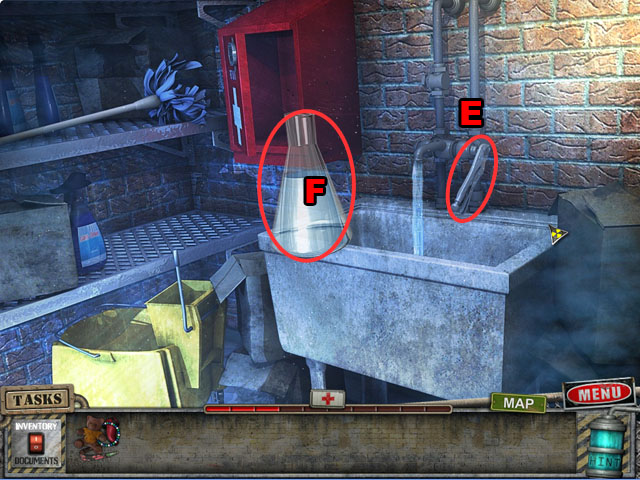 • Use the VICE GRIPS on the faucet (E) and pull it to start
the water. • Then use the BEAKER on the water (F) and return
to the previous room.
• Use the VICE GRIPS on the faucet (E) and pull it to start
the water. • Then use the BEAKER on the water (F) and return
to the previous room.
 • Zoom into the beakers in the corner (G). • Use the BEAKER OF
WATER on one of the colored beakers.
• Zoom into the beakers in the corner (G). • Use the BEAKER OF
WATER on one of the colored beakers.
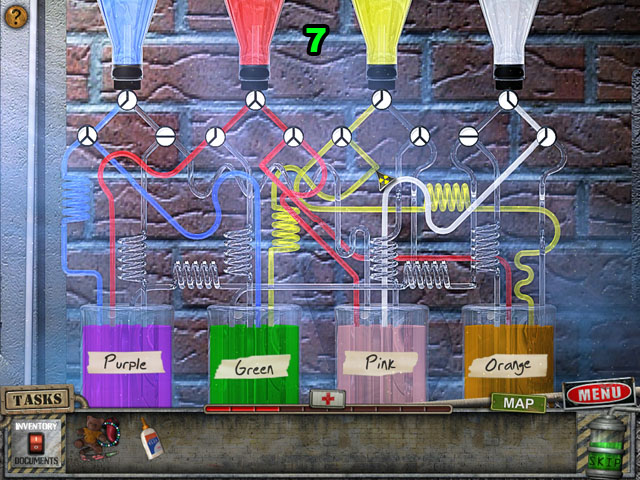 • The object of this game is to mix all of the different
colors by only opening the valves at the top - near the
colored beakers. • The colored water from the beakers will mix
to make the different colors: red and white makes pink, yellow
and red makes orange, red and blue makes purple and yellow and
blue makes green. • See the screenshot for the correct setup
(7). • You will receive the GREEN WATER; go to the diner.
• The object of this game is to mix all of the different
colors by only opening the valves at the top - near the
colored beakers. • The colored water from the beakers will mix
to make the different colors: red and white makes pink, yellow
and red makes orange, red and blue makes purple and yellow and
blue makes green. • See the screenshot for the correct setup
(7). • You will receive the GREEN WATER; go to the diner.
 • Zoom into the mixer and use the GREEN WATER on it and the
GLUE (H). • Press the red mix button. • Take the GREEN SLIME.
• Zoom into the mixer and use the GREEN WATER on it and the
GLUE (H). • Press the red mix button. • Take the GREEN SLIME.
 • Give the GREEN SLIME to the man in the basement (I). • You
will receive the TELESCOPE. • Return to the top floor of the
house and use the TELESCOPE on the base (J).
• Give the GREEN SLIME to the man in the basement (I). • You
will receive the TELESCOPE. • Return to the top floor of the
house and use the TELESCOPE on the base (J).
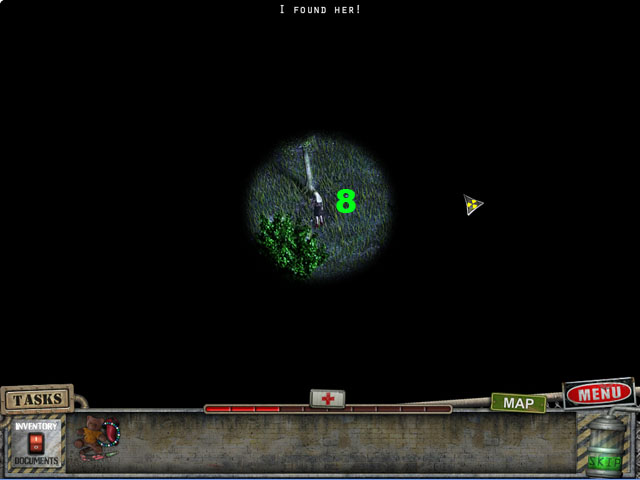 • Move the mouse around until you find the little girl (8). •
She will be near the upper left side of the scene.
• Move the mouse around until you find the little girl (8). •
She will be near the upper left side of the scene.
Chapter 3: The Factory
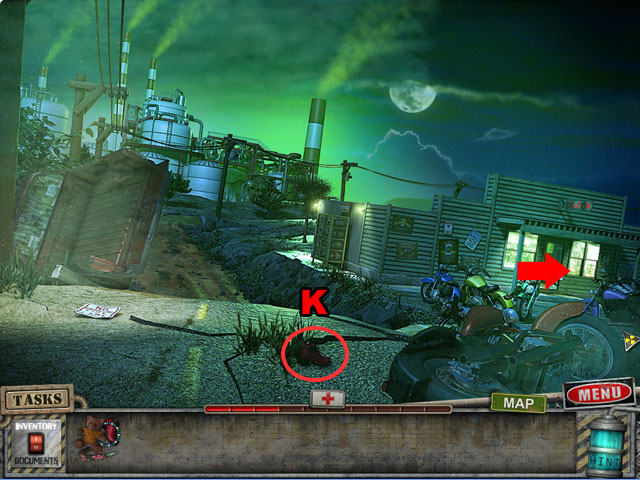 • Take the SHOE (K) and then go to the right.
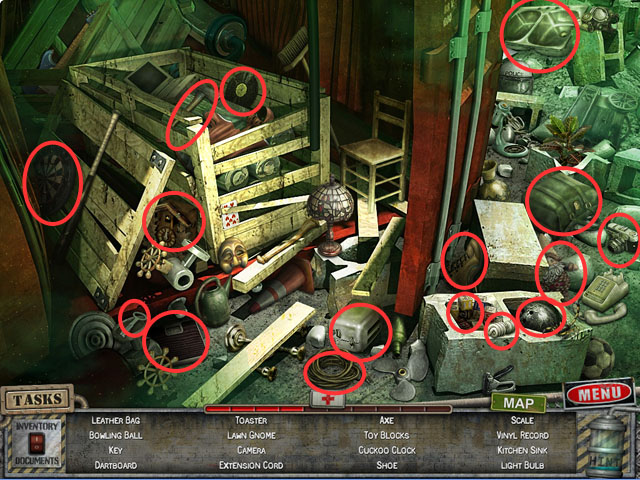
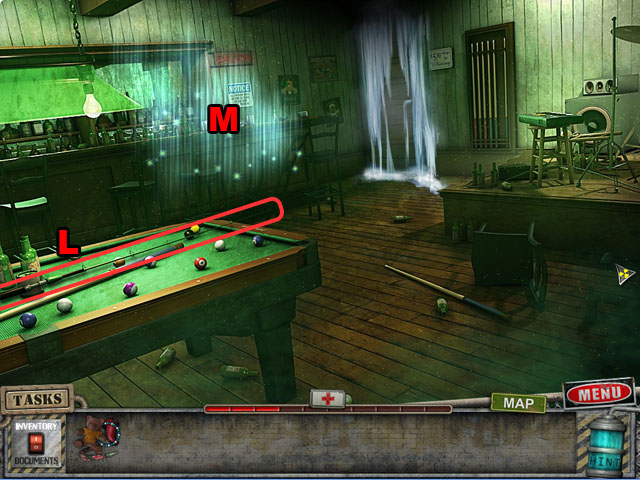 • Take the FISHING ROD (L). • Play the HOS (M).
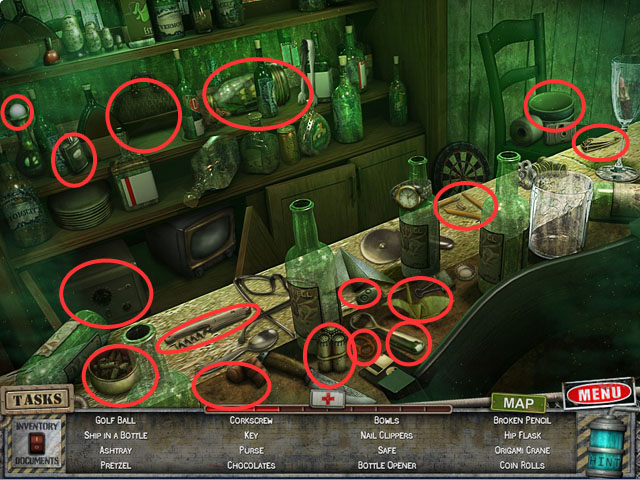 • Open the cabinet door to get the safe. • You will receive a
GOLF BALL.
• Open the cabinet door to get the safe. • You will receive a
GOLF BALL.
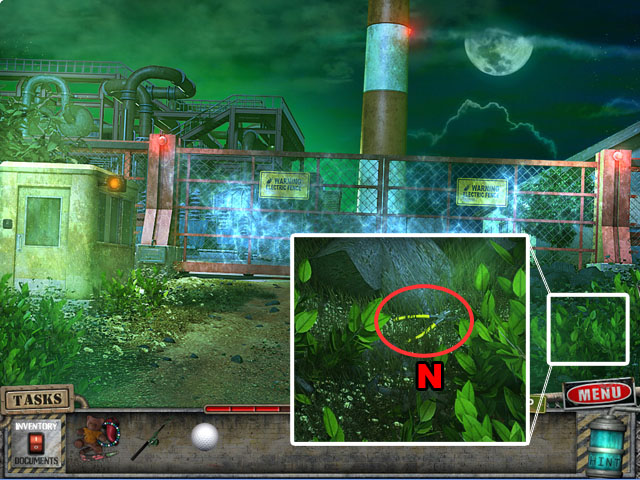 • Exit the building and go north. • Zoom into the grass and
press a few times to remove it. • Take the WIRE CUTTERS (N).
• Exit the building and go north. • Zoom into the grass and
press a few times to remove it. • Take the WIRE CUTTERS (N).
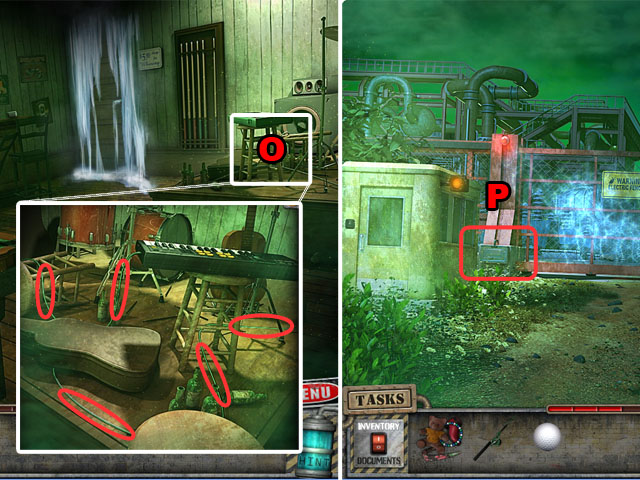 • Return to the building and Zoom into the music equipment
(O). • Use the WIRE CUTTERS to collect the 5 ELECTRICAL WIRES.
• Go back to the factory door and use the WIRES on the
electrical box (P).
• Return to the building and Zoom into the music equipment
(O). • Use the WIRE CUTTERS to collect the 5 ELECTRICAL WIRES.
• Go back to the factory door and use the WIRES on the
electrical box (P).
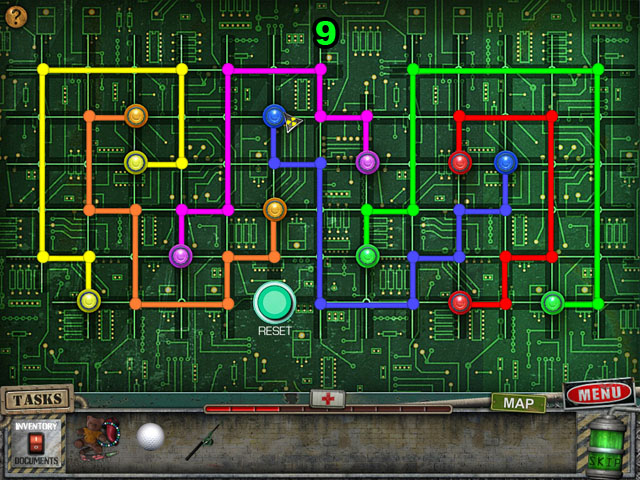 • The object of this mini-game is to connect all of the
like-colored buttons. • Press a lit button to start dragging a
cord on the grid. Drag the cord all the way to the other
button of the same color and press again to finish it. • Do
this will all of the cords without crossing them to finish the
puzzle. • You can redraw a cord by clicking on the end point.
• Press the reset button if you get stuck. • See the
screenshot for the final solution (9). There are no empty
spaces left.
• The object of this mini-game is to connect all of the
like-colored buttons. • Press a lit button to start dragging a
cord on the grid. Drag the cord all the way to the other
button of the same color and press again to finish it. • Do
this will all of the cords without crossing them to finish the
puzzle. • You can redraw a cord by clicking on the end point.
• Press the reset button if you get stuck. • See the
screenshot for the final solution (9). There are no empty
spaces left.
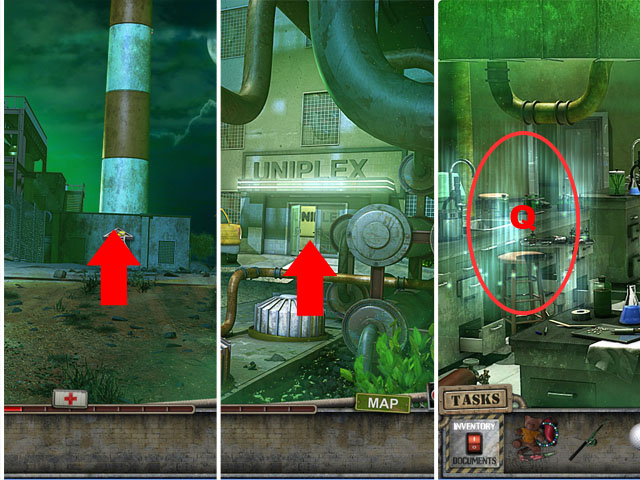 • Open the gate and go through it. • Once inside, enter the
building and play the first HOS (Q).
• Open the gate and go through it. • Once inside, enter the
building and play the first HOS (Q).
 • The car radio is inside a drawer. • You will receive a
PROPANE KEY.
• The car radio is inside a drawer. • You will receive a
PROPANE KEY.
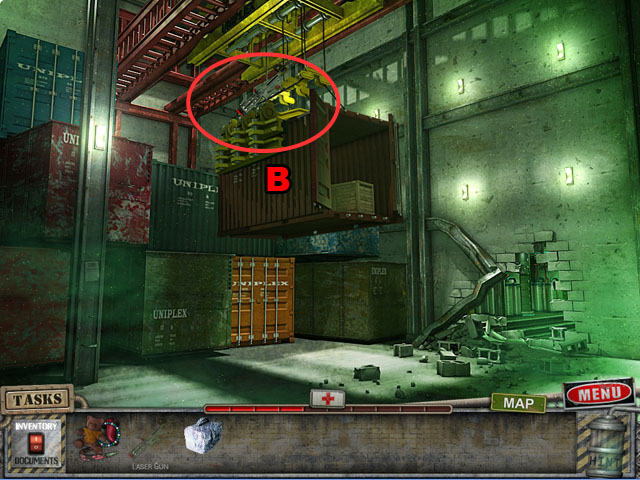
 • Zoom into the window in the back and collect the LASER GUN
PIECE (R). • Look at Emily (S). • Zoom into the lock (T).
• Zoom into the window in the back and collect the LASER GUN
PIECE (R). • Look at Emily (S). • Zoom into the lock (T).
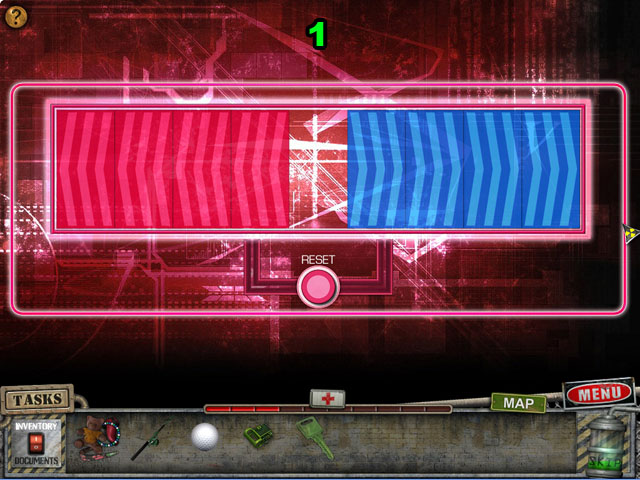 • Switch the positions of the blue and red blocks to complete
the lock. Red goes on the left and blue on the right. • When
you press down on a tile it will move into an empty space.
Each tile can only jump one other tile to get to the next
empty space. A tile will lock in place if there are two tiles
between it and the empty one. • Use the blue, then the red,
and the blue to move a tile from one side to the next. Repeat
to make the puzzle match the screenshot (1). • Once finished
go through the door.
• Switch the positions of the blue and red blocks to complete
the lock. Red goes on the left and blue on the right. • When
you press down on a tile it will move into an empty space.
Each tile can only jump one other tile to get to the next
empty space. A tile will lock in place if there are two tiles
between it and the empty one. • Use the blue, then the red,
and the blue to move a tile from one side to the next. Repeat
to make the puzzle match the screenshot (1). • Once finished
go through the door.
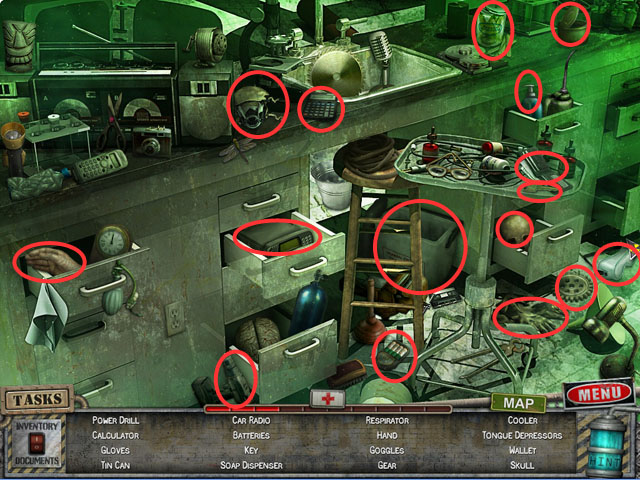
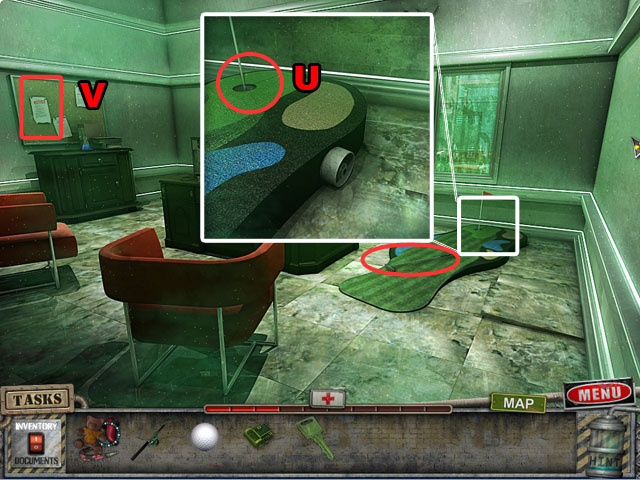 • Take the GOLF CLUB. • Use the BALL on the hole to get the
LASER GUN PIECE (U). • Read the memo on the wall (V). • Go
back to the laboratory and through the door to the left.
• Take the GOLF CLUB. • Use the BALL on the hole to get the
LASER GUN PIECE (U). • Read the memo on the wall (V). • Go
back to the laboratory and through the door to the left.
 • Read the note (W) and take the FIRE EXTINGUISHER (X). • Exit
the building by going back 4 times.
• Read the note (W) and take the FIRE EXTINGUISHER (X). • Exit
the building by going back 4 times.
 • Zoom into the truck window and use the GOLF CLUB 3 times
(Y). • Take the LEVER (Z). • Go forward twice.
• Zoom into the truck window and use the GOLF CLUB 3 times
(Y). • Take the LEVER (Z). • Go forward twice.
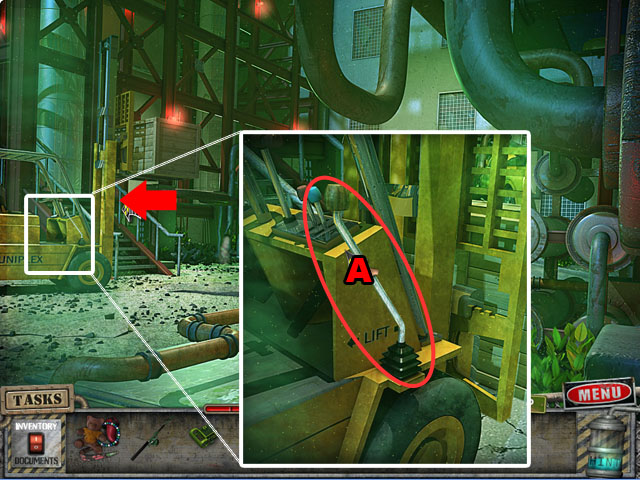 • Zoom in on the forklift and use the LEVER on it (A). • Pull
the lever and go up the stairs.
• Zoom in on the forklift and use the LEVER on it (A). • Pull
the lever and go up the stairs.
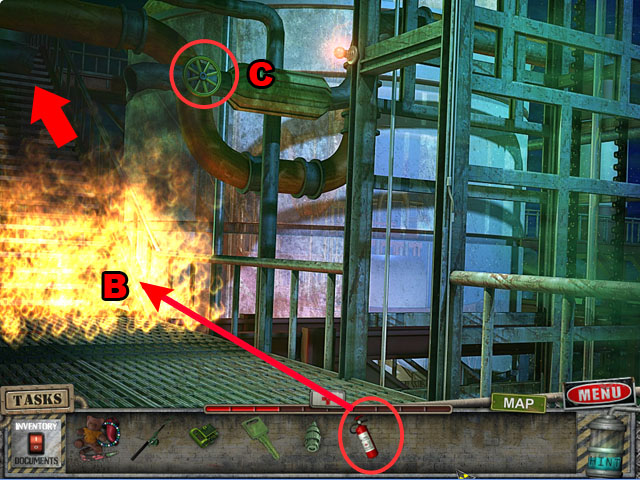 • Use the FIRE EXTINGUISHER on the fire (B) and take the VALVE
HANDLE (C). • Travel up the stairs.
• Use the FIRE EXTINGUISHER on the fire (B) and take the VALVE
HANDLE (C). • Travel up the stairs.
 • Zoom into the area to the right and open the door. • Use the
FISHING ROD to get the Health Pack (D). • Zoom into the area
to the left and pull on the rope (E). • Open the toolbox and
take the SCREWDRIVER (F).
• Zoom into the area to the right and open the door. • Use the
FISHING ROD to get the Health Pack (D). • Zoom into the area
to the left and pull on the rope (E). • Open the toolbox and
take the SCREWDRIVER (F).
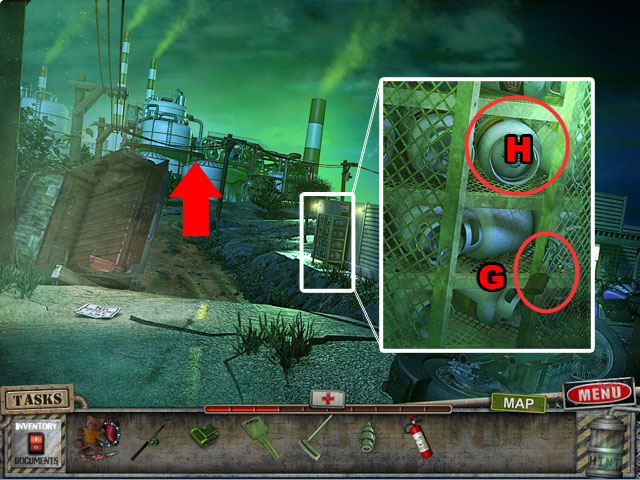 • Return to the first scene and look at the propane storage. •
Use the PROPANE KEY (G) on the lock and open the door. • Take
the PROPANE (H). • Go up twice.
• Return to the first scene and look at the propane storage. •
Use the PROPANE KEY (G) on the lock and open the door. • Take
the PROPANE (H). • Go up twice.
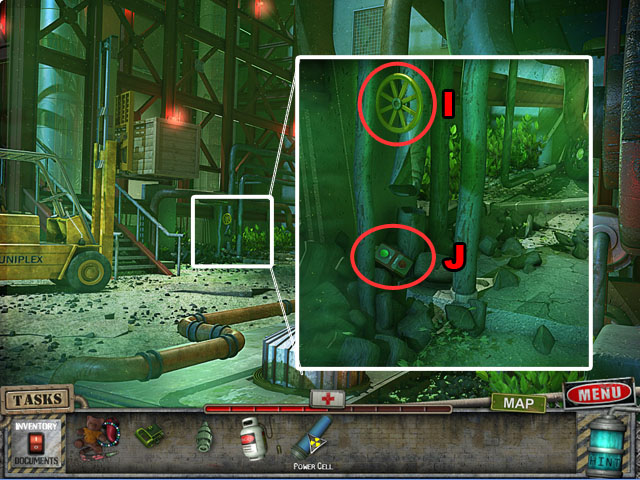 • Zoom in on the smoking pipe. • Place the VALVE at the top
(I) and use it to stop the smoke. • Take the ELEVATOR CONTROLS
(J). • Walk up the stairs.
• Zoom in on the smoking pipe. • Place the VALVE at the top
(I) and use it to stop the smoke. • Take the ELEVATOR CONTROLS
(J). • Walk up the stairs.
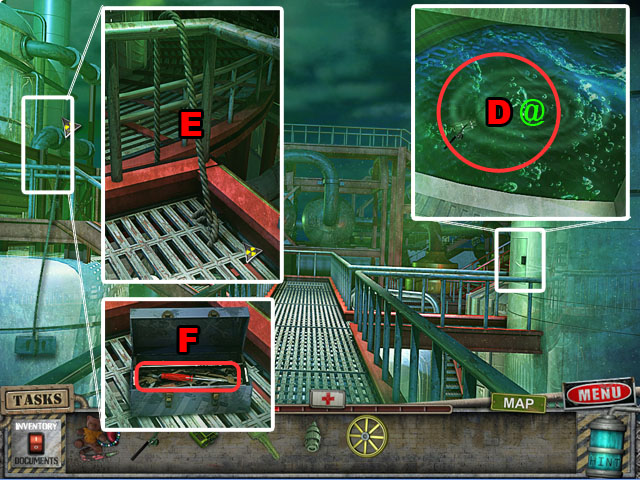
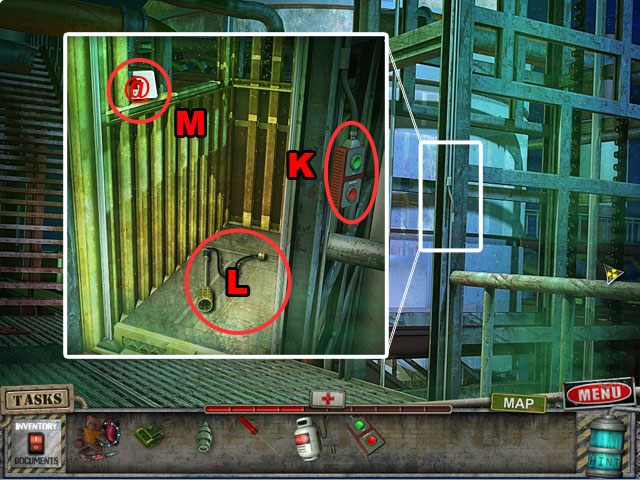 • Zoom into the elevator shaft and use the CONTROLS on the
very right. • Press the green button to call the elevator (K)
and then open the doors. • Take the TORCH (L) and the Health
Pack (M).
• Zoom into the elevator shaft and use the CONTROLS on the
very right. • Press the green button to call the elevator (K)
and then open the doors. • Take the TORCH (L) and the Health
Pack (M).
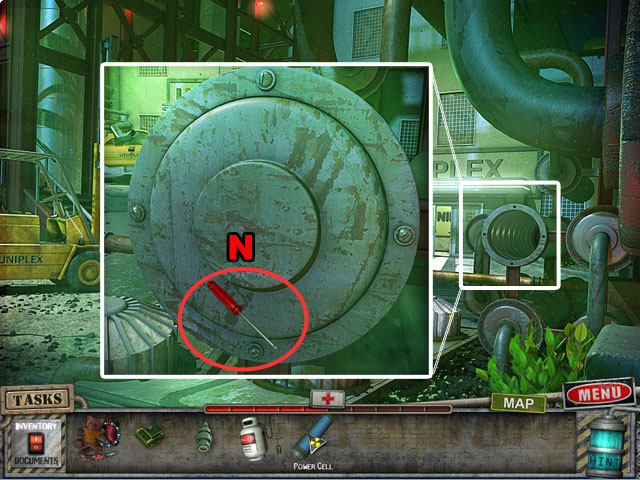 • Return downstairs and zoom in on the pipe end. • Use the
SCREWDRIVER to open it up and take the POWER CELL (N). • Go
upstairs twice.
• Return downstairs and zoom in on the pipe end. • Use the
SCREWDRIVER to open it up and take the POWER CELL (N). • Go
upstairs twice.
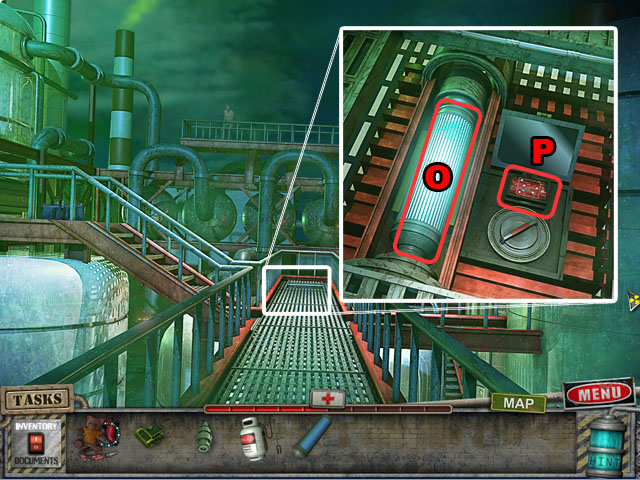 • Zoom into the floor and open the grate. • Place the POWER
CELL (O) and zoom in on the controls (P).
• Zoom into the floor and open the grate. • Place the POWER
CELL (O) and zoom in on the controls (P).
 • The object of this mini-game is to fill up all of the
available spaces with blue (starting from the blue circle). •
You can move in any direction up, down, left or right, and you
can move from 1 to 6 spaces at a time. • Press the reset key
if you cannot place any more blue squares. • See the
screenshot for the correct path (2).
• The object of this mini-game is to fill up all of the
available spaces with blue (starting from the blue circle). •
You can move in any direction up, down, left or right, and you
can move from 1 to 6 spaces at a time. • Press the reset key
if you cannot place any more blue squares. • See the
screenshot for the correct path (2).
 • Pull up the handle after finishing the puzzle (Q).
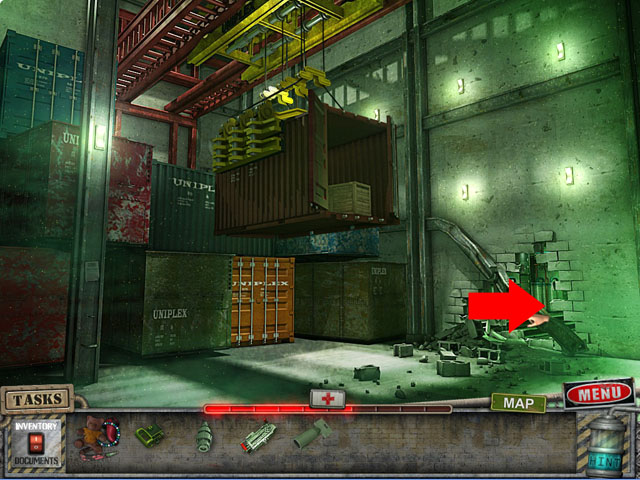
 • Exit the factory and enter the building at the start. • Use
the PROPANE TORCH on the wall (R). • Open the door and zoom in
to see the frozen man; take his SECURITY CARD (S).
• Exit the factory and enter the building at the start. • Use
the PROPANE TORCH on the wall (R). • Open the door and zoom in
to see the frozen man; take his SECURITY CARD (S).
 • Return to the front gate and use the SECURITY CARD on the
guard house (T). • Open the drawers to find a first-aid kit
and a LASER GUN PART (U). • Take the LASER GUN KEY (V) from
the top of the monitor. • Take the Health Pack (W). • Go
inside and enter the laboratory. Go left after that.
• Return to the front gate and use the SECURITY CARD on the
guard house (T). • Open the drawers to find a first-aid kit
and a LASER GUN PART (U). • Take the LASER GUN KEY (V) from
the top of the monitor. • Take the Health Pack (W). • Go
inside and enter the laboratory. Go left after that.
 • Move the large beam out of the way and lose some health. •
Enter the next room.
• Move the large beam out of the way and lose some health. •
Enter the next room.
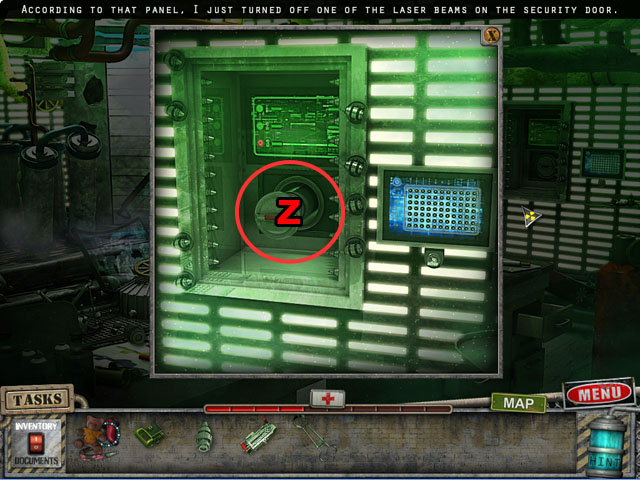
 • Take the TONGS (X). • Zoom into the laser security system
and use the KEY (Y). • Click on the opened panel for another
mini-game.
• Take the TONGS (X). • Zoom into the laser security system
and use the KEY (Y). • Click on the opened panel for another
mini-game.
 • Place circles on the grid to complete the mini-game. • The
numbers across the top and the bottom of the grid show what
arrangement the circles must be in. The groups and numbers
must match and there must be a space between each group. •
When a line is in the correct place it will light up blue. •
You can reset your work with the reset button in the top left
corner. • See the screenshot for the correct solution (3).
• Place circles on the grid to complete the mini-game. • The
numbers across the top and the bottom of the grid show what
arrangement the circles must be in. The groups and numbers
must match and there must be a space between each group. •
When a line is in the correct place it will light up blue. •
You can reset your work with the reset button in the top left
corner. • See the screenshot for the correct solution (3).
 • Pull out the next handle (Z).
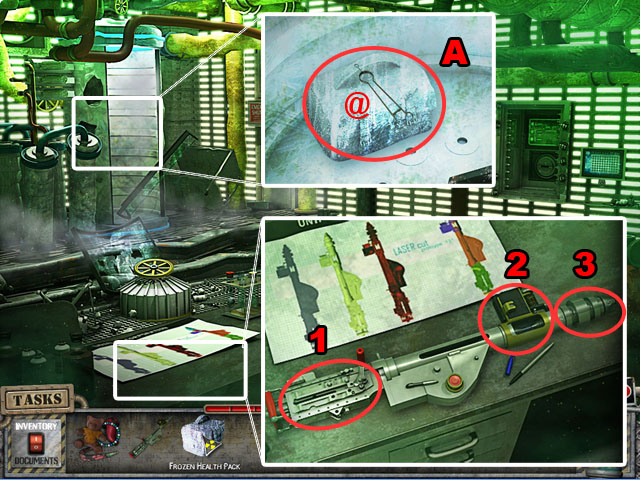 • Zoom into the plans and place the LASER GUN PIECES in the
correct order (1, 2, and 3). • Take the LASER GUN. • Zoom in
on the tube in the back and use the TONGS to get the Health
Pack (A).
• Zoom into the plans and place the LASER GUN PIECES in the
correct order (1, 2, and 3). • Take the LASER GUN. • Zoom in
on the tube in the back and use the TONGS to get the Health
Pack (A).
 • Exit the room and use the LASER to take down the container
(B).
• Exit the room and use the LASER to take down the container
(B).
 • Play the HOS. • You will receive the SAFE KEY. • Go back
once.
• Play the HOS. • You will receive the SAFE KEY. • Go back
once.
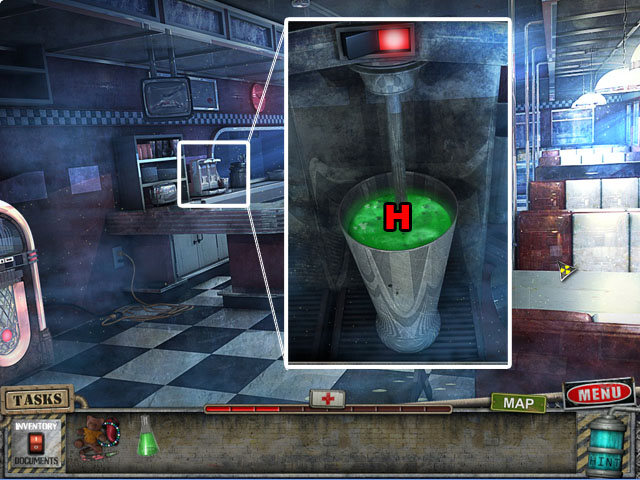
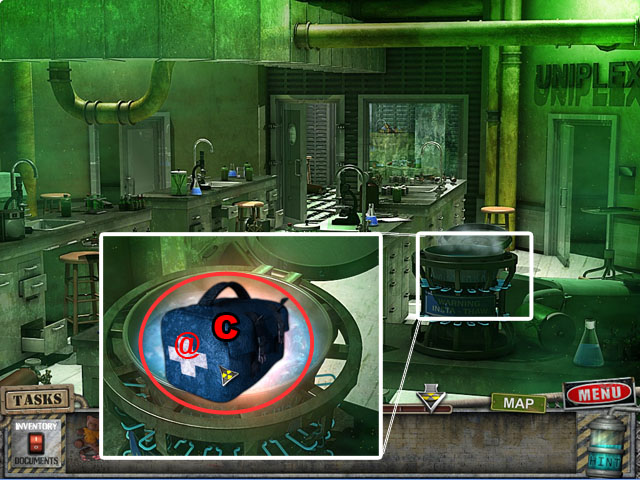 • Use the FROZEN HEALTH PACK with the thawing machine (C). •
Go to the right.
• Use the FROZEN HEALTH PACK with the thawing machine (C). •
Go to the right.
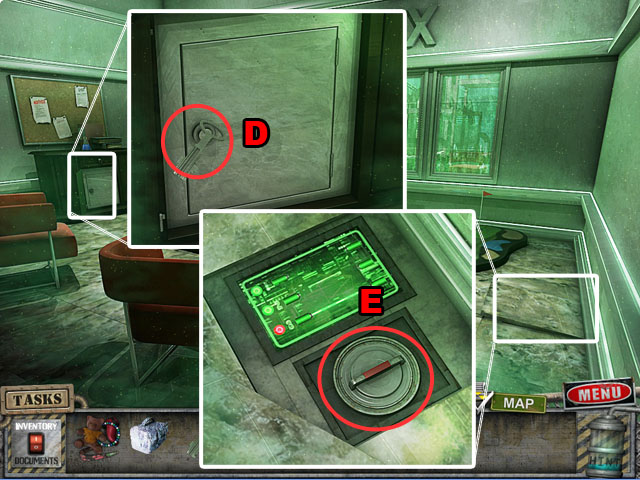 • Zoom into the drawer to the left (D) and open it. • Use the
SAFE KEY to open it and take the Health Pack. • Uncover the
secret floor panel and pull the lever (E). • Return to the
previous room and go through the newly-opened door.
• Zoom into the drawer to the left (D) and open it. • Use the
SAFE KEY to open it and take the Health Pack. • Uncover the
secret floor panel and pull the lever (E). • Return to the
previous room and go through the newly-opened door.
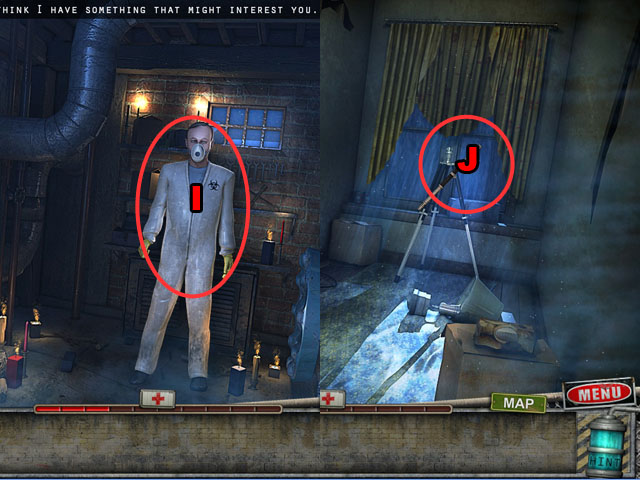
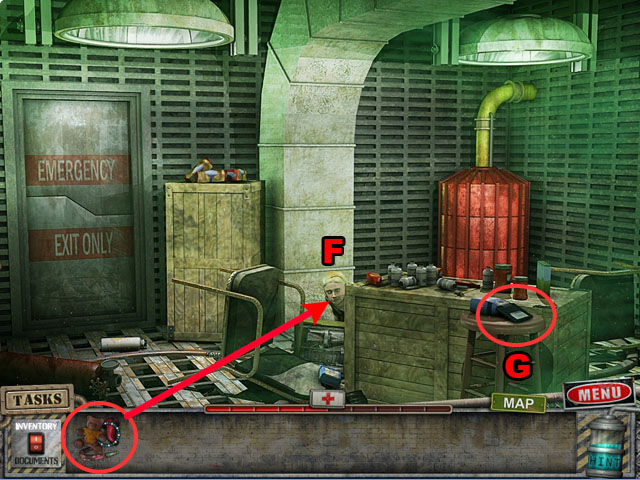 • Give EMILY’S THINGS to her (F). • Take the DISK and exit the
room (G).
• Give EMILY’S THINGS to her (F). • Take the DISK and exit the
room (G).
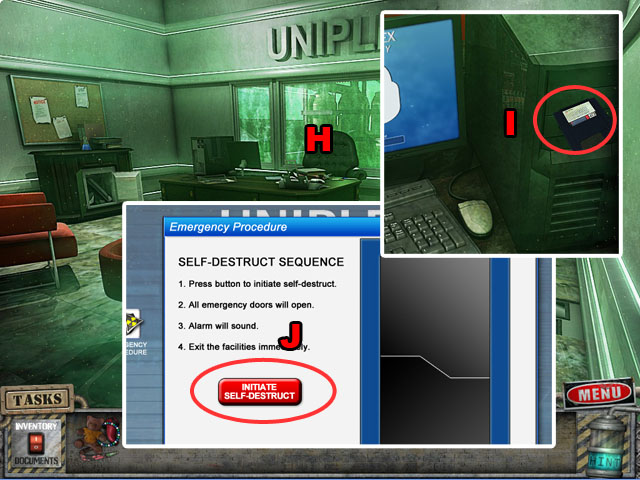 • Enter the office to the right and zoom in on the computer
(H). • Use the DISK on the computer (I). • Close all of the
windows and open the emergency program. • Press the
self-destruct button (J).
• Enter the office to the right and zoom in on the computer
(H). • Use the DISK on the computer (I). • Close all of the
windows and open the emergency program. • Press the
self-destruct button (J).
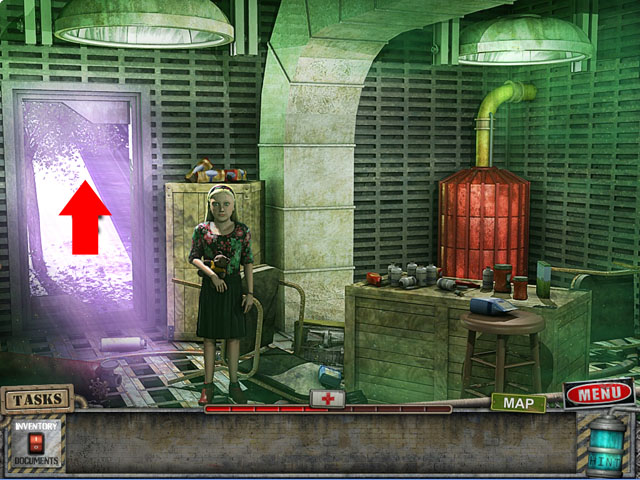 • Return to Emily and exit through the back door.
Chapter 4: Escape
 • Zoom into the panel (K).
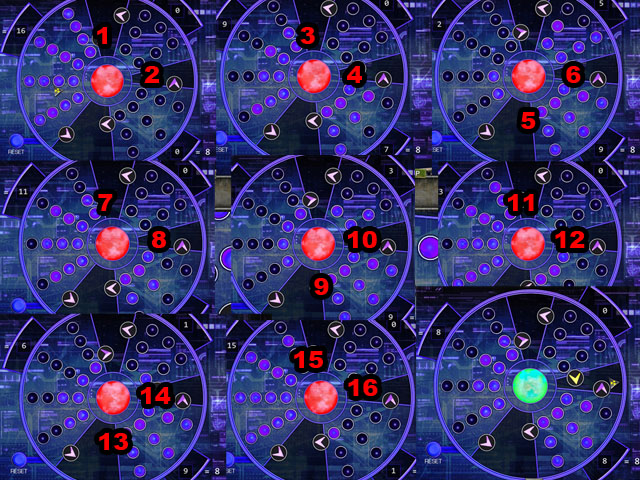 • Press the arrow keys to move as many lights as possible into
another area, filling it up. • Get 8 lights in both the bottom
and the top area to complete the puzzle. • The trick to
finishing the puzzle is to cycle the lights clockwise always
keeping the remainders until you have only one light lit in
one of the areas. Then you can add this to one side to make
two sets of 8. • Follow the instructions in the screenshot
(1-16) for the correct order to push the buttons.
• Press the arrow keys to move as many lights as possible into
another area, filling it up. • Get 8 lights in both the bottom
and the top area to complete the puzzle. • The trick to
finishing the puzzle is to cycle the lights clockwise always
keeping the remainders until you have only one light lit in
one of the areas. Then you can add this to one side to make
two sets of 8. • Follow the instructions in the screenshot
(1-16) for the correct order to push the buttons.
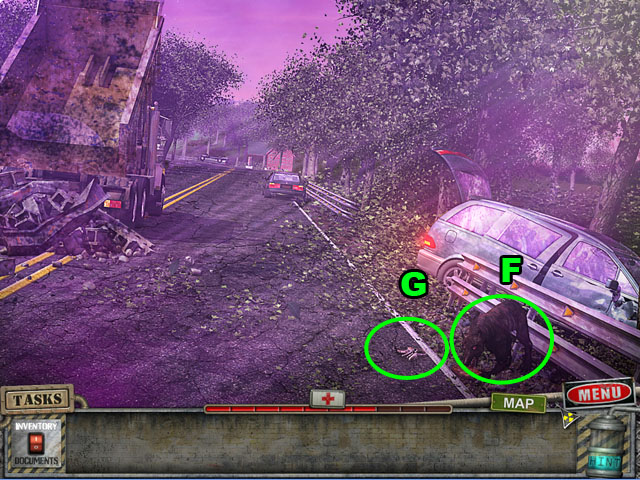
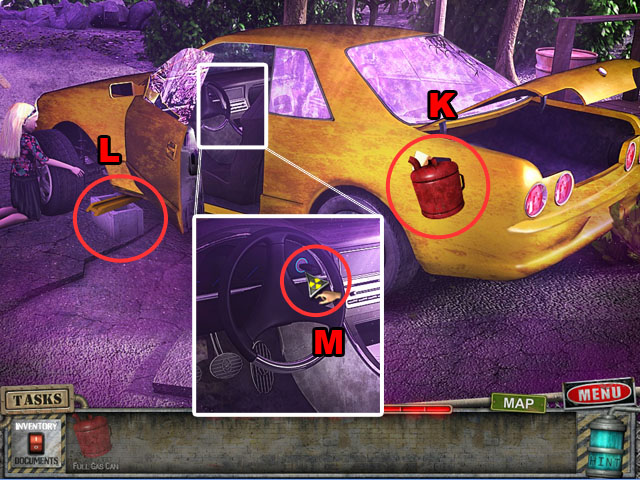
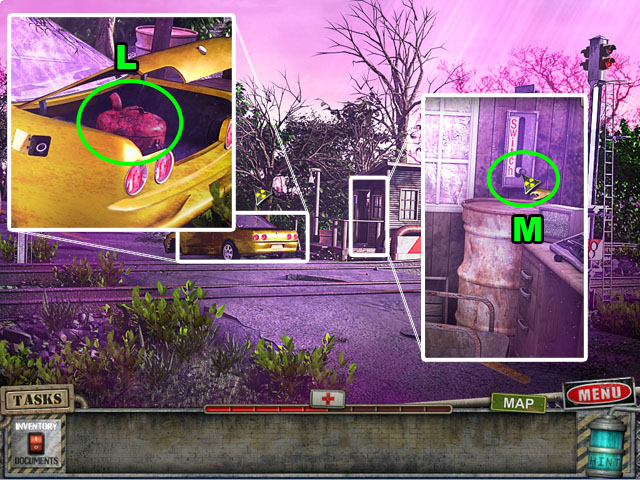 • Move forward and zoom in on the shack. • Take the SWITCH
(M). • Walk forward again to the car and take the GAS CAN from
the trunk (L). • Back up and go farther down the road to the
left.
• Move forward and zoom in on the shack. • Take the SWITCH
(M). • Walk forward again to the car and take the GAS CAN from
the trunk (L). • Back up and go farther down the road to the
left.
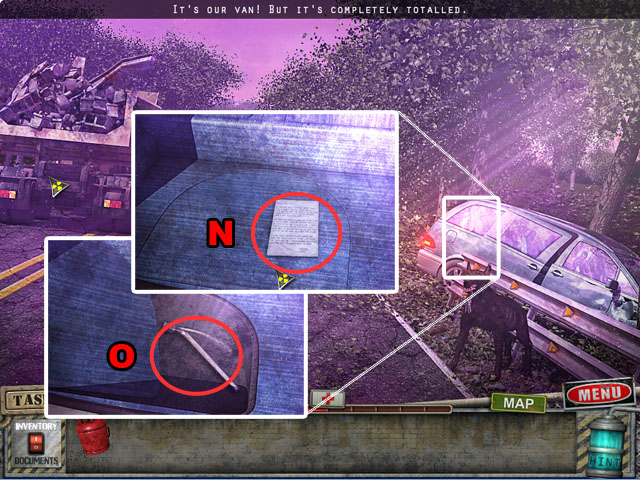 • Zoom in on the van and take the NOTE and the CAR KEY (N). •
Watch the cut scene and zoom in again, open up the hatch and
take the LUG WRENCH (O).
• Zoom in on the van and take the NOTE and the CAR KEY (N). •
Watch the cut scene and zoom in again, open up the hatch and
take the LUG WRENCH (O).
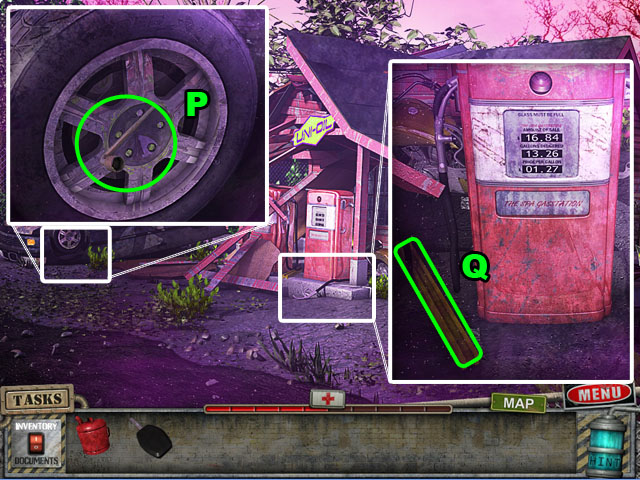 • Walk further down the road and look at the pump to find the
STEEL BEAM (P). • Zoom in on the car tire and use the LUG
WRENCH to get the TIRE (Q). • Go back one scene.
• Walk further down the road and look at the pump to find the
STEEL BEAM (P). • Zoom in on the car tire and use the LUG
WRENCH to get the TIRE (Q). • Go back one scene.
 • Zoom in on the side of the truck; use the LEVER and then
pull it (R). • Take the CEMENT BLOCK from in front of the
rubble (S). • Go back to the yellow car.
• Zoom in on the side of the truck; use the LEVER and then
pull it (R). • Take the CEMENT BLOCK from in front of the
rubble (S). • Go back to the yellow car.
 • Use the TIRE on the car (T), followed by the BLOCK (U) and
the BEAM (V). You need to have up to 100% health in order to
change the tire. • Look inside the car. Place the CAR KEY (W)
in the ignition and take the HAMMER from the glove box (X).
• Use the TIRE on the car (T), followed by the BLOCK (U) and
the BEAM (V). You need to have up to 100% health in order to
change the tire. • Look inside the car. Place the CAR KEY (W)
in the ignition and take the HAMMER from the glove box (X).
 • Return to the gas station at the end of the road and look at
the door. • Use the HAMMER to remove the boards from the door
and enter the station (Y).
• Return to the gas station at the end of the road and look at
the door. • Use the HAMMER to remove the boards from the door
and enter the station (Y).
 • Zoom into the vending machine (Z). • Press each button to
see if it stays down. Once you find the first button that
stays down, try another. • If both buttons pop up, that is not
the right combination. Try another until you find a sequence
where both buttons stay up. • Repeat this until all of the
buttons are depressed to get a first-aid spray. • The solution
is randomized. • Play the HOS (A).
• Zoom into the vending machine (Z). • Press each button to
see if it stays down. Once you find the first button that
stays down, try another. • If both buttons pop up, that is not
the right combination. Try another until you find a sequence
where both buttons stay up. • Repeat this until all of the
buttons are depressed to get a first-aid spray. • The solution
is randomized. • Play the HOS (A).
 • You will get the OIL CAN. • Go back to the shack near the
railroad tracks.
• You will get the OIL CAN. • Go back to the shack near the
railroad tracks.
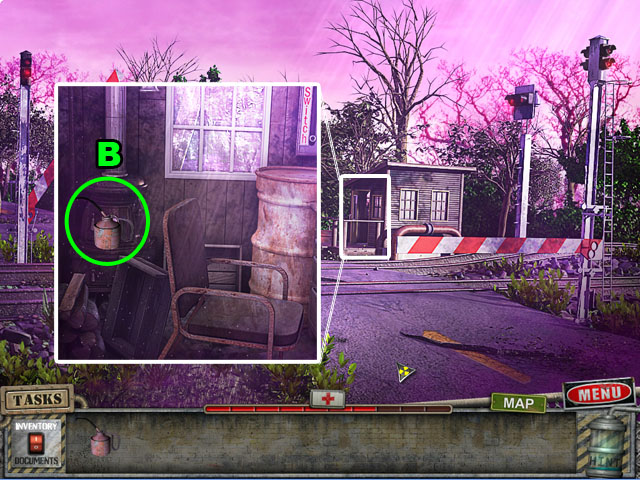 • Use the OIL CAN on the stove in the shack (B). • Take the
first-aid kit and go back one scene.
• Use the OIL CAN on the stove in the shack (B). • Take the
first-aid kit and go back one scene.
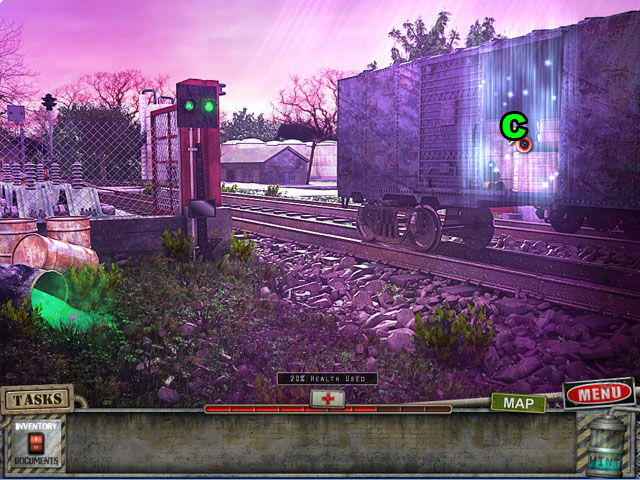 • Open the train car; it will use some of your strength. •
Play the HOS (C).
• Open the train car; it will use some of your strength. •
Play the HOS (C).
 • You will receive an ICE PICK.
 • Return to the inside of the gas station and zoom in on the
ice box. • Use the ICE PICK to get a PIECE OF MEAT (D). • Use
the MEAT on the fire outside to cook it (E). • Go back one
scene.
• Return to the inside of the gas station and zoom in on the
ice box. • Use the ICE PICK to get a PIECE OF MEAT (D). • Use
the MEAT on the fire outside to cook it (E). • Go back one
scene.
 • Give the COOKED MEAT to the dog (F) and take the KEYS (G).
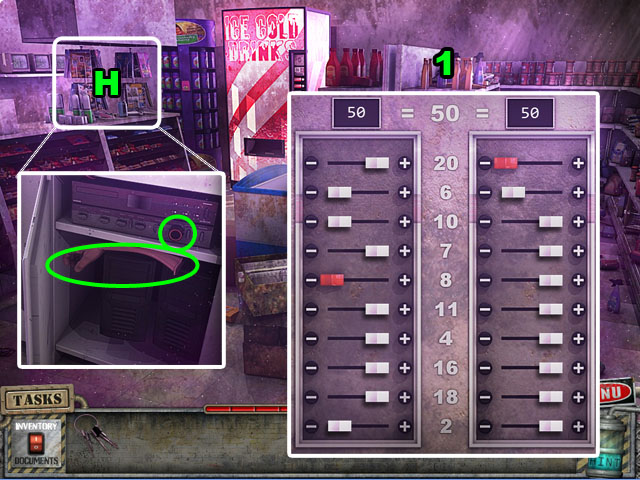 • Zoom into the magazines (H). • Use the KEYS to open the
cabinet. • Take the GLOVE and push the red button to turn on
the pumps. • Zoom into the panel to the left. • The object of
this mini-game is to get both sides to add up to 50. • The
white sliders can be either positive or negative, while the
red sliders can’t be moved. • Remember that flipping something
from one side to the other will add or subtract double the
amount written. • See the screenshot for the solution (1).
• Zoom into the magazines (H). • Use the KEYS to open the
cabinet. • Take the GLOVE and push the red button to turn on
the pumps. • Zoom into the panel to the left. • The object of
this mini-game is to get both sides to add up to 50. • The
white sliders can be either positive or negative, while the
red sliders can’t be moved. • Remember that flipping something
from one side to the other will add or subtract double the
amount written. • See the screenshot for the solution (1).
 • Exit the station. Use the GAS CAN on the pump to place it by
the pump (I). • Grab the pump handle to put it in the can. •
Pull the trigger to add gas and then take the FULL GAS CAN.
• Exit the station. Use the GAS CAN on the pump to place it by
the pump (I). • Grab the pump handle to put it in the can. •
Pull the trigger to add gas and then take the FULL GAS CAN.
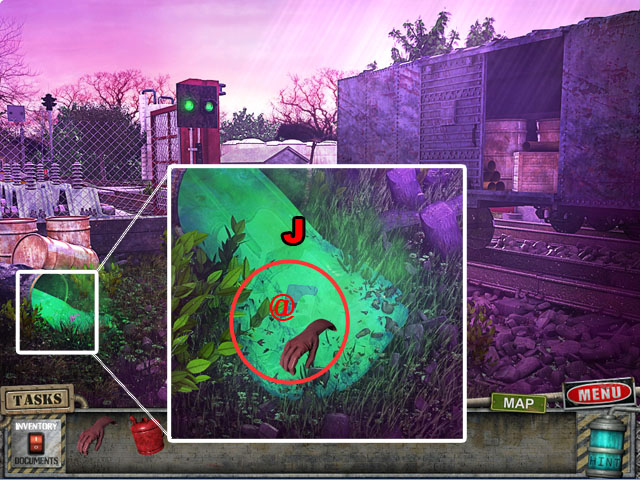 • Return to the train yard and use the GLOVE on the hazardous
waste to get another Health Pack (J).
• Return to the train yard and use the GLOVE on the hazardous
waste to get another Health Pack (J).
 • Walk to the yellow car and push the beam to put on the tire
(L). • Use the GAS CAN on the back to fill it up (K). • Enter
the car and turn the key (M). • Congratulations, you have
completed Small Town Terrors: Livingston!
• Walk to the yellow car and push the beam to put on the tire
(L). • Use the GAS CAN on the back to fill it up (K). • Enter
the car and turn the key (M). • Congratulations, you have
completed Small Town Terrors: Livingston!
Created at: 2012-03-17