

Walkthrough Menu
General Tips
- You will need to pick up all of the hidden Item Pieces in a scene to collect usable inventory items.
- The inventory bar (I) at the bottom of the screen will show you what items you have available and what items you still need to find pieces for.
- If a piece of an item appears in red it is not yet available.
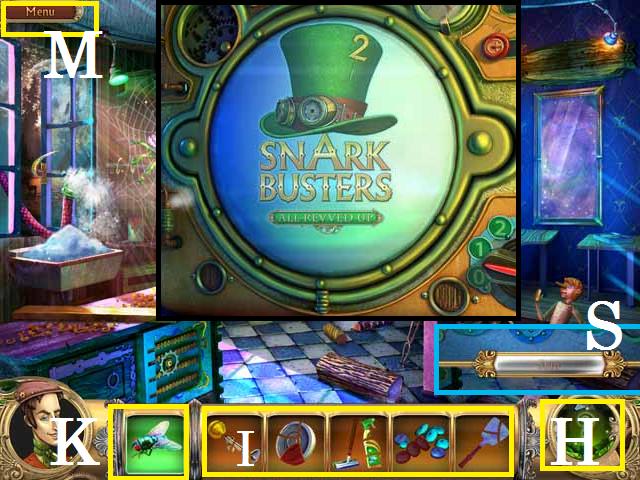
- If an inventory item appears in the far left corner (K) it is useable in another location.
- You do not need to wait until you are done with a scene or item list to use an inventory item and or change scenes.
- If your cursor changes to a hand or magnifying glass, it is indicating that an action is required.
- Your cursor changing to gears indicates that an inventory item needs to be used.
- Click on the Menu (M) button in the upper left corner to exit, pause or resume the game. You can also adjust your options (sound, music, and screen size).
- The Hint Button (H) will show you where a hidden object is, or reveal the next step.
- When playing a mini-game you can use the skip button (S) once it is full.
- Each time you play a mini puzzle the solutions may change. The screenshots in this walkthrough shows the solutions during gameplay at the time.
Level 1
- Skip the tutorial.
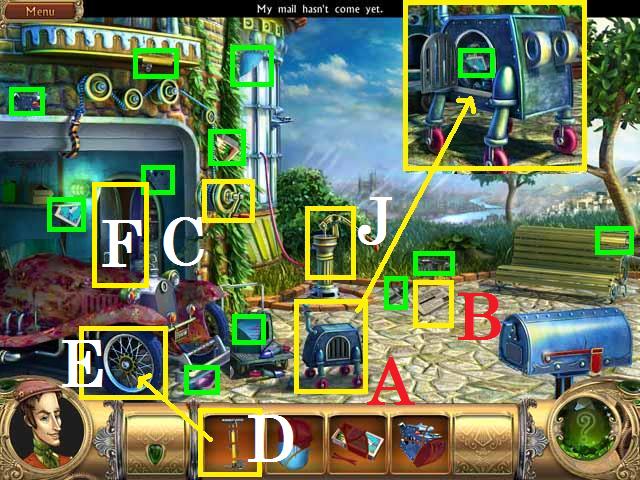
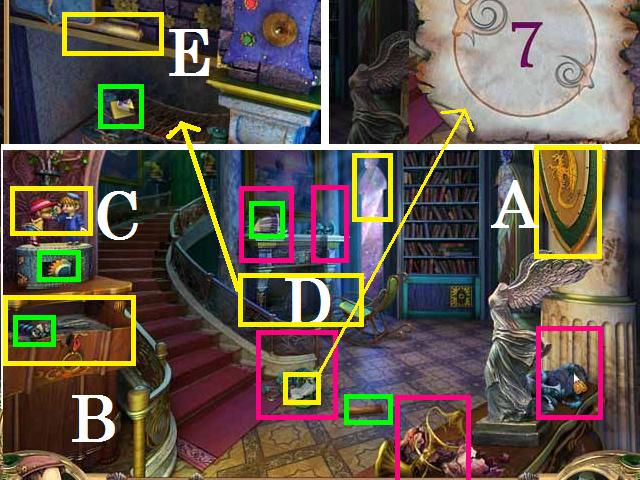
- Move the newspaper (B).
- Click on the wench handle (C) to open the garage.
- Pick up all of the ITEM PIECES marked in green in the screenshot.
- Zoom into the robot dog (A) and pick up the MATCHES PIECE, marked in green.
- Drag the completed AIR PUMP (D) over the cars tire (E) and pick up the ITEM PIECE (green).
- Click on the pump handle (J).
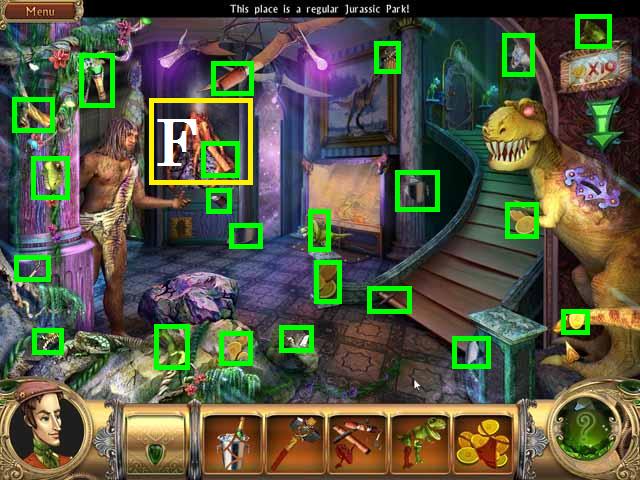
- Enter the shop through the open door (F).
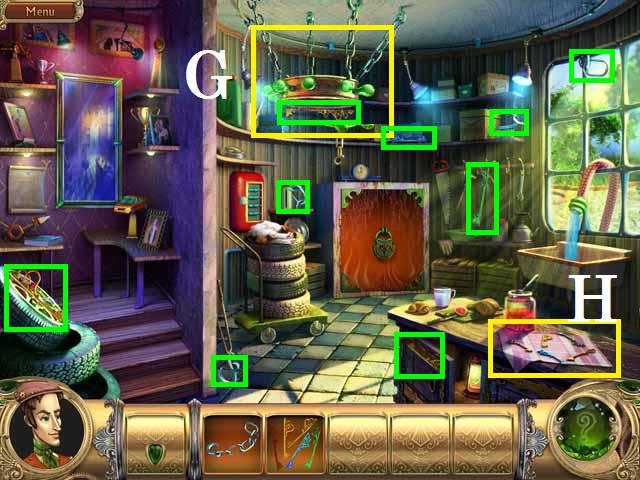
- Pick up all of the available ITEM PIECES (green).
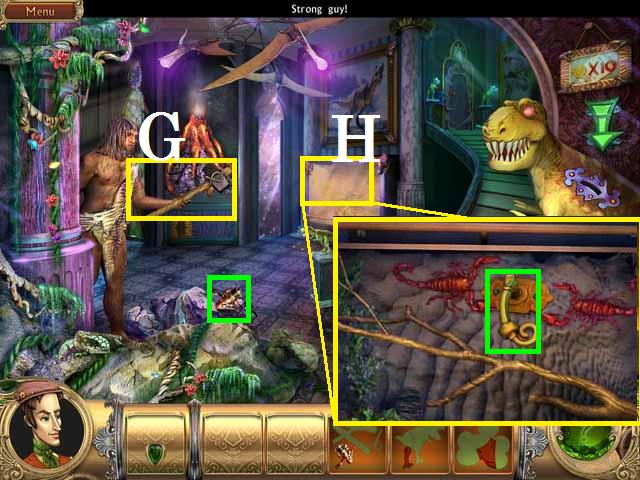
- Drag the completed CHAIN over the hanging light (G) and pick up the last KEY PIECE (green).
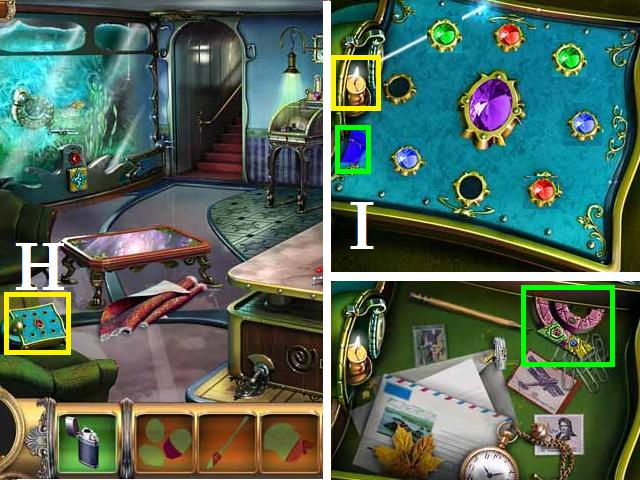
- Zoom into the keys on the table (H).
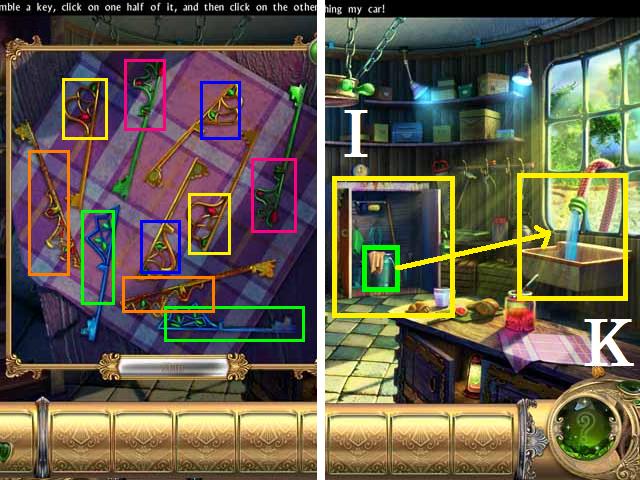
- Match the pairs (color coded in the screenshot).
- Unlock the cabinet (I) with the completed KEY RING and pick up the BUCKET (green).
- Fill the BUCKET with water from sink (K) and go back outside.
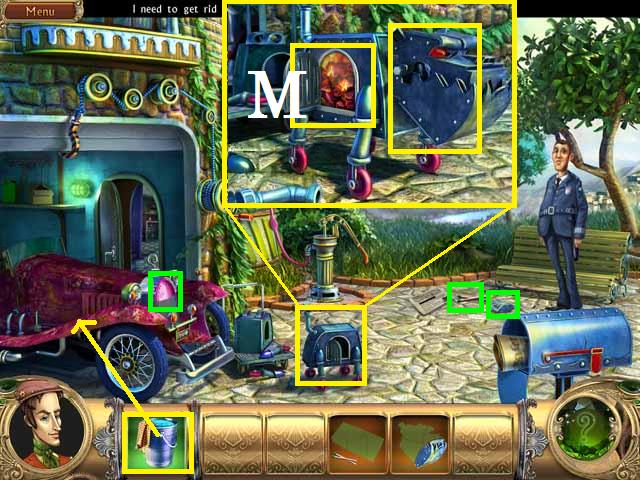
- Open the mailbox (L).
- Clean the car with the BUCKET of WATER.
- Pick up the two PIECES (green).
- PAINT the car.
- You can click the screen to move through the dialog.
- After the dialog is over the last two PIECES will be available. Pick them up (green).
- Zoom in to the dog robot, drag the DOG’S HEAD over it and light the fire (M) with the MATCHES.
- Click through the dialogue then on the car.

- You can watch, pause or fast-forward through the video using the buttons on the bottom of the screen.
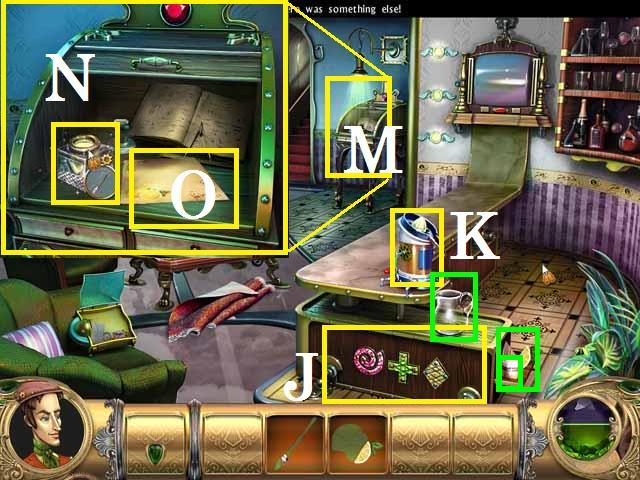
- Pick up the available HOOK PIECES (green).
- Open the car door (N) and zoom in then click on the envelop (O).
- After the video is over pick up the KEY (green) and the last HOOK PIECE that is behind the KEY (green).
- Place the HOOK on the rope (P) at the base of the garage door.
- Enter the shop.
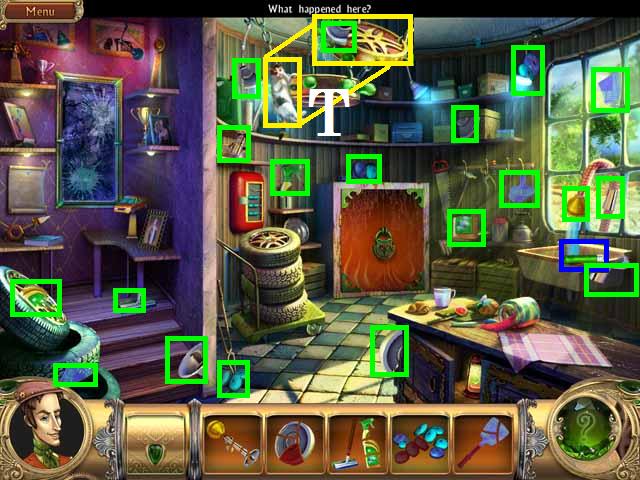
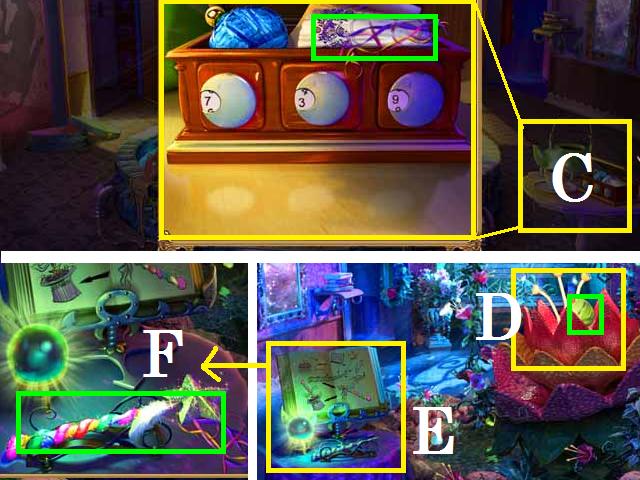
- Pick up all of the available ITEM PIECES (green).
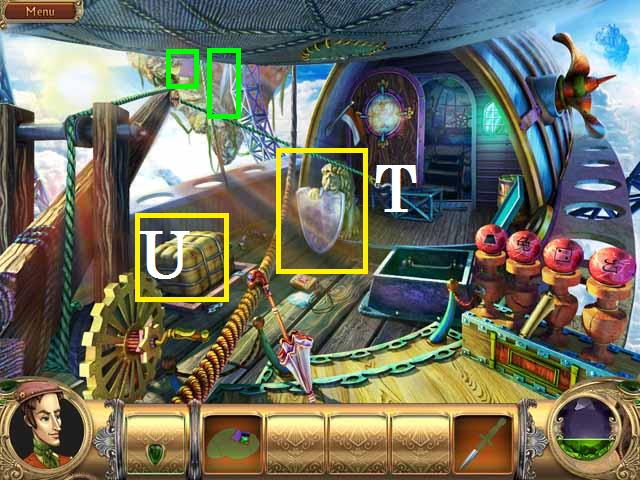
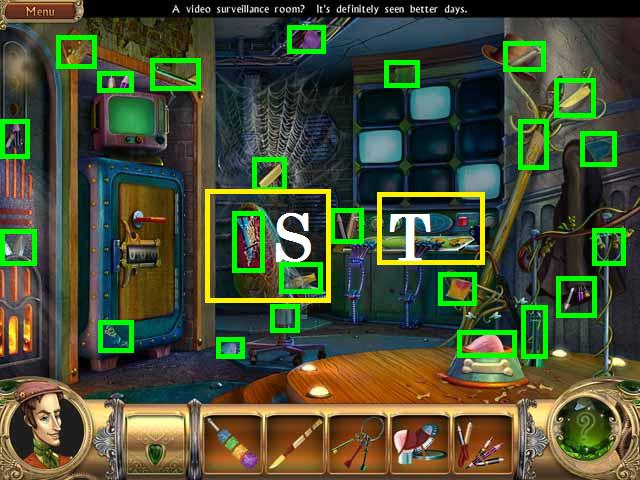
- Use the completed HORN on the cat (T) then pick up the last WHEEL PIECE (green) and the now available COEANING SUPPLY PIECE (blue).
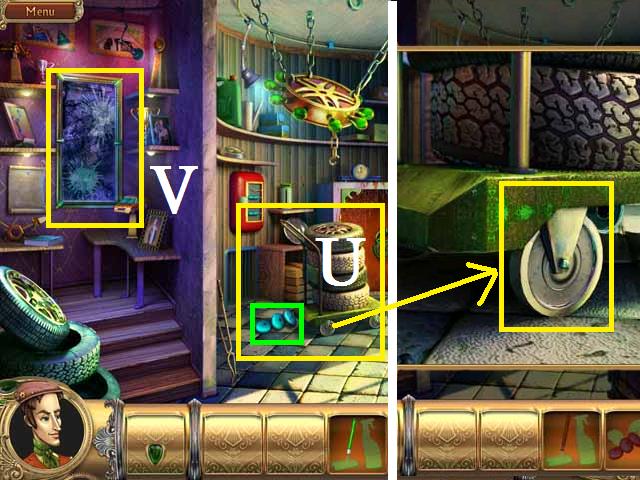
- Place the WHEEL on the tire cart (U) and move it.
- Pick up the last of the BEADS (green).
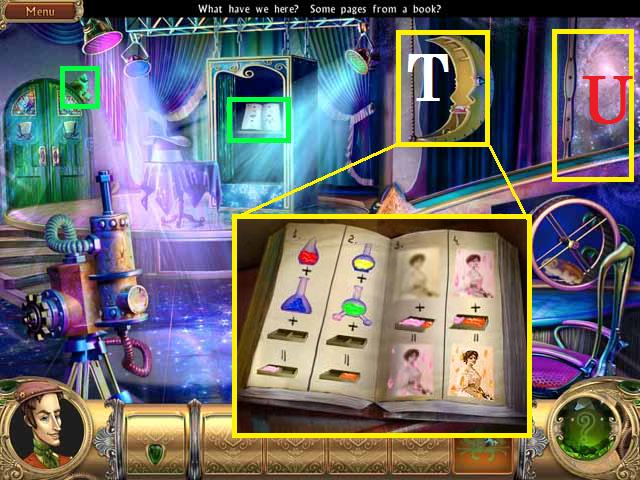
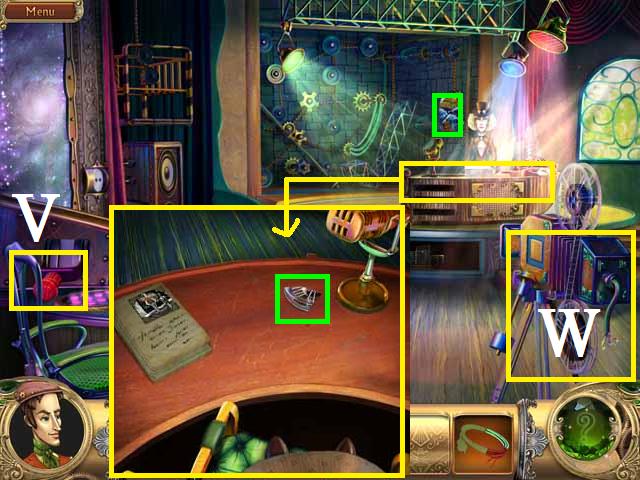
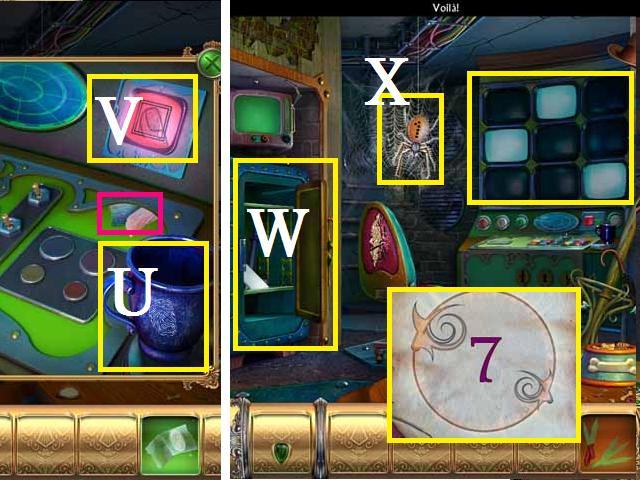
- Use the CLEANING SUPLIES on the mirror (V), to open another portal, and go through it.
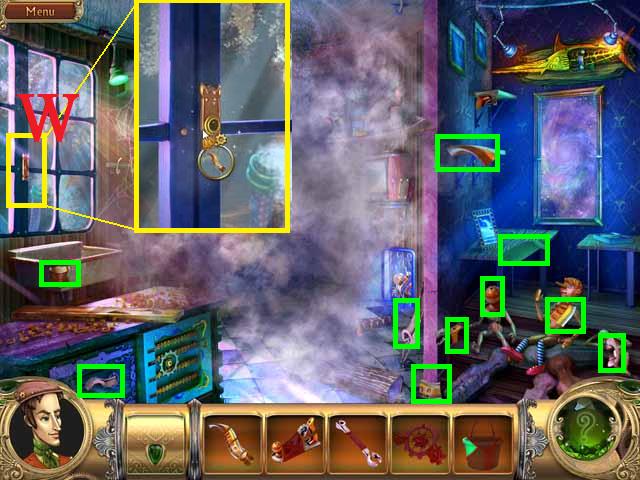
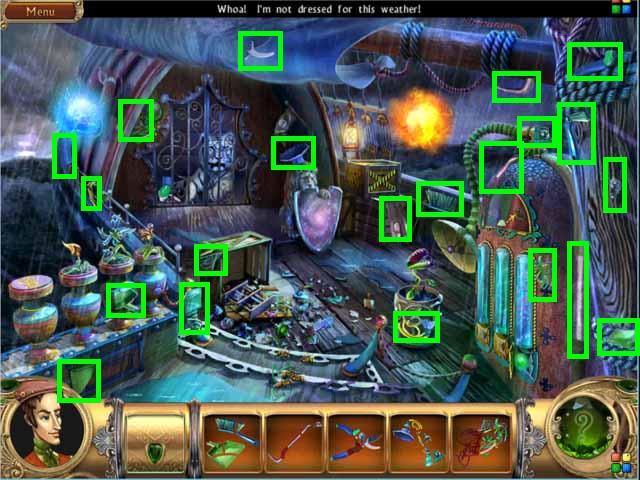
- Pick up all of the available ITEM PIECES (green).
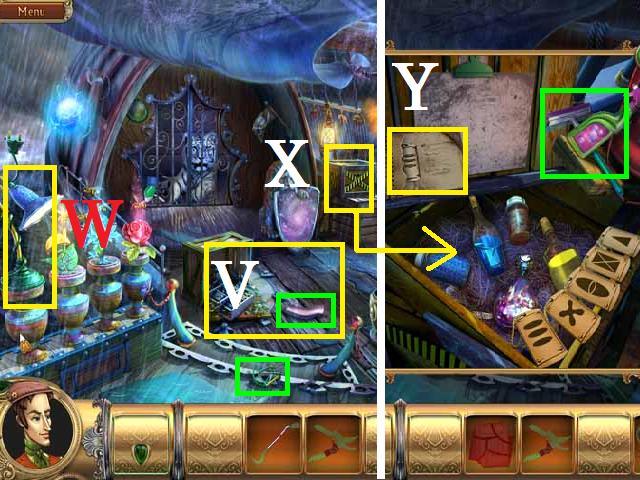
- Place the completed HANDLE on the window (W).
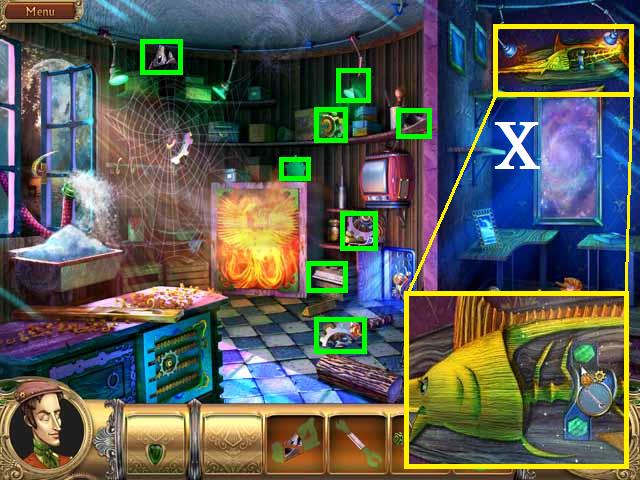
- Pick up all of the now available ITEM PIECES (green).
- Use the WRENCH to remove the FISH (X) from the wall.
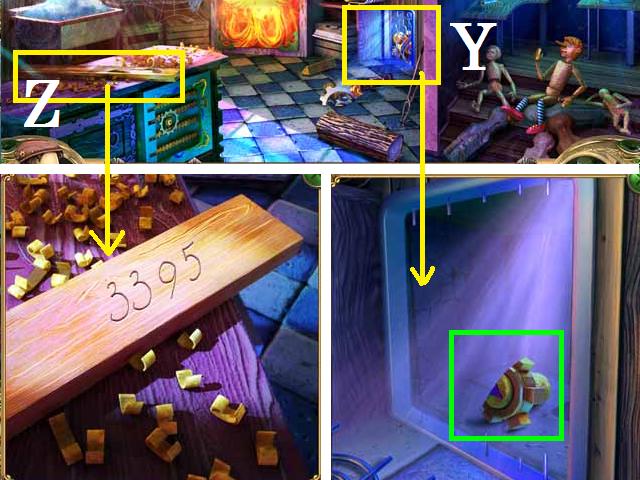
- Cut the grate (Y) with the FISH and pick up the ITEM PIECE (green).
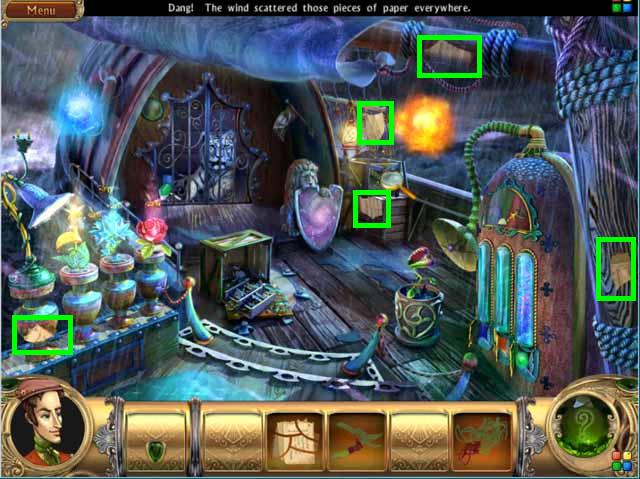
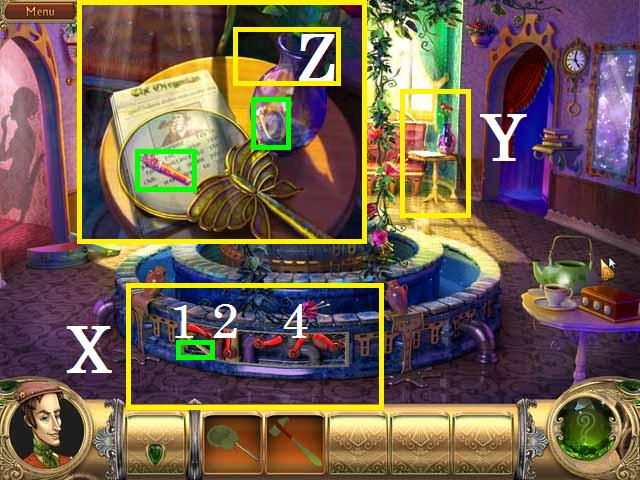
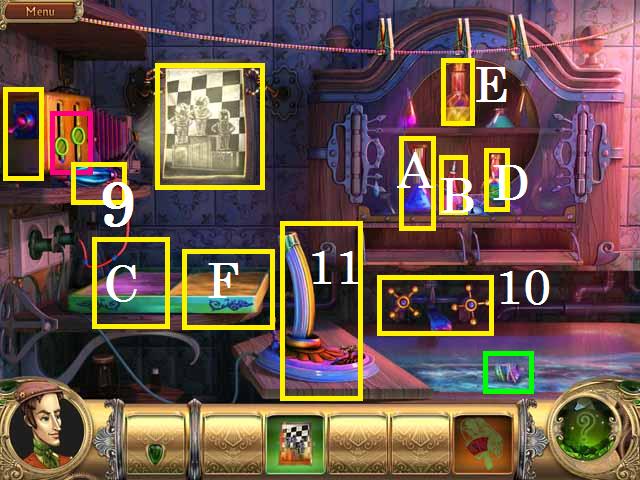
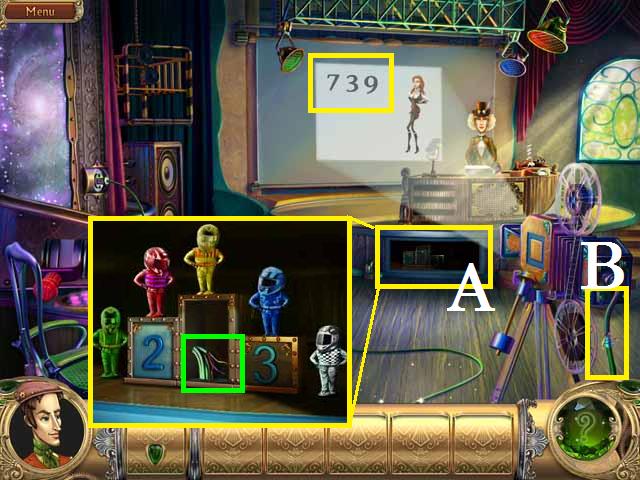
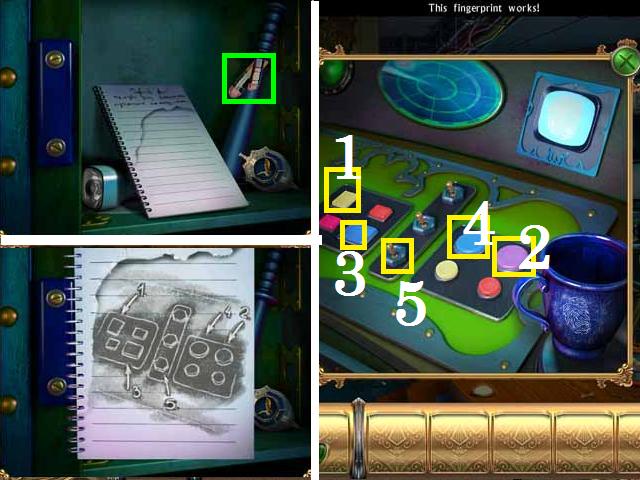
- Zoom into the board (Z) and use the PLANE on it to reveal number. (Note: the number may change with each play through. Use the number that is revealed during your play to solve the puzzle later).
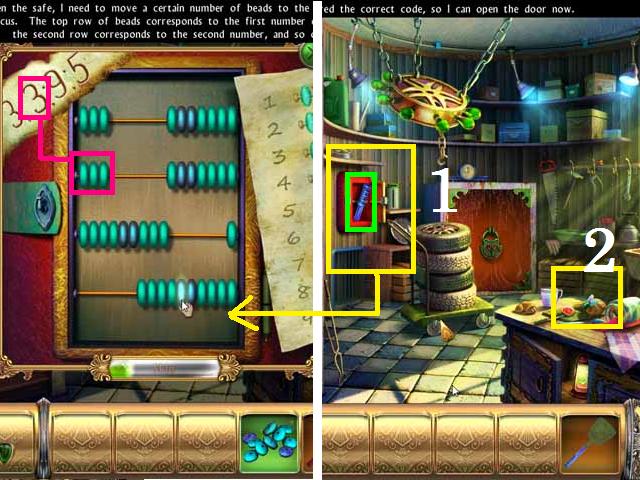
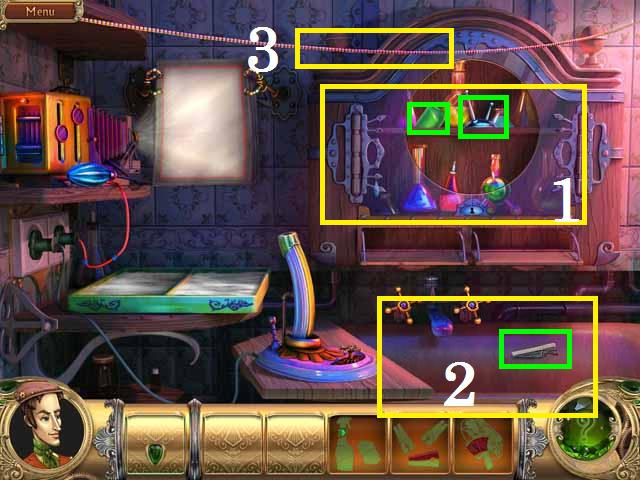
- Return to the shop and zoom into the abacus (1).
- Drop the BEADS over the abacus.
- Solve the puzzle by moving the corresponding number of beads to the left, by clicking on them, as is in the number in the upper left corner (same as on the wood). During my play the number was 4124. I clicked on the fourth bead on the top row, the first bead on the second, the second bead on the third row and the fourth bead on the bottom.
- Pick up the last FLYSWATER PIECE (green) and SWAT the fly (2).
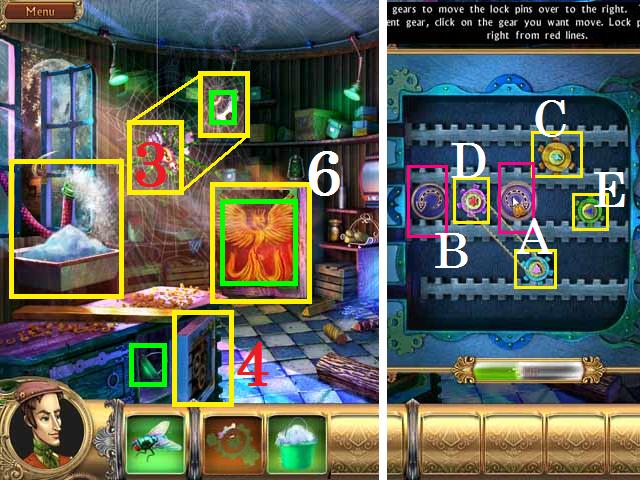
- Go back through the mirror and feed the FLY to the spider (3).
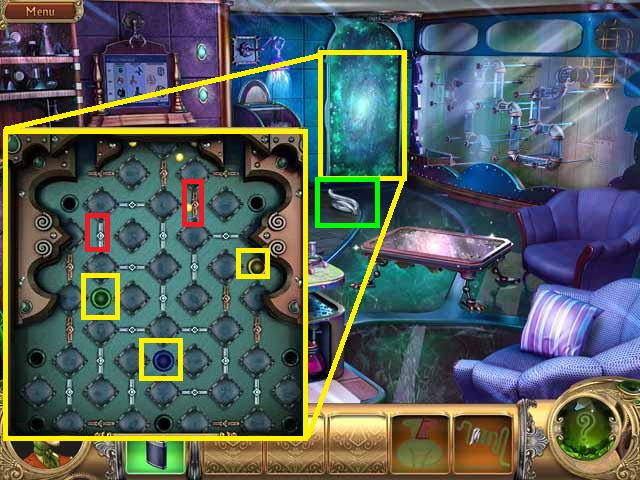
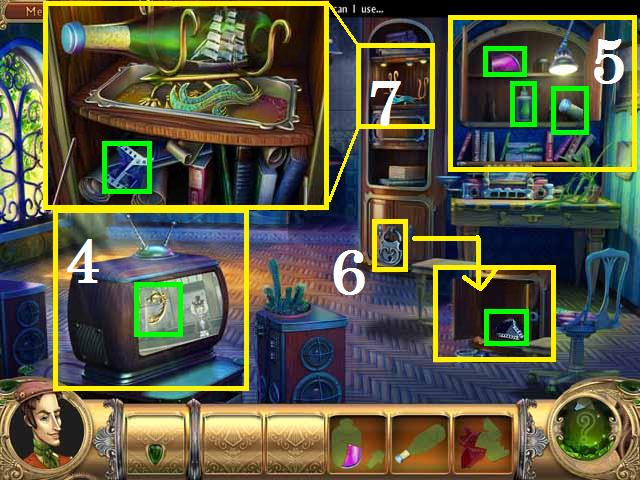
- Pick up the last GEAR PIECE (green) and zoom into the gears on the table (4).
- Drop the GEARS over the pins.
- Move the gears by clicking on each one and then clicking the right (A) and left (B) arrows that appear.
- Move the yellow gear (C) one time to the right (A).
- Move the Pick gear (D) five times to the right.
- Move the green gear (E) two times to the left (B).
- Move the yellow gear (C) one time to the right (A).
- Pick up the BUCKET PIECE (green) and fill it with snow from the sink (5).
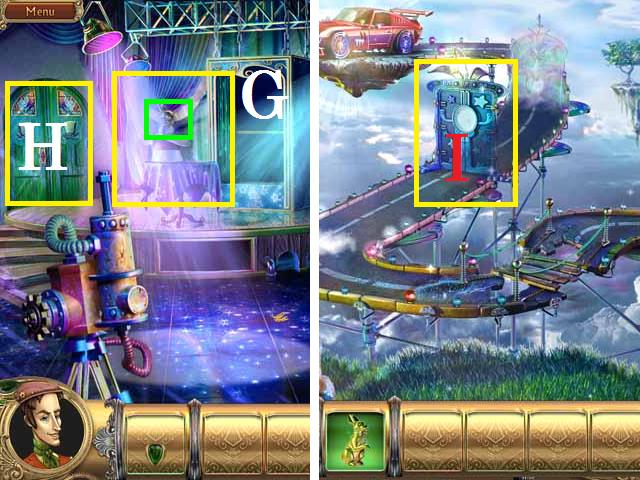
- Pour the BUCKET of SNOW over the safe (6) and pick up the PHOENIX (green).
- Return to the garage.
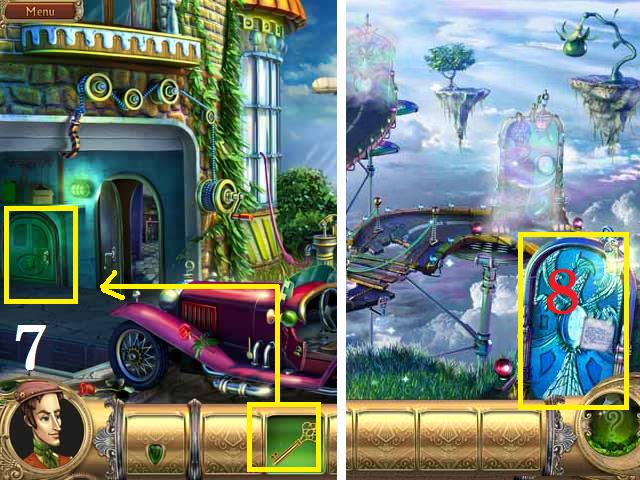
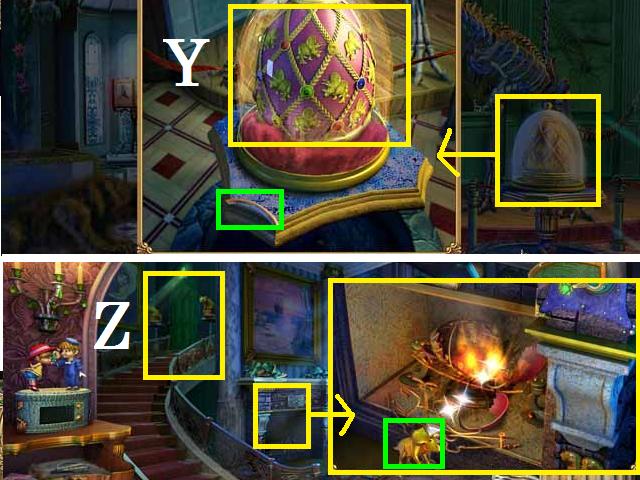
- Zoom into the green door (7) inside the garage and open with the KEY to open a portal.
- Zoom into the portal door (8) and place the PHOENIX in the center and go through the door.
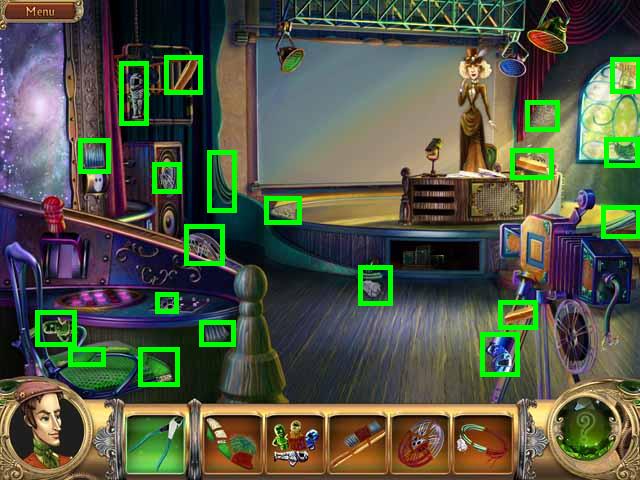
Level 2
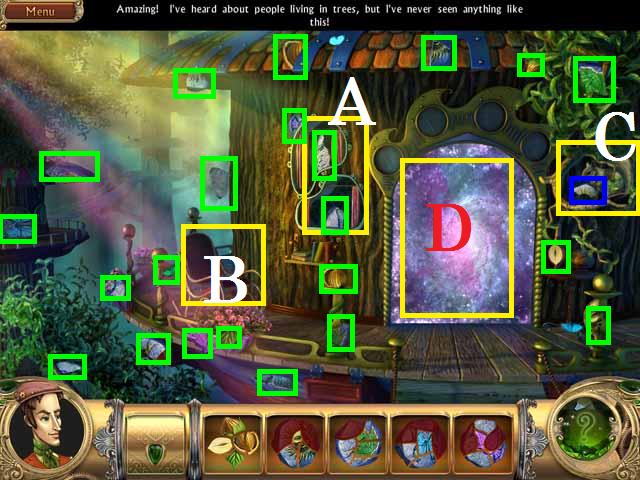
- Open the red curtains (A).
- Move the rocking chair (B).
- Pick up all of the available ITEM PIECES (green).
- Feed the completed NUTS to the squirrel (C) and pick up the PIECE (blue).
- Go through the portal (D).
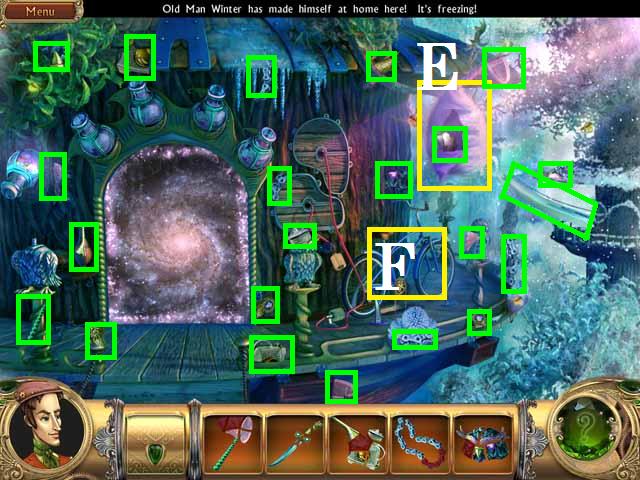
- Pick up all of the available ITEM PIECES (green).
- Cut the cocoon (E) with the completed KNIFE and pick up the PIECE (green).
- Zoom into the bike (F).
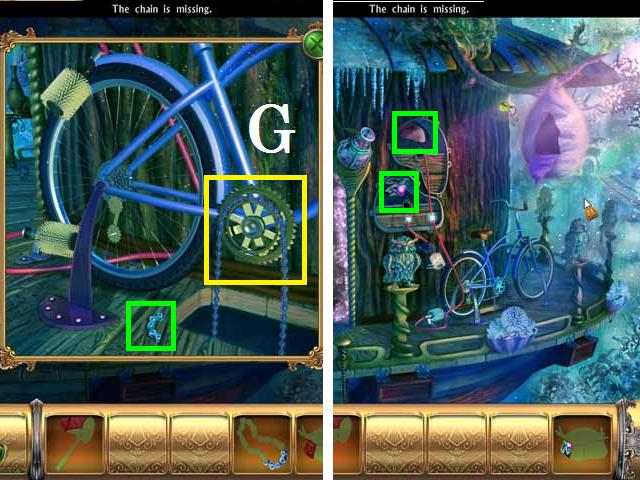
- OIL the chain (G) and pick up the last CHAIN PIECE (green).
- Drop the CHAIN over the bike.
- Pick up the two, now available, PIECE’S (green).
- Place the OWL HEAD on the owl (H) and pick up the PIECE (green).
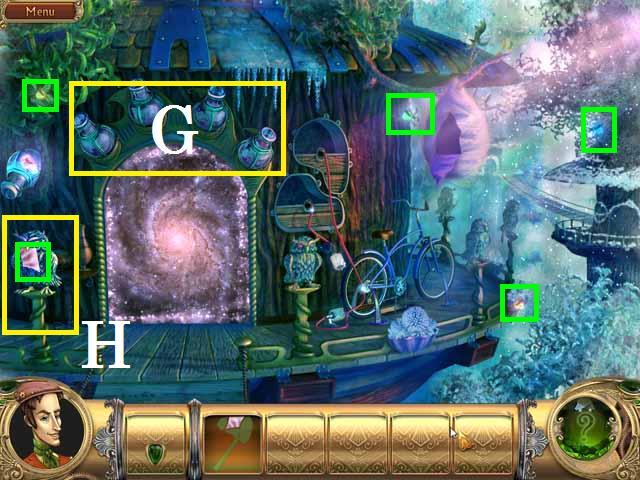
- Collect the four FIREFLYS (green), with the net, and place one in each glass jar above the portal (G).
- Go through the portal.
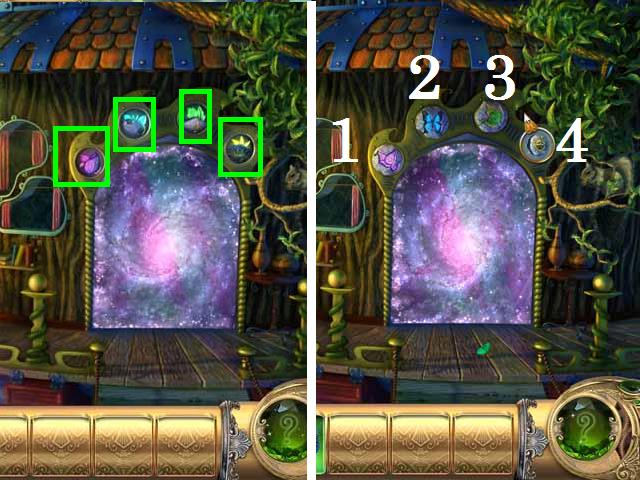
- Pick up the last four ITEM PIECES (green) located in the circles above the portal.
- Place the items in the circles in the following order from left to right: BIRD (1), BUTTERFLY (2), LEAF (3), and SUN (4).
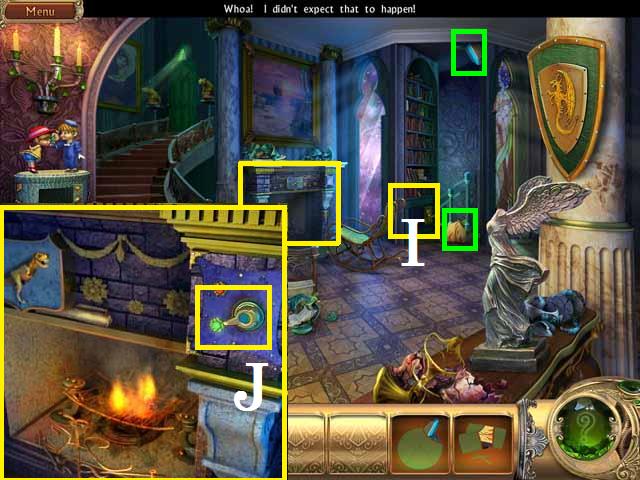
- Go through the door where the portal was to enter the entryway.
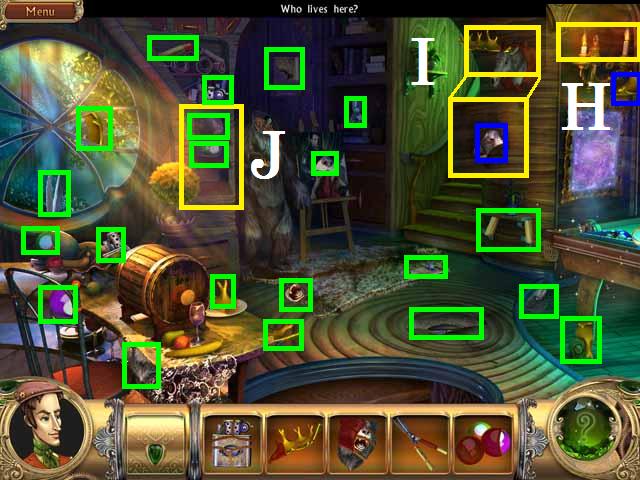
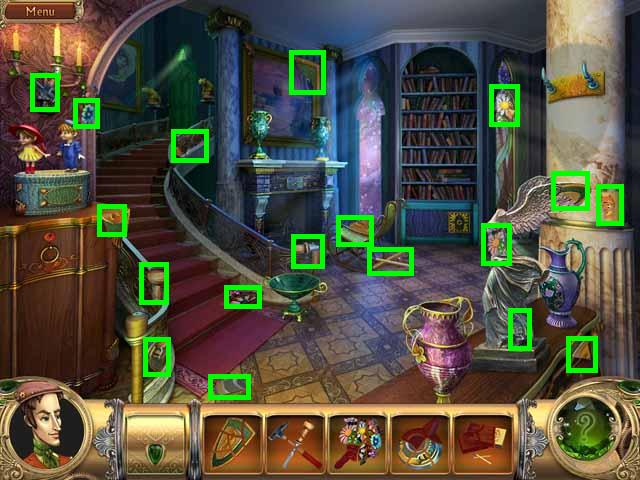
- Open up the drawers (J).
- Pick up all of the available ITEM PIECES (green).
- Light the candles (H) with the LIGHTER and pick up the now available PIECE (blue).
- Place the ANTLER on the moose (I) and pick up the PIECE (blue).
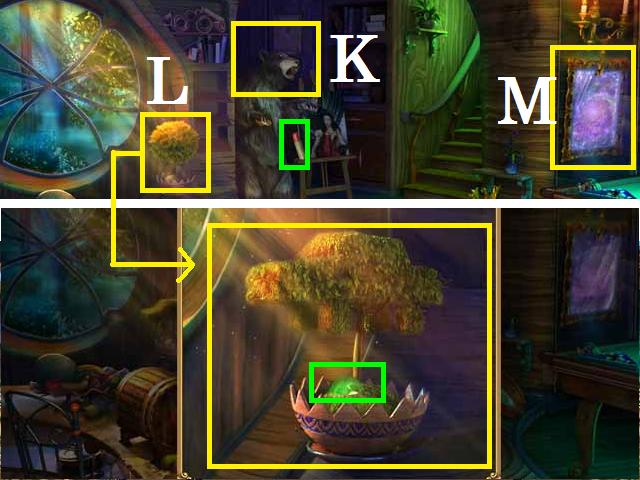
- Place the BEAR HEAD on the bear (K) and pick up the last PRUNING SHEARS PIECE (green).
- Zoom into the tree (L) and PRUNE it.
- Pick up the PIECE (green).
- Go through the mirror (M) to the reverse entry way.

- Pick up all of the available ITEM PIECES (green).
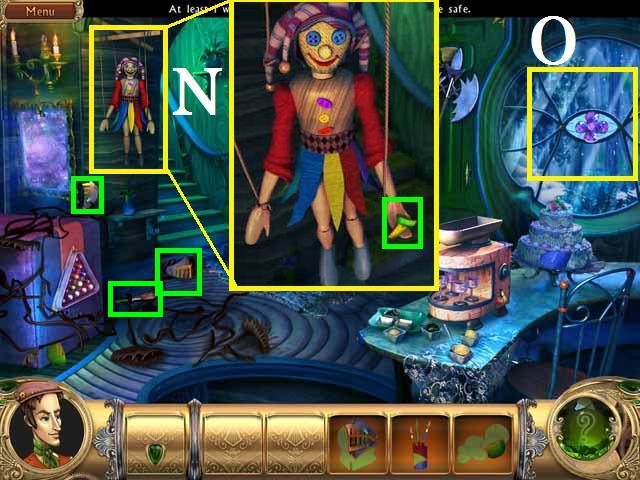
- Zoom into the marinate doll (N) and MEND it.
- Pick up the ITEM PIECE (green) from its hand.
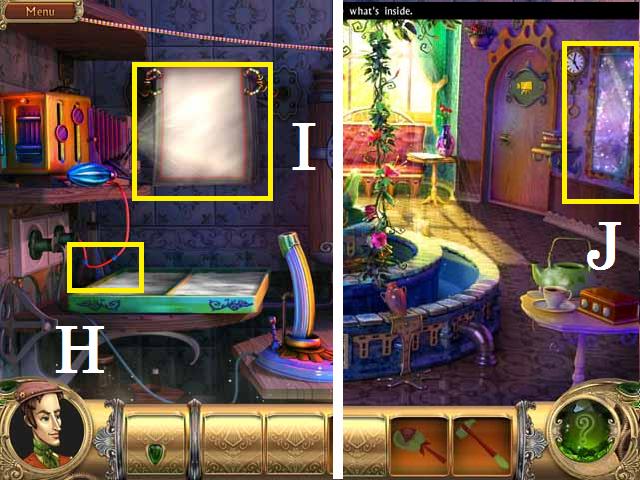
- Place the FLOWER on the window (O) and pick up the additional ITEM PIECES (green).
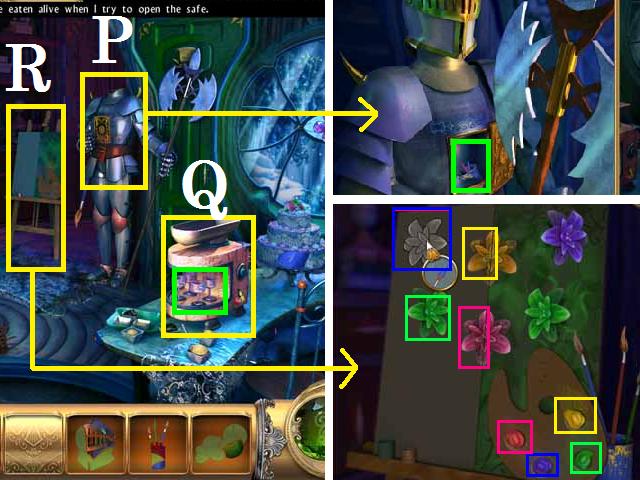
- Place the completed HELMET on the suit of armor (P) and pick up the last ITEM PIECE (green).
- Drop the FRUIT in the juicer (Q) and pick up the PAINTS (green).
- Zoom into the painting (R) and drop the BRUSHES and PAINTS over it.
- Pick up a brush (S) and dip it in the different colors and click on a colorless flower to color it. Mirror the other side of the painting as seen in the screenshot.
- Go up the stairs to the kitchen.
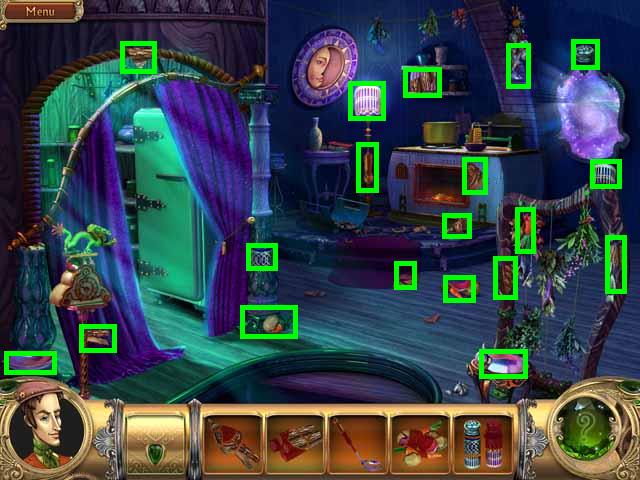
- Pick up all of the available ITEM PIECES (green).
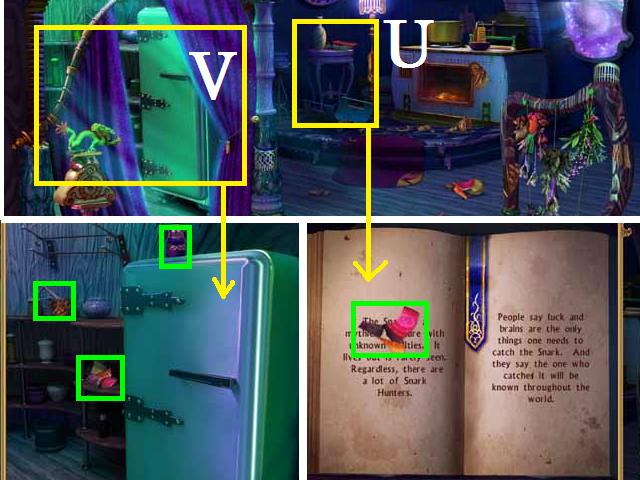
- Zoom into the table (U) and pick up the PIECE (green).
- Zoom into the pantry (V) and pick up the PIECE’s (green).
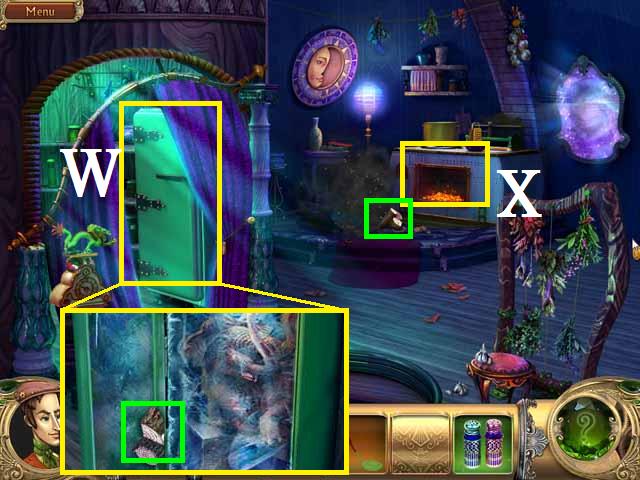
- Open the refrigerator (W) and pick up the PIECE (green).
- Stock the fire (X) with the BILLOWS and pick up the now available WOOD PIECE (green).
- Place the WOOD in the fire.
- Go through the mirror.
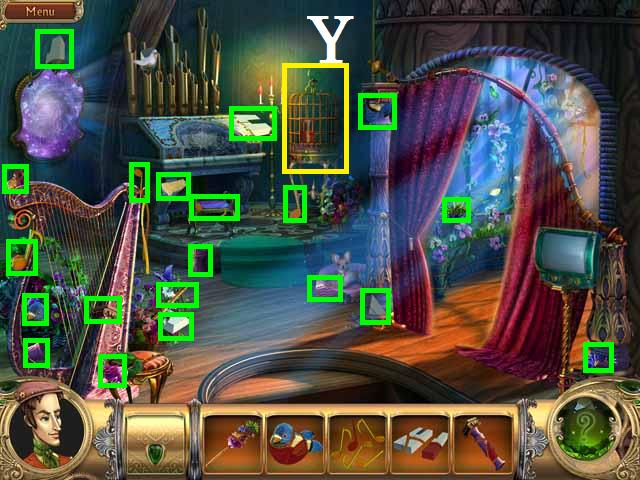
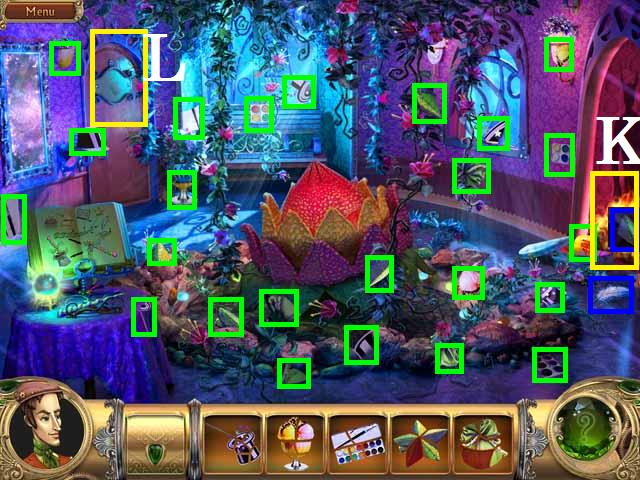
- Pick up all of the available ITEM PIECES (green).
- Zoom into the birdcage (Y) and rearrange the flowers to match the order as shown in the upper left corner. The starting positions may be different each play and there are many solutions.
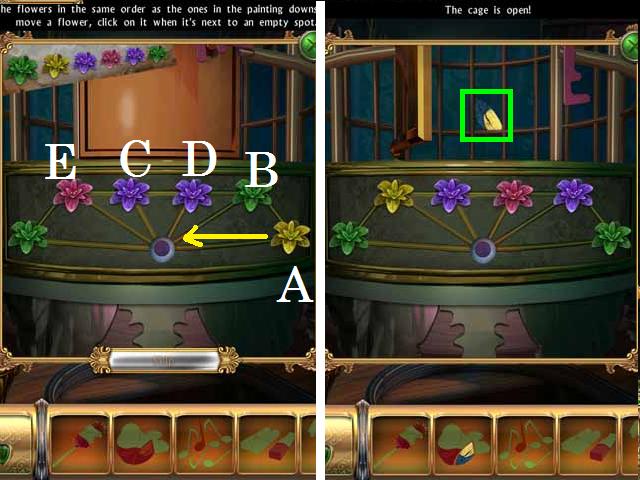
- I solved mine by first moving the yellow flower (A) to the middle then the green (B) and both purple flowers (C, D) along to top line. I moved the yellow flower again then the pink one (E) to the middle. I then moved the yellow flower to the left and the first purple flower C to the let finishing by moving the pink flower out of the middle onto the line.
- Pick up the now available PIECE (green).
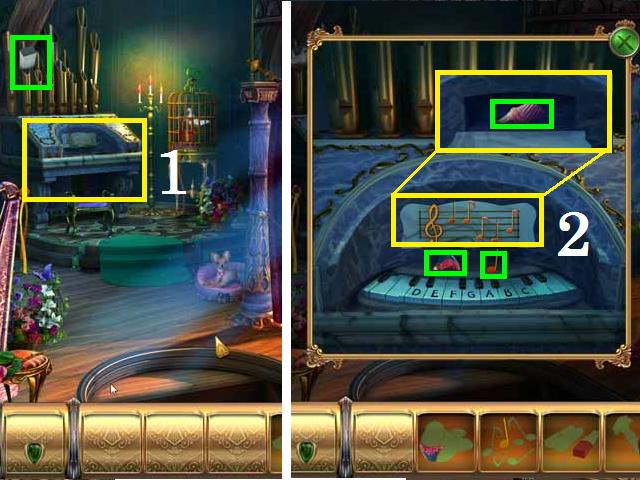
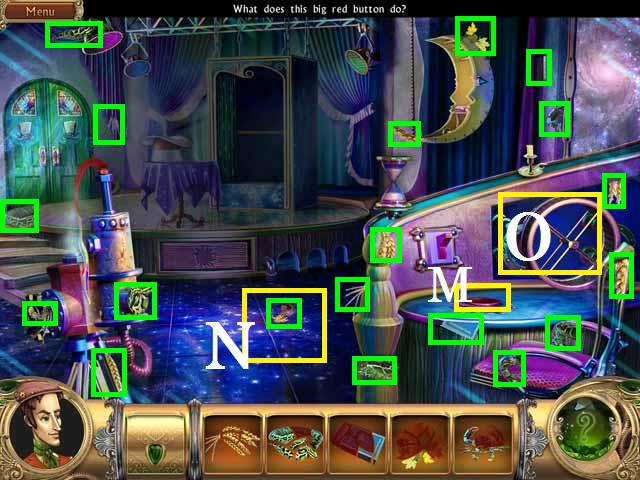
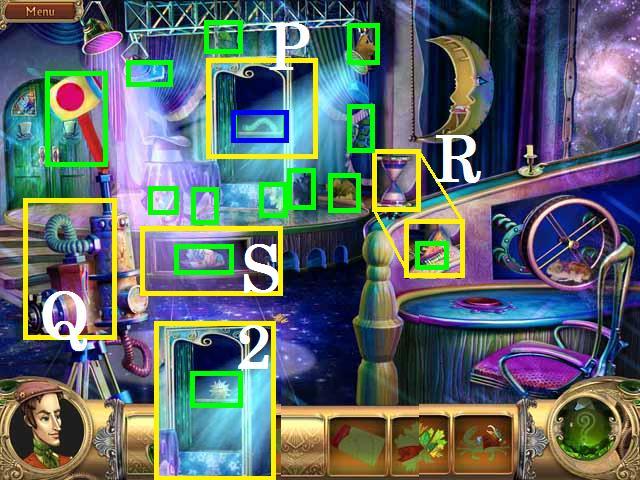
- Zoom into the organ (1), DUST it and pick up the PIECE’s (green).
- Drop the NOTES over the clef bar (2) and close the window.
- Place the BIRD in the cage and pick up the now available PIECE (green) where the other bird was.
- Zoom back into the organ and place the KEYS over it.
- Play the music on the clef bar by using the key in the upper left corner (3). During my play it was C, C, E, D, and G as seen in the screenshot.
- Pick up the last PIECE (green).
- Place the COLUMN at the doorway’s edge (4) and exit the room through the mirror.
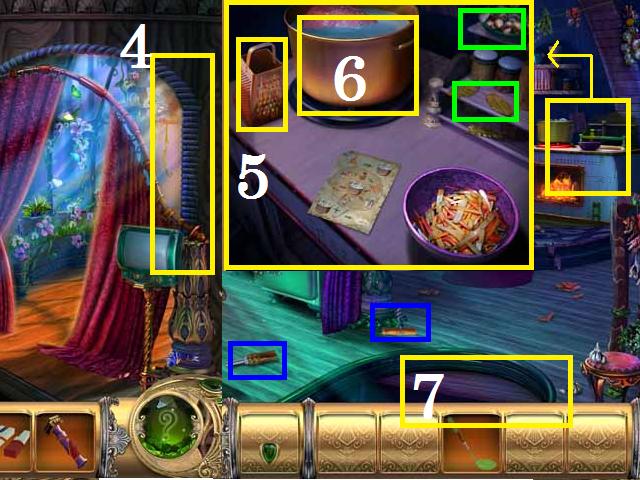
- Pick up the now available LADDLE PIECE (blue) and zoom into the oven.
- Drop the VEGTIBALS over the grater (5) and place them in the pot (6) along with the SALT and PEPPER.
- Pick up the MUSHROOMS (green) and the HERBS (green) and place in the pot.
- Dip the LADDLE in the pot.
- Pick up the now available CORKSCREW (blue) and go down the stairs (7).
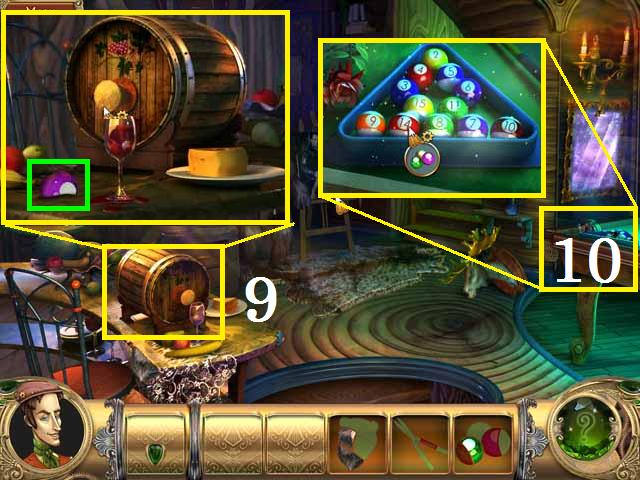
- Go through the mirror and open the wine cask (9) with the CORKSCREW.
- Pick up the last CUE BALL PIECE (green).
- Zoom into the pool table (10) and drop the BALLS there then go through the mirror.
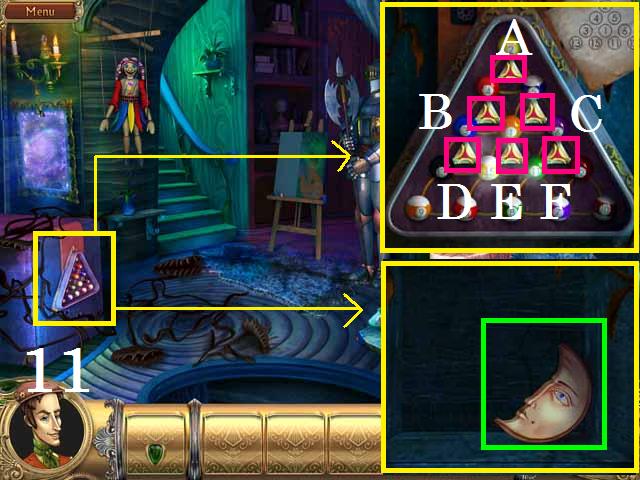
- Zoom into the cue ball rack (11) and solve the puzzle. Each play may be different and there are numerous solutions. I began in the top corner and placed the 2 first then the 4, and 5 on the second line and finished with the bottom line.
- I followed the following sequence of pushing each button (A-F) the following number of times as seen in the screenshot. B-2 times, A-1, C-2, B-1, C-1, B-1, D-1, E-1, D-1, E-2, F-2, E-1time to finish.
- Pick up the MOON PIECE (green) and go up the stairs.
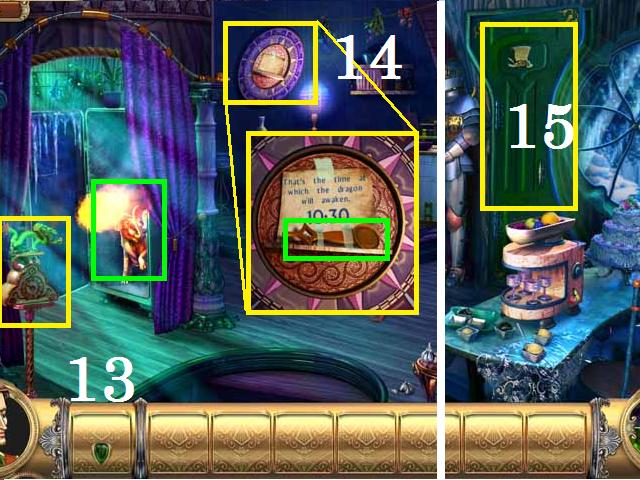
- Drop the MOON over the sun plaque (14) and pick up the CLOCK HAND and pay attention to the time it says.
- Zoom into the clock (13) and place the CLOCK HAND there. My clock automatically set its own time or you may have to move the hour hand to set the time as seen on the sun and moon plaque.
- After the clock melts the ice, pick up the MAMMOTH (green).
- Go back downstairs and exit through the green door (15).

- Zoom into the portal door (16), place the MAMMOTH on it and go through the portal.
Level 3
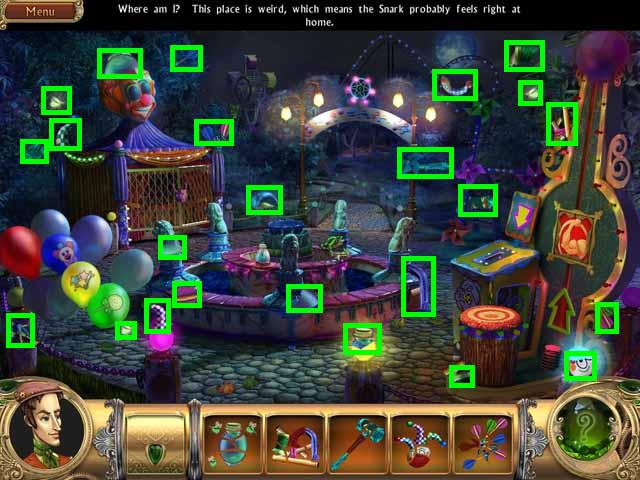
- Pick up all of the available ITEM PIECES (green).
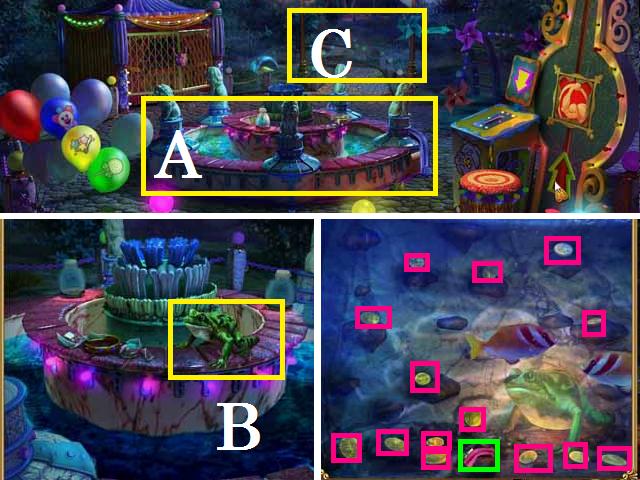
- Zoom into the fountain (A) and feed the frog (B) the completed JAR of FIREFLYS then zoom back into the fountain.
- Pick up the last MAGNET PIECE (green) and use it to pick up all of the coins. When there is a clearing in the fish click the MAGNET to that it drops and picks up the coins.
- Move down the path (C).
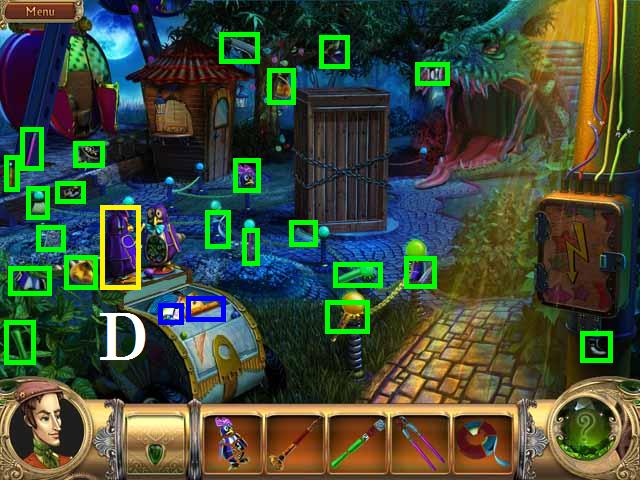
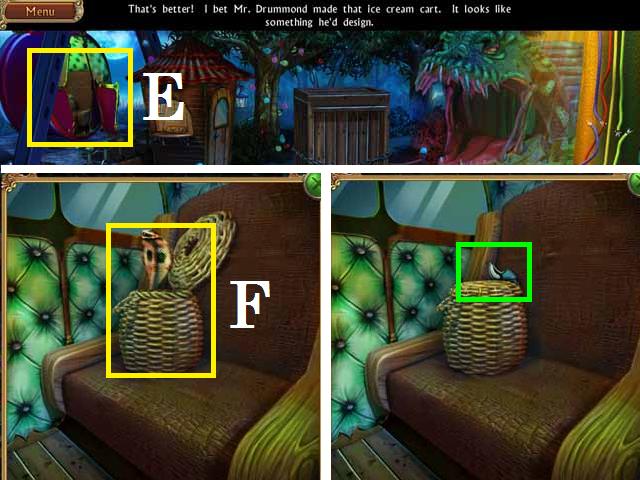
- Pick up all of the available ITEM PIECES (green).
- Place the completed PENGUIN on the ice cream cart (D) and pick up the two PIECES (blue).
- Zoom into the Ferris wheel (E) and charm the cobra (F) with the RECORDER.
- Pick up the PIECE (green).
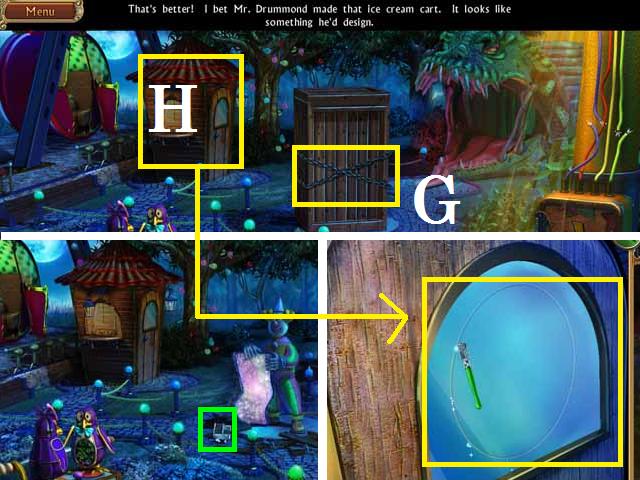
- CUT the chain (G) on the crate to reveal a portal and pick up the now available PIECE (green).
- Zoom into the control booth (H) and use the GLASS CUTTER on the window.
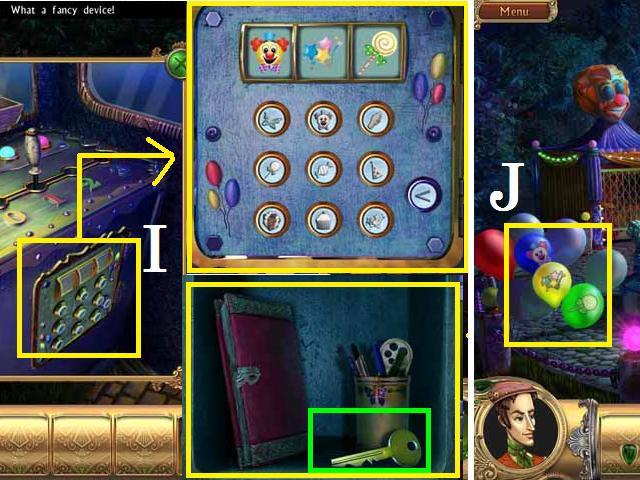
- Zoom into the booth and into the panel (I) press the corresponding buttons to display the symbols on the balloons (J) in the first scene.
- Pick up the IGNITION KEY (green) and put it in the ignition.
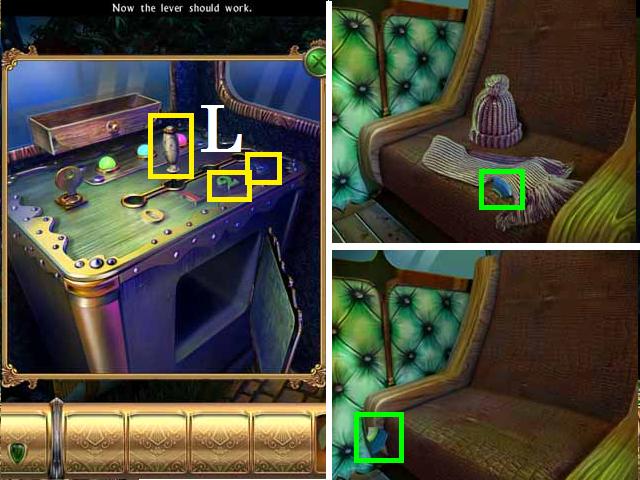
- Move the lever (L) to position 2.
- Zoom into the Ferris wheel and pick up the PIECE (green).
- Move the lever to position 3.
- Zoom into the Ferris wheel and pick up the PIECE (green).
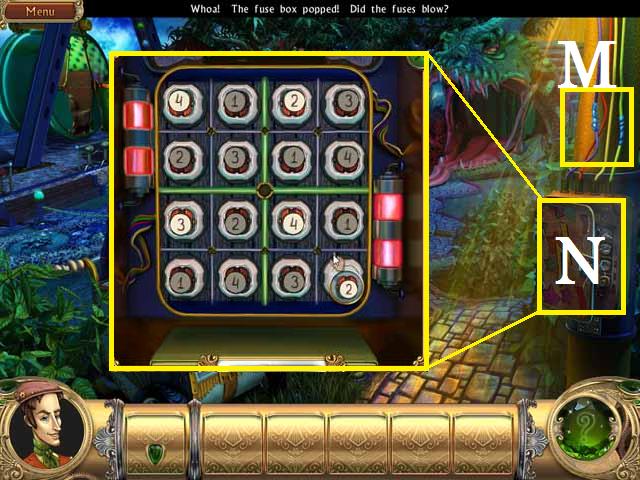
- Place the ELECTRICAL TAPE on the cut wires (M) and zoom into the panel (N).
- Pick up the fuses and drop them in the empty slots so that you do not have any repeating numbers in the same line or column.
- My solution was as follows( rows are from top to bottom and numbers are left to right): The first row- 4, 1, 2, 3. Row two – 2, 3, 1, 4. Row three- 3, 2, 4, 1. Bottom row- 1, 4, 3, 2.
- You can now go into the dragon cave; however you will not be able to complete that scene yet so in this walkthrough we are going to head back down the path to the first scene.
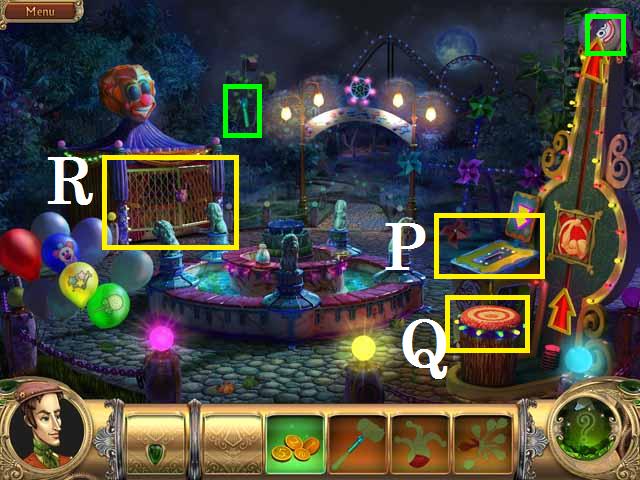
- Pick up the now available HAMMER PIECE and drop the coins into the machine (P).
- Hit the target (Q) with the HAMMER and pick up the now available PIECE.
- Zoom into the game booth (R) and place the JESTER on the lock and enter the booth.
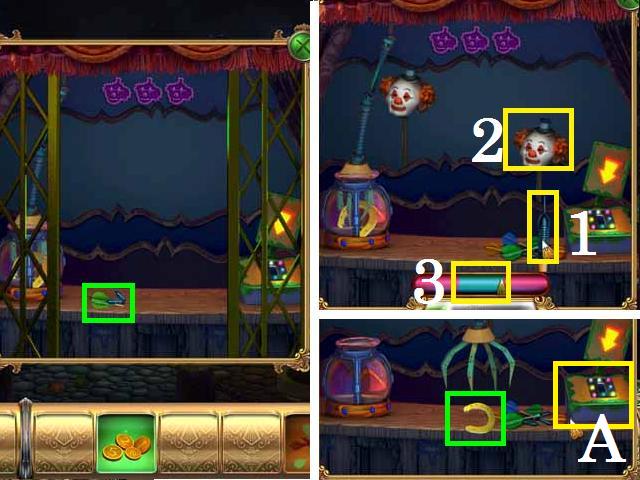
- Pick up the last DART PIECE (green) and drop the DARTS on the table and COINS in the slot (A).
- When the dart (1) is under a clown head, (2) click on it to stop it. Then when the needle is in the green (3) click it to hit the clown. Repeat two more times.
- Pick up the HORSESHOE (green).
- Move down the path and go through the mirror.
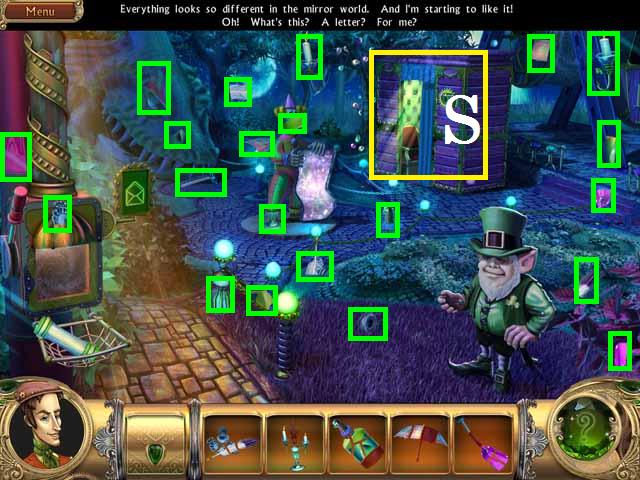
- Pick up all of the available ITEM PIECES (green).
- Zoom into the photo booth (S).

- Pick up the last CANDLE PIECE (green) then place the CANDLE on the shelve (T) and pick up the now available PIECE (green).
- Hit the red button (U) and pick up the photos (green).
- Close the window and zoom into the canister (V).
- Drop the GLUE on the letter in the upper left corner (W) and place the PHOTO there then drag the PEN over the letter.
- Pick up the now available PIECE (green) and move down the path.
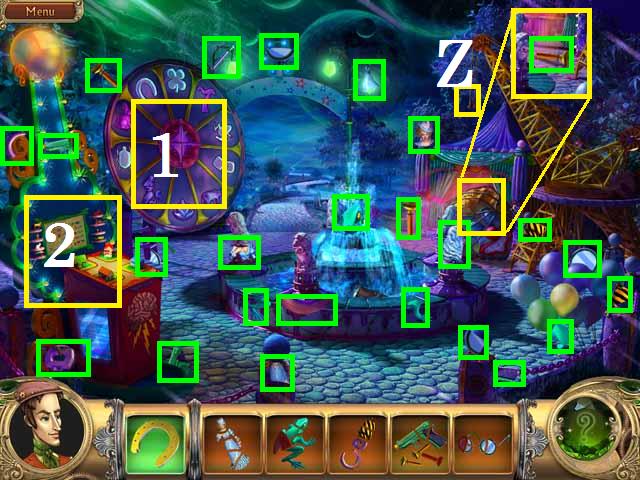
- Pick up all of the available ITEM PIECES (green).
- Place the HOOK on the crane (Z) and pick up the PIECE (green).
- Place the HORSESHOE on the wheel (1) and zoom into the game machine (2).
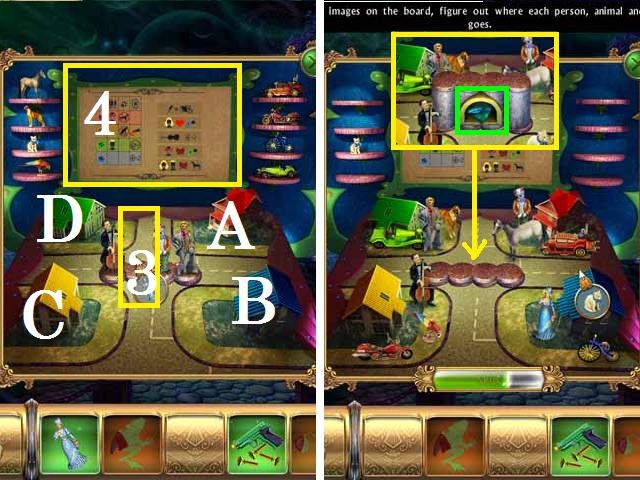
- Drop the figuring over the empty pedestal (3) and arrange the figurines, animals, and vehicles using the chart in the background (4).
- My solution was as follows (as seen in the screenshot): Green house (D) = Man in the gray suite, the dog, and the green car. Red house (A) = Clown, the horse, and the red car. The Blue house (B) = Lady, the cat, and the trike. The yellow house (C) = the Cello player, the parakeet, and the red motorcycle.
- Once you have solved the puzzle pick up the PIECE (green) and close the window.
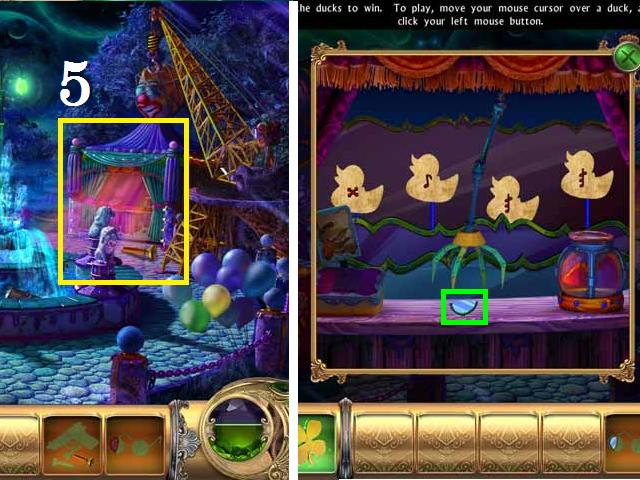
- Place the FROG on the wheel and zoom into the game booth (5) on the right.
- Drop the DART GUN over the counter.
- Shoot the ducks by moving your cursor over them and clicking. (Hint: if the duck is moving up shot a bit hi).
- Pick up the last GLASSES PIECE (green).
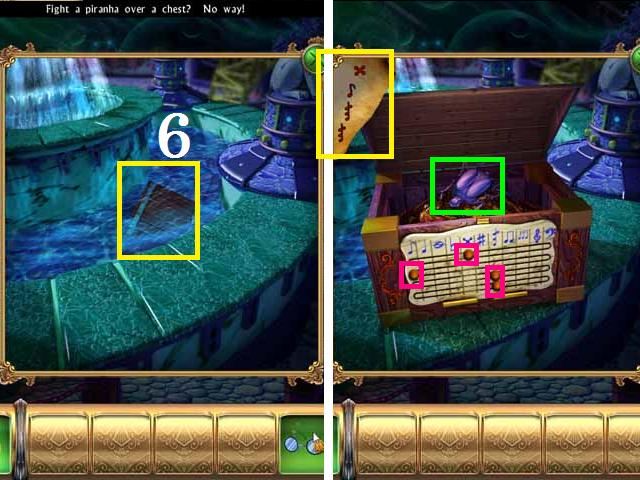
- Zoom into the fountain and give the fish the GLASSES then zoom into the box (6).
- Solve the puzzle by moving the pegs (marked in pink) to match the symbols shown in the upper left corner. (Hint: top symbol is the top row not the most left).
- When the box opens pick up the SCARAB (green).
- Place the SCARAB on the wheel and move down the path.
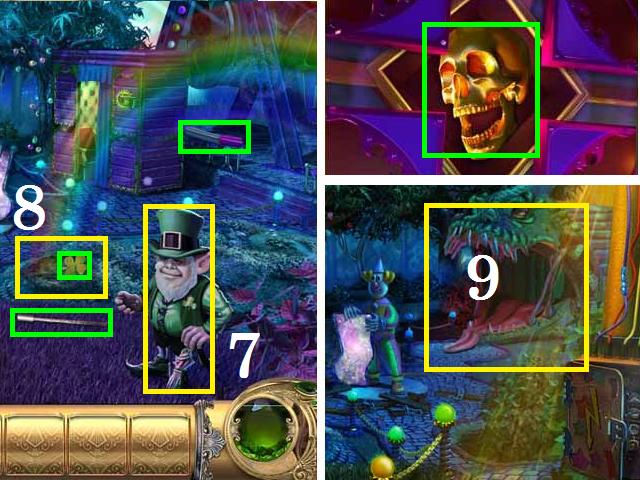
- The cloud over the leprechaun will spit out the last UMBRELLA PIECE (green).
- Pick it up and give the UMBERELLA to the leprechaun (7).
- When the cloud moves pick up the last SHOVEL PIECE (green) and dig at the bottom of the rainbow (8).
- Pick up the CLOVER and move back down the path.
- Place the CLOVER on the wheel and pick up the SKULL (green).
- Go down the path and through the mirror.
- Enter the dragon cave (9).
- Pick up all of the available ITEM PIECES (green).
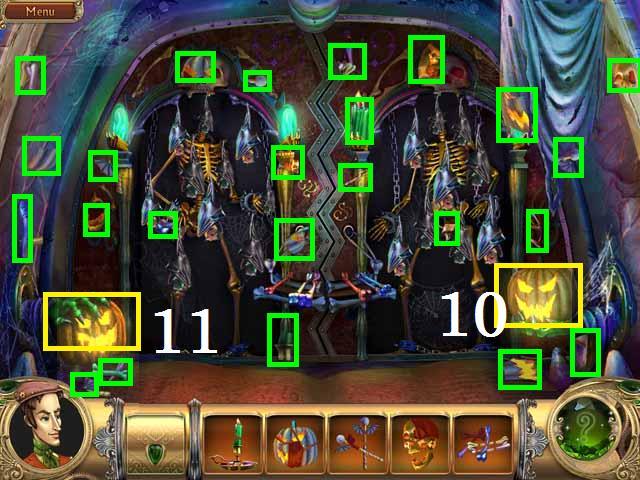
- Drop the CANDLE over the pumpkin (10) and pick up the last JACK-O-LANTERN PIECE (green).
- Place the JACK-O-LANTERN under the hand (11) and pick up the two PIECES (green).
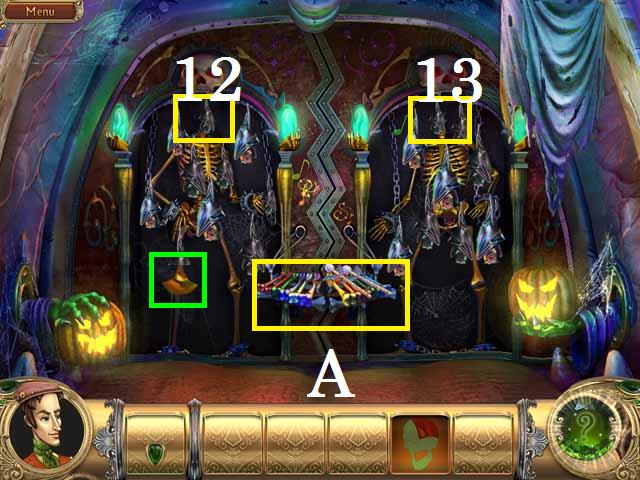
- Place the BONE on the xylophone (A) followed by the MALLETS.
- Pick up the last SKULL PIECE (green) and place a SKULL on each skeleton (12, 13).
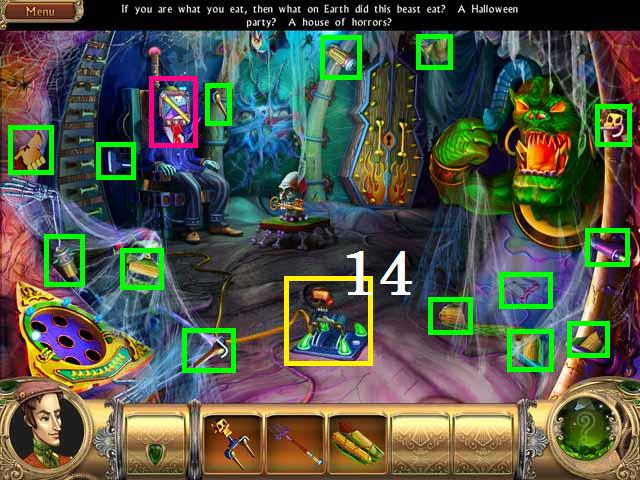
- Zoom into the scene and pick up all of the available ITEM PIECES (green).
- Place the completed SWITCH in the slots (14) on the ground and push it.
- Pick up the PIECE (pink) from the TV head guy (15).
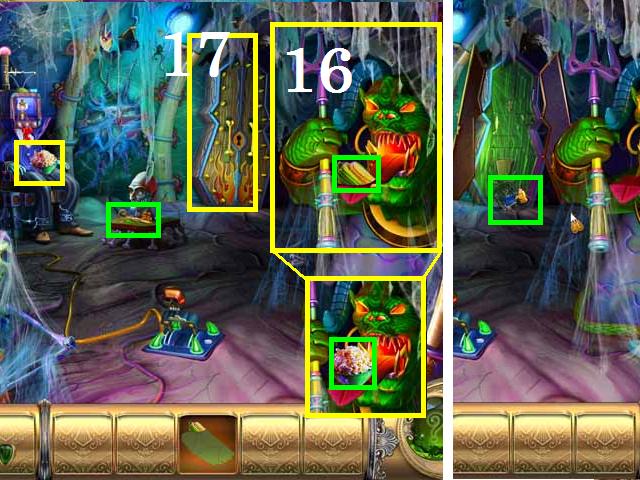
- Give the TRIDENT to the monster (16) and pick up the PIECE (green) from its tongue.
- Place the CORN in the monsters mouth and pick up the POPPED CORN (green).
- Place the POPPED CORN on the TV guys lap and pick up the key (green).
- Unlock the casket (17) with the KEY and click on the grim reaper then pick up the HAMMER.
- The casket becomes the portal to the other levels.
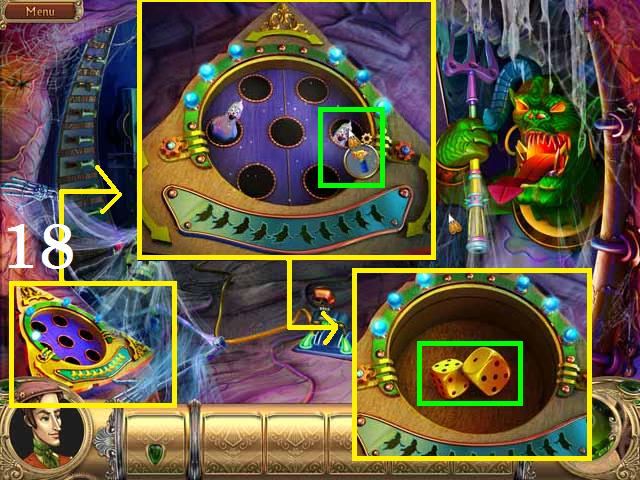
- Zoom into the whack-a-ghost (18) and hit five ghosts with the HAMMER then pick up the DICE (green).
- Return to the wheel and place the DICE there.
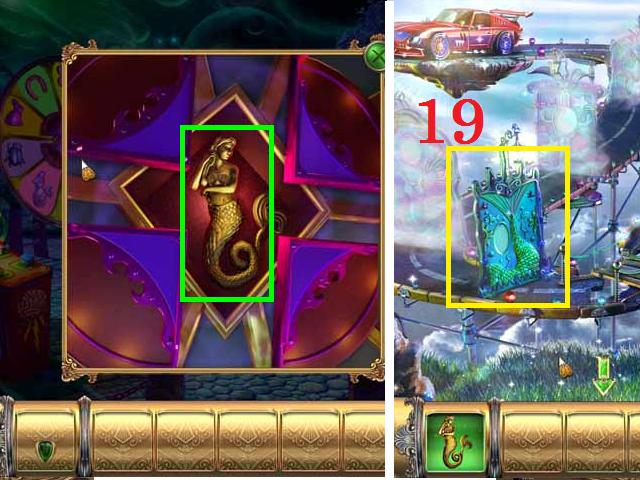
- Zoom in and pick up the MERMAID (green) then return to the casket and go through the portal.
- Zoom into the next door (19) and drop the MERMAID in the middle and go through the portal.
Level 4
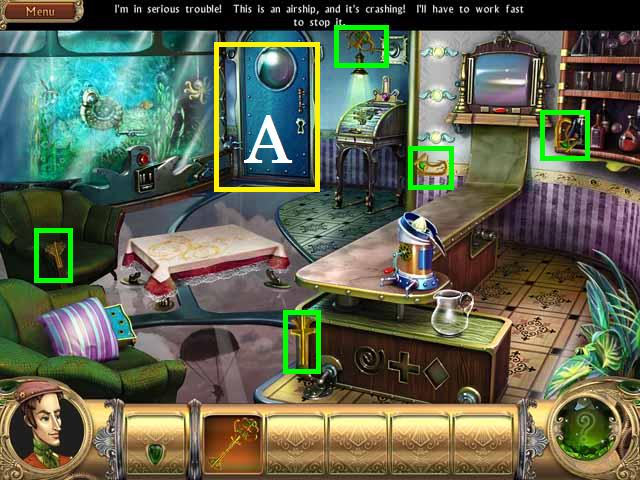
- Pick up all of the KEY PIECES (green).
- Unlock the door (A) with the keys and go up to the deck.
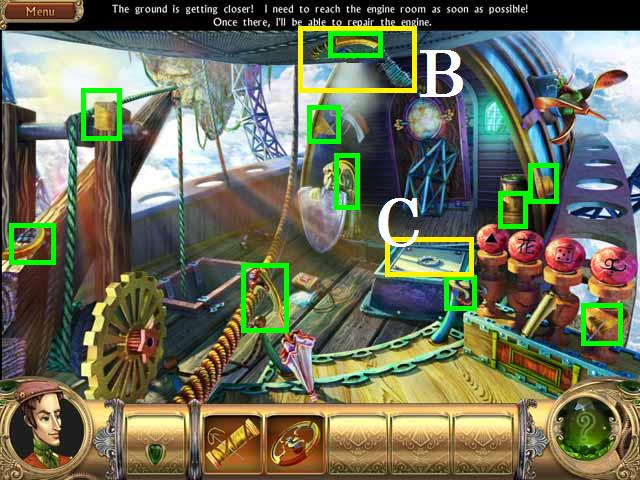
- Pick up all of the available ITEM PIECES (green).
- Fix the sail (B) with the NEEDLE and THREAD then pick up the last PIECE (green).
- Place the VALVE HANDLE on the hatch door (C) and go down it into the engine room.
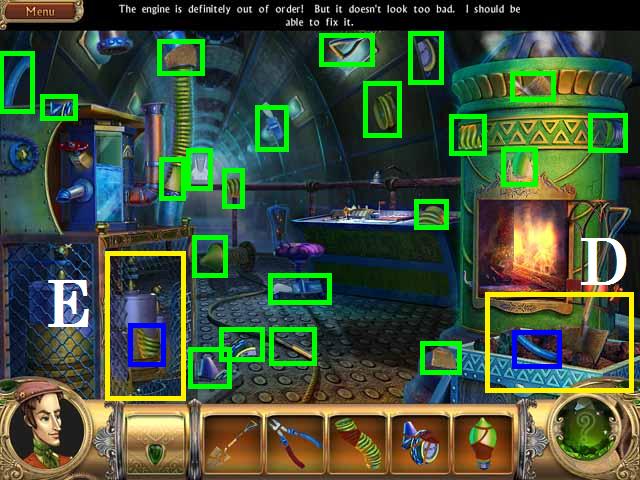
- Pick up all of the available ITEM PIECES (green).
- Use the completed SHOVEL on the coals (D) and pick up the last PLIER PIECE (blue).
- Cut the fence (E) with the PLIERS and pick up the last HOSE PIECE (blue).
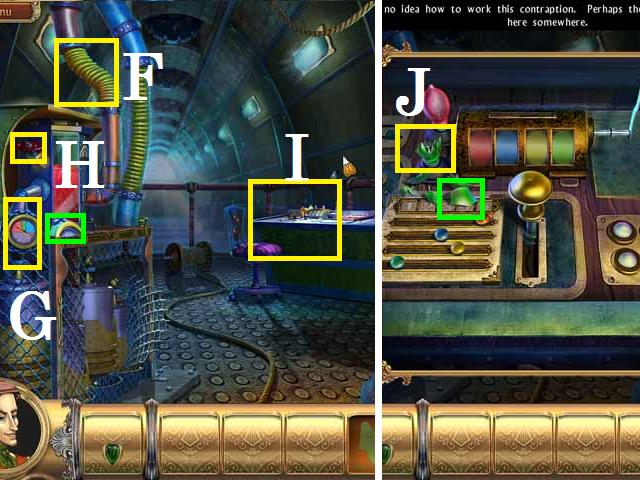
- Replace the missing HOSE on the engine (F) and pick up the last PRESSURE VALVE PIECE (green).
- Place the VALVE on the engine (G) and turn the handle (H) then zoom into the desk (I).
- Pick up the last BULB PIECE (green) and replace the LIGHTBULB (J).
- Go back to the deck and pick up all of the available ITEM PIECES (green).
- Place the completed HANDLE on the crank (K) and turn it.
- Pick up the PIECE (green) on the parcel.
- Drop the TOOLBOX over the broken propeller (L) then pick up the PIECE (green).
- Click on the hook (M) then the HANDLE to move the metal in front of the door then pick up the PIECE (green).
- Zoom into the door and replace the missing WHEEL and go through the door.
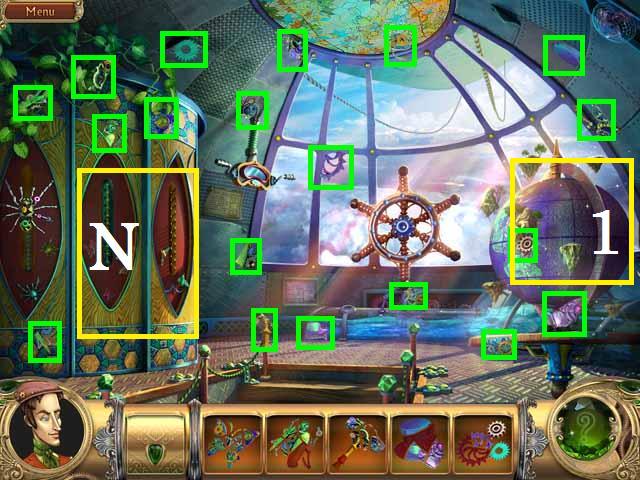
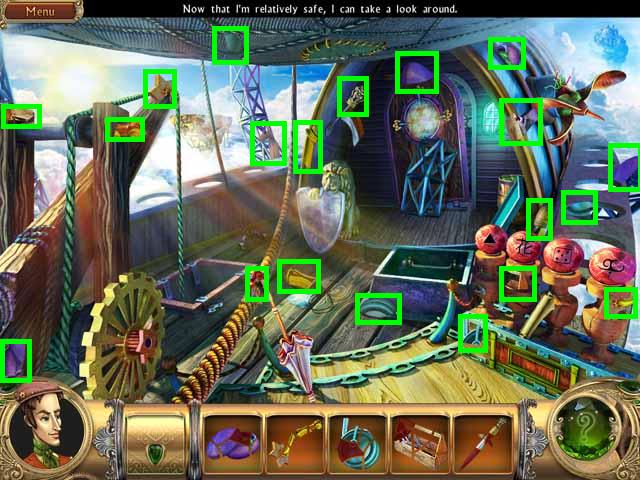
- Pick up all of the available ITEM PIECES (green).
- Spin the globe (1) and pick up the PIECE.
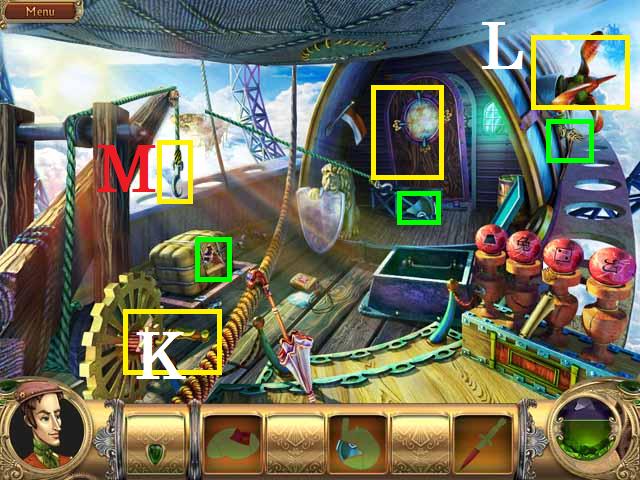
- Place the completed BUTTERFLY and GRASSHOPPER on the sliding doors (N).
- Pick up the HAT PIECE (green).
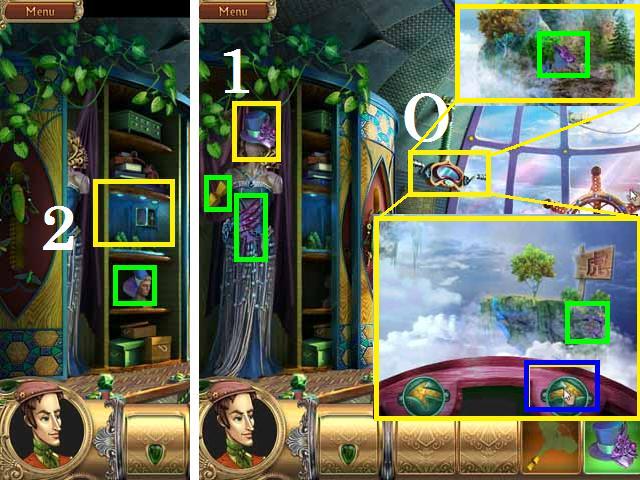
- Zoom into the periscope (O) and pick up the PIECE (green), then hit the right arrow (blue) three times until you see the wooden sign.
- Pick up the last GEAR PIECE (green) and close the window.
- Slide the doors over and place the HAT on the mannequin (1).
- Pick up two PIECES (green).
- Slide the doors over and zoom into the middle shelve (2).
- Place the GEARS in there spot (P) and the KEY and the keyhole (Q).
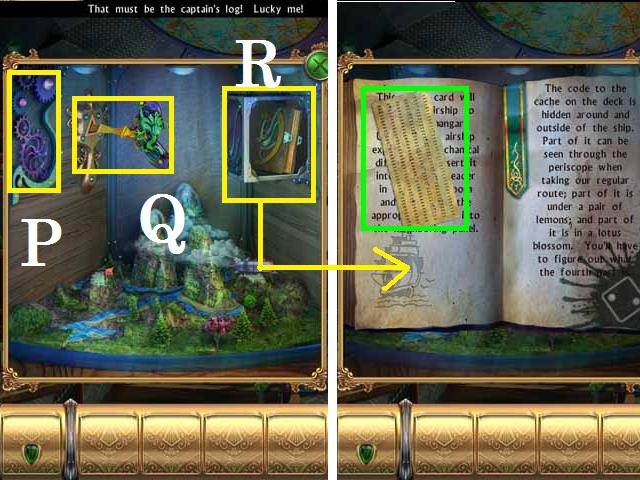
- Zoom into the book (R) and pick up the PUNCH CARD (green).
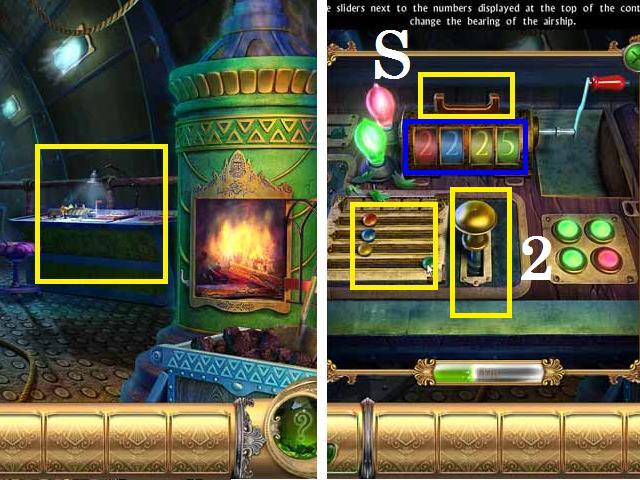
- Leave the bridge and go down to the engine room.
- Zoom back into the desk, move the lever (2) and put the PUNCH CARD in the slot (S).
- Move the colored pegs (yellow) to match the corresponding color numbers (blue) shown on the dial.
- Go back upstairs to the deck and pick up the last two PIECES (green) now available.
- Drop the CLEANER over the mirror (T) then cut the parcel (U) with the KNIFE to get the CLOTH.
- Wipe the mirror with the CLOTH and go through it.
- Pick up all of the available ITEM PIECES (green).
- Clean up the broken mess (V) with the BROOM and DUSTPAN and pick up the PIECE (green).
- Place the LAMP on the vase (W) and pick up the PIECE (green) that was under the bees.
- Open the crate (X) with the crow bar and zoom in.
- Pick up the CLEANING SUPPLIES (green), zoom into the book (Y) and close the window.
- Pick up all of the PAPER PIECES (green) and zoom back into the crate.
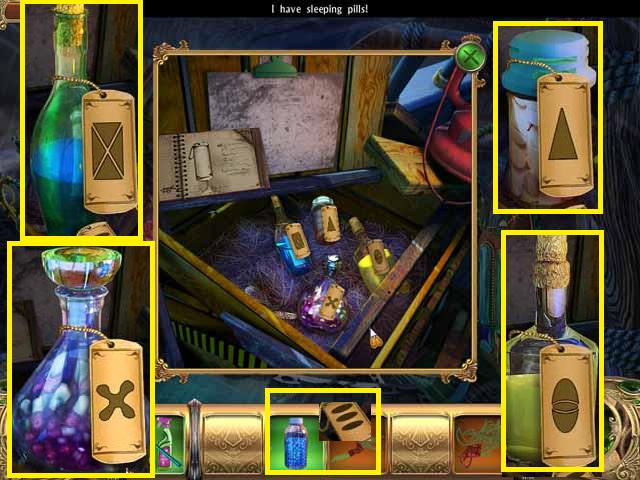
- Place the MANULE papers in the book and flip through it to match the tags to the matching medicine. Each play through is different.
- Zoom in on a bottle and drop the matching tag over it as shown in the screenshot to get the SLEEPING PILLS.
- Feed the SLEEPING PILLS to the tiger (Z) and pick up the last piece of the PRUNING SHEARS (green).
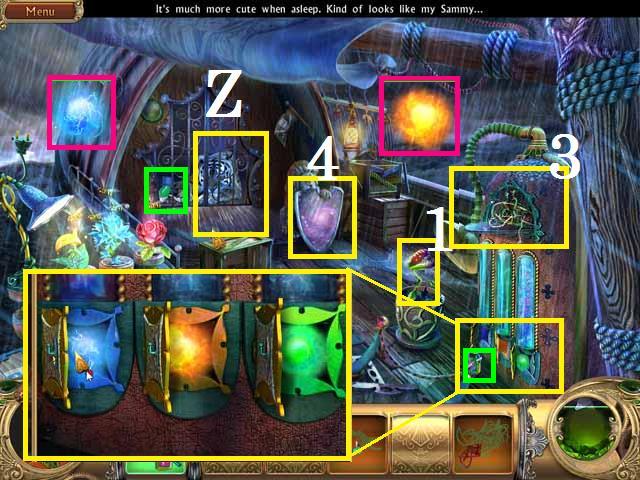
- PRUN the VENUS FLYTRAP (1) and use it to pick up the glowing ORBS (pink) one at a time.
- Zoom into the machine (2) and place the collected ORBS, one at a time, in the matching color slots as shown in the screenshot.
- Pick up the last WIRES PIECE (green) and place in the top panel of the machine (3).
- Zoom into the flower.
- Go back through the mirror (4) and down the stairs.
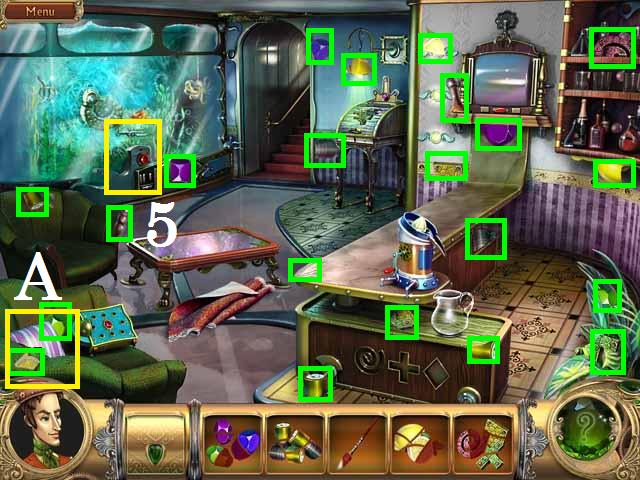
- Move the pillow (A).
- Pick up all of the available ITEM PIECES (green).
- Zoom into the aquarium panel (5).
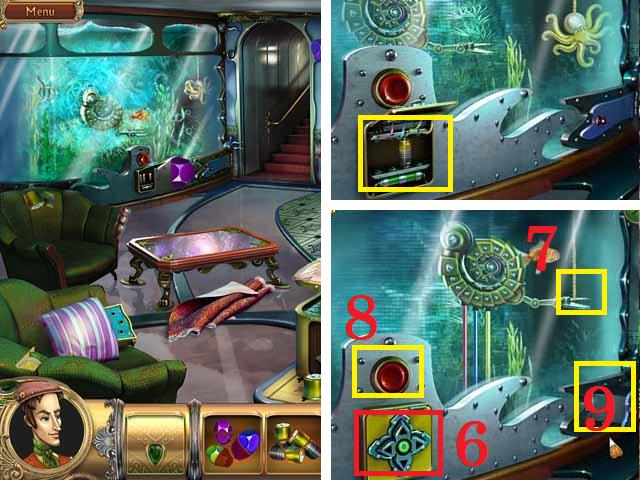
- Replace the missing BATTERIES.
- Using the arrows (6) move the scissors over the rope (7) and hit the red button (8).
- Open the drawer (9) and pick up the OCTOPUS (green).
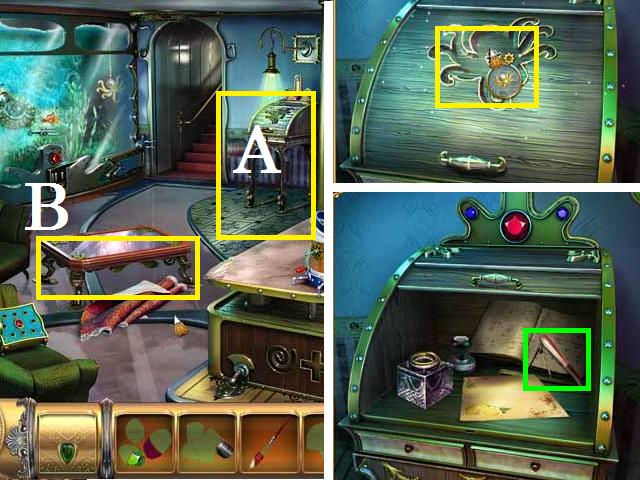
- Zoom into the desk (A) and place the OCTOPUS in the cutout.
- Pick up the PIECE (green) and close the window.
- Go through the portal in the coffee table (B).
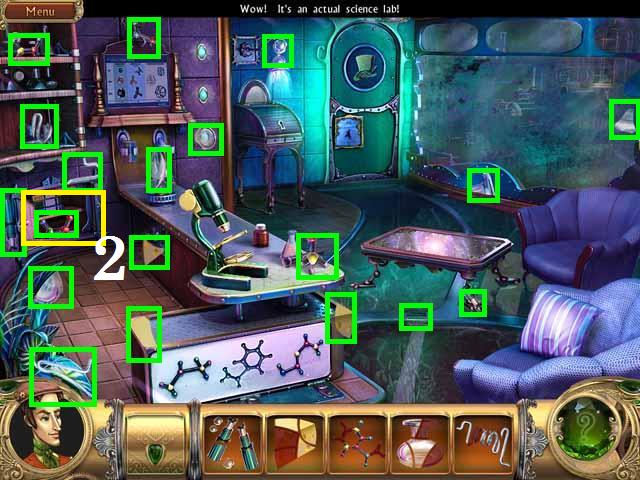
- Open the cabinet (2).
- Pick up all of the available ITEM PIECES (green).
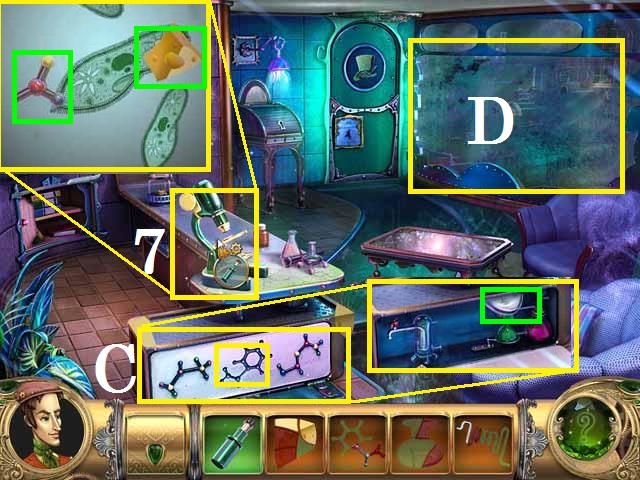
- Place the completed SCOPE on the microscope (1) and zoom in.
- Pick up the two PIECES (green) and close the pop up window.
- Place the MOLECULE on the panel (C) to open it and pick up the PIECE (green).
- Clean the window (D) with the CLEANING SUPPLIES and zoom in.
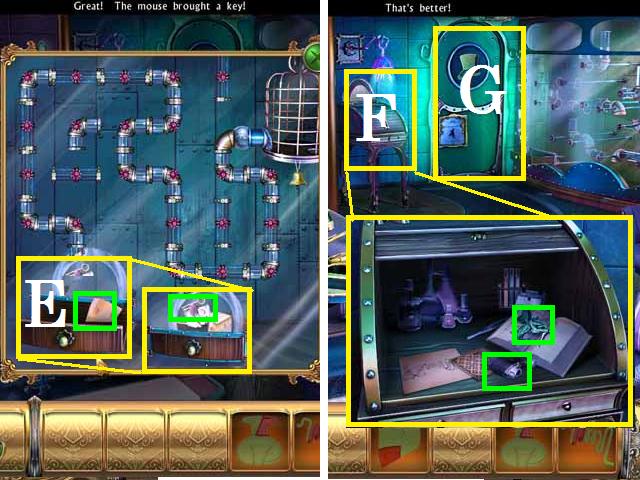
- Connect a patch for the mouse from the cage to the drawer by clicking on the individual pieces to change their orientation, as shown in the screenshot.
- Pick up the last CHEESE PIECE (green), put it in the drawer (E) and close it.
- Once the mouse reaches the drawer open it to get the KEY.
- Zoom into the desk (F) and unlock it with the KEY.
- Pick up the LIGHTER and the FAIRY, both are marked in green.
- Close the window and zoom into the door (G) and place the FAIRY in the cutout.
- Solve the puzzle getting a matching color balls into the corresponding slots. The key is to get a ball in each spot all at the same time. Once you match a ball to a correct spot it will stay there until another ball lands on it, while you match the others. Once you have a matching ball in a hole block it.
- Pick up the now available PIECE (green) place it under the panel and go through the coffee table.
- Zoom into the box (H) on the chair and LIGHT the candle (I) and pick up the last CRYSTAL (green).
- Drag the CRYSTALS over the box and arrange them in the following order: from the top left corner moving clockwise- green, red, green, blue, red, blank, blue.
- Pick up the last KEYS PIECE (green) and close the pop up.
- Place the KEYS on the panel (J) and pick up the last two PIECES (green).
- Drop the LEMONS over the juicer (K) then pick up the pitcher (green).
- Zoom back into the desk (M) and pour the LEMON JUICE into the little jar (N) then drop the BRUSH in the jar and drag across the paper (O).

- Go through the coffee table.
- Pick up the last PIECE (green) that is now available.
- Place the FLASK inside the panel (R) to get the NEUTRALIZING AEGENT and return to the deck.
- Go up to the deck and zoom into the scroll (P).
- Set the balls (Q), by clicking on them, to match the symbols on the scroll.
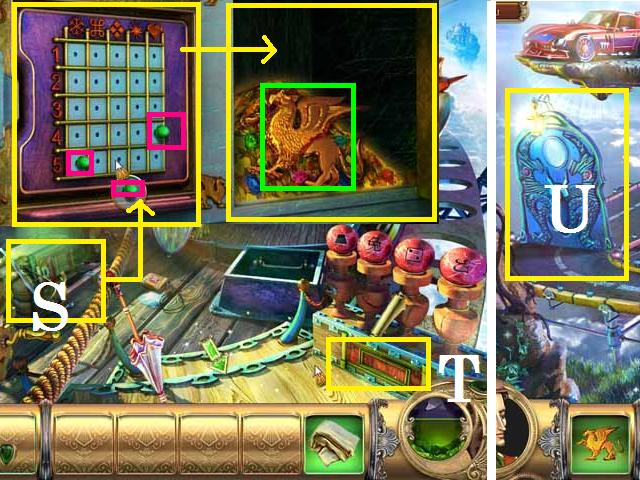
- Pour the NUTRALIZING AGENT on the opened parcel (S) and zoom in.
- Place the pegs (pink) in the holes that correspond to the code you received when you arranged the balls according to the scroll. You can close the window and zoom back into it (T) if you need a refresher. The code may change with each game play.
- My solution began with a snowflake and a 5. I found the snowflake in the top row and drew a line down until I found the five. At that intersection I placed the peg. Continue until you have all of the pegs in the correct positions.
- Pick up the GRIFFIN (green) and go back downstairs.
- Go through the coffee table and through the portal door.
- Zoom into the next door (U) and place the GRIFFIN on the door and go through it.
Level 5
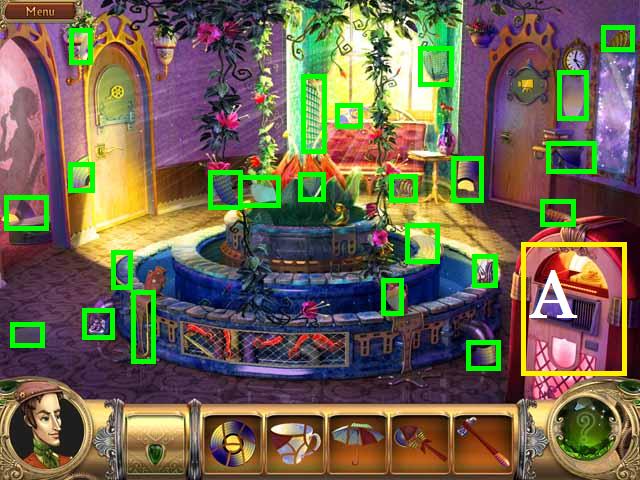
- Pick up all of the available ITEM PIECES (green).
- Place the completed RECORD in the jukebox (A).
- Pick up the revealed PIECE (green).
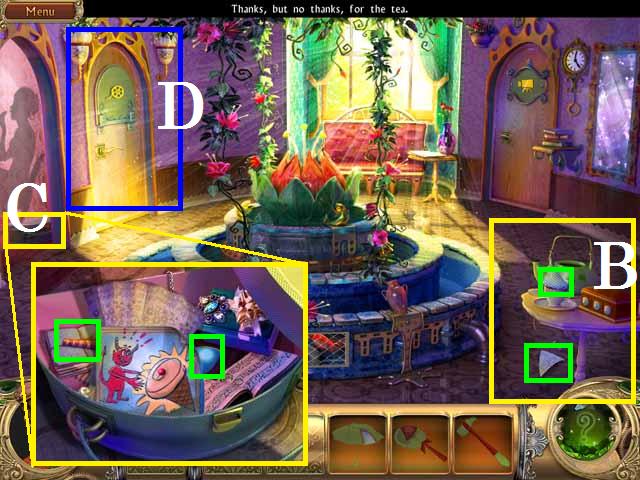
- Place the TEACUP on the table (B) and once it is full pick up the PIECE (green).
- Pull the bag (C) out of the doorway with the UMBERELLA and zoom in.
- Move the items around and pick up the two PIECES (green).
- Open the door (D) and go into the office.
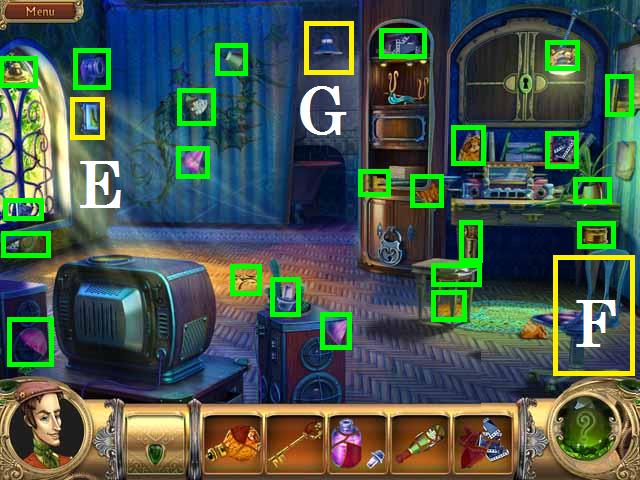
- Flip on the light switch (E), move the chair (F) and pick up all of the items (green).
- Replace the LIGHTBULB (G) and hit the light switch again.
- Go behind the curtain to enter the photo lab.
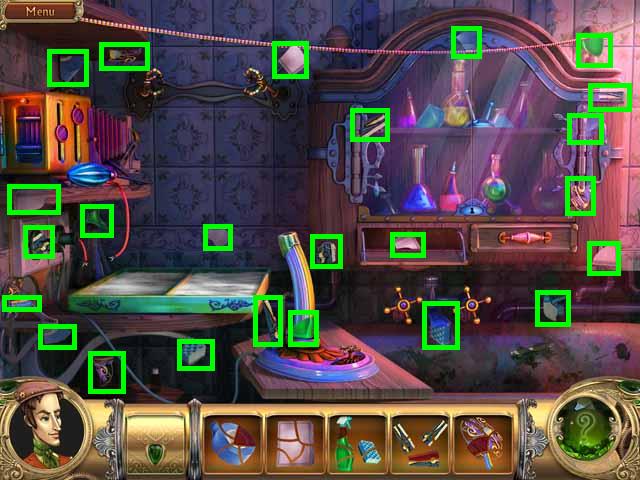
- Pick up all of the available ITEM PIECES (green).
- DUCT TAPE the wire (H) and hang the PHOTOGRAPHIC PAPER on the wall (I).
- Go back to the fountain and go through the mirror (J).
- Pick up all of the available ITEM PIECES (green).
- Throw the ICECREAM on the fire (K) in the doorway and pick up the PIECE (blue) and the FEATHER (blue).
- Zoom into the door (L) and place the HAT in the cut out and go through it.
- Push the red button (M) on the desk and pick up all of the available ITEM PIECES (green).
- Place the WHEAT on the floor (N) in front of the mouse holes then pick up the HAMSTER.
- Place the HAMSTER on the wheel (O).
- Pick up the ITEM PIECES now available on the stage.
- Place the completed SNAKE in the magicians box (P) and pick up the HOSE (blue) once it changes and place it on the balloon pump (Q).
- Pick up the HAMMER (green) from the pump and break the hourglass (R) to pick up the last MATCHES PIECE (green).
- Place the MATCHES in the box to change it into the SUN (2).
- Place the SUN on the panel (S) under the stage and pick up the last LEAVES PIECE (green).
- Place the LEAVES in the box to get the BOOK PAGES (green).
- Pick up the last CRAB PIECE (green) that is now available above the green door and place it in the box to get PLIERS.
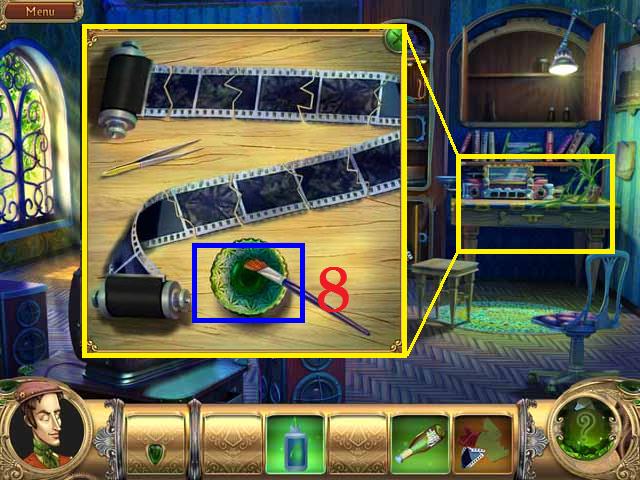
- Zoom into the moon (T) and place the PAGES in the book. Take note of the process for developing film.
- Go through the mirror (U).
- Pick up all of the available ITEM PIECES (green).

- Zoom into the panel and solve the puzzle by getting all of the buttons down at the same time. My solution was as follows 1, 2, 3, 4, 2, 5, and 6 as seen in the screenshot.
- Pick up the PIECES (green) now available on the stage lights.
- Zoom into the desk and smash all of the roaches with the SHOE then BRUSH them off to pick up the last FILM REEL PIECE (green).
- Place the REEL on the camera (W) and pull the lever (V).
- Pick up the last available PIECE (green) and exit the scene at the bottom to return to the fountain.
- Use the PLIERS to cut the screen (X) on the fountain and pick up the last MAGNIFYNG GLASS PIECE (green).
- Turn the red handles in the following order: (from left to right) #2, #4, and then #1 to turn on the fountain.
- Zoom into the table (Y) in the back of the room and place the MAGNIFYING GLASS over the paper and pick up the last HAMMER PIECE (green).
- Break the vase (Z) with the HAMMER and pick up the ring (green).
- Go back to the photo lab room and cut the glass (1) with the RING.
- Pick up the CLEANING SUPLLY PIECE (green) and the TV ANTENNA.
- Use the CLEANNING SULLIES on the tub (2) and pick up the last CLOTHESPIN PIECE (green) and hang then on the rope (3).
- Go back one room to the office and turn the TV (4).
- Place the ANTENNA on the TV and pick up the last KEY PIECE (green).
- Flip the light switch and open the cabinet (5) with the KEY.
- Pick up the PIECES (green) and the GLUE (green).
- Pour the ACID over the lock (6) open the doors and pick up the FILM PIECE (green).
- Zoom into the shelve (7) and place the SHIP in the BOTTLE on the stand and pick up the last FILM PIECE (green) from the panel.
- Zoom into the desk and drop the FILM PIECES on it.
- Arrange the FILM PIECES as shown in the screenshot.
- Fill the dish (8) with GLUE and drag the brush over the FILM then pick it up.
- Flip the light switch and enter the photo lab.
- Place the FILM in the back of the CAMERA.
- Using the two dials (pink) on the side of the camera to focus the photo and hit the trigger (9). It may take you a couple try’s to get it right, use the red line as a guide.
- Pour the BLUE BOTTLE (A) and the PINK BOTTLE (B) in the left side of the tray (C).
- Pour the GREEN BOTTLE (D) and the YELLOW BOTTLE (E) in the right side of the tray (F).
- Pick up the PHOTOGRAPH and drop it in the left side of the tray followed by the right.
- Turn the faucet on (10) and place the PHOTO in the tub then hang it from the CLOTHESPINS.
- Pick up the now available FAN PIECE (green) from the tub and place it on the stand (11).
- Pay attention to the order of the figurines in the photo.
- From the fountain, go through the doorway on the right to enter the stage.
- Zoom into the panel (A) and drop the FIGURIENS over the stands. Arrange them in the order shown in the photograph. The order is different each play through.
- Pick up the last CORD PIECE (green) and place it on the camera (B).
- Pay attention the number that is on the big screen, it is different every play through.
- Return to the fountain and zoom into the box (C) on the table and set the dial to match the number on the big screen.
- Once the box is open, pick up the RIBBON (green) and go through the mirror.
- Pick up the last PIECE (green) and drag the BAG over the top of the flower (D).
- Zoom into the table (E) and drag all of the items over the wand (F).
- Once the WAND is complete pick it up and go through the doorway on the left.
- Place the WAND over the top hat (G) and pick up the RABBIT.
- Go through the green door (H) and zoom into the next door (I).
- Place the RABBIT in the cut out and go through the door.
Level 6
- Pick up all of the available ITEM PIECES (green).
- Place the completed SHIELD on the column (A) then pick up the last TOOL PIECE (green).
- Use the TOOLS to open the drawer (B) and pick up the last FLOWER PIECE (green).
- Give the FLOWERS to the little boy figurine (C) then pick up the PIECE (green).
- Smash the five vases (pink) as marked in the screenshot. One will have a number that you will need later and one will have a PIECE in it (green).
- Zoom into the fireplace (D) to pick up a PIECE (green) and you can zoom into the scroll (E) that will be needed later.
- Go through the portal to the right of the fireplace.
- Pick up all of the available ITEM PIECES (green).
- Click the volcano (F) then pour the CHAMPAGNE on it to cool the PIECE (green) and pick it up.
- Place the HAMMER in the caveman’s hand (G) then pick up the PIECE (green).
- Zoom into the screened cage (H) and, using the FISHING POLL, pick up the HANDLE (green).
- Go back one room and zoom into the base of the bookcase (I).
- Place the HANDLE in the hole then pick up the two PIECES (green) from the doorway.
- Zoom into the fireplace and Place the KNOB on the pin (J) and turn it to green then light the fire with the MATCHES.
- Go back through the portal and pick up the last piece of DINOSAUR (green) and place it on the column (K).
- Pick up the last piece of COINS (green) and place them in the large dinosaurs back (L) then pick up the TICKET (green).
- Zoom into the door (M) at the top of the stairs and place the TICKET in the slot (N).
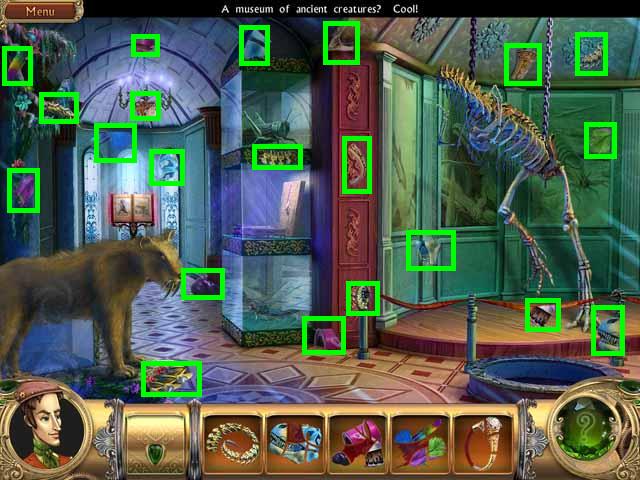
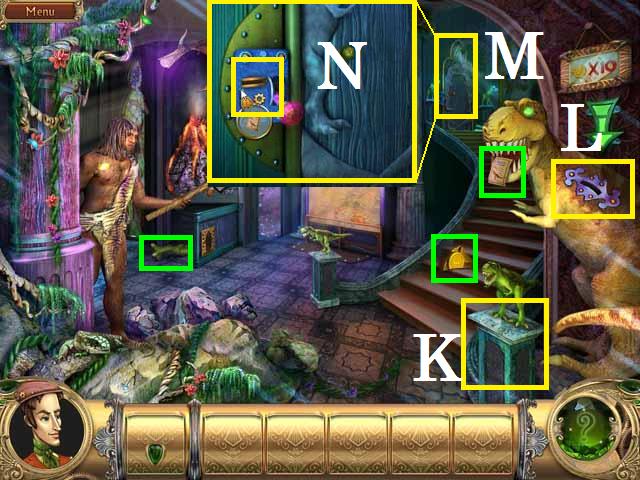
- Enter the exhibit room through the door and pick up all of the available ITEM PIECES (green).
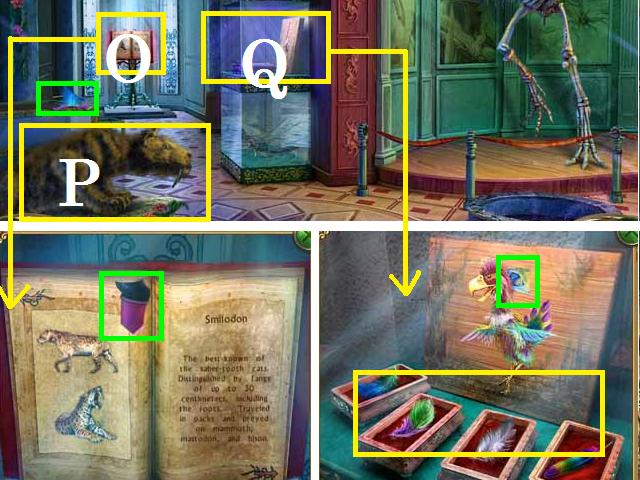
- Zoom into the book (O) and turn the page to pick up a PIECE (green).
- PAINT the large cat (P) then pick up the PIECE (green).
- Zoom into the center shelve (Q) and drop the FEATHERS in the boxes then pick up the PIECE (green).
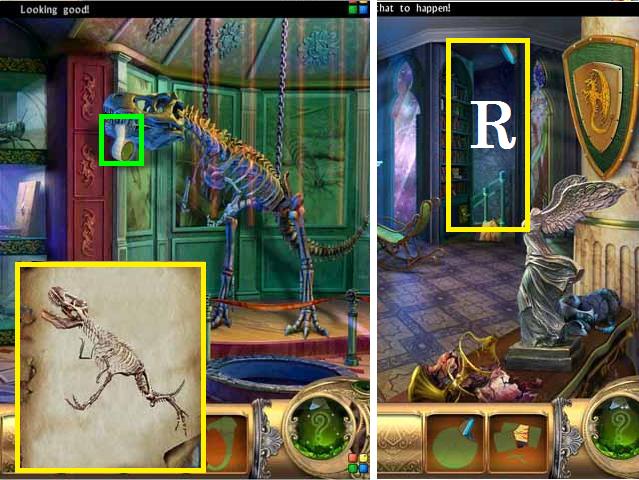
- Drop the TAIL and SKULL over the partial dinosaur skeleton.
- Adjust the HEAD, LEGS, and TAIL to match the scroll from the fireplace then pick up the TAPE (green) from the jaws.
- Go back to the first room then go downstairs (R).
- Pick up all of the available ITEM PIECES (green).
- DUST the chair (S) and pick up the last SCALPEL PIECE (green).
- Cut the back of the chair open with the SCALPEL and pick up the last KEY PIECE (green).
- Zoom into the desk (T) and drop the KEYS over it then zoom back in.
- Pick up the PIECE (pink) then drop the MAKEUP over the coffee cup (U).
- Drop the TAPE over the print and place it over the finger pad (V).
- Zoom into the safe (W) and open it. The first number in the combination is the number that was on the piece of paper from smashing the vases. If you need to return to the first room and check it because it changes every play through.
- The second number is whatever the spider (X) has on its back. Finally, the third number is however many screens are on above the desk.
- Zoom into the safe and pick up the last PIECE (green). Drag the pencils over the paper for the solution to turn the power off.
- Zoom into the desk and press the buttons (yellow) according to the diagram from the safe.
- Go back to the exhibit room, zoom into the EGG and pick up the last RING PIECE (green).
- Cut the glass (Y) with the RING then pick up the EGG.
- Go back to the main room and put the EGG in the fireplace.
- Pick up the DINOSAUR (green) and zoom into the door (Z) at the top of the stairs.
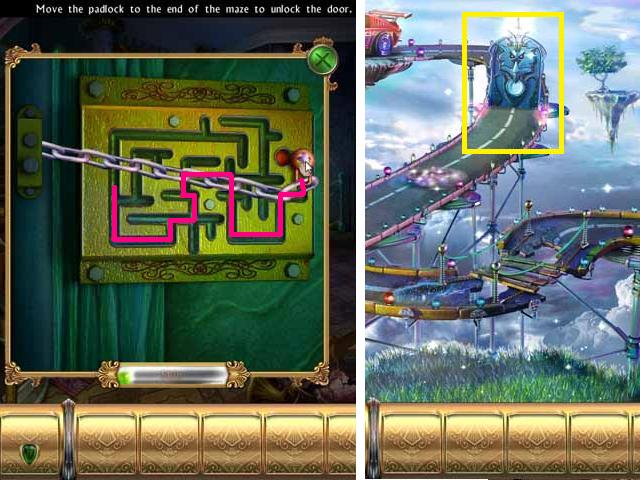
- Move the chain through the maze as shown in the screenshot and go through the door.
- Zoom into the last door and place the DINOSAUR in the cut out.
- Congratulations! You beat the game!
Created at: 2011-05-07