

Walkthrough Menu
- General Tips
- Chapter 1: The Entrance
- Chapter 2: The Theater
- Chapter 3: The Park
- Chapter 4: The Flying Islands
- Chapter 5: The Duchess’ Mansion
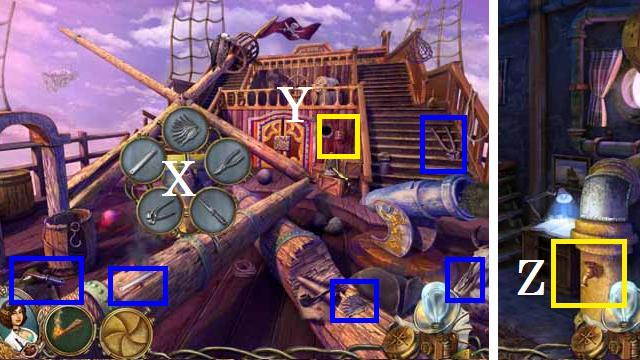
General Tips
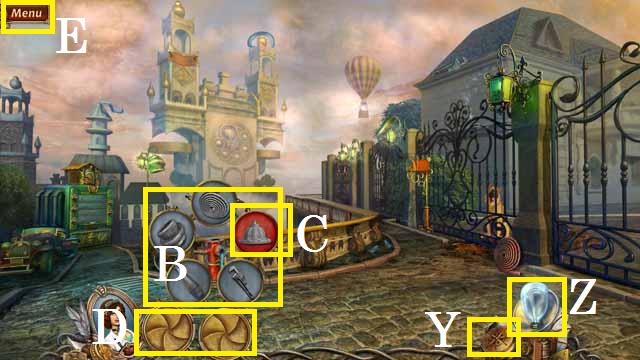 • You will not need to follow the exact path of this guide;
however, some actions are required before you can complete
another scene. • If you get stuck in your game play you can
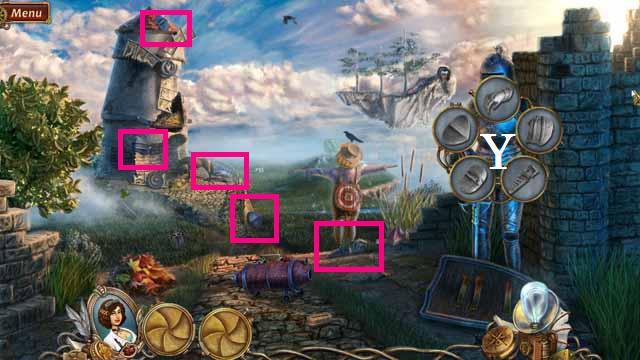
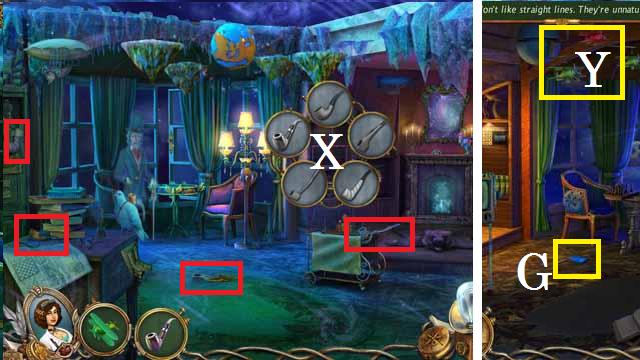
use the Hint Button (Z). • Use the compass (Y) if you need
help with available directions. • You will be required to
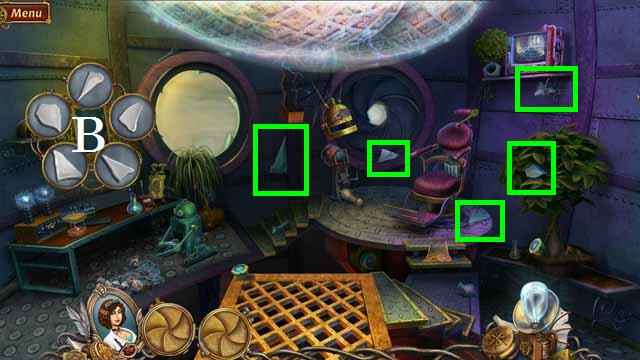
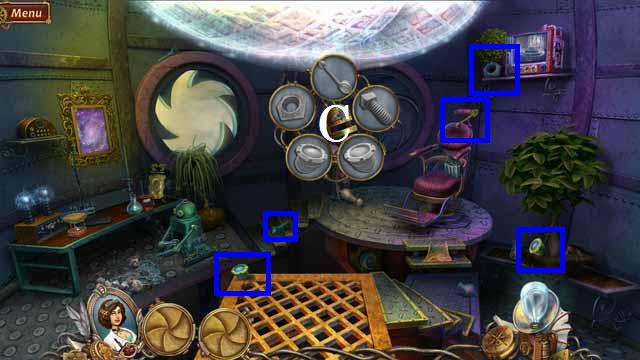
assemble Objects by dragging individual items to the Key
Object (B). An item symbol (C) with a red back ground is not
yet available and will require an additional action to unlock.
You can open a Key Object by picking up one of its items. •
Your inventory bar (D) will hold items needed in other scenes
until you use them. • Click on the Menu (D) button in the
upper left corner to exit, pause or resume the game. You can
also adjust your options (sound, music, and screen size).
• You will not need to follow the exact path of this guide;
however, some actions are required before you can complete
another scene. • If you get stuck in your game play you can
use the Hint Button (Z). • Use the compass (Y) if you need
help with available directions. • You will be required to
assemble Objects by dragging individual items to the Key
Object (B). An item symbol (C) with a red back ground is not
yet available and will require an additional action to unlock.
You can open a Key Object by picking up one of its items. •
Your inventory bar (D) will hold items needed in other scenes
until you use them. • Click on the Menu (D) button in the
upper left corner to exit, pause or resume the game. You can
also adjust your options (sound, music, and screen size).
Chapter 1: The Entrance
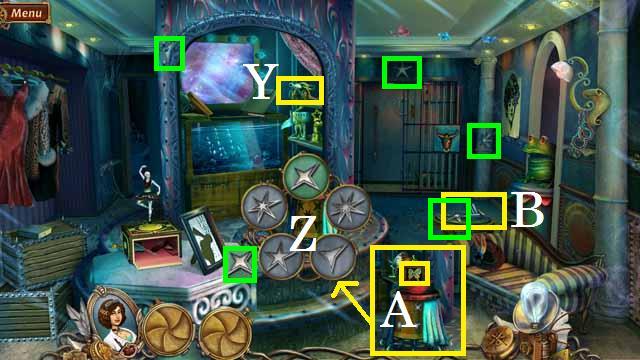
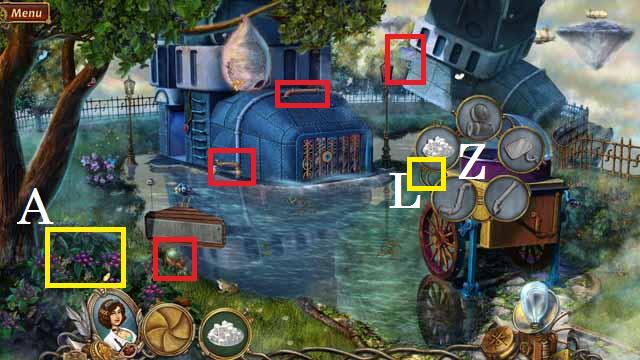
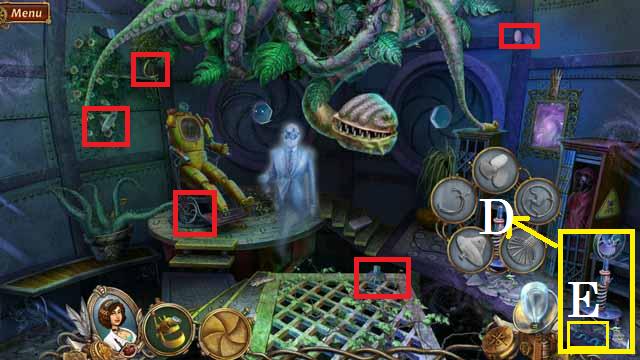
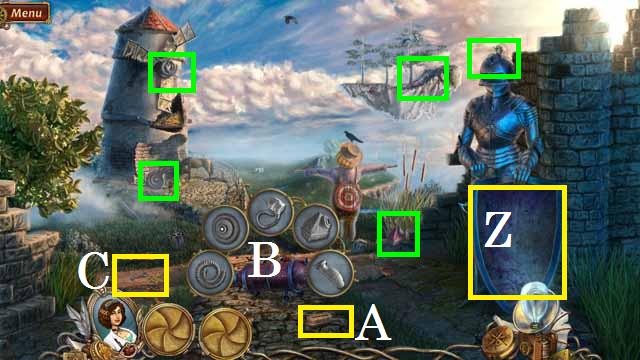
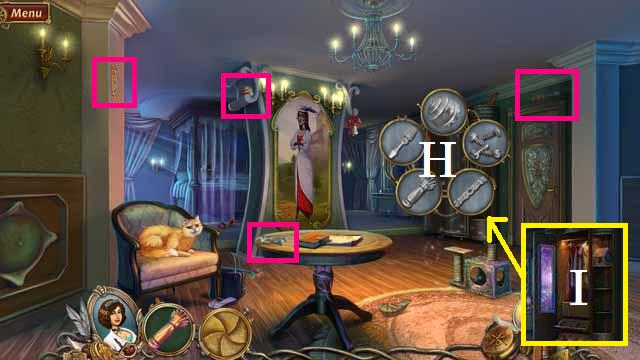
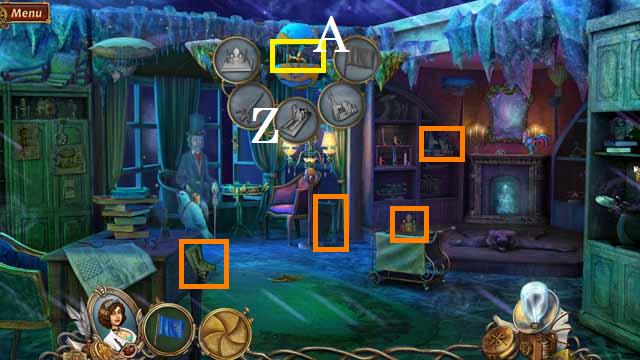
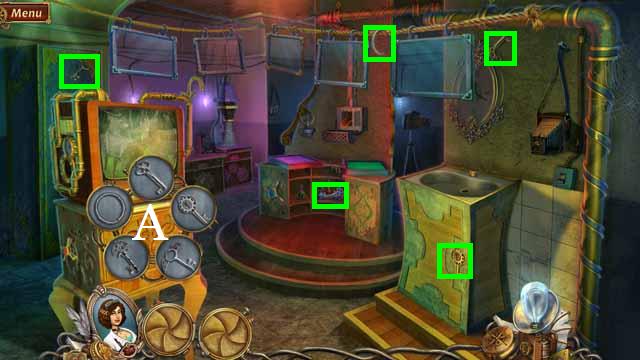 • Place the five items (green) in the Drawer Key Object (A).
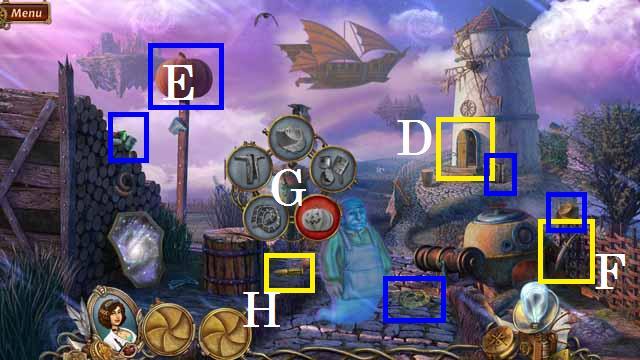
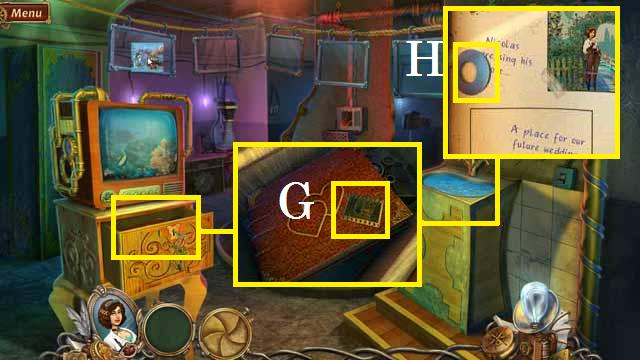 • Zoom into the drawer; pick up the FILM NEGATIVE (G). • Open
the book; pick up the WASHER (H).
• Zoom into the drawer; pick up the FILM NEGATIVE (G). • Open
the book; pick up the WASHER (H).
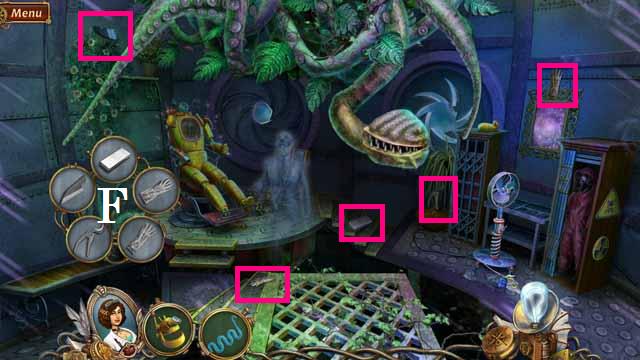
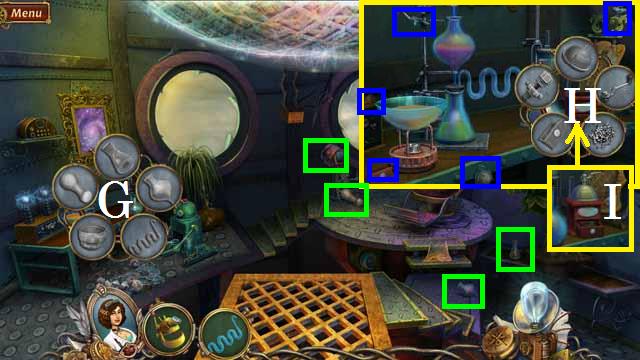
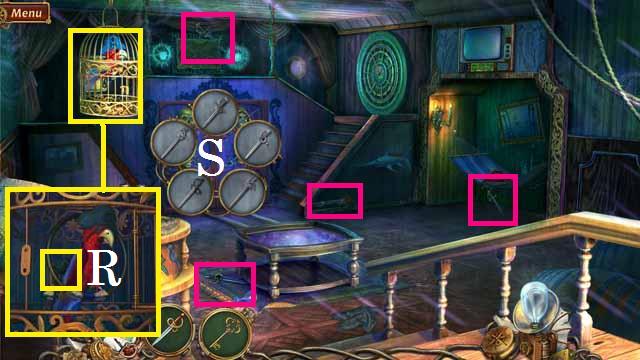
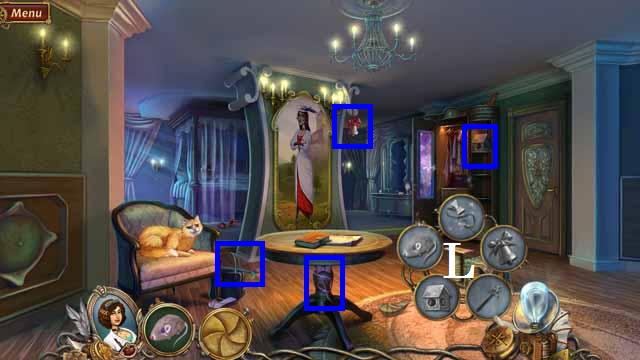
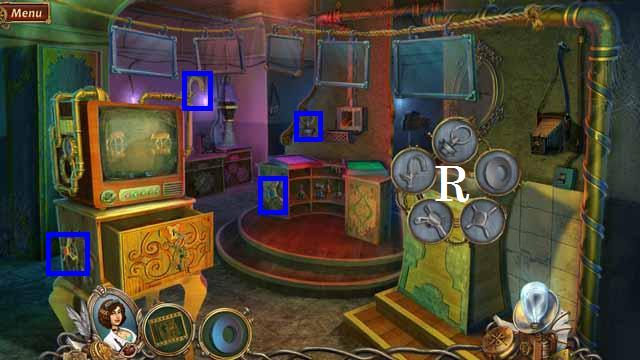 • Place the items (blue) in the Sink Key Object (R).
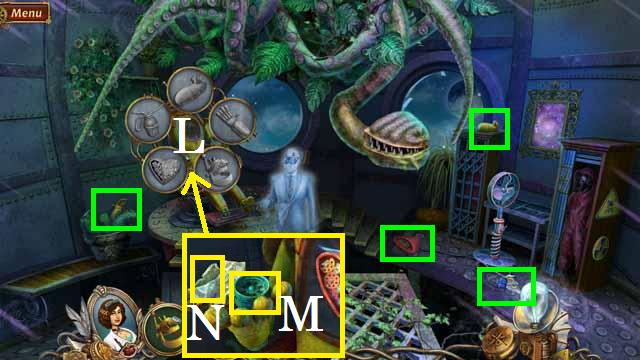
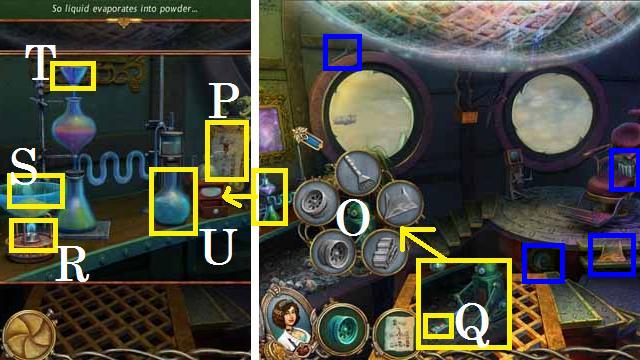
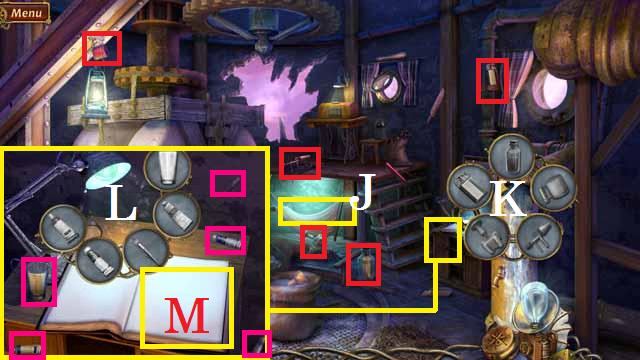
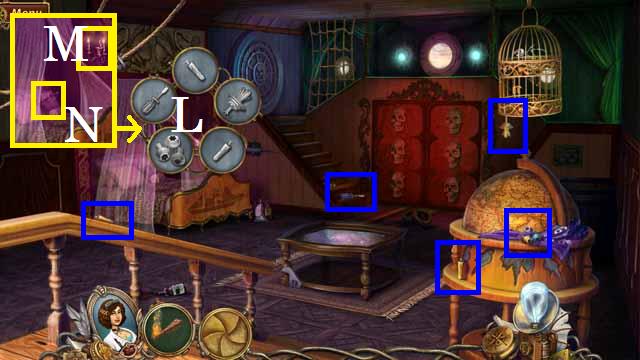
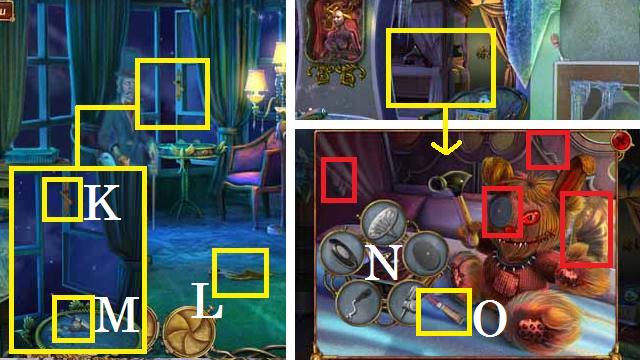
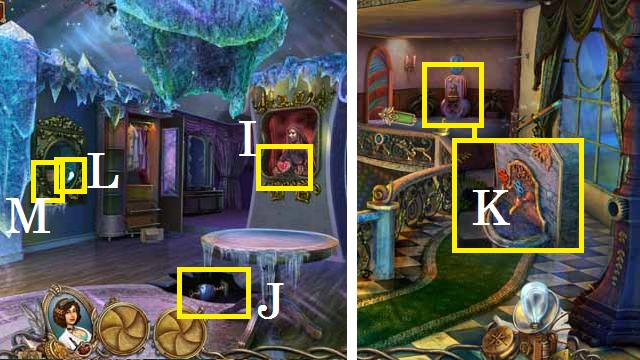
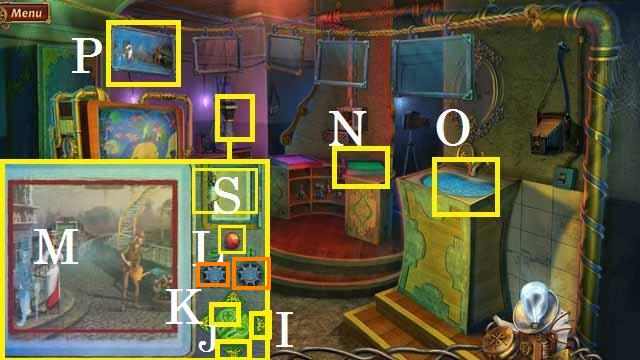 • Zoom into the enlarger; place the FILM NEGATIVE in the slide
(S). • Each time you play, the negative will be out of focus
in a different way. In my first play through, I pressed the
right arrow (I) once and the down arrow (J) once. • Stretch
the photo (orange) both ways once, then zoom in (K) until the
image fills the frame as shown in the screenshot. • Press the
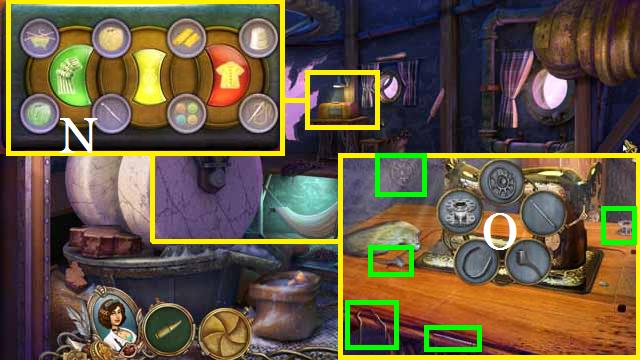
red button (L) and pick up the UNDEVELOPED PHOTOGRAPH (M). •
Place the UNDEVELEOPED PHOTOGRAPH in the developer (N) to
receive the DEVELOPED PHOTOGRAPH. • Place the DEVELOPED
PHOTOGRAPH in the sink (O) to receive the WASHED PHOTOGRAPH. •
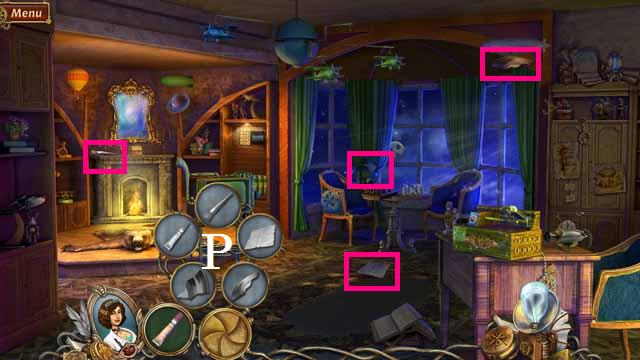
Hang the WASHED PHOTOGRAPH in the frame (P).
• Zoom into the enlarger; place the FILM NEGATIVE in the slide
(S). • Each time you play, the negative will be out of focus
in a different way. In my first play through, I pressed the
right arrow (I) once and the down arrow (J) once. • Stretch
the photo (orange) both ways once, then zoom in (K) until the
image fills the frame as shown in the screenshot. • Press the
red button (L) and pick up the UNDEVELOPED PHOTOGRAPH (M). •
Place the UNDEVELEOPED PHOTOGRAPH in the developer (N) to
receive the DEVELOPED PHOTOGRAPH. • Place the DEVELOPED
PHOTOGRAPH in the sink (O) to receive the WASHED PHOTOGRAPH. •
Hang the WASHED PHOTOGRAPH in the frame (P).
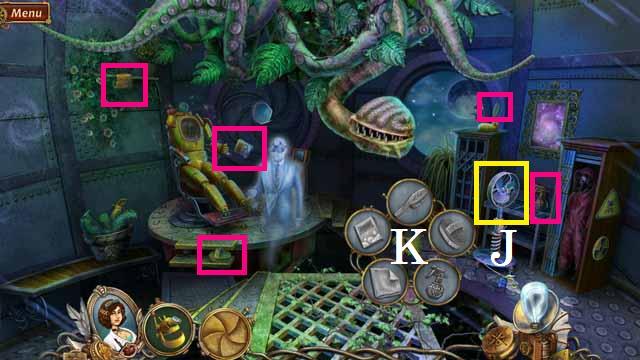
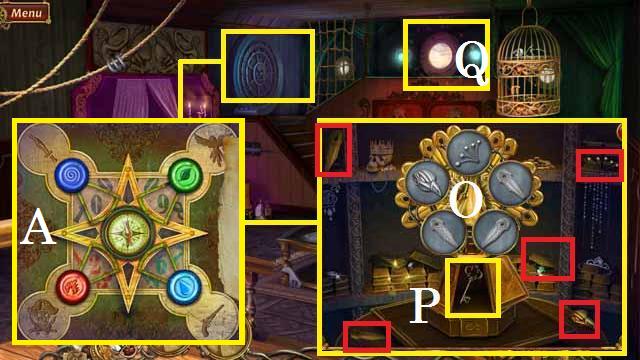
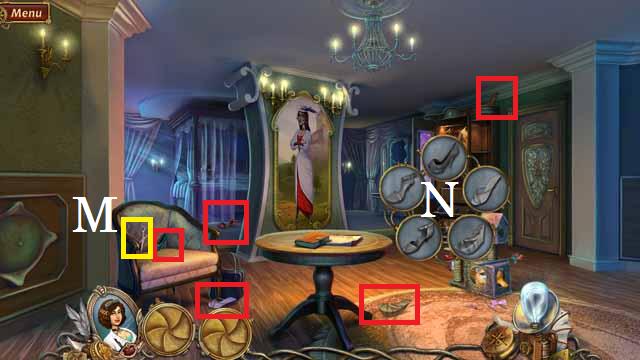
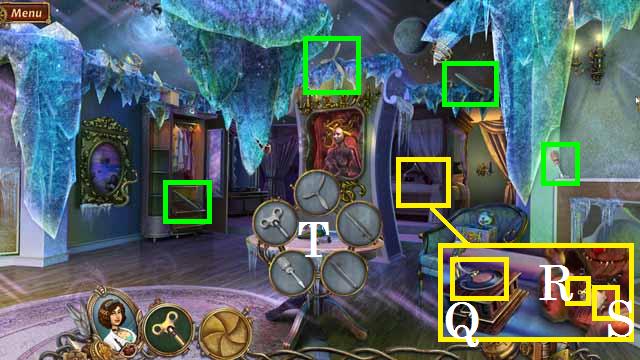
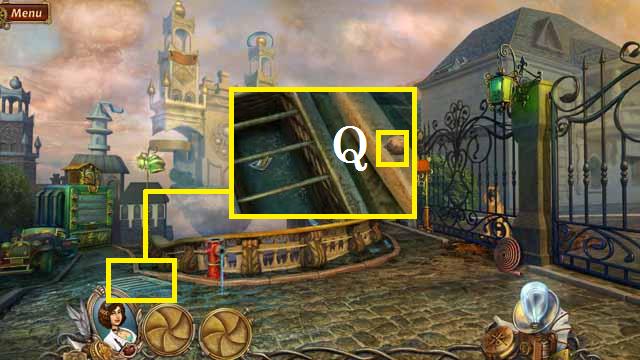 • Zoom into the grate; pick up the STONE (Q).
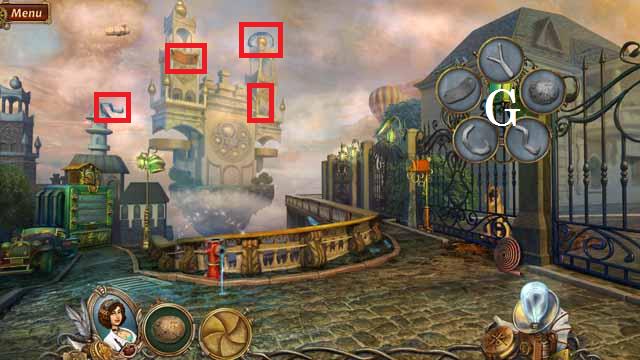 • Place the items (red) and the STONE in the Slingshot Key
Object (G).
• Place the items (red) and the STONE in the Slingshot Key
Object (G).
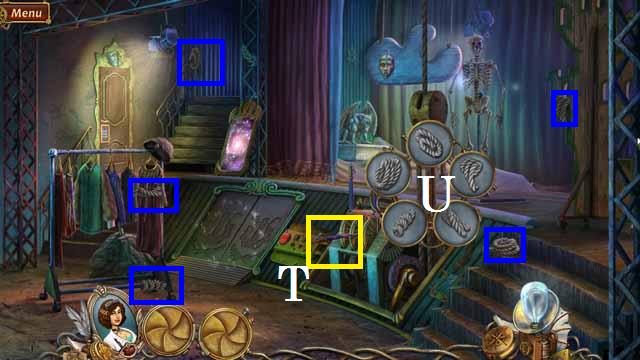
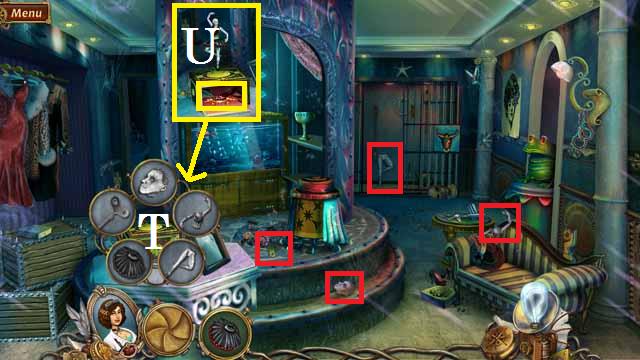
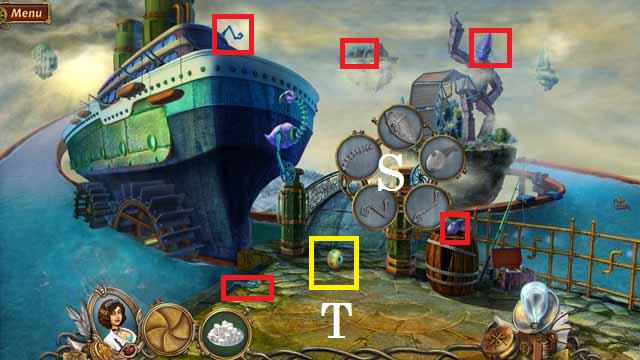
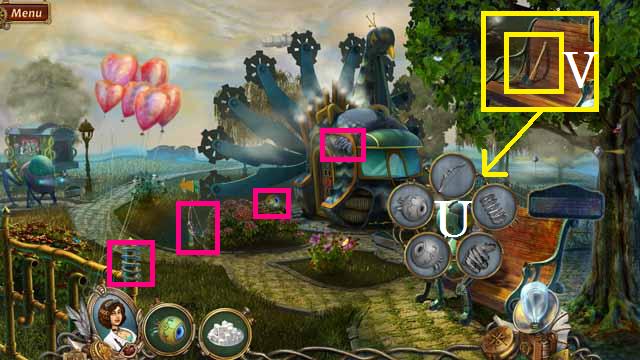
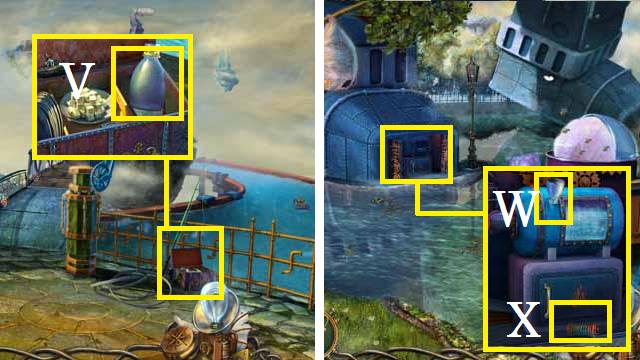
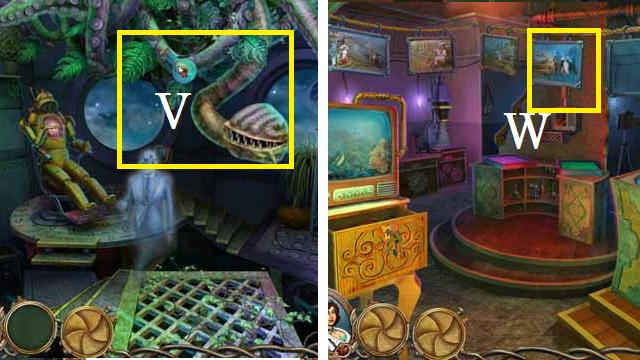
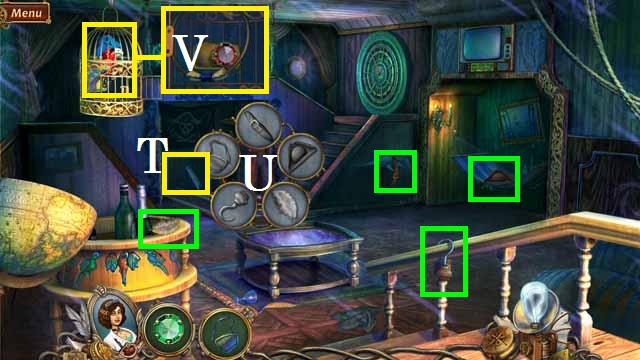
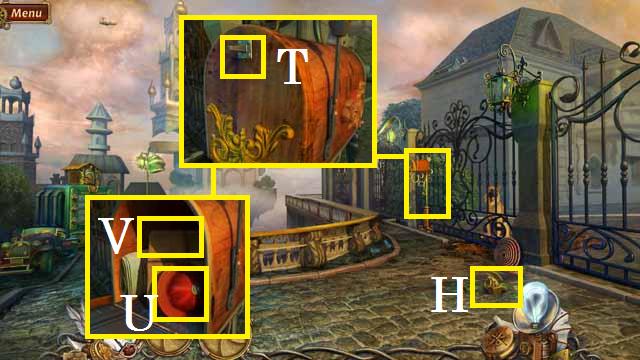 • Pick up the MAILBOX HANDLE (H). • Zoom into the mailbox;
place the MAILBOX HANDLE (T) and pick up the FIRE HYDRANT CAP
(U) and move the package (V).
• Pick up the MAILBOX HANDLE (H). • Zoom into the mailbox;
place the MAILBOX HANDLE (T) and pick up the FIRE HYDRANT CAP
(U) and move the package (V).
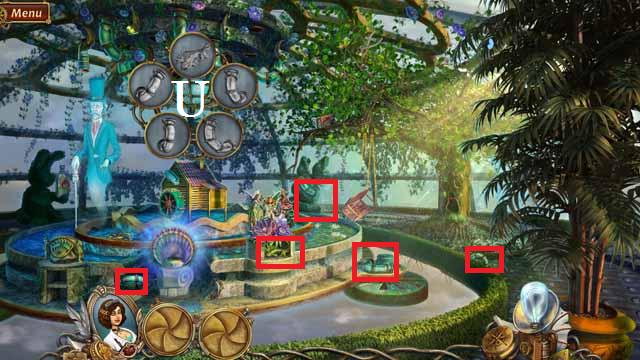
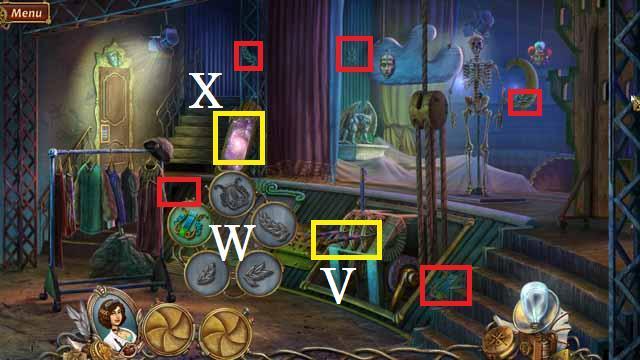
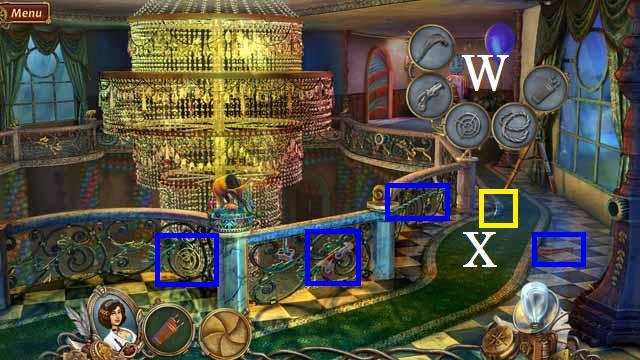
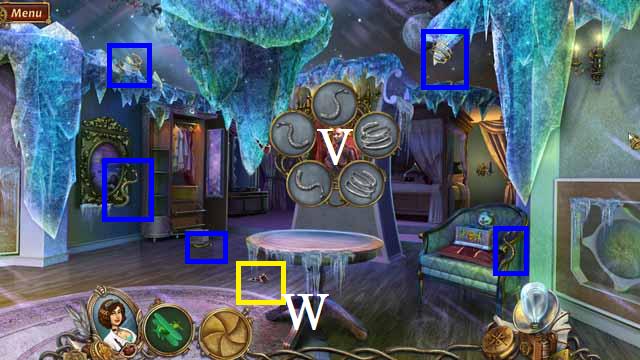
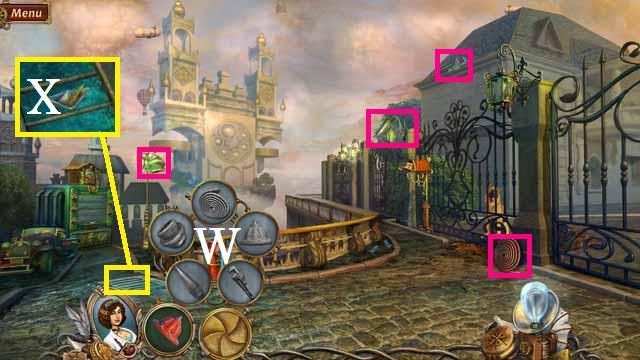 • Place the items (pink) and the FIRE HYDRANT CAP in the Fire
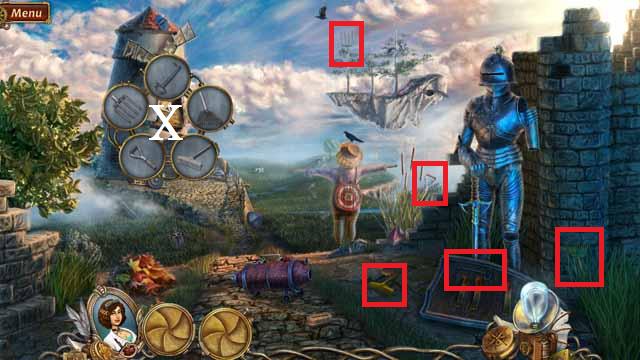
Hydrant Key Object (W). • Pick up the HOUR HAND (X).
• Place the items (pink) and the FIRE HYDRANT CAP in the Fire
Hydrant Key Object (W). • Pick up the HOUR HAND (X).
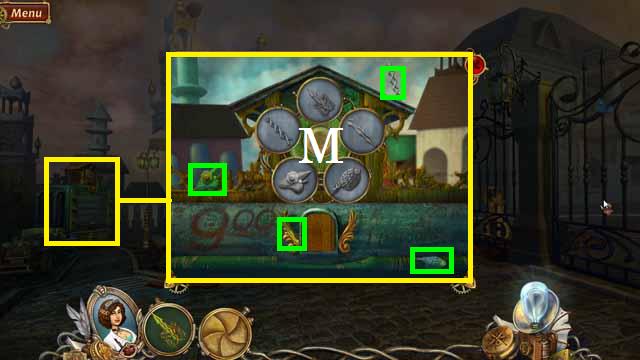 • Zoom into the clock, zoom in again; place the items (green)
and the HOUR HAND in the Clock Key Object (M). • Set the clock
to 9:00.
• Zoom into the clock, zoom in again; place the items (green)
and the HOUR HAND in the Clock Key Object (M). • Set the clock
to 9:00.
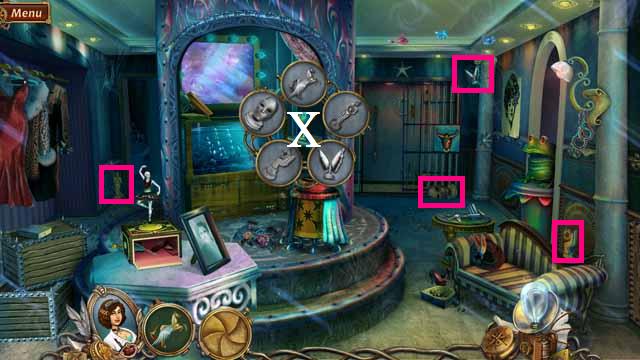
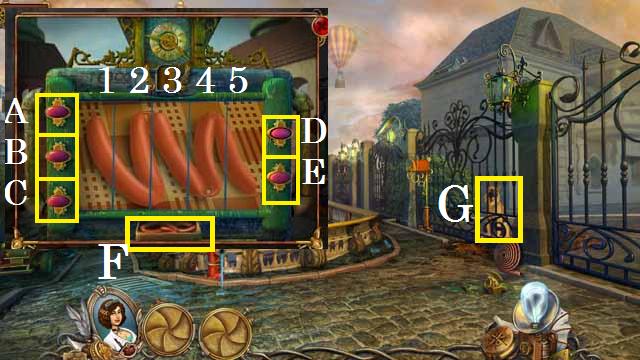 • Use the following sequence to set the picture as shown in
the screenshot: set panel (4) with button (A), panel (1) with
button (D), panel (3) with button (C), panel (2) with button
(B) and panel (5) with button (E). • Pick up the SAUSAGES (F).
• Place the SAUSAGES in front of the dog (G). • Use the hole
to move to the balcony.
• Use the following sequence to set the picture as shown in
the screenshot: set panel (4) with button (A), panel (1) with
button (D), panel (3) with button (C), panel (2) with button
(B) and panel (5) with button (E). • Pick up the SAUSAGES (F).
• Place the SAUSAGES in front of the dog (G). • Use the hole
to move to the balcony.
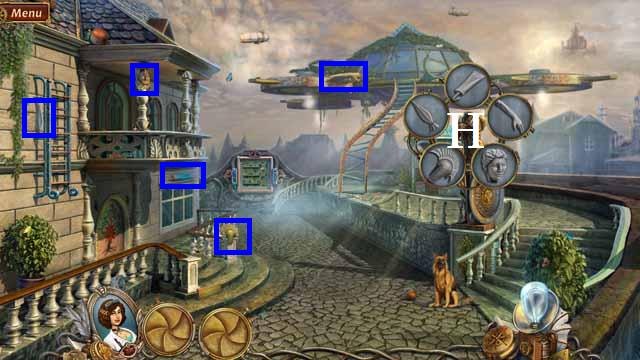 • Place the items (blue) in the Statue Key Object (H).
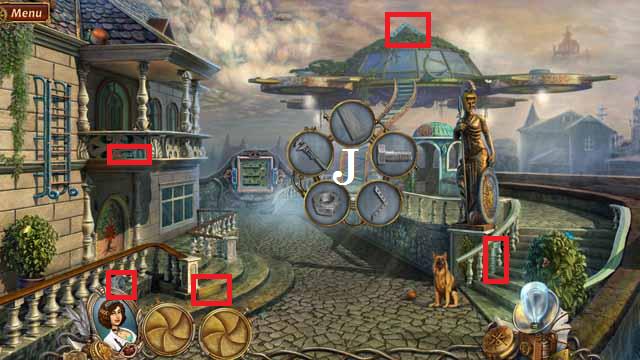 • Place the items (red) in the Stairs Key Object (J). • Enter
the floating garden.
• Place the items (red) in the Stairs Key Object (J). • Enter
the floating garden.
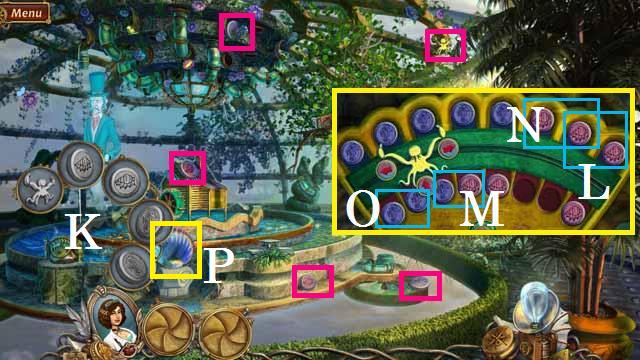 • Place the items (pink) in the Puzzle Key Object (K). • The
beginning arrangements are random. The following solution is
based on the positions shown in the screenshot. Place the
octopus in the far right position (L) and press the arrow to
place the two red pieces on the bottom. Move the blue and red
piece (M) to the top row followed by the two red pieces, now
on the top row, (N) to the bottom and finish with the last two
blue (O) pieces to the top. • Enter the Portal (P) to the
backwards world.
• Place the items (pink) in the Puzzle Key Object (K). • The
beginning arrangements are random. The following solution is
based on the positions shown in the screenshot. Place the
octopus in the far right position (L) and press the arrow to
place the two red pieces on the bottom. Move the blue and red
piece (M) to the top row followed by the two red pieces, now
on the top row, (N) to the bottom and finish with the last two
blue (O) pieces to the top. • Enter the Portal (P) to the
backwards world.
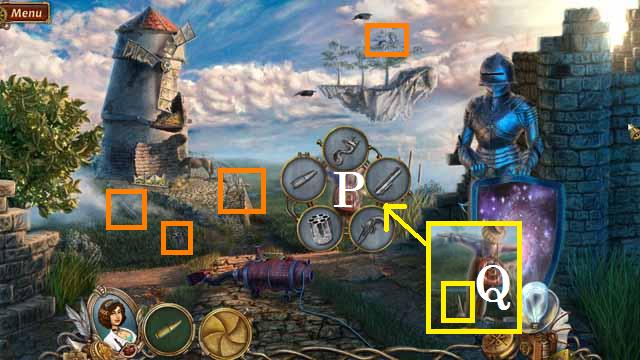
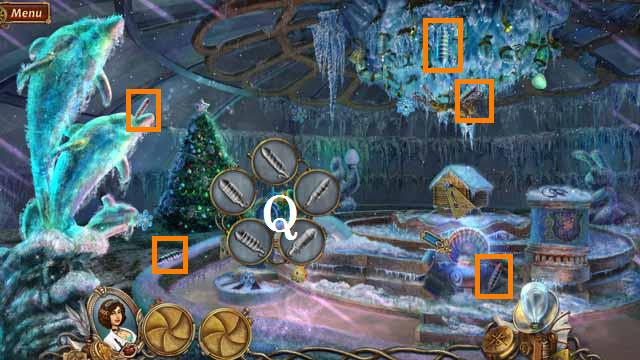 • Place the items (orange) in the Canon Key Object (Q).
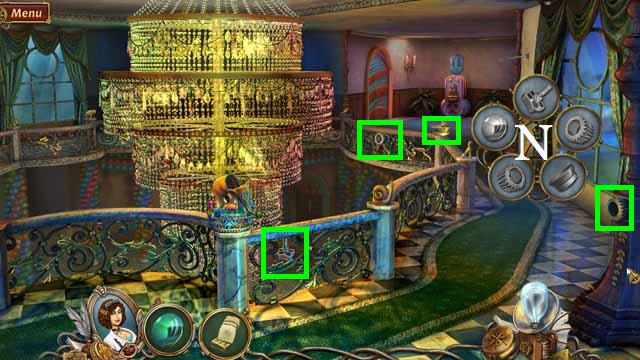
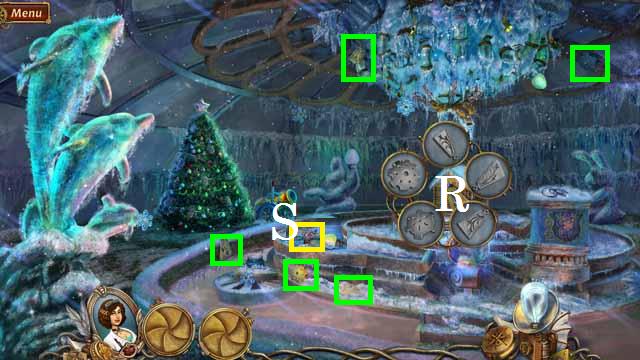 • Place the items (green) in the Windmill Key Object (R). •
Pick up the GARDEN FAIRY (S). • Return through the portal.
• Place the items (green) in the Windmill Key Object (R). •
Pick up the GARDEN FAIRY (S). • Return through the portal.
 • Place the items (blue), including the GARDEN FAIRY, in the
Fountain Key Object (T).
• Place the items (blue), including the GARDEN FAIRY, in the
Fountain Key Object (T).
 • Place the items (red) in the Water Pump Key Object (U).
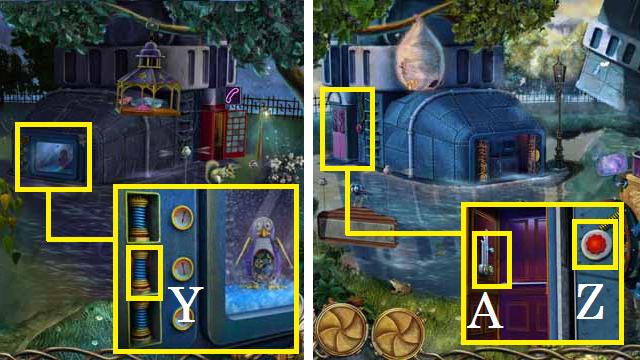
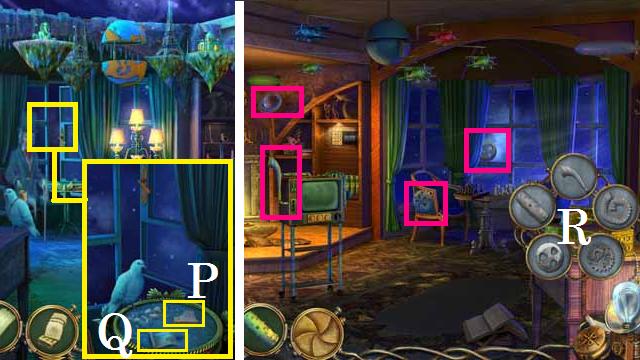
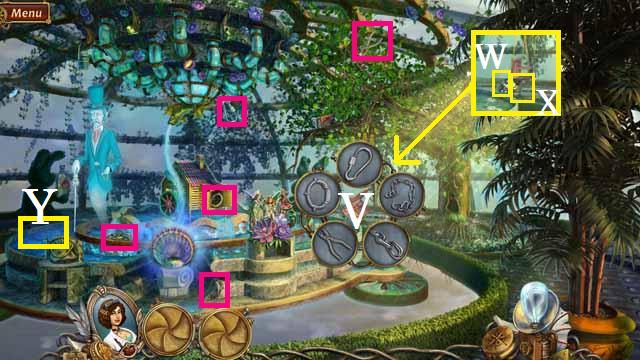 • Place the items (pink) in the Porch Swing Key Object (V). •
Pick up the BUCKET (W) and the LIGHTS (X). • Dip the BUCKET in
the fountain (Y) to receive the BUCKET OF WATER. • Return to
the backwards world.
• Place the items (pink) in the Porch Swing Key Object (V). •
Pick up the BUCKET (W) and the LIGHTS (X). • Dip the BUCKET in
the fountain (Y) to receive the BUCKET OF WATER. • Return to
the backwards world.
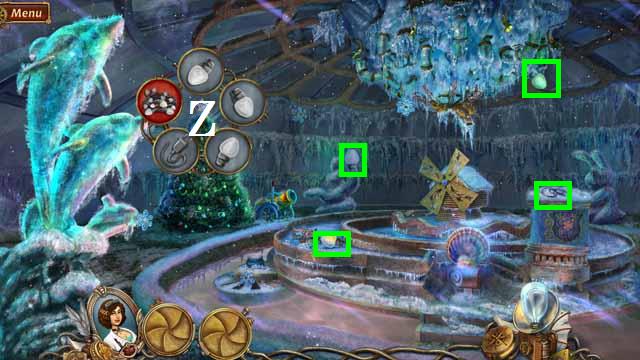 • Place the items (green), including the LIGHTS, in the Tree
Key Object (Z).
• Place the items (green), including the LIGHTS, in the Tree
Key Object (Z).
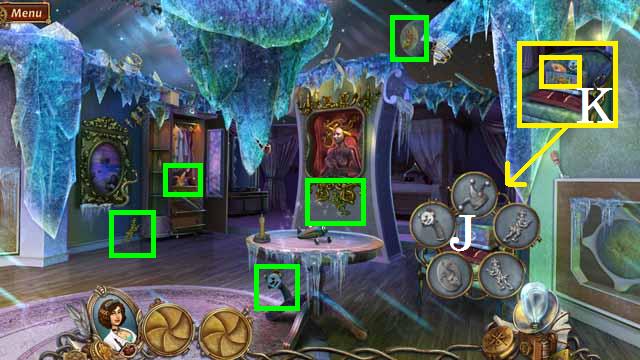
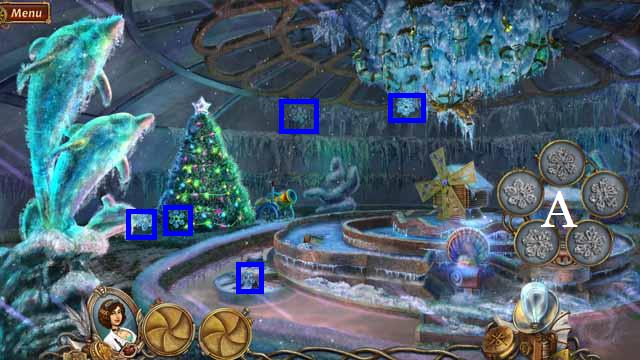 • Place the items (blue) in the Snowflake Key Object (A).
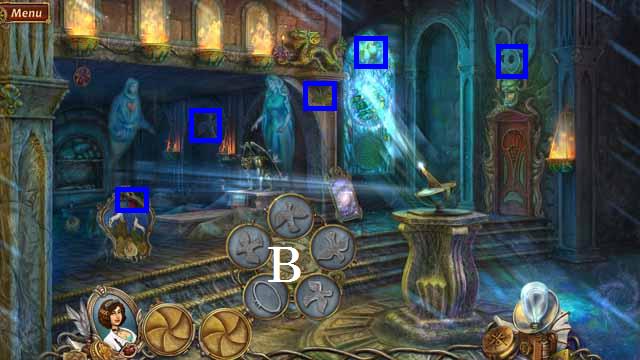
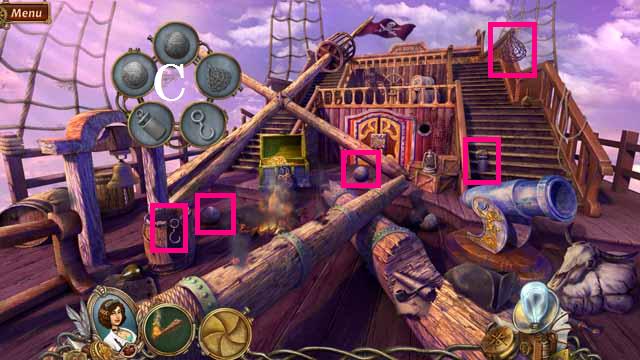
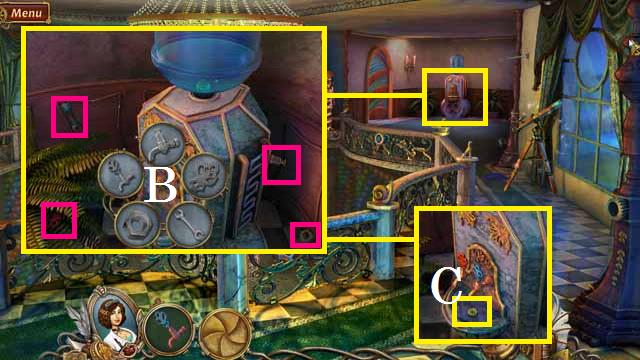
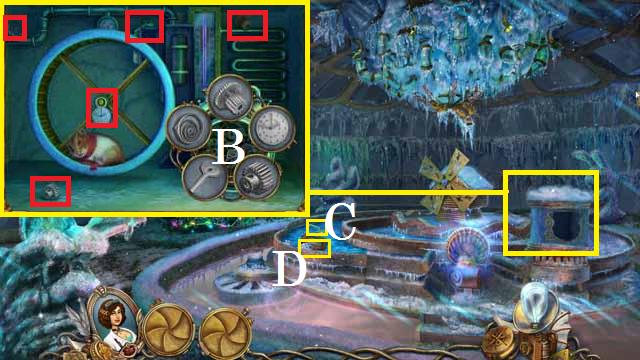 • Zoom into the mechanism and place the items (red) in the
Clock Key Object (B). • Pick up the OIL LAMP BASE (C) and tap
the puzzle box (D). • Move through the portal and back up one
scene to the balcony.
• Zoom into the mechanism and place the items (red) in the
Clock Key Object (B). • Pick up the OIL LAMP BASE (C) and tap
the puzzle box (D). • Move through the portal and back up one
scene to the balcony.
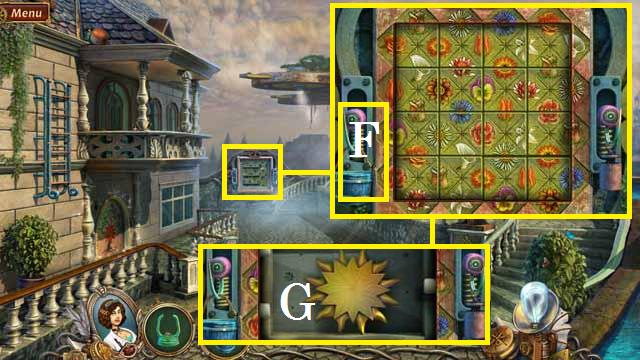 • Zoom into the lock box; hang the BUCKET OF WATER on the hook
(F) and arrange the tiles as shown in the screenshot. • Pick
up the SUN (G).
• Zoom into the lock box; hang the BUCKET OF WATER on the hook
(F) and arrange the tiles as shown in the screenshot. • Pick
up the SUN (G).
 • Place the items (red), including the SUN, in the Door Key
Object (H). • Zoom into the open door; pick up the LAMP COVER
(I). • Enter the floating garden.
• Place the items (red), including the SUN, in the Door Key
Object (H). • Zoom into the open door; pick up the LAMP COVER
(I). • Enter the floating garden.
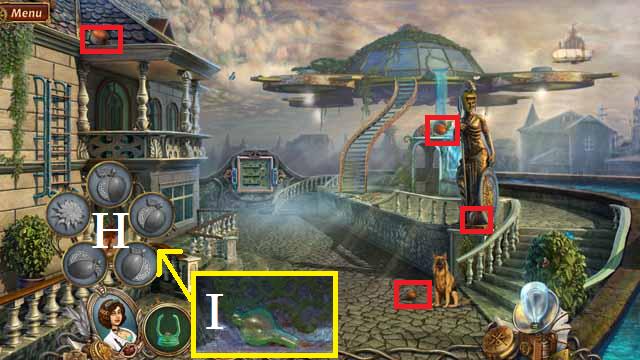
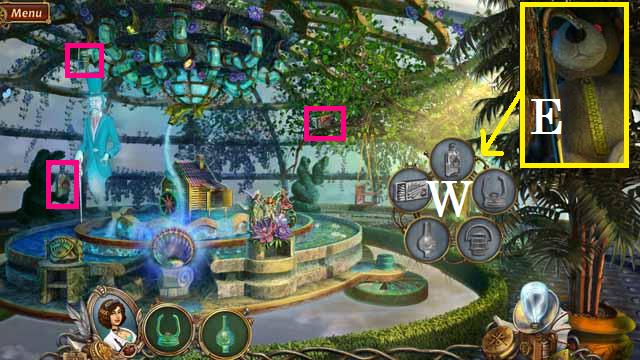 • Place the items, (pink), including the LAMP COVER and OIL
LAMP BASE, in the Lamp Key Object (W). • Zoom into the tree;
pick up the CANE (E). • Back up one scene.
• Place the items, (pink), including the LAMP COVER and OIL
LAMP BASE, in the Lamp Key Object (W). • Zoom into the tree;
pick up the CANE (E). • Back up one scene.
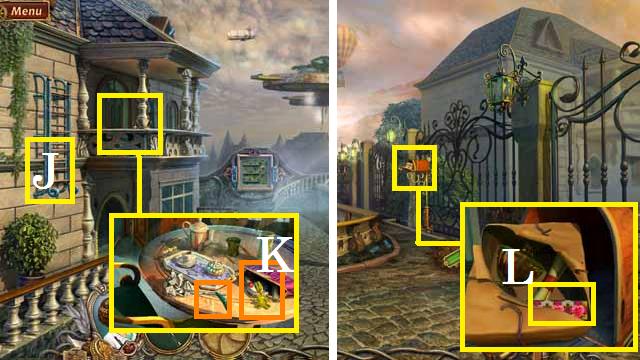 • Lower the ladder (J) with the CANE. • Zoom into the balcony;
open the purse (K) and pick up the RAZOR (orange) and the
ZIPPER SLIDER (orange). • Back up one scene to the front gate.
• Zoom into the mailbox; cut the package with the RAZOR and
pick up the PUZZLE PIECE (L). • Return to the floating garden.
• Lower the ladder (J) with the CANE. • Zoom into the balcony;
open the purse (K) and pick up the RAZOR (orange) and the
ZIPPER SLIDER (orange). • Back up one scene to the front gate.
• Zoom into the mailbox; cut the package with the RAZOR and
pick up the PUZZLE PIECE (L). • Return to the floating garden.
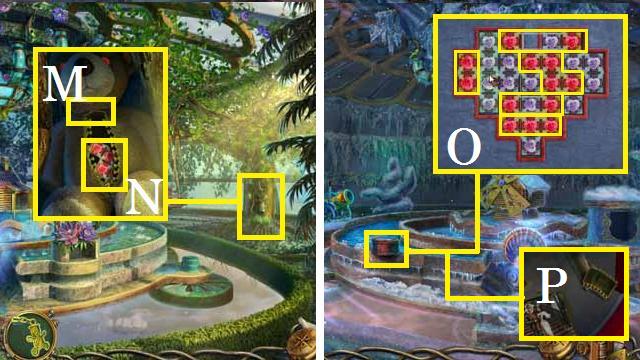 • Zoom into the tree; place the ZIPPER SLIDER (M) and pick up
the PUZZLE PIECE (N). • Return to the backwards world. • Zoom
into the puzzle box; place the PUZZLE PIECES in the puzzle as
shown in the screenshot (O). • Pick up the FILM NEGATIVE (P).
• Zoom into the tree; place the ZIPPER SLIDER (M) and pick up
the PUZZLE PIECE (N). • Return to the backwards world. • Zoom
into the puzzle box; place the PUZZLE PIECES in the puzzle as
shown in the screenshot (O). • Pick up the FILM NEGATIVE (P).
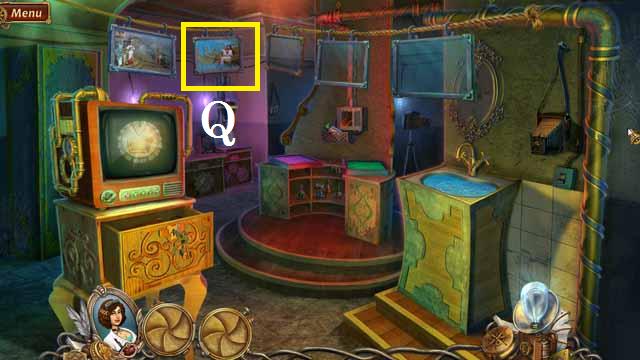 • Develop the FILM NEGATIVE as you did before. • Hang the
WASHED PHOTOGRAPH in the frame (Q).
• Develop the FILM NEGATIVE as you did before. • Hang the
WASHED PHOTOGRAPH in the frame (Q).
Chapter 2: The Theater
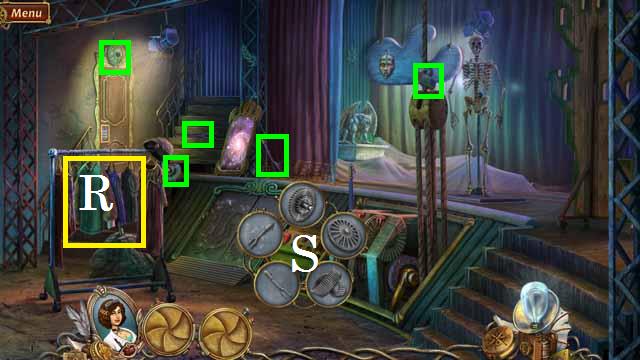 • Move the cloths rack (R). • Place the items (green) in the
Lever Key Object (S).
• Move the cloths rack (R). • Place the items (green) in the
Lever Key Object (S).
 • Pull the lever (T). • Place the items (blue) in the Rope Key
Object (U).
• Pull the lever (T). • Place the items (blue) in the Rope Key
Object (U).
 • Pull the two levers (V). • Place the items (red) in the
Music Room Key Object (W). • Take the portal (X) to the
backwards world.
• Pull the two levers (V). • Place the items (red) in the
Music Room Key Object (W). • Take the portal (X) to the
backwards world.
 • Place the items (orange) in the Dragon Key Object (L).
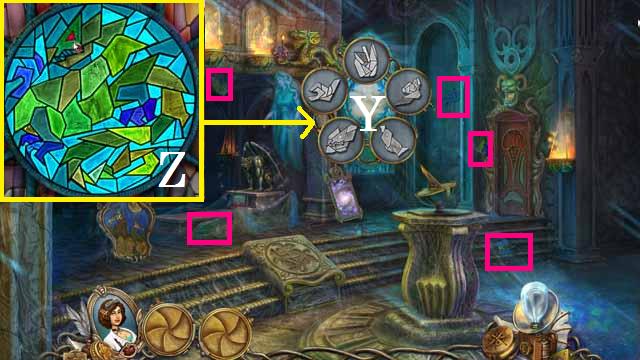 • Place the items (pink) in the Window Key Object (Y). •
Assemble the window as shown in the screenshot (Z).
• Place the items (pink) in the Window Key Object (Y). •
Assemble the window as shown in the screenshot (Z).
 • Zoom into the wolf painting (A). • Place the items (green)
in the Wolf Painting Key Object.
• Zoom into the wolf painting (A). • Place the items (green)
in the Wolf Painting Key Object.
 • Place the items (blue) in the Bird Plaque Key Object (B). •
Return through the portal and enter the music room.
• Place the items (blue) in the Bird Plaque Key Object (B). •
Return through the portal and enter the music room.
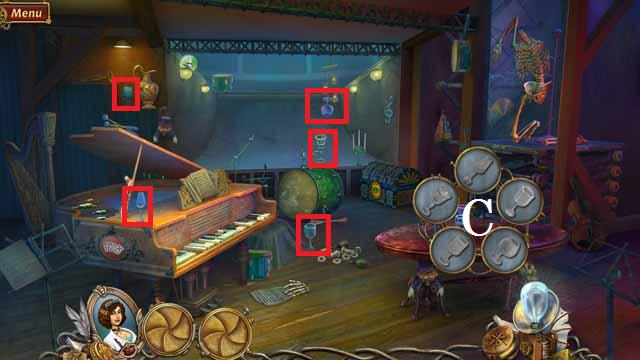 • Place the items (red) in the Glass Key Object (C).
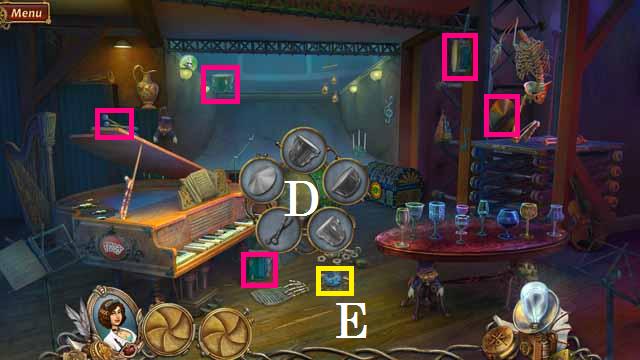 • Place the items (pink) in the Drum Key Object (D). • Pick up
the ANGEL TOKEN (E).
• Place the items (pink) in the Drum Key Object (D). • Pick up
the ANGEL TOKEN (E).
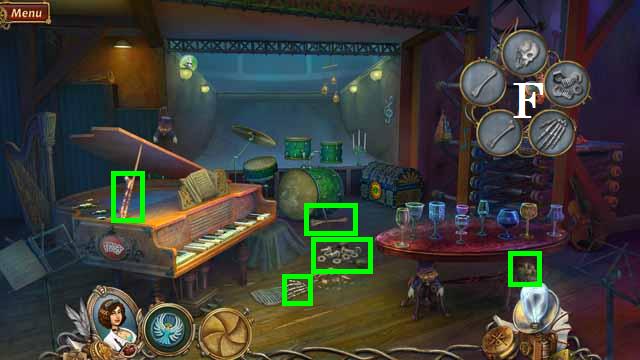 • Place the items (green) in the Skeleton Key Object (F). •
Back up one scene and travel to the backwards world.
• Place the items (green) in the Skeleton Key Object (F). •
Back up one scene and travel to the backwards world.
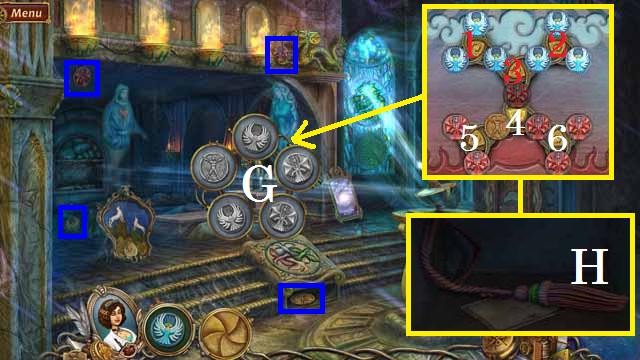 • Place the items (blue), including the ANGEL TOKEN, in the
Statue Key Object (G). • Zoom into the statue and use the
following sequence; 4, 3, 1, 4, 3, 1, 5, 4, 3, 5, 4, 3, 2, 6,
4, 4, 3, 2, 6, 4, 4, 3, 5, and 4. • Pick up the CURTAIN TASSEL
(H) and read the note. • Return through the portal.
• Place the items (blue), including the ANGEL TOKEN, in the
Statue Key Object (G). • Zoom into the statue and use the
following sequence; 4, 3, 1, 4, 3, 1, 5, 4, 3, 5, 4, 3, 2, 6,
4, 4, 3, 2, 6, 4, 4, 3, 5, and 4. • Pick up the CURTAIN TASSEL
(H) and read the note. • Return through the portal.
 • Tap the skeletons (I) and use the CURTAIN TASSLE (J). • Tap
the door (K) then place the items (red) in the Mask Lock Key
Object (K). • Enter the dressing room.
• Tap the skeletons (I) and use the CURTAIN TASSLE (J). • Tap
the door (K) then place the items (red) in the Mask Lock Key
Object (K). • Enter the dressing room.
 • Place the items (orange) in the Dog Key Object (L). • Pick
up the NECKLACE (M). • Travel through the portal (G) to the
backwards world.
• Place the items (orange) in the Dog Key Object (L). • Pick
up the NECKLACE (M). • Travel through the portal (G) to the
backwards world.
 • Place the items (pink) in the Bull Key Object (N). • Open
the gate (N). • Return through the portal.
• Place the items (pink) in the Bull Key Object (N). • Open
the gate (N). • Return through the portal.
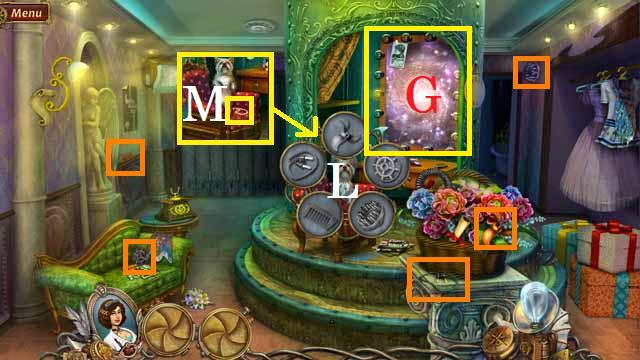
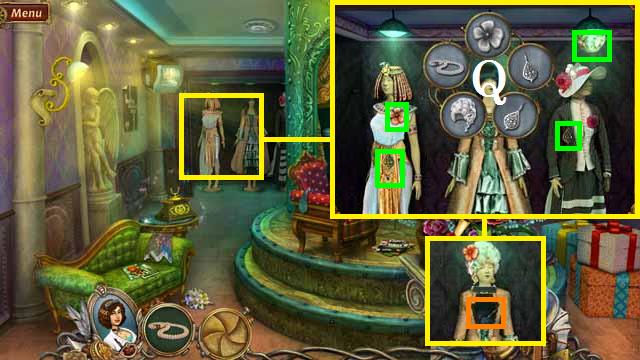 • Zoom into the now open closet; place the items (green),
including the NECKLACE, in the Mannequin Key Object (Q). •
Pick up the TUTU SKIRT and the MOUTHPIECE (orange).
• Zoom into the now open closet; place the items (green),
including the NECKLACE, in the Mannequin Key Object (Q). •
Pick up the TUTU SKIRT and the MOUTHPIECE (orange).
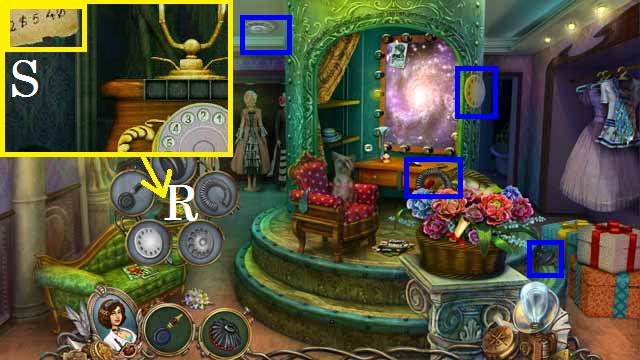 • Place the items (blue) in the Phone Key Object (R). • Zoom
into the phone; dial the number (S) in the corner (Note: the
numbers are random). • Return through the portal to the
backwards world.
• Place the items (blue) in the Phone Key Object (R). • Zoom
into the phone; dial the number (S) in the corner (Note: the
numbers are random). • Return through the portal to the
backwards world.
 • Place the items (red), including the TUTU SKIRT, in the
Music Box Key Object (T). • Pick up the CRAB (U).
• Place the items (red), including the TUTU SKIRT, in the
Music Box Key Object (T). • Pick up the CRAB (U).
 • Zoom into the fish tank; place the CRAB on top to cut the
plants and place the items (orange) in the Lock Key Object
(V). • Pick up the PEGASUS FIGURINE (W).
• Zoom into the fish tank; place the CRAB on top to cut the
plants and place the items (orange) in the Lock Key Object
(V). • Pick up the PEGASUS FIGURINE (W).
 • Drag the items (pink), including the PEGASUS FIGURINE, to
the Trophy Key Object (X).
• Drag the items (pink), including the PEGASUS FIGURINE, to
the Trophy Key Object (X).
 • Tap the champagne bottle (Y) to pop the lid. • Tap the table
(Z) then place the items (green) in the Star Table Key Object
(Z). • Pick up the BUTTERFLY (A). • Pick up the PIANO KEYS
(B). • Return to the Music Room.
• Tap the champagne bottle (Y) to pop the lid. • Tap the table
(Z) then place the items (green) in the Star Table Key Object
(Z). • Pick up the BUTTERFLY (A). • Pick up the PIANO KEYS
(B). • Return to the Music Room.
 • Place the items (blue), including the PIANO KEYS, in the
Piano Key Object (C). • Pick up the DRAGONFLY (D).
• Place the items (blue), including the PIANO KEYS, in the
Piano Key Object (C). • Pick up the DRAGONFLY (D).
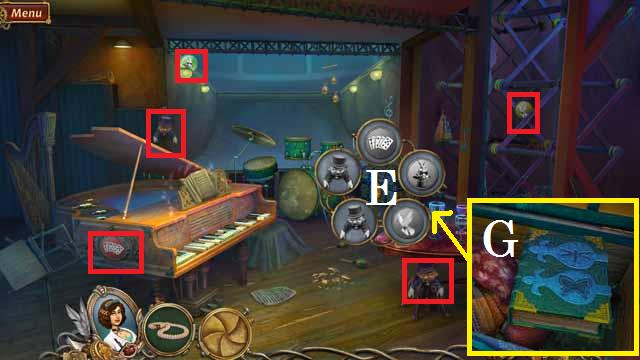 • Place the items (red) in the Trunk Key Object (E). • The
beginning positions of the symbols are random. To unlock the
chest, place the red symbols in the outer ring, yellow in the
middle and green in the inner most ring. (Hint: first move all
of the red symbols from the inner ring to the outer ring then
work inward with the green symbols). • Zoom into the chest;
place the DRAGONFLY and BUTTERFLY on the DIARIES cover (G).
Flip through the books pages then pick it up. • Back up one
scene and travel through the portal.
• Place the items (red) in the Trunk Key Object (E). • The
beginning positions of the symbols are random. To unlock the
chest, place the red symbols in the outer ring, yellow in the
middle and green in the inner most ring. (Hint: first move all
of the red symbols from the inner ring to the outer ring then
work inward with the green symbols). • Zoom into the chest;
place the DRAGONFLY and BUTTERFLY on the DIARIES cover (G).
Flip through the books pages then pick it up. • Back up one
scene and travel through the portal.
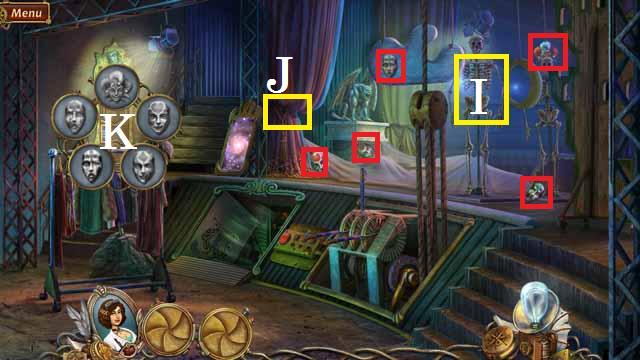
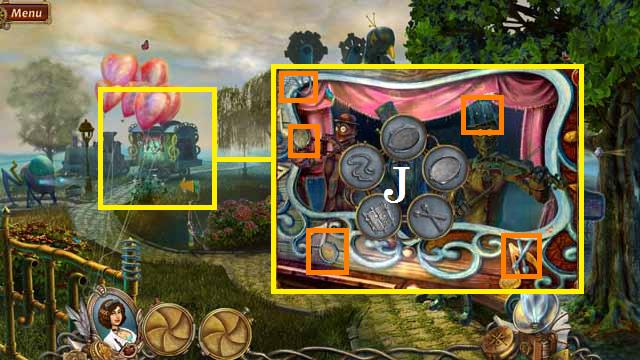
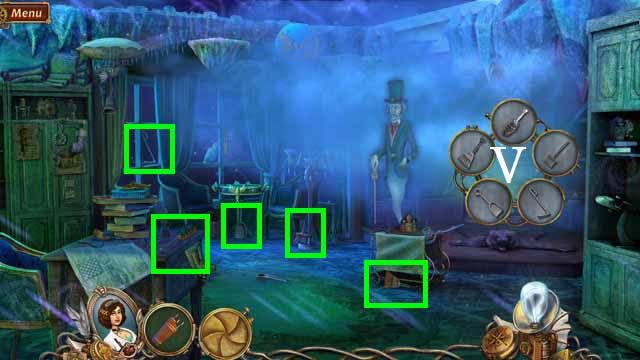
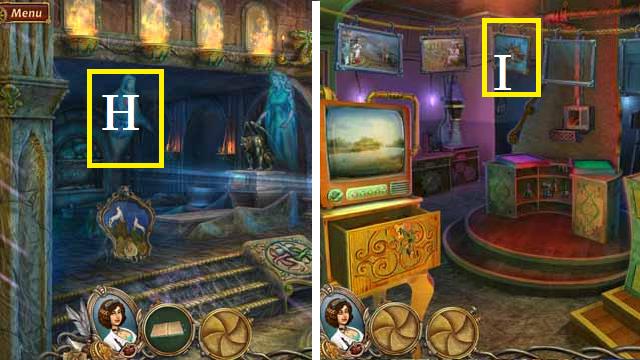 • Give the DIARY to the ghosts (H) to receive the FILM
NEGATIVE. • Develop the FILM NEGATIVE as you have before.
(Hint: to focus the print, zoom in twice). • Hang the WASHED
PHOTOGRAPH in the frame (I).
• Give the DIARY to the ghosts (H) to receive the FILM
NEGATIVE. • Develop the FILM NEGATIVE as you have before.
(Hint: to focus the print, zoom in twice). • Hang the WASHED
PHOTOGRAPH in the frame (I).
Chapter 3: The Park
 • Zoom into the wagon; place the items (orange) in the Drum
Key Object (J). • Take the now open path to the ship exterior.
• Zoom into the wagon; place the items (orange) in the Drum
Key Object (J). • Take the now open path to the ship exterior.
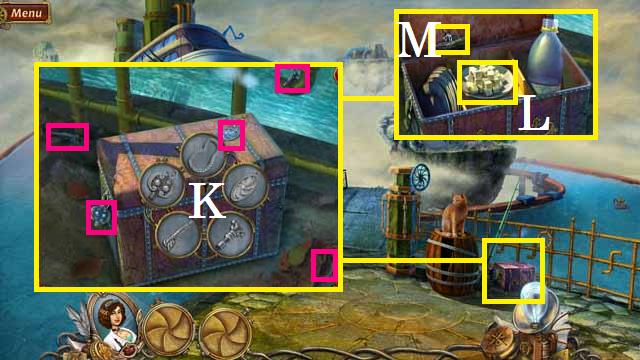 • Zoom into the trunk; place the items (pink) in the Trunk Key
Object (K). • Pick up the SUGAR (L) and the SHIP (M).
• Zoom into the trunk; place the items (pink) in the Trunk Key
Object (K). • Pick up the SUGAR (L) and the SHIP (M).
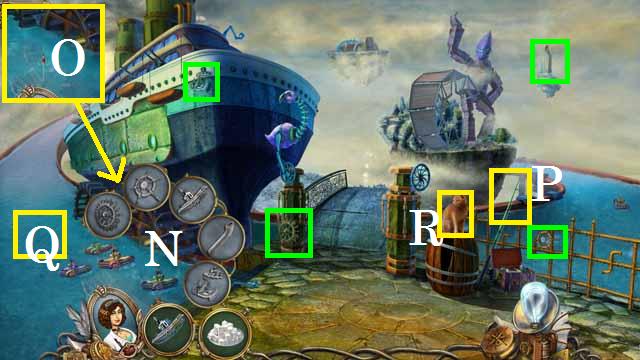 • Place the items (green), including the SHIP, in the Ship Key
Item (N). • Place the HOOK (O) on the pole (P) to receive the
FISHING ROD. • Place the FISHING ROD in the water (Q) to
receive the FISH. • Feed the FISH to the cat (R).
• Place the items (green), including the SHIP, in the Ship Key
Item (N). • Place the HOOK (O) on the pole (P) to receive the
FISHING ROD. • Place the FISHING ROD in the water (Q) to
receive the FISH. • Feed the FISH to the cat (R).
 • Place the items (red) in the Bird Key Object (S). • Pick up
the EYE (T). • Back up one scene.
• Place the items (red) in the Bird Key Object (S). • Pick up
the EYE (T). • Back up one scene.
 • Tap the robot (U) then place the items (pink), including the
EYE, in the Robot Key Object (U). • Pick up the AXE (V). •
Return to the ship exterior.
• Tap the robot (U) then place the items (pink), including the
EYE, in the Robot Key Object (U). • Pick up the AXE (V). •
Return to the ship exterior.
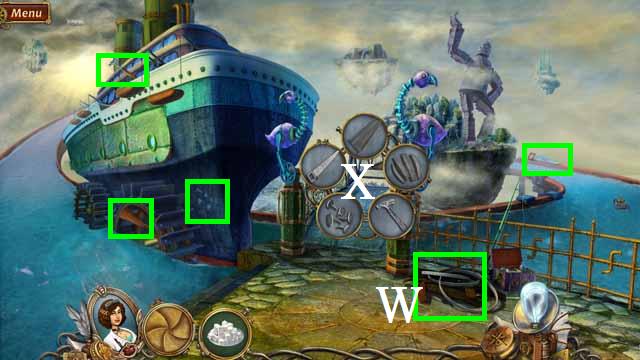 • Chop the barrel (W) with the AXE. • Place the items (green)
in the Bridge Key Object (X). • Take the bridge to the robot’s
feet.
• Chop the barrel (W) with the AXE. • Place the items (green)
in the Bridge Key Object (X). • Take the bridge to the robot’s
feet.
 • Place the items (blue) in the Sign Key Object (Y).
 • Place the items (red), including the SUGAR, in the Cotton
Candy Key Object (Z). • Pick up the BERRIES (A). • Take the
portal (L) to the backwards world.
• Place the items (red), including the SUGAR, in the Cotton
Candy Key Object (Z). • Pick up the BERRIES (A). • Take the
portal (L) to the backwards world.
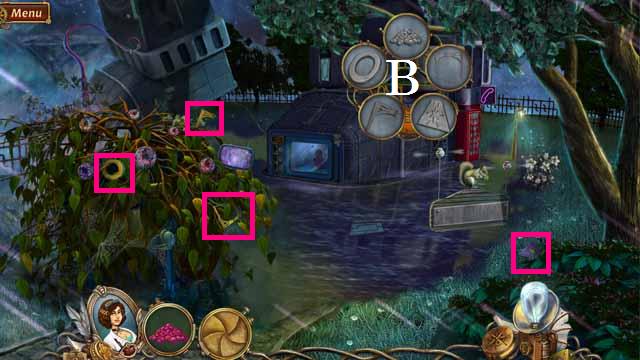 • Place the items (pink), including the BERRIES, in the Bird
Feeder Key Object (B).
• Place the items (pink), including the BERRIES, in the Bird
Feeder Key Object (B).
 • Pick up the SPEAKER (C). • Place the items (green) in the
Flower Key Object (D). • Pick up the COIN (E).
• Pick up the SPEAKER (C). • Place the items (green) in the
Flower Key Object (D). • Pick up the COIN (E).
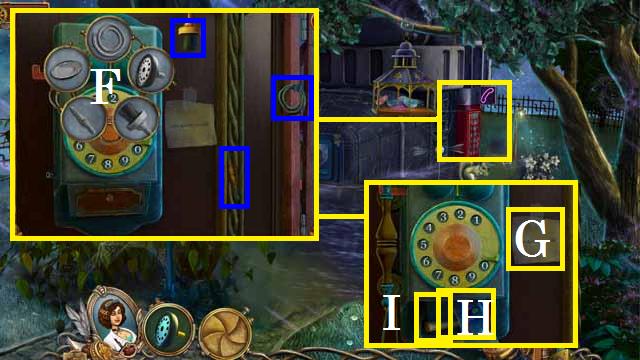 • Zoom into the phone booth; place the items (blue), including
the COIN and SPEAKER in the Phone Key Object (F). • Zoom into
the note (G). • Dial the correct number. (Note: the numbers
are random as well as the position of the correct number). •
Pick up the KEY-BOT (H) and read the note (I). (Remember this
number and the symbol beside it. It is random). • Return
through the portal.
• Zoom into the phone booth; place the items (blue), including
the COIN and SPEAKER in the Phone Key Object (F). • Zoom into
the note (G). • Dial the correct number. (Note: the numbers
are random as well as the position of the correct number). •
Pick up the KEY-BOT (H) and read the note (I). (Remember this
number and the symbol beside it. It is random). • Return
through the portal.
 • Zoom into the robot’s foot; place the items (red), including
the KEY-BOT, in the Lock Key Object (J). • Pick up the ARROWS
(K) and the BUCKET (L) and remove the cap (M). • Dip the
BUCKET in the water (N) to receive the BUCKET OF WATER.
• Zoom into the robot’s foot; place the items (red), including
the KEY-BOT, in the Lock Key Object (J). • Pick up the ARROWS
(K) and the BUCKET (L) and remove the cap (M). • Dip the
BUCKET in the water (N) to receive the BUCKET OF WATER.
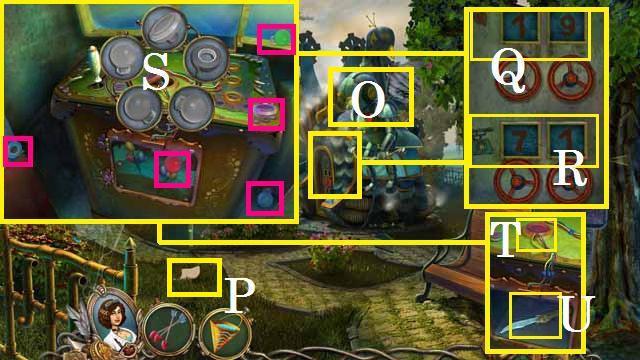 • Return to the first scene. • Give the ARROWS to the robot
(O). • Zoom into the note (P). • Zoom into the door lock:
enter the number from the last note in the slots next to the
heart (Q) and the number from the phone booth next to the
phone (R). (Note; these numbers are random each game play). •
Zoom into the control booth; place the items (pink) in the
Panel Key Object (S). • Press the button (T) and pick up the
KNIFE (U). • Move forward one scene.
• Return to the first scene. • Give the ARROWS to the robot
(O). • Zoom into the note (P). • Zoom into the door lock:
enter the number from the last note in the slots next to the
heart (Q) and the number from the phone booth next to the
phone (R). (Note; these numbers are random each game play). •
Zoom into the control booth; place the items (pink) in the
Panel Key Object (S). • Press the button (T) and pick up the
KNIFE (U). • Move forward one scene.
 • Zoom into the chest; cut the bottle (V) with the KNIFE to
receive the FUNNEL. • Move forward one scene. • Zoom into the
robot’s foot; place the FUNNEL (W) and pour the BUCKET OF
WATER in the FUNNEL. • Pick up the INDUCTOR COIL (X). • Travel
to the backwards world.
• Zoom into the chest; cut the bottle (V) with the KNIFE to
receive the FUNNEL. • Move forward one scene. • Zoom into the
robot’s foot; place the FUNNEL (W) and pour the BUCKET OF
WATER in the FUNNEL. • Pick up the INDUCTOR COIL (X). • Travel
to the backwards world.
 • Zoom into the robots foot; place the INDUCTOR COIL (Y). •
Return through the portal. • Zoom into the elevator; press the
door button (Z) then the floor button (A).
• Zoom into the robots foot; place the INDUCTOR COIL (Y). •
Return through the portal. • Zoom into the elevator; press the
door button (Z) then the floor button (A).
 • Place the items (green) in the Mirror Key Object (B) to open
a new portal.
• Place the items (green) in the Mirror Key Object (B) to open
a new portal.
 • Place the items (blue) in the Robot’s Head Key Object (C) to
receive the ROBOT’S HEAD. • Travel through the portal to the
backwards world.
• Place the items (blue) in the Robot’s Head Key Object (C) to
receive the ROBOT’S HEAD. • Travel through the portal to the
backwards world.
 • Place the items (red) in the Fan Key Object (D). • Pick up
the GLASS COIL (E).
• Place the items (red) in the Fan Key Object (D). • Pick up
the GLASS COIL (E).
 • Place the items (pink) in the Plant Key Object (F). • Return
through the portal.
• Place the items (pink) in the Plant Key Object (F). • Return
through the portal.
 • Place the items (green), including the GLASS COIL, in the
Chemistry Set Key Object (G). • Zoom into the chemistry set;
place the items (blue) in the Pepper Mill Key Object (H). •
Pick up the GROUND PEPPER (I). • Return to the backwards
world.
• Place the items (green), including the GLASS COIL, in the
Chemistry Set Key Object (G). • Zoom into the chemistry set;
place the items (blue) in the Pepper Mill Key Object (H). •
Pick up the GROUND PEPPER (I). • Return to the backwards
world.
 • Throw the GROUND PEPPER in the fan (J). • Place the items
(pink) in the Cleaner Key Object (K).
• Throw the GROUND PEPPER in the fan (J). • Place the items
(pink) in the Cleaner Key Object (K).
 • Place the items (green), including the ROBOT’S HEAD, in the
robot Key Object (L). • Zoom into the robot; pick up the WHEEL
(M) SCHEMATICS (N). (Note: you need to pick the SCHEMATICS
twice). • Return through the portal.
• Place the items (green), including the ROBOT’S HEAD, in the
robot Key Object (L). • Zoom into the robot; pick up the WHEEL
(M) SCHEMATICS (N). (Note: you need to pick the SCHEMATICS
twice). • Return through the portal.
 • Place the items (blue), including the WHEEL, in the Robot
Key Object (O). • Pick up the MATCHES (Q). • Zoom into the
Chemistry Set; place the SCHEMATICS (P) and light the burner
(R) with the MATCHES. • Pour the POWDER (S) into the funnel
(T) then pick up the NEUTRALIZER (U). • Return to the
backwards world.
• Place the items (blue), including the WHEEL, in the Robot
Key Object (O). • Pick up the MATCHES (Q). • Zoom into the
Chemistry Set; place the SCHEMATICS (P) and light the burner
(R) with the MATCHES. • Pour the POWDER (S) into the funnel
(T) then pick up the NEUTRALIZER (U). • Return to the
backwards world.
 • Pour the NEUTRALIZER on the plant (V) to receive the FILM
NEGATIVE. • Develop the FILM NEGATIVE as you have before.
(Hint: to focus the print press the right arrow once, stretch
the image up and down once, zoom in twice). • Hang the WASHED
PRINT in the frame (W).
• Pour the NEUTRALIZER on the plant (V) to receive the FILM
NEGATIVE. • Develop the FILM NEGATIVE as you have before.
(Hint: to focus the print press the right arrow once, stretch
the image up and down once, zoom in twice). • Hang the WASHED
PRINT in the frame (W).
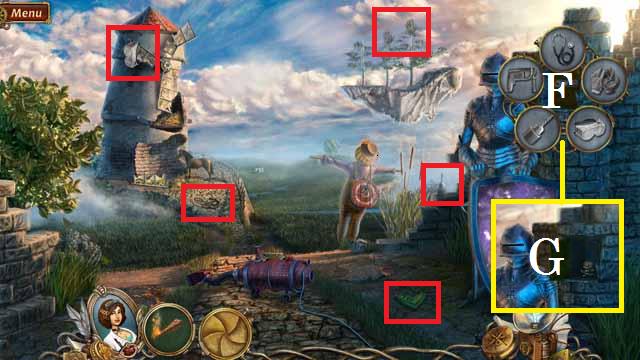
Chapter 4: The Flying Islands
 • Place the items (red) in the Straw Key Object (X).
 • Place the items (pink) in the Armor Key Object (Y).
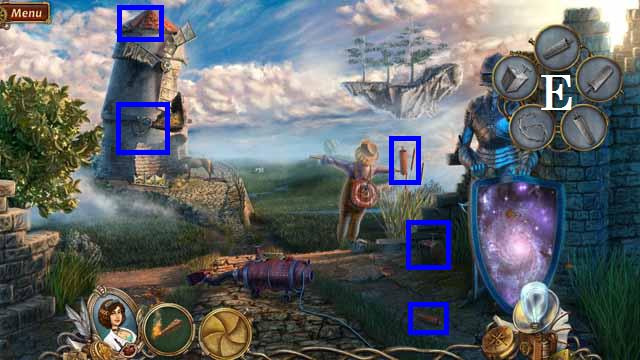
 • Clean the mirror (Z) with the BRUSH (A) to open a portal. •
Place the items (green) in the Vacuum Key Object (B). • Pick
up the KEY (C). • Enter the backwards world.
• Clean the mirror (Z) with the BRUSH (A) to open a portal. •
Place the items (green) in the Vacuum Key Object (B). • Pick
up the KEY (C). • Enter the backwards world.
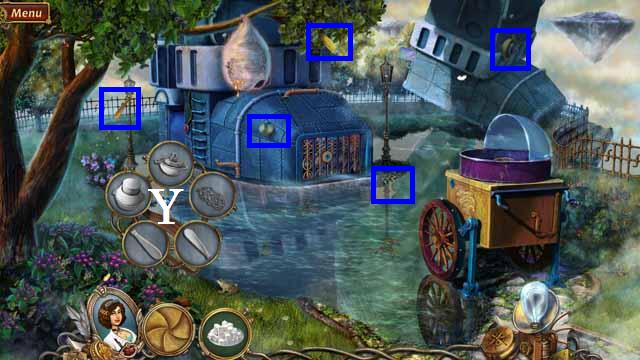
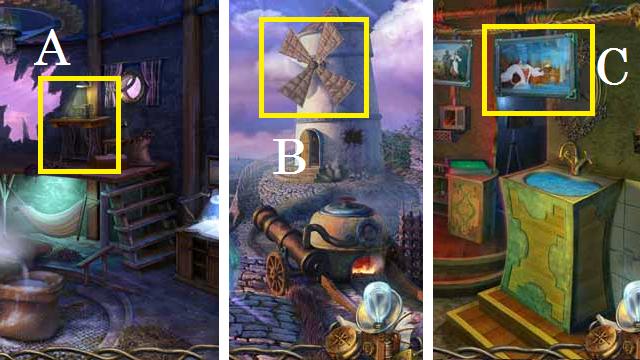
 • Unlock the windmill door (D) with the KEY. • Carve the
pumpkin (E) with the KNIFE (F). • Place the items (blue) in
the Scarecrow Key Object (G). • Pick up the BULLET (H). •
Enter the windmill.
• Unlock the windmill door (D) with the KEY. • Carve the
pumpkin (E) with the KNIFE (F). • Place the items (blue) in
the Scarecrow Key Object (G). • Pick up the BULLET (H). •
Enter the windmill.
 • Tap the hammock (J). • Place the items (red) in the Water
Pipe Key Object (K). • Zoom into the table; place the items
(pink) in the Paintbrush Key Object (L) then zoom into the
book (M). (Note: remember the clues for later, they are
random).
• Tap the hammock (J). • Place the items (red) in the Water
Pipe Key Object (K). • Zoom into the table; place the items
(pink) in the Paintbrush Key Object (L) then zoom into the
book (M). (Note: remember the clues for later, they are
random).
 • Zoom into the sewing machine; arrange the items as shown in
the screenshot (N), the beginning positions are random. •
Place the items (green) in the Sewing Machine Key Object (O).
• Return to the first scene.
• Zoom into the sewing machine; arrange the items as shown in
the screenshot (N), the beginning positions are random. •
Place the items (green) in the Sewing Machine Key Object (O).
• Return to the first scene.
 • Place the items (orange), including the BULLET in the Gun
Key Object (P). • Pick up the MALLET (Q). • Return to the
backwards world.
• Place the items (orange), including the BULLET in the Gun
Key Object (P). • Pick up the MALLET (Q). • Return to the
backwards world.
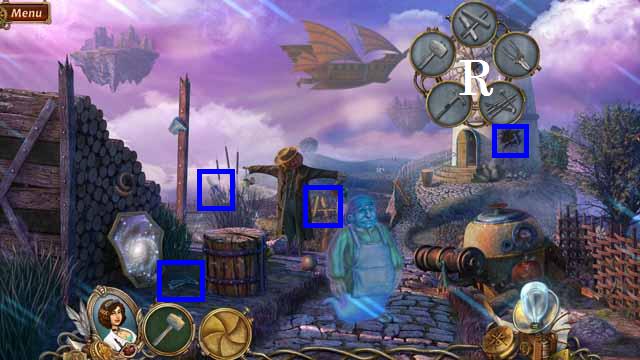 • Place the items (blue), including the MALLET in the Windmill
Key Object (R).
• Place the items (blue), including the MALLET in the Windmill
Key Object (R).
 • Place the items (red) in the Sledgehammer Key Object (S).
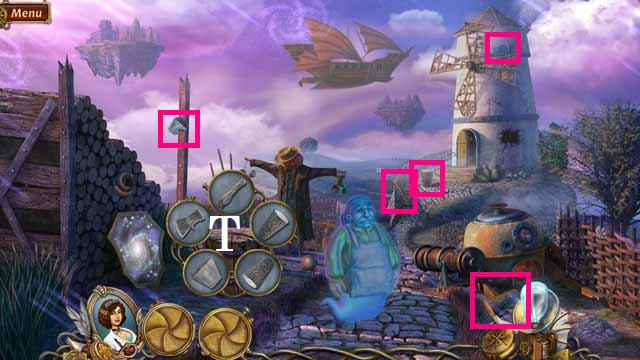 • Place the items (pink) in the Axe Key Object (T).
 • Place the items (green) in the Cannon Key Object (U). •
Light the SPLINTER (V) on the fire (W) to receive the BURNING
SPLINTER. • Enter the floating ship.
• Place the items (green) in the Cannon Key Object (U). •
Light the SPLINTER (V) on the fire (W) to receive the BURNING
SPLINTER. • Enter the floating ship.
 • Place the items (blue) in the Chest Key Object (X). • Pick
up the BUCKET (Y). • Return to the windmill. • Place the
BUCKET under the faucet (Z) to receive the BUCKET OF WATER. •
Return to the floating ship.
• Place the items (blue) in the Chest Key Object (X). • Pick
up the BUCKET (Y). • Return to the windmill. • Place the
BUCKET under the faucet (Z) to receive the BUCKET OF WATER. •
Return to the floating ship.
 • Pour the BUCKET OF WATER over the cannonball (A). • Place
the items (red) in the Bell Key Object (B).
• Pour the BUCKET OF WATER over the cannonball (A). • Place
the items (red) in the Bell Key Object (B).
 • Place the items (pink) in the Weight Key Object (C).
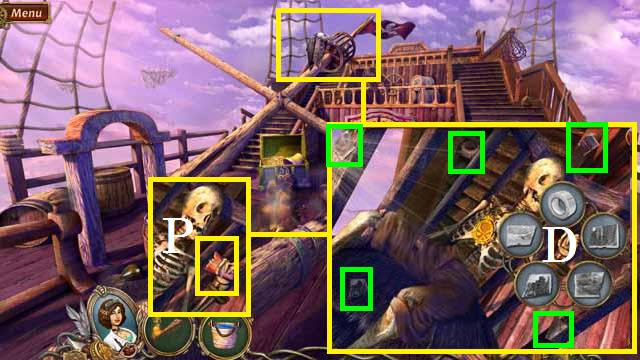 • Zoom into the mast; place the items (green) in the Hand Key
Object (D). • Zoom into the photograph (P). • Return to the
first scene.
• Zoom into the mast; place the items (green) in the Hand Key
Object (D). • Zoom into the photograph (P). • Return to the
first scene.
 • Place the items (blue) in the Dynamite Key Object (E).
 • Place the items (red) in the Drill Key object (F). • Pick up
the LOCKET’S SKULL (G). • Return to the floating ship.
• Place the items (red) in the Drill Key object (F). • Pick up
the LOCKET’S SKULL (G). • Return to the floating ship.
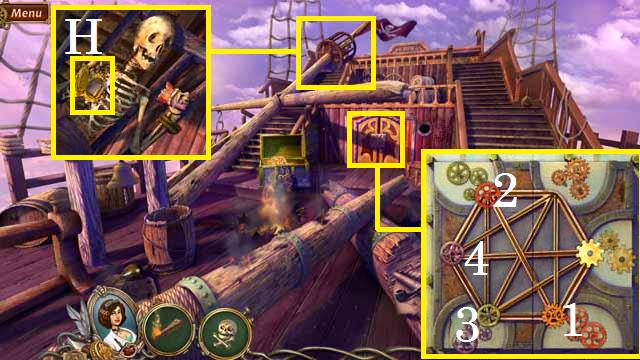 • Zoom into the mast; place the LOCKET’S SKULL in the necklace
and examine the note (H). (Note: pay attention to the clue,
the numbers are random). • Zoom into the lock; the starting
positions are random. Use the sequence 1-4 as an example
solution. • Enter the cabin.
• Zoom into the mast; place the LOCKET’S SKULL in the necklace
and examine the note (H). (Note: pay attention to the clue,
the numbers are random). • Zoom into the lock; the starting
positions are random. Use the sequence 1-4 as an example
solution. • Enter the cabin.
 • Place the items (pink) in the Globe Key Object (I).
 • Place the items (green) in the Rug Key Object (J). • Travel
through the portal (K).
• Place the items (green) in the Rug Key Object (J). • Travel
through the portal (K).
 • Place the items (blue) in the Lamp Key Object (L). • Light
the lamp (M) with the BURNING SPLINTER. • Move the curtain and
pick up the SABRE (N).
• Place the items (blue) in the Lamp Key Object (L). • Light
the lamp (M) with the BURNING SPLINTER. • Move the curtain and
pick up the SABRE (N).
 • Zoom into the safe lock; enter the codes (A) from the clues
in the windmill and skeletons hand (Note: the numbers may be
random. • Zoom into the safe; place the items (red) in the
Peacock Key Object (O). • Pick up the CAGE KEY (P). • Zoom
into the porthole (Q). • Return through the portal.
• Zoom into the safe lock; enter the codes (A) from the clues
in the windmill and skeletons hand (Note: the numbers may be
random. • Zoom into the safe; place the items (red) in the
Peacock Key Object (O). • Pick up the CAGE KEY (P). • Zoom
into the porthole (Q). • Return through the portal.
 • Zoom into the cage; unlock it with the CAGE KEY and pick up
the EYE PATCH (R). • Place the items (pink), including the
SABRE, in the Closet Door Key Object (S).
• Zoom into the cage; unlock it with the CAGE KEY and pick up
the EYE PATCH (R). • Place the items (pink), including the
SABRE, in the Closet Door Key Object (S).
 • Pick up the WRENCH PIECE (T). • Place the items (green) in
the Captain Key Object (U). • Zoom back into the cage; pick up
the RUBY (V). • Return through the portal.
• Pick up the WRENCH PIECE (T). • Place the items (green) in
the Captain Key Object (U). • Zoom back into the cage; pick up
the RUBY (V). • Return through the portal.
 • Place the items (blue), including the WRENCH PIECE, in the
Porthole Key Object (W). • Pick up the EMERALD (X). • Return
through the portal.
• Place the items (blue), including the WRENCH PIECE, in the
Porthole Key Object (W). • Pick up the EMERALD (X). • Return
through the portal.
 • Zoom into the lock; place the EMERALD and the RUBY in the
open spaces (Y). • Zoom into the safe; pick up the SILK (Z). •
Return to the windmill.
• Zoom into the lock; place the EMERALD and the RUBY in the
open spaces (Y). • Zoom into the safe; pick up the SILK (Z). •
Return to the windmill.
 • Zoom into the sewing machine (A); place the SILK in the
machine to receive the SAIL. • Exit the windmill. • Place the
SAIL on the mill (B) to receive the FILM NEGATIVE. • Develop
the FILM NEGATIVE as you have before. (Hint: to focus the
print, press the right arrow twice, zoom in twice and stretch
the image up and down twice). • Hang the WASHED PRINT in the
frame (C).
• Zoom into the sewing machine (A); place the SILK in the
machine to receive the SAIL. • Exit the windmill. • Place the
SAIL on the mill (B) to receive the FILM NEGATIVE. • Develop
the FILM NEGATIVE as you have before. (Hint: to focus the
print, press the right arrow twice, zoom in twice and stretch
the image up and down twice). • Hang the WASHED PRINT in the
frame (C).
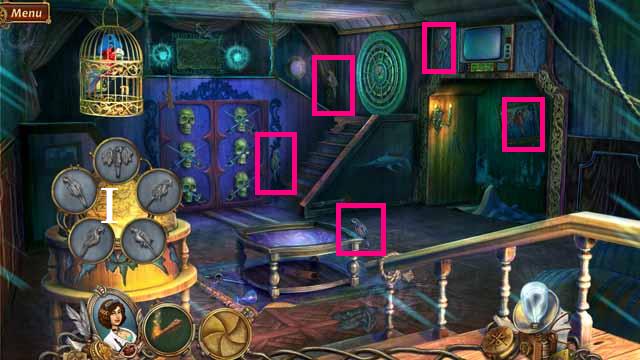
Chapter 5: The Duchess’ Mansion
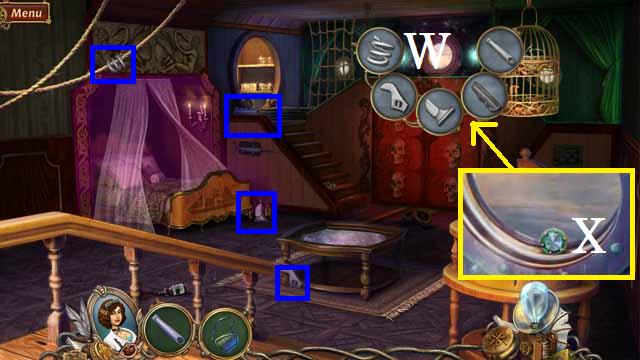
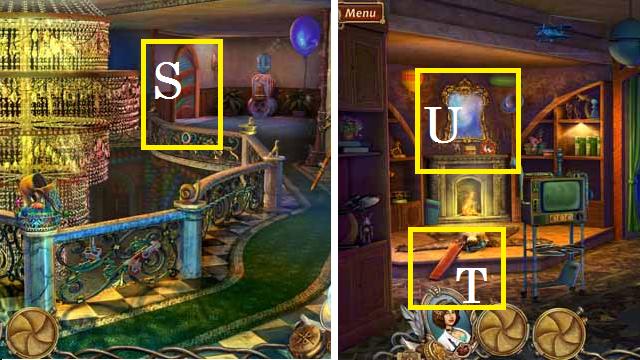
 • Pick up the ELEPHANT (D). • Enter the hallway. • Place the
items (red), including the ELEPHANT, in the Banister Key
Object (F). • Pick up the HANDLE (G). • Return to the bedroom.
• Pick up the ELEPHANT (D). • Enter the hallway. • Place the
items (red), including the ELEPHANT, in the Banister Key
Object (F). • Pick up the HANDLE (G). • Return to the bedroom.
 • Place the items (pink), including the HANDLE, in the Closet
Key Object (H). • Enter the portal (I) to the backwards world.
• Place the items (pink), including the HANDLE, in the Closet
Key Object (H). • Enter the portal (I) to the backwards world.
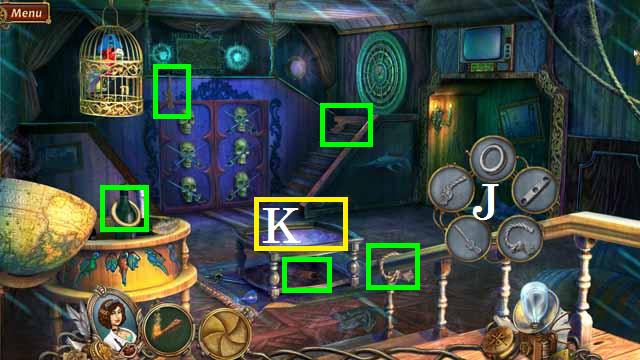
 • Place the items (green) in the Jack in the Box Key Object
(J). • Pick up the MOUSE (K). • Travel back through the
portal.
• Place the items (green) in the Jack in the Box Key Object
(J). • Pick up the MOUSE (K). • Travel back through the
portal.
 • Place the items (blue), including the MOUSE, in the Cat Toy
Key Object (L).
• Place the items (blue), including the MOUSE, in the Cat Toy
Key Object (L).
 • Pick up the SCISSORS (M). • Place the items (red) in the
Shoe Key Object (N).
• Pick up the SCISSORS (M). • Place the items (red) in the
Shoe Key Object (N).
 • Pick up the RING (O). • Zoom into the teddy bear; cut the
package with the SCISSORS and pick up the LOCKET (P). • Zoom
into the table; place the items (pink), including the LOCKET
and RING, in the Cat Weight Key Object (Q). • Pick up the
OFFICE KEY (R). • Return to the hallway.
• Pick up the RING (O). • Zoom into the teddy bear; cut the
package with the SCISSORS and pick up the LOCKET (P). • Zoom
into the table; place the items (pink), including the LOCKET
and RING, in the Cat Weight Key Object (Q). • Pick up the
OFFICE KEY (R). • Return to the hallway.
 • Zoom into the office door; unlock the door (S) with the
OFFICE KEY. • Enter the Office. • Pick up the QUIVER WITH
ARROWS (T). • Travel through the portal (U).
• Zoom into the office door; unlock the door (S) with the
OFFICE KEY. • Enter the Office. • Pick up the QUIVER WITH
ARROWS (T). • Travel through the portal (U).
 • Place the items (green) in the Fireplace Key Object (V). •
Return to the hallway.
• Place the items (green) in the Fireplace Key Object (V). •
Return to the hallway.
 • Place the items (blue), including the QUIVER WITH ARROWS, in
the Balloon Key Object (W). • Pick up the CHESS PIECE (X). •
Enter the office.
• Place the items (blue), including the QUIVER WITH ARROWS, in
the Balloon Key Object (W). • Pick up the CHESS PIECE (X). •
Enter the office.
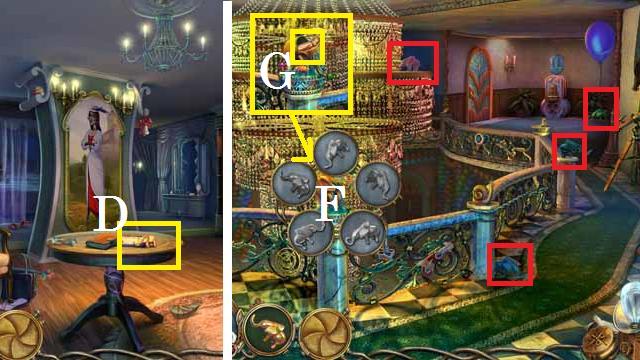
 • Zoom into the chessboard then place the items (red),
including the CHESS PIECE, in the Chessboard Key Object (Y). •
Pick up the ROOSTER HEAD (Z). • Take the portal to the
backwards world.
• Zoom into the chessboard then place the items (red),
including the CHESS PIECE, in the Chessboard Key Object (Y). •
Pick up the ROOSTER HEAD (Z). • Take the portal to the
backwards world.
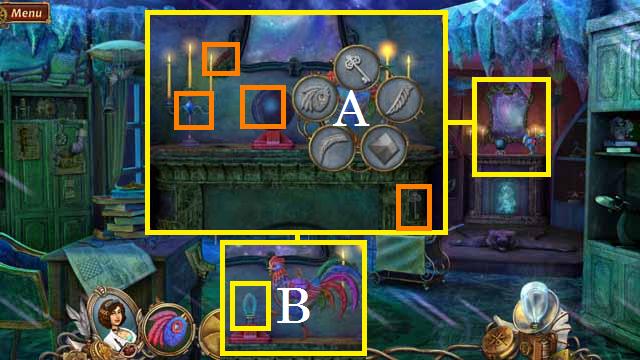 • Zoom into the fireplace; place the items (orange), including
the ROOSTER HEAD, in the Rooster Key Object (A). • Pick up the
BULB (B).
• Zoom into the fireplace; place the items (orange), including
the ROOSTER HEAD, in the Rooster Key Object (A). • Pick up the
BULB (B).
 • Place the items (pink), including the BULB, in the Lamp Key
Object (C). • Pick up the BOOK (D). • Return through the
portal.
• Place the items (pink), including the BULB, in the Lamp Key
Object (C). • Pick up the BOOK (D). • Return through the
portal.
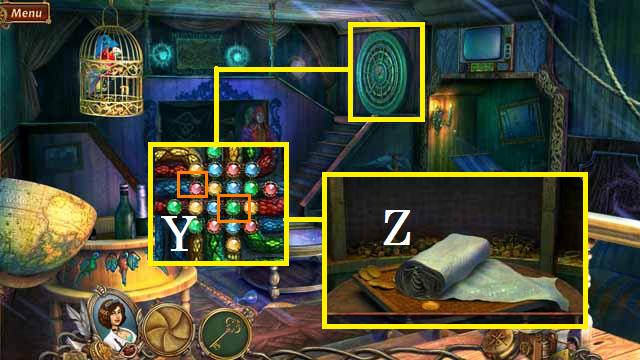
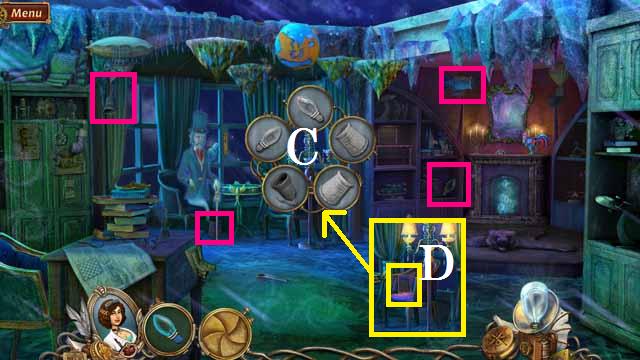
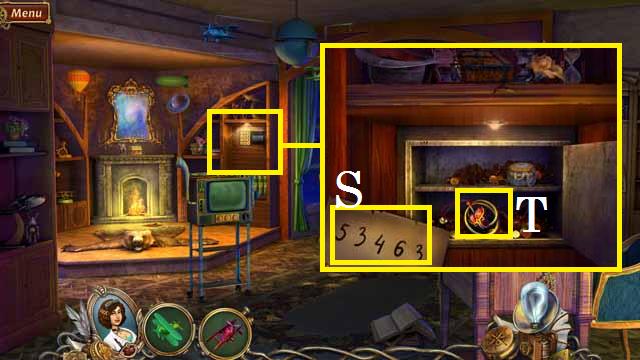
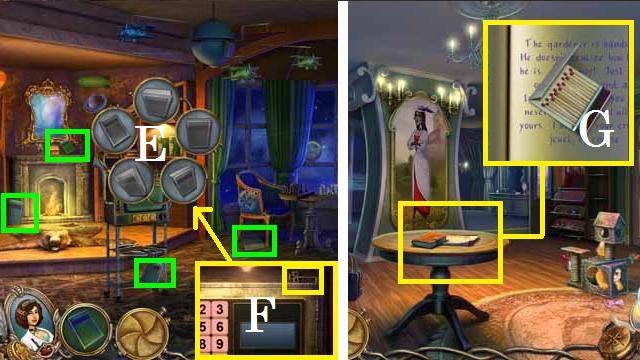 • Place the items (green), including the BOOK, in the Shelf
Key Object (E). • Pick up the SMALL KEY (F). • Return to the
bedroom. • Zoom into the table; open the book with the SMALL
KEY, flip through the pages and pick up the MATCHES (G). •
Travel through the portal.
• Place the items (green), including the BOOK, in the Shelf
Key Object (E). • Pick up the SMALL KEY (F). • Return to the
bedroom. • Zoom into the table; open the book with the SMALL
KEY, flip through the pages and pick up the MATCHES (G). •
Travel through the portal.
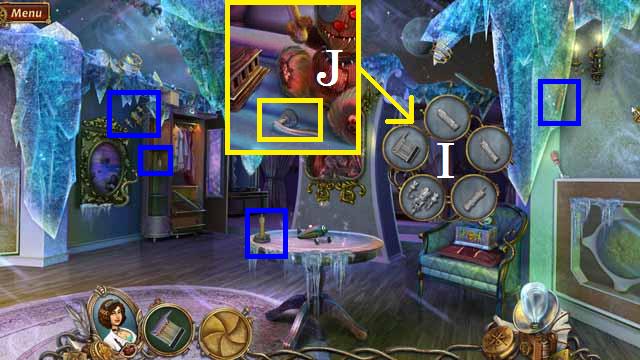 • Place the items (blue), including the MATCHES, in the Candle
Key Object (I). • Zoom into the bed; pick up the HANDLE (J). •
Return to the office and travel through the portal.
• Place the items (blue), including the MATCHES, in the Candle
Key Object (I). • Zoom into the bed; pick up the HANDLE (J). •
Return to the office and travel through the portal.
 • Zoom into the window; place the HANDLE (K). • Pick up the
note (L). • Zoom back into the window; pick up the NEEDLE (M).
• Travel through the portal, return to the bedroom and take
the portal. • Zoom into the bed; place the items (red),
including the NEEDLE, in the Record Player Key Object (N). •
Pick up the GLUE (O). • Travel through the portal and return
to the office.
• Zoom into the window; place the HANDLE (K). • Pick up the
note (L). • Zoom back into the window; pick up the NEEDLE (M).
• Travel through the portal, return to the bedroom and take
the portal. • Zoom into the bed; place the items (red),
including the NEEDLE, in the Record Player Key Object (N). •
Pick up the GLUE (O). • Travel through the portal and return
to the office.
 • Zoom into the Broken Record Key Object (P) to trigger it. •
Place the items (pink), including the GLUE, in the Broken
Record Key Object. • Receive the RECORD. • Return to the
bedroom and take the portal.
• Zoom into the Broken Record Key Object (P) to trigger it. •
Place the items (pink), including the GLUE, in the Broken
Record Key Object. • Receive the RECORD. • Return to the
bedroom and take the portal.
 • Zoom into the bed; remove the broken record then place the
RECORD on the player (Q). • Pick up the WIND-UP KEY (R) and
read the note (S). • Place the items (green), including the
WIND-UP KEY, in the Airplane Key Object (T). • Pick up the
AIRPLAIN.
• Zoom into the bed; remove the broken record then place the
RECORD on the player (Q). • Pick up the WIND-UP KEY (R) and
read the note (S). • Place the items (green), including the
WIND-UP KEY, in the Airplane Key Object (T). • Pick up the
AIRPLAIN.
 • Place the items (blue) in the Medusa Key Object (V). • Pick
up the PIPE (W). • Return to the backwards world office.
• Place the items (blue) in the Medusa Key Object (V). • Pick
up the PIPE (W). • Return to the backwards world office.
 • Zoom into the shelf (X) to trigger the Pipe Collection Key
Object. • Place the item (red), including the PIPE, in the
Pipe Collection Key Object. • Receive the AIRPLANE. • Travel
through the portal. • Place both AIRPLANES on the mobile (Y).
• Pick up the FLAG (G). • Return through the portal.
• Zoom into the shelf (X) to trigger the Pipe Collection Key
Object. • Place the item (red), including the PIPE, in the
Pipe Collection Key Object. • Receive the AIRPLANE. • Travel
through the portal. • Place both AIRPLANES on the mobile (Y).
• Pick up the FLAG (G). • Return through the portal.
 • Place the items (orange), including the FLAG, in the Earth
Key Object (Z). • Pick up the TAP (A). • Return to the
hallway.
• Place the items (orange), including the FLAG, in the Earth
Key Object (Z). • Pick up the TAP (A). • Return to the
hallway.
 • Zoom into the water cooler; place the items (pink),
including the TAP, in the Water Cooler Key Object (B). • Pick
up the ROSE (C). • Return to the bedroom.
• Zoom into the water cooler; place the items (pink),
including the TAP, in the Water Cooler Key Object (B). • Pick
up the ROSE (C). • Return to the bedroom.
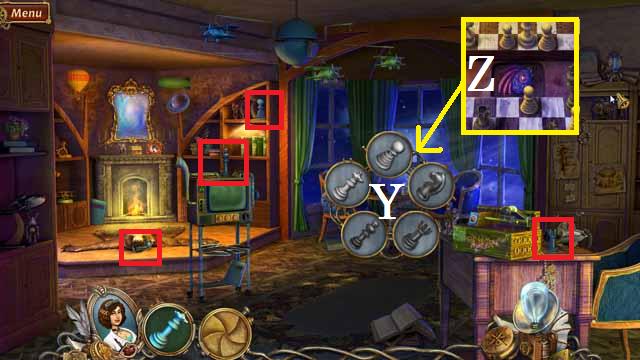
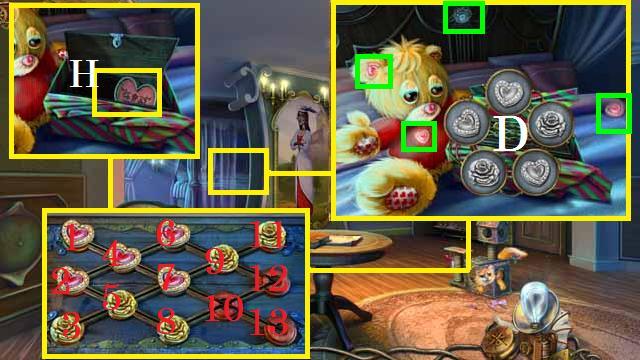 • Zoom into the teddy bear; place the items (green), including
the ROSE, in the Box Key Object (D). • Use the following
sequence to open the box: move position 4 to position 6, 5 to
4, 3, to 7, 10 to 3, 13 to 5 and 12 to 8. See the screenshot
(E) for current positions. • Continue with 7 to 13, 4 to 12, 2
to 10, 9 to 2, 11 to 7, 6 to 11, 1 to 9, 7 to 1, 5 to 4, and
finish with 8 to 4. • Pick up the HEART (H). • Return through
the portal.
• Zoom into the teddy bear; place the items (green), including
the ROSE, in the Box Key Object (D). • Use the following
sequence to open the box: move position 4 to position 6, 5 to
4, 3, to 7, 10 to 3, 13 to 5 and 12 to 8. See the screenshot
(E) for current positions. • Continue with 7 to 13, 4 to 12, 2
to 10, 9 to 2, 11 to 7, 6 to 11, 1 to 9, 7 to 1, 5 to 4, and
finish with 8 to 4. • Pick up the HEART (H). • Return through
the portal.
 • Place the HEART in medusas hands (I). • Pick up the VASE
(J). • Return to the hallway. • Zoom into the water cooler;
place the VASE under the faucet (K) to receive the VASE WITH
WATER. • Return to the backwards bedroom. • Pour the VASE WITH
WATER over the painting and pick up the LENS (L) and the BREAD
(M). • Return to the hallway.
• Place the HEART in medusas hands (I). • Pick up the VASE
(J). • Return to the hallway. • Zoom into the water cooler;
place the VASE under the faucet (K) to receive the VASE WITH
WATER. • Return to the backwards bedroom. • Pour the VASE WITH
WATER over the painting and pick up the LENS (L) and the BREAD
(M). • Return to the hallway.
 • Place the items (green) including the LENS, in the Telescope
Key Object (N). • Zoom into the telescope, remove the STICKY
TAPE and note the number of spires in the skyline. • Return to
the backwards office.
• Place the items (green) including the LENS, in the Telescope
Key Object (N). • Zoom into the telescope, remove the STICKY
TAPE and note the number of spires in the skyline. • Return to
the backwards office.
 • Zoom into the window; place the BREAD on the table (P). •
Once the bird has dropped the note (Q) fix it with the STICKY
TAPE and read it. • Receive the CYLINDER. • Travel back
through the portal. • Place the items (pink), including the
CYLINDER, into the Radio Key Object (R).
• Zoom into the window; place the BREAD on the table (P). •
Once the bird has dropped the note (Q) fix it with the STICKY
TAPE and read it. • Receive the CYLINDER. • Travel back
through the portal. • Place the items (pink), including the
CYLINDER, into the Radio Key Object (R).
 • Zoom into the safe; punch in the code (S). • Pick up the
locket (T). • Congratulations, you found the locket and
cleared your fiancés name! You have completed Snark Busters:
High Society.
• Zoom into the safe; punch in the code (S). • Pick up the
locket (T). • Congratulations, you found the locket and
cleared your fiancés name! You have completed Snark Busters:
High Society.
Created at: 2012-05-23